

Page 1

2
4
,
Package Contents
• Wireless-N PCI Adapter
• External Antenna
•Setup Wizard CD-ROM
•User Guide on CD-ROM
• Quick Installation
GHz
Wireless-N
Model No.
Model No.
Wireless
PCI Adapter
Wireless
WMP300N (EU/LA)
Quick Installation Guide
1
Page 2

1
IMPORTANT: Do not install the Adapter in your PC until
you are instructed to do so in Step 2; otherwise, the
Adapter will not install correctly.
The Adapter is installed and set up
using the Setup Wizard that
comes on the enclosed CD.
Begin Installation
A Insert the Setup Wizard CD-
ROM into your CD-ROM
drive. The Setup Wizard
should run automatically,
and the Welcome screen
should appear.
B To install the Adapter, click
Click Here to Start on the
Welcome screen.
B
C After reading the License
Agreement, click Next to
continue the installation.
D Windows will begin copying
the files onto your PC.
E The Setup Wizard will now
prompt you to install the
Adapter into your PC.
Proceed to Step 2.
2
C
Page 3
2
Go to the section for your
Windows operating system.
Install the Adapter
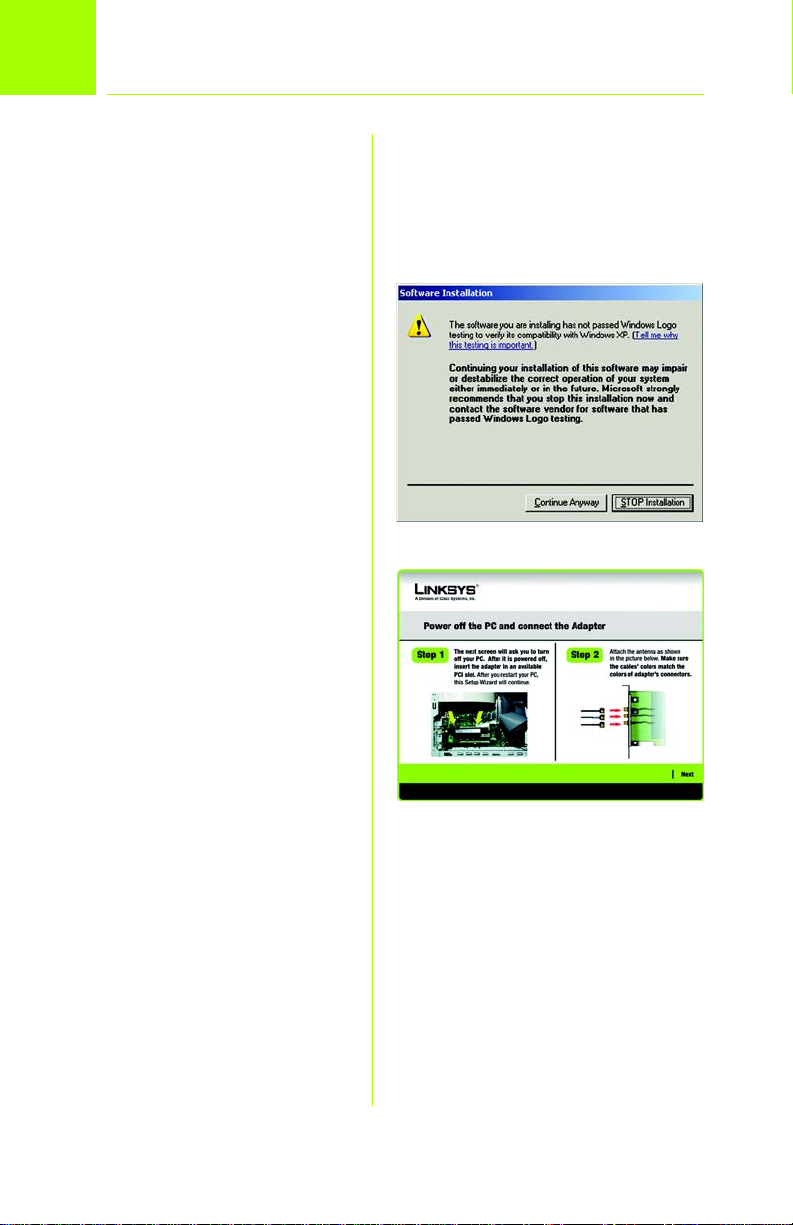
Windows XP
A If the Software Installation
screen appears, click
Continue Anyway.
B Click Next and power off
your PC. After installing the
Adapter and restarting your
PC, the Setup Wizard will
continue.
C Open your PC case and
locate an available PCI slot
on the motherboard.
D Slide the Adapter into the
PCI slot. Make sure that all of
its pins are touching the
slot’s contacts. Secure its
fastening tab to your PC’s
chassis with a mounting
screw. Then close your PC.
E Connect the antenna
stand’s cables to the PCI
card of the Adapter. Plug
the cable with the blue
connector into the blue
CENTER ANT port. Then
attach the remaining
cables to the other ports.
F Power on your desktop PC.
A
B
3
Page 4

G If you have Windows XP with
Service Pack 2, the
Welcome to the Found
New Hardware Wizard
screen will appear. Click
Next.
H On the Found New
Hardware Wizard screen,
make sure that Install the
software automatically
(Recommended) is
selected, then click Next.
I If the Hardware Installation
screen appears, click
Continue Anyway.
J When the wizard has
finished installing the
software, click Finish.
Proceed to Step 3.
G
H
I
J
4
Page 5

Windows 2000
A If the Digital Signature Not
Found screen appears,
click Yes.
B Click Next and power off
your PC. After installing the
Adapter and restarting your
PC, the Setup Wizard will
continue.
C Open your PC case and
locate an available PCI slot
on the motherboard.
D Slide the Adapter into the
PCI slot. Make sure that all of
its pins are touching the
slot’s contacts. Secure its
fastening tab to your PC’s
chassis with a mounting
screw. Then close your PC.
A
B
E Connect the antenna
stand’s cables to the PCI
card of the Adapter. Plug
the cable with the blue
connector into the blue
CENTER ANT port. Then
attach the remaining
cables to the other ports.
F Power on your desktop PC.
G If the Digital Signature Not
Found screen appears,
click Yes.
Proceed to Step 3.
G
5
Page 6

3
The next screen to appear will be
the Available Wireless Networks
screen. From this screen, you can
launch one of the two setup
methods.
IMPORTANT: For quick installation,
use this document only if your
network appears on the Available
Wireless Networks screen.
Advanced Setup: If you are using
manual setup, click Advanced Setup
and follow the on-screen prompts.
Set up the Adapter
Setting Up the Adapter
with Available Networks
On the Available Wireless
Networks screen, the available
networks are listed in the center
table by Wireless Network Name.
Select the wireless network you
wish to connect to and click the
Connect button. (If you do not
see your network listed, you can
click the Refresh button.)
Available Wireless
Networks
If the network uses wireless
security, you will need to
configure security on the Adapter.
If not, you will be taken directly to
the Congratulations screen,
shown in Step B.
A If wireless security is
enabled on this network,
you will see one of these
wireless security screens.
6
Page 7

WEP Key Needed for
Connection
Select 64-bit or 128-bit.
Then, enter the passphrase
or WEP key of your network.
Passphrase - The
passphrase is case-sensitive
and should not be longer
than 16 alphanumeric
characters.
WEP Key - For 64-bit
encryption, enter exactly
10 hexadecimal
characters. For 128-bit
encryption, enter exactly
26 hexadecimal
characters. Valid
hexadecimal characters
are “0” to “9” and “A” to “F”.
Click Connect and go to
Step B.
WEP Key
NOTE: Your passphrase must match
the passphrase of your other wireless
network devices and is compatible
with Linksys wireless products only.
(Non-Linksys wireless products
require a WEP key to be entered.)
PSK Needed for
Connection
Select TKIP or AES for the
Encryption type, and then
enter the Pre-shared Key of
your network. It should have
8-63 characters.
Click Connect and go to
Step B.
PSK
7
Page 8

PSK2 Needed for
Connection
Enter the Pre-shared Key of
your network. It should have
8-63 characters.
Click Connect and go to
Step B.
B After the Adapter is
configured, the
Congratulations screen will
appear. Click Finish to
complete the setup.
Congratulations! Setup is
complete.
NOTE: After the Adapter is installed,
the Wireless Network Monitor icon
will appear in your PC’s system tray.
Double-click the icon if you want to
open the Monitor to find available
wireless networks or change the
Adapter’s configuration.
Wireless Network
Monitor icon
PSK2
B
For additional information or troubleshooting
help, refer to the User Guide on the CD-ROM or
the Technical Support Insert. You can also e-mail
for further support.
Website
http://www.linksys.com/international
Product Registration
http://www.linksys.com/registration
Linksys is a registered trademark or trademark of Cisco
Systems, Inc. and/or its affiliates in the U.S. and certain
other countries. Copyright © 2006 Cisco Systems, Inc. All
rights reserved.
WMP300N-EU-LA-QIG-WOWHQLWIFI-60417NC JL
8
 Loading...