

Page 1

Linksys Video Monitoring
System User Guide
BUSINESS SERIES
Model:
LBAVMS16
Page 2

Linksys is a registered trademark or trademark of Cisco Systems, Inc. and/or its affiliates in the U.S. and certain other countries.
Copyright © 2008 Cisco Systems, Inc. All rights reserved. Other brands and product names are trademarks or registered
trademarks of their respective holders.
Linksys Video Surveillance Application User Guide 2
Page 3

1
Chapter 1: Getting Started . . . . . . . . . . . . . . . . . . . . . . . 1
Before You Begin 1
Camera Installation Guidelines 1
System Requirements 2
What’s In This Guide? 3
Chapter 2: Installing the Linksys Video Monitoring System Software . . 4
Running the Installation CD 4
Launching the Video Monitoring Software 7
Chapter 3: Linksys Video Monitoring System Quick Start . . . . . . . . 8
Adding Local Network Cameras 8
Adding Cameras Manually 11
Configuring a Schedule for Recording on Motion 13
Recording Events 16
Playing Back Recorded Events 17
Deleting Cameras 18
Chapter 4: Getting to Know the Linksys Video Monitoring System . . 20
Understanding the Main Console Window 20
Start 20
Playback 20
Schedule 21
Setup 21
Screen Division Options 21
Camera Control for PTZ Cameras 21
At the bottom of the Main Console window are PTZ camera controls that allow you to direct the movement of your camera. T 21
Patrol 21
Preset Points 22
Zoom 22
PTZ Directional Movement 22
Information Window 22
On Screen Menu 23
Exit and Minimize 24
Chapter 5: Using the Playback Application . . . . . . . . . . . . . . 25
Understanding the Playback Window 25
Open Recording 25
Settings 25
Enhancement 26
Field Definitions 26
Save Video 26
Save Image 27
Print 27
Field Definitions 27
Back Up 28
Log Viewer 29
Viewing the System Log 29
Exporting from the Log Viewer 29
Linksys Video Monitoring System User Guide iii
Page 4

Table of Contents
Playback Controls 30
Exit and Minimize 30
Accessing Recorded Video 31
Understanding the DateTime Search Dialog Window 31
Icons 31
Field Definitions 31
Using the DateTime Search Dialog Window 32
Setting Recording Options 33
Field Definitions 33
Chapter 6: Setting a Schedule . . . . . . . . . . . . . . . . . . . . 35
Day Mode 35
Load Preset Modes 35
Insert New Schedules Manually 36
Copying a Schedule 37
Week Mode 37
Copying a Schedule 37
Adjusting Configuration Settings 38
Field Definitions 38
Chapter 7: Configuring Video Settings . . . . . . . . . . . . . . . . 41
Configuring Settings 41
General Tab 42
Startup 42
Storage Settings 42
Audio Preview Settings 43
Informational Display 43
Auto Reboot 43
Camera Tab 44
Camera Functions 44
Camera Parameter 45
I/O Device Tab 46
I/O Device Tab 46
PTZ Config Tab 47
User Account Tab 48
Monitor Display Tab 48
Saving and Loading to a Configuration File 49
Log Viewer 49
Viewing the System Log 50
Exporting from the Log Viewer 50
Backup 50
Delete Recorded Information from the System 53
About Main Console 54
Appendix A: Frequently Asked Questions . . . . . . . . . . . . . . 55
Appendix B: Software License Agreement . . . . . . . . . . . . . . 56
Software in Linksys Products: 56
Software Licenses: 56
Schedule 1 Linksys Software License Agreement 56
Schedule 2 58
Linksys Video Monitoring System User Guide iv
Page 5

Table of Contents
Schedule 3 63
Appendix C: Contacts. . . . . . . . . . . . . . . . . . . . . . . . . 66
Linksys Video Monitoring System User Guide v
Page 6

1
Getting Started
Linksys Business Internet Video Cameras provide high quality monitoring system that can be
optimized for many different applications. This guide instructs you how to use the camera
monitoring system and recording technology on your PC, which allows you to easily monitor
and record video.
This section includes the following topics:
• ”Before You Begin,” on page 1
• ”System Requirements,” on page 2
• ”What’s In This Guide?” section on page 3
Before You Begin
This document assumes that you have your camera or cameras previously installed and
configured. For installation instructions, see
the User Guide, and the Datasheet for your particular Linksys camera model.
www.linksys.com for the Quick Installation Guide,
The following Linksys cameras use the video monitoring software described in this document:
• PVC2300—Linksys Business Internet Video Camera with Audio and POE
• WVC2300—Wireless-G Linksys Business Internet Video Camera with Audio
• WVC210—Linksys Business Internet Video Camera with Audio
Please check www.linksys.com for compatibility if your camera is not included in this list.
Camera Installation Guidelines
Consider the following guidelines before installing and mounting your cameras. While the
detection window and the degree of sensitivity can be optimized later, it is best to optimize
your camera location first.
• Choose a location that provides adequate coverage of the area to be monitored.
• The Linksys IP cameras have a built-in microphone. If using the microphone in the camera,
note that the cameras are designed to pick up audio from a distance (unlike a web camera
that you would place near you.)
• Two-way audio requires an external speaker to be attached to the camera. If using an
external microphone or speaker, place the microphone far enough away from the speaker
to avoid feedback. The volume of the speaker and the background noise of the
environment will determine the exact distance, possibly up to one yard away.
• Cameras mounted outdoors should be installed in an IP66-certified enclosure to protect the
camera from the elements, while maintaining acceptable operating temperatures. If an
enclosure is used, an external microphone is required for audio.
Linksys Video Monitoring System User Guide 1
Page 7

Getting Started
System Requirements
• If using motion detection, consider potential sources of false positives, such as trees and
shrubs, drastic light changes, wandering animals, and traffic.
• Consider any wiring that you may need to do before installing the camera. You may want to
connect the camera to devices such as:
–sirens
– passive infrared (PIR) sensors
–smoke detectors
– lighting controls (on/off)
– door sensors
–alarms
• If using a wireless camera, a wireless-enabled device (such as an WRVS4400N Wireless-N
Gigabit Security Router with VPN or a Linksys One Ready WAP2000 RangeBooster Wireless
Access Point) is required to provide connectivity to the camera.
System Requirements
The following is required to run the Linksys Video Monitoring System on your camera.
Number of Cameras at VGA Resolution, 30 FPS 1-4 4-8 8-16
CPU Intel P4 2.4
GHz
RAM 512 MB 512 MB 1 GB
Motherboard Intel 945 or 965 chip, Intel Chipset recommended
Display ATI Radeon 9200, nVIDIA GeForce FX-5200, Intel
945 / 965, or above (ATI recommended)
Ethernet 100 BaseT or above, Gigabit LAN recommended
Hard Disk 80 GB or above
OS MS Windows 2000 / XP Pro SP2 / 2003
MS Windows Vista (Note: You must disable User
Account Control (UAC) before running Linksys
Video Monitoring software.
Intel P4 2.8
GHz
Intel Pentium
D 930
Linksys Video Monitoring System User Guide 2
Page 8

Getting Started
What’s In This Guide?
What’s In This Guide?
This guide covers how to install and use the Linksys Video Monitoring System. For complete
information on other components of the Linksys Video Monitoring System (for example,
installing Linksys cameras), see your particular camera documentation as found on
www.Linksys.com.
The following topics are covered in this guide:
• ”Getting Started” section on page 1—Provides system requirements.
”Installing the Linksys Video Monitoring System Software” section on page 4—Describes the
•
installation of the video monitoring software.
”Linksys Video Monitoring System Quick Start” section on page 8—Provides several procedures
•
to set up and use the video monitoring software.
•
”Getting to Know the Linksys Video Monitoring System” section on page 20—Describes the icons
found on the Main Console window of the video monitoring software.
”Using the Playback Application” section on page 25—Describes the icons found on the
•
Playback window and describes how to playback recorded events.
”Setting a Schedule” section on page 35—Describes how to set up a recording schedule.
•
”Configuring Video Settings” section on page 41—Describes how to configure cameras, save or
•
load configuration settings, backup your data, or access information about the Main
Console.
Linksys Video Monitoring System User Guide 3
Page 9
2
Installing the Linksys Video Monitoring System Software
This chapter instructs you on how to install and use the Linksys Video Monitoring System on
your PC. The Linksys Video Monitoring System allows you to easily view and record video.
The following procedures are discussed in this chapter:
• ”Running the Installation CD” section on page 4
• ”Launching the Video Monitoring Software” section on page 7
Running the Installation CD
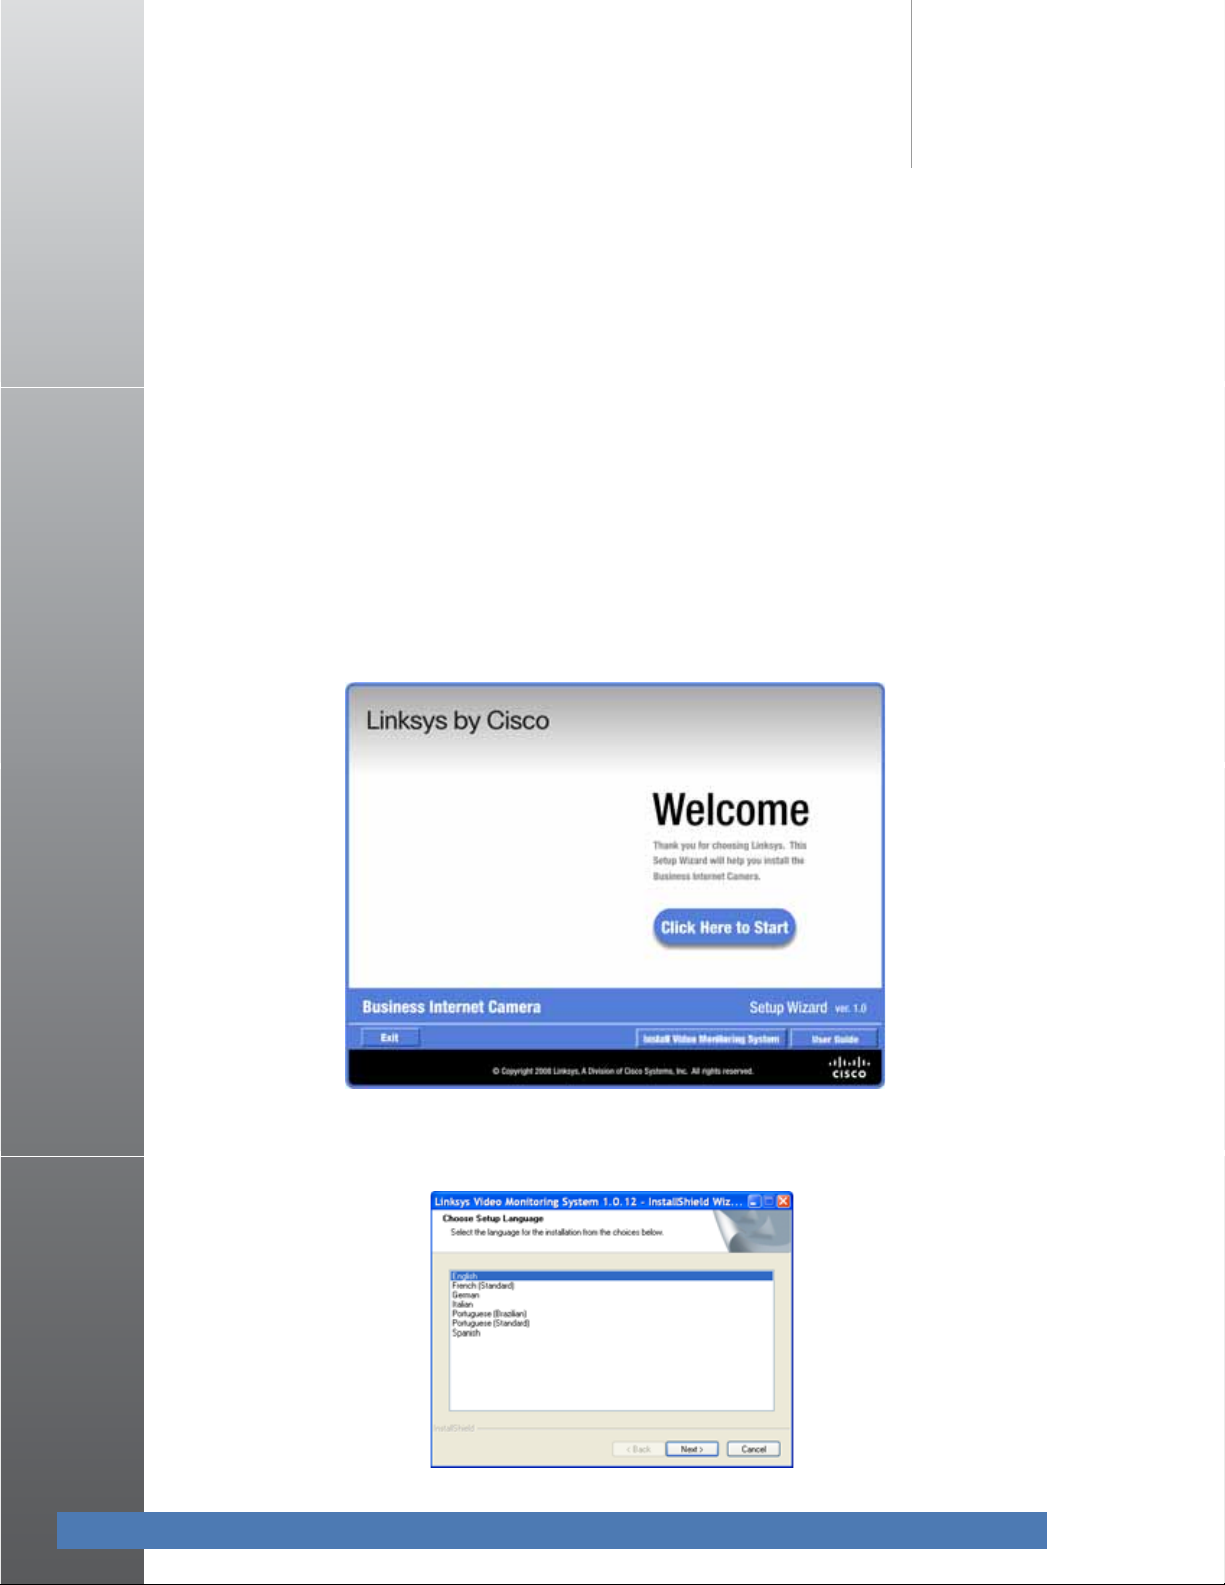
1. Insert the installation CD.
2. When the Welcome window appears, click Install Video Monitoring System.
3. The Select Language window appears. Select your language, and press Next.
Linksys Video Monitoring System User Guide 4
Page 10
Installing the Linksys Video Monitoring System Software
Running the Installation CD
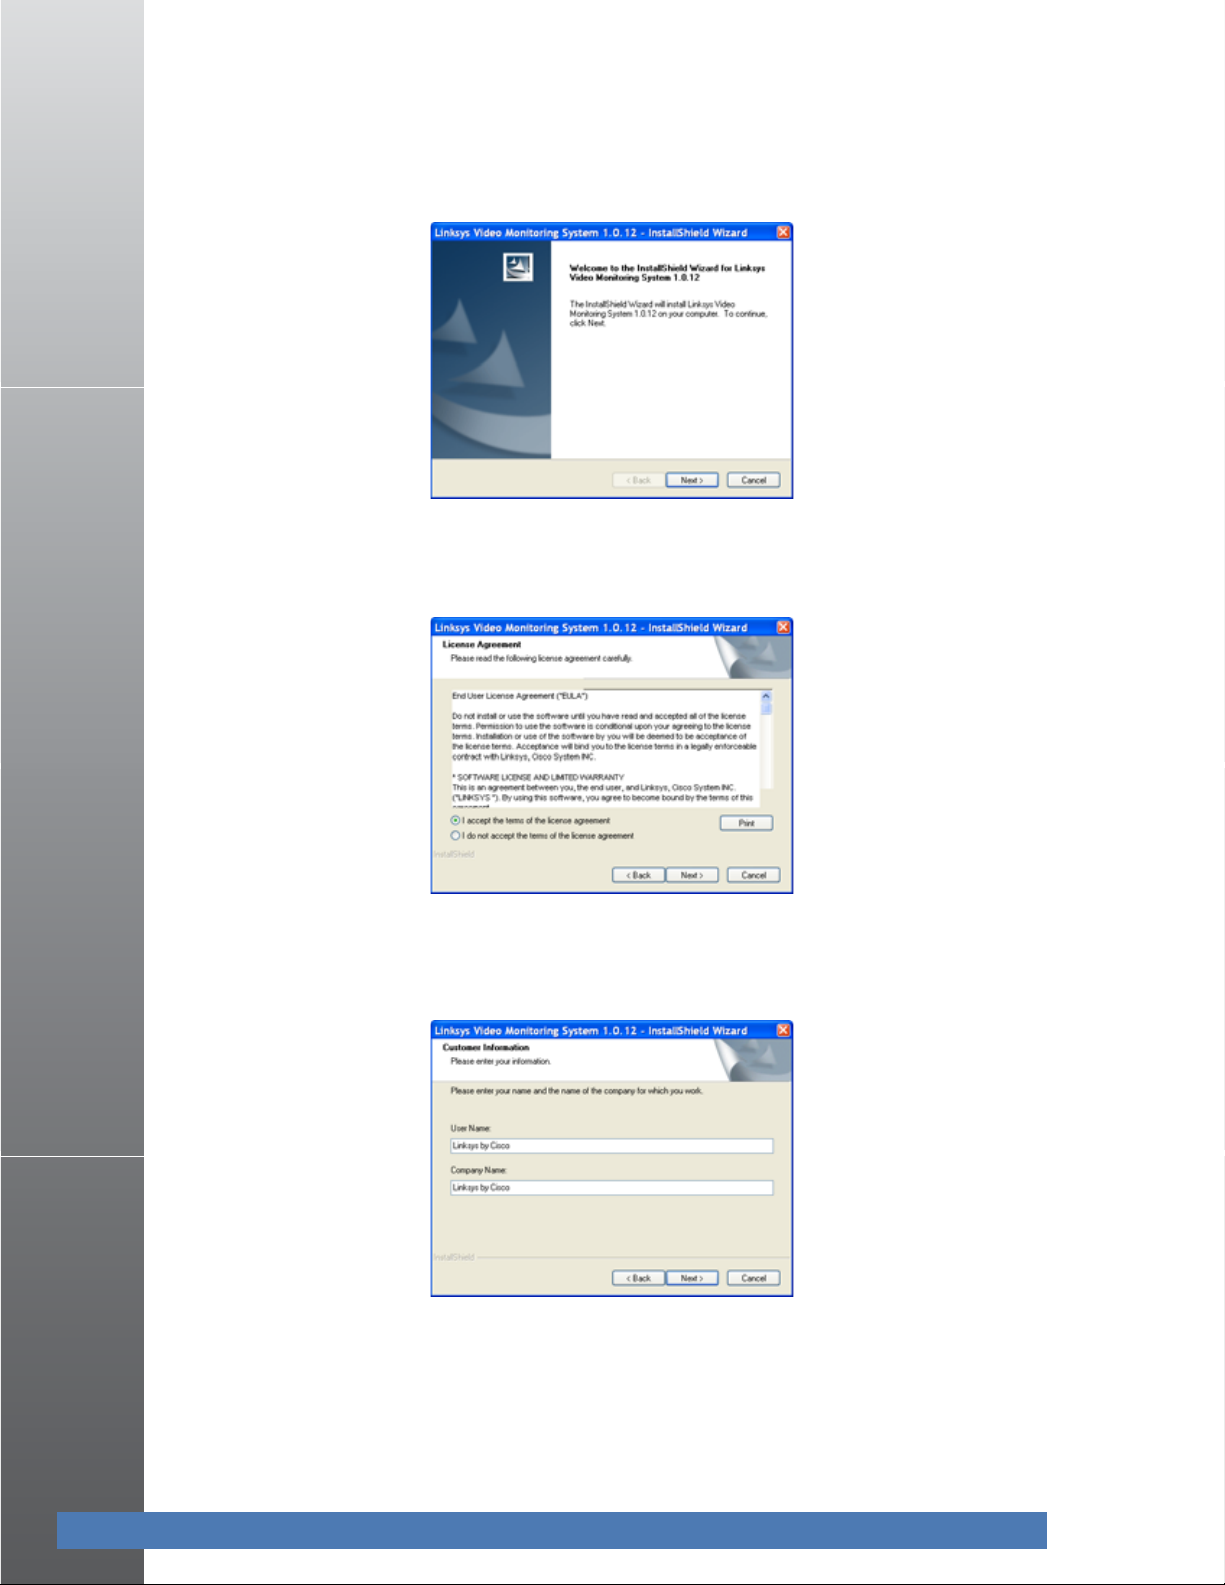
4. The Welcome window appears. Click the Next button to proceed.
5. The License Agreement window appears. Click “I accept the terms of the license
agreement” and click the Next button to proceed.
6. The Customer Information window appears. Provide your customer information and click
the Next button to proceed.
Linksys Video Monitoring System User Guide 5
Page 11

Installing the Linksys Video Monitoring System Software
Running the Installation CD
7. The Setup Type window appears. Select the type of installation and click the Next button.
(Complete is recommended for most users.)
8. The Ready to Install the Program window appears. The selected destination path will be
displayed. If you wish to change the path, click the Back button. If you are satisfied with the
location, click Install.
As the program is installing, the Setup Status window displays the software installation
status.
Linksys Video Monitoring System User Guide 6
Page 12

Installing the Linksys Video Monitoring System Software
Launching the Video Monitoring Software
9. When completed, click Finish to exit the wizard.
Launching the Video Monitoring Software
1. From the Microsoft Windows Start menu, launch the Linksys software by clicking on Main
Console.
2. After launching, the Login/Password window appears. Enter a password into the edit box
and enter it again to confirm. Click OK.
3. The Main Console window appears:
Linksys Video Monitoring System User Guide 7
Page 13

3
Setup
Icon
Linksys Video Monitoring System Quick Start
After you have installed your cameras and the video monitoring software, use this chapter to
get started quickly with some basic video monitoring and recording operations. The following
procedures can be found in this chapter:
• ”Adding Local Network Cameras” section on page 8
• ”Adding Cameras Manually” section on page 11
• ”Configuring a Schedule for Recording on Motion” section on page 13
• ”Recording Events” section on page 16
• ”Playing Back Recorded Events” section on page 17
• ”Deleting Cameras” section on page 18
Adding Local Network Cameras
This procedure is for cameras within your local network. UPnP™ must be enabled on both the
camera and the PC. If your camera is not within your local network, or if you wish to not enable
UPnP™, you can manually insert your camera; see the
page 11.
1. In the Main Console window, click the Setup icon.
”Adding Cameras Manually” section on
2. Choose Setting to bring up the Setting window.
Linksys Video Monitoring System User Guide 8
Page 14

3. Click the Camera tab.
Linksys Video Monitoring System Quick Start
Adding Local Network Cameras
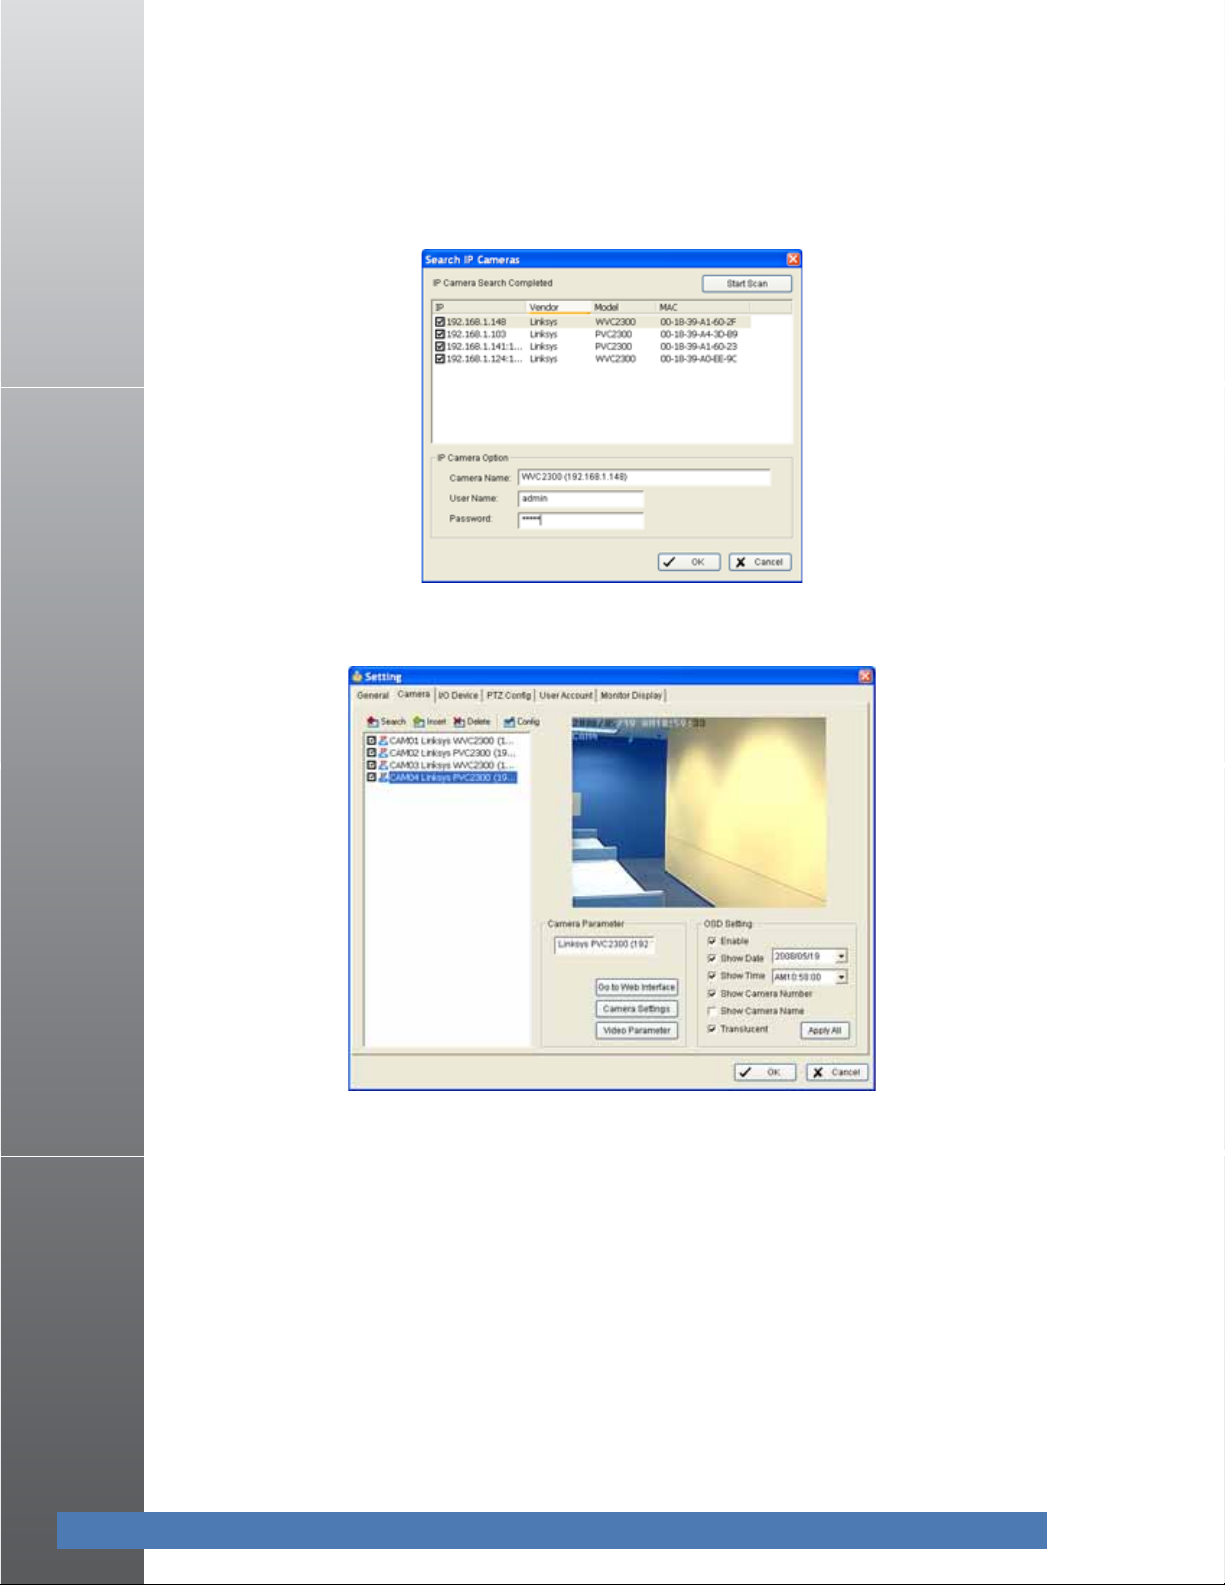
4. Click Search to search for the IP cameras that are available.
Linksys Video Monitoring System User Guide 9
Page 15
Linksys Video Monitoring System Quick Start
Adding Local Network Cameras
5. Select one or more of the IP cameras that are available by checking the camera and enter
the camera’s username and password.
6. Click OK to add the cameras. The detected cameras display in the camera window.
7. Configure any On Screen Display (OSD) Settings, Camera Settings, or Video Parameters as
you wish. See the
8. Click OK to add the cameras and go back to the Main Console. The Main Console window
displays all available cameras.
”Camera Tab” section on page 44.
Linksys Video Monitoring System User Guide 10
Page 16
Linksys Video Monitoring System Quick Start
Setup
Icon
Adding Cameras Manually
Adding Cameras Manually
If your camera is not within your local network, or if you wish to not enable UPnP™, you can
manually insert your camera.
1. In the Main Console window, click the Setup icon.
2. Choose Setting to bring up the Setting window.
3. Click the Camera tab.
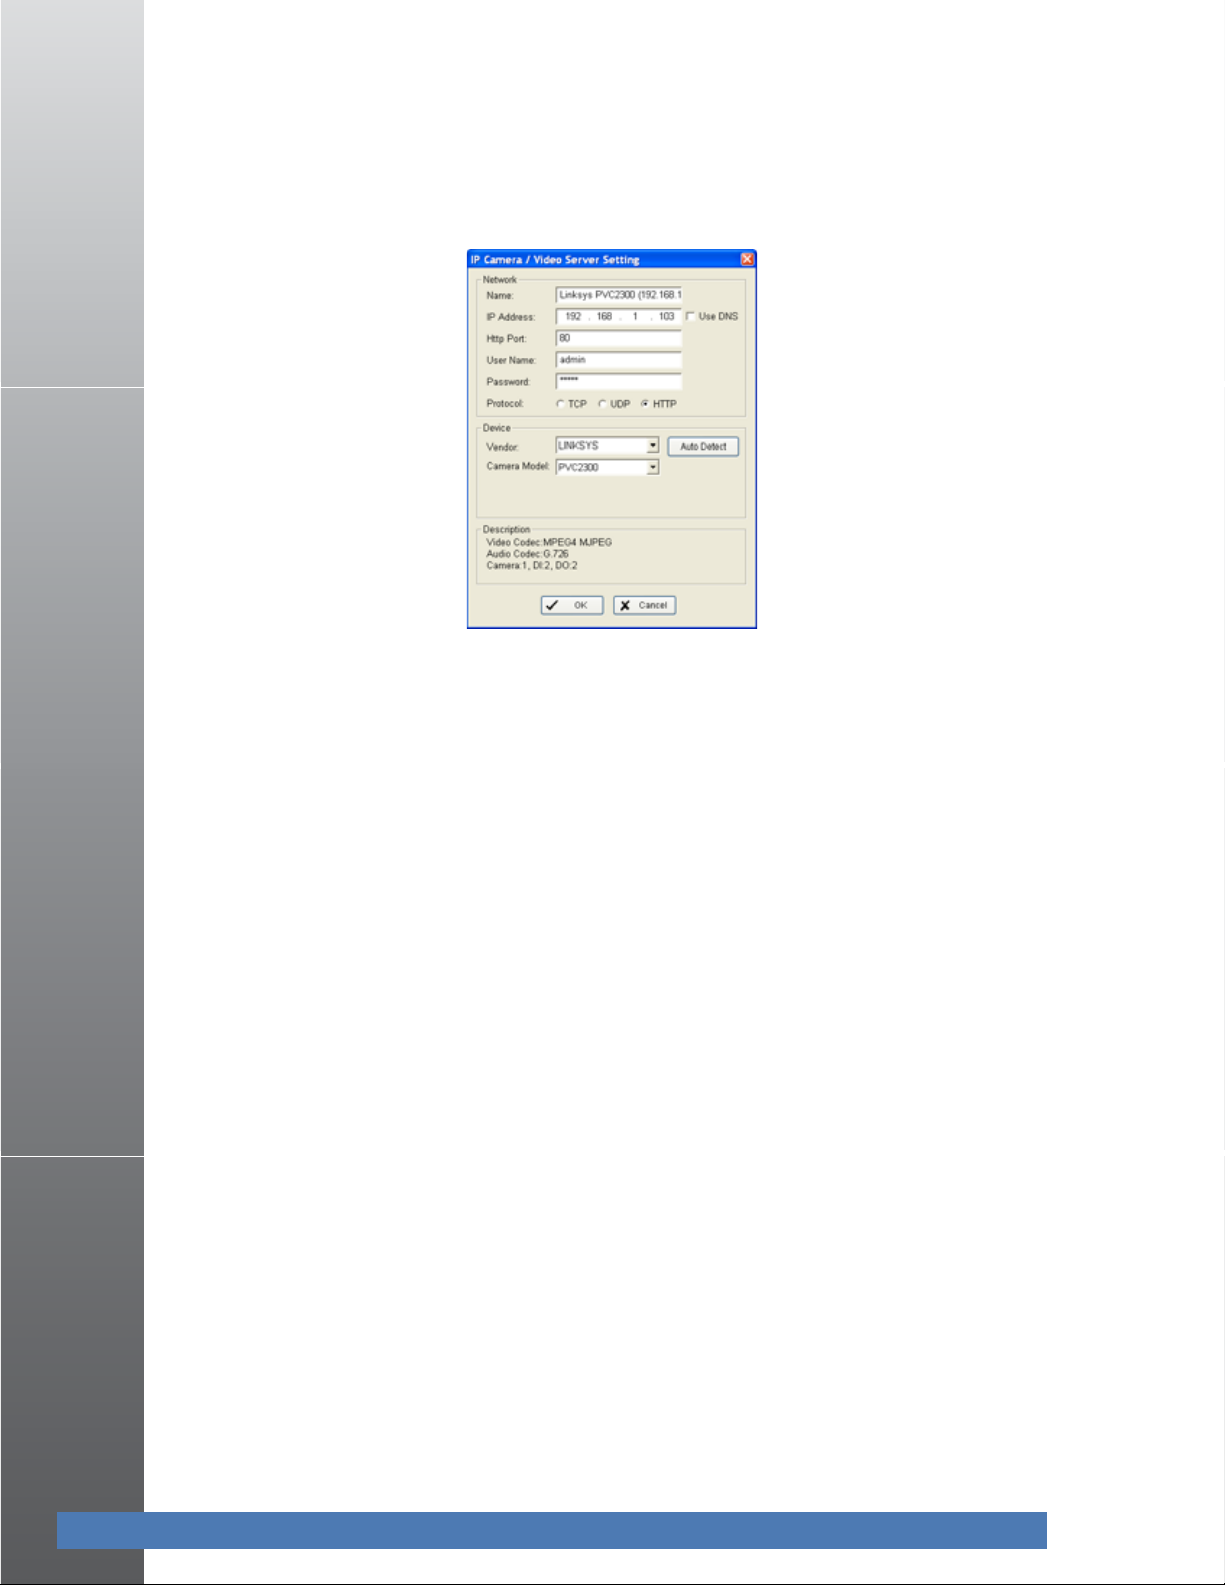
4. Click the Insert icon; the IP Camera /Video Server Setting window appears.
Linksys Video Monitoring System User Guide 11
Page 17
Linksys Video Monitoring System Quick Start
Adding Cameras Manually
5. In the IP Camera /Video Server Setting window, enter the IP address or domain name,
HTTP Port, Username, and Password of the camera.
6. Click Auto Detect. Auto Detect automatically finds your camera model number, the
supported video codec, audio codec, and input/output ports.
7. Click OK to add the camera.
8. Configure any On Screen Display (OSD) Settings, Camera Settings, or Video Parameters. See
”Camera Tab” section on page 44.
the
9. Click OK to add the cameras and go back to the Main Console. The Main Console window
displays all available cameras.
Linksys Video Monitoring System User Guide 12
Page 18

Linksys Video Monitoring System Quick Start
Schedule
Icon
Configuring a Schedule for Recording on Motion
Configuring a Schedule for Recording on Motion
By default, after adding a camera into the system, the recording schedule is automatically set to
record everything, 24 hours a day. This procedure allows you to change the recording schedule
to record only when the camera detects motion, and record that motion only during certain
times of the day.
1. In the Main Console window, click the Schedule icon.
The Schedule Configuration window appears. A red bar indicates that the camera is always
recording.
Linksys Video Monitoring System User Guide 13
Page 19
Linksys Video Monitoring System Quick Start
Configuring a Schedule for Recording on Motion
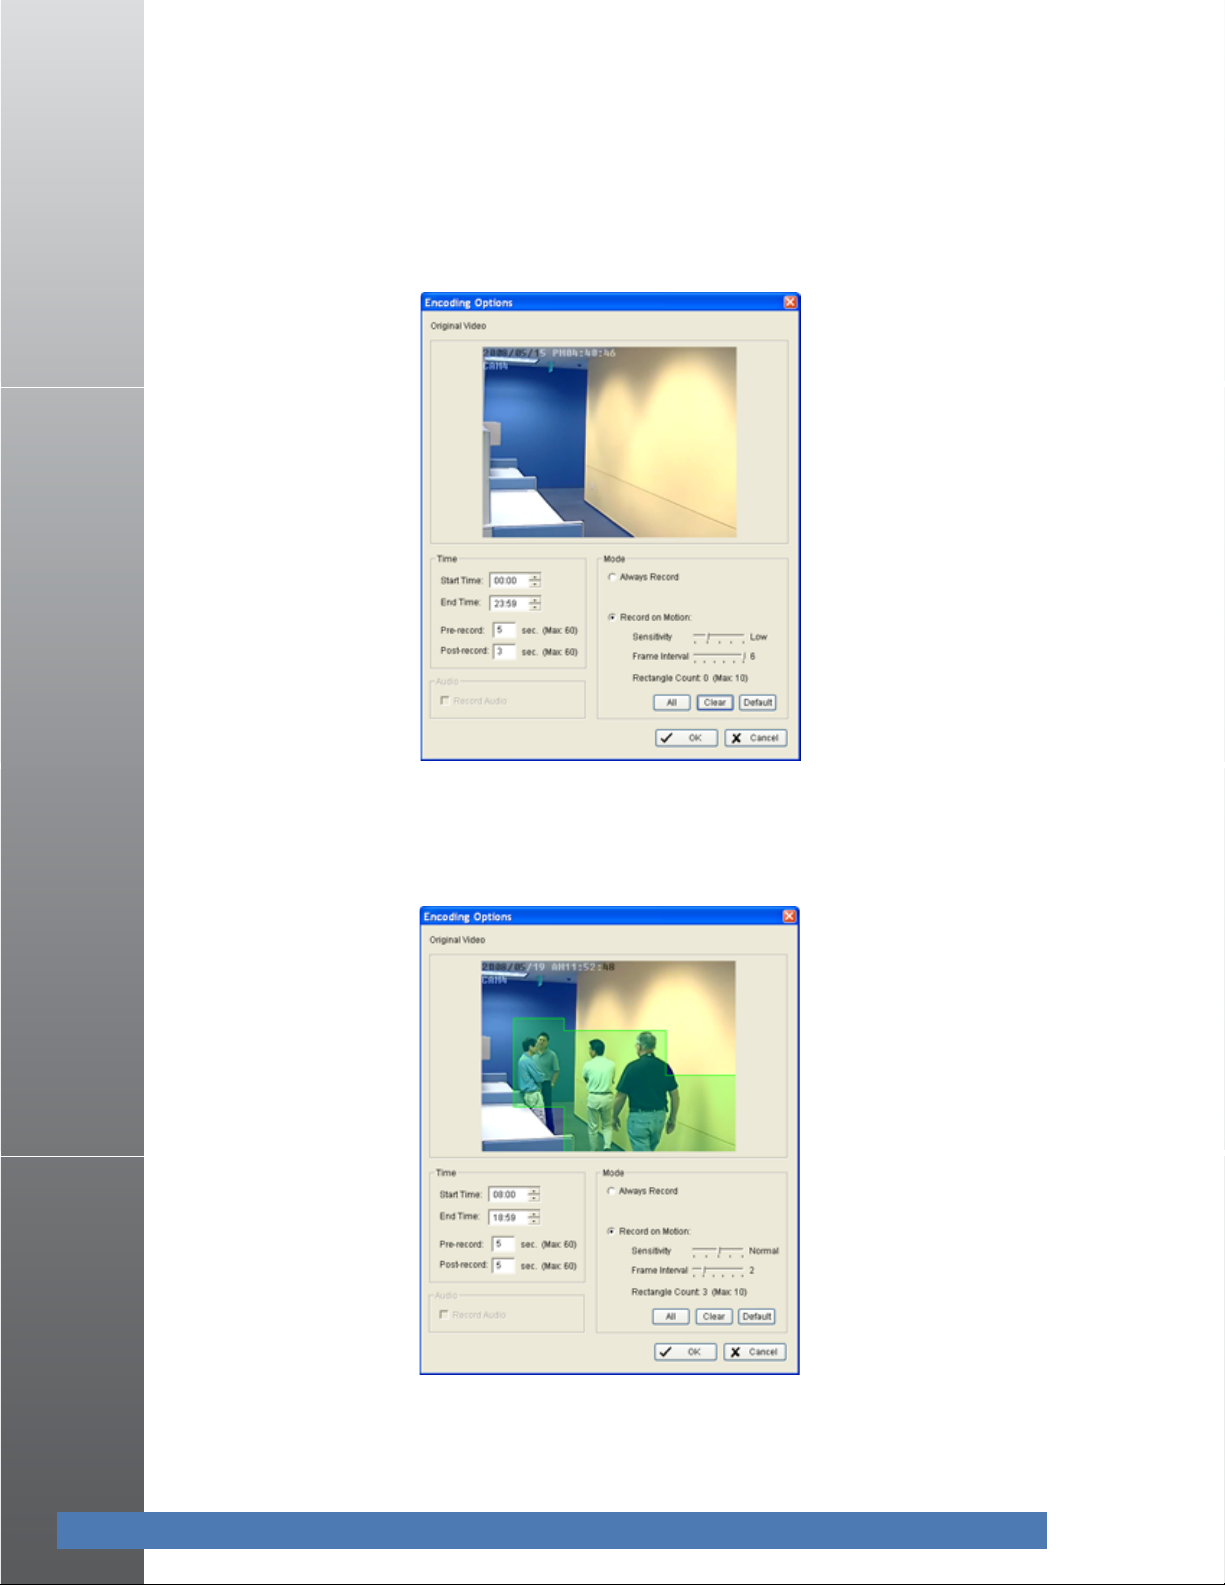
2. To change your default recording settings, double click the red bar of the camera you wish
to configure. Or, you may click the camera you want to configure, and then click the
Configure icon found in the middle of the Schedule Configuration window. The Encoding
Options window appears:
3. Click the radio button for Record on Motion.
4. Left-click and drag the mouse to draw up to 10 (green) rectangular detection zones of the
area you want to monitor.
Linksys Video Monitoring System User Guide 14
Page 20
Linksys Video Monitoring System Quick Start
Configuring a Schedule for Recording on Motion
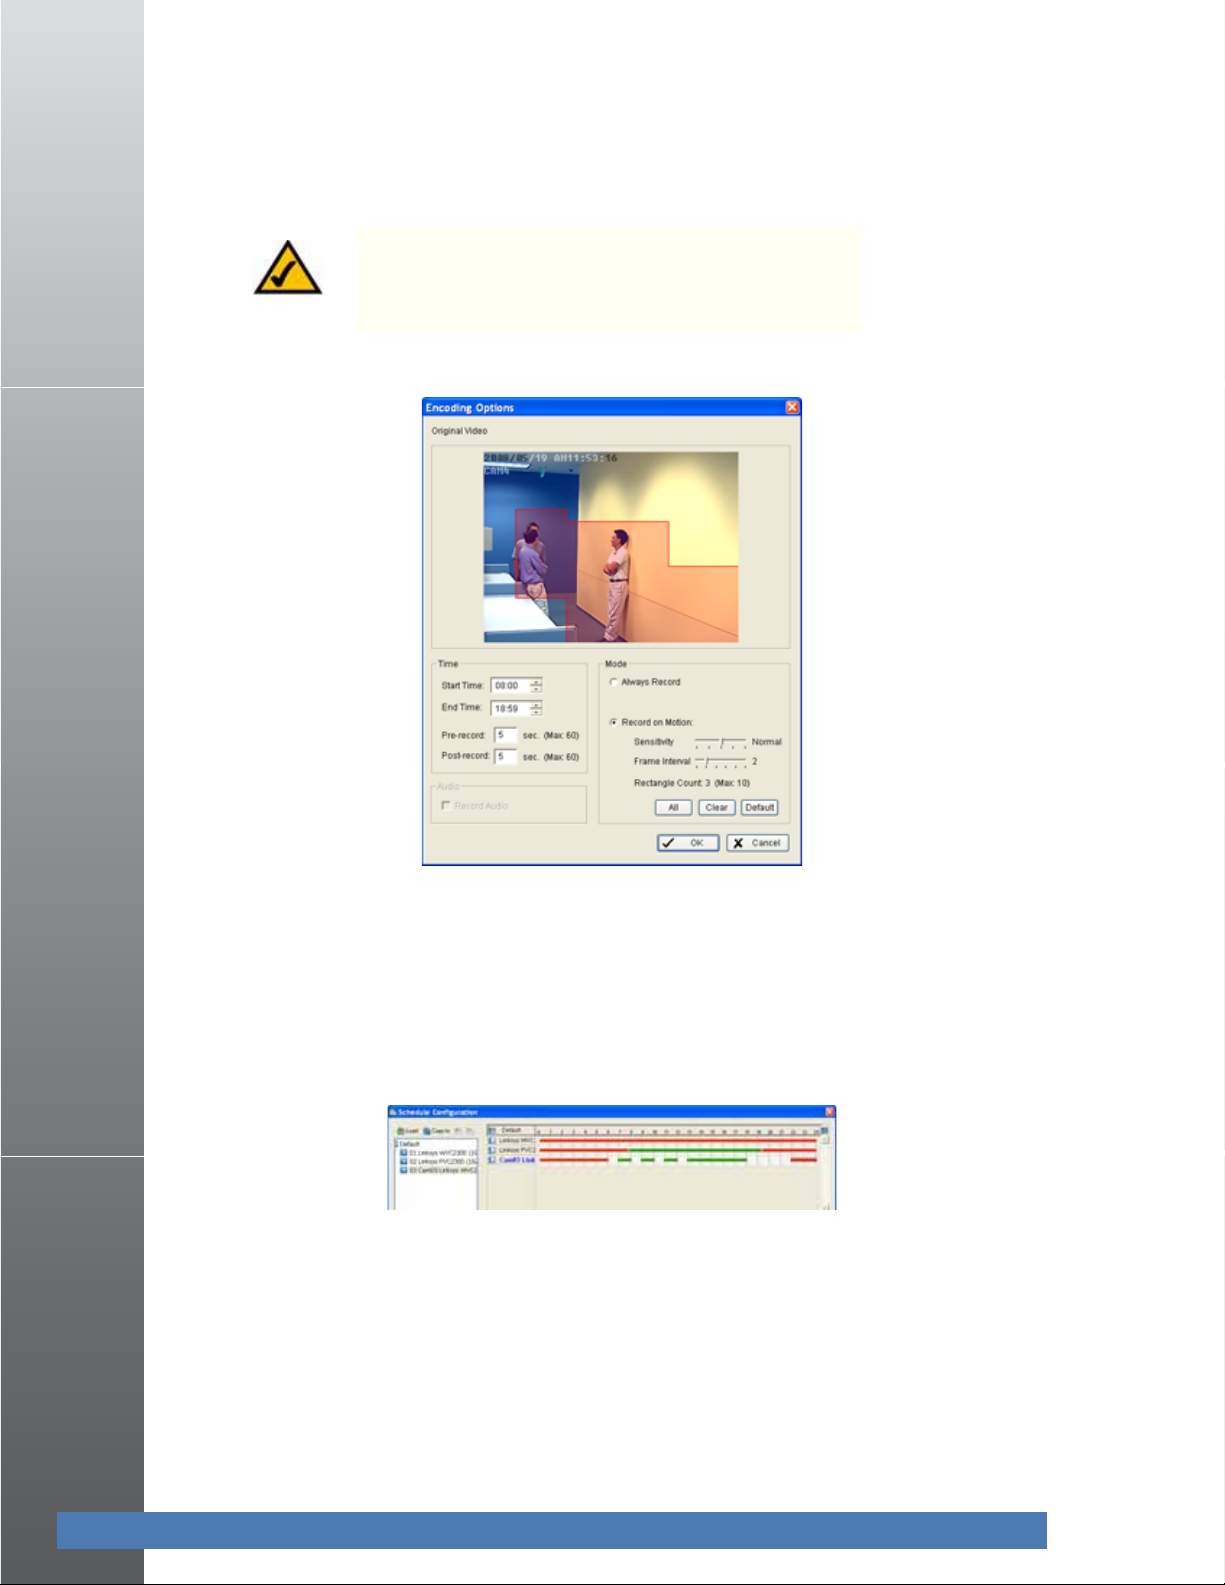
NOTE: When motion is detected in the defined area
of interest, the area starts flashing green and red.
5. Configure the recording schedule on the right side of the screen.
6. Set the Sensitivity to “Normal” and the Frame Intervals to “5” to start. These settings may be
adjusted later.
7. Click OK to go back to the Schedule Configuration window.
8. A green bar indicates that the recording is now done when the camera detects motion.
9. Click OK again to go back to the Main Console. When triggered, the area set as the
detection zone area turns red.
Linksys Video Monitoring System User Guide 15
Page 21
Linksys Video Monitoring System Quick Start
Red, MotionActivated
Green, PendingMotion
Recording Events
Recording Events
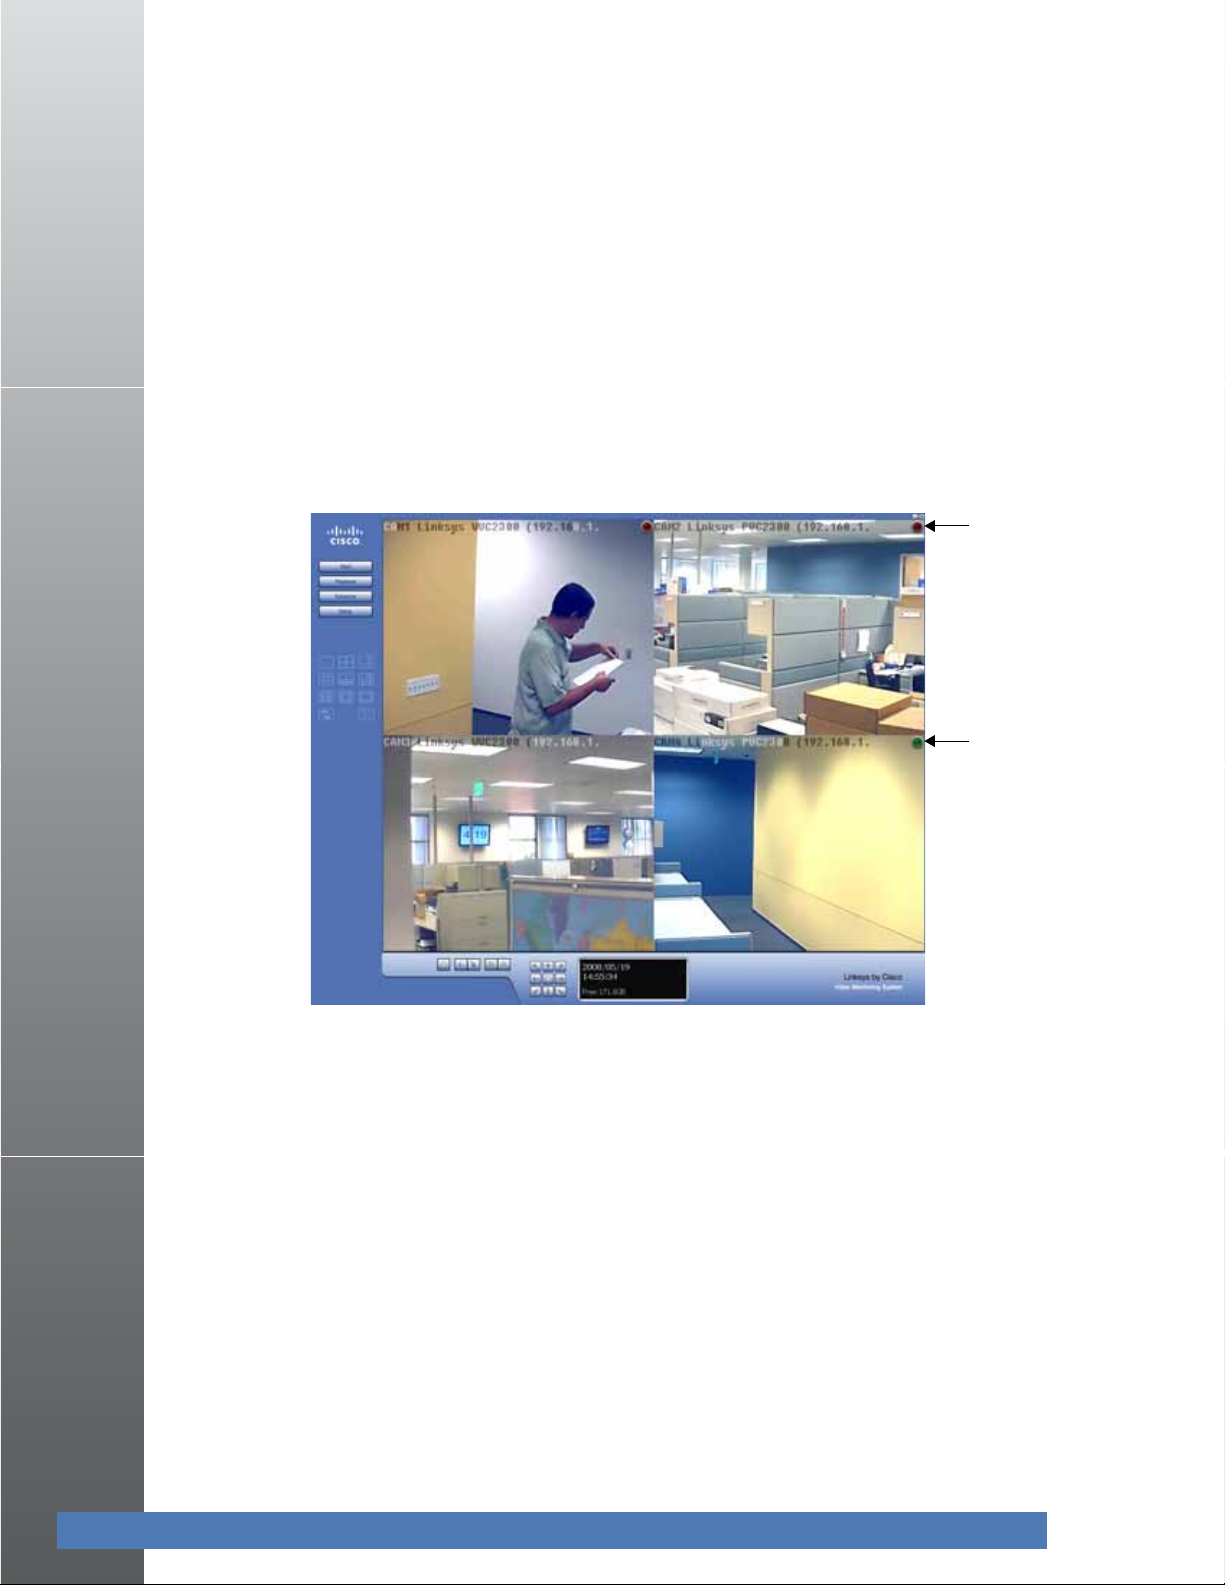
To begin recording events, in the Main Console window, click Start > Start Recording
Schedule.
Recording begins immediately on all configured cameras. During recording, the Main Console
window displays a radio button on the upper right hand corner. A red radio button means
“recording (in session).” During motion recording, when the video monitoring software starts to
record a motion, the radio button turns red. When there is no movement and nothing is being
recorded, the radio button turns green.
If you choose “Always Record” instead of “Record on Motion” the radio button remains red.
Linksys Video Monitoring System User Guide 16
Page 22
Linksys Video Monitoring System Quick Start
Playback
Icon
Playing Back Recorded Events
Use the following procedure to playback recorded events.
1. In the Main Console window, click the Playback icon.
Playing Back Recorded Events
2. The Playback window appears. Click on Open Recording to retrieve records from selected
cameras at a specific date and time.
Linksys Video Monitoring System User Guide 17
Page 23

Linksys Video Monitoring System Quick Start
Setup
Icon
Deleting Cameras
3. In the time table, recorded files are displayed in color bars or colored dots. Highlight any bar
or dot to select playback section.
4. Click OK to return to Playback Console. The recorded files can now be viewed in the
Playback window.
Deleting Cameras
1. In the Main Console window, click the Setup icon.
2. Choose Setting to bring up the Setting window.
Linksys Video Monitoring System User Guide 18
Page 24

3. Click the Camera tab.
Linksys Video Monitoring System Quick Start
Deleting Cameras
4. In the left window, click on the camera or cameras you would like to delete.
5. Click the Delete icon.
6. Click OK.
Linksys Video Monitoring System User Guide 19
Page 25

4
Getting to Know the Linksys Video Monitoring System
Once you have launched the Linksys Video Monitoring software, you will see the Main Console
window. From the Main Console window you can configure and control your cameras.
Understanding the Main Console Window
On the right side, the following menu icons are active.
Start
The Start icon allows you to activate Start or Stop recording. During recording, a radio button
appears on the upper right corner of each camera. Red means that the camera is always
recording. Green means the camera is recording only on motion.
Playback
Click on the Playback icon to access the Playback window. You can watch recorded videos,
adjust images of the stored data, save video and pictures, print images, check log information
and event records. See
”Using the Playback Application,” on page 25 for full information.
Linksys Video Monitoring System User Guide 20
Page 26

Getting to Know the Linksys Video Monitoring System
Understanding the Main Console Window
Schedule
Click on the Schedule icon to set up a recording time schedule and to record on motion. See
”Setting a Schedule,” on page 35 for full information.
Setup
Click on the Setup icon to configure and modify general camera settings, save or load
configuration settings, view logging data, backup your data, or access information about the
Main Console window. See
Screen Division Options
Under the menu icons are the screen division icons. Click on the desired layout icon. To switch
to a single camera display, double-click on a particular sub-screen. Double click on the screen
again to return to the previous screen layout. The Esc key on your keyboard will take you back
to your default Main Console window.
”Configuring Video Settings,” on page 41 for full information.
Camera Control for PTZ Cameras
At the bottom of the Main Console window are PTZ camera controls that allow you to direct the
movement of your camera. T
Patrol
The Patrol icon allows you to move the camera in a preconfigured pattern in order to scan the
field of vision.
When you click the Patrol icon. The following menu items appear:
• Start Patrol—Rotates through the defined preset positions.
• Stop Patrol—Stops the patrol rotation.
• Set Patrol—Define the rotation sequence of the preset positions and the interval in
seconds.
• Start Autopan—Continuous rotation of the camera in the horizontal axis.
• Stop Autopan—Stops the autopan rotation.
Linksys Video Monitoring System User Guide 21
Page 27

Getting to Know the Linksys Video Monitoring System
Understanding the Main Console Window
Preset Points
The Preset Point icons (Set and Go) allow you to set preset points and then move the camera in
conjunction with these points.
•Set—The Set icon allows you to adjust the camera view. Click on the Set icon and set up the
view as the preset point 01. Adjust the camera view again and set up the preset point 02.
Repeat the process until you finish setting up all preset points. You can enter any names you
like to instead of the preset point 01, preset point 02, preset point 03.
• Go—View the result of your preset point settings.
Zoom
Click on the + and – signs to zoom the view in and out.
PTZ Directional Movement
Allows you to incrementally adjust the camera in eight directions, and back to home.
Information Window
At the bottom of the Main Console window, the Information window can display the video date
and time and free disk space. You can change the information display at any time. See
“Informational Display” on page 43.
Linksys Video Monitoring System User Guide 22
Page 28

Getting to Know the Linksys Video Monitoring System
Understanding the Main Console Window
On Screen Menu
Right click on the Main Console and the On Screen Menu appears:.
This menu allows you to do the following tasks:
• Enable Move—With cameras that support PTZ functionality, you may adjust the camera’s
view by clicking on the display screen. The clicked location becomes the center of the view
for the camera. To cancel this function, right click on the screen and select Disable Move,
NOTE: You can only work on the current camera
after clicking Enable Move.
• Enable Talk—With cameras that have audio enabled, and that support two-way audio, this
function enables two-way communication.
The Linksys IP cameras have a built-in microphone or you can attach an external
microphone and/or speakers. Two-way audio requires an external speaker to be attached to
the camera. When using a two-way audio connection, consider setting the speaker a few
feet away from the microphone on the camera.
NOTE: Audio must first be enabled on your camera.
See your camera user guide for details.
• Connect/ Disconnect—Modifies the connecting status of the camera.
• Show Camera—Selects the camera to be displayed in the Show Camera Menu.
• Snapshot—Captures the current video image immediately. You have the option to copy
the image to the clipboard so you can use it in graphic application software, or you can save
the image on your PC.
• Manual Record—Saves the video clip to a defined storage path (defined in
Setup>Setting>General>Storage>Location). Use the Playback window to retrieve the
recording video clips.
• Toggle Full Screen—Views a specific camera in full screen format.
Linksys Video Monitoring System User Guide 23
Page 29

Getting to Know the Linksys Video Monitoring System
Understanding the Main Console Window
Exit and Minimize
As in most programs, click on the “_” to minimize and the “X” in the upper right hand corner to
exit the application:.
Linksys Video Monitoring System User Guide 24
Page 30

5
Using the Playback Application
In the Playback window, you can watch the recorded video, set recording options, view log files,
and save and print your files.
This chapter describes the options found on the Playback window and how to access recorded
video:
• ”Understanding the Playback Window” section on page 25
• ”Accessing Recorded Video” section on page 31
• ”Setting Recording Options” section on page 33
Understanding the Playback Window
On the right side of the window, the following menu icons are active immediately:
Open Recording
Click on the Open Recording button to access the Date-Time Panel and withdraw the video
record that you want to review. See
information.
Settings
“Accessing Recorded Video” on page 31 for further
Brings up the Options menu. See “Setting Recording Options” on page 33 for more information.
Linksys Video Monitoring System User Guide 25
Page 31

Using the Playback Application
Understanding the Playback Window
Video Settings
On the right side of the window, the following menu icons are active while video is played:
Enhancement
The Enhancement Post Processing Tool allows you to enhance your playback video in real
time according to the selections you make in the processing tool
.
Field Definitions
• Visibility—Check the option and adjust the gamma value of the image to enhance the
image and make it cleaner.
• Sharpen—Check the option to activate the function. Move the slider control to the right to
sharpen the image, to the left to soften it.
• Brightness—Check the option to activate the function. Move the slider control to the right
to make the image brighter.
• Contrast—Check the option to activate the function. Move the slider control to the right to
increase contrast.
• Grey Scale—Check the option to show the record in grey scale mode so the image displays
in black and white.
Save Video
The Linksys Video Monitoring System stores all recorded data in a proprietary format. For video
to be shared and viewed on common media players, the video must first be saved in a standard
compression format. The choices of format are ASF and AVI.
Linksys Video Monitoring System User Guide 26
Page 32

Using the Playback Application
Understanding the Playback Window
1. Click on the display screen to choose the camera display that you want to save as a video
clip.
2. Set up the cue in and cue out points; the cue in and cue out time will show on the Playback
window’s information window.
3. Click the Save Video icon and choose the folder where you want to save the file.
4. Enter the file name and click Save. After clicking Save, you may choose to export the file
with both audio and video or video only.
5. Choose the compression format and then save the video.
Save Image
1. Click on the display screen to choose the camera display from which you want to save
pictures.
2. Click Save Image button when the image you want is shown on the screen. You may click
Pause to freeze the video, or use the Step Forward/ Step Backward function to find the
picture(s) that you want to save.
3. Choose the folder and the format of image (BMP or JPEG) you prefer and then click Save.
NOTE: You may skip step 3 by pre-setting a folder and format that you want to save the images.
See Automatically save the image file in
”Setting Recording Options,” on page 33.
This Print Setup window allows you to print the current image of a video.
Field Definitions
• Print in original size—Select to have the image print in original size.
• Fit the page—Select to have the image fit the page.
• Align Image—Align the image to the top, center, or bottom.
Linksys Video Monitoring System User Guide 27
Page 33

Using the Playback Application
Understanding the Playback Window
Back Up
The Backup function saves video and log information. You can load backup files onto a fullyfunctioning Playback Console on any Microsoft Windows computer. This means that you can
monitor the video real time on one PC and work on the backup files on different computer
simultaneously.
Use the following procedure to backup your files:
1. Press Open Recording in the Playback window to select the data to backup. Click OK.
2. Press the Backup button.
3. Adjust the Start Time and End Time of the data that you want to backup.
4. Select the Cameras that you want to backup.
5. Calculate the size of the backup data.
6. Select how you want the backup data stored.
7. Check the log you want to backup.
8. Press Backup.
Linksys Video Monitoring System User Guide 28
Page 34

Log Viewer
Using the Playback Application
Understanding the Playback Window
Viewing the System Log
System Log—You can choose the log type from the drop-down menu. A list of some of the
available log types follows:
All
Main Console Startup
Main Console Shutdown
User Login
User Login Failed
Start Schedule
Stop Schedule
Execute Recycle
Execute Backup
Enable Channel
Disable Channel
Modify Schedule
Modify Configuration
IP Camera Connection Lost
Auto Restart Main Console
1. Choose the event from the Log Type menu or select All from the drop-down menu for all
types of events.
2. You may view events that happened on a particular date or during a given time period. To
search and view unusual event happened on a particular date, mark the box right next to
Date and indicate the date.
You may also point out two different time points and search for unusual events that
happened during the period. Mark the box in the Date&Time column and then enter the
date and time.
3. Click Search.
Exporting from the Log Viewer
After searching the log, you can export to an .xls or .txt file.
Linksys Video Monitoring System User Guide 29
Page 35

Using the Playback Application
Understanding the Playback Window
1. Press Export to.
2. Type the file name and choose the file format (.xls or .txt).
Playback Controls
At the bottom of the playback window are the playback controls.
• Play—Plays the recorded video.
• Pause—Pauses the recorded video.
• Step Forward/Step Backward—Speeds the video forward by frame.
• Previous/Next—Speeds the video forward in minutes. You can set the amount of time in
“Setting Recording Options” on page 33.
• Stop—Stops the playback of the video.
• Zoom—Click on the + and – signs to zoom the view in and out. To get a close up view of the
recorded video; move to the spot you want to view by dragging the screen.
• Speed—Controls the speed of the playing video. Click + to speed up and – to slow down.
• Audio Volume Control—Adjusts the sound level.
• Scroll bar—Indicates the status of the playing video and allows you to drag it to what you
want to review.
• Information Window—Displays video date and time, current video status, cue in/ out time,
and speed.
Exit and Minimize
As in most programs, click on the “_” to minimize the Playback window and the “X” in the upper
right hand corner to exit the Playback window (returns you to the Main Console window).
Linksys Video Monitoring System User Guide 30
Page 36

Using the Playback Application
Accessing Recorded Video
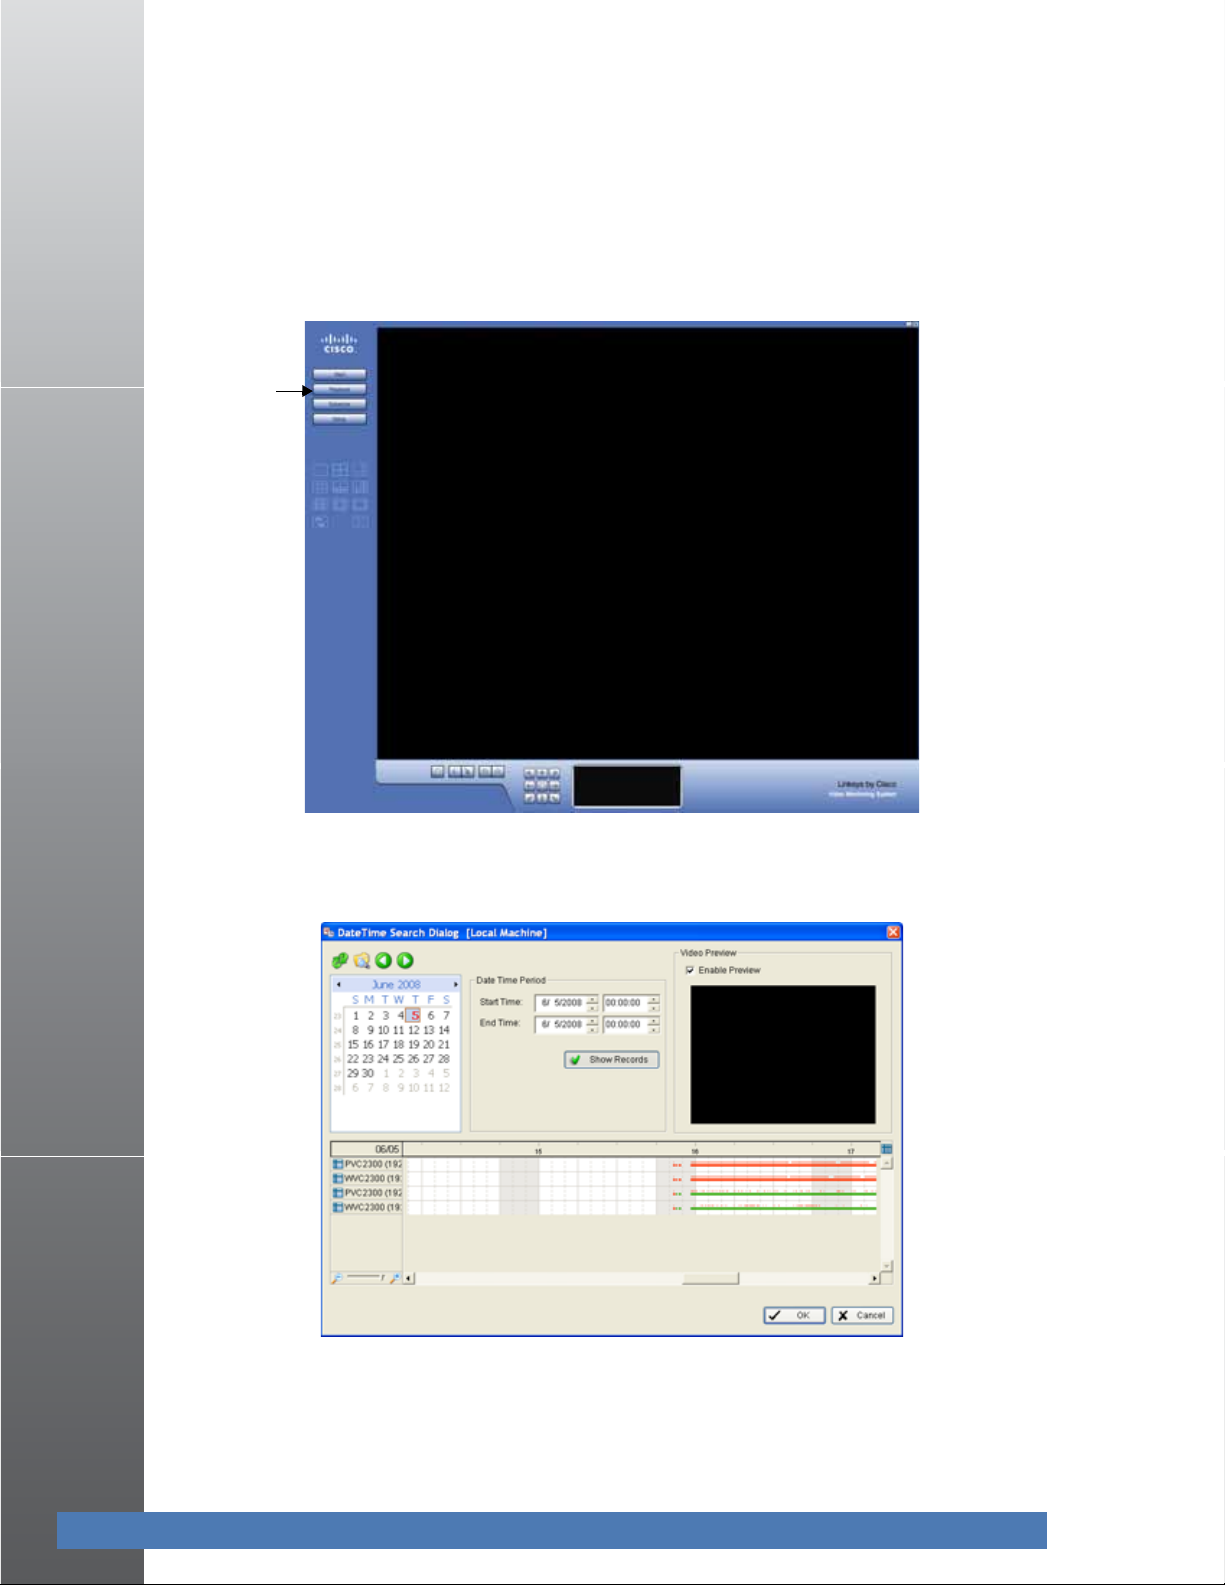
Accessing Recorded Video
The Open Recording button found in the Playback window, brings up the DateTime Search
Dialog window. The DateTime Search Dialog window allows you to view recorded events. It
may show in calendar or list control view. To change the view, see the Options window
described in the
”Setting Recording Options” section on page 33.
Understanding the DateTime Search Dialog Window
Icons
• The green arrow icons refresh the record display window.
• The file icon brings up Log Viewer. See
• The forward and back icons allow you to switch between recording dates.
Field Definitions
• Date Time Period—Selects the start and end time points for the time period you would
like to view.
• Show Records—Places a thin red line, a red dot, or a red dotted line above the recording
bar when a recording occurs. This is especially useful when recording on motion. In such a
case, a red dot or dotted line is placed over the green bar indicating motion-triggered
recording.
• Video Preview—Check the enable preview option to view the selected video.
• Time Table—Shows the recording made throughout a 24-hour period. Use the scroll bar to
zoom into a particular time period. The +/- in the time table help you change the resolution
of the time graph so you can pick the correct time period you want to watch. When you
zoom out you can see all 24 hours in the bar. To select a very small piece of video, zoom in
so you can manage the time more minutely.
”Log Viewer” section on page 29.
Linksys Video Monitoring System User Guide 31
Page 37

Using the Playback Application
Accessing Recorded Video
Using the DateTime Search Dialog Window
The DateTime Search Dialog window can be shown in (a) calendar view or (b) list control view.
To modify the setting of the record display window, click on the Setting button (see
Recording Options” on page 33) in the Playback Console.
To access immediate recorded events:
1. From the Main Console click the Playback icon. The Playback window appears.
2. Click the Open Recording button. The DateTime Search Dialog window appears.
3. Recorded events are shown in red (Record Always), or green (Record on Motion). Highlight
the event in the main window by left clicking and dragging.
4. Check the Enable Preview option to see a preview of the video you selected.
5. Click OK.
“Setting
To access recorded events by date:
1. From the Main Console click the Playback icon. The Playback window appears.
2. Click the Open Recording button. The DateTime Search Dialog window appears.
3. Select the date of the record that you want to withdraw. The red and green lines shown on
the time table indicate available recorded video records.
4. Highlight the video clip you want to review by left-clicking and dragging for the required
time period. You may also pick a Start Time and End Time.
5. Modify the scale of the time table with the + and – signs found at the bottom left of the
screen.
6. Check the Enable Preview option to get the preview of the video you select.
7. Click on specific camera names to increase or decrease the number of cameras you want to
playback.
8. Click OK.
Linksys Video Monitoring System User Guide 32
Page 38

Using the Playback Application
Setting Recording Options
Setting Recording Options
The Options window allows you to change the settings within the DateTime Search Dialog
window. It also allows you to change video recording and saving parameters. To access this
window, click the Settings button in the Playback window.
Field Definitions
• Calendar View—Shows dates of recording in red, with the red square indicating the
current date.
• List Control—Shows dates of recording.
• Play when open— Check this option to start playing the video clip every time a record is
withdrawn.
• Auto skip when record motion only mode—Check the option to set up the system to
automatically skip to the points where there were motions recorded.
• Next interval—Set the time interval the video goes forward when you click on the Next
icon on the control panel.
Linksys Video Monitoring System User Guide 33
Page 39

Using the Playback Application
Setting Recording Options
• Previous interval—Set the time interval the video goes backward when you click on the
Previous icon on the control panel.
• Save in clipboard—The image is saved in the clipboard so you can use it in graphic
application software.
• Manually save the image file—Select where you want to save the image, name the saved
file, and choose the format you want to save the image.
• Automatically save the image file—By pre-setting a path/URL and the image format, the
system automatically saves the image accordingly when you click the Save button in the
control panel.
Linksys Video Monitoring System User Guide 34
Page 40

Setting a Schedule
Using the Schedule Configuration window you can set up the time duration for video
recording.
6
Day Mode
You can schedule the cameras to turn the recorder on and off at the same time every day. To
setup the time schedule for each camera, you may do one of the following:
• “Load Preset Modes” on page 35.
or
• “Insert New Schedules Manually” on page 36
Load Preset Modes
Click on the Load icon (upper left of the Schedule window) for the drop-down menu. Choose
one of the following modes:
• Regular Mode—Sets recording to 24-hours a day with the setting of 30 FPS (frames per
second), normal video quality, and normal resolution.
• Office Mode—Sets recording from 8 am to 8 pm (08:00 – 20:00). The recording is shown on
the red bar in the Schedule Configuration panel with the setting of 30 FPS, normal video
quality, and normal resolution.
• Shop Mode—Sets recording from 10 am to 10 pm (10:00 – 22:00) with 30 FPS, normal
video quality, and normal resolution.
• Highly Secure Mode—Sets recording 24-hours a day with the setting of 30 FPS, the
highest video quality, and with high resolution.
• Disk Saving Mode—Sets recording to start only when a motion is detected on the screen,
24 hours a day (shown on the green bar in the Schedule Configuration panel), with the
setting of 30 FPS, normal quality, and normal resolution. You can adjust the sensitivity,
interval, and area of motion detection in the Schedule Configuration.
Linksys Video Monitoring System User Guide 35
Page 41

Setting a Schedule
Day Mode
• Minor Mode—Sets recording to always record, with the setting of 15 FPS, low quality, and
low resolution. You can adjust the sensitivity, interval and area of motion detection in the
Schedule Configuration.
Insert New Schedules Manually
1. Click the Schedule icon. The Schedule Configuration window appears. The red bar
indicates that the camera is always recording
2. Click the Day Mode button.
3. Choose a camera from the list on the left.
4. Left-click in the main window and draw a bar indicating the time that you want scheduled
on the time table. The scheduled time shows as a grey bar.
5. Click the Insert icon to add a new schedule in the Regular Mode. That is, to record video
during the time period you set with 30 FPS, normal video quality, and normal resolution.
6. Click OK.
Linksys Video Monitoring System User Guide 36
Page 42

Setting a Schedule
Week Mode
Copying a Schedule
You may set up the schedule for each camera by repeating the process above, or by using the
Copy to icon (upper left of the Schedule Configuration window) to apply the setting of a single
camera to all the others.
Week Mode
You may schedule the cameras differently for each day of the week. In addition, you may assign
extra holidays under Week Mode.
• Default—Sets up the schedule for every day in a week.
• Holiday—Assigns holidays and the system works according to a Sunday schedule.
• Custom—Assigns a particular date(s) and the system works according to a special
schedule(s) different from the other schedules.
To set up a schedule for every day in a week:
1. Click Week Mode. The Week Mode window appears.
2. In the left window, scroll down to the selected day of the week.
3. Left-click in the main window and draw a bar indicating the time that you want scheduled
on the time table. The scheduled time shows as a grey bar:
4. Click the Insert icon to add a new schedule in the Regular Mode. That is, to record video
during the time period you set with 30 FPS, normal video quality, and normal resolution.
5. Click OK.
Copying a Schedule
You may set up the schedule for each camera by repeating the process above, or by using the
Copy to icon (upper left of the Schedule Configuration window) to apply the setting of a single
camera to all the others.
Linksys Video Monitoring System User Guide 37
Page 43

Setting a Schedule
Adjusting Configuration Settings
Adjusting Configuration Settings
Many settings are configurable and you can manually change the setting at any time after you
insert or load a period of schedule in either Day or Week mode. To change your settings, click
the Configure icon. The Encoding Options window appears:
Field Definitions
• Start and End Time—Sets your recording time.
• Pre-record and Post-record Time—Saves the recording data accordingly. For instance, a 5second pre-record time means the system starts saving the recording data 5 seconds before
the event happens.
• Always Record—Select this option to record the video at all time.
• Record on Motion—Select this option to start recording when motion is detected.
To record motion, you need to define one or more detection zones:
Linksys Video Monitoring System User Guide 38
Page 44

Setting a Schedule
Adjusting Configuration Settings
1. Click the radio button for Record on Motion.
2. Left-click and drag the mouse to draw up to 10 (green) rectangular detection zones of the
area you want to monitor.
NOTE: When motion is detected in the defined area
of interest, the area starts flashing green and red.
Linksys Video Monitoring System User Guide 39
Page 45

Setting a Schedule
Adjusting Configuration Settings
3. Configure the recording schedule on the right side of the screen.
4. Set the Sensitivity to “Normal” and the Frame Intervals to “5” to start. These settings may be
adjusted later
5. Click OK to go back to the Schedule Configuration window.
6. A green bar indicates that the recording is now done when motion is detected.
7. Click OK again to go back to the Main Console window. When triggered, the area set as the
detection zone area turns red.
NOTE: Specific recording events are shown in the
center of the Schedule window. Double click any
event to go back to the Encoding Options window
to change any setting.
Linksys Video Monitoring System User Guide 40
Page 46

7
Configuring Video Settings
The Setup menu allows you to configure cameras, save or load configuration settings, backup
your data, or access information about the Main Console. To access the Setup menu, click on
the Setup icon in the main window and the following menu appears:
The following menu items that are discussed in this chapter:
• ”Configuring Settings” section on page 41
• ”Saving and Loading to a Configuration File” section on page 49
• ”Log Viewer” section on page 49
• ”Backup” section on page 50
• ”About Main Console” section on page 54
Configuring Settings
When you choose the Setting from the Setup menu, the following window appears:
Linksys Video Monitoring System User Guide 41
Page 47

Configuring Video Settings
Configuring Settings
General Tab
The General tab consists of five active sections: Startup, Storage, Audio Preview, Status
Display, and Auto Reboot.
Startup
Check the features that you would like active upon startup of the Linksys Video Monitoring
System. These features will also be active upon an
• Main Console—Brings up the Main Console window when the Linksys Video Monitoring
System starts.
• Schedule Recording System—Activates recording upon startup. You may start or stop this
function in the Main Console window.
• Full Screen—Opens the Linksys Video Monitoring System to full screen upon startup.
"Auto Reboot”.
• Auto Login—Automatically login with your pre-configured login name and password
upon startup.
• Panel Resolution—Defines the system resolution upon startup. Select Auto Fit to have the
system choose the best resolution for you.
Storage Settings
• Location—Used to assign the default folder for the system to store all data files. You can
also define more than one location as a storage location. The configured locations are
limited to one path per partition drive. For example, you may not set two or more paths in
the same C:/ or D:/ drive, or two or more paths in one partition in a network storage unit.
• Automatic Recycle—Automatically deletes the earliest defined recycle range in the
configured storage. For example, if your storage space is 30 Gb (which equals
approximately 72 hours at 640x480, 10 FPS) and your Recycle Range is set for “6 hours,” the
Linksys Video Monitoring System deletes the first 6 recorded hours once the recording gets
close to using up the full storage space.
• Keep Video—Keeps the recordings for the defined number of days. Only “0” or a positive
number of days is allowed. When “0” (day) is entered, it means the video is only kept the day
of the recording. If Automatic Recycle and Keep Video are both enabled, the recording is
kept for the defined number of days and the earliest hours/days in the range are deleted. If
your storage space is less than what is set in Keep Video, the Linksys Video Monitoring
System falls back to deleting the defined range set in Automatic Recycle, ignoring the days
set in Keep Video.
• Keep System Log—Deletes the system log data that is older than the number of days set.
Only “0” or a positive number of days is allowed. When “0” (day) is entered, it means the log
is only kept the day of the recording.
Linksys Video Monitoring System User Guide 42
Page 48

Configuring Video Settings
Configuring Settings
Audio Preview Settings
NOTE: The Linksys IP cameras have a built-in
microphone or you can attach an external
microphone and/or speakers. Two-way audio
requires an external speaker to be attached to the
camera. When using a two-way audio connection,
consider setting the speaker a few feet away from
the microphone on the camera.
• Default Channel—Select a camera channel to play audio.
• Preview Active Channel—Check the Preview Active Channel option to hear the audio
from the camera you selected on the Main Console. The camera selected in Default
Channel plays if no camera was selected on the Main Console.
• Volume—Adjust the volume with the volume bar.
Informational Display
Check the boxes of the information that you wish displayed in the Information window at the
bottom of the Main Console window:
• Current Date
• Current Time
•Free Disk Space
Auto Reboot
Check Enable Auto Reboot so that you can reboot the system at the time you select, then
select the reboot time.
Linksys Video Monitoring System User Guide 43
Page 49

Configuring Video Settings
Camera Tab
The following are descriptions of the fields found on the camera tab:
Configuring Settings
Camera Functions
Four function buttons are included in the Setting and Camera window.
• Search—Click on the Search icon to obtain the Search IP Camera panel. The system starts
scanning automatically once the panel is opened; stop scanning by clicking on the Stop
Scan button.
Fill in the user name and password for each IP camera found and click OK to add it to the
camera list.
• Insert—Click on the Insert icon to obtain the IP/Video Server Setting panel and add IP
cameras to the list. See
• Delete—Click on the Delete button to remove the selected IP camera(s) from the system.
Click OK to finalize the modification.
• Config—Click on the Config button to obtain the IP Camera/Video Server Setting panel.
– Network—Modify the IP camera settings including Name, IP Address, Http Port,
User Name, Password and Protocol) as provided by the camera manufacturer. Check
“Use DNS” to use domain name instead of IP address.
– Device—Choose the IP camera manufacturer from the drop-down menu. Click on
Auto Detect and the model name will show in the box.
”Adding Cameras Manually” section on page 11 for details.
– Description—Shows information about the IP camera.
• Camera List—Lists the camera(s) connected to the system. Click the name of the camera to
adjust the setting.
Linksys Video Monitoring System User Guide 44
Page 50

Configuring Video Settings
Configuring Settings
Camera Parameter
• Go to Web Interface—Takes you to the cameras main page, where you can view live video,
control the camera, and set other camera functions.
• Camera Settings—Sets camera parameters such as video type (MPEG4, MJPEG), resolution,
bit rate, quality, frame rate, and enabling audio inputs and outputs.
• Video Parameter—Adjusts the video’s brightness, contrast, saturation, and color hue.
• OSD Setting—Selects the information that you wish to see in the on-screen display.
Options include: enable, date, time, camera number and name, and translucent. Translucent
allows OSD text to be transparent, and not block out the video.
Linksys Video Monitoring System User Guide 45
Page 51

Configuring Video Settings
Configuring Settings
I/O Device Tab
The I/O Device tab is for your information only and is not configurable. The following are
descriptions of the fields found on the I/O Device tab.
I/O Device Tab
•Module—Camera name.
• Module—Displays the device(s) already installed to the system.
• Digital Input Monitor—The device(s) is turned on if the dot is red.
• Name—These fields are not configurable.
• Typ e—These fields are not configurable.
– N/O—Normal Open.
– N/C—Normal Close.
• Digital Output Simulation—The device(s) is turned on if the dot is red.
Linksys Video Monitoring System User Guide 46
Page 52

Configuring Video Settings
PTZ Config Tab
The following are descriptions of the fields found on the PTZ Config tab:
Configuring Settings
Cameras without built-in Pan Tilt Zoom capabilities control a PTZ base through an RS-485 serial
connection. Refer to the camera user guide for setup and configuration of the RS-485 interface
to a Pan Tilt base.
Miscellaneous
Patrol Group—Setup the Patrol Group. The Patrol Setup window allows you to define the
sequence of the preset positions and the interval periods between the preset points.
In the left side of the Patrol Setup window, select the cameras that you would like to have in the
patrol group. Align the cameras in order in the right window and adjust the time. Rename the
group name, as desired. After completing the setup, check the Active option, and then click
OK.
You can setup up to four groups of auto patrol.
Linksys Video Monitoring System User Guide 47
Page 53

User Account Tab
Configuring Video Settings
Configuring Settings
The administrator may manage the user accounts here. From the list on the right, highlight
each account and modify the privilege setting.
Monitor Display Tab
The following are descriptions of the fields found on the Monitor Display tab:
• Cameras List—The left side displays a list of all cameras; modify the cameras shown in the
Primary (right) window.
Linksys Video Monitoring System User Guide 48
Page 54

Configuring Video Settings
Saving and Loading to a Configuration File
• Auto Scan—Activate auto scan to rotate the channels/ cameras on the display screen.
For instance, you may select to show only 4 sub-screens on the main console while having
16 channels connected to the system. With auto scan, you will be able to see all 16 channels
in turn. You can set the auto-scan interval and a primary channel that will always be on the
screen and a secondary channel that has secondary priority.
Saving and Loading to a Configuration File
The Save/ Load Configuration function allows system users to save any specific setting as a .cfg
(config) file. You may save up several different .cfg files at any time
Save Configuration—To save a specific setting, go to Setup > Save/ Load Configuration >
Save. In the popup window, type in the file name and then save it as a .cfg file.
Load Configuration—To load a specific setting, go to Config > Save/ Load Configuration >
Load. In the popup window, go to the directory where you saved the .cfg files at, select any one
of them and then click OK to load the file. The Main Console window is automatically shutdown
after loading a new configuration. Please re-start the Main Console window manually.
Log Viewer
Linksys Video Monitoring System User Guide 49
Page 55

Configuring Video Settings
Backup
Viewing the System Log
System Log—You can choose the log type from the drop-down menu. A list of some of the
available log types follows:
All
Main Console Startup
Main Console Shutdown
User Login
User Login Failed
Start Schedule
Stop Schedule
Execute Recycle
Execute Backup
Enable Channel
Disable Channel
Modify Schedule
Modify Configuration
IP Camera Connection Lost
Auto Restart Main Console
1. Choose the event from the Log Type menu or select All from the drop-down menu for all
types of events.
2. You may view events that happened on a particular date or during a given time period. To
search and view unusual event happened on a particular date, mark the box right next to
Date and indicate the date.
You may also point out two different time points and search for unusual events that
happened during the period. Mark the box in the Date&Time column and then enter the
date and time.
3. Click Search.
Exporting from the Log Viewer
After searching the log, you can export to an .xls or .txt file.
1. Press the Export to.
2. Type the file name and choose the file format (.xls or .txt).
Backup
Different from Save Video, the Backup function saves everything from the Playback panel,
including log information.
You can load backup files onto a fully- functioning Linksys Video Monitoring Playback Console
on any Microsoft Windows computer. This means that you can monitor the video real time on
Linksys Video Monitoring System User Guide 50
Page 56

Configuring Video Settings
one PC and work on the backup files on different computer simultaneously. Follow the
instructions below to obtain backup files
Backup
1. Click on New Period to obtain the Select DateTime Period panel.
2. Select the date you want to backup. The color lines indicate available data recorded. Red
indicates “record always”, and green indicates “record on motion”.
3. Select the data you want to backup by right clicking and dragging over the time period.
Besides the time-table, you may also set up start time and end time in the Date Time Period
section.
4. Click on the camera number icon to add camera(s) or click Select All to add all the cameras.
5. Check the Enable Preview box to get the preview of the video you select.
6. Click OK when the settings are complete.
Linksys Video Monitoring System User Guide 51
Page 57

Configuring Video Settings
Backup
7. The Backup window appears, with your new data. Click the Backup icon to see the backup
summary window.
8. The backup summary provides the size of the file. You can also choose the path where you
want to save the file, or if you want to burn the file into a CD (direct CD burning is available
for Windows XP only).
9. Select Backup System Log.
10. Click OK. As the backup process complete, a status dialog box appears.
11. A confirmation window appears when the backup is complete allowing you to view the
video that was backed up.
Linksys Video Monitoring System User Guide 52
Page 58

Configuring Video Settings
Delete Recorded Information from the System
1. Click on New Period to obtain the Select DateTime Period panel.
Backup
2. From the record date section, select the date you want to backup. You will see color lines
appear in the time table implying available data recorded. Red indicates “record always”,
and green indicates “record on motion”.
3. Select the data you want to delete by highlighting the time period. Besides the time-table,
you may also set up start time and end time in the Date Time Period section.
4. Click on the camera number icon to add camera(s) or click Select All to add all the cameras.
5. Check the Enable Preview box to get the preview of the video you select.
6. Click OK when the settings are complete.
7. The Backup window appears, with your new data.
8. Highlight the data to delete, and click on the Delete icon to delete the data.
NOTE: The deleted video cannot be recovered.
Linksys Video Monitoring System User Guide 53
Page 59

Configuring Video Settings
About Main Console
About Main Console
Go to About Main Console to view the version of your monitoring system and the hardware
information.
Linksys Video Monitoring System User Guide 54
Page 60

A
Frequently Asked Questions
How many cameras can I monitor? How many people can monitor a camera?
You can monitor up to 16 cameras at one time. Each camera can be monitored by up to 10
different computers at the same time. When the 11th user tries to access the camera, that user
will receive a message that indicates the maximum number of viewers has been reached. (One
computer can also be set to monitor the same camera multiple times, up to the maximum of
10.)
Can I monitor cameras at other sites within my multi-site network?
Yes. The Linksys Video Monitoring System can be accessed from a remote location.
Can I place the camera in an enclosure?
The compact design of the PVC2300 and WVC2300 cameras allow them to be placed in a
protective enclosure for exterior or interior installations. IP66-certified enclosures are
recommended. Any camera enclosure should have sufficient ventilation and cooling to ensure
that the camera stays within its environmental operating parameters.
My camera doesn't show up when do a search in settings/camera. But I can see the
camera is working by logging into the IP address of the camera.
The camera must have UPnP enabled to be detected by the Linksys Video Monitoring System.
Using a browser, login to the camera and verify that UPnP is enabled.
I save all of my videos in C:\My Documents\videos, but I can't play any of these files.
The Linksys Video Monitoring System stores all recorded data in a proprietary format. For video
to be shared and viewed on common media players, the video must first be saved in a standard
compression format. The choices of format are ASF and AVI. See
information.
I setup my recording schedule to record on motion. When I playback recordings, I don't
see any motion. Why is the application recording?
Motion detection can be triggered by changes in lighting (such a clouds or sunset/sunrise).
While no objects are physically moving in the video, the camera has detected changes which
triggers the recording. You can adjust motion detection settings by changing the sensitivity
and frame interval settings. See
information.
“Adjusting Configuration Settings” on page 38 for more
“Save Video” on page 26 for more
Linksys Video Monitoring System User Guide 55
Page 61

B
Software License Agreement
Software in Linksys Products:
This product from Cisco-Linksys LLC or from one of its affiliates Cisco Systems-Linksys (Asia) Pte
Ltd. or Cisco-Linksys K.K. ("Linksys") contains software (including firmware) originating from
Linksys and its suppliers and may also contain software from the open source community. Any
software originating from Linksys and its suppliers is licensed under the Linksys Software
License Agreement contained at Schedule 1 below. You may also be prompted to review and
accept that Linksys Software License Agreement upon installation of the software.
Any software from the open source community is licensed under the specific license terms
applicable to that software made available by Linksys at
in Schedules 2 and 3 below.
Where such specific license terms entitle you to the source code of such software, that source
code is upon request available at cost from Linksys for at least three years from the purchase
date of this product and may also be available for download from
detailed license terms and additional information on open source software in Linksys products
please look at the Linksys public web site at:
applicable.
www.linksys.com/gpl/ or Schedule 2 below as
www.linksys.com/gpl or as provided for
www.linksys.com/gpl. For
BY DOWNLOADING OR INSTALLING THE SOFTWARE, OR USING THE PRODUCT CONTAINING
THE SOFTWARE, YOU ARE CONSENTING TO BE BOUND BY THE SOFTWARE LICENSE
AGREEMENTS BELOW. IF YOU DO NOT AGREE TO ALL OF THESE TERMS, THEN YOU MAY NOT
DOWNLOAD, INSTALL OR USE THE SOFTWARE. YOU MAY RETURN UNUSED SOFTWARE (OR, IF
THE SOFTWARE IS SUPPLIED AS PART OF ANOTHER PRODUCT, THE UNUSED PRODUCT) FOR A
FULL REFUND UP TO 30 DAYS AFTER ORIGINAL PURCHASE, SUBJECT TO THE RETURN PROCESS
AND POLICIES OF THE PARTY FROM WHICH YOU PURCHASED SUCH PRODUCT OR SOFTWARE.
Software Licenses:
The software Licenses applicable to software from Linksys are made available at the Linksys
public web site at: www.linksys.com and
convenience of reference, a copy of the Linksys Software License Agreement and the main
open source code licenses used by Linksys in its products are contained in the Schedules below.
Schedule 1 Linksys Software License Agreement
THIS LICENSE AGREEMENT IS BETWEEN YOU AND CISCO-LINKSYS LLC OR ONE OF ITS
AFFILIATES CISCO SYSTEMS-LINKSYS (ASIA) PTE LTD. OR CISCO-LINKSYS K.K. ("LINKSYS")
LICENSING THE SOFTWARE INSTEAD OF CISCO-LINKSYS LLC. BY DOWNLOADING OR
INSTALLING THE SOFTWARE, OR USING THE PRODUCT CONTAINING THE SOFTWARE, YOU ARE
CONSENTING TO BE BOUND BY THIS AGREEMENT. IF YOU DO NOT AGREE TO ALL OF THESE
TERMS, THEN YOU MAY NOT DOWNLOAD, INSTALL OR USE THE SOFTWARE. YOU MAY RETURN
UNUSED SOFTWARE (OR, IF THE SOFTWARE IS SUPPLIED AS PART OF ANOTHER PRODUCT, THE
UNUSED PRODUCT) FOR A FULL REFUND UP TO 30 DAYS AFTER ORIGINAL PURCHASE, SUBJECT
TO THE RETURN PROCESS AND POLICIES OF THE PARTY FROM WHICH YOU PURCHASED SUCH
PRODUCT OR SOFTWARE.
www.linksys.com/gpl/ respectively. For your
Linksys Video Monitoring System User Guide 56
Page 62

Software Licenses:
License. Subject to the terms and conditions of this Agreement, Linksys grants the original end
user purchaser of the Linksys product containing the Software ("You") a nonexclusive license to
use the Software solely as embedded in or (where authorized in the applicable documentation)
for communication with such product. This license may not be sublicensed, and is not
transferable except to a person or entity to which you transfer ownership of the complete
Linksys product containing the Software, provided you permanently transfer all rights under
this Agreement and do not retain any full or partial copies of the Software, and the recipient
agrees to the terms of this Agreement.
"Software" includes, and this Agreement will apply to (a) the software of Linksys or its suppliers
provided in or with the applicable Linksys product, and (b) any upgrades, updates, bug fixes or
modified versions ("Upgrades") or backup copies of the Software supplied to You by Linksys or
an authorized reseller, provided you already hold a valid license to the original software and
have paid any applicable fee for the Upgrade.
Protection of Information. The Software and documentation contain trade secrets and/or
copyrighted materials of Linksys or its suppliers. You will not copy or modify the Software or
decompile, decrypt, reverse engineer or disassemble the Software (except to the extent
expressly permitted by law notwithstanding this provision), and You will not disclose or make
available such trade secrets or copyrighted material in any form to any third party. Title to and
ownership of the Software and documentation and any portion thereof, will remain solely with
Linksys or its suppliers.
Collection and Processing of Information. You agree that Linksys and/or its affiliates may,
from time to time, collect and process information about your Linksys product and/or the
Software and/or your use of either in order (i) to enable Linksys to offer you Upgrades; (ii) to
ensure that your Linksys product and/or the Software is being used in accordance with the
terms of this Agreement; (iii) to provide improvements to the way Linksys delivers technology
to you and to other Linksys customers; (iv) to enable Linksys to comply with the terms of any
agreements it has with any third parties regarding your Linksys product and/or Software and/
or (v) to enable Linksys to comply with all applicable laws and/or regulations, or the
requirements of any regulatory authority or government agency. Linksys and/ or its affiliates
may collect and process this information provided that it does not identify you personally. Your
use of your Linksys product and/or the Software constitutes this consent by you to Linksys and/
or its affiliates' collection and use of such information and, for EEA customers, to the transfer of
such information to a location outside the EEA.
Software Upgrades etc. If the Software enables you to receive Upgrades, you may elect at any
time to receive these Upgrades either automatically or manually. If you elect to receive
Upgrades manually or you otherwise elect not to receive or be notified of any Upgrades, you
may expose your Linksys product and/or the Software to serious security threats and/or some
features within your Linksys product and/or Software may become inaccessible. There may be
circumstances where we apply an Upgrade automatically in order to comply with changes in
legislation, legal or regulatory requirements or as a result of requirements to comply with the
terms of any agreements Linksys has with any third parties regarding your Linksys product and/
or the Software. You will always be notified of any Upgrades being delivered to you. The terms
of this license will apply to any such Upgrade unless the Upgrade in question is accompanied
by a separate license, in which event the terms of that license will apply.
Open Source Software. The GPL or other open source code incorporated into the Software
and the open source license for such source code are available for free download at http://
Linksys Video Monitoring System User Guide 57
Page 63

Software Licenses:
www.linksys.com/gpl. If You would like a copy of the GPL or other open source code in this
Software on a CD, Linksys will mail to You a CD with such code for $9.99 plus the cost of
shipping, upon request.
Term an d Te rminatio n. You may terminate this License at any time by destroying all copies of
the Software and documentation. Your rights under this License will terminate immediately
without notice from Linksys if You fail to comply with any provision of this Agreement.
Limited Warranty. The warranty terms and period specified in the applicable Linksys Product
User Guide shall also apply to the Software.
Disclaimer of Liabilities. IN NO EVENT WILL LINKSYS OR ITS SUPPLIERS BE LIABLE FOR ANY
LOST DATA, REVENUE OR PROFIT, OR FOR SPECIAL, INDIRECT, CONSEQUENTIAL, INCIDENTAL OR
PUNITIVE DAMAGES, REGARDLESS OF CAUSE (INCLUDING NEGLIGENCE), ARISING OUT OF OR
RELATED TO THE USE OF OR INABILITY TO USE THE SOFTWARE, EVEN IF LINKSYS HAS BEEN
ADVISED OF THE POSSIBILITY OF SUCH DAMAGES. IN NO EVENT WILL LINKSYS' LIABILITY
EXCEED THE AMOUNT PAID BY YOU FOR THE PRODUCT. The foregoing limitations will apply
even if any warranty or remedy under this Agreement fails of its essential purpose. Some
jurisdictions do not allow the exclusion or limitation of incidental or consequential damages, so
the above limitation or exclusion may not apply to You.
Export. Software, including technical data, may be subject to U.S. export control laws and
regulations and/or export or import regulations in other countries. You agree to comply strictly
with all such laws and regulations.
U.S. Government Users. The Software and documentation qualify as "commercial items" as
defined at 48 C.F.R. 2.101 and 48 C.F.R. 12.212. All Government users acquire the Software and
documentation with only those rights herein that apply to non-governmental customers.
General Terms. This Agreement will be governed by and construed in accordance with the
laws of the State of California, without reference to conflict of laws principles. The United
Nations Convention on Contracts for the International Sale of Goods will not apply. If any
portion of this Agreement is found to be void or unenforceable, the remaining provisions will
remain in full force and effect. This Agreement constitutes the entire agreement between the
parties with respect to the Software and supersedes any conflicting or additional terms
contained in any purchase order or elsewhere.
END OF SCHEDULE 1
Schedule 2
If this Linksys product contains open source software licensed under Version 2 of the "GNU
General Public License" then the license terms below in this Schedule 2 will apply to that open
source software. The license terms below in this Schedule 2 are from the public web site at
http://www.gnu.org/copyleft/gpl.html
________________________________________
GNU GENERAL PUBLIC LICENSE
Version 2, June 1991
Linksys Video Monitoring System User Guide 58
Page 64

Software Licenses:
Copyright (C) 1989, 1991 Free Software Foundation, Inc.
51 Franklin Street, Fifth Floor, Boston, MA 02110-1301, USA
Everyone is permitted to copy and distribute verbatim copies
of this license document, but changing it is not allowed.
Preamble
The licenses for most software are designed to take away your freedom to share and change it.
By contrast, the GNU General Public License is intended to guarantee your freedom to share
and change free software--to make sure the software is free for all its users. This General Public
License applies to most of the Free Software Foundation's software and to any other program
whose authors commit to using it. (Some other Free Software Foundation software is covered
by the GNU Lesser General Public License instead.) You can apply it to your programs, too.
When we speak of free software, we are referring to freedom, not price. Our General Public
Licenses are designed to make sure that you have the freedom to distribute copies of free
software (and charge for this service if you wish), that you receive source code or can get it if
you want it, that you can change the software or use pieces of it in new free programs; and that
you know you can do these things.
To protect your rights, we need to make restrictions that forbid anyone to deny you these rights
or to ask you to surrender the rights. These restrictions translate to certain responsibilities for
you if you distribute copies of the software, or if you modify it.
For example, if you distribute copies of such a program, whether gratis or for a fee, you must
give the recipients all the rights that you have. You must make sure that they, too, receive or can
get the source code. And you must show them these terms so they know their rights.
We protect your rights with two steps: (1) copyright the software, and (2) offer you this license
which gives you legal permission to copy, distribute and/or modify the software.
Also, for each author's protection and ours, we want to make certain that everyone
understands that there is no warranty for this free software. If the software is modified by
someone else and passed on, we want its recipients to know that what they have is not the
original, so that any problems introduced by others will not reflect on the original authors'
reputations.
Finally, any free program is threatened constantly by software patents. We wish to avoid the
danger that redistributors of a free program will individually obtain patent licenses, in effect
making the program proprietary. To prevent this, we have made it clear that any patent must be
licensed for everyone's free use or not licensed at all.
The precise terms and conditions for copying, distribution and modification follow.
TERMS AND CONDITIONS FOR COPYING, DISTRIBUTION AND MODIFICATION
0. This License applies to any program or other work which contains a notice placed by the
copyright holder saying it may be distributed under the terms of this General Public License.
The "Program", below, refers to any such program or work, and a "work based on the Program"
means either the Program or any derivative work under copyright law: that is to say, a work
Linksys Video Monitoring System User Guide 59
Page 65

Software Licenses:
containing the Program or a portion of it, either verbatim or with modifications and/or
translated into another language. (Hereinafter, translation is included without limitation in the
term "modification".) Each licensee is addressed as "you".
Activities other than copying, distribution and modification are not covered by this License;
they are outside its scope. The act of running the Program is not restricted, and the output from
the Program is covered only if its contents constitute a work based on the Program
(independent of having been made by running the Program). Whether that is true depends on
what the Program does.
1. You may copy and distribute verbatim copies of the Program's source code as you receive it,
in any medium, provided that you conspicuously and appropriately publish on each copy an
appropriate copyright notice and disclaimer of warranty; keep intact all the notices that refer to
this License and to the absence of any warranty; and give any other recipients of the Program a
copy of this License along with the Program.
You may charge a fee for the physical act of transferring a copy, and you may at your option
offer warranty protection in exchange for a fee.
2. You may modify your copy or copies of the Program or any portion of it, thus forming a work
based on the Program, and copy and distribute such modifications or work under the terms of
Section 1 above, provided that you also meet all of these conditions:
a) You must cause the modified files to carry prominent notices stating that you changed
the files and the date of any change.
b) You must cause any work that you distribute or publish, that in whole or in part contains
or is derived from the Program or any part thereof, to be licensed as a whole at no charge to
all third parties under the terms of this License.
c) If the modified program normally reads commands interactively when run, you must
cause it, when started running for such interactive use in the most ordinary way, to print or
display an announcement including an appropriate copyright notice and a notice that
there is no warranty (or else, saying that you provide a warranty) and that users may
redistribute the program under these conditions, and telling the user how to view a copy of
this License. (Exception: if the Program itself is interactive but does not normally print such
an announcement, your work based on the Program is not required to print an
announcement.)
These requirements apply to the modified work as a whole. If identifiable sections of that work
are not derived from the Program, and can be reasonably considered independent and
separate works in themselves, then this License, and its terms, do not apply to those sections
when you distribute them as separate works. But when you distribute the same sections as part
of a whole which is a work based on the Program, the distribution of the whole must be on the
terms of this License, whose permissions for other licensees extend to the entire whole, and
thus to each and every part regardless of who wrote it.
Thus, it is not the intent of this section to claim rights or contest your rights to work written
entirely by you; rather, the intent is to exercise the right to control the distribution of derivative
or collective works based on the Program.
Linksys Video Monitoring System User Guide 60
Page 66

Software Licenses:
In addition, mere aggregation of another work not based on the Program with the Program (or
with a work based on the Program) on a volume of a storage or distribution medium does not
bring the other work under the scope of this License.
3. You may copy and distribute the Program (or a work based on it, under Section 2) in object
code or executable form under the terms of Sections 1 and 2 above provided that you also do
one of the following:
a) Accompany it with the complete corresponding machine-readable source code, which
must be distributed under the terms of Sections 1 and 2 above on a medium customarily
used for software interchange; or,
b) Accompany it with a written offer, valid for at least three years, to give any third party, for
a charge no more than your cost of physically performing source distribution, a complete
machine-readable copy of the corresponding source code, to be distributed under the
terms of Sections 1 and 2 above on a medium customarily used for software interchange;
or,
c) Accompany it with the information you received as to the offer to distribute
corresponding source code. (This alternative is allowed only for noncommercial distribution
and only if you received the program in object code or executable form with such an offer,
in accord with Subsection b above.)
The source code for a work means the preferred form of the work for making modifications to it.
For an executable work, complete source code means all the source code for all modules it
contains, plus any associated interface definition files, plus the scripts used to control
compilation and installation of the executable. However, as a special exception, the source
code distributed need not include anything that is normally distributed (in either source or
binary form) with the major components (compiler, kernel, and so on) of the operating system
on which the executable runs, unless that component itself accompanies the executable.
If distribution of executable or object code is made by offering access to copy from a
designated place, then offering equivalent access to copy the source code from the same place
counts as distribution of the source code, even though third parties are not compelled to copy
the source along with the object code.
4. You may not copy, modify, sublicense, or distribute the Program except as expressly provided
under this License. Any attempt otherwise to copy, modify, sublicense or distribute the
Program is void, and will automatically terminate your rights under this License. However,
parties who have received copies, or rights, from you under this License will not have their
licenses terminated so long as such parties remain in full compliance.
5. You are not required to accept this License, since you have not signed it. However, nothing
else grants you permission to modify or distribute the Program or its derivative works. These
actions are prohibited by law if you do not accept this License. Therefore, by modifying or
distributing the Program (or any work based on the Program), you indicate your acceptance of
this License to do so, and all its terms and conditions for copying, distributing or modifying the
Program or works based on it.
6. Each time you redistribute the Program (or any work based on the Program), the recipient
automatically receives a license from the original licensor to copy, distribute or modify the
Program subject to these terms and conditions. You may not impose any further restrictions on
Linksys Video Monitoring System User Guide 61
Page 67

Software Licenses:
the recipients' exercise of the rights granted herein. You are not responsible for enforcing
compliance by third parties to this License.
7. If, as a consequence of a court judgment or allegation of patent infringement or for any other
reason (not limited to patent issues), conditions are imposed on you (whether by court order,
agreement or otherwise) that contradict the conditions of this License, they do not excuse you
from the conditions of this License. If you cannot distribute so as to satisfy simultaneously your
obligations under this License and any other pertinent obligations, then as a consequence you
may not distribute the Program at all. For example, if a patent license would not permit royaltyfree redistribution of the Program by all those who receive copies directly or indirectly through
you, then the only way you could satisfy both it and this License would be to refrain entirely
from distribution of the Program.
If any portion of this section is held invalid or unenforceable under any particular circumstance,
the balance of the section is intended to apply and the section as a whole is intended to apply
in other circumstances.
It is not the purpose of this section to induce you to infringe any patents or other property right
claims or to contest validity of any such claims; this section has the sole purpose of protecting
the integrity of the free software distribution system, which is implemented by public license
practices. Many people have made generous contributions to the wide range of software
distributed through that system in reliance on consistent application of that system; it is up to
the author/donor to decide if he or she is willing to distribute software through any other
system and a licensee cannot impose that choice.
This section is intended to make thoroughly clear what is believed to be a consequence of the
rest of this License.
8. If the distribution and/or use of the Program is restricted in certain countries either by
patents or by copyrighted interfaces, the original copyright holder who places the Program
under this License may add an explicit geographical distribution limitation excluding those
countries, so that distribution is permitted only in or among countries not thus excluded. In
such case, this License incorporates the limitation as if written in the body of this License.
9. The Free Software Foundation may publish revised and/or new versions of the General Public
License from time to time. Such new versions will be similar in spirit to the present version, but
may differ in detail to address new problems or concerns.
Each version is given a distinguishing version number. If the Program specifies a version
number of this License which applies to it and "any later version", you have the option of
following the terms and conditions either of that version or of any later version published by
the Free Software Foundation. If the Program does not specify a version number of this License,
you may choose any version ever published by the Free Software Foundation.
10. If you wish to incorporate parts of the Program into other free programs whose distribution
conditions are different, write to the author to ask for permission. For software which is
copyrighted by the Free Software Foundation, write to the Free Software Foundation; we
sometimes make exceptions for this. Our decision will be guided by the two goals of preserving
the free status of all derivatives of our free software and of promoting the sharing and reuse of
software generally.
NO WARRANTY
Linksys Video Monitoring System User Guide 62
Page 68

Software Licenses:
11. BECAUSE THE PROGRAM IS LICENSED FREE OF CHARGE, THERE IS NO WARRANTY FOR THE
PROGRAM, TO THE EXTENT PERMITTED BY APPLICABLE LAW. EXCEPT WHEN OTHERWISE
STATED IN WRITING THE COPYRIGHT HOLDERS AND/OR OTHER PARTIES PROVIDE THE
PROGRAM "AS IS" WITHOUT WARRANTY OF ANY KIND, EITHER EXPRESSED OR IMPLIED,
INCLUDING, BUT NOT LIMITED TO, THE IMPLIED WARRANTIES OF MERCHANTABILITY AND
FITNESS FOR A PARTICULAR PURPOSE. THE ENTIRE RISK AS TO THE QUALITY AND
PERFORMANCE OF THE PROGRAM IS WITH YOU. SHOULD THE PROGRAM PROVE DEFECTIVE,
YOU ASSUME THE COST OF ALL NECESSARY SERVICING, REPAIR OR CORRECTION.
12. IN NO EVENT UNLESS REQUIRED BY APPLICABLE LAW OR AGREED TO IN WRITING WILL ANY
COPYRIGHT HOLDER, OR ANY OTHER PARTY WHO MAY MODIFY AND/OR REDISTRIBUTE THE
PROGRAM AS PERMITTED ABOVE, BE LIABLE TO YOU FOR DAMAGES, INCLUDING ANY
GENERAL, SPECIAL, INCIDENTAL OR CONSEQUENTIAL DAMAGES ARISING OUT OF THE USE OR
INABILITY TO USE THE PROGRAM (INCLUDING BUT NOT LIMITED TO LOSS OF DATA OR DATA
BEING RENDERED INACCURATE OR LOSSES SUSTAINED BY YOU OR THIRD PARTIES OR A FAILURE
OF THE PROGRAM TO OPERATE WITH ANY OTHER PROGRAMS), EVEN IF SUCH HOLDER OR
OTHER PARTY HAS BEEN ADVISED OF THE POSSIBILITY OF SUCH DAMAGES.
END OF TERMS AND CONDITIONS
END OF SCHEDULE 2
Schedule 3
If this Linksys product contains open source software licensed under the OpenSSL license then
the license terms below in this Schedule 3 will apply to that open source software. The license
terms below in this Schedule 3 are from the public web site at
license.html
________________________________________
The OpenSSL toolkit stays under a dual license, i.e. both the conditions of the OpenSSL License
and the original SSLeay license apply to the toolkit. See below for the actual license texts.
Actually both licenses are BSD-style Open Source licenses. In case of any license issues related
to OpenSSL please contact openssl-core@openssl.org.
OpenSSL License
---------------
/*
=================================================================
===
http://www.openssl.org/source/
Copyright (c) 1998-2007 The OpenSSL Project. All rights reserved.
Redistribution and use in source and binary forms, with or without modification, are permitted
provided that the following conditions are met:
1. Redistributions of source code must retain the above copyright notice, this list of conditions
and the following disclaimer.
Linksys Video Monitoring System User Guide 63
Page 69

Software Licenses:
2. Redistributions in binary form must reproduce the above copyright notice, this list of
conditions and the following disclaimer in the documentation and/or other materials provided
with the distribution.
3. All advertising materials mentioning features or use of this software must display the
following acknowledgment: "This product includes software developed by the OpenSSL
Project for use in the OpenSSL Toolkit. (http://www.openssl.org/)"
4. The names "OpenSSL Toolkit" and "OpenSSL Project" must not be used to endorse or
promote products derived from this software without prior written permission. For written
permission, please contact openssl-core@openssl.org.
5. Products derived from this software may not be called "OpenSSL" nor may "OpenSSL" appear
in their names without prior written permission of the OpenSSL Project.
6. Redistributions of any form whatsoever must retain the following acknowledgment: "This
product includes software developed by the OpenSSL Project for use in the OpenSSL Toolkit
(http://www.openssl.org/)"
THIS SOFTWARE IS PROVIDED BY THE OpenSSL PROJECT ``AS IS'' AND ANY EXPRESSED OR
IMPLIED WARRANTIES, INCLUDING, BUT NOT LIMITED TO, THE IMPLIED WARRANTIES OF
MERCHANTABILITY AND FITNESS FOR A PARTICULAR PURPOSE ARE DISCLAIMED. IN NO EVENT
SHALL THE OpenSSL PROJECT OR ITS CONTRIBUTORS BE LIABLE FOR ANY DIRECT, INDIRECT,
INCIDENTAL, SPECIAL, EXEMPLARY, OR CONSEQUENTIAL DAMAGES (INCLUDING, BUT NOT
LIMITED TO, PROCUREMENT OF SUBSTITUTE GOODS OR SERVICES; LOSS OF USE, DATA, OR
PROFITS; OR BUSINESS INTERRUPTION) HOWEVER CAUSED AND ON ANY THEORY OF LIABILITY,
WHETHER IN CONTRACT, STRICT LIABILITY, OR TORT (INCLUDING NEGLIGENCE OR OTHERWISE)
ARISING IN ANY WAY OUT OF THE USE OF THIS SOFTWARE, EVEN IF ADVISED OF THE
POSSIBILITY OF SUCH DAMAGE.
=================================================================
This product includes cryptographic software written by Eric Young (eay@cryptsoft.com). This
product includes software written by Tim Hudson (tjh@cryptsoft.com).
Original SSLeay License
-----------------------
Copyright (C) 1995-1998 Eric Young (eay@cryptsoft.com)
All rights reserved.
This package is an SSL implementation written by Eric Young (eay@cryptsoft.com).
The implementation was written so as to conform with Netscapes SSL.
This library is free for commercial and non-commercial use as long as the following conditions
are aheared to. The following conditions apply to all code found in this distribution, be it the
RC4, RSA, lhash, DES, etc., code; not just the SSL code. The SSL documentation included with
Linksys Video Monitoring System User Guide 64
Page 70

Software Licenses:
this distribution is covered by the same copyright terms except that the holder is Tim Hudson
(tjh@cryptsoft.com).
Copyright remains Eric Young's, and as such any Copyright notices in the code are not to be
removed.
If this package is used in a product, Eric Young should be given attribution as the author of the
parts of the library used. This can be in the form of a textual message at program startup or in
documentation (online or textual) provided with the package.
Redistribution and use in source and binary forms, with or without modification, are permitted
provided that the following conditions are met:
1. Redistributions of source code must retain the copyright notice, this list of conditions and the
following disclaimer.
2. Redistributions in binary form must reproduce the above copyright notice, this list of
conditions and the following disclaimer in the documentation and/or other materials provided
with the distribution.
3. All advertising materials mentioning features or use of this software must display the
following acknowledgement:
"This product includes cryptographic software written by Eric Young (eay@cryptsoft.com)"
The word 'cryptographic' can be left out if the rouines from the library being used are not
cryptographic related :-).
4. If you include any Windows specific code (or a derivative thereof) from the apps directory
(application code) you must include an acknowledgement: "This product includes software
written by Tim Hudson (tjh@cryptsoft.com)"
THIS SOFTWARE IS PROVIDED BY ERIC YOUNG ``AS IS'' AND ANY EXPRESS OR IMPLIED
WARRANTIES, INCLUDING, BUT NOT LIMITED TO, THE IMPLIED WARRANTIES OF
MERCHANTABILITY AND FITNESS FOR A PARTICULAR PURPOSE ARE DISCLAIMED. IN NO EVENT
SHALL THE AUTHOR OR CONTRIBUTORS BE LIABLE FOR ANY DIRECT, INDIRECT, INCIDENTAL,
SPECIAL, EXEMPLARY, OR CONSEQUENTIAL DAMAGES (INCLUDING, BUT NOT LIMITED TO,
PROCUREMENT OF SUBSTITUTE GOODS OR SERVICES; LOSS OF USE, DATA, OR PROFITS; OR
BUSINESS INTERRUPTION) HOWEVER CAUSED AND ON ANY THEORY OF LIABILITY, WHETHER IN
CONTRACT, STRICT LIABILITY, OR TORT (INCLUDING NEGLIGENCE OR OTHERWISE) ARISING IN
ANY WAY OUT OF THE USE OF THIS SOFTWARE, EVEN IF ADVISED OF THE POSSIBILITY OF SUCH
DAMAGE.
The licence and distribution terms for any publically available version or derivative of this code
cannot be changed. i.e. this code cannot simply be copied and put under another distribution
licence [including the GNU Public Licence.]
END OF SCHEDULE 3
Linksys Video Monitoring System User Guide 65
Page 71

Contacts
For additional information or troubleshooting help, refer to the User Guide on the CD-ROM.
Additional support is also available by phone or online.
US/Canada Contacts
24-Hour Technical Support
800-326-7114
RMA (Return Merchandise Authorization)
http://www.linksys.com/warranty
Website
C
http://www.linksys.com
FTP Site
ftp://ftp.linksys.com
Support
http://www.linksys.com/support
Sales Information
800-546-5797 (800-LINKSYS)
EU Contacts
Website
http://www.linksys.com/international
Product Registration
http://www.linksys.com/registration
Linksys Video Monitoring System User Guide 66
Page 72

8061210NC-IH
 Loading...