

Linksys Instant Wireles Series, Instant Wireless WAP11 User Manual
Instant WirelessTMSeries
Wireless Network
Access Point
Use this guide to install: WAP11
User Guide

COPYRIGHT & TRADEMARKS
Copyright © 2001 Linksys, All Rights Reserved. Instant Wireless™ is a registered trademark of Linksys. Microsoft, Windows, and the Windows logo are registered trademarks
of Microsoft Corporation. All other trademarks and brand names are the property of their
respective proprietors.
LIMITED WARRANTY
Linksys guarantees that every Wireless Network Access Point is free from physical
defects in material and workmanship under normal use for one year from the date of purchase. If the product proves defective during this warranty period, call Linksys Customer
Support in order to obtain a Return Authorization Number. BE SURE TO HAVE YOUR
PROOF OF PURCHASE AND A BARCODE FROM THE PRODUCT’S PACKAGING ON
HAND WHEN CALLING. RETURN REQUESTS CANNOT BE PROCESSED WITHOUT
PROOF OF PURCHASE. When returning a product, mark the Return Authorization
Number clearly on the outside of the package and include your original proof of purchase. All customers located outside of the United States of America and Canada shall
be held responsible for shipping and handling charges.
IN NO EVENT SHALL LINKSYS’ LIABILITY EXCEED THE PRICE PAID FOR THE PRODUCT FROM DIRECT, INDIRECT, SPECIAL, INCIDENTAL, OR CONSEQUENTIAL DAMAGES RESULTING FROM THE USE OF THE PRODUCT, ITS ACCOMPANYING SOFTWARE, OR ITS DOCUMENTATION. LINKSYS DOES NOT OFFER REFUNDS FOR ANY
PRODUCT. Linksys makes no warranty or representation, expressed, implied, or statutory, with respect to its products or the contents or use of this documentation and all
accompanying software, and specifically disclaims its quality, performance, merchantability, or fitness for any particular purpose. Linksys reserves the right to revise or
update its products, software, or documentation without obligation to notify any individual or entity. Please direct all inquiries to:
Linksys P.O. Box 18558, Irvine, CA 92623.
FCC STATEMENT
This product has been tested and complies with the specifications for a Class B digital
device, pursuant to Part 15 of the FCC Rules. These limits are designed to provide reasonable protection against harmful interference in a residential installation. This equipment generates, uses, and can radiate radio frequency energy and, if not installed and
used according to the instructions, may cause harmful interference to radio communications. However, there is no guarantee that interference will not occur in a particular
installation. If this equipment does cause harmful interference to radio or television
reception, which is found by turning the equipment off and on, the user is encouraged to
try to correct the interference by one or more of the following measures:
• Reorient or relocate the receiving antenna
• Increase the separation between the equipment or devices
• Connect the equipment to an outlet other than the receiver’s
• Consult a dealer or an experienced radio/TV technician for assistance
FCC Radiation Exposure Statement
This equipment complies with FCC radiation exposure limits set forth for an uncontrolled
environment. This equipment should be installed and operated with minimum distance
20cm between the radiator and your body.
UG-WAP11-011005E JL

Wireless Network Access Point
Introduction
The Instant WirelessTMWireless Network Access Point
Don’t be bound by cabling restrictions any longer! The Instant Wireless™
Network Access Point from Linksys delivers the freedom to configure your network your way. Utilization of state-of-the-art wireless technology gives you the
ability to set up workstations in ways you never though possible; no cables to
install means fewer expenses and fewer hassles.
The Instant Wireless™ Network Access Point’s high-powered antennae offer a
range of operation of up to 457 meters, providing seamless roaming throughout
your LAN infrastructure. Advanced user authentication ensures a high level of
security for wireless networking, while easy-to-use Windows-based diagnostics
and statistic tools ensure that you’ll always be in control. Best of all, the Instant
Wireless Network Access Point features easy installation—just plug it in and
you’re ready to go!
When all these features come together in one compact, lightweight, and powerefficient unit, you have the ultimate in flexible networking—the Linksys Instant
Wireless™ Network Access Point.
Features
• Highly Efficient Dipole Antennae Provide Extensive Range of Operation
• Enjoy Your Wireless Office Beyond the Range of Ethernet Networking
• Auto Fall-Back Data Rate for Long-Distance Communication and Noisy
Environments
• High-Speed Data Transfer Rate Up to 11 Mbps
• Interoperable with IEEE 802.11b (DSSS) 2.4GHz-Compliant Equipment
• Features Roaming, Best Access Point Selection, Load Balancing, and
Network Traf fic Filtering
• Extensive Operating Range Supports 150m (Indoors) and 500m (Outdoors)
• 64-Bit Wired Equivalent Privacy
• Free Software Driver Upgrades
• Compatible with Virtually All Major Operating Systems
• Free Technical Support—24 Hours a Day, 7 Days a Week for North
America Only
• 1-Year Limited Warranty
Table of Contents
Introduction 1
The Instant WirelessTMWireless Network Access Point 1
Features 1
Package Contents 2
System Requirements 2
Planning Y our Wireless Network 3
Network Topology 3
Roaming 3
Getting to Know the Wireless Network Access Point 4
The Wireless Access Point’s Rear Panel 4
The Wireless Access Point’s Front Panel 6
Connecting and Setting Up
the Wireless Network Access Point 7
Installing the USB Drivers for the Wireless Network Access Point 8
Installing the Driver Software for Windows 98 8
Installing the Driver Software for Windows Millennium 10
Installing the Driver Software for Windows 2000 11
Configuring the Wireless Network Access Point 14
Installing the Configuration Utility 14
The USB Configuration Utility 18
Configuring the Wireless Network Access Point
with the USB Configuration Utility 18
The Access Point’s SNMP Conf iguration Utility 31
Creating a Temporary IP Address 31
Configuring the Wireless Network Access Point
with the Access Point’s SNMP Configuration Utility 32
Troubleshooting 47
Common Problems and Solutions 47
Frequently Asked Questions 47
Glossary 51
Specifications 56
Environmental 57
Warranty Information 58
Contact Information 59
1
Instant WirelessTMSeries

Wireless Network Access Point
3
Planning Your Wireless Network
Network Topology
A wireless LAN is a group of computers, each equipped with one Instant
Wireless™ Series Adapter. Computers in a wireless LAN must be configured
to share the same radio channel.
The Instant Wireless™ Series Adapter provides access to a wired LAN for
wireless workstations. An integrated wireless and wired LAN is called an
Infrastructure configuration. A group of Instant Wireless™ Series Adapter
users and an Instant Wireless™ Netw ork Access Point compose a Basic Service
Set (BSS). Each Instant Wireless™ Series Adapter PC in a BSS can talk to any
computer in a wired LAN infrastructure via the Instant Wireless™ Network
Access Point.
An infrastructure configuration extends the accessibility of an Instant
Wireless™ Series Adapter PC to a wired LAN, and doubles the effective wireless transmission range for two Instant Wireless™ Series Adapter PCs. Since
the Wireless Network Access Point is able to forward data within its BSS, the
effective transmission range in an infrastructure LAN is doubled.
The use of a unique ID in a BSS is essential. All Instant Wireless™ Series
Adapter PCs configured without roaming options in an independent BSS must
be configured with a BSS ID used in the BSS.
The wireless LAN Infrastructure configuration is appropriate for enter prisescale wireless access to a central database, or as a wireless application for
mobile users.
Infrastructure mode also supports roaming capabilities for mobile users. More
than one BSS can be configured as an Extended Service Set (ESS). This continuous network allows users to roam freely within an ESS. All Instant
Wireless™ Series Adapter PCs within one ESS must be configured with the
same ESS ID and use the same radio channel.
Before enabling an ESS with roaming capability, choosing a feasible radio
channel and optimum Wireless Network Access Point position is recommended. Proper Wireless Network Access Point positioning combined with a clear
radio signal will greatly enhance performance.
Instant WirelessTMSeries
Package Contents
• One Instant WirelessTMNetwork Access Point
• One AC Pow er Adapter
• One Setup CD-ROM
• One User Guide
• One Quick Installation and Registration Card (not shown)
• Two Detachable Antennae
• One USB Cable
System Requirements
• A PC with USB Support or Ethernet Connection
• Windows 95, 98, Millennium, NT version 4.0, or 2000 Professional
• 500 kbytes of free disk space for utility and driver installation
• A 10 Mbps Category 3 or Better network RJ-45 connection
2
Roaming
Linux/Unix Users: Though these operating systems are not supported by
Linksys, the Wireless Access Point should work in these environments. The
WAP11 can be configured under these operating systems using SNMP. A
configurable Management Information Base file (MIB) named
AT76C510.MIB can be found on the Setup Utility CD. This file is for
Linux/Unix users only,and is not necessary for any Windows installation.
Instant WirelessTMSeries
Getting to Know the Wireless
Network Access Point
The ADSL Modem Router’s Rear Panel
Your Access Point’s ports, where network cables are connected, are located on
the rear panel of your Access Point.
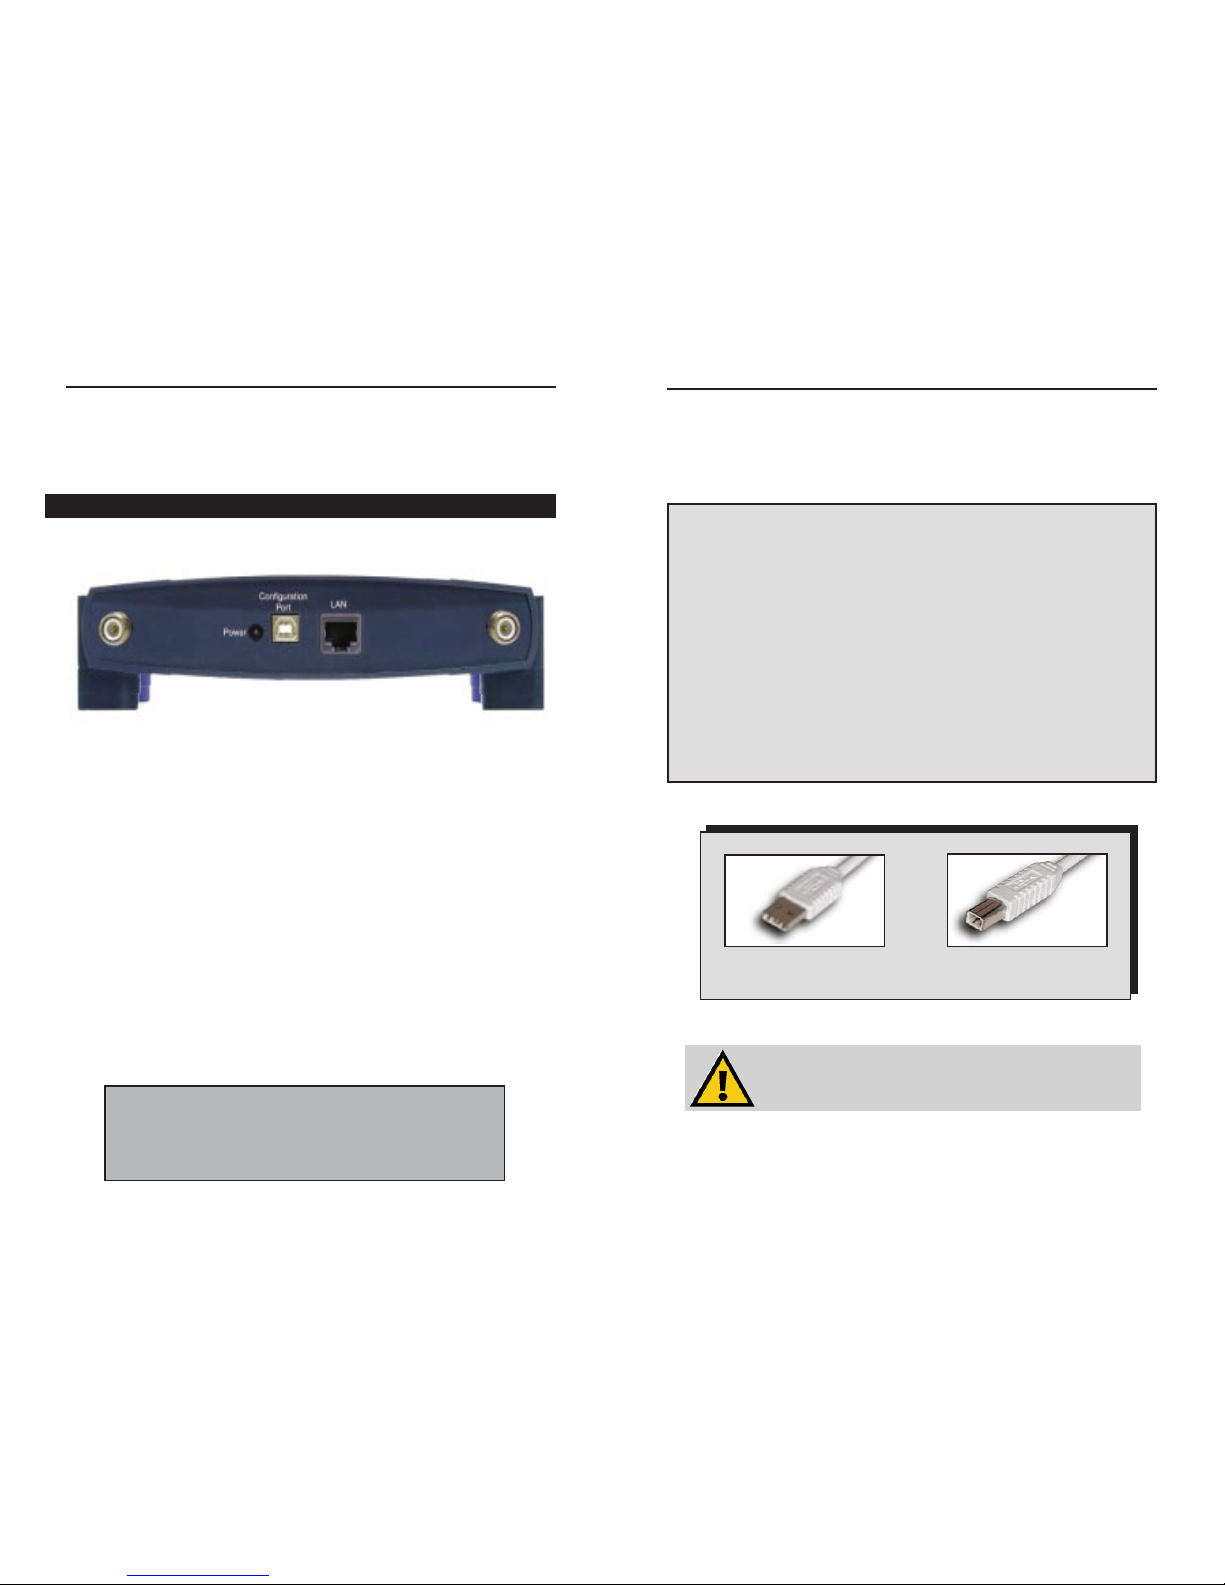
The Wireless Network Access Point’s Ports
Dipole Antenna
Connectors These two round connections are where the anten-
nae are connected to the Access Point.
LAN This LAN (Local Area Network) port connects to
Ethernet network devices, such as a hub, switch, or
router.
Power The Power port is where you will connect the
power adapter. Be sure to connect the pow er cord to
the power adapter before plugging it in.
Configuration Port The Configuration Port is a USB por t (Type B-
slave) which connects to a USB-ready PC in order
to configure the Access Point’s settings. To work
with USB ports, your PC must be running Windo ws
98, 2000, or Millennium.
4
Your Access Point comes with a USB cable that has two different types of connectors. Type A, the master connector, is shaped like a rectangle and plugs into
your PC’s USB port. Type B, the slave connector, resembles a square and connects to the USB port on the rear panel of your Wireless Network Access Point.
USB Compatibility with Your PC
To use the USB port on the Wireless Network Access Point, you must have
Windows 98, 2000, or Millennium installed on your PC. USB is not supported in a Windows 95 or NT environment.
Also, your PC must have a USB port installed and enabled. Some PCs may
have a disabled USB port. If your port doesn’t seem to be working, there may
be jumpers on the motherboard or a menu option in the BIOS to enable a PC’s
USB port.
Other motherboards have USB interfaces, but no ports. You can install your
own USB port and attach it to your PC’s motherboard using hardware purchased at retail computer stores. See your PC’s User Guide for instructions.
There is no USB Support on PCs
running Windows 95 or Windows NT.
USB Type A
USB Type B
The Wireless Access Point’s Rear Panel
Note: The Conf iguration Port does not connect your Access
Point to your PC (or any other device) for networking purposes.
Its only function is to allow you to configure your Access P oint’s
settings. Once the Access Point is configured, you may remove
the USB cable connecting the Access Point to your PC.
Wireless Network Access Point
5
Instant WirelessTMSeries
Connecting and Setting Up the
Wireless Network Access Point
1. Locate an optimum location for the Wireless Network Access Point.The
best place for your Wireless Network Access Point is usually at the center of
your wireless network, with line of sight to all of your mobile stations.
2. Fix the direction of the antenna. Try to place it in a position which can best
cover your wireless network. Normally , the higher y ou place the antenna, the
better the performance will be. The antenna’s position enhances the receiving sensitivity.
3. Connect a standard UTP cable to the Wireless Network Access Point.
Then, connect the other end of the Ethernet cable to a switch or hub. The
Wireless Network Access Point will then be connected to your 10/100
Network.
4. Connect the AC Power Adapter to the Wireless Network Access Point’s
Power Socket. Only use the power adapter supplied with the Wireless
Network Access Point. Use of a different adapter may result in product damage.
5. Connect the appropriate end of the USB Cable to the Wireless Network
Access Point’s Configuration Port. Connect the other end to the USB port
on your PC. If your USB port is working properly, your system should
immediately recognize the Access Point and attempt to install drivers for it.
Continue to the next section for instructions on how to install the drivers.
Now that the hardware installation is complete, proceed to Installing the USB
Drivers for the Wireless Network Access Point and The USB Configuration
Utility for conf iguring the Access Point through your PC’s USB port. To con-
figure the Access Point through an Ethernet or Wireless connection, proceed to
The Access Point’s SNMP Conf iguration Utility.
The Hardware Installation is complete.
7
Wireless Network Access Point
T
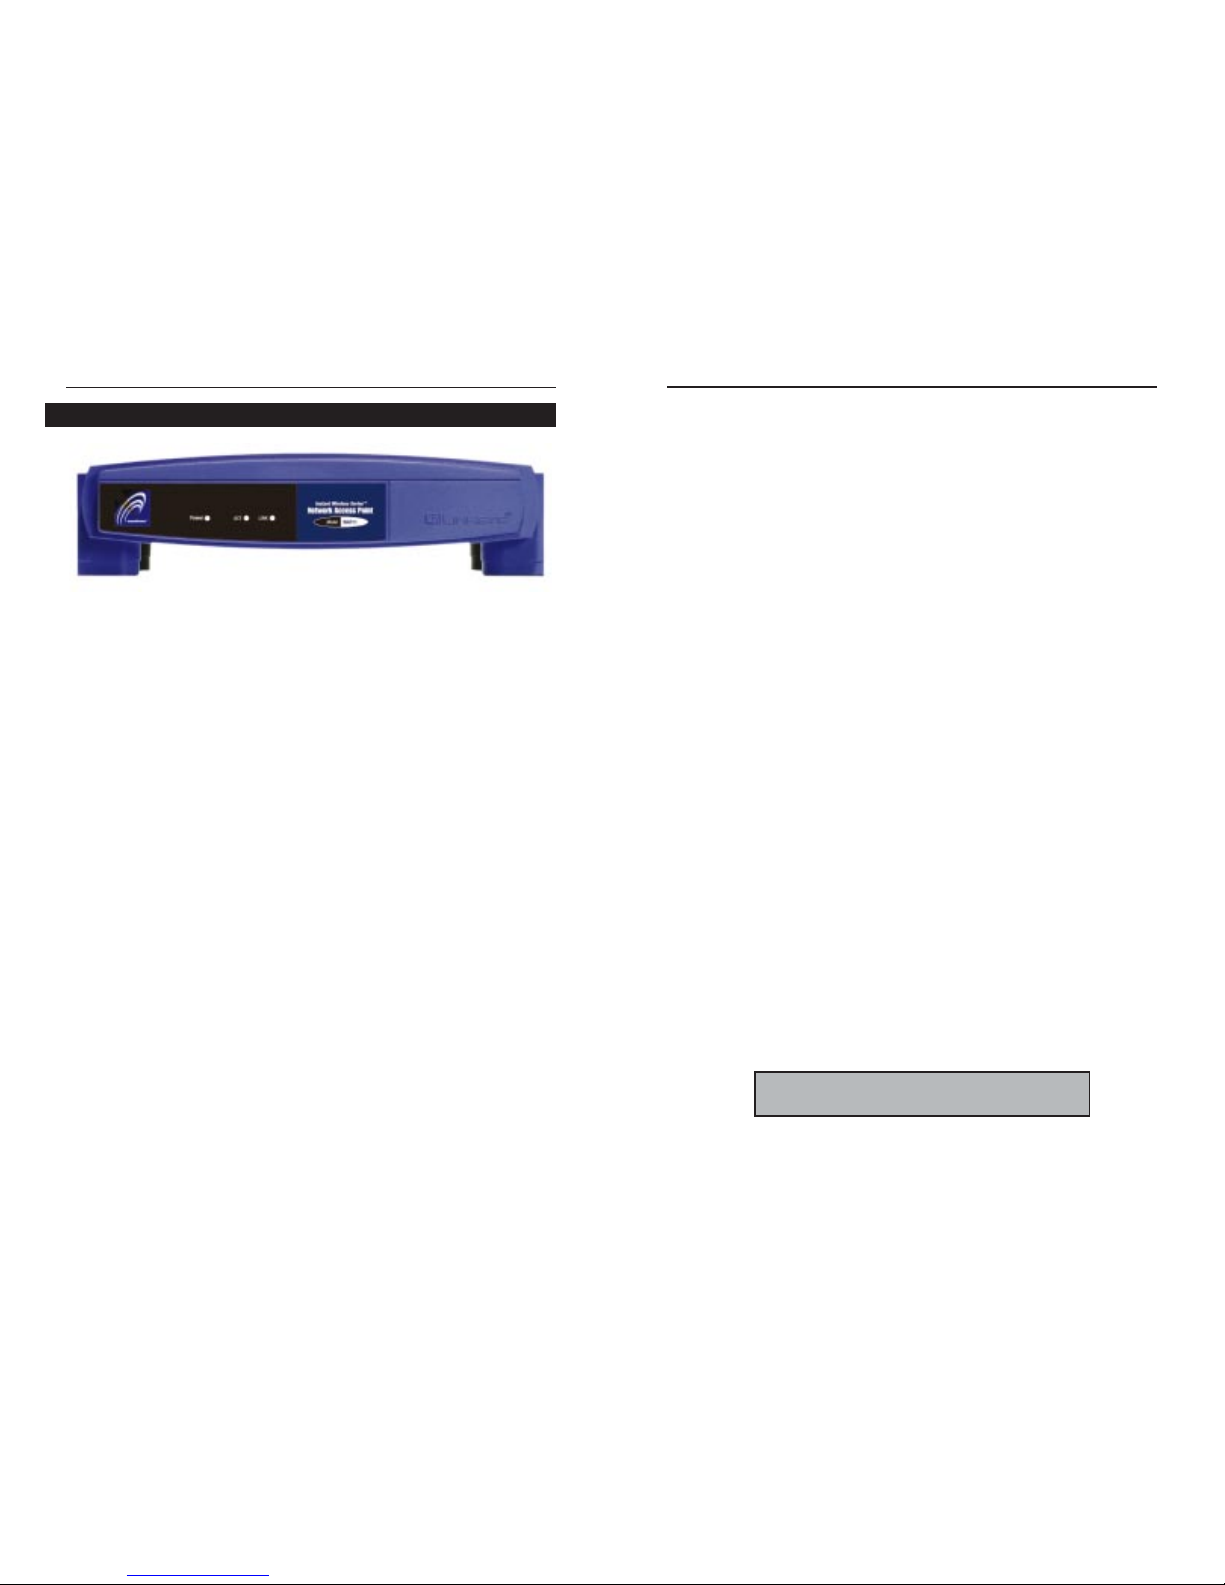
he ADSL Modem + Router’s LEDs
The LAN Indicators
Power Red. The Powe r LED lights up when the Access Point is
powered on.
ACT Green. The ACT LED is lit to show that other wireless
devices are accessing the Access Point. If the LED is flickering, the Access Point is actively sending or receiving data
to or from one of the wireless devices on the network.
LINK Amber. The LINK LED serves two purposes. If the LED is
continuously lit up, the Access Point is successfully connected to a device through the LAN port. If the LED is flickering, it is an indication of any network activity.
The Wireless Access Point’s Front Panel
Note: Once your Access Point is installed and configured, the USB cable may be removed.
6
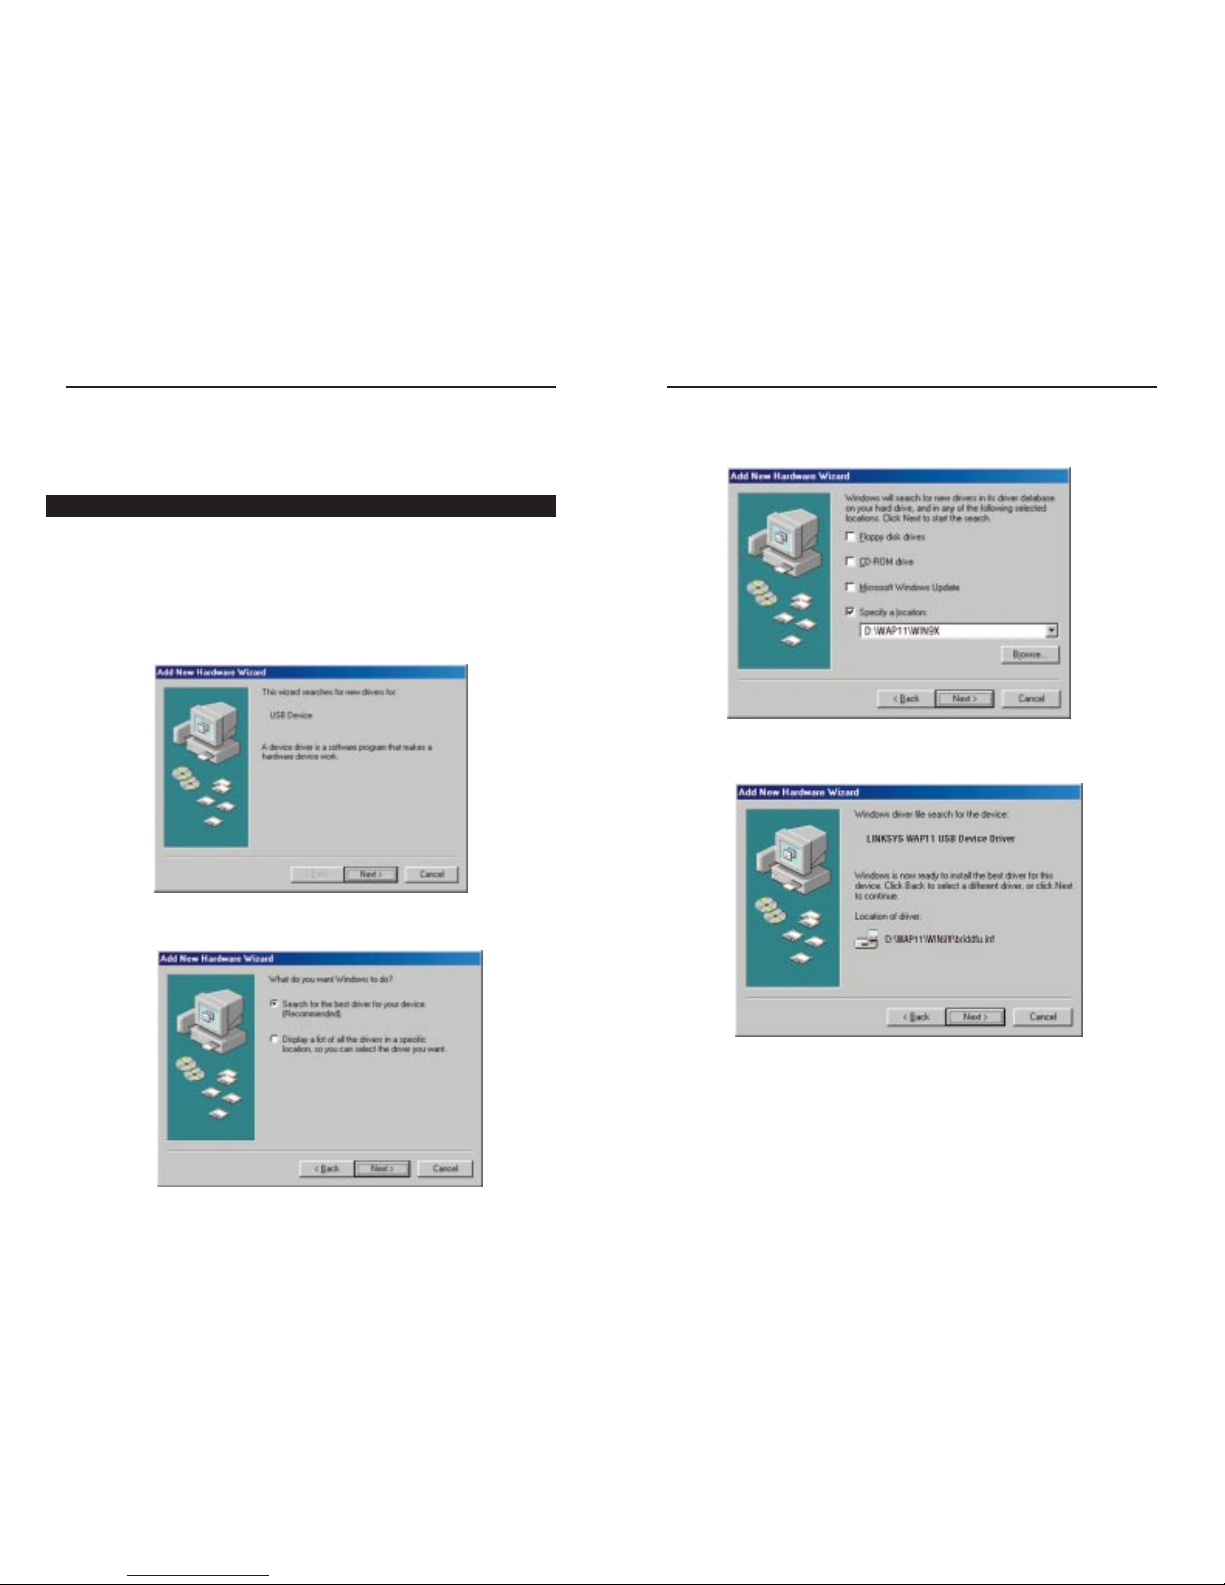
3. Windows will now ask you where to search for the driver software. Select
Specify a location and type in the blank field D:\WAP11\WIN9X (where
“D” specifies your CD-ROM). Then, click the Next button.
4. Windows will now search for the driver. After Windows has acknowledged
finding the driver, click the Next button.
5. Windows will now install the driver files. Click the Finish button when com-
pleted.
6. Continue to the Configuring the Wireless Network Access Point section
for software installation.
9
Installing the USB Drivers for the
Wireless Network Access Point
1. Windows 98 will automatically identify the Wireless Network Access Point,
once it is connected to the PC via the USB cable, and prompt you to install
the necessary driver. Make sure that the Setup Utility CD is inserted into
your CD-ROM drive and click the Next button on the Add New Hardware
Wizard screen to proceed. (When you insert the Setup Utility CD, the instal-
lation may try to run automatically. If it does, exit out of the program and
return here.)
2. Select Search for the best driver... and click the Next button. This will
search for the Windows 98 driver.
8
Instant WirelessTMSeries
Wireless Network Access Point
Installing the Driver Software for Windows 98
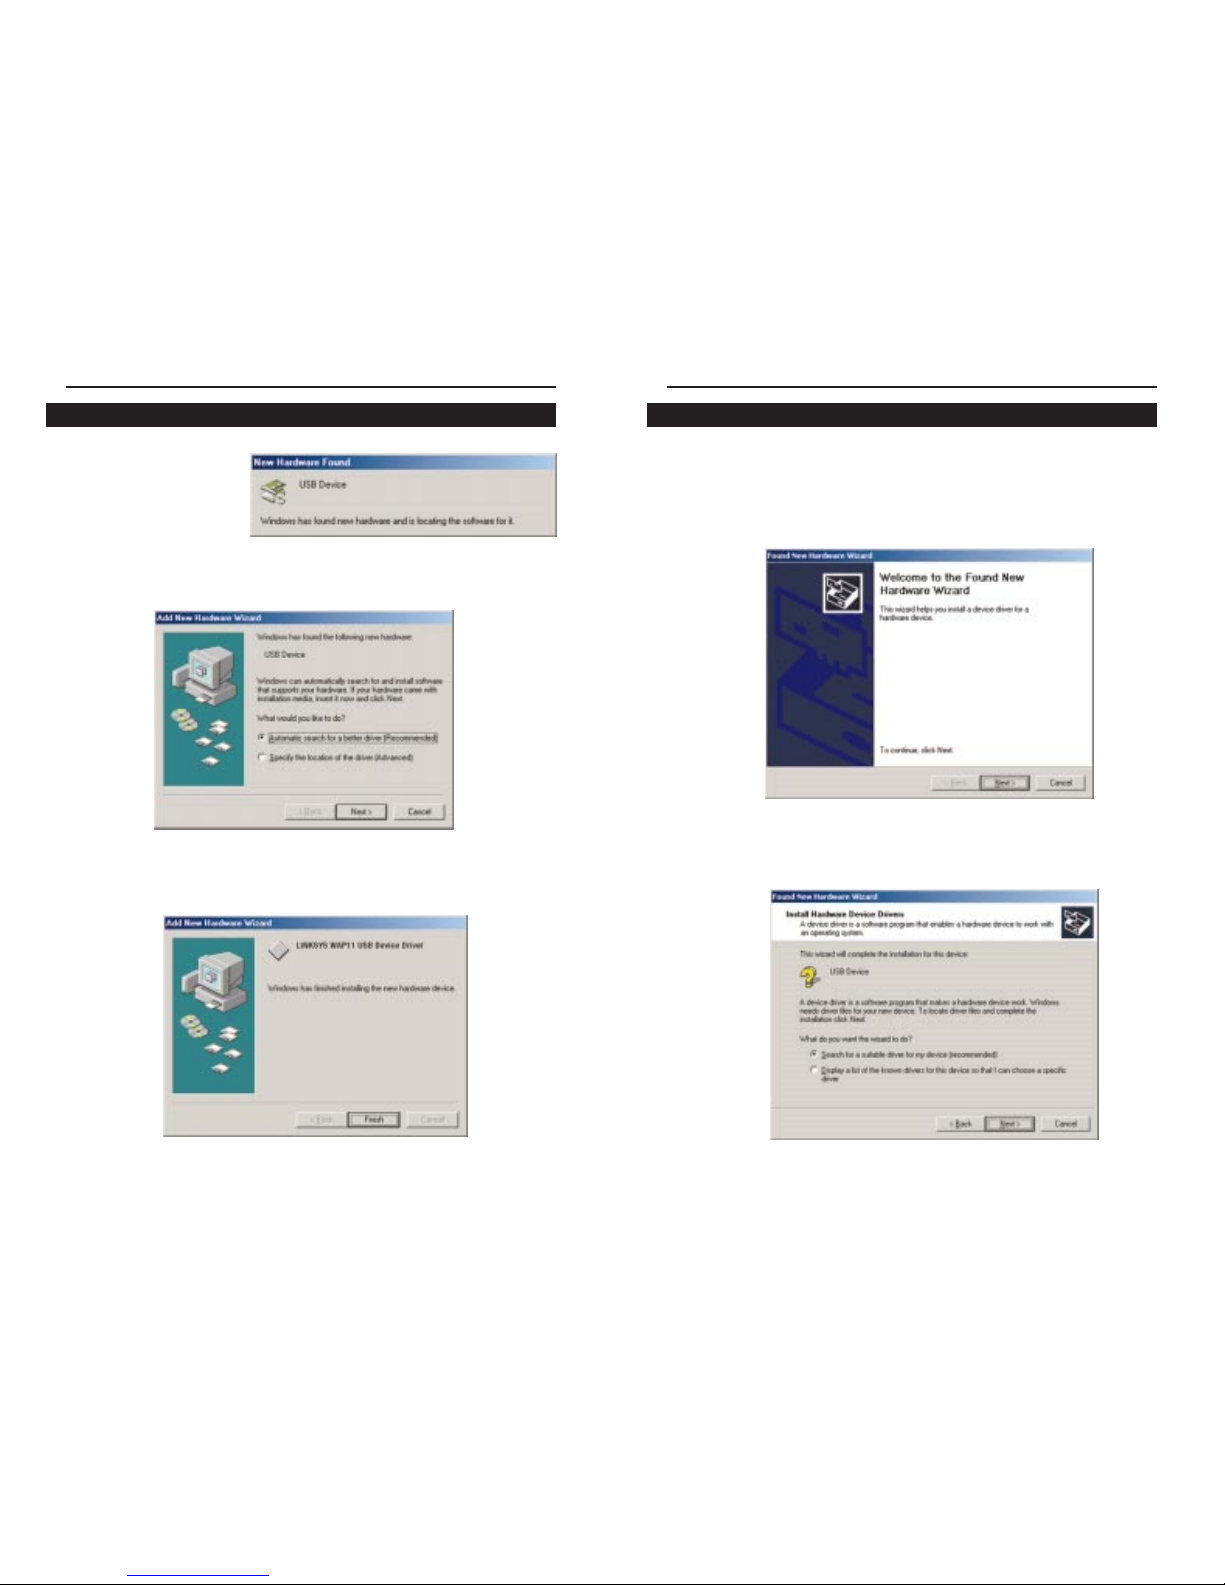
1. Windows 2000 will automatically identify the Wireless Network Access
Point, once it is connected to the PC via the USB cable, and prompt you to
install the necessary driver. Make sure that the Setup Utility CD is inserted
into your CD-ROM drive and click the Next button on the Found New
Hardwar e Wizar d screen to proceed.
2. Select Search for a suitable driver... and click the Next button. This will
search for the Windows 2000 driver.
11
1. Windows Millennium
will automatically identify the Wireless Network
Access Point, once it is
connected to the PC
via the USB cable, and
prompt you to install the
necessary driver.
2. Select A utomatic Sear ch f or a better driv er (Recommended) and click the
Next button. This will search for the Windows Millennium driver.
3. Windows will now install the driver files. Click the Finish button when completed. Windows may ask for the driver, which is located at
“D:\WAP11\usbdrv” (where “D” specifies your CD-ROM drive). Click OK.
4. Continue to the Configuring the Wireless Network Access Point section
for software installation now.
10
Instant WirelessTMSeries
Installing the Driver Software for Windows 2000
Wireless Network Access Point
Installing the Driver Software for Windows Millennium
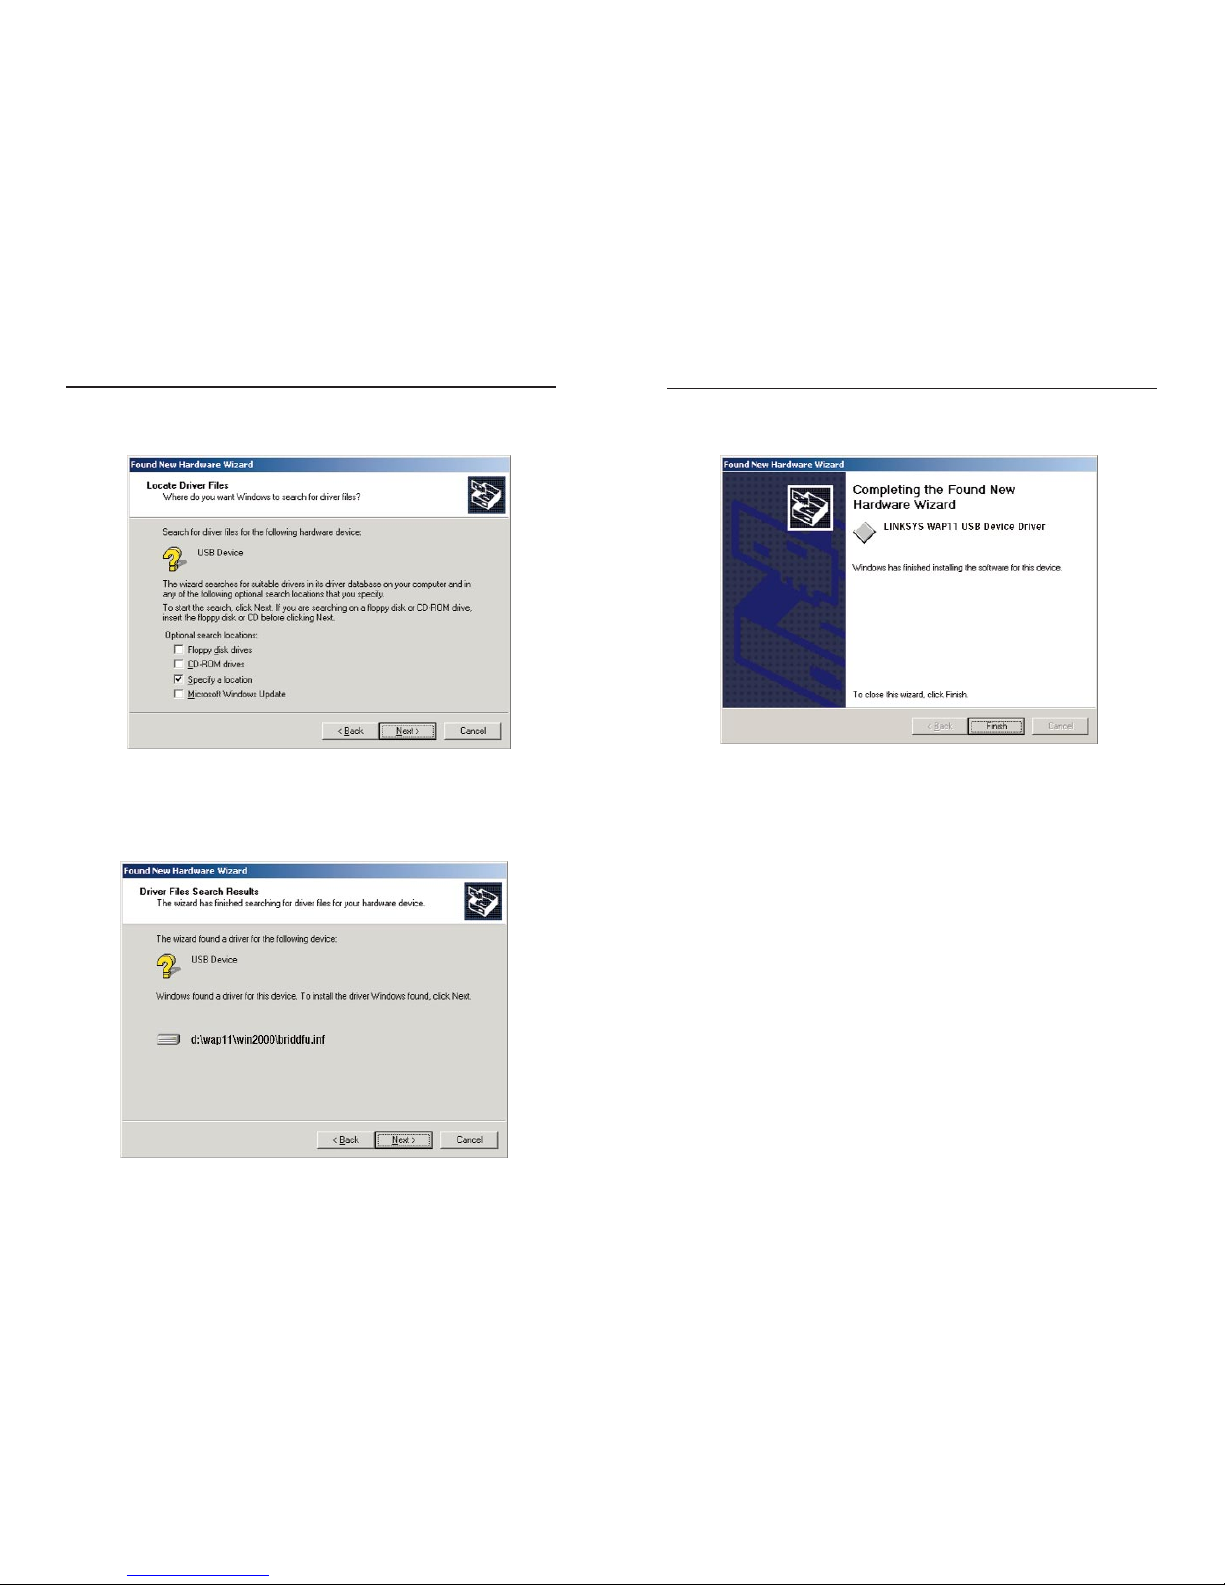
5. Windows will now install the driver files. Click the Finish button when com-
pleted.
6. Continue to the Configuring the Wireless Network Access Point section
for software installation.
13
3. Under “Optional Search Locations,” select Specify a location and click the
Next button.
4. You will be prompted to enter a path; type “D:\WAP11\usbdrv” (where D:
is the letter of your CD-ROM drive) and click OK. Windows will now
search for the driver. After Windows has acknowledged finding the driver,
click the Next button.
12
Instant WirelessTMSeries
Wireless Network Access Point
Instant WirelessTMSeries
Configuring the Wireless
Network Access Point
The Wireless Network Access Point can be configured one of two ways,
through the USB Utility or the Access Point SNMPConfiguration Utility.
USB Utility
The USB Utility can be used when configuring the Wireless Network Access
Point through a USB connection and is compatible with Windows 98,
Millennium, and 2000.
Access Point SNMP Configuration Utility
The Access Point SNMP Conf iguration Utility can be used when configuring
the Wireless Network Access P oint through an Ethernet connection and is compatible with all Windows Operating Systems. You may also configure the
Access Point through its wireless connections.
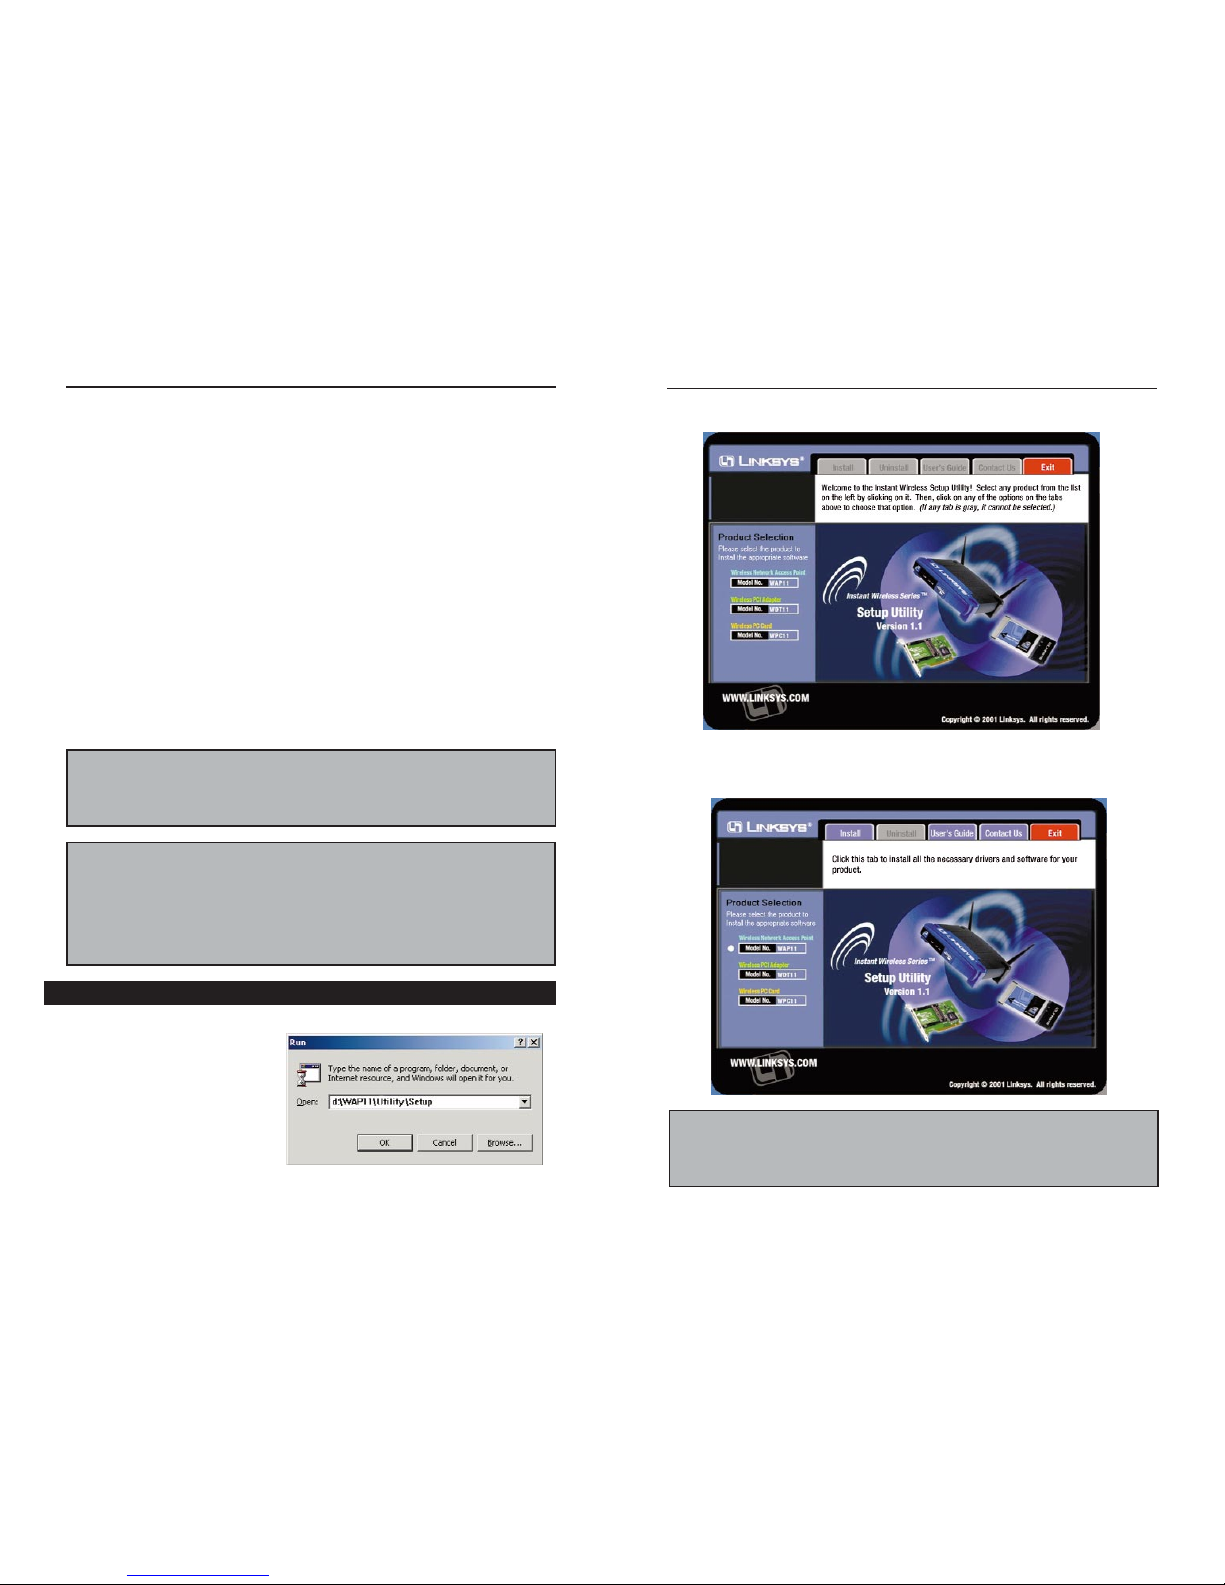
Insert the Setup Utility CD into your CD-ROM Drive. The Setup Utility
should run automatically and
the screen shown on the top of
the next page should appear.
If it does not, click the Start
button and choose Run. In the
box that appears, enter
D:\setup.exe (where “D” is
the letter of your CD-ROM
drive).
14
Note: In order for all other wireless devices to communicate with the Wireless
Network Access Point, those devices must be operating in the Infrastructure
Mode. If any wireless devices are configured in the Ad Hoc Mode, they will
not be recognized by the Access Point.
Installing the Configuration Utility
1.The following screen should appear.
Click on the WAP11 product button in the column on the left to select it.
2.When this screen appears, click on the Install tab to start the setup.
15
Wireless Network Access Point
Linux/Unix Users: Since the Conf iguration Utility is written for Windows
users, you will have to configure the Wireless Access Point using SNMP. A configurable MIB file (AT76C510.MIB) can be found on the Setup Utility CD.
Remember, Linksys does not support Linux or Unix as an operating system.
This file is for Linux/Unix users only,and is not necessary for any Windows
installation.
Note: This useful menu screen can be accessed at any time, simply by inserting the Setup Utility CD into your CD-ROM drive. From this menu, software
can be uninstalled, and you may view online documentation and contact information. Your AP will still work after uninstalling the Utility.
 Loading...