

Page 1
QUICK INSTALLATION GUIDE
INSTALLATIONSVEJLEDNING
KURZANLEITUNG
GUÍA DE INSTALACIÓN RÁPIDA
GUIDE D’INSTALLATION RAPIDE
GUIDA DI INSTALLAZIONE RAPIDA
INSTALLATIEHANDLEIDING
SNABBINSTALLATIONSHANDBOK
QUICK INSTALLATION GUIDE
Media Center Extender
Model: DMA2100, DMA2200
DMA2100 DMA2200
Page 2

Page 3

Table of Contents
QUICK INSTALLATION GUIDE . . . . . . . . . . . . . . . . . . . . . . . . . . . . . . . . 5
INSTALLATIONSVEJLEDNING . . . . . . . . . . . . . . . . . . . . . . . . . . . . . . .25
KURZANLEITUNG . . . . . . . . . . . . . . . . . . . . . . . . . . . . . . . . . . . . . . . . . .45
GUÍA DE INSTALACIÓN RÁPIDA . . . . . . . . . . . . . . . . . . . . . . . . . . . . .65
GUIDE D’INSTALLATION RAPIDE . . . . . . . . . . . . . . . . . . . . . . . . . . . .85
GUIDA DI INSTALLAZIONE RAPIDA . . . . . . . . . . . . . . . . . . . . . . . . 105
INSTALLATIEHANDLEIDING . . . . . . . . . . . . . . . . . . . . . . . . . . . . . . . 125
SNABBINSTALLATIONSHANDBOK . . . . . . . . . . . . . . . . . . . . . . . . . 145
QUICK INSTALLATION GUIDE . . . . . . . . . . . . . . . . . . . . . . . . . . . . . 165
3
Page 4

Page 5
QUICK INSTALLATION GUIDE
Media Center Extender
Models: DMA2100, DMA2200 (EU)
DMA2100 DMA2200
Package Contents
Media Center Extender
•
Remote Control with Two AAA Batteries
•
Power Cord and Clip Adapter - DMA2100
•
Power Cord for your Region - DMA2200
•
Antennas (Two for DMA 2100, Three for DMA 2200)
•
SCART Adapter (DMA2100)
•
SCART Cable (DMA2200)
•
One Component Video Cable
•
One Composite Video Cable
•
One Stereo RCA Audio Cable
•
One Ethernet Cable
•
Quick Installation Guide
•
CD-ROM with Windows Vista™ Operating System Software Updates and User Guide
•
Page 6

Page 7

Table of Contents
Device Installation . . . . . . . . . . . . . . . . . . . . . . . . . . . . . . . . . . . . 5
Install Batteries . . . . . . . . . . . . . . . . . . . . . . . . . . . . . . . . . . . . . . . . . . .5
Network Connection . . . . . . . . . . . . . . . . . . . . . . . . . . . . . . . . . . . . . .5
Display Connection . . . . . . . . . . . . . . . . . . . . . . . . . . . . . . . . . . . . . . .6
Power Device . . . . . . . . . . . . . . . . . . . . . . . . . . . . . . . . . . . . . . . . . . . . .9
Device Configuration . . . . . . . . . . . . . . . . . . . . . . . . . . . . . . . . . 11
Configure Language Settings . . . . . . . . . . . . . . . . . . . . . . . . . . . . .11
Configure Display Connection . . . . . . . . . . . . . . . . . . . . . . . . . . . .11
Configure Network Settings . . . . . . . . . . . . . . . . . . . . . . . . . . . . . .11
Record Setup Key from Device . . . . . . . . . . . . . . . . . . . . . . . . . . .12
Media Center Configuration . . . . . . . . . . . . . . . . . . . . . . . . . . 13
Insert CD-ROMInsert CD-ROM . . . . . . . . . . . . . . . . . . . . . . . . . . . . . . . . . . . . . . . . . . .13
Windows Vista Update . . . . . . . . . . . . . . . . . . . . . . . . . . . . . . . . . . .13
Setup . . . . . . . . . . . . . . . . . . . . . . . . . . . . . . . . . . . . . . . . . . . . . . . . . . . .13
Contact Information . . . . . . . . . . . . . . . . . . . . . . . . . . . . . . . . . 17
7
Page 8
RCA Stereo Audio
Composite Video
Ethernet
SCART Adapter (DMA2100)
SCART Cable (DMA2200)
Component Video
RCA Stereo Audio
Composite Video
Ethernet
SCART Adapter (DMA2100)
SCART Cable (DMA2200)
Component Video
Before You Begin
Make sure you have:
High Definition Video Options:
Component Video (included) or,
•
HDMI (not included)
•
Standard Definition Video Options:
SCART Cable (DMA2200 included)
•
SCART Adapter (DMA2100 included)
•
Component Video (included) or
•
Composite Video (included) or,
•
S-Video (not included)
•
Audio:
•
•
•
Analog RCA Stereo (included) or,
Digital SPDIF Coaxial RCA (not included)
Digital SPDIF SPDIF Toslink (not included -
for DMA2200 only)
Network:
•
•
8
NOTE: If using HDMI or
SCART, additional audio
cables are not necessary.
Ethernet cable (included)
Wireless network (if connecting wirelessly)
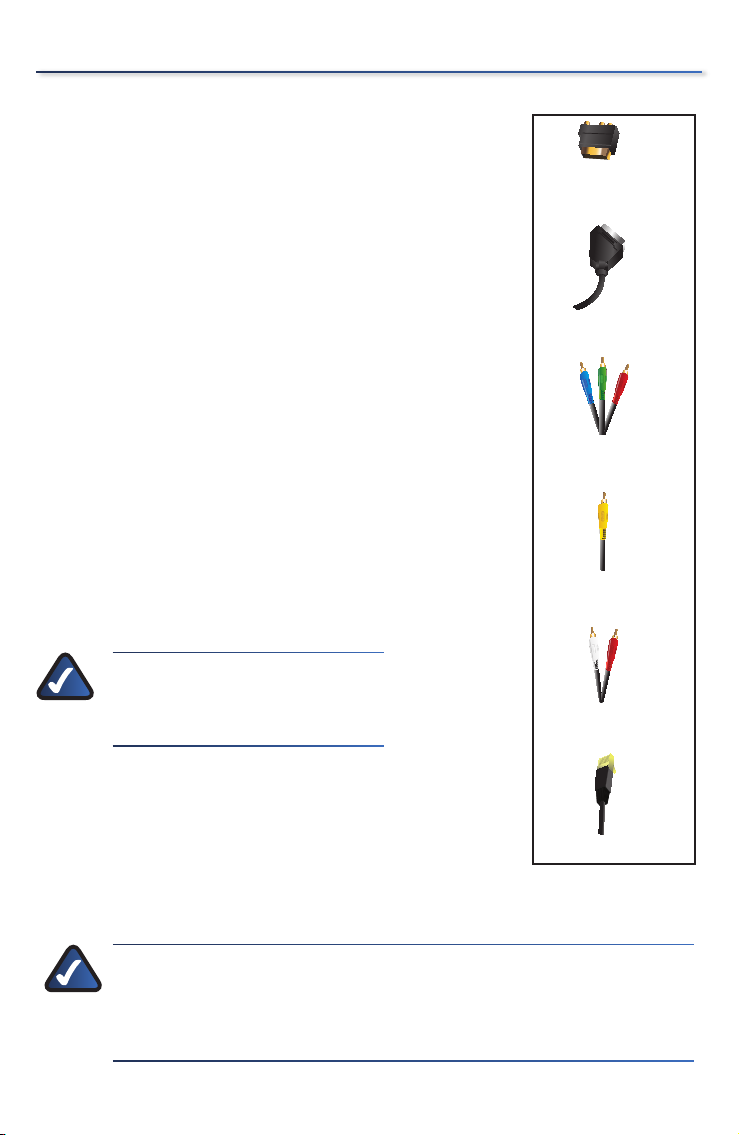
Included Cables
NOTE:If you need more detailed information, consult the User
Guide on the CD-ROM. Take the time to consult Linksys’ safety,
warranty and software license information which you will also
find on the CD-ROM.
Page 9

DMA2100 DMA2200
HDMI, the HD
MI logo is a trademar
k or registered
trademarks of HDMI Lice
nsing, LLC.
Tested To Comply
With FCC Standards
Contains FCC:N89-WM821-LS
Contains FC
C:N89-WM821-LS
FOR HOME OFFICE USE
Default
Reset /
Default
HDMI, the HDMI logo is a trademark or registere
Tested To Comp
ly
With FCC Standards
C
ontains FCC:N89-WM821-LS
FOR HOME OFFICE
USE
Device Installation1�
Install Batteries
Install the two (2) AAA batteries in the
remote control, making sure to place
the positive (+) and negative (-) ends as
shown.
- +
NOTE:For more detailed
information on the features and
functions of the remote control,
including how to program the
learning remote, please consult
the User Guide on the CD-ROM.
Network Connection
For a Wireless Connection to your
Computer
If you are using a wired connection, skip
to the next step.
If connecting wirelessly, you need to
attach the antennas. There are two (2)
antennas for the DMA2100 and three (3)
for the DMA2200. The antennas should
be screwed on in a clockwise direction.
Hand tighten until they are securely in
place. The antennas should be raised
when the Extender is in use.
+ _
Remote Control Battery PlacementRemote Control Battery Placement
Attaching the Antennas
Attaching the Antennas
9
Page 10

Device Installation
DMA2100 DMA2200
S-VIDEO
RIGHT
DIGITAL
ADUIO
ETHERNET
10/100
USB
LEFT ANALOG A
UDIO
s-PDIF
DIGITAL
ADUIO
ETHERNET
10/100
ANALOG AUDIO
USB
Pr
Pb
Left
Right
DMA2100 DMA2200
S-VIDEO
RIGHT
DIGITAL
ADUIO
ETHERNET
10/100
USB
LEFT ANALOG A
UDIO
s-PDIF
DIGITAL
ADUIO
ETHERNET
10/100
ANALOG AUDIO
USB
Pr
Pb
Left
Right
DMA2100 DMA2200
Reset /
Default
LLC.
S-VIDEO
VIDEO
Pb
Pr
Y
ndards
Contains FCC:N89-WM821-LS
FOR HOME OF
FICE USE
COMPONENT
VIDEO
MI Licensing, LLC.
DIGITAL
ADUIO
ETHERNET
10/100
ANALOG AUDIO
USE
S-VIDEO
COMPOSITE
Pr
Pb
Left
Right
Y
COMPONENT
VIDEO
DMA2100 DMA2200
Reset /
Default
LLC.
S-VIDEO
VIDEO
Pb
Pr
Y
ndards
Contains FCC:N89-WM821-LS
FOR HOME OF
FICE USE
COMPONENT
VIDEO
MI Licensing, LLC.
DIGITAL
ADUIO
ETHERNET
10/100
ANALOG AUDIO
USE
S-VIDEO
COMPOSITE
Pr
Pb
Left
Right
Y
COMPONENT
VIDEO
DMA2100 DMA2200
HDMI, the HDMI logo is a trademar
k or registered trademarks of HDMI Licensing, LLC.
Tested To Comply
With FCC Standards
Contains
FCC:N89-WM821-LS
Contains
FCC:N89-WM821-LS
FOR HOME OFFICE USE
Default
Reset /
Default
HDMI, the HDMI logo is a trademark or registered trademarks o
f HDMI Licensing, LLC.
Pb
Pr
Y
Tested To Comply
With FCC Standards
Contains FCC:N89-WM82
1-LS
FOR HOME OFFICE USE
COMPONENT
VIDEO
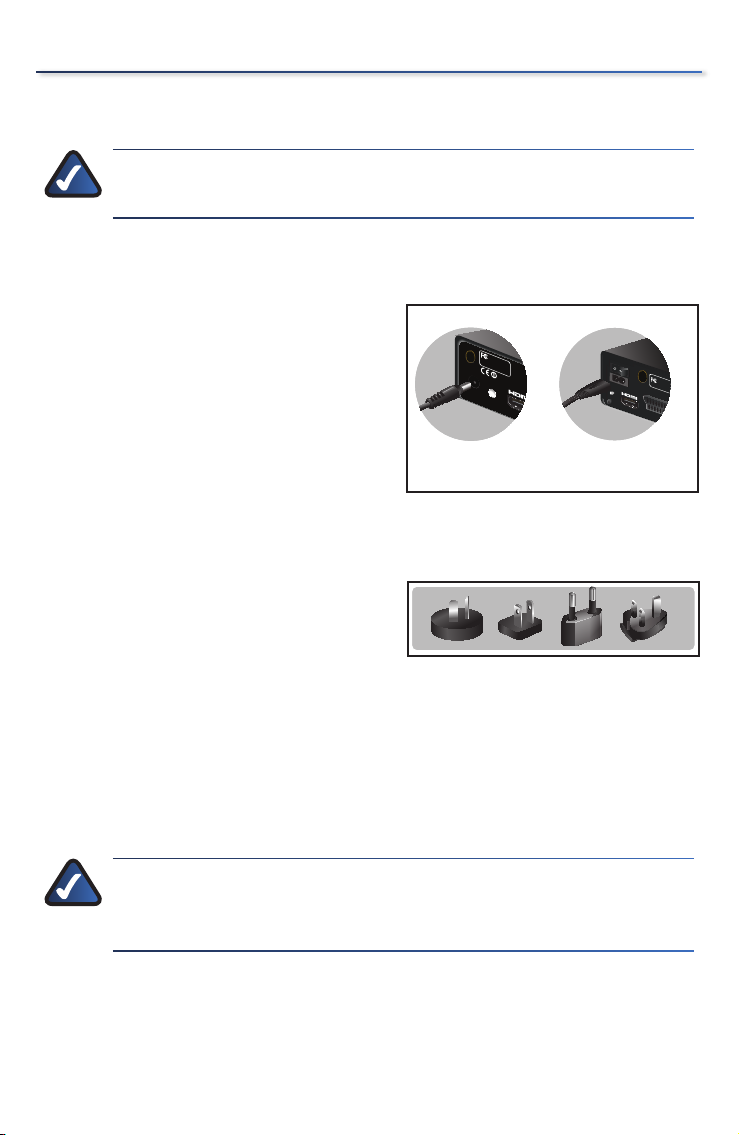
For a Wired Connection to your
Computer
Connect the Ethernet cable from the
back panel of the Media Center Extender
to the back panel of your network router.
Display Connection
NOTE:Before you perform any of the following connections,
power off your TV.
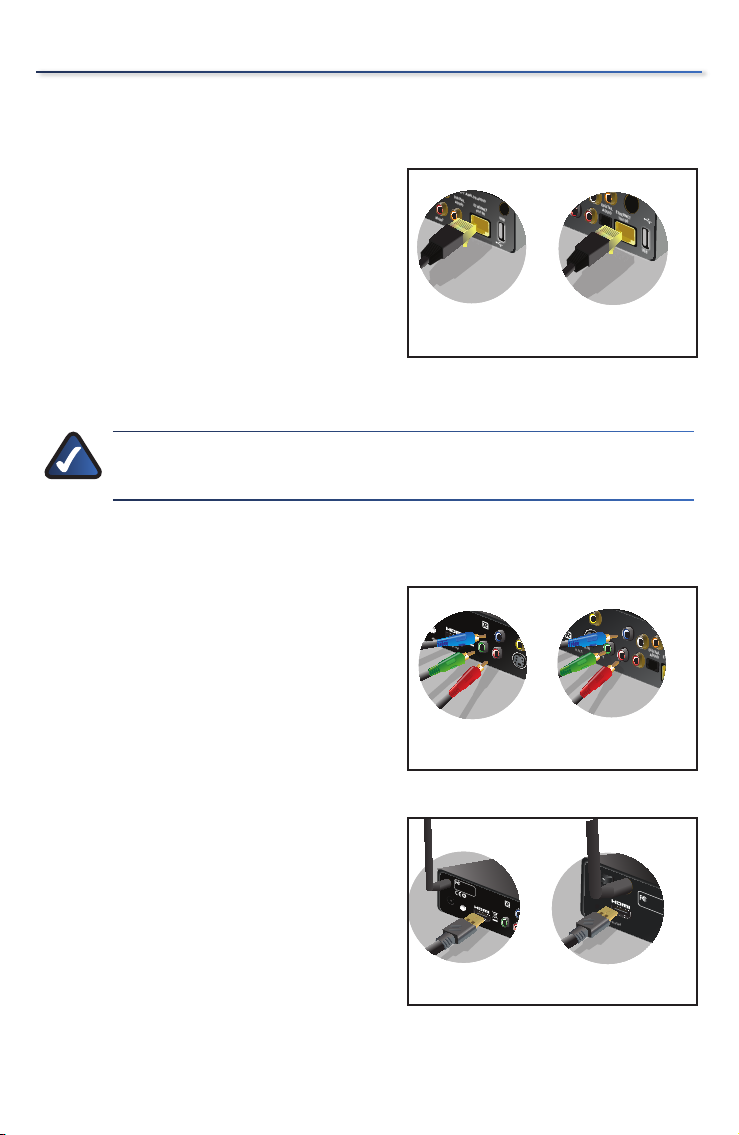
High Definition (HD) Connections
Component Video
Connect the component video (red,
green, blue) cable (included) from the
Media Center Extender’s back panel to
your TV’s available component video
connection ports.
Ethernet Connection
Ethernet Connection
OR
HDMI (Video and Audio)
Connect a HDMI cable (not included)
from the Media Center Extender’s
back panel to your TV’s available HDMI
connection port.
10
Component Video Connection
Component Video Connection
HDMI Connection
HDMI Connection
Page 11
Standard Definition (SD) Connections
FOR HOME OFFICE USE
Tested To Comply
With FCC Standards
S-Video
SCART IN/OUT
Composite
RESET
Pr
VIDEO OUT
FOR HOME OFFICE USE
Tested To Comply
With FCC Standards
S-Video
SCART IN/OUT
Composite
RESET
Pr
VIDEO OUT
~
~
~
S-VIDEO
VIDEO
RIGHT
DIGITAL
ADUIO
ETHERNET
LEFT ANALOG AUDIO
s-PDIF
~
~
~
S-VIDEO
VIDEO
RIGHT
DIGITAL
ADUIO
ETHERNET
LEFT ANALOG AUDIO
s-PDIF
DMA2100 DMA2200
Reset /
Default
LLC.
S-VIDEO
VIDEO
Pb
Pr
Y
ndards
Contains FCC:N89-WM821-LS
FOR HOME OFFICE USE
COMPONENT
VIDEO
MI Licensing, LLC.
DIGITAL
ADUIO
ETHERNET
10/100
ANALOG AUDIO
USE
S-VIDEO
COMPOSITE
Pr
Pb
Left
Right
Y
COMPONENT
VIDEO
DMA2100 DMA2200
Reset /
Default
LLC.
S-VIDEO
VIDEO
Pb
Pr
Y
ndards
Contains FCC:N89-WM821-LS
FOR HOME OFFICE USE
COMPONENT
VIDEO
MI Licensing, LLC.
DIGITAL
ADUIO
ETHERNET
10/100
ANALOG AUDIO
USE
S-VIDEO
COMPOSITE
Pr
Pb
Left
Right
Y
COMPONENT
VIDEO
DMA2100 DMA2200
f
HDMI Licensing, LL
C
.
S-VIDEO
VIDEO
Pb
Pr
Y
RIGHT
DIGITAL
ADUIO
ETHERNET
LEFT ANALOG AUDIO
s-PDIF
y
-
WM82
1-LS
E
COMPONENT
VIDEO
istered trademarks of
HDMI Licensing, LLC.
Tested To Comply
With FCC Standards
Contains FCC:N89-WM
821-LS
Contains FCC:N89-WM821-LS
FOR HOME OF
FICE USE
S-VIDEO
COMPOSITE
Y
Reset /
Default
, L
LC.
S-VIDEO
VIDEO
Pb
Pr
Y
RIGHT
DIGITAL
ADUIO
LEFT ANALOG AUDIO
s-PDIF
Tested To Comply
With FCC Standards
Contains FCC:N89-WM821-LS
FOR HOME OFFICE USE
COMPONENT
VIDEO
istered trademarks of HD
MI Licensing, LLC.
Tested To Comply
With FCC Standards
Contains FCC:N89-WM821-LS
Contains FCC:N89-WM821-LS
FOR HOME OFFICE US
E
S-VIDEO
COMPOSITE
Pr
Pb
Y
COMPONENT
VIDEO
DMA2100 DMA2200
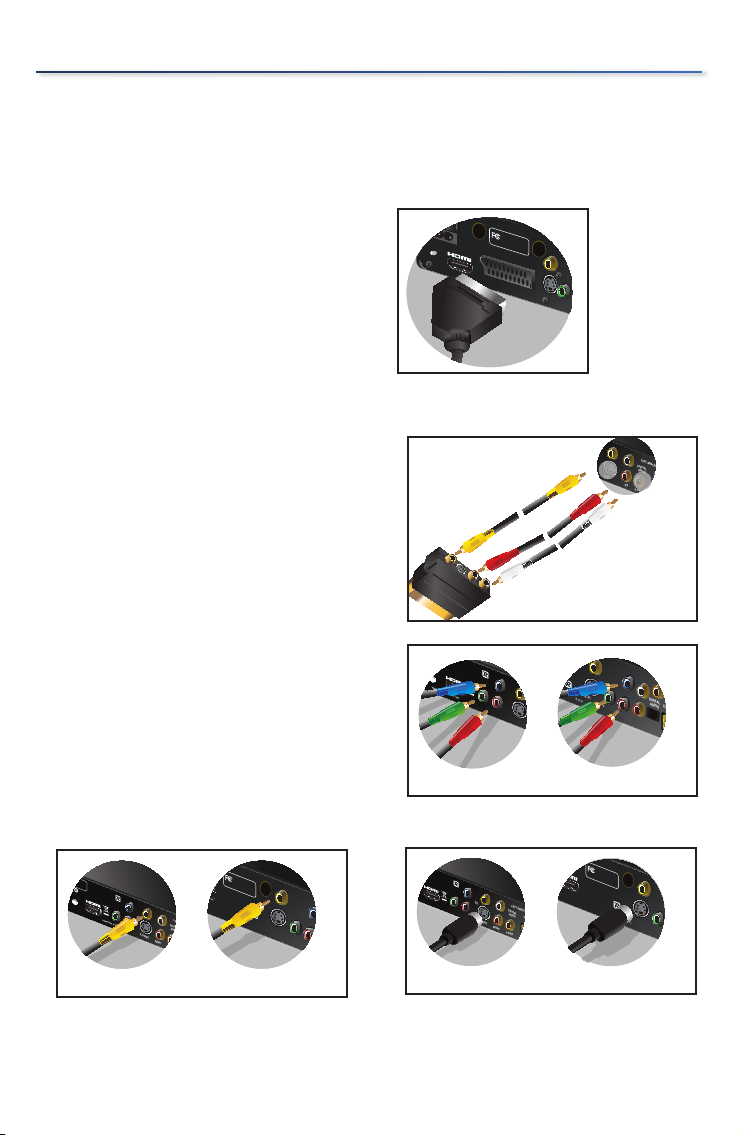
SCART (Video and Audio)
DMA2200
Connect a SCART cable by using the
SCART cable (included) from the Media
Center Extender’s back panel to the TV’s
available SCART connection port.
Device Installation
DMA2100
Connect a SCART Adapter by using
the composite video and audio cables
(included) from the Media Center
Extender’s to the SCART Adapter
composite ports.
Video
Connect one type of standard analog
video cable from the Media Center
Extender’s back panel to your TV’s video
connection port.
You can connect a component video
(red, green, blue) cable (included)
composite video cable (included) or a
S-Video cable (not included).
SCART Cable Connection (DMA2200)
SCART Cable Connection (DMA2200)
SCART Adapter Connection (DMA2100)
SCART Adapter Connection (DMA2100)
Component Video Connection
Component Video Connection
Composite Video Connection
Composite Video Connection
S-Video Connection
S-Video Connection
11
Page 12

Device Installation
DMA2100 DMA2200
S-VIDEO
VIDEO
Pb
Pr
Y
RIGHT
DIGITAL
ADUIO
LEFT ANALOG AUDIO
s-PDIF
COMPONENT
VIDEO
censing, LLC.
DIGITAL
ADUIO
ETHERNET
10/100
ANALOG AUDIO
S-VIDEO
COMPOSITE
Pr
Pb
Left
Right
Y
COMPONENT
VIDEO
DMA2100 DMA2200
S-VIDEO
VIDEO
Pb
Pr
Y
RIGHT
DIGITAL
ADUIO
LEFT ANALOG AUDIO
s-PDIF
COMPONENT
VIDEO
censing, LLC.
DIGITAL
ADUIO
ETHERNET
10/100
ANALOG AUDIO
S-VIDEO
COMPOSITE
Pr
Pb
Left
Right
Y
COMPONENT
VIDEO
DIGITAL
ADUIO
ETHERNET
10/100
ANALOG AUDIO
USB
Pr
Pb
Left
Right
Y
COMPONENT
VIDEO
DIGITAL
ADUIO
ETHERNET
10/100
ANALOG AUDIO
USB
Pr
Pb
Left
Right
Y
COMPONENT
VIDEO
DMA2100 DMA2200
S-VIDEO
VIDEO
RIGHT
DIGITAL
ADUIO
ETHERNET
10/100
USB
LEFT ANALOG AUDIO
s-PDIF
DIGITAL
ADUIO
ETHERNET
10/100
ANALOG AUDIO
S-VIDEO
COMPOSITE
USB
Pr
Pb
Left
Right
Y
COMPONENT
VIDEO
DMA2100 DMA2200
S-VIDEO
VIDEO
RIGHT
DIGITAL
ADUIO
ETHERNET
10/100
USB
LEFT ANALOG AUDIO
s-PDIF
DIGITAL
ADUIO
ETHERNET
10/100
ANALOG AUDIO
S-VIDEO
COMPOSITE
USB
Pr
Pb
Left
Right
Y
COMPONENT
VIDEO
Audio
Connect one type of audio cable from
the Media Center Extender’s back
panel to your TV or AV receiver’s audio
connection port. You can connect the
included RCA stereo audio cables (red,
white) or a digital audio (coaxial RCA
- not included) or, for the DMA2200,
an optical audio cable(Toslink - not
included).
Digital Audio (Coaxial RCA) Connection
Digital Audio (Coaxial RCA) Connection
RCA Stereo Audio Connection
RCA Stereo Audio Connection
Digital Audio (Optical Toslink) Connection
Digital Audio (Optical Toslink) Connection
12
Page 13
Power Device
DMA2100 DMA2200
Reset /
Default
HDMI, the HDMI logo is a trademark or registered
Tested To Com
ply
With FC
C Standards
Conta
ins FCC:N89-WM821
-LS
FOR HOME OFFICE USE
FOR HOME OFFICE USE
Tested To Comply
With FCC Standards
SCART IN/OUT
RESET
DMA2100 DMA2200
Reset /
Default
HDMI, the HDMI logo is a trademark or registered
Tested To Com
ply
With FC
C Standards
Conta
ins FCC:N89-WM821
-LS
FOR HOME OFFICE USE
FOR HOME OFFICE USE
Tested To Comply
With FCC Standards
SCART IN/OUT
RESET
NOTE: Power on your TV. The initial startup of the Extender could
take up to one (1) minute.
Power on the Media Center Extender
DMA2200
Plug the Media Center Extender’s power
cord connector to the unit’s power port
on the back panel. Plug the cord into an
electrical outlet.
There is also an on/off power switch just
above the power port. Power on the unit
before starting Device Configuration.
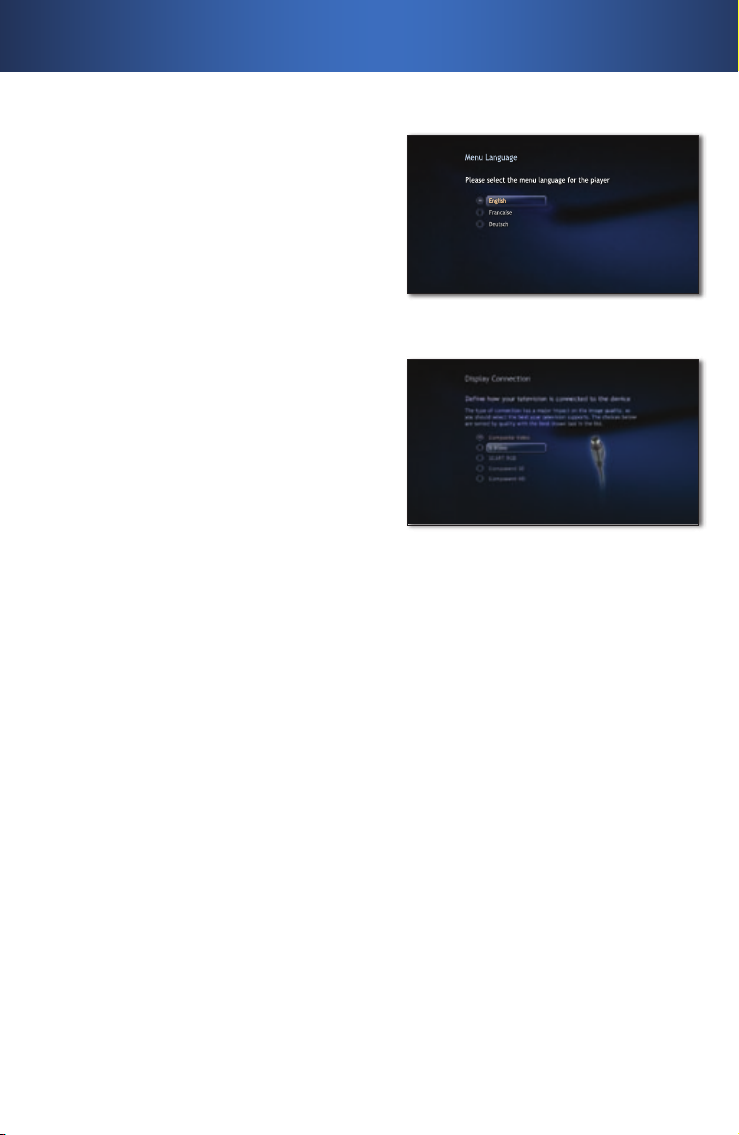
DMA2100
This unit ships with the correct power
clips for your region. If needed, pull
out the clip covering the power port
connector. You can then snap in the
appropriate power clip that matches
your Main power outlet
Power Cord Connection
Power Cord Connection
DMA 2100 Power ClipsDMA 2100 Power Clips
Device Installation
Plug the Media Center Extender’s power
cord connector to the unit’s power port
on the back panel. Plug the cord into an
electrical outlet.
NOTE: There is an IR sensor on the front of the Media Center
Extender. Make sure the front panel is visible for the remote
control.
13
Page 14

Device Installation
14
Page 15
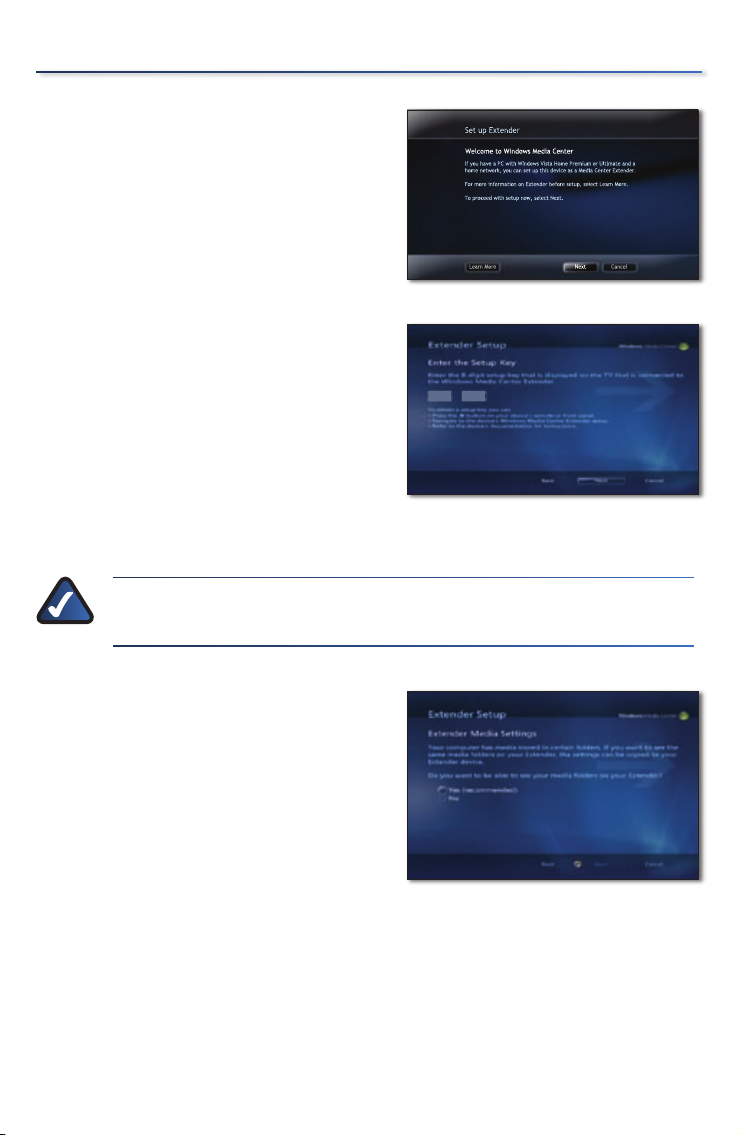
Menu Language
Please select the menu language for the player
English
Francaise
Deutsch
English
Menu Language
Please select the menu language for the player
English
Francaise
Deutsch
English
Device Configuration2�
Configure Language Settings
Use the arrow keys to highlight the
correct language options for your
configuration. Press OK on the remote
control, or select Next to continue.
Configure Display Connection
A HDMI connection should automatically
be discovered, depending on the TV and
settings. For other connections you can
choose the video, audio and aspect ratio
to optimize the playback quality.
Your choice should match the actual
hardware connection that you made.
Press OK on the remote control or select
Next to continue.
Configure Network Settings
Menu Screen Language
Menu Screen Language
Analog Connection ScreenAnalog Connection Screen
Select the type of network connection
you are using, wired or wireless and
press OK on the remote control or select
Next to continue.
If you connect wirelessly, you will be
asked to confirm your current network’s
wireless security level. If an Encryption
key is needed, enter the encryption key
for your network using the on-screen
keyboard and click Next.
15
Page 16

Device Configuration
NOTE: For wireless router settings, the security level chosen on
the Extender setup screens must match your computer security.
Record Setup Key from Device
For the computer to recognize
1.
the Media Center Extender, it will
need a Setup key. The eight digit
Setup key will display on the TV
screen (and on the front panel of
the Media Center Extender if it is a
DMA2200).
Write down this Setup Key and
2.
bring it to your Windows Vista
Premium or Ultimate computer.
You can enter the number here:
--
Setup Key ScreenSetup Key Screen
16
Page 17

Media Center Configuration3�
NOTE: Follow the steps below in order. You must insert the CD-
ROM and proceed through the setup screens.
Insert CD-ROM
Insert the CD-ROM that came with your
Media Center Extender, into your Media
Center computer. Proceed through the
steps displayed on-screen.
Windows Vista Update
If you use a compatible version of
Windows Vista you will be asked to
update your system via Windows Vista
Update. Proceed through the steps
displayed on-screen.
Setup
If your computer has automatically
discovered the Extender, a message will
display, stating that the Extender was
found.
Insert CD-ROMInsert CD-ROM
The type of message displayed may
vary. Click on the screen, or select Yes to
start the setup.
If your Extender was not automatically discovered, proceed with the
following steps.
Open ”Media Center” on the
1.
computer and press the up or down
arrow to select Tasks.
Press the left arrow to select
A.
settings.
Use the up or down arrow to
B.
highlight Extender and then
press the up arrow to highlight
add extender. Click Enter.
Found Media Extender messageFound Media Extender message
Add ExtenderAdd Extender
17
Page 18
Media Center Configuration
Learn More Next Cancel
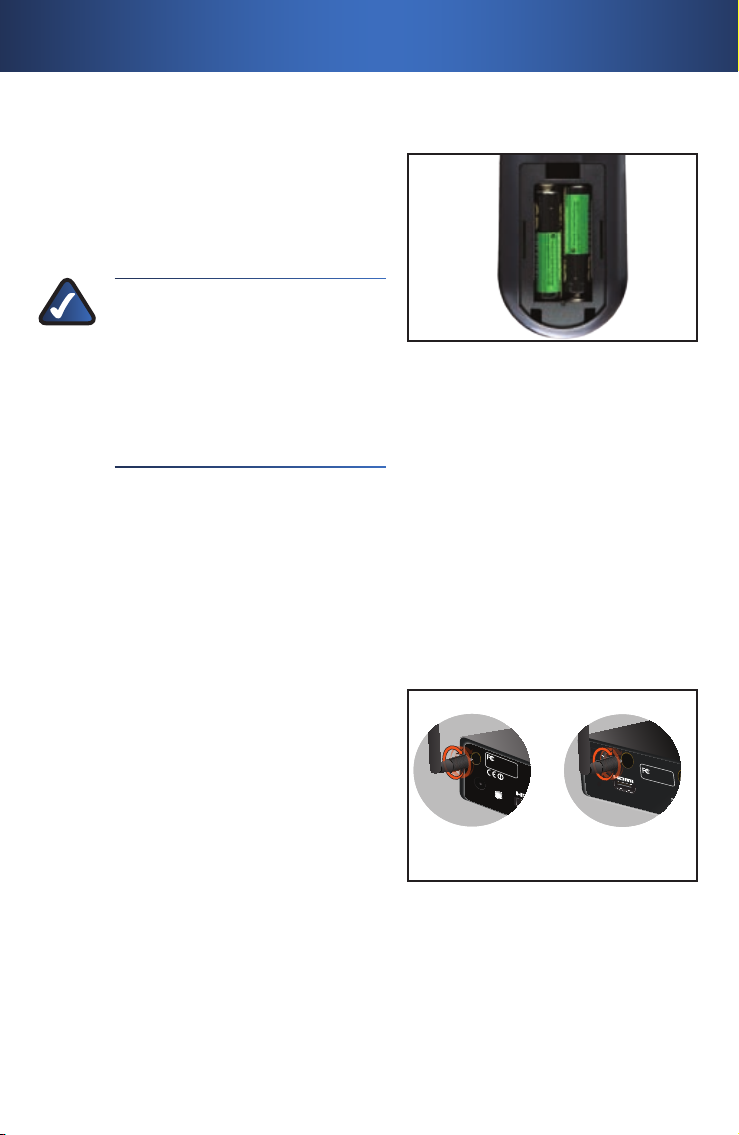
Set up Extender
If you have a PC with Windows Vista Home Premium or Ultimate and a
home network, you can set up this device as a Media Center Extender.
For more information on Extender before setup, select Learn More.
To proceed with setup now, select Next.
Welcome to Windows Media Center
Learn More Next Cancel
Set up Extender
If you have a PC with Windows Vista Home Premium or Ultimate and a
home network, you can set up this device as a Media Center Extender.
For more information on Extender before setup, select Learn More.
To proceed with setup now, select Next.
Welcome to Windows Media Center
XXXX
XXXX
XXXX
XXXX
You will see a Welcome to Windows
2.
Media Center screen. Click Enter or
select Next to continue.
You will be asked to enter the
3.
Extender Setup key that you
noted earlier. After entering the
number, click Enter or select Next to
continue.
The next screen may ask about
4.
firewalls and changing computer
settings, click Enter or select Next to
continue.
NOTE: Third party firewalls may require additional manual
configuration.
Welcome Screen
Welcome Screen
Extender Setup Screen
Extender Setup Screen
You will also be asked if you want to
5.
make media files stored on your PC
available. All media files (pictures,
music, video) will be shared. You
can modify this later in the settings
menu. Click
Yes and click Enter or
select Next to continue.
You may also be asked to allow
6.
changes to some computer
settings, including enabling Away
Mode. Away Mode is a power
saving mode, that allows your
Extender to continue to work even
if you power off your computer.
18
Sharing FilesSharing Files
Page 19

The final setup step configures
7.
your computer to work with the
Extender. When the configuration
is complete, the message “You are
Done” will display. You can now
play music, watch videos or stream
online content (subscription may
be required) on your television
through your Extender. Click Enter
or select Finish to exit the setup.
NOTE: If you see the error message “Extender did not connect”
please return to Section 3, and follow the steps starting with
Insert CD-ROM.
Media Center Configuration
You are Done ScreenYou are Done Screen
19
Page 20

Media Center Configuration
20
Page 21

Contact Information
Region Contact
Europe
Austria www.linksys.com/AT/support
Belgium www.linksys.com/BE/support
Czech Republic www.linksys.com/CZ/support
Denmark www.linksys.com/DK/support
Finland www.linksys.com/FI/support
France www.linksys.com/FR/support
Germany www.linksys.com/DE/support
Ireland www.linksys.com/IE/support
Italy www.linksys.com/IT/support
Netherlands www.linksys.com/NL/support
Norway www.linksys.com/NO/support
Poland www.linksys.com/PL/support
Portugal www.linksys.com/PT/support
Russia www.linksys.com/RU/support
Spain www.linksys.com/ES/support
Sweden www.linksys.com/SE/support
Switzerland www.linksys.com/CH/support
Turkey www.linksys.com/TR/support
United Kingdom www.linksys.com/UK/support
Outside Europe
UAE www.linksys.com/AEen/support(English only)
U.S. and Canada www.linksys.com/support
Visit www.linksys.com/support to view contact information for all countries
7111910NC-DF
21
Page 22

Declaration of Conformity with Regard to the EU Directive
1999/5/EC and 2004/108/EC(R&TTE and EMC Directive)
Български
[Bulgarian]
Česky
[Czech]:
Dansk
[Danish]:
Deutsch
[German]:
Eesti
[Estonian]:
English:
Español
[Spanish]:
Ελληνική
[Greek]:
Français
[French]:
Íslenska
[Icelandic]:
Italiano
[Italian]:
Latviski
[Latvian]:
Lietuvių
[Lithuanian]:
Nederlands
[Dutch]:
Malti
[Maltese]:
Magyar
[Hungarian]:
Norsk
[Norwegian]:
Polski
[Polish]:
Português
[Portuguese]:
Română
[Romanian]
Slovensko
[Slovenian]:
Това оборудване отговаря на съществените изисквания и приложими
клаузи на Директива 1999/5/ЕС.
Toto zařízení je v souladu se základními požadavky a ostatními odpovídajícími
ustanoveními Směrnice 1999/5/EC.
Dette udstyr er i overensstemmelse med de væsentlige krav og andre relevante
bestemmelser i Direktiv 1999/5/EF.
Dieses Gerät entspricht den grundlegenden Anforderungen und den weiteren
entsprechenden Vorgaben der Richtlinie 1999/5/EU.
See seade vastab direktiivi 1999/5/EÜ olulistele nõuetele ja teistele asjakohastele
sätetele.
This equipment is in compliance with the essential requirements and other
relevant provisions of Directive 1999/5/EC.
Este equipo cumple con los requisitos esenciales asi como con otras
disposiciones de la Directiva 1999/5/CE.
Αυτός ο εξοπλισµός είναι σε συµµόρφωση µε τις ουσιώδεις απαιτήσεις και άλλες
σχετικές διατάξεις της Οδηγίας 1999/5/EC.
Cet appareil est conforme aux exigences essentielles et aux autres dispositions
pertinentes de la Directive 1999/5/EC.
Þetta tæki er samkvæmt grunnkröfum og öðrum viðeigandi ákvæðum
Tilskipunar 1999/5/EC.
Questo apparato é conforme ai requisiti essenziali ed agli altri principi sanciti
dalla Direttiva 1999/5/CE.
Šī iekārta atbilst Direktīvas 1999/5/EK būtiskajām prasībām un citiem ar to
saistītajiem noteikumiem.
Šis įrenginys tenkina 1999/5/EB Direktyvos esminius reikalavimus ir kitas šios
direktyvos nuostatas.
Dit apparaat voldoet aan de essentiele eisen en andere van toepassing zijnde
bepalingen van de Richtlijn 1999/5/EC.
Dan l-apparat huwa konformi mal-ħtiġiet essenzjali u l-provedimenti l-oħra
rilevanti tad-Direttiva 1999/5/EC.
Ez a készülék teljesíti az alapvető követelményeket és más 1999/5/EK irányelvben
meghatározott vonatkozó rendelkezéseket.
Dette utstyret er i samsvar med de grunnleggende krav og andre relevante
bestemmelser i EU-direktiv 1999/5/EF.
Urządzenie jest zgodne z ogólnymi wymaganiami oraz szczególnymi warunkami
określonymi Dyrektywą UE: 1999/5/EC.
Este equipamento está em conformidade com os requisitos essenciais e outras
provisões relevantes da Directiva 1999/5/EC.
Acest echipament este in conformitate cu cerintele esentiale si cu alte prevederi
relevante ale Directivei 1999/5/EC.
Ta naprava je skladna z bistvenimi zahtevami in ostalimi relevantnimi pogoji
Direktive 1999/5/EC.
Page 23

Slovensky
[Slovak]:
Suomi
[Finnish]:
Svenska
[Swedish]:
Toto zariadenie je v zhode so základnými požiadavkami a inými príslušnými
nariadeniami direktív: 1999/5/EC.
Tämä laite täyttää direktiivin 1999/5/EY olennaiset vaatimukset ja on siinä
asetettujen muiden laitetta koskevien määräysten mukainen.
Denna utrustning är i överensstämmelse med de väsentliga kraven och andra
relevanta bestämmelser i Direktiv 1999/5/EC.
The complete Declaration of Conformity statement can be found in Appendix E
of the Media Center Extender User Guide on the CD-ROM.
Page 24

For additional information or troubleshooting help, refer to
the User Guide on the CD-ROM. Additional support is also
available online.
Website
http://www.linksys.com/international
Linksys is a registered trademark or trademark of Cisco Systems, Inc. and/or its affiliates in the U.S. and
certain other countries. Copyright © 2007 Cisco Systems, Inc. All rights reserved. Other brands and
product names are trademarks or registered trademarks of their respective holders.
FTP Site
ftp://ftp.linksys.com
www.linksys.com
710100080
Page 25

INSTALLATIONSVEJLEDNING
Media Center Extender
Modeller: DMA2100, DMA2200 (DK)
DMA2100 DMA2200
Pakkens indhold
Media Center Extender
•
Fjernbetjening med to AAA-batterier
•
Strømkabel og adapter - DMA2100
•
Strømkabel - DMA2200
•
Antenner (to til DMA 2100, tre til DMA 2200)
•
SCART-adapter (DMA2100)
•
SCART-kabel (DMA2200)
•
Et komponent-videokabel
•
Et composite-videokabel
•
Et stereo RCA-lydkabel
•
Et Ethernet-kabel
•
Installationsvejledning
•
Cd-rom med softwareopdateringer til Windows Vista™-operativsystemet og
•
brugervejledning
Page 26

Page 27

Indholdsfortegnelse
Installation af enhed . . . . . . . . . . . . . . . . . . . . . . . . . . . . . . . . . 29
Installer batterierne . . . . . . . . . . . . . . . . . . . . . . . . . . . . . . . . . . . . . .29
Netværksforbindelse . . . . . . . . . . . . . . . . . . . . . . . . . . . . . . . . . . . . .29
Vis forbindelse . . . . . . . . . . . . . . . . . . . . . . . . . . . . . . . . . . . . . . . . . . .30
Strømforsyning . . . . . . . . . . . . . . . . . . . . . . . . . . . . . . . . . . . . . . . . . .33
Konfiguration af enhed . . . . . . . . . . . . . . . . . . . . . . . . . . . . . . . 35
Konfigurer sprogindstillingerne . . . . . . . . . . . . . . . . . . . . . . . . . .35
Konfigurer skærmforbindelser . . . . . . . . . . . . . . . . . . . . . . . . . . . .35
Konfigurer netværksindstillinger . . . . . . . . . . . . . . . . . . . . . . . . . .35
Overfør opsætningsnøglen fra enheden . . . . . . . . . . . . . . . . . .36
Konfiguration af Media Center på PC . . . . . . . . . . . . . . . . . . 37
Indsæt cd-rom . . . . . . . . . . . . . . . . . . . . . . . . . . . . . . . . . . . . . . . . . . .37
Windows Vista-opdatering . . . . . . . . . . . . . . . . . . . . . . . . . . . . . . .37
Indstillinger . . . . . . . . . . . . . . . . . . . . . . . . . . . . . . . . . . . . . . . . . . . . . .37
Kontaktoplysninger . . . . . . . . . . . . . . . . . . . . . . . . . . . . . . . . . . 41
27
Page 28

RCA-stereolyd
Composite-video
Ethernet
SCART-adapter (DMA2100)
SCART-kabel (DMA2200)
Komponent-video
RCA-stereolyd
Composite-video
Ethernet
SCART-adapter (DMA2100)
SCART-kabel (DMA2200)
Komponent-video
Før du går i gang
Kontroller, at du har:
Til high definition-videoindstillinger:
Komponent-videokabel eller
•
HDMI-kabel (medfølger ikke)
•
Til standard definition-videoindstillinger:
SCART-kabel (DMA2200 medfølger)
•
SCART-adapter (DMA2100 medfølger)
•
Komponent-videokabel (medfølger)
•
Composite-videokabel (medfølger) eller
•
S-Video-kabel (medfølger ikke)
Lyd:
•
Analog RCA stereo (medfølger) eller
•
Digital SPDIF koaksial RCA-kabel (medfølger ikke)
•
Digital SPDIK toslink-kabel (medfølger ikke -
•
kun til DMA2200)
BEMÆRK: Hvis du bruger
Netværk:
HDMI eller SCART, er yderligere
lydkabler ikke nødvendige.
•
•
28
BEMÆRK: Hvis du har brug for flere oplysninger, skal du se i
brugervejledningen på cd-rom’en. Tag dig tid til at læse Linksys’
oplysninger om sikkerhed, garanti og softwarelicens, som også
findes på cd-rom’en.
Ethernet-kabel (medfølger)
Trådløst netværk (hvis det tilsluttes trådløst)
Medfølgende kabler
Page 29
DMA2100 DMA2200
HDMI, the HD
MI logo is a trademar
k or registered
trademarks of HDMI Lice
nsing, LLC.
Tested To Comply
With FCC Standards
Contains FCC:N89-WM821-LS
Contains FC
C:N89-WM821-LS
FOR HOME OFFICE USE
Default
Reset /
Default
HDMI, the HDMI logo is a trademark or registere
Tested To Comp
ly
With FCC Standards
C
ontains FCC:N89-WM821-LS
FOR HOME OFFICE
USE
Installation af enhed1�
Installer batterierne
Installer de to (2) AAA-batterier i
fjernbetjeningen ved at placere den
positive (+) og negative (-) ende som
vist.
- +
BEMÆRK: Yderligere
oplysninger om funktionerne
på ernbetjeningen, herunder
hvordan du programmerer den
konfigurerede ernbetjening,
findes i brugervejledningen
på cd-rom’en.
Netværksforbindelse
Vedr. trådløs forbindelse til din
computer
Hvis du bruger en kabelbaseret
forbindelse, skal du gå videre til næste
trin.
Hvis du bruger en trådløs forbindelse,
skal du tilslutte antennerne. Der er to
(2) antenner til DMA2100 og tre (3) til
DMA2200. Antennerne skal skrues på i
retning med uret. Stram dem, indtil de
sidder fast. Antennerne skal være oppe,
når Extender’en er i brug.
+ _
Installation af batterier i fjernbetjeningInstallation af batterier i fjernbetjening
Montering af antenner
Montering af antenner
29
Page 30
Installation af enhed
DMA2100 DMA2200
S-VIDEO
RIGHT
DIGITAL
ADUIO
ETHERNET
10/100
USB
LEFT ANALOG A
UDIO
s-PDIF
DIGITAL
ADUIO
ETHERNET
10/100
ANALOG AUDIO
USB
Pr
Pb
Left
Right
DMA2100 DMA2200
S-VIDEO
RIGHT
DIGITAL
ADUIO
ETHERNET
10/100
USB
LEFT ANALOG A
UDIO
s-PDIF
DIGITAL
ADUIO
ETHERNET
10/100
ANALOG AUDIO
USB
Pr
Pb
Left
Right
DMA2100 DMA2200
Reset /
Default
LLC.
S-VIDEO
VIDEO
Pb
Pr
Y
ndards
Contains FCC:N89-WM821-LS
FOR HOME OF
FICE USE
COMPONENT
VIDEO
MI Licensing, LLC.
DIGITAL
ADUIO
ETHERNET
10/100
ANALOG AUDIO
USE
S-VIDEO
COMPOSITE
Pr
Pb
Left
Right
Y
COMPONENT
VIDEO
DMA2100 DMA2200
Reset /
Default
LLC.
S-VIDEO
VIDEO
Pb
Pr
Y
ndards
Contains FCC:N89-WM821-LS
FOR HOME OF
FICE USE
COMPONENT
VIDEO
MI Licensing, LLC.
DIGITAL
ADUIO
ETHERNET
10/100
ANALOG AUDIO
USE
S-VIDEO
COMPOSITE
Pr
Pb
Left
Right
Y
COMPONENT
VIDEO
DMA2100 DMA2200
HDMI, the HDMI logo is a trademar
k or registered trademarks of HDMI Licensing, LLC.
Tested To Comply
With FCC Standards
Contains
FCC:N89-WM821-LS
Contains
FCC:N89-WM821-LS
FOR HOME OFFICE USE
Default
Reset /
Default
HDMI, the HDMI logo is a trademark or registered trademarks o
f HDMI Licensing, LLC.
Pb
Pr
Y
Tested To Comply
With FCC Standards
Contains FCC:N89-WM82
1-LS
FOR HOME OFFICE USE
COMPONENT
VIDEO
Vedr. kabelbaseret forbindelse til din
computer
Slut Ethernet-kablet fra Media Center
Extender’ens bagpanel til bagpanelet på
din netværksrouter.
Vis forbindelse
BEMÆRK: Før du udfører en af følgende tilslutninger, skal du
slukke for dit TV.
High definition (HD)-forbindelser
Komponent-video
Forbind komponent-videokablet (rødt,
grønt, blåt) (medfølger) fra Media Center
Extender’ens bagpanel til komponentvideoforbindelsesportene på dit TV.
Ethernet-forbindelse
Ethernet-forbindelse
ELLER
HDMI (Video og lyd)
Forbind et HDMI-kabel (medfølger ikke)
fra Media Center Extender’ens bagpanel
til HDMI-forbindelsesporten på dit TV.
30
Komponent-videoforbindelse
Komponent-videoforbindelse
HDMI-forbindelse
HDMI-forbindelse
Page 31

Standard definition (SD)-forbindelser
FOR HOME OFFICE USE
Tested To Comply
With FCC Standards
S-Video
SCART IN/OUT
Composite
RESET
Pr
VIDEO OUT
FOR HOME OFFICE USE
Tested To Comply
With FCC Standards
S-Video
SCART IN/OUT
Composite
RESET
Pr
VIDEO OUT
~
~
~
S-VIDEO
VIDEO
RIGHT
DIGITAL
ADUIO
ETHERNET
LEFT ANALOG AUDIO
s-PDIF
~
~
~
S-VIDEO
VIDEO
RIGHT
DIGITAL
ADUIO
ETHERNET
LEFT ANALOG AUDIO
s-PDIF
DMA2100 DMA2200
Reset /
Default
LLC.
S-VIDEO
VIDEO
Pb
Pr
Y
ndards
Contains FCC:N89-WM821-LS
FOR HOME OFFICE USE
COMPONENT
VIDEO
MI Licensing, LLC.
DIGITAL
ADUIO
ETHERNET
10/100
ANALOG AUDIO
USE
S-VIDEO
COMPOSITE
Pr
Pb
Left
Right
Y
COMPONENT
VIDEO
DMA2100 DMA2200
Reset /
Default
LLC.
S-VIDEO
VIDEO
Pb
Pr
Y
ndards
Contains FCC:N89-WM821-LS
FOR HOME OFFICE USE
COMPONENT
VIDEO
MI Licensing, LLC.
DIGITAL
ADUIO
ETHERNET
10/100
ANALOG AUDIO
USE
S-VIDEO
COMPOSITE
Pr
Pb
Left
Right
Y
COMPONENT
VIDEO
DMA2100 DMA2200
f
HDMI Licensing, LL
C
.
S-VIDEO
VIDEO
Pb
Pr
Y
RIGHT
DIGITAL
ADUIO
ETHERNET
LEFT ANALOG AUDIO
s-PDIF
y
-
WM82
1-LS
E
COMPONENT
VIDEO
istered trademarks of
HDMI Licensing, LLC.
Tested To Comply
With FCC Standards
Contains FCC:N89-WM
821-LS
Contains FCC:N89-WM821-LS
FOR HOME OF
FICE USE
S-VIDEO
COMPOSITE
Y
Reset /
Default
, L
LC.
S-VIDEO
VIDEO
Pb
Pr
Y
RIGHT
DIGITAL
ADUIO
LEFT ANALOG AUDIO
s-PDIF
Tested To Comply
With FCC Standards
Contains FCC:N89-WM821-LS
FOR HOME OFFICE USE
COMPONENT
VIDEO
istered trademarks of HD
MI Licensing, LLC.
Tested To Comply
With FCC Standards
Contains FCC:N89-WM821-LS
Contains FCC:N89-WM821-LS
FOR HOME OFFICE US
E
S-VIDEO
COMPOSITE
Pr
Pb
Y
COMPONENT
VIDEO
DMA2100 DMA2200
SCART (Video og lyd)
DMA2200
Forbind et SCART-kabel (medfølger) fra
Media Center Extender’ens bagpanel til
SCART-stikket på TV’et.
Installation af enhed
DMA2100
Tilslut en SCART-adapter ved at sætte
composite-video- og lydkablerne
(medfølger) i Media Center Extender’ens
og i SCART-adapterens composite-porte.
Video
Tilslut et standard analogt videokabel fra
Media Center Extender’ens bagpanel til
videoforbindelsesporten på TV’et.
Du kan tilslutte et komponent-videokabel
(rødt, grønt, blåt) (medfølger), et
composite-videokabel (medfølger) eller et
S-Video-kabel (medfølger ikke).
Tilslutning af SCART-kabel (DMA2200)
Tilslutning af SCART-kabel (DMA2200)
Tilslutning af SCART-adapter (DMA2100)
Tilslutning af SCART-adapter (DMA2100)
Komponent-videoforbindelse
Komponent-videoforbindelse
Composite-videoforbindelse
Composite-videoforbindelse
S-Video-forbindelse
S-Video-forbindelse
31
Page 32

Installation af enhed
DMA2100 DMA2200
S-VIDEO
VIDEO
Pb
Pr
Y
RIGHT
DIGITAL
ADUIO
LEFT ANALOG AUDIO
s-PDIF
COMPONENT
VIDEO
censing, LLC.
DIGITAL
ADUIO
ETHERNET
10/100
ANALOG AUDIO
S-VIDEO
COMPOSITE
Pr
Pb
Left
Right
Y
COMPONENT
VIDEO
DMA2100 DMA2200
S-VIDEO
VIDEO
Pb
Pr
Y
RIGHT
DIGITAL
ADUIO
LEFT ANALOG AUDIO
s-PDIF
COMPONENT
VIDEO
censing, LLC.
DIGITAL
ADUIO
ETHERNET
10/100
ANALOG AUDIO
S-VIDEO
COMPOSITE
Pr
Pb
Left
Right
Y
COMPONENT
VIDEO
DIGITAL
ADUIO
ETHERNET
10/100
ANALOG AUDIO
USB
Pr
Pb
Left
Right
Y
COMPONENT
VIDEO
DIGITAL
ADUIO
ETHERNET
10/100
ANALOG AUDIO
USB
Pr
Pb
Left
Right
Y
COMPONENT
VIDEO
DMA2100 DMA2200
S-VIDEO
VIDEO
RIGHT
DIGITAL
ADUIO
ETHERNET
10/100
USB
LEFT ANALOG AUDIO
s-PDIF
DIGITAL
ADUIO
ETHERNET
10/100
ANALOG AUDIO
S-VIDEO
COMPOSITE
USB
Pr
Pb
Left
Right
Y
COMPONENT
VIDEO
DMA2100 DMA2200
S-VIDEO
VIDEO
RIGHT
DIGITAL
ADUIO
ETHERNET
10/100
USB
LEFT ANALOG AUDIO
s-PDIF
DIGITAL
ADUIO
ETHERNET
10/100
ANALOG AUDIO
S-VIDEO
COMPOSITE
USB
Pr
Pb
Left
Right
Y
COMPONENT
VIDEO
Lyd
Tilslut lydkabler fra Media
Center Extender’ens bagpanel til
lydforbindelsesporten på TV’et eller
AV-modtageren. Du kan tilslutte de
medfølgende RCA-stereolydkabler
(røde, hvide) eller et digitalt lydkabel
(koaksial RCA – medfølger ikke) eller,
for DMA2200, et optisk lydkabel (toslink
– medfølger ikke).
Digital lydforbindelse (koaksial RCA)
Digital lydforbindelse (koaksial RCA)
RCA-stereolydforbindelse
RCA-stereolydforbindelse
Digital lydforbindelse (optisk toslink)
Digital lydforbindelse (optisk toslink)
32
Page 33

Strømforsyning
DMA2100 DMA2200
Reset /
Default
HDMI, the HDMI logo is a trademark or registered
Tested To Com
ply
With FC
C Standards
Conta
ins FCC:N89-WM821
-LS
FOR HOME OFFICE USE
FOR HOME OFFICE USE
Tested To Comply
With FCC Standards
SCART IN/OUT
RESET
DMA2100 DMA2200
Reset /
Default
HDMI, the HDMI logo is a trademark or registered
Tested To Com
ply
With FC
C Standards
Conta
ins FCC:N89-WM821
-LS
FOR HOME OFFICE USE
FOR HOME OFFICE USE
Tested To Comply
With FCC Standards
SCART IN/OUT
RESET
BEMÆRK: Tænd for dit TV. Første opstart af Extender kan tage op
til et (1) minut.
Strøm til Media Center Extender
DMA2200
Sæt Media Center Extender’ens
strømkabel til enhedens strømport på
bagpanelet. Sæt kablet i en stikkontakt.
Der er også en tænd/sluk-knap lige over
strømporten. Tænd for enheden, før du
starter enhedskonfigurationen.
DMA2100
Denne enhed leveres med de korrekte
strømstik til dit område. Hvis det er
nødvendigt, kan du hive det stik ud, der
sidder i strømporten. Derefter kan du
sætte det strømstik i, som passer til din
stikkontakt
Strømkabel-forbindelse
Strømkabel-forbindelse
DMA 2100 strømstikDMA 2100 strømstik
Installation af enhed
Sæt Media Center Extender’ens
strømkabel til enhedens strømport på
bagpanelet. Sæt kablet i en stikkontakt.
BEMÆRK: Der er en IR-sensor foran på Media Center Extender.
Sørg for, at frontpanelet er synligt for ernbetjeningen.
33
Page 34

Installation af enhed
34
Page 35

Konfiguration af enhed2�
Konfigurer sprogindstillingerne
Brug piletasterne til at markere den rigtige
sprogindstilling til konfigurationen. Tryk
på OK på fjernbetjeningen, eller vælg
Next (Næste) for at fortsætte.
Konfigurer skærmforbindelser
En HDMI-forbindelse bør automatisk
registreres, afhængigt af dit TV og
indstillingerne. Ved andre tilslutninger
kan du vælge video, lyd og format for at
optimere afspilningskvaliteten.
Dit valg skal svare til den hardwaretilslutning, du har valgt. Tryk på OK på
fjernbetjeningen, eller vælg Next (Næste)
for at fortsætte.
Konfigurer netværksindstillinger
Vælg den netværksforbindelse, du
anvender (kabelbaseret eller trådløs),
og tryk på OK på fjernbetjeningen, eller
vælg Next (Næste) for at fortsætte.
Hvis en Krypteringsnøgle er
nødvendig, skal du indtaste dit netværks
krypteringsnøgle via tastaturet og
derefter klikke på Next (Næste).
BEMÆRK: I forhold til trådløse routerindstillinger skal
det sikkerhedsniveau, der er valgt på Extender’ens
opsætningsskærm, svare til computerens sikkerhed.
Menuskærmen til sprog Menuskærmen til sprog
Skærmen til analog forbindelseSkærmen til analog forbindelse
35
Page 36

Konfiguration af enhed
Overfør opsætningsnøglen fra enheden
Hvis computeren skal kunne
1.
genkende Media Center
Extender, har den brug
for en opsætningsnøgle.
Opsætningsnøglen på otte cifre
vises på TV-skærmen (og på
frontpanelet på Media Center
Extender, hvis det er en DMA2200).
Skriv denne opsætningsnøgle ned,
2.
og brug den til din Windows Vista
Premium- eller Ultimate-computer.
Du kan indtaste nummeret her:
Skærmen til opsætningsnøgleSkærmen til opsætningsnøgle
--
36
Page 37

Konfiguration af Media Center på PC
3�
BEMÆRK: Følg nedenstående trin i den angivne rækkefølge.
Du skal indsætte cd-rom’en og følge instruktionerne på
opsætningsskærmene.
Indsæt cd-rom
Indsæt den cd-rom, der blev leveret med
din Media Center Extender, i din Media
Center-computer. Følg herefter de trin,
der vises på skærmen.
Windows Vista-opdatering
Hvis du har en kompatibel version af
Windows Vista, bliver du bedt om at
opdatere dit system via Windows Vista
Update. Følg herefter de trin, der vises på
skærmen.
Indsæt cd-romIndsæt cd-rom
Indstillinger
Hvis din computer automatisk har fundet
Extender, vises en meddelelse, der
bekræfter, at Extender blev fundet.
Den meddelelsestype, der vises, kan
variere. Klik på skærmen, eller vælg Yes
(Ja) for at starte konfigurationen.
Hvis din Extender ikke blev fundet automatisk, skal du følge disse trin.
Åbn “Media Center” (Mediecenter)
1.
på computeren, og tryk på pilen
op eller ned for at vælge Tasks
(Opgaver).
Tryk på den venstre pil for at
A.
vælge Settings (Indstilinger).
Brug pilene op eller ned for
B.
at markere Extender, og tryk
derefter på op-pilen for at
markere Add Extender (Tilføj
Extender). Klik på Enter.
Meddelelsen “Found Media Extender”
Meddelelsen “Found Media Extender”
(Fandt Media Extender)
(Fandt Media Extender)
Tilføj ExtenderTilføj Extender
37
Page 38

Konfiguration af Media Center på PC
XXXX
XXXX
XXXX
XXXX
Skærmen Welcome to Windows
2.
Media Center (Velkommen til
Windows mediecenter) vises. Klik
på Enter, eller vælg Next (Næste) for
at fortsætte.
Du bliver bedt om at indtaste den
3.
opsætningsnøgle til Extender, du
skrev ned tidligere. Når du har
indtastet nummeret, skal du trykke
på Enter eller vælge Next (Næste) for
at fortsætte.
Den næste skærm spørger muligvis
4.
til firewalls eller ændringer i
computerindstillingerne. Klik på
Enter, eller vælg Next (Næste) for at
fortsætte.
BEMÆRK: Firewalls fra tredjepartsleverandør kræver muligvis
yderligere manuel konfiguration.
VelkomstskærmenVelkomstskærmen
Opsætningsskærm for Extender
Opsætningsskærm for Extender
Du bliver også spurgt, om du vil
5.
gøre de mediefiler, der er gemt på
din pc, tilgængelige. Alle mediefiler
(billeder, musik, video) bliver
delt. Du kan ændre dette senere i
indstillingsmenuen. Klik på
og klik på Enter , eller vælg Next
(Næste) for at fortsætte.
Du bliver muligvis også bedt
6.
om at tillade ændringer i nogle
computerindstillinger, herunder
aktivering af tilstanden Away
(Væk). Tilstanden Away (Væk) er
strømbesparende, hvilket giver din
Extender mulighed for fortsat at køre,
selv om du slukker for din computer.
38
Yes (Ja),
Deling af filerDeling af filer
Page 39

Det sidste opsætningstrin
7.
konfigurerer din computer til at
fungere sammen med Extender.
Når konfigurationen er gennemført,
vises meddelelsen “You are Done”
(Du er færdig). Nu kan du spille
musik, se videoer eller streame
onlineindhold (abonnement kræves
muligvis) på dit TV via Extender. Klik
på Enter, eller vælg Finish (Afslut) for
at gå ud af konfigurationen.
BEMÆRK: Hvis du ser fejlmeddelelsen “Extender did not connect”
(Der blev ikke oprettet forbindelse til Extender), skal du vende
tilbage til afsnit 3 og følge de trin, der starter fra Indsæt cd-rom.
Konfiguration af Media Center på PC
Du er færdig-skærmenDu er færdig-skærmen
39
Page 40

Konfiguration af Media Center på PC
40
Page 41

Kontaktoplysninger
Region Kontakt
Europa
Østrig www.linksys.com/AT/support
Belgien www.linksys.com/BE/support
Danmark ww.linksys.com/DK/support
Finland www.linksys.com/FI/support
Frankrig www.linksys.com/FR/support
Holland www.linksys.com/NL/support
Irland www.linksys.com/IE/support
Italien www.linksys.com/IT/support
Norge www.linksys.com/NO/support
Polen www.linksys.com/PL/support
Portugal www.linksys.com/PT/support
Rusland www.linksys.com/RU/support
Schweiz www.linksys.com/CH/support
Spanien www.linksys.com/ES/support
Storbritannien www.linksys.com/UK/support
Sverige www.linksys.com/SE/support
Tjekkiet www.linksys.com/CZ/support
Tyrkiet www.linksys.com/TR/support
Tyskland www.linksys.com/DE/support
Uden for Europa
FAE www.linksys.com/AEen/support (kun engelsk)
USA og Canada www.linksys.com/support
7111910NC-DF
41
Page 42

Erklæring om overholdelse af EU-direktiv 1999/5/EC og
2004/108/EC (R&TTE & EMC-direktivet)
Български
[Bulgarian]
Česky
[Czech]:
Dansk
[Danish]:
Deutsch
[German]:
Eesti
[Estonian]:
English:
Español
[Spanish]:
Ελληνική
[Greek]:
Français
[French]:
Íslenska
[Icelandic]:
Italiano
[Italian]:
Latviski
[Latvian]:
Lietuvių
[Lithuanian]:
Nederlands
[Dutch]:
Malti
[Maltese]:
Magyar
[Hungarian]:
Norsk
[Norwegian]:
Polski
[Polish]:
Português
[Portuguese]:
Română
[Romanian]
Slovensko
[Slovenian]:
Slovensky
[Slovak]:
Това оборудване отговаря на съществените изисквания и приложими
клаузи на Директива 1999/5/ЕС.
Toto zařízení je v souladu se základními požadavky a ostatními odpovídajícími
ustanoveními Směrnice 1999/5/EC.
Dette udstyr er i overensstemmelse med de væsentlige krav og andre relevante
bestemmelser i Direktiv 1999/5/EF.
Dieses Gerät entspricht den grundlegenden Anforderungen und den weiteren
entsprechenden Vorgaben der Richtlinie 1999/5/EU.
See seade vastab direktiivi 1999/5/EÜ olulistele nõuetele ja teistele asjakohastele
sätetele.
This equipment is in compliance with the essential requirements and other
relevant provisions of Directive 1999/5/EC.
Este equipo cumple con los requisitos esenciales asi como con otras
disposiciones de la Directiva 1999/5/CE.
Αυτός ο εξοπλισµός είναι σε συµµόρφωση µε τις ουσιώδεις απαιτήσεις και άλλες
σχετικές διατάξεις της Οδηγίας 1999/5/EC.
Cet appareil est conforme aux exigences essentielles et aux autres dispositions
pertinentes de la Directive 1999/5/EC.
Þetta tæki er samkvæmt grunnkröfum og öðrum viðeigandi ákvæðum
Tilskipunar 1999/5/EC.
Questo apparato é conforme ai requisiti essenziali ed agli altri principi sanciti
dalla Direttiva 1999/5/CE.
Šī iekārta atbilst Direktīvas 1999/5/EK būtiskajām prasībām un citiem ar to
saistītajiem noteikumiem.
Šis įrenginys tenkina 1999/5/EB Direktyvos esminius reikalavimus ir kitas šios
direktyvos nuostatas.
Dit apparaat voldoet aan de essentiele eisen en andere van toepassing zijnde
bepalingen van de Richtlijn 1999/5/EC.
Dan l-apparat huwa konformi mal-ħtiġiet essenzjali u l-provedimenti l-oħra
rilevanti tad-Direttiva 1999/5/EC.
Ez a készülék teljesíti az alapvető követelményeket és más 1999/5/EK irányelvben
meghatározott vonatkozó rendelkezéseket.
Dette utstyret er i samsvar med de grunnleggende krav og andre relevante
bestemmelser i EU-direktiv 1999/5/EF.
Urządzenie jest zgodne z ogólnymi wymaganiami oraz szczególnymi warunkami
określonymi Dyrektywą UE: 1999/5/EC.
Este equipamento está em conformidade com os requisitos essenciais e outras
provisões relevantes da Directiva 1999/5/EC.
Acest echipament este in conformitate cu cerintele esentiale si cu alte prevederi
relevante ale Directivei 1999/5/EC.
Ta naprava je skladna z bistvenimi zahtevami in ostalimi relevantnimi pogoji
Direktive 1999/5/EC.
Toto zariadenie je v zhode so základnými požiadavkami a inými príslušnými
nariadeniami direktív: 1999/5/EC.
Page 43

Suomi
[Finnish]:
Svenska
[Swedish]:
Tämä laite täyttää direktiivin 1999/5/EY olennaiset vaatimukset ja on siinä
asetettujen muiden laitetta koskevien määräysten mukainen.
Denna utrustning är i överensstämmelse med de väsentliga kraven och andra
relevanta bestämmelser i Direktiv 1999/5/EC.
For yderligere oplysninger mht. overensstemmelseserklæringen henvises til
brugervejledningen
Page 44

Yderligere oplysninger eller hjælp til fejlfinding finder du i
brugervejledningen på cd-rom’en. Yderligere support kan
også fås online.
Websted
http://www.linksys.com/international
Linksys er et registreret varemærke tilhørende Cisco Systems, Inc. og/eller Cisco Systems’ associerede
selskaber i USA og visse andre lande. Copyright © 2007 Cisco Systems, Inc. Alle rettigheder
forbeholdes. Andre produktmærker og produktnavne er varemærker eller registrerede varemærker
tilhørende deres respektive ejere.
FTP-server
ftp://ftp.linksys.com
www.linksys.com
710100080
Page 45

KURZANLEITUNG
Media Center Extender
Modelle: DMA2100, DMA2200 (DE)
DMA2100 DMA2200
Lieferumfang
Media Center Extender
•
Fernbedienung mit zwei AAA-Batterien
•
Netzkabel und Clip-Adapter – DMA2100
•
Netzkabel, der Region entsprechend – DMA2200
•
Antennen (Zwei für DMA 2100, drei für DMA 2200)
•
SCART-Adapter (DMA2100)
•
SCART-Kabel (DMA2200)
•
Ein Video-Komponentenkabel
•
Ein Audio-/Videokabel
•
Ein RCA-Stereo-Audiokabel
•
Ein Ethernet-Netzwerkkabel
•
Kurzanleitung
•
CD-ROM mit Software-Aktualisierungen für das Betriebssystem Windows Vista™ und
•
Benutzerhandbuch
Page 46

Page 47

Inhalt
Installieren des Geräts . . . . . . . . . . . . . . . . . . . . . . . . . . . . . . . 49
Einsetzen der Batterien . . . . . . . . . . . . . . . . . . . . . . . . . . . . . . . . . .49
Netzwerkverbindung . . . . . . . . . . . . . . . . . . . . . . . . . . . . . . . . . . . .49
Verbindungsanzeige . . . . . . . . . . . . . . . . . . . . . . . . . . . . . . . . . . . . .50
Einschalten des Geräts . . . . . . . . . . . . . . . . . . . . . . . . . . . . . . . . . . .53
Konfigurieren des Geräts . . . . . . . . . . . . . . . . . . . . . . . . . . . . . 55
Konfigurieren der Spracheinstellungen . . . . . . . . . . . . . . . . . . .55
Konfigurieren der Verbindungsanzeige . . . . . . . . . . . . . . . . . . .55
Konfigurieren der Netzwerkeinstellungen . . . . . . . . . . . . . . . . .55
Aufzeichnen des Setup-Schlüssels vom Gerät . . . . . . . . . . . . .56
Konfiguration des Media Center . . . . . . . . . . . . . . . . . . . . . . 57
Einlegen der CD-ROM . . . . . . . . . . . . . . . . . . . . . . . . . . . . . . . . . . . .57
Windows Vista Update . . . . . . . . . . . . . . . . . . . . . . . . . . . . . . . . . . .57
Einrichtung . . . . . . . . . . . . . . . . . . . . . . . . . . . . . . . . . . . . . . . . . . . . . .57
Kontaktinformationen . . . . . . . . . . . . . . . . . . . . . . . . . . . . . . . 61
47
Page 48

RCA-Stereo-Audiokabel
Audio-/Videokabel
Ethernet
SCART-Adapter (DMA2100)
SCART-Kabel (DMA2200)
Komponentenkabel
RCA-Stereo-Audiokabel
Audio-/Videokabel
Ethernet
SCART-Adapter (DMA2100)
SCART-Kabel (DMA2200)
Komponentenkabel
Bevor Sie beginnen
Stellen Sie sicher, dass Ihnen Folgendes zur Verfügung steht:
High-Definition Video-Optionen:
Video-Komponentenkabel (im Lieferumfang
•
enthalten) oder
HDMI (nicht im Lieferumfang enthalten)
•
Standard-Definition Video-Optionen:
SCART-Kabel (DMA2200, im Lieferumfang
•
enthalten)
SCART-Adapter (DMA2100, im Lieferumfang
•
enthalten)
Video-Komponentenkabel (im Lieferumfang
•
•
•
Audio:
•
•
•
enthalten) oder
Audio-/Videokabel (im Lieferumfang
enthalten) oder
S-Videokabel (nicht im Lieferumfang enthalten)
Analoges RCA-Stereo-Audiokabel
(im Lieferumfang enthalten) oder
Digitales SPDIF RCA-Koaxialkabel
(nicht im Lieferumfang enthalten)
Digitales SPDIF Toslink (nicht im
Lieferumfang enthalten – nur für DMA2200)
HINWEIS: Wenn Sie HDMI oder
SCART verwenden, sind keine
zusätzlichen Audiokabel erforderlich.
Netzwerk:
Ethernetkabel (im Lieferumfang enthalten)
•
Wireless-Netzwerk (bei drahtlosem Anschluss)
•
48
HINWEIS: Weitere Informationen finden Sie im
Benutzerhandbuch auf der CD-ROM. Lesen Sie die Sicherheits-,
Garantie- und Softwarelizenzinformationen durch, die ebenfalls
auf der CD-ROM zur Verfügung stehen.
Im Lieferumfang
enthaltene Kabel
Page 49

DMA2100 DMA2200
HDMI, the HD
MI logo is a trademar
k or registered
trademarks of HDMI Lice
nsing, LLC.
Tested To Comply
With FCC Standards
Contains FCC:N89-WM821-LS
Contains FC
C:N89-WM821-LS
FOR HOME OFFICE USE
Default
Reset /
Default
HDMI, the HDMI logo is a trademark or registere
Tested To Comp
ly
With FCC Standards
C
ontains FCC:N89-WM821-LS
FOR HOME OFFICE
USE
Installieren des Geräts1�
Einsetzen der Batterien
Setzen Sie die beiden AAA-Batterien
in die Fernbedienung ein. Achten
Sie darauf, dass jeweils der Pluspol
(+) und der Minuspol (-) der Batterie
in die richtige Richtung zeigt (siehe
Abbildung).
- +
+ _
HINWEIS: Weitere
Informationen zu den
Funktionen der Fernbedienung,
einschließlich Programmierung
der lernfähigen Fernbedienung,
finden Sie im Benutzerhandbuch
auf der CD-ROM.
Netzwerkverbindung
Für eine Wireless-Verbindung mit dem
Computer
Wenn Sie eine verdrahtete Verbindung
verwenden, können Sie diesen Schritt
auslassen.
Wenn Sie einen drahtlosen Anschluss
verwenden, müssen Sie die Antennen
anbringen. Für den DMA2100 gibt es
zwei, für das DMA2200 drei Antennen.
Die Antennen sollten im Uhrzeigersinn
mit der Hand angeschraubt werden, bis
sie fest sitzen. Richten Sie die Antennen
auf, wenn der Extender in Betrieb ist.
Einsetzen der Batterie in die FernbedienungEinsetzen der Batterie in die Fernbedienung
Anbringen der Antennen
Anbringen der Antennen
49
Page 50

Installieren des Geräts
DMA2100 DMA2200
S-VIDEO
RIGHT
DIGITAL
ADUIO
ETHERNET
10/100
USB
LEFT ANALOG A
UDIO
s-PDIF
DIGITAL
ADUIO
ETHERNET
10/100
ANALOG AUDIO
USB
Pr
Pb
Left
Right
DMA2100 DMA2200
S-VIDEO
RIGHT
DIGITAL
ADUIO
ETHERNET
10/100
USB
LEFT ANALOG A
UDIO
s-PDIF
DIGITAL
ADUIO
ETHERNET
10/100
ANALOG AUDIO
USB
Pr
Pb
Left
Right
DMA2100 DMA2200
Reset /
Default
LLC.
S-VIDEO
VIDEO
Pb
Pr
Y
ndards
Contains FCC:N89-WM821-LS
FOR HOME OF
FICE USE
COMPONENT
VIDEO
MI Licensing, LLC.
DIGITAL
ADUIO
ETHERNET
10/100
ANALOG AUDIO
USE
S-VIDEO
COMPOSITE
Pr
Pb
Left
Right
Y
COMPONENT
VIDEO
DMA2100 DMA2200
Reset /
Default
LLC.
S-VIDEO
VIDEO
Pb
Pr
Y
ndards
Contains FCC:N89-WM821-LS
FOR HOME OF
FICE USE
COMPONENT
VIDEO
MI Licensing, LLC.
DIGITAL
ADUIO
ETHERNET
10/100
ANALOG AUDIO
USE
S-VIDEO
COMPOSITE
Pr
Pb
Left
Right
Y
COMPONENT
VIDEO
DMA2100 DMA2200
HDMI, the HDMI logo is a trademar
k or registered trademarks of HDMI Licensing, LLC.
Tested To Comply
With FCC Standards
Contains
FCC:N89-WM821-LS
Contains
FCC:N89-WM821-LS
FOR HOME OFFICE USE
Default
Reset /
Default
HDMI, the HDMI logo is a trademark or registered trademarks o
f HDMI Licensing, LLC.
Pb
Pr
Y
Tested To Comply
With FCC Standards
Contains FCC:N89-WM82
1-LS
FOR HOME OFFICE USE
COMPONENT
VIDEO
Für eine verdrahtete Verbindung mit
dem Computer
Verbinden Sie mithilfe des
Ethernetkabels die Rückseite des Media
Center Extenders mit der Rückseite des
Netzwerk-Routers.
Verbindungsanzeige
HINWEIS: Schalten Sie den Fernseher aus, bevor Sie eine der
folgenden Verbindungen herstellen.
High-Definition (HD)-Verbindungen
Komponentenkabel
Verbinden Sie mithilfe des Video-
Komponentenkabels (rot, grün, blau; im
Lieferumfang enthalten) die Rückseite
des Media Center Extenders mit dem
Video-Komponentenausgang des
Fernsehers.
Ethernet-Anschluss
Ethernet-Anschluss
ODER
HDMI (Video und Audio)
Verbinden Sie mithilfe des HDMI-Kabels
(nicht im Lieferumfang enthalten) die
Rückseite des Media Center Extenders
mit dem HDMI-Ausgang des Fernsehers.
50
Video-Komponenten-Anschluss
Video-Komponenten-Anschluss
HDMI-Anschluss
HDMI-Anschluss
Page 51

Standard-Definition (SD)-Verbindungen
FOR HOME OFFICE USE
Tested To Comply
With FCC Standards
S-Video
SCART IN/OUT
Composite
RESET
Pr
VIDEO OUT
FOR HOME OFFICE USE
Tested To Comply
With FCC Standards
S-Video
SCART IN/OUT
Composite
RESET
Pr
VIDEO OUT
~
~
~
S-VIDEO
VIDEO
RIGHT
DIGITAL
ADUIO
ETHERNET
LEFT ANALOG AUDIO
s-PDIF
~
~
~
S-VIDEO
VIDEO
RIGHT
DIGITAL
ADUIO
ETHERNET
LEFT ANALOG AUDIO
s-PDIF
DMA2100 DMA2200
Reset /
Default
LLC.
S-VIDEO
VIDEO
Pb
Pr
Y
ndards
Contains FCC:N89-WM821-LS
FOR HOME OFFICE USE
COMPONENT
VIDEO
MI Licensing, LLC.
DIGITAL
ADUIO
ETHERNET
10/100
ANALOG AUDIO
USE
S-VIDEO
COMPOSITE
Pr
Pb
Left
Right
Y
COMPONENT
VIDEO
DMA2100 DMA2200
Reset /
Default
LLC.
S-VIDEO
VIDEO
Pb
Pr
Y
ndards
Contains FCC:N89-WM821-LS
FOR HOME OFFICE USE
COMPONENT
VIDEO
MI Licensing, LLC.
DIGITAL
ADUIO
ETHERNET
10/100
ANALOG AUDIO
USE
S-VIDEO
COMPOSITE
Pr
Pb
Left
Right
Y
COMPONENT
VIDEO
DMA2100 DMA2200
f
HDMI Licensing, LL
C
.
S-VIDEO
VIDEO
Pb
Pr
Y
RIGHT
DIGITAL
ADUIO
ETHERNET
LEFT ANALOG AUDIO
s-PDIF
y
-
WM82
1-LS
E
COMPONENT
VIDEO
istered trademarks of
HDMI Licensing, LLC.
Tested To Comply
With FCC Standards
Contains FCC:N89-WM
821-LS
Contains FCC:N89-WM821-LS
FOR HOME OF
FICE USE
S-VIDEO
COMPOSITE
Y
Reset /
Default
, L
LC.
S-VIDEO
VIDEO
Pb
Pr
Y
RIGHT
DIGITAL
ADUIO
LEFT ANALOG AUDIO
s-PDIF
Tested To Comply
With FCC Standards
Contains FCC:N89-WM821-LS
FOR HOME OFFICE USE
COMPONENT
VIDEO
istered trademarks of HD
MI Licensing, LLC.
Tested To Comply
With FCC Standards
Contains FCC:N89-WM821-LS
Contains FCC:N89-WM821-LS
FOR HOME OFFICE US
E
S-VIDEO
COMPOSITE
Pr
Pb
Y
COMPONENT
VIDEO
DMA2100 DMA2200
SCART (Video und Audio)
DMA2200
Anschließen eines SCART-Kabels:
Verbinden Sie mithilfe des SCART-Kabels
(im Lieferumfang enthalten) die Rückseite
des Media Center Extenders mit dem
SCART-Ausgang des Fernsehers.
Installieren des Geräts
DMA2100
Anschließen eines SCART-Adapters:
Verbinden Sie die Audio- und Videokabel
(im Lieferumfang enthalten) des
Media Center Extenders mit dem
Komponentenausgang des SCARTAdapters.
Video
Verbinden Sie mithilfe eines der analogen
Standard-Videokabel die Rückseite
des Media Center Extenders mit dem
Videoausgang des Fernsehers.
Sie können entweder ein VideoKomponentenkabel (rot, grün, blau;
im Lieferumfang enthalten), ein Audio/Videokabel oder ein S-Videokabel (im
Lieferumfang nicht enthalten) anschließen.
SCART-Kabel-Anschluss (DMA2200)
SCART-Kabel-Anschluss (DMA2200)
SCART-Adapter-Anschluss (DMA2100)
SCART-Adapter-Anschluss (DMA2100)
Video-Komponenten-Anschluss
Video-Komponenten-Anschluss
Audio-/Video-Anschluss
Audio-/Video-Anschluss
S-Video-Anschluss
S-Video-Anschluss
51
Page 52

Installieren des Geräts
DMA2100 DMA2200
S-VIDEO
VIDEO
Pb
Pr
Y
RIGHT
DIGITAL
ADUIO
LEFT ANALOG AUDIO
s-PDIF
COMPONENT
VIDEO
censing, LLC.
DIGITAL
ADUIO
ETHERNET
10/100
ANALOG AUDIO
S-VIDEO
COMPOSITE
Pr
Pb
Left
Right
Y
COMPONENT
VIDEO
DMA2100 DMA2200
S-VIDEO
VIDEO
Pb
Pr
Y
RIGHT
DIGITAL
ADUIO
LEFT ANALOG AUDIO
s-PDIF
COMPONENT
VIDEO
censing, LLC.
DIGITAL
ADUIO
ETHERNET
10/100
ANALOG AUDIO
S-VIDEO
COMPOSITE
Pr
Pb
Left
Right
Y
COMPONENT
VIDEO
DIGITAL
ADUIO
ETHERNET
10/100
ANALOG AUDIO
USB
Pr
Pb
Left
Right
Y
COMPONENT
VIDEO
DIGITAL
ADUIO
ETHERNET
10/100
ANALOG AUDIO
USB
Pr
Pb
Left
Right
Y
COMPONENT
VIDEO
DMA2100 DMA2200
S-VIDEO
VIDEO
RIGHT
DIGITAL
ADUIO
ETHERNET
10/100
USB
LEFT ANALOG AUDIO
s-PDIF
DIGITAL
ADUIO
ETHERNET
10/100
ANALOG AUDIO
S-VIDEO
COMPOSITE
USB
Pr
Pb
Left
Right
Y
COMPONENT
VIDEO
DMA2100 DMA2200
S-VIDEO
VIDEO
RIGHT
DIGITAL
ADUIO
ETHERNET
10/100
USB
LEFT ANALOG AUDIO
s-PDIF
DIGITAL
ADUIO
ETHERNET
10/100
ANALOG AUDIO
S-VIDEO
COMPOSITE
USB
Pr
Pb
Left
Right
Y
COMPONENT
VIDEO
Audio
Verbinden Sie mithilfe eines der
Audiokabel die Rückseite des Media
Center Extenders mit dem Fernseher
oder dem Audioausgang eines AVEmpfängers. Sie können entweder das
RCA-Stereo-Audiokabel (rot, weiß; im
Lieferumfang enthalten), ein digitales
Audiokabel (RCA-Koaxialkabel; nicht
im Lieferumfang enthalten) oder ein
optisches Audiokabel (Toslink; nicht im
Lieferumfang enthalten) anschließen.
Digitaler Audio-Anschluss (koaxial, RCA)
Digitaler Audio-Anschluss (koaxial, RCA)
RCA-Stereo-Audio-Anschluss
RCA-Stereo-Audio-Anschluss
Digitaler Audio-Anschluss (optisch, Toslink)
Digitaler Audio-Anschluss (optisch, Toslink)
52
Page 53

Einschalten des Geräts
DMA2100 DMA2200
Reset /
Default
HDMI, the HDMI logo is a trademark or registered
Tested To Com
ply
With FC
C Standards
Conta
ins FCC:N89-WM821
-LS
FOR HOME OFFICE USE
FOR HOME OFFICE USE
Tested To Comply
With FCC Standards
SCART IN/OUT
RESET
DMA2100 DMA2200
Reset /
Default
HDMI, the HDMI logo is a trademark or registered
Tested To Com
ply
With FC
C Standards
Conta
ins FCC:N89-WM821
-LS
FOR HOME OFFICE USE
FOR HOME OFFICE USE
Tested To Comply
With FCC Standards
SCART IN/OUT
RESET
HINWEIS: Schalten Sie Ihren Fernseher ein. Das erstmalige
Starten des Extenders könnte bis zu einer (1) Minute dauern.
Einschalten des Media Center Extenders
DMA2200
Schließen Sie das Netzkabel des Media
Center Extenders an den Netzanschluss
des DMA2200 (Rückseite) an. Verbinden
Sie dann das Kabel mit einer Steckdose.
Direkt über dem Netzanschluss befindet
sich eine Ein/Aus-Taste. Schalten Sie
den DMA2200 ein, bevor Sie mit der
Konfiguration des Geräts beginnen.
DMA2100
Dieses Gerät erhalten Sie zusammen mit
dem entsprechenden Stecker für Ihre
Region. Entfernen Sie ggf. den Stecker,
der mit dem Netzanschluss verbunden
ist. Sie können dann den Stecker
einsetzen, der in die Hauptsteckdose
passt.
Netzkabel-Anschluss
Netzkabel-Anschluss
DMA 2100-SteckerDMA 2100-Stecker
Installieren des Geräts
Schließen Sie das Netzkabel des Media
Center Extenders an den Netzanschluss
des DMA2200 (Rückseite) an. Verbinden
Sie dann das Kabel mit einer Steckdose.
HINWEIS: An der Vorderseite des Media Center Extenders befindet
sich ein Infrarot-Sensor. Stellen Sie sicher, dass die Vorderseite des
Extenders für die Fernbedienung frei zugänglich ist.
53
Page 54

Installieren des Geräts
54
Page 55

Konfigurieren des Geräts2�
Konfigurieren der Spracheinstellungen
Verwenden Sie die Pfeiltasten, um die
richtige Sprache für die Konfiguration
auszuwählen. Drücken Sie dann OK auf
der Fernbedienung, oder wählen Sie
Next (Weiter), um fortzufahren.
Fenster Menu Language (Menüsprache) Fenster Menu Language (Menüsprache)
Konfigurieren der Verbindungsanzeige
Je nach Fernseher und Einstellungen
wird automatisch eine HDMI-Verbindung
gefunden. Sie können für eine andere
Verbindung die Video-, Audio- und
Aspect Ratio auswählen, um die Qualität
der Wiedergabe zu optimieren.
Dabei sollte Ihre Wahl mit der von Ihnen
festgelegten Hardware-Verbindung
übereinstimmen. Drücken Sie OK auf der
Fernbedienung, oder wählen Sie Next
(Weiter), um fortzufahren.
Fenster Analog Connection (Analoge
Fenster Analog Connection (Analoge
Verbindung)
Verbindung)
Konfigurieren der Netzwerkeinstellungen
Wählen Sie die Option für die verdrahtete oder
Wireless-Netzwerkverbindung, und drücken Sie dann
OK auf der Fernbedienung, oder wählen Sie Next
(Weiter), um fortzufahren.
Wenn Sie einen drahtlosen Anschluss
verwenden, werden Sie dazu aufgefordert, die
gegenwärtige Sicherheitsstufe des WirelessNetzwerks zu bestätigen. Wenn ein Encryption
Key (Verschlüsselungsschlüssel) benötigt wird,
geben Sie mithilfe der Bildschirmtastatur den
Verschlüsselungsschlüssel des Netzwerks ein. Klicken
Sie dann auf Next (Weiter).
HINWEIS: Für die Wireless-Router-Einstellungen muss die bei
der Einrichtung des Extenders gewählte Sicherheitsstufe der
Sicherheitsstufe des Computers entsprechen.
55
Page 56

Konfigurieren des Geräts
Aufzeichnen des Setup-Schlüssels vom Gerät
Ein Setup-Schlüssel ist erforderlich,
1.
damit der Computer den Media
Center Extender erkennt. Der
achtstellige Setup-Schlüssel
wird auf dem Fernsehbildschirm
angezeigt (sowie auf der
Vorderseite des Media Center
Extenders, wenn es sich um das
Modell DMA2200 handelt).
Notieren Sie den Setup-Schlüssel,
2.
und übertragen Sie die Nummer
auf Ihren Windows Vista Premiumoder Ultimate-Computer. Sie
können die Nummer hier eintragen:
Fenster Setup Key (Setup-Schlüssel)Fenster Setup Key (Setup-Schlüssel)
--
56
Page 57

Konfiguration des Media Center
3�
HINWEIS: Führen Sie die folgenden Schritte der Reihe nach aus.
Legen Sie die CD-ROM ein, und führen Sie die Anweisungen in
den Einrichtungsfenstern aus.
Einlegen der CD-ROM
Legen Sie die im Lieferumfang des Media
Center Extenders enthaltene CD-ROM in
Ihren Media Center-Computer ein. Führen
Sie die auf dem Bildschirm angezeigten
Schritte aus.
Windows Vista Update
Wenn Sie eine kompatible Version von
Windows Vista verwenden, werden Sie dazu
aufgefordert, das System über Windows Vista
Update zu aktualisieren. Führen Sie die auf
dem Bildschirm angezeigten Schritte aus.
Einlegen der CD-ROMEinlegen der CD-ROM
Einrichtung
Wenn der Computer den Extender
automatisch erkannt hat, wird eine
Meldung angezeigt, dass der Extender
gefunden wurde.
Der Meldungstyp kann variieren. Klicken Sie
auf den Bildschirm, oder wählen Sie Yes (Ja)
aus, um die Einrichtung zu starten.
Wenn der Extender nicht automatisch erkannt wurde, fahren Sie mit den
folgenden Schritten fort.
Öffnen Sie Media Center auf dem
1.
Computer, und wählen Sie mit dem
Pfeil nach oben/unten die Option
Tasks (Aufgaben).
Wählen Sie mit dem Pfeil nach
A.
links die Option Settings
(Einstellungen).
Wählen Sie mit dem Pfeil nach
B.
oben/unten Extender, und
anschließend mit dem Pfeil nach
oben Add Extender (Extender
hinzufügen). Klicken Sie auf Enter
(Eingabe).
Meldung beim Erkennen des ExtendersMeldung beim Erkennen des Extenders
Add Extender (Extender hinzufügen)Add Extender (Extender hinzufügen)
57
Page 58

Konfiguration des Media Center
XXXX
XXXX
XXXX
XXXX
Das Fenster Welcome to Windows
2.
Media Center (Willkommen bei
Windows Media Center) wird
angezeigt. Klicken Sie auf Enter
(Eingabe), oder wählen Sie Next
(Weiter) aus, um fortzufahren.
Sie werden aufgefordert, den
3.
Setup-Schlüssel des Extenders
einzugeben, den Sie zuvor notiert
haben. Klicken Sie nach dem
Eingeben der Nummer auf Enter
(Eingabe), oder wählen Sie Next
(Weiter) aus, um fortzufahren.
Im nächsten Fenster werden Sie
4.
unter Umständen auf Firewalls
und die Änderung von ComputerEinstellungen hingewiesen. Klicken Sie
auf Enter (Eingabe), oder wählen Sie
Next (Weiter) aus, um fortzufahren.
Fenster Welcome (Willkommen)Fenster Welcome (Willkommen)
Fenster Extender Setup (Extender-
Fenster Extender Setup (ExtenderEinrichtung)
Einrichtung)
HINWEIS: Für die Firewalls von Drittanbietern ist unter
Umständen zusätzlich eine manuelle Konfiguration erforderlich.
Sie werden zudem gefragt, ob Sie
5.
auf dem Computer gespeicherte
Mediendateien freigeben möchten.
Alle Mediendateien (Bilder, Musik,
Videos) werden freigegeben. Im
Menü
Settings (Einstellungen)
können Sie diese Einstellung später
ändern. Klicken Sie auf Yes (Ja),
und klicken Sie auf Enter (Eingabe),
oder wählen Sie Next (Weiter) aus,
um fortzufahren.
58
Freigeben von DateienFreigeben von Dateien
Page 59

Sie werden unter Umständen auch
6.
dazu aufgefordert, Änderungen an
einigen Computer-Einstellungen
zuzulassen, darunter die
Aktivierung von Away Mode
(Abwesenheitsmodus). Away
Mode (Abwesenheitsmodus) ist
ein Stromsparmodus, in dem der
Extender auch arbeiten kann, wenn
Sie den Computer ausschalten.
Im letzten Schritt der Einrichtung
7.
wird der Computer für die
Verwendung mit dem Extender
konfiguriert. Wenn die
Konfiguration abgeschlossen ist,
wird die Meldung You are Done
(Fertig) angezeigt. Sie können
nun auf Ihrem Fernseher über
den Extender Musik abspielen,
Videos ansehen oder OnlineInhalte streamen (hierfür ist
möglicherweise ein Abonnement
erforderlich). Klicken Sie auf
Enter (Eingabe), oder wählen Sie
Finish (Fertig stellen) aus, um die
Einrichtung zu beenden.
Konfiguration des Media Center
Fenster You are Done (Fertig)Fenster You are Done (Fertig)
HINWEIS: Wenn die Fehlermeldung Extender did not
connect (Extender konnte nicht verbunden werden) angezeigt
wird, kehren Sie zu Abschnitt 3 zurück, und befolgen Sie die
Anweisungen ab Einlegen der CD-ROM.
59
Page 60

Konfiguration des Media Center
60
Page 61

Kontaktinformationen
Region Kontaktinformationen
Europa
Belgien www.linksys.com/BE/support
Dänemark www.linksys.com/DK/support
Deutschland www.linksys.com/DE/support
Finnland www.linksys.com/FI/support
Frankreich www.linksys.com/FR/support
Großbritannien www.linksys.com/UK/support
Irland www.linksys.com/IE/support
Italien www.linksys.com/IT/support
Niederlande www.linksys.com/NL/support
Norwegen www.linksys.com/NO/support
Österreich www.linksys.com/AT/support
Polen www.linksys.com/PL/support
Portugal www.linksys.com/PT/support
Russland www.linksys.com/RU/support
Schweden www.linksys.com/SE/support
Schweiz www.linksys.com/CH/support
Spanien www.linksys.com/ES/support
Tschechische Republik www.linksys.com/CZ/support
Türkei www.linksys.com/TR/support
Außerhalb von Europa
USA und Kanada www.linksys.com/support
Vereinigte Arabische Emirate www.linksys.com/AEen/support (nur Englisch)
7111910NC-DF
61
Page 62

Konformitätserklärung zur EU-Richtlinie 1999/5/EG und 2004/108/
EG (R&TTE-Richtlinie, auch FTEG-Richtlinie, EMC)
Български
[Bulgarian]
Česky
[Czech]:
Dansk
[Danish]:
Deutsch
[German]:
Eesti
[Estonian]:
English:
Español
[Spanish]:
Ελληνική
[Greek]:
Français
[French]:
Íslenska
[Icelandic]:
Italiano
[Italian]:
Latviski
[Latvian]:
Lietuvių
[Lithuanian]:
Nederlands
[Dutch]:
Malti
[Maltese]:
Magyar
[Hungarian]:
Norsk
[Norwegian]:
Polski
[Polish]:
Português
[Portuguese]:
Română
[Romanian]
Slovensko
[Slovenian]:
Това оборудване отговаря на съществените изисквания и приложими
клаузи на Директива 1999/5/ЕС.
Toto zařízení je v souladu se základními požadavky a ostatními odpovídajícími
ustanoveními Směrnice 1999/5/EC.
Dette udstyr er i overensstemmelse med de væsentlige krav og andre relevante
bestemmelser i Direktiv 1999/5/EF.
Dieses Gerät entspricht den grundlegenden Anforderungen und den weiteren
entsprechenden Vorgaben der Richtlinie 1999/5/EU.
See seade vastab direktiivi 1999/5/EÜ olulistele nõuetele ja teistele asjakohastele
sätetele.
This equipment is in compliance with the essential requirements and other
relevant provisions of Directive 1999/5/EC.
Este equipo cumple con los requisitos esenciales asi como con otras
disposiciones de la Directiva 1999/5/CE.
Αυτός ο εξοπλισµός είναι σε συµµόρφωση µε τις ουσιώδεις απαιτήσεις και άλλες
σχετικές διατάξεις της Οδηγίας 1999/5/EC.
Cet appareil est conforme aux exigences essentielles et aux autres dispositions
pertinentes de la Directive 1999/5/EC.
Þetta tæki er samkvæmt grunnkröfum og öðrum viðeigandi ákvæðum
Tilskipunar 1999/5/EC.
Questo apparato é conforme ai requisiti essenziali ed agli altri principi sanciti
dalla Direttiva 1999/5/CE.
Šī iekārta atbilst Direktīvas 1999/5/EK būtiskajām prasībām un citiem ar to
saistītajiem noteikumiem.
Šis įrenginys tenkina 1999/5/EB Direktyvos esminius reikalavimus ir kitas šios
direktyvos nuostatas.
Dit apparaat voldoet aan de essentiele eisen en andere van toepassing zijnde
bepalingen van de Richtlijn 1999/5/EC.
Dan l-apparat huwa konformi mal-ħtiġiet essenzjali u l-provedimenti l-oħra
rilevanti tad-Direttiva 1999/5/EC.
Ez a készülék teljesíti az alapvető követelményeket és más 1999/5/EK irányelvben
meghatározott vonatkozó rendelkezéseket.
Dette utstyret er i samsvar med de grunnleggende krav og andre relevante
bestemmelser i EU-direktiv 1999/5/EF.
Urządzenie jest zgodne z ogólnymi wymaganiami oraz szczególnymi warunkami
określonymi Dyrektywą UE: 1999/5/EC.
Este equipamento está em conformidade com os requisitos essenciais e outras
provisões relevantes da Directiva 1999/5/EC.
Acest echipament este in conformitate cu cerintele esentiale si cu alte prevederi
relevante ale Directivei 1999/5/EC.
Ta naprava je skladna z bistvenimi zahtevami in ostalimi relevantnimi pogoji
Direktive 1999/5/EC.
Page 63

Slovensky
[Slovak]:
Suomi
[Finnish]:
Svenska
[Swedish]:
Weitere Informationen zur Konformitätserklärung finden Sie im Benutzerhandbuch.†
Toto zariadenie je v zhode so základnými požiadavkami a inými príslušnými
nariadeniami direktív: 1999/5/EC.
Tämä laite täyttää direktiivin 1999/5/EY olennaiset vaatimukset ja on siinä
asetettujen muiden laitetta koskevien määräysten mukainen.
Denna utrustning är i överensstämmelse med de väsentliga kraven och andra
relevanta bestämmelser i Direktiv 1999/5/EC.
Page 64

Weitere Informationen sowie Anleitungen zur
Fehlerbehebung finden Sie im Benutzerhandbuch auf der
CD-ROM. Zusätzlichen Support erhalten Sie im Internet.
Website
http://www.linksys.com/international
Linksys ist eine eingetragene Marke bzw. eine Marke von Cisco Systems, Inc. und/oder deren
Zweigunternehmen in den USA und anderen Ländern. Copyright © 2007 Cisco Systems, Inc. Alle
Rechte vorbehalten. Andere Handelsmarken und Produktnamen sind Mar ken bzw. eingetragene
Marken der jeweiligen Inhaber.
FTP-Site
ftp://ftp.linksys.com
www.linksys.com
710100080
Page 65

GUÍA DE INSTALACIÓN RÁPIDA
Media Center Extender
Modelos: DMA2100, DMA2200 (ES)
DMA2100 DMA2200
Contenido del paquete
Media Center Extender
•
Mando a distancia con 2 pilas AAA
•
Cable de alimentación y adaptador de conexión - DMA2100
•
Cable de alimentación específico para su región - DMA2200
•
Antenas (Dos para DMA 2100 y tres para DMA 2200)
•
Adaptador de euroconector (DMA2100)
•
Cable euroconector (DMA2200)
•
Un cable de vídeo por componentes
•
Un cable de vídeo compuesto
•
Un cable de audio RCA estéreo
•
Un cable Ethernet
•
Guía de instalación rápida
•
CD-ROM con actualizaciones de software para el sistema operativo Windows Vista™ y
•
guía del usuario
Page 66

Page 67

Contenido
Instalación del dispositivo . . . . . . . . . . . . . . . . . . . . . . . . . . . . 69
Instalación de las pilas . . . . . . . . . . . . . . . . . . . . . . . . . . . . . . . . . . .69
Conexión de red . . . . . . . . . . . . . . . . . . . . . . . . . . . . . . . . . . . . . . . . .69
Conexión de la pantalla . . . . . . . . . . . . . . . . . . . . . . . . . . . . . . . . . .70
Alimentación del dispositivo . . . . . . . . . . . . . . . . . . . . . . . . . . . . .73
Configuración del dispositivo . . . . . . . . . . . . . . . . . . . . . . . . . 75
Configuración de los ajustes de idioma . . . . . . . . . . . . . . . . . . .75
Configuración de la conexión de pantalla . . . . . . . . . . . . . . . . .75
Configuración de los parámetros de red . . . . . . . . . . . . . . . . . .75
Grabación de la clave de configuración del dispositivo . . . .76
Configuración de Media Center . . . . . . . . . . . . . . . . . . . . . . . 77
Inserción del CD-ROM . . . . . . . . . . . . . . . . . . . . . . . . . . . . . . . . . . . .77
Actualización de Windows Vista . . . . . . . . . . . . . . . . . . . . . . . . . .77
Configuración . . . . . . . . . . . . . . . . . . . . . . . . . . . . . . . . . . . . . . . . . . . .77
Información de contacto . . . . . . . . . . . . . . . . . . . . . . . . . . . . . 81
67
Page 68

Audio estéreo RCA
Vídeo compuesto
Ethernet
Adaptador de
euroconector (DMA2100)
Cable euroconector
(DMA2200)
Vídeo por
componentes
Audio estéreo RCA
Vídeo compuesto
Ethernet
Adaptador de
euroconector (DMA2100)
Cable euroconector
(DMA2200)
Vídeo por
componentes
Antes de empezar
Asegúrese de que dispone de lo siguiente:
Opciones de vídeo de alta definición:
Cable de vídeo por componentes (incluido), o bien,
•
Cable HDMI (no incluido)
•
Opciones de vídeo de definición estándar:
Cable SCART (DMA2200 incluido)
•
Adaptador SCART (DMA2100 incluido)
•
Cable de vídeo por componentes (incluido), o bien
•
Cable de vídeo compuesto (incluido), o bien
•
Cable de S-Video (no incluido)
•
Audio:
Cable RCA estéreo analógico (incluido), o bien
•
Cable coaxial digital SPDIF RCA (no incluido)
•
Cable Toslink digital SPDIF (no incluido -
•
sólo para el modelo DMA2200)
Red:
•
•
68
NOTA: Si utiliza un cable HDMI o
un euroconector, no se necesitan
cables de audio adicionales.
Cable Ethernet (incluido)
Red inalámbrica (si se conecta de
forma inalámbrica)
Cables incluidos
NOTA: Para obtener más información, consulte la guía del usuario
del CD-ROM. Dedique algún tiempo a consultar la información
referente a la seguridad, garantía y licencia de software de
Linksys. Podrá encontrar esta información en el CD-ROM.
Page 69

DMA2100 DMA2200
HDMI, the HD
MI logo is a trademar
k or registered
trademarks of HDMI Lice
nsing, LLC.
Tested To Comply
With FCC Standards
Contains FCC:N89-WM821-LS
Contains FC
C:N89-WM821-LS
FOR HOME OFFICE USE
Default
Reset /
Default
HDMI, the HDMI logo is a trademark or registere
Tested To Comp
ly
With FCC Standards
C
ontains FCC:N89-WM821-LS
FOR HOME OFFICE
USE
Instalación del dispositivo1�
Instalación de las pilas
Inserte las dos (2) pilas AAA en el mando
a distancia, asegurándose de colocar
los polos positivo (+) y negativo (-) tal y
como se muestra en la imagen.
- +
NOTA: Consulte la guía del
usuario del CD-ROM para
obtener más información acerca
de las características y funciones
del mando a distancia,
incluida la programación de
la memorización de códigos
de otros mandos originales.
Conexión de red
Conexión inalámbrica al ordenador
Si utiliza una conexión con cables, vaya
al siguiente paso.
Si va a conectarse de forma inalámbrica,
tiene que colocar las antenas. El modelo
DMA2100 dispone de dos (2) antenas,
y el DMA2200 de tres (3). Las antenas
se deben enroscar en el sentido de las
agujas del reloj. Sujételas bien hasta que
estén colocadas en su sitio de forma
segura. Las antenas deben estar en
posición vertical cuando el dispositivo
Extender se encuentre en uso.
+ _
Colocación de las pilas del mando a distanciaColocación de las pilas del mando a distancia
Conexión de las antenas
Conexión de las antenas
69
Page 70

Instalación del dispositivo
DMA2100 DMA2200
S-VIDEO
RIGHT
DIGITAL
ADUIO
ETHERNET
10/100
USB
LEFT ANALOG A
UDIO
s-PDIF
DIGITAL
ADUIO
ETHERNET
10/100
ANALOG AUDIO
USB
Pr
Pb
Left
Right
DMA2100 DMA2200
S-VIDEO
RIGHT
DIGITAL
ADUIO
ETHERNET
10/100
USB
LEFT ANALOG A
UDIO
s-PDIF
DIGITAL
ADUIO
ETHERNET
10/100
ANALOG AUDIO
USB
Pr
Pb
Left
Right
DMA2100 DMA2200
Reset /
Default
LLC.
S-VIDEO
VIDEO
Pb
Pr
Y
ndards
Contains FCC:N89-WM821-LS
FOR HOME OF
FICE USE
COMPONENT
VIDEO
MI Licensing, LLC.
DIGITAL
ADUIO
ETHERNET
10/100
ANALOG AUDIO
USE
S-VIDEO
COMPOSITE
Pr
Pb
Left
Right
Y
COMPONENT
VIDEO
DMA2100 DMA2200
Reset /
Default
LLC.
S-VIDEO
VIDEO
Pb
Pr
Y
ndards
Contains FCC:N89-WM821-LS
FOR HOME OF
FICE USE
COMPONENT
VIDEO
MI Licensing, LLC.
DIGITAL
ADUIO
ETHERNET
10/100
ANALOG AUDIO
USE
S-VIDEO
COMPOSITE
Pr
Pb
Left
Right
Y
COMPONENT
VIDEO
DMA2100 DMA2200
HDMI, the HDMI logo is a trademar
k or registered trademarks of HDMI Licensing, LLC.
Tested To Comply
With FCC Standards
Contains
FCC:N89-WM821-LS
Contains
FCC:N89-WM821-LS
FOR HOME OFFICE USE
Default
Reset /
Default
HDMI, the HDMI logo is a trademark or registered trademarks o
f HDMI Licensing, LLC.
Pb
Pr
Y
Tested To Comply
With FCC Standards
Contains FCC:N89-WM82
1-LS
FOR HOME OFFICE USE
COMPONENT
VIDEO
Conexión con cables al ordenador
Conecte el cable Ethernet desde el panel
posterior de Media Center Extender al
panel posterior del router de red.
Conexión de la pantalla
NOTA: Antes de realizar cualquiera de las conexiones siguientes,
apague el televisor.
Conexiones de alta definición (HD)
Vídeo por componentes
Conecte el cable de vídeo por
componentes incluido (rojo, verde, azul)
desde el panel posterior de Media Center
Extender hasta los puertos de conexión
de vídeo por componentes disponibles
en el televisor.
Conexión Ethernet
Conexión Ethernet
O
HDMI (vídeo y audio)
Conecte un cable HDMI (no incluido)
desde el panel posterior de Media Center
Extender hasta el puerto de conexión
HDMI disponible en el televisor.
70
Conexión de vídeo por componentes
Conexión de vídeo por componentes
Conexión HDMI
Conexión HDMI
Page 71

Conexiones de definición estándar (SD)
FOR HOME OFFICE USE
Tested To Comply
With FCC Standards
S-Video
SCART IN/OUT
Composite
RESET
Pr
VIDEO OUT
FOR HOME OFFICE USE
Tested To Comply
With FCC Standards
S-Video
SCART IN/OUT
Composite
RESET
Pr
VIDEO OUT
~
~
~
S-VIDEO
VIDEO
RIGHT
DIGITAL
ADUIO
ETHERNET
LEFT ANALOG AUDIO
s-PDIF
~
~
~
S-VIDEO
VIDEO
RIGHT
DIGITAL
ADUIO
ETHERNET
LEFT ANALOG AUDIO
s-PDIF
DMA2100 DMA2200
Reset /
Default
LLC.
S-VIDEO
VIDEO
Pb
Pr
Y
ndards
Contains FCC:N89-WM821-LS
FOR HOME OFFICE USE
COMPONENT
VIDEO
MI Licensing, LLC.
DIGITAL
ADUIO
ETHERNET
10/100
ANALOG AUDIO
USE
S-VIDEO
COMPOSITE
Pr
Pb
Left
Right
Y
COMPONENT
VIDEO
DMA2100 DMA2200
Reset /
Default
LLC.
S-VIDEO
VIDEO
Pb
Pr
Y
ndards
Contains FCC:N89-WM821-LS
FOR HOME OFFICE USE
COMPONENT
VIDEO
MI Licensing, LLC.
DIGITAL
ADUIO
ETHERNET
10/100
ANALOG AUDIO
USE
S-VIDEO
COMPOSITE
Pr
Pb
Left
Right
Y
COMPONENT
VIDEO
DMA2100 DMA2200
f
HDMI Licensing, LL
C
.
S-VIDEO
VIDEO
Pb
Pr
Y
RIGHT
DIGITAL
ADUIO
ETHERNET
LEFT ANALOG AUDIO
s-PDIF
y
-
WM82
1-LS
E
COMPONENT
VIDEO
istered trademarks of
HDMI Licensing, LLC.
Tested To Comply
With FCC Standards
Contains FCC:N89-WM
821-LS
Contains FCC:N89-WM821-LS
FOR HOME OF
FICE USE
S-VIDEO
COMPOSITE
Y
Reset /
Default
, L
LC.
S-VIDEO
VIDEO
Pb
Pr
Y
RIGHT
DIGITAL
ADUIO
LEFT ANALOG AUDIO
s-PDIF
Tested To Comply
With FCC Standards
Contains FCC:N89-WM821-LS
FOR HOME OFFICE USE
COMPONENT
VIDEO
istered trademarks of HD
MI Licensing, LLC.
Tested To Comply
With FCC Standards
Contains FCC:N89-WM821-LS
Contains FCC:N89-WM821-LS
FOR HOME OFFICE US
E
S-VIDEO
COMPOSITE
Pr
Pb
Y
COMPONENT
VIDEO
DMA2100 DMA2200
Euroconector (vídeo y audio)
DMA2200
Conecte el cable euroconector incluido
del panel posterior de Media Center
Extender hasta el puerto de conexión
SCART del televisor.
DMA2100
Conecte los cables de audio y vídeo
compuesto (incluidos) desde Media
Center Extender hasta los puertos
compuestos del adaptador de
euroconector.
Vídeo
Conecte un tipo de cable de vídeo analógico
estándar desde el panel posterior de Media
Center Extender hasta el puerto de conexión
de vídeo del televisor.
Puede conectar el cable de vídeo por
componentes incluido (rojo, verde, azul),
el cable de vídeo compuesto (incluido) o
un cable de S-Video (no incluido).
Instalación del dispositivo
Conexión de cable euroconector (DMA2200)
Conexión de cable euroconector (DMA2200)
Conexión de adaptador de euroconector
Conexión de adaptador de euroconector
(DMA2100)
(DMA2100)
Conexión de vídeo por componentes
Conexión de vídeo por componentes
Conexión de vídeo compuesto
Conexión de vídeo compuesto
Conexión S-Video
Conexión S-Video
71
Page 72

Instalación del dispositivo
DMA2100 DMA2200
S-VIDEO
VIDEO
Pb
Pr
Y
RIGHT
DIGITAL
ADUIO
LEFT ANALOG AUDIO
s-PDIF
COMPONENT
VIDEO
censing, LLC.
DIGITAL
ADUIO
ETHERNET
10/100
ANALOG AUDIO
S-VIDEO
COMPOSITE
Pr
Pb
Left
Right
Y
COMPONENT
VIDEO
DMA2100 DMA2200
S-VIDEO
VIDEO
Pb
Pr
Y
RIGHT
DIGITAL
ADUIO
LEFT ANALOG AUDIO
s-PDIF
COMPONENT
VIDEO
censing, LLC.
DIGITAL
ADUIO
ETHERNET
10/100
ANALOG AUDIO
S-VIDEO
COMPOSITE
Pr
Pb
Left
Right
Y
COMPONENT
VIDEO
DIGITAL
ADUIO
ETHERNET
10/100
ANALOG AUDIO
USB
Pr
Pb
Left
Right
Y
COMPONENT
VIDEO
DIGITAL
ADUIO
ETHERNET
10/100
ANALOG AUDIO
USB
Pr
Pb
Left
Right
Y
COMPONENT
VIDEO
DMA2100 DMA2200
S-VIDEO
VIDEO
RIGHT
DIGITAL
ADUIO
ETHERNET
10/100
USB
LEFT ANALOG AUDIO
s-PDIF
DIGITAL
ADUIO
ETHERNET
10/100
ANALOG AUDIO
S-VIDEO
COMPOSITE
USB
Pr
Pb
Left
Right
Y
COMPONENT
VIDEO
DMA2100 DMA2200
S-VIDEO
VIDEO
RIGHT
DIGITAL
ADUIO
ETHERNET
10/100
USB
LEFT ANALOG AUDIO
s-PDIF
DIGITAL
ADUIO
ETHERNET
10/100
ANALOG AUDIO
S-VIDEO
COMPOSITE
USB
Pr
Pb
Left
Right
Y
COMPONENT
VIDEO
Audio
Conecte un tipo de cable de audio desde
el panel posterior de Media Center
Extender hasta el puerto de conexión
de audio del televisor o del receptor
AV. Puede conectar los cables de audio
estéreo RCA incluidos (rojo, blanco) o un
cable de audio digital (coaxial RCA, no
incluido) o, para el modelo DMA2200,
un cable de audio óptico (Toslink, no
incluido).
Conexión de audio digital (coaxial RCA)
Conexión de audio digital (coaxial RCA)
Conexión de audio estéreo RCA
Conexión de audio estéreo RCA
Conexión de audio digital (Toslink óptico)
Conexión de audio digital (Toslink óptico)
72
Page 73

Alimentación del dispositivo
DMA2100 DMA2200
Reset /
Default
HDMI, the HDMI logo is a trademark or registered
Tested To Com
ply
With FC
C Standards
Conta
ins FCC:N89-WM821
-LS
FOR HOME OFFICE USE
FOR HOME OFFICE USE
Tested To Comply
With FCC Standards
SCART IN/OUT
RESET
DMA2100 DMA2200
Reset /
Default
HDMI, the HDMI logo is a trademark or registered
Tested To Com
ply
With FC
C Standards
Conta
ins FCC:N89-WM821
-LS
FOR HOME OFFICE USE
FOR HOME OFFICE USE
Tested To Comply
With FCC Standards
SCART IN/OUT
RESET
NOTA: Encienda el televisor. Cuando inicie el dispositivo Extender
por primera vez, puede tardar hasta un (1) minuto.
Encendido de Media Center Extender
DMA2200
Enchufe el conector del cable de
alimentación de Media Center Extender
al puerto de alimentación de la unidad
situado en el panel posterior. Conecte el
cable a una toma de corriente.
También hay un switch de encendido/
apagado justo encima del puerto de
Conexión del cable de alimentación
alimentación. Encienda la unidad antes
de iniciar la configuración del dispositivo.
DMA2100
Esta unidad se entrega con la clavija de
alimentación específica de su región.
Si fuera necesario, quite la clavija del
conector del puerto de alimentación. A
continuación, puede conectar la clavija
de alimentación que corresponda a la
toma de corriente principal.
Si está conectado de forma inalámbrica, se le
solicitará que confirme el nivel de seguridad
de la red inalámbrica actual. Si se necesita una
clave de encriptación, introduzca la clave de
encriptación de la red mediante el teclado en
pantalla y haga clic en Next (Siguiente).
Conexión del cable de alimentación
Clavijas de alimentación del DMA 2100Clavijas de alimentación del DMA 2100
Instalación del dispositivo
NOTA: Hay un sensor de infrarrojos en la parte frontal de Media
Center Extender. Asegúrese de que no haya obstáculos entre el
panel frontal y el mando a distancia.
73
Page 74

Instalación del dispositivo
74
Page 75

Configuración del dispositivo2�
Configuración de los ajustes de idioma
Utilice las flechas de dirección para
resaltar las opciones de idioma
correspondientes para su configuración.
Pulse OK (Aceptar) en el mando a
distancia, o seleccione Next (Siguiente)
para continuar.
Pantalla de idioma de menú Pantalla de idioma de menú
Configuración de la conexión de pantalla
La conexión HDMI debería detectarse
automáticamente, dependiendo del
televisor y de la configuración. Para
otras conexiones puede elegir entre
las distintas opciones de vídeo, audio
y relación de aspecto para optimizar la
calidad de la reproducción.
Esta selección debe coincidir con la
conexión de hardware real que haya
realizado. Pulse OK (Aceptar) en el
mando a distancia, o seleccione Next
(Siguiente) para continuar.
Pantalla de conexión analógicaPantalla de conexión analógica
Configuración de los parámetros de red
Seleccione el tipo de conexión de red que esté
utilizando (con cables o inalámbrica) y pulse OK
(Aceptar) en el mando a distancia o seleccione
Next (Siguiente) para continuar.
Si está conectado de forma inalámbrica, se le
solicitará que confirme el nivel de seguridad
de la red inalámbrica actual. Con el mando a
distancia, seleccione Encryption Key (Clave de
encriptación) en la pantalla e introduzca la clave
de encriptación de la red mediante el teclado en
pantalla. Después haga clic en Next (Siguiente).
NOTA: En los parámetros del router inalámbrico, el nivel de
seguridad elegido en la pantalla de configuración del dispositivo
Extender debe coincidir con el nivel de seguridad del ordenador.
75
Page 76

Configuración del dispositivo
Grabación de la clave de configuración del dispositivo
Para que el ordenador reconozca
1.
Media Center Extender, necesita
una clave de configuración.
La clave de configuración de 8
dígitos aparecerá en la pantalla del
televisor (y en el panel frontal de
Media Center Extender si se trata
del modelo DMA2200).
Anote esta clave de configuración
2.
para utilizarla en el ordenador con
Windows Vista Premium o Ultimate.
Puede anotar el número aquí:
Pantalla de clave de configuraciónPantalla de clave de configuración
--
76
Page 77

Configuración de Media Center3�
NOTA: Siga estos pasos en orden. Inserte el CD-ROM y siga los
pasos que aparecen en las pantallas de configuración.
Inserción del CD-ROM
Inserte el CD-ROM proporcionado con
Media Center Extender en su ordenador
Media Center. Siga los pasos que se
muestran en la pantalla.
Actualización de Windows Vista
Si utiliza una versión compatible de
Windows Vista, se le solicitará actualizar
el sistema a través de Windows Vista
Update. Siga los pasos que se muestran
en la pantalla.
Inserción del CD-ROMInserción del CD-ROM
Configuración
Si el ordenador ha detectado
automáticamente el dispositivo Extender,
aparecerá un mensaje indicando que se
ha encontrado dicho dispositivo.
El tipo de mensaje mostrado puede variar.
Haga clic en la pantalla o seleccione Yes
(Sí) para iniciar la configuración.
Si el dispositivo Extender no se ha detectado automáticamente, siga estos
pasos.
Abra ”Media Center” en el ordenador
1.
y pulse la flecha hacia arriba o hacia
abajo para seleccionar Tasks (Tareas).
Pulse la flecha izquierda
A.
para seleccionar settings
(Parámetros).
Utilice la flecha hacia arriba o
B.
hacia abajo para resaltar Extender
y después pulse la flecha hacia
arriba para resaltar add extender
(Agregar Extender). Haga clic en
Enter (Acceder).
Mensaje de Media Extender detectadoMensaje de Media Extender detectado
Agregar ExtenderAgregar Extender
77
Page 78

Configuración de Media Center
XXXX
XXXX
XXXX
XXXX
Verá la pantalla Welcome to
2.
Windows Media Center (Bienvenido
a Windows Media Center). Haga clic
en Enter (Acceder) o seleccione Next
(Siguiente) para continuar.
Se le solicitará que introduzca
3.
la clave de configuración del
dispositivo Extender. Después de
introducir el número, haga clic en
Enter (Acceder) o seleccione Next
(Siguiente) para continuar.
Posiblemente la siguiente pantalla
4.
le pregunte por los firewalls o
le pida cambiar los parámetros
del ordenador. Haga clic en Enter
(Acceder) o seleccione Next
(Siguiente) para continuar.
Pantalla de bienvenidaPantalla de bienvenida
Pantalla de configuración del dispositivo
Pantalla de configuración del dispositivo
Extender
Extender
NOTA: Es posible que los firewalls de terceros necesiten una
configuración manual adicional.
También se le preguntará si
5.
desea que los archivos de medios
almacenados en el ordenador estén
disponibles. Se compartirán todos
los archivos de medios (imágenes,
música, vídeo). Puede modificar
esto más adelante en el menú de
configuración. Haga clic en
en Enter (Acceder) o seleccione Next
(Siguiente) para continuar.
78
Yes (Sí) y
Intercambio de archivosIntercambio de archivos
Page 79

También se le puede solicitar
6.
que permita realizar cambios
en algunos parámetros del
ordenador, incluido el modo
de ausencia. El modo de
ausencia es un modo de ahorro
de energía que permite al
dispositivo Extender continuar
funcionando aunque apague el
ordenador.
El último paso configura el
7.
ordenador para funcionar con
el dispositivo Extender. Cuando
haya finalizado la configuración,
aparecerá el mensaje “You are
Done” (Finalizado). Ahora puede
reproducir música, ver vídeos o
transmitir contenidos en línea (se
necesita suscripción) en el televisor
a través del dispositivo Extender.
Haga clic en Enter (Acceder) o
seleccione Finish (Finalizar) para
salir de la configuración.
Configuración de Media Center
Pantalla de finalizaciónPantalla de finalización
NOTA: Si aparece el mensaje de error “Extender did not connect”
(Extender no conectado), vuelva a la sección 3 y siga los pasos
indicados, comenzando por Inserción del CD-ROM.
79
Page 80

Configuración de Media Center
80
Page 81

Información de contacto
Región Contacto
Europa
Alemania www.linksys.com/DE/support
Austria www.linksys.com/AT/support
Bélgica www.linksys.com/BE/support
Dinamarca www.linksys.com/DK/support
España www.linksys.com/ES/support
Finlandia www.linksys.com/FI/support
Francia www.linksys.com/FR/support
Irlanda www.linksys.com/IE/support
Italia www.linksys.com/IT/support
Noruega www.linksys.com/NO/support
Países Bajos www.linksys.com/NL/support
Polonia www.linksys.com/PL/support
Portugal www.linksys.com/PT/support
Reino Unido www.linksys.com/UK/support
República Checa www.linksys.com/CZ/support
Rusia www.linksys.com/RU/support
Suecia www.linksys.com/SE/support
Suiza www.linksys.com/CH/support
Turquía www.linksys.com/TR/support
Fuera de Europa
EAU www.linksys.com/AEen/support (sólo en inglés)
EE.UU. y Canadá www.linksys.com/support
7111910NC-DF
81
Page 82

Declaración de conformidad con la directiva de la UE 1999/5/CE
y 2004/108/CE (directiva RTTE y EMC)
Български
[Bulgarian]
Česky
[Czech]:
Dansk
[Danish]:
Deutsch
[German]:
Eesti
[Estonian]:
English:
Español
[Spanish]:
Ελληνική
[Greek]:
Français
[French]:
Íslenska
[Icelandic]:
Italiano
[Italian]:
Latviski
[Latvian]:
Lietuvių
[Lithuanian]:
Nederlands
[Dutch]:
Malti
[Maltese]:
Magyar
[Hungarian]:
Norsk
[Norwegian]:
Polski
[Polish]:
Português
[Portuguese]:
Română
[Romanian]
Slovensko
[Slovenian]:
Slovensky
[Slovak]:
Това оборудване отговаря на съществените изисквания и приложими
клаузи на Директива 1999/5/ЕС.
Toto zařízení je v souladu se základními požadavky a ostatními odpovídajícími
ustanoveními Směrnice 1999/5/EC.
Dette udstyr er i overensstemmelse med de væsentlige krav og andre relevante
bestemmelser i Direktiv 1999/5/EF.
Dieses Gerät entspricht den grundlegenden Anforderungen und den weiteren
entsprechenden Vorgaben der Richtlinie 1999/5/EU.
See seade vastab direktiivi 1999/5/EÜ olulistele nõuetele ja teistele asjakohastele
sätetele.
This equipment is in compliance with the essential requirements and other
relevant provisions of Directive 1999/5/EC.
Este equipo cumple con los requisitos esenciales asi como con otras
disposiciones de la Directiva 1999/5/CE.
Αυτός ο εξοπλισµός είναι σε συµµόρφωση µε τις ουσιώδεις απαιτήσεις και άλλες
σχετικές διατάξεις της Οδηγίας 1999/5/EC.
Cet appareil est conforme aux exigences essentielles et aux autres dispositions
pertinentes de la Directive 1999/5/EC.
Þetta tæki er samkvæmt grunnkröfum og öðrum viðeigandi ákvæðum
Tilskipunar 1999/5/EC.
Questo apparato é conforme ai requisiti essenziali ed agli altri principi sanciti
dalla Direttiva 1999/5/CE.
Šī iekārta atbilst Direktīvas 1999/5/EK būtiskajām prasībām un citiem ar to
saistītajiem noteikumiem.
Šis įrenginys tenkina 1999/5/EB Direktyvos esminius reikalavimus ir kitas šios
direktyvos nuostatas.
Dit apparaat voldoet aan de essentiele eisen en andere van toepassing zijnde
bepalingen van de Richtlijn 1999/5/EC.
Dan l-apparat huwa konformi mal-ħtiġiet essenzjali u l-provedimenti l-oħra
rilevanti tad-Direttiva 1999/5/EC.
Ez a készülék teljesíti az alapvető követelményeket és más 1999/5/EK irányelvben
meghatározott vonatkozó rendelkezéseket.
Dette utstyret er i samsvar med de grunnleggende krav og andre relevante
bestemmelser i EU-direktiv 1999/5/EF.
Urządzenie jest zgodne z ogólnymi wymaganiami oraz szczególnymi warunkami
określonymi Dyrektywą UE: 1999/5/EC.
Este equipamento está em conformidade com os requisitos essenciais e outras
provisões relevantes da Directiva 1999/5/EC.
Acest echipament este in conformitate cu cerintele esentiale si cu alte prevederi
relevante ale Directivei 1999/5/EC.
Ta naprava je skladna z bistvenimi zahtevami in ostalimi relevantnimi pogoji
Direktive 1999/5/EC.
Toto zariadenie je v zhode so základnými požiadavkami a inými príslušnými
nariadeniami direktív: 1999/5/EC.
Page 83

Suomi
[Finnish]:
Svenska
[Swedish]:
Tämä laite täyttää direktiivin 1999/5/EY olennaiset vaatimukset ja on siinä
asetettujen muiden laitetta koskevien määräysten mukainen.
Denna utrustning är i överensstämmelse med de väsentliga kraven och andra
relevanta bestämmelser i Direktiv 1999/5/EC.
Consulte la Guía del usuario para ver la declaración de conformidad completa
Page 84

Para obtener información adicional o ayuda para la
resolución de problemas, consulte la guía del usuario que se
incluye en el CD-ROM. También puede obtener asistencia en
línea.
Sitio Web
http://www.linksys.com/international
Linksys es una marca registrada o marca comercial de Cisco Systems, Inc. o sus filiales en EE.UU. y otros
países. Copyright © 2007 Cisco Systems, Inc.Todos los derechos reservados. Otras marcas y nombres
de productos son marcas comerciales o marcas registradas de sus respectivos propietarios.
Sitio FTP
ftp://ftp.linksys.com
www.linksys.es
710100080
Page 85

GUIDE D’INSTALLATION RAPIDE
Media Center Extender
Modèles : DMA2100, DMA2200 (FR)
DMA2100 DMA2200
Contenu de l’emballage
Media Center Extender
•
Télécommande avec deux piles AAA
•
Cordon d’alimentation et adaptateurs pour prises d’alimentation - DMA2100
•
Cordon d’alimentation pour votre pays - DMA2200
•
Antennes (deux pour le DMA 2100, trois pour le DMA 2200)
•
Adaptateur Péritel (DMA2100)
•
Câble Péritel (DMA2200)
•
Un câble vidéo composante
•
Un câble vidéo composite
•
Un câble audio stéréo RCA
•
Un câble Ethernet
•
Guide d’installation rapide
•
CD-ROM contenant les mises à jour du système d’exploitation Windows Vista™ et le guide
•
de l’utilisateur
Page 86

Page 87

Table des matières
Installation du périphérique . . . . . . . . . . . . . . . . . . . . . . . . . . 89
Installation des piles . . . . . . . . . . . . . . . . . . . . . . . . . . . . . . . . . . . . .89
Connexion réseau . . . . . . . . . . . . . . . . . . . . . . . . . . . . . . . . . . . . . . . .89
Connexion à votre téléviseur . . . . . . . . . . . . . . . . . . . . . . . . . . . . .90
Alimentation du périphérique . . . . . . . . . . . . . . . . . . . . . . . . . . . .93
Configuration du périphérique . . . . . . . . . . . . . . . . . . . . . . . 95
Configuration des paramètres de langue . . . . . . . . . . . . . . . . . .95
Configuration de la connexion de l’écran . . . . . . . . . . . . . . . . . .95
Configuration des paramètres réseau . . . . . . . . . . . . . . . . . . . . .95
Enregistrement de la clé d’installation depuis le
périphérique . . . . . . . . . . . . . . . . . . . . . . . . . . . . . . . . . . . . . . . . . . . .96
Configuration du Media Center . . . . . . . . . . . . . . . . . . . . . . 97
Insertion du CD-ROM . . . . . . . . . . . . . . . . . . . . . . . . . . . . . . . . . . . .97
Mise à jour Windows Vista . . . . . . . . . . . . . . . . . . . . . . . . . . . . . . . .97
Configuration . . . . . . . . . . . . . . . . . . . . . . . . . . . . . . . . . . . . . . . . . . . .97
Contacts. . . . . . . . . . . . . . . . . . . . . . . . . . . . . . . . . . . . . . . . . . . . 101
87
Page 88

Audio stéréo RCA
Vidéo composite
Ethernet
Adaptateur Péritel (DMA2100)
Câble Péritel (DMA2200)
Vidéo composante
Audio stéréo RCA
Vidéo composite
Ethernet
Adaptateur Péritel (DMA2100)
Câble Péritel (DMA2200)
Vidéo composante
Avant de commencer
Vérifiez que vous disposez des éléments suivants :
Options vidéo en haute définition :
Câble vidéo composante (fourni) ou
•
Câble HDMI (non fourni)
•
Options vidéo en définition standard :
Câble Péritel (DMA2200, fourni)
•
Adaptateur Péritel (DMA2100, fourni)
•
Câble vidéo composante (fourni) ou
•
Câble vidéo composite (fourni) ou
•
Câble S-Vidéo (non fourni)
•
Audio :
•
•
•
Câble stéréo RCA analogique (fourni) ou
Câble RCA coaxial SPDIF numérique (non fourni)
Câble SPDIF Toslink numérique (non fourni, pour
DMA2200 uniquement)
Réseau :
•
•
88
REMARQUE : Si vous
utilisez un câble HDMI ou
Péritel, aucun câble audio
supplémentaire n’est requis.
Câble Ethernet (fourni)
Réseau sans fil (si connexion sans fil)
Câbles fournis
REMARQUE : Pour plus d’informations, consultez le guide de
l’utilisateur fourni sur le CD-ROM. Prenez le temps de lire les
informations relatives à la sécurité, à la garantie et aux licences
logicielles de Linksys, également disponibles sur le CD-ROM.
Page 89

DMA2100 DMA2200
HDMI, the HD
MI logo is a trademar
k or registered
trademarks of HDMI Lice
nsing, LLC.
Tested To Comply
With FCC Standards
Contains FCC:N89-WM821-LS
Contains FC
C:N89-WM821-LS
FOR HOME OFFICE USE
Default
Reset /
Default
HDMI, the HDMI logo is a trademark or registere
Tested To Comp
ly
With FCC Standards
C
ontains FCC:N89-WM821-LS
FOR HOME OFFICE
USE
Installation du périphérique1�
Installation des piles
Installez les deux (2) piles AAA dans la
télécommande, en veillant à respecter
les polarités (positive (+) ou négative (-)),
comme indiqué ici.
- +
REMARQUE : Pour plus
d’informations sur les fonctions
et options de la télécommande,
notamment comment
programmer la télécommande
intelligente, consultez
le guide de l’utilisateur
fourni sur le CD-ROM.
Connexion réseau
Pour une connexion sans fil à votre
ordinateur
Si vous utilisez une connexion câblée,
passez à l’étape suivante.
Si vous utilisez une connexion sans fil,
vous devez fixer les antennes. Il existe
deux (2) antennes pour le DMA2100 et
trois (3) pour le DMA2200. Les antennes
doivent être vissées dans le sens des
aiguilles d’une montre. Serrez-les à la
main jusqu’à ce qu’elles soient bien
en place. Les antennes doivent être
redressées lorsque vous utilisez le
périphérique.
+ -
Positionnement des piles de la
Positionnement des piles de la
télécommande
télécommande
Fixation des antennes
Fixation des antennes
89
Page 90

Installation du périphérique
DMA2100 DMA2200
S-VIDEO
RIGHT
DIGITAL
ADUIO
ETHERNET
10/100
USB
LEFT ANALOG A
UDIO
s-PDIF
DIGITAL
ADUIO
ETHERNET
10/100
ANALOG AUDIO
USB
Pr
Pb
Left
Right
DMA2100 DMA2200
S-VIDEO
RIGHT
DIGITAL
ADUIO
ETHERNET
10/100
USB
LEFT ANALOG A
UDIO
s-PDIF
DIGITAL
ADUIO
ETHERNET
10/100
ANALOG AUDIO
USB
Pr
Pb
Left
Right
DMA2100 DMA2200
Reset /
Default
LLC.
S-VIDEO
VIDEO
Pb
Pr
Y
ndards
Contains FCC:N89-WM821-LS
FOR HOME OF
FICE USE
COMPONENT
VIDEO
MI Licensing, LLC.
DIGITAL
ADUIO
ETHERNET
10/100
ANALOG AUDIO
USE
S-VIDEO
COMPOSITE
Pr
Pb
Left
Right
Y
COMPONENT
VIDEO
DMA2100 DMA2200
Reset /
Default
LLC.
S-VIDEO
VIDEO
Pb
Pr
Y
ndards
Contains FCC:N89-WM821-LS
FOR HOME OF
FICE USE
COMPONENT
VIDEO
MI Licensing, LLC.
DIGITAL
ADUIO
ETHERNET
10/100
ANALOG AUDIO
USE
S-VIDEO
COMPOSITE
Pr
Pb
Left
Right
Y
COMPONENT
VIDEO
DMA2100 DMA2200
HDMI, the HDMI logo is a trademar
k or registered trademarks of HDMI Licensing, LLC.
Tested To Comply
With FCC Standards
Contains
FCC:N89-WM821-LS
Contains
FCC:N89-WM821-LS
FOR HOME OFFICE USE
Default
Reset /
Default
HDMI, the HDMI logo is a trademark or registered trademarks o
f HDMI Licensing, LLC.
Pb
Pr
Y
Tested To Comply
With FCC Standards
Contains FCC:N89-WM82
1-LS
FOR HOME OFFICE USE
COMPONENT
VIDEO
Pour une connexion câblée à votre
ordinateur
A l’aide du câble Ethernet, reliez le
panneau arrière du périphérique Media
Center Extender au panneau arrière de
votre routeur.
Connexion à votre téléviseur
REMARQUE : Avant d’effectuer l’une des connexions suivantes,
mettez votre téléviseur hors tension.
Connexions pour la haute définition (HD)
Vidéo composante
Utilisez le câble vidéo composante
(rouge, vert, bleu ; fourni) pour relier le
panneau arrière du périphérique Media
Center Extender aux ports de connexion
vidéo composante disponibles de votre
téléviseur.
Connexion Ethernet
Connexion Ethernet
OU
HDMI (vidéo et audio)
Utilisez un câble HDMI (non fourni)
pour connecter le panneau arrière du
périphérique Media Center Extender au
port de connexion HDMI disponible de
votre téléviseur.
90
Connexion vidéo composante
Connexion vidéo composante
Connexion HDMI
Connexion HDMI
Page 91

Connexions pour la définition standard (SD)
FOR HOME OFFICE USE
Tested To Comply
With FCC Standards
S-Video
SCART IN/OUT
Composite
RESET
Pr
VIDEO OUT
FOR HOME OFFICE USE
Tested To Comply
With FCC Standards
S-Video
SCART IN/OUT
Composite
RESET
Pr
VIDEO OUT
~
~
~
S-VIDEO
VIDEO
RIGHT
DIGITAL
ADUIO
ETHERNET
LEFT ANALOG AUDIO
s-PDIF
~
~
~
S-VIDEO
VIDEO
RIGHT
DIGITAL
ADUIO
ETHERNET
LEFT ANALOG AUDIO
s-PDIF
DMA2100 DMA2200
Reset /
Default
LLC.
S-VIDEO
VIDEO
Pb
Pr
Y
ndards
Contains FCC:N89-WM821-LS
FOR HOME OFFICE USE
COMPONENT
VIDEO
MI Licensing, LLC.
DIGITAL
ADUIO
ETHERNET
10/100
ANALOG AUDIO
USE
S-VIDEO
COMPOSITE
Pr
Pb
Left
Right
Y
COMPONENT
VIDEO
DMA2100 DMA2200
Reset /
Default
LLC.
S-VIDEO
VIDEO
Pb
Pr
Y
ndards
Contains FCC:N89-WM821-LS
FOR HOME OFFICE USE
COMPONENT
VIDEO
MI Licensing, LLC.
DIGITAL
ADUIO
ETHERNET
10/100
ANALOG AUDIO
USE
S-VIDEO
COMPOSITE
Pr
Pb
Left
Right
Y
COMPONENT
VIDEO
DMA2100 DMA2200
f
HDMI Licensing, LL
C
.
S-VIDEO
VIDEO
Pb
Pr
Y
RIGHT
DIGITAL
ADUIO
ETHERNET
LEFT ANALOG AUDIO
s-PDIF
y
-
WM82
1-LS
E
COMPONENT
VIDEO
istered trademarks of
HDMI Licensing, LLC.
Tested To Comply
With FCC Standards
Contains FCC:N89-WM
821-LS
Contains FCC:N89-WM821-LS
FOR HOME OF
FICE USE
S-VIDEO
COMPOSITE
Y
Reset /
Default
, L
LC.
S-VIDEO
VIDEO
Pb
Pr
Y
RIGHT
DIGITAL
ADUIO
LEFT ANALOG AUDIO
s-PDIF
Tested To Comply
With FCC Standards
Contains FCC:N89-WM821-LS
FOR HOME OFFICE USE
COMPONENT
VIDEO
istered trademarks of HD
MI Licensing, LLC.
Tested To Comply
With FCC Standards
Contains FCC:N89-WM821-LS
Contains FCC:N89-WM821-LS
FOR HOME OFFICE US
E
S-VIDEO
COMPOSITE
Pr
Pb
Y
COMPONENT
VIDEO
DMA2100 DMA2200
Péritel (vidéo et audio)
DMA2200
A l’aide du câble Péritel (fourni), reliez le
panneau arrière du périphérique Media
Center Extender au port de connexion
Péritel disponible de votre téléviseur.
DMA2100
Connexion du câble Péritel (DMA2200)
Pour connecter un adaptateur Péritel,
Connexion du câble Péritel (DMA2200)
utilisez les câbles composite vidéo et
audio (fournis) pour relier les ports
composite du périphérique Media
Center Extender à ceux de l’adaptateur.
Vidéo
Utilisez un type de câble vidéo
analogique standard pour relier le
panneau arrière du périphérique Media
Center Extender au port de connexion
vidéo de votre téléviseur.
Vous pouvez utiliser un câble vidéo
composante (rouge, vert, bleu ; fourni),
un câble vidéo composite (fourni) ou un
câble S-Vidéo (non fourni).
Installation du périphérique
Connexion de l’adaptateur Péritel (DMA2100)
Connexion de l’adaptateur Péritel (DMA2100)
Connexion vidéo composante
Connexion vidéo composante
Connexion vidéo composite
Connexion vidéo composite
Connexion S-Vidéo
Connexion S-Vidéo
91
Page 92

Installation du périphérique
DMA2100 DMA2200
S-VIDEO
VIDEO
Pb
Pr
Y
RIGHT
DIGITAL
ADUIO
LEFT ANALOG AUDIO
s-PDIF
COMPONENT
VIDEO
censing, LLC.
DIGITAL
ADUIO
ETHERNET
10/100
ANALOG AUDIO
S-VIDEO
COMPOSITE
Pr
Pb
Left
Right
Y
COMPONENT
VIDEO
DMA2100 DMA2200
S-VIDEO
VIDEO
Pb
Pr
Y
RIGHT
DIGITAL
ADUIO
LEFT ANALOG AUDIO
s-PDIF
COMPONENT
VIDEO
censing, LLC.
DIGITAL
ADUIO
ETHERNET
10/100
ANALOG AUDIO
S-VIDEO
COMPOSITE
Pr
Pb
Left
Right
Y
COMPONENT
VIDEO
DIGITAL
ADUIO
ETHERNET
10/100
ANALOG AUDIO
USB
Pr
Pb
Left
Right
Y
COMPONENT
VIDEO
DIGITAL
ADUIO
ETHERNET
10/100
ANALOG AUDIO
USB
Pr
Pb
Left
Right
Y
COMPONENT
VIDEO
DMA2100 DMA2200
S-VIDEO
VIDEO
RIGHT
DIGITAL
ADUIO
ETHERNET
10/100
USB
LEFT ANALOG AUDIO
s-PDIF
DIGITAL
ADUIO
ETHERNET
10/100
ANALOG AUDIO
S-VIDEO
COMPOSITE
USB
Pr
Pb
Left
Right
Y
COMPONENT
VIDEO
DMA2100 DMA2200
S-VIDEO
VIDEO
RIGHT
DIGITAL
ADUIO
ETHERNET
10/100
USB
LEFT ANALOG AUDIO
s-PDIF
DIGITAL
ADUIO
ETHERNET
10/100
ANALOG AUDIO
S-VIDEO
COMPOSITE
USB
Pr
Pb
Left
Right
Y
COMPONENT
VIDEO
Audio
Utilisez un type de câble audio pour
relier le panneau arrière du périphérique
Media Center Extender au port de
connexion audio de votre téléviseur ou
récepteur AV. Vous pouvez utiliser les
câbles audio stéréo RCA (rouge, blanc)
fournis, un câble audio numérique
(RCA coaxial, non fourni) ou, pour le
DMA2200, un câble audio optique
(Toslink, non fourni).
Connexion audio (RCA coaxial) numérique
Connexion audio (RCA coaxial) numérique
Connexion audio stéréo RCA
Connexion audio stéréo RCA
Connexion audio (Toslink optique)
Connexion audio (Toslink optique)
numérique
numérique
92
Page 93

Installation du périphérique
DMA2100 DMA2200
Reset /
Default
HDMI, the HDMI logo is a trademark or registered
Tested To Com
ply
With FC
C Standards
Conta
ins FCC:N89-WM821
-LS
FOR HOME OFFICE USE
FOR HOME OFFICE USE
Tested To Comply
With FCC Standards
SCART IN/OUT
RESET
DMA2100 DMA2200
Reset /
Default
HDMI, the HDMI logo is a trademark or registered
Tested To Com
ply
With FC
C Standards
Conta
ins FCC:N89-WM821
-LS
FOR HOME OFFICE USE
FOR HOME OFFICE USE
Tested To Comply
With FCC Standards
SCART IN/OUT
RESET
Alimentation du périphérique
REMARQUE : Mettez votre téléviseur sous tension. Le premier
démarrage du périphérique peut prendre jusqu’à une (1) minute.
Mise sous tension du périphérique Media Center Extender
DMA2200
Installez le cordon d’alimentation du
périphérique Media Center Extender
sur le port d’alimentation du panneau
arrière. Branchez le cordon sur une prise
secteur.
Un commutateur d’alimentation ON/
OFF (marche/arrêt) est placé juste audessus du port d’alimentation. Mettez
le périphérique sous tension avant
de commencer la configuration du
périphérique.
DMA2100
Cette unité est livrée avec les
adaptateurs pour prises d’alimentation
adaptés à votre pays. Si nécessaire,
retirez l’adaptateur fixé sur la prise
d’alimentation. Vous pourrez alors
installer l’adaptateur correspondant à
votre principale prise secteur.
Installez le cordon d’alimentation du
périphérique Media Center Extender
sur le port d’alimentation du panneau
arrière. Branchez le cordon sur une prise
secteur.
Connexion du cordon d’alimentation
Connexion du cordon d’alimentation
Adaptateurs pour prises, DMA 2100Adaptateurs pour prises, DMA 2100
REMARQUE : Un capteur infrarouge est placé sur le panneau
avant du périphérique Media Center Extender. Assurez-vous
que le panneau avant est dégagé pour l’utilisation de la
télécommande.
93
Page 94

Installation du périphérique
94
Page 95

Configuration du périphérique
2�
Configuration des paramètres de langue
Utilisez les touches fléchées pour
sélectionner les options de langue
correctes pour votre configuration.
Appuyez sur la touche OK de la
télécommande ou sélectionnez Next
(Suivant) pour continuer.
Ecran Menu Language (Langue du menu) Ecran Menu Language (Langue du menu)
Configuration de la connexion de l’écran
Une connexion HDMI devrait être
automatiquement détectée, en fonction
de votre téléviseur et des paramètres.
Pour les autres connexions, vous pouvez
choisir les rapports vidéo, audio et le
format d’image afin d’optimiser la qualité
de lecture.
Votre sélection doit correspondre à la
connexion matérielle que vous avez
effectuée. Appuyez sur la touche OK de
la télécommande ou sélectionnez Next
(Suivant) pour continuer.
Ecran Analog Connection (Connexion
Ecran Analog Connection (Connexion
analogique)
analogique)
Configuration des paramètres réseau
Sélectionnez le type de connexion
réseau utilisée (câblée ou sans fil),
puis appuyez sur la touche OK de la
télécommande ou sélectionnez Next
(Suivant) pour continuer.
Si vous utilisez une connexion sans fil,
vous serez invité à confirmer le niveau de
sécurité sans fil actuel de votre réseau.
Si une Clé de cryptage est requise,
saisissez la clé de cryptage de votre
réseau à l’aide du clavier qui s’affiche à
l’écran, puis cliquez sur Next (Suivant).
95
Page 96

Configuration du périphérique
REMARQUE : Pour les paramètres du routeur sans fil, le niveau
de sécurité choisi lors de l’installation du périphérique doit
correspondre à celui de votre ordinateur.
Enregistrement de la clé d’installation depuis le périphérique
L’ordinateur a besoin d’une clé
1.
d’installation pour reconnaître
le périphérique Media Center
Extender. La clé, composée de
huit chiffres, s’affiche sur l’écran de
votre téléviseur (et sur le panneau
avant du périphérique Media
Center Extender s’il s’agit d’un
DMA2200).
Notez cette clé d’installation et
2.
reportez-la sur votre ordinateur
exécutant Windows Vista Premium
ou Ultimate. Vous pouvez inscrire
ce numéro ici :
Ecran Setup Key (Clé d’installation)Ecran Setup Key (Clé d’installation)
--
96
Page 97

Configuration du Media Center
3�
REMARQUE : Suivez les étapes ci-dessous en suivant l’ordre
dans lequel elles sont indiquées. Insérez le CD-ROM et suivez les
instructions des écrans d’installation.
Insertion du CD-ROM
Insérez le CD-ROM fourni avec votre
périphérique Media Center Extender
dans votre ordinateur Media Center.
Suivez les étapes qui s’affichent à l’écran.
Mise à jour Windows Vista
Si vous utilisez une version compatible
de Windows Vista, vous serez invité à
mettre à jour votre système via Windows
Vista Update. Suivez les étapes qui
s’affichent à l’écran.
Insertion du CD-ROMInsertion du CD-ROM
Configuration
Si votre ordinateur a automatiquement
détecté le périphérique, un message
indiquant que le périphérique a été
trouvé s’affiche.
Le type du message affiché peut varier.
Cliquez sur l’écran ou sélectionnez Yes
(Oui) pour lancer l’installation.
Si votre périphérique n’a pas été automatiquement détecté, procédez comme suit.
Ouvrez « Media Center » sur
1.
votre ordinateur et utilisez les
touches fléchées haut ou bas pour
sélectionner Tasks (Tâches).
Appuyez sur la flèche gauche
A.
pour sélectionner Settings
(Paramètres).
Utilisez les touches fléchées
B.
haut ou bas pour sélectionner
Extender (Périphérique Media
Center Extender), puis appuyez
sur la touche flèche haut pour
sélectionner Add extender
(Ajouter un périphérique).
Cliquez sur Enter (Entrée).
Message de détection du Media ExtenderMessage de détection du Media Extender
Ajout d’un périphériqueAjout d’un périphérique
97
Page 98

Configuration du Media Center
XXXX
XXXX
XXXX
XXXX
L’écran Welcome to Windows Media
2.
Center (Bienvenue sur Windows
Media Center) s’affiche. Cliquez sur
Enter (Entrée) ou sélectionnez Next
(Suivant) pour continuer.
Vous serez invité à saisir la
3.
clé d’installation relevée
précédemment. Après avoir saisi
la clé, cliquez sur Enter (Entrée) ou
sélectionnez Next (Suivant) pour
continuer.
L’écran suivant concerne les pare-feu
4.
et peut vous inviter à modifier les
paramètres de l’ordinateur ; cliquez
sur Enter (Entrée) ou sélectionnez
Next (Suivant) pour continuer.
Ecran Welcome (Bienvenue)Ecran Welcome (Bienvenue)
Ecran Extender Setup (Configuration du
Ecran Extender Setup (Configuration du
périphérique)
périphérique)
REMARQUE : Les pare-feu tiers nécessitent parfois une
configuration manuelle supplémentaire.
Il vous sera ensuite demandé si vous
5.
souhaitez rendre accessibles les fichiers
multimédia stockés sur votre PC. Tous les
fichiers multimédia (photos, musique,
vidéo) seront partagés. Vous pourrez
modifier ces options ultérieurement
dans le menu des paramètres. Cliquez
sur Yes (Oui), puis sur Enter (Entrée),
ou sélectionnez Next (Suivant) pour
continuer.
98
Partage de fichiersPartage de fichiers
Page 99

Vous serez peut-être également
6.
invité à autoriser la modification
de certains paramètres de votre
ordinateur, notamment l’activation
du mode « Away » (Absence). Ce
mode d’économie d’énergie permet
à votre périphérique de continuer
à fonctionner même lorsque votre
ordinateur est hors tension.
La dernière étape de l’installation
7.
permet de configurer votre
ordinateur afin qu’il fonctionne
avec le périphérique Media Center
Extender. Lorsque la configuration
est terminée, le message « You
are Done » (Terminé) s’affiche.
Vous pouvez désormais écouter
votre musique, regarder vos
vidéos ou diffuser du contenu en
ligne (une inscription peut-être
nécessaire) sur votre téléviseur
via votre périphérique. Cliquez
sur Enter (Entrée) ou sélectionnez
Finish (Terminer) pour quitter
l’installation.
Configuration du Media Center
Ecran You are Done (Terminé)Ecran You are Done (Terminé)
REMARQUE : Si le message d’erreur « Extender did not connect »
(Périphérique non connecté), revenez à la section 3 et suivez les
étapes en commençant par l’étape Insertion du CD-ROM.
7101010NC-DF
99
Page 100

Configuration du Media Center
100
 Loading...