

Linksys DMA2100 - Media Center Extender, DMA2200 Quick Installation Manual
QUICK INSTALLATION GUIDE
GUIDE D’INSTALLATION RAPIDE
GUÍA DE INSTALACIÓN RÁPIDA
Media Center Extender
Model: DMA2100, DMA2200
DMA2100 DMA2200


3
Table of Contents
QUICK INSTALLATION GUIDE . . . . . . . . . . . . . . . . . . . . . . . . . . . . . . . . 5
GUIDE D’INSTALLATION RAPIDE . . . . . . . . . . . . . . . . . . . . . . . . . . . .21
GUÍA DE INSTALACIÓN RÁPIDA . . . . . . . . . . . . . . . . . . . . . . . . . . . . .37

Package Contents
Media Center Extender
Remote Control with Two AAA Batteries
Power Cord and Clip Adapter - DMA2100
Power Cord for your Region - DMA2200
Antennas (Two for DMA 2100, Three for DMA 2200)
One Component Video Cable
One Composite Video Cable
One Stereo RCA Audio Cable
One Ethernet Cable
Quick Installation Guide
CD-ROM with Windows Vista™ Operating System Software Updates and User Guide
•
•
•
•
•
•
•
•
•
•
•
QUICK INSTALLATION GUIDE
Media Center Extender
Models: DMA2100, DMA2200
DMA2100 DMA2200


7
Table of Contents
Device Installation . . . . . . . . . . . . . . . . . . . . . . . . . . . . . . . . . . . . 9
Install Batteries . . . . . . . . . . . . . . . . . . . . . . . . . . . . . . . . . . . . . . . . . . .9
Network Connection . . . . . . . . . . . . . . . . . . . . . . . . . . . . . . . . . . . . . .9
Display Connection . . . . . . . . . . . . . . . . . . . . . . . . . . . . . . . . . . . . . .10
Power Device . . . . . . . . . . . . . . . . . . . . . . . . . . . . . . . . . . . . . . . . . . . .12
Device Configuration . . . . . . . . . . . . . . . . . . . . . . . . . . . . . . . . . 13
Configure Language Settings . . . . . . . . . . . . . . . . . . . . . . . . . . . . .13
Configure Display Connection . . . . . . . . . . . . . . . . . . . . . . . . . . . .13
Configure Network Settings . . . . . . . . . . . . . . . . . . . . . . . . . . . . . .13
Record Setup Key from Device . . . . . . . . . . . . . . . . . . . . . . . . . . .14
Media Center Configuration . . . . . . . . . . . . . . . . . . . . . . . . . . 15
Insert CD-ROM . . . . . . . . . . . . . . . . . . . . . . . . . . . . . . . . . . . . . . . . . . .15
Windows Vista Update . . . . . . . . . . . . . . . . . . . . . . . . . . . . . . . . . . . .15
Setup . . . . . . . . . . . . . . . . . . . . . . . . . . . . . . . . . . . . . . . . . . . . . . . . . . . .15
Contact Information . . . . . . . . . . . . . . . . . . . . . . . . . . . . . . . . . 18
8
Before You Begin
Make sure you have:
High Definition Video Options:
Component Video (included) or,
HDMI (not included)
Standard Definition Video Options:
Component Video (included) or
Composite Video (included) or,
S-Video (not included)
Audio:
Analog Stereo RCA (included) or,
Digital SPDIF Coaxial RCA (not included)
Digital SPDIF Optical Toslink (not included -
for DMA2200 only)
NOTE: If using HDMI, additional
audio cables are not necessary.
Network:
Ethernet cable (included)
Wireless network (if connecting wirelessly)
NOTE:If you need more detailed information, consult the User
Guide on the CD-ROM. Take the time to consult Linksys’ safety,
warranty and software license information which you will also
find on the CD-ROM.
•
•
•
•
•
•
•
•
•
•
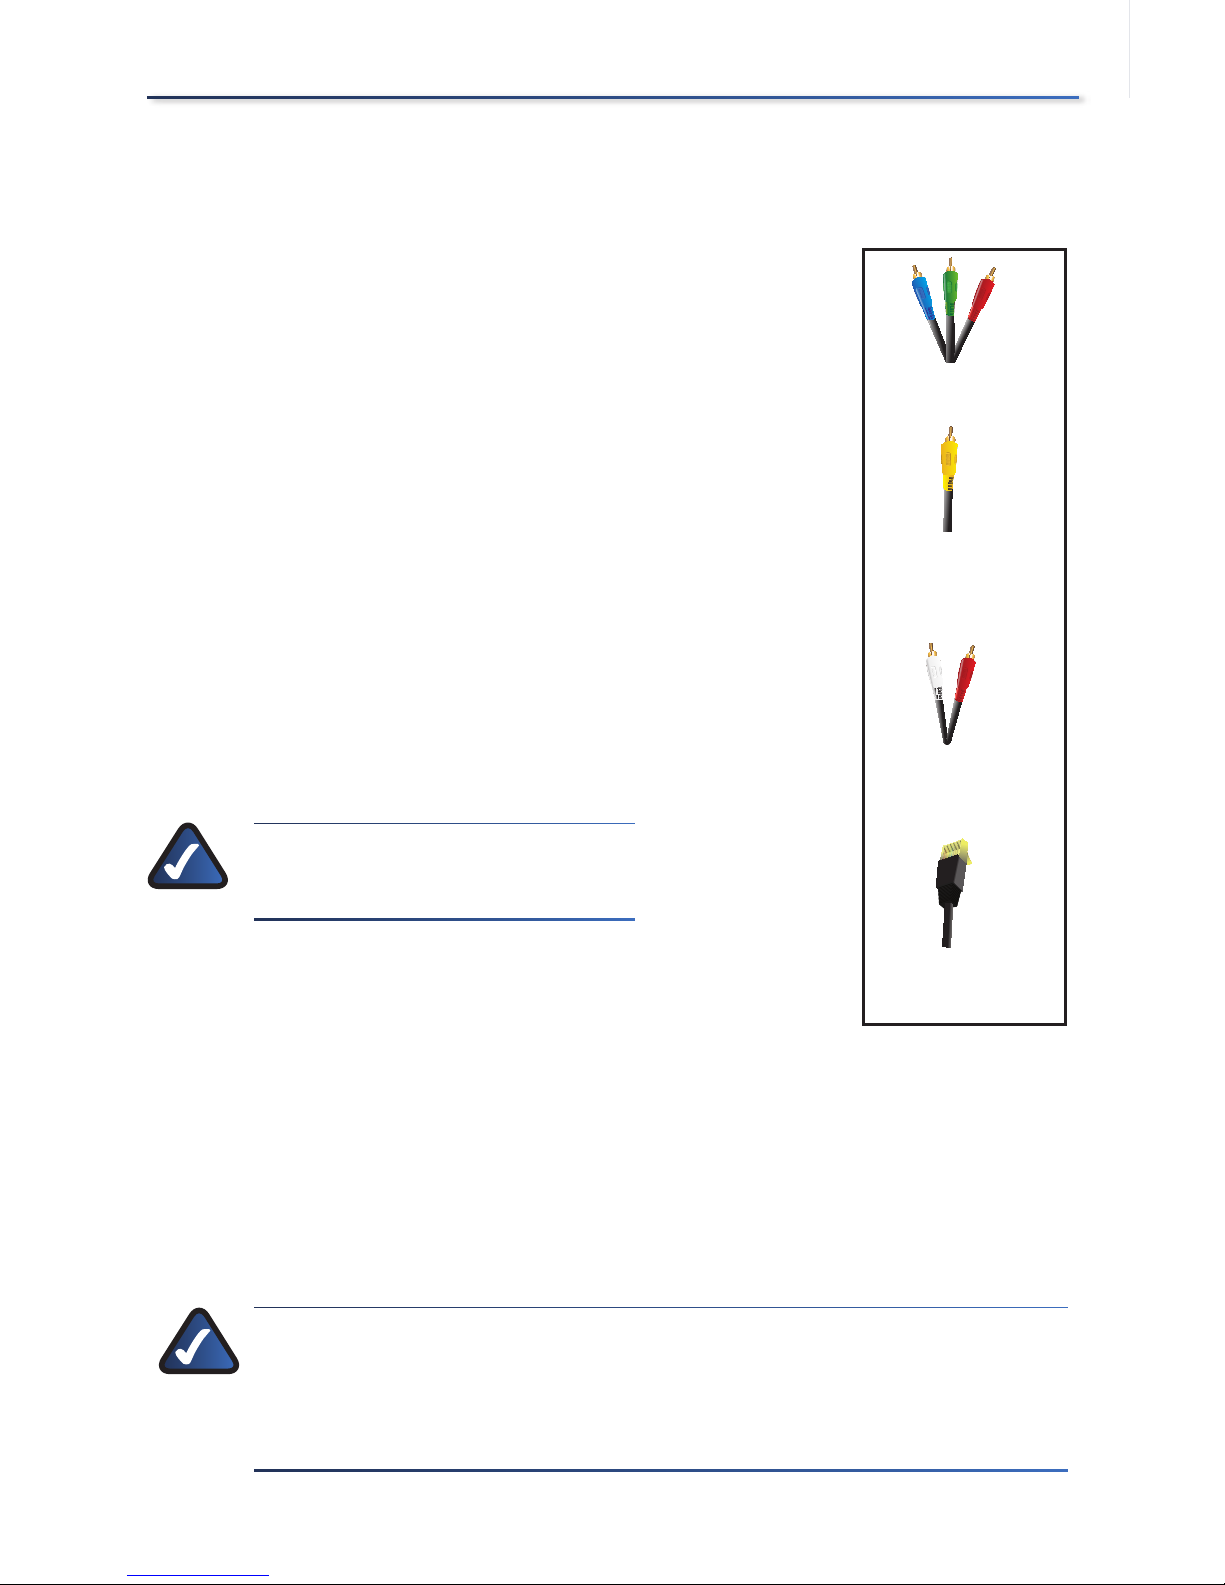
Ethernet
RCA Stereo Audio
Component Video
Composite Video
Ethernet
RCA Stereo Audio
Component Video
Composite Video
Included Cables
9
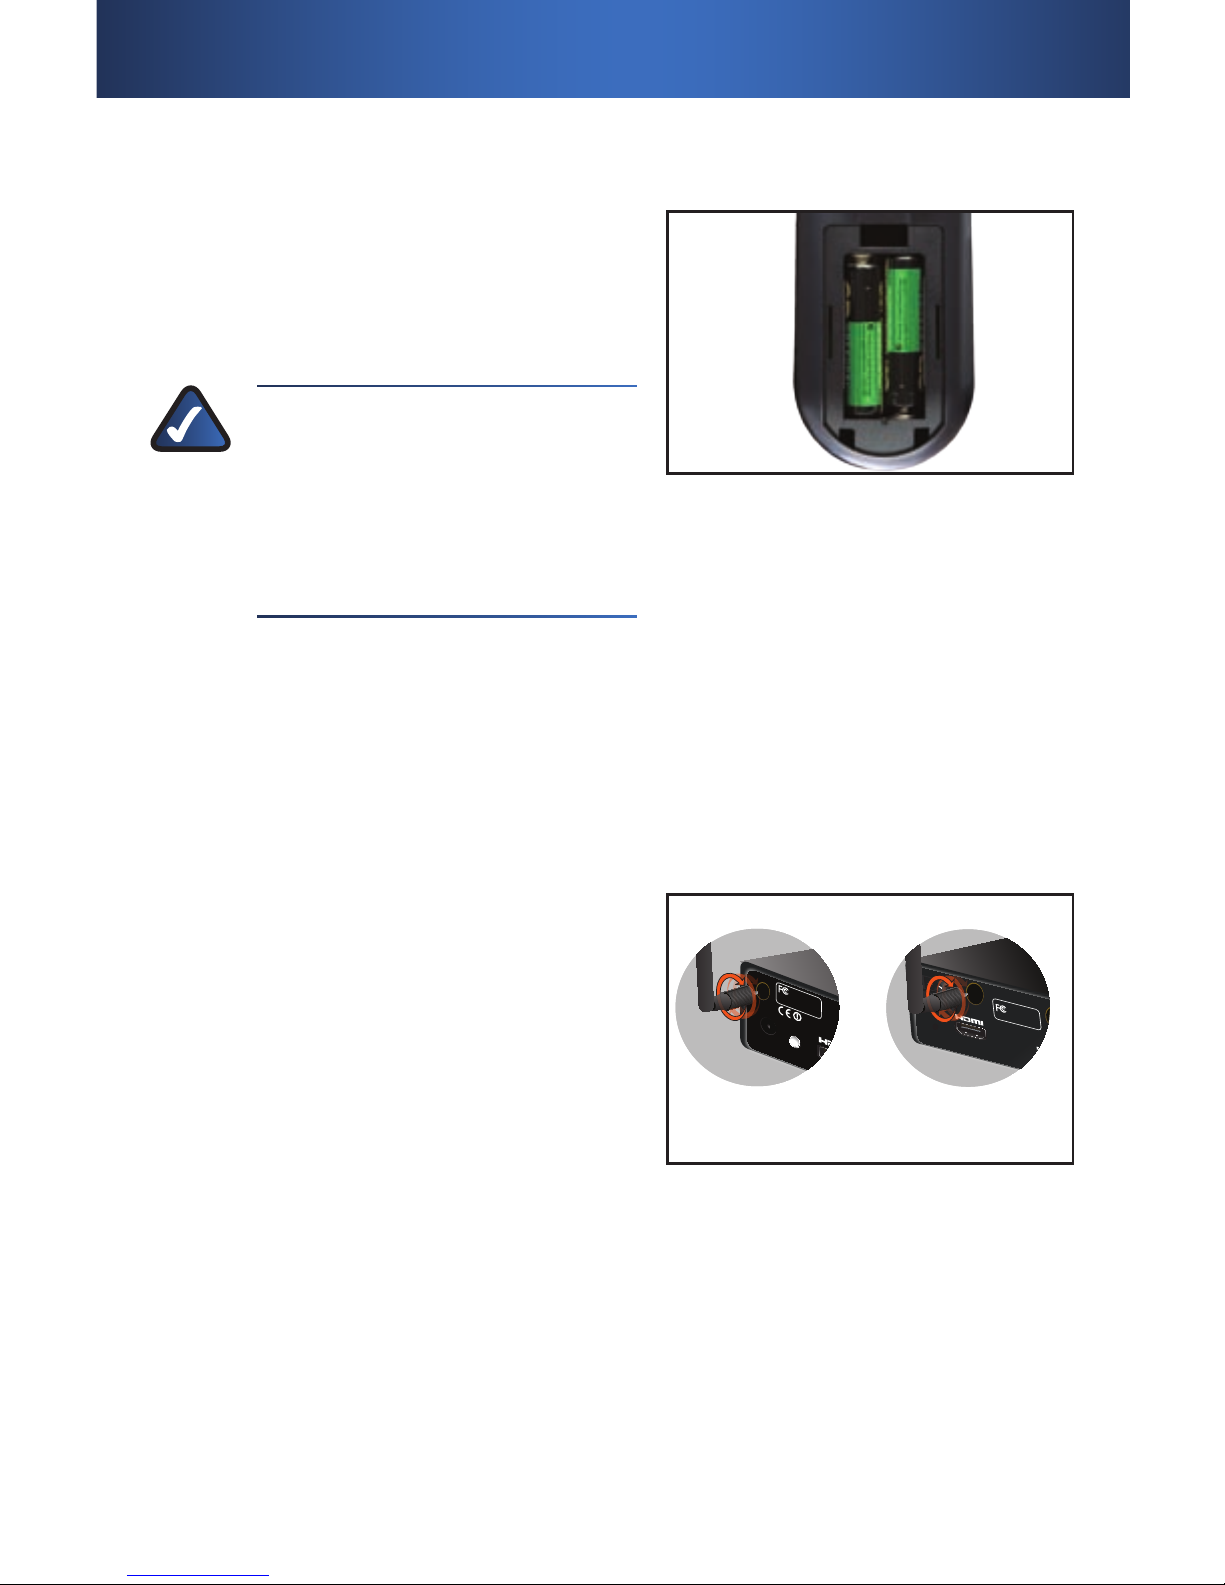
Install Batteries
Install the two (2) AAA batteries in the
remote control, making sure to place
the positive (+) and negative (-) ends as
shown.
NOTE:For more detailed
information on the features and
functions of the remote control,
including how to program the
learning remote, please consult
the User Guide on the CD-ROM.
Network Connection
For a Wireless Connection to your
Computer
If you are using a wired connection, skip
to the next step.
If connecting wirelessly, you need to
attach the antennas. There are two (2)
antennas for the DMA2100 and three (3)
for the DMA2200. The antennas should
be screwed on in a clockwise direction.
Hand tighten until they are securely in
place. The antennas should be raised
when the Extender is in use.
Remote Control Battery PlacementRemote Control Battery Placement
DMA2100 DMA2200
HDMI, the HD
MI logo is a trademar
k or registered
trademarks of HDMI Lice
nsing, LLC.
Tested To Comply
With FCC Standards
Contains FCC:N89-WM821-LS
Contains FC
C:N89-WM821-LS
FOR HOME OFFICE USE
Default
Reset /
Default
HDMI, the HDMI logo is a trademark or registere
Tested To Comp
ly
With FCC Standards
C
ontains FCC:N89-WM821-LS
FOR HOME OFFICE
USE
Attaching the Antennas
Device Installation1�
- +
+ -
10
Device Installation
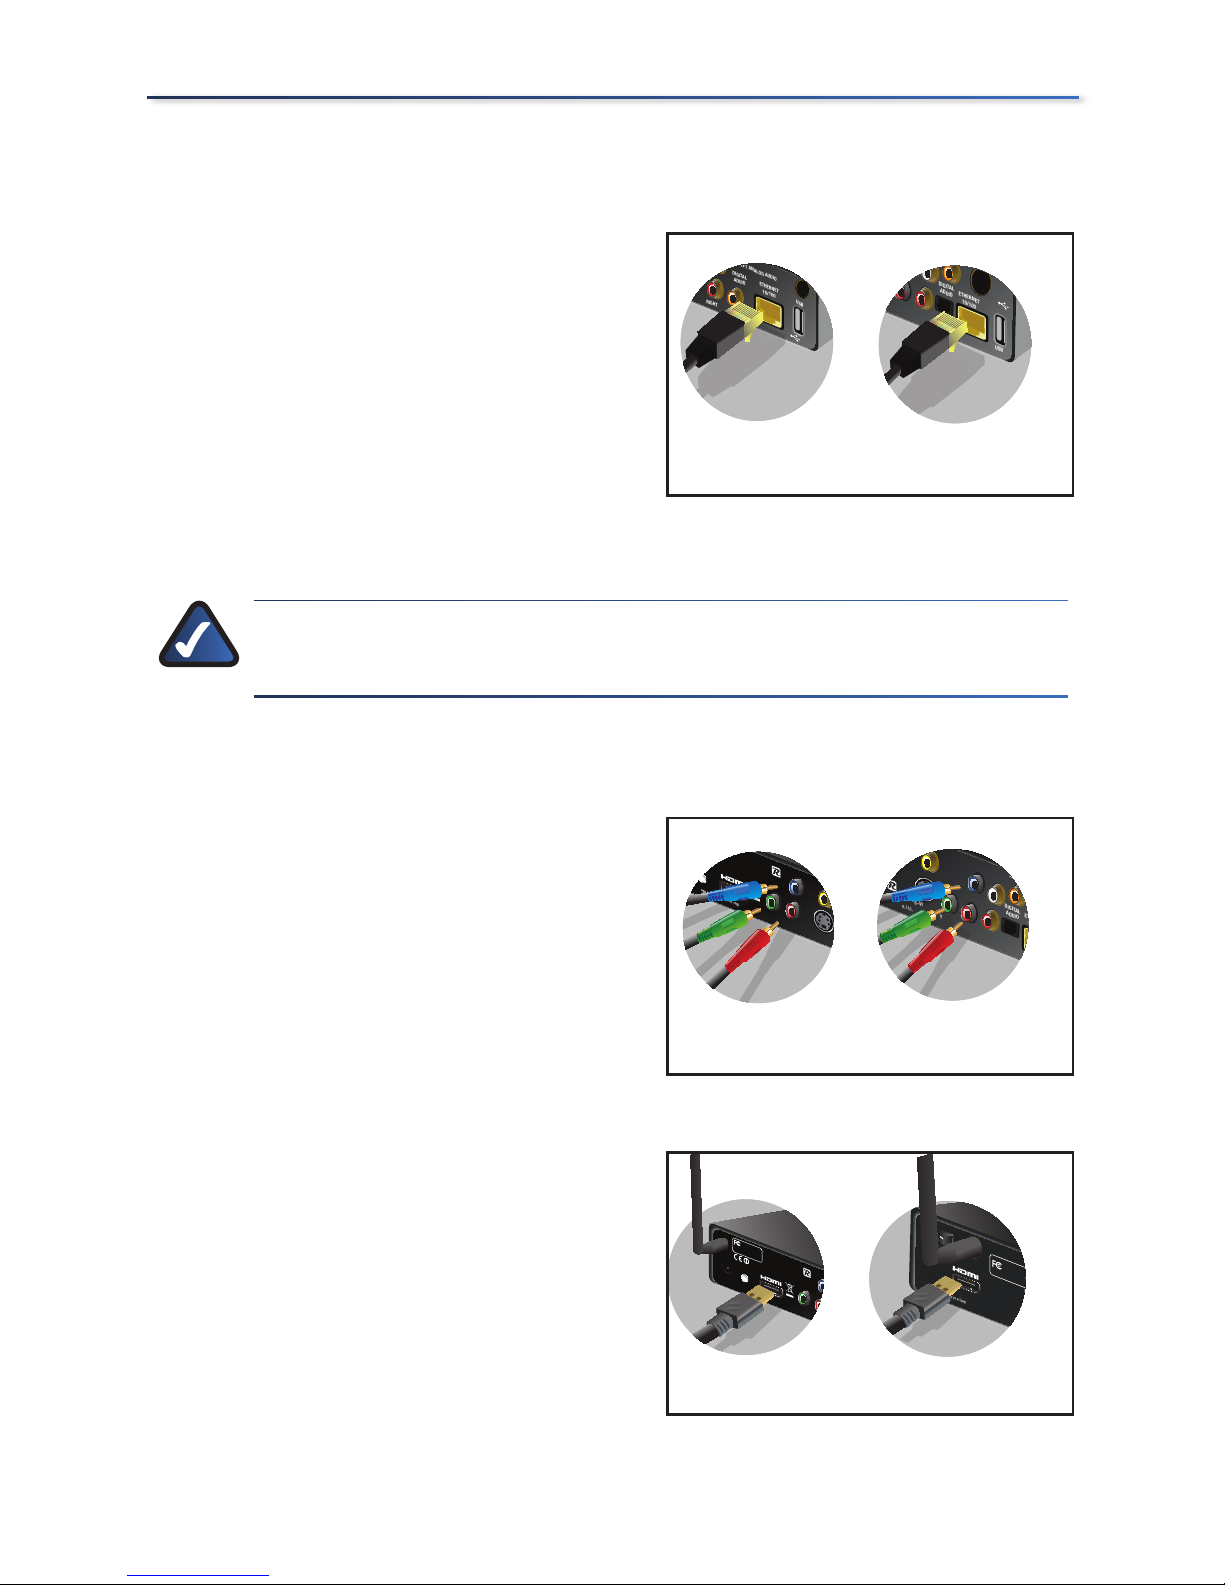
For a Wired Connection to your
Computer
Connect the Ethernet cable from the
back panel of the Media Center Extender
to the back panel of your network router.
Display Connection
NOTE:Before you perform any of the following connections,
power off your TV.
High Definition (HD) Connections
Component Video
Connect the component video (red,
green, blue) cable (included) from the
Media Center Extender’s back panel to
your TV’s available component video
connection ports.
OR
HDMI (Video and Audio)
Connect a HDMI cable (not included)
from the Media Center Extender’s
back panel to your TV’s available HDMI
connection port.
DMA2100 DMA2200
S-VIDEO
RIGHT
DIGITAL
ADUIO
ETHERNET
10/100
USB
LEFT ANALOG A
UDIO
s-PDIF
DIGITAL
ADUIO
ETHERNET
10/100
ANALOG AUDIO
USB
Pr
Pb
Left
Right
Ethernet Connection
DMA2100 DMA2200
S-VIDEO
RIGHT
DIGITAL
ADUIO
ETHERNET
10/100
USB
LEFT ANALOG A
UDIO
s-PDIF
DIGITAL
ADUIO
ETHERNET
10/100
ANALOG AUDIO
USB
Pr
Pb
Left
Right
Ethernet Connection
DMA2100 DMA2200
Reset /
Default
LLC.
S-VIDEO
VIDEO
Pb
Pr
Y
ndards
Contains FCC:N89-WM821-LS
FOR HOME OF
FICE USE
COMPONENT
VIDEO
MI Licensing, LLC.
DIGITAL
ADUIO
ETHERNET
10/100
ANALOG AUDIO
USE
S-VIDEO
COMPOSITE
Pr
Pb
Left
Right
Y
COMPONENT
VIDEO
Component Video Connection
DMA2100 DMA2200
Reset /
Default
LLC.
S-VIDEO
VIDEO
Pb
Pr
Y
ndards
Contains FCC:N89-WM821-LS
FOR HOME OF
FICE USE
COMPONENT
VIDEO
MI Licensing, LLC.
DIGITAL
ADUIO
ETHERNET
10/100
ANALOG AUDIO
USE
S-VIDEO
COMPOSITE
Pr
Pb
Left
Right
Y
COMPONENT
VIDEO
Component Video Connection
DMA2100 DMA2200
HDMI, the HDMI logo is a trademar
k or registered trademarks of HDMI Licensing, LLC.
Tested To Comply
With FCC Standards
Contains
FCC:N89-WM821-LS
Contains
FCC:N89-WM821-LS
FOR HOME OFFICE USE
Default
Reset /
Default
HDMI, the HDMI logo is a trademark or registered trademarks o
f HDMI Licensing, LLC.
Pb
Pr
Y
Tested To Comply
With FCC Standards
Contains FCC:N89-WM82
1-LS
FOR HOME OFFICE USE
COMPONENT
VIDEO
HDMI Connection
11
Device Installation
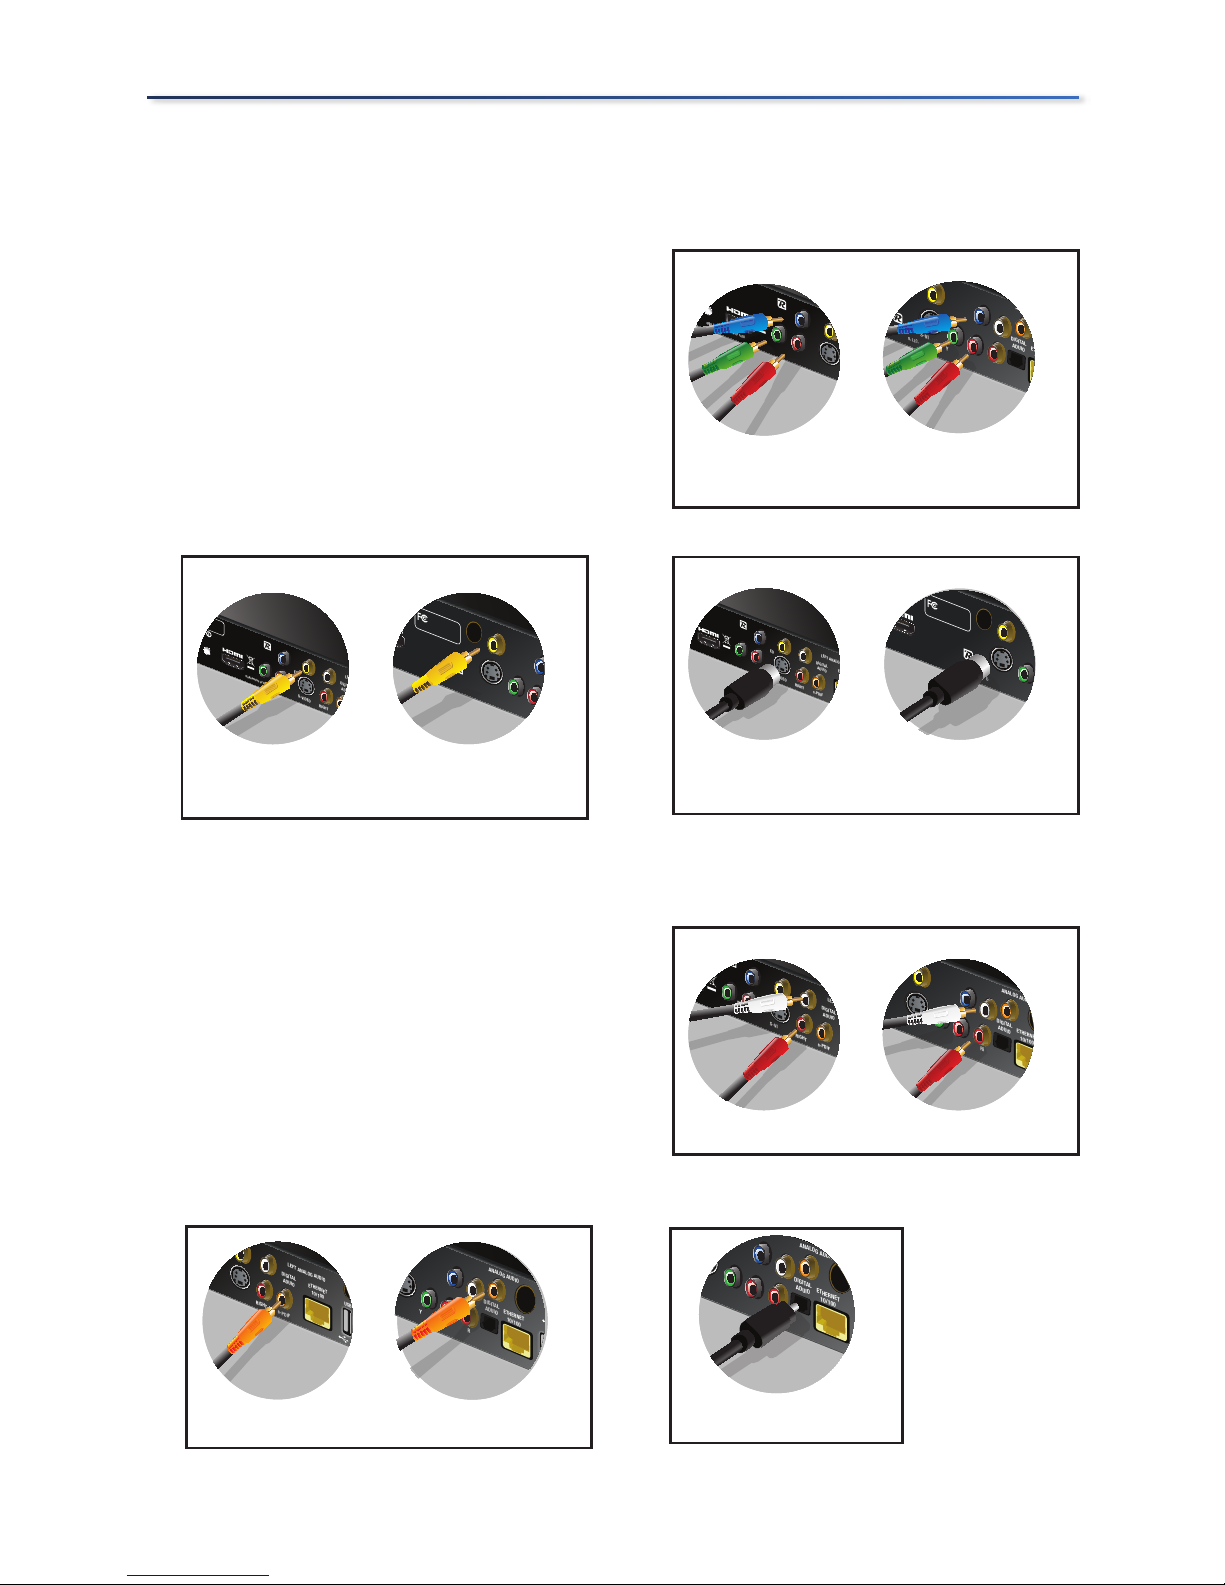
Standard Definition (SD) Connections
Video
Connect one type of standard analog
video cable from the Media Center
Extender’s back panel to your TV’s video
connection port.
You can connect a component video
(red, green, blue) cable (included)
composite video cable (included) or a
S-Video cable (not included).
Audio
Connect one type of audio cable from
the Media Center Extender’s back
panel to your TV or AV receiver’s audio
connection port. You can connect the
included RCA stereo audio cables (red,
white) or a digital audio (coaxial RCA
- not included) or, for the DMA2200,
an optical audio cable(Toslink - not
included).
DMA2100 DMA2200
Reset /
Default
LLC.
S-VIDEO
VIDEO
Pb
Pr
Y
ndards
Contains FCC:N89-WM821-LS
FOR HOME OF
FICE USE
COMPONENT
VIDEO
MI Licensing, LLC.
DIGITAL
ADUIO
ETHERNET
10/100
ANALOG AUDIO
USE
S-VIDEO
COMPOSITE
Pr
Pb
Left
Right
Y
COMPONENT
VIDEO
Component Video Connection
DMA2100 DMA2200
Reset /
Default
LLC.
S-VIDEO
VIDEO
Pb
Pr
Y
ndards
Contains FCC:N89-WM821-LS
FOR HOME OF
FICE USE
COMPONENT
VIDEO
MI Licensing, LLC.
DIGITAL
ADUIO
ETHERNET
10/100
ANALOG AUDIO
USE
S-VIDEO
COMPOSITE
Pr
Pb
Left
Right
Y
COMPONENT
VIDEO
Component Video Connection
DMA2100 DMA2200
f
HDMI Licensing, LL
C
.
S-VIDEO
VIDEO
Pb
Pr
Y
RIGHT
DIGITAL
ADUIO
ETHERNET
LEFT ANALOG AUDIO
s-PDIF
y
-
WM82
1-LS
E
COMPONENT
VIDEO
istered trademarks of
HDMI Licensing, LLC.
Tested To Comply
With FCC Standards
Contains FCC:N89-WM
821-LS
Contains FCC:N89-WM821-LS
FOR HOME OF
FICE USE
S-VIDEO
COMPOSITE
Y
S-Video Connection
Reset /
Default
, L
LC.
S-VIDEO
VIDEO
Pb
Pr
Y
RIGHT
DIGITAL
ADUIO
LEFT ANALOG AUDIO
s-PDIF
Tested To Comply
With FCC Standards
Contains FCC:N89-WM821-LS
FOR HOME OFFICE USE
COMPONENT
VIDEO
istered trademarks of HD
MI Licensing, LLC.
Tested To Comply
With FCC Standards
Contains FCC:N89-WM821-LS
Contains FCC:N89-WM821-LS
FOR HOME OFFICE USE
S-VIDEO
COMPOSITE
Pr
Pb
Y
COMPONENT
VIDEO
DMA2100 DMA2200
Composite Video Connection
DMA2100 DMA2200
S-VIDEO
VIDEO
Pb
Pr
Y
RIGHT
DIGITAL
ADUIO
LEFT ANALOG AUDIO
s-PDIF
COMPONENT
VIDEO
censing, LLC.
DIGITAL
ADUIO
ETHERNET
10/100
ANALOG AUDIO
S-VIDEO
COMPOSITE
Pr
Pb
Left
Right
Y
COMPONENT
VIDEO
RCA Stereo Audio Connection
DMA2100 DMA2200
S-VIDEO
VIDEO
Pb
Pr
Y
RIGHT
DIGITAL
ADUIO
LEFT ANALOG AUDIO
s-PDIF
COMPONENT
VIDEO
censing, LLC.
DIGITAL
ADUIO
ETHERNET
10/100
ANALOG AUDIO
S-VIDEO
COMPOSITE
Pr
Pb
Left
Right
Y
COMPONENT
VIDEO
RCA Stereo Audio Connection
DIGITAL
ADUIO
ETHERNET
10/100
ANALOG AUDIO
USB
Pr
Pb
Left
Right
Y
COMPONENT
VIDEO
Digital Audio (Optical Toslink) Connection
DIGITAL
ADUIO
ETHERNET
10/100
ANALOG AUDIO
USB
Pr
Pb
Left
Right
Y
COMPONENT
VIDEO
Digital Audio (Optical Toslink) Connection
DMA2100 DMA2200
S-VIDEO
VIDEO
RIGHT
DIGITAL
ADUIO
ETHERNET
10/100
USB
LEFT ANALOG AUDIO
s-PDIF
DIGITAL
ADUIO
ETHERNET
10/100
ANALOG AUDIO
S-VIDEO
COMPOSITE
USB
Pr
Pb
Left
Right
Y
COMPONENT
VIDEO
Digital Audio (Coaxial RCA) Connection
DMA2100 DMA2200
S-VIDEO
VIDEO
RIGHT
DIGITAL
ADUIO
ETHERNET
10/100
USB
LEFT ANALOG AUDIO
s-PDIF
DIGITAL
ADUIO
ETHERNET
10/100
ANALOG AUDIO
S-VIDEO
COMPOSITE
USB
Pr
Pb
Left
Right
Y
COMPONENT
VIDEO
Digital Audio (Coaxial RCA) Connection
12
Device Installation
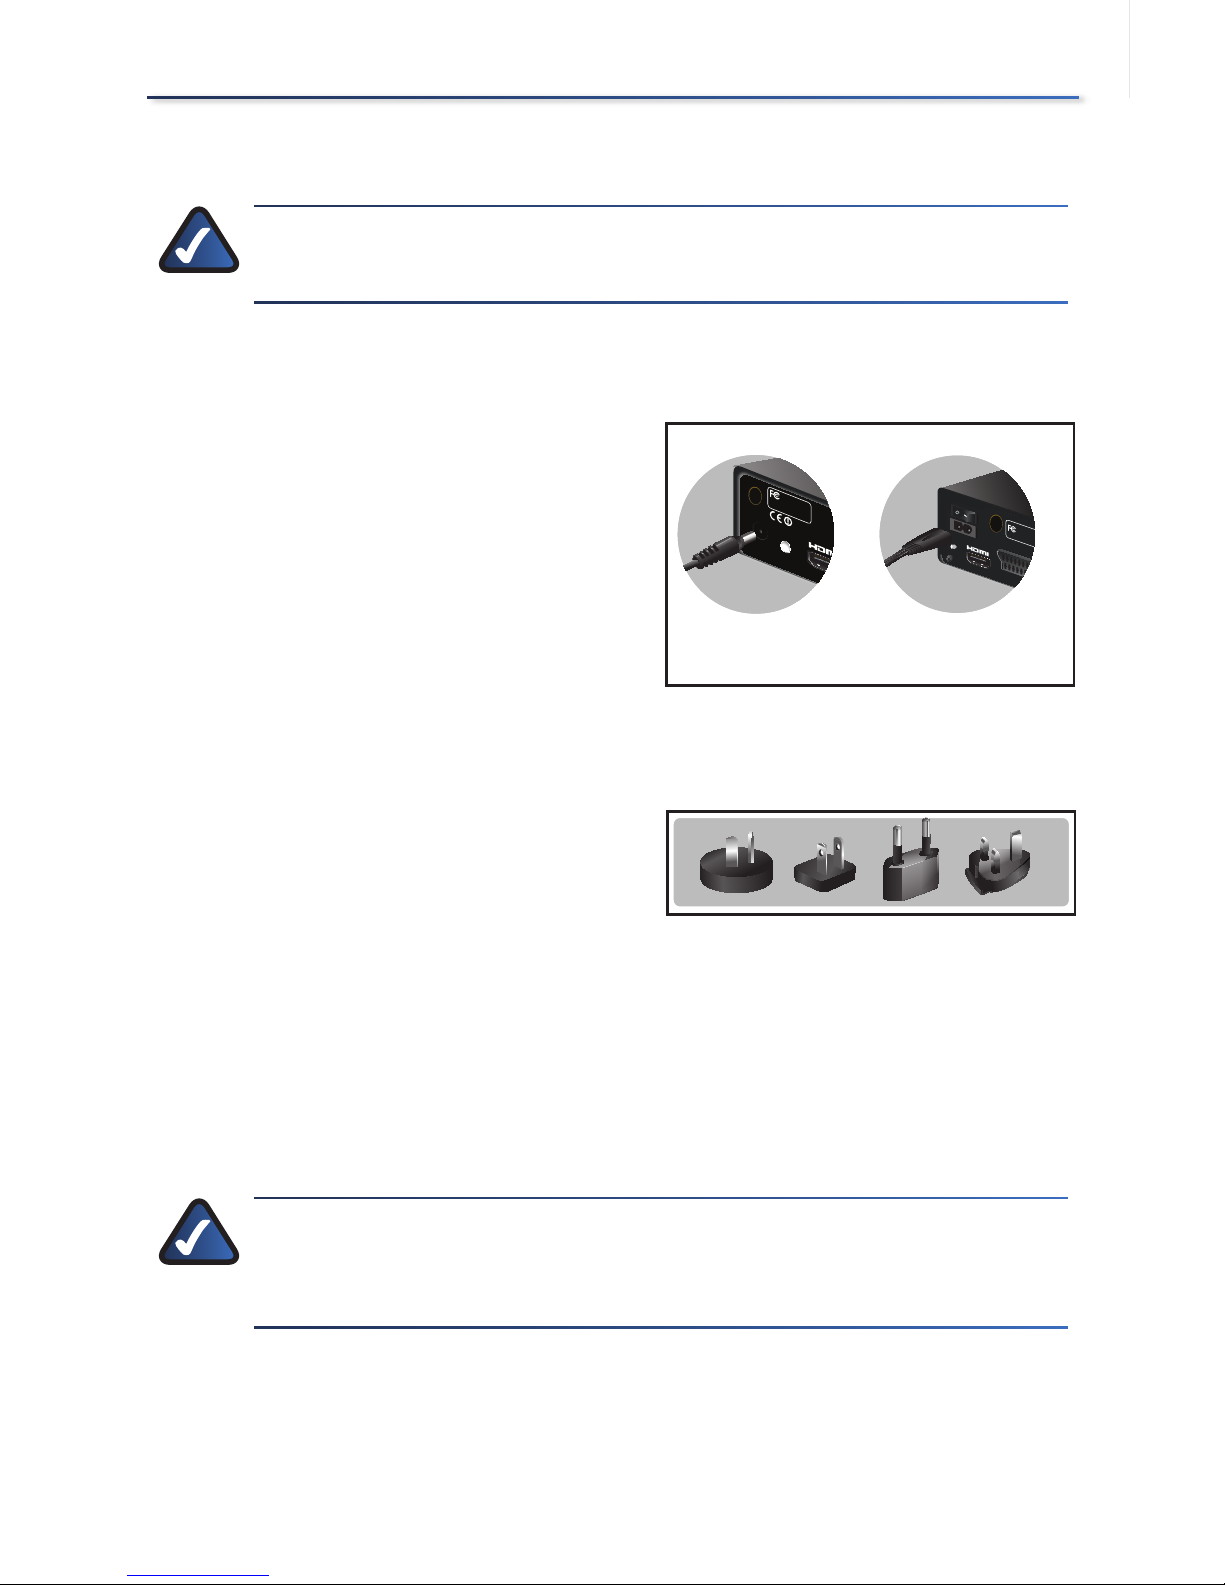
Power Device
NOTE: Power on your TV. The initial startup of the Extender could
take up to one (1) minute.
Power on the Media Center Extender
DMA2200
Plug the Media Center Extender’s power
cord connector to the unit’s power port
on the back panel. Plug the cord into an
electrical outlet.
There is also an on/off power switch just
above the power port. Power on the unit
before starting Device Configuration.
DMA2100
This unit ships with the correct power
clips for your region. If needed, pull
out the clip covering the power port
connector. You can then snap in the
appropriate power clip that matches
your Main power outlet
Plug the Media Center Extender’s power
cord connector to the unit’s power port
on the back panel. Plug the cord into an
electrical outlet.
NOTE: There is an IR sensor on the front of the Media Center
Extender. Make sure the front panel is visible for the remote
control.
DMA2100 DMA2200
Reset /
Default
HDMI, the HDMI logo is a trademark or registered
Tested To Com
ply
With FC
C Standards
Conta
ins FCC:N89-WM821
-LS
FOR HOME OFFICE USE
FOR HOME OFFICE USE
Tested To Comply
With FCC Standards
SCART IN/OUT
RESET
Power Cord Connection
DMA2100 DMA2200
Reset /
Default
HDMI, the HDMI logo is a trademark or registered
Tested To Com
ply
With FC
C Standards
Conta
ins FCC:N89-WM821
-LS
FOR HOME OFFICE USE
FOR HOME OFFICE USE
Tested To Comply
With FCC Standards
SCART IN/OUT
RESET
Power Cord Connection
DMA 2100 Power ClipsDMA 2100 Power Clips
13
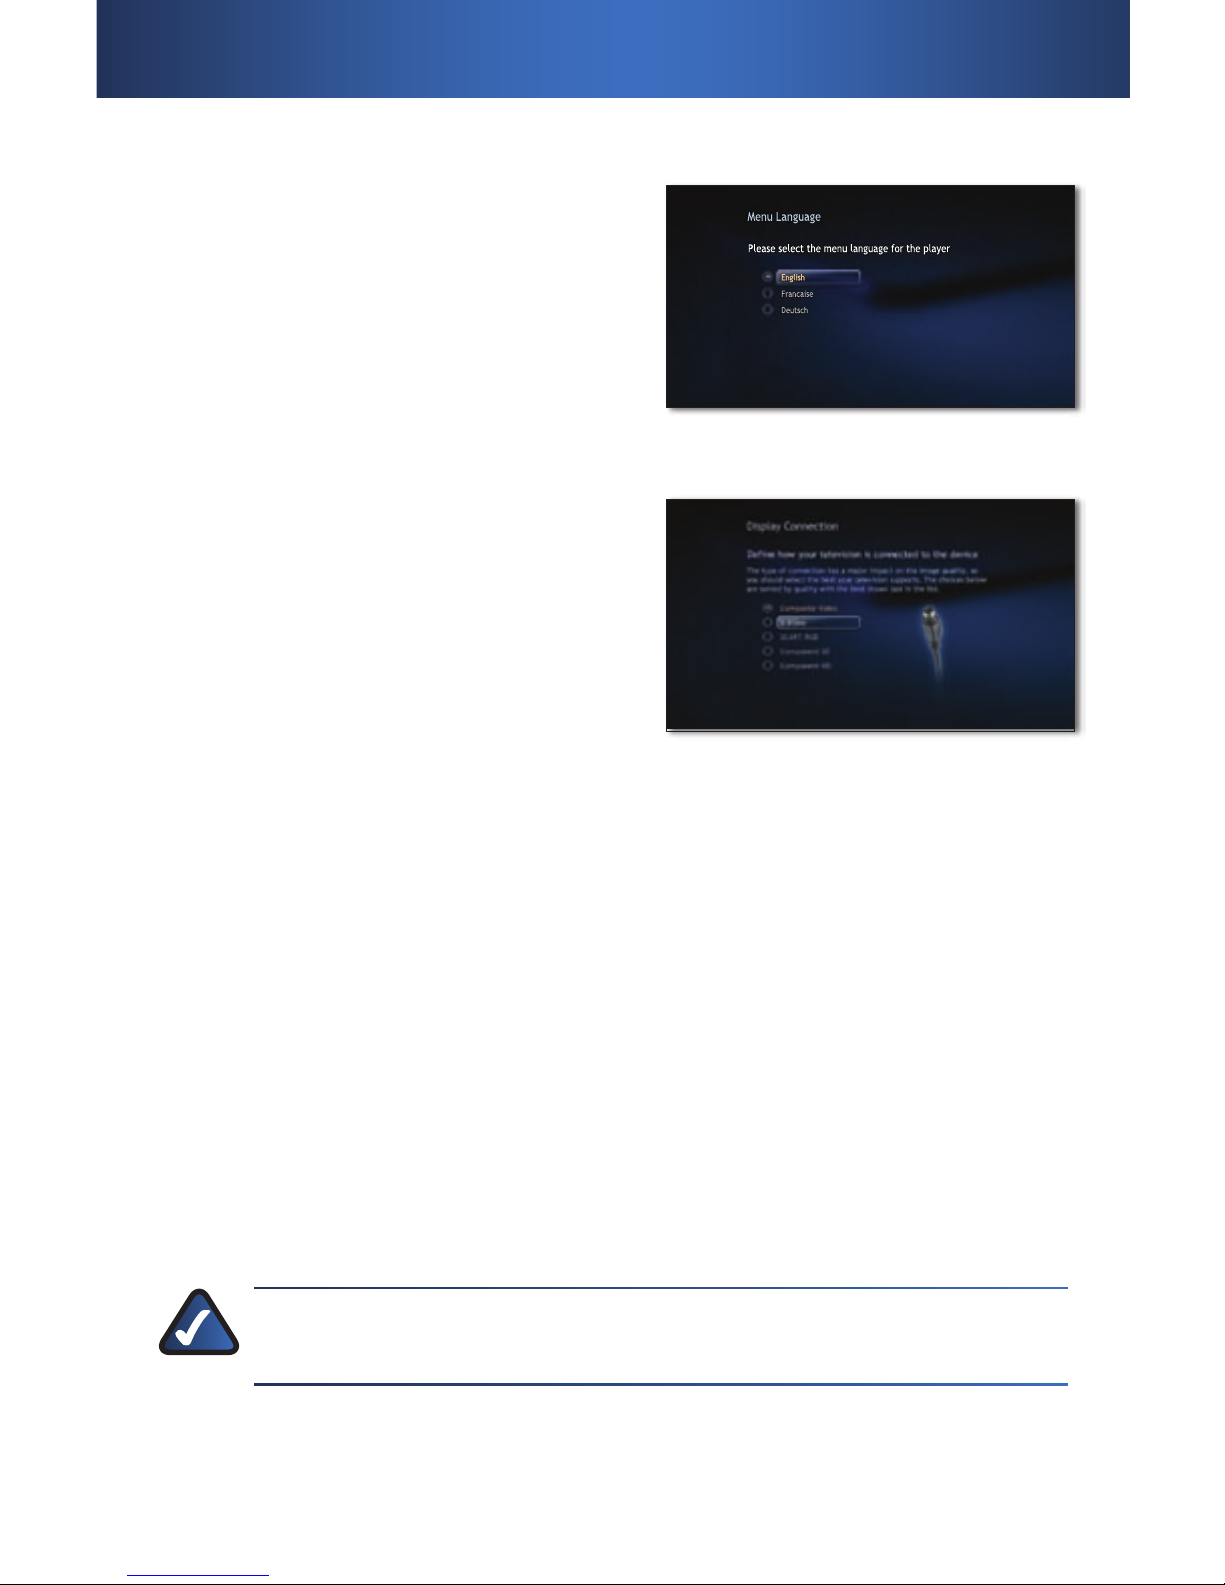
Configure Language Settings
Use the arrow keys to highlight the
correct language options for your
configuration. Press OK on the remote
control, or select Next to continue.
Configure Display Connection
A HDMI connection should automatically
be discovered, depending on the TV and
settings. For other connections you can
choose the video, audio and aspect ratio
to optimize the playback quality.
Your choice should match the actual
hardware connection that you made.
Press OK on the remote control or select
Next to continue.
Configure Network Settings
Select the type of network connection
you are using, wired or wireless and
press OK on the remote control or select
Next to continue.
If you connect wirelessly, you will be
asked to confirm your current network’s
wireless security level. If an Encryption
key is needed, enter the encryption key
for your network using the on-screen
keyboard and click Next.
NOTE: For wireless router settings, the security level chosen on
the Extender setup screens must match your computer security.
Menu Language
Please select the menu language for the player
English
Francaise
Deutsch
English
Menu Screen Language
Menu Language
Please select the menu language for the player
English
Francaise
Deutsch
English
Menu Screen Language
Analog Connection ScreenAnalog Connection Screen
Device Configuration2�
14
Device Configuration
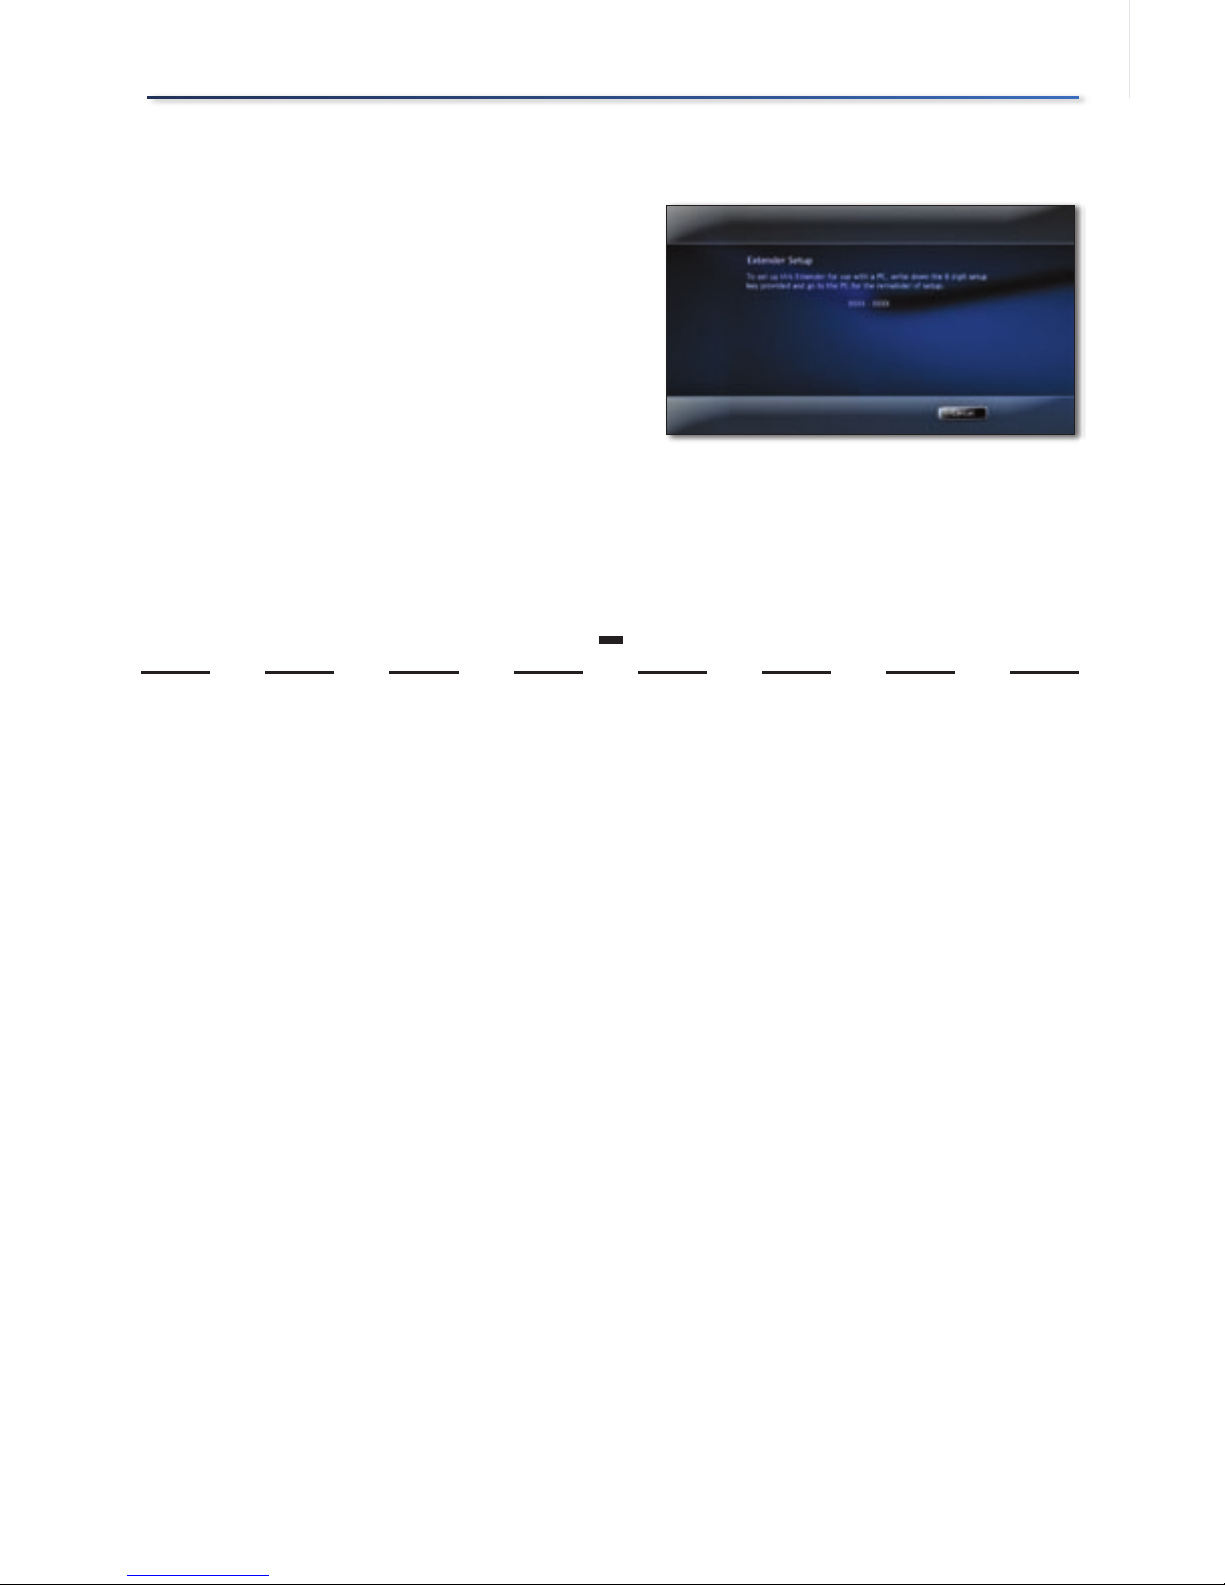
Record Setup Key from Device
For the computer to recognize
the Media Center Extender, it will
need a Setup key. The eight digit
Setup key will display on the TV
screen (and on the front panel of
the Media Center Extender if it is a
DMA2200).
Write down this Setup Key and
bring it to your Windows Vista
Premium or Ultimate computer.
You can enter the number here:
--
1.
2.
Setup Key ScreenSetup Key Screen
15
NOTE: Follow the steps below in order. You must insert the CD-
ROM and proceed through the setup screens.
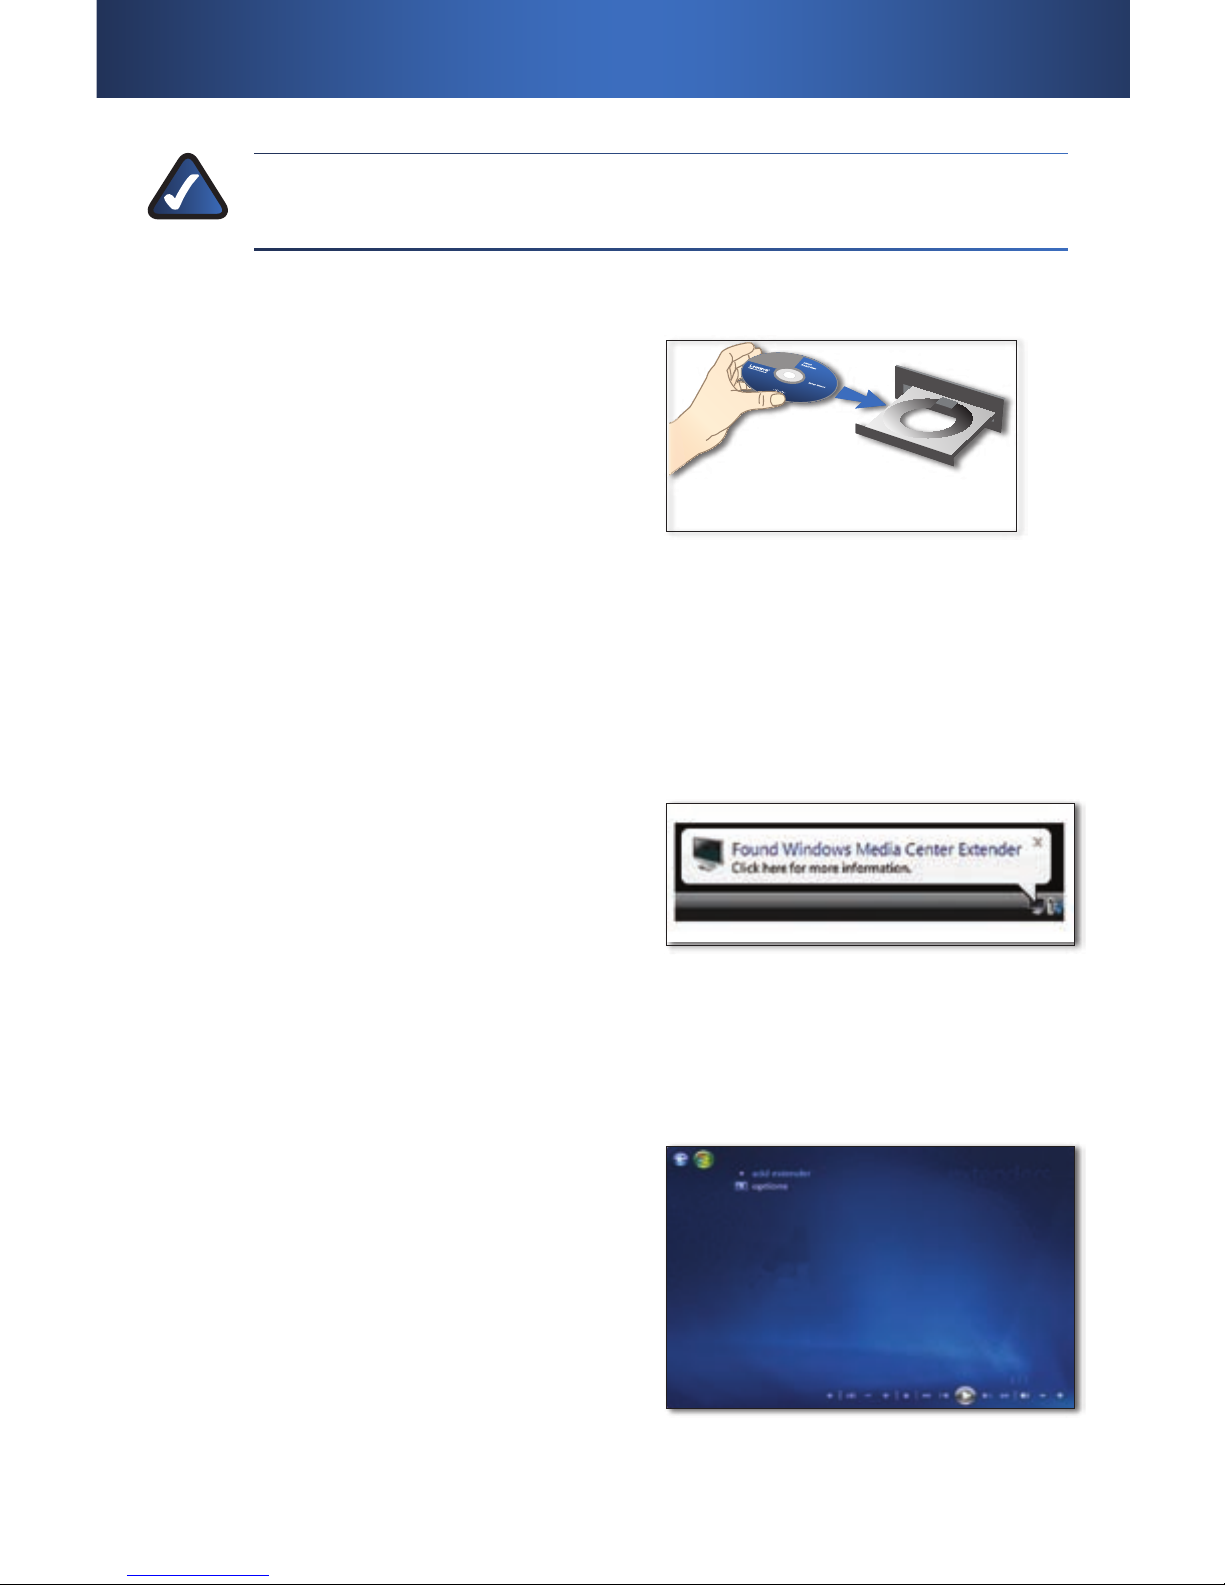
Insert CD-ROM
Insert the CD-ROM that came with your
Media Center Extender, into your Media
Center computer. Proceed through the
steps displayed on-screen.
Windows Vista Update
If you use a compatible version of
Windows Vista you will be asked to
update your system via Windows Vista
Update. Proceed through the steps
displayed on-screen.
Setup
If your computer has automatically
discovered the Extender, a message will
display, stating that the Extender was
found.
The type of message displayed may
vary. Click on the screen, or select Yes to
start the setup.
If your Extender was not automatically discovered, proceed with the
following steps.
Open ”Media Center” on the
computer and press the up or down
arrow to select Tasks.
Press the left arrow to select
settings.
Use the up or down arrow to
highlight Extender and then
press the up arrow to highlight
add extender. Click Enter.
1.
A.
B.
Insert CD-ROMInsert CD-ROM
Found Media Extender messageFound Media Extender message
Add ExtenderAdd Extender
Media Center Configuration3�
16
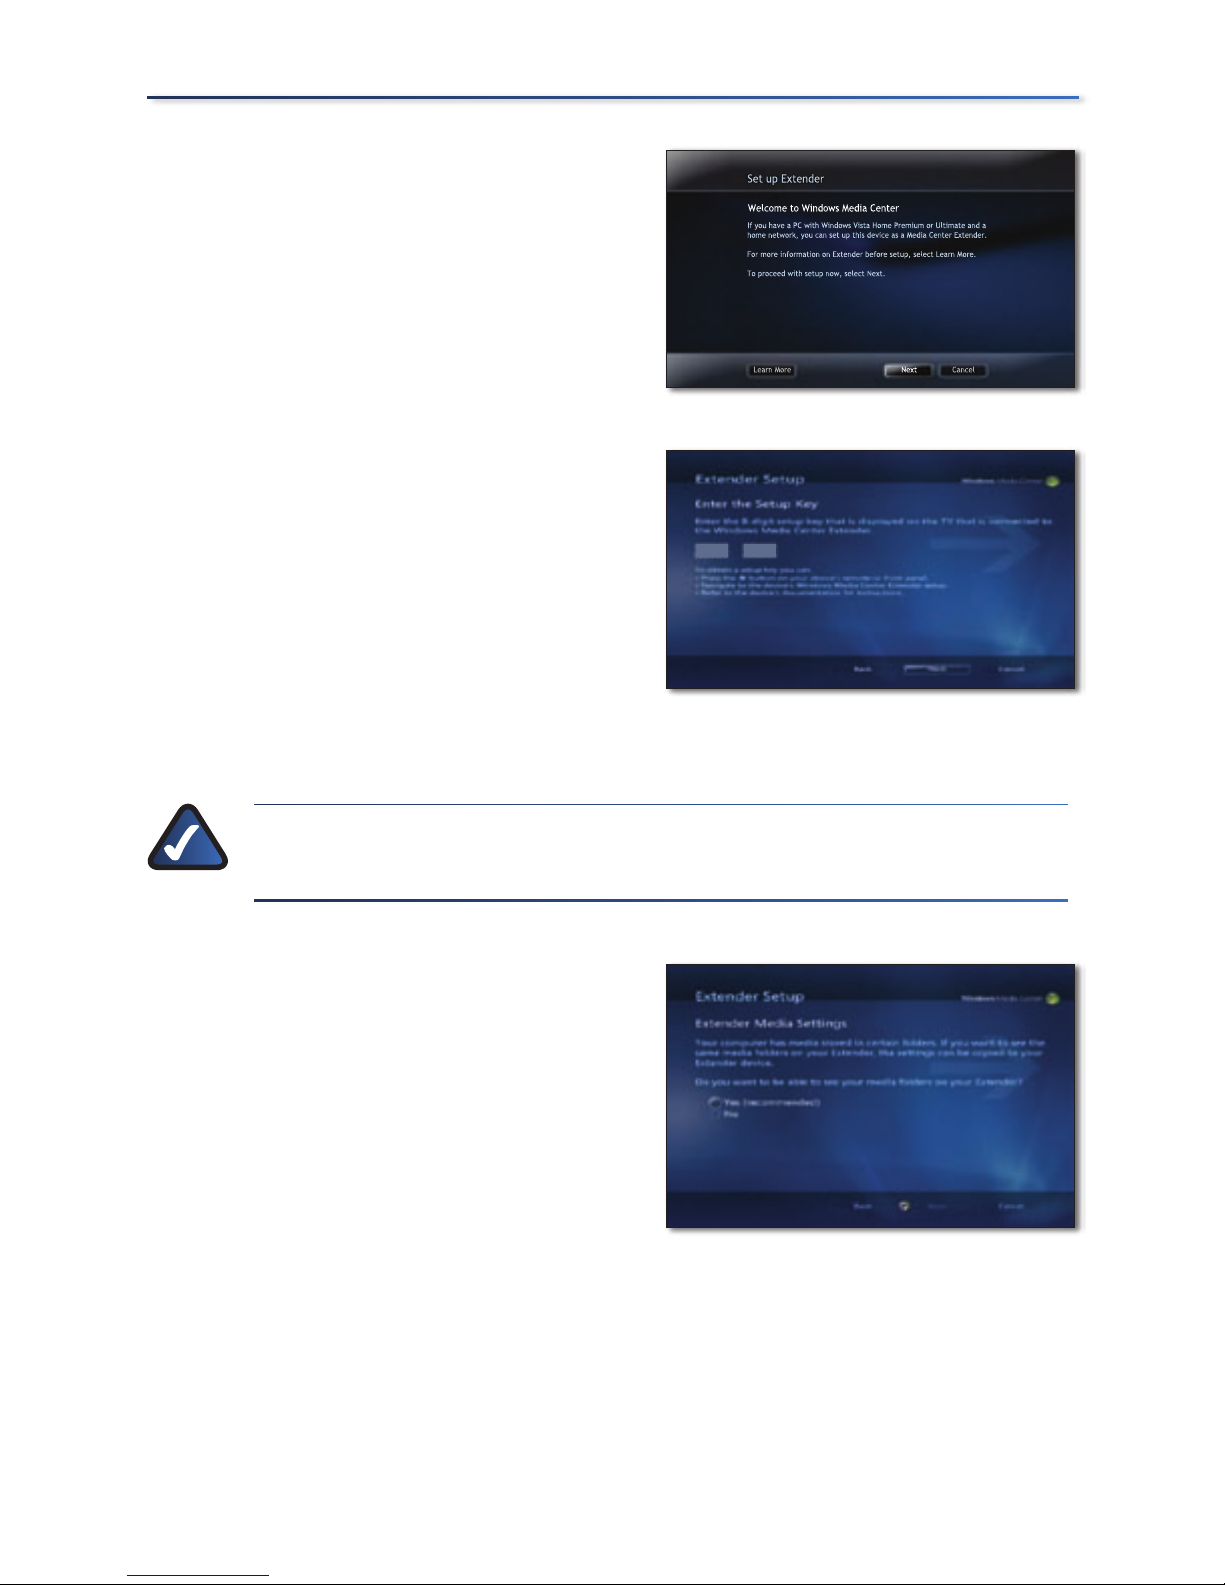
Media Center Configuration
You will see a Welcome to Windows
Media Center screen. Click Enter or
select Next to continue.
You will be asked to enter the
Extender Setup key that you
noted earlier. After entering the
number, click Enter or select Next to
continue.
The next screen may ask about
firewalls and changing computer
settings, click Enter or select Next to
continue.
NOTE: Third party firewalls may require additional manual
configuration.
You will also be asked if you want to
make media files stored on your PC
available. All media files (pictures,
music, video) will be shared. You
can modify this later in the settings
menu. Click
Yes and click Enter or
select Next to continue.
You may also be asked to allow
changes to some computer
settings, including enabling Away
Mode. Away Mode is a power
saving mode, that allows your
Extender to continue to work even
if you power off your computer.
2.
3.
4.
5.
6.
Learn More Next Cancel
Set up Extender
If you have a PC with Windows Vista Home Premium or Ultimate and a
home network, you can set up this device as a Media Center Extender.
For more information on Extender before setup, select Learn More.
To proceed with setup now, select Next.
Welcome to Windows Media Center
Welcome Screen
XXXX
XXXX
Extender Setup Screen
XXXX
XXXX
Extender Setup Screen
Sharing FilesSharing Files
 Loading...