

Page 1
Dual-Mode
Internet Telephony Kit with Skype
TM
User Guide
Model No.
CIT400
Page 2

Page 3

Copyright and Trademarks
Specifications are subject to change without notice. Linksys is a registered trademark or trademark of Cisco Systems,
Inc. and/or its affiliates in the U.S. and certain other countries. Copyright © 2006 Cisco Systems, Inc. All rights
reserved. Other brands and product names are trademarks or registered trademarks of their respective holders.
WARNING: This product contains chemicals, including lead, known to the State of California to cause
cancer, and birth defects or other reproductive harm. Wash hands after handling.
How to Use the User Guide
This User Guide has been designed to make understanding how to use the Dual-Mode Internet Telephony Kit
easier than ever. Look for the following items when reading this User Guide:
This exclamation point means there is a caution or warning and is something that could
damage your property or Dual-Mode Internet Telephony Kit.
This question mark provides you with a reminder about something you might need to do
while using the Dual-Mode Internet Telephony Kit.
This checkmark means there is a note of interest and is something you should pay special
attention to while using the Dual-Mode Internet Telephony Kit.
In addition to these symbols, there are definitions for technical terms that are presented like this:
word: definition.
Also, each figure (diagram, screenshot, or other image) is provided with a figure number and description, like
this:
Figure 0-1: Sample Figure Description
Dual-Mode Internet Telephony Kit
CIT400-UG-61213 A DF
Page 4

Dual-Mode Internet Telephony Kit
Page 5

IMPORTANT SAFETY INSTRUCTIONS
BEFORE USING YOUR TELEPHONE EQUIPMENT, BASIC SAFETY PRECAUTIONS SHOUD ALWAYS BE FOLLOWED TO
REDUCE THE RISK OF FIRE, ELECTRIC SHOCK AND INJURY, INCLUDING THE FOLLOWING.
• Read and follow all warnings and instructions marked on the product.
Dual-Mode Internet Telephony Kit
• Do not use this product near water, laundry tub, in a wet basement, or near a swimming pool.
• Do not place this product on an unstable table. The product may fall and be damaged.
• This product should never be placed near or over a radiator or heat register.
• This product should be operated only from the type of power source indicated on the label.
• Do not allow anything to rest on the power cord. Do not locate this product where the cord will be
abused by persons walking on it.
• Do not overload wall outlets and extension cords as this can result in the risk of fire or electric shock.
• Avoid using a telephone during an electrical storm. There may be a remote risk of electric shock from
lightning.
• Do not use this product to report a gas leak in the vicinity of the leak.
• Do not use this product near intensive care medical equipment or by persons with pacemakers.
• Due to the radio signals between base station and handset, wearers of hearing aids may experience
interference in the form of a humming noise.
SAVE THESE INSTRUCTIONS
Page 6

Dual-Mode Internet Telephony Kit
BATTERIES
• Use only the battery type listed in the instruction manual. Do not use lithium batteries or nonrechargeable batteries that may damage the handset and charger.
• Do not dispose of the battery in a fire, as they can explode.
• Do not open or mutilate the battery. Released electrolyte is corrosive and can cause damage to the eyes
or skin. It can be toxic if swallowed.
• Avoid contact with metal objects when handling the battery. These objects could short out the batteries
or cause the conductor to overheat resulting in burns.
• Do not attempt to recharge the battery cell by heating it. Sudden release of battery electrolyte can cause
burns or irritation to the eyes or skin.
• Observe the proper polarity, or direction, of any battery. Reverse insertion of the battery cell can result in
leakage or explosion.
• Remove the battery cells if you do not plan to use the product for several months at a time.
• Discard any “dead” batteries because they are likely to leak into the product.
• Do not store this product or the battery in a high temperature area. Battery stored in a freezer or
refrigerator should be protected from condensation during storage and defrosting. Battery should be
stabilized at room temperature before using.
• Your battery is rechargeable and can be recycled once it outlives its usefulness. Depending upon your
local and state law, it might be illegal to dispose of this battery into a municipal waste system. Check
with your local solid waste company for more information on your recycling options for the battery cells.
SAVE THESE INSTRUCTIONS
Page 7

Dual-Mode Internet Telephony Kit
Table of Contents
Chapter 1: Introduction 1
Welcome 1
What’s in This User Guide? 2
Chapter 2: Getting to Know the Dual-Mode Internet Telephony Kit 3
Overview 3
The Charger 3
The Base Station 4
The Handset’s Front Panel 5
The Handset’s Side Panel 7
The Handset’s Back Panel 8
Chapter 3: Getting Started 9
Before You Begin 9
Getting Started with the Handset 9
Getting Started with the Base Station 10
Powering On the Handset 10
Entering Names, Numbers and Special Characters 11
Phone Features 12
Adjusting the Call Volume 12
First Time Phone Use 13
Chapter 4: Using the Dual-Mode Internet Telephony Kit 17
Overview 17
Skype Basics 18
Setting up a Skype Contact List 18
Viewing and Calling a SkypeOut Contact 20
Incoming Skype Calls 23
Page 8

Dual-Mode Internet Telephony Kit
Call History 24
Intercom and Conference Calls 26
Skype Voicemail 27
Your Skype Profile 30
Skype Settings 31
The Handset’s Display Screen Icons 35
Landline Features 38
Landline Voicemail 42
Using Additional Features 43
Customizing the Handset 44
Managing the Handset(s) 53
Chapter 5: Network Settings 59
The Network 59
Appendix A: Troubleshooting 67
Common Problems and Solutions 67
Frequently Asked Questions 70
Default Settings 71
Country Codes 72
Appendix B: Specifications 83
Environmental 84
Appendix C: Regulatory Information 85
IMPORTANT SAFETY INSTRUCTIONS. READ CAREFULLY AND KEEP FOR FUTURE REFERENCE. 85
Environment and Safety 85
Compliance Information 87
European Union 92
Appendix D: Warranty Information 95
Appendix E: Contact Information 97
Page 9

Chapter 1: Introduction
Welcome
Thank you for choosing the Linksys Dual-Mode Internet Telephony Kit with Skype. It will allow you to make phone
calls using your broadband connection (through Skype™) and traditional phone service (optional). It also
supports SkypeOut™ dialing. For landline service, you must have a service provider and a telephone port to
connect to.
The Dual-Mode Internet Telephony Kit gives you cordless convenience, so you don't have to sit in front of your
computer when you want to talk to your friends. It comes with a handset, charger, and a base station. After the
handset receives its initial charge, you can plug the base station into an Ethernet port and use the phone
immediately.
What is Skype?
Skype allows you to make free calls to other Skype users and really cheap calls to ordinary phones. Skype also
offers additional features, including:
SkypeOut SkypeOut allows you to place calls to traditional landline and mobile phones.
SkypeIn™ SkypeIn is a subscription feature that provides you with a traditional phone number for
receiving Skype calls on your cordless phone from traditional landlines and mobile phones.
Skype Voicemail™ Skype voicemail allows you to send and receive messages and record a greeting.
Dual-Mode Internet Telephony Kit
All of these features are available at www.skype.com
Chapter 1: Introduction
Welcome
1
Page 10

Dual-Mode Internet Telephony Kit
What’s in This User Guide?
This guide covers the steps for installing the Dual-Mode Internet Telephony Kit.
• Chapter 1: Introduction
This chapter describes the Dual-Mode Telephony Kit’s applications and this User Guide.
• Chapter 2: Getting to Know the Dual-Mode Internet Telephony Kit
This chapter describes the physical features of the Dual-Mode Internet Telephony Kit.
• Chapter 3: Getting Started
This chapter explains how to connect and set up the Dual-Mode Internet Telephony Kit.
• Chapter 4: Using the Dual-Mode Internet Telephony Kit
This chapter discusses how to make calls and configure different features of the Dual-Mode Internet
Telephony Kit.
• Appendix A: Troubleshooting
This appendix describes some potential problems and solutions, as well as frequently asked questions,
regarding use of the Dual-Mode Internet Telephony Kit.
• Appendix B: Specifications
This appendix provides the technical specifications for the Dual-Mode Internet Telephony Kit.
• Appendix C: Warranty Information
This appendix supplies the warranty information for the Dual-Mode Internet Telephony Kit.
• Appendix D: Regulatory Information
This appendix supplies the regulatory information regarding the Dual-Mode Internet Telephony Kit.
• Appendix E: Contact Information
This appendix provides contact information for a variety of Linksys resources, including Technical Support.
2
Chapter 1: Introduction
What’s in This User Guide?
Page 11
Dual-Mode Internet Telephony Kit
Chapter 2: Getting to Know the Dual-Mode Internet Telephony Kit
Overview
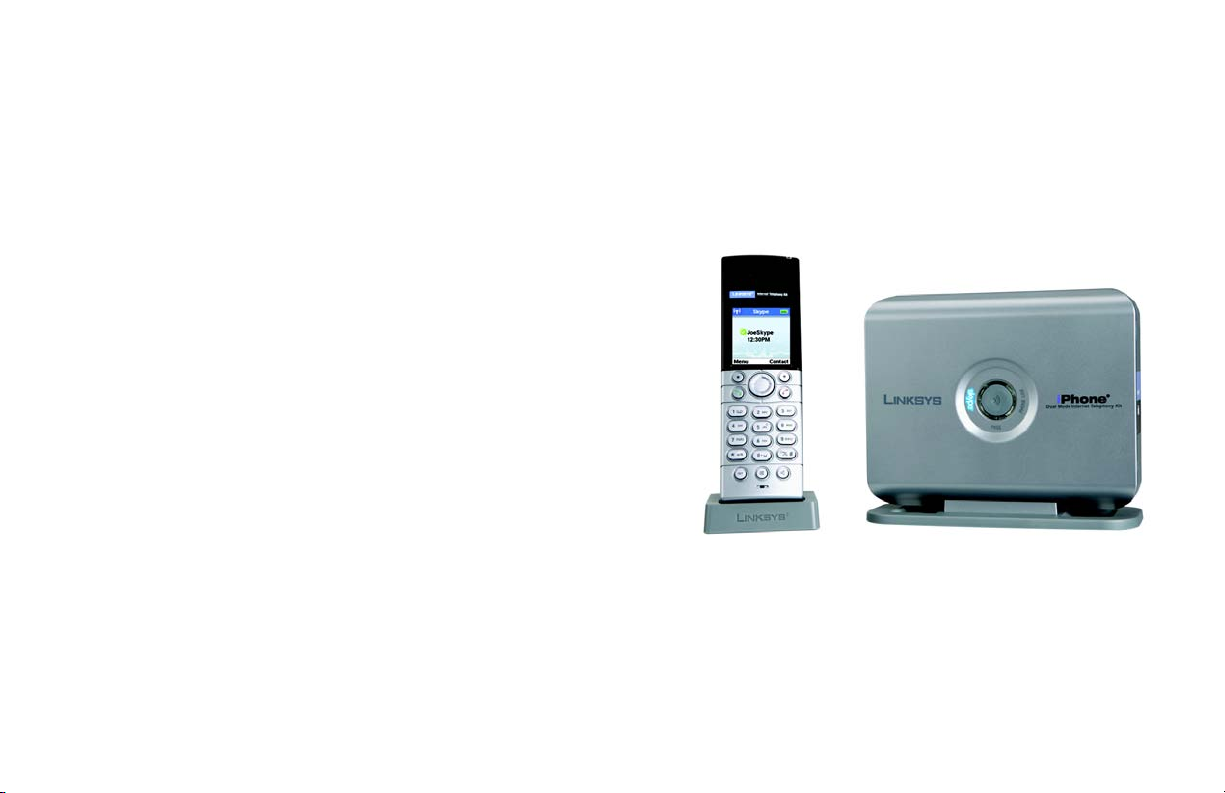
The Dual-Mode Internet Telephony Kit with Skype includes eight items:
• A handset
•A charger
• A power adapter for the charger
• A base station
• A power adapter for the base station
• 2 AAA batteries
• A RJ-11 telephone line cord
• An RJ-45 ethernet cable
The Charger
The Dual-Mode Internet Telephony Kit comes with a charger, which plugs into an electrical outlet. When the
handset’s power runs low, slide it into the charger, and the handset will begin recharging automatically.
Figure 2-1: Handset on
Charger and Base Station
Chapter 2: Getting to Know the Dual-Mode Internet Telephony Kit
Overview
3
Page 12

Dual-Mode Internet Telephony Kit
The Base Station
The base station must be connected to an ethernet port to use Skype. To make landline calls, the base station
should also be connected to a telephone line port.
Front Panel
Skype LED Blue. The Skype LED lights up and is solidly lit during a Skype call.
PHONE LINE LED Amber. The PHONE LINE LED lights up and is solidly lit during a landline call.
Page Button Press this button to page your handset. To stop the page, press the right soft key on your
handset. You will also use this button if you need to register additional handsets (refer to
“Chapter 4: Using the Dual-Mode Internet Telephony Kit” for more information).
Back Panel
Line Port Use the Line port to connect the base station to your telephone wall jack with a RJ-11
telephone cable.
Ethernet Port Use the Ethernet port to connect the base station to your ethernet connection with an RJ-
45 ethernet cable.
Power Port Use the power port to connect the power adapter of the base station.
Reset Button To reset all network settings to the factory default settings, use the end of a paper clip to
push in the reset button.
4
Chapter 2: Getting to Know the Dual-Mode Internet Telephony Kit
Page
Button
Figure 2-2: Front Panel of Base
Station
Figure 2-3: Side Panel of
Base Station
The Base Station
Page 13
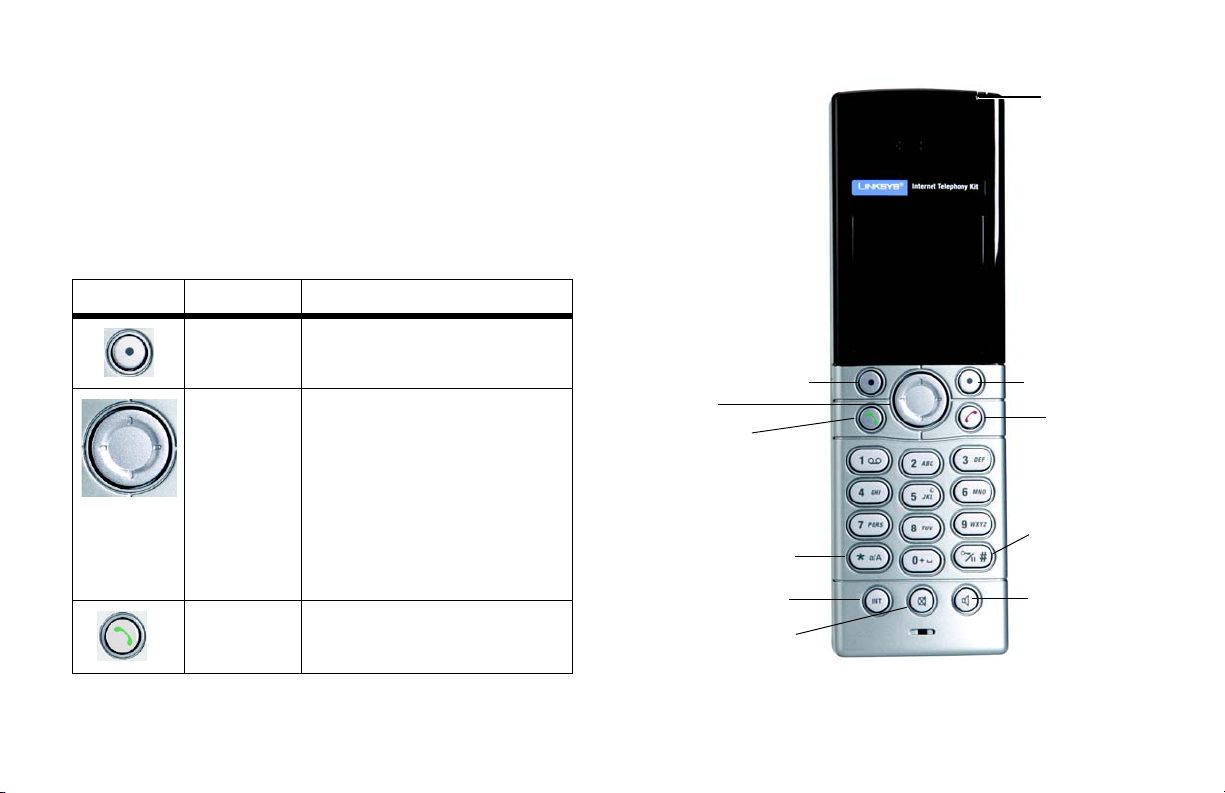
The Handset’s Front Panel
The LED and keys of the handset are described here. You can have up to four cordless handsets for a single
base station (refer to “Chapter 4: Using the Dual-Mode Internet Telephony Kit” for more information).
LED Red. The LED lights up when the handset is in use. It flashes when there is an
incoming call or a message waiting.
Dual-Mode Internet Telephony Kit
LED
The context-sensitive keys are described in this table.
Icon Name Function
Soft Key Press this key to select the appropriate
action shown on the left- or right-hand
side of the screen.
Navigation Pad Use this pad to navigate menus.
Depending on the menu, you may scroll
up, down, left and right.
Press down to adjust ringer or call
volume.
During standby mode, press up to change
your Skype Status, press down to see the
All Calls list.
Call Press this key to make or answer calls.
Chapter 2: Getting to Know the Dual-Mode Internet Telephony Kit
The Handset’s Front Panel
Navigation Pad
Star or Alpha
Soft Key
Call
Intercom
mute
Soft Key
Power/
End Call
#, Key Lock, or
Pause
Speakerphone
Figure 2-4: Front of Handset
5
Page 14

Dual-Mode Internet Telephony Kit
Icon Name Function
Power/End Call Press this key to power on the handset
when the handset is off.
Press and hold this key to see the Skype
menu when the handset is on. Your
choices include powering off the phone.
Star, Alpha Use for the functions of a * (star) key or to
#, Key Lock, or
Paus e
Intercom Press this button to access the intercom
toggle between upper and lower case
alphabetic characters.
This key performs all the functions of a #
(pound) key, locks the keys, or enters a
pause.
feature.
NOTE: If the battery charge is
low, the handset may not
power on for up to 15 minutes.
Mute
Press this button to mute the
microphone. The caller cannot hear
you, but you can hear the caller.
Speakerphone Press this key to use the speakerphone.
6
Chapter 2: Getting to Know the Dual-Mode Internet Telephony Kit
The Handset’s Front Panel
Page 15

The Handset’s Side Panel
If you have a headset (optional), open the headset flap. Then plug your headset into the headset port.
Dual-Mode Internet Telephony Kit
HEADSET
Figure 2-5: Headset
Port
Chapter 2: Getting to Know the Dual-Mode Internet Telephony Kit
The Handset’s Side Panel
7
Page 16

Dual-Mode Internet Telephony Kit
The Handset’s Back Panel
The handset’s speakerphone and battery compartment are located on the back panel. For directions on how to
insert the batteries, refer to “Chapter 3: Getting Started.”
Speakerphone
Battery
Compartment
Figure 2-6: Back Panel
of Handset
8
Chapter 2: Getting to Know the Dual-Mode Internet Telephony Kit
The Handset’s Back Panel
Page 17

Chapter 3: Getting Started
Before You Begin
To use Skype you will need an available ethernet port. If you have traditional phone service (landline), you will
also need an available telephone wall jack.
Getting Started with the Handset
To insert the batteries and charge them, follow these instructions:
1. Remove the cover of the battery compartment.
2. Insert the two NiMH rechargeable, AAA batteries (included). Make sure the polarities are correct. (The + and
- ends of the batteries should be in the + and - slots of the compartment.)
3. Slide the cover upward until it snaps into place.
4. Plug the charger’s power adapter into an electrical outlet. Place the handset on the charger. For the initial
charge, let the batteries charge for 14 hours before using the handset. This maximizes battery performance
and life.
NOTE: The handset may become warm during the initial charge.
NOTE: If the batteries are low, the handset may not power on for up to 15 minutes and will emit a
warning tone. Place the handset on the charger to recharge.
Proceed to the next section, “Getting Started with the Base Station.”
Dual-Mode Internet Telephony Kit
Figure 3-1: Handset’s Batteries
Figure 3-2: Handset on Charger
Chapter 3: Getting Started
Before You Begin
9
Page 18

Dual-Mode Internet Telephony Kit
Getting Started with the Base Station
To connect the base station, follow these instructions:
1. If you have a landline, connect a RJ-11 telephone line cord (included) to the LINE port of the base station.
Then connect the other end to your telephone wall jack. If only the landline is connected you can only make
and receive calls over the landline.
2. Connect the Ethernet RJ-45 cable (included) to the Ethernet port of the base station. Then connect the other
end to a network Ethernet jack. If only the Ethernet cable is connected, you can only make and receive
Skype or SkypeIn calls.
3. Connect the included power adapter to the power port of the base station. Then plug the power adapter into
an electrical outlet.
Proceed to the next section, “Powering On the Handset.”
Figure 3-3: Connect to the
LINE Port
Powering On the Handset
When the handset is fully charged, press and release the Power/End Call key; this will power on the handset. To
power off the handset, press the Power/End Call key until you will see the Skype menu. Scroll to Switch Off.
Press Select and the phone will power off.
• Standby mode is when the phone is on, but not in use. In standby mode your phone displays signal strength,
handset number (in parenthesis), battery charge status, Skype status, user i.d. and time.
10
Figure 3-4: Connect to the
Ethernet Port
Figure 3-5: Connect to the
Power Port
Chapter 3: Getting Started
Getting Started with the Base Station
Page 19

Entering Names, Numbers and Special Characters
Use the handset number keys to enter text, numbers or symbols.
Entering or Deleting Letters, Numbers, Symbols and Special Characters
•Press the star, alpha key to change between uppercase and lowercase letters or numeric characters. Alpha
modes also display some special characters.
•Press the # key for symbols including the @ sign.
• Press and release 0 (zero) to add a space. Press and hold 0 (zero) to add a + (plus).
• To erase a character, press and release Clear; it works as a backspace. To delete all characters, press and
hold Clear.
Dual-Mode Internet Telephony Kit
Chapter 3: Getting Started
Entering Names, Numbers and Special Characters
11
Page 20

Dual-Mode Internet Telephony Kit
Phone Features
Adjusting the Call Volume
During a call, press up or down on the navigation pad to change the volume level.
Making Handsfree Calls
You can use a headset with a 2.5 mm plug or speakerphone for handsfree calls.
To use a headset, follow these instructions:
1. Open the headset flap.
2. Plug your headset into the headset port.
3. Unplug the headset to end the handsfree feature.
You can use the speakerphone instead of the headset:
1. Press the Speaker key on the phone. The speaker icon will display on screen.
2. For call clarity, have the back panel of the phone facing up.
3. To end the call, press the Speaker key again.
Proceed to the next section, “First Time Phone Use”
12
HEADSET
Figure 3-6: Headset
Chapter 3: Getting Started
Phone Features
Page 21

First Time Phone Use
When you turn on the phone for the first time, you will be asked to:
1. Select the language. If the language you want does not appear on-screen, scroll to find the correct language and
press Select to confirm.
Dual-Mode Internet Telephony Kit
2. Review the agreement. Use the navigation button to move up or down. Read the agreement and press Accept to
proceed.
3. Set your country code. For the phone to work correctly according to your country’s standards, you must use the
code for the country you are calling from. For example, the U.S. and Canada use the country code of 1. If you don’t
know your Country’s code, see “Appendix A, Troubleshooting” for a list. Press Clear to make a correction. Press
Enter to confirm the country code.
4. Set your area code. To be able to return local, national or international calls received on the Landline, you must set
your area code. Your phone will update the information and reset itself. If your country does not use area codes,
leave this field blank.
5. Create a Skype Account or sign in to your existing Skype Account. Each Skype account has a unique Skype Name
with a password. If your Skype Name is the same as another Skype user, it will not be accepted. Your existing
Skype Name needs to be at least 6 characters and can be any combination of letters, numbers and symbols. Your
password needs to be at least 4 characters. This password is different from the system PIN of the phone. Each
phone user can have their own Skype account.
Chapter 3: Getting Started
First Time Phone Use
Figure 3-7: Agreement
Figure 3-8: Country Code
Figure 3-9: Password
13
Page 22

Dual-Mode Internet Telephony Kit
Setting the clock
It is necessary to set the clock to the correct time zone of the location where your Skype phone is being used
before initial phone use.
The time zone is based on Greenwich Mean Time (GMT). If you don’t know your time zone, you can obtain it from
http://www.greenwichmeantime.com.
1. Press Menu.
2. Scroll to Settings. Press Select.
3. Scroll to Time & Date. Press Select.
4. Scroll to Time Zone. Press Select.
5. Scroll to the correct zone. Press OK when finished. The correct time and date setting will be entered.
To manually set the time, or to edit the Time and Date settings, see “Editing the Time and Date Settings” in
Chapter 4.
Figure 3-10: Selecting the
Time Zone
14
Chapter 3: Getting Started
First Time Phone Use
Page 23

Registering the Handset
To make calls the handset must be registered to the base unit. This is preset. However, if you bought an extra
handset or de-registered a handset, you may see the message Unregistered on the phone’s LCD screen. To
register the handset when the Unregistered message has displayed:
1. Press Reg.
2. Press the middle button (PAGE) on the base station. When you release it, the lights will flash.
3. If asked, enter the System PIN (default: 0000). Use Clear to make a correction.
4. Press OK to confirm. The handset will start searching for the base station.
5. After successful registration, the signal strength icon will display steadily on the handset screen. If
registration failed, repeat these steps.
NOTE: Your base station can register up to 4 handsets. When 4 handsets are registered, the base
station memory becomes full and no further handsets can be registered to that base station.
Checking the Signal Strength
The signal icon displays the link status between the handset and base station. If the signal icon displays, the
handset and base station are communicating and calls can be made and received.
If you don’t see the Signal Strength icon, you may be too far from the base station. Move the handset closer to
the base station. If you are on a call and losing signal strength, you will hear warning tones, which gives you
time to move the handset and base station closer together.
Dual-Mode Internet Telephony Kit
Figure 3-11: Signal Strength
icon
Chapter 3: Getting Started
First Time Phone Use
15
Page 24

Dual-Mode Internet Telephony Kit
Staying within Range
If you move outside of the base station’s range during a call, an alarm tone will sound and the Base/Handset Link
icon will flash on the handset’s display screen. Your call will be disconnected if you do not move back within
range.
Congratulations! The installation of the Dual-Mode Internet Telephony Kit is complete.
For more information on how to use the Telephony Kit, refer to “Chapter 4: Using the Dual-Mode Internet
Telephony Kit.”
16
Chapter 3: Getting Started
First Time Phone Use
Page 25
Dual-Mode Internet Telephony Kit
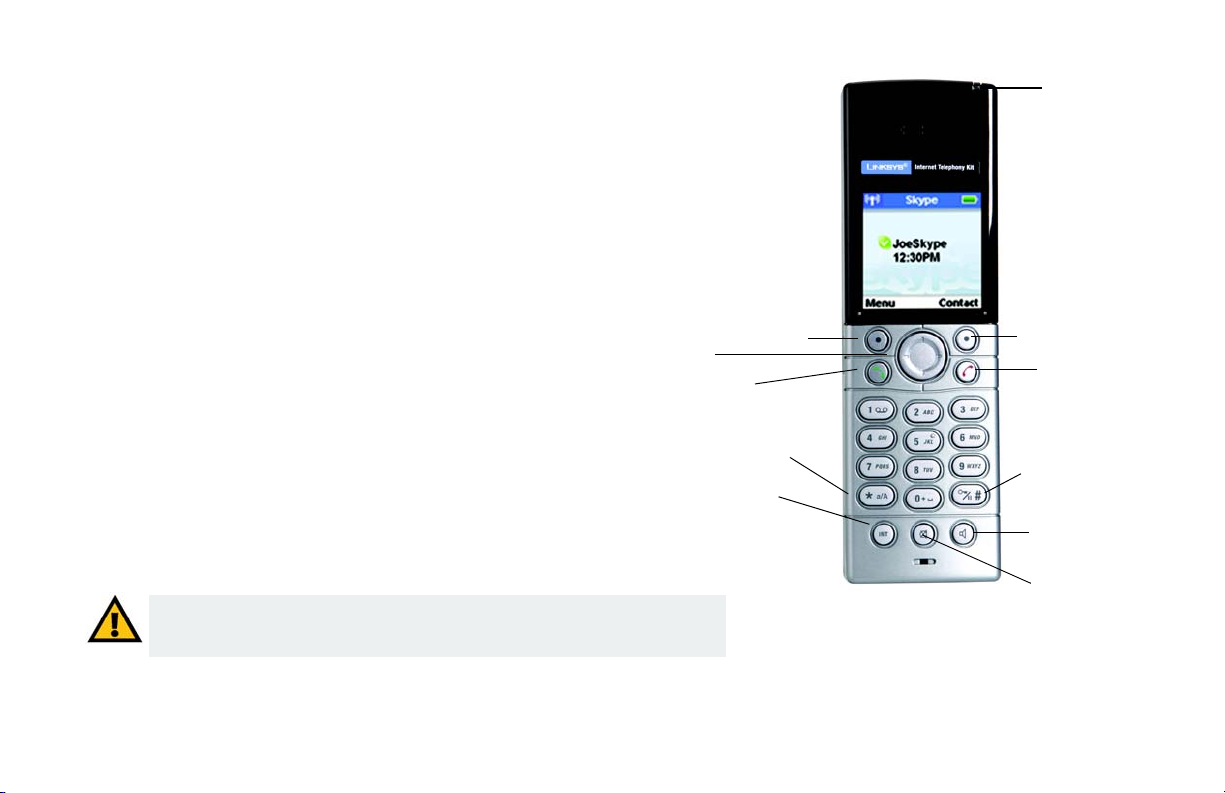
Chapter 4: Using the Dual-Mode Internet Telephony Kit
Overview
This chapter explains how to
• Use the handset
• Use Skype features
• Use landline features
• Manage the handset
IMPORTANT: Emergency calls cannot be placed through a Skype line. If you dial
an emergency number, it will automatically be placed through a landline if one is
available. If a landline is not available the emergency call will not go through.
Navigation Pad
Soft Key
Call
Star, Alpha
Intercom
LED
Soft Key
Power/
End Call
#, Key Lock, or
Pause
Speakerphone
mute
Figure 4-1: Front of
Handset
Chapter 4: Using the Dual-Mode Internet Telephony Kit
Overview
17
Page 26
Dual-Mode Internet Telephony Kit
Skype Basics
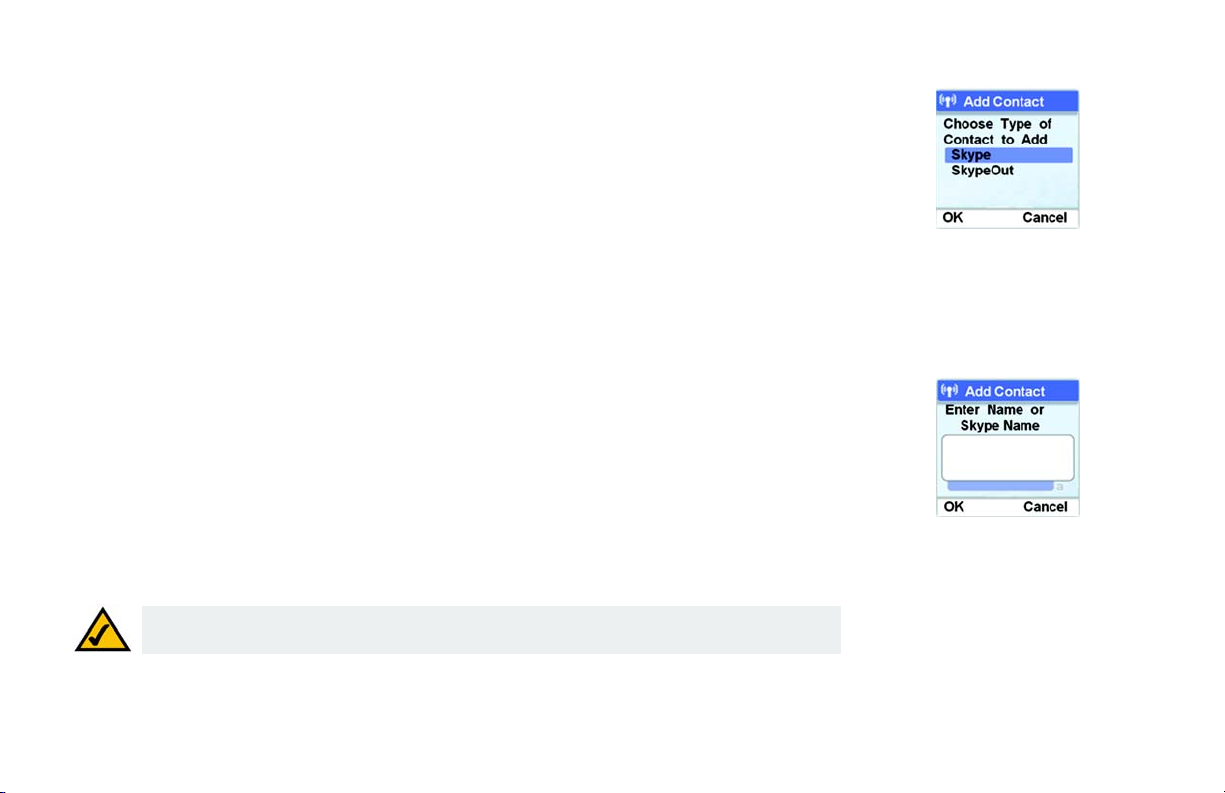
Setting up a Skype Contact List
1. Press Menu.
2. Scroll to Add Contact. Press Select.
3. Scroll to Skype or SkypeOut type of contact and press OK.
4. For a Skype Contact, enter the Name or Skype Name, using the handset keys. When you are finished, press
OK. Skype will search its database for the Contact’s information. When the correct information is displayed,
press OK. The Contact will be added to your list (you can skip step 5).
For a SkypeOut Contact, enter the Contact Name using the handset keys. When you are finished, press OK.
5. Enter the number of the Contact, starting with the + sign (press and hold zero) followed by the international
country code, area code and phone number. Press Enter. (If the number is not valid, you will get an error
message.) The Contact will be added to your list.
When your Contact List is full, a notification displays and you will need to delete entries before adding more.
NOTE: To make a SkypeOut call for the number 905-555-6622 where the country code is “1” (North
America), dial +19055556622.
Figure 4-2: Add Skype
Contact
Figure 4-3: Add Contact,
Enter Name
18
Chapter 4: Using the Dual-Mode Internet Telephony Kit
Skype Basics
Page 27

Viewing and Calling a Skype Contact
To quickly dial a Skype Contact, press the right Contact key. Scroll through the Contact list or use the handset
keys to find the letter of the name. When you have highlighted the name to call, press the Call key. You can also:
1. Press Menu.
2. Scroll to Contacts. Press Select.
3. Scroll to highlight the name you want, or use the handset key to find the name. Press Call.
.
Finding a Skype User
You can search for a Skype user that is not on your contact list.
1. Press Menu.
2. Scroll to Search. Press Select.
3. Enter the Skype name or as much of the name as possible with the handset keys. The more specific the
name, the shorter the search. Press Enter. A list of matching names displays.
4. Scroll to the user’s name and press Options. You can call, view their profile and add to your contact list.
NOTE: If you enter the same name for two different entries, then the message, “DUPLICATE NAME
REPLACE?” will be displayed. Select OK to replace the existing entry with the new entry, or select
CANCEL to change the name.
Dual-Mode Internet Telephony Kit
Figure 4-4: Call a Contact
Figure 4-5: Search for
a Skype Name
Chapter 4: Using the Dual-Mode Internet Telephony Kit
Setting up a Skype Contact List
19
Page 28

Dual-Mode Internet Telephony Kit
Viewing and Calling a SkypeOut Contact
SkypeOut Credit
You can call a traditional landline or mobile phone using SkypeOut. SkypeOut calls require SkypeOut credit.
While your phone is in standby, your Skype credit is displayed. To purchase additional credits, go to
www.skype.com.
Assigning a Preferred Line for SkypeOut Calls
You can assign a preferred line for SkypeOut and landline Contacts (except from the outgoing call list). Details for
assigning a landline Contacts preferred line are found later in this Chapter. The Preferred Line options are:
Always SkypeOut, Always Landline or Always Ask (default).
1. Press Menu.
2. Scroll to Settings. Press Select.
3. Scroll to Call Settings. Press Select.
4. Scroll to Preferred line. Press Select.
5. Scroll to SkypeOut. Press Select. The new setting is saved.
Calling from SkypeOut when the Preferred Line is Always Ask
1. Enter the phone number you want to call, or select it from the contact list.
2. Press Options.
20
Chapter 4: Using the Dual-Mode Internet Telephony Kit
Viewing and Calling a SkypeOut Contact
Page 29

3. Scroll to SkypeOut.
4. Press Select. The call will be dialed.
Managing Your Contacts
You can allow new, rename, block, unblock or remove a contact from your list.
Dual-Mode Internet Telephony Kit
Renaming a Contact
1. Using the Contact key, or Menu, Contact list, find the name you want to change. Press Options.
2. Scroll to Rename. Press Select.
3. Edit the name using the handset keys. Use Clear to make a correction.
4. Press Enter. The new entry is saved.
Blocking a Contact
You can block a contact. You will always appear as offline to any user that you have blocked.
1. Using the Contact key, or Menu, Contact list, find the name you want to block. Press Options.
2. Scroll to Block. Press Select.
3. A confirmation request will display. Press Ye s to confirm. You can then choose to block or remove the
contact.
Chapter 4: Using the Dual-Mode Internet Telephony Kit
Viewing and Calling a SkypeOut Contact
Figure 4-6: Selecting
a Contact
21
Page 30

Dual-Mode Internet Telephony Kit
Unblocking a Contact
1. Press Menu.
2. Scroll to Settings. Press Select.
3. Scroll to Privacy. Press Select.
4. Scroll to Blocked Users. Press Select.
5. Scroll to the contact you want to unblock. Press Options.
6. Press Unblock.
Removing a Contact
1. Using the Contact key, or Menu, Contact list, find the name you want to block. Press Options.
2. Scroll to Remove. Press Select.
3. A confirmation request will display. Press Ye s. The contact is removed.
NOTE: This is the contact list
of the user who is currently
logged into Skype.
22
Chapter 4: Using the Dual-Mode Internet Telephony Kit
Viewing and Calling a SkypeOut Contact
Page 31

Incoming Skype Calls
Answering an Incoming Skype Call
When you receive a Skype call, the handset will ring the selected Skype ring tone (refer to the “Customizing the
Handset” section), and the Skype Call in Progress icon will flash. The display screen will show the display name
and Skype ID of the caller or the number of the call (if it is a SkypeIn call). To answer, press the Call key.
Answering a Second Incoming Skype Call
When there is a second incoming Skype call while you are on the first Skype call, you will hear a short beep
periodically. To pick up the second incoming call, press the Call key. Your current Skype call will be put on hold.
To toggle between the two calls, press the Call key. You can also press the Power/End Call key, to end the
current call and return to the other caller.
Rejecting an Incoming Skype Call
Press Reject while the phone is ringing. The handset returns to standby.
Ending a Skype Call
Press the Power/End Call key, or place the handset on the charger.
Call Timer
When you are on a call, the on-screen call timer shows the duration of your current call.
Dual-Mode Internet Telephony Kit
Chapter 4: Using the Dual-Mode Internet Telephony Kit
Incoming Skype Calls
23
Page 32

Dual-Mode Internet Telephony Kit
Call History
The handset keeps track of the calls you make, miss or receive (answered or not). The history includes caller
name, number call time and date. You can also review received Skype Voicemail, Skype New Contact requests
and landline voicemail.
Checking the Call History
1. Press the Menu key.
2. Scroll to History. Press Select. Scroll through All Calls, Missed Calls, Incoming, Outgoing, Voicemails
(received and not deleted) or New Contact (this allows someone to add you to their Skype contact list).
3. Press Select to see the history of your choice. To view the details of an entry, scroll to the entry and select
Options.
4. Scroll to the option you want, press Select to see details.
Calling from Call History
Use this feature to call a number that is in Call History.Press the Menu key.
5. Scroll to History. Press Select.
6. Scroll to the call list you want. Press Select.
7. Scroll to the call record you want.
8. Press the Call key. The number is dialed out on the preferred line.
24
Chapter 4: Using the Dual-Mode Internet Telephony Kit
Figure 4-7: History
Options
Call History
Page 33

Deleting A Call History List
You can delete an entire call history list at once.
1. Press the Menu key.
2. Scroll to History. Press Select.
3. Scroll to the call list you want. Press Select.
4. Press Options.
5. Scroll to Clear List. Press Select.
Press Yes to confirm. All records are deleted.
Dual-Mode Internet Telephony Kit
NOTE: Your phone stores your
call history only as long as you
are signed in to Skype. When
you sign out, the current call
history is cleared. A new call
history will be saved when you
sign in to Skype again.
Chapter 4: Using the Dual-Mode Internet Telephony Kit
Call History
25
Page 34

Dual-Mode Internet Telephony Kit
Intercom and Conference Calls
Intercom Calls
Press INT (intercom). Scroll to the handset to call. Press Call.
Transferring a Call to another Handset
1. Press INT (intercom) during a call.
2. Scroll to the handset you want. Press Call.
3. Press the Power/End Call key after the other handset user answers. The outside call will be transferred.
Starting a Conference Call
You can place a conference call with two other callers, if one of the other handsets share your same base unit.
During a conference call, access the Options menu for other functions and features.
1. Call the first Skype contact or landline user through SkypeOut.
2. Press the INT key.
3. Scroll to find the handset you want to include in the call.
4. Press CALL.
5. When the caller on the second handset answers, press CONF. You are now on a 3-way call.
26
Chapter 4: Using the Dual-Mode Internet Telephony Kit
Intercom and Conference Calls
Page 35

Skype Voicemail
The Telephony Kit supports landline voicemail and Skype Voicemail. Skype Voicemail requires a subscription
from www.skype.com. These instructions are only for Skype Voicemail. Instructions for landline voicemails are
found later in this chapter.
You can record “My Greeting”.
1. Press Menu.
2. Scroll to Settings. Press Select.
3. Scroll to Call Settings. Press Select.
4. Scroll to Voicemail. Press Select.
5. Scroll to My Greeting. Press Options.
6. Scroll to Record New. Record your greeting.
To listen to your greeting, follow through step 5 above. In Options, scroll to Play. Press Select to hear the
greeting.
To set your greeting to the default Skype Voicemail greeting, follow through step 5 above. In Options scroll to
Reset Default. Press Select. Press Yes to confirm.
When you have new Skype Voicemail, the LED on the handset will flash, and the Skype Voicemail icon will
appear on the display screen.
Chapter 4: Using the Dual-Mode Internet Telephony Kit
Skype Voicemail
Dual-Mode Internet Telephony Kit
NOTE: The Skype Voicemail
list will display an icon next to
each voicemail. The Skype
Voicemail icon with a red star
indicates that a message is
new, while the same icon
without the star indicates that
you have already heard this
message.
27
Page 36

Dual-Mode Internet Telephony Kit
Retrieving a Skype Voicemail Message
1. Press Menu.
2. Scroll to History. Press Select.
3. Scroll to Voicemails. Press Select.
4. Scroll to Skype VM. Press Select.
5. Scroll to the Skype Voicemail you want to listen to. Press Select.
Returning a Skype Voicemail call
You can return a call to the Skype Voicemail sender.
1. Select Menu.
2. Scroll to History. Press Select.
3. Scroll to Voicemails. Press Select.
4. Scroll to Skype VM. Press Options.
5. Select the Skype Voicemail you want to return.
6. Press Call.
28
Chapter 4: Using the Dual-Mode Internet Telephony Kit
Skype Voicemail
Page 37

Deleting a Skype Voicemail
These instructions are only for deleting Skype Voicemails. For Landline voicemail, follow your service provider’s
instructions.
1. Select Menu.
2. Scroll to History. Press Select.
3. Scroll to Voicemails. Press Select.
4. Scroll to Skype VM. Press Options.
5. Select the message you want to delete.
6. Select Delete. Press Select. A confirmation request will display.
7. Select OK to confirm. The Skype Voicemail is deleted.
Dual-Mode Internet Telephony Kit
Chapter 4: Using the Dual-Mode Internet Telephony Kit
Skype Voicemail
29
Page 38

Dual-Mode Internet Telephony Kit
Your Skype Profile
You have the option to create a Public and a Private profile. The details of a Public profile can be viewed by other
Skype users. The details of a Private profile are not available to others. You can change your profile information
at any time.
You are not required to enter any information into your profile, however, the more information you provide, the
easier it will be for your friends to find you on Skype.
Public Details
Your Public profile can store information about you that will be visible to other Skype Users.
1. Press Menu.
2. Scroll to Status. Press Select.
3. Scroll to My Profile. Press Select.
Figure 4-8: Public
Detail Profile
4. Scroll to Public Detail. Press Select. View, add or modify the information.
Private Details
You can store up to three of your E-mail addresses. Another Skype user can find you on the network if they know
your E-mail address and it is stored in Private Details.
To Add, Edit or Delete an E-mail Address:
1. Press Menu.
30
Chapter 4: Using the Dual-Mode Internet Telephony Kit
Figure 4-9: Public
Details
Your Skype Profile
Page 39

2. Scroll to Status. Press Select.
3. Scroll to My Profile. Press Select.
4. Scroll to Private Detail. Press Select.
5. Scroll to the E-mail entry you want to modify. Press Options.
Dual-Mode Internet Telephony Kit
6. Scroll to Edit, Remove or Add. If your e-mail entries are blank, you will only have the Add option. Press
Select.
7. For a new entry, use the keypad to enter your mail address (press the # key to view @ and. ). Press OK when
complete. For Edit or Remove, scroll to the entry and press Select.
Skype Settings
Call Forwarding
You can redirect Skype calls to another landline or mobile number.
1. Press Menu.
2. Scroll to Settings. Press Select.
3. Scroll to Call Settings. Press Select.
4. Scroll to Call Forward. Press Select. (you will do this twice).
5. Scroll to Yes or Call Forward (if changing the call forward number). Press Select.
Chapter 4: Using the Dual-Mode Internet Telephony Kit
Skype Settings
Figure 4-10: Private
Detail Profile
Figure 4-11: Private
Details
31
Page 40

Dual-Mode Internet Telephony Kit
Enter the number to forward your calls to. Press Enter. Your calls will be forwarded. To end call forwarding
perform steps 1-4 above. Then scroll to No and press Select.
Do Not Disturb
You can turn off all ringers for Skype and SkypeIn calls. When you activate DND (Do Not Disturb) your handset
will not ring when it receives incoming Skype calls.
1. Press up on the Navigation pad. The Skype Status menu will display.
2. Scroll to DND. Press Select. This choice will stay active until you select a different Skype Status.
32
Chapter 4: Using the Dual-Mode Internet Telephony Kit
Skype Settings
Page 41

Privacy
You can decide to allow anyone to call you, only your contacts or only authorized users, by setting the Privacy
settings.
1. Press Menu.
Dual-Mode Internet Telephony Kit
2. Scroll to Settings. Press Select.
3. Scroll to Privacy. Press Select.
4. Choose from Skype Calls, SkypeIn Calls or Blocked Users. Press Select.
5. Choose the calls that will be allowed. Press Select. Your choice will be saved.
Automatic Sign In to Skype
You can choose to automatically sign in to your Skype account every time the base unit powers up.
1. Press Menu.
2. Scroll to Settings. Press Select.
3. Scroll to General. Press Select.
4. Scroll to Auto Sign In. Press Select.
5. Select the setting you want. Press OK. The new setting is saved.
Chapter 4: Using the Dual-Mode Internet Telephony Kit
Skype Settings
Figure 4-12: Skype
Calls Option
33
Page 42

Dual-Mode Internet Telephony Kit
Changing your Skype Status
In standby mode you will see an icon that displays your handset’s current status. You can quickly change your
Skype Status by pressing up on the Navigation key. Scroll to the status you want and press Select to set your
phone. You can also change the status through the Menu by selecting Status. Your status choice is active until
you select a different status. Choose from the following:
Table 1: Skype Status
Icon Setting Definition
Silent The phone doesn’t ring.
Online Signed in.
Offline Signed out.
34
Skype Me
Away Signed in, but away.
Not Avail. (not available) You are logged in, but haven’t used Skype over an extended time.
DND (do not disturb) All ringers are turned off.
Invisible Signed in, but others will see you as Offline.
Available for calls from anyone. This setting temporarily disables your privacy
settings.
Chapter 4: Using the Dual-Mode Internet Telephony Kit
Skype Settings
Page 43

The Handset’s Display Screen Icons
The display screen shows descriptive icons, a call timer (displayed during a call), and menus for settings.
Current icons that appear on your handset are described below. .
Icon Description Icon Description
Add Contact All Calls History
Dual-Mode Internet Telephony Kit
Battery full
(This bar shortens as the battery charge runs low
Call in Call in progress
Call missed Call out
Calls blocked Calls forwarded
Contact Contact missed
Error Handset lost link
Headset in use Home phone/landline
Chapter 4: Using the Dual-Mode Internet Telephony Kit
The Handset’s Display Screen Icons
Battery low
35
Page 44

Dual-Mode Internet Telephony Kit
Icon Description Icon Description
Keypad lock Line on hold
Login Missed Event
Mobile phone Mute
New Skype Voicemail New voicemail (Standby mode)
Office phone Ringer off
36
Signal strength Skype Alert (low credit or subscription
expires in 7 days or less)
SkypeOut SkypeOut blocked
Skype Voicemail Speakerphone
Status pending Warning
Chapter 4: Using the Dual-Mode Internet Telephony Kit
The Handset’s Display Screen Icons
Page 45

Updating Skype Software
Skype periodically updates its software. You can check to see if updates are available for your phone.
1. Press Menu.
2. Scroll to Settings. Press Select.
3. Scroll to Advanced. Press Select.
4. Scroll to SW update. Press Select.
5. Follow the on-screen instructions.
Changing Your Skype Password
You can change your Skype password at any time. To maximize security, you should occasionally change your
password. Instructions for setting up your initial Skype Name and password are in Chapter 3.
1. Press Menu.
2. Scroll to Settings. Press Select.
3. Scroll to General. Press Select.
4. Scroll to Change Passwd. Press Select.
Dual-Mode Internet Telephony Kit
5. Enter the new password. Press Enter. Enter the new password again and press Enter.
6. Press Enter to verify the password. The setting will be saved.
Chapter 4: Using the Dual-Mode Internet Telephony Kit
The Handset’s Display Screen Icons
37
Page 46

Dual-Mode Internet Telephony Kit
Landline Features
Answering an Incoming Landline Call
When you receive a call, the handset will ring, and the Home Phone/Landline icon will flash.
To answer, press the Call key.
Answering a Second Landline Incoming Call
When there is an incoming call from another line while you are on the first call, you will hear a call waiting tone.
To pick up the incoming call, select Call. The first call is put on hold. You can press the Call key to toggle
between the calls, or press the Power/End Call key to end the current call.
Making a Second Landline Call
This applies only if you have subscribed to this service from your telephone provider. Press the Call key. Dial the
number you want. Press the Call key to toggle between the two calls. Press the Power/End Call key to end the
current call.
Calling from the Landline Number when the Preferred Line is Always Ask
1. Enter the landline phone number you want to call.
2. Press Options.
3. Scroll to Landline. Press Select. The number will be called.
38
Chapter 4: Using the Dual-Mode Internet Telephony Kit
Landline Features
Page 47

Calling from the Landline Number when the Preferred Line is Landline
1. Dial the landline number you want to call.
2. Press the Call key.
Turning off the Landline Ringer
Press the Power/End Call key to turn off the ringer for a current incoming landline call.
Temporary Tone Mode
If your phone is set to pulse dialing, press the * key during a call for a temporary tone mode. The letter ‘d’
displays. The numbers you enter for the call will be sent as a tone signal.
Adding a Landline Number to the Contact List
1. Enter the number during standby mode.
2. Select Options.
3. Scroll to Add Contacts. Press Select.
4. Enter a unique name for the entry. (If the Contact List is full, a notification/alert message is shown and the
handset will return to standby mode.)
5. Select OK.
Dual-Mode Internet Telephony Kit
Chapter 4: Using the Dual-Mode Internet Telephony Kit
Landline Features
39
Page 48

Dual-Mode Internet Telephony Kit
Dial Mode
If available in your country, Dial Mode allows you to use either tone (DTMF) or pulse (rotary) dialing. To change
the dial mode, follow these steps:
1. Press Menu.
2. Scroll to Settings. Press Select.
3. Scroll to Advanced. Press Select.
4. Scroll to Landline. Press Select.
5. Scroll to Dial Mode. Press Select.
6. Scroll to the new setting. Press OK. The new setting is saved.
Setting the Recall Duration
You can set the recall duration on the handset. In most cases, you do not need to change this setting. If you do
need to change or add recall durations, contact your traditional phone service provider for more information.
1. Select Menu.
2. Scroll to Settings. Press Select.
3. Scroll to Advanced. Press Select.
4. Scroll to Landline. Press Select.
40
Chapter 4: Using the Dual-Mode Internet Telephony Kit
Figure 4-13: Landline
Dial Mode
Landline Features
Page 49

5. Scroll to Recall. Press Select.
6. Scroll to the new setting.
7. Press OK. The new setting is saved.
Setting the Pause Duration
A pause is a break you can enter when making a call. It may be required for PABX or operator services call. The
pause duration can be changed. Consult your telephone service provider regarding this feature.
1. Press Menu.
2. Scroll to Settings. Press Select.
3. Scroll to Advanced. Press Select.
4. Scroll to Landline. Press Select.
5. Scroll to Pause. Press Select.
6. Scroll to the new setting.
7. Select OK. The setting is saved.
Ending a Landline Call
Dual-Mode Internet Telephony Kit
Press the Power/End Call key, or place the handset on the charger.
Chapter 4: Using the Dual-Mode Internet Telephony Kit
Landline Features
41
Page 50

Dual-Mode Internet Telephony Kit
Landline Voicemail
For landline voicemail, you will need to call the service provider’s voicemail message number.
Retrieving a Voicemail Message
1. Press Menu.
2. Scroll to History. Press Select.
3. Scroll to Voicemails. Press Select.
4. Scroll to Landline VMWI. Press Options.
5. Scroll to the service provider you want. Press Options. Scroll to Call. Press Select. Wait for voice
instruction.
Editing or Deleting the Landline Service Provider’s Number
1. Press Menu.
2. Scroll to History. Press Select.
3. Scroll to Landline VMWI. Press Select.
4. Scroll to the service provider you want. Press Options.
5. To edit, scroll to Edit. Enter the new number. Press Enter. The number is saved.
6. To delete, scroll to Delete. A confirmation request displays. Press Yes. The number is deleted.
42
Chapter 4: Using the Dual-Mode Internet Telephony Kit
Landline Voicemail
Page 51

Using Additional Features
Using the Key Lock Feature
During standby mode, press and hold the # key to lock the keypad. A tone will play and you will see Unlock at the
bottom left of the screen. Then you can only answer an incoming call or unlock the keypad. To unlock the
keypad:
1. Press Unlock.
2. Press the * key. You will hear a tone and the phone will be unlocked.
Paging a Handset
If you have misplaced a handset, press and release the page button on the base station. All handsets that are in
standby mode and connected to that base station will play a paging melody.
If an outside call comes in, the handsets will stop paging and play the external call ring tone.
There are two ways to stop the paging melody. If you have multiple handsets, press and release the page button
on the base station. To stop the paging melody for an individual handset, select Stop on that handset, and it will
stop paging. The other handsets will keep playing the paging melody.
If nothing is pressed, then the paging melody will automatically stop after 30 seconds.
Dual-Mode Internet Telephony Kit
Chapter 4: Using the Dual-Mode Internet Telephony Kit
Using Additional Features
43
Page 52

Dual-Mode Internet Telephony Kit
Customizing the Handset
You can customize the look and sound of the handset.
Setting the Language on the Handset
This feature is available only for models with multiple language support.
1. Press Menu.
2. Scroll to Settings. Press Select.
3. Scroll to General. Press Select.
4. Scroll to Language. Press Select.
5. Scroll to the new setting.
6. Press OK when finished. The new setting is saved.
Customizing the Screen
Adjusting the Backlight Time
The background light (Backlight) of the screen turns on when you press a key on the handset and turns off at a
designated time. You can choose a different background light time. The longer the light is on the more power is
used by the handset.
1. Press Menu.
44
Chapter 4: Using the Dual-Mode Internet Telephony Kit
Customizing the Handset
Page 53

2. Scroll to Settings. Press Select.
3. Scroll to Screen. Press Select.
4. Scroll to Backlight. Press Select.
5. Scroll to the new setting.
6. Press OK when finished. The new setting is saved.
Changing the Contrast
Adjust the contrast to change the difference between dark and light areas of the screen. Moving the sliding bar
to the left allows you to see more detailed dark areas. Moving the sliding bar to the right decreases the dark
areas.
1. Press Menu.
2. Scroll to Settings. Press Select.
3. Scroll to Screen. Press Select.
4. Scroll to Contrast. Press Select.
5. Using the navigation pad move left or right to change the contrast.
6. Press OK when finished. The new setting is saved.
Dual-Mode Internet Telephony Kit
Chapter 4: Using the Dual-Mode Internet Telephony Kit
Customizing the Handset
45
Page 54

Dual-Mode Internet Telephony Kit
Changing the Brightness
Adjust the brightness to make the overall screen lighter or darker. Moving the sliding bar to the left darkens the
screen. Moving the sliding bar to the right lightens the screen.
1. Press Menu.
2. Scroll to Settings. Press Select.
3. Scroll to Screen. Press Select.
4. Scroll to Brightness. Press Select.
5. Using the navigation pad move left or right to change the brightness.
6. Press OK when finished. The new setting is saved.
Setting the Ring Tones
You can select different ring tones for each call category (Skype, SkypeIn, Landline and Intercom).
1. Select Menu.
2. Scroll to Settings. Press Select.
3. Scroll to Ton es. Press Select.
4. Scroll to Ring Tone. Press Select.
5. Scroll to the call type you want to change. Press Select.
46
Figure 4-14: Screen,
Brightness Option
Figure 4-15: Tones,
Ring Type Option
Chapter 4: Using the Dual-Mode Internet Telephony Kit
Customizing the Handset
Page 55

6. Scroll to the ring tone you want.
7. Press OK when finished. The new setting is saved.
Setting the Handset Ringer Volume
The handset has five ringer levels. This setting changes the volume level of all ringers.
1. Press Menu.
2. Scroll to Settings. Press Select.
3. Scroll to Ton es. Press Select.
4. Scroll to Volume. Press Select.
5. Press the navigation pad up or down to adjust the volume level.
6. Press Select when finished. The new setting is saved.
Setting the Handset Ringer Style
The handset has 5 ringer styles. Ringing, Ascending, Ring Once, Beep Once, Off.
1. Press Menu.
2. Scroll to Settings. Press Select.
Dual-Mode Internet Telephony Kit
3. Scroll to Ton es. Press Select.
Chapter 4: Using the Dual-Mode Internet Telephony Kit
Customizing the Handset
47
Page 56

Dual-Mode Internet Telephony Kit
4. Scroll to Ring Type. Press Select.
5. Scroll to the new setting.
6. Press OK when finished. Then new setting is saved.
Setting the Notification Tones
You can choose to hear a notification tone when you have a new missed call, voicemail or New Contact request.
1. Press Menu.
2. Scroll to Settings. Press Select.
3. Scroll to Ton es. Press Select.
4. Scroll to Notification. Press Select.
5. Scroll to have the tone on or off. Press Select.
Setting the Keypad Tones
You can choose to hear a keypad tone when you press a key on your handset.
1. Press Menu.
2. Scroll to Settings. Press Select.
3. Scroll to Ton e s . Press Select.
48
Chapter 4: Using the Dual-Mode Internet Telephony Kit
Customizing the Handset
Page 57

4. Scroll to Keypad Tone. Press Select.
5. Scroll to turn the tone on or off. Press Select.
Setting the Confirmation Tones
You can choose to hear a keypad tone when you press a key on your handset.
1. Press Menu.
2. Scroll to Settings. Press Select.
3. Scroll to Ton es. Press Select.
4. Scroll to Confirmation. Press Select.
5. Scroll to turn the tone on or off. Press Select.
Using the Auto Answer Feature
Dual-Mode Internet Telephony Kit
You can automatically answer a call by picking up the handset from the charger when you enable this feature.
1. Press Menu.
2. Scroll to Settings. Press Select.
3. Scroll to General. Press Select.
4. Scroll to Auto Answer. Press Select.
Chapter 4: Using the Dual-Mode Internet Telephony Kit
Customizing the Handset
I
49
Page 58

Dual-Mode Internet Telephony Kit
5. Scroll to turn the Auto Answer feature on or off. Press Select.
Activating Auto Update
Your phone will notify you of any required Skype updates. These updates must be accepted to continue using the
phone. In addition, you can program your phone to notify you automatically of other new Skype software
updates. Keeping your software up-to-date ensures that your phone has the latest features and technology.
1. Press Menu.
2. Scroll to Settings. Press Select.
3. Scroll to Advanced. Press Select.
4. Scroll to Auto Update. Press Select.
5. Scroll to the new setting you want.
6. Press Select. The new setting is saved. Your phone will notify you when there is a new Skype software
update. You can choose to install immediately or later.
50
Chapter 4: Using the Dual-Mode Internet Telephony Kit
Figure 4-16: Advanced,
Auto Update
Figure 4-17: Auto Update
Off (default)
Customizing the Handset
Page 59

Country Code Management
For the phone to work correctly according to your country’s standards, you must use the code for the country you
are calling from. For example, the U.S. and Canada use the country code of 1.
1. Press Menu.
2. Scroll to Settings. Press Select.
3. Scroll to Call Settings. Press Select.
4. Scroll to Country Code. Press Select. Enter the country code. If you don’t know your Country’s code, see
“Appendix A, Troubleshooting” for a list. Press Clear to make a correction.
5. Press OK.
Area Code Management
Not all countries use area codes. If your country is one of these, leave the area code field blank. However, if your
country uses area codes and you leave this field blank, you will not be able to call local numbers using SkypeOut.
Activating the Area Code
Dual-Mode Internet Telephony Kit
You can send an area code with your phone number when you place a Skype call.
1. Press Menu.
2. Scroll to Settings. Press Select.
Chapter 4: Using the Dual-Mode Internet Telephony Kit
Customizing the Handset
51
Page 60

Dual-Mode Internet Telephony Kit
3. Scroll to Call Settings. Press Select.
4. Scroll to Area Code. Press Select.
5. Enter the area code (up to 5 digits). Press OK.
Deactivating the Area Code
Use to delete an area code from the Skype calls that you place.
1. Press Menu.
2. Scroll to Settings. Press Select.
3. Scroll to Call Settings. Press Select.
4. Scroll to Advanced. Press OK.
5. Scroll to Area Code. Press OK.
6. Press Clear to delete the area code.
7. Press Enter when finished. The new setting is saved.
52
Chapter 4: Using the Dual-Mode Internet Telephony Kit
Customizing the Handset
Page 61

Managing the Handset(s)
You can register, add base stations, de-register or change the PIN for your handset. Up to four handsets can be
registered to one base station. To register a handset, see Chapter 3, Registering the Handset.
Registering Your Handset to an Additional Base
This is not for first time registration. This feature will not work for an unregistered handset.
1. Press Menu.
2. Scroll to Settings. Press Select.
3. Scroll to Handset. Press Select.
4. Scroll to Register. Press Select.
5. Enter the system PIN (default: 0000). Press Clear to make a correction.
6. Press OK to confirm. Your handset will start searching for the base.
7. Press the page button on the base unit until the two indicators turn off.
De-Register a Handset
You can de register (delete) a handset from any base station. After you have deleted a handset, it will no longer
be linked to that base station.
Dual-Mode Internet Telephony Kit
1. Press Menu.
Chapter 4: Using the Dual-Mode Internet Telephony Kit
Managing the Handset(s)
53
Page 62

Dual-Mode Internet Telephony Kit
2. Scroll to Settings.Press Select.
3. Scroll to Handset. Press Select.
4. Scroll to De-register. Press Select.
5. Scroll to the handset number you want to de-register. Press OK.
6. Enter the system PIN. Use Clear to make a correction.
7. Press ENTER. The handset is deleted.
Changing the System PIN
The factory default system PIN is 0000. You can change it to a unique PIN code that only you remember for
greater security.
1. Press Menu.
2. Scroll to Settings.Press Select.
3. Scroll to Handset. Press Select.
4. Scroll to CHANGE PIN. Press Select.
5. Enter the current PIN code. Press Enter. Use Clear to make a correction.
6. Enter the new PIN Code. Press Enter.
7. Enter the new PIN code again.
54
Chapter 4: Using the Dual-Mode Internet Telephony Kit
Managing the Handset(s)
Page 63

8. Press Enter. The new setting is saved.
Transferring Your Call to Another Handset During an Outside Call
1. Press the Intercom key.
2. Use the navigation pad to select the handset you want.
3. Select OK.
4. Wait for the other handset to answer your call.
5. When the other handset has answered your call, press the Power/End Call key. The outside call will be
transferred to the other handset.
Editing the Time and Date Settings
You can manually set the time to set the Date Format, Date, Date Separator, Time Zone, Daylight Savings Time,
Time Format, Time, Time Separator.
1. Press Menu.
2. Scroll to Settings. Press Select.
3. Scroll to Time & Date. Press Select.
4. Scroll to setting to change. The grouping consists of: Time, Time Zone, Daylight Time, Time Format, Time
Separator, Date, Date Format, Date Separator. Press Select when you have made your choice.
Dual-Mode Internet Telephony Kit
For time, use the handset number keys to enter the hour, minute and AM or PM. Press OK when finished. The
Chapter 4: Using the Dual-Mode Internet Telephony Kit
Managing the Handset(s)
55
Page 64

Dual-Mode Internet Telephony Kit
new setting is saved .The time zone is based on Greenwich Mean Time (GMT). If you don’t know your time
zone, you can visit http://www.greenwichmeantime.com. Scroll to the correct zone. Press OK when
finished. The new setting is saved.
To have your phone adjust when daylight savings time changes, scroll to Daylight Time and choose Standard
or Daylight time. Press OK when finished. The new setting is saved.
For time format, scroll to either 12 Hour or 24 Hour. Press OK when finished. The new setting is saved.
For time separator, scroll to the format you want. Press OK when finished. The new setting is saved.
For date, use the handset number keys to enter the Month/Day/Year. The new setting is saved.
For date format, scroll to the format you want. Press OK when finished.
For date separator, scroll to the type of separator you want. Press OK when finished. The new setting is
saved.
Reset to Factory Default Settings
You can reset your handset to the factory default settings.
1. Press Menu.
2. Scroll to Settings.Press Select.
3. Scroll to Advanced. Press Select.
NOTE: After reset, your
handset’s power will switch off.
It will automatically turn back on
in a few seconds after updating
the settings.
4. Scroll to Reset Device. Press Select.
56
Chapter 4: Using the Dual-Mode Internet Telephony Kit
Managing the Handset(s)
Page 65

5. Scroll to Reset All to reset all the settings including the network settings OR scroll to Keep Network to reset
all the settings except the network settings. Press Select.
6. Enter the system PIN. Press Enter to confirm. User Clear to Make a correction.
7. Press OK to confirm.
Menus
The handset offers multiple menus for settings and features.
From the standby screen, press the left soft key to select MENU. Use the navigation pad to scroll through the
menus and sub-menus.
In menu mode, select OK or SAVE (press the left soft key) to save your changes. Select CANCEL to cancel your
changes. Press the Power/End Call key to cancel changes and return to the standby screen.
Contacts* History Status Add Contact Search Services Settings
Options All Calls Change status Skype Enter Name Skype credit General
Call Missed Calls My profile SkypeOut number SkypeIn Call Settings
Send
voicemail
View profile Outgoing Tones
Rename Voicemails Screen
Incoming Sign out Voicemail Privacy
Dual-Mode Internet Telephony Kit
Chapter 4: Using the Dual-Mode Internet Telephony Kit
Managing the Handset(s)
57
Page 66

Dual-Mode Internet Telephony Kit
Contacts* History Status Add Contact Search Services Settings
Remove New Contact Time & Date
Block Network
Request
Detail
Information
Advanced
*These choices are also available when you press the right Contact key.
Handset
58
Chapter 4: Using the Dual-Mode Internet Telephony Kit
Managing the Handset(s)
Page 67

Chapter 5: Network Settings
The Network
This chapter is recommended for advanced users who want to configure the phone with their static IP address.
Viewing Your Network Settings
1. Press Menu.
2. Scroll to Settings. Press Select.
3. Scroll to Information. Press Select.
4. Scroll to view the information. When you are finished, press Back.
DHCP
By default, DHCP is activated. If you configure the network to use your own Static IP access, DHCP will be
deactivated. You can re-activate DHCP.
Activating DHCP
1. Press Menu.
Dual-Mode Internet Telephony Kit
NOTE: Incorrect settings will
affect Skype usage on this
phone. We recommend that
you consult your network
administrator or service
provider before making any
changes to the network setting.
2. Scroll to Settings. Press Select.
3. Scroll to Network. Press Select.
Chapter 5: Network Settings
The Network
59
Page 68

Dual-Mode Internet Telephony Kit
4. Scroll to DHCP. Press Select. An activation request is displayed
5. Press Yes to confirm. Your IP address is displayed. The new setting is saved.
PPPoE
Activating PPPoE
1. Press Menu.
2. Scroll to Settings. Press Select.
3. Scroll to Network. Press Select.
4. Scroll to PPPoE. Press Select. An activation request is displayed
5. Press Yes to confirm. Your IP address is displayed. The new setting is saved.
Configuring a Static IP
1. Press Menu.
2. Scroll to Settings. Press Select.
3. Scroll to Network. Press Select.
4. Scroll to Static IP. Press Select. An confirmation request is displayed
5. Press Yes to confirm. Follow the on-screen instructions to finish configuring your network.
60
Chapter 5: Network Settings
The Network
Page 69

Configuring Individual Network Settings
1. Press Menu.
2. Scroll to Settings. Press Select.
3. Scroll to Network. Press Select.
4. Scroll to the item you want to change. Press Select.
5. Edit the information.
6. Press Enter when finished. The new setting is saved.
Resetting the Network
1. Press Menu.
2. Scroll to Settings. Press Select.
3. Scroll to Network. Press Select.
4. Scroll to Reset Network. Press Select. A confirmation request is displayed.
5. Press Yes to confirm. The new setting is reset.
Dual-Mode Internet Telephony Kit
Chapter 5: Network Settings
The Network
61
Page 70

Dual-Mode Internet Telephony Kit
Web Page Configuration
You can configure some of the network settings, Skype settings, system upgrade and administrative settings
from the web pages. For most users, it is not necessary to configure these settings after setting up the phone.
This section is recommended for advanced users only.
Accessing the Web Page
Minimum System Requirement
• CIT400 set
• Computer with a web browser installed
•Router
• Internet connection
NOTE: Incorrect settings will
affect Skype usage on this
phone. We recommend that
you consult your network
administrator or service
provider before making any
changes to the network setting.
62
Chapter 5: Network Settings
The Network
Page 71

Make sure your phone is properly connected and set up sharing the same network with your router as shown
below.
1. Open a web browser.
2. Enter your phone’s IP address in the address bar. An authentication window will appear.
Dual-Mode Internet Telephony Kit
Chapter 5: Network Settings
The Network
63
Page 72

Dual-Mode Internet Telephony Kit
he
3. Enter the user name and password. Admin is the default user name and password.
After verifying your user name and password, you will see the configuration Home page. The Home page shows
your current system and network settings.
64
Chapter 5: Network Settings
The Network
Page 73

The Network page shows your current internet connection type and Ethernet speed. You can make changes to
these settings on this page.
The Skype page shows your current Skype status. You can create a new Skype account or sign in to Skype from
this page.
Dual-Mode Internet Telephony Kit
Chapter 5: Network Settings
The Network
65
Page 74

Dual-Mode Internet Telephony Kit
The System page is where you can upgrade your phone’s operating system. You will need to have the latest
software image download, which is available from www.linksys.com.
The Administration page is where you change the web page access password. You can also reset your phone
and network to the factory default settings from this page.
66
Chapter 5: Network Settings
The Network
Page 75

Appendix A: Troubleshooting
This appendix provides solutions to problems that may occur during the installation and operation of the
Dual-Mode Internet Telephony Kit. Also included is a list of its default settings. Read the descriptions below to
solve your problems. If you can't find an answer here, check the Linksys website at www.linksys.com.
Common Problems and Solutions
1. There is no dial tone when I press the Call key.
Do the following until you get a dial tone:
A. Make sure the RJ-11 telephone line cord is properly connected to the LINE port of the base station and
the telephone wall jack.
B. Make sure that the base unit is powered on.
C. Move the handset closer to the base station.
D. The batteries capacity may be low. Place the handset on the charger and recharge the batteries.
2. The Signal Strength icon is flashing on the handset’s display screen.
Do the following until the icon is not flashing:
A. If the handset displays Unregistered, then refer to “Chapter 3: Getting Started” for instructions on how
to initially register the handset.
B. Move the handset closer to the base station.
C. Check to see if the base station is powered on. Make sure the power adapter is properly connected to
the power port of the base station and an electrical outlet.
Dual-Mode Internet Telephony Kit
Appendix A: Troubleshooting
Common Problems and Solutions
67
Page 76

Dual-Mode Internet Telephony Kit
3. When the handset is placed on the charger, I do not hear a beep.
If you have turned off the handset tone (refer to “Chapter 4: Using the Dual-Mode Internet Telephony Kit) or if
the handset was previously powered off, then this is normal, and you were not supposed to hear a beep.
If you were supposed to hear a beep, then do the following:
A. Remove the handset from the charger, and then place it on the charger again.
B. Clean the charging contacts with a clean and dry cloth.
4. The Battery Empty icon is displayed even though the handset has charged for more than 14 hours.
Do the following:
A. Check that the batteries are installed correctly.
B. Make sure the handset is placed properly on the charger.
C. Use new rechargeable batteries.
5. The handset’s display screen is blank.
Do the following:
A. Check to see if the batteries are positioned properly in the battery compartment.
B. Make sure that you have properly connected the handset, charger, and base station. (Refer to “Chapter
3: Getting Started.”)
C. Put the handset on the charger to recharge the batteries.
6. The audio quality is poor.
Do the following:
A. Move the handset closer to the base station.
B. There may be interference from nearby electrical devices. Move the base station as needed.
C. If the base station and handset are in a room with thick walls, move the base station and handset as
needed.
68
Appendix A: Troubleshooting
Common Problems and Solutions
Page 77

7. The handset does not ring when a call comes in.
A. Make sure the phone’s mute key is not enabled.
B. Make sure the ringer volume setting is enabled (Refer to “Chapter 4: Using the Dual-Mode Internet
Telephony Kit.”).
C. Make sure that Silent has not been selected in the Skype Status settings (press up on the Navigation pad
to view).
8. I get the message, “UNAVAILABLE” when I check the Skype contact list or Status.
Do the following until the contact list and status are available:.
A. Check the cable connections of the base station.
B. Another user may be using the contact list or Skype menu. Try again later.
9. I cannot call a landline number using SkypeOut.
Do the following until you can make your call:
A. Make sure you enter a + before you dial the international country code, area code and number.
B. Check your SkypeOut credit amount to make sure you have enough credits.
C. Move the handset closer to the base station.
10. I can’t see a Caller ID on the Landline.
A. Caller ID service may not be Activated. Check with your Landline service provider.
B. The caller’s information may be withheld.
11. I cannot make or answer a second call on the Landline.
A. Second call service may not be activated.Check with your Landline service provider.
B. Check that the recall selection is correct (refer to “Chapter 4: Using the Dual-Mode Internet Telephony
Kit).
Dual-Mode Internet Telephony Kit
Appendix A: Troubleshooting
Common Problems and Solutions
69
Page 78

Dual-Mode Internet Telephony Kit
Frequently Asked Questions
Can I receive SkypeIn calls?
Yes, if you have purchased a SkypeIn number from Skype (go to www.skype.com for details). When you receive a
SkypeIn call, it will ring the Skype ring tone, and you can answer it the same way you answer a Skype call.
Can I put a Skype call on hold and make a landline call on the same handset?
No. In order to make a call using the other line (the landline), you have to end the current Skype call. However, if
you want to put the current call on hold and make another outgoing call on the same line, press the Call key and
follow the instructions in “Chapter 4: Using the Dual-Mode Internet Telephony Kit.”
How can I add a contact or SkypeOut number to the contact list?
Press Menu, Scroll to Add Contact. Press Select.
Can I make an outgoing call using the landline when someone else is on a Skype call, or vice versa?
To make a landline call while someone else is on a Skype call (or vice versa), pick up the handset and make the
call. If the landline is already in use, you will hear a busy tone.
70
Appendix A: Troubleshooting
Frequently Asked Questions
Page 79

Default Settings
Setting Default Setting Default
Auto Answer On Last Call Timer Reset
Base Selection Auto LCD Contrast Level* 0
Confirmation/Parking Tone On Message Waiting Indicator Off
Dial Mode Ton e PABX Off
Handset Intercom Ring Melody Melody 3 Pause Duration Pau se 1
Handset Key Tones On PIN Code 0000
Handset Landline Ring Melody Melody 1 Recall Duration Recall 1
Handset Ring Volume Middle Receiver Volume Medium
Handset Skype Ring Melody Melody 2 Time Format 12 Hours
Language English
Dual-Mode Internet Telephony Kit
Appendix A: Troubleshooting
Default Settings
71
Page 80

Dual-Mode Internet Telephony Kit
Country Codes
Country
Iso Code
Country Name
AF Afghanistan
AL Albania
DZ Algeria
AS American Samoa
AD Andorra
AO Angola
AI Anguilla
AG Antigua and Barbuda
AR Argentina
AM Armenia
AW Aruba
AU Australia
AT Austria
AZ Azerbaijan
BS Bahamas
BH Bahrain
BD Bangladesh
BB Barbados
BY Belarus
72
Country Code
93
355
213
1684
376
244
1264
1268
54
374
297
61
43
994
1242
973
880
1246
375
Appendix A: Troubleshooting
Country Codes
Page 81

BE Belgium
BZ Belize
BJ Benin
BM Bermuda
BT Bhutan
BO Bolivia
BA Bosnia and Herzegovina
BW Botswana
BR Brazil
IO British Indian Ocean Territory
BN Brunei Darussalam
BG Bulgaria
BF Burkina Faso
BI Burundi
KH Cambodia
CM Cameroon
CA Canada
CV Cape Verde
KY Cayman Islands
CF Central African Republic
TD Chad
CL Chile
CN China
CO Colombia
Dual-Mode Internet Telephony Kit
32
501
229
1441
975
591
387
267
55
1284
673
359
226
257
855
237
1
238
1345
236
235
56
86
57
Appendix A: Troubleshooting
Country Codes
73
Page 82

Dual-Mode Internet Telephony Kit
KM Comoros
CG Congo, Republic of
CD Congo, Democratic Republic of (was Zaire)
CK Cook Islands
CR Costa Rica
CI Coe D’Ivoire (Ivory Coast)
HR Croatia (Hrvatska)
CU Cuba
CY Cyprus
CZ Czech Republic
DK Denmark
DG Diego Garcia
DJ Djibouti
DM Dominica
DO Dominican Republic
EC Ecuador
EG Egypt
SV El Salvador
GQ Equatorial Guinea
ER Eritrea
EE Estonia
ET Ethiopia
FK Falkland Islands (Malvinas)
FO Faroe Islands
269
242
243
682
506
225
385
53
357
420
45
246
253
1767
1829
593
20
503
240
291
372
251
500
298
74
Appendix A: Troubleshooting
Country Codes
Page 83

FJ Fiji
FI Finland
FR France
GF French Guiana
PF French Polynesia
GA Gabon
GM Gambia
GE Georgia
DE Germany
GH Ghana
GI Gibraltar
GR Greece
GL Greenland
GD Grenada
GU Guam
GT Guatemala
GN Guinea
GW Guinea-Bissau
GY Guyana
HT Haiti
HN Honduras
HK Hong Kong
HU Hungary
IS Iceland
Dual-Mode Internet Telephony Kit
679
358
33
594
689
241
220
995
49
233
350
30
299
1473
1671
502
224
245
592
509
504
852
36
354
Appendix A: Troubleshooting
Country Codes
75
Page 84

Dual-Mode Internet Telephony Kit
IN India
ID Indonesia
IR Iran
IQ Iraq
IE Ireland
IL Israel
IT Italy
JM Jamaica
JP Japan
JO Jordan
RU Russian Federation
KZ Kazakhstan
KE Kenya
KI Kiribati
KP Korea (North)
KR Korea (South)
KW Kuwait
KG Kyrgyzstan
LA Laos
LV Latvia
LB Lebanon
LS Lesotho
LR Liberia
LY Libya
91
62
98
964
353
972
39
1876
81
962
7
7
254
686
850
82
965
996
856
371
961
266
231
218
76
Appendix A: Troubleshooting
Country Codes
Page 85

LI Liechtenstein
LT Lithuania
LU Luxembourg
MO Macau
MK Macedonia
MG Madagascar
MW Malawi
MY Malaysia
MV Maldives
ML Mali
MT Malta
MH Marshall Islands
MQ Martinique
MR Mauritania
MU Mauritius
YT Mayotte
MX Mexico
FM Micronesia
MD Moldova
MC Monaco
MN Mongolia
MS Montserrat
MA Morocco
MZ Mozambique
Dual-Mode Internet Telephony Kit
423
370
352
853
389
261
265
60
960
223
356
692
596
222
230
269
52
691
373
377
976
1664
212
258
Appendix A: Troubleshooting
Country Codes
77
Page 86

Dual-Mode Internet Telephony Kit
MM Myanmar
NA Namibia
NR Nauru
NP Nepal
NL Netherlands
AN Netherlands Antilles
NC New Caledonia
NZ New Zealand (Aotearoa)
NI Nicaragua
NE Niger
NG Nigeria
NU Niue
MP Northern Mariana Islands
NO Norway
OM Oman
PK Pakistan
PW Palau
PA Panama
PG Papua New Guinea
PY Paraguay
PE Peru
PH Philippines
PL Poland
PT Portugal
95
264
674
977
31
599
687
64
505
227
234
683
1670
47
968
92
680
507
675
595
51
63
48
351
78
Appendix A: Troubleshooting
Country Codes
Page 87

PR Puerto Rico
QA Qatar
RE Reunion
RO Romania
RW Rwanda
SM San Marino
ST Sa o Tom e an d Princip e
SA Saudi Arabia
SN Senegal
CS Serbia
SC Seychelles
SL Sierra Leone
SG Singapore
SK Slovak Republic
SI Slovenia
SB Solomon Islands
SO Somalia
ZA South Africa
ES Spain
LK Sri Lanka
SH St. Helena
PM St. Pierre and Miquelon
SD Sudan
SR Suriname
Dual-Mode Internet Telephony Kit
1939
974
262
40
250
378
239
966
221
381
248
232
65
421
386
677
252
27
34
94
290
508
249
597
Appendix A: Troubleshooting
Country Codes
79
Page 88

Dual-Mode Internet Telephony Kit
SZ Swaziland
SE Sweden
CH Switzerland
SY Syria
TW Taiwan
TJ Tajikistan
TZ Tanzania
TH Thailand
TG Togo
TK Tokelau
TO Tonga
TT Trinidad and Tobago
TN Tunisia
TR Turkey
TM Turkmenistan
TV Tuvalu
UG Uganda
UA Ukraine
AE United Arab Emirates
GB United Kingdom
UY Uruguay
US United States
UZ Uzbekistan
VU Vanuatu
268
46
41
963
886
7
255
66
228
690
676
1868
216
90
993
688
256
380
971
44
598
1
7
678
80
Appendix A: Troubleshooting
Country Codes
Page 89

VA Vatican City State (Holy See)
VE Venezuela
VN Viet Nam
VI Virgin Islands (U.S.)
WF Wallis and Futuna Islands
YE Yemen
ZM Zambia
ZW Zimbabwe
Dual-Mode Internet Telephony Kit
39
58
84
1340
681
967
260
263
Appendix A: Troubleshooting
Country Codes
81
Page 90

Dual-Mode Internet Telephony Kit
82
Appendix A: Troubleshooting
Country Codes
Page 91

Dual-Mode Internet Telephony Kit
Appendix B: Specifications
Model Number CIT400
Handset
Frequency Bands Europe:1880-1900MHz, North America:1920-1930MHz, South America:1910-1930MHz, Taiwan:1880-1895 MHz
Standards DECT (Digital Enhanced Cordless Telecommunication Standard), GAP (General Access Profile)
Speech Coding 32Kbps ADPCM
Distance Range 300 meters outdoor, 50 meters indoor
Number of Channels 10 channels (Europe and South America), 5 channels (North America), 5 channels (Taiwan)
Standby/Talk Time 120 hours/6 hours
Base Station
Power 7.5V 500mA
Button Handset Locator
LEDs (4) Skype, PSTN, Ethernet, Activity
Ports Ethernet 10/100 (RJ45), Line (RJ11)
Appendix B: Specifications
83
Page 92

Dual-Mode Internet Telephony Kit
Environmental
Base Station
Dimensions 5.79" x 4.96" x 1.40" (147 mm x 126 mm x 35.5 mm) W x H x D
Weight 0.79 lbs (0.36 kg)
Handset
Dimensions 1.77" x 5.63" x 1" (45 mm x 143 mm x 25.5 mm)
Weight 0.22 lbs (0.099 kg)
Charger
Dimensions 2.36" x 2.76" x 2.28" (60 mm x 70 mm x 58 mm)
Weight 0.14 lbs (0.065 kg)
Certification Skype, FCC, cUL, CE
Operating Temp. 0ºC to 45ºC (32ºF to 113ºF)
Storage Temp. -20ºC to 76ºC (-4ºF to 168ºF)
Operating Humidity 10% to 50% Relative Humidity, Non-Condensing
Storage Humidity 10% to 60% Non-Condensing
84
Appendix B: Specifications
Environmental
Page 93

Dual-Mode Internet Telephony Kit
Appendix C: Regulatory Information
IMPORTANT SAFETY INSTRUCTIONS. READ CAREFULLY AND KEEP FOR FUTURE REFERENCE.
Environment and Safety
Safety information: This telephone is not designed for making emergency telephone calls when the power fails. If a power outage occurs, this phone will
not function. An alternative should be made available for the making of emergency calls.
Battery requirements: The handset is powered through two rechargeable NiMH batteries, size AAA 1.2V 750mAh (HR11/45). Please do not use nonrechargeable batteries.
WARNING:
recommended type supplied with this telephone. NiMH batteries must be disposed of in accordance with the applicable waste disposal regulations.
RISK OF EXPLOSION IF BATTERY IS REPLACED BY AN INCORRECT TYPE. Never use non-rechargeable batteries; use only the
WARNING:
WARNING:
possibility of injury, do not place the handset near small metallic objects.
WARNING:
You should not use this product during a thunderstorm.
IMPORTANT:
is by unplugging the power supply from the electrical outlet. Ensure the electrical outlet is located close to the apparatus and is always easily
accessible. You can also power down this product by unplugging the USB base station from the host PC.
CAUTION:
Appendix C: Regulatory Information
IMPORTANT SAFETY INSTRUCTIONS. READ CAREFULLY AND KEEP FOR FUTURE REFERENCE.
The use of wireless devices in hazardous locations is limited by the constraints posed by the safety directives of such environments.
The phone's handset produces a magnetic field that can attract small metallic objects such as pins and staples. In order to avoid the
You may suffer an injury from using this product or other electrical equipment during a thunderstorm. In extreme cases this may be fatal.
The electrical network is classified as dangerous according to criteria in the standard IEC 60950. One way to power down this product
The Dual-Mode Internet Telephony Kit will not operate during a power outage.
85
Page 94

Dual-Mode Internet Telephony Kit
Safety precautions:
• Do not allow the handset to come into contact with liquids or moisture.
• Opening any part of the Dual-Mode Internet Telephony Kit, the handset, charger, or base station, could result in dangerous electrical shock.
• Do not allow the charging contacts of the charger or the handset’s battery to come into contact with extraneous conductive materials.
• Not recommended for use in an explosive environment or where warning signs prohibit the use.
• Young children should be supervised to ensure that they do not play with the Cordless Dual-Mode Internet Telephony Kit.
Environmental care: Please remember to observe your local regulations regarding the disposal of your packaging materials, exhausted batteries and old
phone and, where possible, always recycle.
Because the phone works by sending radio signals between the base station and the handset, wearers of hearing aids may experience interference in the
form of a humming noise.
The Cordless Dual-Mode Internet Telephony Kit should not be used near intensive care medical equipment. Linksys recommends keeping the phone a
minimum of 6 inches away from pacemakers.
As the Cordless Dual-Mode Internet Telephony Kit can interfere with nearby electrical equipment, such as answering machines, televisions and radios, you
should position the base station at least one meter from such appliances.
Privacy of communications may not be ensured when using this telephone.
86
Appendix C: Regulatory Information
Environment and Safety
Page 95

Dual-Mode Internet Telephony Kit
Compliance Information
US and Canada Compliance Information
This equipment has been tested and found to comply with the limits for a Class B device, pursuant to Part 15 of the FCC rules and ICES-003 of Industry
Canada. Operation is subject to the following conditions: (1) This device may not cause interference, and (2) This device must accept any interference,
including interference that may cause undesired operation.
This product has been certified in accordance with 47 Code of Federal Regulations per the requirements as set forth in Part 15D for Unlicensed PCS devices.
This device has been certified in accordance with Industry Canada RSP-100 per the technical requirements as referenced in RSS-213.
FCC Part 68 Statement
This equipment complies with Part 68 of the FCC Rules. A label is attached to the equipment that contains, among other information, its FCC registration
number and ringer equivalence number. If requested, this information must be provided to the telephone company.
This equipment uses the following USOC Jack: RJ-11.
An FCC compliant telephone cord and modular plug is provided with this equipment. This equipment is designed to be connected to the telephone network or
premises wiring using a compatible modular jack, which is FCC Part 68 compliant. Connection to the telephone network should be made by using the
standard modular telephone jack.
The REN is useful to determine the quantity of devices that may be connected to the telephone line and still have all of those devices ring when your
telephone number is called. In most, but not all areas, the sum of RENs should not exceed 5. To be certain of the number of devices that may be connected
to the line, as determined by the total RENs, contact the telephone company to determine the maximum REN for the calling area.
Appendix C: Regulatory Information
Compliance Information
87
Page 96

Dual-Mode Internet Telephony Kit
If this equipment causes harm to the telephone network, the telephone company may discontinue your service temporarily. If advance notice is not practical,
the telephone company will notify the customer as soon as possible. Also, you will be advised of your right to file a complaint with the FCC if you believe it is
necessary.
The telephone company may make changes in its facilities, equipment, operations, or procedures that could affect the operation of the equipment. If this
happens, the telephone company will provide advance notice in order for you to make the necessary modifications in order to maintain uninterrupted service.
In the event this equipment should fail to operate properly, disconnect the unit from the telephone line. Try using another FCC approved device in the same
telephone jack. If the trouble persists, call the telephone company repair service bureau. If the trouble does not persist and appears to be with this unit,
disconnect the unit from the telephone line and discontinue use of the unit until it is repaired. Please note that the telephone company may ask that you
disconnect the equipment from the telephone network until the problem has been corrected or until you are sure that the equipment is not malfunctioning.
The user must use the accessories and cables supplied by the manufacturer to get optimum performance from the product.
No repairs may be done by the customer. If trouble is experienced with this equipment, please contact your authorized support provider for repair and
warranty information. If the trouble is causing harm to the telephone network, the telephone company may request you remove the equipment from the
network until the problem is resolved. This equipment cannot be used on telephone company provided coin service. Connection to Party Line Service is
subject to state tariffs.
Interference
This equipment generates, uses and can radiate radio frequency energy and, if not installed and used in accordance with the instructions, may cause harmful
interference to radio communications.
However, there is no guarantee that interference will not occur in a particular installation. If this equipment does cause harmful interference to radio or
television reception, which can be determined by turning the equipment off and on, the user is encouraged to try to correct the interference by one or more
of the following measures:
1. Re-orient or relocate the receiving antenna.
88
Appendix C: Regulatory Information
Compliance Information
Page 97

Dual-Mode Internet Telephony Kit
2. Increase the distance between the equipment and USB base station.
3. Connect the equipment into an outlet on a circuit different from that to which the USB base station is connected.
4. Consult the dealer or an experienced radio/TV technician for help.
Caution
Users should ensure for their own protection that the electrical ground connections of the power utility, telephone lines and internal metallic water pipe
system, if present, are connected together. This precaution may be particularly important in rural areas.
Do not attempt to repair or modify this equipment.
NOTE: All electrical work should be performed by a licensed electrician or licensed cabler.
Repairs to the Telephony Kit, including the handset, the charger, and the base station, should be made by an authorized maintenance facility designated by
the supplier. Any repairs or alterations made by the user to the equipment may render the equipment void in product warranty and compliance. This could
also void the user's authority to operate the equipment.
RF Radiation Exposure
To maintain compliance with the FCC's RF exposure guidelines, the internal antennas used for this mobile transmitter (USB base station) must provide a
separation distance of at least 20 cm from all persons.
Base and handset must not be co-located or operating in conjunction with any other antenna or transmitter.
The handset has been evaluated and found to comply with the applicable RF exposure regulations in accordance with FCC Part 2.1093 for portable devices.
This compliance is based on Specific Absorption Rate testing.
Appendix C: Regulatory Information
Compliance Information
89
Page 98

Dual-Mode Internet Telephony Kit
The base station and handset have been evaluated and found compliant in accordance with Industry Canada RSS-102 with respect to Canada’s Health
Code 6 for Exposure of Humans to RF Fields.
The highest SAR level measured for this phone is as follows:
Max. Head SAR - 0.153 W/kg
Max. Body SAR - 0.172 W/kg
The recommended limits are based on recommendations from the World Health Organizations (WHO) International Committee on Non Ionizing Radiation
Protection (ICNIRP).
The Maximum allowable SAR as recommended by the ICNIRP limits is 2.0 W/kg based on 10 grams of tissue. However in the US, the recommended FCC limit
is 1.6 W/kg based on 1 gram of tissue.
This phone has been tested and found compliant with the belt clip provided with the product. The use of other type accessories not provided with the product
may not ensure compliance to the recommended RF exposure standards.
Additional information on SAR and RF Exposure can be obtained off the FCC website at www.fcc.gov/oet/rfsafety
There is no conclusive proof that these mobile phones are a health risk. The FDA and numerous researchers are continuing studies of RF radiation and health
issues. Additional information on this subject can be obtained from the FDA web site at www.fda.gov.
There are several suggested methods to reduce exposure for the user. Among those include the following:
1. Using a hands-free handset to increase the distance between the antenna and the head of the user,
2. Orienting the antenna away from the user.
90
Appendix C: Regulatory Information
Compliance Information
Page 99

Dual-Mode Internet Telephony Kit
Additional information can be obtained from the following documentation:
• Cisco white paper on RF exposure
• FCC Bulletin 56: Questions and Answers about Biological Effects and Potential Hazards of Radio Frequency Electromagnetic Fields
Additional information can also be obtained from the following organizations as well as from the Cisco white paper on the subject:
• World Health Organization Internal Commission on Non-Ionizing Radiation Protection. www.who.int/emf
• Cellular Telecommunications Association: www.wow-com.com
Noise
Electrical pulse noise is present at one time or another. This is most intense during electrical storms. Certain kinds of electrical equipment, such as light
dimmers, fluorescent bulbs, motors, fans, etc., also generate pulse noise. Because radio frequencies are susceptible to this, you may on occasion hear pulse
noise through the USB base station. This is usually only a minor annoyance and should not be interpreted as a defect of the unit.
This telephone is not designed for making emergency telephone calls when the power fails. Make alternative arrangements for access to emergency
services.
Appendix C: Regulatory Information
Compliance Information
91
Page 100

Dual-Mode Internet Telephony Kit
European Union
Declaration of Conformity with Regard to the EU
Directive 1999/5/EC (R&TTE Directive)
92
Appendix C: Regulatory Information
European Union
 Loading...