

Linksys BEFN2PE User Manual
This sheet will guide you through the basic steps needed to install the
EtherFast®Cable/DSL Voice Enabler onto your network. If you have
any problems during installation, refer to the Troubleshooting section
of the User Guide.
Befor
Befor
e Y
e Y
ou Start...
ou Start...
You will need the following information in order to install the
Net2Phone Cable/DSL Voice Enabler:
• Your Voice Enabler’s IP Address
• Your Net2Phone account and PIN number (to use their voice
service)*
• Your Subnet Mask
• Your Default Gateway
• Your Primary DNS IP address
Installing Y
Installing Y
our EtherFast
our EtherFast
®
®
Cable/DSL V
Cable/DSL V
oice
oice
Enabler Onto
Enabler Onto
YYour Network
our Network
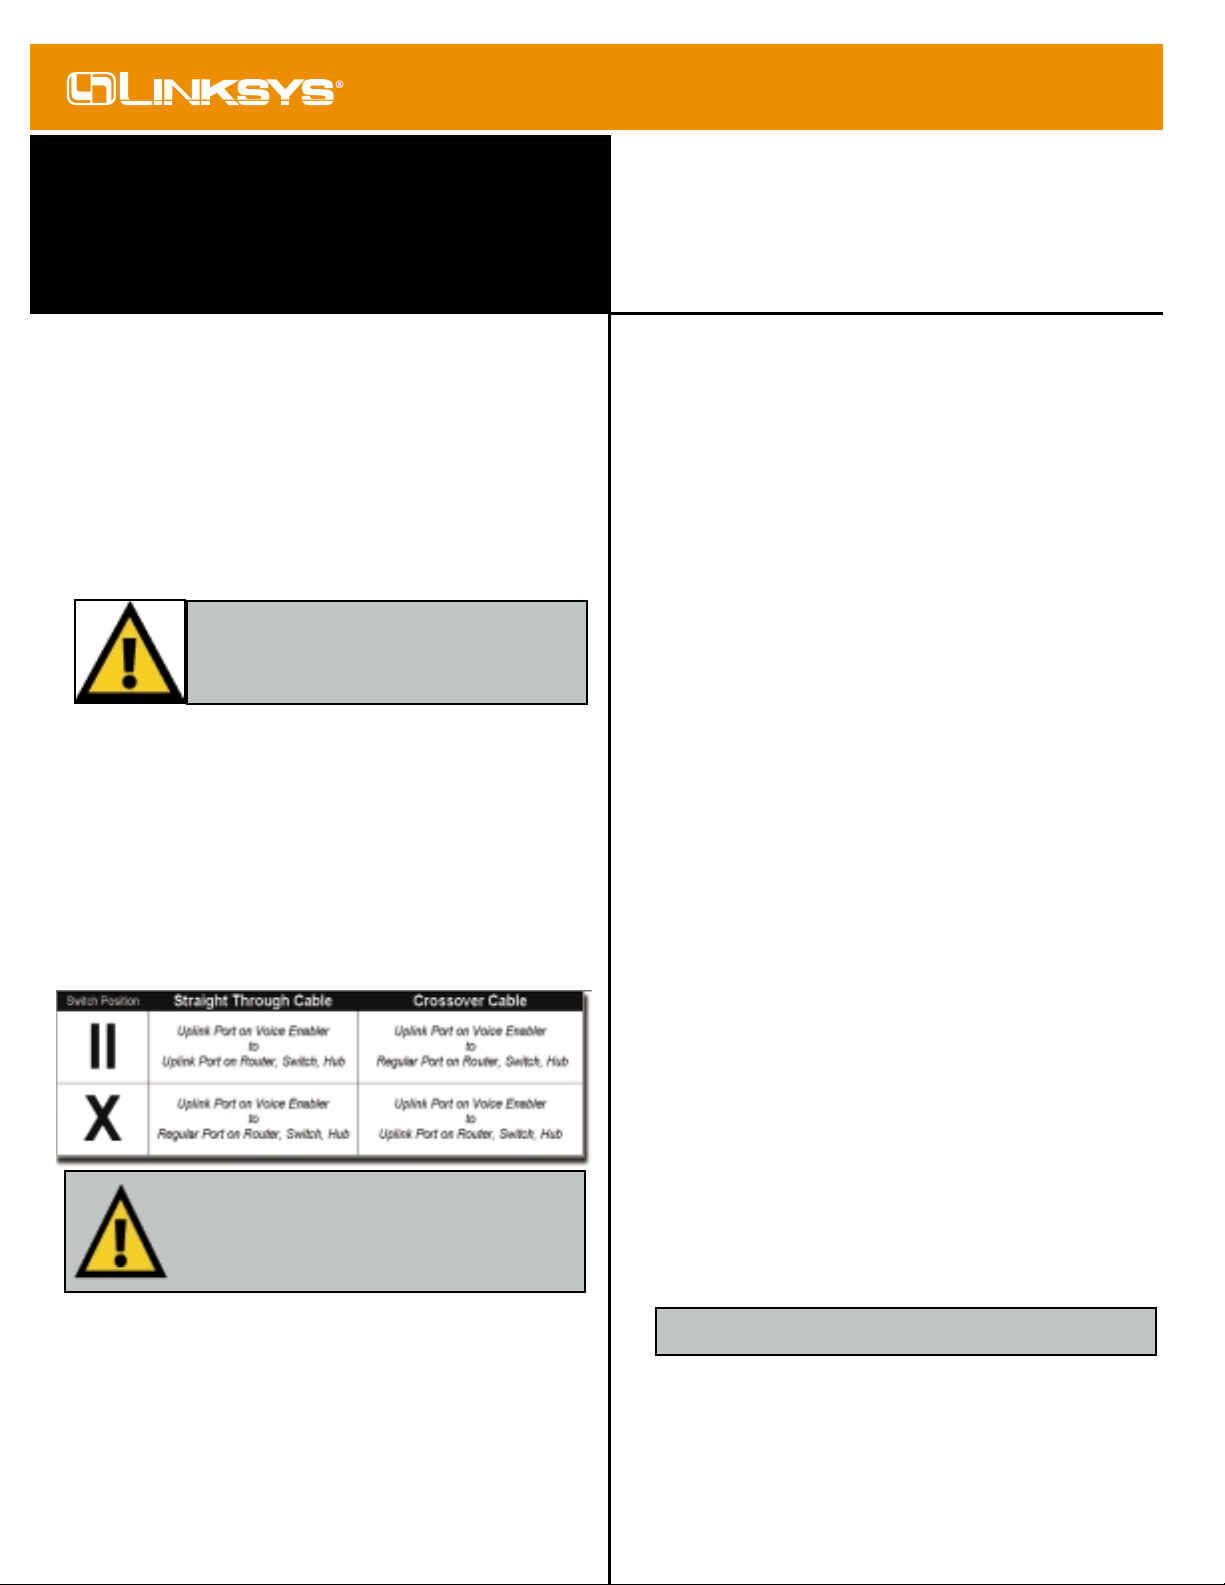
1. Connect a Category 5 (Ethernet) network cable from the
Uplink Port on the back of the Voice Enabler to an open port
on your router, switch or hub, which is connected to the
Internet. Verify that the Crossover Switch is in the correct
position. For more information about the Crossover Switch,
types of cables, and which ports to connect to, refer to the
chart below.
2. Connect the power-supply cable to the Power port on the
rear of the Voice enabler, then plug the supplied AC power
cable into a power outlet.
• The Power LED will illuminate green as soon as the power
adapter is connected.
• The Diag LED will illuminate red for a few seconds while
the Voice enabler goes through its internal diagnostic test.
The LED will turn off when the self-test is complete.
3. Connect a Standard Phone Cord to the RJ-11 Port on the
back of the Voice Enabler. Connect the other end of the cord
to your standard telephone. You will now be able to access
the Voice Over IP features from this telephone. Your
Net2Phone account is NOT set up at this time. Refer to the
section called Configuring Your Network with the
Cable/DSL Voice Enabler for more information.
4. You will need to know the IP address of the Voice Enabler in
order to configure it. This is done using the telephone that is
attached to the Enabler. Pick up the handset of the telephone
that is attached to the Enabler and dial 1**. The currently
assigned IP address of the Enabler will be read back to you.
If you are read a number that is anything besides 0.0.0.0,
write this number down and proceed to Step 6. If the IP
address you are read is 0.0.0.0, proceed to Step 5.
5. If the IP address you are read is 0.0.0.0, then your Voice
Enabler does not have an IP address. There is one of two
ways of assigning the Voice Enabler an IP address. You must
choose between the methods. You cannot use DHCP and a
static IP address for your Voice Enabler at the same time.
a) If you are using DHCP software to assign IP
addresses and your network is currently functioning proper-
ly, press the Reset button on the back of the Voice Enabler
and dial 1** again. Once you are read an IP address other
than 0.0.0.0, write it down and proceed to Step 6. If you
are still read a 0.0.0.0 IP address, make sure that your Voice
Enabler is connected properly and that the Power LED is lit.
If you are still read a 0.0.0.0 IP address, then refer to the
Troubleshooting section.
b) If you are using static IP addresses on your network,
you need to determine what IP address you would like the
Voice Enabler to have. Pick up the handset of the telephone
that is attached to the Enabler and dial 1**, and then
XXX*XXXX*XXX*XXX, where “X” is a digit in the IP
address, and “*” is a period between them. For exam-
ple, dialing 1**192*168*1*2 would result in assigning the
Voice Enabler a static IP address of 192.168.1.2. Check the
address by dialing 1** again and listening for it to be read
back. If you are read the IP address as you assigned it,
write it down and proceed to Step 6.
Model No.:BEFN2PE
EtherFast®Cable/DSL Voice
Enabler powered by Net2Phone
Instant EtherFast®Series
Quick Installation
Making Connectivity Easier
™
Continued on back...
QI-BEFN2PE-10521NC DG
NNoottee::
The diagram above is for reference
purposes only. Every network is different. If
you do not make a connection to the Voice
Enabler by using the settings above, change
the position of the Crossover Switch.
NNoottee::
To avoid IP conflicts, ping the IP address you plan to assign
to the Voice Enabler
}
Only if applicable
If you currently have a Net2Phone PC2Phone or Net2Phone
Direct account number, it can not be used with this service!
You must use the account number printed on the calling card
that was enclosed with your Linksys EtherFast
®
Cable/DSL
Voice Enabler powered by Net2Phone.
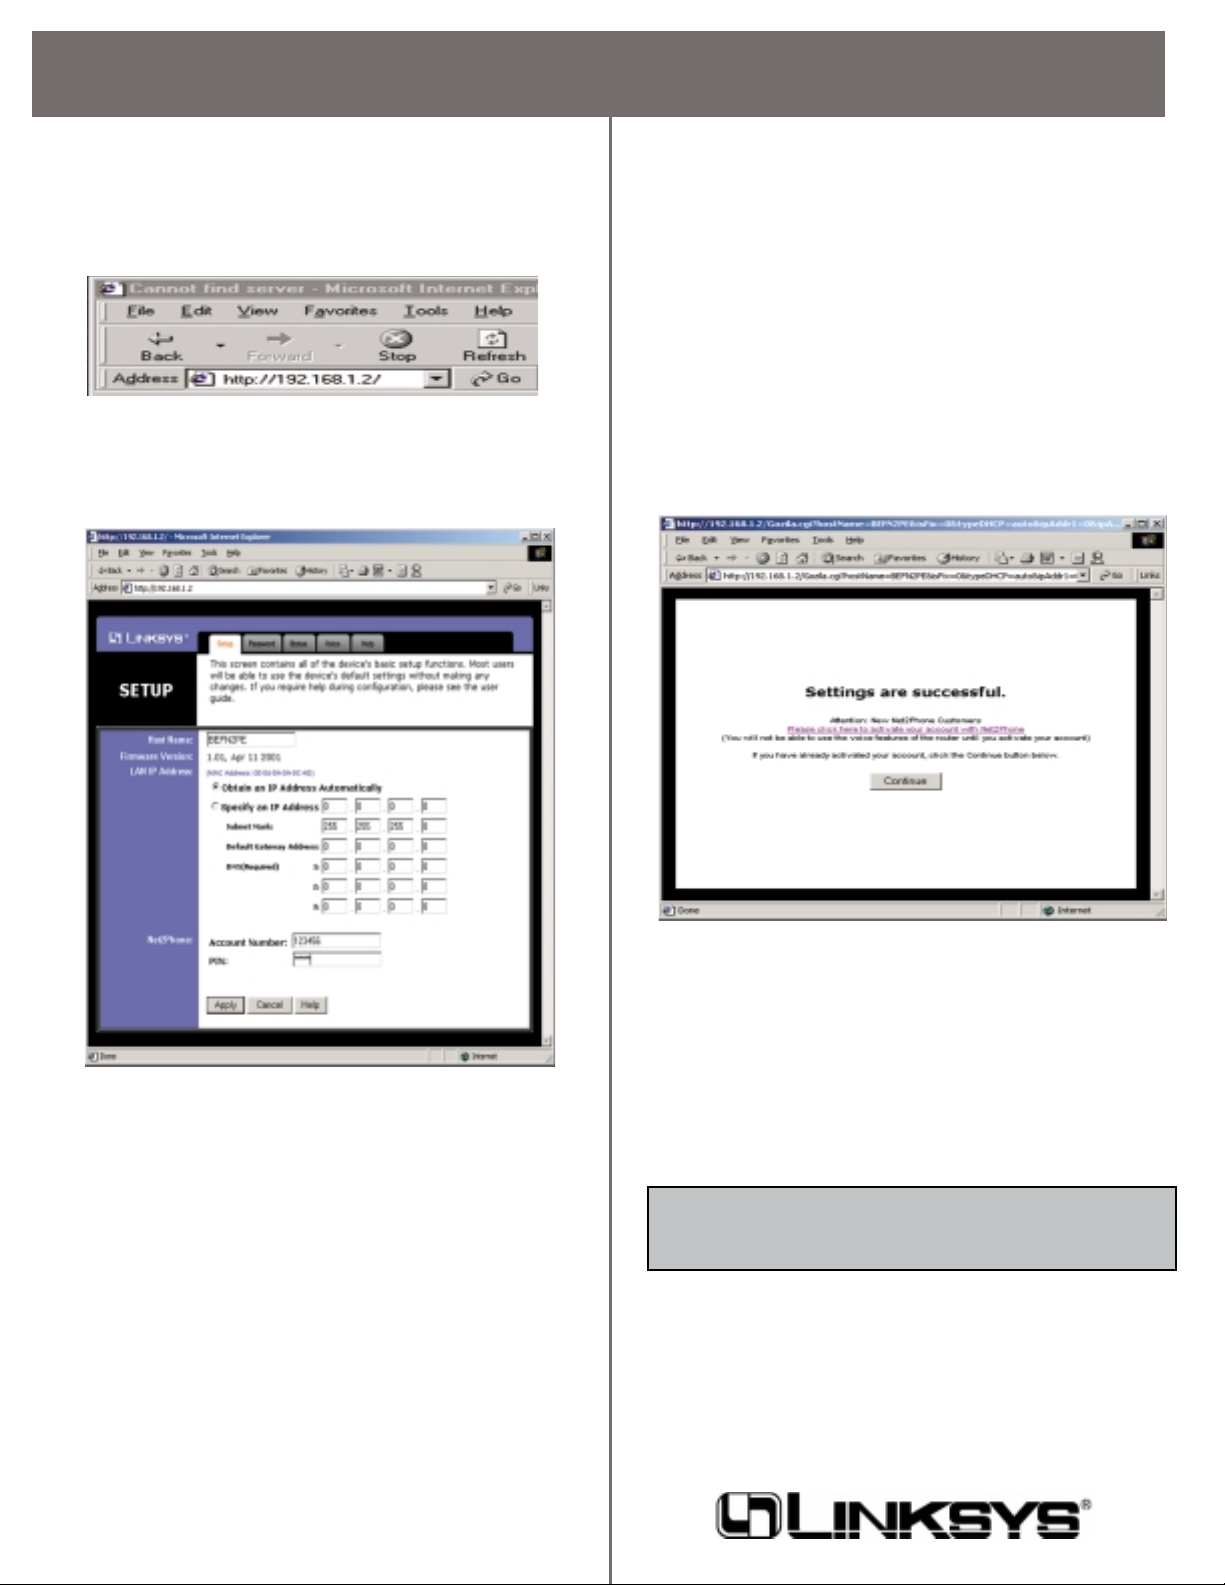
6. Once you know the Voice Enabler’s IP Address, open your
web browser and type http:// and then the Voice
Enabler’s IP address that you have written down in the
browser’s Address box. Press Enter. In the example below,
the IP address is 192.168.1.2.
7. A username and password prompt will appear. Leave the
User Name box empty and type admin (the default password) in the Password box. Click OK.
8. The Cable/DSL Voice Enabler ’s Setup page will appear.
9. Configure the following values.
Host Name This field allows you to supply a host name for
the Voice enabler. In most cases, leaving this field blank will
work.
LAN IP Address These values refer to your internal network
settings. You can change the IP Address information of the
Voice Enabler here. Select either Obtain an IP Address
Automatically (if you use DHCP), or select Specify an IP
Address (if you are using a static IP address). If you select
Specify an IP Address, you may have to enter the values for
your Subnet Mask, your Default Gateway Address and
your DNS. Verify that the settings match the TCP/IP settings
of the other computers on your network. If you are unsure
about automatic IP address assignment or static IP addreses,
see the beginning of this section. All values that you enter
here must be compatible with the rest of your network. You
can also set the IP Address for the Voice Enabler using an
attached telephone. For more information, see the beginning
of this section.
Net2Phone Enter the Account Number and the Personal
Identification Number (PIN) that appear on the
Net2Phone/Linksys Rechargeable Calling Card that came in
your Voice Enabler’s box.
6. When you have properly configured the Setup page, click
Apply. The following page will appear, notifying you that all
of your settings have been accepted. From this page you can
either continue with your Voice Enabler’s setup, or you can
link to the Net2Phone/Linksys webpage in order to activate
your Net2Phone account (if your Internet connection is
already configured properly).
7. Activating Your Net2Phone Account.
a. If you have not activated your Net2Phone account
through the Linksys/Net2Phone website, please select the
link that will direct you to this website. (Follow the instructions to activate your account.) Remember to return here
after you have completed activation and continue from this
step.
b. If you have already activated your account (or do not
wish to activate it at this time), click on Continue.
8. Close the browser window.
Your Cable/DSL Voice Enabler is now configured to your
network and you are ready to make phone calls.
QI-BEFN2PE-10416NC DG
NNoottee::
If you choose not to activate your Net2Phone account now, you
can do it at any time by going to the
HHeellpp
tab in the Voice Enabler’s
Web-based Utility. You will not be able to make any telephone calls
using the Voice Enabler until you activate your Net2Phone account.
 Loading...