

Page 1
1
Connecting the ADSL Modem
2
Configuring the ADSL Modem
Package Contents
•ADSL Modem
• Power Supply
• User Guide on CD-ROM
• Telephone Cable
• Ethernet Cable
ADSL Modem
WIRED
Quick Installation
Connecting the Modem
You can use the Setup CD-ROM or
this Quick Install to install the
modem. The Setup program is
available to Windows 2000 & XP
users only.
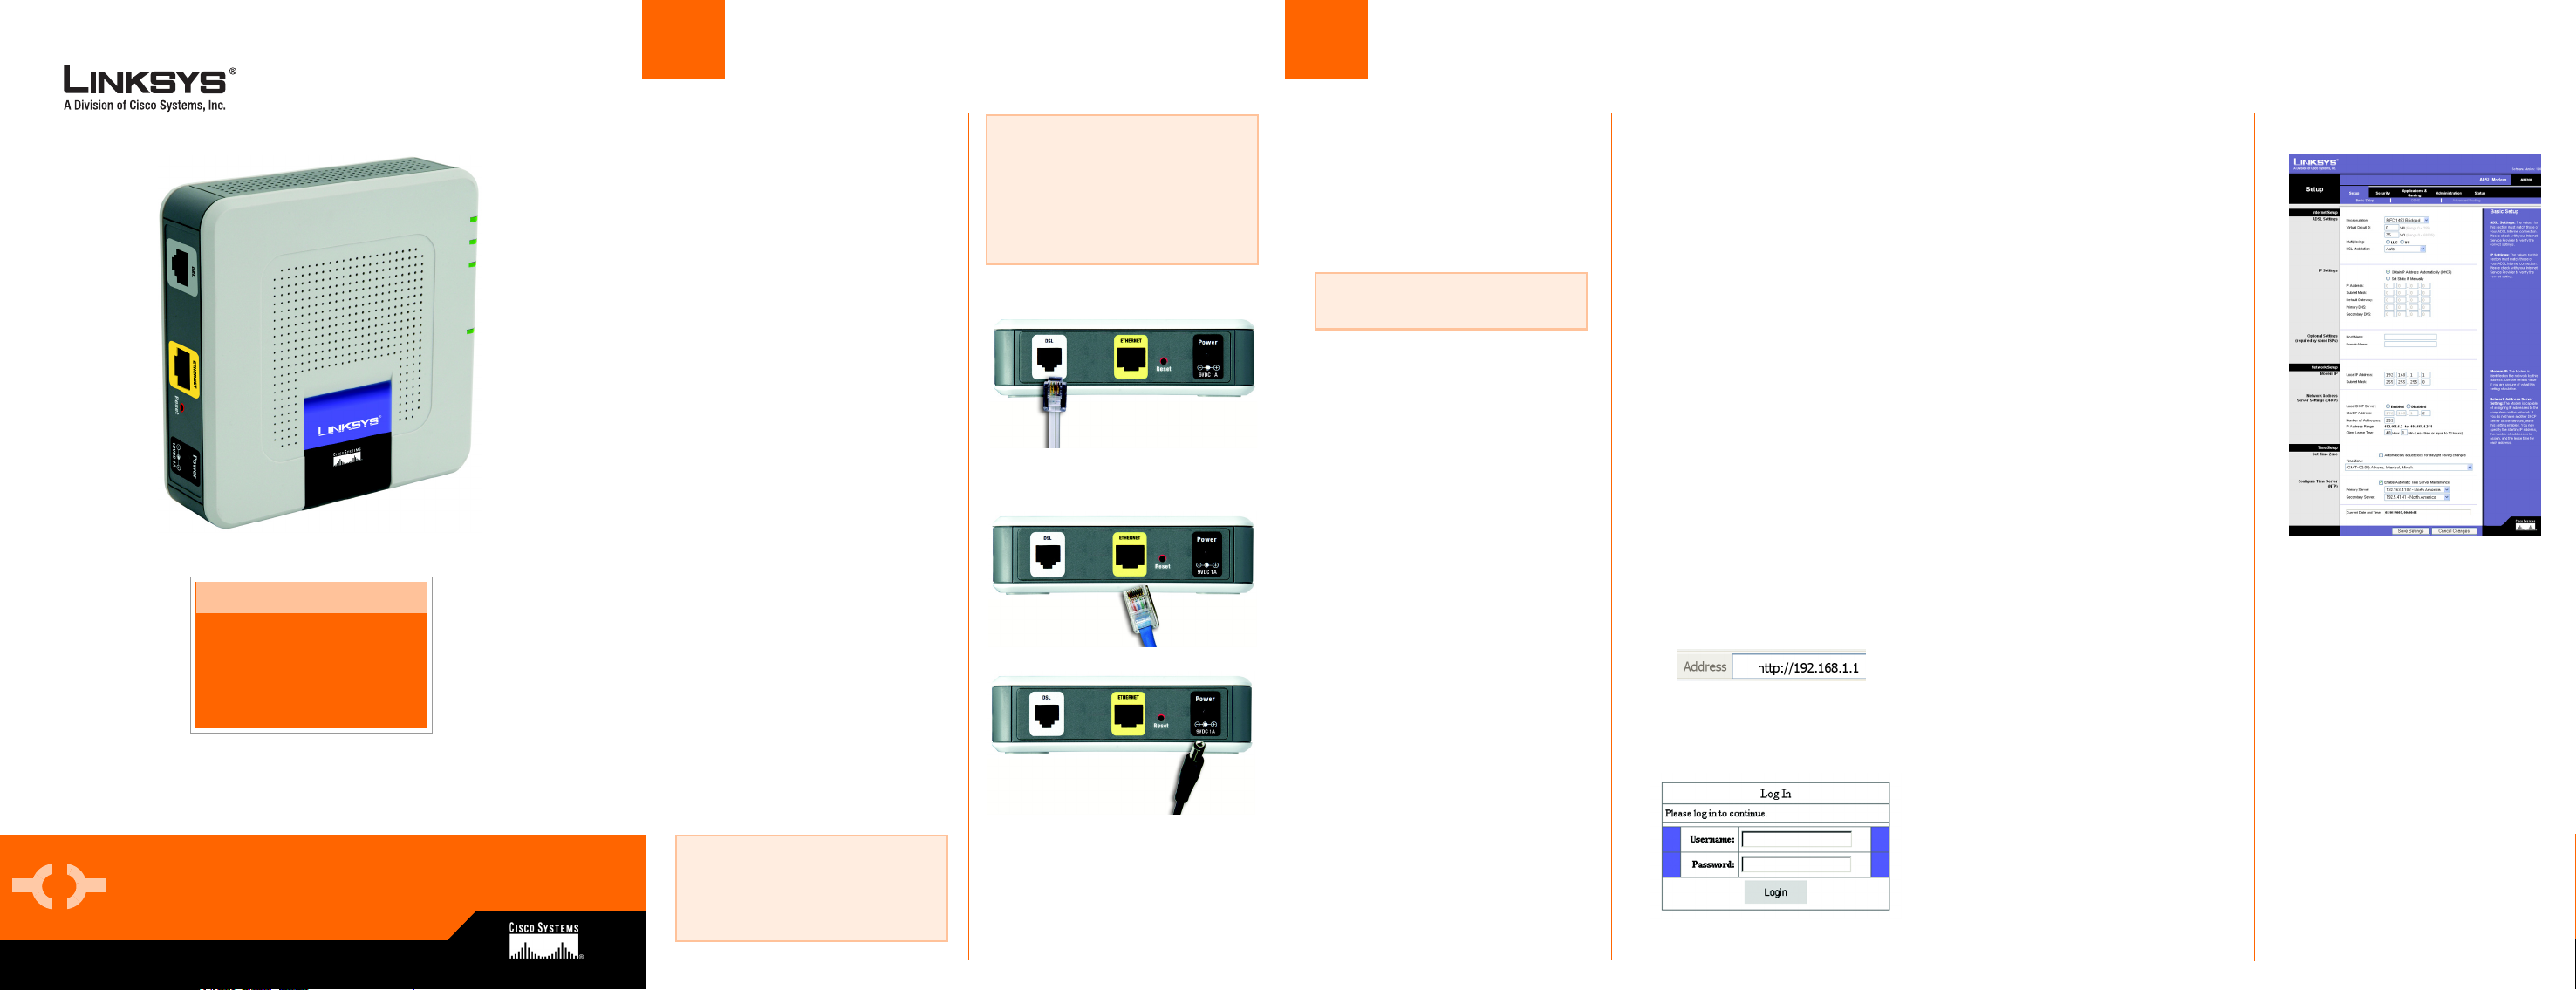
A Connect one end of the
provided phone cable to
the DSL (RJ-11) port that is
on the back of your Modem
(Figure A). Connect the
other end of the phone
cable to the wall jack with
DSL service.
B Connect one end of the
provided Ethernet cable to
your PC’s Ethernet port
(Figure B). Connect the
other end of the cable to
the Ethernet port on the
back of your Modem.
C Connect the power
adapter to your Modem
(Figure C) and to the
electrical outlet.
D Turn on your PC.
NOTE: If your PC’s Ethernet
adapter is not set up, refer to the
Ethernet adapter’s user guide for
more information.
NOTE: Make sure you only place
the microfilter or splitter between
the telephone and wall jack and not
between the Modem and wall jack.
Contact your Internet Service
Provider for additional details.
A
B
C
The connection of the Modem is
complete.
For Step 2, you will need the
setup information provided by
your ADSL Internet Service
Provider (ISP). If you do not
have this information, please
NOTE: You only need to configure
the Modem once.
contact them before
proceeding
.
A Open your web browser.
(You may get an error
message at this point.
Continue following these
directions.) Enter
http://192.168.1.1 in the
web browser’s
field. Press the Enter key
Address
.
B A Login window, shown in
Figure B, will appear.
Enter admin in lowercase
letters in the
field, and enter admin in
lowercase letters in the
Password
the default user name
and password.) Click the
Login button.
C The
Basic Setup
will appear with the Setup
tab selected. Based on
the setup instructions
from your ISP, you may
User Name
field (admin is
screen
A
B
need to provide the
following information.
ADSL Settings. The
Modem supports the
following Encapsulations:
RFC 1483 Bridged, RFC
1483 Routed, RFC 2516
PPPoE, RFC 2364 PPPoA
and Bridged Mode Only.
Each
Basic Setup
and available features
will differ depending on
what type of
encapsulation you select.
VC Settings. Virtual
Circuits (VPI and VCI):
These fields consist of two
items: VPI (Virtual Path
Identifier) and VCI (Virtual
Channel Identifier). Your
ISP will provide the
correct settings for these
fields. Multiplexing: Select
LLC or VC, depending on
your ISP.
Your ISP will provide the
correct settings.
screen
C
Model No.
Model No.
AM200 (EU/LA)
Page 2
Only one of the following
encapsulations is required. Your
Internet Service Provider will tell
you which one to use.
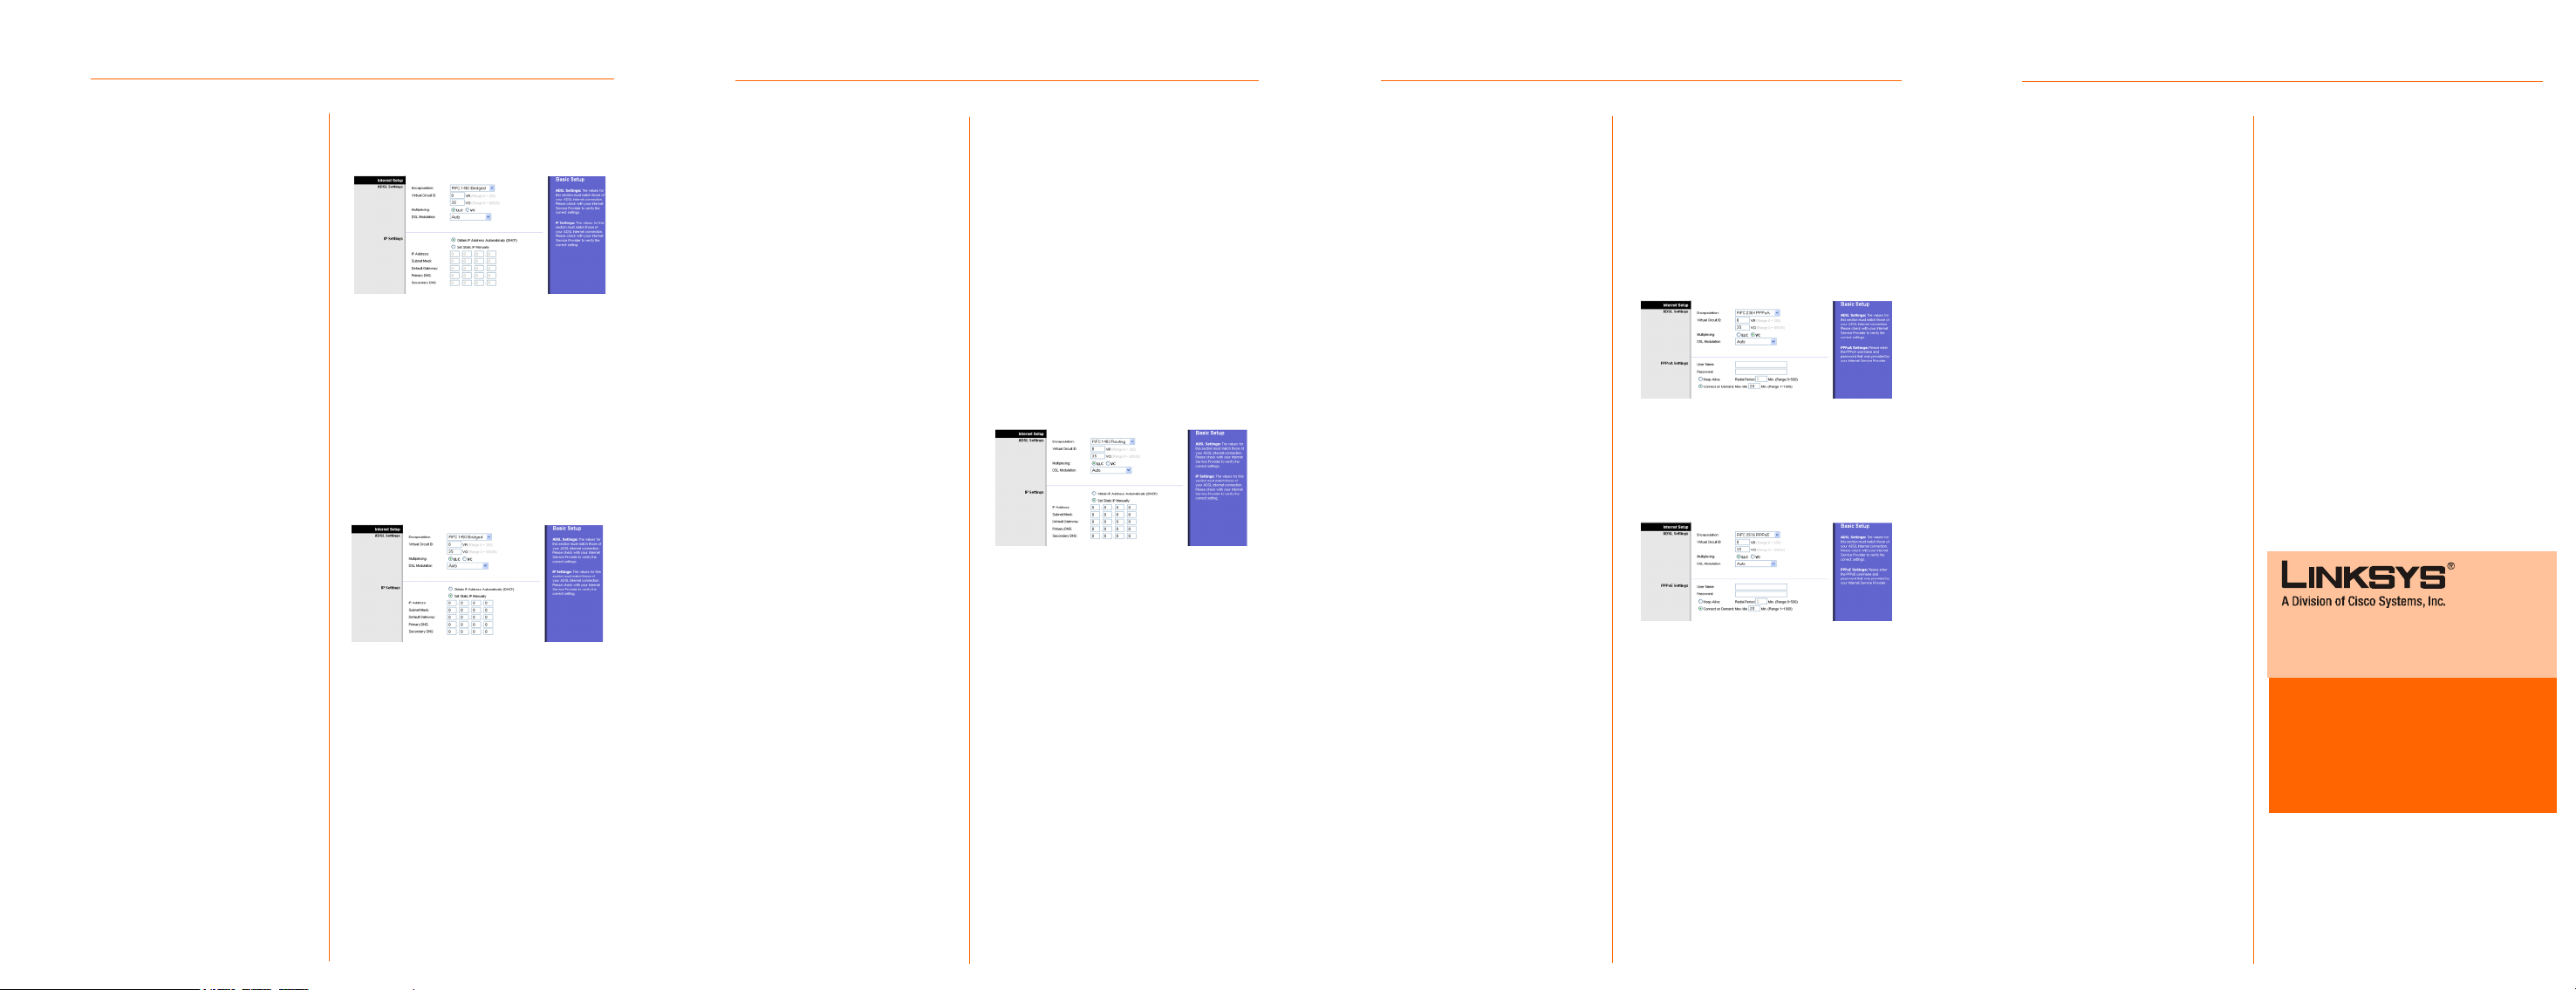
1. RFC 1483 Bridged
Dynamic IP Address
If your ISP says that you are
connecting through a
dynamic IP address, perform
these steps:
a Select RFC 1483 Bridged
for the Encapsulation.
b Select Obtain an IP
Address Automatically as
the IP Setting.
c Click the Save Settings
button to save the
settings.
Static IP Address
If your ISP says that you are
connecting through a static or
fixed IP address, perform these
steps:
a Select RFC 1483 Bridged
for the Encapsulation.
Dynamic IP Address
Static IP Address
b Select Use the following
IP Address as the IP
Setting.
c Enter the IP Address and
the Subnet Mask.
d Enter the Default
Gateway address.
e Enter the DNS in the
Primary
Secondary
need to enter at least
one DNS address.
and/or
fields. You
f Click the Save Settings
button to save the
settings.
2. RFC 1483 Routed
If your ISP says that you are
connecting through RFC 1483
Routed using a static IP
address, perform these steps:
a Select RFC 1483 Routed
for the Encapsulation.
b Enter the IP Address and
the Subnet Mask.
c Enter the Default
Gateway address.
RFC 1483 Routed
d Enter the DNS in the
Primary
Secondary
need to enter at least
one DNS address.
and/or
fields. You
e Clck the Save Settings
button to save the
settings.
3. RFC 2516 PPPoE or RFC
2364 PPPoA
If your ISP says that you are
connecting through PPPoE or
PPPoA, or if you normally enter
a user name and password to
access the Internet, perform
these steps:
a Select RFC2516 PPPoE or
RFC 2364 PPPoA as
appropriate for the
Encapsulation.
b If you selected PPPoE,
enter the Service Name
(if required).
c Enter the User Name (if
required).
d Enter the Password.
e Select Keep Alive if you
always want to be
PPPoA
PPPoE
connected to your ISP, or
select Connect on
Demand if you are
charged for the time that
you are connected to
your ISP.
f Click the Save Settings
button.
D Congratulations! You’ve
successfully configured
the Modem. Test the
setup by opening your
web browser from your
computer and entering:
http://www.linksys.com/registration
If you are unable to reach our
website, you may want to review
the installation and configuration
sections in this Quick Installation or
refer to the Troubleshooting
section of the User Guide.
For additional information or troubleshooting
help, refer to the User Guide on the CD-ROM.
You can also e-mail for further support.
Website
http://www.linksys.com/international
Product Registration
http://www.linksys.com/registration
Linksys is a registered trademark or trademark of
Cisco Systems, Inc. and/or its affiliates in the U.S.
and certain other countries. Copyright © 2006
Cisco Systems, Inc. All rights reserved.
AM200 EU/LA-QI-60523NC DF
 Loading...