

Page 1

AE6000 Wireless Mini USB Adapter AC580 Dual Band
User Guide
a
Page 2

Linksys AE6000
Contents
Product Overview
Features 1
Installation
Installation 2
Wireless Network Conguration
Wi-Fi Protected Setup 3
Wireless network conguration utility 3
Operating system’s built-in wireless network setup 3
Troubleshooting
Linksys AE6000 10
Specications
Linksys AE6000 11
i
i
Page 3
Linksys AE6000
Product Overview
Thank you for choosing the Linksys dual-band wireless mini USB AC580 adapter.
Using the latest wireless networking technology, the adapter adds or upgrades
wireless connectivity on your Windows-based desktop or laptop computer. To
help protect your data and privacy, you can configure your home network and
this adapter to use Wi-Fi Protected Access 2 (WPA2) encryption.
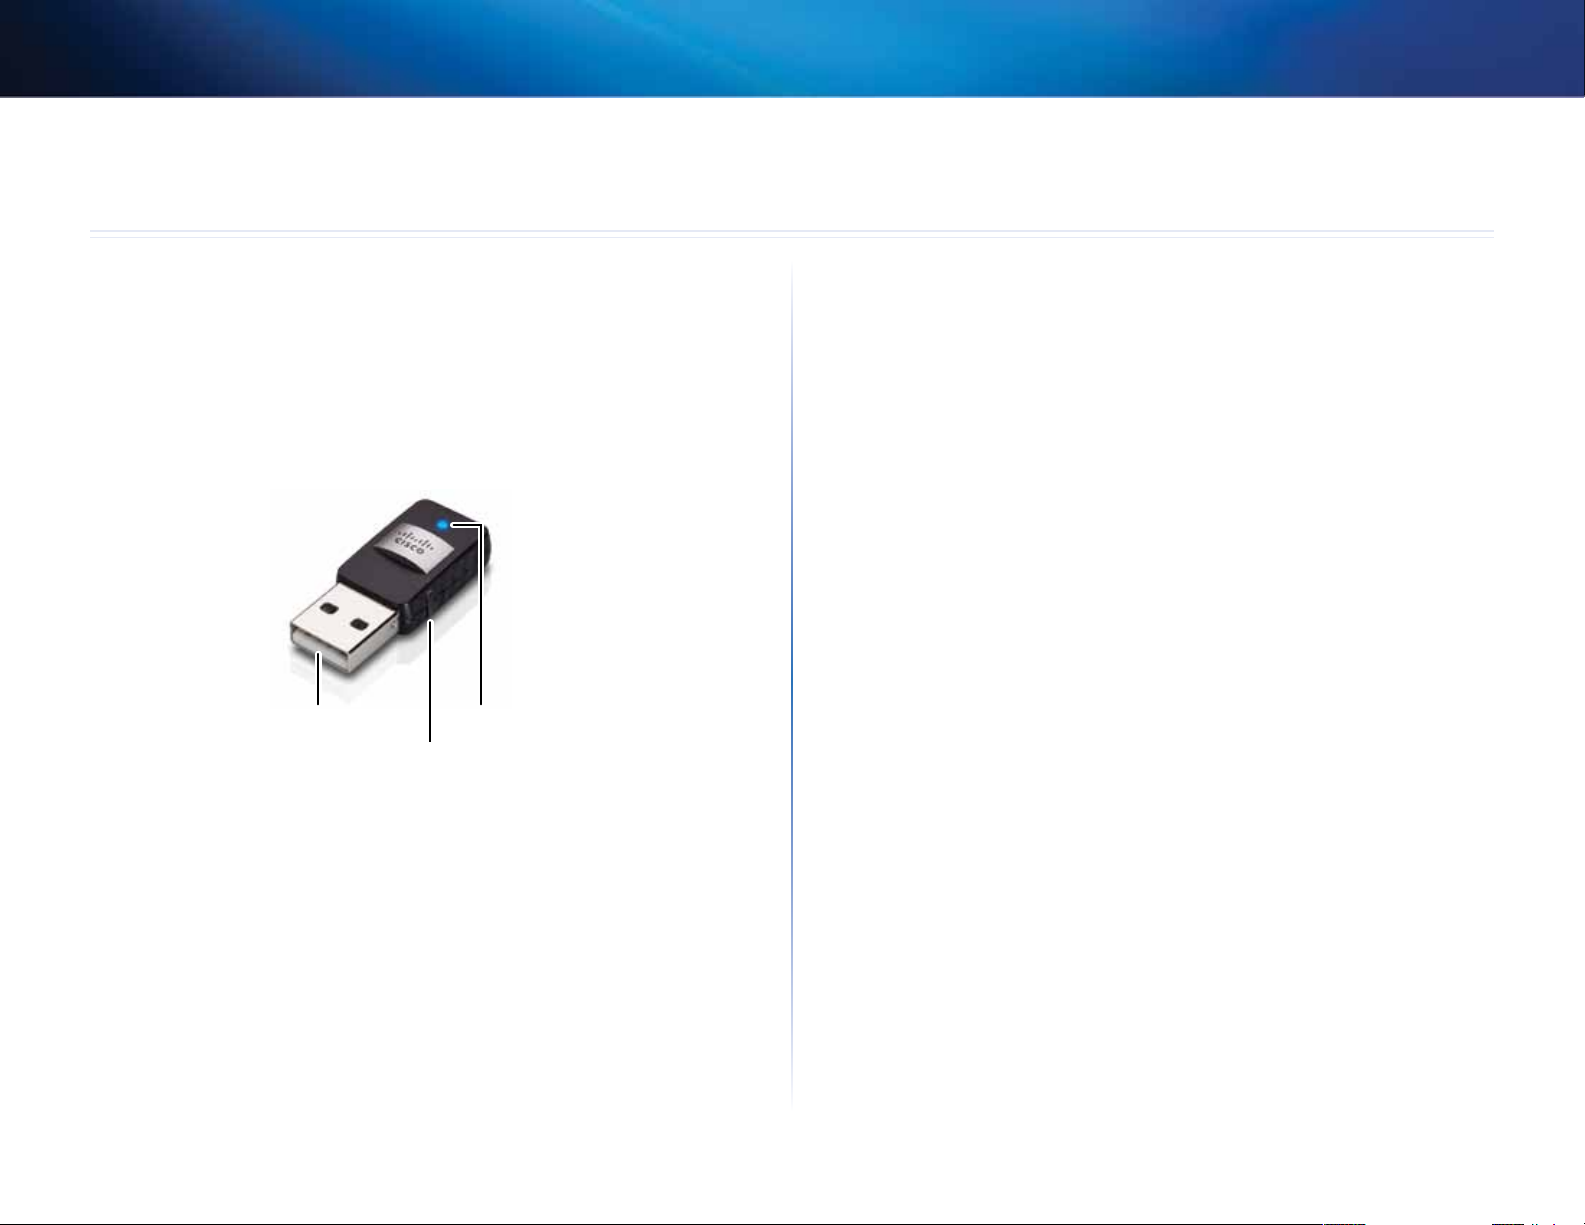
Features
Product Overview
USB plug
Wi-Fi Protected Setup button
USB plug: Connect this end to any available USB port on your computer.
LED: Flashes when there is wireless network activity.
Wi-Fi Protected Setup button: Press this button and the Wi-Fi Protected Setup
button on your router or access point to connect your computer to the wireless
network.
LED
1
1
Page 4

Linksys AE6000
Installation
Installation
This chapter describes the procedure for installing the adapter.
Installation
To install the adapter:
1. Insert the CD into your CD or DVD drive.
2. For Windows 8, click Tap to choose what happens to this disc in the
upper-right corner of the screen.
3. Click Set up your Linksys Adapter.
If you do not see a pop-up menu for the CD, access Setup on the CD
directly. To access the CD, perform the following steps for your operating
system:
Windows XP
a. Click Start, then click My Computer.
b. Double-click your CD or DVD drive.
3. Follow the on-screen instructions to finish setting up your Linksys
wireless adapter.
Note
You need to run Setup only once to install your adapter. After you
run Setup, your computer recognizes the adapter each time it is
connected to your computer’s USB port.
Windows 8
a. Type Computer at the main screen, then click Computer when it
appears in the Apps list.
b. Double-click your CD or DVD drive.
Windows 7 and Windows Vista
a. Click Start, then click Computer.
b. Double-click your CD or DVD drive.
2
2
Page 5

Linksys AE6000
Wireless Network Configuration
Wi-Fi Protected Setup
To configure the adapter’s wireless connection settings, you can use:
• Wi-Fi Protected Setup™ (if your router, gateway, or access point
supportsit)
• Your computer’s wireless network configuration utility
• Your operating system’s built-in wireless network setup
Wi-Fi Protected Setup
To connect using Wi-Fi Protected Setup:
1. Press the Wi-Fi Protected Setup button on your wireless router, gateway,
or access point.
2. Within two minutes, press and hold the Wi-Fi Protected Setup button
on the side of your adapter for at least three seconds. The LED flashes
while connecting, then stays solid when the connection is complete.
Operating system’s built-in wireless network setup
Follow the instructions in the appropriate section below to use your operating
system’s built-in utility:
• “Windows 8” on page 3
• “Windows 7” on page 4
• “Windows Vista” on page 5
• “Windows XP” on page 7
Windows 8
After you have installed the adapter, move your mouse pointer to the
lower-right corner of the screen, then click Settings. Click the wireless
network icon . The Network menu opens from the right side of the
screen, showing you available wireless networks and your current
connection status.
Wi-Fi Protected Setup button
Wireless network configuration utility
If your computer has a wireless network configuration utility installed, refer to
that utility’s documentation for instructions.
3
3
Page 6

Linksys AE6000
Operating system’s built-in wireless network setup
New Wireless Connection
To connect to a different wireless network:
1. Move your mouse pointer to the lower-right corner of the screen, then
click Settings.
2. Click the wireless network icon . The Network menu opens, showing
you available wireless networks and your current connection status.
3. If prompted, enter any additional required network information (such as
password).
Windows 7
After you have installed the adapter, the Wireless Network Configuration
utility icon appears on your computer’s system tray. (If you do not see the
icon, click the Show hidden icons arrow in the system tray.)
New Wireless Connection
To connect to a different wireless network:
1. Click the Wireless Network Configuration utility icon. A list of available
wireless networks appears.
2. Select your network, and then click Connect.
When your mouse pointer hovers over the icon, the status information of
your wireless connection appears.
If your network does not use wireless security, your computer now
connects to the wireless network, and you are done.
4
Page 7

Linksys AE6000
Operating system’s built-in wireless network setup
3. Enter the Wi-Fi Protected Access (WPA/WPA2) passphrase or the Wired
Equivalent Privacy (WEP) key (depending on your type of security), then
click OK.
This screen appears while the adapter connects to your network. Do not
cancel, unless you want to end the connection.
Windows Vista
After you have installed the adapter, the Wireless Network Configuration
utility icon appears on your computer’s system tray.
When your mouse pointer hovers over the icon, the status information of
your wireless connection appears.
New Wireless Connection
To connect to a different wireless network:
1. Right-click the Wireless Network Configuration utility icon.
2. Click Connect to a network.
Your computer is now connected to your wireless network.
Note
For help with the Wireless Network Conguration utility, click Start,
then click Help and Support.
5
Page 8

Linksys AE6000
Operating system’s built-in wireless network setup
3. Select your network, then click Connect.
4. If your network uses wireless security, go to Step 5.
If your network does not use wireless security, this screen appears. Click
Connect Anyway and go to Step 6.
5. Enter the Wi-Fi Protected Access (WPA/WPA2) passphrase or the Wired
Equivalent Privacy (WEP) key (depending on your type of security), then
click Connect.
This screen appears while the adapter connects to your network. Do not
cancel, unless you want to end the installation.
6
Page 9

Linksys AE6000
Operating system’s built-in wireless network setup
This screen appears when you are connected to your network.
6. If you want to save your settings, select Save this network.
7. Click Close.
The Set Network Location screen may appear. This screen helps apply the
correct settings for your type of location.
Note
For help with the Wireless Network Conguration utility, click Start,
then click Help and Support.
Your computer is now connected to your wireless network.
Windows XP
After you have installed the adapter, the Windows XP Wireless Zero
Configuration Utility icon appears on your computer’s system tray.
When your mouse pointer hovers over the icon, the status information of
your wireless connection appears.
a. Click Home, Work, or Public location, then click Close on the
resulting screen.
7
Page 10

Linksys AE6000
Operating system’s built-in wireless network setup
New Wireless Connection
To connect to a new wireless network:
1. Right-click the Windows XP Wireless Zero Configuration icon in your
computer’s system tray, then click View Available Wireless Networks. A
window displays the available wireless networks.
2. Select the network that you want, then click Connect.
If the network uses wireless security, go to Step 4. Otherwise, continue
to Step 3.
4. If your network uses Wired Equivalent Privacy (WEP) wireless security,
enter the WEP Key in the Network key and Confirm network key fields. If
your network uses Wi-Fi Protected Access (WPA/WPA2) wireless security,
enter the passphrase in the Network key and Confirm network key fields.
Click Connect.
Note
Windows XP Wireless Zero Configuration does not support the use
of a WEP passphrase. Enter the exact WEP key used by your wireless
router or access point.
Note
If your network is using WPA2 security, make sure that you have
installed the Update for Windows XP (KB893357), available at
www.microsoft.com.
3. Click Connect Anyway to connect the adapter to your unsecured
network. Your computer now connects to the wireless network, and you
are done.
8
Page 11

Linksys AE6000
Your wireless network will appear as Connected when your connection
is active.
Note
For help with the Wireless Network Conguration utility, click Start,
then click Help and Support.
Operating system’s built-in wireless network setup
Your computer is now connected to your wireless network.
9
Page 12

Linksys AE6000
Troubleshooting
Linksys AE6000
Your computer does not recognize the adapter.
• Make sure that the adapter is properly inserted into your computer’s USB
port.
• Connect the adapter into a different USB port.
Your computer cannot communicate with the other computers on your
wireless network.
• Make sure that the computers are powered on.
• Make sure that the adapter is configured with the same Wireless Network
Name (also called the SSID or Service Set Identifier) and wireless security
settings as the other computers on your wireless network.
Troubleshooting
Note
If your questions are not addressed here, refer to our support
section on the web at Linksys.com/support.
10
10
Page 13

Linksys AE6000
Specifications
Linksys AE6000
Model Number AE6000
Standards 802.11a, 802.11b, 802.11g, 802.11n,
801.11ac
Interface USB 2.0
LED Link/Activity
Antennas 1 Internal dual-band
Button Wi-Fi Protected Setup
Security features WEP, WPA & WPA2 Personal,
WPA & WPA2 Enterprise, WPS
Security key bits Up to 128-Bit Encryption
OS requirements Windows XP, Windows Vista,
Windows Vista 64-bit Edition,
Windows 7, Windows 7 64-bit, Windows 8,
Windows 8 64-bit
Specifications
Environmental
Dimensions 1.38” x 0.59” x 0.32” (35 x 15 x 8 mm)
Weight 0.14 oz (4 g)
Certication FCC, CE, IC, UL, RoHS, WEEE, IDA,
C-Tick, Wi-Fi A/B/G/N/AC
Operating temperature 32 to 104ºF (0 to 40ºC)
Storage temperature -4 to 158ºF (–20 to 70ºC)
Operating humidity 10 to 85% Noncondensing
Storage humidity 5 to 90% Noncondensing
Specications are subject to change without notice.
11
Page 14

Visit linksys.com/support for award-winning 24/7 technical support
A listing of Cisco’s trademarks can be found at www.cisco.com/go/trademarks. All other trademarks mentioned in this document are the property of their respective owners.
Cisco, the Cisco logo, and Linksys are trademarks or registered trademarks of Cisco and/or its affiliates in the United States and other countries.
© 2013 Cisco and/or its affiliates. All rights reserved.
3425-01631A 121119MS
 Loading...