

Page 1
User Guide
Linksys AE1000
High Performance Wireless-N USB Adapter
Page 2

Linksys AE1000 Table of Contents
Contents
Chapter 1: Product Overview 1
LED . . . . . . . . . . . . . . . . . . . . . . . . . . . . . . . . . . . . . . . . . . . . . . . . . . . . . . 1
Chapter 2: Installation 2
Installation. . . . . . . . . . . . . . . . . . . . . . . . . . . . . . . . . . . . . . . . . . . . . . . . . . 2
Chapter 3: Wireless Network Conguration 4
Windows 7. . . . . . . . . . . . . . . . . . . . . . . . . . . . . . . . . . . . . . . . . . . . . . . . . . 4
Windows Vista . . . . . . . . . . . . . . . . . . . . . . . . . . . . . . . . . . . . . . . . . . . . . . . 5
Windows XP . . . . . . . . . . . . . . . . . . . . . . . . . . . . . . . . . . . . . . . . . . . . . . . . . 7
Appendix A: Troubleshooting 8
Appendix B: Specications 9
Appendix C: Warranty Information 10
Limited Warranty . . . . . . . . . . . . . . . . . . . . . . . . . . . . . . . . . . . . . . . . . . . . . .10
Appendix D: Regulatory Information 12
FCC Statement . . . . . . . . . . . . . . . . . . . . . . . . . . . . . . . . . . . . . . . . . . . . . . .12
FCC Radiation Exposure Statement . . . . . . . . . . . . . . . . . . . . . . . . . . . . . . . . . .12
Safety Notices. . . . . . . . . . . . . . . . . . . . . . . . . . . . . . . . . . . . . . . . . . . . . . . .12
Industry Canada Statement . . . . . . . . . . . . . . . . . . . . . . . . . . . . . . . . . . . . . . .13
Règlement d’Industry Canada . . . . . . . . . . . . . . . . . . . . . . . . . . . . . . . . . . . . .13
Wireless Disclaimer . . . . . . . . . . . . . . . . . . . . . . . . . . . . . . . . . . . . . . . . . . . .13
Avis de non-responsabilité concernant les appareils sans l . . . . . . . . . . . . . . . . . .13
User Information for Consumer Products Covered by EU Directive 2002/96/EC on Waste
Electric and Electronic Equipment (WEEE) . . . . . . . . . . . . . . . . . . . . . . . . . . . . . .14
Appendix E: Software End User License Agreement 15
Cisco Products . . . . . . . . . . . . . . . . . . . . . . . . . . . . . . . . . . . . . . . . . . . . . . .15
Software Licenses . . . . . . . . . . . . . . . . . . . . . . . . . . . . . . . . . . . . . . . . . . . . .15
High Performance Wireless-N USB Adapter
ii
Page 3
Linksys AE1000 Chapter 1: Product Overview
Chapter 1: Product Overview
Thank you for choosing the Linksys AE1000 High
Performance Wireless-N USB Adapter. Using the latest
wireless networking technology, the Adapter adds or
upgrades wireless connectivity on your Windows-based
desktop or laptop computer. To help protect your data
and privacy, you can use Wi-Fi Protected Access 2 (WPA2)
encryption to protect your wireless connection.
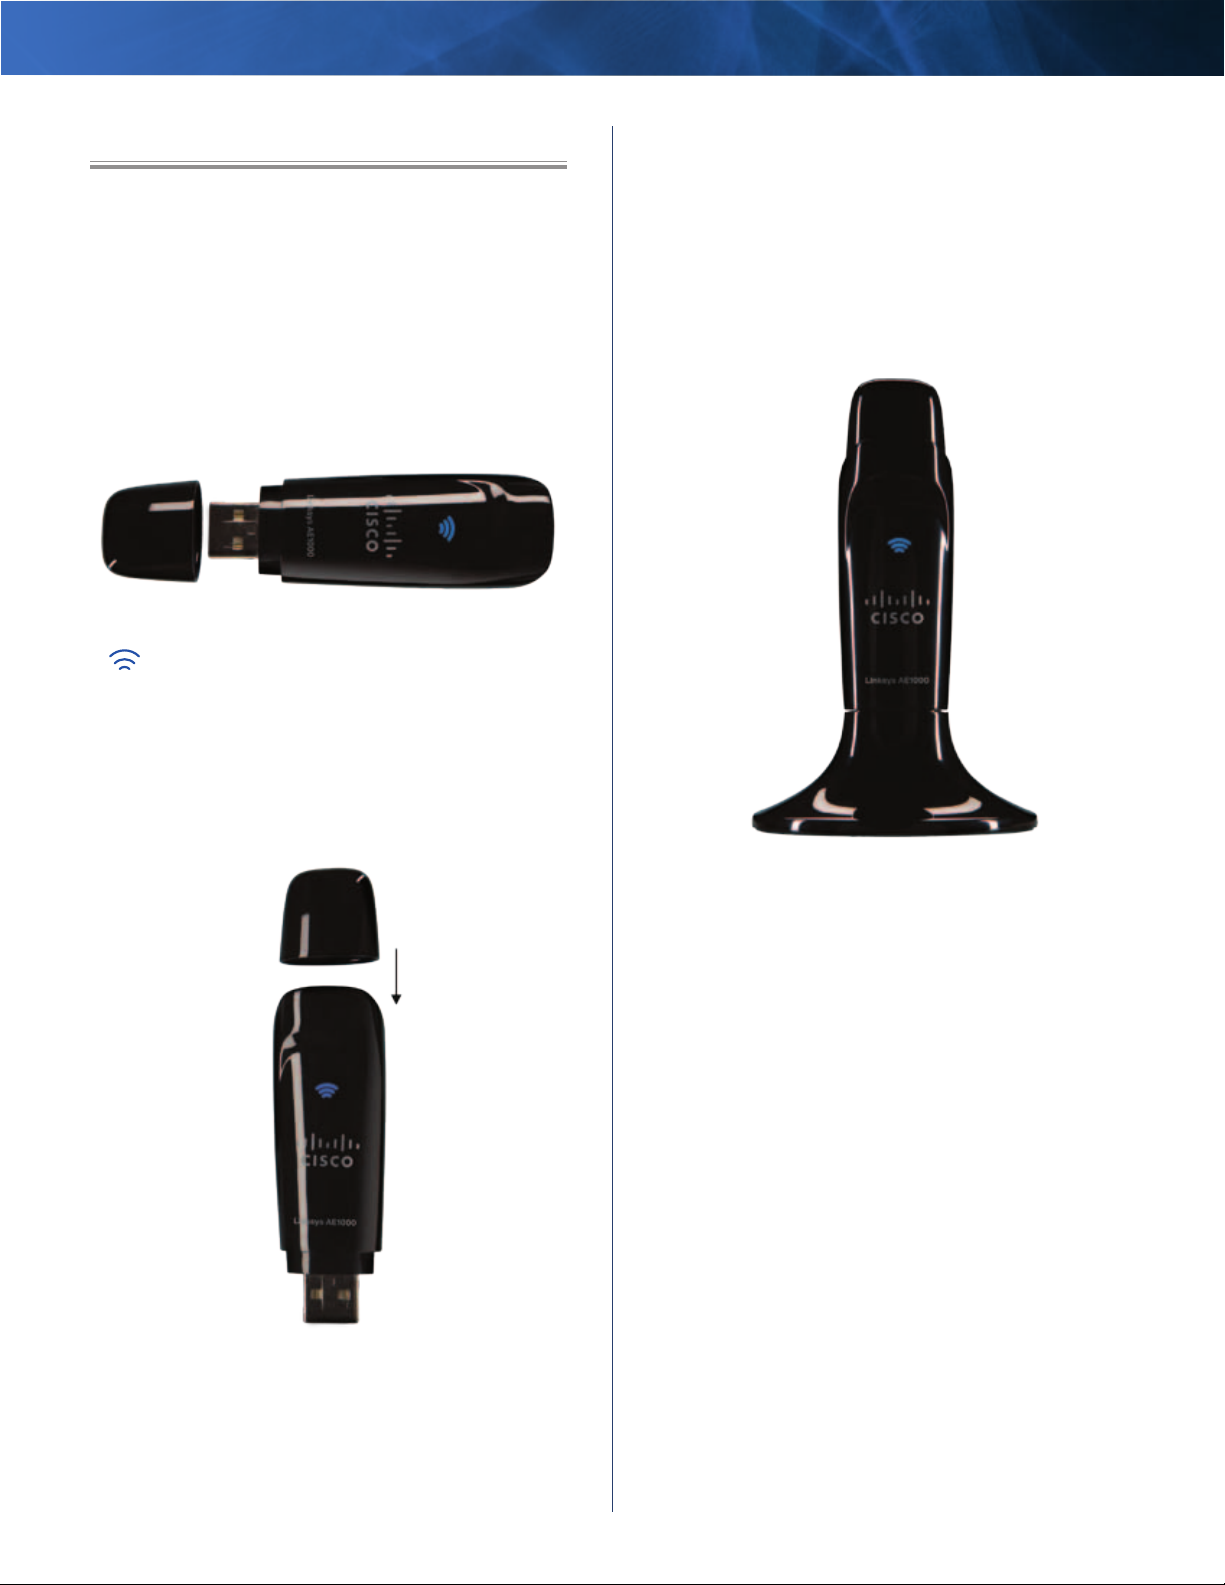
LED
Link (Blue) The LED flashes when there is
wireless network activity.
USB Extension Base
The Adapter comes attached to its USB Extension Base.
Using the Adapter in its Base may often improve wireless
signal performance, especially with desktop computers
that may be located under desks or tabletops.
To use the USB Extension Base, make sure the Adapter
is connected to the Base, and then connect the USB
Extension Base to a USB port on your computer or laptop.
Storing the Cap
When the Adapter is plugged into the USB Extension Base
or your computer’s USB port, you can store the cap by
attaching it to the Adapter.
To store the cap, push it onto the top of the Adapter until
it fits snugly.
High Performance Wireless-N USB Adapter
1
Page 4
Linksys AE1000 Chapter 2: Installation
DVD/CD-RW Drive (E:) Linksys
Router Setup
Always do this for software and games:
Install or run program
General options
Set up your Linksys Adapter
Published by Cisco Consumer Products LLC
Open folder to view files
using Windows Explorer
Chapter 2: Installation
This chapter describes the procedure for installing the
Adapter.
Installation
To install the Adapter:
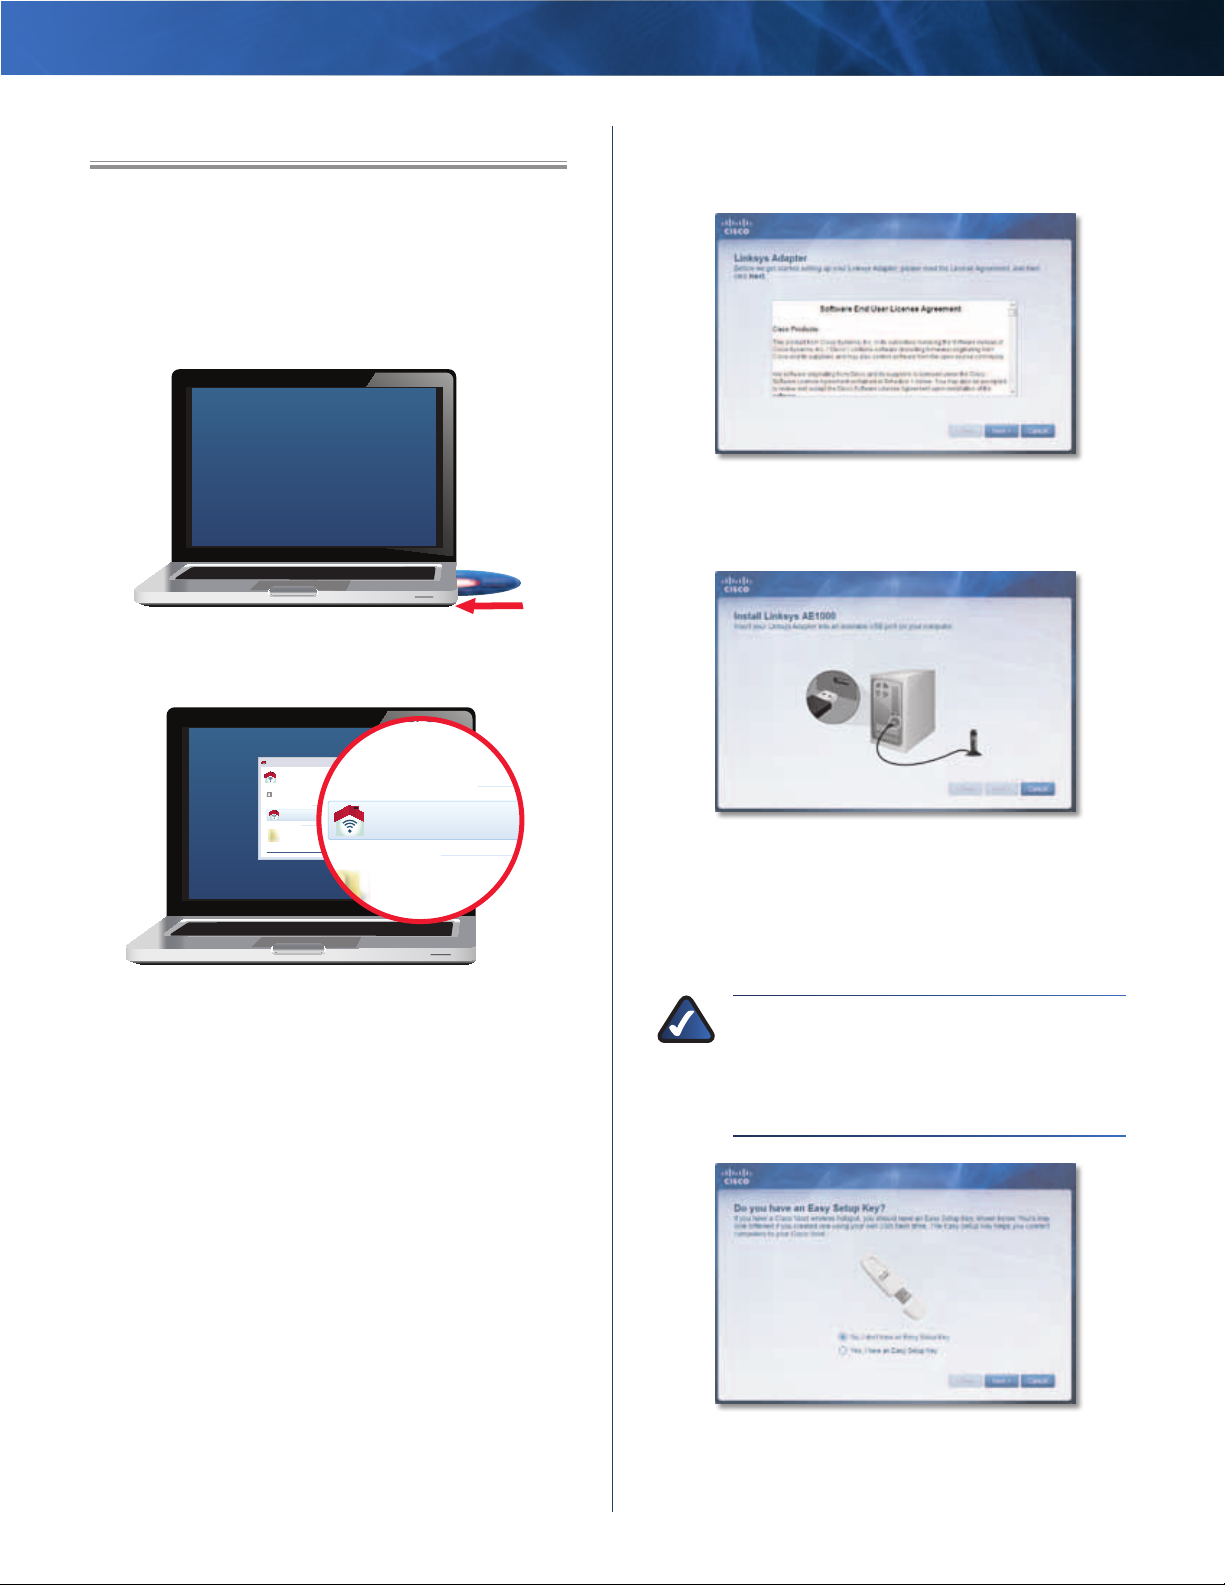
1. Insert the CD into your CD-ROM drive.
Insert CD
2. Click Set up your Linksys Adapter.
3. Read the Software End User License Agreement.
To accept the agreement and continue with the
installation, click Next.
License Agreement
4. Insert the Adapter into an available USB port on your
computer.
Set up Your Linksys Adapter
If you do not see this, access setup on the CD directly.
To do so, perform the following steps for your specific
operating system:
Windows 7
a. Go to Start > Computer.
b. Double-click your CD-ROM drive.
Windows Vista
a. Go to Start > Computer.
b. Double-click your CD-ROM drive.
Windows XP
a. Go to Start > My Computer and select your
CD-ROM drive.
b. Double-click Setup.exe.
High Performance Wireless-N USB Adapter
AutoPlay
DVD/CD-RW Drive (E:) Linksys
Adapter Setup
Always do this for software and games:
Install or run program
Set up your Linksys Adapter
Published by Cisco Consumer Products LLC
General options
Open folder to view files
using Windows Explorer
View more AutoPlay options in Control Panel
Install Linksys AE1000
5. An Easy Setup Key helps you quickly connect to your
wireless hotspot or router. If you do not have an Easy
Setup Key, select No, I don’t have an Easy Setup Key.
If you have an Easy Setup Key, select Yes, I have an
Easy Setup Key. Click Next.
NOTE: Cisco Valet wireless hotspots come with
an Easy Setup Key. Cisco Valet wireless hotspots
and some Linksys routers also let you create one
from your own USB flash drive.
(You do not need
an Easy Setup Key to complete installation.)
Do You Have an Easy Setup Key?
If you do not have an Easy Setup Key, go to step 6.
If you have an Easy Setup Key, go to step 8.
2
Page 5
Linksys AE1000 Chapter 2: Installation
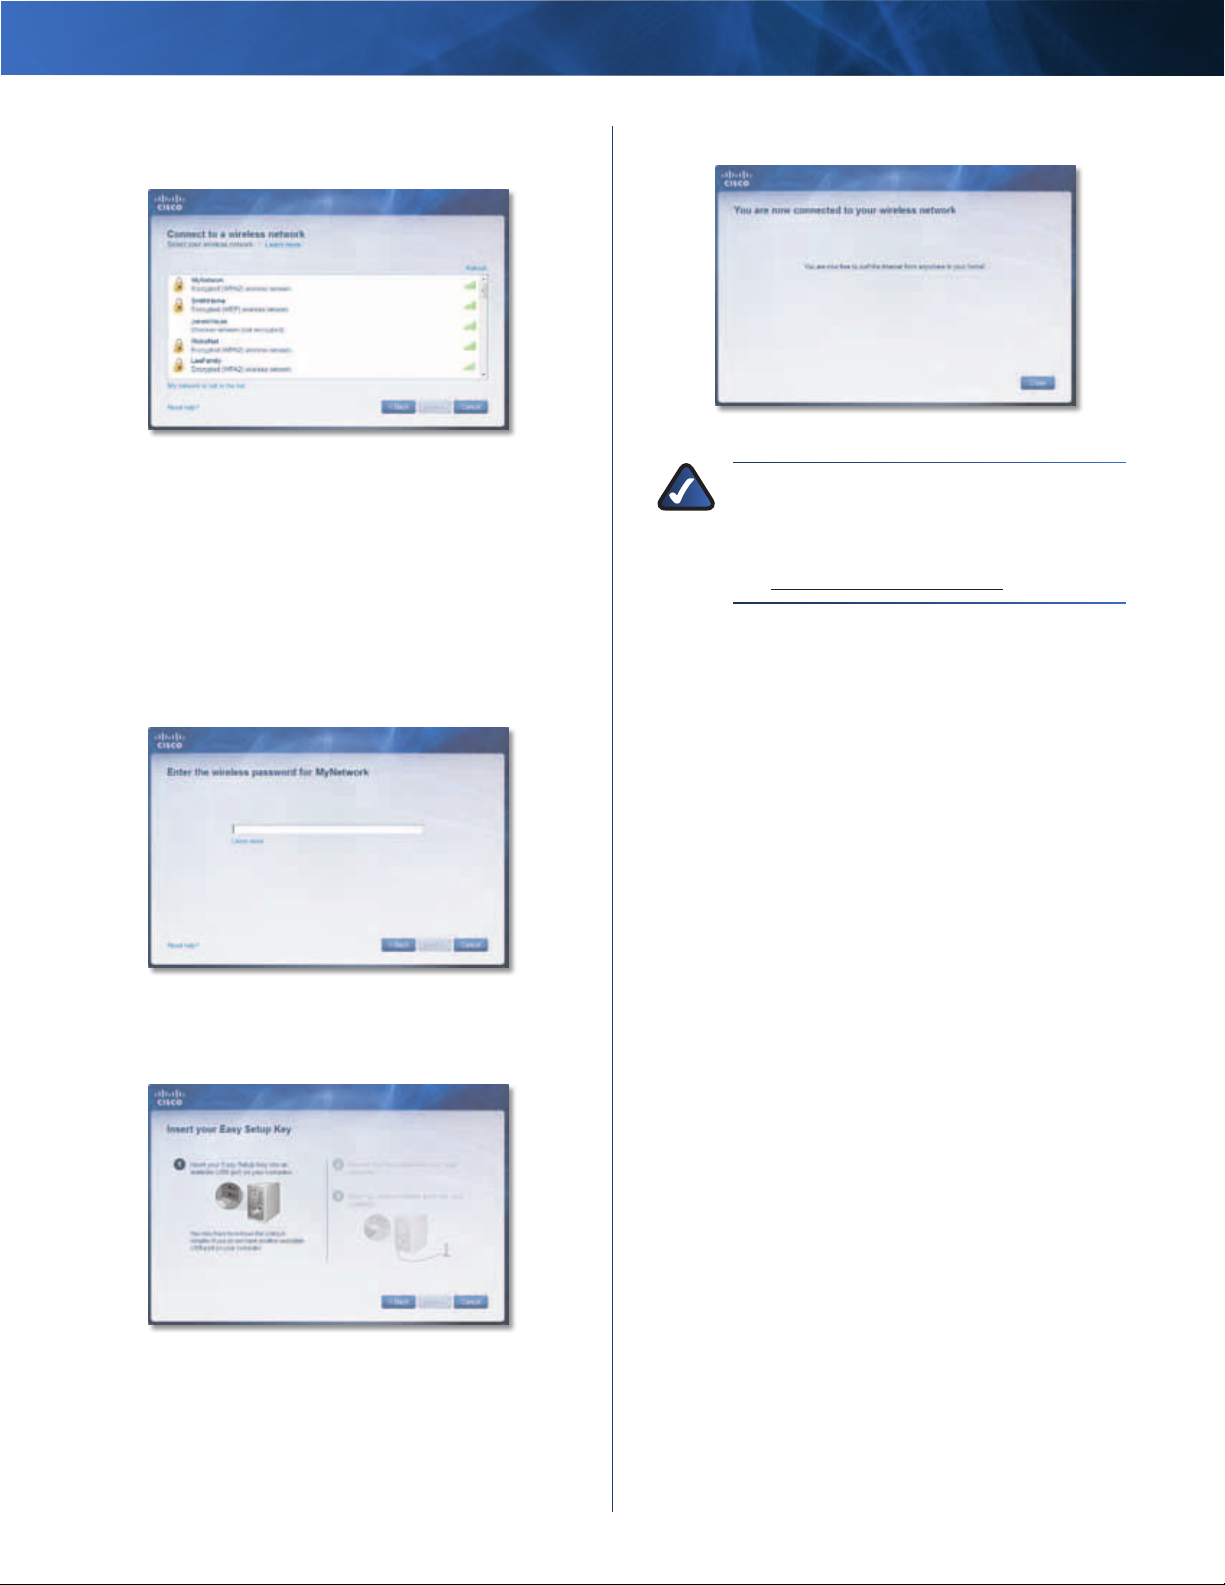
6. A list of available wireless networks appears. Select
your network. Click Next.
Connect to a Wireless Network
7. If your network does not use wireless security, go to
step 9.
If your network uses wireless security, enter the
wireless password for your type of security:
• Wired Equivalent Privacy (WEP):
• Wi-Fi Protected Access (WPA/WPA2): Enter the
Enter the WEP key.
passphrase (also known as a pre-shared key).
Click Next. Go to step 9.
9. The installation is complete. Click Close.
You are Now Connected to Your Wireless Network
NOTE: If you have any problems during the
installation process, refer to the Frequently
Asked Questions in the setup software, or use a
computer with an active Internet connection to
visit www.linksys.com/support.
Enter the Wireless Password
8. Follow the on-screen prompts to use your Easy Setup
Key. Click Next.
Insert your Easy Setup Key
High Performance Wireless-N USB Adapter
3
Page 6
Linksys AE1000 Chapter 3: Wireless Network Configuration
Chapter 3: Wireless Network Configuration
To configure the Adapter’s wireless connection settings,
use a wireless network configuration utility. If you have
installed such a utility on your computer, or if your
computer came with one already installed, refer to that
utility’s documentation for instructions on use. Otherwise,
follow the instructions in the appropriate section below
to use your operating system’s built-in utility: Windows 7,
page 4, Windows Vista, page 5, or Windows XP, page 7.
Windows 7
After you have installed the Adapter, the Wireless Network
Configuration utility icon appears on your computer’s
system tray.
Wireless Network Configuration Utility Icon
(If you do not see the icon, click the Show hidden icons
arrow in the system tray.)
2. Select your network, and then click Connect.
Select Network
3. If your network does not use wireless security, go to
step 5.
4. Enter the security key, Wired Equivalent Privacy (WEP)
key, or Wi-Fi Protected Access (WPA/WPA2) passphrase
(also known as a pre-shared key), depending on your
type of security. Click OK.
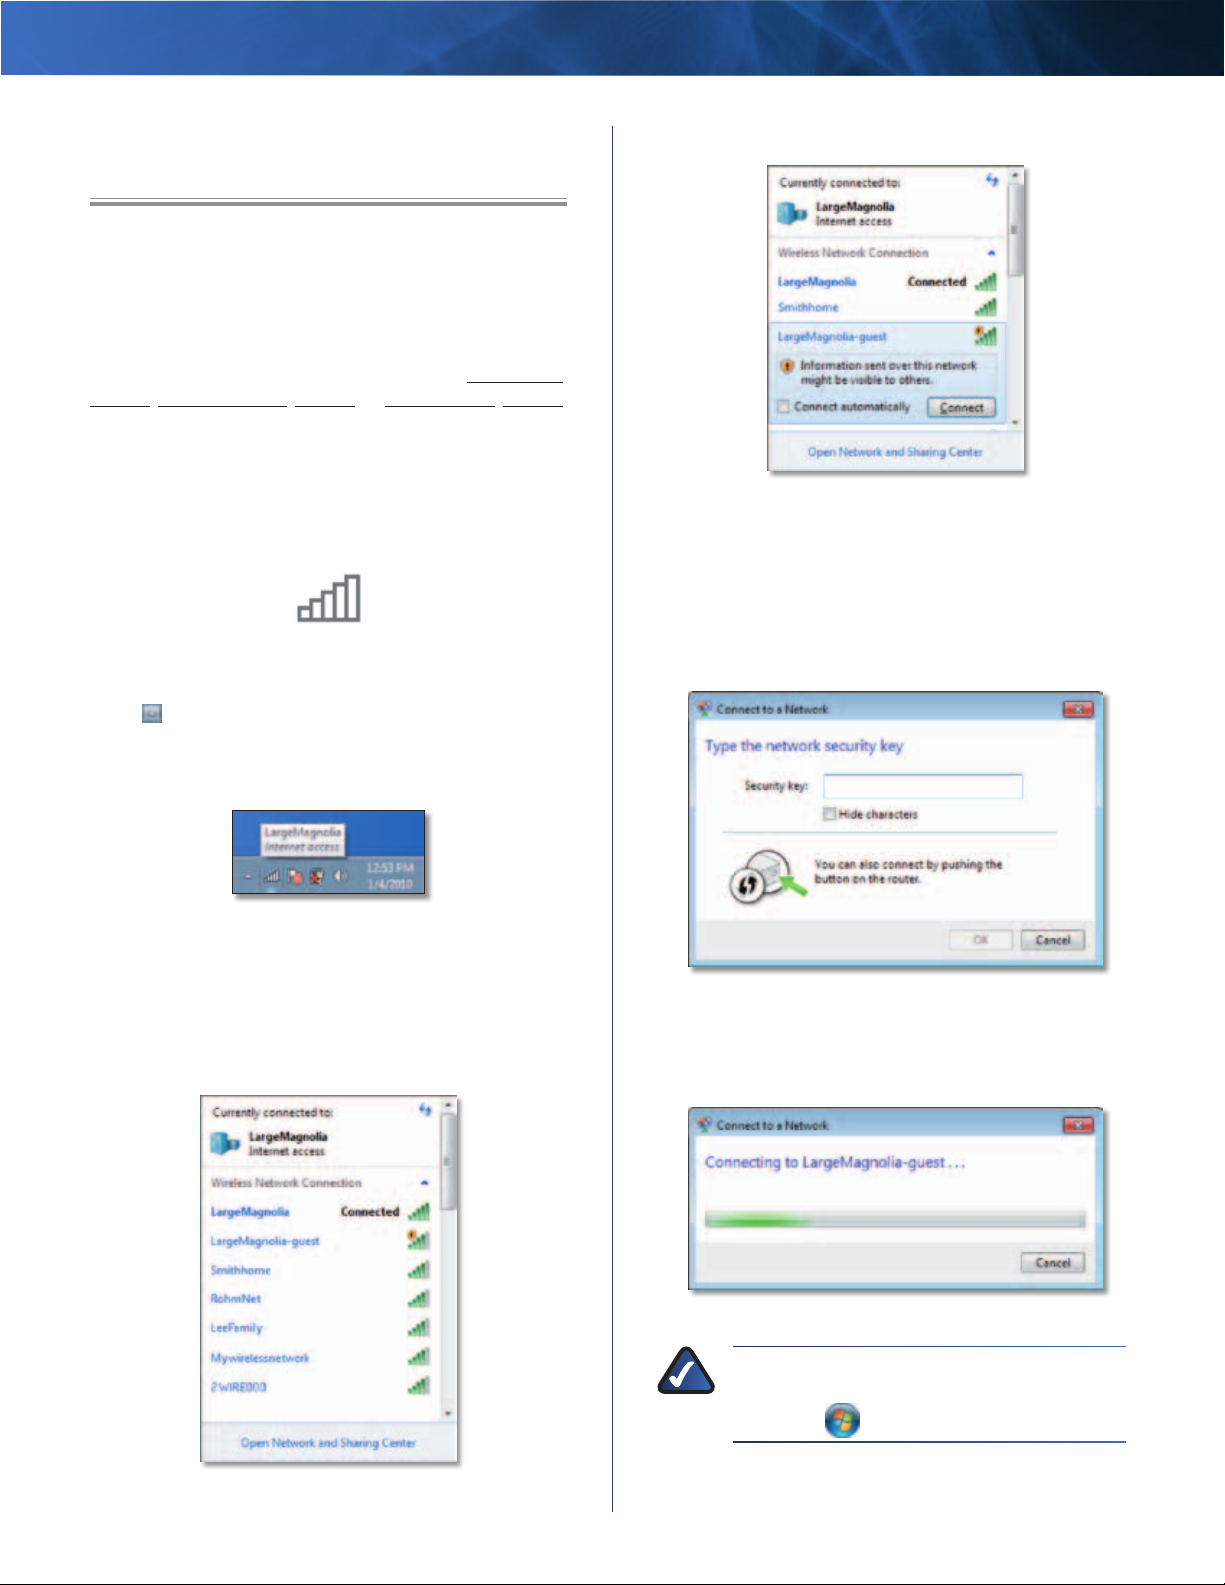
When your mouse pointer hovers over the icon, the status
information of your wireless connection appears.
Wireless Connection Status
New Wireless Connection
To connect to a different wireless network:
1. Click the Wireless Network Configuration utility icon. A
list of available wireless networks appears.
Secured Network
5. This screen appears while the Adapter connects to
your network. Do not cancel, unless you want to end
the connection.
Connecting to Network
Available Wireless Networks
High Performance Wireless-N USB Adapter
NOTE: For help with the Wireless Network
Conguration utility, refer to Help and Support.
Click Start
Your computer is now connected to your
> Help and Support.
wireless network.
4
Page 7
Linksys AE1000 Chapter 3: Wireless Network Configuration
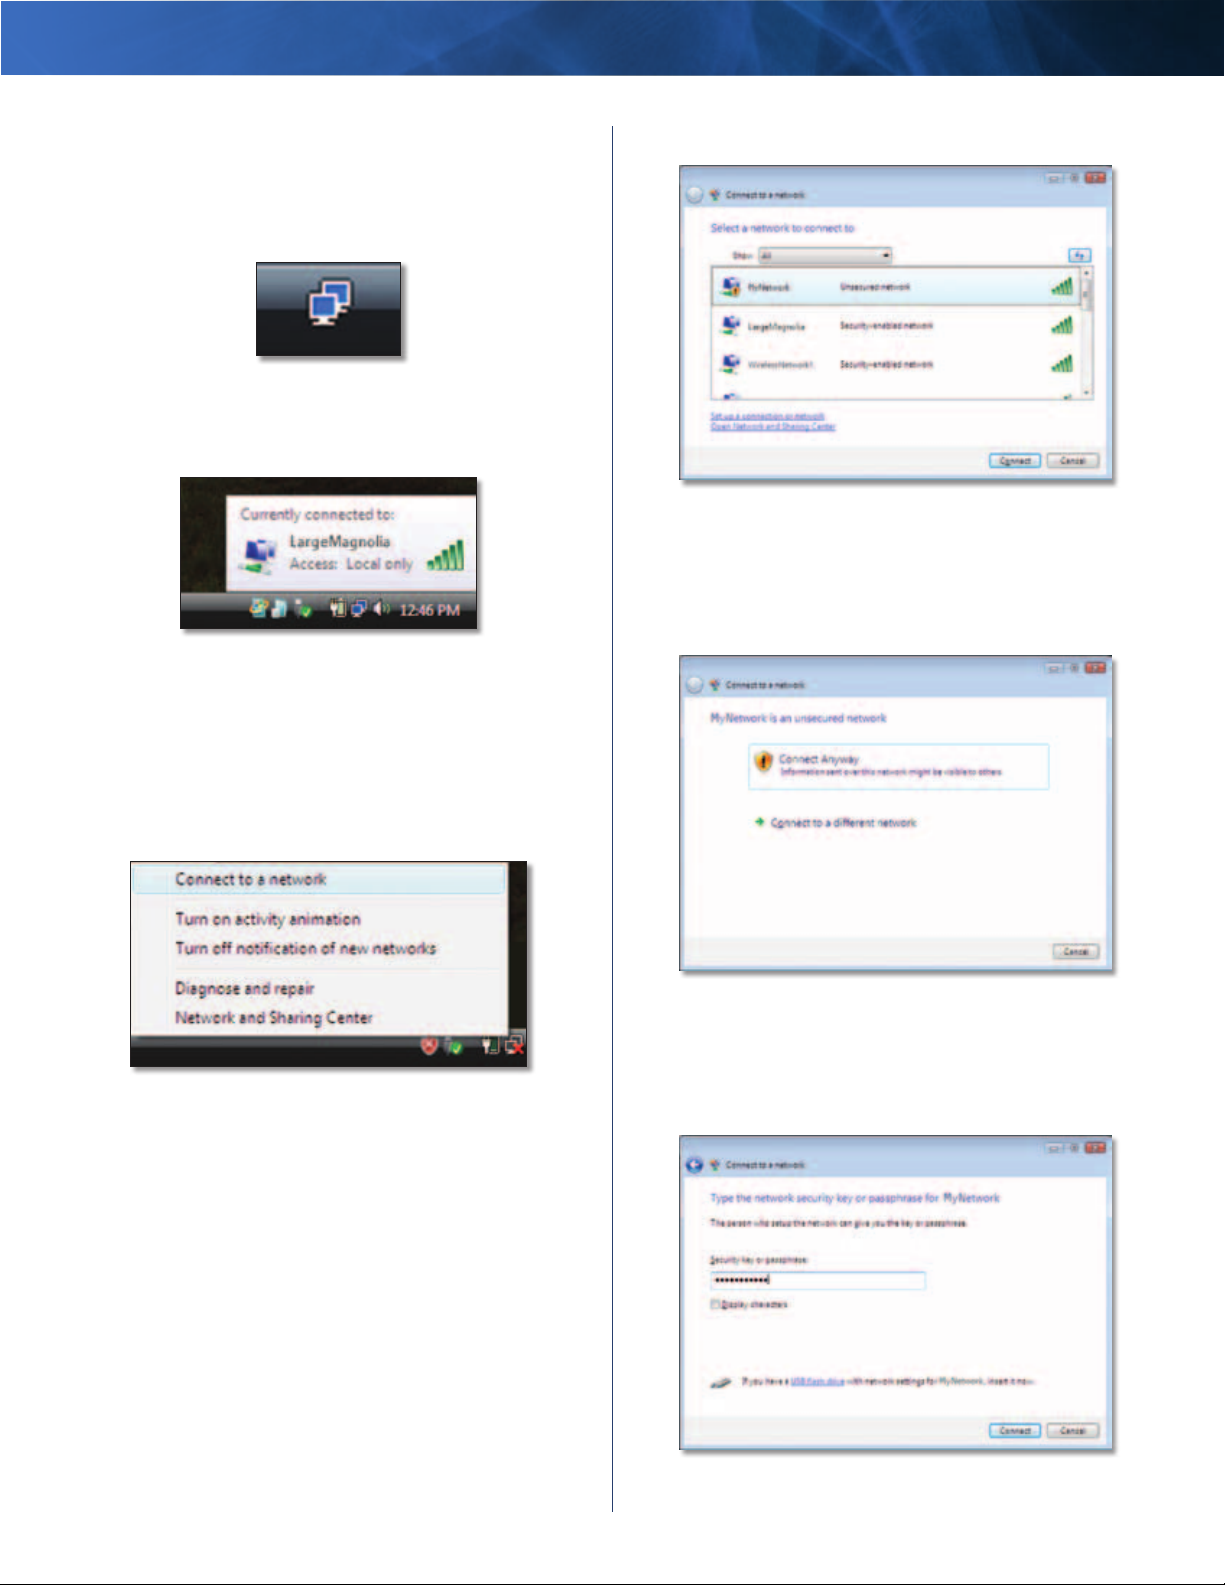
Windows Vista
After you have installed the Adapter, the Wireless Network
Configuration utility icon appears on your computer’s
system tray.
Wireless Network Configuration Utility Icon
When your mouse pointer hovers over the icon, the status
information of your wireless connection appears.
Wireless Connection Status
New Wireless Connection
3. Select your network, and then click Connect.
Select Network
4. If your network uses wireless security, go to step 5.
If your network does not use wireless security, this
screen appears. To connect to your unsecured network,
click Connect Anyway and go to step 7.
To connect to a different wireless network:
1. Right-click the Wireless Network Configuration
utility icon.
2. Click Connect to a network.
Utility Menu
Unsecured Network
5. Enter the security key, Wired Equivalent Privacy (WEP)
key, or Wi-Fi Protected Access (WPA/WPA2) passphrase
(also known as a pre-shared key), depending on your
type of security. Click Connect.
High Performance Wireless-N USB Adapter
Secured Network
5
Page 8
Linksys AE1000 Chapter 3: Wireless Network Configuration
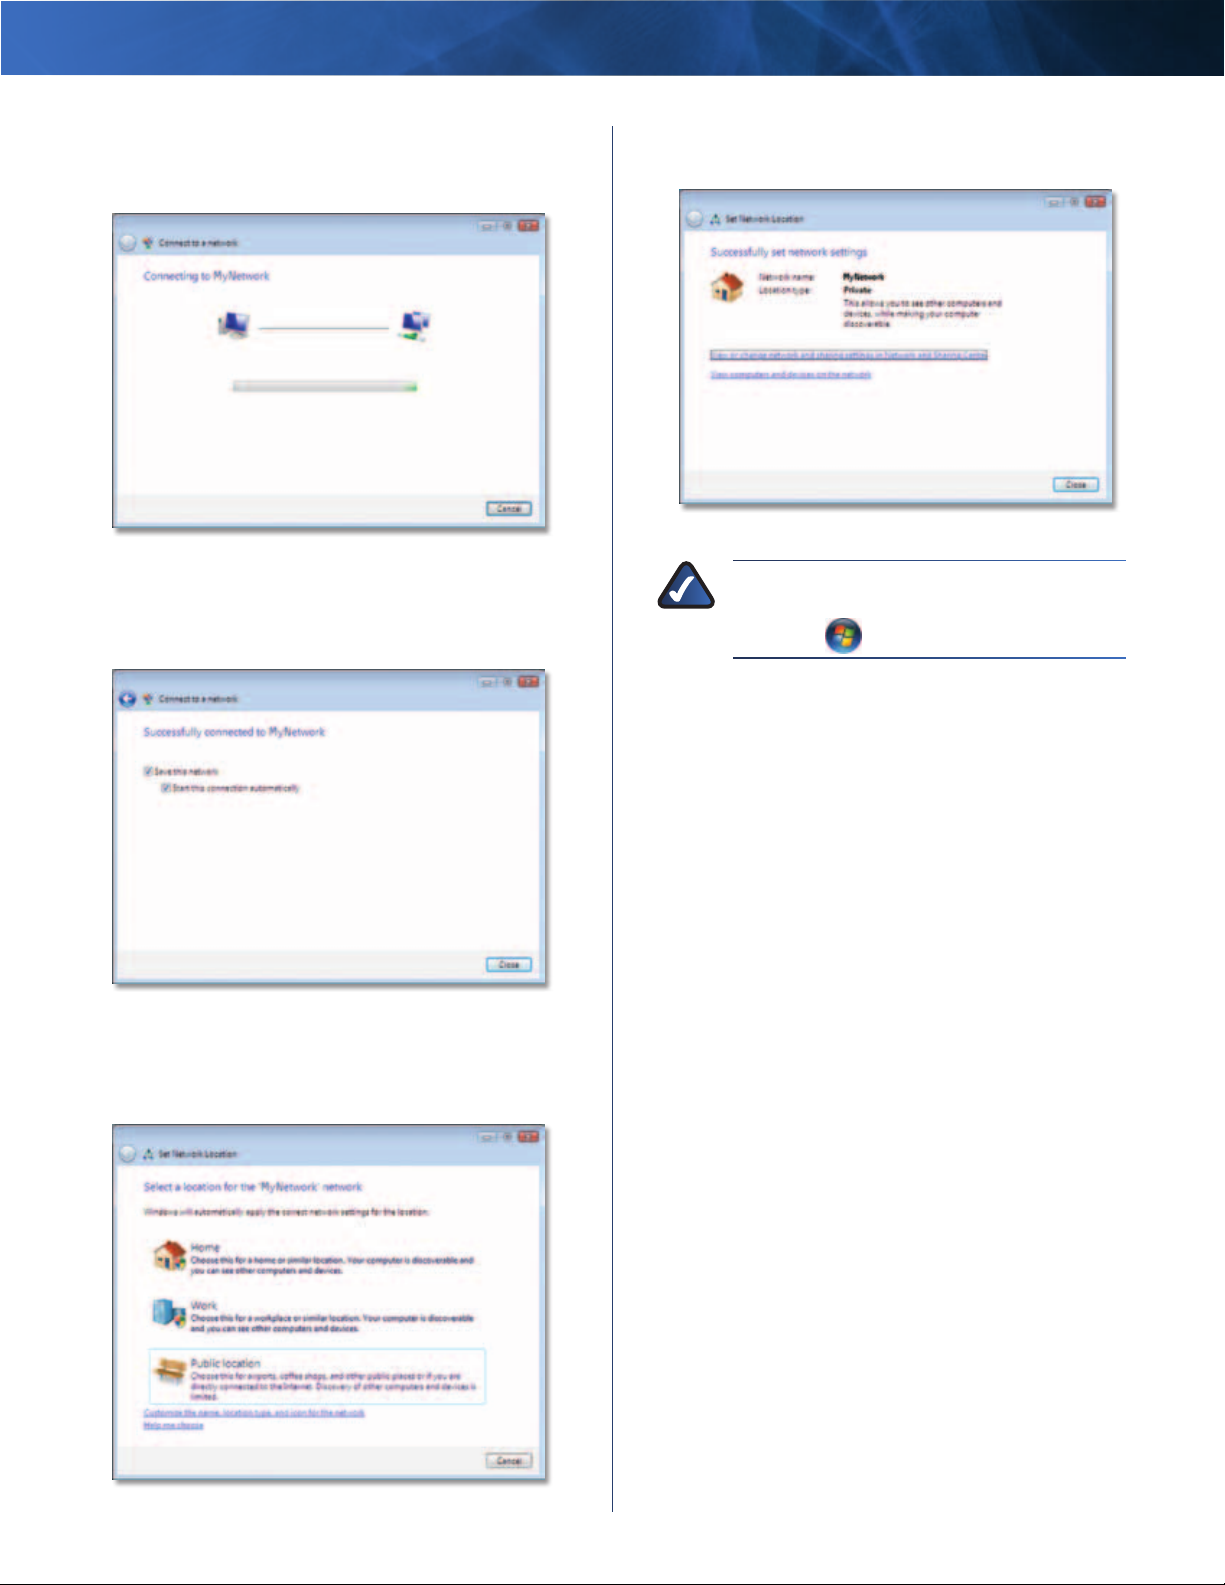
6. This screen appears while the Adapter connects to
your network. Do not cancel, unless you want to end
the installation.
Connecting to Network
7. This screen appears when you are connected to your
network. Select Save this network, if you want to save
your settings. Click Close.
9. This screen varies according to the selected location.
Click Close.
Network Settings Saved
NOTE: For help with the Wireless Network
Conguration utility, refer to Help and Support.
Click Start
> Help and Support.
Your computer is now connected to your
wireless network.
Connected to Network
8. The Set Network Location screen may appear. This
screen helps apply the correct settings for your type of
location. Select Home, Work, or Public location.
Select Network Location
High Performance Wireless-N USB Adapter
6
Page 9
Linksys AE1000 Chapter 3: Wireless Network Configuration
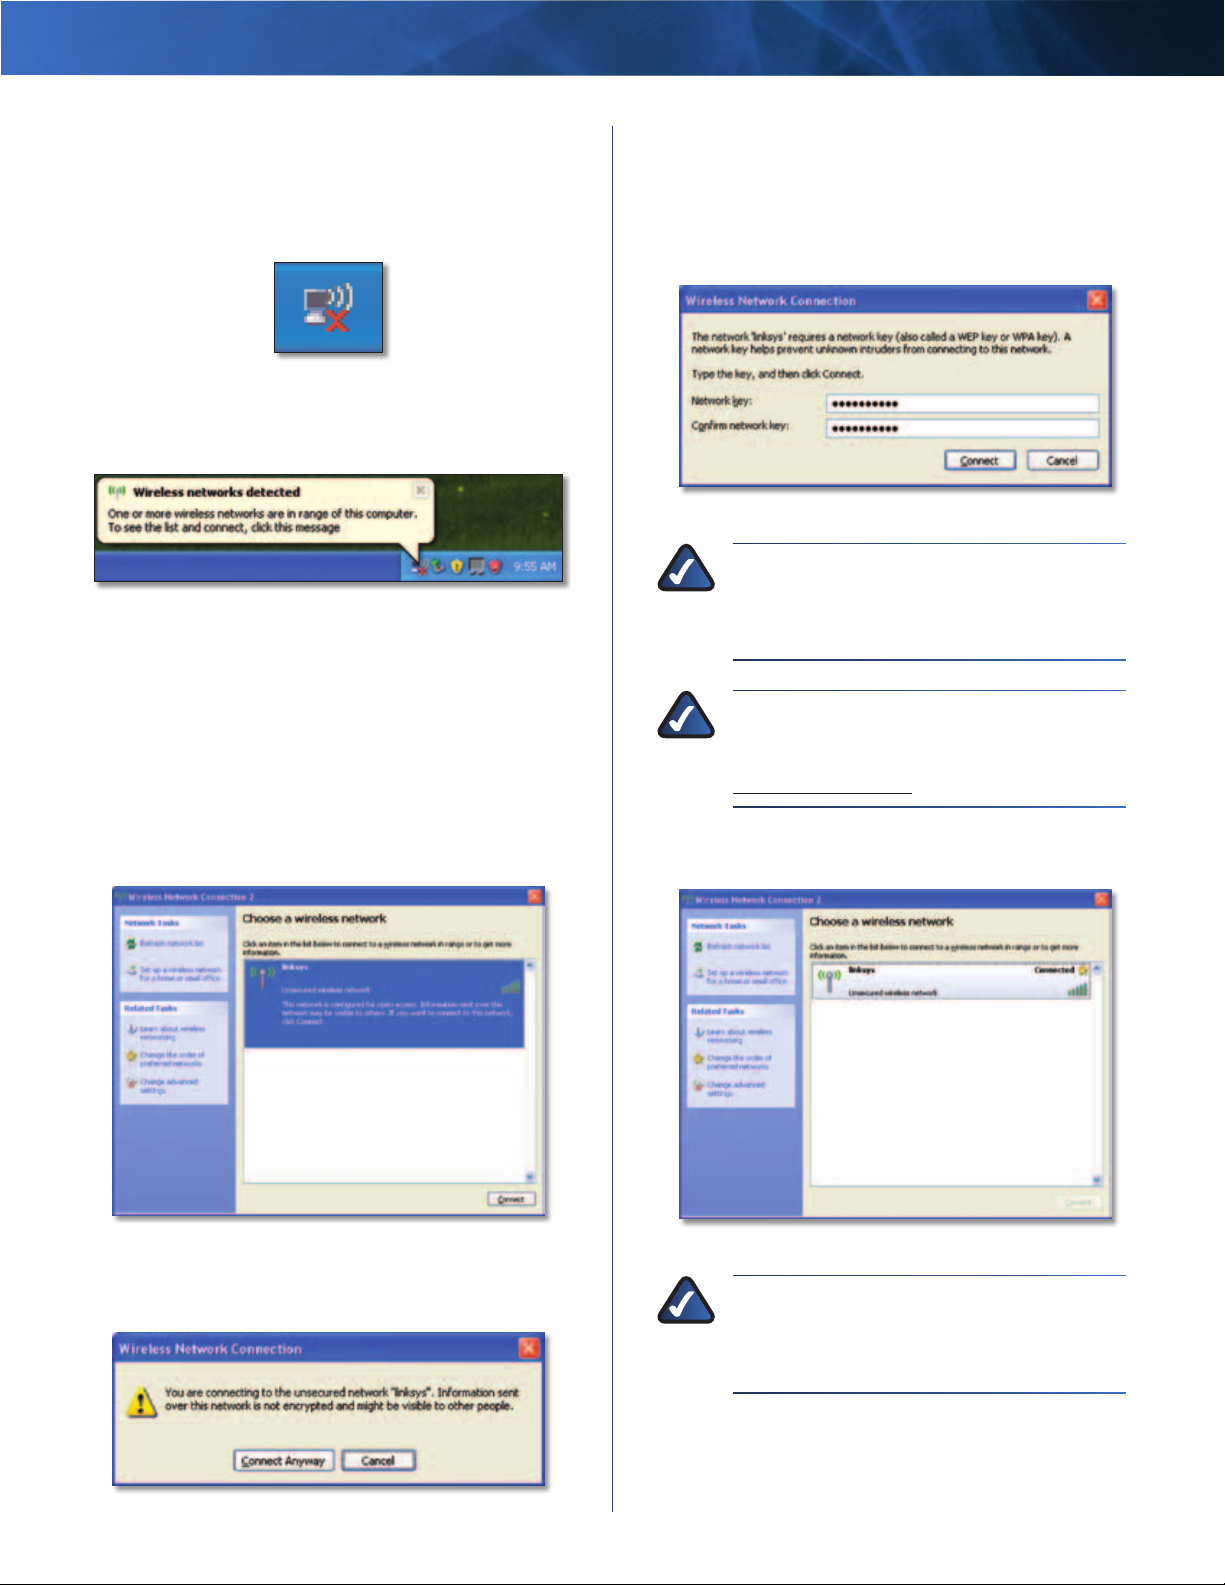
Windows XP
After you have installed the Adapter, the Windows XP
Wireless Zero Configuration Utility icon appears on your
computer’s system tray.
Wireless Zero Configuration Utility Icon
When your mouse pointer hovers over the icon, the status
information of your wireless connection appears.
Wireless Connection Status
New Wireless Connection
1. Right-click the Windows XP Wireless Zero Configuration
icon in your computer’s system tray, and then select
View Available Wireless Networks.
2. A window displays the available wireless networks.
Select the network that you want and click Connect.
If the network uses wireless security, go to step 4.
Otherwise, continue to step 3.
4. If your network uses Wired Equivalent Privacy (WEP)
wireless security, enter the WEP Key in the Network key
and Confirm network key fields. If your network uses
Wi-Fi Protected Access (WPA/WPA2) wireless security,
enter the passphrase in the Network key and Confirm
network key fields. Click Connect.
Wireless Security
NOTE: Windows XP Wireless Zero Configuration
does not support the use of a WEP passphrase.
Enter the exact WEP key used by your wireless
router or access point.
NOTE: If your network is using WPA2 security,
make sure that you have installed the Update
for Windows XP (KB893357), available at
www.microsoft.com.
5. Your wireless network will appear as Connected when
your connection is active.
Available Wireless Network
3. Click Connect Anyway to connect the Adapter to your
unsecured network, and then go to step 5.
No Wireless Security
High Performance Wireless-N USB Adapter
Wireless Network Connection
NOTE: For help with the Wireless Network
Conguration utility, refer to Help and Support.
Click Start > Help and Support. Enter wireless
in the Search eld, and then press Enter.
Your computer is now connected to your
wireless network.
7
Page 10

Linksys AE1000 Appendix A: Troubleshooting
Appendix A: Troubleshooting
Your computer does not recognize the Adapter.
Make sure that the Adapter is properly inserted into your
computer’s USB slot and/or USB Extension Base.
The Adapter does not work properly.
Remove the Adapter, and then reinsert it into the
computer’s USB slot.
Your computer cannot communicate with the other
computers on your wireless network.
1. Make sure that the computers are powered on.
2. Make sure that the Adapter is configured with the
same Wireless Network Name (also called the SSID or
Service Set Identifier) and wireless security settings as
the other computers on your wireless network.
WEB: If your questions are not addressed here,
refer to our AE1000 support section on the web,
www.linksys.com/support/AE1000
High Performance Wireless-N USB Adapter
8
Page 11

Linksys AE1000 Appendix B: Specifications
Appendix B: Specifications
Model Name Linksys AE1000
Description High Performance Wireless-N USB
Adapter
Model Number AE1000
Standards 802.11a, 802.11b, 802.11g,
802.11n
LEDs Link/Act
Number of Antennas 2 Internal Antennas
Transmitted Power 2.4 GHz @ 11 Mbps data rate:
18 dBm ± 1.5 dBm
2.4 GHz @ 54 Mbps data rate:
14 dBm ± 1.5 dBm
5 GHz @ 54Mbps data rate:
12 dBm ± 1.5 dBm
2.4 GHz, 11N (MCS0, HT20/40):
18 dBm ± 1.5 dBm
2.4 GHz, 11N (MCS8, HT20/40):
18 dBm ± 1.5 dBm
2.4 GHz, 11N (MCS15, HT20/40):
12 dBm ± 1.5 dBm
5 GHz, 11N (MCS0, HT20/40):
16 dBm ± 1.5 dBm
5 GHz, 11N (MCS8, HT20/40):
16 dBm ± 1.5 dBm
5 GHz, 11N (MCS15, HT20/40):
10 dBm ± 1.5 dBm
Receive Sensitivity -84 dBm @11 Mbps
-70 dBm @54 Mbps
-83 dBm @2.4 GHz/5GHz, MCS0,
HT20
-80 dBm @2.4 GHz/5GHz, MCS0,
HT40
-83 dBm @2.4 GHz/5GHz, MCS8,
HT20
-80 dBm @2.4 GHz/5GHz, MCS8,
HT40
-65 dBm @2.4 GHz/5GHz, MCS15,
HT20
-62 dBm @2.4 GHz/5GHz, MCS15,
HT40
Antenna Gain in dBi 802.11a: 5 GHz => 4 dBi
802.11g: 2.4 GHz =>
TX0: 0.5 dBi, TX1: 1.4 dBi
Power Consumption TX (2.4GHz):
330 mA, HT20; 340 mA HT40 at 5V
TX (5GHz):
400 mA, HT20; 430 mA HT40 at 5V
RX (2.4GHz):
140 mA, HT20; 160 mA HT40 at 5V
RX (5GHz):
150 mA, HT20; 180 mA HT40 at 5V
Standby: 150 mA
Radio O: 20 mA
High Performance Wireless-N USB Adapter
Security Features WEP, WPA & WPA2 Personal,
WPA & WPA2 Enterprise
Security Key Bits Up to 128-Bit Encryption
OS Requirements Up-to-date Windows XP,
Windows Vista,
Windows Vista 64-bit Edition, or
Windows 7
Environmental
Dimensions 3.15" x 1.00" x 0.49"
(79.9 x 25.4 x 12.4 mm)
Weight 0.39 oz (11 g)
Certication FCC, CE, IC, UL, RoHS, WEEE, IDA,
C-Tick, Wi-Fi A/B/G/N
Operating Temp. 32 to 104ºF (0 to 40ºC)
Storage Temp. -4 to 158ºF (–20 to 70ºC)
Operating Humidity 10 to 85% Noncondensing
Storage Humidity 5 to 90% Noncondensing
Specications are subject to change without notice.
9
Page 12

Linksys AE1000 Appendix C: Warranty Information
Appendix C: Warranty Information
Limited Warranty
(U.S.A, Canada, Asia Pacific, Australia, New
Zealand)
FOR CONSUMERS WHO ARE COVERED BY CONSUMER
PROTECTION LAWS OR REGULATIONS IN THEIR COUNTRY
OF PURCHASE OR, IF DIFFERENT, THEIR COUNTRY OF
RESIDENCE, THE BENEFITS CONFERRED BY THIS WARRANTY
ARE IN ADDITION TO ALL RIGHTS AND REMEDIES
CONVEYED BY SUCH CONSUMER PROTECTION LAWS AND
REGULATIONS. THIS WARRANTY DOES NOT EXCLUDE,
LIMIT OR SUSPEND ANY RIGHTS OF CONSUMERS ARISING
OUT OF NONCONFORMITY WITH A SALES CONTRACT.
SOME COUNTRIES, STATES AND PROVINCES DO NOT
ALLOW THE EXCLUSION OR LIMITATION OF INCIDENTAL OR
CONSEQUENTIAL DAMAGES OR ALLOW LIMITATIONS ON
HOW LONG AN IMPLIED WARRANTY OR CONDITION MAY
LAST, SO THE LIMITATIONS OR EXCLUSIONS DESCRIBED
BELOW MAY NOT APPLY TO YOU. THIS WARRANTY GIVES
YOU SPECIFIC LEGAL RIGHTS, AND YOU MAY ALSO
HAVE OTHER RIGHTS THAT VARY BY COUNTRY, STATE OR
PROVINCE. THIS LIMITED WARRANTY IS GOVERNED BY
AND CONSTRUED UNDER THE LAWS OF THE COUNTRY IN
WHICH THE PRODUCT PURCHASE TOOK PLACE.
This warranty is provided to you by Cisco Systems, Inc.
or its subsidiary instead of Cisco Systems, Inc. (“Cisco”).
Cisco warrants the hardware in this Cisco product against
defects in materials and workmanship under normal
use for the Warranty Period, which begins on the date of
purchase by the original end-user purchaser and lasts for
the period specified below:
• One (1) year for new product
• Ninety (90) days for refurbished product
Your exclusive remedy and Cisco’s entire liability under
this limited warranty will be for Cisco, at its option, to
(a) repair the product with new or refurbished parts,
(b) replace the product with a reasonably available
equivalent new or refurbished Cisco product, or (c) refund
the actual purchase price of the product less any rebates
and discounts, or (d) pay the cost of repair of the product.
Any repaired or replacement products will be warranted
for the remainder of the original Warranty Period or thirty
(30) days, whichever is longer. All products and parts that
are replaced become the property of Cisco.
Cisco additionally warrants that any media on which the
software may be provided will be free from defects in
materials and workmanship under normal use for a period
of ninety (90) days from the date of original purchase.
Your exclusive remedy and Cisco’s entire liability under
this limited warranty will be for Cisco, at its option, to (a)
replace the software media, or (b) refund the purchase
price of the software media.
High Performance Wireless-N USB Adapter
Exclusions and Limitations
This limited warranty does not apply if: (a) the product
assembly seal has been removed or damaged, (b) the
product has been altered or modified, except by Cisco, (c)
the product damage was caused by use with non-Cisco
products, (d) the product has not been installed, operated,
repaired, or maintained in accordance with instructions
supplied by Cisco, (e) the product has been subjected to
abnormal physical or electrical stress, misuse, negligence,
or accident, (f) the serial number on the Product has been
altered, defaced, or removed, or (g) the product is supplied
or licensed for beta, evaluation, testing or demonstration
purposes for which Cisco does not charge a purchase
price or license fee.
EXCEPT FOR THE LIMITED WARRANTY ON MEDIA SET
FORTH ABOVE AND TO THE MAXIMUM EXTENT PERMITTED
BY APPLICABLE LAW, ALL SOFTWARE AND SERVICES
PROVIDED BY CISCO WITH THE PRODUCT, WHETHER
FACTORY LOADED ON THE PRODUCT OR CONTAINED ON
MEDIA ACCOMPANYING THE PRODUCT, IS PROVIDED “AS
IS” WITHOUT WARRANTY OF ANY KIND. Without limiting
the foregoing, Cisco does not warrant that the operation
of the product, software or services will be uninterrupted
or error free. Also, due to the continual development
of new techniques for intruding upon and attacking
networks, Cisco does not warrant that the product,
software or services, or any equipment, system or network
on which the product, software or services are used will
be free of vulnerability to intrusion or attack. The product
may include or be bundled with third party software or
service offerings. This limited warranty shall not apply to
such third party software or service offerings. This limited
warranty does not guarantee any continued availability
of a third party’s service for which this product’s use or
operation may require.
TO THE EXTENT NOT PROHIBITED BY APPLICABLE
LAW, ALL IMPLIED WARRANTIES AND CONDITIONS
OF MERCHANTABILITY, SATISFACTORY QUALITY OR
FITNESS FOR A PARTICULAR PURPOSE ARE LIMITED TO
THE DURATION OF THE WARRANTY PERIOD. ALL OTHER
EXPRESS OR IMPLIED CONDITIONS, REPRESENTATIONS
AND WARRANTIES, INCLUDING BUT NOT LIMITED TO
ANY IMPLIED WARRANTY OF NON-INFRINGEMENT, ARE
DISCLAIMED.
TO THE EXTENT NOT PROHIBITED BY APPLICABLE LAW,
IN NO EVENT WILL CISCO BE LIABLE FOR ANY LOST DATA,
REVENUE OR PROFIT, LOSS OF THE ABILITY TO USE ANY
THIRD PARTY PRODUCTS, SOFTWARE OR SERVICES, OR
FOR SPECIAL, INDIRECT, CONSEQUENTIAL, INCIDENTAL
OR PUNITIVE DAMAGES, REGARDLESS OF THE THEORY
OF LIABILITY (INCLUDING NEGLIGENCE), ARISING OUT
OF OR RELATED TO THE USE OF OR INABILITY TO USE
THE PRODUCT, SOFTWARE OR ANY SERVICES PROVIDED
IN RESPECT OF SUCH PRODUCT, SOFTWARE OR SERVICE,
EVEN IF CISCO HAS BEEN ADVISED OF THE POSSIBILITY
10
Page 13

Linksys AE1000 Appendix C: Warranty Information
OF SUCH DAMAGES. TO THE EXTENT NOT PROHIBITED BY
APPLICABLE LAW, IN NO EVENT WILL CISCO’S LIABILITY
EXCEED THE AMOUNT PAID BY YOU FOR THE PRODUCT.
The foregoing limitations will apply even if any warranty
or remedy provided under this limited warranty fails of its
essential purpose.
If you live in and have purchased the product in Australia
or New Zealand, the following two (2) paragraphs will
apply in place of the preceding paragraph:
To the extent permitted by law, Cisco excludes liability
for any lost data, revenue or profit, loss of the ability to
use any third party products, software or services, and
indirect or consequential loss, whether based in statute,
common law (including negligence) or otherwise, arising
out of or related to the use of or inability to use the
product, software, or any services provided in respect of
such product, software or service, even if Cisco has been
advised of the possibility of such damages and Cisco limits
its liability to an amount not exceeding the amount paid
by you for the product.
Part V of the Trade Practices Act (1974) (C’th of Australia),
corresponding consumer protection provisions of
Australian State and Territory legislation and the Consumer
Guarantees Act 1993 (New Zealand) (together, “Applicable
Laws”) imply terms and warranties which operate to
protect certain Australian and New Zealand purchasers of
goods and services in various circumstances. Nothing in
this warranty excludes, restricts or modifies any condition,
warranty, right or remedy implied or imposed by any
Applicable Laws which cannot lawfully be excluded,
restricted or modified.
Authorization (RMA) number. You are responsible for
properly packaging and shipping your product at your
cost and risk. You must include the RMA number and
a copy of your dated proof of original purchase when
returning your product. Products received without a RMA
number and dated proof of original purchase will be
rejected. Do not include any other items with the product
you are returning. Products returned for replacement
must be returned to Cisco in the same country in which
the original product was purchased. Defective product
covered by this limited warranty will be repaired or
replaced and returned to you without charge. Customers
outside of the United States of America and Canada are
responsible for all shipping and handling charges, custom
duties, VAT and other associated taxes and charges.
Repairs or replacements not covered under this limited
warranty will be subject to charge at Cisco’s then-current
rates.
Technical Support
This limited warranty is neither a service nor a
support contract. Information about Cisco’s current
technical support offerings and policies (including
any fees for support services) can be found at
www.myciscohome.com/support.
Please direct all inquiries to: Cisco, 120 Theory, Irvine, CA
92617.
No Cisco employee, agent or reseller is authorized to
make any verbal or written modification, extension or
addition to this warranty, and Cisco expressly disclaims
any such change to this warranty. If any portion of this
limited warranty is found to be void or unenforceable, its
remaining provisions shall remain in full force and effect.
Obtaining Warranty Service
If you have a question about your product
or experience a problem with it, please go to
www.myciscohome.com/support where you will find a
variety of online support tools and information to assist
you with your product. If the product proves defective
during the Warranty Period, contact Cisco Technical
Support (or, if you purchased your product from a service
provider, contact the service provider) for instructions on
how to obtain warranty service. The telephone number
for Cisco Technical Support in your area can be found
by clicking the “Contact Us” link on the home page of
www.myciscohome.com. Have your product serial
number and proof of purchase on hand when calling. A
DATED PROOF OF ORIGINAL PURCHASE IS REQUIRED TO
PROCESS WARRANTY CLAIMS. If you are requested to
return your product, you will be given a Return Materials
High Performance Wireless-N USB Adapter
11
Page 14
Linksys AE1000 Appendix D: Regulatory Information
Appendix D: Regulatory Information
FCC Statement
This equipment has been tested and found to comply
with the limits for a Class B digital device, pursuant to Part
15 of the FCC Rules. These limits are designed to provide
reasonable protection against harmful interference in a
residential installation. This equipment generates, uses
and can radiate radio frequency energy and, if not installed
and used in accordance with the instructions, may cause
harmful interference to radio communications. However,
there is no guarantee that interference will not occur in
a particular installation. If this equipment does cause
harmful interference to radio or television reception,
which can be determined by turning the equipment
off and on, the user is encouraged to try to correct the
interference by one of the following measures:
• Reorient or relocate the receiving antenna.
• Increase the separation between the equipment and
receiver.
• Connect the equipment into an outlet on a circuit
different from that to which the receiver is connected.
been verified and may not be in compliance with related
RF exposure rule and such use shall be prohibited.
Safety Notices
WARNING: Do not use this product near water,
for example, in a wet basement or near a
swimming pool.
WARNING: Avoid using this product during an
electrical storm. There may be a remote risk of
electric shock from lightning.
WARNING: This product contains lead, known
to the State of California to cause cancer, and
birth defects or other reproductive harm. Wash
hands after handling.
WARNING: For use with a Listed Computer.
• Consult the dealer or an experienced radio/TV
technician for help.
FCC Caution: Any changes or modifications not expressly
approved by the party responsible for compliance could
void the user’s authority to operate this equipment.
This device complies with Part 15 of the FCC Rules.
Operation is subject to the following two conditions: (1)
This device may not cause harmful interference, and (2) this
device must accept any interference received, including
interference that may cause undesired operation.
The availability of some specific channels and/or
operational frequency bands are country dependent
and are firmware programmed at the factory to match
the intended destination. The firmware setting is not
accessible by the end user.
FCC Radiation Exposure Statement
This equipment complies with FCC radiation exposure
limits set forth for an uncontrolled environment. End users
must follow the specific operating instructions for satisfying
RF exposure compliance. To maintain compliance with
FCC RF exposure compliance requirements, please follow
operation instructions as documented in this manual.
This transmitter must not be co-located or operating in
conjunction with any other antenna or transmitter.
SAR compliance has been established in typical laptop
computer(s) with USB slot, and this product could be
used in typical laptop computer(s) with USB slot. Other
applications like handheld PC or similar device have not
High Performance Wireless-N USB Adapter
12
Page 15

Linksys AE1000 Appendix D: Regulatory Information
Industry Canada Statement
This Class B digital apparatus complies with Canadian
ICES-003.
Cet appareil numérique de la classe B est conforme à la
norme NMB-003 du Canada.
This device complies with RSS-210 of the Industry Canada
Rules. Operation is subject to the following two conditions:
(1) This device may not cause harmful interference, and
(2) this device must accept any interference received,
including interference that may cause undesired
operation.
Règlement d’Industry Canada
Les conditions de fonctionnement sont sujettes à deux
conditions:
1. Ce périphérique ne doit pas causer d’interférence et.
2. Ce périphérique doit accepter toute interférence, y
compris les interférences pouvant perturber le bon
fonctionnement de ce périphérique.
IMPORTANT NOTE
Radiation Exposure Statement:
This equipment complies with IC radiation exposure limits
set forth for an uncontrolled environment. End users must
follow the specific operating instructions for satisfying
RF exposure compliance. To maintain compliance with
IC RF exposure compliance requirements, please follow
operation instruction as documented in this manual.
Wireless Disclaimer
The maximum performance for wireless is derived from
IEEE Standard 802.11 specifications. Actual performance
can vary, including lower wireless network capacity,
data throughput rate, range and coverage. Performance
depends on many factors, conditions and variables,
including distance from the access point, volume of
network traffic, building materials and construction,
operating system used, mix of wireless products used,
interference and other adverse conditions.
Avis de non-responsabilité concernant les appareils sans fil
Les performances maximales pour les réseaux sans fil
sont tirées des spécifications de la norme IEEE 802.11.
Les performances réelles peuvent varier, notamment
en fonction de la capacité du réseau sans fil, du débit
de la transmission de données, de la portée et de la
couverture. Les performances dépendent de facteurs,
conditions et variables multiples, en particulier de la
distance par rapport au point d’accès, du volume du trafic
réseau, des matériaux utilisés dans le bâtiment et du
type de construction, du système d’exploitation et de la
combinaison de produits sans fil utilisés, des interférences
et de toute autre condition défavorable.
REMARQUE IMPORTANTE
Exposition aux radiofréquences :
Ce matériel est conforme aux limites d’exposition aux
radiofréquences établies pour un environnement non
contrôlé. Pour assurer le maintien de cette conformité,
l’utilisateur doit suivre les consignes d’utilisation décrites
dans le présent manuel.
High Performance Wireless-N USB Adapter
13
Page 16

Linksys AE1000 Appendix D: Regulatory Information
User Information for Consumer Products Covered by EU Directive 2002/96/EC on Waste Electric and Electronic Equipment (WEEE)
This document contains important information for users
with regards to the proper disposal and recycling of
Linksys products. Consumers are required to comply
with this notice for all electronic products bearing the
following symbol:
English - Environmental Information for Customers in
the European Union
European Directive 2002/96/EC requires that the equipment
bearing this symbol on the product and/or its packaging must
not be disposed of with unsorted municipal waste. The symbol
indicates that this product should be disposed of separately
from regular household waste streams. It is your responsibility to
dispose of this and other electric and electronic equipment via
designated collection facilities appointed by the government or
local authorities. Correct disposal and recycling will help prevent
potential negative consequences to the environment and
human health. For more detailed information about the disposal
of your old equipment, please contact your local authorities,
waste disposal service, or the shop where you purchased the
product.
Français (French) - Informations environnementales
pour les clients de l’Union européenne
La directive européenne 2002/96/CE exige que l’équipement
sur lequel est apposé ce symbole sur le produit et/ou son
emballage ne soit pas jeté avec les autres ordures ménagères. Ce
symbole indique que le produit doit être éliminé dans un circuit
distinct de celui pour les déchets des ménages. Il est de votre
responsabilité de jeter ce matériel ainsi que tout autre matériel
électrique ou électronique par les moyens de collecte indiqués
par le gouvernement et les pouvoirs publics des collectivités
territoriales. L’élimination et le recyclage en bonne et due forme
ont pour but de lutter contre l’impact néfaste potentiel de ce
type de produits sur l’environnement et la santé publique. Pour
plus d’informations sur le mode d’élimination de votre ancien
équipement, veuillez prendre contact avec les pouvoirs publics
locaux, le service de traitement des déchets, ou l’endroit où vous
avez acheté le produit.
WEB: For additional information, please visit
www.myciscohome.com
Español (Spanish) - Información medioambiental para
clientes de la Unión Europea
La Directiva 2002/96/CE de la UE exige que los equipos que
lleven este símbolo en el propio aparato y/o en su embalaje
no deben eliminarse junto con otros residuos urbanos no
seleccionados. El símbolo indica que el producto en cuestión
debe separarse de los residuos domésticos convencionales con
vistas a su eliminación. Es responsabilidad suya desechar este y
cualesquiera otros aparatos eléctricos y electrónicos a través de
los puntos de recogida que ponen a su disposición el gobierno y
las autoridades locales. Al desechar y reciclar correctamente estos
aparatos estará contribuyendo a evitar posibles consecuencias
negativas para el medio ambiente y la salud de las personas. Si
desea obtener información más detallada sobre la eliminación
segura de su aparato usado, consulte a las autoridades locales,
al servicio de recogida y eliminación de residuos de su zona o
pregunte en la tienda donde adquirió el producto.
High Performance Wireless-N USB Adapter
14
Page 17

Linksys AE1000 Appendix E: Software End User License Agreement
Appendix E: Software End User License Agreement
Cisco Products
This product from Cisco Systems, Inc. or its subsidiary
licensing the Software instead of Cisco Systems,
Inc. (“Cisco”) contains software (including firmware)
originating from Cisco and its suppliers and may also
contain software from the open source community.
Any software originating from Cisco and its suppliers is
licensed under the Cisco Software License Agreement
contained at Schedule 1 below. You may also be
prompted to review and accept the Cisco Software License
Agreement upon installation of the software.
Any software from the open source community is licensed
under the specific license terms applicable to that software
made available by Cisco at www.myciscohome.com/gpl,
or as provided for in Schedule 2 below. By using the
Software, You or the entity or company that You represent
(“You”) acknowledge that You have reviewed such
license terms and that You agree to be bound by the
terms of such licenses. Where such specific license terms
entitle You to the source code of such software, that
source code is available upon request at cost from Cisco
for at least three years from the purchase date of this
product and may also be available for download from
www.myciscohome.com/gpl. For detailed license terms
and additional information on open source software in
Cisco products please look at the Cisco public web site
at: www.myciscohome.com/gpl/ or Schedule 2 below as
applicable. If You would like a copy of the GPL or certain
other open source code in this Software on a CD, Cisco will
mail to You a CD with such code for $9.99 plus the cost of
shipping, upon request.
THIS SOFTWARE END USER LICENSE AGREEMENT IS
A LEGAL AGREEMENT BETWEEN YOU AND CISCO.
READ IT CAREFULLY BEFORE INSTALLING AND USING
THE SOFTWARE. IT PROVIDES A LICENSE TO USE THE
SOFTWARE AND CONTAINS WARRANTY INFORMATION
AND LIABILITY DISCLAIMERS. BY CHECKING THE “NEXT”
BOX, DOWNLOADING, INSTALLING OR USING THE
SOFTWARE, OR USING THE PRODUCT CONTAINING THE
SOFTWARE, YOU ARE CONFIRMING YOUR ACCEPTANCE OF
THE SOFTWARE AND CONSENTING TO BE BOUND BY THIS
AGREEMENT. IF YOU DO NOT AGREE TO ALL OF THESE
TERMS, THEN DO NOT CLICK ON THE “NEXT” BUTTON AND
DO NOT DOWNLOAD, INSTALL OR USE THE SOFTWARE.
CISCO’S ACCEPTANCE IS EXPRESSLY CONDITIONED UPON
YOUR AGREEMENT TO ALL THE TERMS AND CONDITIONS
OF THIS AGREEMENT, TO THE EXCLUSION OF ALL OTHER
TERMS.
In addition, if You access or otherwise use any of Cisco’s
web sites, You agree to all of the terms and conditions
of the web sites including the “Terms of Use” located at
the web site you are using, as applicable and as amended
from time to time.
Software Licenses
The software licenses applicable to software
from Cisco are made available at the Cisco public
web site at: www.myciscohome.com and
www.myciscohome.com/gpl/ respectively. For Your
convenience of reference, a copy of the Cisco Software
License Agreement and the main open source code
licenses used by Cisco in its products are contained in the
Schedules below.
Schedule 1
Cisco Software License Agreement
License. Subject to the terms and conditions of this
Agreement and compliance therewith, Cisco grants You
(provided You are the original end user purchaser of
the Cisco product including the Software) a personal,
non-commercial, nontransferable, non-sublicensable,
nonexclusive license to (i) use the Software and
accompanying Documentation (each as defined below)
for Your personal non-commercial use only, in object code
form only, and only in accordance with the accompanying
Documentation; (ii) use the Software solely as embedded
in, as a stand-alone application or (where authorized in
the applicable Documentation) for communication with
such product, each solely at Cisco’s discretion; (iii) if the
Software is purchased separately from any Cisco product,
install the Software on personal computers within a
single household or business location according to the
maximum number of licenses You have purchased; and (iv)
make one copy of the Software in machine-readable form
and one copy of the Documentation, solely for backup
purposes. This license may not be sublicensed, and is
not transferable except to a person or entity to which
You transfer ownership of the complete Cisco product
containing the Software or complete Software product,
provided You permanently transfer all rights under this
Agreement and do not retain any full or partial copies of
the Software, and the recipient agrees to the terms of this
Agreement.
Service Access. Subject to the terms and conditions of
this Agreement, Cisco may make available certain services
through the use of the Software, as described more fully
in the Software (“Services”), solely for Your own use, and
not for the use or benefit of any third party. Cisco may
change, suspend or discontinue the Software and Services
at any time, including the availability of any feature,
functionality, or content without notice or liability. Cisco
may also impose limits on certain features and services or
restrict Your access to parts or all of the Services without
notice or liability.
“Software” includes, and this Agreement will apply to (a)
the software of Cisco or its suppliers purchased separately
High Performance Wireless-N USB Adapter
15
Page 18

Linksys AE1000 Appendix E: Software End User License Agreement
or provided in or with the applicable Cisco product, and
(b) any upgrades, updates, bug fixes or modified versions
(“Upgrades”) or backup copies of the Software supplied
to You by Cisco or an authorized reseller (whether or not
for a fee), provided You already hold a valid license to the
original software and have paid any applicable fee for the
Upgrade.
“Documentation” means all documentation and other
related materials supplied by Cisco to You pursuant to this
Agreement.
“Technology” shall mean the Software and Services
collectively.
License Restrictions. Other than as set forth in this
Agreement, You may not, nor permit anyone else to,
directly or indirectly (i) make, distribute, or, except in
connection with the use of Your Cisco product, copy the
Software or its related Documentation, or electronically
transfer the Software or Documentation from one
computer to another or over a network; (ii) alter, merge,
modify, adapt, decrypt or translate the Software or
related Documentation, or decompile, reverse engineer,
disassemble, or otherwise reduce or attempt to reduce
the Software to a human-perceivable form (except to
the extent expressly permitted by law notwithstanding
this provision or except to the extent that Cisco is legally
required to permit such specific activity pursuant to any
applicable open source license); (iii) share, sell, rent, lease,
or sublicense the Software or related Documentation;
(iv) modify the Software or create derivative works based
upon the Software; (v) if You make a backup copy of the
Software and Documentation, You must reproduce all
copyright notices and any other proprietary legends found
on the original Software and Documentation; (vi) use the
Technology for management of a business network with
more than 8 computers; (vii) use the Software under
any circumstances for competitive evaluation, including
developing competing software; (ix) to the extent
permitted under applicable law, assign, sublicense or
otherwise transfer the Technology unless the prospective
assignee, sublicensee or transferee expressly agrees to all
the terms and conditions under this Agreement.
The Technology and Documentation contain trade secrets
and/or copyrighted materials of Cisco or its suppliers. You
will not disclose or make available such trade secrets or
copyrighted material in any form to any third party.
In the event that You fail to comply with this Agreement,
the license granted to You will automatically terminate,
at which time You must immediately (i) stop using the
Technology and the Cisco product in which the Software
is embedded, or (ii) uninstall the Software and destroy
all copies of the Software and Documentation where the
Technology is purchased separately. All other rights of
both parties and all other provisions of this Agreement
will survive this termination.
Ownership. The Technology and Documentation are
licensed and not sold to You by Cisco and the relevant
third parties set forth in Schedule 2. Cisco, its suppliers
and its licensors respectively retain all right, title and
interest, including all copyright and intellectual property
rights, in and to, the Technology and Documentation
and all copies, derivatives and portions thereof. All
rights not specifically granted to You in this Agreement
are reserved by Cisco and its licensors. Your use of any
software product from an entity other than Cisco that may
have been recommended by Cisco is governed by such
software product’s end user license agreement.
Third Party Services, Links and Advertising. Cisco may
provide from within the Software links to web sites or
third party software products. In addition, third party
Services may be provided with the Software which may be
subject to terms and conditions from the provider of the
Service. Cisco makes no representations as to the quality,
suitability, functionality, or legality of any sites or products
to which links may be provided or third party Services,
and You hereby waive any claim You might have against
Cisco with respect to such sites or third party software
products or Services. Your correspondence or business
dealings with, or participation in promotions of third
parties found through the Software and any other terms,
conditions, warranties, or representations associated with
such dealings, are solely between You and such third
party. You agree that Cisco is not responsible or liable for
any loss or damage of any sort incurred as the result of any
such dealings or as the result of the presence of such third
party links, products or services in the Cisco Software,
and Cisco may discontinue or modify the Services or links
offered at any time.
Collection and Processing of Information. You agree
that Cisco and/or its affiliates may, from time to time,
collect and process information about Your Cisco product
and/or the Software and/or Your use of either in order
(i) to enable Cisco to offer You Upgrades; (ii) to provide
support and assistance with Your product and/or the
Software; (iii) to ensure that Your Cisco product and/or
the Software is being used in accordance with the terms
of this Agreement; (iv) to provide improvements to the
way Cisco delivers technology to You and to other Cisco
customers; (v) to provide reports regarding the status
and health of the network, including network traffic and
application usage; (vi) to enable Cisco to comply with
the terms of any agreements it has with any third parties
regarding Your Cisco product and/or Software; and/or (vii)
to enable Cisco to comply with all applicable laws and/
or regulations, or the requirements of any regulatory
authority or government agency. Cisco and/ or its affiliates
may collect and process this information provided that it
does not identify You personally. You agree that Cisco has
no responsibility or liability for the deletion of or failure to
store any data or other information related to Your Cisco
product, Software or related Services.
High Performance Wireless-N USB Adapter
16
Page 19

Linksys AE1000 Appendix E: Software End User License Agreement
In addition, Cisco may collect and store detailed
information regarding Your network configuration
and usage for the purpose of providing You technical
networking support. The information is associated with
You only when You provide a unique ID number to the
support representative while You are receiving help. The
unique ID is generated randomly on Your computer upon
installation and is completely under Your control.
EXCEPT AS OTHERWISE PROVIDED FOR IN THIS
AGREEMENT, CISCO HAS NO OBLIGATION OF
CONFIDENTIALITY OR (EXCEPT TO THE EXTENT REQUIRED
BY THE APPLICABLE DATA PROTECTION LAWS) PRIVACY OF
ANY COMMUNICATION OR INFORMATION TRANSMITTED
USING THE TECHNOLOGY. Cisco will not be liable for the
privacy of e-mail addresses, registration and identification
information, disk space, communications, confidential
or trade-secret information stored on equipment,
transmitted over networks accessed by the Technology,
or otherwise connected with Your use of the Technology.
Your use of Your Cisco product and/or the Technology
constitutes consent by You to Cisco’s and/or its affiliates’
collection and use of such information and, for Canadian
or European Economic Area (EEA) customers, to the
transfer of such information to a location outside
Canada or the EEA. Any information collected by Your
Cisco product and/or the Software is done and utilized
in accordance with our Privacy Policy available at
http://www.myciscohome.com/privacy. Your election
to use the Cisco product and/or Technology indicates Your
acceptance and consent to Cisco’s use of Your personal
data in accordance with the terms of the Cisco Privacy
Policy, so please review the policy carefully and check the
web site above to review updates to it.
Support; Equipment. This Agreement does not entitle
You to any support, upgrades, patches, enhancements,
or fixes (collectively, “Support”) for the Technology. Any
such Support for the Technology that may be made
available by Cisco, in its sole discretion, shall become
part of the Technology and subject to this Agreement.
You shall be responsible for obtaining and maintaining
any equipment or ancillary services needed to connect
to, access, or otherwise use the Technology, including,
without limitation, modems, hardware, software, and
long distance or local telephone service. You shall be
responsible for ensuring that such equipment or ancillary
services are compatible with the Technology.
Software Upgrades etc. If the Software enables You to
receive Upgrades, You may elect at any time to receive
these Upgrades either automatically or manually. If You
elect to receive Upgrades manually or You otherwise
elect not to receive or be notified of any Upgrades, You
may expose Your Cisco product and/or the Software to
serious security threats and/or some features within Your
Cisco product and/or Software may become inaccessible.
There may be circumstances where we apply an Upgrade
automatically in order to comply with changes in
legislation, legal, security or regulatory requirements or
as a result of requirements to comply with the terms of
any agreements Cisco has with any third parties regarding
Your Cisco product and/or the Software. You will always
be notified of any Upgrades being delivered to You. In
addition, Cisco reserves the right to Upgrade our user
interface with or without notice to You. The terms of this
license will apply to any such Upgrade unless the Upgrade
in question is accompanied by a separate license, in which
event the terms of that license will apply.
Term and Termination. You may terminate this License
at any time by destroying all copies of the Software
and documentation. Your rights under this License will
terminate immediately without notice from Cisco if You
fail to comply with any provision of this Agreement.
Limited Warranty. Cisco additionally warrants that any
media on which the Software may be provided will be
free from defects in materials and workmanship under
normal use for a period of ninety (90) days from the date
of original purchase. Your exclusive remedy and Cisco’s
entire liability under this limited warranty will be for Cisco,
at its option, to (a) replace the Software media, or (b)
refund the purchase price of the Software media.
EXCEPT FOR THE WRITTEN LIMITED WARRANTY ON
MEDIA SET FORTH ABOVE AND PROVIDED IN YOUR
CISCO PRODUCT PACKAGING WITH THE PURCHASE OF
THE RELEVANT CISCO PRODUCT AND TO THE MAXIMUM
EXTENT PERMITTED BY APPLICABLE LAW, ALL SOFTWARE
AND SERVICES PROVIDED BY CISCO ARE PROVIDED “AS
IS” WITH ALL FAULTS AND WITHOUT WARRANTY OF ANY
KIND. Without limiting the foregoing, Cisco does not
warrant that the operation of the product, software or
services will be uninterrupted, bug free or error free. Also,
due to the continual development of new techniques for
intruding upon and attacking networks, Cisco does not
warrant that the product, software or services, or any
equipment, system or network on which the product,
software or services are used will be free of vulnerability
to intrusion or attack. The product may include or be
bundled with third party software or service offerings.
This limited warranty shall not apply to such third party
software or service offerings. This limited warranty does
not guarantee any continued availability of a third party’s
service for which this product’s use or operation may
require.
CISCO DOES NOT AND CANNOT WARRANT THE RESULTS
YOU MAY OBTAIN BY USING THE TECHNOLOGY. THIS
SECTION CONSTITUTES AN ESSENTIAL PART OF THE
AGREEMENT, AND THE FOREGOING DISCLAIMERS ALSO
APPLY WITH RESPECT TO CISCO, THEIR DISTRIBUTORS,
CONTRACTORS AND AGENTS. Further, Cisco has no
special relationship with or fiduciary duty to You. You
acknowledge that Cisco has no control over, and no duty
to take any action regarding: which users gain access to
the Technology. The Technology may contain, or enable
You to access, information that some people may find
High Performance Wireless-N USB Adapter
17
Page 20

Linksys AE1000 Appendix E: Software End User License Agreement
offensive or inappropriate. Cisco makes no representations
concerning any content contained in or accessed through
the Technology, and Cisco will not be responsible or
liable for the accuracy, copyright compliance, legality or
decency of material contained in or accessed through the
Technology.
TO THE EXTENT NOT PROHIBITED BY APPLICABLE
LAW, ALL IMPLIED WARRANTIES AND CONDITIONS
OF MERCHANTABILITY, SATISFACTORY QUALITY,
NONINFRINGEMENT OR FITNESS FOR A PARTICULAR
PURPOSE ARE LIMITED TO THE DURATION OF THE
WARRANTY PERIOD. ALL OTHER EXPRESS OR IMPLIED
CONDITIONS, REPRESENTATIONS AND WARRANTIES ARE
DISCLAIMED. Some jurisdictions do not allow limitations
on how long an implied warranty lasts, so the above
limitation may not apply to You. This limited warranty
gives You specific legal rights, and You may also have
other rights which vary by jurisdiction.
Disclaimer of Liabilities. TO THE EXTENT NOT PROHIBITED
BY APPLICABLE LAW, IN NO EVENT WILL CISCO BE LIABLE
FOR ANY LOST DATA, REVENUE OR PROFIT, OR FOR SPECIAL,
INDIRECT, CONSEQUENTIAL, INCIDENTAL OR PUNITIVE
DAMAGES, REGARDLESS OF THE THEORY OF LIABILITY
(INCLUDING NEGLIGENCE), ARISING OUT OF OR RELATED
TO THE USE OF OR INABILITY TO USE THE PRODUCT,
SOFTWARE OR ANY SERVICES PROVIDED IN RESPECT
OF SUCH PRODUCT OR SOFTWARE, EVEN IF CISCO HAS
BEEN ADVISED OF THE POSSIBILITY OF SUCH DAMAGES.
TO THE EXTENT NOT PROHIBITED BY APPLICABLE LAW,
IN NO EVENT WILL CISCO’S LIABILITY EXCEED THE
AMOUNT PAID BY YOU FOR THE PRODUCT. IF YOU LIVE
IN THE EUROPEAN UNION, REFERENCES TO “SPECIAL,
INDIRECT, CONSEQUENTIAL, PUNITIVE OR INCIDENTAL
DAMAGES” SHALL MEAN ANY LOSSES WHICH (i) WERE
NOT REASONABLY FORESEEABLE BY BOTH PARTIES, AND/
OR (ii) WERE KNOWN TO YOU BUT NOT TO US AND/OR (iii)
WERE REASONABLY FORESEEABLE BY BOTH PARTIES BUT
COULD HAVE BEEN PREVENTED BY YOU SUCH AS, FOR
EXAMPLE (BUT WITHOUT LIMITATION), LOSSES CAUSED
BY VIRUSES, TROJANS OR OTHER MALICIOUS PROGRAMS,
OR LOSS OF OR DAMAGE TO YOUR DATA. THE FOREGOING
LIMITATIONS WILL APPLY WITH RESPECT TO CISCO, ITS
DISTRIBUTORS, CONTRACTORS, AND AGENTS AND EVEN
IF ANY WARRANTY OR REMEDY PROVIDED UNDER THIS
LIMITED WARRANTY FAILS OF ITS ESSENTIAL PURPOSE.
NOTHING IN THIS SECTION SHALL LIMIT THE LIABILITY OF
CISCO OR ITS DISTRIBUTORS, CONTRACTORS OR AGENTS
IN RELATION TO DEATH OR PERSONAL INJURIES CAUSED
BY THEIR NEGLIGENCE.
Indemnity. You agree that Cisco and its distributors,
partners, contractors and agents shall have no liability
whatsoever for any use You make of the Technology.
You shall indemnify and hold harmless Cisco and its
distributors, partners, contractors and agents from
any claims, damages, losses, liabilities, costs and fees
(including reasonable attorney fees) arising from Your use
of the Technology as well as from Your failure to comply
with any term of this Agreement.
Technical Support. This limited warranty is neither
a service nor a support contract. Information about
Cisco’s current technical support offerings and policies
(including any fees for support services) can be found at
www.myciscohome.com/support.
Export. Software, including technical data, may be
subject to U.S. export control laws and regulations and/or
export or import regulations in other countries. You agree
to comply strictly with all such laws and regulations.
U.S. Government Users. The Software and Documentation
qualify as “commercial items” as defined at 48 C.F.R. 2.101
and 48 C.F.R. 12.212. All Government users acquire the
Software and Documentation with only those rights
herein that apply to non-governmental customers. Use of
either the Software or Documentation or both constitutes
agreement by the Government that the Software and
Documentation are “commercial computer software”
and “commercial computer software documentation,”
and constitutes acceptance of the rights and restrictions
herein.
General Terms. This Agreement will be governed by and
construed in accordance with the laws of the State of
California, without reference to conflict of laws principles.
The United Nations Convention on Contracts for the
International Sale of Goods will not apply. If any portion
of this Agreement is found to be void or unenforceable,
the remaining provisions will remain in full force and
effect. Each party recognizes and agrees that the
warranty disclaimers and liability and remedy limitations
in this Agreement are material bargained for bases of
this Agreement and that they are reasonable and have
been taken into account and reflected in determining
the consideration to be given by each party under this
Agreement and in the decision by each party to enter
into this Agreement. Cisco’s distributors, contractors
and agents are intended third party beneficiaries under
this Agreement. This Agreement constitutes the entire
agreement between the parties with respect to the
Software and supersedes any conflicting or additional
terms contained in any purchase order or elsewhere.
Except as set forth in the above “License” Section or
otherwise expressly provided under this Agreement, no
amendment to or modification of this Agreement will be
binding unless in writing and signed by Cisco and You.
Linksys, Cisco and the Cisco Logo and other trademarks
contained in the Software and Documentation are
trademarks or registered trademarks of Linksys, Cisco,
its licensors and third parties, as the case may be. You
may not remove or alter any trademark, trade names,
product names, logo, copyright or other proprietary
notices, legends, symbols or labels in the Software and
Documentation. This Agreement does not authorize
High Performance Wireless-N USB Adapter
18
Page 21

Linksys AE1000 Appendix E: Software End User License Agreement
You to use Cisco’s or its licensors’ names or respective
trademarks.
END OF SCHEDULE 1
Schedule 2
Open Source and Third Party Licenses
Schedule 2-A
If this Cisco product contains open source software
licensed under Version 2 of the “GNU General Public
License” then the license terms below in this Schedule 2-A
will apply to that open source software. The license terms
below in this Schedule 2-A are from the public web site at
http://www.gnu.org/licenses/old-licenses/gpl-2.0.html
GNU GENERAL PUBLIC LICENSE
Version 2, June 1991
Copyright (C) 1989, 1991 Free Software Foundation, Inc.
51 Franklin Street, Fifth Floor, Boston, MA 02110-1301, USA
Everyone is permitted to copy and distribute verbatim
copies of this license document, but changing it is not
allowed.
Preamble
The licenses for most software are designed to take away
your freedom to share and change it. By contrast, the
GNU General Public License is intended to guarantee your
freedom to share and change free software--to make sure
the software is free for all its users. This General Public
License applies to most of the Free Software Foundation’s
software and to any other program whose authors
commit to using it. (Some other Free Software Foundation
software is covered by the GNU Lesser General Public
License instead.) You can apply it to your programs, too.
When we speak of free software, we are referring to
freedom, not price. Our General Public Licenses are
designed to make sure that you have the freedom to
distribute copies of free software (and charge for this
service if you wish), that you receive source code or can
get it if you want it, that you can change the software or
use pieces of it in new free programs; and that you know
you can do these things.
To protect your rights, we need to make restrictions that
forbid anyone to deny you these rights or to ask you to
surrender the rights. These restrictions translate to certain
responsibilities for you if you distribute copies of the
software, or if you modify it.
For example, if you distribute copies of such a program,
whether gratis or for a fee, you must give the recipients
all the rights that you have. You must make sure that they,
too, receive or can get the source code. And you must
show them these terms so they know their rights.
We protect your rights with two steps: (1) copyright the
software, and (2) offer you this license which gives you
legal permission to copy, distribute and/or modify the
software.
Also, for each author’s protection and ours, we want to
make certain that everyone understands that there is no
warranty for this free software. If the software is modified
by someone else and passed on, we want its recipients
to know that what they have is not the original, so that
any problems introduced by others will not reflect on the
original authors’ reputations.
Finally, any free program is threatened constantly by
software patents. We wish to avoid the danger that
redistributors of a free program will individually obtain
patent licenses, in effect making the program proprietary.
To prevent this, we have made it clear that any patent
must be licensed for everyone’s free use or not licensed
at all.
The precise terms and conditions for copying, distribution
and modification follow.
TERMS AND CONDITIONS FOR COPYING,
DISTRIBUTION AND MODIFICATION
0. This License applies to any program or other work
which contains a notice placed by the copyright
holder saying it may be distributed under the terms
of this General Public License. The “Program”, below,
refers to any such program or work, and a “work based
on the Program” means either the Program or any
derivative work under copyright law: that is to say, a
work containing the Program or a portion of it, either
verbatim or with modifications and/or translated into
another language. (Hereinafter, translation is included
without limitation in the term “modification”.) Each
licensee is addressed as “you”.
Activities other than copying, distribution and
modification are not covered by this License; they
are outside its scope. The act of running the Program
is not restricted, and the output from the Program is
covered only if its contents constitute a work based on
the Program (independent of having been made by
running the Program). Whether that is true depends
on what the Program does.
1. You may copy and distribute verbatim copies of the
Program’s source code as you receive it, in any medium,
provided that you conspicuously and appropriately
publish on each copy an appropriate copyright notice
and disclaimer of warranty; keep intact all the notices
that refer to this License and to the absence of any
warranty; and give any other recipients of the Program
a copy of this License along with the Program.
You may charge a fee for the physical act of transferring
a copy, and you may at your option offer warranty
protection in exchange for a fee.
High Performance Wireless-N USB Adapter
19
Page 22

Linksys AE1000 Appendix E: Software End User License Agreement
2. You may modify your copy or copies of the Program
or any portion of it, thus forming a work based on the
Program, and copy and distribute such modifications
or work under the terms of Section 1 above, provided
that you also meet all of these conditions:
a. You must cause the modified files to carry
prominent notices stating that you changed the
files and the date of any change.
b. You must cause any work that you distribute or
publish, that in whole or in part contains or is
derived from the Program or any part thereof, to be
licensed as a whole at no charge to all third parties
under the terms of this License.
c. If the modified program normally reads commands
interactively when run, you must cause it, when
started running for such interactive use in the most
ordinary way, to print or display an announcement
including an appropriate copyright notice and
a notice that there is no warranty (or else, saying
that you provide a warranty) and that users may
redistribute the program under these conditions,
and telling the user how to view a copy of
this License. (Exception: if the Program itself is
interactive but does not normally print such an
announcement, your work based on the Program
is not required to print an announcement.)
These requirements apply to the modified work as
a whole. If identifiable sections of that work are not
derived from the Program, and can be reasonably
considered independent and separate works in
themselves, then this License, and its terms, do not
apply to those sections when you distribute them as
separate works. But when you distribute the same
sections as part of a whole which is a work based on
the Program, the distribution of the whole must be on
the terms of this License, whose permissions for other
licensees extend to the entire whole, and thus to each
and every part regardless of who wrote it.
Thus, it is not the intent of this section to claim rights
or contest your rights to work written entirely by you;
rather, the intent is to exercise the right to control the
distribution of derivative or collective works based on
the Program.
In addition, mere aggregation of another work not
based on the Program with the Program (or with a
work based on the Program) on a volume of a storage
or distribution medium does not bring the other work
under the scope of this License.
a. Accompany it with the complete corresponding
machine-readable source code, which must be
distributed under the terms of Sections 1 and 2
above on a medium customarily used for software
interchange; or,
b. Accompany it with a written offer, valid for at least
three years, to give any third party, for a charge
no more than your cost of physically performing
source distribution, a complete machine-readable
copy of the corresponding source code, to be
distributed under the terms of Sections 1 and 2
above on a medium customarily used for software
interchange; or,
c. Accompany it with the information you received as
to the offer to distribute corresponding source code.
(This alternative is allowed only for noncommercial
distribution and only if you received the program
in object code or executable form with such an
offer, in accord with Subsection b above.)
The source code for a work means the preferred form
of the work for making modifications to it. For an
executable work, complete source code means all
the source code for all modules it contains, plus any
associated interface definition files, plus the scripts
used to control compilation and installation of the
executable. However, as a special exception, the source
code distributed need not include anything that is
normally distributed (in either source or binary form)
with the major components (compiler, kernel, and so
on) of the operating system on which the executable
runs, unless that component itself accompanies the
executable.
If distribution of executable or object code is made
by offering access to copy from a designated place,
then offering equivalent access to copy the source
code from the same place counts as distribution of
the source code, even though third parties are not
compelled to copy the source along with the object
code.
4. You may not copy, modify, sublicense, or distribute
the Program except as expressly provided under
this License. Any attempt otherwise to copy, modify,
sublicense or distribute the Program is void, and will
automatically terminate your rights under this License.
However, parties who have received copies, or rights,
from you under this License will not have their licenses
terminated so long as such parties remain in full
compliance.
3. You may copy and distribute the Program (or a
work based on it, under Section 2) in object code or
executable form under the terms of Sections 1 and 2
above provided that you also do one of the following:
High Performance Wireless-N USB Adapter
20
Page 23

Linksys AE1000 Appendix E: Software End User License Agreement
5. You are not required to accept this License, since you
have not signed it. However, nothing else grants you
permission to modify or distribute the Program or
its derivative works. These actions are prohibited by
law if you do not accept this License. Therefore, by
modifying or distributing the Program (or any work
based on the Program), you indicate your acceptance
of this License to do so, and all its terms and conditions
for copying, distributing or modifying the Program or
works based on it.
6. Each time you redistribute the Program (or any work
based on the Program), the recipient automatically
receives a license from the original licensor to copy,
distribute or modify the Program subject to these
terms and conditions. You may not impose any further
restrictions on the recipients’ exercise of the rights
granted herein. You are not responsible for enforcing
compliance by third parties to this License.
7. If, as a consequence of a court judgment or allegation
of patent infringement or for any other reason (not
limited to patent issues), conditions are imposed on
you (whether by court order, agreement or otherwise)
that contradict the conditions of this License, they do
not excuse you from the conditions of this License. If
you cannot distribute so as to satisfy simultaneously
your obligations under this License and any other
pertinent obligations, then as a consequence you
may not distribute the Program at all. For example,
if a patent license would not permit royalty-free
redistribution of the Program by all those who receive
copies directly or indirectly through you, then the only
way you could satisfy both it and this License would
be to refrain entirely from distribution of the Program.
If any portion of this section is held invalid or
unenforceable under any particular circumstance,
the balance of the section is intended to apply and
the section as a whole is intended to apply in other
circumstances.
It is not the purpose of this section to induce you to
infringe any patents or other property right claims or
to contest validity of any such claims; this section has
the sole purpose of protecting the integrity of the free
software distribution system, which is implemented
by public license practices. Many people have
made generous contributions to the wide range of
software distributed through that system in reliance
on consistent application of that system; it is up to
the author/donor to decide if he or she is willing to
distribute software through any other system and a
licensee cannot impose that choice.
8. If the distribution and/or use of the Program is
restricted in certain countries either by patents or by
copyrighted interfaces, the original copyright holder
who places the Program under this License may add an
explicit geographical distribution limitation excluding
those countries, so that distribution is permitted only
in or among countries not thus excluded. In such case,
this License incorporates the limitation as if written in
the body of this License.
9. The Free Software Foundation may publish revised
and/or new versions of the General Public License
from time to time. Such new versions will be similar in
spirit to the present version, but may differ in detail to
address new problems or concerns.
Each version is given a distinguishing version number.
If the Program specifies a version number of this
License which applies to it and “any later version”, you
have the option of following the terms and conditions
either of that version or of any later version published
by the Free Software Foundation. If the Program does
not specify a version number of this License, you
may choose any version ever published by the Free
Software Foundation.
10. If you wish to incorporate parts of the Program into
other free programs whose distribution conditions are
different, write to the author to ask for permission. For
software which is copyrighted by the Free Software
Foundation, write to the Free Software Foundation;
we sometimes make exceptions for this. Our decision
will be guided by the two goals of preserving the free
status of all derivatives of our free software and of
promoting the sharing and reuse of software generally.
NO WARRANTY
11. BECAUSE THE PROGRAM IS LICENSED FREE OF
CHARGE, THERE IS NO WARRANTY FOR THE PROGRAM,
TO THE EXTENT PERMITTED BY APPLICABLE LAW.
EXCEPT WHEN OTHERWISE STATED IN WRITING THE
COPYRIGHT HOLDERS AND/OR OTHER PARTIES
PROVIDE THE PROGRAM “AS IS” WITHOUT WARRANTY
OF ANY KIND, EITHER EXPRESSED OR IMPLIED,
INCLUDING, BUT NOT LIMITED TO, THE IMPLIED
WARRANTIES OF MERCHANTABILITY AND FITNESS FOR
A PARTICULAR PURPOSE. THE ENTIRE RISK AS TO THE
QUALITY AND PERFORMANCE OF THE PROGRAM IS
WITH YOU. SHOULD THE PROGRAM PROVE DEFECTIVE,
YOU ASSUME THE COST OF ALL NECESSARY SERVICING,
REPAIR OR CORRECTION.
This section is intended to make thoroughly clear
what is believed to be a consequence of the rest of this
License.
High Performance Wireless-N USB Adapter
21
Page 24

Linksys AE1000 Appendix E: Software End User License Agreement
12. IN NO EVENT UNLESS REQUIRED BY APPLICABLE LAW
OR AGREED TO IN WRITING WILL ANY COPYRIGHT
HOLDER, OR ANY OTHER PARTY WHO MAY
MODIFY AND/OR REDISTRIBUTE THE PROGRAM AS
PERMITTED ABOVE, BE LIABLE TO YOU FOR DAMAGES,
INCLUDING ANY GENERAL, SPECIAL, INCIDENTAL OR
CONSEQUENTIAL DAMAGES ARISING OUT OF THE
USE OR INABILITY TO USE THE PROGRAM (INCLUDING
BUT NOT LIMITED TO LOSS OF DATA OR DATA BEING
RENDERED INACCURATE OR LOSSES SUSTAINED BY
YOU OR THIRD PARTIES OR A FAILURE OF THE PROGRAM
TO OPERATE WITH ANY OTHER PROGRAMS), EVEN IF
SUCH HOLDER OR OTHER PARTY HAS BEEN ADVISED
OF THE POSSIBILITY OF SUCH DAMAGES.
END OF TERMS AND CONDITIONS
END OF SCHEDULE 2-A
Schedule 2-B
If this Cisco product contains open source software licensed
under Version 2.1 of the “GNU Lesser General Public
License” then the license terms below in this Schedule 2-B
will apply to that open source software. The license terms
below in this Schedule 2-B are from the public web site at
http://www.gnu.org/licenses/old-licenses/lgpl-2.1.html
GNU LESSER GENERAL PUBLIC LICENSE
Version 2.1, February 1999
Copyright (C) 1991, 1999 Free Software Foundation, Inc.
51 Franklin Street, Fifth Floor, Boston, MA 02110-1301 USA
are designed to make sure that you have the freedom
to distribute copies of free software (and charge for this
service if you wish); that you receive source code or can
get it if you want it; that you can change the software and
use pieces of it in new free programs; and that you are
informed that you can do these things.
To protect your rights, we need to make restrictions that
forbid distributors to deny you these rights or to ask you
to surrender these rights. These restrictions translate to
certain responsibilities for you if you distribute copies of
the library or if you modify it.
For example, if you distribute copies of the library,
whether gratis or for a fee, you must give the recipients
all the rights that we gave you. You must make sure that
they, too, receive or can get the source code. If you link
other code with the library, you must provide complete
object files to the recipients, so that they can relink them
with the library after making changes to the library and
recompiling it. And you must show them these terms so
they know their rights.
We protect your rights with a two-step method: (1) we
copyright the library, and (2) we offer you this license,
which gives you legal permission to copy, distribute and/
or modify the library.
To protect each distributor, we want to make it very clear
that there is no warranty for the free library. Also, if the
library is modified by someone else and passed on, the
recipients should know that what they have is not the
original version, so that the original author’s reputation
will not be affected by problems that might be introduced
by others.
Everyone is permitted to copy and distribute verbatim
copies of this license document, but changing it is not
allowed.
[This is the first released version of the Lesser GPL. It also
counts as the successor of the GNU Library Public License,
version 2, hence the version number 2.1.]
Preamble
The licenses for most software are designed to take away
your freedom to share and change it. By contrast, the
GNU General Public Licenses are intended to guarantee
your freedom to share and change free software--to make
sure the software is free for all its users.
This license, the Lesser General Public License, applies
to some specially designated software packages-typically libraries--of the Free Software Foundation and
other authors who decide to use it. You can use it too,
but we suggest you first think carefully about whether
this license or the ordinary General Public License is the
better strategy to use in any particular case, based on the
explanations below.
When we speak of free software, we are referring to
freedom of use, not price. Our General Public Licenses
Finally, software patents pose a constant threat to the
existence of any free program. We wish to make sure
that a company cannot effectively restrict the users of
a free program by obtaining a restrictive license from a
patent holder. Therefore, we insist that any patent license
obtained for a version of the library must be consistent
with the full freedom of use specified in this license.
Most GNU software, including some libraries, is covered
by the ordinary GNU General Public License. This license,
the GNU Lesser General Public License, applies to certain
designated libraries, and is quite different from the
ordinary General Public License. We use this license for
certain libraries in order to permit linking those libraries
into non-free programs.
When a program is linked with a library, whether
statically or using a shared library, the combination of
the two is legally speaking a combined work, a derivative
of the original library. The ordinary General Public
License therefore permits such linking only if the entire
combination fits its criteria of freedom. The Lesser General
Public License permits more lax criteria for linking other
code with the library.
High Performance Wireless-N USB Adapter
22
Page 25

Linksys AE1000 Appendix E: Software End User License Agreement
We call this license the “Lesser” General Public License
because it does Less to protect the user’s freedom than
the ordinary General Public License. It also provides
other free software developers Less of an advantage over
competing non-free programs. These disadvantages are
the reason we use the ordinary General Public License
for many libraries. However, the Lesser license provides
advantages in certain special circumstances.
For example, on rare occasions, there may be a special
need to encourage the widest possible use of a certain
library, so that it becomes a de-facto standard. To achieve
this, non-free programs must be allowed to use the library.
A more frequent case is that a free library does the same
job as widely used non-free libraries. In this case, there is
little to gain by limiting the free library to free software
only, so we use the Lesser General Public License.
In other cases, permission to use a particular library in nonfree programs enables a greater number of people to use
a large body of free software. For example, permission to
use the GNU C Library in non-free programs enables many
more people to use the whole GNU operating system, as
well as its variant, the GNU/Linux operating system.
Although the Lesser General Public License is Less
protective of the users’ freedom, it does ensure that the
user of a program that is linked with the Library has the
freedom and the wherewithal to run that program using a
modified version of the Library.
The precise terms and conditions for copying, distribution
and modification follow. Pay close attention to the
difference between a “work based on the library” and a
“work that uses the library”. The former contains code
derived from the library, whereas the latter must be
combined with the library in order to run.
GNU LESSER GENERAL PUBLIC LICENSE
TERMS AND CONDITIONS FOR COPYING,
DISTRIBUTION AND MODIFICATION
0. This License Agreement applies to any software library
or other program which contains a notice placed by
the copyright holder or other authorized party saying
it may be distributed under the terms of this Lesser
General Public License (also called “this License”). Each
licensee is addressed as “you”.
A “library” means a collection of software functions
and/or data prepared so as to be conveniently linked
with application programs (which use some of those
functions and data) to form executables.
The “Library”, below, refers to any such software library
or work which has been distributed under these terms.
A “work based on the Library” means either the Library
or any derivative work under copyright law: that is
to say, a work containing the Library or a portion
of it, either verbatim or with modifications and/or
translated straightforwardly into another language.
(Hereinafter, translation is included without limitation
in the term “modification”.)
“Source code” for a work means the preferred form of
the work for making modifications to it. For a library,
complete source code means all the source code for
all modules it contains, plus any associated interface
definition files, plus the scripts used to control
compilation and installation of the library.
Activities other than copying, distribution and
modification are not covered by this License; they are
outside its scope. The act of running a program using
the Library is not restricted, and output from such a
program is covered only if its contents constitute a
work based on the Library (independent of the use
of the Library in a tool for writing it). Whether that is
true depends on what the Library does and what the
program that uses the Library does.
1. You may copy and distribute verbatim copies of the
Library’s complete source code as you receive it, in
any medium, provided that you conspicuously and
appropriately publish on each copy an appropriate
copyright notice and disclaimer of warranty; keep
intact all the notices that refer to this License and to
the absence of any warranty; and distribute a copy of
this License along with the Library.
You may charge a fee for the physical act of transferring
a copy, and you may at your option offer warranty
protection in exchange for a fee.
2. You may modify your copy or copies of the Library or
any portion of it, thus forming a work based on the
Library, and copy and distribute such modifications
or work under the terms of Section 1 above, provided
that you also meet all of these conditions:
a. The modified work must itself be a software library.
b. You must cause the files modified to carry
prominent notices stating that you changed the
files and the date of any change.
c. You must cause the whole of the work to be
licensed at no charge to all third parties under the
terms of this License.
d. If a facility in the modified Library refers to a
function or a table of data to be supplied by an
application program that uses the facility, other
than as an argument passed when the facility is
invoked, then you must make a good faith effort
to ensure that, in the event an application does
not supply such function or table, the facility
still operates, and performs whatever part of its
purpose remains meaningful.
(For example, a function in a library to compute square
roots has a purpose that is entirely well-defined
independent of the application. Therefore, Subsection
2d requires that any application-supplied function or
High Performance Wireless-N USB Adapter
23
Page 26

Linksys AE1000 Appendix E: Software End User License Agreement
table used by this function must be optional: if the
application does not supply it, the square root function
must still compute square roots.)
These requirements apply to the modified work as
a whole. If identifiable sections of that work are not
derived from the Library, and can be reasonably
considered independent and separate works in
themselves, then this License, and its terms, do not
apply to those sections when you distribute them as
separate works. But when you distribute the same
sections as part of a whole which is a work based on
the Library, the distribution of the whole must be on
the terms of this License, whose permissions for other
licensees extend to the entire whole, and thus to each
and every part regardless of who wrote it.
Thus, it is not the intent of this section to claim rights
or contest your rights to work written entirely by you;
rather, the intent is to exercise the right to control the
distribution of derivative or collective works based on
the Library.
In addition, mere aggregation of another work not
based on the Library with the Library (or with a work
based on the Library) on a volume of a storage or
distribution medium does not bring the other work
under the scope of this License.
3. You may opt to apply the terms of the ordinary GNU
General Public License instead of this License to a
given copy of the Library. To do this, you must alter all
the notices that refer to this License, so that they refer
to the ordinary GNU General Public License, version
2, instead of to this License. (If a newer version than
version 2 of the ordinary GNU General Public License
has appeared, then you can specify that version
instead if you wish.) Do not make any other change
in these notices.
Once this change is made in a given copy, it is
irreversible for that copy, so the ordinary GNU General
Public License applies to all subsequent copies and
derivative works made from that copy.
This option is useful when you wish to copy part of the
code of the Library into a program that is not a library.
4. You may copy and distribute the Library (or a portion
or derivative of it, under Section 2) in object code or
executable form under the terms of Sections 1 and
2 above provided that you accompany it with the
complete corresponding machine-readable source
code, which must be distributed under the terms of
Sections 1 and 2 above on a medium customarily used
for software interchange.
If distribution of object code is made by offering
access to copy from a designated place, then offering
equivalent access to copy the source code from the
same place satisfies the requirement to distribute
the source code, even though third parties are not
compelled to copy the source along with the object
code.
5. A program that contains no derivative of any portion
of the Library, but is designed to work with the Library
by being compiled or linked with it, is called a “work
that uses the Library”. Such a work, in isolation, is not
a derivative work of the Library, and therefore falls
outside the scope of this License.
However, linking a “work that uses the Library” with
the Library creates an executable that is a derivative
of the Library (because it contains portions of the
Library), rather than a “work that uses the library”. The
executable is therefore covered by this License. Section
6 states terms for distribution of such executables.
When a “work that uses the Library” uses material from
a header file that is part of the Library, the object code
for the work may be a derivative work of the Library
even though the source code is not. Whether this is
true is especially significant if the work can be linked
without the Library, or if the work is itself a library. The
threshold for this to be true is not precisely defined by
law.
If such an object file uses only numerical parameters,
data structure layouts and accessors, and small
macros and small inline functions (ten lines or less in
length), then the use of the object file is unrestricted,
regardless of whether it is legally a derivative work.
(Executables containing this object code plus portions
of the Library will still fall under Section 6.)
Otherwise, if the work is a derivative of the Library, you
may distribute the object code for the work under the
terms of Section 6. Any executables containing that
work also fall under Section 6, whether or not they are
linked directly with the Library itself.
6. As an exception to the Sections above, you may also
combine or link a “work that uses the Library” with the
Library to produce a work containing portions of the
Library, and distribute that work under terms of your
choice, provided that the terms permit modification
of the work for the customer’s own use and reverse
engineering for debugging such modifications.
You must give prominent notice with each copy of
the work that the Library is used in it and that the
Library and its use are covered by this License. You
must supply a copy of this License. If the work during
execution displays copyright notices, you must include
the copyright notice for the Library among them, as
well as a reference directing the user to the copy of this
License. Also, you must do one of these things:
High Performance Wireless-N USB Adapter
24
Page 27

Linksys AE1000 Appendix E: Software End User License Agreement
a. Accompany the work with the complete
corresponding machine-readable source code
for the Library including whatever changes were
used in the work (which must be distributed
under Sections 1 and 2 above); and, if the work
is an executable linked with the Library, with the
complete machine-readable “work that uses the
Library”, as object code and/or source code, so that
the user can modify the Library and then relink
to produce a modified executable containing the
modified Library. (It is understood that the user
who changes the contents of definitions files in the
Library will not necessarily be able to recompile
the application to use the modified definitions.)
b. Use a suitable shared library mechanism for linking
with the Library. A suitable mechanism is one that
(1) uses at run time a copy of the library already
present on the user’s computer system, rather than
copying library functions into the executable, and
(2) will operate properly with a modified version of
the library, if the user installs one, as long as the
modified version is interface-compatible with the
version that the work was made with.
c. Accompany the work with a written offer, valid
for at least three years, to give the same user the
materials specified in Subsection 6a, above, for a
charge no more than the cost of performing this
distribution.
d. If distribution of the work is made by offering access
to copy from a designated place, offer equivalent
access to copy the above specified materials from
the same place.
e. Verify that the user has already received a copy of
these materials or that you have already sent this
user a copy.
For an executable, the required form of the “work that
uses the Library” must include any data and utility
programs needed for reproducing the executable
from it. However, as a special exception, the materials
to be distributed need not include anything that is
normally distributed (in either source or binary form)
with the major components (compiler, kernel, and so
on) of the operating system on which the executable
runs, unless that component itself accompanies the
executable.
7. You may place library facilities that are a work based
on the Library side-by-side in a single library together
with other library facilities not covered by this License,
and distribute such a combined library, provided that
the separate distribution of the work based on the
Library and of the other library facilities is otherwise
permitted, and provided that you do these two things:
a. Accompany the combined library with a copy of
the same work based on the Library, uncombined
with any other library facilities. This must be
distributed under the terms of the Sections above.
b. Give prominent notice with the combined library of
the fact that part of it is a work based on the Library,
and explaining where to find the accompanying
uncombined form of the same work.
8. You may not copy, modify, sublicense, link with, or
distribute the Library except as expressly provided
under this License. Any attempt otherwise to copy,
modify, sublicense, link with, or distribute the Library
is void, and will automatically terminate your rights
under this License. However, parties who have
received copies, or rights, from you under this License
will not have their licenses terminated so long as such
parties remain in full compliance.
9. You are not required to accept this License, since you
have not signed it. However, nothing else grants
you permission to modify or distribute the Library
or its derivative works. These actions are prohibited
by law if you do not accept this License. Therefore,
by modifying or distributing the Library (or any work
based on the Library), you indicate your acceptance of
this License to do so, and all its terms and conditions
for copying, distributing or modifying the Library or
works based on it.
10. Each time you redistribute the Library (or any work
based on the Library), the recipient automatically
receives a license from the original licensor to copy,
distribute, link with or modify the Library subject
to these terms and conditions. You may not impose
any further restrictions on the recipients’ exercise of
the rights granted herein. You are not responsible
for enforcing compliance by third parties with this
License.
It may happen that this requirement contradicts the
license restrictions of other proprietary libraries that
do not normally accompany the operating system.
Such a contradiction means you cannot use both
them and the Library together in an executable that
you distribute.
High Performance Wireless-N USB Adapter
25
Page 28

Linksys AE1000 Appendix E: Software End User License Agreement
11. If, as a consequence of a court judgment or allegation
of patent infringement or for any other reason (not
limited to patent issues), conditions are imposed on
you (whether by court order, agreement or otherwise)
that contradict the conditions of this License, they do
not excuse you from the conditions of this License. If
you cannot distribute so as to satisfy simultaneously
your obligations under this License and any other
pertinent obligations, then as a consequence you may
not distribute the Library at all. For example, if a patent
license would not permit royalty-free redistribution of
the Library by all those who receive copies directly or
indirectly through you, then the only way you could
satisfy both it and this License would be to refrain
entirely from distribution of the Library.
If any portion of this section is held invalid or
unenforceable under any particular circumstance,
the balance of the section is intended to apply, and
the section as a whole is intended to apply in other
circumstances.
It is not the purpose of this section to induce you to
infringe any patents or other property right claims or
to contest validity of any such claims; this section has
the sole purpose of protecting the integrity of the free
software distribution system which is implemented
by public license practices. Many people have
made generous contributions to the wide range of
software distributed through that system in reliance
on consistent application of that system; it is up to
the author/donor to decide if he or she is willing to
distribute software through any other system and a
licensee cannot impose that choice.
This section is intended to make thoroughly clear
what is believed to be a consequence of the rest of this
License.
12. If the distribution and/or use of the Library is restricted
in certain countries either by patents or by copyrighted
interfaces, the original copyright holder who places
the Library under this License may add an explicit
geographical distribution limitation excluding those
countries, so that distribution is permitted only in or
among countries not thus excluded. In such case, this
License incorporates the limitation as if written in the
body of this License.
13. The Free Software Foundation may publish revised
and/or new versions of the Lesser General Public
License from time to time. Such new versions will be
similar in spirit to the present version, but may differ in
detail to address new problems or concerns.
Each version is given a distinguishing version number.
If the Library specifies a version number of this License
which applies to it and “any later version”, you have the
option of following the terms and conditions either of
that version or of any later version published by the
Free Software Foundation. If the Library does not
specify a license version number, you may choose
any version ever published by the Free Software
Foundation.
14. If you wish to incorporate parts of the Library into
other free programs whose distribution conditions are
incompatible with these, write to the author to ask for
permission. For software which is copyrighted by the
Free Software Foundation, write to the Free Software
Foundation; we sometimes make exceptions for
this. Our decision will be guided by the two goals of
preserving the free status of all derivatives of our free
software and of promoting the sharing and reuse of
software generally.
NO WARRANTY
15. BECAUSE THE LIBRARY IS LICENSED FREE OF CHARGE,
THERE IS NO WARRANTY FOR THE LIBRARY, TO THE
EXTENT PERMITTED BY APPLICABLE LAW. EXCEPT
WHEN OTHERWISE STATED IN WRITING THE COPYRIGHT
HOLDERS AND/OR OTHER PARTIES PROVIDE THE
LIBRARY “AS IS” WITHOUT WARRANTY OF ANY KIND,
EITHER EXPRESSED OR IMPLIED, INCLUDING, BUT
NOT LIMITED TO, THE IMPLIED WARRANTIES OF
MERCHANTABILITY AND FITNESS FOR A PARTICULAR
PURPOSE. THE ENTIRE RISK AS TO THE QUALITY AND
PERFORMANCE OF THE LIBRARY IS WITH YOU. SHOULD
THE LIBRARY PROVE DEFECTIVE, YOU ASSUME THE
COST OF ALL NECESSARY SERVICING, REPAIR OR
CORRECTION.
16. IN NO EVENT UNLESS REQUIRED BY APPLICABLE LAW
OR AGREED TO IN WRITING WILL ANY COPYRIGHT
HOLDER, OR ANY OTHER PARTY WHO MAY MODIFY
AND/OR REDISTRIBUTE THE LIBRARY AS PERMITTED
ABOVE, BE LIABLE TO YOU FOR DAMAGES,
INCLUDING ANY GENERAL, SPECIAL, INCIDENTAL OR
CONSEQUENTIAL DAMAGES ARISING OUT OF THE
USE OR INABILITY TO USE THE LIBRARY (INCLUDING
BUT NOT LIMITED TO LOSS OF DATA OR DATA BEING
RENDERED INACCURATE OR LOSSES SUSTAINED BY
YOU OR THIRD PARTIES OR A FAILURE OF THE LIBRARY
TO OPERATE WITH ANY OTHER SOFTWARE), EVEN IF
SUCH HOLDER OR OTHER PARTY HAS BEEN ADVISED
OF THE POSSIBILITY OF SUCH DAMAGES.
END OF TERMS AND CONDITIONS
END OF SCHEDULE 2-B
High Performance Wireless-N USB Adapter
26
Page 29

Linksys AE1000 Appendix E: Software End User License Agreement
Schedule 2-C
OPENSSL LICENSE
If this Cisco product contains open source software
licensed under the OpenSSL license:
This product includes software developed by the
OpenSSL Project for use in the OpenSSL Toolkit.
(http://www.openssl.org/).
This product includes cryptographic software written by
Eric Young (eay@cryptsoft.com).
This product includes software written by Tim Hudson
(tjh@cryptsoft.com).
In addition, if this Cisco product contains open source
software licensed under the OpenSSL license then the
license terms below in this Schedule 2-C will apply to
that open source software. The license terms below
in this Schedule 2-C are from the public web site at
http://www.openssl.org/source/license.html.
The OpenSSL toolkit stays under a dual license, i.e. both
the conditions of the OpenSSL License and the original
SSLeay license apply to the toolkit. See below for the
actual license texts. Actually both licenses are BSD-style
Open Source licenses. In case of any license issues related
to OpenSSL please contact openssl-core@openssl.org.
OpenSSL License
Copyright (c) 1998-2007 The OpenSSL Project. All rights
reserved.
Redistribution and use in source and binary forms, with
or without modification, are permitted provided that the
following conditions are met:
1. Redistributions of source code must retain the above
copyright notice, this list of conditions and the
following disclaimer.
2. Redistributions in binary form must reproduce the
above copyright notice, this list of conditions and the
following disclaimer in the documentation and/or
other materials provided with the distribution.
3. All advertising materials mentioning features or
use of this software must display the following
acknowledgment: “This product includes software
developed by the OpenSSL Project for use in the
OpenSSL Toolkit. (http://www.openssl.org/)”
4. The names “OpenSSL Toolkit” and “OpenSSL Project”
must not be used to endorse or promote products
derived from this software without prior written
permission. For written permission, please contact
openssl-core@openssl.org.
5. Products derived from this software may not be called
“OpenSSL” nor may “OpenSSL” appear in their names
without prior written permission of the OpenSSL
Project.
6. Redistributions of any form whatsoever must retain the
following acknowledgment: “This product includes
software developed by the OpenSSL Project for use in
the OpenSSL Toolkit (http://www.openssl.org/)”
THIS SOFTWARE IS PROVIDED BY THE OpenSSL PROJECT
``AS IS’’ AND ANY EXPRESSED OR IMPLIED WARRANTIES,
INCLUDING, BUT NOT LIMITED TO, THE IMPLIED
WARRANTIES OF MERCHANTABILITY AND FITNESS FOR
A PARTICULAR PURPOSE ARE DISCLAIMED. IN NO EVENT
SHALL THE OpenSSL PROJECT OR ITS CONTRIBUTORS BE
LIABLE FOR ANY DIRECT, INDIRECT, INCIDENTAL, SPECIAL,
EXEMPLARY, OR CONSEQUENTIAL DAMAGES (INCLUDING,
BUT NOT LIMITED TO, PROCUREMENT OF SUBSTITUTE
GOODS OR SERVICES; LOSS OF USE, DATA, OR PROFITS;
OR BUSINESS INTERRUPTION) HOWEVER CAUSED AND
ON ANY THEORY OF LIABILITY, WHETHER IN CONTRACT,
STRICT LIABILITY, OR TORT (INCLUDING NEGLIGENCE OR
OTHERWISE) ARISING IN ANY WAY OUT OF THE USE OF
THIS SOFTWARE, EVEN IF ADVISED OF THE POSSIBILITY OF
SUCH DAMAGE.
This product includes cryptographic software written by
Eric Young (eay@cryptsoft.com). This product includes
software written by Tim Hudson (tjh@cryptsoft.com).
Original SSLeay License
Copyright (C) 1995-1998 Eric Young (eay@cryptsoft.com)
All rights reserved.
This package is an SSL implementation written by Eric
Young (eay@cryptsoft.com).
The implementation was written so as to conform with
Netscape’s SSL.
This library is free for commercial and non-commercial
use as long as the following conditions are adhered to.
The following conditions apply to all code found in this
distribution, be it the RC4, RSA, lhash, DES, etc., code; not
just the SSL code. The SSL documentation included with
this distribution is covered by the same copyright terms
except that the holder is Tim Hudson (tjh@cryptsoft.com).
Copyright remains Eric Young’s, and as such any Copyright
notices in the code are not to be removed.
If this package is used in a product, Eric Young should be
given attribution as the author of the parts of the library
used. This can be in the form of a textual message at
program startup or in documentation (online or textual)
provided with the package.
Redistribution and use in source and binary forms, with
or without modification, are permitted provided that the
following conditions are met:
1. Redistributions of source code must retain the
copyright notice, this list of conditions and the
following disclaimer.
High Performance Wireless-N USB Adapter
27
Page 30

Linksys AE1000 Appendix E: Software End User License Agreement
2. Redistributions in binary form must reproduce the
above copyright notice, this list of conditions and the
following disclaimer in the documentation and/or
other materials provided with the distribution.
3. All advertising materials mentioning features or
use of this software must display the following
acknowledgement:
“This product includes cryptographic software written
by Eric Young (eay@cryptsoft.com)”
The word ‘cryptographic’ can be left out if the routines
from the library being used are not cryptographic
related.
4. If you include any Windows specific code (or a derivative
thereof) from the apps directory (application code)
you must include an acknowledgement: “This product
includes software written by Tim Hudson (tjh@
cryptsoft.com)”
THIS SOFTWARE IS PROVIDED BY ERIC YOUNG ``AS IS’’
AND ANY EXPRESS OR IMPLIED WARRANTIES, INCLUDING,
BUT NOT LIMITED TO, THE IMPLIED WARRANTIES OF
MERCHANTABILITY AND FITNESS FOR A PARTICULAR
PURPOSE ARE DISCLAIMED. IN NO EVENT SHALL
THE AUTHOR OR CONTRIBUTORS BE LIABLE FOR ANY
DIRECT, INDIRECT, INCIDENTAL, SPECIAL, EXEMPLARY,
OR CONSEQUENTIAL DAMAGES (INCLUDING, BUT NOT
LIMITED TO, PROCUREMENT OF SUBSTITUTE GOODS OR
SERVICES; LOSS OF USE, DATA, OR PROFITS; OR BUSINESS
INTERRUPTION) HOWEVER CAUSED AND ON ANY THEORY
OF LIABILITY, WHETHER IN CONTRACT, STRICT LIABILITY,
OR TORT (INCLUDING NEGLIGENCE OR OTHERWISE)
ARISING IN ANY WAY OUT OF THE USE OF THIS SOFTWARE,
EVEN IF ADVISED OF THE POSSIBILITY OF SUCH DAMAGE.
The license and distribution terms for any publicly
available version or derivative of this code cannot be
changed. i.e. this code cannot simply be copied and put
under another distribution license [including the GNU
Public License.]
END OF SCHEDULE 2-C
High Performance Wireless-N USB Adapter
28
Page 31
www.linksys.com/support
© 2010 Cisco Systems, Inc. All rights reserved. Cisco, the Cisco logo, and Linksys are trademarks or registered trademarks of Cisco Systems, Inc. and/or its
affiliates in the United States and certain other countries. All other trademarks mentioned in this document or website are the property of their respective
owners. The use of the word partner does not imply a partnership relationship between Cisco and any other company.
10021210NC-AI
 Loading...