

Page 1
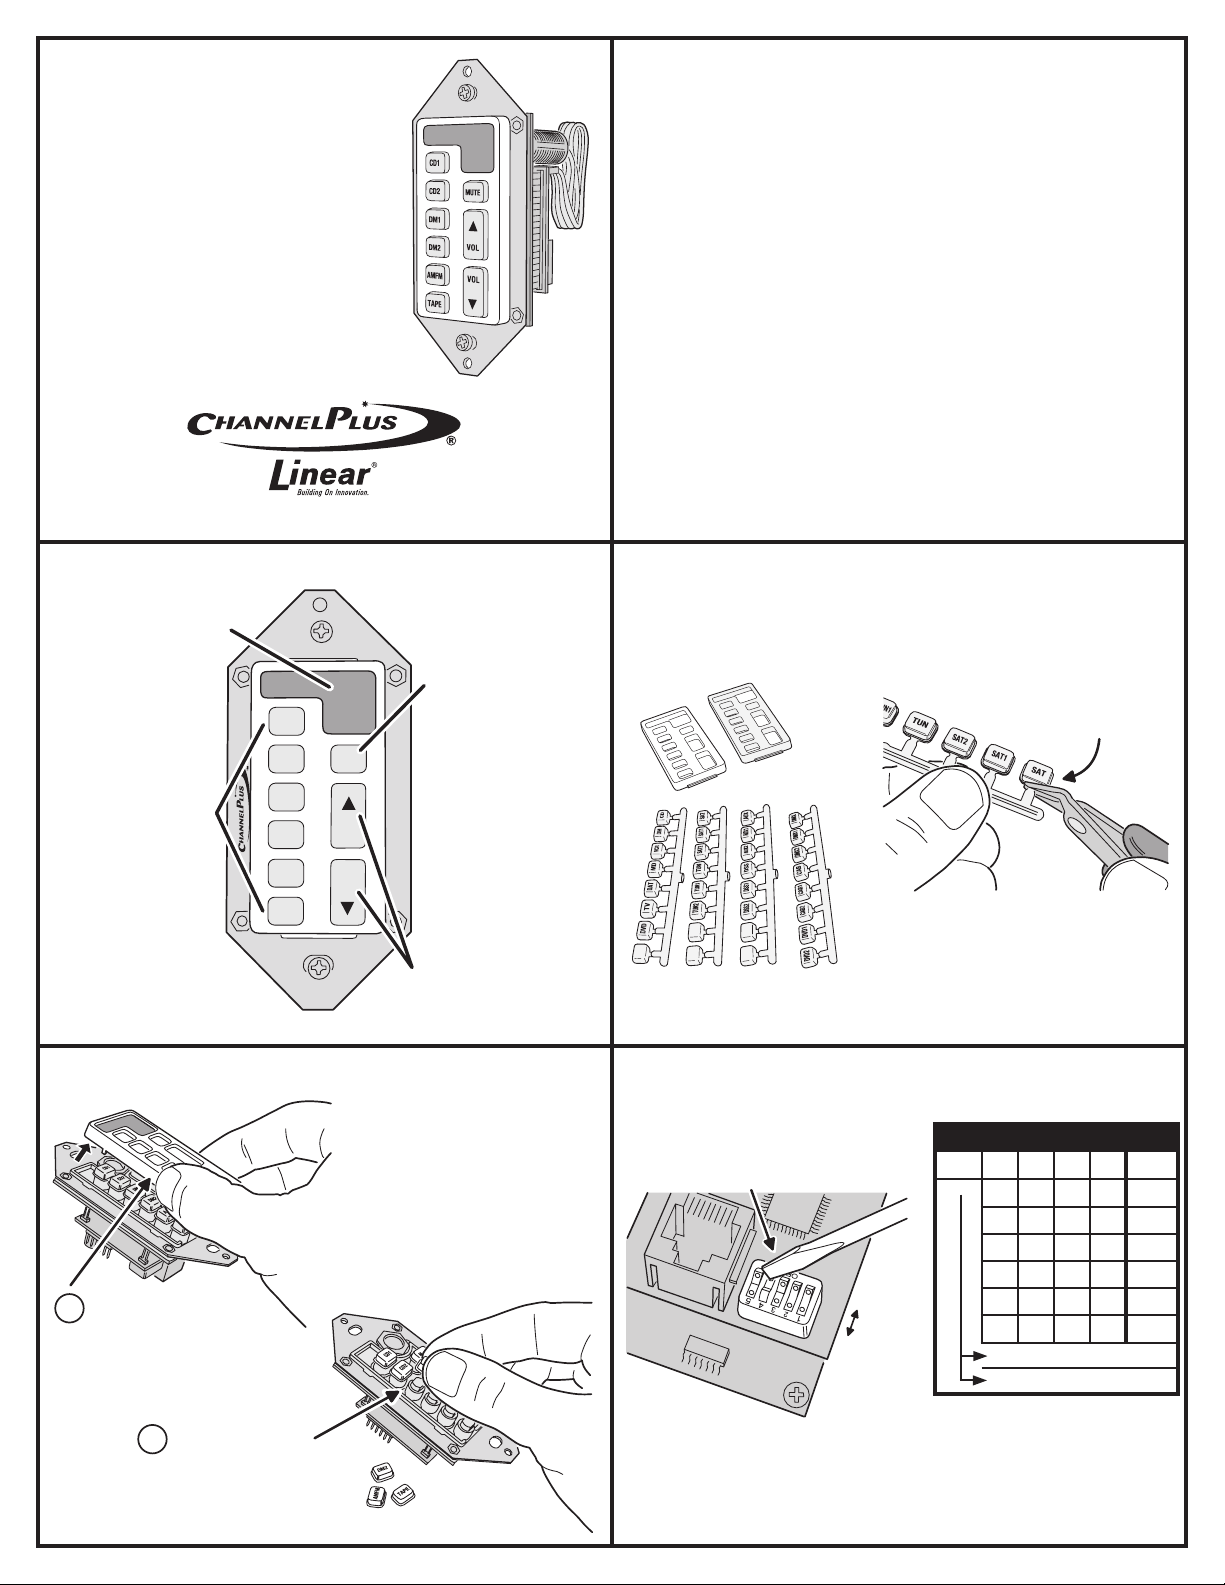
1. PRODUCT DESCRIPTION
MCS-1A
Zone Controller
For Use with the
Model MDS-6A Music
Distribution System
Installation & Operation
Instructions
USA & Canada (800) 421-1587 & (800) 392-0123
(760) 438-7000 - Toll Free FAX (800) 468-1340
www.linearcorp.com
The MCS-1A Zone Controller is designed as an in-room control for the MDS-6A Music
Distribution System. The MDS-6A distributes amplified audio from up to six sources to up to six
speaker zones. In a typical installation, an MCS-1A Zone Controller (or MCS-2A Programmable
Zone Controller) would be installed in each listening room or location to control the speakers
in that zone. The MCS-1A mounts in a standard single-gang electrical box and is covered by a
standard Decora™ wall plate (neither item is included with the controller).
The MCS-1A Zone Controller’s source keys are used to select which audio source device (CD,
TUNER, TAPE, DVD, DBS, TV, etc.) will be played from its specific speaker zone. The speaker’s
volume can be adjusted, or muted, using the keys on the Zone Controller. Any infrared remote
control code sent to the MCS-1A from a handheld remote will be repeated to source devices
through the MDS-6A.
Two special features are available for each Zone Controller. The “whole-house-music” feature
will play a selected audio source from all of the system’s speaker zones. The “do-not-disturb”
feature prevents a speaker zone from responding to “whole-house-music” commands from
other Zone Controllers and mutes any system wide pages to that speaker zone.
The MCS-1A keys can light in three colors (green, red, & yellow) to show the status of the
speaker zone. The optional key backlighting (selectable with dipswitch #1) lights all of the keys
with a pleasant green glow. The audio source selection keys will light red to indicate the selected
audio source. When “whole-house-music” is selected the designated audio source key lights
yellow. The MUTE key normally lights green, then lights red when the speaker zone is muted. The
MUTE key blinks yellow when “do-not-disturb” feature is active for the speaker zone and lights
yellow when “do-not-disturb” is active and the speaker zone is muted.
2. COMPONENT LOCATIONS 3. ACCESSORIES
THE CONTROLLER'S BEZEL CAN BE CHANGED TO WHITE OR IVORY
INFRARED RECEIVER WINDOW
• Receives IR from handheld remotes
IR is passed through to MDS-6A
•
AUDIO SOURCE BUTTONS
Press to select audio source
•
Selected source button lights red
•
• Push for 5 seconds to select
"Whole-house-music" feature
CD1
CD2
DM1
DM2
AMFM
MUTE
VOL
VOL
MUTE BUTTON
• Press to mute the local speakers
• Lights red when source is muted
Lights yellow during "Do-not-disturb"
•
• Push for 5 seconds to switch
MDS-6A power off
• Push with VOL-DOWN to select
"Do-not-disturb" feature
AND SOURCE BUTTONS CAN BE CUSTOMIZED TO MATCH THE INSTALLATION
WHITE &
IVORY
BEZELS
CUT ANY NEW
BUTTONS TO USE
FROM THE HOLDERS
TAPE
VOLUME BUTTONS
• Press VOL-UP for louder local speakers
Press VOL-DOWN for quieter local speakers
•
4. CUSTOMIZE THE SOURCE BUTTONS 5. SET THE DIPSWITCH
SET THE DIPSWITCH TO ASSIGN THE CONTROLLER'S
SPEAKER ZONE NUMBER AND KEYPAD
BACKLIGHT OPTION
THE MCS-1A CONTROLLER'S SPEAKER ZONE
NUMBER MUST MATCH THE NUMBER OF THE MDS-6A
ZONE THAT THE CONTROLLER IS CONNECTED TO
WHEN THE CONTROLLER IS ASSIGNED TO A SPEAKER ZONE USING THE DIPSWITCHES AND
THE CONTROLLER IS PROPERLY WIRED AND PLUGGED INTO THE CORRESPONDING KEYPAD
ZONE, A GREEN LIGHT WILL APPEAR
SELECTED INDICATING THAT THE CONTROLLER HAS BEEN PROGRAMMED FOR THAT SPEAKER
ZONE. WHEN THERE ARE TWO CONTROLLERS PER SPEAKER ZONE, BOTH CONTROLLERS WILL
NEED TO HAVE THE SAME DIPSWITCH SETTINGS FOR THAT SPEAKER ZONE.
NOTE: DIPSWITCH #5 IS NOT USED
SQUEEZE BEZEL SIDES TO
1
REMOVE INNER BEZEL(S)
2
PLACE NEW BUTTONS
ON POSTS AND INSTALL
CHOSEN COLOR BEZEL
THE SOURCE BUTTONS AND BEZEL CAN
BE CHANGED TO SUIT THE INSTALLATION
ALTERNATE
SOURCE
BUTTONS
DIPSWITCH SETTINGS
1 2 3 4 5
ON ON ON OFF ZONE 1
OFF ON ON OFF ZONE 2
ON OFF ON OFF ZONE 3
OFF OFF ON OFF ZONE 4
OFF
ON
ON THE FRONT OF THE MDS-6A WHEN A SERVICE IS
ON ON OFF OFF ZONE 5
OFF ON OFF OFF ZONE 6
#1 ON TURNS KEYPAD BACKLIGHT OFF
#1 OFF TURNS KEYPAD BACKLIGHT ON
ZONE
Page 2
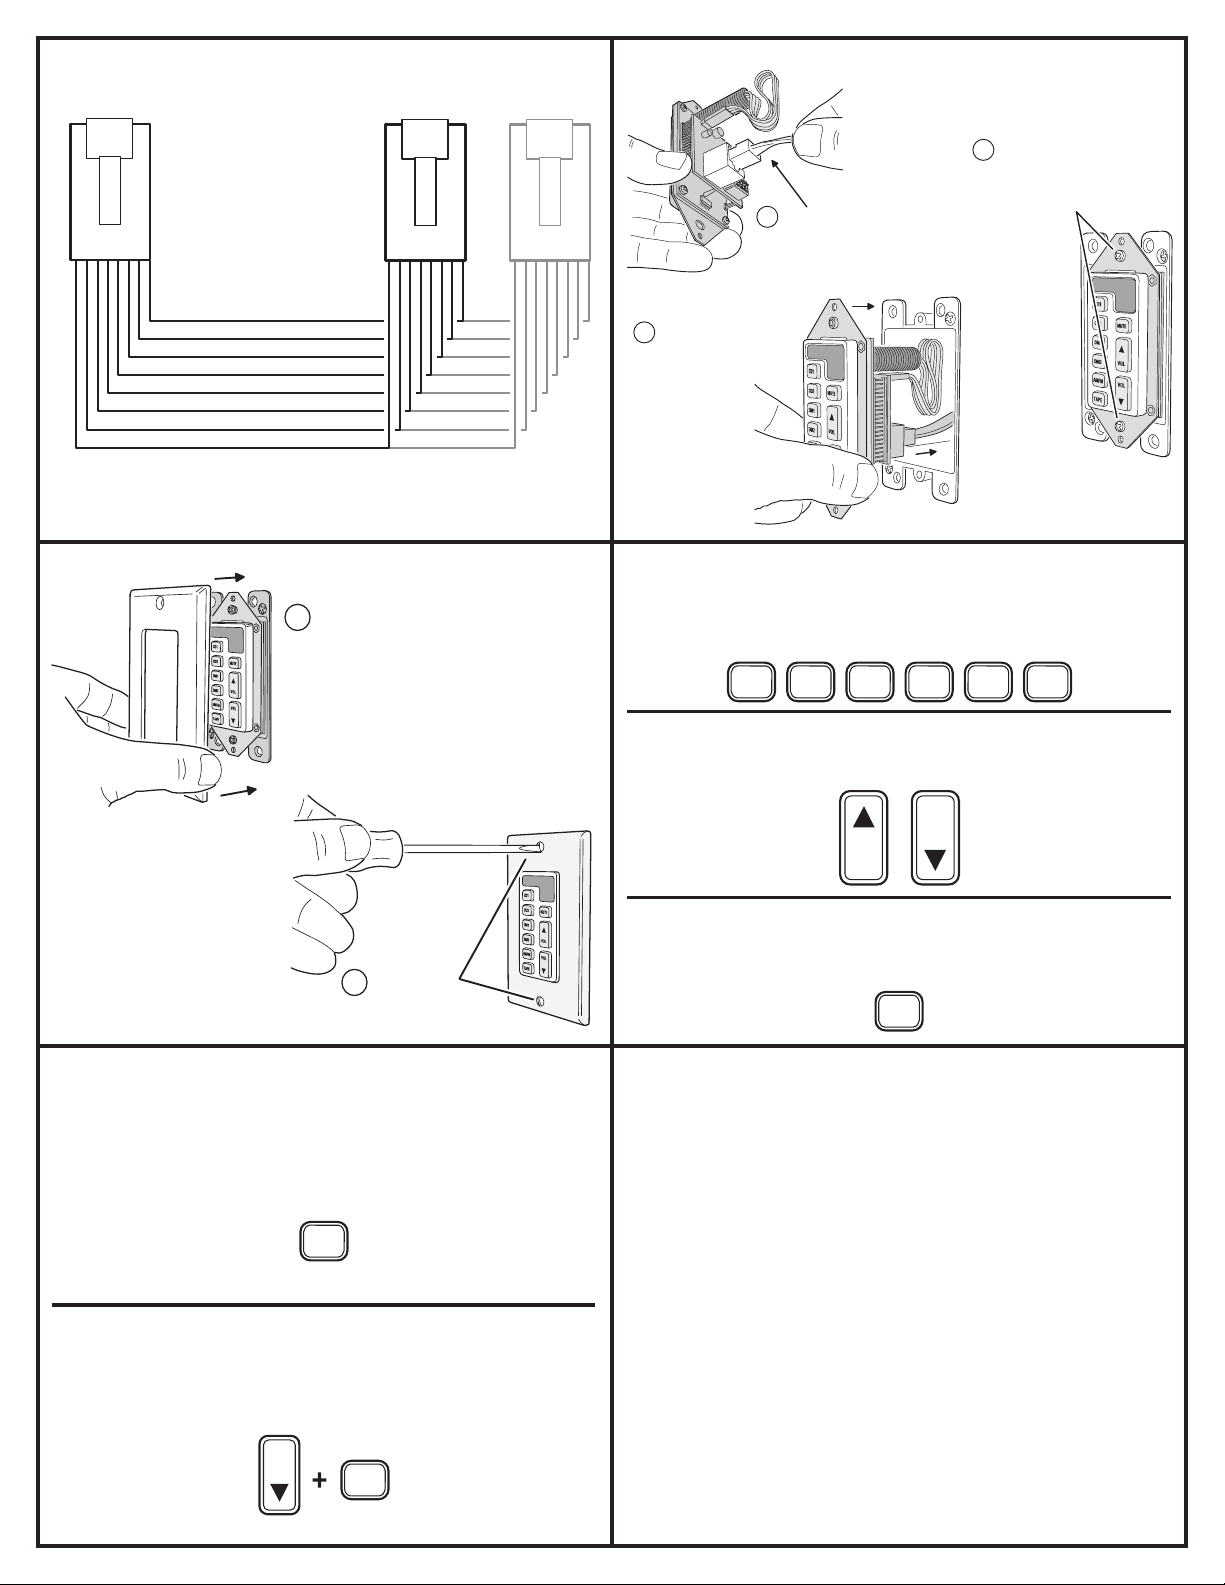
6. BUILD AND CONNECT THE CABLE 7. INSTALL THE CONTROLLER INTO A SINGLE-GANG JUNCTION BOX
TO PRIMARY
MCS-1A OR MCS-2A
PLUG
1234567
TO SECONDARY
CONTROLLER
CLIP
RJ-45
8
PLUG
1234567
2
SLIDE THE CONTROLLER
INTO THE JUNCTION BOX
1
CONNECT THE KEYPAD
END OF CABLE
3
SECURE CONTROLLER
TO JUNCTION BOX
WITH THE TWO SCREWS
TO MDS-6A
AMPLIFIER
CLIP
RJ-45
8
NOTE: UP TO TWO MCS-1A OR MCS-2A CONTROLLERS CAN BE CONNECTED IN PARALLEL TO THE SAME
AMPLIFIER ZONE (WIRE ANOTHER CONTROLLER PLUG TO THE SAME CABLE). WHEN ADDING A SECOND
CONTROLLER PER SPEAKER ZONE, FOLLOW THE SAME COLOR CODED CONNECTION FOR THE SECOND
CONTROLLER.
USE CAT-5 CABLE AND TWO RJ-45
PLUGS TO BUILD A STRAIGHT
THROUGH DOUBLE-ENDED RJ-45
CABLE
BE SURE TO CONNECT THE SAME PIN
NUMBERS TOGETHER BETWEEN EACH
PLUG: 1-1, 2-2, 3-3, 4-4, 5-5, 6-6, 7-7, 8-8
AS LONG AS BOTH RJ-45 PLUGS ARE
PLUG
WIRED IN THE SAME WIRING STANDARD
(T568A, T568B OR AS SHOWN IN THE
EXAMPLE) THE CONTROLLER WILL
1234567
OPERATE THE MDS-6A
MAXIMUM CABLE LENGTH RECOMMENDED
IS 500 FEET
BLUE
WHITE/BLUE
ORANGE
WHITE/ORANGE
GREEN
WHITE/GREEN
BROWN
WHITE/BROWN
MCS-1A OR MCS-2A
CONTROLLER
CLIP
RJ-45
8
8. INSTALL THE WALL PLATE 9. BASIC OPERATION
USING THE SOURCE BUTTONS
•
Press any source button to turn the MDS-6A power on if it's off
1
INSTALL A SINGLE-GANG DECORA™ WALL PLATE
(NOT INCLUDED) TO COVER THE CONTROLLER
•
Press a source button to select the desired audio source for this controller's
zone (the selected source button lights red)
CD1 CD2 DM1 DM2 AMFM TAPE
USING THE VOLUME BUTTONS
•
Press VOL-UP to increase the volume for this controller's speaker zone
•
Press VOL-DOWN to decrease the volume for this controller's speaker zone
USING THE MUTE BUTTON
•
Press MUTE to silence this controller's speaker zone (the MUTE button lights red)
Press MUTE again to return this zone's speakers to their previous volume
•
SECURE THE
2
WALL PLATE
WITH TWO SCREWS
• Push MUTE for 5 seconds to turn the MDS-6A power off
10. SPECIAL FEATURE OPERATION LIMITED WARRANTY
Linear LLC warrants this product to be free from defects in material and workmanship for 2 years. The time period
USING THE WHOLE-HOUSE-MUSIC FEATURE
•
Push a source button for 5 seconds to turn whole-house-music on or off
•
The selected whole-house-music source button lights yellow
•
The selected source will play through all system zones
CD1
USING THE DO-NOT-DISTURB FEATURE
Push and hold the VOL-DOWN button, then press the MUTE button to turn the do-not-disturb
•
feature on or off (the MUTE button lights yellow when on)
•
When do-not-disturb is on, the zone will not play whole-house-music or paging tones
VOL
MUTE
will be measured using the date code labeled on the product. Linear LLC is not responsible for damage to the product
resulting from the buyer’s improper handling, stocking or warehousing of the product. Any implied warranty arising
from the sale of the product including implied warranties of merchantability and fitness for purpose are limited.
Linear LLC shall not be responsible for any losses, damages or expenses, whether direct, consequential, or incidental
arising from the use or the inability to use the product. Some states and countries do not allow limitations or how
long an implied warranty lasts or the exclusion or limitation or incidental or consequential damages, so the above
exclusions may not apply. The Linear LLC warranty gives specific legal rights in addition to other rights, which may
exist and vary from state to state and country to country.
The warranty is limited to repair or replacement of products returned, freight prepaid, to Linear LLC, there is NO
PROVISION FOR LABOR COST OR OTHER REIMBURSEMENTS OF ANY KIND.
1. Failures due to product abuse, such as negligence, improper use, and electrical surge including damage from
lightning, water damage or other damage due to natural disasters are not covered by the warranty. The most
common form of product abuse is surge damage caused by lightning.
2. The warranty shall also be voided by any tampering with the date code, labels or other markings on the
product.
3. Products that are damaged in transit to Linear LLC due to improper packaging or by the carrier (shipping
company) will not be covered under the warranty. If the product was damaged or lost by the carrier, it is the
sender’s responsibility to create a claim against the carrier.
4. The user is responsible for all labor costs associated with removing, reinstalling and returning the product to
Linear LLC.
Linear LLC, at its option, will repair or replace the defective product. Replacements will be made from B-Stock, if
an exact replacement is not available, Linear LLC, at its option, will select the nearest equivalent product. The user
is responsible for freight charges to Linear LLC. Linear LLC will return warranted repaired or replacements by UPS
Ground or an equivalent service. A customer may pay the additional costs for second-day or next-day service.
All products returned for warranty service require a Return Product Authorization Number (RPA#). Contact Linear
Technical Services at 1-800-999-5225 for an RPA# and other important details.
VOL
VOL
MUTE
Copyright © 2010 Linear LLC 222109 D
 Loading...