

Page 1
KVM Extender Classic
User Manual English
Benutzerhandbuch Deutsch
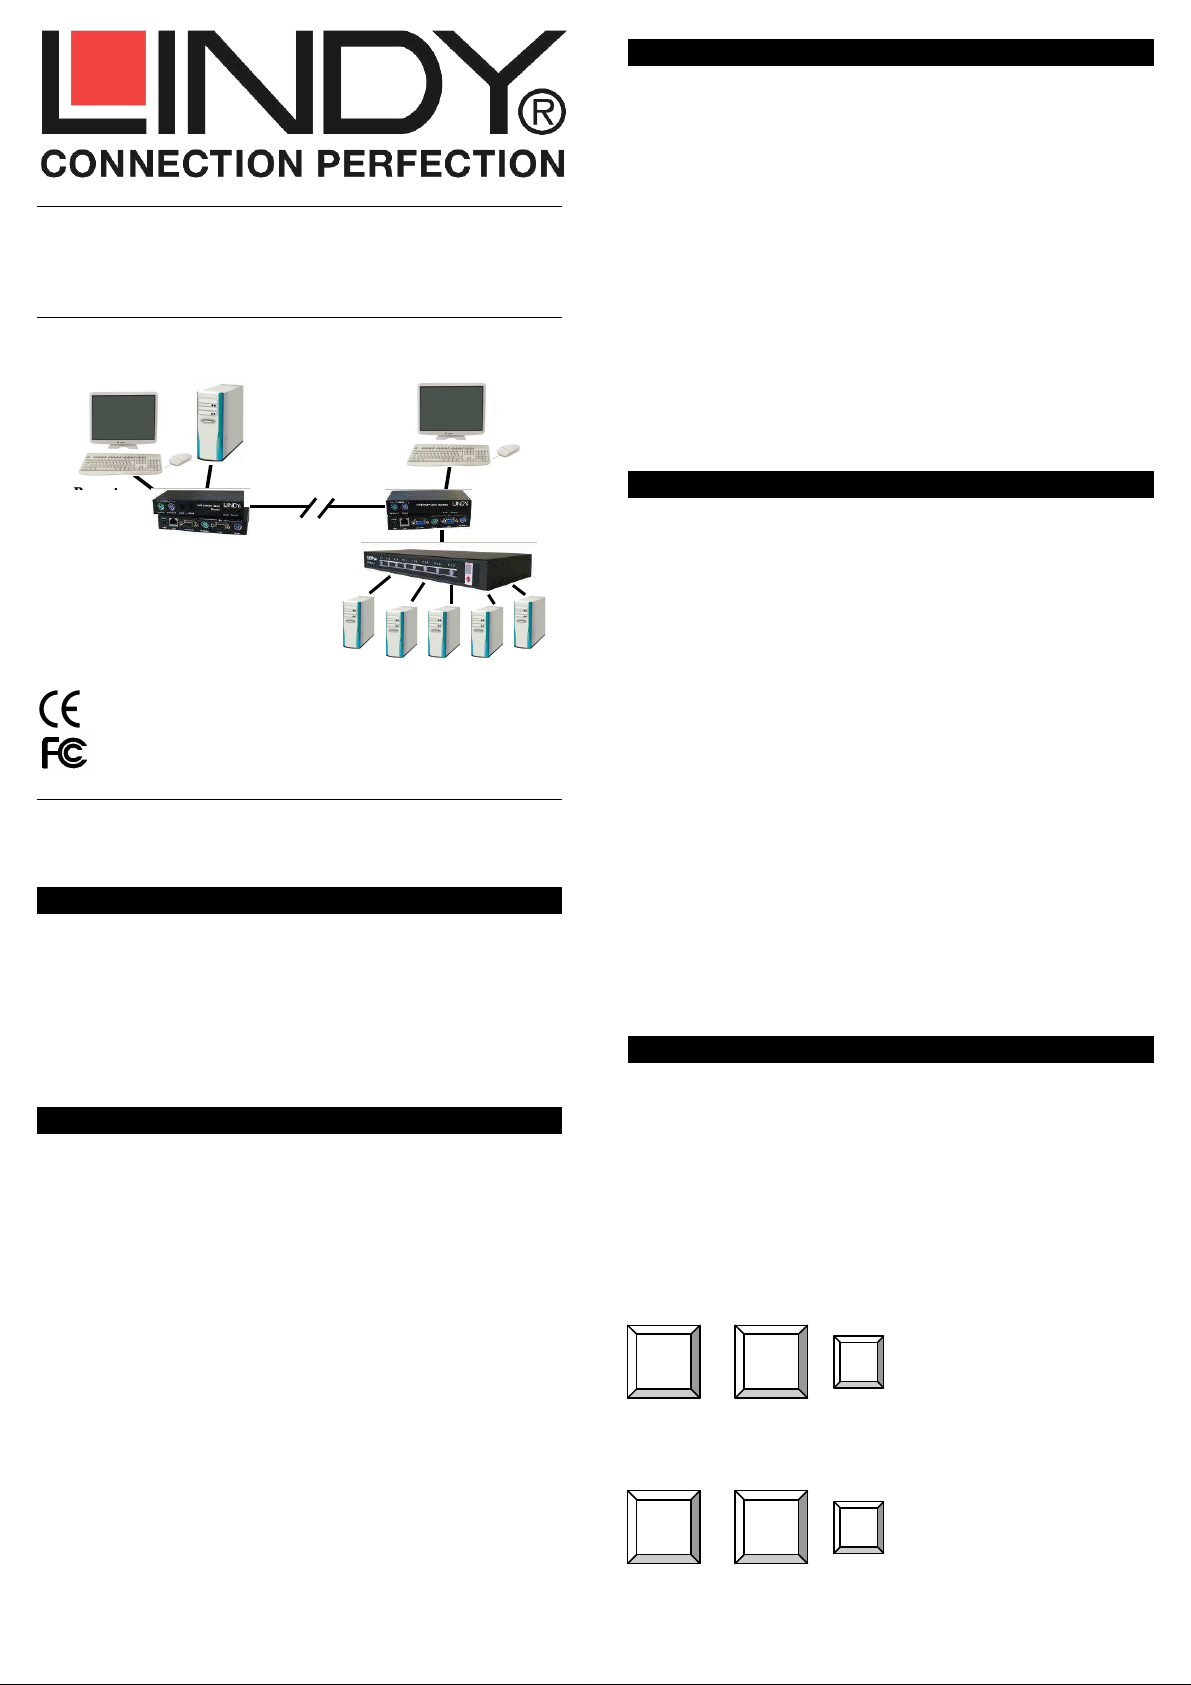
Remote
Operator’s PC
Remote Receiver
Up to 200m
LINDY No. 39397
Tested to Comply with FCC Standards
For Home and Office Use!
© LINDY ELECTRONICS LIMITED & LINDY-ELEKTRONIK GMBH - FIRST EDITION (NOVEMBER 2009)
www.lindy.com
Local
Console
Local
Transmitter
KVM Switch / or PC
Overview English
Thank you for purchasing the LINDY KVM Extender Classic. The KVM
Extender Classic allows you to control your PC, server or KVM switch
from a keyboard, mouse and monitor at a resolution of 1600 x 1200 or
1680 x 1050 at distances of up to approximately 200 metres (600 feet)
away using low cost CAT5 or higher cable. When using lower resolution
the distance may even be extended to 300m (450 feet).
The KVM Extender Classic consists of a Transmitter (Local) unit and a
Receiver (Remote) unit. The Transmitter connects to a computer or KVM
switch. The Receiver unit is located at a remote location and connects to
a keyboard, monitor and mouse console. The KVM Extender Classic
converts the VGA and PS/2 signals into a signal that can be transmitted
over inexpensive CAT5 Ethernet cable.
The KVM Extender Classic is ideal for network managers and system
administrators - a workstation can be connected to the Receiver unit
allowing the operator to work on his computer or remotely on the KVM
switch. Additionally, a local console can be connected to the Transmitter
unit for direct access to the KVM switch. Both local and remote consoles
can access the servers connected to the KVM switch simultaneously,
governed by a short timeout.
Features English
• Provides a real-time, convenient and secure method of remotely
locating PCs or servers without compromising convenience and control
• Distances of up to 300m supported between local and remote units
• Local Transmitter unit features a built-in KVM Switch - allowing local as
well as remote console access
• Remote Receiver unit features a built-in KVM Switch – allowing local
and remote access
• High-resolution video support: typically 1600x1200 or 1680x1050
• Adjustable VGA Gain and Focus tuning control to improve video quality
• Easy, user-friendly installation - no software required
Packaging Contents English
• Local Transmitter unit
• Remote Receiver unit
• 5V DC, ~1A Power Adapter (for the Remote Receiver unit)
• 2 x KVM combo cables to connect the server / KVM Switch to the
transmitter/receiver units
• This manual
Installation and Use English
For connecting the local and remote units Category 5/5e/6 UTP cable
provides the best results. Using higher quality shielded STP/FTP cable
will result in a degraded video signal and shorter transmission distances.
See www.lindy.com for our extensive range of appropriate cables.
Make sure all of your computers and peripherals are switched OFF
before proceeding with the installation.
Local Transmitter Unit, Model 39397 (PS/2 & VGA)
Connect your keyboard, mouse and monitor to the Console ports on the
Transmitter unit using one of the supplied 3-in-1 KVM cables. Connect
the ports labelled PC on the Transmitter unit to the keyboard, mouse and
video ports on your computer or the keyboard, video and mouse control
console ports on your KVM switch. Connect the CAT5/5e/6 network
cable to the RJ45 port.
Remote Receiver Unit, Model 39397 (PS/2 & VGA)
Connect your keyboard, mouse and monitor to the ports on the Remote
unit labelled Console. If you want to have access to the remote server /
KVM switch as well as to your workstation at your desk, use the other 3in-1 cable to connect the keyboard, video and mouse ports labelled PC to
the keyboard, video and mouse ports on your local workstation. Connect
the CAT5/5e/6 network cable to the RJ45 port. Connect the power supply
jack to the port on the Remote unit. Plug the power supply into the mains.
Powering up and checking the installation
Power on the PC connected to the Remote Receiver unit and then power
on the PC / KVM Switch installation connected to the Local Transmitter
unit.
Check the display quality at the Remote Receiver console. Rotate the
VGA GAIN and FOCUS controls to adjust the picture quality until you get
the best result.
Hotkey commands (Remote Receiver only)
Both consoles of the extender can have simultaneous access to the
connected server or KVM switch. Active keyboard and mouse access is
governed by a short timeout period.
When you access from the local console at the Transmitter unit you can
operate your KVM switch using its regular keyboard hotkeys. When you
use the remote console you have two additional hotkeys that allow you to
switch between your workstation and remote KVM access.
You can switch console control at the Remote Receiver unit from PC port
(connected workstation) to RJ45 port (the PC / KVM switch connected to
the Local Transmitter) using this simple hotkey command:
Scroll
+ + = Select PC or RJ45 Port
Lock
When switching, the appropriate LOCAL and REMOTE LED will light on
the Remote unit. You will also hear an audible confirmation. You can
enable and disable this audible beeper using this hotkey command:
Scroll
+ + = Beeper ON/OFF
Lock
Scroll
Lock
Scroll
Lock
X
B
Page 2
Einführung Deutsch
Dieser KVM-Extender erlaubt Ihnen Monitor-, Maus- und Tastatursignale
zu Ihrem PC oder KVM-Switch über günstiges Cat.5 Netzwerkkabel über
eine Entfernung bis zu 200m zu senden. Erhöhte VGA Auflösungen bis
1600x1200 bzw. 1680x1050 unterstützt er bis etwa 200m, bei niedrigen
Auflösungen können bis zu 300m erreicht werden.
Der KVM Extender Classic besteht aus einem Transmitter (Local Unit)
und einem Receiver (Remote Unit). Der Local Unit (Transmitter) wird am
fernzubedienenden PC oder KVM Switch angeschlossen, der Receiver
(Remote Unit) befindet sich (wie eine Fernbedienung: Remote Control)
beim User. Die beiden Units werden mit preiswertem Netzwerkkabel
Cat.5 oder höher verbunden.
Der KVM Extender Classic ist der ideale KVM-Extender für
Netzwerkadministratoren: An der lokalen Seite am KVM Switch erlaubt er
zusätzlich den Anschluss einer Arbeitskonsole mit Monitor, Maus und
Tastatur, z.B. für Wartungsarbeiten vor Ort. Beide Konsolen können
simultan arbeiten, der aktive Zugriff wird über einen kurzen Time-out
geteilt. Am Büroarbeitsplatz (Remote) erlaubt der Extender den
zusätzlichen Anschluss eines Arbeitsplatzrechners, so dass der
Administrator bei Bedarf vom Arbeitsplatzrechner jeder Zeit auf den
KVM-Switch im Serverraum umschalten kann.
Eigenschaften Deutsch
• Erlaubt den bequemen komfortablen Real Time Remote Zugriff auf
PCs, Server und KVM-Switches aus Distanzen bis 200m
• Unterstützt PS/2-Tastaturen und -Mäuse sowie VGA-Monitorsignale
• Dual Console Betrieb: Zugriff sowohl lokal als auch remote
• Option Arbeitsplatzrechner: Der Remote Unit am Arbeitsplatz enthält
einen KVM-Switch zum Umschalten zwischen Arbeitsplatzrechner
und Remote KVM-Zugriff
• Unterstütz hohe VGA Auflösungen, z.B.: 1600x1200 bis 200m
• Einstellbare VGA Verstärkung und Fokussierung
• Einfach zu bedienen und zu installieren - keine Softwareinstallation
Lieferumfang Deutsch
• Local Transmitter Unit
• Remote Receiver Unit
• Netzteil 5V DC, ~1A (zum Anschluss an Remote Receiver)
• Kurzes KVM Kabel zum Anschluss des Server / KVM Switch
• 1,5m KVM Kabel zum Anschluss des Arbeitsplatzrechners
• Diese Anleitung
Installation und Betrieb Deutsch
Verwenden Sie zur Verbindung von Transmitter und Receiver UTP Kabel
der Kategorie 5/5e/6 um die größten Distanzen und beste Bildqualität zu
erreichen. Die Verwendung abgeschirmter STP/FTP Kabel führt in der
Regel zu Nachteilen, geringeren Distanzen und schlechter Bildqualität.
Zur Installation schalten Sie alle Geräte und Computer aus.
Transmitter Unit, Modell 39397 (PS/2 & VGA)
Schließen Sie Tastatur, Maus und Monitor an die CONSOLE gelabelten
Ports am Transmitter an. Mit dem beiliegenden kürzeren 3in1 KVM
Kombikabel können Sie ihren PS oder KVM Switch an die PC gelabelten
Ports anschließen.
Schließen Sie das Cat.5/5e/6 Verbindungskabel an die RJ45 Buchse an.
Remote Receiver Unit, Modell 39397 (PS/2 & VGA)
Schließen Sie Tastatur, Maus und Monitor ihres Arbeitsplatzes an die
CONSOLE gelabelten Ports am Receiver an. Verwenden Sie zum
Anschluss Ihres Arbeitsplatzrechners an die PC gelabelten Ports das
beiliegende längere 3in1 KVM Kombikabel.
Schließen Sie das Cat.5/5e/6 Verbindungskabel an die RJ45 Buchse an.
Schließen Sie das Netzteil am Receiver an.
Einschalten und Inbetriebnahme der Installation
Schalten Sie den Arbeitsplatzrechner und den Monitor ein. Schalten Sie
als nächstes alle am Transmitter angeschlossenen Geräte ein.
Prüfen Sie die Bildqualität und regeln Sie sie gegebenenfalls mit den
Reglern für GAIN und FOCUS am Receiver nach.
Betrieb Deutsch
Es kann sowohl von der Konsole am Local Transmitter wie auch von der
Remote Konsole gleichzeitig auf den ferngesteuerten Rechner / KVM
Switch zugegriffen werden. Der aktive Zugriff wird über einen kurzen
Timeout gesteuert zwischen den beiden Konsolen automatisch
umgeschaltet.
Von der Konsole am KVM Switch können Sie auf die bekannte Art wie
auch vor der Installation des Extenders zugreifen. Vom entfernten
Arbeitsplatz aus haben Sie jetzt zwei zusätzliche Tastatur-HotkeyKommandos zur Verfügung
Rollen
+ + = Umschalten zwischen PC oder
Taste
RJ45 Port (Fernzugriff)
Rollen
Taste
X
Wenn auf den Arbeitsplatzrechner zugegriffen wird, leuchtet am Receiver
die Local LED, wenn auf den ferngesteuerten Rechner/KVM Switch
zugegriffen wird leuchtet die Remote LED.
Beim Umschalten ertönt ein Signalton. Dieser kann bei Bedarf mit dem
folgenden Hotkey aus-/eingeschaltet werden.
Rollen
+ + = Beeper ON/OFF
Taste
Rollen
Taste
B
LINDY Herstellergarantie Deutsch
LINDY gewährt für dieses Produkt über die gesetzliche Regelung hinaus
eine zweijährige Herstellergarantie ab Kaufdatum. Die detaillierten
Bedingungen dieser Garantie finden Sie auf der LINDY Website
aufgelistet bei den AGBs.
FCC Statement
FCC Warning
This device complies with part 15 of the FCC Rules. Operation is subject to the following
two conditions:
1. This device may not cause harmful interference, and
2. This device must accept any interference received, including interference that may
cause undesired operation.
Recycling Information
WEEE (Waste of Electrical and Electronic Equipment),
Recycling of Electronic Products
United Kingdom
In 2006 the European Union introduced regulations (WEEE) for the collection and
recycling of all waste electrical and electronic equipment. It is no longer permitted to
simply throw away electrical and electronic equipment. Instead, these products must enter
an environmentally friendly recycling process.
Each individual EU member state has implemented the WEEE regulations into national
law in slightly different ways. Please follow your national law when you want to dispose of
any electrical or electronic products. More details can be obtained from your national
WEEE recycling agency.
Deutschland
Die EU hat mit der WEEE Direktive Regelungen für die Verschrottung und das Recycling
von Elektro- und Elektronikprodukten geschaffen. Diese wurden im Elektro- und
Elektronikgerätegesetz – ElektroG in deutsches Recht umgesetzt. Dieses Gesetz
verbietet das Entsorgen von entsprechenden, auch alten, Elektro- und Elektronikgeräten
über die Hausmülltonne! Führen Sie Ihre alten Geräte den lokalen Sammelsystemen oder
örtlichen Sammelstellen zu! Dort werden sie kostenlos entgegen genommen. Die Kosten
für den weiteren Recyclingprozess sowie die optimierte umweltgerechte Wiederverwendung der Rohstoffe übernimmt die Gesamtheit der Gerätehersteller.
LINDY No. 39397
www.lindy.com
1st Edition November 2009
 Loading...