

Page 1

2 / 4 Port DVI / DisplayPort / HDMI
USB & Audio Desktop KVM Switch
User Manual English
Benutzerhandbuch Deutsch
Manuel Utilisateur Français
Manuale Italiano
39336 2 Port DVI-I Single Link, USB 2.0 & Audio KVM Switch
39337 4 Port DVI-I Single Link, USB 2.0 & Audio KVM Switch
39338 2 Port DVI-I Dual Link, USB 2.0 & Audio KVM Switch
39339 4 Port DVI-I Dual Link, USB 2.0 & Audio KVM Switch
39300 2 Port DVI-I Single Link, USB 2.0 & Audio Dual Head
KVM Switch
39301 4 Port DVI-I Single Link, USB 2.0 & Audio Dual Head KVM
Switch
39302 2 Port DVI-I Dual Link, USB 2.0 & Audio Dual Head KVM
Switch
39303 4 Port DVI-I Dual Link, USB 2.0 & Audio Dual Head KVM
Switch
39304 2 Port DisplayPort 1.2, USB 2.0 & Audio KVM Switch
39305 4 Port DisplayPort 1.2, USB 2.0 & Audio KVM Switch
39311 2 Port HDMI 10.2G, USB 3.0 & Audio KVM Switch
lindy.com
© LINDY Group - FOURTH EDITION (February 2021)
Page 2

© LINDY Group - FOURTH EDITION (February 2021)
Page 3
User Manual English
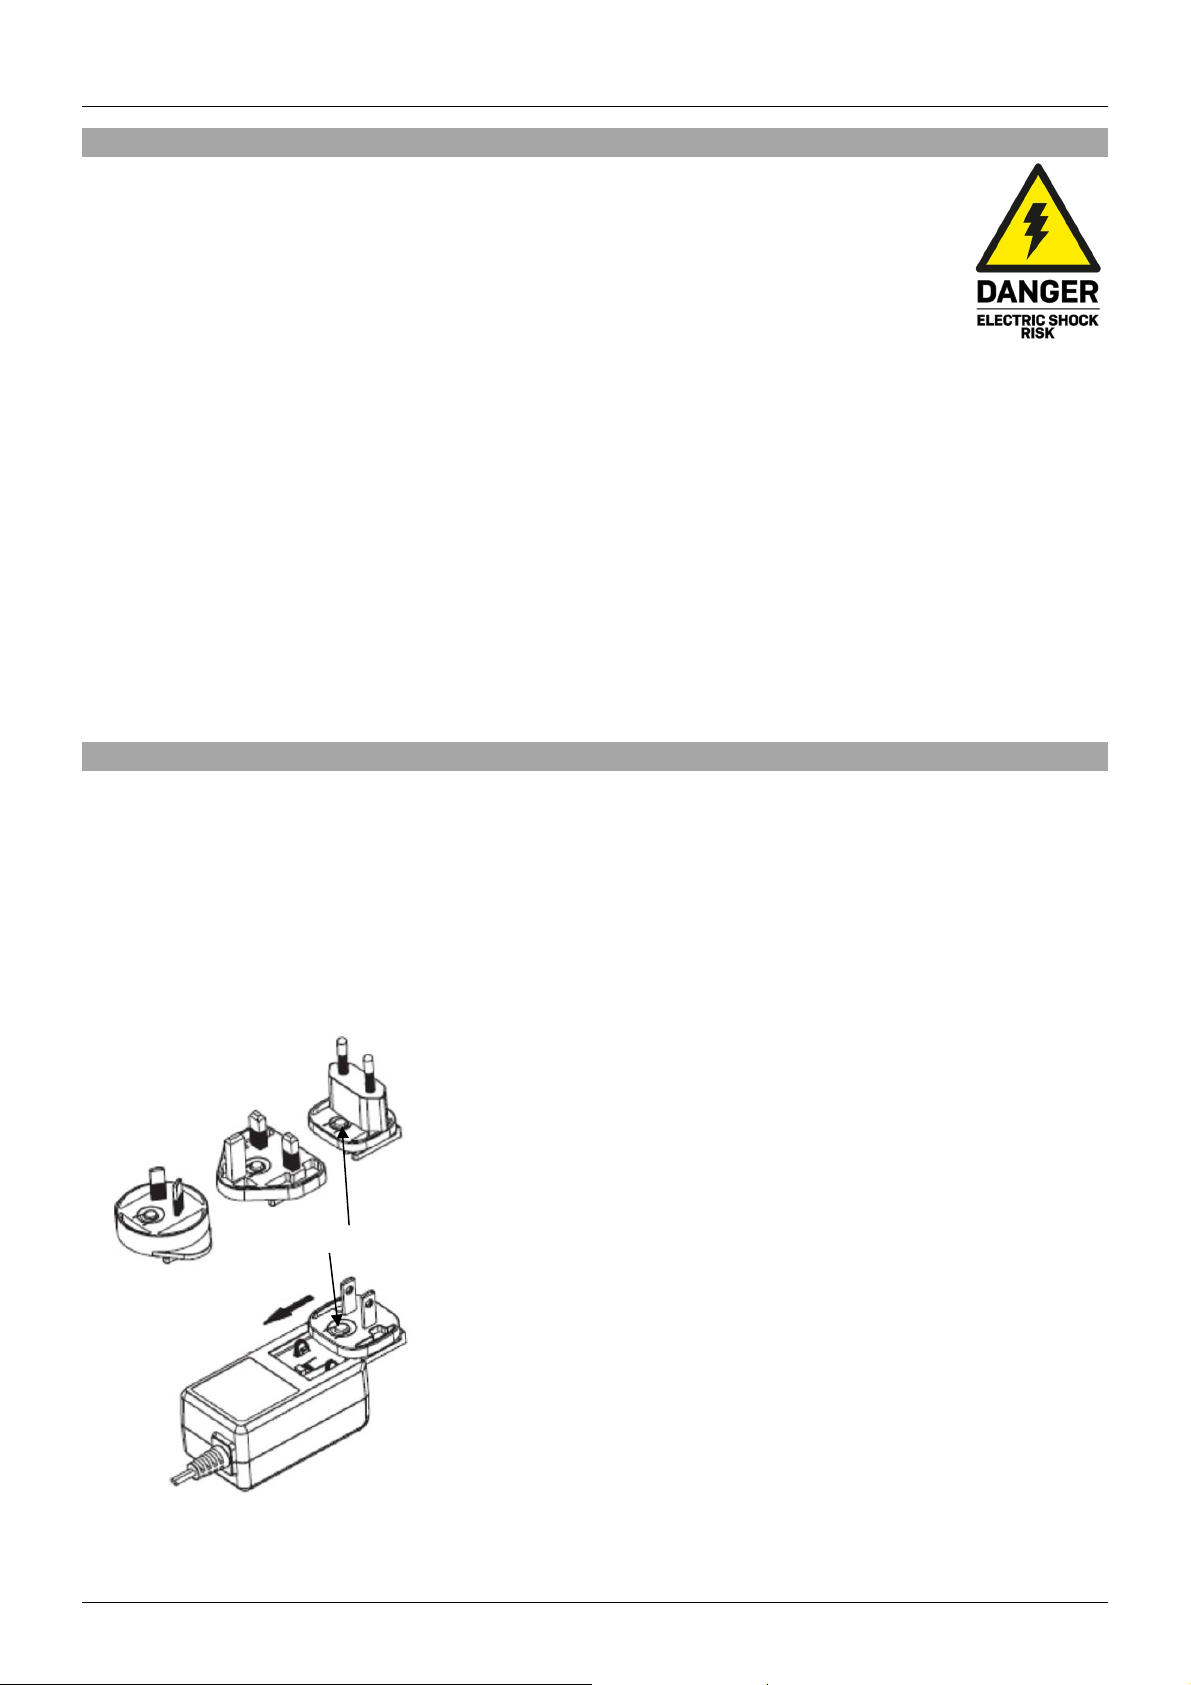
Locking button
Introduction
! WARNING !
Please read the following safety information carefully and always keep this document with
the product.
Failure to follow these precautions can result in serious injuries or death from electric
shock, fire or damage to the product.
Touching the internal components or a damaged cable may cause electric shock, which
may result in death.
This device is a switching type power supply and can work with supply voltages in the range 100 - 240
VAC For worldwide usability four different AC adapters are enclosed: Euro type, UK type, US/Japan type
and Australia/New Zealand type. Use the appropriate AC adapter as shown in the picture and ensure it
is firmly secured in place and does not detach by pulling before installing into a power socket.
To reduce risk of fire, electric shocks or damage:
Do not open the product nor its power supply. There are no user serviceable parts inside.
Only qualified servicing personnel may carry out any repairs or maintenance.
Never use damaged cables.
Do not expose the product to water or places of moisture.
Do not use this product outdoors it is intended for indoor use only.
Do not place the product near direct heat sources. Always place it in a well-ventilated place.
Do not place heavy items on the product or the cables.
Please ensure any adapters are firmly secured and locked in place before inserting into a wall socket
Instructions for Use of Power Supply
Insert the required plug into the adapter from the front. The plugs are keyed to avoid incorrect insertion.
Push the adapter firmly towards the back and allow the latch on the plug to lock into place. Before use
make sure the plug is locked firmly in place and does not slide out without pushing the locking button
down.
To remove and exchange the plug, push the locking button down and slide the plug towards the front.
Never insert the plug separately into a mains socket!
Make sure the plug is locked firmly before use.
Page 4

User Manual English
Introduction
Thank you for purchasing the 2 / 4 Port DVI / DisplayPort / HDMI USB & Audio Desktop KVM Switch. This
product has been designed to provide trouble free, reliable operation. It benefits from both a LINDY 2-year
warranty and free lifetime technical support. To ensure correct use, please read this manual carefully and
retain it for future reference.
It allows several USB equipped computers to be connected and controlled from a single keyboard, monitor
and mouse, thereby reducing hardware costs, maximising desk space and providing advanced features.
Package Contents
KVM Switch
Multi-country Power Supply (UK, EU, US & AUS), Barrel Size: 5.5/2.1mm DC Jack
This Manual
Features & Specification
Simple switching of video and USB devices via push buttons & keyboard hot keys
Supports USB mice and keyboards as well as USB 2.0 or USB 3.0/2.0 (depending on model) device
sharing among the connected computers
The audio output ports allow users to connect headphones or speakers to add immersive 2CH audio
and a microphone which can be configured to exclude audio switching for uninterrupted listening
DVI-I versions support both analogue and digital signals using DVI to VGA adapters or splitter cables
(switches do not convert the video signal)
Metal housing
39336: Console Interfaces: DVI-I (Female), 2 x USB 2.0 HID Type A (Female), 2 x USB 2.0 Type A
(Female), 2 x 3.5mm (Female).
PC/Server Interfaces: 2 x DVI-I (Female), USB 2.0 Type B (Female), 2 x 3.5mm (Female)
Supports DVI resolutions up to 1920x1200@60Hz (VGA: 2048x1536@60Hz).
39337: Console Interfaces: DVI-I (Female), 2 x USB 2.0 HID Type A (Female), 2 x USB 2.0 Type A
(Female), 2 x 3.5mm (Female).
PC/Server Interfaces: 4 x DVI-I (Female), USB 2.0 Type B (Female), 2 x 3.5mm (Female).
Supports DVI resolutions up to 1920x1200@60Hz (VGA: 2048x1536@60Hz).
39338: Console Interfaces: DVI-I (Female), 2 x USB 2.0 HID Type A (Female), 2 x USB 2.0 Type A
(Female), 2 x 3.5mm (Female).
PC/Server Interfaces: 2 x DVI-I (Female), USB 2.0 Type B (Female), 2 x 3.5mm (Female).
Supports DVI resolutions up to 2560x1600@60Hz (VGA: 2048x1536@60Hz).
39339: Console Interfaces: DVI-I (Female), 2 x USB 2.0 HID Type A (Female), 2 x USB 2.0 Type A
(Female), 2 x 3.5mm (Female).
PC/Server Interfaces: 4 x DVI-I (Female), USB 2.0 Type B (Female), 2 x 3.5mm (Female).
Supports DVI resolutions up to 2560x1600@60Hz (VGA: 2048x1536@60Hz).
39300: Console Interfaces: DVI-I Dual Head (Female), 2 x USB 2.0 HID Type A (Female), 2 x USB 2.0
Type A (Female), 2 x 3.5mm (Female).
PC/Server Interfaces: 2 x DVI-I Dual Head (Female), USB 2.0 Type B (Female), 2 x 3.5mm (Female).
Supports DVI resolutions up to 1920x1200@60Hz (VGA: 2048x1536@60Hz).
Page 5

User Manual English
39301: Console Interfaces: DVI-I Dual Head (Female), 2 x USB 2.0 HID Type A (Female), 2 x USB 2.0
Type A (Female), 2 x 3.5mm (Female).
PC/Server Interfaces: 4 x DVI-I Dual Head (Female), USB 2.0 Type B (Female), 2 x 3.5mm (Female).
Supports DVI resolutions up to 1920x1200@60Hz (VGA: 2048x1536@60Hz).
39302: Console Interfaces: DVI-I Dual Head (Female), 2 x USB 2.0 HID Type A (Female), 2 x USB 2.0
Type A (Female), 2 x 3.5mm (Female).
PC/Server Interfaces: 2 x DVI-I Dual Head (Female), USB 2.0 Type B (Female), 2 x 3.5mm (Female).
Supports DVI resolutions up to 2560x1600@60Hz (VGA: 2048x1536@60Hz).
39303: Console Interfaces: DVI-I Dual Head (Female), 2 x USB 2.0 HID Type A (Female), 2 x USB 2.0
Type A (Female), 2 x 3.5mm (Female).
PC/Server Interfaces: 4 x DVI-I Dual Head (Female), USB 2.0 Type B (Female), 2 x 3.5mm (Female).
Supports DVI resolutions up to 2560x1600@60Hz (VGA: 2048x1536@60Hz).
39304: Console Interfaces: DisplayPort (Female), 2 x USB 2.0 HID Type A (Female), 2 x USB 2.0 Type
A (Female), 2 x 3.5mm (Female).
PC/Server Interfaces: 2 x DisplayPort (Female), USB 2.0 Type B (Female), 2 x 3.5mm (Female).
Supports resolutions up to 3840x2160@60Hz, MST hubs are not supported.
39305: Console Interfaces: DisplayPort (Female), 2 x USB 2.0 HID Type A (Female), 2 x USB 2.0 Type
A (Female), 2 x 3.5mm (Female).
PC/Server Interfaces: 4 x DisplayPort (Female), USB 2.0 Type B (Female), 2 x 3.5mm (Female).
Supports resolutions up to 3840x2160@60Hz, MST hubs are not supported.
39311: Console Interfaces: HDMI (Female), 2 x USB 2.0 HID Type A (Female), 2 x USB 3.0 Type A
(Female), 2 x 3.5mm (Female).
PC/Server Interfaces: 4 x HDMI (Female), USB 3.0 Type B (Female), 2 x 3.5mm (Female).
Supports resolutions up to 4096x2160@60Hz 4:2:0 8 Bit.
Installation
Before starting the installation, please ensure that all devices are powered off.
1. Connect the keyboard and mouse to the Console USB ports and the display to the Console video
port on the rear panel. Connect the speakers and microphone to the Console 3.5mm audio ports
if required.
2. Connect the sources to the PC ports on the rear panel with USB Type A to B, DVI / DisplayPort /
HDMI and 3.5mm audio cables (not included).
3. Once all connections are made please power on all devices.
Operation
This KVM switch features two methods of switching between sources: push button & hotkeys.
Front Panel Push Button
Press the Select button on the front panel for manual switching. During the switching process a white
LED behind the switch button will flash. The LED will remain on when switching is completed and the
connections are established. Depending on the configuration, only the KVM ports (USB keyboard,
mouse and monitor) or KVM + USB Hub and/or Audio ports are switched.
Page 6
User Manual English
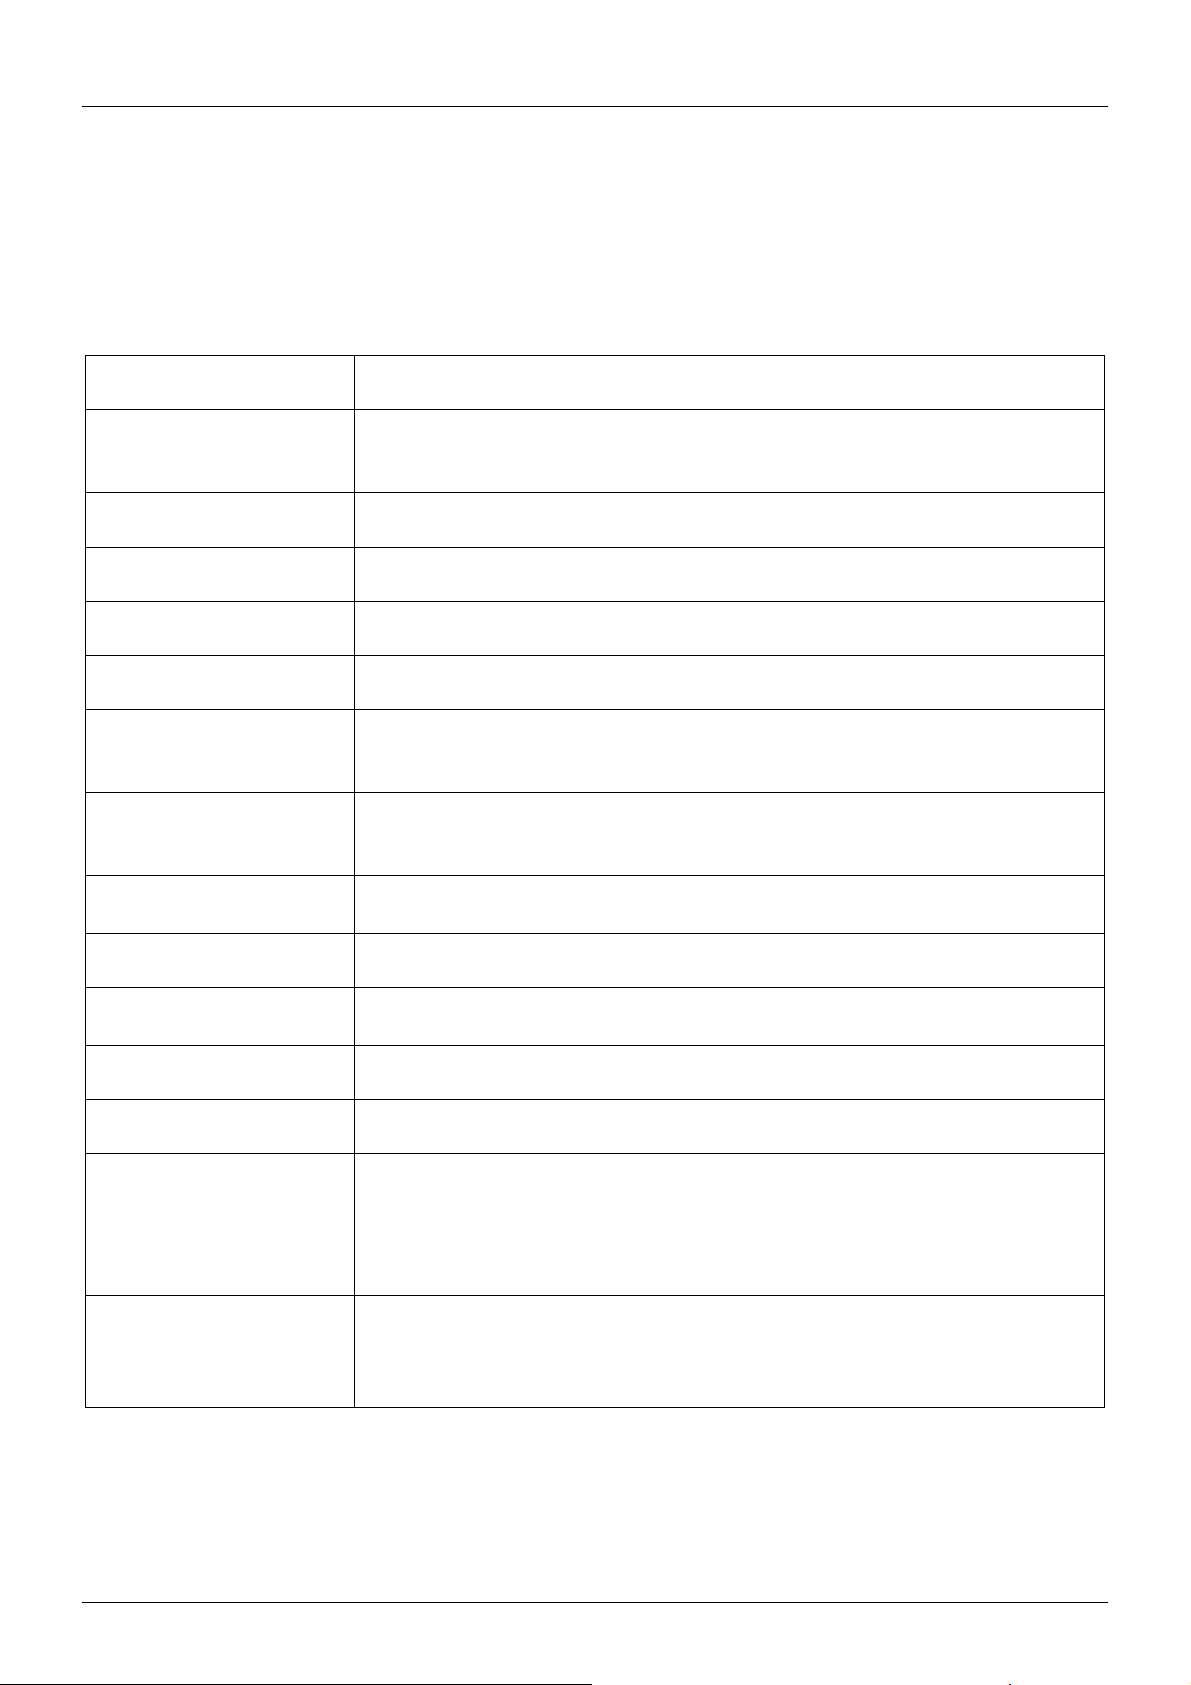
Hotkey
Function
Leading code + “1”, “2”,
Computer port selection 1, 2, 3 or 4.
Leading code + “Z” (or Y)
Bind KVM & Hub switching (Default, Z for QWERTY kb!).
Leading code + “X”
Unbind KVM & Hub switching.
Leading code + “Q”
Bind KVM & Audio switching (Default).
Leading code + “W”
Unbind KVM & Audio switching.
Leading code + “F1”,
Switch USB Hub to port 1, 2, 3 or 4.
Leading code + “F5”,
Switch Audio devices to port 1, 2, 3 or 4.
Leading code ↓
Switch one port down.
Leading code ↑
Switch one port up.
Leading code + ←
Switch to the previous port.
Leading code + “B”
Switch on/off beep signal.
Leading code + “S”
Start Autoscan. Press any button to stop Autoscan.
Leading code + “S” + (z)
Start Autoscan and set up scan delay withing a range of 10~100 sec.:
Leading code + “H” +
Change leading code to “Num Lock”, “Caps Lock”, “F12” or “Esc”*.
To learn more about these features, please refer to the keyboard hotkey switching options below. The
white (or green) port LEDs refer to the KVM section status, the red port LEDs refer to the USB hub
selection status and shows the port/computer currently selected.
Keyboard Hotkeys
Hotkey commands can be activated pressing leading code “Scroll Lock” + “Scroll Lock”* within 2
seconds.
“3” or “4”
“F2”, “F3”, “F4”
“F6”, “F7”, “F8”
z= 0~9
1= 10”; 2= 20”; 3= 30”; 4= 40”; 5= 50”; 6= 60”; 7= 70”; 8=80”; 9= 90”;
0=100”.
Press any button to stop Autoscan.
“Num Lock”, “Caps
Lock”, “F12” or “Esc”*
*: To change the universal hotkey from the front push buttons please press the highest port button until
you hear two short beeps. Then press the chosen new hotkey on your keyboard, the KVM switch will
confirm this by a short beep and the hotkey is permanently changed.
Page 7

User Manual English
Troubleshooting
Please check that all monitor and USB cable connections are firmly connected to ensure correct
operation of the KVM switch.
No video displayed:
If the KVM Switch reacts to the universal hotkey with a beep signal, but no monitor picture is displayed,
please check if the currently selected computer is in sleep mode or powered down.
Please use high quality video cables as short as possible and for HDMI and DP not longer than 2m.
The KVM Switch should be the same video interface as the monitor (and the graphics card). Using
different interfaces and adapter cables may cause unpredictable incompatibilities.
HDMI monitors on DVI KVM Switches: HDMI monitors provide EDID information to the computer
allowing the graphics card to output higher resolution and colour mode/depth signals than supported
by the DVI-D KVM Switch. The KVM Switch cannot support these signals and will not show any picture
unless the graphics card signal gets restricted to DVI-D compatible signals, max. 1920x1200@60Hz
RGB.
DP KVM Switch: When using highest resolutions like 4K @ 60Hz only short 1m high quality DP
cables can be used for reliable operation on powerful graphics cards. DP++ passive protocol
converters may be supported using max. 1m length monitor cables. Active protocol converters and
MST Hubs are not supported.
USB problems:
Do not switch ports or use the keyboard and mouse until USB driver installations are complete (if
required by PCs OS).
Connect the keyboard and mouse or device directly to the computer and check the status of the
installed drivers. Once drivers are installed the devices also should work when connected to the KVM
switch.
The maximum distance supported by USB 2.0 is 5m, 3m for USB 3.0. If a longer distance is required,
please use a USB Active Extension cable.
Page 8
Benutzerhandbuch Deutsch
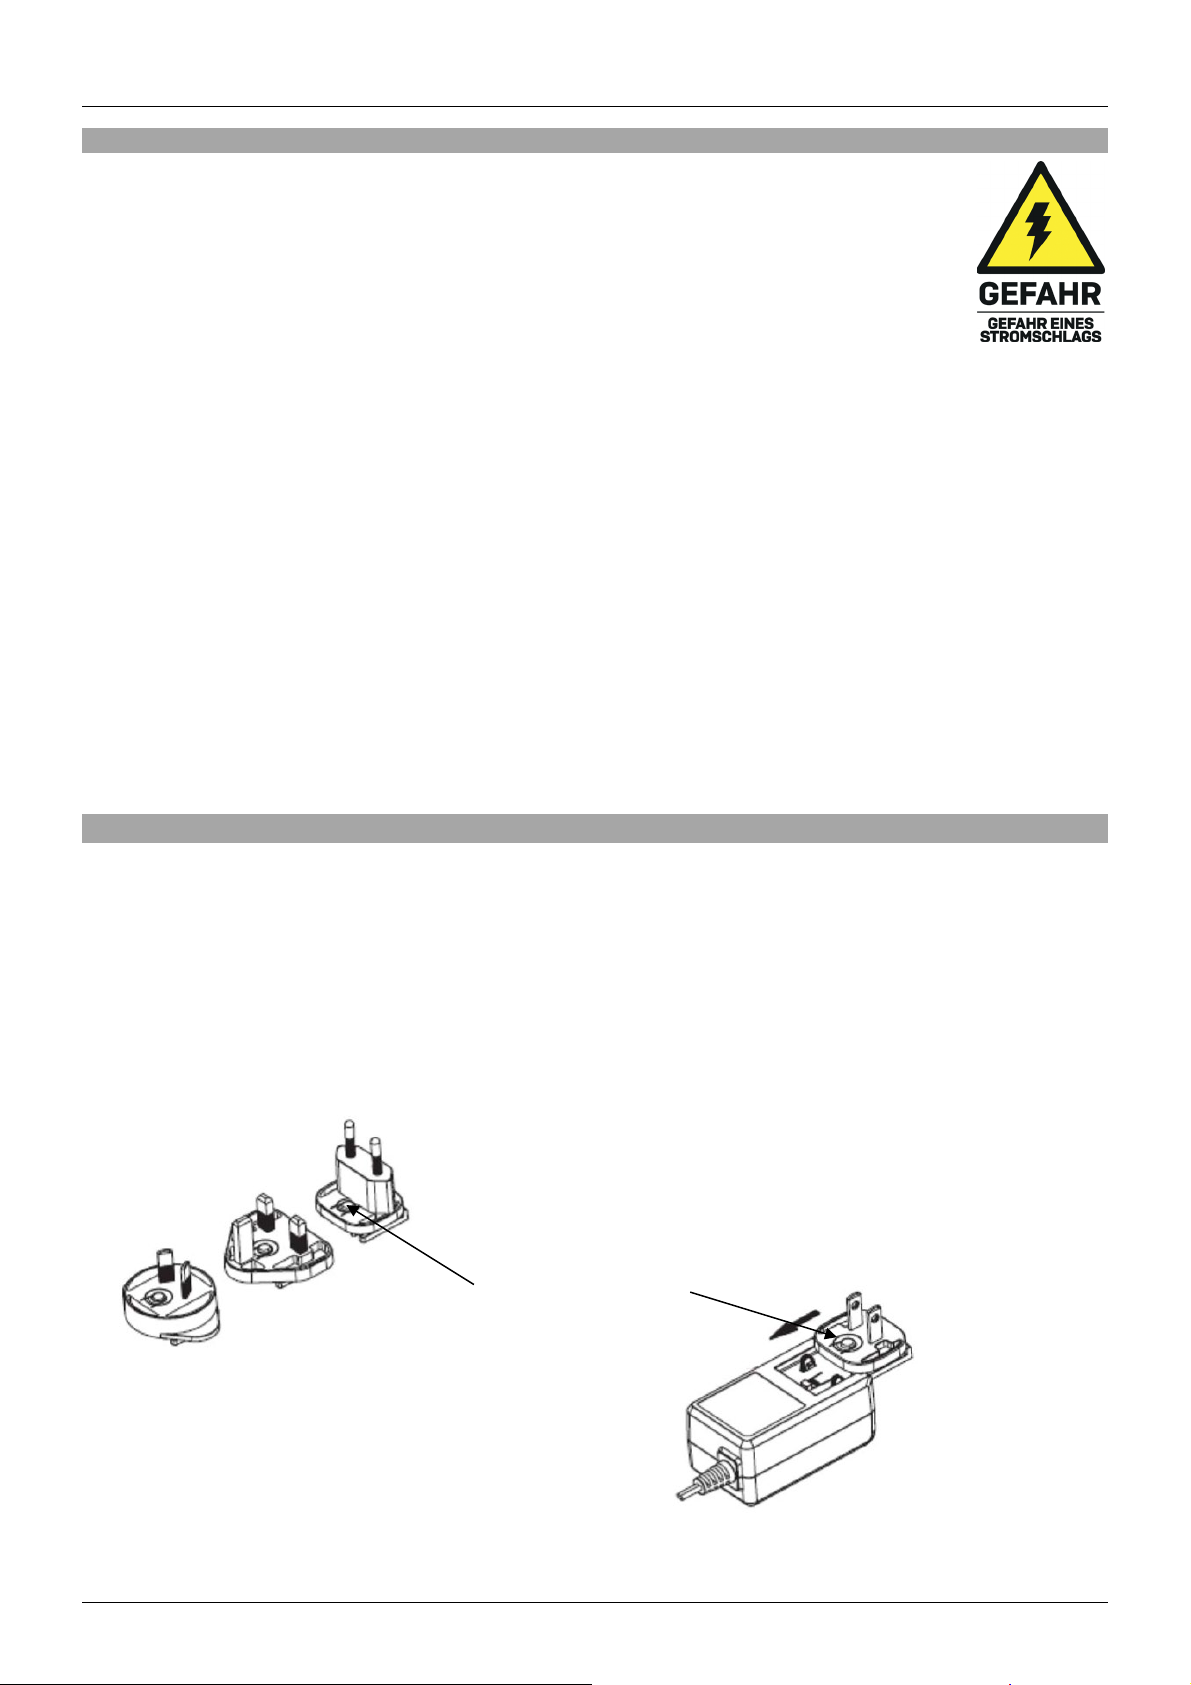
Verriegelungsknopf
Sicherheitshinweise
! GEFAHR !
Bitte lesen Sie die folgenden Sicherheitshinweise sorgfältig durch und bewahren Sie
dieses Dokument immer zusammen mit dem Produkt auf.
Die Nichtbeachtung dieser Vorsichtsmaßnahmen kann zu schweren Verletzungen oder
zum Tod durch Stromschlag, Feuer oder Schäden am Produkt führen.
Das Berühren der internen Komponenten oder eines beschädigten Kabels kann einen
elektrischen Schlag verursachen, der zum Tod führen kann.
Dieses Schaltnetzteil arbeitet mit Anschlussspannungen im Bereich von 100 - 240 VAC. Für weltweiten
Einsatz sind vier verschiedene AC-Adapter für Europa, Großbritannien, USA/Japan und
Australien/Neuseeland enthalten. Verwenden Sie den geeigneten Adapter wie es die Abbildung zeigt.
Stellen Sie bitte sicher, dass der Adapter fest eingerastet ist und sich nicht abziehen lässt, bevor Sie ihn
in die Steckdose stecken.
Um die Gefahr von Bränden, Stromschlägen oder Schäden zu verringern:
Öffnen Sie weder das Produkt noch sein Netzteil. Es befinden sich keine vom Benutzer zu
wartenden Teile im Inneren.
Ausschließlich qualifiziertes Personal darf Reparaturen oder Wartungen durchführen.
Verwenden Sie niemals beschädigte Kabel.
Setzen Sie das Produkt nicht Wasser oder Feuchtigkeit aus.
Dieses Produkt ist nur für den Gebrauch in geschlossenen Räumen bestimmt.
Stellen Sie das Produkt nicht in der Nähe von direkten Wärmequellen auf. Stellen Sie es immer an
einem gut belüfteten Ort auf.
Stellen Sie keine schweren Gegenstände auf das Produkt oder die Kabel.
Bitte stellen Sie vor der Verwendung sicher, dass alle Adapter sicher und fest eingerastet sind
Anwendungshinweise für das Netzteil
Stecken Sie den gewünschten Stecker von vorne in den Adapter. Die Stecker sind kodiert, um ein
falsches Einstecken zu vermeiden. Drücken Sie den Adapter fest nach hinten und lassen Sie die
Verriegelung des Steckers einrasten. Vergewissern Sie sich vor der Verwendung, dass der Stecker fest
eingerastet ist und nicht herausrutscht, ohne den Verriegelungsknopf nach unten zu drücken.
Zum Entfernen und Austauschen des Steckers drücken Sie den Verriegelungsknopf nach unten und
schieben den Stecker nach vorne.
Stecken Sie den Stecker niemals separat in eine Netzsteckdose!
Vergewissern Sie sich vor der Verwendung, dass der Stecker fest verriegelt ist.
Page 9

Benutzerhandbuch Deutsch
Einführung
Wir freuen uns, dass Ihre Wahl auf ein LINDY-Produkt gefallen ist und danken Ihnen für Ihr Vertrauen.
Sie können sich jederzeit auf unsere Produkte und einen guten Service verlassen. Dieser 2 / 4 Port DVI /
DisplayPort / HDMI USB & Audio Desktop KVM Switch unterliegt einer 2-Jahres LINDY
Herstellergarantie und lebenslangem kostenlosen technischen Support. Bitte lesen Sie diese Anleitung
sorgfältig und bewahren Sie sie auf.
Er ermöglicht den Anschluss und die Steuerung mehrerer mit USB ausgestatteter Computer über eine
einzige Tastatur, einen einzigen Monitor und eine einzige Maus, wodurch die Hardwarekosten gesenkt,
der Platz auf dem Schreibtisch maximiert und erweiterte Funktionen bereitgestellt werden.
Lieferumfang
KVM Switch
Eco-Weitbereichsnetzteil mit Steckervorsätzen (für Euro, UK, US und AUS)
Dieses Handbuch
Eigenschaften & Spezifikationen
Einfaches Umschalten von Video- und USB-Geräten über Drucktasten & Tastatur-Hotkeys
Unterstützt USB-Mäuse und -Tastaturen sowie die gemeinsame Nutzung von USB 2.0- oder USB
3.0/2.0-Geräten (je nach Modell) durch die angeschlossenen Computer
Die Audioausgänge ermöglichen den Anschluss von Kopfhörern oder Lautsprechern für immersiven 2
Kanal-Klang und eines Mikrofons, dass so konfiguriert werden kann, dass eine Audioumschaltung für
ununterbrochenes Hören ausgeschlossen wird
DVI-I-Versionen unterstützen sowohl analoge als auch digitale Signale unter Verwendung von DVI-zu-
VGA-Adaptern oder Splitterkabeln (Switches wandeln das Videosignal nicht um)
Metallgehäuse
39336: Console Schnittstellen: DVI-I (Female), 2 x USB 2.0 HID Type A (Female), 2 x USB 2.0 Type A
(Female), 2 x 3.5mm (Female).
PC/Server Schnittstellen: 2 x DVI-I (Female), USB 2.0 Type B (Female), 2 x 3.5mm (Female).
Unterstützt DVI Auflösungen bis zu 1920x1200@60Hz (VGA: 2048x1536@60Hz).
39337: Console Schnittstellen: DVI-I (Female), 2 x USB 2.0 HID Type A (Female), 2 x USB 2.0 Type A
(Female), 2 x 3.5mm (Female).
PC/Server Schnittstellen: 4 x DVI-I (Female), USB 2.0 Type B (Female), 2 x 3.5mm (Female).
Unterstützt DVI Auflösungen bis zu 1920x1200@60Hz (VGA: 2048x1536@60Hz).
39338: Console Schnittstellen: DVI-I (Female), 2 x USB 2.0 HID Type A (Female), 2 x USB 2.0 Type A
(Female), 2 x 3.5mm (Female).
PC/Server Schnittstellen: 2 x DVI-I (Female), USB 2.0 Type B (Female), 2 x 3.5mm (Female).
Unterstützt DVI Auflösungen bis zu 2560x1600@60Hz (VGA: 2048x1536@60Hz).
39339: Console Schnittstellen: DVI-I (Female), 2 x USB 2.0 HID Type A (Female), 2 x USB 2.0 Type A
(Female), 2 x 3.5mm (Female).
PC/Server Schnittstellen: 4 x DVI-I (Female), USB 2.0 Type B (Female), 2 x 3.5mm (Female).
Unterstützt DVI Auflösungen bis zu 2560x1600@60Hz (VGA: 2048x1536@60Hz).
Page 10

Benutzerhandbuch Deutsch
39300: Console Schnittstellen: DVI-I Dual Head (Female), 2 x USB 2.0 HID Type A (Female), 2 x USB 2.0
Type A (Female), 2 x 3.5mm (Female).
PC/Server Schnittstellen: 2 x DVI-I Dual-Head (Female), USB 2.0 Type B (Female), 2 x 3.5mm (Female).
Unterstützt DVI Auflösungen bis zu 1920x1200@60Hz (VGA: 2048x1536@60Hz).
39301: Console Schnittstellen: DVI-I Dual Head (Female), 2 x USB 2.0 HID Type A (Female), 2 x USB 2.0
Type A (Female), 2 x 3.5mm (Female).
PC/Server Schnittstellen: 4 x DVI-I Dual-Head (Female), USB 2.0 Type B (Female), 2 x 3.5mm (Female).
Unterstützt DVI Auflösungen bis zu 1920x1200@60Hz (VGA: 2048x1536@60Hz).
39302: Console Schnittstellen: DVI-I Dual Head (Female), 2 x USB 2.0 HID Type A (Female), 2 x USB 2.0
Type A (Female), 2 x 3.5mm (Female).
PC/Server Schnittstellen: 2 x DVI-I Dual-Head (Female), USB 2.0 Type B (Female), 2 x 3.5mm (Female).
Unterstützt DVI Auflösungen bis zu 2560x1600@60Hz (VGA: 2048x1536@60Hz).
39303: Console Schnittstellen: DVI-I Dual Head (Female), 2 x USB 2.0 HID Type A (Female), 2 x USB 2.0
Type A (Female), 2 x 3.5mm (Female).
PC/Server Schnittstellen: 4 x DVI-I Dual-Head (Female), USB 2.0 Type B (Female), 2 x 3.5mm (Female).
Unterstützt DVI Auflösungen bis zu 2560x1600@60Hz (VGA: 2048x1536@60Hz).
39304: Console Schnittstellen: DisplayPort (Female), 2 x USB 2.0 HID Type A (Female), 2 x USB 2.0 Type
A (Female), 2 x 3.5mm (Female).
PC/Server Schnittstellen: 2 x DisplayPort (Female), USB 2.0 Type B (Female), 2 x 3.5mm (Female).
Unterstützt Auflösungen bis zu 3840x2100@60Hz, MST-Hubs werden nicht unterstützt.
39305: Console Schnittstellen: DisplayPort (Female), 2 x USB 2.0 HID Type A (Female), 2 x USB 2.0 Type
A (Female), 2 x 3.5mm (Female).
PC/Server Schnittstellen: 4 x DisplayPort (Female), USB 2.0 Type B (Female), 2 x 3.5mm (Female).
Unterstützt Auflösungen bis zu 3840x2100@60Hz, MST-Hubs werden nicht unterstützt.
39311: Console Schnittstellen: HDMI (Female), 2 x USB 2.0 HID Type A (Female), 2 x USB 3.0 Type A
(Female), 2 x 3.5mm (Female).
PC/Server Schnittstellen: 4 x HDMI (Female), USB 3.0 Type B (Female), 2 x 3.5mm (Female).
Unterstützt Auflösungen bis zu 4096x2160@60Hz 4:2:0 8 Bit.
Installation
Bevor Sie mit der Installation beginnen, stellen Sie bitte sicher, dass alle Geräte ausgeschaltet sind.
1. Schließen Sie die Tastatur und die Maus an die USB-Anschlüsse der Console sowie das Display
an den Videoanschluss der Console auf der Rückseite an. Schließen Sie bei Bedarf die
Lautsprecher und das Mikrofon an die 3,5-mm-Audioanschlüsse der Console an.
2. Schließen Sie die Quellen an die PC-Anschlüsse auf der Rückseite mit USB Typ A auf B, DVI /
DisplayPort / HDMI und 3,5-mm-Audiokabel (nicht im Lieferumfang enthalten) an.
3. Wenn alle Verbindungen hergestellt sind, schalten Sie bitte alle Geräte ein.
Page 11
Benutzerhandbuch Deutsch
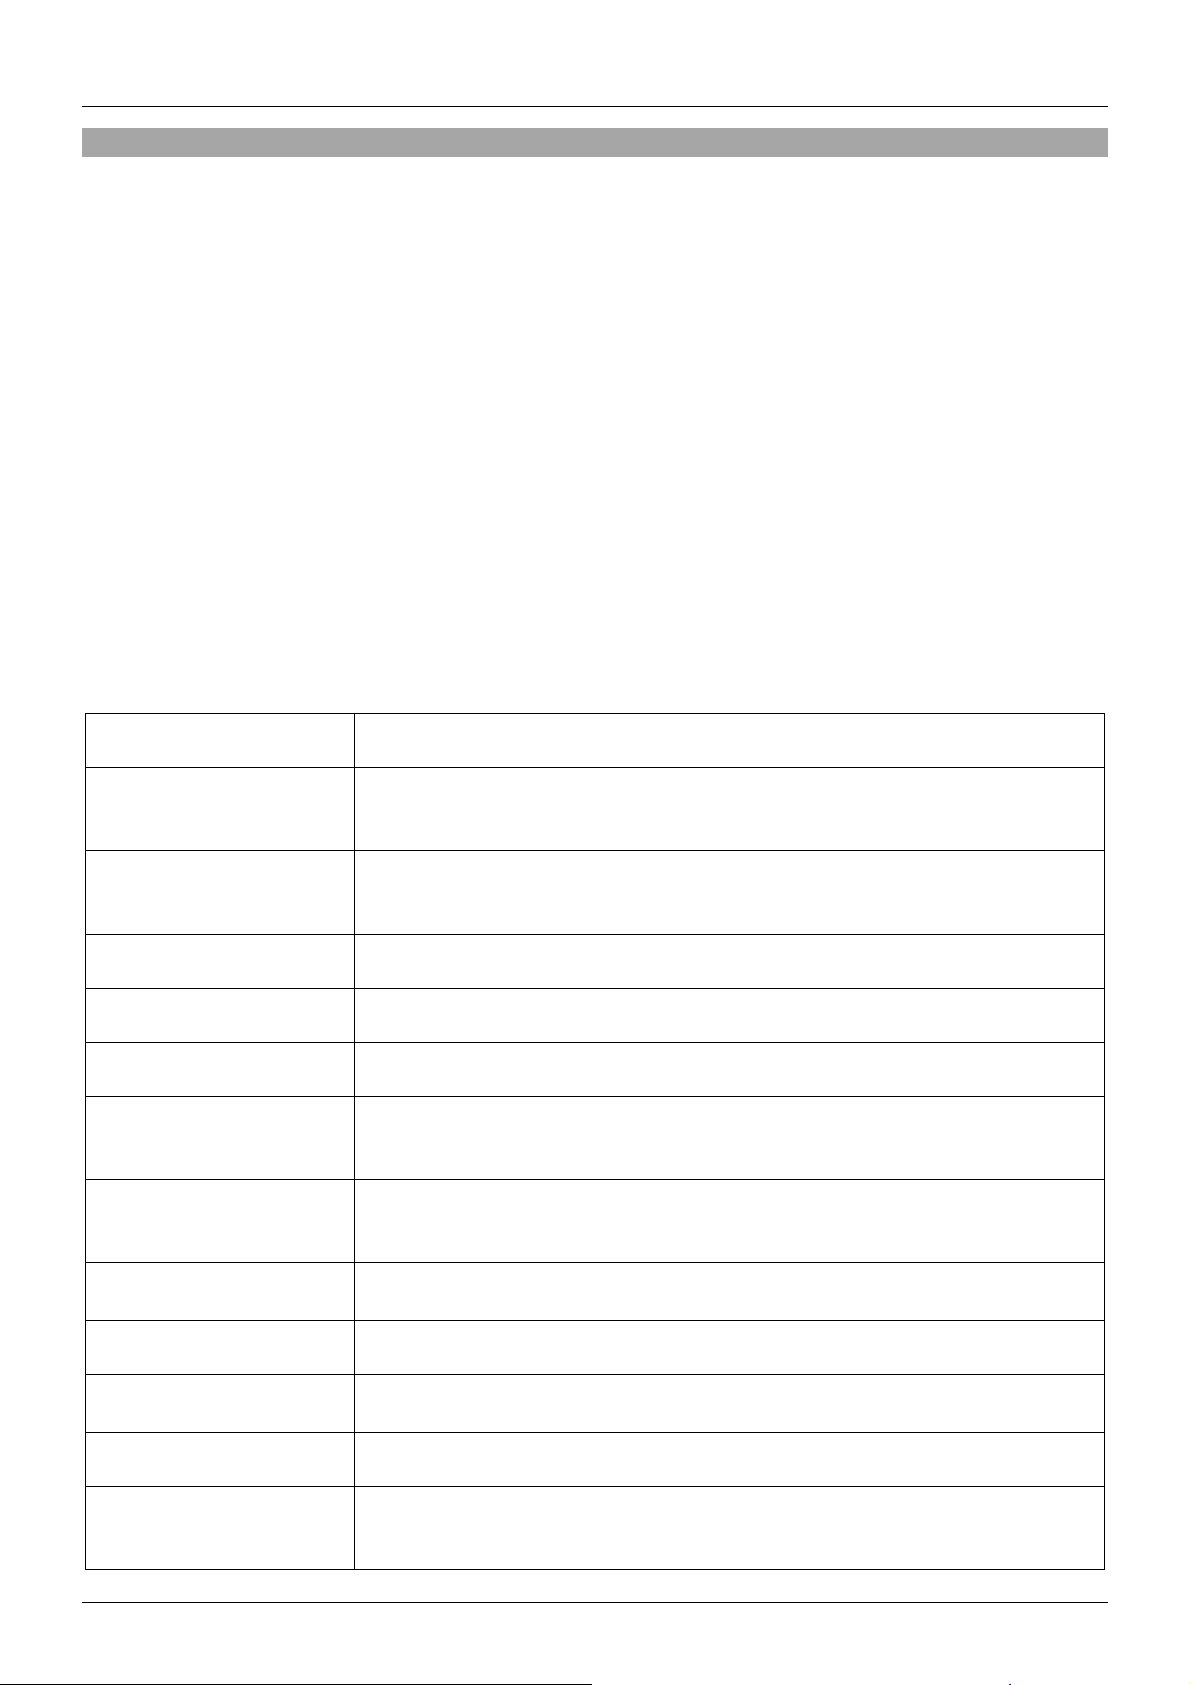
Hotkey
Funktion
Rollen + Rollen + “1”, “2”,
Schaltet direkt zu Port 1, 2, 3 oder 4.
Rollen + Rollen + “Y”
Bindet KVM & Hub-Umschaltung (Default, Z für QWERTY kb!).
Rollen + Rollen + “X”
Entkoppelt KVM- und Hub-Umschaltung.
Rollen + Rollen + “Q”
Bindet KVM & Audio-Umschaltung (Default).
Rollen + Rollen + “W”
Entkoppelt KVM & Audio-Umschaltung.
Rollen + Rollen + “F1”,
Schaltet USB-Hub zu Port 1, 2, 3 oder 4.
Rollen + Rollen + “F5”,
Schaltet Audiogeräte zu Port 1, 2, 3 oder 4.
Rollen + Rollen +↓
Schaltet einen Port hinunter.
Rollen + Rollen + ↑
Schaltet einen Port hoch.
Rollen + Rollen + ←
Schaltet zum vorherigen Port.
Rollen + Rollen + “B”
Schaltet den Piepton An / Aus.
Rollen + Rollen + “S”
Schaltet auf Autoscan. Drücken Sie eine beliebige Taste, um den
Betrieb
Dieser KVM-Switch bietet zwei Methoden zum Umschalten zwischen den Quellen: Drucktaste und
Tastatur-Hotkeys.
Drucktaste an der Vorderseite
Drücken Sie zum manuellen Umschalten die Select-Taste auf der Frontplatte. Während des
Schaltvorgangs blinkt eine weiße LED hinter der Schalttaste. Die LED leuchtet weiter, wenn die
Umschaltung abgeschlossen ist und die Verbindungen hergestellt sind. Je nach Konfiguration werden
nur die KVM-Ports (USB-Tastatur, -Maus und -Monitor) oder KVM + USB-Hub und/oder Audio-Ports
umgeschaltet.
Um mehr über diese Funktionen zu erfahren, lesen Sie bitte die Tastatur-Hotkey-Umschaltoptionen
unten. Die weißen (oder grünen) Port-LEDs beziehen sich auf den Status der KVM-Auswahl, die roten
Port-LEDs beziehen sich auf den Auswahlstatus des USB-Hubs und zeigen den aktuell ausgewählten
Port/Computer an.
Tastatur-Hotkeys
Hotkey-Befehle können durch das zweimalige Drücken der Standard-Codetaste Rollen (SCROLL
LOCK) innerhalb von 2 Sekunden aktiviert werden.
“3” or “4”
(oder Z)
“F2”, “F3”, “F4”
“F6”, “F7”, “F8”
Autoscan zu stoppen.
Page 12

Benutzerhandbuch Deutsch
Rollen + Rollen + “S” +
Schaltet auf Autoscan und stellt eine Scan-Verzögerung im Bereich von
Rollen + Rollen + “H” +
Ändert die Codetaste von „Rollen“ auf die „Num-”, „Feststell-”, „F12-”
(z)
z= 0~9
“Num Lock”, “Caps
Lock”, “F12” oder “Esc”*
*: Um die Codetaste von den Fronttasten aus zu ändern, drücken Sie bitte die höchste Porttaste, bis Sie
zwei kurze Pieptöne hören. Drücken Sie dann den gewählten neuen Hotkey auf Ihrer Tastatur. Der
KVM-Switch bestätigt dies mit einem kurzen Piepton und der Hotkey ist dauerhaft geändert.
Fehlersuche
Bitte überprüfen Sie, ob alle Monitor- und USB-Kabelverbindungen fest angeschlossen sind, um den
korrekten Betrieb des KVM-Switches zu gewährleisten.
Es wird kein Video angezeigt:
10~100 Sek. ein:
1= 10”; 2= 20”; 3= 30”; 4= 40”; 5= 50”; 6= 60”; 7= 70”; 8=80”; 9= 90”;
0=100”.
Drücken Sie eine beliebige Taste, um den Autoscan zu stoppen.
oder „Escape-Taste”*.
Wenn der KVM-Switch auf den Universal-Hotkey mit einem Signalton reagiert, aber kein Monitorbild
angezeigt wird, überprüfen Sie bitte, ob sich der aktuell ausgewählte Computer im Ruhezustand
befindet oder ausgeschaltet ist.
Bitte verwenden Sie hochwertige Videokabel, die so kurz wie möglich sind, bei HDMI und DP nicht
länger als 2m. Der KVM-Switch sollte die gleiche Videoschnittstelle haben wie der Monitor (und die
Grafikkarte). Die Verwendung unterschiedlicher Schnittstellen und Adapterkabel kann zu
unvorhersehbaren Inkompatibilitäten führen.
HDMI-Monitore an DVI-KVM-Switches: HDMI-Monitore liefern EDID-Informationen an den Computer,
die es der Grafikkarte ermöglichen, Signale mit höherer Auflösung und Farbmodus/-tiefe
auszugeben, als vom DVI-D-KVM-Switch unterstützt werden. Der KVM-Switch kann diese Signale
nicht unterstützen und wird kein Bild angezeigt, es sei denn, das Signal der Grafikkarte wird auf DVID-kompatible Signale beschränkt, max. 1920x1200@60Hz RGB.
DP-KVM-Switch: Bei der Verwendung von höheren Auflösungen wie 4K @ 60Hz können für den
zuverlässigen Betrieb an leistungsstarken Grafikkarten nur 1m kurze hochwertige DP-Kabel
verwendet werden. DP++ passive Protokollkonverter können mit max. 1m lange Monitorkabel
verwendet werden. Aktive Protokollkonverter und MST-Hubs werden nicht unterstützt.
USB-Probleme:
Schalten Sie die Anschlüsse nicht um und verwenden Sie Tastatur und Maus nicht, bis die Installation
der USB-Treiber abgeschlossen ist (falls vom Betriebssystem des PCs gefordert).
Schließen Sie die Tastatur und die Maus oder das Gerät direkt an den Computer an und überprüfen
Sie den Status der installierten Treiber. Sobald die Treiber installiert sind, sollten die Geräte auch beim
Anschluss an den KVM-Umschalter funktionieren.
Die maximal unterstützte Entfernung bei USB 2.0 beträgt 5m, bei USB 3.0 3m. Wenn eine größere
Entfernung erforderlich ist, verwenden Sie bitte ein aktive USB-Verlängerungskabel.
Page 13
Manuel utilisateur Français
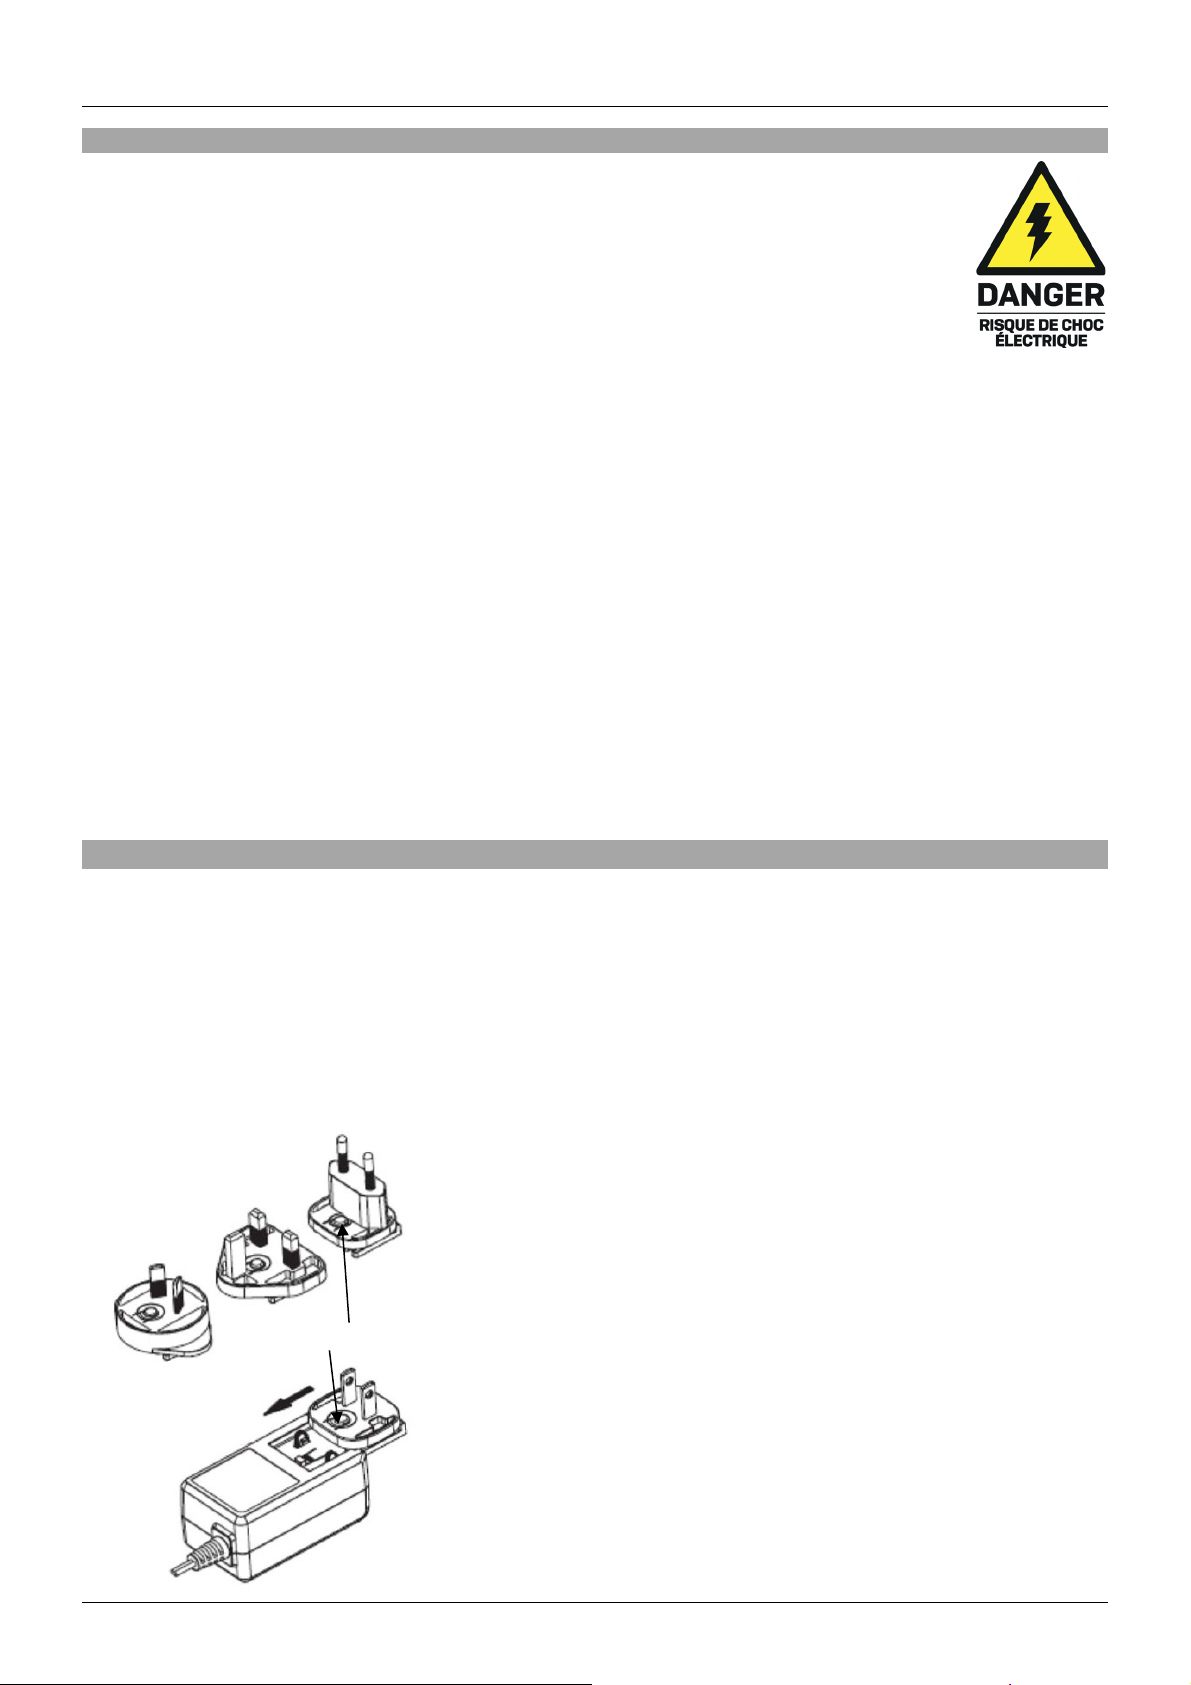
Locking button
Consignes de sécurité
! ATTENTION !
Merci de lire attentivement ces instructions de sécurité et de les conserver avec le
produit.
Le non-respect de ces précautions peut causer un choc électrique entrainant des
blessures graves, voire mortelles, un incendie ou des dommages au produit.
Toucher les composants internes ou un câble endommagé peut provoquer un choc
électrique pouvant entraîner la mort.
Cet appareil est une alimentation à découpage et peut fonctionner avec des tensions d'alimentation de
100...240 VAC Pour une utilisation dans le monde entier, quatre adaptateurs secteur différents sont
inclus : Type Euro, type UK, type US/Japon et type Australie/Nouvelle-Zélande. Utilisez l'adaptateur
secteur approprié comme indiqué sur la photo et assurez-vous qu'il est solidement fixé en place et qu'il
ne se détache pas en tirant avant de l'installer dans une prise électrique.
Pour éviter les risques d'incendie, de choc électrique ou de dommages:
N'ouvrez pas l'appareil ni son alimentation électrique. Il n'y a pas de pièces réparables par
l'utilisateur à l'intérieur.
Seul un personnel d'entretien qualifié est autorisé à effectuer toute réparation ou entretien.
Ne jamais utiliser de câble endommagé.
Ne pas mouiller le produit et ne pas l'exposer à l'humidité.
N'utilisez pas ce produit à l'extérieur, il est destiné à un usage intérieur uniquement.
Ne pas placer le produit à proximité de sources de chaleur. Toujours le placer dans un endroit
suffisamment ventilé.
Ne pas déposer de charge lourde sur le produit ou sur les câbles.
Veuillez vous assurer que l'adaptateur utilisé est fermement fixé et verrouillé en place avant de
l'insérer dans une prise murale.
Instructions d’utilisation de l’alimentation
Insérez la fiche requise dans l'adaptateur par l'avant. Les fiches sont clavetées pour éviter toute erreur
d'insertion. Poussez fermement l'adaptateur vers l'arrière et laissez le loquet de la fiche se verrouiller en
place. Avant de l'utiliser, assurez-vous que la fiche est bien verrouillée en place et qu'elle ne peut pas
glisser sans appuyer sur le bouton de verrouillage.
Pour retirer et remplacer la fiche, poussez le bouton de verrouillage vers le bas et faites glisser la fiche
vers l'avant.
N'insérez jamais la fiche séparément dans une prise de courant !
Assurez-vous que la fiche est bien verrouillée avant de l'utiliser.
Page 14

Manuel utilisateur Français
Introduction
Nous sommes heureux que votre choix se soit porté sur un produit LINDY et vous remercions de votre
confiance. Vous pouvez compter à tout moment sur la qualité de nos produits et de notre service. Ce
Switch KVM de bureau 2/4 ports DVI / DisplayPort / HDMI USB & Audio est soumis à une durée de garantie
LINDY de 2 ans et d’une assistance technique gratuite à vie. Merci de lire attentivement ces instructions
et de les conserver pour future référence.
Ce commutateur KVM de connecter et de contrôler plusieurs ordinateurs équipés d'un port USB à partir
d'un ensemble clavier, écran et souris, réduisant ainsi les coûts de matériel, optimisant l'espace de bureau
et offrant des fonctionnalités avancées.
Contenu de l’emballage
Switch KVM
Alimentation multi-pays (UK, EU, US & AUS), Prise DC ronde: 5.5/2.1mm
Ce manuel
Caractéristiques & Spécifications
Commutation simplifiée de périphérique vidéo et USB via boutons poussoirs et raccourcis clavier
Prend en charge les souris et clavier USB ainsi que des périphériques USB 2.0 ou USB 3.0/2.0 (en
fonction du modèle) partagés sur les ordinateurs connectés
Les ports de sortie audio permettent aux utilisateurs de connecter casques ou haut-parleurs pour
ajouter un son immersif 2 canaux et un microphone, ils peuvent être isolés de la commutation pour
une écoute audio ininterrompue
Les versions DVI-I prennent en charge les signaux analogiques et numériques en utilisant des
adaptateurs DVI vers VGA ou des câbles splitter
Boitier métallique
39336: Interfaces Console: DVI-I (femelle), 2 x USB 2.0 HID Type A (femelle), 2 x USB 2.0 Type A
(femelle), 2 x 3.5mm (femelle).
Interfaces PC/Serveur: 2 x DVI-I (femelle), USB 2.0 Type B (femelle), 2 x 3.5mm (femelle)
Prend en charge les résolutions DVI jusqu’à 1920x1200@60Hz (VGA: 2048x1536@60Hz).
39337: Interfaces Console: DVI-I (femelle), 2 x USB 2.0 HID Type A (femelle), 2 x USB 2.0 Type A
(femelle), 2 x 3.5mm (femelle).
Interfaces PC/Serveur: 4 x DVI-I (femelle), USB 2.0 Type B (femelle), 2 x 3.5mm (femelle).
Prend en charge les résolutions DVI jusqu’à 1920x1200@60Hz (VGA: 2048x1536@60Hz).
39338: Interfaces Console: DVI-I (femelle), 2 x USB 2.0 HID Type A (femelle), 2 x USB 2.0 Type A
(femelle), 2 x 3.5mm (femelle).
Interfaces PC/Serveur: 2 x DVI-I (femelle), USB 2.0 Type B (femelle), 2 x 3.5mm (femelle).
Prend en charge les résolutions DVI jusqu’à 2560x1600@60Hz (VGA: 2048x1536@60Hz).
39339: Interfaces Console: DVI-I (femelle), 2 x USB 2.0 HID Type A (femelle), 2 x USB 2.0 Type A
(femelle), 2 x 3.5mm (femelle).
Interfaces PC/Serveur: 4 x DVI-I (femelle), USB 2.0 Type B (femelle), 2 x 3.5mm (femelle).
Prend en charge les résolutions DVI jusqu’à 2560x1600@60Hz (VGA: 2048x1536@60Hz).
Page 15

Manuel utilisateur Français
39300: Interfaces Console: DVI-I Dual Head (femelle), 2 x USB 2.0 HID Type A (femelle), 2 x USB 2.0
Type A (femelle), 2 x 3.5mm (femelle).
Interfaces PC/Serveur: 2 x DVI-I Dual Head (femelle), USB 2.0 Type B (femelle), 2 x 3.5mm (femelle).
Prend en charge les résolutions DVI jusqu’à 1920x1200@60Hz (VGA: 2048x1536@60Hz).
39301: Interfaces Console: DVI-I Dual Head (femelle), 2 x USB 2.0 HID Type A (femelle), 2 x USB 2.0
Type A (femelle), 2 x 3.5mm (femelle).
Interfaces PC/Serveur: 4 x DVI-I Dual Head (femelle), USB 2.0 Type B (femelle), 2 x 3.5mm (femelle).
Prend en charge les résolutions DVI jusqu’à 1920x1200@60Hz (VGA: 2048x1536@60Hz).
39302: Interfaces Console: DVI-I Dual Head (femelle), 2 x USB 2.0 HID Type A (femelle), 2 x USB 2.0
Type A (femelle), 2 x 3.5mm (femelle).
Interfaces PC/Serveur: 2 x DVI-I Dual Head (femelle), USB 2.0 Type B (femelle), 2 x 3.5mm (femelle).
Prend en charge les résolutions DVI jusqu’à 2560x1600@60Hz (VGA: 2048x1536@60Hz).
39303: Interfaces Console: DVI-I Dual Head (femelle), 2 x USB 2.0 HID Type A (femelle), 2 x USB 2.0
Type A (femelle), 2 x 3.5mm (femelle).
Interfaces PC/Serveur: 4 x DVI-I Dual Head (femelle), USB 2.0 Type B (femelle), 2 x 3.5mm (femelle).
Prend en charge les résolutions DVI jusqu’à 2560x1600@60Hz (VGA: 2048x1536@60Hz).
39304: Interfaces Console: DisplayPort (femelle), 2 x USB 2.0 HID Type A (femelle), 2 x USB 2.0 Type A
(femelle), 2 x 3.5mm (femelle).
Interfaces PC/Serveur: 2 x DisplayPort (femelle), USB 2.0 Type B (femelle), 2 x 3.5mm (femelle).
Prend en charge les résolutions jusqu’à 3840x2160@60Hz, les hubs MST ne sont pas pris en charge.
39305: Interfaces Console: DisplayPort (femelle), 2 x USB 2.0 HID Type A (femelle), 2 x USB 2.0 Type A
(femelle), 2 x 3.5mm (femelle).
Interfaces PC/Serveur: 4 x DisplayPort (femelle), USB 2.0 Type B (femelle), 2 x 3.5mm (femelle).
Prend en charge les résolutions jusqu’à 3840x2160@60Hz, les hubs MST ne sont pas pris en charge.
39311: Interfaces Console: HDMI (femelle), 2 x USB 2.0 HID Type A (femelle), 2 x USB 3.0 Type A
(femelle), 2 x 3.5mm (femelle).
Interfaces PC/Serveur: 4 x HDMI (femelle), USB 3.0 Type B (femelle), 2 x 3.5mm (femelle).
Prend en charge les résolutions jusqu’à 4096x2160@60Hz 4:2:0 8 bit.
Installation
Veuillez vous assurer que tous les appareils sont hors tension avant de débuter l’installation.
1. Connectez clavier et souris aux ports Console USB et l’écran au port Console Vidéo sur le
panneau arrière. Connectez haut-parleurs et microphone aux ports Console audio 3.5mm si
nécessaire.
2. Connectez les ports PC sources sur le panneau arrière avec des câbles USB Type A vers B, DVI
/ DisplayPort / HDMI et audio 3.5mm (non inclus).
3. Une fois toutes les connexions réalisées, veuillez mettre les appareils sous tension.
Page 16
Manuel utilisateur Français
Raccourci
Fonction
Code princip. + “1”, “2”,
Sélection du port ordinateur 1, 2, 3 ou 4.
Code princip. + “Z” (ou
Relie la commutation KVM & Hub (par défaut, Z pour clavier QWERTY !).
Code princip. + “X”
Sépare la commutation KVM & Hub.
Code princip. + “Q”
Relie la commutation KVM & Audio (par défaut).
Code princip. + “W”
Sépare la commutation KVM & Audio.
Code princip. + “F1”,
Commute le hub USB vers le port 1, 2, 3 ou 4.
Code princip. + “F5”,
Commute les périphériques audio vers le port 1, 2, 3 ou 4.
Code princip. ↓
Commute vers le port inférieur.
Code princip. ↑
Commute vers le port supérieur.
Code princip. + ←
Commute vers le port précédent.
Code princip. + “B”
Commute on/off le signal par bip sonore.
Code princip. + “S”
Démarre l’Autoscan. Pressez une touche pour arrêter l’Autoscan.
Utilisation
Ce switch KVM dispose de deux méthodes de commutation entre les sources: boutons poussoirs et
raccourcis clavier.
Boutons poussoirs sur le panneau avant
Appuyez sur le bouton Select du panneau avant pour une commutation manuelle. Pendant le processus
de commutation, une LED blanche située derrière le bouton de commutation clignote. La LED reste
allumée lorsque la commutation est terminée et que les connexions sont établies. Selon la configuration,
seuls les ports KVM (clavier, souris et moniteur USB) ou KVM + Hub USB et/ou ports audio sont
commutés.
Pour en savoir plus sur ces fonctions, veuillez vous reporter aux options de commutation par de
raccourci clavier ci-dessous. Les voyants blancs (ou verts) des ports font référence à l'état de la section
KVM, les voyants rouges des ports font référence à l'état de la sélection du hub USB et indiquent le
port/ordinateur actuellement sélectionné.
Raccourcis clavier
Les commandes de raccourci peuvent être activées en appuyant sur le code principal "Arrêt défil" +
"Arrêt défil "* dans les 2 secondes.
“3” ou “4”
Y)
“F2”, “F3”, “F4”
“F6”, “F7”, “F8”
Page 17
Manuel utilisateur Français
Code princip. + “S” + (z)
Démarre l’Autoscan et règle un délai de scan dans une période de 10~100
Code princip. + “H” +
Change le code principal vers “Verr.Num.”, “Caps Lock”, “F12” ou
z= 0~9
“Verr.Num.”, “Caps
Lock”, “F12” ou “Esc”*
*: Pour changer le code principal à partir des boutons poussoirs avant, appuyez sur le bouton du port le
plus élevé jusqu'à ce que vous entendiez deux bips courts. Ensuite, appuyez sur le nouveau raccourci
choisi sur votre clavier, le commutateur KVM le confirmera par un bip court et le code principal sera
définitivement modifié.
Dépannage
Veuillez vérifier que toutes les connexions écran et USB sont fermement connectées pour assurer le bon
fonctionnement du commutateur KVM.
Aucune image ne s’affiche:
sec.:
1= 10”; 2= 20”; 3= 30”; 4= 40”; 5= 50”; 6= 60”; 7= 70”; 8=80”; 9= 90”;
0=100”.
Pressez une touche pour arrêter l’Autoscan.
“Esc”*.
Si le commutateur KVM réagit au code principal par un signal sonore, mais qu'aucune image n'est
affichée, vérifiez si l'ordinateur sélectionné est en mode veille ou éteint.
Veuillez utiliser des câbles vidéo de haute qualité aussi courts que possible et pas plus de 2m pour
l’HDMI et le DP. Le commutateur KVM doit avoir la même interface vidéo que le moniteur (et la carte
graphique). L'utilisation d'interfaces et de câbles adaptateurs différents peut provoquer des
incompatibilités imprévisibles.
Ecrans HDMI sur commutateurs KVM DVI : Les moniteurs HDMI fournissent des informations EDID à
l'ordinateur, permettant à la carte graphique de sortir des signaux de résolution et de mode/profondeur
de couleur plus élevés que ceux pris en charge par le commutateur KVM DVI-D. Le commutateur KVM
ne peut pas prendre en charge ces signaux. Le commutateur KVM ne peut pas prendre en charge ces
signaux et ne montrera aucune image à moins que le signal de la carte graphique ne soit limité à des
signaux compatibles DVI-D, max. 1920x1200@60Hz RGB.
Commutateur KVM DP: Lors de l'utilisation des plus hautes résolutions comme 4K @ 60Hz, seuls des
câbles DP courts de 1m de haute qualité peuvent être utilisés pour un fonctionnement fiable sur des
cartes graphiques puissantes. Les convertisseurs de protocole passifs DP++ peuvent être pris en
charge en utilisant des câbles de moniteur d'une longueur maximale de 1m. Les convertisseurs de
protocole actifs et les Hubs MST ne sont pas pris en charge.
Problèmes USB:
Ne changez pas de port et n'utilisez pas le clavier et la souris tant que l'installation des pilotes USB
n'est pas terminée (si le système d'exploitation de l'ordinateur l'exige).
Connectez le clavier et la souris ou le périphérique directement à l'ordinateur et vérifiez l'état des
pilotes installés. Une fois les pilotes installés, les périphériques devraient également fonctionner
lorsqu'ils sont connectés au commutateur KVM.
La distance maximale prise en charge par l'USB 2.0 est de 5m, 3m pour l'USB 3.0. Si une distance
plus longue est nécessaire, veuillez utiliser une rallonge active USB Lindy.
Page 18
Manuale Italiano
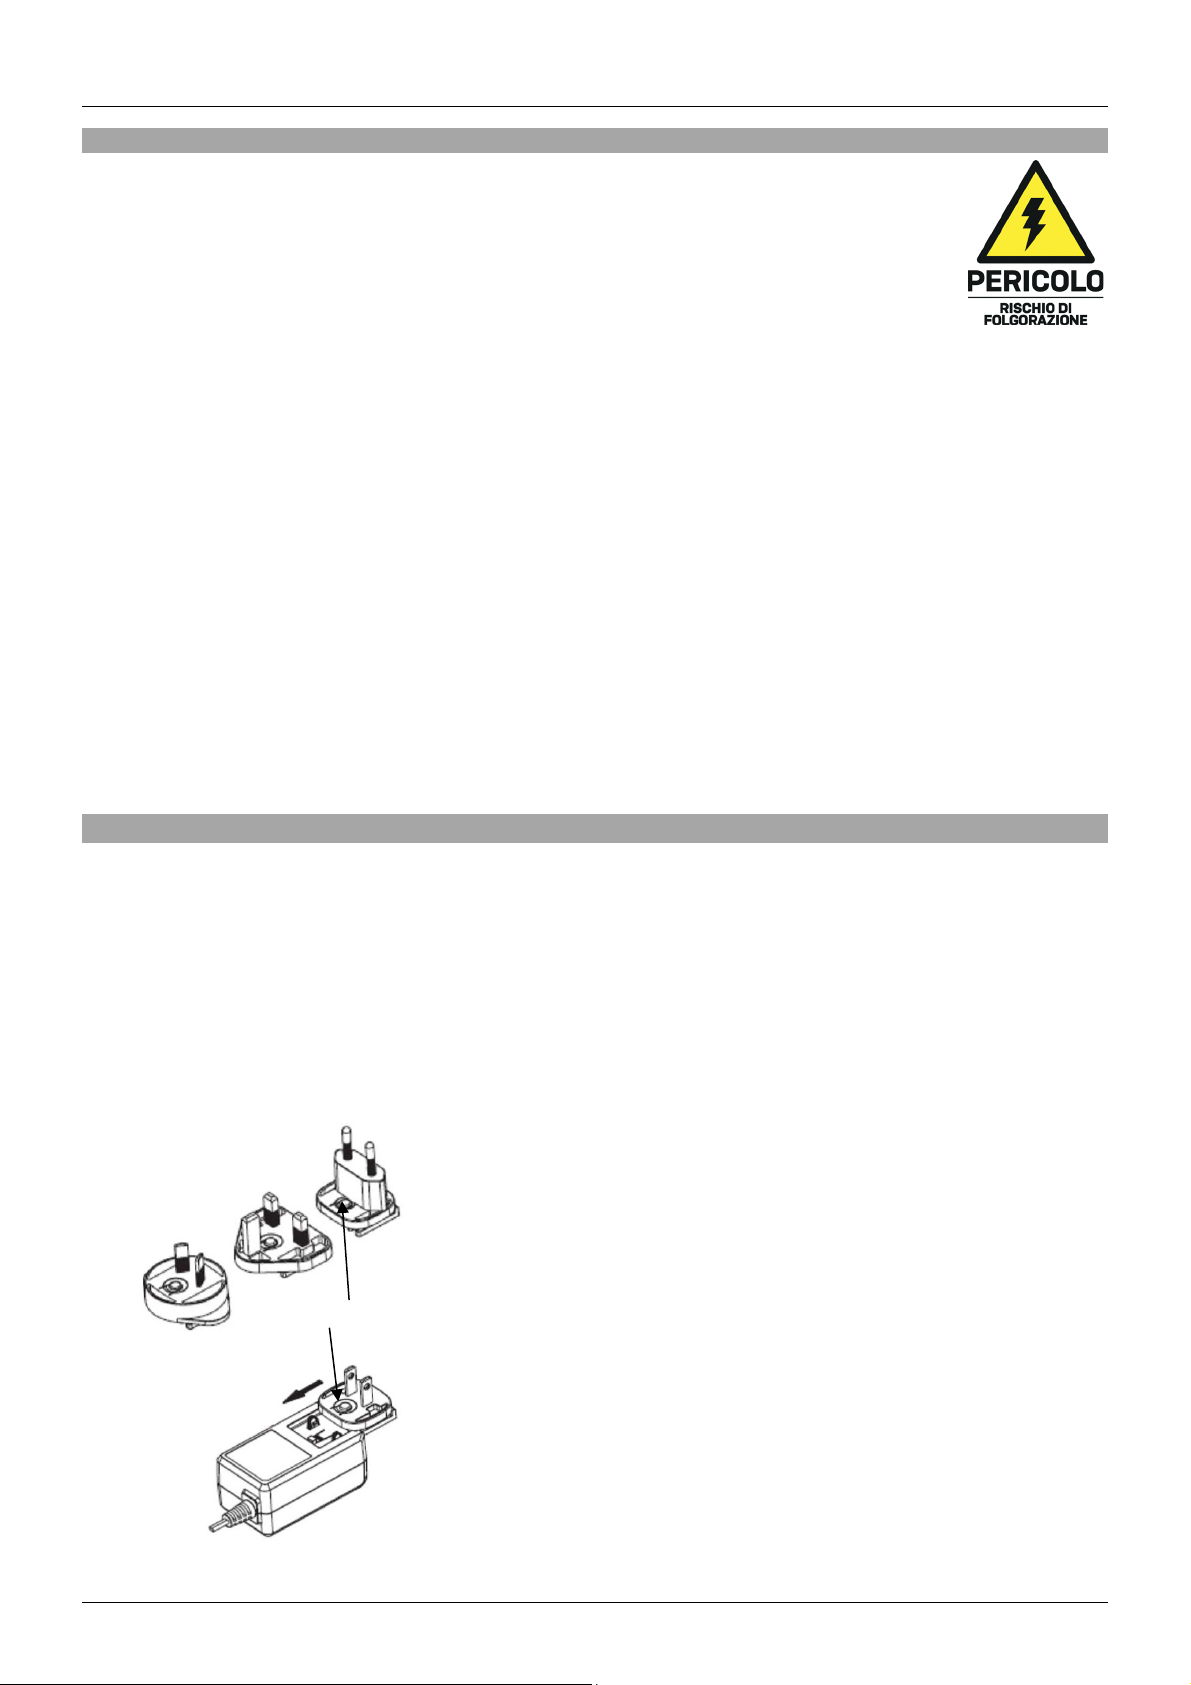
Pulsante di blocco
Istruzioni di sicurezza
! ATTENZIONE !
Per favore leggete la seguente informativa e conservate sempre questo documento con
il prodotto.
La mancata osservanza di queste precauzioni può causare seri infortuni o la morte per
folgorazione, incendi o danneggiare il prodotto.
Toccare i componenti interni o un cavo danneggiato può causare uno shock elettrico che
può condurre alla morte.
Questo dispositivo ha un alimentatore a commutazione che può funzionare con tensioni di alimentazione
all’interno del range 100…240 VAC. La fornitura comprende quattro adattatori AC per prese di tutto il
mondo: Euro, UK, US/Giappone e Australia/Nuova Zelanda. Utilizzate l’adattatore AC appropriato e
montatelo come mostrato nell’immagine, assicurandovi che sia fissato correttamente e che non si
stacchi estraendolo dalla presa.
Per ridurre il rischio di incendi, folgorazione o danni:
Non aprite il prodotto o l’alimentatore. Non esistono componenti utilizzabili all'interno.
La riparazione o manutenzione del prodotto può essere effettuata solo da personale qualificato.
Non utilizzare mai cavi danneggiati.
Non fate entrare il prodotto in contatto con acqua e non utilizzatelo in luoghi umidi.
Questo prodotto è pensato esclusivamente per l’uso in ambienti interni.
Non posizionate il prodotto nelle vicinanze di sorgenti di calore. Installatelo sempre in luoghi ben
ventilati.
Non appoggiate oggetti pesanti sul prodotto o sui cavi.
Vi preghiamo di assicurarvi che ogni adattatore sia fermamente inserito e bloccato in sede prima di
collegarlo a una presa di corrente.
Istruzioni per l’uso dell’alimentatore
Inserire la spina desiderata nell'adattatore dalla parte anteriore. Le spine sono dotate di una linguetta per
evitare un inserimento errato. Spingere saldamente l'adattatore verso la parte posteriore e lasciare che il
fermo della spina si blocchi in posizione. Prima dell'uso assicurarsi che la spina sia bloccata saldamente
in posizione e non scivoli fuori senza spingere il pulsante di bloccaggio verso il basso.
Per rimuovere e sostituire la spina, spingere il pulsante di blocco verso il basso e far scorrere la spina
verso la parte anteriore.
Non inserire mai la spina separatamente in una presa di corrente!
Assicurarsi che la spina sia bloccata saldamente prima dell'uso.
Page 19

Manuale Italiano
Introduzione
Grazie per aver acquistato lo switch KVM da tavolo a 2 / 4 porte DVI / DisplayPort / HDMI USB & Audio.
Questo prodotto è stato progettato per fornire un funzionamento affidabile e sicuro. Beneficia della
garanzia LINDY di 2 anni e del supporto tecnico gratuito a vita. Per assicurare un uso corretto, si prega di
leggere attentamente questo manuale e conservarlo per riferimenti futuri.
Permette a diversi computer dotati di USB di essere collegati e controllati da una singola tastiera, monitor
e mouse, riducendo così i costi dell'hardware, massimizzando lo spazio sulla scrivania e fornendo funzioni
avanzate.
Contenuto della confezione
Switch KVM
Alimentatore Multi-country (UK, EU, US & AUS), Dimensioni jack DC: 5.5/2.1mm
Questo manuale
Caratteristiche & Specifiche
Semplice commutazione di dispositivi video e USB tramite pulsanti e hotkey
Supporta mouse e tastiere USB e la condivisione di dispositivi USB 2.0 o USB 3.0/2.0 (a seconda del
modello) tra i computer collegati
Le uscite audio permettono agli utenti di collegare cuffie o altoparlanti per aggiungere un sistema audio
2 canali e un microfono che può essere configurato per escludere la commutazione audio per un
ascolto senza interruzioni
Le versioni DVI-I supportano sia segnali analogici che digitali utilizzando adattatori da DVI a VGA o
cavi splitter (gli switch non convertono il segnale video)
Struttura in metallo
39336: Interfacce console: DVI-I (femmina), 2 x USB 2.0 HID tipo A (femmina), 2 x USB 2.0 tipo A
(femmina), 2 x 3.5mm (femmina). Interfacce PC/Server: 2 x DVI-I (femmina), USB 2.0 Tipo B (femmina),
2 x 3.5mm (femmina) Supporta risoluzioni DVI fino a 1920x1200@60Hz (VGA: 2048x1536@60Hz).
39337: Interfacce console: DVI-I (femmina), 2 x USB 2.0 HID tipo A (femmina), 2 x USB 2.0 tipo A
(femmina), 2 x 3.5mm (femmina). Interfacce PC/Server: 4 x DVI-I (femmina), USB 2.0 Tipo B (femmina),
2 x 3.5mm (femmina). Supporta risoluzioni DVI fino a 1920x1200@60Hz (VGA: 2048x1536@60Hz).
39338: Interfacce console: DVI-I (femmina), 2 x USB 2.0 HID tipo A (femmina), 2 x USB 2.0 tipo A
(femmina), 2 x 3.5mm (femmina). Interfacce PC/Server: 2 x DVI-I (femmina), USB 2.0 Tipo B (femmina),
2 x 3.5mm (femmina). Supporta risoluzioni DVI fino a 2560x1600@60Hz (VGA: 2048x1536@60Hz).
39339: Interfacce console: DVI-I (femmina), 2 x USB 2.0 HID tipo A (femmina), 2 x USB 2.0 tipo A
(femmina), 2 x 3.5mm (femmina). Interfacce PC/Server: 4 x DVI-I (femmina), USB 2.0 Tipo B (femmina),
2 x 3.5mm (femmina).Supporta risoluzioni DVI fino a 2560x1600@60Hz (VGA: 2048x1536@60Hz).
39300: Interfacce console: DVI-I Dual Head (femmina), 2 x USB 2.0 HID Tipo A (femmina), 2 x USB 2.0
Tipo A (femmina), 2 x 3.5mm (femmina). Interfacce PC/Server: 2 x DVI-I Dual Head (femmina), USB 2.0
Tipo B (femmina), 2 x 3.5mm (femmina).Supporta risoluzioni DVI fino a 1920x1200@60Hz (VGA:
2048x1536@60Hz).
39301: Interfacce console: DVI-I Dual Head (femmina), 2 x USB 2.0 HID Tipo A (femmina), 2 x USB 2.0
Tipo A (femmina), 2 x 3.5mm (femmina). Interfacce PC/Server: 4 x DVI-I Dual Head (femmina), USB 2.0
Tipo B (femmina), 2 x 3.5mm (femmina). Supporta risoluzioni DVI fino a 1920x1200@60Hz (VGA:
2048x1536@60Hz).
Page 20
Manuale Italiano
39302: Interfacce console: DVI-I Dual Head (femmina), 2 x USB 2.0 HID Tipo A (femmina), 2 x USB 2.0
Tipo A (femmina), 2 x 3.5mm (femmina). Interfacce PC/Server: 2 x DVI-I Dual Head (femmina), USB 2.0
Tipo B (femmina), 2 x 3.5mm (femmina). Supporta risoluzioni DVI fino a 2560x1600@60Hz (VGA:
2048x1536@60Hz).
39303: Interfacce console: DVI-I Dual Head (femmina), 2 x USB 2.0 HID Tipo A (femmina), 2 x USB 2.0
Tipo A (femmina), 2 x 3.5mm (femmina). Interfacce PC/Server: 4 x DVI-I Dual Head (femmina), USB 2.0
Tipo B (femmina), 2 x 3.5mm (femmina). Supporta risoluzioni DVI fino a 2560x1600@60Hz (VGA:
2048x1536@60Hz).
39304: Interfacce console: DisplayPort (femmina), 2 x USB 2.0 HID Tipo A (femmina), 2 x USB 2.0 Tipo
A (femmina), 2 x 3.5mm (femmina). Interfacce PC/Server: 2 x DisplayPort (femmina), USB 2.0 Tipo B
(femmina), 2 x 3.5mm (femmina). Supporta risoluzioni fino a 3840x2160@60Hz, gli hub MST non sono
supportati.
39305: Interfacce console: DisplayPort (femmina), 2 x USB 2.0 HID Tipo A (femmina), 2 x USB 2.0 Tipo
A (femmina), 2 x 3.5mm (femmina). Interfacce PC/Server: 4 x DisplayPort (femmina), USB 2.0 Tipo B
(femmina), 2 x 3.5mm (femmina). Supporta risoluzioni fino a 3840x2160@60Hz, gli hub MST non sono
supportati.
39311: Interfacce console: HDMI (femmina), 2 x USB 2.0 HID Tipo A (femmina), 2 x USB 3.0 Tipo A
(femmina), 2 x 3.5mm (femmina). Interfacce PC/Server: 4 x HDMI (femmina), USB 3.0 Tipo B (femmina),
2 x 3.5mm (femmina). Supporta risoluzioni fino a 4096x2160@60Hz 4:2:0 8 Bit.
Installazione
Prima di iniziare l'installazione, assicuratevi che tutti i dispositivi siano spenti.
1. Collegare la tastiera e il mouse alle porte USB della console e lo schermo alla porta video della
console sul pannello posteriore. Collegare gli altoparlanti e il microfono alle porte audio da 3.5mm
della console, se necessario.
2. Collegare le sorgenti alle porte PC sul pannello posteriore con cavi USB tipo A a B, DVI /
DisplayPort / HDMI e audio da 3.5mm (non inclusi).
3. Una volta effettuati tutti i collegamenti, accendere tutti i dispositivi.
Utilizzo
Questo switch KVM presenta due metodi per passare da una sorgente all'altra: pulsanti e hotkeys.
Pulsanti pannello frontale
Premere il pulsante Select sul pannello frontale per la commutazione manuale. Durante il passaggio, un
LED bianco dietro il pulsante di commutazione lampeggerà. Il LED rimarrà acceso quando la
commutazione è completata e le connessioni sono stabilite. A seconda della configurazione, vengono
commutate solo le porte KVM (tastiera, mouse e monitor USB) o KVM + Hub USB e/o porte audio.
Per saperne di più su queste caratteristiche, fate riferimento alle opzioni di commutazione hotkey qui
sotto. I LED bianchi (o verdi) delle porte si riferiscono allo stato della sezione KVM, i LED rossi delle
porte si riferiscono allo stato di selezione dell'hub USB e mostrano la porta/computer selezionata.
Page 21
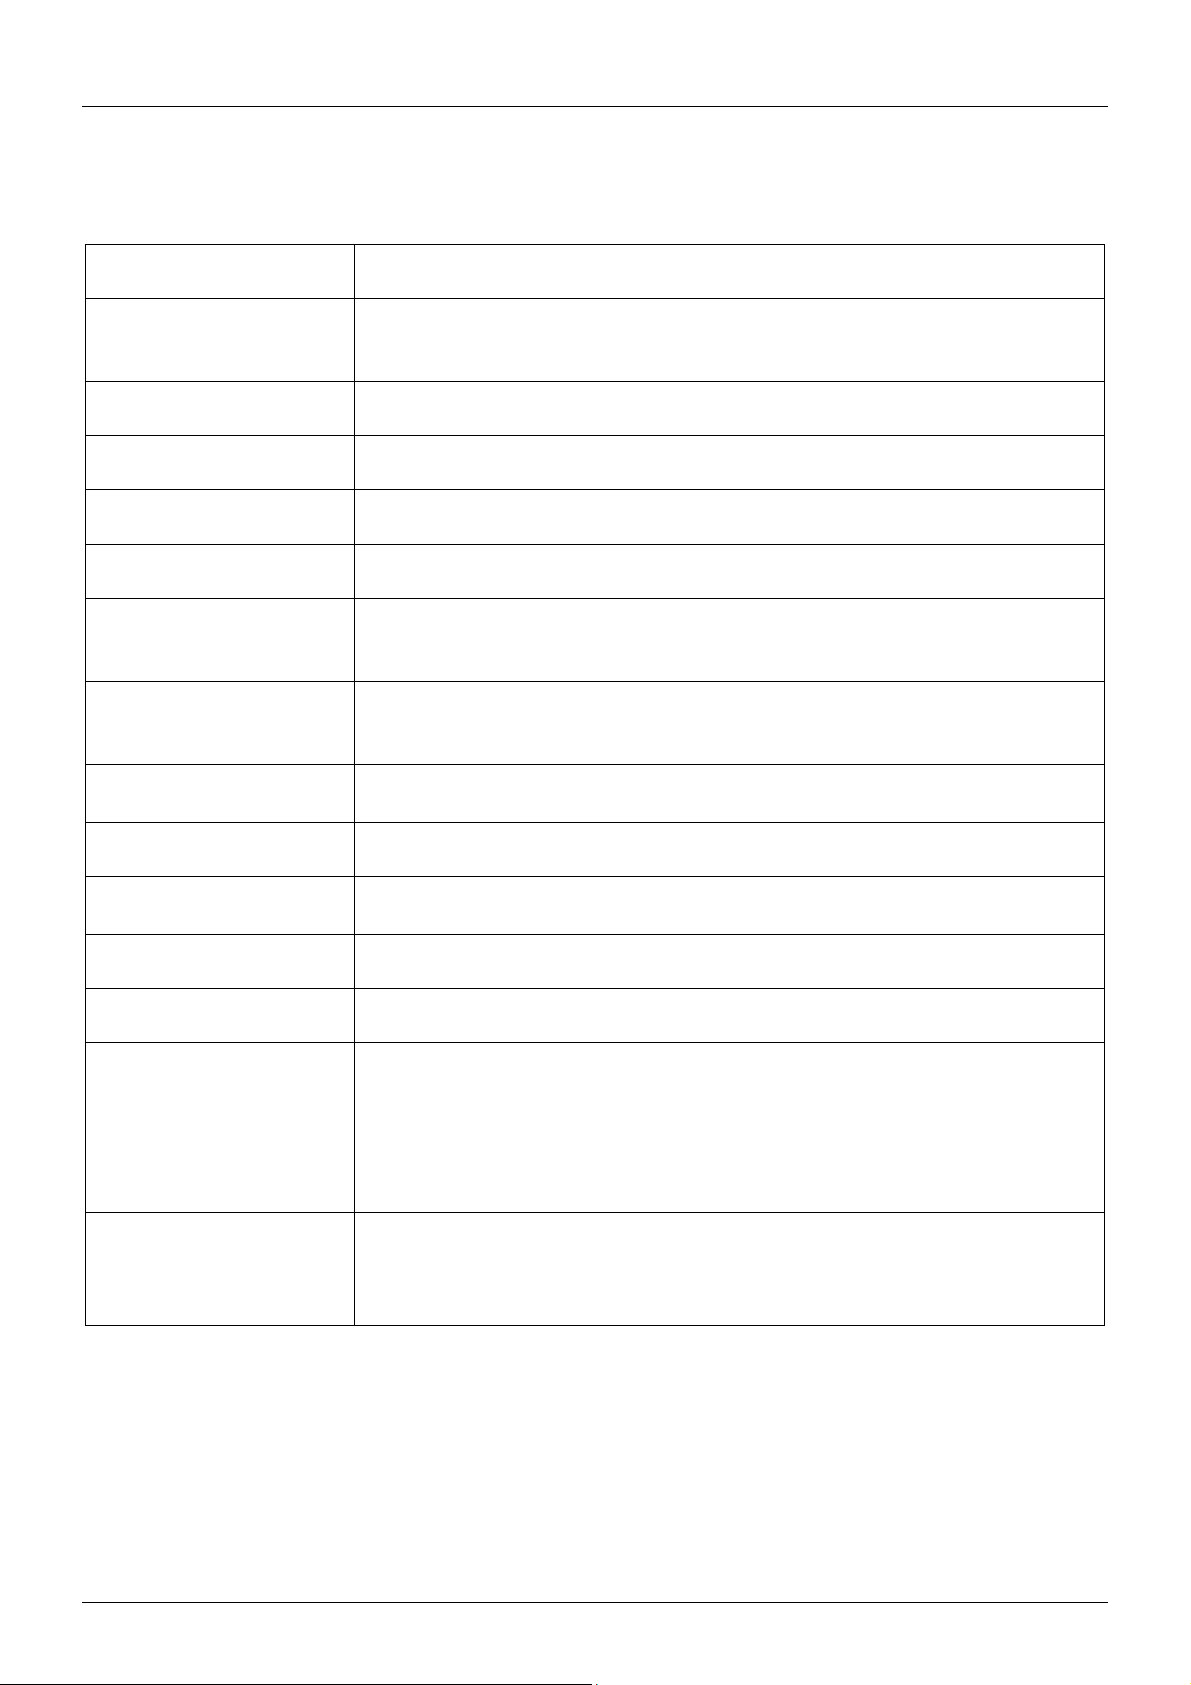
Manuale Italiano
Hotkey
Funzione
Codice guida + “1”, “2”,
Selezione porta del computer 1, 2, 3 or 4.
Codice guida + “Z” (o Y)
Commutazione associata KVM & Hub (Default, Z per tastiera QWERTY!).
Codice guida + “X”
Sblocca la commutazione KVM & Hub
Codice guida + “Q”
Commutazione associata KVM & Hub (Default).
Codice guida + “W”
Sblocca la commutazione KVM & Hub
Codice guida + “F1”,
Commuta l'hub USB sulla porta 1, 2, 3 o 4.
Codice guida + “F5”,
Commuta l’audio sulla porta 1, 2, 3 o 4.
Codice guida ↓
Commutare la porta inattiva
Codice guida ↑
Commutare la porta attiva
Codice guida + ←
Commuta alla porta precedente.
Codice guida + “B”
Attiva/disattiva il segnale acustico.
Codice guida + “S”
Avvia l’Autoscan. Premere qualsiasi pulsante per interrompere l’Autoscan.
Codice guida + “S” + (z)
Avvia l'Autoscan e imposta il ritardo della scansione in un intervallo di
Codice guida + “H” +
Cambia il codice guida a “Num Lock”, “Caps Lock”, “F12” oppure
Hotkeys
I comandi possono essere abilitati premendo il codice guida "Block Scorr" + "Block Scorr"* entro 2
secondi.
“3” or “4”
“F2”, “F3”, “F4”
“F6”, “F7”, “F8”
z= 0~9
“Num Lock”, “Caps
Lock”, “F12” or “Esc”*
10~100 sec.:
1= 10”; 2= 20”; 3= 30”; 4= 40”; 5= 50”; 6= 60”; 7= 70”; 8=80”; 9= 90”;
0=100”.
Premere qualsiasi pulsante per interrompere l’Autoscan.
“Esc”*.
*: Per cambiare la hotkey universale dai pulsanti del pannello frontale, premere il pulsante della porta più
a monte finché non si sentono due brevi segnali acustici. Poi premere il nuovo tasto di scelta rapida, lo
switch KVM lo confermerà con un breve segnale acustico e a questo punto il tasto di scelta rapida è
cambiato permanentemente.
Page 22

Manuale Italiano
Risoluzione dei problemi
Si prega di controllare che tutte le connessioni del monitor e del cavo USB siano saldamente collegate
per assicurare il corretto funzionamento dello switch KVM.
Nessun segnale video visualizzato:
Se lo switch KVM reagisce alla hotkey con un segnale acustico, ma non viene visualizzata alcuna
immagine sul monitor, si prega di controllare se il computer attualmente selezionato è in modalità sleep
o spento.
Si prega di utilizzare cavi video di alta qualità il più corti possibile e per HDMI e DP non più lunghi di
2m. Lo switch KVM dovrebbe avere la stessa interfaccia video del monitor (e della scheda grafica).
L'utilizzo di interfacce e cavi adattatori diversi può causare incompatibilità imprevedibili.
Monitor HDMI su switch KVM DVI: I monitor HDMI forniscono informazioni EDID al computer
permettendo alla scheda grafica di emettere una risoluzione più alta e segnali di modalità/profondità
di colore superiori a quelli supportati dallo switch KVM DVI-D. Lo switch KVM non può supportare
questi segnali e non mostrerà alcuna immagine a meno che il segnale della scheda grafica non
venga limitato a segnali compatibili DVI-D, max. 1920x1200@60Hz RGB.
Switch KVM DP: Quando si utilizzano risoluzioni più alte come 4K @ 60Hz solo cavi DP corti da 1m
di alta qualità possono essere usati per un funzionamento affidabile. I convertitori di protocollo
passivo DP++ possono essere supportati usando cavi per monitor con lunghezza massima di 1m. I
convertitori di protocollo attivi e gli hub MST non sono supportati.
Anomalie USB:
Non commutare le porte o usare la tastiera e il mouse fino a che l'installazione dei driver USB non sia
stata completata (se richiesto dal sistema operativo del PC)
Collegare la tastiera e il mouse o il dispositivo direttamente al computer e controllare lo stato dei driver
installati. Una volta che i driver sono installati, i dispositivi dovrebbero funzionare anche quando sono
collegati allo switch KVM.
La distanza massima supportata dallo standard USB 2.0 è di 5m, 3m per USB 3.0. Se è richiesta una
distanza maggiore, si prega di utilizzare una prolunga attiva USB.
Page 23

CE/FCC Statement
CE Certification
LINDY declares that this equipment complies with relevant European CE requirements.
CE Konformitätserklärung
LINDY erklärt, dass dieses Equipment den europäischen CE-Anforderungen entspricht
UKCA Certification
LINDY declares that this equipment complies with relevant UKCA requirements.
FCC Certification
This equipment has been tested and found to comply with the limits for a Class B digital device, pursuant
to part 15 of the FCC Rules. These limits are designed to provide reasonable protection against harmful
interference in a residential installation.
You are cautioned that changes or modification not expressly approved by the party responsible for
compliance could void your authority to operate the equipment.
This device complies with part 15 of the FCC Rules.
Operation is subject to the following two conditions:
1. This device may not cause harmful interference, and
2. This device must accept any interference received, including interference that may cause undesired
operation.
The enclosed power supply has passed Safety test requirements, conforming to the US American versions
of the international Standard IEC 60950-1 or 60065 or 62368-1.
LINDY Herstellergarantie – Hinweis für Kunden in Deutschland
LINDY gewährt für dieses Produkt über die gesetzliche Regelung in Deutschland hinaus eine zweijährige
Herstellergarantie ab Kaufdatum. Die detaillierten Bedingungen dieser Garantie finden Sie auf der LINDY
Website aufgelistet bei den AGBs.
Hersteller / Manufacturer (EU): Manufacturer (UK):
LINDY-Elektronik GmbH LINDY Electronics Ltd
Markircher Str. 20 Sadler Forster Way
68229 Mannheim Stockton-on-Tees, TS17 9JY
Germany England
Email: [email protected] , T: +49 (0)621 470050 [email protected], T: +44 (0)1642 754000
Page 24
Recycling Information
Tested to comply with
FCC
For home and office use.
WEEE (Waste of Electrical and Electronic Equipment),
Recycling of Electronic Products
Europe, United Kingdom
In 2006 the European Union introduced regulations (WEEE) for the collection and recycling of all waste electrical
and electronic equipment. It is no longer allowable to simply throw away electrical and electronic equipment. Instead,
these products must enter the recycling process.
Each individual EU member state, as well as the UK, has implemented the WEEE regulations into national law in
slightly different ways. Please follow your national law when you want to dispose of any electrical or electronic
products. More details can be obtained from your national WEEE recycling agency.
Germany / Deutschland Rücknahme Elektroschrott und Batterie-Entsorgung
Die Europäische Union hat mit der WEEE Direktive Regelungen für die Verschrottung und das Recycling von Elektround Elektronikprodukten geschaffen. Diese wurden im Elektro- und Elektronikgerätegesetz – ElektroG in deutsches
Recht umgesetzt. Das Entsorgen von Elektro- und Elektronikgeräten über die Hausmülltonne ist verboten! Diese
Geräte müssen den Sammel- und Rückgabesystemen zugeführt werden! Dort werden sie kostenlos entgegen
genommen. Die Kosten für den weiteren Recyclingprozess übernehmen die Gerätehersteller.
LINDY bietet deutschen Endverbrauchern ein kostenloses Rücknahmesystem an, beachten Sie bitte, dass Batterien
und Akkus den Produkten vor der Rückgabe an das Rücknahmesystem entnommen werden müssen und über die
Sammel- und Rückgabesysteme für Batterien separat entsorgt werden müssen. Ausführliche Informationen zu
diesen Themen finden Sie stets aktuell auf der LINDY Webseite im Fußbereich.
France
En 2006, l'union Européenne a introduit la nouvelle réglementation (DEEE) pour le recyclage de tout équipement
électrique et électronique.
Chaque Etat membre de l’Union Européenne a mis en application la nouvelle réglementation DEEE de manières
légèrement différentes. Veuillez suivre le décret d’application correspondant à l’élimination des déchets électriques
ou électroniques de votre pays.
Italy
Nel 2006 l’unione europea ha introdotto regolamentazioni (WEEE) per la raccolta e il riciclo di apparecchi elettrici ed
elettronici. Non è più consentito semplicemente gettare queste apparecchiature, devono essere riciclate. Ogni stato
membro dell’EU ha tramutato le direttive WEEE in leggi statali in varie misure. Fare riferimento alle leggi del proprio
Stato quando si dispone di un apparecchio elettrico o elettronico.
Per ulteriori dettagli fare riferimento alla direttiva WEEE sul riciclaggio del proprio Stato.
No. 39300-5, 39311, 39336-9
4th Edition, February 2021
standards.
lindy.com
 Loading...