

Lincoln Electric Aspect 375 Quick Reference Manual
OFFAUTO
ONAUTO
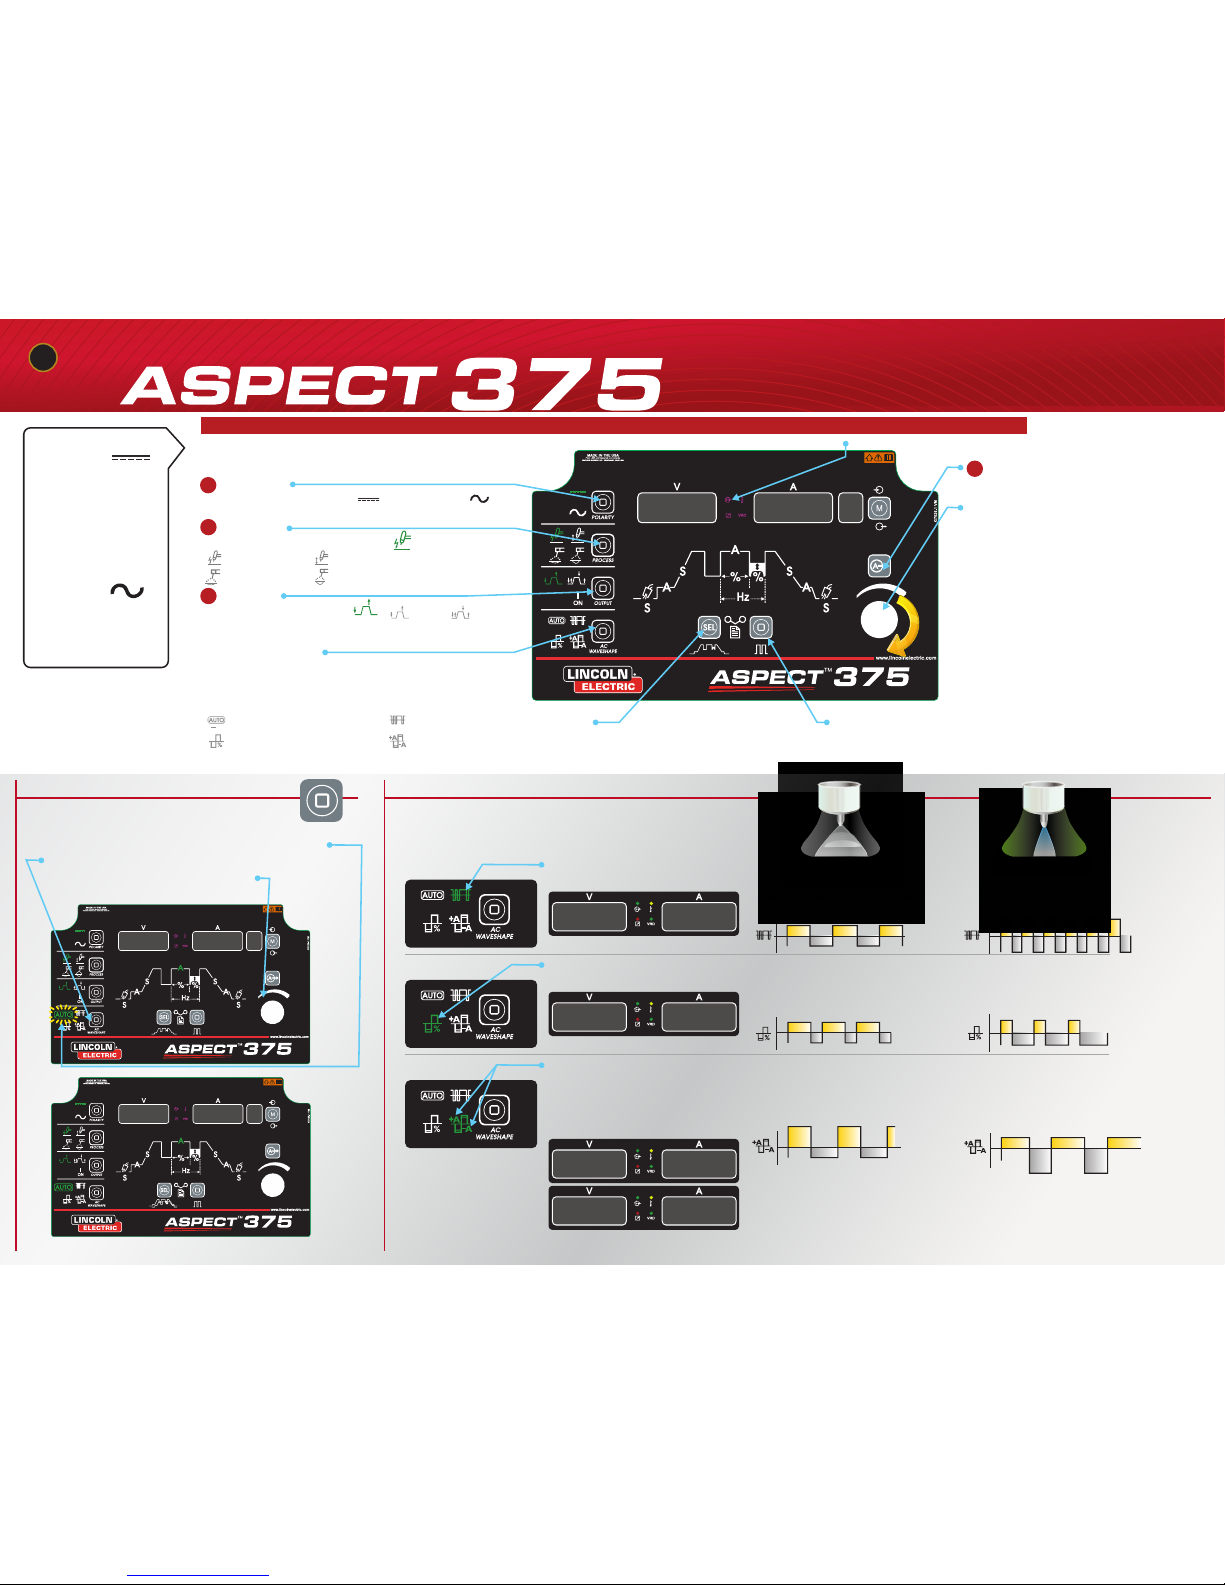
QUICK REFERENCE GUIDE
1 Polarity
Choose between DC polarity and AC polarity
2 Process
Select high-frequency arc starting
3 Output
Select 2-step functionality,
for use with standard foot pedal
AC Wave Shape
AC Balance and Electrode Positive (EP) / Electrode Negative (EN) Offset
are inaccessible with AC Auto Balance® on
AC Frequency is available with AC Auto Balance® on or off
DC
Steel Alloys
Stainless Steels
Nickel Alloys
Copper Alloys
Titanium
AC
Aluminum
Magnesium
Instructions to activate “AC Auto Balance®”
Select the AC Wave Shape button until the “Auto” icon
blinks, at which point “AC Auto Balance
®
” can be turned on
or off by rotating the main control knob.
™
Within each setting, make
adjustments with main control knob
4 Select to change main welding amperage
Note: Also push to exit from menus
AC Auto Balance
®
AC Wave Shape Controls
Sequencer
Machine is set with default settings;
- see Sequencer Functions for specialized settings
Pulse
Machine is set with pulse mode de-activated,
- see Pulse Functions for specialized settings
Hi-Frequency TIG Touch Start TIG
®
Stick- Soft Mode Stick - Crisp Mode
AC Frequency cycles per second
Electrode Positive (EP) /
Electrode Negative (EN)
current values
AC Balance - time as percentage that
polarity is electrode negative
2-Step 4-Step
Machine controls AC Balance, EP and EN
values based on output amperage
Upon machine startup, system is inoperable when green light is
blinking for 7 seconds during system startup sequence.
AC Frequency control
Range 40 - 400Hz
+
–
+
–
+
–
+
–
+
–
+
–
A lower frequency results in a wider bead.
A lower AC Balance (EN%) results in an arc
with increased cleaning action.
A higher Electrode Positive (EP) current value
results in increased cleaning action.
A higher frequency results in a more
focused bead.
A higher AC Balance (EN%) results in
an arc with higher penetration.
A higher Electrode Negative (EN) current
value results in deeper penetration.
AC Balance control
Range 5 - 99% Electrode Negative
120FREQ
75%BAL
125EN
50EP
Electrode Positive and Negative Offset
Independently adjust the amplitude of the
positive and negative portions of the
AC Wave Shape
Range 2 - 375 amps
For Easy TIG Setup Follow Steps 1, 2, 3, & 4 - For AC polarity turn on AC Auto Balance® see instructions below
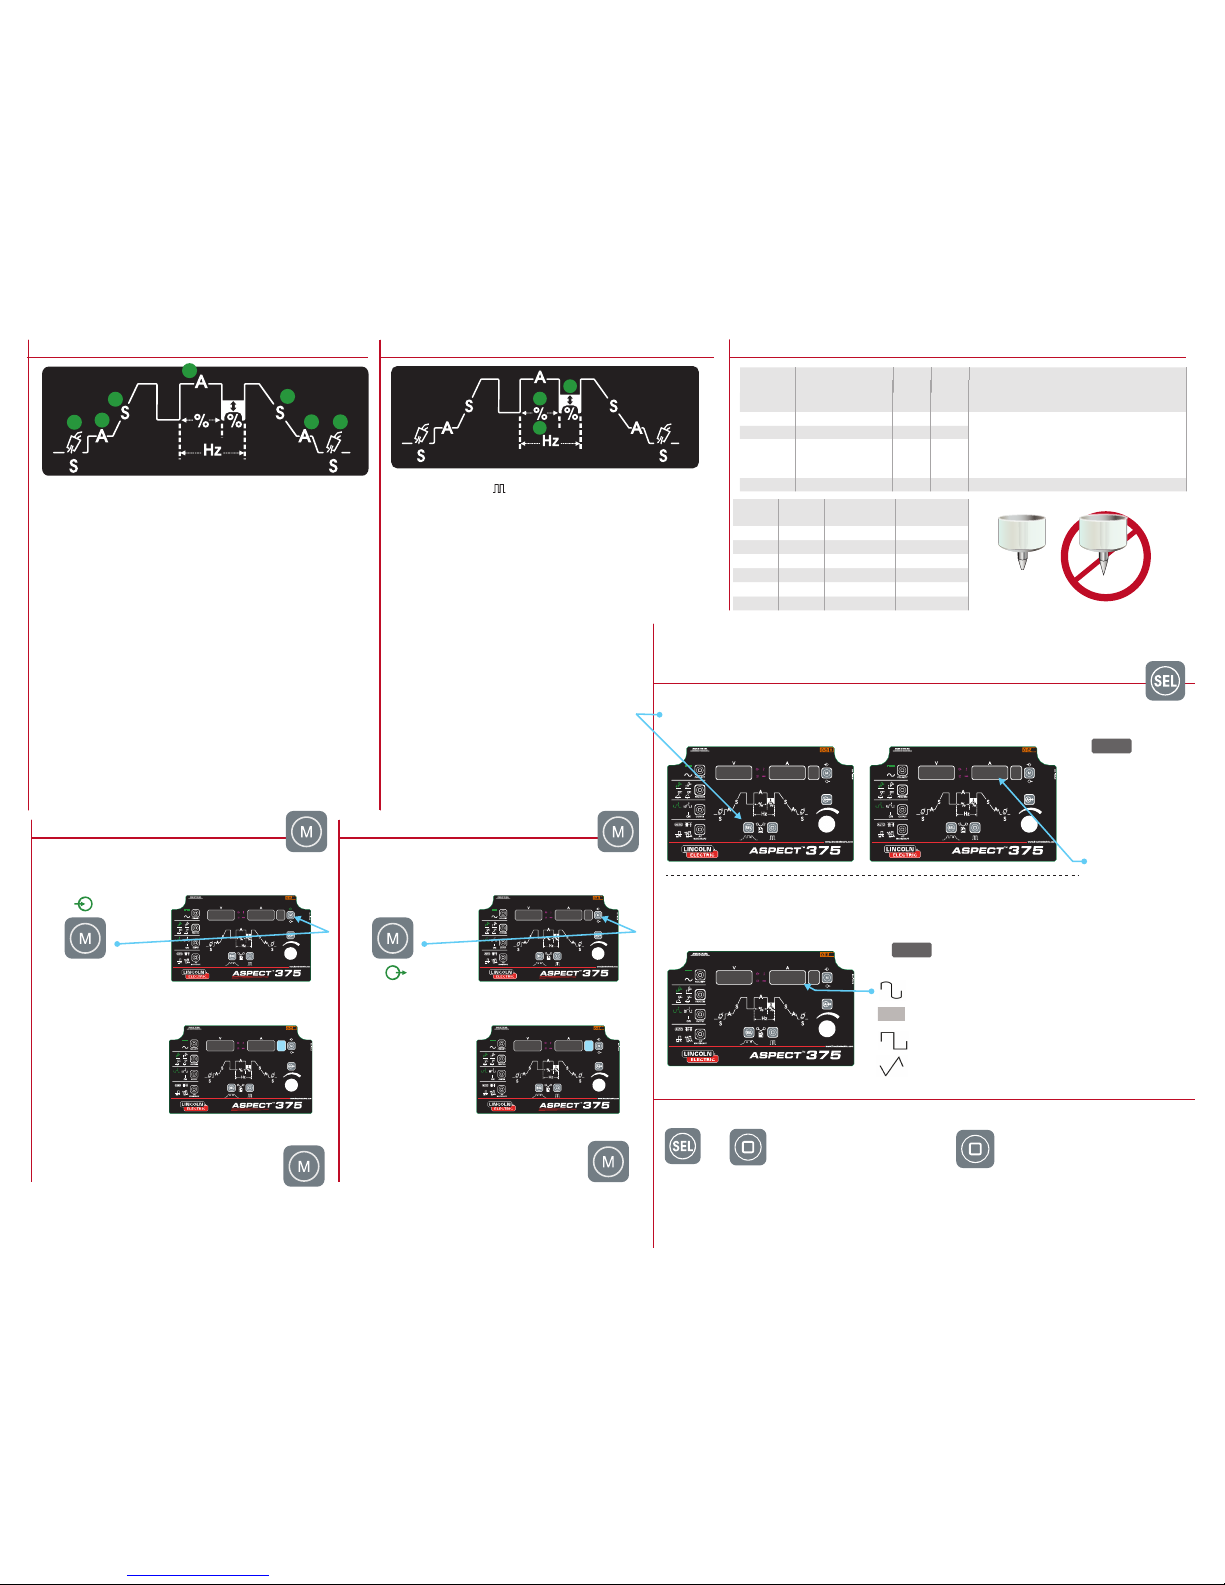
Save
1.) Press Memory button to save a Memory location.
2.) Turn control knob to select Memory location.
3.) Press and hold Memory button for
5 seconds. Memory is now saved.
Memory Save Functions
3 sec.
MEM SET #
MEM SAV
Recall
1.) Press Memory button to recall a Memory location.
2.) Turn control knob to select Memory location.
3.) Press and hold Memory button for
5 seconds. Memory is now recalled.
Memory Recall Functions
3 sec.
MEM RECL
RECL MEM
Tungsten
Diameter
Cup Size DC Polarity
Amp Range
AC Polarity
Amp Range
0.020” 3, 4 or 5 2-20 2-20
0.040” 4 or 5 15-80 20-80
1/16” 4, 5 or 6 30-140 40-150
3/32” 6, 7 or 8 60-220 70-230
1/8” 7, 8 or 10 220-325 240-350
5/32” 8 or 10 300-375 350-375
Tungsten - Pure Tungsten is NOT Recommended
Tungsten should have a slightly blunted tip.
Tungsten Shaping
4 4
MENU G TAW
1
DIA 3/32
1
#
Intellistart, Tungsten Diameter,
and AC Wave Form Settings
5 sec.
5 sec.
5 sec.+
Tungsten Diameter
Selected desired tungsten
diameter for optimized arc
starting performance.
O.020”
0.040”
1/16”
3/32” default
1/8”
5/32”
AUTO = Intellistart™
ADV*
Press Sequencer button (SEL) for 5 seconds to access GTAW Setup Menu.
Press “SEL” button again until Diameter (DIA) setting appears
Rotate the main control knob to desired diameter or AUTO for Intellistart™
Press “SEL” button until Wave Form (WAVE) setting appears
Rotate Main Knob to desired Wave Form
SMAW Menu – Stick Welding
Press Pulse button
for 5 seconds to
access SMAW Setup Menu.
System Menu
Press Sequencer button (SEL) &
Pulse button together for 5 seconds
to access System Setup Menu.
DIA
NOTE * Tungsten ADV represents
Advanced Arc Starting settings.
Refer to Operator’s Manual
IM10152QS - © Lincoln Global Inc.
Press Sequencer (SEL) button to select through each of
the following settings (see 1-7 below). Within each
setting, make adjustments with main control knob.
1.) Pre-Flow: Sets the time in seconds that shielding gas will
ow prior to arc-start initiation.
2.) Starting Amperage: Sets the Starting Amperage for the
process.
3.) Initial Slope: Sets the time in seconds it takes the Starting
Amperage to reach user dened Operating Amperage.
Only functions in 4-Step operation.
4.) Operating Amperage: Sets the maximum Operating
Amperage.
5.) Final Slope: Sets the time in seconds it takes the Operating
Amperage to ramp down to the Finishing Amperage.
Only functions in 4-Step operation.
6.) Finishing Amperage: Sets the Finishing Amperage for the
process.
7.) Post Flow: Sets the time in seconds that shielding gas will
ow after the arc is extinguished. Default is set to Auto.
1
2
3
4
6
Sequencer Functions
Press Pulse button to activate Pulse functions.
Press Sequencer button (SEL) to select through each of the
following settings (see 8-10 below). Within each setting,
make adjustments with main control knob.
8.) Percent Peak Current: Sets the amount of time the pulse
waveform is set at the Peak Current setting. This function is set
as a percentage of total time for the pulse cycle.
9.) Pulses Per Second: Sets the total number of pulse cycles per
second of time.
10.) Background Current: Sets the Background
Current as a percentage of Peak Current.
Pulse Functions
8
9
10
Conventional TIG Pulsing
(< 10 pulses per second)
• Helps moderate filler metal deposition for consistent
bead appearance.
• Alternating the current between peak and background
reduces heat input and material distortion.
High Speed TIG Pulsing
(Up to 2,500 pulses per second)
• Increased puddle agitation for improved weld microstructure.
• Focused, stable arc.
• Increased travel speeds and reduced heat input.
5
7
AC Wave Forms
Soft Square default - Increased puddle control.
Sine - A soft sounding arc.
Square - Faster travel speeds.
Triangular - Reduced heat input on thinner
materials. Also provides for better cleaning
for anodized applications.
WAVE
Color Tungsten Types AC
Polarity
DC
Polarity
Applications
Color Tungsten Types AC
Polarity
DC
Polarity
Applications
Gold 1.5% Lanthanated
X
Blue 2% Lanthanted
X X
Good all around choice for both AC and DC, in welding
low alloyed & non-corroding steels, aluminum, magnesium, titanium, nickel, and copper.
Grey 2% Ceriated
X X
Chartreuse or
Purple
1.5% Lanthanum,
0.08% Zirconium,
0.08% Yttrium
X X
White 0.08% Zirconiated
X
A very good choice for aluminum or magnesium alloys.
Good choice for welding titanium, nickel,
copper, mild steel and stainless steel.
This menu contains system calibration controls and diagnostics - See
manual for additional information.
This menu contains stick welding Arc Force, Hot Start &
Stick Polarity controls - See manual for additional information.
™
1
WAVE SOFT
1
 Loading...