

Page 1

This information is subject to the controls of the Export Administration Regulations [EAR].
RETURN TO MAIN MENU
User's Manual
Spirit II 400
High Current Density Plasma Cutting System
with Manual Gas Console (MGC)
718118 Rev D
This information shall not be provided to non-U.S. persons or transferred by any means to
any location outside the United States contrary to the requirements of the EAR.
Page 2

Prologue Spirit II User’s Manual
Rev
ECO#
Author
Date
Description of Change
Added 100A/150A silver electrodes, replaced RHF with ISC,
pressure.
clarify cabling requirements for various configurations.
Corrected contact ratings on page 3-19.
Added pinouts to CII, FII, JII cables in Parts List.
Revision History
A - CAD 02/04/2013 Initial Release
B LAD0202 CAD 06/07/2013
C LAD0217 CAD 08/06/2013
D LAD0228 CAD 08/28/2013
This documentation may not be copied, photocopied, reproduced, translated,
or reduced to any electronic medium or machine-readable format without
explicit written permission from Kaliburn.
FASTON is a trademark of the TE Connectivity Ltd family of companies.
Other logos, products and company names mentioned herein
may be trademarks of their respective owners.
© Copyright 2013 Kaliburn Inc.
4130 Carolina Commerce Parkway
corrected system interconnect diagrams, changed rated inlet
gas pressure to 115 psi, added 100 psi minimum to inlet gas
Deionization filter cartridge (500510) replaced sediment filter
(300152). Parts list updated.
Expanded notes on System Interconnection diagrams to
a Lincoln Electric Company
Ladson, SC 29456 USA
This information is subject to the controls of the Export Administration Regulations [EAR]. This information shall not be provided to
non-U.S. persons or transferred by any means to any location outside the United States contrary to the requirements of the EAR.
ii
Page 3

Spirit II User’s Manual Prologue
Table of Contents
Section 1: Safety
General Precautions ......................................................................................... 1-1
Ultraviolet Radiation Protection ......................................................................... 1-1
Noise Protection ................................................................................................ 1-1
Toxic Fume Prevention ..................................................................................... 1-2
Electric Shock Prevention ................................................................................. 1-2
Fire Prevention .................................................................................................. 1-3
Explosion Prevention......................................................................................... 1-3
Health Support Equipment ................................................................................ 1-4
Safety Standards Booklet Index ........................................................................ 1-5
Section 2: Specifications
System Description ........................................................................................... 2-1
System Components ......................................................................................... 2-2
Power Supply Specifications ............................................................................. 2-3
Cooling System Specifications .......................................................................... 2-4
Torch Coolant Specifications ............................................................................. 2-5
Manual Gas Console (MGC) Specifications ...................................................... 2-6
Gas Supply Requirements ................................................................................ 2-7
Impulse Start Console (ISC) Specifications ....................................................... 2-8
Torch and 2-Gang Manifold Specifications ........................................................ 2-9
5-Gang Manifold Specifications ......................................................................... 2-10
Airborne Noise Emissions ................................................................................. 2-11
Section 3: Installation
Initial Inspection ................................................................................................ 3-1
Component Placement ...................................................................................... 3-1
System Interconnection ..................................................................................... 3-2
Power Supply Primary Power Connections ....................................................... 3-5
Power Supply Output Connections ................................................................... 3-7
ISC Control Cable and ISC Ground Connections .............................................. 3-9
Cooling System Connections ............................................................................ 3-9
Torch Leads to Impulse Start Console Connections ......................................... 3-11
Torch Leads to Torch Base Connections .......................................................... 3-13
Torch Gas Connections ..................................................................................... 3-14
Gas Supply Connections ................................................................................... 3-17
CAN Communication Connections .................................................................... 3-18
CNC Machine Interface Connections ................................................................ 3-19
Initial Filling of the Cooling System ................................................................... 3-20
This information is subject to the controls of the Export Administration Regulations [EAR]. This information shall not be provided to
non-U.S. persons or transferred by any means to any location outside the United States contrary to the requirements of the EAR.
iii
Page 4

Prologue Spirit II User’s Manual
Section 4: Operation
Operating the Manual Gas Console (MGC) ...................................................... 4-1
Setting up to Cut ............................................................................................... 4-2
Setting up to Mark (Overrides Cut) .................................................................... 4-3
Verifying Input Gas Pressures ........................................................................... 4-3
Making a Cut or Mark ........................................................................................ 4-4
Piercing Thick Materials .................................................................................... 4-5
Moving Pierces and Edge Starts ....................................................................... 4-5
Cut Quality ........................................................................................................ 4-6
Checking Errors ................................................................................................ 4-7
Checking the Version and Serial Number ......................................................... 4-7
Changing the Language .................................................................................... 4-8
Adjusting the Screen Contrast ........................................................................... 4-8
Section 5: Torch Consumables and Cutting Charts
Installing / Removing the Torch Head ............................................................... 5-1
Installing / Replacing Consumables .................................................................. 5-2
Maximizing Consumable Life ............................................................................ 5-3
Inspecting for Damage ...................................................................................... 5-4
Selecting Consumables ..................................................................................... 5-5
Cutting Charts ................................................................................................... 5-12
Section 6: Maintenance and Troubleshooting
Routine Maintenance ........................................................................................ 6-1
Replacing the Torch Coolant and Filter ............................................................. 6-4
Microprocessor (DSP) Status Indicators ........................................................... 6-5
Microprocessor (DSP) Sequence of Operation ................................................. 6-5
Error Codes ....................................................................................................... 6-7
General Troubleshooting ................................................................................... 6-9
Chopper Test Procedure ................................................................................... 6-11
This information is subject to the controls of the Export Administration Regulations [EAR]. This information shall not be provided to
non-U.S. persons or transferred by any means to any location outside the United States contrary to the requirements of the EAR.
iv
Page 5

Spirit II User’s Manual Prologue
Section 7: Parts List
Power Supply (300232 - 300239) ...................................................................... 7-1
Cooling System (300275) .................................................................................. 7-4
Manual Gas Console (300600) ......................................................................... 7-5
Impulse Start Console (300500) ........................................................................ 7-7
Torch and Manifold Assemblies ........................................................................ 7-8
Shielded Torch Leads ....................................................................................... 7-9
CAN Communication Cable and Termination Plug ........................................... 7-9
Manifold Control Cables .................................................................................... 7-9
Gas Hose Package with MGC ........................................................................... 7-10
Cooling System Control Cable .......................................................................... 7-10
Coolant and Power Leads ................................................................................. 7-11
Work Ground Lead ............................................................................................ 7-11
Oxygen Supply Gas Hose (Optional) ................................................................ 7-12
Nitrogen Supply Gas Hose (Optional) ............................................................... 7-12
Air Supply Gas Hose (Optional) ........................................................................ 7-12
H17 Supply Gas Hose (Optional) ...................................................................... 7-12
"CII" Cable (for Optional External Inova) ........................................................... 7-13
"FII" Cable (for Optional Internal Inova) ............................................................. 7-14
"JII" Cable (for Optional Internal Inova) ............................................................. 7-15
Section 8: Internal Inova Console Option
Overview ........................................................................................................... 8-1
Plug Identification .............................................................................................. 8-1
Unique Interconnect Cables .............................................................................. 8-1
Grounding ......................................................................................................... 8-2
Parts List ........................................................................................................... 8-3
Appendix A: Electromagnetic Compatibility (EMC)
Background ....................................................................................................... A-1
Installation and Use ........................................................................................... A-1
Assessment of Area .......................................................................................... A-2
Methods of Reducing Emissions ....................................................................... A-2
This information is subject to the controls of the Export Administration Regulations [EAR]. This information shall not be provided to
non-U.S. persons or transferred by any means to any location outside the United States contrary to the requirements of the EAR.
v
Page 6

Prologue Spirit II User’s Manual
Limited Warranty
KALIBURN expressly warrants that this product shall be free from defects in materials
and workmanship, under proper and normal use for the intended function of such
product, for a period of three (3) years for the Spirit II plasma power supply (includes the
cooling system and internally installed Inova option) and one (1) year for all other Spirit
II system component. This warranty does not apply to torch consumable parts.
The warranty period starts three (3) months after the product ships from the factory.
This product is intended for commercial use and is not intended for personal, family, or
household purposes. There are no warranties that extend beyond the express limited
warranty set forth immediately above. All other warranties, whether expressed, implied,
statutory or made herein or in any other communication, including any implied warranty
of merchantability, fitness for any particular purpose or non-infringement, are expressly
excluded.
This warranty will be considered void if the Spirit II system is operated with non-genuine
KALIBURN torch consumables, or if the equipment has been subjected to improper
installation, improper care or abnormal operation.
If this product or any component thereof is determined to be defective in materials or
workmanship, KALIBURN will repair or replace the defective component or product.
The buyer’s remedies are limited to the return of the product for repair or replacement of
any defective product or part at the sole discretion of KALIBURN. No freight charges of
any kind are covered under this warranty. All returned goods shall be at the buyer’s risk
and expense. In no event will KALIBURN be responsible for any special, incidental or
consequential damages or injury to the person or property of anyone by reason of any
defect in any equipment sold hereunder.
Returned Goods Procedure
KALIBURN utilizes a returned goods procedure that must be followed before returning
any items for repair, replacement, or restocking. This means that a returned goods
authorization number must be obtained prior to shipment to KALIBURN. It will be
necessary for the customer to provide a description, along with the part number and
serial number, if applicable, of the item to be returned. In no case will KALIBURN
accept a returned shipment without the proper returned goods authorization number.
For shipments inside the U.S., parts must be returned to KALIBURN within 30 days of
the invoice date to be considered for credit. For shipments outside the U.S., parts must
be returned within 60 days of the invoice date to be considered for credit.
Electromagnetic Compatibility (EMC)
The 380V 50/60Hz and 415V 50/60Hz CE marked Spirit II plasma cutting systems are
manufactured to comply with the European standard EN 60974-10 (Electromagnetic
compatibility (EMC) – Product standard for arc welding equipment). Information about
the EMC standard EN 60974-10 can be found in Appendix A.
This information is subject to the controls of the Export Administration Regulations [EAR]. This information shall not be provided to
non-U.S. persons or transferred by any means to any location outside the United States contrary to the requirements of the EAR.
vi
Page 7

Spirit II User’s Manual Section 1: Safety
Ultraviolet Radiation Protection
Noise Protection
Section 1: Safety
General Precautions
Whereas plasma cutting has been used safely for years, it does require certain
precautions to ensure the safety of the operator and other people around the
equipment. The following safety information must be provided to each person who will
operate, observe, perform maintenance, or work in close proximity to this piece of
equipment.
Installation, operation, and repairs made to the Spirit system should only be performed
by qualified personnel. The system makes use of both A.C. and D.C. circuitry for
operation. Fatal shock hazard does exist. Exercise extreme caution while working
on the system.
Plasma cutting produces ultraviolet radiation similar to a welding arc. This ultraviolet
radiation can cause skin and eye burns. For this reason, it is essential that proper
protection be worn. The eyes are best protected by using safety glasses or a welding
helmet with an AWS No. 12 shade or ISO 4850 No. 13 shade, which provides protection
up to 400 amperes. All exposed skin areas should be covered with flame-retardant
clothing. The cutting area should also be prepared in such a way that ultraviolet light
does not reflect. Walls and other surfaces should be painted with dark colors to reduce
reflected light. Protective screens or curtains should be installed to protect additional
workers in the area from ultraviolet radiation.
The system generates high noise levels while cutting. Depending on the size of the
cutting area, distance from the cutting torch, and arc current cutting level, acceptable
noise levels may be exceeded. Proper ear protection should be used as defined by
local or national codes. See Section 2 for noise emission levels.
This information is subject to the controls of the Export Administration Regulations [EAR]. This information shall not be provided to
non-U.S. persons or transferred by any means to any location outside the United States contrary to the requirements of the EAR.
1-1
Page 8

Section 1: Safety Spirit II User’s Manual
Toxic Fume Prevention
Electric Shock Prevention
Care should be taken to ensure adequate ventilation in the cutting area. Some
materials give off toxic fumes that can be harmful or fatal to people in the vicinity of the
cutting area. Also, some solvents decompose and form harmful gases when exposed
to ultraviolet radiation. These solvents should be removed from the area prior to cutting.
Galvanized metal can produce harmful gases during the cutting process. Ensure proper
ventilation and use breathing equipment when cutting these materials.
Certain metals coated with or containing lead, cadmium, zinc, beryllium, and mercury
produce harmful toxins. Do not cut these metals unless all people subjected to the
fumes wear proper air breathing equipment.
The Spirit system uses high open circuit voltages that can be fatal. Extreme care
should be used when operating or performing maintenance on the system. Only
qualified personnel should service the system. Observe the following guidelines to
protect against electric shock:
• A wall-mounted disconnect switch should be installed and fused according to local
and national electrical codes. The disconnect switch should be located as close as
possible to the power supply so it can be turned off in case of an emergency.
• The primary power cord should have a 600 volt minimum rating in order to protect
the operator. In addition, it should be sized according to local and national electrical
codes. Inspect the primary power cord frequently. Never operate the system if the
power cord is damaged in any way.
• Make sure the primary power ground wire is connected to the input power ground
stud on the power supply. Make sure the connection is securely tightened.
• Make sure the positive output (work ground) of the power supply is connected to a
bare metal area on the cutting table. A driven ground rod should be placed no
further than five feet from this connection. Make sure this ground point on the
cutting table is used as the star ground point for all other ground connections.
• Inspect the torch leads frequently. Never use the system if the leads are damaged
in any way.
• Do not stand in wet, damp areas when operating or performing maintenance on the
system.
• Wear insulated gloves and shoes while operating or performing maintenance on the
system.
• Make sure the system is switched off at the wall disconnect before servicing the
power supply or torch.
This information is subject to the controls of the Export Administration Regulations [EAR]. This information shall not be provided to
non-U.S. persons or transferred by any means to any location outside the United States contrary to the requirements of the EAR.
1-2
Page 9

Spirit II User’s Manual Section 1: Safety
Fire Prevention
Explosion Prevention
• Never change torch consumable parts unless the system is switched off at the wall
disconnect.
• Do not attempt to remove any parts from beneath the torch when cutting.
Remember that the workpiece forms the current path back to the power supply.
• Never bypass the safety interlock devices.
• Before removing any of the covers, switch the system off at the wall disconnect.
Wait at least five (5) minutes before removing any cover. This will give the
capacitors inside the unit time to discharge. See Section 6 for additional safety
precautions.
• Never operate the system without all of the covers in place. See Section 6 for
additional safety precautions.
• Preventive maintenance should be performed daily to avoid possible safety hazards.
When using the Spirit system, it is necessary to exercise good judgment. While cutting,
the arc produces sparks that could cause a fire if they fall on flammable materials.
Make sure that all flammable materials are a suitable distance away from the cutting
area. All flammable liquids should be at least 40 feet away from the cutting area,
preferably stored in a metal cabinet. Plasma cutting should never be attempted on
containers that contain flammable materials. Make sure that fire extinguishers are
readily accessible in the cutting area.
Make sure that the cutting area is properly ventilated when using oxygen as a cutting
gas.
The Spirit system uses compressed gases. Use proper techniques when handling
compressed gas cylinders and other compressed gas equipment. Observe the
following guidelines to protect against explosion:
• Never operate the system in the presence of explosive gases or other explosive
materials.
• Never cut pressurized cylinders or any closed container.
• When using a water table and cutting aluminum under water or with water touching
the underside of the aluminum plate, hydrogen gas is produced. This hydrogen gas
may collect under the plate and explode during the cutting process. Make sure the
water table is properly aerated to help prevent the accumulation of hydrogen gas.
• Handle all gas cylinders in accordance with safety standards published by the U.S.
Compressed Gas Association (CGA), American Welding Society (AWS), Canadian
Standards Association (CSA), or other local or national codes.
This information is subject to the controls of the Export Administration Regulations [EAR]. This information shall not be provided to
non-U.S. persons or transferred by any means to any location outside the United States contrary to the requirements of the EAR.
1-3
Page 10

Section 1: Safety Spirit II User’s Manual
Health Support Equipment
• Compressed gas cylinders should be maintained properly. Never attempt to use a
cylinder that is leaking, cracked, or has other signs of physical damage.
• All gas cylinders should be secured to a wall or rack to prevent accidental knock
over.
• If a compressed gas cylinder is not being used, replace the protective valve cover.
• Never attempt to repair compressed gas cylinders.
• Keep compressed gas cylinders away from intense heat, sparks, or flames.
• Clear the compressed gas cylinder connection point by opening the valve
momentarily prior to installing a regulator.
• Never lubricate compressed gas cylinder valves or pressure regulators with any type
of oil or grease.
• Never use a compressed gas cylinder or pressure regulator for any purpose other
than which it is intended.
• Never use a pressure regulator for any gas other than which it is intended.
• Never use a pressure regulator that is leaking or has other signs of physical
damage.
• Never use oxygen hoses and pressure regulators for any gas other than oxygen.
• Never use any gas hose that is leaking or has other signs of physical damage.
The Spirit system creates electric and magnetic fields that may interfere with certain
types of health support equipment, such as pacemakers. Any person who uses a
pacemaker or similar item should consult a doctor before operating, observing,
maintaining, or servicing the system. Observe the following guidelines to minimize
exposure to these electric and magnetic fields:
• Stay as far away from the power supply, torch, torch leads, and impulse start
console as possible.
• Route the torch leads as close as possible to the work ground cable.
• Never place your body between the torch leads and work ground cable. Keep the
work ground cable and the torch leads on the same side of your body.
• Never stand in the center of a coiled up set of torch leads or work ground cable.
This information is subject to the controls of the Export Administration Regulations [EAR]. This information shall not be provided to
non-U.S. persons or transferred by any means to any location outside the United States contrary to the requirements of the EAR.
1-4
Page 11

Spirit II User’s Manual Section 1: Safety
Safety Standards Booklet Index
For further information concerning safety practices to be exercised with plasma arc
cutting equipment, please refer to the following publications:
1. AWS Standard AWN, Arc Welding and Cutting Noise, obtainable from the American
Welding Society, 550 NW LeJeune Road, Miami, FL 33126.
2. AWS Standard C5.2, Recommended Practices for Plasma Arc Cutting, obtainable
from the American Welding Society, 550 NW LeJeune Road, Miami, FL 33126.
3. AWS Standard FSW, Fire Safety in Welding and Cutting, obtainable from the
American Welding Society, 550 NW LeJeune Road, Miami, FL 33126.
4. AWS Standard F4.1, Recommended Safe Practices for Preparation for Welding and
Cutting of Containers and Piping, obtainable from the American Welding Society,
550 NW LeJeune Road, Miami, FL 33126.
5. AWS Standard ULR, Ultraviolet Reflectance of Paint, obtainable from the American
Welding Society, 550 NW LeJeune Road, Miami, FL 33126.
6. AWS / ANSI Standard Z49.1, Safety in Welding, Cutting, and Allied Processes,
obtainable from the American Welding Society, 550 NW LeJeune Road, Miami, FL
33126.
7. ANSI Standard Z41.1, Standard For Men’s Safety-Toe Footwear, obtainable from
the American National Standards Institute, 11 West 42nd Street, New York, NY
10036.
8. ANSI Standard Z49.2, Fire Prevention in the Use of Cutting and Welding
Processes, obtainable from the American National Standards Institute, 11 West
42nd Street, New York, NY 10036.
9. ANSI Standard Z87.1, Safe Practices For Occupation and Educational Eye and
Face Protection, obtainable from the American National Standards Institute, 11
West 42nd Street, New York, NY 10036.
10. ANSI Standard Z88.2, Respiratory Protection, obtainable from the American
National Standards Institute, 11 West 42nd Street, New York, NY 10036.
11. OSHA Standard 29CFR 1910.252, Safety and Health Standards, obtainable from
the U.S. Government Printing Office, Washington, D.C. 20402.
This information is subject to the controls of the Export Administration Regulations [EAR]. This information shall not be provided to
non-U.S. persons or transferred by any means to any location outside the United States contrary to the requirements of the EAR.
1-5
Page 12

Section 1: Safety Spirit II User’s Manual
12. NFPA Standard 51, Oxygen - Fuel Gas Systems for Welding, Cutting, and Allied
Processes, obtainable from the National Fire Protection Association, 1
Batterymarch Park, Quincy, MA 02269.
13. NFPA Standard 51B, Cutting and Welding Processes, obtainable from the National
Fire Protection Association, 1 Batterymarch Park, Quincy, MA 02269.
14. NFPA Standard 70, National Electrical Code, obtainable from the National Fire
Protection Association, 1 Batterymarch Park, Quincy, MA 02269.
15. CGA booklet P-1, Safe Handling of Compressed Gases in Containers, obtainable
from the Compressed Gas Association, 1725 Jefferson Davis Highway, Suite 1004,
Arlington, VA 22202.
16. CGA booklet P-14, Accident Prevention in Oxygen-Rich and Oxygen-Deficient
Atmospheres, obtainable from the Compressed Gas Association, 1725 Jefferson
Davis Highway, Suite 1004, Arlington, VA 22202.
17. CGA booklet TB-3, Hose Line Flashback Arrestors, obtainable from the
Compressed Gas Association, 1725 Jefferson Davis Highway, Suite 1004,
Arlington, VA 22202.
18. CSA Standard W117.2, Safety in Welding, Cutting, and Allied Processes,
obtainable from Canadian Standards Association, 178 Rexdale Boulevard, Toronto,
Ontario M9W lR3, Canada.
19. Canadian Electrical Code Part 1, Safety Standard for Electrical Installations,
obtainable from the Canadian Standards Association, 178 Rexdale Boulevard,
Toronto, Ontario M9W 1R3, Canada.
This information is subject to the controls of the Export Administration Regulations [EAR]. This information shall not be provided to
non-U.S. persons or transferred by any means to any location outside the United States contrary to the requirements of the EAR.
1-6
Page 13

Spirit II User’s Manual Section 2: Specifications
Section 2: Specifications
System Description
The Spirit II 400 is a 400 amp microprocessor controlled, 100% duty cycle high current
density plasma cutting and marking system. It utilizes a precision, dual gas torch that is
capable of cutting mild steel up to 3" thick and stainless steel up to 1-1/2” thick.
The system contains a manually controlled gas console, which also provides the
primary interface to the entire Spirit system.
For cutting mild steel, the system uses oxygen for the plasma gas and either oxygen or
air for the shielding gas. When cutting stainless steel or other non-ferrous materials, air
or H17 (17.5% hydrogen, 32.5% argon, 50% nitrogen) is used for the plasma gas and
either air or nitrogen is used for the shielding gas. Oxygen and nitrogen are used for
the preflow and postflow gases.
The torch is water-cooled and consumables are machined to exacting dimensions and
checked with the latest computerized measuring systems. Nine nozzle sizes (30, 50,
70, 100, 150, 200, 260, 275, and 400 amps) are available to produce excellent cut
quality throughout the cutting range.
Each enclosure in the system is rated for IP21S sealing, which is intended for
indoor use only. The system is not suitable for use in rain or snow.
This information is subject to the controls of the Export Administration Regulations [EAR]. This information shall not be provided to
non-U.S. persons or transferred by any means to any location outside the United States contrary to the requirements of the EAR.
2-1
Page 14

Section 2: Specifications Spirit II User’s Manual
System Components
The Spirit II 400 System consists of the following components:
Standard Components
• Power Supply
• Cooling System (includes torch coolant)
• Cooling System Control Cable
• Manual Gas Console
• CAN Cable
• CAN Termination Plug
• Impulse Start Console (ISC)
• ISC Control Cable
• ISC Ground Cable
• Torch and Handle Assembly
• Torch Lead Set
• 5-gang Manifold Assembly
• 5-gang Manifold Control Cable
• 2-gang Manifold Assembly
• 2-gang Manifold Control Cable
• 17 Inch Plasma Hose
• Coolant and Power Leads
• Gas Hose Package
• Work Ground Lead
• Spirit II User’s Manual
Optional Components
• Supply Gas Hoses
• Internal Inova Console
This information is subject to the controls of the Export Administration Regulations [EAR]. This information shall not be provided to
non-U.S. persons or transferred by any means to any location outside the United States contrary to the requirements of the EAR.
2-2
Page 15
Spirit II User’s Manual Section 2: Specifications
Input Current at
Maximum Output
220 VAC, 3Ø, 60Hz
300232
262 amps
240 VAC, 3Ø, 60Hz
300233
240 amps
380 VAC, 3Ø, 50/60Hz
300234
152 amps
400 VAC, 3Ø, 50/60Hz
300235
144 amps
415 VAC, 3Ø, 50/60Hz
300236
140 amps
440 VAC, 3Ø, 50/60Hz
300237
131 amps
480 VAC, 3Ø, 60Hz
300238
120 amps
600 VAC, 3Ø, 60Hz
300239
96 amps
34.2" [869]
49.5" [1257]
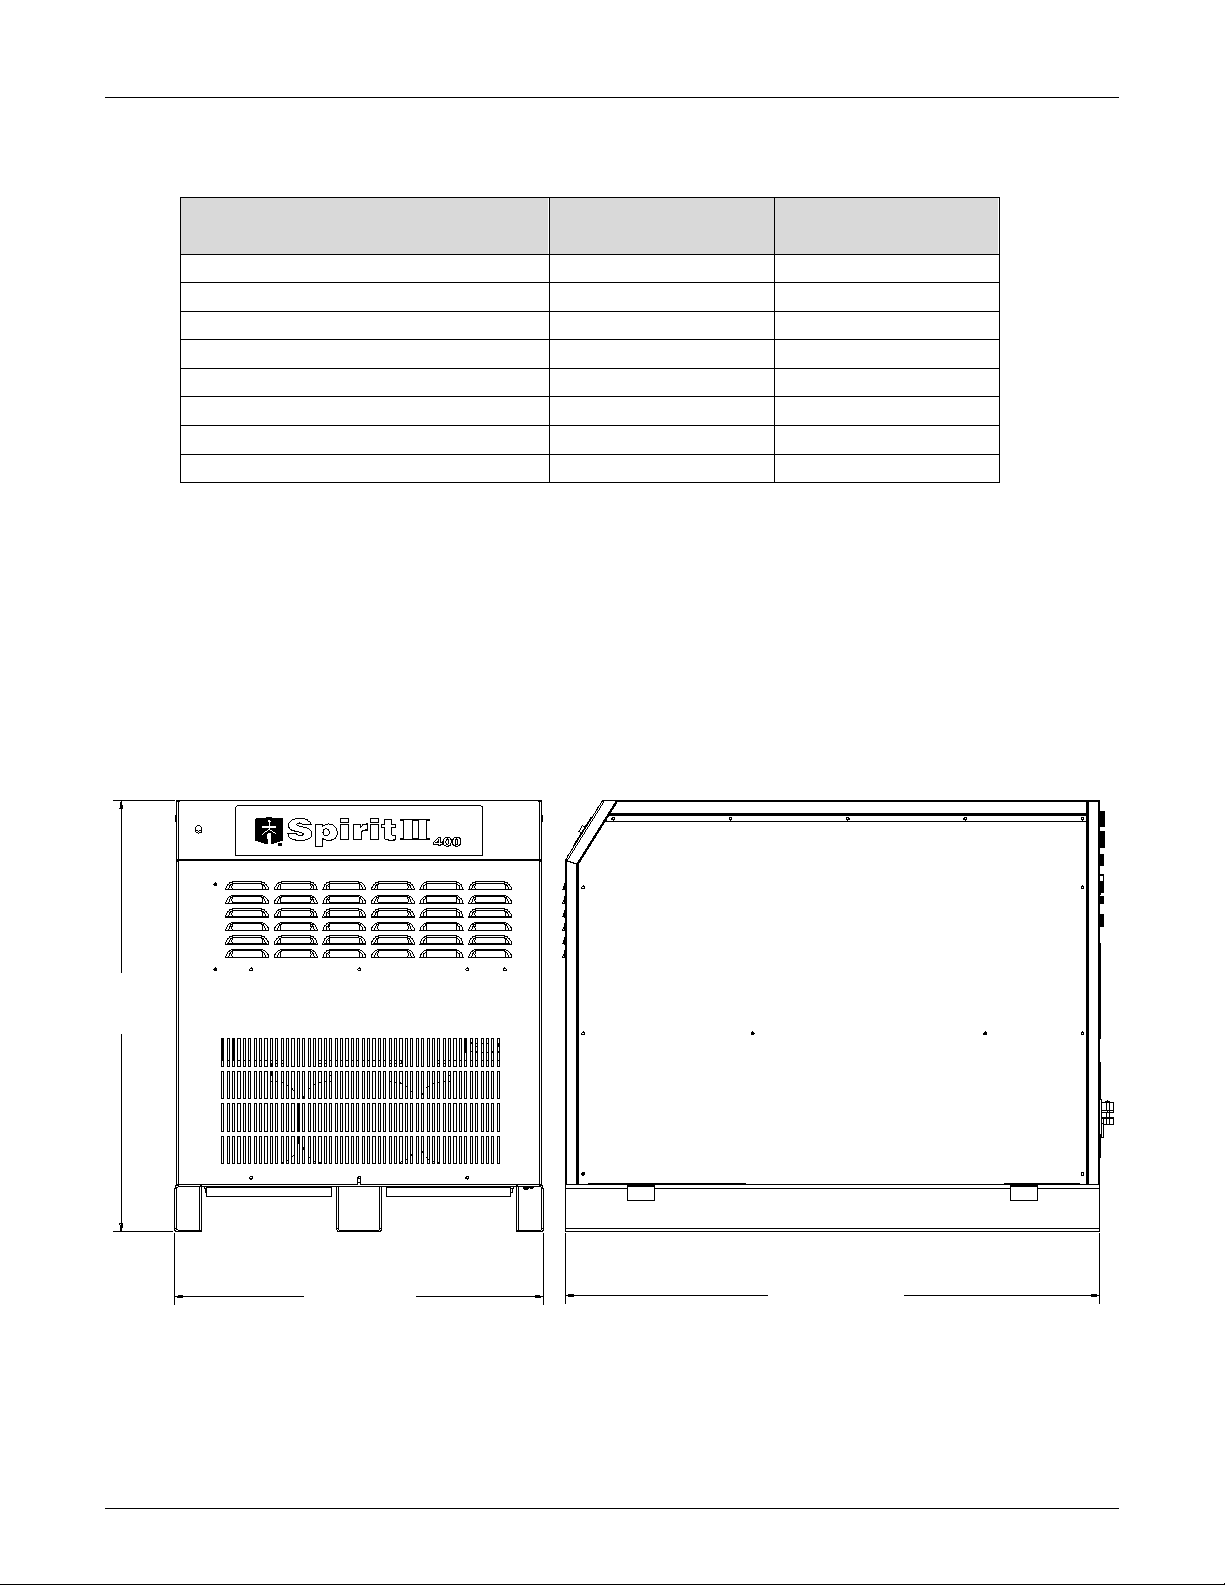
Power Supply Specifications
Power Supply Description Part Number
Open Circuit Voltage ......................................... 370 VDC
Output Current (drooping characteristic) ........... 10 - 400 amps
Maximum Output Voltage ................................. 200 VDC
Duty Cycle ........................................................ 100% @ 80 kW
Maximum Ambient Temperature ....................... 104° F (40° C)
Weight .................................... .......................... 1922 lb (872 kg)
39.9"
[1013]
This information is subject to the controls of the Export Administration Regulations [EAR]. This information shall not be provided to
non-U.S. persons or transferred by any means to any location outside the United States contrary to the requirements of the EAR.
2-3
Page 16
Section 2: Specifications Spirit II User’s Manual
36.0" [914]
23.0" [584]
15.8" [401]
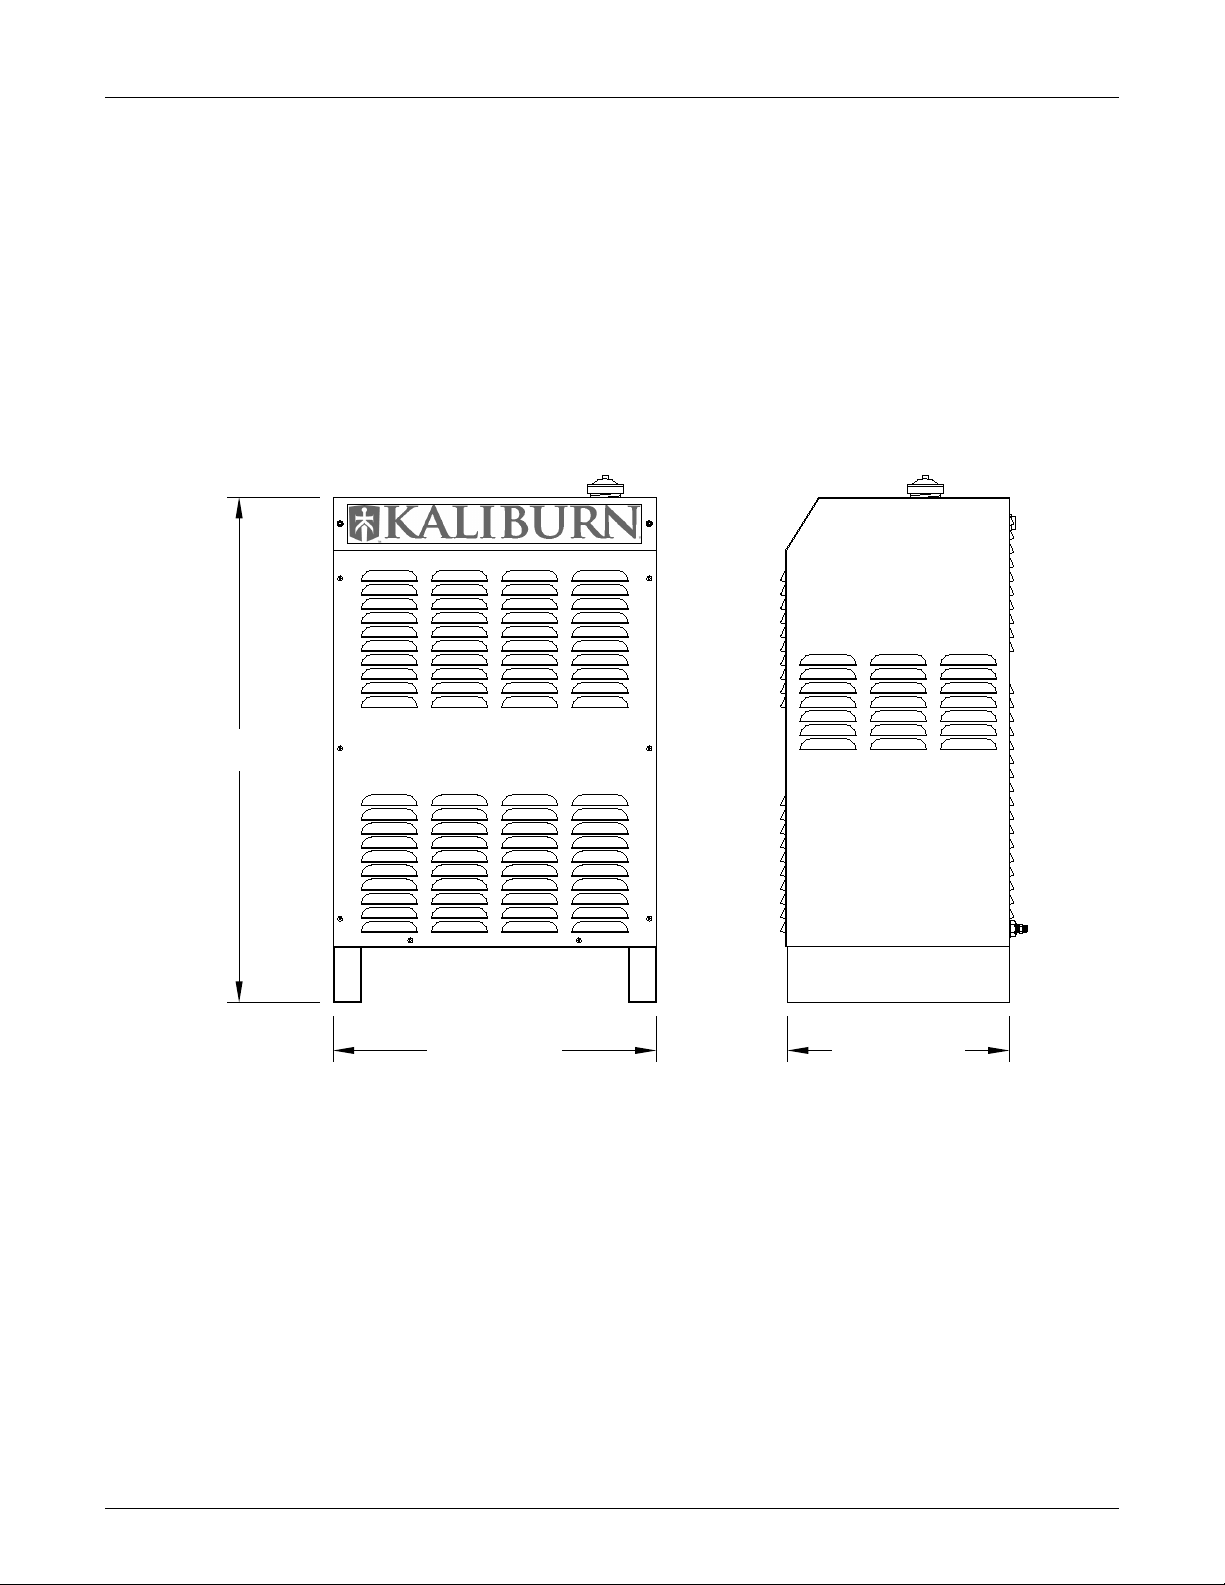
Cooling System Specifications
Part Number ..................................................... 300275
Discharge pressure .......................................... 150 psi (10.2 bar)
Flow rate .......................................................... 2.1 gal/min (7.9 liters/min)
Coolant fluid ..................................................... Propylene glycol solution
Coolant tank capacity ....................................... 3.2 gal (12 liters)
Weight .............................................................. 141 lb (64 kg) (without coolant)
This information is subject to the controls of the Export Administration Regulations [EAR]. This information shall not be provided to
non-U.S. persons or transferred by any means to any location outside the United States contrary to the requirements of the EAR.
2-4
Page 17

Spirit II User’s Manual Section 2: Specifications
Torch Coolant Specifications
Note: Refer to the supplier’s most current Material Safety Data Sheet for
information regarding safety, handling, and storage of torch coolant.
The Spirit system is shipped without torch coolant in the reservoir. Coolant
must be added before applying power to the system. Only use Kaliburn
approved torch coolant solution for optimal system performance as commercially
available antifreeze contains corrosion inhibitors that will damage the cooling
system. The standard coolant solution consists of 25% industrial grade
propylene glycol and provides freezing protection down to -13º C (9º F). The
standard solution can be ordered in one-gallon containers, PN 500695. For
operating temperatures below -13º C, a 50% solution of industrial grade
propylene glycol can be ordered in one-gallon containers, PN 500895, providing
protection down to -36º C (-33º F).
Failure to use the proper propylene glycol solution may result in cooling
system and/or torch damage.
The torch coolant should be flushed out of the Spirit system every six months
and replaced with new coolant. The coolant filter / deionization cartridge should
also be changed at the same time. See Section 6 for details.
This information is subject to the controls of the Export Administration Regulations [EAR]. This information shall not be provided to
non-U.S. persons or transferred by any means to any location outside the United States contrary to the requirements of the EAR.
2-5
Page 18
Section 2: Specifications Spirit II User’s Manual
12.4" [315]
12.0" [305]
13.7" [348]
10.9" [277]
7.0" [178]
(4) Ø .300 [7.6]
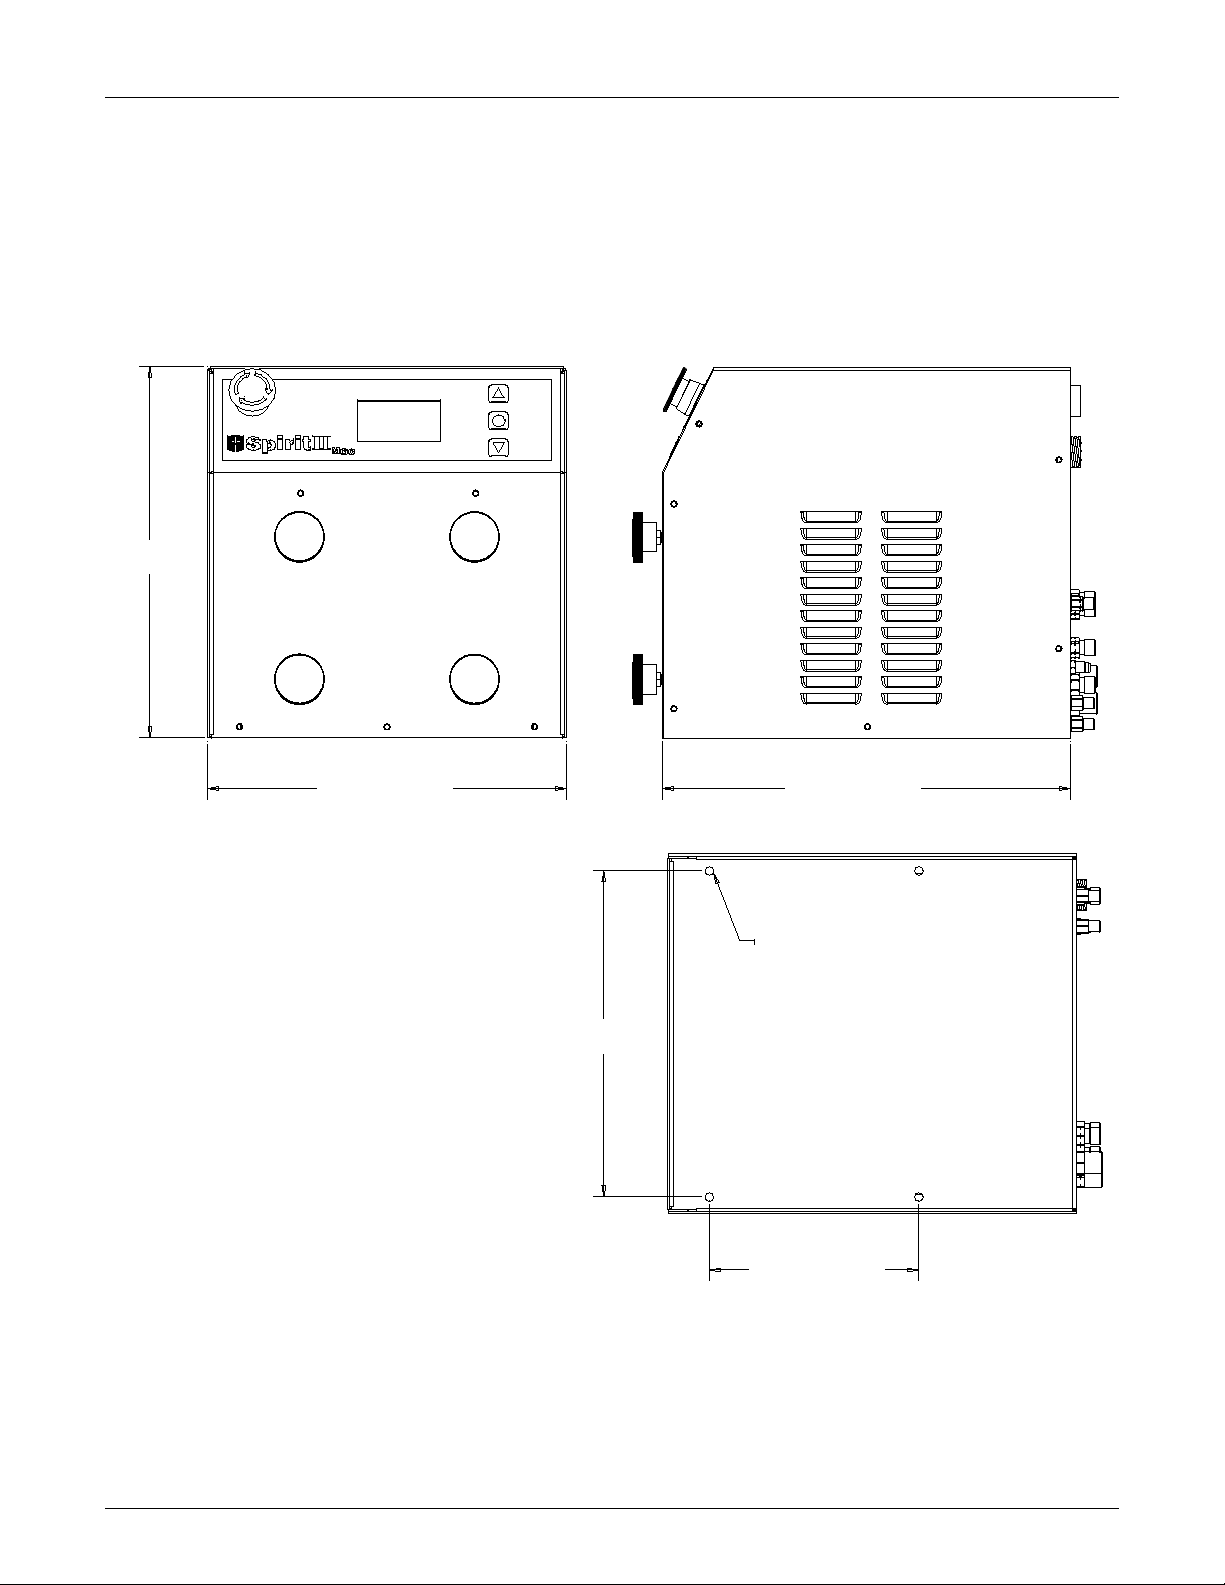
Manual Gas Console (MGC) Specifications
Part Number .................................................... 300600
Weight .............................................................. 50 lb (23 kg)
This information is subject to the controls of the Export Administration Regulations [EAR]. This information shall not be provided to
non-U.S. persons or transferred by any means to any location outside the United States contrary to the requirements of the EAR.
2-6
Page 19

Spirit II User’s Manual Section 2: Specifications
Gas Supply Requirements
Plasma gas types:
Mild Steel ..................................................... Oxygen
Stainless Steel ............................................ Air, Nitrogen, or H17
Aluminum .................................................... Air or Nitrogen
Shield gas types:
Mild Steel ..................................................... Oxygen or Air
Stainless Steel ............................................. Air or Nitrogen
Aluminum .................................................... Air or Nitrogen
Preflow gas type ............................................... Oxygen and Nitrogen
Marking gas type............................................... Nitrogen
Plasma gas flow rate (maximum):
Oxygen ........................................................ 78 scfh (2209 liters/hour)
Air ................................................................ 67 scfh (1897 liters/hour)
H17 or Nitrogen ........................................... 106 scfh (3002 liters/hour)
Shield gas flow rate (maximum):
Oxygen ........................................................ 19 scfh (538 liters/hour)
Air ................................................................ 258 scfh (7306 liters/hour)
Nitrogen ...................................................... 326 scfh (9231 liters/hour)
Preflow gas flow rate (maximum) ...................... 60 scfh (1699 liters/hour)
Marking gas flow rate (maximum) ..................... 89 scfh (2520 liters/hour)
Rated Inlet gas pressure ................................... 115 psi (7.9 bar)
Minimum Inlet gas pressure .............................. 110 psi (7.6 bar)
Maximum Inlet gas pressure ............................. 145 psi (10.0 bar)
Oxygen and nitrogen should be supplied with a purity of at least 99.5%.
H17 should be supplied with a purity of at least 99.995%.
A potential fire hazard exists when cutting with oxygen. KALIBURN recommends
that an exhaust ventilation system be used when cutting with oxygen. Flashback
arrestors must be supplied (unless they are not available for the chosen gases
and pressures) to prevent a possible fire from propagating back to the gas
supplies.
Ensure that oxygen lines remain free from contaminants such as oil and grease. The
mixture of such contaminants with oxygen presents an additional fire hazard.
Compressed air must be clean, dry, and oil-free and may be supplied from compressed
cylinders or from an air compressor. Be aware that shop air systems are prone to oil
and moisture contamination. If shop air is used, it must be cleaned to ISO 8573.1:
Class 1.4.1. Specify dry air when using compressed cylinders. Breathing quality air
contains moisture and must not be used.
3/8” (inside diameter) hoses are required for all inlet gas connections. Mating
connectors are supplied with the unit. Quick-connect fittings must not be used.
This information is subject to the controls of the Export Administration Regulations [EAR]. This information shall not be provided to
non-U.S. persons or transferred by any means to any location outside the United States contrary to the requirements of the EAR.
2-7
Page 20
Section 2: Specifications Spirit II User’s Manual
12.75" [324]
8.00" [203]
12.00" [305]
13.50" [343]
10.00" [254]
5.35" [136]
(4) Ø.312 [8]
Impulse Start Console (ISC) Specifications
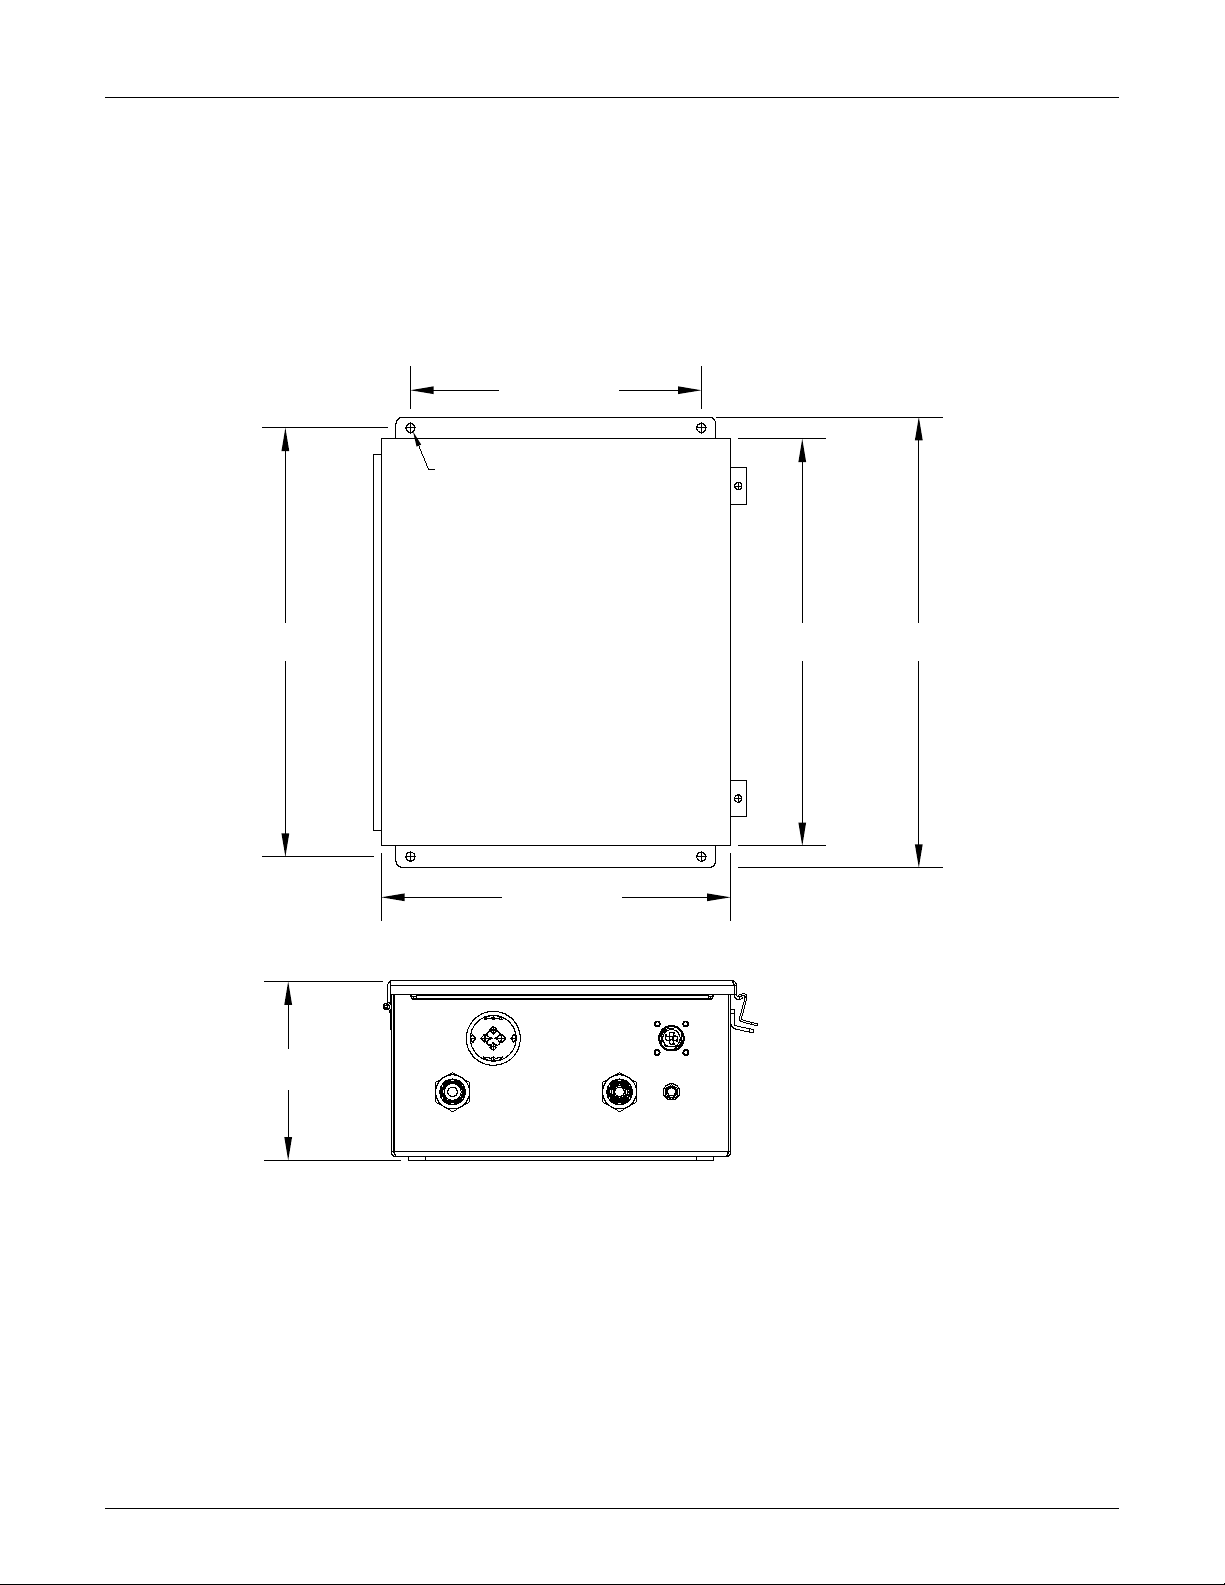
Part Number ..................................................... 300500
Weight .............................................................. 22 lb (10 kg)
This information is subject to the controls of the Export Administration Regulations [EAR]. This information shall not be provided to
non-U.S. persons or transferred by any means to any location outside the United States contrary to the requirements of the EAR.
2-8
Page 21
Spirit II User’s Manual Section 2: Specifications
Torch Head
Torch Base
Torch Handle
1.99"
Alignment Indicator
Attachment Ring
Manifold
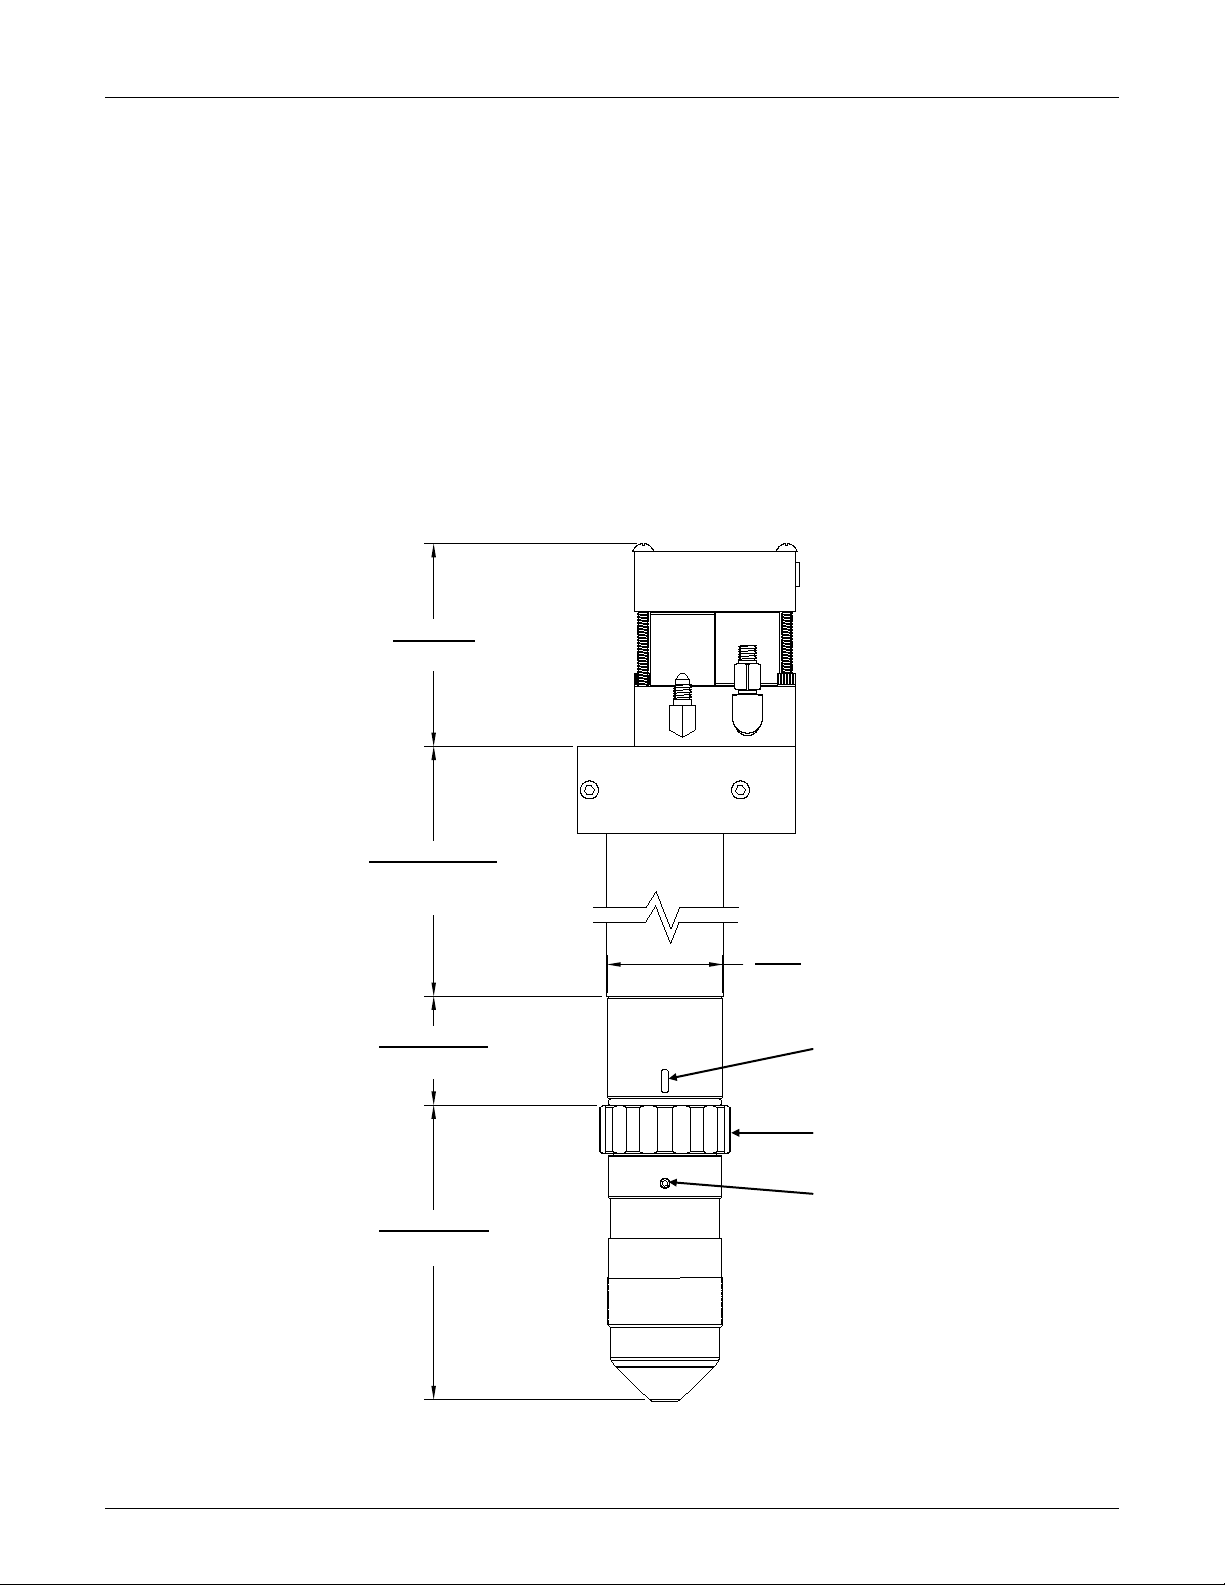
Torch and 2-Gang Manifold Specifications
Part Number:
2-Gang Manifold Assembly .................................................. 284214
Torch Handle (standard) ...................................................... 278001
Torch Handle (short) ............................................................ 278018
Torch Base........................................................................... 279000
Torch Head (Copper Electrode) ........................................... 279100
Torch Head (Silver Electrode) .............................................. 279060
Max Weight:
Manifold/Bracket, Handle (278001), Base and Head ........... 8.3 lbs (3.8 kg)
3.38" [86]
278001 = 9.46" [240]
278018 = 7.06" [179]
[51]
1.87" [47]
5.08" [129]
(Slot)
Alignment Indicator
(Circle)
This information is subject to the controls of the Export Administration Regulations [EAR]. This information shall not be provided to
non-U.S. persons or transferred by any means to any location outside the United States contrary to the requirements of the EAR.
2-9
Page 22
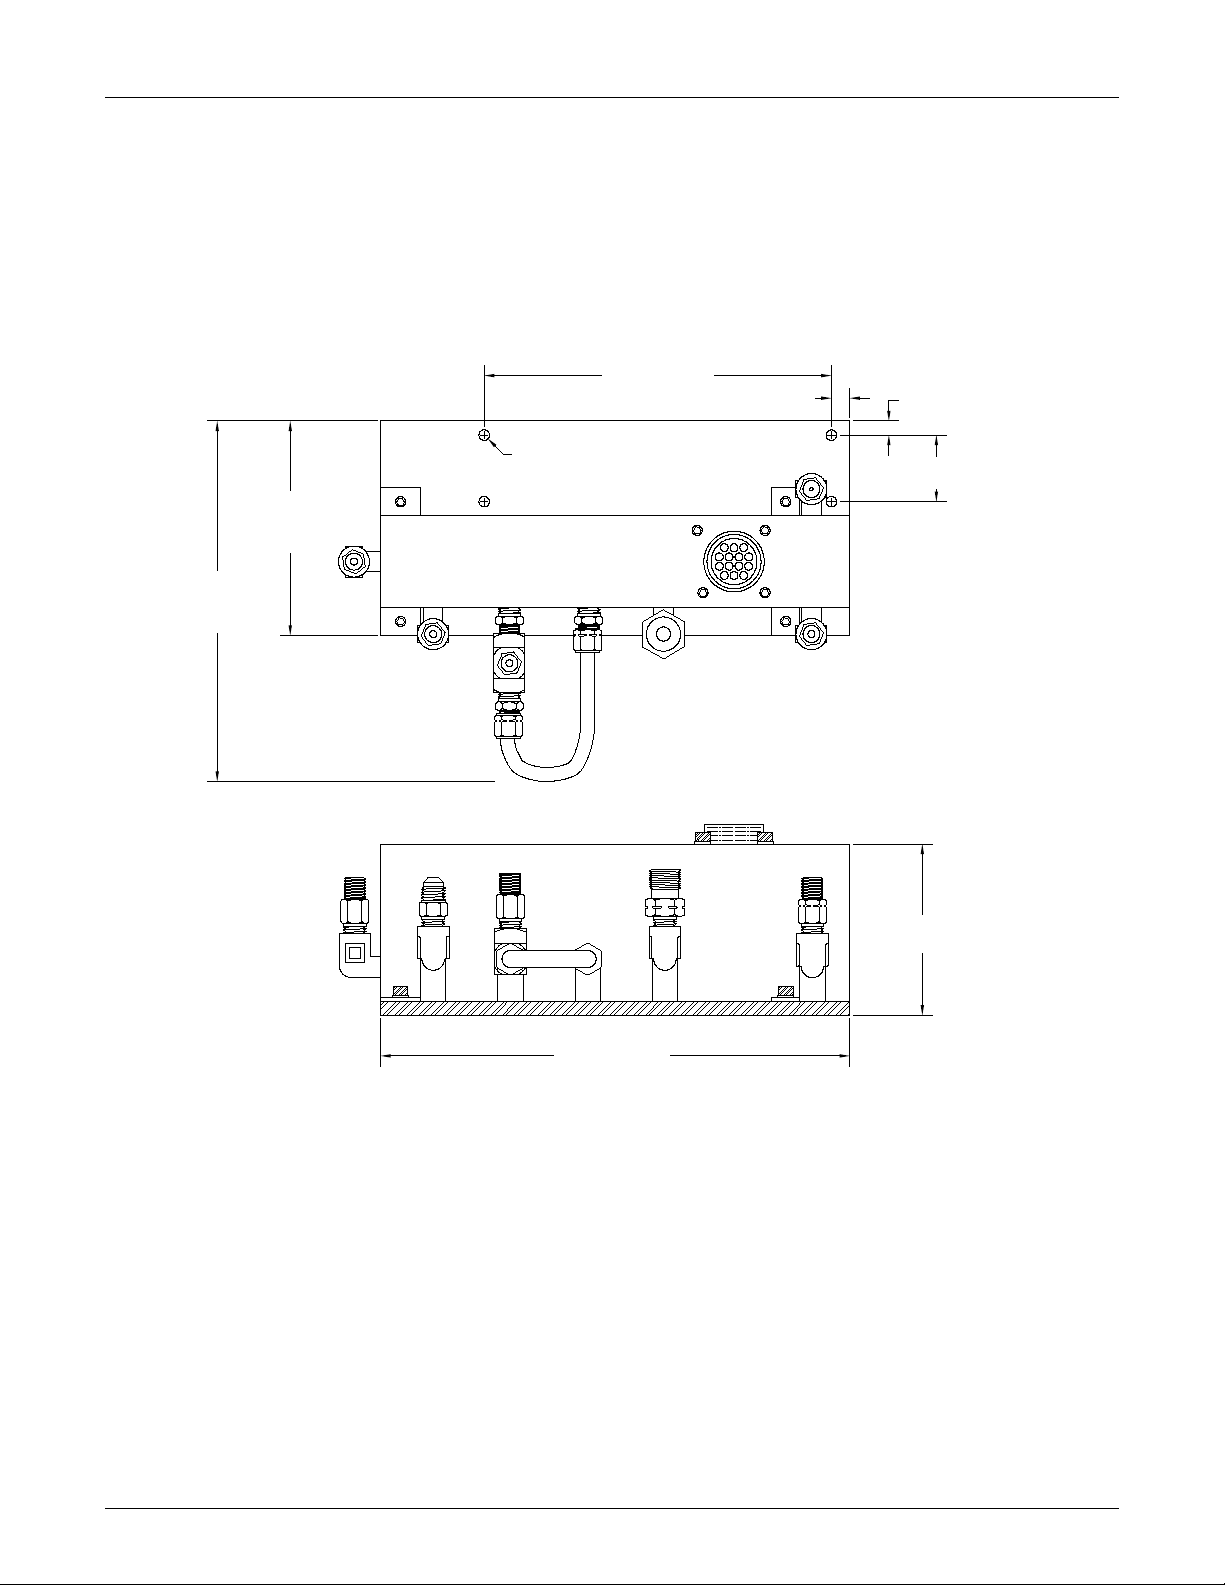
Section 2: Specifications Spirit II User’s Manual
4.20"
6.18" [157]
0.327" [8.3]
0.25" [6.4]
1.18" [30]
3.035" [77]
(4) 0.187" [4.8] Mounting Holes
5-Gang Manifold Specifications
Part Number .................................................... 280022
Weight .............................................................. 6 lb (2.7 kg)
3.80"
[97]
[107]
8.35" [212]
This information is subject to the controls of the Export Administration Regulations [EAR]. This information shall not be provided to
non-U.S. persons or transferred by any means to any location outside the United States contrary to the requirements of the EAR.
2-10
Page 23

Spirit II User’s Manual Section 2: Specifications
A-Weighted Sound
Pressure Level
C-Weighted Sound
Pressure Level
1 meter horizontal / 1.6
workpiece
Airborne Noise Emissions
The system generates high noise levels while cutting. Depending on the size of the
cutting area, distance from the cutting torch, and arc current cutting level, acceptable
noise levels may be exceeded. Proper ear protection should be used as defined by
local or national codes. The following chart gives the noise levels generated by the
system when operating at 400 amps, 205 arc volts. The measurements were made
with a sound level meter.
Distance From Torch
meters above the
120 dB 115 dB
The maximum noise level is 131 dB at a distance of 3 inches (76.2 mm) from the torch
while cutting at 400 amps, 205 arc volts.
This information is subject to the controls of the Export Administration Regulations [EAR]. This information shall not be provided to
non-U.S. persons or transferred by any means to any location outside the United States contrary to the requirements of the EAR.
2-11
Page 24

Section 2: Specifications Spirit II User’s Manual
BLANK
This information is subject to the controls of the Export Administration Regulations [EAR]. This information shall not be provided to
non-U.S. persons or transferred by any means to any location outside the United States contrary to the requirements of the EAR.
2-12
Page 25
Spirit II User’s Manual Section 3: Installation
WARNING
when lifting.
Section 3: Installation
Initial Inspection
All systems undergo full testing before being shipped from Kaliburn. In the unlikely
event that one of the components is defective or missing, please contact Kaliburn so a
replacement item can be sent. Also, Kaliburn has taken special care in packaging the
system. If the system was damaged during shipment, file a claim with the shipping
company, and then contact Kaliburn to order replacement parts.
Component Placement
Plasma Power Supply
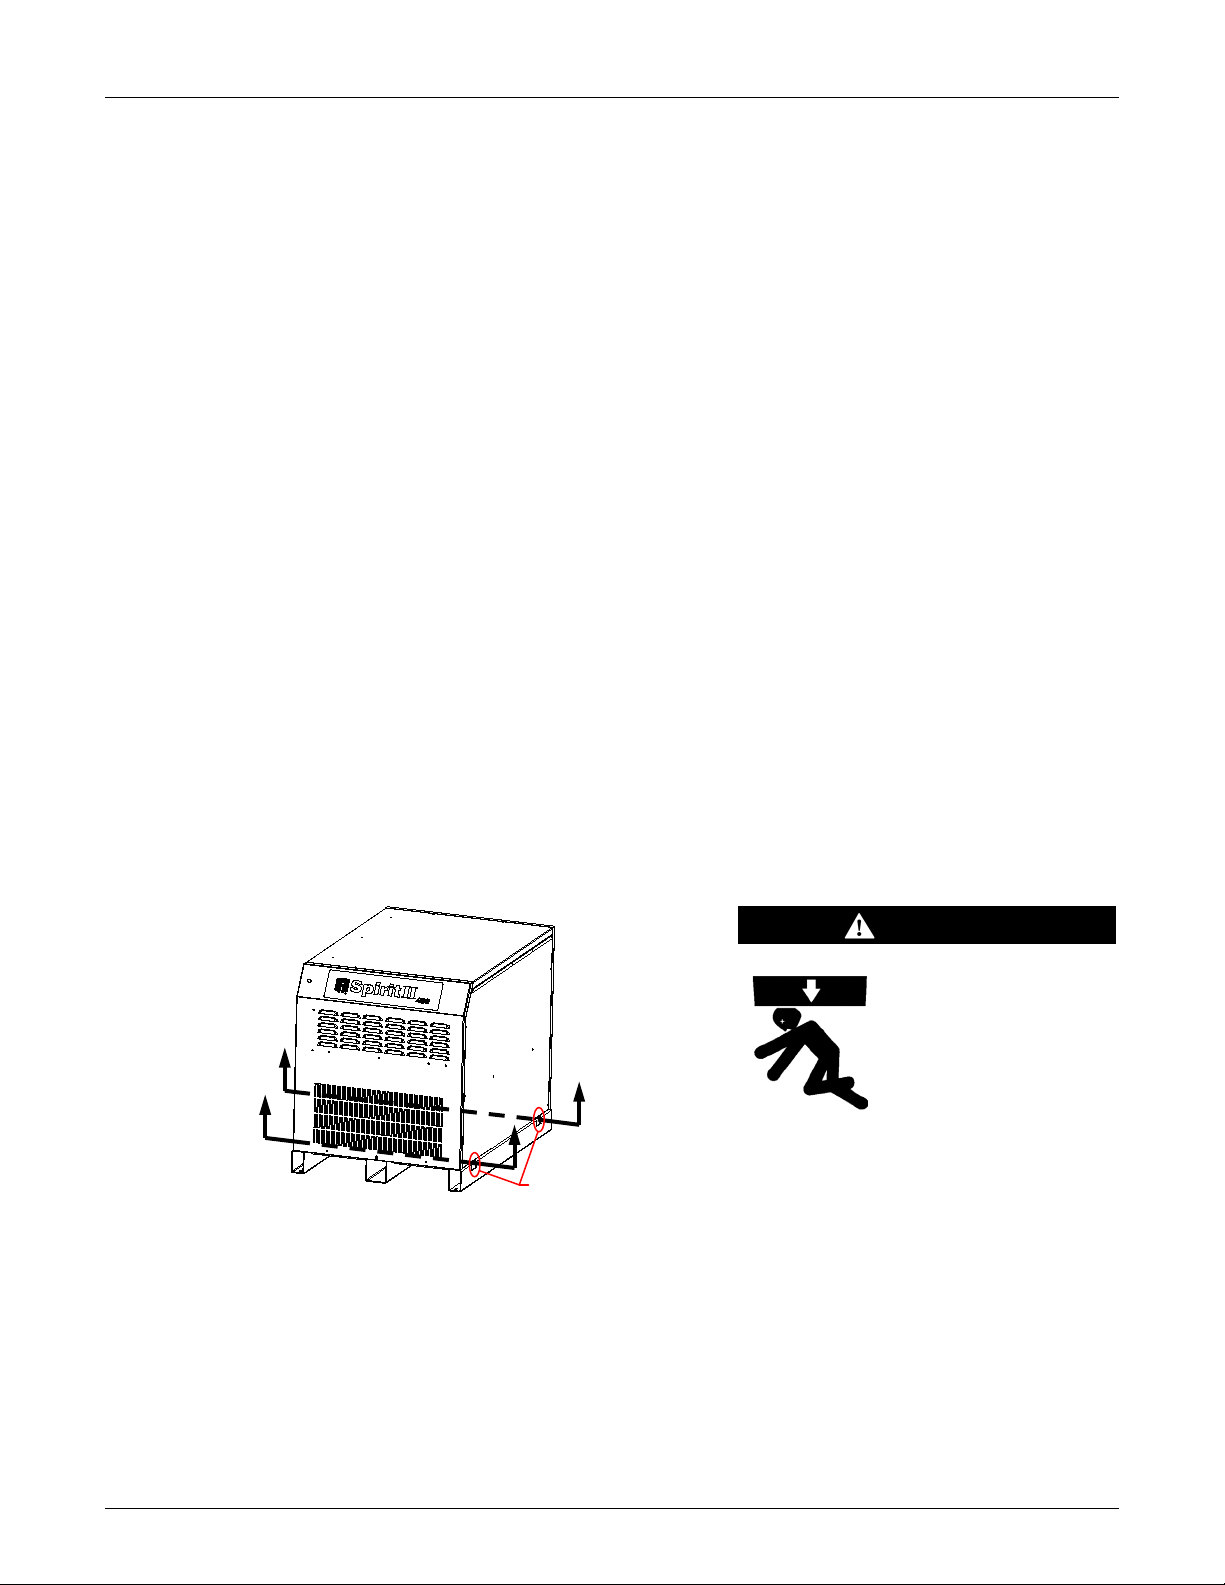
The power supply should be lifted by a forklift, pallet jack or crane. In order to prevent
damaging the power supply when lifting with a forklift or pallet jack, the forks should be
of adequate length to protrude on the far side of the power supply. If lifting with a sling
(lifting straps), ensure the following:
• Sling and material handling equipment must comply with local and national laws
and regulations. The personnel involved in the move must be properly trained
and qualified to use such equipment.
• All power supply covers must be securely installed.
• Two slings are required. Each sling should pass through all three (3) structural
members on the bottom of the power supply. See sling access holes below.
• Lift slowly -not more than 8 in. (203 mm) high- to ensure even weight distribution.
• Move slowly to prevent uncontrollable acceleration/deceleration.
Falling equipment
can cause injury.
• Lift only with
equipment of
adequate lifting
capacity.
• Be sure power
Sling
Access
Hole
supply is stable
The proper location of the power supply will provide dependable service and reduce
periodic maintenance time. Choose a location that will provide unrestricted air
movement into and out of the power supply. Maintain at least 24 inches of space on
all sides of the unit. The location should subject the power supply to the least amount
of dust, dirt, moisture, and corrosive vapors. The surface on which the power supply is
located should have a grade of no greater than 10º to eliminate the risk of toppling over.
This information is subject to the controls of the Export Administration Regulations [EAR]. This information shall not be provided to
non-U.S. persons or transferred by any means to any location outside the United States contrary to the requirements of the EAR.
3-1
Page 26

Section 3: Installation Spirit II User’s Manual
The power supply must be cleaned as often as necessary to prevent the accumulation
of metallic dust inside the unit. See Section 2 for unit dimensions.
Manual Gas Console (MGC)
The MGC should be mounted near the CNC controller so that it is easy accessible by
the operator. See Section 2 for mounting dimensions.
Impulse Start Console (ISC)
The ISC should be mounted in a convenient location that is away from other electronic
control devices. The ISC offers significantly reduced emissions compared to traditional
high frequency, however, the high voltage pulse generated inside the unit may interfere
with the operation of sensitive control electronics. The ISC is usually mounted on the
gantry of the cutting machine or on the cutting table. See Section 2 for mounting
dimensions.
5-Gang Manifold
The 5-gang manifold assembly must be mounted within 6 feet (1.8 m) of the torch. See
Section 2 for mounting dimensions.
2-Gang Manifold
The 2-gang manifold assembly must be mounted to the torch. See Section 2 for
mounting dimensions.
Torch
The torch must be installed on the positioner of an arc voltage control (height control)
capable of maintaining the cutting arc voltage within 1 arc volt. The arc voltage must be
adjustable in 1 arc volt increments. The positioner must be rigid to ensure cut quality
and a torch collision sensor is highly recommended. See Section 2 for mounting
dimensions.
Cooling System
The cooling system must be located within 8 feet (2.4 meters) of the plasma power
supply. The surface on which the cooling system is located should have a grade of no
greater than 10º to eliminate the risk of toppling over. See Section 2 for unit
dimensions.
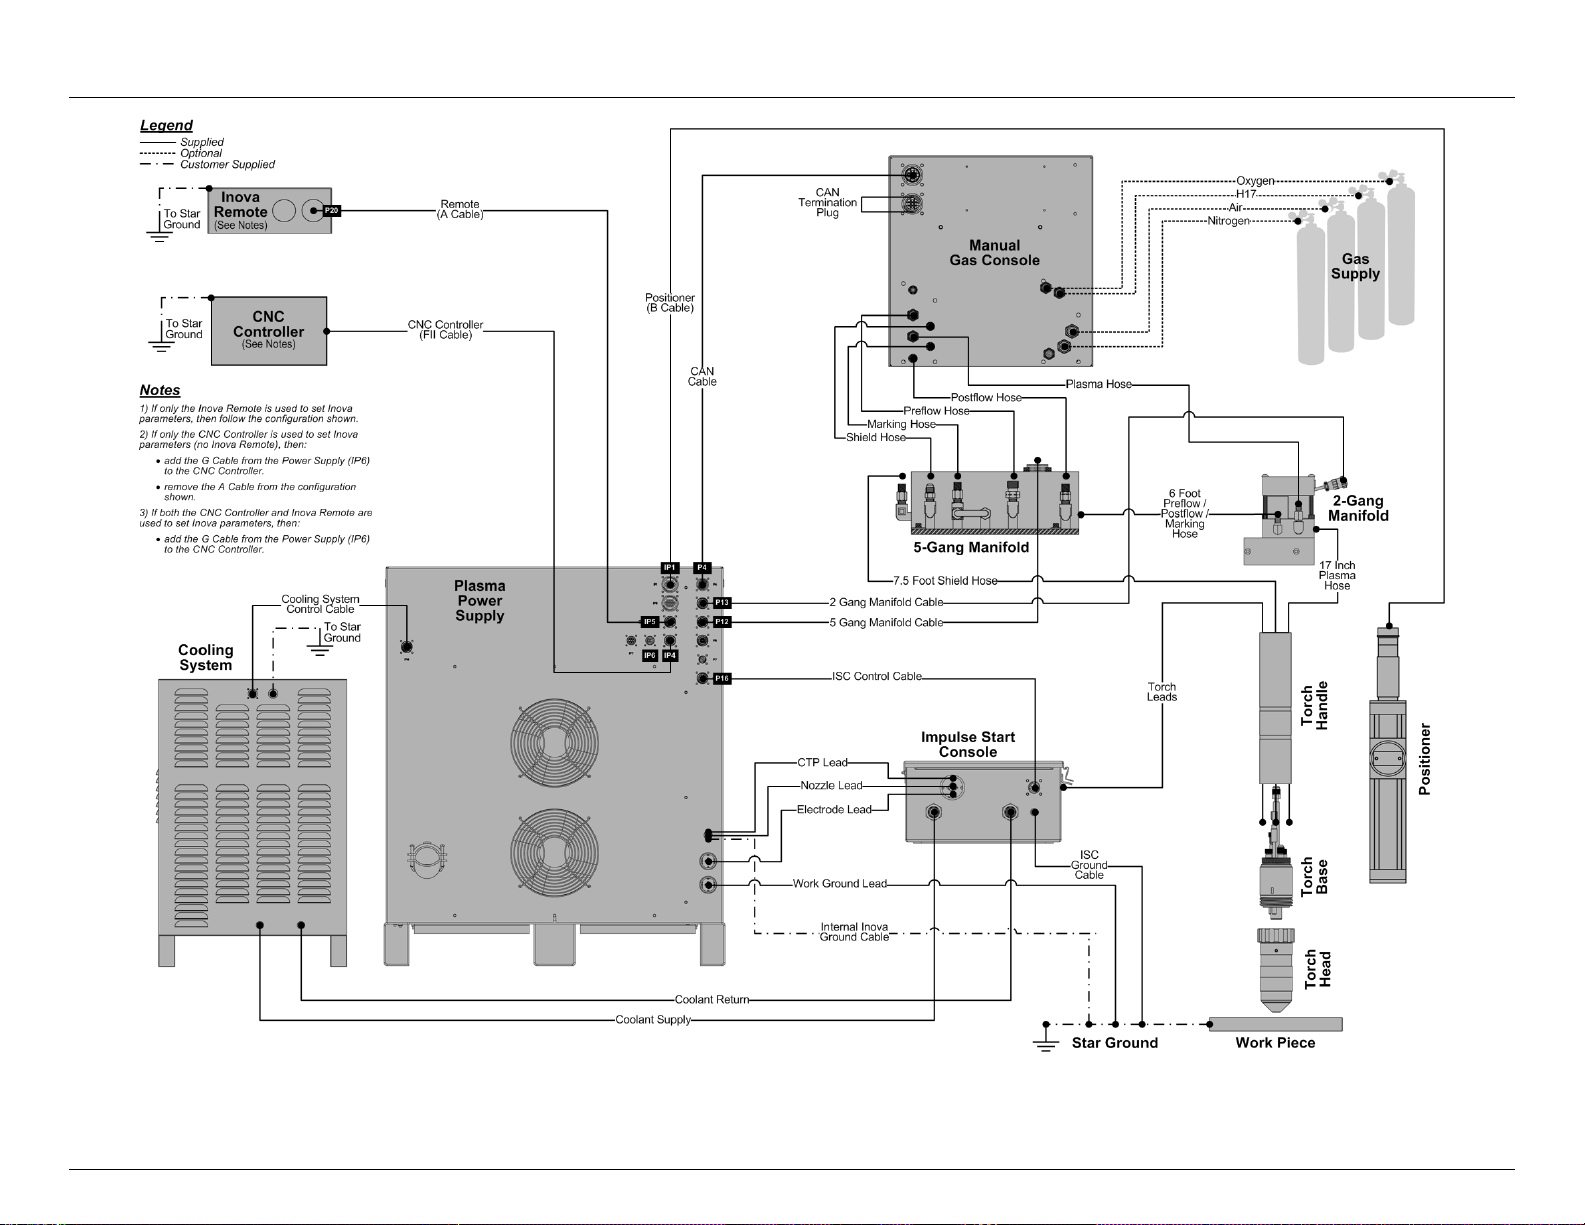
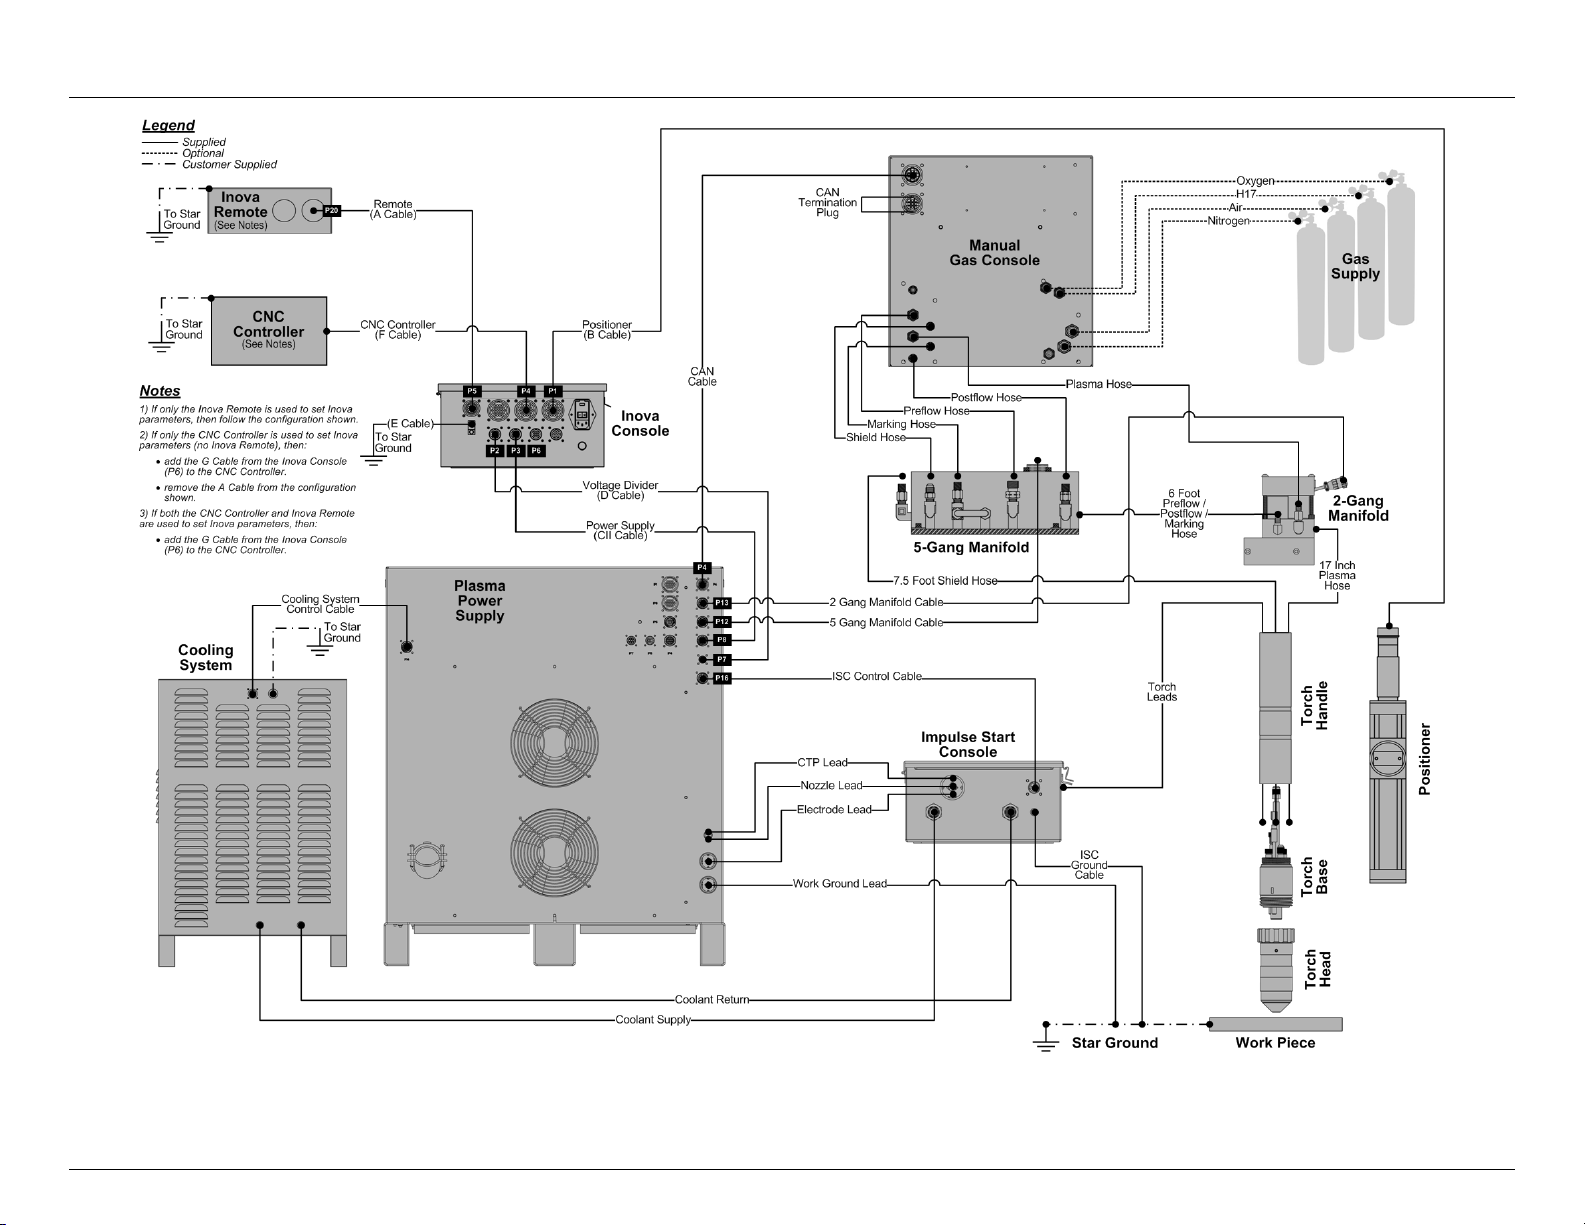
System Interconnection
The Spirit II system interconnection diagrams on the following pages will assist in the
planning and installation of the system as well as identifying cables and hoses upon
receipt.
The optional Inova torch height control is also shown to assist with its connections,
whether as an external console or internal to the plasma power supply.
This information is subject to the controls of the Export Administration Regulations [EAR]. This information shall not be provided to
non-U.S. persons or transferred by any means to any location outside the United States contrary to the requirements of the EAR.
3-2
Page 27
Spirit II User’s Manual Section 3: Installation
Figure 1: Spirit II System with Manual Gas Console and Internal Inova System
This information is subject to the controls of the Export Administration Regulations [EAR]. This information shall not be provided to
non-U.S. persons or transferred by any means to any location outside the United States contrary to the requirements of the EAR.
3-3
Page 28
Section 3: Installation Spirit II User’s Manual
Figure 2: Spirit II System with Manual Gas Console and External Inova System
This information is subject to the controls of the Export Administration Regulations [EAR]. This information shall not be provided to
non-U.S. persons or transferred by any means to any location outside the United States contrary to the requirements of the EAR.
3-4
Page 29
Spirit II User’s Manual Section 3: Installation
Input Current
Output (amps)
Recommended
Size (amps)
220 VAC, 60Hz
262
350
240 VAC, 60Hz
240
300
380 VAC, 50/60Hz
152
200
400 VAC, 50/60Hz
144
175
415 VAC, 50/60Hz
140
175
440 VAC, 50/60Hz
131
175
480 VAC, 60Hz
120
150
600 VAC, 60Hz
96
125
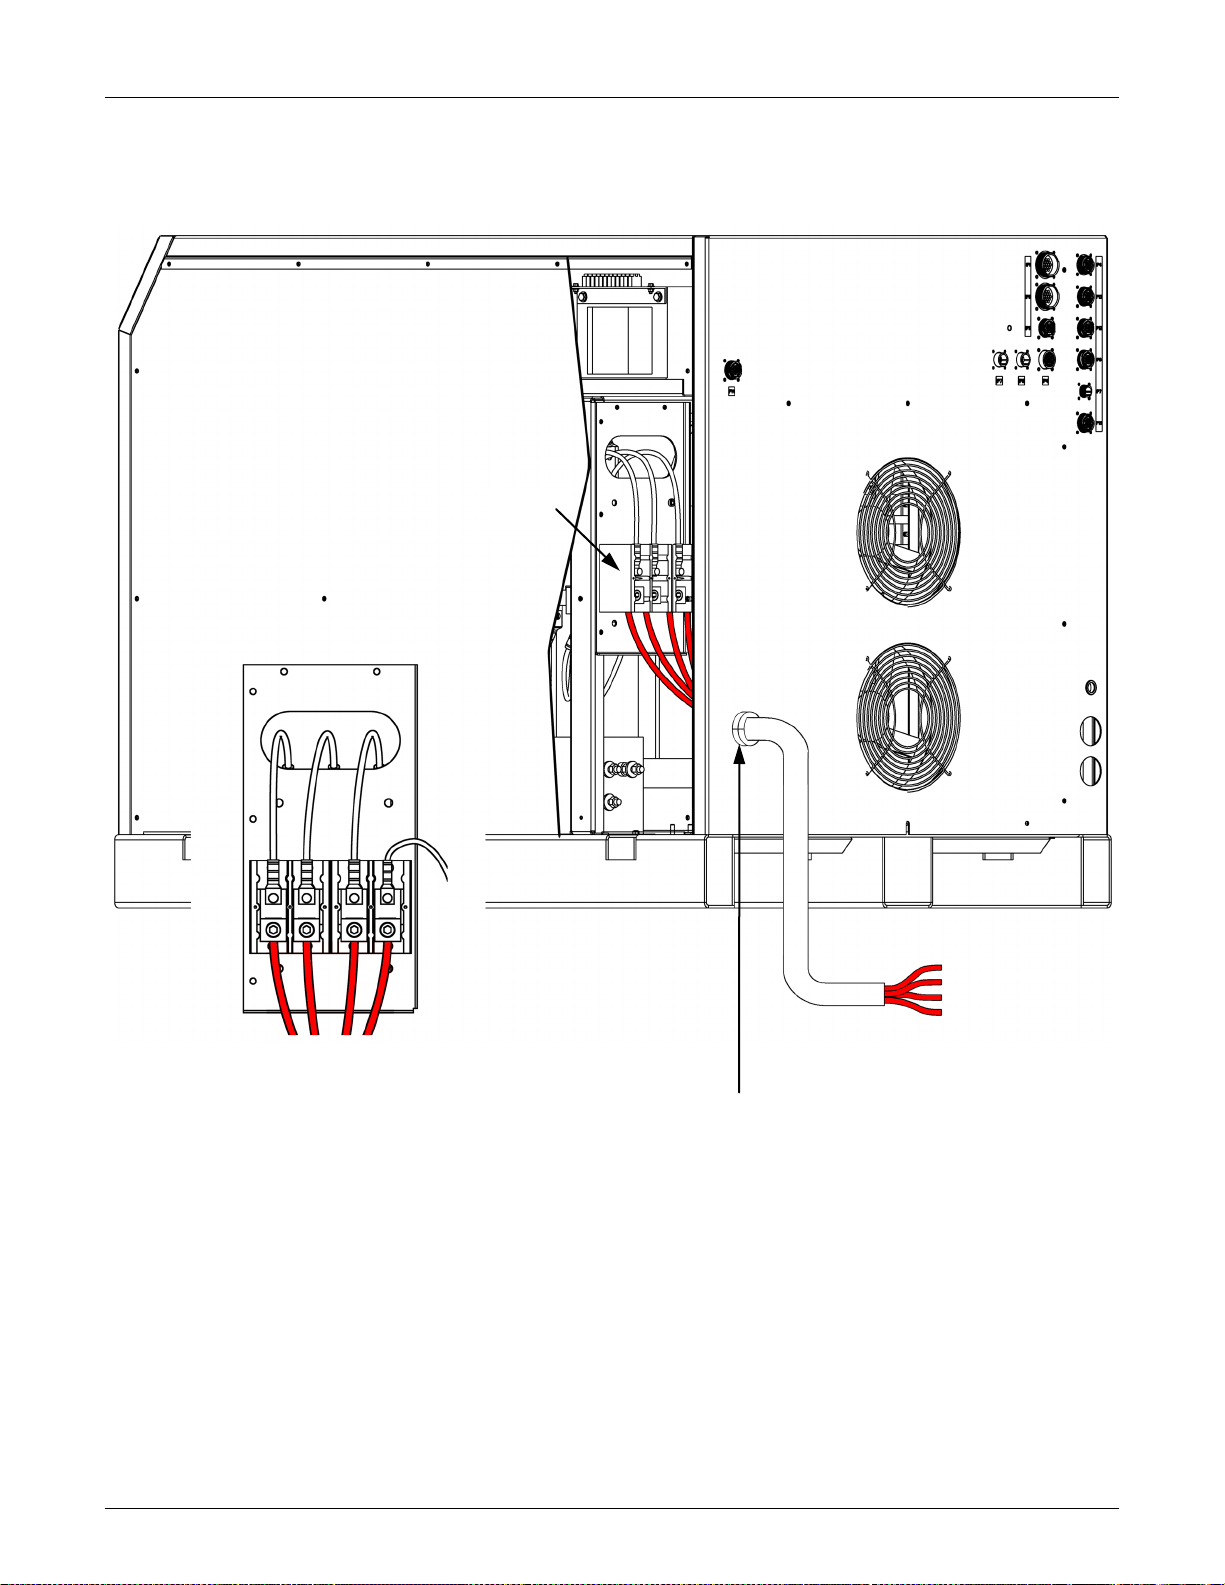
Power Supply Primary Power Connections
** Before connecting primary power, check the data plate
on the power supply to verify the voltage required **
A primary disconnect switch, switching all ungrounded supply conductors, should be
provided for each Spirit system. The disconnect switch should be located as close as
possible to the power supply so it can be turned off quickly in case of an emergency.
The disconnect switch should be equipped with time delay fuses only. The
magnetic inrush current of the power supply will cause fast acting fuses to blow. The
disconnect switch should be sized according to local and national codes. The rating
must meet or exceed the continuous rating of the fuses used. See the following chart
for recommended fuse sizes:
3 Phase
Input Voltage (VAC)
at Maximum
Time-Delay Fuse
Connection to the supply circuit can be by means of flexible supply cables or supply
cables through conduit to a permanent installation. The supply cables should have a
600 volt minimum rating and should be sized according to local and national codes.
Route flexible supply cables through the strain relief on the back of the power supply
and connect to the input terminal block TB5 as shown. For supply cables through
conduit, install the conduit in place of the strain relief and connect the associated supply
cables to the input terminal block TB5. See Figure 3 on the next page.
TB5 is located on the rear of the power supply and is accessible with the right-side
cover removed. Be sure to connect the primary ground cable to the ground stud
on the input terminal block.
Under no circumstances are the supply cables to be routed through the opening in the
power supply cabinet without conduit or an appropriate strain relief as per local and
national codes.
This information is subject to the controls of the Export Administration Regulations [EAR]. This information shall not be provided to
non-U.S. persons or transferred by any means to any location outside the United States contrary to the requirements of the EAR.
3-5
Page 30
Section 3: Installation Spirit II User’s Manual
Strain Relief
Disconnect Box
TB5 Connections
L1 (U)
L1 L2 L3 Gnd
TB5
This information is subject to the controls of the Export Administration Regulations [EAR]. This information shall not be provided to
non-U.S. persons or transferred by any means to any location outside the United States contrary to the requirements of the EAR.
Figure 3: Power Supply Primary Connections
3-6
L2 (V)
L3 (W)
Ground
Connections
Page 31

Spirit II User’s Manual Section 3: Installation
1 2 3
4
Power Supply Output Connections
Perform the following steps to connect the output of the power supply to the impulse
start console and the work table. See Figure 4 on the next page.
Power Supply Electrode Lead
1. Route one end of the #4/0AWG power supply electrode lead through the upper
strain relief on the rear of the power supply and connect it to the electrode terminal.
2. Route the other end of the power supply electrode lead through the strain relief on
the impulse start console and connect it to the cathode manifold.
Power Supply Nozzle Lead
1. Route the larger ring terminal end of the #10AWG power supply nozzle lead through
the bushing on the rear of the power supply and connect it to the nozzle terminal.
2. Route the smaller ring terminal end of the power supply nozzle lead through the
strain relief on the impulse start console and connect it to the pilot terminal on the
printed circuit board.
Power Supply CTP Sensor Lead
1. Route the ring terminal end of the #14AWG power supply CTP sensor lead through
the bushing on the rear of the power supply and connect it to the CTP terminal.
2. Route the FASTON end of the power supply CTP sensor lead through the strain
relief on the impulse start console and connect it to the CTP sensor lead with
FASTON connector.
Work Ground Lead
1. Route one end of the #4/0AWG work ground lead through the bottom strain relief on
the rear of the power supply and connect it to the work terminal.
2. Connect the other end of the work ground lead to the star ground point on the cutting
table.
The star ground point is generally referred to as the common ground point on the
cutting table where all subsystems of the machine are grounded. This point is then
connected to a driven earth ground rod that should be as close as possible to the
star ground. The ground rod should have no other wires connected to it. The
ground rod should be at least 3/4 inches in diameter and should be driven into the
earth’s permanent moisture layer. The length of the ground rod varies from
installation to installation and should be installed according to local and national
codes. Refer to the National Electrical Code, Article 250, Section H, Ground
Electrode System for additional information.
This information is subject to the controls of the Export Administration Regulations [EAR]. This information shall not be provided to
non-U.S. persons or transferred by any means to any location outside the United States contrary to the requirements of the EAR.
3-7
Page 32

Section 3: Installation Spirit II User’s Manual
4 1 3
2
1 2 3
Strain Relief
Figure 4: Power Supply Output Connections
This information is subject to the controls of the Export Administration Regulations [EAR]. This information shall not be provided to
non-U.S. persons or transferred by any means to any location outside the United States contrary to the requirements of the EAR.
3-8
Page 33

Spirit II User’s Manual Section 3: Installation
10 5 6 7 8
9
ISC Control Cable and ISC Ground Connections
Perform the following steps to connect the ISC control cable and ISC ground . See
Figure 5 on the next page.
ISC Control Cable
1. Connect the ISC control cable plug labeled P16 to the connector labeled P16 on the
rear of the power supply.
2. Connect the ISC control cable plug labeled P1 to the connector labeled P1 on the
impulse start console.
ISC Ground Cable
1. Connect one end of the ISC ground cable to the ground stud on the impulse start
console.
2. Connect the other end of the ISC ground cable to the star ground on the cutting
table. Make sure that good metal-to-metal contact is made.
Cooling System Connections
Perform the following steps to connect the cooling system to the power supply and the
impulse start console. See Figure 5 on the next page.
Coolant Supply Hose
1. Connect one end of the coolant supply hose to the coolant out fitting on the rear of
the cooling system. Note that the coolant out fitting has right hand threads.
2. Connect the other end of the coolant supply hose to the coolant in fitting on the
impulse start console. Note that the coolant in fitting has right hand threads.
Coolant Return Hose
1. Connect one end of the coolant return hose to the coolant in fitting on the rear of the
cooling system. Note that the coolant in fitting has left hand threads.
2. Connect the other end of the coolant return hose to the coolant out fitting on the
impulse start console. Note that the coolant out fitting has left hand threads.
Cooling System Control Cable
1. Connect the cooling system control cable plug labeled P14 to the connector labeled
P14 on the rear of the power supply.
2. Connect the cooling system control cable plug labeled P1 to the connector labeled
P1 on the cooling system.
Cooling System Ground Connection (Customer Supplied)
The Cooling System must be connected to protective earth ground in accordance
with national or local codes. The Cooling System receives its power from the
plasma power supply and as such must be connected to the same protective ground
as the plasma power supply.
Use a minimum of 8 AWG (10 mm2) wire connected from the cooling system
grounding stud to the plasma power supply protective earth ground. Note: the
customer must supply grounding wire.
This information is subject to the controls of the Export Administration Regulations [EAR]. This information shall not be provided to
non-U.S. persons or transferred by any means to any location outside the United States contrary to the requirements of the EAR.
3-9
Page 34

Section 3: Installation Spirit II User’s Manual
Figure 5: Cooling System Connections
7 8 10 9 6 5 7
8
This information is subject to the controls of the Export Administration Regulations [EAR]. This information shall not be provided to
non-U.S. persons or transferred by any means to any location outside the United States contrary to the requirements of the EAR.
3-10
Page 35

Spirit II User’s Manual Section 3: Installation
11
12
13
14
15
Torch Leads to Impulse Start Console Connections
Perform the following steps to connect the torch leads to the impulse start console.
See Figure 6 on the next page.
Note: When making hose connections, only tighten the brass fittings enough to
make water or gas seals. The fittings are subject to damage if over tightened.
Braided Shield
1. Remove the threaded ring from the brass shield connector on the end of the braided
shield. Route the torch leads through the opening in the impulse start console and
push the shield connector through the hole until it is seated against the side of the
console.
2. Slide the threaded ring over the torch leads, thread it onto the brass shield
connector, and tighten firmly. The shield connector should ground the braided
shield to the case of the impulse start console in order to help reduce high frequency
noise emission. Using an ohmmeter, measure for zero ohms between the braided
shield and the ground stud located on the outside of the impulse start console.
Torch Electrode/Coolant Supply Lead
• Connect the torch electrode/coolant supply lead to the brass cathode manifold. Note
that the torch electrode/coolant supply lead has right hand threads.
Torch Coolant Return Lead
• Connect the torch coolant return lead to the brass cathode manifold. Note that the
torch coolant return lead has left hand threads.
Torch Nozzle Lead
• Connect the torch nozzle lead to the angled bracket on the red standoff. Note that
the torch nozzle lead has right hand threads.
Torch CTP Sensor Lead
• Connect the #18AWG torch CTP sensor lead to the red standoff as shown.
This information is subject to the controls of the Export Administration Regulations [EAR]. This information shall not be provided to
non-U.S. persons or transferred by any means to any location outside the United States contrary to the requirements of the EAR.
3-11
Page 36

Section 3: Installation Spirit II User’s Manual
15
13
14
12
11
Figure 6: Torch Leads to Impulse Start Console Connections
This information is subject to the controls of the Export Administration Regulations [EAR]. This information shall not be provided to
non-U.S. persons or transferred by any means to any location outside the United States contrary to the requirements of the EAR.
3-12
Page 37

Spirit II User’s Manual Section 3: Installation
18
19
18
19
17
16
17
16
16
17
18
19
Torch Leads to Torch Base Connections
Perform the following steps to connect the torch leads to the torch base.
Note: When making hose connections, only tighten the brass fittings
enough to make water or gas seals. The fittings are subject to damage if
over tightened. Also, use two wrenches when tightening the torch fittings
to avoid damaging the torch base.
Torch Lead through Torch Handle Installation
1. Route the torch leads through the torch handle. Note that the threaded end of
the torch handle mates with the torch base.
Torch Electrode/Coolant Supply Lead
• Connect the torch electrode/coolant supply lead to the torch base as shown.
Torch Coolant Return Lead
• Connect the torch coolant return lead to the torch base as shown. Note that
the torch coolant return lead fitting has left hand threads.
Torch Nozzle Lead
• Connect the torch nozzle lead to the torch base as shown.
Torch CTP Sensor Lead
• Connect the torch CTP sensor lead to the torch base as shown.
Figure 7: Torch Leads to Torch Base Connections
This information is subject to the controls of the Export Administration Regulations [EAR]. This information shall not be provided to
non-U.S. persons or transferred by any means to any location outside the United States contrary to the requirements of the EAR.
3-13
Page 38

Section 3: Installation Spirit II User’s Manual
20
21
22
23
Torch Gas Connections
Perform the following steps to connect the torch gas hoses to the manual gas
console, torch base, and manifold assemblies. See figure 8.
Note: When making hose connections, only tighten the brass fittings
enough to make gas seals. The fittings are subject to damage if over
tightened.
7.5 Foot Shield Gas Hose
1. Route one end of the 7.5 foot (2.3 m) shield gas hose through the torch
handle and connect to the shield gas fitting on the torch base.
2. Connect the other end of the 7.5 foot (2.3 m) shield gas hose to the shield
gas outlet on the 5-gang manifold.
17 Inch Plasma Gas Hose
1. Route one end of the 17 inch (432 mm) plasma gas hose through the torch
handle and connect to the plasma gas fitting on the torch base.
2. Thread the torch handle onto the torch base, being careful not to twist the
torch leads and gas hoses when tightening the torch handle.
3. Tighten the base to the handle using a pin style adjustable spanner wrench
(fits 2" diameter with ¼" diameter pin).
4. Attach the 2-gang manifold assembly to the torch handle. The top of the
manifold bracket should be flush with the top of the torch handle.
5. Connect the other end of the 157 inch (432 mm) plasma gas hose to the
plasma gas outlet on the 2-gang manifold.
6. Mount the torch handle/base/manifold to the positioner. Note the alignment
indicators on the torch base (slot) and torch head (circle). These aid in
aligning the quick-disconnect torch base and head and should be oriented so
they are clearly visible when the operator is changing heads.
6 Foot Preflow/Postflow/Marking Gas Hose
1. Connect one end of the 6 foot (1.8 m) preflow/postflow/marking gas hose to
the preflow/postflow/marking outlet on the 5-gang manifold.
2. Connect the other end of the 6 foot (1.8 m) preflow/postflow/marking gas
hose to the preflow/postflow/marking inlet on the 2-gang manifold.
Marking Gas Hose
1. Connect one end of the marking shield gas hose to the marking shield outlet
on the rear of the MGC.
2. Connect the other end of the marking shield gas hose to the marking shield
inlet on the 5-gang manifold.
This information is subject to the controls of the Export Administration Regulations [EAR]. This information shall not be provided to
non-U.S. persons or transferred by any means to any location outside the United States contrary to the requirements of the EAR.
3-14
Page 39

Spirit II User’s Manual Section 3: Installation
25
26
27
28
29
30
Postflow Gas Hose
1. Connect one end of the postflow hose to the postflow outlet on the rear of the
MGC. Note that the postflow hose fittings have left hand threads.
2. Connect the other end of the postflow hose to the postflow inlet on the 5-gang
manifold.
Plasma Gas Hose
1. Connect on end of the plasma hose to the plasma outlet on the rear of the
MGC.
2. Connect the other end of the plasma hose to the plasma inlet on the 2-gang
manifold.
Shield Gas Hose
1. Connect one end of the shield hose to the shield outlet on the rear of the
MGC.
2. Connect the other end of the shield hose to the shield inlet on the 5-gang
manifold.
Preflow Gas Hose
1. Connect one end of the preflow hose to the preflow outlet on the rear of the
MGC. Note that the preflow hose fittings have left hand threads.
2. Connect the other end of the preflow hose to the preflow inlet on the 5-gang
manifold.
5-Gang Manifold Control Cable
1. Connect the 5-gang manifold control cable plug marked P15 to the 5-gang
manifold as shown.
2. Connect the 5-gang manifold control cable plug labeled P12 to the connector
labeled P12 on the rear of the power supply.
2-Gang Manifold Control Cable
1. Connect the 2-gang manifold control cable plug marked P18 to the 2-gang
manifold as shown.
2. Connect the 2-gang manifold control cable plug labeled P13 to the connector
labeled P13 on the rear of the power supply.
This information is subject to the controls of the Export Administration Regulations [EAR]. This information shall not be provided to
non-U.S. persons or transferred by any means to any location outside the United States contrary to the requirements of the EAR.
3-15
Page 40

Section 3: Installation Spirit II User’s Manual
Manual Gas
25
22
26
27
23
25
22
21
30
GREEN
REAR
REAR
BLUE
27
21
20
28
26
20
28
29
23
BLUE
GREEN
RED
Console
RED
Figure 8: Torch Gas Connections
PORT
PORT
This information is subject to the controls of the Export Administration Regulations [EAR]. This information shall not be provided to
non-U.S. persons or transferred by any means to any location outside the United States contrary to the requirements of the EAR.
3-16
Page 41

Spirit II User’s Manual Section 3: Installation
31
32
33
34
32
34
31
33
Gas Supply Connections
Perform the following steps to connect the gas supply lines to the MGC. See Section 2
for gas supply requirements. Mating hose barbs and connectors are supplied with the
system and are sized for 3/8 inch inside diameter hose. Do not change the inlet gas
supply fittings to quick-connect fittings. Using quick-connect fittings to connect
and disconnect pressurized hoses may cause damage to the system.
Note: When making hose connections, only tighten the brass fittings enough to
make gas seals. The fittings are subject to damage if over tightened.
Air Inlet (ISO 3821 hose color - black)
• Air must be supplied to the unit at all times, regardless of the cutting current or
material type.
Oxygen Inlet (ISO 3821 hose color - blue)
• Oxygen must be supplied to the unit at all times, unless stainless steel is being cut
with H17 plasma.
Nitrogen Inlet (ISO 3821 hose color - black)
• Nitrogen must be supplied to the unit at all times, regardless of the cutting current or
material type.
H17 Inlet (ISO 3821 hose color - red)
• H17 must be supplied to the unit when stainless steel is being cut with H17 as the
plasma gas. See cutting charts in Section 5 for more information.
This information is subject to the controls of the Export Administration Regulations [EAR]. This information shall not be provided to
non-U.S. persons or transferred by any means to any location outside the United States contrary to the requirements of the EAR.
3-17
Page 42
Section 3: Installation Spirit II User’s Manual
35
36
35
35
36
CAN Communication Connections
Perform the following steps to connect the plasma power supply to the MGC.
CAN Cable
• Connect the male end of the CAN cable to the connector labeled P4 on the rear of
the plasma power supply.
• Connect the female end of the CAN cable to the top connector on the rear of the
MGC.
CAN Termination Plug
• If not already installed, connect the CAN termination plug to the bottom connector on
the rear of the MGC.
This information is subject to the controls of the Export Administration Regulations [EAR]. This information shall not be provided to
non-U.S. persons or transferred by any means to any location outside the United States contrary to the requirements of the EAR.
3-18
Page 43

Spirit II User’s Manual Section 3: Installation
CNC Machine Interface Connections
Perform the following steps to properly interface the Spirit system with a CNC cutting
machine. See the system schematic for additional information.
Plasma Start Input
The power supply requires a contact closure between P8 pins 3 and 4 to commence the
cutting or marking sequence. The sequence is terminated when the contacts are
opened. The contacts should be rated for 24VDC - 7.3mA.
Plasma Cut/Mark Input
The power supply requires a contact closure between P8 pins 1 and 2 to put the system
in plasma marking mode. Opening the contacts puts the system in cutting mode. The
operating mode should be selected prior to applying a start signal. The contacts should
be rated for 24VDC - 7.3mA.
Arc Hold Input
The power supply requires a contact closure between P8 pins 10 and 11 to inhibit arc
starting even though a plasma start signal has been applied to the unit. When the
contacts are opened, the arc is initiated. This feature is used to decrease cycle time by
allowing pre-cut gas and contact sequencing to occur simultaneously with initial torch
height positioning. The contacts should be rated for 24VDC - 7.3mA.
Motion Output
The power supply provides a maintained contact closure output between P8 pins 12
and 14 as long as an arc is maintained between the torch and the workpiece. The
motion contacts are rated for 24VDC – 10mA.
Remote On/Off Input
The power supply requires a maintained contact closure between P8 pins 5 and 6 to
energize the system from a remote location, provided that the OFF Button on the
manual gas console is released. Opening the contacts deenergizes the system. If the
remote on/off feature is not used, install a jumper between terminal block TB1 positions
7 and 8. The contacts should be rated for 24VAC – 10mA.
Power Supply Ready Output
The power supply provides a maintained contact closure output between P8 pins 7 and
8 when the system is ready to cut or mark. The contacts are open during gas purge or
when an error occurs. The contacts are rated for 24VDC – 10mA.
This information is subject to the controls of the Export Administration Regulations [EAR]. This information shall not be provided to
non-U.S. persons or transferred by any means to any location outside the United States contrary to the requirements of the EAR.
3-19
Page 44

Section 3: Installation Spirit II User’s Manual
Filling the Cooling System
WARNING: Do not touch the fans inside the cooling system.
Important: Never turn on the system when the coolant reservoir is empty.
Important: When handling coolant, wear nitrile gloves and safety glasses.
Important: Only use Kaliburn approved coolant. Commercially available
antifreeze contains corrosion inhibitors that will damage the cooling
system. See Section 2 for more information.
1. Remove primary power from the Spirit system.
2. Ensure the torch base and torch head (with consumables) are properly installed.
3. Ensure the coolant supply (in and out) hoses are properly installed.
4. Remove the coolant reservoir cap/level gauge and then remove the cover from the
cooling system.
5. Ensure the coolant filter housing is tightened securely.
6. Ensure the drain petcock on the bottom of the reservoir is tightened securely.
7. Fill the reservoir with approximately 2 ½ gallons of approved coolant.
8. Apply primary power to the Spirit system and enable it by releasing (turn right) the
OFF Button on the MGC.
9. On the MGC main menu, move the pointer to On. Press SELECT to start the
coolant pump circulating coolant through the system. Note: The coolant pump will
turn off automatically if the coolant level drops below the minimum level inside the
reservoir. If this happens, add more coolant.
10. With the coolant pump running, locate the small red push-button on top of the
coolant filter housing. Press and hold the red button until no air or bubbles are seen
inside the filter housing. Dry any coolant that leaks out.
11. Check for coolant leaks at all hose connections, the ISC, and at the torch.
12. Push the OFF Button on the MGC to stop the coolant pump.
13. Remove primary power from the Spirit system.
14. Fill the reservoir with coolant until the coolant gauge indicates full.
15. Replace the cooling system cover and replace the coolant reservoir cap/level gauge.
16. End of procedure.
This information is subject to the controls of the Export Administration Regulations [EAR]. This information shall not be provided to
non-U.S. persons or transferred by any means to any location outside the United States contrary to the requirements of the EAR.
3-20
Page 45

Spirit II User’s Manual Section 4: Operation with Manual Gas Console
OFF Button
Section 4: Operation
Operating the Manual Gas Console (MGC)
The Manual Gas Console (MGC) is the interface to the entire Spirit system when the
MGC is used instead of the Automatic Gas Console (AGC).
Push to disable the Spirit system.
Release (turn to the right) to enable
the system, which can then be
energized by choosing ON and then
SELECT.
Up/Down/Select Buttons
Press the up or down button to move
the pointer ( ) accordingly on the
display. These buttons are
represented as UP and DOWN
throughout this manual.
Press the select button to access
menu items or settings identified by
the pointer. This button is shown as
SELECT throughout this manual.
Display
The display turns on automatically
when AC power is applied to the
Spirit system. It displays the menu
tree, which is navigated using the
Up/Down/Select buttons and is used
to control the entire Spirit system.
Pressure Regulator Knobs
Turn to the left or right to adjust the
amount of output gas pressure for
PreFlow, PostFlow, Plasma and
Shield gases.
This information is subject to the controls of the Export Administration Regulations [EAR]. This information shall not be provided to
non-U.S. persons or transferred by any means to any location outside the United States contrary to the requirements of the EAR.
4-1
Page 46
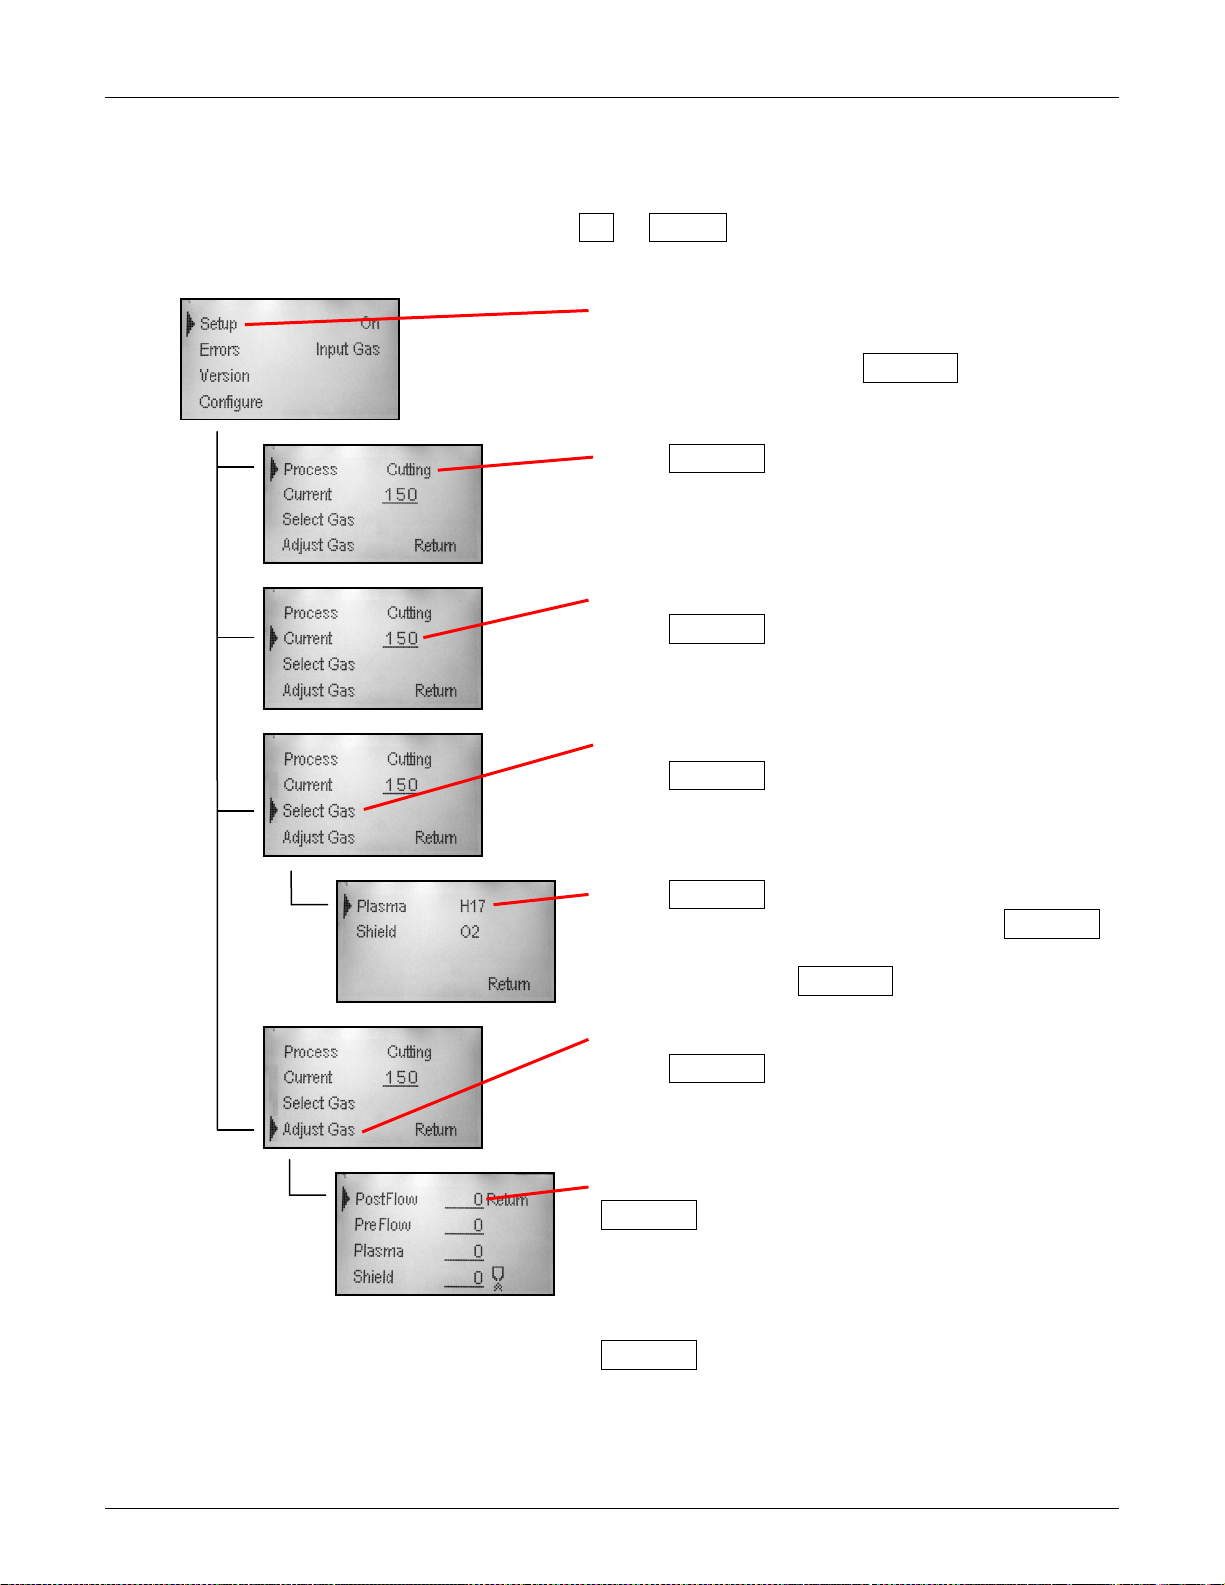
Section 4: Operation with Manual Gas Console Spirit II User’s Manual
Push the OFF Button on the MGC to disable
Move the pointer to Current.
Move the pointer to Select Gas.
Move the pointer to Adjust Gas.
Move the pointer to a gas and then press
The system is now setup to cut.
Setting up to Cut
The following procedure uses the information from the cutting charts in Section 5 to
prepare the system to cut. Press the UP or DOWN button on the MGC to move the
pointer through the menu as described below.
the system. On the main menu, move the
pointer to Setup. Press SELECT.
Cutting is displayed.
Press SELECT to cycle through the list until
the desired amperage is displayed.
Press SELECT to cycle through the list until
Press SELECT.
Press SELECT to choose the Plasma gas.
Move the pointer to Shield and press SELECT
to choose the shield gas. Move the pointer to
Return and press SELECT.
Press SELECT.
This information is subject to the controls of the Export Administration Regulations [EAR]. This information shall not be provided to
non-U.S. persons or transferred by any means to any location outside the United States contrary to the requirements of the EAR.
SELECT to start the flow of that gas. Turn the
corresponding regulator knob on the MGC to
adjust the displayed pressure to match the
value in the cutting chart. Repeat for all other
gases. Move the pointer to Return and press
SELECT. Repeat to return to the main menu.
4-2
Page 47
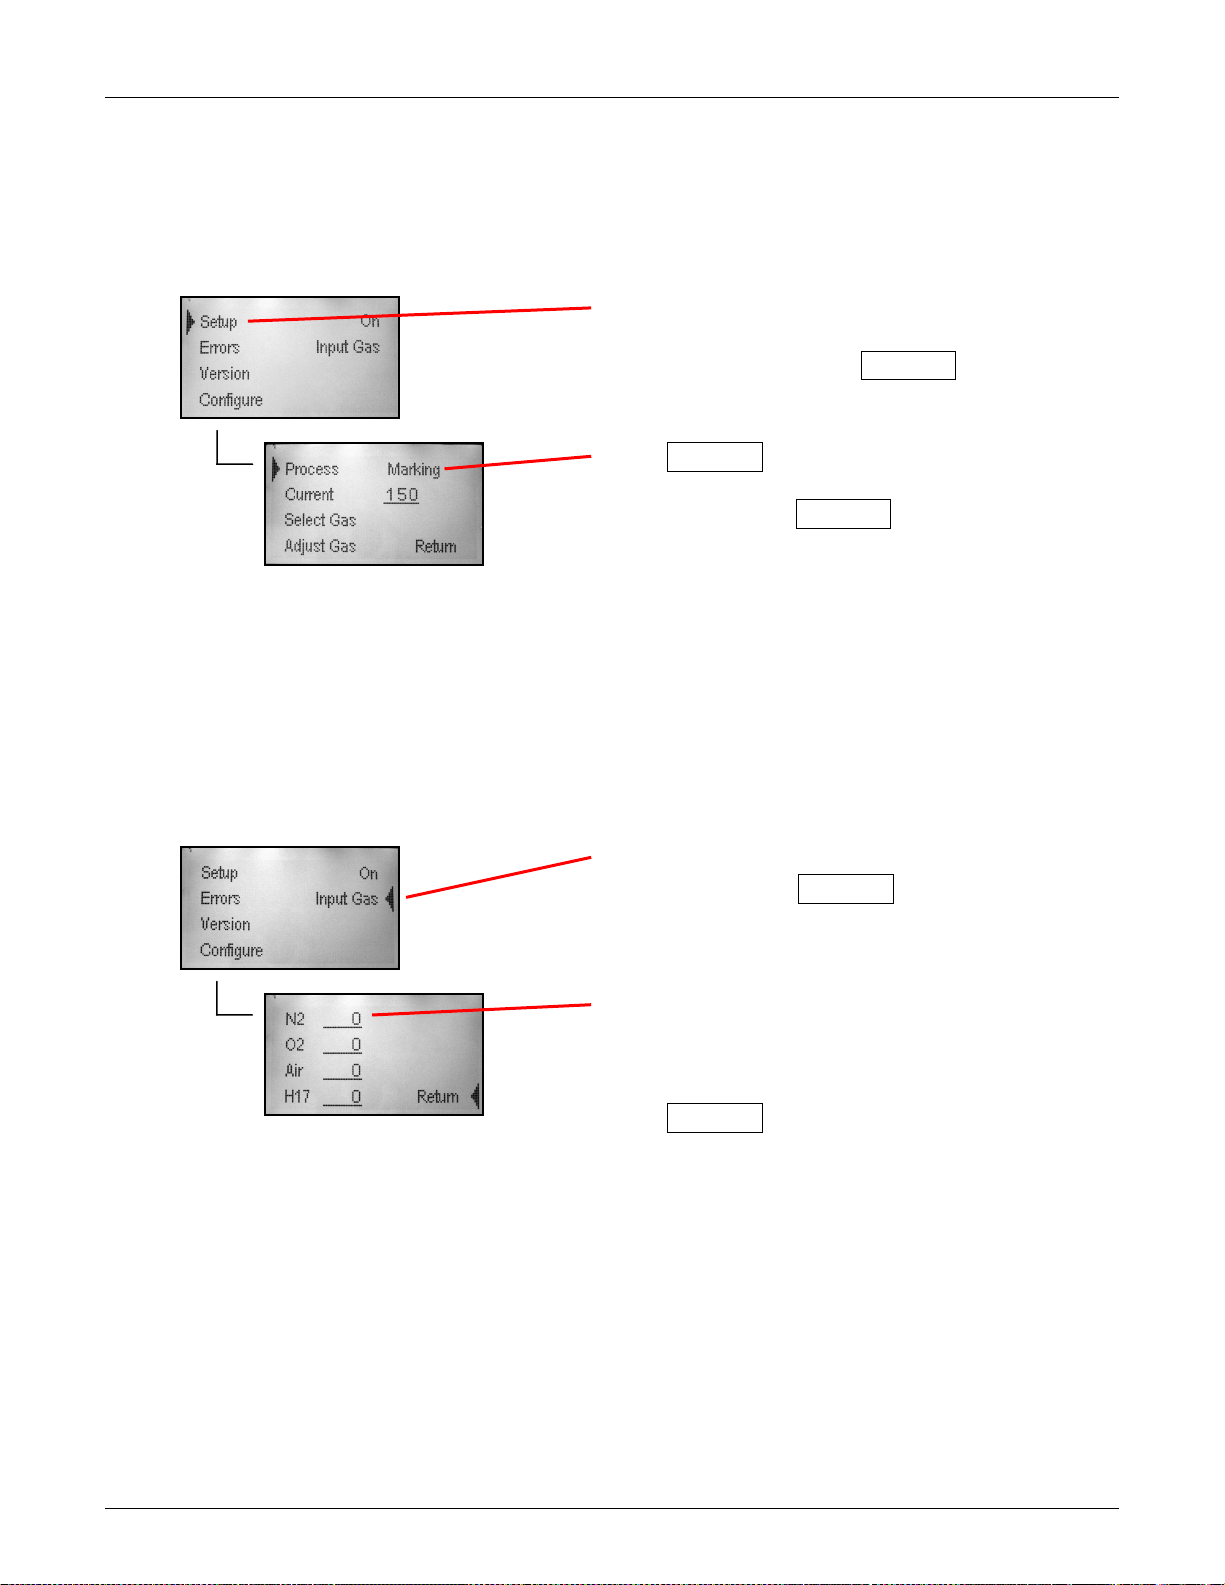
Spirit II User’s Manual Section 4: Operation with Manual Gas Console
Push the OFF Button on the MGC to disable
Press SELECT to cycle through the list until
cut.
On the main menu, move the pointer to
Verify that all connected gas pressures are at
Setting up to Mark (Overrides Cut)
The system will automatically switch between cutting and marking based upon
commands in the part program. However, all cutting commands in the part program can
be overridden with marking commands by simply changing the Process to Marking.
the system. On the main menu, move the
pointer to Setup. Press SELECT.
Marking is displayed. Move the pointer to
Return and press SELECT.
The system is now setup to mark instead of
Verifying Input Gas Pressures
For the system to work properly the input gas pressures must be within an acceptable
range. To check the input pressures, follow the steps below.
Input Gas. Press SELECT.
least 120psi. The maximum input gas pressure
is 145psi.
Press SELECT to return to the main menu.
This information is subject to the controls of the Export Administration Regulations [EAR]. This information shall not be provided to
non-U.S. persons or transferred by any means to any location outside the United States contrary to the requirements of the EAR.
4-3
Page 48

Section 4: Operation with Manual Gas Console Spirit II User’s Manual
Release the OFF Button (turn to the right) on
The MGC will purge the gas hoses. The purge
deenergized.
Making a Cut or Mark
Once the process type, gas types and gas pressures have been set in the MGC; the
correct torch parts (consumables) installed; and the X/Y controller and torch height
control are properly configured; the system is ready to cut or mark.
the MGC. On the main menu, move the
pointer to On. Press SELECT.
icon ( ) is displayed during this process.
Once purging is complete, the ready icon ( )
is displayed. The system is now ready to cut or
mark.
When the system receives a start signal from
the X/Y controller, the following sequence is
initiated:
• Two second gas preflow
• Impulse start circuit energized
• Pilot arc initiation
• Transferred arc (cutting or marking arc)
established
• Motion output relay energized
When the start signal is removed, the arc is
extinguished and the motion output relay is
This information is subject to the controls of the Export Administration Regulations [EAR]. This information shall not be provided to
non-U.S. persons or transferred by any means to any location outside the United States contrary to the requirements of the EAR.
4-4
Page 49

Spirit II User’s Manual Section 4: Operation with Manual Gas Console
Piercing Thick Materials
Care must be taken when piercing thick materials in order to prevent damage to the
shield cap and nozzle. As with all thicknesses, the pierce height must be set high
enough so the metal ejected while piercing does not come into contact with the shield
cap. Also, some of the material ejected during the pierce may adhere to the top side of
the plate and form a ring of solidified material around the pierce point.
Action must be taken so the torch does not move from the pierce height down to the
cutting height and come into contact with this solidified metal. The torch should not
move from the pierce height down to the cutting height until the X/Y controller has
moved the torch away from the pierce point.
One way to accomplish this may be to program the pierce time on the torch height
control system to a value that is longer than the X/Y controller motion delay time.
Moving Pierces and Edge Starts
On very thick materials, an edge start or moving pierce may be required to prevent
damage to the torch consumables.
With a moving pierce, the X/Y machine should begin moving at approximately 5–10
inches/minute (125–250 mm/min) as soon as the arc transfers to the plate. After the arc
completely penetrates the plate, the torch should be positioned at the proper cutting
height and the X/Y machine speed should be increased to the correct level.
With an edge start the torch should be positioned at the edge of the material prior to
starting the arc.
This information is subject to the controls of the Export Administration Regulations [EAR]. This information shall not be provided to
non-U.S. persons or transferred by any means to any location outside the United States contrary to the requirements of the EAR.
4-5
Page 50

Section 4: Operation with Manual Gas Console Spirit II User’s Manual
Cut Quality
Before the optimum cutting condition can be achieved on a particular material type and
thickness, the machine operator must have a thorough understanding of the cutting
characteristics of the Spirit system. When the cut quality is not satisfactory, the cutting
speed, torch height, or gas pressures may need to be adjusted in small increments until
the proper cutting condition is obtained. The following guidelines should be useful in
determining which cutting parameter to adjust.
Note: Before making any parameter changes, verify that the torch is square to
the workpiece. Also, it is essential to have the correct torch parts in place and to
ensure that they are in good condition. Check the electrode for excessive wear
and the nozzle and shield cap orifices for roundness. Also, check the parts for
any dents or distortions. Irregularities in the torch parts can cause cut quality
problems.
1. A positive cut angle (top dimension of piece smaller than the bottom dimension)
usually occurs when the torch standoff distance is too high, when cutting too fast, or
when excessive power is used to cut a given plate thickness.
2. A negative cut angle (top dimension of piece larger than the bottom dimension)
usually occurs when the torch standoff distance is too low or when the cutting speed
is too slow.
3. Top dross usually occurs when the torch standoff distance is too high.
4. Bottom dross usually occurs when the cutting speed is either too slow (slow-speed
dross) or too fast (high-speed dross). Low-speed dross is easily removed, while
high-speed dross usually requires grinding or chipping off. When using oxygen as
the shielding gas, bottom dross can sometimes be removed by increasing the shield
gas pressure. However, increasing the shield pressure too much can cause cut face
irregularities (see below). Bottom dross also occurs more frequently as the metal
heats up. As more pieces are cut out of a particular plate, the more likely they are to
form dross.
5. When using oxygen as a shielding gas, cut face irregularities usually indicate that
the shield gas pressure is too high or the torch standoff distance is too low.
6. A concave cut face usually indicates that the torch standoff distance is too low or the
shield gas pressure is too high. A convex cut face usually indicates that the torch
standoff distance is too high or the shield gas pressure is too low.
7. Note that different material compositions have an effect on dross formation.
8. If the material is not being completely severed, the likely causes are that the cutting
current is too low, the travel speed is too high, the gas pressures are incorrect, the
incorrect gas types are selected, the incorrect consumables are installed in the
torch, or the consumables are worn.
This information is subject to the controls of the Export Administration Regulations [EAR]. This information shall not be provided to
non-U.S. persons or transferred by any means to any location outside the United States contrary to the requirements of the EAR.
4-6
Page 51

Spirit II User’s Manual Section 4: Operation with Manual Gas Console
On the main menu, move the pointer to Errors.
On the main menu, move the pointer to
Move the pointer to either Power Supply or
Review the necessary information.
SELECT to return to the main menu.
Checking Errors
The last ten (10) system errors are available through the MGC as described below.
Press SELECT.
(10) error codes.
See Section 6 in this manual for details on the
Press SELECT to cycle through the last ten
error codes.
Simultaneously pressing DOWN and SELECT
will erase all ten error codes.
Move the pointer to Return and press
SELECT to return to the main menu.
Checking the Version and Serial Number
The hardware version, software version and serial number for the Power Supply and
Gas Console can be displayed as described below.
Version. Press SELECT.
This information is subject to the controls of the Export Administration Regulations [EAR]. This information shall not be provided to
non-U.S. persons or transferred by any means to any location outside the United States contrary to the requirements of the EAR.
Gas Console. Press SELECT.
Press SELECT to return to the previous
screen.
Move the pointer to Return and press
4-7
Page 52

Section 4: Operation with Manual Gas Console Spirit II User’s Manual
On the main menu, move the pointer to
Languages
Move the pointer to the desired language and
return to the main menu.
On the main menu, move the pointer to
Move the pointer to Contrast.
to return to the main menu.
Changing the Language
The language displayed on the MGC can be changed as described below.
Configure. Press SELECT.
then press SELECT. The display changes
immediately to the selected language.
Press SELECT on
Move the pointer to Return and press SELECT
to return to the previous screen. Repeat to
Adjusting the Screen Contrast
The contrast of the display on the MGC can be adjusted as described below.
Configure. Press SELECT.
.
This information is subject to the controls of the Export Administration Regulations [EAR]. This information shall not be provided to
non-U.S. persons or transferred by any means to any location outside the United States contrary to the requirements of the EAR.
Press SELECT to cycle through the list of
contrast settings.
Move the pointer to Return and press SELECT
4-8
Page 53

Spirit II User’s Manual Section 5: Torch Consumables and Cutting Charts
YES
NO!
There is no
Gap is visible
O-ring
Torch Base
Section 5: Torch Consumables and Cutting Charts
Installing / Removing the Torch Head
WARNING: Remove primary power from the Spirit system!
1. Each time the torch head is connected to the torch base, use a cotton swab to apply
a small amount of o-ring lubricant on each of the seven o-rings on the top of the
torch head. Reminder: do not use an excessive amount of o-ring lubricant.
2. Align the indicator on the torch head (circle) with the one on the torch base (slot).
3. Apply enough upward force to engage the threads while tightening the attachment
ring. Turn the attachment ring to the RIGHT to tighten.
4. Keep tightening the attachment ring until it stops. There should be no gap between
the attachment ring and the o-ring on the torch base.
During this process, a small amount of coolant will collect in the torch head.
It is normal for this coolant to discharge between the o-ring on the torch base and
the attachment ring while the system is being pressurized. If coolant continues to
discharge after the system is pressurized, turn off the plasma power supply, remove
the torch head and inspect the o-rings for damage.
O-ring
Torch Head
gap between
o-ring and
attachment
ring
between
o-ring and
attachment
ring
To remove the torch head, turn the attachment ring to the LEFT.
This information is subject to the controls of the Export Administration Regulations [EAR]. This information shall not be provided to
non-U.S. persons or transferred by any means to any location outside the United States contrary to the requirements of the EAR.
5-1
Page 54

Section 5: Torch Consumables and Cutting Charts Spirit II User’s Manual
YES
NO!
PULL
PULL
Installing / Replacing Consumables
WARNING: Remove primary power from the Spirit system!
Note: When installing the consumables, do not use an excessive amount
of o-ring lubricant. Also ensure that the lubricant is placed only on the
o-rings. Excess lubricant can interfere with gas flow, which can cause
starting problems, poor cut quality, and short consumable life.
1. Unthread the torch head from the torch base by turning the attachment ring to
the LEFT. Verify the torch base doesn't unthread from the torch handle.
2. Remove the outer retaining cap from the torch head.
3. Remove the inner retaining cap from the torch head.
4. Separate the shield cap from either the inner retaining cap or the outer
retaining cap.
5. Use the nozzle removal tool (P/N 277056) to remove the nozzle from the
torch head. To do this, insert the tool into the groove on the nozzle and hold
the tool/nozzle in the palm of your hand. Pull both hands apart using a linear
motion as shown in the left image below. Do not use a prying or bending
motion as shown in the right image below.
OR
6. Use the swirl ring removal tool (P/N 260105) to remove the swirl ring from the
nozzle.
7. Remove the electrode from the torch head using the appropriate tool:
• 400A copper electrodes use socket P/N 284052 & driver P/N 277086.
• All other copper electrodes use socket P/N 277087 & driver P/N 277086.
• All silver electrodes use P/N 279061.
8. Inspect all consumables and o-rings for damage and excess wear. Replace
with new consumables as necessary.
9. Inspect the cooling tube in the torch head for damage. See Section 6
Maintenance and Troubleshooting if replacement is necessary.
This information is subject to the controls of the Export Administration Regulations [EAR]. This information shall not be provided to
non-U.S. persons or transferred by any means to any location outside the United States contrary to the requirements of the EAR.
5-2
Page 55

Spirit II User’s Manual Section 5: Torch Consumables and Cutting Charts
Current (A)
Time (ms)
30
490
50
390
70
300
100
300
150
175
200
195
260
175
275
175
400
375
Maximizing Consumable Life
Use the following guidelines to maximize consumable parts life:
1. The Spirit system utilizes the latest advancement in technology for extending the life
of the torch consumable parts. To maximize the life of the consumable parts, it is
imperative that the shutdown procedure of the arc is carried out properly. The arc
must be extinguished while it is still attached to the workpiece. A popping
noise may be heard if the arc extinguishes abnormally. Note that holes are usually
programmed without lead-outs to prevent loss of the arc during shutdown. There is
a time delay between the reception of a stop signal and when the arc is
extinguished. During this time, the gases and cutting current are changed to
optimum values for extinguishing the arc. Ideally, the x/y machine controller should
provide a plasma stop signal prior to the end of the cut path so the gases and
current reach the shut off values at the same time that the part has been completely
cut. The shut down times are different for each current and are given below.
Arc Shutdown Times
2. Use the recommended pierce height given in the cutting charts. A pierce height that
is too low will allow molten metal that is ejected during the piercing process to
damage the shield cap and nozzle. A pierce height that is too high will cause the
pilot arc time to be excessively long and will cause nozzle damage. See “Piercing
Thick Materials” in Section 4.
3. Never fire the torch in the air. Nozzle damage will occur.
4. Make sure the torch does not touch the plate while cutting. Shield cap and nozzle
damage will result.
5. Use a chain cut when possible. Starting and stopping the torch is more detrimental
to the consumables than making a continuous cut.
6. Always use error tracking on the plasma console to keep track of cut errors. See
Section 4 for information on error tracking.
This information is subject to the controls of the Export Administration Regulations [EAR]. This information shall not be provided to
non-U.S. persons or transferred by any means to any location outside the United States contrary to the requirements of the EAR.
5-3
Page 56

Section 5: Torch Consumables and Cutting Charts Spirit II User’s Manual
Part
Inspect For
Corrective Action
Outer Cap
Damaged o-ring
Replace shield cap
Center hole out of round
Damage o-ring
Replace retaining cap
Replace retaining cap
Center hole out of round
Damaged o-rings
Replace nozzle
Replace nozzle
Damage
Damaged o-rings
Replace swirl ring
Replace swirl ring
Pit depth
Damaged o-rings
Replace electrode if center pit depth is
Replace electrode
Inspecting for Damage
When the cut quality is not satisfactory, use the following guidelines for
determining which consumable parts need to be changed. Inspect all parts for
dirt, debris, and excess o-ring lubricant and clean as necessary.
Shield Cap
Retaining Cap
Nozzle
Dents, cracks
Center hole out of round
Dents, Scratches
Dry o-ring
Dents, cracks
Dry o-ring
Erosion or arcing
Dry o-rings
Replace outer cap
Replace shield cap
Replace shield cap
Apply a thin film of o-ring lubricant
Replace retaining cap
Apply a thin film of o-ring lubricant
Replace nozzle
Apply a thin film of o-ring lubricant
Swirl Ring
Electrode
or
This information is subject to the controls of the Export Administration Regulations [EAR]. This information shall not be provided to
non-U.S. persons or transferred by any means to any location outside the United States contrary to the requirements of the EAR.
Clogged holes
Dry o-rings
Erosion or arcing
Dry o-rings
Blow out with compressed air. Replace
swirl ring if clogs can’t be removed.
Apply a thin film of o-ring lubricant
greater than 0.040” (1 mm) for copper
electrode or 0.098" (2.5mm) for silver.
Replace electrode
Apply a thin film of o-ring lubricant
5-4
Page 57

Spirit II User’s Manual Section 5: Torch Consumables and Cutting Charts
Retaining Cap
Cap
Retaining Cap
Ring
Electrode
Head
284150
277145
277153
277120
277140
277130
279100
284150
277115
277153
277122
277140/
277142
277131
279100
284150
277117
277151/
277152
277293
277139
277292
279100
284150
284123
284121
284125
284122
284124
279100
Selecting Consumables
Mild Steel
Copper Electrode
Outer
Shield
Inner
Nozzle
Swirl
Copper
Torch
30A
50A
70A
100A
150A
284150 277150 277153 277125 277142 277131 279100
284150 277286 277151 277284 277283 277282 279100
284150 277274 277266 277289 277143 277291 279100
200A
275A
400A
This information is subject to the controls of the Export Administration Regulations [EAR]. This information shall not be provided to
284150 277263 277266 277269 277258 277270 279100
non-U.S. persons or transferred by any means to any location outside the United States contrary to the requirements of the EAR.
5-5
Page 58

Section 5: Torch Consumables and Cutting Charts Spirit II User’s Manual
Outer
Retaining Cap
Shield
Cap
Inner
Retaining Cap
Swirl
Ring
Silver
Electrode
Torch
Head
284150
277286
277151
279484
279483
279060
284150
277117
277151/
277152
279493
279439
279060
284150
277274
277266
279489
279443
279440
(yellow o-ring)
279060
284150
277263
277266
279469
279458
279450
279060
284150
284123
284121
284125
279422
279460
(black o-ring)
279060
Mild Steel
Silver Electrode
Nozzle
100A
150A
200A
275A
279410
(brown o-ring)
279420
(green o-ring)
(red o-ring)
400A
This information is subject to the controls of the Export Administration Regulations [EAR]. This information shall not be provided to
non-U.S. persons or transferred by any means to any location outside the United States contrary to the requirements of the EAR.
5-6
Page 59

Spirit II User’s Manual Section 5: Torch Consumables and Cutting Charts
Outer
Retaining Cap
Shield
Cap
Inner
Retaining Cap
Swirl
Ring
Copper
Electrode
Torch
Head
284150
277150
277113
277124
277140
277132
279100
284150
277146
277113
277126
277141
277133
279100
284150
277298
277266
277297
277139
277135
279100
284150
277274
277266
277287
277259
277135
279100
284150
277211
277280
277118
277139
277135
279100
284150
284155
284156
284158
284122
284159
279100
Stainless Steel - H17 Plasma
Copper Electrode
70A
100A
150A
200A
Nozzle
260A
400A
This information is subject to the controls of the Export Administration Regulations [EAR]. This information shall not be provided to
non-U.S. persons or transferred by any means to any location outside the United States contrary to the requirements of the EAR.
5-7
Page 60
Section 5: Torch Consumables and Cutting Charts Spirit II User’s Manual
Outer
Retaining Cap
Shield
Cap
Inner
Retaining Cap
Swirl
Ring
Copper
Electrode
Torch
Head
284150
277144
277110
277121
277138
277137
279100
284150
277149
277110
277123
277142
277137
279100
284150
277150
277153
277125
277142
277131
279100
284150
277286
277151
277284
277283
277282
279100
284150
277117
277152
277293
277139
277292
279100
284150
277274
277266
277289
277143
277291
279100
284150
277263
277266
277276
277258
277270
279100
284150
284155
284156
284157
284122
284159
279100
Stainless Steel - Air or Nitrogen Plasma
Copper Electrode
Nozzle
30A
50A
70A
100A
150A
200A
275A
400A
This information is subject to the controls of the Export Administration Regulations [EAR]. This information shall not be provided to
non-U.S. persons or transferred by any means to any location outside the United States contrary to the requirements of the EAR.
5-8
Page 61

Spirit II User’s Manual Section 5: Torch Consumables and Cutting Charts
Outer
Retaining Cap
Shield
Cap
Inner
Retaining Cap
Swirl
Ring
Silver
Electrode
Torch
Head
284150
277286
277151
279484
279483
279060
284150
277117
277152
279493
279439
279420
(green o-ring)
279060
279440
Stainless Steel - Air or Nitrogen Plasma
Silver Electrode
Nozzle
100A
150A
200A
284150 277274 277266 279489 279443
279410
(brown o-ring)
(yellow o-ring)
279060
This information is subject to the controls of the Export Administration Regulations [EAR]. This information shall not be provided to
non-U.S. persons or transferred by any means to any location outside the United States contrary to the requirements of the EAR.
5-9
Page 62

Section 5: Torch Consumables and Cutting Charts Spirit II User’s Manual
Outer
Retaining Cap
Shield
Cap
Inner
Retaining Cap
Swirl
Ring
Copper
Electrode
Torch
Head
284150
277145
277153
277120
277140
277130
279100
284150
277150
277153
277122
277142
277131
279100
284150
277150
277153
277125
277142
277131
279100
284150
277286
277151
277284
277283
277282
279100
284150
277117
277152
277293
277139
277292
279100
284150
277274
277266
277289
277143
277291
279100
284150
277263
277266
277276
277258
277270
279100
284150
284155
284156
284158
284122
284159
279100
Aluminum
Copper Electrode
30A
50A
70A
100A
Nozzle
150A
200A
275A
400A
This information is subject to the controls of the Export Administration Regulations [EAR]. This information shall not be provided to
non-U.S. persons or transferred by any means to any location outside the United States contrary to the requirements of the EAR.
5-10
Page 63

Spirit II User’s Manual Section 5: Torch Consumables and Cutting Charts
Outer
Retaining Cap
Shield
Cap
Inner
Retaining Cap
Swirl
Ring
Silver
Electrode
Torch
Head
284150
277286
277151
279484
279483
279060
284150
277117
277152
279493
279439
279420
(green o-ring)
279060
284150
277274
277266
279489
279443
279440
279060
284150
277263
277266
279469
279458
279450
(red o-ring)
279060
Aluminum
Silver Electrode
100A
150A
200A
275A
Nozzle
279410
(brown o-ring)
(yellow o-ring)
This information is subject to the controls of the Export Administration Regulations [EAR]. This information shall not be provided to
non-U.S. persons or transferred by any means to any location outside the United States contrary to the requirements of the EAR.
5-11
Page 64

Section 5: Torch Consumables and Cutting Charts Spirit II User’s Manual
Copper
Electrode
Silver
Electrode
Mild Steel
30 Amps
Oxygen
Oxygen
Page 5-13
Mild Steel
50 Amps
Oxygen
Oxygen or Air
Page 5-14
Mild Steel
70 Amps
Oxygen
Air
Page 5-15
Mild Steel
100 Amps
Oxygen
Air
Page 5-16
Page 5-43
Mild Steel
150 Amps
Oxygen
Air
Page 5-17
Page 5-44
Mild Steel
200 Amps
Oxygen
Air
Page 5-18
Page 5-45
Mild Steel
275 Amps
Oxygen
Air
Page 5-19
Page 5-46
Mild Steel
400 Amps
Oxygen
Air
Page 5-20
Page 5-47
Stainless Steel
30 Amps
Air
Air
Page 5-21
Stainless Steel
50 Amps
Air
Nitrogen
Page 5-22
Stainless Steel
70 Amps
H17
Nitrogen
Page 5-23
Stainless Steel
70 Amps
Air
Nitrogen
Page 5-24
Stainless Steel
100 Amps
H17
Nitrogen
Page 5-25
Stainless Steel
100 Amps
Air
Nitrogen
Page 5-26
Page 5-48
Stainless Steel
150 Amps
H17
Nitrogen
Page 5-27
Stainless Steel
150 Amps
Air
Nitrogen
Page 5-28
Page 5-49
Stainless Steel
200 Amps
H17
Nitrogen
Page 5-29
Stainless Steel
200 Amps
Air
Nitrogen
Page 5-30
Page 5-50
Stainless Steel
260 Amps
H17
Nitrogen
Page 5-31
Stainless Steel
275 Amps
Air
Nitrogen
Page 5-32
Stainless Steel
400 Amps
H17
Nitrogen
Page 5-33
Stainless Steel
400 Amps
Nitrogen
Air
Page 5-34
Aluminum
30 Amps
Air
Nitrogen
Page 5-35
Aluminum
50 Amps
Air
Nitrogen
Page 5-36
Aluminum
70 Amps
Air
Nitrogen
Page 5-37
Aluminum
100 Amps
Air
Nitrogen
Page 5-38
Page 5-51
Aluminum
150 Amps
Air
Nitrogen
Page 5-39
Page 5-52
Aluminum
200 Amps
Air
Nitrogen
Page 5-40
Page 5-53
Aluminum
275 Amps
Air
Nitrogen
Page 5-41
Page 5-54
Aluminum
400 Amps
Nitrogen
Air
Page 5-42
Cutting Charts
The cutting charts shown on the following pages are intended to give the
operator the best starting point to use when making a cut on a particular material
type and thickness. Small adjustments may have to be made to achieve the best
cut. Also, remember that the arc voltage must be increased as the electrode
wears in order to maintain the correct cutting height.
Cutting Chart Index
Material Current Plasma Gas Shield Gas
This information is subject to the controls of the Export Administration Regulations [EAR]. This information shall not be provided to
non-U.S. persons or transferred by any means to any location outside the United States contrary to the requirements of the EAR.
5-12
Page 65

Spirit II User’s Manual Section 5: Torch Consumables and Cutting Charts
277145
277120
277130
Outer Cap
Retaining Cap
Swirl Ring Torch Head
284150
277153
277140 279100
Mild Steel - 30 Amps - Oxygen Plasma / Oxygen Shield
Copper Electrode
Shield Cap Nozzle Electrode
Imperial*
Material
Thickness
(ga) (in) (psi) (psi) (psi) (psi) (volts) (ipm) (in) (in) (msec) (in)
20 .036
18 .048 121 97 .090
16 .060 125 78
14 .075 126 65
12 .105 127 55
11 .120 129 50
10 .135 131 40
Preflow Plasma Shield Postflow
35 77 6 75
Arc
Voltage
120 105 .080
Travel
Speed
Cutting
Height
.105 200
.120 .125 300
Pierce
Height
.110
Pierce
Time
100 .062
Metric*
Material
Thickness
(mm) (psi) (psi) (psi) (psi) (volts) (mm/m) (mm) (mm) (msec) (mm)
1
1.5 124 2020 2.6
2
2.5 1455
3 128 1285 2.9 3.1 300
Preflow Plasma Shield Postflow
35 77 6 75
Arc
Voltage
120 2615 2.0
126
Travel
Speed
1615
Cutting
Height
2.7
Pierce
Height
2.8
Pierce
Time
100 1.6
200
Marking* – For All Material Thicknesses
Type of Gas Preflow Plasma Shield Postflow
(Plasma) (Shield) (psi) (psi) (psi) (psi) (volts) (ipm) (mm/min) (in) (mm) (in) (mm) (msec)
Nitrogen Nitrogen N/A 25 25 N/A 145 250 6350 .177 4.5 .100 2.5 0
Argon** Air** N/A 50 25 N/A 66 100 2540 .100 2.5 .100 2.5 0
* Use an arc transfer height (ignition height) of .100” (2.5 mm) for cutting and marking.
** Only available on systems with the Automatic Gas Console.
(Revised 04/26/2013)
Arc
Voltage
Travel
Speed
Marking
Height
Initial
Height
Kerf
Width
.065
.070
Kerf
Width
1.7
1.8
Pierce
Time
This information is subject to the controls of the Export Administration Regulations [EAR]. This information shall not be provided to
non-U.S. persons or transferred by any means to any location outside the United States contrary to the requirements of the EAR.
5-13
Page 66

Section 5: Torch Consumables and Cutting Charts Spirit II User’s Manual
277115
277122
277131
Outer Cap
Retaining Cap
Swirl Ring Torch Head
284150
277153
277140 / 277142
279100
Mild Steel - 50 amps - Oxygen Plasma / Oxygen or Air Shield
Copper Electrode
Shield Cap Nozzle Electrode
Imperial*
Material
Thickness
(ga) (in) (psi) (psi) (psi) (psi) (volts) (ipm) (in) (in) (msec) (in)
Preflow Plasma Shield Postflow
Cold-Rolled Steel – Oxygen Shield – Swirl Ring 277140
12 .105
11 .120 126 60 .125
10 .135 128 50 .135
25 74 12 72
Hot-Rolled Steel – Air Shield – Swirl Ring 277142
14 .075
12 .105 190
.125 180
10 .135 110 170 .110
3/16 113 105
1/4 117 75 .225 400 .087
25 74 19 72
Arc
Voltage
123 70 .120
106
Travel
Speed
200
Cutting
Height
.100
.140
Pierce
Height
.135
.135
.200 300 .085
Pierce
Time
100 .075
200 .078
100 .075
200 .080
Metric*
Material
Thickness
(mm) (psi) (psi) (psi) (psi) (volts) (mm/m) (mm) (mm) (msec) (mm)
Preflow Plasma Shield Postflow
Arc
Voltage
Travel
Speed
Cutting
Height
Pierce
Height
Pierce
Time
Kerf
Width
Kerf
Width
Cold-Rolled Steel – Oxygen Shield – Swirl Ring 277140
2.5
3 125 1555 3.1 200 2.0
25 74 12 72
121 1895 2.9
3.4
100 1.9
Hot-Rolled Steel – Air Shield – Swirl Ring 277142
2.5
3 4660 200 2.0
5 113 2555
6 116 2075 5.5
25 74 19 72
106
4885
2.5 3.4
3.6
5.1
100 1.9
400 2.2
Marking* – For All Material Thicknesses
Type of Gas Preflow Plasma Shield Postflow
(Plasma) (Shield) (psi) (psi) (psi) (psi) (volts) (ipm) (mm/min) (in) (mm) (in) (mm) (msec)
Nitrogen Nitrogen N/A 25 25 N/A 145 250 6350 .147 3.7 .100 2.5 0
Argon** Air** N/A 50 25 N/A 71 100 2540 .100 2.5 .100 2.5 0
* Use an arc transfer height (ignition height) of .135” (3.4 mm) for cutting and .100” (2.5 mm) for marking.
** Only available on systems with the Automatic Gas Console.
(Revised 04/26/2013)
This information is subject to the controls of the Export Administration Regulations [EAR]. This information shall not be provided to
non-U.S. persons or transferred by any means to any location outside the United States contrary to the requirements of the EAR.
Arc
Voltage
Travel
Speed
Marking
Height
Initial
Height
Pierce
Time
5-14
Page 67

Spirit II User’s Manual Section 5: Torch Consumables and Cutting Charts
277150
277125
277131
Outer Cap
Retaining Cap
Swirl Ring Torch Head
284150
277153
277142 279100
Mild Steel - 70 Amps - Oxygen Plasma / Air Shield
Copper Electrode
Shield Cap Nozzle Electrode
Imperial*
Material
Thickness
(in) (psi) (psi) (psi) (psi) (volts) (ipm) (in) (in) (msec) (in)
1/8
3/16
1/4 116 120 .110 .225 300
3/8 122 75 .140 .250 400
Preflow Plasma Shield Postflow
35
25 76
40
Metric*
Material
Thickness
(mm) (psi) (psi) (psi) (psi) (volts) (mm/m) (mm) (mm) (msec) (mm)
3
5
6 115 3105 2.7 5.5 2.2
Preflow Plasma Shield Postflow
35
25 76
40
Marking* – For All Material Thicknesses
Type of Gas Preflow Plasma Shield Postflow
74
74
Height
.100
Height
2.5
Pierce
Height
.150 100
Pierce
Height
Marking
Height
Arc
Voltage
110 190
113 130 .200 200
Arc
Voltage
109 4995
113 3265 5.1
Arc
Voltage
Travel
Speed
Travel
Speed
Travel
Speed
Cutting
Cutting
Pierce
Time
Pierce
Time
3.6 100
300
Initial
Height
Kerf
Width
.080
.085
Kerf
Width
2.0
Pierce
Time
(Plasma) (Shield) (psi) (psi) (psi) (psi) (volts) (ipm) (mm/min) (in) (mm) (in) (mm) (msec)
Nitrogen Nitrogen N/A 25 25 N/A 135 250 6350 .096 2.4 .100 2.5 0
Argon** Air** N/A 50 25 N/A 62 100 2540 .100 2.5 .100 2.5 0
* Use an arc transfer height (ignition height) of .150” (3.8 mm) for cutting and .100” (2.5 mm) for marking.
** Only available on systems with the Automatic Gas Console.
(Revised 04/26/2013)
This information is subject to the controls of the Export Administration Regulations [EAR]. This information shall not be provided to
non-U.S. persons or transferred by any means to any location outside the United States contrary to the requirements of the EAR.
5-15
Page 68

Section 5: Torch Consumables and Cutting Charts Spirit II User’s Manual
277286
277284
277282
Outer Cap
Retaining Cap
Swirl Ring Torch Head
284150
277151
277283 279100
Mild Steel - 100 Amps - Oxygen Plasma / Air Shield
Copper Electrode
Shield Cap Nozzle Electrode
Imperial*
Material
Thickness
(in) (psi) (psi) (psi) (psi) (volts) (ipm) (in) (in) (msec) (in)
1/4
3/8
1/2 65 .155 .300 500
5/8 143 47
3/4 145 35 .350 1000
Preflow Plasma Shield Postflow
25 83 26 81
Metric*
Material
Thickness
(mm) (psi) (psi) (psi) (psi) (volts) (mm/m) (mm) (mm) (msec) (mm)
6
10
12 1850 3.7 7.3
16 143 1180
20 145 800 9.0
Preflow Plasma Shield Postflow
25 83 26 81
Marking* – For All Material Thicknesses
Type of Gas Preflow Plasma Shield Postflow
.185
4.7
Pierce
Height
.325 800
Pierce
Height
Marking
Height
Arc
Voltage
125 150 .090 .200 300
130
Arc
Voltage
124 3950 2.1 4.9 300
130
Arc
Voltage
Travel
Speed
100 .130 .250 400
Travel
Speed
2405 3.3 6.5
Cutting
Height
Cutting
Height
Travel
Speed
8.3
Pierce
Time
Pierce
Time
500
1000 2.4
Initial
Height
Kerf
Width
.090
.095
Kerf
Width
2.3
Pierce
Time
(Plasma) (Shield) (psi) (psi) (psi) (psi) (volts) (ipm) (mm/min) (in) (mm) (in) (mm) (msec)
Nitrogen Nitrogen N/A 25 25 N/A 130 250 6350 .100 2.5 .100 2.5 0
Argon** Air** N/A 50 25 N/A 60 100 2540 .100 2.5 .100 2.5 0
* Use an arc transfer height (ignition height) of .200” (5.1 mm) for cutting and .100” (2.5 mm) for marking.
** Only available on systems with the Automatic Gas Console.
(Revised 04/26/2013)
This information is subject to the controls of the Export Administration Regulations [EAR]. This information shall not be provided to
non-U.S. persons or transferred by any means to any location outside the United States contrary to the requirements of the EAR.
5-16
Page 69

Spirit II User’s Manual Section 5: Torch Consumables and Cutting Charts
277117
277293
277292
Outer Cap
Retaining Cap
Swirl Ring
Torch Head
284150
277151 / 277152
277139 279100
Mild Steel - 150 Amps - Oxygen Plasma / Air Shield
Copper Electrode
Shield Cap Nozzle Electrode
Imperial*
Material
Thickness
(in) (psi) (psi) (psi) (psi) (volts) (ipm) (in) (in) (msec) (in)
1/4
3/8 123 125 .135 .250 400
1/2 125 90 .140 .300 500 .130
5/8
3/4 130 55 .350 1000 .135
1 134 40 .150 .400
1.25 *** 145 25 .200 .350
1.50 *** 155 15 .225 .350
Preflow Plasma Shield Postflow
Retaining Cap 277151
20 71 30 69
Retaining Cap 277152
20 71 45 69
Metric*
Material
Thickness
(mm) (psi) (psi) (psi) (psi) (volts) (mm/m) (mm) (mm) (msec) (mm)
6
10 123 3040 3.4 6.5
12 124 2485 3.5 7.3 3.3
16
20 130 1340 9.0
25 133 1040 3.7 10.1
32 *** 145 625 5.1 8.9
38 *** 154 385 5.6 8.9
Preflow Plasma Shield Postflow
Retaining Cap 277151
20 71 30 69
Retaining Cap 277152
20 71 45 69
Marking* – For All Material Thicknesses
Type of Gas Preflow Plasma Shield Postflow
.140
3.6
Pierce
Height
.325 600 .130
Pierce
Height
8.3 1000 3.3
Marking
Height
Arc
Voltage
118 165 .105 .200 300
127 70
Arc
Voltage
117 4305 2.6 4.9 300
127 1760
Arc
Voltage
Travel
Speed
Travel
Speed
Travel
Speed
Cutting
Height
Cutting
Height
Pierce
Time
1500 .140
Pierce
Time
500
1500
Initial
Height
Kerf
Width
.125
Kerf
Width
3.2
3.4
3.6
Pierce
Time
(Plasma) (Shield) (psi) (psi) (psi) (psi) (volts) (ipm) (mm/min) (in) (mm) (in) (mm) (msec)
Nitrogen Nitrogen N/A 25 25 N/A 135 250 6350 .100 2.5 .100 2.5 0
Argon** Air** N/A 50 25 N/A 61 100 2540 .100 2.5 .100 2.5 0
* Use an arc transfer height (ignition height) of .200” (5.1 mm) for cutting and .100” (2.5 mm) for marking.
** Only available on systems with the Automatic Gas Console.
*** Edge start recommended.
(Revised 04/26/2013)
This information is subject to the controls of the Export Administration Regulations [EAR]. This information shall not be provided to
non-U.S. persons or transferred by any means to any location outside the United States contrary to the requirements of the EAR.
5-17
Page 70

Section 5: Torch Consumables and Cutting Charts Spirit II User’s Manual
277274
277289
277291
Outer Cap
Retaining Cap
Swirl Ring
Torch Head
284150
277266
277143 279100
Mild Steel - 200 Amps - Oxygen Plasma / Air Shield
Copper Electrode
Shield Cap Nozzle Electrode
Imperial*
Material
Thickness
(in) (psi) (psi) (psi) (psi) (volts) (ipm) (in) (in) (msec) (in)
1/4
3/8 130 140 .090 .250 400
1/2 133 120 .115 .300 500
5/8 137 100 .130 .350 600 .152
3/4 140 75 .150 .400 800 .153
1 147 50 .175 .450 1000
1.25 155 25 .240 .500
1.50 *** 165 17 .300
1.75 *** 175 12 .350
2.00 *** 185 7 .500 .500 .160
Preflow Plasma Shield Postflow
20 74 58 72
Arc
Voltage
125 230 .040 .200 300
Travel
Speed
Cutting
Height
Pierce
Height
.350 158
Pierce
Time
1500
Metric*
Material
Thickness
(mm) (psi) (psi) (psi) (psi) (volts) (mm/m) (mm) (mm) (msec) (mm)
6
10 130 3480 2.3 6.5
12 132 3160 2.7 7.3
16 137 2515 3.3 8.9 800
20 141 1810 3.8 10.3
25 146 1310 4.3 11.3
32 155 610 6.1 12.7
38 *** 164 435 7.5 8.9
45 *** 175 295 9.2 9.2
50 *** 183 195 12.2 12.2 4.1
Preflow Plasma Shield Postflow
20 74 58 72
Arc
Voltage
124 6100 .8 4.9 300
Travel
Speed
Cutting
Height
Pierce
Height
Pierce
Time
500
1000
1500
Marking* – For All Material Thicknesses
Type of Gas Preflow Plasma Shield Postflow
(Plasma) (Shield) (psi) (psi) (psi) (psi) (volts) (ipm) (mm/min) (in) (mm) (in) (mm) (msec)
Nitrogen Nitrogen N/A 25 25 N/A 120 250 6350 .100 2.5 .100 2.5 0
Argon** Air** N/A 50 25 N/A 62 100 2540 .100 2.5 .100 2.5 0
* Use an arc transfer height (ignition height) of .200” (5.1 mm) for cutting and .100” (2.5 mm) for marking.
** Only available on systems with the Automatic Gas Console.
*** Edge start recommended.
(Revised 04/26/2013)
Arc
Voltage
Travel
Speed
Marking
Height
Initial
Height
Kerf
Width
.150
.155
Kerf
Width
3.8
3.9
4.0
Pierce
Time
This information is subject to the controls of the Export Administration Regulations [EAR]. This information shall not be provided to
non-U.S. persons or transferred by any means to any location outside the United States contrary to the requirements of the EAR.
5-18
Page 71

Spirit II User’s Manual Section 5: Torch Consumables and Cutting Charts
277263
277269
277270
Outer Cap
Retaining Cap
Swirl Ring
Torch Head
284150
277266
277258 279100
Mild Steel - 275 Amps - Oxygen Plasma / Air Shield
Copper Electrode
Shield Cap Nozzle Electrode
Imperial*
Material
Thickness
(in) (psi) (psi) (psi) (psi) (volts) (ipm) (in) (in) (msec) (in)
1/2
5/8 105 .135 .325 600
3/4 138 90 .120 .350 800 .170
1 144 65 .160 .400 1000
1.25 150 45 .175 .500
1.50 *** 163 25 .235
1.75 *** 170 20 .290
2.00 *** 180 15 .350
2.25 *** 185 13 .375 .375 .260
2.50 *** 190 9 .385 .385 .275
Preflow Plasma Shield Postflow
20 81 70 79
Arc
Voltage
139
Travel
Speed
125 .140 .300 500
Cutting
Height
Pierce
Height
.350 .190
Pierce
Time
1500
Metric*
Material
Thickness
(mm) (psi) (psi) (psi) (psi) (volts) (mm/m) (mm) (mm) (msec) (mm)
12
16
20 2190 3.1 9.0
25 143 1690 4.0 10.1
32 150 1120 4.4 12.8
38 *** 162 645 5.9
45 *** 170 495 7.5
50 *** 178 395 8.7
55 *** 183 345 9.2 9.2 6.6
60 *** 187 285 9.6 9.6 6.9
Preflow Plasma Shield Postflow
20 81 70 79
Arc
Voltage
139 3290 3.6 7.4 500
138
Travel
Speed
2650 3.3 8.3 800
Cutting
Height
Pierce
Height
8.9 4.8
Pierce
Time
1000
1500
Marking* – For All Material Thicknesses
Type of Gas Preflow Plasma Shield Postflow
(Plasma) (Shield) (psi) (psi) (psi) (psi) (volts) (ipm) (mm/min) (in) (mm) (in) (mm) (msec)
Nitrogen Nitrogen N/A 25 25 N/A 108 250 6350 .100 2.5 .100 2.5 0
Argon** Air** N/A 50 25 N/A 54 100 2540 .120 3.0 .100 2.5 0
* Use an arc transfer height (ignition height) of .300” (7.6 mm) for cutting and .100” (2.5 mm) for marking.
** Only available on systems with the Automatic Gas Console.
*** Edge start recommended.
(Revised 04/26/2013)
Arc
Voltage
Travel
Speed
Marking
Height
Initial
Height
Kerf
Width
.165
.185
Kerf
Width
4.2
4.3
4.7
Pierce
Time
This information is subject to the controls of the Export Administration Regulations [EAR]. This information shall not be provided to
non-U.S. persons or transferred by any means to any location outside the United States contrary to the requirements of the EAR.
5-19
Page 72

Section 5: Torch Consumables and Cutting Charts Spirit II User’s Manual
284123
284125
284124
Outer Cap
Retaining Cap
Swirl Ring
Torch Head
284150
284121
284122 279100
Material
Thickness
Arc
Voltage
Travel
Speed
Cutting
Height
Pierce
Height
Pierce
Time
Kerf
Width
5/8
135
.350
600
.155
1
150
85
.160
.500
1000
.180
1.75
162
40
.260
.800
3000
.200
2.25 ***
170
20
.280
.350
1000
.235
3.00 ***
195 8 .350
.350
2000
.250
Thickness
Voltage
Speed
Height
Height
Time
Width
16
3405
3.3
8.9
800
3.9
25
149
2200
4.0
12.5
4.6
32
155
1500
4.4
15.3
1500
45
162
995
6.6
20.5
3000
5.1
55 ***
168
620
6.9
11.9
1000
6.0
60 ***
175
450
7.2
1300
70 ***
185
300
8.3
Mild Steel - 400 Amps - Oxygen Plasma / Air Shield
Copper Electrode
Shield Cap Nozzle Electrode
Imperial*
(in) (psi) (psi) (psi) (psi) (volts) (ipm) (in) (in) (msec) (in)
1/2
3/4 110 .400 800 .160
1.25 155 60 .175 .600 1500
1.5 160 50 .225 .700 2000
2.00 165 33 .270 1.00 4500 .210
2.50 *** 182 15 .300 .350 1300 .245
2.75 *** 185 12 .325 .350 1500 .245
Metric*
Material
(mm) (psi) (psi) (psi) (psi) (volts) (mm/m) (mm) (mm) (msec) (mm)
12
20 2700 3.4 10.5
Preflow Plasma Shield Postflow
30 79 70 76
Preflow Plasma Shield Postflow
.130
Pierce
Pierce
1000
140 160 .140 .300 500 .150
145
Arc
138 4205 3.6 7.3 500 3.8
145
Travel
Cutting
.190
Kerf
4.1
38 159 1275 5.6 17.7 2000
30 79 70 76
50 164 860 6.8 25.4 4500 5.3
65 *** 182 365 7.7 1500
75 *** 193 220 8.7
8.9
2000 6.4
Marking* – For All Material Thicknesses
Type of Gas Preflow Plasma Shield Postflow
(Plasma) (Shield) (psi) (psi) (psi) (psi) (volts) (ipm) (mm/min) (in) (mm) (in) (mm) (msec)
Nitrogen Nitrogen N/A 25 25 N/A 112 250 6350 .100 2.5 .100 2.5 0
Argon** Air** N/A 50 25 N/A 53 100 2540 .120 3.0 .100 2.5 0
* Use an arc transfer height (ignition height) of .300” (7.6 mm) for cutting and .100” (2.5 mm) for marking.
** Only available on systems with the Automatic Gas Console.
*** Edge start recommended.
(Revised 04/26/2013)
This information is subject to the controls of the Export Administration Regulations [EAR]. This information shall not be provided to
non-U.S. persons or transferred by any means to any location outside the United States contrary to the requirements of the EAR.
Arc
Voltage
Travel
Speed
Marking
Height
Initial
Height
4.8
6.2
Pierce
Time
5-20
Page 73

Spirit II User’s Manual Section 5: Torch Consumables and Cutting Charts
277144
277121
277137
Outer Cap
Retaining Cap
Swirl Ring Torch Head
284150
277110
277138 279100
Stainless Steel - 30 Amps - Air Plasma / Air Shield
Copper Electrode
Shield Cap Nozzle Electrode
Imperial*
Material
Thickness
(ga) (in) (psi) (psi) (psi) (psi) (volts) (ipm) (in) (in) (msec) (in)
20 .036
18 .048 165
16 .060 74 125
14 .075 75 90 .025 .070
Preflow Plasma Shield Postflow
35 81 30 85
Arc
Voltage
71
Travel
Speed
200 .020
Cutting
Height
.035
Pierce
Height
.050
Pierce
Time
100 .065
200
Metric*
Material
Thickness
(mm) (psi) (psi) (psi) (psi) (volts) (mm/m) (mm) (mm) (msec) (mm)
1
1.5 73 3260 0.9 200
Preflow Plasma Shield Postflow
35 81 30 85
Arc
Voltage
71 4855 0.6
Travel
Speed
Cutting
Height
Pierce
Height
1.3
Pierce
Time
100
Marking* – For All Material Thicknesses
Type of Gas Preflow Plasma Shield Postflow
(Plasma) (Shield) (psi) (psi) (psi) (psi) (volts) (ipm) (mm/min) (in) (mm) (in) (mm) (msec)
Nitrogen Nitrogen N/A 25 25 N/A 145 250 6350 .177 4.5 .100 2.5 0
Argon** Nitrogen** N/A 50 25 N/A 55 100 2540 .140 3.6 .100 2.5 0
* Use an arc transfer height (ignition height) of .050” (1.3 mm) for cutting and .100” (2.5 mm) for marking.
** Only available on systems with the Automatic Gas Console.
(Revised 04/26/2013)
Arc
Voltage
Travel
Speed
Marking
Height
Initial
Height
Kerf
Width
.068
Kerf
Width
1.7
Pierce
Time
This information is subject to the controls of the Export Administration Regulations [EAR]. This information shall not be provided to
non-U.S. persons or transferred by any means to any location outside the United States contrary to the requirements of the EAR.
5-21
Page 74

Section 5: Torch Consumables and Cutting Charts Spirit II User’s Manual
277149
277123
277137
Outer Cap
Retaining Cap
Swirl Ring Torch Head
284150
277110
277142 279100
Stainless Steel - 50 Amps - Air Plasma / Nitrogen Shield
Copper Electrode
Shield Cap Nozzle Electrode
Imperial*
Material
Thickness
(ga) (in) (psi) (psi) (psi) (psi) (volts) (ipm) (in) (in) (msec) (in)
14 .075
12 .105 88 75
11 .120 89 65
10 .135 90 55
3/16 94 50 .040 .080 300
1/4 100 40 .060 .125 400 .115
Preflow Plasma Shield Postflow
25 66 40 67
Arc
Voltage
87 105
Travel
Speed
Cutting
Height
.035 .070
Pierce
Height
Pierce
Time
100
200
Metric*
Material
Thickness
(mm) (psi) (psi) (psi) (psi) (volts) (mm/m) (mm) (mm) (msec) (mm)
2
2.5 2080
3 88 1685 200
5 94 1235 1.0 2.1
6 98 1075 1.3 2.9 2.9
Preflow Plasma Shield Postflow
25 66 40 67
Arc
Voltage
87
Travel
Speed
2565
Cutting
Height
.9 1.8
Pierce
Height
Pierce
Time
100
400
Marking* – For All Material Thicknesses
Type of Gas Preflow Plasma Shield Postflow
(Plasma) (Shield) (psi) (psi) (psi) (psi) (volts) (ipm) (mm/min) (in) (mm) (in) (mm) (msec)
Nitrogen Nitrogen N/A 25 25 N/A 145 250 6350 .147 3.7 .100 2.5 0
Argon** Nitrogen** N/A 50 25 N/A 65 100 2540 .100 2.5 .100 2.5 0
* Use an arc transfer height (ignition height) of .070” (1.8 mm) for cutting and .100” (2.5 mm) for marking.
** Only available on systems with the Automatic Gas Console.
(Revised 04/26/2013)
Arc
Voltage
Travel
Speed
Marking
Height
Initial
Height
Kerf
Width
.105
.110
Kerf
Width
2.7
2.8
Pierce
Time
This information is subject to the controls of the Export Administration Regulations [EAR]. This information shall not be provided to
non-U.S. persons or transferred by any means to any location outside the United States contrary to the requirements of the EAR.
5-22
Page 75

Spirit II User’s Manual Section 5: Torch Consumables and Cutting Charts
277150
277124
277132
Outer Cap
Retaining Cap
Swirl Ring Torch Head
284150
277113
277140 279100
Stainless Steel - 70 Amps - H17 Plasma / Nitrogen Shield
Copper Electrode
(H17 = 17.5% Hydrogen / 32.5% Argon / 50% Nitrogen)
This gas combination gives the best cut quality and minimum dross levels
Shield Cap Nozzle Electrode
Imperial*
Material
Thickness
(in) (psi) (psi) (psi) (psi) (volts) (ipm) (in) (in) (msec) (in)
3/16 35 65 30 60 135 80 .100 .200 300 .090
Preflow Plasma Shield Postflow
Arc
Voltage
Travel
Speed
Cutting
Height
Pierce
Height
Pierce
Time
Metric*
Material
Thickness
(mm) (psi) (psi) (psi) (psi) (volts) (mm/m) (mm) (mm) (msec) (mm)
5 35 65 30 60 135 2030 2.5 5.1 300 2.3
Preflow Plasma Shield Postflow
Arc
Voltage
Travel
Speed
Cutting
Height
Pierce
Height
Pierce
Time
Marking* – For All Material Thicknesses
Type of Gas Preflow Plasma Shield Postflow
(Plasma) (Shield) (psi) (psi) (psi) (psi) (volts) (ipm) (mm/min) (in) (mm) (in) (mm) (msec)
Nitrogen Nitrogen N/A 25 25 N/A 135 250 6350 .096 2.4 .100 2.5 0
Argon** Nitrogen** N/A 50 25 N/A 80 100 2540 .130 3.3 .100 2.5 0
* Use an arc transfer height (ignition height) of .150” (3.8 mm) for cutting and .100” (2.5 mm) for marking.
** Only available on systems with the Automatic Gas Console.
(Revised 04/26/2013)
Arc
Voltage
Travel
Speed
Marking
Height
Initial
Height
Kerf
Width
Kerf
Width
Pierce
Time
This information is subject to the controls of the Export Administration Regulations [EAR]. This information shall not be provided to
non-U.S. persons or transferred by any means to any location outside the United States contrary to the requirements of the EAR.
5-23
Page 76

Section 5: Torch Consumables and Cutting Charts Spirit II User’s Manual
Shield Cap
Nozzle
Electrode
Outer Cap
Retaining Cap
Swirl Ring Torch Head
284150
277153
277142 279100
Stainless Steel - 70 Amps - Air Plasma / Nitrogen Shield
Copper Electrode
This gas combination gives medium cut quality and minimum dross levels
277150 277125 277131
Imperial*
Material
Thickness
(ga) (in) (psi) (psi) (psi) (psi) (volts) (ipm) (in) (in) (msec) (in)
10 .135
3/16 134 100 .070 .200 300
1/4 140 75 .090 .225 400
3/8 148 50 .120 .250 500
Preflow Plasma Shield Postflow
25 76 25 76
Arc
Voltage
132 120 .060 .150 200
Travel
Speed
Cutting
Height
Pierce
Height
Pierce
Time
Metric*
Material
Thickness
(mm) (psi) (psi) (psi) (psi) (volts) (mm/m) (mm) (mm) (msec) (mm)
3
5 134 2445 1.8 5.1
6 138 2050 2.1 5.5 2.3
Preflow Plasma Shield Postflow
25 76 25 76
Arc
Voltage
131 3210 1.4 3.3 200
Travel
Speed
Cutting
Height
Pierce
Height
Pierce
Time
400
Marking* – For All Material Thicknesses
Type of Gas Preflow Plasma Shield Postflow
Arc
Voltage
Travel
Speed
Marking
Height
Initial
Height
Kerf
Width
.085
.090
Kerf
Width
2.2
Pierce
Time
(Plasma) (Shield) (psi) (psi) (psi) (psi) (volts) (ipm) (mm/min) (in) (mm) (in) (mm) (msec)
Nitrogen Nitrogen N/A 25 25 N/A 135 250 6350 .096 2.4 .100 2.5 0
Argon** Nitrogen** N/A 50 25 N/A 65 100 2540 .100 2.5 .100 2.5 0
* Use an arc transfer height (ignition height) of .150” (3.8 mm) for cutting and .100” (2.5 mm) for marking.
** Only available on systems with the Automatic Gas Console.
(Revised 04/26/2013)
This information is subject to the controls of the Export Administration Regulations [EAR]. This information shall not be provided to
non-U.S. persons or transferred by any means to any location outside the United States contrary to the requirements of the EAR.
5-24
Page 77

Spirit II User’s Manual Section 5: Torch Consumables and Cutting Charts
277146
277126
277133
Outer Cap
Retaining Cap
Swirl Ring Torch Head
284150
277113
277141 279100
Stainless Steel - 100 Amps - H17 Plasma / Nitrogen Shield
Copper Electrode
(H17 = 17.5% Hydrogen / 32.5% Argon / 50% Nitrogen)
This gas combination gives the best cut quality and minimum dross levels
Shield Cap Nozzle Electrode
Imperial*
Material
Thickness
(in) (psi) (psi) (psi) (psi) (volts) (ipm) (in) (in) (msec) (in)
3/16
1/4 140 100 .125 .225 400
3/8 152 65 .180 .250 500
Preflow Plasma Shield Postflow
28 72 40 67
Arc
Voltage
138 115 .105 .200 300 .100
Travel
Speed
Cutting
Height
Pierce
Height
Pierce
Time
Metric*
Material
Thickness
(mm) (psi) (psi) (psi) (psi) (volts) (mm/m) (mm) (mm) (msec) (mm)
5
6 139 2625 3.0 5.5 2.7
Preflow Plasma Shield Postflow
28 72 40 67
Arc
Voltage
138 2865 2.7 5.1
Travel
Speed
Cutting
Height
Pierce
Height
Pierce
Time
400
Marking* – For All Material Thicknesses
Type of Gas Preflow Plasma Shield Postflow
(Plasma) (Shield) (psi) (psi) (psi) (psi) (volts) (ipm) (mm/min) (in) (mm) (in) (mm) (msec)
Nitrogen Nitrogen N/A 25 25 N/A 130 250 6350 .100 2.5 .100 2.5 0
Argon** Nitrogen** N/A 50 25 N/A 80 100 2540 .110 2.8 .100 2.5 0
* Use an arc transfer height (ignition height) of .200” (5.1 mm) for cutting and .100” (2.5 mm) for marking.
** Only available on systems with the Automatic Gas Console.
(Revised 04/26/2013)
Arc
Voltage
Travel
Speed
Marking
Height
Initial
Height
Kerf
Width
.105
Kerf
Width
2.5
Pierce
Time
This information is subject to the controls of the Export Administration Regulations [EAR]. This information shall not be provided to
non-U.S. persons or transferred by any means to any location outside the United States contrary to the requirements of the EAR.
5-25
Page 78

Section 5: Torch Consumables and Cutting Charts Spirit II User’s Manual
Shield Cap
Nozzle
Electrode
Outer Cap
Retaining Cap
Swirl Ring Torch Head
284150
277151
277283 279100
Stainless Steel - 100 Amps - Air Plasma / Nitrogen Shield
Copper Electrode
This gas combination gives medium cut quality and minimum dross levels
277286 277284 277282
Imperial*
Material
Thickness
(in) (psi) (psi) (psi) (psi) (volts) (ipm) (in) (in) (msec) (in)
1/4
3/8 147 80 .170 .250 500
1/2 154 55 .210 .300 600
Preflow Plasma Shield Postflow
25 80 35 80
Metric*
Material
Thickness
(mm) (psi) (psi) (psi) (psi) (volts) (mm/m) (mm) (mm) (msec) (mm)
6
10 148 1935 4.4 6.5
12 152 1540 5.0 7.3
Preflow Plasma Shield Postflow
25 80 35 80
Marking* – For All Material Thicknesses
Type of Gas Preflow Plasma Shield Postflow
Height
Height
Pierce
Height
Pierce
Height
Marking
Height
Pierce
Time
Pierce
Time
600 2.4
Initial
Height
Arc
Voltage
141 100 .135 .225 400 .092
Arc
Voltage
140 2595 3.2 5.6 400 2.3
Arc
Voltage
Travel
Speed
Travel
Speed
Travel
Speed
Cutting
Cutting
Kerf
Width
.095
Kerf
Width
Pierce
Time
(Plasma) (Shield) (psi) (psi) (psi) (psi) (volts) (ipm) (mm/min) (in) (mm) (in) (mm) (msec)
Nitrogen Nitrogen N/A 25 25 N/A 130 250 6350 .100 2.5 .100 2.5 0
Argon** Nitrogen** N/A 50 25 N/A 68 100 2540 .100 2.5 .100 2.5 0
* Use an arc transfer height (ignition height) of .200” (5.1 mm) for cutting and .100” (2.5 mm) for marking.
** Only available on systems with the Automatic Gas Console.
(Revised 04/26/2013)
This information is subject to the controls of the Export Administration Regulations [EAR]. This information shall not be provided to
non-U.S. persons or transferred by any means to any location outside the United States contrary to the requirements of the EAR.
5-26
Page 79

Spirit II User’s Manual Section 5: Torch Consumables and Cutting Charts
277298
277297
277135
Outer Cap
Retaining Cap
Swirl Ring Torch Head
284150
277266
277139 279100
Stainless Steel - 150 Amps - H17 Plasma / Nitrogen Shield
Copper Electrode
(H17 = 17.5% Hydrogen / 32.5% Argon / 50% Nitrogen)
This gas combination gives the best cut quality and minimum dross levels
Shield Cap Nozzle Electrode
Imperial*
Material
Thickness
(in) (psi) (psi) (psi) (psi) (volts) (ipm) (in) (in) (msec) (in)
1/4
3/8 75 .150 .275 500
1/2 60 .165 .300 600
5/8 50 .185 .325 800
3/4 40 .250 .350 1200 .145
Preflow Plasma Shield Postflow
25 77 75 81 165
Metric*
Material
Thickness
(mm) (psi) (psi) (psi) (psi) (volts) (mm/m) (mm) (mm) (msec) (mm)
10
12 1610 4.1 7.4
16 1260 4.7 8.3 800
20 167 940 6.9 9.0 1200 3.7
Preflow Plasma Shield Postflow
25 77 75 81
Marking* – For All Material Thicknesses
Type of Gas Preflow Plasma Shield Postflow
Arc
Voltage
Arc
Voltage
155
Arc
Voltage
Height
Pierce
Height
Pierce
Height
Marking
Height
Travel
Speed
95 .250 .250 400
Travel
Speed
1845 3.8 7.0
Cutting
Cutting
Height
Travel
Speed
Pierce
Time
Pierce
Time
600
Initial
Height
Kerf
Width
.135
.140
Kerf
Width
3.4
3.6
Pierce
Time
(Plasma) (Shield) (psi) (psi) (psi) (psi) (volts) (ipm) (mm/min) (in) (mm) (in) (mm) (msec)
Nitrogen Nitrogen N/A 25 25 N/A 135 250 6350 .100 2.5 .100 2.5 0
Argon** Nitrogen** N/A 50 25 N/A 81 100 2540 .140 3.6 .100 2.5 0
* Use an arc transfer height (ignition height) of .200” (5.1 mm) for cutting and .100” (2.5 mm) for marking.
** Only available on systems with the Automatic Gas Console.
(Revised 04/26/2013)
This information is subject to the controls of the Export Administration Regulations [EAR]. This information shall not be provided to
non-U.S. persons or transferred by any means to any location outside the United States contrary to the requirements of the EAR.
5-27
Page 80

Section 5: Torch Consumables and Cutting Charts Spirit II User’s Manual
Shield Cap
Nozzle
Electrode
Outer Cap
Retaining Cap
Swirl Ring Torch Head
284150
277152
277139 279100
Stainless Steel - 150 Amps - Air Plasma / Nitrogen Shield
Copper Electrode
This gas combination gives medium cut quality and minimum dross levels
277117 277293 277292
Imperial*
Material
Thickness
(in) (psi) (psi) (psi) (psi) (volts) (ipm) (in) (in) (msec) (in)
1/4
3/8 150 115 .180 .275 500
1/2 155 85 .210 .300 600
5/8 160 60 .220 .325 800
3/4 168 45 .240 .350 1200 .135
Preflow Plasma Shield Postflow
20 71 70 69
Metric*
Material
Thickness
(mm) (psi) (psi) (psi) (psi) (volts) (mm/m) (mm) (mm) (msec) (mm)
6
10 150 2805 4.7 7.0
12 153 2330 5.1 7.4
16 160 1510 5.6 8.3 800
20 170 1030 6.2 9.0 1200 3.4
Preflow Plasma Shield Postflow
20 71 70 69
Marking* – For All Material Thicknesses
Type of Gas Preflow Plasma Shield Postflow
Height
Pierce
Height
Pierce
Height
Marking
Height
Arc
Voltage
145 150 .160 .250 400
Arc
Voltage
144 3910 4.0 6.3 400
Arc
Voltage
Travel
Speed
Travel
Speed
Travel
Speed
Cutting
Height
Cutting
Pierce
Time
Pierce
Time
600
Initial
Height
Kerf
Width
.125
.130
Kerf
Width
3.2
3.3
Pierce
Time
(Plasma) (Shield) (psi) (psi) (psi) (psi) (volts) (ipm) (mm/min) (in) (mm) (in) (mm) (msec)
Nitrogen Nitrogen N/A 25 25 N/A 135 250 6350 .100 2.5 .100 2.5 0
Argon** Nitrogen** N/A 50 25 N/A 65 100 2540 .100 2.5 .100 2.5 0
* Use an arc transfer height (ignition height) of .200” (5.1 mm) for cutting and .100” (2.5 mm) for marking.
** Only available on systems with the Automatic Gas Console.
(Revised 04/26/2013)
This information is subject to the controls of the Export Administration Regulations [EAR]. This information shall not be provided to
non-U.S. persons or transferred by any means to any location outside the United States contrary to the requirements of the EAR.
5-28
Page 81

Spirit II User’s Manual Section 5: Torch Consumables and Cutting Charts
277274
277287
277135
Outer Cap
Retaining Cap
Swirl Ring Torch Head
284150
277266
277259 279100
Stainless Steel - 200 Amps - H17 Plasma / Nitrogen Shield
Copper Electrode
(H17 = 17.5% Hydrogen / 32.5% Argon / 50% Nitrogen)
This gas combination gives the good cut quality and minimum dross levels
Shield Cap Nozzle Electrode
Imperial*
Material
Thickness
(in) (psi) (psi) (psi) (psi) (volts) (ipm) (in) (in) (msec) (in)
3/8
1/2 148 75 .130 .300 600
5/8 155 60 .190 .350 800
3/4 160 50 .200 .400 1200
1.0 170 35 .240 .450 1500 .160
Preflow Plasma Shield Postflow
37 72 79 68
Metric*
Material
Thickness
(mm) (psi) (psi) (psi) (psi) (volts) (mm/m) (mm) (mm) (msec) (mm)
10
12 149 1935 3.6 7.3
16 155 1515 4.8 8.9 800
20 161 1215 5.2 10.3
25 169 915 6.0 11.3 4.1
Preflow Plasma Shield Postflow
37 72 79 68
Marking* – For All Material Thicknesses
Type of Gas Preflow Plasma Shield Postflow
Arc
Voltage
156 80 .195 .250 500
Arc
Voltage
154 2010 4.7 6.5
Arc
Voltage
Travel
Speed
Travel
Speed
Travel
Speed
Cutting
Height
Cutting
Height
Pierce
Height
Pierce
Height
Marking
Height
Pierce
Time
Pierce
Time
600 3.8
1500
Initial
Height
Width
Width
Kerf
.150
.155
Kerf
3.9
Pierce
Time
(Plasma) (Shield) (psi) (psi) (psi) (psi) (volts) (ipm) (mm/min) (in) (mm) (in) (mm) (msec)
Nitrogen Nitrogen N/A 25 25 N/A 120 250 6350 .100 2.5 .100 2.5 0
Argon** Nitrogen** N/A 50 25 N/A 72 100 2540 .120 3.0 .100 2.5 0
* Use an arc transfer height (ignition height) of .200” (5.1 mm) for cutting and .100” (2.5 mm) for marking.
** Only available on systems with the Automatic Gas Console.
(Revised 04/26/2013)
This information is subject to the controls of the Export Administration Regulations [EAR]. This information shall not be provided to
non-U.S. persons or transferred by any means to any location outside the United States contrary to the requirements of the EAR.
5-29
Page 82

Section 5: Torch Consumables and Cutting Charts Spirit II User’s Manual
Shield Cap
Nozzle
Electrode
Outer Cap
Retaining Cap
Swirl Ring Torch Head
284150
277266
277143 279100
Stainless Steel - 200 Amps - Air Plasma / Nitrogen Shield
Copper Electrode
This gas combination gives medium cut quality and minimum dross levels
277274 277289 277291
Imperial*
Material
Thickness
(in) (psi) (psi) (psi) (psi) (volts) (ipm) (in) (in) (msec) (in)
1/4
3/8 133 150 .250 500
1/2 140 110 .115 .300 600 .152
5/8 146 75 .150 .350 800
3/4 153 60 .190 .400 1200
1.0 158 40 .210 .450
1.25 *** 170 20 .250 .350 .165
1.50 *** 180 10 .275 .350 .175
Preflow Plasma Shield Postflow
20 74 58 72
Metric*
Material
Thickness
(mm) (psi) (psi) (psi) (psi) (volts) (mm/m) (mm) (mm) (msec) (mm)
6
10 134 3655 1.9 6.5
12 138 3020 2.6 7.3
16 146 1890 3.8 8.9 800
20 153 1450 4.8 10.3
25 157 1050 5.2 11.3 4.1
32 *** 170 495 6.4 8.9 4.2
38 *** 179 260 6.9 8.9 4.4
Preflow Plasma Shield Postflow
20 74 58 72
Marking* – For All Material Thicknesses
Type of Gas Preflow Plasma Shield Postflow
.070
Height
Pierce
Height
.200 400
Pierce
Height
Marking
Height
Arc
Voltage
130 200
Arc
Voltage
129 5220 1.8 4.9 400
Arc
Voltage
Travel
Speed
Travel
Speed
Travel
Speed
Cutting
Height
Cutting
Pierce
Time
1500
Pierce
Time
600
1500
Initial
Height
Kerf
Width
.150
.155
.160
Kerf
Width
3.8
3.9
Pierce
Time
(Plasma) (Shield) (psi) (psi) (psi) (psi) (volts) (ipm) (mm/min) (in) (mm) (in) (mm) (msec)
Nitrogen Nitrogen N/A 25 25 N/A 120 250 6350 .100 2.5 .100 2.5 0
Argon** Nitrogen** N/A 50 25 N/A 70 100 2540 .100 2.5 .100 2.5 0
* Use an arc transfer height (ignition height) of .200” (5.1 mm) for cutting and .100” (2.5 mm) for marking.
** Only available on systems with the Automatic Gas Console.
*** Edge start recommended.
(Revised 04/26/2013)
This information is subject to the controls of the Export Administration Regulations [EAR]. This information shall not be provided to
non-U.S. persons or transferred by any means to any location outside the United States contrary to the requirements of the EAR.
5-30
Page 83

Spirit II User’s Manual Section 5: Torch Consumables and Cutting Charts
277211
277118
277135
Outer Cap
Retaining Cap
Swirl Ring Torch Head
284150
277280
277139 279100
Stainless Steel - 260 Amps - H17 Plasma / Nitrogen Shield
Copper Electrode
(H17 = 17.5% Hydrogen / 32.5% Argon / 50% Nitrogen)
This gas combination gives the best cut quality and minimum dross levels
Shield Cap Nozzle Electrode
Imperial*
Material
Thickness
(in) (psi) (psi) (psi) (psi) (volts) (ipm) (in) (in) (msec) (in)
3/8
1/2 142 80 .140 .300 600
5/8 145 65 .185 .350 800
3/4 150 55 .225 .400 1200
1.0 160 33 .250 .450
1.25 *** 170 26 .280 .350 .205
Preflow Plasma Shield Postflow
40 63 64 63
Metric*
Material
Thickness
(mm) (psi) (psi) (psi) (psi) (volts) (mm/m) (mm) (mm) (msec) (mm)
10
12 142 2060 3.7 7.3
16 145 1640 4.7 8.9 800
20 151 1315 5.8 10.3
25 159 875 6.3 11.3 5.1
32 *** 170 650 7.1 8.7 5.2
Preflow Plasma Shield Postflow
40 63 64 63
Marking* – For All Material Thicknesses
Type of Gas Preflow Plasma Shield Postflow
Arc
Voltage
145 85 .160 .250 500
Arc
Voltage
144 2140 4.0 6.5
Arc
Voltage
Travel
Speed
Travel
Speed
Travel
Speed
Cutting
Height
Cutting
Height
Pierce
Height
Pierce
Height
Marking
Height
Pierce
Time
1500
Pierce
Time
600 4.8
1500
Initial
Height
Width
Kerf
Width
.190
.195
.200
Kerf
5.0
Pierce
Time
(Plasma) (Shield) (psi) (psi) (psi) (psi) (volts) (ipm) (mm/min) (in) (mm) (in) (mm) (msec)
Nitrogen Nitrogen N/A 25 25 N/A 108 250 6350 .100 2.5 .100 2.5 0
Argon** Nitrogen** N/A 50 25 N/A 75 100 2540 .160 4.1 .100 2.5 0
* Use an arc transfer height (ignition height) of .250” (6.4 mm) for cutting and .100” (2.5 mm) for marking.
** Only available on systems with the Automatic Gas Console.
*** Edge start recommended.
(Revised 04/26/2013)
This information is subject to the controls of the Export Administration Regulations [EAR]. This information shall not be provided to
non-U.S. persons or transferred by any means to any location outside the United States contrary to the requirements of the EAR.
5-31
Page 84

Section 5: Torch Consumables and Cutting Charts Spirit II User’s Manual
Shield Cap
Nozzle
Electrode
Outer Cap
Retaining Cap
Swirl Ring Torch Head
284150
277266
277258 279100
Stainless Steel - 275 Amps - Air Plasma / Nitrogen Shield
Copper Electrode
This gas combination gives medium cut quality and minimum dross levels
277263 277276 277270
Imperial*
Material
Thickness
(in) (psi) (psi) (psi) (psi) (volts) (ipm) (in) (in) (msec) (in)
1/2
5/8 148 90 .140 .350 800
3/4 152 80 .180 .400 1200
1.0 165 55 .210 .450
1.25 *** 175 35 .250 .350
1.50 *** 185 25 .300 .350
Preflow Plasma Shield Postflow
20 73 70 75
Metric*
Material
Thickness
(mm) (psi) (psi) (psi) (psi) (volts) (mm/m) (mm) (mm) (msec) (mm)
12
16 148 2275 3.6 8.9 800
20 153 1940 4.7 10.3
25 164 1435 5.2 11.3
32 *** 175 880 6.4 8.9
38 *** 184 640 7.5 8.9
Preflow Plasma Shield Postflow
20 73 70 75
Marking* – For All Material Thicknesses
Type of Gas Preflow Plasma Shield Postflow
Arc
Voltage
143 120 .125 .300 600
Arc
Voltage
141 3220 3.1 7.3 600
Arc
Voltage
Travel
Speed
Travel
Speed
Travel
Speed
Cutting
Height
Cutting
Height
Pierce
Height
Pierce
Height
Marking
Height
Pierce
Time
1500
Pierce
Time
1500
Initial
Height
Kerf
Width
.165
.170
.180
Kerf
Width
4.2
4.3
4.6
Pierce
Time
(Plasma) (Shield) (psi) (psi) (psi) (psi) (volts) (ipm) (mm/min) (in) (mm) (in) (mm) (msec)
Nitrogen Nitrogen N/A 25 25 N/A 108 250 6350 .100 2.5 .100 2.5 0
Argon** Nitrogen** N/A 50 25 N/A 55 100 2540 .130 3.3 .100 2.5 0
* Use an arc transfer height (ignition height) of .250” (6.4 mm) for cutting and .100” (2.5 mm) for marking.
** Only available on systems with the Automatic Gas Console.
*** Edge start recommended.
(Revised 04/26/2013)
This information is subject to the controls of the Export Administration Regulations [EAR]. This information shall not be provided to
non-U.S. persons or transferred by any means to any location outside the United States contrary to the requirements of the EAR.
5-32
Page 85

Spirit II User’s Manual Section 5: Torch Consumables and Cutting Charts
284155
284158
284159
Outer Cap
Retaining Cap
Swirl Ring
Torch Head
284150
284156
284122 279100
Stainless Steel - 400 Amps - H17 Plasma / Nitrogen Shield
Copper Electrode
(H17 = 17.5% Hydrogen / 32.5% Argon / 50% Nitrogen)
This gas combination gives the best cut quality and minimum dross levels
Shield Cap Nozzle Electrode
Imperial*
Material
Thickness
(in) (psi) (psi) (psi) (psi) (volts) (ipm) (in) (in) (msec) (in)
1/2
5/8 90 .180 .350 800 .175
3/4 75 .170 .400 1200
1 170 50 .185 .500 1500
1.25 175 40 .210 .700 2000
1.5 185 30 .270 .800 2500 .225
1.75 *** 193 23 .300
2.00 *** 200 18 .350 .250
Preflow Plasma Shield Postflow
30 80 82 96
Metric*
Material
Thickness
(mm) (psi) (psi) (psi) (psi) (volts) (mm/m) (mm) (mm) (msec) (mm)
12
16 2270 4.5 8.9 800 4.4
20 1810 4.3 10.5
25 169 1310 4.6 12.5
32 175 1005 5.3 18.0 2000
38 184 765 6.8 20.2 2500 5.7
45 *** 193 570 7.6 7.8
50 *** 199 470 8.7 8.9 6.4
Preflow Plasma Shield Postflow
30 80 82 96
Marking* – For All Material Thicknesses
Type of Gas Preflow Plasma Shield Postflow
Arc
Voltage
165
Arc
Voltage
165
Arc
Voltage
Travel
Speed
105 .190 .300 600 .165
Travel
Speed
2750 4.8 7.3 600 4.2
Cutting
Height
Cutting
Height
Travel
Speed
Pierce
Height
.350 1500
Pierce
Height
Marking
Height
Pierce
Time
Pierce
Time
1500
1500
Initial
Height
Kerf
Width
.200
.235
Kerf
Width
5.1
6.0
Pierce
Time
(Plasma) (Shield) (psi) (psi) (psi) (psi) (volts) (ipm) (mm/min) (in) (mm) (in) (mm) (msec)
Nitrogen Nitrogen N/A 25 25 N/A 100 250 6350 .100 2.5 .100 2.5 0
Argon** Nitrogen** N/A 50 25 N/A 68 100 2540 .160 4.1 .100 2.5 0
* Use an arc transfer height (ignition height) of .300” (7.6 mm) for cutting and .100” (2.5 mm) for marking.
** Only available on systems with the Automatic Gas Console.
*** Edge start recommended.
(Revised 04/26/2013)
This information is subject to the controls of the Export Administration Regulations [EAR]. This information shall not be provided to
non-U.S. persons or transferred by any means to any location outside the United States contrary to the requirements of the EAR.
5-33
Page 86

Section 5: Torch Consumables and Cutting Charts Spirit II User’s Manual
Shield Cap
Nozzle
Electrode
Outer Cap
Retaining Cap
Swirl Ring
Torch Head
284150
284156
284122 279100
Stainless Steel - 400 Amps - Nitrogen Plasma / Air Shield
Copper Electrode
This gas combination gives medium cut quality and minimum dross levels
284155 284157 284159
Imperial*
Material
Thickness
(in) (psi) (psi) (psi) (psi) (volts) (ipm) (in) (in) (msec) (in)
1/2
5/8 170 110 .170 .350 800
3/4 165 90 .150 .400 1200
1 170 65 .150 .500 1500
1.25 175 45 .160 .700 2000
1.5 180 35 .170 .800 2500
1.75 *** 190 25 .190 .350
2.00 *** 205 15 .210 .350
Preflow Plasma Shield Postflow
30 85 63 96
Metric*
Material
Thickness
(mm) (psi) (psi) (psi) (psi) (volts) (mm/m) (mm) (mm) (msec) (mm)
12
16 169 2775 4.2 8.9 800
20 165 2190
25 169 1690 12.5
32 175 1120 4.1 18.0 2000
38 179 895 4.2 20.2 2500
45 *** 190 610 4.8 7.8
50 *** 203 410 5.2 8.9
Preflow Plasma Shield Postflow
30 85 63 96
Marking* – For All Material Thicknesses
Type of Gas Preflow Plasma Shield Postflow
3.8
Pierce
Height
Pierce
Height
10.5
Marking
Height
Arc
Voltage
175 130 .210 .300 600
Arc
Voltage
176 3415 5.5 7.3 600
Arc
Voltage
Travel
Speed
Travel
Speed
Travel
Speed
Cutting
Height
Cutting
Height
Pierce
Time
1500
Pierce
Time
1500
1500
Initial
Height
Kerf
Width
.165
.200
.205
Kerf
Width
4.2
5.1
5.2
Pierce
Time
(Plasma) (Shield) (psi) (psi) (psi) (psi) (volts) (ipm) (mm/min) (in) (mm) (in) (mm) (msec)
Nitrogen Nitrogen N/A 25 25 N/A 107 250 6350 .100 2.5 .100 2.5 0
Argon** Nitrogen** N/A 50 25 N/A 71 100 2540 .160 4.1 .100 2.5 0
* Use an arc transfer height (ignition height) of .300” (7.6 mm) for cutting and .100” (2.5 mm) for marking.
** Only available on systems with the Automatic Gas Console.
*** Edge start recommended.
(Revised 04/26/2013)
This information is subject to the controls of the Export Administration Regulations [EAR]. This information shall not be provided to
non-U.S. persons or transferred by any means to any location outside the United States contrary to the requirements of the EAR.
5-34
Page 87

Spirit II User’s Manual Section 5: Torch Consumables and Cutting Charts
277145
277120
277130
Outer Cap
Retaining Cap
Swirl Ring Torch Head
284150
277153
277140 279100
Aluminum - 30 Amps - Air Plasma / Nitrogen Shield
Copper Electrode
Shield Cap Nozzle Electrode
Imperial*
Material
Thickness
(in) (psi) (psi) (psi) (psi) (volts) (ipm) (in) (in) (msec) (in)
.040
.050 120
.063 90 .150 200 .070
Preflow Plasma Shield Postflow
35 81 20 85 135
Arc
Voltage
Travel
Speed
150
Cutting
Height
.030
Pierce
Height
.100 100 .065
Pierce
Time
Metric*
Material
Thickness
(mm) (psi) (psi) (psi) (psi) (volts) (mm/m) (mm) (mm) (msec) (mm)
1
1.5 2520 3.4 200 1.8
Preflow Plasma Shield Postflow
35 81 20 85 135
Arc
Voltage
Travel
Speed
3885
Cutting
Height
0.8
Pierce
Height
2.5 100 1.7
Pierce
Time
Marking* – For All Material Thicknesses
Type of Gas Preflow Plasma Shield Postflow
(Plasma) (Shield) (psi) (psi) (psi) (psi) (volts) (ipm) (mm/min) (in) (mm) (in) (mm) (msec)
Nitrogen Nitrogen N/A 25 25 N/A 145 250 6350 .177 4.5 .100 2.5 0
Argon** Air** N/A 50 25 N/A 75 100 2540 .120 3.0 .100 2.5 0
* Use an arc transfer height (ignition height) of .100” (2.5 mm) for cutting and .100” (2.5 mm) for marking.
** Only available on systems with the Automatic Gas Console.
(Revised 04/26/2013)
Arc
Voltage
Travel
Speed
Marking
Height
Initial
Height
Kerf
Width
Kerf
Width
Pierce
Time
This information is subject to the controls of the Export Administration Regulations [EAR]. This information shall not be provided to
non-U.S. persons or transferred by any means to any location outside the United States contrary to the requirements of the EAR.
5-35
Page 88

Section 5: Torch Consumables and Cutting Charts Spirit II User’s Manual
277150
277122
277131
Outer Cap
Retaining Cap
Swirl Ring Torch Head
284150
277153
277142 279100
Aluminum - 50 Amps - Air Plasma / Nitrogen Shield
Copper Electrode
Shield Cap Nozzle Electrode
Imperial*
Material
Thickness
(in) (psi) (psi) (psi) (psi) (volts) (ipm) (in) (in) (msec) (in)
.050
.063 138 140 .065 150 .082
.080 143 90 .075 .150 200 .085
Preflow Plasma Shield Postflow
25 66 19 67
Arc
Voltage
135 180 .050
Travel
Speed
Cutting
Height
Pierce
Height
.100
Pierce
Time
100 .080
Metric*
Material
Thickness
(mm) (psi) (psi) (psi) (psi) (volts) (mm/m) (mm) (mm) (msec) (mm)
1.5
2.0 142 2360 1.8 3.7 200 2.2
Preflow Plasma Shield Postflow
25 66 19 67
Arc
Voltage
137 3870 1.5 2.5 150 2.1
Travel
Speed
Cutting
Height
Pierce
Height
Pierce
Time
Marking* – For All Material Thicknesses
Type of Gas Preflow Plasma Shield Postflow
(Plasma) (Shield) (psi) (psi) (psi) (psi) (volts) (ipm) (mm/min) (in) (mm) (in) (mm) (msec)
Nitrogen Nitrogen N/A 25 25 N/A 145 250 6350 .147 3.7 .100 2.5 0
Argon** Air** N/A 50 25 N/A 77 100 2540 .120 3.0 .100 2.5 0
* Use an arc transfer height (ignition height) of .100” (2.5 mm) for cutting and .100” (2.5 mm) for marking.
** Only available on systems with the Automatic Gas Console.
(Revised 04/26/2013)
Arc
Voltage
Travel
Speed
Marking
Height
Initial
Height
Kerf
Width
Kerf
Width
Pierce
Time
This information is subject to the controls of the Export Administration Regulations [EAR]. This information shall not be provided to
non-U.S. persons or transferred by any means to any location outside the United States contrary to the requirements of the EAR.
5-36
Page 89

Spirit II User’s Manual Section 5: Torch Consumables and Cutting Charts
277150
277125
277131
Outer Cap
Retaining Cap
Swirl Ring Torch Head
284150
277153
277142 279100
Aluminum - 70 Amps - Air Plasma / Nitrogen Shield
Copper Electrode
Shield Cap Nozzle Electrode
Imperial*
Material
Thickness
(in) (psi) (psi) (psi) (psi) (volts) (ipm) (in) (in) (msec) (in)
.080
1/8 135 160 .070 .175
3/16 145 80 .100 .200 200
1/4 150 50 .060 .250 300
3/8 155 40 .075 .275 400
1/2 162 30 .115 .300 500
Preflow Plasma Shield Postflow
25 76 25 76
Arc
Voltage
130 250 .050 .150
Travel
Speed
Cutting
Height
Pierce
Height
Pierce
Time
100 .080
Metric*
Material
Thickness
(mm) (psi) (psi) (psi) (psi) (volts) (mm/m) (mm) (mm) (msec) (mm)
2
3 134 4420 1.7 4.3
5 145 1920 2.3 5.2
6 148 1440 1.7 6.1
10 156 975 2.0 7.0
12 160 820 2.6 7.4
Preflow Plasma Shield Postflow
25 76 25 76
Arc
Voltage
129 6400 1.2 3.7
Travel
Speed
Cutting
Height
Pierce
Height
Pierce
Time
100 2.0
300 2.2
500 2.3
Marking* – For All Material Thicknesses
Type of Gas Preflow Plasma Shield Postflow
(Plasma) (Shield) (psi) (psi) (psi) (psi) (volts) (ipm) (mm/min) (in) (mm) (in) (mm) (msec)
Nitrogen Nitrogen N/A 25 25 N/A 135 250 6350 .096 2.4 .100 2.5 0
Argon** Air** N/A 50 25 N/A 69 100 2540 .120 3.0 .100 2.5 0
* Use an arc transfer height (ignition height) of .150” (3.8 mm) for cutting and .100” (2.5 mm) for marking.
** Only available on systems with the Automatic Gas Console.
(Revised 04/26/2013)
Arc
Voltage
Travel
Speed
Marking
Height
Initial
Height
Kerf
Width
.085
.090
Kerf
Width
Pierce
Time
This information is subject to the controls of the Export Administration Regulations [EAR]. This information shall not be provided to
non-U.S. persons or transferred by any means to any location outside the United States contrary to the requirements of the EAR.
5-37
Page 90

Section 5: Torch Consumables and Cutting Charts Spirit II User’s Manual
277286
277284
277282
Outer Cap
Retaining Cap
Swirl Ring Torch Head
284150
277151
277283 279100
Aluminum - 100 Amps - Air Plasma / Nitrogen Shield
Copper Electrode
Shield Cap Nozzle Electrode
Imperial*
Material
Thickness
(in) (psi) (psi) (psi) (psi) (volts) (ipm) (in) (in) (msec) (in)
1/4
3/8 162 90 .180 .275 400 .098
1/2 165 70 .195 .300 500 .100
Preflow Plasma Shield Postflow
25 80 26 80
Arc
Voltage
158 105 .155 .250 300 .095
Travel
Speed
Cutting
Height
Pierce
Height
Pierce
Time
Metric*
Material
Thickness
(mm) (psi) (psi) (psi) (psi) (volts) (mm/m) (mm) (mm) (msec) (mm)
6
10 162 2210 4.6 7.0
12 165 1890 4.9 7.4
Preflow Plasma Shield Postflow
25 80 26 80
Arc
Voltage
158 2710 3.8 6.3 300 2.4
Travel
Speed
Cutting
Height
Pierce
Height
Pierce
Time
500 2.5
Marking* – For All Material Thicknesses
Type of Gas Preflow Plasma Shield Postflow
(Plasma) (Shield) (psi) (psi) (psi) (psi) (volts) (ipm) (mm/min) (in) (mm) (in) (mm) (msec)
Nitrogen Nitrogen N/A 25 25 N/A 130 250 6350 .100 2.5 .100 2.5 0
Argon** Air** N/A 50 25 N/A 71 100 2540 .120 3.0 .100 2.5 0
* Use an arc transfer height (ignition height) of .250” (6.4 mm) for cutting and .100” (2.5 mm) for marking.
** Only available on systems with the Automatic Gas Console.
(Revised 04/26/2013)
Arc
Voltage
Travel
Speed
Marking
Height
Initial
Height
Kerf
Width
Kerf
Width
Pierce
Time
This information is subject to the controls of the Export Administration Regulations [EAR]. This information shall not be provided to
non-U.S. persons or transferred by any means to any location outside the United States contrary to the requirements of the EAR.
5-38
Page 91

Spirit II User’s Manual Section 5: Torch Consumables and Cutting Charts
277117
277293
277292
Outer Cap
Retaining Cap
Swirl Ring Torch Head
284150
277152
277139 279100
Aluminum - 150 Amps - Air Plasma / Nitrogen Shield
Copper Electrode
Shield Cap Nozzle Electrode
Imperial*
Material
Thickness
(in) (psi) (psi) (psi) (psi) (volts) (ipm) (in) (in) (msec) (in)
1/4
3/8 155 115 .185 .275 500
1/2 165 90 .230 .300 600 .130
5/8
3/4 45 .350 1200 .140
Preflow Plasma Shield Postflow
20 71 50 69
Arc
Voltage
145 145 .130 .250 400
170
Travel
Speed
65
Cutting
Height
.250
Pierce
Height
.325 800 .135
Pierce
Time
Metric*
Material
Thickness
(mm) (psi) (psi) (psi) (psi) (volts) (mm/m) (mm) (mm) (msec) (mm)
6
10 156 2825 4.8 7.0
12 162 2430 5.5 7.4 3.3
16 170 1630
20 170 990 9.0 3.6
Preflow Plasma Shield Postflow
20 71 50 69
Arc
Voltage
143 3770 3.1 6.3 400
Travel
Speed
Cutting
Height
6.4
Pierce
Height
8.3
Pierce
Time
600
1200
Marking* – For All Material Thicknesses
Type of Gas Preflow Plasma Shield Postflow
(Plasma) (Shield) (psi) (psi) (psi) (psi) (volts) (ipm) (mm/min) (in) (mm) (in) (mm) (msec)
Nitrogen Nitrogen N/A 25 25 N/A 135 250 6350 .100 2.5 .100 2.5 0
Argon** Air** N/A 50 25 N/A 69 100 2540 .100 2.5 .100 2.5 0
* Use an arc transfer height (ignition height) of .250” (6.4 mm) for cutting and .100” (2.5 mm) for marking.
** Only available on systems with the Automatic Gas Console.
(Revised 04/26/2013)
Arc
Voltage
Travel
Speed
Marking
Height
Initial
Height
Kerf
Width
.125
Kerf
Width
3.2
3.4
Pierce
Time
This information is subject to the controls of the Export Administration Regulations [EAR]. This information shall not be provided to
non-U.S. persons or transferred by any means to any location outside the United States contrary to the requirements of the EAR.
5-39
Page 92

Section 5: Torch Consumables and Cutting Charts Spirit II User’s Manual
277274
277289
277291
Outer Cap
Retaining Cap
Swirl Ring Torch Head
284150
277266
277143 279100
Aluminum - 200 Amps - Air Plasma / Nitrogen Shield
Copper Electrode
Shield Cap Nozzle Electrode
Imperial*
Material
Thickness
(in) (psi) (psi) (psi) (psi) (volts) (ipm) (in) (in) (msec) (in)
1/4
3/8
1/2 110
5/8
3/4 65 .150
1.0 *** 175 35 .200 1000 .170
Preflow Plasma Shield Postflow
20 74 58 72
Arc
Voltage
150 190 .135 .250 300
155
160
Travel
Speed
145 .140 .275 400
95 .350 600
Cutting
Height
.135
Pierce
Height
.300 500
.400
Pierce
Time
800 .160
Metric*
Material
Thickness
(mm) (psi) (psi) (psi) (psi) (volts) (mm/m) (mm) (mm) (msec) (mm)
6
10
12 2995
16 160 2380 8.9 800
20 162 1575 3.9
25 *** 174 940 5.0 4.3
Preflow Plasma Shield Postflow
20 74 58 72
Arc
Voltage
149 4955 3.3 6.3 300
155
Travel
Speed
3545 3.5 7.0
Cutting
Height
3.4
Pierce
Height
7.4
10.2 1000
Pierce
Time
500
Marking* – For All Material Thicknesses
Type of Gas Preflow Plasma Shield Postflow
(Plasma) (Shield) (psi) (psi) (psi) (psi) (volts) (ipm) (mm/min) (in) (mm) (in) (mm) (msec)
Nitrogen Nitrogen N/A 25 25 N/A 120 250 6350 .100 2.5 .100 2.5 0
Argon** Air** N/A 50 25 N/A 71 100 2540 .100 2.5 .100 2.5 0
* Use an arc transfer height (ignition height) of .250” (6.4 mm) for cutting and .100” (2.5 mm) for marking.
** Only available on systems with the Automatic Gas Console.
*** Edge start recommended.
(Revised 04/26/2013)
Arc
Voltage
Travel
Speed
Marking
Height
Initial
Height
Kerf
Width
.150
.155
Kerf
Width
3.8
3.9
4.1
Pierce
Time
This information is subject to the controls of the Export Administration Regulations [EAR]. This information shall not be provided to
non-U.S. persons or transferred by any means to any location outside the United States contrary to the requirements of the EAR.
5-40
Page 93

Spirit II User’s Manual Section 5: Torch Consumables and Cutting Charts
277263
277276
277270
Outer Cap
Retaining Cap
Swirl Ring
Torch Head
284150
277266
277258 279100
Aluminum - 275 Amps - Air Plasma / Nitrogen Shield
Copper Electrode
Shield Cap Nozzle Electrode
Imperial*
Material
Thickness
(in) (psi) (psi) (psi) (psi) (volts) (ipm) (in) (in) (msec) (in)
3/8
1/2 165 125 .180 .300 500
5/8 168 105 .190 .350 600
3/4 172 85 .200
1.00 *** 180 60 .240
1.25 *** 185 45 .260
1.50 *** 190 25 .270 .180
Preflow Plasma Shield Postflow
20 73 65 75
Arc
Voltage
160 160 .160 .275 400
Travel
Speed
Cutting
Height
Pierce
Height
.400
Pierce
Time
800
1000
Metric*
Material
Thickness
(mm) (psi) (psi) (psi) (psi) (volts) (mm/m) (mm) (mm) (msec) (mm)
10
12 163 3375 4.4 7.4
16 168 2645 4.8 8.9
20 173 2055 5.3
25 *** 179 1565 6.0
32 *** 185 1120 6.6
38 *** 189 645 6.8 4.6
Preflow Plasma Shield Postflow
20 73 65 75
Arc
Voltage
160 3930 4.1 7.1
Travel
Speed
Cutting
Height
Pierce
Height
10.2
Pierce
Time
500 4.1
800 4.2
1000
Marking* – For All Material Thicknesses
Type of Gas Preflow Plasma Shield Postflow
(Plasma) (Shield) (psi) (psi) (psi) (psi) (volts) (ipm) (mm/min) (in) (mm) (in) (mm) (msec)
Nitrogen Nitrogen N/A 25 25 N/A 108 250 6350 .100 2.5 .100 2.5 0
Argon** Air** N/A 50 25 N/A 56 100 2540 .120 3.0 .100 2.5 0
* Use an arc transfer height (ignition height) of .275” (7.0 mm) for cutting and .100” (2.5 mm) for marking.
** Only available on systems with the Automatic Gas Console.
*** Edge start recommended.
(Revised 04/26/2013)
Arc
Voltage
Travel
Speed
Marking
Height
Initial
Height
Kerf
Width
.160
.165
.170
Kerf
Width
4.3
Pierce
Time
This information is subject to the controls of the Export Administration Regulations [EAR]. This information shall not be provided to
non-U.S. persons or transferred by any means to any location outside the United States contrary to the requirements of the EAR.
5-41
Page 94

Section 5: Torch Consumables and Cutting Charts Spirit II User’s Manual
284155
284157
284159
Outer Cap
Retaining Cap
Swirl Ring
Torch Head
284150
284156
284122 279100
Aluminum - 400 Amps - Nitrogen Plasma / Air Shield
Copper Electrode
Shield Cap Nozzle Electrode
Imperial*
Material
Thickness
(in) (psi) (psi) (psi) (psi) (volts) (ipm) (in) (in) (msec) (in)
1/2
5/8 180 125 .190 .400 700 .205
3/4 185 100 .205 .500 800
1 190 75 .215 .600 1200
1.25 200 55 .220 .700 1500 .225
1.5 205 35 .225 .800 2000 .240
Preflow Plasma Shield Postflow
30 85 63 96
Arc
Voltage
175 150 .170 .300 600 .200
Travel
Speed
Cutting
Height
Pierce
Height
Pierce
Time
Metric*
Material
Thickness
(mm) (psi) (psi) (psi) (psi) (volts) (mm/m) (mm) (mm) (msec) (mm)
12
16 180 3150 4.8 10.3 800 5.2
20 185 2445 5.2 13.0
25 189 1945 5.4 15.0
32 200 1375 5.6 17.9 1500 5.7
38 204 895 5.6 20.2 2000 6.1
Preflow Plasma Shield Postflow
30 85 63 96
Arc
Voltage
173 3950 4.1 7.0 600 5.1
Travel
Speed
Cutting
Height
Pierce
Height
Pierce
Time
1200 5.3
Marking* – For All Material Thicknesses
Type of Gas Preflow Plasma Shield Postflow
(Plasma) (Shield) (psi) (psi) (psi) (psi) (volts) (ipm) (mm/min) (in) (mm) (in) (mm) (msec)
Nitrogen Nitrogen N/A 25 25 N/A 106 250 6350 .100 2.5 .100 2.5 0
Argon** Air** N/A 50 25 N/A 75 100 2540 .140 3.6 .100 2.5 0
* Use an arc transfer height (ignition height) of .300” (7.6 mm) for cutting and .100” (2.5 mm) for marking.
** Only available on systems with the Automatic Gas Console.
(Revised 04/26/2013)
Arc
Voltage
Travel
Speed
Marking
Height
Initial
Height
Kerf
Width
.210
Kerf
Width
Pierce
Time
This information is subject to the controls of the Export Administration Regulations [EAR]. This information shall not be provided to
non-U.S. persons or transferred by any means to any location outside the United States contrary to the requirements of the EAR.
5-42
Page 95

Spirit II User’s Manual Section 5: Torch Consumables and Cutting Charts
277286
279484
279410
Outer Cap
Retaining Cap
Swirl Ring Torch Head
284150
277151
279483 279060
Mild Steel - 100 Amps - Oxygen Plasma / Air Shield
Silver Electrode
Shield Cap Nozzle Electrode
(brown o-ring)
Imperial*
Material
Thickness
(in) (psi) (psi) (psi) (psi) (volts) (ipm) (in) (in) (msec) (in)
1/4
3/8
1/2 65 .155 .300 500
5/8 143 47
3/4 145 35 .350 1000
Preflow Plasma Shield Postflow
25 83 26 81
Metric*
Material
Thickness
(mm) (psi) (psi) (psi) (psi) (volts) (mm/m) (mm) (mm) (msec) (mm)
6
10
12 1850 3.7 7.3
16 143 1180
20 145 800 9.0
Preflow Plasma Shield Postflow
25 83 26 81
Marking* – For All Material Thicknesses
Type of Gas Preflow Plasma Shield Postflow
Cutting
Height
.185
Cutting
Height
4.7
Pierce
Height
.325 800
Pierce
Height
Marking
Height
Arc
Voltage
125 150 .090 .200 300
130
Arc
Voltage
124 3950 2.1 4.9 300
130
Arc
Voltage
Travel
Speed
100 .130 .250 400
Travel
Speed
2405 3.3 6.5
Travel
Speed
8.3
Pierce
Time
Pierce
Time
500
1000 2.4
Initial
Height
Kerf
Width
.090
.095
Kerf
Width
2.3
Pierce
Time
(Plasma) (Shield) (psi) (psi) (psi) (psi) (volts) (ipm) (mm/min) (in) (mm) (in) (mm) (msec)
Nitrogen Nitrogen N/A 25 25 N/A 130 250 6350 .100 2.5 .100 2.5 0
Argon** Air** N/A 50 25 N/A 60 100 2540 .100 2.5 .100 2.5 0
* Use an arc transfer height (ignition height) of .200” (5.1 mm) for cutting and .100” (2.5 mm) for marking.
** Only available on systems with the Automatic Gas Console.
(Revised 04/26/2013)
This information is subject to the controls of the Export Administration Regulations [EAR]. This information shall not be provided to
non-U.S. persons or transferred by any means to any location outside the United States contrary to the requirements of the EAR.
5-43
Page 96

Section 5: Torch Consumables and Cutting Charts Spirit II User’s Manual
277117
279493
279420
Outer Cap
Retaining Cap
Swirl Ring
Torch Head
284150
277151 / 277152
279439 279060
Mild Steel - 150 Amps - Oxygen Plasma / Air Shield
Silver Electrode
Shield Cap Nozzle Electrode
(green o-ring)
Imperial*
Material
Thickness
(in) (psi) (psi) (psi) (psi) (volts) (ipm) (in) (in) (msec) (in)
1/4
3/8 123 125 .135 .250 400
1/2 125 90 .140 .300 500 .130
5/8
3/4 130 55 .350 1000 .135
1 134 40 .150 .400
1.25 *** 145 25 .200 .350
1.50 *** 155 15 .225 .350
Preflow Plasma Shield Postflow
Retaining Cap 277151
20 71 30 69
Retaining Cap 277152
20 71 45 69
Metric*
Material
Thickness
(mm) (psi) (psi) (psi) (psi) (volts) (mm/m) (mm) (mm) (msec) (mm)
6
10 123 3040 3.4 6.5
12 124 2485 3.5 7.3 3.3
16
20 130 1340 9.0
25 133 1040 3.7 10.1
32 *** 145 625 5.1 8.9
38 *** 154 385 5.6 8.9
Preflow Plasma Shield Postflow
Retaining Cap 277151
20 71 30 69
Retaining Cap 277152
20 71 45 69
Marking* – For All Material Thicknesses
Type of Gas Preflow Plasma Shield Postflow
Cutting
Height
.140
Cutting
Height
3.6
Pierce
Height
.325 600 .130
Pierce
Height
8.3 1000 3.3
Marking
Height
Arc
Voltage
118 165 .105 .200 300
127 70
Arc
Voltage
117 4305 2.6 4.9 300
127 1760
Arc
Voltage
Travel
Speed
Travel
Speed
Travel
Speed
Pierce
Time
1500 .140
Pierce
Time
500
1500
Initial
Height
Kerf
Width
.125
Kerf
Width
3.2
3.4
3.6
Pierce
Time
(Plasma) (Shield) (psi) (psi) (psi) (psi) (volts) (ipm) (mm/min) (in) (mm) (in) (mm) (msec)
Nitrogen Nitrogen N/A 25 25 N/A 135 250 6350 .100 2.5 .100 2.5 0
Argon** Air** N/A 50 25 N/A 61 100 2540 .100 2.5 .100 2.5 0
* Use an arc transfer height (ignition height) of .200” (5.1 mm) for cutting and .100” (2.5 mm) for marking.
** Only available on systems with the Automatic Gas Console.
*** Edge start recommended.
(Revised 04/26/2013)
This information is subject to the controls of the Export Administration Regulations [EAR]. This information shall not be provided to
non-U.S. persons or transferred by any means to any location outside the United States contrary to the requirements of the EAR.
5-44
Page 97

Spirit II User’s Manual Section 5: Torch Consumables and Cutting Charts
277274
279489
279440
(yellow o-ring)
Outer Cap
Retaining Cap
Swirl Ring
Torch Head
Mild Steel - 200 Amps - Oxygen Plasma / Air Shield
Silver Electrode
Shield Cap Nozzle Electrode
284150 277266 279443 279060
Imperial*
Material
Thickness
(in) (psi) (psi) (psi) (psi) (volts) (ipm) (in) (in) (msec) (in)
1/4
3/8 130 140 .090 .250 400
1/2 133 120 .115 .300 500
5/8 137 100 .130 .350 600 .152
3/4 140 75 .150 .400 800 .153
1 147 50 .175 .450 1000
1.25 155 25 .240 .500
1.50 *** 165 17 .300
1.75 *** 175 12 .350
2.00 *** 185 7 .500 .500 .160
Preflow Plasma Shield Postflow
20 74 58 72
Arc
Voltage
125 230 .040 .200 300
Travel
Speed
Cutting
Height
Pierce
Height
.350 158
Metric*
Material
Thickness
(mm) (psi) (psi) (psi) (psi) (volts) (mm/m) (mm) (mm) (msec) (mm)
6
10 130 3480 2.3 6.5
12 132 3160 2.7 7.3
16 137 2515 3.3 8.9 800
20 141 1810 3.8 10.3
25 146 1310 4.3 11.3
32 155 610 6.1 12.7
38 *** 164 435 7.5 8.9
45 *** 175 295 9.2 9.2
50 *** 183 195 12.2 12.2 4.1
Preflow Plasma Shield Postflow
20 74 58 72
Arc
Voltage
124 6100 .8 4.9 300
Travel
Speed
Cutting
Height
Pierce
Height
Marking* – For All Material Thicknesses
Type of Gas Preflow Plasma Shield Postflow
Arc
Voltage
Travel
Speed
Marking
Height
Pierce
Time
1500
Pierce
Time
500
1000
1500
Initial
Height
Kerf
Width
.150
.155
Kerf
Width
3.8
3.9
4.0
Pierce
Time
(Plasma) (Shield) (psi) (psi) (psi) (psi) (volts) (ipm) (mm/min) (in) (mm) (in) (mm) (msec)
Nitrogen Nitrogen N/A 25 25 N/A 120 250 6350 .100 2.5 .100 2.5 0
Argon** Air** N/A 50 25 N/A 62 100 2540 .100 2.5 .100 2.5 0
* Use an arc transfer height (ignition height) of .200” (5.1 mm) for cutting and .100” (2.5 mm) for marking.
** Only available on systems with the Automatic Gas Console.
*** Edge start recommended.
(Revised 04/26/2013)
This information is subject to the controls of the Export Administration Regulations [EAR]. This information shall not be provided to
non-U.S. persons or transferred by any means to any location outside the United States contrary to the requirements of the EAR.
5-45
Page 98

Section 5: Torch Consumables and Cutting Charts Spirit II User’s Manual
277263
279469
279450
(red o-ring)
Outer Cap
Retaining Cap
Swirl Ring
Torch Head
Mild Steel - 275 Amps - Oxygen Plasma / Air Shield
Silver Electrode
Shield Cap Nozzle Electrode
284150 277266 279458 279060
Imperial*
Material
Thickness
(in) (psi) (psi) (psi) (psi) (volts) (ipm) (in) (in) (msec) (in)
1/2
5/8 105 .135 .325 600
3/4 138 90 .120 .350 800 .170
1 144 65 .160 .400 1000
1.25 150 45 .175 .500
1.50 *** 163 25 .235
1.75 *** 170 20 .290
2.00 *** 180 15 .350
2.25 *** 185 13 .375 .375 .260
2.50 *** 190 9 .385 .385 .275
Preflow Plasma Shield Postflow
20 81 70 79
Metric*
Material
Thickness
(mm) (psi) (psi) (psi) (psi) (volts) (mm/m) (mm) (mm) (msec) (mm)
12
16
20 2190 3.1 9.0
25 143 1690 4.0 10.1
32 150 1120 4.4 12.8
38 *** 162 645 5.9
45 *** 170 495 7.5
50 *** 178 395 8.7
55 *** 183 345 9.2 9.2 6.6
60 *** 187 285 9.6 9.6 6.9
Preflow Plasma Shield Postflow
20 81 70 79
Marking* – For All Material Thicknesses
Type of Gas Preflow Plasma Shield Postflow
Cutting
Height
Cutting
Height
Pierce
Height
.350 .190
Pierce
Height
Marking
Height
Arc
Voltage
139
Arc
Voltage
139 3290 3.6 7.4 500
138
Arc
Voltage
Travel
Speed
125 .140 .300 500
Travel
Speed
2650 3.3 8.3 800
Travel
Speed
Pierce
Time
1500
Pierce
Time
1000
8.9 4.8
1500
Initial
Height
Kerf
Width
.165
.185
Kerf
Width
4.2
4.3
4.7
Pierce
Time
(Plasma) (Shield) (psi) (psi) (psi) (psi) (volts) (ipm) (mm/min) (in) (mm) (in) (mm) (msec)
Nitrogen Nitrogen N/A 25 25 N/A 108 250 6350 .100 2.5 .100 2.5 0
Argon** Air** N/A 50 25 N/A 54 100 2540 .120 3.0 .100 2.5 0
* Use an arc transfer height (ignition height) of .300” (7.6 mm) for cutting and .100” (2.5 mm) for marking.
** Only available on systems with the Automatic Gas Console.
*** Edge start recommended.
(Revised 04/26/2013)
This information is subject to the controls of the Export Administration Regulations [EAR]. This information shall not be provided to
non-U.S. persons or transferred by any means to any location outside the United States contrary to the requirements of the EAR.
5-46
Page 99

Spirit II User’s Manual Section 5: Torch Consumables and Cutting Charts
284123
284125
279460
(black o-ring)
Outer Cap
Retaining Cap
Swirl Ring
Torch Head
Material
Thickness
Arc
Voltage
Travel
Speed
Cutting
Height
Pierce
Height
Pierce
Time
Kerf
Width
1/2
140
160
.140
.300
500
.150
3/4
110
.400
800
.160
1.5
160
50
.225
.700
2000
2.00
165
33
.270
1.00
4500
.210
2.75 ***
185
12
.325
.350
1500
.245
Material
Thickness
Arc
Voltage
Travel
Speed
Cutting
Height
Pierce
Height
Pierce
Time
Kerf
Width
12
138
4205
3.6
7.3
500
3.8
20
2700
3.4
10.5
4.1
25
149
2200
4.0
12.5
4.6
38
159
1275
5.6
17.7
2000
50
164
860
6.8
25.4
4500
5.3
55 ***
168
620
6.9
11.9
1000
6.0
65 ***
182
365
7.7
1500
75 ***
193
220
8.7
Mild Steel - 400 Amps - Oxygen Plasma / Air Shield
Silver Electrode
Shield Cap Nozzle Electrode
284150 284121 279422 279060
Imperial*
(in) (psi) (psi) (psi) (psi) (volts) (ipm) (in) (in) (msec) (in)
5/8
1 150 85 .160 .500 1000 .180
1.25 155 60 .175 .600 1500
1.75 162 40 .260 .800 3000 .200
2.25 *** 170 20 .280 .350 1000 .235
2.50 *** 182 15 .300 .350 1300 .245
3.00 *** 195 8 .350 .350 2000 .250
Metric*
(mm) (psi) (psi) (psi) (psi) (volts) (mm/m) (mm) (mm) (msec) (mm)
Preflow Plasma Shield Postflow
30 79 70 76
Preflow Plasma Shield Postflow
.130
.350 600 .155
.190
145
135
16
32 155 1500 4.4 15.3 1500
45 162 995 6.6 20.5 3000 5.1
60 *** 175 450 7.2
70 *** 185 300 8.3
30 79 70 76
145
3405 3.3 8.9 800 3.9
1000
1300
8.9
2000 6.4
Marking* – For All Material Thicknesses
Type of Gas Preflow Plasma Shield Postflow
(Plasma) (Shield) (psi) (psi) (psi) (psi) (volts) (ipm) (mm/min) (in) (mm) (in) (mm) (msec)
Nitrogen Nitrogen N/A 25 25 N/A 112 250 6350 .100 2.5 .100 2.5 0
Argon** Air** N/A 50 25 N/A 53 100 2540 .120 3.0 .100 2.5 0
* Use an arc transfer height (ignition height) of .300” (7.6 mm) for cutting and .100” (2.5 mm) for marking.
** Only available on systems with the Automatic Gas Console.
*** Edge start recommended.
(Revised 04/26/2013)
Arc
Voltage
Travel
Speed
Marking
Height
Initial
Height
4.8
6.2
Pierce
Time
This information is subject to the controls of the Export Administration Regulations [EAR]. This information shall not be provided to
non-U.S. persons or transferred by any means to any location outside the United States contrary to the requirements of the EAR.
5-47
Page 100

Section 5: Torch Consumables and Cutting Charts Spirit II User’s Manual
277286
279484
279410
Outer Cap
Retaining Cap
Swirl Ring Torch Head
284150
277151
279483 279060
Stainless Steel - 100 Amps - Air Plasma / Nitrogen Shield
Silver Electrode
Shield Cap Nozzle Electrode
(brown o-ring)
Imperial*
Material
Thickness
(in) (psi) (psi) (psi) (psi) (volts) (ipm) (in) (in) (msec) (in)
1/4
3/8 147 80 .170 .250 500
1/2 154 55 .210 .300 600
Preflow Plasma Shield Postflow
25 80 35 80
Arc
Voltage
141 100 .135 .225 400 .092
Travel
Speed
Cutting
Height
Pierce
Height
Pierce
Time
Metric*
Material
Thickness
(mm) (psi) (psi) (psi) (psi) (volts) (mm/m) (mm) (mm) (msec) (mm)
6
10 148 1935 4.4 6.5
12 152 1540 5.0 7.3
Preflow Plasma Shield Postflow
25 80 35 80
Arc
Voltage
140 2595 3.2 5.6 400 2.3
Travel
Speed
Cutting
Height
Pierce
Height
Pierce
Time
600 2.4
Marking* – For All Material Thicknesses
Type of Gas Preflow Plasma Shield Postflow
(Plasma) (Shield) (psi) (psi) (psi) (psi) (volts) (ipm) (mm/min) (in) (mm) (in) (mm) (msec)
Nitrogen Nitrogen N/A 25 25 N/A 130 250 6350 .100 2.5 .100 2.5 0
Argon** Nitrogen** N/A 50 25 N/A 68 100 2540 .100 2.5 .100 2.5 0
* Use an arc transfer height (ignition height) of .200” (5.1 mm) for cutting and .100” (2.5 mm) for marking.
** Only available on systems with the Automatic Gas Console.
(Revised 04/26/2013)
Arc
Voltage
Travel
Speed
Marking
Height
Initial
Height
Kerf
Width
.095
Kerf
Width
Pierce
Time
This information is subject to the controls of the Export Administration Regulations [EAR]. This information shall not be provided to
non-U.S. persons or transferred by any means to any location outside the United States contrary to the requirements of the EAR.
5-48
 Loading...