

Page 1
• Sales and Service through Subsidiaries and Distributors Worldwide •
• World's Leader in Welding and Cutting Products •
VISTA™ AUTO-DARKENING
FILTER CARTRIDGE (ADF) HELMETS
OPERATOR’S MANUAL
IM948-A
October, 2008
Copyright © Lincoln Global Inc.
This manual covers equipment which is no
longer in production by The Lincoln Electric Co.
Specications and availability of optional
features may have changed.
Page 2

TABLE OF CONTENTS Page
SAFETY WARNINGS – READ BEFORE USING 1
PATENT INFORMATION 2
SPECIFICATIONS 2
OPERATING INSTRUCTIONS 3 - 4
SHADE GUIDE 5 - 6
LENS REPLACEMENT 7 - 8
HELMET CARE AND MAINTENANCE 9
TROUBLE SHOOTING 10
WARRANTY INFORMATION 11
REPLACEMENT PARTS 12
Page 3
SAFETY WARNINGS – READ BEFORE USING
ARC Rays can injure eyes and burn skin
• Before welding, always inspect helmet and filter lens to be sure they are in good condition
and not damaged.
• Check to see that the clear lens is clean and securely attached to the helmet.
• Always wear safety glasses or goggles under the welding helmet and protective clothing to
protect your skin from radiation, burns and spatter.
FUMES AND GASES can be dangerous to your health.
• Keep your head out of fumes.
• Use enough ventilation or exhaust at the arc or both to keep fumes and gases from your
breathing zone and general area.
• See www.lincolnelectric.com/community/safety/
Note: For Auto-darkening Filters only: Auto darkening Filters in Lincoln helmets are designed to protect the
user against harmful ultra-violet and infrared rays both in the dark and light states. No matter what shade the
filter is set to, the UV/IR protection is always present.
• The user's eyes can be severely burned if welding with a damaged lens, (cracked, pitted,
etc..) Auto-darkening filters (ADF) protect the user against harmful ultra-violet and infrared
rays, both in the dark and the light states. No matter what shade the filter is set to, the
UV/IR protection is always there. As long as the lens is not damaged and is operating
properly, you are protected from the optical radiation passing through the filter.
• Optical radiation can enter in from behind the helmet and ADF lens from other welderʼs
arcs in the immediate area.
• ANSI defines all welding helmets as a secondary eye protection from optical radiation and impact. For complete safety, primary protection, such as safety glasses, spectacles or goggles, should be used in conjunction
with welding helmets. Protective clothing and accessories such as leather bibs attached to the welding helmet will protect the user from spatter and optical radiation indirectly entering from areas behind the helmet.
• ACGIH (American Conference of Governmental Industrial Hygienists) has established a
TLV-TWA of 5 mg/m3 for welding fumes. Welding fumes can not be simply classified.
The composition and quantity of fumes are both dependent on the alloy being welded and
the arc welding process and consumable type used
1
Product Name
Description
LCD Size mm
W x H inch
ADF Range
Light State
Sensitivity
Delay Modes
Sensors
Light to Dark
Dark to Light
TIG Amps
Compliance
WARNING
WARNING
PATENT INFORMATION
Page 4
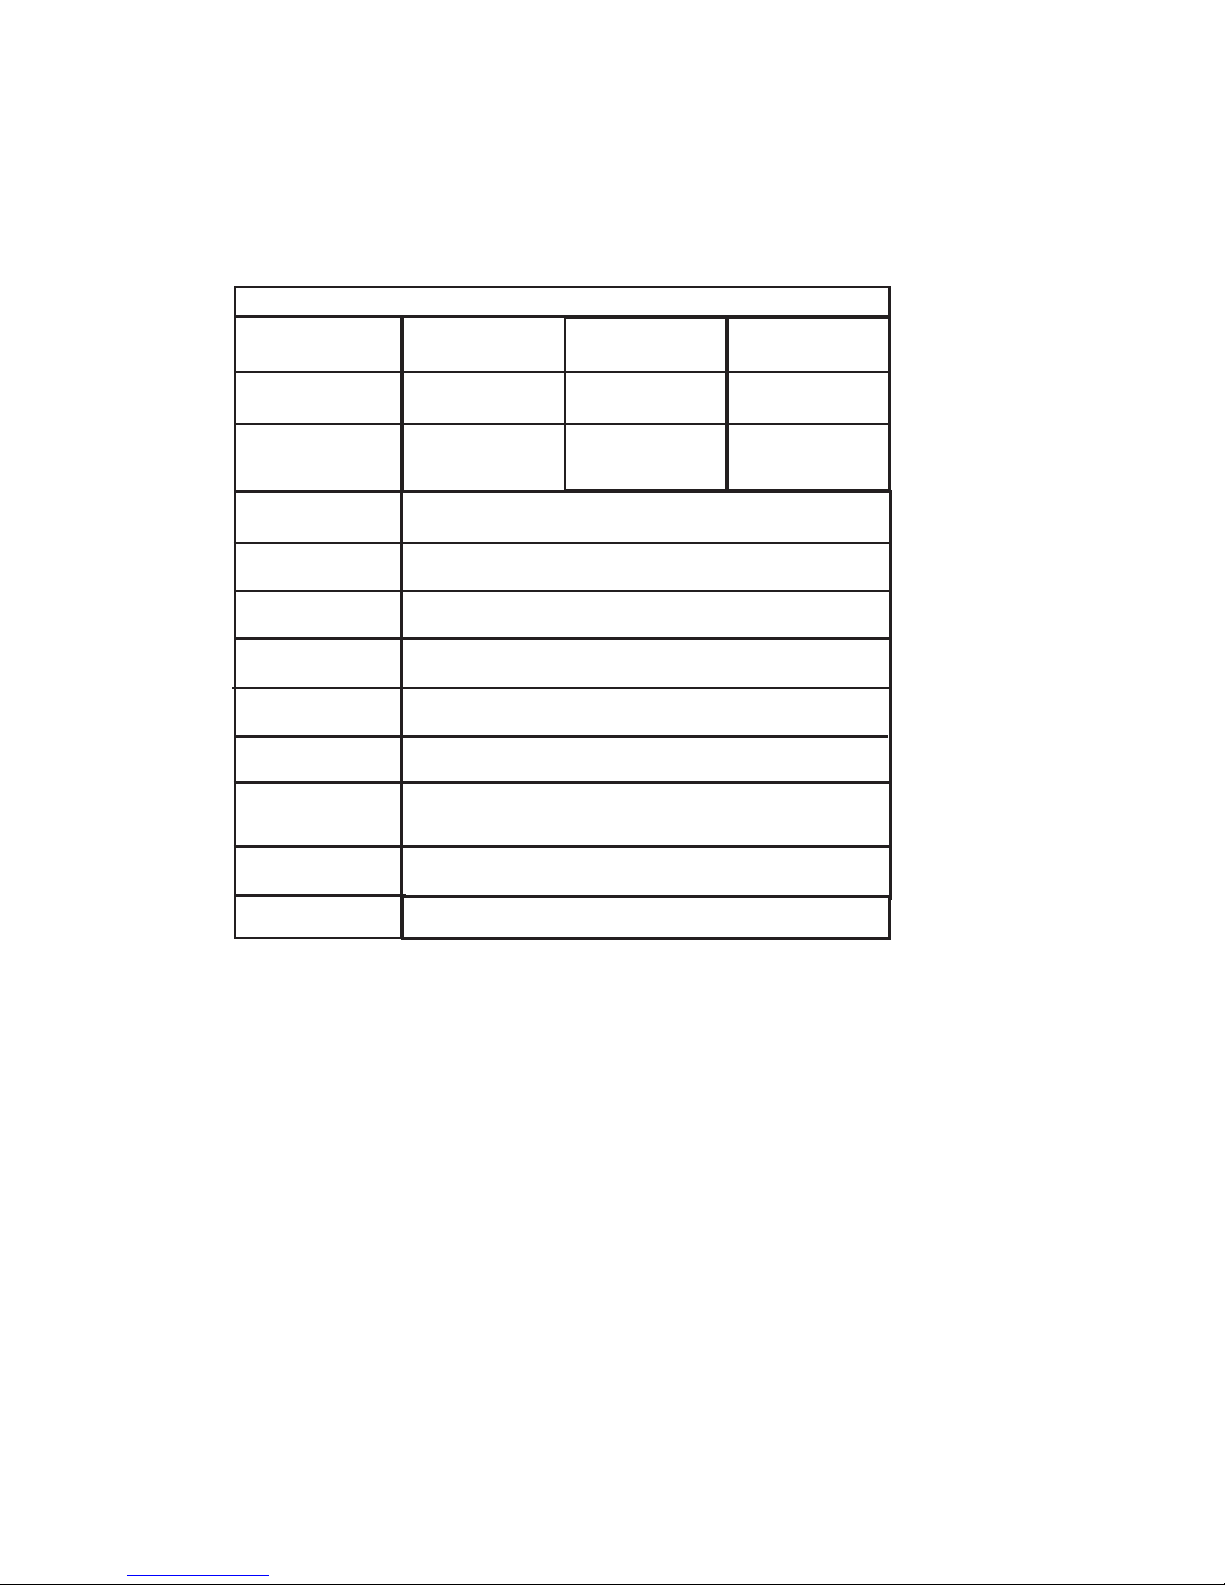
SPECIFICATIONS
Product Name
Description
LCD Size mm
W x H inch
ADF Range
Light State
Sensitivity
Delay Modes
Sensors
Light to Dark
Dark to Light
TIG Amps
Compliance
Vista 1000
ADF Shade 9-13
95 x 35
3-3/4 x 1-3/8
Vista 2000
ADF Shade 9-13
95 x 48
3-3/4 x 1-7/8
9,10,12,13
3
Grind/Normal/TIG
Fast/Slow
4
0.1ms
0.1s (fast)
2.0 s (slow)
5
Vista 3000
ADF Shade 9-13
98 x 81
3-7/8 x 3-1/8
ANSI Z87.1, CSA Z94.3
2
PATENT INFORMATION
Patent Pending
Page 5
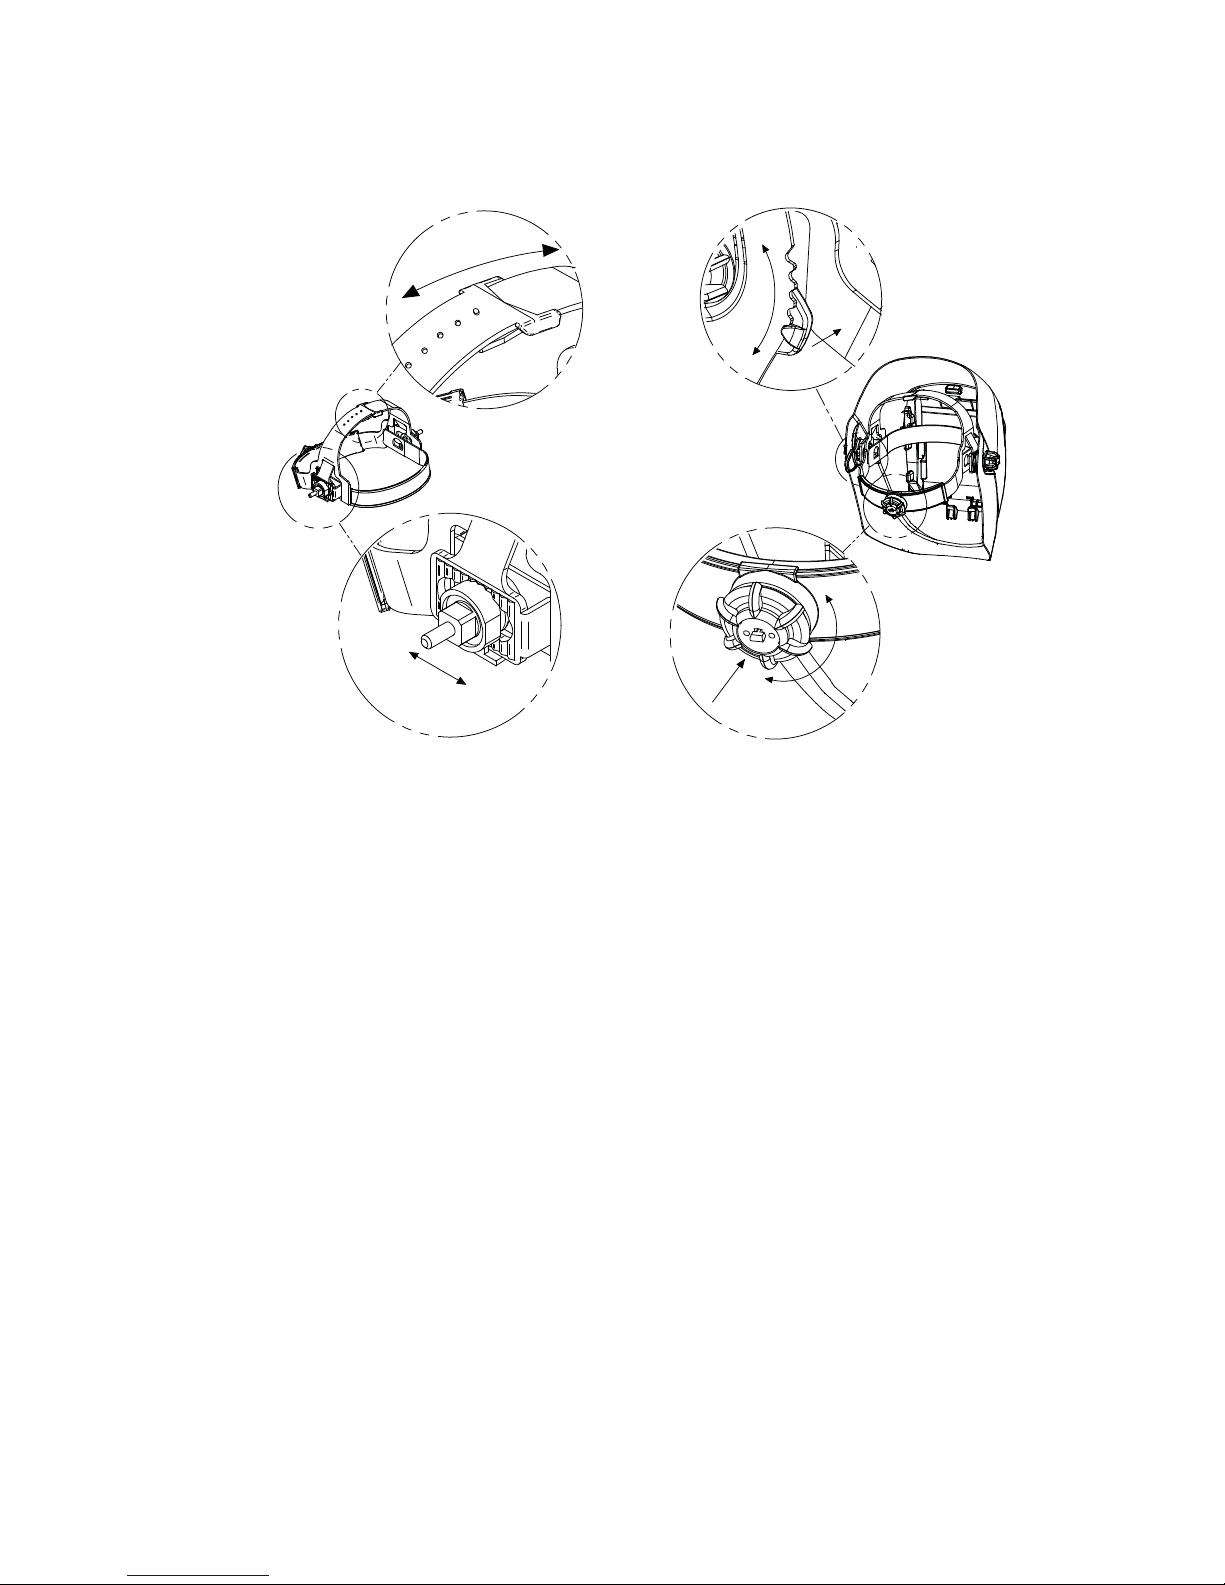
OPERATING INSTRUCTIONS
HEADGEAR ADJUSTMENT
HEAD SIZE ADJUSTMENT: HEADGEAR TIGHTNESS is adjusted by push-
ing in the Ratchet Knob and turning to adjust for the desired head size. This
knob is located at the back of the helmet. HEADGEAR CROWN ADJUSTMENT is made by adjusting for comfort and snapping the pin into the hole to
lock securely in place.
TILT: Tilt adjustment is located on left side of helmet. Loosen the left headgear tension knob and push the top end of the adjustment lever inward until
the leverʼs Stop Tab clears the notches. Then rotate the lever up or down to
the desired tilt position. The Stop will automatically engage again when
released locking the helmet into position.
FORE / AFT ADJUSTMENT: Adjusts the distance between userʼs face and
lens. To adjust, loosen both outside tension knobs and slide forward or back
to desired position and retighten. NOTE: Make sure both sides are equally
positioned for proper operation.
BATTERIES: No batteries are required! This product is solar powered and
contains solar panels. CAUTION: Insure the solar panels are facing forward
toward the outside of the helmet to capture light from the welding arc and
surrounding environment.
3
AUTO-DARKENING CARTRIDGE CONTROLS:
VISTA™ - 4 x 5 ADF include Variable Shade, Sensitivity and Delay.
To make adjustments to your ADF controls, push appropriate button through
clear protective lens until desired setting is achieved. There is no need to
disassemble helmet to access control buttons on your ADF cartridge. Simply
press directly on the inside cover lens to change button settings.
Test your ADF filter prior to welding by directing the front of the filter toward a
bright source of light, then using your fingers rapidly cover and uncover the
sensors. The filter should darken momentarily as the sensor is exposed. A
torch striker can also be used.
SENSITIVITY MODE
Select the sensitivity of the filter by pushing the Sensitivity button. You can
choose Grind, Normal or TIG.
Grind mode allows you to use the filter with a constant shade when grinding,
so that raising the helmet is unnecessary. Set Grind mode by pressing and
holding down the button until the filter LCD flickers. To remove from Grind
mode press the button again (note: the filter will not flicker).
Normal mode (no LEDs are on) is recommended for general welding and
production welding (i.e. where welders are welding in close proximity to each
other). Set Normal mode by pressing button until no LEDs are on (Grind
and TIG LED are not on).
TIG mode is recommended for situations where the filter may be temporarily
blocked or the welding amperage is low. Set TIG mode by pressing button
until TIG LED is on.
Page 6

AUTO-DARKENING CARTRIDGE CONTROLS:
VISTA™ - 4 x 5 ADF include Variable Shade, Sensitivity and Delay.
To make adjustments to your ADF controls, push appropriate button through
clear protective lens until desired setting is achieved. There is no need to
disassemble helmet to access control buttons on your ADF cartridge. Simply
press directly on the inside cover lens to change button settings.
Test your ADF filter prior to welding by directing the front of the filter toward a
bright source of light, then using your fingers rapidly cover and uncover the
sensors. The filter should darken momentarily as the sensor is exposed. A
torch striker can also be used.
SENSITIVITY MODE
Select the sensitivity of the filter by pushing the Sensitivity button. You can
choose Grind, Normal or TIG.
Grind mode allows you to use the filter with a constant shade when grinding,
so that raising the helmet is unnecessary. Set Grind mode by pressing and
holding down the button until the filter LCD flickers. To remove from Grind
mode press the button again (note: the filter will not flicker).
Normal mode (no LEDs are on) is recommended for general welding and
production welding (i.e. where welders are welding in close proximity to each
other). Set Normal mode by pressing button until no LEDs are on (Grind
and TIG LED are not on).
TIG mode is recommended for situations where the filter may be temporarily
blocked or the welding amperage is low. Set TIG mode by pressing button
until TIG LED is on.
4
Page 7

SHADE SETTING:
Shade selection is accomplished by pushing the Shade button on the back of
the filter. Follow shade selection chart.
If your helmet does not include any one of the shades referenced above, it is
recommended you use the next darker shade.
5
• DO NOT WELD WITH A DAMAGED OR DEFECTIVE LENS,
i.e. cracked, pitted, etc.
DELAY MODE: Set the Delay to Fast or Slow by pushing the Delay button.
The Slow setting is recommended for high amperage applications where the
weld puddle is still very bright after the welding arc has ceased and for situa-
tions where the filter may be temporarily blocked from seeing the welding
arc.
ALWAYS TEST TO BE SURE THE ADF CARTRIDGE IS CHARGED
BEFORE WELDING. The helmet can be placed in sunlight to charge. Do
not store the helmet in a dark cabinet or other storage area for extended peri-
ods. While welding the Arc also charges the ADF cartridge.
Recommended welding processes and cartridge settings can vary for each
welding application. For some low amperage welding applications, cartridge
performance will improve if the Delay Mode is set to SLOW.
AUTO DARKING FILTER / HELMET STORAGE:
• Store in a clean dry location.
FAST
SLOW
TIGGRIND
9101213
GRIND (PRESS- HOLD)
CHECK SETTI NGS
SHADE SENSITIVITY
DELAY
GUIDE FOR SHADE NUMBERS
OPERATION ELECTRODE SIZE ARC MINIMUM SUGGESTED
(1)
1/32 in. (mm) CURRENT (A) PROTECTIVE SHADE NO.
SHADE (COMFORT)
Shielded metal arc Less than 3 (2.5) Less than 60 7 –
welding 3-5 (2.5–4) 60-160 8 10
5-8 (4–6.4) 160-250 10 12
More than 8 (6.4) 250-550 11 14
Gas metal arc Less than 60 7 –
welding and flux 60-160 10 11
cored arc welding 160-250 10 12
250-500 10 14
Gas tungsten arc Less than 50 8 10
welding 50-150 8 12
150-500 10 14
Air carbon (Light) Less than 500 10 12
Arc cutting (Heavy) 500-1000 11 14
Plasma arc welding Less than 20 6 6 to 8
20-100 8 10
100-400 10 12
400-800 11 14
Plasma arc cutting (Light
)
(2)
(2)
(2)
Less than 300 8 9
(Medium) 300-400 9 12
(Heavy) 400-800 10 14
Torch brazing – – 3 or 4
Torch soldering – – 2
Carbon arc welding – – 14
PLATE THICKNESS
in. mm
Gas welding
Light Under 1/8 Under 3.2 4
or 5
Medium 1/8 to 1/2 3.2 to 12.7 5 or 6
Heavy Over 1/2 Over 12.7 6 or 8
Oxygen cutting
Light Under 1 Under 25 3 or 4
Medium 1 to 6 25 to 150 4 or 5
Heavy Over 6 Over 150 5 or 6
(1)
As
a
rule
of thumb, start with a shade that is too dark, then go to a lighter shade which gives sufficient view of the weld zone without going
below the
minimum. In oxyfuel gas welding or cutting where the torch produces a high yellow light, it is desirable to use a filter lens that absorbs
the
yellow or
sodium line the visible light of the (spectrum) operation
(2)
These values apply where the actual arc is clearly seen. Experience has shown that lighter filters may be used when the arc is hidden by the
workpiece.
.
Data from ANSI Z49.1-2005
Page 8

• DO NOT WELD WITH A DAMAGED OR DEFECTIVE LENS,
i.e. cracked, pitted, etc.
DELAY MODE: Set the Delay to Fast or Slow by pushing the Delay button.
The Slow setting is recommended for high amperage applications where the
weld puddle is still very bright after the welding arc has ceased and for situations where the filter may be temporarily blocked from seeing the welding
arc.
ALWAYS TEST TO BE SURE THE ADF CARTRIDGE IS CHARGED
BEFORE WELDING. The helmet can be placed in sunlight to charge. Do
not store the helmet in a dark cabinet or other storage area for extended periods. While welding the Arc also charges the ADF cartridge.
Recommended welding processes and cartridge settings can vary for each
welding application. For some low amperage welding applications, cartridge
performance will improve if the Delay Mode is set to SLOW.
AUTO DARKING FILTER / HELMET STORAGE:
• Store in a clean dry location.
6
WARNING
(1)
Page 9

LENS REPLACEMENT
OUTSIDE PROTECTIVE COVER LENS REPLACEMENT:
Press down on the Tab inside the top of the helmet while also pressing in on
the Finger Tabs on both sides of the bezel piece on the front of the helmet.
Pull the bezel outward to remove. Remove the polycarbonate protective
lens. Place the new Polycarbonate lens in the recessed lens area. Be sure
cover lens is properly seated. Then, simply insert the lower tabs of the bezel
back into the helmet shell and rotate up, snapping the bezel into place.
Ensure all three tabs have been correctly snapped in. Never use the AutoDarkening cartridge without the inside and outside cover lens properly
installed.
Tab
Lens Removal
7
AUTO-DARKENING CARTRIDGE ACCESS AND REPLACEMENT:
Remove Bezel as described in previous section on Lens Replacement. After
removing the outside lens, simply remove the Adaptor by applying thumb
pressure to top center tab to release top portion of Adaptor. Pull forward and
release feet of Adaptor from Shell. Then remove the ADF filter. When replac-
ing, be sure the light sensors are facing toward the front of the helmet when
replacing the cartridge. Replace the inside cover lens, Cartridge, Adaptor,
outside spatter lens and Bezel in reverse order. The outer polycarbonate
lens is required to protect the ADF from weld spatter and impacts.
INSTALLING AN AFTERMARKET MAGNIFYING LENS
Simply slide the magnifying lens into the short rails located over the protec-
tive cover lens.
Finger Tab
Finger Tab
Page 10

AUTO-DARKENING CARTRIDGE ACCESS AND REPLACEMENT:
Remove Bezel as described in previous section on Lens Replacement. After
removing the outside lens, simply remove the Adaptor by applying thumb
pressure to top center tab to release top portion of Adaptor. Pull forward and
release feet of Adaptor from Shell. Then remove the ADF filter. When replacing, be sure the light sensors are facing toward the front of the helmet when
replacing the cartridge. Replace the inside cover lens, Cartridge, Adaptor,
outside spatter lens and Bezel in reverse order. The outer polycarbonate
lens is required to protect the ADF from weld spatter and impacts.
INSTALLING AN AFTERMARKET MAGNIFYING LENS
Simply slide the magnifying lens into the short rails located over the protective cover lens.
8
Page 11

HELMET CARE AND MAINTENANCE
Virtually maintenance free:
• Periodic cleaning with soapy water solution or standard glass
cleaner is suggested for any ADF to function properly. Use soft
cloth or eye glass wipes.
• This ADF is water resistant. Do “NOT” submerge in water or other
solution.
• Change or clean cover lens when it becomes dirty or cloudy.
Storage:
• Store in a clean dry location.
9
Test your ADF filter prior to welding by directing the front of the filter toward a
bright source of light, then using your fingers rapidly cover and uncover the
sensors. The filter should darken momentarily as the sensor is exposed. A
torch striker can also be used.
Difficult to see through the filter:
• Clean or replace protective cover lenses.
• Clean the Auto-Darkening cartridge by using a cloth with soapy
water solution or standard window cleaner.
The ADF will not darken after striking an arc:
• Avoid blocking the Solar Panels. Must be facing forward (outside
of) in the helmet.
• Test the ADF by exposing to a bright light source and run your fin-
gers quickly over the arc sensors. The filter should darken momen-
tarily then switch back to the light state.
Slow to darken:
• If the filter has not been used for a day or more, the circuitry will
enter a sleep mode. It will wake up when tested or when you begin
welding. Note that the first time, it may darken to a lighter shade
even though set for a darker shade. After the first time, it will dark-
en to the correct shade setting every time. It is recommended to
test your ADF prior to welding.
• Colder temperatures can slow the switching speed of any ADF.
Once the helmet warms up from the welding process, the switching
will increase to rated speeds.
ADF (Auto-Darkening Filter Cartridge) flickers or returns to light state
while welding:
• Clean or replace protective cover lenses if dirty or cloudy.
• Check that the solar panels or sensors are not damaged or dirty.
Clean with a soft cloth and soapy water solution or standard glass
cleaner. Do not use abrasive or dirty cloths.
• Make sure you are not blocking the sensors or solar panels with
your arm or other obstacle (including the welding torch gun or noz-
zle) while welding. Adjust your position so that the sensors can
“see” the weld arc.
Page 12

TROUBLE SHOOTING GUIDE
Test your ADF filter prior to welding by directing the front of the filter toward a
bright source of light, then using your fingers rapidly cover and uncover the
sensors. The filter should darken momentarily as the sensor is exposed. A
torch striker can also be used.
Difficult to see through the filter:
• Clean or replace protective cover lenses.
• Clean the Auto-Darkening cartridge by using a cloth with soapy
water solution or standard window cleaner.
The ADF will not darken after striking an arc:
• Avoid blocking the Solar Panels. Must be facing forward (outside
of) in the helmet.
• Test the ADF by exposing to a bright light source and run your fingers quickly over the arc sensors. The filter should darken momentarily then switch back to the light state.
Slow to darken:
• If the filter has not been used for a day or more, the circuitry will
enter a sleep mode. It will wake up when tested or when you begin
welding. Note that the first time, it may darken to a lighter shade
even though set for a darker shade. After the first time, it will darken to the correct shade setting every time. It is recommended to
test your ADF prior to welding.
• Colder temperatures can slow the switching speed of any ADF.
Once the helmet warms up from the welding process, the switching
will increase to rated speeds.
ADF (Auto-Darkening Filter Cartridge) flickers or returns to light state
while welding:
• Clean or replace protective cover lenses if dirty or cloudy.
• Check that the solar panels or sensors are not damaged or dirty.
Clean with a soft cloth and soapy water solution or standard glass
cleaner. Do not use abrasive or dirty cloths.
• Make sure you are not blocking the sensors or solar panels with
your arm or other obstacle (including the welding torch gun or nozzle) while welding. Adjust your position so that the sensors can
“see” the weld arc.
10
Page 13

ADF stays dark after you stop welding:
• The temperature limitations of the ADF have been exceeded. Let
the ADF cool down and try not to over heat it again by viewing the
arc from the side or at a greater distance.
• It may remain dark if you are facing a bright light or the sun. Look
away or pass your hand between the sensor and light source.
ADF is cracked:
• Cease (STOP) using this product if this problem exists. UV/IR protection may be compromised resulting in burns to the eyes or skin.
Weld Spatter is Damaging the ADF:
• Missing, damaged, broken, cracked or distorted Protective Cover
Lens. Replace inside and outside Clear Cover Lenses as needed.
• Do not use this product if severe spatter damage has
occurred to the Auto-Darkening Filter Cartridge or protective clear cover lens. Severe eye damage and burns can
result.
------------------------------------------------------------------------------------------------------
WARRANTY INFORMATION: Reference IMWS1 included in Literature
SPATTER DAMAGE IS NOT COVERED BY WARRANTY:
Do not use this product without the correct protective clear cover lenses
installed properly on both sides of the Auto-Darkening Filter cartridge (ADF).
The cover lenses supplied with this helmet are properly sized to work with
this product and substitutions from other suppliers should be avoided.
For Warranty Transactions, contact your local Lincoln Electric distributor.
(Ref IMWSI)
11
WARNING
ITEM
1
2
3
4
5
6
7
8
PART No.
Note 1
Note 1
Note 1
KP2796-1
K2690-1
K2690-2
K2690-3
KP2760-1
L13821
KP2081-5B1
6
KNOB
SHELL
BOLT
HEADGEAR
Note 1- Contact Lincoln Electric Service for appropriate replacement.
Page 14

12
ITEM
1
2
3
4
5
6
7
8
QTY.
1
1
1
2
1
1
1
1
1
1
PART No.
Note 1
Note 1
Note 1
KP2796-1
K2690-1
K2690-2
K2690-3
KP2760-1
L13821
KP2081-5B1
DESCRIPTION
5x4 SHELL, BLACK
ADAPTOR
BEZEL, BLACK
CLEAR POLYCARBONATE LENS
ADF 9-13 SHADE CARTRIDGE – SMALL
VISTA 1000
ADF 9-13 SHADE CARTRIDGE - MEDIUM
VISTA 2000
ADF 9-13 SHADE CARTRIDGE - LARGE
VISTA 3000
RATCHET HEADGEAR
ADJUSTMENT LEVER
SWEATBAND
REPLACEMENT PARTS
6
6
KNOB
5
ADF
SMALL
VIEW
SHELL
2
4
3
ADAPTOR
OUTSIDE
LENS
BEZEL
BOLT
ADF
MEDIUM
VIEW
ADF
LARGE
VIEW
HEADGEAR
ADJUSTMENT
LEVER
7
8
SWEATBAND
1
4
INSIDE
LENS
Note 1- Contact Lincoln Electric Service for appropriate replacement.
Page 15

Cleveland, Ohio 44117-1199 U.S.A. TEL: 216.481.8100 FAX: 216.486.1751 WEB SITE: www.lincolnelectric.com
NOTES
Page 16

• Sales and Service through Subsidiaries and Distributors Worldwide •
Cleveland, Ohio 44117-1199 U.S.A. TEL: 216.481.8100 FAX: 216.486.1751 WEB SITE: www.lincolnelectric.com
• World's Leader in Welding and Cutting Products •
 Loading...