

LIGHTNING Instrumentation Pocket MultiCom User Manual

Pocket Multi Com
User’s Manual
Version 1.5 - 99/2/9


1
Copyright, Warranty, Liability
Warnings
Pocket Multi Com
— User’s Manual
I

C
OPYRIGHT
NO WARRANTIES ARE EXTENDED BY THIS DOCUMENT. The technical
information in this document is proprietary to LIGHTNING Instrumentation S.A.
and the recipient has a personal, non–exclusiv e and non transferable license to use
this information solely with the use of LIGHTNING Instrumentation products.
The only product warranties made by LIGHTNING Instrumentation, if any, are
set forth in the agreed terms and conditions for the purchase of LIGHTNING
Instrumentation products. LIGHTNING Instrumentation declaims liability for
any and all direct and indirect damages that may result from publication or use of
this document and/or its contents.
The information in this document is subject to change without notice. Revisions
may be issued at any time.
Copyright ©1993-1999 LIGHTNING Instrumentation S.A.
No part of this document may be reproduced in any manner without the prior
written consent of LIGHTNING Instrumentation S.A.
W
ARRANTY
LIGHTNING Instrumentation S.A. warrants all hardware products of its manufacture to be free from defects in material and workmanship for 12 months from
date of delivery, provided that the product has been registered within 10 days of
purchase.
Upon prompt notification by the purchaser, Lightning will correct, within the w ar ranty period, any defects in equipment of its manufacture, either by repair at its
factory or by supply of replacement parts to the purchaser.
ON
H
ARDWARE
Lightning must decide to its own satisfaction that the equipment is defective and
has not developed malfunctions as a result of misuse, modification, or abnormal
conditions of operation. Opening the products also voids the warranty. Lightning
assumes no liability for consequential damages, and its liability shall in no case
exceed the original purchase price of the equipment.
II
Pocket Multi Com
— User’s Manual version 1.5

W
ARRANTY
LIGHTNING Instrumentation S.A. provides no warranty on software and
firmware. Software and firmware are provided “as is” and no w arranty is made for
perfect function or fitting to particular applications.
Lightning provides its best effort in issuing high quality software and firmware,
and will devote its best effort in finding and correcting potential problems occurring with other equipment following international standards, but does not make
any express warranty to correct such problems, if they arise. Lightning assumes
no liability for consequential damages, and its liability shall in no case exceed the
original purchase price of the equipment.
The warranties set forth above for hardware, software and firmware are the sole
warranties applicable to Lightning products. THE IMPLIED WARRANTY OF
MERCHANTABILITY AND ALL OTHER WARRANTIES, EXPRESS OR
IMPLIED, ARE EXCLUDED.
ON
S
OFTWARE
AND
F
IRMWARE
IMITATION
L
UNDER NO CIRCUMSTANCES, INCLUDING NEGLIGENCE, SHALL
LIGHTNING INSTRUMENTATION SA BE LIABLE FOR LOSS OF USE,
INTERRUPTION OF BUSINESS, OR ANY INDIRECT, SPECIAL, INCIDENTAL, OR CONSEQUENTIAL DAMAGES OF ANY KIND (INCLUDING
LOST PROFITS) REGARDLESS OF THE FORM OF ACTION WHETHER IN
CONTRACT, TORT (INCLUDING NEGLIGENCE), STRICT PRODUCT LIABILITY OR OTHERWISE, EVEN IF LIGHTNING HAS BEEN ADVISED OF
THE POSSIBILITY OF SUCH DAMAGES.
In no event shall Lightning be liable for costs of procurement of substitute goods.
The potential liability of Lightning arising out of this product is in any case limited to the purchase price paid to Lightning for its products.
OF
IABILITY
L
Pocket Multi Com
— User’s Manual version 1.5
III

ISDN C
In no event shall Lightning be liable for costs incurred by a user on its ISDN line.
The
Pocket Multi Com
depending on traffic on the Ethernet and ISDN line and on parameters set in the
configuration. Front-panel signals and specific commands may indicate the current state and activity of the ISDN line, and the user should keep an eye on those
status indications to avoid excessive bills, due to misconfiguration, protocol
errors, polling applications, potential software or firmware errors and so forth.
THE USER AND THE USER ONLY IS SOLELY RESPONSIBLE FOR
ALL INCURRED ISDN COSTS.
RADEMARKS
T
OSTS
is designed to open and close ISDN lines automatically,
Multi Com
tation S.A. All other trademarks are property of their respective owners.
EVISIONS
R
The information in this document is subject to change without notice. Revisions
may be issued at any time. Watch http://www
the latest revision of our manuals.
LIGHTNING Instrumentation SA
Avenue des Boveresses 50
1010 Lausanne
SWITZERLAND
Phone: +41 21 654-2000
Fax: +41 21 654-2001
E-mail: info@lightning.ch
Web: www.lightning.ch
and Lightning are registered trademarks of LIGHTNING Instrumen-
.lightning.ch/products/manual for
IV
Pocket Multi Com
— User’s Manual version 1.5

1
Contents
NTRODUCTION
I
HECKING
C
Y
.......................................................1 C
OUR
ACKAGE
P
ONTENTS
C
2
..................2
Contents
HAPTER
§ 1.1
U
PGRADE
F
THE
I
K
RODUCT
P
EY
P
ON
ACKAGE
S RECEIVED DAMAGED ..............3 § 1.3
I
...................................3
§ 1.2
TO RETURN THE PRODUCT......................................3 § 1.4
ABOUT THE ETHERNET AND SERIAL CABLES .........4 § 1.5
ABOUT THE DOCKING STATION ..............................4 § 1.6
GETTING STARTED ................................................5 CHAPTER 2
O NOT CONNECT TO A NETWORK BEFORE….........6 § 2.1
D
PREPARING A SETUP WITH ETHERNET ....................6 § 2.2
ONFIGURING THE COMPUTER INTO DHCP MODE.............8 § 2.2.1
C
AUTO-CONFIGURING THE POCKET MULTICOM ..................9 § 2.2.2
REGISTERING YOUR PRODUCT ON-LINE................12 § 2.3
FINE-TUNING THE CONFIGURATION.......................12 § 2.4
ONFIGURATION OF THE CHANNEL AGGREGATION (MPP)13 § 2.4.1
C
CONFIGURING FOR STATIC IP ADDRESSES............14 § 2.5
NSTALLING EASYCONFIG ON WINDOWS 95/98/NT.........14 § 2.5.1
I
USING EASYCONFIG..........................................................15 § 2.5.2
Pocket Multi Com
— User’s Manual
V

CONTENTS
USING EASYCONFIG TO SET STATIC IP ADDRESSING .......16 § 2.5.3
USING OTHER EXAMPLE CONFIGURATIONS ......................16 § 2.5.4
REFERENCE MANUAL, WEB, AND FAQ................17 § 2.6
INSTALLATION FOR A NETWORK...........................17 § 2.7
ONFIGURING OTHER COMPUTERS ON THE NETWORK ......18 § 2.7.1
C
INSTALLING FOR A NOTEBOOK COMPUTER..........19 § 2.8
CONNECTING TO THE COMMAND INTERFACE .......19 § 2.9
SING TELNET TO ACCESS THE COMMAND INTERFACE ..19 § 2.9.1
U
USING THE SERIAL INTERFACE .........................................20 § 2.9.2
TROUBLE-SHOOTING & FAQ..............................21 CHAPTER 3
REQUENTLY ASKED QUESTIONS (FAQ)..............22 § 3.1
F
GENERAL TROUBLE-SHOOTING SCHEME ..............24 § 3.2
CONNECTING TO A DISTANT SITE .........................25 § 3.3
CHECKING THE ETHERNET CONNECTION..............25 § 3.4
DIAGNOSE COMMAND...........................................25 § 3.5
CHECKING THE ISDN CONNECTION......................26 § 3.6
FURTHER TROUBLE-SHOOTING .............................26 § 3.7
RESETTING FACTORY CONFIGURATION ............27 CHAPTER 4
ESETTING THE DEFAULT CONFIGURATION .........28 § 4.1
R
DOCKING STATION ..............................................31 CHAPTER 5
DENTIFYING CABLES OF THE DOCKING STATION 32 § 5.1
I
ASSEMBLING THE DOCKING STATION...................34 § 5.2
APPENDIX .............................................................35 CHAPTER 6
PECIFICATIONS.....................................................36 § 6.1
S
OCKET MULTICOM HARDWARE......................................36 § 6.1.1
P
SERIAL CONFIGURATION...................................................36 § 6.1.2
CONNECTORS PIN ASSIGNMENT............................37 § 6.2
THERNET & CONSOLE .....................................................37 § 6.2.1
E
ISDN.................................................................................37 § 6.2.2
CONSOLE CABLE................................................................37 § 6.2.3
DECLARATION OF CONFORMITY ...........................38 § 6.3
WARRANTY REGISTRATION CARD........................39 § 6.4
VI Pocket MultiCom — User’s Manual version 1.5

Introduction 1
Congratulations for your choice of the Pocket
MultiCom!
Chapter 1
The Pocket MultiCom is not only the world-
smallest ISDN router today, but also a swiss
quality product designed and manufactured by
LIGHTNING Instrumentation SA in Lausanne,
Switzerland.
The Pocket MultiCom is a small, efficient device
designed to connect remote Ethernet networks
through a Basic-Rate ISDN line. It is very easy to
install and works with standard TCP/IP and/or
IPX/SPX protocols. To set up your Pocket
MultiCom, simply follow the few quick steps
described in the following chapters.
We wish you a lot of pleasure using your Pocket
MultiCom.
Pocket MultiCom — User’s Manual 1

1CHECKING YOUR PACKAGE CONTENTS
CHECKING YOUR PACKAGE CONTENTS
Your Pocket MultiCom package includes a CD-ROM (with Reference Manual
& Software), this User’s Manual, as well as the following:
Pocket MultiCom
Special console cable: to
connect to the Ethernet port of
your MultiCom and a DB9
serial port
1.1
Straight Ethernet cable: a
short grey cable with RJ45
connectors to connect to a
hub
ISDN cable: a long black
cable with RJ45 connectors
Crossed Ethernet cable: a
short blue (or grey with a blue
marking) cable with RJ45
connectors to connect
directly to a PC or hub uplink
Power supply adaptor with cable
Please check that the power supply has appropriate voltage.
If the docking station option has been ordered, three cables may be assembled in
it. Please refer to § 5, "Docking Station" on page 31.
2 Pocket MultiCom — User’s Manual

UPGRADE KEY ON PACKAGE
UPGRADE KEY ON PACKAGE
The first time you configure your router you may need an upgrade key to install
all the software options you ordered.
In this case, you should find the upgrade key (e.g.: “NOPQ1234DEFG”) on a
sticker on the package of the router or on the delivery notice you got with the
router. Keep this key in a safe place. You will need it during the installation.
IF THE PRODUCT IS RECEIVED DAMAGED
Forward an immediate request to the delivering carrier to perform an inspection
and prepare a damage report. Save the container and packing material until contents are verified.
1.2
1.3
Report the nature and extent of the damage to Customer Support so that action
can be initiated to repair or replace damaged items, or instructions issued for
returning items.
The responsibility of the manufacturer ends at the deliv ery to the first carrier. ALL
CLAIMS for loss, damage, or nondelivery must be made against the delivering
carrier WITHIN 8 DAYS OF RECEIPT of shipment.
TO RETURN THE PRODUCT
Please obtain instructions and a Return Material Authorization (RMA) Number
from Customer Support before returning any item(s). Report the fault or deficiency along with the model, type, and serial number of the item(s) to Customer
Support. Upon receipt of this information, Customer Support will provide service
instructions or shipping information. In any case, clearly mark the RMA number,
your address, and shipping address on the original packaging, which has to be
used for shipments. Improperly packaged products will loose their warranty. For
warranty repairs, please include a dated proof of purchase.
1.4
Pocket MultiCom — User’s Manual 3

1ABOUT THE ETHERNET AND SERIAL CABLES
ABOUT THE ETHERNET AND SERIAL CABLES
The two Ethernet cables that come in your package are 4-wire Ethernet-type
cables. Please note that universal-type 8-wire cables may in some cases (par-
ticularly with 10/100 Mbits/s interfaces) not work properly.
The two Ethernet cables have the following uses:
• Blue or grey with a blue marking, crossed: acts as a special Ethernet cable
between your Pocket MultiCom and a single computer. As such, it is not a
standard 10-Base-T Ethernet cable: it is wired as a crossover allowing you to
connect your Pocket MultiCom directly to a computer without a hub. This
cable can also be used to connect to the “uplink” (X) port of a hub.
• Grey cable: acts as a standard Ethernet cable between your Pocket Multi-
Com and a normal port of a hub, to build an Ethernet network with multiple
computers.
The Serial cable has the following uses:
1.5
• Act as a cable for connecting the Console Port (embedded in the Ethernet
port) of your Pocket MultiCom to a serial port of either a terminal or a
computer (with a terminal-emulation software or EasyConfig™ wizard), for
management purposes. This is useful for configuring or modifying the configuration of your Pocket MultiCom. This type of connection is described in
chapter § 2.9, "Connecting to the Command Interface" on page 19.
ABOUT THE DOCKING STATION
If your Pocket MultiCom comes with its optional desktop support, as shown
below, please refer first to instructions in § 5, "Docking Station" on page 31.
1.6
4 Pocket MultiCom — User’s Manual

Getting Started
This chapter describes the installation procedure
for the Pocket MultiCom in a very few and
detailed steps. First, installation with a single
computer using Ethernet and a Web-browser is
described. Then, network installation and finetuning is shortly described. Finally, the usage of
the serial console is reviewed.
Chapter 2
2
This manual is valid starting with Software and
CD-ROM Release 2.5. Please consult
http://www.lightning.ch/ for newer releases.
Pocket MultiCom — User’s Manual 5
CHAPTER 2GETTING STARTED DO NOT CONNECT TO A NETWORK BEFORE…
DO NOT CONNECT TO A NETWORK BEFORE…
Your Pocket MultiCom must be configured before being connected to an
existing Ethernet network. You may do it yourself or ask your dealer or network
specialist to configure it for you.
There are two possibilities to configure your Pocket MultiCom: the simplest
one is to do it using Ethernet to connect it to your PC and a Web-Browser, like
Netscape™ or Explorer™, already installed on your computer, and also available
on the CD-ROM. You can also use the serial cable and a terminal emulator or the
Windows™ wizard EasyConfig, also on the CD-ROM (see § 2.9.2 on page 20).
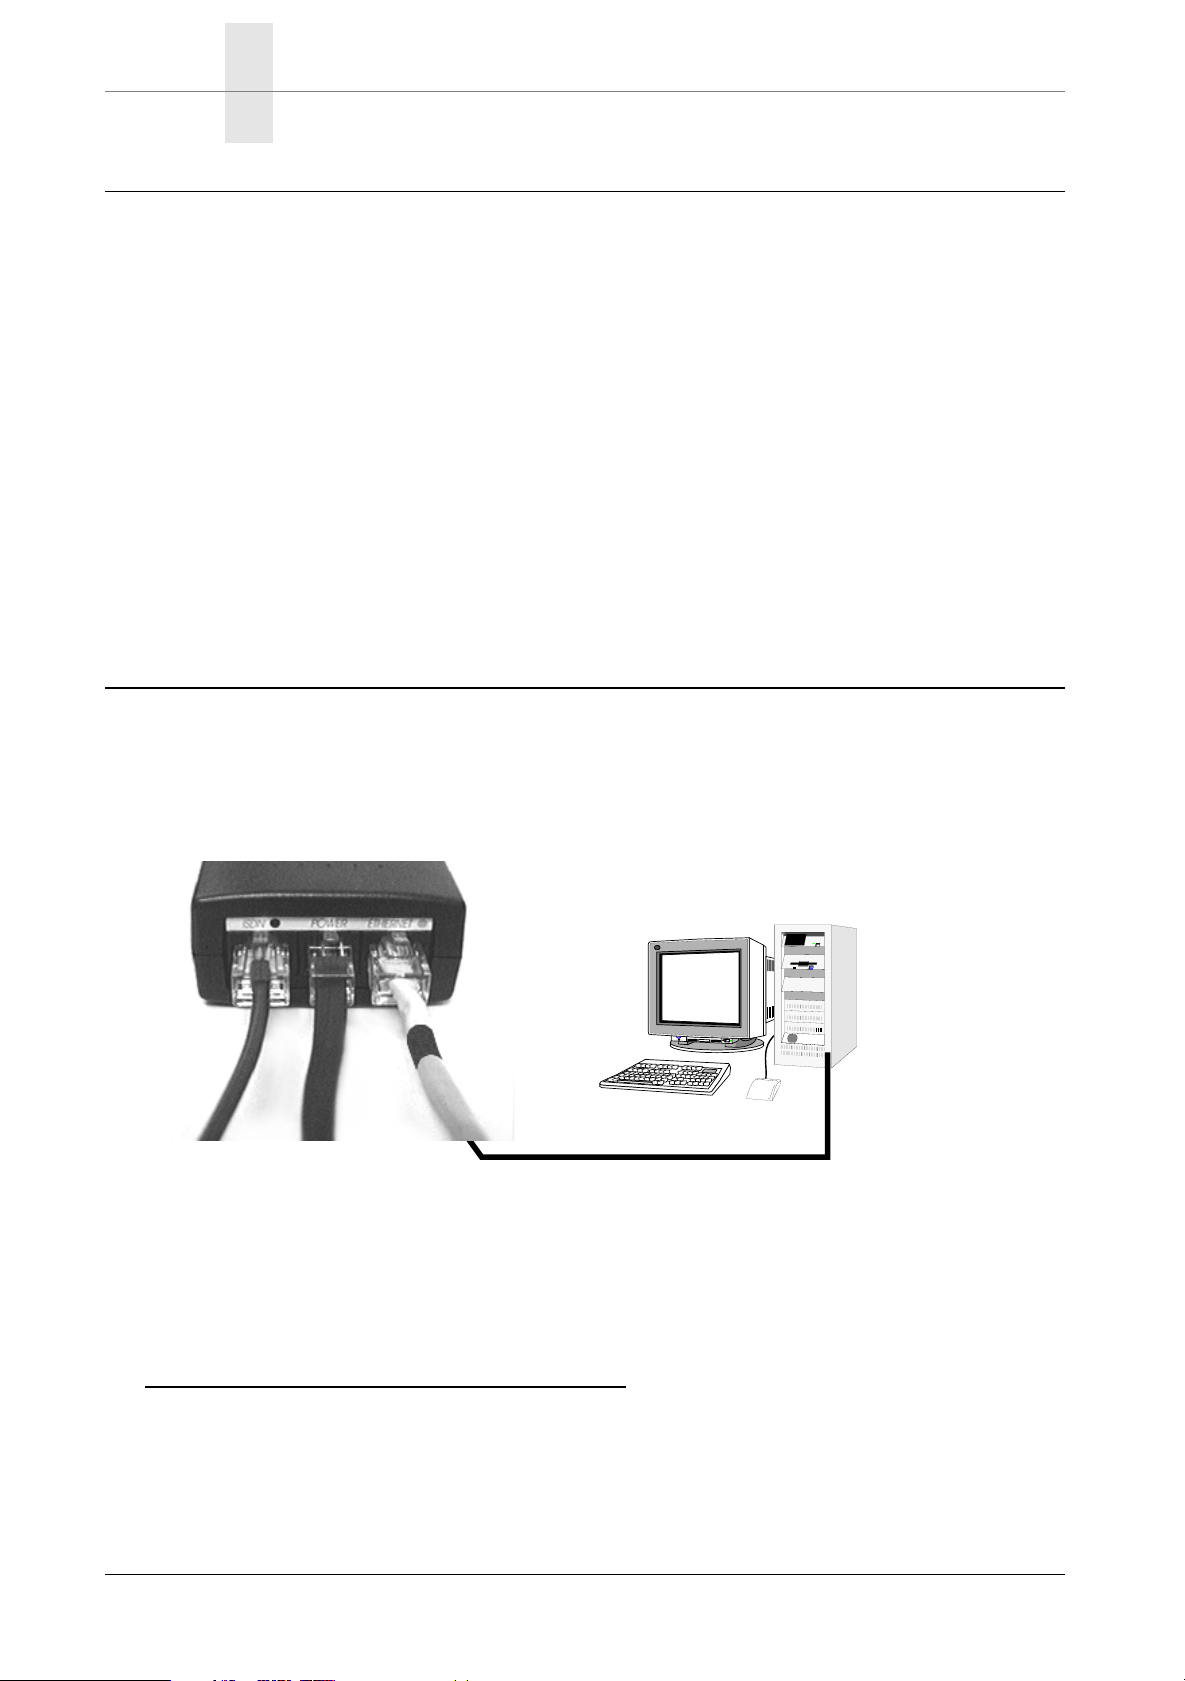
PREPARING A SETUP WITH ETHERNET
The simplest installation procedure requires that you first connect the Ethernet
port to a single computer:
2.1
2.2
Ethernet
PowerISDN
To connect your Pocket MultiCom to a single computer:
1. Plug the crossed Ethernet cable (blue or grey with blue mark) to the “Ethernet”
port of the Pocket MultiCom and to the Ethernet port of your computer1.
1. This connection applies to most laptops as well as to desktop computers. Installing the
Pocket MultiCom with a NoteBook computer without a female Ethernet plug may
require an Ethernet gender-changer: please refer to § 2.8, "Installing for a NoteBook
Computer" on page 19.
6 Pocket MultiCom — User’s Manual
Crossed Ethernet cable (blue or grey with a blue marking)

PREPARING A SETUP WITH ETHERNET
2. Turn the computer on (if it is not already on).
3. Plug one end of the ISDN cable into the “ISDN” port of your Pocket Multi-
Com and the other end into a terminated ISDN BRI So wall socket.
4. Check that the power supply has the correct voltage rating for your
country. Then connect the power supply cable into the “Power” port on your
Pocket MultiCom and plug the power supply into an AC wall socket.
The Pocket MultiCom then automatically launches the start-up operation. The
following series of signals provide information on the status of operations:
Signals
• The Ethernet, ISDN (D, B1, B2), and Power signals turn orange.
This indicates that your Pocket MultiCom is carrying out the initial tests:
memory, and peripherals, as described in the Reference Manual.
• The Power signal remains orange slightly longer than the others
This indicates that your Pocket MultiCom is starting-up.
• The Power signal turns green
1
This indicates that start-up is successful. Your Pocket MultiCom is now
ready for use.
• The ISDN D signal turns green
This indicates that the ISDN connection is connected and properly wired2.
• The ISDN B1 and B2 signals remain off
This indicates that no data channel is in use. When a channel is connected, the
corresponding signal will turn green, or blink orange when there is traffic on it.
• The Ethernet signal turns green
This indicates that the Ethernet connection is working.
1. On models with the encryption option, the Power signal may stay orange at this stage.
Please refer to “Visual Display”, “Security” chapter of the Reference Manual on CD.
2. On some ISDN network, this ISDN D signal may go off or turn red after a while after
the start-up. This is normal.
Pocket MultiCom — User’s Manual 7
 Loading...