

Page 1
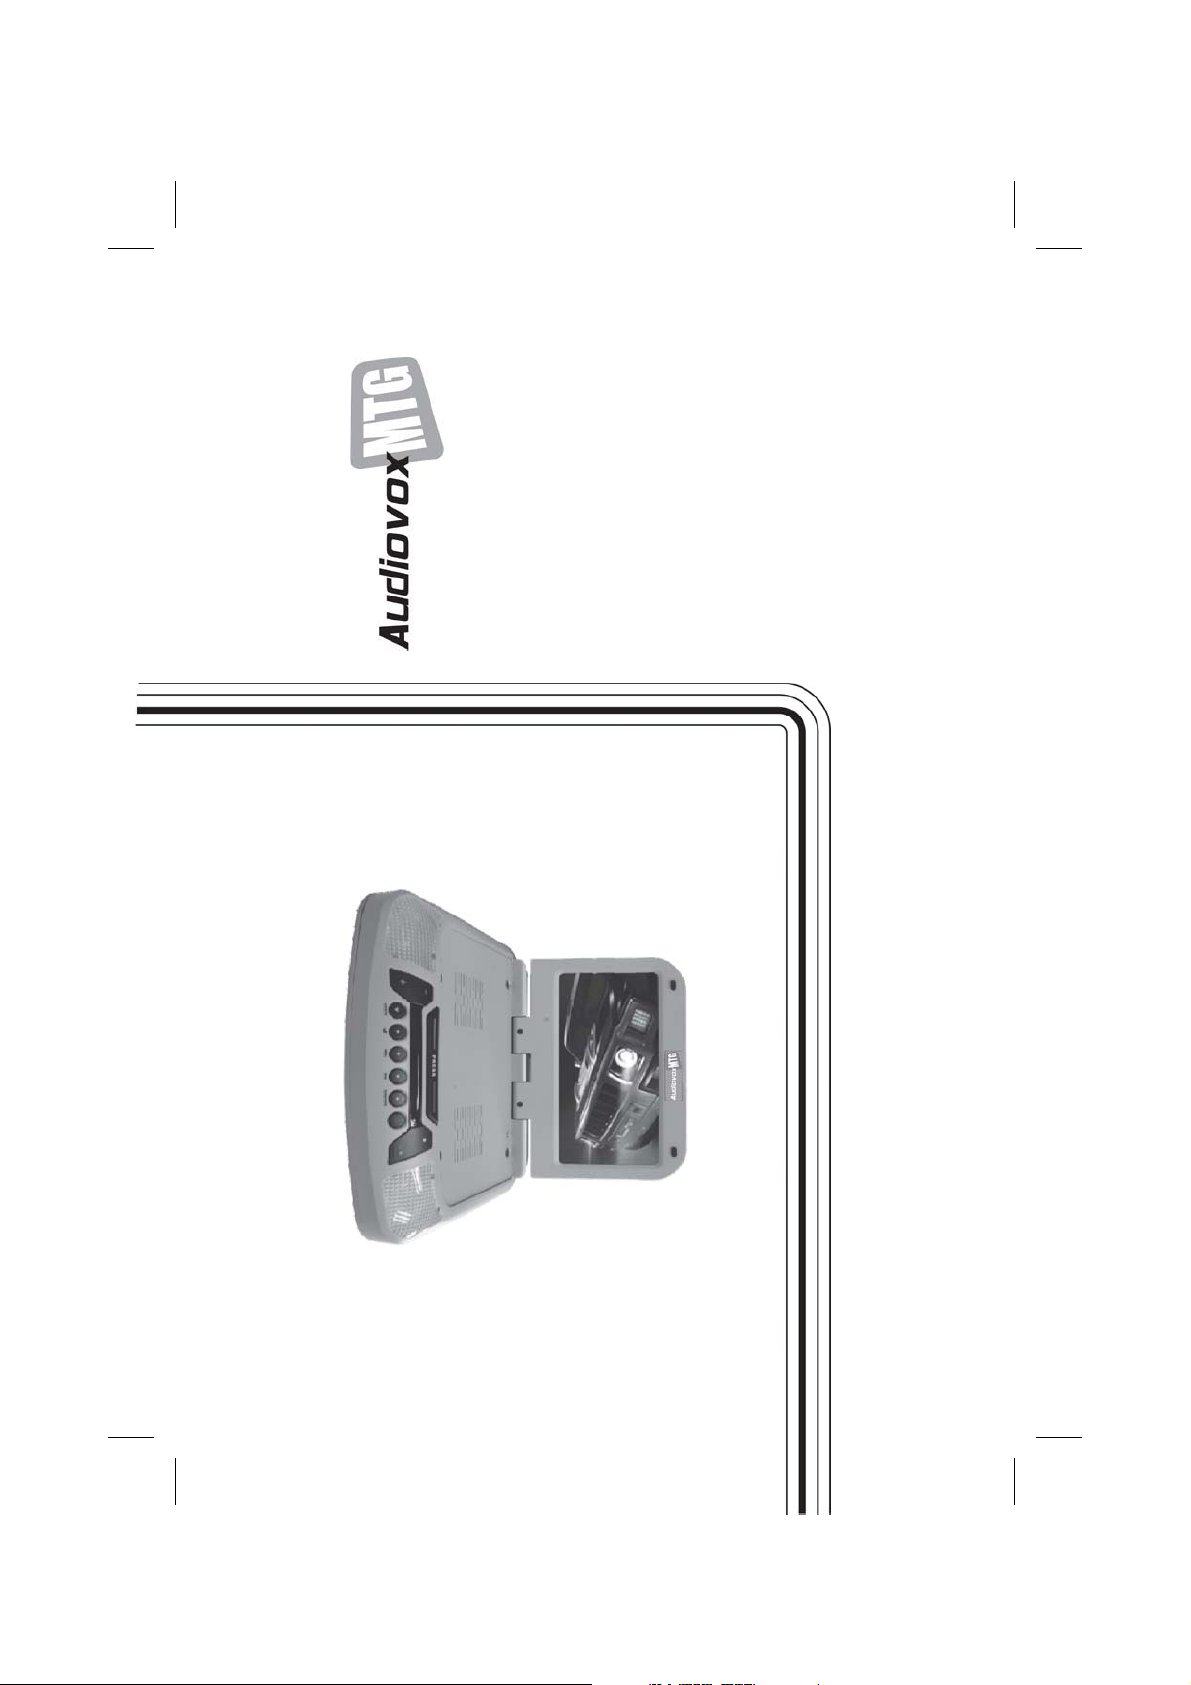
MANUAL
OPERATION
With DVD /CD/MP3 System
9-inch Roof-Mount DVD Player
AVXMTG9B/P/S
Page 2

Page 3

TABLE OF CONTENTS
ImportantNotices...... ... ... ... ... ... ... ... ... ... 2
1
Congratulations ....... ... ... ... ... ... ... ... ... ... 3
Features .. ... ....... ... ... ... ... ... ... ... ... ... 3
Controls and Indicators Diagram . . . . . . . . . . . . . . . . . . . . . 4
Remote Control Operation . . . . . . . . . . . . . . . . . . . . . . . . . . 6
Loading and Playing Discs. . . . . . . . . . . . . . . . . . . . . . . ...12
Settings and Adjustments . . . . . . . . . . . . . . . . . . . . . . . ...12
Playing JPG Files...... ... ... ... ... ... ... ... ... ...16
Playing MP3 Files ..... ... ... ... ... ... ... ... ... ...17
SourceFeatures....... ... ... ... ... ... ... ... ... ...18
Troubleshooting....... ... ... ... ... ... ... ... ... ...20
DVDBasics ... ....... ... ... ... ... ... ... ... ... ...10
Specifications . ....... ... ... ... ... ... ... ... ... ...22
Notes..... ... ....... ... ... ... ... ... ... ... ... ...23
Page 4

WARNING
IMPORTANT NOTICES
An LCD panel and/or video monitor may be installed in a motor
vehicle and visible to the driver only if the LCD panel or video
Do not use any abrasive cleaners, they may scratch the screen.
Do not use any solvents or cleaning materials when cleaning
the video monitor.
monitor is used for vehicle information, system control, rear or
side observation or navigation. If the LCD panel or video monitor
is used for television reception, video or DVD play, the LCD panel
Use only lightly dampened lint free cloth to wipe the screen if it
or video monitor must be installed so that these features will only
Lock the LCD screen in fully closed position when not in use.
Before putting on headphones, always adjust the volume setting
is dirty.
function when the vehicle is in “park” or when the vehicle's
parking brake is applied.
Remember to leave the dome light switch in the off or auto
to OFF or lowest position.
position when the vehicle is unattended, as the dome lights, if
When connecting power and ground in a mobile video
installation, insure that the ACC wire is fused at the point where it
is connected to the vehicle’s ACC wiring. Failure to do so can
Do not put pressure on the screen.
Caution children to avoid touching or scratching the screen, as
left on, can drain the vehicle battery.
result in damage to the vehicle if a short circuit develops between
the vehicle connection point and the mobile video product.
it may become dirty or damaged
Safety Precautions
An LCD panel and/or video monitor used for television reception,
video or DVD play that operates when the vehicle is in gear or
when the parking brake is not applied must be installed to the rear
For safety reasons, when changing video media, it is
of the driver seat where it will not be visible, directly or indirectly,
to the operator of the motor vehicle.
recommended that the vehicle is not in motion, and that you do
not allow children to unfasten seat-belts to change video media
or make any adjustments to the system. System adjustments can
be accomplished using the remote control, while seat-belts
remain fastened. Enjoy your AUDIOVOX entertainment system
but remember that the safety of all passengers remains the
number one priority.
Licensed under one or more of the following patents, Patent
Numbers 5,775,762, 5,927,784, and 6,678,892.
2
Page 5

CONGRATULATIONS
Congratulations on your purchase of the AUDIOUVOX AVXMTG9B/P/S DVD player with Drop-Down Video/Monitor. The
AVXMTG9/B/P/S DVD player has been designed to give you and your family many years of video entertainment in the mobile
environment. Please read the directions that follow in order to familiarize yourself with the product to ensure that you obtain the
best results from your equipment.
9” TFT LCD monitor
FEATURES
Built-in DVD player
Auto on with disc insertion
Selectable IR transmit codes
Multi-lingual OSD (On Screen Display) for control of picture quality and functions
Audio/Video source inputs
Dome lights with built-in three way switch
Last memory for DVD
Built-in 16 channel frequency wireless FM modulator
Earphone jack
Screen mode selection (16:9/4:3)
Backlight controls
Day/night picture modes
AV output
USB/SD support
3
Page 6
.
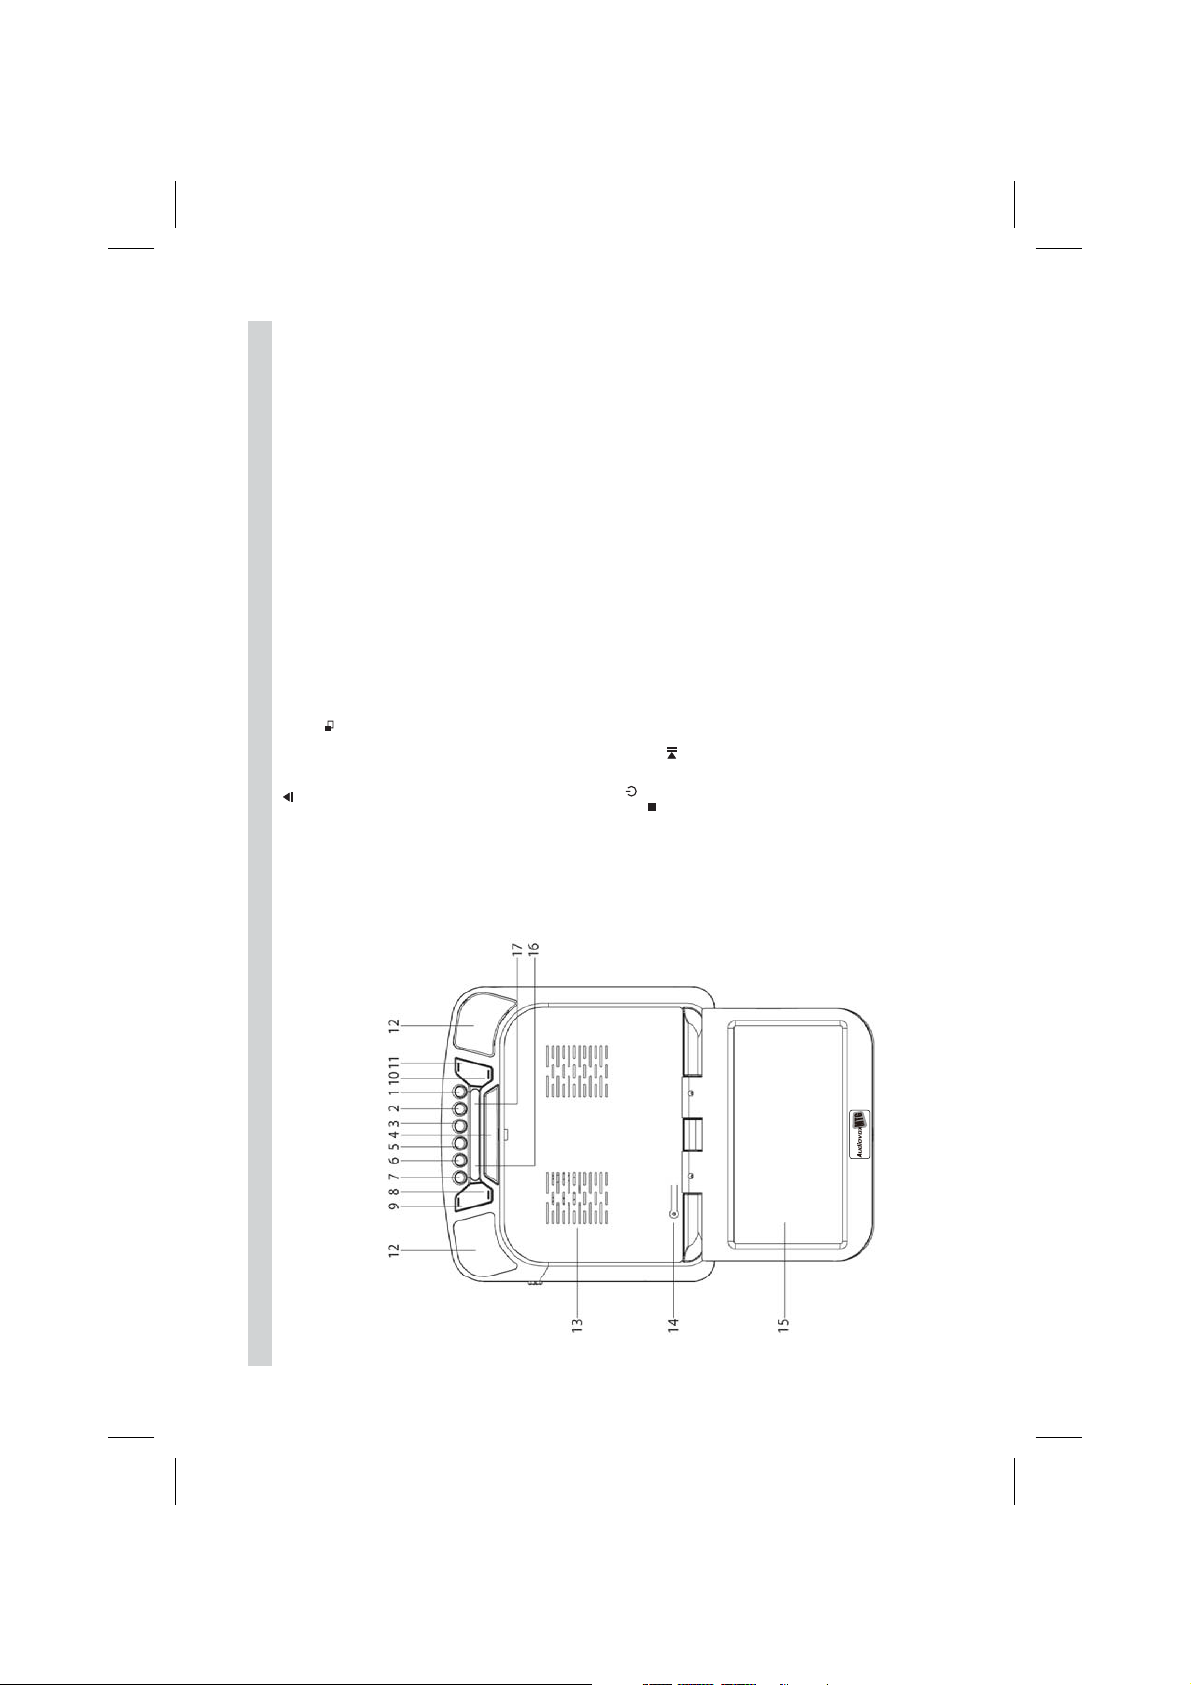
( ) Button - Press this button to select or
aspect ratios.
Normal (4:3)
compartment.
2. SCREEN MODE Wide (16:9)
1. EJECT( ) Button - Press this button to eject discs from the disc
Front View
,,,
,,,
,,,
,,,
Button - ,
h , , Ch3 88.5 Mhz,
C 1 88.1 Mhz Ch2 88.3 Mhz
Ch4 88.7 Mhz Ch5 88.9 Mhz Ch6 89.1 Mhz
Ch7 89.3 Mhz Ch8 89.5 Mhz Ch9 89.7 Mhz
Ch10 89.9MHz Ch11 90.1 Mhz Ch12 90.3 Mhz
Ch13 90.5 Mhz Ch14 90.7 Mhz Ch15 90.9 Mhz
3. FMM Used to select the frequency in sequence rotation: FM OFF
.
Ch16 91.1 Mhz
SCREEN RELEASE (PRESS) Button - Press this button to release the
4.
LCD screen. The screen will drop down slightly. Pivot the screen
downward until a comfortable viewing angle is reached
Button - Press d Press to adjust
in the following sequence: Brightness, Contrast, Hue, Saturation, Reset.
5. PIC to enter the picture a justment mode.
6 SOURCE Button - Press to select the source menu: DVD/AV1/SD/USB.
7. POWER( ) Button - Press this button to turn the system on or off.
8. STOP( ) Button - Press this button to stop playback.
9. PLAY/PAUSE( ) Button - Press to start playback or pause playing.
-
decrease the level of selected picture controls.
10. VOLUME ( ) Button - Press this button to decrease the volume or
+
increase the level of selected picture controls.
11. VOLUME ( ) Button - Press this button to increase the volume or
position.
12. DOME LIGHTS - Provides additional interior illumination.
13. Ventilation openings
14. LCD Cut Off Switch - Used to turn off the LCD screen when in the closed
15. 9” LCD screen
16. Wireless Headphone Transmitter - Transmits audio to an optional
wireless headphone.
4
17. Infrared Remote Sensor - Allows remote control to operate the unit.
CONTROLS AND INDICATORS DIAGRAM
Page 7
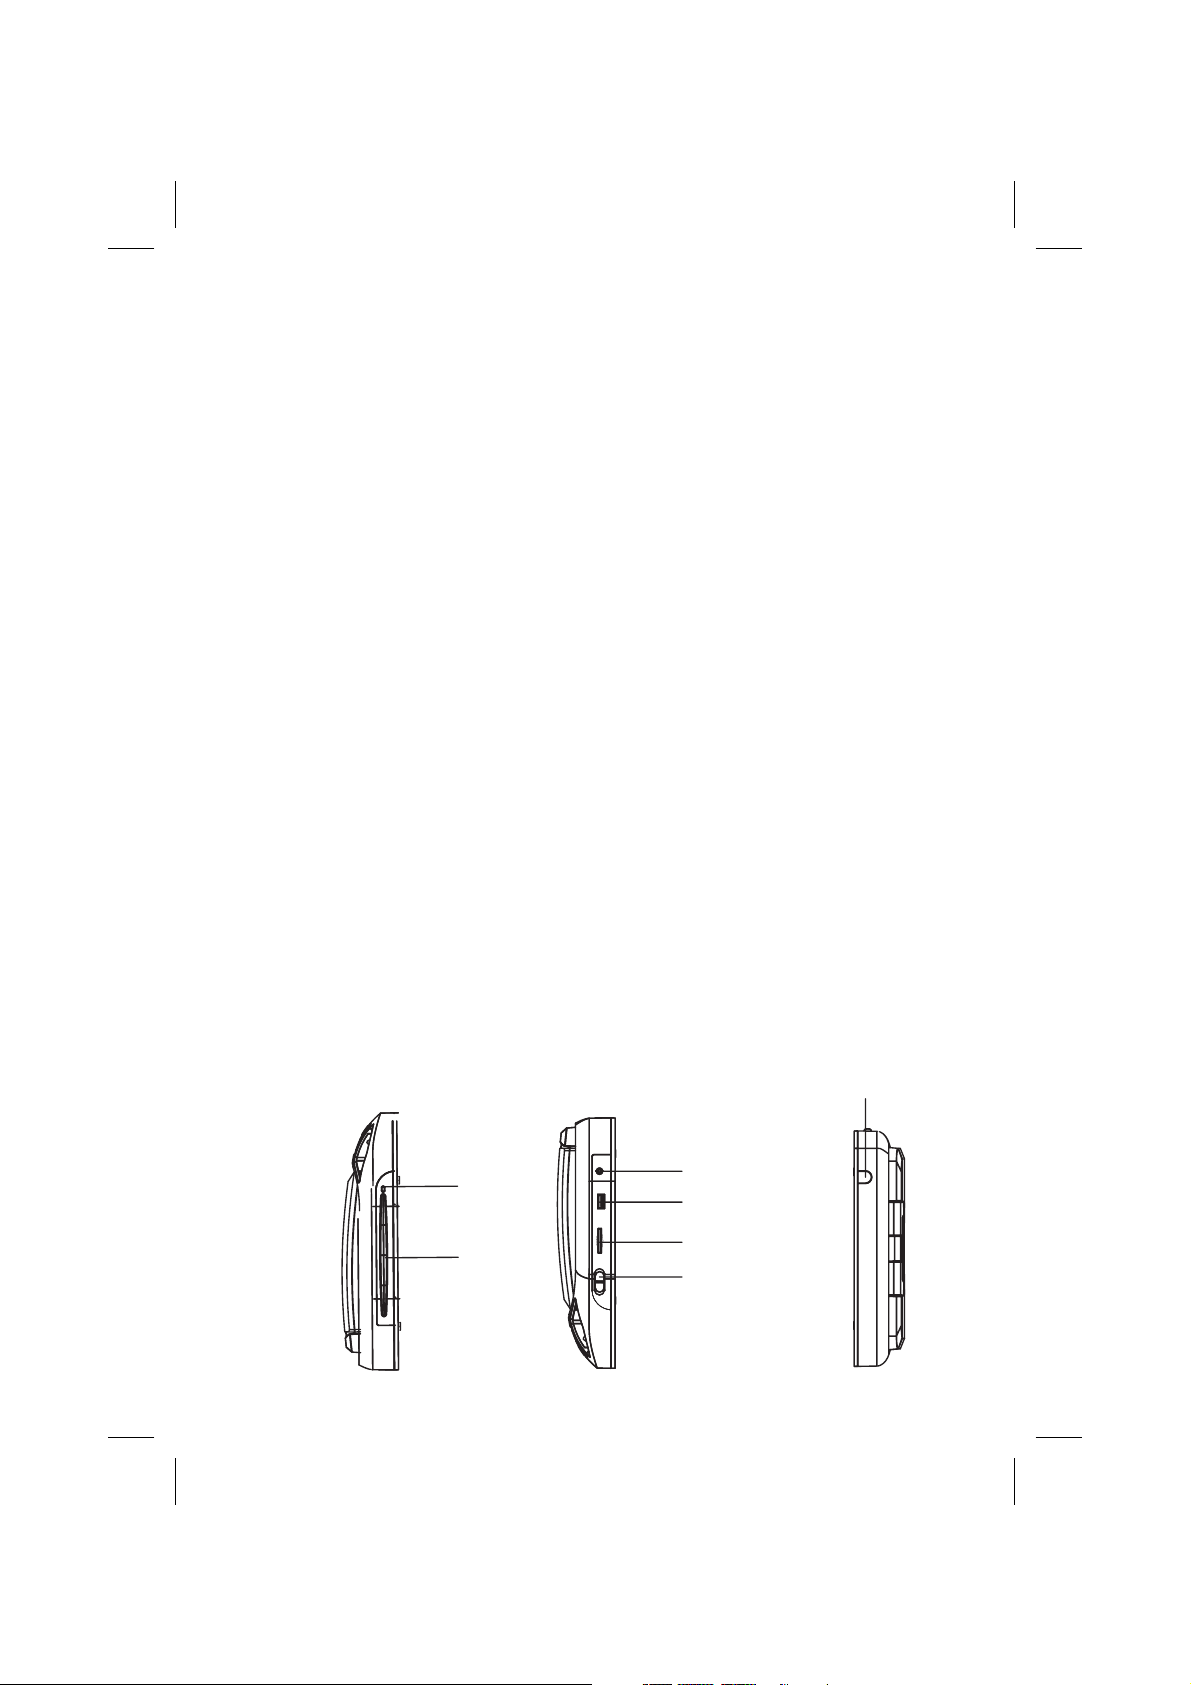
Allows remote control to operate the unit from the front seat.
5
Side Views
load a disk when a disk is inserted. Insert a disk with the label facing up towards
1. DVD disc insertion slot - For loading and removing disks. Unit will turn on and
the headliner.
a disk is not present.
2. Disc indicator light - Illuminates green when a disk is inserted. Illuminates red when
ON - Turns on the dome lights.
3. Three Position Dome Light Switch:
2
1
OFF - The dome lights will not turn on in this position.
AUTO - Automatically switches on the dome lights in conjunction with the vehicle’s
interior illumination.
4. SD Card Slot - Insert SD card for playback of audio/video files.
5. USB Port - Insert USB drive for playback of audio/video files.
6. Headphone jack
Note: The driver should stop the vehicle when operating the remote control.
1. Infrared Remote Sensor -
1
6
5
4
3
Back View
Page 8
Back View
6
REMOTE CONTROL OPERATION
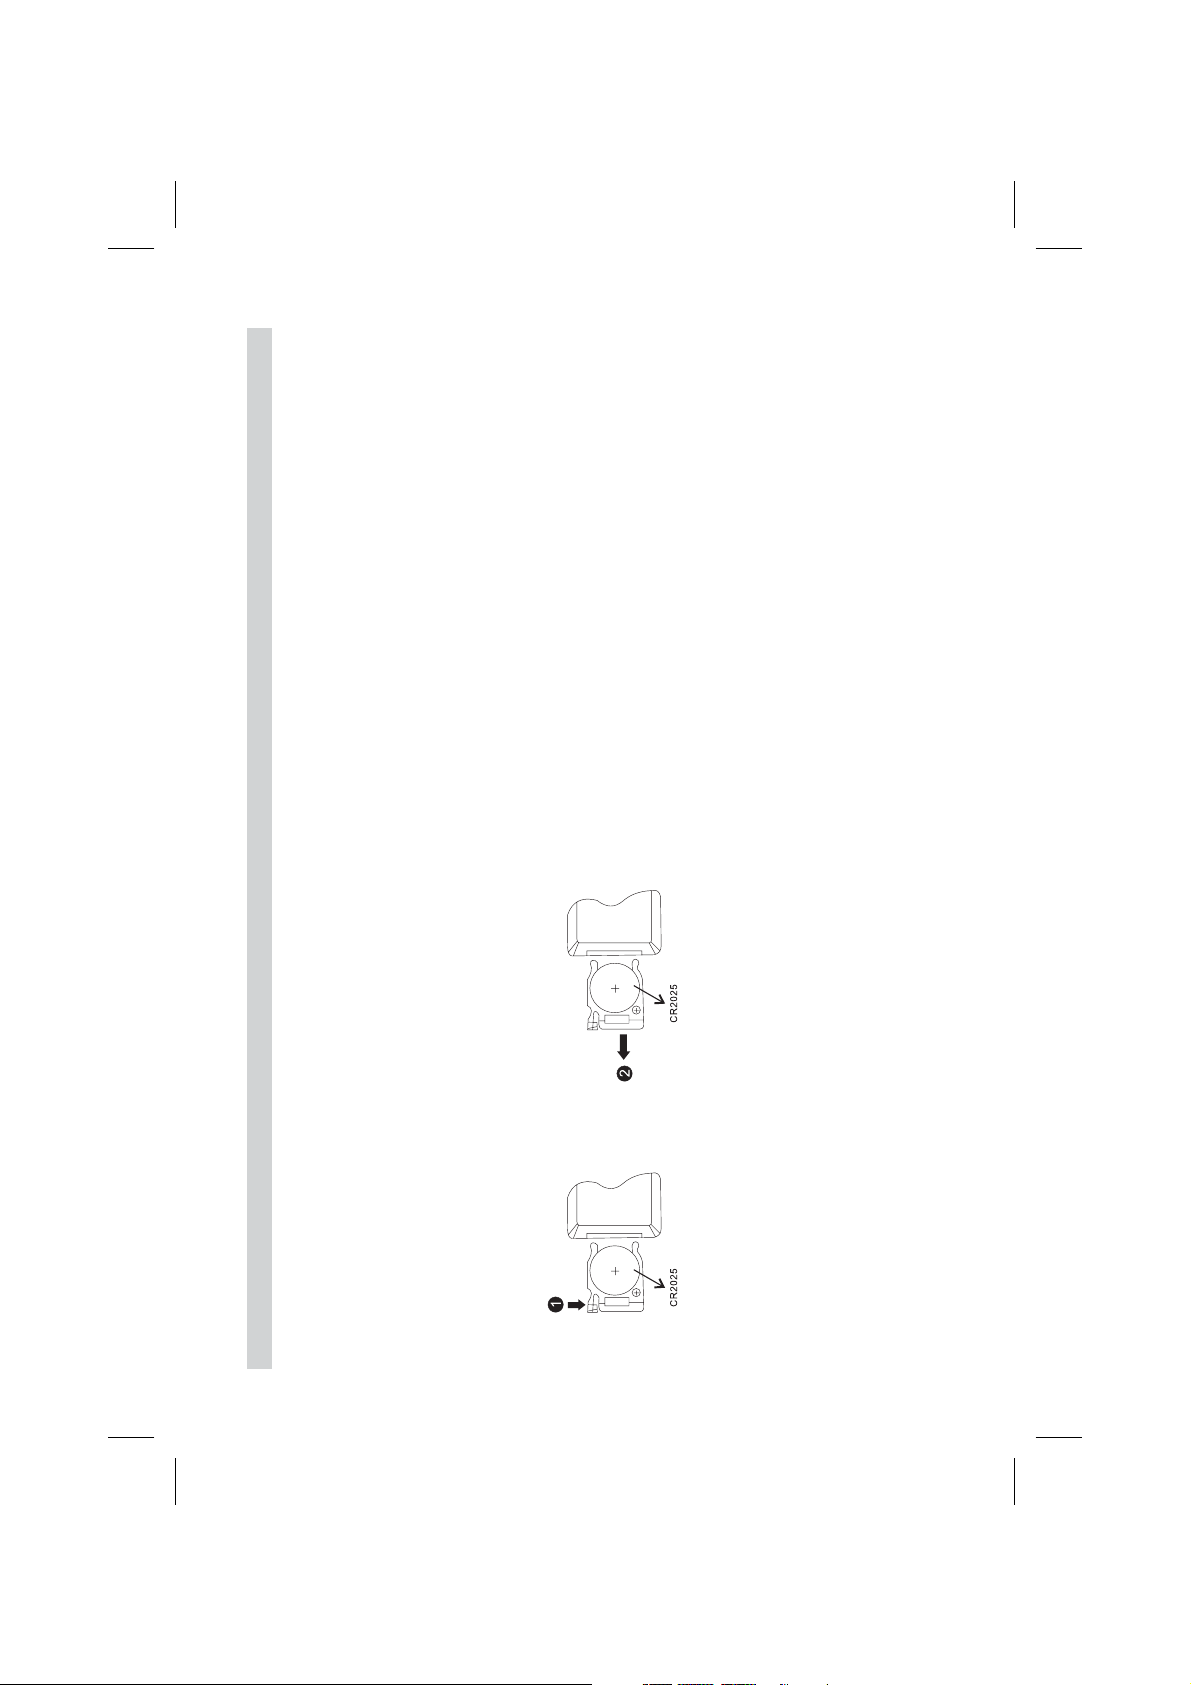
Battery Installation
Before attempting to operate your remote control, install the battery as described below:
1. Using your finger, press the tab (1) down in the direction of the arrow.
2. Slide the battery holder (2) out in the direction of the arrow.
3. Install one CR2025 battery. Make sure that the proper polarity (+ or -) is observed.
4. Slide the battery holder into the remote control until it locks.
Page 9
( ) Button - s
The c is menu
selection of CD tracks, DVD chapters or password setting.
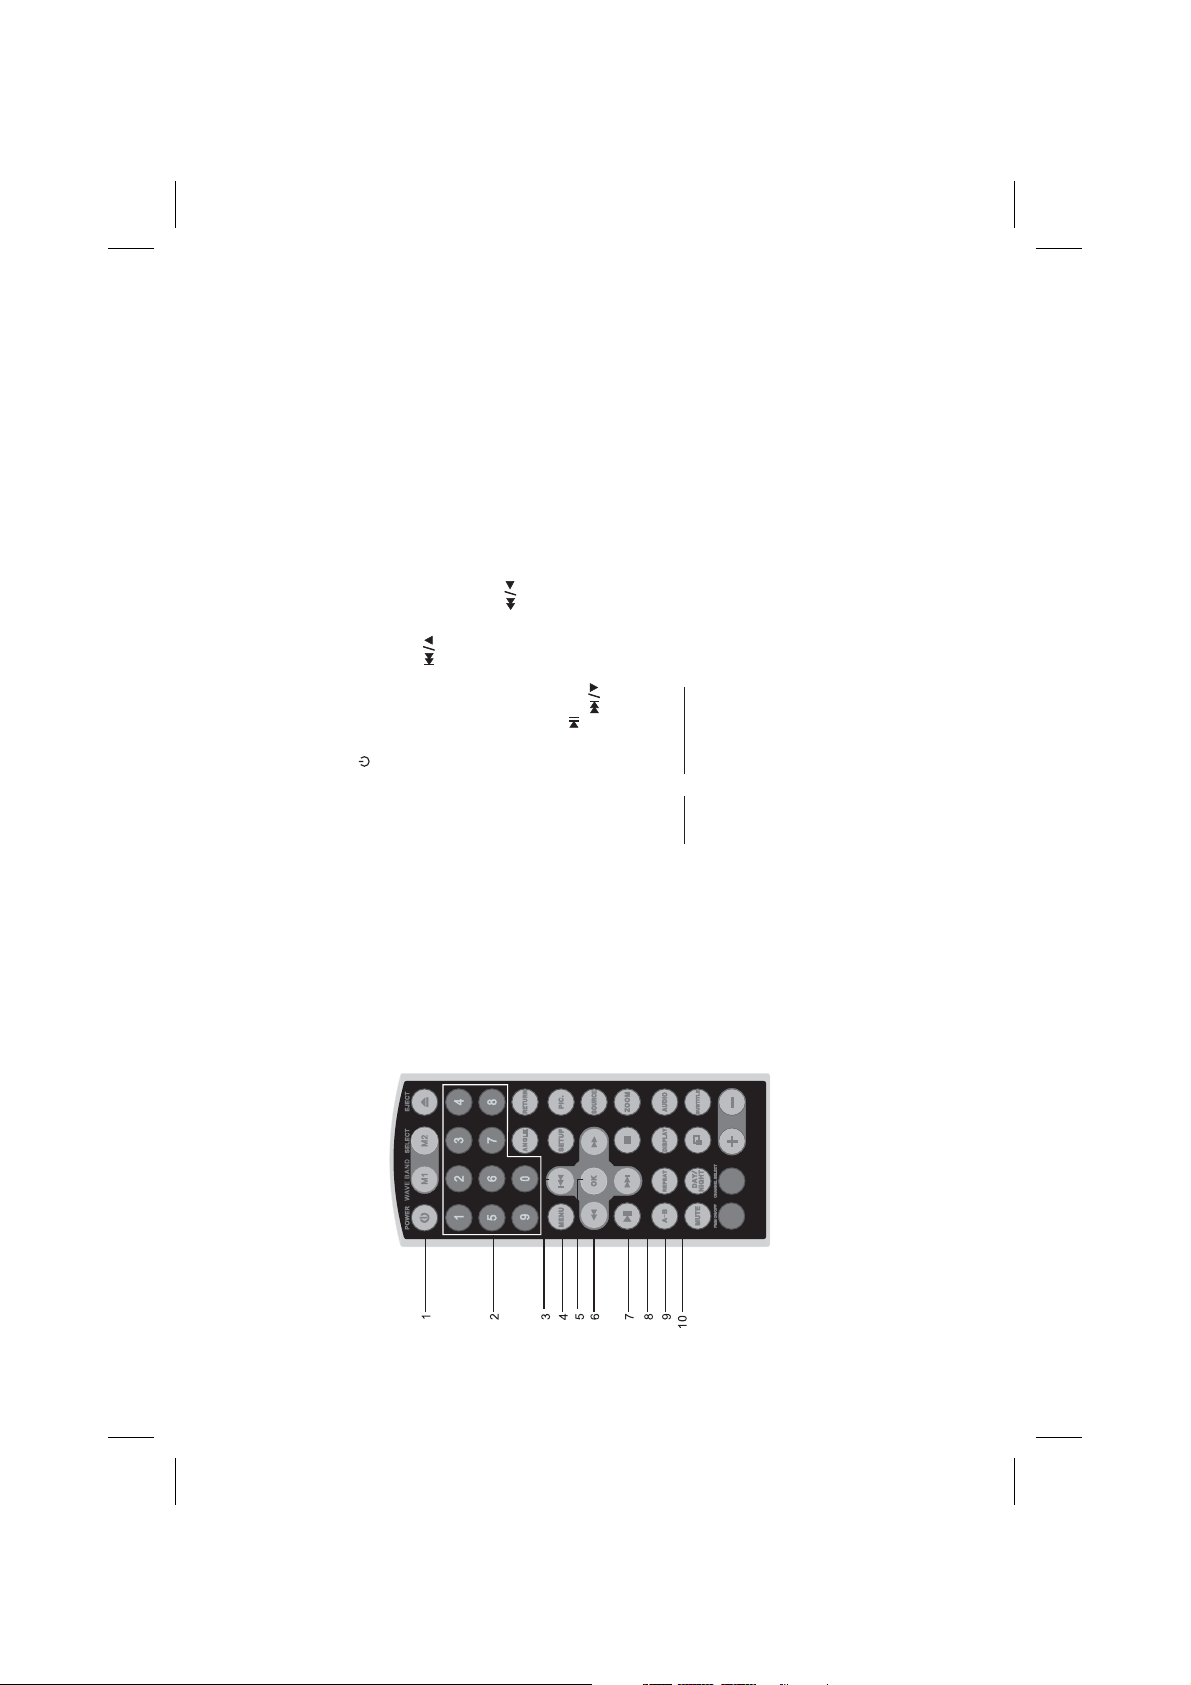
Remote Control Functional Description
1. POWER ( ) Button - Press this button to turn the unit ON and OFF.
2. NUMBER Buttons - Press to enter the numbers 0 to 9 for
/ ) Button -
3. PREVIOUS CURSOR ( Go to the previous chapter or
Button - Press root menu .
The c is menus
track. ursor used to select on the screen.
4. MENU to access the DVD (DVD MODE)
Button -
5. OK Used to implement a selected setting or menu option.
6. SCAN BACKWARD/CURSOR Scan backward at
2,4,8,16 times speed. ursor used to select s on the
( ) Button - or
screen.
7. PLAY/PAUSE Used to start playback pause playing.
T ( ) Button - The
ursor used to select on the screen.
c is menus
8. NEX /CURSOR Go to the next chapter or track.
point A).
point B).
point B.
Once Repeat A - Marks the beginning of the section to repeat (set
Twice Repeat AB - Marks the end of the section to repeat (set
3 times Repeat Off - Cancels the A-B repeat function.
track.
For MP3 disc, press “REPEAT” to repeat playing present file; press
Press: DVD Player
9. A-B Button - Allows the user to repeat the playback from point A to
10. REPEAT Button - Allows the user to repeat a selected title, chapter or
it again to repeat playing the folder.
7
Page 10
the picture adjustment.
Ch3 88.5MHz,
Button - is switch
.I the
Button - s F .
Button-
Button -
intensity is at maximum n “NIGHT” mode, the LCD backlight is
“NIGHT” LCD illumination modes. In the “DAY” mode, the LCD backlight
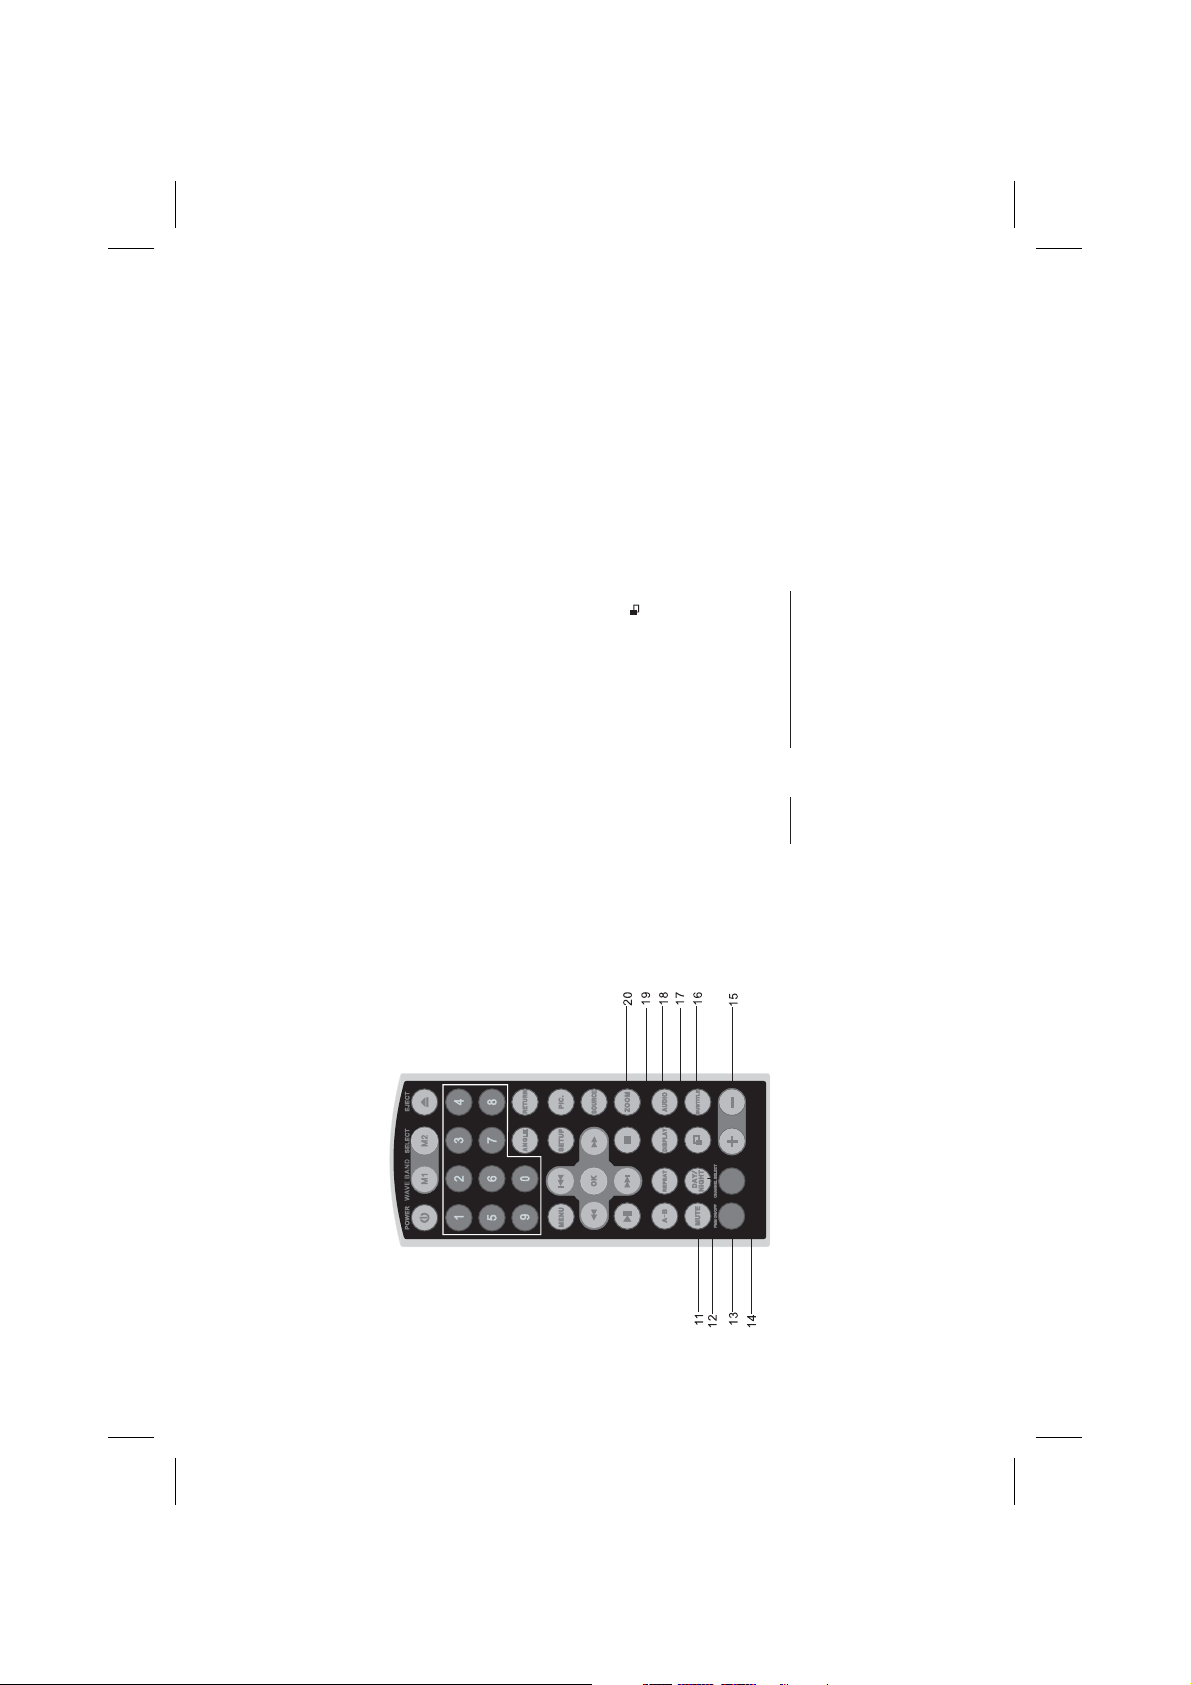
Remote Control Functional Description
11. MUTE Press this button to mute the audio for wireless FMM.
12. DAY/NIGHT This control toggles the unit between “ DAY” and
dimmed to a preset level that is more suitable for low light operation.
. Button 13 FMM ON/OFF Turns the wireless FM Modulator on or off.
14. CHANNEL SELECT Select wireless FM Modulator requency
Ch1 88.1MHz, Ch2 88.3MHz,
Ch4 88.7MHz, Ch5 88.9MHz, Ch6 89.1MHz,
Ch7 89.3MHz, Ch8 89.5MHz, Ch9 89.7MHz,
Ch10 89.9MHz, Ch11 90.1MHz, Ch12 90.3MHz,
Ch13 90.5MHz, Ch14 90.7MHz, Ch15 90.9MHz,
Ch16 91.1MHz
or decrease or increase the level of the selected
. Button - ,
15 VOLUME (-/+) Press to decrease or increase the volume level
Button - an
language in DVD mode.
16. SUBTILE Press to display and select available subtitle
17. SCREEN MODE SELECTION ( ) Press th button to
16:9 4:3
Button - to display and select an available language
between Wide ( ) or Normal ( ) aspect ratios.
18. AUDIO Press audio.19. DISPLAY Press to display current disc information while the
Button -
in DVD mode
Button -
disc is playing.
20. ZOOM Press to change picture size when playing a DVD disc.
Once - Enlarges the picture to 2 times the original size.
Twice - Enlarges the picture to 3 times the original size.
Press: DVD player performs:
3 times - Enlarges the picture to 4 times the original size.
4 times - Reduces the picture to 1/2 times the original size.
5 times - Reduces the picture to 1/3 times the original size.
6 times - Reduces the picture to 1/4 times the original size.
Picture returns to the original size.
7 times -
8
Page 11
/CURSOR Button -
Button - Press to select the source menu 1/SD/USB .
. ( )Button-Pr
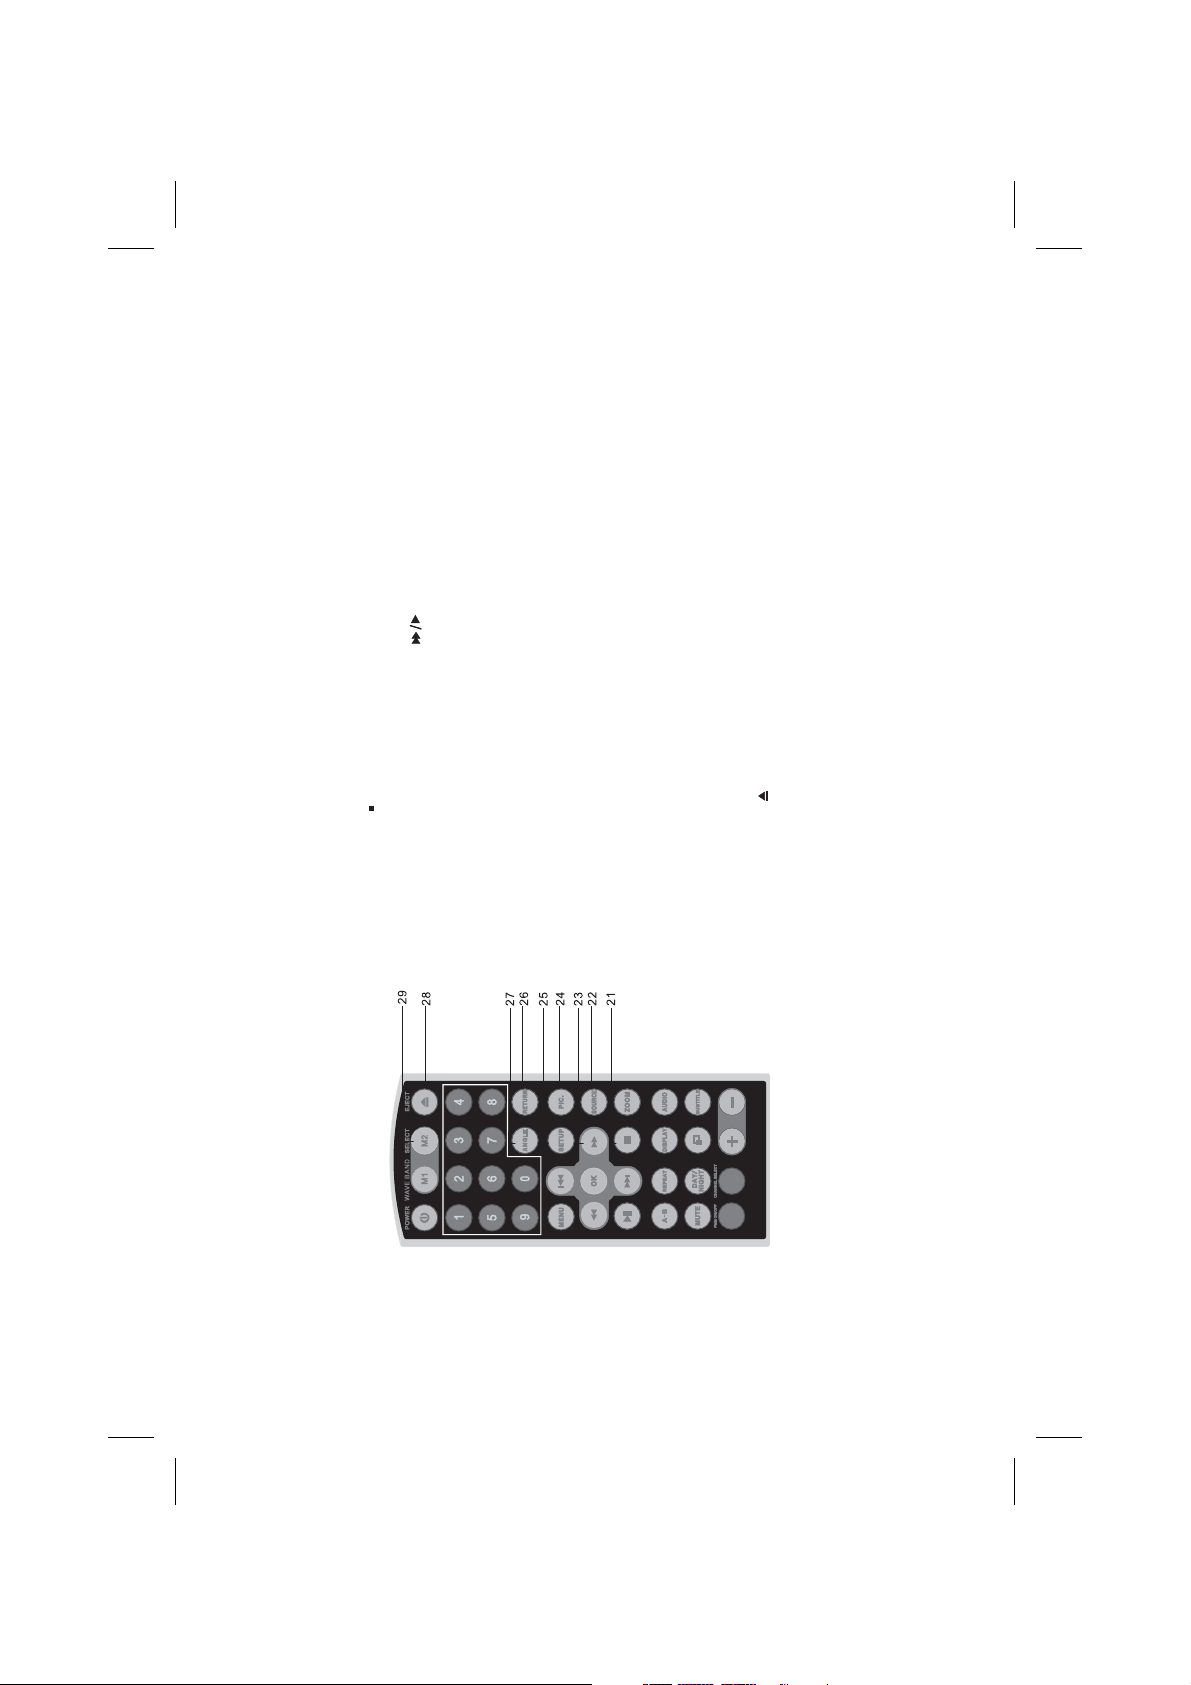
Remote Control Functional Description
21 STOP ess to stop playback.
22 SOURCE (DVD/AV )
23 SCAN FORWARD ( ) Scan forward at
The c is s menus
Button - Press this button picture
2,4,8,16 times speed. ursor used to elect on the screen.
24. PIC to enter the adjustment mode
Brightness,
isplayed, use the VOLUME (+)/VOLUME (-) button to adjust the
Contrast, Hue, Saturation, Reset. Once the desired adjustment bar is
Press repeatedly to adjust in the following sequence:
setting. The display will automatically turn off in 6 seconds, or if any
d
Button - this button . The setup
allows the user to change DVD player options such as OSD
other button is pressed.
menu
25. SETUP Press to display the setup menu
AN
Button:
LANGUAGE, P RE TAL CONTROL etc.
Press Return once: Go to disc menu.
26. RETURN
Button - Press this button t and select different camera
Press Return twice: Go to movie playback.
angles in DVD mode. Not all discs contain this option.
27. ANGLE o display
Button - Press this button
28. EJECT ( ) to eject the disc.
29. WAVE BAND Button - Press to change IRT transmitter wave band
between M1 & M2.
9
Page 12
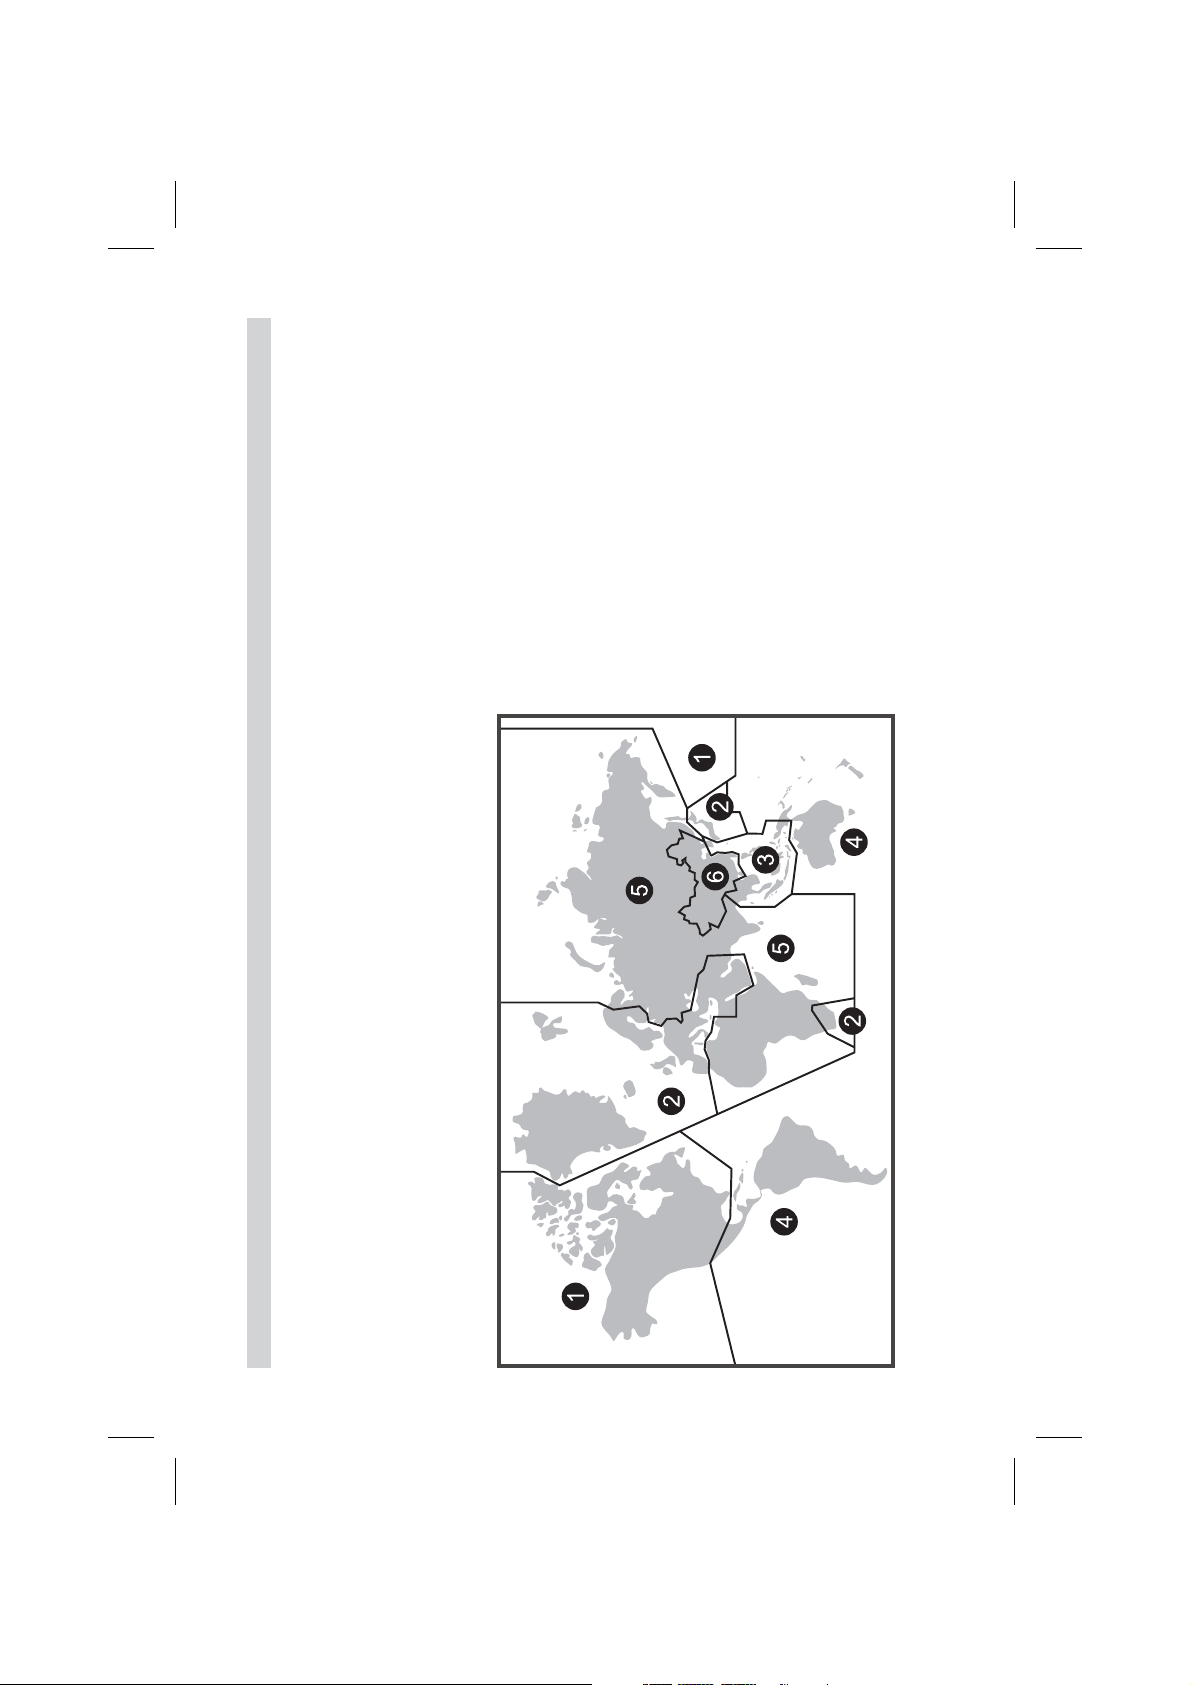
Region 1- USA, Canada
Region 2- Japan, Europe, South Africa, Middle East,
Greenland
Region 3- S. Korea, Taiwan, Hong Kong, Parts of
South East Asia
Region 4- Australia, New Zealand, Latin America
(including Mexico)
Region 5- Eastern Europe, Russia, India, Africa
Region 6- China
10
DVD BASICS
To get the optimum use out of the DVD player, please read this section.
DVD Region Code
The DVD player is preset to a region code at the factory depending on where the unit is sold. DVDs are also coded by
region. These region codes must match in order for the disc to play. If the region codes don’t match, the disc won’t play.
This system is set to Region 1 (USA) and will not play discs that have a region code different from Region 1. The system
will display “WRONG REGION.”
Page 13

Types of Discs Your System Will Play
DVD disc - DVD discs that contain video.
Your system will play the following types of discs:
!!!
Audio discs - Audio CDs that contain musical or sound content only.
MP3 discs - A disc that contains audio files (for example, a CD-R with downloaded MP3 files).
Disc Compatibility
This unit is capable of playing most recordable DVD formats. However, due to the variety of disc manufacturers and
software, playback can not be guaranteed for every disc.
Before a disc is loaded, make sure that it is compatible with the player. The following discs can not be played with this
player:
MiniDisc
Laserdisc
CD-I, CD-ROM, DVD-ROM, Super Audio CD (SACD) or DVD Audio
!!!
Blue-Ray Disc™
!
11
Page 14
12
LOADING AND PLAYING DISCS
1. Press the Screen Release (PRESS) button to unlock the LCD screen. The LCD screen will drop down slightly.
while the unit is in use.
2. Pivot the screen downward until a conformable viewing angle is reached. The hinge friction will hold the screen in position
3. Press the power ( ) button on the unit or remote control to turn the unit on.
Note: The unit will turn on automatically when a disc is inserted.
4. Insert a disc into the disc insertion slot with the label facing up towards the headliner.
quality.
5. After the unit has been turned on and is displaying a picture, adjust the viewing angle. Pivot the screen to optimize the picture
6. Remember to turn the unit off and pivot the screen to the locked position when not in use.
SETTINGS AND ADJUSTMENTS
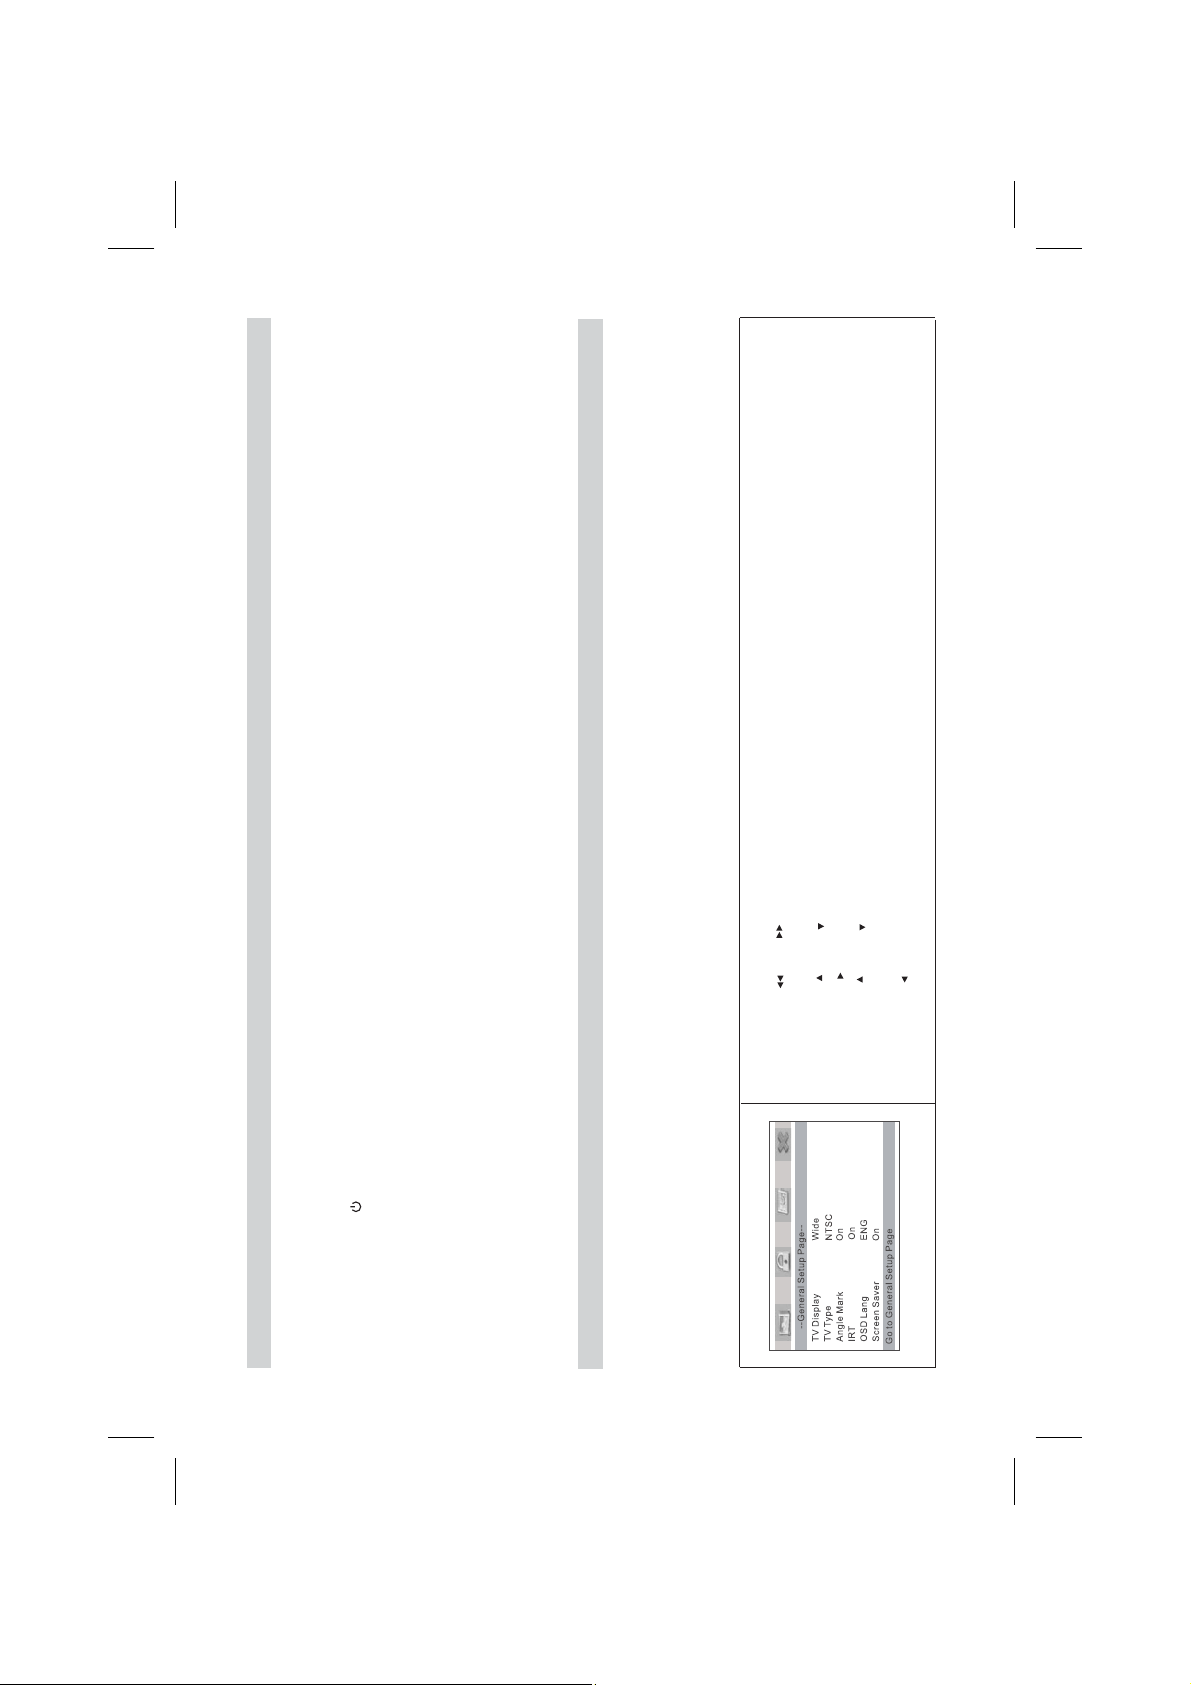
The setup menu contains features and options that let you customize your DVD player. For example, you can set a language for
the On Screen Display (OSD) or control DVD playback content for children.
Main Menu
2. Press the “ ” or “ ” button to highlight the General, Preference or Password setup pages.
1. Press the “SETUP” button. The Main Menu will be displayed on the screen.
4. Press the “ ” or “ ” CURSOR button to select a menu item.
3. Press the “OK” button to access the selected page.
Press the “ ” CURSOR button to enter the option submenu.
7. Press the “OK” button to confirm your selection.
6. Press the “ ” or “ ” CURSOR button to select an option.
5.
8. Press the “ ” button to return to the Main Menu or the “SETUP” button to exit.
Page 15
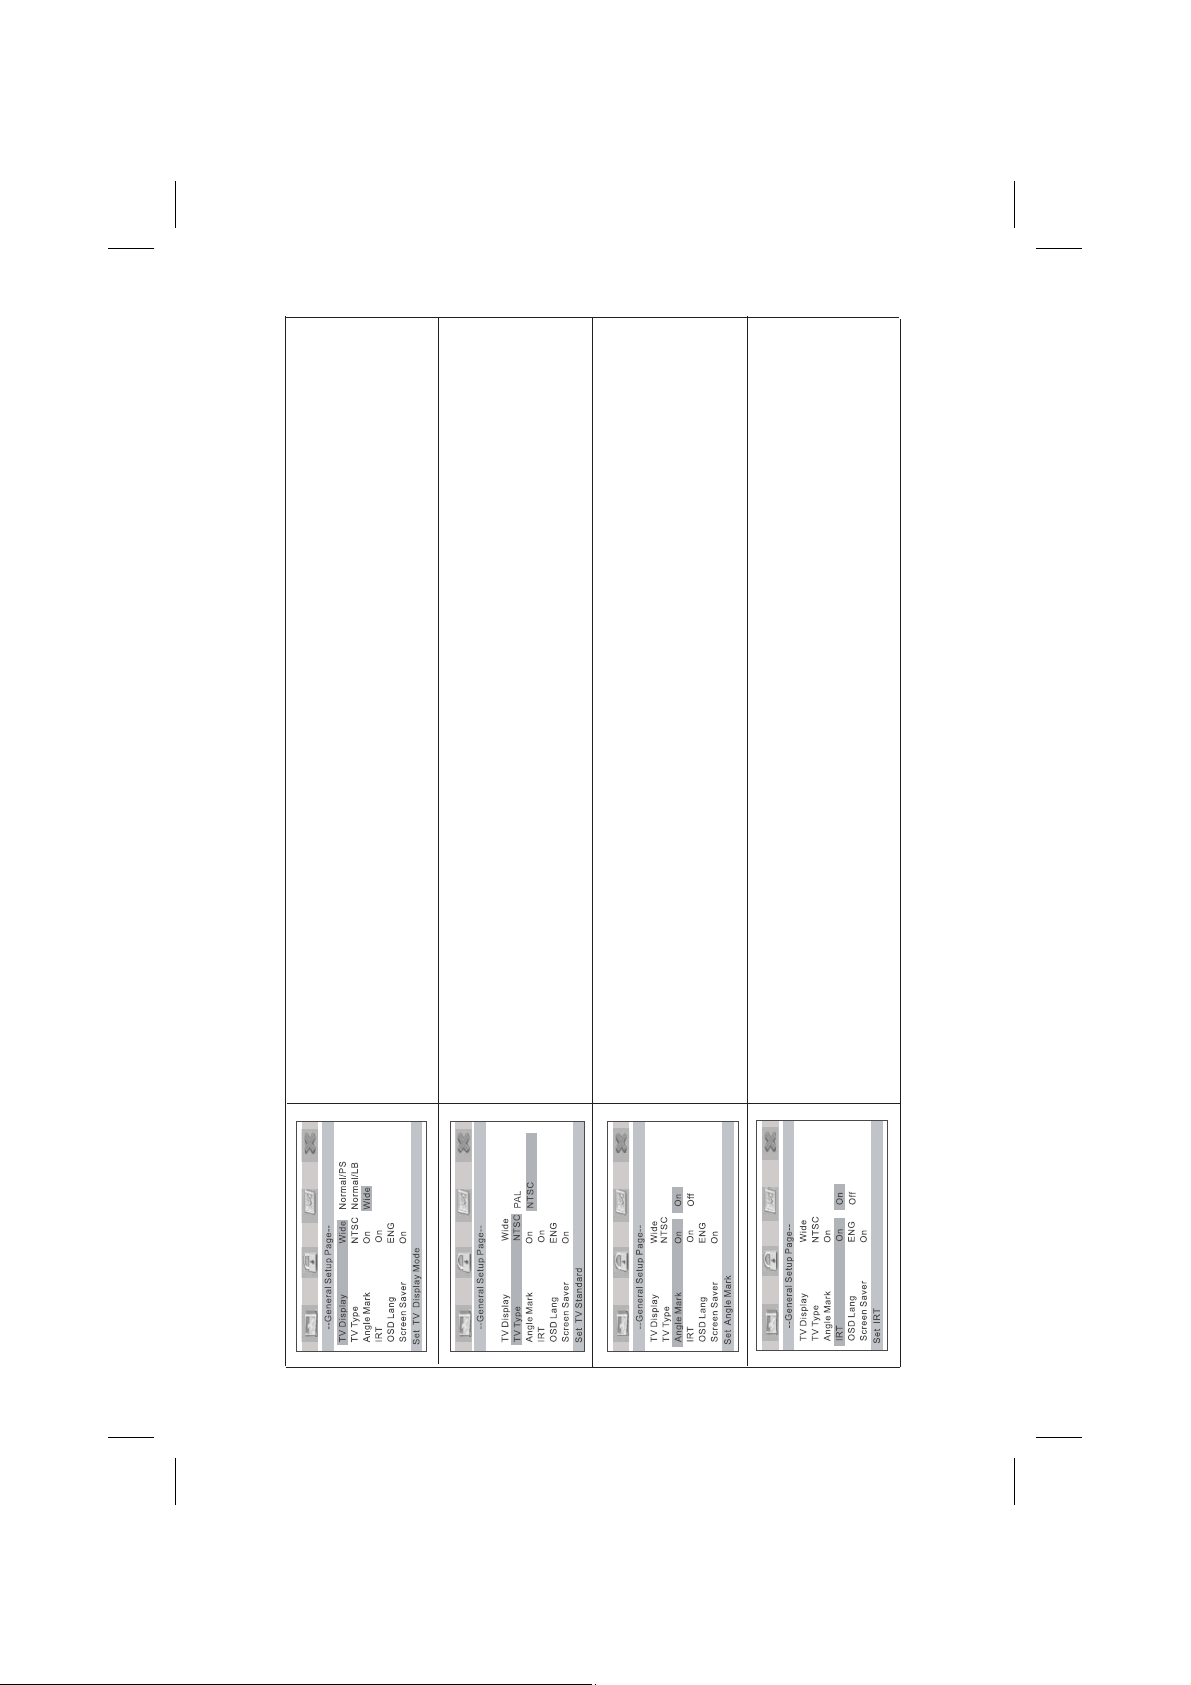
General Setup Page
TV Display
This function allows you to set the screen display format.
Optional Settings: Normal/PS, Normal/LB, Wide
.
The default setting is Wide
Note: This function depends on the aspect ratio with which the DVD disc is recorded.
TV Type
This function allows you to select TV type.
Optional Settings: PAL, NTSC
The default setting is NTSC.
Note: For best system performance, the selected setting should remain at NTSC.
Angle Mark
This function allows you to turn angle mode playback on or off. Angle mode allows you to select
different camera angles in DVD playback.
Optional settings: On, Off
The default setting is Off.
Note: The number of angles vary from disc to disc. Not all discs contain this option.
IRT
13
This function allows you to turn the infrared transmitter (IRT) for wireless headphone operation on or
off.
Optional settings: On, Off
The default setting is On.
Page 16
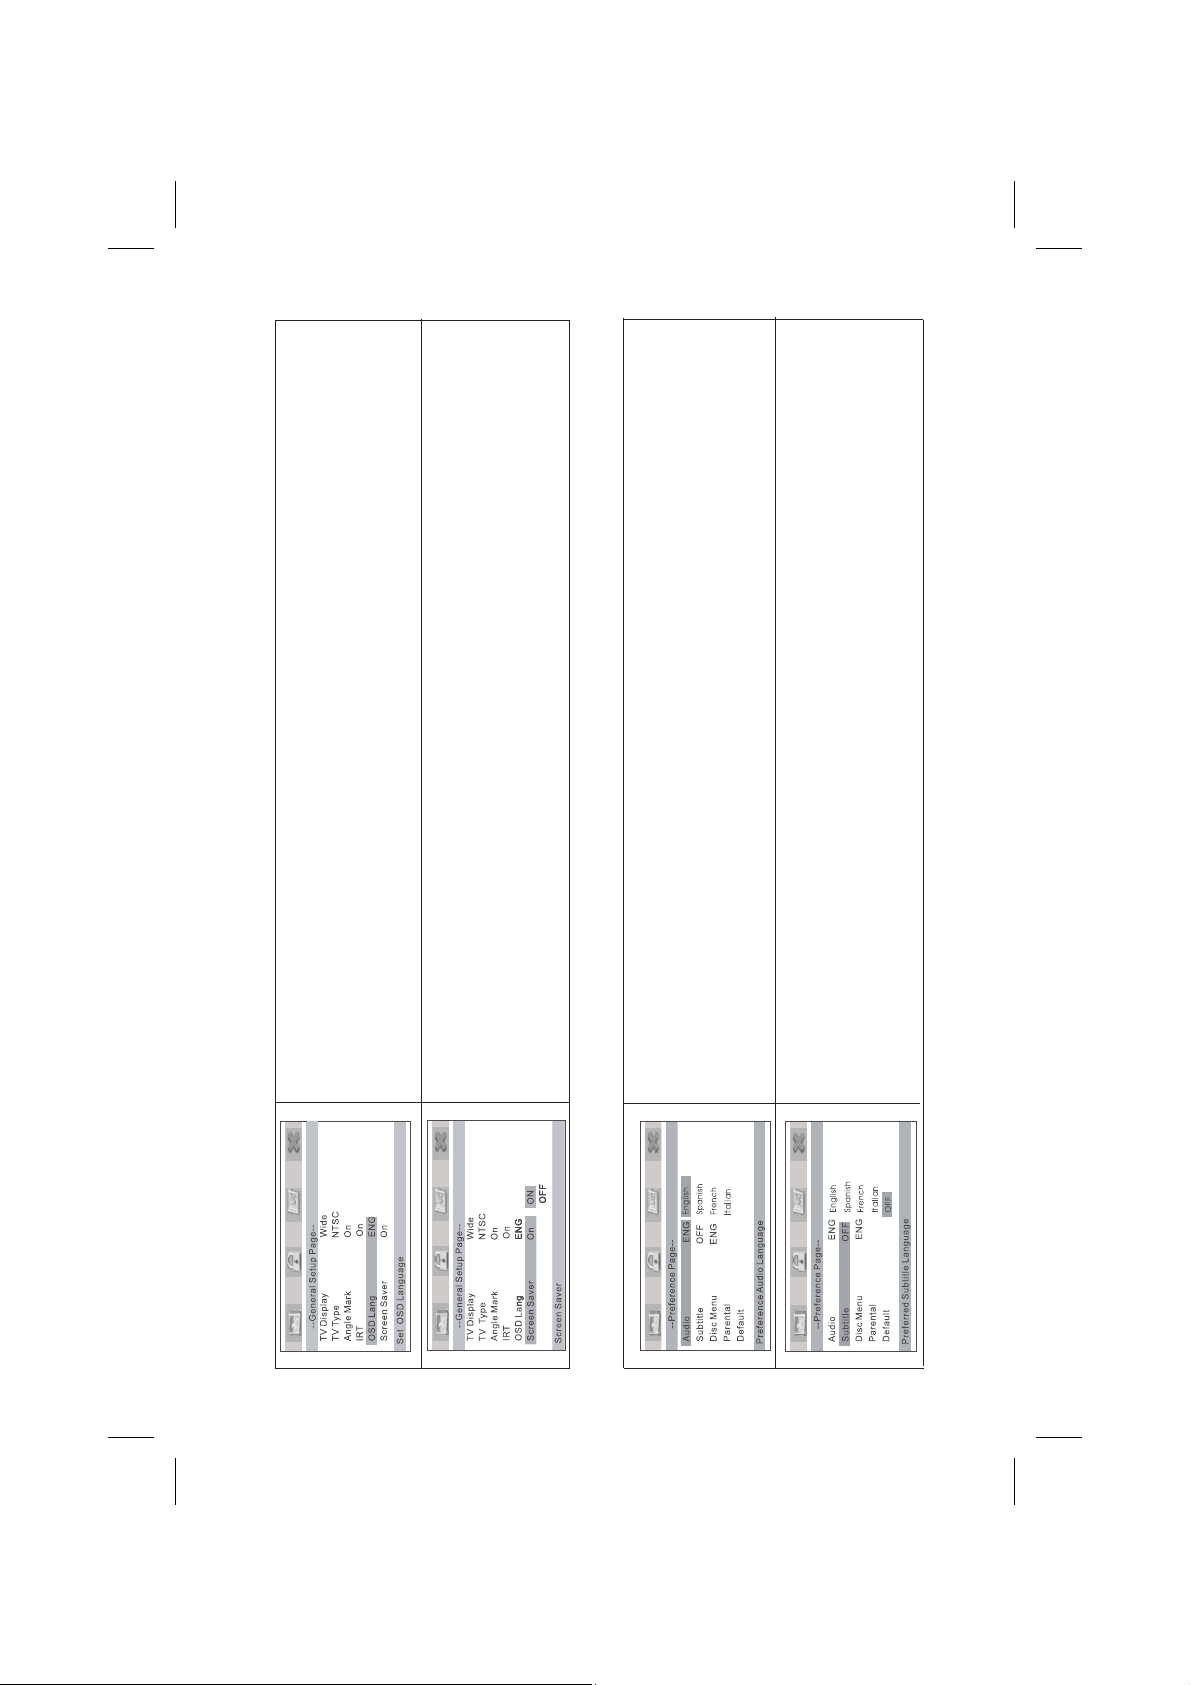
OSD Language
This function allows you to set the OSD menu language.
Optional Settings: English, Spanish, French, Italian
The default setting is English.
Screen Saver
This function allows you to turn the screen saver on or off.
14
Audio
This function allows an user to select an audio language for DVD playback. The audio language
depends on the information available on each disc.
Optional Settings: English, Spanish, French, Italian.
The default setting is English.
Note You can also change the audio language during playback by pressing the Audio button.:
Subtitles
This function allows you to select the subtitle language to be shown on the screen. The subtitle
language depends on the information available on each disc.
Optional Settings: English, Spanish, French, Italian, Off.
The default setting is Off.
Optional Settings: On, Off
The default setting is On.
Note: The DVD player will enter screen saver mode if the unit is inactive for approximately four
minutes.
Note: You can also change the subtitle language during playback by pressing the Subtitle button.
General Setup Page
Preference Page
Page 17
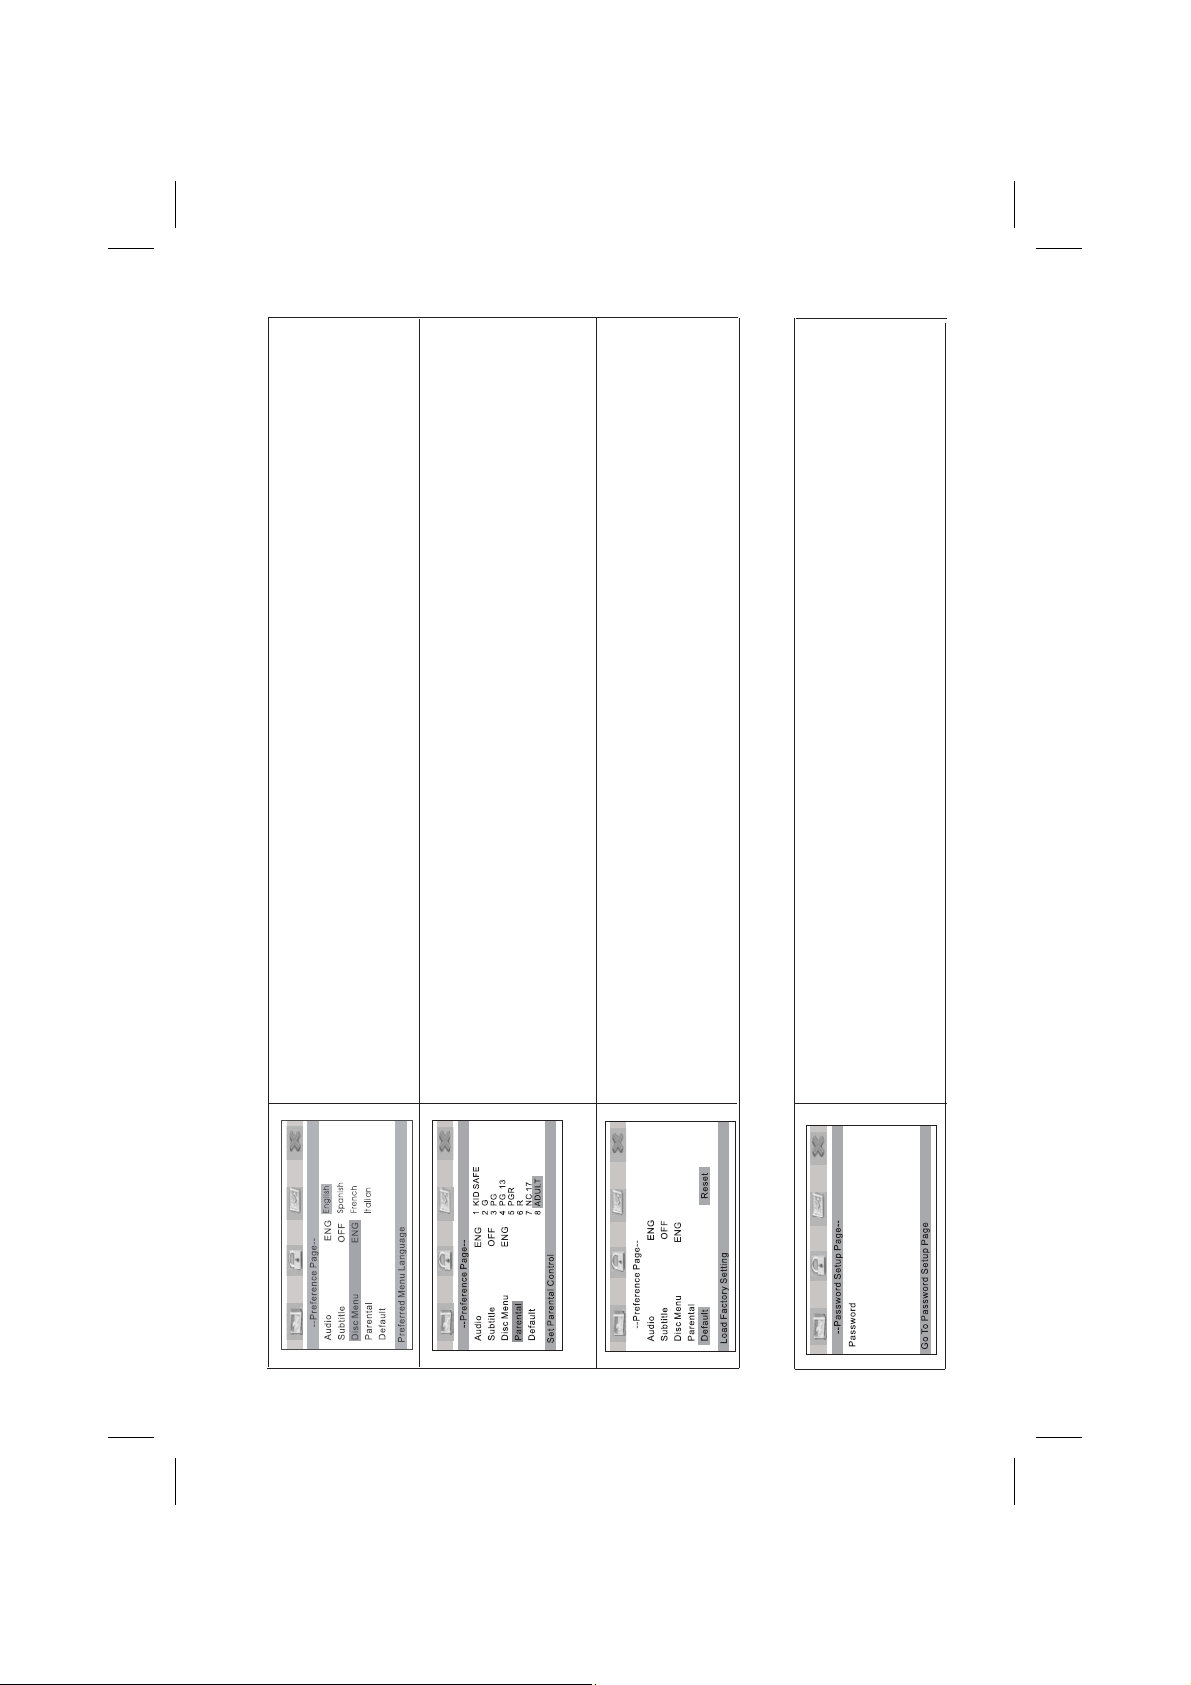
Disc Menu
This function allows you to choose the menu language stored on the disc.
Optional Settings: English, Spanish, French, Italian
The default setting is English.
Note: This function is only available for DVD playback.
Parental
This function prevents children from watching unsuitable DVD content. You can limit the content of
movie playback from 1. Kid Safe to 8. Adult. The lower the value, the more strict the control. The
restriction of viewing disc content by younger viewers may be available on some discs but not others.
Optional Settings: 1. KID SAFE; 2. G; 3. PG; 4. PG 13; 5. PGR; 6. R; 7. NC 17; 8. ADULT.
The default setting is 8. ADULT.
he correct password has been entered.
t
Parental Control features are password protected. The
Note: rating level can only be changed when
Default
This function allows you to reset all settings to the original factory settings. Select this item and press
the “OK” button.
Note: This function does not reset the Parental level to the original factory setting.
has been entered. To avoid the possibility of others using the default password to change
Password
This option allows you to set a password (four numbers).
Note: The default password is 3308. This password is always accepted even after a new password
15
passwords, record this default password in another area and delete it from this manual.
Preference Page
Password Setup Page
Page 18

PLAYING JPG FILES
1. Place a JPG disc into the disc insertion slot, the unit will start reading the disc and play.
2. Press the “MENU” button to browse JPG files.
3. Press the “ ” or “ ” cursor button to select a JPG file and press the “OK” button to confirm.
a. From top to bottom
b. From bottom to top
4. Press the cursor button to rotate the picture counter-clockwise; press the cursor button to rotate the picture clockwise.
5. Press the “DISPLAY” button when viewing pictures. You can select different refresh modes as follows:
c. From left side to right side
d. From right side to left side
e. From left top to right bottom
f. From right top to left bottom
g. From left bottom to right top
h. From right bottom to let top
i. From horizontal center to both sides
j. From vertical center to both sides
k. From top and bottom to center
l. From right and left to center
m. From four window's top side to bottom side
n. From four window's left side to right side
o. From four edges to center.
6. When viewing files, “ ” may appear when pressing “Angle”, “Subtitle”, “Audio” or “Title” etc.
In this situation, these options are unavailable.
or press the “ OK ”button to select one picture to view.
7. When viewing JPG files, press “ ”, pictures will be displayed in thumbnail mode. Press “ ”
16
Page 19
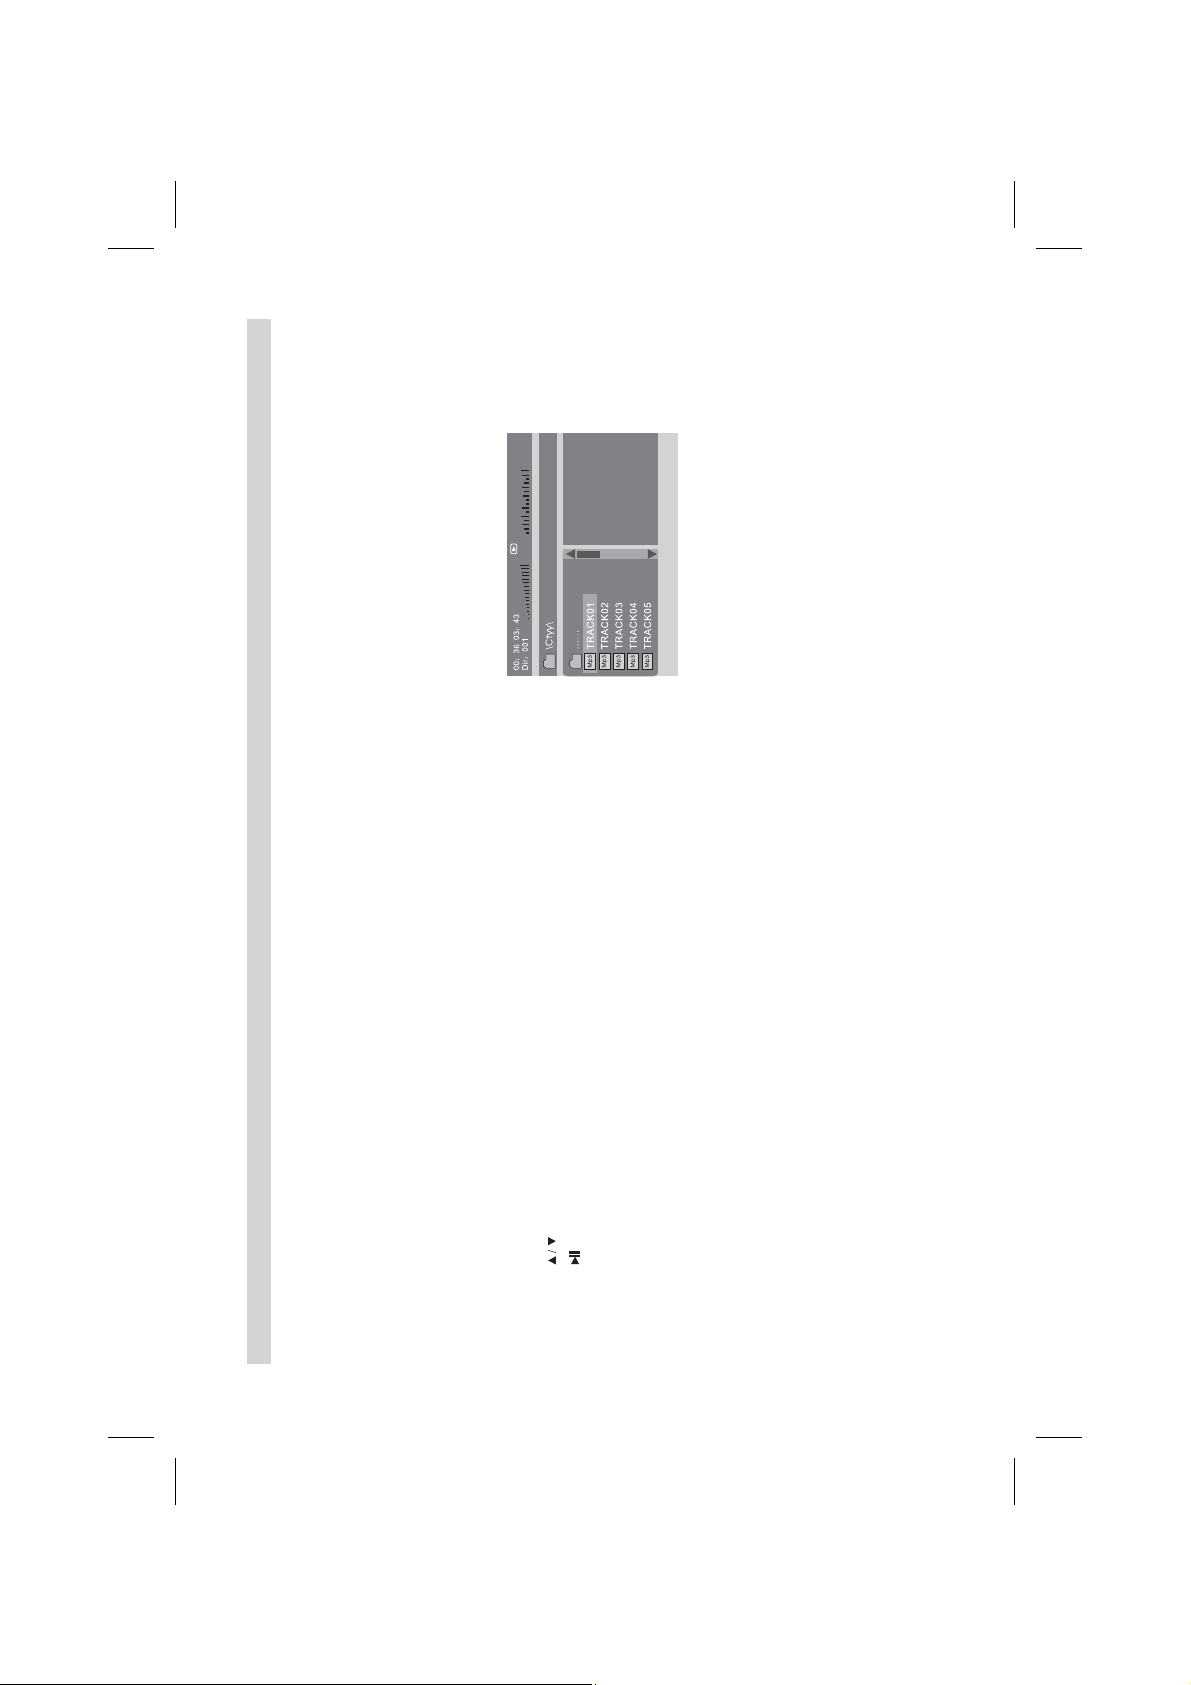
PLAYING MP3 FILES
17
a P insertion slot, an rive into the USB
, SD card SD card slot
ress or button to choose a MP3 file
ress or button to play the file selected.
port or insert a into the .
1. Place M 3 disc into the disc insert USB d
2. P the “ ” cursor button the “ OK ” .
MP3 is a format for storing digital audio. An audio CD-quality song can be compressed into the MP3 format with very little loss of
quality, while taking up much less space. CD-R discs that have been encoded in MP3 format can be played on a DVD player. The
DVD player plays the songs in the order they were burned on to the disc. When playback is started, the elapsed time of the track that
is playing will be displayed.
3. P the “ ” button the “ OK ”
Page 20

18
SOURCE FEATURES
1. Press the “SOURCE” button on the unit or remote control. The following menu will appear on the screen:
DVD
ⅠⅡ
ⅠⅡ
the unit will turn on automatically when a disc is inserted.
AV1
SD
USB
2. Press the “ ” or “ ” cursor button to choose an item.
3. Press the “OK” button.
DVD
If a disc is loaded into the unit when the source is set to Av1, SD or USB, the unit will automatically switch the source over to DVD.
Last Memory for the DVD mode: If the unit is turned off and then on, and the DVD disc is not removed, the unit will play the DVD
from the point it stopped last time.
At power OFF mode,
The unit will accept an audio/video input through the 3 RCA jacks located at the base of the unit. The audio/video device can be a
video game system, video camera or other input device.
AV1
Note: AV1 sources are available only if they are pre-installed with your video product.
Insert a SD card (compatible with normal SD/MMC/MS) and play the content.
SD
Supported formats: MP3, JPEG, AVI, MPEG , etc.
Insert a USB device and play the content.
USB
Supported formats: MP3, JPEG, AVI, MPEG , etc.
Page 21

OVERHEAD DOME LIGHTS
The Dome Lights integrated into the unit are controlled by a three position slide switch. Sliding the switch to the ON position will
turn the light ON. The OFF position will prevent the lights from turning ON with the vehicle interior lighting. The AUTO position will
allow the lights to turn ON and OFF with the vehicle interior lighting.
Refer to the installation guide for wire connections. Do not leave the vehicle unattended with the dome light switch in the ON
position, as this could discharge the battery.
INFRARED REMOTE SENSORS
The unit incorporates two infrared remote sensors which relay signals from the remote control to allow the unit to be controlled
simply by pointing its remote control at the remote sensor. The infrared sensor can relay signals from most manufacturer's remote
control to its respective component connected to the AV input, in this case, you must use the remote control supplied with the
19
component.
Page 22
20
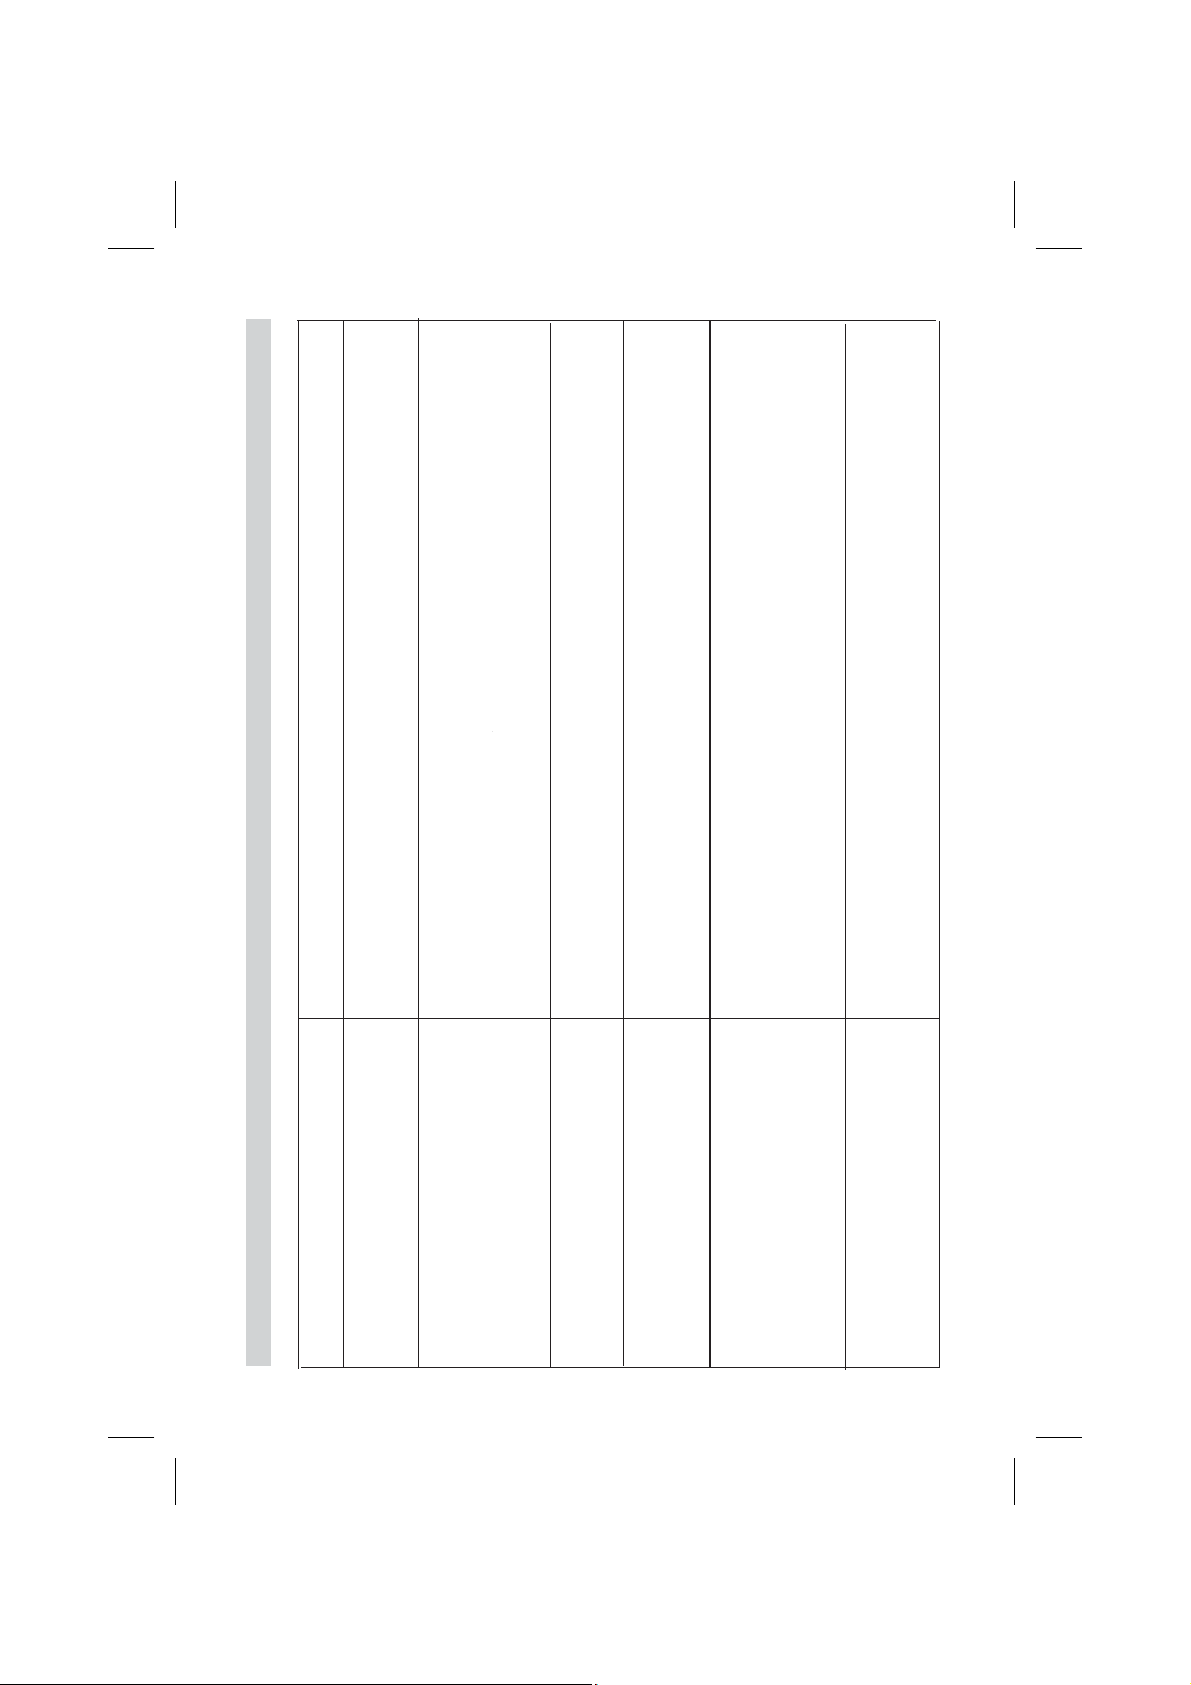
SOLUTION
TROUBLE SHOOTING
PROBLEM
1. Verify that the batteries in the remote are fresh.
2. Verify that the infrared remote sensor is not obstructed.
IR remote is inoperative.
audio CD, JPEG, MP3 and MPEG4.
1 Insert a disc with the label side facing up towards the headliner.
2. Check the type of the disc you put into the disc tray. This DVD only plays DVD,
Disc will not play or wrong region is
displayed.
the disc can’t be played.
3. Both the unit and the disc are coded by region. If the regional code doesn’t match,
1. Insert a disc with the label side facing up towards the headliner.
No Disc error message appears.
1. The disc is dirty. Clean it.
Play starts, but then stops immediately.
2. The disc is damaged. Try another disc.
3. Condensation has formed. Allow player to dry out.
inserted into the appropriate jacks.
1. Make sure your DVD is connected properly. Make sure all cables are securely
2. If you are using 2-channel IR headphones, make sure you turn on the IR headphone
No sound or distorted sound.
power. Make sure the correct channel (A-B) is selected.
3. Make sure the modulator is ON and the proper frequency has been selected.
4. Make sure the IR transmitter has been turned on.
1. You can’t advance through the opening credits and warning information that
Can’t advance through a movie.
appears at the beginning of a movie because the disc is programmed to prohibit that
action.
Page 23
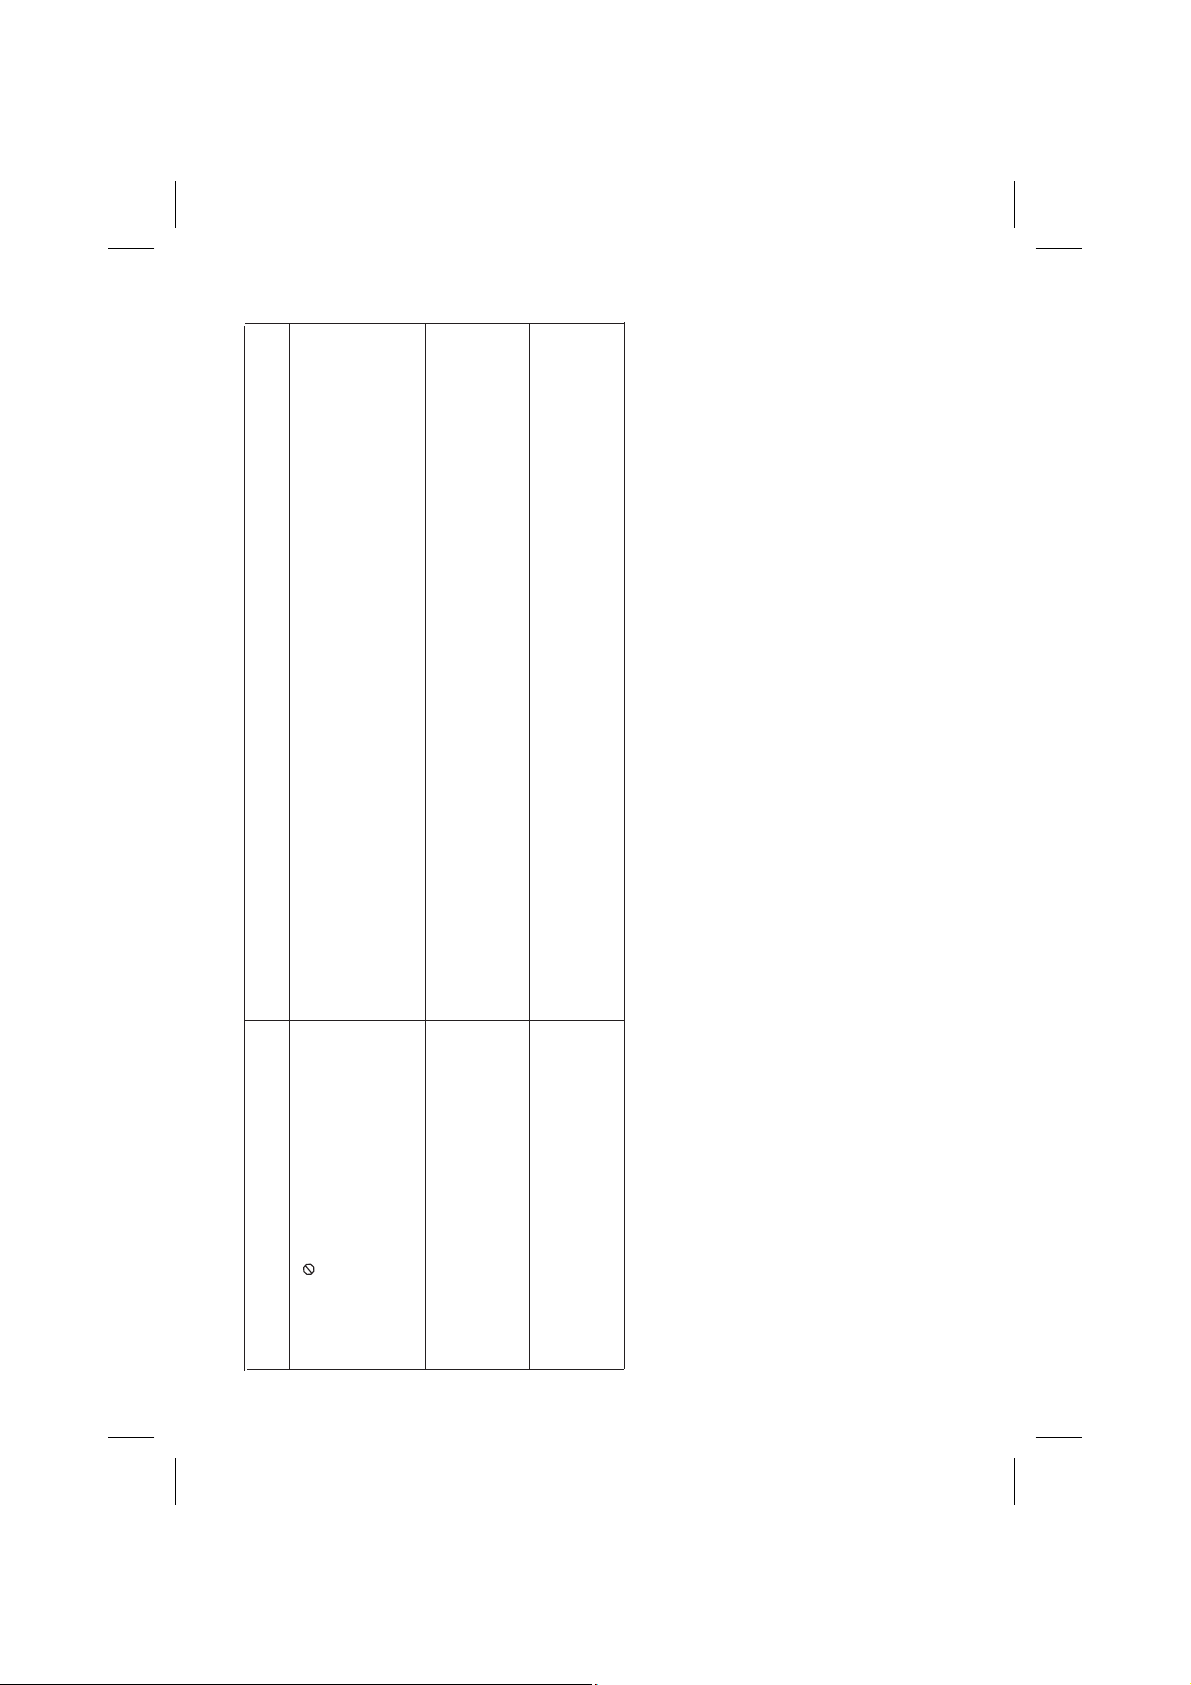
The feature or action cannot be completed at this time because:
SOLUTION
PROBLEM
1. The disc’s software restricts it.
The icon ( ) appears on screen.
2. The disc’s software doesn’t support the feature (for example, angles).
3. The feature is not available at the moment.
4. You have requested a title or chapter number that is out of the range.
1. Some discs have sections that prohibit rapid scanning or title and chapter skip.
2. If you try to skip through the warning information and credits at the beginning of a
No forward or reverse scan.
movie, you won’t be able to. This part of the movie is often programmed to prohibit
skipping through it.
1. The disc might be damaged, try another disc.
2. It is normal for some distortion to appear during forward or reverse scan.
Picture is distorted.
21
Page 24

SPECIFICATIONS
Screen Type: TFT Active Matrix LCD
Screen Resolution: 640 x 220
°F
Operation Temperature: 32 - 122 (0 - 50 °C)
°F
Storage Temperature: -4 - 158 (-20 - 70 °C)
Backlight: LED
Power Source: 12 VDC
Video Display System: NTSC/PAL
Headphone Audio Output: 5 mw @ 32 ohms
Video Output: 1.0 Vpp @ 75 ohms
FCC STATEMENT
1. This device complies with Part 15 of the FCC Rules.
Operation is subject to the following two conditions:
(1) This device may not cause harmful interference, and
(2) This device must accept any interference received, including interference that may cause undesired operation.
2. Changes or modifications not expressly approved by the party responsible for compliance could void the user's authority to operate the equipment.
NOTE: This equipment has been tested and found to comply with the limits for a
Class B digital device, pursuant to Part 15 of the FCC Rules. These limits are
designed to provide reasonable protection against harmful interference in a
residential installation. This equipment generates, uses and can radiate radio
frequency energy and, if not installed and used in accordance with the
instructions, may cause harmful interference to radio communications. However,
there is no guarantee that interference will not occur in a particular installation.
If this equipment does cause harmful interference to radio or television reception,
which can be determined by turning the equipment off and on, the user is
encouraged to try to correct the interference by one or more of the following
measures:
-- Reorient or relocate the receiving antenna.
-- Increase the separation between the equipment and receiver.
-- Connect the equipment into an outlet on a circuit different
22
from that to which the receiver is connected.
-- Consult the dealer or an experienced radio/TV technician for help.
Page 25

NOTES
23
Page 26

NOTES
24
Page 27
Applies to Movies To Go Mobile Video Products
12 MONTH LIMITED WARRANTY
128-8895
25
AUDIOVOX ELECTRONICS CORP. (the Company) warrants to the original retail purchaser of this product that should this product
or any part thereof, under normal use and conditions, be proven defective in material or workmanship within 12 months from the date
of original purchase, such defect(s) will be repaired or replaced with reconditioned product (at the Company's option) without charge
for parts and repair labor. Agamecontroller, if supplied, is similarly warranted for ninety (90) days.
To obtain repair or replacement within the terms of this Warranty, the product is to be delivered with proof of warranty coverage (e.g.
dated bill of sale), specification of defect(s), transportation prepaid, to the Company at the address shown below.
This Warranty does not extend to the elimination of externally generated static or noise, to correction of antenna problems, to costs
incurred for installation, removal or reinstallation of the product, or to damage to digital memory/media devices, gaming devices,
discs, speakers, accessories, or vehicle electrical systems.
This Warranty does not apply to any product or part thereof which, in the opinion of the Company, has suffered or been damaged
through alteration, improper installation, mishandling, misuse, neglect, accident, or by removal or defacement of the factory serial
number/bar code label(s). THE EXTENT OF THE COMPANY'S LIABILITY UNDER THIS WARRANTY IS LIMITED TO THE
REPAIR OR REPLACEMENT PROVIDED ABOVE AND, IN NO EVENT, SHALL THE COMPANY'S LIABILITY EXCEED THE
PURCHASE PRICE PAID BY PURCHASER FOR THE PRODUCT.
This Warranty is in lieu of all other express warranties or liabilities. ANY IMPLIED WARRANTIES, INCLUDING ANY IMPLIED
WARRANTY OF MERCHANTABILITY, SHALL BE LIMITED TO THE DURATION OF THIS WRITTEN WARRANTY. ANY ACTION
FOR BREACH OF ANY WARRANTY HEREUNDER INCLUDING ANY IMPLIED WARRANTY OF MERCHANTABILITY MUST BE
BROUGHT WITHIN A PERIOD OF 24 MONTHS FROM DATE OF ORIGINAL PURCHASE. IN NO CASE SHALL THE COMPANY
BE LIABLE FOR ANY CONSEQUENTIAL OR INCIDENTALDAMAGES FOR BREACH OF THIS OR ANY OTHER WARRANTY. No
person or representative is authorized to assume for the Company any liability other than expressed herein in connection with the
sale of this product.
Some states do not allow limitations on how long an implied warranty lasts or the exclusion or limitation of incidental or consequential
damage so the above limitations or exclusions may not apply to you. This Warranty gives you specific legal rights and you may also
Audiovox Electronics Corporation, 150 Marcus Blvd., Hauppauge, New York 11788 1-800-645-4994●
have other rights which vary from state to state.
Page 28
128-8884
© 2010 A ,150 Marcus Blvd. Hauppauge, NY 11788UDIOVOX
 Loading...