

Page 1
ERMAWin
Event Record Monitoring and Analysis Software
User’s Guide
Visit us on the World-Wide Web at
www.sentexsystems.com
Software Version
4.0 and up
Doc 6001648, Rev B
Page 2

Table of Contents
Table of Contents
Overview.........................................................3
About ERMAWin 3
System Requirements Error! Bookmark not defined.
Installing ERMAWin 4
Helpful Hints and Edit Functions 4
Starting ERMAWin 5
Exiting ERMAWin 5
Transaction Reports: Analyzing Your
System............................................................6
Getting Access to Transactions 6
Types of Reports and Analyses: An Overview 6
Printing a Report 7
Report Using Selected Data Only 8
Transaction Detail Report 10
Transaction Summary Report 11
Transaction History Report 12
Transaction Type History Report 13
Real-Time Event Monitoring........................14
Monitoring Events 14
Monitoring Multiple Units 15
Setting Alarm Profiles 17
Timestamp Edit Utility .................................19
Selecting Transaction Batches 19
Editing Timestamps 20
Housekeeping and Your Database .............21
Selecting a Database 21
Purging All Transactions 22
Purging a Unit’s Transactions 23
Changing Purge Defaults 24
Deleting a Database 24
Creating a Database 24
Other Database Functions 25
Utilities..........................................................26
Archiving Transactions 26
Changing Archive Defaults 27
Exporting Transactions 28
Changing Export Defaults 29
Help...............................................................30
Getting Help 30
Technical Support 31
About ERMAWin (Menu Option) 32
Page 2 of 33
Doc 6001648, Rev B
Page 3

This chapter will cover . . .
Overview
Overview
About ERMAWin
Installing ERMAWin
Helpful Hints and Edit Functions
Page 3
Page 4 Exiting ERMAW in Page 5
Page 4
About ERMAWin
E
T
ERMAWin gives you the power to analyze
transactions from your Infinity or Multi-Link telephone
entry systems. By providing a wide variety of formats
and choices, data can be arranged to track system
operation according to your needs.
R
Use ERMAWin to monitor the activities of your
telephone entry systems in real time. You can even
monitor multiple units simultaneously.
S
ERMAWin allows you to create customized alarm
profiles. You can send messages explaining who to
call or what to do in case of an alarm.
C
ERMAWin gives you the capability to correct invalid
timestamps, should one of the units mark
transactions with an invalid date or time.
R
RANSACTION REPORTS
EAL TIME EVENT MONITORING
ET ALARM PROFILES
ORRECT INVALID TIMESTAMPS
The procedures in this manual assume that . . .
vent
ecord
onitoring and Analysis Software
M
Starting ERMAW in Page 5
ATABASE MAINTENANCE
D
ERMAWin can perform database housekeeping
chores like saving transactions in archive files and
purging old records, so your databases don’t
become too large and unwieldy. You can also export
files to different applications, such as spreadsheets.
ONVENIENCE OF WINDOWS™
C
ERMAWin gives you all the convenience of
Windows, including Toolbar, Taskbar, function tabs
and drop-down menus that allow instant access to all
ERMAWin features.
I
CONS AND HIGHLIGHTS
ERMAWin’s eye-catching icons and highlighting
help you to sort through and analyze transactions with
ease. You no longer have to look for data differences
— ERMAWin icons and highlighting make the
information jump off the screen at you.
You have basic computer knowledge. If not, please review your computer manuals before
continuing.
You have already reviewed the manuals for your telephone entry system (Infinity or Multi-
Link). If not, please review the appropriate manual(s) before continuing.
Page 3 of 33
Doc 6001648, Rev B
Page 4
Overview
Installing ERMAWin
For installation information, please refer to the SPSWin Installation Instructions.
Helpful Hints and Edit Functions
ELP
H
ERMAWin has four “help” aids:
Tool Tips are brief identifying statements
describing most buttons and many screen
features - activated when the cursor is
positioned on top of a button or icon.
Status bar help is located at the bottom of the
Main Screen and is activated by mouse
movement.
I
CONS
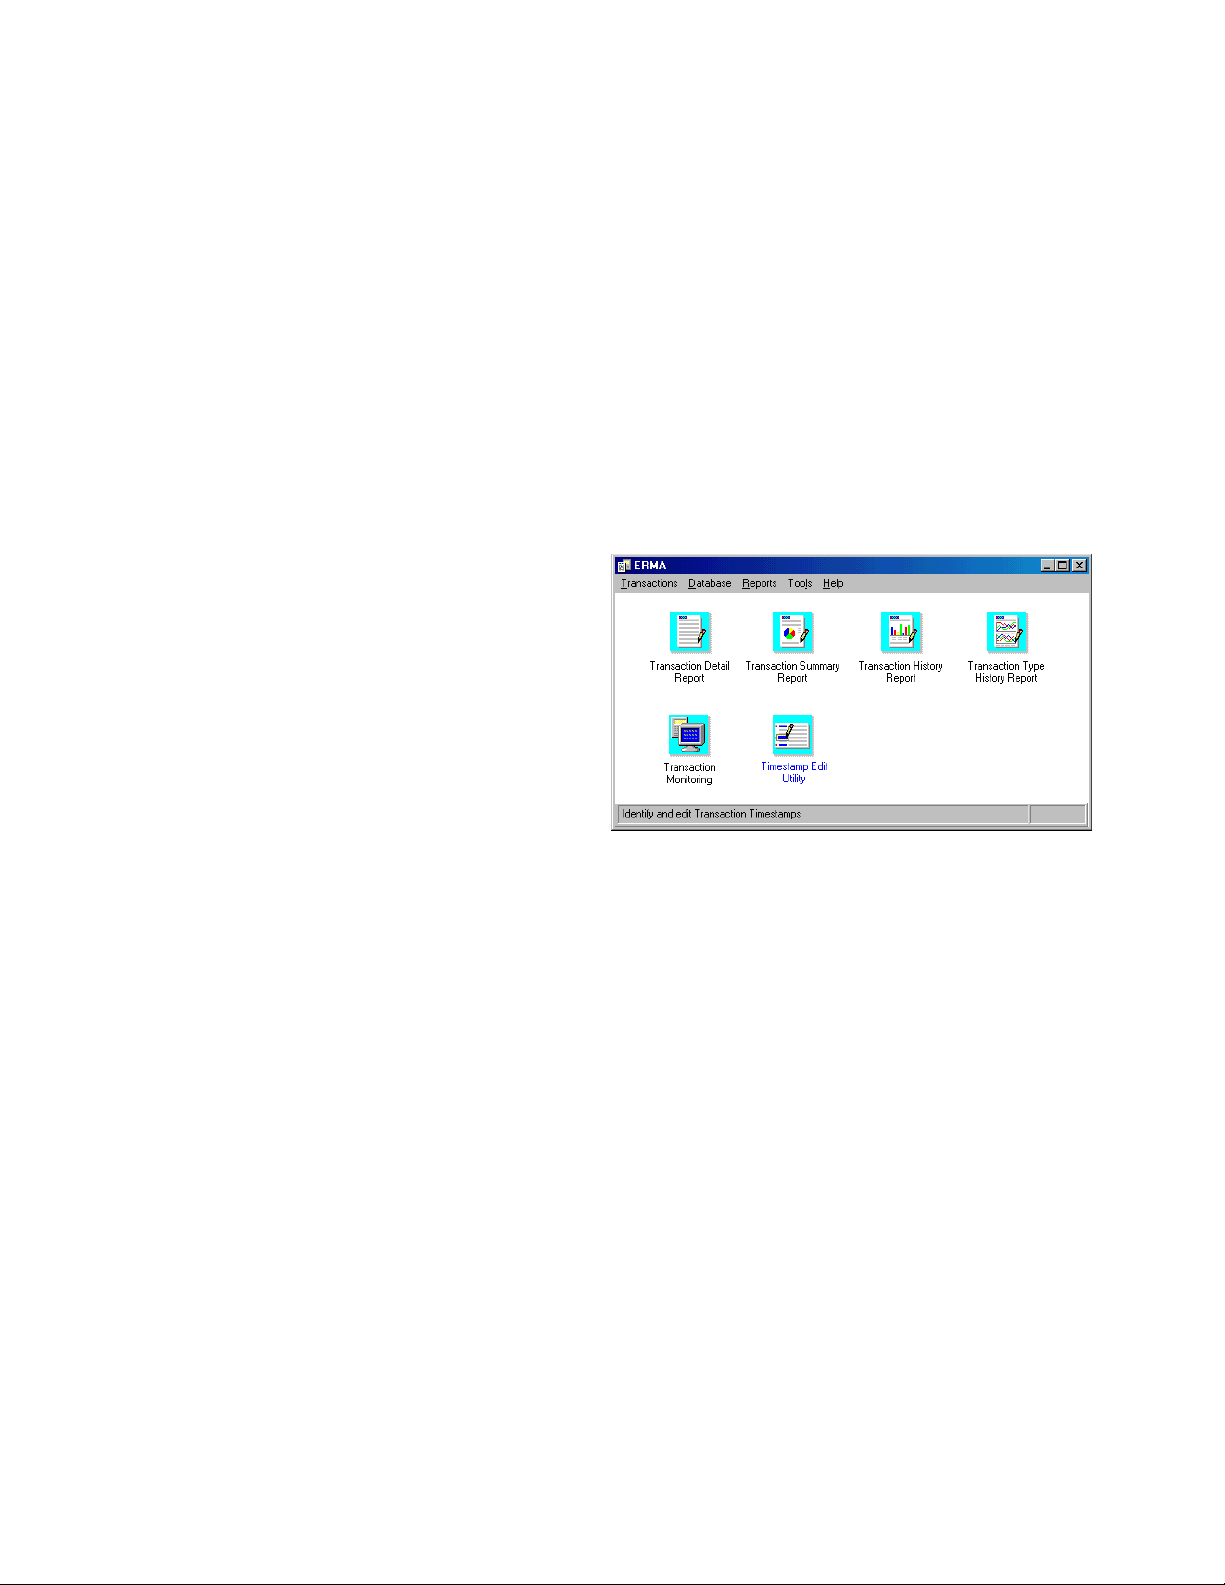
The ERMAWin Main Window displays six icons which
can be used quickly to access the main functions of
ERMAWin.
Click once on any icon to start its function.
Move the cursor over an icon. At the bottom of
the window, you will see a short explanation of
the icon’s function (Status Bar Help).
K
EYBOARD SHORTCUTS
Online Help is an online version of this
manual provided for reference.
Help buttons are available in most of the
dialog boxes by pressing F1 or from Help
menu.
Figure 1: ERMAWin Main Window
Many menus and buttons have an underlined
Most options within menus have an underlined
letter. To access a menu or button from the
keyboard, simultaneously press the [ALT] key
and the underlined letter key.
To move the highlight within a screen, use the
[TAB] key.
C
ORRECTING DATA INPUT
To correct a mistake while keying in data, do one of the following:
Select and Delete: Highlight the incorrect
Backspace: Place the cursor to the right of
data with the mouse by placing the I-beam
over the beginning of the data that is to be
deleted. Press and hold the left mouse button.
While still pressing and holding the mouse
Delete: Place the cursor to the left of the
button, drag the I-beam over the data. The
data becomes highlighted. When all the data
is highlighted, press the [DELETE] key. All
highlighted data is deleted.
Page 4 of 33
Doc 6001648, Rev B
letter in their name. To access an option on a
menu from the keyboard, press the key for the
underlined letter.
the word(s) or data that is incorrect. Press the
[BACKSPACE] key until the data is deleted.
incorrect data and press the [DELETE] key.
Page 5
EDIT FUNCTIONS
Select and/or edit the various functions in the following ways:
Overview
Round Buttons: Round buttons (also called
radio buttons) which are highlighted (filled in)
indicate that the corresponding option is
currently selected. To select a different
option, click on the corresponding round
button. That button becomes highlighted.
Usually, you may only select one of these
buttons at a time.
Text Entry Boxes: Blank text entry boxes
indicate that no value has been set for the
corresponding option. To enter a value, place
the mouse I-beam in the box and key in the
desired value. To edit a text entry box with a
value displaying, drag the mouse I-beam over
the value. The value becomes highlighted.
Enter the desired value. The new value
replaces the previously displayed value.
Starting ERMAWin
1. Click on .
2. From the fly-up START menu, select
PROGRAMS >> Sentex Applications >>
ERMAWin.
Check Boxes: Check boxes are used to
select one or more items in a category. When
they have a check (9999) in them, the
corresponding option is currently selected. To
select a different or additional option, click on
the corresponding check box. That box will
display a check (9999). To deselect an item, click
on the box. The check (9999) will disappear.
Apply: After completing screen entries, click
the Apply button to save the work you have
done. The window will remain open so you
can continue working.
Done: After completing the screen entries,
click the Done button or the OK button (if
available) to return to the Main Screen.
Cancel: Selecting Cancel will close a window
without making any changes.
Sentex Applications is the default name of
the program group and will appear unless the
user has changed the program group name.
To create a shortcut to ERMAWin, drag the
ERMAWin icon onto the desktop (see
Windows User Guide for details).
Exiting ERMAWin
From the Main Window:
1. From the toolbar, select Transactions.
2. From the drop-down menu, select Exit.
3. Select Yes at the confirmation dialog box.
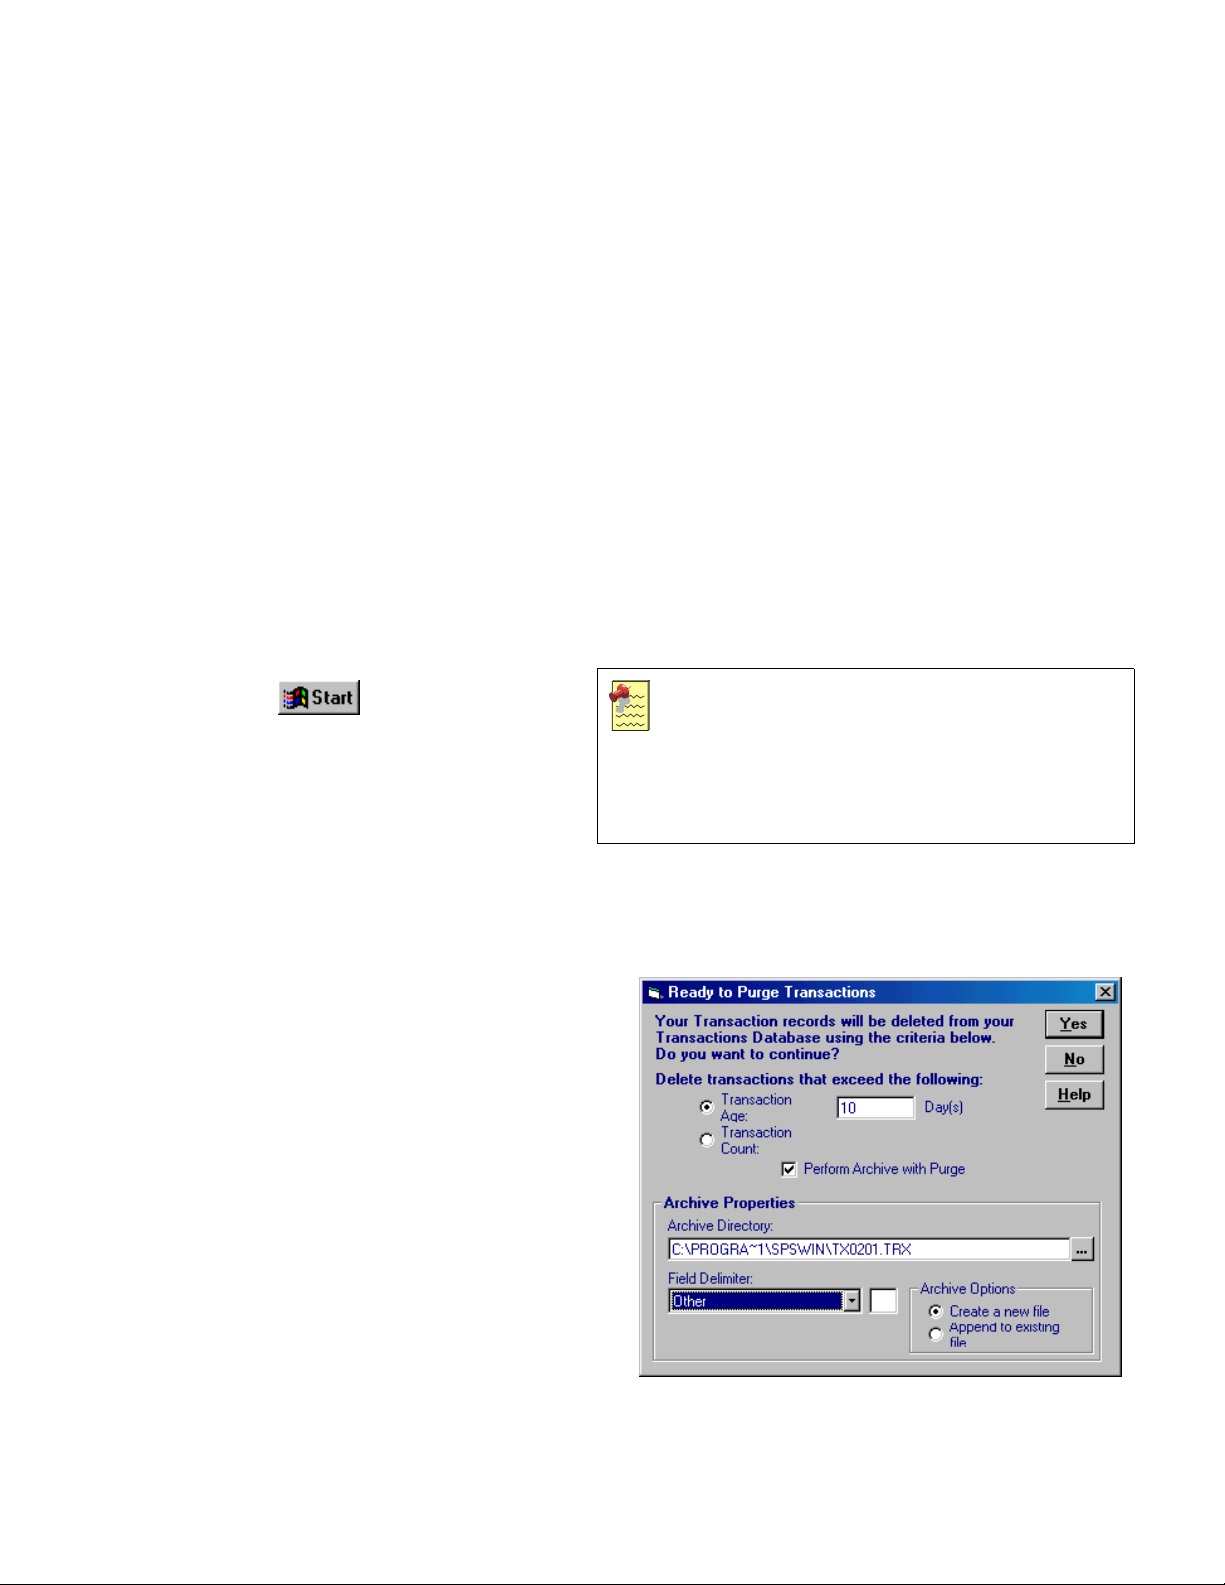
4. When you exit ERMAWin, the program checks
to see if any transactions need to be purged.
If so, the Ready to Purge Transactions dialog
box will be displayed. This box appears only
when there are transactions to be purged, so
you probably won’t see it the first few times
you exit ERMAWin.
5. From here, you may archive and purge old
transactions. Purge transactions you no
longer need to see. For more information
about archiving and purging records, see
Purging a Unit’s Transactions on page 23.
6. Select Yes to purge or archive, and exit
ERMAWin. Select No to exit ERMAWin
without purging or archiving.
Figure 2: Ready to Purge Transactions Screen
Page 5 of 33
Doc 6001648, Rev B
Page 6
Transaction Reports: Analyzing Your System
Transaction Reports: Analyzing Your System
This chapter will cover . . .
Getting Access to Transactions
Types of Reports and Analyses:
An Overview
Printing a Report
Report Using Selected Data Only
Page 7 Transaction History Report Page 12
Page 6 Transaction Detail Report Page 10
Page 6
Page 8 Transaction Type History Report Page 13
Transaction Summary Report
Page 11
Getting Access to Transactions
There are two ways to get access to the unit transactions: real-time event monitoring and retrieving the
transactions from the unit(s) through SPSWin.
For real-time event monitoring, see Real-Time Event Monitoring on page 14.
To use SPSWin to retrieve the transactions, see the SPSWin User’s Guide, Downloading
Transactions, under Viewing and Printing Transactions.
Types of Reports and Analyses: An Overview
ERMAWin provides you with four different types of reports. Each report includes the following information in the
header:
Unit Name and Description
Unit Type – Infinity or Multi-Link
Multi-Link Chain Information – if applicable
Number of Transactions for the Unit
Transaction Detail Report provides you with a list of the transactions that took place at the unit
or units you choose. The transactions are printed in date and time order. This is a powerful tool
for checking security because it lists results of events. For example, you may see a pattern of
alarm conditions if someone is leaving a particular door open when it should be closed; or you
can check to insure time zones and schedules are operating correctly.
Transaction Summary Report provides you with three pie graphs illustrating the transactions
that have taken place at a unit. The first graph shows the percentage of Transactions by Date;
you can see what days are busiest and adjust your schedules accordingly. The Transactions by
Source graph shows which keypads, doors, etc. are busiest; you can use this information to
evaluate where you may wish to place lights or closed circuit TV cameras in the future. The last
graph, Transactions by Result, illustrates the results of each transaction.
Transaction History Report provides you with bar graphs illustrating the number of
transactions that took place on each date. This can help you evaluate the busiest times and
days of week for each unit. Use this information to adjust your schedules.
Transaction Type History Report provides you with bar graphs illustrating the number of
transactions by source and result that took place each date. The report includes a table of the
dates and the source-result count for each transaction. You can use this report to evaluate what
is happening at each of your doors, keypads, etc. Use it to adjust your schedules, times zones,
and general security.
Page 6 of 33
Doc 6001648, Rev B
Page 7
Transaction Reports: Analyzing Your System
TO ACCESS REPORTS
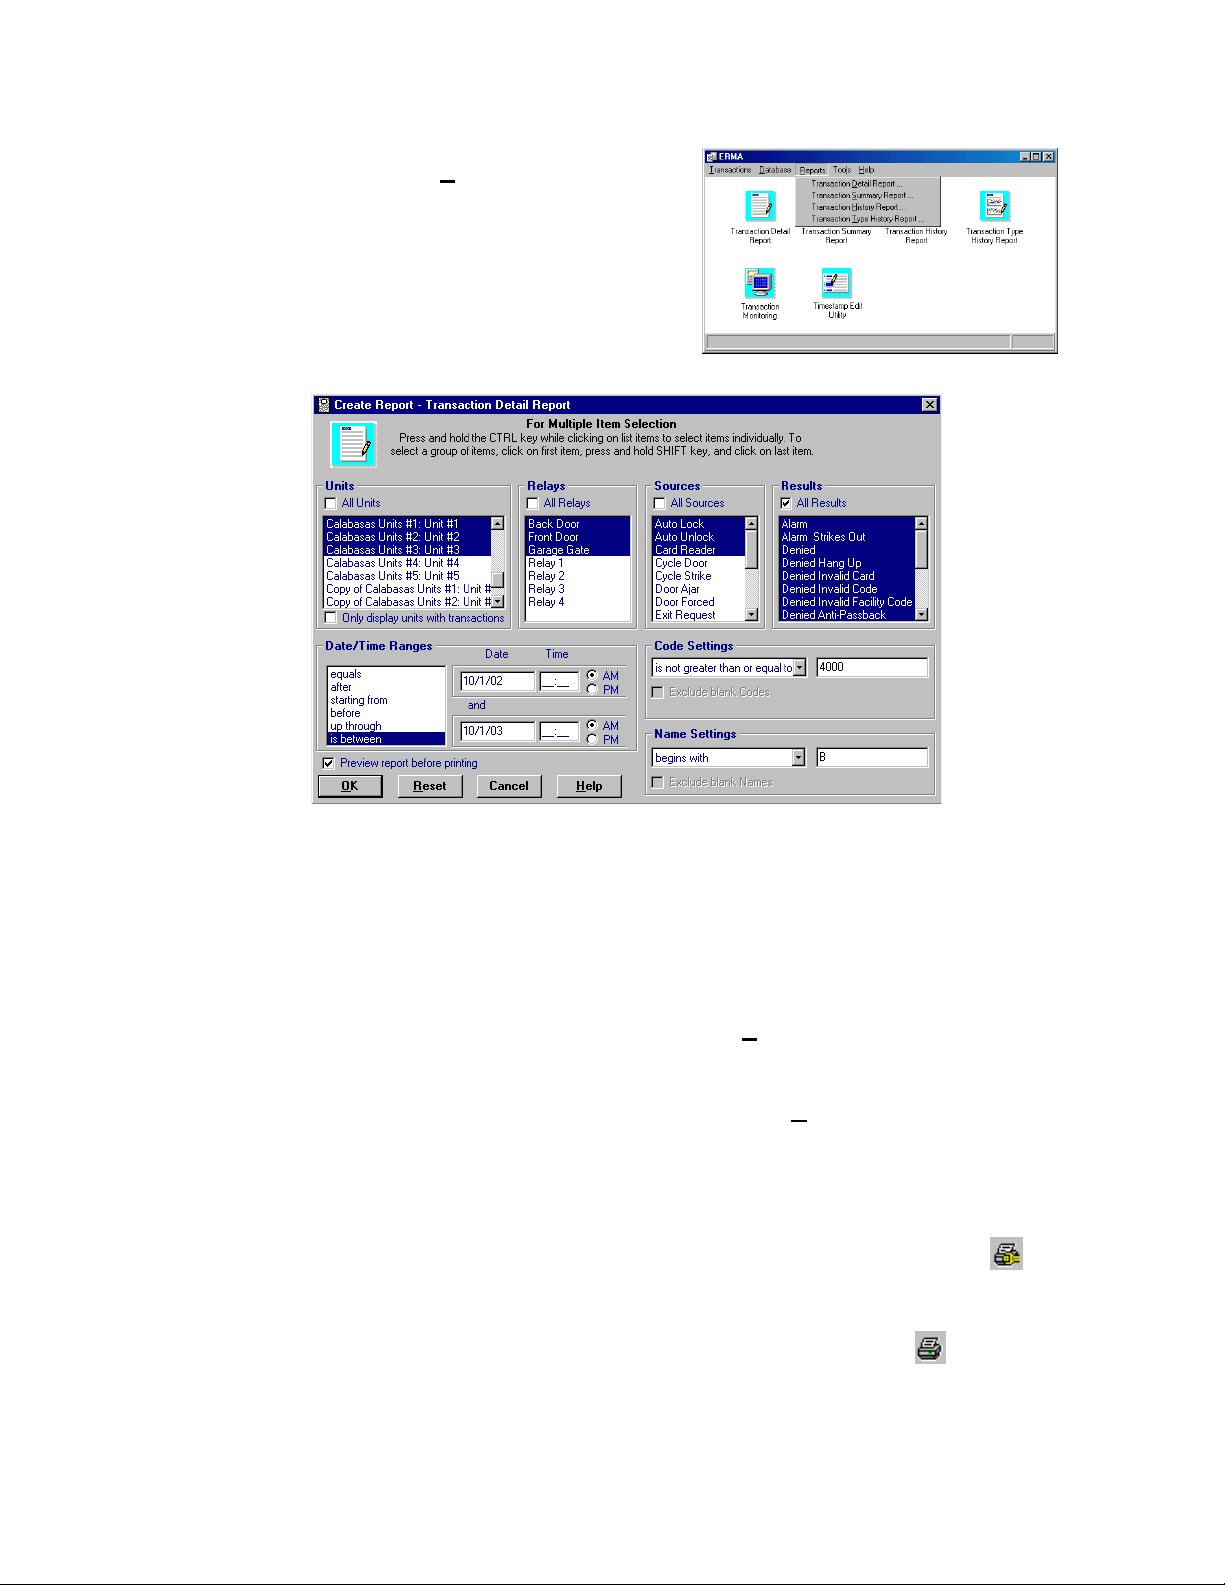
In the Main Window, click the icon for report of your choice OR
1. From the menu bar, select R
2. From the drop-down menu, select the report
of your choice (Figure 3).
3. The Create Report window will appear (Figure
4). From the Create Report Window, you can
structure your report in the way that will best
suit your needs.
eports.
Figure 3: Main Window, Reports Drop-Down Menu
Figure 4: Create Report Window
Printing a Report
All reports have a default print layout (e.g., portrait or landscape). Please note that changing report layouts from
landscape to portrait (when landscape is the default setting of a particular report) may truncate areas of the
report.
1. Specify the unit, units or all units.
2. Specify the relay, relays, or all relays.
3. Specify the source, sources or all sources.
4. Specify the result, results or all results.
5. Choose all dates/times, a range of dates and
times, or a particular date/time.
6. Chose all access/directory codes, a range of
codes, or a particular code. You may exclude
blank codes.
7. Choose all Names, a range of names, or a
particular name. You may exclude blank
names.
8. If you wish to display the report on screen,
make sure there is a check () in the box next
to Preview report before printing. If you
wish to print the report, click in the box; the
checkmark will disappear.
9. To reset your selection to the defaults, click
the R
eset button. To return to the Main
Window without printing, click the Cancel
button.
10. Click the O
displayed or printed. Click the Cancel button
to return to the Main Window without printing
or displaying the report.
11. When previewing a report:
Click the Printer Setup icon
the printer’s default settings (e.g., paper
orientation).
Click the Print icon
K button. The report will be
to change
to print the report.
Page 7 of 33
Doc 6001648, Rev B
Page 8
Transaction Reports: Analyzing Your System
Report Using Selected Data Only
You may filter the transactions you wish to see on your reports using the following options (see Figure 4). You
may print the same types of reports, filtered many different ways, from the same set of transactions. ERMAWin
will not purge transactions until you are ready.
Units: select one unit, several units, or all
units.
Relays: select one relay, several relays, or
all relays.
Sources: select one source (such as a
keypad, or door), several sources, or all
sources.
Results: select one result (such as access
denied, or alarm condition), several results,
or all results.
S
TEP 1: SPECIFY THE UNITS TO USE
Other methods of filtering transactions include:
Date/Time Ranges: print transactions for a
specific date, range of dates, or exclude a date
or range of dates.
Code Settings: print transactions initiated by a
certain access/directory code, a range of codes,
or exclude a code or range of codes.
Name Settings: print transactions initiated by a
particular person by specifying a name, a set of
names, or exclude a name or set of names.
To choose all units, make sure there is a
check () in the box next to All Units
If you
.
choose one or more units, but not all, the
checkmark will disappear.
To select one unit, click on the unit in the
list. Use the up and down arrows on the right
side of the Units box to scroll through the list
of units.
S
TEP 2: SPECIFY THE RELAYS AND/OR SOURCES TO USE
If you have defined names for
relays in SPSWin (e.g., Front Door,
Back Door, etc.), they will appear
rather than the regular relay
number. The relay and source will
both appear on the report in the
Unit Relay Name Source Appears in Report as . . .
Unit A Front Door CARD READER CARD READER, Front Door
Unit A Back door DOOR AJAR DOOR AJAR, Back Door
Unit B Relay 1 CARD READER CARD READER 1
Unit B Relay 2 DOOR AJAR DOOR AJAR 2
example (see right):
To choose all relays and/or sources,
make sure there is a check () in the
box(es) next to All Relays and/or All
Sources.
To select one relay/source, click on the
relay/source in the list. Use the up and down
arrows on the right side of the
Relays/Sources box to scroll through the
list.
S
TEP 3: SPECIFY THE RESULTS TO USE
To select several contiguous units from the
list, hold down the SHIFT key, move the pointer
over the first unit, and press and hold the left
mouse key. Pull down until all the units you
want to select are highlighted.
To select several units, hold down the CTRL
key and click on the units you wish to see.
To select several contiguous relays/sources
from the list, hold down the SHIFT key, move the
pointer over the first unit, and press and hold the
left mouse key. Pull down until all the
relays/sources you want to select are
highlighted.
To select several relays/sources, hold down
the CTRL key and click on the relays/sources
you wish to see.
To choose all Results, make sure there is
a check () in the box next to All Results. If
you choose one or more results, but not all,
the checkmark will disappear.
To select one result, click on the result in
the list. Use the up and down arrows on the
right side of the Results box to scroll
through the list of results.
Page 8 of 33
Doc 6001648, Rev B
To select several contiguous results from the
list, hold down the SHIFT key, move the pointer
over the first unit, and press and hold the left
mouse key. Pull down until all the results you
want to select are highlighted.
To select several results, hold down the CTRL
key and click on the results you wish to see.
Page 9

Transaction Reports: Analyzing Your System
STEP 4: SELECT A DATE OR RANGE OF DATES
You may select a date or range of dates. For example, you may wish to see the transactions that occurred over
a three-day weekend, such as Labor Day. You may enter the Time you wish the report to begin (12:00 am,
Midnight, to see all events on the date(s) you chose).
To see transactions for one date, select
equals in the Date/Time Ranges box. In the
Date box, enter the date. Enter a time only if
you want to see transactions that happened at
that specific time.
To exclude one date, select not equal to in
the Date/Time Ranges box. In the Date box,
enter the date. Enter a time only if you want to
exclude transactions that happened at that
specific time.
To choose all dates after a particular date,
select after in the Date/Time Ranges box. In
the Date box, enter the date; you may enter a
time.
To choose all dates prior to a specific date,
select before in the Date/Time Ranges box. In
the Date box, enter the date; you may enter a
time.
To choose all dates starting up to and
including a specific date, select up through in
the Date/Time Ranges box. In the Date box,
enter the date; you may enter a time.
To choose transactions between two specific
dates, select is between in the Date/Time
Ranges box. In the top Date box, enter the
date on which to begin the report; you may
enter a time. In the bottom Date box, enter the
date on which to end; you may enter a time.
To choose all dates starting from a particular
date, select starting from in the Date/Time
Ranges box. In the Date box, enter the date;
you may enter a time.
S
TEP 5: SELECT AN ACCESS/DIRECTORY CODE OR RANGE OF CODES
You may select a particular access/directory code or range of codes.
To see transactions for one access/directory
code, select is equal to in the Code Settings
box. In the Code box, enter the
access/directory code.
To exclude one access/directory code, select
is not equal to in the Code Settings box. In
the Code box, enter the access/directory code.
You may not want to see events that have no
codes. Click in the box next to Exclude blank
Codes. A checkmark () will appear.
To choose all codes lower than a specific
access/directory code, select is less than or
is not greater than or equal to in the Code
Settings box. In the Code box, enter the
access/directory code.
To choose all access/directory codes starting
up to and including a specific access/directory
code, select is less than or equal to or is not
greater than in the Code Settings box. In the
Code box, enter the access/directory code.
To choose all access/directory codes greater
than a particular access/directory code, select
is greater than or is not less than or equal
to in the Code Settings access/directory code.
In the Code box, enter the access/directory
code.
To choose all access/directory codes starting
from a particular access/directory code, select
is greater than or equal to in the Code
Settings. In the Code box, enter the
access/directory code.
To choose transactions between two specific
access/directory code, select is between in
the Code Settings box. In the top Code box,
enter the access/directory code you wish the
report to begin. In the bottom Code box, enter
the access/directory code to end the report.
To exclude transactions between two specific
access/directory code, select is not between
in the Code Settings box. In the top Code box,
enter the access/directory code you wish the
report to begin excluding. In the bottom Code
box, enter the access/directory code to end
the report excluding.
Page 9 of 33
Doc 6001648, Rev B
Page 10
Transaction Reports: Analyzing Your System
STEP 6: SELECT A NAME OR RANGE OF NAMES
You may select a particular name or range of names. For example, if you wish to see the transactions for a
particular family, you may wish to see events initiated by everyone with the last name Smith.
To see transactions for one name, select is
equal to in the Name Settings box. In the
Name box, enter the name.
To exclude one name, select is not equal to
in the Name Settings box. In the Name box,
enter the name. You may not want to see
events that have no names. Click in the box
next to Exclude blank Names. A checkmark
() will appear.
To choose names starting with a letter or set
of letters, select begins with in the Name
Settings access/directory code. In the Name
box, enter the name.
To exclude names starting with a particular
To choose names ending with a letter or set of
letters, select ends with in the Name Settings
box. In the Name box, enter the name.
To exclude names starting with a letter or set
of letters, select does not end with in the
Name Settings box. In the Name box, enter
the letter(s).
To choose names that contain a letter or set of
letters, select contains in the Name Settings
box. In the top Name box, enter the letter(s).
To exclude names that contain a letter or set
of letters, select does not contain in the
Name Settings box. In the top Name box,
enter the letter(s).
letter or set of letters, select does not begin
with in the Name Settings. In the Name box,
enter the name.
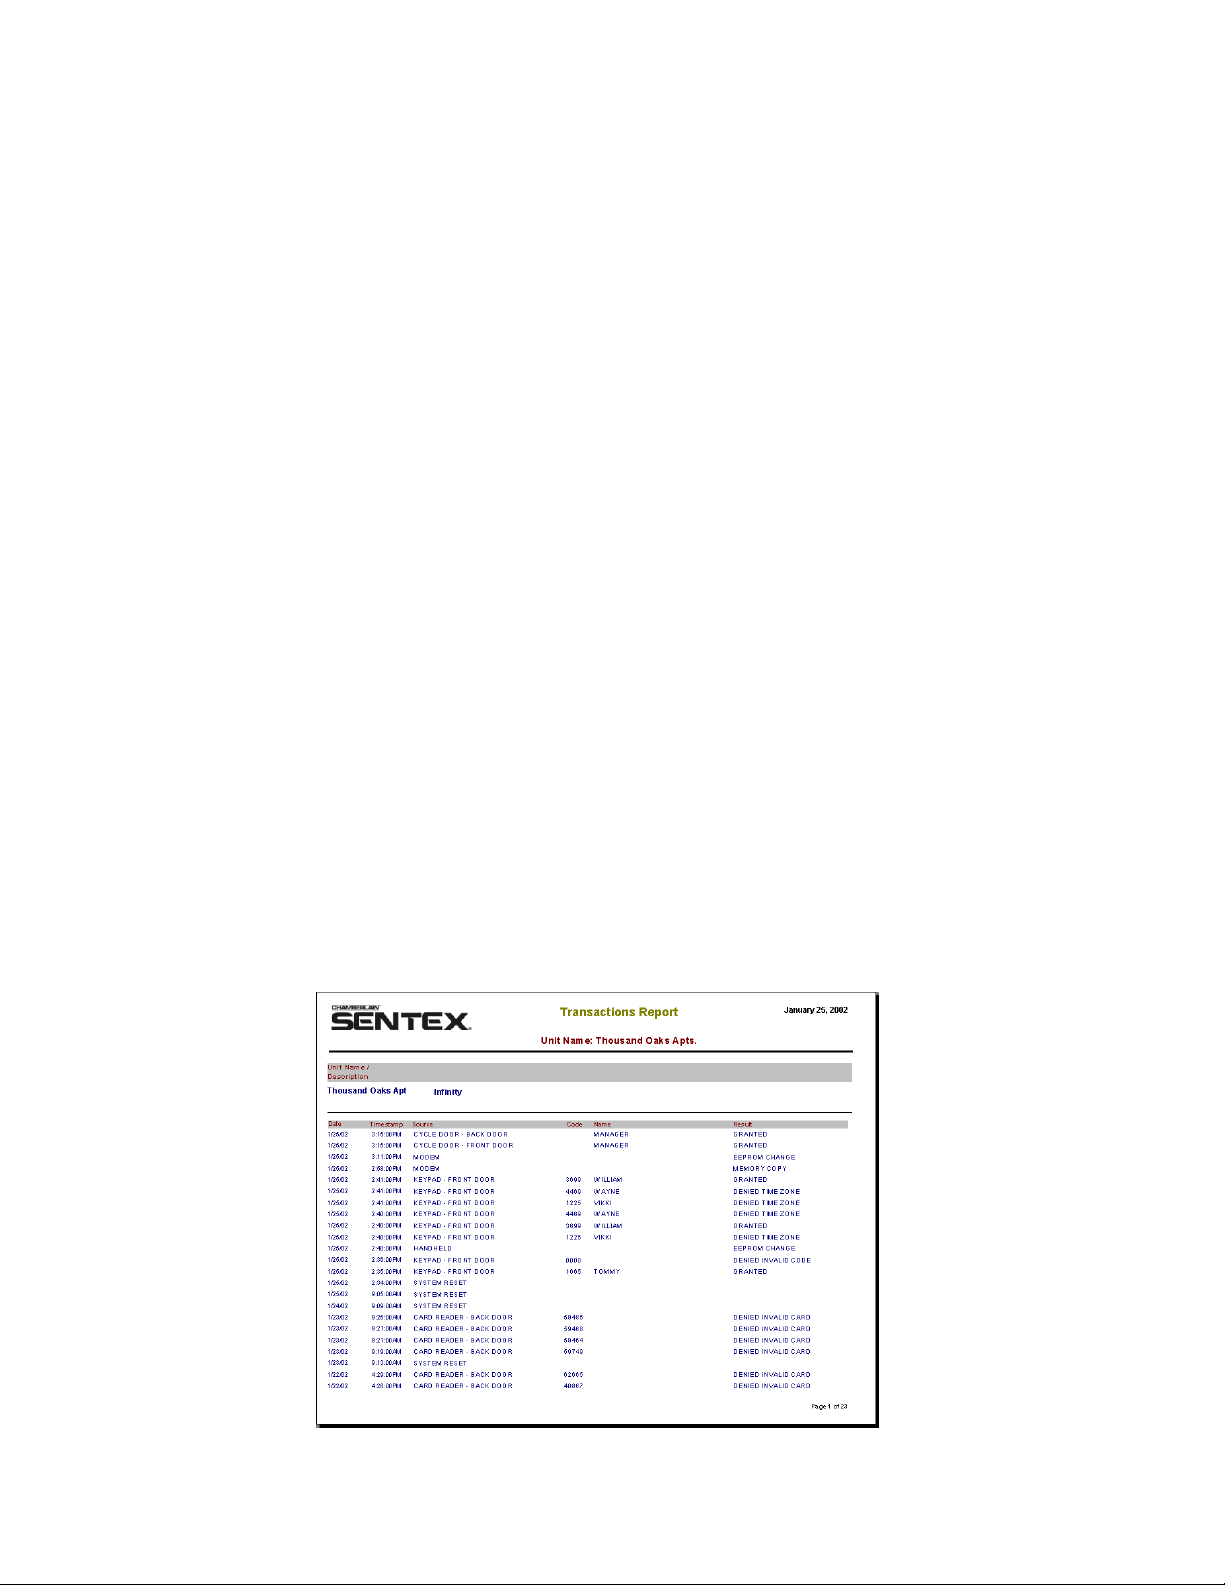
Transaction Detail Report
The Transaction Detail Report provides you with a list of the transactions which took place at the unit(s) of your
choice. The transactions are listed in date and time order, beginning with the oldest transaction. Information
provided includes:
Timestamp: Date and Time the transaction
took place.
Unit Number: Displays the unit’s number
within a multi-link chain (used only in a multilink configuration).
Source: What initiated the event such as a
scheduled activation, telephone entry, or
alarm condition.
Code: The access/directory code used.
Name: The name associated with the
access/directory code.
Result: What action the system took such as
access granted or denied (and the reason).
Figure 5: Transactions Report
Page 10 of 33
Doc 6001648, Rev B
Page 11

Transaction Reports: Analyzing Your System
Transaction Summary Report
The Transaction Summary Report provides you with three pie graphs illustrating the transactions that have
taken place at a unit. The report includes the following information:
Transactions by Date: a pie graph showing the percentage of events occurring each date within the
time period of the report, along with the Daily Transaction Count (the number of transactions that
occurred on each date).
Transactions by Source: a pie graph showing the percentage of events occurring at each source
along with a Transaction Source Count (the number of transactions that occurred at each source).
Transactions by Result: a pie graph showing the percentage of each result (Figure 7) along with a
Transaction Result Count (the number of each type of transaction result that occurred).
Figure 6: Transaction Summary Report (Page 1)
Figure 7: Transaction Summary Report (Page 2)
Page 11 of 33
Doc 6001648, Rev B
Page 12

Transaction Reports: Analyzing Your System
Transaction History Report
The Transaction History Report provides you with bar graphs illustrating the number of transactions that took
place each date. The report includes the following information:
Bar Graph: showing the number of events occurring each date. The date is shown on the x-axis; the
number of transactions is shown on the y-axis.
Transaction Count by Day: The number of transactions that took place on each date.
Figure 8: Transaction History Report
Page 12 of 33
Doc 6001648, Rev B
Page 13

Transaction Reports: Analyzing Your System
Transaction Type History Report
The Transaction Type History Report provides you with line graphs illustrating the number of transactions by
source and result that took place on each date, as well as a count of the transactions by date.
Transactions by Source-Result Line Graph: the dates are shown on the x-axis; the number of
transactions by source and result are shown on the y-axis.
Table of Dates with List of Source and Result Counts: The report includes a table of the dates and
the source-result count for each transaction.
Figure 9: Transaction Type History Report
Page 13 of 33
Doc 6001648, Rev B
Page 14

Real-Time Event Monitoring
Real-Time Event Monitoring
This chapter will cover . . .
Monitoring Events
Monitoring Multiple Units
Setting Alarm Profiles
Page 14
Page 15
Page 17
Monitoring Events
Important: In order to monitor real-time events, you must be directly connected to the Infinity unit or the first
unit in a Multi-Link Chain via RS-232.
1. Click on the Transaction Monitoring icon.
OR select Transactions from the Toolbar;
then, select Monitor from the drop-down
menu (see Figure 10). The Transaction
Monitoring Window will be displayed (see
Figure 11 on page 15).
2. From the toolbar, select New. A fly-out menu
of units will be displayed.
3. From the fly-out menu, select the unit you
want to monitor. The Connection window will
be displayed.
4. ERMAWin will bring up a default Connect Set.
If the Connect Set is blank, use SPSWin to
set it up (see SPSWin User Guide,
Configuring Your Modem).
If you need to use a different connect set, click
on the down arrow. Highlight and select your
choice. You may need to do this if you have
direct connection to multiple units using
different COM ports.
5. ERMAWin automatically brings up the unit
password, which you setup through SPSWin.
6. Click on the right arrow button
monitoring events. OR, on the toolbar, click on
Monitor. Select Start from the drop-down
menu.
Events are recorded in the Event box at the
bottom of the window. The Connection
Progress box will display messages
pertaining to the connection with the unit.
to start
Figure 10: Monitor Option
7. Click the pause button
monitoring OR, on the toolbar, click on
Monitor. Select Pause from the drop-down
menu. ERMAWin does not stop recording, but
does stop displaying new messages. Note:
You cannot pause monitoring with Multi-Link
units.
8. To stop monitoring, click the stop button
OR, on the toolbar, click on Monitor. Select
Stop from the drop-down menu.
9. To hide the Connection area, click the
button. The Connection Progress and
Connection Properties boxes disappear.
10. To bring up the Connection area, click the
button. The Connection Progress and
Connection Properties boxes reappear.
11. When you are done monitoring, click the
button in the upper right hand corner. You will
be returned to the Transaction Monitoring
Window.
Note
: You must stop real-time monitoring
before you will be allowed to close the
Connection Window.
to pause
Page 14 of 33
Doc 6001648, Rev B
Page 15

Transactions are displayed
in descending order, from
the newest to the oldest.
Monitoring Multiple Units
Important: To
monitor multiple units, each unit must be connected to a separate COM port on your computer.
Real-Time Event Monitoring
Figure 11: Connection Window
1. From the Transaction Monitoring window,
select Monitor. A fly-out menu of units will
appear.
2. From the fly-out menu, select the unit you
wish to monitor. A Connection window for
that unit will be displayed.
3. Use the buttons at the top of the window
to start, pause or stop monitoring. OR, on
the toolbar, click on Monitor. Select Start,
Pause, or Stop from the drop-down menu.
4. You can arrange the way the Connection windows
are displayed. On the toolbar, click on W
Cascade will display the Connection windows
one on top of the next, diagonally across the
Transaction Monitoring window (Figure 12).
Tile Horizontally will arrange the Connection
windows in horizontal rows (Figure 13).
Tile Vertically will arrange the Connection
windows in vertical columns (Figure 14).
indow.
Figure 12: Multiple Connection Windows
Page 15 of 33
Doc 6001648, Rev B
Page 16

Real-Time Event Monitoring
Figure 13: Multiple Connection Windows, Tile Horizontally
Figure 14: Multiple Connection Windows, Tile Vertically
Page 16 of 33
Doc 6001648, Rev B
Page 17

Real-Time Event Monitoring
Setting Alarm Profiles
ERMAWin allows you to create a message for certain alarm conditions. The alarm message will be displayed
while you are doing real-time event monitoring. Three alarm conditions will cause a response:
1) Door ajar
2) Door forced
3) Struck out
The alarm window operates only while ERMAWin is monitoring events in real time.
1. From the Main Window, select T
the toolbar.
OR from the Transaction Monitoring
window, select T
Tools drop-down menu will be displayed.
2. From the Tools drop-down menu, select
Alarm Profiles (Figure 15). The Setting
Alarm Parameters window will be displayed.
3. Select the unit. Use the scroll bar on the right
to view your choices.
4. Select OK to continue; the Alarm Settings
Window is displayed. Select Cancel to return
to the Main Window. To edit the settings for a
particular door or other relay, click in the
column on the left. The right-arrow points to
the current selection.
5. To display an alarm for any of the three alarm
conditions, make sure there is a check () in
the Display Alarm column.
6. If you want to require a response, make sure
there is a check () in the Response
Required column.
ools from the toolbar. The
If one of these conditions occurs, the alarm window will be
displayed on the screen. You can program ERMAWin to
display the alarm window until someone clicks the OK
button or for a period of time you specify.
ools from
7. You can change the length of time the alarm
warning is displayed in the Display Time
column. Or you can choose Wait For
Response; the alarm is displayed until
someone responds.
8. In the Alarm Text column, you can enter
instructions on how to handle the alarm
conditions. For example, you may want to
enter the name and telephone number of a
security service.
9. To preview your alarm message, select
Preview; OR click in the Preview on
Click/Keystroke box.
10. Repeat steps 5 through 10 to set alarm
profiles for more unit relays.
11. Select D
Cancel to exit without saving. You will be
returned to the Main Window.
12. Figure 17 shows a sample preview alarm
window.
one to save the alarm profiles. Select
Figure 15: Setting Alarm Parameters Window
Page 17 of 33
Doc 6001648, Rev B
Page 18

Real-Time Event Monitoring
Figure 16: Alarm Settings Window
Figure 17: Alarm Has Occurred Screen
Page 18 of 33
Doc 6001648, Rev B
Page 19

Timestamp Edit Utility
Timestamp Edit Utility
From time to time, transactions downloaded through SPSWin may have invalid timestamps. ERMAWin allows
you to correct the invalid timestamps through the Timestamp Edit Utility.
This chapter will cover . . .
Selecting Transaction Batches
Editing Timestamps
Page 20
Page 19
Selecting Transaction Batches
1. From the Main Menu, click on
the Timestamp Edit Utility
icon. OR
From the toolbar, select Tool
drop-down menu, select T
Utility.
2. At the top of the Timestamp Edit Utility
window, you will see a box labeled
Transaction Batches. Each batch contains
a group of transactions downloaded from the
unit (see Unit Site Name in Figure 18).
s. From the
imestamp Edit
2a. Use the up and down arrows on the right
side of the box to scroll through the batches.
Use the right and left arrows at the bottom of
the box to see more information about the
batches.
2b. Move the right-arrow into the box next to the
batch you want to look at; the line will be
highlighted.
3. Select Retrieve. ERMAWin will retrieve the
batch of transactions for that unit from the
database.
Figure 18: Timestamp Edit Utility Window
Page 19 of 33
Doc 6001648, Rev B
Page 20

Timestamp Edit Utility
Editing Timestamps
1. In the large Transactions box at the bottom of
the window, the transactions are listed. Use
the up and down arrows to the right of the box
to scroll to the bottom.
Transactions with invalid dates will have a red
question mark ("?") in the left column and the
timestamp will be highlighted.
Note
: ERMAWin does not allow you to change
timestamps that are valid.
2. Click on the down arrow next to the timestamp
to make a correction. The Modify Transaction
Timestamp box will appear (Figure 19).
3. In the Date text box, the date will be
highlighted. Type in the month, date and last
two digits of the year. You do not need to type
a slash ("/").
4. In the Time text box, highlight the time. Type
the hour and minutes. You do not need to type
a colon (" : ").
5. Select D
Select Cancel to leave the Modify Transaction
Timestamp box without saving. You will be
returned to the Timestamp Edit Utility window
(Figure 18).
6. Click on the N
invalid timestamp.
7. Repeat steps 1-6 as many times as
necessary.
8. Select Ap
continue. Select D
timestamps and return to the Main Window.
To return to the Main Window without saving
the timestamps, select Cancel.
one to save the new date and time.
ext button to move to the next
ply to save the new timestamps and
one to save the new
Figure 19: Modify Transaction Timestamp Box
Page 20 of 33
Doc 6001648, Rev B
Page 21

Housekeeping and Your Database
This chapter will cover . . .
Housekeeping and Your Database
Selecting a Database
Purging All Transactions
Purging a Unit’s Transactions
Changing Purge Defaults
Page 21
Page 22 Creating a Database Page 24
Page 23 Other Database Functions Page 25
Page 24
Selecting a Database
You may select an existing database or create a new
one by entering a name that doesn't exist.
Note
: If you select the wrong type of database
(e.g., an SPSWin database), you will receive
an error message.
1. From the Main Window, select D
the toolbar. A drop-down menu will be
displayed (Figure 20).
2. Choose S
Select ERMAWin Database dialog box will be
displayed (Figure 21). From here you may
choose the drive, folder, file type and file name
to use.
3. Select O
database. Select Cancel if do not want to
select a different database. You will be
returned to the Main Window.
elect from the drop-down menu. The
pen to choose the displayed
atabase from
Deleting a Database Page 24
Figure 20: Main Window, Database Drop-Down
Menu
Figure 21: Selecting a Database
Page 21 of 33
Doc 6001648, Rev B
Page 22

Housekeeping and Your Database
Purging All Transactions
After analyzing particular data, you can delete and/or archive the transactions from your transactions database.
This insures that your database of transactions is manageable and that ERMAWin continues to work quickly.
Whenever you exit, ERMAWin checks if any transactions need to be archived and/or purged. For example,
when archiving and/or purging transactions that are 10 days old or older, ERMAWin checks the databases for
transactions that old. If any exist, ERMAWin asks you to confirm when to archive/purge.
Perform the following instructions only if you want to purge your transactions without exiting ERMAWin; the
purge option is also available on exiting ERMAWin.
1. In the Main Window, select D
toolbar (see Figure 20).
2. From the drop-down menu, select P
Ready to Purge Transactions dialog box is
displayed (Figure 22). Changes made in this
dialog box will not be saved. To change the
default Purge settings, see Changing Purge
Defaults on page 24.
3. You may purge transactions by Transaction
Age or Transactions Count.
Transaction Age: Enter the number of days
old the transactions should be in order to be
purged. For example, if you want to purge all
transaction one week old or older, enter 8
days. ERMAWin will subtract 8 days from the
current date and delete all transactions with a
timestamp of the purge date or older,
beginning at midnight of the purge date.
Transaction Count: Enter the number of
transactions you would like to keep. For
example, if you enter 100, ERMAWin will keep
the 100 most recent transactions for each unit
and purge the rest. If a unit has fewer than the
specified number of transactions in the
database, no transactions will be deleted.
4. You can save the transactions you are purging
in an archive file. Make sure there is a check
() in the box next to Perform Archive with
Purge. If you do not want to archive
transactions, click in the box to un-check it.
atabase from the
urge. The
If you choose to archive the older transactions,
they will be saved in a text file. You may look
at the text file using any text editor; or you can
import the data into another application, such
as a spreadsheet or database.
In the Archive Properties box (see Figure
22), you can specify the archive directory and
file name. If you want to change the default
directory or file name, click on the
The Change Archive File Dialog Box will be
displayed.
5. Specify the field delimiter. Click on the downarrow to the right of the Field Delimiter box
for a list of choices. A delimiter is a character
(e.g., a backslash “/”) that marks the beginning
or end of a unit of data.
6. In the Archive Options box, choose whether
to Create a new file or Append to an
existing file. Click in either of the radio
buttons. Make sure a black dot is showing in
the button next to your choice.
7. When you have completed your choices,
select Yes. The transactions will be archived if
you chose to archive; and purged. If you
change your mind, select No. You will be
returned to the Main Window.
button.
Figure 22: Ready to Purge Transactions Dialog Box
Page 22 of 33
Doc 6001648, Rev B
Page 23

Housekeeping and Your Database
Purging a Unit’s Transactions
Use the Purge a U
database. You may want to do this if a unit’s data is still present in the transactions database after you have
deleted the unit from SPSWin.
nit command (see Figure 23) to delete all
the data for a specific unit from the transactions
1. At the Purge Unit Definition window (Figure
24), select the unit(s) to purge from the All
Units box.
Tip
: To select multiple units, hold down the
[Ctrl] or [Shift] key on your keyboard and click
the desired units.
Note
: If you select a multi-link chain name to
purge, all the units within the chain will also be
purged. To purge individual units within a
chain, select each unit by its number within the
chain (e.g., Unit #1, Unit #2, etc.).
2. Click the single right arrow button
selected unit(s) will appear in the Selected
Units box.
. The
Clicking the double right arrow button
selects all units.
Clicking the single left arrow button
removes a highlighted unit from the
Selected Units box.
Clicking the double left arrow button
removes all units from the
Selected Units box.
3. Click O
confirmation dialog box.
K and then click Yes at the
Figure 23: Purge a Unit
Figure 24: Purge Unit Definition Window
Page 23 of 33
Doc 6001648, Rev B
Page 24

Housekeeping and Your Database
Changing Purge Defaults
1. In the Main Window, select Tool
toolbar (Figure 25).
2. Select P
Preferences window, Purge page, is displayed
(see Figure 26).
3. In the Purge By box, click in the circle next to
your selection; a black dot will appear. Select
either Transaction Age and the number of
days; or Transaction Count and the number
of transactions to keep in the database for
each unit (starting with the most recent).
Figure 25: Main Window, Tools Drop-Down Menu
references. The File Maintenance
s from the
4. You may choose to write the transactions into
an archive file when you purge them, or you
may simply erase them. Make sure there is a
check () in the box next to Perform Archive
with Purge if
transactions.
5. Select Ap
entered. Select D
return to the Main Window. Select Cancel to
return to the Main Window without saving
changes.
you want to archive your
ply to save the changes you
one to save the changes and
Figure 26: File Maintenance Preferences Window,
Purge Page
Deleting a Database
If a database is corrupted beyond repair or if you want to run with a “fresh” database, you can delete your
current database. ERMAWin will automatically create a new database for you or you can create a new
database (see Creating a Database below).
1. In the Main Window, select D
displayed.
2. From the Database drop-down menu, select D
delete the database.
3. After the database is deleted, you will be returned to the Main Window.
atabase from the toolbar. The Database drop-down menu will be
elete. ERMAWin will ask you to confirm that you wish to
Creating a Database
ERMAWin gives you the ability to create a new database if you have deleted it. If you want the new database to
have the same name as the old one, you must delete the old database (see Deleting a Database above). To
create one with a different name, use the Select a Database utility (see Selecting a Database on page 21).
1. In the Main Window, select D
displayed.
atabase from the toolbar. The Database drop-down menu will be
2. From the Database drop-down menu, select C
create a new database. The new database will be named TRXWIN32.MDB (or the name of your last
database).
3. After the database is created, you will be returned to the Main Window.
Doc 6001648, Rev B
reate. ERMAWin will ask you to confirm that you wish to
Page 24 of 33
Page 25

Housekeeping and Your Database
Other Database Functions
BACKUP
ERMAWin lets you create a backup file of your ERMAWin database. You may specify the backup database
name and directory.
: If your directory does not have enough disk space to hold a copy of the database, your backup
Note
will fail. In this case, delete the failed copy and back up your database again.
D
ATABASE UPGRADE UTILITY
Launches the database upgrade utility. Once the utility has completed its task, you must either re-"Select" the
database (from the database menu) or close ERMAWin and re-launch it. For more information about running
this utility, refer to the SPSWin User’s Guide or On-line Help.
The following functions should be used only under the qualified guidance of your local Sentex Systems dealer.
C
OMPACT
This function allows you to compact an existing database in order to minimize memory usage and speed up
data access. A faulty database must be compacted before it can be repaired.
R
EPAIR
This and the Compact function (above) are used to clean up a sluggish or hard-to-open database. This feature
should only be used after trying Compact.
Page 25 of 33
Doc 6001648, Rev B
Page 26

Utilities
This chapter will cover . . .
Utilities
Archiving Transactions
Changing Archive Defaults
Exporting Transactions
Changing Export Defaults
Page 26
Page 27
Page 28
Page 29
Archiving Transactions
Archive transactions when they’re no longer needed, to keep an audit for historical records, and when you want
to look at them using another application such as a text editor, spreadsheet, or database. The transactions will
be deleted from the database and written to a text file. The first few lines will be a descriptive header.
1. In the Main Window, select T
from the toolbar (refer to Figure 10).
2. From the drop-down menu, select A
The Transaction Archive Utility window will
appear (see Figure 27).
3. A right arrow points to the name of unit for
which transactions will be archived.
Scroll left or right for more information about
the transactions.
Scroll up or down to see more units.
Select the unit.
4. Select what you want to archive: No
Transactions, All Transactions, Date Limited,
or Count Limited.
Date Limited: allows you to specify the
beginning and ending date of the transactions
you want to archive.
ransactions
rchive.
Count Limited: allows you to archive a
specific number of transactions. Transactions
are archived beginning with the oldest
transaction.
5. Specify the drive, folder and name of the
archive file. If you wish to change the default
drive, folder and name, click on the
6. Select whether to create a new file or append
the transactions to an existing file.
7. Specify the delimiter to use between fields. A
delimiter is a character (e.g., a backslash "/")
that marks the beginning or end of a unit of
data. Click on the down-arrow to the right of
the Field Delimiter box for a list of choices.
8. Select A
Ar
transactions. Select Cancel to leave without
archiving.
pply to save the settings. Select
chive to save the settings and archive the
button.
Figure 27: Transaction Archive Utility Window
Page 26 of 33
Doc 6001648, Rev B
Page 27

Changing Archive Defaults
Utilities
1. In the Main Window, select Tool
toolbar (see Figure 25).
2. Select P
Preferences window is displayed (Figure 28).
3. The default directory appears in the Archive
Directory text box. You may type in the
extension you wish to use; OR click on the
browse button. The Browse for Folder box is
displayed (Figure 29).
4. The default field delimiter is displayed in the
Field Delimiter box. A delimiter is a character
(e.g., a backslash "/") that marks the beginning
or end of a unit of data.
references. The File Maintenance
s from the
To change the delimiter, click on the downarrow to the right of the Field Delimiter box.
Select a delimiter from the list.
5. You may create a new archive file or append
the new transactions to an existing archive file.
Click in the circle next to your choice. A black
dot will appear in the circle.
6. Select Ap
Select D
the Main Window. Select Cancel to return to
the main window without changing the archive
preferences.
ply to save the archive settings.
one to save the settings and return to
Figure 28: File Maintenance Preferences Window, Archive Page
Figure 29: Browse for Folder Window
Page 27 of 33
Doc 6001648, Rev B
Page 28

Utilities
Exporting Transactions
Exporting transactions copies the transactions into a file, but does not delete them. The transactions are written
to a text file without a header. You can then import the transactions into another application such as a
spreadsheet or text editor.
1. In the Main Window, select Transactions
from the toolbar.
2. From the drop-down menu, select E
Transaction Export Utility Window is
displayed.
3. A right arrow points to the name of the unit for
which transactions will be exported. Select the
unit.
4. Select what you want to export: No
Transactions, All Transactions, Date Limited,
or Count Limited.
Date Limited: allows you to select the
beginning and ending date of the transactions
you want to export.
Count Limited: allows you to export a specific
number of transactions. Transactions are
exported starting with the most recent.
xport. The
5. Specify the drive, folder and name of the
export file. If you wish to change the default
drive, folder and name, click on the
6. Select whether to create a new file or append
the transactions to an existing file.
7. You may specify the delimiter to you use
between fields. A delimiter is a character
(e.g., a backslash "/") that marks the beginning
or end of a unit of data. Click on the down-
arrow to the right of the Field Delimiter box
for a list of choices.
8. Select A
Ex
transactions. Select Cancel to leave without
exporting. You will be returned to the Main
Window.
pply to save the settings. Select
port to save the settings and export the
button.
Figure 30: Transaction Export Utility Window
Page 28 of 33
Doc 6001648, Rev B
Page 29

Changing Export Defaults
Utilities
1. In the Main Window, select Tool
toolbar.
2. Select P
Preferences window is displayed.
3. The default directory appears in the Export
Directory text box. To change the drive or
directory, type in your choice. OR click on the
4. The default file extension is displayed in the
Export Extension text box (Figure 31). You
may change the extension by typing in your
choice.
5. The default field delimiter is displayed in the
Field Delimiter box. A delimiter is a character
(e.g., a backslash "/") that marks the beginning
or end of a unit of data. To change the
delimiter, click on the down-arrow to the right
of the Field Delimiter box. Select a delimiter
from the list.
references. The File Maintenance
button.
s from the
6. You may create a new export file or append
the new transactions to an existing export file.
Click in the circle next to your choice. A black
dot will appear in the circle.
7. Select Ap
Select D
return to the Main Window. Select Cancel to
return to the main window without changing
the export preferences.
ply to save the export settings.
one to export the transactions and
Figure 31: File Maintenance Preferences Window, Export Page
Page 29 of 33
Doc 6001648, Rev B
Page 30

Help
This chapter will cover . . .
Help
Getting Help
Technical Support
About ERMAWin (Menu Option
Page 30
Page 31
) Page 32
Getting Help
To access the ERMAWin online help, press F1 at any time, OR
1. From the Main Window, select H
2. Select H
Select Help I
K
eep Help on Top: When enabled, ERMAWin Help will remain in front of all other ERMAWin windows.
elp to start the online help on the Contents tab. OR
ndex to start the online help on the Index tab.
elp on the toolbar. The drop-down Help menu will appear.
Figure 32: Main Window, Help Drop-Down Menu
Page 30 of 33
Doc 6001648, Rev B
Page 31

Help
Technical Support
Figure 33: Help Drop-Down, Technical Support Fly-Out Menu
D
UMP TRANSACTIONS IMAGE
Displays the Dump Transactions Image screen (Figure 34). This screen allows you to select the desired unit
transactions which will then be dumped into a file at <ermawin path><shortname.dbg>. This feature is usually
used for debugging.
Note
: This function should be used ONLY under the guidance of qualified technical support personnel.
Figure 34: Dumping Transaction Images
Page 31 of 33
Doc 6001648, Rev B
Page 32

Help
TRACE
Displays the Trace Options window, containing a list of program functions which can be selected to create a log
of ERMAWin program activity.
Notes:
The factory default for Trace functions is None.
This feature should ONLY be used under the guidance of qualified technical support personnel.
Figure 35: Trace Options
H
OW TO CONTACT
Select this feature for information about whom to contact for technical support.
About ERMAWin (Menu Option)
Selecting this option will display information about the version and release of your copy of ERMAWin, along with
the full path of the EXE files and databases. You may need this information when calling Technical Support.
Page 32 of 33
Doc 6001648, Rev B
Page 33

Help
COPYRIGHT 2002, ALL RIGHTS RESERVED
This document is protected by copyright and may not be copied or adapted without the prior written consent of
Sentex Systems. This documentation contains information proprietary to Sentex and such information may not
be distributed without the prior written consent of Sentex. The software and firmware included in the Sentex
product as they relate to this documentation are also protected by copyright and contain information proprietary
to Sentex.
Microsoft and Windows are registered trademarks of Microsoft Corporation. Other brands and their products are
trademarks or registered trademarks of their respective holders and should be noted as such.
FOR TECHNICAL SUPPORT, PLEASE CONTACT YOUR LOCAL SENTEX SYSTEMS DEALER
Page 33 of 33
Doc 6001648, Rev B
 Loading...