

Page 1
Model 379LM-10 and 379LMC-10
Fingerprint Keyless Entry
Overview
For use with any 315 MHz SECURITY®® garage door openers
having a purple "learn" button (refer to Step 4.)
The system uses biometric technology that enables an
authorized user to gain access by scanning their fi ngerprint.
The sensor strip on the unit makes a numeric template of the
fi ngerprint that is unique to that user. The unit’s memory can
store up to ten fi ngerprints.
• The term “enroll” refers to scanning the fi ngerprint so the
device will recognize the user.
• The term “swipe” refers to the movement of the fi nger across
the sensor strip.
• The term “LED” stands for Light Emitting Diode. There are 6
LEDs located on the Fingerprint Keyless Entry.
When unit is on, it is programmed to shut off after a short period
of time. The unit’s sensor strip is sensitive so it is important to
read the Tips for Success before attempting to use the
Fingerprint Keyless Entry.
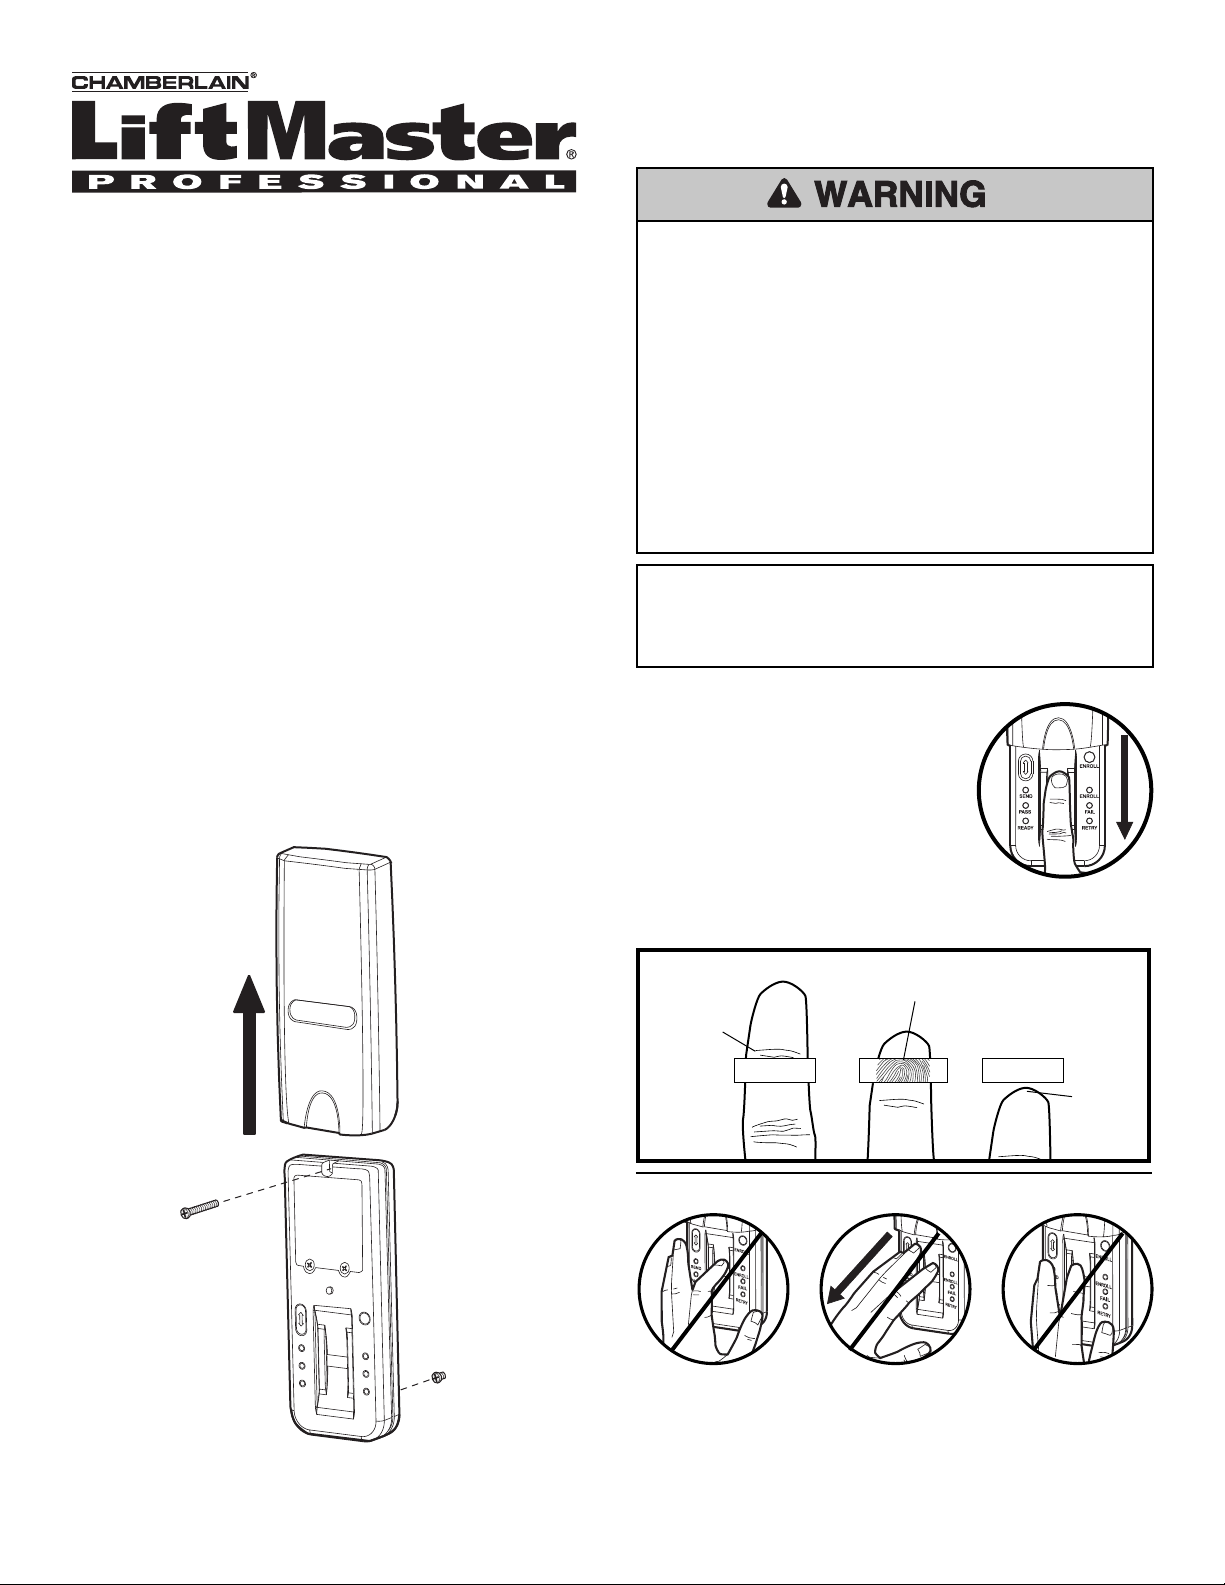
Step 1 Install the Unit
1. Remove cover.
2. Fasten bottom screw to mounting surface. Allow 1/8" (3 mm)
to protrude above surface. Position unit on screw head and
adjust for snug fi t.
3. Fasten top screw. Replace cover.
1
To prevent possible SERIOUS INJURY or DEATH from a
moving gate or garage door:
• Install Keyless Entry Control within sight of the garage door,
out of reach of children at a minimum height of 5 feet
(1.5 m), and away from ALL moving parts of door.
• ALWAYS keep remote controls out of reach of children.
NEVER permit children to operate, or play with remote
control transmitters.
• Activate gate or door ONLY when it can be seen clearly, is
properly adjusted, and there are no obstructions to door
travel.
• ALWAYS keep gate or garage door in sight until completely
closed. NEVER permit anyone to cross path of moving gate or
door.
NOTICE: To comply with FCC and or Industry Canada (IC) rules, adjustment or modifi cations of
this receiver and/or transmitter are prohibited, except for changing the code setting or replacing
the battery. THERE ARE NO OTHER USER SERVICEABLE PARTS.
Tested to Comply with FCC Standards for Home or offi ce use. Operation is subject to the following
two conditions: (1) this device may not cause harmful interference, and (2) this device must
accept any interference received, including interference that may cause undesired operation.
Tips for Success
CORRECT
1. Make sure fi nger is clean and dry.
Place fi nger fl at above the sensor strip
with the top knuckle above the sensor.
2. Swipe fi nger straight down keeping
fi rm contact with the sensor. The swipe
should be a slow, constant speed.
SPECIAL NOTES: Use the same fi nger for
every swipe. It is important to swipe fi nger slowly and fi rmly as
this is the reason most swipes fail.
Swipe finger straight down
keeping firm contact with
Start swipe with
the top knuckle
above the
sensor strip.
Sensor Strip
the sensor.
Sensor Strip
The scan
should end
at the tip of
finger.
INCORRECT
3
• Do not bend fi nger during swipe as this will only scan the tip of
2
your fi nger.
• Swipe fi nger straight down, not at an angle.
• Swipe fl at, not tilted or rolled to one side.
1
Page 2
Reference
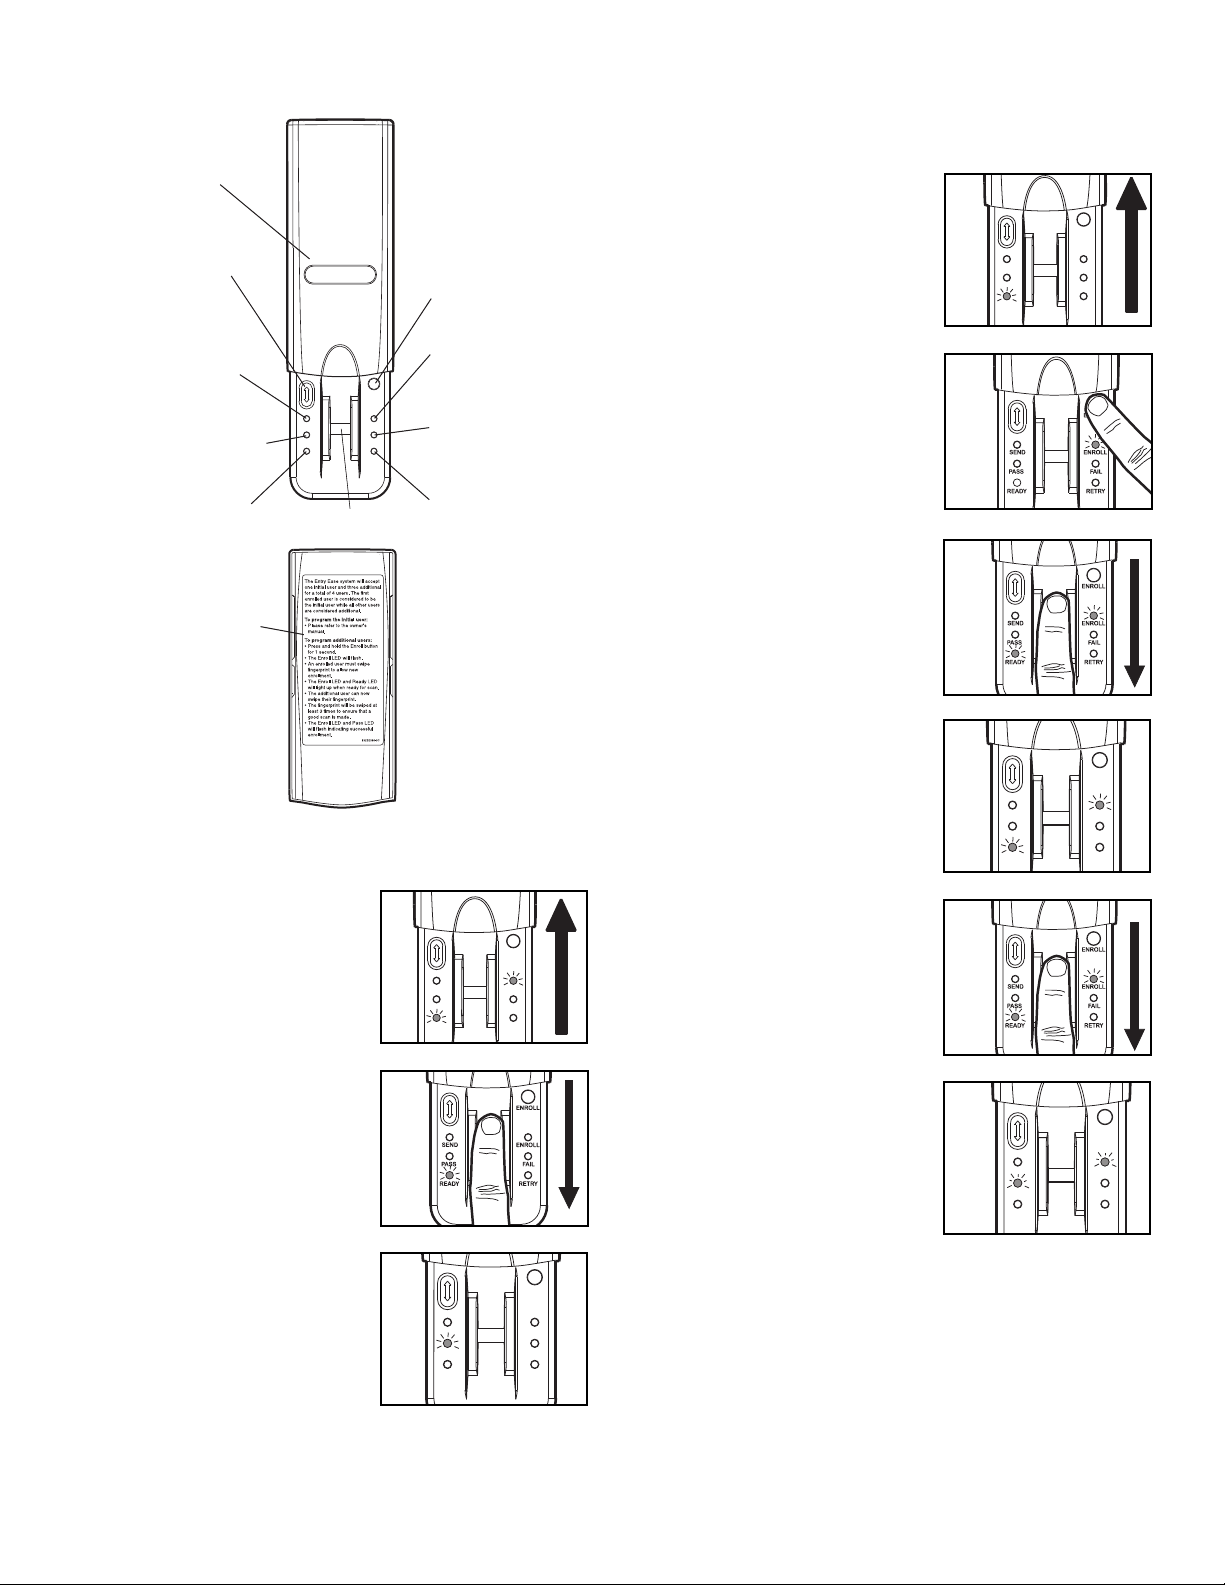
Step 3 Enroll Additional Users
NOTE: The device can store up to ten fi ngerprints at a time.
An enrolled user must swipe fi nger fi rst to enroll new user.
Cover
Resend button: When
pressed the door will stop if
moving up or reverse if
moving down.
Send LED (yellow): Lit
after a passed fingerprint
scan and indicates that the
Resend button is active
and can be used to stop
or reverse door travel.
Pass LED (green): Lit when
a scanned fingerprint
matches a stored print.
Ready LED (green): Lit
when unit is ready to scan
fingerprint.
Extra directions are located
on the inside of cover.
SEND
PASS
READY
Sensor Strip
ENROLL
ENROLL
RETRY
1. Open cover and wait until Ready
1
LED is lit.
ENROLL
Enroll button: When
pressed the unit will go
into Enroll mode.
Enroll LED (yellow):
Lit when the unit is in
Enroll mode.
2. Press and hold Enroll button until
Enroll LED starts to fl ash.
SEND
PASS
READY
2
ENROLL
FAIL
RETRY
Fail LED (red): Lit when
a scanned fingerprint
FAIL
does not match a
stored print.
Retry LED (yellow): Lit
when another swipe is
required.
3. While the Enroll LED is fl ashing an
enrolled user must slowly and
fi rmly swipe fi nger.
3
4. The Enroll LED and Ready LED
will light when ready for new user
to swipe fi nger.
4
ENROLL
Step 2 Enroll Initial User
NOTE: The unit requires 3 passed swipes to enroll a user.
1. Open cover to turn unit on. Wait
until Enroll LED and Ready LED
are lit (not fl ashing).
2. Swipe fi nger slowly and fi rmly
down the sensor strip until three
passed swipes are made.
NOTE: The Pass LED will light for a
passed swipe. The Retry LED will
light if another swipe is needed.
Swipe slowly and with more pressure
if this occurs.
3. After the third passed swipe, the
Enroll and Pass LED will fl ash.
Enrollment is complete.
SEND
PASS
READY
SEND
PASS
READY
ENROLL
ENROLL
FAIL
RETRY
ENROLL
ENROLL
FAIL
RETRY
5. New user should swipe fi nger
slowly and fi rmly down the sensor
SEND
PASS
READY
ENROLL
FAIL
RETRY
strip until three passed swipes are
made.
5
6. The Enroll LED and Pass LED will
fl ash when new user is enrolled.
Unit will return to Ready mode.
6
ENROLL
SEND
PASS
READY
ENROLL
FAIL
RETRY
NOTE: If cover is already open, press either the Resend or
the Enroll button to turn unit on. The Pass LED will light for a
passed swipe. The Retry LED will light if another swipe is
needed.
NOTE: If cover is already open, press
either the Resend or the Enroll button to turn unit on.
If the Ready LED is lit refer to Factory Reset in the
Erase/Reset section.
2
Page 3
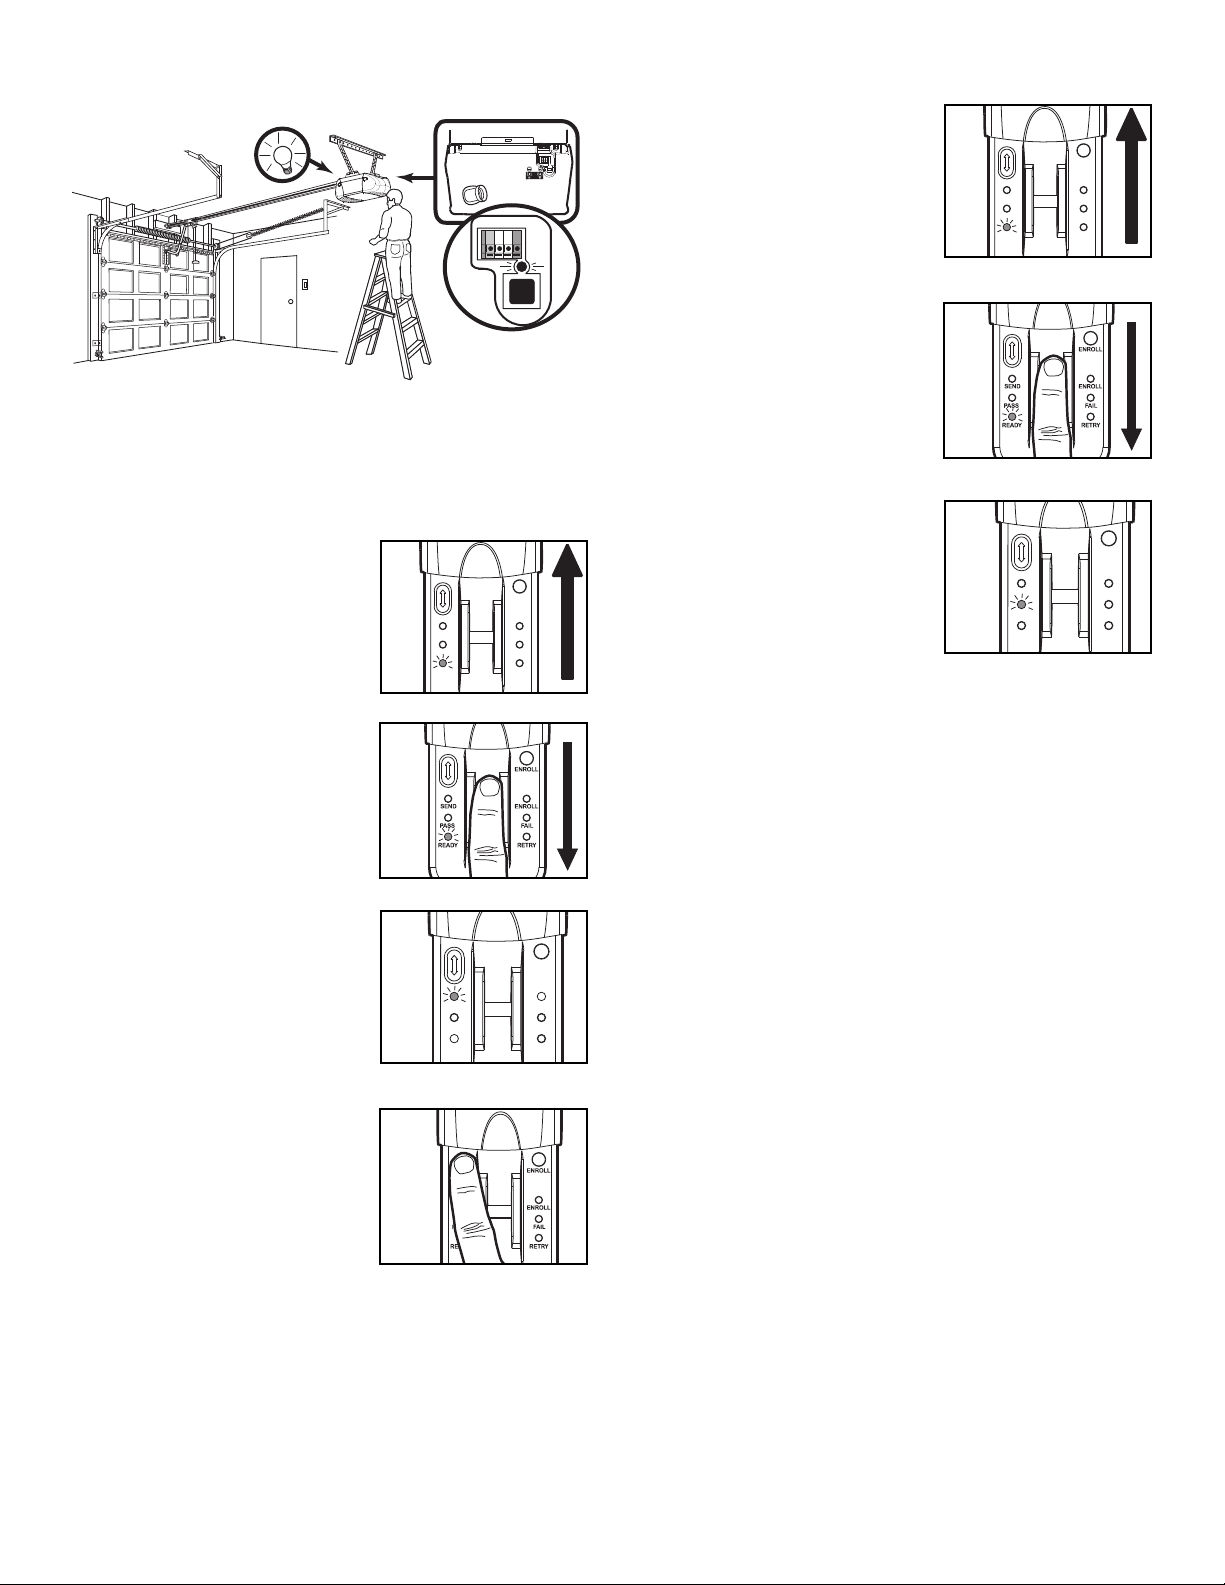
Step 4 Program to Opener
Step 5 Operation
1. Open cover and wait until Ready
LED is lit.
1
ENROLL
NOTE: The unit must have an enrolled user before it can be
programmed to the opener. Due to the 30 second time interval,
a second person may be needed to press the “learn” button. If
there is no purple “learn” button refer to Troubleshooting.
1. Press and release the purple “learn” button on the motor unit
of the garage door opener. See illustration above.
2. Open cover and wait for Ready
LED to light.
3. Within 30 seconds of pressing the
“learn” button, slowly and fi rmly
2
ENROLL
SEND
PASS
READY
ENROLL
FAIL
RETRY
3
swipe enrolled fi nger.
NOTE: The Retry LED will light if
another swipe is needed.
2. Swipe fi nger slowly and fi rmly
down the sensor strip.
3. The Pass LED will fl ash and
garage door will either open or
close.
SEND
PASS
READY
2
3
READY
SEND
PASS
ENROLL
FAIL
RETRY
ENROLL
ENROLL
FAIL
RETRY
NOTE: If cover is already open, press either the Resend or the
Enroll button to turn unit on. The Fail or Retry LED will light if
another swipe is needed. If this occurs, swipe slowly and with
more pressure. It may require multiple swipes to get a passed
swipe.
While the door is traveling the Send LED will be lit. During this
time the only way to reverse or stop the door is to press the
Resend button.
4. After a passed swipe the Pass
LED will light followed by a lit Send
LED. The opener lights will fl ash.
Programming is complete.
5. If the opener lights don’t fl ash,
4
ENROLL
SEND
PASS
READY
ENROLL
FAIL
RETRY
5
press and release the Resend
button at 1 second intervals for up
to 5 seconds until the opener
lights fl ash or the door moves.
Programming is complete.
NOTE: If unit will not program to opener repeat the steps above
or refer to Troubleshooting.
3
Page 4

Erase/Reset
• To erase users:
NOTE: Erasing a user will erase ALL stored fi ngerprints. User
does NOT need to reprogram to opener.
1. Open cover and wait until Ready
LED is lit.
2. Enrolled user must slowly and
fi rmly swipe fi ngerprint.
3. Press and hold the Enroll button
for at least 6 seconds. The Pass
LED and Fail LED will fl ash for 15
seconds. During this time the
Resend button is active. After 15
seconds the Enroll and Ready
LEDs will light indicating
fi ngerprints are erased. The unit
will return to Enroll mode.
1
ENROLL
SEND
ENROLL
PASS
READY
FAIL
RETRY
2
3
• K <If fi nger is enrolled but unit will not program to
opener:
— Ensure that the opener has a purple “learn” button. If
opener does not have a purple “learn” button it is not
compatible with the unit.
• If the unit is in Enroll mode at power up:
— Complete enrollment process for initial user.
— The initial enroll process failed (signalled by a lit Enroll
LED and Fail LED) and must be repeated.
• If enrolling new user and all LEDs fl ash and unit
returns to Ready mode:
— The memory is full. In order to add new user, the memory
needs to be erased. Refer to Erase User or Factory Reset.
• If the unit does not wake:
— A button may be stuck. Press Enroll and Resend buttons
to ensure free movement.
— The batteries may need to be replaced.
• If the Fail LED fl ashes during use:
— The batteries need to be replaced.
NOTE: If sensor is dirty, user should wipe sensor with a clean
fi nger. It is recommended that the sensor be periodically
cleaned with a lint-free cloth dampened with alcohol.
• To return to Factory Reset state:
NOTE: Factory reset state will erase ALL stored fi ngerprints. This
method should be used ONLY when an enrolled user is not
available as it requires user to reprogram unit to opener.
1. Open cover and wait until Ready
LED is lit.
2. Press and hold the Enroll button
until all LEDs turn off. Release
button.
1
ENROLL
SEND
PASS
READY
ENROLL
FAIL
RETRY
2
3. Again press and hold the Enroll
button until the Ready and Enroll
LEDs are lit and not fl ashing.
3
Troubleshooting
• If no known enrolled users are available:
— The memory must be erased using the Factory Reset
process.
• If no known enrolled users are available:
— Ensure that the Ready LED is lit before you swipe.
— Ensure that the fi ngerprint is swiped correctly (See Tips
for Success).
— Ensure that fi ngerprint is enrolled.
— Ensure that suffi cient pressure is being applied to sensor
strip (do not press too hard).
— Ensure that the sensor and fi nger are not wet.
The Battery
To prevent possible SERIOUS INJURY or DEATH:
• NEVER allow small children near batteries.
• If battery is swallowed, immediately notify doctor.
The batteries should produce power for at
least one year. Replace when the Fail LED
fl ashes during use. The unit requires 4
AAA batteries.
Dispose of old batteries properly.
1. Slide cover completely off.
2. Unscrew the two screws and remove
the battery cover.
3. Replace the batteries. Screw the
battery cover back on.
4. Slide cover back into place.
Replacement parts:
Cover ............................................................41A6481
FOR SERVICE DIAL OUR TOLL FREE NUMBER:
1-800-528-9131
Cover
Battery
Cover
Screws
SEND
PASS
READY
ENROLL
ENROLL
FAIL
RETRY
© 2008, The Chamberlain Group, Inc.
114A3597 All Rights Reserved
Page 5

Modèle 379LM-10 et 379LMC-10
AVERTISSEMENT
Système d’Ouverture Sans
Clé à Empreintes Digitales
Caractéristiques
Pour utilisation avec les ouvre-portes de Security:® 315 MHz
possédant un bouton « Learn » violet (se reporter à l’Étape 4).
Le système utilise une technologie biométrique qui permet l’accès à un
utilisateur autorisé par vérifi cation des empruntes digitales. Le capteur
de bande situé sur l’appareil effectue un modèle numérique de
l’emprunte digitale propre à cet utilisateur. La mémoire de l’appareil
peut stocker jusqu’à dix empreinte digitales.
• Le terme « enroll » (« inscrire ») se rapporte au scanner de
l’empreinte digitale pour que l’appareil reconnaisse l’utilisateur.
• Le terme « swipe » (« glisser ») se rapporte au mouvement du doigt
sur le capteur de bande.
• Le terme « LED » désigne Light Emitting Diode (diode
électroluminescente). Il y a 6 voyants lumineux sur le Système
d’Ouverture Sans Clé à Empreintes Digitales.
Lorsque l’appareil est en marche, il est programmé pour s’éteindre
après un court laps de temps. La bande de sensorimétrie de ce modèle
étant sensitive, il est important de lire les Tuyaux pour le Succès avant
d’essayer d’utiliser le Système d’Ouverture Sans Clé à Empreintes
Digitales.
Étape 1 Installation de l’appareil
1. Retirez le couvercle.
2. Serrez la vis du bas sur la surface de montage. Laissez dépasser un
espace de 3 mm (1/8 po) au-dessus de la surface.
3. Serrez la vis du haut. Repositionnez le couvercle.
AVERTISSEMENT
Afi n d’éliminer les risques de BLESSURES GRAVES ou de MORT
découlant de l’actionnement d’une clôture ou d’une porte de garage :
• Poser la commande de porte en vue de la porte de garage, hors de la
portée des enfants à une hauteur minimum de 5 pieds (1,5 m), et à
l’écart de TOUTES les pièces mobiles de la porte.
• TOUJOURS garder les télécommandes hors de la portée des enfants.
NE JAMAIS laisser un enfant manipuler une télécommande ni jouer
avec elle.
• Actionner la clôture ou la porte UNIQUEMENT lorsqu’elle est
clairement visible, correctement ajustée et que le mécanisme est
libre de toute entrave.
• TOUJOURS garder la clôture ou la porte de garage en vue jusqu’à
sa fermeture complète. NE PERMETTEZ à quiconque de passer
lorsqu’une clôture ou une porte est en mouvement.
AVIS : Les règles de la FCC ou d’Industrie Canada (IC), ou les deux, interdisent tout ajustement
ou toute modifi cation de ce récepteur et/ou de cet émetteur, sauf pour modifi er le code ou pour
remplacer la pile. IL N’EXISTE AUCUNE AUTRE PIÈCE SUSCEPTIBLE D’ÊTRE ENTRETENUE PAR
L’UTILISATEUR.
Vérifi é pour conformité avec les normes de la FCC POUR UTILISATION À LA MAISON OU AU
BUREAU. L’utilisation est sujette aux deux conditions ci-après : (1) ce dispositif ne peut causer
des interférences nuisibles, et (2) ce dispositif doit accepter toute interférence reçue, y compris
une interférence pouvant causer un fonctionnement non désiré.
Conseils utiles
CORRECT
1. Vérifi ez que votre doigt est propre et sec.
Placez votre doigt au-dessus du capteur de
bande, votre l’articulation du haut doit se
trouver au-dessus du capteur.
2. Faites glisser votre doigt vers le bas en
maintenant un contact ferme avec le capteur.
Faites lentement glisser votre doigt.
1
REMARQUES SPÉCIALES : Use el mismo dedo para cada pasada. Es
importante pasar el dedo lenta y fi rmemente, ya que ésta es la razón
por la que no son aceptadas la mayoría de las pasadas.
Commencer à faire glisser le doigt avec
l’articulation
supérieure située
au-dessus
du capteur
de bande.
Bande de
capteur
Faire glisser le doigt bien droit vers le bas en
maintenant un contact ferme avec le capteur.
Bande de capteur
La vérification se
termine par le
bout du doigt.
ERRONÉ
3
2
• Ne pliez pas votre doigt lorsque vous le faites glisser car seul le bout
de votre doigt sera scanné.
• Faites glisser votre doigt bien droit vers le bas, ne l’inclinez pas.
• Faites glisser votre doigt bien à plat et non incliné ou roulé vers
un côté.
1
Page 6

Referencía
Couvercle
Bouton Resend (Renvoyer) :
Lorsqu’il est appuyé, la porte
s’arrête si elle monte ou s’inverse si
elle descend.
LED Send (Envoyer) (jaune) :
S’allume après une vérification
réussie de l’empreinte digitale ;
elle indique que le bouton Resend
(Renvoyer) est actif et peut être
utilisé pour arrêter ou inverser le
parcours de la porte.
LED Pass (Réussi) (vert) :
S’allume lorsqu’une empreinte
digitale scannée correspond à une
emprunte mémorisée.
LED Ready (Prêt) (vert) :
S’allume lorsque l’appareil est prêt
à scanner l’empreinte digitale.
SEND
PASS
READY
Bande de capteur
ENROLL
ENROLL
RETRY
Étape 3 Inscription d’utilisateur(s)
supplémentaire(s)
REMARQUE : L’appareil peut stocker jusqu’à quatre empreintes
digitales à la fois. Un utilisateur inscrit doit faire glisser son doigt en
premier pour pouvoir inscrire un nouvel utilisateur.
Bouton Enroll (Inscrire) :
Lorsqu’il est appuyé,
l’appareil entre en mode
1. Ouvrez le couvercle et patientez
jusqu’à ce que la LED Reday (Prêt)
s’allume.
Enroll (Inscrire).
LED Enroll (Inscrire)
(jaune) : S’allume lorsque
l’appareil est en mode Enroll
(Inscrire).
LED Fail (Échec) (rouge) :
S’allume lorsque l’emprunte
FAIL
digitale scannée ne
correspond pas à une
empreinte mémorisée.
2. Appuyez et maintenez appuyé le
bouton Enroll (Inscrire) jusqu’à ce que
la LED Enroll (Inscrire) commence à
clignoter.
LED Retry (Réessayer)
(jaune) : S’allume lorsqu’un
autre passage est nécessaire.
1
ENROLL
SEND
PASS
READY
ENROLL
FAIL
RETRY
2
Des directions supplémentaires
sont situées à l’intérieur du
couvercle.
Étape 2 Inscription de l’utilisateur
initial
REMARQUE : Pour inscrire un utilisateur, l’appareil requiert 3 passages
réussis.
1. Ouvrez le couvercle pour allumer
l’appareil. Patientez jusqu’à ce que les
LED Enroll (Inscrire) et Ready (Prêt)
s’allument (elles ne doivent pas
clignoter).
2. Faites glisser votre doigt lentement et
fermement sur le capteur de bande
jusqu’à ce que trois passages réussis
soient réalisés.
REMARQUE : La LED Pass (Réussi)
s’allume lorsqu’un passage est réussi. La
LED Retry (Réessayer) s’allume lorsqu’un
autre passage est nécessaire. Auquel
cas, faites glisser lentement et fermement
avec plus de pression.
1
ENROLL
SEND
PASS
READY
ENROLL
FAIL
RETRY
2
3. Tandis que la LED Enroll (Inscrire)
clignote, un utilisateur inscrit doit faire
glisser lentement et fermement son
doigt.
4. Les LED Enroll (Inscrire) et Ready
(Prêt) s’allument lorsque l’appareil est
prêt pour qu’un autre utilisateur fasse
glisser son doigt.
5. Un nouvel utilisateur doit faire glisser
lentement et fermement son doigt de
haut en bas du capteur de bande
jusqu’à ce que trois passages réussis
soient réalisés.
6. Les LED Enroll (Inscrire) et Pass
(Réussi) s’allument lorsque le nouvel
utilisateur est inscrit. L’appareil revient
ensuite en mode Ready (Prêt).
3
4
ENROLL
SEND
PASS
READY
ENROLL
FAIL
RETRY
5
6
ENROLL
SEND
PASS
READY
ENROLL
FAIL
RETRY
3. Après le troisième passage réussi, les
3
ENROLL
LED Enroll (Inscrire) et Pass (Réussi)
s’allument. L’inscription est terminée.
SEND
PASS
READY
ENROLL
FAIL
RETRY
REMARQUE : Si le couvercle est déjà
ouvert, appuyez sur le bouton Resend
(Renvoyer) ou sur le bouton Enroll (Inscrire) pour allumer l’appareil. Si
la LED Ready (Prêt) est allumée, reportez-vous à la restauration des
paramètres usine de la section Suppression/Réinitialisation.
REMARQUE : Si le couvercle est déjà ouvert, appuyez sur le bouton
Resend (Renvoyer) ou sur le bouton Enroll (Inscrire) pour allumer
l’appareil. La LED Pass (Réussi) s’allume lorsqu’un passage réussi
est réalisé. La LED Retry (Réessayer) s’allume si un autre passage
est nécessaire.
2
Page 7

Étape 4 Programmation au dispositif
d’ouverture
REMARQUE : L’appareil doit avoir un utilisateur inscrit avant d’être
programmé au dispositif d’ouverture. Étant donné l’intervalle de 30
secondes, une deuxième personne peut être nécessaire pour appuyer
sur le bouton « learn » (« apprendre »). Si personne n’est présent pour
appuyer sur le bouton « learn » (« apprendre ») violet, reportez-vous à
la section Dépannage.
1. Appuyez puis relâchez le bouton « learn » (« apprendre ») violet
situé sur le moteur du dispositif d’ouverture de la porte du garage.
Voir illustration ci-dessus.
2. Ouvrez le couvercle et patientez
jusqu’à ce que la LED Ready (Prêt)
s’allume.
2
ENROLL
Étape 5 Fonctionnement
1. Ouvrez le couvercle et patientez
jusqu’à ce que la LED Ready (Prêt)
s’allume.
2. Faites glisser votre doigt lentement et
fermement du haut vers le bas sur le
capteur de bande.
3. La LED Pass (Réussi) clignote et la
porte du garage s’ouvre ou se ferme.
1
ENROLL
SEND
PASS
READY
ENROLL
FAIL
RETRY
2
3
ENROLL
SEND
PASS
READY
ENROLL
FAIL
RETRY
3. Dans les 30 secondes après avoir
appuyé sur le bouton « learn » («
apprendre »), faites glisser lentement
et fermement le doigt inscrit.
REMARQUE : La LED Retry (Réessayer)
s’allume si un autre passage est
nécessaire.
4. Après un passage réussi, la LED Pass
(Réussi) puis la LED Send (Envoyer)
s’allument. Les lumières du dispositif
d’ouverture clignotent. La
programmation est terminée.
5. Si les lumières du dispositif d’ouverture
ne clignotent pas, appuyez puis
relâchez le bouton Resend (Renvoyer)
à 1 seconde d’intervalle pendant 5
secondes jusqu’à ce que les lumières
du dispositif d’ouverture clignotent ou
que la porte bouge. La programmation
est terminée.
SEND
PASS
READY
ENROLL
FAIL
RETRY
REMARQUE : Si le couvercle est déjà ouvert, appuyez sur le bouton
Resend (Renvoyer) ou sur le bouton Enroll (Inscrire) pour allumer
l’appareil. La LED Fail (Échec) ou Retry (Réessayer) s’allume si un
autre passage est nécessaire. Auquel cas, faites glisser lentement et
fermement avec plus de pression. Plusieurs passages sont parfois
nécessaires pour réussir un passage.
3
Lorsque la porte est en mouvement, la LED Send (Envoyer) s’allume. À
cet instant, la seule manière d’inverser ou d’arrêter la porte est
d’appuyer sur le bouton Resend (Renvoyer).
4
ENROLL
SEND
PASS
READY
ENROLL
FAIL
RETRY
5
REMARQUE : Si l’appareil ne se programme pas au dispositif
d’ouverture, répétez les étapes ci-dessus ou reportez-vous à la section
Dépannage.
3
Page 8

Suppression/Réinitialisation
AVERTISSEMENT
• Pour supprimer des utilisateurs :
REMARQUE : La suppression d’un utilisateur supprimera TOUTES les
empreintes digitales mémorisées. L’utilisateur ne doit PAS reprogrammer
au dispositif d’ouverture.
1. Ouvrez le couvercle et patientez
jusqu’à ce que la LED Ready (Prêt)
s’allume.
2. L’utilisateur inscrit doit faire glisser
lentement et fermement son empreinte
digitale.
1
ENROLL
SEND
ENROLL
PASS
READY
FAIL
RETRY
2
3. Appuyez et maintenez appuyé le
bouton Enroll (Inscrire) pendant au
moins 6 secondes. Les LED Pass
(Réussi) et Fail (Échec) clignotent
pendant 15 secondes. Pendant ce
temps, le bouton Resend (Renvoyer)
est actif. Après 15 secondes les LED
3
Enroll (Inscrire) et Ready (Prêt)
s’allument indiquant que les empruntes
digitales ont été supprimées. L’appareil
revient ensuite en mode Enroll
(Inscrire).
• Pour restaurer les paramètres usine de l’appareil :
REMARQUE : La restauration des paramètres usine supprimera TOUTES
les empreintes digitales mémorisées. Cette méthode doit être utilisée
UNIQUEMENT lorsqu’un utilisateur inscrit est indisponible étant donné
que l’utilisateur doit reprogrammer l’appareil au dispositif d’ouverture.
1. Ouvrez le couvercle et patientez
jusqu’à ce que la LED Ready (Prêt)
s’allume.
2. Appuyez et maintenez appuyé le
bouton Enroll (Inscrire) jusqu’à ce que
1
ENROLL
SEND
PASS
READY
ENROLL
FAIL
RETRY
2
toutes les LED s’éteignent. Relâchez
le bouton.
3
3. Appuyez et maintenez appuyé de
nouveau le bouton Enroll (Inscrire)
jusqu’à ce que les LED Ready (Prêt) et
Enroll (Inscription) s’allument mais ne
clignotent pas.
Dépannage
• Si aucun utilisateur inscrit connu n’est disponible :
— La mémoire doit être effacée à l’aide de la procédure de
restauration des paramètres usine.
• Si le doigt est inscrit mais que l’appareil ne se programme
pas au dispositif d’ouverture :
— Vérifiez que le dispositif d’ouverture a un bouton « learn »
(« apprendre ») violet. Si le dispositif d’ouverture n’a pas de
bouton « learn » (« apprendre ») violet, il n’est pas compatible à
l’appareil.
• Si l’appareil est en mode Enroll (Inscrire) à l’allumage :
— Suivez la procédure d’inscription pour l’utilisateur initial.
— La procédure d’inscription initiale a échoué (signalé par les LED
Enroll (Inscrire) et Fail (Échec) qui s’allument) et doit être répétée.
• Si à l’inscription d’un nouvel utilisateur toutes les LED
clignotent et l’appareil revient en mode Ready (Prêt) :
— La mémoire est pleine. Pour ajouter un nouvel utilisateur, la
mémoire doit être effacée. Reportez-vous à l’étape Suppression
d’utilisateur ou Restauration des paramètres usine..
• Si l’appareil ne répond pas :
— Un bouton est peut-être bloqué. Appuyez sur les boutons Enroll
(Inscrire) et Resend (Renvoyer) pour assurer un mouvement libre.
— Les piles doivent être remplacées.
• Si la LED Fail (Échec) clignote durant l’utilisation :
— Les piles doivent être remplacées.
REMARQUE : Si le capteur est sale, l’utilisateur doit faire glisser un
doigt propre. Il est conseillé de nettoyer le capteur régulièrement à l’aide
d’un chiffon sans peluche humidifi é avec de l’alcool.
Pile
AVERTISSEMENT
Pour prévenir d’’eventuelles BLESSURES GRAVES ou la MORT:
• NE JAMAIS laisser de petits enfants à proximité des piles.
• Aviser immédiatement un médecin en cas d’ingestion de la pile.
La durée théorique des piles est d’au moins un
an. Remplacez-les lorsque la LED Fail (Échec)
clignote durant l’utilisation. L’appareil nécessite
4 piles AAA.
Jetez vos vieilles piles dans les centres de
récupérations prévus à cet effet.
1. Retirez le couvercle en le glissant
complètement.
2. Dévissez les deux vis et retirez le couvercle
des piles.
3. Remplacez les piles. Revissez le couvercle
des piles.
4. Repositionnez le couvercle en le faisant
glisser.
Couvercle
Couvercle du
compartiment de
la pile
Vis
SEND
PASS
READY
ENROLL
ENROLL
FAIL
RETRY
• Si l’appareil ne reconnaît pas une emprunte digitale :
— Vérifiez que la LED Ready (Prêt) est allumée avant de faire
Pièces de Reparation:
Couvercle .........................................................................41A6481
glisser votre doigt.
— Vérifiez que l’empreinte digitale est glissée correctement (Voir
Conseils utiles).
— Vérifiez que l’emprunte digitale est inscrite.
— Vérifiez qu’une pression suffisante est appliquée au capteur de
POUR LE SERVICE, PRIÈRE DE COMPOSER NOTRE
NUMÉRO SANS FRAIS:
1-800-528-9131
bande (n’appuyez par trop fort).
— Vérifiez que le capteur et le doigt ne sont pas mouillés.
© 2008, The Chamberlain Group, Inc
114A3597 Tous droits réservés.
 Loading...