

Page 1

Standing Desk
Owner’s Manual
SD9
Page 2

Table of Contents
Welcome
Getting Started
Welcome
Warranty
Power
SD9 Desk Assembly
Assembly Instructions
SD9 Desk Operations
Specications
Console Buttons
3
6
17
2
Page 3

Welcome
Congratulations on choosing the LifeSpan Workplace™ line of products. These
products give you the opportunity to remain productive while taking care of
yourself as you integrate movement with normally sedentary tasks.
The average American now spends eleven hours, ve days a week, sitting, and
burns one-hundred fewer calories each day than they did a few decades ago.
Sitting for long periods slows your metabolism, reduces calories burned, and
increases your risk for heart disease and diabetes.
Whether you plan on placing this product in a TV room, replace your desk at
home or are adding another workspace in the oce, LifeSpan Workplace™
products are a great way to add movement to an otherwise sedentary activity.
Before you assemble or operate your product, please read this manual
thoroughly. Important information, including safety precautions, ongoing
product maintenance, assembly instructions, and information on proper
operation are included.
If you need to contact LifeSpan customer service, visit our website at
www.LifeSpanFitness.com and select customer service. Complete the
information requested and we will respond to your inquiry within one
business day. In the United States and Canada you can also call
(877) 654-3837 and choose option 4.
Neither LifeSpan Fitness nor its representatives can accept responsibility for any damages or
injury incurred as a result of information presented in this manual except under the terms
of the product warranty.
3
Page 4

Warranty
Your LifeSpan standing desk comes with the following limited warranty valid
in North America and the United Kingdom. If you are outside of these areas
contact your local distributor for warranty information or visit
www.LifeSpanFitness.com.
Warranty
Frame & Parts
SD9
2 Years
LifeSpan warrants the equipment it manufactures is free from defects in
materials and workmanship under normal use and services. The periods
above are based on the date of purchase. During these periods, LifeSpan will
replace defective parts. Free labor is included on all parts that are not normally
assembled or replaced by the customer within the labor period.
If within the time frames specied above, any part fails to operate properly,
login to our website at www.LifeSpanFitness.com, click on “Customer Service”
and complete the form to request assistance or call 877.654.3837 option 4 for a
Customer Service Agent (please note that certain kinds of service should only
be performed by a qualied service technician).
LifeSpan reserves the right to make changes and improvements to our products
without incurring any obligations to similarly alter any product purchased.
In order to insure our product warranty and to ensure the safe and ecient
operation of your LifeSpan product, only authorized parts can be used. The
warranty is void if any parts other than those provided by LifeSpan are used.
Exclusions and Limitations:
• This warranty does not apply to any defects caused by negligence, misuse,
improper assembly, or maintenance, accident, or “act of God.”
• This warranty does not apply to discoloration of paints or plastics.
• LifeSpan shall not be responsible for incidental or consequential damages.
• This warranty is non-transferable form the original owner.
Registration
Should you need to process a warranty claim make sure you retain your
purchase receipt to verify the date of purchase and register your LifeSpan
product online. To complete the registration go to www.LifeSpanFitness.com
and select “Product Registration”.
4
Page 5
About Your Standing Desk
Proper Grounding
LifeSpan equipment must be grounded. Improper connection of the
equipment’s grounding conductor can result in the risk of electric shock.
Check with a qualied electrician or service person if you are in doubt as to
whether the outlet is properly grounded. Do not modify the plug provided
with the product or use a ground plug adapter to adapt to a non-grounded
outlet. If the plug will not t in the outlet, have the proper outlet installed by a
qualied electrician.
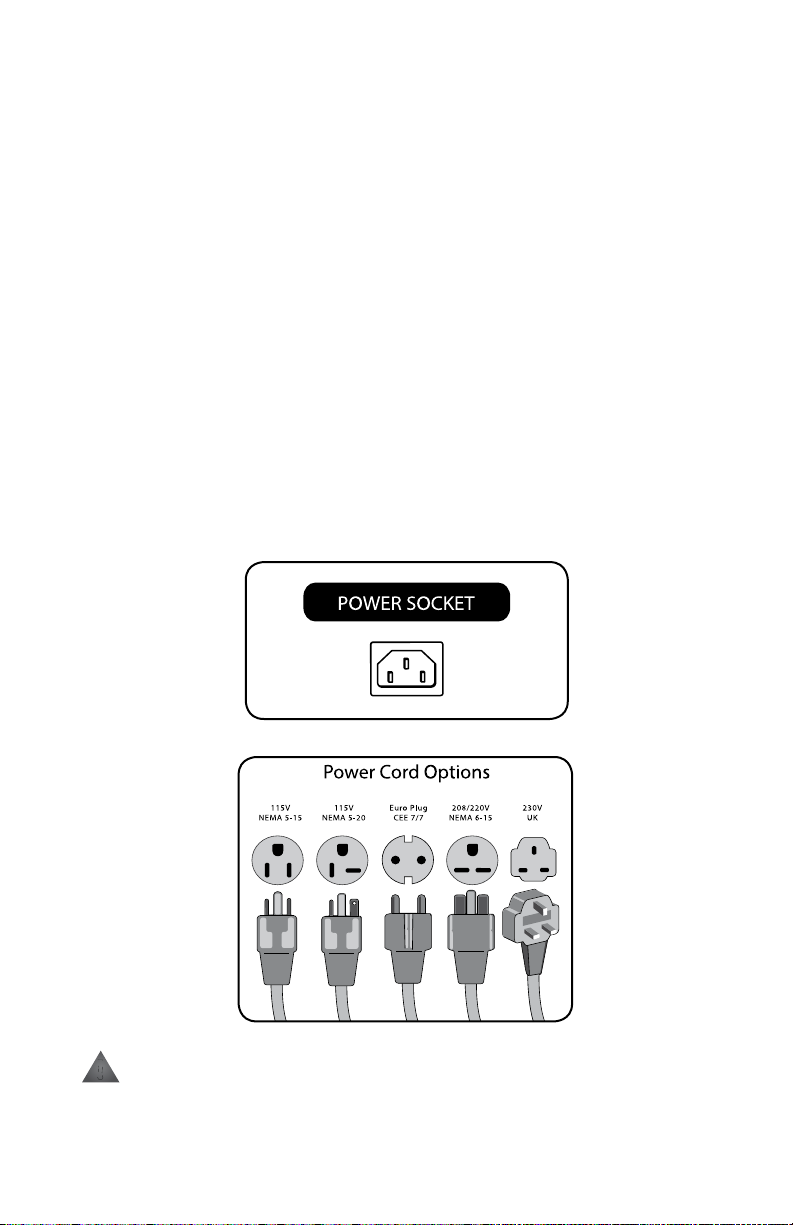
Power Cord Options
This standing desk should only be used with the proper power cord and
power outlet. Several power cord options (shown below) are available from
LifeSpan. We do our best do include the correct power cord with the standing
desk for your area. In the event that the correct power cord is not included in
the packaging please contact your local distributor.
Do not use extension cords between the standing desk and power
!
outlet.
5
Page 6

SD9 Standing Desk: Assembly Instructions
At LifeSpan we strive to make our equipment easy to assemble and start
using. Parts that can be pre-assembled are always assembled and tested on
the product line.
Prior to starting the assembly process, take all the parts out of the box,
remove plastic bags and lay everything out on the oor to become familiar
with the components.
Since your desk is a heavy piece of equipment, it is recommended that you
use two people during assembly and follow these assembly instructions to
reduce any problems that may occur.
Desktop Ships Separately
3
9
2
1
11
4
10
8
5
7
12
6
6
Tool Bag - Contents
5mm Allen
Wrench
4mm Allen
Wrench
w/Phillipsw/Phillips w/Phillips
2.5mm Allen
Wrench
Page 7

SD9 Standing Desk: Assembly Instructions
Hardware Included
Item# Part Description Item# Part Description
1 Front Reinforcement Frame 8 Left Desk Support Bracket
2 Back Reinforcement Frame 9 Right Desk Support Bracket
3 Desktop 10 Electronics Control Box
4 Right Motorized Leg 11 Height Controller
5 Left Motorized Leg 12 Power Cord
6 Left Base Foot
7 Right Base Foot
Bag # Item # Qty. Part Description
1 13 6 M8x12L Screws/Washers
2 14 8 M8x55L Bolts/Washers
3 15 6 M6x15L Screws/Washers
4 16 8 M8x35L Screws/Washers
4 17 6 M6x15L Screws/Washers
5 18 3 M4 x10L Screws/Washers
6 19 2 Phillips Screws
7 20 4 Cable Ties
M8x12L (x6) M8x55L (x8)
STEP 2 BAGSTEP 1 BAG
M8x35L Screw
(x8)
Phillips Screw
(x2)
STEP 6 BAG STEP 7 BAG
M6x15L Screw
(x6)
STEP 4 BAG
Cable Ties
M6x15L Screw
(x6)
STEP 3 BAG
M4x10L Screw
(x3)
STEP 5 BAG
7
Page 8

SD9 Standing Desk: Assembly Instructions
Step 1: Attach Right and Left Side Bracket
LOCATE BAG LABELED STEP 1
Contents: 6 each M8x12L screws with washers
A. Add the Left Desk Support Bracket(8) to the Left Motorized Leg(5). Each will
have an “LLL” sticker attached for easy identication.
B. Stand the leg on the motor side as shown in the illustration and align the
bracket.
C. Locate the screws for Step 1 and hand tighten the bracket to the leg.
Then securely tighten with the included tool.
D. Repeat for the Right Desk Support Bracket(9) and Right Motorized Leg(4).
NOTE: Make sure that the
power cable isn’t set hard
on the ground which could
damage the wire.
NOTE: Do not tighten or
loosen set screws. They
have been pre-adjusted
prior to shipping.
Set Screws
5
5mm Allen
Wrench w/
Phillips
8
M8x12L (x6)
8
Page 9

L L L
L L L
Step 2: Attach Base
L L L
L L L
SD9 Standing Desk: Assembly Instructions
LOCATE BAG
LABELED STEP 2
Contents: 8 each M8x55L
bolts with washers
A. Align Left Base Foot(6)
labelled 'LLL" with the
Left Motorized Leg (5) and
connect the wires.
B. Push ALL extra wiring into
the Left Base Foot(6).
6
6
9
Page 10

SD9 Standing Desk: Assembly Instructions
LL L
C. Connect the Left Base
Foot(6) to the Left Motorized
Leg(5) with the four M8x55L
Bolts with Washers(14).
D. Insert four M8x55L Bolts(14)
being careful not to
damage wires inside the
Left Base Foot(6).
E. Hand tighten each of the
four bolts.
F. Tip the left post on its side.
G. Repeat the same procedure
on the right side.
Step 3: Attach Desktop to Posts
LOCATE BAG LABELED STEP 3
Contents: 6 M6x15L Screws and Washers
5mm Allen
Wrench w/
Phillips
6
M8x55L (x8)
3
RRR
A. Place the left post on
top of the Desktop(3) as
shown in the illustration.
Tighten each of the three
M6 Phillips Screws and
Washers(15) as shown.
B. Repeat on the right side.
10
LLL
NOTE:
Be careful not to let
the post tip.
RRR
RRR
M6x15L Screw
(x6)
4mm
Page 11

SD9 Standing Desk: Assembly Instructions
Step 4: Attach Reinforcement Frame
LOCATE BAG LABELED STEP 4
Contents: 8 each M8x35L Bolts with Washers, 6 each M6x15L Screws.
A. Locate the Front Reinforcement Frame labelled (1) and the Back
Reinforcement Frame labeled (2). Place these frames on desktop with
screw tabs down and facing each other as shown in gure below.
B. Extend Front and Back Reinforcement Frames(1, 2) to align all mounting
holes with Desktop(3) and Motorized Legs(4, 5).
C. Loosely install the eight M8x35L(16) bolts through the Reinforcement
Frames (1,2) and into the Motorized Legs (4,5).
D. Tighten all eight M8x35L(16) bolts.
E. Using the six M6x15L Screws(17) attach both reinforcement frames to the
desktop as shown in the illustration.
F. Tighten the pre-installed Set Screws(A) . Be careful not to overtighten as
the tube will bend.
NOTE:
72" desktop shown for clarity of frame
components. When mounting the frame
to smaller desktop sizes, the front and
back reinforcement frame pieces slide and
compress into shorter lengths.
Center Positions
17
16
5
17
16
16
17
2
A
1
4
A
Front
3
16
5mm Allen
Wrench w/
Phillips
M8x35L Screw
(x8)
M6x15L Screw
(x6)
4mm
11
Page 12

SD9 Standing Desk: Assembly Instructions
Step 5: Attach Electronics Controller Box
LOCATE BAG LABELED STEP 5
Contents: 3 each M4x10L Screws/Washers
A. Guide the cable with the square connector(B) to the middle of the desk as
shown.
B. Connect the 2 pin power cable(C) to the Electronics Controller Box(10).
C. Secure the Electronics Controller Box(10) in place with three M4 screws(18).
D. Attach square connector cables (B, D) to the left side of the Electronics
Controller Box(10).
18
C
Right Side
Square
Connector
Cable
M4x10L Screw
(x3)
2.5mm
10
B
Left Side
B
D
12
Page 13

SD9 Standing Desk: Assembly Instructions
Step 6: Attach Height
Controller
LOCATE BAG STEP 6
Contents: Height Controller,
Mounting Clip,
2 Phillips Screws
A
Height
Controller
Mounting Clip
A. Locate Mounting Clip and
Height Controller(11).
B. Connect Mounting Clip to
B
Height Controller by lining
up the locking tabs.
C. Slide Mounting clip
backward to locking
position.
D. Attach to right side of
desktop with 2 Phillip
screws(19) into pre-drilled
C
holes.
D
1919
View from beneath
Desk & Height
Controller
Phillips Screw
(x2)
13
Page 14

SD9 Standing Desk: Assembly Instructions
Step 7: Attach Height Controller Cable
LOCATE BAG LABELED STEP 7
Contents: 4 Cable Ties
A. Locate end of Height Controller Cable (E), guide through hole in Front
Reinforcement Frame (1) and connect to the Electronics Control Box(10).
B. Attach Cable Ties(20) to underside of desk in areas to best secure the
Height Controller Cable.
10
Left Side
14
E
20
Cable Ties
Page 15

SD9 Standing Desk: Assembly Instructions
Step 8: Turn Upright and Attach Power
A. Use 2 people to lift and turn upright; and position on oor where
desired.
B. Connect the Power Cord (12) from rear Left Desk Foot to an outlet.
12
12
Close-up
15
Page 16

Standing Desk
Operations
16
Page 17

SD9 Standing Desk: Console Overview & Specications
SD9
White LED
Memory Pre-sets
Readouts
Display
Buttons
CONSOLE
Height Adjustment Levels
Height Adjustments,
1 2 3 4
Console Buttons
1. S: Sets desk to desired height. Adjust desk height. Hold 'S' button down
until display ashes. Push and hold 1,2,3 or 4 until number shows in
display. This sets your desired height to that button.
2. 1-2-3-4: Pre-set buttons remember 4 dierent heights.
3. Display: Shows height number setting from range of 079-099.
4. : Increases or decreases desk height.
17
Page 18

SD9 Standing Desk: Console Overview & Specications
Error Codes
Error Code Description Handling Steps
Overheat- System detects
HOT
E01
E16
* Rated weight capacity is 220 lbs (100kg)
the action by not following
the rated duty cycle and pre-
vents it from overheating.
Overload- System detects
excessive weight*
arrangement by not
following the rated capacity
Block- System detects a
sudden resistance or pinch
during moving.
Calibration
1. Press and hold S and UP buttons. The S button needs to be pressed and
held rst then the UP button so both are being held at the same time.
After a second or two the display will start ashing “Set”. The buttons can
be released. The desktop will go to the lowest position and then to the
highest position and then back to the lowest. The console will then show
the normal reading of the desktop.
Stop operating
until cool o.
Please remove some
weight. Release button then
press again can continue
operation and show current
height.
Release button. Remove
the block source then press
button again can continue
operation.
18
Page 19

LifeSpan Fitness
P.O. Box 981316
Park City, Utah 84098-1316
Phone: 877.654.3837
www.LifeSpanFitness.com
Standing Desk Patent(s) Pending
SD9
Version 1.4
Standing Desk
 Loading...