

Page 1

LifeSize® Focus™
Installation Guide
Page 2

August 2009
Copyright Notice
©2008-2009 LifeSize Communications Inc, and its licensors. All rights reserved.
LifeSize Communications has made every effort to ensure that the information contained in this
document is accurate and reliable, but assumes no responsibility for errors or omissions. Information
in this document is subject to change without notice. Companies, names, and data used in examples
herein are fictitious unless noted. This document contains copyrighted and proprietary information,
which is protected by United States copyright laws and international treaty provisions. No part of the
document may be reproduced or transmitted, in any form or by any means, electronic or mechanical,
for any purpose, without the express written permission from LifeSize Communications.
Trademark Acknowledgments
LifeSize® is the trademark of LifeSize Communications Inc. All other trademarks are the property of
their respective owners.
Patent Notice
For patents covering LifeSize® products, refer to http://www.lifesize.com/support/legal.
Contacting Customer Support
If you have questions, concerns, or need assistance, contact your LifeSize Channel Partner.
Providing Customer Feedback
LifeSize Communications welcomes your comments regarding our products and services. If you have
feedback about this or any LifeSize product, please send it to [email protected]. Contact
information for LifeSize Communications is as follows:
Method Address
Fax (512) 347-9301
(512) 347-9300
2 LifeSize Focus Installation Guide
Page 3

Welcome to LifeSize Video Communications Systems
LifeSize high definition video communications systems enable anyone with dispersed
colleagues and operations to collaborate more clearly and effectively. Each system is
designed to make video communication a highly productive, simple, and reliab le experience.
This guide explains how to install LifeSize Focus for use with a LifeSize video
communications system. Related documentation is available from the documentation CD
included in the product box and from the Support page of www.lifesize.com.
Installation Overview
LifeSize Focus is a fixed focus camera that includes microphones for audio input during
calls. Installing LifeSize Focus includes the following tasks:
1. Attach the camera to a mount.
2. Remove the lens cap.
3. Connect the camera to the codec.
4. Adjust the camera position, if necessary.
5. Select the device you wish to use as the active microphone for audio input during calls.
LifeSize Focus Installation Guide 3
Page 4

Installation Prerequisites
Before installing LifeSize Focus, complete the following tasks:
• Ensure that your LifeSize video communications system is installed with software
release v3.5 or later.
• Select a mounting option for the camera:
- desktop mount—a movable mount for positioning the camera on a desk or table.
- display mount—a fixed mount for positioning the camera on top of a display
connected to your LifeSize video communications system. The mount attaches to
the display with an adhesive tape located under the base of the mount. The
adhesive requires 72 hours to achieve full bond strength at room temperature. Plan
your installation to allow time for the adhesive to bond securely to the display.
The adhesive tape is intended for a single use and permanent application. LifeSize
recommends that you determine the op tim a l ar e a for plac ing the cam er a by
removing the lens cap and connecting it to the codec as descri bed in th is docume nt
before attaching the mount to the display. For information a bout techniq ues that you
may consider for removing the adhesive tape and cleaning the adhesive residue
from the display surface, contact the 3M company to obtain product documentation
for 3M VHB tapes. To obtain a replacement display mount, contact your LifeSize
reseller.
WARNING: Use the desktop and display mounts on a horizontal surface only. Using
either mount on a vertical surface or on a surface with a slope gr eater than 10 degrees
may cause the camera to detach from the mount resulting in damage to the camera .
- tripod socket—a 1/4-20 UNC threaded socket for connecting the camera to a
tripod. Refer to “Using the Tripod Socket” on page 8.
Note: LifeSize Focus does not include a tripod.
• If you intend to use the camera as the active microphone for audio input during calls,
follow these guidelines to optimize camera placement:
- Avoid placing the camera less than .5 meters (1.64 feet) away from the front of the
speakers connected to your LifeSize video communications system.
- Avoid placing devices that generate noise (such as fans or personal computers)
between video conference participants and the camera.
- The camera microphones attenuate sound directed at the back of the camera. Place
the camera in a location that ensures video conference p articip ant s speak in fr ont of
the camera from a distance greater than .5 meters but less than 2.5 meters (8.2
feet).
4 LifeSize Focus Installation Guide
Page 5
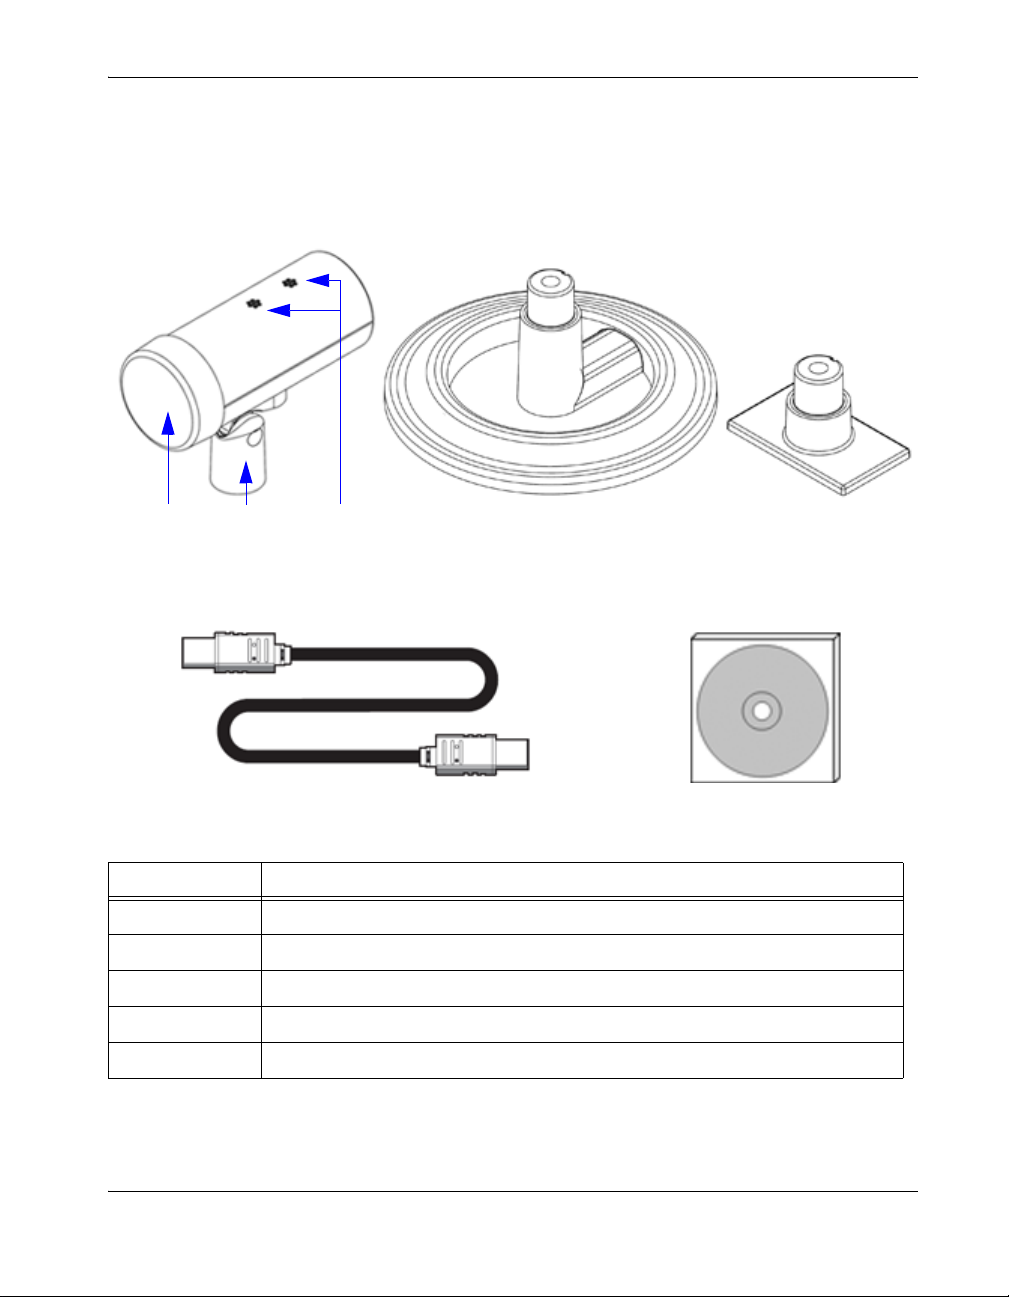
Installing LifeSize Focus
A
BCA-1 A-2 A-3
D
E
LifeSize Focus includes the following components:
Component Description
A camera with lens cap (A-1), pivot collar (A-2), and microphones (A-3)
B desktop mount
C display mount
D camera cable ( 3 meters)
E documentation CD
LifeSize Focus Installation Guide 5
Page 6
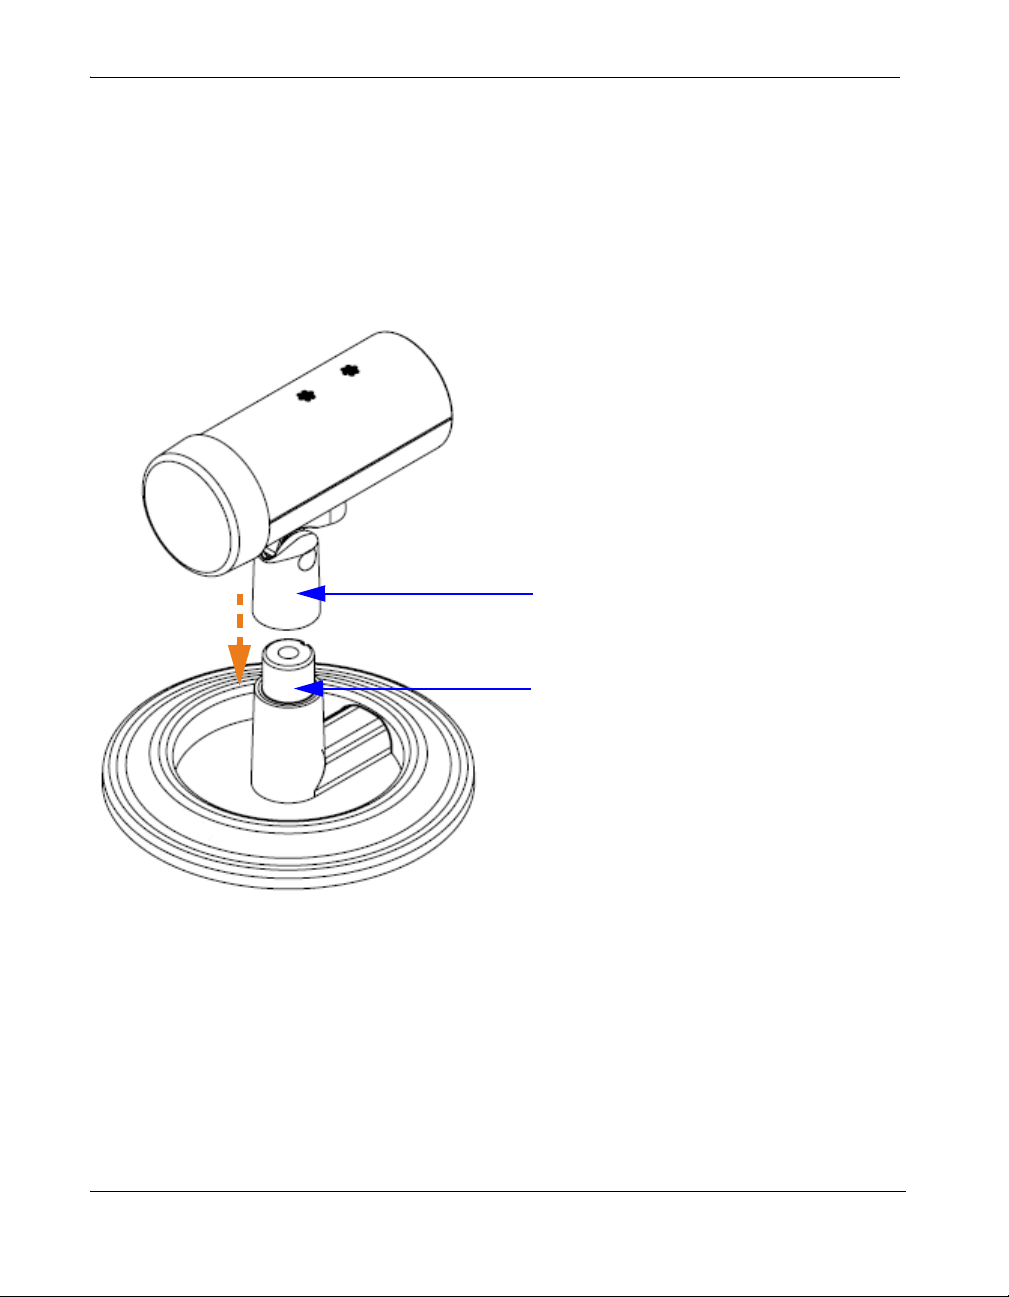
1. Attaching the Camera to a Mount
pivot collar
pivot
Follow the instructions in this section to attach the camera to a mount.
Attaching the Desktop Mount
To attach the camera to the desktop mount, slide the pivot collar on the camera over the
pivot on the mount.
Attaching the Display Mount
To attach the camera to the display mount, follow these steps:
1. Ensure that the temperature in the room in which the display is located is at least 60
(15
°C). The ideal temperature range for applying the adhesive t ape on the mount is
70°F to 100°F (21°C to 38°C).
WARNING: At temperatures below 60
to the display.
6 LifeSize Focus Installation Guide
°F (15°C), the adhesive may fail to adhere readily
°F
Page 7
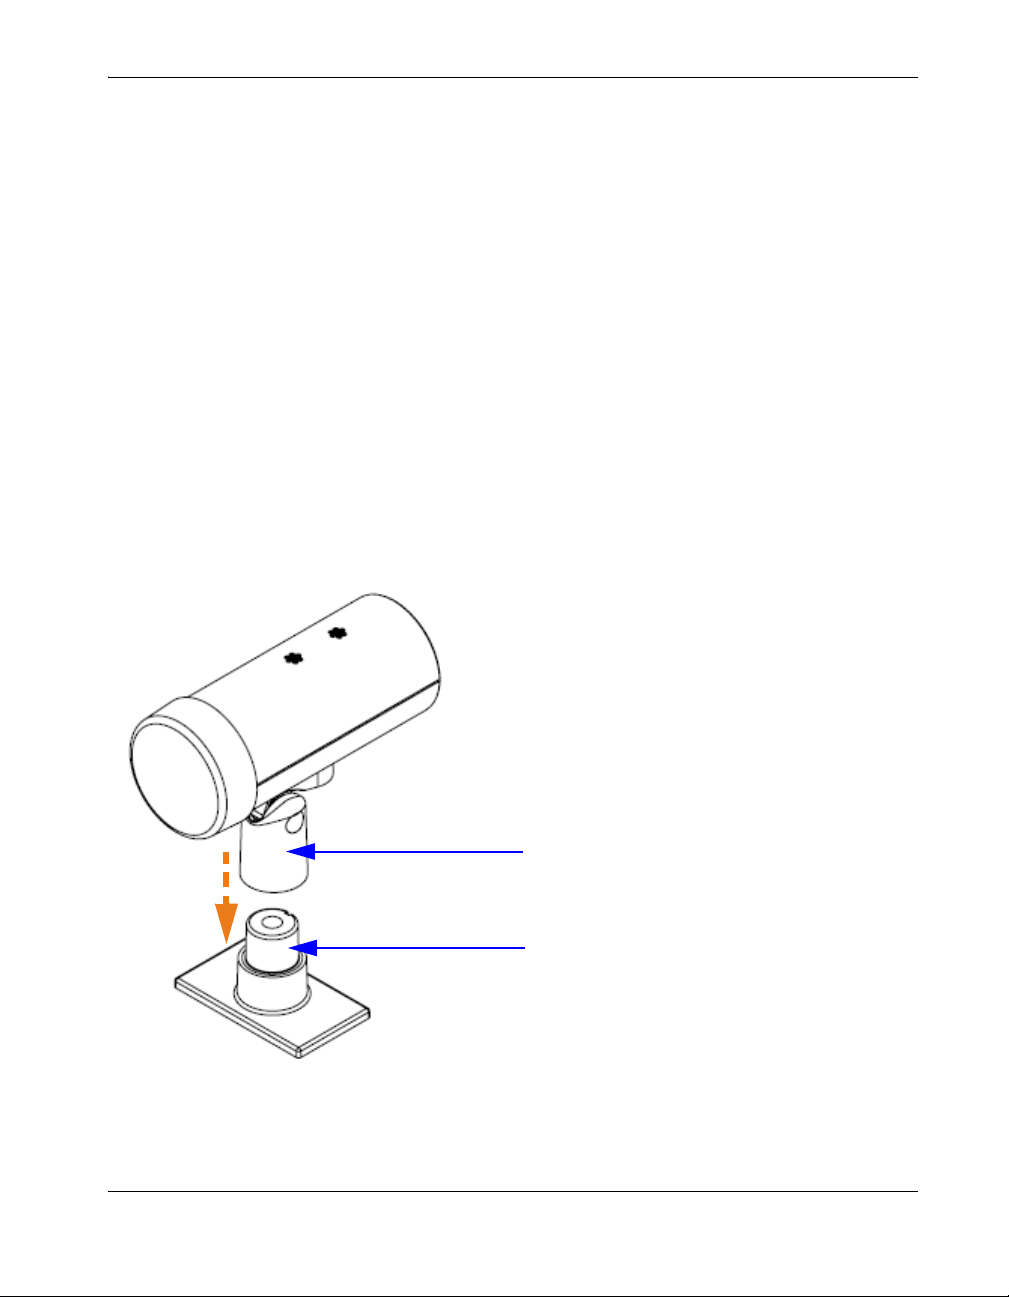
2. Ensure that the area on top of the display where you intend to attach the mount meets
pivot collar
pivot
the following conditions:
- horizontal
- clean (free of dirt, dust, oil, and other residues)
- dry and free of condensed moisture
3. Remove the red film from the adhesive under the display mount.
4. Press the mount firmly into place on top of the display.
5. Allow the adhesive to bond to the display. At room temperature, the b ond fo rmed b y the
adhesive reaches full strength after 72 hours.
WARNING: Ensure that the mount is securely attached to the display before proceeding
with the installation. An insecure mount can fail resulting in damage to the camera.
6. Attach the camera to the display mount by sliding the pivot collar on the camera over the
pivot on the mount.
LifeSize Focus Installation Guide 7
Page 8
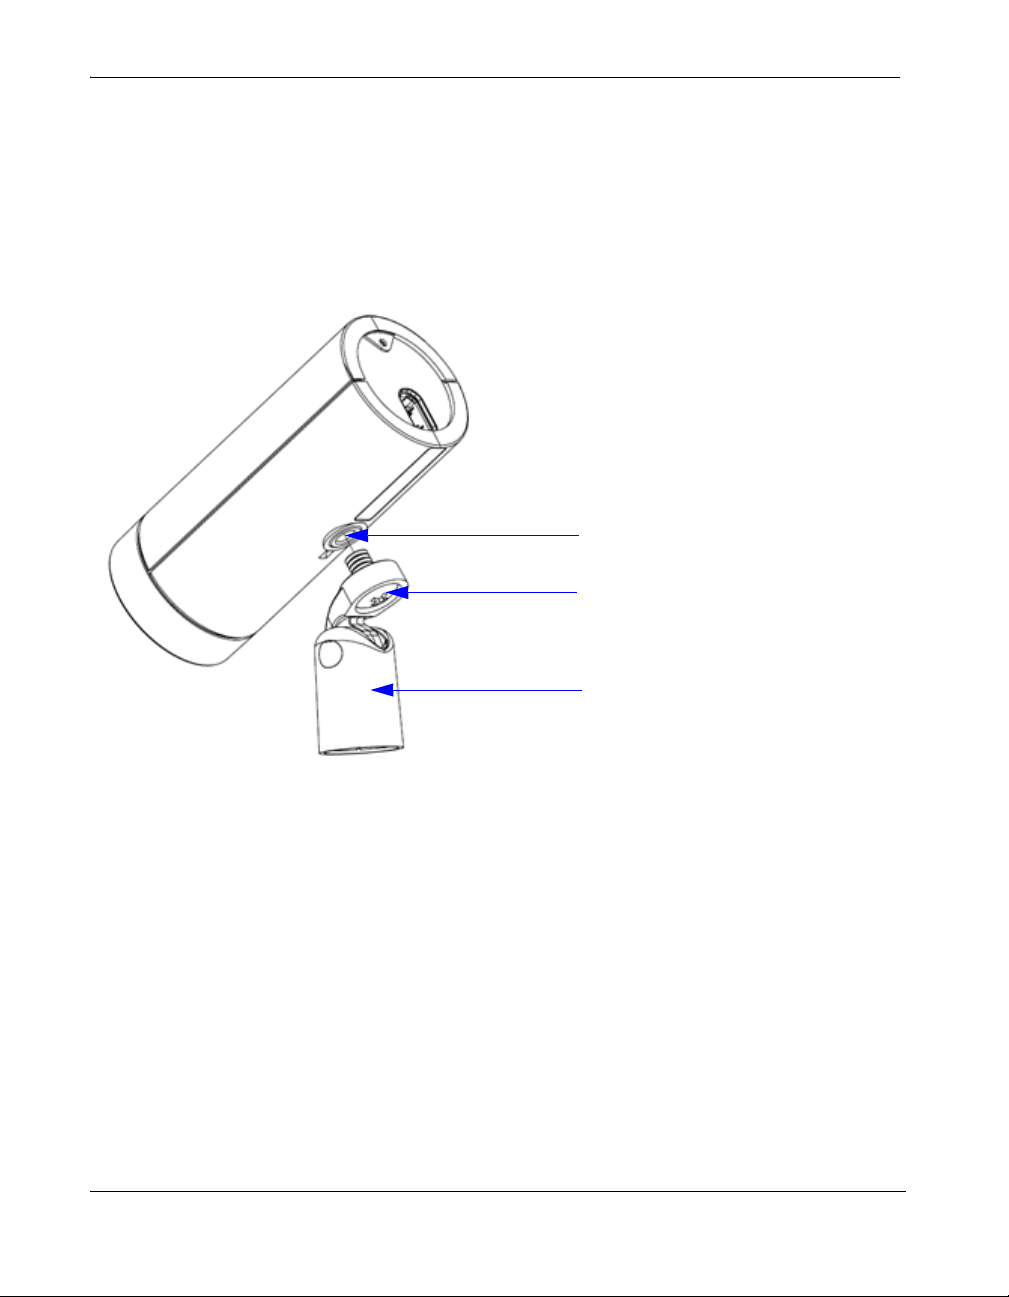
Using the Tr ipod Socket
tripod socket
screw
pivot collar
The tripod socket and a screw secure the pivot collar to the camera. To expose the tripod
socket for use with a tripod, loosen the screw until the pivot collar detaches from the camera.
Note: The screw remains attached to the pivot collar.
8 LifeSize Focus Installation Guide
Page 9
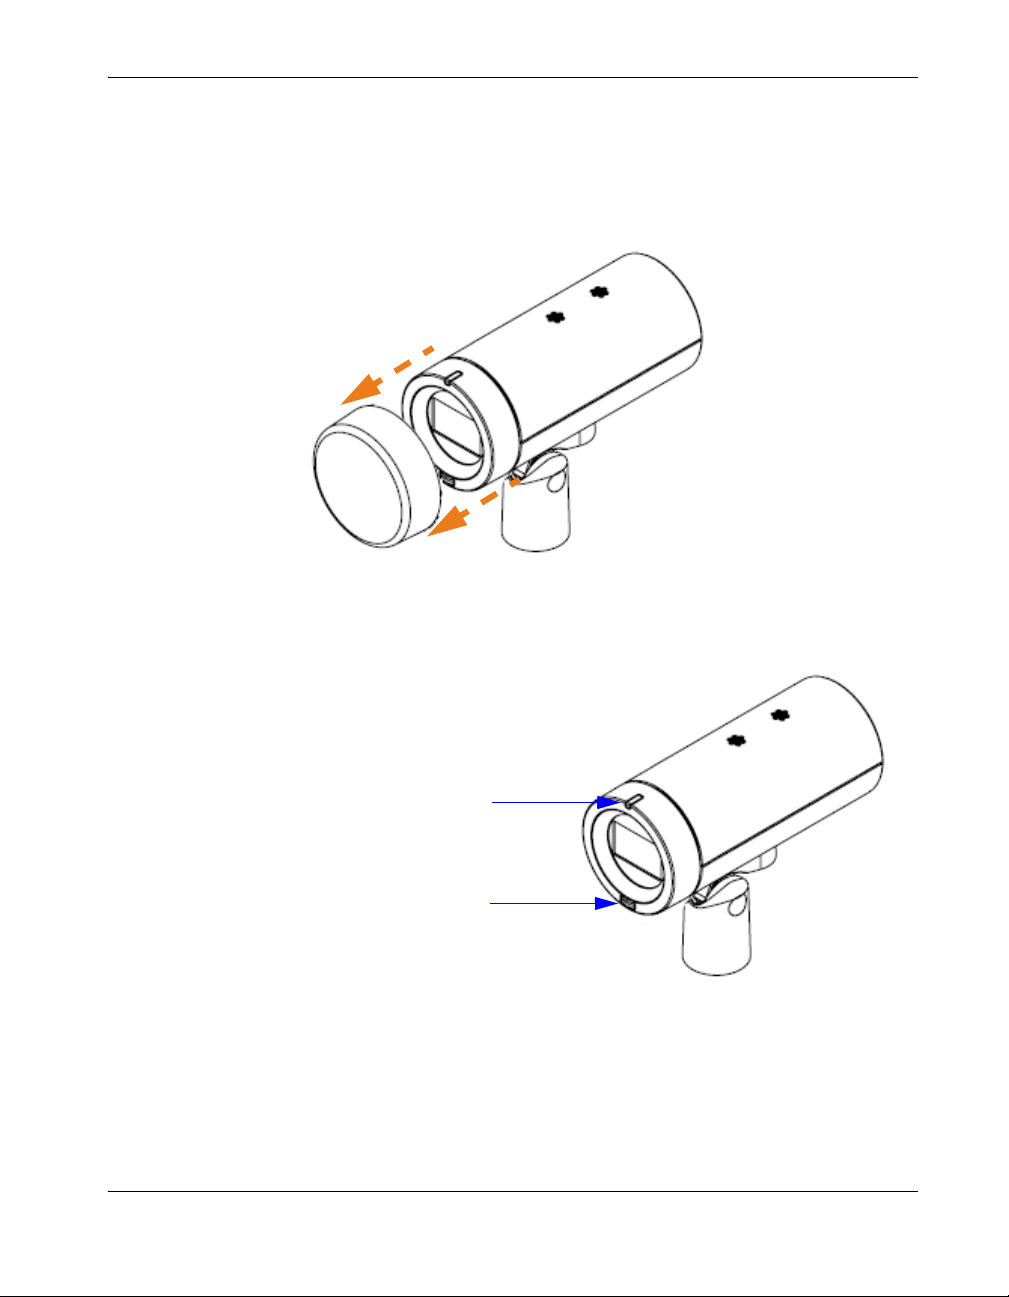
2. Removing the Lens Cap
Status LED
Infrared (IR) sensor
Remove the lens cap from the camera.
Removing the lens cap also exposes the status LED and the infrared (IR) sensor.
The IR sensor detects signals from the LifeSize remote control up to eight meters (26 feet)
away when you use the remote control within two meters (6.5 feet) to the left or right of the
front of LifeSize Focus. If you use the remote control directly in front of LifeSize Focus, the
IR sensor detects the signal up to 14 meters (45 feet) away.
LifeSize Focus Installation Guide 9
Page 10

The status LED indicates the status of the camera as follows:
LED Color Status
No color Power is off.
Purple flash The camera is initializing.
Blue flash The camera software is upgrading.
Dim blue The camera is receiving power and is inactive.
Bright blue The camera is receiving power and is active.
Bright blue flash Signal received from the LifeSize remote control.
Solid red or purple The camera is malfunctioning. Contact LifeSize
Technical Services for assistance.
10 LifeSize Focus Installation Guide
Page 11
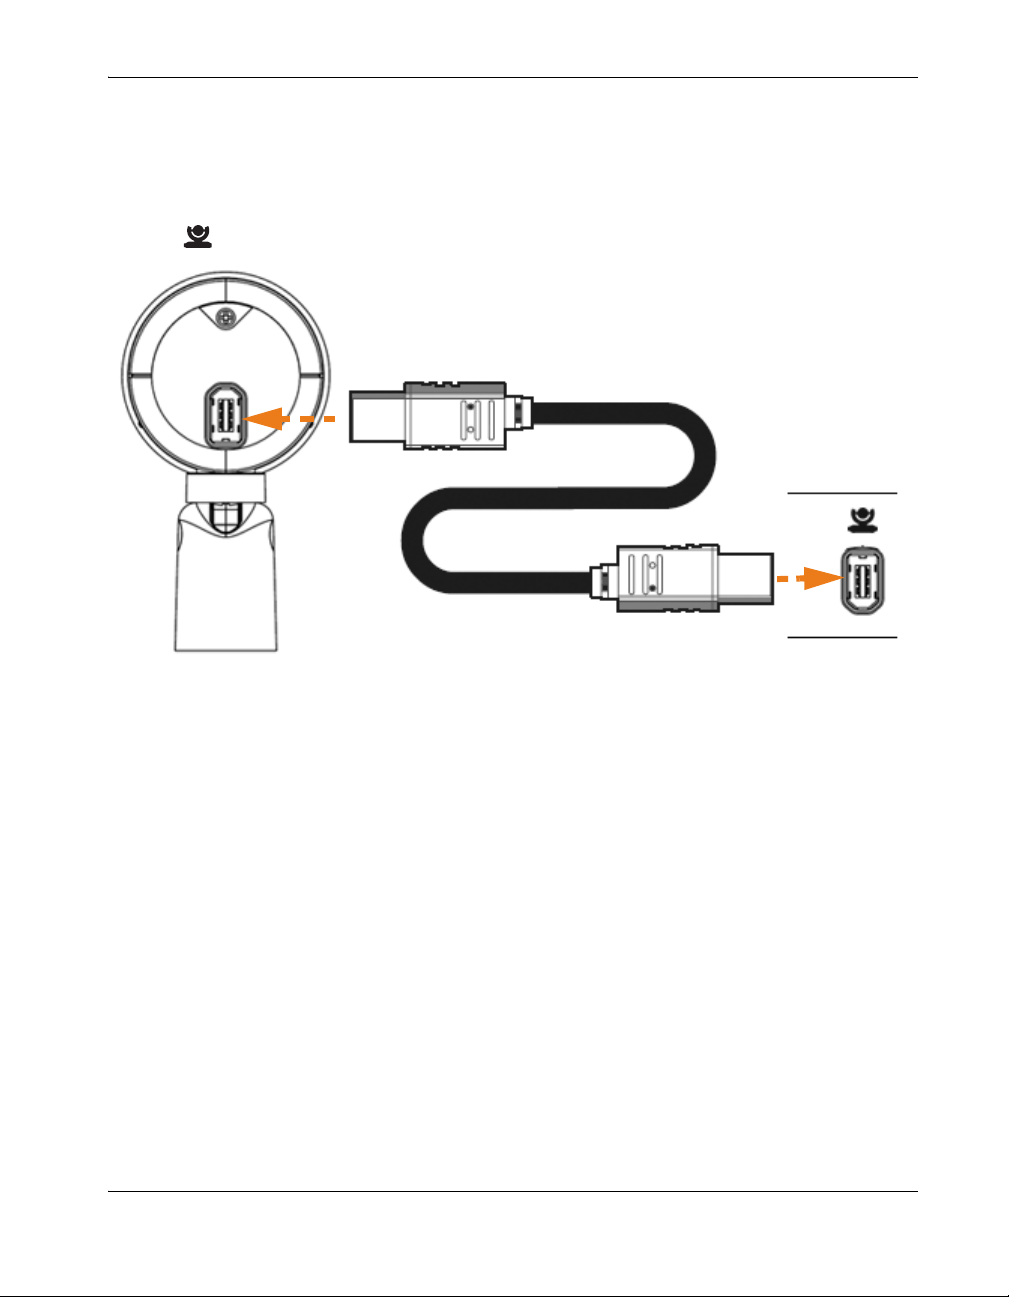
3. Connecting the Camera to the Codec
To connect the camera to the LifeSize codec, insert one end of the camera cable into the
port on the back of the camera and insert the opposite end into the port marked with the
camera symbol on the back panel of the codec.
Note: Depending on the model of your LifeSize video communications system, the
camera symbol appears either above or below the port on the codec.
LifeSize Focus Installation Guide 11
Page 12
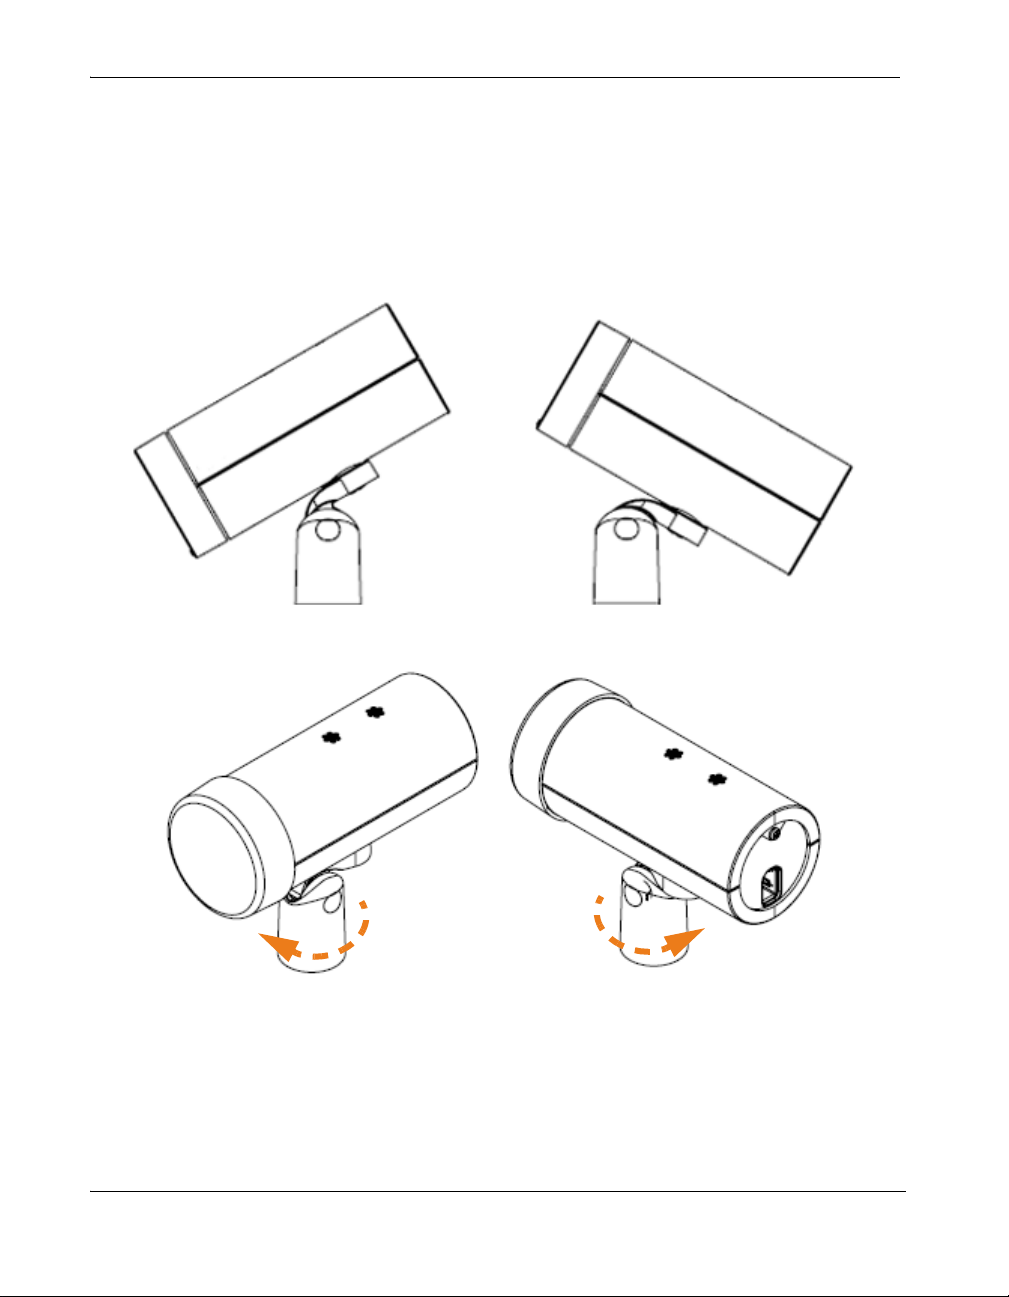
4. Adjusting the Camera Position
Use the pivot collar to tilt and pivot the camera manually when using either the desktop or
display mount. The pan, tilt, zoom, and camera preset buttons on the LifeSize remote
control are not supported with this camera.
12 LifeSize Focus Installation Guide
Page 13

5. Controlling the Camera Microphones
You can use LifeSize Focus as both the video and audio input for your LifeSize video
communications system. If you do not have a LifeSize Phone or LifeSize MicPod connected
to your LifeSize video communications system in addition to LifeSize Focus, and you use
the default system settings, the system uses LifeSize Focus as the active microphone.
If LifeSize Focus is one of several audio input devices connected to your system, and you
want LifeSize Focus to be the active microphone, you must explicitly set the active
microphone preference at Administrator Preferences : Audio : Active Microphone. For
more information on selecting the active microphone, refer to the LifeSize Video
Communications Systems Administrator Guide.
Navigate to the System Information page on your LifeSize system to verify which audio
input device is the active microphone. When the active microphone status is None, the No
Active Microphone indicator appears in the status bar indicating that no active
microphone is available.
To control the volume of the active microphone, adjust th e Active Microphone Volume
preference in User Preferences or Administrator Preferences : Audio.
To mute or unmute the camera micropho nes during a call, press the mute button on the
LifeSize remote control. A mute icon appears in the user interface. If a LifeSize Phone or
LifeSize MicPod is connected to the system, you can also mute the microphones on the
camera by pressing the mute button on either of these devices.
Troubleshooting
The following sections describe symptoms, possible causes, and potential solutions for
common problems you may encounter when installing LifeSize LifeSize Focus.
No Video
If no video appears in the display from the camera :
• Ensure that the camera cable is securely connected to the camera and to the
appropriate camera input on the codec and that nothing is obstructing the cable.
• Verify that the blue LED on the front of the camera is lit, indicating that the camera is
receiving power. Reboo t the LifeSize system if necessary to verify that the camera
receives power.
• Navigate to the System Information page and locate the HD Camera 1 (and HD
Camera 2 if you are using two cameras with LifeSize Room) and Type fields for the
cameras. Ensure that the status of each connected camera is Ready and that Fixed +
Microphone appears as the type for the LifeSize Focus connected to the system.
LifeSize Focus Installation Guide 13
Page 14

• Ensure that the primary input for your LifeSize system is set to the high definition
camera.
• Ensure that cable connections from the display to the codec are correct and secure and
that the display is receiving power.
Distorted or Dark Video
If video appears blurred or dark:
• Ensure that the camera lens is clean. Use a dry, soft, lint-free cloth to clean the camera
lens.
• Adjust the room lighting, or navigate to User Preferences : Diagnostics : High
Definition Camera and adjust the HD Camera Brightness preference.
Distorted Audio Received at Far End
If you are using the camera as the active microphone for audio input during calls and fa r end
participants report distorted audio, ensure that the camera is placed more than .5 meters
away from the front of the speakers attached to the LifeSize system. Refer to “Installation
Prerequisites” on page 4 for information about camera placement.
14 LifeSize Focus Installation Guide
 Loading...