

Page 1
Owner’s
Booklet
Page 2

The SURESTEP®System is intended for use
outside the body (in vitro diagnostic use). It
should be used only for testing purposes and
only with fresh whole blood samples. It should
not be used for the diagnosis of diabetes.
Page 3
Welcome to LifeScan
Congratulations! You’ve chosen a product
made by LifeScan, a leading company in
providing products to help you manage
your diabetes. SURESTEP
®
blood glucose
monitoring products are widely available
without a prescription.
Blood glucose monitoring plays an important
role in controlling your diabetes. A recent
study showed that keeping blood glucose
levels close to normal can reduce the risk
of complications by up to 60%. The results
you get with the SURESTEP
®
System can
help you and your healthcare professional
monitor and adjust your treatment plan to
gain better control of your diabetes.
Everything you need to know about using
the SURESTEP System is included in this
booklet. A free instructional videotape is
also available by calling LifeScan
Customer Services. If you have any questions, please feel free to call the toll-free
numbers to speak with our Customer
Services Department.
Remember to complete and mail the
Warranty Registration Card. A complimen-
tary gift is sent when we receive your
Warranty Registration Card.
Important phone numbers:
Meter Serial Number _______________
LifeScan Customer Services (24 hours a day, 7 days a week):
USA English 1 800 227-8862 Español 1 800 381-7226
Healthcare professional ________________________ Pharmacist _________________________
Diabetes educator _____________________________ Other ______________________________
Page 4

CAUTION: Before using any product to test your blood glucose (blood
sugar), read all instructions and practice the test. Do all quality control
checks as directed and consult with a diabetes healthcare professional.
These recommendations apply to all blood glucose monitoring systems
and are supported by the American Association of Diabetes Educators,
the American Diabetes Association, the U.S. Food and Drug Administration, and the Health Industry Manufacturers Association.
IMPORTANT: If you have followed the tips to ensure accuracy and
your blood glucose results are still out-of-range, call your healthcare
professional.
®
The SURESTEP
battery door, batteries, PENLET
System contains many small parts: test strip holder,
®
II Cap, lancets, control solution vial,
test strips, test strip bottle cap, etc. Keep the system out of the reach of
small children because these parts may be dangerous if swallowed.
If using a 10% bleach solution to disinfect the meter, be sure to completely
remove any bleach from the meter and test strip holder with a cloth dampened with water. Bleach will react with the test strips and cause inaccurate
results.
Page 5
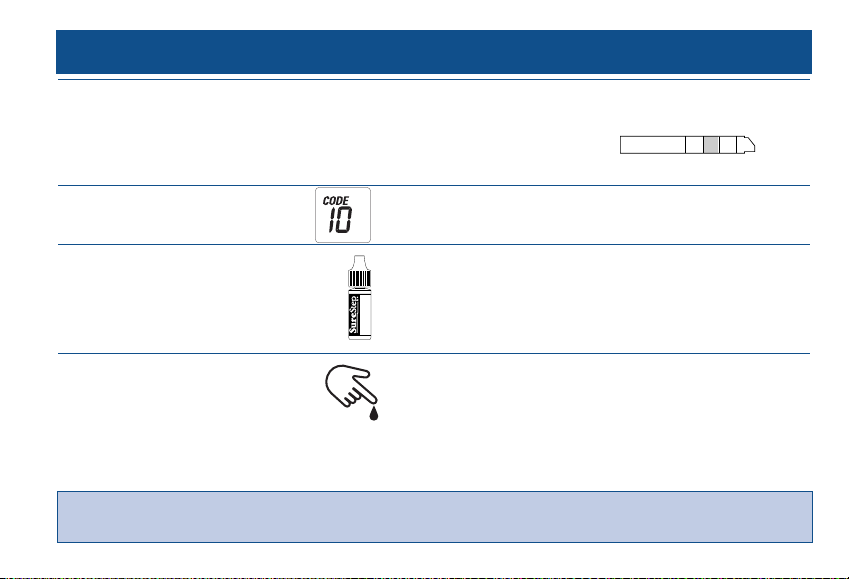
TABLE OF CONTENTS
Glucos
Shake befor
Not Intende
Discard 3 m
Discard date
Lot No.
Exp. Date
© LIFESCAN
I
LEARNING THE SYSTEM 1
SURESTEP®Blood Glucose Meter 3
SURESTEP®Test Strips 4
Display Symbols 6
CODING THE METER
Three Easy Steps to Coding 10
CHECKING THE SYSTEM
SURESTEP®Glucose Control Solution 12
Control Solution Test 12
Control Solution Range 17
TESTING YOUR BLOOD
Getting a Drop of Blood 18
Step-by-Step Test Procedure 24
Optional Color Chart 32
LifeScan Customer Services (24 hours a day, 7 days a week):
USA English 1 800 227-8862 Español 1 800 381-7226
Page 6
UNDERSTANDING
YOUR RESULTS Overview 34
Comparing Meter and Laboratory Results 35
Expected Test Results (Target Range) 36
Testing Tips to Ensure Accuracy 38
Health Conditions Causing
Out-of-Range Results 39
Recommendations for Better
Diabetes Control 41
RECALLING RESULTS
FROM METER MEMORY Using the Meter for the First Time 42
Recalling All Results in Meter Memory 43
Recalling Your Last Result 44
CARING FOR YOUR METER
General Care 45
Cleaning the Meter 45
Changing the Batteries 49
LifeScan Customer Services (24 hours a day, 7 days a week):
USA English 1 800 227-8862 Español 1 800 381-7226
Page 7

CHANGING METER SETTINGS 52
(Set-Up Mode) Entering Set-Up Mode 53
Display of Last Result 53
Unit of Measurement (mg/dL or mmol/L) 54
Beep Signals 55
SOLVING PROBLEMS
Helpful Messages 57
Error Messages 59
SPECIFICATIONS
Performance Characteristics 64
Guarantee and Warranty 65
QUICK REFERENCE GUIDE 67
LifeScan Customer Services (24 hours a day, 7 days a week):
USA English 1 800 227-8862 Español 1 800 381-7226
Page 8

Page 9

LEARNING THE SYSTEM
LEARNING
The SURESTEP®Blood Glucose
Monitoring System is the next
advance in the self-monitoring of
blood glucose. The SURESTEP
System is for people with diabetes
who need to check the level of sugar
(glucose) in their blood. A drop of
blood is taken from the finger and
placed on a SURESTEP
®
Test Strip,
which is then inserted into the
SURESTEP
®
Blood Glucose Meter.
The meter measures the blood
glucose level and displays the result
on average in 30 seconds. The system
is calibrated to give a plasma value,
the measurement used by most
clinical laboratories. Easy-to-under-
stand symbols guide you through
the test procedure and help you if
any problems arise.
SURESTEP Test Strips are the only
test strips that have been specifically designed, developed, and tested
for use with the SURESTEP Meter
to ensure consistent quality and
accuracy. For reliable results and
to maintain the manufacturer’s
complete service, support, and
warranty, use only SURESTEP Test
Strips made by LifeScan.
1
Page 10
Glucose
Shake before
Not Intended
Discard 3 mo
Discard date:
Lot No.
Exp. Date
© LIFESCAN IN
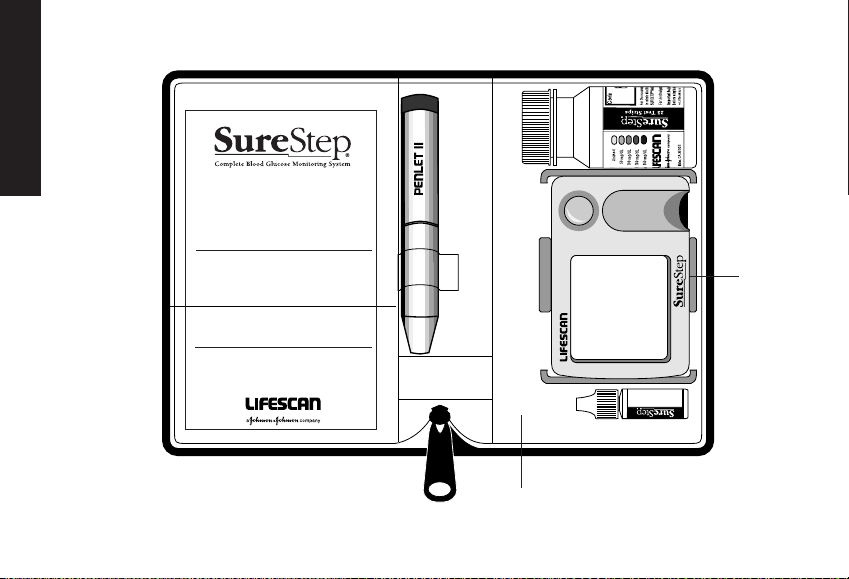
Color Chart
LEARNING
QUICK
REFERENCE
BEFORE TESTING:
See inside for instructions on
proper blood application
and coding the meter.
*IMPORTANT: Read detailed instructions in your
SureStep®Owner’s Booklet before doing a test.
*
Lancets
Inside
Tray
Extra Space for Diabetes Supplies
and Syringes
2
Page 11

SURESTEP®Blood Glucose Meter
L 5037 ZG 00171
Toll-free customer service:
UNITED STATES:
English
1 800 227-8862
Español
1 800 381-7226
CANADA:
1 800 663-5521
Milpitas, CA 95035
C22.2 No. 125; Risk Class 2
ÿ LIFESCAN INC. 1995
AW 052-178-01A Made in U.S.A.
BLOOD GLUCOSE METER
Front
DISPLAY
Shows your test results
and symbols that guide
you through the test.
LENS AREA
Contains the meter optics
that read the glucose level.
Test strip holder covers
the lens area.
Back
C BUTTON (Green)
Codes the meter, changes the
meter settings, and scrolls
through the memory.
POWER BUTTON (Blue)
Turns the meter on and off.
CONTACT POINTS
Sense the position and orientation
of the SURESTEP®Test Strip.
TEST STRIP HOLDER
Closed
Opened
Cover
LEARNING
SERIAL NUMBER
(Example)
BATTERY
COMPARTMENT
Holds two AAA alkaline
batteries.
Test Strip
Insertion
Point
Base
The cover protects the lens area
®
and the base holds the SURESTEP
Test Strip.
3
Page 12
SURESTEP®Test Strips
When blood is applied to the pink
test square, it is absorbed and a
chemical reaction takes place. A
LEARNING
blue color forms in the confirmation
dot on the back of the test strip and
is read by the meter to determine
the blood glucose level; the darker
the color, the higher the blood
glucose level.
White Tip is inserted
into the meter. The
side where you apply
blood must be face up
when you insert the
test strip.
Pink Test Square is
where you apply a
drop of blood.
White Pad absorbs the
excess blood that may
extend beyond the
pink test square.
not apply blood
directly onto the
white pad.
Do
White Tip
Pink Test
Square
FRONT
White Pad
BACK
Black Tip
Confirmation
Dot
Black Tip helps the
meter detect that
the strip has been
inserted properly.
Confirmation Dot on the
back of the test strip
is where you check to
confirm proper blood
application. When it
turns completely
blue, enough blood
has been applied for
an accurate test.
4
Page 13

IMPORTANT TEST STRIP INFORMATION
■
Contact with air, moisture, and light can cause false results. Keep test
strips sealed in the original moisture-resistant, light-protected package
and store in a cool, dry place not above 86° F (30° C). Do not refrigerate,
place in direct heat or sunlight, or leave bottle open.
■
DO NOT use SURESTEP®Test Strips beyond the expiration date.
■
If using test strips from a bottle, write the discard date on the bottle
label. Discard unused test strips 4 months after first opening the bottle.
■
DO NOT use SURESTEP Test Strips that are bent, torn, cut, or changed
in any way.
■
Before testing, the confirmation dot should be off-white. DO NOT use
test strip if confirmation dot is darker than the color of an unused test
strip shown on the Color Chart included with the test strip package.
■
Use each test strip immediately after removing it from the package.
■
Replace the test strip bottle cap immediately after removing a test strip
and close the cap tightly.
■
Never transfer test strips to a new bottle or any other container.
■
DO NOT use bleach, or products containing bleach, with the test strips.
■
For reliable results, use only SURESTEP Test Strips made by LifeScan.
5
LEARNING
Page 14
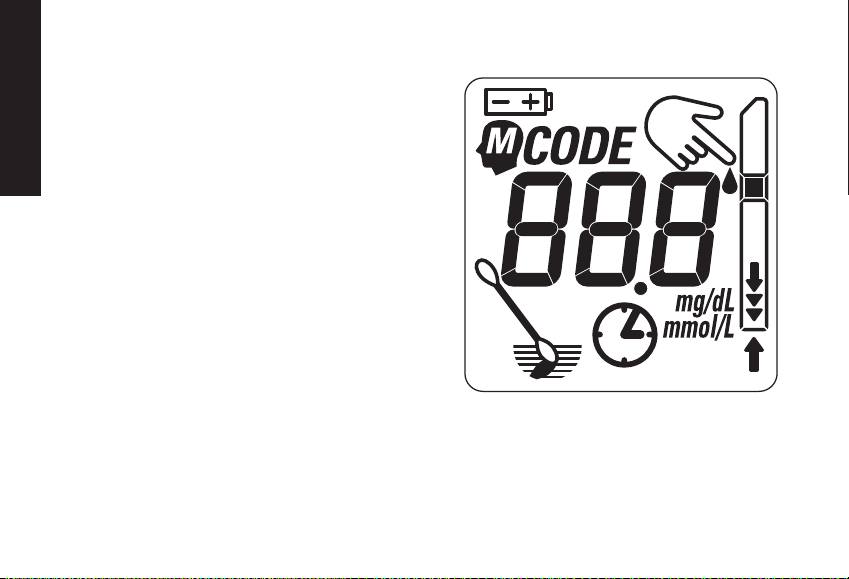
Display Symbols
The SURESTEP®Blood Glucose
Meter uses symbols to guide you
LEARNING
through a test and to help you
determine if something is wrong
with your test strip or meter.
To check that all display symbols
are working, press and hold
down the power button. All of
these symbols should appear.
Call LifeScan Customer Services
at 1 800 227-8862 if any segments
are missing.
6
Page 15
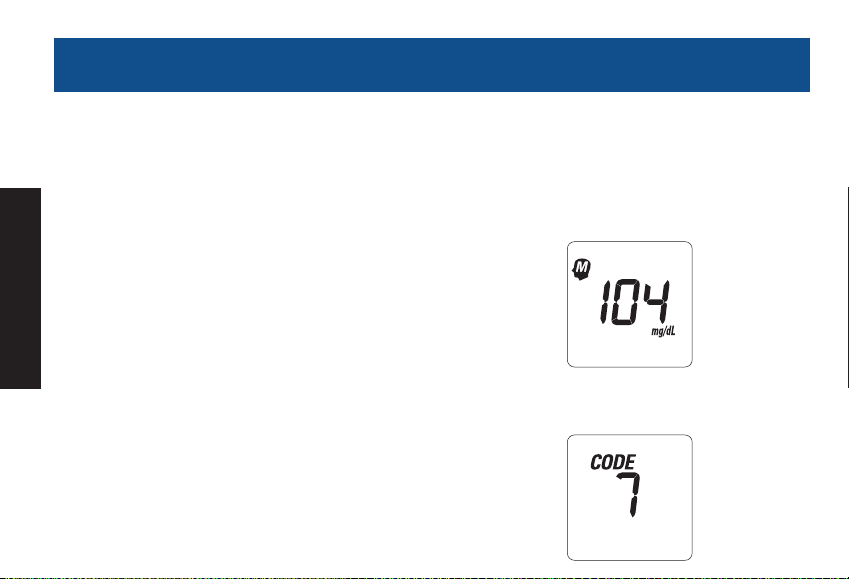
Meter Memory Result. Your
SURESTEP
®
Meter stores up to 10
blood glucose or control solution
test results in its memory. Every
time you turn the meter on, it will
automatically recall and display
your last (most recent) result.
Code Number. The number on the
display must match the code number on your SURESTEP
®
Test Strip
package. It must be checked every
time you use a new package of test
strips and changed if the code number is different.
LEARNING
(Example)
(Example)
7
Page 16
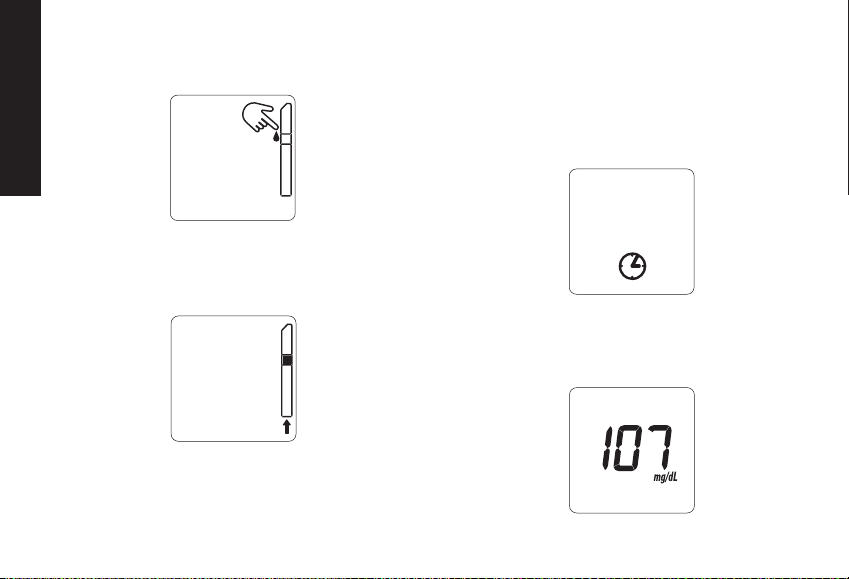
Apply Blood Sample to Pink Test
Square.
LEARNING
Push the Test Strip, Pink Side Up,
Firmly into the Test Strip Holder
Until It Stops.
If you fail to completely insert
the test strip, the test may start.
However, you may receive an
inaccurate low result.
Meter Is Reading Your Result.
The result appears, on average, in
30 seconds. The clock may flash
longer at cooler temperatures or
shorter at warmer temperatures.
Test Result.
The meter displays results between
0–500 mg/dL (0–27.8 mmol/L).
(Example)
8
Page 17
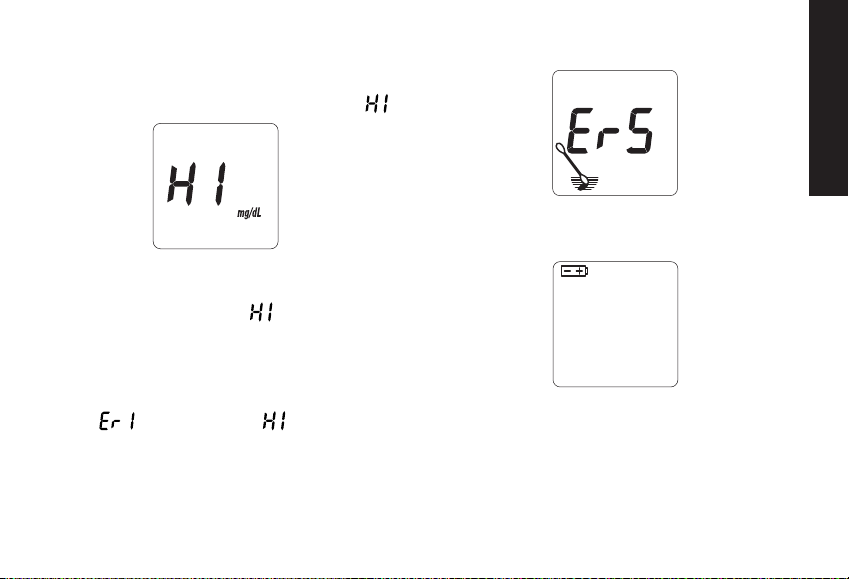
HI mg/dL.
In virtually all cases above 500 mg/dL
(27.8 mmol/L), the meter reads “.
(Example)
When proper procedures are followed, a reading of “ ” means
very high blood glucose (severe
hyperglycemia). In extremely rare
circumstances, the meter will
read “ ” instead of “ ” above
500 mg/dL (27.8 mmol/L). Compare
the color of the test strip confirmation
dot with the Color Chart on the test
strip package (see pages 32–33).
Clean Meter and Test Strip Holder.
”
Replace the Two AAA Alkaline
Batteries.
9
LEARNING
Page 18
CODING THE METER
Code numbers are used to calibrate
the SURESTEP
the SURESTEP
results.
You must code the meter
before using
®
Test Strip with
®
Meter for accurate
it for the first time. You
must check the code every time you
change to another package of test
strips. Check that the code number
CODING
on the display matches the code
number on the test strip package.
Caution: If the code numbers do
not match, you may get inaccurate
results.
Three Easy Steps to Coding
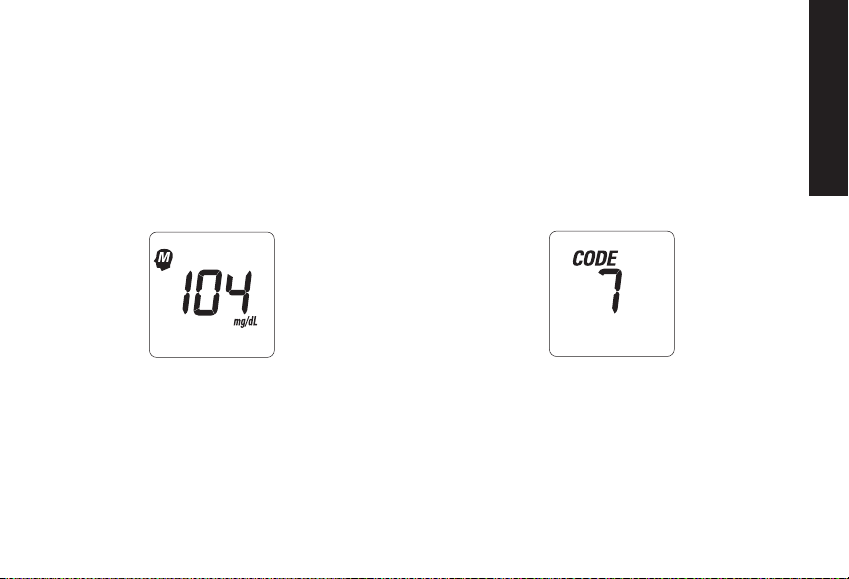
Step 1: Turn on the Meter.
Press the blue power button. The
result from your last blood glucose
or control solution test will appear.
(Example)
Next, the meter code will appear
for a few seconds.
(Example)
10
Page 19
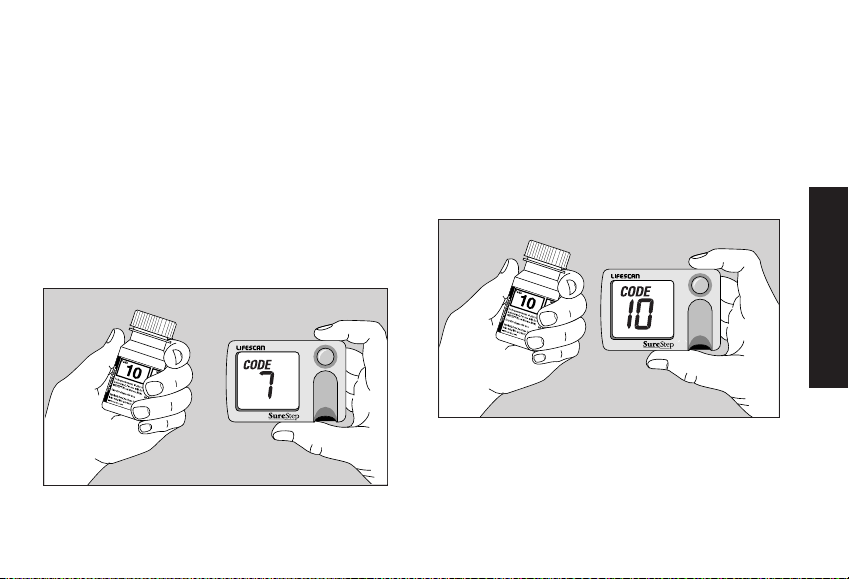
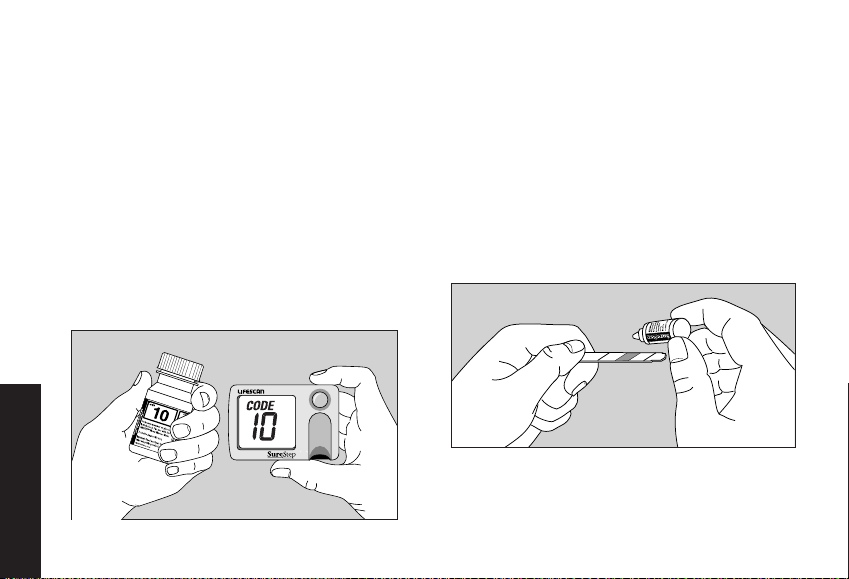
Step 2: Check the Code Numbers.
Step 3: Code the Meter.
The code number on the test strip
package will range from 1 to 21. If
the number on the display matches
the code number on the SURESTEP
Test Strip package, begin testing. If
the two code numbers do not match,
follow Step 3 to code the meter.
(Example)
After the
CODE
symbol appears, press
the green C button. Continue pressing
until the code number on the display
®
matches the code number on the test
strip package.
(Example)
The code is now set for the package
of test strips you are using. The
meter will retain this code until
you change it.
11
C Button
▼
CODING
Page 20
CHECKING THE SYSTEM
Glucos
Shake befor
Not Intende
Discard 3 m
Discard date
Lot No.
Exp. Date
© LIFESCAN
I
The SURESTEP®System does not
require a check strip. The meter
performs an automatic check every
time you turn it on.
SURESTEP
®
Glucose Control Solution
Control solution is used instead of blood
to tell you that the SURESTEP
Glucose Meter and SURESTEP
®
Blood
®
Test
Strips are working together properly.
The control solution contains
a known amount of glucose
that reacts with a SURESTEP
Test Strip.
CHECKING
SURESTEP Glucose
Control Solution
Control Solution Test
Do a control solution test:
■
Before testing with the SURESTEP
Blood Glucose Meter for the
first time.
■
Every time you open a new package of test strips.
■
Whenever you suspect that the
meter or test strips are not working
properly.
■
When your results do not reflect
how you feel.
■
If you drop the meter.
12
Page 21

IMPORTANT CONTROL SOLUTION TEST INFORMATION
■
Use only SURESTEP®Glucose Control Solution.
■
Check the expiration date. Write the discard date on the vial. Do not
use if expired. Discard the vial 3 months after first opening it.
■
The control range printed on the test strip bottle is for SURESTEP
Glucose Control Solution only. It is NOT a recommended range for
your blood glucose level.
■
Do not store the glucose control solution at room temperatures above
86° F (30° C). Do not refrigerate or freeze.
■
If a control solution test falls outside of the control range, do not
use the meter to test your blood until you get a control solution
test result within the range. Call LifeScan Customer Services at
1 800 227-8862 if you need assistance.
Warnings
■
Control solution is NOT TO BE USED as a cleaning solution.
■
DO NOT swallow or inject control solution or put it in your eyes.
■
Control solution contains a dye that stains clothing.
13
CHECKING
Page 22
Follow the test procedure, using
®
SURESTEP
Glucose Control
Solution instead of blood.
Before Testing, Check the Code.
After turning the meter on, the last
result appears, followed by the
CODE
symbol and number. If the code on
the meter does not match the code
on the test strip package, press the
green C button until the codes match.
C Button
▼
Step 1: Apply a Small Drop of
Control Solution.
After shaking the control solution
vial, apply one drop of control
solution to the pink test square.
Note: Applying too much control
solution may cause out-of-range
results and dirty the meter.
CHECKING
(Example)
14
Page 23

Step 2: Check Confirmation Dot.
Check to see that the confirmation
dot on the back of the test strip
has turned completely blue to
ensure you have applied enough
control solution.
Step 3: Insert the Test Strip
and Read Result.
Within two minutes after applying
control solution, insert the test strip
firmly into the test strip holder,
pink side up, until it comes to
a complete stop.
CHECKING
15
Page 24
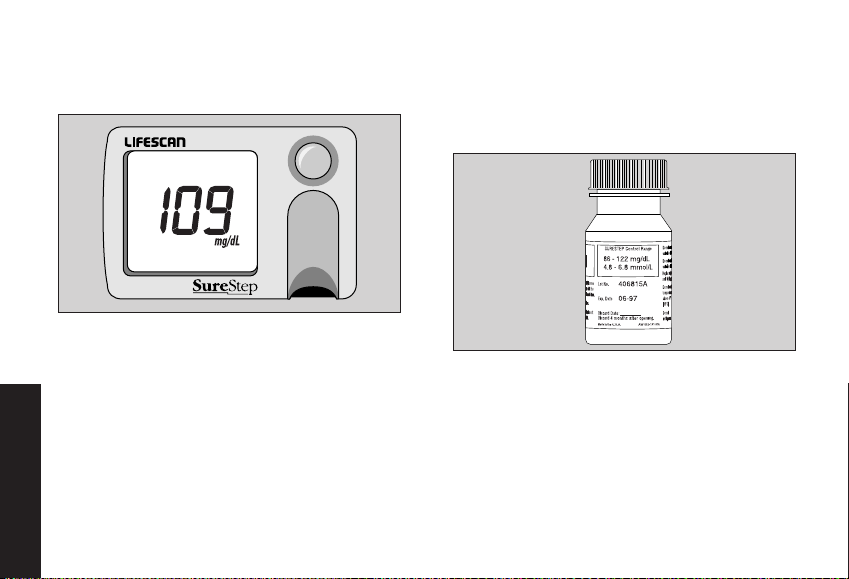
The control solution result appears,
on average, in 30 seconds.
(Example)
Compare the control solution test
result with the control range
printed on the SURESTEP
®
Test
Strip package.
SURESTEP
Control
Range
Note: Do not use the Color Chart
to verify control solution tests.
CHECKING
(Example)
16
Page 25

When the control solution test result
is within the control range, you are
ready to test your blood. Your control solution test will be stored in
the meter memory. Record control
solution tests in your logbook by
placing a C next to the result to
indicate a control solution test.
NOTES
DATE TEST
TEST
RESULT
DATE
TIME
INSULIN/
MEDICATION
TEST
RESULT
TIME
INSULIN/
MEDICATION
NOTESTEST
Control Solution Range
If test results fall outside the expected
range, repeat the test. Results that fall
outside the expected range may
indicate the system is not working
properly. Some possible causes are:
■
Procedural error
■
Expired or contaminated
control solution
■
Test strip code and meter code
do not match
■
Dirty meter or test strip holder
■
Test strip deterioration
■
Meter malfunction
■
Control solution that is outside
of the temperature range 59–95˚F
(15–35˚C)
If you are unable to resolve the
problem, call LifeScan Customer
Services, 1 800 227-8862.
17
CHECKING
Page 26

TESTING YOUR BLOOD
Getting a Drop of Blood
TESTING
IMPORTANT: Getting an adequate
drop of blood is one of the most
important steps in getting an
accurate result.
CAUTION:
■
Use a new, sterile lancet every
time you test.
■
Do not uselancet ifprotective disk
has been removed or damaged.
■
Never use a lancet that has been
used by someone else.
■
If you share a PENLET®II, each
person should always use a
new lancet and a new or properly disinfected cap.
■
For assistance, call LifeScan
Customer Services,
1800227-8862.
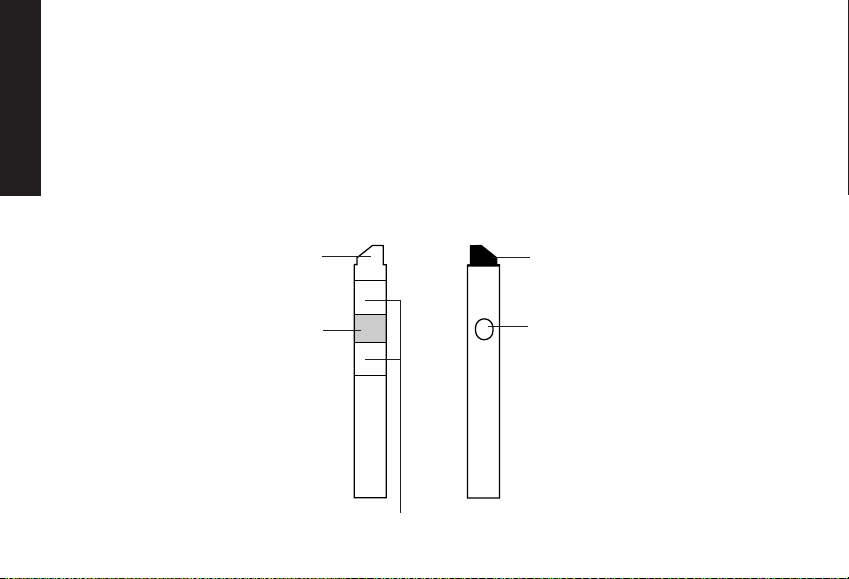
Step 1: Insert a Lancet in the
PENLET
®
II Automatic Blood
Sampler.
Remove the PENLET
®
pulling it straight off.
18
II Cap by
Page 27

Insert a new, sterile lancet into the
lancet holder.
Hold the lancet firmly, and gently
twist and pull off the protective
disk.
Note: Save the protective disk for safe
removal of the lancet after testing.
19
TESTING
Page 28

Choose either the regular or deep
penetration PENLET
®
II Cap and
slide it back onto the PENLET II
TESTING
Sampler.
Regular
Deep Penetration
Step 2: Cock the PENLET
®
II
Sampler.
Holding the lower portion of the
PENLET II Sampler, pull out the dark
gray sliding barrel until it clicks. If it
does not click, the PENLET II Sampler
may have been cocked when the
lancet was inserted.
20
Page 29

Step 3: Get a Drop of Blood.
Wash your hands with soap and
warm water and dry them thoroughly. Warm water stimulates
blood flow to the fingers. Hang
your arm down for 10–15 seconds
before you stick your finger. If you
use alcohol to clean your finger,
make sure you let it dry.
To avoid soreness, choose a site on
the side of your fingertips. To avoid
calluses, choose a different spot each
time you test.
21
TESTING
Page 30

Hold the PENLET®II Sampler firmly against the side of the finger,
with the cap resting on the finger.
(The harder you press, the deeper
TESTING
the puncture.) Press the dark gray
release button.
By holding your hand down and
kneading your palm, blood will
flow more quickly and easily to
your finger. If necessary, squeeze
the finger gently.
Proceed with the blood glucose
test. For information, see
pages 24–33.
22
Page 31

Step 4: Remove the Lancet.
When removing the PENLET®II
Cap, be careful not to prick yourself or anyone else. After removing
the cap, grasp the two dark gray
prongs located near the release
button,
the lancet
pointing
down
and away from
you. Pull back
on the dark
gray sliding
barrel until the
lancet drops
out. Another
way to remove
the lancet is
to put the
protective disk back on the lancet.
Place the disk on a hard surface
and gently stick the lancet needle
into the protective disk.
Now carefully pull the lancet out.
Discard the used lancet in a container for sharp objects.
23
TESTING
Page 32

Step-by-Step Test Procedure
When learning to use the meter for
your own diabetes care, first do
TESTING
a control solution test. When the
control solution test result is within
the control range, you are ready to
practice by testing your blood. Next
you should perform three blood
cose tests in a row. You will know you
have applied blood correctly when the
confirmation dot turns
blue and you obtain a glucose result
from the meter.
completely
glu-
Choose a clean, dry work surface.
Make sure you have your:
Unused,
sterile lancet
SURESTEP®Blood
Glucose Meter
24
SURESTEP
Test Strip
®
PENLET
Sampler
®
II
Page 33

Before Testing.
Press the blue power button.
Your last test result will appear.
(Example)
Next, the code number appears. It
must match the code number on the
SURESTEP
®
Test Strip package. If it
does not match, change the meter
code number following the instructions on pages 10–11.
(Example)
25
TESTING
Page 34

Then these symbols will alternate
on the display:
TESTING
Apply blood to Insert test strip
test strip. into meter.
The meter is ready for a test. You
have two minutes to insert the test
strip before the meter automatically
turns off.
Step 1: Apply Blood to the
Test Strip.
Apply a drop of blood to the center
of the pink test square.
Note: Do not add more blood to the
first drop. Adding more blood may
give false results.
26
Page 35

You can apply blood to the pink test square in one of two ways.
TESTING
1) Hold the test strip under your
finger and touch the drop of blood
to the pink test square.
OR
2) Turn the test strip over and dab
the pink test square to the finger.
You can touch the test strip. The
pink test square will quickly absorb
the blood and the confirmation dot
will begin changing color.
27
Page 36

You have applied too much blood
to the test strip if the entire white
pad is soaked. You must begin the
TESTING
test with a new test strip to avoid
false results from too much blood.
Too Much Blood
Step 2: Check the Confirmation
Dot.
After a few seconds, look at the
confirmation dot on the back of
the test strip. If it is completely
blue, go on with the test.
Enough Blood
Front
28
Front
Confirmation
Dot
Back
Page 37

If any white patches or white streaks
appear on the confirmation dot,
you have not applied enough blood
for an accurate test. You must start
the test over with a new test strip.
Not Enough Blood
Caution: If you do not insert the
test strip properly, you may get
an inaccurate result.
Step 3: Insert the Test Strip and
Read Result.
Turn the SURESTEP
®
Test Strip to
the front side and slide it into the
test strip holder, pink side up. Push
the test strip in firmly until it stops.
Insert the test strip within two
minutes after applying blood to
obtain an accurate result.
29
TESTING
Page 38

The flashing clock symbol appears
while the meter is reading your
result. You will hear a three-tone
TESTING
beep when the meter displays your
result. Results appear, on average,
in 30 seconds.
(Example)
The meter displays results between
0 and 500 mg/dL. In virtually all
cases above 500 mg/dL, the meter
reads “.
”
Note: Your meter is designed to give
accurate results at temperatures
between 50° and 95°F (10–35°C).
At the higher end of this temperature range the test time may be as
short as 15 seconds. At the lower
end of this temperature range, the
test time will be extended.
The SURESTEP
ed to give plasma
®
System is calibrat-
values. Because
most clinical laboratories measure
plasma glucose, the SURESTEP
System enables you to more directly
compare meter results with lab
results. See pages 35–36 to learn
how to compare meter and lab
results
.
30
Page 39

IMPORTANT: When proper procedures are followed, the meter will display
“ ”
when your result is above 500 mg/dL (27.8 mmol/L). This indicates very
high blood glucose (severe hyperglycemia).
Low and High Blood Glucose:
Test results below 60 mg/dLi(3.3 mmol/L)
mean low blood glucose (hypoglycemia). Test results greater than 240 mg/dL
(13.3 mmol/L) mean high blood glucose (hyperglycemia). If you get results
below 60 mg/dL or above 240 mg/dL and you do not have symptoms that
match your results, repeat the test following the guidelines on pages 38–39 to
ensure testing accuracy. You may also use the Color Chart (see pages 32–33).
If you have symptoms that match your results or if you continue to get results
that fall below 60 mg/dL or above 240 mg/dL, follow the treatment advice of
your healthcare professional.
Record your test result in your
LifeScan logbook. The logbook
allows you to keep a record of your
test results, along with information
on your meals and medication.
DATE TEST
TEST
RESULT
TIME
INSULIN/
MEDICATION
DATE
TEST
RESULT
TIME
INSULIN/
MEDICATION
i. Kahn, R., and Weir, G.: Joslin’s Diabetes Mellitus, 13th
ed. Philadelphia: Lea and Febiger (1994), 489.
ii. Krall, L.P., and Beaser, R.S.: Joslin Diabetes Manual.
Philadelphia: Lea and Febiger (1989), 261-263.
31
NOTES
NOTESTEST
TESTING
ii
Page 40

Press the blue power button to turn
off the SURESTEP®Blood Glucose
Meter. (To save energy, the meter
automatically turns off three
TESTING
minutes after the meter displays
your test result.)
Optional Color Chart
A Color Chart is included with
each package of SURESTEP
Strips. It is useful as an additional
check that your meter and test
strips are working properly. The
Color Chart is NOT a replacement
for a SURESTEP Meter test.
The chart shows four shades of
blue, each corresponding to a blood
glucose level. It also shows an offwhite shade for new, unused test
strips. Use the Color Chart in the
following two ways.
32
®
Test
Page 41

1. Before testing. Compare the
confirmation dot on the back of
the new test strip to the shade
marked
unused on the chart.
Do not use the test strip if the
confirmation dot is darker than
the color of an unused test strip
on the Color Chart.
2. After testing. Directly after read-
ing a meter result, you can com-
pare the color of the test strip confirmation dot with the colors on
the chart. The color of the confir-
mation dot will either match one
of the colors on the chart or fall
between two colors. When the
color of the blue dot falls between
two colors, your blood glucose
level is between the values printed
next to the two colors. This compar-
ison will give you a rough estimate
of your blood glucose level.
Note: If your Color Chart reading
and meter result do not agree and do
not reflect how you feel, follow the
testing tips for accuracy on pages
38–39. Do not use the Color Chart
with control solution tests.
33
TESTING
Page 42

UNDERSTANDING YOUR RESULTS
Overview
Recent Diabetes Findings.
In 1993 the National Institutes of
Health
term
diabetes. This study, called the
Diabetes Control and Complications
Trial (DCCT), found that by keeping
RESULTS
your blood glucose close to the levels
of people without diabetes you can
reduce
involving the eyes, kidneys, and nervous system by approximately 60%.
concluded an extensive long-
study of people with Type 1
the risk of complications
What This Means for You.
Frequent blood glucose testing is
the best means you have for
keeping track of how well you are
doing with the factors that affect
your diabetes—medication, diet,
exercise,
Blood glucose
and stress management.
test results can also
tell you whether your diabetes is
changing in ways that might require
an adjustment to
plan. Always
1
care professional before making
your treatment
consult your health-
any adjustments.
34
Page 43

Frequency of Testing.
How often you need to test your
blood glucose will vary according
to your age, the type of diabetes you
have, the medications you are taking,
your physical and emotional
and
health. Your healthcare professional
will guide you. After you decide
when and how often you should
test, it is important that you make
testing part of your daily routine.
Comparing Meter and
Laboratory Results
The SURESTEP®System’s plasma
calibration enables you to more
directly compare SURESTEP Meter
results with your lab results because
most laboratories measure plasma
glucose; however, your meter blood
glucose test result may be different
from your laboratory result (by up
2
to 20%)
due to normal sources of
variation. Make sure you are following Testing Tips to Ensure Accuracy
on pages 38–39. To make an accurate
comparison between meter and
laboratory results, the meter test
must be done within 10 to 15 minutes of the laboratory test. If samples
are taken more than 15 minutes
the two tests could have very
apart,
different results.
Blood glucose levels can change
significantly over short periods,
especially
if you have recently eaten,
35
RESULTS
Page 44

exercised,
experienced stress.
taken medication, or
3
In addition, if
you have eaten recently, the blood
glucose level from a fingerstick can
be up to 70 mg/dL higher than that
of a venous sample (blood drawn
from a vein) used for a laboratory
4
Therefore it is best to fast for
test.
eight hours before doing the comparison tests. Factors such
or low hematocrit (amount of red
RESULTS
blood cells in the blood) or severe
as a high
dehydration (loss of body fluid)
may also cause a meter result to be
different from a laboratory result.
For more detail, see pages 39–40.
Expected Test Results
(Target Range)
Your test results will vary somewhat
from test to test. Blood glucose levels
change throughout the day. T
and amounts
of food you eat, your
activity and stress levels, and how
much insulin or other medication
you take affect your blood glucose
levels. If you are controlling your
diabetes well, your test results
should fall within a personal target
range recommended by your healthcare professional. Once you have
established your target range, you
will be able to detect when your
results are high or low and can take
action with advice from your healthcare professional.
36
he types
Page 45

GLUCOSE RANGES
FOR PEOPLE WITHOUT YOUR TARGET
DIABETES,5mg/dL RANGES, mg/dL
Before
breakfast 70–105 ______________________
Before lunch
or dinner 70–110 ______________________
1 hour
after meals Less than 160 ______________________
2 hours
after meals Less than 120 ______________________
Between
2 and 4 a.m. Greater than 70 ______________________
37
RESULTS
Page 46

Testing Tips to Ensure Accuracy
If you have a test result that falls
outside of your target range and
you cannot link it to diet, exercise,
medication, or stress, repeat
the test. If the result is similar and
still outside of your range, try these
troubleshooting steps:
Before Testing
■
Wash your hands.
RESULTS
■
Use a new, sterile lancet.
■
Check the expiration date on the test
strip package. If it has passed, discard
the unused test strips and open a new
package. When using test strips from
a bottle, discard any remaining
strips 4 months after first opening.
:
test
■
Make sure the confirmation dot on
the unused test strip is not darker
than the color of an unused test
strip shown on the Color Chart.
■
Make sure the code on the meter
matches the code on the test strip
package.
■
Do a test with SURESTEP®Glucose
Control Solution to verify that the
test strip and meter are working
properly.
■
Make sure the meter test strip
holder, lens area, and contact
points are clean. Follow
instructions on pages 45–49.
After Testing:
■
Make sure you applied enough
blood to the test strip by inspecting
38
Page 47

the test strip confirmation dot to be
certain it turned completely blue.
■
Make sure you did not apply too
much blood to the test strip. You
have applied too much
blood if
there is no white visible on the
white pad.
■
Directly after the meter displays a
result, compare the color of the
test strip confirmation dot with
the Color Chart on the test strip
package (see pages 32–33).
IMPORTANT:
If you have followed the tips
to ensure accuracy and your
blood glucose results are still
out-of-range, call your healthcare professional.
Health Conditions Causing
Out-of-Range Results
If you are getting results outside
your range of expected blood
glucose levels, and you are certain
that the SURESTEP
®
SURESTEP
Test Strips are working
together properly, ask yourself the
following questions:
“How do I feel?”
“Do I have symptoms of low blood
glucose (hypoglycemia): slurred
speech, headache, tingling of lips,
cool sweating, rapid heartbeat,
disorientation, weakness, dizziness,
fainting, hunger, nervousness,
irritability, or tremors?”
39
®
Meter and
RESULTS
Page 48

“Do I have symptoms of high blood
glucose (hyperglycemia): fatigue, dry
mouth and skin, increased thirst or
hunger, blurry vision, increased urination, rapid deep breathing, or a
fruity smell to the breath?”
“What have I eaten?”
“How much have I exercised?”
“Am I ill (common cold, flu, etc.)?”
“Have I been under stress lately?”
RESULTS
In addition to these factors, there
are other abnormal conditions that
can affect your results.
1. Extremes in hematocrit (the
amount of red blood cells in the
blood) can affect test results. Very
high hematocrits (above 60%) and
very low hematocrits (below 25%)
can cause false results.
6
2. Severe dehydration and
excessive water loss may cause
7, 8
false low results.
Severe dehydration, which may lead to many
serious medical complications,
can be caused by:
■
Vomiting and diarrhea
■
Prescription drugs (e.g., diuretics)
■
Inability to recognize or respond
to “thirst” sensations
■
Uncontrolled diabetes
Shock
9
■
If you believe you are suffering from
severe dehydration, consult a healthcare professional immediately.
40
Page 49

Recommendations for
Better Diabetes Control
■
Follow the advice of your
healthcare professional.
■
Follow the exercise and meal
plans recommended by your
healthcare professional.
■
Take insulin or diabetes medication
at your scheduled times.
■
Keep in touch with your emotional
and physical condition. Stress or
illness can affect diabetes.
■
Watch for symptoms of hypoglycemia (low blood glucose) and
hyperglycemia (high blood glucose).
■
Review your logbook of test
results with your healthcare
professional regularly.
References
1. American Diabetes Association position statement on the Diabetes Control and Complications
Trial (1993).
2. Clarke, W.L., et al.: Diabetes Care, Vol. 10, No. 5
(1987), 622-628.
3. Surwit, R.S., and Feinglos, M.N.: Diabetes
Forecast (1988), April, 49-51.
4. Sacks, D.B.: “Carbohydrates.” Burtis, C.A. and
Ashwood, E.R. (ed.), Tietz Textbook of Clinical
Chemistry. Philadelphia: W.B. Saunders
Company (1994), 959.
5. Krall, L.P., and Beaser, R.S.: Joslin Diabetes
Manual. Philadelphia: Lea and Febiger (1989),
138.
6. LifeScan data on file.
7. Wickham, N.W.R., et al.: Practical Diabetes, Vol.
3, No. 2 (1986), 100.
8. Cohen, F.E., et al.: Diabetes Care, Vol. 9, No. 3
(1986), 320-322.
9. Atkin, S.H., et al.: “Fingerstick glucose determination in shock.” Annals of Internal Medicine,
Vol. 114 (1991), 1020-1024.
41
RESULTS
Page 50

RECALLING RESULTS FROM METER MEMORY
The SURESTEP®Blood Glucose
Meter is pre-set to automatically
display your last test result when
the meter is turned on. You can also
review your last result immediately
after a new test is completed. The
meter stores your 10 most recent
blood glucose or control solution
test results in its memory. When
the memory is full, the oldest result
is dropped as the newest is added.
MEMORY
Using the Meter
for the First Time
The first time you turn on your
meter the following symbol will
appear briefly, showing that there
is no test result in the memory:
This symbol will also appear after
turning on your meter when your
previous test ended in an error
the meter did not display a result.
42
and
Page 51

Recalling All Results in
Meter Memory
To access the meter memory, press
the blue power button and hold
down for five seconds. When the
display flashes, release the blue
power button. You are now in
memory mode. Your most recent
result will appear on the display.
Press the green C button to scroll
through the memory. Each time you
press the green C button, a number
from most recent (1) to oldest (10)
will appear, telling you the order of
the test result, followed by the result.
Green
C Button
Order of test result Result
(most recent test first) (Example)
MEMORY
Order of test result Result
(second most recent) (Example)
43
Page 52

If a previous test resulted in an
error condition, the error will be
stored in the memory.
Order of test result Result
(third most recent) (Example)
Recalling Your Last Result
Immediately after completing a test,
you can also review your previous
test result.
Current result
(Example)
With the current test result displayed,
press and hold the green C button.
Your previous result will appear.
Green C Button
MEMORY
Previous result
(Example)
44
Page 53

CARING FOR YOUR METER
MAINTENANCE
Your SURESTEP
®
Blood Glucose
Meter is easy to maintain. However,
to keep it in good operating condition, follow these simple rules:
General Care
■
Keep your meter dry and avoid
exposing it to extremes in temperature. Do not store your meter or
test strips in a car or refrigerator.
■
Dropping the meter could damage
its electronics. If you drop your
meter, do a control solution test to
ensure it is working properly.
■
Do not take the meter apart.
Sensitive parts could be damaged,
causing false results and voiding
the warranty.
Cleaning the Meter
Clean the test strip holder (cover
and base), lens area, and contact
points with water when there is
dirt, blood, or lint present.
CAUTION:
■
Use only water when cleaning
the meter. Do not get water
inside the SURESTEP Meter.
Never immerse the meter or
hold it under running water.
■
Do not use cleansers or glass
cleaners with ammonia.
■
When disinfecting the meter,
use a 10% bleach solution
(9 parts water, 1 part bleach)
and remove with water.
45
Page 54

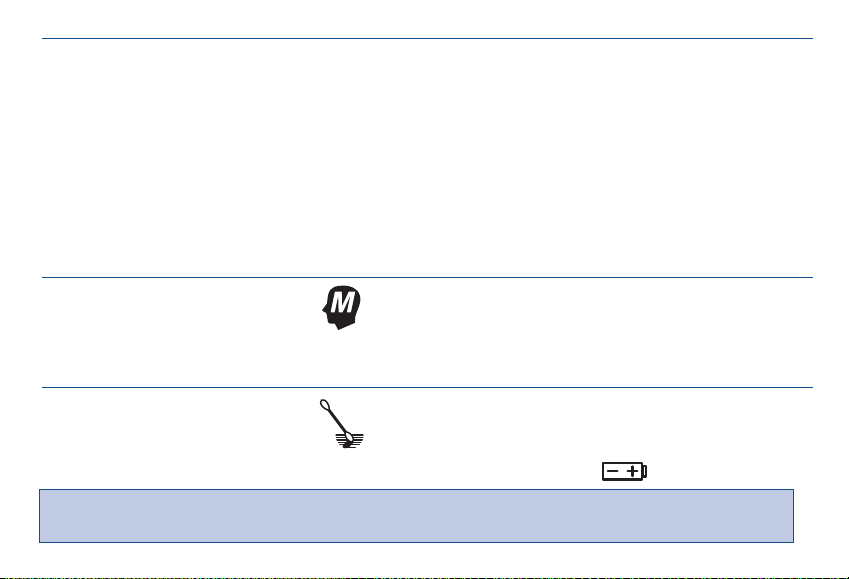
Always clean your meter when this
symbol appears:
MAINTENANCE
If you are concerned that your test
results do not compare with how
you feel, clean the meter and do a
control solution test to check if it is
working properly. Clean the meter
using these easy steps:
Step 1: Remove the Test Strip
Holder.
Press down at the top end (near the
power button) of the test strip holder
and slide it away from the meter.
Step 2: Clean the Test Strip
Holder.
Remove debris from the test strip
holder by wiping gently with a cotton
swab or cloth dampened with water.
46
Page 55

Make sure you thoroughly wipe the
gray area on the inside cover. Wash
both sides of test strip holder base;
carefully clean around the hole. Dry
the test strip holder completely with
a soft cloth or lint-free tissue.
Cover
Inside Cover
Top of
Base
Gray Area
Bottom
of Base
Hole (clean both sides)
Base
MAINTENANCE
Step 3: Clean the Lens Area and
Contact Points.
Use a cotton swab or a soft cloth
dampened with water to wipe the
lens area and contact points. Be
careful not to scratch the lens area.
Dry with a soft cloth or tissue that
does not contain lint, lotion, or perfume. Do not use abrasive materials
such as paper towels.
Contact Points
Lens Area
47
Page 56

Step 4: Replace the Test Strip
Holder.
Slide the test strip holder into
the meter, press down, and push
MAINTENANCE
forward at the strip insertion point
until you hear a click. Make sure
the test strip holder is firmly in
place. Make sure it does not extend
beyond the meter.
Note: You can clean the outside of
the meter by lightly wiping it with
a damp cloth.
Turn on the meter.
48
Page 57

If this symbol appears after cleaning
the meter, check to see if you inserted the test strip holder completely
and securely. The test strip holder
may be out of position. See pages
59–63 for error descriptions.
Note: If using a 10% bleach solution,
this message may indicate that you
have not completely removed the
bleach residue on the gray area of
the inside of the test strip holder
cover. Wipe with a cloth dampened
with water.
MAINTENANCE
Changing the Batteries
The SURESTEP®Blood Glucose
Meter comes with two AAA alkaline batteries already installed.
When this symbol appears
the batteries are low and you
should replace them as soon as
possible. The meter will still
provide accurate test results with
49
Page 58

low batteries. If the symbol is flashing, the batteries are dead and you
should replace them immediately.
You will not be able to do
the symbol is flashing. Replace both
MAINTENANCE
a test when
batteries with new AAA alkaline
batteries. Do not use rechargeable
batteries.
Note: Low batteries, dead batteries,
and battery removal will not affect
the test results stored in the memory.
To change the batteries, turn off
the meter and turn it over.
Follow these steps:
Step 1: Remove the Battery Door.
Squeeze the tab and lift up.
L 5037 ZG 00171
®
50
Page 59

Step 2: Remove the Old Batteries.
MAINTENANCE
Step 4: Close the Battery Door.
Use your fingers or gently tap the
meter on the palm of your hand.
Never tap the meter against a hard
surface.
L 5037 ZG 00171
®
Step 3: Insert New Batteries.
Insert two new AAA alkaline
batteries, matching the + end of
each battery with the + signs
inside the meter.
Insert the two hinges into the slots
and press down until the tab catches.
AW 052-178-01A Made in U.S.A.
C22.2 No. 125; Risk Class 2
© LIFESCAN INC. 1995
Milpitas,CA 94035
51
Page 60

CHANGING METER SETTINGS (Set-Up Mode)
The SURESTEP®Meter has been
pre-set to meet the needs of most
users. There are three features you
can change. Be sure you want to
FEATURE PRE-SET ALTERNATIVE
Automatic display On Off
SETTINGS
of last result
Unit of mg/dL mmol/L
measurement
Beep signals On Off
during testing
change these settings before entering the set-up mode to avoid having
meter settings that do not meet your
needs.
52
Page 61

Entering Set-Up Mode
1. Make sure the meter is off.
2. Press and hold down the green
C button.
3. Press and release the blue
power button while holding
the C button.
4. Release the C button.
In the set-up mode, the current set-
ting for each of the three changeable
features is automatically displayed
in sequence. Each setting flashes
on the display for five seconds.
While it flashes, the setting may be
changed by pressing the C button.
After the last feature is displayed,
the meter automatically turns off.
To re-enter set-up mode, begin with
Step 2.
Display of Last Result
The SURESTEP®Meter is pre-set to
automatically display your last test
result when you turn on the meter.
After you release both the power and
C buttons, this symbol will flash on
the display:
53
SETTINGS
Page 62

If you wish to turn off the automatic display of your last result,
press the C button. This symbol
will flash
indicating that the automatic
SETTINGS
display is turned off. Then, wait
for the next feature setting (unit
of measurement) to appear.
Unit of Measurement
The meter is pre-set to display test
results in milligrams per deciliter
(mg/dL). You have the option to
select millimoles per liter (mmol/L),
the unit of measurement used in
Canada and some European
countries. The mmol/L results
include a decimal point, but
mg/dL results do not.
In set-up mode the unit of measurement will be the second feature to
flash on the display.
54
Page 63

If you wish to change the unit of
measurement to mmol/L, press the
C button. This symbol will flash on
the display.
Then, wait for the next feature setting (beep signals) to appear.
Beep Signals
The SURESTEP®Blood Glucose
Meter uses beeping tones to
signal various steps in the meter
procedures. However, these tones
do not indicate that the procedures
are being performed correctly. The
meter is pre-set to emit three different beep signals:
1. A single short beep signals each
step in the test procedure.
2. A single long beep accompanies
error messages, a
“ ”
result, and
certain mistakes in doing the test
procedure.
3. A three-tone beep sounds when
the meter displays a test result
and when the meter is in set-up
mode on the beep signal feature.
55
SETTINGS
Page 64

If you want the meter to operate
without beeps, enter the set-up
mode. After the meter displays the
memory and unit of measurement
features, the meter will sound a threetone beep and flash this message
SETTINGS
Press the C button to turn off the
beep signals. The following display
will appear
You will hear a three-tone beep
when is first displayed. Then it
will flash silently until the meter
turns off.
The meter will continue to use
these settings until you change
them.
56
Page 65

SOLVING PROBLEMS
When any of the following symbols
or error messages appear, there
may be a problem with the meter,
test strip, or the way in which you
are doing the procedure. These
messages help to identify certain
problems but do not appear in all
cases when a problem has occurred.
In most cases, a problem is easy to
solve. Assistance is available from
LifeScan Customer Services 24
hours a day at 1 800 227-8862.
Helpful Messages
SYMBOL MESSAGE WHAT TO DO
The test strip was not Push the test strip in firmly
fully inserted. until it stops.
57
MESSAGES
Page 66

SYMBOL MESSAGE WHAT TO DO
1. The test strip was 1. Remove the test strip
inserted before the and reinsert the
meter was turned on strip after this
or before the insert test symbol appears.
strip symbol appeared, or
2. The test strip was inserted 2. Reinsert the test strip, tip
incorrectly, or first, with the pink side
facing up.
3. The test strip was 3. Reinsert test strip slowly.
inserted too quickly.
If the symbol is constant, Replace the batteries
the batteries are low. If the (see pages 49–51).
symbol is flashing, the
batteries are dead.
MESSAGES
58
Page 67

Error Messages
The meter gives specific error messages when it detects a problem with
its internal functions, the test strip,
or the testing procedure. However,
improper use may cause an inaccurate
ERROR POSSIBLE CAUSE WHAT TO DO
1. Blood was applied to 1. Clean the meter. Repeat the test
the wrong side of the with a new test strip, applying
test strip, or blood to the pink test square.
2. Not enough blood is 2. Repeat the test with a new test
on the test strip, or strip. Apply a larger drop of blood
result without producing an error
message or a symbol. When error messages appear, note the error number,
turn off the meter, then resolve the
error by following these instructions:
to the pink test square and
verify that the confirmation
dot on the back of the test strip
has turned completely blue.
59
Confirmation
Dot
Pink
Test
Square
MESSAGES
Page 68

ERROR POSSIBLE CAUSE WHAT TO DO
3. The test strip was 3. Repeat the test with a new test
inserted more than
strip. Insert it within 2 minutes
2 minutes after after applying blood.
applying blood, or
4. You may have a 4. Do a visual check of the color of
very high blood the confirmation dot versus the
glucose level, Color Chart on the test strip packpossibly exceeding age. A color that matches or is
500 mg/dL. darker than the 350 mg/dL color
on the chart indicates a high
blood glucose level. Follow the
treatment advice of your healthcare professional.
1. Not enough blood 1. Repeat the test with a
was applied to the new test strip. Apply a
test strip, or larger drop of blood to the
pink test square and verify
that the confirmation dot
MESSAGES
on the back of the test strip
has turned completely blue.
60
Confirmation
Dot
Page 69

ERROR POSSIBLE CAUSE WHAT TO DO
2. The test strip has 2. Check the expiration date on
been altered, exposed your test strip package. Do not
to air, or has passed store test strips outside of the
its expiration date. original bottle. Do not alter test
strips.
1. The test strip was 1. Do not remove the test strip
removed or partially until the meter displays the
removed before the result.
result was displayed,
or
2. The meter contact 2. Clean meter contact points.
points are dirty.
Note: If more than two minutes have passed since you applied
blood to the test strip, repeat the test with a new test strip.
61
MESSAGES
Page 70

ERROR POSSIBLE CAUSE WHAT TO DO
The meter is not Allow the meter to warm or
within the temperature cool slowly before performing
range of 50–95°F another test. Do not apply heat
(10–35°C). or cold to the meter or test strips.
1. The meter test strip 1. Clean; refer to pages 45–49.
holder, lens area,
and contact points
are dirty, or
2. The test strip holder 2. Slide the test strip holder
is not fully in place, into the meter until it is
or completely inserted.
MESSAGES
62
Page 71

ERROR POSSIBLE CAUSE WHAT TO DO
3. The test strip was 3. Remove test strip and turn
partially inserted meter off. Turn meter on, then
before turning the reinsert test strip when insert
meter on. test strip symbol appears.
A possible failure has Turn meter on. Before testing,
occurred in the meter. check that the code on your
meter matches the code on
your test strip package. If
continues, call LifeScan
Customer Services at
1 800 227-8862.
63
MESSAGES
Page 72

SPECIFICATIONS
Performance Characteristics
See the SURESTEP®Test Strip
SPECIFICATIONS
package
precision information.
Power Supply: Two AAA alkaline
batteries.
Battery Life: Approximately 18
months when doing two tests a day.
Result Range: 0–500 mg/dL
(0–27.8 mmol/L). Higher results
are displayed as “.
Display: Liquid crystal.
Blood Source: Whole blood.
insert for accuracy and
”
Calibration: Plasma equivalent.
Hematocrit Range: 25–60%.
Dimensions: Length, 3.5 inches;
Width, 2.4 inches; Height, 0.80
inches; Weight, 3.8 ounces with
batteries.
Operating Temperatures: 50–95˚ F
(10–35˚ C).
Operating Humidity Range:
10–90% relative humidity
(noncondensing).
Memory: 10 test results.
64
Page 73

Guarantee and Warranty
30-Day Money-Back Guarantee
If you are not fully satisfied with
the SURESTEP
refund may
a LifeScan Customer Services
Representative at the toll-free
number within 30 days
After calling LifeScan, you will
need to return the SURESTEP
Meter and a copy of your receipt
to receive a refund.
Three-Year Warranty
If, at any time during the first three
years after purchase, the meter does
®
System, a full
be obtained by calling
of purchase.
®
not work for any reason (except
for obvious abuse), LifeScan will
replace it with a new meter or
equivalent product free of charge.
The Warranty Policy applies only
to the original purchaser of this
meter and does not include the
batteries supplied with the meter.
Please complete the Warranty
Registration Card and mail it to
LifeScan.
The SURESTEP Meter has a full
three-year warranty from the original date of purchase. Write your
date of purchase here:
________________________________
65
WARRANTY
Page 74

The Warranty Policy does not
apply to the performance of the
SURESTEP
®
Meter when used
with any test strip other than
SURESTEP
®
Test Strips from
LifeScan, or when the SURESTEP
Meter or Test Strips are modified
in any way.
Before you return your meter,
or any product, first call your
WARRANTY
LifeScan Customer Services
Representative at the toll-free
number for instructions.
This warranty is in lieu of all other
warranties, express or implied,
including any implied warranty of
merchantability or fitness for a
particular purpose.
66
Page 75

CODING THE METER
Before testing, make sure the
meter is coded correctly.
(Example)
3-STEP TEST PROCEDURE
Press power button
1
and apply blood to
pink test square.
QUICK REFERENCE
Press power button. 2Meter automatically
1
(Example)
Code number is
3
automatically
displayed.
displays last test
result.
C Button
(Example)
Press C button until
4
code number on meter
matches code number
on test strip package.
→
67
Check confirmation dot on back
2
of test strip.
Firmly insert test
strip pink side up,
3
until it comes to
a complete stop,
and read result
(30-second average
test time).
Page 76

How you can be sure that you have applied the right amount of blood:
Front
Pink
Test
Square
Pink test square is
where you apply a
drop of blood.
White pad absorbs the
excess blood that may
QUICK REFERENCE
extend beyond the pink
test square. Do not apply
blood directly onto the
white pad.
Confirmation dot
of test strip is where you
check to confirm proper
blood application.
Back Not Enough
Confirmation
White
Pad
Dot
on back
BLOOD APPLICATION
Enough Blood
Front
Apply a drop of blood
to the pink test square
on the front of the test
strip. The confirmation
dot on the back should
be completely blue for
an accurate test.
Back
If any white patches or
streaks appear on the
blue confirmation dot,
you have not applied
enough blood for an
accurate test. You must
start the test over with
a new test strip to
avoid false low results.
68
Blood
Too Much Blood*
Back
Front
If there is no white
visible on the white
pad, you have applied
too much blood. You
must start the test over
with a new test strip to
avoid false high results.
*Be careful not to
apply too much blood,
especially if you tend
to bleed easily or are
taking blood-thinning
medications.
Page 77

El Folleto para el Propietario del SURESTEP®se encuentra disponible en
*05225103A*
español. Para recibir su copia gratuita, favor del llamar al número gratis
1 800 381-7226.
The SURESTEP instructional materials are available in Spanish. To receive
your free copy, please call toll-free 1 800 381-7226.
LifeScan Customer Services toll-free numbers:
(24 hours a day, 7 days a week)
U.S.A. English 1 800 227-8862
Español 1 800 381-7226
Milpitas, California 95035
Printed in U.S.A.
AW 052-251-03A Patents Pending © LIFESCAN INC. 1998
 Loading...