

Page 1

The system described herein is covered by one or more of the following U.S.
Patents/ Le système décrit aux présentes est protégé par un ou plusieurs
des brevets américains suivants: D367,109,D371,198, D428,150, 5,418,142,
5,515,170, 5,526,120, 5,563,031, 5,605,837, 5,780,304, 5,789,255,
5,922,530, 5,968,836, 6,045,567, 6,156,051, 6,197,040, 6,335,203 and/et
6,491,870. Use of the monitoring device described herein is protected under
the U.S. patents 4,935,346/L’utilisation du dispositif de surveillance décrit
aux présentes est protégée par le brevet américain 4,935,346.
Purchase of the monitoring system described herein does not act to grant a
use license under this patent. Such a license is granted only when the
device is used with SureStep
L’achat du système de surveillance de la glycémie décrit aux présentes n’accorde pas de licence en vertu de ces brevets. Une telle licence est accordée
seulement lorsque le dispositif est utilisé avec les bandelettes réactives
®
SureStep
Pro ou OneTouch®SureStep®.
®
Pro or OneTouch®SureStep®Test Strips/
AW 05090602A
No test strip supplier other than LifeScan, Inc. is authorized to grant such a
license. The accuracy of results generated with LifeScan meters using test
strips manufactured by anyone other than LifeScan has not been evaluated
by LifeScan/Aucun fournisseur de bandelettes de test autre que LifeScan
Inc. n’est autorisé à accorder une telle licence. L’exactitude des résultats
produits par les lecteurs LifeScan utilisant les bandelettes réactives fabriquées par quiconque autre que LifeScan n’a pas été évaluée par LifeScan.
One Touch®Customer Care Line/ Ligne InfoSoins One Touch®:
Monday – Friday 9AM – 8PM Eastern Time, 6AM – 5PM Pacific Time/
Lundi au vendredi, 9 H – 20 H (Heure de l’Est), 6 H – 17 H
(Heure du Pacifique)
Canada 1 800 663-5521 U.S.A./É.-U. 1 800 227-8862
www.OneTouch.ca
Distributed by/Distribué par: LifeScan Canada Ltd./Produits médicaux
LifeScan Canada Itée, Burnaby, B.C./C.-B. V5C 6C6
Manufacturer/Fabricant:
LifeScan Inc., Milpitas, CA 95035, U.S.A./É.-U.
© 2003 LifeScan, Inc.
Milpitas, CA 95035
CA/OB/OTSS Rev. 08/2003
Page 2

The OneTouch®SureStep®System is intended for
use outside the body (in vitro diagnostic use).
It should be used only for testing purposes and
only with fresh whole blood samples. It should not
be used for the diagnosis of diabetes.
i
Page 3
Welcome to LifeScan
Congratulations! You’ve chosen a product made by
LifeScan, a leading company in providing products to
help you manage your diabetes. OneTouch
®
SureStep
®
blood glucose monitoring products are widely
available without a prescription.
Blood glucose monitoring plays an important role in
controlling your diabetes. A long-term study showed
that keeping blood glucose levels close to normal can
reduce the risk of complications by up to 60%.
The results you get with the OneTouch
®
SureStep
®
System can help you and your Healthcare
Professional monitor and adjust your treatment
plan to gain better control of your diabetes.
Everything you need to know about using the
OneTouch
®
SureStep®System is included in this
owner’s booklet and in the test strip package
insert that comes in each box of test strips. It is
important that you read both this booklet and the
test strip package insert for critical information on
how to use this product. If you have any questions,
please feel free to call the toll-free number to
speak with our Customer Care Line.
Remember to complete and mail the Warranty
Registration Card.
Important phone numbers:
OneTouch®Customer Care Line:
CANADA 1 800 663-5521
www.OneTouch.ca
Meter Serial Number _____________________________________
Healthcare Professional _______________________________________
Pharmacist ________________________________________________
Diabetes Educator ___________________________________________
Other _____________________________________________________
ii
Page 4

CAUTION:
Before using any product to test your blood glucose (blood sugar), read
all instructions and practice the test. Do all quality control checks as directed and
consult with a diabetes Healthcare Professional. These recommendations apply to
all blood glucose monitoring systems and are supported by the Diabetes Educator
Section of the Canadian Diabetes Association.
IMPORTANT:
If you have followed the tips to ensure accuracy and your blood
glucose results are still out of range, call your Healthcare Professional.
The OneTouch
®
SureStep®System may contain many small parts: test strip holder,
battery door, batteries, lancets, control solution bottle, test strips, test strip bottle
cap, etc. Keep the system out of the reach of small children because these parts
may be dangerous if swallowed.
If using a 10% bleach solution to disinfect the meter, be sure to completely remove
any bleach from the meter and test strip holder with a cloth dampened with water.
Bleach will react with the test strips and cause inaccurate results. Failure to
remove the excess bleach may result in an error message ( , ) or an
inaccurately high result.
iii
Page 5
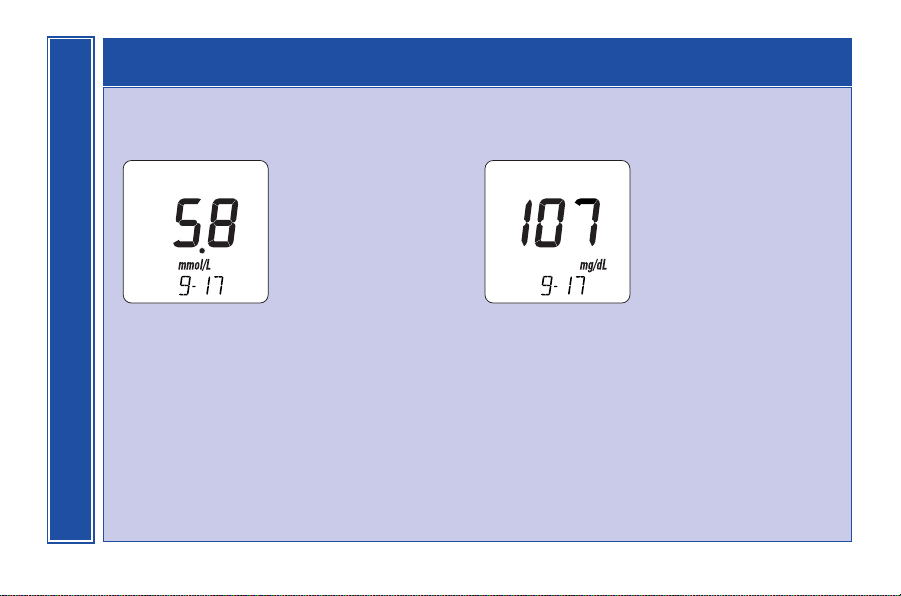
Units of Measure for Meter Readouts
mmol/L
millimoles/liter
decimal point
Your
OneTouch®SureStep®Meter can display results in two different units of measure,
millimoles per liter (mmol/L) or milligrams per deciliter (mg/dL). The mmol/L unit is
standard in Canada. The mg/dL unit is standard in the United States. Please contact
your Healthcare Professional to determine the unit of measure you should use. If the
incorrect unit of measure is used, you may get inaccurate results, which can lead to
improper treatment.
mg/dL
milligrams/deciliter
no decimal point
PLEASE READ
iv
Page 6
Table of Contents
Learning 2
Purpose 2
What to Expect from Your System 3
Warnings and Precautions 4
Importance of Following Instructions 5
OneTouch
Optional Colour Chart 9
Display Symbols 10
Coding 13
Coding the Meter 13
Checking 15
Checking the System 15
Understanding Control Solution Results 20
Testing 22
Testing Your Blood 22
Testing Tips for Accurate Results 23
Test Procedures 24
OneTouch®Customer Care Line: CANADA 1 800 663-5521 www.OneTouch.ca
®
SureStep®Test Strips 8
v
Page 7
Results 35
Understanding Your Results 35
How to Check if Your Meter is Working Correctly 37
Comparing Meter and Laboratory Results 38
Health Conditions Which Can Cause Out-of-Range Results 40
Maintenance 41
Caring for Your Meter 41
General Care 41
Cleaning the Meter 41
Changing the Batteries 44
Storage Instructions 47
Troubleshooting 48
Error Messages 48
Symbols 56
Symbols 56
Settings 58
Changing Meter Settings 58
Entering Set-Up Mode 59
Changing the Date and Time 59
Setting the Time 60
OneTouch®Customer Care Line: CANADA 1 800 663-5521 www.OneTouch.ca
vi
Page 8
Setting the Year 60
Setting the Month 61
Setting the Day 61
Display of Last Results 61
Unit of Measurement 61
Beep Signals 62
14- and 30- Day Averages 63
Time Format 64
Date Format 64
Exiting the Set-Up Mode 64
Memory 65
Background Information on Meter Memory 65
Getting All Results from Meter Memory 65
First Time Turning on Meter 67
Uploading Memory Data 67
Specifications 68
Specifications 68
Guarantee and Warranty 69
Quick Reference 70
OneTouch®Customer Care Line: CANADA 1 800 663-5521 www.OneTouch.ca
vii
Page 9

Page 10

Page 11

Purpose
People with diabetes use the
OneTouch
Monitoring System to measure the level of
glucose (sugar) in their blood. The sys-
LEARNING
tem is intended for testing whole blood
samples at the time when the blood sample is obtained.
®
SureStep®Blood Glucose
Why Test Your Blood Glucose
Diabetes is a disease where the body has
trouble controlling glucose levels properly.
Glucose levels may change greatly and
quickly. Glucose levels that are too high or
too low can lead to serious health issues.
This test enables a person to know what his
or her glucose is at the time it is measured.
In 1993 the National Institutes of Health
finished the Diabetes Control and Complications Trial (DCCT.) This was a long-term
study of people with type 1 diabetes. This
study found that you should keep your blood
glucose close to the levels of people without diabetes. You can reduce the risk of
problems with the eyes, kidneys, and nervous system by about 60%. You should be
aware that keeping your blood glucose level
close to the levels of people without diabetes increases your risk of hypoglycemic
1
events
(low blood sugar).
How often you need to test your blood
glucose depends on many factors. These
include your age, if you have type 1 or type
2 diabetes, your medications, and your
health. Your Healthcare Professional will
guide you. It is important that you make
testing part of your daily routine.
When Not to Use
Do not use OneTouch®SureStep®blood
glucose results to determine whether or
2
Page 12

not you have diabetes. Only your doctor
can diagnose this disease.
What to Expect from your System
◆
Blood glucose meters are clinically
accurate, but not a substitute for a
laboratory result. Originating from laboratory methods, glucose meter systems
provide a convenient, portable way to
test inexpensively and quickly. However,
meter results can be affected by factors
and conditions that do not affect laboratory results in the same way. Keep in
mind that testing conditions for laboratories are tightly controlled and highly
automated. Your meter glucose result
should agree with a laboratory result to
within ±20% under normal conditions. A
result within that range is considered
clinically accurate when testing with the
OneTouch
®
SureStep®Meter. However,
results can differ by more than ±20% in
some situations. See Comparing Meter
and Laboratory Results for more information.
◆
Blood glucose meters increase your
ability to frequently check your blood
sugar at reasonable cost so you can see
the effect different foods, exercise, and
medications can make on your glucose
level. You can keep your blood glucose
in better control with these devices.
◆
Make sure that you are familiar with the
limitations of the system before testing.
See important information in your
OneTouch
®
SureStep®Test Strip Package
Insert. Know the factors that can affect
the accuracy of your results.
◆
Make sure that you understand your
results before acting on them, especially
if your results do not reflect how you
3
LEARNING
Page 13

feel. See Understanding Your Results
on page 35.
Warnings and Precautions
◆
Read all the instructions, including the
LEARNING
test strip package insert, and practice the
test with control solution (see Checking
the System) before testing your blood
glucose. Do all quality control checks as
directed, including checking the meter
display symbols (see Description of
System), and consult your Healthcare
Professional before using this product.
◆
The system may contain small parts such
as lancets, bottle caps, etc. Keep your
system out of the reach of small children
because these parts may be dangerous if
swallowed. The test strip packaging contains a drying agent that may be harmful
if inhaled or swallowed. It may also
cause skin or eye irritation.
◆
Do not use the test strips after the expiration date printed on the bottle label or
more than 4 months after first opening
the bottle, whichever comes first. You
may get inaccurate results if you use the
test strips after these dates.
◆
Do not use strips that are bent, cut, or
altered in any way.
◆
Do not use the control solution after the
expiration date printed on the bottle label
or more than 3 months after first opening
the bottle, whichever comes first. Control
solution results may not be reliable if you
use the solution after these dates.
◆
Testing at a very high or very low temperature or relative humidity may affect
results particularly if both the temperature and humidity are either high or low.
If you test under these conditions, repeat
4
Page 14

the test in a climate-controlled location
as soon as possible.
◆
Excessive water loss (severe dehydration)
may cause false low results.
2,3
Severe
dehydration, if untreated, can lead to lifethreatening medical complications such
as diabetic ketoacidosis. Some factors
causing dehydration are vomiting, diarrhea, inadequate fluid intake, some
drugs (for example, diuretics), sustained
uncontrolled diabetes, and shock.
4
have these symptoms, consult your
Healthcare Professional immediately,
even if your glucose reading is not
unusually high.
◆
Because some diseases can be transmitted by blood, use care when disposing of
used lancets and test strips.
If you
LEARNING
NOTE: Blood glucose monitoring
requires the help of a Healthcare
Professional. Work with your Healthcare
Professional to set your own target
blood glucose values, arrange your testing times, and discuss the meaning of
your blood glucose results.
Importance of Following Instructions
Your OneTouch®SureStep®Blood Glucose
Monitoring System will provide accurate
glucose results that can help you control
your diabetes, if you follow the directions
in this Owner’s Booklet and the test strip
package insert. Be sure to check the test
strip package insert each time you open a
new box of test strips for important
updates. If you do not follow the instructions, you may get inaccurate results,
which can lead to improper treatment.
5
Page 15
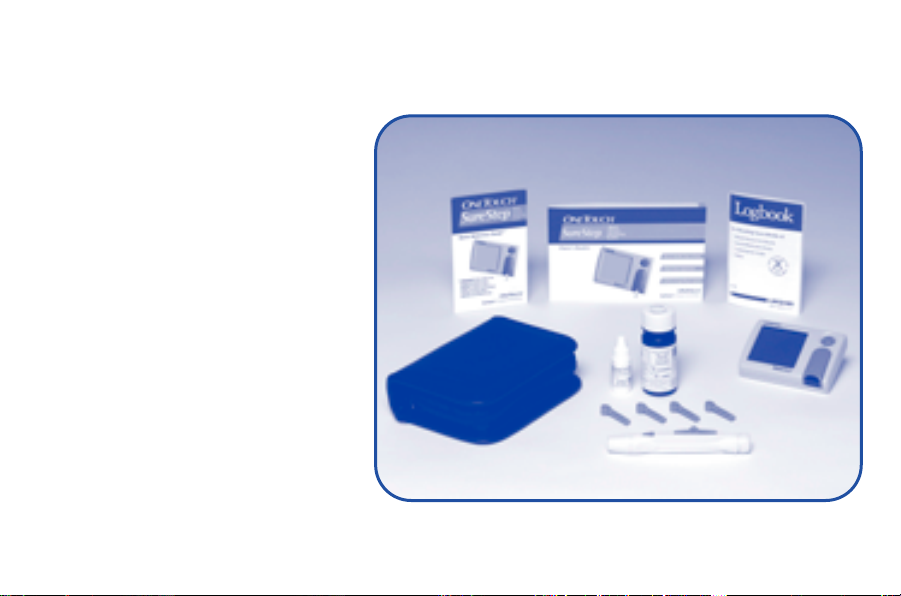
The Complete OneTouch
SureStep®Blood Glucose
Monitoring System
■
OneTouch®SureStep®Meter
(Batteries installed)
■
Owner’s Booklet
■
Quick Reference Guide
■
OneTouch®SureStep
Control Solution
■
OneTouch®Penlet®Plus
Adjustable Blood Sampler
■
OneTouch®FinePoint™
Lancets
■
Carrying Case
■
Logbook
■
OneTouch®SureStep®Test Strips
(May be sold separately)
®
®
6
Page 16
L 5037 ZG 00171
1 800 227-8862
1 800 381-7226
1 800 663-5521
UNITED STATES:
CANADA:
Milpitas, CA 95035
BLOOD GLUCOSE METER
Toll-free customer service:
English
Español
© LIFESCAN INC. 1998
AW 052-178-01B Made in U.S.A.
®
B1
NRTL /C
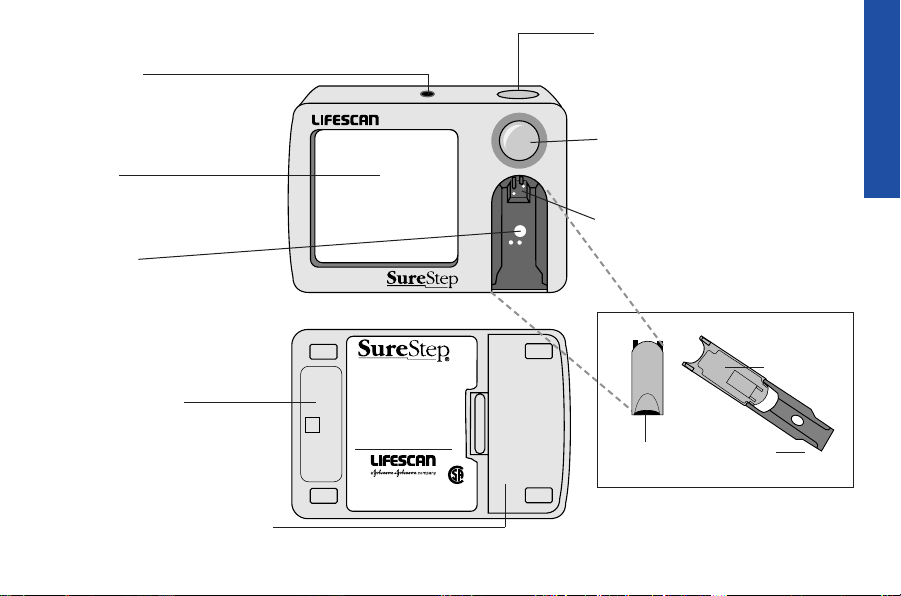
OneTouch®SureStep®Blood Glucose Meter
DATA PORT
Allows you to transfer the information stored in the meter’s
memory to a computer to view,
analyze, and print.
DISPLAY
Shows your test results and
symbols that guide you
through the test.
LENS AREA
Contains the meter optics that
reads the glucose level. Test
strip holder covers the lens area.
SERIAL NUMBER
(Example)
BATTERY COMPARTMENT
Holds two AAA alkaline batteries.
Front
Back
7
C
BUTTON (Green)
Codes the meter, changes the meter
settings, marks control solution test
results, and scrolls through the
memory.
POWER BUTTON (Blue)
Turns the meter on and off, accesses
the memory, and navigates through
the set-up mode.
CONTACT POINTS
Sense the position and orientation of
the OneTouch®SureStep®Test Strip.
TEST STRIP HOLDER
Closed
Test Strip
Insertion
Point
Opened
Cover
Base
The cover protects the lens
area and the base holds the
OneTouch
®
SureStep®Test Strip.
LEARNING
Page 17
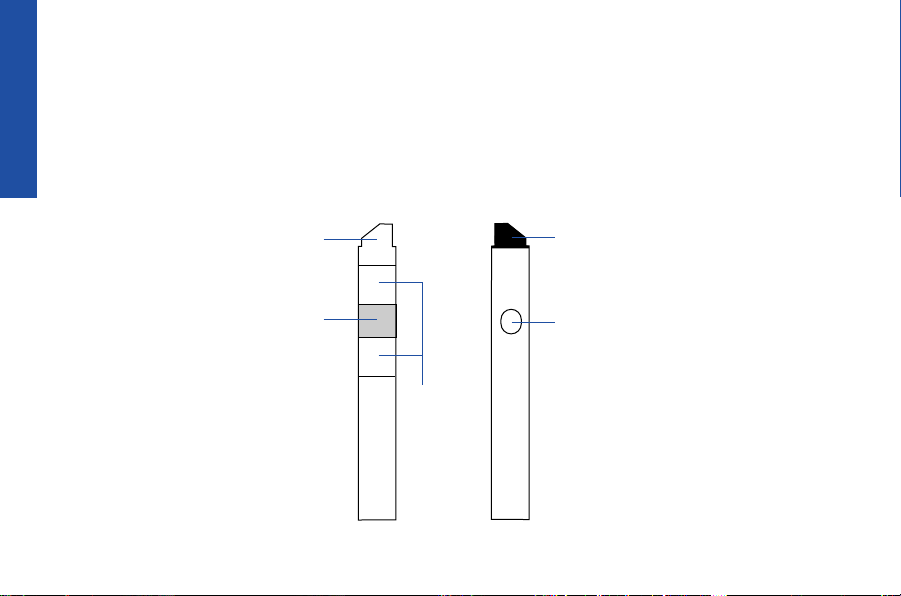
OneTouch®SureStep®Test Strips
Front Back
Pink Test
Square
White Pad
Confirmation
Dot
White Tip Black Tip
When blood is applied to the pink test
square, it is absorbed and a chemical reaction takes place. A blue colour forms in the
LEARNING
confirmation dot on the back of the test
strip and is read by the meter to determine
the blood glucose level; the darker the
colour, the higher the blood glucose level.
White Tip is inserted into the
meter. The side where you
apply blood must be face
up when you insert the test
strip.
Pink Test Square is where
you apply a drop of blood.
White Pad absorbs the
excess blood that may
extend beyond the pink test
square.
Do not apply blood directly
onto the white pad.
Black Tip helps the meter
detect that the strip has
been inserted properly.
Confirmation Dot on the
back of the test strip is
where you check to confirm proper blood application. When it turns completely blue, enough
blood has been applied
for an accurate test.
8
Page 18
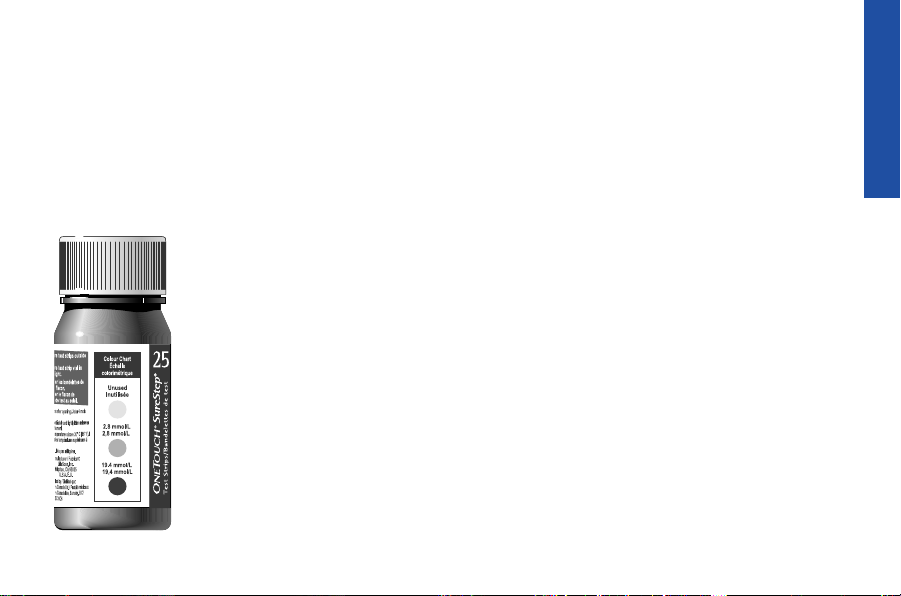
Optional Colour Chart
Directly after reading a meter result, you
can compare the colour of the confirmation
dot on the back of the test strip with the
Colour Chart on the test strip bottle label.
The chart shows two shades of blue, which
correspond to a very low blood glucose
(2.8 mmol/L) level and a
very high blood glucose
(19.4 mmol/L) level. It also
shows an off-white shade
for new, unused test strips.
Important: The sample colour dots are
only approximate. They can give you an
indication of whether your glucose is very
low (2.8 mmol/L) or very high (19.4
mmol/L). Results obtained using the
sample colour dots are not a replacement for a OneTouch
®
SureStep®meter
test result. Do not use Colour Chart to
verify control solution tests.
9
LEARNING
Page 19
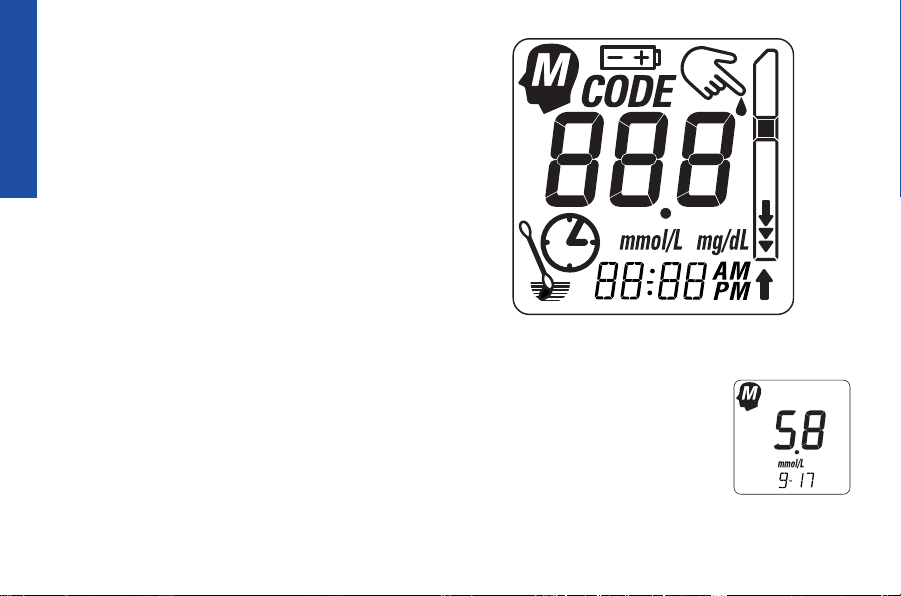
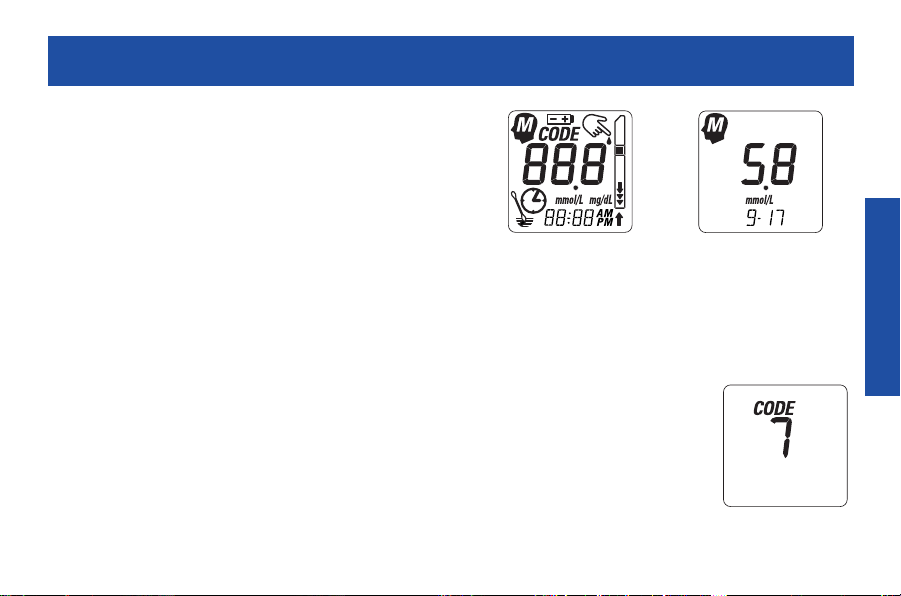
Display Symbols
The OneTouch®SureStep®Blood Glucose
Meter uses symbols and error messages to
guide you through a test and to help you
determine if something is wrong.
LEARNING
Carefully check that all symbols shown on
the right appear each time you turn on your
meter. To check that all display symbols are
working, press and hold down the blue
power button. This display check also
appears briefly each time you turn on the
meter. Call the OneTouch
Line at 1 800 663-5521 if any segments
are missing.
®
Customer Care
Display Check
When you turn on the meter,
it automatically recalls and
displays your most recent
glucose result and the date it
was measured.
(Example)
10
Page 20
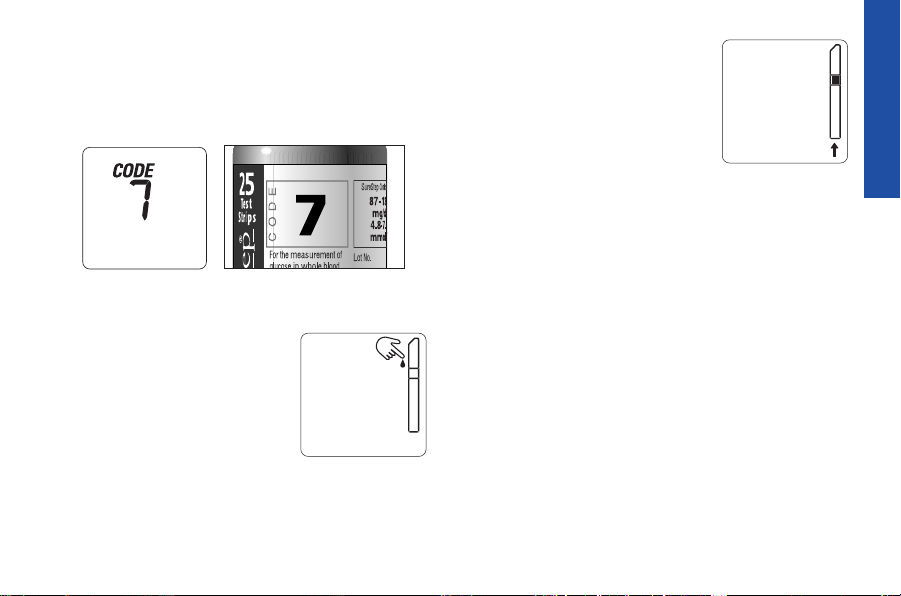
The current code number is displayed.
The number on the display must match the
code number on the OneTouch
®
SureStep
®
Test Strip vial.
(Example)
Apply blood to the centre
of the pink test square
on the test strip.
Check that the pink side of
the test strip faces up
firmly push the test strip
into the test strip holder
until it stops. Insert the
test strip tapered-end first.
11
LEARNING
and
Page 21
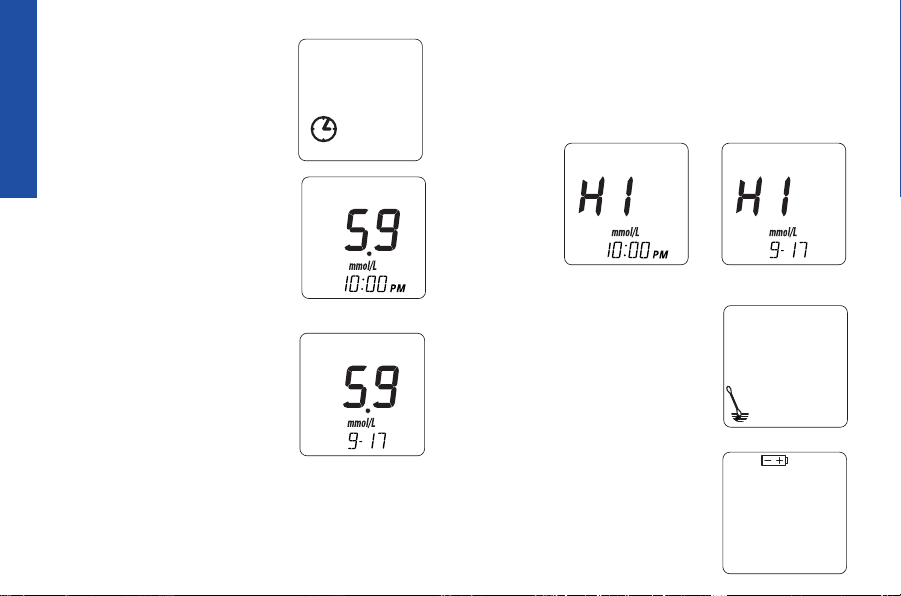
The meter is measuring
your glucose level.
LEARNING
The meter displays your
test result
in mmol/L or
mg/dL together with the
date and time of the test.
(Example)
When the meter determines
that your
blood glucose level exceeds 27.8 mmol/L
(500 mg/dL), it displays
HI
in virtually all
cases.
(Example) (Example)
Clean the meter and test
strip holder.
(Example)
Replace the two AAA
alkaline batteries.
12
Page 22
Coding the Meter
A code number is printed on each test strip
vial label. The code numbers (ranging from
1 to 21) are used to calibrate the meter.
Each time you test, check that the code
number on the meter display matches the
code number on the test strip vial label.
Display Check (Example)
CODING
CAUTION: If the code number on the
meter display does NOT match the code
number on the test strip vial label, you
may get inaccurate results.
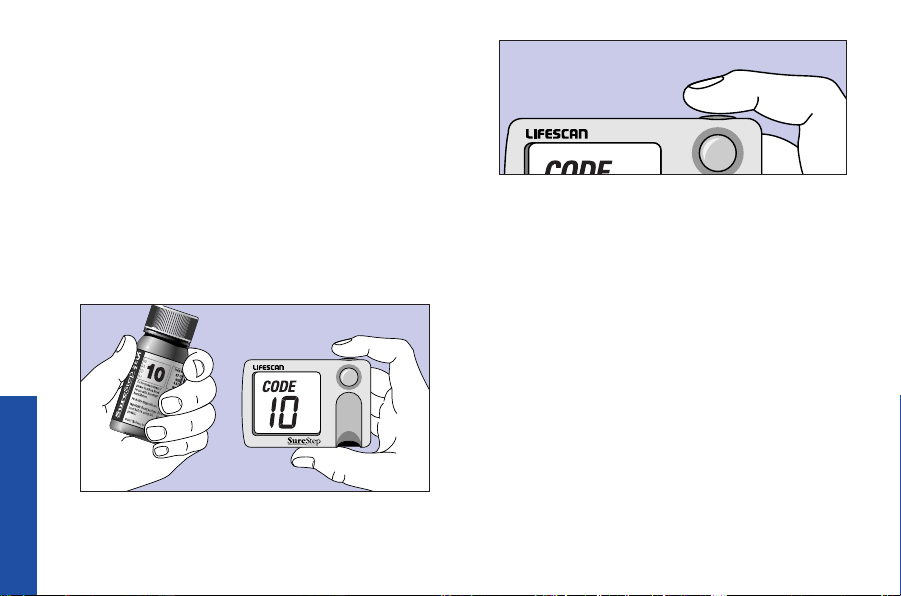
1. Press the blue power button to turn on
the meter.
Make sure there is not a test strip in the
meter when you turn it on.
The display check appears briefly. Carefully
check that all symbols appear. The result of
your last blood glucose or control solution
test appears.
If you are turning on the
meter for the first time, – – –
appears on the display.
◆
Next, a code number
appears for a few
seconds.
13
Page 23
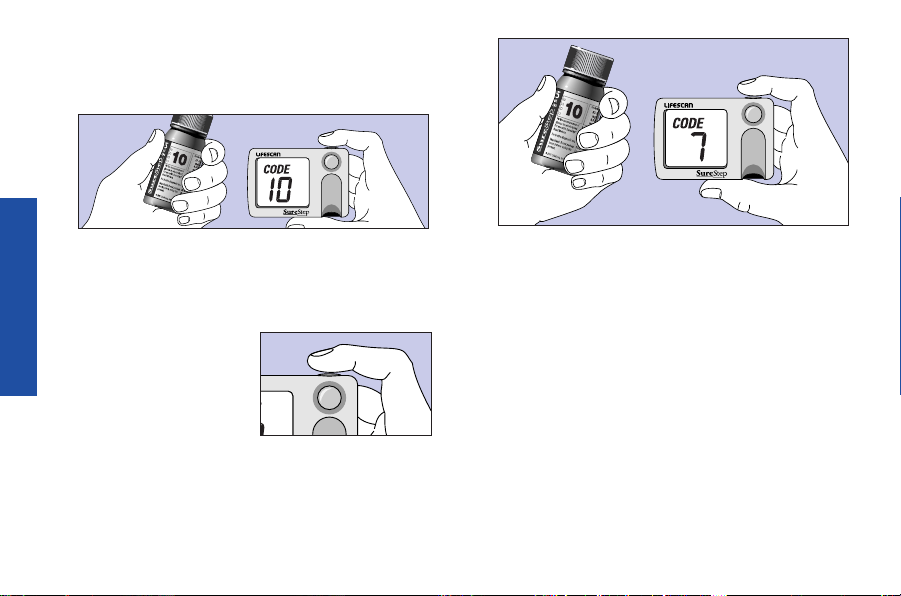
2. Compare the code number on the test
strip vial with the code number on the
meter display.
(Example)
If the code numbers match, you may
begin testing.
3. If the code numbers
CODING
do not match, press
the green C button.
Continue pressing
until the code number on the display matches the code
number on test strip vial. The meter will
retain this code until you change it.
Green C Button
(Example)
NOTE: If the meter advances past the
code number before you are able to
change it, continue pressing the green
button until the code number appears.
CAUTION: Your meter has been preset to
meet the needs of most users in the
Canada. Refer to Changing Meter Settings
if you need to verify or change the settings, such as date, time, or unit of measurement. See page 58 for a complete
listing of features that can be changed.
14
▼
Page 24
Checking the System
Glucos
Shake befor
Not Intende
Discard 3 m
Discard date
Lot No.
Exp. Date
© LIFESCAN
I
®
Use OneTouch®SureStep®Glucose Control
Solution to check if the meter and test strips
are working together properly. A control
solution test is performed exactly like a
blood test except that control solution is
used as a sample instead of your blood.
This control solution is a liquid with a
known amount of glucose in it. Practice the
test with the control solution before testing
your blood for the first time.
When to do a control solution test.
◆
Before testing your blood for the
first time.
◆
Every time you open a new vial of
test strips.
◆
If you drop the meter.
◆
To check that the meter and test strips
are working together properly.
◆
If your results do not
reflect how you feel.
◆
After you clean the meter.
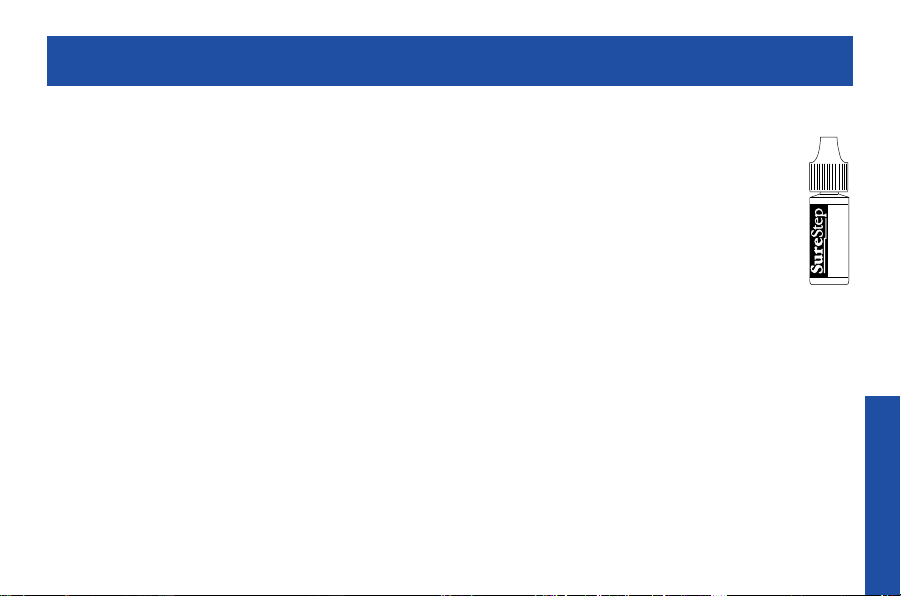
OneTouch
WARNING:
◆
Do not use the control
SureStep®Glucose
Control Solution
solution to clean the meter.
◆
Do not swallow or inject the control
solution or put it in your eyes.
◆
The control solution is for use outside
the body (in vitro use).
◆
The control solution contains a dye
that stains clothing.
15
®
CHECKING
Page 25
1. Press the blue power button to turn on
the meter. The display check appears
briefly. Carefully check that all symbols
appear. Make sure a test strip is not in
the meter when you turn it on.
2. Compare the code number on the meter
display with the code number on the
test strip vial. If they do not match,
press the green C button until the
codes match.
Green C Button
▼
(Example)
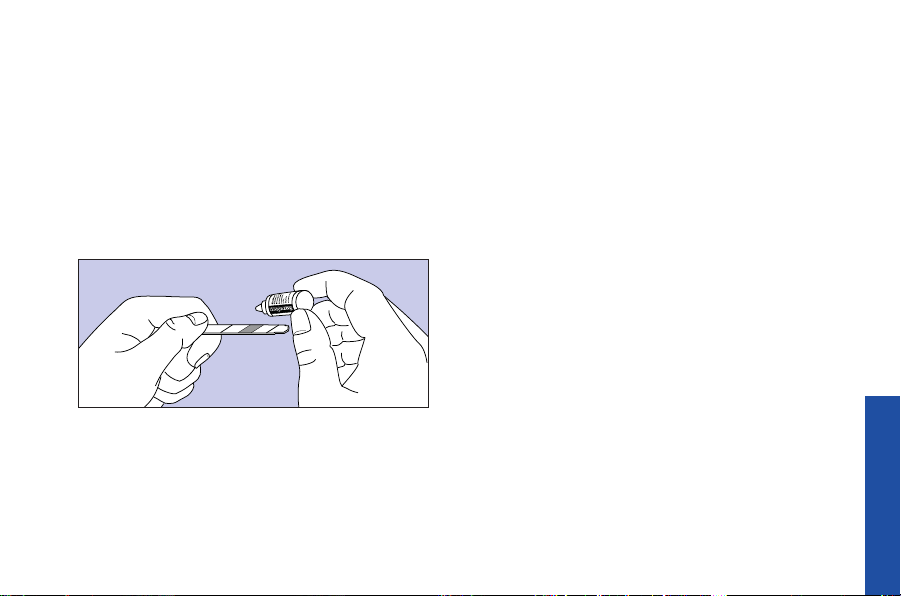
3. Remove a test strip from the vial and
replace the vial cap. Close it tightly.
◆
Check the expiration date and discard
date. Do not use the test strips after
these dates.
◆
Compare the colour of the confirmation
dot on the test strip with the “Unused”
colour dot shown on the Colour Chart
on the test strip vial label. If the colour
of the confirmation dot on the test strip
is darker than that shown on the Colour
Chart, do not use the test strip. The
result may be inaccurate.
CHECKING
16
Page 26
NOTE: If opening the test strip vial for
the first time, write the discard date
(4 months from today) on the vial label
and perform a control solution test following the instructions below.
4. Shake the control solution vial. Apply 1
drop of control solution to the centre of
the pink test square.
◆
The first time you open the control
solution vial, write the discard date on
the label in the space provided. The
discard date for control solution is 3
months from the date you first open
the vial.
◆
Check expiration date and discard
date. Do not use the control solution
after these dates.
◆
If the entire white pad surrounding the
pink test square is soaked, you have
applied too much Glucose Control
Solution.
CAUTION: Applying too much control
solution may cause out–of–range results
and may make the meter dirty.
17
CHECKING
Page 27
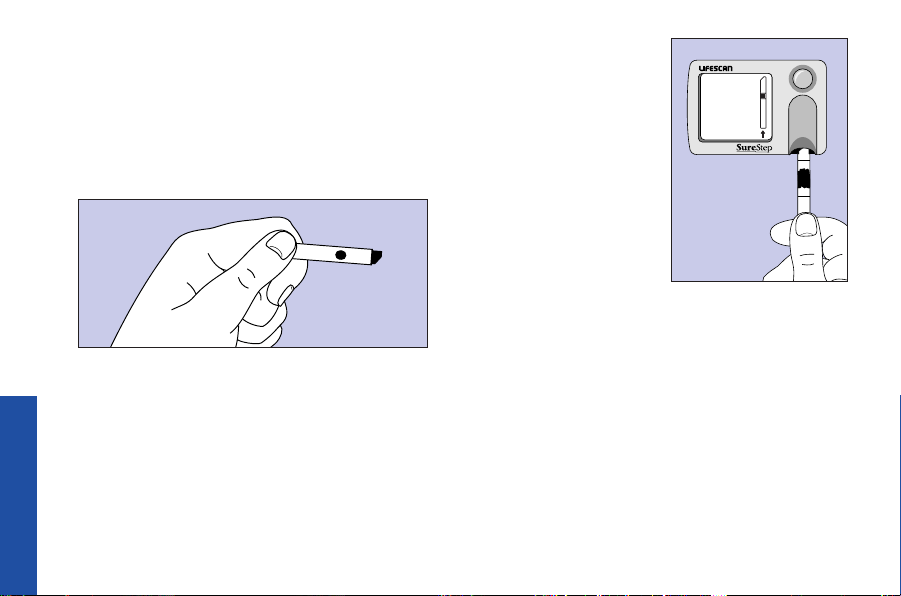
5. Turn the test strip over and check to see
that the confirmation dot is completely
blue. If it is not, discard the test strip.
Repeat the test with a new test strip,
applying a larger drop of control solution
to the centre of the pink test square.
6. Firmly insert the
test strip, confirmation dot side down,
into the test strip
holder until
it stops.
CAUTION: If you do not firmly insert the
test strip into the meter until it stops, you
may get an inaccurately low result.
IMPORTANT: Immediately insert the test
strip after applying the control solution. If
you do not insert the test strip within 2 minutes, discard the test strip and start over
with a new test strip.
CHECKING
18
Page 28

A flashing clock symbol appears while
the meter is reading your result. The
control solution result appears in about
30 seconds. The wait may be shorter or
longer depending upon the current temperature.
7. Press the green C button to mark the test
result as a control solution result ( ) in
meter memory. Marking the control result
prevents it from being included in the
14- and 30-day blood glucose averages.
(Example)
NOTE: Pressing the green C button
again while the glucose level is displayed removes the marker.
8. Compare the result
with the control
range printed on
the test strip
vial label.
19
(Example)
OneTouch
SureStep
Control
Range
®
®
CHECKING
Page 29
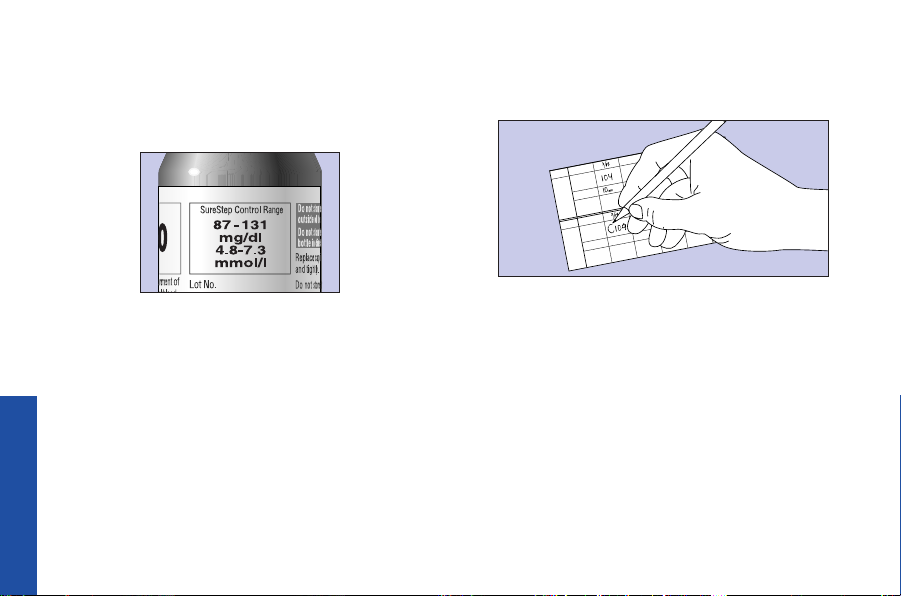
CAUTION: The range printed on the test
strip vial label is the expected range for control solution results. It is NOT a recommended range for your blood glucose level.
(Example)
9. Record the control solution test result in
your logbook. Place a C next to the result
to mark it as a control solution test.
NOTES
DATE TEST
TEST
RESULT
DATE
TIME
INSULIN/
MEDICATION
TEST
TEST
RESULT
TIME
INSULIN/
MEDICATION
NOTES
Understanding Control Solution Results
Control solution test results should fall
within the printed range on the test strip
vial label. If a control solution test result
falls outside the range, repeat the control
test. Control results that fall outside the
range may indicate that:
CHECKING
20
Page 30

◆
you are not following all test steps or
performing them incorrectly.
◆
the code number on the meter does not
match the code number on the test
strip vial.
◆
the meter or test strip holder is dirty.
◆
the control solution is expired, or beyond
its discard date, contaminated, or not
well mixed.
◆
there is a problem with the test strip
(expired, damaged, etc.).
◆
the meter has malfunctioned.
◆
the control solution test is performed
outside of the temperature range
15–35°C (59–95°F).
◆
you have applied too much control
solution.
If your control solution result falls outside
the printed range, repeat the control solution test with a new test strip. If your second
control solution result is also outside the
printed range, call the OneTouch
®
Customer
Care Line at 1 800 663-5521.
WARNING: Do NOT use your system to test
your blood when your control solution
results fall outside the printed range. You
may get inaccurate blood glucose results.
Call the OneTouch
®
Customer Care Line
at 1 800 663–5521 if this occurs.
21
CHECKING
Page 31

Choose a clean, dry work
surface. Make sure you
TESTING
have all the items needed
for a blood test as shown.
Testing your Blood
Sterile
Lancet
Meter
Cap
Release Button
Ejection/Cocking Control
Lancing Device
22
Depth Settings
Depth Indicator
Depth
Adjustment
Knob
OneTouch
SureStep
Test Strip
®
®
Page 32

Testing Tips for Accurate Results
There are several important steps you
should follow before and during the test that
will help you get accurate results.
Before Testing
◆
Wash and dry your hands.
◆
Use a new, sterile lancet.
◆
Check the test strip expiration date and
discard date (4 months after first opening
the test strip vial). Do not use the test
strips after these dates.
◆
Compare the colour of the confirmation
dot on the Unused test strip with the
colour shown for an “Unused” colour
dot on the Colour Chart on the test strip
vial label. If the colour of the confirmation dot on the test strip is darker than
the “Unused” colour, do not use the test
strip.
◆
Make sure the code on the meter display
matches the code on the test strip
vial label.
◆
Do a test with OneTouch®SureStep
Glucose Control Solution to make sure
the meter and test strip are working
properly together.
◆
Make sure the test strip holder, lens area,
and contact points on the meter are
clean. See Cleaning the Meter for
cleaning instructions.
During Testing
◆
Make sure you applied enough blood to
the test strip by checking that the confirmation dot turned completely blue.
◆
Make sure you did not apply too much
blood to the test strip. You have applied
too much blood if the white pad is
soaked and there is no white visible.
23
TESTING
®
Page 33

Test Procedures
1. Remove the lancing device cap. Insert a
lancet into the lancet holder. Push down
firmly until the lancet is seated in the
TESTING
lancet holder.
CAUTION: Only
one person
should use the
lancing device.
CAUTION: Never share a lancet with
another person. Lancets are for single
use only. Always use a new, sterile lancet.
2. Carefully remove the lancet’s protective
cover. Replace the lancing device’s cap.
24
Page 34

3. If you are using an adjustable
sampler, adjust the puncture depth
setting as needed.
4. Cock the lancing device.
5. Use warm, soapy water to wash your
hands. Dry them thoroughly. To increase
blood flow to the fingertips, massage
your hand two or three times from
wrist to fingertips.
6. Press the blue power button to turn
on the meter. The display check appears
briefly. Carefully check that all symbols
appear. Your last test result appears
next. (If this is your first test, – – –
appears instead.)
25
TESTING
Page 35

TESTING
(Example)
Make sure a test strip is not in the meter
when you turn it on.
Next, the code number appears.
7. Compare the code number on the meter
display with the code number on the test
strip vial. If they do not
match, press the green
C button until the
codes match.
These two symbols will
alternate on the display. The meter is
now ready to perform a test. The meter
will turn off automatically after 2 minutes
if a test strip is not inserted.
Apply blood to Insert test strip
test strip into meter
26
Page 36

8. Remove a test strip from the vial and
replace the vial cap. Close it tightly.
◆
Check the expiration date and discard
date. Do not use the test strips after
these dates.
◆
Compare the colour of the confirmation
dot on the test strip with the
“
Unused”
colour dot shown on the Colour Chart on
the test strip vial label. If the colour of
the confirmation dot on the test strip
is darker than that shown on the Colour
Chart, do not use the test strip. The
result may be inaccurate.
CAUTION: Use a test strip as soon as
possible after removing it from the vial.
Prolonged exposure to moisture, light,
or heat can cause inaccurate results.
Store test strips tightly capped in the
original vial in a cool, dry place away
from direct heat and sunlight. Never
transfer test strips to another
container.
NOTE: If opening the test strip vial
for the first time, write the discard date
(4 months from day of opening) on the
vial label and perform a control solution
test following the instructions in
Checking the System.
27
TESTING
Page 37

9. Hold the lancing device firmly against the
side of your finger. Firmer pressure will
give a deeper puncture. Use a different
spot each time to help prevent soreness
and callus formation. Press the release
TESTING
button. If needed, gently massage your
finger from base to tip to help obtain the
needed volume of blood.
10. Apply one drop of blood to the centre of
the pink test square in one of the ways
shown. Never add a second drop as this
may cause inaccurate results.
Front Back
White Tip Black Tip
28
Pink Test
Square
White Pad
Confirmation
Dot
Page 38

◆
Turn the test strip so the pink test square
faces your finger. Touch the centre of the
pink test square on the test strip to the
drop of blood on your finger. The pink
test square will quickly absorb blood.
TESTING
Be careful not to apply too much blood,
especially if you tend to bleed easily or
are taking blood-thinning medications.
OR
◆
Hold the test strip under your finger and
touch the drop of blood to the centre of
the pink test square.
29
If the entire white pad
surrounding the pink
test square is soaked,
you have applied too
much blood. Your test
result may be inaccurate. You must start
over with a new test
strip.
Too Much
Blood
Front
Page 39

11.Check the confirmation dot on the back
of the test strip after a few seconds. If
the confirmation dot is completely blue,
go to step 12.
TESTING
Enough Blood
Confirmation
Dot
If white patches or streaks appear on the
confirmation dot, you have not applied
enough blood to obtain an accurate test.
You must start over with a new test strip.
Not Enough
Blood
Front
Back
If there is no colour or if white patches or
streaks appear after you have repeated
the test, call the OneTouch
Care Line at 1 800 663–5521.
30
Back
®
Customer
Page 40

12.Confirm that the
meter is still on.
Firmly insert the
test strip, taperedend first, confirmation dot side
down, into the
test strip holder
until it stops.
CAUTION: If you do not firmly insert the
test strip into the meter until it stops, the
test may start but you may get an inaccurately low result. Do not remove test
strip until countdown is complete.
IMPORTANT: Immediately insert the
test strip after applying the blood. If you
do not insert the test strip within 2 minutes, discard the test strip and start over
with a new test strip.
A flashing clock symbol
appears while the meter is
reading your result. Your
glucose result appears in
about 30 seconds. Do not
remove strip until countdown is complete. The wait may be shorter or longer
depending upon the current temperature.
The test result is displayed alternating
with the time, then with the date. The
meter displays results between
0-27.8 mmol/L (0 and 500 mg/dL). If
the result is above 27.8 mmol/L
(500 mg/dL) the meter displays
HI
in
virtually all cases.
TESTING
31
(Examples)
Page 41

IMPORTANT: When proper procedures
are followed, the meter will display HI in
virtually all cases when your result is
above 27.8 mmol/ L (500 mg/dL). The
confirmation dot colour will also be
TESTING
darker than the 19.4 mmol/ L
(350 mg/ dL) sample colour dot on the
Colour Chart. This indicates very high
blood glucose (severe hyperglycemia).
Follow the advice of your Healthcare
Professional.
If you get an error message, see “What to
do” in Troubleshooting.
(Example)
If you get an error message instead of a number as a result, you can
quickly check to see if
your glucose is very low
(2.8 mmol/L) or very
high (19.4 mmol/L)
prior to troubleshooting
the error message. To
quickly see if your glucose is very low (2.8 mmol/L) or very high
(19.4 mmol/L), compare the colour of the
test strip confirmation dot with the sample colour dots on the Colour Chart on the
test strip vial label.
◆
If the test strip confirmation dot colour is
approximately the same as or lighter than
the “2.8 mmol/L” colour dot, your glucose level is very low.
◆
If the test strip confirmation dot colour is
approximately the same as or darker
32
Page 42

than the “19.4 mmol/L” sample colour
dot, your glucose level is very high.
CAUTION: The Sample colour dots are
only approximate. They should be
used only as a guide in the event you
get an error message instead of a
numerical result. They can give you an
indication of whether your glucose is
very low 2.8 mmol/ L (50 mg/dL) or
very high 19.4 mmol/ L (350 mg/dL)
while you troubleshoot the error message. Results obtained using the
sample colour dots are not a replacement for a OneTouch
®
SureStep
®
meter test result. Do not use Colour
Chart to verify control solution tests.
13. Record your test result in your logbook.
If a test result falls outside of the target
range that you and your Healthcare
Professional have established and you
cannot link it to diet, exercise, medication, or stress, repeat the test.
14. Remove and discard the test strip.
15. Turn off the meter by pressing the blue
power button. The meter automatically
turns off 3 minutes after it displays your
test result.
16. Remove the lancing device cap.
Removing Lancing Device Cap
33
TESTING
Page 43

17. Place the protective
cover on a hard surface
and push the lancet
tip into it.
TESTING
18. Point the lancet down and away from
you. Eject the used lancet into a
container for sharp objects.
CAUTION: To reduce the risk of an acci-
dental needle stick, carefully follow the
lancet and lancing device instructions
for safe removal and disposal of used
lancets.
19. Return the lancing device to its original
position, following the lancing device
instructions.
34
Page 44

Understanding Your Results
The result is displayed on the meter as a
plasma glucose value. The system’s plasma
calibration makes it easier for you to compare meter results with lab results. See
Comparing Meter and Laboratory Results
for more information.
You and your Healthcare Professional have
established target ranges for your blood glucose levels and any actions you should take
in response to your test results. Follow your
Healthcare Professional’s recommendations
to receive the maximum benefit from testing.
If a test result falls outside of the target
range that you and your Healthcare Professional have established and you cannot link
it to diet, exercise, medication, or stress,
repeat the test. If the result is similar and
still outside of your range, review Testing
Tips for Accurate Results.
If you get an error message instead of a
number as a test result, compare the test
strip confirmation dot to the sample colour
dots on the Colour Chart on the test strip vial
label. If the comparison indicates your glucose is very low or very high and you have
symptoms, follow the advice of your
Healthcare Professional. If you do not have
symptoms, follow the “What to Do” recommendations in Troubleshooting to resolve
the problem. Repeat the test with a new test
strip using the procedures outlined in
Troubleshooting. If you continue to get an
error or other message, call the OneTouch
Customer Care Line 1 800 663–5521.
35
RESULTS
®
Page 45

Low or High Results
You have
◆
◆
You have high blood sugar (hyperglycemia) if:
◆
◆
RESULTS
If you have symptoms that match your test
results, or if you continue to get results that
fall below 3.3 mmol/L or above 10 mmol/L
when you repeat the test, follow the advice
of your Healthcare Professional.
low blood sugar
(hypoglycemia) if:
Your meter result is 3.3 mmol/L
(60 mg/dL) or below.
The colour dot comparison shows approximately 2.8 mmol/L (50 mg/dL) (very low).
Your meter result is 10 mmol/L
(180 mg/dL) or greater.
The colour dot comparison shows approximately 19.4 mmol/L (350 mg/dL)
(very high).
CAUTION:
◆
If your meter result is very low, 1.1
mmol/L (20 mg/dL) or less, and you do
not have symptoms of low blood glucose, remove the test strip from the meter
and look at the confirmation dot on the
back of the test strip. You should do one
of the following depending on the colour
of the confirmation dot on the test strip:
■
If the confirmation dot is not completely blue or has white patches or
white streaks (see “How To Test Your
Blood”), repeat the test with a new
test strip. If the problem continues,
call the OneTouch®Customer Care
Line at 1 800 663-5521.
■
If the confirmation dot is completely
blue, compare the confirmation dot to
the sample colour dots on the Colour
Chart of the test strip label on the vial.
If this comparison indicates that your
36
Page 46

blood glucose is very low
(2.8 mmol/ L), conduct a Control
Solution Test (see “Checking The
System”). If the Control Solution test
indicates that your meter and test
strips are working together properly,
repeat your blood glucose test with a
new test strip. If you continue to
receive a very low blood glucose test
result, the low glucose result is likely
to be correct and you should follow
your Healthcare Professional’s advice
for treating low glucose levels. If the
Control Solution test is out of range,
call the OneTouch®Customer Care Line
at 1 800 663-5521.
I MPORTANT: When proper procedures are
followed, the meter will display “HI” in virtually all cases when your result is above
27.8 mmol/ L (500 mg/dL). The confirmation
dot colour will also be darker than the
“19.4 mmol/ L” sample colour dot on the
test strip vial label. This indicates very high
blood glucose (severe hyperglycemia).
Follow the advice of your Healthcare
Professional. If you have never experienced
blood glucose levels this high or have not
been instructed in how to deal with them by
your Healthcare Professional, you should
contact your Healthcare Professional at
once.
How to Check if Your
Meter is Working Correctly
The easiest way to check if your meter and
test strip are working together properly is to
run a test with OneTouch
Glucose Control Solution. See Checking
the System for more information.
37
®
SureStep
RESULTS
®
Page 47

Comparing Meter and Laboratory Results
The OneTouch®SureStep®System is plasma
calibrated. Because most laboratories measure plasma glucose, you can directly compare your meter test results with the lab
results. However, your meter blood glucose
test result may differ somewhat from your
laboratory result due to normal sources of
variation. Meter results can be affected by
factors and conditions that do not affect
laboratory results in the same way. Your
meter glucose result should agree with a
laboratory result within ±20% most of the
RESULTS
time under normal conditions. A result within that range is considered accurate when
testing with the OneTouch
However, results can differ by more than
±20% in some situations. Such results are
more likely to occur under the following
conditions:
®
SureStep®Meter.
◆
If you have recently eaten, exercised,
taken medication, or experienced
5
stress.
If you have eaten recently, the
blood glucose level from a fingerstick
can be up to 3.9 mmol/L (70 mg/dL)
higher than that of a venous sample
(blood drawn from a vein) used for a
lab test.
◆
For the most accurate comparison
6
between meter and laboratory results,
the meter test must be done within 10
to 15 minutes of the laboratory test. If
samples are taken more than 15 minutes apart, the two tests could have
very different results because blood
glucose levels can change significantly
within short periods of time.
38
Page 48

◆
Factors such as a low or high hematocrit
(the percentage volume of red blood
cells in your blood). For example, if your
hematocrit is too low (below 25%) or too
high (above 60%).
◆
Severe dehydration (loss of body fluid) may
also cause meter results to be different
from a laboratory result. Repeated vomiting
or diarrhea, both of which can occur when
your glucose is very high, can cause this.
Your blood may become thick, with not
enough liquid to properly wet the test strip.
This may cause your meter to give false low
blood glucose results.
◆
If you test at a very low or high temperature or a low or high relative humidity or
some other extreme environmental condition. If you test under these conditions,
repeat the meter test in a climatecontrolled place as soon as possible. The
operating temperature is
10–35°C (50–95°F). The operating humidity is 10–90%. You should always test
within these ranges.
◆
You may also get inaccurate results if
you test when both the temperature and
relative humidity are near the limits
defined above. If you test under these
conditions, repeat the meter test in a
climate-controlled place as soon as
possible.
◆
Conditions affecting circulation to the
hands may also lead to inaccurate
results. These include shock, some
drugs called vasoactive agents, and
Raynaud’s disease.
4, 7, 8
See the Important Technical and Healthcare
Professional Information section in the
OneTouch
insert for typical accuracy and precision data
for the OneTouch
®
SureStep®Test Strip package
®
SureStep®system. Make
39
RESULTS
Page 49

sure you read Important things to know
before testing in the test strip package
insert. You should also review “Testing Tips
for Accurate Results” in the Testing Your Blood
section.
Health Conditions Which Can Cause
Out–of–Range Results
If you are getting results outside your target
range and you believe the
OneTouch
OneTouch
together properly, ask yourself the following
RESULTS
questions.
◆
“How do I feel?”
◆
“Do I have symptoms of low blood sugar
(hypoglycemia): slurred speech,
headache, tingling of lips, cool sweating,
rapid heartbeat, disorientation, weakness,
®
SureStep®Meter and
®
SureStep®Test Strips are working
dizziness, fainting, hunger, nervousness,
irritability, or tremors?”
◆
“Do I have symptoms of high blood
glucose (hyperglycemia): fatigue, dry
mouth and skin, increased thirst or
hunger, blurry vision, increased urination,
rapid deep breathing, or a fruity smell to
the breath?”
◆
“What have I eaten?”
◆
“How much have I exercised?”
◆
“Am I ill (common cold, flu, etc.)?”
◆
“Have I been under stress lately?”
If your Healthcare Professional has not
already instructed you in dealing with these
situations, you should contact your
Healthcare Professional.
40
Page 50

Caring for your Meter
General Care
◆
Keep your meter dry and avoid exposing
it to extremes in temperature. Do not
store your meter or test strips in your car
or in the refrigerator or freezer.
◆
Dropping the meter can damage the
electronics. If you drop your meter, do a
control solution test (see Checking the
System) and a display segment check
(see Display Symbols) before using the
meter to test your blood.
◆
Do not take the meter apart. Sensitive
parts could be damaged causing inaccurate results. Taking the meter apart will
also void your warranty.
Cleaning the Meter
CAUTION:
◆
Use water to clean the meter.
◆
Do not get water inside the meter case.
◆
Never immerse the meter or hold it
under running water.
◆
Do not use alcohol, glass cleaners, or
any other cleansers to clean the test
strip holder or lens area.
NOTE: For Healthcare Professionals or
caregivers who assist multiple users, to
disinfect the meter, cleanse the meter as
described below using a 10% bleach solution (9 parts water, 1 part bleach) and
then clean again with water to remove
any remaining bleach. Thoroughly dry
the meter. Failure to remove the excess
bleach may result in an error message
(, )
41
or an inaccurately high result.
MAINTENANCE
Page 51

Always clean the meter
when this symbol
appears.
1. Press down at the top end (near blue
power button) of the test strip holder and
slide it away from the meter.
2. Wipe the test strip holder gently with a
cotton swab or soft cloth dampened with
water. Thoroughly wipe the grey area on
the inside cover. Clean both sides of the
test strip holder base, especially around
the hole. Dry the test strip holder com-
pletely with a soft cloth or lint–free
tissue.
Cover
Inside Cover Grey Area Hole (clean both sides)
Top of
Base
Bottom
of Base
Base
MAINTENANCE
42
Page 52

3. Dampen a cotton swab or soft cloth with
water and wipe the lens area and contact
points with it. Do not scratch the lens
area. Dry with a soft cloth or tissue that
does not contain lint, lotion, or perfume. Do not use abrasive materials
such as paper towels.
Contact Points
Lens Area
4. Slide the test strip holder into the meter,
press down, and push forward at the test
strip insertion point until you hear a click.
Make sure the test strip holder is firmly
in place and does not extend beyond
the meter.
5. Turn on the meter by pressing the blue
power button. The display check
appears briefly. Carefully check that
all symbols appear.
43
MAINTENANCE
Page 53

6. If the Er 5 symbol
appears after cleaning,
check to see if you
inserted the test strip
holder completely and
securely (see step 4 in
this section).
Note: If you disinfected the meter
with a 10% bleach solution, you may
not have completely removed the
bleach residue from the grey area
inside the test strip holder cover. Wipe
this area with a cloth dampened with
water and dry thoroughly. Failure to
remove the excess bleach may result in
an error message
(, )
or an
inaccurately high result.
Note: Clean the outside of the
meter by gently wiping it with a cloth
dampened with water. Dry it with a
soft cloth.
MAINTENANCE
44
Page 54

Changing the Batteries
CAUTION: The OneTouch®SureStep
Meter uses two AAA alkaline batteries.
Do not use rechargeable batteries.
1. When this symbol
appears constant on the
display, the batteries
are low and need to be
replaced as soon as
possible with new AAA
alkaline batteries. If this symbol starts
flashing, battery power is insufficient
to run the meter. You will not be able
to test.
Note: Low batteries and battery removal
®
will not affect test results stored in meter
memory. However, the current time and
date will be lost and must be reset each
time you change the battery. See Changing
Meter Settings for information on
setting the current date and time.
2. Turn off the meter and remove the
battery door by squeezing the tab and
lifting it up.
R
E
T
E
M
E
S
O
:
C
e
U
ic
L
rv
e
G
D
r s
O
e
O
m
L
to
B
s
u
c
e
:
S
E
ll-fre
T
o
A
T
T
S
D
E
IT
N
U
h
lis
g
n
E
1 800 227-8862
l
o
ñ
a
p
s
E
1 800 381-7226
:
A
D
A
N
A
C
1 800 663-5521
, C
s
ita
ilp
M
L 5037 ZG 00171
© LIFESCAN INC. 1998
AW 052-178-01B Made in U.S.A.
®
NRTL /C
5
3
0
5
9
A
1
B
MAINTENANCE
45
Page 55

3. Remove the old batteries with your fin-
gers, or by tapping the meter gently
against the palm of your hand. Never tap
the meter against a hard surface.
B
1
M
i
l
p
i
t
a
L 5037 ZG 00171
s
,
C
A
9
5
0
3
5
N
R
T
L
/
C
®
1 800 663-5521
CANADA:
1 800 381-7226
E
sp
a
ñ
o
l
1 800 227-8862
E
n
g
lish
UN
ITED STATES:
T
o
ll-fre
e
cu
sto
m
e
r se
B
L
O
rvice
O
D
G
:
L
U
C
O
S
E
M
E
T
E
R
5. Insert the two battery cover hinges into
the slots and press down gently until the
tab catches.
AW 052-178-01A Made in U.S.A.
C22.2 No. 125; Risk Class 2
© LIFESCAN INC. 1995
M
ilpitas
,C
A
94
03
5
4. Insert two new AAA alkaline batteries,
matching the + end of each battery with
the + sign in the battery compartment.
MAINTENANCE
6. Set the current time and date in the
meter as described in Changing Meter
Settings.
46
Page 56

Storage Instructions
WARNING: The system contains small
parts such as lancets, vial caps, etc. Keep
your system out of the reach of small children because these parts may be dangerous if swallowed. The test strip packaging contains a drying agent that may be
harmful if inhaled or swallowed. It may
also cause skin or eye irritation.
◆
Store the OneTouch®SureStep®Meter at
room temperature. If the meter is
exposed to cold, direct heat, or sunlight
(for example, when transported in a car),
allow it to come to room temperature
before testing your blood.
◆
Store your OneTouch®SureStep®Test
Strips in a cool, dry place in the original
moisture–resistant, light–protected vial.
The storage temperature should not
exceed 30°C (86°F). Do not refrigerate or
freeze test strips. Do not store test strips
in any container other than the original
vial. Do not expose the test strips to
bleach fumes or hydrogen peroxide.
◆
Store OneTouch®SureStep®Glucose
Control Solution in a cool, dry place at
temperatures below 30°C (86°F). Do not
refrigerate or freeze. When used for testing, the solution should be at normal
room temperature above 15°C (59°F).
◆
Store the lancing device and lancets at
room temperature out of reach of small
children.
47
MAINTENANCE
Page 57

Error Messages
Troubleshooting
The meter displays specific error messages
TROUBLESHOOTING
when it detects a problem with its internal
functions, the test strip, or the testing procedure. However, the meter cannot detect all
problems. For those problems the meter can
detect, it may not produce an error message
every time the problem occurs.
When an error message appears, note the
error number, turn off the meter, and then
resolve the error by following the instructions in the “What to Do” column. If you
continue to get an error message after following the instructions, call the OneTouch
Customer Care Line at 1 800 663–5521.
48
®
Page 58

NOTE: If the actions listed below do not resolve the error, call the OneTouch®Customer Care Line at 1 800 663-5521.
ERROR POTENTIAL PROBLEM WHAT TO DO
The meter detected
a problem with the
colour of the test
strip.
1. Repeat the test with a new test strip and:
◆
Apply blood to the pink test square only.
◆
Make sure the confirmation dot turns completely blue.
◆
Insert the test strip within 2 minutes of applying
blood.
Note: If you continue to get any error message, com-
pare the colour of the test strip confirmation dot to the
Colour Chart on the test strip vial. If the glucose level is
very low (2.8 mmol/ L) or very high (19.4 mmol/L),
follow the advice of your Healthcare Professional.
◆
Clean the meter and repeat the test with a new test
strip. See Caring for Your Meter for further informa-
tion.
2.
If these actions do not resolve the error, call the
OneTouch
®
Customer Care Line at 1 800 663–5521.
49
TROUBLESHOOTING
Page 59

NOTE: If the actions listed below do not resolve the error, call the OneTouch®Customer Care Line at 1 800 663-5521.
ERROR POTENTIAL PROBLEM WHAT TO DO
Er 1
continued
TROUBLESHOOTING
The meter detected
a problem with the
colour of the test
strip.
Professional Use:
◆
Test the sample with an alternate method.
While awaiting results:
Compare the colour of the test strip confirmation dot
to the Colour Chart on the test strip vial label. If the
glucose level is very low (2.8 mmol/L) or very high
(19.4 mmol/L), take appropriate precautions
immediately.
Before retesting verify that the sample hematocrit is
within range.
◆
If these actions do not resolve the error, call the
OneTouch
®
Customer Care Line at 1 800 663–5521.
The meter detected
a problem with the
test strip.
1.
Repeat the test with a new test strip and:
◆
Check the test strip expiration date. Do not use
test strips beyond the expiration or discard
date.
50
Page 60

NOTE: If the actions listed below do not resolve the error, call the OneTouch®Customer Care Line at 1 800 663-5521.
ERROR POTENTIAL PROBLEM WHAT TO DO
Er 2
continued
The meter detected
a problem with the
test strip.
◆
Apply the sample to the pink test square only.
◆
Make sure the confirmation dot turns completely blue.
◆
Wait approximately 1 minute, but not more than 2
minutes, after applying sample before inserting the
test strip into the meter.
◆
Do not alter the test strips.
Note: If you continue to get any error message, compare
the colour of the test strip confirmation dot to the
Colour Chart on the test strip vial. If the glucose level is
very low (2.8 mmol/L) or very high (19.4 mmol/L),
follow the advice of your Healthcare Professional.
◆
Clean the meter and repeat the test with a new
test strip. See Caring for Your Meter for more
information.
2.
If these actions do not resolve the error, call the
OneTouch
®
Customer Care Line at 1 800 663–5521.
51
TROUBLESHOOTING
Page 61

NOTE: If the actions listed below do not resolve the error, call the OneTouch®Customer Care Line at 1 800 663-5521.
ERROR POTENTIAL PROBLEM WHAT TO DO
The meter detected
a problem with the
TROUBLESHOOTING
position of the test
strip.
1. Repeat the test with a new test strip and:
◆
Clean the meter, especially the contact points,
before retesting. See Caring for your Meter for
more information.
Note: Before cleaning the meter, compare the colour
of the test strip confirmation dot to the Colour Chart
on the test strip vial. If the glucose level is very low
(2.8 mmol/L) or very high (19.4 mmol/L), follow the
advice of your Healthcare Professional.
◆
Do not move the test strip after you insert it into the
meter. Remove the test strip only when the test is
complete.
2. If these actions do not resolve the error, call the
OneTouch
®
Customer Care Line at 1 800 663–5521.
52
Page 62

NOTE: If the actions listed below do not resolve the error, call the OneTouch®Customer Care Line at 1 800 663-5521.
ERROR POTENTIAL PROBLEM WHAT TO DO
The meter detected a
temperature
problem.
1. Repeat the test with a new test strip. Make sure the
meter and test strip are at room temperature.
◆
Do not apply heat or cold to the meter.
Note: If you continue to get any error message,
compare the colour of the test strip confirmation dot
to the Colour Chart on the test strip vial. If the glucose
level is very low (2.8 mmol/L) or very high
(19.4 mmol/L), follow the advice of your Healthcare
Professional.
TROUBLESHOOTING
2. If these actions do not resolve the error, call the
OneTouch
®
Customer Care Line at 1 800 663–5521.
53
Page 63

NOTE: If the actions listed below do not resolve the error, call the OneTouch®Customer Care Line at 1 800 663-5521.
ERROR POTENTIAL PROBLEM WHAT TO DO
The meter detected a
problem with the
TROUBLESHOOTING
optical system.
1. Repeat the test with a new test strip and:
◆
Clean the meter, especially the grey area inside the
test strip holder, before retesting. See Caring for Your
Meter.
Note: Before cleaning the meter compare the
colour of the test strip confirmation dot to the Colour
Chart on the test strip vial. If the glucose level is
low (2.8 mmol/L) or very high (19.4 mmol/L)
, follow the
advice of your Healthcare Professional.
◆
Make sure the test strip holder is fully inserted into
the meter. See Caring for Your Meter for more
information.
◆
Wait for the “Insert test strip” symbol to appear on
the display before inserting the test strip.
2. If these actions do not resolve the error, call the
OneTouch
®
Customer Care Line at 1 800 663–5521.
54
very
Page 64

NOTE: If the actions listed below do not resolve the error, call the OneTouch®Customer Care Line at 1 800 663-5521.
ERROR POTENTIAL PROBLEM WHAT TO DO
The meter detected
a problem with the
electronics.
1. Repeat the test with a new test strip and:
◆
If you use bleach to disinfect the meter, before retesting, wipe the meter and contact points with a cloth
moistened with water to remove residual bleach and
thoroughly dry the meter. Failure to remove the excess
bleach may result in an error message ( , ) or an
inaccurately high result.
◆
Recheck the code number entered in the meter and
make sure it matches the code number on the test
strip package.
Note: If you continue to get any error message,
compare the colour of the test strip confirmation dot
to the Colour Chart on the test strip vial. If the glucose
level is very low (2.8 mmol/L) or very high
(19.4 mmol/L), follow the advice of your Healthcare
Professional.
2. If these actions do not resolve the error, call the
OneTouch
®
Customer Care Line at 1 800 663–5521.
55
TROUBLESHOOTING
Page 65

Symbols
The following symbols appear on the meter display to help guide you through the testing
process. If they occur during testing, they may indicate problems.
SYMBOL WHAT IT MEANS WHAT TO DO
Insert Test
Strip
Firmly push the test strip into the test strip holder, with the
tapered-end first and the confirmation dot facing down, until it
stops. If you fail to completely insert the test strip, the test may
start. However, you may receive an inaccurately low result.
Remove
Test Strip
SYMBOLS
Remove the test strip from the meter. If white patches or streaks
appear on the confirmation dot, you have not applied enough blood
to obtain an accurate test. You must start over with a new test strip.
When the “Insert Test Strip” symbol appears on the display, insert
the test strip. Push it firmly and more slowly into the test strip holder
until it stops.
Note: It is possible to push the test strip into the test strip holder
too fast. If this happens, the meter displays the “Remove Test
Strip” symbol.
56
Page 66

NOTE: If the actions listed below do not resolve the error, call the OneTouch®Customer Care Line at 1 800 663-5521.
SYMBOL WHAT IT MEANS WHAT TO DO
Replace
battery
Replace the batteries (see Caring for your Meter) as soon as possible. If this symbol appears constant, batteries are low. If this symbol is
flashing, batteries are dead and the meter will no longer operate.
OTHER S YMBOLS
SYMBOL WHAT IT MEANS
Apply blood to test strip.
See p. 26-29
Meter and/or test strip
holder need cleaning.
See p. 42-44
Meter is reading
your result.
See p. 31
*
If you have never experienced blood glucose levels this high or have not been instructed in how to deal with them by your Healthcare Professional,
you should contact your Healthcare Professional at once. If this reading does not reflect how you feel, repeat the test with a new test strip.
SYMBOL WHAT IT MEANS
Result from
meter memory.
See p. 65-67P. -
Result is over 27.8 mmol/L
(500 mg/dL).*
See p. 36 IMPORTANT
57
Match meter code
with the code on the
vial.
See p. 16
SYMBOLS
Page 67

Changing Meter Settings (Set–Up Mode)
The OneTouch®SureStep®Meter has been preset to meet the needs of most users in
Canada. There are six features you can change in addition to the date and time.
FEATURE PRESET ALTERNATIVE SEE PAGE
Set time and date AM/PM Any 59
month/day/year
Automatic display of last result On Off 61
Unit of measurement mmol/L mg/dL 61
Beep signals during testing On Off 62
14– and 30–day averages On Off 63
Time format AM/PM 24 hour 64
Date format Month/Day Day/Month 64
SETTINGS
58
Page 68

Entering Set–Up Mode
1. Turn off the meter.
2. Press and hold down the green C button.
3. Press and release the blue power button
while holding down the green C button.
6. You can change the setting while it flash-
es by pressing the green C button.
NOTE: To move quickly through the
features, press the blue button repeatedly or press and hold it down to
scroll.
4. Release the green C button.
Blue Power
Button
Green C Button
5. Each setting flashes on the display until
you press the blue power button to move
to the next feature.
Setting the Date and Time
The OneTouch®SureStep®Meter records the
time and date of each glucose test you perform. You may have to change the time and
date, for example, when the batteries are
changed. You will also need to reset the
time when daylight savings time starts or
ends. The accuracy of your glucose results is
not affected if the date and time settings are
incorrect.
When setting the date and time, if you pass
the desired number (for example, day, month
year), continue pressing the green C button
to cycle through the values and back to the
desired number.
59
SETTINGS
Page 69

Setting the Time
To set the time, enter the set-up mode as
described in “Entering Set-Up Mode” above.
The time appears with the hour flashing.
Press and release the green C button to
advance 1 hour. To move faster, hold down
the green C button. With the correct hour on
the display, press and release the blue power
button and the minutes will start flashing.
Press and release the green C button to
advance 1 minute. To move faster, hold the
green C button down. With the correct minutes on the display, press the blue power
button and the year setting will appear on
the display.
AM
Note: Calculated 14–day and 30–day aver-
ages may change if you change the date
and time. The averages are calculated from
glucose results measured during the 14 or
30 days preceding the current date and time
settings.
Setting the Year
With the year on the display, press and
release the green C button to advance 1
year. To move faster, hold down the green C
button. With the correct year on the display,
press and release the blue power button
and the month and day will appear on the
screen with the month segment flashing
(month/day format is preset).
SETTINGS
60
Page 70

Setting the Month
Press and release the green C button until
the correct month number appears. To
move faster, hold down the green C button.
With the correct month on the display, press
the blue power button and the day segment
will start flashing.
Setting the Day
Press and release the green button until
the correct day appears. To move faster,
hold the green button down. With the
correct day on the display, press the blue
power button and the display of last result
setting will appear.
Display of Last Result
The meter is preset to
display your last glucose
result when you turn on
the meter.
To turn this feature off, press
the green C button. This symbol will flash, indicating that
automatic display is turned
off. Press the blue power button to move to the unit of
measurement setting.
Unit of Measurement
The meter is preset to display test results in
millimoles per liter (mmol/L), the unit of
measure most often used in Canada. You may
change the setting to milligrams per deciliter
(mg/dL) the unit of measure used in the
61
SETTINGS
Page 71

United States. If you are not sure which unit of
measurement to use, please check with your
Health Care Professional. The mmol/L results
include a decimal point and the mg/dL results
do not.
To change the unit of measurement to
mg/dL, press the green C button.
This symbol will flash on the display.
Press the blue power button to move to the
beep signals setting.
Beep Signals
The OneTouch®SureStep®Meter uses beeping tones to signal certain steps in the procedure. However, these “beep” signals do not
mean that the step was performed correctly.
Three types of beep signals sound.
1. A single, short beep identifies each step
in the test procedure.
2. A single, long beep accompanies error
HI
messages, a “
takes in doing the test procedure.
3. A three–tone beep sounds when the
meter displays a test result and when the
meter moves to the beep signal feature
in set–up mode.
” result, and certain mis-
SETTINGS
62
Page 72

In set–up mode, a
three–tone beep sounds and
the following symbol flashes
when you move to the beep
signals feature.
To operate without beep signals, press the green C button. The following display
will appear.
You will hear a three–tone beep when
OFF
is displayed. Press the blue power button to
move to the 14– and 30–day
test averages setting.
14– and 30–Day Test Averages
The meter is preset to
display 14–day and 30–day
averages of your blood
glucose results in memory
mode.
For accurate 14–day and 30–day blood
glucose averages, you must mark control
solution test results by pressing the green
C button again while the glucose level is
displayed. This will keep them from being
included in your blood glucose test averages.
If you wish to turn the
averages off, press the green
button. The following display
will appear:
No averages will be displayed
in memory mode. Press the
blue power button to move to
the time format setting.
63
SETTINGS
Page 73

Time Format
The meter is preset to display time in the
AM/PM format. An alternative 24–hour time
format is available.
Date Format
The meter is preset to display the date in
month/day format. An alternate day/month
format is available.
To change to the 24–hour time format, press
the green C button. Press the blue power
button to move to the date format setting.
SETTINGS
To change the display of the date to the
day/month format, press the green C button.
Press the blue power button to turn off the
meter.
Exiting the Set–Up Mode
You may exit the set–up mode at any time
by pressing and holding the blue power
button down until the display is blank.
64
Page 74

Getting Results from Meter Memory
MEMORY
Background Information
on Meter Memory
When you turn on the OneTouch®SureStep
Blood Glucose Meter you will see the result
of your last test. The meter stores your last
150 results (blood glucose or control solution test) with the date and time in its
memory. When the meter’s memory is filled
with 150 results, the oldest result is dropped
and the newest one is added. The meter
also gives 14–day and 30–day averages of
your blood glucose test results. Results
marked as control solution results will not
be included in your averages.
®
Getting All Results from Meter
Memory
To get the results stored in the meter’s
memory:
1. Press the blue power button and hold it
down for about 5 seconds.
2. When the display flashes, let go of the
blue button.
You are now in memory mode.
3. First, the 14–day average will appear. This
is the average of your blood glucose
results during the last 14 days. (Ask your
Healthcare Professional how to use these
averages.)
4. Then, when you press the green C button, your 30–day average appears. (Ask
your Healthcare Professional how to use
these averages.)
Note: A“HI” result is included in
your 14–day and 30–day averages as
27.8 mmol/L.
65
Page 75

5. Each time you press and let go of the
green C button, the meter displays the
next most recent of your 150 stored test
results. The date and time of each result
is displayed alternately under the test
MEMORY
result. If the test result was marked as a
control solution result, appears
under the result.
6. To scroll quickly through the results,
press and hold the green C button.
Green
Button
Blue
Power
Button
C
(Examples)
7. If a test resulted in an error message, the
error message is stored in the memory.
Note: A “HI” result is
included in your
14–day and 30–day
averages as 27.8
mmol/L.
(Example)
66
Page 76

First Time Turning on Meter
The first time you turn on your meter you
will see the following symbol. This shows
that there are no test results in memory.
You will also see this symbol after you turn
on your meter when your last test ended in
an error and the meter did not display a
glucose result.
Uploading Memory Data
Test results stored in the memory may be
uploaded to a personal computer using
OneTouch
™
Diabetes Management software.
See www.OneTouch.ca or call The
OneTouch
®
Customer Care Line at
1 800 663-5521 for more information.
67
MEMORY
Page 77

Specifications
The performance of the OneTouch®SureStep®Blood Glucose Monitoring System was tested
under the conditions below. See “Important Technical and Healthcare Professional
Information” in the OneTouch
precision data.
®
SureStep®Test Strips package insert for typical accuracy and
Power Supply: Two AAA alkaline batteries
Battery Life: Approximately 18 months when
doing two tests per day
Result Range: 0–27.8 mmol/L
(0–500 mg/dL). Higher results are
virtually always displayed as “HI”
SPECIFICATIONS
Display: Liquid crystal
Blood Source: Whole blood
Calibration: Plasma equivalent
Hematocrit Range: 25–60%
*See “Comparing Meter and Laboratory Results” for additional information.
Size: 8.9 cm x 6.1 cm x 2.0 cm
(3.5” x 2.4” x 0.8”)
Weight: 108 grams (with batteries)
(3.8 ounces)
Operating Temperature Range*: 10–35°C
(50–95°F)
Operating Humidity Range*: 10–90% relative
humidity (noncondensing)
Memory: 150 results (blood glucose and
control solution).
68
Page 78

Guarantee and Warranty
30–Day Money–Back Guarantee
If you are not fully satisfied with the
OneTouch
receive a full refund by calling a OneTouch
Customer Services Representative at
1 800 663-5521 (Canada) within 30 days of
purchase. You will need to return the
OneTouch
your receipt to receive a refund. The
Warranty Policy does not apply to the performance of the OneTouch
when used with any test strip other than
OneTouch
LifeScan, or when the OneTouch
Meter or Test Strips are modified in any way.
This warranty is in lieu of all other warranties, express or implied, including any
implied warranty of merchantability or fitness for a particular purpose.
®
SureStep®System, you may
®
SureStep®Meter and a copy of
®
SureStep®Meter
®
SureStep®Test Strips from
®
SureStep
®
®
Three–Year Warranty
The OneTouch®SureStep®Meter has a full
3-year warranty from the date of purchase.
If, at any time during the first 3 years after
purchase, the meter does not work for any
reasons (except for obvious abuse), LifeScan
will replace it with a new meter or equivalent
product free of charge.
The Warranty Policy applies only to the original
purchaser of this meter and does not
include the batteries supplied with the meter.
Please complete the Warranty Registration
Card and mail it to LifeScan.
Write your date of purchase here:
______________________________________
Before you return your meter or any product, first call your OneTouch
Services Representative at 1 800 663-5521
(Canada) for instructions.
69
®
Customer
SPECIFICATIONS
Page 79

CODING THE METER
Before testing, make sure the meter is coded correctly.
PERFORMING A TEST
Press blue power button
1
to turn on meter. Make
sure a test strip is not in the
meter when you turn it on.
(Example)
. . . and then the code
3
number is displayed
afterward.
QUICK REFERENCE
The meter automatical-
2
ly displays the last test
result with the date. . .
Green C Button
→
(Example)
Compare the code
4
number on the meter to
the code number on the test
strip vial. If the code numbers do not match, press
the green C button until the
code number on the meter
matches the code number
on the test strip vial.
70
Press blue power button
1
to turn on meter. Make
sure a test strip is not in the
meter when you turn it on.
Check confirmation dot
3
on back of test strip and
make sure it is completely
blue.
Apply blood to the
2
centre of the pink test
square. Never add a second
drop of blood.
Firmly push the test
4
strip into the test strip
holder, with the tapered-end
first and the confirmation
dot facing down, until it
stops. Read result. Do not
remove strip until countdown is complete.
Page 80

BLOOD APPLICATION
FrontBackFront Back
Pink
Test
Square
White
Pad
Confirmation
Dot
Front Back
Test Strip Enough Blood Not Enough Blood Too Much Blood
How you can be sure that you have applied the right amount of blood:
QUICK REFERENCE
Pink test square is
where you apply a drop
of blood.
White pad absorbs the
excess blood that may
extend beyond the pink
test square. Do not apply
blood directly onto the
Apply a drop of blood to
the centre of the pink
test square on the front
of the test strip. The confirmation dot on the
back should be completely blue for an
accurate test.
white pad.
Confirmation dot
of test strip is where you
check to confirm proper
onback
If any white patches or
streaks appear on the
blue confirmation dot,
you have not applied
enough blood for an
accurate test. You must
start the test over with a
new test strip to avoid
inaccurately low results.
* Never add a second
drop of blood.
blood application.
71
If there is no white visible
on the white pad, you
have applied too much
blood. You must start the
test over with a new test
strip to avoid inaccurately high results.
* Be careful not to apply
too much blood, espe-
cially if you tend to
bleed easily or are
taking blood-thinning
medications.
Page 81

Numerics
14-and 30-day averages . . . . . . . . . . . . . .
A
Accuracy . . . . . . . . . . . . . . . . . . . . . . . . . . . . . . . . . . 39
Applying sample
INDEX
– Adequate amount . . . . . . . . . . . . . . . . . . . . . . . . . . 30
– Blood . . . . . . . . . . . . . . . . . . . . . . . . . . . . . . . 28-30
– Control solution . . . . . . . . . . . . . . . . . . . . . . . . . . 17
– Not enough . . . . . . . . . . . . . . . . . . . . . . . . . . . . . 30
– Pink test square . . . . . . . . . . . . . . . . . 11, 17, 28-29
– Too much . . . . . . . . . . . . . . . . . . . . . . . . . 17, 23, 29
B
Batteries
– Changing . . . . . . . . . . . . . . . . . . . . . . . . . . . . . 44-46
– Symbol indicating replacement . . . . . . . . . . . 12, 44
Battery compartment . . . . . . . . . . . . . . . . . . . 7, 45-46
Beep signals . . . . . . . . . . . . . . . . . . . . . . . . . . . . 62-63
Blood
– Applying . . . . . . . . . . . . . . . . . . . . . . . . . . . . . 28-30
– Obtaining . . . . . . . . . . . . . . . . . . . . . . . . . . 24-25, 28
Blood glucose
– Results . . . . . . . . . . . . . . . . . . . . . . . . . . . . . . 31-33
– Target ranges . . . . . . . . . . . . . . . . . . . . . . . . . 35, 40
– Test . . . . . . . . . . . . . . . . . . . . . . . . . . . . . . . . . . 22-34
C
C
Button . . . . . . . . . . . . . . . . . . . . . . . . . . . . . . . . . . . 7
– Changing code number . . . . . . . . . . . . . . . . . . . . 14
19, 60, 63, 65
– Changing meter settings . . . . . . . . . . . . . . . . . 58-64
– Marking control solution result . . . . . . . . . . . . . . . 19
Changing
– Batteries . . . . . . . . . . . . . . . . . . . . . . . . . . . . . 44-46
– Code number . . . . . . . . . . . . . . . . . . . . . . . . . . . . 14
– Meter settings . . . . . . . . . . . . . . . . . . . . . . . . . 58-64
Checking
– Code number . . . . . . . . . . . . . . . . . . . . . . . . . 16, 26
– Confirmation dot . . . . . . . . . . . . . . . . . . . . . . 18, 30
– System . . . . . . . . . . . . . . . . . . . . . . . . . . . . . . 15-21
Cleaning
– Contact points . . . . . . . . . . . . . . . . . . . . . . . . . . . 43
– Disinfecting . . . . . . . . . . . . . . . . . . . . . . . . . . . . . 41
– Display symbol . . . . . . . . . . . . . . . . . . . . . . . . 12, 42
– Lens area . . . . . . . . . . . . . . . . . . . . . . . . . . . . . . . 43
– Meter . . . . . . . . . . . . . . . . . . . . . . . . . . . . . . . 41-44
– Test strip holder . . . . . . . . . . . . . . . . . . . . . . . 42-43
Code number . . . . . . . . . . . . . . . . . . . . . . . . . . . . . . 11
– Changing . . . . . . . . . . . . . . . . . . . . . . . . . . . . . 13-14
– Displayed at meter power up . . . . . . . . . . 13, 16, 26
Coding the meter . . . . . . . . . . . . . . . . . . . . . . . . 13-14
Colour Chart . . . . . . . . . . . . . . . . . . . . . . . . . . . . . . . . 9
– Checking confirmation dot against . . . . . . . . . 32-33
– Unused test strip . . . . . . . . . . . . . . . . . . . . 7, 23, 27
– Very low or very high . . . . . . . . . . . . . . . . . . . . 9, 36
Comparing meter and lab results . . . . . . . . . . 3, 38-40
Confirmation dot . . . . . . . . . . . . . . . . . . . . . . . . . . . . 8
– Checking (control solution test) . . . . . . . . . . . . . . 18
72
Page 82

– Checking (blood test) . . . . . . . . . . . . . . . . . . . . . . 30
– Colour of unused test strip . . . . . . . . . . . . 17, 23, 27
– Comparing to Colour Chart . . . . . . . . . . . . . 9, 32-33
– Facing down when inserting test strip . . . 11, 18, 31
– Patches or streaks appear . . . . . . . . . . . . . . . . . . 30
Control solution
– Applying . . . . . . . . . . . . . . . . . . . . . . . . . . . . . . . . 17
– Discard date . . . . . . . . . . . . . . . . . . . . . . . . . . . 4, 17
– Expiration date . . . . . . . . . . . . . . . . . . . . . . . . . 4, 17
– Marking result . . . . . . . . . . . . . . . . . . . . . . . . . . . 19
– Out of range . . . . . . . . . . . . . . . . . . . . . . . 17, 20-21
– Results . . . . . . . . . . . . . . . . . . . . . . . . . . . . . . 20-21
– Storage . . . . . . . . . . . . . . . . . . . . . . . . . . . . . . . . . 47
– Test . . . . . . . . . . . . . . . . . . . . . . . . . . . . . . . . . . 15-21
Contact points . . . . . . . . . . . . . . . . . . . . . . . . . . . . . . 7
– Cleaning . . . . . . . . . . . . . . . . . . . . . . . . . . . . . . . . 43
D
Data port . . . . . . . . . . . . . . . . . . . . . . . . . . . . . . . . . . 7
Date and time
– Changing . . . . . . . . . . . . . . . . . . . . . . . . . . . . . 59-61
– Format . . . . . . . . . . . . . . . . . . . . . . . . . . . . . . . . . 64
Discard date
– Control solution . . . . . . . . . . . . . . . . . . . . . . . . 4,17
– Test strip . . . . . . . . . . . . . . . . . . . . . . . . 4, 16, 23, 27
Display
– Of last result . . . . . . . . . . . . . . . . . . . . . . . . . . . . . 61
– Screen . . . . . . . . . . . . . . . . . . . . . . . . . . . . . . . . . . 7
– Symbols . . . . . . . . . . . . . . . . . . . . . . . . . . . . . 10-12
E
Error message
– Instead of blood glucose result . . . . . . . . . 32-33, 35
– Troubleshooting . . . . . . . . . . . . . . . . . . . . . . . 48-57
Expiration date
– Control solution . . . . . . . . . . . . . . . . . . . . . . . . 4, 17
– Test strip . . . . . . . . . . . . . . . . . . . . . . . . 4, 16, 23, 27
G
Glucose
– See also control solution
– Levels . . . . . . . . . . . . . . . . . . . . . . . . . . . . . . . . . . . 2
– Results (blood) . . . . . . . . . . . . . . . . . . . . . . . . 31-33
– Target ranges . . . . . . . . . . . . . . . . . . . . . . . . . 35, 40
– Test . . . . . . . . . . . . . . . . . . . . . . . . . . . . . . . . . 22-34
H
Hematocrit . . . . . . . . . . . . . . . . . . . . . . . . . . 39, 50, 68
“
”
HI
result . . . . . . . . . . . . . . . . . . . . . . . 12, 32, 37, 66
Humidity . . . . . . . . . . . . . . . . . . . . . . . . . . . . . . 39, 68
L
Lancing device . . . . . . . . . . . . . . . . . . . . . 24-25, 33-34
– Storage . . . . . . . . . . . . . . . . . . . . . . . . . . . . . . . . . 47
Lens area . . . . . . . . . . . . . . . . . . . . . . . . . . . . . . . . . . 7
– Cleaning . . . . . . . . . . . . . . . . . . . . . . . . . . . . . . . . 43
Logbook
– Recording blood glucose results . . . . . . . . . . . . . 33
73
INDEX
Page 83

– Recording control solution results . . . . . . . . . . . . 20
M
Matching code number . . . . . . . . . . . . . . . . 11, 16, 26
Memory . . . . . . . . . . . . . . . . . . . . . . . . . . . . . . . . 65-67
Meter
INDEX
– Care . . . . . . . . . . . . . . . . . . . . . . . . . . . . . . . . . . . 41
– Cleaning . . . . . . . . . . . . . . . . . . . . . . . . . . . . . 41-44
Coding . . . . . . . . . . . . . . . . . . . . . . . . . . . . . . . . . . . 13-14
– Description . . . . . . . . . . . . . . . . . . . . . . . . . . . . . . . 7
– Display symbols . . . . . . . . . . . . . . . . . . . . . . . . . . 10
– Serial number . . . . . . . . . . . . . . . . . . . . . . . . . . . . . 7
– Settings . . . . . . . . . . . . . . . . . . . . . . . . . . . . . . 58-64
– Storage . . . . . . . . . . . . . . . . . . . . . . . . . . . . . . . . . 47
– Turning on . . . . . . . . . . . . . . . . . . . . . . . . . . . 16, 25
Meter settings
– 14- and 30-day averages . . . . . . . . . . . . . . . . . . . 63
– Beep signals . . . . . . . . . . . . . . . . . . . . . . . . . . 62-63
– Date format . . . . . . . . . . . . . . . . . . . . . . . . . . . . . 64
– Date and time . . . . . . . . . . . . . . . . . . . . . . . . . 59-61
– Display of last result . . . . . . . . . . . . . . . . . . . . . . . 61
– Time format . . . . . . . . . . . . . . . . . . . . . . . . . . . . . 64
– Unit of measurement . . . . . . . . . . . . . . . . . . . . 61-62
O
Optional Colour Chart . . . . . . . . . . . . . . . . . . . . . . . . 9
P
Pink test square . . . . . . . . . . . . . . . . . . . . . . . . . . 8, 11
– Applying blood . . . . . . . . . . . . . . . . . . . . . . . . 28-29
– Applying control solution . . . . . . . . . . . . . . . . . . . 17
– Plasma glucose value . . . . . . . . . . . . . . . . . . . 35, 38
– Power button . . . . . . . . . . . . . . . . . . . . . . . 7, 16, 25
– Precautions . . . . . . . . . . . . . . . . . . . . . . . . . . . . . 4-5
R
Result
– 14-and 30-day averages . . . . . . . . . . . . . . . . . 19, 63
– Blood glucose . . . . . . . . . . . . . . . . . . . . . . . . . 31-33
– Comparing to lab result . . . . . . . . . . . . . . . . 3, 38-40
– Control solution . . . . . . . . . . . . . . . . . . . . . . . 20 -21
– With date and time . . . . . . . . . . . . . . . . . . . . . . . . 12
– Getting results from meter memory . . . . . . . . 65-67
– High . . . . . . . . . . . . . . . . . . . . . . . . . . . . . . . 12, 33, 36
– Low . . . . . . . . . . . . . . . . . . . . . . . . . . . . . . . . . . . . 36
– Out-of-range (control) . . . . . . . . . . . . . . . . . . . 20-21
– Recording in logbook . . . . . . . . . . . . . . . . . . . 20, 33
– Target ranges . . . . . . . . . . . . . . . . . . . . . . . . . 35, 40
– Tips to ensure accuracy. . . . . . . . . . . . . . . . . . . . . 23
– Turning on the meter . . . . . . . . . . . . . . . . . . . . . . 10
– Understanding . . . . . . . . . . . . . . . . . . . . . . . . 35-40
– Units . . . . . . . . . . . . . . . . . . . . . . . . . . . . . . . . . . . 12
– Uploading to PC . . . . . . . . . . . . . . . . . . . . . . . . . . 67
– Using the Colour Chart . . . . . . . . . . . . . . . . 9, 32-33
S
Segment . . . . . . . . . . . . . . . . . . . . . . . . . . . . . . . . . . 10
Settings (meter) . . . . . . . . . . . . . . . . . . . . . . . . . 58-64
Symbols
– Apply sample . . . . . . . . . . . . . . . . . . . . . . . . . 11, 26
74
Page 84

– Battery . . . . . . . . . . . . . . . . . . . . . . . . . . . 12, 44, 57
– Clean meter . . . . . . . . . . . . . . . . . . . . . . . . . . . 12,
– Clock . . . . . . . . . . . . . . . . . . . . . . . . . . . . . 12, 19, 31
– Descriptions . . . . . . . . . . . . . . . . . . . . . . . . . . 56-57
– Empty memory . . . . . . . . . . . . . . . . . . . . . . . . . . . 65
– Insert test strip . . . . . . . . . . . . . . . . . . . . . 11, 26, 56
– Remove test strip . . . . . . . . . . . . . . . . . . . . . . . . . 56
T
Temperature . . . . . . . . . . . . . . . . . . . . . . . . . . . 39, 68
Test strip . . . . . . . . . . . . . . . . . . . . . . . . . . . . . . . . . . 8
– Code number . . . . . . . . . . . . . . . . . . . . . . . . . 11, 14
– Colour of unused confirmation dot . . . . . . 17, 23, 27
– Discard date . . . . . . . . . . . . . . . . . . . . . 4, 16, 23, 27
– Expiration date . . . . . . . . . . . . . . . . . . . 4, 16, 23, 27
– Inserting firmly . . . . . . . . . . . . . . . . . . . . . . . . 18, 31
– Storage . . . . . . . . . . . . . . . . . . . . . . . . . . . . . . 46-47
– Storage precautions . . . . . . . . . . . . . . . . . . . . . . . 27
Test strip holder . . . . . . . . . . . . . . . . . . . . . . . . . . . . 7
– Cleaning . . . . . . . . . . . . . . . . . . . . . . . . . . . . . . . . 42
– Removing . . . . . . . . . . . . . . . . . . . . . . . . . . . . . . . 42
– Replacing . . . . . . . . . . . . . . . . . . . . . . . . . . . . . . . 43
Troubleshooting . . . . . . . . . . . . . . . . . . . . . . . . . 48-55
U
Unit of measurement . . . . . . . . . . . . . . . . iv, 12, 61-62
42
W
Warnings . . . . . . . . . . . . . . . . . . . . . . . . . . . . . . . . . 4-5
White pad . . . . . . . . . . . . . . . . . . . . . . . . . . . . . . . . . 8
FOOTNOTES
1
American Diabetes Association, “Implications of the
Diabetes Control and Complications Trial,” (Position
Statement),
S88-S90.
2 Wickham, NWR et al.: Practical Diabetes, Vol. 3, No. 2
(1986), 100.
3 Cohen, FE et al.: Diabetes Care, Vol 9, No. 3 (1986),
320–322.
4 Atkin, SH, et al. Fingerstick glucose determination in
shock. Ann of Intern Med. 1991;114:1020–1024.
5 Surwit RS, Feinglos MN Diabetes Forecast 1988;
April 49-57
6 Sacks, DB in “Carbohydrates”, Burtis, CA, Ashwood,
ER (ed), Tietz Textbook of Clinical Chemistry.
Philadelphia, WB Saunders Company (1994), p. 959
7 Sylvain, HF, et al. American Journal of Critical Care.
1995; 4:44–48.
Rushakoff RJ, Lewis SB. Case of Pseudohypoglycemia
8
(letter), Diabetes Care 2001; 24:2157-2158.
Diabetes Care
1988; 21; (Supplement 1);
75
Page 85

Page 86

®
Owner's Booklet
Guide d'utilisation
Blood Glucose
®
Monitoring System
Système de surveillance
de la glycémie
INCLUDES 150-Test
Memory Time & Date
AVEC mémoire de 150
tests, date et heure
Page 87

Le système OneTouch®SureStep®est conçu pour être
utilisé à l’extérieur du corps (utilisation diagnostique in
vitro) Il devrait être utilisé seulement pour faire des
tests avec des échantillons de sang entier fraîchement
prélevés. Il ne devrait pas être utilisé pour le
diagnostic du diabète.
i
Page 88

Bienvenue chez LifeScan.
Félicitations! Vous avez choisi un produit fabriqué par
LifeScan, un chef de file dans le domaine des produits
conçus pour vous aider à maîtriser votre diabète. Les
produits pour la surveillance de la glycémie de marque
OneTouch®SureStep®sont largement répandus et sont
accessibles sans ordonnance.
La surveillance de la glycémie joue un rôle important dans le
contrôle de votre diabète. En effet, une étude à long terme a
montré que le maintien de la glycémie à des valeurs près de
la normale peut réduire les risques de complications du
diabète dans des proportions pouvant aller jusqu’à 60 %.
Les résultats que vous obtenez grâce au système
OneTouch®SureStep®peuvent vous aider, ainsi que votre
professionnel de la santé, à surveiller et à ajuster au besoin
votre plan de traitement pour mieux contrôler votre diabète.
Tout ce que vous devez savoir pour utiliser le système
OneTouch®SureStep®se trouve dans ce guide d’utilisation et dans le feuillet d’information des bandelettes de
test contenu dans chaque emballage de bandelettes de
test. Il est important de lire ce guide d’utilisation et le
feuillet d’information de l’emballage des bandelettes
pour bénéficier de renseignements importants sur la
façon d’utiliser ce produit. Si vous avez des questions,
n’hésitez pas à appeler sans frais un de nos préposés du
service à la clientèle.
N’oubliez pas de remplir et de poster la fiche d’enregistrement de la garantie.
Numéros de téléphone importants :
Ligne InfoSoins OneTouch®:
Canada 1 800 663-5521
www.OneTouch.ca
Numéro de série du lecteur : __________________________________
Professionnel(le) de la santé _________________________________________
Pharmacien(ne) ___________________________________________________
Éducateur(trice) en diabète __________________________________________
Autre ____________________________________________________________
ii
Page 89

ATTENTION: Avant d’utiliser un produit quelconque pour vérifier votre glycémie (taux de
sucre dans le sang), lisez attentivement toutes les instructions et exercez-vous à effectuer
les tests. Effectuez tous les tests de contrôle de la qualité suggérés et consultez un professionnel de la santé qui s’occupe de diabète. Ces recommandations sont communes à tous
les systèmes de surveillance de la glycémie, et elles ont reçu l’appui de la section des éducateurs dans le domaine du diabète de l’Association canadienne du diabète.
IMPORTANT: Si vous avez suivi les conseils pour assurer la précision de vos résultats
de glycémie et que ces derniers sont encore à l’extérieur de l’échelle visée, communiquez avec votre professionnel de la santé.
Le système OneTouch®SureStep®contient plusieurs petits éléments comme le support de
bandelette, le couvercle du logement des piles, les piles, les lancettes, le flacon de solution
de contrôle, les bandelettes de test, le bouchon du flacon de bandelettes de test, etc.
Puisque ces éléments peuvent être dangereux s’ils sont avalés, gardez le système hors de
portée des enfants.
Si vous utilisez une solution d’eau de Javel à 10 % pour désinfecter le lecteur, prenez soin
d’éliminer toute trace d’eau de Javel du lecteur et du support de bandelette avec un chiffon
humidifié d’eau. L’eau de Javel pourra réagir avec les bandelettes de test et fausser les
résultats. En n’enlevant pas les résidus d’eau de Javel vous risquez d’obtenir un message
d’erreur « ,
»
ou un résultat faussement élevé.
iii
Page 90

Unités de mesure pour les lectures avec l’appareil
mmol/L
millimoles/litre
point décimal
Votre lecteur
mesure, les millimoles par litre (mmol/L) ou les milligrammes par décilitre (mg/dL). Au Canada
les mmol/L sont utilisées comme unité standard. Aux États-Unis, les mg/dL sont utilisées comme
unité standard. Veuillez communiquer avec votre professionnel de la santé pour déterminer quelle unité de mesure vous devriez utiliser. Si vous utilisez la mauvaise unité de mesure, vous risquez d’obtenir des résultats inexacts qui peuvent mener à un traitement inadéquat.
OneTouch®SureStep®peut afficher les résultats en utilisant deux types d’unités de
mg/dL
milligrammes/décilitre
sans point décimal
VEUILLEZ LIRE
iv
Page 91

Table des matières
Apprentissage 2
Objet 2
Qu’attendre de votre système 3
Mises en garde et précautions 4
Importance de suivre les instructions 5
Les bandelettes de test OneTouch
Échelle colorimétrique optionnelle 9
Symboles de l’affichage 10
Codage 13
Codage du lecteur 13
Vérification 15
Vérification du système 15
Comprendre les résultats des épreuves de contrôle 20
Test 22
Test sanguin 22
Conseils pour obtenir des résultats exacts 23
Comment effectuer un test 24
Ligne InfoSoins OneTouch®: CANADA 1 800 663-5521 www.OneTouch.ca
v
®
SureStep
®
8
Page 92

Résultats 35
Compréhension de vos résultats 35
Comment vérifier si votre lecteur fonctionne correctement 37
Comparaison des résultats du lecteur à ceux du laboratoire 38
États de santé pouvant causer des résultats hors limites 40
Entretien 41
Soins à porter à votre lecteur 41
Soins généraux 41
Nettoyage du lecteur 41
Comment changer les piles 44
Instructions d’entreposage 47
Dépannage 48
Messages d’erreur 48
Symboles 56
Symboles 56
Réglages 58
Modification des réglages du lecteur 58
Comment entrer en mode de réglage 59
Modification de la date et de l’heure 59
Réglage de l’heure 60
Ligne InfoSoins OneTouch®: CANADA 1 800 663-5521 www.OneTouch.ca
vi
Page 93

Réglage de l’année 60
Réglage du mois 61
Réglage du jour 61
Affichage des derniers résultats 61
Unité de mesure 61
Signaux sonores 62
Moyennes sur 14 et 30 jours 63
Format de l’heure 64
Format de la date 64
Sortie du mode de réglage 64
Mémoire 65
Documentation de base à propos de la mémoire du lecteur 65
Comment obtenir tous les résultats de la mémoire du lecteur 65
Première mise en marche du lecteur 67
Téléchargement des données en mémoire 67
Spécifications 68
Spécifications 68
Garanties 69
Aide-mémoire 70
Ligne InfoSoins OneTouch®: CANADA 1 800 663-5521 www.OneTouch.ca
vii
Page 94

Page 95

Page 96

Objet
Les personnes atteintes du diabète utilisent
le système de surveillance de la glycémie
OneTouch®SureStep®pour mesurer le niveau
de glucose (sucre) dans leur sang. Le système est conçu pour analyser un échantillon de
APPRENTISSAGE
sang entier au moment de son prélèvement.
Pourquoi vérifier votre glycémie
Le diabète est une maladie caractérisée par la
difficulté du corps à contrôler correctement les
niveaux de glucose. Les niveaux de glucose peuvent changer considérablement et rapidement.
Les niveaux de glucose qui sont trop hauts ou
trop bas peuvent entraîner de sérieux problèmes
de santé. Ce test permet à une personne de
connaître sa glycémie au moment où elle est
mesurée.
En 1993, le National Institute of Health terminait une étude nommée : Diabetes Control and
Complications Trial (DCCT). Il s’agissait d’une
étude à long terme de personnes atteintes de
diabète de type 1. Cette étude a démontré que
vous devriez maintenir votre glycémie près des
valeurs obtenues par les personnes qui ne sont
pas diabétiques.
Vous pouvez réduire le risque de complications
aux yeux, aux reins et au système nerveux par
approximativement 60%. Par contre, vous
devriez savoir qu’en maintenant votre glycémie
près des niveaux affichés par les personnes
non diabétiques vous augmentez le risque
d’épisodes d’hypoglycémie
1
(bas niveaux de
glucose dans le sang).
La fréquence avec laquelle vous devriez effec-
tuer vos tests de glycémie dépend de plusieurs
facteurs. Parmi ces facteurs, on retrouve l’âge,
le type de diabète (type 1 ou type 2), les médicaments et l’état de santé. Votre professionnel
de la santé pourra vous guider. Il est important
d’insérer la vérification de la glycémie dans
votre routine quotidienne.
Quand ne faut-il pas l’utiliser
N’utilisez pas les résultats de glycémie obtenus avec le lecteur OneTouch®SureStep
2
®
Page 97

APPRENTISSAGE
pour déterminer si vous êtes atteint ou atteinte du diabète. Seul votre médecin peut
diagnostiquer cette maladie.
Qu’attendre de votre système
◆
Les lecteurs de glycémie sont cliniquement
exacts, mais ne peuvent remplacer un résultat obtenu en laboratoire. Conçus selon des
méthodes utilisées en laboratoire, les systèmes de surveillance de la glycémie fournissent un moyen pratique et portatif de
vérifier la glycémie rapidement et à faible
coût. Toutefois, les résultats du lecteur peuvent être influencés par des facteurs et des
conditions qui n’ont pas le même effet sur
les résultats obtenus en laboratoire.
Souvenez-vous que les conditions des tests
en laboratoire sont soigneusement contrôlées et très automatisées. Le résultat obtenu avec le lecteur devrait, dans des conditions normales, être à ±20% des valeurs
obtenues en laboratoire. Un résultat de cet
ordre est considéré cliniquement précis
lorsque que vous vérifiez avec le lecteur
OneTouch®SureStep®. Toutefois, l’écart
entre les résultats peut être supérieur à
±20% dans certaines situations. Pour plus
de renseignements, consultez la rubrique
Comparaison des résultats du lecteur à
ceux du laboratoire.
◆
Les lecteurs de glycémie augmentent votre
capacité de vérifier fréquemment votre glycémie à un coût raisonnable de sorte que
vous pouvez voir l’effet de la nourriture, de
l’activité physique et des médicaments sur
votre glycémie. Vous pouvez mieux contrôler votre glycémie avec ces appareils.
◆
Assurez-vous de bien connaître les limites
du système avant de vérifier votre glycémie.
Lire les renseignements importants contenus dans l’emballage des bandelettes de
test OneTouch®SureStep®. Apprenez les
facteurs qui peuvent influencer la précision
de vos résultats.
◆
Assurez-vous de comprendre vos résultats
avant d’agir en fonction de ceux-ci, spécialement si vos résultats ne reflètent pas ce que
3
Page 98

vous ressentez. Voir la rubrique
Compréhension de vos résultats à la page 35.
Mises en garde et précautions
◆
Prenez le temps de lire toutes les instructions,
y compris le feuillet d’information de l’embal-
APPRENTISSAGE
lage des bandelettes de test et exercez-vous à
effectuer les tests avec la solution de contrôle
(voir la rubrique Vérification du système)
avant de vérifier votre glycémie. Faites toutes
les vérifications de contrôle de la qualité tel
que suggéré, y compris la vérification des
symboles de l’affichage (voir la description du
système) et consultez un professionnel de la
santé avant d’utiliser ce produit.
◆
Le système contient de petits éléments
comme les lancettes, les bouchons des flacons, etc. Puisque ces éléments peuvent être
dangereux s’ils sont avalés, gardez le système hors de portée des enfants. L’emballage
des bandelettes de test contient un agent
dessiccatif qui peut irriter la peau et les yeux
et être nocif s’il est inhalé ou avalé.
◆
N’utilisez pas les bandelettes de test après la
date de péremption imprimée sur l’étiquette
du flacon ou plus de quatre mois après avoir
ouvert le flacon pour la première fois, le premier des deux prévalant. Vous pourriez obtenir des résultats inexacts si vous utilisez les
bandelettes de test après ces dates.
◆
N’utilisez pas les bandelettes qui ont été
pliées, coupées ou modifiées de quelque
manière que ce soit.
◆
N’utilisez pas la solution de contrôle après la
date de péremption imprimée sur l’étiquette
du flacon ou plus de trois mois après avoir
ouvert le flacon pour la première fois, la première des deux prévalant. Les épreuves de
contrôle ne seront peut-être pas fiables si vous
utilisez la solution après ces dates.
◆
Une humidité relative ou une température
très élevée ou très basse peuvent avoir un
effet sur les résultats, surtout si les deux
valeurs sont élevées ou basses. Si vous
faites un test dans ces conditions, refaites le
4
Page 99

APPRENTISSAGE
test dans un milieu contrôlé aussitôt que
possible.
◆
Une perte excessive de liquides (déshydratation importante) peut donner des résultats inférieurs aux valeurs réelles.
2,3
Une
déshydratation grave, si elle n’est pas traitée, peut entraîner des complications médicales sérieuses pouvant causer la mort
comme l’acidocétose diabétique. Voici
quelques facteurs qui peuvent entraîner
une déshydratation : les vomissements, la
diarrhée, l’absorption inadéquate de
liquides, certains médicaments (par
exemple, les diurétiques), le diabète non
contrôlé pendant une période prolongée et
un état de choc.4Si vous avez ces symptômes, consultez immédiatement un professionnel de la santé, même si votre glycémie
n’est pas plus élevée que d’habitude.
◆
Parce que certaines maladies peuvent être
transmises par le sang, soyez prudent
lorsque vous jetez les lancettes et les bandelettes de test usagées.
REMARQUE: Vous avez besoin d’un profes-
sionnel de la santé pour la surveillance de la
glycémie. Travaillez avec votre professionnel
de la santé pour fixer vos propres objectifs
de glycémie, organiser votre horaire de test
et discuter de la signification de vos résultats
de glycémie.
Importance de suivre les instructions
Votre système de surveillance de la glycémie
OneTouch®SureStep®donnera des résultats de
glycémie exacts qui vous aideront à maîtriser
votre diabète, si vous suivez les directives de ce
guide d’utilisation et du feuillet d’information
des bandelettes de test. Assurez-vous de vérifier le feuillet d’information des bandelettes
chaque fois que vous ouvrez un nouveau flacon
de bandelettes pour voir les mises à jour importantes. Si vous ne suivez pas ces instructions,
vous risquez d’obtenir des résultats inexacts
qui pourront entraîner un traitement inadéquat.
5
Page 100

Tout ce que contient le système de
surveillance de la glycémie
OneTouch
■
Lecteur de glycémie
®
SureStep
OneTouch®SureStep
(piles installées)
■
Guide d’utilisation
■
Aide-mémoire
■
Solution de contrôle
■
Dispositif réglable de prélèvement
sanguin Penlet
■
Lancettes
OneTouch®FinePointe
■
Étui de transport
■
Carnet de résultats
■
Bandelettes de test OneTouch®SureStep
OneTouch®SureStep
®
Plus
(peuvent être vendues séparément)
®
®
®
MC
®
6
 Loading...