

Page 1

CLUB SERIES TREADMILL (CST)
OPERATION MANUAL
M051-00K60-B098
Page 2

AMERICAS
North America
Life Fitness Inc.
5100 N River Road
Schiller Park, IL 60176 U.S.A
Telephone: (847) 288 3300
Fax: (847) 288 3703
Service Email: commercialservicereply@lifefitness.com
Sales/Marketing Email:commercialsales@lifefitness.com
Operating Hours: 7:00 am - 6:00 pm (CST)
Brazil
Life Fitness Brasil
Av. Cidade Jardim, 900
Jd. Paulistano
São Paulo, SP 01454-000
BRAZIL
SAC: 0800 773 8282
Telephone: +55 (11) 3095 5200
Fax: +55 (11) 3095 5201
Service Email: suporte@lifefitness.com.br
Sales/Marketing Email: lifefitness@lifefitness.com.br
Service Operating Hours:
9:00 - 17:00 (BRT) (Monday-Friday)
Store Operating Hours:
9:00 - 20:00 (BRT) (Monday-Friday)
10:00 - 16:00 (BRT) (Saturday)
Latin America & Caribbean*
Life Fitness Inc.
5100 N River Road
Schiller Park, IL 60176 U.S.A
Telephone: (847) 288 3300
Fax: (847) 288 3703
Service Email: customersupport@lifefitness.com
Sales/Marketing Email:commercialsales@lifefitness.com
Operating Hours: 7:00am-6:00pm (CST)
EUROPE, MIDDLE EAST, & AFRICA (EMEA)
Netherlands & Luxemburg
Life Fitness Atlantic BV
Bijdorpplein 25-31
2992 LB Barendrecht
THE NETHERLANDS
Telephone: (+31) 180 646 666
Fax: (+31) 180 646 699
Service Email: service.benelux@lifefitness.com
Sales/Marketing Email:
marketing.benelux@lifefitness.com
Operating Hours: 9.00h-17.00h (CET)
United Kingdom & Ireland
Life Fitness UK LTD
Queen Adelaide
Ely, Cambs, CB7 4UB
Telephone: General Office (+44) 1353.666017
Customer Support (+44) 1353.665507
Fax: (+44) 1353.666018
Service Email: uk.support@lifefitness.com
Sales/Marketing Email: life@lifefitness.com
Operating Hours:
General Office: 9.00am - 5.00pm (GMT)
Customer Support: 8.30am - 5.00pm (GMT)
Germany & Switzerland
Life Fitness Europe GMBH
Siemensstraße 3
85716 Unterschleißheim
GERMANY
Telephone: (+49) 89.31 77 51.0 (Germany)
(+41) 0848 000 901 (Switzerland)
Fax: (+49) 89.31 77 51.99 (Germany)
(+41) 043 818 07 20 (Switzerland)
Service Email: kundendienst@lifefitness.com
Sales/Marketing Email: kundenberatung@lifefitness.com
Operating Hours: 08.30 -16.30h (CET)
Austria
Life Fitness Austria
Vertriebs G.m.b.H.
Dückegasse 7-9/3/36
1220 Vienna
AUSTRIA
Telephone: (+43) 1.61.57.198
Fax: (+43) 1.61.57.198.20
Service Email: kundendienst@lifefitness.com
Marketing/Sales Email: kundenberatung@lifefitness.com
Operating Hours: 9.00h-17.00h (MEZ)
Spain
Life Fitness IBERIA
C/Frederic Mompou 5,1º1ª
08960 Sant Just Desvern Barcelona
SPAIN
Telephone: (+34) 93.672.4660
Fax: (+34) 93.672.4670
Service Email: info.iberia@lifefitness.com
Sales/Marketing Email: info.iberia@lifefitness.com
Operating Hours:
9.00h-18.00h (Monday-Thursday)
8.30h-15.00h (Friday)
Belgium
Life Fitness Benelux NV
Parc Industrial de Petit-Rechain
4800 Verviers
BELGIUM
Telephone: (+32) 87 300 942
Fax: (+32) 87 300 943
Service Email: internationalservicesupport@lifefitness.com
Sales/Marketing Email: marketing.benelux@lifefitness.com
Operating Hours: 9.00h -17.00h (CET)
Italy
Life Fitness Europe GmbH
Siemensstraße 3
85716 Unterschleißheim
GERMANY
Telephone: (+39) 02-55378611
Service: 800438836 (In Italy)
Fax: (+39) 02-55378699
Service Email: assistenzatecnica@lifefitness.com
Sales/Marketing Email: info@lifefitnessitalia.com
Operating Hours: 08:30 - 16:30h (CET)
All Other EMEA countries &
distributor business C-EMEA*
Bijdorpplein 25-31
2992 LB Barendrecht
THE NETHERLANDS
Telephone: (+31) 180 646 644
Fax: (+31) 180 646 699
Service Email: service.db.cemea@lifefitness.com
Sales/Marketing Email:
marketing.db.cemea@lifefitness.com
Operating Hours: 9.00h-17.00h (CET)
ASIA PACIFIC (AP)
Japan
Life Fitness Japan
Nippon Brunswick Bldg., #8F
5-27-7 Sendagaya
Shibuya-Ku, Tokyo
Japan 151-0051
Telephone: (+81) 3.3359.4309
Fax: (+81) 3.3359.4307
Service Email: service@lifefitnessjapan.com
Sales/Marketing Email: sales@lifefitnessjapan.com
Operating Hours: 9.00h-17.00h (JAPAN)
China and Hong Kong
Life Fitness Asia Pacific LTD
Room 2610, Miramar Tower
132 Nathan Road
Tsimshatsui, Kowloon
HONG KONG
Telephone: (+852) 2891.6677
Fax: (+852) 2575.6001
Service Email: HongKongEnquiry@lifefitness.com
Sales/Marketing Email: ChinaEnquiry@lifefitness.com
Operating Hours: 9.00h-18.00h
All Other Asia Pacific countries &
distributor business Asia Pacific*
Room 2610, Miramar Tower
132 Nathan Road
Tsimshatsui, Kowloon
HONG KONG
Telephone: (+852) 2891.6677
Fax: (+852) 2575.6001
Service Email: HongKongEnquiry@lifefitness.com
Sales/Marketing Email: ChinaEnquiry@lifefitness.com
Operating Hours: 9.00h-18.00h
CORPORATE HEADQUARTERS
5100 River Road
Schiller Park, Illinois 60176 • U.S.A.
847.288.3300 • FAX: 847.288.3703
800.735.3867 (Toll-free within U.S.A., Canada)
Global Website: www.lifefitness.com
INTERNATIONAL OFFICES
* Also check www.lifefitness.com for local representation or distributor/dealer.
1
Page 3

TABLE OF CONTENTS
Section Description
1. Getting Started . . . . . . . . . . . . . . . . . . . . . . . . . . . . . . . . . . . . . . . . . . . . . . . . . . . . . . . . . . . . . . . . .5
1.1 Important Safety Instructions . . . . . . . . . . . . . . . . . . . . . . . . . . . . . . . . . . . . . . . . . . . . . . . . . . . . . .5
1.2 Setup . . . . . . . . . . . . . . . . . . . . . . . . . . . . . . . . . . . . . . . . . . . . . . . . . . . . . . . . . . . . . . . . . . . . . . . .9
2. Console Overlay and Activity Zone . . . . . . . . . . . . . . . . . . . . . . . . . . . . . . . . . . . . . . . . . . . . . . . . .12
2.1 Console Overlay and Activity Zone Overview . . . . . . . . . . . . . . . . . . . . . . . . . . . . . . . . . . . . . . . . .12
2.2 Console Overlay and Activity Zone Description . . . . . . . . . . . . . . . . . . . . . . . . . . . . . . . . . . . . . . .13
2.3 Reading Rack and Accessory Trays . . . . . . . . . . . . . . . . . . . . . . . . . . . . . . . . . . . . . . . . . . . . . . . .15
3. Heart Rate Zone Training
®
Exercise . . . . . . . . . . . . . . . . . . . . . . . . . . . . . . . . . . . . . . . . . . . . . . . .16
3.1 Why Heart Rate Zone Training®Exercise . . . . . . . . . . . . . . . . . . . . . . . . . . . . . . . . . . . . . . . . . . . .16
3.2 Heart Rate Monitoring . . . . . . . . . . . . . . . . . . . . . . . . . . . . . . . . . . . . . . . . . . . . . . . . . . . . . . . . . . .17
4. The Workouts . . . . . . . . . . . . . . . . . . . . . . . . . . . . . . . . . . . . . . . . . . . . . . . . . . . . . . . . . . . . . . . . .18
4.1 Workout Overviews . . . . . . . . . . . . . . . . . . . . . . . . . . . . . . . . . . . . . . . . . . . . . . . . . . . . . . . . . . . . .18
4.2 Using the Workouts . . . . . . . . . . . . . . . . . . . . . . . . . . . . . . . . . . . . . . . . . . . . . . . . . . . . . . . . . . . .20
4.3 Workout Descriptions . . . . . . . . . . . . . . . . . . . . . . . . . . . . . . . . . . . . . . . . . . . . . . . . . . . . . . . . . . .21
4.4 Maximizing Workouts on a Life Fitness Treadmill . . . . . . . . . . . . . . . . . . . . . . . . . . . . . . . . . . . . . .30
5. User Menu (Optional Settings) . . . . . . . . . . . . . . . . . . . . . . . . . . . . . . . . . . . . . . . . . . . . . . . . . . . .32
5.1 Entering and Using the User Menu . . . . . . . . . . . . . . . . . . . . . . . . . . . . . . . . . . . . . . . . . . . . . . . . .32
5.2 Manager’s Configuration (Optional Settings) . . . . . . . . . . . . . . . . . . . . . . . . . . . . . . . . . . . . . . . . .33
6. Service and Technical Data . . . . . . . . . . . . . . . . . . . . . . . . . . . . . . . . . . . . . . . . . . . . . . . . . . . . . .37
6.1 Preventive Maintenance Tips . . . . . . . . . . . . . . . . . . . . . . . . . . . . . . . . . . . . . . . . . . . . . . . . . . . . .37
6.2 Preventive Maintenance Schedule . . . . . . . . . . . . . . . . . . . . . . . . . . . . . . . . . . . . . . . . . . . . . . . . .38
6.3 Troubleshooting the Treadmill . . . . . . . . . . . . . . . . . . . . . . . . . . . . . . . . . . . . . . . . . . . . . . . . . . . . .39
6.4 Troubleshooting the Optional Polar
®
Telemetry Heart Rate Chest Strap . . . . . . . . . . . . . . . . . . . .42
6.5 Troubleshooting the iPod
®
. . . . . . . . . . . . . . . . . . . . . . . . . . . . . . . . . . . . . . . . . . . . . . . . . . . . . . .44
6.6 How to Adjust and Tension the Striding Belt . . . . . . . . . . . . . . . . . . . . . . . . . . . . . . . . . . . . . . . . . .46
6.7 Proactive Belt Wear Notification . . . . . . . . . . . . . . . . . . . . . . . . . . . . . . . . . . . . . . . . . . . . . . . . . . .47
6.8 How to Obtain Product Service . . . . . . . . . . . . . . . . . . . . . . . . . . . . . . . . . . . . . . . . . . . . . . . . . . . .47
7. Specifications . . . . . . . . . . . . . . . . . . . . . . . . . . . . . . . . . . . . . . . . . . . . . . . . . . . . . . . . . . . . . . . . .48
7.1 CST Treadmill Specifications . . . . . . . . . . . . . . . . . . . . . . . . . . . . . . . . . . . . . . . . . . . . . . . . . . . . .48
7.2 Warrantly Information . . . . . . . . . . . . . . . . . . . . . . . . . . . . . . . . . . . . . . . . . . . . . . . . . . . . . . . . . . .49
2
Page 4

Before using this product, it is essential to read this ENTIRE operation manual and ALL installation instructions.
It describes equipment setup and instructs members on how to use it correctly and safely.
Avant d'utiliser ce produit, il est indispensable de lire ce manuel d'utilisation dans son INTÉGRALITÉ, ainsi que TOUTES
les instructions d'installations.
Ce manuel explique comment installer l'équipement et comment l'utiliser correctement et sans danger.
Class HB (Home): Domestic use.
CAUTION: Any changes or modifications to this equipment could void the product warranty.
Mise en garde : tout changement ou toute modification de ce matériel peut annuler la garantie
du produit.
Any service, other than cleaning or user maintenance, must be performed by an authorized service representative. There
are no user serviceable parts.
3
Page 5

This Operation Manual describes the functions of the following product:
Club Series Treadmill (CST)
See "Specifications" in this manual for product specific features.
Statement of Purpose: The treadmill is an exercise machine that enables users to walk or run, in place, on a moving
surface.
Life Fitness STRONGLY recommends seeing a physician for a complete medical exam before undertaking an exercise
program, particularly if the user has a family history of high blood pressure or heart disease, is over the age of 45,
smokes, has high cholesterol, is obese, or has not exercised regularly in the past year.
If, at any time while exercising, the user experiences faintness, dizziness, pain, or shortness of breath, he or she must
stop immediately.
Life Fitness recommande FORTEMENT de consulter un médecin pour subir un examen médical complet avant de commencer tout programme d'exercice, et tout particulièrement si l'utilisateur a des antécédents familiaux d'hypertension ou
de troubles cardiaques, s'il a plus de 45 ans, s'il fume, s'il a du cholestérol, s'il est obèse ou n'a pas fait d'exercice
régulièrement depuis un an.
Si, pendant l'utilisation de l'appareil, l'utilisateur ressent un malaise, des vertiges, des douleurs ou des vertiges, des
douleurs ou des difficultés à respirer, il doit s'arrêter immédiatement.
4
Page 6

1 GETTING STARTED
1.1 IMPORTANT SAFETY INSTRUCTIONS
Read all instructions before using the treadmill.
•
DANGER: To reduce the risk of electrical shock, always unplug this Life Fitness product before cleaning or
attempting any maintenance activity.
• WARNING: To reduce the risk of burns, fire, electric shock, or injury, it is imperative to connect each product
to a properly grounded electrical outlet.
• WARNING: Keep the area 6.5 feet (2 meters) by 3 feet (1 meter) behind the treadmill clear of any obstruc-
tions, including walls, furniture, and other equipment.
• WARNING: Be sure the emergency stop lanyard is clipped to the user and in proper position on the tread-
mill before beginning any workout.
• To disconnect, turn the power OFF at the ON/OFF switch, then remove the plug from the electrical outlet.
• Never operate a Life Fitness product if it has a damaged power cord or electrical plug, or if it has been dropped,
damaged, or even partially immersed in water. Contact Life Fitness Customer Support Services.
• Position this product so that the power cord plug is accessible to the user.
• Keep the power cord away from heated surfaces. Do not pull the equipment by the power cord or use the cord as a
handle. Do not run the power cord on the floor under or along the side of the treadmill. Refer to Section 1.2 for proper
power cord routing.
• If the electrical supply cord is damaged, it must be replaced by the manufacturer, an authorized service agent, or a
similarly qualified person to avoid a hazard.
• Do not use this product in areas where aerosol spray products are being used or where oxygen is being administered. Such substances create the danger of combustion and explosion.
• Always follow the console instructions for proper operation.
• Close supervision is necessary when used near children, invalids or disabled persons.
• Do not use this product outdoors, near swimming pools or in areas of high humidity.
• Never operate a Life Fitness product with the air openings blocked. Keep air openings free of lint, hair, or any other
obstructing material.
• Never insert objects into any opening in this product. If an object should drop inside, turn off the power, unplug the
power cord from the outlet, and carefully retrieve it. If the item cannot be reached, contact Life Fitness Customer Support Services.
• Never place liquids of any type directly on the unit, except in an accessory tray or holder. Containers with lids are
recommended.
• Do not use this product in bare feet. Always wear shoes. Wear shoes with rubber or high-traction soles. Do not use
shoes with heels, leather soles, cleats or spikes. Make sure no stones are embedded in the soles.
• Keep all loose clothing, shoelaces, and towels away from moving parts.
• Do not reach into, or underneath, the unit or tip it on its side during operation.
• Handrails may be held to enhance stability as needed, but are not for continuous use.
• Never mount or dismount the treadmill while the running belt is moving. Use the handrails whenever additional
stability is required. In case of an emergency, such as tripping, grasp the handrails, and place the feet on the side
platforms.
• Never walk or jog backwards on the treadmill.
5
Page 7

• When it is necessary to immobilize the treadmill, set the display to read SELECT WORKOUT. (Press the STOP key
twice if not already there.) Then hold down the SPEED DOWN key and press the PAUSE key. The treadmill now
displays IMMOBILIZED”. In this state, the treadmill cannot be operated. The belt and incline motors are disabled.
The treadmill will remain in this state across resets, power cycles, etc. To restore normal operation, repeat the same
key sequence: hold down the SPEED DOWN key, and press the PAUSE key. The treadmill will display “SELECT
WORKOUT” again.
• Use this appliance only for its intended use as described in this manual. Do not use attachments that have not been
recommended by the manufacturer.
SAVE THESE INSTRUCTIONS
FOR FUTURE REFERENCE.
6
Page 8

1 DÉMARRAGE
1.1 CONSIGNES DE SÉCURITÉ IMPORTANTES
Lire toutes les instructions avant d'utiliser le tapis roulant.
• DANGER: Pour réduire les risques de décharge électrique, toujours débrancher cet appareil Life Fitness
avant le nettoyage ou toute mesure d'entretien.
•
AVERTISSEMENT: Pour réduire les risques de brûlures, d'incendies, de décharges électriques ou de
blessures, chaque appareil doit absolument être branché sur une prise électrique correctement mise à la terre.
• AVERTISSEMENT: Conserver une zone de 2 m sur 1 m libre de toute obstruction derrière le tapis
roulant (aucun mur, meuble ou autre appareil).
• AVERTISSEMENT: S'assurer que la dragonne d'arrêt d'urgence est attachée à l'utilisateur et fixée
adéquatement au tapis roulant avant de commercer un exercice.
• Pour débrancher, mettre l'appareil hors tension au niveau de l'interrupteur d'alimentation, puis retirer la fiche de la
prise électrique.
• Ne jamais faire fonctionner un produit Life Fitness dont la fiche ou le cordon d'alimentation est endommagé, ni aucun
appareil qui serait tombé ou aurait été endommagé ou même partiellement plongé dans l'eau. Appeler le service
clientèle de Life Fitness.
• Placer ce produit de manière à ce que l'utilisateur puisse accéder à la fiche du cordon d'alimentation.
• Tenir le cordon d'alimentation à l'écart de toute surface chauffée. Ne pas tirer l'appareil par le cordon d'alimentation;
ne pas utiliser le cordon comme poignée. Ne pas faire passer le cordon sur le sol, sous le tapis roulant, ni le long de
l'appareil. Se reporter à la section 1.2 pour la disposition adéquate du cordon d'alimentation.
• Si le cordon d'alimentation électrique est endommagé, il doit être remplacé par le fabricant, par un réparateur agréé
ou par une personne qualifiée afin d'éviter tout danger.
• Ne pas utiliser ce produit dans des salles où des vaporisateurs aérosols sont employés ou bien où de l'oxygène est
administré. Ces substances créent des risques de combustion et d'explosion.
• Les instructions de la console doivent toujours être suivies pour obtenir un fonctionnement correct.
• Une surveillance étroite est nécessaire si l'appareil est utilisé près d'enfants ou de personnes invalides ou handicapées.
• Ne pas utiliser ce produit à l'extérieur, près d'une piscine ou dans des endroits très humides.
• Ne jamais faire fonctionner d'appareil Life Fitness dont les orifices d'aération seraient bloqués. Les garder exempts de
peluches, de cheveux ou de toute obstruction.
• Ne jamais rien insérer dans les ouvertures de cet appareil. Si un objet tombe à l'intérieur de l'appareil, couper l'alimentation électrique, débrancher le cordon de la prise et le récupérer avec précaution. S'il est impossible de l'atteindre, communiquer avec le service à la clientèle de Life Fitness.
• Ne jamais placer aucun liquide directement sur l'appareil, sauf dans le plateau pour accessoires ou un support prévu
à cet effet. Il est recommandé d'utiliser des conteneurs munis de couvercles.
• Ne pas utiliser cet appareil pieds nus. Toujours porter des chaussures. Porter des chaussures avec des semelles en
caoutchouc ou fournissant une très bonne adhérence. Ne pas utiliser de chaussures à talons, à semelles en cuir ou
munies de crampons. S'assurer qu'aucun caillou n'est incrusté dans les semelles.
• Éloigner les vêtements lâches, les lacets et les serviettes des pièces en mouvement.
• Ne pas placer les mains sous l'appareil ou dans l'appareil, et ne pas le renverser sur le côté pendant le fonctionnement.
7
Page 9

• Les rampes latérales peuvent servir à rétablir son équilibre, mais ne sont pas destinées à un usage continu.
• Ne jamais monter sur le tapis de course et ne pas en descendre jamais pendant qu'il tourne. Utiliser les rampes
latérales afin de ne pas perdre l'équilibre. En cas d'urgence, par exemple, en cas de trébuchement ou de faux pas,
saisir les barres latérales et placer les pieds sur les plates-formes latérales.
• Ne jamais marcher ni courir à reculons sur le tapis roulant.
• S'il est nécessaire d'immobiliser le tapis roulant, régler l'afficheur sur SELECT WORKOUT (SÉLECTIONNER EXERCICE). (Appuyer deux fois sur la touche REMISE À ZÉRO si l'afficheur n'en est pas déjà à ce point.) Maintenir ensuite
la touche SPEED DOWN (RALENTISSEMENT) enfoncée et appuyer sur la touche PAUSE. L'appareil affiche désormais IMMOBILIZED (Immobilisé). Il ne peut alors plus fonctionner, Le moteur principal, le moteur en ligne et le cireur
sont désactivés. Le tapis roulant restera immobilisé, même s'il est réinitialisé, mis hors tension, puis remis sous tension, etc. Le mode de fonctionnement normal ne peut être rétabli qu'au moyen de la même séquence de touches :
maintenir la touche SPEED DOWN (RALENTISSEMENT) enfoncée et appuyer sur PAUSE. L'appareil affichera SELECT WORKOUT (SÉLECTIONNER EXERCICE) à nouveau.
• Cet appareil ne doit être employé que pour l'usage auquel il est destiné, conformément aux directives du manuel. Ne
pas utiliser d'accessoires qui ne sont pas recommandés par le fabricant.
CONSERVER CES INSTRUCTIONS
POUR TOUT USAGE ULTÉRIEUR.
8
Page 10
1.2 SETUP
Read the Operation Manual before setting up the Life Fitness Treadmill. Place the treadmill where it will be used before
beginning the setup procedure.
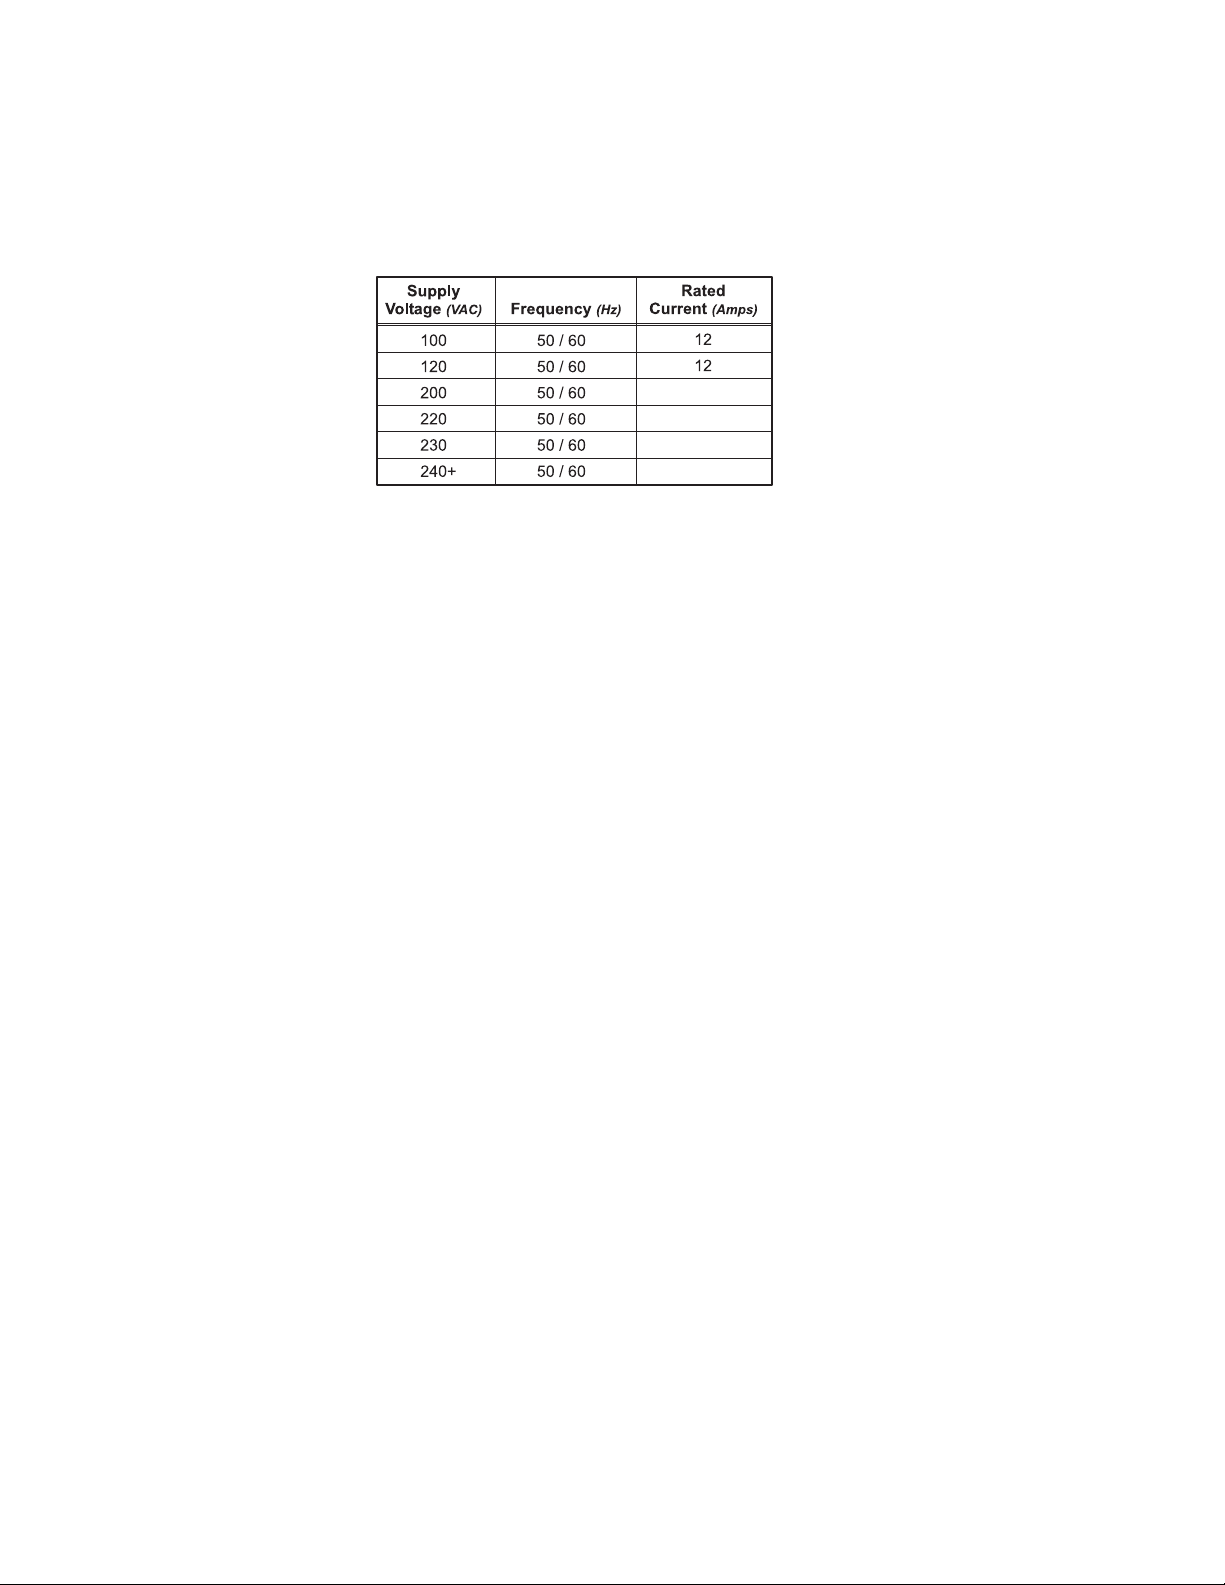
ELECTRICAL POWER REQUIREMENTS
The Life Fitness CST Treadmill requires a non-dedicated electrical line according to the configurations listed in the chart
below.
NOTE: Do not modify the plug provided with this product. If the plug does not fit into an available electrical outlet, have a
proper outlet installed by a qualified electrician.
GROUNDING INSTRUCTIONS
This Life Fitness product must be properly grounded. If the unit malfunctions or breaks down, proper grounding provides
a path of least resistance for the electric current, which reduces the risk of shock to anyone touching or using the equipment. Each unit is equipped with an electrical cord, which includes an equipment grounding conductor and a grounding
plug. The plug must be inserted into an outlet that has been properly installed and grounded in accordance with all local
codes and ordinances.
An adapter MUST NOT BE USED to connect this plug to a two-pole receptacle in North America. If a properly
grounded, 15-amp outlet is not available, one must be installed by a qualified electrician.
IL EST ABSOLUMENT INTERDIT d'employer un adaptateur pour brancher cette fiche sur une prise bipolaire
en Amérique du Nord. Si aucune prise de 15 A correctement mise à la terre n'est disponible, en faire installer
une par un électricien qualifié.
DANGER: A risk of electrical shock may result from improper connection of the equipment-grounding conductor. Check with a qualified electrician if in doubt as to proper grounding technique. DO NOT modify the
plug provided with the product. If it will not fit an electrical outlet, have a proper outlet installed by a qualified
electrician. Any modification to the electrical plug will result in a voided warranty.
Un branchement incorrect du conducteur de mise à la terre peut entraîner des risques de décharge électrique.
Consulter un électricien si des doutes subsistent quant à la technique de mise à la terre. NE PAS MODIFIER la
fiche fournie avec l'appareil. Si elle ne s'adapte pas à une prise, faire installer une prise correcte par un électricien
qualifié. Toute modification à la fiche annule la garantie.
9
9
9
9
9
Page 11
HOW TO POSITION AND STABILIZE THE LIFE FITNESS TREADMILL
Following all safety instructions in Section 1.1 and move the treadmill to the location in which it will be used. See Section 7 for the
dimensions of the product footprint (assembled dimensions).
SAFETY CLEARANCES
The following information is supplied as regional reference data regarding safety clearances around the exterior of the
treadmill.
• EU: The European EN957 Safety Standard requires a 2 meter (6.5 feet) minimum from the rear of the treadmill
to any object or surface.
• U.S. and other regions: The ASTM International (ASTM ) F2115 - 05 Standard recommends the minimum
dimensions to be 0.5 meter (1.64 feet) on each side of the treadmill and 1 meter (3.28 feet) behind the rearward
most portion of the usable moving surface or 2 meters (6.5 feet) behind the furthest rearward obstruction to
emergency egress from the treadmill.
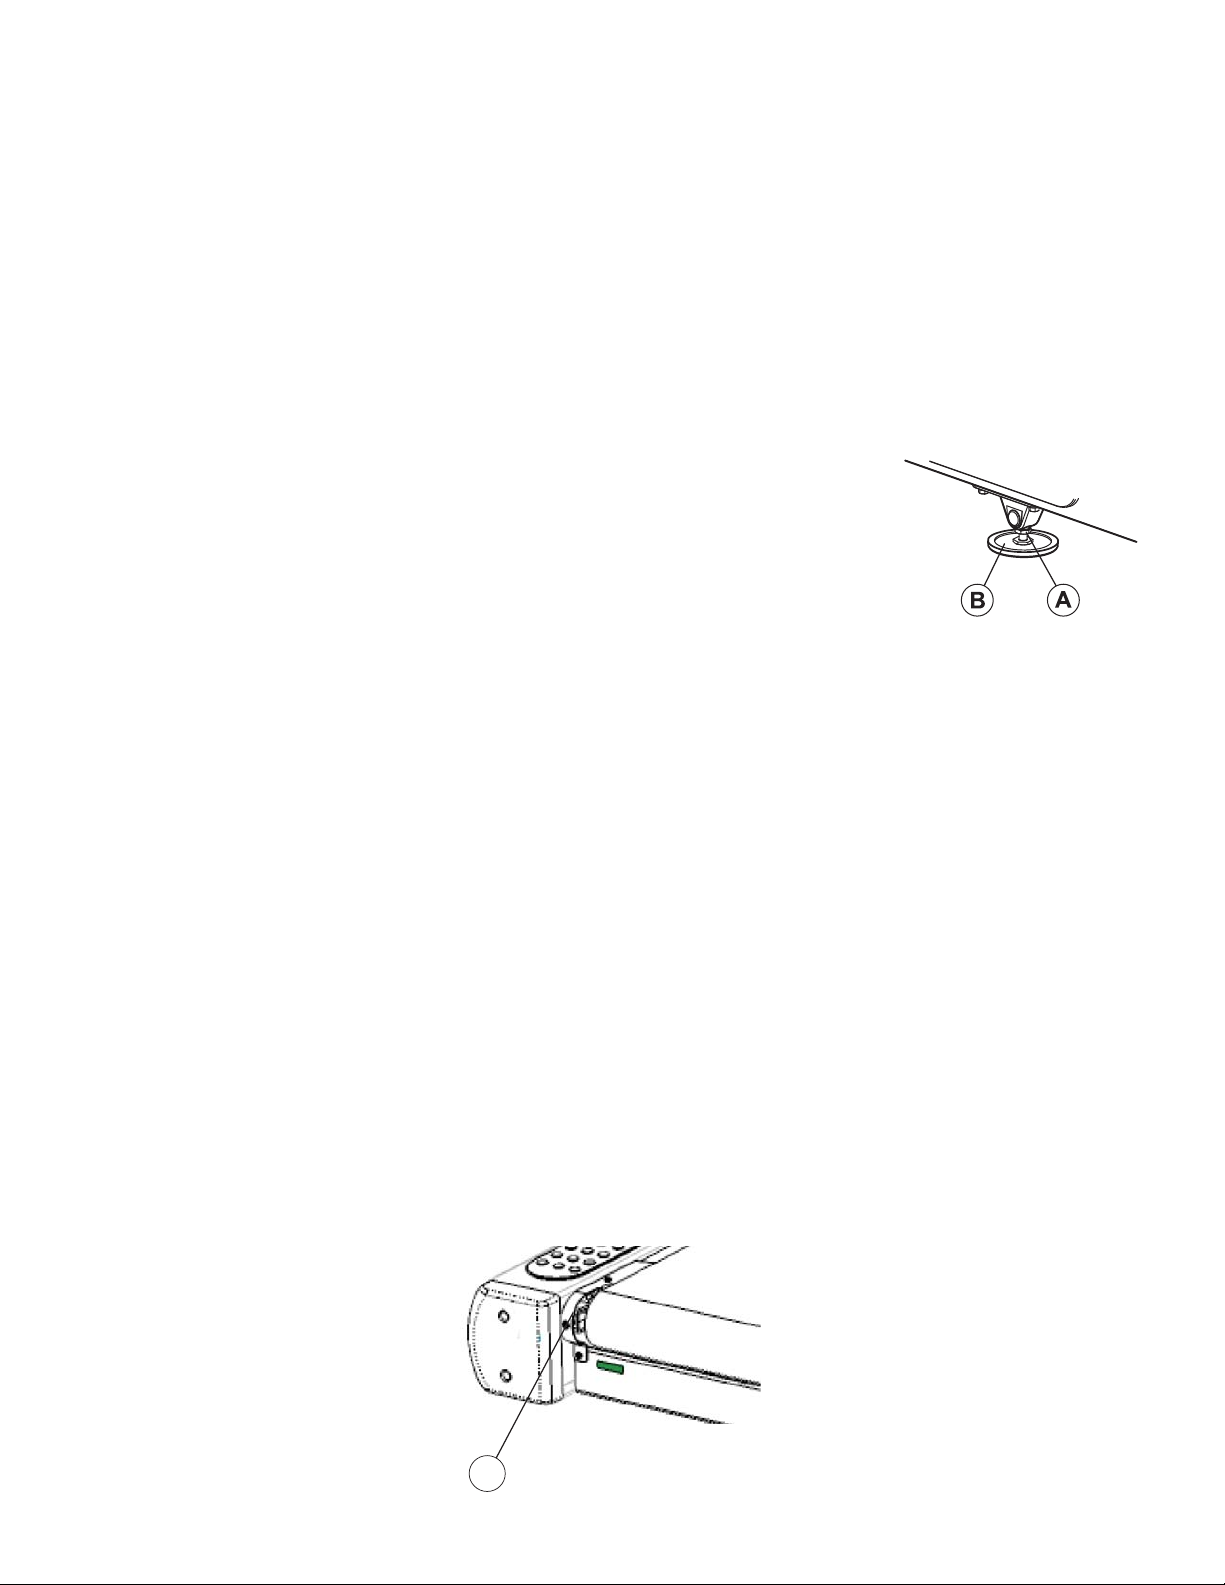
After placing the unit where it will be used, check its stability. If there is even a slight
rocking motion or the unit is not stable, determine which stabilizing leg is not resting on
the floor. To adjust, loosen the JAM NUT (A), and turn the STABILIZING LEG (B) until the
rocking motion ceases, and both stabilizing legs rest firmly on the floor.
Retighten the JAM NUT.
Note: It is extremely important that the stabilizing leg be correctly adjusted for proper
operation. An unbalanced unit may cause striding belt misalignment. A bubble level is
recommended to ensure proper leveling.
POWER SWITCH
Located on the front panel at the base of the treadmill, the ON/OFF switch has two positions: "I" (one) for ON and "0"
(zero) for OFF.
CENTERING THE BELT
After installing and levelling the treadmill, check the belt to ensure that it is tracking properly. First, plug the power cord
into an appropriate outlet. See Electrical Requirements at the beginning of this section for details. Then turn the treadmill
ON.
Have one person stand on the platforms on either side of the treadmill frame. Do not stand on the belt at this time. Press
the QUICK START key, and increase the speed to 4.0 miles per hour (mph), or 6.4 kilometers per hour (kph), using the
SPEED UP arrow.
If the striding belt moves to the right while it is running, have a second person turn the right tension bolt a quarter-turn
clockwise, and then turn the left tension bolt (C) a quarter-turn counter-clockwise. See the illustration. This action sets the
striding belt tracking back to center of the roller.
If the striding belt moves to the left, turn the left tension bolt a quarter-turn clockwise and then turn the right tension bolt a
quarter-turn counter-clockwise to start the striding belt tracking back to center of roller.
Repeat these adjustments until striding belt appears centered. Allow the belt to continue running for several minutes to be
sure that the tracking is stabilized.
Note: Do not exceed one full turn of the adjusting screws in either direction. If, after one full turn, the belt does not track
properly, contact Customer Support Services.
10
C
Page 12
SERVICE ACCESS PORT
The two interchangeable type RJ45 networking ports (A) are located on the back of the display
console. These network ports, located behind the display console rear access door, allow for console
software updates.
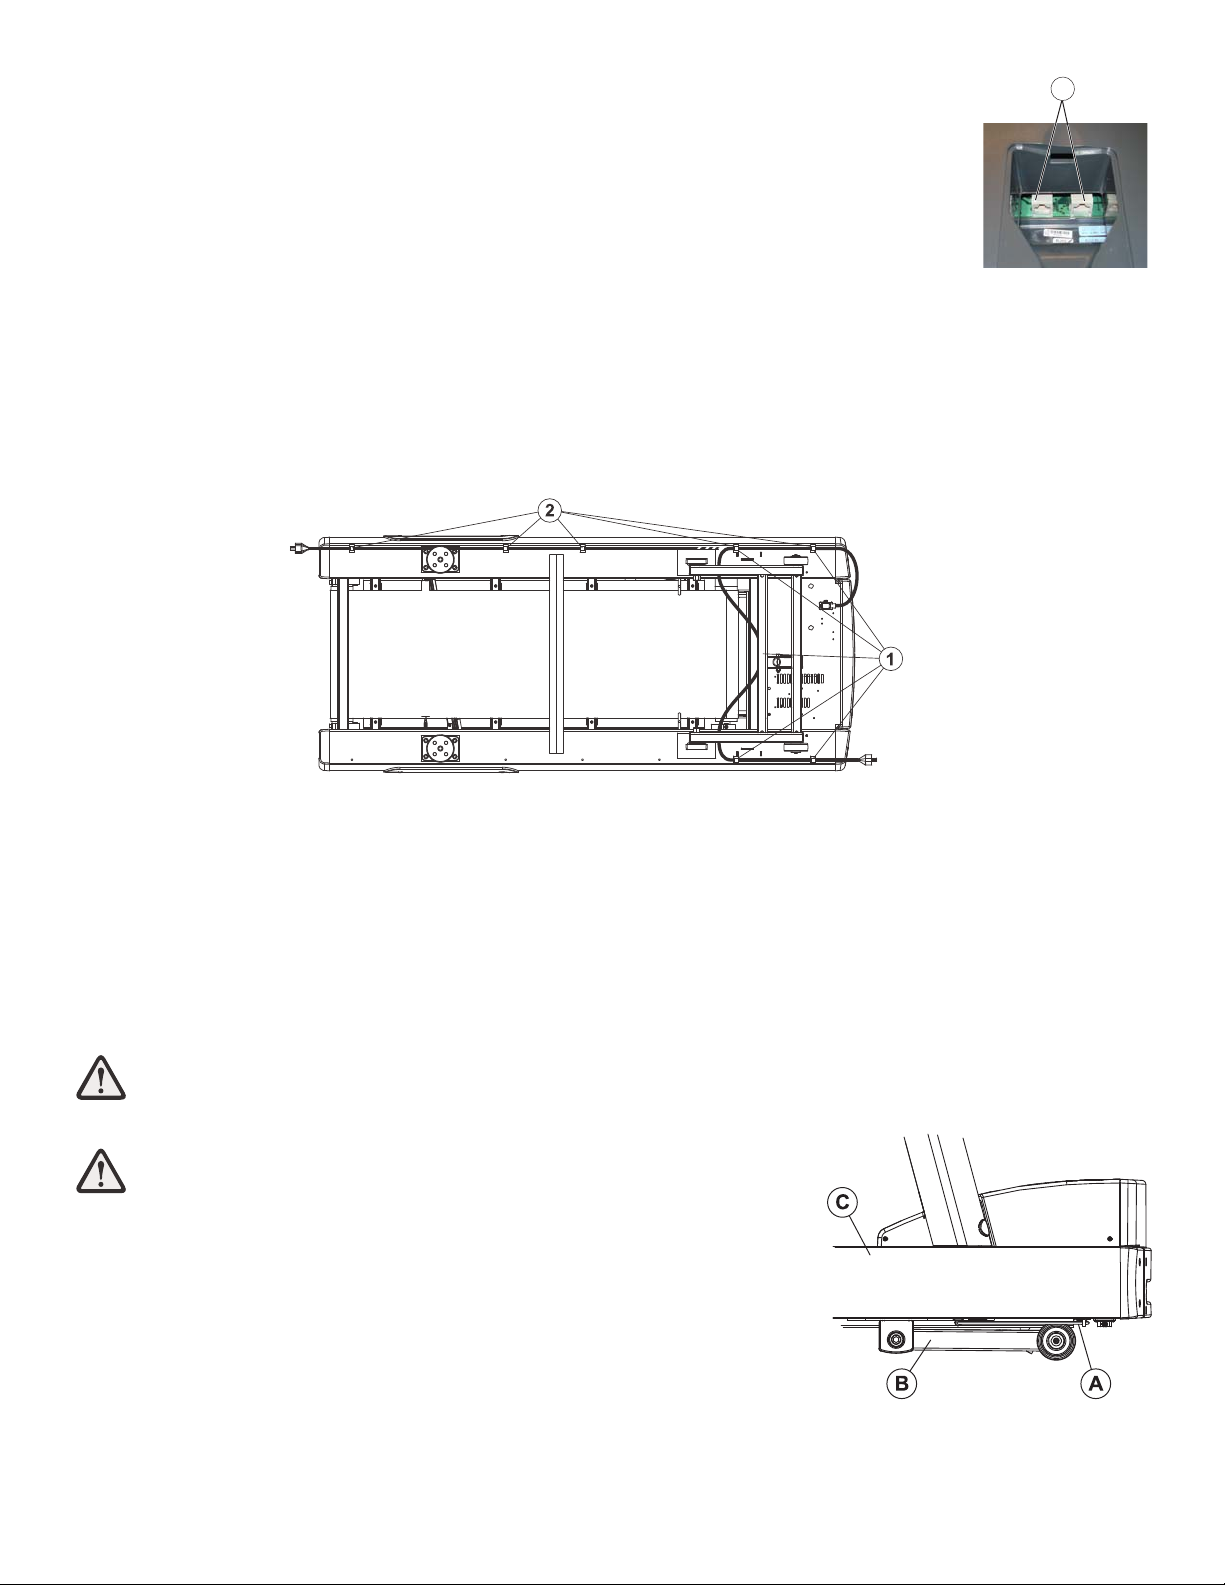
POWER CORD ROUTING
The power cord can be run straight from the treadmill, shortened and exited out the user-front left side, or run under the
frame using the power cord clips and exited out the user right-rear side of the treadmill.
For efficient cord management, the following routing options are recommended:
With the power cord unplugged, insert the clips in the appropriate holes. See the illustration below. Use Hole Pattern 1 or
2 to locate the clips and secure the power cord with the clips, taking up any slack between clips.
Note: It may be necessary to tip the treadmill to route the power cord properly.
To plug the power cord into an outlet in front of the treadmill, use Hole Pattern 1 for outlets located at the front of the
machine.
Note: To accommodate treadmill incline, at least two feet (24”) of power cord is required between the outlet and the last
power cord clip for outlets in front of the treadmill.
To plug the power cord into an outlet in rear of the treadmill, use Hole Pattern 2 for outlets located at the rear of the
machine.
WARNING: Make sure that there is a 6.5 foot clearance behind the treadmill. Contact Life Fitness
Customer Services for an optional longer power cord if necessary.
WARNING: Insure that the power cord (A) does not contact the
striding belt or get pinched between the frame (C), lift arm (B) or the
wheel. Failure to follow this warning may result in serious injury.
AVERTISSEMENT : S'assurer que le cordon d'alimentation n'entre
pas en contact avec le tapis et ne soit pas pincé entre le cadre, le
bras de levage ou la roue. Le non-respect de cet avertissement peut
provoquer de graves blessures.
NOTE: When using Pattern 1, it is extremely important to route the power cord
BETWEEN the lift frame and the main frame.
11
A
Page 13
2 CONSOLE OVERLAY AND ACTIVITY ZONE
2.1 CONSOLE OVERLAY AND ACTIVITY ZONE OVERVIEW
The computerized display console and Activity Zone on the treadmill allows the user to tailor a workout to personal fitness
abilities and goals and to monitor progress. With this easy-to-use console and Activity Zone, the user can track fitness
improvement from one workout to another.
Enter
Weight
iPod
®
Workout ProfilesWorkout Profiles
The heart rate
displayed may be inaccurate and should be used for reference only.
La fréquence
cardiaque affichée peut être inexacte et ne doit être utilisée qu'à titre de référence.
C
B
A
D
H
F
G
E
I
J
K
L
N
M
O
12
Page 14

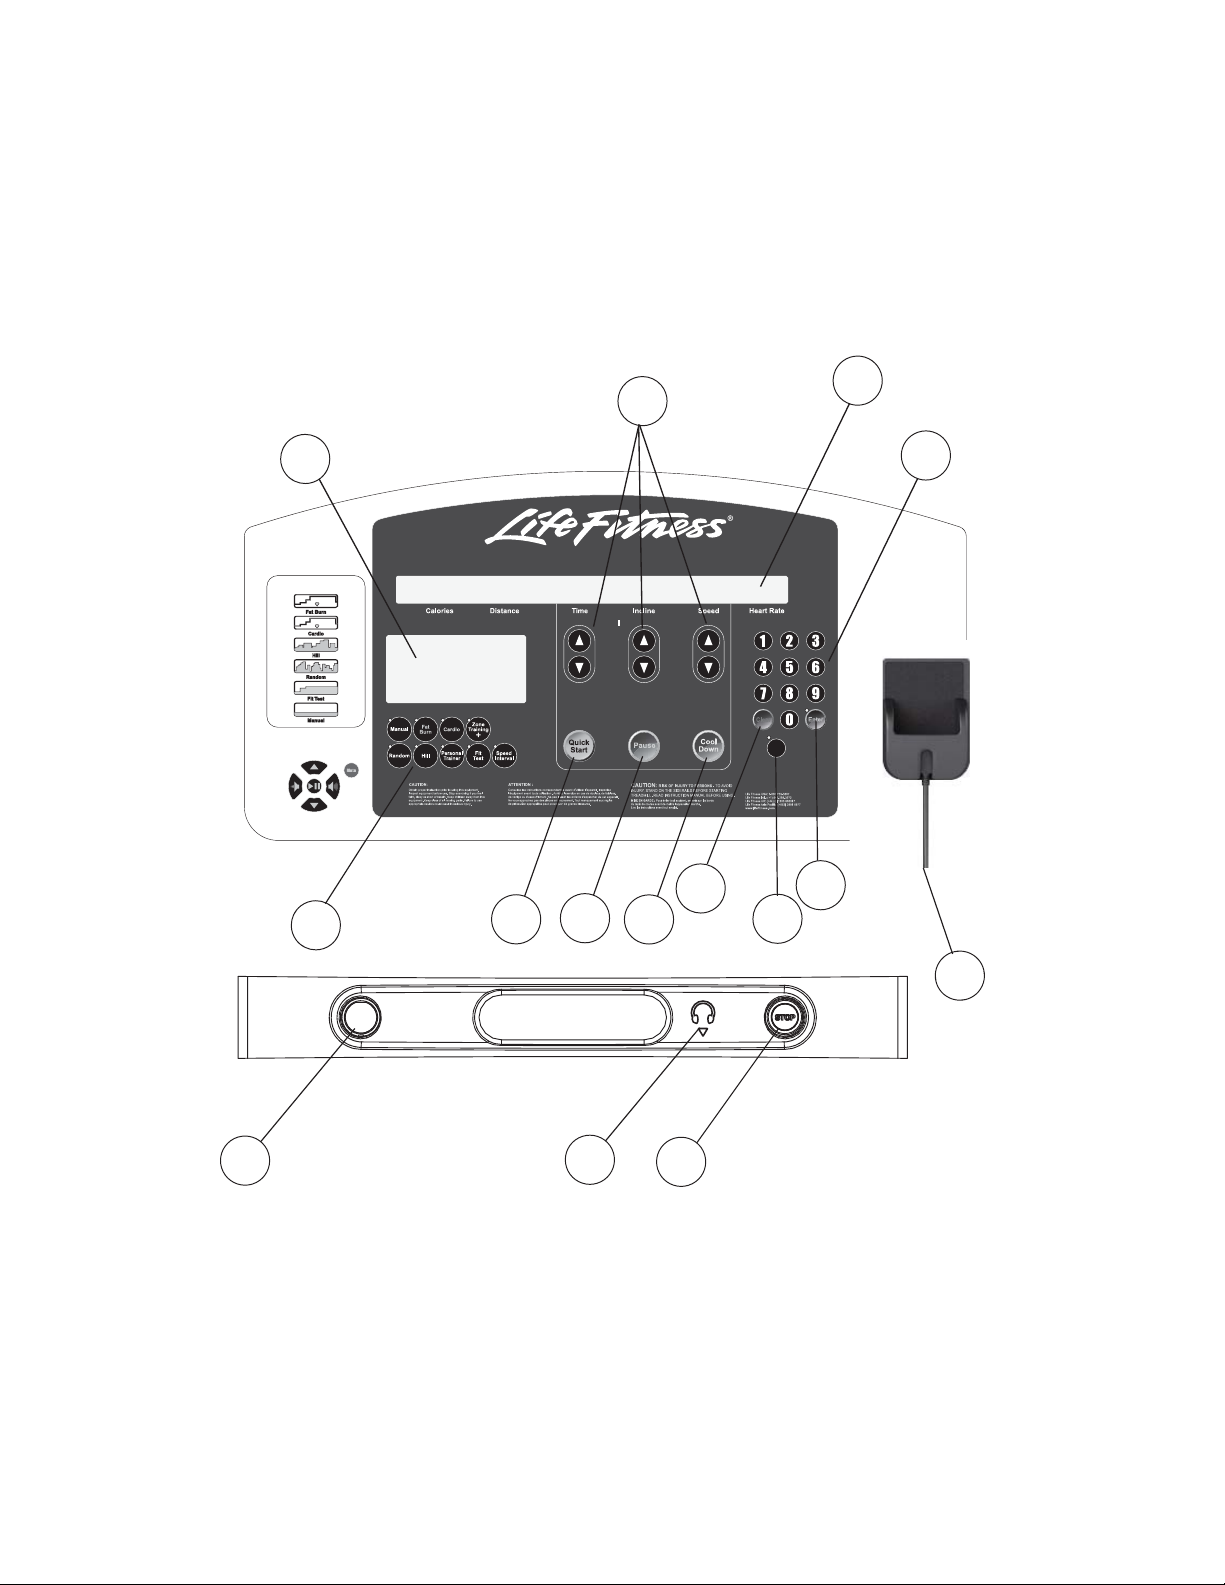
2.2 CONSOLE OVERLAY AND ACTIVITY ZONE DESCRIPTIONS
A. WORKOUT PROFILE WINDOW: During a workout, interval hills and valleys appear in this window as rows of light
stacked in columns. The number of lit rows within a column corresponds to an incline percentage.
B. MESSAGE CENTER: This window displays step-by-step instructions for setting up a workout. During a workout, it
displays calories, distance, time, incline, speed and heart rate. Additionally, the MESSAGE CENTER displays calories
per hour, METS, Watts, pace in minutes per mile/kilometer, and distance climbed, if enabled to do so in the
Manager’s Configuration. See Section 5.1 Entering and Using the Service Menu.
C. TIME, INCLINE, and SPEED arrow keys: Press these keys to increase or decrease the workout time, the incline of the
treadmill deck, or the striding belt speed. The MESSAGE CENTER displays the input data in sections located just above
the keys. Additionally, any of these keys may be pressed to set up a workout or to change Manager’s Configuration
settings.
D. NUMERIC keypad: Use NUMERIC keys to enter exercise time, difficulty level, belt speed, weight, distance, goal
selection, gender, and target heart rate.
E. CLEAR key: Press this key once to clear data not yet entered. Press it twice in succession, while programming, to
reset the treadmill and restart the programming sequence.
F. ENTER key: Press this key to confirm entries of workout setup values, as displayed in the MESSAGE CENTER.
G. ENTER WEIGHT key: Press this key to enter a user weight during a workout. Use the TIME ARROW keys or the
NUMERIC keypad to enter a weight value.
H. WORKOUT SELECTION keys: Press any of these keys to select the program identified on the given key’s label.
These programs include: MANUAL, FAT BURN, CARDIO, ZONE TRAINING +, RANDOM, HILL, PERSONAL
TRAINER, FIT TEST, and SPEED INTERVAL.
I. QUICK START key: Press this key to begin a manual workout immediately, without having to select a workout pro-
gram. Once the workout is in progress, use the ARROW keys or the NUMERIC keypad to change the intensity level
or workout duration as desired.
J. PAUSE key: Press this key to stop the belt and hold the current workout. Continue the workout by pressing the
ENTER key.
K. COOL DOWN key: Press this key to begin an automatically customized workout cool down.
L. A circular-shaped STOP magnet is located on the left side of the panel below the display console. A cord with a clip is
attached to this magnet. Before starting a workout, attach the clip to clothing. To stop the striding belt on the treadmill,
pull the cord, removing the magnet from the console. Replace the magnet to reset the system.
M. A circular-shaped STOP button is located on the right side of the panel below the display console. Press the button to
stop the striding belt and end the current workout.
13
Page 15
14
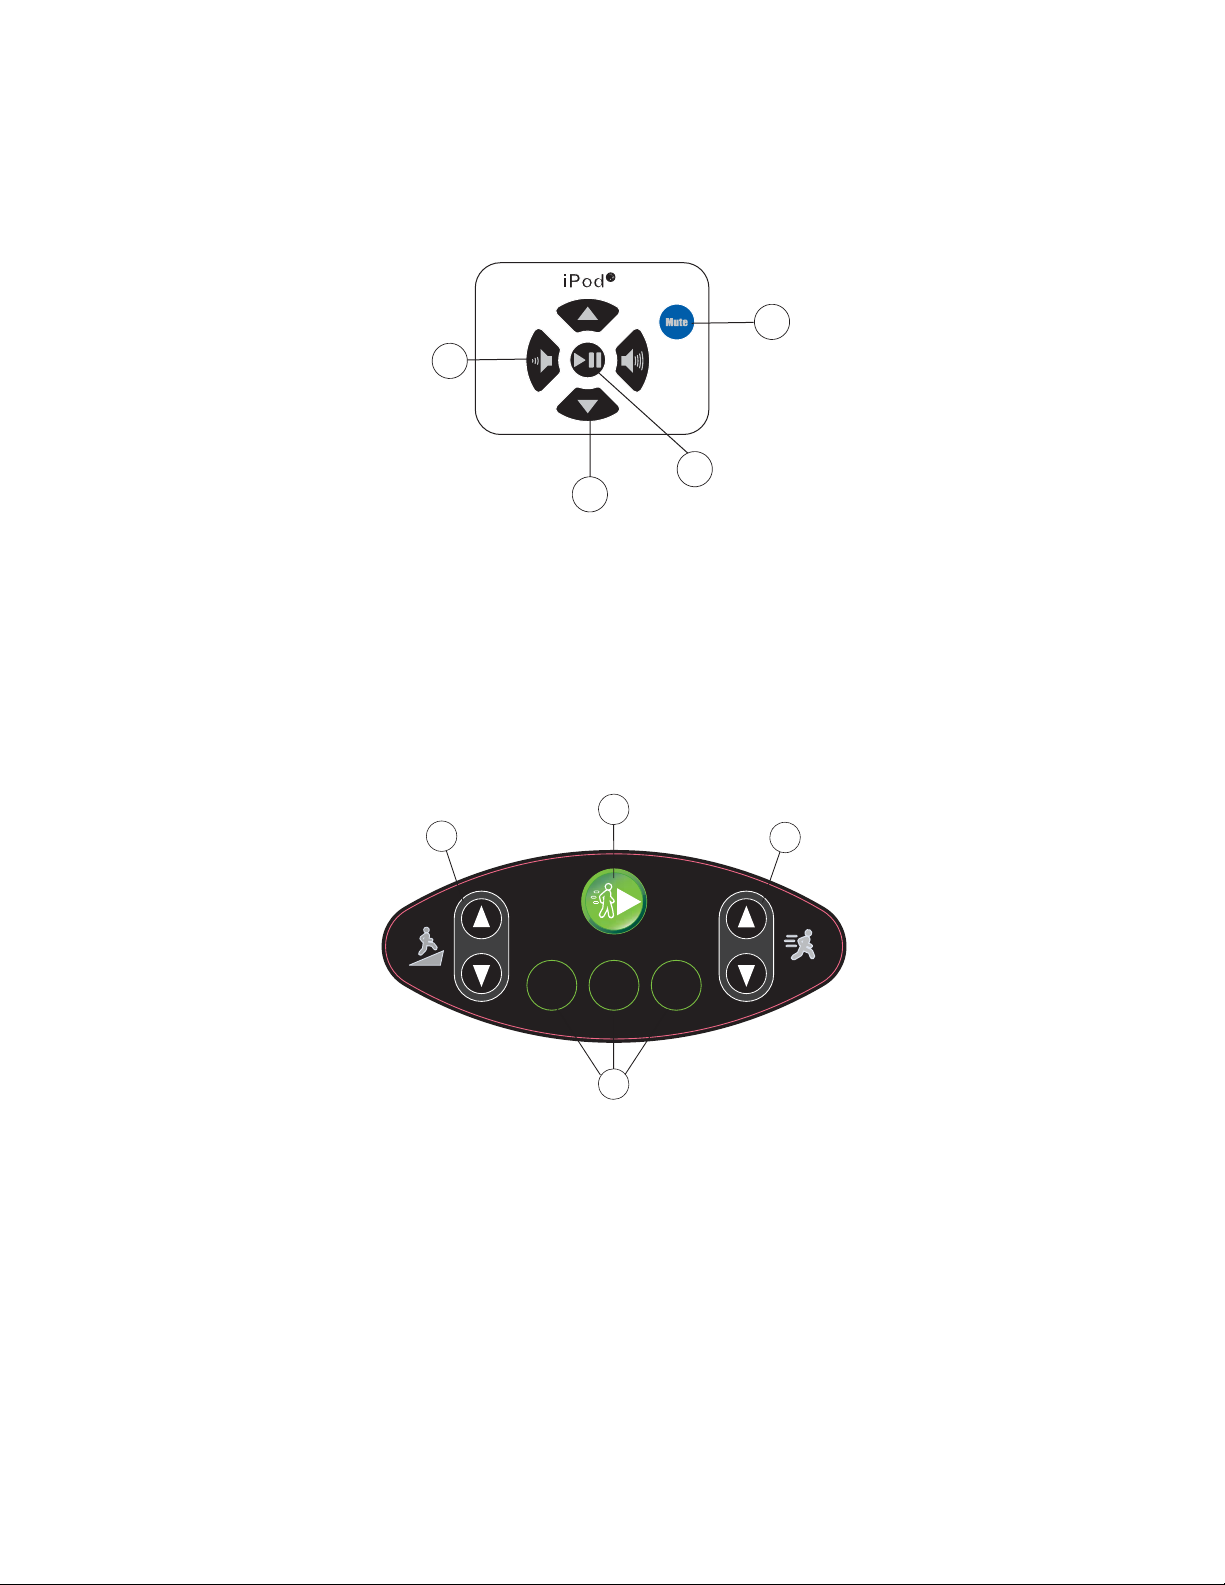
N. HEADPHONE JACK: Headphones must be plugged into the treadmill to access the sound for the iPod. The jack is not
a user-replaceable feature. Contact Life Fitness Customer Support Services for more information.
O. iPOD HOLDER: Users can attach an iPod via a 30-pin connector. Use the iPod keypad controls to play, or your iPod
controls to select a song or video and begin playing.
P. iPOD KEYPAD: The keys are used to provide control of an iPod.
IPOD KEYPAD
Q. MUTE: Press this key to turn off the sound.
R. PLAY / PAUSE: Use this key to Play or Pause the current track.
S. LEFT AND RIGHT ARROW KEYS: Use these key to increase or decrease the volume.
T. UP AND DOWN ARROW KEYS: Use these keys to select the next track and previous track .
ACTIVITY ZONE
U. INCLINE UP AND DOWN ARROW KEYS: Use these keys to increase or decrease the incline by 0.5% increments.
V. QUICK START: Press this key to begin a manual workout immediately, without having to select a workout program.
W. SPEED UP AND DOWN ARROW KEYS: Use these keys to increase or decrease the speed in 0.1 mph increments.
X. PRESET SPEED KEYS: Press one of the 3-Speed keys prior to a workout to have the treadmill belt being moving at a
preset value. The preset values are 2 mph / 3kph, 4 mph / 6kph, and 6 mph / 9 kph. During a workout, press these
buttons to immediately change the belt speed to the preset value.
Q
S
R
T
V
U
GO
2 mph
3 km/h
4 mph
6 km/h
6 mph
9 km/h
X
W
Page 16

15
2.3 READING RACK AND ACCESSORY TRAYS
The display console design includes a built-in reading rack (A) allowing a book or magazine to be supported during the
workout. Also included in the display console are three built-in accessory trays (B), two side trays to accommodate large
items such as water bottles and one center tray for smaller items.
A
B
Page 17

3 HEART RATE ZONE TRAINING
®
3.1 WHY HEART RATE ZONE TRAINING®EXERCISE?
Research shows that maintaining a specific heart rate while exercising is the optimal way to monitor the intensity of a
workout and to achieve maximum results. That is the idea behind the Life Fitness Heart Rate Zone Training® approach to
exercise.
Zone Training identifies an exerciser's ideal heart rate range, or zone, for burning fat or increasing cardiovascular fitness.
The zone is a percentage of the theoretical maximum (HRmax), and its value depends on the workout. The maximal Heart
Rate formula is defined by the American College of Sports Medicine's "Guidelines for Exercise Testing and Prescription",
8th Edition, 2010. HRmax equals to 206.9 minus the total of 0.67 multiplied by a person’s age.
HR Max = 206.9 - (0.67 *age)
The Life Fitness Treadmill features five exclusive workouts designed to take full advantage of the benefits of Heart Rate
Zone Training+ exercise:
• FAT BURN • HEART RATE HILLTM • EXTREME HEART RATE
TM
• CARDIO • HEART RATE INTERVAL
TM
Each workout offers different benefits, as discussed in Section 4, titled The Workouts.
Note: Consulting a fitness trainer is recommended for defining specific fitness goals and designing a workout program.
To change the target heart rate during a workout, simply enter a new target heart rate using the NUMERIC keypad.
To switch between programs during a workout, use the WORKOUT SELECTION keys.
The Heart Rate Zone Training® workout programs measure heart rate. Wear the optional Polar® telemetry heart rate
chest strap, or grip the Lifepulse
TM
sensors, to enable the treadmill’s on-board computer to monitor the heart rate during a
workout. The computer automatically adjusts the incline level to maintain the target heart rate based on the actual heart
rate.
Note: Reference the above chart for Theoretical Maximum Heart Rates and Target Heart Rates.
Age
Theoretical Maximum
Heart Rate
65%
(Fat Burn)
80%
(Cardio)
10 200 130 160
20 194 126 155
30 187 121 149
40 180 117 144
50 173 113 139
60 167 108 133
70 160 104 128
80 153 100 123
90 147 95 117
99 141 91 112
16
Page 18

3.2 HEART RATE MONITORING
THE LIFEPULSETMSYSTEM
To use the treadmill’s LifepulseTMsystem to check the heart rate during a workout, grasp the stainless steel sensors on the
ErgoTMfront handlebar. Two sensors are located on each of the handlebars. Contact must be maintained with all four sensors to obtain a heart rate. The console displays a heart rate within 20 to 30 seconds of contact with the sensors.
Do not attempt to grasp the sensors at speeds above 4.5 mph or 7.2 kph. For these speeds, the use of a heart rate chest
strap is recommended.
THE OPTIONAL POLAR®TELEMETRY HEART RATE CHEST STRAP
The Life Fitness Treadmill is equipped with Polar® telemetry, a heart rate monitoring system in which electrodes, pressed
against the skin, transfer heart rate signals to the treadmill console. These electrodes are attached to a chest strap that the
user wears during the workout. The Polar telemetry heart rate chest strap is optional. Contact Life Fitness Customer Support
Services to order.
See the diagram below for correct positioning of the Polar telemetry heart rate chest strap. The electrodes (A), which are
the two grooved surfaces on the underside of the strap, must remain wet to transmit accurately the electrical impulses of
the heart back to the receiver. Moisten the electrodes. Then, secure the Polar telemetry heart rate chest strap as high
under the chest muscles as possible. The strap should be snug, but comfortable enough to allow for normal breathing.
The transmitter strap delivers an optimal heart rate reading when the electrodes are in direct contact with bare skin. However, it functions properly through a thin layer of wet clothing.
If it becomes necessary to re-moisten the Polar telemetry heart rate chest strap electrodes, grasp the center of the strap,
pull it away from the chest to expose the two electrodes, and re-moisten them.
During the setup of a heart rate zone training workout, the user will be required to enter a start-up speed. If a Polar telemetry heart rate chest strap is not detected, the maximum allowable speed is 4.5 mph. If a Polar telemetry heart rate chest
strap is detected, the maximum speed is 12 mph.
A A
17
Page 19

4 THE WORKOUTS
4.1 WORKOUT OVERVIEWS
The following workouts are pre-programmed for the Life Fitness Treadmill.
QUICK START: Press one of the Quick Start keys prior to a workout to have the treadmill belt begin moving at a preset
value. The preset values are 2 mph (3 kph), 4 mph (6 kph), and 6 mph (9 kph). During a workout, press these buttons to
immediately change the belt speed to the preset value.
MANUAL is a constant effort workout in which the user can change incline level or speed at any time.
RANDOM is an interval training workout of constantly changing intensity levels that occur in no regular pattern or progres-
sion.
HILL is an interval training workout. Intervals are periods of intense aerobic exercise separated by regular periods of
lower-intensity exercise.
SPEED INTERVAL allows the user to toggle between user defined JOG and RUN speeds.
ZONE TRAINING + Zone Training workouts target specific ranges, or zones, for maintaining a heart rate to achieve maxi-
mum exercise results.
HEART RATE HILL
TM
takes the user through three different hills based on the target heart rate. The user wears
a Polar telemetry heart rate chest strap, or grasps the LifepulseTMsensors continuously.
HEART RATE INTERVAL
TM
alternates between a hill and a valley based on the target heart rate. The user wears
a Polar telemetry heart rate chest strap, or grasps the LifepulseTMsensors continuously.
EXTREME HEART RATE TMis an intense workout for more experienced users. It is designed to get the heart
rate up and down as quickly as possible. The user wears a Polar telemetry heart rate chest strap, or grasps the
Lifepulse
TM
sensors continuously.
FAT BURN is a low-intensity workout for burning a higher percentage of calories from fat. The user wears a Polar
telemetry heart rate chest strap, or grasps the LifepulseTMsensors continuously. The program adjusts the intensity
level through changing the incline (elevation), based on the actual heart rate, to maintain the rate at 65 percent of
the theoretical maximum.
CARDIO is a higher intensity workout for more fit users, maximizing cardiovascular benefits and total calories
burned. The user wears a Polar telemetry heart rate chest strap, or grasps the Lifepulse
TM
sensors continuously.
The program adjusts the intensity level, based on the actual heart rate, to maintain the rate at 80 percent of
the theoretical maximum.
18
Page 20

PERSONAL TRAINER workouts are accessed through the PERSONAL TRAINER key. These include the pre-programmed DISTANCE GOAL, CALORIES GOAL, TIME IN ZONE GOAL, and SPORT TRAINING, workouts, as well as up
to six CUSTOM WORKOUTS, which may be programmed by the user.
DISTANCE GOAL is a distance based workout.
CALORIES GOAL is a calorie expenditure based workout.
TIME IN ZONE GOAL is a time spent within a target zone based workout.
SPORT TRAINING
TM
(5K) is a distance-goal workout that simulates an actual terrain with varying incline levels.
It is designed to assist runners in training for a 5-kilometer, or 3.1-mile, race. Accessible through the PERSONAL
TRAINER workouts key.
SPORT TRAINING
TM
(10K) is a distance-goal workout that simulates an actual terrain with varying incline levels. It is
designed to assist runners in training for a 10-kilometer, or 6.2-mile, race. Accessible through the PERSONAL TRAINER
workouts key.
FITNESS TESTS
LIFE FITNESS FIT TEST estimates cardiovascular fitness and can be used to monitor improvements in endurance
every 4-6 weeks.
ADDITIONAL FITNESS TESTS are similar to the FIT TEST workout, except these programs are based upon specific
predefined protocols. The available tests are:
• ARMY PHYSICAL FITNESS TEST (PFT) - (U.S. MILITARY)
• NAVY PHYSICAL READINESS TEST (PRT) - (U.S. MILITARY
• MARINES PHYSICAL FITNESS TEST (PFT) - (U.S. MILITARY)
• AIR FORCE FITNESS TEST (PRT) - (U.S. MILITARY)
• WFI SUBMAX PROTOCOL - (INTERNATIONAL ASSOCIATION OF FIRE FIGHTERS)
• PHYSICAL EFFICIENCY BATTERY (PEB) - (U.S. FEDERAL LAW ENFORCEMENT)
19
Page 21

4.2 USING THE WORKOUTS
Select a workout using the WORKOUT SELECTION or GO SYSTEM QUICK START KEYS. The chart below lists the steps
for setting up each workout. Use the NUMERIC keypad to enter the values when prompted by the MESSAGE CENTER, or
use TIME, INCLINE, or SPEED ARROW keys to scroll to desired values displayed on the MESSAGE CENTER. Press
ENTER to confirm each selection. These entered values can be changed during all workouts, except for those found
under the FIT TEST button.
20
ACTIVITY ZONE
Press 2.0 mph, 4.0 mph, or
6.0 mph
Begin workout
QUICK START
Press QUICK START
Begin workout
MANUAL
Press MANUAL
Enter weight
Enter time
Enter incline
Enter speed
Begin workout
RANDOM
Press RANDOM
Enter weight
Enter time
Enter level
Enter speed
Begin workout
FAT BURN
Press FAT BURN
Enter weight
Enter time
Enter age
Enter target heart rate
Enter speed
Begin workout
CARDIO
Press CARDIO
Enter weight
Enter time
Enter age
Enter target heart rate
Enter speed
Begin workout
HILL
Press HILL
Enter weight
Enter time
Enter level
Enter speed
Begin workout
PERSONAL TRAINER
WORKOUTS
Press PERSONAL TRAINER
repeatedly until PERSONAL
TRAINER WORKOUTS appears; press ENTER
Select the desired workout
number, from 1 to 6; press
ENTER
Begin workout
CALORIES GOAL
Press PERSONAL TRAINER
repeatedly until
CALORIES GOAL
appears; press ENTER
Enter weight
Enter calories
Enter incline
Enter speed
Begin workout
DISTANCE GOAL
Press PERSONAL TRAINER
repeatedly until
DISTANCE GOAL
appears; press ENTER
Enter weight
Enter distance
Enter incline
Enter speed
Begin workout
TIME IN ZONE GOAL
Press PERSONAL TRAINER
repeatedly until
TIME IN ZONE GOAL
appears; press ENTER
Enter weight
Enter time
Select Fat Burn or Cardio
Enter age
Enter target heart rate
Enter speed
Begin workout
SPORT TRAINING
TM
Press PERSONAL TRAINER
repeatedly until
SPORT TRAINING 5K or
SPORT TRAINING 10K or
appears; press ENTER
Enter weight
Enter level
Enter speed
Begin workout
HEART RATE HILL
TM
Press ZONE TRAINING+
repeatedly until HEART
RATE HILL appears;
press ENTER
Enter weight
Enter time
Enter age
Enter target heart rate
Enter speed
Begin workout
HEART RATE INTERVAL
TM
Press ZONE TRAINING+
repeatedly until
HEART RATE INTERVAL
appears; press ENTER
Enter weight
Enter time
Enter age
Enter target heart rate
Enter speed
Begin workout
EXTREME HEART RATE
TM
Press ZONE TRAINING+
repeatedly until
EXTREME HEART RATE
appears; press ENTER
Enter weight
Enter time
Enter age
Enter target heart rate
Enter walk speed
Enter jog speed
Begin workout
LIFE FITNESS FIT TEST
Press FIT TEST
repeatedly until
FIT TEST = 5 MIN appears;
press ENTER
Enter weight
Enter age
Enter gender
Enter speed
Begin workout
ARMY PFT
Press FIT TEST
repeatedly until ARMY PFT
appears; press ENTER
Enter weight
Enter age
Enter gender
Enter speed
Begin 2.0 mile test
NAVY PRT
Press FIT TEST
repeatedly until NAVY PRT
appears; press ENTER
Enter YES or NO
to question:
IS ELEVATION LESS THAN
5000 FEET ABOVE SEA
LEVEL?
Enter weight
Enter age
Enter gender
Enter speed
Begin 1.5 mile test
MARINES PFT
Press FIT TEST
repeatedly until MARINE
PFT appears; press ENTER
Enter YES or NO
to question:
IS ELEVATION LESS THAN
4500 FEET ABOVE SEA
LEVEL?
Enter weight
Enter gender
Enter speed
Begin 3.0 mile test
AIR FORCE PRT
Press FIT TEST
repeatedly until AIR FORCE
PRT appears; press ENTER
Enter weight
Enter age
Enter gender
Enter speed
Begin 1.5 mile test
WFI SUBMAX PROTOCOL
Press FIT TEST
repeatedly until WFI SUB-
MAX PROTOCOL appears;
press ENTER
Enter weight
Enter height
Enter age
Begin 3-minute warmup
Begin test
PEB TEST
Press FIT TEST repeatedly
until PEB TEST appears;
press ENTER
Enter weight
Enter age
Enter gender
Enter speed
Begin test
SPEED INTERVAL
Press SPEED INTERVAL
Enter weight
Enter time
Enter incline
Enter jog speed
Enter run speed
Page 22

4.3 WORKOUT DESCRIPTIONS
QUICK START is the fastest way to begin exercising. After the QUICK START key is pressed, a MANUAL workout begins, at a
very slow speed with the incline level set to zero by default. Change the speed using the PRESET SPEED keys on the
Activity Zone to jump to a preset speed. Use the SPEED ARROW keys on the console or on the Activity Zone to gradually
move the speed up or down as desired, or use the NUMERIC keypad to enter a new speed value. Use the INCLINE ARROW
keys on the console or on the Activity Zone to move the incline gradually up or down as desired. For accurate caloric expenditure, enter your weight using the ENTER WEIGHT button. The preset speeds are as follows:
MANUAL
The MANUAL program is a constant effort workout in which the user can change incline level or speed at any
time.
RANDOM
The RANDOM program creates a terrain of hills and valleys that varies with each workout. More than one million
different patterns are possible.
FAT BURN
The FAT BURN workout is designed to maintain a user’s heart rate at 65%t of the theoretical maximum(HRmax) for optimal
results. Throughout the workout, the user wears a Polar telemetry heart rate chest strap or grasps the Lifepulse
TM
sensors.
If the user is not wearing a Polar telemetry heart rate chest strap, the WORKOUT PROFILE WINDOW displays a heart shape,
and the MESSAGE CENTER displays a prompt to grasp the sensors. The console continuously monitors and displays the
heart rate, adjusting the intensity level of the treadmill to reach and maintain the target. This system eliminates over- training
and under-training, and it maximizes the aerobic benefits of exercise by using the body's fat stores for fuel.
Note: The intensity level is changed by incline. Speed can only be changed by the user.
CARDIO
The CARDIO workout is virtually identical to FAT BURN, however the target heart rate is calculated at 80% of the
theoretical maximum (HRmax). The higher target promotes cardiovascular improvement by placing a heavier workload on
the heart muscle.
Note: The intensity level is changed by incline. Speed can only be changed by the user.
Note: Change the target heart rate at any time by using the NUMERIC KEYPAD.
SPEED INTERVAL
This program allows the user to toggle between user defined JOG and RUN speeds. The SPEED INTERVAL button will
flash throughout the workout. The user can toggle the speeds at any time during the workout by pressing the speed interval button. The current speed will appear in the speed display window.
The preset JOG and RUN speeds cannot be changed during a workout. The speed can be adjusted at any time during a
workout using the SPEED ARROW keys. Toggling the JOG and RUN speeds using the SPEED INTERVAL button will
reset the speeds to the preset JOG and RUN speeds.
English Default Units Metric Default Units
2.0 mph 3.0 kph
4.0 mph 6.0 kph
6.0 mph 9.0 kph
21
Page 23

HILL
The Life Fitness-patented HILL workout offers a variety of configurations for interval training. Intervals are periods of intense
cardiovascular exercise separated by regular periods of lower-intensity exercise. The WORKOUT PROFILE window represents
these high and low intervals as columns of illuminated LEDs, which together have the appearance of hills and valleys. The computerized interval training workout has been scientifically demonstrated to promote greater cardiorespiratory improvement than
steady-pace training.
The HILL workout goes through four phases, each marked by different intensity levels. The WORKOUT PROFILE window displays the progress of these phases. As noted in the descriptions below, the heart rate should be measured at two stages in the
workout to gauge its effectiveness. Wear the Polar telemetry heart rate chest strap or continuously grip the Lifepulse
TM
handles.
The MESSAGE CENTER does not display a request for a heart rate measurement, as it does with CARDIO, FAT BURN and
the HEART RATE ZONE TRAINING programs.
1. Warm-up is a phase of low, gradually rising resistance, which brings the heart rate into the lower end of the target
zone and increases respiration and blood flow to working muscles.
2. Plateau increases the intensity slightly and keeps it steady, to bring the heart rate to the low end of the target zone.
Check the heart rate at the end of this phase.
3. Interval Training is a series of increasingly steeper hills alternating with valleys or stints of recovery. The heart rate
should rise to the high end of the target zone. Check the heart rate at the end of this phase.
4 Cool Down is a low-intensity phase that allows the body to begin removing lactic acid and other exercise by-products
which build up in muscles and contribute to soreness.
Each column, as seen in the WORKOUT PROFILE WINDOW and the chart above, represents one interval. The overall
duration of the workout determines the length of each interval. Each workout is made up of 20 intervals, so the duration of
each interval is equal to the duration of the entire workout divided by 20.
1 to 9 minutes: A workout with a duration of less than 10 minutes is insufficient for the HILL program to complete all four
phases adequately. The program therefore condenses a workout of this duration at various stages.
10 to 19 minutes: The interval durations initially are set at 30 seconds for a 10-minute workout. For every minute over 10,
each interval increases by three seconds. A 15-minute workout consists of 20 intervals at 45 seconds each.
20 to 99 minutes: All intervals last 60 seconds. If the user adds minutes to the pre-set duration while the workout is in
progress, the program adds hills and valleys that are identical to the first eight intervals of the Interval Training phase. This
pattern repeats until the workout is completed.
22
Page 24

PERSONAL TRAINER
• CUSTOM WORKOUTS
The treadmill console stores up to six custom workouts. For information on creating these workouts, see the topic titled
Programming Custom Workouts in Section 5.
To use custom workouts, press the PERSONAL TRAINER key repeatedly until the MESSAGE CENTER displays “PERSONAL TRAINER WORKOUTS”. Then, press ENTER. The MESSAGE CENTER displays a prompt to select a custom
workout number, ranging from 1 to 6. Using the ARROW keys or the NUMERIC keypad, select the number and press
ENTER. If a workout has not been created for that number, the MESSAGE CENTER simply scrolls to the next number. If
a workout has been created for the selected number, the MESSAGE CENTER displays successive prompts to enter the
weight and choose a speed. After these entries are provided, the workout begins.
•
DISTANCE GOAL
This workout is designed to build endurance. The objective is to cover a certain distance in miles. Once the objective is
met, the workout automatically goes into a cool down phase, and ends afterward.
Note: When a user sets this goal with the TIME ARROW keys, the console displays the values in .10-mile increments.
•
CALORIES GOAL
This workout is designed to promote weight loss and weight control. The objective is to burn a certain number of calories
in the selected time duration. Once the objective is met, the workout automatically goes into a cool down phase, and ends
afterward.
•
TIME IN ZONE GOAL
The Time in Zone Goal program, a feature of Heart Rate Zone Training®, enhances FAT BURN and CARDIO workouts by set-
ting a duration for staying within the target zone as the workout goal. Once the duration objective is met, the workout goes into a
cool down phase.
•
SPORT TRAINING
TM
This distance-goal workout is designed for runners training for races. The program creates realistic terrains by setting different
incline levels throughout the course. Incline grades depend on the difficulty levels selected during the workout setup. A 1.5%
incline grade, which is the baseline level, simulates a flat running surface. A zero percent grade simulates running downhill. Incline durations range between 30 and 60 seconds. The course ends when the distance goal is met. Two Sport Training
TM
pro-
grams are available on the treadmill:
• SPORT TRAINING
TM
(5K) is a 5-kilometer, or 3.1-mile, course.
• SPORT TRAININGTM(10K) is a 10-kilometer, or 6.2-mile, course.
23
Page 25

ZONE TRAINING +
Zone Training workouts target specific ranges, or zones, for maintaining a heart rate to achieve maximum
exercise results.
H
EART RATE HILL
TM
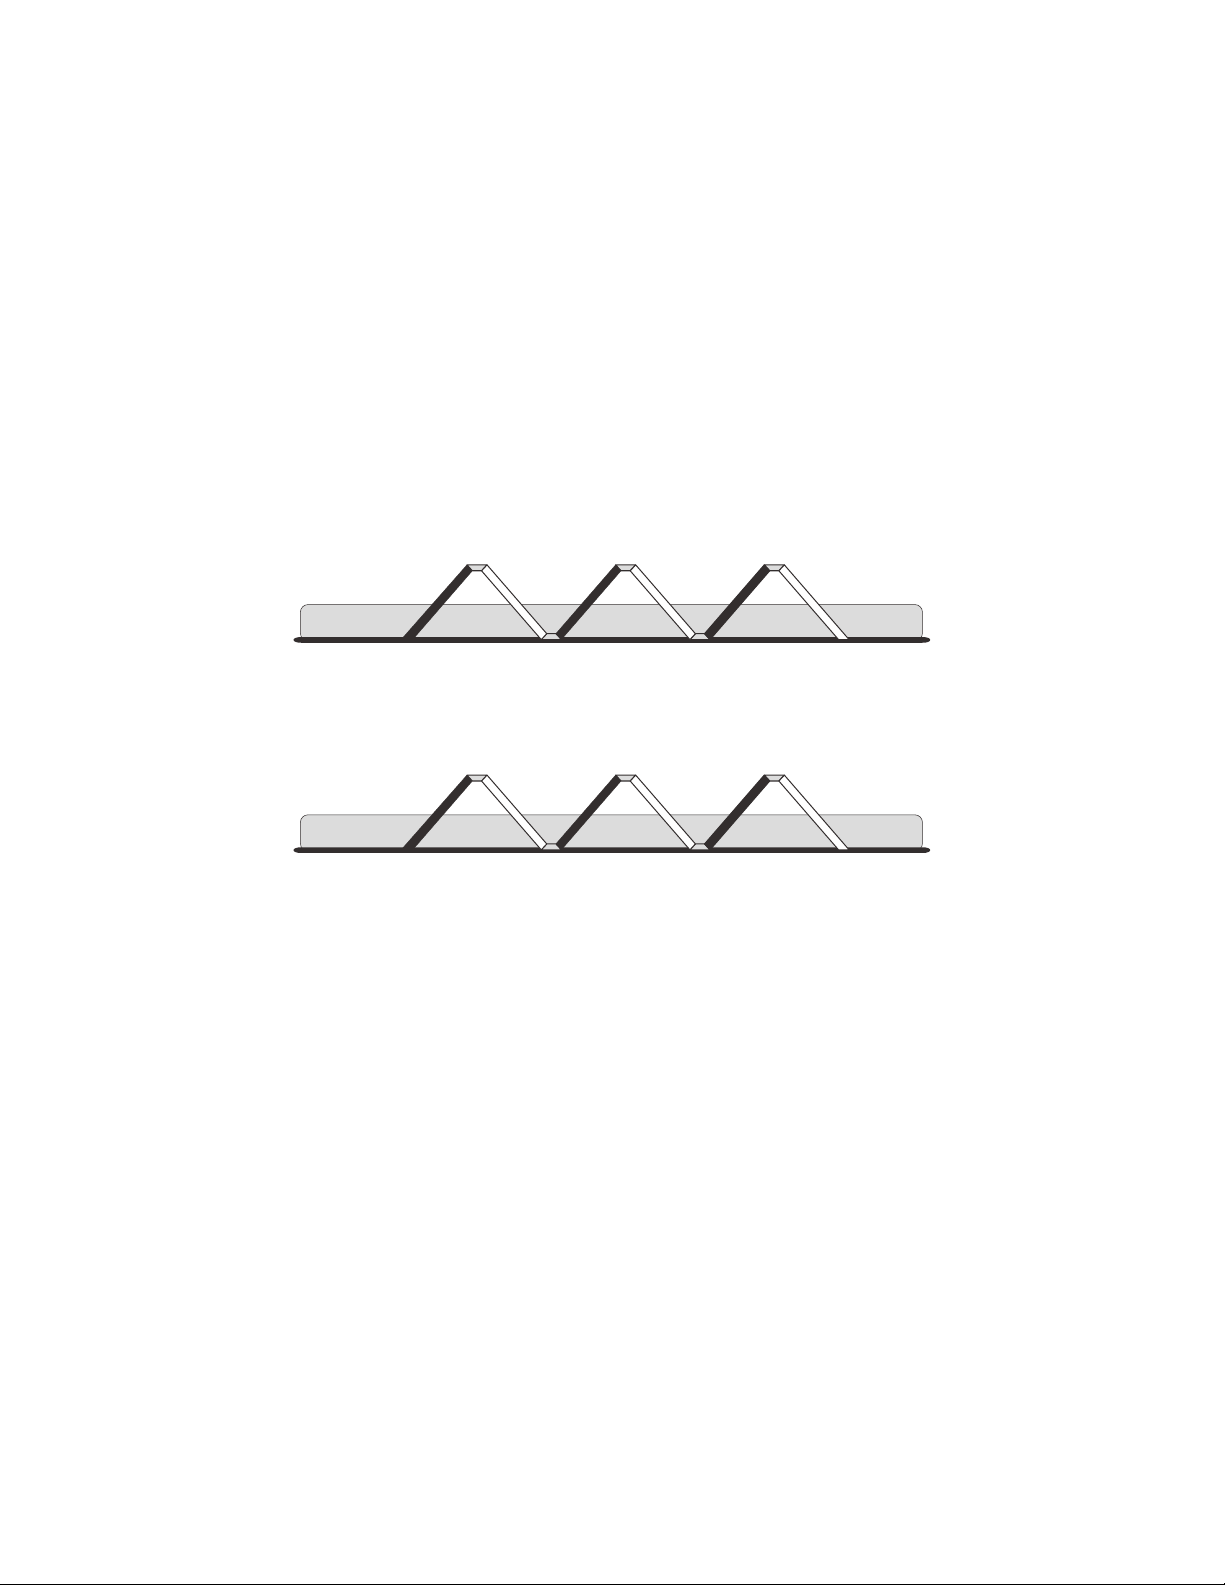
This program combines the standard HILL workout profile with the concept of Heart Rate Zone Training. The default target heart rate* is calculated as 80% of the theoretical maximum† (HRmax), but the user can adjust the target rate during
the workout setup. All hills and valleys are percentages of HRmax. The workout consists of three hills that target three
heart rate goals: The first hill brings the heart rate to 70%t of HRmax. The second hill increases the rate to 75% of
HRmax. The third hill matches the Target Heart Rate bringing the heart rate to 80% of HRmax. The valley always is
defined as 65 percent of HRmax.
After a standard three-minute warm-up, the workout progresses toward the first hill and heart rate goal. Once the user
reaches 70% of HRmax, the hill continues for one minute. When the minute expires, the level decreases into a valley.
Once the user's heart rate falls to 65% of HRmax, the valley continues for one minute. Then, the next hill begins with its
corresponding heart rate goal. After the user completes the third hill/valley pair, the program returns to the first hill and repeats the cycle as long as the duration allows. At the end of the duration, the workout goes into a cool-down phase. If the
heart rate goes above the theoretical maximum for more than 45 seconds, the treadmill automatically goes into pause
mode. If the user does not reach a heart rate goal after five minutes, the MESSAGE CENTER displays a prompt to increase or decrease speed, depending on whether the workout is in a hill or valley phase. The program does not proceed
to a new heart rate goal until the user reaches the current goal.
24
70% HRmax
Hill
80% HRmax
75% HRmax
Hill
Valley Valley Valley
85% THR
65% HRmax
Hill
65% HRmax 65% HRmax65% HRmax
HEART RATE HILL Workout Profile
135 BPM
126 BPM
117 BPM
User Example: 80 (40 year old / 144 recommended BPM)percent of theoretical maximum (HR )max
117BPM 117BPM 117BPM
144 BPM
Page 26

HEART RATE INTERVAL
TM
This program also combines the standard HILL workout profile with the concept of Heart Rate Zone Training. The default
target heart rate is calculated as 80% of the theoretical maximum (HRmax), but the user can adjust the target rate during
the workout setup. The workout alternates between a hill, which brings the heart rate up to the target rate of 80% of
HRmax, and a valley which brings the heart rate down to 65% of HRmax. After a standard three-minute warm-up, the
workout progresses toward the first hill and heart rate goal. Once the goal is reached, the hill continues for three minutes,
then the level decreases into a valley. Once the 65% of HRmax goal is reached, the valley continues for three minutes,
after which the next hill begins. The user's fitness level determines the number of hills and valleys encountered within the
duration. At the end of the duration, the workout goes into a cool down phase. If the heart rate goes above the theoretical
maximum for more then 45 seconds, the treadmill automatically goes into pause mode. If the user does not reach a heart
rate goal after five minutes, the MESSAGE CENTER displays a prompt to increase or decrease speed, depending on
whether the workout is in a hill or valley phase. The program does not proceed to a new heart rate goal until the user
reaches the current goal.
Warm-up
65% HRmax
HEART RATE INTERVAL Workout Profile
80% HRmax
Hill
Hill
Valley
Valley
Valley
Hill
65% HRmax
80% HRmax
65% HRmax
80% HRmax
117 BPM 117 BPM 117 BPM
User Example: 80 (40 year old / 144 recommended BPM)percent of theoretical maximum (HR )max
144 BPM144 BPM144 BPM
117 BPM
25
Page 27
EXTREME HEART RATE
TM
This intense, varied workout is designed to help more experienced users to break through fitness improvement plateaus.
The workout alternates between two target heart rates* as quickly as possible. The effect is similar to that of running
sprints. The user must wear a Polar telemetry heart rate chest strap or grip the LifepulseTMsensors throughout the
workout.
Note: It is recommended that users who run at speeds faster than 4.5 mph wear the Polar telemetry heart rate chest strap
and do not use the Lifepulse
TM
sensors.
When setting up the workout, the user enters a target heart rate and selects a walk speed and a jog speed. After a standard three-minute warm-up, the treadmill accelerates to the jog speed, and the incline increases, until the user reaches
the target heart rate goal of 85% of the theoretical maximum
†
(HRmax). That target rate is maintained for a stabilizing period. Then, the incline is reduced to 0%, and the treadmill slows to the walk speed. When the heart rate falls to the 65%
of HRmax goal, it is maintained there for a stabilizing period. The program repeats the alternating of speeds and incline
levels, continuing this pattern throughout the duration.
If the user does not reach a heart rate goal after five minutes, the MESSAGE CENTER displays a prompt to increase or
decrease speed, depending on whether the workout is in a hill or valley phase. The program does not proceed to a new
heart rate goal until the user reaches the current goal.
Cool Down
118 BPM
65% HRmax
118 BPM
65% HRmax
118 BPM
Jog Speed
Walk Speed
Jog Speed
Walk Speed
Jog Speed
Walk Speed
Jog Speed
Walk Speed
Jog Speed
Walk Speed
Jog Speed
Walk Speed
User Example (40 year old / 153 recommended BPM)85 percent of theoretical maximum (HR )max
EXTREME HEART RATE Workout Profile
85% HRmax
Stabilizing Period
Stabilizing Period
Stabilizing Period
Stabilizing Period
Stabilizing Period
Stabilizing Period
153 BPM
85% HRmax
153 BPM
85% HRmax
153 BPM
Warm-up
118 BPM
26
Page 28

FIT TEST
The treadmill Fit Test program is another exclusive feature of this versatile treadmill. The Fit Test workout estimates cardiovascular fitness and can be used to monitor improvements in endurance every four to six weeks. The user must grasp
the hand sensors (if equipped) when prompted, or wear a Polar telemetry heart rate chest strap as the test score calculation is based on a heart rate reading. The workout duration will be five minutes total with a one minute warm-up at 0% incline followed by four additional minutes at a 5% incline. Immediately afterward, the console will take the user's heart rate
reading, calculate a fitness score and display the score in the MESSAGE CENTER.
The Fit Test is considered to be a submax VO
2
(volume of oxygen) test. It gauges how well the heart supplies oxygenated
blood to the exercising muscles and how efficiently those muscles receive oxygen from the blood. Physicians and exercise physiologists generally regard this test as a good measure of aerobic capacity.
To set up the Fit Test:
• Press the FIT TEST button repeatedly until the FIT TEST option appears in the message center. Press ENTER to
select the FIT TEST option.
• The message center will prompt for a user weight (ENTER WEIGHT). Use the NUMERIC KEYS or UP/DOWN
ARROW KEYS to input your weight. Press ENTER to accept the weight.
• The message center will next prompt for a user age (ENTER AGE). Use the NUMERIC KEYS or UP/DOWN
ARROW KEYS to input your age. Press ENTER to accept the age.
• The message center will next prompt for a user gender (SELECT GENDER). Using the UP/DOWN ARROW
KEYS, select a gender. Press ENTER to accept the gender selection.
• The message center will next prompt for a workout level (ENTER SPEED)(2-4.5 mph). Consult the following recommended fit test level chart for an appropriate effort level based on your age, gender and activity level. Use the
NUMERIC KEYS or UP/DOWN SPEED ARROW KEYS to enter the corresponding level.
After the five-minute FIT TEST is completed, a FIT TEST score and rating will be displayed.
FIT TEST PROGRAM SUGGESTED EXERTION LEVELS
Inactive Active Very Active
Treadmill Fit Test Level 2-3 mph 3-4 mph 3.5-4.5 mph
3.2-4.8 kph 4.8-6.4 kph 5.6-7.2 kph
Note: Treadmill will incline to 5% after a one minute warm-up.
Suggested exertion levels should be used as a guideline for setting up the Fit Test program. The goal is to elevate the
user's heart rate to a level that is between 60%-85% of their theoretical maximum heart rate.
Within each suggested range, these additional guidelines can be used:
Lower Half of Range Upper Half of Range
higher age lower age
lower weight higher weight*
shorter taller
* In cases of excessive weight, use lower half of range
The computer will not accept:
• heart rates less than 52 or greater than 200 beats per minute
• body weights less than 75 pounds (34 kg) or greater than 400 pounds (181 kg)
• ages below 10 or over 99 years
• data input that exceeds human potential
27
Page 29

If you make an error when entering any Fit Test data, you can correct it by pressing CLEAR, inputting the correct information, and pressing ENTER.
It is important for you to take the Fit Test under similar circumstances each time. Your heart rate is dependent on many
factors, including:
• amount of sleep the previous night (at least seven hours is recommended)
• time of day
• time you last ate (two to four hours after the last meal is recommended)
• time since you last drank a liquid containing caffeine or alcohol, or smoked a cigarette (at least four hours is recommended)
• time since you last exercised (at least six hours is recommended)
For the most accurate Fit Test results, you should perform the Fit Test on three consecutive days and average the three
scores.
Note: To receive a proper Fit Test score, the work done must be within a training heart rate zone that is 60% to 85%t of
the theoretical maximum heart rate (HRmax).
The tables below list fit test results.
Life Fitness developed this rating scale based on VO
2
max percentile distributions referenced in American College of Sports Medicine's
"Guidelines for Exercise Testing and Prescription" (8th Ed. 2010). It is designed to provide a qualitative description of a user's VO
2
max
estimation, and a means of assessing initial fitness level and tracking improvement.
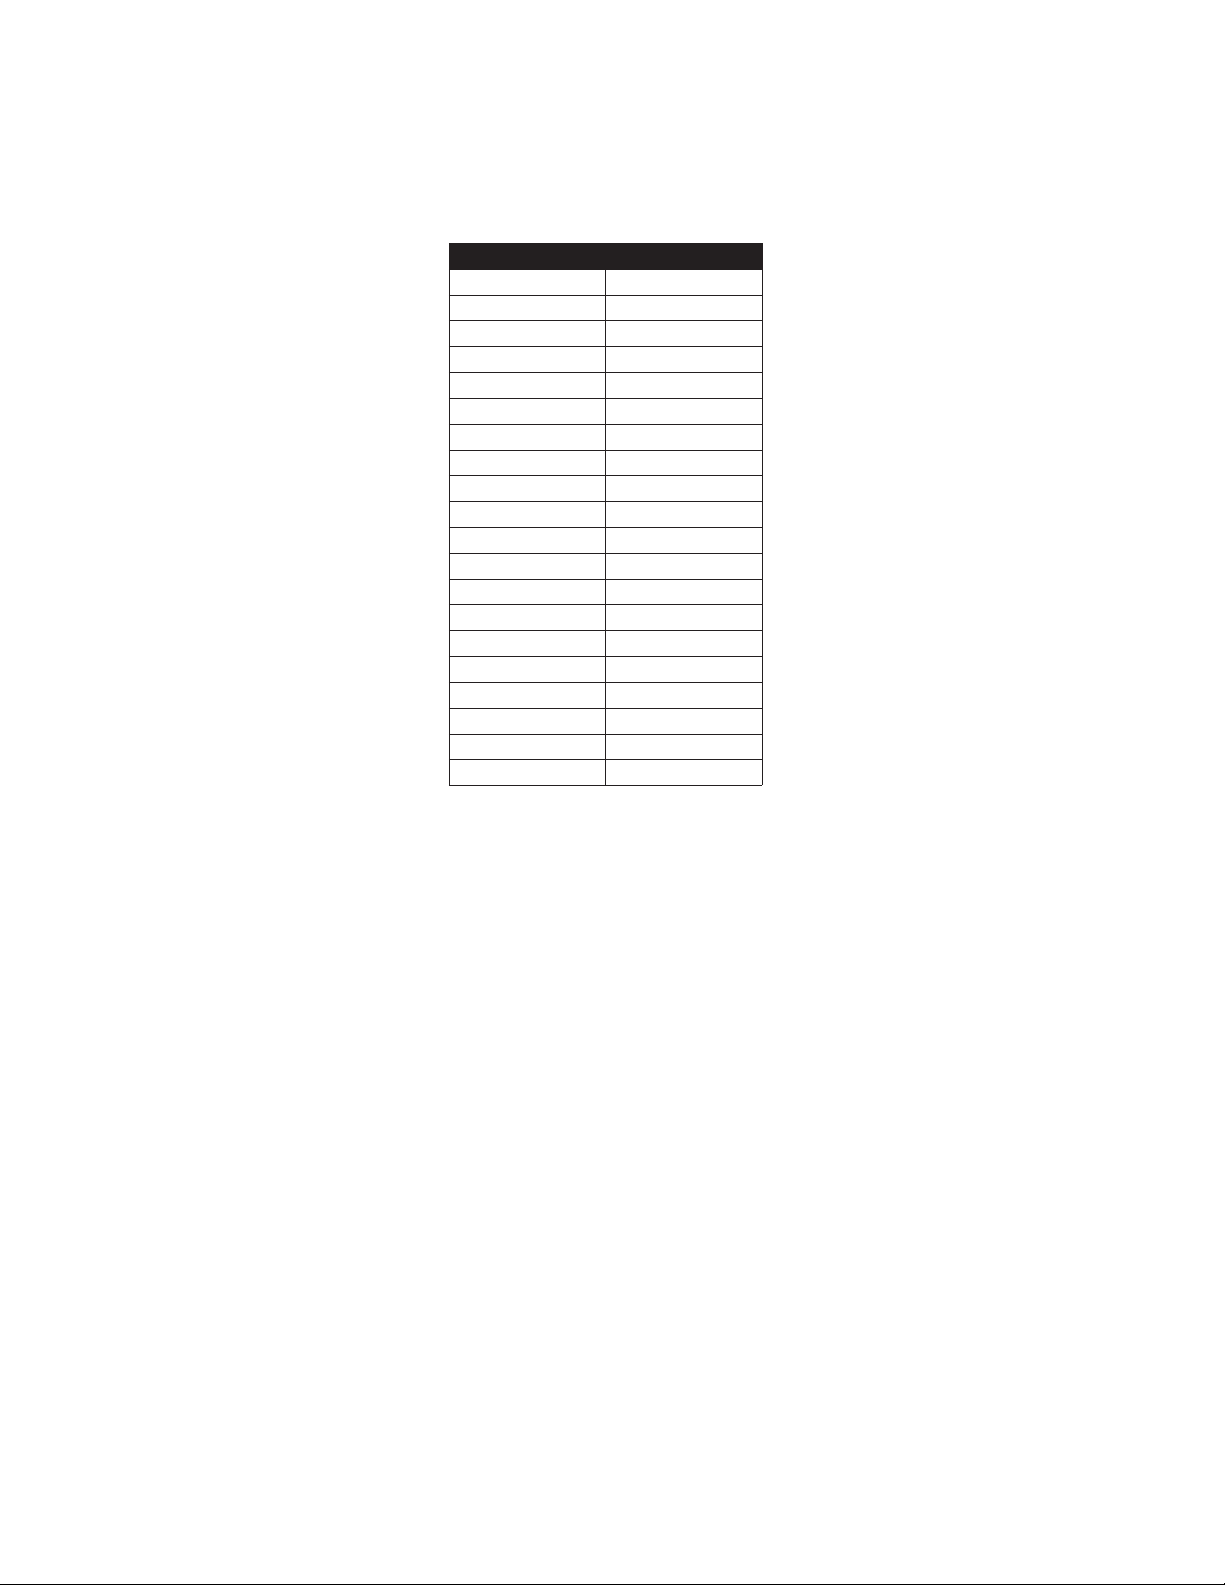
RELATIVE FITNESS CLASSIFICATION FOR WOMEN
Estimated VO2Max (ml/kg/min) Per Age Category
Rating 20-29 30-39 40-49 50-59 60+
Elite 47+ 44+ 42+ 37+ 35+
Excellent 45-46 42-43 40-41 35-36 33-34
Very Good 43-44 40-41 38-39 33-34 31-32
Above Average 38-42 36-39 34-37 30-32 27-30
Average 33-37 31-35 30-33 26-29 24-26
Below Average 31-32 29-30 28-29 24-25 22-23
Low 28-30 27-28 25-27 22-23 20-21
Very Low <28 <27 <25 <22 <20
RELATIVE FITNESS CLASSIFICATION FOR MEN
Estimated VO2Max (ml/kg/min) Per Age Category
Rating 20-29 30-39 40-49 50-59 60+
Elite 55+ 52+ 51+ 47+ 43+
Excellent 53-54 50-51 49-50 45-46 41-42
Very Good 50-52 48-49 46-48 43-44 39-40
Above Average 45-49 43-47 42-45 39-42 35-38
Average 40-44 38-42 37-41 34-38 31-34
Below Average 38-39 36-37 34-36 32-33 29-30
Low 35-37 34-35 32-33 29-31 26-28
Very Low <35 <34 <32 <29 <26
28
Page 30

FITNESS TESTS
The Life Fitness Treadmill features fitness tests based upon specific predefined protocols.
• ARMY PFT: 2.0 miles
The U.S. Army Physical Fitness Test is a physical performance test used to assess muscular endurance and cardiorespiratory fitness.
• NAVY PRT: 1.5 miles
The running portion of the U.S. Navy Physical Readiness Test is a distance goal test based on the time needed to
complete the required distance and is used by the U.S. Navy and Naval academies to measure aerobic capacity.
• MARINES PFT: 3.0 miles
The U.S. Marines Physical Fitness Test is a physical performance test used to assess muscular endurance and
cardiorespiratory fitness.
• AIR FORCE PRT: 1.5 miles
The U.S. Air Force Physical Readiness Test is a physical performance test used to assess muscular endurance
and cardiorespiratory fitness.
• WFI Submax Protocol: Submaximal VO
2
The WFI Submax Protocol is a graded submax assessment used to predict a fire fighter’s aerobic capacity. This
test automatically increases speed and incline until a target heart rate is reached. This assessment replaces the
Gerkin assessment.
• PHYSICAL EFFICIENCY BATTERY: 1.5 miles
The Physical Efficiency Battery is used by U.S. Federal Law Enforcement, U.S. Federal Bureau of Investigation,
and other federal organizations for the hiring and maintenance of federal jobs.
Scores for these tests are based on finishing time, age, and gender.
To set up one of these tests, press the FIT TEST key repeatedly until the MESSAGE CENTER displays the name of the
desired test, then press ENTER. If the selected test is either the NAVY or MARINES test, the MESSAGE CENTER dis-
plays a question as to whether or not the test is taking place below a certain altitude. For the NAVY test, the altitude is
5,000 feet above sea level; and for the MARINES test, the altitude is 4,500 feet above sea level. Press 1 for YES and 2
for NO then press Enter.
At the MESSAGE CENTER prompts, enter the weight, age, gender, and desired speed, using the ARROW keys or the
NUMERIC keypad. Press ENTER after each entry. Then, begin the workout. To ensure an accurate test score, do not
change these entries once the workout begins.
For all FITNESS TESTS except WFI SUBMAX PROTOCOL, after the distance goal is reached, the workout program
goes into a cool down. The duration of this phase depends on the amount of time taken to complete the test. For less than
five minutes, the cool down is one minute. For five to fifteen minutes, the cool down is three minutes. For longer times, the
cool down is five minutes. The user can abort the cool down by pressing the STOP button or the CLEAR key. After the
cool down is aborted or completed, the MESSAGE CENTER displays the finishing time and a point score for the PEB,
Army, and Marines tests; or a qualitative score, such as EXCELLENT, for the Navy test.
For the WFI SUBMAX PROTOCOL, once the target heart rate has been exceeded for fifteen seconds, the program goes
into a cool down. The cool down last for three minutes at 3 mph at a 0% grade. The workout summary includes the
following information:
• The test time is displayed in the TIME window.
• The VO
2
max test score is displayed in the SPEED window.
• The recovery heart rate is displayed in the HEART RATE window.
29
Page 31
4.4 MAXIMIZING WORKOUTS ON A LIFE FITNESS TREADMILL
SELECTING A LEVEL
The steps for setting up a HILL, RANDOM, SPORT TRAINING 5K, and SPORT TRAINING 10K workout include selecting a level. The word “level” refers to a range of incline percentages. The treadmill features 20 levels, with Level 1 having
the lowest average incline grade and Level 20 having the highest.
Within each level are seven incline percentages, or hills. During a workout, each hill appears in the WORKOUT PROFILE
window as rows of light stacked in a column. The number of lit rows within a column corresponds to an incline percentage.
For example, in Level 5 the lowest incline is 0.0% and is represented as one lit row. The highest incline, 4.3%, is represented by a column with all seven rows lit.
In the HILL and RANDOM workouts, these varying hills occur for equal durations, as discussed in the HILL workout description. When the workout program brings up a new hill, the incline percentage changes automatically to match that hill.
To change levels during a workout, use the ARROW keys or the NUMERIC keypad.
USING INSTAPACETMFEEDBACK
The InstaPaceTMFeedback feature enables users to monitor their pace, or rate of minutes per mile, while running on the
treadmill. This feature must be enabled in the Manager’s Configuration. See Section 5, titled for more information. The
MESSAGE CENTER displays the MPH and pace simultaneously when the user adjusts the treadmill speed with the
ARROW KEYS. If the user adjusts the speed using the NUMERIC keypad, the MESSAGE CENTER displays the pace
after the treadmill reaches the new speed.
USING ZEROUTTMSPEED CONTROL
If during a workout, a user decreases the speed to the minimum and continues to hold the DECREASE SPEED ARROW,
the speed falls to 0 mph which is pause mode. The minimum speed is 0.5 mph, unless changed in the Manager’s Configuration. See Section 5 for more information.
30
Level % Incline
1 0.0 - 1.5
2 0.0 - 2.2
3 0.0 - 2.9
4 0.0 - 3.6
5 0.0 - 4.3
6 0.0 - 5.0
7 0.0 - 5.7
8 0.0 - 6.4
9 0.5 - 7.1
10 1.5 - 7.8
11 2.0 - 8.5
12 3.0 - 9.2
13 3.5 - 9.9
14 5.0 - 10.6
15 5.5 - 11.3
16 6.5 - 12.0
17 7.0 - 12.7
18 8.0 - 13.4
19
8.7 - 14.1
20 9.0 - 15.0
Page 32

COOL DOWN
Life Fitness' unique Cool Down Protocol automatically customizes every cool down based on each user's workout
performance. Workout performance factors such as speed, incline, duration and heart rate determine the duration
and intensity of the cool down.
DIMMING
The dimming feature controls the brightness of the treadmill console display. To change the default brightness setting,
press the PERSONAL TRAINER button repeatedly until the MESSAGE CENTER displays “DIMMING,” and press
ENTER. Then use the ARROW keys to increase or decrease the brightness to the desired setting, and press ENTER to
save the new setting, or press CLEAR to revert to the default brightness setting.
If a new brightness setting is selected for a workout, that setting remains in place until it is manually changed, or the
workout concludes. When a new workout begins the brightness reverts to the default setting.
31
Page 33

5 USER MENU (OPTIONAL SETTINGS)
5.1 ENTERING AND USING THE SERVICE MENU
Managers and other authorized personnel can use the Service Menu to access diagnostics, information, maintenance,
and configuration submenus. Enter this menu system by pressing and holding down the PAUSE key and pressing the
CLEAR key twice. Continue to hold down the PAUSE key until the MESSAGE CENTER displays the words SERVICE
MENU. Release the PAUSE key and press the QUICK START key. The MESSAGE CENTER then displays MANAGER
CONFIG. Use the UP and DOWN arrow keys to navigate through the two Configuration Submenus:
• Manager’s Configuration. See the following page for a list of Manager’s Configuration (Optional Settings).
• Manufacturer’s Configuration.
Note: The ENTER key cannot be used to select the Manufacturer’s Configuration submenu which contains settings that
cannot be changed by the customer.
SERVICE MENU OVERVIEW
DIAGNOSTICS (SYSTEM TEST)
The Diagnostics submenu allows technicians to run systems diagnostics. Use the UP and DOWN arrow keys to navigate
through the list of diagnostic utilities. Use the ENTER key to select the current navigated utility. Press the CLEAR key to
exit the current diagnostic utility. Press the CLEAR key repeatedly to exit the Diagnostics Menu.
Note: These tests should only be used by (or with the express instruction of) a trained Life Fitness service technician.
INFORMATION
The Information submenu allows authorized personnel to view system statistics and other details. Use the UP and DOWN
arrow keys to navigate through the list of diagnostic utilities and / or display information. Use the ENTER key to select the
current navigated utility. Press the CLEAR key to exit the current diagnostic utility. Press the CLEAR key repeatedly to exit
the Information Menu.
System Statistics Software Version
Main Motor Information Lift Motor Information
System Errors Maintenance Information
Belt / Deck Information
MAINTENANCE
The Maintenance submenus allow authorized personnel to log maintenance events.
CONFIGURATION
Use the UP and DOWN arrow keys to navigate through the two Configuration Submenus: Manager’s Configuration and
Manufacturers Configuration. See the next page for a list of Manager’s Configurations (Optional Settings).
32
Page 34

5.2 MANAGER’S CONFIGURATION (OPTIONAL SETTINGS)
33
Setting Default Value Description
Language English
This option allow for the setting of a new default
language for user and service messages.
Maximum Workout Duration 60 Minutes
This feature allows the setting of maximum workout
duration limits.
English / Metric Units
English
(International: Metric)
This option sets the measurement unit type for weight,
distance, and speed.
Custom Workout Entry None Defined
This feature allows for creation or modification of six
custom personal trainer workouts.
Telemetry On
Switching on the telemetry feature makes it possible to
use the Polar®-compatible Heart Rate Zone Training
exercise Polar telemetry heart rate chest strap for
monitoring the heart rate.
Maximum Speed
14.0 mph
(International: 23 kph)
This option allows for setting the fastest speed at which
the treadmill can operate.
Minimum Speed
0.5 mph
(International: 0.8 kph)
This option allows for setting the slowest speed at which
the treadmill can operate.
Pause Timeout 1 Minute
This sets the maximum time during which a workout can
remain in pause mode.
WATTS Display Off (International: On)
If this option is enabled, the MESSAGE CENTER
displays the Watts equivalent of the step rate.
METS Display Off
If this option is enabled, the MESSAGE CENTER
displays the METs equivalent of the step rate.
Pace Display On
If this option is enabled, the rate of minutes per mile is
displayed.
Calorie Per Hour (CPH)
Display
On (International: Off)
If this option is enabled, the MESSAGE CENTER
displays the number of calories burned per hour during
the workout.
Distance Climbed Off
If this option is enabled, the total distance climbed,
based on the incline and speed of the treadmill, is
displayed.
Acceleration Rate 3
This sets the rate at which the treadmill accelerates to
the selected speed, ranging from one (slowest) to five
(fastest).
Deceleration Rate 3
This sets the rate at which the treadmill decelerates to
the selected speed, ranging from one (slowest) to
five (fastest).
Page 35

34
MANAGER’S CONFIGURATION (OPTIONAL SETTINGS) (CONTINUED)
Setting Default Value Description
Erase Custom Workouts Not Applicable
If this option is selected, all six custom workout programs
will be erased.
Maximum Incline 15.0
This option changes the maximum incline grade to a
value lower than 15%.
Start Message Setup NO MESSAGE
This option allows managers to create and change the
Start Message.
Quick Start via Numeric Keys Allowed
Use this option to disable or enable QUICK START workouts via the Numeric Keys. See Using Quick Start Dis-
able.
Fit Test Plus On (International: Off)
This option enables / disables the additional Fit Tests.
These include: Army PFT; Navy PRT; Marines PFT; WFI
Submax Protocol, and PEB.
System Beeps On
This option controls whether the system speaker beep is
generated on key presses.
Language Select Off
If this option is enabled, users can set the User
Language. Choices include: English, German, French,
Spanish, Italian, Dutch, and Russian.
Marathon Mode Off
This option allows the user to workout indefinitely.
Belt Wear
Notification Indicator
Off
If enabled, this option will alert a manager if a belt
notification exists.
iPod Video Enable
This feature allows control over allowing iPod video
tracks to be played on the Life Fitness Attachable TV, if
present. If enabled by selecting the On setting, and an
iPod video track is selected, the video shall be routed to
the TV. Otherwise, the video shall not.
AUX Source Off
This setting allows control over whether or not an optional
CSAFE compatible audio device attached to the CSAFE
connector shall be selectable as an audio source with the
Source Select key.
TV GAIN 2
This setting allows control over the console earphone
volume range for the Life Fitness Attachable TV Source.
The range of settings are from 0 (Low) to 7 (High).
Page 36

35
PROGRAMMING CUSTOM WORKOUTS
After entering the Manager’s Configuration (Optional Settings), use the TIME arrow keys to scroll through the list of configuration options, or allow the MESSAGE CENTER to scroll automatically through the options. When “CUSTOM WORKOUT ENTRY” appears, press ENTER to select this option.
The custom workouts are identified as numbers 1 through 6. Enter the desired number on the NUMERIC KEYPAD or use
the arrow keys to scroll through the displayed numbers. Press ENTER to confirm the number selection. If a workout does
not already exist for that number, the MESSAGE CENTER displays a request to begin creating the workout.
If a workout does exist for the number in question, the MESSAGE CENTER displays a statement to that effect, followed by
the option to modify the existing workout. The steps for modifying a workout are the same as those for creating a new workout:
Using the TIME arrow keys or the NUMERIC keypad, select a workout duration time in minutes and press
ENTER. The duration cannot exceed the MAX DURATION set in the Manager's Configuration.
Next, select the interval type. Use the arrow keys to toggle between the displayed options, and press the ENTER
key to select the desired interval type. Options are:
• Speed/Incline, in which a treadmill speed and/or incline grade is selected for each interval.
• Target Heart Rate, in which a maximum target heart rate is selected for each interval.
The number of intervals is always 30, so the length of each interval equals the selected duration divided by 30. Each
interval is identified by the time at which it occurs during the workout.
If Speed/Incline is selected, the MESSAGE CENTER displays each interval, identified as the time at which the interval
occurs. For each displayed interval, enter a speed using the SPEED arrow keys, and/or enter an incline grade using the
INCLINE arrow keys. Press ENTER to confirm each selection. After values are selected for all 30 intervals, the MESSAGE
CENTER displays the statement “CUSTOM WORKOUT COMPLETED” followed by a prompt to create a workout for the
next number.
If Target Heart Rate is selected, the MESSAGE CENTER displays each interval identified as a numeral from 1 to 30. For
each displayed interval, enter a target heart rate using the arrow keys. Press ENTER to confirm each selection. After values are selected for all 30 intervals, the MESSAGE CENTER displays the statement “CUSTOM WORKOUT
COMPLETED” followed by a prompt to create a workout for the next number.
USING QUICK START DISABLE
This configuration has two possible values which are selected using the incline arrow keys.
The values are as follows:
• Quick Start with numeric keys “allowed”
• Quick Start with numeric keys “not allowed”
The default value is “allowed”. This means that a user can start a QUICK START workout by simply entering a desired
workout speed using the numeric keys only. If the configuration is set to “not allowed”, a user cannot use the numeric keys
to start a QUICK START workout. A QUICK START workout can always be started by pressing the QUICK START key.
USING THE START MESSAGE SETUP
This configuration allows for a custom start-up message to be displayed before the default “Select Workout or Press
Quick Start” message. The custom message can contain up to 52 characters.
CREATING / CHANGING A START MESSAGE
After entering the Manager’s Configuration (Optional Settings), scroll to the START MESSAGE SETUP option and press
ENTER. Use the SPEED arrow keys to select an available letter, number or special character. Use the INCLINE arrow
keys to move forward or backward throughout the message, or insert spaces one character at a time. The current character will blink until the position is moved with the INCLINE arrow keys.
Page 37

SAVING A START MESSAGE
To save the START MESSAGE, press ENTER. “MESSAGE SAVED” will appear in the message center confirming the
message has been saved. To exit the start message setup without saving, press the clear key twice. “MESSAGE NOT
SAVED” will appear in the MESSAGE CENTER confirming the message has not been saved.
ERASING A START MESSAGE
After entering the Manager’s Configuration (Optional Settings), scroll to the START MESSAGE SETUP option and press
ENTER. Press ENTER to enter the current START MESSAGE. Press the COOL DOWN key to erase the current START
MESSAGE. “MESSAGE ERASED” will appear in the MESSAGE CENTER stating the message has been erased.
MARATHON MODE
Marathon Mode has no preset or settable goal. It allows the user to workout indefinitely. A workout in Marathon Mode
ends only if the user chooses to end it or a stop system is activated.
To enable the Marathon Mode, enter the Manager's Configuration (Optional Settings). Using the TIME UP / DOWN
arrow keys, scroll to MARATHON MODE. Once MARATHON MODE appears in the Message Center, press any of the
INCLINE or SPEED UP/DOWN arrow KEYS to toggle the mode from OFF to ON.
While setting up a workout, enter a time value greater than the upper limit displayed on the console. Once the upper time
limit is exceeded, the message center will display MARATHON MODE.
Within a workout, Marathon Mode can be immediately ended by pressing the TIME Key. Pressing the TIME Key makes it
possible to set a time goal as long as it's not less than the time already spent in the workout.
USER LANGUAGE SELECT
If enabled, this option allows users to select the language by which to interact with the unit during a workout.
To enable the User Language Select option, enter the Manager’s Configuration (Optional Settings). Using the TIME
UP / DOWN arrow keys, scroll to LANGUAGE SEL. Once LANGUAGE SEL appears in the Message Center, press any of
the INCLINE or SPEED UP/DOWN arrow keys to toggle the mode from OFF to ON.
The console will display the message “SELECT LANGUAGE USING ARROW KEYS”. The user can select from a list of
available languages (English, German, French, Spanish, Italian, Dutch, and Russian) using any of the arrow keys. Press
enter when the desired language appears to select that language. A workout can now be started using the selected
language. Selecting a language is not necessary to begin a workout. Simply press the QUICK START key to start a work-
out or any of the program keys to begin workout programming using the default language.
36
Page 38

6 SERVICE AND TECHNICAL DATA
6.1 PREVENTIVE MAINTENANCE TIPS
The Life Fitness Treadmill is backed by the engineering excellence and reliability of Life Fitness and is one of the most
rugged and trouble-free pieces of exercise equipment on the market today. Consumer Life Fitness Treadmills are among
the most popular of aerobic trainers in health clubs, colleges and military facilities the world over.
Note: Safety of the equipment can be maintained only if the equipment is examined regularly for damage or wear. Keep
the equipment out of use until defective parts are repaired or replaced. Pay special attention to parts that are subject to
wear, as outlined below.
REMARQUE : pour conserver un matériel sûr, il convient de l'inspecter régulièrement afin de déceler tout signe d'usure
ou d'endommagement. N'utilisez pas l'appareil tant que les pièces défectueuses n'ont pas été réparées ou remplacées.
Portez une attention toute particulière aux pièces qui s'usent, comme indiqué ci-dessous.
The following preventive maintenance tips will keep the Life Fitness Treadmill operating at peak performance:
• Clean the display console and all exterior surfaces with an approved or compatible cleaner (see Life Fitness
Approved Cleaners) and a soft cotton cloth.
DO NOT use ammonia or acid based cleaners. DO NOT use abrasive cleaners. DO NOT use paper towels, DO
NOT apply cleaners directly to equipment surfaces.*
• Check operation of the emergency stop system once a week.
• Check the operation of the stop button once a week.
• Inspect and vacuum the area directly surrounding and under the unit regularly.
• Vacuum around the striding belt regularly to keep debris from accumulating.
• Inspect exterior parts regularly for wear, particularly the striding belt, deck and line cord.
• Check to make sure the unit is properly leveled.
• Check the position (centering) of the striding belt.
The optimum operating position of the striding belt is from 1.5 inches (38 mm) to 2.0 inches (51 mm) from either side of
the frame. If the striding belt travels beyond this position, see section 6.5 titled How to Adjust and Tension the Striding
Belt, or contact Life Fitness Customer Support Services for proper alignment instructions at1-800-351-3737 (USA).
*Note: When cleaning the exterior of the unit, a non-abrasive cleaner and soft cotton cloth are strongly recommended. At no
time should cleaner be applied directly to any part of the equipment; use non-abrasive cleaner on a soft cloth and then wipe the
unit. Contact Life Fitness Customer Support Services for more details (refer to page one).
LIFE FITNESS APPROVED CLEANERS
Two preferred cleaners have been approved by Life Fitness reliability experts: PureGreen 24 and Gym Wipes. Both cleaners will safely and effectively remove dirt, grime and sweat from equipment. PureGreen 24 and the Antibacterial Force formula of Gym Wipes are both disinfectants that are effective against MRSA and H1N1.
PureGreen 24 is available in a spray which is convenient for gym staff to use. Apply the spray to a microfiber cloth and
wipe down the equipment. Use PureGreen 24 on the equipment for at least 2 minutes for general disinfection purposes
and at least 10 minutes for fungus and viral control.
Gym Wipes are large, durable pre-moistened wipes to use on the equipment before and after workouts. Use Gym Wipes
on the equipment for at least 2 minutes for general disinfection purposes.
Contact Customer Support Services to order these cleaners (1-800-351-3737 or email: customersupport@lifefitness.com).
LIFE FITNESS COMPATIBLE CLEANERS
Mild soap and water or a mild non-abrasive household cleaner can also be used to clean the display and all exterior surfaces. Use a soft cotton cloth only. Apply the cleaner to the cotton cloth before cleaning. DO NOT use ammonia or acid
based cleaners. DO NOT use abrasive cleaners. DO NOT use paper towels. DO NOT apply cleaners directly to the
equipment surfaces.
37
Page 39

6.2 PREVENTIVE MAINTENANCE SCHEDULE
ITEM WEEKLY MONTHLY QUARTERLY BI-ANNUAL ANNUAL
DISPLAY CONSOLE ASSEMBLY
Hardware Inspect
Console Overlay and
Activity Zone
Clean Inspect
iPod
Connector/Cable
Clean / Inspect
USB port Inspect
Accessory Cups Clean Inspect
Stop Switch Clean Inspect
Emergency
Switch/Magnet
Clean Inspect
HANDLEBAR ASSEMBLY
Hardware Inspect
ErgoTMFront
Handlebar
Clean Inspect
Side Hand Rails Clean Inspect
Lifepulse Sensors Clean / Inspect
FRAME ASSEMBLY
Hardware Inspect
Motor Cover Clean Vacuum / Clean
Motor Electronic
Compartment
Inspect
Drive Belt Inspect
Drive Belt Anti-Static
Bracket
Inspect
Leg Levelers Inspect / Adjust
Front Roller Inspect
Rear Roller Inspect
Side Step Area Clean Inspect
GENERAL
Machine Level *Inspect
Striding Belt
Centered
Inspect
Frame, Toe Guards,
Endcaps
Visual / Inspect
* Use bubble level to inspect.
38
Page 40

6.3 TROUBLESHOOTING THE TREADMILL
Malfunction Probable Cause Corrective Action
No power.
ON/OFF switch is not in proper
position.
Turn the switch to the ON position.
Power source is insufficient.
Plug treadmill into a 15 amp circuit.
Refer to the Operations
Manual.
Using a voltmeter, verify power at
outlet. If no power exists, reset
circuit breaker at panel.
Line cord is damaged.
Replace line cord. Contact Life
Fitness Customer Support
Services.
Line cord is improperly seated in
socket.
Inspect power connection at wall
outlet and at machine for proper
contact.
39
Page 41

TROUBLESHOOTING THE TREADMILL (CONTINUED)
Malfunction Probable Cause Corrective Action
Striding belt slips off-center. Floor surface is uneven.
Check levelers and level treadmill.
Check striding belt & re-tension as
necessary. Refer to How to Adjust and
Tension the Striding Belt.
Maximum speed is reduced.
User is pushing striding belt. This occurs when the runner is running faster
than the striding belt will travel, with
the result of the striding belt being
pushed with the runner’s feet.
Instruct users not to push striding belt
in either direction.
User is stalling striding belt.This will
occur with heavier users at lower striding belt speeds. The striding belt will
“stall” if the user is traveling slower
than the striding belt speed.
Striding belt/deck malfunctions. The
deck laminate is worn through or the
underside of striding belt is glazed
over (hard, glossy).
Replace belt and deck.
Power source is insufficient. Plug treadmill into a 15 amp. circuit.
Rubbing sound comes from
underneath machine.
Foreign objects may be stuck underneath the machine.
Inspect underneath striding belt and
machine. Remove any debris or
objects that may cause interference
with the treadmill.
Display does not illuminate when
machine is powered on.
Loose 10 pin connection at display
console or DSP motor control board.
Check all electrical connections for
proper attachment. Contact Life
Fitness Customer Support Services.
40
Page 42

TROUBLESHOOTING THE TREADMILL (CONTINUED)
Malfunction Probable Cause Corrective Action
Unit resets randomly or
pauses.
Power source is insufficient.
Plug treadmill into a 15 amp
circuit.
Damaged ground prong is on
line cord.
Replace line cord.
Line cord improperly seated
in electrical outlet.
Inspect power connection at
electrical outlet and at machine for proper contact.
Emergency stop magnet is
not engaged.
Re-engage the emergency
stop magnet.
Towel or other item may be
making contact with stop
switch while user is running.
Move all possible obstructions off display console and
handlebar.
Stop switch is activated with
very light pressure or returns
slowly after being pressed.
Contact Life Fitness
Customer Support Services.
Stop switch cable is not making proper contact.
Contact Life Fitness
Customer Support Services.
Main wire harness is pinched.
Contact Life Fitness
Customer Support Services.
Ground path is open.
Contact Life Fitness
Customer Support Services.
41
Page 43

6.4 TROUBLESHOOTING THE OPTIONAL POLAR TELEMETRY HEART RATE CHEST STRAP
HEART RATE READING IS ERRATIC OR ABSENT ENTIRELY
Malfunction Probable Cause Corrective Action
Heart rate reading is erratic or
absent entirely.
Belt transmitter electrodes are not
wet enough to pick up accurate
heart rate readings.
Wet the belt transmitter
electrodes (see Section 3.2).
Belt transmitter electrodes are not
laying flat against the skin.
Ensure the belt transmitter
electrodes are laying flat against
the skin (see Section 3.2).
Belt transmitter needs cleaning.
Wash the belt transmitter with
mild soap and water.
Belt transmitter is not within 3.25
feet (1 meter) of the heart rate
receiver.
Make sure the Polar telemetry
heart rate chest strap transmitter
is within 3 feet (1 meter) of the
heart rate receiver.
Polar telemetry heart rate chest
strap battery is depleted.
Contact Life Fitness Customer
Support Services for instructions
on how to have the Polar
telemetry heart rate chest strap
replaced.
Polar telemetry heart rate chest
strap did not lock in with the heart
rate receiver.
Make sure the Polar telemetry
heart rate chest strap is installed
and move closer to the heart
rate receiver. Wait up to 10
seconds for the heart rate to
display on the console.
Notes:
1. Ensure proper adherence of
the Polar telemetry heart rate
chest strap to user’s chest.
2. Ensure proper conductivity
between the electrodes and
user’s chest.
3. If needed, use the Polar
watch to verify the Polar
telemetry heart rate chest
strap’s operation.
42
Page 44

6.4 TROUBLESHOOTING THE OPTIONAL POLAR TELEMETRY HEART RATE CHEST STRAP
HEART RATE READING IS ERRATIC OR ABSENT ENTIRELY (CONTINUED)
Malfunction Probable Cause Corrective Action
Heart rate reading is initially
detected and functioning
normally but then is lost.
Use of personal electronic
devices, such as cell phones
and portable MP3 players,
causes external noise interference.
Remove the source of noise or
reposition the exercise
equipment.
Equipment is in close proximity
to other sources of noise such
as audio/ video equipment, fans,
two way radios, and high voltage/high current power lines.
Heart rate readings are
abnormally elevated.
Television sets and/or antennas
generate electromagnetic
interference.
Move the treadmill a few inches
away from the probable cause,
or move the probable cause a
few inches away from the treadmill, until the heart rate readings
are accurate.
Cell phones generate
electromagnetic interference.
Computers generate electromagnetic interference.
Cars generate electromagnetic
interference.
High voltage power lines
generate electromagnetic
interference.
Motor driven exercise equipment generates electromagnetic
interference.
Another heart rate transmitter
within 3 feet (1 meter)
generates electromagnetic
interference.
43
Page 45

6.5 TROUBLESHOOTING THE IPOD
®
Malfunction Probable Cause Corrective Action
Cannot control iPod using
controls keypad controls.
iPod is not fully connected due
to interference with after market iPod protective cases.
Remove after market iPod
protective case and reconnect.
Cannot hear iPod.
iPod paused.
Use iPod keypad controls on
console to play a selection.
Source selected is not currently set to iPod.
Press Source Select key until
iPod is displayed.
Mute key is pressed.
Press Mute key to unmute
iPod source.
Cannot control iPod volume
using console keypad controls.
Headphones are plugged into
iPod instead of console headphone jack.
Plug headphones into console
headphone jack.
Volume control on iPod is
being used with headphones
plugged into console jack.
Use console iPod keypad
volume controls.
Console displays a message
that tells me to update my iPod
firmware.
The iPod is not compatible due
to its outdated firmware.
Visit www.apple.com for
instructions on how to update
your iPod device firmware.
Console displays a message
that tells me “IPOD COMMUNICATION TIMEOUT”.
Use of an older third generation
(3G) iPod is not supported.
Use newer iPod model.
iPod battery charge is
extremely low.
Charge iPod to a minimum
level before using.
44
Page 46

TROUBLESHOOTING THE IPOD (CONTINUED)
Malfunction Probable Cause Corrective Action
Cannot navigate iPod menus.
Use of console keypad controls
to navigate iPod menus.
Use iPod controls to navigate
menus and select playlists. Use
console keypad controls to
Play/Pause and to change
volume and tracks.
Cannot control iPod volume
using iPod slider ring.
Use of iPod slider ring controls
to adjust iPod volume when
headphones are plugged into
the console jack.
Use console volume arrow keys
to control volume.
No controls to change playlist
on console.
Use of console keypad controls
to change playlist on iPod.
Select playlist on iPod using
iPod controls.
45
Page 47

6.6 HOW TO ADJUST AND TENSION THE STRIDING BELT
Do not move the treadmill or place hands under the treadmill while it is plugged into an electrical outlet!
THE BELT TENSIONING BOLTS
A 5/16-inch hex key wrench is required for this task. The Life Fitness Treadmill has access holes in the rear roller guards
which allow access to the tensioning bolts. These tensioning bolts make it possible to adjust the tracking and centering of
the striding belt (A) without removing the guards.
Note: It is extremely important that the treadmill be correctly leveled prior to any tracking adjustments. An unstable unit
may cause striding belt misalignment. See the topic titled "How To Stabilize the Life Fitness Treadmill" in the Section 1.2,
titled Set Up, prior to attempting any rear roller adjustments.
Before proceeding, it is helpful to visualize the REAR ROLLER (B) pivot point (C). Each adjustment made to one side of
the ROLLER must be met with an equal and opposite adjustment (D) to the other side of the ROLLER to maintain an
ideal belt tension at the pivot point.
TRACKING (CENTERING) A STRIDING BELT
Two people are needed to perform this procedure.
1 Locate the two access holes to the belt tensioning bolts on each of the rear roller guards.
2 One person stands on the side rails of the treadmill and straddles the belt. This person presses the MANUAL workout
and sets the belt speed to 2.5 mph (4.0 kph).
3 If the striding belt has moved to the right, the second person turns the right tension bolt a quarter-turn clockwise and
then turns the left tension bolt a quarter-turn counter-clockwise to make the striding belt track back to the center of
the roller.
If the striding belt has moved to the left, turn the left tension bolt a quarter-turn clockwise and then turn the right tension bolt a quarter-turn counter-clockwise to make the striding belt track back to the center of the roller.
4 Repeat the adjustments until the striding belt appears centered. Allow the machine to continue running for several
minutes at 4.0 mph (6.4 kph) to observe if tracking remains stabilized.
Note: Do not exceed one full turn of the adjusting screws in either direction. If after one full turn the belt does not track
properly, contact Customer Support Services.
46
Page 48

TENSIONING AN EXISTING STRIDING BELT
1. Enter the MANUAL workout and operate the treadmill for five minutes at 5.0 mph (8.0 kph).
Note: DO NOT RUN OR WALK ON BELT.
2. Reduce the speed to 2.0 mph (3.2 kph). Walk on the treadmill. Tightly grip the handrails and apply force with feet on
the striding belt near the motor cover against the moving belt direction. If the belt slips, continue to Step 3. If it does
not slip, the tension is correct.
3. Using the STOP key, stop the treadmill. Turn the belt tensioning bolts a quarter-turn clockwise for each side.
4. Repeat STEPS 2 and 3 until the belt no longer slips. Do not exceed one full turn (four quarter turns) per side when
adjusting the belt tensioning bolts.
5. Enter the MANUAL workout, and operate the treadmill at 2.0 mph (3.2 kph) and check to insure proper tracking. If the
striding belt drifts to the left or right see Tracking (Centering) A Striding Belt on the previous page.
Do not over-tighten the tensioning bolts while making belt adjustments. Over-tightening of bolts may over stretch and
damage the striding belt or roller bearings. Do not exceed one full turn of either bolt in either direction.
6.7 PROACTIVE BELT WEAR NOTIFICATION
The treadmill proactively notifies the facility manager about belt wear through diagnostics. A single indicator is lit on the
treadmill console (if manager-enabled) when a belt check is required. This indicator light is located in the upper left corner
of the workout profile window.
• Automatic belt check reminder at 30,000 miles (48,000 km)
• Notification based on “Unable to Attain Target Speed” errors for specific user weights/speeds.
TO CHECK FOR NOTIFICATIONS:
To enter Belt/Deck Info, press and hold the PAUSE key and press the CLEAR key twice. Continue to hold down the
PAUSE key until the MESSAGE CENTER displays the words “SERVICE MENU”. Use the TIME UP and DOWN
arrow keys to navigate to the INFORMATION Menu. Then access the “Belt / Deck Information” submenu.
Note: Notifications are automatically cleared once they have been displayed.
6.8 HOW TO OBTAIN PRODUCT SERVICE /
SERIAL NUMBER LOCATION
1. Verify the symptom and review the operating instructions.
The problem may be unfamiliarity with the product and its
features and workouts.
2. Locate and write down the serial number of the unit which is
located on the back of the unit near the toe guard as well as
under the left rear endcap.
3. Contact Life Fitness Customer Support Services.
47
Large Serial Label
Remove plastic shroud to nd large serial label location.
Small Serial Label
Page 49
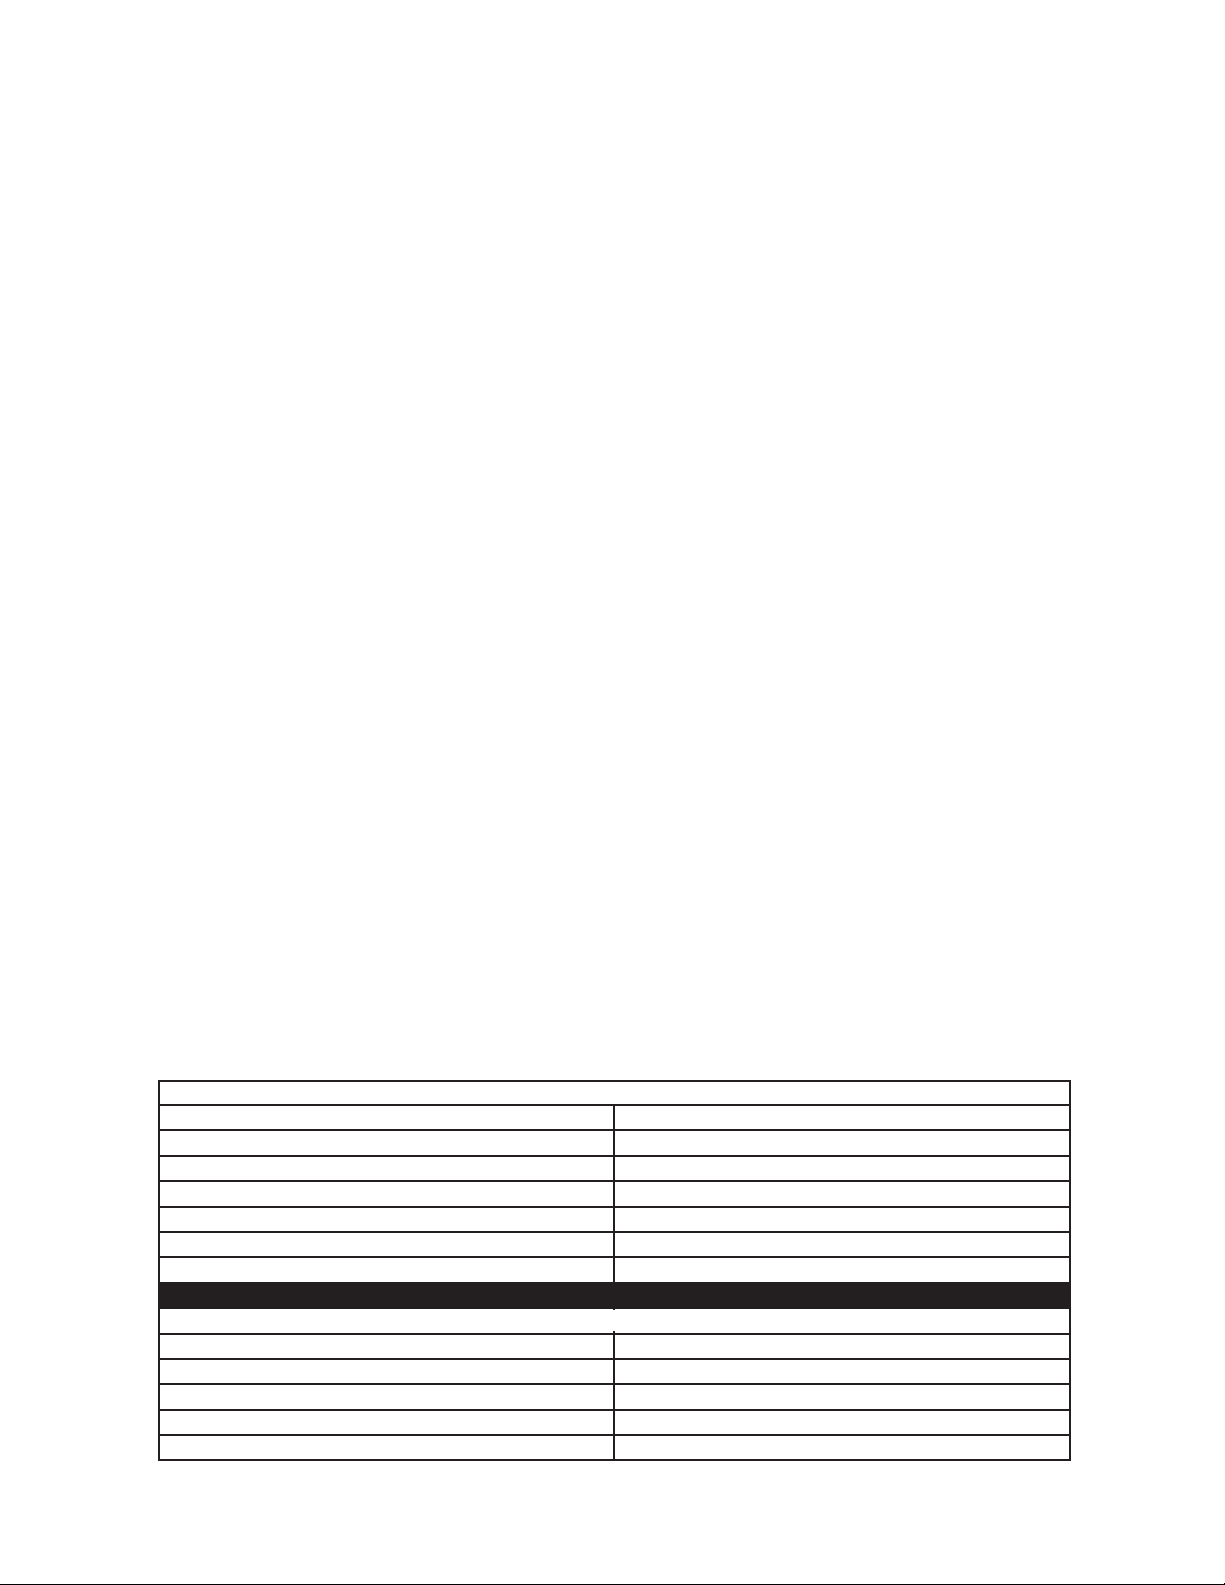
7 SPECIFICATIONS
7.1 LIFE FITNESS CST TREADMILL SPECIFICATIONS
Designed use: Consumer
Maximum user weight: 400 pounds / 181 kilograms
Speed range: 0.3 - 12.0 mph (0.5 - 20 kph) in 0.1 increments
Elevation range: 0%-15% (in 0.1% increments)
Drive train: AC motor with MagnaDrive™ motor controller
Motor type: Variable Speed AC
Motor size: 4.0 HP continuous duty
Power requirements: 120 volt, 15 amp (U.S.). See Electrical Requirements for requirements outside the United States.
Rollers: 3.5 inch / 9 centimeter diameter, precision-crowned, front and back
Striding Belt: 60" Length x 20" Width (152 cm Length x 51 cm Width), pre-lubricated, multi-ply
Deck type: 3/4" medium density reversible fiberboard
Shock Absorption System: Patented FlexDeck
®
Shock Absorption System with Lifesprings
TM
Ergo
TM
Front Handrail: Ergonomically shaped, overmolded elastomeric grips
Side handrails: 26" (66 cm) long, flared, cantilevered, overmolded elastomeric grips
Stop systems: Red and yellow magnetic lanyard emergency stop system, and Session Stop Push Switch raised and
prominently positioned
Workouts: Quick Start, Manual, Cardio, Fat Burn, Heart Rate Hill
TM
, Heart Rate IntervalTM, Extreme Heart Rate
TM
Random, Hill, Sport TrainingTM(5K and 10K), Speed Interval Training, Calories Goal, Distance Goal,
Time in Zone Goal, Time-based Goal, Custom Workouts (6), Life Fitness Fit Test, Army PFT, Navy
PRT, Air Force PRT, Marine PFT, WFI Submax Protocol, Physical Efficiency Battery (PEB), Cool
Down Mode, Marathon Mode
Levels: 20 (Hill, Random, 5K and 10K workouts)
Heart rate monitoring systems: Patented Lifepulse™ digital contact heart rate and Polar® telemetry-compatible heart rate monitoring
system
Console displays: Elapsed time, total distance, distance climbed, total calories burned, pace, calories burned per hour,
heart rate, target heart rate, Watts, METS, workout profile, custom start message, resistance level,
speed, incline
Ports (2): Type RJ45, interchangeable
iPod power and charging: 5Vdc @ 500mA
iPod compatibility: Play / Pause
Volume Control / Mute
Previous Track / Next Track (Button Tap)
Scan Forward / Scan Back (Button Hold)
Headphone jack: 3.5mm Stereo, 150mW max
48
Base Only Console Only
Length: 83 in. / 211 cm. 33.5 in. / 85 cm.
Width: 37 in. / 94 cm. 5 in. / 13 cm.
Height: 63.5 in. / 161 cm. 15.75 in. / 40 cm.
Low Voltage: 410 lbs. / 186 kg. 9 lbs. / 4 kg.
High Voltage: 420 lbs. / 190 kg.
Step-Up Height: 11 in. / 28 cm.
Length: 87 in. / 221 cm. 36.5 in. / 93 cm.
Width: 43 in. / 109 cm. 6.5 in. / 85 cm.
Height: 23.5 in. / 60 cm. 19 in. / 48 cm.
Low Voltage: 472 lbs. / 214 kg. 14 lbs. / 6 kg.
High Voltage: 482 lbs. / 219 kg.
PHYSICAL DIMENSIONS
SHIPPING DIMENSIONS
Page 50

7.2 WARRANTY INFORMATION
WARRANTY COVERAGE: CST TREADMILL
MODEL
CST
Treadmill
1 Year
3
Mechanical (i.e. belt and
deck)
3
Electro-Mechanical (i.e.
switches, lift motor, electrodes)
3
Labor
2 Years
3
Electronics
(i.e. PCBs such as
motor controller and
console board)
6 Months
3
Console Overlay
3
Line Cord
3
Plastic Parts
7 Year
3
LifespringTMShock Absorbers
3
Drive Motor
3
Frame
49
WHAT IS COVERED:
This Life Fitness consumer exercise equipment (“Product”) is warranted to be
free of all defects in material and workmanship.
WHO IS COVERED:
The original purchaser or any person receiving the Product as a gift from the
original purchaser.
HOW LONG IS IT COVERED:
All coverage is provided by specific Product according to the guidelines listed on
the chart accompanying this warranty card.
WHO PAYS TRANSPORTATION & INSURANCE FOR SERVICE:
If the Product or any covered part must be returned to a service facility for repairs, We, Life Fitness, will pay all transportation and insurance charges for the
first year. You are responsible for transportation and insurance charges during
the second and third years (if applicable).
WHAT WE WILL DO TO CORRECT COVERED DEFECTS:
We will ship to you any new or rebuilt replacement part or component, or, at our
option, replace the Product. Such replacement parts are warranted for the remaining portion of the original warranty period.
WHAT IS NOT COVERED:
Any failures or damage caused by unauthorized service, misuse, accident, negligence, improper assembly or installation, debris resulting from any construction
activities in the Product’s environment, rust or corrosion as a result of the Product’s location, alterations or modifications without our written authorization or by
failure on your part to use, operate and maintain the Product as set out in your
Operation Manual (“Manual”).
Two type RJ45 interchangeable Network ready and Fitness Entertainment ports
are supplied with the Product. These ports comply with the FitLinxx CSAFE
specification dated August 4, 2004 stating: 4.75VDC to 10VDC; maximum current of 85mA. Any Product damage caused by a load exceeding this FitLinxx
CSAFE specification is not covered by warranty.
All terms of this warranty are void if this product is moved beyond the
continental borders of the United States of America (excluding Alaska,
Hawaii and Canada) and are then subject to the terms provided by that
country’s local authorized Life Fitness representative.
WHAT YOU MUST DO:
Retain proof of purchase (our receipt of the attached registration card assures
registration of purchase information but is not required);
use, operate and maintain the Product as specified in the Manual;
notify Customer Support Services of any defect within 10 days after discovery
of the defect; if instructed,
return any defective part for replacement or, if necessary, the entire Product for
repair.
OPERATION MANUAL:
It is VERY IMPORTANT THAT YOU READ THE MANUAL before operating the
Product. Remember to perform the periodic maintenance requirements specified
in the Manual to assure proper operation and your continued satisfaction.
HOW TO GET REPLACEMENT PARTS & SERVICE:
Simply call Customer Support Services at (800) 351–3737 or (847) 451–0036,
Monday through Friday from 8:00 a.m. to 6:00 p.m. Central Standard Time, and
tell them your name, address and the serial number of your product (refer to
page 1 for Customer Services contact information). They will tell you how to get
a replacement part, or, if necessary, arrange for service where your product is
located or advise you on how and where to ship the product for service.
Before shipping:
1. obtain a Return Authorization Number (RA#) from Customer Support Serv-
ices
2. securely pack your console (use the original shipping carton, if possible)
3. write the RA# on the outside of the carton
4. insure the console, and
5. include a letter explaining the defect or problem and a copy of your proof of
purchase if you believe the service is covered by warranty
EXCLUSIVE WARRANTY:
THIS LIMITED WARRANTY IS IN LIEU OF ALL OTHER WARRANTIES OF
ANY KIND EITHER EXPRESSED OR IMPLIED, INCLUDING BUT NOT LIMITED TO THE IMPLIED WARRANTIES OF MERCHANTABILITY AND FITNESS
FOR A PARTICULAR PURPOSE, AND ALL OTHER OBLIGATIONS OR LIABILITIES ON OUR PART. We neither assume nor authorize any person to assure
for us any other obligation or liability concerning the sale of this Product. Under
no circumstances shall we be liable under this warranty, or otherwise, of any
damage to any person or property, including any lost profits or lost savings, for
any special, indirect, secondary, incidental or consequential damages of any nature arising out of the use of or inability to use this Product. Some states do not
allow the exclusion or limitation of implied warranties or of liability for incidental
or consequential damages, so the above limitations or exclusions may not apply
to you.
CHANGES IN WARRANTY NOT AUTHORIZED:
No one is authorized to change, modify or extend the terms of this limited warranty.
EFFECT OF STATE LAWS:
This warranty gives you specific legal rights and you may have other rights
which vary from state to state.
OUR PLEDGE TO YOU:
Our Products are designed and manufactured to the highest standards.
We want you completely satisfied with our Products and will do everything possible under the terms of this warranty to keep you secure in knowing you have
bought the best!
 Loading...