

Lifebreath RNC series Owner's Manual
RNC Series
Homeowners Guide
69-RNC-Owners Sep-13

Table of Contents
Homeowner/Contractor Information ............................................................................................ 2
Ventilation Variable Settings ....................................................................................................... 3
How the Dehumidistat Works ...................................................................................................... 4
Lifestyle RNC Ventilation Control ................................................................................................. 5
Lifestyle RNC Digital Control ....................................................................................................... 6
Timers and Dehumidistat ............................................................................................................ 8
Maintenance Routine .................................................................................................................. 9
Troubleshooting ........................................................................................................................ 11
Additional Information ............................................................................................................... 12
Warranty .................................................................................................................................. 12
Homeowner Information
Model___________________________________
Serial Number____________________________
Register your HRV for warranty at www.lifebreath.com
Dealer / Contractor Information
Dealer_________________________________
Installer________________________________
Telephone/Contact_______________________
Installation Date_________________________
For any warranty information, please contact Airia Brands
511 McCormick Blvd. London ON N5W 4C8
T 1-855-247-4200 F 1-800-494-4185
2
Selecting the Ventilation Rate That is Right for You
The modes of operation and speeds are used to adjust your indoor ventilation rate. Experiment with
the ventilation levels in your home to evaluate the ideal amount of ventilation to suit your home and
personal preferences.
I. Continuous Ventilation
This mode of operation provides continuous ventilation within the home. You may, for example,
select Continuous Ventilation at low speed for normal operation and increase to high speed during
increased activity levels, such as cooking and showering, etc.
II. 20 Minutes On, 40 Minutes Standby
This mode of operation provides 20 minutes of ventilation each hour. You can use this ventilation
mode at low speed for low household activity levels or when the home is unoccupied.
III. 20 Minutes On, 40 Minutes Recirculation
Ventilates for 20 minutes and recirculates the household air every 40 minutes each hour. This
mode is not applicable if your HRV is connected to a forced air system.
IV. Continuous Recirculation
Continuously recirculate your household air (no ventilation). This mode is not applicable if your
HRV is connected to a forced air system.
Recirculation
Recirculates existing household air without introducing fresh air. Recirculation modes (III and IV) are
not applicable if your HRV is connected to a forced air system, since your forced air system already
circulates the household air. Recirculation modes are unavailable on some models.
Note
Due to ongoing research and product development, specifications, ratings, and dimensions are subject to change
without notice.
Warning
Disconnect the power from the unit before cleaning or servicing.
To prevent electrical shock, it is extremely important to confirm the polarity of the power line that is switched by
the safety (disconnect) switch. The hot line (black) is the proper line for switching. Use either a voltmeter or test
lamp to confirm the absence of a voltage between the disconnect switch and ground (on the cabinet) while the
door is open. This procedure must be followed, as dwellings are occasionally wired improperly. Always ensure the
proper grounding of the unit.
3

How the Dehumidistat Works
High indoor humidity levels, during the heating season, have become a problem in many well
insulated, tight homes, excessive condensation on the window is a visual sign of high indoor
humidity levels. High indoor humidity levels can result in mold and mildew and the eventual
degradation of the building structure itself.
Your HRV reduces indoor humidity levels when the outdoor air is drier than the indoor air. These
conditions usually occur during the heating season when outdoor temperatures are less than 15oC
(59oF). During the heating season, the operation of the HRV may reduce indoor humidity levels
sufficiently to eliminate the need for further dehumidification. If your home requires further
dehumidification, use the dehumidistat feature located on the main control. This feature
aggressively addresses high indoor humidity levels by initiating high speed ventilation when the
indoor humidity levels rise above the adjustable set point on the control. Refer to the Main Control
instructions located in the Installation Guide for instructions on how to set the dehumidistat. The
dehumidistat function should be set to off for all seasons except the heating season because a
dehumidifying effect occurs only when the outdoor air is dryer than the indoor air. (Refer to the
Control Instructions for information on how to set the dehumidistat).
Your Lifestyle RNC Digital Control has an adjustable dehumidistat which can be set to achieve a
further dehumidification effect from your HRV. High speed ventilation will be initiated upon
exceeding the dehumidistat set point regardless of the mode and speed of operation. Once the
humidity in the house is reduced, the HRV will revert back to its previous setting.
We suggest operating the HRV for the first few days without use of the dehumidistat function to
observe if a further dehumidification effect will be required. The dehumidistat operates in % of RH
(relative humidity) with 80 being high and 20 being low. Set the dehumidistat to 80% to disable. If
after a few days, further dehumidification is required (the house is still too humid), set the humidity
level to a lower amount.
The average person is comfortable between 30% and 50% RH. The dehumidistat should be set to
off for all seasons except the heating season. Off is achieved by setting the dehumidistat to 80.
Dehumidistat Notes
Dehumidistat Disable automatically disables the dehumidistat function on the main control when outdoor
temperatures exceed 15oC (59oF) for a full 24 hour period. All other HRV features and functions operate normally
while the dehumidistat function is disabled.
Dehumidistat Re-Enable automatically re-enables the dehumidistat function if either the outdoor temperature
drops below 15oC (59oF) for a full 24 hour period or if the HRV is reset (unplugged for 30 seconds).
4
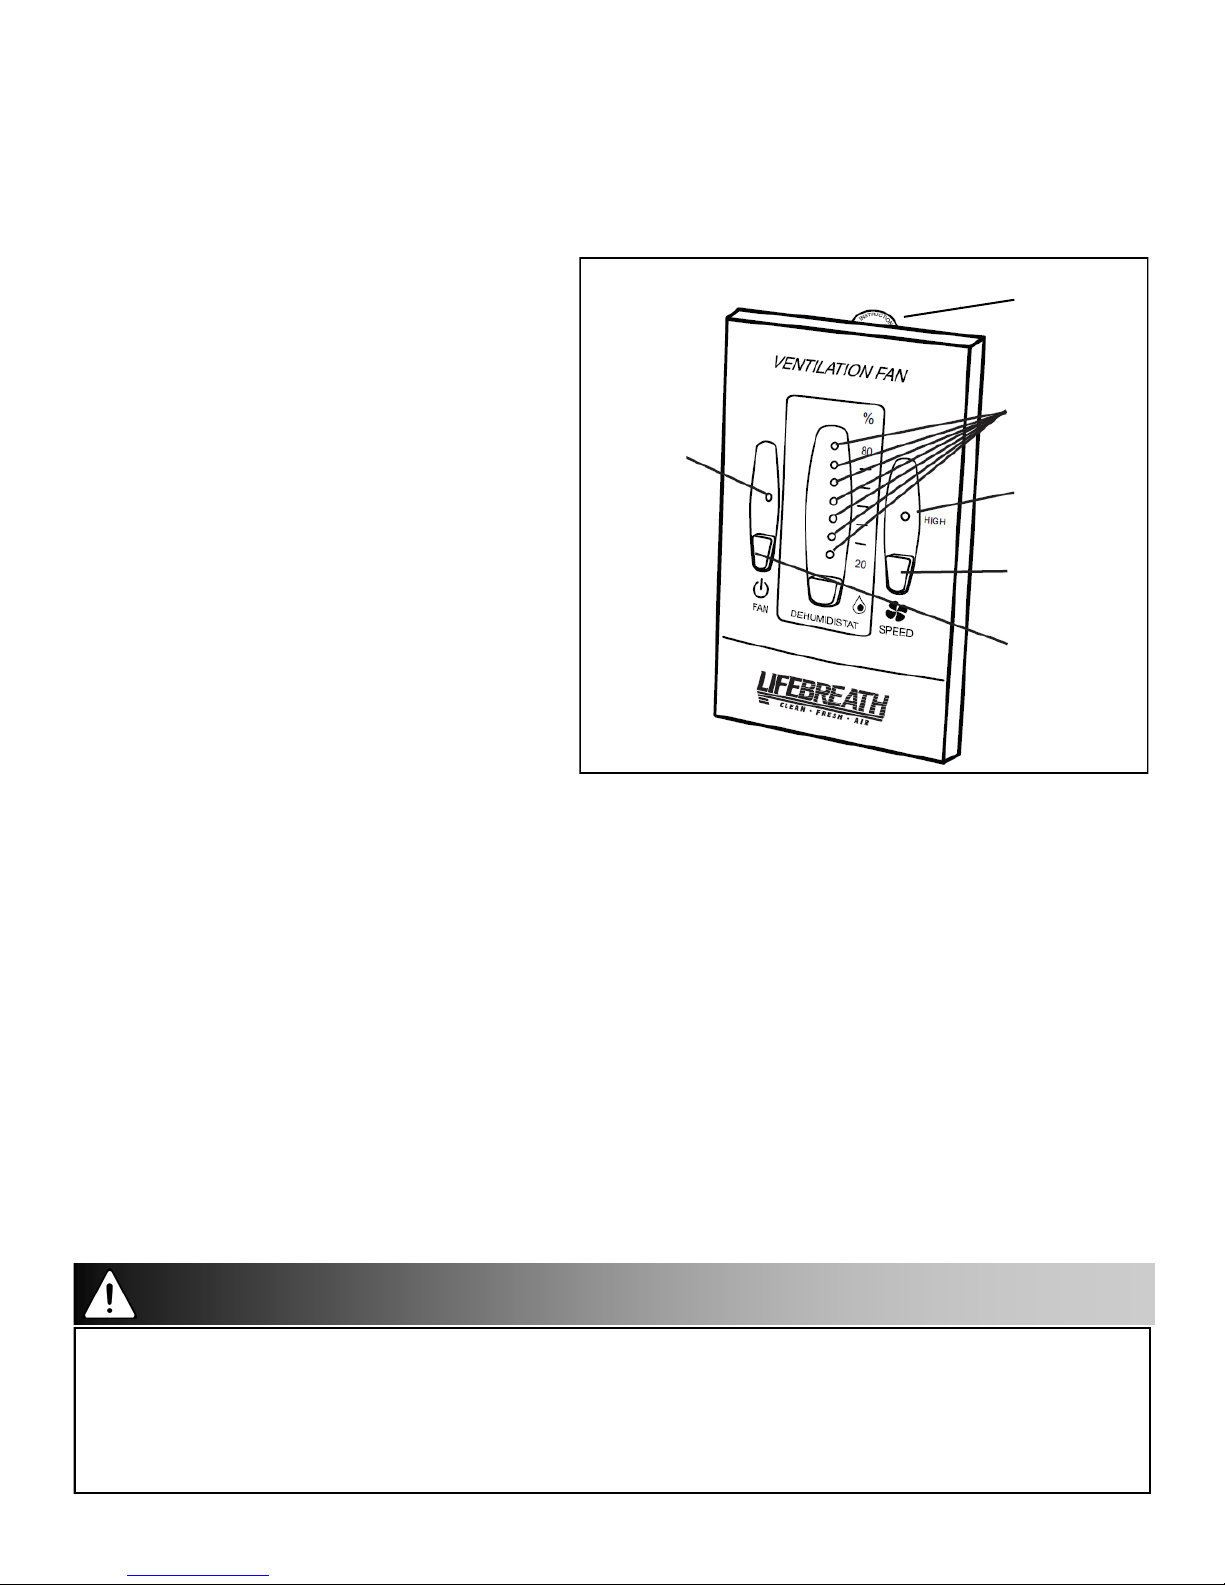
The Lifestyle RNC Ventilation Control 99-BC01 (Included)
(Not included with RNC120F Model)
The Lifestyle RNC Ventilation Control offers ON/OFF, high speed/low speed plus and electronic
dehumidistat.
Key Features
2 speed fan setting
Electronic dehumidistat
Instruction card inserted in the control
Slim-line design
Connect to 3 wire 20 gauge low voltage
wire
Turning on the Control
Press and release the ON/OFF button. The
“ON indicator light” will illuminate.
Adjusting the Ventilation Speed
The unit will normally operate at low speed.
ON Indicator
light
Instruction
Card
Dehumidistat
Indicator LED
Hi Speed
Indicator LED
High/Low
speed button
ON/OFF
button
Press and release the SPEED button to initiate
high speed ventilation. The “High Speed Indicator LED” will illuminate.
Humidity Control
Your unit will produce a dehumidifying effect when outdoor humidity levels are lower than indoor
humidity levels. Never use the dehumidistat feature when outdoor temperatures are above 59oF
(15oC).
Setting the Dehumidistat
Press and release the DEHUMIDISTAT button until the dehumidistat LED is at the desired setting.
After 5 seconds the dehumidistat light will either flash or be on continuous.
A flashing light indicates the humidity level is higher than the setting and the unit is operating on
high speed ventilation. A continuous light indicates the humidity level is lower than the setting. Refer
to manual for instructions on “How the Dehumidistat Works.”
Attention
Only one main control can be installed on your system.
Recirculation is not available on all models.
Timers will not function when mode of operation is set to “OFF”, unless specifically installed for that function. (See
Installation Guide for other options.)
Install a jumper between 2 (ON) and 3 (RED) on the HRV terminal block to configure the ON/OFF button to ON/
STANDBY. Refer to “Setting Standby when using a Main Control” in this manual.
5
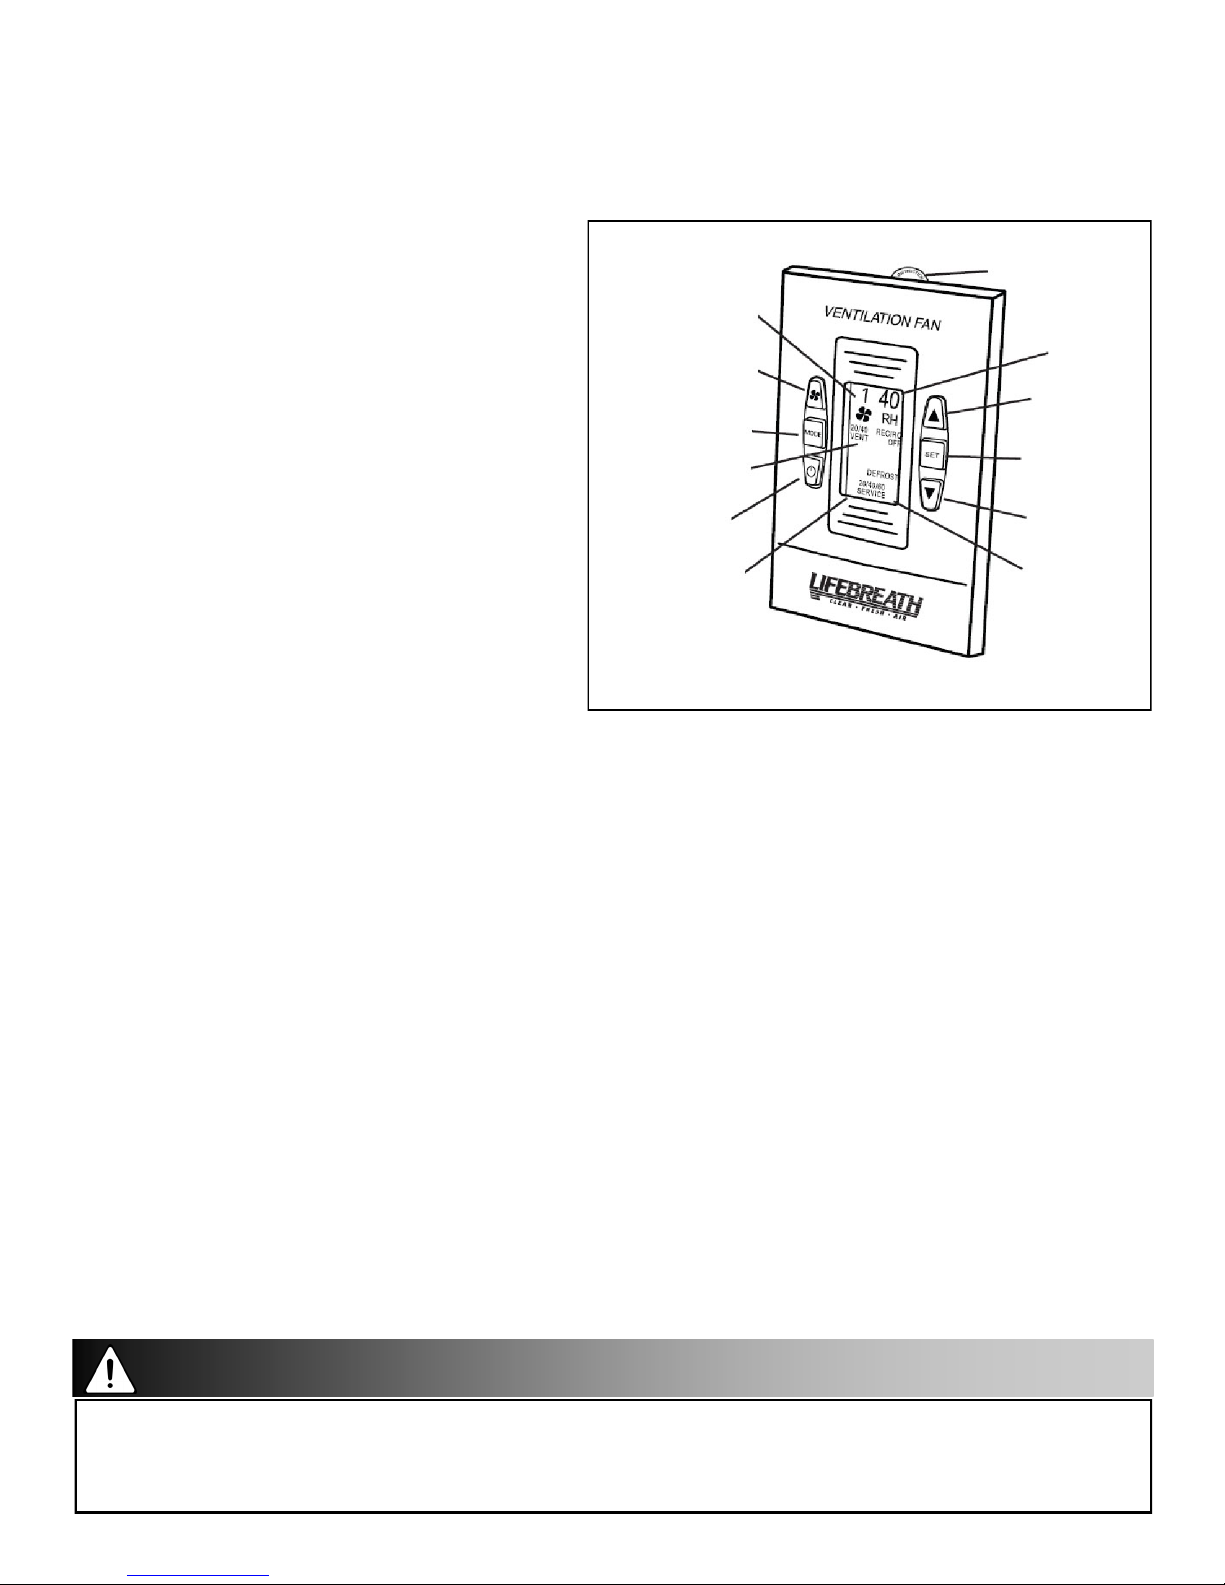
The Lifestyle RNC Digital Control 99-DX01 (Optional)
(Included with DX Models)
The Lifestyle RNC Digital Control offers advanced features to control your home's ventilation.
Key Features
2 speed fan setting (low-1/high-2)
Standby setting (fan speed 0)
Electronic dehumidistat
Four selectable modes of operation
20 min. ON/40 min. OFF
20 min. ON/40 min. recirculation
Continuous ventilation
Continuous recirculation
20/40/60 high speed override button
Instruction card is inserted in the control
Easy to read backlit LCD screen
Slim-line design
Connect to 3 wire 20 gauge low voltage
20/40/60 Minute
High Speed Override
“Fan”
Fan Speed
Indicator
Mode Select
Button
Mode Indicator
ON/OFF Button
High Speed
Override Timer
Indicator
wire
Setting the Control
1. Refresh the screen: use the ON/OFF button to turn the control off and on.
2. Press the SET button.
3. The “FAN” symbol flashes. Scroll (using Up/Down buttons) to select desired fan speed. Press the
SET button.
4. Scroll to select the desired operational mode (VENT, 20/40, 20/40 RECIRC, RECIRC, or OFF).
Press the SET button. Refer to manual for explanation of operational modes.
20/40/60 Minute High Speed Timer
This function temporarily initiates high speed ventilation for 20, 40, or 60 minutes.
1. Refresh the screen: use the ON/OFF button to turn the control off and on.
2. Press FAN button once for 20, twice for 40, three times for 60 minutes and four times to cancel
the timer.
Setting the Dehumidistat
Refer to "How the Dehumidistat Works" in this manual before setting the dehumidistat.
1. Refresh the screen: use the ON/OFF button to turn the control off and on.
2. Press and release MODE until "RH" number flashes.
3. Scroll to desired “RH” number. Press the MODE button.
Instruction Card
Humidity
Indicator
Up Button
SET Button
Down Button
Service
Indicator
Attention
Only one main control can be installed on your system.
Recirculation is not available on all models.
Timers will not function when mode of operation is set to “OFF”, unless specifically installed for that function. (See
Installation Guide for other options.)
6

99-DX01 Continued
The Lifestyle RNC Digital Control Gives you 4 Mode Selection
The Lifestyle RNC Digital Control has 4 operational modes and 2 speeds on each mode to adjust
indoor ventilation levels.
Experiment with the ventilation levels in your home to evaluate the best amount of ventilation to
suit your home and preferences.
I. Continuous Ventilation Mode
This is the most popular mode since it provides continuous ventilation within the home. You
may, for example, select Continuous Ventilation at high speed for high household activity levels
or Continuous Ventilation for lower activity levels.
II. 20 minutes On, 40 minutes OFF Mode
This operational mode will provide 20 minutes of ventilation each hour. You may wish to use this
ventilation mode in low speed for low household activity levels or if the home is unoccupied.
III. 20 minutes On, 40 minutes Recirculation Mode
The operational mode provides 20 minutes of ventilation (fresh air) and 40 minutes of
recirculate air. Use this mode only if your HRV is not connected to a forced air system (the
forced air system has already circulated household air).
IV. Continuous Recirculation Mode
This operational mode recirculates your household air (no ventilation). Use this mode only if your
HRV is not connected to a forced air system.
How to Synchronize the Humidity Setting
The Lifestyle RNC Digital wall control has a feature that will allow it to be synchronized with other
humidity instruments in your home.
1. Turn off the control with the ON/OFF button.
2. Simultaneously press and release the ON/OFF button and the 20/40/60 minute high speed
override button.
3. Use the Up/Down buttons to adjust the humidity indicator on the display screen to the number
of degrees difference between your humidity measuring device. Minus is indicated by flashing.
4. Press the MODE button.
Attention
Only one main control can be installed on your system.
Recirculation is not available on all models.
Timers will not function when mode of operation is set to “OFF”, unless specifically installed for that function. (See
Installation Guide for other options.)
7
Timers
Depending on the type of HRV installation, you may have timers in areas such as restrooms. The
timer will override the operational mode (regardless of the setting) and initiate high speed ventilation.
Upon completion of the timer cycle, the HRV will return to your selected operational mode and speed
setting.
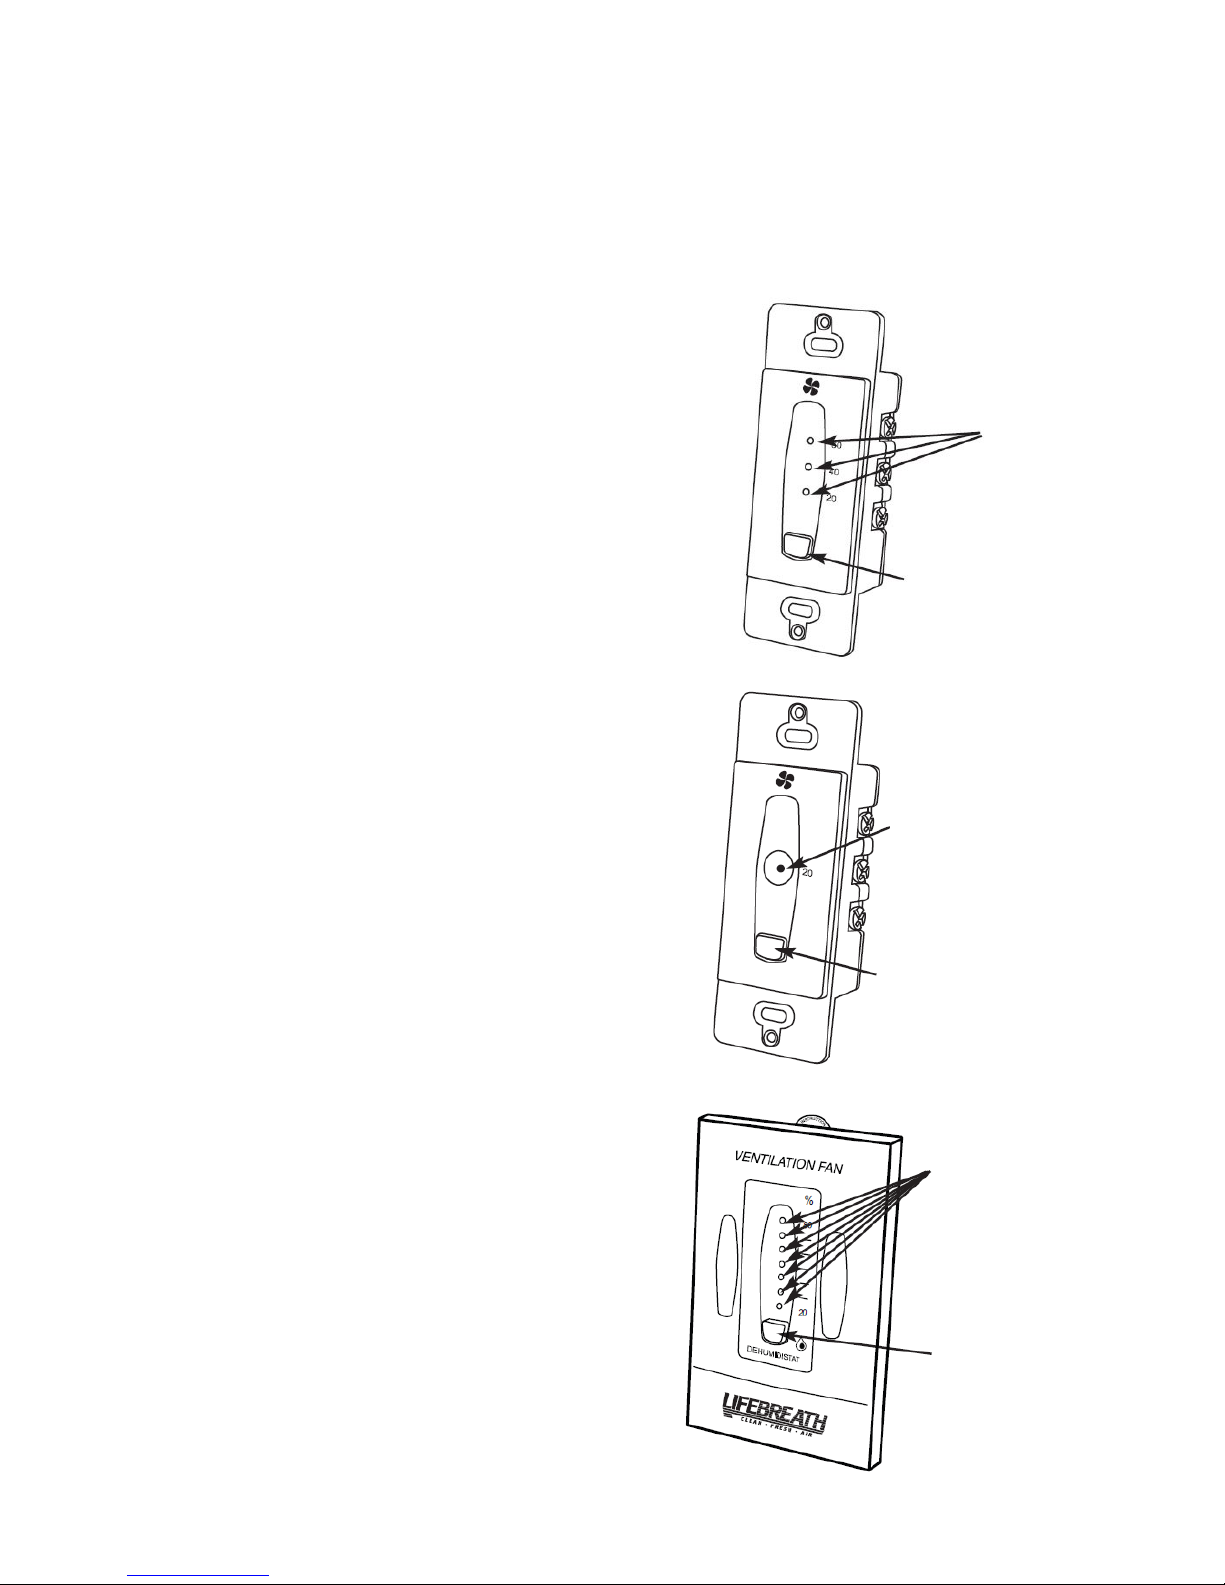
Lifestyle 20/40/60 Minute Timer 99-DET01
Initiates high speed ventilation for 20, 40 or 60 minutes.
The 20/40/60 minute status lights indicate high speed
operation. Lockout mode is useful if you wish to disable
the timer. Set lockout by holding the select button for 5
seconds. Unlock by holding for 5 seconds.
Lifestyle 20 Minute Timer 99-20M01
Initiates high speed ventilation for 20 minutes. The 20
minute status light indicates high speed operation.
Lockout mode is useful if you wish to disable the timer.
Set lockout by holding the select button for 5 seconds.
Unlock by holding for 5 seconds.
20/40/60 Minute
Status Lights
Select Button
20 Minute
Status Light
Select Button
Dehumidistat
Lifestyle Dehumidistat 99-DH01
Initiates high speed ventilation when the moisture level
in the home exceeds the set point on the control. Once
the humidity in the house is reduced, the HRV will
revert back to its previous setting. The dehumidistat
should be set to OFF for all seasons except the heating
season. Refer to "How the Dehumidistat Works" in this
manual before setting the dehumidistat.
Dehumidistat LEDs
Set to the desired
humidity level. High
speed ventilation will
initiate when the indoor
moisture level exceeds
the set point on the
control
Dehumidistat Adjust
Button
8
 Loading...