

Lifebreath CAF-U-L4A-36-P16, CAF-U-L2A-48-P16, CAF-D-L4A-36-P16, CAF-H-L4A-36-P16, CAF-D-S4A-24-P16 Operation, Sizing And Installation Manual
...Page 1

Operation, Sizing and Installation Manual
Models
CAF-U-S4A-24-P16 (E16)
CAF-D-S4A-24-P16 (E16)
CAF-H-S4A-24-P16 (E16)
CAF-U-L4A-36-P16 (E16)
CAF-D-L4A-36-P16 (E16)
CAF-H-L4A-36-P16 (E16)
CAF-U-L2A-48-P16 (E16)
CAF-U-00-24-P16 (E16)
CAF-U-00-36-P16 (E16)
CAF-U-00-48-P16 (E16)
Hydronic Models with Built-in
Heat Recovery Ventilator (HRV)
MANUFACTURED WITH
AIRCOM ELECTRONICS
69-CAF
0912
Page 2
Never install an HRV/ERV in a situation
where its normal operation, lack of operation
or partial failure may result in the
backdrafting or improper functioning of
vented combustion equipment!
CAUTION
Assess how the operation of an HRV/ERV
may interact with already installed vented
combustion equipment (ie. Gas Furnaces,
Oil Furnaces, Wood Stoves, etc.).
CAUTION
Table of Contents
The Clean Air Furnace hydronic coil is not to
be used for chilled water applications where
condensation is expected.
ATTENTION
Air Condition coil freezing can damage the
hydronic coil of the Clean Air Furnace.
Install a Freeze Thermostat Kit to your air
conditioning coil to prevent coil freeze up.
Check with your air conditioner distributor to
obtain a Freeze Thermostat Kit.
ATTENTION
Do not apply electrical power to the unit until
installation has been fully completed (including
low voltage control wiring).
Introduction
Overview of the Clean Air Furnace ..................................3
Description and Purpose
Operation Heating/Cooling...............................................4
The Recovery Core ...........................................................5
Combo System Basic Principles .......................................6
Plumbing......................................................................7-14
Installation .................................................................15-17
Pitot Tube Air Flow Balancing ..................................18-19
Function and Controls ...............................................20-21
Optional Dehumidistat
Optional Timers ..............................................................22
Wiring the Controls.........................................................23
Aircom Relays ................................................................24
Start-up Procedure ..........................................................25
Register for your warranty at www.lifebreath.com
Airia will require the Model and Serial Number to register the unit.
TO BE COMPLETED BY CONTRACTOR AFTER INSTALLATION
Service and Maintenance ................................................26
Troubleshooting ..............................................................27
Controlling your HRV
How the Dehumidistat Works.........................................28
Model Number Nomenclature Breakdown.....................29
Specifications ............................................................30-39
System Commissioning ..................................................40
Work Sheets ...............................................................41-42
Wiring Diagrams .......................................................43-44
Installation Date Model
Installing Contractor
Telephone / Contact
Serial Number
2
Page 3
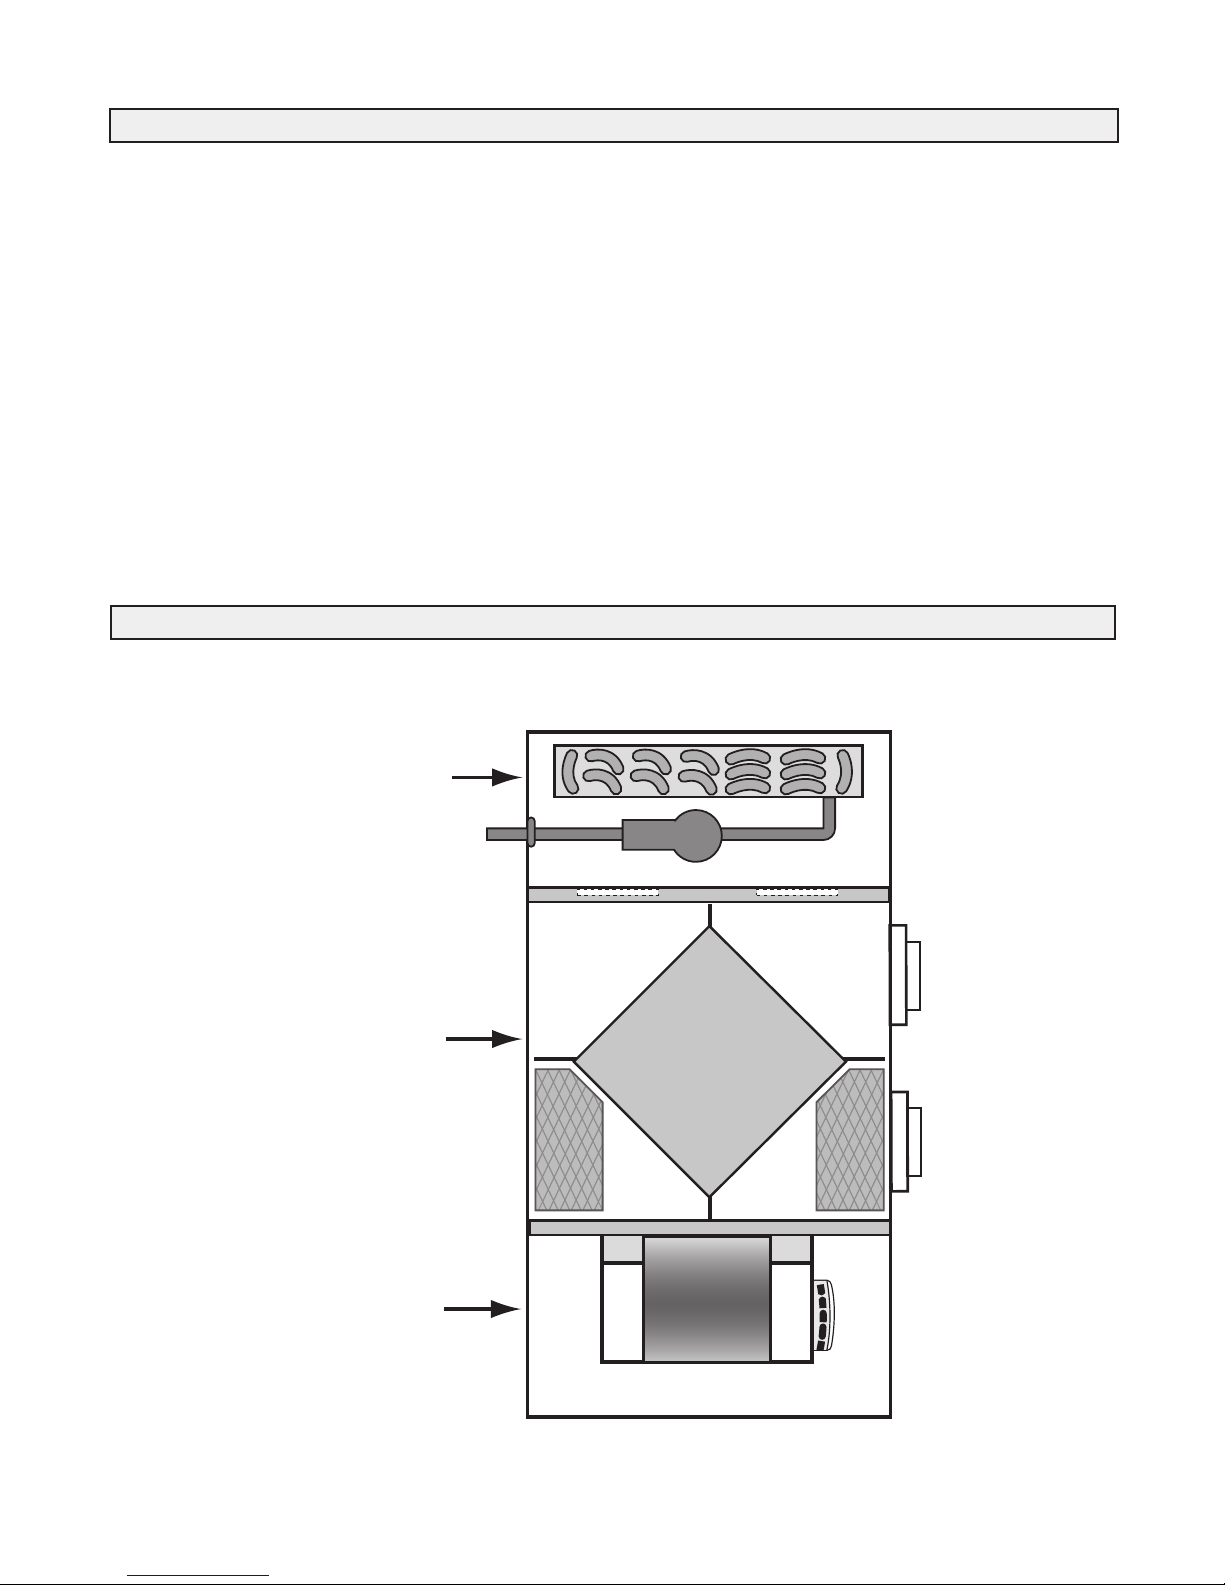
Introduction
Hydronic Coil
and Pump
Compartment
Recovery Core
and Ventilation
Compartment
Aircom
Electronics
and Fan
Compartment
You will notice that the heated air in your home feels more
comfortable than air heated by a conventional furnace. One
reason for this is that LIFEBREATH's hydronically heated
air is uniform and temperate... no short blasts of hot air or
hot and cold temperature spikes. The air flowing from your
hot air vents will not feel as hot to the touch as air from a
conventional furnace.
With a high efficiency, adequately sized natural gas,
propane or oil hot water heater/boiler, you will always have
plenty of hot water for showers and baths, washing dishes
and clothes, and all other normal domestic hot water needs.
If there is an unusually high demand for hot water, such as
filling a large hot tub, then all you need to do is allow more
time for the task so the water heater/boiler can keep up to
its job of providing hot water for the heating system as well
as other household uses.
Overview of the Clean Air Furnace
Once it is correctly installed, safety will never be an issue
with your LIFEBREATH furnace. No flames, fumes or flue
gases to be concerned about. Your domestic hot water
heater/boiler now provides the heat source for your furnace.
This Operation and Installation Guide will help you learn
about your LIFEBREATH Clean Air Furnace quickly and
easily. The table of contents will show you where to find
information on every feature of this unit along with easy to
understand operating instructions. If, however, you do
encounter a question that is not covered in this Guide you
should call the LIFEBREATH dealer who installed your
furnace. Chances are that he will be able to give you a
satisfactory answer but if he is unable to do so then we
invite you to contact us directly.
Airia Brands Inc.
3
Page 4

Description and Purpose
IMPORTANT NOTE
The purpose of this manual is to act as an installation guide
only for t h e LIFEBRE ATH Cle a n Air F u r n a c e.
Manufacturers' instructions for other components, such as
the water-heater/boiler, must be followed.
All national and local code requirements must be met when
installing a LIFEBREATH Clean Air Furnace. Be sure to
consult the proper authorities.
Note: Temperatures greater than 130°F (54°C) pose a seri-
ous risk of scalding individuals running domestic
hot water for potable use.
This appliance complies with IAS Canada Inc. Requirement
CR95-003, Additional Requirements for Fan Coil Units for
use with Potable Water Heaters.
All piping and components connected to this appliance shall
be suitable for use with potable water.
Toxic chemicals, such as used for boiler treatment, shall not
be introduced into the potable water heater system.
When using this system and the hot water for space heating
is set to a higher temperature than for other uses, an antiscald valve shall be used to ensure water for common use is
reduced in temperature to minimize a scalding hazard.
Combining two or more end uses such as space heating and
the heating of domestic hot water in a single system has the
potential to increase efficiency and reduce overall capital
costs. However, the proper design, installation, and commissioning of these systems are critical if these advantages
are to be realized.
This manual provides a guideline of good engineering practice in the desi gn, install atio n and commiss ioni ng of
Integrated Combo Systems. The guidelines in the manual
are designed for residential forced warm air Integrated
Combo Systems which utilize domestic water heaters or
boilers and the LIFEBREATH furnace. Heating and cooling
loads shall be calculated in accordance with recognized
Residential Heat Loss and Heat Gain Calculation methods.
Duct design shall comply with recognized Residential Air
System Design methods. This manual provides worksheets
to be used for the purpose of sizing residential water heaters
and the combo furnace.
The LIFEBREATH Clean Air Furnace is a volume ventilation system. Use the optional Lifebreath Bathroom Exhaust
System Kit (Part 99-CAF-BESKIT) if you wish to exhaust
from specific locations such as bathrooms.
Operation Heating/Cooling
When the room thermostat calls for heat, it activates a circulation pump located inside the Clean Air Furnace. This
pump delivers hot water from the water heater, through the
furnace coil and back to the water tank. Simultaneously, the
furnace blower switches on to high speed and will start circulating air across the coil, which picks up heat and delivers
it to the rest of your home.
Once the thermostat's temperature is reached the pump will
shut off, and the blower will return to its pre-set speed or
off.
Note: When the furnace blower is left running on low
speed the air in the home circulates continuously. When
the heat is called for the blower will automatically switch
to a higher speed. After the required hot air has been
delivered the blower will switch back to low speed.
When the thermostat calls for cooling (evaporator coil and
condensing unit required), the furnace blower activates to
high speed and the outdoor condenser unit is energized.
After the thermostat temperature is reached, the condensing
unit will shut off and the blower will return to its preset
speed or off.
Ventilation
The heat recovery ventilation (HRV) portion of the Clean
Air Furnace, is automatic. Once set, a desired amount of
fresh air will be drawn into the home while the furnace
blower is activated.
To reduce humidity, increased ventilation may be required
during heating season. An optional remote dehumidistat can
be installed. The dehumidistat will increase the speed of the
furnace blower to high and will return to its original setting
when humidity levels decrease. Your dehumidistat must be
switched off during warmer months. A quality humidifier
should be added if you wish to increase winter humidity
levels
Typically the air flow for ventilation will be set to 50 70cfm, for low sp e ed fu r n a ce op e r at ion, an d
100 - 150cfm at high speed. The pleated furnace filter
should be checked regularly and replaced as needed. The
HRV filter should be washed twice a year or more often if
needed.
Off Season Circulation Timer
All models are equipped with a circulation timer. It is normal operation for these models to automatically run the
circulation pump intermittently for a short period of time.
4
Page 5
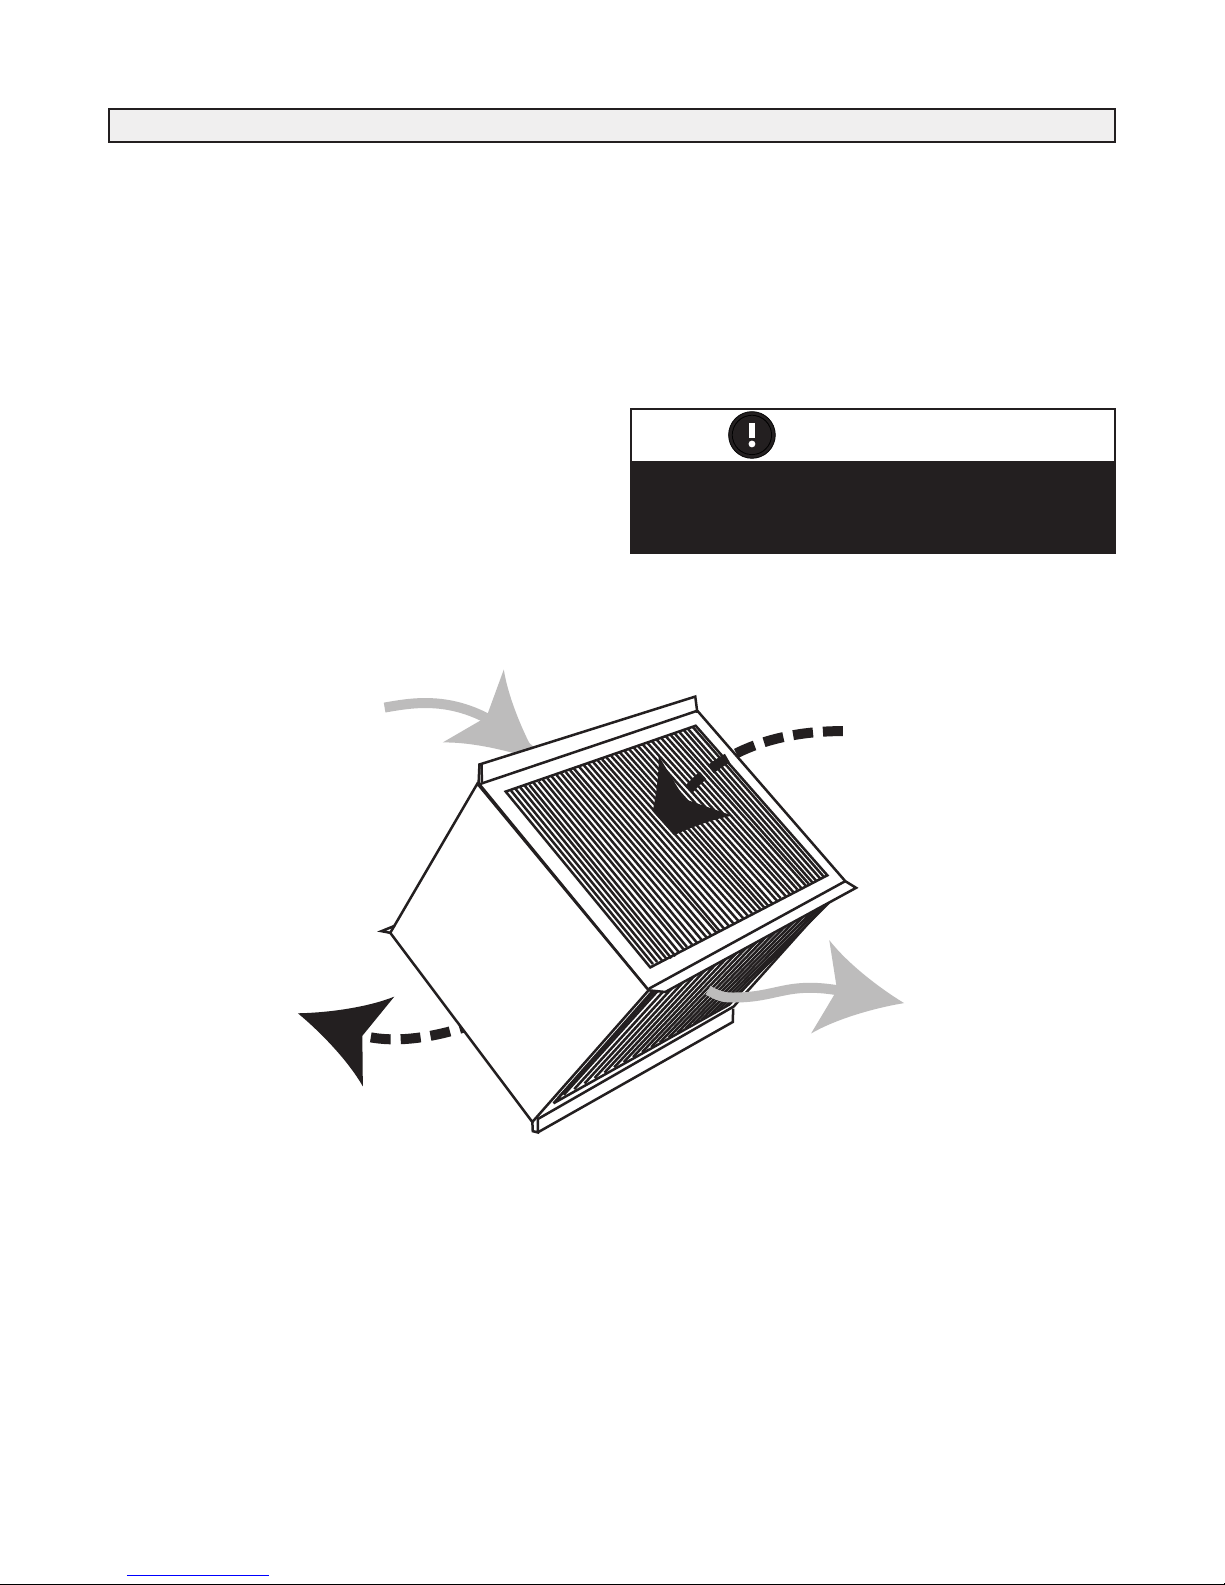
The Recovery Core
Stale Air
from Building
Stale Air
to Outside
Fresh
Outdoor Air
Fresh Air
to Building
The ERV - Enthalpic Core is not suitable for
climates where the outdoor temperature
drops below -4°C (25°F).
ATTENTION
HRV - Aluminum Core
A Heat Recovery Ventilator (HRV) is designed to provide
fresh air into a building while exhausting an equal amount
of stale air. During the winter months, the incoming cold
fresh air is warmed by utilizing the heat recovered from the
stale air before it is exhausted to the outdoors. During summer months when the indoor space is air conditioned, the
Heat Recovery Ventilator will help in cooling the incoming
fresh air with the stale air that is being exhausted.
ERV - Enthalpic Paper Core
An Energy Recovery Ventilator (ERV) is designed to provide fresh air into a building while exhausting an equal
amount of stale air. An ERV is designed for use in warm
humid areas with heavy air conditioning use. The ERV will
transfer both sensible and latent heat from the incoming
fresh air to the outgoing stale air thereby reducing the load
(due to ventilation) on the air conditioning system.
5
Page 6
WATER HEATER
DOMESTIC HOT WATER
SUPPLY AIR
BLOWER
HEATING COIL
HRV/ERV CORE
CHECK
VALVE
RETURN AIR
COLD WATER INLET
ANTI-SCALD VALVE
(WHEN REQUIRED)
VALVE
(shut off)
VALVE
(shut off)
VALVE
(shut off)
VALVE
(balancing)
COOLING COIL
(OPTIONAL)
DRAIN
VALVE
EXPANSION TANK
(WHEN REQUIRED)
CHECK
VALVE
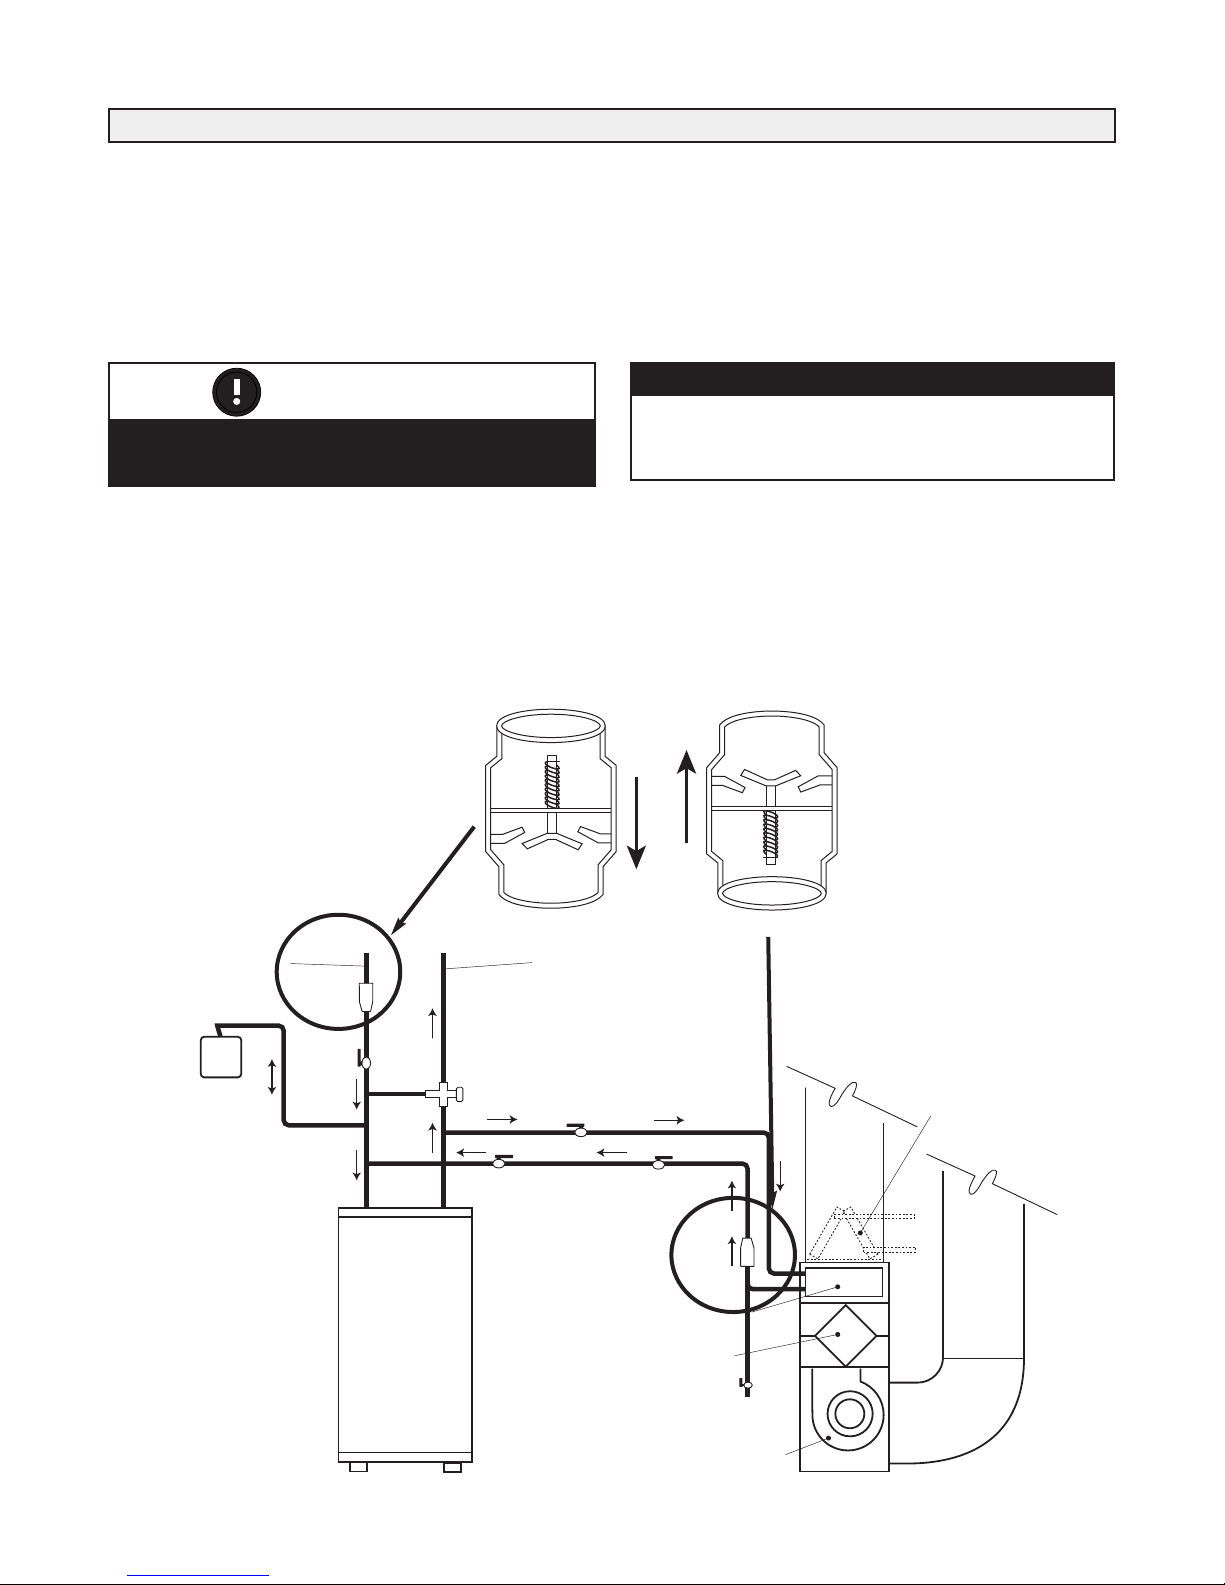
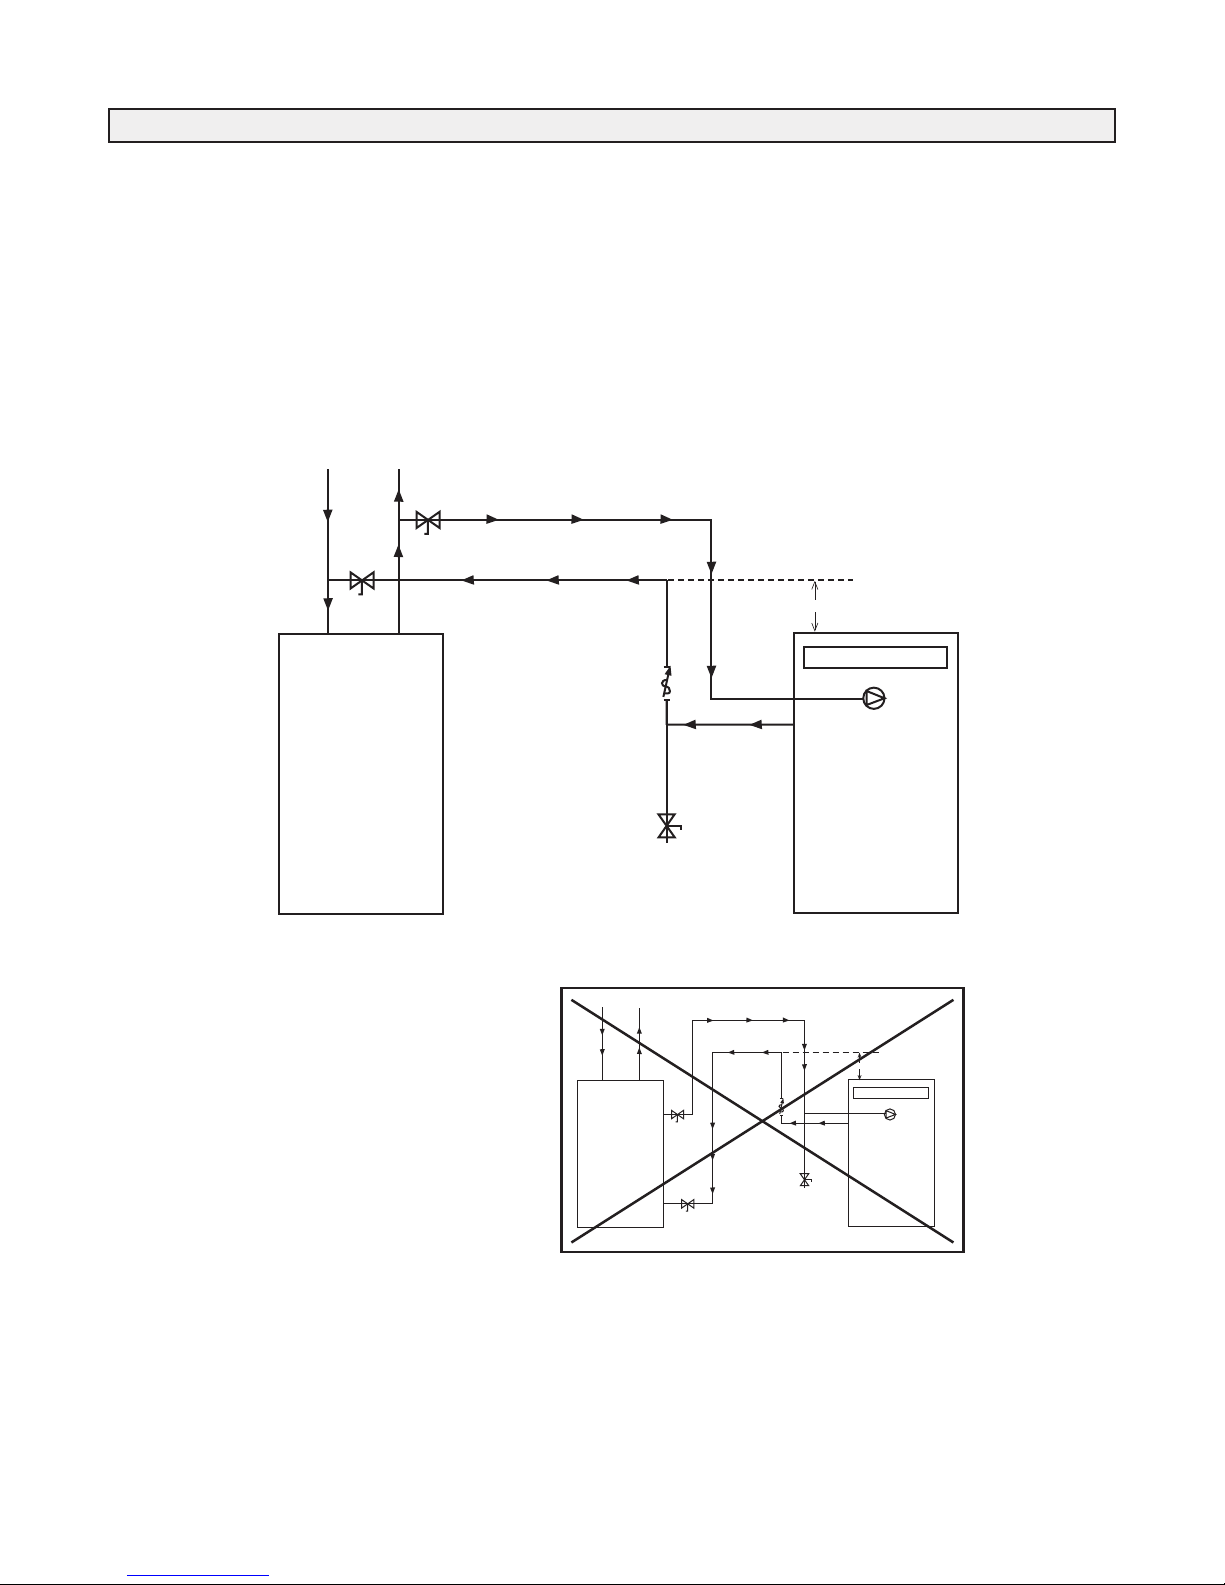
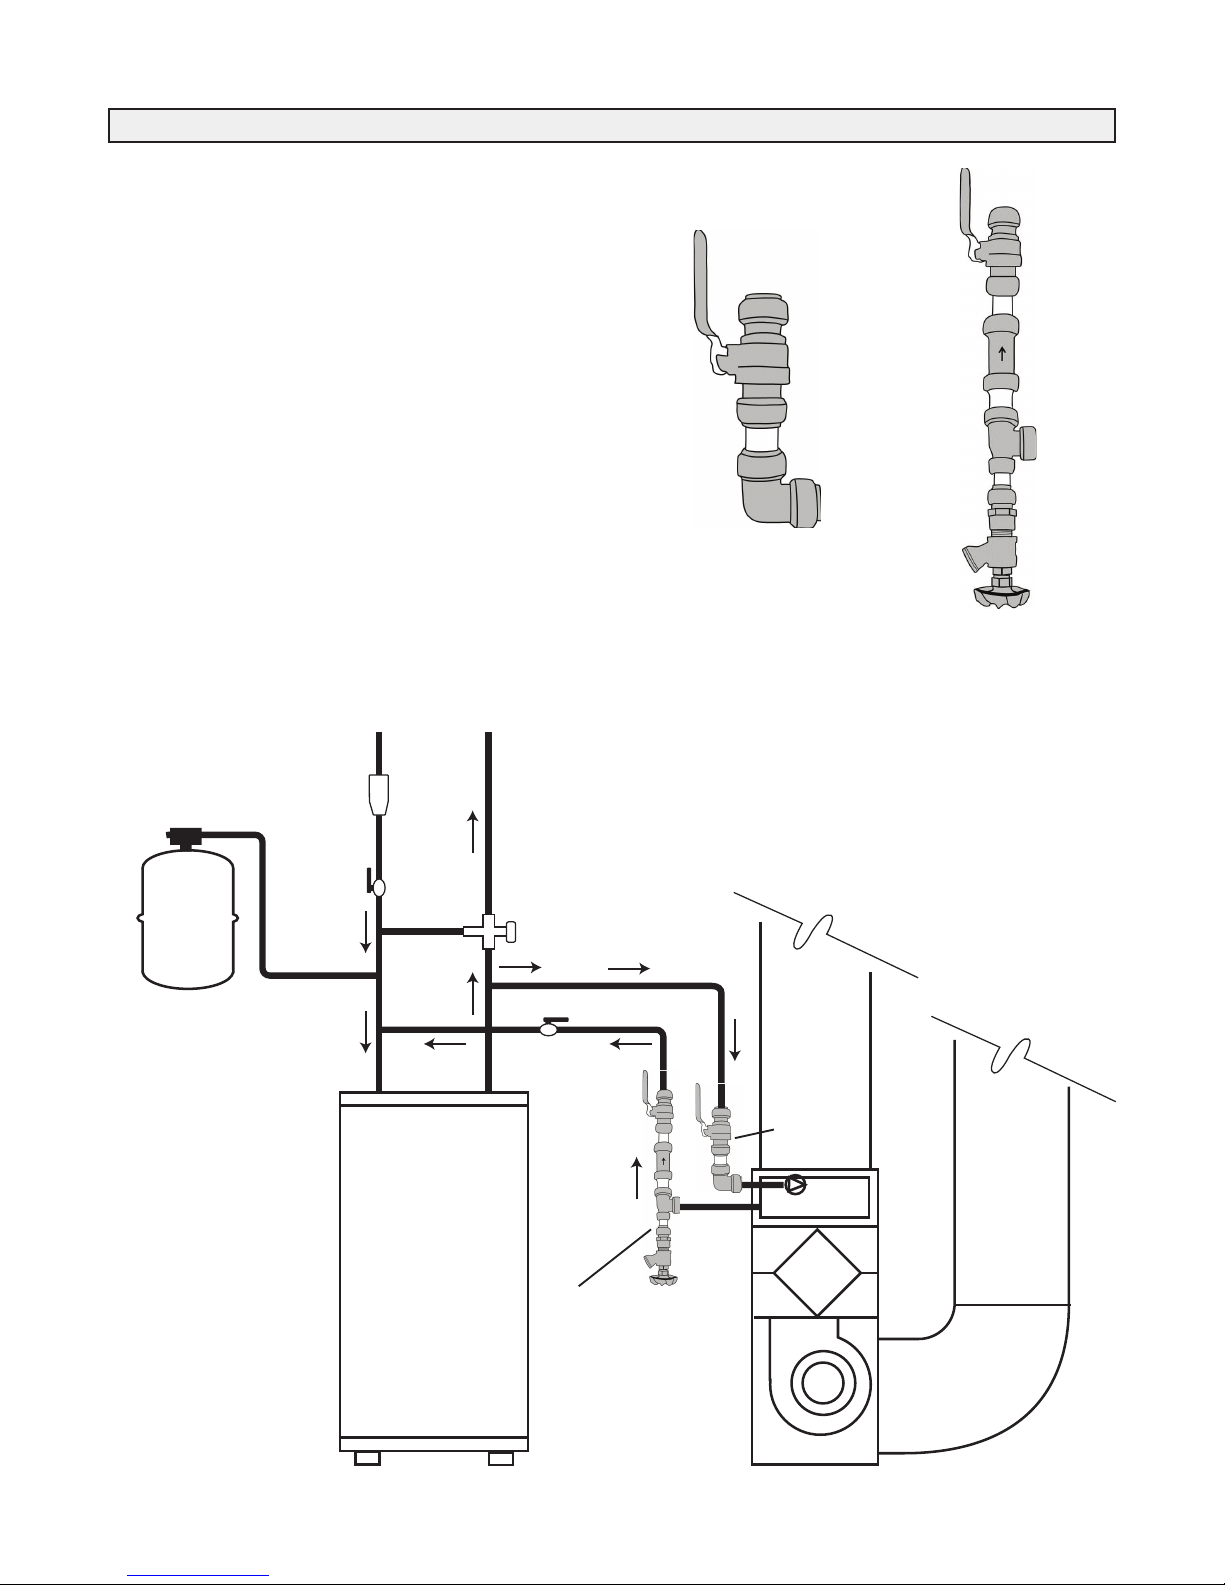
Combo System Basic Principles
ATTENTION
Check valves should always be installed in a
vertical rise with the flow of water shown.
Open and Closed Systems
Open and Closed systems both deliver hot water and space
heating.
Water systems that incorporate a pressure tank (i.e. well
systems) are normally Open Systems and most municipal
water systems are Closed Systems.
Closed Loop System
A system becomes closed when a Check Valve or a backflow prevention valve is installed in the cold water piping
upstream of the water heater.
A check valve will prevent water being relieved into the
cold water system due to pressure created when water is
heated in the water heater.
Drain Valve
A drain valve is required to allow the heating loop to be
drained for service or repair and to remove air from the
heating loop when commissioning a system. The drain
valve should be near the low point of the return piping system to be near the water heater. Ball, Globe or Gate Valves
are suitable for drain valves.
IMPORTANT
Refer to local codes, local bylaws and installation
manuals supplied with water heater before starting
any installation work.
This Check Valve minimizes
Thermo-Siphoning. Thermo
Siphoning is the cold water
backflowing through the
heating loop when domestic
hot water is called for.
Conventional
Cooling
(Not available
through Airia)
6
Page 7
Plumbing
Water
Heater
Check
Valve
To
House
CAF
or
AH
Min. 12" (305 mm)above
top of CAF / AH
12"
Water
Heater
CAF
or
AH
Check
Valve
Min. 12" (305 mm)
above top of CAF / AH
To
House
12"
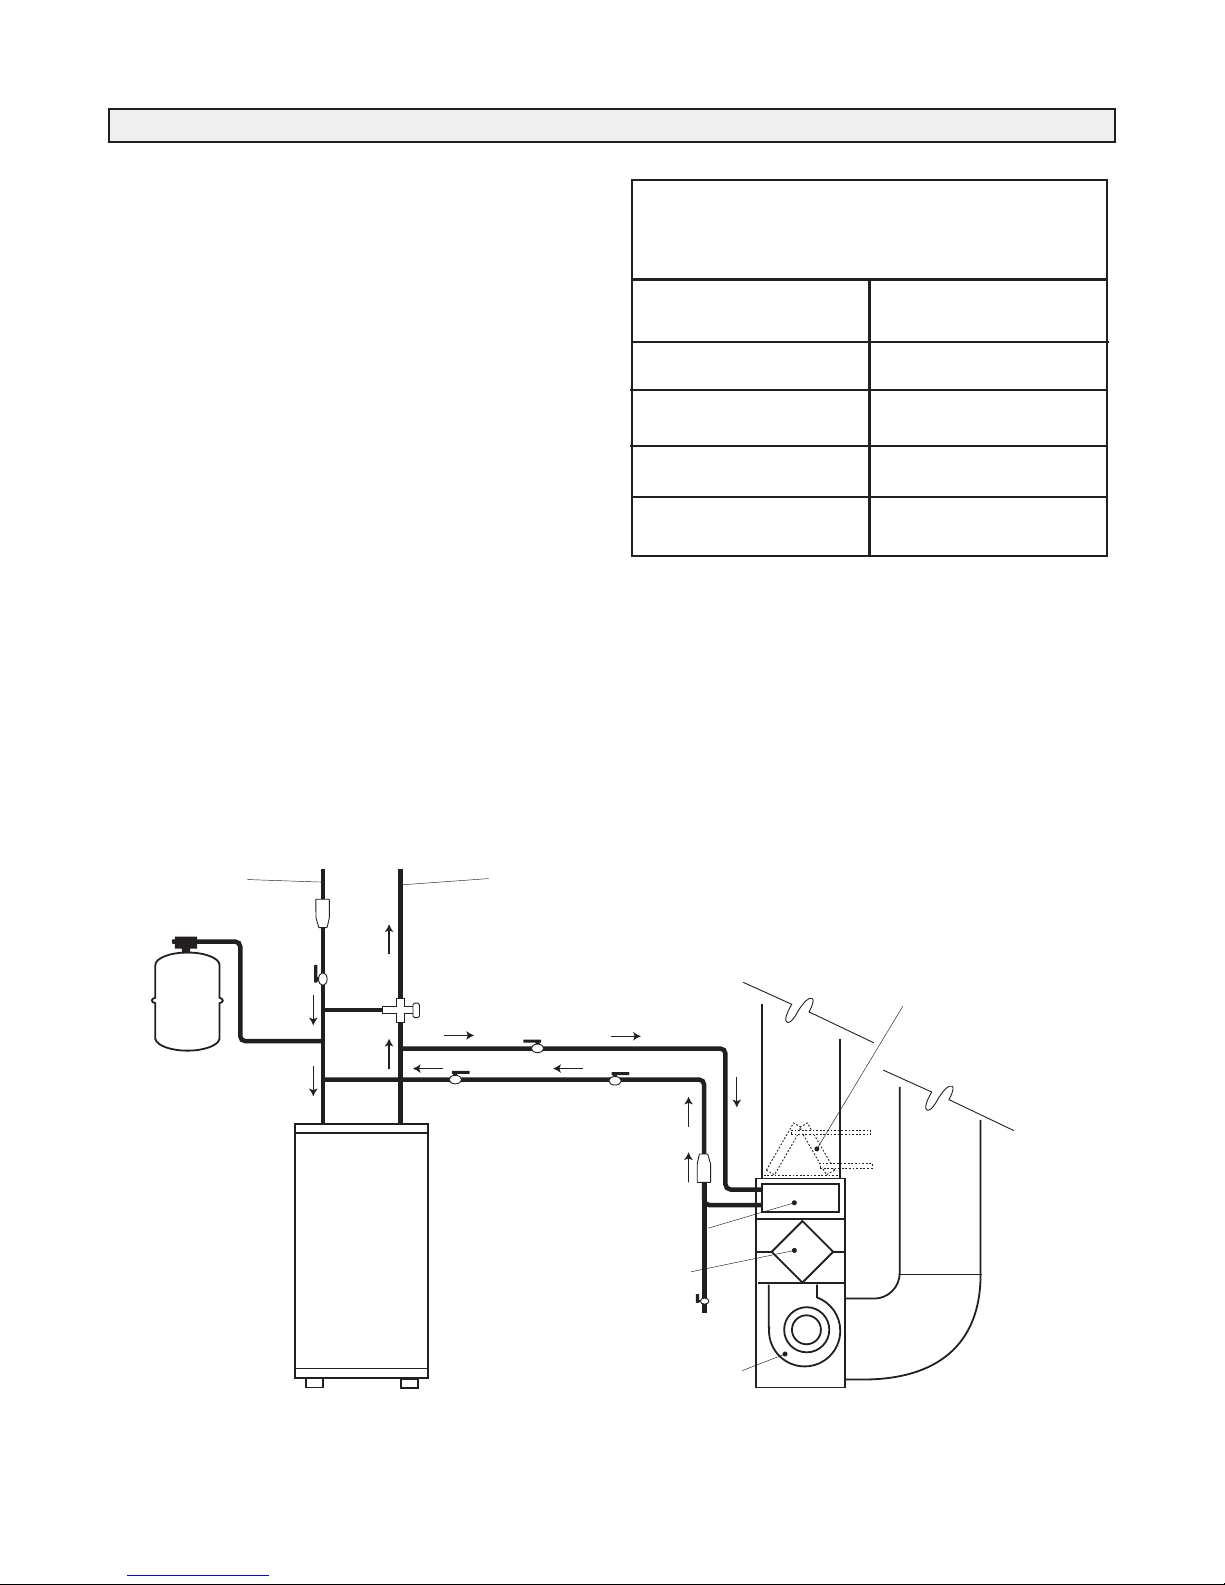
In order to improve serviceability of our products, the
check valve is included with our manual kit for field installation between the air-handler and hot water source.
The check valve should be installed in a vertical run of
pipe with the flow of water in an upward direction.
An arrow on the check valve indicates its correct orientation and must match the direction of water flow.
This will allow for ease of service to remove any installation debris or service required due to extended hard water
conditions.
Figure 1
Note: Take care during soldering to avoid debris or
solder from lodging in the check valve.
Note: It is critical to follow the piping configuration
shown. Maintain a minimum distance of 12” above
the CAF/AH. This will minimize thermal siphoning in
the combo system.
Figure 2
* It should be noted that problems have been observed when using the side
tappings on certain water heaters; therefore, it is strongly recommended to use the top
water tappings as indicated in Figure 1 to minimize thermal-siphoning and related
issues.
7
Page 8
Plumbing
WATER HEATER
DOMESTIC HOT WATER
SUPPLY AIR
BLOWER
HEATING COIL
HRV/ERV CORE
CHECK
VALVE
RETURN AIR
COLD WATER INLET
ANTI-SCALD VALVE
(WHEN REQUIRED)
VALVE
(shut off)
VALVE
(shut off)
VALVE
(shut off)
VALVE
(balancing)
COOLING COIL
(OPTIONAL)
DRAIN
VALVE
EXPANSION TANK
(WHEN REQUIRED)
CHECK
VALVE
Expansion Tanks
Expansion tanks are required in addition to a Check Valve
for Closed Systems because pressure is created when water
is heated in the water heater.
The expansion tank has an air bladder which will contract to
relieve pressure in the system. The tank should always be
connected to the cold water piping between the water heater
shut off valve and the cold water inlet to the water heater.
Anti-Scald Valve
An anti-scald valve is required when the water heater thermostat is set above 140°F (60°C). Also, an anti-scald valve
may be required for all installations by the “authority having jurisdiction”. The valve is placed in the hot water supply
piping from the water heater downstream of the heating
loop connection and upstream of any domestic hot water
connection.
The purpose of the valve is to limit the maximum temperature available for domestic hot water by mixing hot water
from the water heater with cold water from the municipal
supply.
The Anti-Scald valve must be thermostatically controlled
and approved to the ASSE standard No. 1016 and 1017 for
use as an anti-scald device.
Time to Scald
(1st degree burns)
Temperature Time
120°F 8 min.
130°F 20 sec.
140°F 3 sec.
160°F <1 sec.
Closed Loop System
Conventional
Cooling
(Not available
through Airia)
8
Page 9
(a)
H
C
(b)
(c)
Supply
Return
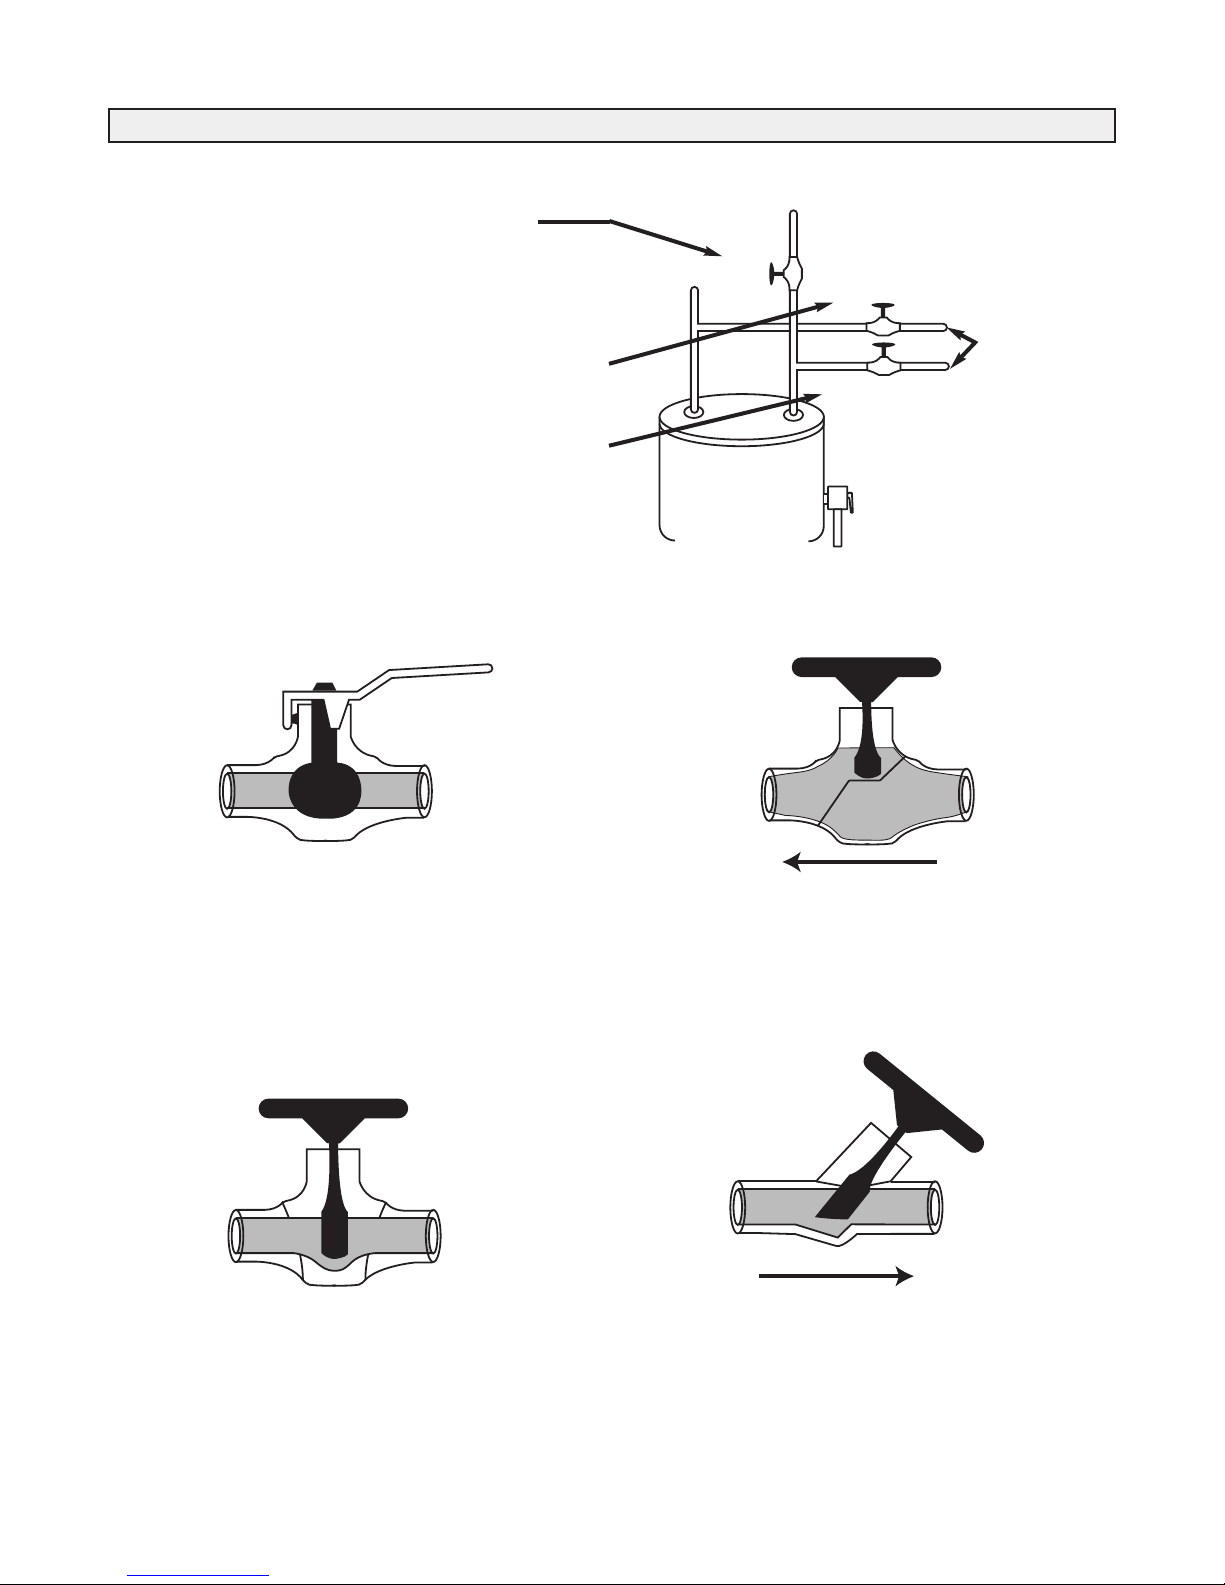
Plumbing
Valves
(a) Located on the cold water side of the Heater.
This valve has the ability to isolate the hot water
(domestic and space heating) from the household cold
water supply. Every water heater requires this valve
regardless of space heating use.
(b) Located on the hot water supply side of the heating
loop, downstream of its connection to the domestic
water.
(c) Located on the return side of the heating loop upstream
of its connection to the domestic cold water.
These two
valves isolate
the heating
loop for
service or
repair.
Ball Valve
The Ball Valve can be used as a shut off or drain valve.
When in the open position, a full bore ball valve has very
little resistance to flow, and these valves tend to be both the
least expensive and the least susceptible to seizing over
time. Do not use reduced bore ball valves as they are very
restrictive to water flow.
Gate Valve
Globe Valve
The Globe valve can be used as a shut off, drain or throttling valve. Even in the open position, the valve is fairly
restrictive to flow. It has a much greater equivalent length
(resistance.) than the other types of valves.
Balancing (Throttling) Valve
The Gate Valve can be used as a shut off or drain valve.
When in the open position, there is very little resistance to
flow. Gate valves tend to be less expensive than other types
of valves but are susceptible to chatter (noise) and malfunction with age.
The Balancing (Throttling) Valve is used to reduce the
water flow rate and thereby increase the water temperature
drop. This is done to ensure proper activation of the water
heater thermostat.
A Globe Valve could also be used for Balancing (Throttling)
but has more resistance than the Balancing Valve.
9
Page 10
Plumbing
WATER HEATER
D
OMESTIC HOT WATER
SUPPLY AIR
BLOWER
CHECK
VALVE
R
ETURN AIR
C
OLD WATER INLET
ANTI-SCALD VALVE
(WHEN REQUIRED)
VALVE
(shut off)
VALVE
(shut off)
VALVE
(
shut off)
VALVE
(balancing)
C
OOLING COIL
(OPTIONAL)
DRAIN
VALVE
HEATING COIL
HRV/ERV CORE
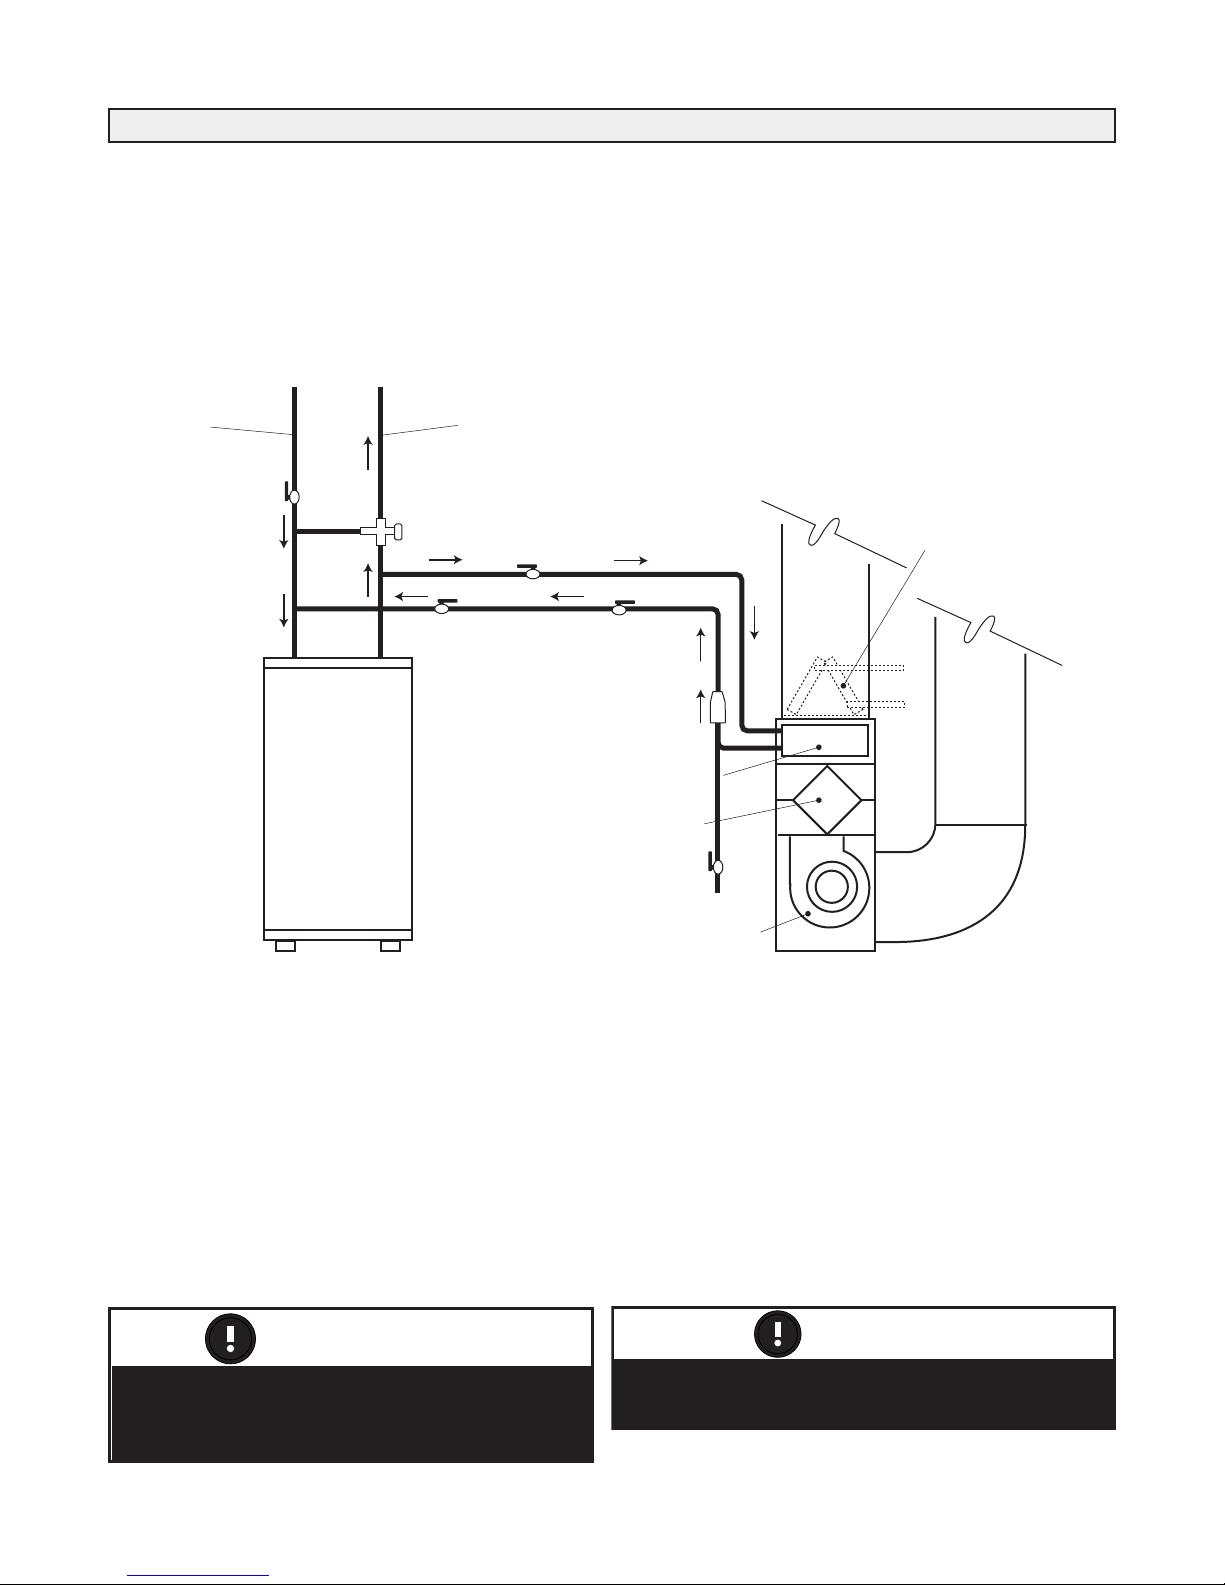
Plumbing components and system
configuration may vary from diagrams
portrayed.
ATTENTION
Chemicals (such as boiler system additives)
cannot be added to a domestic hot water system.
ATTENTION
Call for Space Heating
There are two thermostats controlling every combo system,
the water heater thermostat (controlling the hot water temperature) and the room thermostat (controlling the room air
temperature).
Open Loop System
When the room thermostat calls for heat, the circulation
pump is activated. Hot water is then drawn from the top of
the water heater through the air handler, and then returned
to the water heater.
Conventional
Cooling
(Not available
through Airia)
Hot Water Temperature Drop
The water heater thermostat will initiate the water heater as
required as long as there is a 20°F (11°C) temperature drop
between the hot water supplied to the air handler and the
returning water.
A temperature drop less than 20°F (11°C) can cause the
water heater thermostat not to initiate. This will result in a
lower hot water supply temperature or poor space heating
performance with fluctuating domestic water temperatures.
Call for Domestic Hot Water and Space Heating
When both return water from the space heating loop and
new cold water (replacing domestic water being used)
enters the water heater, the mixed entering water is cool
enough to activate the thermostat quickly. In this situation,
the water heater must be capable of satisfying the combined
need for domestic hot water and space heating at the same
time.
10
Page 11
Quick Connect Kit: PART# 99-CAF-PKit 1/2 or 3/4
WATER HEATER
SUPPLY AIR
RETURN AIR
Balancing
Valve
VALVE
(shut off)
WATER OUT
Assembly
EXPANSION TANK
(WHEN REQUIRED)
CHECK
VALVE
WATER IN
Assembly
KIT CONTENTS
WATER IN Assembly
WATER OUT Assembly
The pre-assembled, Quick Connect Kit shortens the
installation time. It provides an instant, easy assembly of the
major plumbing fittings required for a proper CAF/AH
installation.
The Quick Connect Kit includes the WATER IN and
WATER OUT assemblies. Kits are available in 1/2” and
3/4”sizes. Refer to the CAF/AH specification sheet located
in the Operation and Installation Manual to obtain the correct
size of water connections for the unit being installed.
Push-fit Fittings instantly make plumbing connections
thereby eliminating the need for solder. Be sure to read the
Push-fit Fitting Installation Instructions (included with the
Quick Connect Fitting Kit) before making any connections.
PART #99-CAF-PKit1/2
The 1/2” assembled kit.
PART #99-CAF-PKit3/4
The 3/4” assembled kit.
11
Page 12

Plumbing
16
1
4
12
10
8
6
4
2
0
Capacity on U.S. gpm
S2 and S4 Models
1 2 4 6 8 10 12
To tal Head in Feet
L2 and L4 Models
1 2 4 6 8 10 12 14 16 18 20
16
14
12
10
8
6
4
2
0
Capacity on U.S. gpm
To tal Head in Feet
Air System
A circulation fan draws cool house air at approx. 70°F
(21°C) from the return ductwork, forces it through the water
coil where it is heated, and then distributes it to the various
rooms of the house through the supply ductwork.
Water System Pressures
Within the water system of an Integrated Combo system, a
designer/installer must understand the following terms:
1. Hot water supply temperature (EWT)
2. Hot water flow rate (GPM)
3. Air handler return temperature
4. Air handler flow rate (CFM)
Head Pressure
Head pressure is the pressure created by the circulation
pump to push water through the piping system. It is this
pressure which is used to overcome the resistance to water
flow (friction) caused by the water pipe and fittings. It is
similar in concept to the external static pressure in an air
duct system. Head pressure is measured in feet of water
(millimeters of water).
NOTE
The vertical height of the heating loop does not
impact on th e he a d p r e ssure as the pr e s s ur e
required to push the water up the vertical height is
offset by the weight of the water in the vertical drop
on the other side of the heating loop.
Pressure Drop (PD)
Pressure drop (PD) is the reduction in total pressure caused
by components added to a piping system such as coils,
valves, and fittings. The measurement of pressure drop is
the difference in pressure on the inlet side of the component
and the outlet side. Pressure drop is measured in feet of
water (millimeters of water).
When connecting the water lines for heating loop (air handler) to the domestic water system, the pipes should be
connected with a “tee” to the side of a vertical domestic
water pipe or the bottom of a horizontal domestic water
pipe. This is to help prevent air from entering the heating
loop. The connections should be as near as practical to the
water heater.
Water Pump Performance Specifications
Water Flow Rate
Water flow rate is the amount of water flowing in the system. It is directly related to the head pressure and the
resistance to flow. Flow rate is measured in gallons per
minute (liters per minute).
The circulation pump is factory installed within the air handler. The water flow rate will vary depending on the pumps
performance and the head pressure (resistance) of the complete heating loop system.
The piping and fittings used to connect the water heater and
air handler must be sized to handle the volume of hot water
required by the air handler within the pressure limitations of
the circulation pump. All piping, fittings solders, and fluxes
must be acceptable for use with domestic hot water.
12
Page 13
Plumbing
Air Handler Output Capacity
There are four factors that will significantly affect the
heating output of the air handler.
They are:
• Hot water supply temperature (EWT)
• Hot water flow rate (GPM)
• Air Handler return air temperature
• Air Handler air flow rate (CFM)
Hot Water Supply Temperature
The hot water supply temperature is controlled by the water
heater thermostat. This is set by the installing contractor to
provide the required temperature at the hot water outlet of
the water heater.
The hot water supply temperature is typically 140°F (60°C).
If this temperature must be increased to achieve higher
outputs from the furnace an anti-scald valve must be used to
prevent domestic hot water temperatures above 140°F
(60°C). The manufacturer of the Hot water Tank should be
consulted for temperatures higher than 140°F.
It is important that a warning label be placed near the water
heater thermostat telling the homeowner not to change the
thermostat setting. The label is included with the furnace.
Hot Water Flow Rate
The hot water entering the water coil is the source of heat to
the air handler. The effect of changing the amount of water
entering the c o i l is t h e sa m e a s ch a n g i n g th e w a t e r
temperature. As water flow is reduced, the output of the air
handler and the air temperature rise will both be lowered.
Air Handler Return Air Temperature
The return air temperat ure e ntering the air handler is
approx. 60°F (33°C) below the hot water inlet temperature.
If the return air temperature entering the air handler is
reduced, more heat transfer will occur and the output of the
air handler will increase.
NOTE
Although the water in the combo system is
pressurized by the domestic water system, the
pump is required to create water flow in the heating
loop. The domestic water system applies the same
pressure to the supply and return sides of the
heating loop.
Air Handler Air Flow Rate
The air entering the air handler can only be warmed by the
temperature difference between the hot water and the cool
air. As the volume (CFM (L/s)) of air is reduced, the amount
of heat which can be transferred is also reduced.
Air Handler Temperature Rise
In a fuel fired furnace, the combustion gases can be 1000°F
(538°C) above the return air temperature. These units
typically have a temperature rise from 50°F (10°C) to 90°F
(32°C) and therefore delivers air at the diffuser at 120°F
(49°C) to 160°F (71°C).
Wit h an I n t e g rated C o mb o S y s t e m , th e hot w a t er
temp e r a t u r e is a p p r o x . 130°F ( 5 4 °C) w h i c h is 6 0 ° F
(15.5°C) above the return air temperature. These units
typically have a temperature rise of 35°F (2°C) to 40°F
(4°C) and therefore would deliver air at the diffuser at
approximately 105°F (40.5°C) to 110°F (43°C).
Room Thermostat
The ro o m ther m o s t a t cont r o l s both the wa t er
circulation pump and the air circulation fan. It should be on
a centrally located, inside wall away from any source of
heat such as diffusers, appliances and direct sunlight.
Energy Saving Room Thermostat
A set back thermostat or “smart stat” can be used with a
combo system, but care must be taken in the timing of the
temperature changes. The timing of morning warm up
should be early enough that the desired air temperature has
been reached before the people begin to use domestic hot
water. The highest demand for space heating is during the
morning warm up and the highest demand for domestic hot
water is during morning showers. Even if the water heater
is properly sized, it may not be able to meet this combined
load. Therefore, large set backs should be avoided.
Design vs. Field Conditions
The factors discussed between design parameters and actual
field conditions can impact greatly on output capacity.
Therefore, it is important to do a thorough and complete
commissioning of the integrated combo system to ensure
the design parameters are met.
13
Page 14
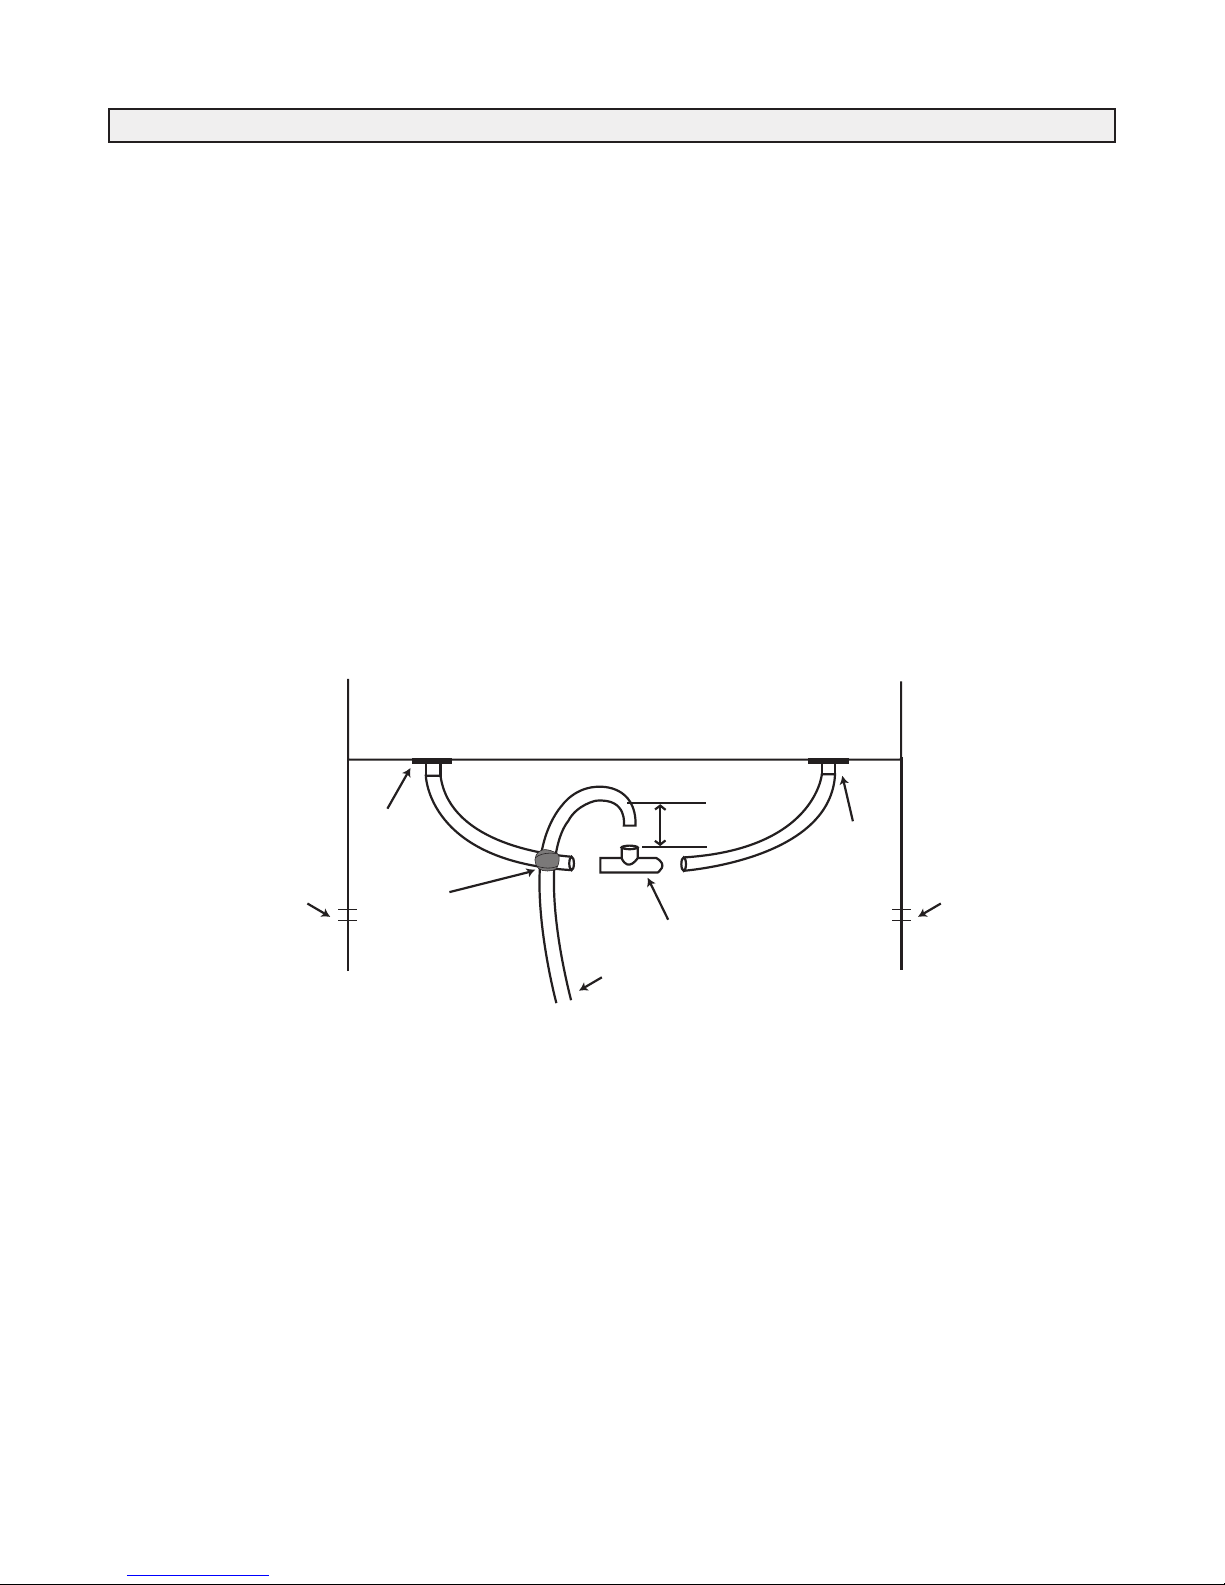
Plumbing
DRAIN
SPOUT
TAPE
THROUGH KNOCKOUT
TO DRAIN
TEE
CONNECTOR
DRAIN
SPOUT
2” (50 mm)
KNOCKOUT
KNOCKOUT
Drain Line
The ventilation portion of the Clean Air Furnace has two
drain pans for removing condensation, which may occur on
the heat recovery core during cold weather.
Piping
The hot water piping between the hot water tank and the
Clean Air Furnace should be new copper type, and should
not be treated with chemicals, sealant or anything else, that
will interfere with the purity of the potable water. Only nonlead, low temperature solder is permitted for sealing copper
joints.
Where possible the length of pipe should not exceed 200'
total equivalent length. Any piping running through unconditioned space must be insulated to prevent heat loss, and
possible freezing of the line.
HRV Drain Line Diagram
Look inside the furnace and locate the pump. Attach the
"Hot Water In" (Supply) to the pipe running to the pump.
Attach the "Hot Water Out" (Return) to the pipe running to
the coil. Do not reverse these lines, as this will cause the
unit to malfunction.
For piping conventional water heaters, connections to and
from the Clean Air Furnace to the water tank should be
made at the point where the pipes leave the tank vertically.
A "T" fitting used in each vertical line, with the Clean Air
Furnace piping connected to the horizontal side of this fitting, will work best in avoiding air locks in the circulation
pump of the furnace.
*Note: Remove shipping block from underneath pump and
discard.
14
Page 15

Remove circular
metal knockout
Remove
styrofoam
knockout
Remove circular
metal knockout
Remove
styrofoam
knockout
Installation
ATTENTION
This manual gives the contractor guidelines for installing
the LIFEBREATH Clean Air Furnace. All national and
local codes relating to this type of equipment must be
followed.
Locating The Unit
The C l e a n A i r Fu r nace i s de s i gned t o be in s talled
vertically, (unless it is designated as a Horizontal unit
”H”), in a conditioned space, where the surrounding
temperature does not fall below 50°F (10°C). Attic
installations are not recommended. Typically the unit is
installed in a mechanical area of the basement, or other
partitioned mechanical room, elsewhere in the home.
A location close to an outside wall is recommended, as the
ventilation supply and exhaust portion will need to be
ducted to the outside air. Sufficient clearance around the
unit is required for service of the filter, heat recovery core
and components. As a rule this unit should be installed
adjacent to the hot water heater. If this is not possible, or if
the piping layout is complex, the total head pressure on the
pump should be calculated.
Option 1 - Upflow Models
Duct Connections
To accommodate various installations, the Clean Air
Furnace has knockouts for the return air plenum and
ventilation ducts, on both sides of the cabinet. Special care
an d atten tion should be gi ven to determin ing whi ch
knockouts are to be removed.
Slide H eat Recovery Co re out to remove ventilati on
knockouts. Never install ductwork directly to the cabinet
that is smaller than the opening provided.
Penetrations from sheet metal screws used to fasten the
ductwork to the cabinet of the unit should only be placed
into the duct flange provided. This is to avoid contact and
damage of the heating/air conditioning coils and internal
wiring.
Ventilation Ports Off Left
NOTE: Return plenum opening can be on either side of cabinet and is not dependent on which side the ventilation ports are on.
Ventilation Ports Off Right
Do not remove circular knockout when
installing the optional Bathroom Exhaust
System (Part 99-CAF-BESKIT). Refer to
instructions with kit.
15
Page 16

Remove circular
metal knockout
Installation
A Backdraft Damper is required in the exhaust
air duct to prevent cold air from entering the
unit when the Clean Air Furnace is not running.
WARNING
ATTENTION
Remove
styrofoam
knockout
Remove
styrofoam
knockout
Remove
styrofoam
knockout
Remove
styrofoam
knockout
ATTENTION
Option 2 - Downflow Models
Ventilation Ports Off Left
Do not remove lower styrofoam knockout when
installing the optional Bathroom Exhaust System
(Part 99-CAF-BESKIT). Refer to instructions with kit.
Ventilation Ports Off Right
Option 3 - Horizontal Models
Ducting
The duct sizing for the furnace section can be determined
using H RAI Residential Air System Design Manual,
SMACNA, or any other industry-recognized manuals.
Note: "Combo units" normally deliver air at approx.
110°F (43°C), and therefore may require larger than
normal ductwork. When installing the Clean Air Furnace
as a replacement unit on a retrofit application, always
calculate the size of duct that is there.
Any ductwork running through unconditioned space must
be sealed properly and insulated to prevent heat loss. All
local codes must be followed in determining the amount of
insulation needed.
The 99-CAF-BESKIT is not compatible
with horizontal models.
The ventilation section consists of two 6" (15.2cm) round
ports located on the side of the cabinet, which vent to the
outside. Insulated ducting with a vapor barrier such as flexducting, or ridged pipe wrapped in pipe sleeve, is required
to prevent condensation from occurring on the pipe. Also
the air f l o w in thes e l ines is d e si gned to b e
balanced. (See "Balancing Airflows" in this manual, for
damper location and procedure).
16
Page 17

1. Thermal Collar slides over galvanized
sleeve of Weatherhood.
2. Fasten Thermal Collar to Belt.
3. Slide the Insulated Flexible Ducting over
the Weatherhood's galvanized sleeve and
fasten it to the Thermal Collar.
4. Hood is hinged to allow for easy access
for cleaning of bird screen.
WEATHERHOOD INSTALLATION
1/4" (6 mm) SCREEN
(front view)
EXTERIOR
WALL
SCREEN
(side view)
COLLAR IS SUPPLIED TO
ENSURE VAPOUR BARRIER
IS 100% SEALED TO
WALL PLATE
12" galvanized
pipe supplied
Installation
Design and install the fresh air intake in an
area where the hoods will gather the
freshest air.
ATTENTION
Locating Intake Weatherhood
The intake weatherhood should be located as follows:
• 4 - 6' from ventilation exhaust hood, and upstream of
prevailing winds, if possible.
• At least 6' from a dryer vent, oil fill pipes, combustion
outlets, gas meters, garbage containers or anything else,
which may contaminate the air.
• Do not locate fresh air intake in garages, crawl spaces or
attics.
• Install 18" (45.72 cm) above grade, or above expected
snow accumulation.
Locating the Exhaust Weatherhoods
The Exhaust Weatherhood should be located as follows:
• At least 4-6' from the supply inlet
• At least 18" (45.72 cm) above grade or expected snow
accumulation
• At least 3' from gas meters, combustion vents, or dryer
vents
• Do not install in garages, crawl spaces or attics
Outside Ducting the Weatherhoods
The ventilation portion of the Clean Air Furnace can be
vented off either side of the unit by removing knockouts
provided. Once the knockouts in are removed, a bead of
si licon e can be placed on th e plasti c therm o-col lars
(provided), to form a seal between the collars and the
cabinet. The collars can then be fastened into place with
screws. Note the exhaust outlet is always the port on the
bottom, and the supply inlet is always the port on the top,
both ports should be labeled from the factory as such.
The ductwork from the outside weatherhoods to the unit, is
usually flexible ducting, although rigid pipe may be needed
if the runs are greater than 10 feet. In either case the pipes
(both exhaust and supply and the added fittings) must be
insulated, with a complete vapor barrier.
To minimize restriction in airflows the ducting should be
short, with as few bends as possible. See diagram below
for recomm ended connection of insulated ducting to
outside weatherhoods.
It is necessary to have balanced air flows in an HRV. The
volume of air brought in from the outside must equal the
volume of air exhausted by the unit. If the air flows are not
properly balanced then:
• The HRV may not operate at its
maximum efficiency
• A negative or positive air pressure may occur
in the house
• The unit may not defrost properly
• Failure to balance the HRV may void warranty
Locating Weatherhood
17
Page 18

Note: For best results keep Pitot tube
well away from dampers.
Pitot Tube
Pitot Tube Air Flow Balancing
Prior to balancing, ensure that:
1. All sealing of the ductwork system has been
completed.
2. All of the HRV's components are in place and
functioning properly.
3. Balancing dampers are fully open.
4. Unit is on high speed.
5. After taking readings of both the stale air to the HRV
duct and fresh air to the house duct, the duct with the
lower CFM ([L/s] velocity) reading should be left alone,
while the duct with the higher reading should be
dampered back to match the lower reading.
6. Return unit to appropriate fan speed for normal
operation.
Balancing Procedure
The following is a method of field balancing an HRV using
a Pitot tube, advantageous in situations when flow stations
are not installed in the ductwork. Procedure should be performed with the HRV on high speed.
Choose the straightest section of duct between the HRV
and the weatherhoods. This will be used for both the
supply and return ducts.
Drill a small hole in the duct (about 3/16"), three feet
downstream of any elbows or bends, and one foot upstream
of any elbows or bends. These are recommended distances
but the actual installation may limit the amount of straight
duct.
The Pitot tube should be connected to a magnehelic gauge
or other manometer capable of reading from 0 to 0.25 in.
(0 - 62 Pa) of water, preferably to 3 digits of resolution.
The tube coming out of the top of the Pitot is connected to
the high pressure side of the gauge. The tube coming out of
the side of the Pitot is connected to the low pressure or
reference side of the gauge.
Insert the Pitot tube into the duct, pointing the tip into the
airflow.
For general balancing it is sufficient to move the Pitot tube
around in the duct and take an average or typical reading.
Repeat this procedure in the other (supply or return) duct.
Determine which duct has the highest airflow (highest
reading on the gauge). Then damper that airflow back to
match the lower reading from the duct. The flows should
now be balanced.
Actual airflow can be determined from the gauge reading.
The value read on the gauge is called velocity pressure.
The Pitot tube comes with a chart that will give the air flow
velocity based on the velocity pressure indicated by the
gauge. This velocity will be either feet per minute or
meters per second. To determine the actual airflow, the
velocity is multiplied by the cross sectional area of the duct
being measured.
This is an example for determining the airflow in a 6" duct.
The Pitot tube reading was 0.025inches of water. From the
chart, this is 640 feet per minute.
The 6" (15.2 cm) duct has a c ross sectiona l area of:
= [3.14 x (6"÷12)
2
]÷4
= 0.2 square feet
The airflow is then:
640 ft./min. x 0.2 square feet = 128 cfm
For your convenience, the cross sectional area of some
common round duct is listed below:
DUCT DIAM. (inches) CROSS SECTION AREA (sq. ft.)
5.0 (125 mm) .14
6.0 (150 mm) .20
7.0 (175 mm) .27
Pitot Tube and Gauge
Placement of the Pitot Tube
Figure B
Figure A
18
Page 19

BUILT-IN
BALANCING
DAMPERS
BACK DRAFT
DAMPER
OUTSIDE
INSULATED PIPE
WITH VAPOUR
BARRIER
Pitot Tube Air Flow Balancing
A Backdraft Damper is required in the exhaust
air duct to prevent cold air from entering the
unit when the Clean Air Furnace is not running.
WARNING
The accuracy of the airflow reading will be affected by how
close to a ny elbows or bends the r eadings are t aken.
Accuracy can be increased by taking an average of multiple
readings as outlined in the literature supplied with the Pitot
tube.
Balancing Collar Instructions
Push and turn with slotted
screwdriver. Damper
automatically locks when
pressure is released.
Back Draft Damper
The back draft damper (not included) can be located anywhere in a vertical rise of the exhaust duct.
Figure C
Insulated flexible
ducting
When connecting ductwork
to the collar, take note where
screws are located. Screws
should be located no further
than 1/2” (12.70 mm) from outside edge of collar, so as not to
impede operation of the damper.
1/2” (12 mm)
Figure D
19
Page 20

R W Y G
A/C Unit
Thermostat
To“Y”
To“C”
T30
SW1
T29T28REDOGYWRCT25
T
17
K3 K4 K5
COM
N.O.
K6
COM
N.O.
COM
N.O.
COM
N.O.
T
18 T19
T20
RELAY
FEED
T43
SPARE
T26 T27 GRNYEL
P2 P3
R
24Vac12Vac Com
Thermostat DET
C
Defrost
Freeze
Fan Hi Fan Med Fan Low
ON
P1
C
4
C3
K7 K1 K2K8
8 7 6 5 4 3 2 1
C
2
C
1
T31
T32
T33
T34
T35
T36
T37
T38
T39
T40
T41
T42
Contact 1
N.0. COM N.C. N.0. COM N.C. N.0. COM N.C. N.0 . COM
Contact 2 Contact 3 Contact 4
Digital Controls
DIP SWITCHES TO BE
ADJUSTED BY QUALIFIED
TECHNICIANS ONLY.
N.C
SEUL UN TECHNICIEN
QUALIFIÉ PEUT AJUSTÉ LES
COMMUTATEURS DIP.
CHASSIS
T44
T21 T22
T
23
T24
AUX 1
AUX 2
T3
T4
T
5
T6
L
ine/Ligne
T1
T2
T13 T14
T15
T
16
Neutral/Neutre
T11 T12
2 AMPS
Function and Controls Standard Motor
ON
8 7 6 5 4 3 2 1
Do not adjust any other DIP switches than
indicated above.
WARNING
Do not energize the CAF until the plumbing is
connected and commissioned. Failure to do so
will damage the pump.
WARNING
Standard 24 Volt
Thermostat
Connection
(Thermostats are not available through Airia)
Standard Motor DIP Switch Settings
(DIP #1-8 OFF is Factory Setting)
DIP #2 to ON will disable the
Off Season Circulation Timer
DIP #6 to ON will select
Medium Speed for heating
(Factory setting is OFF for High
Speed)
DIP #7 to ON will select
Medium Speed for cooling
switch (Factory setting is OFF
for High Speed)
Thermostat Heat Anticipator Settings
Mechanical Thermostats - start at .5 amp and may need to
be increased depending upon the residual heat left in the
hydronic coil and duct work.
Electronic Thermostats - to be set on electric style heat.
Off Season Circulation Timer
Water is periodically circulated through the space heating
loop during the summer and other periods of infrequent use.
The concern is that water which remains stationary in the
heating loop during the summer may be less than desirable
as domestic hot water when it is returned to the water heater
at system startup in the fall.
Basic Functions
C - Common
R - 24 volt Supply
W - Medium or High Fan Relay with Circulation Pump
(The speed depends on Dip Switch # 6 setting)
Y&G- Medium or High Fan Relay
(The speed depends on Dip Switch # 7 setting)
G - Low Speed Fan Relay
O - High Speed Fan Relay with Circulation Pump
20
Page 21

Switch Setting
Adjust Switches
Both OFF
5 0N - 6 OFF
5 OFF - 6 ON
5 ON - 6 ON
Heat
Normal
Increase 15%
Decrease 15%
Normal
Cool
Normal
Increase 15%
Decrease 15%
Normal
Fan Speeds
Switch Setting
Heat Switches
Both OFF
3 0N - 4 OFF
3 OFF - 4 ON
3 ON - 4 ON
Fan Speeds
Heat
High
Med High
Med Low
Low
Switch Setting
Cool Switches
Both OFF
1 0N - 2 OFF
1 OFF - 2 ON
1 ON - 2 ON
Fan Speeds
Cool
High
Med High
Med Low
Low
Delay Switches are for future use - no function at this time
Note:
Refer to individual specification pages for Airflow
Performance specifications. Above settings correspond
to DIP switch settings on the ECM circuit board only.
Do not adjust DIP switches on MAIN Circuit Board.
T31
C
o
N
.0. C
Digital Controls
R W Y G
A/C Unit
Thermostat
To“Y”
To“C”
T
30T29T28REDOGYWRCT25
T17
K3
COM
K6
COM
N
.O.
T
26 T27 GRNYEL
P2 P3
R
24Vac12Vac Com
Thermostat DET
C
Defrost
Freeze
F
an
P1
C4
C3
K8
T31
Co
N
.0.
Digital Controls
DIP SWITCHES TOBE
A
DJUSTED BY QUALIFIED
TECHNICIANS ONLY.
S
EUL UN TECHNICIEN
Q
UALIFIÉ PEUT AJUSTÉ LES
COMMUTATEURS DIP.
CHASSIS
T44
T
3
T
4
T
5
T
6
Line/Ligne
T
1
T
2
T
13 T14
T
15
T16
Neutral/Neutre
T
11 T12
2 AMPS
SW1
ON
8 7 6 5 4 3 2 1
T21 T22
T
23
T24
A
UX 1
A
UX 2
Function and Controls ECM Motor
Do not energize the CAF until the plumbing is
connected and commissioned. Failure to do so
will damage the pump.
WARNING
DIP switches #6 & #7 must be ON for the
ECM motor to function (factory setting).
ATTENTION
ON
8 7 6 5 4 3 2 1
Do not adjust any other DIP switches than
indicated above.
WARNING
COOL
12 34 5678
HEAT
ADJUST DELAY
COOL HEAT
ADJUST DELAY
SW1
off on
T2
T1
ECM Motor DIP Switch Settings
Standard 24 Volt
Thermostat
Connection
Thermostats are not avail-
(
ble through Airia)
a
Thermostat Heat Anticipator Settings
Mechanical Thermostats - start at .5 amp and may need to be
increased depending upon the r esidu al heat l eft in th e
hydronic coil and duct work.
Electronic Thermostats - to be set on electric style heat.
ECM Motor DIP Switch Settings
(DIP 6&7 ON is Factory Setting)
DIP #2 to ON will disable the
Off Season Circulation Timer
Basic Functions
• Thermostat fan switch will control low speed fan
operation
• Call for heating - high speed
• Call for cooling - high speed
Factory Setting
21
Page 22

Optional Dehumidistat - Part #99-DH-01
%
80
2
0
Key Features
• The Dehumidistat measures the indoor humidity level and will
initiate high speed ventilation when the moisture level in the
building exceeds the set point on the control.
• Once the humidity in the building is reduced, the unit will revert to
its previous setting.
• The Dehumidistat should be set to OFF for all season except the
heating season.
• Connect to 3 wire 20 gauge low voltage wire.
Humidity Control
Your HRV will produce a dehumidifying effect when outdoor humidity
lev e l s are l o w e r t h a n i n d o o r h u m i d i t y l e v e l s. N e v e r u s e t h e
dehumidistat feature when outdoor temperatures are above 59 F (15 C).
Note: The indoor humidity level is measured at the control.
Setting the Dehumidistat
Pre s s an d rele a s e th e DEH U M I D I S TAT b u t t o n u n t i l t h e
DEHUMIDISTAT LIGHT is at the desired setting. After 5 seconds the
dehumidistat light will either flash or be on continuous.
A flashing light indicates the humidity level is higher than the setting
and the unit is operating on high speed ventilation. A continuous light
indicates the humidity level is lower than the setting. Connect to 3 wire
20 gauge low voltage wire. Mounts in a standard 2” x 4” electrical box.
Note - Only 1 dehumidistat should be active on a system.
Instruction card
Dehumidistat Indicator
LEDs
Set to the desired humidity
level. High speed ventilation
will initiate when the indoor
moisture level exceeds the set
point on the control.
Dehumidistat
Adjust button
Optional Timers
The timer will override the Operational Mode (regardless of the
settings) and initiate high speed ventilation. Upon completion of the
timer cycle, the HRV will return to your selected Operational Mode
and speed setting.
Lifestyle 20/40/60 Minute Timer
Part # 99-DET01
Initiates high speed ventilation for 20, 40 or 60 minutes. The 20/40/60
Minute Status Lights indicate high speed operation.
Lockout Mode is useful if you wish to disable the timer. Set lockout by
holding the Select Butt on for 5 s econds. Unlo ck by holding for
5 seconds.
Connect to 3 wire 20 gauge low voltage wire. Mounts in a standard
2" x 4" electrical box.
Lifestyle 20 Minute Timer
Part # 99-20M01
Initiates high speed ventilation for 20 minutes. The 20 Minute Status
Light indicates high speed operation.
Lockout Mode is useful if you wish to disable the timer. Set lockout by
hold ing the sel ect button for 5 seconds. Unlock by holding for
5 seconds.
Connect to 3 wire 20 gauge low voltage wire. Mounts in a standard
2" x 4" electrical box.
20 / 4 0 / 6 0 M i n u t e
Status Lights
Select Button
20 Minute
Status Lights
Select Button
22
Page 23

Wiring the Controls
%
80
2
0
T30
SW1
T29T28REDOGYWRCT25
T17
K3 K4 K5
COM
N.O.
K6
COM
N.O.
COM
N.O.
COM
N.O.
T18 T19
T20
RELAY
FEED
T43
SPARE
T26 T27 GRNYEL
P2 P3
R
24Vac12Vac Com
Thermostat DET
C
Defrost
Freeze
Fan Hi Fan Med Fan Low
ON
P1
C4
C3
K7 K1 K2K8
8 7 6 5 4 3 2 1
C2 C1
T31
T32
T33
T34
T35
T36
T37
T38
T39
T40
T41
T42
Contact 1
N.0. COM N.C. N.0. COM N.C. N.0. COM N.C. N.0 . COM
Contact 2 Contact 3 Contact 4
Digital Controls
DIP SWITCHES TO BE
ADJUSTED BY QUALIFIED
TECHNICIANS ONLY.
N.C
SEUL UN TECHNICIEN
QUALIFIÉ PEUT AJUSTÉ LES
COMMUTATEURS DIP.
CHASSIS
T44
T21 T22
T23
T24
AUX 1
AUX 2
T3
T4
T5
T6
Line/Ligne
T1
T2
T13 T14
T15
T16
Neutral/Neutre
T11 T12
2 AMPS
Optional Timers
Connect to Yellow, Red
& Green
Optional Dehumidistat
Connect to Yellow, Red & Green
23
Page 24

Aircom Relays
T30T29T28
T43
SPARE
P2 P3
F2 MAX 2 amp
R
2
4Vac
Defrost
Freeze
K7 K1 K2K8
T31
T32
T33
T34
T35
T36
T37
T38
T39
T40
T41
T42
Contact 1
N.0. COM N.C. N.0. COM N.C. N.0. COM N.C. N.0 . COM
Contact 2 Contact 3 Contact 4
N.C
Boiler
Contact
T30T29T28
T43
SPARE
P3
MAX 2 amp
R
24Vac
Defrost
K7 K1 K2K8
T31
T32
T33
T34
T35
T36
T37
T38
T39
T40
T41
T42
Contact 1
N.0. COM N.C. N.0. COM N.C. N.0. COM N.C. N.0 . COM
Contact 2 Contact 3 Contact 4
N.C
H
umidifier
Contact
The Aircom circuit board has three available “dry contact”
relays. Contact 3 is not available.
Maximum 115V 10 amp resistive load.
Contact 1
This relay is a dry contact (no power supplied from board).
The relay switches states upon a call for heat.
This relay can be used to switch the heat demand signal for
boiler operation.
Power (if required) must be supplied to common from an
external source.
Max. voltage - 120 volts
Max. Amperage - 10 amps
Contact 2
This relay is a dry contact (no power supplied from board).
The relay switches states when the CAF blower motor is in
operation.
Th i s r elay can be used to int e rlock humid i fiers, Air
Cleaning Equipment, etc.
Power (if required) must be supplied to common from an
external source.
Max. voltage - 120 volts
Max. Amperage - 10 amps
24
Page 25

Start-Up Procedure
In order for any appliance to work properly it must be set
up and tested by a knowledgeable technician.
The following conditions must be met prior to
start-up:
1. Ensure that connecting water lines are purged and free of
debris.
Caution: solder or other debris may cause the furnace
pump or check valve to malfunction.
2. Blower wheel rotates freely inside its housing.
3. Wiring connections are tight.
4. Water is sitting in the "P" trap below the HRV core.
5. All duct and pipe connections are sealed.
6. Check that styrene block is removed from under pump.
7. Front access door is on tight.
8. Fan speed selection:
a) Heating/Cooling - factory setting is at high speed and
can be changed in the electrical box to medium-high or
medium if required.
b) Ventilation - low speed is controlled by the
Thermostat Fan switch.
Once all of the necessary connections have been
made, the Clean Air Furnace Start-Up Procedure is
as follows:
1. Close shut-off valves separating the Clean Air Furnace
from the water heater.
2. Set up water heater according to manufacturer's
instructions.
3. Purge air from unit. To do so, open the supply shut-off
valve to the furnace. Attach a garden hose to drain valve,
and drain water until you get a continuous flow. Close
the drain valve and purge the pump. To purge the air
from the pump, turn the large screw on the face of the
pump counter-clockwise until water leaks out, then
tighten. Open the supply shut-off valve.
4. Turn on power supply to Clean Air Furnace.
5. Switch the room thermostat to heat. The thermostat
should be set higher than the current room temperature in
order to energize the pump and commence the heating
cycle. (If the pump does not start, or the Clean Air
Furnace is not producing heat, refer to the
Troubleshooting Section in this manual.
6. Set room thermostat at desired temperature setting.
25
Page 26

Service/Maintenance
Ultra-ecient
heating coil
Tempered fresh air
to heating coil
Fresh air intakes to HRV
Heated fresh air
to registers
Stale air to outside
Hot water
circulation pump
Hot water
return
Heat recovery
ventilator heat
exchanger
PSC type
hi-eciency
motor
Return air
from house
Hot water
supply
Note: This illustration may vary from
the actual model installed.
A dedicated maintenance program will prolong the life of
the equipment, and maintain its optimum performance.
We r e commend at lea s t t w o ( 2) full inspect i ons and
cleanings per year under normal operating conditions, and
more if circumstances warrant it (i.e. situations of heavy
smoke may require servicing every one to two months).
Service should include:
• Cleaning of screens protecting outside hoods.
• Cleaning of the HRV (aluminum) core.
• Inspect filters and replace as necessary.
• Wipe down drain pans and inside of cabinet, using a mild
disinfectant.
• Ensure condensate drain has free flow of moisture.
• Inspect operation of blowers and electrical panel.
• Confirm operation.
Clean Core Twice a Year
a) Open access door.
b) Carefully grip ends of core, and pull evenly outward.
Core may be snug, but will slide out of the "H" channel.
c) Once removed from the cabinet, remove the foam filters.
d) Wash the core in warm soapy water (do not use dish-
washer).
e) Install the clean filters
f) Install the clean core.
26
Page 27

Troubleshooting
Lack of heat
1. Check that the room thermostat is set to the desired
temperature.
2. Confirm the units have power and the shut-off valves are
open.
3. Ensure there is power to the unit and that the pump is
working. If the pump is not working properly it may be
stuck. Disconnect power and remove screw in center face
of the pump. Using a screwdriver, turn the pump shaft
several times to free it from sticking. Replace centerscrew and re-connect power. If pump still fails to start, it
may require replacement.
4. Confirm that the hot water heater is working and that hot
water is entering the Clean Air Furnace.
5. Verify that the airflow in and out of the system matches
designed specs. If airflow is low, check for blockage in
the filter or some other obstruction.
6. Make sure your water heater is sized large enough for
heat load of house and for domestic hot water use.
7. Air may still be in the water lines. If so, re-purge the
system according to the start up procedure.
8. Confirm that the inlet and outlet pipe connections are not
reversed.
9. Ensure that there are no other restrictions in the water
lines, such as faulty valves, or debris.
Pump is noisy
Pumps can become noisy when air remaining in the lines
interfere with their operation. If this occurs re-purge the
system as indicated in the Start-Up Procedure.
HRV core freezes up
1. Make sure that the supply and exhaust lines are balanced
according to the "Balancing Procedure" in this manual.
2. If out of balance, ensure that the balancing dampers have
not been moved and that there are no obstructions in the
outside hoods.
During cooling cycle, hot water circulates through
the coil
If the check valve inside the cabinet is stuck in the open
position, hot water may infiltrate the heating coil. This
occurs when the ho t pipes a re not capped- off du ring
installation or service and foreign debris enters the piping.
This debris can settle under the check valve seat and permit
hot water to flow into the coil. The problem can be corrected by repeatedly flushing the heating loop until it is clean.
Water sits in drain pipes
1. Check drain pans or lines for plugs.
2. Confirm that the HRV core is installed according to
manufactures recommendations.
3. Check the drain line for kinks.
4. Make sure that the O-ring in the drain nozzles sit flat.
5. Ensure the drain line has enough "fall" to it.
Condensation/ice forming inside ventilation ducts
A rip in the vapor barrier or poorly sealed joints may cause
condensation or ice to form on the ducting. If this occurs,
replace the entire line.
27
Page 28

Controlling your HRV
Today's modern, tight homes require fresh outdoor air to
maintain a healthy indoor air environment. The amount of
ventilation you require in your home will depend upon:
• the number of occupants and their activity levels,
• the way your home was built.
• your personal preferences for fresh air,
The HRV intro d u c e s f r e s h a i r to your home while
recovering energy from the air it exhausts. Specifically, an
HRV that is properly installed, operated and maintained
will:
• exhaust stale, contaminated air
• recover the majority of the energy from the exhausted
stale air
• use the recovered energy to preheat or precool outside air
that is drawn into the house
• distribute the fresh air throughout the house
How the Dehumidistat Works
High indoor humidity levels are apparent from the visible
condensation on windows. The amount of condensation on
the windows will increase as outdoor temperatures drop.
Your HRV will reduce indoor humidity levels when outdoor
air is drier than indoor air. This usually occurs during the
heating season when outdoor temperatures are less than
15°C (59°F).
The Optional Dehumidistat (99-DH01) can be set to achieve
a further dehumidification effect from your HRV. High
speed ventilation will be initiated upon exceeding the
dehumidistat set point regardless of the mode and speed of
operation. Once the humidity in the house is reduced, the
HRV will revert back to its previous setting.
We suggest operating the unit for the first few days without
use of the dehumidistat function to observe if a further
dehumidification effect will be required. The dehumidistat
operates in % of RH (relative humidity) with 80 being high
and 20 being low. Set the Dehumidistat to 80% to disable.
If, after a few days, further dehumidification is required (the
house is still too humid), set the humidity level to a lower
amount.
HOW MUCH VENTILATION DO I NEED?
During seasons when your windows and doors are closed
(winter, and summer if air conditioned), the HRV should be
set to operate continuously on low speed with the option of
going to high speed as the need arises. For example: if you
are entertaining and there is a large number of people
present, the unit should be switched temporarily to high
speed.
You may wish to use an intermittent operational mode if
your home is unoccupied (20 minutes ON / 40 minutes
OFF).
The average person is comfortable between 30-50% RH.
The dehumidistat should be set to OFF for all seasons
except the heating season. OFF is achieved by setting the
dehumidistat to 80.
28
Page 29

Configuration
U - Upflow - Return Air off Left or Right side
D - Downflow - Return Air off Left side, Right side or Top
(not available for L2A or 00 Coils)
H - Horizontal - Return on left side only
(not available for L2A or 00 Coils)
Hydronic Coil Size
S4A - Small Coil - 4 Row Coil
L2A - Large Coil - 2 Row Coil (available in upflow only)
L4A - Large Coil - 4 Row Coil
00 - No Hydronics - No Heating Coil, No Pump
(available in upflow only)
24 - 2 tons
30 - 2.5 tons
36 - 3.0 tons
48 - 4.0 tons
*Cooling coils not available from Airia
Motor Configuration
P16 - Standard PSC Motor 120V/60Hz
E16 - Upgrade ECM Motor 120V/60Hz
Example Model Number CAF - U - S2A - 24 - P16
* CFM (High Speed)
Cooling Capacity
Model Configuration
CAF - Clean Air Furnace (Built-in HRV)
Refer to AH (Air Handler) specifications if
a built-in HRV is not required.
Available Clean Air
Furnace Models
CAF-U-S4A-24-P16(E16)
CAF-D-S4A-24-P16(E16)
CAF-H-S4A-24-P16(E16)
CAF-U-L4A-36-P16(E16)
CAF-D-L4A-36-P16(E16)
CAF-H-L4A-36-P16(E16)
CAF-U-L2A-48-P16(E16)
CAF-U-00-24-P16(E16)
CAF-U-00-36-P16(E16)
CAF-U-00-48-P16(E16)
Refer to individual specifications pages for
Hydronic Coil and Blower outputs and
configurations.
Model Number Nomenclature Breakdown
Refer to individual specification pages for
Hydronic Coil and Blower outputs and
configurations.
ATTENTION
29
Page 30

info@lifebreath.com
Top
Front
29.5”
(749 mm)
29.5"
(749 mm)
19"
(483 mm)
47.5"
(1207 mm)
6"
14"
(356 mm)
12"
(305 mm)
4”
(100 mm)
19”
(483 mm)
22.4”
(567 mm)
Supply Air
17.25”
(438 mm)
Ventilation
Supply Air
Inlet
Ventilation
Exhaust Air
Outlet
22”
(559 mm)
Return Air
Blower Section
(SERVICE CLEARANCE 1') (SERVICE CLEARANCE 3')
Side
Latches
(150 mm)
6"
(150 mm)
Model CAF-U-S4A-24-P16
Core Ventilation system has patented aluminum heat recovery core (standard) or an enthalpic energy recovery core (optional) for
energy-efficient ventilation. Enthalpic cores are recommended for regions where the temperature does not drop
below 25°F (-4°C).
Filters Washable air filters in exhaust and supply air streams of ventilation section, 1" (25 mm) pleated in return plenum side.
Case Pre-painted galvanized steel for superior corrosion resistance.
Dimensions & Clearances
Not e: Ventil at ion ports and return ple num
opening available off either side of cabinet. All
units conform to CSA and UL Standards.
Options
99-186 Weatherhoods, Two - 6" (150 mm) c/w 1/4" (6 mm) mesh
screen
99-RSK6 6” (150 mm) back draft damper
99-DH-01 Lifestyle Dehumidistat - Initiates high speed
ventilation for 20, 40, or 60 minutes (3 wire) 20 gauge wire
(minimum) 100 ft. length
Warranty
Units carry a lifetime warranty on the heat recovery (aluminum) core, a five year warranty on the energy recovery (enthalpic) core and a
five year replacement parts warranty on all other components.
Date: ___________________________________________
Tag: _____________________Qty:___________________
Project: _________________________________________
Engineer: _______________________________________
OPTIONAL TIMERS
99-DET01 Lifestyle 20/40/60 Minute Timer - Initiates high speed
ventilation for 20, 40, 60 minutes. (3 wire) 20 gauge wire
(minimum) 100 ft. length
99- 20M01 Lifestyle 20 Minute Timer - Initiates high speed
ventilation for 20 minutes. (3 wire) 20 gauge wire (minimum)
100 ft. length.
Contractor: ______________________________________
Supplier: ________________________________________
Quote#: _________________________________________
Submitted by: ____________________________________
Model CAF-U-S4A-24-P16
Voltage 120 VAC 60 Hz
Hp 1/3
Amps (total) 8
Water
Connections Soldered Connection
Airflow (High)
.25 in wg
.5 in. wg 890 CFM
Ventilation 100 - 140 CFM
Airflow
Effectiveness 70%
(Aluminum Core)
Total Efficiency 50%
(Enthalpic Core)
Net Weight 150 lbs.
Shipping Weight 165 lbs.
1/2" (12 mm) Copper
1030 CFM
30
Page 31

info@lifebreath.com
SideFront
29.5"
(749 mm)
19"
(483 mm)
47.5"
(1207 mm)
6”
(150 mm)
12"
(305 mm)
4"
(100 mm)
To p
29.5"
(749 mm)
22"
(559 mm)
19"
(483 mm)
14"
(356 mm)
Bottom
29.5”
(749 mm)
19"
(483 mm)
16"
(406 mm)
Supply Air
Return Air
17.25"
(438 mm)
Ventilation Supply
Air Inlet
Ventilation Exhaust
Air Outlet
22"
(559 mm)
Return Air
Latches
Blower Section
(SERVICE CLEARANCE 1') (SERVICE CLEARANCE 3')
14”
(356 mm)
6”
(150 mm)
Model CAF-D-S4A-24-P16
Core Ventilation system has patented aluminum heat recovery core (standard) or an enthalpic energy recovery core (optional) for ener-
gy-efficient ventilation. Enthalpic cores are recommended for regions where the temperature does not drop below 25°F (-4°C).
Filters Washable air filters in exhaust and supply air streams of ventilation section, 1" (25 mm) pleated in return plenum side
Case Pre-painted galvanized steel for superior corrosion resistance.
Dimensions & Clearances
Note: Ventilation ports and return plenum opening available off either side of cabinet.
All units conform to CSA and UL Standards.
Options
99-186 Weatherhoods, Two - 6" (150 mm) c/w 1/4" (6 mm) mesh
screen
99-RSK6 6” (150 mm) back draft damper
99-DH-01 Lifestyle Dehumidistat - Initiates high speed
ventilation for 20, 40, or 60 minutes (3 wire) 20 gauge wire
(minimum) 100 ft. length
Model CAF-D-S4A-24-P16
Voltage 120 VAC 60 Hz
p 1/3
H
Amps (total) 8
Water
Connections Soldered Connection
Airflow (High)
.25 in wg
.5 in. wg 890 CFM
Ventilation 100 - 140 CFM
Airflow
Effectiveness 70%
(Aluminum Core)
Total Efficiency 50%
(Enthalpic Core)
1/2" (12 mm) Copper
1030 CFM
Net Weight 150 lbs.
Shipping Weight 165 lbs.
OPTIONAL TIMERS
99-DET01 Lifestyle 20/40/60 Minute Timer - Initiates high speed
ventilation for 20, 40, 60 minutes. (3 wire) 20 gauge wire
(minimum) 100 ft. length
99- 20M01 Lifestyle 20 Minute Timer - Initiates high speed
ventilation for 20 minutes. (3 wire) 20 gauge wire (minimum)
100 ft. length.
Warranty
Units carry a lifetime warranty on the heat recovery (aluminum) core, a five year warranty on the energy recovery (enthalpic)
core and a five year replacement parts warranty on all other components.
Date: ___________________________________________
Tag: _____________________Qty:___________________
Project: _________________________________________
Engineer: _______________________________________
Contractor: ______________________________________
Supplier: ________________________________________
Quote#: _________________________________________
Submitted by: ____________________________________
31
Page 32

info@lifebreath.com
Front
19"
(483 mm)
47.5"
(1207 mm)
Latches
Blower Section
(SERVICE CLEARANCE 10")
To p
29.5"
(749 mm)
14"
(356 mm)
12"
(305 mm)
4"
(100 mm)
Ventilation
Supply
Air Inlet
Ventilation
Exhaust
Air Outlet
2
2"
(559 mm)
Return Air
29.5"
(749 mm)
22"
(
559 mm)
19"
(
483 mm)
1
4"
(356 mm)
Return Air
Return
Air End
1
6"
(406 mm)
Supply Air
1
7.25"
(438 mm)
Supply Air End
Service
Drain
6”
(150 mm)
6”
(150 mm)
19"
(
483 mm)
29.5"
(749 mm)
Model CAF-H-S4A-24-P16
Core Ventilation system has patented aluminum heat recovery core (standard) or an enthalpic energy recovery core (optional) for ener-
gy-efficient ventilation. Enthalpic cores are recommended for regions where the temperature does not drop below 25°F (-4°C).
Filters Washable air filters in exhaust and supply air streams of ventilation section, 1" (25 mm) pleated in return plenum side.
Case Pre-painted galvanized steel for superior corrosion resistance. Service drain 1/2” (12 mm) or 3/4” (19 mm) NPT.
Dimensions & Clearances
Model CAF-H-S4A-24-P16
Voltage 120 VAC 60 Hz
Hp 1/3
Amps (total) 8
Water
Connections Soldered Connection
Airflow (High)
.25 in wg 1030 CFM
.5 in. wg 890 CFM
Ventilation 100 - 140 CFM
Airflow
Effectiveness 70%
(Aluminum Core)
Total Efficiency 50%
(Enthalpic Core)
1/2" (12 mm) Copper
Net Weight 150 lbs.
Shipping Weight 165 lbs.
Note: All units conform to CSA and UL Standards.
OPTIONS
99-186 Weatherhoods, Two - 6" (150 mm) c/w 1/4" (6 mm) mesh
screen
99-RSK6 6” (150 mm) back draft damper
99-DH-01 Lifestyle Dehumidistat - Initiates high speed ventila-
tion for 20, 40, or 60 minutes (3 wire) 20 gauge wire (minimum)
100 ft. length
Warranty
Units carry a lifetime warranty on the heat recovery (aluminum) core, a five year warranty on the energy recovery (enthalpic)
core and a five year replacement parts warranty on all other components.
Date: ___________________________________________
Tag: _____________________Qty:___________________
Project: _________________________________________
Engineer: _______________________________________
OPTIONAL TIMERS
99-DET01 Lifestyle 20/40/60 Minute Timer - Initiates high speed
ventilation for 20, 40, 60 minutes. (3 wire) 20 gauge wire
(minimum) 100 ft. length
99- 20M01 Lifestyle 20 Minute Timer - Initiates high speed
ventilation for 20 minutes. (3 wire) 20 gauge wire (minimum)
100 ft. length.
Contractor: ______________________________________
Supplier: ________________________________________
Quote#: _________________________________________
Submitted by: ____________________________________
32
Page 33

info@lifebreath.com
To p
Side
22.25"
(565 mm)
Supply Air
Ventilation
Supply Air
Inlet
Ventilation
Exhaust Air
Outlet
Return Air
Blower Section
(SERVICE CLEARANCE 1') (SERVICE CLEARANCE 3')
Front
L
atches
29.5"
(749 mm)
19"
(483 mm)
47.5"
(1207 mm)
6"
14"
(356 mm)
12"
(305 mm)
4”
(100 mm)
1
9”
(483 mm)
17.25”
(
438 mm)
22”
(559 mm)
(150 mm)
6"
(150 mm)
29.5"
(749 mm)
Model CAF-U-L4A-36-P16
Core Ventilation system has patented aluminum heat recovery core (standard) or an enthalpic energy recovery core (optional) for ener-
gy-efficient ventilation. Enthalpic cores are recommended for regions where the temperature does not drop below 25°F (-4°C).
Filters Washable air filters in exhaust and supply air streams of ventilation section, 1" (25 mm) pleated in return plenum side
Case Pre-painted galvanized steel for superior corrosion resistance.
Dimensions & Clearances
Note: Ventilation ports and return plenum
opening available off either side of cabinet.
All units conform to CSA and UL Standards.
Options
99-186 Weatherhoods, Two - 6" (150 mm) c/w 1/4" (6 mm) mesh
screen
99-RSK6 6” (150 mm) back draft damper
99-DH-01 Lifestyle Dehumidistat - Initiates high speed ventila-
tion for 20, 40, or 60 minutes (3 wire) 20 gauge wire (minimum)
100 ft. length
Warranty
Units carry a lifetime warranty on the heat recovery (aluminum) core, a five year warranty on the energy recovery (enthalpic)
core and a five year replacement parts warranty on all other components.
Date: ___________________________________________
Tag: _____________________Qty:___________________
Project: _________________________________________
Engineer: _______________________________________
Model CAF-U-L4A-36-P16
Voltage 120 VAC 60 Hz
Hp 1/2
Amps (total) 10.6
Water
Connections Soldered Connection
Airflow (High)
.25 in wg
.5 in. wg 1180 CFM
Ventilation 100 - 140 CFM
Airflow
Effectiveness 70%
(Aluminum Core)
Total Efficiency 50%
(Enthalpic Core)
Net Weight 150 lbs.
Shipping Weight 165 lbs.
3/4" (19 mm) Copper
1350 CFM
OPTIONAL TIMERS
99-DET01 Lifestyle 20/40/60 Minute Timer - Initiates high speed
ventilation for 20, 40, 60 minutes. (3 wire) 20 gauge wire
(minimum) 100 ft. length
99- 20M01 Lifestyle 20 Minute Timer - Initiates high speed
ventilation for 20 minutes. (3 wire) 20 gauge wire (minimum)
100 ft. length.
Contractor: ______________________________________
Supplier: ________________________________________
Quote#: _________________________________________
Submitted by: ____________________________________
33
Page 34

Side
Front
29.5"
(749 mm)
19"
(483 mm)
47.5"
(1207 mm)
6"
14"
(356 mm)
12"
(305 mm)
4"
(100 mm)
To p
29.5"
(749 mm)
2
2"
(559 mm)
19"
(483 mm)
14"
(356 mm)
Bottom
22.25"
(565 mm)
Supply Air
Return Air
17.25"
(438 mm)
Ventilation Supply
Air Inlet
Ventilation Exhaust
Air Outlet
22"
(559 mm)
Return Air
Latches
Blower Section
(SERVICE CLEARANCE 1') (SERVICE CLEARANCE 3')
19"
(483 mm)
29.5"
(749 mm)
(150 mm)
6"
(150 mm)
info@lifebreath.com
Model CAF-D-L4A-36-P16
Core Ventilation system has patented aluminum heat recovery core (standard) or an enthalpic energy recovery core (optional) for ener-
gy-efficient ventilation. Enthalpic cores are recommended for regions where the temperature does not drop below 25°F (-4°C).
Filters Washable air filters in exhaust and supply air streams of ventilation section, 1" (25 mm) pleated in return plenum side
Case Pre-painted galvanized steel for superior corrosion resistance.
Dimensions & Clearances
Note: Ventilation ports and return plenum opening available off either side of cabinet.
All units conform to CSA and UL Standards.
Options
99-186 Weatherhoods, Two - 6" (150 mm)
c/w 1/4" (6 mm) mesh screen
99-RSK6 6” (150 mm) back draft damper
99-DH-01 Lifestyle Dehumidistat - Initiates high speed ventila-
tion for 20, 40, or 60 minutes (3 wire) 20 gauge wire (minimum)
100 ft. length
Warranty
Units carry a lifetime warranty on the heat recovery (aluminum) core, a five year warranty on the energy recovery (enthalpic)
core and a five year replacement parts warranty on all other components.
Date: ___________________________________________
Tag: _____________________Qty:___________________
Project: _________________________________________
Engineer: _______________________________________
Model CAF-D-L4A-36-P16
Voltage 120 VAC 60 Hz
Hp 1/2
Amps (total) 10.6
Water
Connections Soldered Connection
Airflow (High)
.25 in wg
.5 in. wg 1180 CFM
Ventilation 100 - 140 CFM
Airflow
Effectiveness 70%
(Aluminum Core)
Total Efficiency 50%
(Enthalpic Core)
3/4" (19 mm) Copper
1350 CFM
Net Weight 150 lbs.
Shipping Weight 165 lbs.
OPTIONAL TIMERS
99-DET01 Lifestyle 20/40/60 Minute Timer - Initiates high speed
ventilation for 20, 40, 60 minutes. (3 wire) 20 gauge wire
(minimum) 100 ft. length
99- 20M01 Lifestyle 20 Minute Timer - Initiates high speed
ventilation for 20 minutes. (3 wire) 20 gauge wire (minimum)
100 ft. length.
Contractor: ______________________________________
Supplier: ________________________________________
Quote#: _________________________________________
Submitted by: ____________________________________
34
Page 35

info@lifebreath.com
Front
47.5"
(1207 mm)
Latches
Blower Section
(SERVICE CLEARANCE 10")
Side
29.5"
(749 mm)
6"
(150 mm)
14"
(356 mm)
12"
(305 mm)
4"
(100 mm)
Ventilation
Supply
Air Inlet
Ventilation
Exhaust
Air Outlet
22"
(559 mm)
Return Air
Return
Air End
29.5"
(749 mm)
19"
(483 mm)
Supply Air
17.25"
(438 mm)
Supply Air End
Service
Drain
14"
(356 mm)
Return Air
6"
(150 mm)
22"
(
559 mm)
19"
(483 mm)
19"
(483 mm)
22"
(559 mm)
29.5"
(749 mm)
Model CAF-H-L4A-36-P16
Core Ventilation system has patented aluminum heat recovery core (standard) or an enthalpic energy recovery core (optional) for ener-
gy-efficient ventilation. Enthalpic cores are recommended for regions where the temperature does not drop below 25°F (-4°C).
Filters Washable air filters in exhaust and supply air streams of ventilation section, 1" (25 mm) pleated in return plenum side.
Case Pre-painted galvanized steel for superior corrosion resistance. Service drain 1/2” (12 mm) or 3/4” (19 mm) NPT.
Dimensions & Clearances
Model CAF-H-L4A-36-P16
oltage 120 VAC 60 Hz
V
p 1/2
H
Amps (total) 10.6
Water
3/4" ( 19 mm) Copper
Connections Soldered Connection
Airflow (High)
.25 in wg
.5 in. wg 1180 CFM
1350 CFM
Ventilation 100 - 140 CFM
Airflow
Effectiveness 70%
(Aluminum Core)
Total Efficiency 50%
(Enthalpic Core)
Note: All units conform to CSA and UL Standards.
Net Weight 150 lbs.
Shipping Weight 165 lbs.
OPTIONS
99-186 Weatherhoods, Two - 6" (150 mm) c/w 1/4" (6 mm) mesh
screen
99-RSK6 6” (150 mm) back draft damper
99-DH-01 Lifestyle Dehumidistat - Initiates high speed ventila-
tion for 20, 40, or 60 minutes (3 wire) 20 gauge wire (minimum)
100 ft. length
Warranty
Units carry a lifetime warranty on the heat recovery (aluminum) core, a five year warranty on the energy recovery (enthalpic)
OPTIONAL TIMERS
99-DET01 Lifestyle 20/40/60 Minute Timer - Initiates high speed
ventilation for 20, 40, 60 minutes. (3 wire) 20 gauge wire
(minimum) 100 ft. length
99- 20M01 Lifestyle 20 Minute Timer - Initiates high speed
ventilation for 20 minutes. (3 wire) 20 gauge wire (minimum)
100 ft. length.
core and a five year replacement parts warranty on all other components.
Date: ___________________________________________
Tag: _____________________Qty:___________________
Project: _________________________________________
Engineer: _______________________________________
Contractor: ______________________________________
Supplier: ________________________________________
Quote#: _________________________________________
Submitted by: ____________________________________
35
Page 36

info@lifebreath.com
Top
Front
29.5”
(749 mm)
29.5"
(749 mm)
19"
(483 mm)
47.5"
(1207 mm)
6"
14"
(356 mm)
12"
(305 mm)
4”
(100 mm)
19”
(483 mm)
22.4”
(567 mm)
Supply Air
17.25”
(438 mm)
Ventilation
Supply Air
Inlet
Ventilation
Exhaust Air
Outlet
22”
(559 mm)
Return Air
Blower Section
(SERVICE CLEARANCE 1') (SERVICE CLEARANCE 3')
Side
Latches
(150 mm)
6"
(150 mm)
Model CAF-U-L2A-48-P16
Core Ventilation system has patented aluminum heat recovery core (standard) or an enthalpic energy recovery core (optional) for ener-
gy-efficient ventilation. Enthalpic cores are recommended for regions where the temperature does not drop below 25°F (-4°C).
Filters Washable air filters in exhaust and supply air streams of ventilation section, 1" (25 mm) pleated in return plenum side.
Case Pre-painted galvanized steel for superior corrosion resistance.
Dimensions & Clearances
Not e: Ventil at ion ports and return ple num
opening available off either side of cabinet. All
units conform to CSA and UL Standards.
Options
99-186 Weatherhoods, Two - 6" (150 mm) c/w 1/4" (6 mm) mesh
screen
99-RSK6 6” (150 mm) back draft damper
99-DH-01 Lifestyle Dehumidistat - Initiates high speed
ventilation for 20, 40, or 60 minutes (3 wire) 20 gauge wire
(minimum) 100 ft. length
Date: ___________________________________________
Tag: _____________________Qty:___________________
Project: _________________________________________
Engineer: _______________________________________
Model CAF-U-L2A-48-P16
Voltage 120 VAC 60 Hz
Hp 1/2
Amps (total) 10.6
Water
Connections Soldered Connection
Airflow (High)
.25 in wg
.5 in. wg 1388 CFM
Ventilation 100 - 140 CFM
Airflow
Effectiveness 70%
(Aluminum Core)
Total Efficiency 50%
(Enthalpic Core)
Net Weight 150 lbs.
Shipping Weight 165 lbs.
1/2" (12 mm) Copper
1588 CFM
OPTIONAL TIMERS
99-DET01 Lifestyle 20/40/60 Minute Timer - Initiates high speed
ventilation for 20, 40, 60 minutes. (3 wire) 20 gauge wire
(minimum) 100 ft. length
99- 20M01 Lifestyle 20 Minute Timer - Initiates high speed
ventilation for 20 minutes. (3 wire) 20 gauge wire (minimum)
100 ft. length.
Contractor: ______________________________________
Supplier: ________________________________________
Quote#: _________________________________________
Submitted by: ____________________________________
36
Page 37

info@lifebreath.com
Top
Front
29.5”
(749 mm)
29.5"
(749 mm)
19"
(483 mm)
47.5"
(1207 mm)
6"
14"
(356 mm)
12"
(305 mm)
4”
(100 mm)
19”
(483 mm)
22.4”
(567 mm)
Supply Air
17.25”
(438 mm)
Ventilation
Supply Air
Inlet
Ventilation
Exhaust Air
Outlet
22”
(559 mm)
Return Air
Blower Section
(SERVICE CLEARANCE 1') (SERVICE CLEARANCE 3')
Side
Latches
(150 mm)
6"
(150 mm)
Model CAF-U-00-24-P16
Core Ventilation system has patented aluminum heat recovery core (standard) or an enthalpic energy recovery core (optional) for ener-
gy-efficient ventilation. Enthalpic cores are recommended for regions where the temperature does not drop below 25°F (-4°C).
Filters Washable air filters in exhaust and supply air streams of ventilation section, 1" (25 mm) pleated in return plenum side.
Case Pre-painted galvanized steel for superior corrosion resistance.
Static Pressure Fan Speed (cfm)
Low M Low M High High
0.5 “ WC
0.25 “ WC
Dimensions & Clearances
Not e: Ventil at ion ports and return ple num
opening available off either side of cabinet. All
units conform to CSA and UL Standards.
Options
99-186 Weatherhoods, Two - 6" (150 mm) c/w 1/4" (6 mm) mesh
screen
99-RSK6 6” (150 mm) back draft damper
99-DH-01 Lifestyle Dehumidistat - Initiates high speed
ventilation for 20, 40, or 60 minutes (3 wire) 20 gauge wire
(minimum) 100 ft. length
Date: ___________________________________________
Tag: _____________________Qty:___________________
Project: _________________________________________
Engineer: _______________________________________
660 740 790 890
740 825 900 1030
Model CAF-U-00-24-P16
Voltage 120 VAC 60 Hz
Hp 1/3
Amps (total) 8
Water
Connections Soldered Connection
Airflow (High)
.25 in wg
.5 in. wg 890 CFM
Ventilation 100 - 140 CFM
Airflow
Effectiveness 70%
(Aluminum Core)
Total Efficiency 50%
(Enthalpic Core)
Net Weight 150 lbs.
Shipping Weight 165 lbs.
OPTIONAL TIMERS
99-DET01 Lifestyle 20/40/60 Minute Timer - Initiates high speed
ventilation for 20, 40, 60 minutes. (3 wire) 20 gauge wire
(minimum) 100 ft. length
99- 20M01 Lifestyle 20 Minute Timer - Initiates high speed
ventilation for 20 minutes. (3 wire) 20 gauge wire (minimum)
100 ft. length.
Contractor: ______________________________________
Supplier: ________________________________________
Quote#: _________________________________________
Submitted by: ____________________________________
1/2" (12 mm) Copper
1030 CFM
37
Page 38

To p
Side
22.25"
(565 mm)
Supply Air
Ventilation
Supply Air
Inlet
V
entilation
Exhaust Air
Outlet
Return Air
Blower Section
(SERVICE CLEARANCE 1') (SERVICE CLEARANCE 3')
Front
Latches
29.5"
(749 mm)
19"
(483 mm)
47.5"
(1207 mm)
6"
14"
(356 mm)
12"
(305 mm)
4”
(100 mm)
19”
(483 mm)
17.25”
(438 mm)
22”
(559 mm)
(150 mm)
6"
(150 mm)
29.5"
(749 mm)
info@lifebreath.com
Model CAF-U-00-36-P16
Core Ventilation system has patented aluminum heat recovery core (standard) or an enthalpic energy recovery core (optional) for
energy-efficient ventilation. Enthalpic cores are recommended for regions where the temperature does not drop below 25°F
(-4°C).
Filters Washable air filters in exhaust and supply air streams of ventilation section, 1" (25 mm) pleated in return plenum side.
Case Pre-painted galvanized steel for superior corrosion resistance.
Static Pressure Fan Speed (cfm)
Low M Low M High High
0.5 “ WC
0.25 “ WC
Dimensions & Clearances
Note: Ventilation ports and r et urn plen um
opening available off either side of cabinet.
All units conform to CSA and UL Standards.
OPTIONS
99-186 Weatherhoods, Two - 6" (150 mm) c/w 1/4" (6 mm) mesh
screen
99-RSK6 6” (150 mm) back draft damper
99-DH-01 Lifestyle Dehumidistat - Initiates high speed ventila-
tion for 20, 40, or 60 minutes (3 wire) 20 gauge wire (minimum)
100 ft. length
Warranty
Units carry a lifetime warranty on the heat recovery (aluminum) core, a five year warranty on the energy recovery (enthalpic)
core and a five year replacement parts warranty on all other components.
Date: ___________________________________________
Tag: _____________________Qty:___________________
Project: _________________________________________
Engineer: _______________________________________
675 890 1120 1180
730 940 1275 1350
OPTIONAL TIMERS
99-DET01 Lifestyle 20/40/60 Minute Timer - Initiates high speed
ventilation for 20, 40, 60 minutes. (3 wire) 20 gauge wire
(minimum) 100 ft. length
99- 20M01 Lifestyle 20 Minute Timer - Initiates high speed
ventilation for 20 minutes. (3 wire) 20 gauge wire (minimum)
100 ft. length.
Contractor: ______________________________________
Supplier: ________________________________________
Quote#: _________________________________________
Submitted by: ____________________________________
Model CAF-U-00-36-P16
oltage 120 VAC 60 Hz
V
Hp 1/2
Amps (total) 10.6
*Airflow (High)
.25 in wg
.5 in. wg 1180 CFM
Ventilation 100 - 140 CFM
Airflow
Effectiveness 70%
(Aluminum Core)
Total Efficiency 50%
(Enthalpic Core)
Net Weight 115 lbs.
Shipping Weight 130 lbs.
* Airflow performance assumes an evaporator
coil static pressure loss of .25”WC
1350 CFM
38
Page 39

To p
Side
22.25"
(565 mm)
Supply Air
Ventilation
Supply Air
Inlet
Ventilation
Exhaust Air
Outlet
Return Air
Blower Section
(SERVICE CLEARANCE 1') (SERVICE CLEARANCE 3')
Front
Latches
29.5"
(749 mm)
19"
(483 mm)
47.5"
(1207 mm)
6"
14"
(356 mm)
12"
(305 mm)
4”
(100 mm)
19”
(483 mm)
17.25”
(438 mm)
22”
(559 mm)
(150 mm)
6"
(150 mm)
29.5"
(749 mm)
info@lifebreath.com
Model CAF-U-00-48-P16
Core Ventilation system has patented aluminum heat recovery core (standard) or an enthalpic energy recovery core (optional) for ener-
gy-efficient ventilation. Enthalpic cores are recommended for regions where the temperature does not drop below 25°F (-4°C).
Filters Washable air filters in exhaust and supply air streams of ventilation section, 1" (25 mm) pleated in return plenum side.
Case Pre-painted galvanized steel for superior corrosion resistance.
Static Pressure Fan Speed (cfm)
Low M Low M High High
0.5 “ WC
0.25 “ WC
690 1033 1469 1589
806 1134 1650 1888
Dimensions & Clearances
Not e: Ve ntila tio n ports and r eturn plenum
opening available off either side of cabinet.
All units conform to CSA and UL Standards.
OPTIONAL
99-186 Weatherhoods, Two - 6" (150 mm) c/w 1/4" (6 mm) mesh
screen
99-RSK6 6” (150 mm) back draft damper
99-DH-01 Lifestyle Dehumidistat - Initiates high speed ventila-
tion for 20, 40, or 60 minutes (3 wire) 20 gauge wire (minimum)
100 ft. length
Model CAF-U-00-48-P16
Voltage 120 VAC 60 Hz
p 1/2
H
Amps (total) 10.6
*Airflow (High)
.25 in wg
.5 in. wg 1589 CFM
Ventilation 100 - 140 CFM
Airflow
Effectiveness 70%
(Aluminum Core)
Total Efficiency 50%
(Enthalpic Core)
Net Weight 132 lbs.
Shipping Weight 147 lbs.
* Airflow performance assumes an evaporator
coil static pressure loss of .25”WC.
1888 CFM
OPTIONAL TIMERS
99-DET01 Lifestyle 20/40/60 Minute Timer - Initiates high speed
ventilation for 20, 40, 60 minutes. (3 wire) 20 gauge wire
(minimum) 100 ft. length
99- 20M01 Lifestyle 20 Minute Timer - Initiates high speed
ventilation for 20 minutes. (3 wire) 20 gauge wire (minimum)
100 ft. length.
Warranty
Units carry a lifetime warranty on the heat recovery (aluminum) core, a five year warranty on the energy recovery
(enthalpic) core and a five year replacement parts warranty on all other components.
Date: ___________________________________________
Tag: _____________________Qty:___________________
Project: _________________________________________
Engineer: _______________________________________
Contractor: ______________________________________
Supplier: ________________________________________
Quote#: _________________________________________
Submitted by: ____________________________________
39
Page 40

System Commissioning
This section of the manual is designed to be used with the
“Commissioning of Integrated Combo System” worksheet.
The worksheet is designed to guide you through the start-up
process in a logical, step by step method which should minimize the work and time involved in having the system meet
the designed parameters.
The following conditions are assumed:
• The air filter is in place
• All supply diffusers and return grilles are fully open and
unrestricted
• Hot water is available to the furnace
• The drain valve for the heating loop is closed
• The shut off valves for the heating loop are fully open
• The throttling valve for the heating loop (if applicable), is
fully opened
• Electrical power is available at the furnace
• The return air temperature from the house is approximately 70°F (21°C)
40
Page 41

41
Page 42

Part E - SYSTEM START UP
E.1 Fill Water-Heater with water
E.2 Set Water-Heater at designed temperature
E.3 Fill Heating Loop with water
E.4 Purge Circulation Pump
E.5 Start Air Handler
E.6 Check Circulation Pump Operation
E.7 Check Circulation Fan Operation
E.8 Label Water-Heater
HRV BALANCING
Exhaust Air Flow
Fresh Air Intake Air Flow
Back Draft Damper installed in Stale Air to Outside Duct
Part F - SYSTEM COMMISSIONING
Design Information: (Information for this section can be found on the “Worksheet for Integrated Combo System Design” part B)
Total Heat Loss
Btu/h
Air Handler ESP:
ins. W.C.
Supply Water temp.:
°F
Air Handler: output
Btu/h
Btu/h
Eff. Water-Heater output
Return Water temp.:
°F
°F
°F
Supply Air temp.:
Return Air temp.:
°F
°F
°F
°F
°F
°F
°F
°F
Btu/h
CFM
F.1 Supply Water Temp.
(measured)
F. 2 Air Handler Output
Air Flow rate:
CFM
Fan speed
at F.1 Condition
F. 3 Air Handler Operating CFM
(measured)
F. 4 Return Air Temperature
(measured)
F.5 Required Air Temperature Difference
(F.2 ÷(F.3 x 1.08))
F.6 Required Supply Air Temperature
F.7 Returned Water Temperature
(F.4 + F.5)
(measured)
(measured)
(measured)
(min. 20 F)
◦
F. 8 Water Temperature Difference
(F.1 - F.7)
F.9 Actual Supply Air Temperature
F.10 Anti-Scald Valve Outlet Temperature (if present)
42
Page 43

Transformer
12/24Vac
Transfor-
mateur
12/24 VCA
Standard Motor CAF/Air Handler Wiring Diagram
Schéma de câblage d’un moteur
de FAP/Appareil de traitement de l’air standard
Optional Pump
Pompe
Facultative
Fan
Motor
Moteur du
ventilateur
Door Switch
Interrupteur de porte
BLACK
BLACK
WHITE
GND
WHITE
BLUE
BLACK
RED
YELLOW
RED
WHITE
BLUE
BLACK
BLACK
N.O. Normally open
Normalement ouvert
N.C. Normally closed
Normalement fermé
COM Common
Commun
T# Terminal
P# Plug
Prise
K# Relay
Relais
F# Fuse
Fusible
SW# Switch
Commutateur
BLACK
BLACK
WHITE
BLUE
60-CAF-AH-01
THERMISTOR
THERMISTANCE
54321
T30T29T28REDOGYWRCT25
T17
K3 K4 K5
COM
N.O.
K6
COM
N.O.
COM
N.O.
COM
N.O.
T18 T19
T20
RELAY
FEED
T43
SPARE
RÉSERVE
T26 T27 GRNYEL
P2 P3
R
24Vac12Vac Com
DET
C
Defrost
Dégivrage
Freeze
Congélation
Fan Hi/Vent. haut Fan Med/Vent. moyen Fan Low/Vent. bas
P1
C4
C3
K7 K1 K2K8
C2 C1
T31
T32
T33
T34
T35
T
36
T
37
T
38
T
39
T40
T
41
T42
Contact 1
N.0. COM N.C. N.0. COM N.C. N.0. COM N.C. N.0 .COM
Contact 2 Contact 3 Contact 4
Digital Controls/
Contrôles numériques
N.C
R W Y G
A/C Unit
Unité A/C
Thermostat
To/Vers “Y”
To/Vers “C”
Electrical control panel service by electrician only.
Disconnect electrical supply prior to servicing. Improper
wiring may result in damage to this unit. Use copper supply
wires.
CAUTION
Entretien du panneau de contrôle électrique par un électricien
seulement. Coupez l’alimentation électrique avant de
procéder à l’entretien. Un câblage inadéquat pourrait
endommager cet appareil. Utilisez des câbles de cuivre
Alimen-
tation
à relais
Terre
Black = noir
White = blanc
Red = rouge
Blue = bleu
Yellow = jaune
SW1
ON
8 7 6 5 4 3 2 1
DIP SWITCHES TO BE
ADJUSTED BY QUALIFIED
TECHNICIANS ONLY.
SEUL UN TECHNICIEN
QUALIFIÉ PEUT AJUSTÉ
LES COMMUTATEURS DIP
CHASSIS
T44
T3
T4
T5
T6
Line/Ligne
T1
T2
Thermostat
T13 T14
T15
T16
Neutral/Neutre
T11 T12
T21 T22
T23
T24
AUX 1
AUX 2
2 AMPS
ATTENTION
Standard Motor Wiring Diagram
Do not initiate power before plumbing is
commissioned.
WARNING
43
Page 44

Transformer
Trans-
formateur
12/24Vac
ECM - CAF/Air Handler
Wiring Diagram/
Schéma de câblage
FAP/Appareil de
traitement de l’air -
moteur à commutation
électronique ECM
Pump
pompe
WHITE
WHITE
BLACK
TAN
TAN
PURPLE
PURPLE
1 2 3 4 5 6 7 8
COOL HEAT
ADJUST DELAY
BLACK
BLACK
WHITE
WHITE
BROWN
BROWN
RED
RED
RED
BLACK/YELLOW
BLACK/YELLOW
BLUE
BLUE
GREEN
GREEN
YELLOW
YELLOW
BLACK
BLUE
WHITE
RED
Door Switch
Interrupteur de porte
BLACKBLACK
WHITE
GND
BLACK
BLACK
BLUE
60-CAF-01-ECM
0207
S
W1
o
ff on
12345678
9
10111213141516
5
432
1
Molex
Connectors/
Connecteurs
Molex
Jumper/cavalier
(120 VOLT Only/
seulement)
T2
T1
THERMISTOR
Fan Motor/Moteur du ventilateur
C R W W
2
Y Y
1
G O
ECM
TERMINAL
BLOCK
(TBM)/
Plaquette
à bornes ECM
T30T29T28REDOGYWRCT25
T17
K3 K4 K5
COM
N.O.
K6
COM
N.O.
COM
N.O.
COM
N.O.
T18 T19
T20
RELAY
FEED
T43
SPARE
RÉSERVE
T26 T27 GRNYEL
P2 P3
R
24Vac12Vac Com
DET
C
D
efrost
F
reeze
Fan Hi/Vent.haut Fan Med/Vent. moyen Fan Low/Vent. bas
P1
C4
K7 K1 K2K8
C2 C1
T
31
T32
T33
T34
T35
T36
T
37
T
38
T
39
T40
T
41
T42
Contact 1
N.0. COM N.C. N.0. COM N.C. N.0. COM N.C. N.0 . COM
Contact 2 Contact 3 Contact 4
Digital Controls/
Contrôles numériques
N.C
R W Y G
A/C Unit
Unité A/C
Thermostat
To“Y”
To“C”
O
RANGE
N.O. Normally open
Normalement ouvert
N.C. Normally closed
Normalement fermé
COM Common
Commun
T# Terminal
P# Plug
Prise
K# Relay
Relais
F# Fuse
Fusible
SW# Switch
Commutateur
Electrica l control panel service by electricia n only.
Disconnect electrical supply prior to servicing. Improper
wiring may result in damage to this unit. Use copper supply
wires.
CAUTION
Entretien du panneau de contrôle électrique par un électricien
seulement . Coupez l’alimentatio n électriqu e avant de
procéder à l’entretien . Un câblage inadéquat pourrait
endommager cet appareil. Utilisez des câbles de cuivre.
Black = noir
White = blanc
Red = rouge
Blue = bleu
Yellow = jaune
Tan = havane
Purple = pourpre
Brown = brun
Alimen-
tation
à relais
COOL
FROID
HEAT
CHALEUR
ADJUST
RÉGLAGE
DELAY
DÉLAI
Terre
DIP SWITCHES TOBE
ADJUSTED BY QUALIFIED
TECHNICIANS ONLY.
SEUL UN TECHNICIEN
QUALIFIÉ PEUT AJUSTÉ LES
COMMUTATEURS DIP.
SW1
ON
8 7 6 5 4 3 2 1
CHASSIS
T44
T21 T22
T23
T24
AUX1
AUX2
T13 T14
T15
T16
Neutral/Neutre
T11 T12
Thermostat
2 AMPS
T3
T4
T5
T6
Line/Ligne
T1
T2
C3
ATTENTION
ECM Wiring Diagram
Do not initiate power before plumbing is
commissioned.
WARNING
69-CAF
44
0912
 Loading...