

Page 1

user guide
PowerEase® 90W Power Supply
Catalog Numbers
Publication Number MAN0009597
Revision B.0
PS0090, PS0091, PS0092
Research Use Only. Not for use in diagnostic procedures.
Page 2

Important Licensing Information:
These products may be covered by one or more Limited Use Label Licenses. By use of these products, you accept the
terms and conditions of all applicable Limited Use Label Licenses.
DISCLAIMER: LIFE TECHNOLOGIES CORPORATION AND/OR ITS AFFILIATE(S) DISCLAIM ALL WARRANTIES WITH
RESPECT TO THIS DOCUMENT, EXPRESSED OR IMPLIED, INCLUDING BUT NOT LIMITED TO THOSE OF
MERCHANTABILITY, FITNESS FOR A PARTICULAR PURPOSE, OR NON-INFRINGEMENT. TO THE EXTENT ALLOWED BY
LAW, IN NO EVENT SHALL LIFE TECHNOLOGIES AND/OR ITS AFFILIATE(S) BE LIABLE, WHETHER IN CONTRACT, TORT,
WARRANTY, OR UNDER ANY STATUTE OR ON ANY OTHER BASIS FOR SPECIAL, INCIDENTAL, INDIRECT, PUNITIVE,
MULTIPLE OR CONSEQUENTIAL DAMAGES IN CONNECTION WITH OR ARISING FROM THIS DOCUMENT, INCLUDING BUT
NOT LIMITED TO THE USE THEREOF.
©2014 Life Technologies Corporation. All rights reserved. The trademarks mentioned herein are the property of Life
Technologies Corporation and/or its affiliates or their respective owners.
Page 3

Contents
Introduction ........................................................................................................................................................................ 4
Product contents ............................................................................................................................................................ 4
Contents .......................................................................................................................................................................... 4
Product description ....................................................................................................................................................... 4
Description of buttons and switches ........................................................................................................................... 6
Operational keys ............................................................................................................................................................ 6
Methods ............................................................................................................................................................................... 7
Getting started ................................................................................................................................................................ 7
Important guidelines ..................................................................................................................................................... 7
Operation modes ............................................................................................................................................................ 8
Limiting parameter settings ......................................................................................................................................... 8
Appendix A ...................................................................................................................................................................... 10
General safety ............................................................................................................................................................... 10
Instrument safety ......................................................................................................................................................... 10
Explanation of symbols and warnings ...................................................................................................................... 11
Production regulatory compliance ............................................................................................................................ 12
Appendix B ....................................................................................................................................................................... 13
Troubleshooting ........................................................................................................................................................... 13
Common errors ............................................................................................................................................................ 14
Appendix C ....................................................................................................................................................................... 15
Operational electrical parameters .............................................................................................................................. 15
Appendix D ...................................................................................................................................................................... 16
Product specifications ................................................................................................................................................. 16
Appendix E ....................................................................................................................................................................... 17
Repair and maintenance ............................................................................................................................................. 17
Appendix F ....................................................................................................................................................................... 18
Documentation and support ...................................................................................................................................... 18
PowerEase® 90W Power Supply User Guide
Page 4

Product contents
Contents
Regulatory mark(s) on
electrical plug
PowerEase® 90W Power Supply
1 each
Extra Fuse
1 each
Type B Power Cord
1 each (PS0090)
CSA
JIS 8303 Power Cord
1 each (PS0090)
PSE
Type G Power Cord
1 each (PS0091, PS0092)
ASTA
Type CEE 7/7 Power Cord
1 each (PS0091, PS0092)
VDE, KEMA, CEBEC,
CE, ESC, IMQ
GB 15934-2008 Power Cord
1 each (PS0091, PS0092)
CCC
Type I Power Cord
1 each (PS0092)
NSW 18392
Quick Reference Card
1 each
Important:
Upon receiving the
Examine the unit carefully for any damage incurred during transit. Any damage claims
Introduction
The PowerEase® 90W Power Supply is a microprocessor-controlled power supply
approved for their country/region. North America customers should use the Type B
power cord and Japanese customers should use the JIS 8303 power cord. Chinese
customers should use the GB 15934-2008 power cord and Australia/New Zealand
customers should use the Type I power cord.
Introduction
Component Quantity
NEMKO, DEMKO,
FIMKO, SEMKO, OVE,
Some of the power cords appear similar; users should utilize the cord
instrument
must be filed with the carrier, keep the supplied box for inspection. The warranty does
not cover in-transit damage.
To ensure safe, reliable operation, always operate the PowerEase® 90W Power Supply in
accordance with the manufacturer’s instructions. Always wear protective gloves and
safety glasses when working in a laboratory environment. Avoid exposing the power
supply to liquids as these may damage the unit and void the warranty.
Product description
designed to meet most electrophoresis needs in a single easy to use unit. The power
supply’s small foot print and stacking feature conserve valuable bench space. This
instrument is ideal for DNA/RNA electrophoresis, SDS-PAGE, and native PAGE. With
four sets of output jacks that can be used simultaneously, the PowerEase
Supply is designed to run applications at maximal power and efficiency. The PowerEase
90W Power Supply offers two modes: Constant Voltage and Constant Current. This
manual describes the setup and operation of PowerEase
important information on safety and maintenance of the unit.
®
90W Power
®
90W Power Supply including
®
4
PowerEase® 90W Power Supply User Guide
Page 5

Features of the
•
Constant Voltage or Current
PowerEase® 90W
• Capable of running multiple electrophoresis units
Power Supply
• LCD display with clear menu prompts for easy use
• Four sets of output terminals
• Capability to specify run durations
PowerEase® 90W Power Supply User Guide
5
Page 6
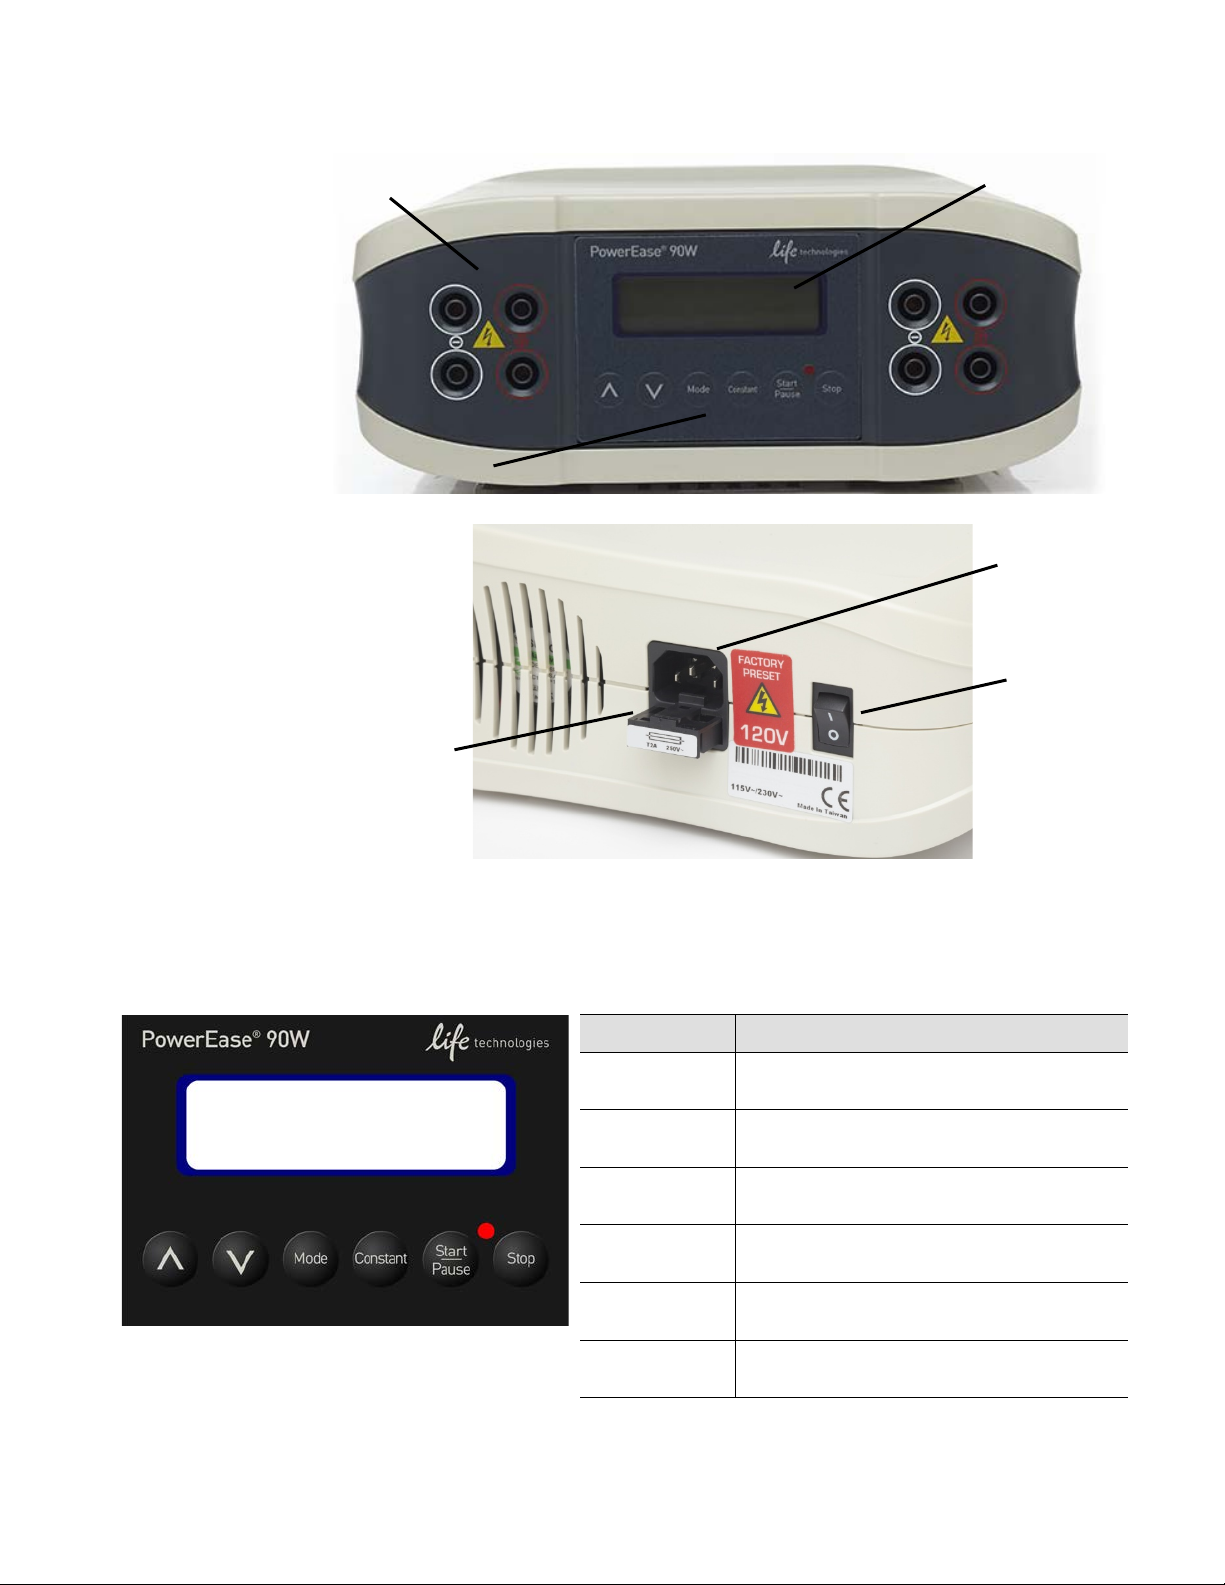
Description of buttons and switches
Front view of
Rear view of
Control buttons
Output jacks
Backlit LCD display
Fuse compartment
Power inlet
Power switch
PowerEase® 90W
Power Supply
PowerEase® 90W
Power Supply
Operational keys
PowerEase® 90W Power Supply key pad
Key Use the key to…
∧ (Up Arrow) Toggle the cursor position up and increase
values when settings are flashing.
∨ (Down Arrow) Toggle the cursor position down and
decrease values when settings are flashing.
Mode Cycle between voltage, current, and time
settings, allowing values to be changed.
Constant Toggle between constant voltage and
current operation.
Start/Pause Start, pause, and resume power supply
Stop Stop power supply operation, reset the
operation without resetting the timer.
timer, turn off the beeper.
6
PowerEase® 90W Power Supply User Guide
Page 7

Getting started
Install the
1. Check the label located near the AC inlet to ensure that the unit is compatible with
Introduction
The important guidelines for operating the PowerEase® 90W Power Supply are provided
Recommendation
The duration of electrophoresis can be defined in time (hours/minutes). When using this
Methods
PowerEase® 90W
Power Supply
locally provided voltage.
2. Place the PowerEase
around the power supply clear to ensure proper ventilation of the unit.
3. For your safety: Position the unit properly such that the On-Off switch and the AC
inlet located on the rear of the unit are easily accessible.
4. Ensure the AC power switch is in the Off position.
5. Attach the power cord to the AC inlet. Use only properly grounded AC outlets and
power cords.
6. Connect the leads from the electrophoresis unit; insert the positive lead (+) into the
positive (red) output jack, and the negative lead (–) into the negative (black) output
jack.
Important guidelines
in this section. We recommend that you carefully review these guidelines before
operating the instrument.
Important: For best results, do NOT use the PowerEase
maximum electrical load limits. Variations in buffer conditions can result in exceeding the
power supply’s maximum voltage or current output capacity and produce undesirable
variations in performance.
®
90W Power Supply on a level laboratory bench. Keep the area
®
90W Power Supply at its
or any electrophoresis product, we recommend that you adhere to the protocols given in
the electrophoresis product manuals, and durations, specified in time.
Important: For best results, follow these important guidelines when running multiple
gels and electrophoresis units concurrently. For example:
• Avoid running samples of widely differing salt concentrations or sample buffers at
the same time or on the same gel.
• Properly prepare your samples.
Note: Variations in conductivity due to differences in buffer salt concentrations can affect
the run of all the samples run at the same time.
PowerEase® 90W Power Supply User Guide
7
Page 8

Operation modes
Introduction
The PowerEase® 90W Power Supply is a microprocessor-controlled power supply
Constant operation
Instructions for operating the PowerEase® 90W Power Supply in the Constant Mode are
∧ ∨
∧ ∨
Note: After stopping and restarting an operation, the timer resets to the selected time
Introduction
The PowerEase® 90W Power Supply is capable of operating at limiting Voltage, or
designed to meet most electrophoresis needs in a single, easy to use unit. The power
supply offers two modes: Constant Voltage and Constant Current. Use the Constant
Voltage or Constant Current Mode for applications that require only one specific voltage
limit or current limit during the entire duration of electrophoresis.
protocol
provided in this section. The Constant Voltage or Constant Current Mode allows you to
specify a voltage limit or current limit to be used during the entire duration of
electrophoresis. Review the guidelines provided in this manual before starting
electrophoresis using the PowerEase
A basic Constant Voltage or Constant Current Mode operating procedure of the
PowerEase
guidelines provided in this manual for best results before starting an operation.
1. Use the power switch on the rear side of the instrument to turn on the PowerEase
90W Power Supply.
The display screen will illuminate.
The screen displays the last set V (voltage) in large bold type on the left side of the
display and TIME and AMP in small type on the right side of the display.
2. Press the Constant key to select either Constant Voltage or Constant Current from
the display screen.
The screen displays the selected operating mode in large bold type on the left of the
display.
3. Use the
(AMP)] to the appropriate values.
4. Use the Mode key to select TIME and use
(hours/minutes) to specify the duration of the electrophoresis.
®
90W Power Supply is provided below. We recommend reading the
arrow keys to set the selected operation [voltage (VOLT) or current
®
90W Power Supply.
arrow key to set the time
®
5. Press Start/Pause key to start electrophoresis. The Red LED illuminates when the
electrophoresis is running.
6. Press the Start/Pause key again to temporarily interrupt power to ongoing
electrophoresis without terminating the operation along with LED flashing.
7. Press Start/Pause key to restart electrophoresis.
8. Press Stop key to stop the electrophoresis.
Note: If the parameters need to be changed during the run you must press Start/Pause, enter the
changes, and then press Start/Pause once again to restart your operation.
Limiting parameter settings
limiting Current. We recommend operating the PowerEase® 90W Power Supply at
limiting voltage for most applications. See below for more details.
8
PowerEase® 90W Power Supply User Guide
Page 9

Voltage limiting
For most electrophoresis methods resistance increases throughout the run. Limiting the
voltage provides the following advantages:
Current limiting
Discontinuous buffer systems and, to a lesser extent, continuous systems increase
• Current and power decrease throughout the run, providing an improving margin of
safety over time.
• The same voltage setting can be used regardless of the number or thickness of gels
being electrophoresed.
resistance during the run. If you use the current limiting setting on the PowerEase® 90W
Power Supply, the voltage will increase as resistance increases to satisfy Ohm’s law
(V=IR). If no voltage limit is set and a local fault condition occurs, such as a poor
connection, very high local resistance may cause the voltage to increase to the maximum
capacity of the power supply. This may lead to local overheating and damage to the
electrophoresis cell or create unsafe conditions. When operating under constant current
conditions, set a voltage limit on the power supply at or slightly above the maximum
expected voltage.
PowerEase® 90W Power Supply User Guide
9
Page 10

General safety
WARNING! Protection impairment if used in a manner not specified by the
Avoid electrical
The PowerEase® 90W Power Supply produces up to 300 voltage outputs which are
Avoid damage to
1. For proper ventilation, leave at least 10 cm of space behind the instrument, and at
Appendix A
manufacturer.
Instrument safety
shock
electrically isolated from ground to reduce the risk of electrical shock to the user. Follow
the guidelines below to ensure safe operation of the unit.
The PowerEase® 90W Power Supply has been designed for use with electrophoresis cells
with shielded banana plugs thus minimizing any potential shock hazard to the user. Life
Technologies recommends against the use of unshielded banana plugs.
To avoid electrical shock:
1. NEVER connect or disconnect wire leads from the power jacks when the red indicator
2. WAIT at least 5 seconds after stopping a run before handling output leads or
3. ALWAYS make sure that hands, work area, and instruments are clean and dry before
4. ALWAYS connect the power supply to a properly grounded AC outlet.
light at the Start/Stop key is on or when “RUNNING” is displayed on the screen.
connected apparatus.
making any connections or operating the power supply.
the instrument
least 5 cm of space on each side.
2. Do not operate the power supply in high humidity environments (> 95%), or where
condensation may occur.
3. To avoid condensation after operating the power supply in a cold room, place the
unit in a sealed plastic bag prior to removing the power supply from the cold room.
After removing the power supply from the cold room, allow at least 2 hours for the
unit to equilibrate to room temperature before removing the plastic bag and
operating the unit.
10
PowerEase® 90W Power Supply User Guide
Page 11
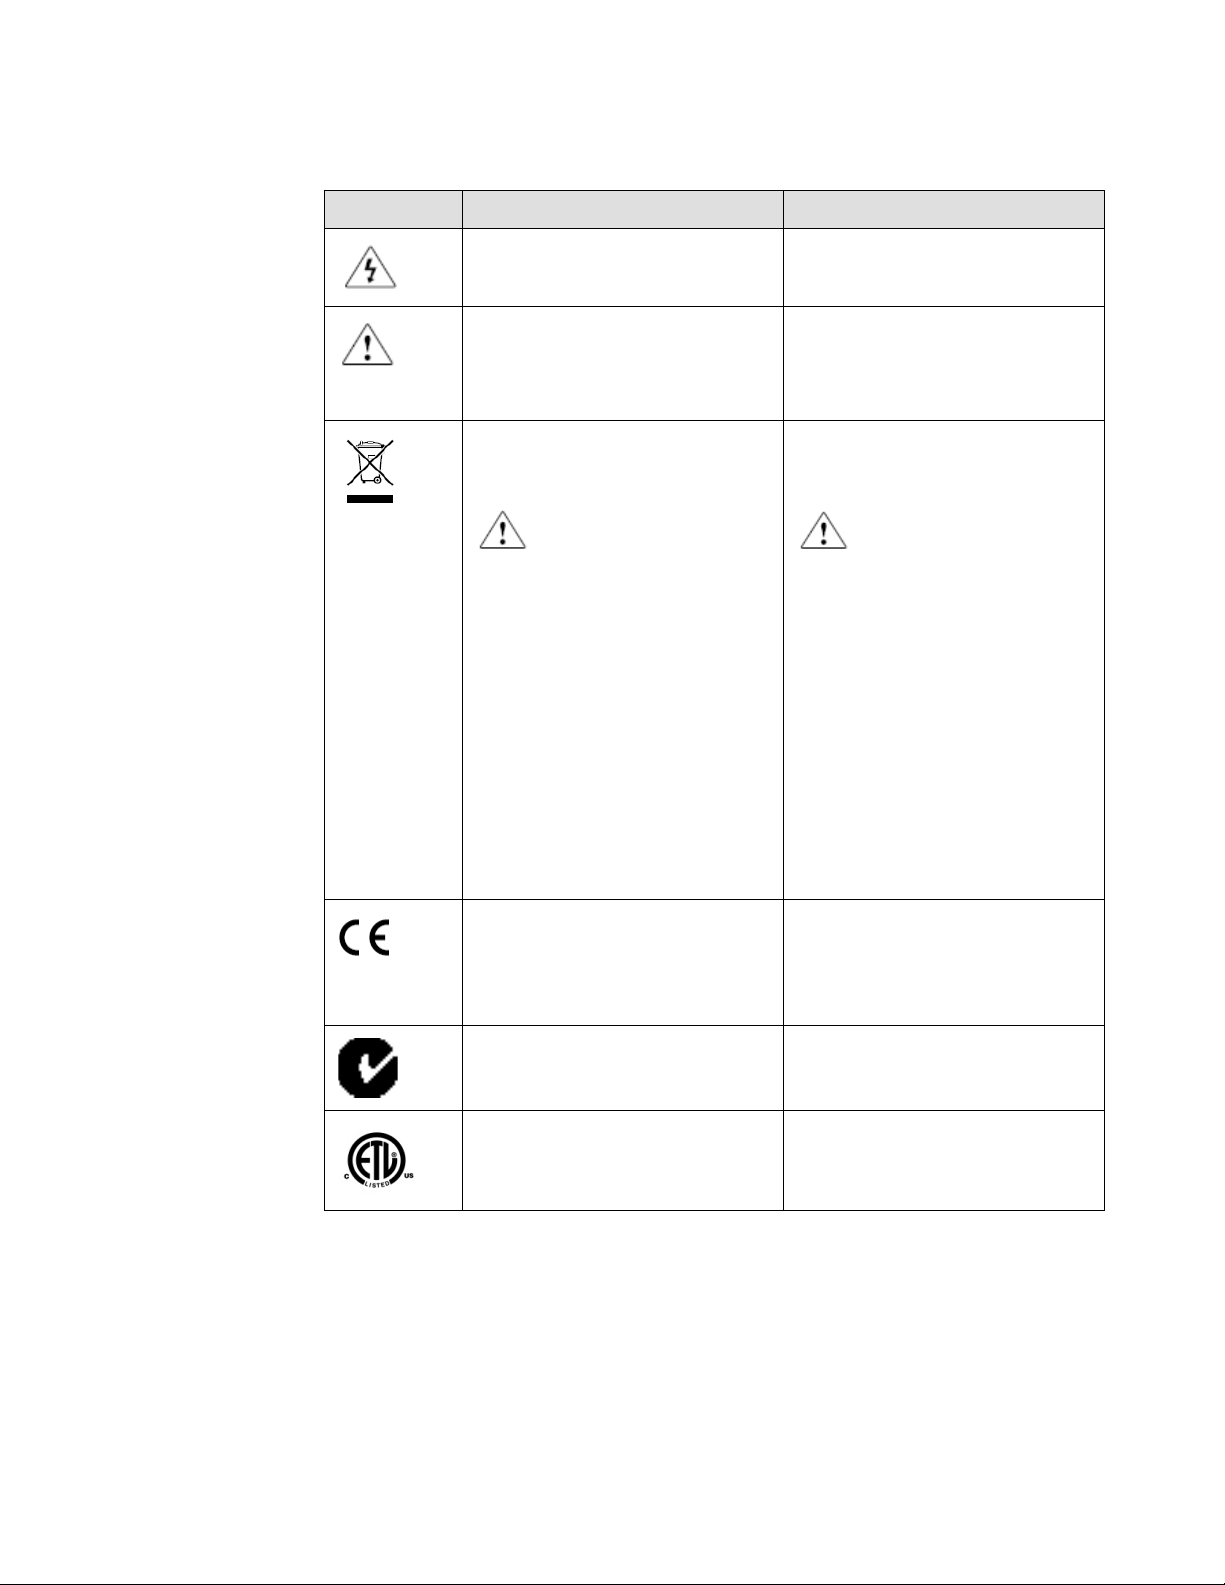
Explanation of symbols and warnings
Symbols and
Caution, risk of electrical shock
CAUTION!
CAUTION!
Indicates conformity with European
Indique la conformité avec les
warnings
Symbol English Français
Attention, risque de choc
électrique
Caution, risk of danger
Consult the manual for further
safety information.
Do not dispose of this product in
unsorted municipal waste.
Attention, risque de danger
Consulter le manuel pour d’autres
renseignements de sécurité.
Ne pas éliminer ce produit avec les
déchets usuels non soumis au tri
sélectif.
To minimize
negative environmental impact
from disposal of electronic waste,
do not dispose of electronic waste
in unsorted municipal waste.
Follow local municipal waste
ordinances for proper disposal
provision and contact customer
service for information about
responsible disposal options.
les consequences négatives sur
l’environnement à la suite de
l’élimination de déchets
électroniques, ne pas éliminer ce
déchet électronique avec les
déchets usuels non soumis au tri
sélectif. Se conformer aux
ordonnances locales sur les
déchets municipaux pour les
dispositions d’élimination et
communiquer avec le service à la
clientèle pour des renseignements
sur les options d’élimination
responsable.
Pour minimiser
PowerEase® 90W Power Supply User Guide
Union requirements for safety and
electromagnetic compatibility.
Indicates conformity with Australian
standards for electromagnetic
compatibility.
Indicates conformity with safety
requirements for Canada and USA
prescriptions en matière de sécurité
et de compatibilité
électromagnétique de l'Union
européenne.
Indique la conformité avec les
normes australiennes de
compatibilité électromagnétique.
Indique la conformité avec les
prescriptions en matière de sécurité
du Canada et des États-Unis.
11
Page 12

Production regulatory compliance
Federal
This equipment has been tested and found to comply with the limits for a Class A digital
Environmental
Communications
Commission
Advisory
design compliance
device, pursuant to part 15 of the FCC rules. These limits are designed to provide
reasonable protection against harmful interference when the equipment is operated in a
commercial environment. This equipment generates, uses, and can radiate radio
frequency energy and, if not installed and used in accordance with the instruction
manual, may cause harmful interference to radio communications. Operation of this
equipment in a residential area is likely to cause harmful interference in which case the
user will be required to correct the interference at their expense. Changes or
modifications not expressly approved by the party responsible for compliance could void
the user’s authority to operate the equipment.
This equipment is compliant with Directive 2011/65/EU - European Union "RoHS
Directive" - Restriction of hazardous substances in electrical and electronic equipment.
12
PowerEase® 90W Power Supply User Guide
Page 13

Troubleshooting
The LCD screen remains
AC power cord is not connected
Check AC power cord connections at both ends.
The fuse has blown
Replace the fuse
Operation stops with
Electrophoresis leads are not
Check the connections to the power supply and
Start/Pause
High resistance due to tape left on
Correct the condition by making sure the tape
Operation stops with
Circuit is interrupted
• Verify that the running buffer is correct.
Operation stops with
Ground leak detected during run
Check the electrophoresis system for improper
Operation stops with
Power supply is overheating
• Turn off power supply. Check for sufficient
Observation Possible cause Recommended action
Appendix B
blank and the fan does not
run when the power is
turned on
alarm: The screen displays
“NO LOAD”
alarm: Display shows
“OVER VOLTAGE”
connected to the power supply or
to the electrophoresis unit(s), or
there is a broken circuit in the
electrophoresis cell
a pre-cast gel, incorrect buffer
concentration, or incorrect buffer
volumes in the electrophoresis
cell
Use the correct cord.
on your electrophoresis cell to make sure the
connection is intact; check condition of wires in
electrophoresis unit. Close the circuit by
reconnecting the cables. Press
restart the run.
is removed from the pre-cast gel, buffers are
prepared correctly, and the recommended
volume of buffer is added to the electrophoresis
unit.
• Verify the all cables are attached correctly
• Turn the Power switch off and on again;
restart application.
• If you cannot restart the instrument, turn
off the power, disconnect the power cord
from the outlet, and contact Technical
Service.
to
alarm: Display
shows“LEAKAGE”
alarm:
Display shows “OVER
TEMP”
PowerEase® 90W Power Supply User Guide
grounding. Restart the power supply by turning
the Power switch off and on.
airflow around the power supply fan. After
cooling down, restart the power supply by
turning the Power switch to the on position.
• If you cannot restart the instrument, turn
off the power, disconnect the power cord
from the outlet, and contact Technical
Service.
13
Page 14

Common errors
No load
• The electrophoresis system is not connected to the power leads, check the power leads
Short circuit
• Load exceeds 500 mA
Change in load
• Electrophoresis systems were added or removed during a run
Change in constant
Voltage changes to current
Observation Possible cause
• The electrophoresis system has a short, the platinum wire is broken or the banana
connectors are damaged
• Buffer concentration too low
• Buffer volume too low
• Short in power cord
• Current has dropped below acceptable rating (4 mA)
• Blown fuse in the power supply
• Incorrect input voltage (check input voltage switch near power inlet)
• Buffer leaking in a connected system
• Excessive temperature increase
• Excessive buffer evaporation
• Loose connection in a connected system
• Current set too low
•
mode
• Current changes to voltage
Current set too low. Ceiling hit and constant mode changed from voltage to
current. Increase current to 500 mA.
Voltage set to low. Ceiling hit and constant mode changed from current to
voltage. Increase voltage to 300 V
The PowerEase® 90W Power Supply has automatic cross over, set voltage or current, and preset power.
During the electrophoresis process only one parameter is limiting at a time. The limiting parameter, together
with the conductivity in the electrophoresis system, and the values for the other parameters determine the
maximum output.
14
PowerEase® 90W Power Supply User Guide
Page 15

Appendix C
Ohm’s Law and
Electrophoresis is the migration of a charged particle under the influence of an electrical
Resistance
Resistance of the assembled electrophoresis cell is dependent on the conductivity of the
Voltage
The velocity with which an ion moves in an electric field will vary in proportion to the
Current
Current is a function of the number of ions passing a given cross-section of the circuit at a
Power
The power in Watts, or the rate of heat generated by the system, is directly proportional
Operational electrical parameters
Joule’s Law
field. The power supply output parameters voltage, current, and power are related by the
following two equations:
Voltage (V) = Current (I) x Resistance (R); (V=IR)
Power (P) = Current (I) x Voltage (V); (P=IV)
gel buffer, the thickness of the gel, and the number of gels being run. Although the
resistance is determined by the gel system, the resistance can vary over the course of an
electrophoretic separation. For instance, in the Tris-Glycine buffer system, the fast
moving, highly conductive chloride ions in the gel are gradually replaced by the slower
moving, less conductive glycine ions from the running buffer as the gel runs. As a result,
the resistance of the gel increases as the chloride/glycine front moves down the gel.
field strength (volts per unit distance). The higher the voltage the faster an ion will move.
given time. For a given gel/buffer system, at a given temperature, current will vary in
proportion to the field strength (voltage) and/or cross-sectional area (number and/or
thickness of the gels). Ions in solution and at a given voltage will move faster as the
temperature increases, increasing current.
to voltage and current (P=IV).
PowerEase® 90W Power Supply User Guide
15
Page 16

Product specifications
Input Power (switchable)
115 VAC, 50/60 Hz
Fuses
One 2A/250V, one extra fuse is provided
Output power in watts
90 watts
Output voltage range
2~300 V
Output current range
4~500 mA
Timer
~99.99 hr/min
Terminal pairs
4 (4 positive voltage and 4 negative voltage)
Operating Modes
Crossover
Automatic
Display type
Backlit LCD Graphic type
Display size
53.64 x 15.64 mm (W x H)
Pause function
Yes
Safety features
No Load Detection
Stackable
Yes
Housing material
Flame retardant ABS
Housing size
200 x 290 x 70 mm (W x D x H)
Operating temperature
0°C–40°C
Environmental condition
95% RH (non-condensing), 75 KPa–106 Kpa, altitude
Weight
1.2 kg
Certifications
CE, cETLus, c-Tick
Warranty
1 year
Appendix D
Feature Specifications
230 VAC, 50/60 Hz
• Constant Voltage
• Constant Current
1 V incremental settings
1 mA incremental settings
Load Change Detection
Overload Detection
Ground Leak Detection
Auto Restart
not to exceed 2000 meters
16
PowerEase® 90W Power Supply User Guide
Page 17
Repair and maintenance
Introduction
The PowerEase® 90W Power Supply requires no periodic maintenance program with the
Encountering
Check the troubleshooting section, see Appendix B
Replace the fuse
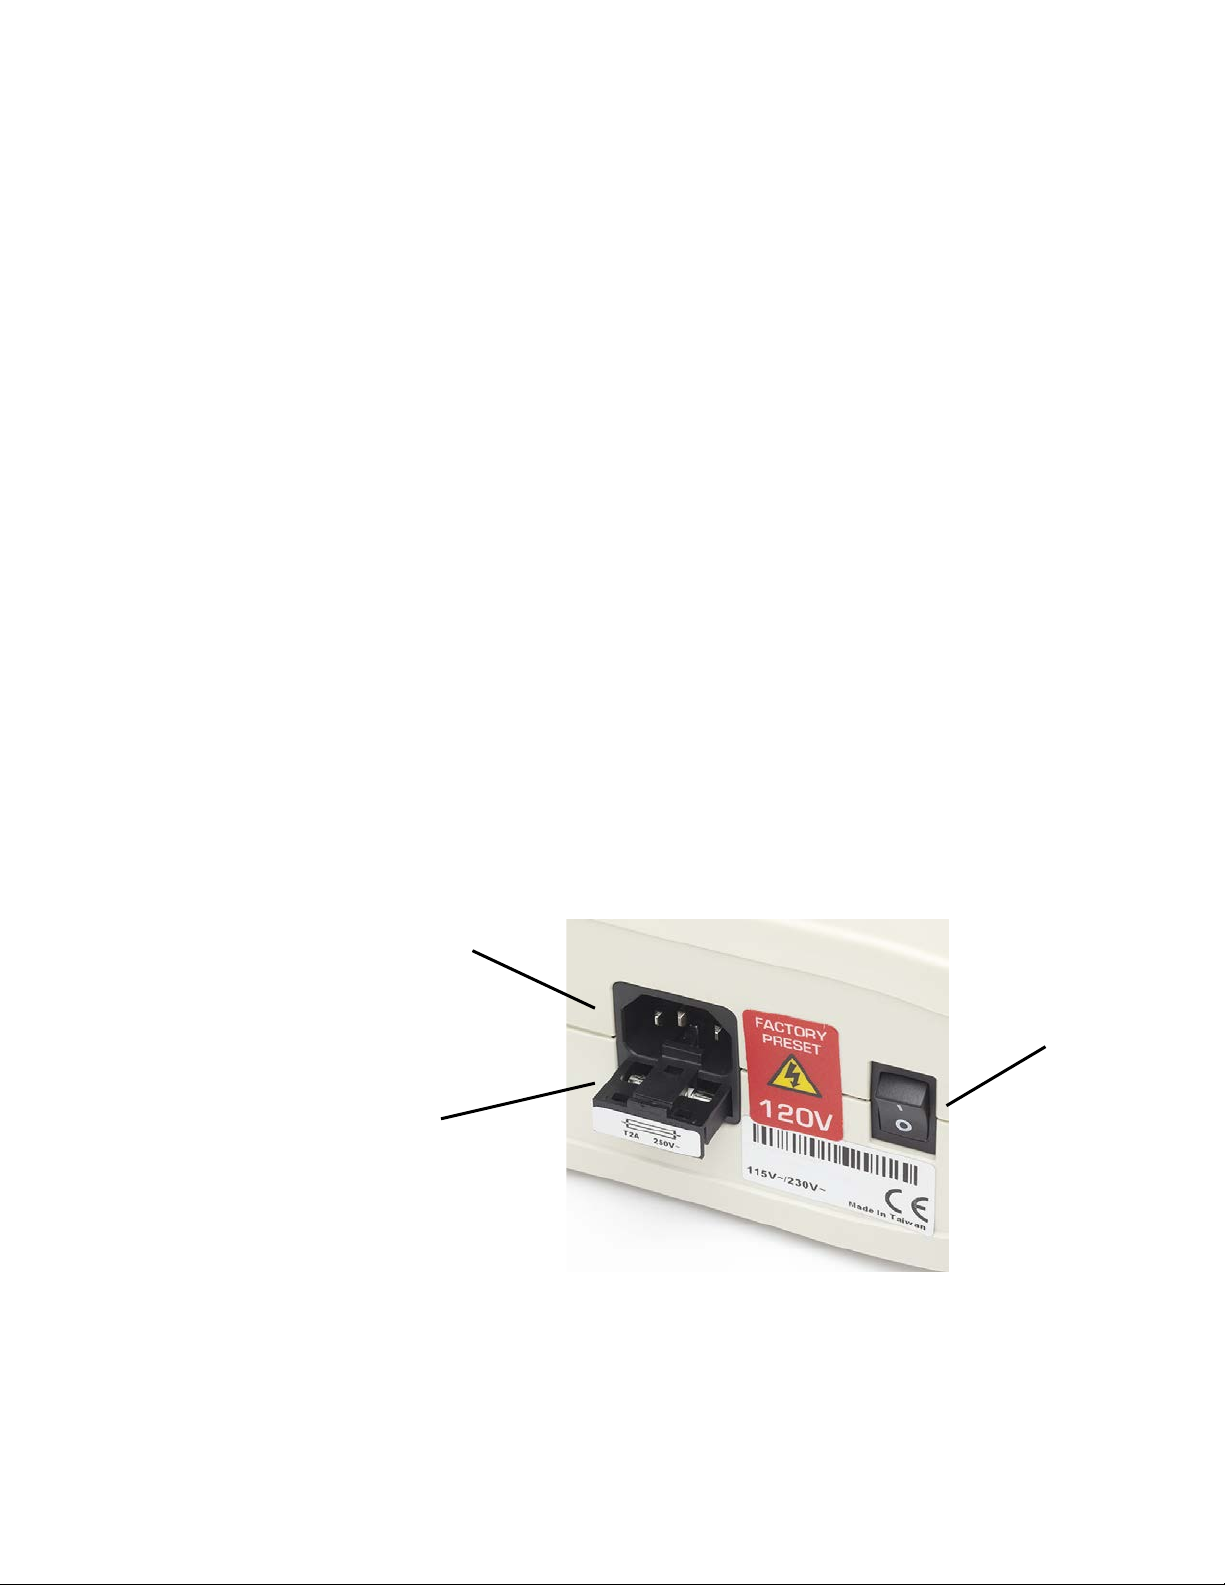
One extra fuse is supplies with the PowerEase® 90W Power Supply. For additional fuses,
Fuse compartment
Power inlet
Power switch
Appendix E
problems
exception of an occasional dry wipe-down of the instrument.
Contact Technical Support, see Appendix F
If the unit must be shipped back for repair, contact support for a Return Authorization
Number and shipping instructions; see Appendix F
contact support; see Appendix F
To replace the fuse:
1. Turn off the main power switch at the rear of the PowerEase
detach the power cord from the rear of the PowerEase
2. Open the fuse compartment located inside the Power Inlet by inserting a small flat
blade screwdriver into the slot on top of the fuse compartment. Turn the screwdriver
to gently pry open the fuse compartment.
Note: The fuse compartment will not open with the power cord in place.
3. Pull the fuse holder out of the compartment and inspect the fuse. If the fuse is burned
or there is a break in the fuse element, replace the fuse with an identical type of fuse
(2A/250V).
4. Place the fuse holder back into the compartment.
®
®
90W Power Supply and
90W Power Supply.
5. Snap the cover closed.
PowerEase® 90W Power Supply User Guide
17
Page 18

Documentation and support
Services and
For the latest services and support information for all locations, go
Safety Data Sheets
(SDS)
Safety Data Sheets (SDSs) are available at www.lifetechnologies.com/support.
Certificate of
The Certificate of Analysis provides detailed quality control and product qualification
Limited product
Life Technologies Corporation and/or its affiliate(s) warrant their products as set forth in
please contact Life Technologies at www.lifetechnologies.com/support.
Appendix F
support
Analysis
to www.lifetechnologies.com
At the website, you can:
• Access worldwide telephone and fax numbers to contact Technical Support and Sales
facilities
• Search through frequently asked questions (FAQs)
• Submit a question directly to Technical Support ([email protected])
• Search for user documents, SDSs, vector maps and sequences, application notes,
formulations, handbooks, certificates of analysis, citations, and other product support
documents
• Obtain information about customer training
• Download software updates and patches
information for each product. Certificates of Analysis are available on our website. Go
www.lifetechnologies.com/support and search for the Certificate of Analysis by
to
product lot number, which is printed on the box.
warranty
the Life Technologies’ General Terms and Conditions of Sale found on Life Technologies’
website at
www.lifetechnologies.com/termsandconditions. If you have any questions,
18
PowerEase® 90W Power Supply User Guide
Page 19

Page 20

For support visit lifetechnologies.com/support or email [email protected]
lifetechnologies.com
06 May 2014
 Loading...