

Page 1
Liesegang ddv 1111
Bediener-Handbuch - User Manual - Mode
Guía del operador
Istruzioni per l'uso - Gebruiksaanwijzing
d'emploi
Page 2

Before use 2
1. Scope of delivery, accessories
1.1 Disposal of packing material 8
2. Quick Setting Up
2.1 Setting up and Connecting the Projector 9
2.2 Projector Terminal Connections 9
2.3 Control Panel Keypad 10
2.4 Mouse Connection 11
2.5 Cable Connections 11
2.6 Image Size 12
3. Starting up the Projector
3.1 First Steps 12
3.2 Standby Mode 13
3.3 Projector Power Down 13
Table of contents
8
4. Using System Menu
4.1 Main Menu 14
4.2 Sub Menus 14
4.3 Menu Adjustments / Settings 15
5. Infrared Remote Control
5.1 How to use the Infrared Remote Control 19
5.2 Meaning of Icons 21
5.3 Battery Replacement 22
6. Replacing the Air Filter
7. Replacing Projection Lamp
7.1 Lamp Life Indicator 25
8. Cleaning the Projector
9. Troubleshooting Problems and Solutions
10. Service Hotline
11. Product Manufacturer
Projection Table 28
Resetting the Projector to Factory Default Settings 28
23
24
25
26
27
27
Table of predefined Resolutions for User Mode 1...3 28
Glossary of Terms 28
Technical Details 29
Supported Data Modes and Resolutions 31
Index
32
_______________________________________________________________
User Manual Data Video Projector 1
Page 3
Before use
Before use
The following notes are intended to be a help for handling the product in accordance
with its designated purpose.
Warnung:
A person could be killed or injured if the wrong operation is done by ignoring this
indication.
_______________________________________________________________
Do not install this unit
in an unstable place.
Avoid placing it in an unstable place such as a weak base, an inc lined floor , etc. T his may caus e
the projector to drop or fall over, resulting in injury.
Do not remodel
this unit.
Do not remodel this unit. It may cause a fire, an electric shock, etc.
Never use
the projector in a humid
environment.
Never use the projector in a humid environment, e.g. bathroom or close to cookers or
humidifiers. This could cause a fire, an electric shock, etc.
Only connect
to the specified mains voltage.
The projector must only be operated with the alternating current specified on the identification
plate. Please immediately check whether the supplied mains connection cable coincides with
wall outlets at the installation location.
_______________________________________________________________
User Manual Data Video Projector 2
Page 4

Before use
Do not forget
the protective conductors.
Only use extension leads or cables with a minimum cross-section of 1.5 mm² and protective
conductors.
Do not apply any shock.
If you drop this unit or if the casing is broken, tur n off the power switch, disconnect the power
plug and contact your dealer. If you use it as it is, it may cause a fire, an electric shock, etc.
If any abnormality occurs.
It there is abnormal smell or smoke, if you use this unit as it is, this could cause a fire or an
electric shock, etc. Immediately turn off the power switch and pull out the power plug. Contact
your dealer to repair the unit. Do not repair it yourself, as it is very dangerous.
Do not use this unit as it is after trouble has occurred. Immediately turn off the power switch and
pull out the power plug, then contact your dealer to have it repaired.
If water, etc., enters the unit, turn it off, pull out the power plug and contact your dealer to have
it repaired.
Be careful with the power cord.
Do not scratch, damage or modify the power cord. Do not bend it forcibly. Also do not put a
heavy object on it, do not heat it and do not pull it. If you do, the power cord may be damaged
and it may cause fire, electric shock, etc.
If the power cord is damaged (exposed or disconnected wire, etc.), replace it. It may otherwise
cause a fire, an electric shock, etc.
Make sure that no dirt adheres to the power plug and insert it until it s tops. If dirt adheres or the
connection is incomplete it may cause a fire, an electric shock, etc.
_______________________________________________________________
3 Data Video Projector User Manual
Page 5

Before use
Do not look directly into the lens
when the lamp is switched on.
Do not look directly into the lens when the lamp is switched on. Since a powerful lamp is used, it
could damage your vision, etc.
Do not put a container, etc,
with liquid on this unit.
Do not put a vase, flower pot, cosmetic container, medicine or water on this unit. If liquid spills
and enters the unit, it may cause fire, electric shock, etc.
Never leave the projector
switched on unsupervised.
Never leave the projector switched on unsupervised or let children play with it as unusual
conditions may occur which can cause a fire, an electric shock, etc.
_______________________________________________________________
User Manual Data Video Projector 4
Page 6
Before use
Caution !
Non-observance can lead to injury or damage.
_______________________________________________________________
Caution
when carrying the unit.
When the unit is to be moved, be sure to disconnect the power plug and check that all external
connection cords are removed before moving it. If not, the cord may be damaged and it may
cause a fire, an electric shock, etc.
Do not place this unit
where it gets hot.
Be careful if you place the unit outdoors, in a place expos ed to direct sunlight or near a heating
device, the casing and parts could be affected.
Cleaning the projector.
Handle the projector as you would do any other devic e with glass components. Avoid impact or
dropping. Before cleaning the device disconnect the mains plug.
The worktop is covered with a scratch-resistant glass plate. If necessary, the glass can be
cleaned with a soft cloth and a conventional glass cleaner.
The casing can be cleaned with a soft, slightly moistened cloth and mild detergent. Avoid the
ingress of moisture into the inside of the equipment. Never use solvents or abr asive cleaners.
Do not leave cleaners inside the projector.
Handle the power cord carefully.
Do not bring the power cord near a heating device. The cor d’s shield may melt and it may c aus e
a fire, an electric shock, etc.
Do not insert / disconnect the power plug with wet hands. It may cause an electric shock.
Do not pull the power cord when the power plug is to be disconnected. The power cord may be
damaged and it may cause a fire, an electric shock, etc. Be sure to seize the power plug.
_______________________________________________________________
5 Data Video Projector User Manual
Page 7
Before use
Do not step on this unit.
Do not put a heavy object on it.
Do not step on this unit or put a heavy object on it. Pay attention when children are present. If
you do, the unit may fall over or may be broken causing an injury.
Never block
the ventilation slots.
Never block the openings for the ventilation or place objects in the projector. Heat may
accumulate inside the projector and it may catch fire.
Set the caster stoppers.
When this unit is installed on a table with casters, set the caster stoppers. If the table moves, it
may fall over, causing an injury.
If you do not use
the unit for a long time.
If you do not use the unit for an extended period of time, be sure to pull out the power plug from
the power outlet.
Replacing the lamp.
Switch off the projector and disconnect the mains plug before replacing the lamp. Let the device
cool down, as the lamp and other components in the projector casing have heated up during
operation, which can cause injury when touched.
Do not place this unit
in a moist or dusty place.
Do not place this unit in a moist or dusty place. It may cause a fire, an electric shock, etc. Do not
place this unit where it would be exposed to soot or steam, near a cooking stove or humidifier,
etc. It may cause a fire, an electric shock, etc.
_______________________________________________________________
User Manual Data Video Projector 6
Page 8

Before use
Volume.
Use a volume level that does not bother persons in the neighborhood. Especially, since the
sound is likely to carry well at nighttime even at a low volume, be careful to choose a suitable
level.
Clean the projector inside
at least once a year!
Ask your dealer to clean the unit inside once a year. If the unit is left with too much dust inside it
may cause fire.
Use of batteries.
Do not use batteries not specified for this unit. Do not use new batteries mixed with old ones.
This may cause a fire, injury due to burst of battery, liquid leakage.
When inserting batteries in this unit, pay attention to the direction of the + and - polarities and
insert the batteries correctly. If the polarities are confused, it may cause injury or damage near
the unit due to burst batteries, liquid leakage, etc.
_______________________________________________________________
7 Data Video Projector User Manual
Page 9

Scope of delivery / Accessories / Packing
1. Scope of delivery, accessories
The packing contains the following parts:
1 projector
1 travel bag
1 infrared remote control with batteries
1 connecting cable for IBM compatible PC
1 mouse cable for serial Microsoft mouse
1 PS/2 mouse adapter
1 video / audio cable
1 S-VHS cable
1 Scart adapter
1 mains cable with Schuko plug
1 user manual
The following accessories are available:
Hard case, monitor splitterbox, connecting set for Macintosh (computer
cable, ADB and USB mouse adapter), separate USB mouse adapter,
connecting cables for workstations.
Important note
The projector features its own electronic multi-range power supply with
automatic switching. It must only be operated with 100 V - 240 V AC with a
frequency of 50 Hz to 60 Hz. The unit must only be connected to a
installed network with protective conductor. Please check immediately
whether the supplied mains cable is compatible with the mains sock ets onsite. Please contact your supplier if a different power supply cable is required
for use abroad.
1.1 Disposal of packing material
The transport packing consists of materials which may be disposed of as
paper and cardboard.
Remark:
should be kept for further transport etc.
the transport packing offers perfect protec tion for the product and
properly
_______________________________________________________________
User Manual Data Video Projector 8
Page 10
Quick Setting Up: Setting up and connecting the projector
2. Quick Setting Up
2.1 Setting up and connecting the projector
These instructions are intended to get you going fast.
Attention:
input sources must be turned off during cable hook up.
1. Place the projector on a rigid, non-slip surface.
2. Connect the power cord.
3. Connect the audio and computer/video input cables to the projector input
terminals.
4. For mouse emulation, connect the mouse and, in case of PS/2 and USB,
the appropriate adapter. (Apple Macintosh computers require an additional
adapter or connecting cable.)
5. Power up the projector then the computer and the video sources.
6. Move the projector nearer or further away from the screen to obtain the
best image size or adjust the image size with the Zoom buttons of the remote
control.
To avoid damage to the equipment, all power to projector and
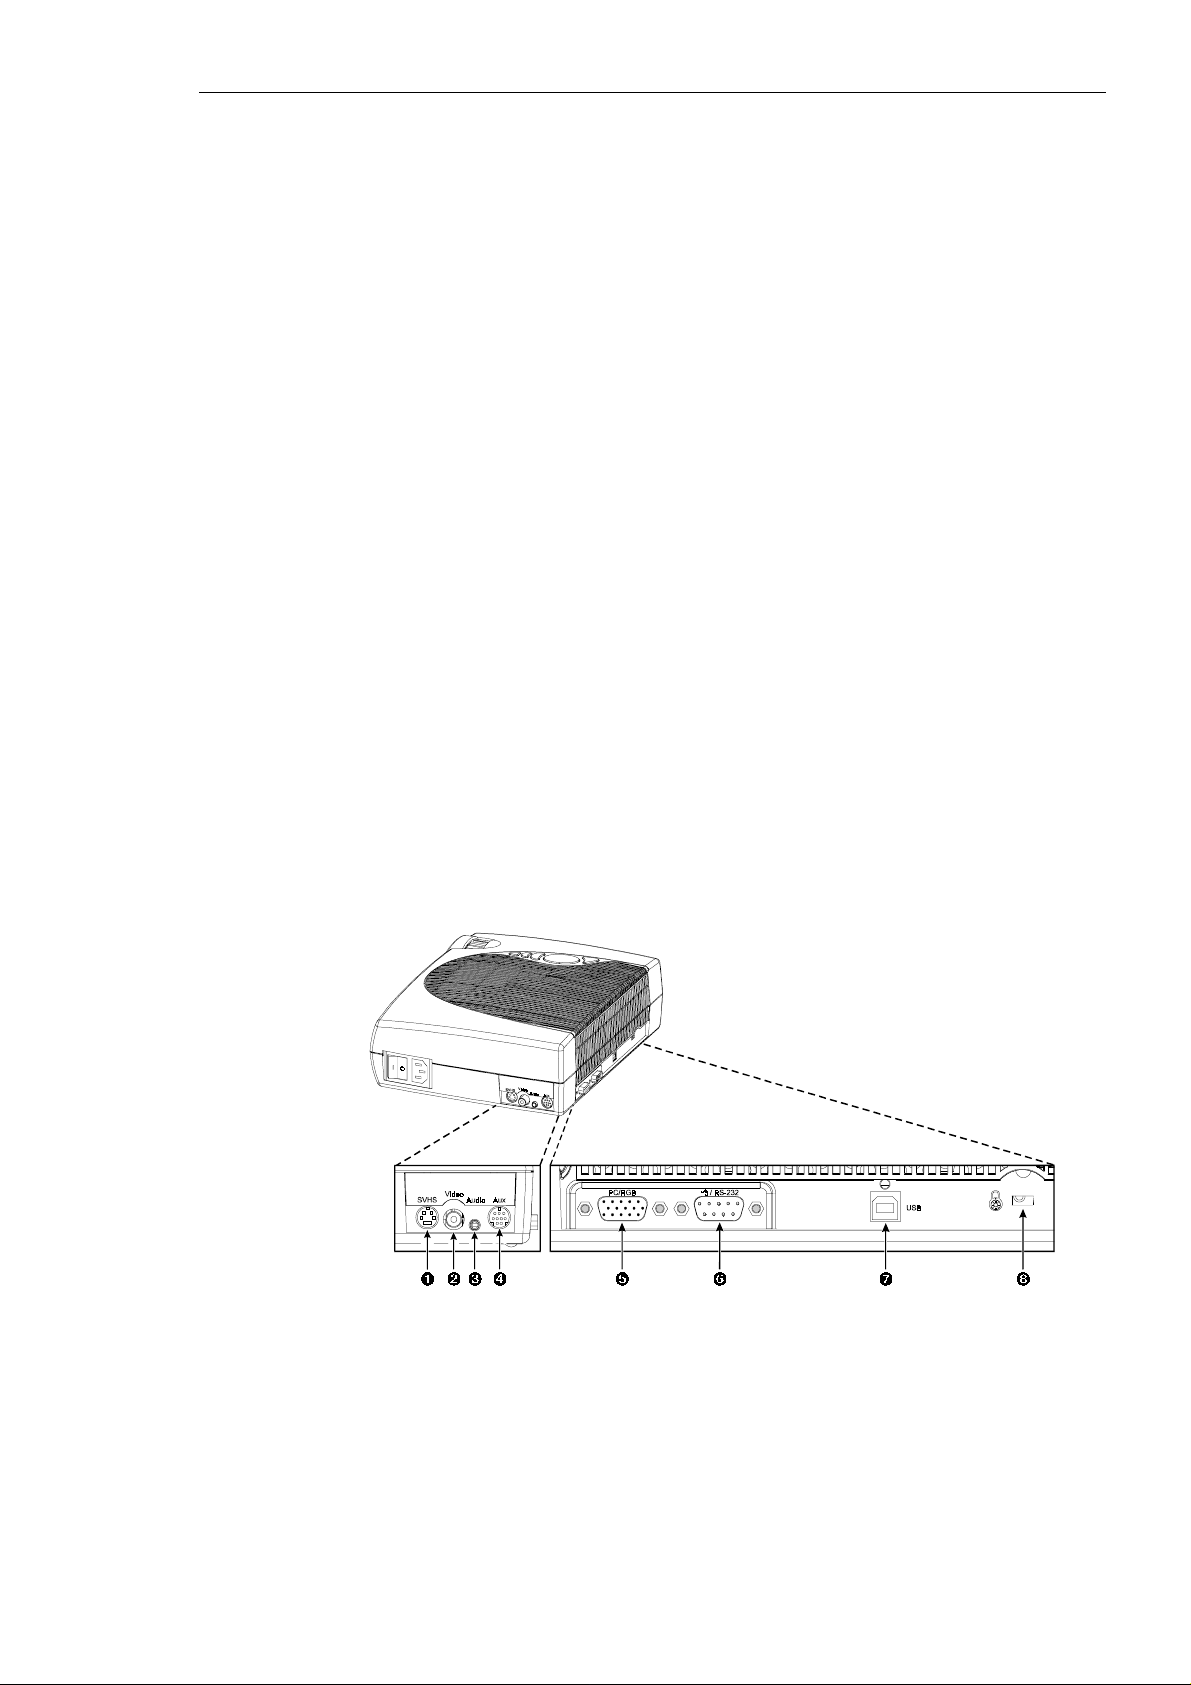
2.2 Projector Terminal Connections
Take a moment to look over the input terminals on the back of the pr ojector.
Terminal connectors are SVHS, Video in, Audio in, Aux in ( not yet in use),
PC/RGB in, RS232C, USB, Kensington Security.
_______________________________________________________________
9 Data Video Projector User Manual
Page 11
Quick Setting Up: Connections / Projector Keypad
1 - SVHS
2 - Video in
3 - Audio in
4 - Aux in
5 - PC / RGB in
6 - RS-232C
7 - USB
8 - Interface for
S-VHS video input
Composite video input
Audio input (stereo converted to mono)
Not yet used
RGB video input from computer
USB mouse emulation output
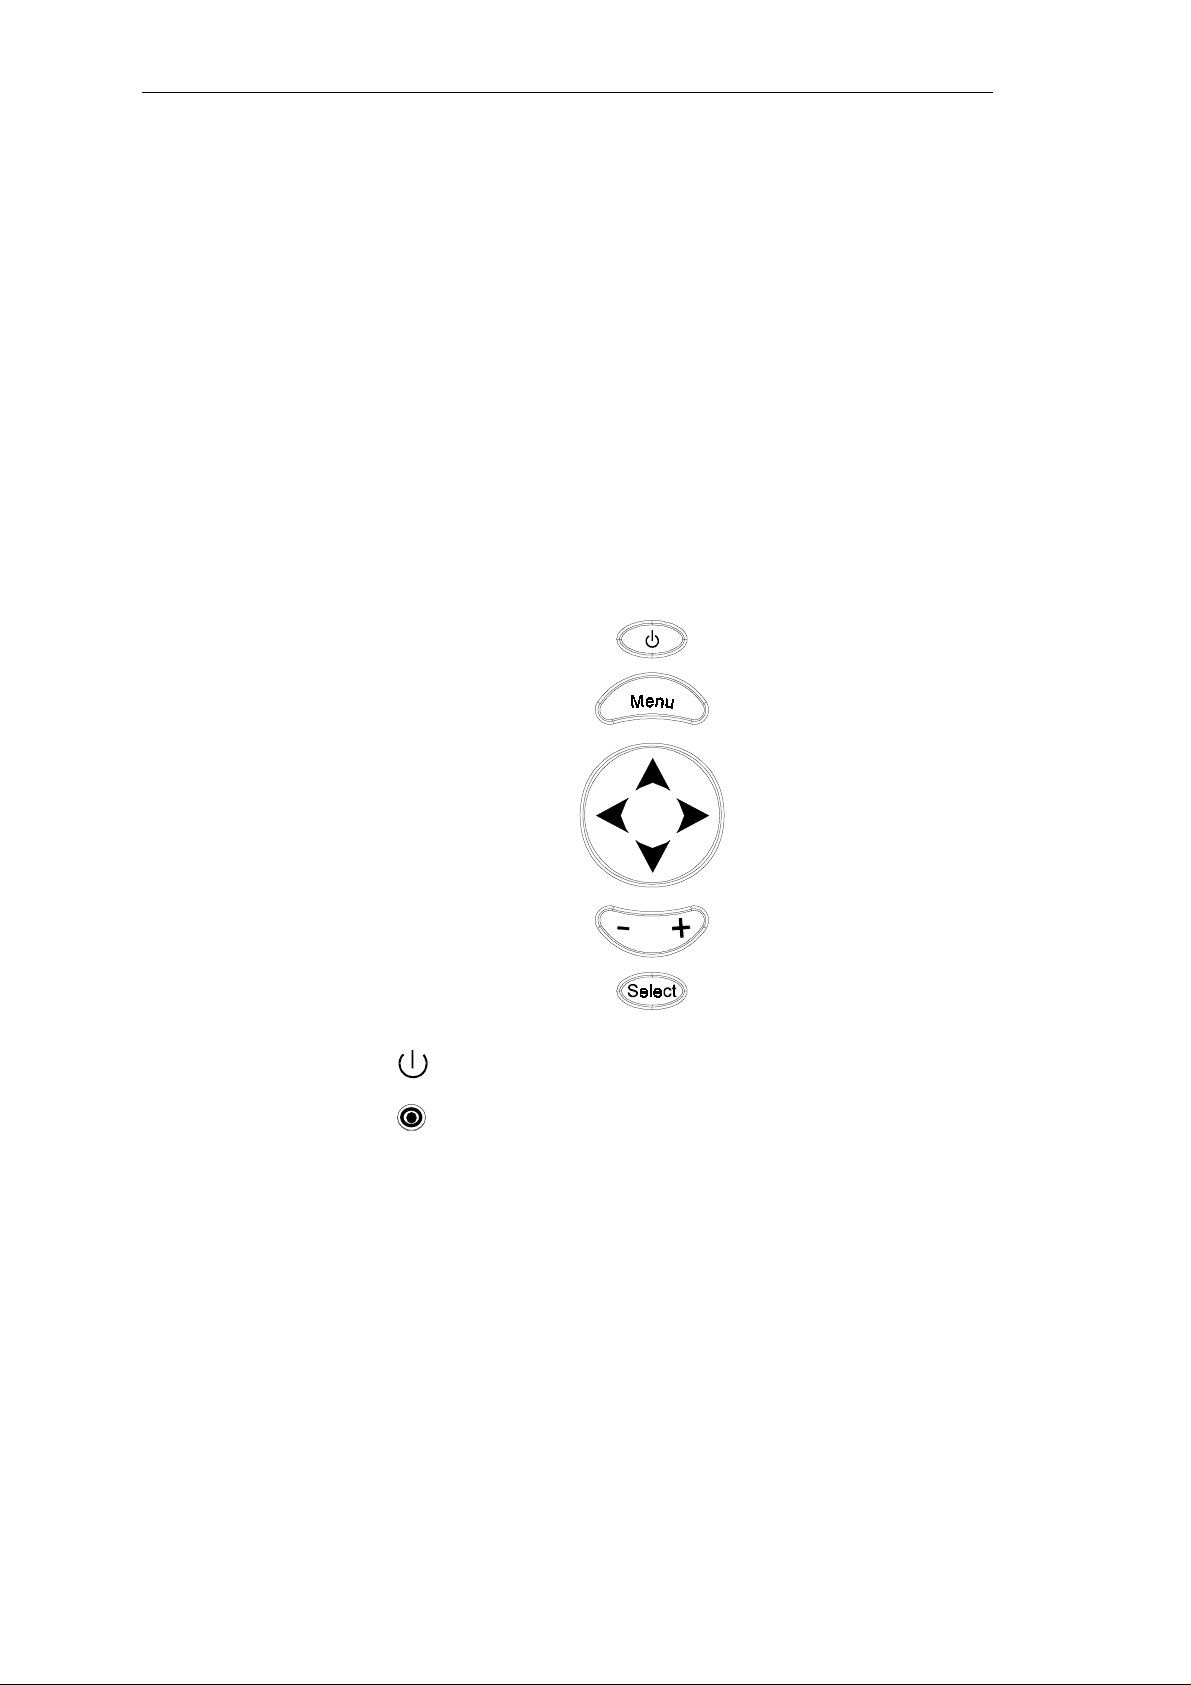
2.3 Control Panel Keypad
The control panel keypad is located on the top of the projector . It has the
following buttons:
Mouse emulation/external projector control
Kensington Security Lock
Standby
Menu
Joystick
+/-
Select
display info sub menus
Display/remove menus
Switch between standby mode and projection mode
Move cursor (up/down, left/right)
Increase/decrease menu value
Increase/decrease volume outside menu mode
Initiate drop windows, check box on/off,
Toggles input source outside menu mode between
PC/RGB, Video, S-VHS and AUX input
_______________________________________________________________
User Manual Data Video Projector 10
Page 12

Mouse Connection / Connecting Cables
2.4 Mouse Connection
The projector has internal mouse emulation capability. Connect computer
and projector with the mouse cable (supplied with projector). Then the
computer mouse functions can be controlled via the projector’s remote
control.
1. Power down computer and projector.
2. Remove mouse cable conneciton from your computer mouse port.
3. Connect the plug of mouse cable to the RS232C port on the projector.
(Not necessary for USB mouse emulation!)
Serial RS232 mouse
port on the computer.
PS/2 Mouse
connect the 6-pin Mini-DIN adapter plug to the PS/2 port on the computer.
MAC ADB
adapter and connect the 4-pin Mini-DIN plug on ADB adapter to the ADB port
on the computer. (The Mac ADB adapter is an accessory item that must be
ordered separately.)
USB Mouse:
port. On first time startup of the computer will ask for device driver installation
and configuration. (The USB mouse cable is an accessory item that must be
ordered separately.)
4. First power on the projector, then power on the computer.
: Connect 9-pin D-Sub plug on mouse cable to PS/2 adapter and
: Connect 9-pin D-Sub plug on mouse cable to the Mac ADB
Connect 4-pin USB mouse cable to the computer USB hub
: Connect 9-pin D-Sub plug on mouse cable to the serial
Note
For serial mouse connections to a laptop computer, refer to the manufacturer’s operating instructions. The internal pointing device or serial port
configurations may need to be changed.
Mouse emulation only works, when all cable connections are established and
the proper startup sequence is followed.
The recommended mouse driver for mouse emulation is the Standard
Microsoft Mouse, Serial or PS/2.
2.5 Cable Connections
1. Turn off all power to the projector and input sources during cable hook up.
Caution:
sources must be
2. Connect cables being careful not to bend any pins in the cable plug or
input terminal.
3. Start up projector then start up input sources.
To prevent
damage to equipment
turned off
during cable hook up.
, all power to projector and input
_______________________________________________________________
11 Data Video Projector User Manual
Page 13

Image Size / Height / Starting up the Projector
2.6 Image Size
Adjust the size of the projected image by using the zoom ring on the upper
side of the projection lens. The projected image size values, as they relate to
the distance-to-screen value, are shown for focal lengths of f=28 mm and
f=36.2 mm. Details on page 28.
3. Starting Up The Projector
3.1 First Steps
Read the important safeguards before operating the projector. After all cable
connections have been completed, the projector can be power ed up. During
operation, keep the exhaust and intake air vents clear of obstructions to allow
proper cooling.
Note:
Allow a projector that has been stored in a cold place to warm up to
room temperature before applying power.
1. Press the Main Power switch (1) to O N. The
red to indicate there is power. (| = ON, O = OFF).
2. Press the standby button
will turn green as an image appears and grows brighter on the screen.
3. Check all ventilation slots (3) and clear away all obstructions.
4. Adjust the Focus (5) and Zoom (4) buttons for best image quality. Press
the foot release button (6) to release the height adjustment foot (7).
5. Power up your computer and video source(s).
Note
In most cases, the projector will automatically adjust to the graphic mode of
your computer by selecting a pre-programmed setting. See page 31.
. to illuminate the lamp. The red LED indicator
button (2) will illuminate
_______________________________________________________________
User Manual Data Video Projector 12
Page 14

Standby / Projector Power Down
3.2 Standby Mode
When the projector is not being used, place it into standby mode.
1. Press the Standby button
2. The lamp will switch off and the Standby button
Note:
The fan motor will continue to run for a few minutes until the projector
cools down and then the fan will turn off.
3. Press again the Standby button
image on the screen.
3.3 Projector Power Down
1. Press the Standby button
Standby button is illuminated red.
2. Wait until the cooling fan motor cycles off.
3. Press the
4. Turn off the power to your input devices.
5. To transport the projector, disconnect all power and connection cables.
Note:
Switching the main power off before the fan has cycled off will
decrease the life of the projection lamp.
Main Power switch
.
will illuminate red.
to illuminate the lamp and project an
to place the projector in standby mode. The
to OFF.
_______________________________________________________________
13 Data Video Projector User Manual
Page 15

Using System Menus
4. Using System Menus
4.1 Main Menu
Press the Menu button on the touch panel keypad or the remote control to
display the Main Menu:
- The menu name is on the top line.
- An arrowhead at the right of a menu line indicates that this item is a submenu that can be selected.
- A text field at the right of a line indicates that this is a value that you can
change in a drop down window.
- Press Select to display the Info window.
4.2 Sub-Menus
Select:
desired sub-menu. Then press the Disc Pad/Joystick to the right or the
Select button to display the sub-menu.
Change a text field value (e.g. VESA 1024x768 60 Hz):
Pad/Joystick up or down to highlight (select) the menu line. Then press the
Disc Pad/Joystick to the right or the Select button to display a drop down
window of all the possible values. Use the Disc Pad/Joystick to select a value
and press Select to initiate the selection.
Change a slider bar value:
highlight (select) the value. Press the +/- button on the remote control or the
projector’s panel to increase or decrease the value.
Change a number field:
(select) the value. Then press the +/- button on the remote control or on the
projector’s panel to increase or decrease the value.
Change a check box field
indicates that you can toggle that value On/Off by pressing the Select button.
Exit a sub-menu:
Return to the projected image
Press the Disc Pad/Joystick up or down to highlight (select) the
Press the Disc
Press the Disc Pad/Joystick up or down to
Press the Disc Pad/Joystick up or down to highlight
: A check box field at the right of a sub-menu line
Press Disc Pad/Joystick to the left.
: Press menu button.
_______________________________________________________________
User Manual Data Video Projector 14
Page 16

Menu Adjustments / Settings
4.3 Menu Adjustments / Settings
The following charts lists all the menu items that can be adjusted along with
the default settings.
Main Menu
Picture Display picture submenu
Tools Display tools submenu
Source
(drop down window)
User Interface Display user interface
Advanced Setup Display advanced setup
Info Display information
Description / Action Default setting
Select input source
(PC/RGB / SVHS /
VIDEO / AUX)
submenu
submenu
window (press Select)
In active PC / RGB mode:
Picture (PC/RGB)
Submenu Items
Brightness Adjust the brightness
Contrast Adjust the contrast
Optimize Set best brightness for image
Hor. Position Adjust horizontal position of
Ver. Position Adjust vertical position of
Tracking Adjust number of pixels per
Sync Adjust phase synchronization
Description / Action Default setting
image
image
line
According to search
procedure
Mode
(drop down window)
Resolution
(drop down window)
Select data mode to adjust
within this menu (Predefined
modes / User Mode 1...3)
Select pixel resolution
(640x350 / 640x400 / 720x400
/ 640x480 / 800x600 / 832x624
/ 1024x768 / 1152x864 /
1152x870 / 1152x900 /
1280x960 / 1280x1024)
<Automatic>
_______________________________________________________________
15 Data Video Projector User Manual
Page 17

Menu Adjustments / Settings
In active Video mode:
Picture (video)
Submenu Items
Brightness Adjust the brightness
Contrast Adjust contrast
Colour Adjust colour saturation
Tint Adjust hue for NTSC
Tools
Submenu Items
Volume Adjust volume
Audio Audio mute on
Freeze Freeze frame off
Magnify Magnify mode off
Factor Adjust magnification factor
Speaker Speaker on
Timer
(drop down window)
Minutes Adjust time countdown
Description / Action Default
Description / Action Default
Select timer mode
(off/small/large)
(1 to 90 minutes)
off
10 minutes
setting
Setting
_______________________________________________________________
User Manual Data Video Projector 16
Page 18

Menu Adjustments / Settings
User Interface
Submenu Items
Language
(drop down window)
Blank Screen Colour
(drop down window)
Graphics Activate on-screen status bar
Reset window position Reset all menu window positions
Help
(drop down window)
In active PC/RGB mode:
Advanced Setup
Submenu Items
Projection
(drop down window)
Colour Manager Display Colour Manager submenu
Remote control Remote control receiver on/off on
Sync mode
(drop down window)
SOG level Adjust level for sync on green
Reset data modes Set all predefined data modes to
Reset lamp display
Test Display test submenu
Description / Action Default
Select user interface language
(English / Deutsch / Français /
Español / Italiano / Nederlands /
Svenska)
Select colour of blank screen
(black / red / green / blue / yellow
/ cyan / magenta / white)
indicators and icons
to default
Select Help window mode
(immediate / 1,3 or 5 seconds /
off)
Description / Action Default
Select projection orientation
(standard / rear )
Select Sync mode for PC/RGB
(separate TTL / composite TTL /
separate ana. / composite ana. /
sync on green)
synchronization
factory default settings. User
modes remain unchanged.
Resets the lamp hours displayed
on the Info window
Setting
Deutsch
Black
on
3 seconds
Setting
standard
separate
TTL
_______________________________________________________________
17 Data Video Projector User Manual
Page 19

Menu Adjustments / Settings
In active video mode:
Advanced Setup
Submenu Items
Projection
(drop down window)
Colour Manager Display Colour Manager
Remote control Remote control receiver on/off on
Video standard
(drop down window)
Reset lamp display
Test Display test submenu
Colour Manager
Submenu Items
Brightness red Adjust brightness for red portion
Contrast red Adjust contrast for red portion
Brightness green Adjust brightness for green
Contrast green
Description / Action Default
Select projection orientation
(standard / rear )
submenu
Select video standard
(PAL B,G,H,I / NTSC M /
SECAM / NTSC 44 / PAL M /
PAL N / PAL 60 / NTSC COMB /
automatic)
Resets the lamp hours
displayed on the info window
Description / Action Default
portion
Adjust contrast for green portion
standard
automatic
Setting
Setting
Brightness blue
Contrast blue Adjust contrast for blue portion
Default Set settings to default values
Test
Submenu Items
Parameter display
Colour test picture
Frame test picture
Info (display only)
(Video / PC)
Hardware Current hardware level
Firmware Current firmware level
VESA xxxxxxxxxx Current data or video mode
Lamp (bar indicator) Lamp life hours (Green: lamp
OK! Closes the Info display by
Adjust brightness for blue
portion
Description Default
Parameter display window off
Display colour test picture
Display frame test picture. It
shows the dimensions of the
available picture, so that the
projection may be adjusted.
Description
good / red: lamp needs
replacement)
pressing the Select button
Setting
_______________________________________________________________
User Manual Data Video Projector 18
Page 20

Infrared Remote Control
5. Infrared Remote Control
5.1 How to use the Infrared Remote Control
Aim the remote control toward the projection screen or at the sensor . Press
desired remote button to send a signal to the projector.
Button
(*)
(*)
BRIGHT
PC
VIDEO
VOLUME
JOYSTICK (*)
SELECT (*)
Description
Switch the projector between standby mode and operation
mode
Toggle on/off the audio sound
Decrease or increase brightness of displayed image
Switch displayed image to PC/RGB input
Switch displayed image to video input. In video mode
toggles between Video / SVHS / AUX.
Decrease or increase speaker volume.
Move the cursor on the projected image.
Navigate menus.
In mouse emulation mode: right mouse button.
Not in mouse emulation mode: menu window positioning.
Joystick centers image.
In mouse emulation mode: left mouse button.
Not in mouse emulation mode: Enter button for
confirmation of a selection.
_______________________________________________________________
19 Data Video Projector User Manual
Page 21

Infrared Remote Control
Button
MENU (*)
OPTIMIZE
REVEAL
POINTER
FREEZE
TIMER
BLACK
MAGNIFY
MOUSE
Description
Display system menus
Optimizes the level setting so that light areas of the image
are projected with optimal intensity.
Press Reveal to cover the image on the screen with a gray
mask. Use the Joystick to reveal the image.
Place a pointing device on the screen. Use Joystick to
move pointer.
Stores (freezes) the projected image. Press again to return
the projection of the current image
Display timer (window in lower part of screen or full screen).
Repeated operation of key toggles between.
Replace projected image with preselected background
blank colour. Press again to return image.
Magnification mode on/off. Press +/- buttons to
increase/decrease the magnification factor. Move Joystick
to displace the magnified area within the image.
In video mode (NTSC only!), press Magnify to toggle
between scaled and unscaled representation.
Activates the mouse emulation. The mouse pointer can be
moved using Joystick. Pressing the button again switches
off the mouse emulation.
Note
The buttons marked with an asterisk (*) also appear on the projector’s
keypad.
_______________________________________________________________
User Manual Data Video Projector 20
Page 22

Meaning of Icons
5.2 Meaning of Icons
An icon will display to indicate a presentation tool is active.
Pointer mode:
In the Pointer mode you can move a pointer over and arround the picture area.
By pressing the
turned off.
In the Freeze mode the picture will be freezed. Pressing the
remote control a second time or the
turned off.
In the magnify mode the image can be magnified (zoomed). With the – and
keys you can decrease or increase the magnifying factor. You can select the
magnified area by using the
control a second time, the magnify mode will be turned off.
In the reveal mode the picture will be covered by a grey sheet. You now can
reveal the covered image by using
remote control a second time, the reveal mode will be turned off
Pointer
Freeze mode:
Magnify mode:
Reveal mode:
key on the remote control a second time it will be
Activate with
Activate with
Magnify
Activate with
Joystick
Activate with
Joystick
. Pressing the
Pointer
Freeze
key, the freeze mode will be
Magnify
Reveal
. Pressing the
key on IR remote control
key on IR remote control
Freeze
key on IR remote control
Magnify
key on IR remote control
key on the remote
Reveal
key on the
key on the
+
.
In the muting mode the sound output of the projectors internal speakers and the
external output will be muted. Pressing the
second time, the muting mode will be turned off.
If you’ve connected the projector with the mouse cable and the right adapters to
your PC and turned on the projector before booting the PC it will emulate a
mouse over the IR remote control transmitter. By pressing the
the IR remote control the mouse emulation will be activated. You can move
arround the mouse pointer with the
by the two buttons
can be turned off by pressing the
Muting mode:
Mouse emulation (Only in data mode available!)
Activate with
left
and
Activate with
Mouse
right
beside the
Mouse
key on IR-Remote control
Joystick
Mute
key on IR-Remote control
Mute
key on the remote control a
Mouse
. The mouse keys will be emulated
Joystick
key a second time.
. The mouse emulation
key on
_______________________________________________________________
21 Data Video Projector User Manual
Page 23

Meaning of Icons/Battery Replacement
Question mark:
the projector can’t recognize the mode of the data input
source.
Even if you select a standard VESA mode on your system this can
happen, because some device drivers of the graphic cards in the PC
using timing parameters which differ from the parameters given out
from the VESA organization.
As a result of this, the projector may detect a wrong predefined data
mode or switches to a User mode, so you may see only a part of the
whole picture.
To correct this situation you must select manually a data Mode in the
Picture menu which should match the mode you’ve selected on the PC.
If there is no matching mode you must select a User mode.
In a User mode you can manually select the Resolution which is
normally not choosable.
It may be necessary to correct the Horizontal and Vertical Position and
the Tracking and Sync values in the Picture menu. These values will be
stored so the mode can be recognized the next time.
If you’ve accidently misadjusted the values of a standard predefined
data mode, you can reset them by selecting Reset Data Modes in the
Advanced Setup menu. The settings of a User mode won’t be affected
by this action.
A question mark in a box will appear if
5.3 Battery Replacement
The remote control uses two AAA batteries. The battery cover is located
on the back of the remote control.
1. Press the locking button (1) to release door.
2. Move the door (2) to remove it and set it to the side.
3. Remove old batteries.
4. Install new batteries (3). Make sure the polarity (+/-) on each battery
matches the decal.
5. Replace battery compartment door.
_______________________________________________________________
User Manual Data Video Projector 22
Page 24

Air Filter Change
6. Replacing the Air Filter
For best performance, replace the air filter each time the projection lamp is
changed.
Note:
Periodically check air filter for excess dust or dirt. Replace or clean as
needed.
1. Switch off the unit (1) and unplug the power cord of the projector.
2. Remove the back panel (2).
- Press the left and the right tabs of the back panel with your finger tips
to the middle of the back panel.
- Pull the lower end of the back panel towards yourself.
- Pull out the back panel with air filter.
4. Separate the air filter from the back panel (3).
5. Vacuum (4) the air filter to remove the dust and dirt.
6. Insert the air filter in the back panel.
7. Insert the back panel the reverse way until both tabs of the back panel
snap in.
_______________________________________________________________
23 Data Video Projector User Manual
Page 25

Lamp Change
7. Replacing Projection Lamp
The NTP lamp of the projector has a limited lifetime of approximately 2,000
hours. If the projected image appears dark or a red lamp life indicator bar
displays during projector startup, you should change the lamp and air filter.
Important Note:
waste regulations and dispose of this lamp in a proper manner.
Caution:
the lamp. There are high voltage parts inside the projector that may cause
electric shock.
Caution:
metal parts become extremely hot and can cause burns to your fingers.
1. Press the Standby button on the projector’s panel or the remote control.
Wait for the fan to cycle off. Turn the
the power cord.
2. Set the projector on a sturdy surface with the front of the projector facing
you.
3. Press the
on the
cartridge
4. Press both sides of the metal shackle securing the
5. Grasp
the projector.
6. Carefully insert the new
shackle
the
Always switch off the unit and unplug the projector when changing
Allow the projector to cool down for 30 minutes. Lamp and adjacent
lamp door
(3).
metal shackle
(4) behind the
lock tab
This lamp contains mercury. Consult your local hazardous
main power switch to OFF
lock tab
(1) slides into the locked position.
(1) of the
(2) to hinge it to the upside position and access the
(4) and carefully pull the
secure tabs
lamp door
lamp cartridge
(5). Close the
(2) with your finger. Pull outward
lamp cartridge
lamp cartridge
(3) and secure with
lamp door
metal
(2) tightly until
and unplug
lamp
(3).
(3) out of
7. Go to the
Advanced Setup
menu and
reset
the lamp life display to zero.
_______________________________________________________________
User Manual Data Video Projector 24
Page 26

Lamp Life Indicator / Cleaning the Projector
7.1 Lamp Life Indicator
The elapsed operating time of the lamp is displayed on the Info sub-menu.
From the Main menu, select
lamp indicator bar is green, the lamp is good. When the bar changes to red,
the lamp should be changed.
After changing the projection lamp, the lamp life indicator must be reset to
zero. To reset the lamp life indicator:
INFO
to display the lamp life. As long as the
8.
1. Press the
2. Select the
3. Select
4. The following message will display: „Really reset lamp life display ? OK! /
Cancel“
5. Using the Disc Pad or Joystick, select
acknowledge the change.
6. Press Menu to exit the menu system.
Note:
To view the used/remaining lamp life: (1) Go to the Main Menu.
(2) Select INFO. (3) Press Select button.
Menu button
Advanced Setup sub-menu
Reset lamp display
to display the main menu.
and press the Select button.
using the Disc Pad or Joystick.
OK!
and press
Select
to
Cleaning the Projector
For best performance, keep your projector free of excess dust and s urface
dirt. Use a soft cloth to remove dust from the projector housing. Use a mild
cleaner to remove surface dirt and smudges from the projection lens.
Caution:
liquids get inside the projector. There are high voltage parts inside the
projector that may cause electric shock.
Always unplug the projector when cleaning. Take care that no
_______________________________________________________________
25 Data Video Projector User Manual
Page 27

Troubleshooting Problems and Solutions
9. Troubleshooting Problems and Solutions
Problem Probable Cause Possible Solution
Image is disturbed
or unstable.
No computer
image projected.
Message „Looking
for signal...“
displays.
No video image
projected.
Mouse does not
work.
Image off-center. Image position. Center image with the Disc Pad or the
Cannot get entire
image on the
screen.
Washed out
image.
Wrong Sync setting
Wrong Tracking value
Loose cable.
No power to computer.
Wrong synchronization
mode.
Loose cable.
No signal from video source.
Loose cable.
Wrong connection.
Wrong power up sequence.
Wrong Tracking value.
Compatibility problem.
Wrong Contrast setting.
Wrong Brightness setting.
Set to factory default setting.*
Change Sync setting in the Picture
menu for optimum performance.
For vertical interference stripes, change
the Tracking in the Picture menu for
optimum performance.
Check and secure cable connections.
Turn on computer.
Adjust synchronization mode of the
projector to that of the computer via
Advanced Setup menu.
Check and secure cable connections.
Check video picture on TV.
Check and secure cable connections.
For PS/2, USB and ADB (Apple) mouse
a special adapter is necessary. Only use
adapters from the original manufacturer.
The mouse emulation operates correctly
only if the correct power up sequence
has been used.
remote control.
If vertical interference stripes occur,
change the Tracking value in the Picture
menu for optimum performance.
Refer to the documentation for your
graphic card. Change the Resolution
setting in the Picture menu to the
resolution of the video mode output from
the computer graphic card.
Change Contrast setting in the Picture
menu. The bar should be in the middle
position.
Lower Brightness setting in the Picture
menu. Choosing brightness and
pressing Select can perform an
automatic adjustment.
_______________________________________________________________
User Manual Data Video Projector 26
Page 28

Service Hotline / Manufacturer
Humming noise.
Slowly passing
horizontal bars.
* The factory default settings of the projector can be restored by pressing
Select and Menu simultaneously on the projector’s control panel while
switching on the main power switch of the projector and pressing the
Standby button afterwards.
The projector will start immediately and the mes sage
wiederhergestellt“
starting screen will indicate the default settings are reset.
10. Service Hotline
In case of technical problems please feel free to call Liesegang at +49 211
39 01 444.
For information about Liesegang products and if you have problems with
operation of Liesegang products please do not hesitate to call Liesegang at
+49 211 39 01 245.
Signal sources are
connected to different
power sources.
VCR connected to aerial
system and to projector.
Bad signal.
(Parameter factory settings restored) displayed in the
Locate the source of disturbance.
Disconnect the sources one after
another from the projector. Connect all
sources to a common power source.
Remove antenna connection from VCR.
If the distrurbance disappears, use a bypass filter (isolating transformer) to
connect the antenna to the VCR.
Try different input source.
“Standard-Parameter
Fax Hotline +49 211 39 01 226
11. Product Manufacturer
Ed. Liesegang
Volmerswerther Str. 21
D-40221 Düsseldorf
Phone +49 211 3901-1
Fax +49 211 3901-227
Trademarks used in this manual: ADB, USB, IBM, Apple, Macintosh, Kensington Lock and
Microsoft are registered trademarks of these manufacturers.
All details are correct at time of going to press, 3/20/2000. We reserve the right to make
technical changes due to further development , any delivery changes and ac cept no liability for
errors contained. The published data i s only intended for purposes of produc t description and
are not to be understood as assured and legally binding characteristics.
_______________________________________________________________
27 Data Video Projector User Manual
Page 29

Projection Table / Projector Reset / User Modes
Projection Table
Below information refers to the standard f=28-36.2 mm lens.
Maximum (f=28 mm) Minimum (f=36.2 mm)
Distance
to screen
m
Image widthmImage
height
m
Image
width
m
Image
height
m
1.50 0.92 0.69 0.70 0.53
2.50 1.54 1.15 1.19 0.89
3.00 1.85 1.39 1.43 1.07
5.00 3.09 2.32 2.39 1.79
7.00 4.34 3.25 3.35 2.51
10.00 6.20 4.65 4.79 3.59
Resetting The Projector To Factory Default Settings
The factory default settings of the projector can be restored by pressing
Select
main power switch of the projector and pressing the
afterwards.
and
Menu
simultaneously on the control panel when switching on the
Standby
button
The projector will start immediately and the message “
settings restored
” displayed in the starting screen will indic ate the default
Parameter factory
settings are reset.
If you've had selected another menu language than German, which is the
default language, you'll have to select your menu language again.
Table of predefined Resolutions for User-Mode 1...3:
Predefined Resolutions
640 x 350
720 x 350
640 x 400
720 x 400
640 x 480
800 x 600
832 x 624
1024 x 768
1152 x 864
1152 x 870
1152 x 900
1280 x 960
1280 x 1024
_______________________________________________________________
User Manual Data Video Projector 28
Page 30

Glossary of Terms
Glossary of Terms
Hz, KHz, MHz (Hertz, Kilohertz, Megahertz)
Hertz is a unit of measurement used to express the frequency, in cycles per
second, of an electrical signal or event. (Megahertz = 1 million cycles per
second)
Lumens
A measure of light output on a screen or other surface. One lumen is the light
of one candle power on each square foot of a surface of a sphere at a radius
of one foot from the light soruce.
Metal halide lamp
A modified mercury arc lamp that is extremely bright. It is filled with a gas
with elements known as halogens. The properties of this fill gas allows the
lamp to burn longer and brighter than ordinary lamps.
NTSC (National Television Systems Committee)
Standard for television signals and other video equipment signals. The
standard uses interlaced scans and 525 horizontal lines per frame, at a rate
of 30 frames per second.
PAL (Phase Alternate Line)
The format for colour television signals used in Germany, England and many
other countries. PAL is an interlaced format with 25 frames per second and
625 lines per screen.
Pixel (word coined from Picture Element)
This is one image dot, a definite position on a display that consists of a single
dot or a group of three dots (red, green, blue).
Resolution
The number of pixels available in a display device for creating images.
Expressed as a number of columns by number of rows (e.g. SVGA
resolution, 800 x600).
S-VHS (S-Video, Super VHS)
A video signal which separates the luminance (Y) and chrominance (C)
signals. Also known as Y/C video.
SECAM (Séquentiel Couleur a Mémoire)
A colour television standard developed in France and also used in certain
other countries.
XGA
A standard PC computer analogue interface: resolution of 1024 x 768.
_______________________________________________________________
29 Data Video Projector User Manual
Page 31

Technical Details
Technical Details
Power supply: 100-240 V ~ , 50-60 Hz
Connections: RGB data input : 15 pin DSub
RS232C/
Serial mouse connection: 9 pin DSub
USB mouse: USB
Video: Koax (Cinch)
SVHS: S-Video
Audio In: 1xMiniklinke
Aux: 1x 9 pin mini plug
Only use the factory supplied cables!
Operating temperature: max. 40°C ambient temperature
Storage temperature: -20°C to +60°C
Dimensions and weight: approx. 257 mm x 83 mm x 216 mm
(W x H x D), approx. 2.9 kg
IR remote control: Power supply with two batteries
type IEC LR03 (size AAA)
Projector characteristics:
DMD with high contrast ratio of typically 1:400.
Resolution of 1024 x 768 pixels.
200 W NTP lamp with a lamp life of typically 2,000 hours.
Approx. 1,200 ANSI lumens image brightness.
Infinite magnification up to 8 times. Image section may be changed.
Parameters can be freely adjusted by the user, for connec ting the projector
to computers which deviate from the pre-programmed standards.
Automatic setting of tracking and synchronization.
Automatic adaptation of brightness and contrast with OPTIMIZE.
Current settings are saved and also remain saved after switching off.
Menu-guided parameter setting with help text in several languages.
Freeze function for momentarily saving the displayed image.
Digital multi-standard video decoder. Connection for two video sources (one
with S-VHS input). Supported video standards:
PAL 625 lines, 50 Hz,
SECAM 625 lines, 50 Hz
NTSC 525 lines, 60 Hz
Video picture without interferences and artefacts due to integrated De-
Interlacer with interpolation over successive images (Triple-V De-Interlacer).
Infrared remote control can be switched off via the options menu when
interference occurs due to other infrared devices.
Interface for Kensington Lock™.
_______________________________________________________________
User Manual Data Video Projector 30
Page 32

Supported Data Modes and Resolutions
Supported Data Modes and Resolutions
Table of the predefined Data modes:
Data Mode Name Resolution
Hor. x Vert.
VGA 640x350 640 x 350 30,000 70,000 25
VESA 640x350 85Hz 640 x 350 37,861 85,081 32
VGA Text 720x350 720 x 350 31,469 70,087 28
VGA 640x400 640 x 400 25,560 60,000 25
VESA 640x400 85Hz 640 x 400 37,861 85,081 32
VGA Text 720x400 720 x 400 31,469 70,087 28
VGA 640x480 640 x 480 31,469 59,941 25
VESA 640x480 72Hz 640 x 480 37,861 72,810 32
VESA 640x480 75Hz 640 x 480 37,500 75,000 32
VESA 640x480 85Hz 640 x 480 43,269 85,008 36
VESA 800x600 56Hz 800 x 600 35,156 56,250 36
VESA 800x600 60Hz 800 x 600 37,879 60,317 40
VESA 800x600 72Hz 800 x 600 48,077 72,188 50
VESA 800x600 75Hz 800 x 600 46,875 75,000 50
VESA 800x600 85Hz 800 x 600 53,674 85,062 56
VESA 1024x768 43Hz 1024 x 768 35,522 86,957 45
VESA 1024x768 60Hz 1024 x 768 48,363 60,004 65
VESA 1024x768 70Hz 1024 x 768 56,476 70,069 75
VESA 1024x768 75Hz 1024 x 768 60,023 75,029 79
VESA 1024x768 85Hz 1024 x 768 68,677 84,996 95
VESA 1152x864 75Hz 1152 x 864 67,500 75,000 108
VESA 1280x960 60Hz 1280 x 960 60,000 60,000 108
VESA 1280x1024 60Hz 1280 x 1024 63,981 60,020 108
VESA 1280x1024 75Hz 1280 x 1024 79,975 75,024 136
Mac 640x480 640 x 480 35,000 66,667 30
Mac LC 640x480 640 x 480 34,975 66,619 31
Quadra 832x624 832 x 624 49,107 75,087 57
Mac 1024x768 1024 x 768 60,241 74,927 80
Mac 1152x870 1152 x 870 68,681 75,062 100
Mac 1280x960 1280 x 960 85,938 85,003 139
Sun 1152x900 66Hz 1152 x 900 61,846 66,004 95
Sun 1152x900 76Hz 1152 x 900 71,713 76,047 105
Horizontal
Frequency
kHz
Vertical
Frequency
Hz
Pixel-Clock
MHz
_____________________________________________________________________________
31 Data Video Projector User Manual
Page 33

Index
Index
A
Air filter 22, 23
B
Batteries 7, 8, 21, 29
F
Factory default settings 15, 16, 17, 18, 26
Frame test picture 9, 18
L
Lamp 4, 6, 13, 17, 18, 23, 24, 28, 29
Lumen 28, 29
R
Reset (see factory default settings)
Resolution 27, 28, 29
S
Standby 10, 12, 13
Switching off 13
Switching on 12
T
Troubleshooting 25
U
User mode 15, 17, 27
V
Video mode 18, 25, 27
_______________________________________________________________
User Manual Data Video Projector 32
Page 34

CE
CE
This equipment
for electromagnetic compatibility and therefore bears the CE sign. The equipment
satisfies the following standards:
EN 55022 Interference voltage and perturbing radiation
EN 50082-1 Immunity to interference
EN 61000-4-2 Electrostatic discharge
EN 61000-4-3 HF irradiation
EN 61000-4-4 Burst test
Warning!
This is a class A apparatus. This apparatus can cause radio interference in
residential quarters; in such circumstances the user may be asked to take
appropriate steps and be responsible for these.
Note
The European standards EN 55022 and EN 50082 differentiate between equipment
of class B (for use in living areas ) and equipment of class A. Residential quarters
are defined as those areas where a radio or televis ion receiver is operated within a
radius of 10 m. Equipment of class A may produce a higher level of interference
voltage but must itself also be less sensitive to interference caused by other
devices than equipment of class B. This equipment fulfills the requirements of class
A. If radio or television receivers are used in the immediate vicinity of this
equipment then usually interference is not to be expected as long as these
receivers are connected to a properly installed aerial system.
complies with the requirements of the EU guidelines 89/336/EWG
_____________________________________________________________________________
33 Data Video Projector User Manual
 Loading...