

Page 1
Liebert® Air Cooled, Direct Drive Condensers
Installation, Operation and Maintenance Manual - 50/60Hz
Precision Cooling
For Business-Critical Continuity™
Page 2
Figure i Product model nomenclature
Example: DCDF165-Y
DD 165-Y
D = Disconnect Switch
(optional on Fan Speed
Control, Chiller &
Standard Lee-Temp
Condensers; standard
on Quiet-Line and VFD
Control condensers
T = TVSS & Disconnect
Switch; available only
on the VFD Control
condensers
NOT ALL POSSIBLE COMBINATIONS OF MODELS,
CONTROLS AND VOLTAGES ARE AVAILABLE.
C
Condenser
F
F = Fan Speed Control
L = Main Control / Lee-Temp
C = No Control / Chiller
Lee-Temp
T = Ambient Fan Cycle/
Lee-Temp
V = Variable Frequency
Drive (VFD) Control
(available only for dual
refrigerant circuit
condensers
S = Single Refrigerant Circuit
D = Dual Refrigerant Circuit
*
Reserved
Model Size
* Single-phase voltage is only voltage available as standard
on Fan Speed Control 1-fan condensers
* Three-phase voltage is only voltage available as standard
on condensers with VFD Control, Lee-temp receivers, and
Fan Speed Control (2-8 fan models only).
* VFD Control Condensers are not available in 575-3-60.
P = 208/230V-1ph-60Hz
Z = 460V-1ph-60Hz
V = 575V-1ph-60Hz
W = 200/230V-1ph-50Hz
Y = 208/230V-3ph-60Hz
A = 460V-3ph-60Hz
B = 575V-3ph-60Hz
N = 200/230V-3ph-50Hz
M = 380/415V-3ph-50Hz
Page 3

TABLE OF CONTENTS
1.0 INTRODUCTION . . . . . . . . . . . . . . . . . . . . . . . . . . . . . . . . . . . . . . . . . . . . . . . . . . . . . . . . . . 1
1.1 Product Description and Features. . . . . . . . . . . . . . . . . . . . . . . . . . . . . . . . . . . . . . . . . . . . . . . 1
1.2 Head Pressure Control Types . . . . . . . . . . . . . . . . . . . . . . . . . . . . . . . . . . . . . . . . . . . . . . . . . . 1
1.2.1 Fan Speed . . . . . . . . . . . . . . . . . . . . . . . . . . . . . . . . . . . . . . . . . . . . . . . . . . . . . . . . . . . . . . . . . . . 1
1.2.2 Variable Frequency Drive . . . . . . . . . . . . . . . . . . . . . . . . . . . . . . . . . . . . . . . . . . . . . . . . . . . . . . 1
1.2.3 Liebert Lee-Temp
1.3 Sound Level Options . . . . . . . . . . . . . . . . . . . . . . . . . . . . . . . . . . . . . . . . . . . . . . . . . . . . . . . . . 2
1.3.1 Standard Condenser. . . . . . . . . . . . . . . . . . . . . . . . . . . . . . . . . . . . . . . . . . . . . . . . . . . . . . . . . . . 2
1.3.2 Quiet-Line Condenser . . . . . . . . . . . . . . . . . . . . . . . . . . . . . . . . . . . . . . . . . . . . . . . . . . . . . . . . . 2
1.4 Transient Voltage Surge Suppression Option . . . . . . . . . . . . . . . . . . . . . . . . . . . . . . . . . . . . . 2
1.5 Typical System Configurations . . . . . . . . . . . . . . . . . . . . . . . . . . . . . . . . . . . . . . . . . . . . . . . . . 2
2.0 SITE PREPARATION . . . . . . . . . . . . . . . . . . . . . . . . . . . . . . . . . . . . . . . . . . . . . . . . . . . . . .4
2.1 Site Considerations . . . . . . . . . . . . . . . . . . . . . . . . . . . . . . . . . . . . . . . . . . . . . . . . . . . . . . . . . . 4
2.2 Dimensions and Weights . . . . . . . . . . . . . . . . . . . . . . . . . . . . . . . . . . . . . . . . . . . . . . . . . . . . . . 4
2.3 Refrigerant Planning Values . . . . . . . . . . . . . . . . . . . . . . . . . . . . . . . . . . . . . . . . . . . . . . . . . . 12
3.0 INSPECTION AND INSTALLATION . . . . . . . . . . . . . . . . . . . . . . . . . . . . . . . . . . . . . . . . . . . .13
3.1 Equipment Inspection . . . . . . . . . . . . . . . . . . . . . . . . . . . . . . . . . . . . . . . . . . . . . . . . . . . . . . . 13
3.1.1 Packing Material . . . . . . . . . . . . . . . . . . . . . . . . . . . . . . . . . . . . . . . . . . . . . . . . . . . . . . . . . . . . 13
3.2 Handling Unit on the Skid. . . . . . . . . . . . . . . . . . . . . . . . . . . . . . . . . . . . . . . . . . . . . . . . . . . . 14
3.3 Unpacking the Unit . . . . . . . . . . . . . . . . . . . . . . . . . . . . . . . . . . . . . . . . . . . . . . . . . . . . . . . . . 14
3.4 Preparing a 1-, 2-, 3- or 4-Fan Condenser for Moving and Installation . . . . . . . . . . . . . . . . 15
3.4.1 Removing the Skid and Attaching Slings . . . . . . . . . . . . . . . . . . . . . . . . . . . . . . . . . . . . . . . . . 15
3.5 Preparing a 6-Fan or 8-Fan Condenser for Moving and Installation . . . . . . . . . . . . . . . . . . 16
3.5.1 Removing the Skid and Attaching Slings . . . . . . . . . . . . . . . . . . . . . . . . . . . . . . . . . . . . . . . . . 16
3.5.2 Mounting the Condenser . . . . . . . . . . . . . . . . . . . . . . . . . . . . . . . . . . . . . . . . . . . . . . . . . . . . . . 17
3.6 Electrical Supply Preparation . . . . . . . . . . . . . . . . . . . . . . . . . . . . . . . . . . . . . . . . . . . . . . . . . 18
3.6.1 Line Voltage Wiring . . . . . . . . . . . . . . . . . . . . . . . . . . . . . . . . . . . . . . . . . . . . . . . . . . . . . . . . . . 18
3.6.2 Low Voltage Control Wiring . . . . . . . . . . . . . . . . . . . . . . . . . . . . . . . . . . . . . . . . . . . . . . . . . . . 20
3.6.3 Low Voltage Monitoring Wiring—TCDV Only . . . . . . . . . . . . . . . . . . . . . . . . . . . . . . . . . . . . . 20
3.7 Electrical Connections . . . . . . . . . . . . . . . . . . . . . . . . . . . . . . . . . . . . . . . . . . . . . . . . . . . . . . . 20
3.7.1 VFD Control Condensers (TCDV) only . . . . . . . . . . . . . . . . . . . . . . . . . . . . . . . . . . . . . . . . . . . 21
3.7.2 Wye-Connected Power Supply . . . . . . . . . . . . . . . . . . . . . . . . . . . . . . . . . . . . . . . . . . . . . . . . . . 21
3.7.3 Delta-Connected Power Supply . . . . . . . . . . . . . . . . . . . . . . . . . . . . . . . . . . . . . . . . . . . . . . . . . 21
3.8 Electrical Field Connection Descriptions . . . . . . . . . . . . . . . . . . . . . . . . . . . . . . . . . . . . . . . . 23
3.9 Refrigeration Piping Connections . . . . . . . . . . . . . . . . . . . . . . . . . . . . . . . . . . . . . . . . . . . . . . 26
3.9.1 Piping Guidelines . . . . . . . . . . . . . . . . . . . . . . . . . . . . . . . . . . . . . . . . . . . . . . . . . . . . . . . . . . . . 26
3.9.2 Field Piping Installation . . . . . . . . . . . . . . . . . . . . . . . . . . . . . . . . . . . . . . . . . . . . . . . . . . . . . . 27
3.10 System Dehydration/Leak Test and Charging Procedures . . . . . . . . . . . . . . . . . . . . . . . . . . 30
™
Refrigerant Control. . . . . . . . . . . . . . . . . . . . . . . . . . . . . . . . . . . . . . . . . . . 2
4.0 CHECKLIST FOR COMPLETED INSTALLATION . . . . . . . . . . . . . . . . . . . . . . . . . . . . . . . . . . .31
4.1 Moving and Placing Equipment . . . . . . . . . . . . . . . . . . . . . . . . . . . . . . . . . . . . . . . . . . . . . . . 31
4.2 Electrical . . . . . . . . . . . . . . . . . . . . . . . . . . . . . . . . . . . . . . . . . . . . . . . . . . . . . . . . . . . . . . . . . . 31
4.3 Piping . . . . . . . . . . . . . . . . . . . . . . . . . . . . . . . . . . . . . . . . . . . . . . . . . . . . . . . . . . . . . . . . . . . . 31
i
Page 4

4.4 Other . . . . . . . . . . . . . . . . . . . . . . . . . . . . . . . . . . . . . . . . . . . . . . . . . . . . . . . . . . . . . . . . . . . . . 31
5.0 OPERATION . . . . . . . . . . . . . . . . . . . . . . . . . . . . . . . . . . . . . . . . . . . . . . . . . . . . . . . . . . .32
5.1 Startup Checklist . . . . . . . . . . . . . . . . . . . . . . . . . . . . . . . . . . . . . . . . . . . . . . . . . . . . . . . . . . . 32
5.2 Startup . . . . . . . . . . . . . . . . . . . . . . . . . . . . . . . . . . . . . . . . . . . . . . . . . . . . . . . . . . . . . . . . . . . 32
6.0 SYSTEM MAINTENANCE . . . . . . . . . . . . . . . . . . . . . . . . . . . . . . . . . . . . . . . . . . . . . . . . . .33
6.1 General Procedures . . . . . . . . . . . . . . . . . . . . . . . . . . . . . . . . . . . . . . . . . . . . . . . . . . . . . . . . . 33
6.2 Special Procedures . . . . . . . . . . . . . . . . . . . . . . . . . . . . . . . . . . . . . . . . . . . . . . . . . . . . . . . . . . 34
6.2.1 Condenser Cleaning . . . . . . . . . . . . . . . . . . . . . . . . . . . . . . . . . . . . . . . . . . . . . . . . . . . . . . . . . . 34
6.2.2 Maintenance Inspection Checklist . . . . . . . . . . . . . . . . . . . . . . . . . . . . . . . . . . . . . . . . . . . . . . 35
FIGURES
Figure i Product model nomenclature . . . . . . . . . . . . . . . . . . . . . . . . . . . . . . . . . . . . . . . . . Inside Front Cover
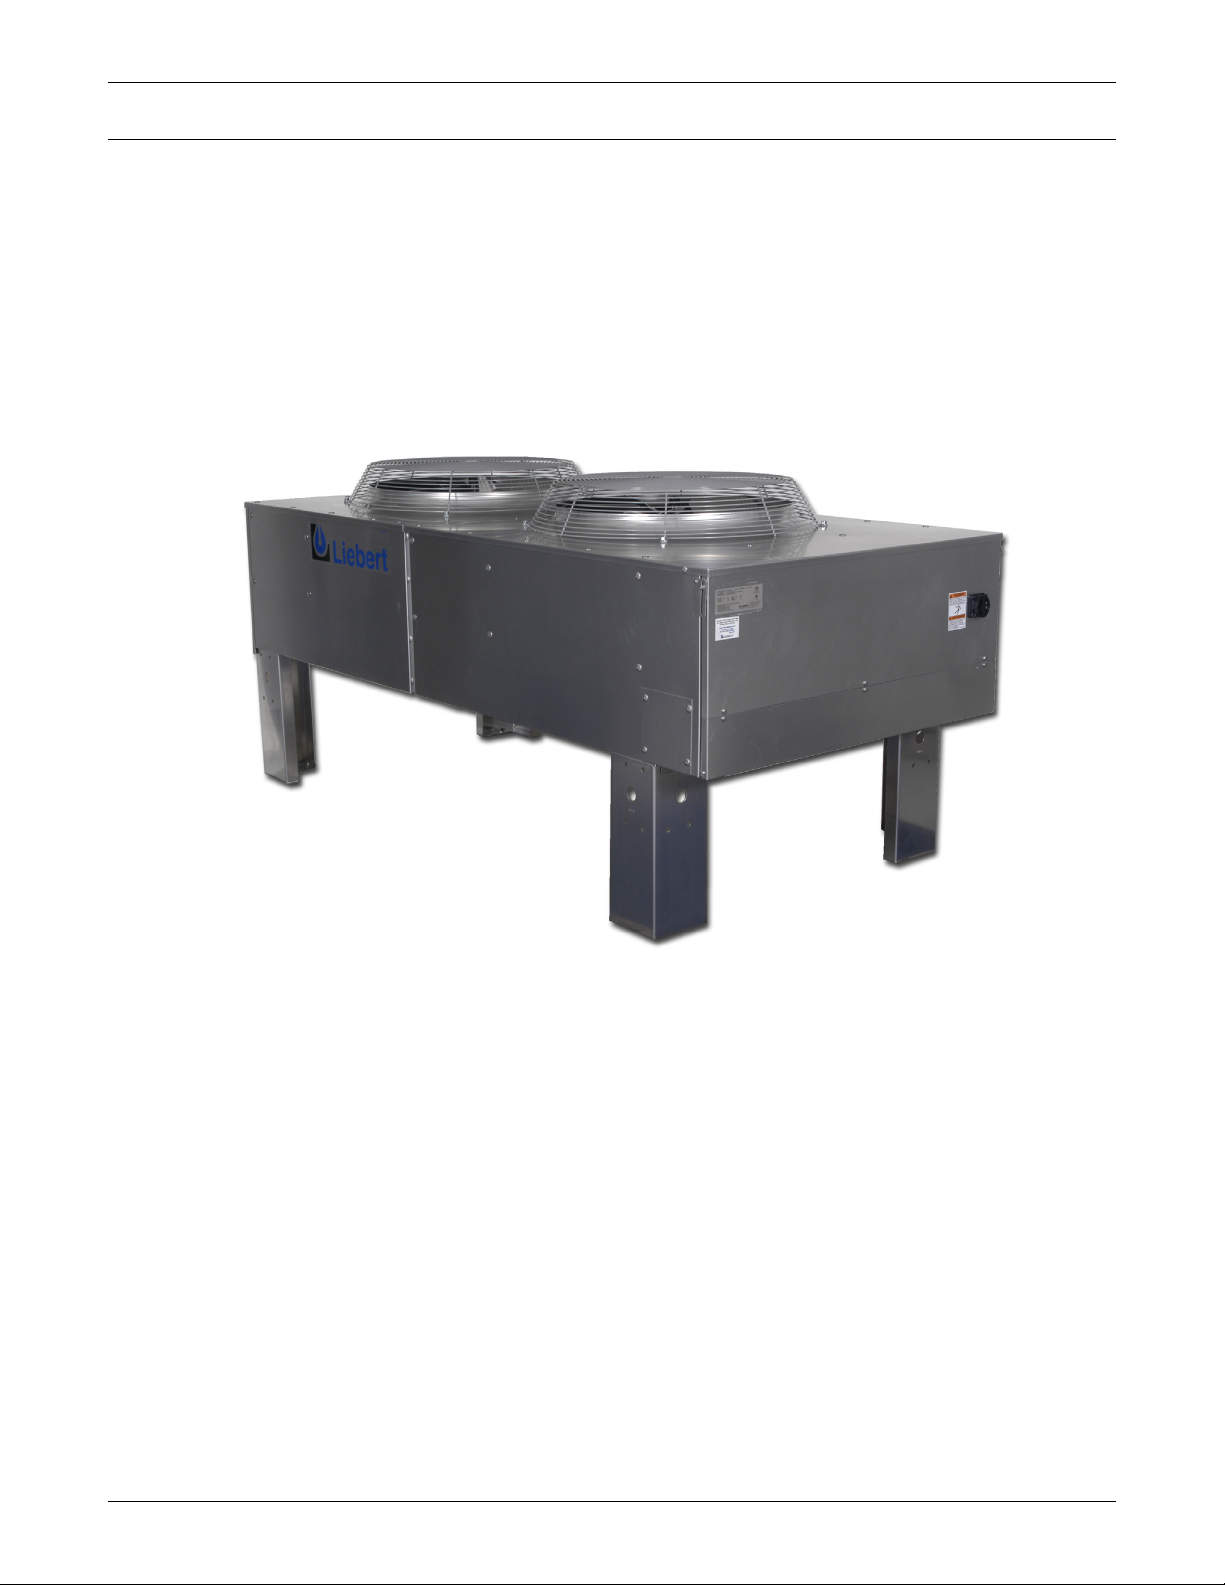
Figure 1 Liebert two-fan condenser . . . . . . . . . . . . . . . . . . . . . . . . . . . . . . . . . . . . . . . . . . . . . . . . . . . . . . . . . 1
Figure 2 Typical system configuration—indoor unit and outdoor condenser and field piping . . . . . . . . . . . 3
Figure 3 Condenser planning dimensional data—One-fan and two-fan units. . . . . . . . . . . . . . . . . . . . . . . . 5
Figure 4 Condenser planning dimensional data—Three-fan and four-fan units . . . . . . . . . . . . . . . . . . . . . . 6
Figure 5 Condenser planning dimensional data—Six- and eight-fan units . . . . . . . . . . . . . . . . . . . . . . . . . . 7
Figure 6 Typical condenser footprint—dimensions . . . . . . . . . . . . . . . . . . . . . . . . . . . . . . . . . . . . . . . . . . . . . 8
Figure 7 Piping connection locations for 1-, 2-, 3- and 4-fan VFD Control and Fan Speed Condensers . . . 8
Figure 8 Piping connections for 1-, 2-, 3- and 4-fan Lee-Temp and Quiet-Line Condensers . . . . . . . . . . . . . 9
Figure 9 Piping connections for 6- and 8-fan Fan Speed Condensers . . . . . . . . . . . . . . . . . . . . . . . . . . . . . . . 9
Figure 10 Piping connections for 6- and 8-fan Lee-Temp and Quiet-Line Condensers . . . . . . . . . . . . . . . . . 10
Figure 11 Equipment recommended for handling a Liebert condenser . . . . . . . . . . . . . . . . . . . . . . . . . . . . . 13
Figure 12 Removing shipping crate . . . . . . . . . . . . . . . . . . . . . . . . . . . . . . . . . . . . . . . . . . . . . . . . . . . . . . . . . 14
Figure 13 Attaching legs and sling to a 1-, 2-, 3- or 4-fan condenser for moving . . . . . . . . . . . . . . . . . . . . . . 15
Figure 14 Attaching legs to a 6-fan or 8-fan unit . . . . . . . . . . . . . . . . . . . . . . . . . . . . . . . . . . . . . . . . . . . . . . . 16
Figure 15 Attaching sling to a 6-fan or 8-fan unit for moving. . . . . . . . . . . . . . . . . . . . . . . . . . . . . . . . . . . . . 17
Figure 16 Wye-connected power diagram . . . . . . . . . . . . . . . . . . . . . . . . . . . . . . . . . . . . . . . . . . . . . . . . . . . . . 21
Figure 17 Delta-connected power diagram . . . . . . . . . . . . . . . . . . . . . . . . . . . . . . . . . . . . . . . . . . . . . . . . . . . . 21
Figure 18 Disconnecting EMC filter for operation with Delta-connected power . . . . . . . . . . . . . . . . . . . . . . 22
Figure 19 Electrical field connections for Fan Speed Control Condensers . . . . . . . . . . . . . . . . . . . . . . . . . . . 23
Figure 20 Electrical field connections for VFD control condensers. . . . . . . . . . . . . . . . . . . . . . . . . . . . . . . . . 24
Figure 21 Electrical field connections for Liebert Lee-Temp control condensers. . . . . . . . . . . . . . . . . . . . . . 25
Figure 22 VFD and Fan Speed Control condenser piping . . . . . . . . . . . . . . . . . . . . . . . . . . . . . . . . . . . . . . . . 27
Figure 23 Lee-Temp head pressure control condenser piping. . . . . . . . . . . . . . . . . . . . . . . . . . . . . . . . . . . . . 28
Figure 24 General arrangement—Air cooled models with Lee-Temp control . . . . . . . . . . . . . . . . . . . . . . . . 29
TABLES
Table 1 Condenser shipping weights, dimensions and volume, approximate . . . . . . . . . . . . . . . . . . . . . . . 4
Table 2 Condenser physical data. . . . . . . . . . . . . . . . . . . . . . . . . . . . . . . . . . . . . . . . . . . . . . . . . . . . . . . . . . 11
Table 3 R-22 and R-407C refrigerant required, approximate . . . . . . . . . . . . . . . . . . . . . . . . . . . . . . . . . . . 12
Table 4 Interconnecting piping refrigerant charge . . . . . . . . . . . . . . . . . . . . . . . . . . . . . . . . . . . . . . . . . . . 12
Table 5 60Hz condenser data. . . . . . . . . . . . . . . . . . . . . . . . . . . . . . . . . . . . . . . . . . . . . . . . . . . . . . . . . . . . . 19
Table 6 60Hz condenser data, Quiet-Line (Lee-Temp controlled/fan-cycling) . . . . . . . . . . . . . . . . . . . . . . 19
Table 7 50Hz condenser full load amp values. . . . . . . . . . . . . . . . . . . . . . . . . . . . . . . . . . . . . . . . . . . . . . . . 19
Table 8 Lee-Temp receiver electrical data, 50Hz and 60Hz . . . . . . . . . . . . . . . . . . . . . . . . . . . . . . . . . . . . 20
Table 9 Troubleshooting. . . . . . . . . . . . . . . . . . . . . . . . . . . . . . . . . . . . . . . . . . . . . . . . . . . . . . . . . . . . . . . . . 36
ii
Page 5
1.0 INTRODUCTION
1.1 Product Description and Features
The Liebert condenser is low-profile direct-drive propeller fan-type air cooled unit suitable for mounting outdoors. It provides for the heat rejection of either one or two separate refrigeration circuits,
matching heat rejection capacity varying with the outdoor ambient temperatures with each corresponding compressors heat rejection requirements. Constructed with an aluminum cabinet and a copper-tube aluminum fin coil, the unit is quiet and corrosion resistant. The condenser is quickly and
easily installed, because all internal wiring is completed at the factory with only electrical connections to be made at the job site. All electrical connections and controls are enclosed in an integral
weatherproof section of the condenser.
Figure 1 Liebert two-fan condenser
Introduction
1.2 Head Pressure Control Types
1.2.1 Fan Speed
Fan speed control utilizes a wave-chopper control to vary the air volume over the condenser coil,
based on refrigerant head pressure. The fan motor next to the electrical panel (two fans on 6-fan and
8-fan models) is a single-phase, permanent split capacitor motor with motor speed adjusted in
response to refrigerant pressure. The balance of fans on multi-fan units cycle on ambient thermostats.
The control system provides refrigerant head pressure control for outdoor ambients as low as
-20°F (-28.9 °C).
1.2.2 Variable Frequency Drive
VFD Condenser control system utilizes a variable frequency drive, inverter duty fan motor operating
from 0% to 100% motor RPM based on head pressure, sensed by refrigerant pressure transducers.
VFD, ambient-temperature thermostat(s), motor overload protection and electrical control circuit are
factory-wired in the integral control panel. VFD controls the fan adjacent to the connection end of the
condenser and remains energized with active compressor operation. The balance of fans on multi-fan
units cycle on ambient thermostats. This system provides refrigerant head pressure control for outdoor ambients as low as -20°F (-28.9°C).
1
Page 6

1.2.3 Liebert Lee-Temp™ Refrigerant Control
The Liebert Lee-Temp head pressure control system is designed to maintain proper operating head
pressures in outdoor temperatures down to -30°F (-34.4°C). The condensers utilize head pressure control valves, extra refrigerant and insulated refrigerant receivers with heater pads. It works by flooding the condenser coil with liquid refrigerant to a level that balances the system condensing
requirements with the condenser coil surface available to reject the system heat. During the summer,
the system requires the entire condenser coil surface for heat rejection and most of the refrigerant is
stored in a receiver. In the winter, the same amount of heat can be rejected by only a fraction of the
coil surface. As head pressure begins to fall, the control valve restricts the flow of liquid refrigerant
exiting from the condenser. This extra liquid refrigerant reduces the effective condenser surface area
available for heat transfer. The head pressure control valve also bypasses hot gas into the receiver to
warm the liquid and maintain liquid pressure for proper operation of the expansion valve. Condenser
fan controls are either fan cycling on ambient temperature or constant on. Lee-Temp control is
required for Quiet-Line Condensers.
1.3 Sound Level Options
1.3.1 Standard Condenser
All Fan Speed and VFD Condensers are standard condensers with moderate operating sound levels.
Lee-Temp Condensers with standard-size coils matching Fan Speed and VFD coil sizes are standard
sound level condensers.
1.3.2 Quiet-Line Condenser
Introduction
Quiet-Line condensers can help your facility meet the strictest noise codes and do so at less cost than
traditional condensers with acoustical shielding. The Quiet-Line condensers utilize the same reliable
construction features of the standard condensers and have oversized coils and slower speed fan
motors which yield the required heat rejection needed at significantly lower sound levels. Lee-Temp
control is required for Quiet-Line Condensers.
1.4 Transient Voltage Surge Suppression Option
Transient Voltage Surge Suppression (TVSS) panel is standard in the VFD Condenser models only.
Surge protection is necessary because rooftop voltage supply often is not conditioned the same as the
voltage supply inside the data center. The TVSS is designed to protect sensitive electronic condenser
components from high voltage transients, up to 25kVA/phase.
An illuminated green LED indicates power supply is On and panel status is OK. An illuminated red
LED indicates conditions require service and the TVSS may require replacement to restore surge protection to the condenser.
1.5 Typical System Configurations
Figure 2 shows a single refrigeration circuit diagram, displaying the indoor air conditioning unit, the
outdoor condenser (VFD, Fan Speed Control or Lee-Temp) and field supplied interconnection piping.
2
Page 7
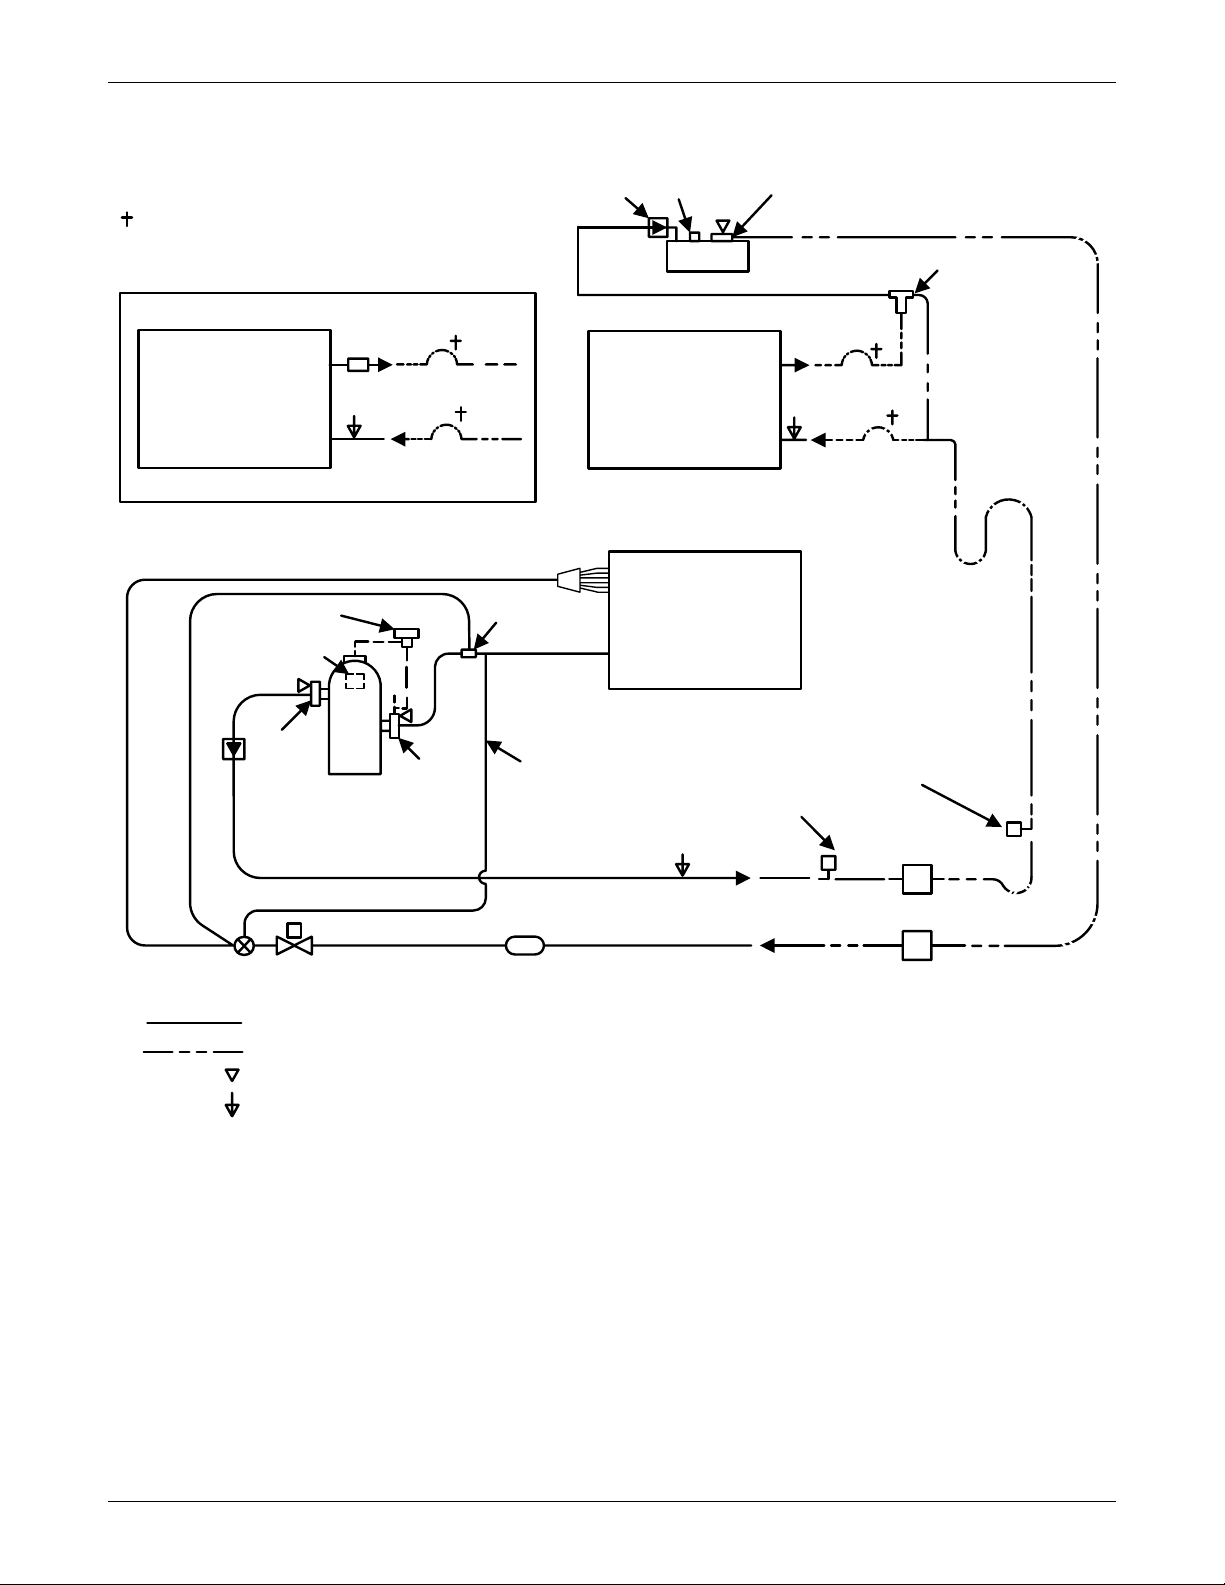
Figure 2 Typical system configuration—indoor unit and outdoor condenser and field piping
Introduction
Inverted trap on discharge & liquid
lines to ext end above base of coil
by a minimum of 7-1/2” (190mm ).
Fusible
Plug
Condenser Coil
(Fan Speed
and VFD )
Fan Speed and VFD
28-42kW Digital Solenoid Valve
53-70kW Digital
Solenoid Valve
Service
Valve
Compressor
Chec k
Valve
Service
Valve
Chec k
Valve
Lee-Temp R eceiv er
Condenser Coil
(Lee-Temp )
Lee-Temp
Liquid
Sensing
Bulb
Evaporator C oil
Suction
External
Equalizer
Pitch horizontal hot gas piping
1/2" per 10 ft. (42mm per 10m)
in direction of refr igerant/oil flow.
Relief
Valve
Service
Valve
Liquid Return
Head Pressure
Control Valve
Hot Gas
Discharge
* Traps every
25ft (7.6m)
of rise
Field-installed relief v alve (s) required
for 50 Hz EU C E units rated maximum
480 PSIG (33 Bar).
* Isolation
valve
Hot Gas Discharge
Expansion
Valve
Solenoid
Filter DryerSight Glass
Valve
Factory Refrigerant Piping
Field Refrigerant Piping
Service/Schrader (Access) Connection No Valve Core
Liquid R eturn
Components are not supplied by
*
Liebert, but are recommended
for proper circuit operation and
maintenance.
Service/Schrader (Access) Connection W ith Valve Core
Note: Sc hematic representation shown . Do not use for specific connection loc ations .
Two refrigeration circuits provided . Single refrigeration circuit shown for clarity .
3
* Isolation
valve
DPN000798
Rev. 2
Page 8
2.0 SITE PREPARATION
2.1 Site Considerations
The condensers should be installed in a location offering maximum security and access for maintenance.
Avoid ground-level sites with public access and areas that contribute to heavy snow or ice accumulations. Utilize Piggyback condensers whenever interior building locations must be used. To ensure adequate air supply, Liebert recommends that condensers be installed in an area with clean air, away
from loose dirt and foreign matter that might clog the coil. In addition, condensers should not be
located near steam, hot air or fume exhausts. Also, the condensers should be located no closer than
3 feet (1m) from a wall, obstruction or adjacent unit.
The condenser must not be installed in a pit.
The condenser must be installed on a level surface to ensure proper refrigerant flow.
For roof installation, mount the condenser on suitable curbs or other supports in accordance with
local codes.
Lee-Temp receiver tanks should be mounted on the condenser legs for proper operation. Remote
mounting of tanks must be within 10 feet of the condenser—Contact Liebert Application Engineering
Department for assistance.
Site Preparation
2.2 Dimensions and Weights
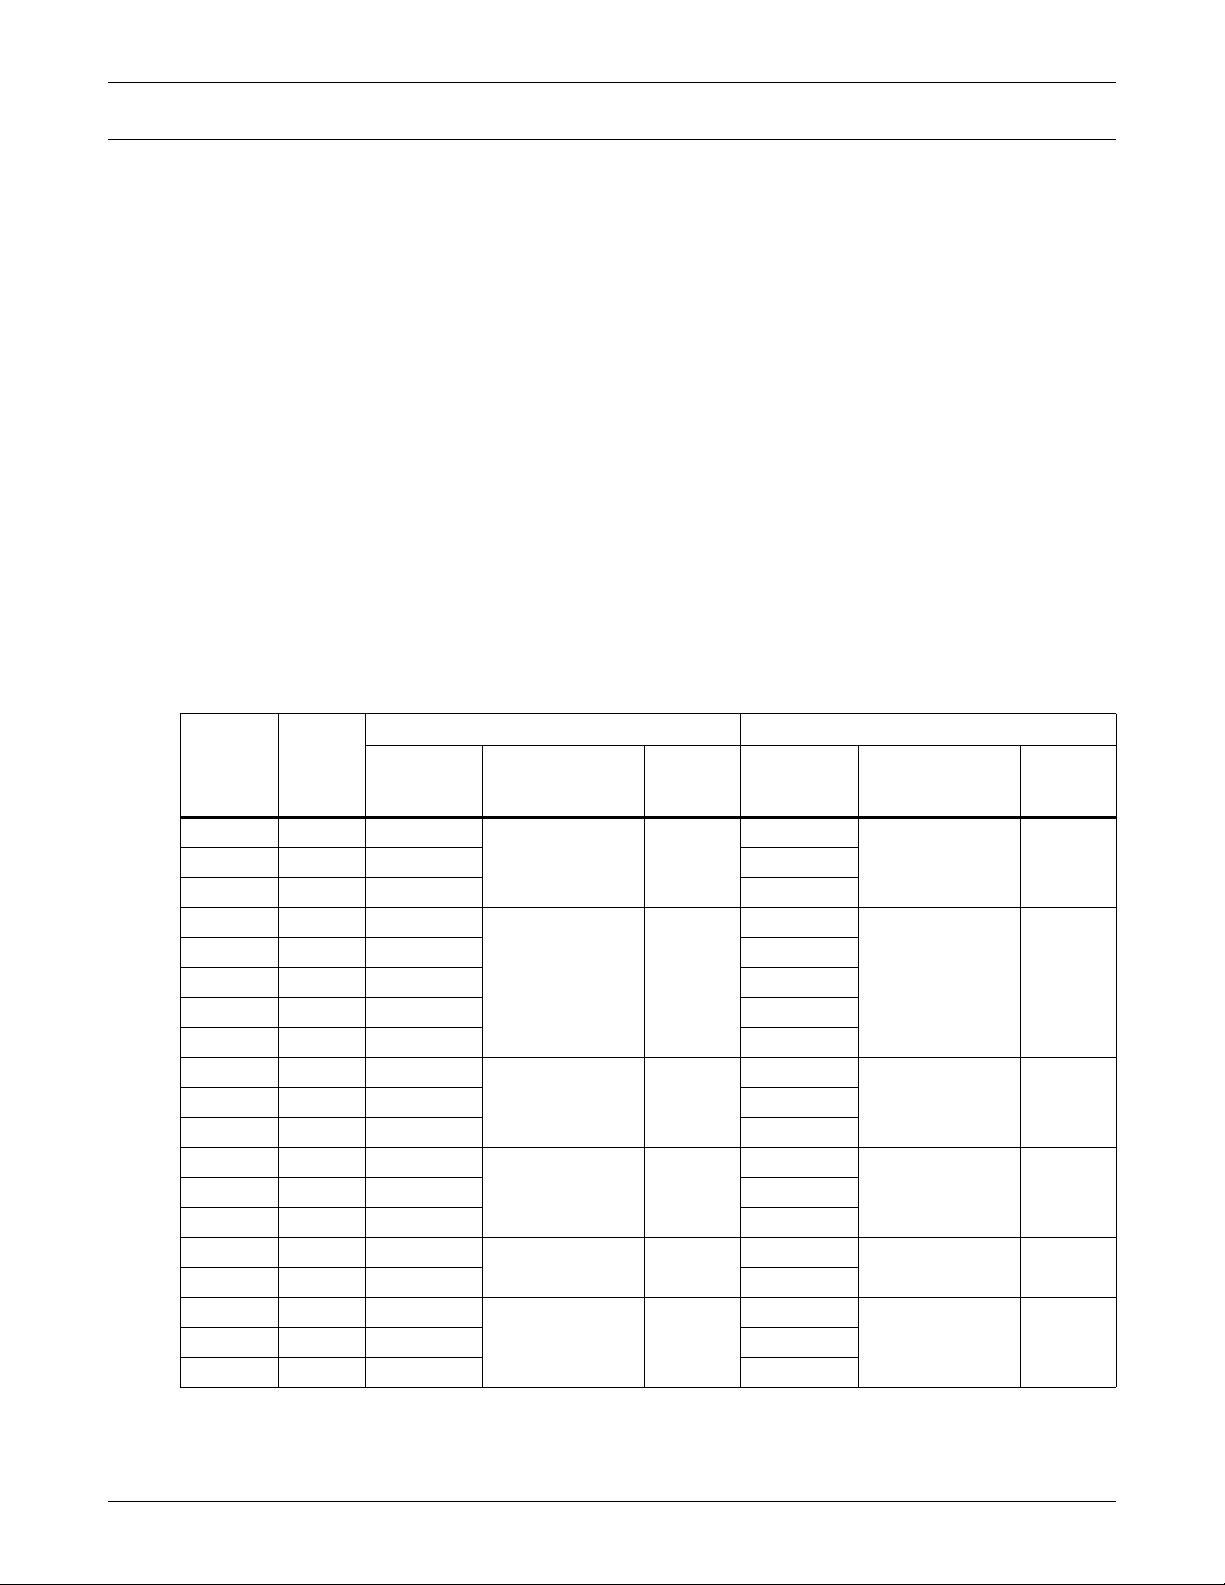
Table 1 Condenser shipping weights, dimensions and volume, approximate
Number
Model
*C**083 1 330 (150)
DC**063 1 350 (159) 435 (197)
*C**165 2 490 (222)
*C**205 2 560 (254) 760 (345)
DC**119 2 490 (222) 690 (313)
DC**127 2 560 (254) 760 (345)
DC**143 2 655 (297) 855 (388)
*C**251 3 590 (268)
DC**214 3 885 (401) 1165 (528)
*C**415 4 935 (424)
DC**286 4 1185 (537) 1485 (674)
*C**616 6 1560 (708)
DC**409 6 1620 (735) 2070 (939)
*CD*830 8 1930 (875)
DC**572 8 2575 (1168) 3075 (1395)
of Fans
Weight
lb (kg)
Domestic Packaging Export Packaging
Dimensions
(LxWxH)
in. (mm)
59x30x51
(1500x760x1300)
97x30x51
(2460x760x1300)
139x30x51
(3530x760x1300)
179x30x51
(4550x760x1300)
144x36x97
(3660x910x2460)
184x36x97
(4670x910x2460)
Volume
3
ft
(m3)
52 (1.4)
86 (2.4)
123 (3.4)
158 (4.4)
291 (8.3)
372 (10.)
Weight
lb (kg)
415 (188)
690 (313)
870 (395)
1235 (560)
2010 (912)
2430 (1102)
Dimensions
(LxWxH)
in. (mm)
60x31x52
(1520x790x1320)
98x31x52
(2490x790x1320)
140x31x52
(3560x790x132)0
180x31x52
(4570x790x1320)
145x37x97
(3680x940x2460)
185x37x97
(4700x940x2460)
Volume
3
ft
(m3)
56 (1.5)*C**104 1 350 (159) 435 (197)
91 (2.5)
131 (3.5)*C**308 3 760 (345) 1040 (472)
168 (4.5)*C**510 4 1230 (558) 1530 (694)
301 (8.4)
384 (10.)*CD*1010 8 2910 (1321) 3410 (1548)
4
Page 9
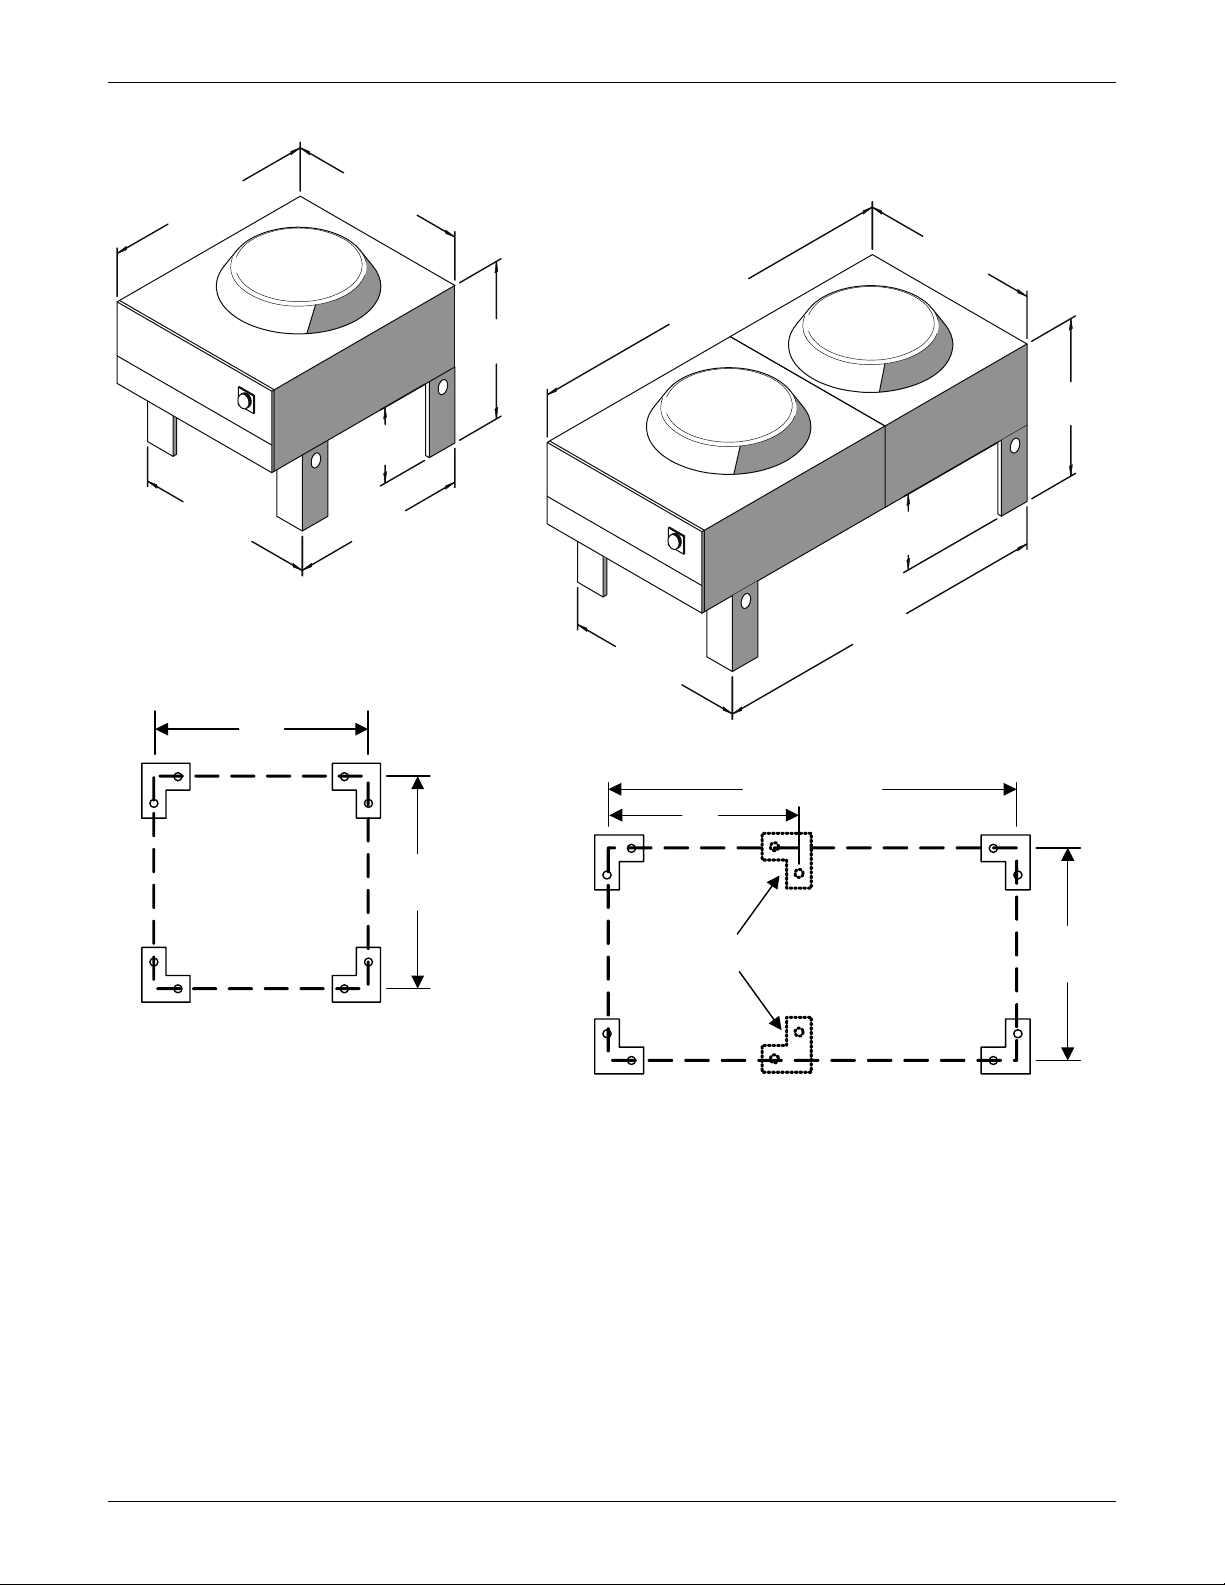
Figure 3 Condenser planning dimensional data—One-fan and two-fan units
Site Preparation
51-1/2"
(1308mm)
43-3/16"
(1097mm)
43-9/16"
(1106mm)
18"
(457mm)
44"
(1118mm)
Note:
Overall height to the top of fan guard
43-1/8" (1095mm)
42"
ANCHOR PLAN
(1067 mm)
37-7/8"
(962mm)
91-1/2"
(2324mm)
43-3/16"
(1097mm)
ANCHOR PLAN
42"
(1067 mm)
43-9/16"
(1106mm)
37-7/8"
(962mm)
18"
(457mm)
84"
(2134mm)
Liebert recommends a clearance
of 36" (915mm) on each side for
proper operation and component
access.
82" (2083mm)
One -Fan
Condenser
See Figure 6 for typical condenser
footprint dimensions.
41-3/16"
(1046 mm)
Electric
Box
End
Legs supplied with
Lee-Temp option only
Two-Fan
Condenser
41-3/16"
(1046mm)
5
Page 10
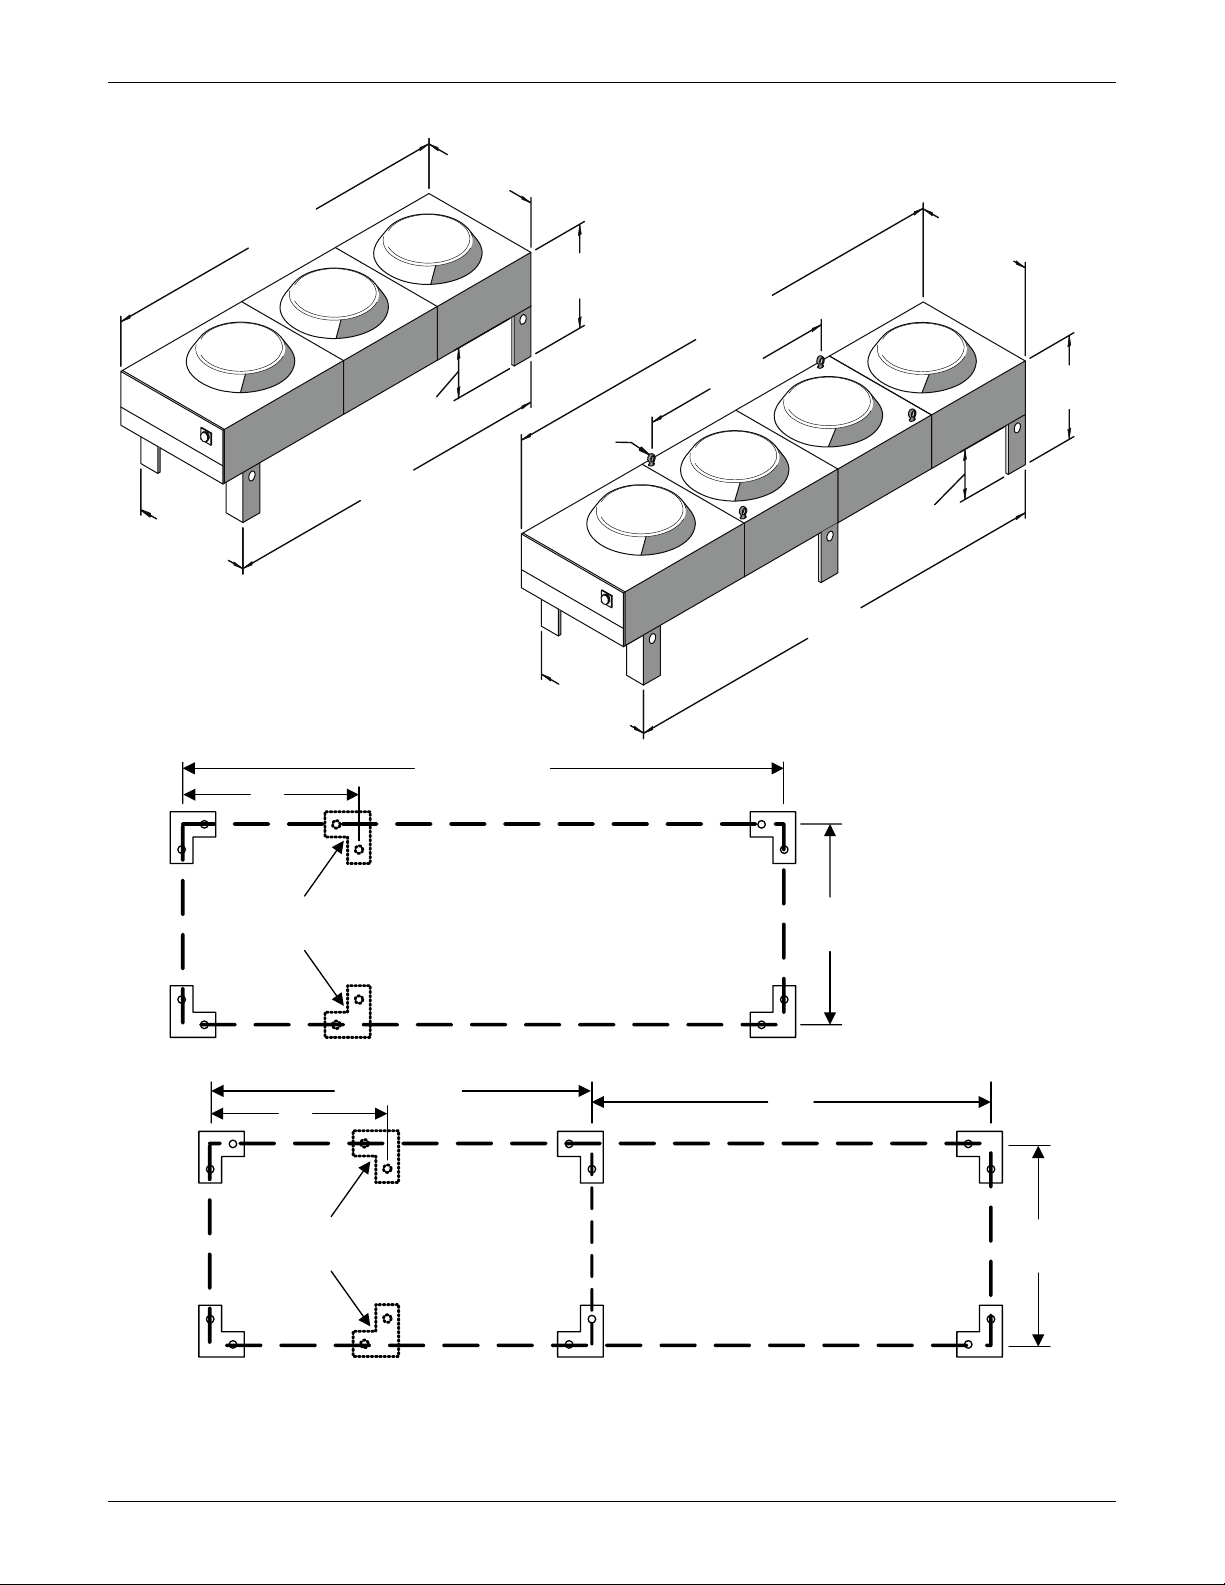
Figure 4 Condenser planning dimensional data—Three-fan and four-fan units
43-9/16"
(1106mm)
131-1/2"
(3340mm)
37-7/8"
(457mm)
124"
(3150mm)
43-3/16"
(1097mm)
Note:
Overall height to the top of fan guard
43-1/8" (1095mm)
ANCHOR PLAN
42"
(1067mm )
(962mm)
18"
Eyebolts
for Lifting
43-3/16"
(1097mm)
122" (3099 mm)
171-1/2"
(4356mm)
70"
(1778mm)
164"
(4166mm)
Liebert recommends a clearance
of 36" (915mm) on each side for
proper operation and component
access.
Site Preparation
43-9/16"
(1106mm)
37-7/8"
(962mm)
18"
(457mm)
See Figure 6 for typical
condenser footprint
dimensions.
Electric
Box
End
Electric
Box
End
Legs s upplied with
Lee-Temp option only
ANCHOR PLAN
82" (2083 mm)
42"
(1067mm)
Legs s upplied wit h
Lee-Temp option only
Three -Fan
Condenser
41-3/16 "
(1046mm )
80"
(2032 mm)
Four-Fan
Condenser
41-3/16"
(1046mm)
6
Page 11
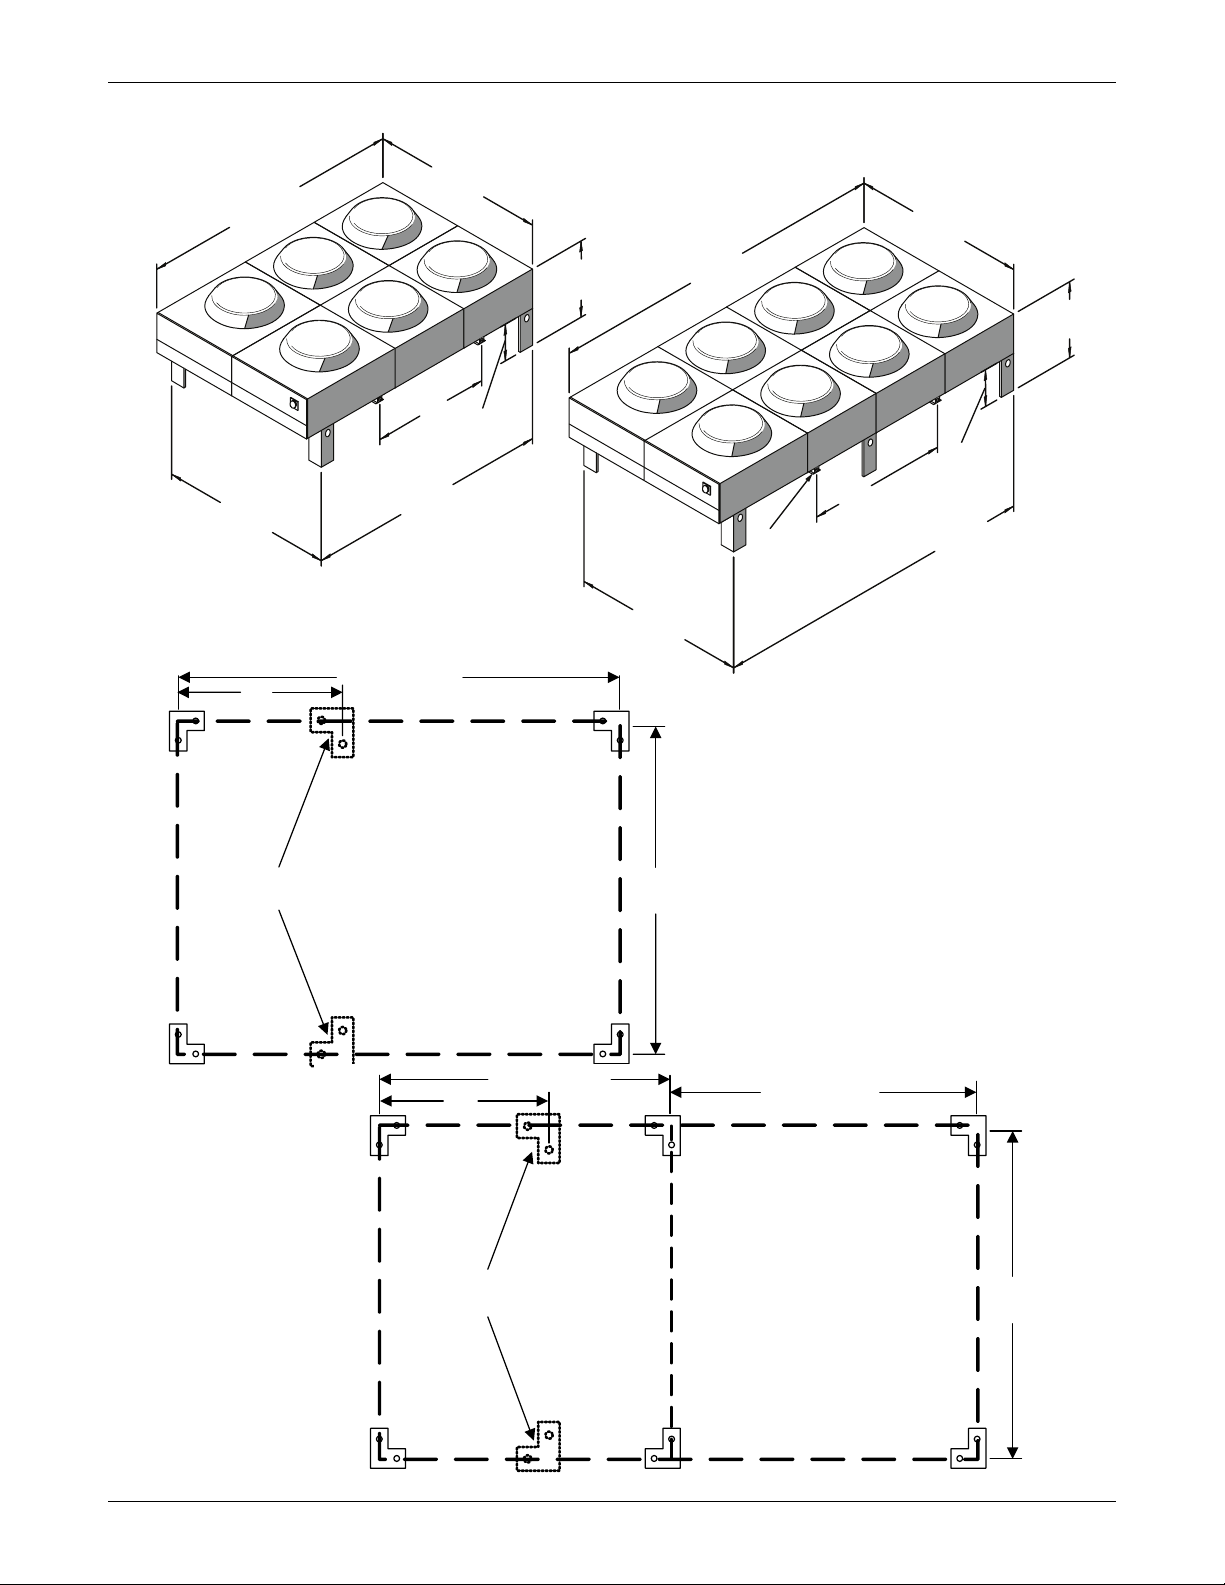
Figure 5 Condenser planning dimensional data—Six- and eight-fan units
87-1/8"
131-1/2"
(3340mm)
86-3/4"
(2203mm)
Overalll height to the top
of the fan guard is 43-1/8” (1095mm).
42"
(1067 mm )
122" (3099 mm)
(2213mm)
59"
(1499mm)
(3150mm)
18"
(457mm)
124"
ANCHOR PLAN
37-7/8"
(962mm)
(4356mm)
86-3/4"
(2203mm)
171-1/2"
1-1/2" (38mm)
diameter
hole for rigging
(typ.4)
Site Preparation
87-1/8"
(2213mm)
37-7/8"
(962mm)
18"
(457mm)
70" (1778mm)
164"
(4166mm)
Liebert recommends a
clearance of 36" (915mm)
on each side for proper
operation and component
access.
Electric
Box
End
Legs s upplied with
Lee-Temp option only
Electric
Box
End
Six-Fan
Condenser
82" (2083 mm)
42"
(1067mm)
Legs s upplied with
Lee-Temp option only
84-3/ 4"
(2153mm )
See Figure 6 for typical
condenser footprint dimensions.
ANCHOR PLAN
80" (2032 mm )
Eight -Fan
Condenser
84-3/4"
(2153 mm)
7
Page 12
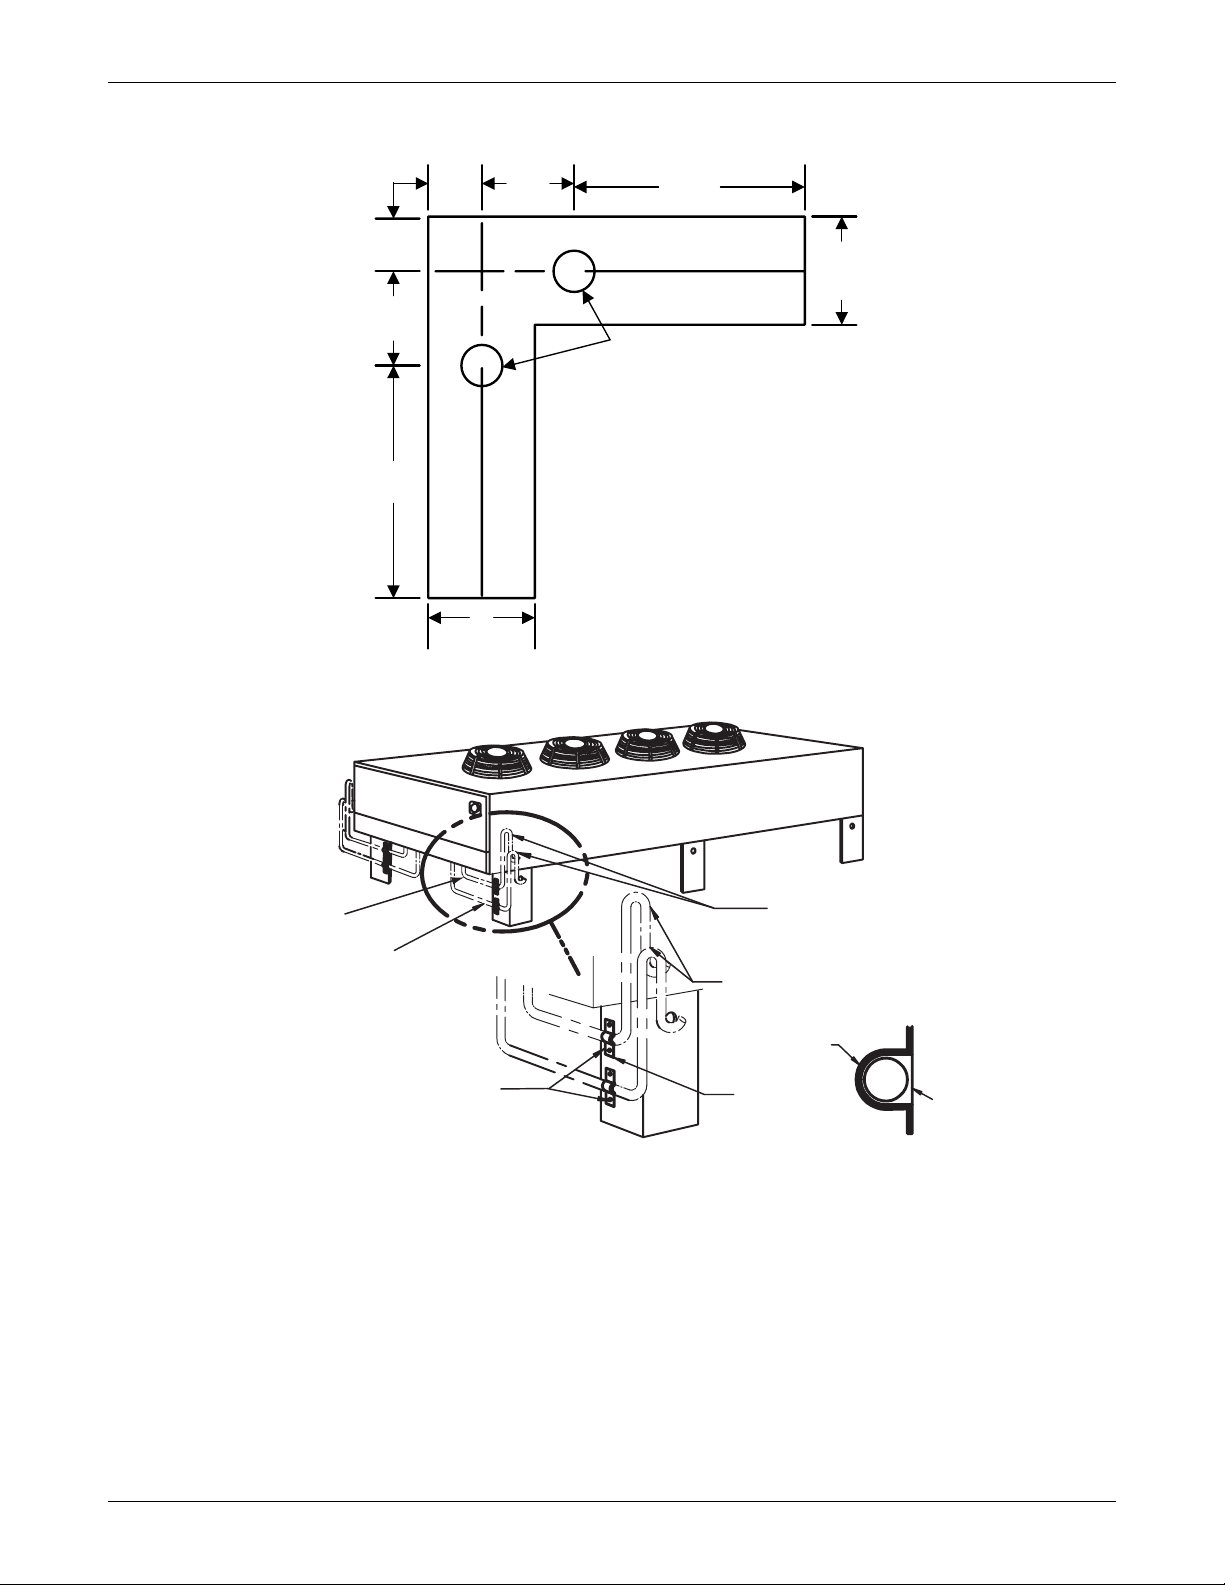
Figure 6 Typical condenser footprint—dimensions
1”
(25.4mm)
1-3/4”
(44.5mm)
4-1/4”
(108mm)
1-3/4”
(44.5mm)
2”
(50.8mm)
Site Preparation
4-1/4”
(108mm)
2”
(50.8mm)
9/16" (14mm)
Typical Diameter
Figure 7 Piping connection locations for 1-, 2-, 3- and 4-fan VFD Control and Fan Speed Condensers
Entering
Hot Gas Line
Leaving
Liquid Line
Traps to extend above
coil base by a minimum
of 7-1/2" (190mm)
Inverted Traps
(field-supplied)
Metal
Fasten liquid and hot gas lines
to leg using flat surface clamps
with isolators (field-supplied).
Support field piping separately
See
Detail
A-A
clamp
Isolator
Detail A-A
to avoid coil damage and loss
of charge.
DPN000665
Rev. 02
8
Page 13
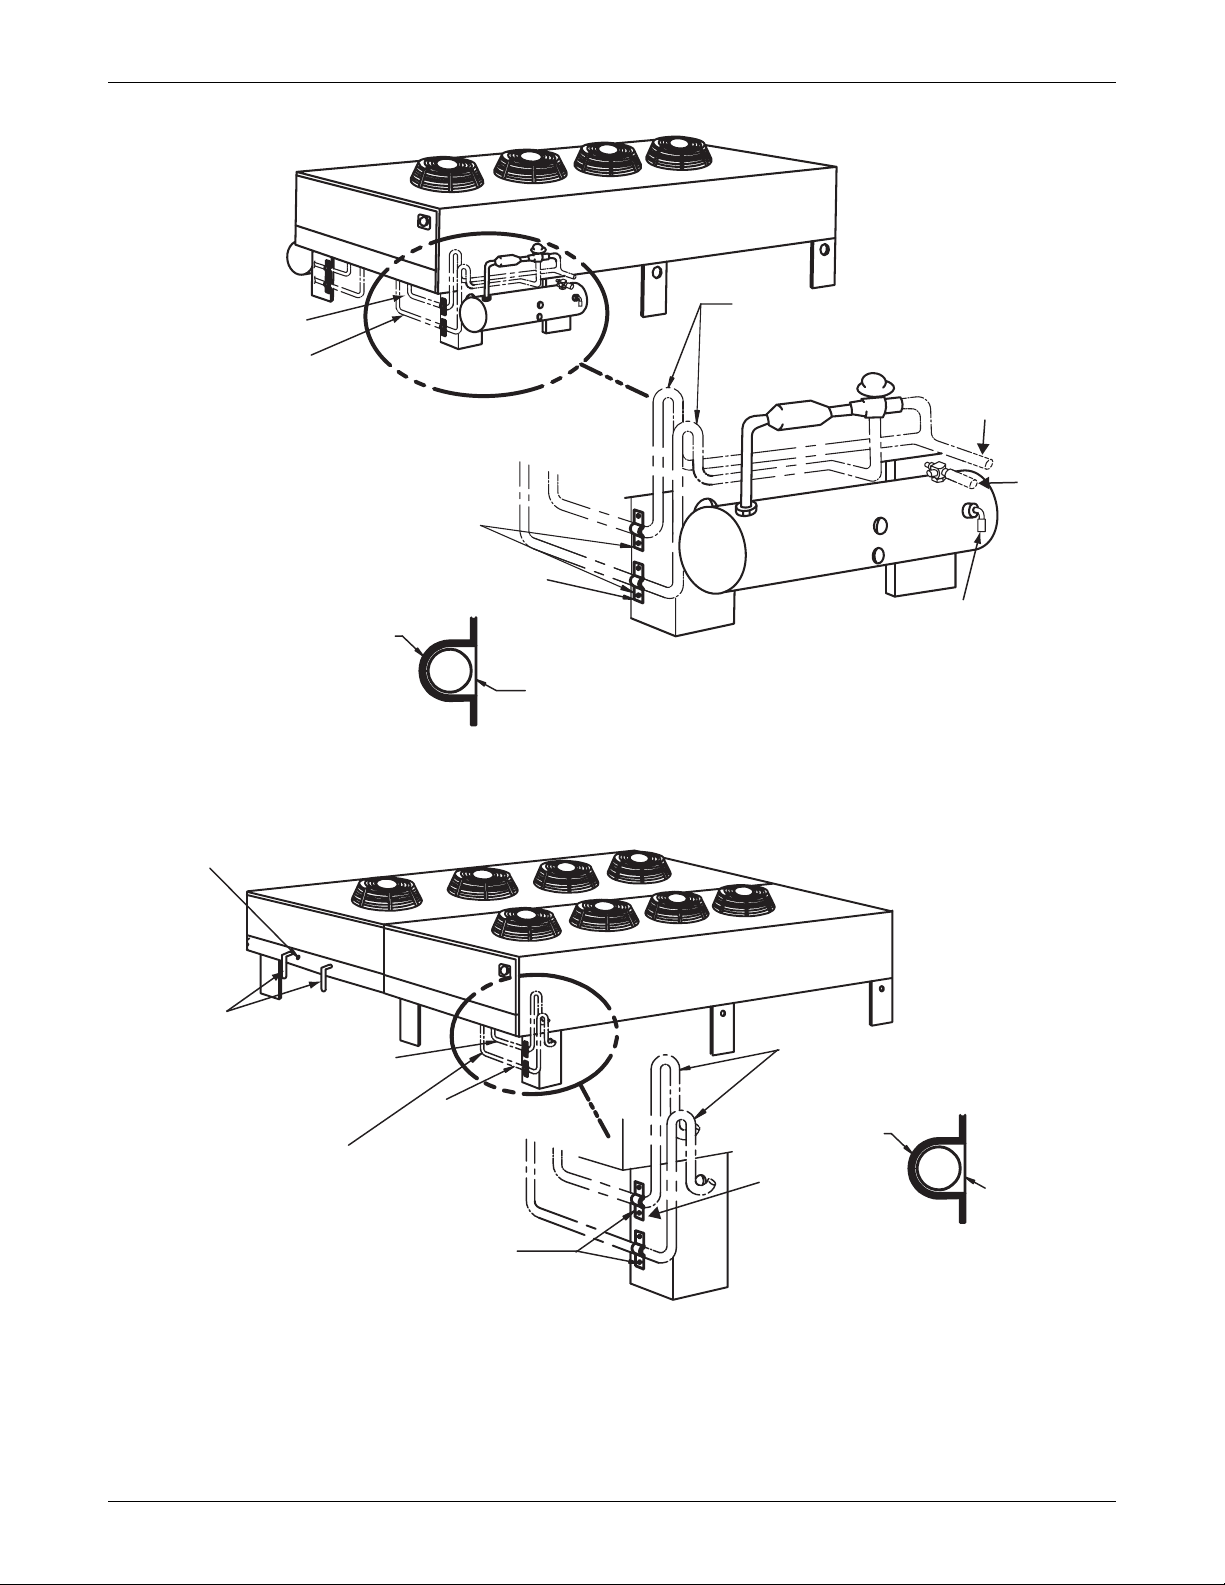
Figure 8 Piping connections for 1-, 2-, 3- and 4-fan Lee-Temp and Quiet-Line Condensers
Site Preparation
Hot Gas
Line
Liquid
to extend 8" (203mm) above
coil base
Line
Fasten liquid and hot gas lines
to leg using flat surface clamps
with isolators (field-provided).
Support field piping separately
to avoid coil damage and loss
Inverted Traps (field-supplied)
of charge.
See Detail A-A
Metal clamp
Isolator
Detail A-A
Figure 9 Piping connections for 6- and 8-fan Fan Speed Condensers
Access Valve (Hot Gas) on
Condensers (Typ. 2)
Entering
Hot Gas Line
Leaving
Liquid
Line
Position elbow
to direct relief
valve downward
DPN001067
Rev. 0
Inlet Connection
Upper Headers
(Typ.)
Fasten liquid and hot gas lines
to leg using flat surface clamps
with isolators (field-supplied).
Entering
Hot Gas
Line
Condenser
Connections,
Typical
Leaving
Liquid Line
Inverted traps (field-supplied)
to extend above base of coil by
a minimum of 7-1/2" (190mm).
Metal
Clamp
See
Detail
Isolator
A-A
Detail A-A
DPN000668
Rev. 01
9
Page 14
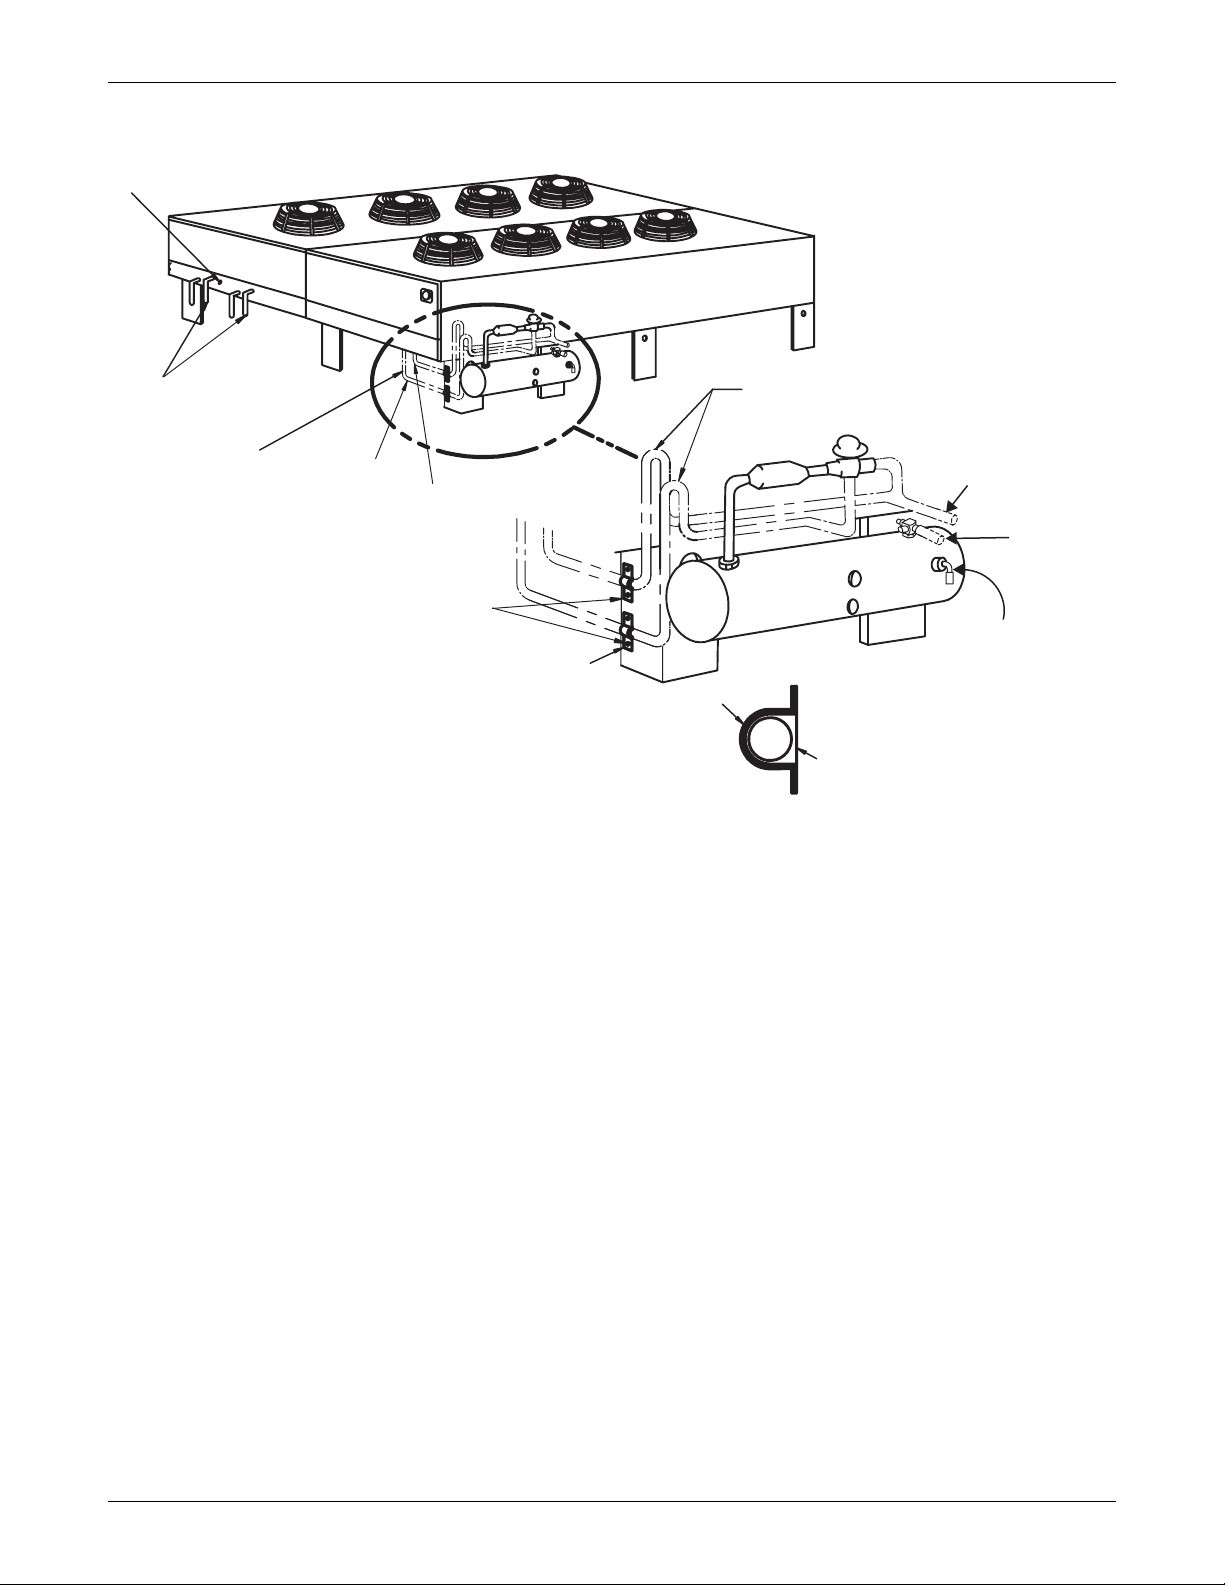
Figure 10 Piping connections for 6- and 8-fan Lee-Temp and Quiet-Line Condensers
A
ccess Valve (Hot Gas) on
Condensers (Typ. 2)
Site Preparation
Inlet Connection
Upper Headers (Typ.)
Condenser
Connections,
Typical
Liquid
Line
Hot Gas Line
Inverted traps (field-supplied)
to extend above base of coil by
a minimum of 7-1/2" (190mm).
Entering Hot
Gas Line
Leaving
Liquid Line
Fasten liquid and hot gas lines
to leg using flat surface clamps
with isolators (field-supplied).
See
Detail
A-A
Metal
Clamp
Position elbow
to direct relief
valve downward
Note: Two circuits supplied; single circuit shown for clarity.
Isolator
Detail A-A
DPN000670
Rev. 01
10
Page 15

Table 2 Condenser physical data
Connection Size, OD, In.
Net Weight
lb (kg) Hot Gas Liquid
Model #
Number
of Fans
Number
of Circuits
Standard Models
CS*083 1 1 7/8 5/8 295 (134)
CD*104 1 2 7/8 1/2 315 (143)
CS*104 1 1 1-1/8 5/8 315 (143)
CD*165 2 2 7/8 5/8 425 (193)
CS*165 2 1 1-1/8 7/8 425 (193)
CD*205 2 2 1-1/8 7/8 495 (225)
CS*205 2 1 1-1/8 7/8 495 (225)
CD*251 3 2 1-1/8 7/8 500 (227)
CS*251 3 1 1-3/8 1-1/8 500 (227)
CD* 308 3 2 1-3/8 1-1/8 670 (304)
CS*308 3 1 1-5/8 1-1/8 670 (304)
CD* 415 4 2 1-3/8 1-1/8 840 (381)
CS*415 4 1 1-5/8 1-1/8 840 (381)
CD*510 4 2 1-5/8 1-1/8 1188 (539)
CD*616 6 2 1-5/8 1-1/8 1380 (626)
CS*616
1
6 1 (2)1-5/8 (2)1-1/8 1380 (626)
CD*830 8 2 1-5/8 1-1/8 1750 (794)
CD*1010 8 2 2-1/8 1-5/8 2640 (1197)
Quiet-Line Models
DCS*063 1 1 1-1/8 5/8 315 (143)
DCD*063 1 2 7/8 1/2 315 (143)
DCS*119 2 1 1-1/8 7/8 425 (193)
DCD*119 2 1 1-1/8 7/8 425 (193)
DCS*127 2 1 1-1/8 7/8 495 (225)
DCD*127 2 2 1-1/8 7/8 495 (225)
DCS*143 2 1 1-1/8 7/8 515 (234)
DCD*143 2 2 1-1/8 7/8 515 (234)
DCS*214 3 1 1-5/8 1-1/8 840 (381)
DCD*214 3 2 1-1/8 7/8 840 (381)
DCS*286 4 1 2-1/8 1-1/8 1105 (501)
DCD*286 4 2 1-1/8 7/8 1105 (501)
DCD*409 6 2 1-5/8 1-1/8 1380 (626)
DCD*572 8 2 2-1/8 1-1/8 2430 (1102)
1. Interconnection piping (field-supplied and installed) required. Configure piping for parallel
refrigerant flow between condenser sections.
Site Preparation
11
Page 16

2.3 Refrigerant Planning Values
Planning for the refrigerant requirements of the completed system is the addition of the charges from
Indoor Unit, Condenser (including Lee-Temp receiver, if used) and the interconnecting piping.
Tables 3 and 4 provide the approximate charge required for the condensers and the interconnecting
piping. Consult indoor unit manuals for indoor unit charge requirements.
These values can be used for obtaining adequate refrigerant for the system, but should not be used for
final charging. Consult indoor unit manual for charging procedures.
Table 3 R-22 and R-407C refrigerant required, approximate
Approximate R-22 Refrigerant Needed Approximate R-407C Refrigerant Needed
Single Circuit
lb (kg)
Standard
Condenser
Models
83 5 (2.3) 27 (12.3) 3 (1.4) 15 (6.8) 5 (2.3) 26 (11.8) 3 (1.4) 15 (6.8)
104 8 (3.6) 39 (17.7) 7 (3.2) 21 (9.5) 8 (3.6) 37 (16.8) 7 (3.2) 20 (9.0)
165 15 (6.8) 53 (24.0) 5 (2.3) 27 (12.3) 15 (6.8) 50 (22.7) 5 (2.3) 26 (11.8)
205 20 (9.1) 76 (34.5) 7 (3.2) 38 (17.2) 19 (8.6) 72 (32.7) 7 (3.2) 36 (16.3)
251 19 (8.6) 75 (34.0) 10 (4.6) 38 (17.2) 18 (8.2) 71 (32.23) 10 (4.6) 36 (16.3)
308 29 (13.2) 113 (51.3) 11 (5.0) 58 (26.3) 28 (12.7) 107 (48.5) 11 (5.0) 55 (24.9)
415 54 (24.5) 182 (82.6) 15 (6.8) 75 (34.0) 51 (23.1) 173 (78.4) 15 (6.8) 71 (32.2)
510 72 (32.7) N/A 30 (13.6) 149 (67.6) 68 (30.8) N/A 29 (13.2) 142 (64.4)
616 N/A 267 (121.3) 27 (12.3) 113 (51.3) N/A 254 (115.2) 26 (11.8) 108 (49.0)
830 N/A N/A 30 (13.6) 149 (67.6) N/A N/A 29 (13.2) 142 (64.4)
1010 N/A N/A 60 (27.2) 154 (69.9) N/A N/A 57 (25.9) 147 (66.7)
Quiet-Line Condenser Models
63 N/A 39 (17.7) N/A 21 (9.5) N/A 37 (16.8) N/A 20 (9.1)
119 N/A 50 (22.7) N/A 27 (12.3) N/A 48 (21.8) N/A 26 (11.8)
127 N/A 76 (34.5) N/A 38 (17.2) N/A 72 (32.6) N/A 36 (16.3)
143 N/A 126 (57.2) N/A 64 (29.0) N/A 120 (54.5) N/A 61 (27.7)
214 N/A 161 (73.0) N/A 81 (36.7) N/A 153 (69.4) N/A 77 (34.9)
286 N/A 196 (88.9) N/A 125 (56.7) N/A 186 (84.4) N/A 119 (54.0)
409 N/A N/A N/A 129 (58.5) N/A N/A N/A 125 (55.8)
572 N/A N/A N/A 196 (88.9) N/A N/A N/A 186 (84.4)
FSC or
VFD
Lee-Temp
(includes
receiver)
Dual Circuit
lb/circuit (kg/circuit)
Lee-Temp
FSC or
VFD
(includes
receiver)
Single Circuit
lb (kg)
FSC or
VFD
Lee-Temp
(includes
receiver)
Site Preparation
Dual Circuit
lb/circuit (kg/circuit)
Lee-Temp
FSC or
VFD
(includes
receiver)
Table 4 Interconnecting piping refrigerant charge
Line Size,
O.D., in.
3/8 3.8 (1.7) — 3.7 (1.7) —
1/2 7.3 (3.3) — 6.9 (3.1) —
5/8 11.7 (5.3) 2.1 (1.0) 11.0 (5.0 2.2 (1.0)
3/4 16.6 (7.5) 3.0 (1.4) 15.7 (7.1) 3.1 (1.3)
7/8 24.4 (11.1) 4.4 (2.0) 23.0 (10.4) 4.5 (1.9)
1-1/8 41.4 (18.9) 7.8 (3.5) 39.3 (17.8) 7.8 (3.5)
1-3/8 63.3 (28.7) 11.8 (5.4) 59.8 (27.1 11.8 (5.4)
1-5/8 — 16.7 (7.6) — 16.7 (7.6)
R-22, lb/100 ft. (kg/30m) R-407C, lb/100 ft. (kg/30m)
Liquid Line Hot Gas Line Liquid Line Hot Gas Line
12
Page 17

3.0 INSPECTION AND INSTALLATION
3.1 Equipment Inspection
Before unpacking the condenser, verify that the labeled equipment matches the bill of lading. Carefully inspect all items for damage, either visible or concealed. Report any damage immediately to the
carrier and your local Liebert representative. File a damage claim with the carrier and send a copy to
your local Liebert representative.
3.1.1 Packing Material
All material used to package this unit is recyclable. Please save it for future use or
dispose of the material appropriately.
SAFETY INFORMATION
WARNING
!
Risk of top-heavy unit falling over. Can cause equipment damage, injury or death.
Read all of the following instructions before attempting to move, lift, remove packaging from
or preparing unit for installation.
WARNING
!
Risk of sharp edges, splinters and exposed fasteners. Can cause personal injury.
Inspection and Installation
R
Only properly trained and qualified personnel wearing appropriate safety headgear, gloves,
shoes, glasses and protective clothing should attempt to move, lift, remove packaging from or
prepare unit for installation.
NOTICE
Risk of overhead interference. Can cause unit and/or structure damage.
Refer to the installation plans prior to moving the unit to verify clearances.
NOTICE
Risk of damage from forklift. Improper handling with the forklift. Can cause exterior and/or
underside damage.
Keep tines of the forklift level and at a height suitable to fit below the skid.
NOTICE
Risk of unit damage if improperly stored. Keep the unit upright, indoors and protected from
dampness, freezing temperatures and contact damage.
Figure 11 Equipment recommended for handling a Liebert condenser
13
Page 18

3.2 Handling Unit on the Skid
Transport the unit using a fork lift or a crane with sling and spreader bars.
• If using a fork lift, make sure the forks (if adjustable) are spread to the widest allowable distance
to still fit under the skid.
• Ensure the fork length is suitable for the unit length.
• When moving the packaged unit, do not lift the unit any higher than 6" (152mm) off the ground.
Exercise great care if the unit must be lifted higher than 6" (152mm). Personnel not involved in
moving the unit must be at least 20' (6m) from the lift point of the unit.
3.3 Unpacking the Unit
Remove outer packaging when ready to install the unit. Be sure to locate, and set aside, the bag of
mounting hardware that is to be used for mounting the support legs on the unit.
Figure 12 Removing shipping crate
Inspection and Installation
Three-fan unit shown for illustration.
Methods for other sizes of condensers are the same.
14
Page 19

Inspection and Installation
3.4 Preparing a 1-, 2-, 3- or 4-Fan Condenser for Moving and Installation
3.4.1 Removing the Skid and Attaching Slings
1. Install the legs, provided by Liebert, on the condenser with the mounting bolts, also provided by
Liebert. Liebert recommends using a 5/8" socket and ratchet.
2. Place slings or equivalent items through holes in the legs on 1, 2- and 3-fan condensers (see Step
2 and Step 3 in Figure 13). Use eyebolts for attaching a sling or similar equipment to 4-fan
units.
3. Using spreader bars and a crane, or similar lifting equipment, lift the condenser off the skid to
allow safely turning the condenser upright.
4. Lift the condenser and move it to the installation location.
Figure 13 Attaching legs and sling to a 1-, 2-, 3- or 4-fan condenser for moving
Step 1
Step 2
Three-fan unit shown for illustration.
Method for 1-fan and 2--fan condensers is the same.
Attach sling to 4-fan condensers with eyebolts.
Step 3
15
Page 20

Inspection and Installation
3.5 Preparing a 6-Fan or 8-Fan Condenser for Moving and Installation
3.5.1 Removing the Skid and Attaching Slings
The following procedure is one recommended process for removing a Liebert condenser from its shipping skid. Other methods may be used, provided that the methods are safe for personnel, the condenser and equipment.
1. Place a sling through to rigging attachment points as shown in Step 1 in Figure 14.
2. Raise the condenser high enough that the skid can be safely removed.
3. Place protective material under the unit to protect it from scrapes and gouges. Lower the
condenser onto the material.
4. Lower the condenser to an angle and distance that will allow attaching the legs to one side of the
condenser. The number of legs varies according to the condenser model.
5. Install the legs, provided by Liebert, on the condenser with the mounting bolts, also provided by
Liebert. Liebert recommends using a 5/8" socket and ratchet.
6. Turn the condenser so that the legs just installed support one side of the unit as shown in Step 3
in Figure 14.
7. Remove the sling and it attach it to the opposite side of the condenser as shown in Step 4 in
Figure 15.
8. Raise the condenser to an angle to safely install legs on the opposite side of the condenser.
9. Lower the condenser so all legs support it.
10. Place slings on both sides of the condenser to lift and move it to the installation location.
Figure 14 Attaching legs to a 6-fan or 8-fan unit
Step 3
Step 1
Step 2
Protective Material
Under the Condenser
Six-fan unit shown for illustration.
Method for eight-fan condenser is
the same.
16
Page 21

Figure 15 Attaching sling to a 6-fan or 8-fan unit for moving
Step 4
Step 5
Inspection and Installation
3.5.2 Mounting the Condenser
The condenser must be installed so that it is level within 1/2" (13mm) to ensure proper refrigerant
flow. For roof installation, mount the condenser on suitable curbs or other supports; follow all local
and national codes. Secure the legs to the mounting surface using a field-supplied 1/2" (13mm) diameter bolt in each of the two 5/8" (16mm) holes in each leg. See Figures 3, 4 and 5 for anchor dimen-
sions.
Six-fan unit shown for illustration.
Method for 8-fan condenser is the same.
17
Page 22

3.6 Electrical Supply Preparation
Line voltage electrical service is required for all models. Refer to equipment nameplate regarding
wire size and circuit protection requirements. Electrical service must conform to national and local
electrical codes. Refer to Figures 19, 20 and 21 for electrical service entrances into unit. Refer to
electrical schematic when making connections.
Each unit is shipped from the factory with all internal unit wiring completed.
WARNING
!
Risk of electric shock. Can cause injury or death.
Disconnect all local and remote electrical power supplies before working within the electrical
enclosure.
The line side of the disconnect remains energized when the disconnect is Off.
Use a voltmeter to verify that the electrical power is Off before performing any electrical
and/or mechanical service and/or maintenance operations.
WARNING
!
Risk of high speed moving parts. Can cause injury or death.
The fan(s) blades can start to rotate unexpectedly when the power is On. Disconnect all local
and remote electrical power supplies before working within the fan compartment.
Inspection and Installation
Use a voltmeter to verify that the electrical power is Off before performing any electrical
and/or mechanical service and/or maintenance operations.
Each unit is shipped from the factory with all internal unit wiring completed. Refer to the electrical
schematic supplied with the condenser when making line voltage supply, low voltage indoor unit
interlock and any low voltage alarm connections. All wiring must be done in accordance with all applicable local, state and national electrical codes.
3.6.1 Line Voltage Wiring
WARNING
!
Risk electrical fire and short circuit. Can cause property damage, injury or death.
Select and install the electrical supply wire and overcurrent protection device(s) according to
the specifications on the unit nameplate(s), per the instructions in this manual and according
to the applicable national, state and local code requirements. Use copper conductors only.
Make sure all electrical connections are tight. Unit-specific wiring diagrams are provided on
each unit.
Condenser-rated voltage should be verified with available power supply before installation. Refer to
the unit’s electrical schematic and serial tag for specific electrical requirements.
Line voltage electrical service is required for all condensers at the location of the condenser. The
power supply does not necessarily have to be the same voltage supply as required by the indoor unit
connected to the condenser. See the unit’s serial tag for specific condenser electrical requirements. A
unit disconnect is standard on VFD and Quiet-Line Condensers and is optional on Fan Speed Control
and standard Lee-Temp condensers. However, a site disconnect may be required per local code to isolate the unit for maintenance. Route the supply power to the site disconnect switch and then to the
unit. Route the conduit through the hole provided in the cabinet. Connect earth ground to lug provided near terminal board.
NOTE
Lee-Temp and Quiet-Line Condensers require a separate line voltage electrical supply for the
heated receivers. See Table 8 for power requirements.
18
Page 23

Inspection and Installation
Table 5 60Hz condenser data
Model # 83, 104 165, 205 251, 308 415, 510 616 830, 1010
# of Fans 1 2 3 4 6 8
Input
Voltage ph FLA WSA OPD FLA WSA OPD FLA WSA OPD FLA WSA OPD FLA WSA OPD FLA WSA OPD
Fan Speed Controlled
208/230
460 2.5 3.1 15 — — — — — — — — — — — — — — —
575 1.9 2.4 15 — — — — — — — — — — — — — — —
208/230
460 — — — 4.2 4.8 15 5.9 6.5 15 7.6 8.2 15 11.8 12.4 15 15.2 15.8 20
575 — — — 3.3 3.8 15 4.7 5.2 15 6.1 6.6 15 9.4 9.9 15 12.2 12.7 15
VFD Controlled
208/230
460 1.8 2.3 15 3.5 4.0 15 5.2 5.7 15 6.9 7.4 15 N/A N/A N/A N/A N/A N/A
Lee-Temp Controlled/Fan-Cycling
208/230
460 1.7 2.1 15 3.4 3.8 15 5.1 5.5 15 6.8 7.2 15 10.2 10.6 15 13.6 14.0 15
575 1.4 1.8 15 2.8 3.2 15 4.2 4.6 15 5.6 6.0 15 8.4 8.8 15 11.2 11.6 15
FLA = Full Load Amps; WSA = Wire Size Amps; OPD = Maximum Overcurrent Protection Device
4.86.015————— ——— ——— ————
1
— — — 8.3 9.5 15 11.8 13.0 15 15.3 16.5 20 23.6 24.8 25 30.6 31.8 35
3
3.7 4.6 15 7.2 8.1 15 10.7 11.6 15 14.2 15.1 20 N/A N/A N/A N/A N/A N/A
3
3.5 4.4 15 7.0 7.9 15 10.5 11.4 15 14.0 14.9 15 21.0 21.9 25 28.0 28.9 30
3
Table 6 60Hz condenser data, Quiet-Line (Lee-Temp controlled/fan-cycling)
Model # ph 63 119, 127, 143 214 286 409 572
# of Fans 1 2 3 4 6 8
Input
Voltage ph FLA WSA OPD FLA WSA OPD FLA WSA OPD FLA WSA OPD FLA WSA OPD FLA WSA OPD
208/230
460 0.9 1.1 15 1.8 2.0 15 2.7 2.9 15 3.6 3.8 15 5.4 5.6 15 7.2 7.4 15
575 0.7 0.9 15 1.4 1.6 15 2.1 2.3 15 2.8 3.0 15 4.2 4.4 15 5.6 5.8 15
FLA = Full Load Amps; WSA = Wire Size Amps; OPD = Maximum Overcurrent Protection Device
1.8 2.3 15 3.6 4.1 15 5.4 5.9 15 7.2 7.7 15 10.8 11.3 15 14.4 14.9 15
3
Table 7 50Hz condenser full load amp values
Condenser
Control Type
Model## of
Fans
83, 104 1 4.0 - 3.7 1.8 3.5 1.7 63 1.8 0.9
165, 205 2 — 3.7 7.2 3.5 7.0 3.4
251, 308 3 — 5.4 10.7 5.2 10.5 5.1 214 5.4 2.7
415, 510 4 — 7.1 14.2 6.9 14.0 6.8 286 7.2 3.6
616 6 — 10.8 — — 21.0 10.2 409 10.8 5.4
830, 1010 8 — 14.2 — — 28.0 13.6 572 14.4 7.2
Fan Speed
Controlled
Input
Voltage - Phase
200/230-1 380/415-3 200/230-3 380/415-3 200/230-3 380/415-3 200/230-3 380/415-3
VFD
Controlled
Input
Voltage - Phase
Lee Temp
Controlled/Fan-Cycling
Input
Voltage - Phase
Quiet-Line (Lee Temp
Controlled/Fan-Cycling)
Input
Model
#
119,
127,
143
Voltage - Phase
3.6 1.8
19
Page 24

Table 8 Lee-Temp receiver electrical data, 50Hz and 60Hz
Rated Voltage - Single Phase 120 200/208/230
Watts/Receiver 150 300 450 150 300 450
Full Load Amps 1.4 2.8 4.2 0.7 1.4 2.1
Wire Size Amps 1.8 3.5 5.3 0.9 1.8 2.7
Maximum Overcurrent
Protection Device, Amps
15 15 15 15 15 15
3.6.2 Low Voltage Control Wiring
NOTICE
Risk of control malfunction. Can cause improper unit operation. Make sure that all low
voltage electrical wiring has been performed per the schematic diagram provided and that all
low voltage wiring connections are tight.
A control interlock between the condenser and the indoor cooling units is required. Field-supplied copper wire (Class 1 for TCDV models and Class 2 for all other condenser models) is required for connection between like-numbered terminals 70 & 71 on both units. Wiring must be sized so that the voltage
drop in the circuit does not exceed 1 volt. See Figures 19, 20 and 21 and indoor unit manual for location of terminals on condensers and indoor units.
3.6.3 Low Voltage Monitoring Wiring—TCDV Only
Inspection and Installation
Condensers with monitoring terminals may be wired with Class 1 copper wire to the indoor cooling
unit or other monitoring panel. Wiring must be sized so that the voltage drop in the circuit does not
exceed 1 volt. Dry contacts close when a monitored event occurs. Consult condenser electrical schematic, supplied with the unit, for details.
Contact closure on VFD Drive monitoring terminals indicates a permanent VFD fault. A factory-programmed VFD must be used as the replacement.
Contact closure on TVSS monitoring terminals may indicate unit trouble ranging from electrical supply issues to TVSS replacement required. A properly trained and qualified electrician is required.
3.7 Electrical Connections
Electrical service is required for all models. Electrical service shall conform to national and local electrical codes. Refer to equipment nameplate regarding wire size and circuit protection requirements.
Refer to electrical schematic when making connections. Refer to Figures 19, 20 and 21 for electrical
service entrances into unit.
A manual electrical disconnect switch should be installed in accordance with local codes. Consult local
codes for external disconnect requirements.
WARNING
!
Risk of electric shock. Can cause injury or death.
Disconnect all local and remote electric power supplies before working in the unit. Unit
contains lethal voltage in some circuits. Use voltmeter to make sure power is turned Off
before making any electrical connections.
NOTICE
Installation and service of this equipment should be done only by properly trained and
qualified personnel who have been specially trained in the installation of air conditioning
equipment.
NOTICE
Use copper wiring only. Make sure that all conections are tight.
20
Page 25

3.7.1 VFD Control Condensers (TCDV) only
The installer/startup technician must determine the type of 3-phase supply power being used for the
VFD Control Condenser: Wye-connected power or Delta- connected power.
Wye-connected power has two different voltages that can be measured: Phase-to-Phase voltage (this
is equal to the nominal input voltage) and Phase-to-Neutral voltage (typically used for small single
phase loads (120 VAC or 277 VAC). See Figure 16.
Delta-connected power only has one voltage level that can be measured: Phase-to-Phase. See
Figure 17.
3.7.2 Wye-Connected Power Supply
No control changes are required if the Liebert VFD Control Condenser will be operated with Wye-connected power.
Figure 16 Wye-connected power diagram
Inspection and Installation
Phase A
Winding
A
Winding
C
3.7.3 Delta-Connected Power Supply
Figure 17 Delta-connected power diagram
Winding
C-A
Winding
B
Winding B-C
Phase B
Neutral
Phase C
Phase A
Winding
A-B
Phase B
21
Phase C
Page 26

Disconnect EMC Filter for Delta-Connected Power
Installer/startup technician needs to disconnect the EMC filter on the VFD to ensure proper operation
if the Liebert VFD Control Condenser will be operated with Delta-connected power.
1. Disconnect the power supply before working on the unit.
2. Open the electrical panel cover and locate the VFD (Refer to Figure 20).
3. Using Figure 18, locate the small black plastic tab immediately to the right of the wiring
connection block of the VFD control
4. Pull the tab to fully extend it, disconnecting the EMC filter from the circuit.
Figure 18 Disconnecting EMC filter for operation with Delta-connected power
A
Internal
EMC filter
Tab fully inserted:
EMC filter fitted
B
Internal
EMC filter
Inspection and Installation
Tab fully extended:
EMC filter disconnected
22
Page 27

3.8 Electrical Field Connection Descriptions
Figure 19 Electrical field connections for Fan Speed Control Condensers
Electric service connection
terminals when factory
Electric service connection
and fuse block.
Factory wired to 24V
Class 2 control circuit.
Control interlock (70, 71)
Field-supplied Class 2 wiring to
interlock condenser 24V controls
to Liebert room unit;
7/8 in. (22.2mm) diameter
hole provided in bottom
of electric box.
disconnect is NOT supplied.
Inspection and Installation
Electric service connection
terminals when factory
disconnect is supplied.
Factory installed disconnect
switch (optional).
Factory-wired to components
on electric panel.
Earth ground bar (optional on 50Hz only).
Connection terminals with factory
ground from each high voltage
component for field-supplied
earth grounding wire.
Earth ground connection (60Hz).
Connection terminals for field
supplied earth grounding wire
when factory disconnect is NOT
supplied.
NOTE: Refer to specification sheet for full load amp. and wire size amp. ratings.
Earth ground connection (60Hz).
Connection terminal for fieldsupplied earth grounding wire
when factory disconnect is
supplied.
Electric service entrance. A 7/8
in. (22.2mm) diameter hole in a
1 1/8 in (28.6mm) knockout
provided in bottom of electric box.
Electric service, not by Liebert.
Single-phase for condenser
models CSF, CDF with single
fan motor. Three-phase for
all other condenser models.
DPN000666
Rev. 0
23
Page 28

Figure 20 Electrical field connections for VFD control condensers
A
Factory-wired to 24V
control circuit.
Control interlock (70, 71)
Field-supplied
Class 1 wiring to
interlock condenser 24V
controls to Liebert
room unit; 7/8 in.
(22.2mm) diameter
hole provided in
bottom of electric box.
larm Connections
Field-supplied 24V Class 1
wiring to remote alarm circuits
Variable Frequency Drive (VFD)
alarm contact connections (13, 14)
Transient Voltage Surge Suppressor (TVSS)
alarm contact connections (11, 12).
Factory-wired to components
on electric panel.
Earth ground bar (optional on 50Hz only).
Connection terminals with factory
ground from each high voltage
component for field-supplied
earth grounding wire.
NOTE: Refer to specification sheet for full load amp. and wire size amp. ratings.
Earth ground connection (60Hz).
Connection terminal for
field-supplied earth grounding wire
when factory disconnect is supplied.
Inspection and Installation
Factory-installed fuse block on
60Hz units. Circuit breaker supplied
in lieu of fuse block on 50Hz units.
Electric service connection
terminals with factorysupplied disconnect.
Factory-installed
disconnect switch.
Electric service entrance.
A 7/8" (22.2mm) diameter
hole in a 1-1/8 in (28.6mm)
knockout provided in bottom
of electric box.
Electric service,
not by Liebert
DPN001051
Rev. 0
24
Page 29

Figure 21 Electrical field connections for Liebert Lee-Temp control condensers
Lee-Temp receiver tank (1 per circuit).
NOTE: Standard heater pads are 150 watts each.
(Optional 300 watt heater pads are available.)
Standard heater pad voltage is 230V. (120V
heater pad voltage is optional.)
Electrical connection box with cover.
Electrical service connection.
Pigtails in electric handy
box are factory wired to LeeTemp heater pads for field
connection of separate
continuous electric source,
Electric service connection
and fuse block.
Factory wired to 24V
Class 2 control circuit.
Control interlock (70, 71)
Field-supplied Class 2 wiring to
interlock condenser 24V controls
to Liebert room unit;
7/8 in. (22.2mm) diameter
hole provided in bottom
of electric box.
70
71
Factory-wired to components
on electric panel.
Earth ground bar (optional on 50Hz only).
Connection terminals with factory ground
from each high-voltage component
for field-supplied earth grounding wire.
Earth ground connection (60Hz).
Connection terminal for field-supplied
earth grounding wire when factory
disconnect is NOT supplied.
NOTE: Refer to specification sheet for full load amp. and wire size amp. ratings.
Earth ground connection (60Hz).
Connection terminal for field-supplied
earth grounding wire when factory disconnect
is supplied.
wiring not by Liebert.
Electric service connection
terminals when factory
disconnect is NOT supplied.
Electric service connection
terminals when factory
disconnect is supplied.
Factory-installed disconnect
switch (optional).
Electric service entrance. A
7/8 in (22.2mm) diameter hole
in a 1 1/8 in (28.6mm) knockout
provided in bottom of electric box.
Electric service. Three-phase for
all models. Wiring not by Liebert.
Inspection and Installation
DPN000683
Rev. 0
25
Page 30

3.9 Refrigeration Piping Connections
WARNING
!
Risk of explosive discharge from high-pressure refrigerant. Can cause equipment damage,
injury or death. Relieve pressure before working with piping.
WARNING
!
Risk of refrigerant system rupture or explosion from overpressurization. Can cause
equipment damage, injury or death.
If a pressure relief device is not provided with the condenser unit, the system installer must
provide and install a discharge pressure relief valve rated for a maximum of 500 psig (34bar)
in the high side refrigerant circuit. Do not install a shutoff valve between the compressor and
the field installed relief valve.
One or more additional pressure relief valves are required downstream of any and all field
installed isolation valves as shown in Figures 2 and 24. Do not isolate any refrigerant
circuits from overpressurization protection.
NOTE
POE (polyol ester) oil, required with R407C and used with some R22 systems, is much more
hygroscopic than mineral oils. This means that POE oil absorbs water at a much faster rate
when exposed to air than previously used mineral oils. Because water is the enemy of a reliable
refrigeration system, extreme care must be used when opening systems during installation or
service. If water is absorbed into the POE oil, it will not be easily removed and will not be
removed through the normal evacuation process. If the oil is too wet, it may require an oil
change. POE oils also have a property that makes them act as a solvent in a refrigeration
system. Maintaining system cleanliness is extremely important because the oil will tend to
bring any foreign matter back to the compressor.
Inspection and Installation
3.9.1 Piping Guidelines
Indoor units and condensers both ship with nitrogen holding charges. Do not vent the condenser until
all refrigerant piping is in place, ready for connection to indoor unit and condenser.
• Use copper piping with a brazing alloy with a minimum temperature of 1350°F (732°C), such as
Sil-Fos. Use a flow of dry nitrogen through the piping to prevent the formation of copper oxide
scale inside the piping. Avoid soft solders such as 50/50 or 95/5.
• Isolate piping from building using vibration isolating supports.
• Refer to indoor unit user manual for appropriate piping sizes.
• Install traps on the hot gas (discharge) lines at the bottom of any rise over 5 feet high. If the rise
exceeds 25 feet (7.5m), then install a trap in 20 foot (6m) increments or evenly divided.
• Pitch horizontal hot gas piping at a minimum rate of 1/2" per 10 ft. (42mm per 10m) so that gravity will aid in moving oil in the direction of refrigerant/oil flow.
• Consult factory if Lee-Temp condenser is located more than 15 ft (4.6m) below the evaporator or if
Fan Speed/VFD Control Condenser is located more than 30 ft. (9.2m) below the evaporator.
• Consult factory if piping run exceeds 150 feet (46m) equivalent length.
• Keep piping clean and dry, especially on units with POE oil (R407C or R22 refrigerant).
• Avoid piping runs through noise-sensitive areas.
• Do not run piping directly in front of indoor unit discharge airstream.
• Refrigerant oil – do not mix oil types or viscosities. Consult indoor unit for refrigerant type and oil
requirements.
NOTE
Failure to use compressor oils recommended by compressor manufacturer will void compressor
warranty. Consult Liebert or compressor manufacturer for further recommendations or if you
have questions about compressor oils.
Refer to ASHRAE Refrigeration Handbook for general good practices for refrigeration piping.
A pressure relief valve is provided with Liebert Lee-Temp condensers. A fusible plug is
provided on Liebert Fan Speed Control and VFD condensers. The Liebert indoor cooling unit
has a factory-installed high-pressure safety switch in the high side refrigerant circuit.
26
Page 31

3.9.2 Field Piping Installation
One discharge line and one liquid line must be field-installed for each circuit of the indoor unit and
the outdoor condenser(s). Dual circuit condensers are available for most dual circuit indoor unit applications. Refer to Figures 22, 23 and 24 below for additional field-installed piping needed at the condenser. This piping is needed for proper system performance and for installation/interconnecting
receivers and head pressure control valves for Lee-Temp systems.
NOTE
Keep the evaporator unit and condenser closed with their factory charge of dry nitrogen while
all field piping is installed. Keep the field piping clean and dry during installation, and do not
allow it to stand open to the atmosphere.
When all the field interconnecting piping is in place, vent the condenser’s dry nitrogen charge
and connect to the field piping. Finally, vent the evaporator unit’s dry nitrogen charge and
make its piping connections last.
Follow all proper brazing practices, including a dry nitrogen purge to maintain system
cleanliness.
Figure 22 VFD and Fan Speed Control condenser piping
Inspection and Installation
Entering Hot
Gas Line
Leaving
Liquid Line
Fasten liquid and hot gas lines
to leg using flat surface clamps
with isolators ( field-supplied).
Support field piping separately
to avoid coil damage and loss of charge.
Traps to Extend Above Base of
Coil by a Minimum of 7-1/2" (190mm)
Inverted Traps
(Field Supplied)
Metal
Clamp
See
Detail
A-A
Detail A-A
Isolator
DPN001065
Rev. 0
27
Page 32

Figure 23 Lee-Temp head pressure control condenser piping
Inspection and Installation
Hot Gas Line
Liquid
Line
Fasten liquid and hot gas lines
to leg using flat surface clamps
with isolators (field-supplied).
Support field piping separately
to avoid coil damage and loss
of charge.
Metal
Clamp
Detail A-A
See Detail A-A
Isolator
Inverted Traps (field-supplied)
to extend 8" (203mm)
above coil base
Entering Hot
Gas Line
Leaving
Liquid
Line
Position elbow to direct
relief valve downward
DPN000669
Rev. 2
28
Page 33

Figure 24 General arrangement—Air cooled models with Lee-Temp control
Condenser Coil
Inverted Trap *
on discharge line
to extend 7-1/2" (190mm)
Piping Assembly **
above coil base
Rotalock Valve **
Check
Head Pressure
Control with
Integral Check
Valve
Valve
Lee-temp
Receiver
Sight Glass
* Traps every 25 ft
(7.6m) of rise on
hot gas line only
Liquid Return
from
Condenser
Inspection and Installation
1/4" (6.4mm)
Pressure Relief
Valve**
Evaporator
Coil
Shutoff *
(Isolation)
Valve
Liquid
Return
Hot Gas
Bypass
(optional)
Hot Gas
Discharge
Solenoid
Valves
Sight
Glass
Filter
Dryer
Check
Valve
Single Circuit Shown
Factory Piping
Optional Piping
Field Piping
Expansion
Valve
Sensing Bulb
External
Equalizers
Service Valves
Compressor***
* Components are not supplied by Liebert
but are recommended for proper
circuit operation and maintenance.
** Components supplied by Liebert and
must be field-installed.
*** Various compressor types may be available.
DPN000681
Rev. 0
29
Page 34

3.10 System Dehydration/Leak Test and Charging Procedures
Procedures for leak check and evacuation of the entire refrigeration system are contained in the
installation manual of the indoor unit. Use the proper manual section corresponding to the winter
control system used on the condenser (VFD/Fan Speed Control or Lee-Temp Control) and the refrigerant to be charged into the system.
Inspection and Installation
30
Page 35

4.0 CHECKLIST FOR COMPLETED INSTALLATION
4.1 Moving and Placing Equipment
___ 1. Unpack and check received material
___ 2. Proper clearance for service access has been maintained around the equipment
___ 3. Equipment is level and mounting fasteners are tight
4.2 Electrical
___ 1. Line voltage connected and matches equipment nameplate
___ 2. Power line circuit breakers or fuses have proper ratings for equipment installed
___ 3. Control wiring connections completed between indoor cooling unit and condenser
___ 4. All internal and external high and low voltage wiring connections are tight
___ 5. TCDV condensers only—Check for Delta-Connected Power Supply and make any needed
adjustments per 3.7.1 - VFD Control Condensers (TCDV) only
___ 6. Monitoring wiring connections completed, when equipped, to indoor cooling unit or external
monitoring panel
___ 7. Confirm that unit is properly grounded to an earth ground
___ 8. Control transformer setting matches incoming power
___ 9. Electrical service conforms to national and local codes
___ 10. Check fans for proper phase rotation. Blades should rotate clockwise when viewing the unit
from the fan guard side.
Checklist for Completed Installation
4.3 Piping
___ 1. Piping is completed to corresponding indoor cooling unit refrigeration circuit.
___ 2. Piping leak-checked, evacuated and charged.
___ 3. Piping is properly sized, sloped and trapped for proper oil return.
___ 4. Piping is routed to reduce potential of rub-through or chaffing.
4.4 Other
___ 1. Fans rotate freely and in proper direction
___ 2. Adjust ambient thermostat setpoints to match setpoints on the electrical schematic supplied
___ 3. Foreign material removed from in and around all equipment installed (construction
___ 4. Installation materials and tools have been removed from in and around all equipment
___ 5. Blank start-up sheet located, ready for completion by installer or start-up technician.
with the condenser.
materials, construction debris, etc.).
(literature, shipping materials, tools, etc.).
31
Page 36

5.0 OPERATION
WARNING
!
Risk of electric shock. Can cause injury or death.
Disconnect all local and remote electric power supplies before working within. Unit contains
potentially lethal electrical voltage.
Only properly trained and qualified personnel may perform repair, maintenance and cleaning
operations.
The fans may start unexpectedly. Disconnect power supply before working on unit. Line side
of factory disconnect remains energized when disconnect is off. Use a voltmeter to make sure
power is turned off before checking any electrical connections or functions.
5.1 Startup Checklist
Refer to 4.0 - Checklist for Completed Installation and verify that all installation items have
been completed before beginning to start the condenser.
5.2 Startup
• Locate “Liebert Condensers and Drycoolers Warranty Inspection Check Sheet”
(Document # SAFM-8542-54).
• Turn the condenser disconnect ON. Indoor units should be turned on and set for cooling to allow
operation of condenser.
• Check the fans for proper rotation: Clockwise when viewing the unit from the fan guard (top) side.
Check that air is being drawn through the coil and discharged out the fan assembly. Some ambient thermostats may need to be temporarily adjusted to lower temperature settings to observe all
fans operate. Readjust thermostat settings to correspond to setpoints shown on the electrical
schematic supplied with the unit.
• Complete “Liebert Condensers and Drycoolers Warranty Inspection Check Sheet”
(Document # SAFM-8542-54).
Operation
NOTE
This document must be completed and forwarded to your local Liebert sales office to validate
warranty.
• Contact your local Liebert sales representative or Liebert Air Product Support if you have any
questions or problems during unit startup and commissioning.
• Local Liebert sales offices and Liebert air product support contacts can be found at
www.liebert.com/servicesupport_pages/ServiceSupport.aspx?x=servicesupport or by
calling 1-800-LIEBERT.
32
Page 37

6.0 SYSTEM MAINTENANCE
WARNING
!
Risk of electric shock. Can cause injury or death.
Disconnect all local and remote electric power supplies before working in the unit. Use
voltmeter to make sure power is turned Off before making any electrical connections.
Unit contains lethal voltage in some circuits.
Only properly trained and qualified personnel may perform repair, maintenance and cleaning
operations.
The fans may start unexpectedly. Disconnect power supply before working on unit. Line side
of factory disconnect remains energized when disconnect is off. Use a voltmeter to make sure
power is turned off before checking any electrical connections or functions.
6.1 General Procedures
NOTE
When ordering replacement parts for equipment, it is necessary to specify unit model number,
serial number, and voltage. Please record those numbers in the spaces below.
• Model Number ____________________________________________________
System Maintenance
• Serial Number ____________________________________________________
• Voltage/Phase/Frequency _________________________________________
Periodic attention is necessary for continued satisfactory operation of your unit. Restricted air flow
through the condenser coil, reduced airflow from non-functioning fans and low refrigerant system
charge levels will reduce the operating efficiency of the unit and can result in high condensing temperatures and loss of cooling. In winter, do not permit snow to accumulate around the sides or underneath the condenser coil.
Monthly and semi-annual inspections and maintenance are recommended for proper system operation. Use copies of 6.2.2 - Maintenance Inspection Checklist for each of these inspections.
If performance or operation problems are detected at anytime, refer to Table 9 - Troubleshooting
for required action.
33
Page 38

6.2 Special Procedures
6.2.1 Condenser Cleaning
Keeping the outdoor condenser coils clean is an important factor in maintaining peak efficiency, reliability and long life of the equipment. It is much easier to keep up on frequent cleanings rather than
wait until heavy build up has occurred which may create head pressure problems with the evaporator
units.
When to Clean
Normal conditions typically dictate cleaning twice a year, spring and fall. On-site or area conditions
such as cottonwood trees, construction, etc., can increase cleaning frequency. On your standard
monthly preventive maintenance schedule, a visual inspection of the coil is recommended to monitor
conditions.
What to Use
The best overall condenser coil cleaner to use is plain water. If the coil has been maintained and
cleaned at regular intervals, water is sufficient to remove dirt and debris from the fins. Heavy build
up on the exterior of the fins can be removed with a brush. Water pressure from a garden hose and
sprayer usually works well. If a pressure washer is used, make sure the equipment is set to a lower
pressure setting and that the nozzle is set to the fan spray, not stream. Otherwise, damage to the fins
could result. If a cleaner is required, we recommend a non-acidic type cleaner be used. Acid-type
cleaners can be aggressive to the coil fins as well as surrounding areas. Many sites do not allow the
use of acidic cleaners for environmental reasons.
System Maintenance
How to Clean
The absolute best way to clean coils is from the inside out. This requires disconnecting the power supply from the condenser before working on the unit. The fan guards and fan blades must be removed to
gain access to the coil surface. The sprayer can then be worked across the coil using the water/cleaning solution, pushing the dirt and debris out the bottom of the coil. Although this does extend the time
involved, the results are well worth it. This method should be used at least once a year. Spraying the
coil from the outside repeatedly can push a majority of the dirt to the inner section of the fins and continue to restrict air flow. Keep in mind you may not have the luxury of shutting the unit(s) down for
an extended time. A pre-scheduled shutdown with the operator may be in order. If you are using a
cleaner along with the spraying process, follow recommended manufacturer instructions and be sure
to rinse the coil thoroughly. Any residue left on the coil can act as a magnet to dirt.
Reinstall and secure the fan blades and fan guards after the cleaning is finished. Last, reconnect the
power supply to the condenser.
34
Page 39

System Maintenance
6.2.2 Maintenance Inspection Checklist
Date:____________________________________ Prepared By:____________________________________
Model #:_________________________________ Serial Number:__________________________________
NOTE
Regular inspections are necessary to ensure that the cooling fins are clean. Should inspection
reveal dirt or corrosion, appropriate cleaning should be performed.
Monthly Semiannually
Condenser
___ 1. Coil surfaces free of debris
___ 2. Fans free of debris
___ 3. Fan motors securely mounted
___ 4. Motor bearings in good
condition
___ 5. Check all refrigerant lines and
capillaries for vibration
isolation. Support as
necessary.
___ 6. No refrigerant leaks.
Condenser
___ 1. Complete all monthly items
___ 2. Piping in good condition
___ 3. Inspect refrigerant lines for signs of oil
leaks. Repair leaks as found.
___ 4. Check refrigerant charge level in each
receiver tank (if equipped), based on
procedures in the indoor unit’s manual.
Continuous system operation required.
___ 5. Wash coil as needed
___ 6. Repair bent or damaged fins.
Condenser Electrical Panel
___ 1. On TCDV models, check TVSS
protection status indicator
light.
Notes
Condenser Electric Panel
___ 1. Check all electrical connections
___ 2. Check contactors for pitting
___ 3. Operational sequence/setpoints
Fan Motors
___ 1. Motor # 1 amp draw __________ amps
___ 2. Motor # 2 amp draw __________ amps
___ 3. Motor # 3 amp draw __________ amps
___ 4. Motor # 4 amp draw __________ amps
___ 5. Motor # 5 amp draw __________ amps
___ 6. Motor #6 amp draw __________ amps
___ 7. Motor # 7 amp draw __________ amps
___ 8. Motor # 8 amp draw __________ amps
Signature: _________________________________________________________________________________________
Make photocopies of this form for your records
35
Page 40

Table 9 Troubleshooting
Symptom Possible Cause Check or Remedy
No power to condenser Check voltage at input terminal block
Condenser will not start
Low indoor unit
suction pressure
Low discharge pressure
High discharge pressure
VFD Condenser trips out
on overvoltage
(OU displayed on VFD
controller)
TVSS indicator lights are
extinguished or red LED is
illuminated and monitoring
terminals 11/12 are closed
Circuit breaker for low voltage
transformer in condenser is tripped
No low voltage signal to/from indoor unit Locate open circuit and repair
Insufficient refrigerant in system Check for leaks, repair, and add refrigerant
Fan-cycling ambient thermostats
setpoints too low
Faulty head pressure control valve
or condenser FSC/VFD control
Dirty condenser fins Clean coil
Condenser fans not operating
High refrigerant charge Check refrigerant charge
Supply voltage is Delta configuration
or is ungrounded/high impedance
No voltage or improper phasing exists
at condenser
Electrical connections to TVSS are
faulty
A surge exceeding the rating
of the TVSS has occurred
Locate problem in condenser electrical
panel and repair
Check schematic for recommended
setpoints and adjust.
Replace if defective
Check for low voltage signal from indoor unit
Check fan motors and fuses
Check for correct ambient thermostat
setpoints, as applicable.
Shut off AC voltage, locate the VFD, pull out
the EMC tab and reconnect power
Check voltage at input terminal block
Locate connection problem and repair
Replace TVSS and inspect other
components for damage and replace them if
necessary
System Maintenance
36
Page 41

NOTES
System Maintenance
37
Page 42

System Maintenance
38
Page 43

Page 44

Ensuring The High Availability
0f Mission-Critical Data And Applications.
Emerson Network Power, the global leader in enabling business-critical
continuity, ensures network resiliency and adaptability through
a family of technologies—including Liebert power and cooling
technologies—that protect and support business-critical systems.
Liebert solutions employ an adaptive architecture that responds
to changes in criticality, density and capacity. Enterprises benefit
from greater IT system availability, operational flexibility and
reduced capital equipment and operating costs.
While every precaution has been taken to ensure the accuracy
and completeness of this literature, Liebert Corporation assumes no
responsibility and disclaims all liability for damages resulting from use of
this information or for any errors or omissions.
© 2007 Liebert Corporation
All rights reserved throughout the world. Specifications subject to change
without notice.
® Liebert is a registered trademark of Liebert Corporation.
All names referred to are trademarks
or registered trademarks of their respective owners.
Technical Support / Service
Web Site
www.liebert.com
Monitoring
800-222-5877
monitoring@emersonnetworkpower.com
Outside the US: 614-841-6755
Single-Phase UPS
800-222-5877
upstech@emersonnetworkpower.com
Outside the US: 614-841-6755
Three-Phase UPS
800-543-2378
powertech@emersonnetworkpower.com
Environmental Systems
800-543-2778
Outside the United States
614-888-0246
Locations
United States
1050 Dearborn Drive
P.O. Box 29186
Columbus, OH 43229
Europe
Via Leonardo Da Vinci 8
Zona Industriale Tognana
35028 Piove Di Sacco (PD) Italy
+39 049 9719 111
Fax: +39 049 5841 257
Asia
7/F, Dah Sing Financial Centre
108 Gloucester Road, Wanchai
Hong Kong
852 2572220
Fax: 852 28029250
SL-10066_REV0_12-07
Emerson Network Power.
The global leader in enabling Business-Critical Continuity.
AC Power
Connectivity
DC Power
Business-Critical Continuity, Emerson Network Power and the Emerson Network Power logo are trademarks and ser vice marks of Emerson Electric Co.
©2007 Emerson Electric Co.
Embedded Computing
Embedded Power Power Switching & Controls
Monitoring
Outside Plant
Precision Cooling
EmersonNetworkPower.com
Racks & Integrated Cabinets
Services
Surge Protection
 Loading...