

Page 1

LI-180 Spectrometer
LI-COR Biosciences
4647 Superior Street
Lincoln, Nebraska 68504
Phone: +1-402-467-3576
Toll free: 800-447-3576 (U.S. and Canada)
[email protected]
Regional Offices
LI-COR Biosciences GmbH
Siemensstraße 25A
61352 Bad Homburg
Germany
Phone: +49 (0) 6172 17 17 771
[email protected]
LI-COR Biosciences UK Ltd.
St. John’s Innovation Centre
Cowley Road
Cambridge
CB4 0WS
United Kingdom
Phone: +44 (0) 1223 422102
[email protected]
LI-COR Distributor Network:
www.licor.com/env/distributors
984-17598 • 06/18
52-72-00023-0000
User Guide
Page 2

English ......P1~P19
Deutsch ......P20~P33
Francés ......P34~P47
Italiano ......P48~P61
Español ......P62~P75
日本語 ......P76~P89
繁體中文 ......P90~P103
简体中文 ......P104~P117
Page 3
CE Marking:
This product is a CE-marked product. For conformity informaon,
contact LI-COR Support at [email protected]. Outside of
the U.S., contact your local sales office or distributor.
RCM Marking:
This product is a RCM-marked product. For conformity informaon,
contact LI-COR Support at [email protected]. Outside of
the U.S., contact your local sales office or distributor.
Federal Communicaons Commission Radio
Interference Statement
WARNING: This equipment generates, uses, and can radiate
radio frequency energy and if not installed in accordance with
the instrucon manual, may cause interference to radio
communicaons. It has been tested and found to comply with
the limits for a Class A compung device pursuant to Subpart J
of Part 15 of FCC rules, which are designed to provide a
reasonable protecon against such interference when
operated in a commercial environment. Operaon of this
equipment in a residenal area is likely to cause interference in
which case the user, at his own expense, will be required to
take whatever measures may be required to correct the
interference.
Waste Electronic and Electrical Equipment (WEEE)
Noce
This symbol indicates that the product is to be
collected separately from unsorted municipal waste.
The following applies to users in European countries:
This product is designated for separate collecon at an
appropriate collecon point. Do not dispose of as household
waste. For more informaon, contact your local distributor or
the local authories in charge of waste management.
Contents
1.1 Package Contents
1
1.2 Product Introduction
1.3 Product Notes and Precautions
2.1 Preparing Before Use
2
2.2 Preparing for Use
2.3 Basic Measurement
3.1 Connecting to the LI-180 Spectrometer APP
3
3.2 Connecting to LI-180 Spectrometer Software
4.1 Variable Definitions
4
4.2 Warranty
For additional information, technical support, and
software for the LI-180 Spectrometer, please visit
licor.com/env/support.
.................................................... 2
............................................... 3
.............................. 4
.............................................. 5
.................................................... 8
............................................... 11
.............................................. 15
............................................................... 18
....... 13
..... 14
- 1 -
Page 4

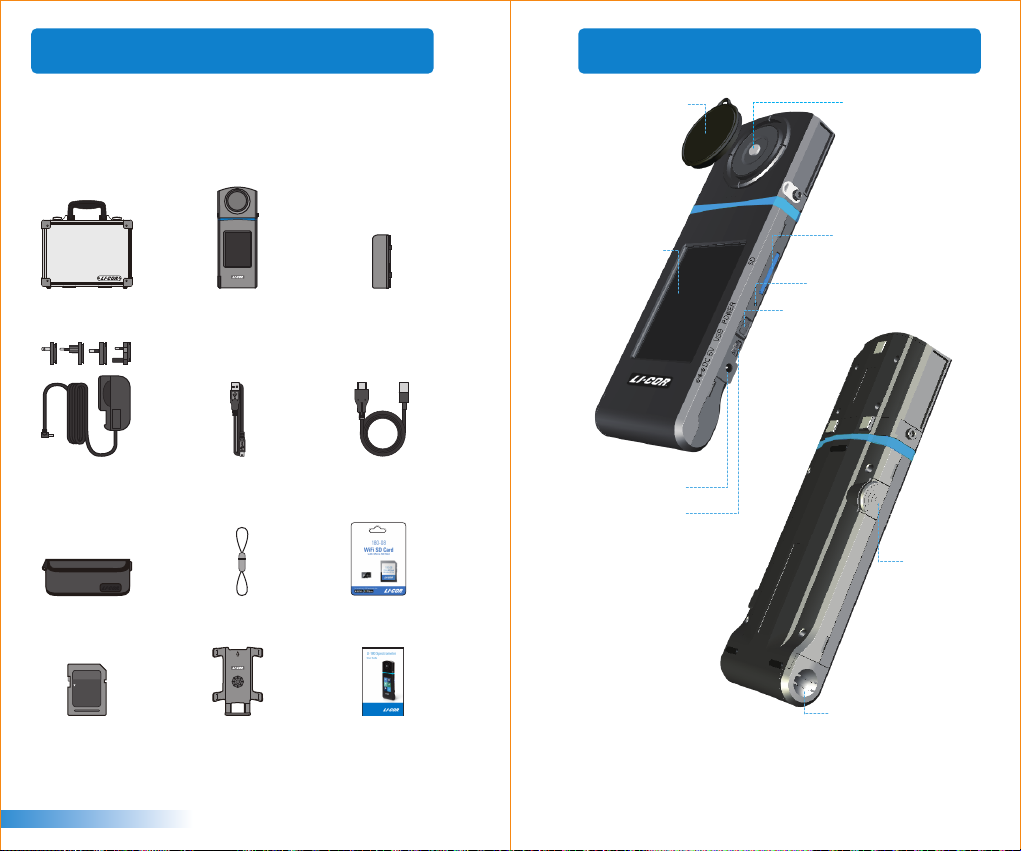
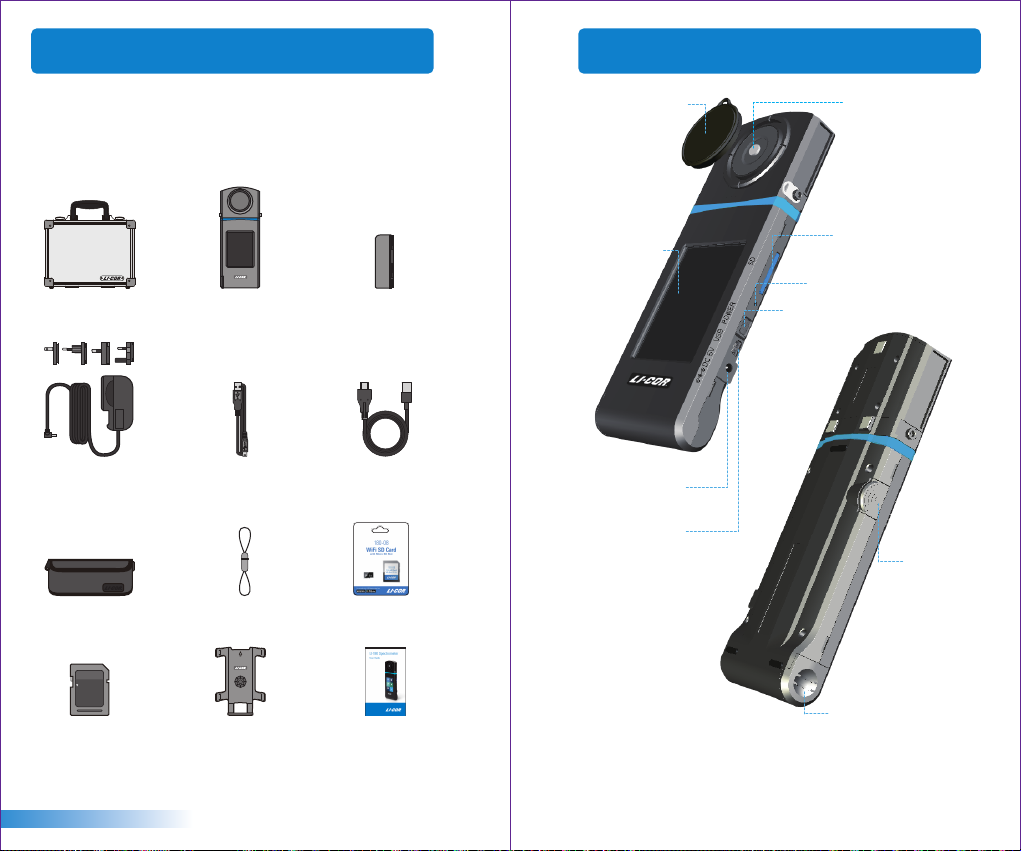
1.1 Package Contents
1.2 Product Introduction
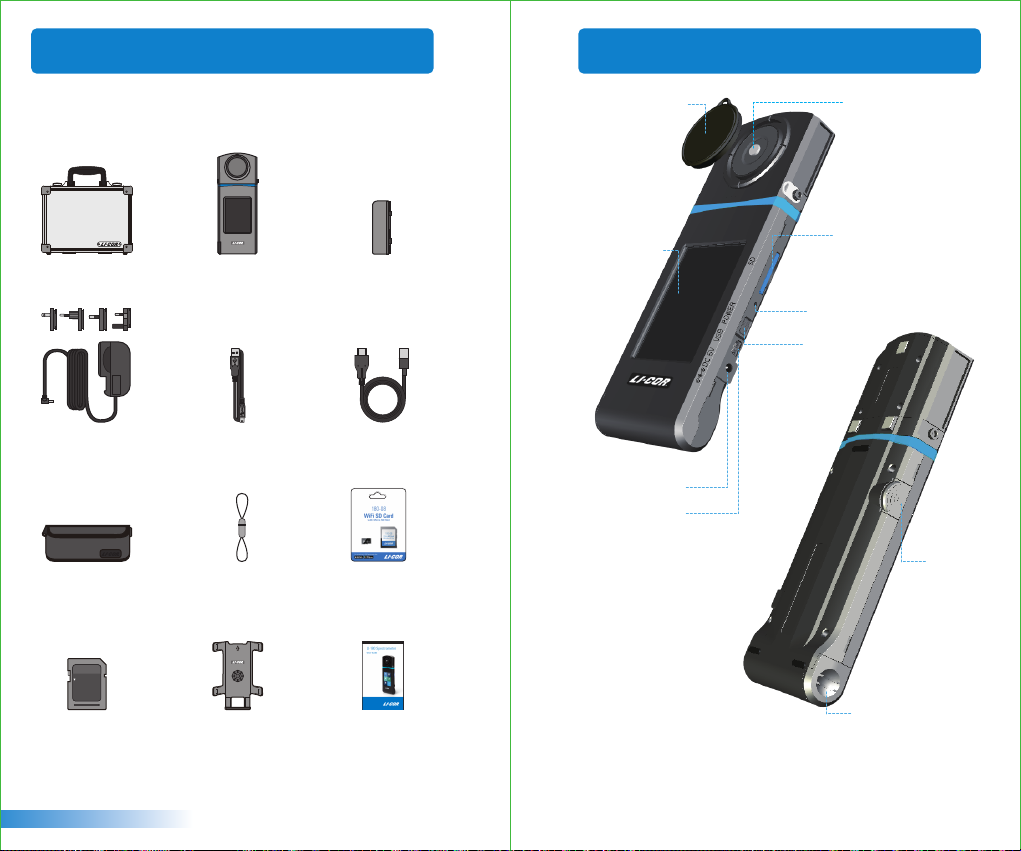
Please ensure the following are included in the package of this
product. If any parts are missing, contact LI-COR Biosciences
Environmental Support (licor.com/env/support).
Case
Power Adaptor Type-C USB Cable
Protection Bag
LI-180 Spectrometer
USB Cable
Cap Strap
Lithium Battery
(remote measurement)
180-08 WiFi SD Card
sensor cover
3.5" touch panel
DC power connector
mini USB port
optical sensor
SD card slot
reset key
power key
measure key
English
LOCK
GB
SD Card
Tripod /
Stand Bracket
- 2 -
battery cover
User Manual
- 3 -
Page 5
1.3 Product Notes and Precautions
The LI-180 Spectrometer is a high-precision instrument.
1.
Please unpack with care. Any vibraon or collision may cause
instrument damage. If the product doesn’t work normally or
needs repair, don’t aempt any repairs. All repairs must be
performed by authorized technicians.
Most LCD screens have a very small and inconsequenal
2.
defecve pixel rate (usually less than 0.1%). This results in
occasional pinpoints of white or other colors but will not
affect the accuracy of measurements.
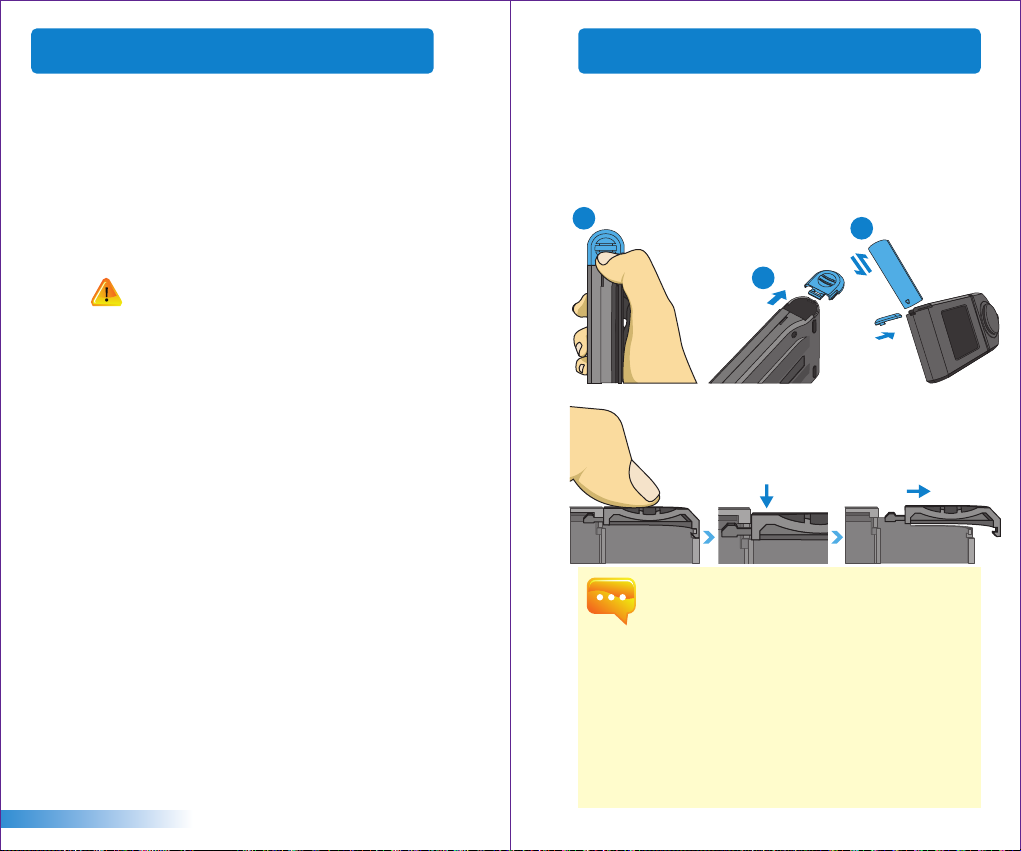
2.1 Preparing Before Use
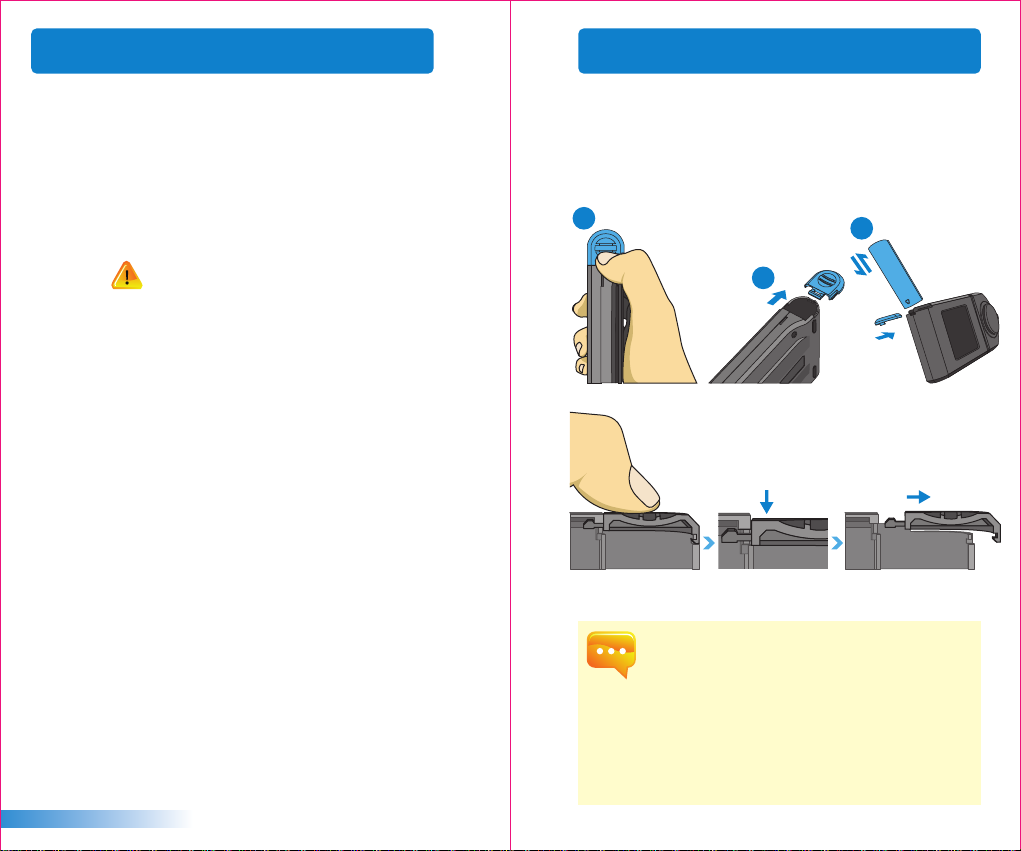
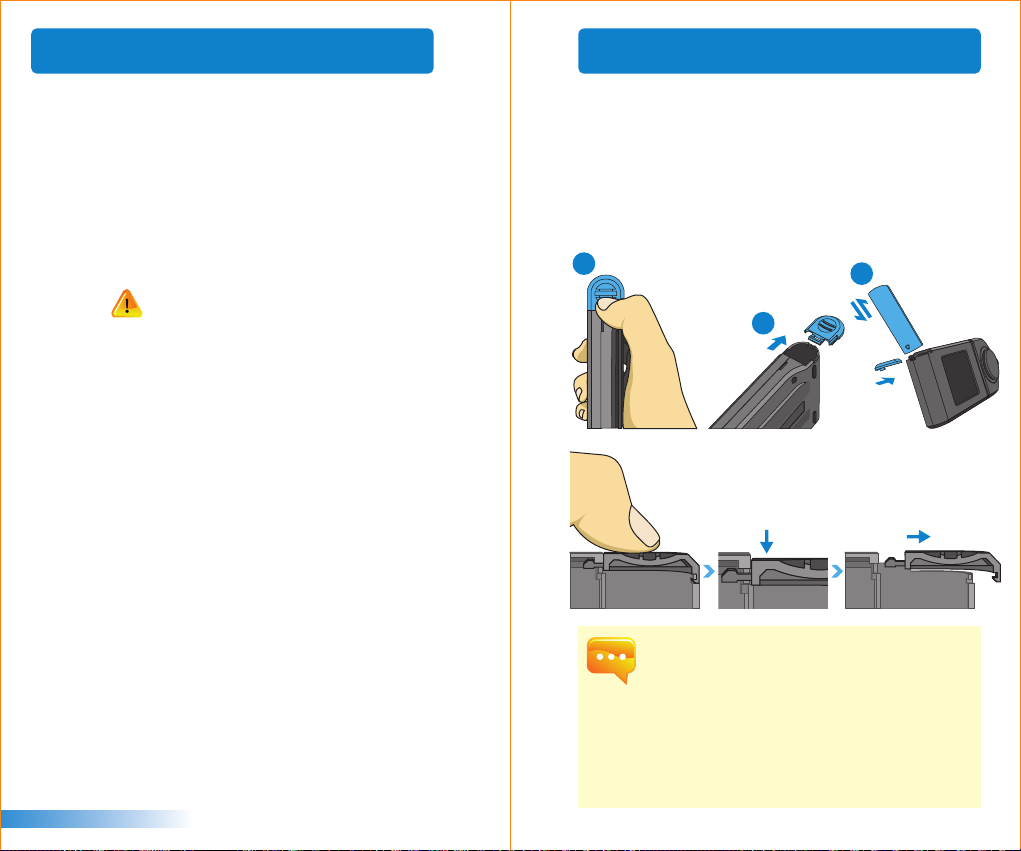
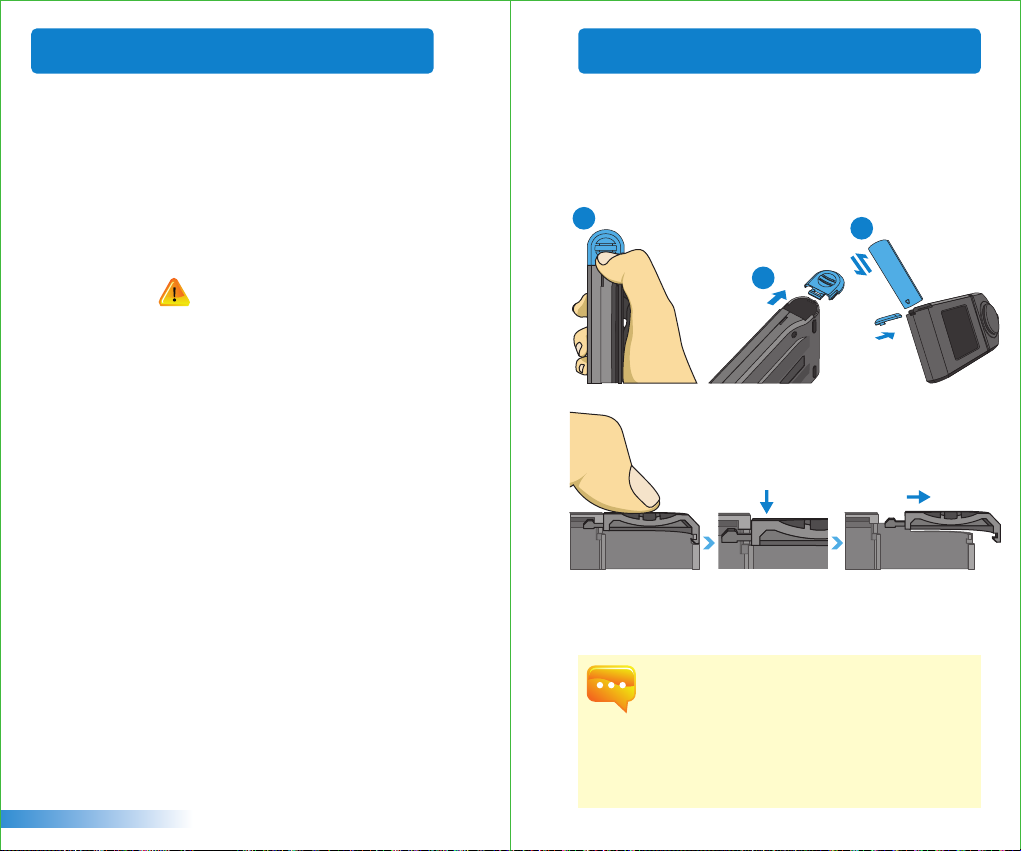
Baery installaon
:
Step 1. Hold the LI-180 Spectrometer and press the baery cover.
Step 2. Press the baery cover down to remove it.
Step 3. Install the baery aer removing baery cover.
1
3
Precautions / Warnings
Please read the following precauons to avoid fire, excessive
heat, chemical leakage, and explosion:
■
Do not disassemble or modify the baery.
■
Do not expose the baery to heat (fire) or water/moisture.
■
When disposing of used/old baeries, wrap with insulaon
tape to shield the baery from electrical contact with
metallic objects, which might ignite a fire or explosion.
■
If the unit is plugged into the power adapter and the baery
seems to be overheang, or if there is smoke or peculiar
odors emanang from the unit, unplug immediately to avoid
the possibility of fire.
■
Do not touch the cables if there is heat emanang from or
near the cables as melted or deformed cables could expose
wiring and result in burns or electric shock.
■
Do not use cloth or anything to wrap or cover the equipment
while charging – this could cause the unit to overheat,
melng the casing or causing fire.
■
If the unit is accidently immersed in water, or if moisture has
seeped inside, or metal objects have dropped into the
casing, immediately remove the baery to avoid fire or
electric shock.
■
Do not operate or store the baery in high-temperature
environments. This will cause baery leakage and/or
shorten the life of the baery.
■
Do not use paint thinner, benzene, or other organic solvents
to clean the equipment. This may damage the exterior finish
or touch screen and may even ignite a fire.
English
- 4 -
2
Press baery cover down to unlock it from the
※
cover latch before pushing it out from the body
of the spectrometer.
Charge the baery for 6 hours before using it for the first me.
1.
To prevent power outage during use, check whether the red light
2.
has turned off (fully charged) according to the instrucons given
on the next page (Item1). Once the spectrometer is turned on,
keep an eye on the baery charge indicator at the upper right
corner of screen.
If your baery drains quickly aer being fully charged, it needs to
3.
be replaced. Please contact LI-COR to order a replacement baery.
Baery life varies with baery age and usage. A new baery
4.
typically lasts about 5 hours aer a full charge.
- 5 -
Page 6
2.1 Preparing Before Use
2.1 Preparing Before Use
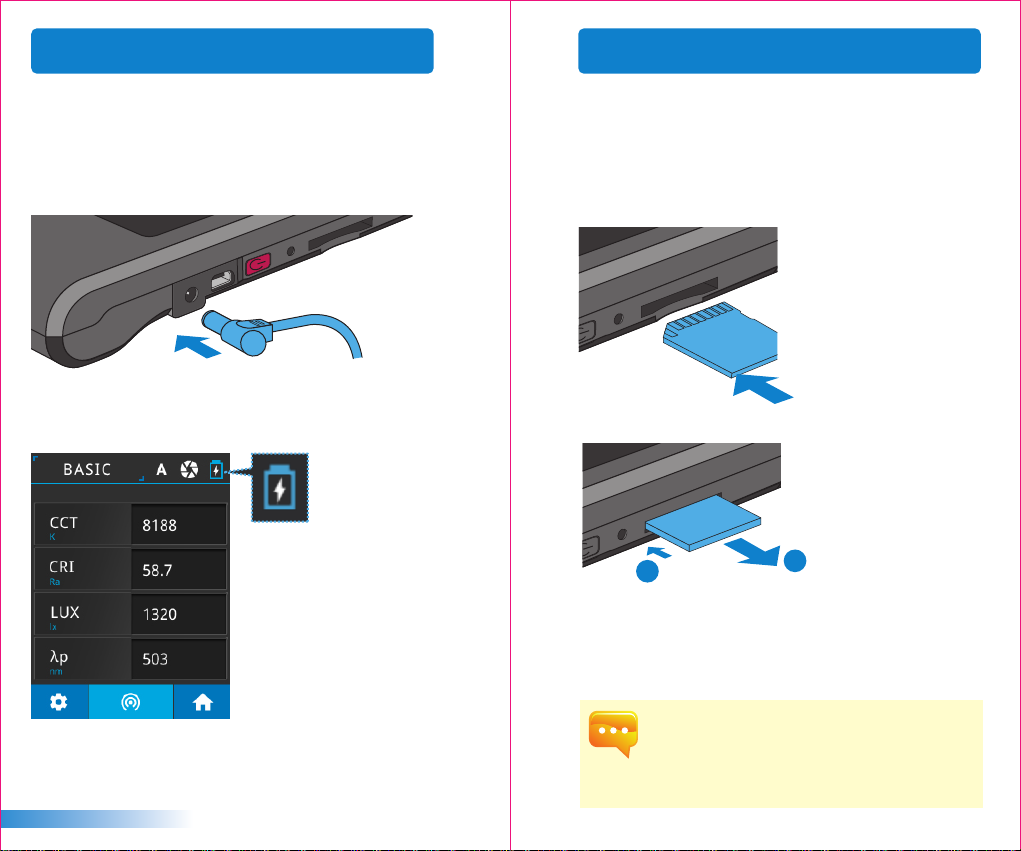
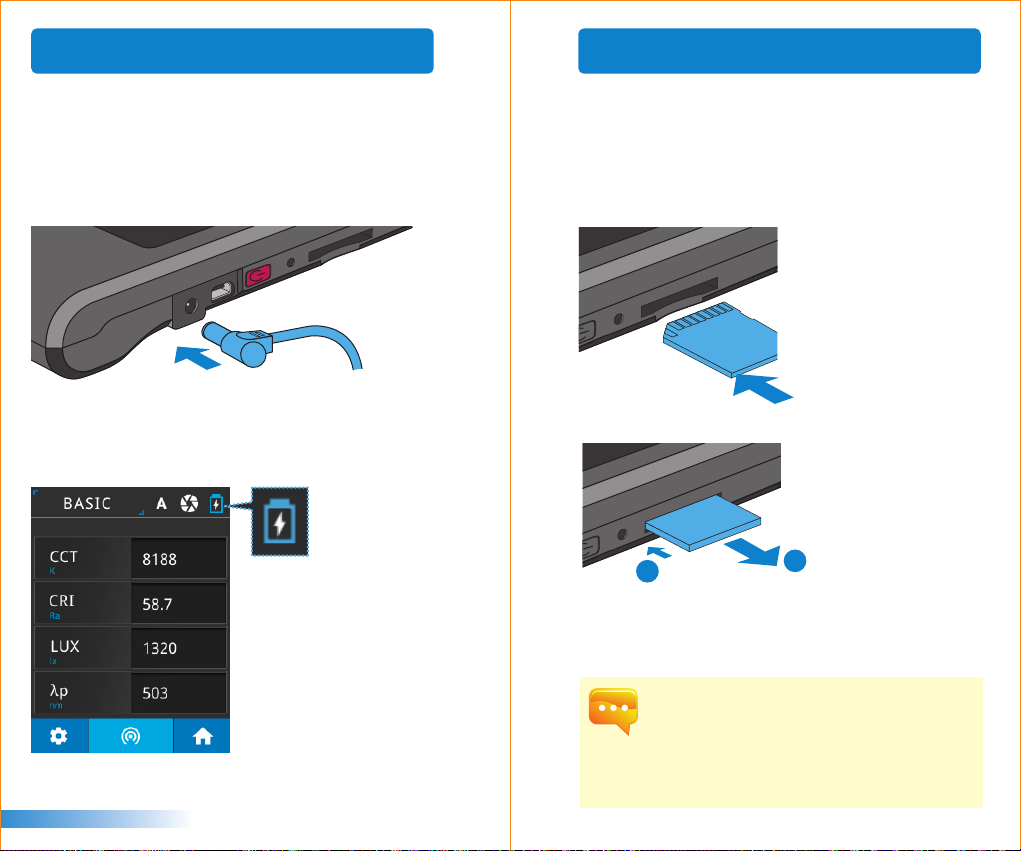
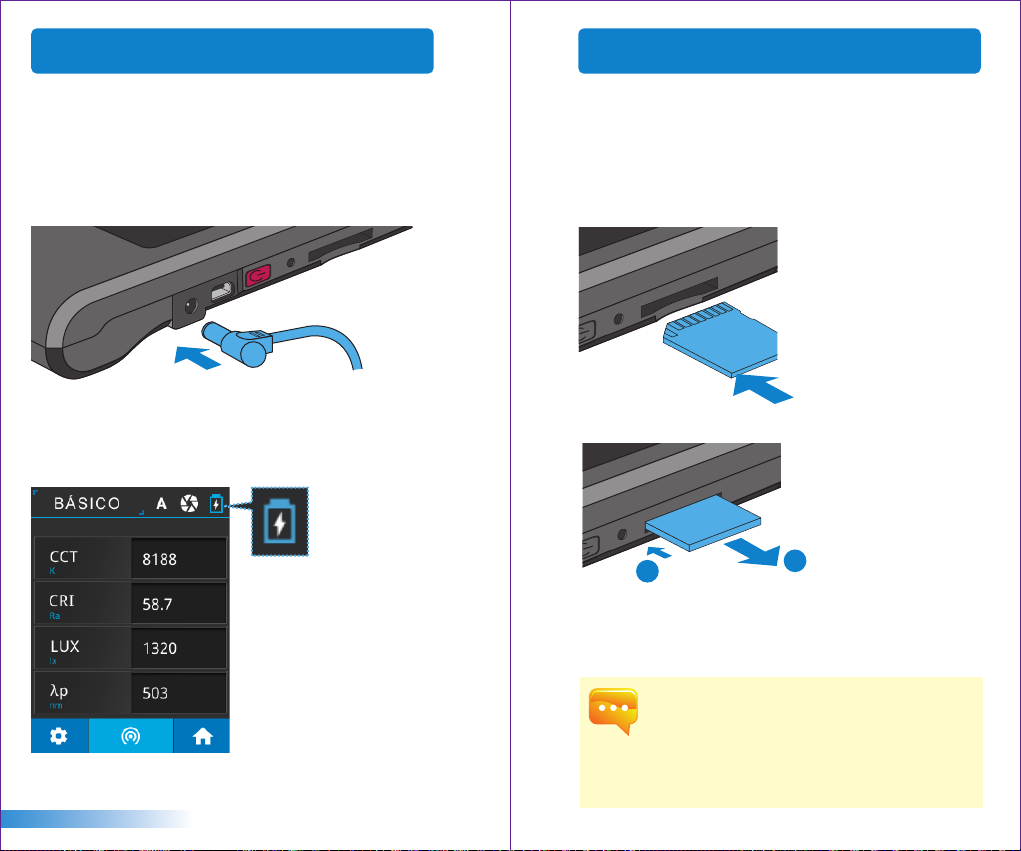
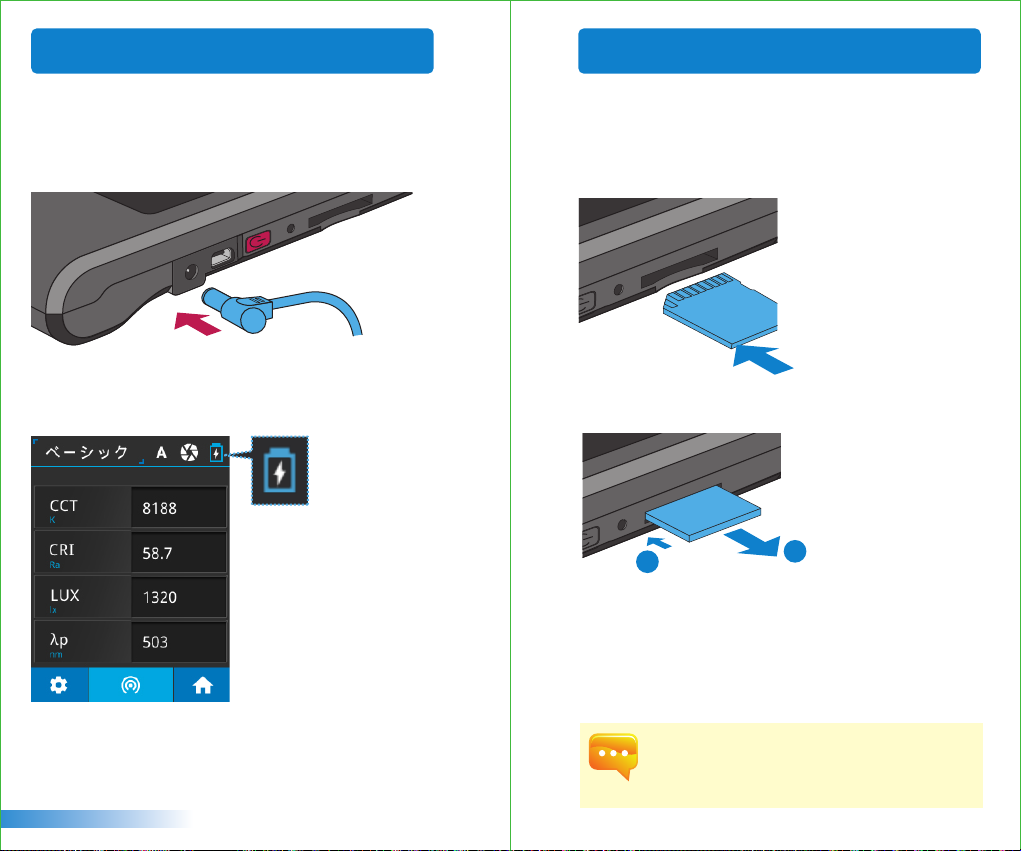
Charge your baery
:
Connect charger to the charging port to start charging the
baery.
1. The power key lights red during baery charging and turns
off aer it is fully charged.
2. A flash symbol displays at upper right corner of the LCD
screen during charging and disappears aer it is fully charged.
Install SD card
:
Measurement data may be saved in Excel (xls) format, and
image data (spectrum and chromacity coordinates diagram)
may be saved in JPG format in the SD card with capacity at 1GB
or more.
Insert SD card in direcon as indicated
※
Press to remove SD card
※
1
2
English
- 6 -
The SD card features a card latch design to prevent it from coming
1.
loose. You may feel that the SD card is stuck when it is inserted in
or removed. In this case, pull or push it a lile harder to get it in
place or removed. To remove SD card: Press it as shown in step
① and pull it out aer ejecng as shown in step ②.
- 7 -
Page 7
2.2 Preparing for Use
2.2 Preparing for Use
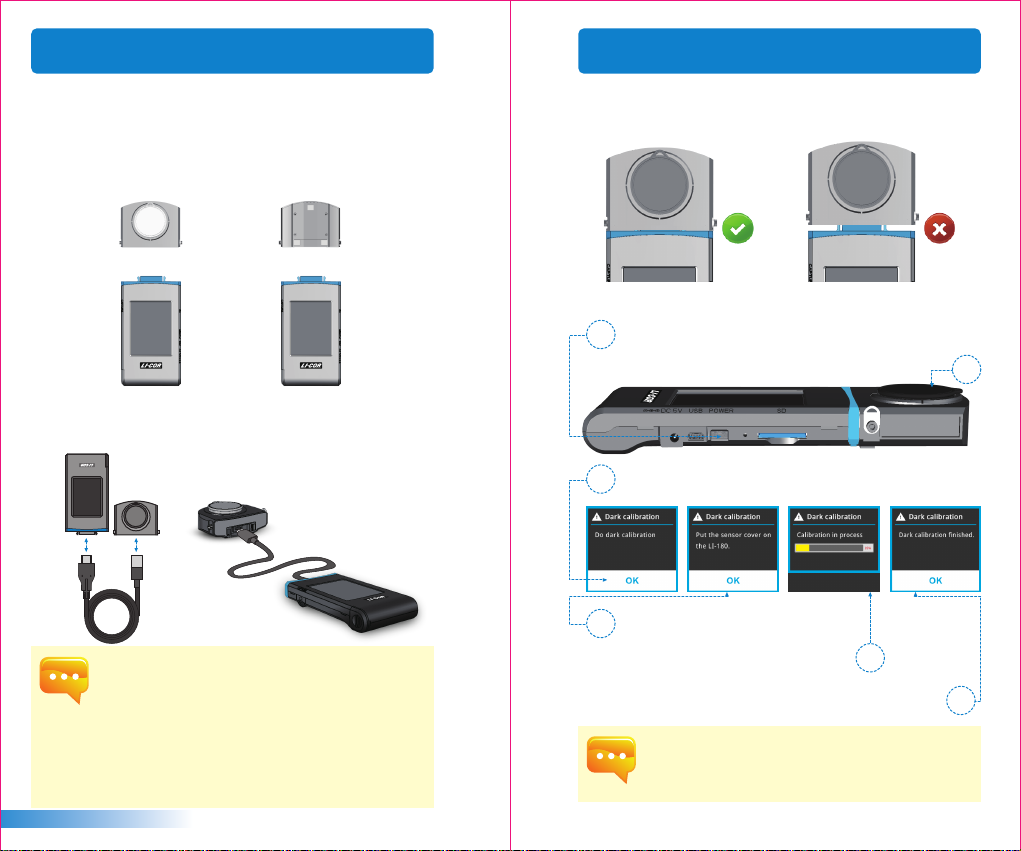
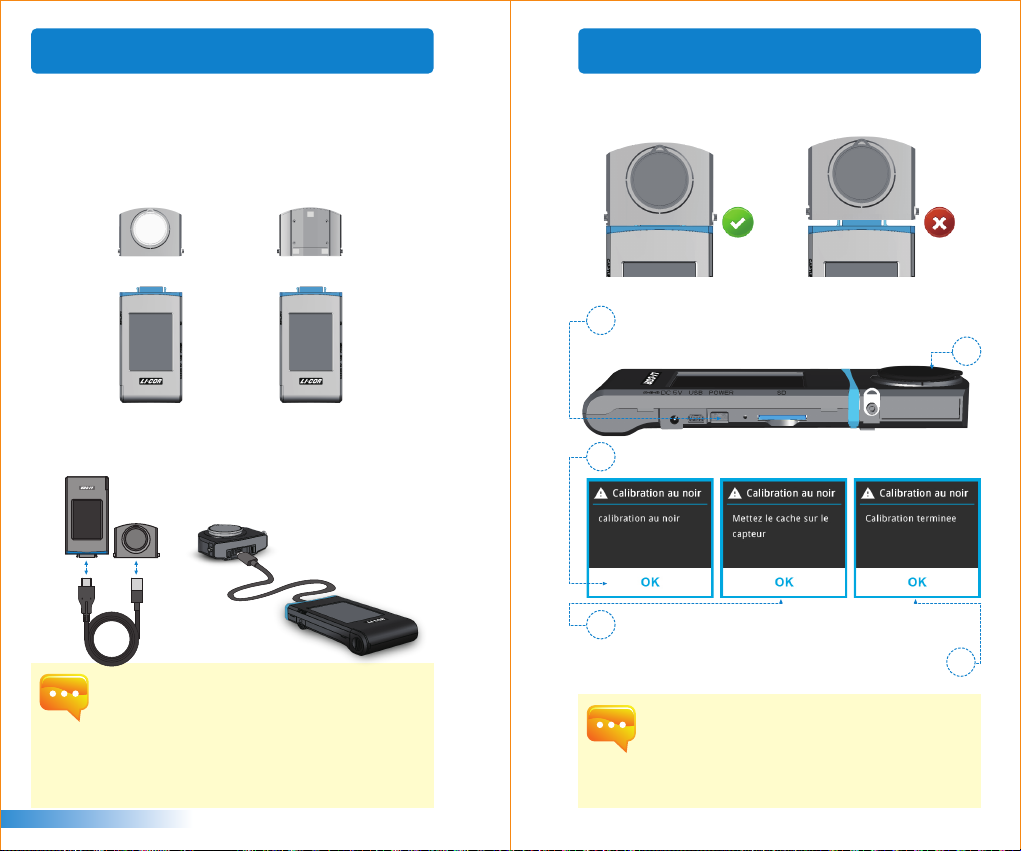
Connect opcal sensor to console
:
See the diagram below for reverse installing your opcal sensor.
Please power off the spectrometer before removing opcal
sensor from the console then turn around before inserng in
the console. Power may be restarted aer the opcal sensor is
fully installed.
+ +
or
Use the Type-C USB cable for remote measurement as shown
in the diagram below. Power off the spectrometer before
connecng the USB cable. Power it on again aerwards.
Male
Port
English
Female
Port
Opcal sensor and console are paired before shipment to you. DO
1.
NOT use either of the two with any other LI-180 Spectrometer. If
you have more than one LI-180 Spectrometer, DO NOT swap opcal
sensor between instruments.
Use the cables provided with the product.
2.
Power off the spectrometer before installing or uninstalling opcal
3.
sensor from console.
Run background calibraon aer turning power on and before
4.
taking measurements.
- 8 -
Precauons on opcal sensor installaon
Make sure the opcal sensor latch is well connected to console.
Dark calibraon
Once the spectrometer is powered on and the power key
1
light is green, the screen will prompt you with a message
for dark calibraon.
The "Do dark calibraon" dialog box displays, click OK to
2
proceed.
Click OK once the cover is replaced.
3
Status bar shows the progress of the dark
calibraon.
4
Once the message "Dark calibraon finished" appears,
click "OK" and you will be returned to the main menu.
Press and hold power key for 1 second to power on the spectrometer.
1.
Press and hold power key for 3 seconds to power it off.
2.
Run dark calibraon aer each power on of this product.
3.
- 9 -
3
5
Page 8
2.2 Preparing for Use
2.3 Basic Measurement
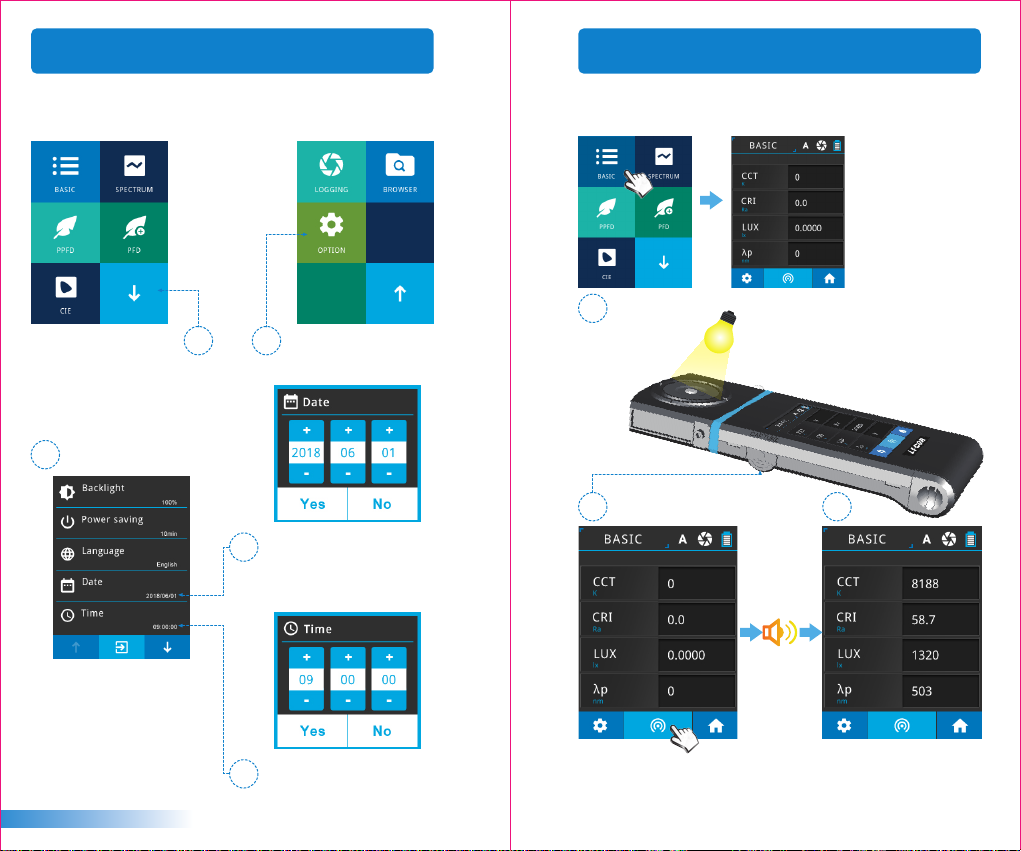
Set up date and me
Set up date and me before taking any measurements.
Press lower right
arrow icon to go to
the next page.
1 2
Click "Opon" icon.
3
Once date is set, press
4
"Yes" to exit to setup
opon page.
Press "Date" and "Time"
to update sengs.
Measurement
Click “BASIC” mode to enter measurement page.
Point opcal sensor to light source to be tested.
1
2
3
English
Once me is set, press
5
"Yes" to exit to setup
opon page.
- 10 -
Press the measurement buon at the
boom center of the LCD screen or the
measurement key on the le hand side
of the spectrometer to take a measurement.
- 11 -
This product beeps once aer
measurement is done and
displays results on screen.
Page 9
2.3 Basic Measurement
3.1 Connecting to the LI-180 Spectrometer APP
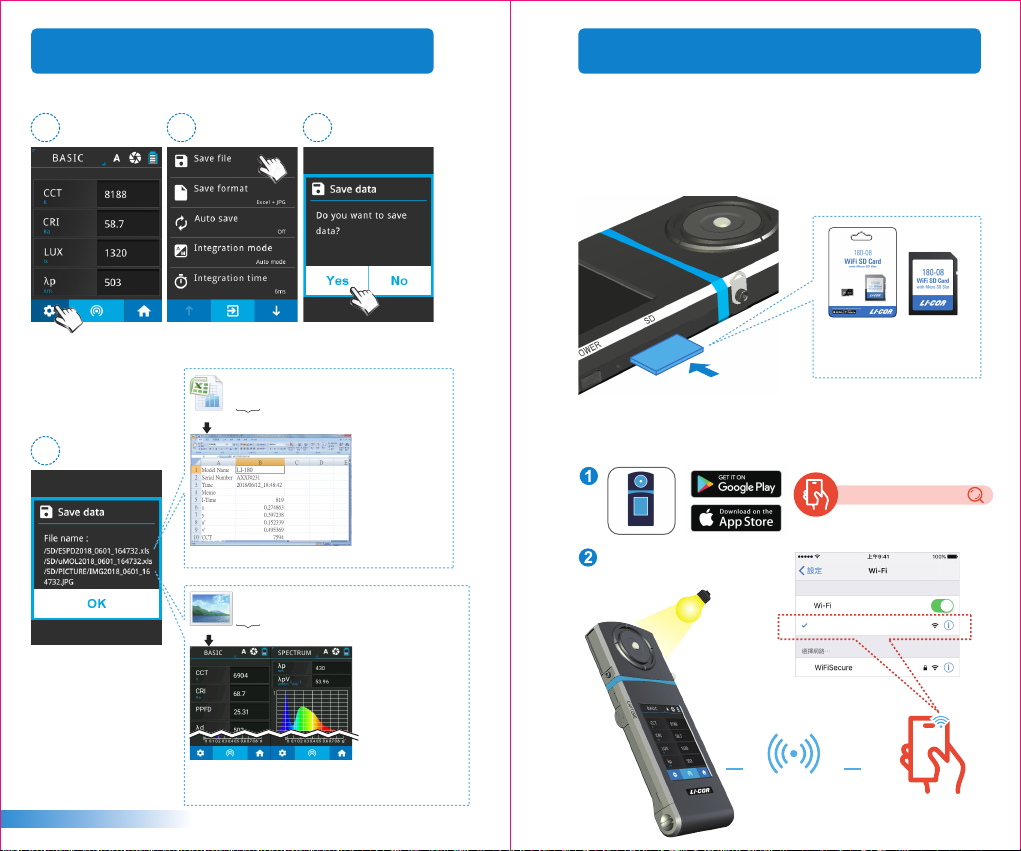
Save measurement data
1
Press the setup buon
at lower le corner.
4
Measurement data is
now saved in the SD card.
2
Click “Save file”
EXCEL file name:
ESPDYYYY_MMDD_HHMMSS
.xls
( year ) (month)(day) (hour/min/seconds)regular
▲You may save entire source data.
JPG file name:
IMGYYYY_MMDD_HHMMSS
.JPG
( year ) (month)(day) (hour/min/seconds)regular
180-08 WiFi SD card
3
Insert the 180-08 WiFi SD card into the spectrometer. For iOS
or Android devices, download the LI-180 Spectrometer APP
and install it on your devices. Then you can connect it wirelessly
to the spectrometer for mobile measurement.
WiFi 180-08
wireless remote control card
( It is used to connect with APP.)
Install APP
Download and install the LI-180 Spectrometer APP on your
mobile device.
LI-180 Spectrometer
Select 180-08 WiFi SD Card.
Measure
180-08 WiFi SD Card
English
▲You may save measurement screen in “BASIC mode”,
“SPECTRUM mode”, “PPFD mode”, “PFD mode” and
“CIE 1931.1976 mode”.
- 12 -
WiFi connecon
- 13 -
Page 10
3.2 Connecting to LI-180 Spectrometer Software
4.1 Variable Definitions
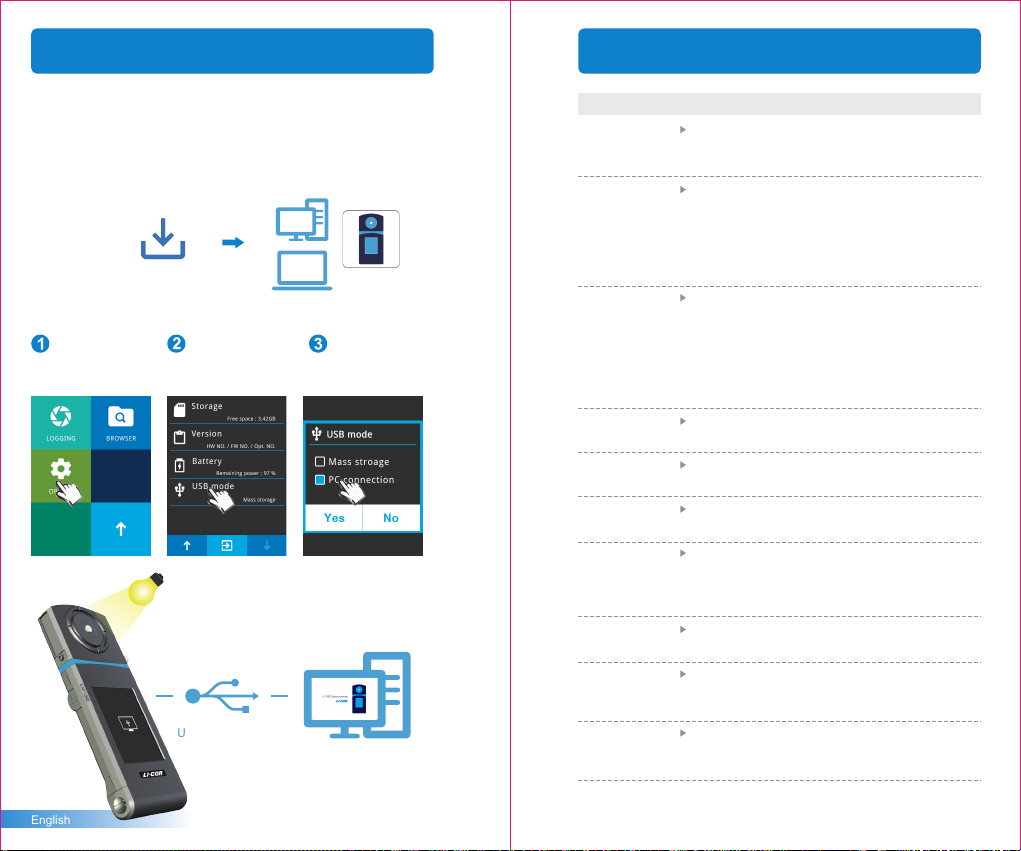
Install LI-180 Spectrometer Soware
Visit the LI-COR Support Site to download the LI-180 Spectrometer
soware on your PC (www.licor.com/env/support). Then, connect
it to the spectrometer using the USB cable to control the instrument
and save data on your PC.
LI-180 Spectrometer
Install file
Set USB PC connecon mode
Select “OPTION”. Select “USB mode”. Select “PC connection”
and press “Yes”.
Measure
USB connecon
LI-180 Spectrometer
PC soware
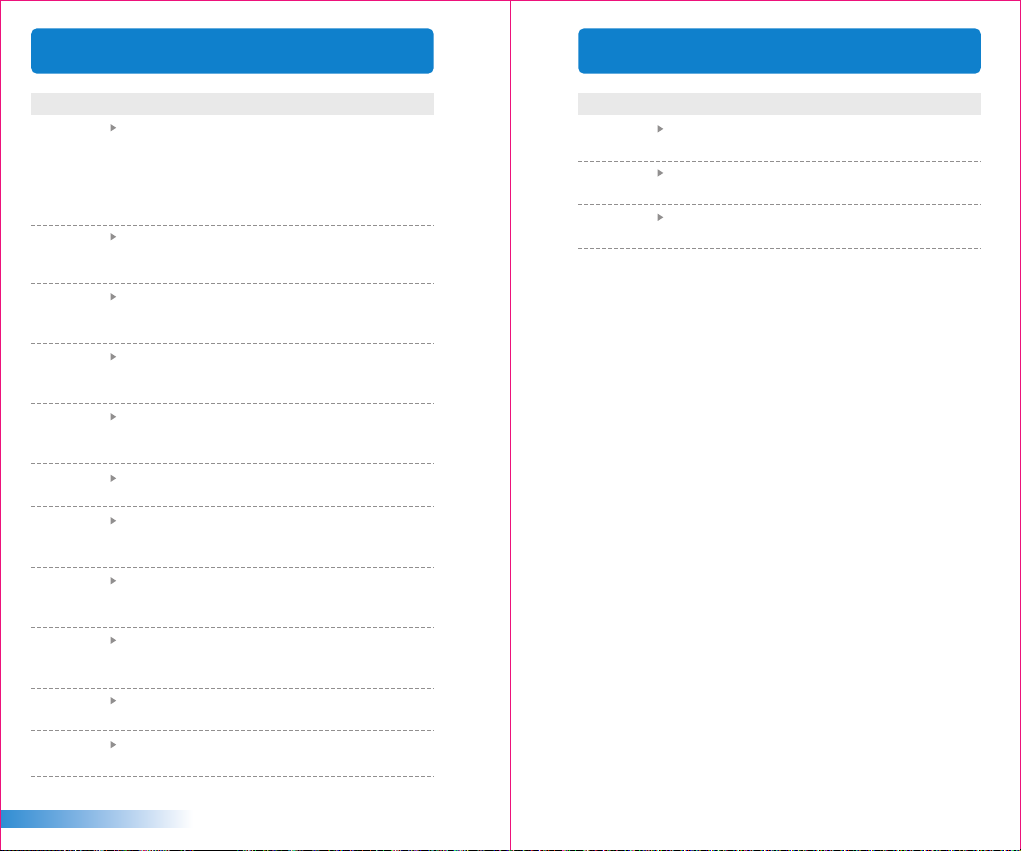
Abbreviation
CCT
The color radiated by a black-body radiator under different temperatures.
CCT has the color that is the closest to the ideal black-body radiator.
CRI (Ra)
The average value of R1 ~ R8, where R1 ~ R8 represent the value of eight
standard colors as defined by Commission International de l'Eclairage (CIE).
A CRI value of 100 indicates the best quality of light for rendering color
appearance, while a value of 0 indicates the worst quality of light for
rendering color appearance.
R1, R2, ... , R15
Represents the quality of the light source with the indexes corresponding to
15 standard colors, including: R1: light grey-red; R2: dark grey-yellow; R3:
saturated yellow-green; R4: middle yellow-green; R5: light yellow-green; R6:
light blue; R7: light purple-blue; R8: light red-purple; R9: saturated red; R10:
saturated yellow; R11: saturated green; R12: saturated blue; R13: white skin
color; R14: leaf green; and R15: yellow skin color.
Lux
Light flux received by each unit area.
λp
Wavelength with the highest intensity in the measured spectrum.
λpV
Intensity of the peak wavelength in the measured spectrum.
λd
Used to express the color of the measured light. May be hybridized by the
spectrum color of the wavelength and the standard illuminant E(x, y = 0.333,
0.333).
I-Time
Integration time measured by the spectrometer.
x, y, X, Y, Z
Light color with 2-dimensional plane coordinates (x, y) as defined in CIE
Chromaticity Chart CIE1931.
u',v'
Light color with 2-dimensional plane coordinates (u', v') as defined in CIE
Chromaticity Chart CIE1976.
Full Name
Correlated Color Temperature
Color Rendering Index
Color Rendering Index Varieties
Illuminance
Peak Wavelength
Peak Wavelength Value
Dominant Wavelength
Integration Time
CIE1931 Chromaticity Chart Color Coordinates
CIE1976 Color Coordinate
mW/m
Unit
K
lx
nm
2
nm
ms
English
- 14 -
- 15 -
Page 11
4.1 Variable Definitions
4.1 Variable Definitions
Abbreviation
Duv
UV distance between CIE1960 plane coordinate(s) and Planck’s blackbody
radiation with the same color temperature. A value close to 0 indicates the
color temperature and color are closer to that of the blackbody radiation. A
positive value indicates it is above the blackbody radiation, while a negative
value indicates it is below the blackbody radiation.
Δx
X difference between CIE1931 plane coordinates and Planck’s blackbody
radiation with the same color temperature.
Δy
Y difference between CIE1931 plane coordinates and Planck’s blackbody
radiation with the same color temperature.
Δu'
U' difference between CIE1976 plane coordinates and Planck’s blackbody
radiation with the same color temperature.
Δv'
V’ difference between CIE1976 plane coordinates and Planck’s blackbody
radiation with the same color temperature.
fc
Non-SI unit of illuminance defined as lumens per square foot (lm/ft
Purity
Percent of the dominant wavelength in the standard illuminant. The closer
the color purity is to 100%, the closer it is to the dominant wavelength.
IRR
Flux of radiant energy per unit area within the range of a specified
wavelength.
PPFD
Number of photons per unit area per unit of time (Photon Flux Density, or
PFD) for photosynthetically-active radiation (400~700nm wavelength range).
PPFD-R
PFD in the 600~700 nm wavelength range.
PPFD-G
PFD in the 500~600 nm wavelength range.
Full Name
CIE1960 UV Color Coordinate Difference
CIE1931 Color Coordinate Difference
CIE1931 Color Coordinate Difference
CIE1976 Color Coordinate Difference
CIE1976 color coordinate difference
Foot-candle
Color Purity
Irradiance
Photosynthetic Photon Flux Density
PFD in Red Field
PFD in Green Field
2
).
W/m
-2 s-1
µmol m
µmol m-2 s
µmol m-2 s
Unit
fc
%
2
-1
-1
Abbreviation
PPFD-B
PFD in the 400~500 nm wavelength range.
PFD-UV
PFD in the 380~400 nm wavelength range.
PFD-FR
PFD in the 700~780 nm wavelength range.
Full Name
PFD in Blue Field
PFD in UV Field
PFD in FR Field
-2 s-1
µmol m
µmol m-2 s
µmol m-2 s
Unit
-1
-1
English
- 16 -
- 17 -
Page 12

4.2 Warranty
Each LI-COR, Inc. instrument is warranted by LI-COR, Inc. to be
free from defects in material and workmanship; however,
LI-COR, Inc.'s sole obligaon under this warranty shall be to
repair or replace any part of the instrument which LI-COR, Inc.'s
examinaon discloses to have been defecve in material or
workmanship without charge and only under the following
condions, which are:
1.
The defects are called to the aenon of LI-COR, Inc. in
Lincoln, Nebraska, in wring within one year aer the
shipping date of the instrument.
2.
The instrument has not been maintained, repaired or altered
by anyone who was not approved by LI-COR, Inc.
3.
The instrument was used in the normal, proper and ordinary
manner and has not been abused, altered, misused,
neglected, involved in an accident or damaged by act of God
or other casualty.
4.
The purchaser, whether it is a DISTRIBUTOR or direct
customer of LI-COR or a DISTRIBUTOR'S customer, packs and
ships or delivers the instrument to LI-COR, Inc. at LI-COR
Inc.'s factory in Lincoln, Nebraska, U.S.A. within 30 days aer
LI-COR, Inc. has received wrien noce of the defect. Unless
other arrangements have been made in wring,
transportaon to LI-COR, Inc. (by air unless otherwise
authorized by LI-COR, Inc.) is at customer expense.
5.
No-charge repair parts may be sent at LI-COR, Inc.'s sole
discreon to the purchaser for installaon by purchaser.
6.
LI-COR, Inc.'s liability is limited to repair or replace any part
of the instrument without charge if LI-COR, Inc.'s
examinaon disclosed that part to have been defecve in
material or workmanship.
There are no warranes, express or implied, including but not
limited to any implied warranty of merchantability of fitness for
a parcular purpose on underwater cables or on expendables
such as baeries, lamps, thermocouples, and calibraons.
English
- 18 -
4.2 Warranty
Other than the obligaon of LI-COR, Inc. expressly set forth
herein, LI-COR, Inc. disclaims all warranes of merchantability
or fitness for a parcular purpose. The foregoing constutes
LI-COR, Inc.'s sole obligaon and liability with respect to
damages resulng from the use or performance of the
instrument and in no event shall LI-COR, Inc. or its
representaves be liable for damages beyond the price paid for
the instrument, or for direct, incidental or consequenal
damages.
The laws of some locaons may not allow the exclusion or
limitaon on implied warranes or on incidental or consequenal
damaged, so the limitaons herein may not apply directly. This
warranty gives you specific legal rights, and you may already
have other rights which vary from state to state. All warranes
that apply, whether included by this contract or by law, are
limited to the me period of this warranty which is a
twelve-month period commencing from the date the
instrument is shipped to a user who is a customer or eighteen
months from the date of shipment to LI-COR, Inc.'s authorized
distributor, whichever is earlier.
This warranty supersedes all warranes for products purchased
prior to June 1, 1984, unless this warranty is later superseded.
To the extent not superseded by the terms of any extended
warranty, the terms and condions of LI-COR’s Warranty sll
apply.
DISTRIBUTOR or the DISTRIBUTOR's customers may ship the
instruments directly to LI-COR if they are unable to repair the
instrument themselves even though the DISTRIBUTOR has been
approved for making such repairs and has agreed with the
customer to make such repairs as covered by this limited
warranty.
Further informaon concerning this warranty may be obtained
by wring or telephoning Warranty manager at LI-COR, Inc.
- 19 -
Page 13
Verzeichnis
1.1 Paketinhaltsbeschreibung
1
1.2 Beschreibung des Aussehens
1.3 Produktvorsichtshinweise
2.1 Vorbereitung für den Einsatz
2
2.2 Grundspezifikationen
3.1 Verbindung mit der Handy-APP
3
.......................................... 30
3.2 Verbindung mit LI-180 Spectrometer
................................... 21
.............................. 22
................................... 23
.............................. 24
.......................... 32
................. 33
Für weitere Informationen über den Betrieb und
Firmware-Updates, Online-Korrektur und anwenden
Reparaturservice; siehe licor.com/env/support
- 20 -
Page 14

1.1 Paketinhaltsbeschreibung
1.2 Beschreibung des Aussehens
Vor dem Gebrauch prüfen Sie, ob in Ihrem LI-180-Paket
Folgendes enthalten ist. Falls etwas fehlt, kontakeren Sie bie
Ihren Händler.
Handkoffer
Ladegerät USB-Kabel, Typ C, 3 m
Schutzhülle
LI-180
Mobiles Spektroskop
USB -Übertragungskabel
Hängeleine
Lithium-Batterie
(Fernmessung)
WiFi 180-08
-Wireless-Fernbedienungskarte
Abdeckplatte für den
optischen Abtastkopf
3.5 „Touchscreen
Ladebuchse
Mini USB
Lichtsensor
SD-Kartenschlitz
Reset-Taste
Schalter-Taste
Messtaste
Deutsch
LOCK
GB
SD-Karte
Basisträger
- 21 -
Batterie-Abdeckung
Benutzungsanleitung
- 22 -
Page 15
1.3 Produktvorsichtshinweise
Das LI-180-Handheld-Spektroskop ist ein sehr anspruchsvolles Model.
1.
Seien Sie beim ersten Enernen der Verpackung besonders
vorsichg, das jede Vibraon oder Kollision dieses Instrument
beschädigen kann. Behandeln Sie es daher sehr sorgfälg. Wenn das
Produkt nicht richg funkoniert oder Wartung erfordert, versuchen
Sie bie nicht sich selbst, dies zu reparieren. Alle Wartungsarbeiten
müssen für von einem für den Kundendienst autorisierten Händler
durchgeführt werden.
Was Pixel angeht, so erreichen die meisten LCD-Monitor-Ergebnisse
2.
während des Produkonsprozesses mehr als 99,9% akve Pixel Die
Zahl der inakven Pixel liegt bei weniger als 0,1%. Inakve Pixel
können weiß oder andersfarbig sein. Inakve Pixel haben keinen
Einfluss auf die Genauigkeit der Messungen. Daher können Sie bei
der Benutzung unbesorgt sein.
Sicherheitswarnung
Bie lesen Sie die folgenden Vorsichtsmaßnahmen, zum Verhindern von
Feuer, übermäßiger Hitze, chemischen Lecks sowie Explosionen und
Unfällen sorgfälg durch.
■
Zerlegen oder modifizieren Sie Akkus nicht.
■
Posionieren Sie Akkus nicht in Feuer oder Wasser.
■
Wenn Sie einen Akku oder Ersatzakku entsorgen, isolieren Sie bie
die elektrischen Kontakte des Akkus mit Isolierband, um Kontakte des
Akkus mit Metallgegenständen oder anderen Baerien bzw. Akkus zu
verhindern, welche eventuell zu Feuer oder Explosionen führenkönnten.
■
Wenn es während des Akkuladevorgangs zu Überhitzung, Rauch,
abnormalen Gerüchen usw. kommen sollte, enernen Sie das
Akkuladegerät sofort vom Stromanschluss und beenden Sie das
Aufladen, um mögliche Feuer zu verhindern.
■
Schließen Sie keine Verbindungskabel in der Nähe einer Hitzequelle
an, da es sonst beim Verbindungskabel zu einer thermischen Verformung
kommen kann oder die isolierende Randschicht schmelzen könnte,
was Feuer oder einen elektrischen Schlag verursachen könnte.
■
Vermeiden Sie ein Abdecken oder Einwickeln des Geräts während
des Aufladens, da dies wegen der schlechten Hitzeableitung zur
Verformung des Gehäuses oder einem Brand führen kann.
■
Wenn das Produkt versehentlich ins Wasser gefallen ist oder wenn
Wasser, oder metallische Fremdkörper in das Innere eindringen
sollten, enernen Sie sofort den Akku, um eine Entzündung oder
einen elektrischen Schlag zu vermeiden.
■
Verwenden oder Lassen Sie den Akku oder den Hilfsakku niemals in
einer Hochtemperaturumgebung, da es sonst beim Akku zu Leckage
oder einer kürzeren Lebensdauer kommt.
■
Verwenden Sie niemals Farbverdünner, Benzol oder andere organische
Lösungsmiel, um das Gerät zu reinigen, da sonst sein Äußeres oder
der Touch-Screen beschädigt wird oder es zu einem Brand kommen
könnte.
Deutsch
- 23 -
2.1 Vorbereitung für den Einsatz
Einlegen eines Akkus
:
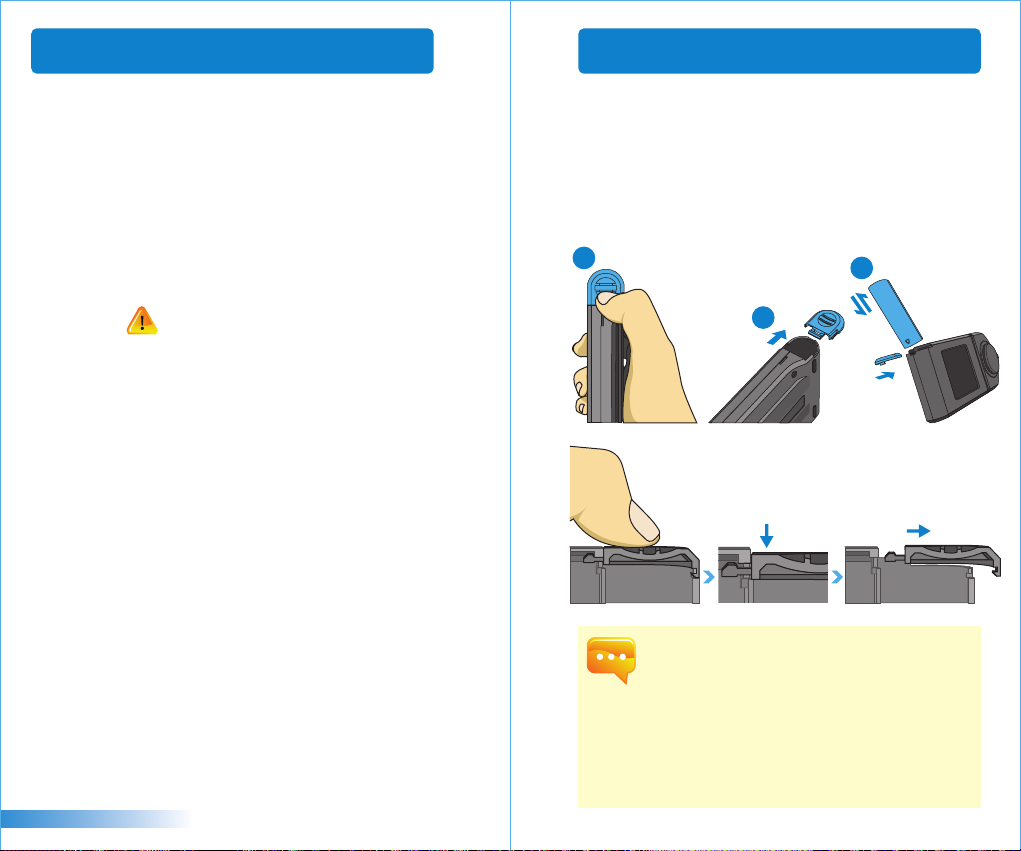
Schri 1: Halten Sie das Gerät in den Händen und halten Sie mit
dem Daumen die Akkuabdeckung gedrückt.
Schri 2: Drücken Sie die Akkuabdeckung nach unten, wonach
die kuabdeckung herausgedrückt werden kann.
Schri 3: Nach dem Herausdrücken der Akkuabdeckung kann
der Akku eingelegt werden.
1
3
2
Der Daumendruck nach unten auf die Akkuabdeckung hil
※
dabei, dass sich die Akkuabdeckung vom Haltezapfen lösen kann,
wonach die Akkuabdeckung problemlos nach außen geschoben
werden kann.
Bei der ersten Benutzung laden Sie sie bite zuerst 6 Stunden lang
1.
voll auf.
Überprüfen Sie den Ladezustand des Akkus vor dem Gebrauch,
2.
um Unterbrechungen zu vermeiden.
Wenn sich der Akku nach einer vollständigen Aufladung rasch
3.
entleert, ist das Ende der Gebrauchslebensdauer fast erreicht.
Erwerben Sie bie einen neuen Originalakku.
Die Nutzungszeit hängt mit der Akkugebrauchslebensdauer
4.
zusamen. Die Gebrauchszeit des Modells LI-180 ab Fabrik beträgt
etwa fünf Stunden.
- 24 -
Page 16
2.1 Vorbereitung für den Einsatz
2.1 Vorbereitung für den Einsatz
Das Aufladen des Akkus
:
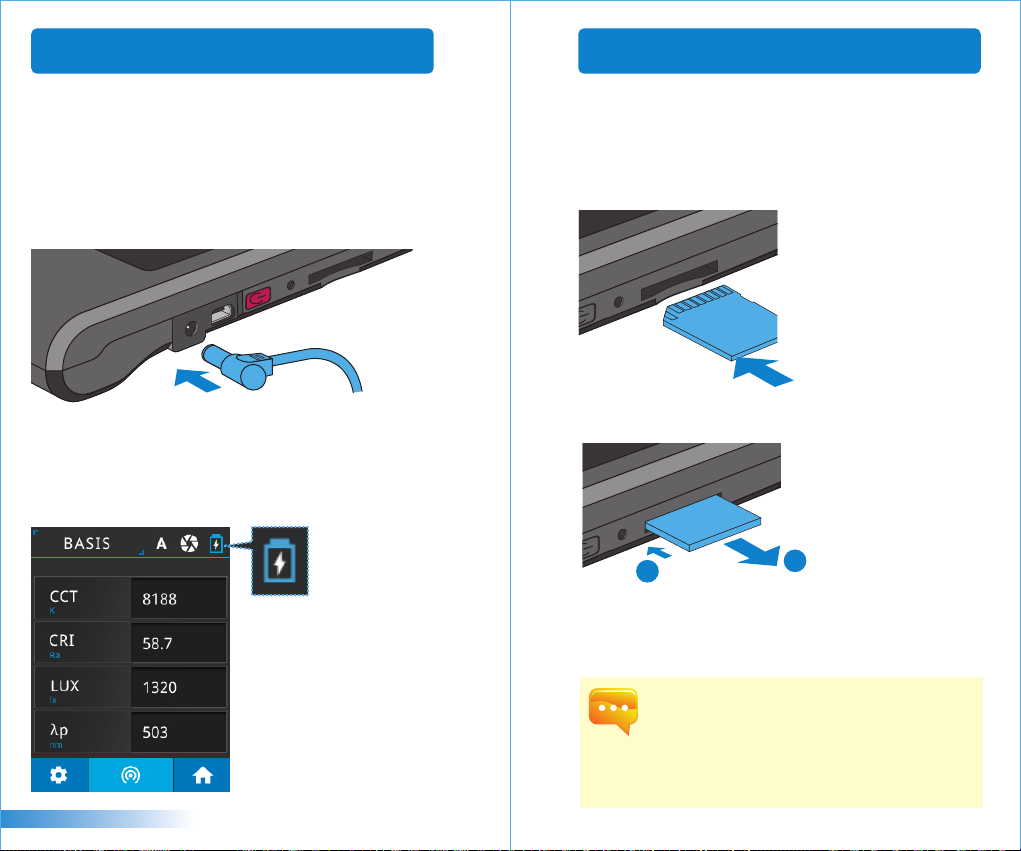
Nehmen Sie die Stromladeleitung heraus und stecken Sie damit
das Produkt in den Stromanschluss. Danach kann direkt mit
dem Aufladenbegonnen werden.
1. Im ausgeschalteten Zustand kann der Benutzer bemerken,
wie an der Strom-Taste eine rote Anzeigelampe aufleuchtet.
Nach vollständiger Aufladung erlischt die rote Anzeigelampe.
2. Im eingeschalteten Zustand kann der Benutzer sehen, dass
auf dem Bildschirm ein Blitz-Symbol erscheint, das die
Durchführung des Aufladens anzeigt. Nach dem vollständigen
Aufladen verschwindet das Blitz-Symbol.aer it is fully charged.
SD-Karte installieren
:
Sie können Messdaten im Excel-Format (XLS) sowie Bilddaten
(Spektrum und Chromazitätskoordinatendiagramm) im JPG-Format
auf SD-Karten speichern. Wir empfehlen eine Kapazität ab 1 GB.
Einstecken der Speicherkarte in die angegebene Richtung.
※
Durch Drücken kann die Speicherkarte direkt enernt
※
werden.
1
2
Deutsch
- 25 -
Die SD-Karte wird intern gehalten, damit sie sich nicht
1.
versehentlich lockert. Beim Einlegen und Herausnehmen spüren
Sie eventuell einen Widerstand. In diesem Fall schieben oder
ziehen Sie einfach ein wenig stärker. SD-Karte entnehmen:
Drücken Sie die Karte wie in Schri ① gezeigt zunächst nach
innen; die Karte springt ein Stückchen heraus. Ziehen Sie die Karte
dann ganz heraus – Schri ②.
- 26 -
Page 17
2.1 Vorbereitung für den Einsatz
2.1 Vorbereitung für den Einsatz
Opschen Sensor mit dem Host verbinden
:
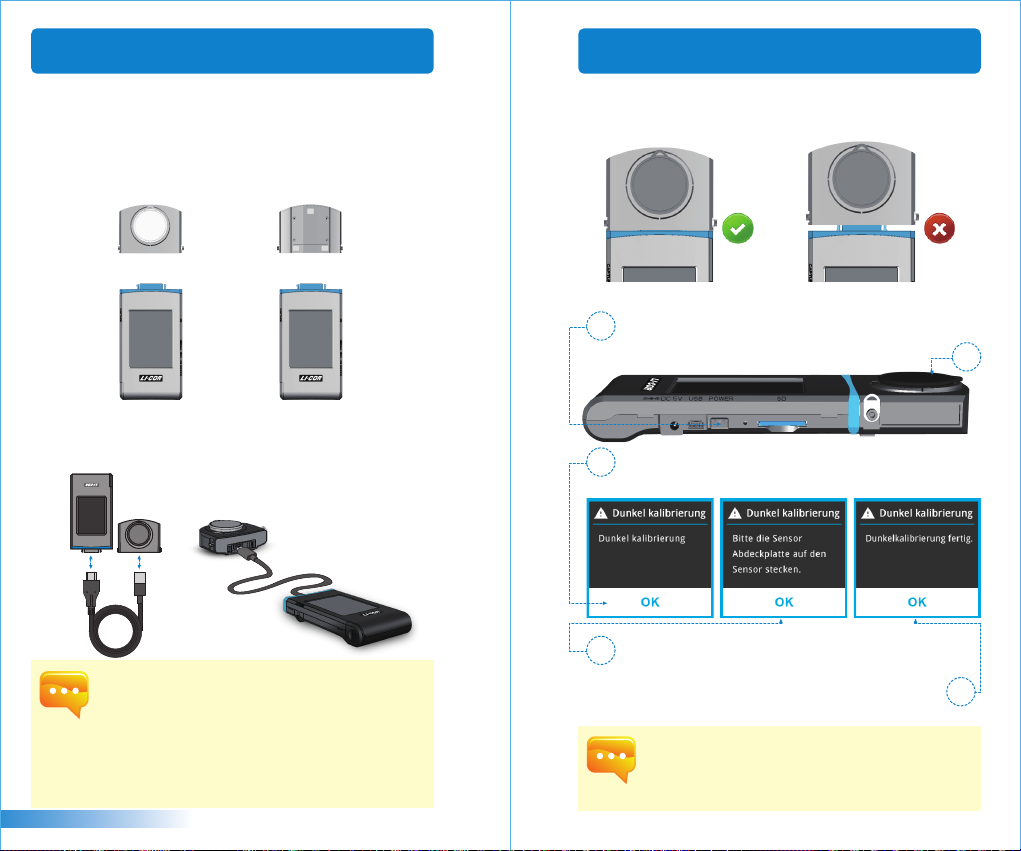
Bie beachten Sie die nachstehende Abbildung zur umgedrehten
Installaon des opschen Sensors. Schalten Sie das Gerät ab, bevor
Sie den opschen Sensor vom Gerät trennen und umgedreht wieder
einsetzen. Schalten Sie das Gerät erst nach abgeschlossener
Installaon wieder ein.
+ +
oder
Verwenden Sie das USB-Kabel vom Typ C zur Fernmessung,
orieneren Sie sich an der nachstehenden Abbildung. Schalten
Sie das Gerät ab, bevor Sie das Typ-C-USB-Kabel anschließen.
Anschließend schalten Sie das Gerät wieder ein.
Stecker
Deutsch
Buchse
Opscher Sensor und Host werden bereits im Werk miteinander
1.
gekoppelt. Verwenden Sie die beiden Geräte NICHT mit anderen
LI-180-Geräten. Wenn Sie mit mehreren LI-180 arbeiten, achten
Sie darauf, nichts miteinander zu vertauschen.
Schalten Sie das Gerät ab, bevor Sie den opschen Sensor
2.
anbringen oder abnehmen.
Führen Sie nach dem Einschalten immer zunächst eine
3.
Hintergrundkalibrierung aus.
- 27 -
Precauons on opcal sensor installaon
Achten Sie darauf, dass der opsche Sensor vollständig im Host
sitzt.
Durchführung der Dunkelkalibrierung
Nach dem Einschalten des Geräts leuchtet bei der
1
Strom-Taste ein grünes Licht auf, wonach ein Bildschirm
für die Dunkelkalibrierung erscheint.
Der Bildschirm zeigt in einem Dialogfenster die Frage„
2
Möchten Sie eine Dunkelkalibrierung durchführen?
3
"Wählen Sie die Taste„ Ja".
Nachdem Sie überprü haben, dass die Abdeckplae
3
aufgesetzt ist, wählen Sie die Schalläche „ Ja".
Wenn das Dialogfenster "Dunkelkalibrierung ferg."
angezeigt wird, drücken Sie die Taste„ Ja", um zum
4
Hauptbildschirm zu gelangen.
Zum Einschalten halten Sie die Ein-/Austaste („POWER“) 1 Sekunde
1.
lang gedrückt.
Zum Abschalten halten Sie dieselbe Taste 3 Sekunden lang gedrückt.
2.
Führen Sie nach jedem Einschalten eine Dunkelkalibrierung durch.
3.
- 28 -
Page 18
2.1 Vorbereitung für den Einsatz
2.2 Grundspezifikationen
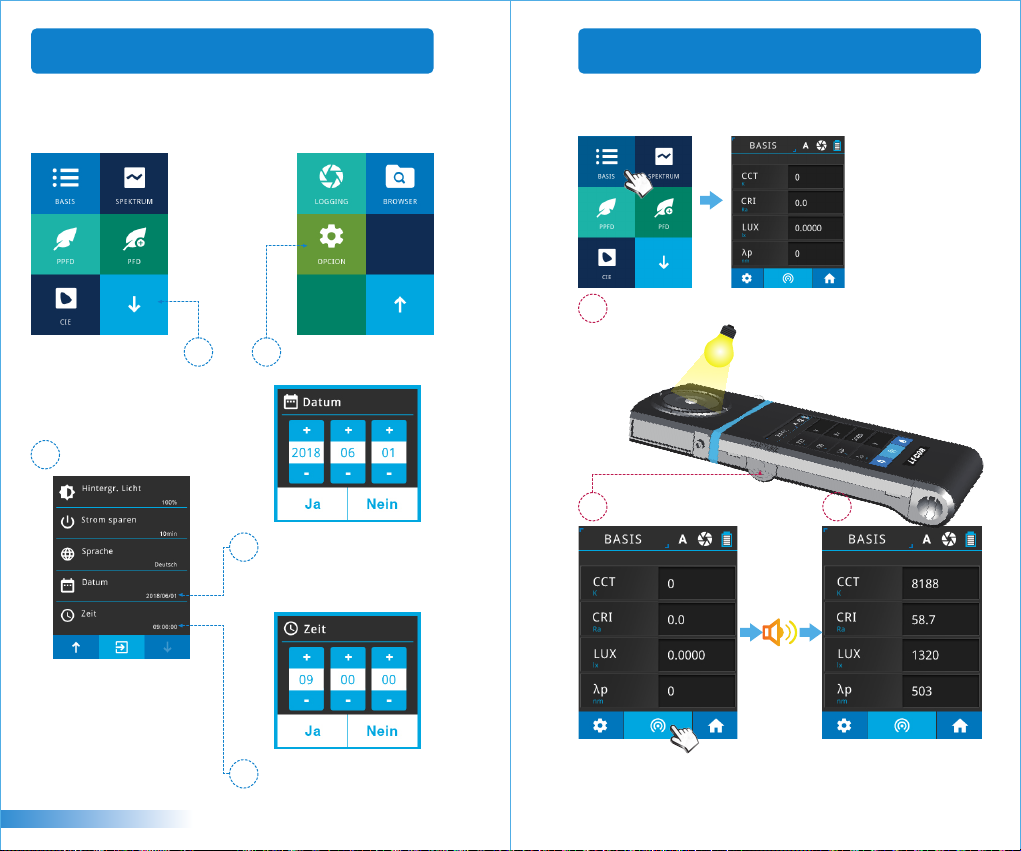
Einstellen von Datum und Uhrzeit
Nach der Dunkelkalibrierung werden vor der Messung das
Datum und die Zeit eingestellt.
Drücken Sie das Pfeilsymbol
unten rechts zum Aufrufen
der nächsten Seite.
1 2
Bie klicken Sie auf das
Symbol [Oponen].
3
Nachdem Sie die Datumseinstellung
4
abgeschlossen haben, drücken
Sie die Ja-Taste, um zur Auswahl
-Registerkarte zurückzukehren.
Bie klicken Sie auf [Datum]
und dann auf [Zeit] zur
Einstellung.
Messung
Klicken Sie auf den Modus "BASIS" und kommen Sie zur Messungsseite.
Den opschen Sensorkopf miels photometrischer
1
Quelle ausrichten.
2
3
Deutsch
Nachdem Sie die Zeiteinstellung
5
abgeschlossen habe,n, drücken
Sie die Ja-Taste, um zur Auswahl
-Registerkarte zurückzukehren.
- 29 -
Zum Messen drücken Sie die
Messschalläche in der Mie des
Bildschirms oder die Messtaste an
der linken Seite des Gerätes. (Sie
können beide Alternaven nutzen.)
Wenn Sie den Signalton hören,
werden die Messdaten auf dem
Bildschirm angezeigt.
- 30 -
Page 19
2.2 Grundspezifikationen
3.1 Verbindung mit der Handy-APP
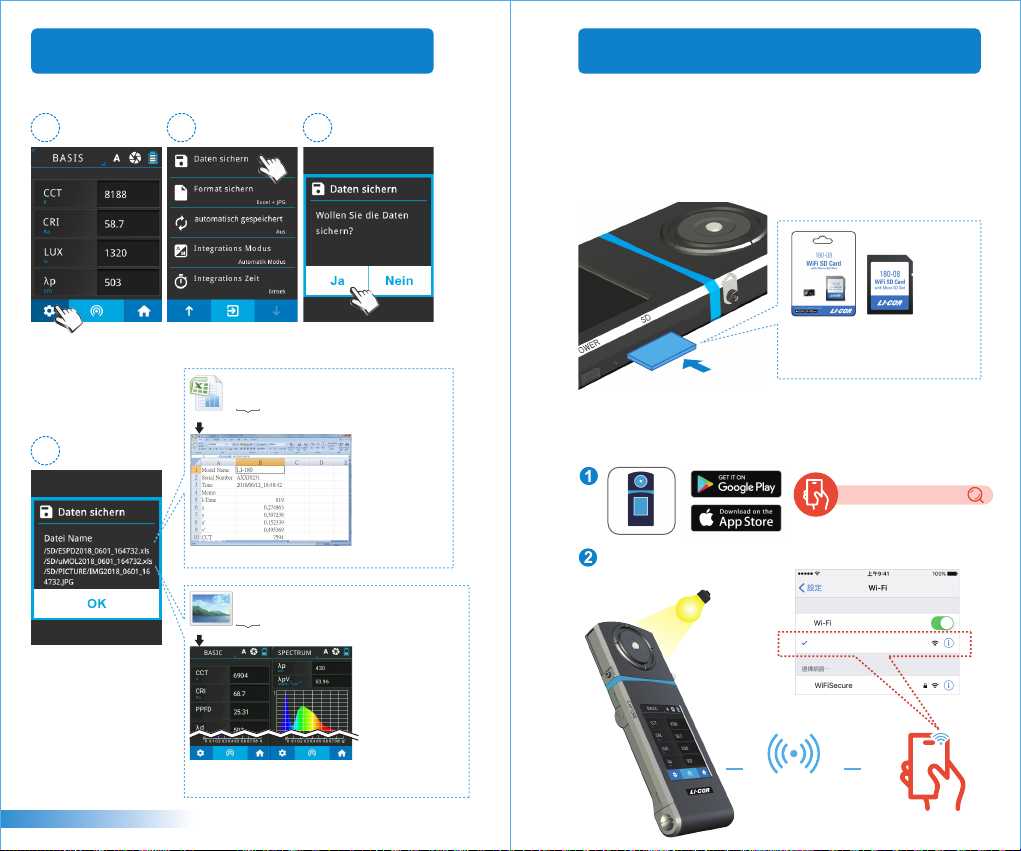
Messdatenspeicher
1
Drücken Sie die
Einrichtungsschalläche
unten links.
4
Die Messdaten sind bereits
erfolgreich auf der
Speicherkarte gespeichert
worden. Falls erforderlich,
merken Sie sich bie den
gespeicherten Dateinamen.
Deutsch
2
Wählen Sie „Datei
speichern“.
EXCEL-Dateiname:
ESPDYYYY_MMDD_HHMMSS
.xls
( Jahr ) (Monat)(Datum) (Uhrzeit)Feststehend
▲ Speicherung der vollständigen Rohdaten möglich.
JPG-Dateiname:
IMGYYYY_MMDD_HHMMSS
.JPG
( Jahr ) (Monat)(Datum) (Uhrzeit)Feststehend
▲Sie können Messungen im „BASIS“-, „SPEKTRUM“-,
„PPFD“-, „PFD“- und „CIE 1931.1976“-Modus speichern.
- 31 -
3
WiFi 180-08-Wireless-Fernbedienungskarte
Platzieren Sie 180-08 in diesem Gerät und suchen Sie bei iOS
oder Android nach der entsprechenden APP zum Herunterladen
und Installieren auf dem mobilen Gerät. Dann kann eine
drahtlose Verbindung mit dem Gerät hergestellt werden, um
Verbindungsmesskontrolllen durchzuführen .
WiFi 180-08
-Wireless-Fernbedienungskarte
( Nutzung zur Verbindung mit Handy-APP )
Installaon der APP
Finden Sie Ihre APP zum Herunterladen und Hnstallieren auf
mobilen Geräten.
LI-180 Spectrometer
Bei WiFi wählen Sie bie 180-08 WiFi SD Card.
Messung
180-08 WiFi SD Card
WiFi-Verbindung
- 32 -
Page 20
3.2 Verbindung mit LI-180 Spectrometer
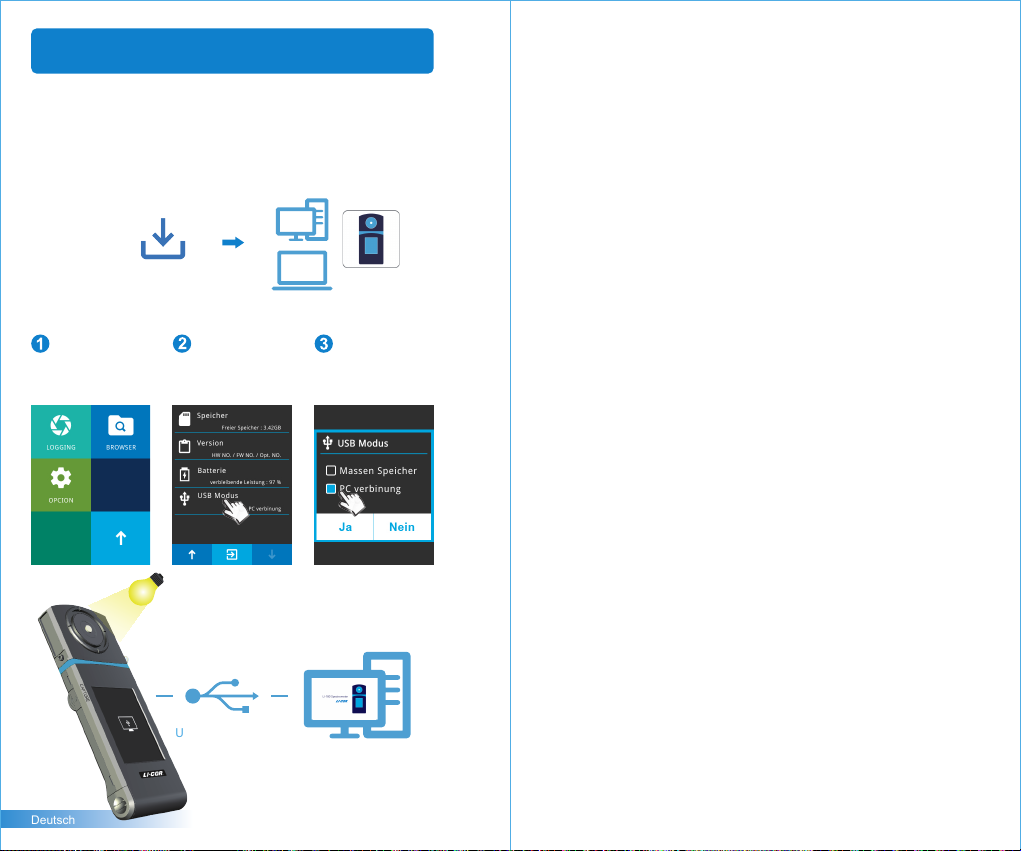
LI-180 Spectrometer-Computersoware-Installaon
Bie gehen Sie zur offiziellen Website von LI-COR,
www.licor.com/env/support. Herunterladen und Installaon auf
dem Computersystem durchführen. Dann können durch eine
USB-Verbindung mit dem Gerät Verbindungsmesskontrolllen
durchgeführt werden.
LI-180 Spectrometer
Installaonsdatei
Einstellung des USB-Computerverbindungsmodus
Bie klicken Sie auf
das Symbol [OPCION].
Messung
Deutsch
Bie klicken Sie auf
den Punkt „ USB-Modus".
USB-Verbindung
- 33 -
Bie klicken Sie auf
den Punkt „ PC verbinung"
und drücken Sie„ Ja.
LI-180 Spectrometer
-Computersoware
Page 21
Table des matières
1.1 Contenu de l’emballage
1
1.2 Description de l’appareil
1.3 Maintenance et précautions
2.1 Préparations avant utilisation
2
2.2 Mesure basique
3.1 Connexion à l’application mobile
3
................................................... 44
3.2 Connexion à LI-180 Spectrometer
...................................... 35
..................................... 36
............................... 37
............................. 38
........................ 46
...................... 47
Pour plus d’informations sur la manipulation de
l’appareil et sur les mises à jour du firmware,
demande en ligne de services de correction et de
réparation,veuillez onsulter licor.com/env/support.
- 34 -
Page 22
1.1 Contenu de l’emballage
1.2 Description de l’appareil
Avant ulisaon, veuillez vérifier que l’emballage de votre
LI-180 conent les objets suivants. En cas d’équipement
manquant, veuillez contacter votre revendeur.
Mallette de transport
Chargeur Câble USB Type-C 3M
Poche de protection
LI-180
Spectromètre portable
Câble USB
Lanière
Batterie au lithium
(mesure à distance)
Carte de connexion sans fil
WiFi 180-08
Capuchon de
lentille optique
Écran tactile 3.5”
Prise de charge
Mini USB
capteur de luminosité
Fente pour carte SD
Bouton reset
Bouton d’alimentation
Bouton de
mesure
Francés
LOCK
GB
Carte SD
Socle de support
- 35 -
Couvercle de batterie
Manuel d’utilisation
- 36 -
Page 23
1.3 Maintenance et précautions
Le spectromètre portable LI-180 est un appareil de haute précision,
1.
veuillez exercer la plus grande précauon lors du déballage du
produit, toute secousse ou choc peut endommager l’appareil. En cas
de mauvais fonconnement de l’appareil ou de nécessité de
réparaon, veuillez ne pas tenter vous-même de réparaon; toute
réparaon doit se faire via le service clients d’un agent approuvé.
Le processus de fabricaon de la plupart des écrans LCD produit un
2.
taux de pixels valides de plus de 99.9%, avec moins de 0,1% de pixels
défectueux. Les pixels défectueux peuvent être blancs ou d’une autre
couleur, et n’affectent aucunement la précision des mesures,
l’appareil peut être ulisé sans problème.
Precautions / Warnings
Veuillez lire avec aenon les points d’averssement ci-dessous, afin
d’éviter tout risque d’incendie, de surchauffe, de disséminaon de
substances chimiques et d’explosion:
Ne pas démonter ou modifier la baerie.
■
Ne pas exposer la baerie à une source de chaleur, et ne pas la mouiller.
■
Lorsque vous jetez la baerie ou la baerie de rechange, veuillez
■
appliquer du ruban adhésif pour isoler les connecteurs de la baerie,
afin d’éviter tout contact avec des objets métalliques ou une autre
baerie, qui pourrait entraîner un incendie ou une explosion.
Si la baerie surchauffe, émet de la fumée ou une odeur suspecte
■
lors de la charge, veuillez rerer immédiatement le chargeur de la
prise électrique et arrêter la charge, pour éviter tout risque
d’incendie.
Veuillez ne pas placer de câbles de connexion près de sources de
■
chaleur, la chaleur pourrait se déformer le câble ou faire fondre la
gaine isolante du câble, entrainant un risque d’incendie et d’électrocuon.
Veuillez ne pas couvrir l’appareil avec du ssu lors de la charge, la
■
mauvaise dissipaon de la chaleur pourrait déformer la coque de
l’appareil ou causer un incendie.
Si le produit tombe dans l’eau par inadvertance, ou un liquide ou
■
objet métallique s’introduit à l’intérieur de l’appareil, veuillez rerer
la baerie immédiatement afin d’éviter tout risque d’incendie et
d’électrocuon.
Veuillez ne pas uliser ou stocker la baerie et la baerie de
■
rechange dans un environnement à forte température, la baerie
pourrait fuir ou perdre en durée de vie.
Veuillez ne pas appliquer de peinture à l’huile, de benzène ou tout
■
autre solvant organique pour neoyer le produit, cela pourrait
endommager l’aspect extérieur de l’appareil et l’écran tacle, ainsi
qu’entraîner un risque d’incendie.
Francés
- 37 -
2.1 Préparations avant utilisation
Installaon de la baerie
:
Étape 1. En tenant l’appareil dans la paume de la main, presser
le couvercle de la baerie avec le pouce.
Étape 2. Pousser le couvercle de la baerie de manière à le
faire sorr de son emplacement.
Étape 3. Une fois le couvercle de la baerie enlevé, insérer la
baerie.
1
3
2
En appuyant sur le couvercle de la baerie avec le
※
pouce, celui-ci se libère de son loquet; il est alors facile
de faire sorr le couvercle de son emplacement.
Lors de la première ulisaon, veuillez charger préalablement la
1.
baerie pendant 6h.
Veuillez vérifier le niveau de charge de la baerie avant
2.
ulisaon, afin d’éviter toute coupure en cours d’ulisaon.
Si la durée de vie de la baerie est arrivée à son terme et celle-ci
3.
se décharge rapidement après une charge complète, veuillez
acheter une nouvelle baerie auprès du fabricant.
L’autonomie de l’appareil est liée à la durée de vie de la baerie;
4.
les baeries neuves du LI-180 fournissent une autonomie
d’environ 5h.
- 38 -
Page 24
2.1 Préparations avant utilisation
2.1 Préparations avant utilisation
Charge de la baerie
:
Brancher le câble de charge à la prise de charge située sur
l’appareil pour commencer à charger la baerie.
1. Lorsque l’appareil est éteint, l’état de charge est indiqué par
un indicateur lumineux rouge s’allumant sur le bouton d’alimentaon.
Celui-ci s’éteint lorsque la charge est complète.
2. Lorsque l’appareil est allumé, l’état de charge est indiqué par
unsymbole d’éclair apparaissant sur l’écran, qui disparaît lorsque
la charge est complète.
Installaon de la carte SD
:
Vous pouvez enregistrer les données de mesure dans un fichier
au format Excel (xls) et les données d'image (diagramme de
coordonnées de spectre et de chromacité) au format (JPG)
dans une carte SD d'une capacité minimale d'1 Go.
Insérer la carte SD selon le sens indiqué.
※
Presser la carte SD pour la faire sorr.
※
1
2
Francés
- 39 -
La carte SD est conçue avec un loquet pour l'empêcher de se
1.
détacher. Vous pouvez senr que la carte SD est coincée
lorsqu'elle est insérée ou rerée. Dans un tel cas, rez-la ou
poussez-la un peu plus fortement pour la mere en place ou la
rerer. Pour rerer la carte SD : Appuyez dessus comme indiqué
dans l'étape ①, rerez-la avec l'avoir légèrement éjectée
comme indiqué dans l'étape ②.
- 40 -
Page 25
2.1 Préparations avant utilisation
2.1 Préparations avant utilisation
Connexion du capteur opque à l'hôte
:
Consultez le diagramme ci-dessous pour effectuer l'installaon
inversée de votre capteur opque. Veuillez mere ce produit
hors tension avant de rerer le capteur opque de l'hôte, puis
retournez-le avant de l'insérer dans l'hôte. Meez à nouveau
ce produit sous tension une fois qu'il est complètement
installé.
+ +
ou
Ulisez le câble USB Type-C pour la mesure à distance comme
indiqué dans le diagramme ci-dessous. Mere le produit hors
tension avant d'y connecter le câble USB Type-C. Remeez-le
sous tension ensuite.
Port
mâle
Francés
Port
femelle
Le capteur opque et l'hôte sont appairés avant leur expédion.
1.
N'ulisez PAS l'un des deux avec un autre appareil LI-180. Si vous
possédez plusieurs produits LI-180, NE mélangez PAS l'ulisaon
des deux.
Veuillez mere ce produit hors tension avant d'installer le
2.
capteur opque ou de le désinstaller de l'hôte.
Veuillez exécuter l'étalonnage en arrière plan avant de l'uliser
3.
après la mise sous tension.
- 41 -
Précauons lors de l'installaon du capteur opque
Assurez-vous que le loquet du capteur opque est bien raccordé
à l'hôte.
Procéder à la calibraon au noir
Après la mise en marche de l’appareil, un indicateur
1
lumineux vert s’allume sur le bouton d’alimentaon, et
l’écran de calibraon au noir s’affiche.
TUne fenêtre de dialogue « Effectuer une calibraon
2
au noir? » apparaît sur l’écran, veuillez choisir « Oui ».
Vérifier que le capuchon de la lenlle opque est bien
3
en place, puis choisir « Oui ».
Une fois que la fenêtre de dialogue « Calibraon
terminée » apparaît, veuillez choisir « Oui » pour
3
4
accéder à la page d’accueil.
Appuyez et maintenez la touche d'alimentaon enfoncée pendant
1.
1 seconde pour mere ce produit sous tension.
Appuyez et maintenez la touche d'alimentaon enfoncée pendant
2.
3 secondes pour le mere hors tension.
Veuillez exécuter l'étalonnage de l'obscurité après chaque mise
3.
sous tension de ce produit.
- 42 -
Page 26
2.1 Préparations avant utilisation
2.2 Mesure basique
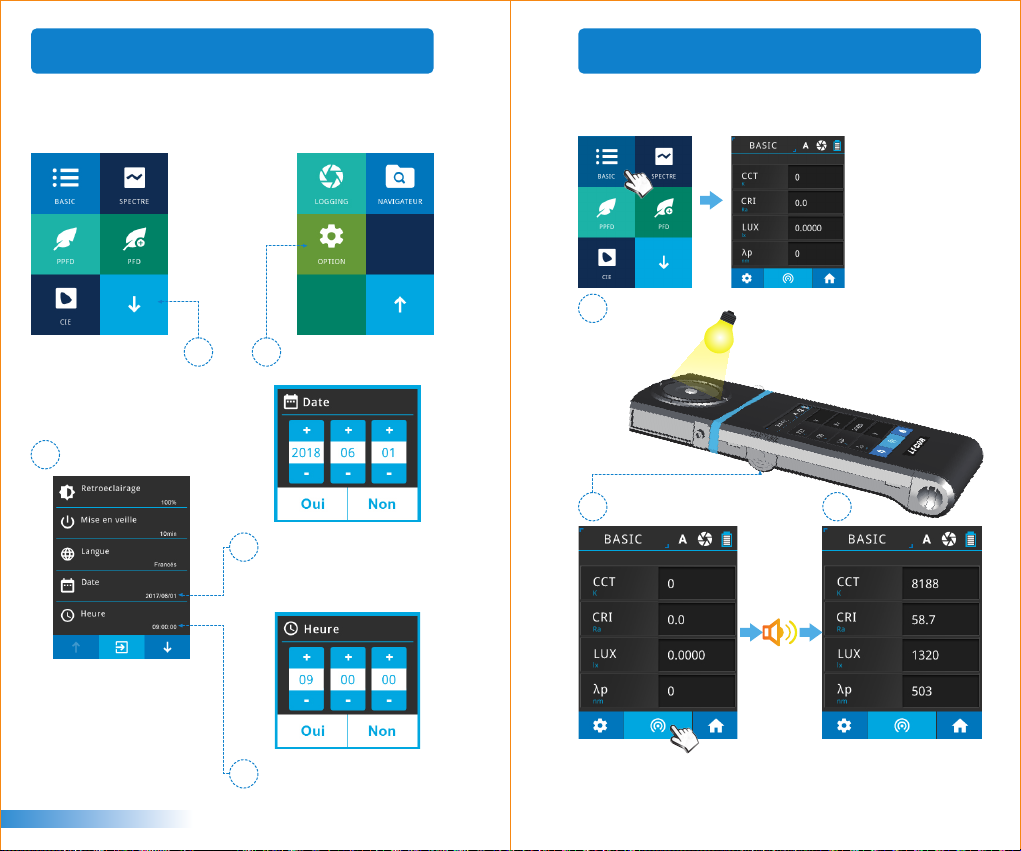
Configurer la date et l’heure
Une fois la calibraon au noir effectuée, veuillez configurer la
date et l’heure avant de procéder à des mesures.
Appuyez sur l'icône
de la flèche droite vers
le bas pour accéder
à la page suivante.
1 2
Veuillez cliquer sur
l’icône « OPTION ».
3
Une fois la date configurée,
4
cliquer sur le bouton de
confirmaon pour retourner
au menu de configuraon.
Veuillez cliquer sur « Date »
et « Heure » pour procéder
à la configuraon.
Mesure
Choisir le mode « BASIC » pour ouvrir l’écran de mesure.
Diriger la lenlle opque vers la source de lumière à
1
capturer.
2
3
Francés
Une fois l’heure configurée,
5
cliquer sur le bouton de
confirmaon pour retourner
au menu de configuraon.
- 43 -
Appuyez sur le bouton de mesure dans la
pare inférieure centrale de l'écran ou sur
la touche de mesure située sur la gauche
pour mesurer. (Vous pouvez appuyer sur
la touche de mesure des deux côtés.)
Un signal sonore indique la
capture, et les données
mesurées s’affichent alors
à l’écran.
- 44 -
Page 27
2.2 Mesure basique
3.1 Connexion à l’application mobile
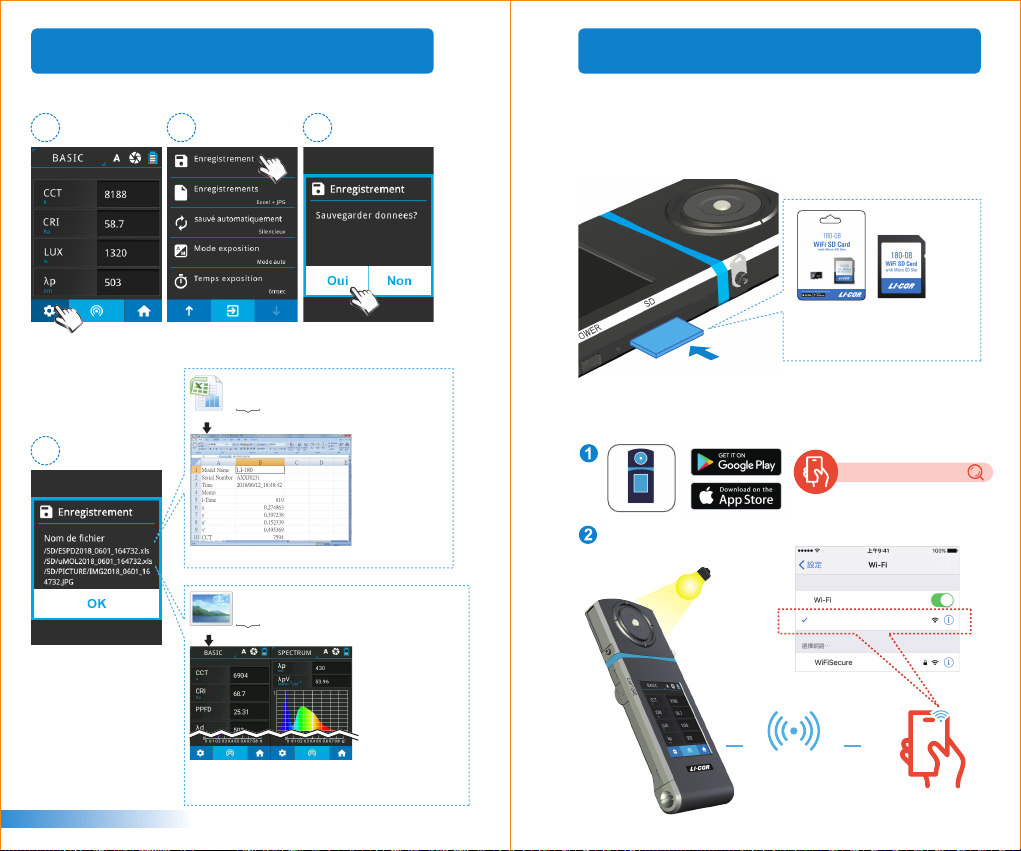
Enregistrement des données mesurées
1
Appuyez sur le bouton
de configuraon dans
le coin inférieur gauche.
2
Cliquez sur
« Enregistrer fichier »
Nom du fichier EXCEL:
ESPDYYYY_MMDD_HHMMSS
.xls
(année) (mois)(jour) (heure)Fixe
4
▲ La totalité des données originales sont conservées.
Nom du fichier JPG :
IMGYYYY_MMDD_HHMMSS
.JPG
(année) (mois)(jour) (heure)Fixe
Les données mesurées
ont bien été enregistrées
sur la carte SD. Si nécessaire,
veuillez noter le nom
du fichier.
Carte de connexion sans fil WiFi LI-180 Spectrometer
3
Insérer la carte 180-08 dans l’appareil; retrouvez l’applicaon
sur les appareils mobiles iOS et Android et installez-la pour
pouvoir contrôler les mesures de l’appareil en mode sans fil.
Carte de connexion sans fil WiFi 180-08
( À uliser pour connecter
à l’applicaon mobile )
Installer l’applicaon
Retrouvez l’applicaon et installez-la sur votre appareil mobile.
LI-180 Spectrometer
Choisir le WiFi 180-08 WiFi SD Card.
Mesure
180-08 WiFi SD Card
Francés
▲Vous pouvez enregistrer l'écran de mesure en « mode DE
BASE », « mode SPECTRE », « mode PPFD », « mode PFD »
et « mode CIE 1931.1976 ».
- 45 -
Connexion WiFi
- 46 -
Page 28
3.2 Connexion à LI-180 Spectrometer
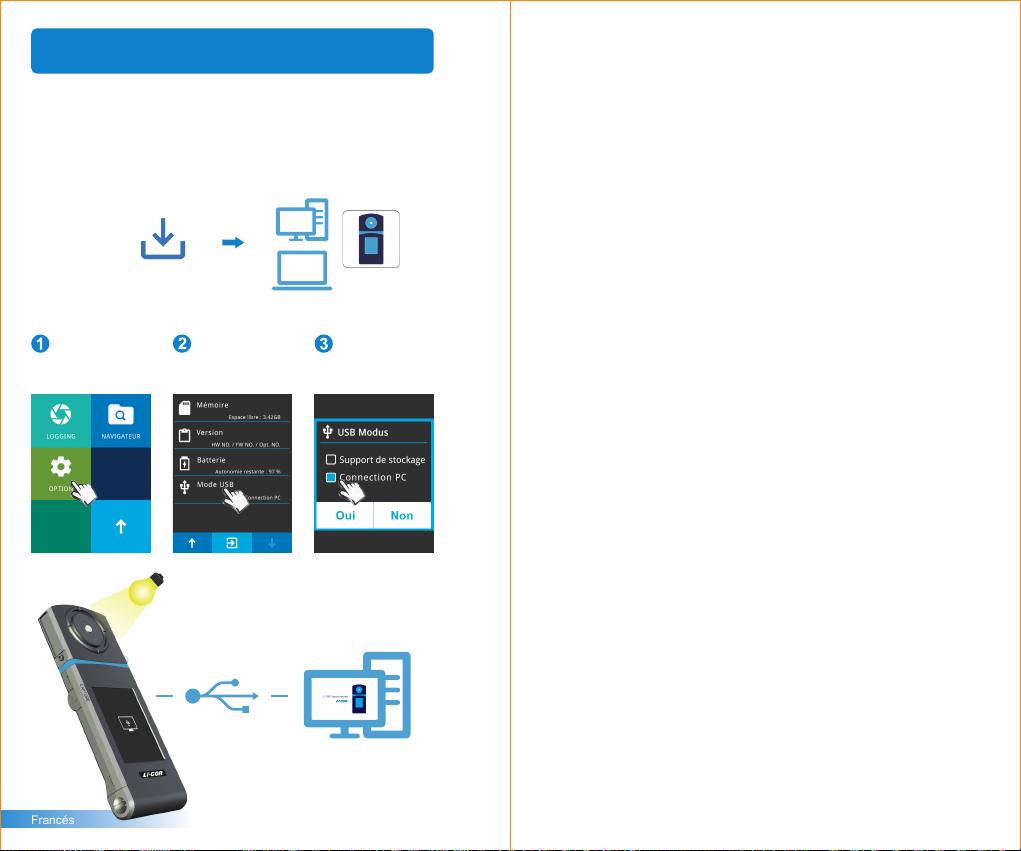
Installer le logiciel PC LI-180 Spectrometer
Veuillez aller sur le site web LI-COR : www.licor.com/env/support;
Télécharger le logiciel et l’installer sur le PC pour pouvoir
brancher le câble USB et contrôler les mesures de l’appareil
depuis le PC.
LI-180 Spectrometer
fichier d'installaon
Instrucons d’installaon de la connexion USB au PC
Cliquer sur
« OPTION »
Mesure
Francés
Cliquer sur
« Mode USB »
Câble USB
- 47 -
Cliquer sur « Connecon
PC », puis confirmer.
Logiciel PC
LI-180 Spectrometer
Page 29
Indice
1.1 Contenuto della confezione
1
1.2 Introduzione sull'aspetto
.................................... 50
1.3 Note sul prodotto e precauzioni
2.1 Preparazione prima dell'uso
2
2.2 Misurazione di base
3.1 Connessione con app mobile
3
............................................ 58
3.2 Connessione con LI-180 Spectrometer
Per oenere ulteriori informazioni relave al
funzionamento, all'aggiornamento del firmware e
alle condizioni di garanzia e la richiesta online del
servizio di correzione e riparazione, visitare il sito
licor.com/env/support per scaricare la versione
completa.
............................... 49
........................ 51
............................... 52
.............................. 60
.............. 61
- 48 -
Page 30
1.1 Contenuto della confezione
1.2 Introduzione sull'aspetto
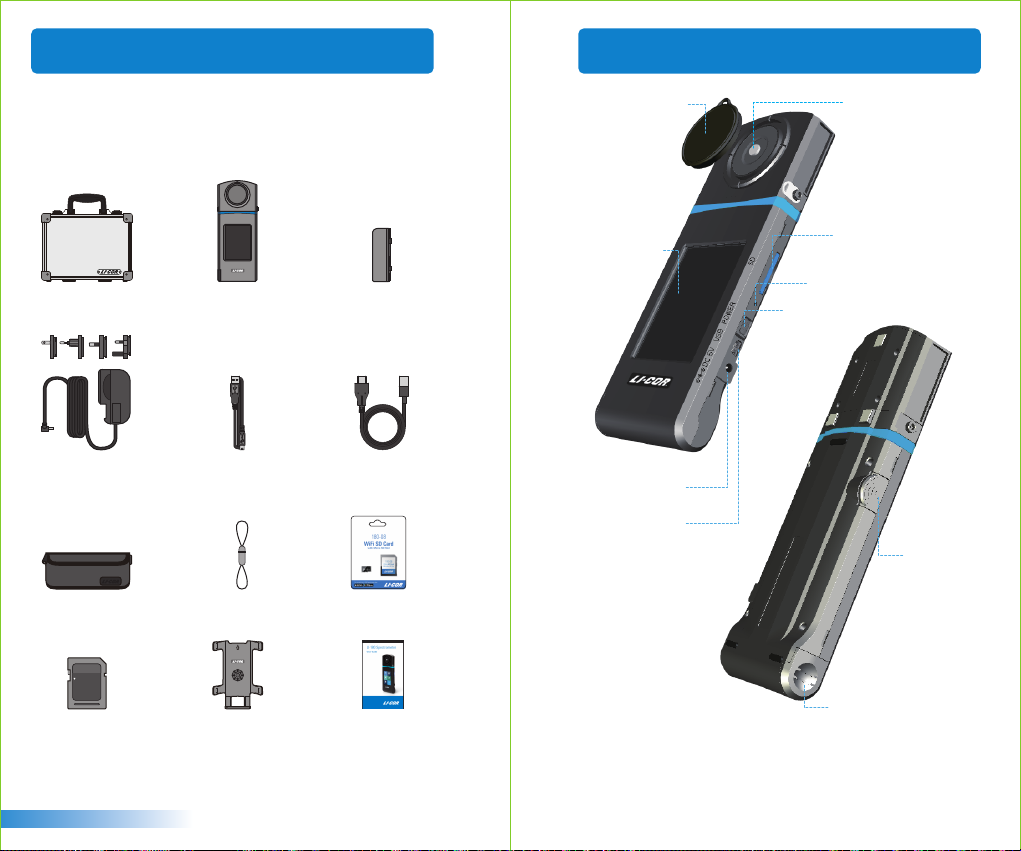
Assicurarsi che i seguen elemen siano inclusi nella confezione
di questo prodoo: In caso di dife e/o elemen mancan,
contaare il rivenditore o la compagnia.
Custodia
Adattatore di
alimentazione
Custodia di
protezione
LOCK
GB
Scheda SD
LI-180 Spettrometro
Cavo USB
Cinghietta
Treppiede /
Staffa di supporto
Batteria al litio
3M Type-C USB Cable
(remote measurement)
WiFi 180-08
Scheda di controllo remoto wireless
Manuale utente
coperchio sensore
Touch panel
da 3,5"
Connettore di
alimentazione CC
porta mini USB
sensore ottico
Slot scheda SD
tasto di ripristino
tasto di alimentazione
tasto di
misurazione
coperchio della batteria
Italiano
- 49 -
- 50 -
Page 31

1.3 Note sul prodotto e precauzioni
Lo sperometro LI-180 è uno strumento ad alta precisione.
1.
Disimballare con cura. Qualsiasi vibrazione o collisione potrebbe
causare danni allo strumento. Se il prodoo non funziona normalmente
o richiede riparazioni, non tentare di ripararlo da soli. Tue le
riparazioni devono essere eseguite dall'agente del servizio clien
autorizzato.
La maggior parte degli schermi LCD hanno un leggerissimo e
2.
irrilevante tasso di pixel difeosi (in genere, inferiore allo 0,1%). Ciò
causa di bianco l'idenficazione di bianco o altri colori, ma non
pregiudica la precisione delle misurazioni.
Precauzioni / Avvertenze
Leggere le seguen precauzioni per evitare incendi, eccessivo calore,
perdite chimiche ed esplosioni :
■
Non smontare o modificare la baeria.
■
Non esporre la baeria a calore (fuoco) o acqua/umidità.
■
Durante lo smalmento di baerie usate/vecchie, avvolgere con
nastro isolante per proteggere la baeria dal contao elerico con
ogge metallici che potrebbero causare incendi o esplosioni.
■
Se l'unità è collegata all'adaatore di alimentazione e la baeria
sembra surriscaldarsi, oppure se fuoriescono fumo o odori parcolari
dall'unità, scollegarlo immediatamente per evitare la possibilità di
incendi.
■
Tuavia, non toccare i cavi se viene emesso calore in prossimità dei
cavi, poiché i cavi fusi o deforma potrebbero esporre i cablaggi e
provocare usoni o scosse eleriche.
■
Non ulizzare panni o altro per avvolgere o coprire l'apparecchiatura
durante la ricarica. Ciò potrebbe causare surriscaldamento dell'unità,
fusione dell'involucro o incendi.
■
Se l'unità viene accidentalmente immersa in acqua o se l'umidità è
penetrata all'interno oppure ogge metallici sono penetra
nell'involucro, rimuovere immediatamente la baeria per evitare
incendi o scosse eleriche.
■
Non ulizzare o conservare la baeria in ambien ad alta
temperatura. Causa perdite dalla baeria e/o ridurre la durata della
baeria.
■
Non ulizzare diluen, benzene o altri solven organici per pulire
l'apparecchiatura. Potrebbero danneggiare la finitura esterna o il
touchscreen e causare incendi.
Italiano
- 51 -
2.1 Preparazione prima dell'uso
Inserimento delle baerie
:
Fase 1. Tenere LI-180, quindi premere il coperchio della baeria.
Fase 2. Premere il coperchio della baeria verso il basso per rimuoverlo.
Fase 3. Inserire la baeria dopo aver rimosso il coperchio della baeria.
1
3
2
Premere il coperchio della baeria verso il basso per
※
sbloccarlo dal fermo prima di premerlo verso l'esterno
della struura
Caricare completamente la baeria per 6 ore prima di usarlo per
1.
la prima volta.
Per prevenire l'interruzione dell'alimentazione durante l'ulizzo di
2.
questo prodoo, controllare se la spia rossa è spenta (completamente
carica) in base alle istruzioni fornite nell'elemento 1 della pagina
successiva. Una volta avato questo prodoo, controllare l'indicatore di
bilanciamento della carica della baeria nell'angolo superiore
destro dello schermo.
Se la baeria si scarica subito dopo la carica completa, è terminata
3.
la sua vita ule. Contaare il rivenditore per la sostuzione con
una nuova.
La durata della baeria varia in base alla vita ule. La nuova
4.
baeria dopo la carica completa potrebbe durare circa 5 ore.
- 52 -
Page 32

2.1 Preparazione prima dell'uso
2.1 Preparazione prima dell'uso
Caricare la baeria
:
Collegare il caricatore alla porta di carica del prodoo per
avviare la carica della baeria.
1. Prodoo in modalità di spegnimento: La spia di alimentazione
si illumina di rosso durante la carica della baeria e spegnere al
termine della carica completa.
2. Prodoo in modalità di accensione: Un simbolo a forma di
fulmine viene visualizzato nell'angolo superiore destro dello
schermo di questo prodoo durante la carica e scompare al
termine della carica completa.
Inserire la scheda SD
:
È possibile salvare i da di misurazione in formato Excel (xls) e i
da di immagine (diagramma di coordinate di spero e cromasmo)
in formato JPG nella scheda SD con capacità di almeno 1 GB.
Inserire la scheda SD nella direzione indicata
※
Premere per rimuovere la scheda SD
※
1
2
Italiano
- 53 -
La scheda SD è dotata di un disposivo di bloccaggio della scheda
1.
per impedirne l'allentamento. Si può ritenere che la scheda SD sia
bloccata quando è inserita o rimossa. In tal caso, rare o spingerlo
un po' di più per posizionarla o rimuoverla. Per rimuovere la
scheda SD: premere come mostrato nella fase ①, estrarlo dopo
averla espulsa leggermente, come mostrato nella fase ②.
- 54 -
Page 33
2.1 Preparazione prima dell'uso
2.1 Preparazione prima dell'uso
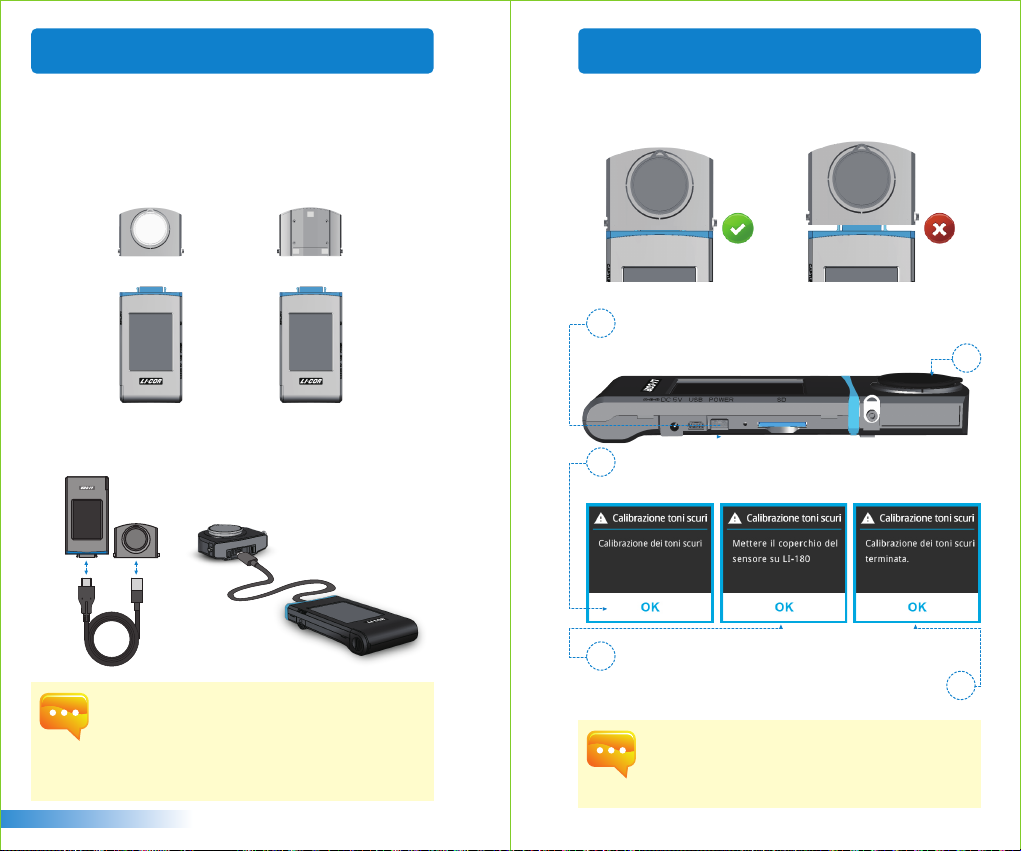
Conneere il sensore oco all'host
:
Vedere il diagramma seguente per l'installazione inversa del
sensore oco. Spegnere il prodoo prima di rimuovere il
sensore oco dall'host, quindi capovolgerlo prima di inserirlo
nell'host. Accendere nuovamente questo prodoo dopo che è
completamente installato.
+ +
or
Ulizzare il cavo USB po C per la misurazione remota, come
mostrato nel diagramma di seguito. Spegnere il prodoo prima
di collegare il cavo USB po C. Quindi, accenderlo di nuovo.
Porta
maschio
Italiano
Porta
femmina
Il sensore oco e l'host sono associa prima della spedizione. NON
1.
ulizzare nessuno dei due con altri disposivi LI-180. Se si dispone di
più di un prodoo LI-180, NON confonderli ulizzando ques due.
Spegnere il prodoo prima di installare/disinstallare il sensore oco
2.
sull'host/dallhost.
Eseguire la calibrazione di sfondo prima dell'uso dopo l'accensione.
3.
- 55 -
Precauzioni sull'installazione del sensore oco
Assicurarsi che il fermo del sensore oco sia connesso correamente
all'host.
Calibrazione dello scuro
Una volta acceso il prodoo, il tasto di alimentazione si
1
accende di verde e sullo schermo viene visualizzato il
messaggio di calibrazione dello scuro.
Quando viene visualizzata la finestra di dialogo "Vuoi
2
eseguire la calibrazione dei toni scuri?" , fare clic su Sì
3
per procedere.
Fare clic su OK una volta riposto il coperchio.
3
Quando appare il messaggio "Calibrazione dei toni scuri
terminata." , fare clic su OK per visualizzare il menu
4
principale.
Tenere premuto il tasto di alimentazione per 1 secondo per accendere
1.
il prodoo.
Tenere premuto il tasto di alimentazione per 3 secondi per spegnere.
2.
Eseguire la calibrazione dello scuro dopo l'accensione del prodoo.
3.
- 56 -
Page 34
2.1 Preparazione prima dell'uso
2.2 Misurazione di base
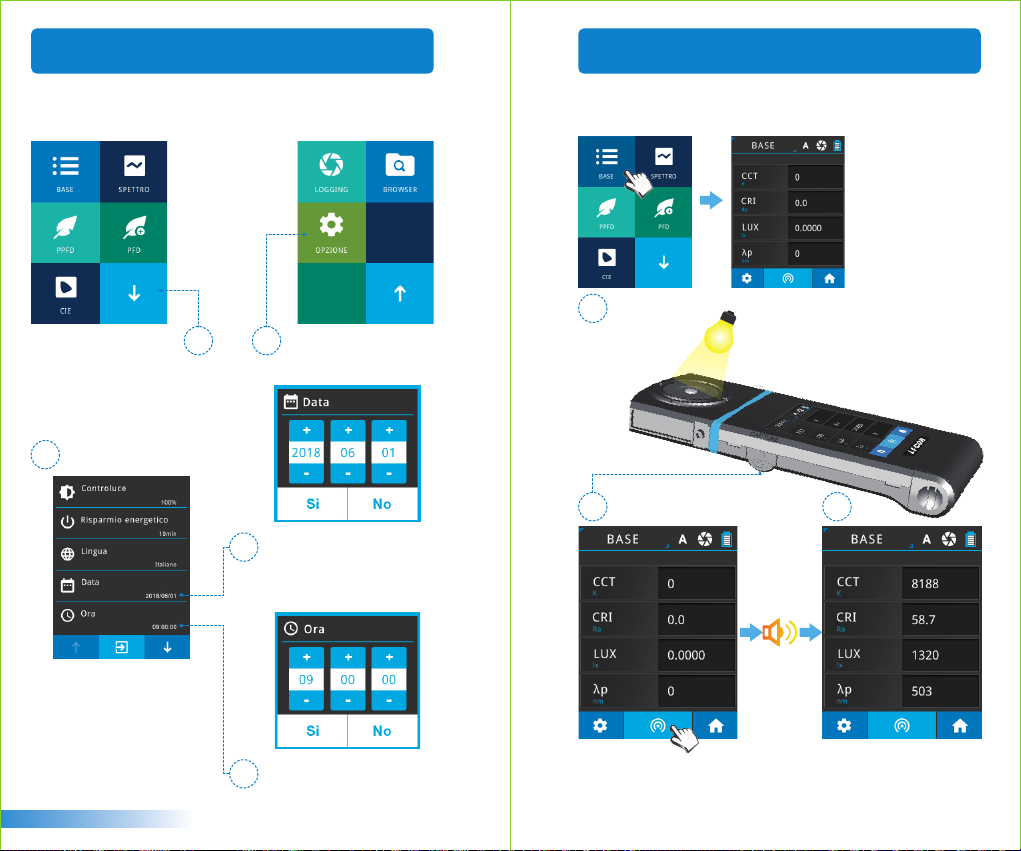
Impostare data e ora
Impostare data e ora prima di effeuare la misurazione.
Premere l'icona della
freccia in basso a destra
per accedere alla pagina
successiva.
1 2
Fare clic sull’icona
“OPZIONE” .
3
Una volta impostata la data,
4
premere Sì per uscire dalla
pagina delle opzioni di
configurazione.
Premere “Data” e “Ora” per
le relave impostazioni.
Misurazione
Fare clic sulla modalità “BASE” per accedere alla pagina di misurazione.
Rivolgere il sensore oco verso la sorgente luminosa da
1
testare.
2
3
Italiano
Una volta impostata l'ora,
5
premere Sì per uscire dalla
pagina delle opzioni di
configurazione.
- 57 -
Premere il tasto di misurazione in
basso al centro della schermata o il
tasto di misurazione a sinistra per
misurare (è possibile premere il tasto
di misurazione da entrambi i la).
Questo prodoo emee un
segnale acusco al termine
della misurazione e visualizza
i risulta sullo schermo.
- 58 -
Page 35

2.2 Misurazione di base
3.1 Connessione con app mobile
Salvataggio dei da della misurazione
1
Premere il tasto di
configurazione nell'angolo
inferiore sinistro.
2
Fare clic su “Salva da”
Nome file EXCEL
ESPDYYYY_MMDD_HHMMSS
.xls
normale
4
È possibile salvare tu i da sorgente.
▲
Nome file JPG
IMGYYYY_MMDD_HHMMSS
.JPG
normale
I da di misurazione
vengono quindi salva
nella scheda SD. Se
necessario, è possibile
annotare il nome file.
3
:
( anno ) (mese)(giorno) (ora/min/secondi)
:
( anno ) (mese)(giorno) (ora/min/secondi)
Scheda di controllo remoto wireless WiFi LI-180 Spectrometer
Inserire la scheda WiFi LI-180 Spectrometer nel sistema. Su
piaaforma IOS o Android, scaricare l'app LI-180 e installarla
sul disposivo mobile. Quindi, e possibile conneerla al sistema
per la misurazione del controllo wireless.
WiFi 180-08
scheda di controllo remoto wireless
(Ulizzato per il collegamento con
l'applicazione.)
Installare l'app
Scaricare e installare l'app LI-180 sul disposivo mobile.
LI-180 Spectrometer
Selezionare WiFi 180-08 WiFi SD Card.
Misurare
180-08 WiFi SD Card
Italiano
È possibile salvare la schermata di misurazione in modalità
▲
“BASE”, “SPETTRO”, “PPFD”, “PFD” e “CIE 1931.1976”.
- 59 -
Connessione WiFi
- 60 -
Page 36
3.2 Connessione con LI-180 Spectrometer
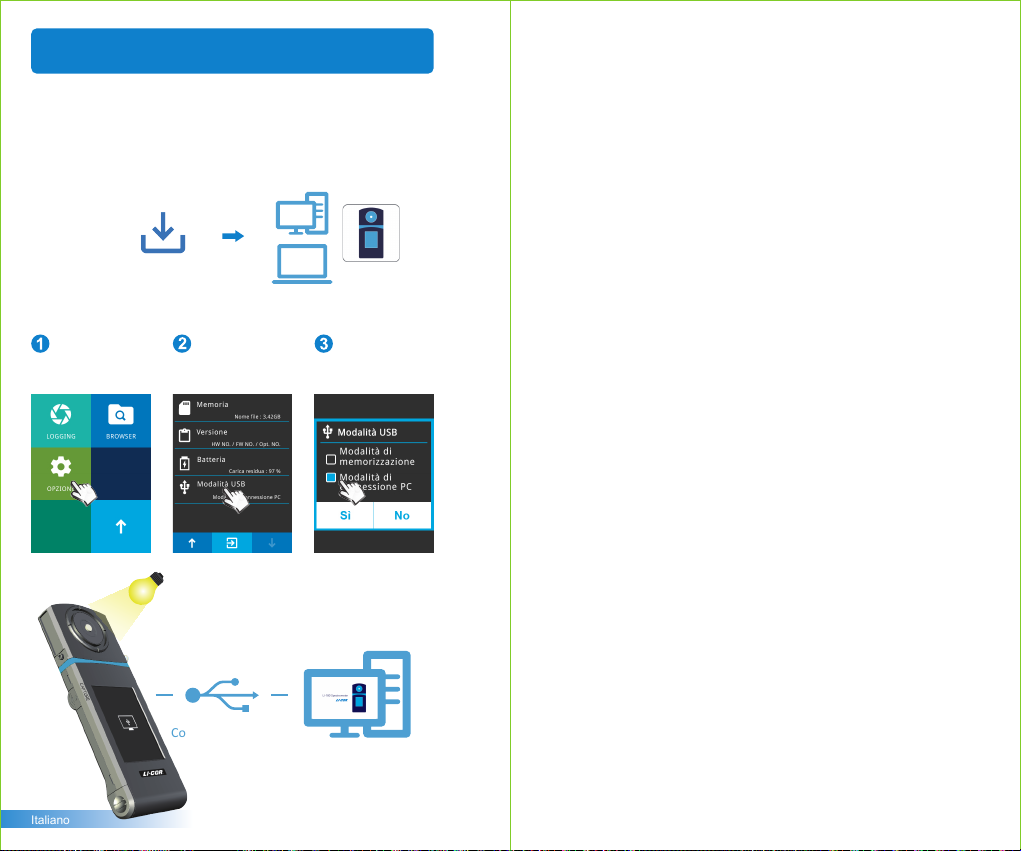
Installare il soware per PC LI-180 Spectrometer
Visitare il sito ufficiale LI-COR www.licor.com/env/support.
Scaricare e installare il soware LI-180 Spectrometer sul PC.
Quindi, è possibile conneerlo al sistema per il controllo USB
della misurazione.
LI-180 Spectrometer
File di installazione
Impostare la modalità di collegamento USB del PC
Selezionare
“OPZIONE” .
Misurare
Italiano
Selezionare
“Modalità USB”.
Connessione USB
- 61 -
Selezionare “Connessione
PC” e premere Sì.
Soware per PC
LI-180 Spectrometer
Page 37
Contenido
1.1 Contenido del paquete
1
1.2 Aspecto
............................................................... 64
1.3 Notas y precauciones
relacionadas con el producto
2.1 Preparación antes del uso
2
2.2 Medición básica
3.1 Conectar con la aplicación móvil
3
.................................................. 73
3.2 Conectar con LI-180 Spectrometer
Para obtener más información relacionada con el
funcionamiento, la actualización del firmware y los
términos de garana, así como la solicitud en línea
para corrección y servicio de reparación, visite el
sio web licor.com/env/support para descargar la
versión completa.
....................................... 63
............................. 65
................................. 66
....................... 74
.................... 75
- 62 -
Page 38
1.1 Contenido del paquete
1.2 Aspecto
Asegúrese de que el paquete de este producto conene los
siguientes arculos. En el caso de que haya alguno defectuoso
o que falte, llame al proveedor o a esta compañía para obtener
ayuda.
Carcasa
Adaptador de
alimentación
Bolsa de protección
LI-180 Medidor espectral
Cable USB
Correa para la tapa
Batería de litio
Cable USB Tipo-C 3M
(medición remota)
Tarjeta de control remoto
inalámbrica WiFi 180-08
Tapa del sensor
Panel táctil
de 3,5"
Conector de
alimentación de CC
Puerto mini-USB
Sensor óptico
Ranura para
tarjetas SD
Botón de restablecimiento
Botón de alimentación
Botón
de medición
Español
LOCK
GB
Tarjeta SD
Trípode/
Soporte para la base
- 63 -
Tapa de la batería
Manual del usuario
- 64 -
Page 39
1.3 Notas y precauciones relacionadascon el producto
El espectrómetro LI-180 es un instrumento de alta precisión.
1.
Desembálelo con cuidado. Cualquier vibración o colisión puede dañar
el instrumento. Si el producto no funciona con normalidad o necesita
repararse, no lo haga usted mismo. Todas las reparaciones deben ser
realizadas por el agente de servicio de atención al cliente autorizado.
La mayoría de las pantallas LCD enen una tasa de píxeles
2.
defectuosos muy pequeña e intranscendente (normalmente inferior
al 0,1 %). Esto da lugar a puntos ocasionales de color blanco u otros
colores, pero esta circunstancia no afecta a la precisión de las
mediciones.
Precauciones y advertencias
Lea las siguientes precauciones para evitar incendios, calor excesivo,
fuga de sustancias químicas y explosiones :
No desmonte ni modifique la batería.
■
No exponga la batería al calor (fuego), agua o humedad.
■
Cuando se deshaga de baterías usadas o anguas, envuélvalas con
■
cinta aislante para impedir el contacto eléctrico de las mismas con
objetos metálicos, lo cual podría producir un incendio o una
explosión.
Si la unidad se enchufa en el adaptador de alimentación y la batería
■
se sobrecalienta, o si sale humo o emanan olores peculiares de dicha
unidad, desenchúfela inmediatamente para evitar la posibilidad de
un incendio.
No obstante, no toque los cables si sale calor cerca de ellos, ya que
■
los cables derredos o deformados podrían dejar al descubierto los
hilos y provocar quemaduras o descargas eléctricas.
No ulice un paño ni ninguna otra cosa para envolver o cubrir el
■
equipo durante la carga, ya que la unidad podría sobrecalentarse, la
carcasa podría derrerse o se podría producir un incendio.
Si la unidad se sumerge en agua por accidente, se ha filtrado
■
humedad en el interior o se han caído objetos metálicos en la
carcasa, extraiga inmediatamente la batería para evitar un incendio o
descargas eléctricas.
No ulice ni almacene la batería en entornos con temperatura
■
elevada, y que se podrían producir fugas en la misma y/o acortarse su
período de vida úl.
No ulice disolvente, benceno u otros disolventes orgánicos para
■
limpiar el equipo; si no sigue esta recomendación, el acabado
exterior o la pantalla tácl podría dañarse o iniciar un incendio.
Español
- 65 -
2.1 Preparación antes del uso
Instalación de la batería
:
Paso 1. Sostenga su LI-180 y, a connuación, presione la tapa
de la batería.
Paso 2. Presione la tapa de la batería hacia abajo para quitarla.
Paso 3. Instale la batería después de quitar la tapa de la misma.
1
3
2
Presione la tapa de la batería hacia abajo para
※
desbloquearla de su cierre empujándola hacia afuera
del cuerpo.
Cargue la batería durante 6 horas antes de ulizarla por primera vez.
1.
Para no quedarse sin energía durante el uso de este producto,
2.
compruebe que la luz roja se ha apagado (batería totalmente
cargada) conforme a las instrucciones proporcionadas en el elemento
1 de la página siguiente. Una vez encendido el producto, vigile el
indicador de equilibrio de carga de la batería situado en la esquina
superior derecha de la pantalla.
En el caso de que la batería se agote pronto después de haberse
3.
quedado completamente, significa que su ciclo de vida se ha terminado.
Póngase en contacto con el proveedor para cambiar la batería
por otra nueva.
El período de empo que puede durar la batería varía en función
4.
de su ciclo de vida. Las baterías recién comercializadas enen una
autonomía aproximada de 5 horas después de una carga completa.
- 66 -
Page 40
2.1 Preparación antes del uso
2.1 Preparación antes del uso
Cargar la batería
:
Conecte el cargador al puerto de carga de este producto para
iniciar la carga de su batería.
1. Producto apagado: El botón de alimentación se ilumina en
rojo durante la carga de la batería y se apaga cuando esta se ha
cargado completamente.
2. Producto encendido: Un símbolo intermitente aparece en la
esquina superior derecha de la pantalla de este producto
durante la carga y desaparece una vez completada esta.
Instalar la tarjeta SD
:
Puede guardar datos de mediciones en un archivo con formato
de Excel (xls) y datos de imagen (diagramas de coordenadas de
cromacidad y espectro) en formato (JPG) en la tarjeta SD con
gran capacidad de 1 GB o más.
Inserte la tarjeta SD en la dirección indicada
※
Presionar para extraer la tarjeta SD
※
1
2
Español
- 67 -
La tarjeta SD cuenta con un diseño de seguro de tarjeta para
1.
evitar que se suelte. Puede senr que la tarjeta SD está pegada
cuando se inserta o se quita. En este caso, re de ella o empújela
un poco para colocarla en su lugar o extraerla. Para extraer la
tarjeta SD: Presiónela tal y como se muestra en el paso ① y re de
ella después de que se expulse un poco tal y como se muestra en
el paso ②.
- 68 -
Page 41
2.1 Preparación antes del uso
2.1 Preparación antes del uso
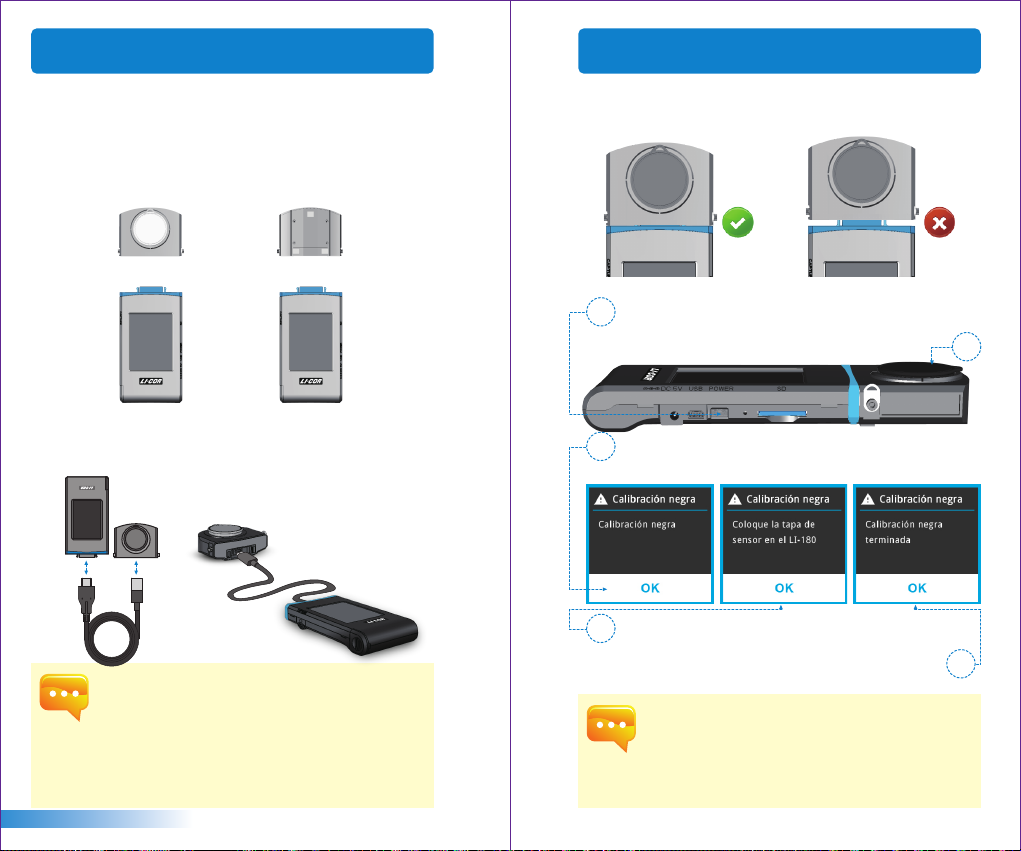
Conectar el sensor ópco al receptor
:
Consulte el diagrama que se muestra a connuación para
inverr la instalación del sensor ópco. Apague el producto
antes de rerar el sensor ópco del receptor y, a connuación,
dele la vuelta antes de insertarlo que dicho receptor. Encienda
este producto de nuevo después de instalarlo completamente.
+ +
or
Ulice un cable USB Tipo-C para la medición remota tal y como
se muestra en el diagrama siguiente. Apague el producto antes
de conectarle el cable Tipo-C USB. Una vez realizada la
conexión, vuelva a encenderlo.
Puerto
macho
Español
Puerto
hembra
El sensor ópco y el receptor están asociados antes de su
1.
comercialización. NO ulice ninguno de los dos con ningún otro
disposivo LI-180. Si ene varios productos LI-180, NO los mezcla
ulizando estos dos.
Apague este producto que antes de instalar el sensor ópco en el
2.
receptor o desinstalar aquel de este.
Ejecute la calibración en segundo plano antes de ulizar el
3.
producto después de encenderlo.
- 69 -
Precauciones relacionadas con la instalación del sensor ópco
Asegúrese de que seguro del sensor ópco está bien conectado
al receptor.
Calibración de la oscuridad
Una vez encendido este producto, el botón de alimentación
1
se ilumina en verde y la pantalla muestra el mensaje de
calibración de la oscuridad.
Aparece el cuadro de diálogo "Do you want to do dark
2
calibraon?" (¿Desea realizar la calibración de la oscuridad?).
3
Haga clic en Yes (Sí) para connuar.
Haga clic en OK (Aceptar) cuando la tapa se haya vuelto
3
a colocar perfectamente.
Cuando aparezca el mensaje "Dark calibraon finish"
(Calibración de la oscuridad), haga clic en OK (Aceptar)
y aparecerá el menú principal.
Presione sin soltar el botón de alimentación durante 1 segundo
1.
para encender este producto.
Presione sin soltar el botón de alimentación durante 3 segundos
2.
para apagarlo.
Ejecute la calibración de la oscuridad después de cada encendido
3.
de este producto.
- 70 -
4
Page 42
2.1 Preparación antes del uso
2.2 Medición básica
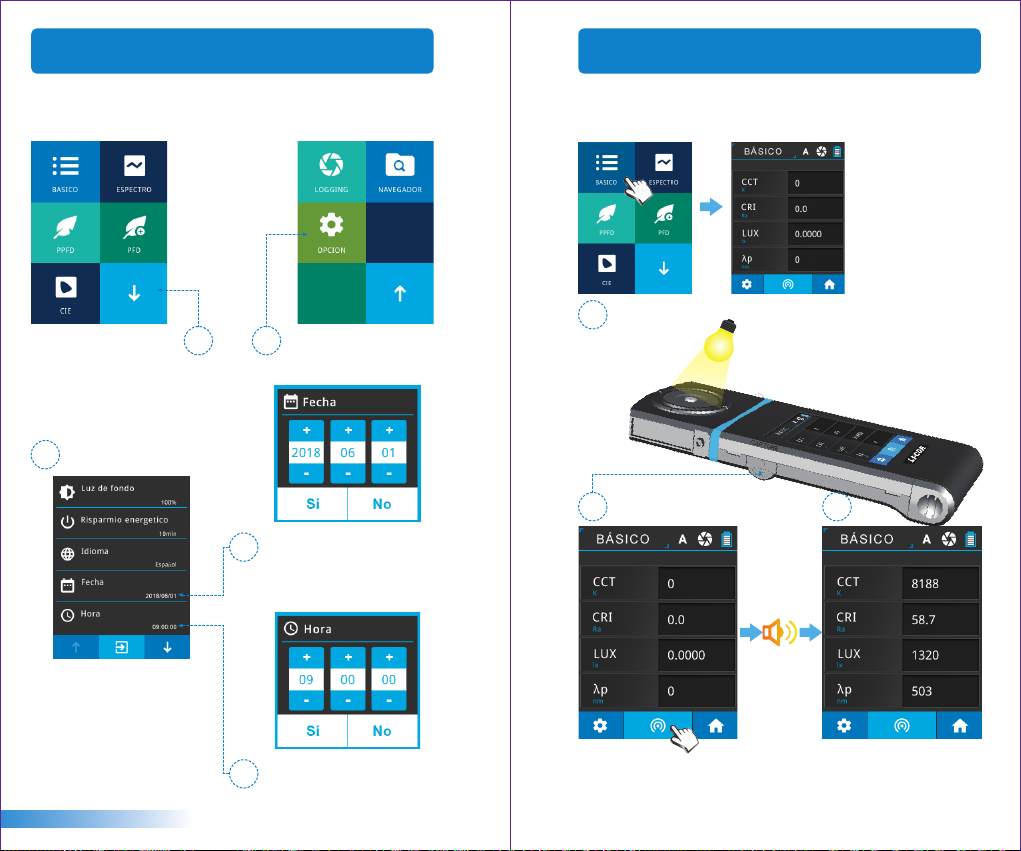
Ajustar la fecha y la hora
Configure la fecha y hora antes de realizar mediciones.
Presione el icono de la
flecha inferior derecha
para entrar en la página
siguiente.
1 2
Haga clic en el icono
“Opción”.
3
Una vez establecida la fecha,
4
presione Sí para salir a la
página de opciones de
configuración.
Presione “Fecha” y “Hora”
para su configuración.
Medición
Haga clic en el modo “BÁSICO” para entrar en la página de mediciones.
Apunte con el sensor ópco a la fuente de luz que desea
1
comprobar.
2
3
Español
Una vez establecida la hora,
5
presione Sí para salir a la
página de opciones de
configuración.
- 71 -
Presione el botón de mediciones situado
en la parte inferior central de la pantalla
o situado en el lado izquierdo para realizar
la medición. (Puede presionar el botón
de mediciones de ambos lados).
Este producto emite un pido
después de realizar la medición
y muestra el resultado en la
pantalla.
- 72 -
Page 43
2.2 Medición básica
3.1 Conectar con la aplicación móvil
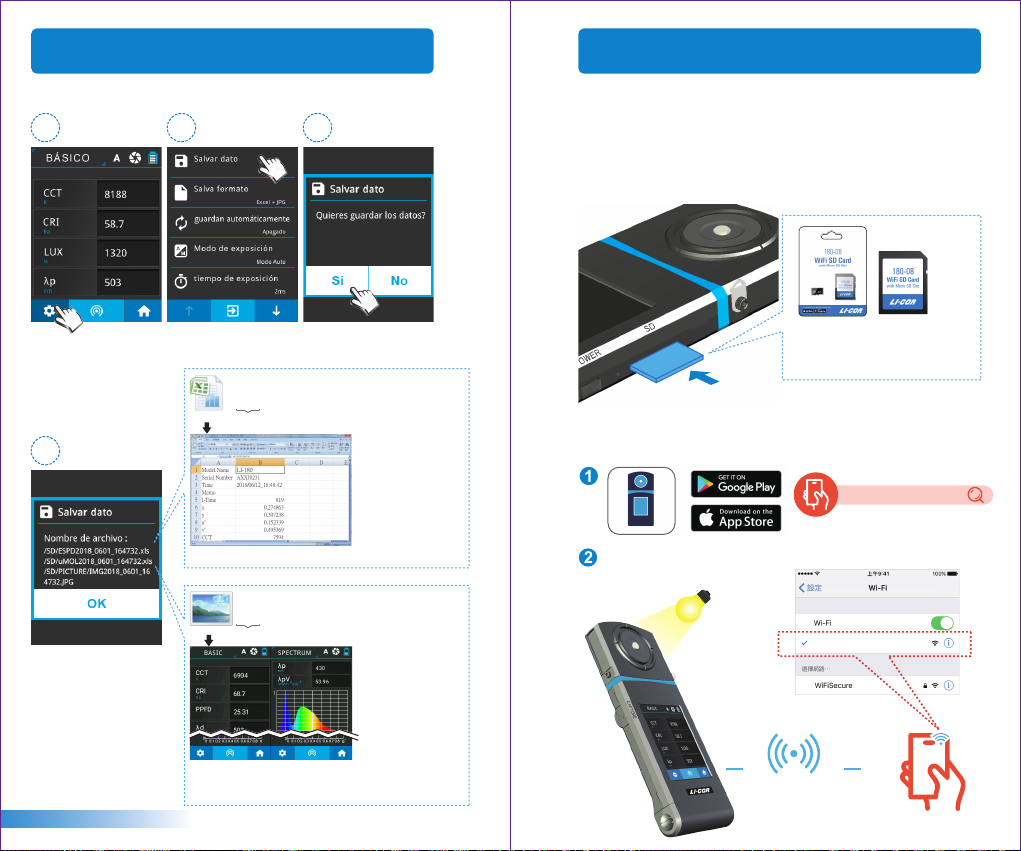
Guardar los datos de la medición
1
Presione el botón de
configuración situado
en la esquina inferior
izquierda.
2
Haga clic en “Salvar dato”.
.xls
habitual
4
▲Puede guardar todos los datos de origen.
.JPG
habitual
Los datos de medición
ahora se guardarán en
la tarjeta SD. Puede
anotar el nombre de
archivo si es necesario.
3
Nombre de archivo de EXCEL:
ESPDYYYY_MMDD_HHMMSS
( año ) (mes)(día) (hora/min/segundos)
Nombre de archivo JPG:
IMGYYYY_MMDD_HHMMSS
( año ) (mes)(día) (hora/min/segundos)
Tarjeta de control remoto inalámbrica WiFi 180-08
Inserte la tarjeta WiFi 180-08 en el sistema. En la plataforma
IOS o Android, descargue la aplicación LI-180 e instálela en su
disposivo móvil. A connuación, puede conectarla al sistema
para realizar la medición del control inalámbrico.
Tarjeta de control remoto inalámbrica
180-08 WiFi
(se uliza para conectar con la aplicación).
Instalar la aplicación
Descargue e instale la aplicación LI-180 en su teléfono móvil.
LI-180 Spectrometer
Seleccione WiFi 180-08 WiFi SD Card.
Medición
180-08 WiFi SD Card
Español
▲Puede guardar la pantalla mediciones en los siguientes
modos: “BÁSICO”, “ESPECTRO”, “PPFD”, “PFD” y
“CIE 1931.1976”.
- 73 -
Conexión WiFi
- 74 -
Page 44
3.2 Conectar con LI-180 Spectrometer
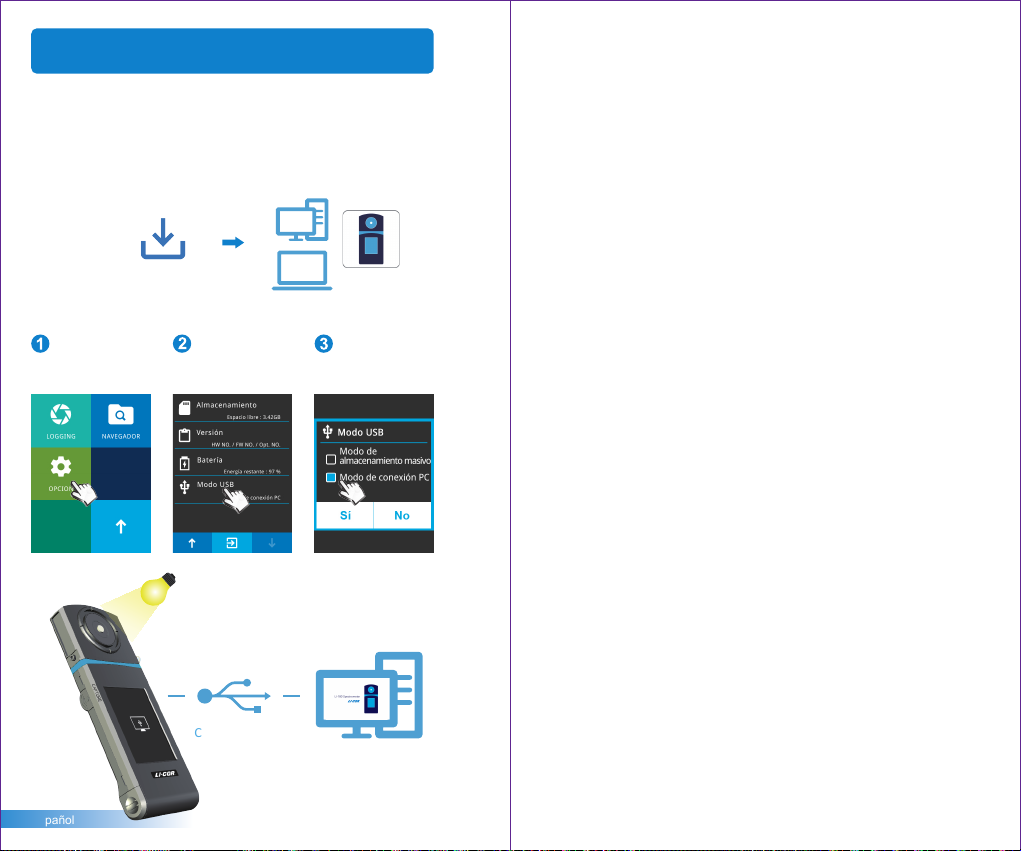
Instalar el soware para PC LI-180 Spectrometer
Visite el sio web oficial de LI-COR, www.licor.com/env/support.
Descargue e instale el soware LI-180 Spectrometer en su PC.
A connuación, puede conectarlo con el sistema para control
de mediciones USB.
LI-180 Spectrometer
Instalar el archivo
Establecer el modo de conexión de PC USB
Seleccione
“OPCIÓN”.
Medición
Español
Seleccione
“Modo USB” .
Conexión USB
- 75 -
Seleccione “Modo de
conexión PC” y presione Sí.
Soware para PC
LI-180 Spectrometer
Page 45
目次
1.1パッケージの内容説明
1
1.2外観説明
1.3製品についての注意事項
2.1使用前の準備
2
2.2基本測定
3.1携帯電話のアプリとの通信
3
3.2LI-180Spectrometerとの通信
................................................................ 78
........................................................ 80
................................................................ 86
........................................ 77
.................................... 79
................................. 88
.......................... 89
さらに多くの操作とファームウェアのアップデート
についての情報をお求めの場合は、オンライン修正
して適用修理サービス、licor.com/env/supportをご
参照ください。
- 76 -
Page 46
1.1パッケージの内容説明
1.2外観説明
ご使用する前に、LI-180包装に以下のアイテムが含まれているかどうかを
確認してください。不足している場合は、販売店にご相談ください。
ケース
電源アダプター USBType-C.ケーブル
簡易収納ケース
LOCK
LI-180
ハンディタイプ分光光度計
USB伝送ケーブル
ストラップ
無線リモートコントロールカード
(携帯電話とリンクしてアプリを使用)
リチウム電池
(遠隔測定)
WiFi180-08
GB
SDカード
取り付け金具
簡易取扱説明書
光学部カバ一
3.5インチ
タッチパネル
外部電源ジャック
ミニUSBポート
光学部センサ一
SDカードスロット
リセットボタン
電源ボタン
測定キー
バッテリーカバー
日本語
- 77 -
- 78 -
Page 47
1.3製品についての注意事項
2.1使用前の準備
1.
LI-180ハンディタイプ分光光度計は、非常に精密な機器のため、はじめ
て開梱する際の取り出しにはご注意ください。いかなる振動や衝突もこ
の機器に損害を与えますので、特に注意しての処理をお願いいたします
。本製品が正常に操作できない、あるいは修理が必要な場合の、ご自身
での修理はおやめください。すべての修理は合格し授権されたカスタマ
ーサービスの販売店にて実施する必要があります。
2.
ほとんどのモニターの製造過程での結果は99.9%以上のピクセルが有効
画素数であり、デッドピクセルの数量は0.1%以下です。デッドピクセル
は白色あるいはその他の色の可能性がありますが、測定の正確性には影
響を与えませんので、安心してご使用ください。
安全への注意
火災、過熱、化学品の遺漏と爆発事故を防止するために、以下の注意事項
をしっかりとお読みください。
■
解体あるいは電池の変更はしないでください。
■
電池を火あるいは水中に置かないでください。
■
電池とその他の金属あるいは電池との接触を防止し、引火や爆発を防止
するために、電池や予備の電池を捨てる際は、セロテープで電池の電気
的接点を絶縁してください。
■
火災の発生を防止するために、電池の充電中に過熱、発煙、異臭が発生
した場合は、ただちに電源のコンセントから電池の充電器を外して充電
を停止してください。
■
いかなる接続ケーブルも熱源の付近に置かないでください。接続ケーブ
ルが熱の影響を受けて変形あるいは絶縁層が溶け、火災や感電を引き起
こす恐れがあります。
■
充電中の機材を布で覆ったり、包んだりしないでください。放熱の不良
によりケースの変形が発生したり、火災が発生する恐れがあります。
■
誤って製品が水中に落下したり、水や金属の異物が内部に侵入したりし
た場合は、火災や感電が発生するのを防止するために、ただちに電池を
取り出してください。
■
高温の環境での使用、電池や予備電池の保管はしないでください。電池
の遺漏や電池の寿命の短縮を容易に引き起こす原因となります。
■
塗料用シンナー、ベンゼンやその他の有機溶剤を使用して本器材のクリ
ーニングを行わないでください。製品の外観とタッチパネルに損害を与
え、火災を引き起こす恐れがあります。
日本語
- 79 -
バッテリーの取付
手順1:手のひらに測定器本体を持って、親指で電池カバーを軽く押し込
みます。
手順2:そのまま電池カバーを本体下方にスライドさせて取り外します。
手順3:バッテリーを三角印▲の向きから入れ再び電池カバ一をします。
1
3
2
※親指で電池カバーを押し、ラッチから外すとを簡単に
取り外せます。
初めてご使用の際は、バッテリ一が完全に充電されるまで、6時
1.
間以上充電してください。
操作の途中で電源不足にならない様に、操作中は画面右上の電
2.
池アイコンにて電池の残量を確認ください。
十分に充電しても、使用時間が極端に短くなったときはバッテ
3.
リ一の寿命が考えられます。その場合は販売店よりご購入くだ
さい。
寿命は測定器の使用年数に応じて異なります。新品でフル充電
4.
の場合、連続使用時間は約5時間程です。
- 80 -
Page 48
2.1使用前の準備
2.1使用前の準備
バッテリーを充電する方法
外部電源ジャックに電源アダプターのプラグを挿入すると、充電が開始さ
れます。
1.本体電源がオフの場合、充電中は、電源ボタンが赤色に点灯します。充
電が完了すると、消灯します。
2.本体電源がオンの場合、充電中は機器の画面右上に稲妻のマ一クが表示
されます。完全に充電されるとマ一クが消えます。
SDカードの取付方法
この装置は測定データをSDカード(1GB以上のみ対応)に書き込むことが
できます。データはエクセル・ファイル(xls)、またはjpg画像ファイル
(スペクトル分布図と色度座標図)で保存されます。
※正しい向きでSDカードを挿入します。
※SDカードを取り出すときは、①へ「カチッ」と音がするまで押し
②へまっすぐ引き抜いてください。
1
2
日本語
- 81 -
SDカードの脱落防止の為、ロック機構を設けております。その
1.
為、引っ掛かりがある様に感じますが、向きが正しければ、再
度押し込むと挿入できます。取り出す時にも引っ掛りがありま
すが、そのまま引き抜いてください。
- 82 -
Page 49
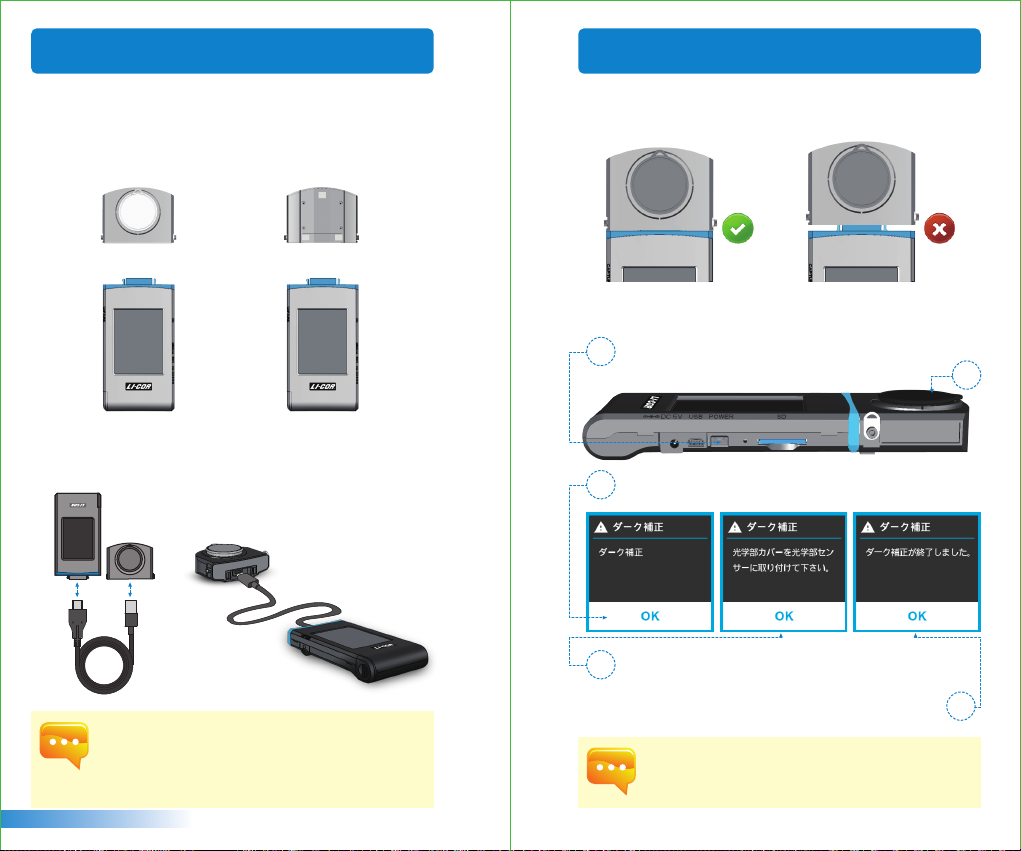
2.1使用前の準備
2.1使用前の準備
光学部と本体の接続
光学部を反面にしたい時は下記の図のように光学部の向きを切替えること
が可能です。必ず電源を切ってから受光部を本体上方へ引き抜き、裏返し
て差し込みます。その際、正しく取り付けられているかご確認の上、起動
してください。
+ +
or
遠隔測定を行う場合は付属のUSBType-C.ケーブルを使ってください。USB
Type-C.ケーブルを連接する場合も、電源を切ってから行ってください。
Male
Port
日本語
Female
Port
光学部と本体はペアリングなので、他のLI-180と共用できません
1.
。2台以上お持ち方は光学部と本体を混同しないでください。
光学部をの向きを切換える時には必ず電源オフの状態で取り付
2.
けしてください。
本体の起動時はダ一ク補正をしてください。
3.
- 83 -
光学部センサ一取付時に確認頂く事項
起動する前に光学部センサ一が正しく取り付けられているかご確認くださ
い。
ダ一ク補正
起動後は、電源ボタンが緑色に点灯し、ダ一ク補正の画面が表示
1
されます。
「ダーク補正を行いますか?」の画面で,「はい」をタップして
2
ください。
光学部カバ一をつけた後、「OK」をタップしてください。
3
「ダーク補正が完了しました」の画面で、「OK」をタップして主
画面に入ります。
電源ボタンを1秒くらい軽く押ぜば本体が起動します。
1.
電源ボタンを3秒ほど押せば電源が切れます。
2.
毎回起動するたびにダ一ク補正を行うことを推奨します。
3.
- 84 -
4
3
Page 50
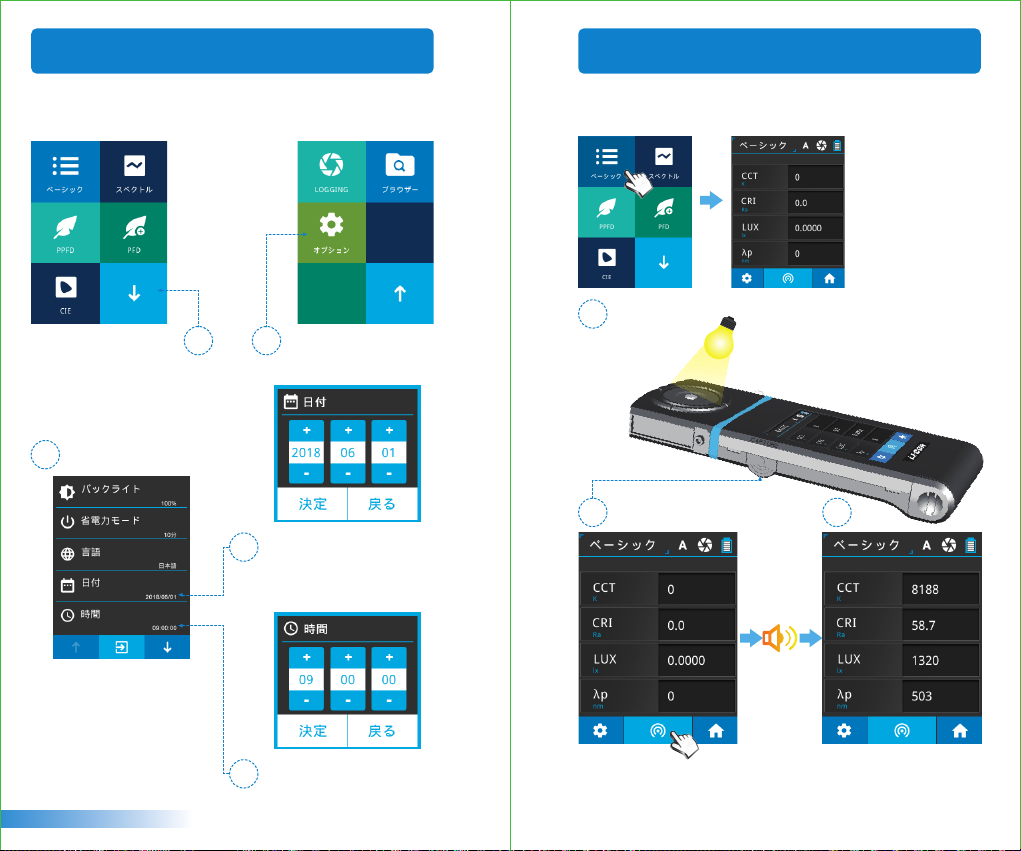
2.1使用前の準備
2.2基本測定
日付と時間の設定
測定前に必ず、日付と時間を設定してください。
右下の矢印アイコンをタ
ップして次頁に入ります
。
1 2
3
日付を設定したあと、「はい」
4
をタップして戻ります。
「日付」と「時間」をタップし
て設定してください。
「オプション」アイコン
をタップします。
測定
「ベーシック」をタップして下さい。
光源に光学部センサ一を向けます。
1
2
3
日本語
時間を設定したあと、「はい」
5
をタップして戻ります。
- 85 -
画面下の中央の測定ボタンをタップし
てください。又は本体横の測定キ一を
押しても測定可能です。(タッチ測定と
測定キ一測定の両方で測定ができます
。)
“ビ一”という音が鳴れば、測定
完了です。測定結果が画面上に
表示されます。
- 86 -
Page 51
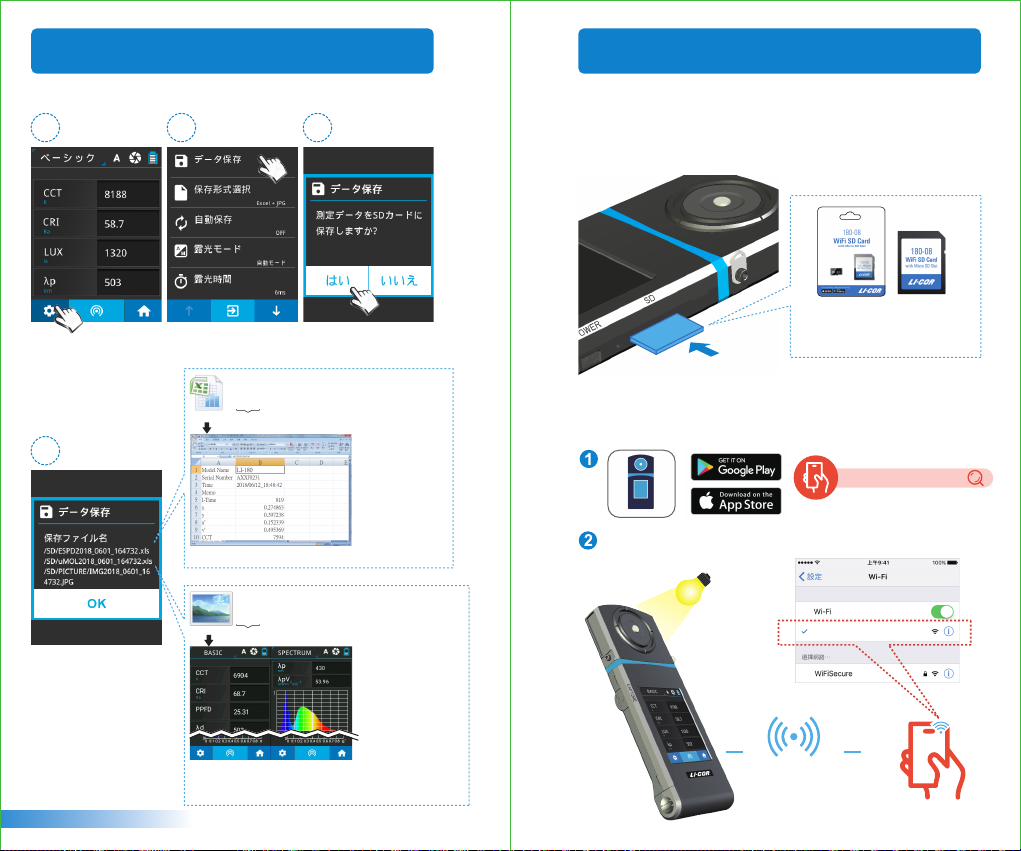
2.2基本測定
3.1携帯電話のアプリとの通信
測定デ一タの保存
1
画面下の左側の「詳細
設定ボタン」をタップ
してください。
4
測定デ一タがSDカ一ド
に保存されます。測定
されたデ一タを探す場
合は、測定された際の
日時、時間をご参照下
さい。
2
「デ一タ保存」をタッ
プしてください。
EXCELファイルのファイル名規則:
ESPDYYYY_MMDD_HHMMSS
.xls
( 年 ) (月)(日) ( 時間 )固定
▲測定した各項目毎の値が全て保存されます。
JPGファイルのファイル名規則:
IMGYYYY_MMDD_HHMMSS
.JPG
固定
( 年 ) (月)(日) ( 時間 )
▲「ベ一シック」「スベクトル」「PPFD」「PFD」
「CIE 1931 と1976」測定画面が保存されます。
3
WiFi180-08無線リモートコントロールカード
180-08を本機器に設置し、iOS或はAndroidのプラットフォーム上で、アプ
リを探してお客様のモバイル装置にダウンロードとインストールすれば、
無線方式にて本機器と通信し測定とコントロールができます。
WiFi180-08
無線リモートコントロールカード
(携帯電話とリンクしてアプリを使用)
インストールAPP
アプリのインストールにて、アプリを探してお客様のモバイル装置にダウ
ンロードしインストールしてください。
LI-180 Spectrometer
WiFiは180-08WiFiSDCardを選択してください。
測定
180-08 WiFi SD Card
WiFi通信
日本語
- 87 -
- 88 -
Page 52
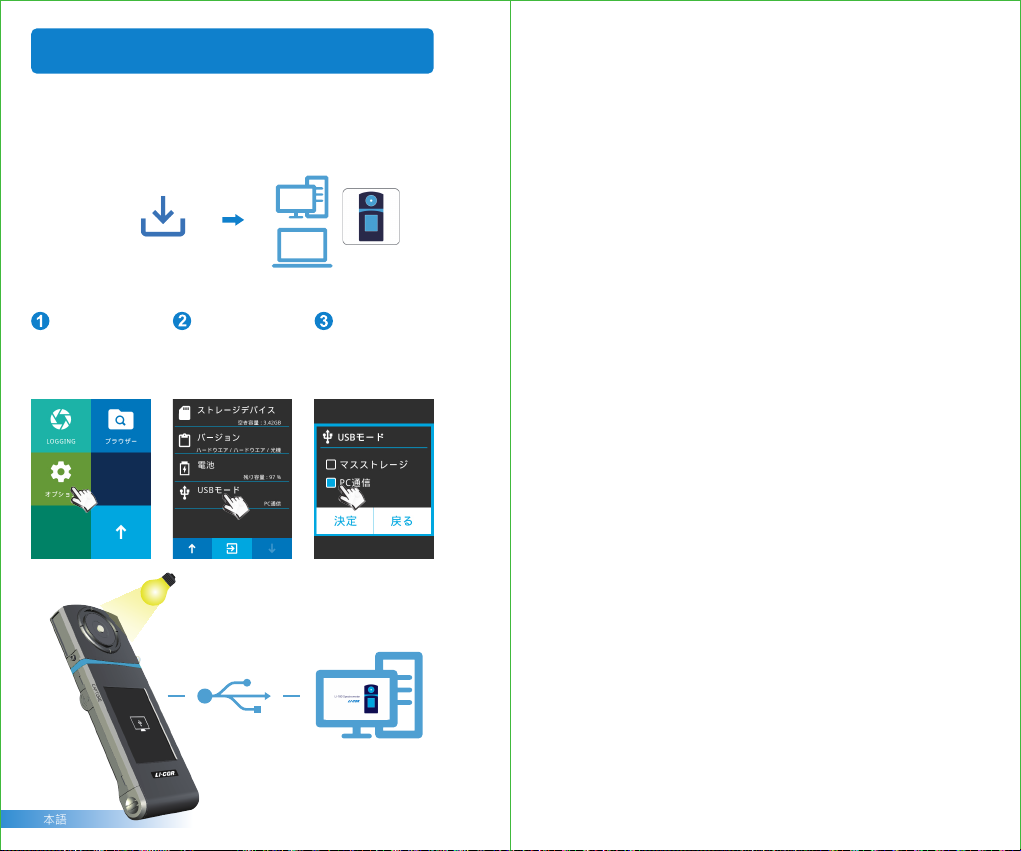
3.2LI-180Spectrometerとの通信
LI-180Spectrometerコンピュータ用ソフトウェアをインストール
LI-CORの公式ウェブサイトwww.licor.com/env/support;にてコンピュー
タシステムへのダウンロードと設置を行えば、USB通信にて本機器と通信
し、測定とコントロールができます。
LI-180Spectrometer
インストールファイル
USBコンピュータ通信モードの設定
【オプション】のイラ
ストをクリックしてく
ださい。
測定
日本語
「USBモード」の項目
をクリックしてくださ
い。
USBでの通信
- 89 -
「コンピュータ通信」
の項目をクリックした
後、確定を押してくだ
さい。
LI-180Spectrometer
コンピュータ用ソフトウェア
Page 53
目錄
1.1 包裝內容說明
1
1.2 外觀說明
1.3 產品注意事項
2.1 使用前準備
2
2.2 基本量測
3.1 與手機APP連線
3
3.2 與LI-180 Spectrometer連線
.......................................................... 91
................................................................. 92
.......................................................... 93
.............................................................. 94
................................................................ 100
..................................................... 102
................................ 103
欲了解更多操作和韌體更新的信息,線上申請校正
及維修服務,請參閱licor.com/env/support
- 90 -
Page 54
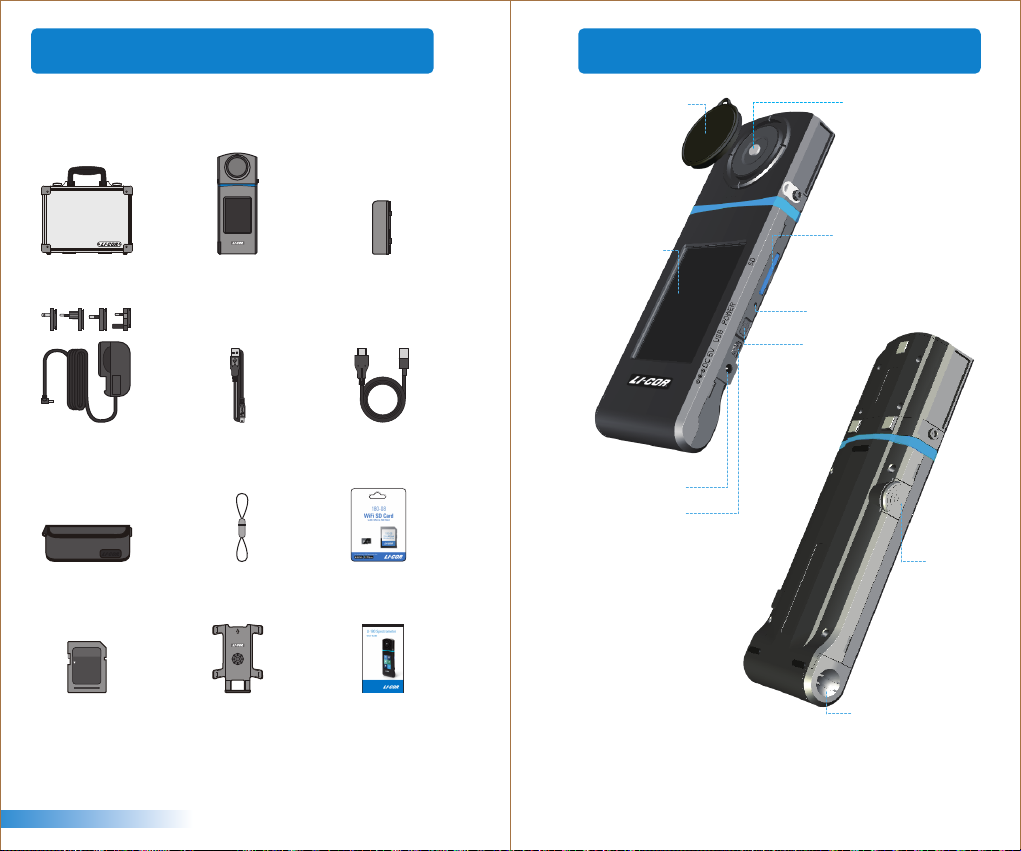
1.1 包裝內容說明
1.2 外觀說明
使用前,請檢查您的LI-180包裝內是否包括以下設備。如有漏失
,請與您的經銷商聯繫。
手提箱
充電器 3米USB typeC傳輸線
保護套
LOCK
LI-180 手持式
分光光譜計
USB傳輸線
帽蓋吊繩
鋰電池
(遠距離量測)
WiFi 180-08 無線遙控卡
( 連結手機APP使用 )
GB
光學感測器帽蓋
3.5吋觸控螢幕
充電孔
Mini USB埠
光學感測器
SD卡插槽
重置鍵
電源按鈕
量測鍵
繁體中文
SD卡
底座支架
- 91 -
簡易使用說明書
電池蓋
- 92 -
Page 55
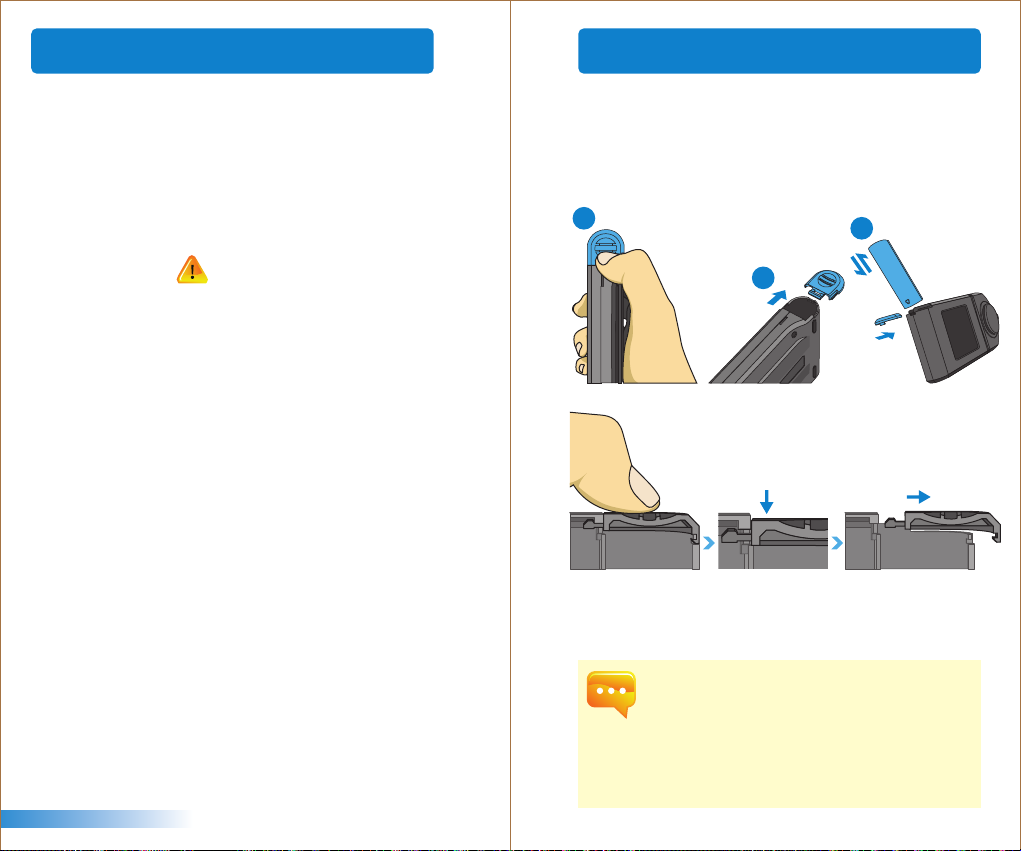
1.4 產品注意事項
2.1 使用前準備
LI-180植物照明檢測計是一款相當精密的儀器,請在第一次拆
1.
封時特別小心取出,任何的震動或是碰撞都將會傷害到此儀器
,請特別小心處理。如本產品無法正常操作或需要維修,請勿
試圖自行維修,所有維修需經由合格授權的客戶服務經銷商執
行。
大多液晶螢幕製造過程產出結果會超過99.9%的像素為有效像
2.
素,存在壞點的數量少於0.1%。壞點可能為白色或其他顏色,
壞點並不影響量測的精確度,請使用者安心使用。
安全警告
請仔細閱讀以下注意事項,以免造成火災、過熱、化學品洩漏及
爆炸事故:
■
請勿拆解或改裝電池。
■
請勿將電池置於火或水中。
■
丟棄電池或備用電池時,請用膠帶使電池電子接點絕緣,以免
電池與其他金屬物件或電池接觸, 避免引起火災或爆炸。
■
電池充電過程中,如出現過熱、冒煙、發出異味,請立即從電
源插座上拔除電池充電器停止充電,以免發生火災。
■
請勿將任何連接線置於熱源附近,否則連接線可能受熱變形或
使絕緣層熔化,並引起火災或觸電。
■
請勿用布覆蓋或包裹充電中的器材,否則可能會因為散熱不佳
引起外殼變形或造成火災。
■
若不慎將產品掉落水中,或有水或金屬異物進入內部,請立即
取出電池,以免引起火災或觸電。
■
請勿在高溫環境中使用或存放電池或備用電池,這樣容易造成
電池洩漏或縮短電池壽命。
■
請勿使用油漆稀釋劑、苯或其他有機溶劑清潔本器材,否則可
能損害產品外觀與者觸控螢幕而且也可能引發火災。
繁體中文
- 93 -
電池安裝
步驟1. 手掌握住本機,將大拇指輕壓電池蓋。
步驟2. 輕壓電池蓋,往本機下方方向推出,即可將電池蓋推出。
步驟3. 電池蓋推出後,電池的三角形印記朝下放入後,再將電池
蓋蓋回。
1
3
2
※ 大拇指下壓電池蓋,以利電池蓋脫離卡榫,即可
順利將電池蓋往外推開。
1.
第一次使用時,請先將電力充飽 6小時。
2.
避免使用途中發生中斷,使用前請依照下頁1.的指示,確認
電源紅燈是否消燈(是否完全充飽電力)。另外,起動後請確
認本機畫面右上方電池殘量。
如電池充滿後迅速耗盡代表電池壽命已盡,請與經銷商購買
3.
新電池。
使用時間會與電池壽命相關,新品的情況,出廠電池充飽後
4.
約可使用5小時。
- 94 -
Page 56
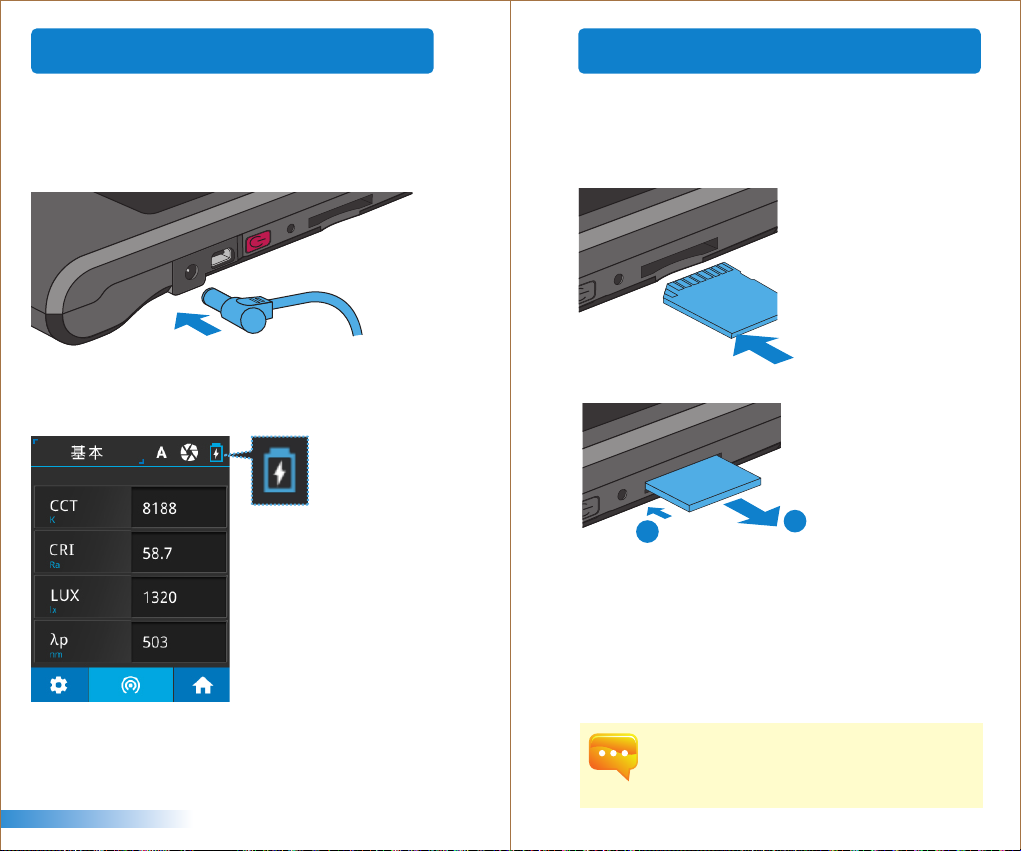
2.1 使用前準備
2.1 使用前準備
電池充電方式
取出充電器,插入本產品電源充電孔後即可開始充電。
1. 關機狀態下,使用者可以查看電源鈕會亮起紅色指示燈,充飽
電後紅色指示燈即會熄滅。
2. 開機狀態下,使用者可以查看本產品螢幕畫面右上角出現閃電
符號,以表示本產品進行充電中,充飽後閃電符號即會消失。
安裝SD卡
您可以儲存量測檔案Excel(xls)檔案及畫像(JPG)檔案(光譜圖、色
度座標圖)於SD卡中,SD卡容量要求需1 GB以上。
※ 依指示方向插入SD卡
※ 按壓即可取出SD卡
1
2
繁體中文
- 95 -
1. 為了防止SD卡脫落設計卡榫的機構設計。插入及拔出SD卡
時會有卡住的感覺,當有卡住的感覺時,繼續按壓卡片即可
確實安裝完成。取出卡片時,如同①所示先按壓卡片後,同
②
所示卡片會有些微退出,即可順勢拉出卡片。
- 96 -
Page 57
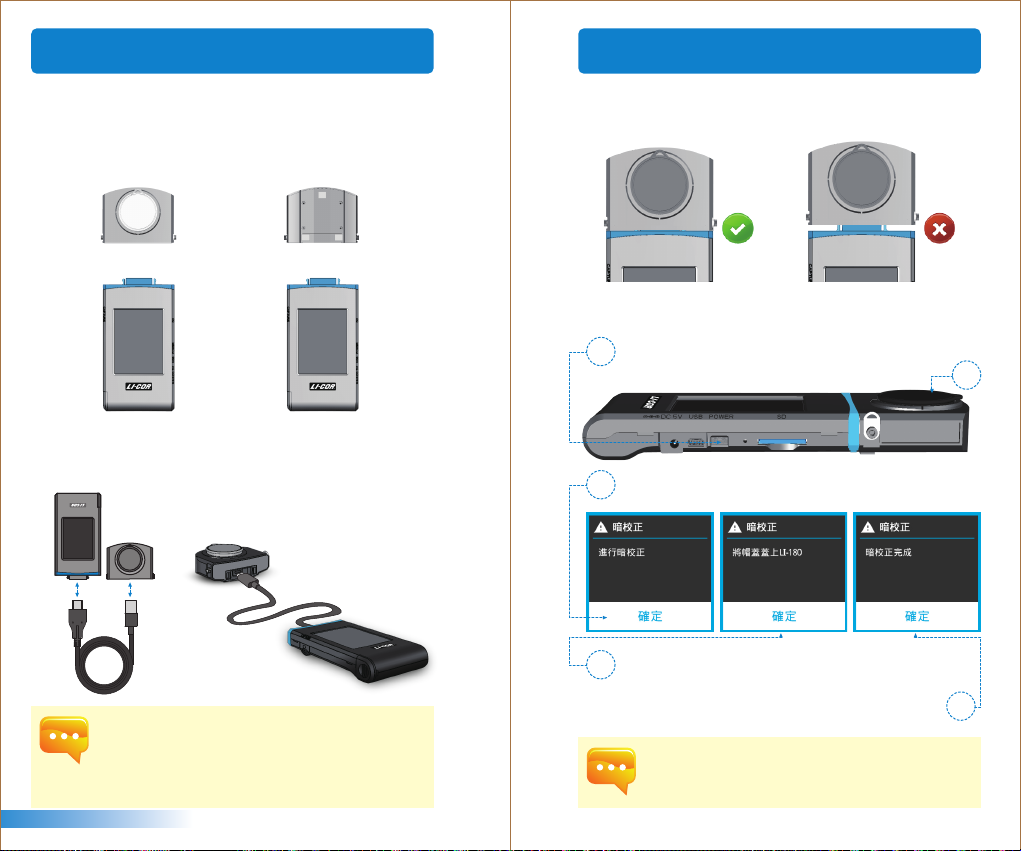
2.1 使用前準備
2.1 使用前準備
光機與本體連接
欲將光機反面安裝時,如下圖所示進行反面安裝。務必將電源關
閉後將光機與本體拆開,轉向反面後再插入本體。請在確認是否
正確安裝完成後,再次啟動本機。
+ +
or
進行遠距離量測時,如下圖所示請使用USB typeC 傳輸線。使用
USB typeC 傳輸線時,請務必也將電源關閉後再執行。
Male
Port
繁體中文
Female
Port
1.
光機與本機出廠前已互相配對,切勿與其它LI-180機台共用
。持有2台LI-180以上的顧客,光機切勿與其它本體混搭使
用。
光機正反拆裝拔插前,請於關機狀態下組裝。
2.
建議每次開機使用前執行暗校正。
3.
- 97 -
光學感測器安裝時注意事項
開機前請先確認光學感測器卡榫是否和機身正確連結。
暗校正
開機後,電源鈕會亮起綠色指示燈後,螢幕即會顯示暗校
1
正畫面。
畫面出現「是否要做暗校正?」對話視窗,請選擇「確定」
2
按鈕。
確認帽蓋蓋上後,選擇「確定」按鈕。
3
當對話視窗顯示「暗校正完成」後,按下「確定」按鈕進
入首頁。
電源按鍵輕按1秒左右即可啟動本機。
1.
電源按鍵輕按3秒左右即可關機。
2.
建議每次開機時執行暗校正。
3.
- 98 -
3
4
Page 58
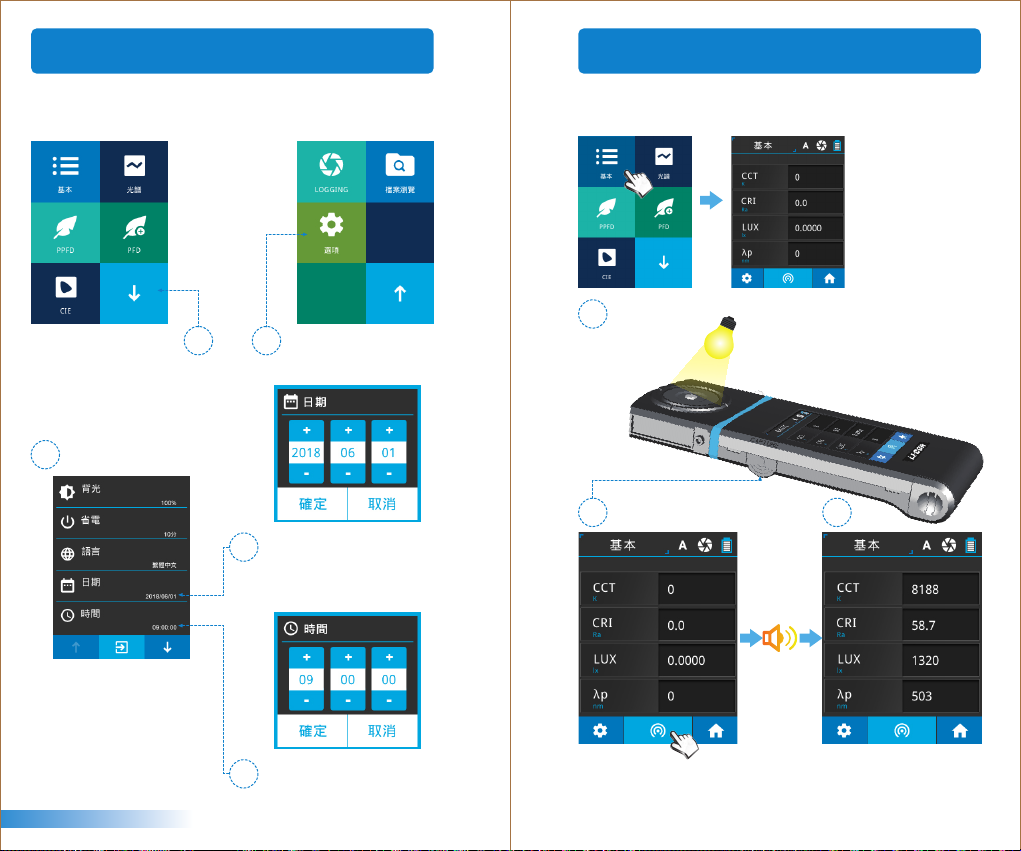
2.1 使用前準備
2.2 基本量測
設定日期&時間
測定前務必先完成日期及時間設定。
按下右下箭頭符號即
可進入到下頁。
1 2
3
4
點選【日期】將【時間】進
行設定。
請點選【選項】圖示
。
日期設定完成後,按下確定
鍵返回設定項目頁面。
量測
點選「基本」模式,進入量測頁面。
將光學感測器對準受測光源。
1
2
3
繁體中文
時間設定完成後,按下確定
5
鍵返回設定項目頁面。
- 99 -
按下畫面下方中間的量測鈕
或按壓左側量測鍵即可測定
。 (兩邊皆可按壓量測)
聽到「嗶」一聲後即完成量
測,測定結果顯示在畫面上
。
- 100 -
Page 59
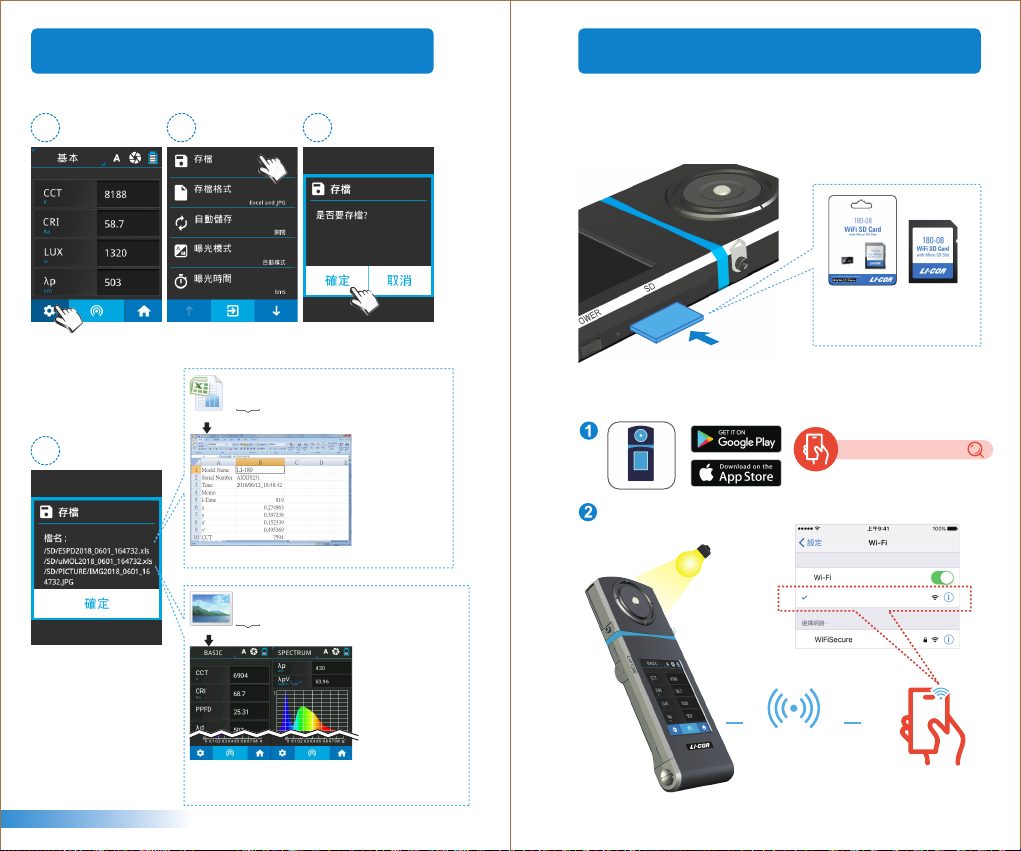
2.2 基本量測
3.1 與手機APP連線
儲存量測資料
1
按下畫面左下方設定
按鈕。
4
量測資料已成功儲存
於記憶卡中。必要時
請紀錄檔案名稱。
2
點選「存檔」項目。
EXCEL檔案名稱:
ESPDYYYY_MMDD_HHMMSS
.xls
( 年 ) (月)(日) ( 時間 )固定
▲可保存完整原始數據。
JPG檔案名稱:
IMGYYYY_MMDD_HHMMSS
.JPG
固定
( 年 ) (月)(日) ( 時間 )
WiFi 180-08無線遙控卡
3
置入180-08於本機,於iOS或Android平台上,尋找您的APP下載
安裝於行動裝置,即可採無線方式與本機做連線量測控制。
WiFi 180-08
無線遙控卡
( 連接手機APP使用 )
安裝APP
於行動裝置下載安裝LI-180 Spectrometer APP。
LI-180 Spectrometer
180-08 WiFi SD Card.
WiFi選擇
量測
180-08 WiFi SD Card
繁體中文
▲可保存「基本模式」 「光譜模式」 「PPFD模式」
「PFD模式」 「CIE 1931・1976模式」量測畫面。
- 101 -
WiFi連線
- 102 -
Page 60
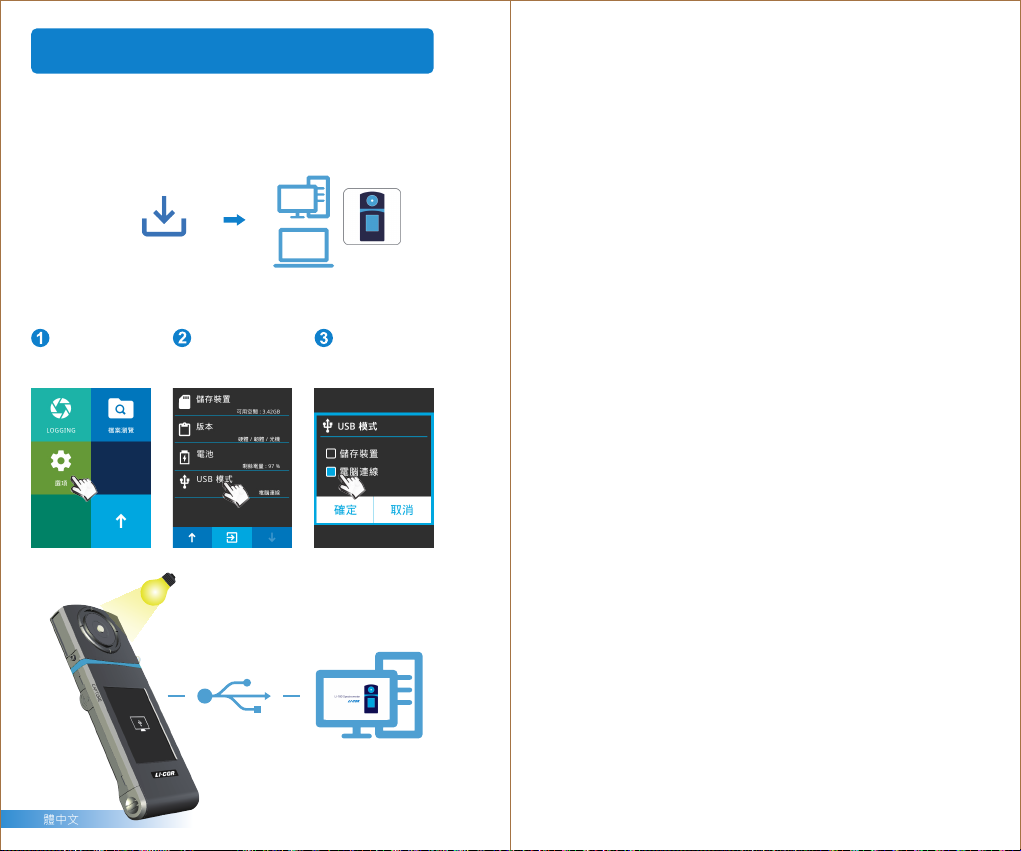
3.2 與LI-180 Spectrometer連線
安裝LI-180 Spectrometer電腦軟體
請至LI-COR官網,www.licor.com/env/support;進行下載與安
裝於電腦系統裝置,即可採USB連線方式與本機做連線量測控制。
LI-180 Spectrometer
安裝檔
設定USB電腦連線模式
請點選「選項」圖
示。
量測
繁體中文
請點選「USB模式」
項目。
USB連線
- 103 -
請點選「電腦連線」
項目後,按下確定。
LI-180 Spectrometer
電腦軟體
Page 61
目录
1.1 包装内容说明
1
1.2 外观说明
1.3 产品注意事项
2.1 使用前准备
2
2.2 基本量测
3.1 与手机APP连线
3
3.2 与LI-180 Spectrometer连线
........................................................ 105
............................................................... 106
....................................................... 107
........................................................... 108
............................................................... 114
..................................................... 116
................................ 117
欲了解更多操作和韧体更新的信息,线上申请校正
及维修服务,请参licor.com/env/support
- 104 -
Page 62
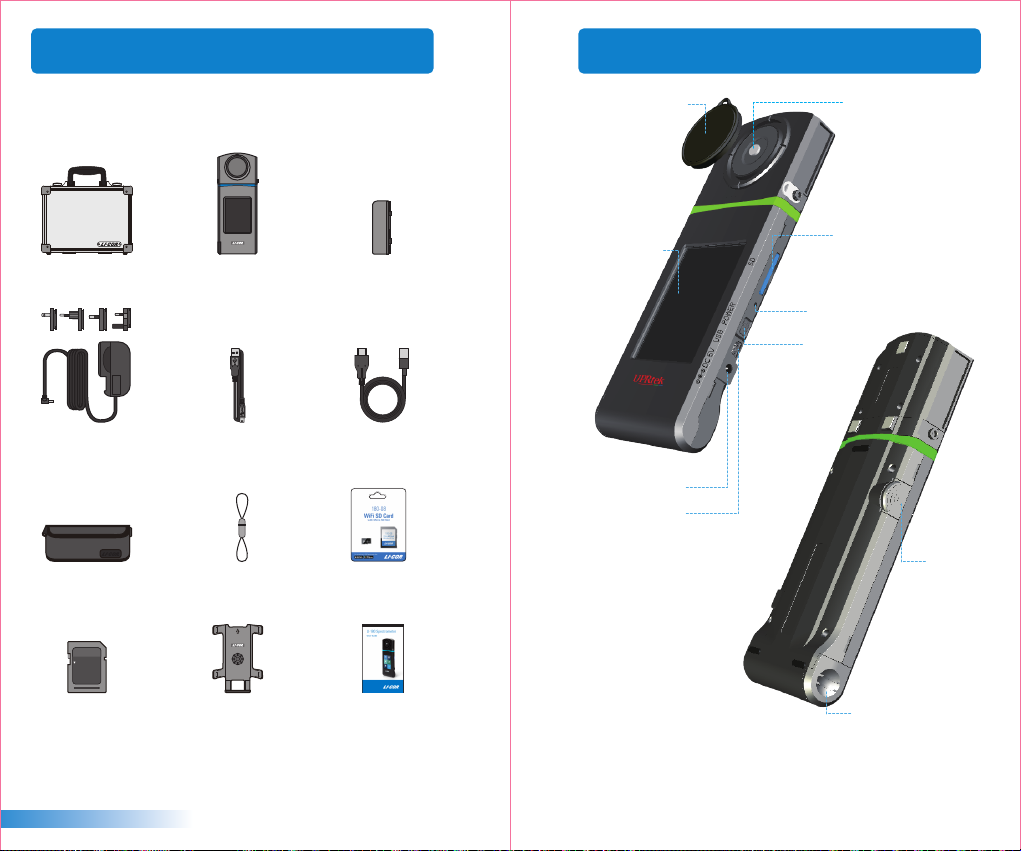
1.1 包装内容说明
1.2 外观说明
使用前,请检查您的LI-180包装内是否包括以下设备。如有漏失
,请与您的经销商联系。
手提箱
充电器 3米USB typeC传输线
保护套
LOCK
LI-180 手持式
分光光谱计
USB传输线
帽盖吊绳
锂电池
(远距离量测)
WiFi 180-08 无线遥控卡
( 连结手机APP使用 )
GB
光学感测器帽盖
3.5吋触控萤幕
充电孔
USB埠
光学感测器
SD卡插槽
重置键
电源按钮
量测键
简体中文
SD卡
底座支架
- 105 -
简易使用说明书
电池盖
- 106 -
Page 63
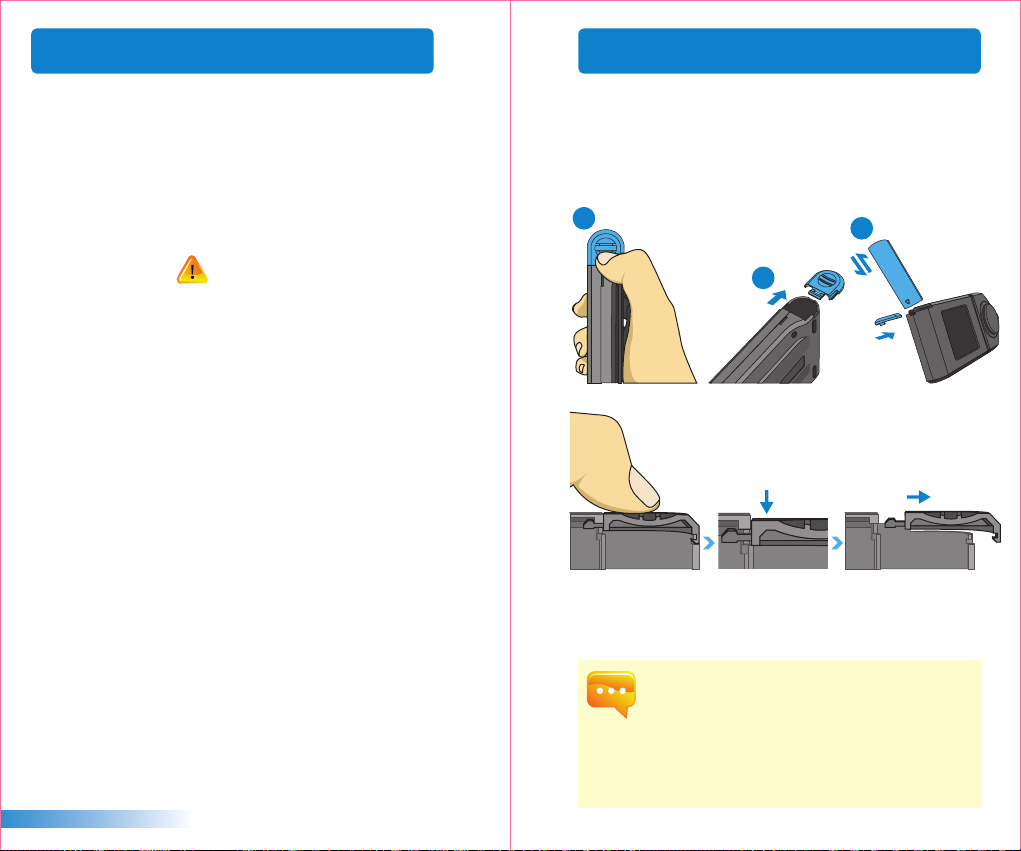
1.3 产品注意事项
2.1 使用前准备
LI-180植物照明检测计是一款相当精密的仪器,请在第一次拆
1.
封时特别小心取出,任何的震动或是碰撞都将会伤害到此仪器
,请特别小心处理。如本产品无法正常操作或需要维修,请勿
试图自行维修,所有维修需经由合格授权的客户服务经销商执
行。
大多液晶萤幕制造过程产出结果会超过99.9%的像素为有效像
2.
素,存在坏点的数量少于0.1%。坏点可能为白色或其他颜色,
坏点并不影响量测的精确度,请使用者安心使用。
安全警告
请仔细阅读以下注意事项,以免造成火灾、过热、化学品泄漏及
爆炸事故:
■
请勿拆解或改装电池。
■
请勿将电池置于火或水中。
■
丢弃电池或备用电池时,请用胶带使电池电子接点绝缘,以免
电池与其他金属物件或电池接触, 避免引起火灾或爆炸。
■
电池充电过程中,如出现过热、冒烟、发出异味,请立即从电
源插座上拔除电池充电器停止充电,以免发生火灾。
■
请勿将任何连接线置于热源附近,否则连接线可能受热变形或
使绝缘层熔化,并引起火灾或触电。
■
请勿用布覆盖或包裹充电中的器材,否则可能会因为散热不佳
引起外壳变形或造成火灾。
■
若不慎将产品掉落水中,或有水或金属异物进入内部,请立即
取出电池,以免引起火灾或触电。
■
请勿在高温环境中使用或存放电池或备用电池,这样容易造成
电池泄漏或缩短电池寿命。
■
请勿使用油漆稀释剂、苯或其他有机溶剂清洁本器材,否则可
能损害产品外观与者触控萤幕而且也可能引发火灾。
简体中文
- 107 -
电池安装
步骤1. 手掌握住本机,将大拇指轻压电池盖。
步骤2. 轻压电池盖,往本机下方方向推出,即可将电池盖推出。
步骤3. 电池盖推出后,电池的三角形印记朝下放入后,再将电池
盖盖回。
1
3
2
※ 大拇指下压电池盖,以利电池盖脱离卡榫,即可
顺利将电池盖往外推开。
1.
第一次使用时,请先将电力充饱 6小时。
2.
避免使用途中发生中断,使用前请依照下页1.的指示,确认
电源红灯是否消灯(是否完全充饱电力)。另外,起动后请确
认本机画面右上方电池残量。
如电池充满后迅速耗尽代表电池寿命已尽,请与经销商购买
3.
新电池。
使用时间会与电池寿命相关,新品的情况,出厂电池充饱后
4.
约可使用5小时。
- 108 -
Page 64

2.1 使用前准备
2.1 使用前准备
电池充电方式
取出充电器,插入本产品电源充电孔后即可开始充电。
1. 关机状态下,使用者可以查看电源钮会亮起红色指示灯,充饱
电后红色指示灯即会熄灭。
2.开机状态下,使用者可以查看本产品萤幕画面右上角出现闪电
符号,以表示本产品进行充电中,充饱后闪电符号即会消失。
安装SD卡
您可以储存量测档案Excel(xls)档案及画像(JPG)档案(光谱图、色
度座标图)于SD卡中,SD卡容量要求需1 GB以上。
※ 依指示方向插入SD卡
※ 按压即可取出SD卡
1
2
简体中文
- 109 -
1. 为了防止SD卡脱落设计卡榫的机构设计。插入及拔出SD卡
时会有卡住的感觉,当有卡住的感觉时,继续按压卡片即可
确实安装完成。取出卡片时,如同①所示先按压卡片后,同
②
所示卡片会有些微退出,即可顺势拉出卡片。
- 110 -
Page 65

2.1 使用前准备
2.1 使用前准备
光机与本体连接
欲将光机反面安装时,如下图所示进行反面安装。务必将电源关
闭后将光机与本体拆开,转向反面后再插入本体。请在确认是否
正确安装完成后,再次启动本机。
+ +
or
进行逺隔量测时,如下图所示请使用USB typeC传输线。使用USB
typeC传输线时,请务必也将电源关闭后再执行。
Male
Port
简体中文
Female
Port
1.
光机与本机出厂前已互相配对,切勿与其它LI-180机台共用
。持有2台LI-180以上的顾客,光机切勿与其它本体混搭使
用。
光机正反拆装拔插前,请于关机状态下组装。
2.
建议每次开机使用前执行暗校正。
3.
- 111 -
光学感测器安装时注意事项
开机前请先确认光学感测器卡榫是否和机身正确连结。
暗校正
开机后,电源钮会亮起绿色指示灯后,萤幕即会显示暗校
1
正画面。
画面出现「是否要做暗校正?」对话视窗,请选择「确定」
2
按钮。
确认帽盖盖上后,选择「确定」按钮。
3
当对话视窗显示「暗校正完成」后,按下「确定」按钮进
入首页。
电源按键轻按1秒左右即可启动本机。
1.
电源按键轻按3秒左右即可关机。
2.
建议每次开机时执行暗校正。
3.
- 112 -
3
4
Page 66
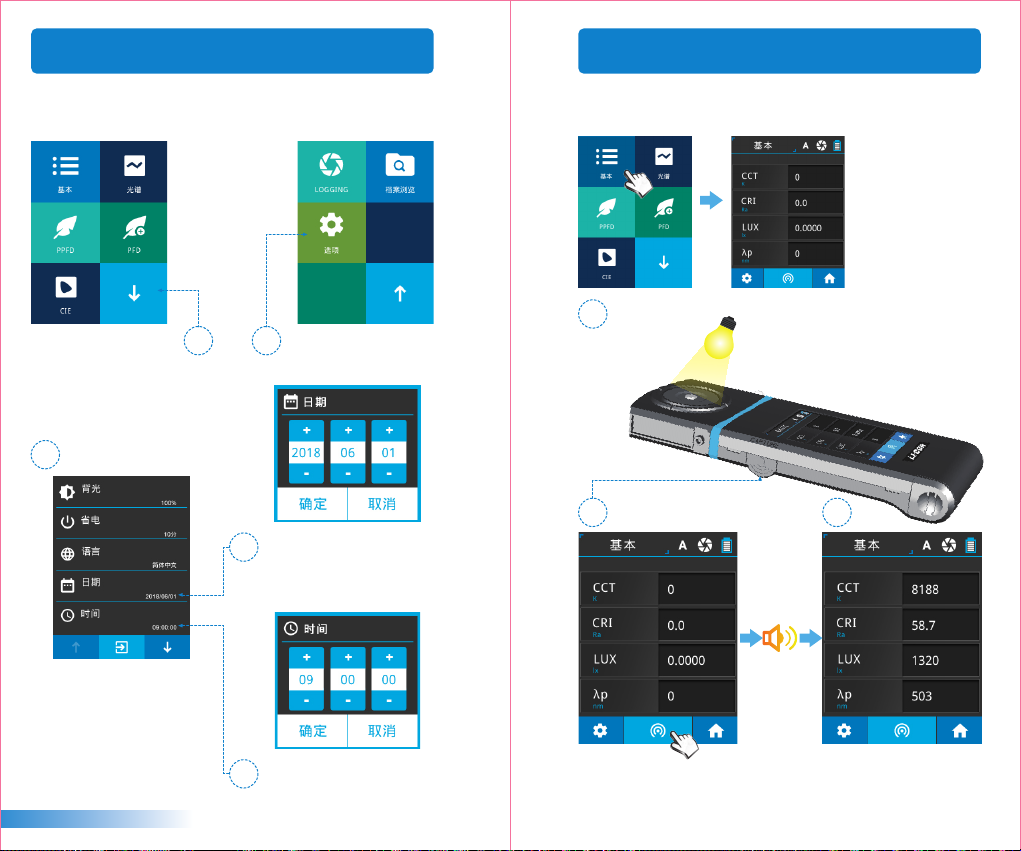
2.1 使用前准备
2.2 基本量测
设定日期&时间
测定前务必先完成日期及时间设定。
按下右下箭头符号即
可进入到下页。
1 2
3
4
点选【日期】将【时间】进
行设定。
请点选【选项】图示
。
日期设定完成后,按下确定
键返回设定项目页面。
量测
点选「基本」模式,进入量测页面。
将光学感测器对准受测光源。
1
2
3
简体中文
时间设定完成后,按下确定
5
键返回设定项目页面。
- 113 -
按下画面下方中间的量测钮
或按压左侧量测键即可测定
。 (两边皆可按压量测)
听到「哔」一声后即完成量
测,测定结果显示在画面上
。
- 114 -
Page 67
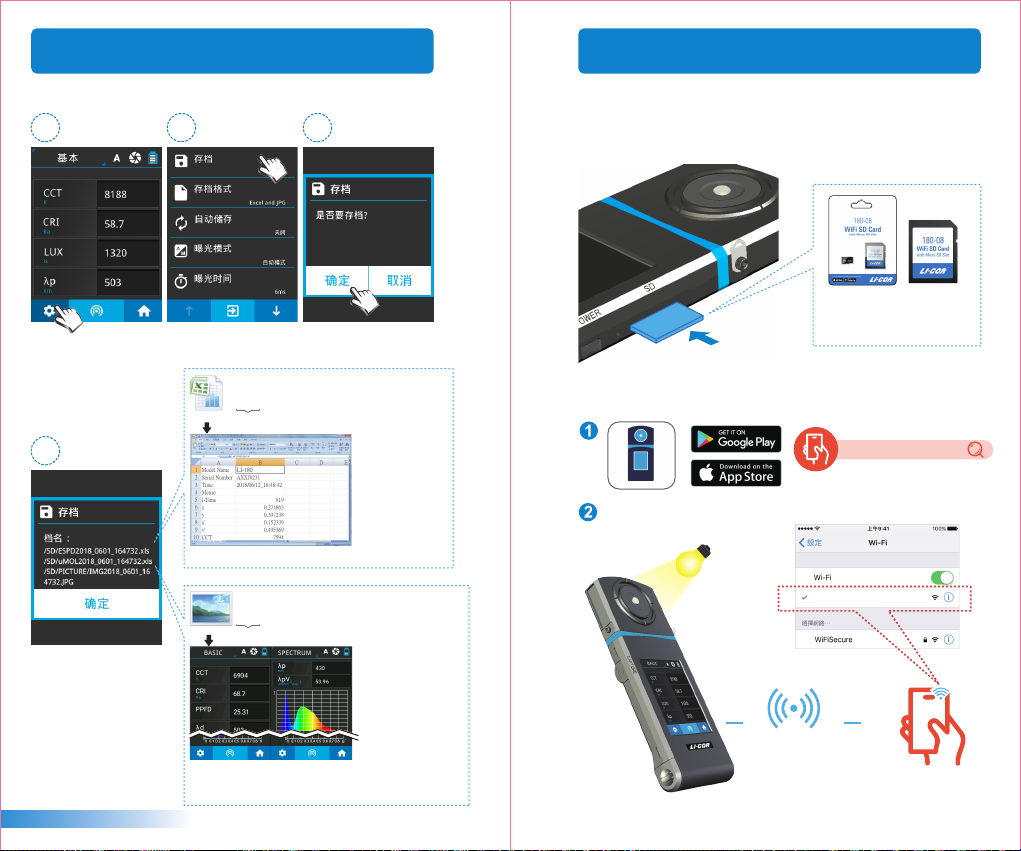
2.2 基本量测
3.1 与手机APP连线
量测资料储存
1
按下画面左下方设定
按钮。
4
量测资料已成功储存
于记忆卡中。必要时
请纪录档案名称。
2
点选「存档」项目。
EXCEL档案名称:
ESPDYYYY_MMDD_HHMMSS
.xls
( 年 ) (月)(日) ( 时间 )固定
▲可保存完整原始数据。
JPG档案名称:
IMGYYYY_MMDD_HHMMSS
.JPG
固定
( 年 ) (月)(日) ( 时间 )
WiFi 180-08无线遥控卡
3
置入180-08于本机,于iOS或Android平台上,寻找您的APP下载
安装于行动装置,即可采无线方式与本机做连线量测控制。
WiFi 180-08
无线遥控卡
( 连接手机APP使用 )
安裝APP
于行动装置下载安装LI-180 Spectrometer APP。
LI-180 Spectrometer
180-08 WiFi SD Card.
WiFi选择
量測
180-08 WiFi SD Card
简体中文
▲可保存「基本模式」 「光谱模式」 「PPFD模式」
「PFD模式」 「CIE 1931・1976模式」量测画面。
- 115 -
WiFi连线
- 116 -
Page 68
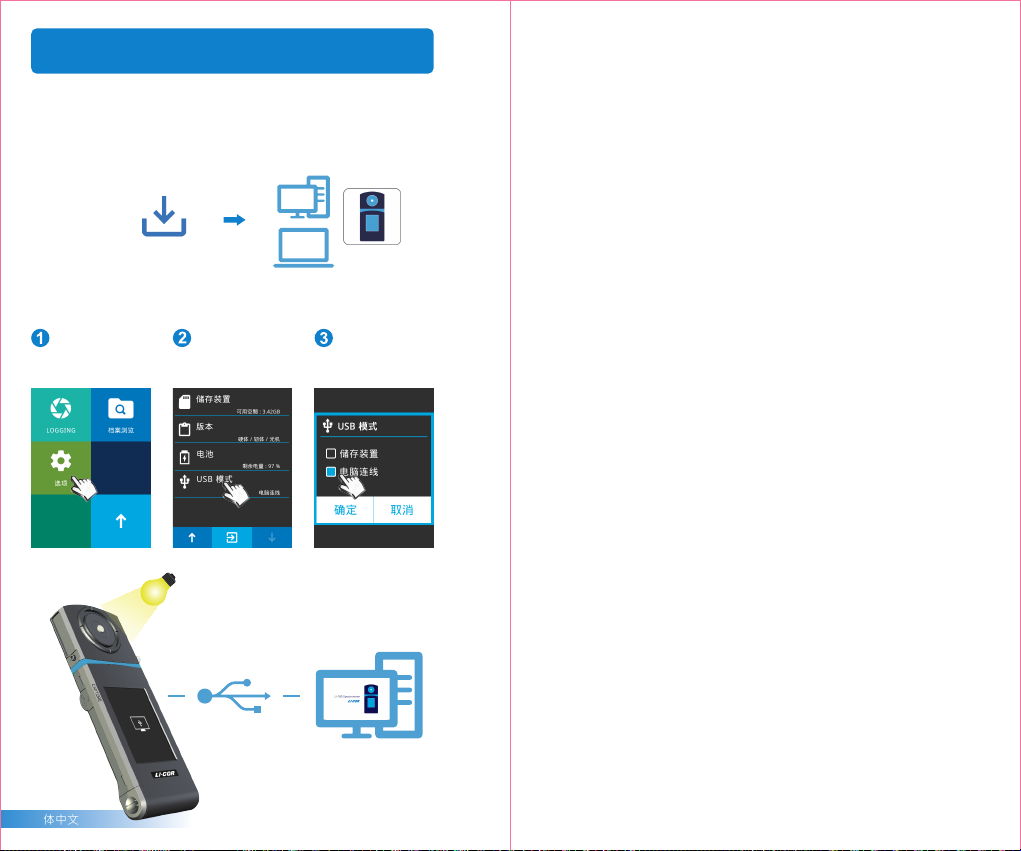
3.2 与LI-180 Spectrometer连线
安装LI-180 Spectrometer电脑软体
请至LI-COR官网,www.licor.com/env/support;进行下载与安
装于电脑系统装置,即可采USB连线方式与本机做连线量测控制。
LI-180 Spectrometer
安装档
设定USB电脑连线模式
请点选【选项】图示。请点选「USB模式」
项目。
量测
USB连线
简体中文
- 117 -
请点选「电脑连线」
项目后,按下确定。
LI-180 Spectrometer
电脑软体
 Loading...