

Page 1

LIBIFY® GC5
Instruction manual
Enterprise
Page 2

Congratulations
on your purchase of the GEOCARE® GC5
GEOCARE® is a mobile emergency call system that can trigger an
emergency call virtually anywhere and at any time.
Pressing the SOS key for three seconds establishes a telephone
connection to an emergency contact
can be an emergency call center or a contact person (e.g. a care
giver). In parallel with the telephone call, the emergency contact
will be informed of your whereabouts via SMS
The product package GEOCARE® with wireless transmitter and
active charging cradle can be used both as stationary and mobile
emergency call system. It makes it possible for the user to have
a more autonomous lifestyle. The user has more autonomy and
mobility as he/she knows that, in the event of an emergency,
quick and professional help is just a button press away.
GEOCARE® is compatible with all common emergency call monitoring centers and can therefore be connected to most operators.
(1). The emergency contact
(2).
OVERVIEW
OVERVIEW
1)
A GSM wireless network must be available.
2)
GPS reception must be available. If no GPS reception is available,
the most recent location with GPS reception is registered.
GEOCARE®
2
GEOCARE®
3
Page 3
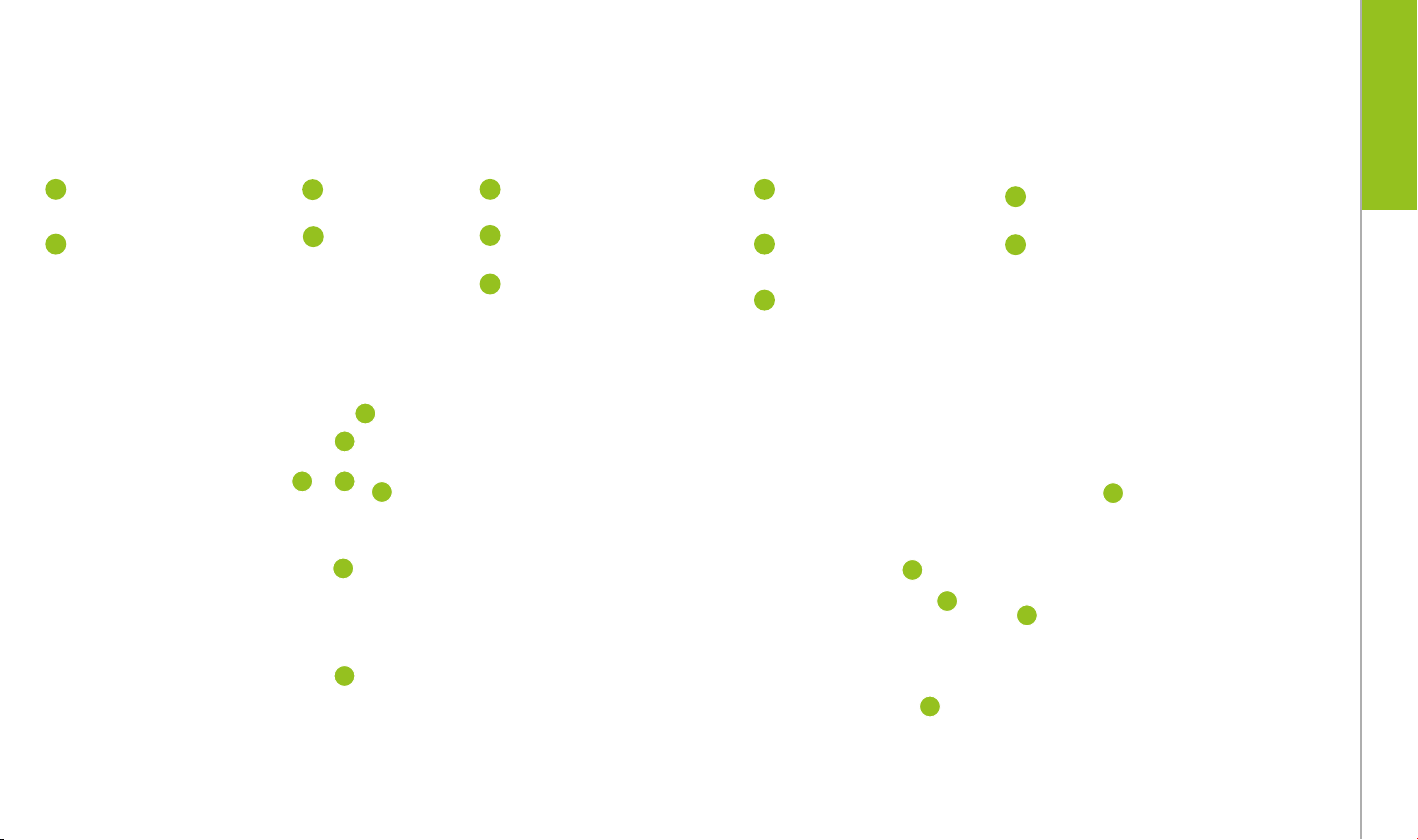
Device description GEOCARE®
OVERVIEW
Device description Active charging cradle
1
On/off key
2
SOS key
3
Microphone
4
Speaker
4
5 6
2
3
5
Network status
6
Service
7
Battery status
1
7
1
SOS key
2
Day-care-key
3
Search-for-GEOCARE-key
2
4
Speaker
5
Microphone
4
1
5
3
GEOCARE®
4
GEOCARE®
5
Page 4
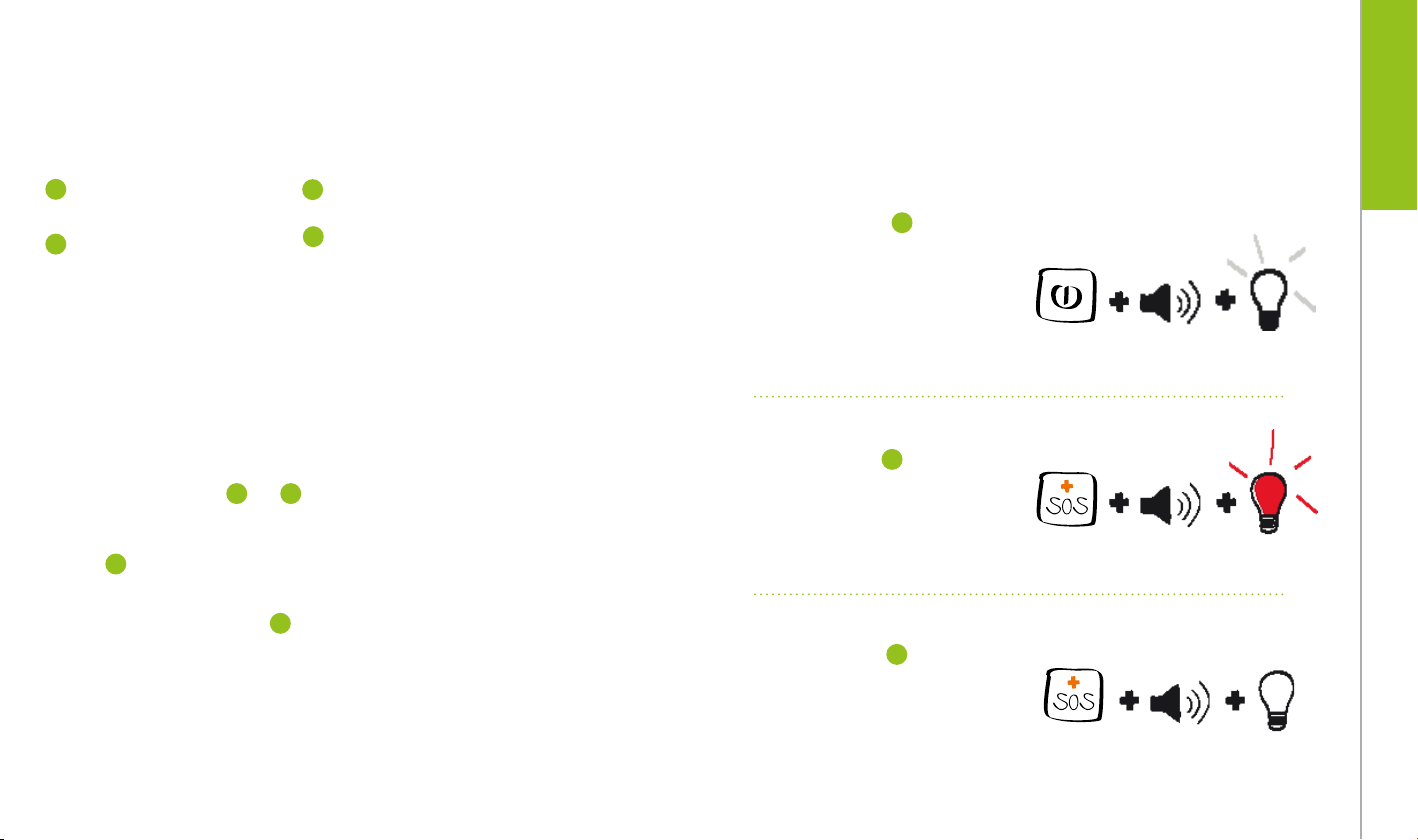
Device description Wireless transmitter
OVERVIEW
Brief description GEOCARE®
1
SOS key
2
Strap closure
2
3
Wristband
4
Status indicator LED
1. Switch device on and off:
Keep the on/off key 1 pressed for
at least 3 seconds until the on/off
key slowly flashes a white light. The
device is ready for operation when
network status indicator shines
in green
3 Sek
2. Trigger emergency call:
Keep the SOS key 2 pressed for
1
4
approx. 3 seconds until an audible
signal is emitted and the SOS key
flashes red light.
3 Sek
3
3. Cancel emergency call:
Press the SOS key 2 for approx.
10 seconds until an audible signal
is emitted and the SOS key no
longer flashes red light.
10 Sec
GEOCARE®
6
GEOCARE®
7
Page 5

Scope of delivery
OVERVIEW
Software and manual
The delivered GEOCARE® package contains
the following components:
• GEOCARE®
• Active charging cradle
• Wireless transmitter with wristband and necklace
• AC adapter with USB-Cable
The Software for the configuration of GEOCARE®
and the appropriate manual are available online at
following internet address:
www.libify.com/GEOCARE-GC5
GEOCARE®
8
GEOCARE®
9
Page 6

Table of contents
OVERVIEW
Device description GEOCARE®. . . . . . . . . . . . . . . . . . . . . . . . . . . . . . . . . . .S.4
Device description Active charging cradle . . . . . . . . . . . . . . . . . . . . . . . . . .S.5
Device description Wireless transmitter . . . . . . . . . . . . . . . . . . . . . . . . . . . .S.6
Brief description GEOCARE® . . . . . . . . . . . . . . . . . . . . . . . . . . . . . . . . . . . .S.7
Scope of delivery . . . . . . . . . . . . . . . . . . . . . . . . . . . . . . . . . . . . . . . . . . .S.8
Software and manual . . . . . . . . . . . . . . . . . . . . . . . . . . . . . . . . . . . . . . . .S.9
Table of contents . . . . . . . . . . . . . . . . . . . . . . . . . . . . . . . . . . . . . . . . . . .S.10
Charging the battery/battery life . . . . . . . . . . . . . . . . . . . . . . . . . . . . . . . . .S.12
Switching on and off . . . . . . . . . . . . . . . . . . . . . . . . . . . . . . . . . . . . . . . . .S.13
Installing the software . . . . . . . . . . . . . . . . . . . . . . . . . . . . . . . . . . . . . . .S.14
Configuring GEOCARE®. . . . . . . . . . . . . . . . . . . . . . . . . . . . . . . . . . . . . . . .S.15
INSTALLATION
Permissions for notification profiles. . . . . . . . . . . . . . . . . . . . . . . . . . . . . . .S.21
Notes on „general settings“ . . . . . . . . . . . . . . . . . . . . . . . . . . . . . . . . . . . .S.24
Alarm settings . . . . . . . . . . . . . . . . . . . . . . . . . . . . . . . . . . . . . . . . . . . . .S.28
Zone Configuration . . . . . . . . . . . . . . . . . . . . . . . . . . . . . . . . . . . . . . . . . .S.30
SIM card settings: PIN, APN and AGPS . . . . . . . . . . . . . . . . . . . . . . . . . . . . . .S.32
GEOCARE® Hardware/status. . . . . . . . . . . . . . . . . . . . . . . . . . . . . . . . . . . .S.33
Top menu bar . . . . . . . . . . . . . . . . . . . . . . . . . . . . . . . . . . . . . . . . . . . . .S.34
USAGE
Wireless transmitter . . . . . . . . . . . . . . . . . . . . . . . . . . . . . . . . . . . . . . . . .S.36
First use of the wireless transmitter. . . . . . . . . . . . . . . . . . . . . . . . . . . . . . .S.37
Remodelling instructions for the wireless transmitter / radiobutton . . . . . . . . . .S.40
To wear the radiobutton, you have two alternatives: . . . . . . . . . . . . . . . . . . . .S.40
Wearing the radiobutton as a wristwatch . . . . . . . . . . . . . . . . . . . . . . . . . . .S.40
Wearing the radiobutton as a necklace . . . . . . . . . . . . . . . . . . . . . . . . . . . . .S.43
Active charging cradle. . . . . . . . . . . . . . . . . . . . . . . . . . . . . . . . . . . . . . . .S.46
First use of the Active charging cradle . . . . . . . . . . . . . . . . . . . . . . . . . . . . .S.48
Operating GEOCARE®. . . . . . . . . . . . . . . . . . . . . . . . . . . . . . . . . . . . . . . . .S.51
SMS commands. . . . . . . . . . . . . . . . . . . . . . . . . . . . . . . . . . . . . . . . . . . .S.53
GEOCARE™ mobile App
for Android phones . . . . . . . . . . . . . . . . . . . . . . . . . . . . . . . . . . . . . . . . . .S.55
Setting up the GEOCARE® Portal. . . . . . . . . . . . . . . . . . . . . . . . . . . . . . . . . .S.57
Room monitoring . . . . . . . . . . . . . . . . . . . . . . . . . . . . . . . . . . . . . . . . . . .S.60
INDICATIONS
Cleaning. . . . . . . . . . . . . . . . . . . . . . . . . . . . . . . . . . . . . . . . . . . . . . . . .S.61
Wireless transmitter‘s battery. . . . . . . . . . . . . . . . . . . . . . . . . . . . . . . . . . .S.62
Troubleshooting. . . . . . . . . . . . . . . . . . . . . . . . . . . . . . . . . . . . . . . . . . . .S.63
Maintenance. . . . . . . . . . . . . . . . . . . . . . . . . . . . . . . . . . . . . . . . . . . . . .S.67
Technical data - GEOCARE® GC5 (1/3). . . . . . . . . . . . . . . . . . . . . . . . . . . . . .S.69
Technical data - GEOCARE® GC5 (2/3). . . . . . . . . . . . . . . . . . . . . . . . . . . . . .S.70
Technical data - GEOCARE® GC5 (3/3). . . . . . . . . . . . . . . . . . . . . . . . . . . . . .S.71
Technical data - Wireless transmitter RB3 . . . . . . . . . . . . . . . . . . . . . . . . . . .S.72
Technical data - Active charging cradle AC3 . . . . . . . . . . . . . . . . . . . . . . . . . .S.73
Warning notices. . . . . . . . . . . . . . . . . . . . . . . . . . . . . . . . . . . . . . . . . . . .S.74
For Safety. . . . . . . . . . . . . . . . . . . . . . . . . . . . . . . . . . . . . . . . . . . . . . . .S.75
Operation – Overview . . . . . . . . . . . . . . . . . . . . . . . . . . . . . . . . . . . . . . . .S.80
LED indicators – Overview . . . . . . . . . . . . . . . . . . . . . . . . . . . . . . . . . . . . .S.80
EU declaration of conformity
GEOCARE® GC5 . . . . . . . . . . . . . . . . . . . . . . . . . . . . . . . . . . . . . . . . . . . .S.84
EU declaration of conformity
radiobutton. . . . . . . . . . . . . . . . . . . . . . . . . . . . . . . . . . . . . . . . . . . . . . .S.85
EU declaration of conformity
Active charging cradle AC3 . . . . . . . . . . . . . . . . . . . . . . . . . . . . . . . . . . . . .S.87
Notes. . . . . . . . . . . . . . . . . . . . . . . . . . . . . . . . . . . . . . . . . . . . . . . . . . .S.89
OVERVIEW
INSTALLATION USAGE
INDICATIONS
GEOCARE®
10
GEOCARE®
11
Page 7
Charging the battery/battery life
OVERVIEW
Switching on and off
Connect the USB connector of the charging cradle to the supplied
charger adapter. Fit the required AC plug (EU or UK)* and connect
it to the power supply.
Place the GEOCARE® in the charging cradle. The GEOCARE® must be
charged before it is used for the first time. The duration for a complete charge is approx. 3 hours.
The typical battery lifetime is 30 hours. When only 20% of this lifetime is remaining, GEOCARE® emits an audible sound. From the
moment when only 10% of the battery lifetime is remaining, an
audible sound is emitted periodically every 15 minutes. Beside the
audible sounds signaling low battery when its remaining lifetime
is 20%, 10% and 0%, a notification is sent to the configured emergency contact by SMS. After the first notification, the GEOCARE® is
still operational for 3 hours, depending on the configuration.
* The AC plug is attached to the bottom of the charging adapter (it is attached and then snapped
upwards and into place). To remove the AC plug, release the catch on the bottom of the charging adapter
(OPEN).
Caution: To save energy, the illumination for all keys is switched off one
minute after the device is last used. The illumination can be reactivated
by briefly pressing the SOS key.
Switching on
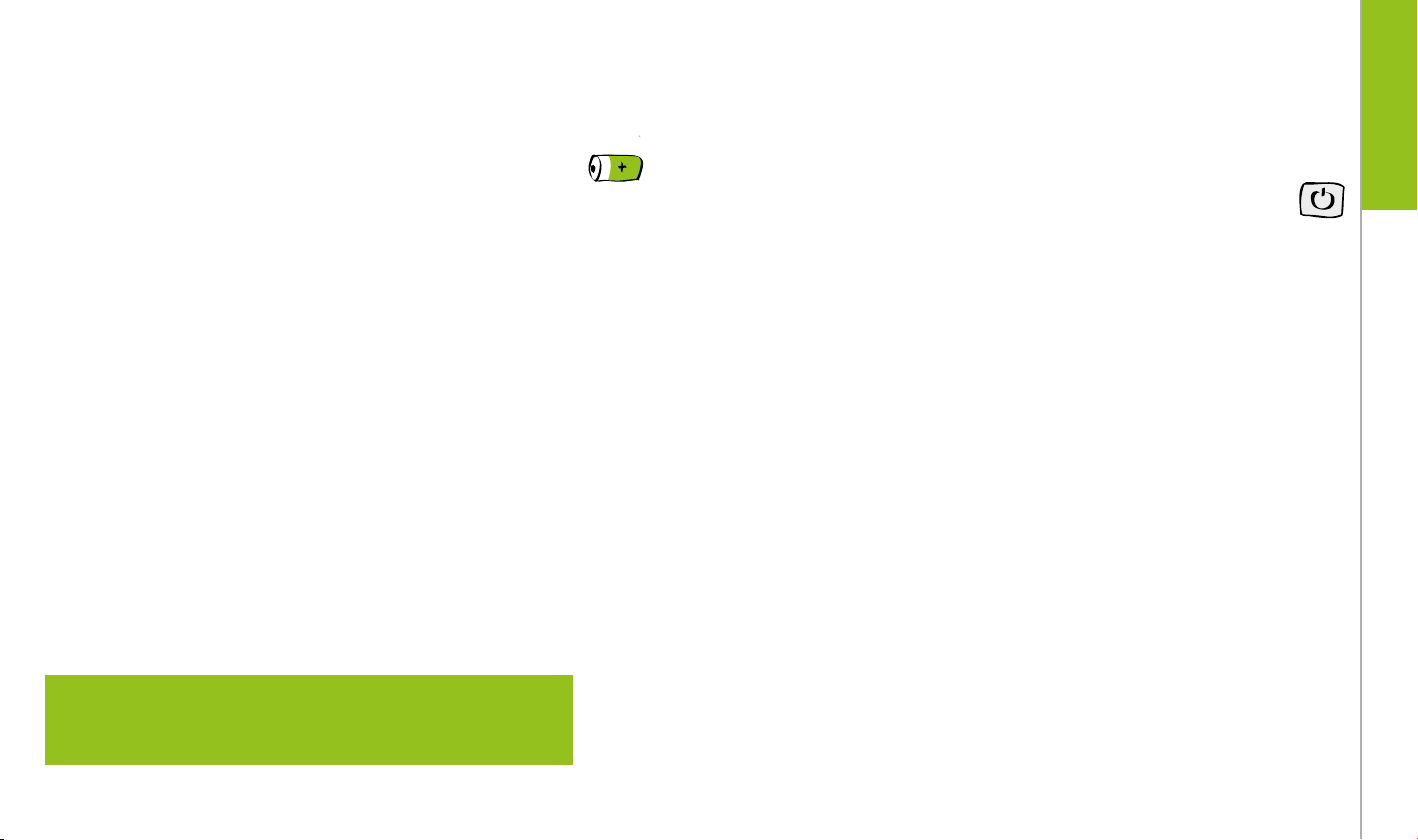
To switch on GEOCARE®, hold the on/off key pressed for at least 3
seconds until the on/off key slowly flashes. Then release the on/
off key. At the end of this starting process a sound is emitted and
status lights show the operational readiness.
Alternatively, GEOCARE® will be switched on automatically when
the device is placed in the charging cradle. It then remains ready
for use until it is switched off. When GEOCARE® is in the charging
cradle, the on/off key lights up white.
Switching off
Preferably, you should always keep GEOCARE® switched on, so
that you can always trigger an emergency call and receive incoming calls. The only time you have to switch off GEOCARE® is when
you have to enter an area where the usage of mobile phones is
dangerous or prohibited (e.g. on an aircraft). To do this, keep the
on/off key pressed for at least 3 seconds until it flashes a white
light. After a brief moment an audible sound is emitted. Then both
keys no longer light. GEOCARE® is switched off.
GEOCARE®
12
GEOCARE®
13
Page 8
INSTALLATION
Installing the software
Your computer must have a USB port and be connected to Internet.
It should also have the operating system windows 7 or windows
10 installed on it.
Open your browser and enter the following address in the address
bar: www.libify.com/GEOCARE-GC5
Download the installation file for GC5. Start the installation with
a double click on the file. After the installation, you will find the
GEOCARE® Software in the installation directory you selected. You
also find a shortcut to this software on your desktop.
Connecting GEOCARE® to your computer
Switch on GEOCARE®. Connect the charging cradle to your PC using
the USB cable and place GEOCARE® in the charging cradle.
Starting the program
Start the software by double-clicking the program icon on your
computer.
Configuring GEOCARE®
Plug GEOCARE® in the charging cradle and connect the cradle to your
computer via its USB cable. Wait until the On/Off key lights up white.
Start the software by double-clicking on the program symbol on
the desktop of your computer.
As soon as the program detects the plugged in GEOCARE®,
the corresponding field is highlighted in yellow in the device overview (Device Explorer). Select this field by double-clicking on it – it will then be highlighted in blue.
By this doubleclick, the Configuration-/Statuswindow is opened.
Alternatively it can be opened from the menu „Edit Device“ in the
upper menu bar.
General settings
INSTALLATION
INSTALLATION
GEOCARE®
14
GEOCARE®
15
Page 9

In the field „Owner“ of the configuration menu, you can edit individual data of the GEOCARE®‘s user – e.g. Name, phone number as
well as relevant informations about the person.
In the menu „General Settings“, you can edit amongst others de-
vice language, time zone, map references, as well as distance formats.
Settings for emergency calls
Emergency contacts/notification points
INSTALLATION
It is imperative to set an emergency alarm receiver (Notification
point). Move the cursor to the first entry „not configured“ in the
menu „Alarm Receivers/Peer Notifications“. Select the type of phone connection from the drop down list in the middle. In the field on
First of all, define the first emergency alarm receiver – It is only after doing this that you can use GEOCARE® as a mobile tracking- and
emergency call system.
GEOCARE®
16
the right next to the selection box, type the phone number using
the following format: Country code + phone number without leading zero e.g. +49151234567 („+49“ = country code for Germany).
Subsequently select a notification profile from the next selection
box. Notification profiles are explained in the following part.
GEOCARE®
17
Page 10

Trusted monitor:
This is the highest privacy level („Trusted monintor“) – In the event
of an emergency, the set emergency alarm receiver is contacted
by a phone call as well as an SMS. This set alarm receiver also
receives all messages from GEOCARE® (including battery warning
messages, status messages and location data) and can actively
locate GEOCARE®.
Gateway forwarding:
The messages from GEOCARE® are sent to an external gateway (such
as a rescue coordination center).
Follow the same procedure for each phone number that you wish to
assign. In the field „Info“, you can add a name or other information for
each phone number.
INSTALLATION
Caution: You should only register highly trustworthy people
as „trusted monitors“!
Only receive emergency calls
(SMS and calls):
This emergency alarm receiver is informed with a phone call and a
notification by SMS. He/she does not receive any further notifications or permissions.
Only receive emergency calls
(voice connection only):
This emergency alarm receiver is informed with a phone call. He/
She receives no further permissions or notifications.
GEOCARE®
18
The priorities for the first four phone numbers are set in advance, ac
cording to the order in which they were listed. The priority determines
the order in which the set phone numbers are informed about an
emergency situation.
The fields 5 and 6 for phone numbers are reserved for emergency
service operators. When needed, you can configure all settings indi
vidually instead of using a predefined profile. You do this by clicking
on „More“.
Preferably you should save your changes as soon as you make
them. You save them by pressing the button „Save“ in top menu bar.
Click with the cursor outside a field once before saving your settings.
This is imperative for the data you edited to be saved correctly.
!
GEOCARE®
-
-
19
Page 11

GEOCARE®-Gateway
In the last assignable phone number position, you have the possibility to select the GEOCARE® gateway. Emergency call messages from
GEOCARE® are then also sent to the server. The emergency messages
can thereby be seen by the emergency alarm receiver on our online
portal (https://portal.geocare.de).
For more information, please refer to page 53.
Permissions for notification profiles
Type of the SOS notification
INSTALLATION
SMS notification The emergency alarm receiver
(notification point) is informed by
text message (SMS).
Call notification The emergency alarm receiver
(notification point) is informed by
a phone call.
Permissions
Allow status messages The emergency alarm receiver
(notification point) is authorised
to query the device status (e.g.
battery level) and to receive other
status messages.
GEOCARE®
20
GEOCARE®
21
Page 12

Receive undefined
messages
Allow system
configuration
SMS-information
messages
The emergency alarm receiver
(notification point) is allowed to
receive messages that are forwarded by GEOCARE® as undefined
messages. These may include
incoming SMS from unauthorised
third parties.
(e.g. information from the mobile
phone network etc.)
The emergency alarm receiver
(notification point) is allowed to
change GEOCARE® configuration
settings via SMS — for example, the
time zone.
The emergency alarm receiver
(notification point) is allowed to
receive information messages from
GEOCARE®. These may include messages when GEOCARE® is leaving
or returning to a particular defined
zone (e.g. HOME zone).
Allow SOS
confirmation
When this setting is active, the
SOS is confirmed in the event of an
emergency call when the phone
call is received.
If this setting is not selected, it
is imperative in the even of an
emergency call, to call back the
GEOCARE® or to confirm the SOS
with an SMS.
Gateway mode active Messages from GEOCARE® are
simultaneously sent to another
phone number.
Hereby, you have more service
options. However, depending on
the type of your contract, it could
cause additional costs.
INSTALLATION
22
GEOCARE®
GEOCARE®
23
Page 13
Notes on „general settings“
SMS map style
Defines how the position of the emergency caller is displayed in
the SMS to the emergency alarm receiver
Tex t Plain text message with details of
coordinates.
Google Maps
(Android, Blackberry,
iPhone, Windows Phone 7)
Map link is optimised for display in
Google Maps.
This is a standard setting and true
in most application scenarios.
Deviation from UTC standard
Sets the current time zone
INSTALLATION
All telephones
(manual map selection)
KML
(Google Maps für Nokia s60,
Windows Mobile)
LMX
(Nokia Navigator)
Blackberry
(Blackberry Maps)
GEOCARE®
24
Working map link for all internetable phones. In an intermediate
step, the appropriate map must be
selected manually on the smartphone.
Map link is already optimised for
Google Maps on Nokia phones
(Symbian 60) as well as on
phones with Windows Mobile.
Map link is already optimised for
Nokia Navigator.
Map link is already optimised for
Blackberry Maps.
UTC
is the coordinated universal time at the prime
meridian in Greenwich. By
entering the relevant deviation, GEOCARE® is set to
+1 = Central European Time
+2 = Central European Summer Time
Important: It is essential to change the
settings when changing from winter to summer
time and vice versa to ensure that an incoming
emergency call is marked with the correct time
the correct local time.
Disable on/off key Check the box if you wish to pre-
vent the user of the GEOCARE® device from switching off the device.
GEOCARE®
25
Page 14
Usage Profile
Highest accuracy (40) GEOCARE® stores location data every
40 seconds. This storage interval
provides the highest accuracy and
lowest battery lifetime.
Precise (90) Location data are stored every 90
seconds.
This is the recommended setting.
Standard (120) Location data are stored every 120
seconds. This storage interval provides an optimised setting in terms of
accuracy and battery lifetime.
Long runtime (600) Location data are stored every 600
seconds.
Long runtime (1200)
Attention! with „Long runtime“ profile
enabled, the departure of the wearer
from a specific zone remains undetected for a longer period of time.
Location data are stored every 1200
seconds.
Status message interval A status message is sent to the
emergency alarm receiver within a
defined interval of minutes. A such
interval is at least 240 minutes long.
Ring tone
INSTALLATION
Extended standard (180) Location data are stored every 180
seconds.
GEOCARE®
26
Sound 1 to 3
There are three different ring tones
to choose from.
Handset volume Volume of the
GEOCARE®
Charging cradle volume Volume setting for the external
charging cradle.
GEOCARE®
27
Page 15

Alarm settings
Maximum emergency call
ringing duration
How long should the emergency
call ring at the emergency alarm
receiver’s end?
Maximum wait time for
emergency call confirmation with key „5“
(Tone dialling)
Within the defined time, the emergency call receiver must press key
„5“ on his/her telephone. If this is not
done within the set time, the connection is terminated and a new call is
made to the emergency call receiver.
Do not select a too long time inter val. If an emergency call from GEOCARE® is answered by voicemail, GEOCARE® is blocked by voicemail for the complete duration of the selected time interval before it can continue
to work through its emergency call priorities
Call acceptance for nonemergency calls activated
The GEOCARE® user can be called
from the telephone numbers configured as emergency alarm receivers
without having triggered an SOS
alarm.
SOS alarm transmission
delay in seconds
Wait time in seconds before
redial
(
This value must be set for
each priority level
)
Number of emergency call
recurrences
Duration of SOS alarm‘s delay in
seconds. Enables cancellation of
false alarms before notification of
contact.
Duration for GEOCARE® to wait for a
return call before redialling . This has
to be done after GEOCARE® has established and ended a connection to the
emergency alarm receiver without
speaking to him/her . The wait time is
given in seconds.
How often should the emergency call
to an emergency alarm receiver be
repeated before the next recipient is
called?
INSTALLATION
GEOCARE®
28
GEOCARE®
29
Page 16

Zone Configuration
Zones, home zones or hazard zones (NoGo-Zone) can be set by a
free selectable circular radius around a free selectable position.
In these fields, you can define zones and reference points for GEOCARE® to use in its position reports.
When the fence is activated („fence active“), all authorised emergency alarm receivers receive an SMS as soon as the wearer
leaves or enters the zone.
We recommend that you basically do not select a too small radius, because if you do, even small fluctuations in GPS signal
quality can trigger SMS notifications.
Using the cursor, select the location you want to edit from the locations list (left).
Enter a concise description in the field „Name“. If you are setting
a „zone“, you can now also adjust the radius as well as enable or
disable the fence.
Enter the address information and click on the button „Determine
coordinates from address“. A green pin is placed on the adjacent
map (requires an Internet connection).
For checking purposes and if necessary fine corrections, you can
zoom in to this map. If the green pin is not exactly in the required
position, move the cursor to the required position and double click
— the green pin then jumps to this position.
INSTALLATION
30
GEOCARE®
GEOCARE®
31
Page 17

SIM card settings: PIN, APN and AGPS
GEOCARE® Hardware/status
SIM card
Internet access settings are automatically adopted based
on the SIM card that is inserted. If necessary, you can change them
manually.
Make sure the APN Data are entered correctly. If these Data are
not correct, there is a possibility that the GEOCARE® restricted in
its functionality.
GPS
In order to accelerate the location detection, you can enable AGPS
(Assisted Global Positioning System). If GEOCARE® has not been in
use for a long period of time or has been in areas without any GPS
reception, the first location detection process usually takes a little
longer as some basic data must first be transmitted from the satellites. When using AGPS, these data are transmitted separately via
the mobile phone network. They then enable a quick position detection. This function imperatively requires the correct Internet settings for the SIM card (see above).
GEOCARE®
32
In this tab, informations about the GEOCARE® are being displayed,
for example, the serial number, IMEI number and the telephone
number of the GEOCARE® device.
These details are automatically shown as soon as GEOCARE®
is connected to the PC.
If all details have been given in automatically, no more entries are
required from you. If this is not the case (if necessary e.g. phone
number), type in the missing informations and save them with the
button “Save” in the the top menu bar.
GEOCARE®
INSTALLATION
33
Page 18
Top menu bar
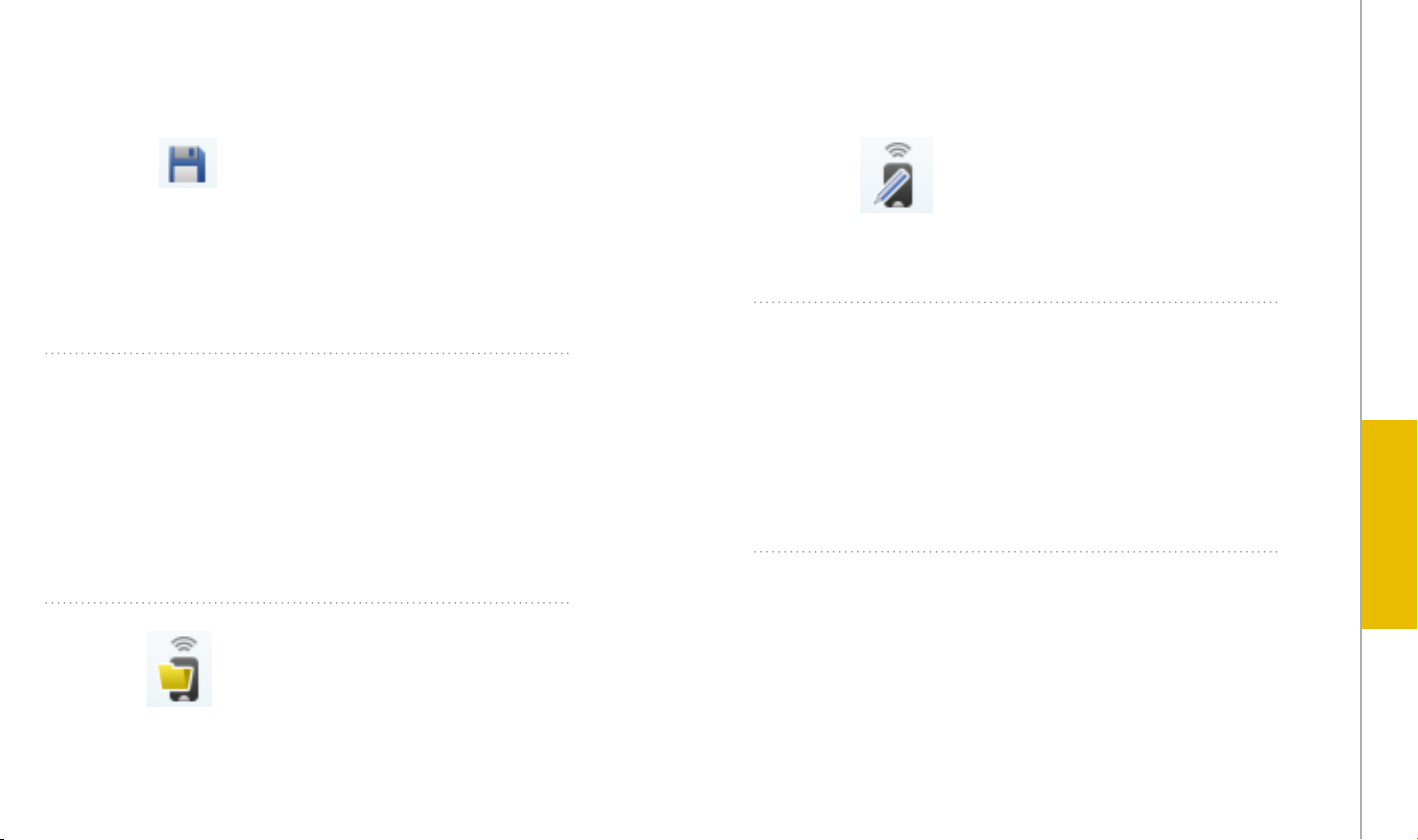
Save
Load from DB
Saves the configuration
settings simultaneously to
the GEOCARE® device and a
database that is managed
by the software. Prior to
clicking on the button „Save“
you must click once outside
the edited field.
Loads the last settings that
were saved to the database
into the PC software, even
if configuration settings on
the device have since been
changed via SMS commands.
Loads the last settings that
were saved on the device
into the PC software.
Edit device
Delete device
Update firmware
Opens the configuration
window.
Removes the device from
the device overview.
Installs the most current
firmware version on the
device, when there is a new
version.
USAGE
USAGE
Load from device
GEOCARE®
34
GEOCARE®
35
Page 19

Wireless transmitter
First use of the wireless transmitter
You do not have to renounce
to safety while the
GEOCARE®
device is being charged in the
charging cradle.
The comfortable and stylish wireless transmitter can be worn like a wristwatch on the wrist .
What looks like a watch dial
at first glance is actually the
easy-to-use SOS button. The emergency call is securely transmitted via radio.
Special technology prevents call failures and accidental triggering
of an alarm. Of course the GEOCARE® wireless transmitter is waterproof, and therefore ideal to wear when bathing or showering.
Details on the GEOCARE® wireless transmitter:
● Complies with the DIN standard for personal alarm systems / triggering devices
●
Range: 250 metres outdoors, 30 metres indoors
●
Simple to trigger alarm — directly from the wrist
● Radiobutton is the product name of GEOCARE®‘s wireless transmitter
Connect your GEOCARE® to your PC and start the GEOCARE® software.
As soon as the GEOCARE® software has detected the GEOCARE®
(highlighted in yellow in the overview on the left of the display),
activate the GEOCARE® by double-clicking on the device in the display. Afterward, go to the main panel on the right, and move down
to the „ZigBee radio unit“ section.
USAGE
It may take a few seconds until the device has been read out and
you can click the „ZigBee radio unit“ section.
Now click on the checkbox „Switch on“ in case it has not yet been
checked to activate the ZigBee module in the GEOCARE®. Next,
click on the „+“ icon.
GEOCARE®
36
GEOCARE®
37
Page 20

A dialogue box then opens (see above) and you have two possibilities to connect the wireless transmitter to the GEOCARE®:
Connect by entering the IEEE address
Enter the IEEE number without hyphens in the previously opened
dialogue box and confirm with „OK“. The sixteen-digits IEEE number can be found on the packaging for the wireless transmitter
(e.g. 00-1B-C5-07-80-00-00-55).
Connect through automatic detection
Press the button on the wireless transmitter shortly until it shines
red. The wireless transmitter now tries to connect to the GEOCARE®.
This process can last up to 30 seconds. If during this time the wireless transmitter flashes a green light, then the connection was
completed successfully. If the the wireless transmitter flashes a
red light once again after 30 seconds, then the connection could
not be completed. In this case, please repeat the connecting pro-
cess once again until it shines green.
If you do not enter any IEEE address in the dialogue box, the GEOCARE® automatically connects to the wireless transmitter whose
signal is the strongest.
Caution: After the connection, it is imperative to run a test to ensure that the GEOCARE® is connected to the appropriate wireless transmitter. When the the wireless transmitter is successfully connected , it is indicated by an entry in the GEOCARE®
Enterprise Software.
USAGE
GEOCARE®
38
GEOCARE®
39
Page 21

Remodelling instructions for the wireless transmitter / radiobutton
To wear the radiobutton, you have two alternatives:
• Wear it as a wristwatch
• Wear it as a necklace
In the following you find – depending on the way you want to wear
your wireless transmitter– two illustrated guides to assist you in
remodelling it for each of the two alternatives:
Fig. 1: All individual parts of the radiobutton.
Wearing the radiobutton as a wristwatch
1. Take out the radiobutton‘s package from GEOCARE®‘s package, open it and place the individual parts on an empty and plane
surface in front of you. The radiobutton consists of five individual
parts(Fig. 1).
2. Introduce the metall pin of the wristband (Fig. 2) in the lower hole
of the radiobutton‘s housing. The pin is retractable at both ends, so the
wristband can easily and quickly be mounted.
GEOCARE®
40
Fig. 2: Plugging in the wristband‘s pin on the lower side.
GEOCARE®
USAGE
41
Page 22

3. Now plug in the upper end of the pin (Fig. 3) in upper hole in
the radiobutton‘s housing. Should it be difficult to plug in the pin in
the lower side of the housing, then you must also press down the
upper side of the pin a little bit.
Subsequently, take the second half of the wristband and proceed
the same way you did for the first half, following the steps 2. and 3.
4. Once you have successfully performed the steps one to three,
you can easily and comfortably put on the radiobutton on your arm
(Fig. 4).
Wearing the radiobutton as a necklace
1. Take out the radiobutton package from the GEOCARE®‘s package, open it and place the individual parts on an empty and plane
surface in front of you. The radiobutton consists of five individual
parts(Fig. 1).
2. Introduce the metall pin of the fixing ring (Fig. 5)
of the radiobutton‘s housing.
fixing ring
can easily and quickly be mounted.
The pin is retractable at both ends, so the
3. Now plug in the upper end of the pin (Fig. 6) in upper hole in
the radiobutton‘s housing. Should it be difficult to plug in the pin in
the lower side of the housing, then you must also press down the
upper side of the pin a little bit.
4. Introduce one side of the wearing strap through the fixing ring (Fig.
7).
5. Plug the two ends of the wearing strap together (Fig. 8).
6.
Once you have successfully performed the steps one to four, you
can easily and comfortably put on the radiobutton as a necklace
(Fig. 9).
in the lower hole
USAGE
Fig. 3: Plugging in the wristband‘s pin on the
upper side.
GEOCARE®
42
Fig. 4: Radiobutton assembled as a wristband.
GEOCARE®
43
Page 23

Fig. 5: Plugging the pin of the wearing ring on
the lower side.
Fig. 7: Radiabutton with mounted wearing strap. Fig. 8: Plugged together wearing strap.
Fig. 6: Plugging the pin of the wearing ring on
the upper side.
Fig. 9: Radiobutton assembled as a necklace.
USAGE
Note:
The lock of the wearing strap is constructed in such a manner that
it can automatically be opened in emergency situations when the
band is pulled a bit more firmly.
44
GEOCARE®
GEOCARE®
45
Page 24

Active charging cradle
1. SOS-Button: Triggering the SOS
The active charging cradle has a speaker and a microphone installed,
that have a higher acoustic performance than the components integrated in the GEOCARE®. Speaker, microphone and SOS-Button are
not active as long as the
GEOCARE® is not inserted in the charging
cradle.
Therefore, in order to make use of improved acoustic performance,
you should not forget to plug in the
GEOCARE® in the charging cradle
as soon as you get home.
The active charging cradle has three buttons for its operation:
When the GEOCARE® is plugged in the charging cradle and the charging cradle is ready for operation, its ring shines green. Additionally,
there is a radio connection between GEOCARE® and the charging cradle. When the GEOCARE® is not plugged in the charging cradle but
is connected via radio, the ring shines green, but a little less bright.
The active charging cradle has three buttons for its control. With
each button press, the appropriate button lights up. Additionally,
the ring shines green two times when the function of the button
could be transmitted to the GEOCARE®. In the event that the function could not be executed successfully, the ring shines red, two
times.
2. Left button: Search for GEOCARE® button: By pressing
this button, GEOCARE® emits an accoustic signal that
makes it easy to find (Depending on the implementaton).
3. Right button: Daily reminder for the daily OK-notifiction
to an emergency call center.
Depending on the implementation of your charging cradle, it is
able to communicate via radio with the last GEOCARE® that was
plugged in it. Thereby, it is possible to press the buttons when
the GEOCARE® is not plugged in the charging cradle but is in radio
range.
If the buttons are pressed when only a radio connection is available, the applying confirmation signals are the same as when
there is a direct connection to the device.
USAGE
46
GEOCARE®
GEOCARE®
47
Page 25
First use of the Active charging cradle
For commissioning, plug the charging cradle‘s USB cable in the
provided AC adapter and connect the latter to a power outlet.
The charging cradle is furnished with an internal battery, so that
it can provide its complete functionality within 24 hours without
external power source. This battery is fully charged after it has
been connected to a power outlet for twelve hours. In the event of
a power failure, the ring slowly pulsates green. The function of the
charging cradle is still assured. Should the internal emergency
power supply reach a critiacl state, the illuminated ring alternatively shines red and green. In this case, the power supply must
urgently be restaured.
is placed in it. When an implementation with radio connection is
used, this connection still remains even when the GEOCARE® is
taken out of the charging cradle (the illuminated ring only lights
slight green).
To stop the connection between GEOCARE® and charging cradle,
press the green and yellow button simultaneously for at least
4 seconds. The charging cradle then lights green and again red.
After this the illuminated ring no longer lights and once more, the
charging cradle is ready to be connected to a device.
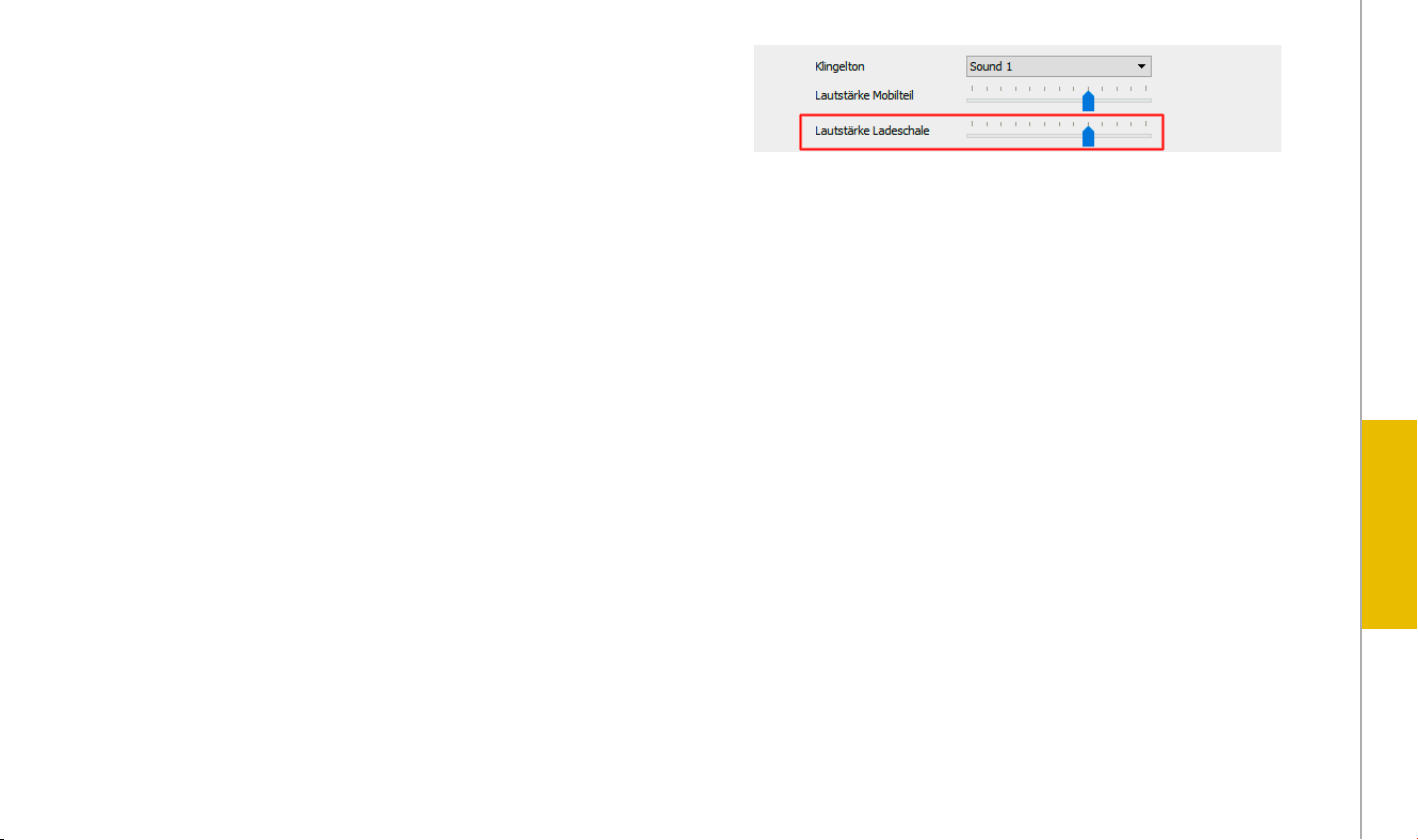
The volume of the charging cradle can be configured in the software GEOCARE® Enterprise. To do this, start the software, connect
GEOCARE® with your computer via charging cradle and USB cable
and open the device configuration as described on page 15.
The following figure shows the section of the software in which
the volume can be modified. This setting is found in the field
„General settings“.
The charging cradle automatically connects to the GEOCARE® that
GEOCARE®
48
GEOCARE®
USAGE
49
Page 26

Function test
To complete commissioning, a function test of the GEOCARE® must
be performed. To do this, you must trigger an emergency call as
described on page page 7. If the emergency alarm receiver gives a feedback and receives your location data displayed correctly, then the function check is successful.
BENUTZUNG
Operating GEOCARE®
What do I have to do as a GEOCARE® user?
Switching on GEOCARE®
In order to trigger an emergency call, press the SOS button for 3
seconds. As a confirmation, an audible signal is emitted. During
the emergency call, the SOS button flashes red light.
The emergency alarm receiver receives a notification about the
emergency call (according to settings on page page 15). Wait
until he/she calls back and the audio connection is established.
After the emergency alarm receiver answered/ended the call a
further audible signal is emitted as a confirmation that the emergency call is ended.
Subsequently, test the radiobutton by pressing its SOS button. If
an alarm is triggered, then the radiobutton is connected correctly
and ready to be used.
GEOCARE®
50
To switch on the GEOCARE®, hold the on/off key pressed for 3 seconds until
As a confirmation, an audible sound is emitted. As soon as
GEOCARE® is ready to be used, the status lights show its operati-
onal readiness. Alternatively,
as soon as the device is inserted
then stays ready for operation until it is turned off. When
is in the charging cradle, the On/Off key flashes white light.
it flashes white light. Then release the On/Off key.
GEOCARE® is automatically turned on
in a powered charging cradle. It
GEOCARE®
Triggering a GEOCARE® emergency call
To trigger an emergency call, press the SOS key for 3 seconds. As a
confirmation, an audible signal is emitted.
During the emergency call, the On/Off key flashes RED light. The
emergency alarm receiver is informed of your emergency situation
by call or/and SMS. As soon as he/she actively calls you back, an
audible connection is established.
GEOCARE®
USAGE
51
Page 27

Ending a GEOCARE® emergency call
If necessary (e.g. if an emergency call is triggered erroneously),
you can end the emergency call yourself by keeping the SOS button pressed for 10 seconds. The termination is confirmed by an
audible signal.
Accepting a GEOCARE® call
SMS commands
Position reports
One-off query of the current
position
SMS
commands
position
Example
SMS
position
If the number dialed is busy, GEOCARE® automatically repeats
the call several times. If it is still not possible to establish a connection, GEOCARE® selects the next emergency alarm receiver
from your emergency contacts list.
Depending on the configuration, GEOCARE® rings several seconds like telephone. The call is automatically accepted. You do
not have to press any key. During connection with the caller, the
On/Off key flashes red light. Talk to the caller.
When the emergency call is terminated by the emergency alarm
receiver, the conversation is ended automatically. You do not have
to press any key. The emergency alarm receiver knows your location. He/She organises the required help. He/She ends the phone
call. An audible signal signalises the end of the emergency call.
Even if you can‘t speak or hear, you get the help you need because
your emergency alarm receiver automatically gets the information
that it is an emergency call from you as well as your location.
GEOCARE®
52
Search modeDepending on the searchradius,
it sends a message at regular intervals with the wearer‘s current
position
Deactivate search mode
Switch on Eco Mode When Eco Mode is turned on, the
GPS function is not active. Position cannot be determined
Switch off Eco Mode
Device status – an SMS containing various informations is
sent to the emergency contact
(e.g. battery status etc.)
searchon
searchoff
ecoon
ecooff
status
searchon
searchoff
ecoon
ecooff
status
GEOCARE®
USAGE
53
Page 28

GEOCARE® version number
SMS language selection selects the language in which
SMS should be sent
Siren function - the GEOCARE®
emits sounds at the desired
intervals.
version
de/gb
sirene=X
version
GEOCARE™ mobile App
for Android phones
de
An optional app is available for mobile phones with an Android
operating system. If needed, the GEOCARE™ mobile app can be installed directly onto your phone from the Android Play Store.
sirene=3
The GEOCARE™ mobile app provides a convenient overview and
USAGE
control function for one or more GEOCARE® devices in a special
application for Android phones. Incoming emergency calls are displayed directly in this software and can also be answered from the
Write down the IMEI number
and phone number of the
GEOCARE®. You find these
details in the „Hardware/
Status“ section.
GEOCARE®
54
GEOCARE®
55
Page 29

same software.
Setting up the GEOCARE® Portal
With a keystroke, you can query (irrespective of an emergency call)
the position of the GEOCARE® user and immediately get it displayed
on a map. Using the navigation function you can be directed to the
location of the GEOCARE® user.
The software shows you at a glance whether the GEOCARE® user is
inside or outside the selected home zone.
Registration of the GEOCARE®
In order to use the GEOCARE® Portal, you must activate the permissions of the last entry of the notification points.
USAGE
After doing this click on „Save“. Please note that when this function
is selected, an additional SMS is always sent to our gateway (German T-Mobile number).
56
GEOCARE®
Please register now in the GEOCARE® Portal at
https://portal.geo-care.de and enter your personal data under
GEOCARE®
57
Page 30

„Profile“.
Afterwards, click on „Add another GEOCARE“ under GEOCARE® Devices.
Enter the phone number of the GEOCARE® and the IMEI. Click on
„Create GEOCARE“. The GEOCARE® is now succesfully registered in
the portal.
Setting up the dashboard in the Software
The dashboard allows you to see a general overview of the user.
When you click on a device in the device overview, the dashboard
for the corresponding user is opened.
If you possess the alarm management function, you will have to
request an application ID in the GEOCARE® portal. To do so, go to
the portal and click on „Profile“ in the upper navigation bar. (htt-
USAGE
ps://portal.geo-care.de)
GEOCARE®
58
GEOCARE®
59
Page 31

Room monitoring
Cleaning
The GEOCARE® device offers you the possibility of a room monitoring function, so you can monitor what is happening in the environment of the GEOCARE® by listening. In case of an emergency
call, an audio connection with the GEOCARE® is established . By so
doing, an automatic room monitoring is provided. This is also the
case for an emergency call that is directed to an emergency call
centre.
A room monitoring without an emergency call is only possible if the
phone number of the caller device is configured in the GEOCARE®
Enterprise Software as emergency call receiver as described in the
section „Configuring GEOCARE®“ under „Emergency contacts\Notification points“.
After doing this, the room monitoring can be started by a call to the
GEOCARE® device. The device automatically accepts the call and
the caller can listen to what is happening in the surroundings of
the GEOCARE®.
When GEOCARE®, the charging cradle or the wireless transmitter
get dirty, they should be cleaned.
Cleaning GEOCARE® and wireless transmitter
1. Remove GEOCARE® from the charging cradle before cleaning.
2. Clean GEOCARE® und and wireless transmitter with a soft, damp,
lintfree cloth. In exceptional cases only, use a mild, diluted detergent.
Cleaning the charging cradle
1. Unplug the charging cradle’s AC adapter from the mains socket
before cleaning.
2. Clean the charging cradle with a soft cloth.
3. Plug the charging cradle‘s AC adapter back in to the mains socket.
INDICATIONS
GEOCARE®
60
GEOCARE®
61
Page 32

Desinfecting the device
For the dampened desinfection of the device, use commercial disinfectants.
Troubleshooting
GSM Signalindicator flashes red light
Wireless transmitter‘s battery
The wireless transmitter contains a non-rechargeable battery.
When the battery is low and needs to be replaced, the GEOCARE®
automatically informs your emergency contact. He/she will contact you.
If the indicator light on the wireless transmitter does not light
up after you have pressed its SOS key, then the battery is empty
or the wireless transmitter is faulty. Please contact your emergency contact, e.g. by pressing the SOS key on the GEOCARE®
for 3 seconds.
Warning! If the battery of your wireless transmitter is already quite old and the wireless transmitter is located in a
cold environment (below +15°C) for an extended period of
time (approx. 18 hours), it may incorrectly report to your
emergency contact that the battery is low and needs to
be replaced. Your emergency contact will call you on the
GEOCARE®. Inform them that you are currently in a cold environment. When you return to a warm environment, this incorrect
notification will stop.
The GEOCARE® can‘t log on to the mobile network.
1. Ensure that the SIM-Card is inserted correctly
2. Using a mobile phone, check if the SIM-Card is activated
3. Test the mobile radio reception in the environment where the
GEOCARE® is located. Basically, while placing the GEOCARE® in an
environment, you should ensure that the mobile radio reception is
good and that no disturbance sources (e.g. large metal surfaces)
are present in this environment.
GEOCARE® can‘t find the current position
The GEOCARE® can‘t perform the positioning. Positioning is performed using GPS based on satellites. Basically, this function is available only in outdoor areas or close to windows.
When positioning is executed for the first time after the delivery
of the device, the first positioning can possibly last longer. This is
caused by the fact that basic data for the positioning need to be
loaded first.
INDICATIONS
GEOCARE®
62
GEOCARE®
63
Page 33

1. GEOCARE® sends an old position:
From version 5, the GEOCARE® possesses a motion sensor. Current
position data are only recorded when a slight motion takes place.
2. GEOCARE® finds no position:
The basic data for positioning probably could not be loaded yet.
Please check the APN access data in the settings of the GEOCARE®
using the Enterprise software. You obtain the APN access data from
your mobile phone operators. For systems that are distributed by
Libify, following access data apply:
3. GEOCARE® only finds the current position irregularly :
When GEOCARE® is moved, it tries to record a position in the configured time interval. Depending on the Profile that is set, the position
can differ from the current location. For a balanced operation, we
recommend an interval of 90 seconds.
4. I need a current position without the GEOCARE® beeing moved
Send the command „Searchon“ to the GEOCARE® with an SMS. This
command causes the GEOCARE® to immediately start searching for
the current position. Depending on the condition of the environment,
this search can last some time because the GEOCARE® tries to find
the most accurate position.
US SIM cards:
APN: c1.korem2m.com
M2M (Telefonica):
APN: m2mde.telefonica.com
usr:
pwd:
After modifying the APN access data, turn off the GEOCARE® and then
on again. Afterward , place the GEOCARE® in an environment with
good satellite reception (e.g. in the open)
GEOCARE®
64
After the successful positioning, the searchmodus must be ended by
sending the command „searchoff“ to the GEOCARE® with an SMS.
GEOCARE® displays error messages on the PC
The GEOCARE® communicates with the computer via USB. Simultaneously, the GEOCARE® is charged using the USB-port. If the connection
is not flawless, the installation of an USB-hub can help. First of all, it
should be checked that the connection to another computer works
correctly.
GEOCARE®
INDICATIONS
65
Page 34

1. Ensure that you are using the latest version of the GEOCARE®
Enterprise(At least Version 1.2.9-State 09/16)
2. Check if the connection cable of the charging cradle and/or the
GEOCARE® is faulty or dirty.
Maintenance
Each time the user of the emergency system changes, a technician must perform following maintenance. To ensure that GEOCARE®
provides the maximum security even after beeing in use for a longer period, a maintenance should be performed latest after 3 years of usage if there was no change of user.
Naturally, in all cases, our support team is at your disposal for
further informations.
GEOCARE®
66
Mechanical maintenance
1. Have the battery replaced latest after two years.
2. Clean and disinfect the GEOCARE®, charging cradle and wireless
transmitter.
3. Check the housing of the GEOCARE® and wireless transmitter for
mechanical damage. Have a damaged housing replaced.
4. Check the charging cradle for mechanical damage. Check the
connecting cable for damage and loose connections. Have faulty
parts replaced.
Function check
1. Check the function of the GEOCARE® and the wireless transmitter.
2. Check the indicator lights: When the GEOCARE® is placed in the
charging cradle, the On/Off key must be lit in white. Outside of the
charging cradle, briefly press the SOS key, then the network-and
GSM symbol will be lit up. If you have triggered an emergency call,
the SOS key must flash red light.
GEOCARE®
INDICATIONS
67
Page 35
Reuse
Technical data - GEOCARE® GC5 (1/3)
GEOCARE® is appropriate for reuse by other users. For reuse, a technician must prepare GEOCARE® as follows:
1. To uninstall, simply disconnect the charging cradle from the
mains and switch off the GEOCARE®.
2. Perform maintenance on the GEOCARE®, wireless transmitter and
charging cradle, as described on page 63.
3. Replace missing accessories and operating instructions.
4. Configure GEOCARE® for the new user, as described on page
15.
Disposal
The batteries for the GEOCARE® and wireless transmitter must
not be disposed in household waste. They must be disposed of in
accordance with the local waste disposal regulations.
GEOCARE®, wireless transmitter and charging cradle should not be
disposed of in household waste. They must be taken to a collection
point for recycling electronic equipment.
WEEE-Reg.- Nr. DE 66751118
Height
3.1 inch,
width
Dimensions
With Clip:
1.25 inch
Weight
GSM Energy-saving GSM processor
GPS 72
IEEE 802.15.4
transceiver
Microphone Condenser microphone (ECM)
Speaker 1.0 W, 8 Ohms
Battery Li-Po 1000 mAh, 3.7 V
Battery Lifetime 2 years
2.3 oz
Quad-band GSM/GPRS/EDGE
(850 MHz, 900 MHz, 1800 MHz, 1900 MHz)
Dual-band UMTS WCDMA FDD:
850 MHz, 1900 MHz or
900 MHz, 2100 MHz
Triple-band UMTS WCDMA FDD:
800 MHz, 850 MHz, 2100 MHz
GPS
Tracking
Navigation
2,4 GHz (
for handheld transmitter for connection to
other devices
Height
channel
GPS, QZSS, GLONASS, BeiDou / Ublox M8
position accuracy:
sensitivity
sensitivity
short-distance data transmission
1.7 inch,
3.1 inch,
width
<2.0m
: 167 dBm
: 167 dBm
(e.g. Wireless transmitter)
depth
1.05 inch
1.7 inch,
depth
)
INDICATIONS
Charging time 3 hours
Running time in various
GEOCARE®
68
modes
Depending on the usage (30+ hours)
GEOCARE®
69
Page 36
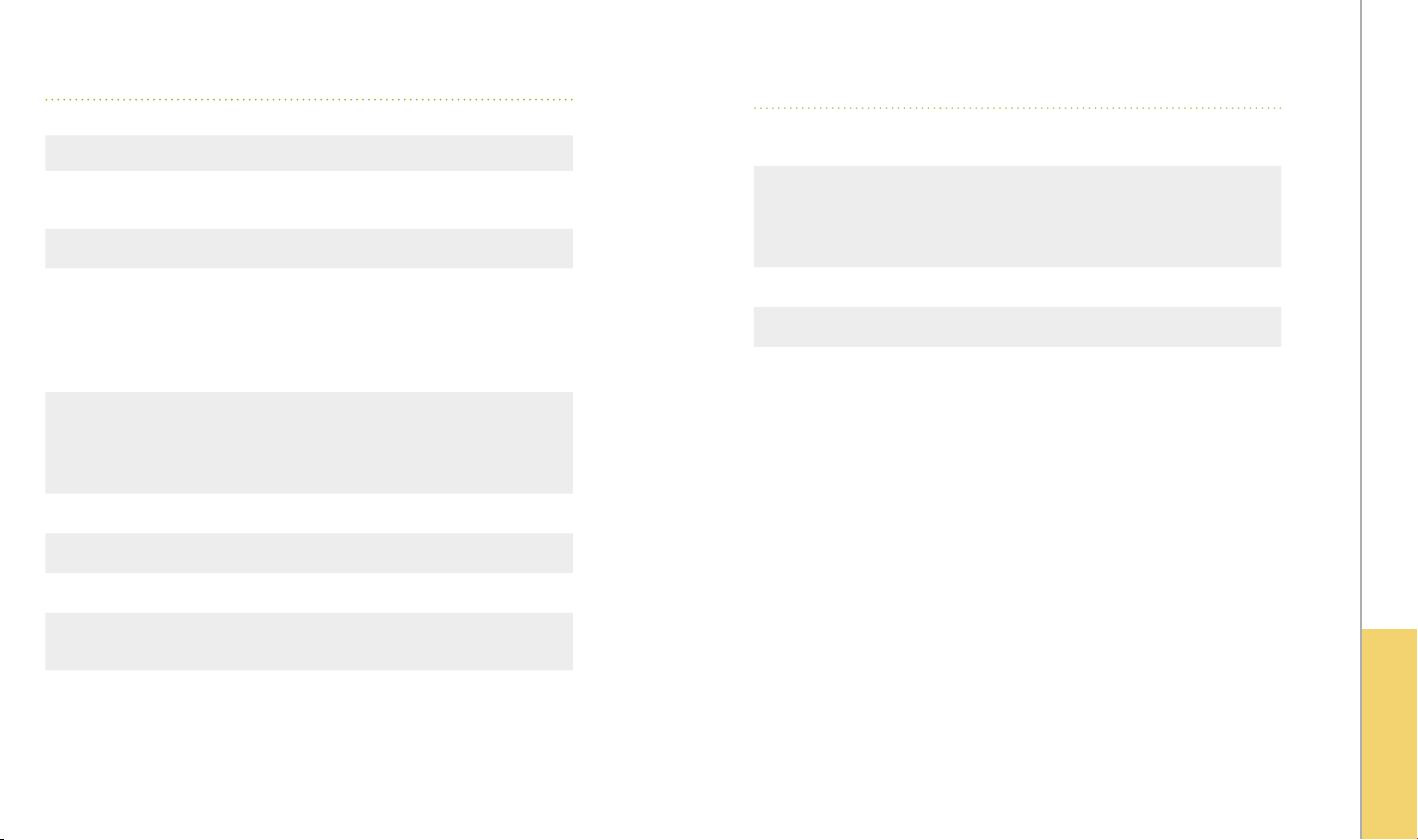
Technical data - GEOCARE® GC5 (2/3)
Technical data - GEOCARE® GC5 (3/3)
Sensors motion detector, temperature sensor
AC/DC adapter 5 V 1000 mA
Connections Magnetic connector with reverse polarity protec-
tion and USB connector
Buttons 2 (SOS key and On/Off key)
LEDs LED 0n/Off key (white)
LED SOS key (green/red)
LED Battery display (red/green)
LED Configuration (green/red)
LED GSM signal (red/green)
Housing materials Clips and Upper-/Subshell: PC + ABS
Clip: PC + ABS
Screen: PC
Seals: TPE
IP-Norm IP 67 according to IEC 60529
Operating temperature -20°C to +50°C
Storage temperature -25°C to +70°C
Relativ humidity
(Operating / Storage)
5% to 95% /
45% to 95%
Active charging cradle To charge the battery, for connection with a compu-
ter using USB, as well as as a hands-free module.
Support from emergency
call control centers
Configuration
SIM Card slot
UMO – Verklizan
LMS – Telealarm
PNC – Tunstall
(Depending on the version and function‘s range)
PortalPlus or PC Software
yes, Mini-SIM (2FF)
INDICATIONS
GEOCARE®
70
GEOCARE®
71
Page 37

Technical data - Wireless transmitter RB3
Technical data - Active charging cradle AC3
Protection class
Dimensions
Weight
(incl. battery & wristband)
Funk
Housing material
Wristband material
Battery type
(Battery exchange only by Libify GmbH)
Battery lifetime -
with 1 emergency call per day and an
ambient temperature of approx. 23°C
Funk range to GEOCARE® GC3
within buildings
Funk range toGEOCARE® GC3 out
of buildings
Max. ambient temperature
During Usage/During storage:
Optimal ambient temperature
During Usage/During storage:
IP 67 according to IEC 60529
Height 0.5 inch, Width 1.44 inch, Depth
1.75 inch
1 oz
2,4 GHz
Makrolon
PVC
CR3032: 3 V, 500 mAh
approx. 2 Years
(Wireless transmitter coupled to GEOCARE®)
1170 inch
(3 rooms, depending on their condition)
9750 inch
0 °C to +50 °C/ -30 °C to +50 °C
+15 °C to +30 °C/+10 °C to +30 °C
Diameter
Weight
Compatible to
Connection
Battery
Battery lifetime
Charging time
Operational readiness with fully
charged battery
(without network connection)
Operating temperature
Storage temperature
Housing Material
4.9 inch
Approx. 13.8 oz
GEOCARE® GC5
USB (42.9 inch)
LiPo 3.7 V, 1000mAh
approx. 2 Years
12 hours
24 hours
0 °C to +50 °C
-30 °C to +40 °C
Bottom part: PC + ABS
Top part: PC + ABS
Light guide: PC
INDICATIONS
Wristband width
GEOCARE®
72
0.8 inch
GEOCARE®
73
Page 38

Warning notices
For Safety
Do not use a wet cloth to clean the GEOCARE® or charging cradle. Do
not use any window cleaners, household cleaners, aerosol sprays,
solvents, alcohol-based cleaners, ammonia solutions or abrasives
to clean them. These damage the devices. Make sure no electrical
contact come in contact with moisture while cleaning the devices.
Place the charging cradle at least 39–78 inch away from other electronic devices in order to prevent any interference between them.
Charge the battery daily for at least three hours to ensure that
GEOCARE® is always ready for operation.
If the audible signals for a low battery is emitted just a few hours
after the battery has been fully charged, the battery needs to be replaced. Contact your emergency contact for assistance.
Read this instruction manual carefully before you start using GEOCARE®. GEOCARE® was developed and produced according to the
highest safety standards. Nevertheless, as for comparable electronic devices, you must observe the following safety instructions.
GEOCARE® must be configured
GEOCARE® must be configured before use, otherwise you cannot
trigger an emergency call.
Battery must be charged
Make sure that the battery in the GEOCARE® is always charged, otherwise you cannot trigger an emergency call. Use only the supplied
charging cradle and AC adapter plug.
(Important reminder: the system is only available to deliver an
emergency call if it is ON and has GSM reception (GSM LED is green).
For safety reasons the system will reset itself when the mobile unit
is taken from the cradle or disconnected from charging cable.)
INDICATIONS
GEOCARE®
74
GEOCARE®
75
Page 39

The charging cradle should not come in contact
with moisture
Should the charging cradle ever become wet, unplug it from the
mains socket and notify the emergency contact.
Locating via Global Positioning System (GPS)
To determine your position in the event of an emergency call,
GEOCARE® uses GPS. This system is operated and controlled by
the United States. They are responsible for the availability and accuracy of the system. All changes to the availability and accuracy
of GPS or other environmental influences can have an impact on
the operation of the GEOCARE®. We do not assume any liability for
the availability and accuracy of GPS. In buildings, GPS reception
is often reduced and sometimes (e.g. in basements) completely
unavailable.
Mobile phone network (GSM)
Prohibited areas for mobile phones
GEOCARE® must not be used in areas where the use of mobile
phones is prohibited, such as on aeroplanes, in hospitals or in the
vicinity of medical devices or equipements, fuels and chemicals,
as well as blasting areas. Switch off GEOCARE® before you enter
these areas. Then take other steps to ensure your safety, e.g. by
taking an accompanying person.
Implanted medical devices
People who use an implanted medical device, such as a pacemaker or implanted cardioverter/defibrillator, must always maintain a
distance of at least 5.85 inch between these medical devices and
GEOCARE®.
This minimum distance is recommended by manufacturers of
medical devices to prevent possible interference with the medical device. If you suspect that interference has occurred, switch
GEOCARE® off immediately. Use another way to contact your emergency contact and discuss the problem with them.
In order to reach the highest possible network coverage in the
event of an emergency, GEOCARE® can access all mobile phone
networks from different providers.
GEOCARE®
76
GEOCARE®
INDICATIONS
77
Page 40

Other medical devices
Temperature range
Using the GEOCARE® may interfere with the operation of inadequately shielded medical devices. Contact a doctor or the manufacturer of the medical device to find out whether the device is sufficiently shielded against external high-frequency waves.
Motor vehicles
Radio signals may negatively affect the performance of improperly installed or insufficiently shielded electronic systems in motor
vehicles. For more detailled informations about this, contact the
manufacturer of your vehicle or a specialist workshop.
Other electronic devices
Virtually every electronic device is susceptible to interference
from external sources.
Only use GEOCARE® in a temperature range of -20 ºC to +50 ºC
Store GEOCARE® in temperature range of -25 ºC to +70 ºC.
Temperatures outside this range may damage the
GEOCARE® and the battery.
Do not leave GEOCARE® in a car, as temperatures of +70 ºC can easily be exceeded in parked cars.
Faults or malfunctions
Never open the housing of the GEOCARE® or the charging cradle.
The housings must only be opened by authorized specialists. If
there is a malfunction or a fault in the GEOCARE® or the charging
cradle, contact your emergency contact.
Small children
There are parts included in the delivery package of the GEOCARE®
that could be swallowed by small children. Keep these parts out
of their reach.
INDICATIONS
GEOCARE®
78
GEOCARE®
79
Page 41
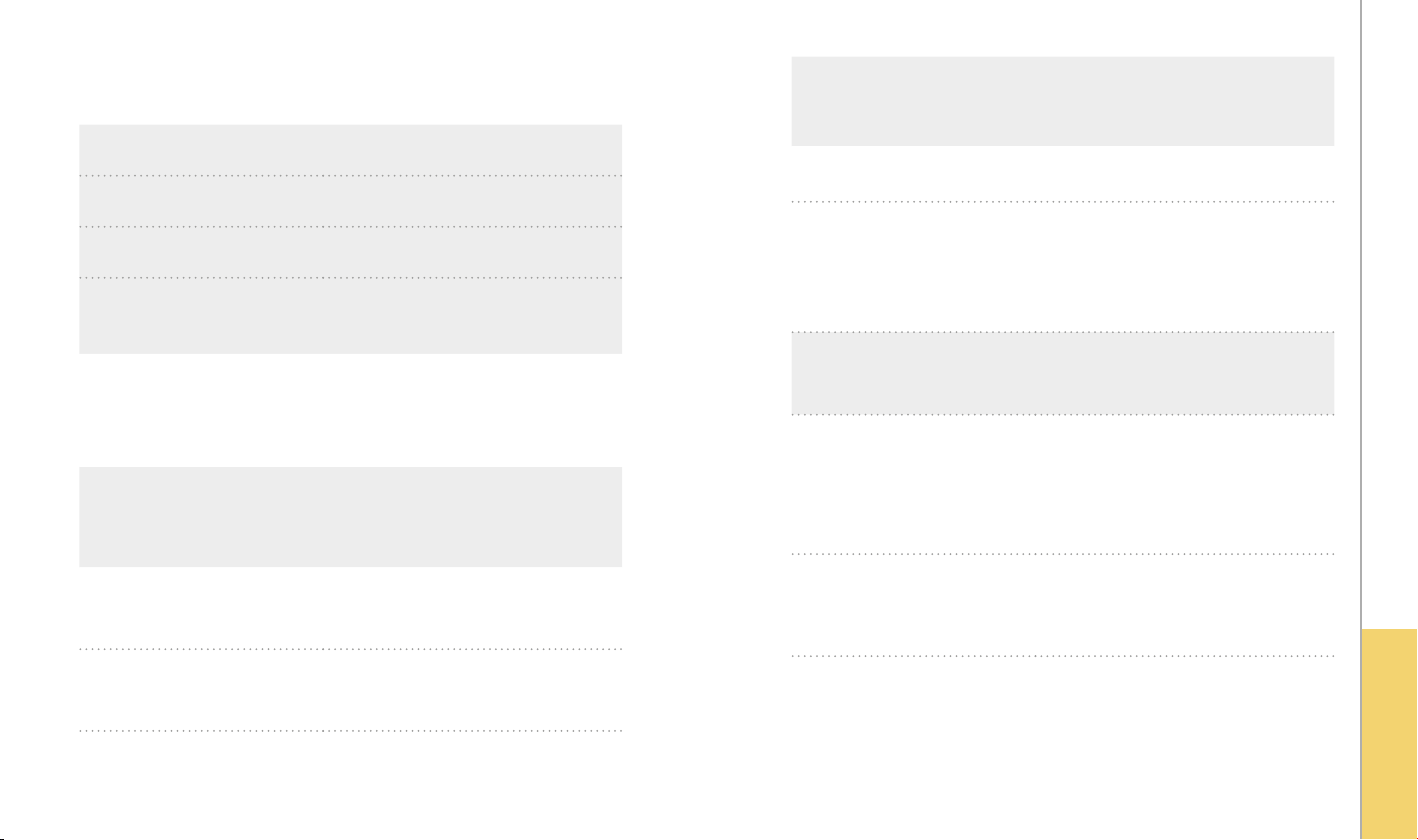
Operation – Overview
Switch on GEOCARE® Press on/off key for 3 seconds
Switch off GEOCARE® Press on/off key for 3 seconds
Trigger EMERGENCY CALL Press SOS key for 3 seconds
Emergency call key
Meaning
(SOS key)
Flashes red light SOS is active
Lights up red Phone conversation is active
Cancel EMERGENCY CALL
yourself
Press SOS key for 10 seconds
LED indicators – Overview
On/off
(power switch)
Lights up white GEOCARE® is connected to the charg-
Pulsates in white GEOCARE® is currently been turned
GEOCARE®
80
Meaning
ing cradle.
on or off.
Network symbol Meaning
Lights up green Connection to mobile phone network
established
Amount of lit bars symbolises
strengh of the signal
Flashes green light Connection to mobile phone network
not yet established.
Caution: No emergency call possible!
Lights up red or flashes red
light
GSM-or SIM-Error.
Caution: No emergency call possible!
GEOCARE®
INDICATIONS
81
Page 42

Configuration-symbol Meaning
Charging cradle Meaning
Pulsates green GEOCARE® is being updated via
internet
Battery-symbol Battery capacity
2 LEDs light up green more than 75 %
1 LED lights up green more than 40 %
1 LED lights up green and
1 LED lights up red
1 LED flashes red after button press
1 LED continuously flashes
red
more than 20 %
more than 10 %
more than 0 %
Pulsates in red SOS is active.
Pulsates 2x in red Button has been pressed-However,
function is not possible.
Pulsates in green for 3
seconds
SOS has been ended or confirmation of a function after button press
Wireless transmitter Meaning
Green → Green → Sound Emergency call is being triggered
Green → Red → Red →
Sound
Fault. GEOCARE® is out of reach or
not ready for operation.
INDICATIONS
GEOCARE®
82
GEOCARE®
83
Page 43

Declaration of conformity
GEOCARE® GC5
Health & Safety (Art. 3.1a)
EN 60950-1:2006 + A11:2009 + A1:2010
+ A12:2011 + A2:2013
This device complies with Part 15 of the FCC Rules and with Industry Canada license-exempt RSS standard(s). Operation is subject to the following two conditions: (1) this device may not cause harmful interference,
and (2) this device must accept any interference received, including interference that may cause undesired operation.
Le présent appareil est conforme aux CNR d’Industrie Canada applicables
aux appareils radio exempts de licence. L’exploitation est autorisée aux
deux conditions suivantes : (1) l’appareil ne doit pas produire de brouillage, et (2) l’utilisateur de l’appareil doit accepter tout brouillage radioélectrique subi, même si le brouillage est susceptible d’en compromettre
le fonctionnement.
Changes or modifications not expressly approved by the party responsible for compliance could void the user’s authority to operate the equipment.
LIBIFY Technologies GmbH hereby declares that the GEOCARE® product, designation: mobile positioning and emergency call system, type
GC5, complies with the regulations of the telecommunications directive
1999/5/EC. It also declares compliance with further directives/regulations that apply to the product:
GEOCARE®
84
Radio (Art. 3.1b)
EMC (Art. 3.2)
FCC
Contains FCC ID
IC
Contains IC
EN 301 511, EN 300 440-1/ -2, EN 300
328, FCC Part 15
EN 301 489-1/-3/-7/-24, FCC 15.247
2AGMC-GC5A
N7NSL8080
20893-GC5A
2417C-SL8080
Radiobutton
This device complies with Part 15 of the FCC Rules and with Industry
Canada license-exempt RSS standard(s). Operation is subject to the
following two conditions: (1) this device may not cause harmful interference, and (2) this device must accept any interference received,
including interference that may cause undesired operation.
Le présent appareil est conforme aux CNR d’Industrie Canada applicables aux appareils radio exempts de licence. L’exploitation est autori-
GEOCARE®
INDICATIONS
85
Page 44

sée aux deux conditions suivantes : (1) l’appareil ne doit pas produire
Active charging cradle AC3
de brouillage, et (2) l’utilisateur de l’appareil doit accepter tout brouillage radioélectrique subi, même si le brouillage est susceptible d’en
compromettre le fonctionnement.
This device complies with Part 15 of the FCC Rules and with Industry Canada
license-exempt RSS standard(s). In accordance with FCC Rules and Regula-
tions Part 2, Subpart J – Radiofrequency Radiation Exposure, § 2.1091 (b)
Changes or modifications not expressly approved by the party responsible for compliance could void the user’s authority to operate the
equipment.
a minimum RF Exposure test separation distance of 20 cm was applied.
Operation is subject to the following two conditions: (1) this device may not
cause harmful interference, and (2) this device must accept any interfer-
ence received, including interference that may cause undesired operation.
LIBIFY Technologies GmbH hereby declares that the wireless
transmitter product, designation: radio emergency call signalling
system, type RB3, complies with the regulations of the telecommunications directive 1999/5/EC. It also declares compliance with
further directives/regulations that apply to the product:
Le présent appareil est conforme aux CNR d’Industrie Canada applicables aux
appareils radio exempts de licence. Conformément aux règles et règlements
de la FCC, partie 2, sous-section J – exposition aux radiations radiofréquenc-
es, § 2,1091 (b) une distance minimale de séparation de l’essai d’exposition
RF de 20 cm a été appliquée. L’exploitation est autorisée aux deux conditions
suivantes : (1) l’appareil ne doit pas produire de brouillage, et (2) l’utilisateur
Health & Safety (Art. 3.1a)
Radio (Art. 3.1b)
EN 60950-1:2006 + A11:2009
+ A1:2010 + A12:2011
EN 300 328 V 1.7.1
de l’appareil doit accepter tout brouillage radioélectrique subi, même si le
brouillage est susceptible d’en compromettre le fonctionnement.
Changes or modifications not expressly approved by the party responsible
EMC (Art. 3.2)
EN 301 489-1 (V 1.9.2)
EN 301 489-17 (V 2.1.1)
EN 61000-4-2:2009
EN 61000-4-3: 2006
+ A1: 2008 + A2: 2010
EN 6100-4-8: 1993 + A1:2001
for compliance could void the user’s authority to operate the equipment.
LIBIFY Technologies GmbH hereby declares that the active charging cra-
dle product, designation: emergency call system type AC3, complies
with the regulations of the telecommunications directive 1999/5/EC. It
INDICATIONS
also declares compliance with further directives/regulations that apply
to the product:
GEOCARE®
86
GEOCARE®
87
Page 45
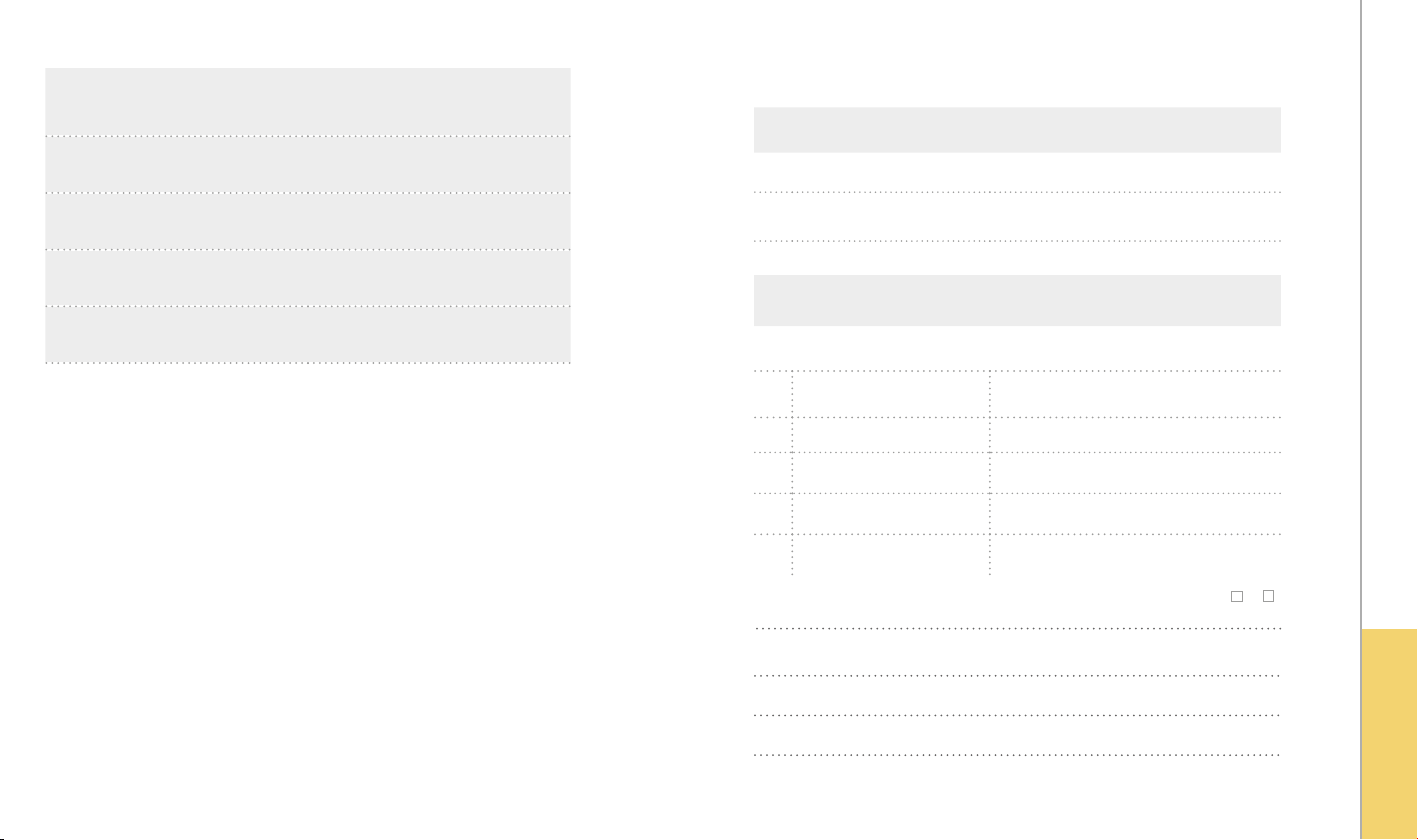
Health & Safety (Art. 3.1a)
Radio (Art. 3.1b)
EN 60950-1:2006 + A11:2009 + A1:2010
+ A12:2011
EN 300 328, OET 65, FCC Part 15
Notes
Device notes
Name of wearer:
EMC (Art. 3.2)
FCC
IC
EN 301 489-17, FCC 15.247
2AGMC-AC3A
20893-AC3A
Telephone number:
Emergency call chain
Telephone number Nam e
1.
2.
3.
4.
5.
Gateway active: yes
no
INDICATIONS
GEOCARE®
88
GEOCARE®
89
Page 46
Artikel.-Nr.:60342.11
Version: EN a36 Stand: 05/2018
A LIBIFY Technologies GmbH product // www.libify.com
Rüdesheimer Straße 11 · 80686 München · Tel +49 89 416 147 980
 Loading...