

LG Electronics XB-64 OWNER’S MANUAL [ml]

ITALIANO ESPAÑOL
ENGLISH DEUTSCH FRANÇAIS
OWNER'S MANUAL
DVD Micro Hi-Fi System
Please read this manual carefully before operating
your set and retain it for future reference.
MODEL
XB64 (XB64-D0U/XBS64V)
P/NO : MFL63266233
ΕΛΛΗΝΙΚΑ
NEDERLANDS
PORTUGUÊS
SLOVENŠČINA
Safety Precaution
CAUTION
RISK OF ELECTRIC SHOCK
DO NOT OPEN
CAUTION: TO REDUCE THE RISK OF ELECTRIC SHOCK DO NOT REMOVE
COVER (OR BACK) NO USER-SERVICEABLE PARTS INSIDE REFER
SERVICING TO QUALIFIED SERVICE PERSONNEL.
WARNING: TO PREVENT FIRE OR ELECTRIC SHOCK HAZARD, DO NOT
EXPOSE THIS PRODUCT TO RAIN OR MOISTURE.
WARNING: Do not install this equipment in a confined space such as a book case or
similar unit.
CAUTION: Do not block any ventilation openings. Install in accordance with the
manufacturer's instructions.
Slots and openings in the cabinet are provided for ventilation and to ensure reliable
operation of the product and to protect it from over heating. The openings be never
be blocked by placing the product on a bed, sofa, rug or other similar surface. This
product not be placed in a built-in installation such as a bookcase or rack unless
proper ventilation is provided or the manufacturer's instruction has been adhered to.
CAUTION: This product employs a Laser System.
To ensure proper use of this product, please read this owner’s manual carefully and
retain it for future reference. Shall the unit require maintenance, contact an
authorized service center. Use of controls, adjustments or the performance of
procedures other than those specified herein may result in hazardous radiation
exposure.
To prevent direct exposure to laser beam, do not try to open the enclosure. Visible
laser radiation when open. DO NOT STARE INTO BEAM.
CAUTION: The apparatus shall not be exposed to water (dripping or splashing) and
no objects filled with liquids, such as vases, shall be placed on the apparatus.
2
This lightning flash with arrowhead symbol within an equilateral triangle is
intended to alert the user to the presence of uninsulated dangerous voltage
within the product’s enclosure that may be of sufficient magnitude to
constitute a risk of electric shock to persons.
The exclamation point within an equilateral triangle is intended to alert the
user to the presence of important operating and maintenance
(servicing) instructions in the literature accompanying the product.
CAUTION concerning the Power Cord
Most appliances recommend they be placed upon a dedicated circuit;
That is, a single outlet circuit which powers only that appliance and has no
additional outlets or branch circuits. Check the specification page of this owner's
manual to be certain.
Do not overload wall outlets. Overloaded wall outlets, loose or damaged wall
outlets, extension cords, frayed power cords, or damaged or cracked wire insulation
are dangerous. Any of these conditions could result in electric shock or fire.
Periodically examine the cord of your appliance, and if its appearance indicates
damage or deterioration, unplug it, discontinue use of the appliance, and have the
cord replaced with an exact replacement part by an authorized service.
Protect the power cord from physical or mechanical abuse, such as being twisted,
kinked, pinched, closed in a door, or walked upon. Pay particular attention to plugs,
wall outlets, and the point where the cord exits the appliance.
To disconnect power from the mains, pull out the mains cord plug. When installing
the product, ensure that the plug is easily accessible.
This device is equipped with a portable battery or accumulator.
Safe way to remove the battery or the battery from the equipment:
Remove the old battery or battery pack, follow the steps in reverse order than the
assembly. To prevent contamination of the environment and bring on possible threat
to human and animal health, the old battery or the battery put it in the appropriate
container at designated collection points. Do not dispose of batteries or battery
together with other waste. It is recommended that you use local, free reimbursement
systems batteries and accumulators.
The battery shall not be exposed to excessive heat such as sunshine, fire or the like.
Disposal of your old appliance
1. When this crossed-out wheeled bin symbol is attached to a product it
means the product is covered by the European Directive 2002/96/EC.
2. All electrical and electronic products should be disposed of separately from
the municipal waste stream via designated collection facilities appointed by
the government or the local authorities.
3. The correct disposal of your old appliance will help prevent potential
negative consequences for the environment and human health.
4. For more detailed information about disposal of your old appliance, please
contact your city office, waste disposal service or the shop where you
purchased the product.
LG Electronics hereby declares that this/these product(s) is/are in
compliance with the essential requirements and other relevant
provisions of Directive 2004/108/EC, 2006/95/EC, and 2009/125/EC.
European representative:
LG Electronics Service Europe B.V.
Veluwezoom 15, 1327 AE Almere, The Netherlands
(Tel: +31-(0)36-547-8888)

Welcome to your New DVD MICRO Hi-Fi SYSTEM
Contents
Setting up 4
Main Unit 5
Remote control 6
OSD initial language settings - Optional 7
Initial settings the Area Code - Optional 7
Adjusting the general settings 8-9
Setting the Clock 10
Displaying Disc information 11
Playing a Disc or file 11-13
Listening to the radio 14
Listening to music from your portable player 15
Using an USB device 15
Recording to USB 16
Language Codes 17
Area Codes 17
Troubleshooting 18
Types of Playable Discs 19
Specifications 20
3
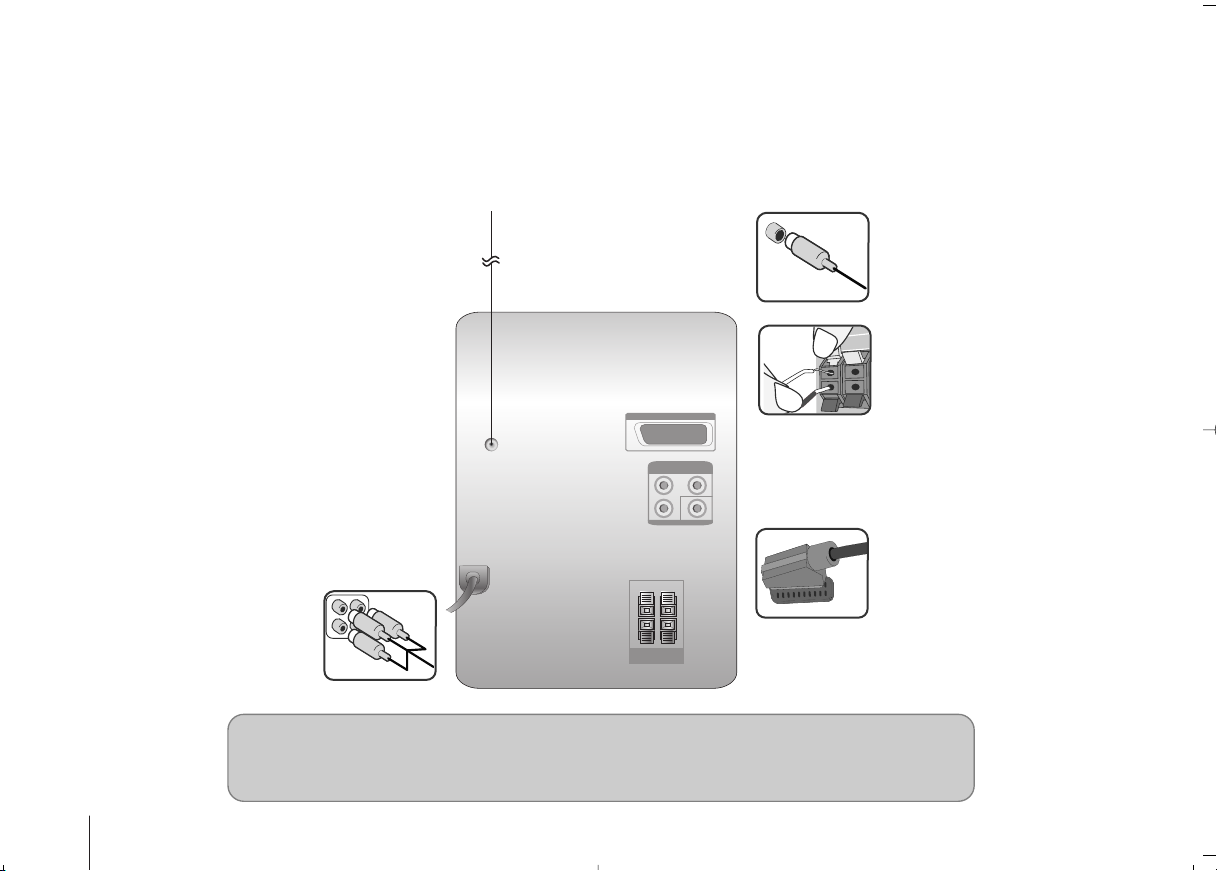
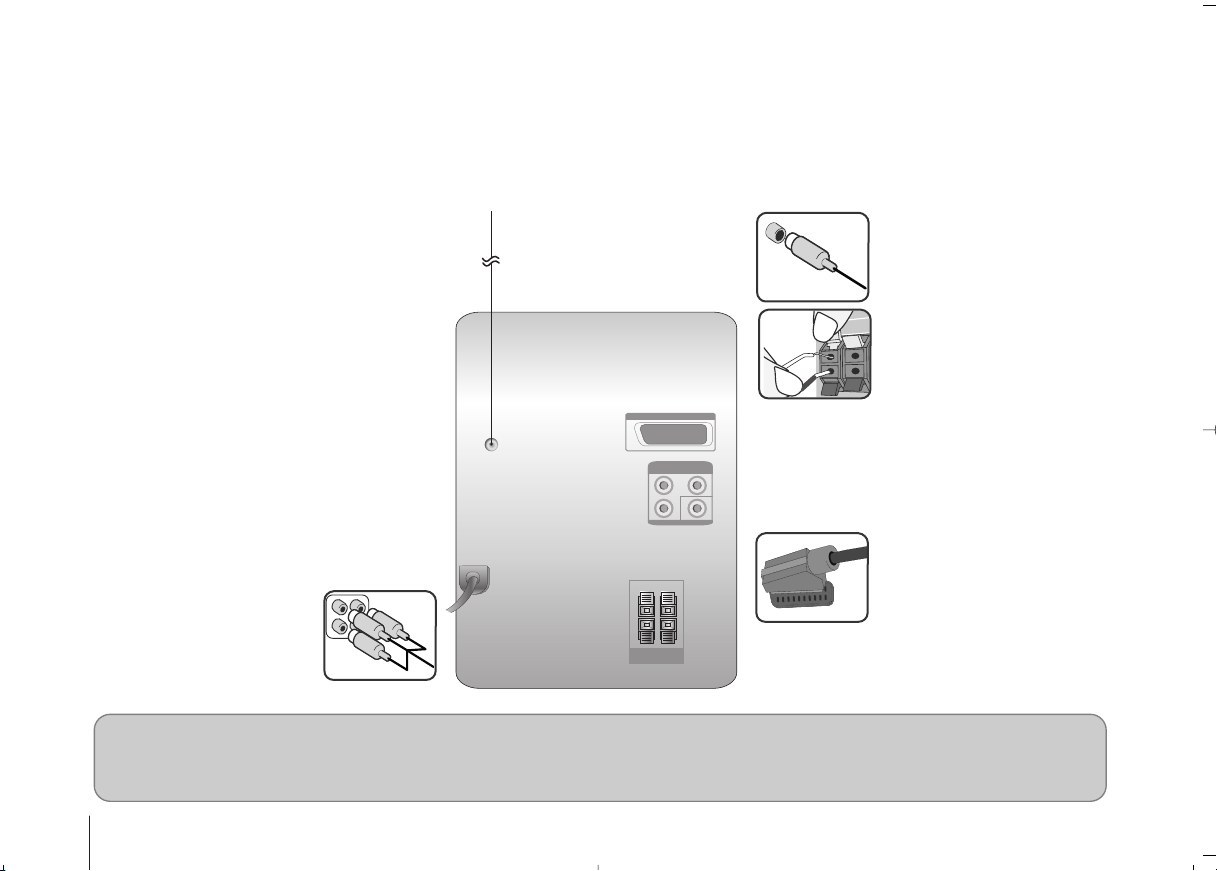
Setting up
Connecting your unit to your TV and aerials.
Connect jacks on the unit and your TV (DVD player or Digital Device etc.) using the cables.
Check the jacks of your TV and choose the A, B connection. Picture quality improves in order from A to B.
a Stretch the FM aerial.
The reception will be at its best when the end of the
aerial is stretched to be in a straight line and
horizontal.
b Component Video connection (B)
Connect the COMPONENT VIDEO (PROGRESSIVE
SCAN) OUTPUT jacks on the unit to the
corresponding input jacks on your TV using a Y PB
PR cable.
- If your TV accepts progressive format signals, you
must use this connection and set [Progressive
Scan] in [Display] setup to [On]
(See page 8).
NOTES:
• If TV screen becomes discolored do not place speakers within 30cm from TV.
• Be sure to match the speaker cord to the appropriate terminal on the components: + to + and – to –. If the
cords are reversed, the sound will be distorted and will lack base.
FM - aerial
a
e
b
d
c
c Video Out connection
Connect the VIDEO
OUTPUT(MONITOR) jack on the
unit to the corresponding input jack
on your TV using a Video cable.
d Connect the speaker cables to the
player
To connect the cable to the unit,
press each plastic finger pad to
open the connection terminal. Insert
the wire and release the finger pad.
Connect the black end of each wire
to the terminals marked -(minus)
and the other end to the terminals
marked + (plus).
e SCART connection
Connect the TO TV jack on the unit
and your TV using the SCART
cable. You can enjoy audio from an
external source through your unit.
Press FUNC.(FUNCTION)
repeatedly to select TV-AUDIO.
(A)
4
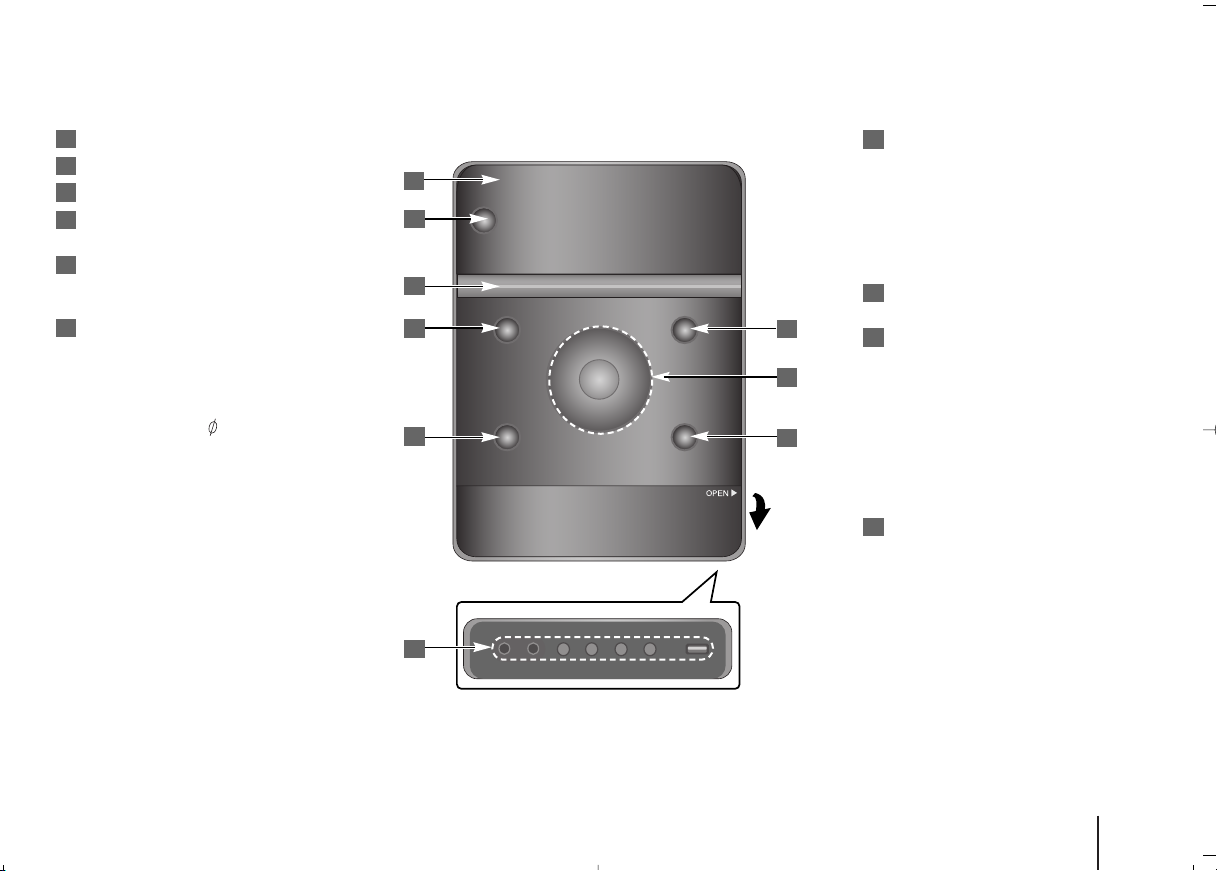
Main Unit
1
DISPLAY WINDOW
2
11/]]
Power on/off
3
DISC TRAY
4
FUNC.
Selects the function.
5
EQ: Sound quality adjustment
You can choose sound impressions.
6
PORT.IN
The player can be used to play the
music from many types of portable
player.
PHONES
Headphone jack. ( 3.5 mm)
A warning that excessive sound
pressure from earphones and
headphones can cause hearing loss.
CLOCK
For setting the clock and checking the
time.
TIMER
(See the “Using your player as an
alarm clock”).
6
SET/RDS (Optional)
Confirms the setting
1
RDS (Optional)
Shows information about radio
2
stations.
REC.
Recording (Recording to USB)
3
4
7
8
USB Connector
7
ZZ
OPEN/CLOSE
You can use it when inserting or
removing CDs.
8
VOL.+/ -
Controls the volume when using any
function.
./>
5
9
TUN.-/ TUN.+
Selects the radio station
Searches backward or Forward
Skips to the previous/ next track
BB [[]]
Playing/Pausing
9
xx
OPEN
6
STOP
5
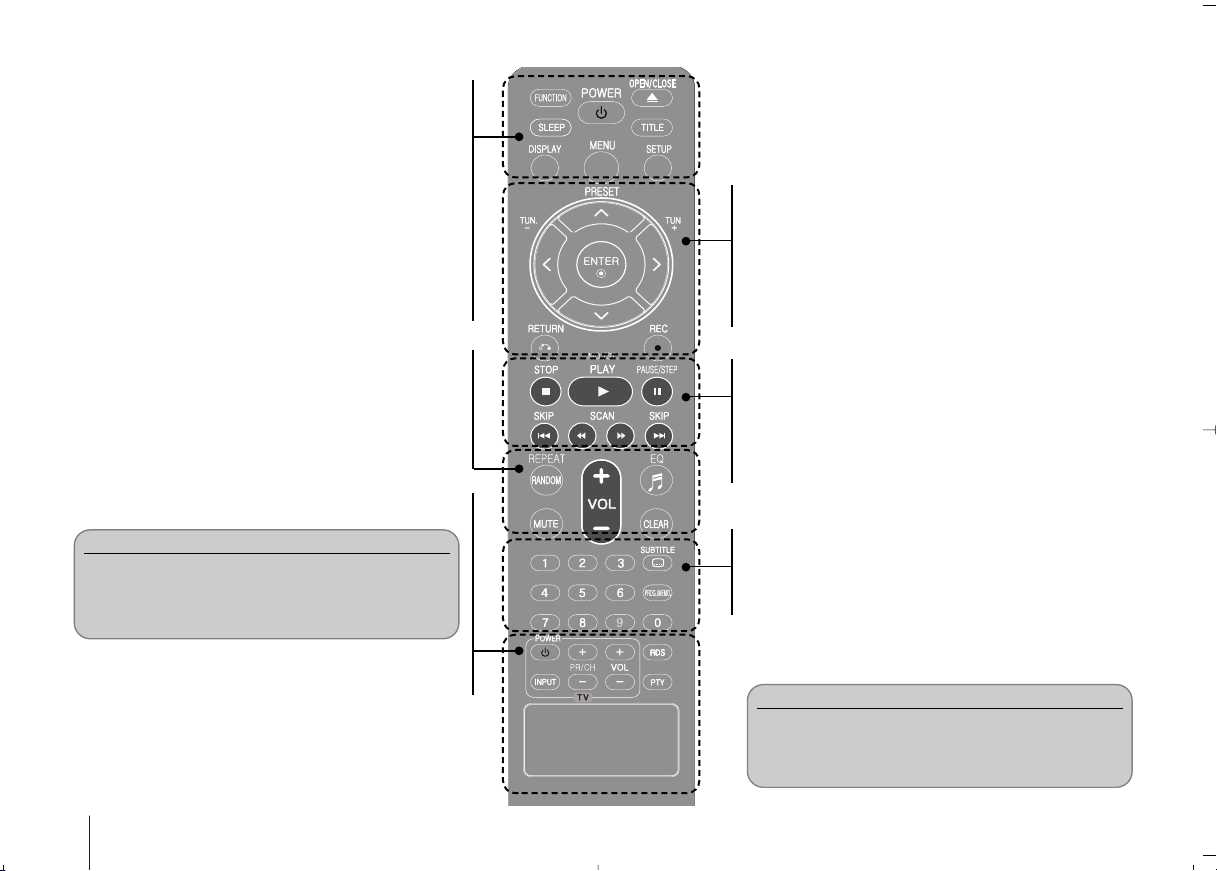
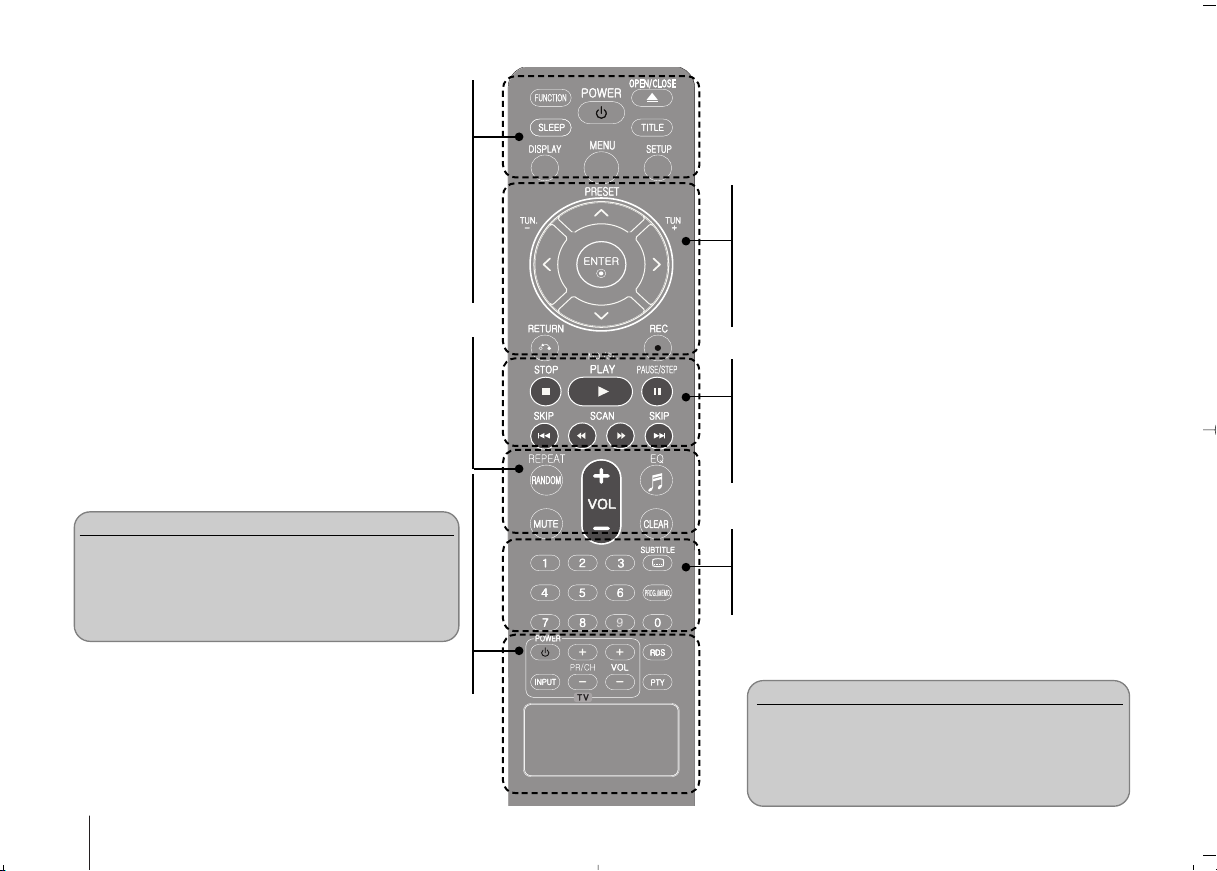
Remote control
FUNCTION: Selects the function and input source.
SLEEP: You can select delay time between 10 and 180
minutes, after the unit will turn off. To check the remaining
time, press SLEEP. (Dimmer: Dims the LED (Light-emitting
EQ (Equalizer effect): You can choose sound impressions.
diode) of front panel by half in power-on status.).
11
Z OPEN/CLOSE: Opens and closes the disc Drawer.
TITLE: If the current DVD title has a menu, the title menu
appears on the screen. Otherwise, the disc menu
CLEAR: Removes a track number on the program List.
TV Control buttons: Controls the TV. (LG TV only)
POWER: Switches the unit ON or OFF.
may not appear.
DISPLAY: Accesses On-Screen Display.
MENU: Accesses the menu on a DVD disc.
SETUP: Accesses or removes setup menu.
REPEAT/RANDOM: To select a play mode.
(Random/ Repeat)
MUTE: Temporarily stop the sound.
VOL: Adjusts spaker volume.
PRESET (
TUN. (-/+): Tunes in the desired radio station.
II ii UU uu
ENTER: Acknowledges menu selection.
RETURN (OO): Moves backwards in the menu or exited
REC(z): Recording to USB
STOP (x): Stops playback or recording.
PLAY (B): Starts playback.
MO./ST.: Improves radio signal reception.
PAUSE/STEP (X): Pauses playback.
SKIP (./>): Goes to next or previous chapter/
SCAN (
UU uu
): Selects programme of Radio.
(left/right/up/down): Navigates on-screen
the setup menu.
bbbb//BBBB
track / file.
): Searches backward or forward.
displays.
Controlling the TV.
You can control the sound level, input source, and
power switching of LG TVs as well. Hold POWER (TV)
and press PR/CH (+/–) button repeatedly until the TV
turns on or off.
RDS/ PTY: Radio Data System.
Searches radio stations by radio type.
6
0-9 numerical buttons: Selects numbered options in a
menu.
SUBTITLE: During playback, you can select a desired
subtitle language.
PROG./MEMO.: Accesses or removes Program menu.
Put the battery into the remote control.
Make sure that the + (plus) and - (minus) on the
batteries match those on the remote control.
Battery shall not be exposed to excessive heat such
as sunshine, fire or the like.
OSD initial language settings
- Optional
During the first use of this unit, the initial language setup menu
appears on your TV screen. You must complete initial language
selection before using the unit.
ON REMOTE
1 Turn the power on
The language list appears
2 Select the language
3 Press ENTER
4 To confirm press
11
POWER
II ii UU uu
II ii
ENTER
Initial settings the Area Code
- Optional
When you use this unit for the first time, you have to set the Area Code
as shown below.
ON REMOTE
1 Display setup menu SETUP
2 Select LOCK menu on the first level
3 Move to second level
The activated Area Code appears on the
second level.
4 Move to the third level
5 Enter a new password Numeric (0-9)
6 Recheck the entered new password Numeric (0-9)
7 Select a code for a geographic area
After select, Rating and Password will be
activated.
8 To confirm what you press ENTER
Make sure to finish setting the Area Code.
UU uu
ii
ii
and ENTER
and ENTER
UU uu II ii
7
Adjusting the general settings
ON REMOTE
1 Display setup menu SETUP
UU uu
UU uu
ii
UU uu
ii
, ENTER
2 Select a desired option on the first level
3 Move to the second level
4 Select a desired option on the second level
5 Move to the third level
6 Change the setting
Adjusting the general settings more you can do
Adjusting the language settings
OSD (Menu Language) – Select a language for the Setup menu and on-
screen display.
Disc Audio/ Disc Subtitle/ Disc Menu – Select a language for the Disc Audio/
Disc Subtitle/ Disc Menu.
[Original]: Refers to the original language in which the disc was recorded.
[Other]: To select another language, press number buttons then ENTER to
enter the corresponding 4-digit number according to the language
code list in the reference chapter (Page 17). If you make a mistake
before pressing ENTER, press CLEAR.
[Off] (for Disc Subtitle): Turn off Subtitle.
Adjusting the display settings
TV Aspect – Select which screen aspect to use based on the shape of your TV
screen.
[4:3] Select when a standard 4:3 TV is connected.
[16:9] Select when a 16:9 wide TV is connected.
Display Mode – If you selected 4:3, you’ll need to define how you would like
wide screen programs and films to be displayed on your TV
screen.
[Letterbox] This displays a wide screen picture with black bands at
the top and bottom of the screen.
[Panscan] This fills the entire 4:3 screen, cropping the picture as
necessary.
TV Output Select – Select an option according to the TV connection type.
[RGB]: When your TV is connected with the SCART jack.
[YPbPr]: When your TV is connected with the
COMPONENT/ PROGRESSIVE SCAN jacks on the unit.
- If you change TV Output Select to RGB from YPbPr on the setup menu
especially when connecting the unit in the way of component video
connection, the screen turns black. In that case, connect the video cable to
MONITOR jack and select YPbPr on the setup menu again.
Progressive Scan (For Component Video connections) – Selects whether
the COMPONENT/PROGRESSIVE SCAN OUTPUT jacks output progressive
signal. If your TV accepts progressive format signals, you will enjoy accurate
color reproduction and high quality image by selecting [On]. If your TV does not
accept progressive format signals, select [Off].
If you set Progressive Scan to [On] in error, you must reset the unit. First,
remove the disc in the unit. Next, press and hold STOP for five seconds. The
video output will be restored to the standard setting, and a picture will be visible
on your TV.
8

Adjusting the audio settings
DRC (Dynamic Range Control) – Make the sound clear when the volume is
turned down (Dolby Digital only). Set to [On] for this effect.
Vocal – Select [On] to mix karaoke channels into normal stereo.
This function is effective for multi-channel karaoke DVDs only.
Adjusting the lock settings
To access the lock options, you must enter the 4-digit password. If you have not
yet entered a password you are prompted to do so.
1 Enter a 4-digit password then press ENTER.
2 Enter it again then press ENTER to verify. If you make a mistake while
entering number, press CLEAR then correct it.
Area Code – Select a code for a geographic area as the playback rating level.
This determines which area’s standards are used to rate DVDs controlled by the
parental lock. ( See the Area Codes on page 17.)
Rating – Select a rating level. The higher the level is, the stricter the rating.
Select [Unlock] to deactivate the rating.
Password – Sets or changes the password for lock settings.
[New] Enter a new 4-digit password using the numerical buttons then press
ENTER. Enter the password again to confirm.
[Change] Enter the new password twice after entering the current password.
If you forget your password you can reset it.
1 Remove the disc in the unit.
2 Press SETUP to display the Setup menu. Input ‘210499’ and press ENTER.
The password has now been cleared.
Adjusting the others settings
DivX(R) Registration – We provide you with the DivX®VOD (Video On Demand)
registration code that allows you to rent and purchase videos using the DivX
®
VOD service.
For more information, visit www.divx.com/vod.
Press ENTER and you can view the registration code of the unit.
9
Enjoying a pre-programmed sound field
The system has a number of pre-set surround sound fields. You can select a
desired sound mode by using EQ. The displayed items for the Equalizer may
be different depending on sound sources and effects.
AUTO EQ Realizes the sound equalizer that is the most similar to
the genre of which is included in the MP3 ID3 tag of song
files.
POP This program lends an enthusiastic atmosphere to the
CLASSIC sound, giving you the feeling you are at an actual rock
ROCK pop, jazz or classic concert.
XDSS ON Reinforce the treble, bass and surround sound effect.
NORMAL You can enjoy the sound without equalizer effect.
Setting the Clock
ON UNIT
1 Turn the power on
2 Press for at least 2 seconds CLOCK
3 Choose from either
AM 12:00 (for an AM and PM display) or
0:00 (for a 24 hour display)
4 Confirm your selection SET
5 Select the hours ./>
6 Press SET
7 Select the minutes ./>
8 Press SET
Using your player as an alarm clock
1 Turn the power on.
2 Press TIMER. Each functions flashes.
3 Press SET when the function you want to be woken by is showing.
4 “ON TIME” will be displayed. This is where you set the time you want the
alarm to start. Use ./> to change the hours and minutes and SET to
save.
5 The “OFF TIME” will be displayed. This is where you set the time you want
the function to stop.
6 Use ./> to change the hours and minutes and press SET
to save.
7 You will be shown the volume (VOL) you want to be woken by. Use
./> to change the volume and SET to save. The clock icon “ ”
shows that the alarm is set.
8 Press TIMER button 2 times. You can check the setting status.
11/]]
./>
10
NOTES:
- If you set the clock time, you can check the time by pressinng CLOCK
even when the plyaer is turned off.
- If you set the clock time and alarm, you can check the alarm icon
by pressing CLOCK even when the player is turned off.

Displaying Disc information Playing a Disc or file
ON REMOTE
1 Press
2 Select an item
3 Adjust the display menu settings
4 To return the exit
DISPLAY
UU uu
II ii
OO
RETURN
Displaying Disc Information - more you can do
You can select an item by pressing
pressing
II ii
.
Current title (or track/ file)
number/ total number of titles (or tracks/ files)
Current chapter number/ total number of chapters
Elapsed playing time
Selected audio language or channel
Selected subtitle
Selected angle/ total number of angles
Selected sound/ EQ mode
UU uu
and change or select the setting by
Symbol Used in this Manual
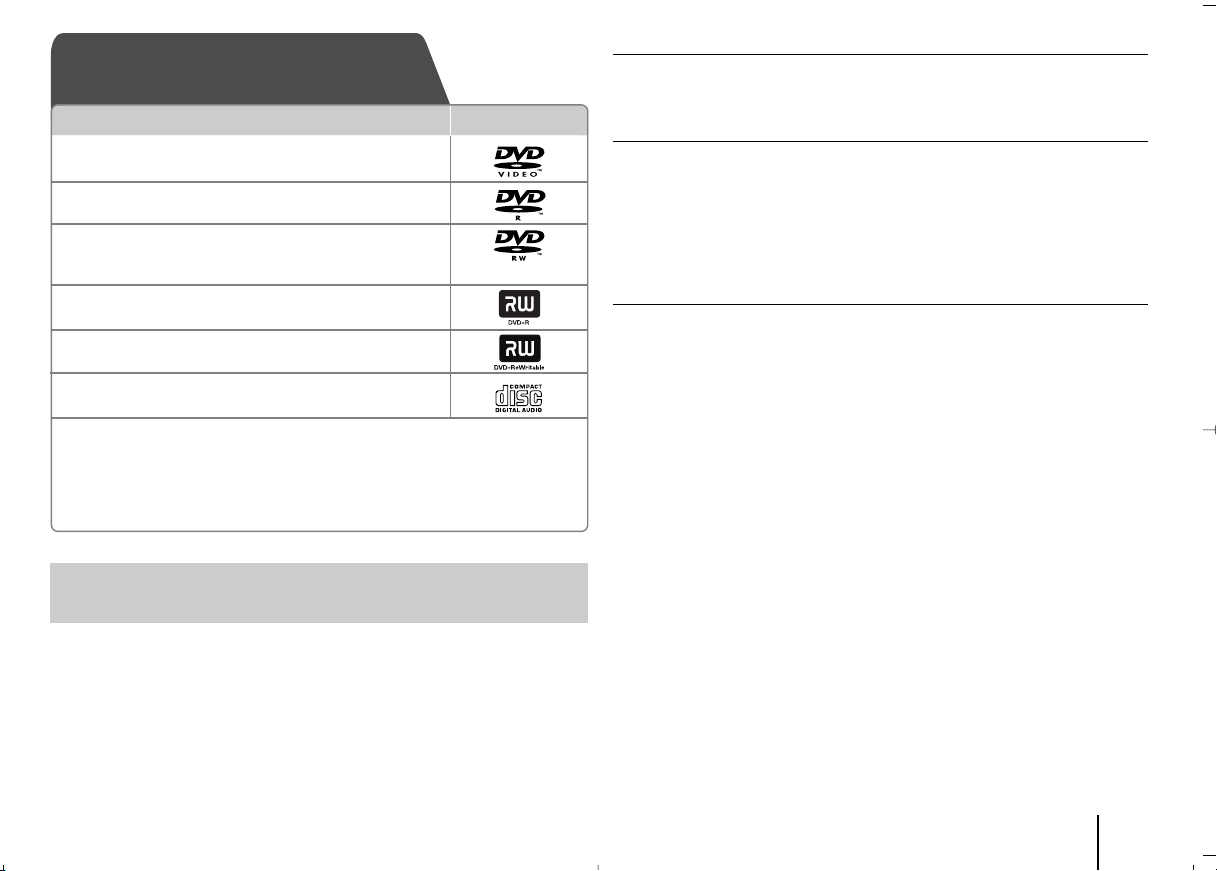
All discs and file listed below MP3 files
DVD and finalized DVD ± R/ RW WMA files
DivX files
JPEG files
ALL
DVD
Audio CDs
JPG
MP3
WMA
ACDDivX
ON REMOTE
1 Insert a disc on unit
2 Select a DVD/CD FUNCTION
3 Adjust the menu settings /
Select a file from the menu
4 Start the Disc playing
5 To stop the Disc playing
Notes:
Put a disc on the disc tray with the disc hole on it matched and press it unitl you
hear a click. If not, the disc cannot be read.
ZZ
OPEN/CLOSE
II ii UU uu
BB
PLAY or ENTER
xx
STOP
Playing a Disc or file - more you can do
Mixed disc or USB Flash Drive – DivX, MP3/ WMA and JPEG
When playing a disc or USB Flash Drive containing with DivX, MP3/ WMA and
JPEG files together, you can select menu of files which you would like to play
by pressing MENU.
Moving to the previous/ next page on the file list menu
Press and hold
UU uu
to move to the previous or next page.
Playing a DVD that has a menu
Most DVDs now have menus which load first before the film begins to play.
1 You can navigate these menus using
2 Press ENTER to select.
Skipping to the next/ previous chapter/ track/ file
Press SKIP (>) to move to the next chapter/ track/ file.
Press SKIP (.) to return to the beginning of the current chapter/ track/ file.
Press SKIP (.) twice briefly to step back to the previous chapter/ track/ file.
JPGACDDivXWMAMP3
DVD
UU uu II ii
ACDDivXDVDWMAMP3
to highlight an option.
11
Pausing playback
ALL
1 Press PAUSE/STEP (X) to pause playback.
2 Press PLAY (B) to continue playback.
Frame-by-Frame playback
DivXDVD
Press PAUSE/STEP (X) repeatedly to play title Frame-by-Frame.
Playing repeatedly or randomly
ACDDivXDVDWMAMP3
Press REPEAT/RANDOM repeatedly, and the current title, chapter or track will
be played back repeatedly or randomly.
To return to normal playback, press REPEAT/RANDOM repeatedly.
- Random play mode: only music files.
Fast forward or fast reverse
ACDDivXDVDWMAMP3
Press SCAN (m or M) to play fast forward or fast reverse during playback.
You can change the playback speed by pressing SCAN (m or M)
repeatedly. Press PLAY (B) to continue play at normal speed.
Slowing down the playing speed
DVD
While playback is paused, press SCAN (bb or BB) to slow down forward or
reverse playback. You can change the various playback speed by pressing
SCAN (m or M) repeatedly. Press PLAY (B) to continue play at normal
speed.
1.5 times faster playback
DVD
Press PLAY (B) when a DVD is already playing to watch and listen to a DVD
1.5 times faster than normal playback speed. “B x1.5” will appear in the screen.
Press PLAY (B) again to return to normal playback speed.
Selecting a subtitle language
DivXDVD
During playback, press SUBTITLE repeatedly to select a desired subtitle
language.
Changing the character set to display DivX®subtitle correctly
- Optional
DivX
1 If the subtitle does not display properly during playback, press and hold
SUBTITLE for about 3 seconds to display the language code menu.
2 Press SUBTITLE repeatedly to change the language code until the subtitle is
displayed properly.
Viewing the Title menu
DVD
Press TITLE to display the disc's title menu, if available.
Starting play from selected time
DivXDVD
Searches for the starting pointing of entered time code.
1 Press DISPLAY then select clock icon.
2 Enter a time then press ENTER.
For example, to find a scene at 1 hour, 10 minutes, and 20 seconds, enter
“11020” by using numerical buttons and press ENTER. if you enter the wrong
number, press CLEAR to enter again.
Last Scene Memory
DVD
This unit memorizes the last scene from the last disc that is viewed. The last
scene remains in memory even if you remove the disc from the player or switch
off (Stand-by mode) the unit. If you load a disc that has the scene memorized,
the scene is automatically recalled.
Creating your own program
WMAMP3ACD
You can play the contents of a disc in the order you want by arranging the order
of the music on the disc. The program is cleared when the disc is removed.
1 Select a desired music then press PROG./MEMO. or select “ ” and then
press ENTER to add the music to the program list.
2 To add all music in the disc, select “ ” and then press ENTER.
3 Select a music from the program list then press ENTER to start programmed
playback.
4 To clear a music from the program list, select the music you want to clear then
press CLEAR or select “
icon and then press ENTER. To clear all music
”
from the program list, select “ ” then press ENTER.
Displaying file information (ID3 TAG)
MP3
You can check the ID3 TAG information of MP3 files only in discs by pressing
DISPLAY repeatedly.
Viewing photo files as a slide show
UU uu II ii
1 Use
to highlight ( ) icon then press ENTER to start slide Show.
2 You can change slide show speed using
JPG
II ii
when ( ) icon is highlighted.
12

Skipping to the next/ previous photo
JPG
II ii
to view the previous/ next photo.
Press SKIP (. or >) or
Rotating a photo
UU uu
Use
viewing a photo in full screen.
to rotate the photo in full screen counterclockwise or clockwise while
JPG
Screen Saver
The screen saver appears when you leave the unit in Stop mode for about five
minutes.
System Select - Optional
You must select the appropriate system mode for your TV system. If “NO DISC”
appears in the display window, press and hold PAUSE/STEP (X) for more
than five seconds to be able to select a system. (PAL/ NTSC/ AUTO)
Playable file requirement
DivX
• Available resolution: within 800x600 (W x H) pixels
• The file name of the DivX subtitle should be entered within 45 characters.
• If there is impossible code to express in the DivX file, it may be displayed as
“ _ ” mark on the display.
• If the video and audio structure of recorded files is not interleaved, either
video or audio is outputted.
• Playable DivX file: “.avi”, “.mpg”, “.mpeg”, “.divx”
• Playable Subtitle format: SubRip (*.srt/ *.txt), SAMI (*.smi), SubStation Alpha
(*.ssa/ *.txt), MicroDVD (*.sub/ *.txt), SubViewer 2.0 (*.sub/ *.txt)
• Playable Codec format: “DIVX3.xx”, “DIVX4.xx”, “DIVX5.xx”, “MP4V3”, “3IVX”
• Playable Audio format: “AC3”, “PCM”, “MP3”, “WMA”
• For discs formatted in Live file system, you can not it on this player.
• If the name of movie file is different from that of the subtitle file, during
playback of a DivX file, subtitle may not be display.
• If you play a DivX file differ from DivX spec, it may not operate normally.
MP3/ WMA
• Sampling frequency: within 32 to 48 kHz (MP3/ WMA)
• Bit rate: within 32 to 320 kbps (MP3), 40 to 192 kbps (WMA)
• File extensions: “.mp3”/ “.wma”
• CD-ROM file format: ISO 9 660 LEVEL 1 / JOLIET
• We recommend that you use Easy-CD Creator, which creates an ISO 9 660
file system.
• They should not contain special letters such as / ? * : “ < > l etc.
• The total number of files on the disc should be less than 999.
This unit requires discs and recordings to meet certain technical standards
in order to achieve optimal playback quality. Pre-recorded DVDs are
automatically set to these standards. There are many different types of
recordable disc formats (including CD-R containing MP3 or WMA files) and
these require certain pre-existing conditions (see above) to ensure
Compatible playback.
Customers should note that permission is required in order to
download MP3/ WMA files and music from the Internet. Our company
has no right to grant such permission. Permission should always be
sought from the copyright owner.
JPG
• Normal: 5 120 x 3 840, Progressive jpeg: 2 043 x 1 536
• Recording condition: ISO9660 LEVEL 1/ JOLIET
• Maximum files: Under 999.
• Some discs may not operate due to a different recording format or the
condition of disc.
• File extensions: “.jpg”
13

Listening to the radio
Make sure both for the FM aerials to be stretched to the most.
ON REMOTE
1 Select FM FUNCTION
2 Select a radio station TUN.- / +
3 To save a radio station PROG./MEMO.
A preset number will show in
the display.
4 Select the preset number PRESET
Up to 50 radio stations can
be saved.
5 To confirm press PROG./MEMO.
Listening to the radio - More you can do
Looking for radio stations automatically
Press and hold TUN.-/ TUN.+ for more than a second. The tuner will scan
automatically and stop when it finds a radio station.
Deleting all the saved stations
1 Press and hold PROG./MEMO. for two seconds.
- “ERASE ALL” will flash up on the display.
2 Press PROG./MEMO.
Improving poor FM reception
Press PLAY (B) (MO./ST.) on the remote control. This will change the tuner
from stereo to mono and usually improve the reception.
UU //uu
See information about your radio stations - OPTIONAL
The FM tuner is supplied with the Radio Data System (RDS) facility. This
shows the letters RDS on the display, plus information about the radio
station being listened to. Press RDS on the remote control several times to
view the information.
PTY - Programme Type, such as News, Sport, Jazz.
RT - Radio Text, the name of the radio station.
CT - Time Control, the time at the location of the radio station.
PS - Programme Service name, the name of channel.
You can search the radio stations by programme type by pressing RDS.
The display will show the last PTY in use. Press PTY one or more times to
select your preferred programme type. Press
automatically. When a station is found the search will stop.
II //ii
. The tuner will search
14
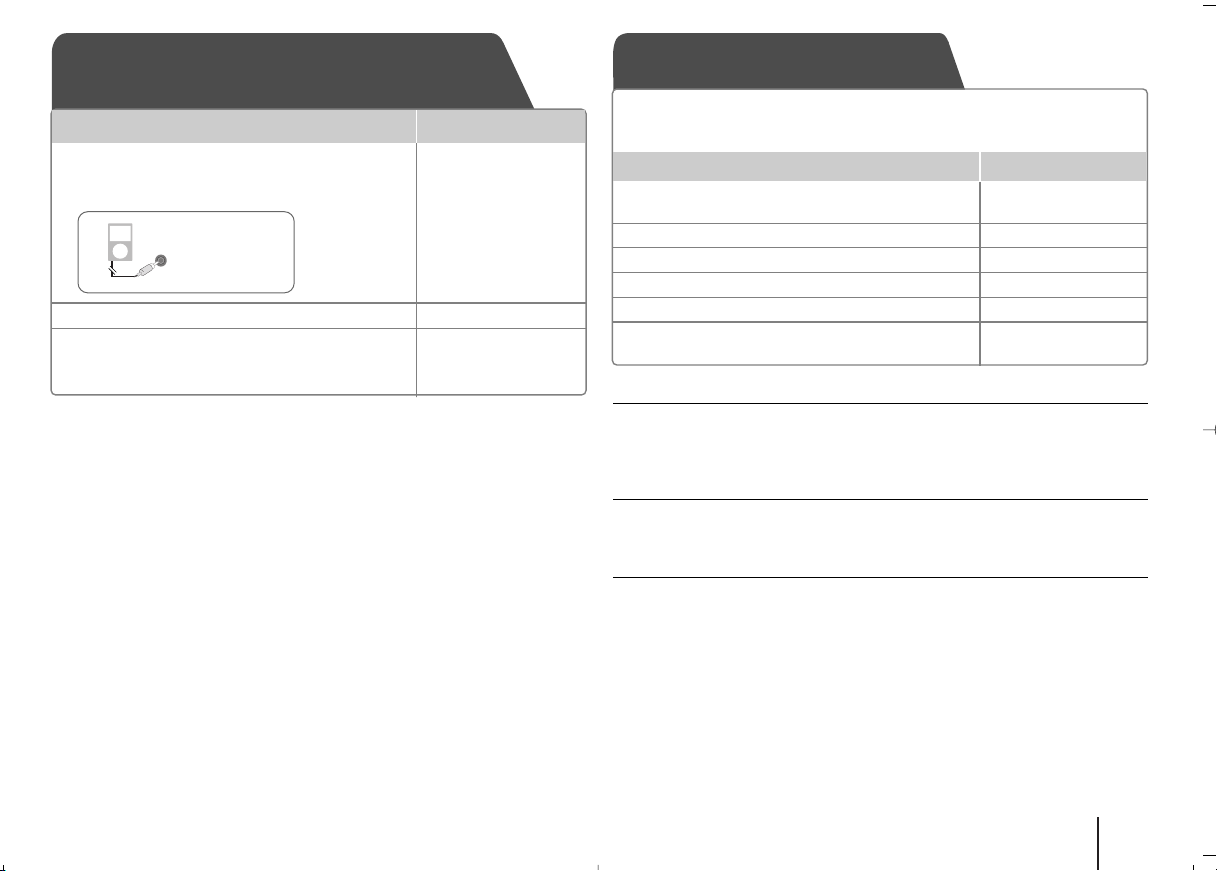
Listening to music from your
portable player
ON REMOTE
1 Connect the portable player
to the PORT.IN (PORTABLE IN)
connector of the unit.
PORT.IN
2 Turn the power on.
3 Select the function.
Turn on the portable player and FUNCTION
start it playing.
11
POWER
Using an USB device
You can enjoy media files saved on an USB device by connecting it to
the USB port of the unit. If you want to operate other function, see the
Playing a Disc or file section.
ON REMOTE
1 Connect the USB device to
the USB port of the unit.
2 Select the function. FUNCTION
3 Select a file you want to play.
4 Start your media playing.
5 To stop, press
6 Before disconnecting, you have FUNCTION
to change to any other function.
Compatible USB Devices
• MP3 Player: Flash type MP3 player.
• USB Flash Drive: Devices that support USB2.0 or USB1.1.
• The USB function of this unit does not support all USB devices.
USB device requirement
Devices which require additional program installation when you have connected
it to a computer, are not supported.
Look out for the follows
• Do not extract the USB device while in operation.
• For a large capacity USB, it may take longer than a few minute to be searched
• To prevent data loss, back up all data.
• If you use a USB extension cable or USB hub, the USB device is not
recognized.
• Using NTFS file system is not supported. (Only FAT(16/32) file system is
supported.)
• This unit is not supported when the total number of files is 1000 or more.
• External HDD, Card readers, Locked devices, or hard type USB devices are
not supported.
• USB port of the unit cannot be connected to PC.
• The unit can not be used as a storage device.
UU uu
BB
PLAY or ENTER
xx
STOP
15
Recording to USB
ON REMOTE
1 Connect the USB device to the
USB port of the unit.
2 Select a mode in which you want
to record (ex. CD/ TUNER/ ...) FUNCTION
Play a sound source first.
If you want to record desired music
file in disc to USB, play a file before
starting the recording.
3 Start the recording
4 To stop, press
Recording to USB - more you can do
Recording Music file in disc source to USB
One track recording
If the USB recording is started during playback of the CD, the one track/ file
would be recording into the USB.
All tracks recording
If the recording button is pressed at the CD stop, all tracks/ files would be
recording.
Program list recording
USB records after creating your own program if you want to record the track
you want (AUDIO CD Only).
zz
xx
REC
STOP
When you are recording, look out for the following
• You can check the recording percentage rate for the USB record on the
screen during the recording.(AUDIO, MP3/ WMA CD only)
• During recording MP3/ WMA, there is no sound.
• When you stop recording, the file that has been recorded at that time will be
stored.(AUDIO CD Only)
• Do not remove the USB device during USB recording. If not, an incomplete
file may be made and not deleted on PC.
• If USB recording does not work, the message like “NO USB”, “ERROR”,
“USB FULL” or “NO REC” is displayed on the display window.
• Multi card reader device or External HDD can not be used for USB
recording.
• A file is recorded by 2 hours (about 128 Mbytes) when you record for a long
term.
• When you stop recording during playback, the file will not be stored.
• In the state CD-G disc, USB record is not operated.
• You may not record more than 999 files.
• The file number is saved automatically.
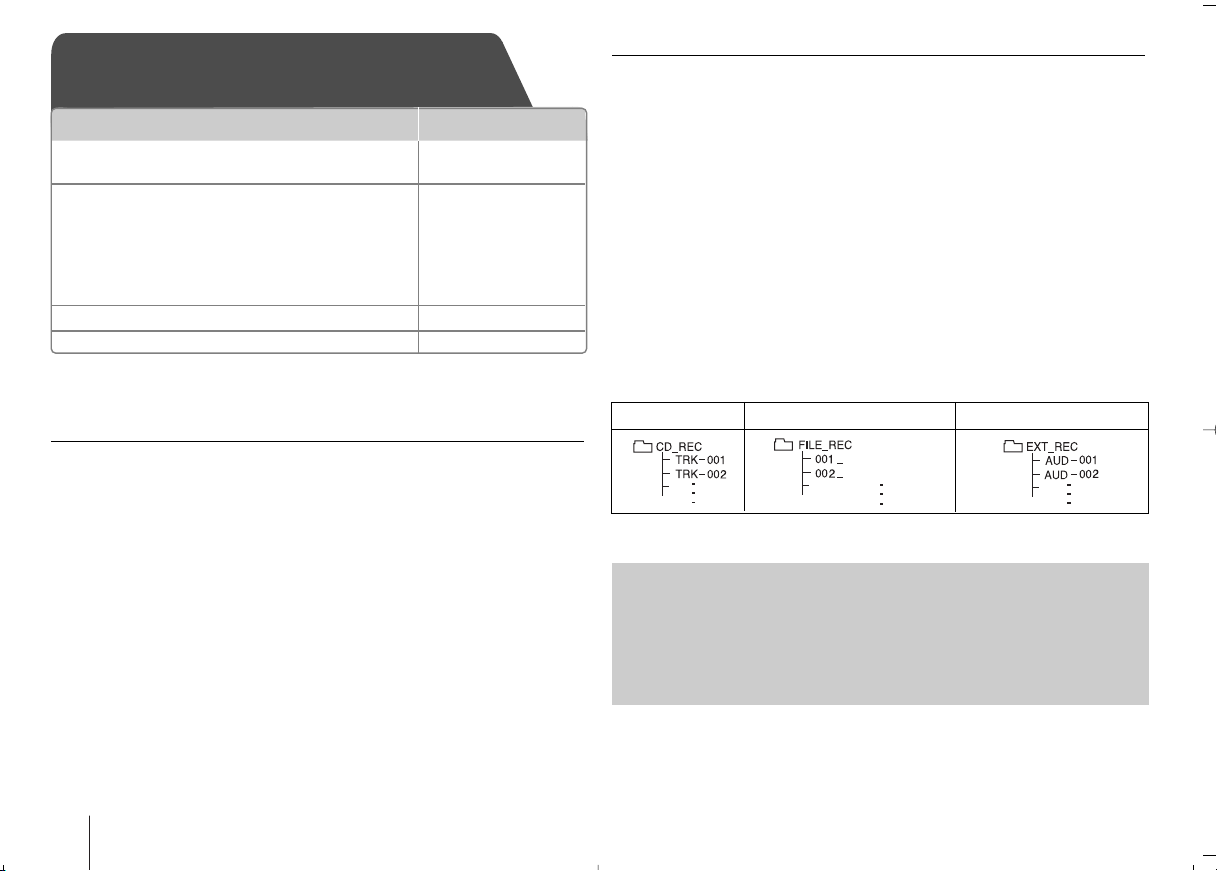
• It’ll be stored as follows.
AUDIO CD MP3/ WMA
ABC(File name)
DEF(File name)
The other sources
The making of unauthorized copies of copy-protected material, including
computer programs, files, broadcasts and sound recordings, may be an
infringement of copyrights and constitute a criminal offense. This
equipment should not be used for such purposes.
Be responsible
Respect copyrights
16
Language Codes
Use this list to input your desired language for the following initial settings: Disc Audio, Disc Subtitle, Disc Menu.
Language Code
Afar 6565
Afrikaans 6570
Albanian 8381
Ameharic 6577
Arabic 6582
Armenian 7289
Assamese 6583
Aymara 6588
Azerbaijani 6590
Bashkir 6665
Basque 6985
Bengali; Bangla 6678
Bhutani 6890
Bihari 6672
Breton 6682
Bulgarian 6671
Burmese 7789
Byelorussian 6669
Chinese 9072
Language Code
Croatian 7282
Czech 6783
Danish 6865
Dutch 7876
English 6978
Esperanto 6979
Estonian 6984
Faroese 7079
Fiji 7074
Finnish 7073
French 7082
Frisian 7089
Galician 7176
Georgian 7565
German 6869
Greek 6976
Greenlandic 7576
Guarani 7178
Gujarati 7185
Language Code
Hausa 7265
Hebrew 7387
Hindi 7273
Hungarian 7285
Icelandic 7383
Indonesian 7378
Interlingua 7365
Irish 7165
Italian 7384
Japanese 7465
Kannada 7578
Kashmiri 7583
Kazakh 7575
Kirghiz 7589
Korean 7579
Kurdish 7585
Laothian 7679
Latin 7665
Latvian, Lettish 7686
Language Code
Lingala 7678
Lithuanian 7684
Macedonian 7775
Malagasy 7771
Malay 7783
Malayalam 7776
Maori 7773
Marathi 7782
Moldavian 7779
Mongolian 7778
Nauru 7865
Nepali 7869
Norwegian 7879
Oriya 7982
Panjabi 8065
Pashto, Pushto 8083
Persian 7065
Polish 8076
Portuguese 8084
Area Codes
Choose a area code from this list.
Area Code
Afghanistan AF
Argentina AR
Australia AU
Austria AT
Belgium BE
Bhutan BT
Bolivia BO
Brazil BR
Cambodia KH
Canada CA
Chile CL
China CN
Colombia CO
Congo CG
Area Code
Costa Rica CR
Croatia HR
Czech Republic CZ
Denmark DK
Ecuador EC
Egypt EG
El Salvador SV
Ethiopia ET
Fiji FJ
Finland FI
France FR
Germany DE
Great Britain GB
Greece GR
Area Code
Greenland GL
Hong Kong HK
Hungary HU
India IN
Indonesia ID
Israel IL
Italy IT
Jamaica JM
Japan JP
Kenya KE
Kuwait KW
Libya LY
Luxembourg LU
Malaysia MY
Area Code
Maldives MV
Mexico MX
Monaco MC
Mongolia MN
Morocco MA
Nepal NP
Netherlands NL
Netherlands Antilles AN
New Zealand NZ
Nigeria NG
Norway NO
Oman OM
Pakistan PK
Panama PA
Language Code
Quechua 8185
Rhaeto-Romance 8277
Rumanian 8279
Russian 8285
Samoan 8377
Sanskrit 8365
Scots Gaelic 7168
Serbian 8382
Serbo-Croatian 8372
Shona 8378
Sindhi 8368
Singhalese 8373
Slovak 8375
Slovenian 8376
Spanish 6983
Sudanese 8385
Swahili 8387
Swedish 8386
Tagalog 8476
Area Code
Paraguay PY
Philippines PH
Poland PL
Portugal PT
Romania RO
Russian Federation RU
Saudi Arabia SA
Senegal SN
Singapore SG
Slovak Republic SK
Slovenia SI
South Africa ZA
South Korea KR
Spain ES
Language Code
Tajik 8471
Tamil 8465
Telugu 8469
Thai 8472
Tonga 8479
Turkish 8482
Turkmen 8475
Twi 8487
Ukrainian 8575
Urdu 8582
Uzbek 8590
Vietnamese 8673
Volapük 8679
Welsh 6789
Wolof 8779
Xhosa 8872
Yiddish 7473
Yoruba 8979
Zulu 9085
Area Code
Sri Lanka LK
Sweden SE
Switzerland CH
Taiwan TW
Thailand TH
Turkey TR
Uganda UG
Ukraine UA
United States US
Uruguay UY
Uzbekistan UZ
Vietnam VN
Zimbabwe ZW
17
Troubleshooting
PROBLEM
No power.
No picture.
A DVD/CD will not play.
Humming noise heard while a
DVD or CD is playing.
Radio stations can’t be
tuned in properly.
The remote control doesn’t
work well / at all.
CAUSE
The power cord is disconnected.
The TV is not set to receive the DVD signal.
The video cables are not connected securely.
No disc is inserted.
An unplayable disc is inserted.
The disc is inserted upside down.
The menu is open on screen.
There is a parental lock which prevents the playback of DVDs
with a certain rating.
The disc is dirty.
The unit is located too close to the TV, causing feedback.
The aerial is positioned or connected poorly.
The signal strength of the radio station is too weak.
No stations have been preset or preset stations have been
cleared (when tuning by scanning preset channels).
The remote is not pointed directly at the unit.
The remote is too far from the unit.
There is an obstacle in the path between the remote control
and the unit.
The battery in the remote control is flat.
CORRECTION
Plug the power cord into the wall outlet securely.
Select the appropriate video input mode on the TV so the
picture from the unit appears on the TV screen.
Connect the video cables securely to both the TV and unit.
Insert a disc
Insert a playable disc (check the disc type, colour system and
regional code).
Place the disc the side you can see the printed side.
Press SETUP to close the menu screen.
Enter your password or change the rating level.
Clean the disc using a soft cloth with outward strokes.
Move the unit and audio components further away from your
TV.
Check the aerial connection and adjust its position.
Attach an external aerial if necessary.
Tune to the station manually.
Preset some radio stations.
Point the remote directly at the unit.
Use the remote within 23 feet (7 m) of the unit.
Remove the obstacle.
Replace the battery with new one.
18
Types of Playable Discs
Type
DVD-VIDEO: Discs such as movies that can
be purchased or rented.
DVD-R: Video mode and finalized only
DVD-RW: Video mode and finalized only
DVD VR format that have been finalized can not be
played in this unit
DVD+R: Video mode only
Supports the double layer disc also
DVD+RW: Video mode only
Audio CD: Music CDs or CD-R/ CD-RW in music
CD format that can be purchased.
This unit plays DVD ± R/ RW and CD-R/ RW that contains audio
titles, DivX, MP3, WMA or JPEG files. Some DVD ± RW/ DVD ± R or
CD-RW/ CD-R cannot be played on this unit due to the recording
quality or physical condition of the disc, or the characteristics of the
recording device and authoring software.
“Dolby”and the double-D symbol are trademarks of Dolby Laboratories.
Manufactured under license from Dolby Laboratories.
Logo
About the Symbol Display
“ ” may appear on your TV display during operation and indicates that the
function explained in this owner’s manual is not available on that specific DVD
video disc.
Regional Codes
This unit has a regional code printed on the rear of the unit. This unit can play
only DVD discs labeled same as the rear of the unit or “ALL”.
• Most DVD discs have a globe with one or more numbers in it clearly visible
on the cover. This number must match your unit’s regional code or the disc
cannot play.
• If you try to play a DVD with a different regional code from your player, the
message “Check Regional Code” appears on the TV screen.
Copyrights
It is forbidden by law to copy, broadcast, show, broadcast via cable, play in
public, or rent copyrighted material without permission. This product features
the copy protection function developed by Macrovision. Copy protection signals
are recorded on some discs. When recording and playing the pictures of these
discs picture noise will appear. This product incorporates copyright protection
technology that is protected by U.S. patents and other intellectual property
rights. Use of this copyright protection technology must be authorized by
Macrovision, and is intended for home and other limited viewing uses only
unless otherwise authorized by Macrovision. Reverse engineering or
disassembly is prohibited.
CONSUMERS SHOULD NOTE THAT NOT ALL HIGH DEFINITION
TELEVISION SETS ARE FULLY COMPATIBLE WITH THIS PRODUCT AND
MAY CAUSE ARTIFACTS TO BE DISPLAYED IN THE PICTURE. IN CASE
OF 525 OR 625 PROGRESSIVE SCAN PICTURE PROBLEMS, IT IS
RECOMMENDED THAT THE USER SWITCH THE CONNECTION TO THE
‘STANDARD DEFINITION’ OUTPUT. IF THERE ARE QUESTIONS
REGARDING OUR TV SET COMPATIBILITY WITH THIS MODEL 525p AND
625p UNIT, PLEASE CONTACT OUR CUSTOMER SERVICE CENTER.
You have to set the disc format option to [Mastered] in order to make the discs
compatible with the LG players when formatting rewritable discs. When setting
the option to Live File System, you cannot use it on LG players.
(Mastered/ Live File System: Disc format system for Windows Vista)
19
Specifications
General
Power supply 200 - 240 V, 50/60 Hz
Power consumption 50 W
Net Weight 2.8 kg
Bus power supply (USB) 5 V 500 mA
USB Version 1.1
External dimensions (170 x 244 x 275) mm
(W x H x D)
Operating temperature 5 °C to 35 °C
Operating humidity 5 % to 85 %
Output power 30 W + 30 W
T.H.D 0.50 %
Tuner
FM Tuning Range 87.5 to 108.0 MHz or 87.50 to 108.00 MHz
DVD/CD
Frequency response 100 Hz to 18 kHz
Signal-to-noise ratio 60 dB
Dynamic range 65 dB
Available resolution according to connection
[COMPONENT VIDEO OUT] Y:1.0
[VIDEO OUT] 1.0 ± 0.1 V
Speaker
Type 2 Way 2 Speaker
impedance 6 Ω
Rated Input Power 30 W
Max. Input Power 60 W
Net Dimensions (W x H x D) (150 x 244 x 182) mm
Net Weight 1.9 kg
± 0.2, PB:0.7 ± 0.1, PR:0.7 ± 0.1
XBS64V
Designs and specifications are subject to change without prior notice.
20


BEDIENUNGSANLEITUNG
DVD Micro-Hi-Fi-Anlage
Bitte lesen Sie dieses Handbuch vor der Bedienung des Gerätes sorgfältig durch
und bewahren Sie es zum späteren Nachschlagen auf.
MODELL
XB64 (XB64-D0U/XBS64V)
P/NO : MFL63266233
DEUTSCH
Sicherheitshinweise
VORSICHT
GEFAHR VON STROMSCHLAGEN
VORSICHT: UM DIE GEFAHR VON STROMSCHLÄGEN ZU VERMEIDEN, DAS
GEHÄUSE (BZW. DIE RÜCKSEITE) NICHT ABNEHMEN UND/ODER DAS GERÄT
SELBST REPARIEREN. ES BEFINDEN SICH KEINE BAUTEILE IM GERÄT, DIE
VOM BENUTZER REPARIERT WERDEN KÖNNEN. REPARATUREN STETS VOM
FACHMANN AUSFÜHREN LASSEN.
Der Blitz mit der Pfeilspitze im gleichseitigen Dreieck warnt den Benutzer vor
unisolierten und gefährlichen spannungsführenden Stellen innerhalb des
Gerätegehäuses, an denen die Spannung groß genug ist, um für den
Menschen die Gefahr eines Stromschlages zu bergen.
Das Ausrufezeichen im gleichseitigen Dreieck weist den Benutzer auf
wichtige vorhandene Betriebs- und Wartungsanleitungen in der
produktbegleitenden Dokumentation hin.
ACHTUNG: ZUR VERMEIDUNG VON BRÄNDEN ODER STROMSCHLÄGEN
DIESES GERÄT NIEMALS REGEN ODER FEUCHTIGKEIT AUSSETZEN.
ACHTUNG: Installieren Sie das Gerät nicht in einem geschlossenen Raum, z. B. in
einem Bücherregal oder an einem ähnlichen Ort.
VORSICHT: Die Belüftungsöffnungen niemals verdecken. Das Gerät immer laut
Herstellerangaben anschließen. Schlitze und Öffnungen im Gehäuse dienen der
Belüftung, gewährleisten einen störungsfreien Betrieb des Gerätes und schützen es vor
Überhitzung. Öffnungen sollte niemals durch Aufstellen des Gerätes auf einem Bett, Sofa,
Teppich oder ähnlichen Untergründen verdeckt werden. Das Gerät sollte nicht in z. B. in
einem Bücherregal oder Schrank aufgestellt werden, wenn keine ausreichende Belüftung
gewährleistet werden kann oder die Anleitungen missachtet wurden.
VORSICHT: Dieses Gerät besitzt ein Laser-System. Um das Gerät richtig zu
verwenden, lesen Sie dieses Benutzerhandbuch sorgfältig durch und bewahren Sie
es auf. Setzen Sie sich zur Wartung mit einem qualifizierten Servicebetrieb in
Verbindung. Durch Bedienungen, Einstellungen oder Verfahren, die in diesem
Handbuch nicht erwähnt werden, können gefährliche Strahlungen verursacht werden.
Um einen direkten Kontakt mit dem Laserstrahl zu vermeiden, darf das Gehäuse
nicht geöffnet werden. NIEMALS IN DEN LASERSTRAHL BLICKEN.
VORSICHT: Das Gerät darf nicht mit Wasser (Tropf- oder Spritzwasser) in Berührung
kommen und es sollten keine mit Flüssigkeiten gefüllten Behälter auf das Gerät
gestellt werden, wie z. B. Vasen.
2
NICHT OFFNEN
VORSICHTSHINWEISE zum Netzkabel
Die meisten Geräte sollten an einen eigenen Stromkreis angeschlossen werden.
D. h. eine separate Steckdose ohne weitere Anschlüsse oder Zweigleitungen, über
die ausschließlich dieses Gerät mit Strom versorgt wird. Beachten Sie hierzu die
technischen Daten des Gerätes in diesem Benutzerhandbuch. Steckdosen niemals
überlasten. Bei überlasteten, lockeren oder beschädigten Steckdosen,
Verlängerungskabeln, bei abgenutzten Kabeln oder beschädigter Isolierung besteht
die Gefahr von Stromschlägen oder Bränden. Die Gerätekabel sollten regelmäßig
überprüft werden. Bei Beschädigungen oder Abnutzungen der Kabel sofort den
Netzstecker ziehen und das Kabel von einem qualifizierten Techniker durch ein
gleiches Modell austauschen lassen. Das Netzkabel vor mechanischen
Beschädigungen schützen, wie z. B. Verdrehen, Knicken, Eindrücken, Einklemmen in
einer Tür oder Darauftreten. Achten Sie besonders auf die Stecker, Steckdosen und
den Bereich, an dem das Kabel aus dem Gerät austritt. Ziehen Sie zum
Unterbrechen der Stromversorgung den Netzstecker. Achten Sie beim Aufstellen des
Gerätes darauf, dass der Netzstecker leicht erreichbar bleibt.
Dieses Gerät besitzt eine tragbare Batterie oder Akku-Batterie.
Sicherheitshinweise zum Herausnehmen der Batterie aus dem Gerät: Führen
Sie zum Herausnehmen der alten Batterie bzw. das Batteriepakets die Einzelschritte
zum Einlegen der Batterie in umgekehrter Reihenfolge durch. Um eine Gefährdung
der Umwelt sowie mögliche Gesundheitsgefährdungen von Menschen und Tieren zu
vermeiden, sollten Altbatterien in einen geeigneten Behälter einer Sammelstelle
gegeben werden. Altbatterien niemals zusammen mit dem Hausmüll entsorgen. Bitte
geben Sie Altbatterien an einer kostenlosen Sammelstelle für Batterien und AkkuBatterien ab. Die Batterie keiner extremen Hitze aussetzen, wie z. B. direkte
Sonneneinstrahlung, Feuer o. ä.
Entsorgung von Altgeräten
1. Wenn dieses Symbol eines durchgestrichenen Abfalleimers auf einem
Produkt angebracht ist, unterliegt dieses Produkt der europäischen
Richtlinie 2002/96/EC.
2. Alle Elektro- und Elektronik-Altgeräte müssen getrennt vom Hausmüll über
dafür staatlich vorgesehene Stellen entsorgt werden.
3. Mit der ordnungsgemäßen Entsorgung des alten Gerätes vermeiden Sie
Umweltschäden sowie eine Gefährdung der eigenen Gesundheit.
4. Weitere Informationen zur Entsorgung des alten Gerätes erhalten Sie bei
der Stadtverwaltung, beim Entsorgungsamt oder in dem Geschäft, in dem
Sie das Produkt erworben haben.
Hiermit erklärt LG Electronics, dass diese(s) Produkt(e) die
grundlegenden Anforderungen und die sonstigen Bestimmungen
der Richtlinien 2004/108/EC, 2006/95/EC und 2009/125/EC
erfüllt/erfüllen.
Vertretung Europa:
LG Electronics Service Europe B.V.
Veluwezoom 15, 1327 AE Almere, The Netherlands
(Tel : +31-(0)36-547-8888)

Ihre neue DVD MICRO-HIFI-ANLAGE
Inhalt
Einstellungen 4
Hauptgerät 5
Fernbedienung 6
Standardsprache für OSD-Bildschirmmenüs - Optional 7
Erste Einstellung des Ländercodes - Optional 7
Allgemeine Einstellungen ändern 8-9
Uhrzeit einstellen 10
Anzeige von Disc-Informationen 11
Wiedergabe einer Disc oder Datei 11-13
Radio hören 14
Musik von einem tragbaren Player hören 15
Anschluss eines USB-Gerätes 15
USB-Aufnahme 16
Sprachcodes 17
Ländercodes 17
Fehlersuche 18
Abspielbare Disc-Typen 19
Technische Daten 20
3
Einstellungen
Anschluss des Gerätes an Ihren Fernseher und an die Antenne.
Verbinden Sie die Buchsen am Gerät über die Kabel mit dem Fernseher (oder z. B. DVD-Player oder Digitalgerät).
Überprüfen Sie die Buchsen Ihres Fernsehgerätes und wählen Sie die geeignete Anschlussart A, B. Die Bildqualität der einzelnen Anschlussarten erhöht sich von A nach B.
FM-Antenne
a Legen Sie die UKW-Antenne aus
Ein optimaler Empfang wird erreicht, wenn die beiden
losen Enden der Antenne gerade und waagerecht
ausgerichtet werden.
b Component-Video-Anschluss (B)
Verbinden Sie die COMPONENT VIDEO
(PROGRESSIVE SCAN) OUTPUT-Ausgangsbuchsen
am Gerät über ein Y PB PR-Kabel mit den
entsprechenden Eingangsbuchsen am Fernsehgerät.
- Falls Ihr Fernsehgerät Progressive-Signale
verarbeiten kann, sollte dieser Anschlussart gewählt
und die Option [Progressive Scan] im
Einstellungsmenü [Anzeige] auf [Ein] eingestellt
werden (siehe Seite 8).
HINWEISE:
• Falls der Fernsehbildschirm ungewöhnliche Farben anzeigt, sollten die Lautsprecher mindestens 30 cm vom Fernseher entfernt aufgestellt werden.
• Die Lautsprecherkabel müssen an die richtigen Geräteanschlüsse angeschlossen werden:+ an + und – an –. Bei vertauschten Kabeln wird der
Klang verzerrt und die Bässe werden verringert.
a
e
b
c
d
c Video-Ausgangsanschluss
Verbinden Sie die VIDEO OUTPUT
(MONITOR)-Buchse am Gerät über ein
Videokabel mit den entsprechenden
Eingangsbuchsen am Fernsehgerät.
d
Schließen Sie die Lautsprecherkabel
an den Player an
Um die Kabel am Gerät anzuschließen,
drücken Sie jeweils auf eine der
Anschlussklemmen auf der Rückseite,
so dass sich die Anschlüsse öffnen.
Führen Sie das jeweilige Kabel ein und
lassen Sie die Anschlussklemme wieder
los. Schließen Sie das schwarze Ende
jedes Kabels an die Anschlüsse mit der
Bezeichnung - (minus), und das rote
Ende jedes Kabels an die Anschlüsse
mit der Bezeichnung + (plus) an.
e SCART-Anschluss
Verbinden Sie den Anschluss TO TV
am Gerät über ein SCART-Kabel mit
dem Fernsehgerät. Mit diesem Gerät
kann der Ton eines Zusatzgerätes
wiedergegeben werden. Drücken
Sie zur Auswahl von TV-AUDIO
mehrmals die Taste FUNC.
(FUNCTION).
(A)
4
Hauptgerät
1
ANZEIGEFENSTER
2
11/]]
Gerät ein-/ausschalten
3
DISC-FACH
4
FUNC.
Auswahl einer Funktion.
5
EQ: Einstellung der Tonqualität
Auswahl zwischen verschiedenen
Klangarten.
6
PORT.IN
Der Player kann zur Wiedergabe von
Musiktiteln zahlreicher tragbarer
Player eingesetzt werden.
PHONES
Kopfhörerbuchse ( 3.5 mm).
Beachten Sie, dass ein übermäßiger
Schalldruck durch die Kopfhörer
Gehörschäden verursachen kann.
CLOCK
Uhrzeit einstellen und anzeigen.
TIMER
(Siehe “Player als Wecker
verwenden”)
6
SET/RDS (Optional)
Einstellungen übernehmen.
1
RDS (Optional)
Informationen zum Radiosender
2
anzeigen.
REC.
Aufnahme (USB-Aufnahme)
3
4
7
8
USB-Anschluss
7
ZZ
OPEN/CLOSE
CDs einlegen und auswerfen.
8
VOL.+/ -
Lautstärke in allen Betriebsarten
einstellen.
./>
TUN.-/ TUN.+
5
9
Radiosender auswählen.
Suchlauf zurück oder vor.
Zum vorherigen/nächsten Track
springen.
BB [[]]
Wiedergabe/Pause
9
xx
OPEN
6
STOP
5
Fernbedienung
FUNCTION: Auswahl der Funktion und Eingangsquelle.
SLEEP: Die Zeit bis zum Ausschalten des Gerätes kann zwischen
10 und 180 Minuten eingestellt werden. Drücken Sie zur Anzeige
der verbleibenden Zeit die Taste SLEEP. (Dimmer: Helligkeit der
LED-Anzeige (Leuchtdioden) auf dem Bedienungsfeld bei
eingeschaltetem Gerät um die Hälfte verringern.)
11
POWER: Schaltet das Gerät EIN und AUS.
Z OPEN/CLOSE: Disc-Fach öffnen und schließen.
TITLE: Falls die aktuelle DVD ein Menü besitzt, wird das
Titelmenü auf dem Bildschirm angezeigt. Ansonsten
REPEAT/RANDOM: Wiedergabemodus auswählen.
MUTE: Ton vorübergehend stummschalten.
EQ (EQUALIZER-Effekt): Auswahl zwischenverschiedenen
CLEAR: Tracknummer aus der Programmliste löschen.
Steuertasten für das Fernsehgerät: Bedienung des
Bedienung des Fernsehers.
Über die mitgelieferte Fernbedienung kann die Lautstärke
und die Eingangsquelle auch eines nicht-LGFernsehgerätes bedient und das Gerät ein- undausgeschaltet
werden. Halten Sie die Taste POWER (TV) gedrückt und
drücken Sie mehrmals die Taste PR/CH (+/–), bis sich
der Fernseher ein- bzw. ausschaltet.
erscheint u. U. das Disc-Menü.
DISPLAY: Bildschirmmenü aufrufen.
MENU: Menü einer DVD-Disc aufrufen.
SETUP: Setup-Menü ein-/ausblenden.
(WIEDERHOLUNG, ZUFÄLLIG)
Klangarten.
VOL: Lautstärke einstellen.
Fernsehgerätes (nur LG-Fernseher).
PRESET (
TUN. (-/+): Einstellen des gewünschten Radiosenders.
II ii UU uu
Bildschirmmenü.
ENTER: Menüauswahl bestätigen.
RETURN (OO): Innerhalb eines Menüs zurück oder Setup-
Menü verlassen.
REC(z): USB-Aufnahme
STOP (x): Wiedergabe oder Aufnahme anhalten.
PLAY (B): Wiedergabe starten.
MO./ST.: Schlechten Radioempfang verbessern.
PAUSE/STEP (X): Wiedergabe Pause.
SKIP (./>): Zum nächsten oder vorherigen
Kapitel/Track/Titel.
SCAN (
Nummerntasten 0-9: Auswahl von Aufzählungsoptionen
ineinem Menü.
SUBTITLE: Auswahl der gewünschten Untertitelsprache
während der Wiedergabe.
PROG./MEMO.: Programm-Menü ein-/ausblenden.
UU uu
): Auswahl eines Radiosenders.
(links/rechts/auf/ab): Steuerung im
bbbb//BBBB
): Suchlauf zurück oder vor.
RDS/ PTY: Radio Data System.
Radiosender nach Typ suchen.
Legen Sie die Batterie in die Fernbedienung ein
Beachten Sie die richtige Polung + (plus) und
– (minus) der Batterie und der Fernbedienung.
Die Batterie keiner extremen Hitze aussetzen, wie
z. B. direkte Sonneneinstrahlung, Feuer o. ä.
6

Standardsprache für OSDBildschirmmenüs - Optional
Beim ersten Einschalten des Gerätes wird das Setup-Menü zur
Einstellung der Sprache auf den Fernsehbildschirm eingeblendet.
Vor dem ersten Einsatz des Gerätes muss zunächst die Sprache
ausgewählt werden.
AUF DER FERNBED.
1 Gerät einschalten
Daraufhin wird die Liste der Sprachen
angezeigt.
2 Sprache auswählen
3 Drücken Sie ENTER
4 Drücken Sie zur Bestätigung
11
POWER
II ii UU uu
II ii
ENTER
Erste Einstellung des
Ländercodes - Optional
Beim ersten Einschalten des Gerätes muss der Ländercode wie folgt
eingestellt werden.
AUF DER FERNBED.
1 Setup-Menü aufrufen SETUP
2 Erste Ebene des Menüs SPERRE aufrufen
3 Zur zweiten Menüebene wechseln
Der aktuelle Ländercode wird im
Unterverzeichnis angezeigt.
4 Zur dritten Ebene wechseln
5 Neues Kennwort eingeben Nummerntasten (0-9)
6
Eingegebenes neues Kennwort wiederholen
7 Wählen Sie einen Code für Ihr Land aus
Daraufhin werden die Funktionen
Einstufung und Kennwort aktiviert.
8 Drücken Sie zur Bestätigung ENTER
Einstellung des Ländercodes bestätigen.
Nummerntasten (0-9)
UU uu
ii
ii
und ENTER
und ENTER
UU uu II ii
7

Allgemeine Einstellungen ändern
AUF DER FERNBED.
1 Setup-Menü aufrufen SETUP
UU uu
UU uu
ii
UU uu
ii
, ENTER
2
Gewünschte Option der ersten Ebene wählen
3 Zur zweiten Menüebene wechseln
4
Gewünschte Option der zweiten Ebene wählen
5 Zur dritten Ebene wechseln
6 Einstellung ändern
Allgemeine Einstellungen ändern - und mehr
Spracheinstellungen
OSD (Menüsprache) – Sprache für das Einstellungsmenü und für die
Disc-Audio/Disc-Untertitel/Disc-Menü – Sprache für Disc-Audio/Disc-
[Voreinstellung]: Originalsprache, in der die Disc erstellt wurde.
[Andere]: Um eine andere Sprache zu wählen, geben Sie über die
Nummerntasten die entsprechende vierstellige Nummer ein, die
Sie der Listeder Sprachcodes im Anhang entnehmen können
(siehe Seite 17). Um einefalsche Eingabe vor dem Drücken auf
ENTER zu korrigieren, drücken Sieauf CLEAR.
[Aus] (für Disc-Untertitel): Untertitel ausschalten.
Bildschirmmenüs festlegen.
Untertitel/Disc-Menüs festlegen.
Anzeigeeinstellungen
Bildformat – Wählen Sie das Bildformat Ihres Fernsehgerätes aus.
[4:3] Beim Anschluss an einen normalen 4:3-Fernseher.
[16:9] Beim Anschluss an einen 16:9-Breitbildfernseher.
Anzeigemodus – Bei Auswahl von 4:3 müssen Sie zudem festlegen, wie im
Breitbildformat ausgestrahlte Fernsehprogramme und Filme
auf dem Bildschirm angezeigt werden sollen.
[Letterbox] Zeigt das Widescreen-Bild mit schwarzen Balken am
oberen und unteren Bildrand an.
[Panscan] Der gesamte 4:3-Bildschirm wird ausgefüllt, wobei das
Bild an den Rändern u. U. abgeschnitten wird.
Video-Ausgang – Wählen Sie die für den TV-Anschlusstyp geeignete
Einstellung.
[RGB]: Beim Anschluss des Fernsehgerätes an die SCART-Buchse.
[YPbPr]: Beim Anschluss des Fernsehgerätes an die COMPONENT/
PROGRESSIVE SCAN-Buchsen dieses Gerätes.
- Beim Wechsel des Video-Ausgangs von YPbPr nach RGB im Setup-Menü,
insbesondere beim Component-Video-Anschluss des Gerätes, wird ein
schwarzer Bildschirm angezeigt. Schließen Sie in diesem Fall das Videokabel
an die Buchse MONITOR an und wählen Sie im Setup-Menü nochmals die
Einstellung YPbPr.
Progressive Scan (für Component-Video-Anschlüsse) – Festlegen, ob die
COMPONENT/PROGRESSIVE SCAN-Ausgangsbuchsen Progressive-Signale
ausgeben können. Falls Ihr Fernsehgerät Progressive-Signale verarbeiten
kann, wählen Sie die Einstellung [EIN], um das Bild in brillanten Farben und
detailgenau anzuzeigen. Falls Ihr Fernsehgerät keine Progressive-Signale
verarbeiten kann, wählen Sie die Einstellung [AUS].
Wenn Progressive Scan versehentlich auf [Ein] eingestellt wurde, muss das
Gerät neu gestartet werden. Nehmen Sie dazu zunächst die Disc aus dem
Gerät heraus. Halten Sie nun die Taste STOP etwa fünf Sekunden lang
gedrückt. Die Standard-Einstellung für die Video-Ausgabe wird
wiederhergestellt, so dass wieder ein Bild auf dem Fernseher angezeigt wird.
8
 Loading...