

Page 1

MFL69824601
PRINTING DEGREE
EXTERIER INTERIER
01
210
T1742WGPSV.ABWREAP
LG
T1742WGPSV5.ASSREAP
145
145
MFL69824601
1
1
4
T1742WGPSV
T1742WGPSV5
ABWREAP
ASSREAP
SAPIENCE BEST
44
AUSTRALIA
<< NOTES >>
1. Material : Printing and exterier size are refer to work tables
2. Print work
1) G/S(LG) BRAND(FIG1) : * Cover - First color : LG Red Pantone #207
- Second color : LG GRAY PANTONE #430
* Inside - First color : Black
2) OEM BRAND(FIG2) : * Cover - First color : Black
* Inside - First color : Black
3. Printing, text size and line are based on LG designg film.
4. Size will Follow the standard.
5. Before product controlled by criteria sample.
6. Standard of supervision for hazardous material
Revise content of page 2 & 27
2
Revise content of page 41
ECO No. Date Prepared ApprovedREVISION CONTENTSYM.
EDXH200073 20170211 P.Q.Oanh DM.Kim
EDXH300070 20170307 P.Q.Oanh DM.Kim
:
P.Q.Oanh
D.K.Hung
DM.Kim
SAPIENCE BEST AUSTRALIA
MFL69824601
Page 2
ver.070317.02
Page 3
Page 4

C ont e n t s
R EA D T HIS MA NUA L
Inside you will find many helpful hints on how to use and maintain your washer properly. Just a
little preventive care on your part can save you a great deal of time and money over the life of your
washer. You will find many answers to common problems in the T roubleshooting section. If you
review our chart of Troubleshooting Tips first, you may not need to call for service at all.
Introduction
Before Starting to
Wash
Washing Programs
Additional Function
Program
Installation
Care and Maintenance
Troubleshooting
Specification
Safety Information 4
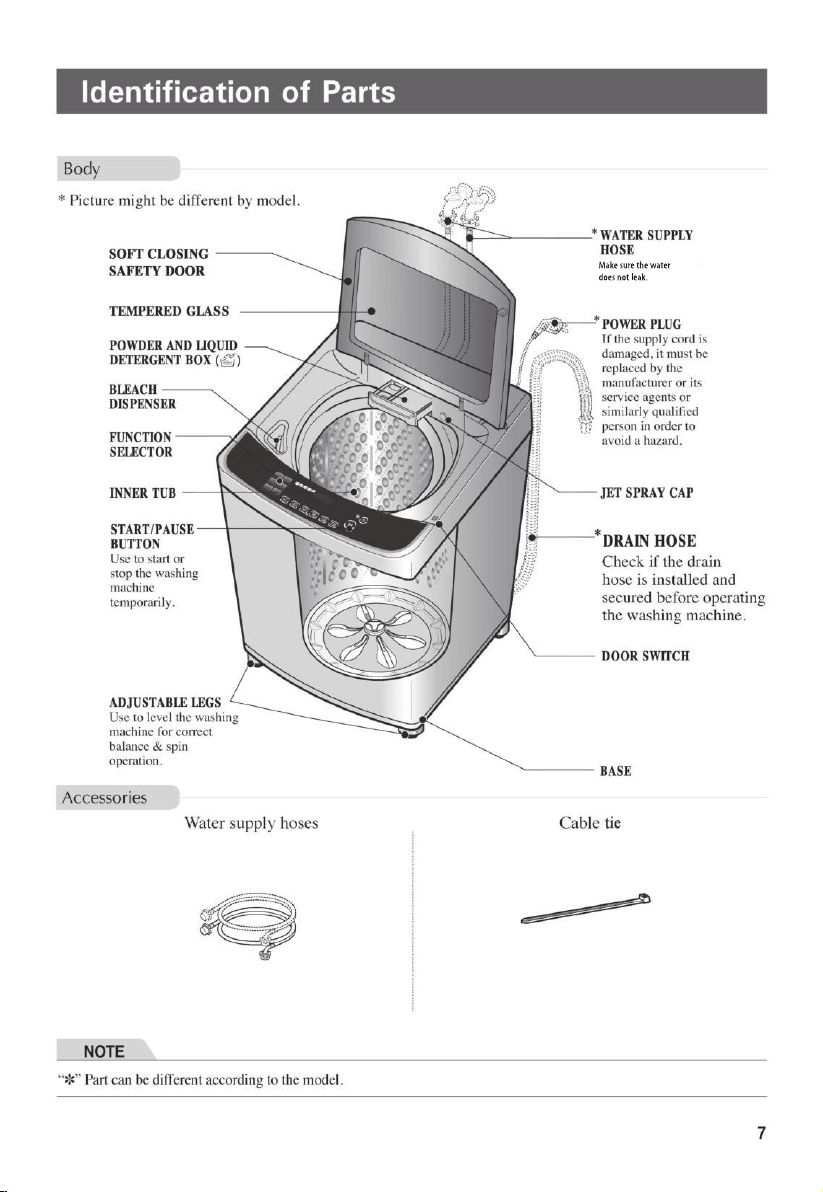
Identification of Parts 7
Function Information 8
Preparation Before W ashing 9
U se of W ater, D ispenser D rawer, D etergent, Bleach and Softener
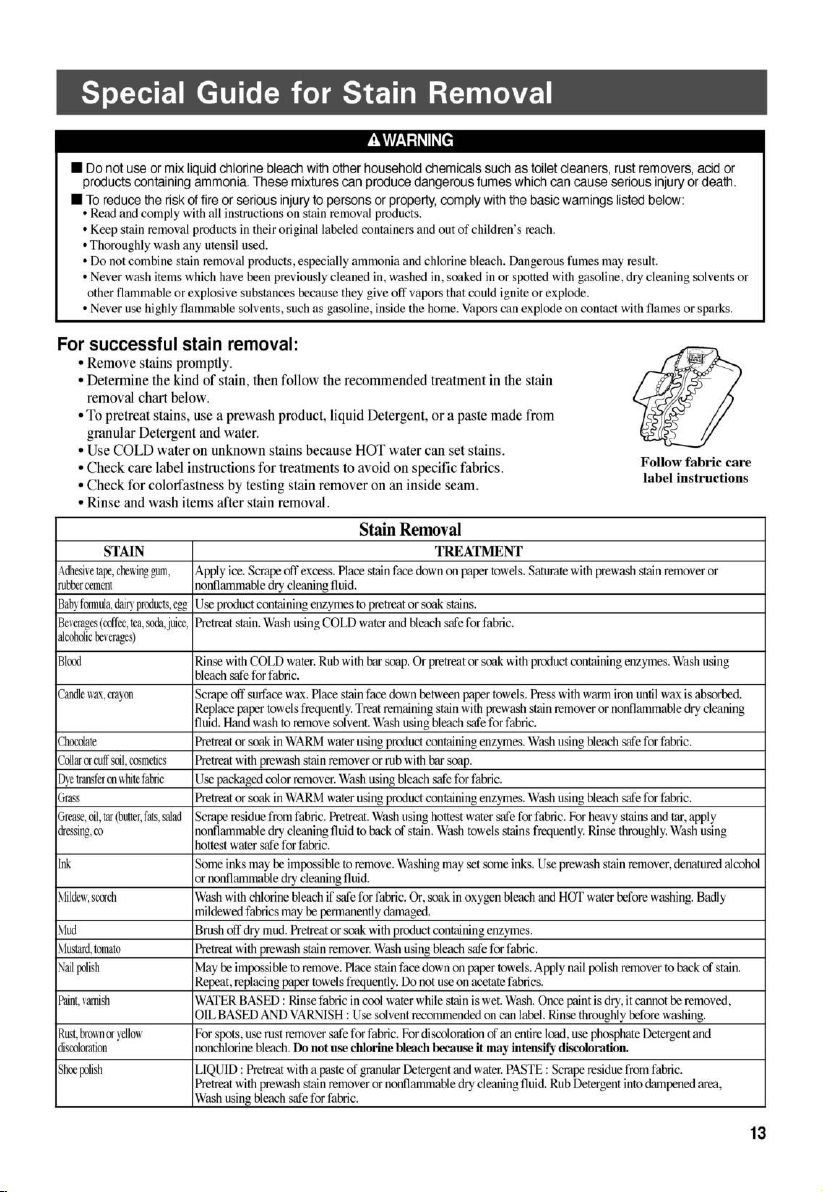
Special G uide for Stain Removal 13
Function of each Button 14
Cotton Wash
Stain Care W ash 16
Allergy Care W ash 16
Extra
Rinse 16
Eco Cotton
Q uick W ash 18
Delicates W ash 18
Towels
Duvet W ash 18
Quiet Wash
Soak W ash 20
Intensive Rinse 21
Tub Clean 22
Air Dry 23
O ption W ashing 24
Time Delay (R ESER V ATIO N) W ash 25
O ther U seful Functions 26
Smart Functions 28
Placing and Leveling 30
Connecting W ater Supply Hose 31
Connecting D rain H ose 34
Cleaning and Maintenance
Soft Safety Door
Common washing problems 38
Troubleshooting 39
SmartDiagnosis
Specification
W ash 18
TM
10
16
16
18
35
37
40
41
3
Page 5

Page 6
Page 7

Page 8
Page 9
Page 10
Page 11
Page 12
U s e o f Wa ter, D is pens er D raw er, D eter gent , B leach a nd S oftener
Page 13

Page 14
Page 15

Page 16

F
unction of each Button
Air dry
• To shorten dry time.
• Press the Spin button
for 3 seconds
to select, press power
button to deselect.
(refer to page 23)
START/PAUSE button
• Use to start or pause
the washing process.
• After 4 minutes in
pause status, the
washer will
automatically turn
o .
SmartDiagnosis
TM
Function Display
• It marks the place
to put the phone to
receive signal when
a problem occurs.
(refer to page 40)
Power button
• Use to turn the power
on or o.
• Push again and power
goes on or o.
• The power goes o
automatically about
10 seconds after the
wash is nished.
•
Wash, Rinse, Spin button Child lock function
•
To change laundry time,
number of rinse, strength
of spin dry.
•
Use safe rinse to more
eectively remove
detergent.
•
Press START/PAUSE button
•
Use to prevent an accident
by children operating the
machine.
•
Press ‘Rinse’ button for 3
seconds to select or
deselect.
(refer to page 26)
Program button
•
To select laundry
course.
•
Select course by
type of clothes
and level of
dirtiness.
to indicate remaining time.
NOTE
* For optimal Vapour cleaning performance, limit laundry loads to 4 kg or less.
* When the Vapour mode option is selected for the Medium Solied the water level will not
exceed level “7” in order to maintain optimal performance.
* The control panel may dier according to dierrent models.
Do not touch the lid
during steam cycles.
The lid Surface can
become very hot.
Allow the lid lock to
release before
opening the door.
•
Do not attempt to
override the lid lock
mechanism or reach
into the washer
during a steam cycle.
Steam can cause
severe burns.
WARNING
15
Page 17

Page 18

Page 19

Page 20

Page 21

Page 22

Page 23

Page 24

Page 25

Page 26

Page 27

Page 28

O t h e r U s e f u l Fu nc ti o n s
Wi-F i( )
Press and hold the button for 3 seconds.
When W i-F i is turned on, theWi-Fi indicator( ) on thecontrol panel is lit.
R emote Start
Use a smartphone to control your appliance remotely. Y ou canalso monitor your cycle operation so you know
Y ou can alsomonitor your cycle operationso you know
NO T E
• You mus t first connect to a gateway a nd registeryour appliance in order to use the R emote S tart function.
(Refer to 'Smart Functions'.)
To use Remote Start:
1. Press the button.
2. Put the laundry in thedrum.
3. Press and hold button for 3 seconds toenable Remote Startfunction.
4. Start a cyclefromthe LG SmartThinQ application on your smart phone.
NO T E
• If you do not start your appliance, it will wait to s tart a cycle until you turn off your appliance from the appli
cation or disable theRemoteStart function.
• When R emoteStart is turned on, the door is automatically locked.
Time Delay
Power
Remote Start
To disable Remote Start:
When the Remote Start is activated, press and hold button for 3 seconds.
Download Cy
TheDownload Cycle features of thisappliance allow you to download new andspecial cycles that are notincluded in
the appliance's basic cycles.
Appliances that have been successfully registered can download a variety of specialty cycles specific tothe appliance.
Only one cycle canbestored on theappliance at a time.
Oncecycle download is completed in the washer, theproductkeeps the downloaded cycle until youchange it to a new
downloaded cycle.
NO T E
• Youcan download cycles after registering the product and configuring the Wi-Ficonnection. Forinformation on
how to register the product and configure the Wi-Fi connection, refer to 'Us ing the W i-F i F
• Youcan download a desired cycle through the 'LG Smart ThinQ' a pp. Formore information on each cycle, refer
to the 'LG S
• Depending on the type of washer purchased , different cycles will be available.
• Thedownloa
Smart ThinQ' app.
c
e
l
ThinQ' app.
mart
cycles maybe different dep
ded
Remote Start
ending on the updated version of the 'LG
unc
tion'.
27
Page 29

S m ar t Fu n c t io n s
Application I nstallation
Search for the LG Smart ThinQ application from
the G oogle Play Store on a smart phone.
Follow instructions to download and install the
application.
ProductRegistration
1. R un the LG Smart ThinQ application on a
smart phone.
2. C reate an ac count and sign in.
3. Select Register.
4. Select Top Load Washer.
5. Follow the instructions on the smart phone.
N O T E
• T o verify the W iW
icon on the control panel is lit.
i-Fi
• LG Smart T hinQ is not responsible for any net
work connection problems or any faults, mal
functions, or errors caused by network con
nection.
• T he machine supports 2.4 G H z W
works only.
• If the appli ance is having trouble connecting
to the Wi-Fi network, it may be too far from
the router. Purchase a Wi-Fi repeater (range
ext
ender) to improve the Wi-Fi signal strength.
• T he Wi-Fi connection may not connect or may
be i nterrupted because of the home network
enviro n ment.
• T he network connection may not work proper
ly depending on the internet servic e provider.
• T he surrounding wireless environment c an
make the wireless network service run slowly.
• T hi s information is current at the time of publi
cation. The application is subj
appliance improvement purposes without
notice to users.
Fi connection, check the
i-Fi
net
ect to change for
Using the Wi-Fi Function
Communicate with the appliance from a smart
phone using the convenient smart features.
Using the Application
1. Select the appliance in the application and
connect it to a W
2. Select the menu on the upper right side to
acc ess settings and features.
asher
ean
C
ycle
Coach
W
Set or download any perferred cycle
by remote c ontrol.
Tub Cl
Check the appropriate Tub Clean period by
washing frequency.
Energy M onitoring
Check the energy consupmtion of the recently
used cycles and monthly average.
Smart Diagnosis
This function provides useful information for
diagnosing and solving issues with the appliance
based on the pattern of use.
Settings
Various functions are available.
Push Alert
Turn on the Push
status notific ations. The notific ations are
triggered even if the LG Smar t ThinQ application
is off.
i-Fi
network.
and operate
Alerts to receive appliance
8
2
Page 30

S m ar t Fu n c t io n s
1
0
m
M
a
x
.
m
pen
O
SourceSoftware N
Information
To obtain the source code under GPL, LG PL,
MPL, and other open sourc e licenses, that is contained in this product, please visit http://opensource. lge. com.In addition to the source code,
all referred license terms, warranty disclaimers
and copyright notices are available for
download.LGElectronics will also provide open
source c ode to you on C D -R OMfor a charge
c
overin g the cost of performing such distribution
(such as the cost of media, shipping, and handling) upon emai l request to
opensource@ lge.c om. This offer is valid for three
(3) years from the date on which you purchased
the product
otice
a
s
Smart Di
osi
n
™ Thr ough the
g
Customer Infor mation Center
1. Press the Power button.
2. O pen the Settings menu on upper side and
select More Settings.
3. Select Smart Diagnosis and then press the
Start/Pause button.
4. Place the phone close to the Power button.
• Place the mouthpiece of the phone to the
appliance.
Using Smart Diagn
Should you experience any problems with the
appliance, it has the capability of transmitting
data to a smart phone using the LG Smart ThinQ
application o
ThinQ call center.Smart D iagnosis™ c an not be
activated unless the appliance is turned on by
pressing the Power button. If the appliance i s
unable to turn on, then troubleshooting must be
done without using Smart D iagnosis™ .
Smart Di
1. Open the LG Smart ThinQ application on the
smart phone.
2. Select the appliance and then the menu on
upper right
3. Select the Smart Diagnosis, then press Start
Smart Diagnosis button.
N O T E
• If the dia gnosis fails several times, use the foll
owing instructions.
4. Select the T ry Again or A udible D iagnosis.
5. Follow the instructions on the smart phone.
r via the phone to the LG Smart
agn
side.
os
s™
i
o
is™ Using a Smart Phone
s
5. K eep the phone in plac e until the tone trans
mission has finished
• For best resul
the tones are being transmitted.
• If the call center agent is not able to get an
acc urate recording of the data, you may be
asked to try again.
e
nc
6. O
N O T E
• The Smart Di
• The communication performance will
• If the Smart D iagnosis™ data transfer is poor
the countdown is over and the tones
have stopped, resume your conversation with
the call center agent, who will then be able to
assist you using the information transmitted for
analysis.
the local call quality.
improve and you can receive better service if
you use the home phone.
due to poor cal l quality, you may not receive
the best Smart Diagnosis™ service.
ts, do not mo ve the phone while
a
nosis™ function
g
depends on
29
Page 31

Page 32

Page 33

Page 34

C onn e c ti n g W a te r S u p p ly H o s e
Page 35

Page 36

Page 37

Page 38

Page 39

Page 40

Page 41

Page 42

Page 43

Page 44

Page 45

 Loading...