

Page 1

ENGLISH
ESPAÑOL
OWNER’S MANUAL
WASHING MACHINE
Please read this owner's manual thoroughly before operating and keep it handy
for reference at all times.
W
T901CW
WT901CF
MFL68485602
www.lg.com
Page 2

TABLE OF CONTENTS
13
2
TABLE OF CONTENTS
3
IMPORTANT SAFETY INSTRUCTIONS
3 Basic Safety Precautions
4 Grounding Instructions
5 Safet y Instructions for Installation
6 Safet y Instructions for Use, Care, Cleaning
and Disposal
7
PRODUCT FEATURES
8
INTRODUCING YOUR WASHING MACHINE
8 Parts and Accessories
9 Control Panel Features
10 Time and Status Display
11
INSTALLATION INSTRUCTIONS
11 Inst allation Overview
12 Choose the Proper Location
12 Power Outlet
12 Flooring
Unpack and Remove Shipping Material
14 Connect the Water Lines
15 Connect the Drain Hose
16 Level the Washer
1 7 Connect to the Power Supply
1 7 Test the Washer
18
PREPARATION
18 Sorting Wash Loads
18 Fabric Care Labels
18 Loading t he Washer
19 About the Dispenser
19 Detergent and D ispenser Use
21
USING YOUR WASHING MACHINE
2 1 Basic Operation
22 Cycle Guide
23 Main Cycle
24 Cycle Modifier Buttons
25 Option Buttons
25 - Delay Wash
25 - Fabric Sof tener
25 - Extra Rinse
25 - Water Plus
25 - Signal
25 - Child Lock
25 - Add Garments
26
MAINTENANCE
26 Regular Cleaning
26 - Cleaning the Exterior
26 - Care and Cleaning of the Interior
26 - Tub Clean Cycle
26 - Removing Mineral Buildup
26 - Leave the Lid Open
26 - Cleaning the Lint Filters
27 - Cleaning the Water Inlet Filters
27 - Storing
Cleaning the Washer
28
29
TROUBLESHOOTING
29 Checking Error Messages
31 Normal Sounds You May Hear
31 Before Calling for Service
35
SPECIFICATIONS
the Washer
35
SMART DIAGNOSIS™ SYSTEM
36
WARRANTY
Page 3
IMPORTANT SAFETY INSTRUCTIONS
READ ALL INSTRUCTIONS BEFORE USE
3
IMPORTANT SAFETY INSTRUCTIONS
WARNING
For your safety, the information in this manual must be followed to minimize the risk of re, explosion, or electric
shock, or to prevent property damage, injury to persons, or to death.
Your safety and the safety of others are very important.
We have provided many important safety messages in this manual and on your appliance. Always read and obey
all safety messages.
This is the safety alert symbol.
This symbol alerts you to potential hazards that can kill or hurt you and others.
All safety messages will follow the safety alert symbol and either the word DANGER, WARNING or CAUTION. These
words means:
DANGER
You will be killed or seriously injured if you don’t immediately follow instructions.
WARNING
You can be killed or seriously injured if you don’t follow instructions.
CAUTION
You may be slightly injured or cause damage to the product if you do not follow instructions.
All safety messages will tell you what the potential hazard is, tell you how to reduce the chance of injury, and
tell you what can happen if the instructions are not followed.
BASIC SAFETY PRECAUTIONS
WARNING
To reduce the risk of re, electric shock, or injury to persons when using this appliance, follow basic precautions,
including the following.
• Use this appliance only for its intended purpose as des-
cribed in this Owner’s Manual.
• Before use, the washer must be properly installed as
described in this manual.
•
Do not wash articles that have been previously cleaned
in, washed in, soaked in, or spotted with gasoline, dry
cleaning solvents, or other flammable or explosive
substances, as they give o vapors that could ignite or
explode.
•
Do not add gasoline, dry cleaning solvents, or other
flammable or explosive substances to the wash water.
These substances give o vapors that could ignite or
explode.
• Under certain conditions, hydrogen gas may be produced
in a hot water system that has not been used for 2 weeks
or more. HYDROGEN GAS IS EXPLOSIVE. If the hot water
system has not been used for such a period, before
using the washer, turn on all hot water faucets and
let the water flow from each for several minutes.
This will release any accumulated hydrogen gas. As the
gas is ammable, do not smoke or use an open flame
during this time.
• Do not allow children to play on or in the washer. Close
supervision of children is necessary when the washer
is used near children.
•
Before the washer is removed from service or discarded, remove the lid to prevent children from climbling
inside.
• Do not install or store the washer where it will be ex-
posed to the weather or freezing temperatures.
• Do not tamper with controls.
• Keep the area underneath and around your appliances
free of combustible materials (lint, paper, rags, etc.), gasoline, chemicals and other ammable vapors and liquids.
• Do not repair or replace any part of the washer or
attempt any servicing other than as described in this
manual. We strongly recommend that any service be
performed by a qualied technician.
• See Installation Instructions for grounding requirements
• ALWAYS follow the fabric care instructions supplied by
the garment manufacturer.
• Do not place items exposed to cooking oil in your wash-
er. Items contaminated with cooking oils may contribute
to a chemical reaction that could cause a load to catch re.
• Use fabric softeners or products to eliminate static only
as recommended by the manufacturer.
• This washer is not designed for maritime use or for mo-
bile installations such as in RVs, aircraft, etc.
• Turn off the water faucets and unplug the washer if the
machine is to be left for an extended period of time,
such as during vacations.
• Do not use to dry articles containing foam rubber or
similarly textured rubber-like materials.
• Packaging material can be dangerous for children. There
is a risk of suocation! Keep all packaging away from
children.
• Always check the inside of the washer for foreign ob-
jects before loading laundry. Keep the lid closed when
not in use.
• Do not reach into the appliance if the tub or agitator is
moving.
WARNING: This product contains chemicals known to
•
the State of California to cause cancer and birth defects
or other reproductive harm. Wash hands after handling.
ENGLISH
Page 4

IMPORTANT SAFETY INSTRUCTIONS
4
IMPORTANT SAFETY INSTRUCTIONS
READ ALL INSTRUCTIONS BEFORE USE
WARNING
For your safety, the information in this manual must be followed to minimize the risk of fire, explosion, or
electric shock, or to prevent property damage, injury to persons, or death.
GROUNDING INSTRUCTIONS
This appliance must be grounded. In the event of malfunction or breakdown, grounding will reduce the risk
of electric shock by providing a path of least resistance for electric current. This appliance is equipped with
a cord having an equipment-grounding conductor and grounding plug. The plug must be plugged into an
appropriate outlet that is properly installed and grounded in accordance with all local codes and ordinances.
WARNING
Improper connection of the equipment-grounding conductor can result in risk of electric shock. Check with
a qualified electrician or servicer if you are in doubt as to whether the appliance is properly grounded. Do
not modify the plug provided with the appliance. If it does not fit the outlet, have a proper outlet installed
by a qualified electrician. Failure to follow these warnings can cause serious injury, fire, electric shock, or
death.
Page 5

IMPORTANT SAFETY INSTRUCTIONS
READ ALL INSTRUCTIONS BEFORE USE
• Do not, under any circumstances, cut or remove
the third (ground) prong from the power cord.
Failure to follow this warning can cause serious
injury, fire, electric shock, or death.
• For personal safety, this appliance must be pro-
perly grounded. Failure to follow this warning can
cause serious injury, fire, electric shock, or death.
•
The power cord of this appliance is equipped with
a 3-prong (grounding) plug which mates with a
standard 3-prong (grounding) wall outlet to mini-
mize the possibility of electric shock from this
appliance.
•
This washer must be plugged into a 120 VAC, 60
Hz grounded outlet. Failure to follow this warning
can cause serious injury, fire, electric shock, or
death.
•
Have the wall outlet and circuit checked by a qualified electrician to make sure the outlet is properly grounded. Failure to follow this warning can
cause serious injury, fire, electric shock, or death.
•
Where a standard 2-prong wall outlet is encountered, it is your personal responsability and obligation to have it replaced with a properly grounded 3-prong wall outlet. Failure to follow this warn-
ing can cause serious injury, fire, electric shock,
or death.
•
Do not install on carpet. Install washer on a solid
floor. Failure to follow this warning can cause
serious leak damage.
•
Do not remove ground prong. Do not use an
adapter or extension cord. Plug into a grounded
3-prong outlet. Failure to follow these warnings
can cause serious injury, fire, electric shock, or
death.
• Never unplug your washer by pulling on the power
cord. Always grip plug firmly and pull straight out
from the oulet. Failure to follow this warning can
cause serious injury, fire, electric shock, or death.
• When installing or moving the washer, be careful
not to pinch, crush, or damage the power cord.
Failure to follow this warning can cause serious
injury, fire, electric shock, or death.
• The washer must be installed and electrically
grounded by a qualified service person in accordance with local codes to prevent shock hazard
and assure stability during operation.
• The washer is heavy. Two or more people may be
needed to install and move the appliance. Failure
to do so can result in back or other injury.
• Store and install the washer where it will not be
exposed to temperatures below freezing or exposed to outdoor weather conditions. Failure to
follow this warning can cause serious leak damage.
•
To reduce the risk of electric shock, do not install
the washer in humid spaces. Failure to follow this
warning can cause serious injury, fire, electric
shock, or death.
• To reduce the risk of injury to persons, adhere to
all industry recommended safety procedures including the use of long sleeved gloves and safety
glasses. Failure to follow all of the safety warnings
in this manual could result in property damage,
injury to persons or death.
5
IMPORTANT SAFETY INSTRUCTIONS
WARNING
For your safety, the information in this manual must be followed to minimize the risk of fire, explosion,
or electric shock, or to prevent property damage, injury to persons, or death.
SAFETY INSTRUCTIONS FOR INSTALLATION
WARNING
To reduce the risk of fire, electric shock, or injury to persons when using this appliance, follow basic
precautions, including the following.
• Refer to INSTALLATION INSTRUCTIONS for de-
tailed grounding procedures. Installation instruc-
tions are packed with the washer for installer’s reference. If the washer is moved to a new location,
have it checked and reinstalled by a qualified service technician. Failure to follow this warning can
cause serious injury, fire, electric shock, or death.
• The washer should always be plugged into its own
individual electrical outlet which has a voltage rating that matches the rating plate. This provides
the best performance and also prevents overloading house wiring circuits which could cause a
fire hazard from overheated wires.
• All power cords that have become frayed or
otherwise damaged must be replaced by the
manufacturer or its service agent or a similar
qualified person in order to avoid a safety hazard.
Do not use a cord that shows cracks or abrasion
damage along its length or at either end. Failure
to follow this warning can cause serious injury, fire,
electric shock, or death.
ENGLISH
Page 6

IMPORTANT SAFETY INSTRUCTIONS
READ ALL INSTRUCTIONS BEFORE USE
SAVE THESE INSTRUCTIONS
6
IMPORTANT SAFETY INSTRUCTIONS
WARNING
For your safety, the information in this manual must be followed to minimize the risk of fire or explosion,
electric shock, or to prevent property damage, injury to persons, or death.
SAFETY INSTRUCTIONS FOR USE, CARE, CLEANING, AND DISPOSAL
WARNING
To reduce the risk of fire, electric shock, or injury to persons when using this appliance, follow basic precautions, including the following.
• Unplug the washer before cleaning to avoid the
risk of electrick shock.
• Never use harsh chemicals, abrasive cleaners, or
solvents to clean the washer. They will damage the
finish.
• Do not put oily or greasy rags or clothing on top of
the washer. These substances give off vapors that
could ignite the materials.
• Do not wash items that are soiled with vegetable
or cooking oil. These items may contain some oil
after laundering. Due to the remaining oil, the fabric may smoke or catch fire by itself.
• Disconnect this appliance from the power supply
before attempting any user maintenance. Turning
the controls to the OFF position does not disconnect this appliance from the power supply. Failure
to follow this warning can cause serious injury,
fire, electric shock, or death.
• Do not combine laundry products for use in one
load unless specified on the label.
• Do not mix chlorine bleach with ammonia or acids
such as vinegar. Follow package directions when
using laundry products. Incorrect usage can pro-
duce poisonous gas, resulting in serious injury or
death.
• Do not reach into the washer while parts are mo-
ving. Before loading, unloading, or adding items,
press the START/PAUSE button and allow the
drum to coast to a complete stop before reaching
inside. Failure to follow this warning can cause se-
rious injury, fire, electric shock, or death.
• Do not allow children to play on or in the washer.
Close supervision of children is necessary when
the washer is used near children. As children
grow, teach them the proper, safe use of all appliances. Failure to comply with these warnings could
result in serious injury to persons or death.
• Destroy the carton, plastic bag, and other packing
materials after the washer is unpacked. Children
might use them for play. Cartons covered with
rugs, bedspreads, or plastic sheets can become
airtight chambers. Failure to comply with these
warnings could result in serious injury to persons
or death.
•
Keep laundry products out of children’s reach. To
prevent injury to persons, observe all warnings on
product labels. Failure to comply with these warn-
ings could result in serious injury to persons or
death.
Remove the door to the washing compartment
•
before your washer is removed from service or
discarded to avoid the danger of children or small
animals getting trapped inside. Failure to do so can
result in serious injury to persons or death.
Make sure the dispenser drawer is closed at all
•
times when not being filled with laundry products.
Failure to keep the drawer closed can result in personal injury or flooding.
Keep fingers, clothing or other objects away from
•
pinch points when closing the lid to avoid personal
injury or product damage.
Use the handle when closing the lid.
•
Page 7

PRODUCT FEATURES
7
PRODUCT FEATURES
Enhanced Burst Action Pulsator
The unique structure of this pulsator brings optimal washing action to your washer. The enhanced central
burst action of the pulsator creates powerful streams of water which repeatedly move the laundry up and
down in the drum, ensuring that tough soil is removed from your laundry.
Smart Diagnosis™
Should you experience any technical difficulty with your washing machine, it has the capability of transmitting data by phone to the Customer Information Center. The call center agent records the data transmitted from your machine and uses it to analyze the issue, providing a fast and effective diagnosis (Refer
to page 35).
Lint Filters
The two lint filters in the walls of the washer tub are designed to filter out lint and other debris and prevent it from depositing on your laundry during the wash cycle.
Tub Clean
Regular cleaning of the tub on a monthly basis using the Tub Clean cycle can help keep the tub clean and
fresh.
Stainless Steel Tub
The stainless steel tub offers durability and hygienic benefits.
Child Lock
Use this option to disable the controls during a wash cycle. This option can prevent children from changing cycles or operating the machine.
ENGLISH
Page 8
INTRODUCING YOUR WASHING MACHINE
8
INTRODUCING YOUR WASHING MACHINE
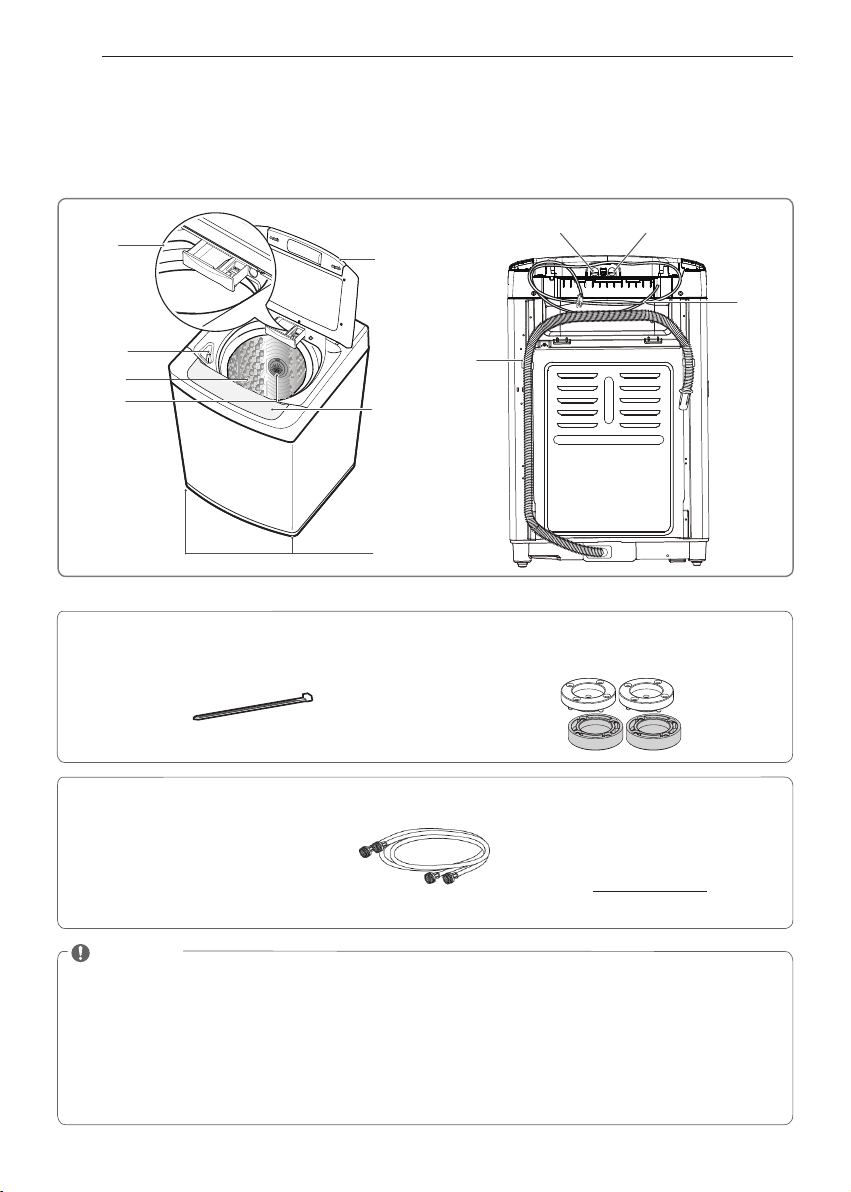
Parts and Accessories
Parts
Dispenser box
(See page 19)
Lid
Cold Water
Inlet valve
Hot Water
Inlet valve
Power
Cord
Bleach
dispenser
Tub
Lint filter
Control panel
(See page 9 )
Leveling feet
Drain
Hose
Accessories
Included Accesories
Tie Strap (for securing drain hose) Risers (rear feet leveling only)
•
Required Accesory (sold separately)
Part number
•
5215FD3715U: Hot water hose
•
5215FD3715V: Cold water hose
Hot/cold water hoses
•
•
Required accesory is sold
separately. It can be ordered
through LG Website.
US: www.lg.com/us
NOTE
•
Contact LG Customer Service at 1-800-243-0000 if any accessories are missing.
•
For your safety and for extended product life, use only authorized components. The manufacturer is not
responsible for product malfunction or accidents caused by the use of separately purchased unauthorized
components or parts. For your safety, and for extended product life, we recommend using high-quality
LG components. LG is not responsible for product malfunction or damage caused by the use of separately
purchased non-LG parts.
•
The images in this guide may be different from the actual components and accessories, and are subject
to change by the manufacturer without prior notice for product improvement purposes.
Page 9

INTRODUCING YOUR WASHING MACHINE
9
CONTROL PANEL FEATURES
D E
POWER (ON/OFF) BUTTON
A
Press to turn the washer ON. Press
again to turn the washer OFF. Pressing
the POWER button during a cycle will
cancel that cycle and any load settings
will be lost.
NOTE: If there is any water remaining in
the tub after the washer shuts off, it will
drain following a five minute delay. The
washer can be restarted any time before
the draining begins. However, once the
water begins to drain, all functions will
be suspended until the water has been
co
mpletely drained and the washer
shuts off.
CYCLE SELECTOR BUTTON
B
Press the Cycle Button repeatedly until
the desired cycle is selected. Once the
desired cycle has been selected, the
standard presets will appear in the display. These settings can be adjusted using the cycle modifier buttons any time
before starting the cycle.
NOTE: To protect your clothing, not all
settings are available on all cycle selections.
ENGLISH
F
A
CG B
START/PAUSE BUTTON
C
Press this button to start the selected
cycle. If the washer is running, use this
button to pause the cycle without losing
the current settings.
NOTE: If you do not press the START/
PAUSE button within five minutes of selecting a cycle, the washer automatically
turns OFF and all cycle settings are lost.
Any water remaining in the tub will drain
after a five minute delay.
CYCLE MODIFIER BUTTONS
D
Use these buttons to adjust the settings
for the selected cycle. The setting lights
above the buttons illuminate to show the
current selection.
SPECIAL CYCLE AND OPTION BUTTONS
E
These buttons allow you to select special
cycles or options.
TIME AND STATUS DISPLAY
F
The display shows the cycle status and
estimated time remaining.
SIGNAL BUTTON
G
setting.
emulov eht tsujda ot nottub siht sserP
Page 10
INTRODUCING YOUR WASHING MACHINE
10
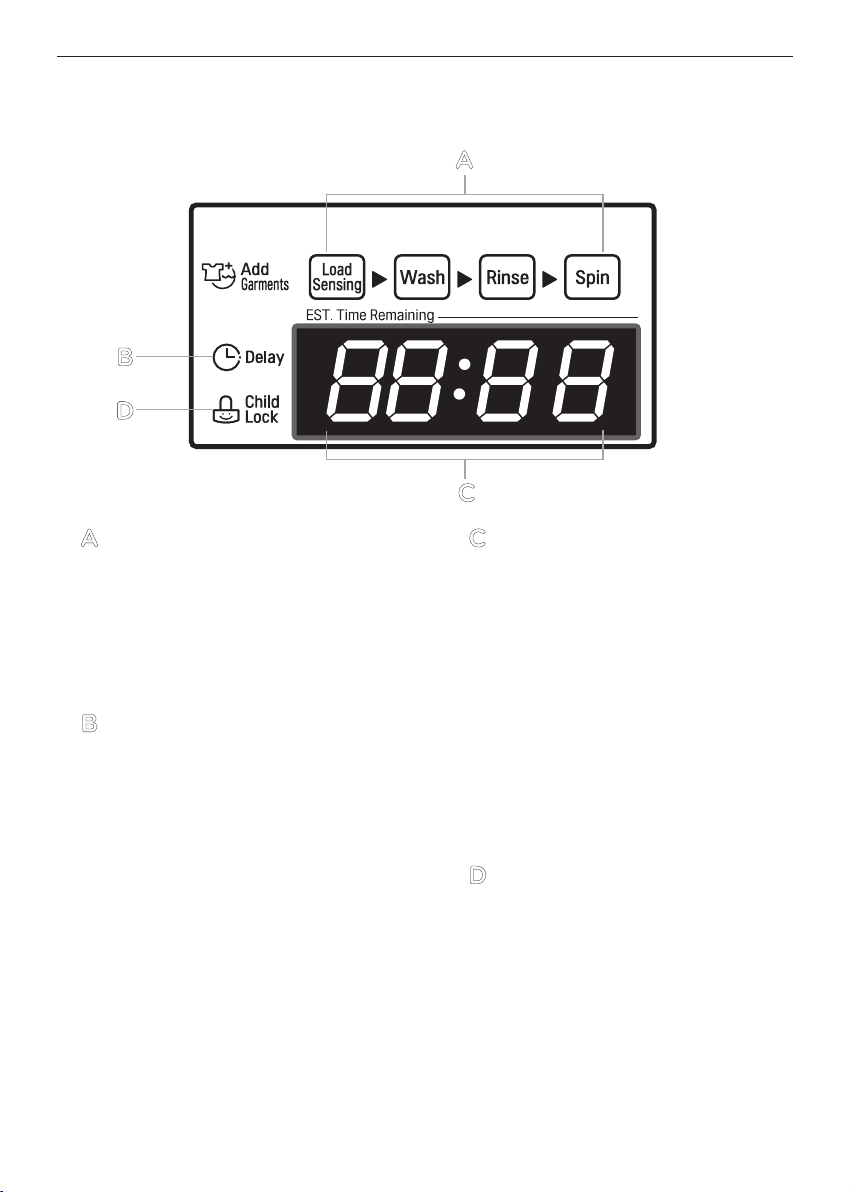
TIME AND STATUS DISPLAY
The time and status display shows the estimated time remaining and cycle progress.
A
B
D
C
CYCLE STATUS INDICATOR
A
These LEDs will illuminate when a cycle
is selected to indicate which stages will
run. When a cycle is running, the LED for
the active stage will blink, and the LEDs
for the remaining stages will remain
steady. Once a stage is complete, the
LED will turn off. If a cycle is paused, the
active stage LED will stop blinking.
DELAY WASH INDICATOR
B
The Delay Wash Indicator will illuminate
when a delay wash is set. The indicator light will turn off once the cycle has
started.
ESTIMATED TIME REMAINING
C
When a cycle is selected, the default
time for that cycle is displayed. This time
will change as modifiers or options are
selected. Once the START/PAUSE button is pressed, the washer will measure
the size of the load. The estimated time
may change once the load size has been
measured. If Delay Wash is set, the re maining delay time counts down until the
cycle begins.
NOTE: The time shown is only an estima
te. This time is based on normal operating conditions. Several external factors
(load size, room temperature, incoming
water temperature, etc.) can affect the
actual time.
CHILD LOCK INDICATOR
D
The Child Lock indicator will illuminate
when the Child Lock function is operating.
The Child Lock function locks the controls to prevent anyone from changing
the settings while the machine is run ning or to keep children from operating
the machine. It does not lock the lid.
Page 11
INSTALLATION INSTRUCTIONS
11
INSTALLATION INSTRUCTIONS
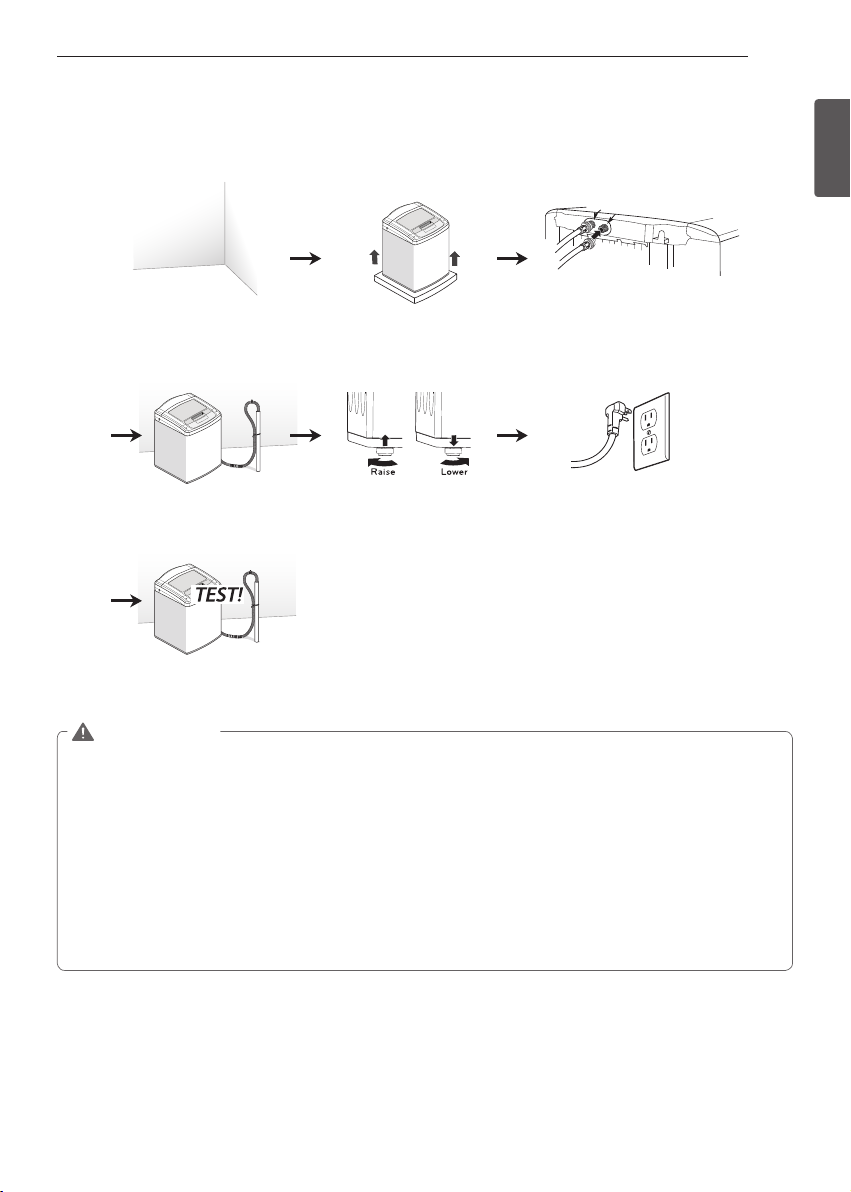
Installation Overview
Choose the proper
location
Connect the drain line Level the washer Connect to the power
Test the washing machine
Unpack and remove
shipping material
Cold
Hot
Connect the water line
supply
ENGLISH
WARNING
The washer is heavy! Two or more people are required when moving and unpacking the washer.
•
Failure to do so can result in back or other injury.
Store and install the washer where it will not be exposed to temperatures below freezing or exposed
•
to outdoor weather conditions. Failure to follow this warning can cause serious injury, re, electric shock, or
death.
Properly ground the washer to conform with all governing codes and ordinances. Failure to follow this
•
warning can cause serious injury, re, electric shock, or death.
•
To reduce the risk of electric shock, do not install the washer in humid spaces. Failure to follow this
warning can cause serious injury, re, electric shock, or death.
To ensure proper air ow, do not block the large opening on the bottom of the washer with carpeting or other
•
materials.
•
Do not remove the ground prong. Do not use an adapter or extension cord. Plug into a grounded
3-prong outlet. Failure to follow this warning can cause serious injury, re, electric shock, or death.
Page 12
INSTALLATION INSTRUCTIONS
12
CHOOSE THE PROPER LOCATION
Install the washing machine on a solid floor that is
strong and rigid enough to support the weight of
the washing machine, even when fully loaded, without flexing or bouncing. If the floor has too much
flex, you may need to reinforce it to make it more
rigid. If the floor is not solid, it may cause severe
vibration and noise.
POWER OUTLET
•
The power outlet must be within 60 in. (1.5 m) of
either side of the washer.
•
The appliance and outlet must be positioned so
that the plug is easily accessible.
•
Do not overload the outlet with more than one
appliance.
•
The outlet must be grounded in accordance with
current wiring electric codes and regulations.
•
Time-delay fuse or circuit breaker is
recommended.
NOTE: It is the personal responsibility and
obligation of the product owner to have a proper
outlet installed by a qualified service technician.
FLOORING
•
To minimize noise and vibration, the washer
MUST be installed on a solidly constructed floor.
•
Allowable slope under the entire washer is a
maximum 1 in. difference from side to side or
from front to back.
•
Installing on carpeting and soft tile surfaces is not
recommended.
•
Never install the washer on a platform or weakly
supported structure.
NOTE: The washer must be installed on firm flooring to minimize vibration during the spin cycle.
Concrete flooring is best, but a wood floor is sufficient, provided it is built to FHA standards. The
washer should not be installed on rugs or exposed
to weather.
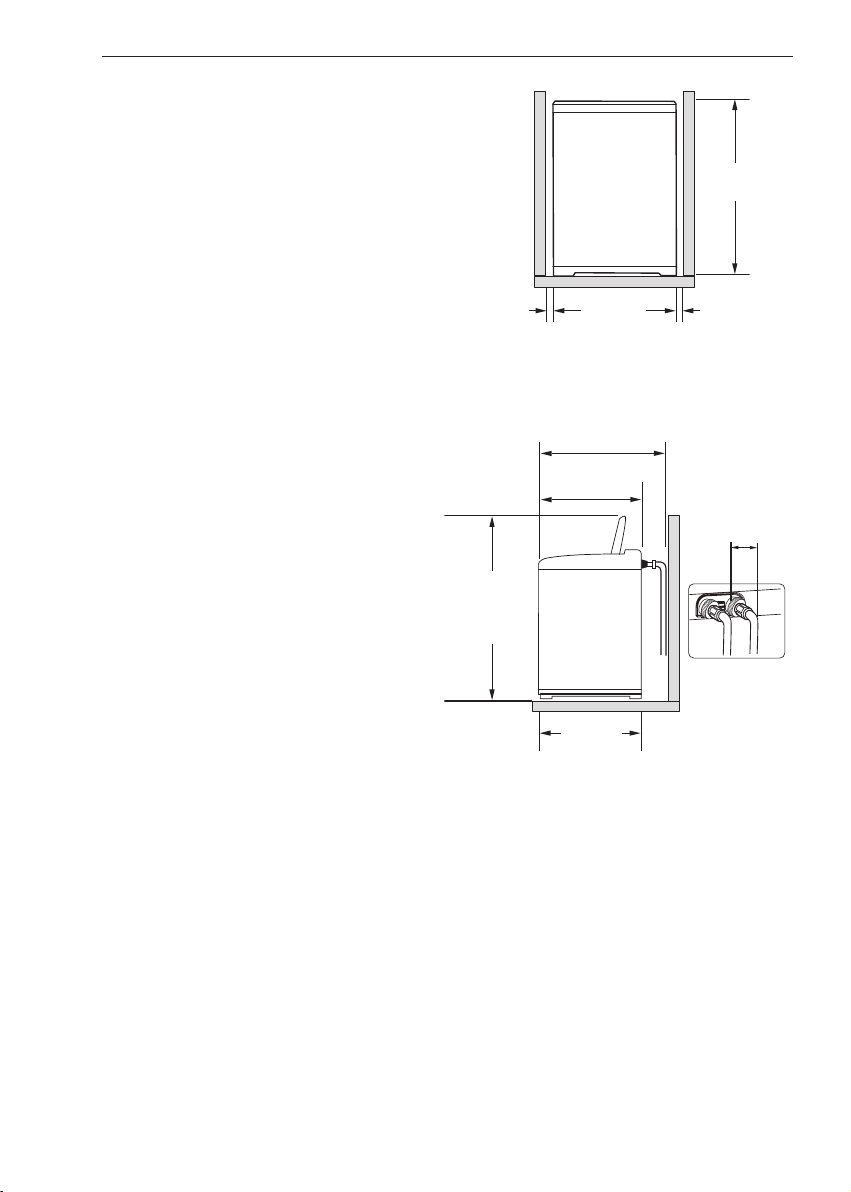
1
40
/8”
(102 cm)
1”
(2.5c m)
7
24
/8”
(63. 2 cm)
1”
(2.5c m)
To ensure sufficient clearance for water lines and
airflow, allow minimum clearances of at least 1 in.
(2.5 cm) at the sides and 4 in. (10 cm) behind the
unit. Be sure to allow for wall, door, or floor mold ings that may increase the required clearances.
54 3/4”
(139 cm)
(with open lid)
(76 cm)
3
26
(67 cm)
25 ”
(63. 4 cm)
30 ”
/8”
1
3
(9 cm)
/2”
Minimum vertical space from floor to overhead
shelves, cabinets, ceilings, etc., is 56 in.
NOTE: If overhead space is especially tight, using
the fold-down lid handle can reduce the minimum
vertical clearance by approximately 1 in.
Page 13
INSTALLATION INSTRUCTIONS
13
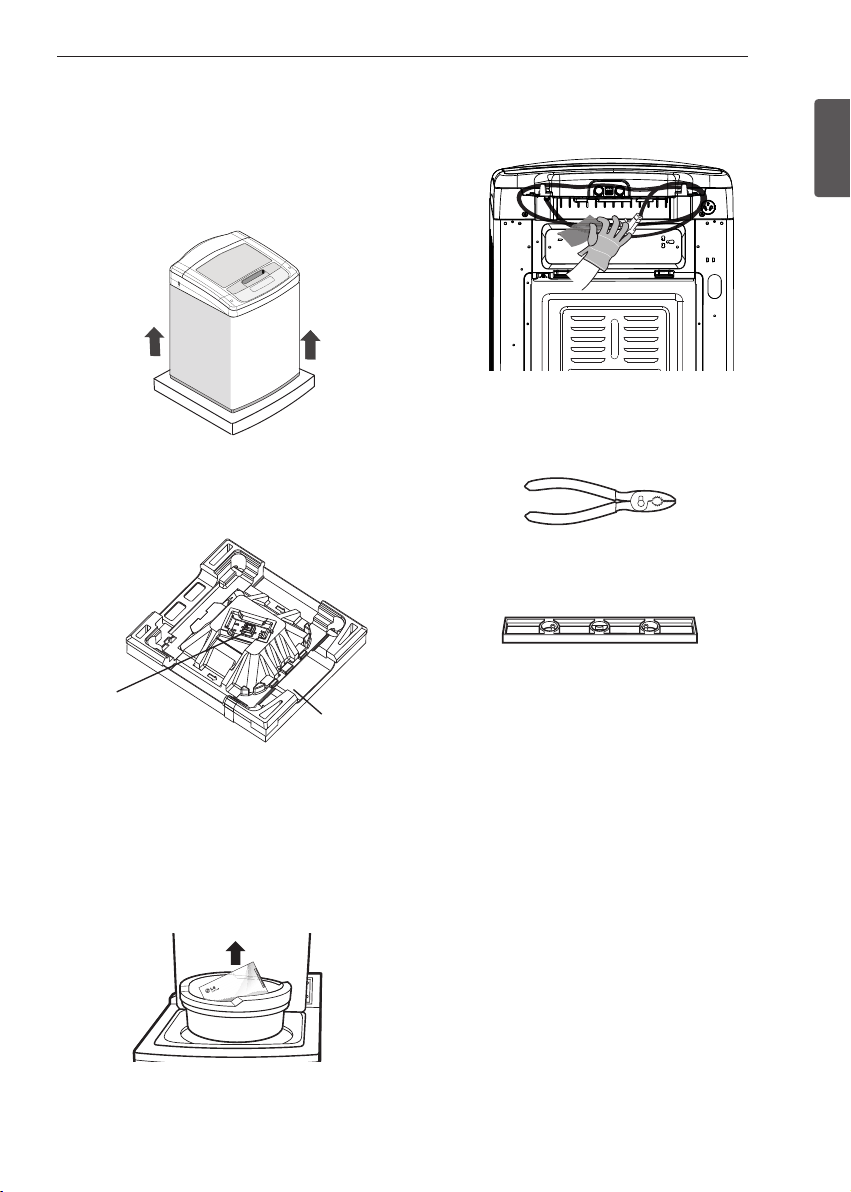
UNPACK AND REMOVE SHIPPING
MATERIAL
1. After removing the carton and shipping material,
lift the washer off the foam base. Make sure the
plastic tub support comes off with the base and
is not stuck to the bottom of the washer.
If you must lay the washer down to remove the base
packaging materials, always protect the side of the
washer and lay it carefully on its side. DO NOT lay
the washer on its front or back.
3. Unfasten the power cord from the back of the
washer.
TOOLS YOU WILL NEED
•
Adjustable Pliers
•
Carpenter's Level
ENGLISH
Plastic Tub Support
Carton Base
2. Save the foam block containing the Owner's
, parts and laundry product samples for
Manual
fu
ture use. If the washer must be moved in the
future, the foam block will help prevent damage
to the washer during transportation.
NOTE: To prevent damage, do not remove the
foam block until the washer is at the final location.
Page 14
INSTALLATION INSTRUCTIONS
14
CONNECT THE WATER LINES
•
LG recommends the use of LG hoses. Any leaking,
property damage, or damage to the washing machine caused by an improper installation or by the
use of non-LG hoses is not covered under the terms
of the LG warranty and is the sole responsibility of
the customer and/or an installer. For your safety, and
for extended product life, we recommend using highquality LG components. LG is not responsible for product malfunction or damage caused by the use of separately purchased non-LG parts. Contact LG Customer Service for assistance in buying hoses: 1-800243-0000.
•
Water supply pressure must be between 14.5 psi
and 116 psi (100 - 800 kPa). If the water supply pressure
is more than 116 psi, a pressure reducing valve must
be installed.
•
Periodically check the hose for cracks, leaks, and
wear, and replace the hose if necessary.
•
Make sure that the water lines are not stretched,
pinched, crushed, or kinked.
•
The was
her should never be installed or stored in a
location subject to freezing temperatures. Damage to
the water lines and internal mechanisms of the washer
can result. If the washer was exposed to freezing tem
peratures prior to installation, allow it to stand at room
temperature for several hours before use and check for
leaks prior to operation.
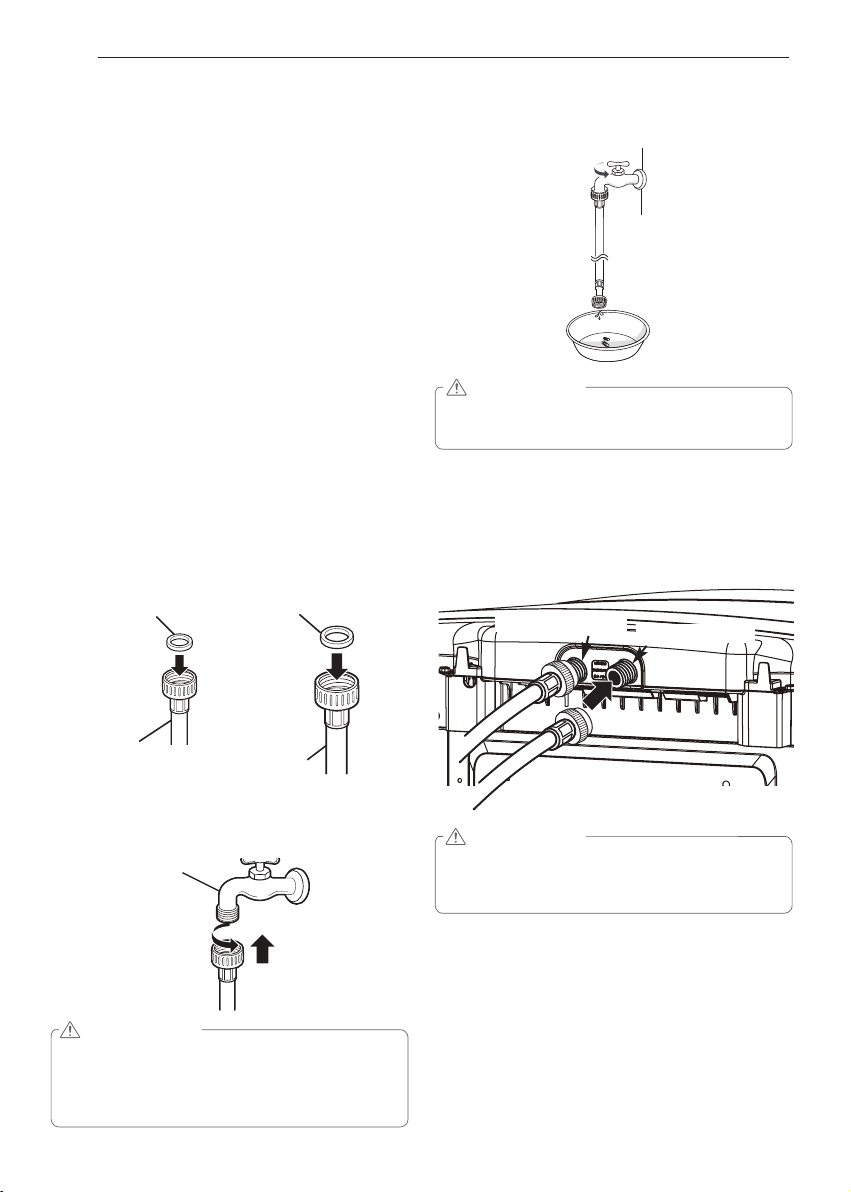
Rubber Seal
Rubber Seal
2. Connect the water supply hoses to the HOT and
COLD water faucets tightly by hand and then tighten another 2/3 turn with pliers.
WARNING
•
Do not overtighten.
can result.
3. Always run a gallon or two of water through each
inlet hose to flush dirt, scale and other debris out
of the water lines. Doing so will help prevent future
-
problems with clogged filter screens, and will also
is cold.
Cold water inlet
Damage to the coupling
Hot water inlet
hcihw dna toh si esoh hcihw yfirev ot uoy wolla
Water Hose
(to water inlet
on washer)
1. Inspect the threaded fitting on each hose and
make sure there is a rubber seal in place in both
ends.
Water Faucet
Water Hose
(to tap)
WARNING
•
Do not reuse old hoses.
when you install the washing machine. Old
hoses could leak or burst causing flooding and
property damage.
Only use new hoses
WARNING
•
Do not overtighten the hoses.
can damage the valves resulting in leaking and
property damage.
4. Attach the hot water line to the hot water inlet (orange) on the back of the washer. Attach the cold
water line to the cold water inlet (blue) on the back
of the washer.
Tighten the fittings securely. Turn ON both
cets
all the way and check for leaks at both ends
of the hoses.
NOTE: Be careful not to cross-thread the hose fittings. This will damage the valve and could result in
property damage from leaks.
Overtightening
fau-
Page 15
INSTALLATION INSTRUCTIONS
15
CONNECT THE DRAIN HOSE
•
The drain hose should always be properly secured.
Failure to properly secure the drain hose can result in
flooding and property damage.
•
The drain must be installed in accordance with any
applicable local codes and regulations.
•
Make sure that the drain hose is not stretched,
pinched, crushed, or kinked.
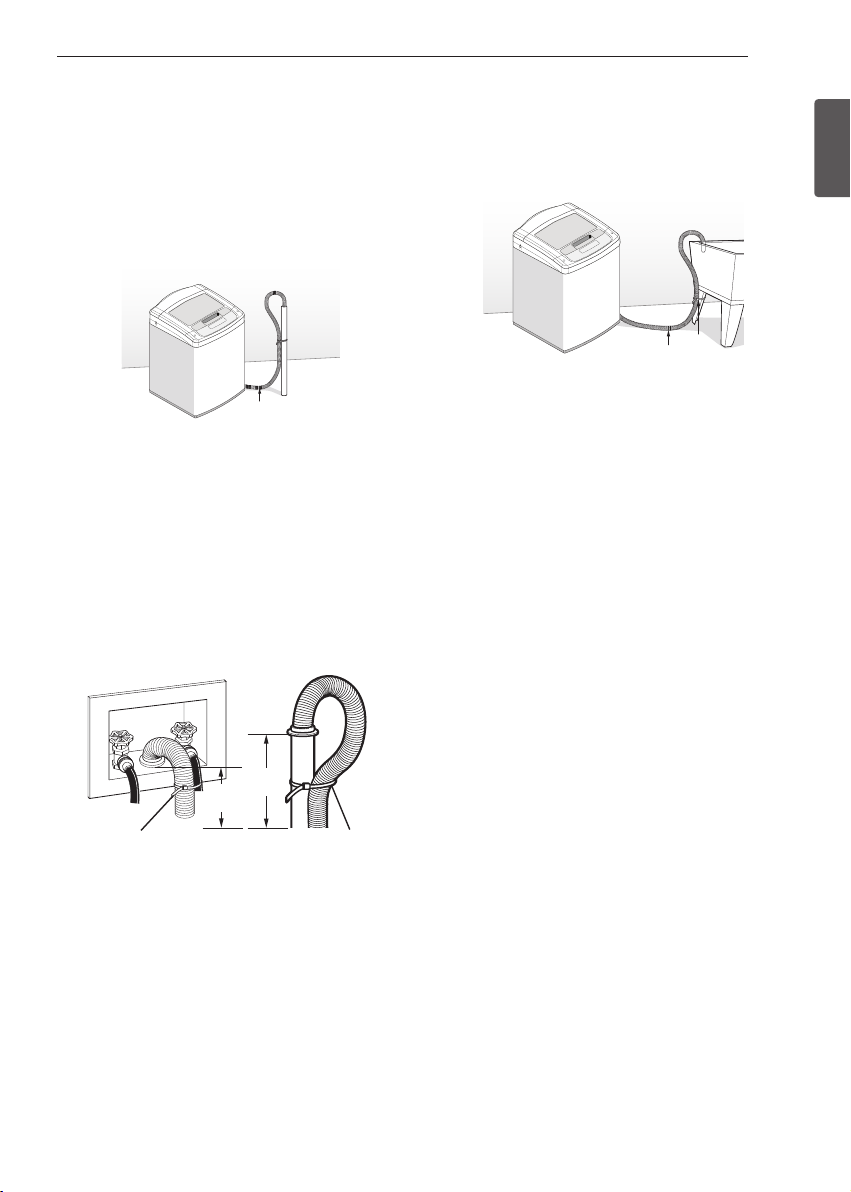
Drain Hose
OPTION 1: STANDPIPE
Bend the outlet end of the drain hose to form a U
shape. Insert the end of the drain hose into the drain.
If the drain is large enough for the flange on the hose
to fit inside, then do not insert the flange more than
1-2 inches into the drain. Use the tie strap included
with the installation materials in the foam block in
the tub to secure the drain hose to the drain.
If the water valves and drain are built into the wall,
fasten the drain hose to one of the water hoses with
the tie strap (ribbed side on inside).
OPTION 2: LAUNDRY TUB
Bend the end of the drain hose to the desired shape
and support it on the edge of the laundry tub. Use
the tie strap to secure the drain hose in place.
Drain Hose
ENGLISH
39”
(99 cm)
39”
(99 cm)
Tie Strap
If y
our drain is a standpipe, fasten the drain hose to
Tie Strap
the standpipe with the tie strap provided.
NOTE:
•
Normal height of the end of the hose should be approximately 35” - 47” (0.9 - 1.2 m) from the floor.
Do not install the end of the drain hose lower than
•
29.5 in (75 cm) or higher than 96 in. (243.8 cm)
above the bottom of the washer or more than 60
in. (152.4 cm) away from the washer.
•
Never seal the drain hose to the drain with methods such as tape. If no air gap is present, water
ca
n be siphoned out of the tub resulting in poor
wash/rinse performance or clothing damage.
Page 16
INSTALLATION INSTRUCTIONS
16
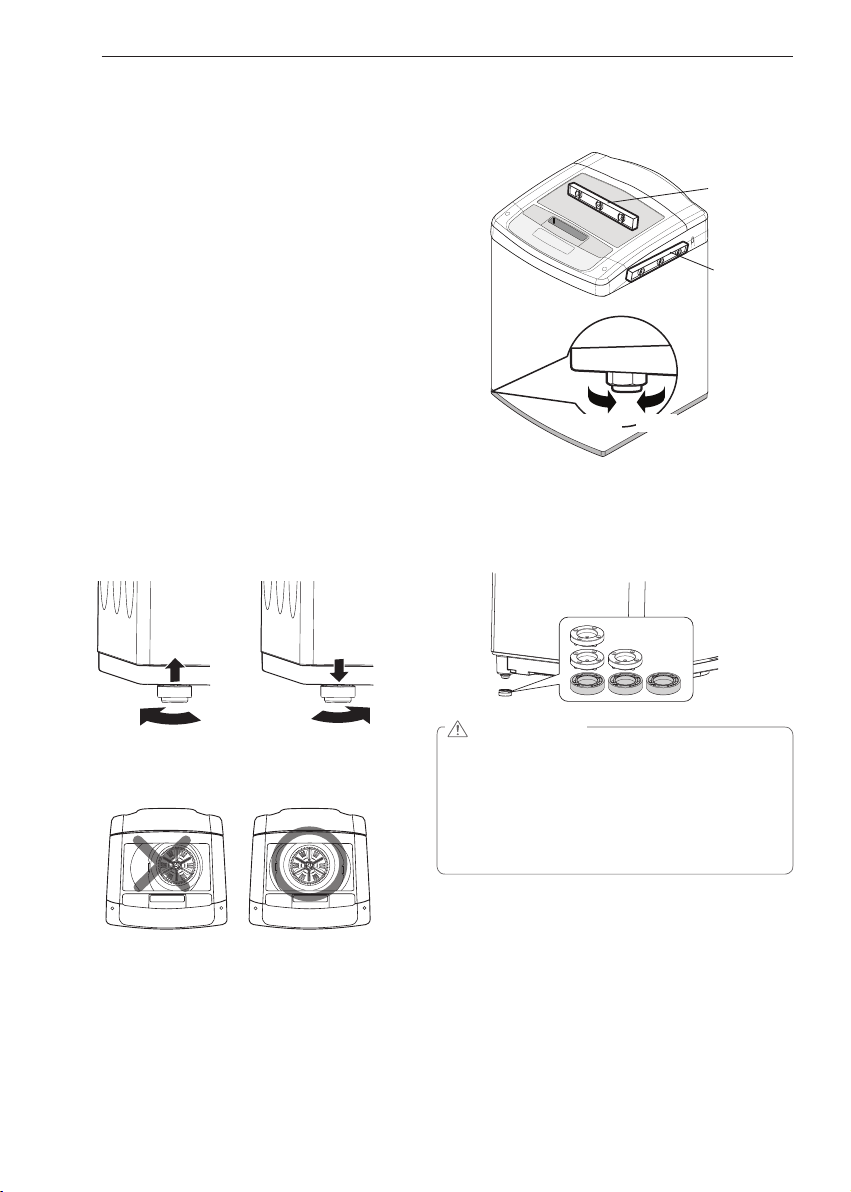
LEVEL THE WASHER
The tub of your new washer spins at very high
speeds. To minimize vibration, noise, and unwanted
movement, the floor must be a level, solid surface.
NOTE:
• Adjust the leveling feet only as far as necessary
to level the washer. Extending the leveling feet
more than necessary can cause the washer to
vibrate.
• Before installing the washer, make sure that the
floor is clean, dry and free of dust, dirt, water
and oil so the washer feet cannot slide easily.
Fe
et that move or slide on the floor can contribute to excessive vibration and noise due to poor
contact with the floor.
All four feet must rest solidly on the floor. Attempt to
rock the washer from corner to corner to make sure
that all four feet are in firm contact with the floor.
1. Position the washer in its final location, taking special care not to pinch, strain, or crush the water
and drain lines. Place a leve
washer.
l across the top of the
the cabinet side meets the top cover. Do not place
the level on the top of the lid. Using these surfaces will result in the washer being unlevel.
Side to Side
Front to Back
Lower
•
If the leveling feet have been adjusted as much as
Raise
possible and the washer is still not level, use the
risers to lift the back leg(s) of the washer to help
level it. To use, press the riser onto the leg. You
can stack up to three risers under one leg.
Raise
Lower
2. Adjust the leveling feet. Turn clockwise to raise
the washer or counterclockwise to lower it.
3. To make sure that the washer is properly level,
open the lid and look from above to see if the tub
is centered. If the tub is NOT centered (as shown
in the drawing with the X through it), readjust the
front feet. If you have a level, check your washer
with the level.
•
To check if the washer is level from side to side,
place a level on the back edge of the lid.
•
To
check if the washer is level front to back, place
a level at the side of the washer on the edge where
WARNING
•
Using the washing machine without leveling
it may result in malfunction caused by the
production of excess vibration and noise.
•
Use the leveling feet only when you level the
washing machine.
unnecessarily, it may cause abnormal vibration
of the washing machine.
If you raise the leveling feet
Page 17
INSTALLATION INSTRUCTIONS
17
CONNECT TO THE POWER SUPPLY
The washer should be plugged into a 120-VAC, 60Hz grounded 3 -prong outlet. Plug in the washer.
Improper connection of the equipment-grounding
conductor can result in risk of electric shock. Check
with a qualified electrician or service technician
if you are in doubt as to whether the appliance is
properly grounded. Do not modify the plug provided with the appliance. If it does not fit the outlet,
have a proper outlet installed by a qualified electrician. Failure to follow these warnings can cause
serious injury, fire, electrical shock, or death.
WARNING
The power outlet must be within 60 inches (1.5
•
m) of either side of the washer.
The appliance and outlet must be positioned so
•
that the plug is easily accessible.
•
Do not overload the outlet with more than one
appliance.
The outlet must be grounded in accordance
•
with current wiring codes and regulations.
Time-delay fuse or circuit breaker is
•
recommended.
It is the personal responsibility and obligation
•
of the product owner to have a proper outlet
installed by a qualified electrician.
•
Do not use a worn or damaged power cord or
power plug. Replace or repair it immediately.
Failure to do so may result in death, fire, electric
shock, or malfunction.
•
Do not modify the power cord and take care
not to damage it when installing or moving the
washing machine.
death, fire, electric shock, or malfunction.
•
Make sure that the washing machine is
grounded.
Connect this washing machine to a grounded
•
outlet conforming to the rating prior to use.
Failure to do so may result in fire, electric
shock, or malfunction.
•
Do not use adaptors or extension cords.
washing machine should always be plugged
into its own individual electrical outlet which has
a voltage rating that matches the rating plate.
Failure to do so may result in fire, electric shock
or disorder.
•
Do not damage or cut off the ground prong of
the power cord.
fire, electric shock, or product malfunction.
Failure to do so may result in
The
Doing so may cause death,
TEST THE WASHER
Check if the washing machine is properly installed
and run a test cycle.
1. Load the washing machine with 6 pounds of
laundry (approximately 6 thick bath towels).
2. Press the POWER button.
3. Press the RINSE + SPIN button.
4. Press the START/PAUSE button.
- The wash cycle starts.
5. Check if water is supplied, that the machine does
not rock or vibrate excessively, and th
ll during the spin cycle.
we
- If water leaks during water supply, see page
14, Connect the Water Lines to connect them
properly.
- If the washing machine rocks and vibrates
excessively, see page 16, Level the Washer to
level it again.
- If the drain does not work, see page 15, Connect the Drain Hose to install the hose properly.
at it drains
ENGLISH
Page 18
18
PREPARATION
PREPARATION
SORTING WASH LOADS
CAUTION
Do not load items higher than the top edge of
•
the tub. Failure to follow this caution can result
in leakage or damage to fabrics.
•
Use the BULKY cycle for buoyant or nonabsorbent items such as pillows or comforters. Fail-
ure to follow this caution can result in leakage.
If possible, do not wash any water-resistant
•
items. If you must, please select the BULKY
cycle.
GROUPING SIMILAR ITEMS
For the best washing results, and to reduce the possibility of damage to clothing, care should be taken
to sort the clothing into loads that are made up of
similar items.
Mixing different fabric types and/or soil levels can
result in poor wash performance, color transfer, discoloration, fabric damage or linting. Fabrics should
be s
orted into groups as described below.
COLORS
Sort articles by color. Wash dark clothes together
in a separate load from light colors or whites. Mixing dark clothes with light clothes can result in dye
transfer or discoloration of the lighter clothes.
SOIL LEVEL
Wash heavily soiled clothing together. Washing
lightly soiled clothing in the same load with heav ily soiled clothing could result in poor wash performance for the lightly soiled clothing.
FABRIC TYPE
Delicate articles should not be mixed with heavier
or sturdier fabric types. Washing heavier fabrics in
a delicate load can result in poor wash performance
for the heavier fabrics and possible damage to the
delicates.
LINT TYPE
Some fabrics attract and bind lint to them while others give off lint in the laundry process. Avoid mixing
these lint collectors and lint producers in the same
load. Mixing these fabrics will result in pilling and
linting on the lint collectors. (For example, lint collector – knit sweater; lint producer – terry cloth towels.)
SORT LAUNDRY…
By Colors By Soil By Fabric By Lint
White
Lights
Darks
Heavy
Normal
Light
Delicates
Easy Care
Sturdy
Lint Producer
Lint Collector
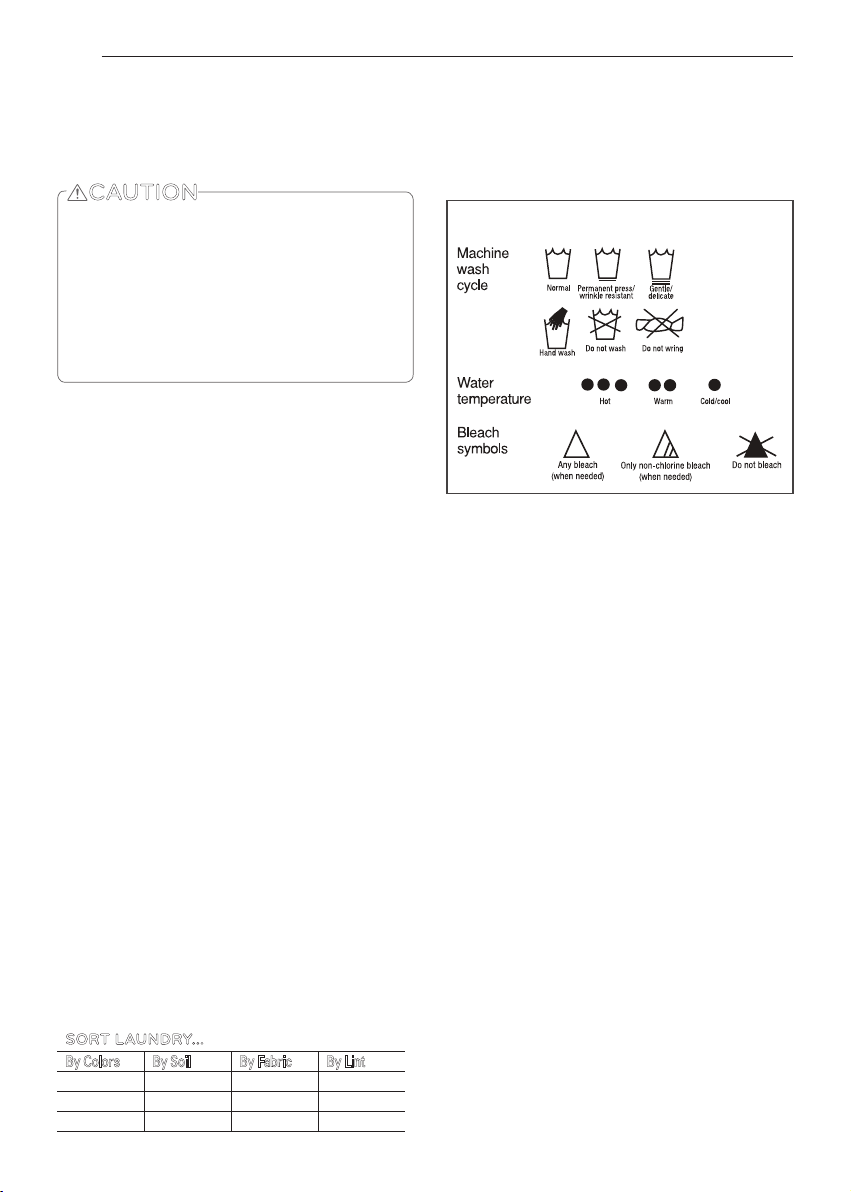
FABRIC CARE LABELS
Many articles of clothing include a fabric care label.
Using the chart below, adjust the cycle and option
selections to care for your clothing according to the
manufacturer’s recommendations.
Fabric Care Labels
LOADING THE WASHER
•
Check all pockets to make sure that they are empty.
Items such as clips, matches, pens, coins, and keys
can damage both your washer and your clothes.
Close zippers, hooks, and drawstrings to prevent
•
these items from snagging or tangling on other
clothes.
Pretreat heavily stained areas for best results.
•
Combine large and small items in a load. Load large
•
items first.
Large items should not be more than half of the
•
total wash load.
The washer can be fully loaded, but the tub should
•
not be tightly packed with items. The lid of the
washer should close easily.
To prevent an out-of-balance load, do not wash sin -
•
gle items. Add one or two similar items to the load.
Large, bulky items, such as a blanket, comforter, or
bedspread, should be washed individually.
•
Do not wash or spin waterproof items, such as rain
coats, sleeping bags, etc.
•
The washer will not fill or operate with the lid open.
NOTE: Use the BULKY cycle for large or bulky items
such as poly-filled jackets, comforters, pillows, etc.
These items may not be as absorbent as other laundry
items and should be sorted into a separate wash load
for optimal results.
Bulky items should be placed as far down in the tub
as possible for optimal results. Always place buoyant items at the bottom of the tub. The washer will
automatically detect the load size. Because of the
hi
gh-efficiency wash system, the water level may not
completely cover the load.
Page 19
PREPARATION
19
ABOUT THE DISPENSER
The automatic dispenser consists of two compartments which hold:
Liquid fabric softener.
•
Liquid or powdered detergent for main wash.
•
Main wash
Detergent
Compartment
Liquid Fabric
Softener
Compartment
MAIN WASH DETERGENT COMPARTMENT
This compartment holds laundry detergent for the
main wash cycle. Either powdered or liquid detergent may be used in this compartment. The detergent is added to the load at the beginning of the cy cle. Liquid detergent will be dispensed immediately.
This is normal. This machine is not designed to use
a separate liquid detergent dispenser cup. Always
use High-Efficiency (HE) detergent with your washing machine.
Never exceed the manufacturer’s recommendations
when adding detergent. Using too much detergent can
result in detergent buildup in clothing and the washer.
FABRIC SOFTENER COMPARTMENT
This compartment holds liquid fabric softener, which
is automatically dispensed during the final rinse cycle.
Never exceed the manufacturer’s recommendations
when adding softener. Using too much fabric softener can result in buildup in clothing and the washer.
Either powdered or liquid fabric softener may be
used.
Always follow the manufacturer’s recommenda-
•
tions when adding fabric softener. Do not exceed
the maximum fill line. Using too much fabric softener may stain clothes.
Dilute concentrated fabric softeners with warm
•
wa
ter. Do not exceed the maximum fill line.
•
Never pour fabric softener directly onto the load
or into the tub.
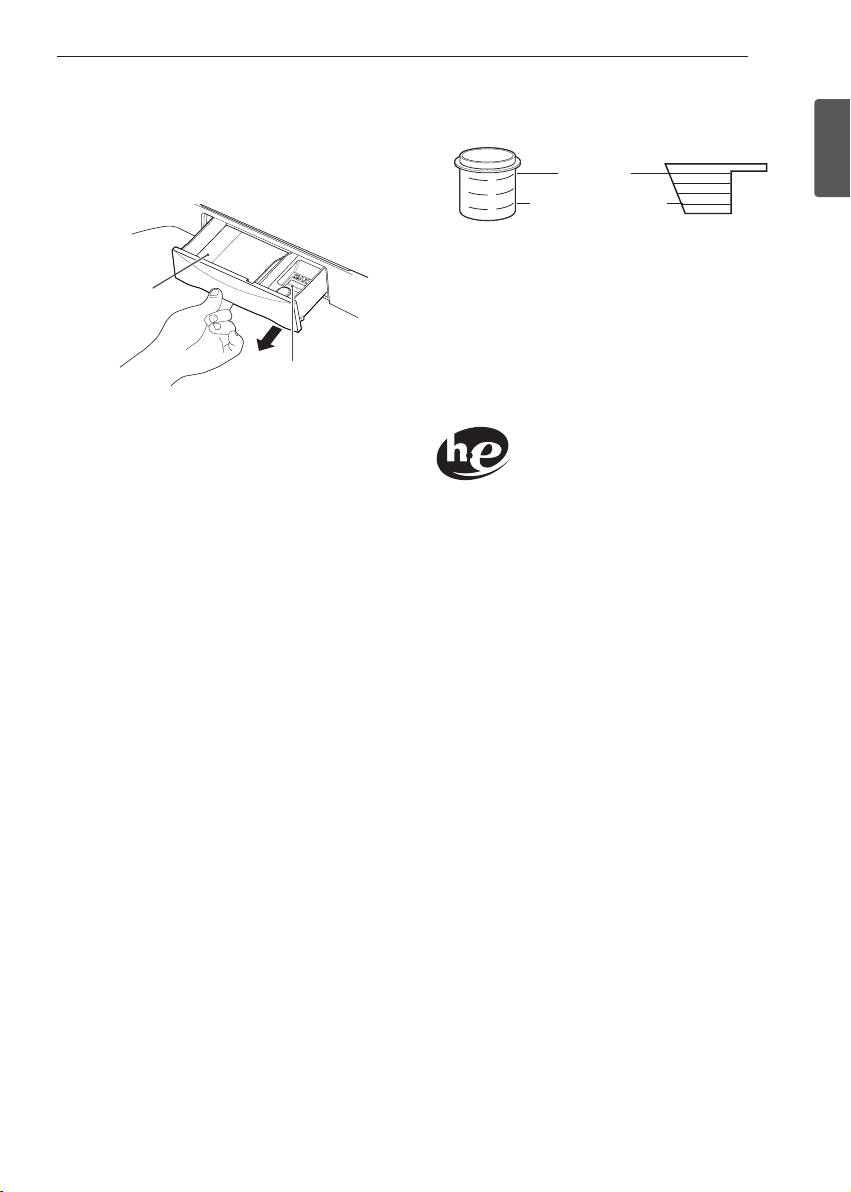
DETERGENT AND DISPENSER USE
A WORD ABOUT DETERGENTS
High-Efficiency (HE) detergents produce fewer suds,
dissolve more efficiently to improve washing and
rinsing performance, and help to keep the interior of
your washer clean. Using detergent that is not HE may
cause oversudsing and unsatisfactory performance
which could result in error codes, cycle failure, and
ma
chine damage.
Maximum
Normal Load Amount
Liquid
Detergent
For proper wash performance, always measure the
detergent using the measurements provided by the
detergent manufacturer.
The normal amount of HE detergent needed, for aver-
age loads, is less than ½ of the recommended maxi-
mum. Use less detergent for soft water, light soil or
smaller loads. Never use more than the maximum
amount recommended by the detergent manufacturer.
Detergent
Powder
DESIGNED TO USE ONLY
HIGH-EFFICIENCY (HE)
DETERGENT
IMPORTANT: Your washing machine is designed for
use with only High-Efficiency (HE) detergents. HE de-
tergents are formulated specifically for High-Efficiency
washers and contain suds-reducing agents. Always
look for the HE symbol when purchasing detergent.
IMPORTANT: Not all detergents are the same. Pay
careful attention to the amount of detergent used
to avoid oversudsing, poor rinsing and detergent
buildup in clothing, and residue buildup that can
contribute to odors in the machine. NEVER use a
cup or scoop other than the one supplied by the
manufacturer of the detergent you are using. Never
use more than the maximum amount of detergent
recommended by the manufacturer. A full scoop or
measure of detergent should only be used for very
large and heavily soiled loads. Using too much de-
tergent can result in detergent buildup in the washer
and in your clothes.
Always measure the detergent amount. While HE
detergents are designed for this type of washing
machine, be careful when measuring the detergent.
For most normal loads, no more than 1/4 to 1/2 of
cap or scoop of HE detergent should be used.
NOTE:
Extra care must be exercised when using 2X and 3X
•
concentrated detergents because even a little bit extra can contribute to the problems mentioned above.
Detergents designated as HE compatible may not
•
provide optimal results.
ENGLISH
Page 20
20
PREPARATION
USING THE SOFTENER AND DETERGENT
DISPENSER
To add detergent, and fabric softener to the auto matic dispenser:
1. Open the dispenser drawer.
2. Load the laundry products into the appropriate
compartments.
3. Close the drawer before starting the cycle.
4. If using fabric softener on NORMAL or HEAVY
DUTY cycles, press the FABRIC SOFTENER button or select the EXTRA RINSE option.
NOTE: It is normal for a small amount of water to
remain in
th
IMPORTANT: Do not place or store laundry products, such as detergent, bleach, or liquid fabric softener, on top of your washer or dryer. Wipe up any
spills immediately. These products can damage the
finish and controls.
the softener compartment at the end of
e cycle.
USING THE LIQUID BLEACH DISPENSER
Bleach dispenser
1. Check clothing care labels for special instructions.
2. Measure liquid bleach carefully, following instructions on the bottle. High-efficiency washers use
less water, so less bleach is needed. One half cup is
enough for most loads.
3. Carefully pour the pre-measured amount of bleach
directly into the bleach dispenser. If you are using
powdered bleach of any kind, pour it directly into the
tub before adding the laundry. Never add powdered
bl
each to the liquid bleach dispenser.
•
Never pour undiluted liquid chlorine bleach directly
onto clothes or into the tub.
•
Do not pour powdered bleach into bleach dispenser.
•
Do not place laundry items on top of the bleach dispenser when loading and unloading the washer.
Always measure and pour bleach carefully.
•
Avoid overfilling or splashing when adding bleach
to the dispenser.
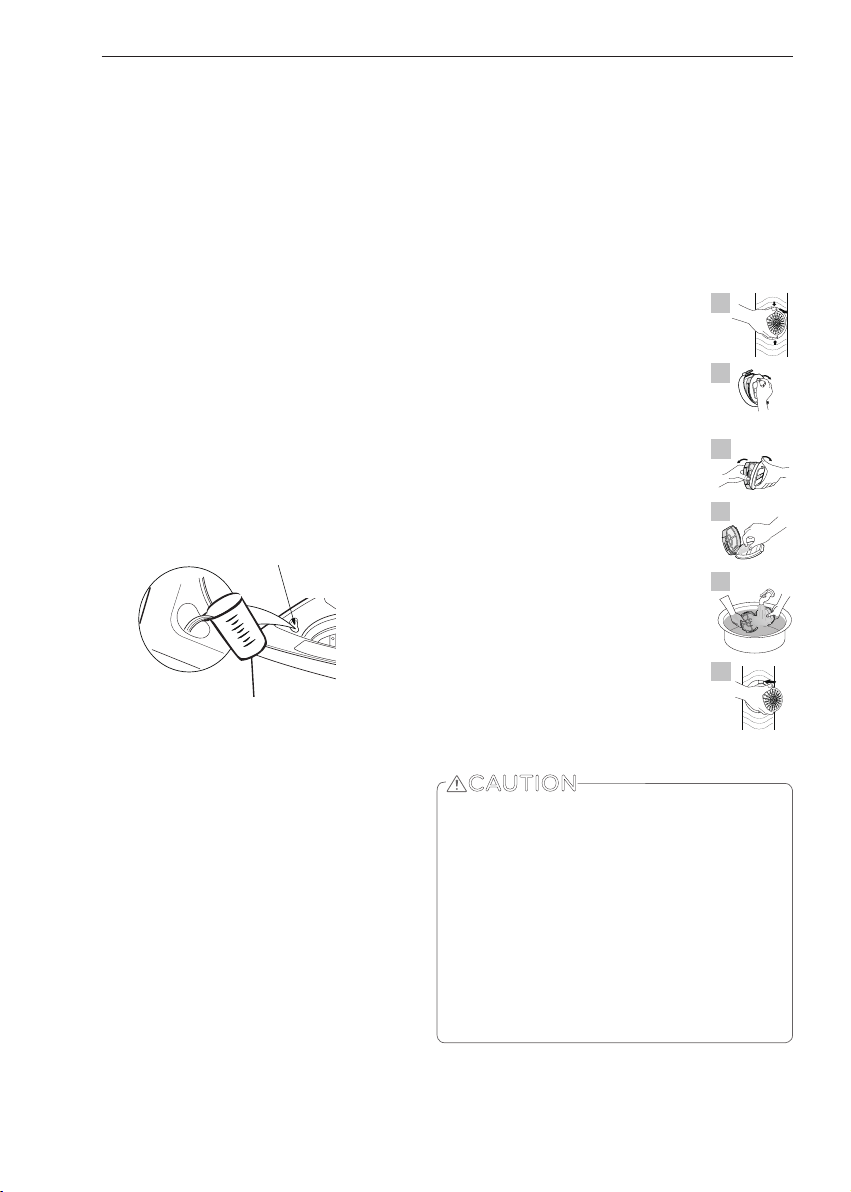
CLEANING THE LINT FILTERS
Your washer comes with two lint filters inside the
drum. These lint filters are designed to collect lint
and other debris and prevent it from depositing on
your laundry during the wash cycle.
Clean the lint filters at least every 2-3 loads. Clean
the filters more often if washing high lint-producers
(like towels) or if you notice that filters are filling
more quickly.
To clean the lint filters:
1. Pinch the tabs on the top and bottom of the filter to release the filter
fr
om the drum wall.
2. On the back of the filter, pull on the
triangular tab to open the filter. (It
may help to place your thumb in the
middle slot on the back and gently
pull.)
3. Pull the filter completely open.
4. Use your fingers or a soft brush to
remove the lint from both sides of
the filter.
5. If necessary, rinse the filter under
running water to clean out any remaining lint.
6. Close the filter and snap it back
in
to place with the tabs at top and
bottom. Make sure both tabs are
locked into the housing by pressing
firmly until you hear the tabs click.
1
2
3
4
5
6
CAUTION
Make sure the filters are locked in place. Failure
•
to lock both upper and lower tabs could cause
the filter to come loose during a cycle resulting in damage to the filter and/or articles in the
load.
Failure to clean the filters regularly can result in
•
reduced cleaning performance due to reduced
water flow through the filters.
•
Failure to clean the filters regularly can result in
odors caused by lint buildup in the filters.
•
Operating the washer without the lint filters
can result in damage to clothing caught in the
open filter housing.
NOTE: If a lint filter becomes torn or damaged, you
can purchase a new one by calling your LG service
center.
Page 21
USING YOUR WASHING MACHINE
21
USING YOUR WASHING MACHINE
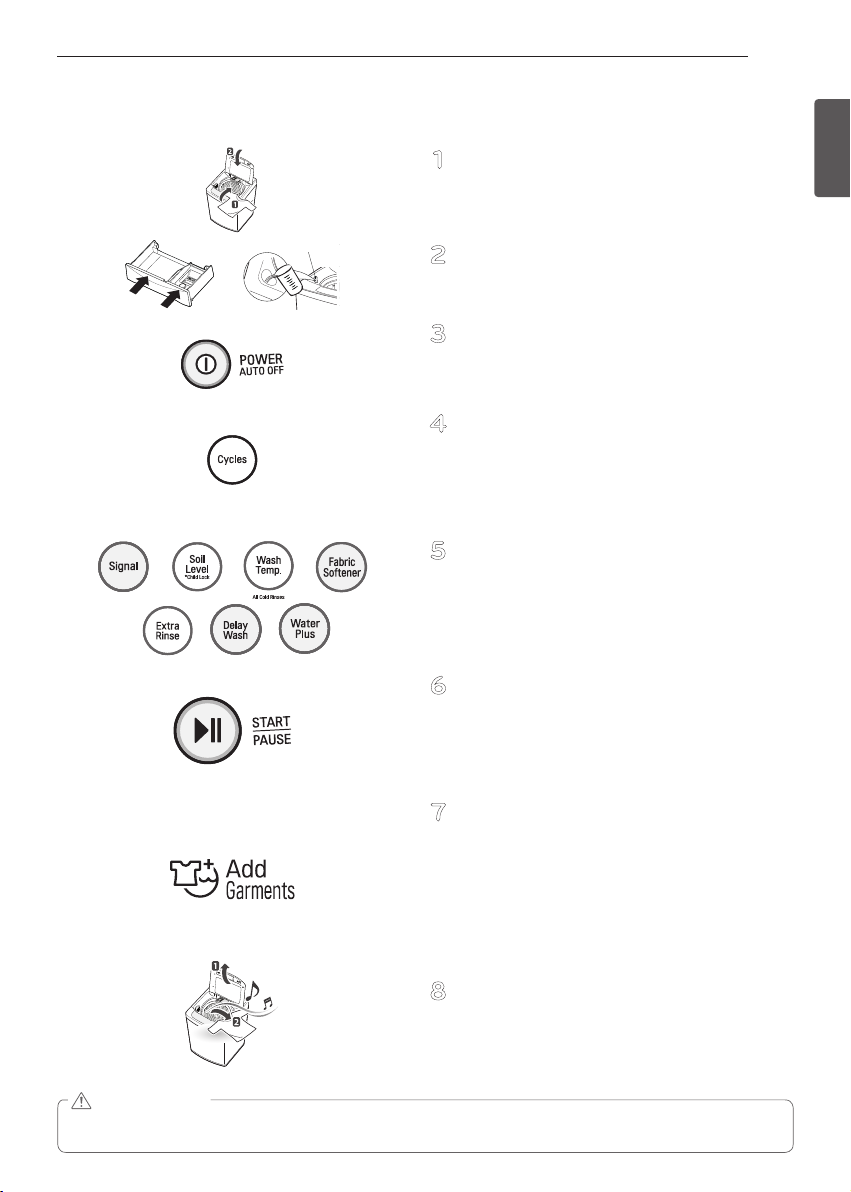
BASIC OPERATION
SORT LAUNDRY AND LOAD THE WASHER
1
Sort laundry by fabric type, soil level, color and
load size, as needed. Open the lid and load items
into the washer.
Main Wash
Detergent
Fabric Softener
Bleach dispenser
CLEANING PRODUCT
2
Add High-Efficiency (HE) detergent to the detergent dispenser. If bleach or fabric softener is to
be used, add these to the appropriate dispenser.
TURN ON THE WASHER
3
Press the POWER button to turn ON the washer.
The lights above the cycle buttons will illuminate
and a chime will sound.
CYCLE SELECTOR BUTTON
4
Press the Cycle Button repeatedly until the desired
cycle is selected. The preset Wash Temp., Soil
Level and option settings for that cycle will be
shown. Pressing the Start Pause button without
selecting a cycle will cause the NORMAL cycle
to begin immediately.
ADJUST SETTINGS
5
Default settings for the selected cycle can now
be changed, if desired, using the cycle modifier
and option buttons.
NOTE: Not all modifiers and options are available
on all cycles. A different chime will sound and the
LED will not come on if the selection is not allowed.
BEGIN CYCLE
6
Press the START/PAUSE button to begin the cycle. The washer will agitate briefly without water
to measure the weight of the load. If the START/
PAUSE button is not pressed within 5 minutes,
the washer will shut off and all settings will be
lost.
ADD GARMENTS LIGHT
7
The ADD GARMENTS light will illuminate near
the beginning of the wash cycle to indicate when
it is safe to add items to the load. Press the
START/PAUSE button to pause the cycle and add
garments to the load. Press the START/PAUSE
button to resume the cycle.
NOTE: It is not recommended to add items unless the ADD GARMENTS light is illuminated, as
this could result in poor performance.
END OF CYCLE
8
When the cycle is finished, a melody will sound.
Immediately remove your clothing from the
washer to reduce wrinkling. After every two to
three cycles, remember to check the lint filters.
ENGLISH
WARNING
•
To reduce the risk of fire, electric shock, or injury to persons,
INSTRUCTIONS before operating this appliance.
read the IMPORTANT SAFETY
Page 22
USING YOUR WASHING MACHINE
22
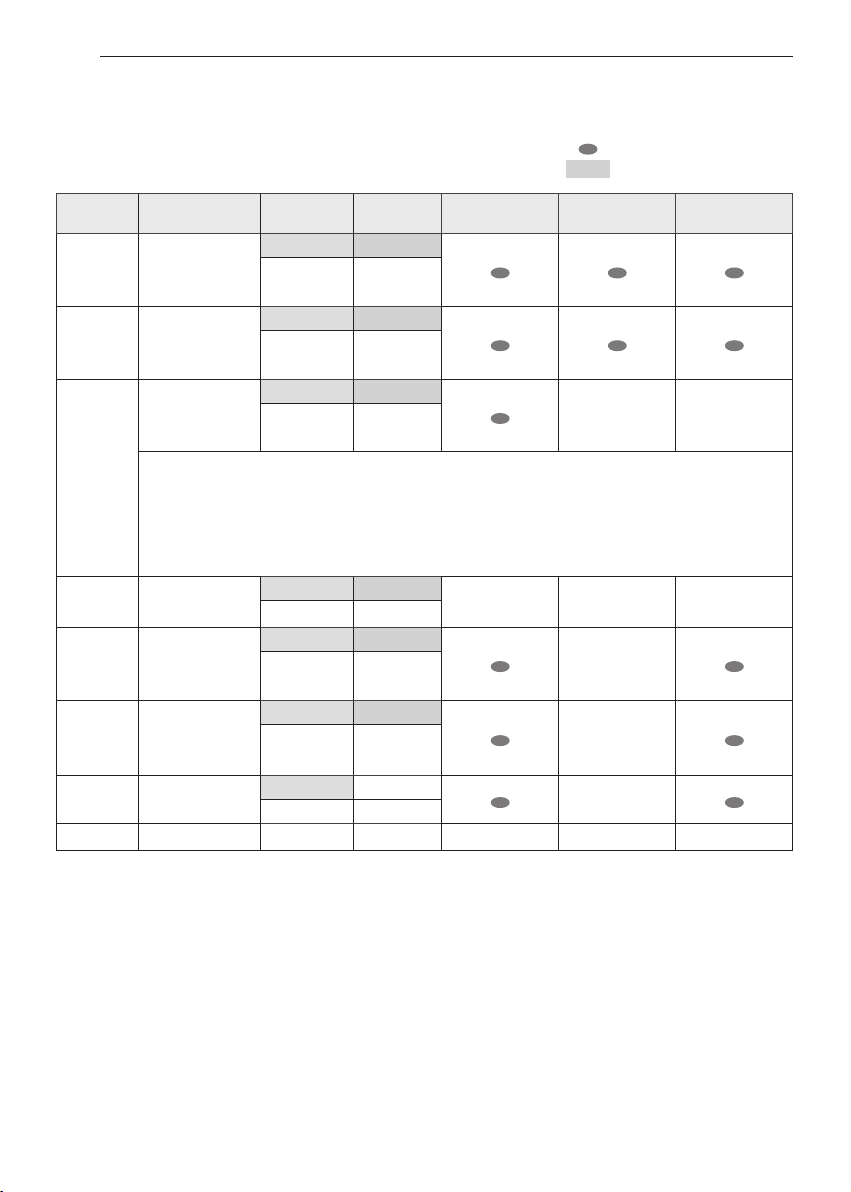
CYCLE GUIDE
The cycle guide below shows the default settings, available options
and recommended fabric types for each cycle. Allowable modifier ad justments are shown below the default setting for each cycle.
Cycle
Normal
Heavy
Duty
Bulky
Tub Clean
Speed
Wash
Delicates
Rinse+Spin
Fabric or
Load Type
Cotton,
linen,towels,
shirts,sheets,
jeans,mixed loads
Heavy soiled
cotton fabrics
Large items
such as blankets
and comforters
* Use the BULK Y cycle for items such as pillows, comforters, pet bedding and other articles
which have difficulty absorbing water. DO NOT WASH EXCESSIVELY LARGE ITEMS. If
large/bulky items do not fit easily into the tub, there may not be enough room for them to
move during washing. Keep like items together; do not mix large bulky items with smaller
clothing items. Failure to follow these instructions may result in damage to the clothing or to
the washer.
Wash Temp. Soil Level
Warm Normal
Hot Heavy
Cold Light
Warm Heavy
Hot Normal
Cold Light
Warm Normal
Hot Heavy
Cold Light
Cold Light
Warm Light
Hot Heavy
Cold Normal
Cold Light
Warm Heavy
Normal
Cold
Extra
Rinse
= Default Setting
Fabric
Softener
=
AVAILABLE OPTION
Water
Plus
Spin Only
NOTE:
To protect your garments, not every wash/rinse temperature, soil level, or option is available with every cycle
A chime will sound and the LED will not light if the selection is not allowed.
*When a cycle is selected, the default time for that cycle is displayed. This time will change as modifiers or
options are selected. Once the START/PAUSE button is pressed, the washer will measure the size of the
load. The estimated time may change once the load size
adjusts the wash time for the amount of laundry, water pressure, water and other operating conditions.
*If you load excessive items into the washer, washer will alternate 3 times soak cycle, this means washer
will not operate for 4 minutes. This operation is normal to remove the dirt and grime, in order to reduce the
risk of fire and electrick shock.
has been measured. The washer automatically
Page 23

USING YOUR WASHING MACHINE
23
MAIN CYCLE
Wa sh c y cles are desig ned f or t he best wash
performance for each type of load. Select the cycle
that best matches the load contents for maximum
wash performance and fabric care. Press the cycle
selector button repeatedly to select the desired
cycle. When you select a wash cycle, the light for
the corresponding wash cycle will turn on. See page
21,
BASIC OPERATION
ting methods.
NORMAL
Use this cycle to wash all normal items, except
delicate fabrics such as wool or silk.
Pressing the START/PAUSE button without
NOTE:
selecting a cycle will cause the NORMAL cycle to
begin immediately using the default settings.
HEAVY DUTY
This cycle is for washing heavily soiled laundry using
more powerful wash motions.
BULKY
This cycle is for washing blankets or bulky items.
NOTE: Using the BULKY Cycle is recommended
when washing water-proof or water-resistant items,
to help protect the fabric’s properties.
TUB CLEAN
Use this cycle to clean the tub of your washing
machine.
, for more details on opera-
SPIN ONLY
Use this option to drain the water from the tub and
spin out the clothes. This can be used, for example,
if the wash cycle is interrupted by a power failure.
SPECIAL DRAIN FEATURE
This washer is equipped with a special feature that is
designed to make your washer as safe as possible.
If the washer is paused or shut off while there is still
water in the tub, the water will drain automatically
after several minutes of inactivity. This helps keep
children safe by reducing the possibility of water
remaining in the tub.
Any water remaining in the tub will automatically
drain five minutes after the washer has shut off. If
the washer is paused and the START/PAUSE button
is not pressed within 5 minutes, the washer will
shut off and all cycle settings will be lost. Any water
remaining will drain five minutes later.
The washer can be turned on or restarted any time
before the draining begins. However, once the water
begins to drain, all functions will be suspended until
the water has been completely drained and the
washer shuts off.
ENGLISH
SPEED WASH
Use the Speed Wash cycle to quickly wash lightly
soiled clothing and small loads. For high wash and
rinse efficiency, it is recommended to wash small
loads of 2-3 lightly soiled garments.
Use very little deterge
NOTE:
you want more rinsing, you can add extra rinse by
using the Extra Rinse button.
nt in this cycle. If
DELICATES
This cycle is for washing lingerie or sheer and lacy
clothes which can easily be damaged.
RINSE + SPIN
Select this option to rinse and spin a load separately
from a regular cycle. This can be helpful in preventing
fresh stains from setting in fabrics.
Page 24

USING YOUR WASHING MACHINE
24
CYCLE MODIFIER BUTTONS
Each cycle has default settings that are selected
automatically. You may also customize these settings using the cycle modifier buttons. Press the
button for the desired modifier until the indicator
light for the desired setting is lit. The washer auto matically adjusts the water level for the type and
size of wash load for best results and maximum
efficiency. Due to the high- efficiency nature of this
product, water levels may be much lower than expected. This is normal and cleaning/rinsing performance will not be compromised.
NOTE: To protect your garments, not every wash/
rinse temperature, soil level, or option is available
with every cycle. A chime will sound and the LED
will not light if a selection is not allowed.
SOIL LEVEL
Adjusting the soil level setting will modify the cycle
times and/or wash actions. Press the SOIL LEVEL
button until the desired soil level is selected.
NOTE: This feature needs more time for heavily
soiled loads or less time for lightly soiled loads.
WASH TEMP.
WASH TEMP. selects the wash and rinse temperature combination for the selected cycle. Press
the WASH TEMP. button until the indicator light
for the desired setting is lit. All rinses use tap cold
water.
•
Select the water temperature suitable for the
type of load you are washing. Follow the garment fabric care labels for best results.
•
Warm rinses are regulated at approximately 74°F
(23°C).
•
Warm rinses leave the clothes dryer than cold
rinses, but will result in increased energy consumption and greater wrinkling of clothes.
•
Cold rinses use less energy. The actual cold
rinse temperature depends on the temperature
of the cold water at the faucet.
Page 25

USING YOUR WASHING MACHINE
25
OPTION BUTTONS
Your washing machine features several additional cycle
options that customize cycles to meet your individual
needs. To use these options, select the desired option
AFTER selecting the desired cycle.
After selecting the desired cycle and settings, press
the cycle option button(s) for the option(s) you would
like to add. The button will light when that option is
selected. If the selected option is not allowed for the
lected cycle, the chime will sound twice to alert you
se
and the LED will not illuminate.
NOTE:
•
To protect your garments, not every option is available with every cycle.
•
If the START/PAUSE button is not pressed within
five minutes to start the cycle, the controls will shut
off and all settings will be lost.
DELAY WASH
Once you have selected the cycle and other settings,
press this button to delay the start of the wash cycle.
Each press of the button increases the delay time by
one hour, for up to 19 hours. Once the desired delay
time is set, press the START/PAUSE button to start the
delay time.
NOTE:
If the START/PAUSE button is not pressed to
begin the delay time, the washer will automatically
shut off after five minutes and all cycle settings will
be lost.
FABRIC SOFTENER
The fabric softener is dispensed in the final rinse.
This washer is designed to save rinse water by using a
more efficient rinse system in NORMAL and HEAVY
DUTY cycles. Press the FABRIC SOFTENER button to
change the final rinse to a regular rinse so that fabric
softener is most effective.
NOTE:
Select the FABRIC SOFTENER option or use
the EXTRA RINSE option if liquid fabric softener is
used in NORMAL or HEAVY DUT Y cycles. Failure to
select one of these options will greatly reduce the effectiveness of the softener.
EXTRA RINSE
This option will add an extra rinse to the selected cycle.
Use this option to help ensure the removal of detergent
or bleach residue from fabrics. Liquid fabric softener, if
used, is always dispensed in the final rinse. Pressing
the EXTRA RINSE button twice will add two additional
rinses to the cycle.
NOTE:
You cannot select the Extra Rinse option with
the Spin Only or Tub Clean options.
WATER PLUS
Use this option if you wish to add more water to your wash
load. This option is especially useful for large or bulky loads.
NOTE:
•
If the washing machine reaches its maximum water
level, the WATER PLUS button will have no effect.
•
You cannot select the WATER PLUS option in the
Tub Clean and Bulky cycles.
SIGNAL
The washing machine plays a melody when the wash
cycle is finished. The buttons make a sound each time
a button is pressed. Use this option to adjust the vol ume of the melody and button tones.
CHILD LOCK
Use this option to disable the controls. This feature
can prevent children from changing cycles or operating
the machine. The feature does not lock the lid. Once
the Child Lock is set, it must be deactivated before
any controls, except the POWER button, can be used.
Once the washer has shut off, the POWER button will
allow the machine to be turned ON, but the controls
will still be locked. When the controls are locked, CL
will display alternately with the estimated time remaining. Press and hold the SOIL LEVEL button for five seconds to activate or deactivate Child Lock.
NOTE: Once the controls are locked, they must be
manually unlocked to restore operation.
ADD GARMENTS
Laundry may ONLY be added to the load at the
proper time in the wash cycle. When the ADD GARMENTS light is illuminated, it is safe to pause the cycle and add more items to the load. If garments are
added when the ADD GARMENTS light is off, the
washer will not adjust for these items which could
result in poor performance and/or fabric damage.
1. Press the START/PAUSE button to pause the
washer.
2. Open the lid.
3. Add your additional items.
4. Close the lid.
5. Press the START/PAUSE button. The cycle will
resume.
NOTE:
If the washer remains idle for nine minutes
after pausing the cycle, the water in the tub will drain.
ENGLISH
Page 26

MAINTENANCE
26
MAINTENANCE
WARNING
To reduce the risk of fire, electric shock, or injury to persons, read and follow this entire Owner’s
Manual, including the Important Safety Instructions, before operating this washer.
•
Unplug the washer before cleaning to avoid the risk of electric shock. Failure to follow this warning
can cause serious injury, fire, electric shock, or death.
•
Never use harsh chemicals, abrasive cleaners, or solvents to clean the washer. They will damage
the fi
nish.
REGULAR CLEANING
CLEANING THE EXTERIOR
Proper care of your washer can extend its life. The
outside of the machine can be cleaned with warm
water and a mild, nonabrasive household detergent.
Immediately wipe off any spills with a soft, damp
cloth.
IMPORTANT: Do not use solvents, cleaning alcohols, or similar products. Never use steel wool or
abrasive cleaners because they can damage the
surface.
CARE AND CLEANING OF THE INTERIOR
Use a towel or soft cloth to wipe around the washer
lid opening and lid glass.
Always remove items from the washer as soon as
the cycle is complete. Leaving damp items in the
washer can cause wrinkling, color transfer, and odor.
Run the Tub Clean cycle once a month, or more often if needed, to remove detergent buildup and
other residue.
TUB CLEAN CYCLE
Some environmental and usage conditions can
cause a residue to build up in the tub over time and
can lead to a mildewy or musty smell. The Tub Clean
cycle is specially designed to remove this buildup
using bleach or other cleaners designed specifically
for cleaning washing machines. Run the Tub Clean
cycle once a month, or more often under heavy use
conditions or if odor is present
1. Remove any clothing from the tub.
2. Fill the bleach dispenser to the MAX line with
liquid chlorine bleach. Do not overfill the bleach
dispenser
pense immediately.
NOTE: For other tub cleaning products, follow the
cleaner manufacturer’s instructions and recommendations. For powdered cleaning products, add the
cleaner to the main wash compartment of the dis penser drawer after removing the liquid detergent
dispenser insert.
. Overfilling will cause the bleach to dis-
3. Close the lid and press the POWER button to turn
the washer ON. Press the TUB CLEAN button,
en press the START/PAUSE button to begin the
th
cycle. Selecting any other cycle after Tub Clean
has been selected will cause the Tub Clean cycle
to be cancelled.
4. eht wolla dna dil eht nepo ,sdne elcyc eht retfA
tub interior to dry completely.
NOTE:
•
Never load laundry while using TUB CLEAN. The
laundry may be damaged or contaminated with
cleaning products. Make sure to run the Tub
Clean cycle ONLY when it is empty.
•
It
is recommended to leave the lid open after fin-
ishing the laundry to keep the tub clean.
•
It is recommended that TUB CLEAN should be
repeated monthly.
•
If mildew or musty smell already exists, run TUB
CLEAN once a week for 3 consecutive weeks.
REMOVING MINERAL BUILDUP
If you live in an area with hard water, mineral scale
can form on internal components of the washer.
Use of a water softener is recommended in areas
with hard water.
Use a descaler, such as Washer Magic®, to remove
visible mineral buildup. After descaling, always run
the Tub Clean cycle before washing clothing.
Mineral scale and other spots may be removed
from the stainless steel tub using a stainless steel
cleaner. Do NOT use steel wool or abrasive cleaners.
LEAVE THE LID OPEN
If the washer will not be used for several days, leave
the lid open overnight to allow the tub to dry.
CLEANING THE LINT FILTERS
Clean the two blue lint filters inside the drum after
every two to three wash cycles. For instructions on
how to clean the filters, see page 20.
Page 27

MAINTENANCE
27
CLEANING THE WATER INLET FILTERS
If the washer does not fill properly, an error mes -
sage will show on the display. The inlet valve filter
screens could be plugged by hard water scale,
sediment in the water supply, or other debris.
NOTE: The inlet screens protect the delicate parts
of the inlet valve from being damaged by particles
that could enter the valves with the water supply.
Operating the washer with these filters removed
could cause a valve to stick open resulting in flood in
g and/or property damage.
1. Turn OFF both water faucets completely. Un-
screw the hot and cold water lines from the back
of the washer.
Cold
Hot
Inlet Filter
IMPORTANT: Aftermarket hoses are not guaranteed to fit or function correctly. Other hoses may
not tighten correctly and could cause leaks. Subsequent damage to product or property will not be
covered under the terms of the product warranty.
2. Carefully remove the filters from the water valves
an
d soak them in white vinegar or a lime scale
remover, following the manufacturer’s instruc tions. Be careful not to damage the filters while
cleaning.
3. Rinse thoroughly before reinstalling. Press the filters back into place.
4. Before reattaching the hoses, flush the hoses and
water lines by running several gallons of water
into a bucket or drain, preferably with the faucets
wide open for maximum flow.
NOTE: I E mes
the water pressure is weak or an inlet filter is
clogged with dirt. Clean the inlet filter.
sage may blink on the display when
WARNING
•
Unplug the power cord and turn off the faucets
before cleaning. Failure to do so may cause
electric shock.
•
Do not use the washing machine without the
inlet filters. If you use the washing machine
without the inlet filters it will cause leaks and
malfunction.
•
If you use the washing machine in an area with
hard water, the inlet filter may clog due to lime
buildup.
STORING THE WASHER
If the washer will not be used for an extended period of
time and is in an area that could be exposed to freezing
temperatures, perform the following steps to protect the washer from damage.
1. Turn OFF the water supply.
2. Disconnect hoses from water supply and drain
water from hoses.
3.
Plug the power cord into a properly grounded
electrical outlet.
4. Add 1 gallon of nontoxic recreational vehicle (RV )
antifreeze to the empty tub and close the lid. Nev-
er use automotive antifreeze.
5. Press the POWER button, then select SPIN ONLY.
Press the START/PAUSE button to activate the
drain pump. Allow the drain pump to run for one
minute, then press the POWER button to shut off
the washer. This
aving enough to protect the washer from dam-
le
age.
6. Unplug the power cord, dry the tub interior with a
soft cloth, and close the lid.
7. Remove the inserts from the dispenser. Drain any
water in the compartments and let them dry.
8. Store the washer in an upright position.
9. To remove the antifreeze from the washer after
storage, run a complete Speed Wash cycle using
detergent. Do not add laundry to this cyc
will expel some of the antifreeze,
le.
ENGLISH
Page 28

MAINTENANCE
28
CLEANING THE WASHER
PROPER USE OF DETERGENT
Using too much detergent is a common cause of
laundry problems. Today’s detergents are formulated to be effective without visible sudsing. Be sure
to carefully read and follow manufacturer’s recommendations for how much detergent to use in your
wash. You can use less detergent if you have soft
water, a smaller load, or a lightly soiled load.
NOTE: Use only low-sudsing, high-efficiency detergent. These detergents can be identified by the
HE l
ogo.
WARNING
•
Do not spray water inside the washing
machine. Doing so may cause fire or electric
shock.
CARE AND CLEANING OF THE WASHER
Lid: Wash with a damp cloth on the outside and inside and then dry with a soft cloth.
Exterior: Immediately wipe off any spills. Wipe with
damp cloth. Do not touch the surface or the display
with sharp objects.
Moving and Storage: Contact a service technician
to remove water from the drain pump and hoses.
Reinstall the foam tub block to protect the washer
from damage while moving. Do not store the washer where it will be exposed to outdoor weather condi
tions.
Long Vacations: Be sure water supply is shut off at
the faucets. Follow the instructions in the Storing
the Washer section if the washer will be exposed to
freezing temperatures.
Dispenser Drawer: Detergent and fabric softener
may build up in the dispenser drawer. Remove the
drawer and inserts and check for buildup once or
twice a month.
1. Remove the drawer by pulling it straight out until
it stops. Lift up on the front of the drawer and pull
it completely out.
2. Remove the inserts from the two compartments.
Rinse the inserts and the drawer with warm water to remove buildup from laundry products.
3. To clean the drawer opening, use a small, nonmetal brush to clean the recess. Remove all
residue from the upper and lower parts of the
recess.
4. Return the inserts to the proper compartments
an
d replace the drawer. Set the drawer into the
opening at an angle as shown above, then lower
it and slide it into place.
Page 29

TROUBLESHOOTING
29
TROUBLESHOOTING
CHECKING ERROR MESSAGES
If the following message appears on the display, check the following and take the appropriate corrective
action.
Problem Possible Cause Solutions
The display shows:
Washer fills with water slowly or
not at all, or the display shows:
Washer will not turn on Power cord is not properly
The lid is not closed properly.
The fold-down lid handle is in use.
Water supply faucets are not fully
open.
Water line hoses are kinked,
pinched, or crushed.
Water inlet filters are clogged. Clean the inlet filters. See Maintenance in
Water supply pressure to faucet or
house is too low.
Water supply connected with leaklimiting hoses.
plugged in.
House fuse is blown, circuit breaker has tripped, or power outage
s occurred.
ha
Make sure that the lid is closed properly
and press the START/PAUSE button. After
starting a cycle, it may take a few moments
before the tub begins to turn or spin. The
washer will not spin unless the lid is closed.
Make sure the fold-down lid is in the extended position so the door sensor will operate
properly.
If the lid is closed and the error message is
displayed, call for service.
Make sure that the water faucets are fully
open.
Make sure that the hoses are not kinked or
pinched. Be careful when moving the washer
during cleaning and maintenance.
the Care and Cleaning section.
Check another faucet in the house to make
sure that household water pressure is adequate and flow is not restricted. Disconnect
th
e inlet hose from the washer and run a few
gallons of water through the hose to flush
the water supply lines. If flow is too low,
contact a plumber to have the water lines
repaired.
Hoses designed to limit leaks can trip falsely
and prevent the washer from filling. The use
of leak limiting hoses is not recommended.
Make sure that the plug is plugged securely
into a grounded, 3-prong. 120-VAC, 60-Hz.
outlet.
Reset circuit breaker or replace fuse. Do not
increase fuse capacity. If the problem is a
circuit overload, have it corrected by a qualified electrician.
ENGLISH
Page 30

TROUBLESHOOTING
30
CHECKING ERROR MESSAGES (CONTINUED)
Problem Possible Cause Solutions
Water in the washer drains slowly
or not at all, or the display shows:
The display shows:
The display shows :
Drain hose is kinked, pinched, or
clogged
Drain discharge is more than 96
inches above bottom of washer.
If the uE rebalance (see above) is
not successful, this error will be
displayed.
The load is too small. Small loads may need additional items to be
Heavy articles are mixed with
lighter items.
The load is out of balance. Manually redistribute the load if articles have
Water level is too high due to a
faulty water valve.
Make sure the drain hose is free of clogs,
kinks, etc., and is not pinched behind or
under the washer.
Adjust or repair drain. Maximum drain height
is 96 inches (8 ft.)
The automatic attempt to rebalance the load
was not successful. The cycle has been
paused to allow the load to be manually
adjusted.
added to allow the washer to balance the
loads.
The load may have heavy items loaded with
lighter items. Always try to wash articles of
somewhat similar weight to allow the washer
to evenly dist
spinning.
become tangled preventing the automatic
distribution from working properly.
Close the water faucets, unplug the washer,
and call for service.
ribute the weight of the load for
The display shows: The water level sensor is not
working correctly.
The display shows: The washer has detected an out of
balance load.
Close the water faucets, unplug the washer,
and call for service.
If the washer detects a load that is too far
out of balance to spin, it will display this code
while it is attempting to rebalance the load. The
washer will add water and try to redistribute
the load automatically. This display is for your
information only, and no action is required.
Page 31

TROUBLESHOOTING
31
NORMAL SOUNDS YOU MAY HEAR
The following sounds may be heard while the washer is operating. They are normal.
SPRAYING OR HISSING:
Water spraying or circulating during the cycle.
HUMMING OR GURGLING:
Drain pump is pumping water from the washer at
times during a cycle.
SOUND OF WATER BEING ADDED AFTER
THE WASHER HAS ALREADY BEEN IN
OPERATION
•
The washer adapts to the load size and type to
add more water to the cycle as needed.
•
The wash load may be unbalanced. If the washer
senses that the load is unbalanced, it will stop and
refill to redistribute the load.
•
The washer may be diluting laundry additives to
add to the wash load.
WATER SLOSHING SOUND:
A liquid in the balance ring around the wash basket
helps the basket spin smoothly.
BEFORE CALLING FOR SERVICE
Your washing machine is equipped with an automatic error-monitoring system to detect and diagnose problems at an early stage. If your washer does not function properly or does not function at all, check the following before you call for service:
Problem Possible Cause Solutions
Rattling and clanking
noise
Thumping sound Heavy wash loads may produce a
Vi
brating noise Packaging materials were not re-
Water leaking Inlet hose connection is loose at
Foreign objects, such as keys,
coins, or safety pins may be in tub
or pump.
thumping sound.
Wash load may be out of balance. Pause the cycle and redistribute the load.
moved.
Wash load may be unevenly dis-
tributed in the tub.
Not all leveling feet are resting
firmly and evenly on the floor.
Floor not rigid enoug
faucet or washer.
House drain pipes are clogged. The washer pumps out water very rapidly. Check for
Drain hose has come out of drain
or is not inserted far enough.
A large item such as a pillow or
bl
anket is above the top of the tub.
h. Make s
Stop washer, check tub and drain filter for foreign objects. If noise continues after washer is restarted, call
for service.
This is normal. If sound continues, washer is probably
out of balance. Stop and redistribute wash load.
See the Unpacking and Removing Shipping Material
section in the installation requirements section.
Pause the cycle and redistribute the load.
See Leveling the Washer in the Installation Instructions
section.
ure that the floor is solid and does not flex. See
Flooring in the Installation Requirements section.
Check hoses for leaks, cracks and splits.
Check and tighten hose connections.
water backing up out of the drain pipe during drain. If
water is seen coming out of the drain, check for proper
drain
hose installation and check for restrictions in the
ain. Contact a plumber to repair drain pipe.
dr
Tie drain hose to inlet hose or stand pipe to prevent it
from coming out during drain. For smaller drain pipes,
insert the drain hose into the pipe as far as the drain
hose flange. For larger drain pipes, insert the drain
hose into the pipe 1-2 inches past the flange.
Use the BULKY cycle for large or bulky items. Use extra care and never wash more than half a load of items
that float, such as pillows.
Stop the washer and check the load. Make sure the
load does not crest above the top edge of the tub.
ENGLISH
Page 32

TROUBLESHOOTING
32
BEFORE CALLING FOR SERVICE (continued)
Problem Possible Cause Solutions
Wrinkling Washer not unloaded promptly. Always remove items from the washer as soon as the
Washer overloaded. The washer can be fully loaded, but the tub should not be
Hot and cold water inlet hoses are
reversed.
Excessive sudsing Too much detergent or incorrect
Staining Bleach or softener dispensed too
Washer will not turn ONPower cord is not properly plugged
Wash cycle time is longer than usual
Musty or mildewy odor
in washer
Water leaks Oversudsing of detergent.
de
tergent.
soon.
Bleach or softener was added directly to the wash load in the tub.
Washer was not unloaded promptly.
Clothes were not properly sorted. Always wash dark col
in.
House fuse is blown, circuit break-
er has tripped, or power outage
has occurred.
NOTE: If the washer stopped during a cycle due to a loss of power, the washer will resume
the cycle where it stopped when the power is restored.
The washer automatically adjusts
the wash time for the amount of
laundry, water pressure and other
operating conditions.
Incorrect or too much detergent
has been used.
Inside of tub was not cleaned properly.
Lint filters have not been cleaned
for a long time.
cycle is complete.
tightly packed with items. The lid of the washer should
close easily.
Hot water rinse can set wrinkles in garments. Check the
inlet hose connections.
HE detergents are formulated specifically for High-Efficiency washers and contain suds-reducing agents. Only
use detergent with the High-Efficiency (HE) logo. For detergent quantities refer to the How to Use section.
Dispenser compartment is overfilled causing bleach or
softener to dispense immediately. ALWAYS measure
bleach to prevent overfilling - one cup maximum.
Dispenser d
dispense immediately.
Always use the dispensers to ensure that laundry products are properly dispensed at the right time in the cycle.
Always remove items from the washer as soon as possible after the cycle is complete.
wh
Never wash heavily soiled items washed with lightly
soiled items.
Make sure that the plug is plugged securely into a ground-
ed, 3-prong, 120-VAC, 60-Hz outlet.
Reset circuit breaker or replace fuse. Do not increase
fuse capacity. If the problem is a circuit overload, have it
co
rrected by a qualified electrician.
This is normal. The washer adjusts cycle time automatically t
time remaining shown in the display is only an estimate.
Actual time may vary.
Use only High-Efficiency (HE) detergent in accordance
with the manufacturer’s instructions.
Run the Tub clean cycle regularly.
Clean out the lint filters. See page 20 for instructions.
Oversudsing may create leaks, and may be caused by the
type and amount of detergent used. High-Efficiency detergent is the only detergent recommended. Make sure that
detergent and any additives are put into the correct dispenser compartments. The normal amount of detergent to
use is 1/4 to 1/2 of the maximum amount recommended by
the detergent manufacturer. Always reduce the amount of
detergent if the load is small or lightly soiled, or if your water is very soft. Never use more than the maximum amount
recommended by the detergent manufacturer.
rawer closed too quickly causing softener to
ors separately from light colors and
ites to prevent discoloration.
o provide optimal results for the selected cycle. The
Page 33

TROUBLESHOOTING
33
BEFORE CALLING FOR SERVICE (continued)
Problem Possible Cause Solutions
Washer will not operate Control panel has powered off due
Washer not filling properly Filter clogged. Make sure the inlet filters on the fill valves are not
to inactivity.
Washer is unplugged. Make sure cord is plugged securely into a working
Water supply is turned off. Turn both hot and cold faucets fully on.
Controls are not set properly. Make sure the cycle was set correctly, close the lid
Lid is open The washer will not op
Circuit breaker/fuse is tripped/
blown.
Control needs to be reset. Press the POWER button, then re-select the desired
ST
ART/PAUSE was not pressed
after a cycle was set.
Extremely low water pressure. Check another faucet in the house to make sure that
Washer is too cold. If the washer has been exposed to temperatures be-
Inlet hoses may be kinked. Check that inlet hoses are not kinked or clogged.
Energy efficiency. This is a High Efficiency (HE) washer. As a result, the
Insufficient water supply. Make sure that both hot and cold water faucets are
The washer lid is open. The washer will not operate if the lid is open. Close
Hot and cold inlet hoses are
reversed.
Water level is too low. This is a high efficiency washer. The water will not
This is normal. Press the POWER button to turn the
washer on.
outlet.
and press the START/PAUSE button.
e lid and make sure that nothing is caught under
th
the lid preventing it from closing completely.
Check house circuit breakers/fuses. Replace fuses
or reset breaker. The washer should be on a dedicated branch circuit. The washer will resume the cycle
where it stopped once power is restored.
cycle and press the START/PAUSE button.
Press the POWER button then re-select the desired
cycle and press the START/PAUSE button. The
washer will shut off if the START/PAUSE button is
not pressed within five minutes.
household water pressure is adequate.
low freezing for an extended period of time, allow
it
to warm up before pressing the POWER button.
Otherwise, the display will not come on.
clogged. Refer to the filter cleaning instructions.
water level settings for this washer may be different
th
an for conventional washers.
turned on all the way.
the lid and make sure that nothing is caught under
the lid preventing it from closing completely.
Check inlet hose connections. Make sure the hot
water supply is connected to the hot inlet valve, and
th
e cold water supply is connected to the cold inlet
valve.
normally cover the clothes. The fill level is optimized
for the wash motion to achieve the best wash performance.
erate if the lid is open. Close
ENGLISH
Page 34

TROUBLESHOOTING
34
BEFORE CALLING FOR SERVICE (continued)
Problem Possible Cause Solutions
Washer will not drain water Kinked drain hose. Ensure that the drain hose is not kinked.
Drain located higher than 96 in.
above the floor.
Poor stain removal Proper options not selected. Heavier soils and tougher stains may require extra
Pr
eviously set stains. Articles that have previously been washed may have
Bleach does not dispense Bleach dispenser cover is not
Premature dispensing of
bleach
Incomplete or no dispensing
of detergent
Water leaks every load Hoses not installed correctly. Check all fill and drain hose connections to ensure
properly installed.
Bleach dispenser is dirty or
cl
ogged.
Bleach dispenser filled for future
load.
Detergent compartments
clogged from incorrect filling.
Too much detergent used. Make sure that the suggested amount of detergent is
Insufficient water supply. Make sure that both hot and cold water faucets are
Normal residue. It is normal for a small amount of detergent to remain
Make sure that the drain hose is no higher than 8 ft.
above the bottom of the washer and is no more than
5 ft. away from the washer.
cleaning power. Select the Soak or Stain Care feature
to boost the cleaning power of the selected cycle.
stains that have been set. These stains may be difficult to remove and may require hand washing or pretreating to aid in stain removal.
Make sure that the bleach cover is properly installed
and snapped into place before the beginning of the
cycle.
Lift out the bleach dispenser cover and clean out the
reservoir. Lint and other foreign debris that collects in
the inside the dispenser may prevent proper dispensing of the bleach.
You cannot store bleach in the dispenser for future
use. The bleach will be dispensed every load.
Ma
ke sure that detergent and additives are put into
the correct dispenser compartments. For all detergent types, always make sure that the dispenser
drawer is fully closed before the start of the cycle.
used per the manufacturer’s recommendations. You
may also dilute the detergent with water to the maximum fill line on the compartment to avoid clogging.
Us
e only HE (High- Efficiency) detergent.
NOTE: Always use as little detergent as possible.
High-Efficiency washers need very little detergent to
achieve optimum results. Using too much detergent
will cause poor wash and rinse performance and may
contribute to odors in washer.
turned on all the way.
in
the dispenser. If this residue builds up it can interfere with normal dispensing of products. Refer to the
cleaning instructions.
that they are tight and secure.
Page 35

SPECIFICATIONS/USING SMARTDIAGNOSIS™
35
SPECIFICATIONS
Model WT901CW / WT901CF
Description Top-Loading Washer
Electrical requirements 120 VAC @ 60 Hz.
Max. water pressure 14.5 - 116 PSI (100 - 800 kPa)
Dimensions 24 7/8”(W) X 26 3/8”(D) X 40 1/8”(H), 54 3/4” (H with lid open)
Net weight 103 lbs. (47kg)
Max. spin speed 700 RPM
63.2cm (W) X 67cm (D) X 102cm (H), 139cm (H with lid open)
SMART DIAGNOSIS™ SYSTEM
Should you experience any problems with your
washing machine, it has the capability of transmitting data via your telephone to the Smart Diagnosis Team. This gives you the capability of speaking
directly to our specially trained technicians. The
technician records the data transmitted from your
machine and uses it to analyze the issue, providing a
fast and effective diagnosis.
USING THE SMART DIAGNOSIS™ SYSTEM
Follow the technician’s instructions and perform the following steps when requested.
If you experience problems with your washer, call
1-800-243-0000. Only use the Smart Diagnosis System
when instructed to do so by the Smart Diagnosis Team.
The transmission sounds that you will hear are normal
and sound similar to a melody.
Smart Diagnosis cannot be activated unless your
washing machine is turned on by pressing the POWER button. If your washing machine is unable to turn
on, then troubleshooting must be done without using Smart Diagnosis.
ENGLISH
HOLD the mouthpiece of your phone over the power button, when instructed to do so by the call center, no more than
one inch from (but not touching) the machine.
NOTE: Do not press any other buttons.
PUSH and hold the WASH TEMP. button while continuing to hold your phone to the POWER button.
LISTEN for three beeps. After you hear the three beeps, release the WASH TEMP. button. Keep the phone in place
until the tone trans
the countdown is over and the tones have stopped, resume your conversation with the technician, who will then be
able to assist you in using the information transmitted for analysis.
Smart Diagnosis™ is a troubleshooting feature designed to assist, not replace, the traditional method of
troubleshooting through service calls. The effectiveness of this feature depends upon various factors, including, but not limited to, the reception of the cellular phone being used for transmission, any external noise
that may be present during the transmission,
Accordingly, LG does not guarantee that Smart Diagnosis™ would accurately troubleshoot any given issue.
mission has finished. This takes about 6 seconds, and the display will count down the time. Once
and the acoustics of the
room where the machine is located.
Page 36

WARRANTY
36
LG WASHING MACHINE LIMITED WARRANTY (USA)
WARRANTY:
LG Electronics U.S.A., Inc. (“LG”) warrants your LG Washing Machine (“product”) against defect in materials or
workmanship under normal household use, during the warranty period set forth below, LG will, at its option, repair or
replace the product. This limited warranty is valid only to the original retail purchaser of the product, is not assignable
or transferrable to any subsequent purchaser or user, and applies only when the product is purchased through an LG
authorized dealer or distributor and used within the United States (“U.S.”) including U.S. Territories.
Note: Replacement products and repair parts may be new or factory-remanufactured and are warranted for the
remaining portion of the original unit’s warranty period or ninety (90) days, whichever is longer. Please retain dated
receipt or delivery ticket as evidence of the Date of Purchase for proof of warranty (you may be required to submit a
copy to LG or authorized representative).
WARRANTY PERIOD:
Period
Scope of Warranty
Remark
HOW SERVICE IS HANDLED: In-Home Service
In-home service will be provided, as available, during the warranty period subject to servicer availability within the
U.S. To receive in-home service, the product must be unobstructed and accessible to service personnel. If the inhome service repair cannot be completed, it may be necessary to remove, repair and return the product. If in-home
service is unavailable, LG may elect, at its option, to provide for transportation of the product to and from an LG
authorized service center.
THIS LIMITED WARRANTY DOES NOT COVER:
1. Service trips to deliver, pick up, or install the product or for instruction on product use.
2. Replacing house fuses or resetting of circuit breakers, correction of house wiring or plumbing, or correction of
product installation.
3. Damage or failure caused by leaky/ broken/ frozen water pipes, restricted drain lines, inadequate or interrupted
water supply or inadequate supply of air.
4. Damage or failure caused by accidents, pests and vermin, lightning, wind, fire, floods or acts of God.
5. Damage or failure resulting from misuse, abuse, improper installation, repair or maintenance. Improper repair
includes use of parts not approved or specified by LG.
6. Damage or failure caused by unauthorized modification or alteration to the product.
7. Damage or failure caused by incorrect electrical current, voltage, or plumbing codes.
8. Cosmetic damage, including scratches, dents, chips or other damage to the finish of the product, unless such
damage results from defects in materials or workmanship and is reported to LG within seven (7) calendar days
from the date of delivery.
9. Damage or missing items to any display, open box, discounted, or refurbished product.
10. Product where the original factory serial numbers have been removed, defaced or changed in any way.
11. Repairs when product is used in other than normal and usual household use (e.g. rental, commercial use,
offices, or recreational facilities) or contrary to the instructions outlined in the owner’s manual.
12. The removal and reinstallation of the Product if it is installed in an inaccessible location.
THIS WARRANTY IS IN LIEU OF ANY OTHER WARRANTY, EXPRESS OR IMPLIED, INCLUDING AND WITHOUT
LIMITATION TO, ANY WARRANTY OF MERCHANTABILITY OR FITNESS FOR A PARTICULAR PURPOSE. TO THE
EXTENT ANY IMPLIED WARRANTY IS REQUIRED BY LAW, THIS WARRANTY IS LIMITED IN DURATION TO THE
TERM PERIOD EXPRESSED ABOVE. REPAIR OR REPLACEMENT AS PROVIDED UNDER THIS WARRANTY IS THE
EXCLUSIVE REMEDY FOR THE CUSTOMER. NEITHER THE MANUFACTURER NOR ITS U.S. DISTRIBUTOR
SHALL BE LIABLE FOR ANY INCIDENTAL, CONSEQUENTIAL, INDIRECT, SPECIAL, OR PUNITIVE DAMAGES OF
ANY NATURE, INCLUDING AND WITHOUT LIMITATION TO, LOST REVENUES OR PROFITS, OR ANY OTHER
DAMAGE, WHETHER BASED IN CONTRACT, TORT, OR OTHERWISE.
SOME STATES DO NOT ALLOW THE EXCLUSION OR LIMITATION OF INCIDENTAL OR CONSEQUENTIAL
DAMAGES OR LIMITATIONS ON HOW LONG AN IMPLIED WARRANTY LASTS, SO THE ABOVE EXCLUSION OR
LIMITATION MAY NOT APPLY TO YOU. THIS WARRANTY GIVES YOU SPECIFIC LEGAL RIGHTS AND YOU MAY
ALSO HAVE OTHER RIGHTS THAT VARY FROM STATE TO STATE.
HOW TO OBTAIN WARRANTY SERVICE & ADDITIONAL INFORMATION: Write your warranty information
below:
Call 1-800-243-0000 or visit our website at www.lg.com. Product Registration Information:
Mail to: LG Customer Information Center (ATTN: CIC) Model:
201 James Record Road, Huntsville, AL 35824 Serial Number:
Date of Purchase:
One (1) year from date of
original retail purchase:
Any internal /functional
Parts & Labor
LG will provide parts & labor to
repair or replace defective parts.
Parts only. Customer will be responsible for any labor or in-home
Lifetime from date of
original retail purchase:
Stainless Steel Drum
service to replace defective parts.
Page 37

37
MEMO
Page 38

38
MEMO
Page 39

MANUAL DEL PROPIETARIO
ESPAÑOL
LAVADORA
Por favor lea atentamente este manual de instrucciones antes de
comenzar a instalar y manténgalo cerca de la lavadora para referencia
en todo momento.
W
T901CW
WT901CF
MFL68485602
www.lg.com
Page 40

ÍNDICE
2
ÍNDICE
3
INSTRUCCIONES IMPORTANTES DE
SEGURIDAD
3 Precauciones Básic as de Segurida d
4 Requisi tos de Conexión a Tierr a
5 Instr ucciones de Seguridad Para la Instalación
6 Instr ucciones de Seguridad Para la Utilización,
Cuidado y Limpieza, y la Eliminación
7
CARACTERÍSTICAS DEL PRODUCTO
8
CONOCIENDO SU ELECTRODOMÉSTICO
8 Partes y Accesorios
9 Funciones del Panel de Control
10 Pantalla de Tiempo y Estado
21
INSTRUCCIONES DE USO
21 Manejo de la Lavadora
22 Guía de Ciclos
2 3 Ciclo Pr incipal
24 Botones Modificadores de Cicl o
25 Botones de Opción
- Lavado Demorado
25
25
- Suavizante
25
- Enjuague Extra
- Agregue el Agua
25
- Señal
25
25
- Blo queo Infantil
25
- Añadir Ropa
26
MANTENIMIENTO
11
INSTRUCCIONES PARA LA
INSTALACIÓN
11
Descripción de la Instalación
12
Escoja el Lugar Adecuado
Toma de Corriente
12
Tipo de Piso
12
13
Desempaque y Desecho del Material de
Transpor te
14
onexión de la
C
15
Conexió n de la Manguera de Drena je
ivelación de la Lavadora
N
16
17
Conexión del Suministro Eléc tric o
17
Haga una prueba a la lavadora
18
PREPARACIÓN
18
Clasificación de las Cargas de Lavado
Etiquetas de Cuidado de las Prendas
18
18
Carga de la Lavadora
Acerca de Los Dispensadores
19
19
Uso de l Deterg ente y del Dispensador
s Tuberías de Agua
26 Limpieza Regular
26
- Limp ieza del E xterior
26
- Cuida do y Limpieza del Interior
- Ciclo de Limpieza de Tina
26
- El iminación de la Acumulación de Miner ales
26
- Deje la Tapa Abierta
26
- Limpie los Filtros de Pelusa
26
Limpieza de los Filtros de Entrada de Agua
-
27
-
27 Almacenamiento de la Lavadora
28
Limpieza de la Lavadora
29
SOLUCIÓN DE PROBLEMAS
29
Códigos de Er ror
31 So nidos Normales Que se Pueden Escuchar
31 Antes de Solicitar Asistencia Técnic a
35
ESPECIFICACIONES
35
SISTEMA SMART DIAGNOSIS™
36
GARANTÍA
Page 41

INSTRUCCIONES IMPORTANTES DE SEGURIDAD
3
INSTRUCCIONES IMPORTANTES DE SEGURIDAD
LEA TODAS LAS INSTRUCCIONES ANTES DE USAR
ADVERTENCIA
Por su seguridad, debe seguir la información indicada en este manual para minimizar el riesgo de incendio o
explosión , descarga eléctr ica o para prevenir daños a la propiedad, lesiones personales o muerte.
Su seguridad y la de otras personas es muy importante. En este manual y en su electrodoméstico figuran
muchos mensajes importantes de seguridad. Lea y cumpla siempre con todos los mensajes de seguridad.
Éste es el símbolo de alerta de seguridad. Este símbolo lo alerta sobre posibles riesgos que pueden resultar en daños sobre la propiedad y/o lesiones físicas graves o la muerte.
To
dos los mensajes de seguridad estar
la palabra PELIGRO, ADVERTENCIA o PRECAUCIÓN. Estas palabras significan:
PELIGRO
ADVERTENCIA
PRECAUCIÓN
Todos los mensajes de seguridad le indicarán cuál es el riesgo potencial, cómo reducir las posibilidades
de sufrir heridas y qué podría suceder si no se siguen las instrucciones.
Corre riesgo de muerte o de sufrir heridas serias si no sigue las instrucciones
inmediatamente.
Corre riesgo de muerte o de sufrir heridas serias si no sigue las instrucciones.
De no seguir las instrucciones podría sufrir daños leves o causar daños en el
producto.
PRECAUCIONES BÁSICAS DE SEGURIDAD
ADVERTENCIA
Para minimizar el riesgo de incendio o explosión, descarga eléctrica, o para prevenir lesiones personales cuando
use electrodomésticos, se deben seguir precauciones básicas de seguridad, incluyendo las siguientes:
•
Utilice este electrodoméstico sólo para los fines para los que fue diseñado, según lo descrito en este manual
de
l usuario.
•
Antes de usar, la lavadora debe estar correctamente instalada como se describe en este manual.
•
No lave artículos que han sido limpiados, lavados, remojados o salpicados previamente con gasolina, disolventes de limpieza en seco, u otras substancias inflamables o explosivas, ya que emanan vapores que podrían
encenderse o explotar.
No agregue gasolina, disolventes de limpieza en seco u otras substancias explosivas al agu
•
substancias emanan vapores que podrían encenderse o explotar.
•
Bajo ciertas condiciones, se puede producir gas hidrógeno en un sistema de agua caliente que no se haya
usado por un plazo de 2 semanas o más. EL GAS HIDRÓGENO ES EXPLOSIVO. Si no se ha usado el sistema
de agua caliente durante tal periodo, antes de utilizar la lavadora, abra todas las llaves de agua caliente y deje
que el agua fluya durante algunos minutos. Es
i
nflamable, no fume ni use ninguna llama abierta durante este periodo.
•
No deje que los niños jueguen en la lavadora o dentro de ella. Es necesario supervisar de cerca a los niños si
utiliza la lavadora cerca de ellos.
•
Antes de poner la lavadora fuera de servicio o de tirarla, quite la puerta para prevenir que los niños se metan
adentro.
•
No instale ni guarde la lavadora en lugares donde estará expuesta a la intemperie o a temperaturas de c
gelamiento.
No toquetee los controles.
•
•
Mantenga el área alrededor y
productos químicos, etc.
•
No introduzca su mano si la tina o el agitador están funcionando.
debajo del electrodomestico
á
n a continuación del símbolo de alerta de seguridad y con
avado. Estas
a de l
to liberará cualquier gas hidrógeno acumulado. Ya que el gas es
on-
libre de materiales combustibles, como pelusa, papel
ESPAÑOL
•
ADVERTENCIA: Este producto contiene químicos conocidos por el Estado de California de causar cáncer. Lávese las manos después de manipular.
Page 42

INSTRUCCIONES IMPORTANTES DE SEGURIDAD
4
•
Vea las intrucciones de instalación para los requisitos de toma a tierra.
•
Siga SIEMPRE las instrucciones de cuidado de la tela suministradas por el fabricante de las prendas.
•
No coloque artículos expuestos a aceite de cocina en su lavadora. Lo
aceites de cocina podrían causar una reacción química que cause que la carga de lavado se incendie.
•
Use suavizantes de tela o productos para eliminar estática únicamente recomendado por el fabricante.
•
Esta lavador
aeronaves, etc.
•
Ci
erre las llaves de agua y desenchufe la lavadora si no utilizará la unidad por un periodo prolongado de
tiempo, como durante las vacaciones.
•
No utilice la lavadora para secar artículos que contengan caucho, foam, o materiales con texturas simi-
res a caucho.
la
•
El material de empaque podría resultar peligroso para los niños. ¡Existe el peligro de sofocación! Mantenga todos los materiales de emp
•
Antes de cargar la lavadora, siempre revise que no haya objetos extraños en su interior. Mantenga la
puerta cerrada cuando no se use.
•
No coloque las manos dentro del electrodoméstico si el tambor o el agitador están en movimiento.
a no está diseñada para uso marino o instalaciones móviles tales como vehículos recreativos,
aque fuera del alcance de los niños.
s artículos contaminados con
LEA TODAS LAS INSTRUCCIONES ANTES DE USAR
ADVERTENCIA
Por su seguridad, se debe seguir la información indicada en este manual para minimizar el riesgo de incen-
dio o explosión, descarga eléctrica, o para prevenir daños a la propiedad, lesiones personales, o muerte.
REQUISITOS DE CONEXIÓN A TIERRA
Este aparato debe ser conectado a tierra. En el caso de descompostura o mal funcionamiento, la conexión
a tierra reduce el riesgo de recibir una descarga eléctrica al proveer una vía de menor resistencia a la corri-
ente el
éctrica. Este aparato está equipado con un cable que tiene un conductor de equipo a tierra y una
clavija de tierra. La clavija debe ser conectada en una toma de corriente adecuada que est
te instalada y conectada a tierra de acuerdo con los códigos y ordenanzas locales.
é apropiadamen-
ADVERTENCIA
Una conexión inapropiada del conductor de equipo a tierra puede resultar en riesgo de recibir una descarga
eléctrica. Verifique con un electricista calificado si tiene dudas sobre si el aparato est
nectado a tierra. No modifique la clavija provista con el aparato. Si no encaja con la toma de corriente, llame
a un electricista calificado para que instale una toma de corriente adecuada. Si no se cumple con esta advertencia se podr
án producir heridas graves, incendios, descargas eléctricas, o muerte.
á correctamente co-
Page 43

INSTRUCCIONES IMPORTANTES DE SEGURIDAD
5
INSTRUCCIONES IMPORTANTES DE SEGURIDAD
LEA TODAS LAS INSTRUCCIONES ANTES DE USAR
ADVERTENCIA
Por su seguridad, se debe seguir la información indicada en este manual para minimizar el riesgo de incendio o explosión, descarga eléctrica, o para prevenir daños a la propiedad, lesiones personales o muerte.
INSTRUCCIONES DE SEGURIDAD PARA LA INSTALACIÓN
ADVERTENCIA
Para minimizar el riesgo de incendio o explosión, descarga eléctrica, o para prevenir lesiones personales cuando
use electrodomésticos, se deben seguir precauciones básicas de seguridad, incluyendo las siguientes:
•
Consulte las INSTRUCCIONES DE INSTALACIÓN para un procedimiento detallado de conexión a tierra. Las instrucciones de instalación son incluidas con su lavadora para ser utilizadas como referencia. Si mueve la lavadora a una nueva ubicación, contrate a una
rsona de servicio calificada para que la revise y reinstale. Si no se cumple con esta advertencia se podrán producir heridas graves,
pe
incendios, descargas eléctricas, o muerte.
•
Bajo ninguna circunstancia deberá cortar o eliminar la tercera punta (de toma a tierra) del cable de alimentación. Si no se cumple con
esta advertencia se podrán producir heridas graves, incendios, descargas eléctricas, o muerte.
•
Para su seguridad personal, este electrodoméstico debe estar adecuadamente conectado a tierra. Si n
cia se podrán producir heridas graves, incendios, descargas eléctricas, o muerte.
•
El cable de corriente de este electrodoméstico contiene un enchufe de 3 cables (conexión a tierra) que se conecta a un tomacorriente
de pared estándar de 3 cables (conexión a tierra) para minimizar la posibilidad de riesgos de descargas eléctricas por parte del mismo.
•
La lavadora deberá estar conectada a un tomacorriente con conexión a tierra de 1
se podrán producir heridas graves, incendios, descargas eléctricas, o muerte.
•
Contrate a un electricista calificado para que revise el tomacorriente y el circuito eléctrico con el fin de asegurar que el enchufe esté
correctamente conectado a tierra. Si no se cumple con esta advertencia se podrán producir heridas graves, incendios, descargas
eléctricas, o muerte.
•
En caso de contar con un tomacorriente de pared de 2 cables, es su responsabilidad y obligación reemplazarlo por un tomacorriente
de p
ared de 3 cables correctamente conectado a tierra. Si no se cumple con esta advertencia se podrán producir heridas graves,
incendios, descargas eléctricas, o muerte.
•
No instale la lavadora sobre una alfombra. Instale la lavadora sobre un piso sólido. El incumplimiento de esta advertencia puede causar
daños provocados por fuga de agua.
•
No elimine el cable de conexión a tierra. No use un adaptador o cable de extensión. Conecte la lavadora en un tomacorriente con
nexión a tierra de 3 cables. Si no se cumple con esta advertencia se podrán producir heridas graves, incendios, descargas eléctricas,
co
o muerte.
La lavadora deberá estar siempre conectada a un enchufe individual con un índice de voltaje equivalente al que figura en su etiqueta
•
de características técnicas. Esto garantiza el mejor funcionamiento y además previene la sobrecarga de los circuitos del hogar, lo cual
podrí a ocasionar riesgos de incendio debido al recalentamiento de cables.
•
nca desenchufe su lavadora tirando del cable de corriente. Siempre tome el enchufe firmemente y jale el mismo hacia fuera para
Nu
retirarlo. Si no se cumple con esta advertencia se podrán producir heridas graves, incendios, descargas eléctricas, o muerte.
Todos los cables de corriente pelados o con cualquier tipo de daño deberán ser sustituidos por el fabricante, su agente de servicio o
•
personal calificado para evitar peligros. No use un cable con cortaduras o abrasión sobre su extensión o extremos. Si no se cumple con
esta advertencia se podrán producir heridas graves, incendios, descargas eléctricas, o muerte.
•
Al instalar o cambiar de lugar la lavadora, evite todo tipo de cortes u otros daños en el cable de corriente. Si no se cumple con esta
advertencia se podrán producir heridas graves, incendios, descargas eléctricas, o muerte.
•
avadora debe ser instalada y conectada a tierra por una persona especializada del servicio técnico cumpliendo con los codigos
La l
locales para prevenir riesgos de descargas y asegurar la estabilidad durante el funcionamiento.
•
La lavadora es pesada. Se necesitan dos o más personas para instalar y trasladar el electrodoméstico. Si esto no se cumple se podrán
producir diversas heridas.
•
Almacene e instale la lavadora donde no esté expuesta a temperaturas bajo cero o a condiciones climáticas en áreas exteriores. Si n
se cumple con esta advertencia se podrán producir daños por fugas de agua.
•
Con el fin de reducir el riesgo de descargas eléctricas no instale la lavadora en espacios húmedos. Si no se cumple con esta advertencia se podrán producir heridas graves, incendios, descargas eléctricas, o muerte.
•
Para reducir el riesgo de lesiones personales, cumpla con todos los procedimientos de seguridad recomendados por la industria,
cluyendo el uso de guantes con mangas largas y gafas de seguridad. En caso de no cumplir con todas las advertencias de seguridad
in
de este manual se podrán producir daños sobre la propiedad, lesiones personales o la muerte.
20VAC, 60 Hz. Si no se cumple con esta advertencia
o se cumple con esta adverten-
ESPAÑOL
o
Page 44

INSTRUCCIONES IMPORTANTES DE SEGURIDAD
6
INSTRUCCIONES IMPORTANTES DE SEGURIDAD
LEA TODAS LAS INSTRUCCIONES ANTES DE USAR
ADVERTENCIA
Por su seguridad, se debe seguir la información indicada en este manual para minimizar el riesgo de incen dio o explosión, descarga eléctrica, o para prevenir daños a la propiedad, lesiones personales o muerte.
INSTRUCCIONES DE SEGURIDAD PARA LA UTILIZACIÓN, CUIDADO Y
LIMPIEZA, Y LA ELIMINACIÓN
ADVERTENCIA
Para minimizar el riesgo de incendio o explosión, descarga eléctrica, o para prevenir lesiones personales cuando
use electrodomésticos, se deben seguir precauciones básicas de seguridad, incluyendo las siguientes:
•
Desenchufe la lavadora antes de limpiar la misma para evitar el riesgo de descargas eléctricas.
•
Nunca utilice químicos fuertes, limpiadores abrasivos o solventes para limpiar su lavadora. Los mismos
dañaran el acabado de la unidad.
•
No coloque trapos con grasa o aceite encima de la lavadora. Estas sustancias emiten vapores que podrían prender fuego a los materiales.
•
No lave prendas que estén sucias con aceite
de aceite luego del lavado. Debido al aceite que permanece, la tela puede despedir humo o prenderse
fuego por sí sola.
•
Desconecte este electrodoméstico del tomacorriente antes de realizar cualquier tipo de mantenimiento.
Colocar los controles en la posicion OFF (apagado) no desconecta el electrodoméstico de la toma de
corriente. No cumplir con esta advertencia, podrá ocasionar heridas graves, incendios, descargas eléctri-
cas, o mu
•
No combine diferentes productos de lavandería en una misma carga a menos que esto se especifique
en la etiqueta.
•
No mezcle cloro con amoníaco o ácidos como el vinagre. Siga las instrucciones del paquete cuando
utilice productos de lavandería. El uso incorrecto puede producir gases tóxicos, lo que podría resultar en
lesiones graves o la muerte.
•
No coloque las manos dentro de la lavadora cuando sus partes estén en movimiento. Antes de cargar,
descargar o agregar prendas, pulse el botón de INIC
tenga totalmente antes de colocar las manos dentro. Si no se cumple con esta advertencia se podrán
producir heridas graves, incendios, descargas eléctricas, o muerte.
•
No permita que los niños jueguen sobre o dentro de la lavadora. Si hay niños cerca mientras la lavadora
está en funcionamiento es necesario supervisarlos de cerca. A medida que los niños crezcan, enséñeles
sobre el uso adecuado y seguro de todos los electrodomésticos. Si estas adv
se podrían producir heridas graves.
•
Destruya la bolsa plástica y otros materiales de empaque una vez retirada la lavadora. Es posible que
los niños deseen usarlas para jugar. Los cartones cubiertos con alfombra, colchas o láminas de plástico
se pueden convertir en cámaras herméticas. Si estas advertencias no se cumplen se podrían producir
heridas graves o muerte.
•
Mantenga los productos de lavandería fuera del alcance de los niños. Para evitar heridas,
das las advertencias que figuran en las etiquetas de los productos. Si estas advertencias no se cumplen
se podrían producir heridas graves.
•
Antes de que su lavadora sea quitada de servicio o desechada, quite la puerta del compartimiento de
la lavadora para evitar el peligro de que los niños o pequeños animales queden atrapados dentro. El no
hacerlo puede ocasionar lesiones personales graves o la muerte.
•
Asegúrese de que el cajón dispensador esté cerrado en todo momento cuando no está lleno de productos
de lavandería. Si no se mantiene el cajón cerrado puede ocasionarle lesiones personales o inundaciones.
•
Mantenga los dedos, ropa u otros objetos alejados de los puntos de pellizco cuando se cierra la tapa para
evitar lesiones personales o daños en el producto.
•
Utilice la manija cuando se cierra la tapa.
erte.
vegetal o de cocina. Las mismas pueden quedar con algo
IO/PAUSA y espere hasta que el tambor se de -
ertencias no se cumplen
cumpla con to -
GUARDE ESTAS INSTRUCCIONES
Page 45

CARACTERÍSTICAS DEL PRODUCTO
CARACTERÍSTICAS DEL PRODUCTO
Pulsador de Acción Mejorada
La estructura única de este pulsador le da a su lavadora una acción de lavado óptimo. La acción central me-
jorada del pulsador crea poderosas corrientes de agua que mueven repetidamente la ropa arriba y abajo en
la tina, asegurando que la suciedad se elimine completamente de la ropa.
Smart Diagnosis™
Si se experimenta alguna dificultad técnica con la lavadora, ésta tiene la capacidad de transmitir datos por
medio del teléfono al Centro de Información del Cliente. El agente telefónico graba los datos transmitidos
por la lavadora y los utiliza para analizar el problema, proporcionando un diagnóstico rápido y efectivo. (Ver
página 35).
Filtros de Pelusa
Los dos filtros de pelusa en las paredes de la tina de la lavadora están diseñados para filtrar pelusa y otros
residuos para prevenir que se depositen en su ropa durante el ciclo de lavado.
Tub Clean (Limpieza de la Tina)
La limpieza regular de la tina en forma mensual usando el ciclo Tub Clean puede ayudar a mantener la tina
limpia y fresca.
Tina de Acero Inoxidable
La tina de acero inoxidable ofrece durabilidad y beneficios de higiene.
7
ESPAÑOL
Child Lock (Bloqueo Infantil)
Utilice esta opción para deshabilitar los controles durante un ciclo de lavado. Esta opción previene que los
niños cambien los ciclos o que operen la máquina.
Page 46

ACCESORIOS INCLUIDOS
Sujetador de cable (para asegurar la manguera
de drenaje)
CONOCIENDO SU ELECTRODOMÉSTICO
Partes y Accesorios
Placa de ajuste de altura
8
CONOCIENDO SU ELECTRODOMÉSTICO
Partes
Accesorios
Dispensador de
detergente
(Ver página 19)
Dispensador de
blanqueador
Tina
Filtro de
pelusas
Tapa
Manguera
de drenaje
Panel de
control
(Ver página 9)
Tornillos
niveladores
Válvula de entrada
de agua fría
Válvula de entrada
de agua caliente
Cable de
energía
••
Accesorio necesario (se vende por separado)
Número de parte
•
5215FD3715U: Manguera de agua
caliente
•
5215FD3715V: Manguera de agua
fr
NOTA
•
P
óngase en contacto con el Departamento de atención al cliente de
falta alguno de los accesorios.
•
Por su seguridad y para extender la vida del producto, use s
se hace responsable por el mal funcionamiento del producto o accidentes causados por el uso de componentes y partes no autorizadas. Por su seguridad y para extender la vida del producto, le recomendamos que utilice componentes LG de alta calidad. LG no se hace responsable por el mal funcionamiento
del producto o daños causados por el uso de piezas compradas por separado no LG.
•
ágenes en este manual pueden ser diferentes de los componentes y accesorios reales, y están
Las im
sujetos
a cambios sin previo aviso para mejorar el producto.
í
a
Mangueras de agua
caliente/fría
•
El accesorio necesario se vende
por separado. Se puede pedir a
és del sitio Web de LG.
trav
EE.UU: www.lg.com/us
LG, en el número 1-800-243-0000 si
ólo com
ponentes autorizados
. El fabricante no
Page 47

FUNCIONES DEL PANEL DE CONTROL
CONOCIENDO SU ELECTRODOMÉSTICO
9
D E
BOTÓN POWER (ENCENDER/
A
APAGAR)
resione este botón para
P
Presiónelo de nuevo para apagarla.
vadora.
Al presionar el botón POWER durante
un ciclo, se cancelará el ciclo y todos los
ajustes de carga se perderán.
NOTA: Si queda agua en la
apagarse la lavadora, se vaciará después
de cinco minutos. La lavadora se puede
volver a poner en funcionamiento en cualquier momento antes de comenzar el
vaciado. Sin embargo, una vez que ha comenzado el vaciado, se suspenden todas
las funciones hasta que ha finalizado el
vaciado y se ha apagado la lavadora.
SELECTOR DE CICLOS
B
Presione el botón ciclo hasta que se se leccione el ciclo deseado. Una vez seleccionado el ciclo deseado, se mostrarán
en pantalla los ajustes estándar para dicho ciclo. Estos ajustes pueden cambiarse utilizando los botones de ajuste del
ciclo en cualquier momento antes de que
el ciclo comience.
NOTA: Para proteger sus prendas, no
todos los ajustes están disponibles para
todas las selecciones de ciclos.
encender la la-
tina tras
F
A
ESPAÑOL
CG B
BOTÓN START/PAUSE (INICIO/
C
PAUSA)
Presione este botón para iniciar el ciclo
seleccionado. Si la lavadora está funcionando, use el botón para poner en pausa
el ciclo sin perder los ajustes actuales.
NOTA: Si no pulsa el botón START/PAUSE en cinco minutos tras la selección de
un ciclo, la lavadora se apagará automáticamente y se perderán los ajustes del ci clo. El agua restante en la tina se vaciará
después de cinco minutos.
BOTONES MODIFICADORES DE CICLO
D
Utilice estos botones para definir los
ajustes del ciclo seleccionado. Las luces
situadas encima de los botones se iluminan para mostrar la selección actual.
CICLO ESPECIAL Y BOTONES DE OPCIÓN
E
Estos botones le permiten seleccionar
ciclos u opciones especiales.
PANTALLA DE TIEMPO Y ESTADO
F
La pantalla muestra el estado del ciclo y
el tiempo restante estimado.
BOTÓN SIGNAL (SEÑAL)
G
Presione este botón para ajustar el nivel de volumen.
Page 48

CONOCIENDO SU ELECTRODOMÉSTICO
10
PANTALLA DE TIEMPO Y ESTADO
La pantalla de tiempo y estado muestra el tiempo estimado restante y el progreso del ciclo.
A
B
D
C
INDICADOR DE ESTADO DEL CICLO
A
Estos LED se iluminan cuando se selec ciona un ciclo para indicar las fases que
se van a realizar. Cuando un ciclo está en
marcha, parpadeará el LED de la fase activa y permanecerán iluminados los LED
de las fases siguientes. Una vez completada la fase, el LED se apagará. Si un ciclo está en pausa, el LED de fase activo
dejará de parpadear.
LAVADO CON INICIO DEMORADO
B
El indicador de lavado con inicio demorado se iluminará cuando se seleccio ne un inicio demorado. El indicador se
apagará cuando se haya iniciado el ciclo.
TIEMPO ESTIMADO RESTANTE
C
Cuando se selecciona un ciclo, se muestra el tiempo estimado para dicho ciclo.
Ese tiempo puede cambiar a medida que
se agregan opciones o si se modifican
los ajustes. Una vez que se pulsa el bo-
tón START/PAUSE, la lavadora medirá el
tamaño de la carga. El tiempo estimado
que se muestra puede cambiar si el control modifica el ciclo debido al tamaño de
la carga. Si se selecciona el retardo del
inicio de lavado, el tiempo cuenta hasta
que se inicia el ciclo.
NO
TA: El tiempo que se muestra es sólo
una estimación. Este tiempo está calculado en base a condiciones normales de
funcionamiento. Algunos factores externos (tamaño de la carga, temperatura
de la habitación, temperatura del agua
entrante, etc.) pueden afectar al tiempo
real.
INDICADOR CHILD LOCK (BLOQUEO
D
INFANTIL)
El indicador Child Lock se iluminará cuando la función Child Lock esté activada.
La función Child Lock bloquea los controles para prevenir que se cambien los
ajustes mientras la máquina esté funcionando o para evitar que los niños operen
la lavadora. No bloquea la tapa.
Page 49

INSTRUCCIONES PARA LA INSTALACIÓN
INSTRUCCIONES PARA LA INSTALACIÓN
Descripción de la Instalación
11
Fría
Caliente
Elija una ubicación
adecuada
Conecte la manguera
de drenaje
Haga una prueba a la lavadora
ADVERTENCIA
¡La lavadora es pesada! Se necesitan dos o más personas para moverla y desempacarla. Si no se cum-
•
ple con esta advertencia, se podrían sufrir lesiones.
•
Almacene e instale la lavadora donde no esté expuesta a temperaturas bajo cero o a condiciones climáticas en áreas exteriores. Si esto no se cumple se podrán sufrir lesiones, incendios, descargas eléctri-
cas, o muerte.
•
La lavadora debe ser conectada a tierra por una persona especializada cumpliendo con los códigos y ordenanzas locales. Si esto no se cumple se podrán sufrir lesiones, fuego, descargas eléctricas, o muerte.
•
Para reducir el riesgo de descargas eléctricas no instale la lavadora en espacios húmedos. Si esto no se
cumple se podrán sufrir lesiones, incendios, descargas eléctricas, o muerte.
•
Para asegurar el flujo adecuado de aire, no instale la lavadora sobre una alfombra. Instale la lavadora en
un piso sólido.
•
No elimine el cable de conexión a tierra. No use un adaptador o cable de extensión. Conecte la lavadora
en un tomacorriente con conexión a tierra de 3 cables. Si esto no se cumple se podrán producir heridas
graves, incendios, descargas eléctricas, o muerte.
Desempaque y retire
el material de transporte
Subir
Nivele la lavadora Conecte al suministro
Bajar
Conecte las tuberías de agua
eléctrico
ESPAÑOL
Page 50

INSTRUCCIONES PARA LA INSTALACIÓN
12
INSTRUCCIONES PARA LA INSTALACIÓN
ESCOJA EL LUGAR ADECUADO
Instale la lavadora en un piso sólido que sea lo
suficientemente fuerte y rígido para sostener el
peso de la lavadora incluso cuando tenga carga
completa. Si el piso es muy flexible, se deberá
reforzar para hacerlo más rígido. Si el piso no está sólido, se puede provocar vibración y ruido intenso.
102cm
(40.125 pulg.)
TOMA DE CORRIENTE
•
La toma de corriente debe estar dentro de un área
mínima de 1,5 m (60 pulgadas) a cualquiera de los
lados de la lavadora.
•
El electrodoméstico y la toma de corriente deben
estar colocados de forma tal que se pueda acced er al enchufe fácilmente.
No sobrecargar la toma de corriente con más de
•
un electrodoméstico.
•
La toma de corriente deberá estar conectada a
tierra de acuerdo con los códigos y las regulaciones de cableado actuales.
•
Se recomienda utilizar un fusible de demora de
tiempo o disyuntor.
NOTA: Es responsabilidad y obligación personal del
dueño del producto pedir a una persona del servicio
técnico calificado que instale la toma de corriente
adecuada.
TIPO DE PISO
•
Para minimizar el ruido y vibración, se DEBE instalar la
lavadora en un piso sólidamente construido.
•
La cuesta permisible debajo de toda la lavadora es
una diferencia máxima de 2,5 cm. (1 pulgada) de lado
a lado o entre la parte delantera y la trasera.
•
No se recomiendan las superficies alfombradas o
de baldosas blandas.
•
Nunca instale la lavadora en una plataforma o estructura soportada con poca solidez.
NOTA: Se debe instalar la lavadora en un piso firme
para minimizar la vibración durante el centrifugado.
El piso de concreto es el mejor, pero un piso de
madera es suficiente, siempre que se haya construido respetando los estándares FHA. No se debe
instalar la lavadora sobre alfombras o expuesta a la
intemperie.
2.5cm
(1 pulg.)
63,2 cm
(24.7 pulg.)
2.5cm
(1 pulg.)
Para asegurar que se haya dotado de suficiente espacio para las tuberías de agua y flujo de aire, deje
espacios mínimos de por lo menos 2,5 cm (1 pulgada) en los lados y de 10 cm (4 pulgadas) detrás de
la unidad. No olvide tener en cuenta las molduras
de paredes, puertas o piso, que podrían aumentar
la distancia de separación necesaria.
76 cm
(30 pulg.)
67 cm
3
/8 pulg.)
(26
9 cm
2
/4 pulg.)
(3
139 cm
3
/4 pulg.)
(54
(Con la tapa
abierta)
63.4 cm
(25 pulg.)
El espacio vertical mínimo desde el piso a los es tantes superiores, muebles, techo, etc., es de 1,40
metros (56 pulgadas).
NOTA: Si el espacio de arriba es especialmente estrecho, utilizar el mango plegable de la tapa puede
reducir la distancia mínima vertical por aproximadamente 2.5 cm (1 pulgada).
Page 51

INSTRUCCIONES PARA LA INSTALACIÓN
13
DESEMPAQUE Y DESECHO DEL MATERIAL DE TRANSPORTE
1. Después de quitar el cartón y el material de empaque, levante y saque la lavadora de la base de
espuma. Asegúrese de que el soporte de plástico
de la tina sale con la base y no se queda atascado
en la parte inferior de la lavadora.
Si debe asentar la lavadora hacia abajo para quitar
los materiales de empaque de la base, siempre proteja el lado de la lavadora y deposítela con cuidado
sobre su lado. NUNCA asiente la lavadora sobre su
parte frontal o posterior.
3. Libere el cable de alimentación de la parte posterior
de la lavadora.
HERRAMIENTAS QUE NECESITARÁ
•
Pinzas ajustables
•
Nivel de carpintero
ESPAÑOL
Soporte de Plástico
de la base
2. Retire el bloque de espuma que contiene el manual del propietario y los accesorios incluidos. Si en el
futuro debe trasladar en una mudanza la lavadora,
este bloque ayudará a impedir daños a la lavadora
durante el transporte.
NOTA: Para evitar cualquier daño, no retire el blo que de espuma hasta que la lavadora no esté en
su u
bicación final.
Base de cartón
Page 52

INSTRUCCIONES PARA LA INSTALACIÓN
14
CONEXIÓN DE LAS TUBERÍAS DE
AGUA
•
LG le recomienda el uso de mangueras LG. Cualquier
fuga, daño en la propiedad o daño a la lavadora causado por una instalación inadecuada o por el uso de mangueras no LG no está cubierto por los términos de la
garantía de LG.
vida del producto, le recomendamos que utilice
componentes LG de alta calidad. LG no se hace responsable por el mal funcionamiento del producto o
daños causados por el uso de piezas compradas por
separado no LG. Póngase en contacto con el servicio al cliente de LG para la ayuda en la compra
de mangueras: 1-800-243-0000.
La presión del suministro de agua debe estar entre
•
14,5 psi y 116 psi (100-800 kPa). Si la presión del
suministro de agua es superior a 116 psi, se deberá instalar una válvula de reducción de la presión del agua.
•
Periódicamente, compruebe las mangueras en
busca de grietas, fugas y desgastes, y reemplace la
manguera si es necesario.
•
Asegúrese de que las mangueras no estén estiradas,
pinzadas, aplastadas o retorcidas.
•
La lavadora no se deberá instalar ni almacenar en
un lugar sometido a temperaturas de congelación.
Pueden dañarse las tuberías de agua y mecanismos
internos de la lavadora. Si la lavadora estuvo expuesta
a temperaturas de congelación antes de la instalación,
permita que permanezca a temperatura ambiente por
varias horas antes de usarla y verifique la presencia de
fugas antes del funcionamiento.
Sello de caucho
Por su seguridad y para extender la
Sello de caucho
2. Conecte las mangueras de suministro de agua a
las llaves de paso de agua CALIENTE y FRÍA y apriete las conexiones con la mano. A continuación,
utilice pinzas para apretarlas otros
2
/3 de vuelta.
ADVERTENCIA
•
No tense en exceso.
resultar dañado.
3. Siempre deje fluir uno o dos galones de agua a través de cada manguera de entrada para ayudar a
evitar futuros problemas con pantallas de filtro
obstruidas al vaciar la suciedad, depósitos de mi-
nerales y otros residuos de las tuberías de agua.
De paso, al hacerlo comprobará cuál es la manguera de agua caliente y cuál la de agua fría.
Entrada de agua fría
El acoplamiento puede
Entrada de agua caliente
Manguera
de agua
(entrada de
agua en la
lavadora)
Manguera
de agua (a
la tubería)
1. Inspeccione el accesorio roscado de cada
manguera y verifique que haya un sello de caucho
en ambos extremos
Llave de agua
.
ADVERTENCIA
•
No vuelva a reutilizar mangueras usadas. Utilice
mangueras nuevas para la instalación de la
lavadora. Las mangueras usadas podrían causar
fugas o explotar, haciendo que el suelo se
inunde con los consiguientes daños materiales.
ADVERTENCIA
•
No ajuste las mangueras en exceso.
puede dañar las válvulas, causando fugas y
daños a la propiedad.
4. Conecte la tubería de agua caliente a la entrada
de agua caliente (naranja) ubicada en la parte trase-
ra de la lavadora. Conecte la tubería de agua fría a
la entrada de agua fría (azul) situada en la parte posterior de la lavadora. Ajuste las uniones con firmeza.
Abra las llaves de paso del agua y revise si hay fugas.
NOTA: Aseg
úrese de no enroscar mal los accesorios de la manguera. Ya que ello dañaría la válvula
y podría provocar daños a la propiedad debido a las
fugas.
Hacerlo
Page 53

CONEXIÓN DE LA MANGUERA DE
DRENAJE
•
La manguera de drenaje siempre debe estar asegurada adecuadamente. No asegurar adecuadamente
la manguera de drenaje puede resultar en inundación o daños a la propiedad.
•
El drenaje debe instalarse según todos los códigos y
regulaciones locales vigentes.
•
Asegúrese de que la manguera de drenaje no está
estirada, pinzada, aplastada o retorcida.
Manguera de drenaje
OPCIÓN 1: TUBO VERTICAL
Doble el extremo de salida de la manguera de drenaje hasta formar una U. Ingrese el extremo de la
manguera de drenaje en el desagüe. Si el desagüe
es lo suficientemente ancho como para que el reborde de la manguera encaje dentro, entonces, no
inserte el reborde más de 2-5 cm (1-2 pulgadas) en
el desagüe. Use el sujetador de cable, incluido con
los materiales de instalación que había en el bloque
de espuma de la tina, para asegurar la manguera de
drenaje al desagüe.
INSTRUCCIONES PARA LA INSTALACIÓN
•
No selle la manguera de drenaje, por ejemplo,
15
con cinta. Si no hay ninguna ranura de aire, puede
earse un efecto sifón y el agua verse impulsada
cr
fuera de la tina lo que ocasionaría una reducción
del rendimiento del lavado/enjuague o daños en
las prendas.
OPCIÓN 2: LAVADERO
Doble el extremo de la manguera de drenaje hasta
que tenga la forma deseada y engánchelo al borde
del lavadero. Use un sujetador de cable para asegurar
la manguera de drenaje en su lugar.
Manguera de drenaje
ESPAÑOL
39”
(99 cm)
39”
(99 cm)
Sujetador de cable
Sujetador de cable
Si las válvulas de agua y el desagüe están instaladas
en la pared, sujete la manguera de drenaje a una de
angueras de agua con la correa (el lado estriado
las m
hacia el interior).
NOTA:
•
La altura total del extremo de la manguera debería estar aproximadamente a 0.9 - 1.2 metros
(35”- 47”) del piso.
•
No instalar el extremo de la manguera a una altura
de más de 243.8 cm (96 pulgadas) sobre la parte
inferior de la lavador a o menos de 75 cm (29.5 pulgadas) o 152.4 cm (60 pulgadas) por encima de la
tapa de la lavadora.
Page 54

INSTRUCCIONES PARA LA INSTALACIÓN
16
NIVELACIÓN DE LA LAVADORA
La tina de su nueva lavadora gira a velocidades muy
elevadas. Para minimizar la vibración, los ruidos y los
movimientos no deseados, el piso deberá ser una
superficie perfectamente nivelada y sólida.
NOTA:
•
Ajuste los tornillos niveladores sólo en la medida
necesaria para nivelar la lavadora. La extensión de
los tornillos niveladores más de lo necesario puede
causar vibración de la lavadora.
•
Antes de instalar la lavadora, asegúrese de que el
piso esté limpio, seco y libre de polvo, suciedad,
ag
ua y aceites, de forma que los tornillos niveladores del electrodoméstico no puedan deslizarse con
facilidad. Los tornillos niveladores podrían moverse
o deslizarse, conllevando una vibración y ruido excesivos derivados de un contacto deficiente con el
piso.
•
Para comprobar si la tapa está nivelada de adelante hacia atrás, coloque un nivel en el lateral de
la lavadora en el borde donde se unen el lateral del
mueble y la tapa superior. No coloque el nivel en la
parte superior ni en la tapa. Si utiliza esas referencias, el resultado será una lavadora desnivelada.
De lado a lado
De la par te
frontal a la parte
trasera
Los cuatro tornillos niveladores
memente
en el piso. Intente mover la lavadora de una
deben apoyarse fir-
esquina hacia otra para asegurar que los cuatro tornillos niveladores tengan un contacto firme sobre el piso.
1. Coloque la lavadora en el lugar final,tomando la
precaución especial de no apretar, forzar ni aplastar las tuberías de drenaje y agua. Coloque un nivel
sobre la parte superior de la lavadora.
Subir Bajar
2. Ajuste el tornillo nivelador. Gire en sentido horario para levantar la lavadora y en sentido antihorario para bajarla.
3. Para asegurarse de que la lavadora está correctamente nivelada, abra la tapa y mire desde arriba
para ver si la tina está centrada. Si la tina NO está
centrada como muestra el dibujo de la derecha,
vuelva a ajustar el tornillo nivelador. Si tiene un ni-
vel, compruebe la lavadora con el nivel.
•
Para comprobar si la lavadora está nivelada de
lado a lado, coloque un nivel en el filo posterior
de la tapa.
SubirBajar
•
Si los tornillos niveladores se han ajustado al mámo y la lavadora no está nivelada, utilice los elevadores para levantar el tornillo o tornillos niveladores traseros de la lavadora para nivelarla. Para su
utilización, presione el elevador sobre el tornillo
nivelador. Puede apilar hasta tres elevadores bajo
un tornillo nivelador.
ADVERTENCIA
•
Si utiliza la lavadora sin nivelarla, pueden
producirse fallos de funcionamiento causados
por el exceso de vibraciones y ruido.
•
Utilice los tornillos niveladores sólo para nivelar
la lavadora.
forma innecesaria, puede causar vibraciones
anómalas de la lavadora.
Si eleva los tornillos de nivelación de
Page 55

INSTRUCCIONES PARA LA INSTALACIÓN
17
CONEXIÓN DEL SUMINISTRO ELÉCTRICO
La lavadora requiere una toma de corriente de 120
V de CA, 60Hz y tres clavijas con conexión a tierra.
Enchufe la lavadora. Una conexión inadecuada del
conductor de conexión a tierra del equipo puede
ocasionar un riesgo de descarga eléctrica. Consulte a un eléctrico o técnico calificado si tiene dudas
sobre si el electrodoméstico está correctamente
conectado a tierra. No modifique el enchufe que
se entrega con el electrodoméstico. Si no encaja
en la toma de corriente, solicite a un electricista
calificado que le instale una toma de corriente apropiada. Si no se cumple con estas advertencias se
podrán producir lesiones graves, incendios, descargas eléctricas o muerte.
HAGA UNA PRUEBA A LA LAVADORA
Verifique que la lavadora esté correctamente ins-
talada y ejecute un ciclo de prueba.
1. Cargue la lavadora con 3 kg (6 libras) de ropa (a-
proximadamente 6 toallas de baño gruesas).
2. Presione el botón POWER.
3. Presione el botón RINSE+SPIN.
4. Presione el botón START/PAUSE.
- El ciclo de lavado empieza.
5. Verifique que se suministre agua, que la máquina
no vibre excesivamente, y que drene bien duran-
te el ciclo de centrifugado.
- Si hay fugas durante el suministro de agua, vea
la página 14, Conexión de las tuberías de agua
para conectarlas correctamente.
- Si la lavadora vibra excesivamente, vea la pági-
na 16, Nivelación de la lavadora para nivelarla o-
tra vez.
- Si la lavadora no drena, vea la página 15, Cone-
xión de la manguera de drenaje para conectar la
manguera correctamente.
ADVERTENCIA
•
El tomacorriente debe estar dentro de un área
mínima de 1,5 m (60 pulgadas) a cualquiera de
los lados de la lavadora.
•
El electrodoméstico y el tomacorriente deben
estar colocados de forma tal que se pueda
acceder al enchufe fácilmente.
•
No sobrecargar el tomacorriente con más de
un electrodoméstico.
•
El tomacorriente deberá estar puesto a tierra
de acuerdo con los códigos y las regulaciones
de cableado actuales.
Se recomienda utilizar un fusible de demora de
•
tiempo o disyuntor.
•
Es responsabilidad y obligación personal del
dueño del producto pedir a un electricista
calificado que instale el tomacorriente
adecuado.
•
No utilice un cable o enchufe desgastado
o dañado. Repárelos o sustitúyalos
inmediatamente. En caso
haber peligro de incendio, descargas eléctricas
o fallos del aparato.
No modifique el cable de alimentación y tenga
•
cuidado de no dañarlo durante la instalación o
cuando mueva la lavadora. En caso contrario
podría haber peligro de incendio,
eléctricas o fallos del aparato.
•
Asegúrese de que la lavadora esté conectada a
tierra.
•
Conecte esta lavadora a una toma eléctrica
dedicada y adecuada a su capacidad. En caso
contrario, podría haber
eléctricas, incendio o fallos, del aparato.
•
No utilice adaptadores o cables de extensión.
La lavadora
su propia toma de alimentación, compatible
con lo indicado en la placa de características.
En caso contrario, podría haber peligro de
descargas eléctricas, incendio o fallos del
aparato.
•
No dañe ni corte el conductor de tierra
interno del enchufe.
haber peligro de muerte, incendio, descargas
eléctricas o fallos del aparato.
•
deberá ser conectada siempre en
contrario, podría
descargas
peligro de descargas
En caso contrario, podría
ESPAÑOL
Page 56

18
PREPARACI ÓN
CLASIFICACIÓN DE LAS CARGAS DE LAVADO
PRECAUCIÓN
•
No cargue prendas por encima d e la a l tura
máxim a de la tina. Si no se sigue esta adver-
tencia, se podrían producir fugas o daños en los
tejidos.
•
Use el ciclo BULKY para prendas voluminosas
como almohadas o edredones. Si no se sigue es-
ta advertencia, se pueden producir fugas.
•
Si es posible, no lave la ropa resistente al agua. Si
debe hacerlo, seleccione el ciclo BULKY.
AGRUPACIÓN DE PRENDAS SIMILARES
Para obtener los mejores resultados al lavar y reducir las
posibilidades de dañar las prendas, es necesario tener
cuidado a la hora de clasificar la ropa en cargas forma das por prendas similares. Si se mezclan diferentes tipos
de tejidos o niveles de suciedad, el rendimiento del lavado se verá degradado, y podrían producirse transferen cias de color o decoloraciones, daños en los tejidos o formación de pelusas en las prendas. Los tejidos se deben
clasificar en grupos tal como se describe a continuación.
COLORES
Clasifique las prendas por color. Las prendas oscu ras juntas en una carga separada de las prendas blan-
cas o de colores claros. Mezclar prendas oscuras
con prendas claras puede dar como resultado el tinte o la decoloración de las prendas más claras.
NIVEL DE SUCIEDAD
Lave la ropa muy sucia junta. Si se lava ropa que no está
muy sucia en la misma carga que la ropa muy sucia, es
muy posible que la ropa con poca suciedad no se lave bien.
TIPO DE TEJIDO
Las prendas delicadas no se deben mezclar con
prendas más pesadas y resistentes. Si se lavan prendas pesadas en una carga de ropa delicada, puede
resultar que la ropa pesada no se lave correctamente
y que se produzcan daños en las prendas delicadas.
TIPO DE PELUSAS
Algunos tejidos atraen las pelusas mientras que
otros sueltan pelusas en el proceso de lavado. Evite
mezclar prendas recolectoras de pelusas con prendas generadoras de pelusas en la misma colada. Si
mezcla estos dos tipos de tejidos, se formarán bolas
y pelusas en las prendas recolectoras de pelusas.
(Por ejemplo, recolector de pelusas: suéter tejido o
de punto; productor de pelusas: toalla de felpa).
CLASIFICACIÓN DE ROPA...
Por Color
Blanca
Clara
Obscura
Por Suciedad
Muy sucio
Normal
Ligero
Por Tejido
Delicados
Fácil Cuidado
Robusto
Por Pelusas
Productor de Pelusa
Recolector de Pelusa
ETIQUETAS DE CUIDADO DE LAS PRENDAS
Muchas prendas de vestir incluyen una etiqueta de cuidado de la prenda. Utilice el siguiente diagrama para
ajustar el ciclo y las opciones para cuidar la prenda
de acuerdo con las recomendaciones del fabricante.
Etiqueta de Cuidado de Telas
Ciclo de
Lavado de la
Lavadora
Temperatura
del Agua
S
í
mbolos
de Blanqueador
CARGA DE LA LAVAD0RA
•
Compruebe que todos los bolsillos están vacíos. Objetos como clips, cerillas, bolígrafos, monedas y llaves
pueden dañar tanto la lavadora como las prendas.
•
Cierre cremalleras, broches y cordones para evitar enganches o enredos en otras prendas.
•
Aplique un tratamiento previo a las áreas muy sucias
para mejorar el resultado.
•
Mezcle prendas grandes y pequeñas en la misma
carga. Cargue primero las prendas grandes.
•
Las prendas grandes no deben ocupar más de la mitad
de la carga total de la colada.
La lavadora se puede cargar completamente, pero la
•
tina no debe estar abarrotada con prendas. La tapa de
la lavadora se debería cerrar con facilidad.
•
Para evitar una carga desequilibrada, no lave prendas únicas. Agregue una o dos prendas similares a la
carga.
cobertores, edredones o colchas, deberían lavarse indiv
idualmente.
•
No lave o ce n tr i fu g ue ar t íc ul os a p r ue b a d e
agua, como impermeables o bolsas de dormir.
•
La lavadora no se llenará de agua ni funcionará si la
tapa está abierta.
NOTA: Use el ciclo para prendas voluminosas y de
cama con ropa voluminosa como chaquetones relle-
nos, edredones, almohadas, etc. Es posible que estas
prendas no sean tan absorbentes como otras prendas
y deberían lavarse en una carga independiente para
lograr unos resultados óptimos.
Las prendas voluminosas se deben colocar lo más
abajo posible dentro de la tina para obtener los mejores
resultados. Coloque siempre los objetos flotantes en la
parte inferior de la tina. La lavadora detectará de forma
automática el tamaño de la carga. Debido al sistema de
lavado de alta eficiencia, es posible que el nivel de agua
no cubra completamente la carga de ropa.
Normal Planchado permanente/
resistente a arrugas
Lavado a mano
Cualquier blanqueador
(cuando sea necesario)
No lave
Caliente
Suave/
delicado
No exprima
Tibia
Bla
nqueador sin cloro
(cuando sea necesario)
ría
F
No usar blanqueador
Las prendas grandes y voluminosas, como los
Page 57

PREPARACIÓN
19
ACERCA DE LOS DISPENSADORES
El dispensador automático está compuesto de dos
compartimientos que contienen:
•
Suavizante líquido.
•
Detergente en polvo o líquido para el lavado principal.
Compartimiento
principal de
detergente
para lavadora
Compartimiento
de suavizante
de tela líquido.
COMPARTIMIENTO DEL DETERGENTE
DEL LAVADO PRINCIPAL
Este compartimiento contiene el detergente para el
ciclo principal del lavado. El detergente se agrega
a la carga al principio del ciclo. Utilice siempre detergente de alta eficiencia (HE) con su lavadora. Se
de usar tanto detergente líquido como en polvo.
pue
Al agregar el detergente, nunca exceda las reco-
mendaciones del fabricante. Si usa demasiado detergente, puede suceder que en lugar de diluirse se
acumule en la ropa y en la lavadora.
COMPARTIMIENTO DEL SUAVIZANTE
Este compartimiento contiene el suavizante líquido, que se dis pensará de forma automática durante el ciclo de enjuague final.
Al agregar el suavizante, nunca exceda las recomendaciones del fabricante. Si usa demasiado suavizante, puede suceder que en lugar de diluirse se
acumule en la ropa y en la lavadora.
•
Al agregar el suavizante, respete siempre las recomendaciones del fabricante. No exceda la línea de
llenado máximo. El uso de demasiado suavizante
puede manchar las prendas.
•
Diluya el suavizante concentrado con agua templada. No exceda la línea de llenado máximo.
•
Nunca vi
ga o dentro de la tina.
erta el suavizante directamente en la car-
USO DEL DETERGENTE Y DEL DISPENSADOR
UNAS PALABRAS SOBRE LOS DETERGENTES
Los detergentes de alta eficiencia (HE) generan menos
espuma y se disuelven más eficazmente para mejorar el
rendimiento del lavado y del enjuague, además de ayudar a mantener limpio el interior de la lavadora. Usar un
detergente que no es de alta eficiencia puede provocar
un e
xceso de espuma y un rendimiento poco satisfactorio
que podrían dar como resultado códigos erróneos, errores
de ciclo y daños a la máquina.
Máxima
Cantida d de carga normal
Detergente
líquido
Detergente
en polvo
Para un rendimiento adecuado del lavado, mida siempre el detergente usando las medidas que proporciona el fabricante del
detergente. La cantidad normal de detergente necesaria, para las
cargas habituales, es menos de ½ del máximo recomendado.
Use menos detergente si el agua es blanda, la ropa tiene poca
suciedad o las cargas son pequeñas. Nunca use más de la canti-
ima recomendada por el fabricante del detergente.
dad máx
DISEÑADO PARA USAR SÓLO DETERGENTE DE ALTA EFICIENCIA(HE)
IMPORTANTE: Su lavadora está diseñada para su uso
exclusivo con detergentes de alta eficiencia (HE). Los
detergentes HE están formulados específicamente
para lavadoras de alta eficiencia y contienen agentes
reductores de espuma. Cuando compre detergente,
busque siempre el símbolo HE, de alta eficiencia.
IMPORTANTE: No todos los detergentes son iguales.
Tenga cuidado con la cantidad de detergente que use
para evitar un uso excesivo, un mal enjuague y la acumulación de detergente en la ropa, además, la acumulación
de residuos puede contribuir a la aparición de olores en la
máquina. NUNCA use un recipiente o una taza distinta de
la suministrada por el fabricante del detergente que está
usando. Nunca use más de la cantidad máxima de deter-
te recomendada por el fabricante. Sólo se necesita
gen
una cucharada o medida completa de detergente para cargas de ropa muy sucia. Si utiliza demasiado detergente,
podría acumularse en la lavadora y en la ropa.
Recuerde medir siempre la cantidad de detergente,
como los detergentes de alta eficiencia están dise ñados para este tipo de lavadoras, es necesario tener cuidado al medir el detergente. Para la mayoría de
normales, se debe usar entre 1/4 y 1/2 del
cargas
recipiente o taza del detergente de alta eficiencia.
NOTA:
•
Debe tener un extremo cuidado cuando use detergentes
concentrados 2X y 3X, ya que incluso muy poca cantidad
extra puede contribuir a la aparición de los problemas antes
mencionados.
•
Es posible que los detergentes denominados como compatibles con alta eficiencia no proporcionen resultados óptimos.
ESPAÑOL
Page 58

20
PREPARACIÓN
USO DE SUAVIZANTE Y DE DISPENSADOR
DE DETERGENTE
Para agregar detergente y suavizante al dispensador
automático:
1. Abra el cajón del dispensador.
2. Cargue los productos de lavado en el compartimiento adecuado.
3. Cierre el cajón antes de comenzar el ciclo.
4. Si está utilizando los ciclos NORMAL o HEAVY
DUTY, pulse el botón FABRIC SOFTENER o seleccione la opción EX TRA RINSE.
NOTA: Es normal que al finalizar el ciclo haya una
pequeña cantida
del detergente y del suavizante.
IMPORTANTE: No co
de lavado, como detergente, blanqueador o suavizante líquido, encima de la lavadora o la secadora.
Seque los derrames inmediatamente. Estos productos pueden dañar la pintura y los controles.
d de agua en los compartimientos
loque ni almacene productos
USO DEL DISPENSADOR DE BLANQUEADOR LÍQUIDO
Dispensador del blanqueador
LIMPIEZA DE LOS FILTROS DE PELUSA
La lavadora viene con dos filtros de pelusa dentro
de la tina. Estos filtros están diseñados para recolectar pelusa y otros residuos y prevenir que se depositen en su ropa durante el ciclo de lavado.
Limpie los filtros de pelusa al menos cada 2 o 3
cargas. Limpie los filtros más seguido si lava productores de pelusa (como toallas) o si nota que los
fil
tros se llenan rápidamente.
Para limpiar los filtros de pelusa:
1. Presione las lengüetas de arriba
y abajo del filtro para liberarlo de
la pared de la tina.
2. En la parte posterior del filtro, ti re de la lengüeta triangular para
abrirlo. (Puede ayudarse colocando
su pulgar en la ranura central de la
parte posterior).
3. Tire para abrir completamente el
filtro.
4. Use sus dedos o un cepillo suave
para remover las pelusas de los dos
lados del filtro.
5. Si es necesario, enjuague el filtro
para limpiar cualquier pelusa res tante.
1
2
3
4
5
1. Revise las etiquetas de cuidado de las prendas en
busca de instrucciones especiales.
2. Mida cuidadosamente el blanqueador líquido res petando las instrucciones de la botella. Las lavadoras de alta eficiencia usan menos agua, así que se
necesita menos blanqueador. Media taza es suficiente para la mayoría de las cargas.
3. Con cuidado, vierta la cantidad de blanqueador medida previamente directamente en el dispensador
anqueador. Si usa blanqueador en polvo de al-
de bl
gún tipo, viértalo directamente en la tina antes de
agregar la carga. Nunca agregue blanqueador en
polvo al dispensador de blanqueador líquido.
•
Nunca vierta el blanqueador con cloro líquido sin diluir directamente en la ropa o dentro de la tina.
•
No vierta blanqueador en polvo en el dispensador de
blanqueador.
•
No coloque prendas encima del dispensador de
blanqueador al llenar o vaciar la lavadora.
•
Sie
mpre mida y vierta el blanqueador con mucho
cuidado. Cuando agregue el blanqueador al dispen sador, evite el sobrellenado y las salpicaduras.
6. Cierre el filtro y vuelva a ponerlo en
su lugar. Asegúrese de que ambas
lengüetas se traben, presionando
firmemente hasta que se escuche
un click.
6
PRECAUCIÓN
•
Asegúrese de colocar firmemente lo
lugar. Si no se cumple con esto, los filtros
su
podrían soltarse durante algún ciclo y dañarse o
dañar su ropa.
•
Si no se limpian los filtros regularmente se podría reducir el desempeño de lavado debido al
flujo reducido de agua a través de los filtros.
•
Si no se limpian los filtros pueden aparecer olores causados por las pelusas acumuladas.
•
Operar la lavadora sin los filtros de pelusa puede resultar en daño a las prendas que se atoren
en la caja.
NOTA: Si un filtro de pelusa se daña o rompe, usted
puede comprar uno nuevo llamando al centro de servicio LG.
s filtros en
Page 59

MANEJO DE LA LAVADORA
CLASIFICACIÓN DE LAS PRENDAS Y CARGA DE LA LAVADORA
1
Clasifique las prendas por tipo de tela, nivel de
suciedad, color y tamaño de la carga, según sea
necesario. Abra la tapa y cargue las prendas selec-
Dispensador de blanqueador
Detergente
de Lavado Principal
Suavizante de Tela
ADVERTENCIA
•
Para reducir el riesgo de fuego, descargas eléctricas o daños personales, lea las
IMPORTANTES DE SEGURIDAD
antes de utilizar el dispositivo.
cionadas en la lavadora.
PRODUCTO DE LIMPIEZA
2
Agregue detergente de alta eficiencia (HE) al dis-
queador o suavizante, añádalos en el dispensador
apropiado.
ENCENDER LA LAVADORA
3
Presione el botón POWER para encender la lavadora. Las luces alrededor del botón cycle se iluminarán y se emitará un aviso sonoro.
SELECTOR DE CICLOS
4
Presione el botón ciclo hasta que se seleccione el ciclo deseado. Se mostrarán los valores predefinidos
de temperatura de lavado y enjuague, nivel de suciedad y los ajustes de op ción para dicho ciclo. Si
pulsa el botón START/PAUSE sin seleccionar un ciclo,
comenzará inmediatamente el ciclo NORMAL.
CONFIGURACIÓN DE AJUSTES
5
Ahora se pueden cambiar los ajustes para el ciclo
seleccionado, si así se desea, utilizando el modificador de ciclos y los botones de opciones.
NOTA: No todas las opciones están disponibles
para todos los ciclos. Sonará un aviso sonoro dife rente y el LED no se encenderá si no se permite una
determinada selección.
INICIAR EL CICLO
6
Presione el botón START/PAUSE para que comience el ciclo. La tapa se bloqueará y la lavadora se agitará brevemente sin agua para medir
el peso de la carga. Si no pulsa el botón START/
PAUSE en un tiempo de 5 minutos, se apagará la
lavadora y se perderán todos los ajustes.
LUZ PARA AGREGAR UNA PRENDA
7
La luz ADD GARMENTS se prenderá al principio
del ciclo de lavado para indicar que es seguro
agregar más prendas a la carga. Presione el botón
START / PAUSE para pausar el ciclo y agregar
prendas a la carga. Pulse el botón START/PAUSE
para reanudar el ciclo.
NOTA: No se recomienda agregar prendas a menos que la luz ADD GARMENTS esté encendida,
ya que podría reducir el rendimiento del lavado.
FINAL DE CICLO
8
Cuando el ciclo ha terminado, sonará una melo día. Retire la ropa inmediatamente de la lavadora
para evitar que se formen arrugas. Recuerde revisar los filtros de pelusa después de cada dos o
tres ciclos.
INSTRUCCIONES DE USO
INSTRUCCIONES
21
ESPAÑOL
-nalb razilitu a av es iS .etnegreted ed rodasnep
Page 60

INSTRUCCIONES DE USO
22
GUÍA DE CICLOS
La siguiente guía de ciclos muestra los ajustes predeterminados, así
como las opciones disponibles y los tipos de tejidos recomendados
para cada ciclo. Debajo del ajuste predeterminado para cada ciclo, se
muestran los ajustes modificadores permitidos.
Ciclo
Normal
Heavy Duty
(Fuerte)
Bulky
(Voluminoso)
Tub Clean
(Limpieza
de la tina)
Speed Wash
(Lavar rápido)
Delicates
(Delicada)
Rinse+Spin
(Enjuague +
Centrifugado)
Spin Only
(Sólo Centrifugado)
Tipo de tejido
o de carga
Algodón, lino,
toallas, camisas,
jeans, cargas
mixtas
Prendas de
algodón muy
sucias
Prendas grandes
como mantas o
edredones
* Utilice el ciclo BULK Y (Voluminoso / ropa de cama) para artículos como almohadas, edredones, camas
para mascotas y otros artículos que tengan problemas para absorber el agua. NO LAVE ROPAS EXCESIVAMENTE GRANDES. Si la ropa grande/voluminosa no puede introducirse correctamente en la tina,
quizás no haya espacio suficiente para su movimiento durante el lavado. Mantenga juntas las prendas
similares. Agrupe los artículos similares, no mezcle artículos voluminosos co
seguir estas instrucciones puede causar daños en las prendas o a la lavadora.
Temperatura de
lavado
Tibia
Caliente
Fría
Tibia
Caliente
Fría
Tibia
Caliente
Fría
Fría
Tibia
Caliente
Fría
Fría
Tibia
Fría
Nivel de
suciedad
Normal
Muy sucio
Ligero
Muy sucio
Normal
Ligero
Normal
Muy sucio
Ligero
Ligero
Ligero
Muy sucio
Normal
Ligero
Muy sucio
Normal
Enjuague
Extra
=
OPCIÓN DISPONIBLE
=
Ajuste predeterminado
Suavizante
n pequeñas prendas. No
Agua Plus
NOTA:
Para proteger sus prendas, no todas las temperaturas de lavado/enjuague, niveles de suciedad y opciones
están disponibles para todos los ciclos. Sonará un aviso sonoro y el LED no se iluminará si no se permite
una determinada selección.
*Cuando se seleccione un ciclo, se muestra el tiempo predeterminado para ese ciclo. Este tiempo cambiará
si se seleccionan otras opciones. Una vez que se presione el botón START/PAUSE, la lavadora medirá el tamaño de la carga. El tiempo estimado puede cambiar una vez que la carga haya sido medida. La lavadora ajustará de forma automática el tiempo de lavado para la cantidad de carga, presión del agua, agua y demás
condiciones de funcionamiento.
*Si se cargan muchos artículos en la lavadora, la lavadora alternará 3 veces el ciclo Remojo, esto significa que
la lavadora no operará durante 4 minutos. Esta operación es normal para quitar el polvo y la suciedad, con el
fin de reducir el riesgo de incendios y
descargas eléctricas.
Page 61

INSTRUCCIONES DE USO
23
CICLO PRINCIPAL
Los ciclos de lavado se han diseñado para lograr los
mejores resultados para cada tipo de carga. Seleccione el ciclo que mejor se adapte al contenido de
la carga para un mejor desempeño de lavado y cui-
obtener el ciclo deseado. Cuando seleccione un
correspondiente. Consulte la página 21, Funcionamiento básico, para más información sobre los
métodos de funcionamiento.
NORMAL
Utilice este ciclo para lavar prendas norm ales,
excepto tejidos delicados, como lana o seda.
Si pulsa el botón START/PAUSE
NOTA:
nar un ciclo , c omenzará aut omáticamen te el
ciclo NORMAL con los ajustes predefinidos.
HEAVY DUTY (CARGA PESADA)
Este ciclo se utiliza para lavar ropa muy sucia con
movimientos de lavado enérgicos.
BULKY (VOLUMINOSO)
Este ciclo se utiliza para el lavado de mantas o ropas
voluminosas.
Se recomienda la utilización de un ciclo de
NOTA:
ropa voluminosa/ropa de cama cuando se lave ropa
impermeable o resistente al agua, para ayudar a
proteger las propiedades de los productos.
olcic le arap zul al áranimuli es ,odaval ed olcic
sin seleccio-
SPIN ONLY (SÓLO CENTRIFUGADO)
Use esta opción para vaciar el agua de la tina y
centrifugar la ropa. Se puede usar, por ejemplo, si
se interrumpe el ciclo de lavado por un corte de
suministro eléctrico.
arap solciC nótob le enoiserP .salet sal ed odad
SPECIAL DRAIN FEATURE (FUNCIÓN
DE DRENAJE ESPECIAL)
Esta lavadora está equipada con una función especial diseñada para que la lavadora sea lo más segura posible. Si la lavadora queda en pausa o se
apaga con agua en la tina, se vaciará después de
varios minutos. Esto ayuda a mejorar la seguridad
de los niños, reduciendo la posibilidad de que quede agua en la tina.
El agua restante de la tina se vaciará después de
cinco minutos tras apagarse la lavadora. Si la lavadora
está en pausa y no se pulsa el botón START/PAUSE
en un tiempo de 5 minutos, se apagará la lavadora
y se perderán todos los ajustes. El agua restante se
vaciará después de cinco minutos.
L a l av a do ra se pu ed e v ol v er a p o ne r e n
funcionamiento en cualquier momento antes de
comenzar el vaciado. Sin embargo, una vez que
ha comenzado el vaciado, se suspenden todas las
funciones hasta que ha finalizado el vaciado y se ha
apagado la lavadora.
ESPAÑOL
TUB CLEAN (LIMPIEZA DE LA TINA)
Utilice este ciclo cuando quiera limpiar la tina de su
lavadora.
SPEED WASH (LAVADO RÁPIDO)
Use el ciclo de lavado de velocidad para lavado rápido
de ropa levemente sucia y carga pequeña. Para el
lavado y enjuague de alta eficiencia se recomiendan
cargas pequeñas de 2-3 prendas levemente sucias.
Use poco detergente en este ciclo. Si usted
NOTA:
desea más enjuague, puede agregar suavizante
adicional utilizando el botón Extra Rinse para esta
función.
DELICATES (DELICADA)
Este ciclo se utiliza para lavar lencería o ropa con
encajes que se pueda dañar fácilmente.
RINSE + SPIN (ENJUAGUE + CENTRIFUGADO)
Utilice este ciclo para obtener un enjuague intenso
seguido de un centrifugado a alta velocidad.
Page 62

INSTRUCCIONES DE USO
24
BOTONES MODIFICADORES DE
CICLO
Cada ciclo dispone de ajustes predeterminados
que se seleccionan automáticamente. También
puede personalizar estos ajustes utilizando los
botones modificadores de ciclo. Presione el botón
del modificador deseado hasta que se prenda la luz
indicadora del ajuste deseado. La lavadora ajustará
de forma automática el nivel de agua para el tipo y
tamaño de la carga que lavar para obtener los me-
jores resultados y la máxima eficiencia. Debido a la
naturaleza de alta eficiencia de este producto, los
niveles de agua pueden ser mucho menores de lo
esperado. Esto es normal y el rendimiento de la
limpieza y el enjuague no se verá afectado.
NOTA: Para proteger sus prendas, no todas las
turas de lavado/enjuague, niveles de sucie-
tempera
dad y opciones están disponibles para todos los ciclos. Sonará un aviso sonoro y el LED no se iluminará si no se permite una determinada selección.
SOIL LEVEL (NIVEL DE SUCIEDAD)
Cuando se ajusta el nivel de suciedad, se modifica
el tiempo del ciclo y/o las acciones de lavado. Presione el botón SOIL LEVEL hasta que seleccione
el nivel de suciedad deseado.
NOTA: Esta función utiliza más tiempo para ropa
muy sucia o menos tiempo para ropa menos sucia.
WASH TEMP (TEMPERATURA DEL
AGUA)
WASH TEMP selecciona la combinación de temperaturas de lavado y enjuague para el ciclo selec cionado. Presione el botón WASH TEMP hasta
que se prenda la luz del indicador para el ajuste deseado. Todos los enjuagues utilizan agua de la lla-
ve.
•
Seleccione la temperatura del agua deseable
para el tipo de carga que va a lavar. Para obtener
los mejores resultados, siga las instrucciones de
las etiquetas de cuidado de las pr
•
Los enjuagues con agua tibia están regulados a
una temperatura aproximada de 23°C (74°F).
•
Los enjuagues con agua tibia dejan la ropa más
seca que con agua fría, pero esto da lugar a un
mayor consumo de energía y una mayor formación de arrugas en la ropa.
•
Los enjuagues fríos usan menos energía. La
temperatura real del enjuague frío depende de
la temperatura del agua fría de la llave.
endas.
Page 63

INSTRUCCIONES DE USO
25
BOTONES DE OPCIÓN
La lavadora incluye varias opciones adicionales para
adaptar los ciclos a sus necesidades particulares. Para utilizar estas opciones, seleccione la opción deseada DESPUÉS de seleccionar el ciclo deseado.
Tras seleccionar el ciclo y los ajustes deseados, pulse
el botón o botones de opción de ciclo para la opción u
opciones que desea añadir. El botón se iluminará cuando se haya seleccionado esa opción. Si la opción seleccio
nada no está permitida para el ciclo seleccionado, la
señal acústica sonará dos veces para alertarle, y no se
iluminará el LED.
NOTA:
•
Para proteger sus prendas, no todas las opciones están disponibles para todos los ciclos.
•
Si no se presiona el botón START/PAUSE en cinco
minutos para iniciar el ciclo, el control se apagará y
se perderán todos los ajustes.
DELAY WASH (LAVADO DEMORADO)
Después de seleccionar el ciclo y los demás ajustes,
presione este botón para demorar el inicio del ciclo de
lavado. Cada presión del botón aumenta una hora al
tiempo de demora, así hasta 19 horas. Una vez establecido el tiempo de demora, presione el botón START
/PAUSE para que comience a correr el tiempo de demora.
NOTA:
Si no se presiona el botón START/PAUSE para
que comience a correr el tiempo de retraso, la lavadora
se apagará de forma automática al cabo de cinco minutos y se perderán todos los ajustes de ciclos.
FA
BRIC
SOFTENER (SUAVIZANTE)
El suavizante se distribuye en el enjuague final. Esta
lavadora está diseñada para ahorrar agua usando un
sistema eficiente de enjuague en los ciclos NORMAL Y HEAVY DUTY. Presione el botón FABRIC
SOFTENER para cambiar el enjuague final a un enjuague regular para que el suavizante de telas sea más eficiente.
NOTA: Seleccione la opción FABRIC SOFTENER o EXTRA RINSE si se utiliza suavizante de telas en los ciclos
NORMAL o HEAVY DUTY. Si no se selecciona una de
estas opciones se reducirá en gran medida la efectividad del suavizante.
EXTRA RINSE (ENJUAGUE EXTRA)
Esta opción agregará un enjuague extra al ciclo selec
cionado. Use esta opción para asegurarse de la total
eliminación de los residuos de detergente o blanqueador de las telas. El suavizante líquido, si se usa,
siempre se dispensa en el enjuague final. Si pulsa el
botón EXTRA RINSE dos veces, añadirá dos enjuagues
adicionales al ciclo.
NOTA:
No se puede seleccionar la opción EXTRA
RINSE con el ciclo SPIN ONLY ni con el ciclo TUB
CLEAN.
WATER PLUS (AGREGUE EL AGUA)
Utilice esta opción si desea agregar más agua a su carga
de lavado. Esta opción es especialmente útil para cargas
grandes o voluminosas.
NOTA:
•
Si la lavadora alcanza el nivel maximo de agua,
aunque pulsemos el boton WATER PLUS, éste no
funcionará.
•
No puede seleccionar la opción WATER PLUS durante los ciclos Tub Clean and Bulky.
SIGNAL (SEÑAL)
La lavadora emite una melodía cuando ha finalizado
el ciclo de lavado. Los botones hacen un sonido cada
vez que se pulsa un botón. Utilice esta opción para ajustar el volumen de los tonos de melodía y de los botones.
CHILD LOCK (BLOQUEO INFANTIL)
Utilice esta opción para deshabilitar los controles.
La lavadora sólo se puede bloquear durante un ciclo.
Esta función impide que los niños cambien los ciclos
o manejen la máquina. Una vez activado el bloqueo de
los controles, es necesario desactivarlo antes de que
se pueda usar cualquiera de los controles, excepto el
botón de alimentación. Una vez apagada la lavadora,
el botón de alimentación permitirá prender la máquina,
pero los controles continuarán bloqueados. Cuando los
controles están bloqueados, el mensaje CL aparecerá
alternativamente junto con el tiempo estimado restan-
te. Mantenga presionado el botón SOIL LEVEL durante
cinco segundos para activar o desactivar CHILD LOCK.
NOTA: Una vez que los controles estén bloqueados,
se deben desbloquear manualmente para restablecer el
funcionamiento.
ADD GARMENTS (AÑADIR ROPA)
SÓLO puede añadirse ropa a la carga en el momento
adecuado del ciclo de lavado. Cuando se ilumina el
indicador ADD GARMENTS (Añadir ropa), se puede
hacer una pausa en el ciclo y añadir más prendas.
Si se añaden prendas con el indicador ADD GARMENTS apagado, la lavadora no se ajustará para
estas prendas y puede reducirse el rendimiento de
lavado o dañarse los tejidos.
1. Pulse el botón de START/PAUSE para pausar la
lavadora.
2. Abra la tapa cuando se destrabe.
-
3. Agregue las prendas adicionales.
4. Cierre la tapa.
5. Presione el botón START/PAUSE. El ciclo continuará lu
ego de que se trabe la tapa.
NOTA:
Si la puerta permanece abierta durante 9 minu-
tos tras pausar el ciclo, el agua del tambor se drenará.
ESPAÑOL
Page 64

MANTENIMIENTO
26
CUIDADO Y LIMPIEZA
ADVERTENCIA
Para reducir el riesgo de incendio, descarga eléctrica o lesiones personales, lea y cumpla completamente este manual de
instrucciones , incluyendo las instrucciones importantes sobre seguridad, antes de poner en funcionamiento la lavadora.
•
Desenchufe la lavadora antes de proceder a su limpieza para evitar posibles descargas eléctricas. Si no se sigue esta
advertencia, podrían ocasionarse riesgos de lesiones graves, incendio, descarga eléctrica o, incluso, muerte.
•
No utilice nunca productos químicos fuertes, limpiadores abrasivos o disolventes para limpiar la
lavadora. Dañarán el acabado.
LIMPIEZA REGULAR
LIMPIEZA DEL EXTERIOR
Unos cuidados adecuados prolongarán la vida útil de
la lavadora. Puede limpiar el exterior de la máquina
con agua caliente y un detergente doméstico suave
y no abrasivo. Limpie inmediatamente cualquier derrame con un paño suave y húmedo.
IMPORTANTE: No utilice alcoholes de limpieza, disolventes ni productos similares. No utilice nunca
lana metálica ni limpiadores abrasivos; pueden dañar
la su
perficie.
CUIDADO Y LIMPIEZA DEL INTERIOR
Use una toalla o un trapo suave para limpiar alre-
dedor de la abertura y del cristal de la tapa de la la-
vadora. Siempre saque las prendas de la lavadora
en cuanto se complete el ciclo. Dejar prendas hú -
medas en la lavadora puede ocasionar la aparición
de arrugas, transferencias de color y olores. Utilice
el ciclo TUB CLEAN una vez al mes, o más a menudo si es necesario, para eliminar la acumulación de
detergente y demás residuos.
TUB CLEAN CYCLE (CICLO DE LIMPIEZA
DE TINA)
Algunas condiciones medioambientales y de uso pueden causar la acumulación de residuos en la tina
con el paso del tiempo y producir un olor a moho
o humedad. El ciclo TUB CLEAN se ha diseñado
especialmente para eliminar la citada acumulación
utilizando blanqueador u otros limpiadores diseñados
específicamente para la limpieza de lavadoras. Ejecu-
te el ciclo TUB CLEAN una vez al mes, o con mayor
frecuencia, si el olor persiste.
1. Retire toda la ropa de la tina.
2. Llene el dosificador de blanqueador hasta la línea
MAX con blanqueador líquido. No llene en exceso
el dosificador de blanqueador. De lo contrario, po dría hacer que el blanqueador se distribuya inme diatamente.
NOTA: Para otros productos de limpieza de tinas,
a las instrucciones y recomendaciones del fabri-
sig
cante. Para productos de limpieza en polvo, añada
el limpiador al cajón dosificador de lavado principal
tras retirar los restos de detergente líquido. Coloque
•
las pastillas limpiadoras directamente en la tina.
3. Cierre la tapa y presione el botón POWER para
encender la lavadora. Presione el botón TUB
CLEAN , y luego presione el botón START/PAUSE
para iniciar el ciclo. Si selecciona cualquier otro ciclo d
espués de seleccionar TUB CLEAN, éste se
cancelará.
4. Cuando finalice el ciclo, abra la tapa y deje que el interior de la tina se seque completamente.
NOTA:
•
No cargue ropa durante la opción TUB CLEAN.
La ropa podría dañarse o contaminarse. Asegúrese de limpiar la tina cuando esté vacía.
•
Se recomienda dejar la puerta abierta después
de finalizado el lavado para mantener limpia la
tina.
•
Se recomienda usar el programa de TUB CLEAN
una v
ez al mes.
•
Si ya se hubiera formado moho o se percibiese
olor a humedad, ejecute el programa de TUB
CLEAN semanalmente durante 3 semanas.
ELIMINACIÓN DE LA ACUMULACIÓN DE
MINERALES
Si vive en una zona donde el agua es dura, se pueden formar depósitos de minerales en los compo nentes internos de la lavadora. Se recomienda usar
un descalcificador en zonas con agua dura.
Use un desincrustante, como Washer Magic®,
par
a eliminar la acumulación visible de minerales.
Después de desincrustar, ejecute siempre un ciclo
TUB CLEAN antes de proceder a lavar ropa.
Los depósitos minerales y demás manchas se pueden eliminar de la tina de acero inoxidable usando
un limpiador para acero inoxidable. NO utilice nunca
lana metálica ni limpiadores abrasivos.
DEJE LA TAPA ABIERTA
Si no va a usar la lavadora en varios días, deje la
tapa abierta para permitir que se seque la tina.
LIMPIE LOS FILTROS DE PELUSA
Limpie los filtros de pelusa que están dentro de la
tina cada dos o tres ciclos de lavado. Para las instrucciones de cómo limpiar los filtros, vea la página 20.
Page 65

MANTENIMIENTO
27
MANTENIMIENTO
LIMPIEZA DE LOS FILTROS DE ENTRADA DE AGUA
Si la lavadora no se llena correctamente, en la pantalla aparecerá un mensaje de error. Las pantallas
del filtro de la válvula de entrada podrían estar taponadas por depósitos de agua dura, sedimentos
en el suministro de agua u otros residuos.
NOTA: Las pantallas de entrada protegen las partes delicadas de la válvula de entrada para que no
se vean dañadas por partículas que podrían ingresar
en las válvulas con el suministro de agua. Si se quitan estos filtros y se utiliza la lavadora, la válvula podría quedarse atascada con una abertura lo que ocasionaríia una inundación y/o daños en la propiedad.
Frío
Caliente
Filtro de entrada
1. Cierre las dos llaves de agua completamente.
Desato
rnille las tuberías de agua caliente y fría de
la parte posterior de la lavadora.
IMPORTANTE: Las mangueras comerciales no
tienen garantía de que se ajusten o funcionen correc
tamente. Otras mangueras puede que no se
aprieten correctamente y ocasionen fugas. Los daños subsiguientes a los productos o la propiedad no
quedarán cubiertos de acuerdo con los términos de
la garantía del producto.
cuidado retire los filtros de las válvulas de
2. Con
agu
a y póngalos a remojo con vinagre o con un removedor de sarro, siguiendo las instrucciones del
fabricante. Tenga cuidado de no dañar los filtros
durante la limpieza.
3. Enjuague abundantemente antes de volver a instalarlos. Presione sobre los filtros para colocarlos
en su sitio.
4. Antes de volver a conectar las mangueras, deje
correr varios litros de agua por las mangueras y
tub
erías de agua en un cubo o un desagüe.
NOTA:
IE es un mensaje que puede parpadear en
la pantalla cuando la presión del agua es baja o si un
filtro de entrada está atascado con suciedad.
ADVERTENCIA
•
Desconecte el enchufe y cierre las llaves de
paso antes de la limpieza. En caso contrario, pue-
den producirse descargas eléctricas.
•
No utilice la lavadora sin los filtros de entrada.
En caso contrario, podrían producirse fugas y
fallos de funcionamiento.
•
Si utiliza la lavadora en un área con agua dura, el
filtro podría obstruirse debido a la acumulación
de cal.
ALMACENAMIENTO DE LA LAVADORA
Si no se va a usar la lavadora durante un período
prolongado y se encuentra en una zona de inviernos
rigurosos, realice los siguientes pasos para proteger
la lavadora de cualquier daño.
1. Cierre el suministro de agua.
2. Desconecte las mangueras del suministro de agua
ne el agua contenida en las mangueras.
y dre
3. Enchufe el cable de alimentación a una toma de
corriente conectada a tierra adecuadamente.
4. Agregue 3.5 litros de anticongelante no tóxi
tipo RV en la tina vacía y cierre la tapa. Nunca use
anticongelante automotriz.
5. Presione el botón POWER y luego pulse el botón
SPIN ONLY. Presione el botón START/PAUSE
para activar la bomba de desagüe. Deje que la
bomba de drenaje funcione durante un minuto y
go presione el botón POWER para apagar la
lue
lavadora. Esto expulsará parte del anticongelante,
dejando el suficiente para proteger la lavadora.
6. Desenchufe el cable de alimentación, seque el interior de la tina con un trapo suave y cierre la tapa.
7. Retire los insertos del dispensador. Drene el agua
de los compartimientos y déjelos secar.
8. Almacene la lavadora en posición vertical.
9. Para extraer el anticongelante de la lavadora
s el almacenamiento, ejecute un ciclo SPEED
tra
WASH completo usando detergente. No agregue
ropa a este ciclo.
co de
ESPAÑOL
Page 66

MANTENIMIENTO
28
LIMPIEZA DE LA LAVADORA
USO ADECUADO DEL DETERGENTE
Usar demasiado detergente es una de las causas
habituales de los problemas de lavado. Los de-
tergentes actuales están formulados para ser
eficaces sin espuma visible. Asegúrese de leer y
cumplir las recomendaciones del fabricante acerca
de cuánto detergente usar en el lavado. Se puede
usar menos detergente si el agua es blanda, la
carga de ropa es pequeña o tiene poca suciedad.
NOTA: Use só
poca espuma. Podrá identificar estos detergentes
por el logotipo
lo detergentes de alta eficiencia y
ADVERTENCIA
No rocíe agua en el interior de la lavadora.
Podría causar un incendio o descargas eléctricas.
CUIDADO Y LIMPIEZA DE LA LAVADORA
Tapa: Limpie con un trapo húmedo el exterior y el
interior y, a continuación, seque con un trapo suave.
Exterior: Seque los derrames inmediatamente.
Limpie con un trapo húmedo. No toque la superficie
de la pantalla con objetos punzantes.
Mudanza y Almacenamiento: Solicite a un técnico de
mantenimiento que saque el agua de las mangueras
y de la bomba de drenaje. Vuelva a colocar el bloque
de es
puma de la tina para proteger la lavadora durante la mudanza. No almacene la lavadora donde
pueda estar expuesta a la intemperie.
Vacaciones Largas: Asegúrese de que el suministro
de agua está cortado en las llaves. Siga las instrucciones si la lavadora va a estar expuesta a tempe-
raturas de congelación.
Cajón del Dispensador: El detergente y el suavizante pueden haberse acumulado en el cajón del
dispensador. Extraiga el cajón y los insertos y com-
ebe si hay acumulaciones una o dos veces por
pru
mes.
1. Saque el cajón tirando de éste hasta que se detenga. Levante la parte delantera del cajón y
sáquela completamente.
2. Retire los insertos de los dos compartimientos.
Enjuague los insertos y el cajón con agua templada para diluir las acumulaciones de productos
de lavandería.
3. Para limpiar la abertura del cajón, use un cepillo pequeño que no sea metálico para limpiar
el hueco. Elimine todos los residuos de la parte
superior e inferior del hueco.
4. V
uelva a instalar los insertos en los compartimientos correspondientes y vuelva a colocar el
cajón . Coloque el cajón en la abertura en ángulo como se muestra en la imagen de arriba y
luego bájela y deslícela en su sitio.
Page 67

SOLUCIÓN DE PROBLEMAS
29
SOLUCIÓN DE PROBLEMAS
CÓDIGOS DE ERROR
Si aparece alguno de los siguientes mensajes en la pantalla, compruebe lo siguiente y tome la acción correctiva apropiada.
Problema Causa posible Soluciones
La pantalla muestra:
La lavadora se rellena con agua
lentamente o no se llena en absoluto, o la pantalla muestra:
La tapa no se cierra correctamente.
Las llaves de suministro del agua
no están completamente abiertas.
Las mangueras de las tuberías
de agua están retorcidas, pinzadas
o taponadas.
Los filtros de entrada de agua
están taponados.
La presión del suministro de agua
a la llave o a la casa es demasiado baja.
Suministro de agua conectado
a mangueras con limitación de
fugas.
Asegúrese de que la tapa está correctamente ce rrada y presione el botón START/PAUSE. Después
de iniciar un ciclo, tomará unos momentos antes de
que la tina comience a girar o centrifugar. La lavadora no comenzará a centrifugar hasta que la tapa
no esté trabada.
Si la tapa está cerrada y se muestra el mensaje
error de bloqueo de la tapa, llame a servicio técnico.
Asegúrese de que las llaves de agua están totalmente abiertas.
Asegúrese de que las mangueras no estén retorcidas ni pinzadas. Tenga cuidado al desplazar la
lavadora durante las tareas de limpieza o mantenimiento.
Limpie los filtros de entrada. Consulte el apartado
Mantenimiento en la sección Cuidado y limpieza.
Compruebe otra llave de la casa para asegurarse
de que la presión de agua es la adecuada y que el
flujo no está restringido. Desconecte la manguera
de entrada de la lavadora y deje que corran algunos
litros de agua a través de la manguera para purgar
las tuberías de suministro de agua. Si el flujo es
demasiado débil, contacte con un plomero para
que repare las tuberías de agua.
Las mangueras diseñadas para limitar las fugas
pueden activarse erróneamente y evitar que la
lavadora se llene. No se recomienda el uso de
mangueras con limitación de fugas.
de
ESPAÑOL
La lavadora no se enciende El cable de alimentación no está
conectado correctamente.
El fusible está fundido, el disyun-
tor se ha desconectado o se ha
ducido un corte de energía.
pro
Asegúrese de que el enchufe esté correctamente
puesto a tierra, con una toma de 3 púas, 120 V de
CA y 60 -Hz.
Restablezca el disyuntor o cambie el fusible.
No aumente la capacidad del fusible. Si el problema
radica en la sobrecarga del circuito, éste deberá ser
reparado por un electricista calificado.
Page 68

SOLUCIÓN DE PROBLEMAS
30
CÓDIGOS DE ERROR (continuación)
Problema Causa posible Soluciones
El agua en la lavadora drena demasiado lento o no drena, o la
pantalla muestra:
La manguera de drenaje está retorcida, apretada o taponada.
La descarga del desagüe está
a más de 243,8 cm (96 pulgadas)
por encima de la parte inferior de
la lavadora.
Asegúrese de que la manguera de drenaje esté
libre de taponamientos, dobladuras, etc., y no esté
apretada debajo de la lavadora. Ajuste o repare el
drenaje. La altura máxima del drenaje es de 243,8
cm (96 pulgadas).
La pantalla muestra:
La pantalla muestra:
La pantalla muestra: El sensor de nivel de agua no
La pantalla muestra:
Si el rebalanceo uE (ver arriba)
no tiene éxito, mostrará este error.
La carga es demasiado pequeña.
Hay artículos pesados mezclados
con artículos más ligeros.
La carga está desbalanceada.
El nivel de agua es demasiado
alto debido a una válvula de agua
con falla.
funciona correctamente.
La lavadora ha detectado una
carga desbalanceada.
El intento automático para rebalancear la carga no
tuvo éxito. El ciclo se puso en pausa para permitir
que la carga se ajuste manualmente.
Puede ser que necesite agregar artículos adicionales a las cargas pequeñas para que la lavadora
pueda balancear las cargas.
Puede ser que la carga contenga artículos pesados
y otros más ligeros. Siempre trate de lavar artículos
que de alguna manera sean de pesos similares para
ayudar a la lavadora a distribuir el peso de la carga
para una buena rotación.
Redistribuya manualmente la carga si los artículos
se han enredado y no permiten que la distribución
automática funcione apropiadamente.
Cierre las llaves de agua, desenchufe la lavadora y
llame al servicio técnico.
Cierre las llaves de agua, desenchufe la lavadora y
llame al servicio técnico.
Si la lavadora detecta una carga demasiado des
balanceada como para poder girar, mostrará este
código mientras intenta rebalancear la carga. La la
vadora agregará agua e intentará redistribuir la carga
automáticamente. Esta pantalla es únicamente para
su información y no requiere ninguna acción.
-
-
Page 69

SOLUCIÓN DE PROBLEMAS
31
SONIDOS NORMALES QUE SE
PUEDEN ESCUCHAR
Los siguientes sonidos se pueden oír mientras la lavadora
está en funcionamiento. Son ruidos normales.
ROCIADO O SIBILANTE:
Agua rociándose o circulando durante el ciclo.
ZUMBIDO O BORBOTEO:
La bomba de drenaje bombeando agua desde la lavadora durante un ciclo.
EL SONIDO DEL AGUA QUE SE AÑADE
DESPUÉS DE QUE LA LAVADORA YA HA
ESTADO OPERANDO
•
La lavadora se adapta al tamaño y tipo de carga para
añadir más agua en el ciclo, según sea necesario.
La carga de lavado puede estar desequilibrada. Si
•
la lavadora detecta que la carga está desequilibrada, se parará y rellenará para redistribuir la carga.
•
La lavadora puede diluir los aditivos de lavandería
para añadirlos a la carga de lavado.
SONIDO DEL AGUA SALPICANDO:
Un líquido en el anillo de equilibrio de todo el tambor de lavado ayuda a la canasta a girar sin problemas. (La lavadora se apaga y el tambor gira.)
ANTES DE SOLICITAR ASISTENCIA TÉCNICA
Su lavadora está equipada con un sistema automático de monitorización de errores para detectar y diagnosticar
problemas en una fase temprana. Si su lavadora no funciona correctamente o no funciona en absoluto,
compruebe lo siguiente antes de llamar al servicio técnico:
Problema Causa posible Soluciones
Ruido metálico y de
traqueteo
Sonido de golpes Las cargas de prendas pesadas pu-
Ruido de vibración No se han retirado todos los mate -
Fuga de agua La conexión de las mangueras de
Objetos extraños, como llaves,
monedas, o imperdibles, pueden
estar en la tina o en la bomba.
eden producir un sonido de golpes.
Es posible que la carga de la lava-
dora esté desbalanceada.
riales del empaque.
Es posible que la carga de lavado no es-
té uniformemente distribuida en la tina.
No todas las patas niveladoras se encuen- C
tran apoyadas firmemente en el piso.
El piso no es lo suficientemente
rígido.
agua no está bien encajada en la
llave o en la lavadora.
Las tuberías de drenaje de la casa
están taponadas.
La manguera de drenaje se ha salido del drenaje o no está insertada
lo suficiente.
Una prenda grande, como una almohada o un cobertor, están sobre
la parte superior de la tina.
Detenga la lavadora, compruebe la tina y el filtro de
drenaje en busca de objetos extraños. Si después de
reiniciar la lavadora el ruido continúa, llame al servicio.
Esto es normal. Si el sonido continúa, es posible que la
adora está desbalanceada.
lav
Deténgala y redistribuya la carga de lavado. Pause el ciclo
y redistribuya la carga después de que la tapa se destrabe.
Consulte la sección Desempaque y Desecho
Del Material de Transporte en los requisitos de instalación.
Pause el ciclo y redistribuya la carga después de que
la tapa se destrabe.
onsulte la sección Nivelación de la lavadora en las
Instrucciones.
Asegúrese de que el piso sea sólido y no ceda. Consulte
la sección Tipo de piso en Requisitos de instalación.
Compruebe las mangueras en busca de fugas, grietas
y rupturas.
Compruebe y apriete las conexiones de las mangueras.
La lavadora bombea agua muy rápidamente. Compruebe si
durante el drenaje, el agua vuelve hacia atrás y se sale de la tubería de drenaje. Si ve agua saliendo del desagüe, compruebe
que la instalación de la manguera de drenaje es correcta y
busque si hay algún taponamiento en el desagüe. Póngase en
contacto con un plomero para reparar la tubería de drenaje.
Amarre la manguera de drenaje a la manguera de entrada o
a una tubería fija para impedir que se pueda salir durante el
drenaje. Debería estar insertada al reborde en las tuberías de
drenaje más pequeñas o el reborde debería estar insertado
entre 3 y 5 centímetros en la tubería de drenaje.
Use el ciclo BULKY para las prendas grandes o voluminosas.
Tenga mucho cuidado y nunca lave más de la mitad de la carga con prendas que flotan, como las almohadas.
Pare la lavadora y compruebe la carga. Asegúrese de
que la carga no sobrepasa la parte superior de la tina.
ESPAÑOL
Page 70

SOLUCIÓN DE PROBLEMAS
32
ANTES DE SOLICITAR ASISTENCIA TÉCNICA (continuación)
Problema Causa posible Soluciones
Arrugas La lavadora no se ha descargado S
inmediatamente.
La lavadora está sobrecargada.
Las mangueras de entrada de agua
fría y caliente están invertidas.
Exceso de espuma Demasiado detergente o detergen-
te inadecuado.
Manchas
El blanqueador o el suavizante se
ha distribuido demasiado pronto.
El blanqueador o el suavizante se
ha agregado directamente a la
carga de lavado en la tina.
La lavadora no se descargó inmediatamente.
La ropa no se agrupó correctamente.
La lavadora no se
enciende.
El cable de alimentación no se ha enchufado de forma adecuada.
Se ha fundido el fusible, ha saltado el
disyuntor o se ha producido un corte de
suministro eléctrico en la vivienda.
NOTA:
Si la lavadora se detiene durante un ciclo debido a una interrupción del suministro eléc-
trico, la lavadora continuará el ciclo en donde se detuvo cuando se restaure el suministro.
El ciclo de lavado tarda
más de lo normal
La lavadora ajusta de forma automática el tiempo de lavado en
función de la cantidad de ropa para
lavar, la presión del agua y demás
condiciones de funcionamiento.
Olor a humedad o
moho en la lavadora
Se ha estado usando demasiado
detergente o un detergente inadecuado.
El interior de la tina no se lavó correctamente.
Los filtros de pelusa no han sido
limpiados en mucho tiempo.
Fugas de agua Exceso de espuma de detergente.
iempre saque las prendas de la lavadora en cuanto se comple te el ciclo.
La lavadora se puede cargar completamente, pero la tina no debe
estar abarrotada con prendas. La tapa de la lavadora se debería
cerrar con facilidad.
El enjuague con agua caliente puede hacer aparecer arrugas en
las prendas. Compruebe las conexiones de las mangueras de entrada.
Los detergentes HE están formulados específicamente para lavadoras
de alta eficiencia y contienen agentes reductores de espuma. Utilice só lo detergentes con el logotipo de alta eficiencia (HE).
Para información sobre las cantidades de detergente, consulte la secc ión Instrucciones.
El compartimiento del dispensador se ha sobrellenado lo que ha ocasionado que el
mente. SIEMPRE mida el blanqueador para evitar el sobrellenado -una
taza al máximo.
El cajón del dispensador se cerró demasiado rápido provocando que
el suavizante se distribuyera inmediatamente.
Use siempre los dispensadores para asegurarse de que los productos
de lavandería se distribuyen correctamente en el momento adecuado
del ciclo.
Siempre saque las prendas de la lavadora lo antes posible en cuanto
se complete el ciclo.
Siempre lave los colores oscuros separados de los colores claros y los
blancos para evitar la decoloración.
Nunca lave prendas con mucha suciedad junto con otras con poca
suciedad.
Asegúrese de que el enchufe está correctamente conectado a una
toma de corriente de 120 V de CA, 60 Hz y tres clavijas con toma de
tie
cidad del fusible. Si el problema es una sobrecarga del circuito, haga
que lo solucione un electricista calificado.
blanqueador o el suavizante se distribuyan inmediata-
rra. Reinicie el disyuntor o sustituya el fusible. No aumente la capa-
Esto es normal. La lavadora ajusta el tiempo de ciclo de forma
automática para brindar los resultados óptimos para el ciclo seleccionado. El tiempo restante que se muestra en la pantalla es
sólo una estimación. El tiempo real puede variar.
Use sólo detergente de alta eficiencia (HE) de acuerdo con las
instrucciones del fabricante.
Ejecute el ciclo de limpieza, TUB CLEAN, con regularidad.
Limpie los filtros de pelusa. Vea la página 20 para las instrucciones.
El exceso de espuma puede provocar fugas, y puede estar ocasionado
por el tipo y la cantidad de detergente usado. Sólo se recomienda el
de detergente de alta eficiencia. As
uso
egúrese de que el detergente
y cualquier aditivo se agregan a los compartimientos adecuados del
dispensador. La cantidad de detergente normal que se debe usar está
entre una 1/4 parte y 1/2 de la cantidad máxima recomendada por el
fabricante del detergente. Siempre reduzca la cantidad de detergente
si la carga es pequeña o tiene poca suciedad, o si el agua es muy
bla
nda. Nunca use más de la cantidad máxima recomendada
bricante del detergente.
por el fa-
Page 71

SOLUCIÓN DE PROBLEMAS
ANTES DE SOLICITAR ASISTENCIA TÉCNICA (continuación)
Problema Causa posible Soluciones
La lavadora no funciona El panel de control se ha apagado
La lavadora no se llena de
agua correctamente
debido a la inactividad.
La lavadora está desenchufada. Asegúrese de que el cable está correctamente
El suministro de agua está cerrado.
Los controles no están ajustados
correctamente.
La tapa está abierta.
El disyuntor ha saltado o el fusible
se ha fundido.
Se debe reiniciar el control.
No se presionó START/PAUSE
después de ajustar un ciclo.
La presión del agua es extremadamente baja.
La lavadora está demasiado fría.
El filtro está taponado.
Las mangueras de entrada pueden
estar retorcidas
Eficiencia energética.
Insuficiente suministro de agua.
La tapa de la lavadora está abierta.
Las mangueras de entrada de agua
fría y caliente están invertidas.
El nivel de agua está demasiado
bajo.
Esto es normal. Presione el botón POWER para
encender la lavadora.
enchufado en una toma de corriente que funcione.
Abra completamente las dos llaves de agua fría y caliente.
Asegúrese de que el ciclo se ajustó correctamente, cierre
la tapa y presione el botón START/PAUSE.
La lavadora no funcionará si la tapa está abierta. Cierre
la tapa y asegúrese de que no hay nada atascado bajo la
tapa que impida que se cierre completamente.
Compruebe los disyuntores y fusibles de la casa. Sustituya los fusibles o reinicie el disyuntor. La lavadora debería estar en un ramal de circuito dedicado. La lavadora
continuará el ciclo en el lugar en que se detuvo una vez
restaurada la alimentación.
Presione el botón POWER, luego vuelva a seleccionar el
ciclo deseado y presione el botón START/PAUSE.
Presione el botón POWER, luego vuelva a seleccionar el
ciclo deseado y presione el botón START/PAUSE. La
lavadora se apagará si no se presiona el botón START/
PAUSE después de cinco minutos.
Compruebe otra llave de la casa para asegurarse de que
la presión del agua es la adecuada.
Si la lavadora ha estado expuesta a temperaturas por
debajo del punto de congelación durante un período
prolongado de tiempo, permita que se caliente antes de
presionar el botón POWER. En otro caso, la pantalla no
se prenderá.
Asegúrese de que los filtros de entrada de las válvulas
de llenado no están taponados. Consulte instrucciones
de limpieza de filtros.
Compruebe que las mangueras de entrada no están retorcidas ni atascadas.
Esta es una lavadora de alta eficiencia (HE). Por esta
razón, sus niveles de agua pueden variar con respecto a
las lavadoras convencionales.
Asegúrese de que las llaves de agua fría y caliente estén
completamente abiertas.
La lavadora no funcionará si la tapa está abierta. Cierre
la tapa y asegúrese de que no hay nada atascado bajo la
tapa que impida que se cierre completamente.
Compruebe las conexiones de las mangueras de entrada. Asegúrese de que el suministro de agua caliente
está conectado a la válvula de entrada de agua caliente
y de que el suministro de agua fría está conectado a la
válvula de entrada de agua fría.
Esta lavadora es de alta eficiencia. Normalmente el
agua no cubrirá las prendas. El nivel de llenado está
optimizado para el movimiento de lavado y, de esta
manera, lograr el mejor rendimiento de lavado.
33
ESPAÑOL
Page 72

SOLUCIÓN DE PROBLEMAS
34
ANTES DE SOLICITAR ASISTENCIA TÉCNICA (continuación)
Problema Causa posible Soluciones
La lavadora no drena
Mala eliminación de las manchas
El blanqueador no se distribuye
Prematura distribución del
blanqueador
Incompleta o ninguna distribución de detergente
Fugas de agua en todas las
cargas
La manguera del drenaje está retorcida.
El desagüe está ubicado a una altura
superior a los 243.8 cm (8 pies) por
encima del piso.
No se seleccionaron las opciones
adecuadas.
Manchas asentadas previamente.
La tapa del dispensador del blanqueador
no está instalada correctamente.
El dispensador del blanqueador está su-
cio o taponado.
El dispensador del blanqueador está
relleno para una carga futura.
Compartimientos de detergente taponados debido a un rellenado incorrecto.
Se usó demasiado detergente.
Insuficiente suministro de agua.
Residuo normal.
Las mangueras no están instaladas
Es normal que una pequeña cantidad de detergente permanezca en
correctamente.
Asegúrese de que la manguera de drenaje no está retorcida.
Asegúrese de que la manguera de drenaje no esté a una altura superior a los 243.8 cm (8 pies) por encima de la parte inferior de la
lavadora y que no esté a una distancia superior a los 1,5 metros (5
pies) de la lavadora.
Las prendas muy sucias o con manchas resistentes pueden re-
querir un poder limpiador adicional. Seleccione SOAK o STAIN
CARE para mejorar el poder de limpieza del ciclo seleccionado.
Las prendas que se han lavado anteriormente pueden tener manchas
que ya se hayan asentado. Esas manchas pueden ser muy difíciles de
eliminar y pueden requerir ser lavadas a mano o la aplicación de un
tratamiento previo que ayude a eliminar las manchas.
Asegúrese de que la tapa del dispensador del blanqueador está co-
rrectamente instalada y bien cerrada en su sitio antes de comenzar el ciclo.
Levante la tapa del dispensador del blanqueador y limpie el dispensador. Las pelusas y otros residuos extraños que se acumulan dentro del
dispensador pueden impedir la correcta distribución del blanqueador.
No puede almacenar el blanqueador en el dispensador para un futuro
uso. El blanqueador se distribuirá en cada carga.
Asegúrese de que el detergente y los aditivos se agregan a los compartimientos adecuados del dispensador. Si usa detergente líquido,
asegúrese de que la taza para el detergente líquido y el inserto estén en el compartimiento de detergente. Si usa detergente en polvo,
asegúrese de que no se usen la taza para el detergente líquido ni el
inserto. Para todos los tipos de detergente, asegúrese siempre de
que el cajón del dispensador esté totalmente cerrada antes del inicio
del ciclo.
Asegúrese de usar la cantidad de detergente sugerida en las recomendaciones del fabricante. Para evitar taponamientos, puede diluir
el detergente con agua hasta la línea de llenado máximo en el compartimiento. Use sólo detergentes HE (alta eficiencia).
NOTA: Siempre use la menor cantidad posible de detergente. Las
lavadoras de alta eficiencia requieren muy poca cantidad de detergente para lograr resultados óptimos. La utilización de demasiado
detergente reduce el rendimiento del lavado y el enjuague, y puede
contribuir a la aparición de olores en la lavadora.
Asegúrese de que las llaves de agua fría y caliente estén completamente abiertas.
el dispensador. Si este residuo se acumula, puede interferir en la
distribución normal de los productos. Consulte las instrucciones de
limpieza.
Compruebe todas las conexiones de las mangueras de entrada y dre -
naje para asegurarse de que están ajustadas y seguras.
Page 73

ESPECIFICACIONES
ESPECIFICACIONES
Model WT901CW / WT901CF
Descripción Lavadora de carga superior.
Requisitos eléctricos 120 VAC @ 60 Hz.
Presión máx. de agua 100 - 800 kPa (14.5 - 116 PSI)
Medidas 24 7/8” (An) X 26 3/8”(F) X 40 1/8”(Al), 54 3/4” (F con puerta abierta)
Peso neto 103 lbs. (47kg)
Velocidad máx. de centrifugado
700 rpm
)atreiba atreup noc F( mc931 ,)lA( mc201 X )F( mc76 X )nA( mc2.36
SISTEMA SMART DIAGNOSIS™
Si experimenta algún problema con la lavadora,
podrá transmitir datos a través del teléfono con el
equipo Smart Diagnosis. Así podrá hablar directamente con nuestros técnicos especializados. El técnico graba los datos transmitidos desde la máquina
y los utiliza para analizar el problema, ofreciendo un
diagnóstico rápido y eficaz.
USO DEL SISTEMA SMART DIAGNOSIS™
Siga las instrucciones del técnico y siga estos pasos cuando se le solicite.
Si experimenta problemas con la lavadora, llame al
1-800-243-0000. Sólo utilice el sistema Smart Diagnosis
cuando se lo pida el equipo Smart Diagnosis. Los sonidos de transmisión que oirá son normales y suenan de
forma parecida a una melodía.
Smart Diagnosis no se puede activar a menos que
la lavadora se encienda presionando el botón PO-
ción de problemas deberá llevarse a cabo sin utilizar
Smart Diagnosis.
35
ESPAÑOL
-ulos al ,rednecne edeup es on arodaval al iS .REW
MANTENGA el micrófono del teléfono sobre el botón de ENCENDIDO, cuando el centro de llamadas se lo solicite, a
no más de 2,5 cm (pero sin tocar) la máquina.
NOTA: No pulse ningún otro botón ni gire el mando del selector de ciclo.
MANTENGA PULSADO el botón WASH TEMP m ientra s sig u e suj e tand o el teléf o no s obre el bo tón P OWER.
ESPERE A ESCUCHAR tres pitidos. Tras escuchar los tres pitidos, suelte el botón de WASH TEMP. Mantenga el
teléfono en su sitio hasta que haya terminado la transmisión de tonos. Esto tarda unos 6 segundos y
aparecerá el recuento de tiempo. Una vez finalizada la cuenta atrás y cuando los tonos se hayan detenido, reanude su
versación con el técnico que le podrá ayudar a utilizar la información transmitida para el análisis.
con
“SmartDiagnosis (Diagnóstico Inteligente) es una función de resolución de problemas diseñada para asistir,
no reemplazar, al método tradicional de resolución de problemas a través de llamadas de servicio técnico.
La efectividad de esta función depende de diversos factores, entre los cuales se incluyen pero no están
limitados, la recepción del telé
presentarse durante la transmisión, y la acústica de la habitación donde está ubicada la lavadora. Por lo tanto, LG no garantiza que SmartDiagnosis resuelva con precisión cualquier cuestión dada.”
en la pantalla
™
fono celular utilizado para la transmisión, cualquier ruido externo que pueda
™
Page 74

GARANTÍA
36
GARANTÍA LIMITADA PARA LAVADORA LG (EE.UU.)
COBERTURA DE LA GARANTÍA:
LG Electronics U.S.A., Inc. (“LG”) garantiza su lavadora LG (“producto”) contra cualquier defecto en materiales o mano de obra bajo un uso doméstico normal,
durante el período de garantía indicado más adelante, y LG podrá reparar o sustituir el producto, bajo su exclusivo criterio. Esta garantía limitada tiene validez sólo
para el comprador minorista original del producto, no puede cederse o transferirse a cualquier comprador o usuario posterior, y se aplica sólo cuando el producto
se haya adquirido a través de un distribuidor LG autorizado y se haya utilizado en Estado Unidos (“EE.UU.”), incluidos los Territorios de EE.UU.
Nota: Los productos de sustitución o piezas de reparación pueden ser nuevos o remanufacturados en fábrica y tendrán garantía para el tiempo
restante del período original de garantía o noventa (90) días, el que sea más largo. Guarde la factura o el justificante de compra como prueba de la
fecha de compra para la garantía (se le podría pedir que envíe una copia a LG o un representante autorizado).
PERÍODO DE GARANTÍA:
Período
Alcance de la garantía
Observación
CÓMO SE PRESTA EL SERVICIO: Servicio a domicilio
El servicio a domicilio se prestará, según esté disponible, durante el período de garantía según la disponibilidad del personal de
servicio técnico en EE.UU. Para recibir servicio a domicilio el producto deberá estar accesible y sin obstrucciones para el personal de
servicio. Si no se puede prestar el servicio de reparación a domicilio, puede ser necesario retirar, reparar y devolver el producto. Si
no está disponible el servicio a domicilio, LG podrá decidir si facilitará transporte para el producto a y desde cualquier servicio técnico
de LG, según su elección.
ESTA GARANTÍA LIMITADA NO CUBRE:
1. Desplazamientos de servicio para el envío, recogida o instalación del
producto o para dar instrucciones sobre la utilización del producto.
2. Sustitución de los fusibles de la vivienda o puesta en funcionamiento de
los disyuntores, corrección de la instalación eléctrica de la casa o
fontanería, o corrección de la instalación del producto.
3. Daños o fallos causados por tubos de agua con fugas o roturas, tubos
de agua congelados, tubos de desagüe atascados, suministro de agua
decuado o con interrupciones o suministro de aire inadecuado.
ina
4. Daños al producto causados por accidentes, pestes e insectos, rayos,
viento, fuego, inundaciones o causas de fuerza mayor.
5. Daños o fallos resultantes de un uso inadecuado, abusos, instalación,
reparaciones o mantenimiento incorrectos. Las reparaciones
incorrectas incluyen la utilización de piezas no aprobadas o
especificadas por LG.
6. Daños o fallos causados por la modificación o alteración no autorizada
del producto.
ESTA GARANTÍA EXCLUYE CUALQUIER OTRA GARANTÍA, EXPRESA O IMPLÍCITA, INCLUYENDO Y SIN LIMITACIÓN A
CUALQUIER GARANTÍA DE COMERCIABILIDAD O ADECUACIÓN A UN FIN PARTICULAR. EN EL GRADO EN QUE CUALQUIER
GARANTÍA IMPLÍCITA SEA REQUERIDA POR LEY, ESTA GARANTÍA SE LIMITARÁ EN SU DURACIÓN AL PERÍODO INDICADO
ANTERIORMENTE. LA REPARACIÓN O SUSTITUCIÓN
EL FABRICANTE, NI SUS DISTRIBUIDORES EN EE.UU.
CONSECUENCIAL, INDIRECTO, ESPECIAL O PUNITIVO DE
INGRESOS O BENEFICIOS, O CUALQUIER OTRO DAÑO BASADOS
EXTRACONTRACTUALES O DE OTRO TIPO.
ALGUNOS ESTADOS NO PERMITEN LA EXCLUSIÓN O LIMITACIÓN DE LOS DAÑOS INCIDENTALES O CONSECUENCIALES
O LAS LIMITACIONES SOBRE LA DURACIÓN DE UNA GARANTÍA IMPLÍCITA, POR LO QUE PUEDEN NO SER APLICABLES
A SU CASO LAS CITADAS EXCLUSIONES. ESTA GARANTÍA LE CONFIERE DERECHOS LEGALES ESPECÍFICOS Y TAMBIÉN
PUEDE TENER OTROS DERECHOS QUE VARÍAN DE UNOS ESTADOS A OTROS.
CÓMO OBTENER SERVICIO DE GARANTÍA E INFORMACIÓN ADICIONAL:
Llame al número 1-800-243-0000 o visite nuestro sitio web en www.lg.com.
Si desea ponerse en contacto por correo: Centro de información al cliente LG (ATTN: CIC)
201 James Record Road, Huntsville, AL 35824
Un (1) año a partir de la fecha de
compra original:
Cualquier pieza interna/funcional
LG suministrará las piezas
y la mano de obra para la
reparación o sustituirá las piezas
defectuosas.
BAJO ESTA GARANTÍA ES LA ÚNICA SOLUCIÓN PARA EL CLIENTE. NI
SERÁN RESPONSABLES DE CUALQUIER DAÑO INCIDENTAL,
CUALQUIER TIPO, INCLUIDAS SIN LIMITACIÓN, PÉRDIDAS DE
Sólo piezas. El cliente será responsable de la mano de obra
o la reparación a domicilio para la sustitución de las piezas
7. Daños o fallos causados por la corriente eléctrica, tensión o códigos
de fontanería incorrectos.
8. Daños cosméticos, incluidos arañazos, abolladuras u otros daños en el
acabado del producto, a menos que los daños sean resultado de
defectos de materiales o mano de obra y se informe a LG en un plazo
de siete (7) días calendarios a partir de la fecha de entrega.
9. Daños o falta de elementos en cualquier producto de exposición, caja
abierta, de descuento o reacondicionado.
10. Productos en los que se haya borrado, desdibujado o cambiado el
número de serie original de fábrica.
11. Reparaciones cuando se esté dando al producto una utilización
diferente del uso doméstico normal (por ejemplo, alquiler, uso
comercial, oficinas e instalaciones recreativas) o contraria a las
instrucciones del manual del propietario del producto.
12. La retirada y nueva instalación del producto si se ha instalado en una
ubicación inaccesible.
EN CONTRATOS, RESPONSABILIDADES
Toda la vida útil desde la fecha
de compra original:
Tambor de acero inoxidable
defectuosas.
Escriba su información de la garantía a
continuación:
Información de registro del producto:
Modelo:
Número de Serie:
Fecha de Compra:
Page 75

37
MEMO
Page 76

LG Customer Information Center
1-800-243-0000
Register your product Online!
www.lg.com
USA
 Loading...