

Page 1

OWNER'S MANUAL
WASHING
MACHINE
ESPAÑOLENGLISH
Read this owner's manual thoroughly before operating the appliance and keep it handy
for reference at all times.
WT7800C*
MFL68267050
Rev.01_032519
Copyright © 2018-2019 LG Electronics Inc. All Rights Reserved.
www.lg.com
Page 2

2
TABLE OF CONTENTS
3 SAFETY INSTRUCTIONS
3 IMPORTANT SAFETY INSTRUCTIONS
7 PRODUCT OVERVIEW
7 Parts
7 Accessories
8 INSTALLATION
8 Tools Needed
8 Installation Overview
9 Product Specifications
10 Choosing the Proper Location
11 Unpacking and Removing Shipping Material
12 Connecting the Water Lines
13 Connecting the Drain Hose
14 Leveling the Washer
15 Connecting to the Power Supply
15 Testing the Washer
16 OPERATION
33 SMART FUNCTIONS
33 LG SmartThinQ Application
36 Smart Diagnosis™ Function
37 MAINTENANCE
37 Regular Cleaning
39 Cleaning the Water Inlet Filters
40 Care in Cold Climates
41 TROUBLESHOOTING
41 Before Calling for Service
49 LIMITED WARRANTY
49 FOR USA
52 Warranty Exceptions (U.S.)
16 Using the Washer
17 Sorting Laundry
18 Loading the Washer
19 Adding Cleaning Products
22 Control Panel
24 Wash Cycles
26 Cycle Guide
29 Cycle Modifier Buttons
30 Special Care Features
31 Option Buttons
Page 3
SAFETY INSTRUCTIONS
3SAFETY INSTRUCTIONS
READ ALL INSTRUCTIONS BEFORE USE
Your safety and the safety of others are very important.
We have provided many important safety messages in this manual and on your appliance. Always read and
follow all safety messages.
This is the safety alert symbol.
This symbol alerts you to potential hazards that can kill or injure you and others.
All safety messages will follow the safety alert symbol and either the word WARNING or CAUTION.
These words mean:
WARNING
If you do not follow instructions, it could result in death or serious injury.
CAUTION
If you do not follow instructions, it could result in minor or moderate injury or damage to the product.
All safety messages tell you what the potential hazard is, tell you how to reduce the chance of injury, and tell
you what may happen if the instructions are not followed.
IMPORTANT SAFETY INSTRUCTIONS
WARNING
To reduce the risk of explosion, fire, death, electric shock, scalding or injury to
persons when using this product, follow basic precautions, including the
following:
ENGLISH
INSTALLATION
• Adhere to all industry recommended safety procedures including the use of long-sleeved gloves and safety
glasses.
• Never attempt to operate this appliance if it is damaged, malfunctioning, partially disassembled, or has
missing or broken parts, including a damaged cord or plug.
• Before use, the appliance must be properly installed as described in this manual.
• To reduce the risk of severe injury or death, follow all installation instructions.
• Refer to the INSTALLATION INSTRUCTIONS for detailed grounding procedures. Installation instructions
are packed with the appliance for the installer’s reference. If the appliance is moved to a new location, have
it checked and reinstalled by qualified service personnel.
• Moving or installation of the appliance requires two or more people.
• Do not install the appliance in humid spaces.
• Store and install the appliance where it will not be exposed to temperatures below freezing or exposed to
outdoor weather conditions.
• This appliance is not designed for maritime use or for mobile installations such as in RVs, trailers, or aircraft.
Page 4

4 SAFETY INSTRUCTIONS
• Keep packing materials out of the reach of children. Packaging material can be dangerous for children.
There is a risk of suffocation.
• Destroy the carton, plastic bag, and other packing materials after the appliance is unpacked. Children might
use them for play. Cartons covered with rugs, bedspreads, or plastic sheets can become airtight chambers.
• The appliance must be installed and electrically grounded by qualied service personnel in accordance with
local codes.
• Do not, under any circumstances, cut or remove the third (ground) prong from the power cord.
• When installing or moving the appliance, be careful not to pinch, crush, or damage the power cord.
• Connect to a properly rated, protected, and sized power circuit to avoid electrical overload.
• This appliance must be positioned near to an electrical power supply.
• Disconnect the power cord, house fuse or circuit breaker before installing or servicing the appliance.
• The power cord of this appliance is equipped with a 3-prong (grounding) plug which mates with a standard
3-prong (grounding) wall outlet to minimize the possibility of electric shock from this appliance.
• Use new hoses when connecting the appliance to the water supply. Do not reuse old hoses.
OPERATION
• Read all instructions before using the appliance and save these instructions.
• Use this appliance only for its intended purpose.
• If the product has been submerged, contact an LG Electronics customer information center for instructions
before resuming use.
• If you detect a strange sound, a chemical or burning smell, or smoke coming from the appliance, unplug it
immediately, and contact an LG Electronics customer information center.
• Under certain conditions, hydrogen gas may be produced in a hot-water system that has not been used
for two weeks or more. HYDROGEN GAS IS EXPLOSIVE. If the hot-water system has not been used for
such a period, before using the appliance turn on all hot water faucets and let the water ow from each for
several minutes. This will release any accumulated hydrogen gas. As the gas is ammable, do not smoke or
use an open ame during this time.
• Do not reach into the washer if the tub or drum, agitator, or any interior parts are moving. Before loading,
unloading, or adding items, press Start/Pause and allow the tub or drum to coast to a complete stop before
reaching inside.
• This appliance is not intended for use by persons (including children) with reduced physical, sensory or
mental capabilities, or lack of experience and knowledge, unless they have been given supervision or
instruction concerning the use of the appliance by a person responsible for their safety.
• Do not allow children or pets to play on, in or with the appliance. Close supervision is necessary when the
appliance is used near children or pets.
• Keep laundry products out of children’s reach. To prevent injury to persons, observe all warnings on product
labels.
• Repair or immediately replace all power cords that have become frayed or otherwise damaged. Do not use
a cord that shows cracks or abrasion damage along its length or at either end.
• Never unplug the appliance by pulling on the power cord. Always grip the plug rmly and pull straight out
from the outlet.
• Do not use an extension cord or adapter with this appliance.
• Do not grasp the power cord or touch the appliance controls with wet hands.
• Do not modify or extend the power cord.
Page 5

• If the electrical supply cord is damaged, it must only be replaced by the manufacturer or its service agent or
a similar qualied person in order to avoid a hazard.
• Do not put oily or greasy clothing, candles or ammable materials on top of the appliance.
• Keep the area underneath and around your appliances free of combustible materials (lint, paper, rags, etc.),
gasoline, chemicals and other ammable vapors and liquids.
• Do not store or use gasoline or other ammable vapors and liquids in the vicinity of this or any other
appliance.
• Do not mix chlorine bleach with ammonia or acids such as vinegar. Follow package directions when using
laundry products. Incorrect usage can produce poisonous gas, resulting in serious injury or death.
• Never use harsh chemicals, abrasive cleaners, or solvents to clean the washer. They will damage the nish.
• Do not wash articles that have been previously cleaned in, washed in, soaked in, or spotted with gasoline,
dry-cleaning solvents, vegetable or cooking oil, or other ammable or explosive substances, as they give off
vapors that could ignite or explode.
• Do not add gasoline, dry cleaning solvents, or other ammable or explosive substances to the wash water.
These substances give off vapors that could ignite or explode.
• In the event of a gas leak (propane gas, LP gas, etc.) do not operate this or any other appliance. Open a
window or door to ventilate the area immediately.
• Do not tamper with controls.
• Fix the drain hose securely in place to avoid ooding.
• Do not abuse, sit on, or stand on the lid (door) of the appliance.
• Keep hands and foreign objects clear of the lid (door) and latch area when closing the lid (door).
• Always check the inside of the appliance for foreign objects.
5SAFETY INSTRUCTIONS
ENGLISH
MAINTENANCE
• Do not repair or replace any part of the appliance. All repairs and servicing must be performed by qualied
service personnel unless specically recommended in this owner’s manual. Use only authorized factory
parts.
• Disconnect this appliance from the power supply before cleaning and attempting any user maintenance.
Turning the controls to the OFF position does not disconnect this appliance from the power supply.
• Remove any dust or foreign matter from the power plug pins.
• Do not disassemble or repair the appliance by yourself.
• Remove the lid (door) before the appliance is removed from service or discarded to avoid the danger of
children or small animals getting trapped inside.
• Make sure the dispenser drawer or lid (door) is closed at all times when not being lled with laundry
products.
GROUNDING INSTRUCTIONS
• Improper connection of the equipment-grounding conductor can result in a risk of electric shock. Check with
a qualied electrician or service personnel if you are in doubt whether the appliance is properly grounded.
Do not modify the plug provided with the appliance; if it will not t the outlet, have a proper outlet installed by
a qualied electrician.
• The appliance must be grounded. In the event of a malfunction or breakdown, grounding will reduce the risk
of electric shock by providing a path of least resistance for electric current. The appliance is equipped with
a cord having an equipment-grounding conductor and a grounding plug. The plug must be plugged into an
appropriate outlet that is installed and grounded in accordance with all local codes and ordinances.
Page 6

6 SAFETY INSTRUCTIONS
CAUTION
To reduce the risk of minor or moderate injury to persons, malfunction, or damage
to the product or property when using this product, follow basic precautions,
including the following:
INSTALLATION
• Install the product on a rm and level oor.
OPERATION
• Do not place objects on top of the appliance.
• Turn off the water faucets and unplug the appliance if the appliance is to be left for an extended period of
time, such as during vacations.
• ALWAYS follow the fabric care instructions supplied by the garment manufacturer.
• Use fabric softeners or products to eliminate static only as recommended by the manufacturer.
• Do not combine laundry products for use in one load unless specied on the label.
• Do not touch draining water which may be hot.
• If the drain hose and the water supply hose are frozen in winter, defrost before using the appliance.
• Do not store or spill liquid detergents, cleaners, or bleaches (chlorine bleach, oxygen bleach) on the
appliance. Doing so may result in corrosion, discoloration or damage to the surface of the appliance.
• Clothing or articles that are waterproof or water resistant must be washed in the Waterproof cycle only.
(e.g. water resistant clothing, mattress covers, outdoor clothes, plastic mats, etc.) Otherwise, it may result
in personal injury or damage to the washer, clothes, walls, oor, and surrounding objects due to abnormal
vibration.
SAVE THESE INSTRUCTIONS
Page 7
PRODUCT OVERVIEW
9
7PRODUCT OVERVIEW
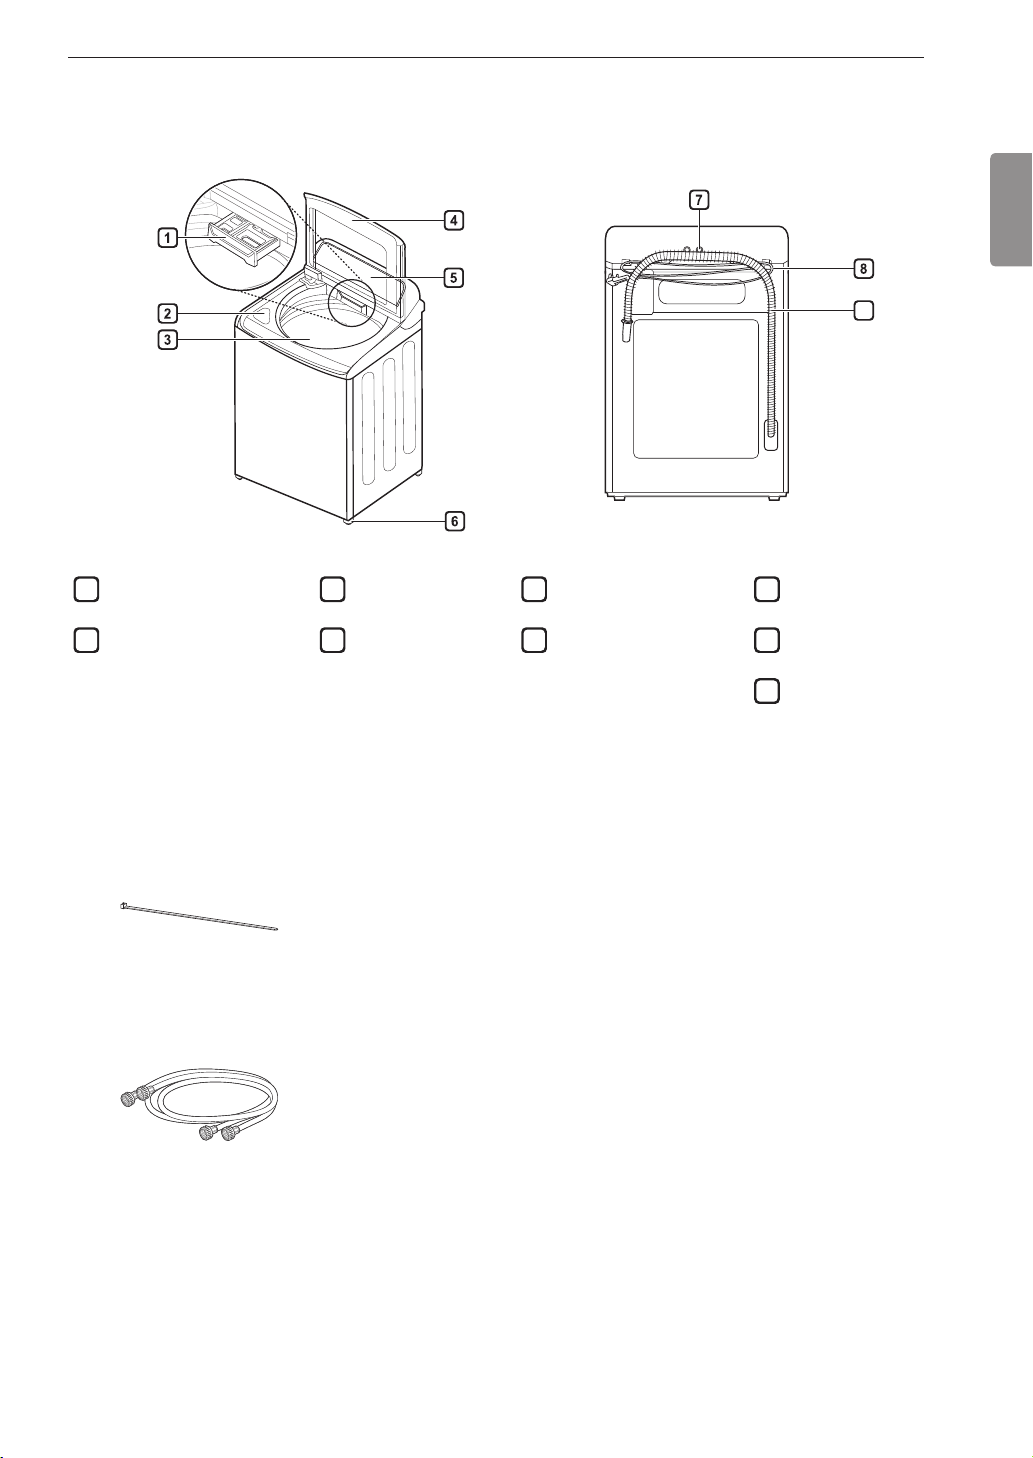
Parts
Detergent Dispenser
1
Liquid Bleach
2
Compartment
Tub
3
Lid (Door)
4
Control Panel
5
Leveling Feet
6
Water Inlets
7
Power Cord
8
Drain Hose
9
ENGLISH
Accessories
Included Accessories
Tie Strap
Required Accessories
Hot and Cold Water Hoses
NOTE
• The images in this guide may be different from the actual components and accessories, which are subject to
change by the manufacturer without prior notice for product improvement purposes.
• For your safety and for extended product life, use only authorized components. The manufacturer is not
responsible for product malfunction or accidents caused by the use of separately purchased unauthorized
components or parts.
Page 8
8 INSTALLATION
INSTALLATION
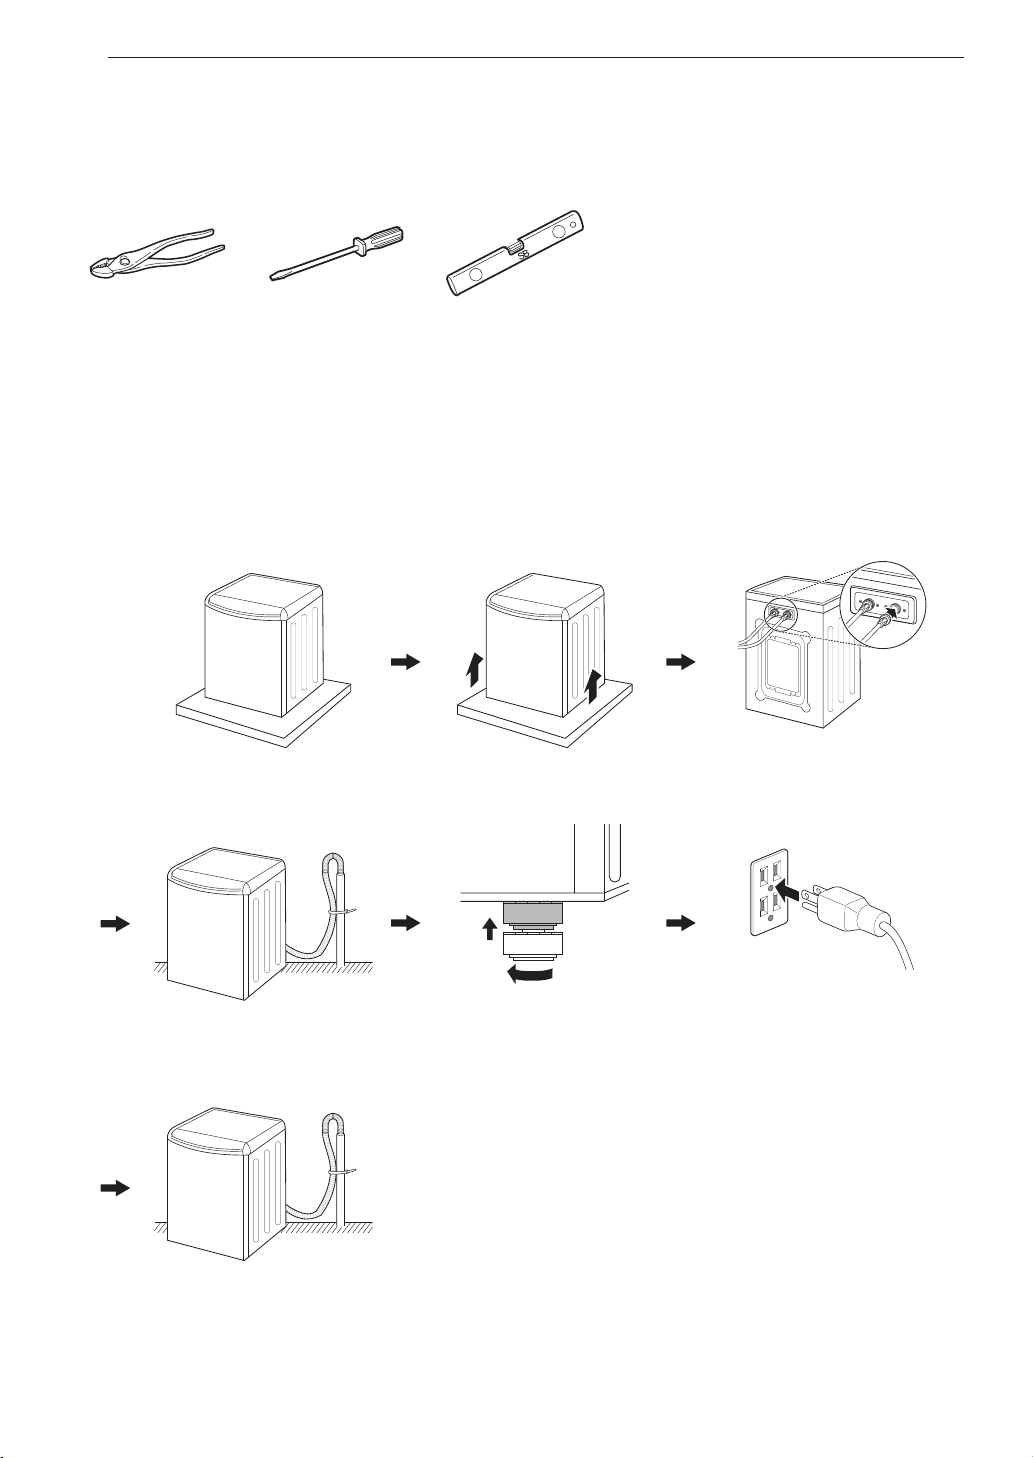
Tools Needed
Pliers Flat-blade
Screwdriver
Level
Installation Overview
Please read the following installation instructions first after purchasing this product or transporting it to another
location.
Choosing the proper location
Unpacking and removing shipping
material
Connecting the water lines
Connecting the drain hose
TEST!
Testing the washer
Leveling the washer
Connecting to the power supply
Page 9
Product Specifications
The appearance and specifications listed in this manual may vary due to constant product improvements.
Electrical requirements 120 VAC @ 60 Hz
Min. / Max. water pressure 20 - 120 psi (138 - 827 kPa)
3
Dimensions
Net weight 132.3 lbs. (60.0 kg)
Max spin speed 950 RPM (±50 rpm)
27" (W) X 28
68.6 cm (W) X 72.1 cm (D) X 113 cm (H), 145.3 cm (H with lid (door) open)
WARNING
• Moving or installation of the appliance requires two or more people. Failure to follow these instructions may
result in injury.
• Store and install the appliance where it will not be exposed to temperatures below freezing or exposed to
outdoor weather conditions. Failure to follow this warning can cause product or part failure, serious injury,
fire, electric shock, or death.
• Properly ground the washer to conform with all governing codes and ordinances. Failure to follow this
warning can cause serious injury, fire, electric shock, or death.
• To reduce the risk of electric shock, do not install the appliance in humid spaces. Failure to follow this
warning can cause serious injury, fire, electric shock, or death.
• To ensure proper airflow, do not block the large opening on the bottom of the washer with carpeting or other
materials.
• Do not remove the ground prong. Do not use an adapter or extension cord. Plug into a grounded 3-prong
outlet. Failure to follow this warning can cause serious injury, fire, electric shock, or death.
• Certain internal parts are intentionally not grounded and may present a risk of electric shock only during
servicing. Service personnel-do not contact the following parts while the appliance is energized. : pump,
motor, noise filter cover, and heater (on applicable models).
/8" (D) X 44 1/2" (H), 57 1/4" (H with lid (door) open)
9INSTALLATION
ENGLISH
Page 10
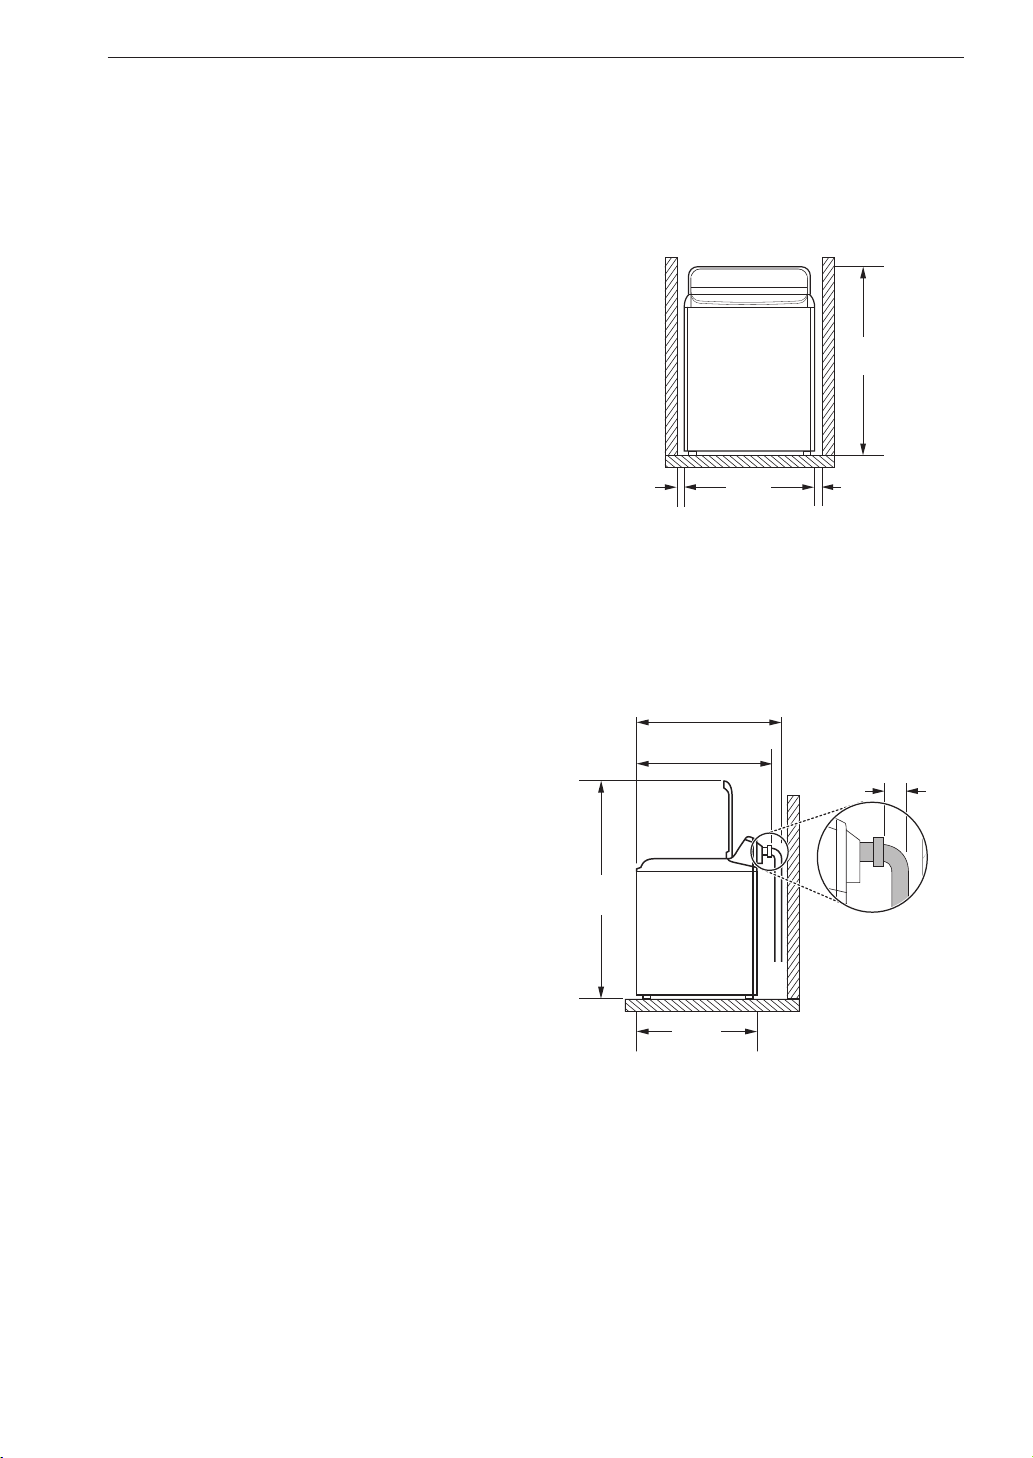
10 INSTALLATION
(68.6 cm)
(2.5 cm)
(2.5 cm)
32"
Choosing the Proper
Location
Install the washer on a solid floor that is strong and
rigid enough to support the weight of the washer,
even when fully loaded, without flexing or bouncing.
If the floor has too much flex, you may need to
reinforce it to make it more rigid. If the floor is not
solid, it may cause severe vibration and noise.
NOTE
• Before installing the washer, make sure the oor
is clean, dry and free of dust, dirt, water and oil so
the washer feet cannot slide easily. Leveling feet
that can move or slide on the oor can contribute to
excess vibration and noise due to poor contact with
the oor.
• Allow for sufcient space between the walls and the
washer for installation.
Power Outlet
• The power outlet must be within 60 inches (1.5 m)
of either side of the washer.
• The appliance and outlet must be positioned so that
the plug is easily accessible.
• Do not overload the outlet with more than one
appliance.
• The outlet must be grounded in accordance with
current electrical wiring codes and regulations.
• Use a time-delay fuse or circuit breaker.
NOTE
• The washer must be installed on rm ooring to
minimize vibration during the spin cycle. Concrete
ooring is best, but a wood oor is sufcient,
provided it is built to FHA standards.
Floor Installation
44 ¼"
(113 cm)
1"
27"
To ensure sufficient clearance for water lines, the
drain line and airflow, allow minimum clearances of
at least 1 inch (2.5 cm) at the sides and 4 inches (10
cm) behind the unit. Be sure to allow for wall, door,
or floor moldings that may increase the required
clearances.
(81.1 cm)
28 ⅜"
(72.1 cm)
1"
3 ½"
(9 cm)
NOTE
• It is the personal responsibility and obligation of the
product owner to have a proper outlet installed by a
qualied electrician.
Flooring
• To minimize noise and vibration, the washer must
be installed on a solidly constructed floor.
• Allowable slope under the entire washer is a
maximum 1 inch difference from side to side or from
front to back.
• Installing on carpeting and soft tile surfaces is not
recommended.
• Never install the washer on a platform or weakly
supported structure.
57 ¼"
(145.3 cm)
26 ¾"
(68 cm)
• Minimum vertical space from floor to overhead
shelves, cabinets, ceilings, etc., is 58 inches (147
cm).
Page 11
11INSTALLATION
Unpacking and Removing
Shipping Material
Unpack all shipping materials from the washer for
proper operation and inspect it for shipping damage.
CAUTION
• Failure to remove shipping materials can cause
excessive noise and vibration.
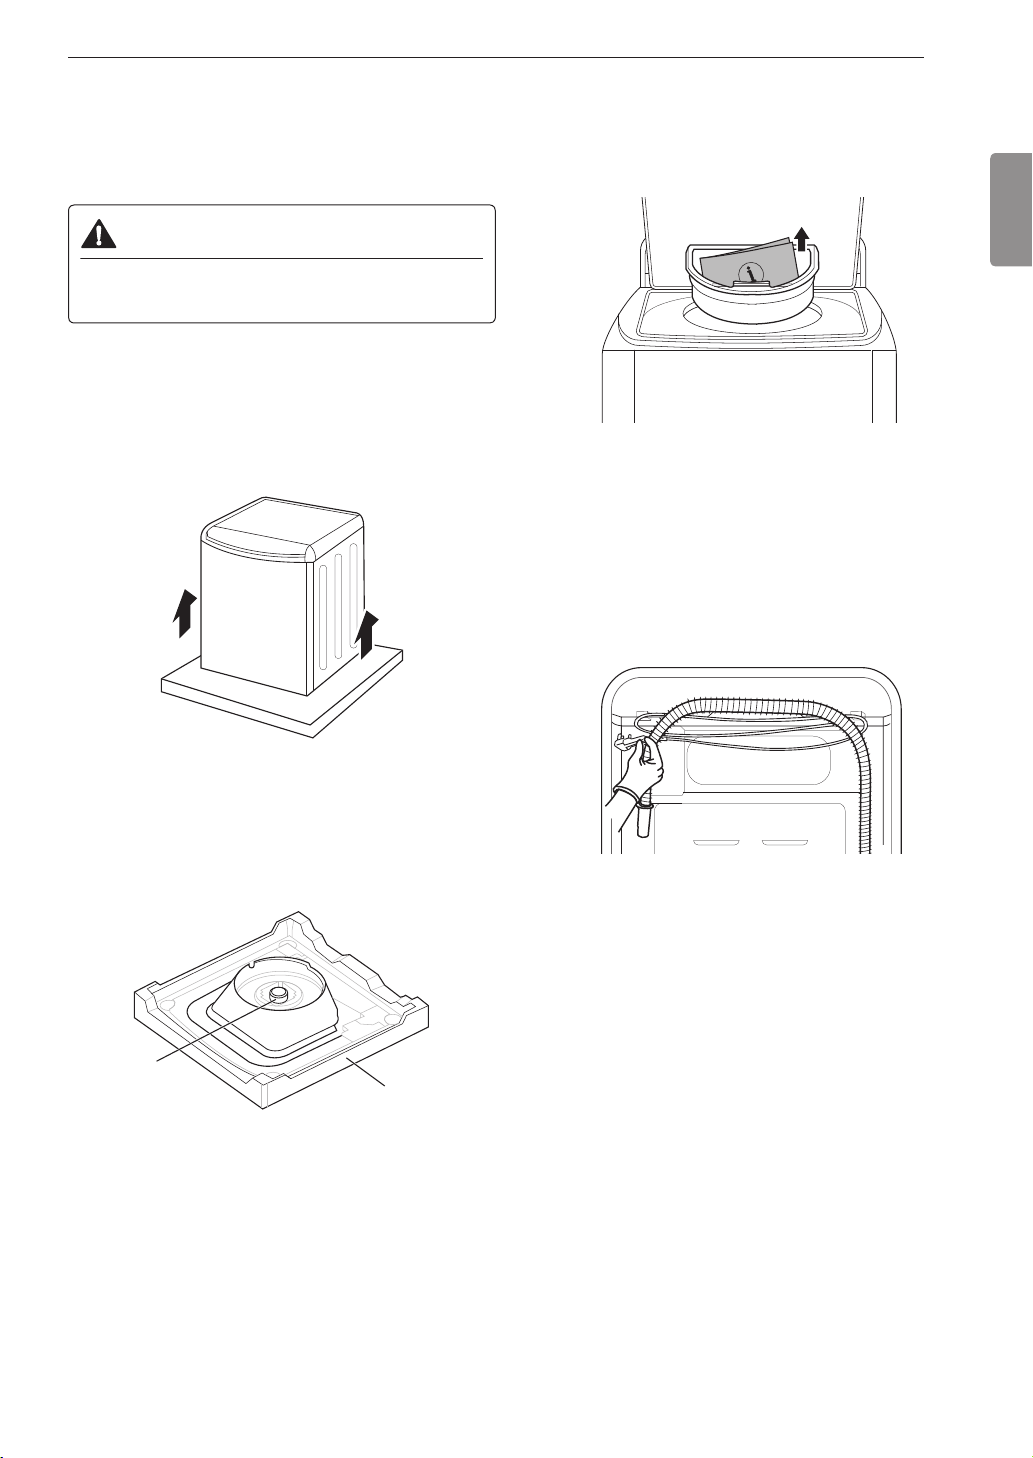
Lift the washer off the foam base.
1
After removing the carton and shipping material,
lift the washer off the foam base. Make sure the
plastic tub support comes off with the base and is
not stuck to the bottom of the washer.
To prevent damage, do not remove the foam
2
block containing the owner’s manual, parts, and
laundry product samples from the washer tub until
the washer is in the final location.
NOTE
• Once removed, save the foam block for future use.
If the washer needs to be moved, the foam block
will help prevent damage during transportation.
Unfasten the power cord from the back of the
3
washer.
ENGLISH
If you must lay the washer down to remove the
base packaging materials, always protect the side
of the washer and lay it carefully on its side. Do
not lay the washer on its front or back.
Plastic tub support
Carton base
Page 12
12 INSTALLATION
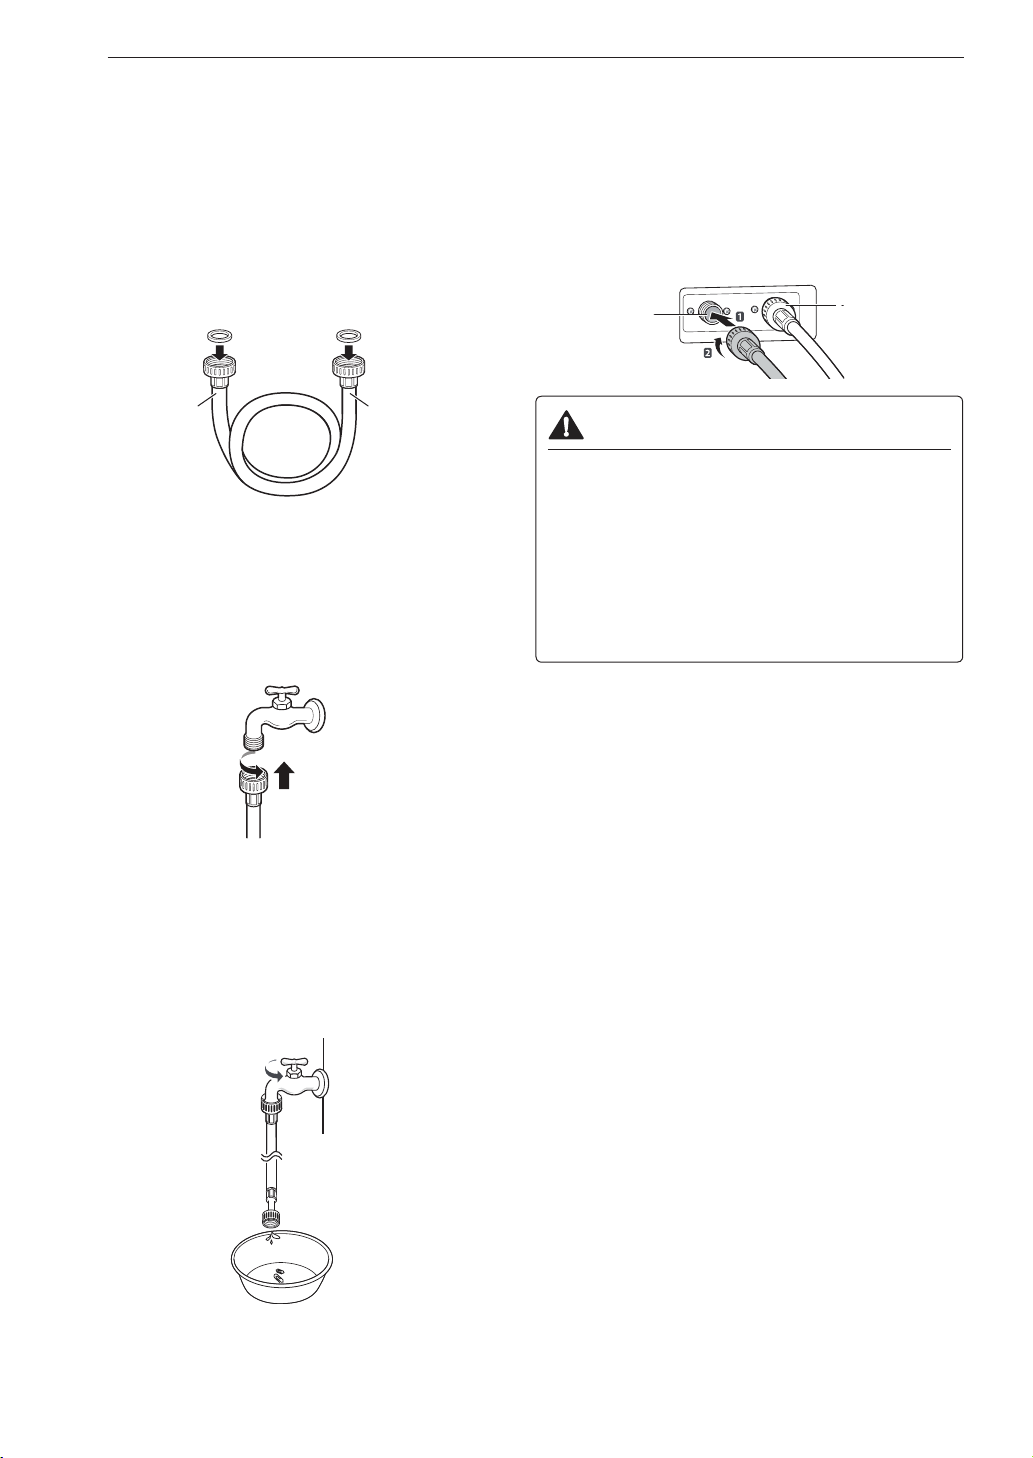
Connecting the Water Lines
To avoid the risk of costly water damage, purchase
and install new inlet hoses when installing the
washer.
Check the fittings and seals.
1
Inspect the threaded fitting on each hose and
make sure there is a rubber seal in place in both
ends of each hose to prevent leaking.
Rubber seal Rubber seal
Water hose (to water
inlet on washer)
Connect the water supply hoses.
2
Connect the water supply hoses to the hot and
cold water faucets tightly by hand and then
tighten another 2/3 turn with pliers. Connect the
blue hose to a cold water faucet and the red hose
to a hot water faucet.
Water hose (to tap)
Attach the water lines to the back of the
4
washer.
Attach the hot water line to the hot water inlet on
the back of the washer. Attach the cold water line
to the cold water inlet on the back of the washer.
Tighten the fittings securely. Turn ON both faucets
all the way and check for leaks at both ends of the
hoses.
Hot water inlet
Cold water inlet
WARNING
• Do not overtighten the hoses or cross-thread the
hose ttings. Overtightening or cross-threading
can damage the valves or couplings, resulting in
leaking and property damage.
• Do not reuse old hoses. Use only new hoses
when installing the washer. Old hoses could leak
or burst causing ooding and property damage.
Contact an LG Customer Information Center for
assistance in buying hoses.
Flush out the inlet hoses.
3
After connecting the inlet hoses to the water
faucets, turn on the water faucets to flush out
foreign substances (dirt, sand or sawdust) in the
water lines. Let water drain into a bucket, and
check the water temperature to make sure you've
connected the hoses to the correct faucets.
NOTE
• Periodically check the hoses for cracks, leaks, and
wear, and replace the hoses every ve years. Do
not stretch the water hoses intentionally, and make
sure that they are not pinched, crushed or kinked by
other objects.
• Water supply pressure must be between 20 psi
and 120 psi (138 – 827 kPa). If the water supply
pressure is more than 120 psi, a pressure reducing
valve must be installed.
• To provide optimum washing performance, the hot
water temperature should be set at 120 – 135 °F
(48 – 57 °C) and the cold at 60 °F (15 °C).
• The washer should never be installed or stored in a
location subject to freezing temperatures. Damage
to the water lines and internal mechanisms of the
washer can result. If the washer was exposed to
freezing temperatures prior to installation, allow it to
stand at room temperature for several hours before
use and check for leaks prior to operation.
• Do not use ood-preventing hoses with auto shutoff
devices. The devices can be tripped during ll and
prevent the machine from lling properly.
Page 13
13INSTALLATION
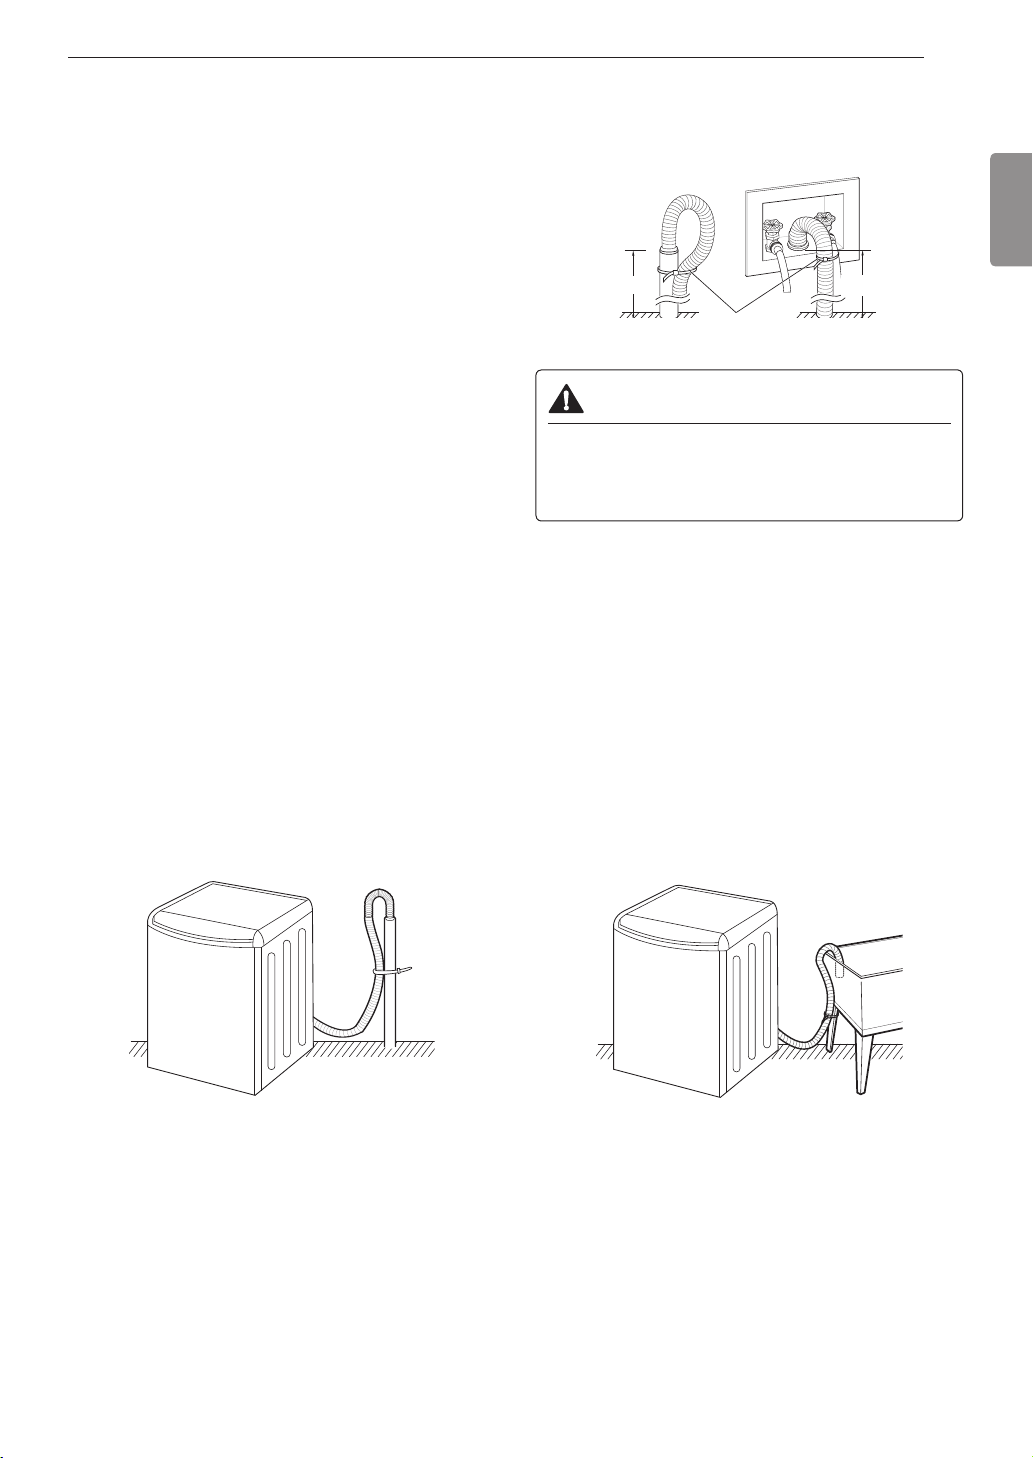
(75 - 244 cm)
(75 - 244 cm)
Connecting the Drain Hose
Connect the drain hose to either a standpipe or
laundry tub.
NOTE
• The drain hose should always be properly secured.
Failure to properly secure the drain hose can result
in ooding and property damage.
• The drain must be installed in accordance with any
applicable local codes and regulations.
• Make sure that the drain hose is not stretched,
pinched, crushed, or kinked.
• Do not install the drain hose with the end lower than
29.5 inches (75 cm) or higher than 96 inches (244
cm) above the bottom of the washer or more than
60 inches (152 cm) away from the washer.
• Never create an airtight seal between the hose and
the drain with tape or other means. If no air gap
is present, water can be siphoned out of the tub
resulting in poor wash/rinse performance or clothing
damage.
• Normal height of the end of the hose should be
approximately 35 inches (89 cm) to 47 inches (120
cm) from the oor.
If the water valves and drain are built into the wall,
3
fasten the drain hose to one of the water hoses
with the tie strap provided (ribbed side on inside).
29.5 - 96 "
Tie strap
29.5 - 96 "
CAUTION
• Do not insert the end of the drain hose into the
standpipe more than 8 inches (20 cm). Doing
so can cause siphoning, odors, or improper
draining.
NOTE
• If the drain is large enough for the ange on the
hose to t inside, then do not insert the ange more
than 1-2 inches into the drain.
ENGLISH
Option 1: Standpipe
Insert the end of the drain hose into the
1
standpipe.
Use the provided tie strap to secure the drain
2
hose in place.
Option 2: Laundry Tub
Hang the end of the drain hose over the side of
1
the laundry tub.
Use the provided tie strap to secure the drain
2
hose in place.
Page 14
14 INSTALLATION
Leveling the Washer
The tub of the washer spins at very high speeds. To
minimize vibration, noise, and unwanted movement,
the floor must be a level, solid surface.
NOTE
• Adjust the leveling feet only as far as necessary to
level the washer. Extending the leveling feet more
than necessary can cause the washer to vibrate.
• Before installing the washer, make sure that the
oor is clean, dry and free of dust, dirt, water and
oil so the washer feet cannot slide easily. Feet
that move or slide on the oor can contribute to
excessive vibration and noise due to poor contact
with the oor.
Position the washer in its final location.
1
Take special care not to pinch, strain, or crush the
water and drain lines. If you have a carpenter’s
level, you can use it to check that the washer is
level. The slope beneath the washer should not
exceed 1 inch, and all four leveling feet must rest
firmly on the floor.
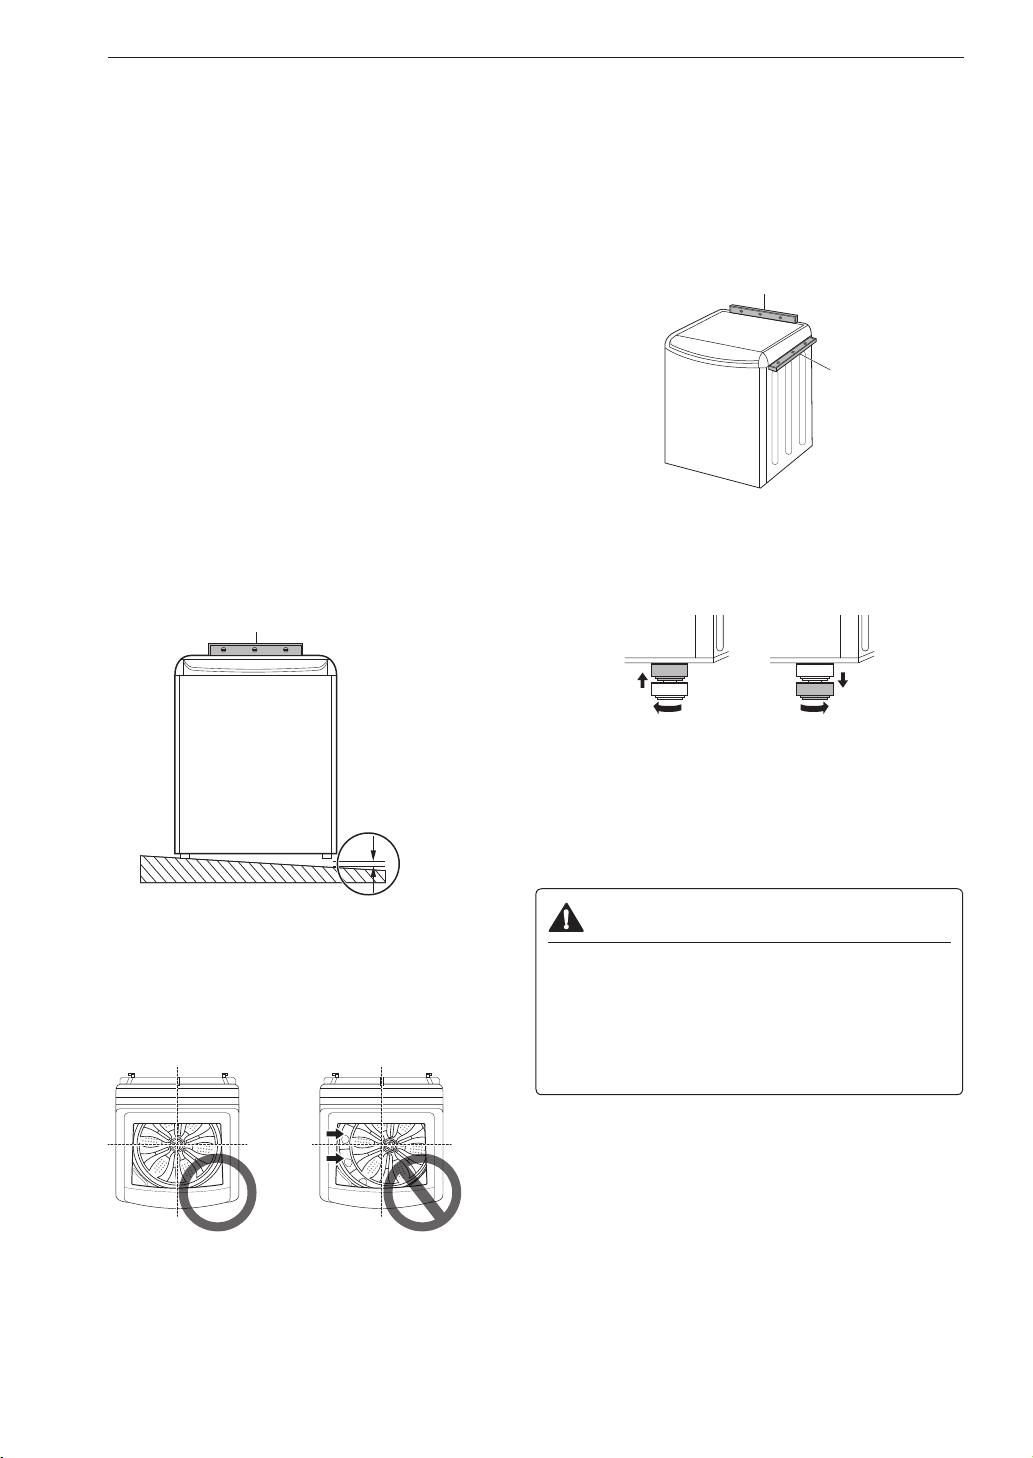
Level
NOTE
• To check if the washer is level from side to side,
place a level on the back edge of the lid (door).
• To check if the washer is level from front to back,
place a level at the side of the washer on the
edge where the cabinet side meets the top cover.
Do not place the level on the top of the lid (door).
Using these surfaces will result in the washer being
unlevel.
Adjust the lower leveling feet.
3
Turn in one direction to raise the washer or the
other direction to lower it.
Level from side to side
Level from
front to back
1"
Open the lid (door) and look from above to see
2
if the tub is centered.
If the tub is NOT centered, readjust the front feet.
If you have a level, check the washer with the
level.
Raise Lower
Recheck the washer’s levelness.
4
Push or rock the top edges of the washer gently
to make sure the washer does not rock. If the
washer rocks, repeat steps 1-3.
CAUTION
• Using the washer without leveling it may cause
excess vibration and noise, leading to a machine
malfunction.
• Extend the leveling feet only to level the washer.
If you extend the leveling feet unnecessarily, it
may cause abnormal vibration of the washer.
NOTE
• If the washer is not level, the lid (door) may not
stay open properly. If this happens, extend the front
leveling legs until the washer is level from front to
back.
Page 15

15INSTALLATION
Connecting to the Power
Supply
The washer should be plugged into a 120-VAC, 60
Hz grounded 3-prong outlet. Plug in the washer.
WARNING
• Do not use a worn or damaged power cord or
power plug. Replace or repair it immediately.
Failure to do so may result in death, fire, electric
shock, or malfunction.
• Do not modify the power cord and plug
provided with the appliance. Do not damage
it when installing or moving the washer. Doing
so may result in death, fire, electric shock, or
malfunction.
• Make sure that the washer is grounded.
• Connect this washer to a grounded outlet
conforming to the rating prior to use. Failure
to do so may result in fire, electric shock, or
malfunction.
• Do not damage or cut off the ground prong of
the power cord. Doing so may cause death, fire,
electric shock, or product malfunction.
• Improper connection of the equipment-grounding
conductor can result in risk of electric shock.
Check with a qualified electrician or service
technician if you are in doubt as to whether the
appliance is properly grounded. If it does not fit
the outlet, have a proper outlet installed by a
qualified electrician.
• The appliance and outlet must be positioned so
that the plug is easily accessible.
• Do not use adapters or extension cords. Doing
so may result in serious injury, fire, electric
shock, or death.
• For best performance, plug the washer into
its own individual outlet. This helps prevent
overloading house wiring circuits which could
cause a fire hazard from overheated wires.
• If necessary, use a new, UL-listed 3-prong
adapter or 3-wire extension cord with a 3-prong
(grounding) plug rated at no less than the branch
circuit. Do not use an extension cord longer
than 3 feet. Failure to follow these warnings may
result in serious injury, fire, electric shock, or
death.
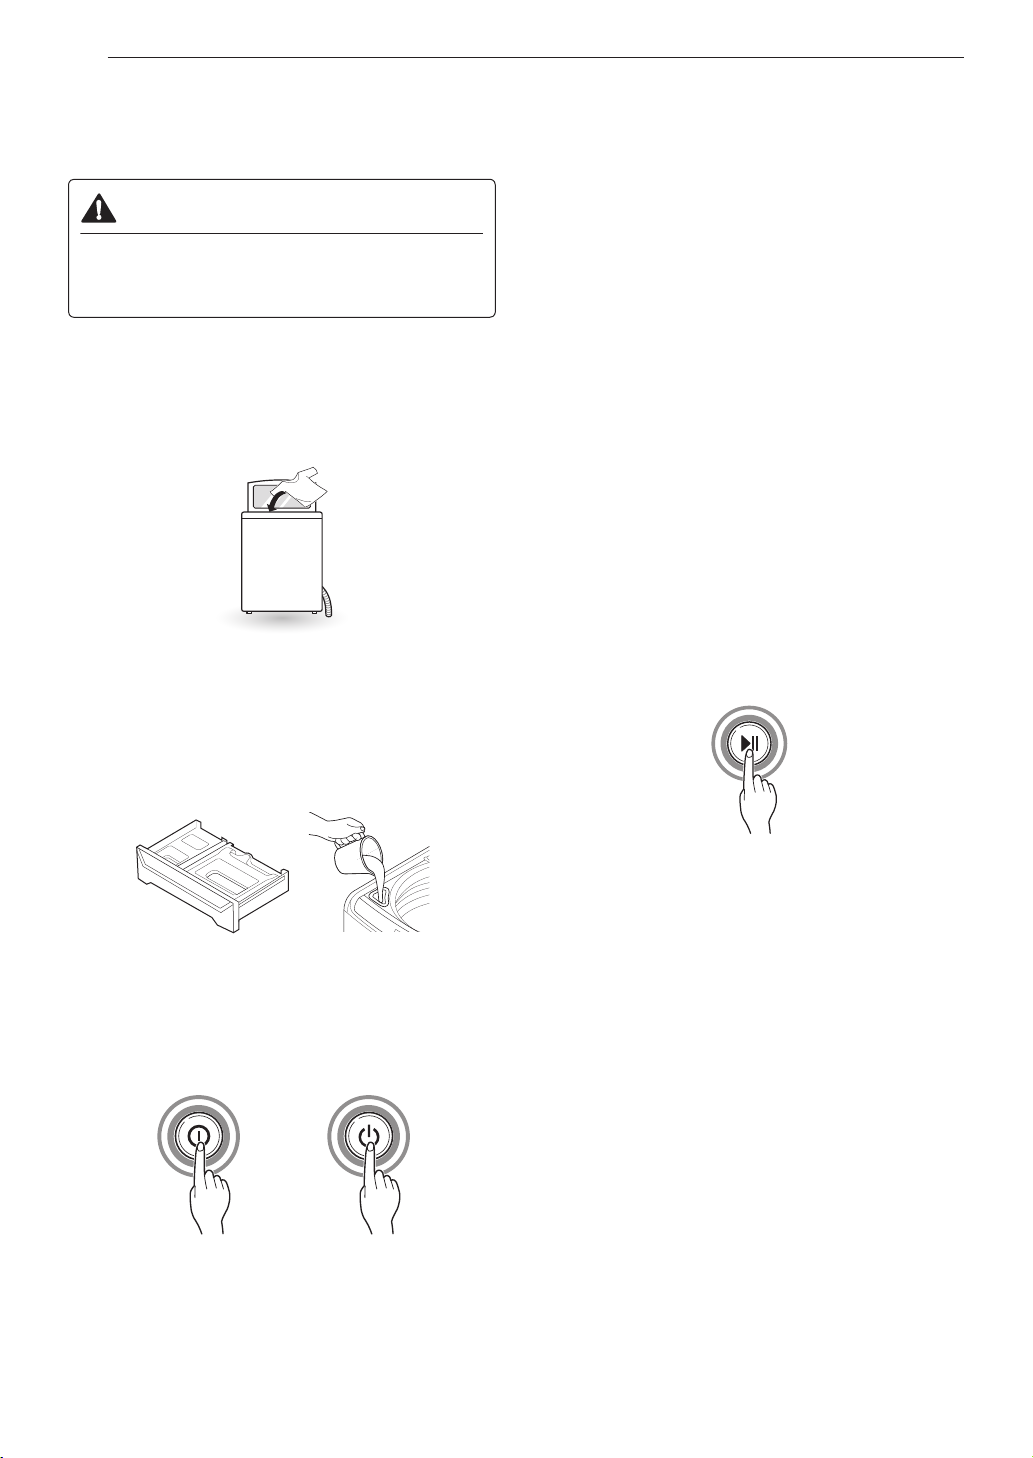
Testing the Washer
Check if the washer is properly installed and run a
test cycle.
Make sure the tub is empty. Do not load anything
1
in the tub for this test.
Press the Power button then immediately press
2
and hold both the Spin and Soil buttons until an
code appears in the display. (See below for
a key to the codes.)
Display Information
Initial test
Previous test result was good.
Previous test was ended with an
error.
NOTE
•
is displayed rst, and , or is displayed.
• The indication is different for each model.
Press the Start/Pause button.
3
The washer will start the test, which will last about
3 minutes. The test automatically checks the
water inlet hoses and the drain hose.
Check the display for results.
4
If error code is displayed, refer to the following
guide.
Error Code Solution
Fully open the water faucets.
Straighten out any kinks in the inlet
hoses and make sure the hoses are
not pinned against the wall or under
the washer.
Straighten out any kinks in the drain
hose and make sure the hose is not
pinned against the wall or under the
washer. Remove and flush out the
drain hose to remove clogs. Adjust
or repair the drain. Maximum drain
height is 96 inches.
ENGLISH
End of cycle.
5
At the end of the test cycle,
display. The test cycle will end and the washer will
shut off automatically after a short delay.
or will
Page 16
16 OPERATION
OPERATION
Using the Washer
WARNING
• To reduce the risk of re, electric shock, or injury
to persons, read the SAFETY INSTRUCTIONS
before operating this appliance.
Sort laundry and load the washer.
1
Sort laundry by fabric type, soil level, color and
load size, as needed. Open the lid (door) and load
items into the washer.
Add cleaning products.
2
Add the proper amount of HE (High-Efficiency)
detergent to the detergent dispenser. If desired,
add bleach or fabric softener to the appropriate
dispensers.
Select a cycle.
4
Turn the cycle selector knob or press the cycle
buttons repeatedly until the desired cycle is
selected. The preset wash temperature, spin
speed, soil level and option settings for that cycle
are shown.
• Pressing the Start/Pause button without
selecting a cycle will cause the Normal cycle to
begin immediately.
Adjust settings.
5
Default settings for the selected cycle can now be
changed, if desired, using the cycle modifier and
option buttons.
NOTE
• Not all modiers and options are available on all
cycles. A different chime sounds and the LED does
not light up if the selection is not allowed.
Begin cycle.
6
Press the Start/Pause button to begin the cycle.
The lid (door) locks, and the washer agitates
briefly without water to measure the weight of the
load.
Turn on the washer.
3
Press the Power button to turn on the washer.
The lights above the cycle buttons will illuminate
and a chime will sound.
Additional garments can be added to the tub
7
while the Add Garment light is on.
The Add Garment light illuminates near the
beginning of the wash cycle to indicate when
it is safe to add items to the load. Press the
Start/Pause button to pause the cycle and add
garments to the load. Press the Start/Pause
button to resume the cycle.
NOTE
• Adding items after the Add Garment light turns off
may result in poor wash performance.
End of cycle.
8
When the cycle is finished, a melody sounds.
Immediately remove the clothing from the washer
to reduce wrinkling.
• If the washer includes lint filters, remember to
check them after every 2 to 3 loads.
Page 17
17OPERATION
Sorting Laundry
CAUTION
• The washer can be fully loaded, but the tub
should not be tightly packed with items. The lid
(door) of the washer should close easily.
• Use the Bedding cycle for buoyant or
nonabsorbent items such as pillows or
comforters. Failure to follow this caution can
result in leakage.
• Clothing or articles that are waterproof or water
resistant must be washed in the Waterproof
cycle only. (e.g. water resistant clothing, mattress
covers, outdoor clothes, plastic mats, etc.)
Otherwise, it may result in personal injury or
damage to the washer, clothes, walls, oor, and
surrounding objects due to abnormal vibration.
Grouping Similar Items
For the best washing results, and to reduce the
possibility of damage to clothing, care should be
taken to sort the clothing into loads that are made up
of similar items.
Mixing different fabric types and/or soil levels can
result in poor wash performance, color transfer,
discoloration, fabric damage or linting. Fabrics should
be sorted into groups as described below.
Colors
Sort articles by color. Wash dark clothes together in a
separate load from light colors or whites. Mixing dark
clothes with light clothes can result in dye transfer or
discoloration of the lighter clothes.
Soil Level
Wash heavily soiled clothing together. Washing lightly
soiled clothing in the same load with heavily soiled
clothing could result in poor wash performance for
the lightly soiled clothing.
Fabric Type
Delicate articles should not be mixed with heavy
or sturdy fabric types. Washing heavy fabrics in a
delicate load can result in poor wash performance
for the heavy fabrics and possible damage to the
delicates.
Lint Type
Some fabrics attract and bind lint to them while others
give off lint in the laundry process. Avoid mixing these
lint collectors and lint producers in the same load.
Mixing these fabrics will result in pilling and linting on
the lint collectors. (For example, lint collector—knit
sweater; lint producer—terry cloth towels.)
Sort Laundry
By Colors By Soil By Fabric By Lint
White Heavy Delicates
Lights Normal Easy Care
Darks Light Sturdy
Lint
Producer
Lint
Collector
Fabric Care Labels
Many articles of clothing include a fabric care label.
Using the chart below, adjust the cycle and option
selections to care for your clothing according to the
manufacturer’s recommendations.
Category Label Directions
Hand wash
Machine wash, Normal cycle
Perm Press/Wrinkle
Resistant setting (which has
a cool down or cold spray
before the slower spin)
Washing
Water
Temperature
Bleach
Symbols
Gentle/Delicate setting (slow
agitation and/or reduced
wash time)
Do not wash
Do not wring
Hot
Warm
Cold/Cool
Any bleach (when needed)
Only non-chlorine bleach
(when needed)
Do not bleach
ENGLISH
Page 18
18 OPERATION
Loading the Washer
• Check and empty pockets. Paper clips, coins,
matches, etc. can damage clothing and the washer.
• Close zippers and hooks, and tie drawstrings to
prevent snagging or tangling of clothes.
• Pretreat heavily stained areas for best results.
• Combine large and small items in a load. Load large
items first. Large items should not be more than half
of total load.
• Wash thick, bulky items individually. Heavy blankets,
comforters, bedspreads, or pet beds can get
tangled or cause an unbalanced load if combined
with other items.
• The washer can be fully loaded, but the tub should
not be tightly packed with items. The lid (door) of
the washer must close easily.
• Use the Bedding cycle for large or bulky items such
as poly-filled jackets, comforters, pillows, etc. These
items may not be as absorbent as other laundry
items and should be sorted into a separate wash
load for optimal results.
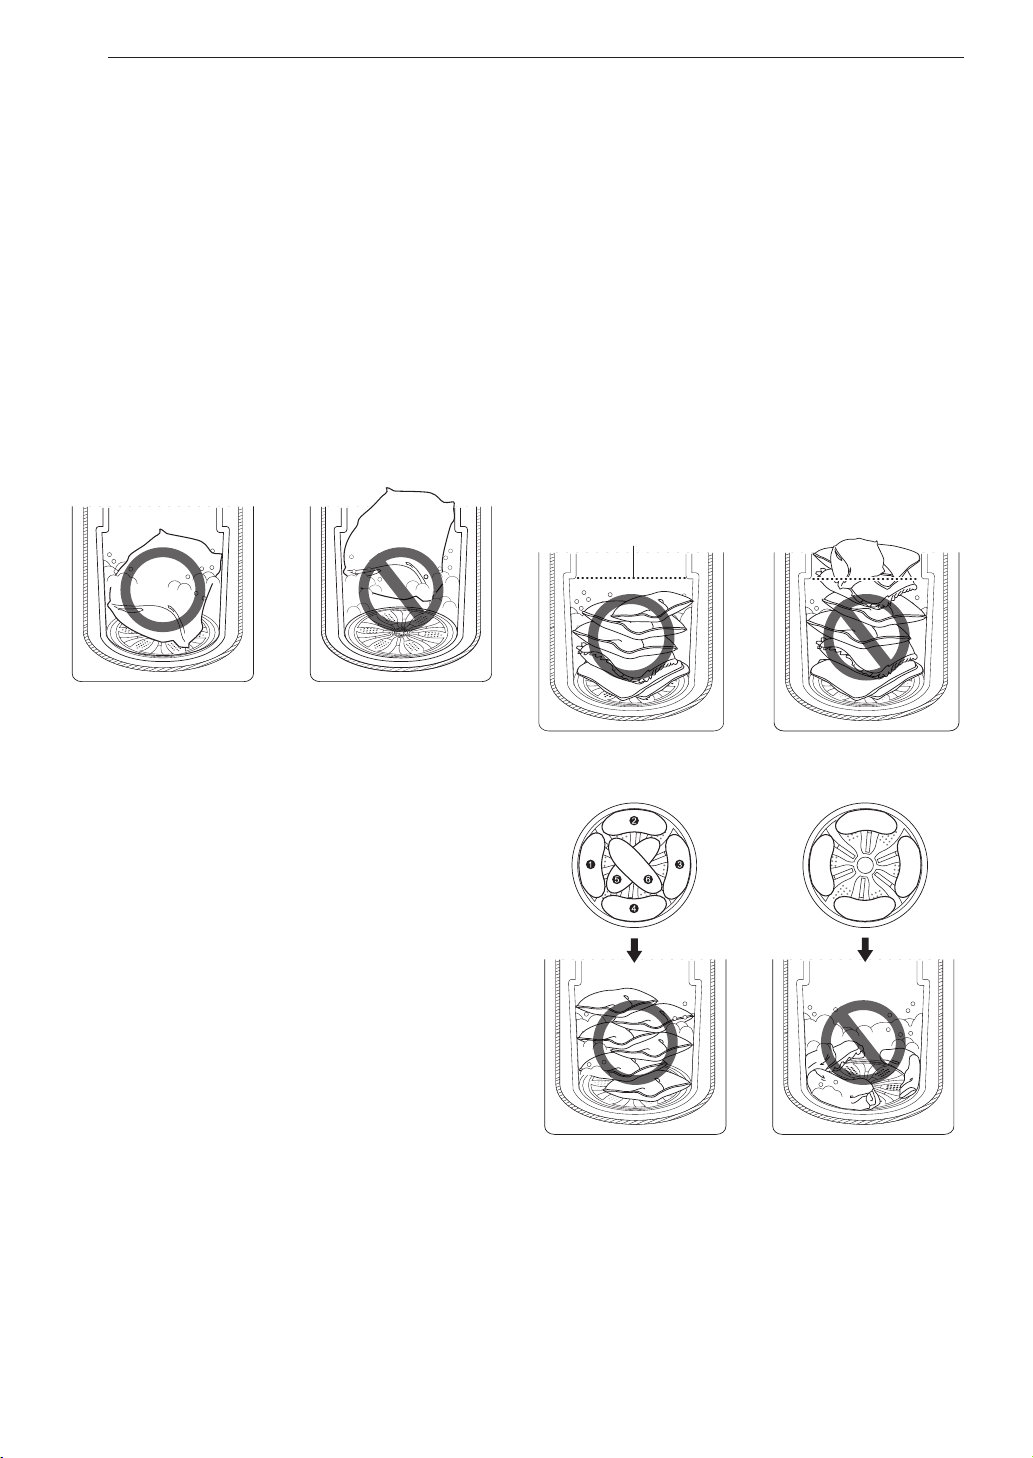
• Bulky items should be placed as far down in the
tub as possible for optimal results. Always place
buoyant items at the bottom of the tub. The washer
will automatically detect the load size. Because of
the high efficiency wash system, the water level
may not completely cover the load.
• Do not overload the tub. Clothes should fit loosely in
the tub under the maximum fill line. Loading clothes
over the fill line may result in damage to clothing
and the washer.
- Load clothes loosely, and do not overfill the tub.
Clothes need room to circulate in order to get
clean.
- Do not press down on items while stacking them
in the tub.
Maximum fill line
• Do not wash single small items. Add 1-2 similar
items to the load to prevent an out-of-balance load.
• Clothing or articles that are waterproof or water
resistant must be washed in the Waterproof cycle
only. (e.g. water resistant clothing, mattress covers,
outdoor clothes, plastic mats, etc.) Otherwise, it may
result in personal injury or damage to the washer,
clothes, walls, floor, and surrounding objects due to
abnormal vibration.
• Wash small, light items in a mesh bag. Small items
can get caught in the impeller at the bottom of the
tub, and brassiere hooks can damage other items
or the tub.
• Brush off heavy soil, dust, and hair from items
before washing. Excess dirt or sand can abrade
other fabrics and lead to poor wash performance.
• The washer will not fill or operate with the lid (door)
open.
• For best performance, load clothes as shown.
Page 19
19OPERATION
Adding Cleaning Products
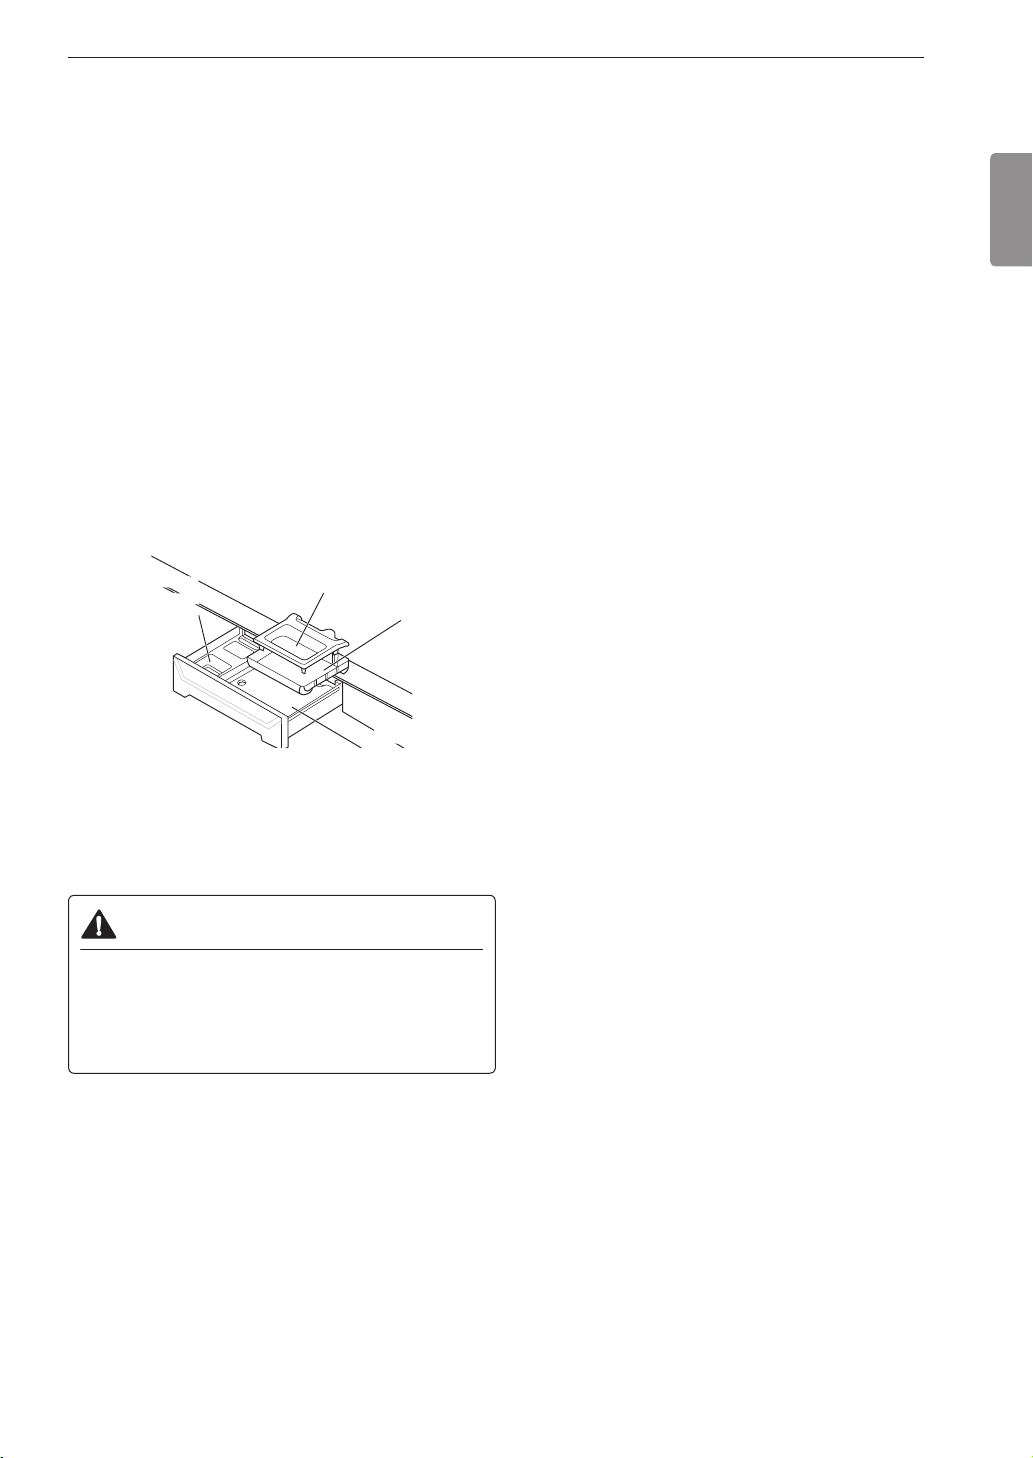
About the Dispensers
The automatic dispenser consists of two
compartments which hold:
• Liquid fabric softener
• Liquid or powdered detergent for main wash
Using the Detergent and Softener
Dispensers
To add detergent and fabric softener to the automatic
dispenser:
Open the dispenser drawer.
1
Load the laundry products into the
2
appropriate compartments.
Main wash liquid
Liquid fabric softener
compartment
Close the drawer completely before starting
3
the cycle.
• Be careful not to catch a hand in the drawer
while closing.
CAUTION
• Do not place or store laundry products, such
as detergent, bleach, or liquid fabric softener,
on top of your appliance. Wipe up any spills
immediately. These products can damage the
appliance’s finish and controls.
detergent compartment
Insert
Main wash powder
detergent compartment
Main Wash Detergent Compartment
This compartment holds laundry detergent for the
main wash cycle. Either powdered or liquid detergent
may be used in this compartment. The detergent
is added to the load at the beginning of the cycle.
Always use HE (High-Efficiency) detergent with your
washer.
NOTE
• Never exceed the manufacturer’s recommendations
when adding detergent. Using too much detergent
can result in detergent buildup in clothing and the
washer.
• When using liquid detergent, make sure the liquid
detergent compartment and insert are in place. Do
not exceed the maximum ll line.
• When using powdered detergent, remove the
insert and liquid detergent compartment from the
dispenser. Powdered detergent will not dispense
with the liquid detergent compartment and insert in
place.
• If you use a detergent that does not dissolve easily
or a detergent with high viscosity, it will leave a
residue and clog the dispenser.
Fabric Softener Compartment
This compartment holds liquid fabric softener, which
is automatically dispensed during the final rinse cycle.
NOTE
• Do not exceed the manufacturer’s
recommendations when adding softener. Using too
much fabric softener can result in buildup in clothing
and the washer. Either powdered or liquid fabric
softener may be used.
• Follow the manufacturer’s recommendations when
adding fabric softener. Do not exceed the maximum
fill line. Using too much fabric softener may stain
clothes.
• Dilute concentrated fabric softeners with warm
water.
• Never pour fabric softener directly onto the load or
into the tub.
ENGLISH
NOTE
• It is normal for a small amount of water to remain in
the dispenser compartments at the end of the cycle.
Page 20
20 OPERATION
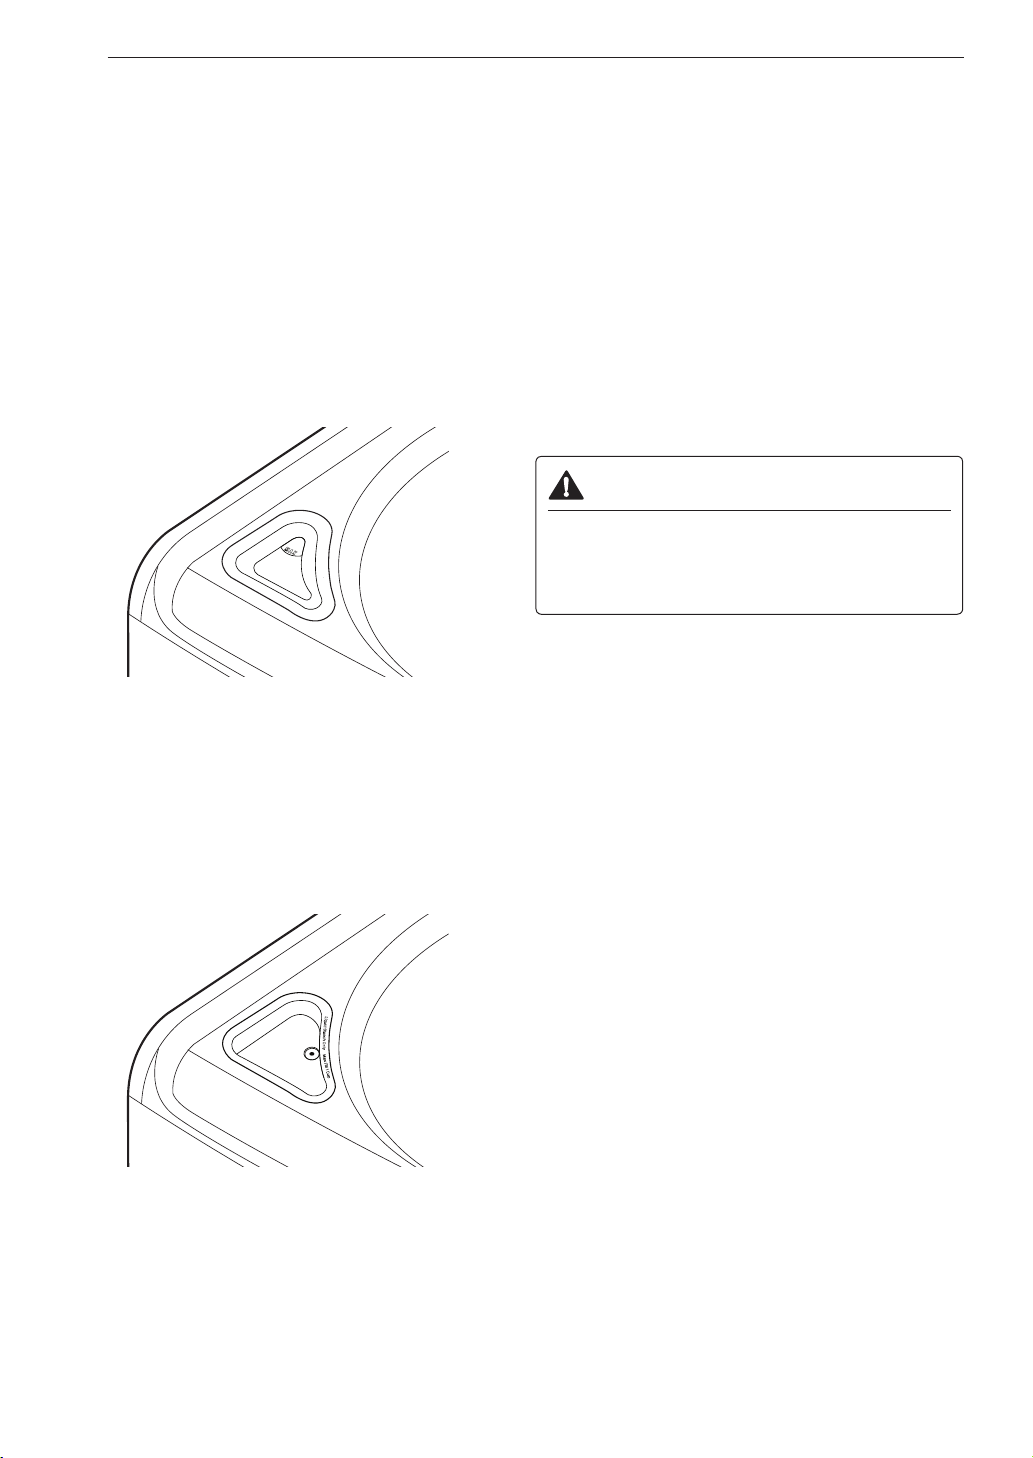
Using the Liquid Bleach Dispenser
The bleach dispenser is a separate compartment at
the left front of the tub opening.
Type 1
The bleach dispenser is connected to the inlet valve.
The bleach is automatically diluted and dispensed at
the proper time in the wash cycle.
NOTE
• The dispenser is activated twice to ensure complete
dispensing of the bleach. Any liquid remaining in
the dispenser at the end of the cycle is water, not
bleach.
Type 2
When you pour the bleach into the bleach dispenser,
the bleach is immediately added to the tub as it fills
with water, safely diluting the bleach.
NOTE
• The dispenser cover cannot be removed. To clean
the cover, wipe it with a damp paper towel.
Check clothing care labels for special instructions.
1
Measure liquid bleach carefully, following
2
instructions on the bottle.
• High-efficiency washers use less water, so less
bleach is needed. One half cup is enough for
most loads.
Carefully pour the pre-measured amount of
3
bleach directly into the bleach dispenser.
• If you are using powdered bleach of any kind,
pour it directly into the tub before adding the
laundry. Never add powdered bleach to the
liquid bleach dispenser.
WARNING
• Do NOT mix chlorine bleach with ammonia or
acids such as vinegar or rust/scale remover.
Mixing chemicals like these can produce a lethal
gas, resulting in severe injury or death.
NOTE
• Do not add powdered bleach to this dispenser. The
bleach dispenser is designed to dispense liquid
bleach only. Powdered or liquid color-safe bleach
will not dispense properly.
• Do not place laundry items on top of the bleach
dispenser when loading and unloading the washer.
• Always follow the manufacturer’s recommendations
when adding bleach. Never add more than one cup
and do not exceed the maximum fill line since this
can cause the bleach to be dispensed immediately,
resulting in damage to fabrics. Using too much
bleach can damage fabrics.
• Never pour undiluted liquid chlorine bleach directly
onto the load or into the tub. Fabric damage can
occur.
• Do not use color-safe bleach or Oxi products in the
same cycle with liquid chlorine bleach.
Page 21
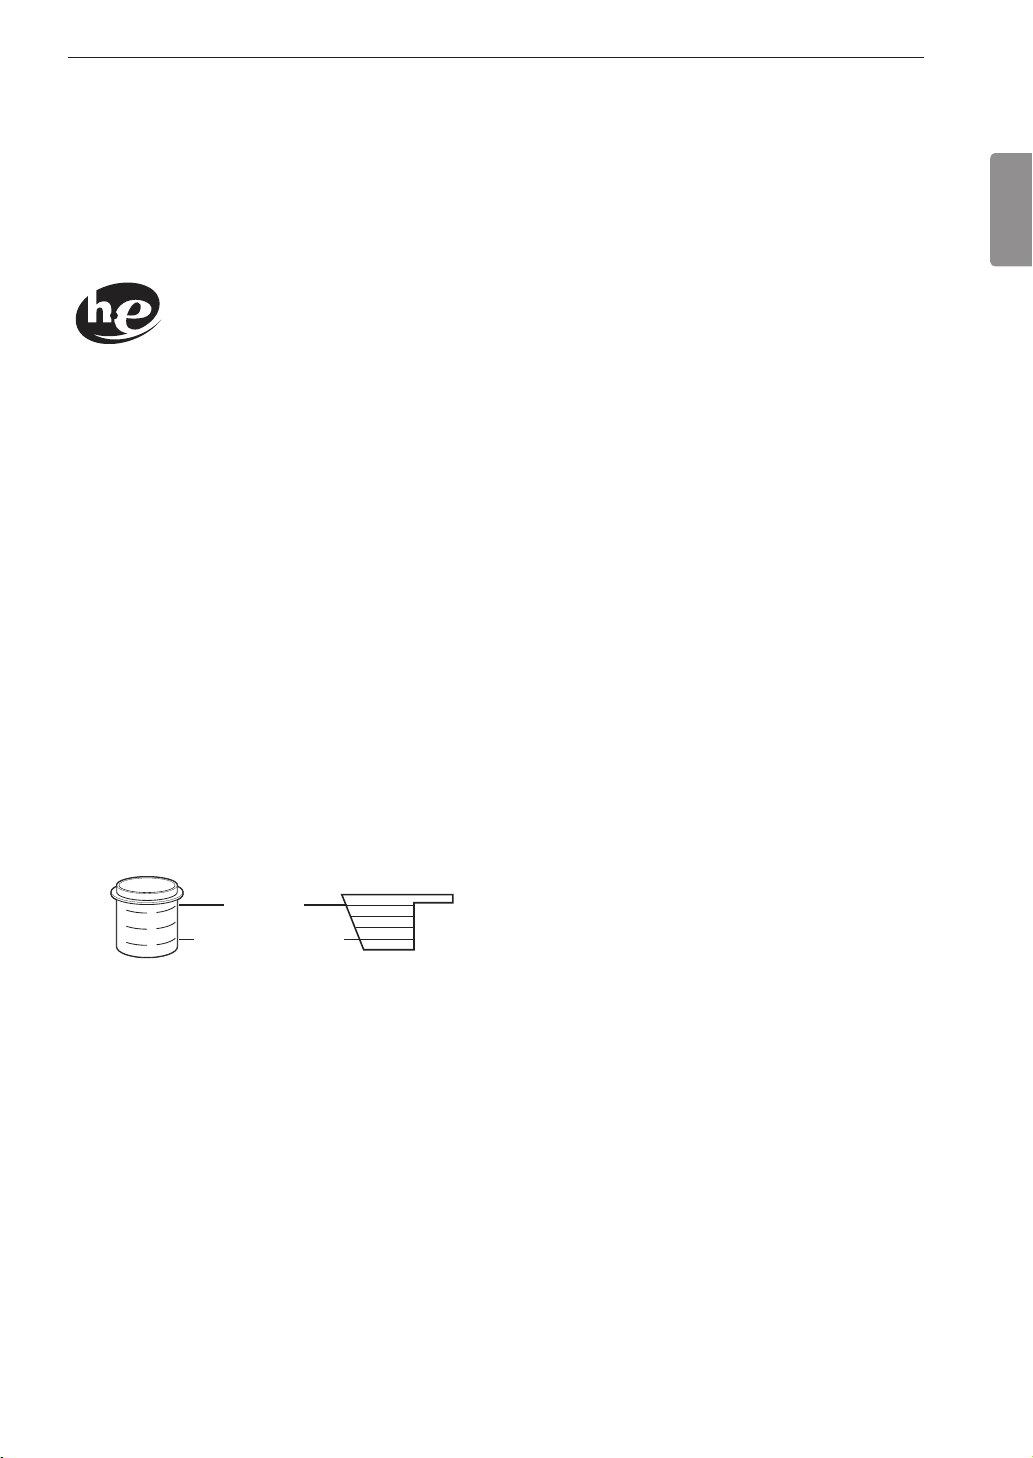
Detergent Use
• This washer is designed for use with only HE (High-
Efficiency) detergents. HE detergents produce fewer
suds, dissolve more efficiently to improve washing
and rinsing performance, and help to keep the
interior of the washer clean. Using detergent that is
not HE may cause oversudsing and unsatisfactory
performance which could result in error codes, cycle
failure, and machine damage.
Designed specially to use only HE
(High-Efficiency) detergent
• For proper wash performance, always measure
detergent using the measuring device provided by
the detergent manufacturer. For an average load,
use less than half of the recommended maximum.
Use less detergent for soft water, light soil, or
smaller loads.
• Never use more than the maximum amount of
detergent recommended by the manufacturer. Using
too much detergent can lead to oversudsing, poor
rinsing, detergent buildup in clothing, and residue
buildup that can contribute to odors in the machine.
• Use extra care when measuring 2X and 3X
concentrated detergents because even a small
amount extra can lead to problems.
• Detergents designated as HE-compatible may not
provide optimal results.
• Do not use more than one detergent pod in the
washer. Using too much detergent may cause
oversudsing and unsatisfactory performance.
Reduce detergent amount or add an extra rinse if
detergent residue is left on fabrics. To add an extra
rinse, press the Extra Rinse button.
21OPERATION
ENGLISH
Liquid
detergent
Maximum
Normal Load Amount
Powdered
detergent
Page 22
22 OPERATION
3
4
5
6
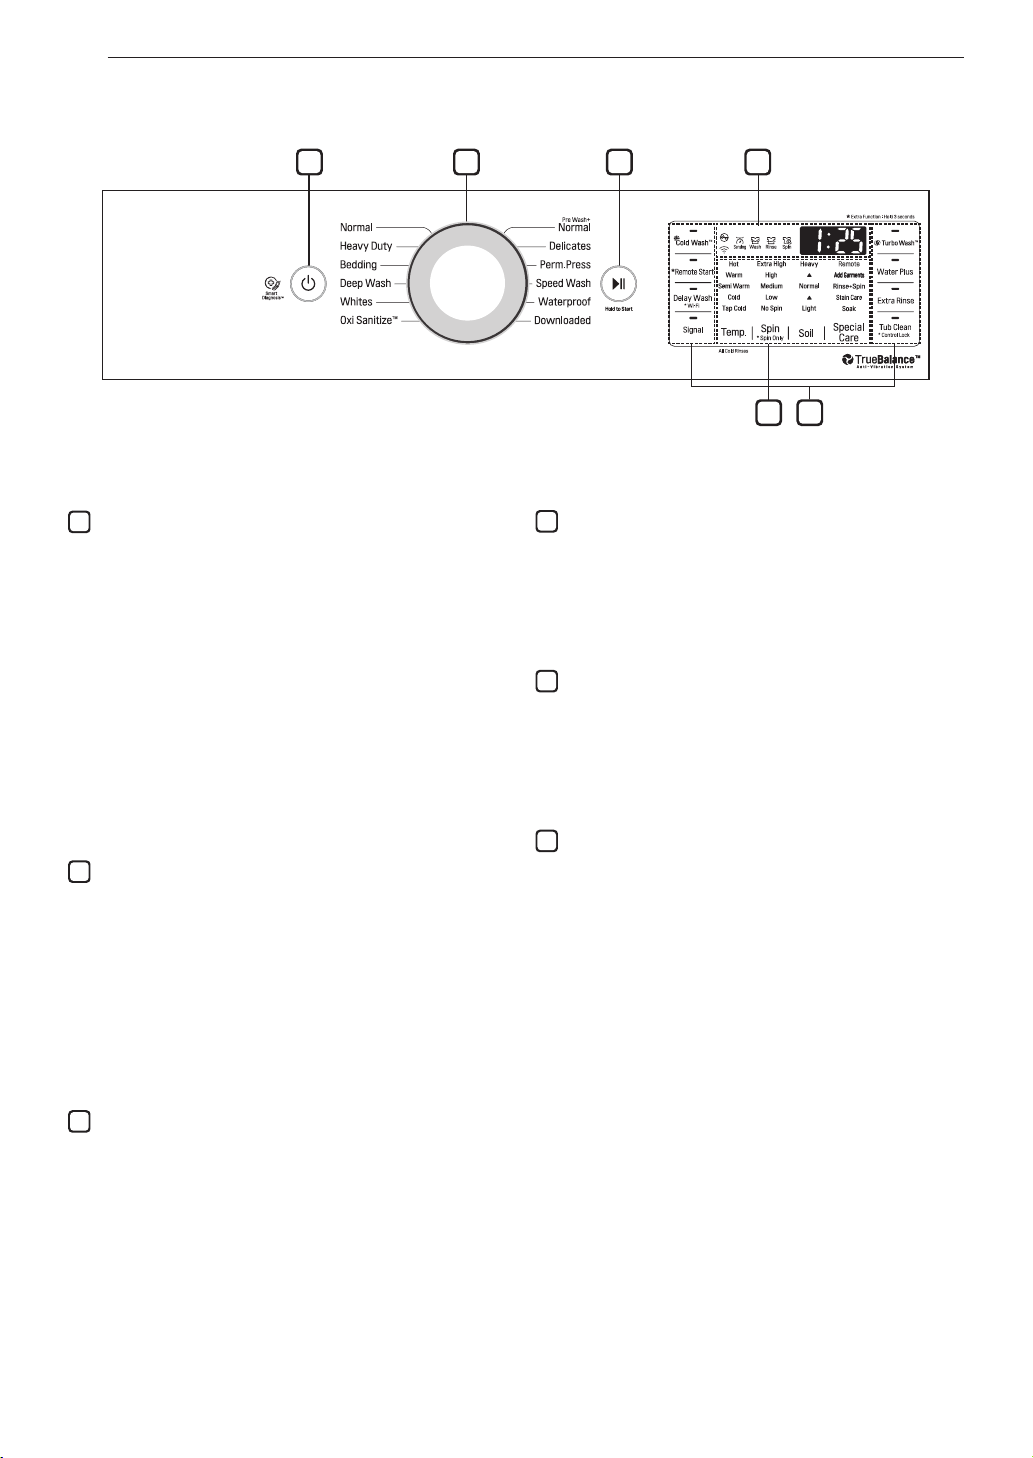
Control Panel
1
Control Panel Features
Power On/Off Button
1
Press to turn the washer on. Press again to
turn the washer off. Pressing the Power button
during a cycle will cancel that cycle and any load
settings will be lost. The lid (door) will unlock
after a brief pause.
3 62
3
54
Cycle Modifier Buttons
Use these buttons to adjust the water
temperature, spin speed and soil level settings
for the selected cycle. The current settings are
shown in the display. Press the button for that
option to select other settings.
NOTE
• If there is any water remaining in the tub after
the washer shuts off, it will drain following 4
minutes delay. The washer can be restarted any
time before the drain begins. However, once
the water begins to drain, all functions will be
suspended until the water has been completely
drained and the washer shuts off.
Cycle Selector Knob
2
Turn this knob to select the desired cycle.
Once the desired cycle has been selected, the
standard presets will appear in the display. These
settings can be adjusted using the cycle modifier
buttons anytime before starting the cycle.
NOTE
• To protect your clothing, not all settings are
available on all cycle selections.
Start/Pause Button
Press this button to start the selected cycle. If the
washer is running, use this button to pause the
cycle without losing the current settings.
NOTE
• If Start/Pause is not pressed within 60 minutes
of selecting a cycle, the washer automatically
turns off and all cycle settings are lost. Any
water remaining in the tub will be drained.
Special Cycle and Option Buttons
Press these buttons to select special cycles
or additional cycle options. Certain buttons
also allow you to activate special functions
by pressing and holding the button for three
seconds.
Time and Status Display
The display shows the settings, estimated time
remaining, options, and status messages for
your washer. When the washer is turned on, the
default settings in the display will illuminate.
Page 23
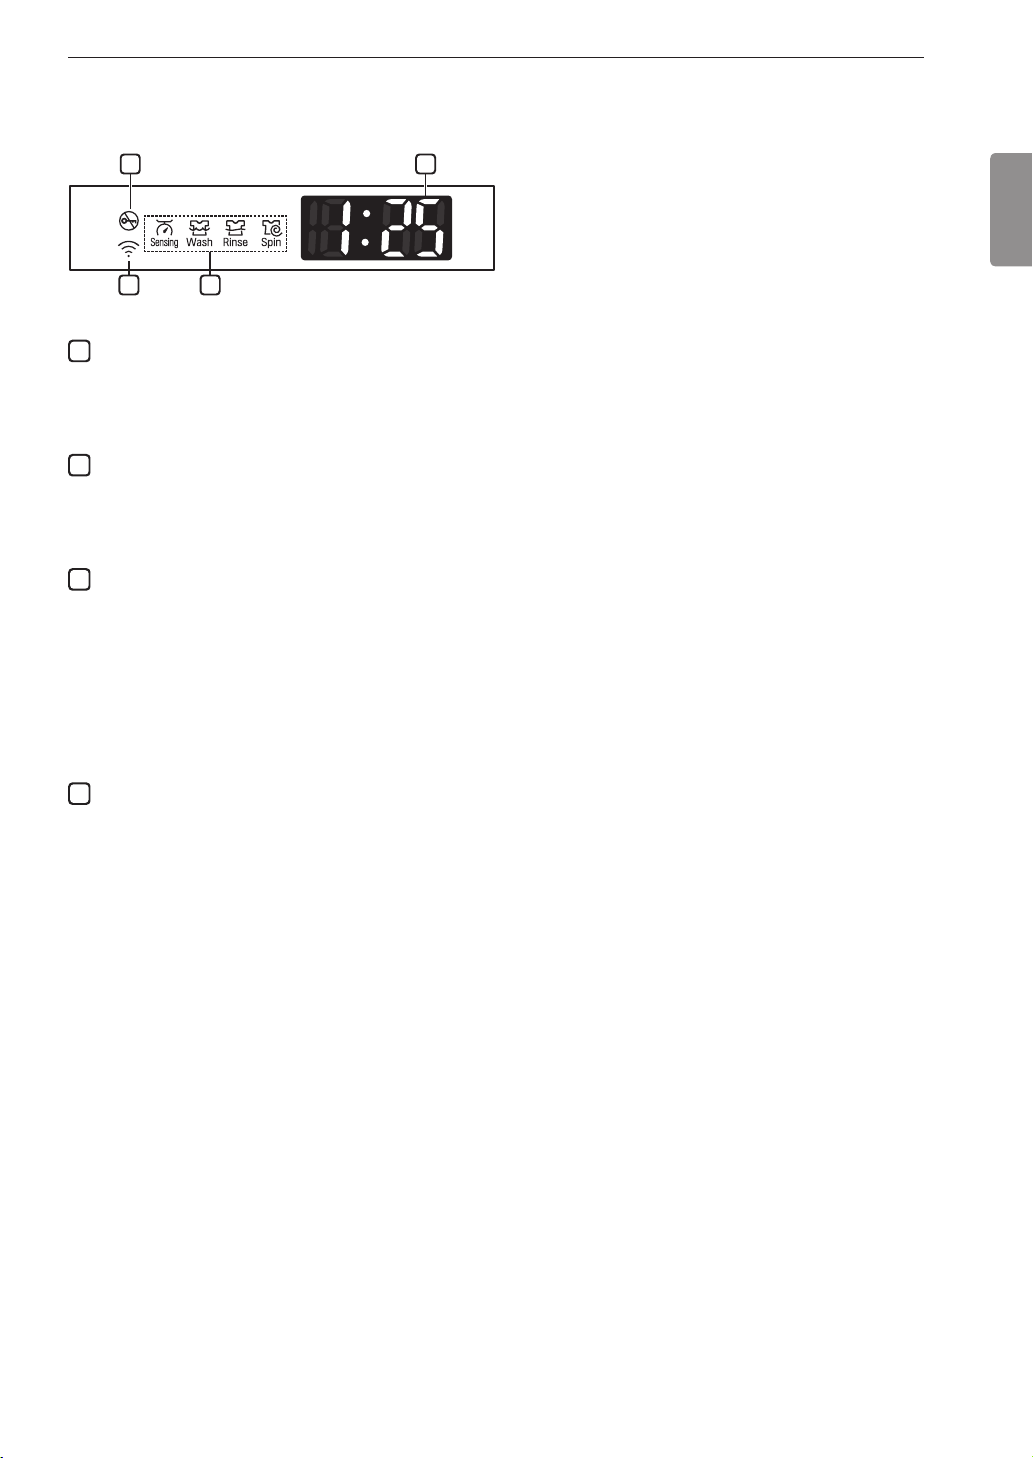
Time and Status Display
1
2
3
23OPERATION
1
2 3
4
Door Lock Indicator
The Door Lock indicator will light up once a cycle
has started. The indicator light will stay on until
the cycle is paused, stopped or has finished.
Wi-Fi Connect Indicator
The indicator blinks during product registration
and Wi-Fi setup and illuminates when the
appliance is connected to a home Wi-Fi network.
Cycle Status Indicator
These LEDs illuminate when a cycle is selected
to indicate which stages are included. When a
cycle is running, the LED for the active stage
blinks, and the LEDs for the remaining stages
remain steady.
Once a stage is complete, the LED turns off. If
a cycle is paused, the active stage LED stops
blinking.
ENGLISH
Estimated Time Remaining
4
When a cycle is selected, the default time for
that cycle is displayed. This time will change
as modifiers or options are selected. Once the
Start/Pause button is pressed, the washer will
measure the size of the load. The estimated
time may change once the load size has been
measured. If Delay Wash is set, the remaining
delay time counts down until the cycle begins.
NOTE
• The time shown is only an estimate. This time is
based on normal operating conditions. Several
external factors (load size, room temperature,
incoming water temperature,etc.) can affect the
actual time.
Page 24

24 OPERATION
Wash Cycles
Wash cycles are designed for the best wash performance for each type of load. Select the cycle that best
matches the load contents for maximum wash performance and fabric care. See the Sorting Laundry section for
best results, follow the fabric care labels on your garments. For a guide to fabric care symbols, see the Sorting
Laundry section.
Turn the knob or press the button to select the desired cycle. When you select a wash cycle, the light for the
corresponding wash cycle will turn on.
NOTE
• Whenever load weights are mentioned, assume 1 lb (0.45 kg) = 1 thick bath towel (dry).
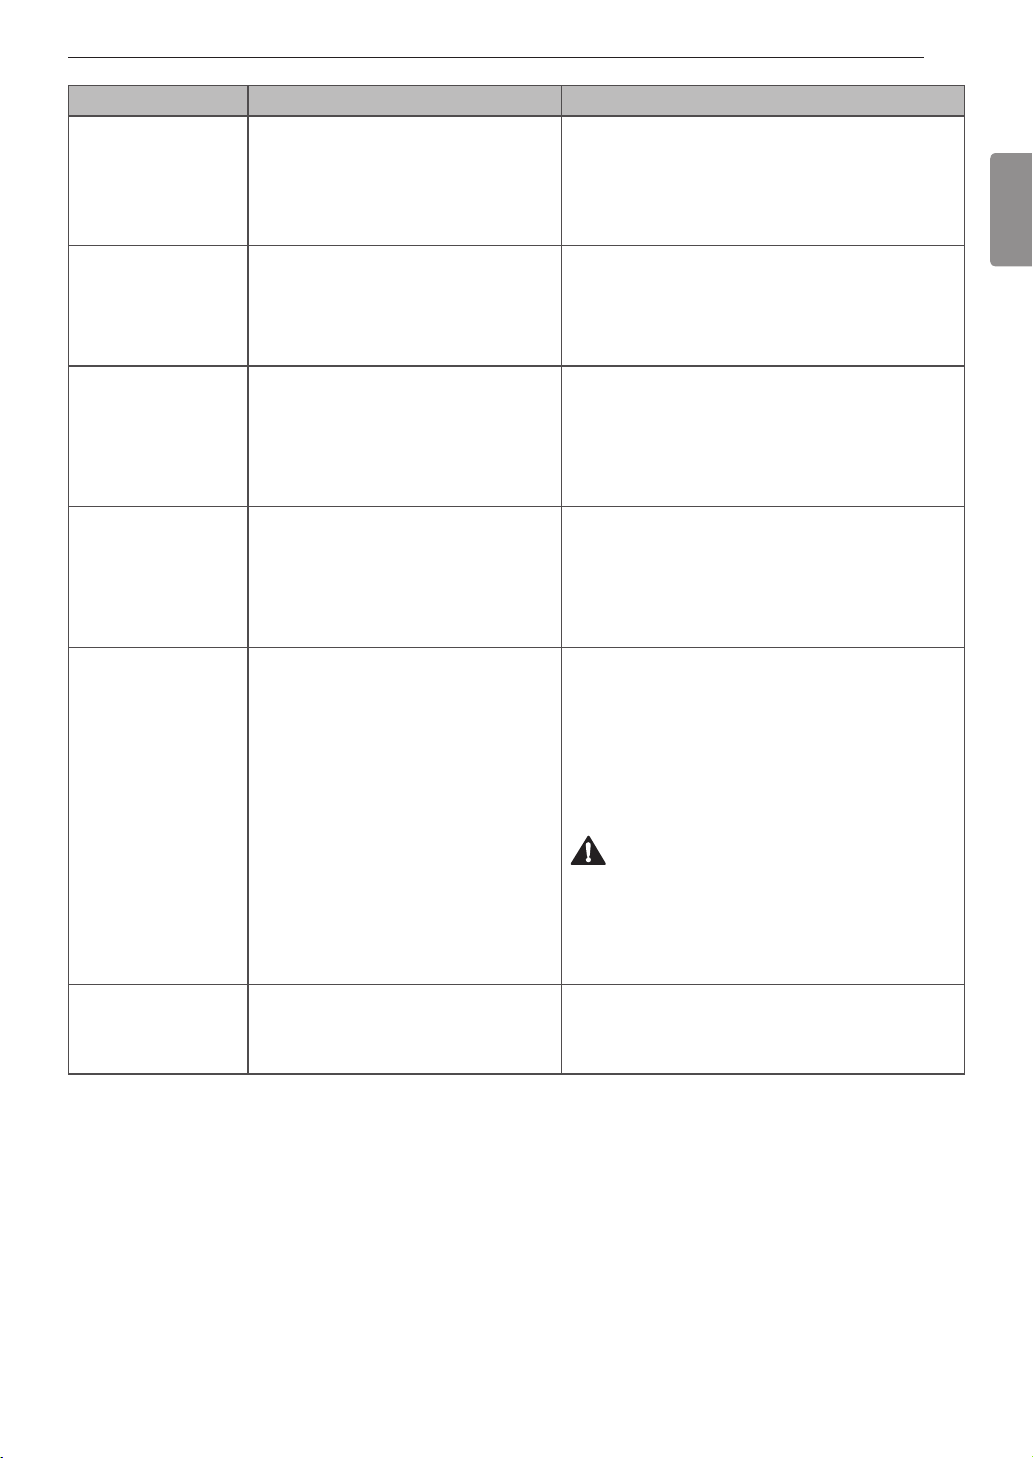
Cycle Description Note
Use this cycle to wash all normal items,
Normal
Heavy Duty
Bedding
Deep Wash
Whites
Oxi Sanitize™
except delicate fabrics such as wool
or silk.
Fabric type : Cotton, linen, shirts,
jeans, mixed loads
This cycle is for washing heavily soiled
laundry using more powerful wash
motions.
Fabric type : Heavily soiled cotton
fabrics
This cycle is for washing blankets or
bulky items.
Fabric type : Large items such as
blankets, comforters, and sheets
Use this cycle to provide addtional
water and wash heavily soiled mixed
items, except delicate fabrics.
This cycle is for washing white items
only.
Fabric type : Underwear, pillow covers,
bed sheets, baby wear. (less than 12
lbs.)
This wash cycle offers hygienic care
for laundry when used in conjunction
with bleach, without high energy
consumption.
Fabric type : Cotton, underwear, pilow
covers, bed sheets, baby-clothing.
(less than 11lbs.)
• Pressing the Start/Pause button without selecting
a cycle will cause the Normal cycle to begin
immediately, using the default settings.
• When washing large loads, in order to deliver the
best performance, there will be brief periods of
2 minutes or more without agitation. These soak
periods are part of the cycle’s design, and are
normal.
• Do not use this cycle to wash a mixed load of
bedding and non-bedding items.
• Use this cycle for items such as pillows,
comforters, pet bedding and other articles which
have difficulty absorbing water.
• Do not wash excessively large items. If large/bulky
items do not fit easily into the tub, there may not
be enough room for them to move during washing.
• Keep like items together; do not mix large/bulky
items with smaller articles of clothing.
-
-
• Follow the product manufacturer’s instructions for
using Oxi products with this cycle.
• Never load powdered products into the liquid
bleach dispenser. Doing so can result in the
product not being dispensed or being dispensed
incorrectly. Powders can clog the bleach
dispenser, resulting in leaks or damage to the
washer or your clothing.
Page 25
Perm.Press
Speed Wash
Waterproof
Downloaded
Cycle Description Note
• When chime sounds, press the Start/Pause
button to unlock lid, add main detergent to
dispenser, and insert remainder of laundry. If
the Start/Pause is not pressed within about 3
minutes, the cycle continues. (If Signal is turned
Pre Wash+
Normal
Use this cycle to prewash stains
without needing to hand wash. Prompt
treatment helps to prevent stains from
setting or odors from developing.
off, the chime won’t sound.)
This cycle is for washing lingerie or
sheer and lacy clothes which can
Delicates
easily be damaged.
Fabric type : Dress shirts/blouses, nylons,
sheer or lacy garments (less than 8 lb.)
This cycle is for washing items such as
wrinkle-free clothes or tablecloths to
minimize wrinkles.
Fabric type : Dress shirts/pants,
wrinkle-free clothing, poly/cotton blend
clothing, tablecloths
Use the Speed Wash cycle to quickly
wash lightly soiled clothing and
small loads. For high wash and rinse
efficiency, washing small loads of 2-3
lightly soiled garments is recommended.
• Use very little detergent in this cycle. If you want
additional rinsing, you can add extra rinses by
using the Extra Rinse button.
Fabric type : Lightly soiled and small loads
• Do not use any other wash cycle to wash
waterproof fabrics.
• Do not use this cycle to wash a mixed load of
waterproof and non-waterproof items.
This cycle is used for washing
waterproof material.
Fabric type : Waterproof items such
as water resistant clothing, mattress
covers, outdoor clothes, and plastic
mats (less than 14 lb.)
• Check the washing instructions on items before
using this cycle.
• Do not wash other fabics using this cycle.
CAUTION
• If waterproof material laundry is washed in a
course other than Waterproof, it may result in
injury or damage to the washer, clothes, walls,
floor, and surrounding objects due to abnormal
vibration.
If you download a cycle using the
function, it will be placed in the
Downloaded cycle position. Choose the
Downloaded cycle to run the new cycle.
• The default cycle for this position is Small Load,
used for normally soiled loads with just a few
items. The Small Load cycle is also available for
download.
25OPERATION
ENGLISH
-
-
Page 26
26 OPERATION
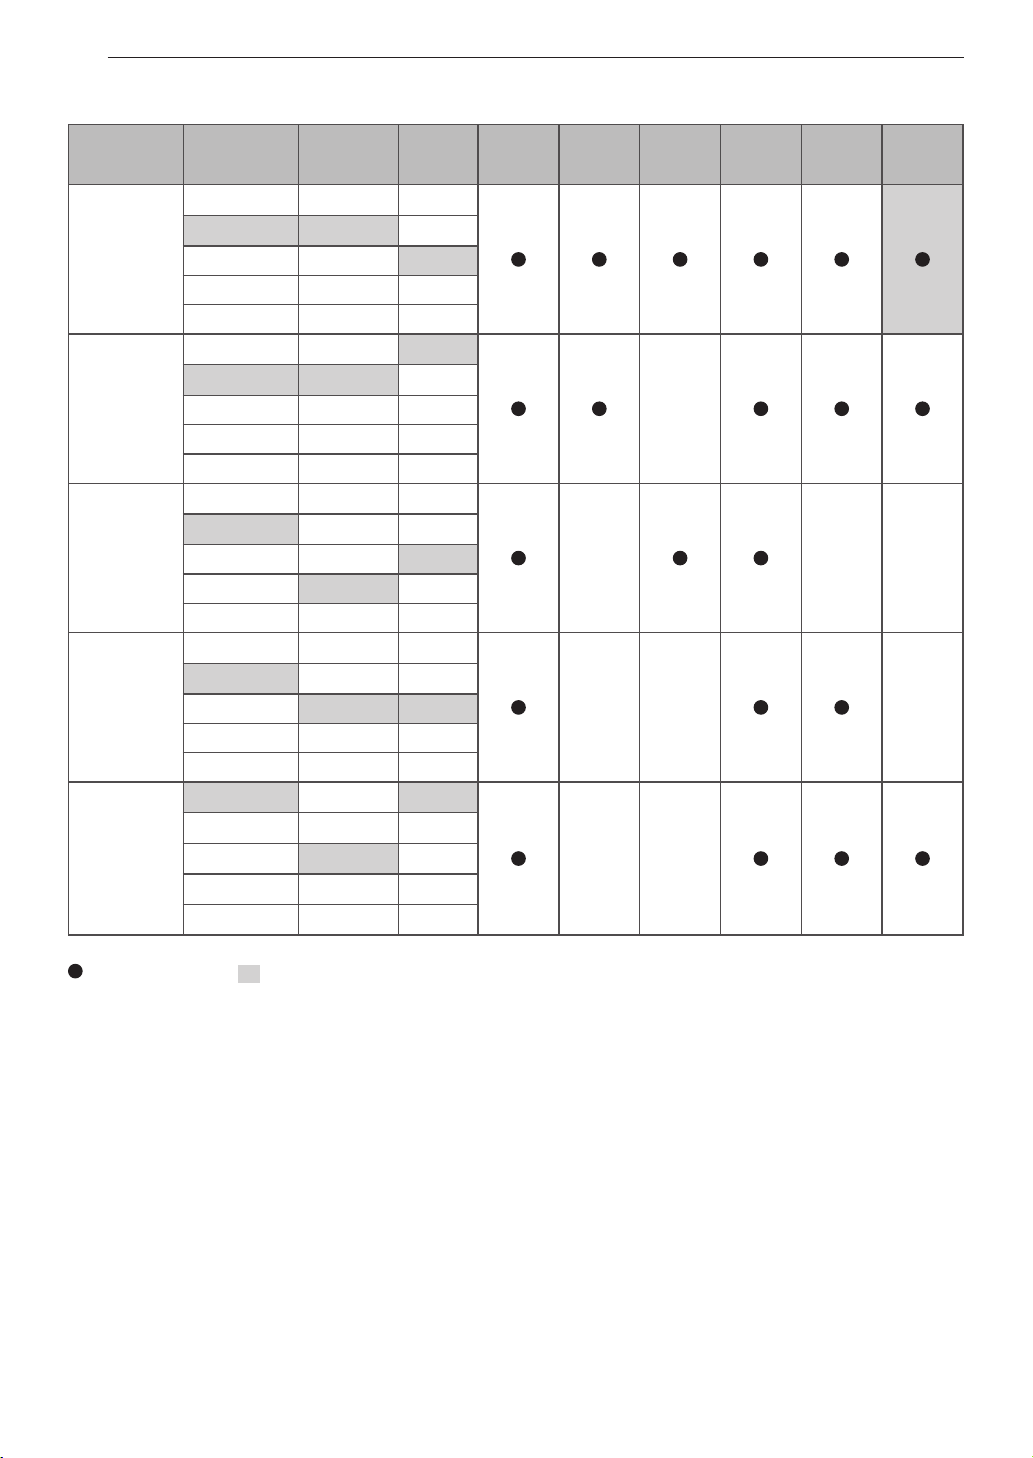
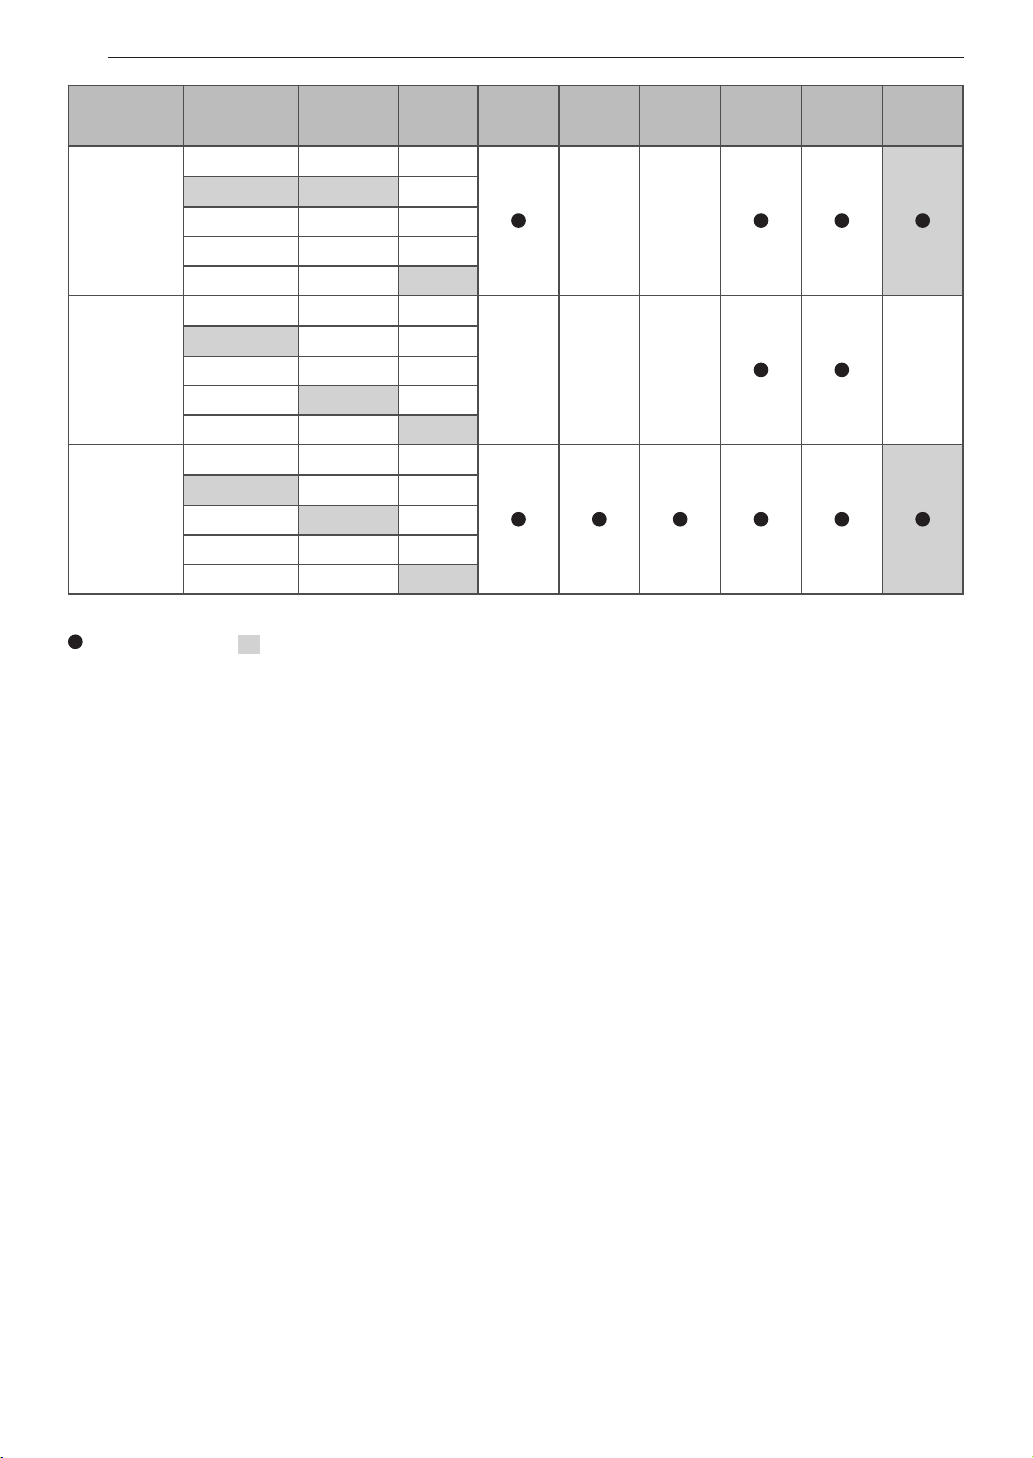
Cycle Guide
Cycle
Normal
Heavy Duty
Bedding
Deep Wash
Whites
Wash Temp.
Hot
Warm
Semi Warm Medium Normal
Cold
Tap cold No spin Light
Hot
Warm
Semi Warm Medium Normal
Cold Low
Tap Cold No spin Light
Hot Heavy
Warm
Semi Warm Medium Normal
Cold Low
Tap Cold No spin Light
Hot
Warm
Semi Warm Medium Normal
Cold Low
Tap Cold No spin Light
Hot
Warm
Semi Warm
Spin
Speed
Extra high
High
Extra high
High
Extra high
High
Extra high
High
Medium
Low
No spin
Soil
Level
Heavy
Heavy
Heavy
Heavy
Normal
Light
Soak
Stain
Care
Cold
Wash
Extra
Rinse
Water
Plus
Turbo
TM
Wash
= available option, = default setting
Page 27
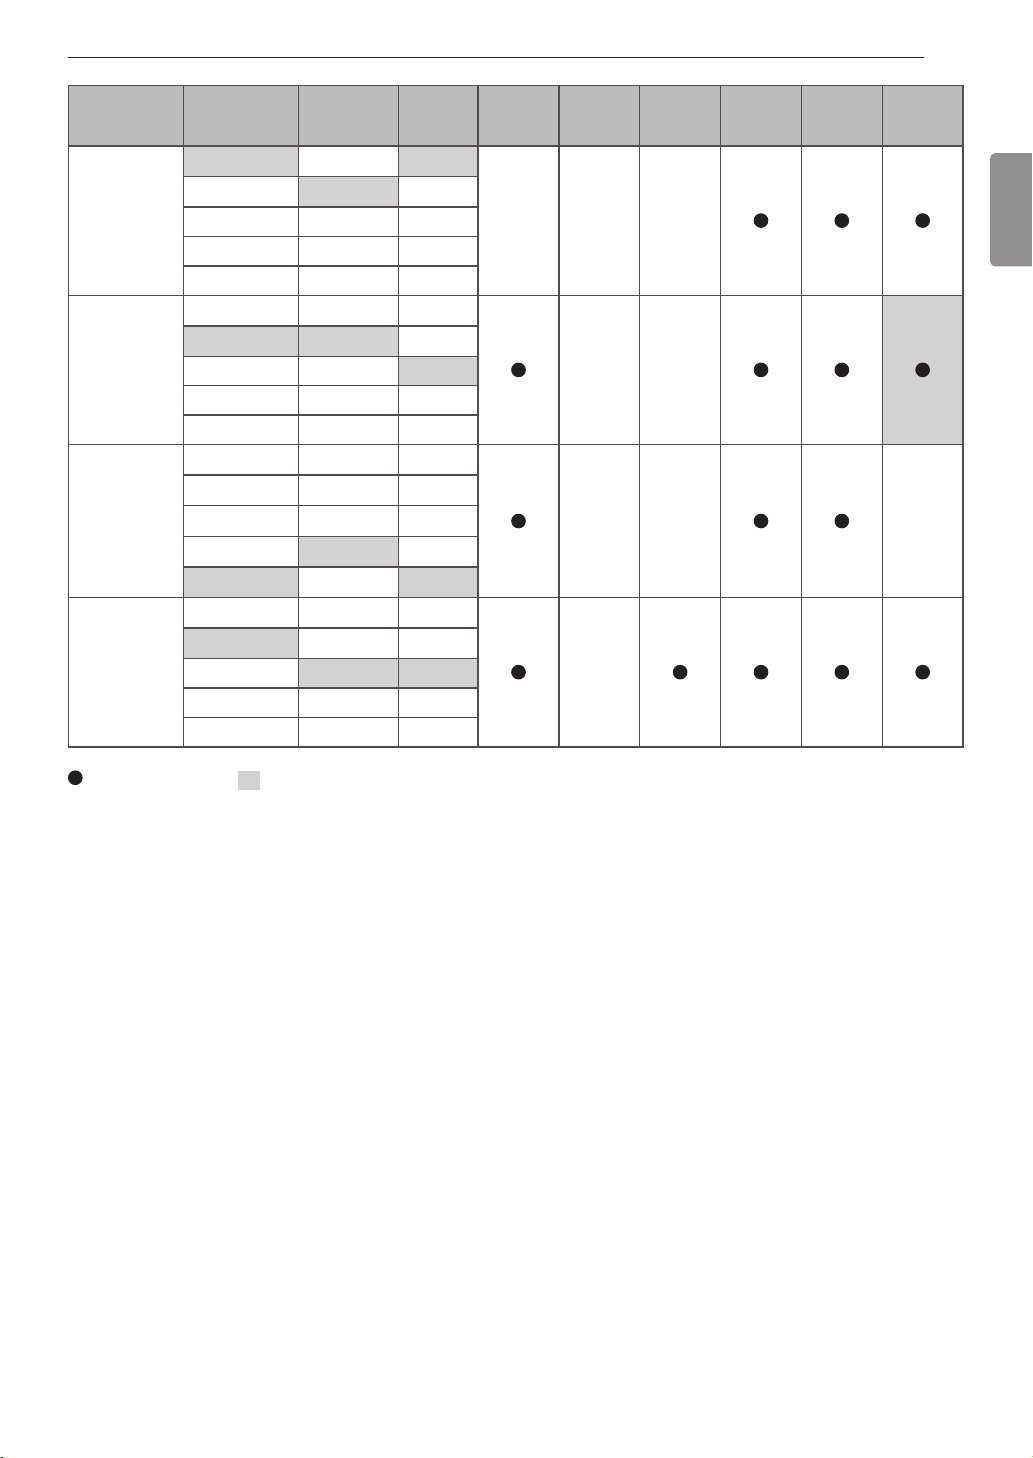
27OPERATION
Cycle
Oxi
Sanitize™
Pre Wash+
Normal
Delicates
Perm.
Press
Wash Temp.
Hot
Hot
Warm
Semi Warm Medium Normal
Cold Low
Tap Cold No spin Light
Warm
Semi Warm Normal
Cold
Tap Cold
Warm
Semi Warm Medium Normal
Cold Low
Tap Cold No spin Light
Spin
Speed
Extra High
High
Medium Normal
Low
No Spin Light
Extra high
High
Low
No spin
High
Soil
Level
Heavy
Heavy
Light
Heavy
Soak
Stain
Care
Cold
Wash
Extra
Rinse
Water
Plus
Turbo
TM
Wash
ENGLISH
= available option, = default setting
Page 28
28 OPERATION
Cycle
Speed
Wash
Waterproof
Downloaded
Default:
Small Load
Wash Temp.
Warm
Semi Warm Medium Normal
Cold Low
Tap Cold No spin Light
Warm
Semi Warm Normal
Cold Low
Tap Cold No spin Light
Hot
Warm
Semi Warm Medium Normal
Cold
Tap Cold No spin Light
Spin
Speed
Extra high
High
Extra high
High
= available option, = default setting
Soil
Level
Heavy
Heavy
Heavy
Soak
Stain
Care
Cold
Wash
Extra
Rinse
Water
Plus
Turbo
TM
Wash
Page 29
29OPERATION
Cycle Modifier Buttons
Each cycle has default settings that are selected
automatically. You may also customize these settings
using the cycle modifier buttons. Press the button
for the desired modifier until the indicator light for
the desired setting is lit. The washer automatically
adjusts the water level for the type and size of wash
load for best results and maximum efficiency. Due
to the high-efficiency nature of this product, water
levels may be much lower than expected. This is
normal and cleaning/rinsing performance will not be
compromised.
NOTE
• To protect your garments, not every wash
temperature, spin speed, soil level, or option is
available with every cycle. A chime will sound and
the LED will not light if a selection is not allowed.
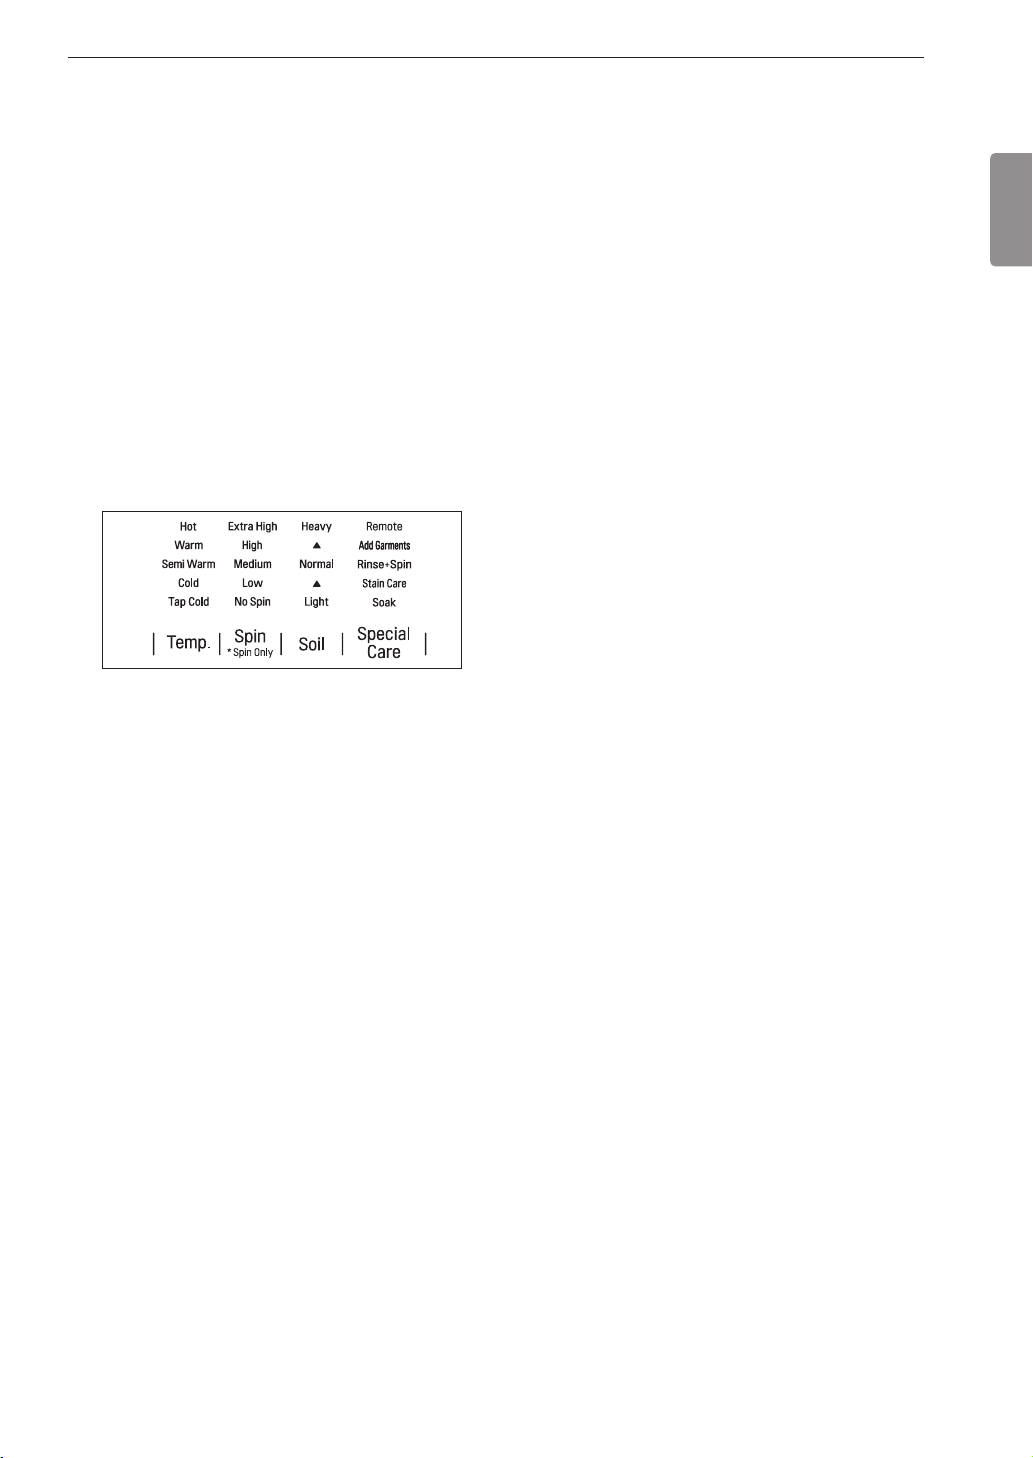
Temp.
Temp. selects the wash and rinse temperature
combination for the selected cycle.
• Press the Temp. button until the indicator light for
the desired setting is lit.
• All rinses use tap cold water.
Spin
Higher spin speeds extract more water from clothes,
reducing drying time and saving energy.
• Press the Spin button until the desired speed is
selected.
• Some fabrics, such as delicates, require a slower
spin speed. To protect your clothing, not all spin
speeds are available for all cycles.
Soil
Adjusting the soil level setting will modify the cycle
times and/or wash actions.
• Press the Soil button until the desired soil level is
selected.
NOTE
• This feature needs more time for heavily soiled
loads or less time for lightly soiled loads.
Special Care
Press the Special Care button to select additional
features, such as Soak, Stain Care, and Rinse+Spin.
• Pressing the Special Care button before selecting
a cycle will automatically default to the Normal cycle
with the Soak feature selected.
ENGLISH
NOTE
• Select the water temperature suitable for the type of
load you are washing. Follow the fabric care labels
on the garment for best results.
Page 30

30 OPERATION
Special Care Features
Press the Special Care button to select specialized
cycles or add features to standard cycles. Press
the button repeatedly to move through the available
features.
NOTE
• To protect your garments, not every feature is
available with every cycle.
• If the Start/Pause button is not pressed within 60
minutes to start the cycle, the washer will shut off
and all settings will be lost.
Soak
This option provides a 30-minute presoak prior to
the start of the selected cycle. Use the Soak option
to presoak garments to help remove difficult spots or
stains on fabrics. At the end of the presoak time, the
selected cycle will begin with the same water used for
the soak.
NOTE
• You cannot select the Soak option for the Tub Clean
cycle.
Stain Care
Use this option for heavily soiled loads that need
improved stain treatment. When Stain Care is
selected, the wash cycle will begin with warm water
to help prevent the setting of certain types of stains.
Then, as the cycle progresses, hot water will be
added to gradually increase the water temperature to
help remove stains that require treatment at higher
temperatures.
NOTE
• Best results are obtained with smaller loads (less
than 6 lb.)
• If you select Stain Care, the Cold Wash option is not
available.
Rinse+Spin
Select this option to rinse and spin a load separately
from a regular cycle. This can be helpful in preventing
fresh stains from setting in fabrics. You can change
the spin speed by pressing the Spin button.
Press the Power button to turn on the washer.
1
Press the Special Care button repeatedly until
2
Rinse+Spin is selected.
3
Press the Start/Pause button.
Special Drain Feature
This washer is equipped with a special drain feature
that is designed to make your washer as safe as
possible. If the washer is paused or shut off while
there is still water in the tub, the water will drain
automatically after several minutes of inactivity. This
helps keep children safe by reducing the possibility of
water remaining in the tub.
Any water remaining in the tub will automatically drain
4 minutes after the washer has shut off. If the washer
is paused and the Start/Pause button is not pressed
within 60 minutes, the washer will shut off and all
cycle settings will be lost. And any water remaining in
the tub will be drained.
The washer can be turned on or restarted any time
before the drain begins. However, once the washer
begins to drain, all controls and functions will be
disabled until the water has been completely drained
and the washer shuts off.
Add Garments
If you’ve forgotten to add an item or need to remove
foreign objects like coins or keys after the cycle
has started, the best time to do so is while the Add
Garments indicator is on. Once the indicator turns off,
adding garments may affect the cycle time or wash
performance.
Press Start/Pause. The cycle pauses and the
1
lid (door) unlocks.
Open the lid (door), add garments or remove
2
foreign objects, and close the lid (door).
Press the Start/Pause button to start the cycle.
3
The cycle continues automatically.
Page 31

31OPERATION
Option Buttons
Your washer features several additional cycle options
that customize cycles to meet your individual needs.
To use these options, select the desired option after
selecting the desired cycle.
After selecting the desired cycle and settings, press
the cycle option button(s) for the option(s) you would
like to add. The button will light when that option is
selected. If the selected option is not allowed for the
selected cycle, the chime will sound twice to alert you
and the LED will not illuminate.
NOTE
• To protect your garments, not every feature is
available with every cycle.
Cold Wash
This option saves energy by using cooler water while
increasing the wash and rinse times to maintain wash
performance.
NOTE
• Wash time will increase up to several minutes with
this option.
• For best wash results, only wash small loads (less
than 8 lb.) with this option.
Delay Wash
Once you have selected the cycle and other settings,
press this button to delay the start of the wash cycle.
Each press of the button increases the delay time by
1 hour, for up to 19 hours. Once the desired delay
time is set, press the Start/Pause button to start the
delay time.
NOTE
• If the Start/Pause button is not pressed to begin
the delay time, the washer will automatically shut off
after 60 minutes and all cycle settings will be lost.
Signal
The washing machine plays a melody when the
wash cycle has finished. The volume of the melody is
adjusted using the Signal button.
• Press the Signal button repeatedly to adjust the
volume of the signal.
• The signal can be turned On or Off. When the LED
on the button turns off, the signal is off. The signal
volume can be adjusted at any time as long as the
washer is turned on.
ENGLISH
Page 32

32 OPERATION
Turbo Wash™
Adding the Turbo Wash™ option to a cycle reduces
the length of the cycle while maintaining a similar
wash performance.
NOTE
• The Turbo Wash™ option cannot be used with all
cycles.
• Turbo Wash™ defaults On for Normal, Pre
Wash+Normal and Speed Wash cycles.
Water Plus
Use this option to add extra water to the wash cycle
for better wash performance (stain treatment) with
large or bulky items.
NOTE
• If the washer reaches its maximum water level, the
Water Plus button will have no effect.
• To add more water while a cycle is running, pause
the cycle before pressing Water Plus.
• Selecting the Water Plus option with the Normal
cycle automatically changes the cycle to the Deep
Wash cycle.
Control Lock
Use this option to disable the controls. This feature
can prevent children from changing cycles or
operating the machine. The feature does not lock the
lid (door). Once the Control Lock is set, it must be
deactivated before any controls, except the Power
button, can be used. Once the washer has shut off,
the Power button will allow the machine to be turned
on, but the controls will still be locked. When the
controls are locked,
the estimated time remaining.
• Press and hold the Tub Clean button for 3 seconds
to activate or deactivate Control Lock.
NOTE
• Once the controls are locked, they must be
manually unlocked to restore operation.
will display alternately with
Extra Rinse
This option will add an extra rinse to the selected
cycle. Use this option to help ensure the removal of
detergent or bleach residue from fabrics. Liquid fabric
softener, if used, is always dispensed in the final
rinse.
• Pressing the Extra Rinse button twice will add two
additional rinses to the cycle.
NOTE
• You cannot select the Extra Rinse option with the
Spin Only option and Tub Clean cycle.
• Selecting the Extra Rinse option with the Normal
cycle automatically changes the cycle to the Deep
Wash cycle.
Tub Clean
Use this cycle to clean the tub of your washing
machine. See the Maintenance section.
Page 33

33SMART FUNCTIONS
SMART FUNCTIONS
LG SmartThinQ Application
The LG SmartThinQ application allows you to
communicate with the appliance using a smartphone.
Before Using LG SmartThinQ
• For appliances with the or logo
Use a smartphone to check the strength of
1
the wireless router (Wi-Fi network) near the
appliance.
• If the distance between the appliance and the
wireless router is too far, the signal strength
becomes weak. It may take a long time to
register or installation may fail.
Turn off the Mobile data or Cellular Data on your
2
smartphone.
• If the appliance is having trouble connecting to the
Wi-Fi network, it may be too far from the router.
Purchase a Wi-Fi repeater (range extender) to
improve the Wi-Fi signal strength.
• The network connection may not work properly
depending on the Internet service provider.
• The Wi-Fi connection may not connect or may
be interrupted because of the home network
environment.
• If the appliance cannot be registered due to
problems with the wireless signal transmission,
unplug the appliance and wait about a minute
before trying again.
• If the firewall on your wireless router is enabled,
disable the firewall or add an exception to it.
• The wireless network name (SSID) should be a
combination of English letters and numbers. (Do not
use special characters.)
• Smartphone user interface (UI) may vary depending
on the mobile operating system (OS) and the
manufacturer.
• If the security protocol of the router is set to WEP,
network setup may fail. Change the security
protocol (WPA2 is recommended), and register the
product again.
ENGLISH
Connect your smartphone to the wireless router.
3
NOTE
• To verify the Wi-Fi connection, check that Wi-Fi
icon on the control panel is lit.
• The appliance supports 2.4 GHz Wi-Fi networks
only. To check your network frequency, contact your
Internet service provider or refer to your wireless
router manual.
• LG SmartThinQ is not responsible for any network
connection problems or any faults, malfunctions, or
errors caused by network connection.
• The surrounding wireless environment can make
the wireless network service run slowly.
Installing the LG SmartThinQ
Application
Search for the LG SmartThinQ application from the
Google Play Store or Apple App Store on a smart
phone. Follow instructions to download and install the
application.
Page 34

34 SMART FUNCTIONS
LG SmartThinQ Application Features
• For appliances with the or logo
Washer Cycle (Remote Start, Downloaded)
Set or download any preferred cycle and operate by
remote control.
Tub Clean Coach
This function shows how many cycles remain before
it is time to run the Tub Clean cycle.
Smart Diagnosis™
This function provides useful information for
diagnosing and solving issues with the appliance
based on the pattern of use.
Energy Monitoring
The washer energy usage is affected by the cycles
and options so you may see some changes in energy
usage from one cycle to another.
Push Alerts
When the cycle is complete or the appliance has
problems, you have the option of receiving push
notifications on a smart phone.
Settings
Set the product nickname and delete product.
Using Washer Cycle
Remote Start
Use a smart phone to control the appliance remotely
or check to see how much time is left in the cycle.
Using Remote Start
Press the Power button.
1
Load the laundry.
2
Press and hold Remote Start button for 3
3
seconds to enable the Remote Start function.
Start a cycle from the LG SmartThinQ application
4
on your smart phone.
NOTE
• Once the Remote Start mode is enabled, you can
start a cycle from the LG SmartThinQ smartphone
application. If the cycle is not started, the machine
will wait to start the cycle until it is turned off
remotely from the application or the Remote Start
mode is disabled.
• When Remote Start is turned on, the door is
automatically locked.
NOTE
• If you change your wireless router, Internet service
provider, or password, delete the registered
appliance from the LG SmartThinQ application and
register it again.
• This information is current at the time of publication.
The application is subject to change for product
improvement purposes without notice to users.
Disabling Remote Start
When the Remote Start is activated, press and hold
the Remote Start button for 3 seconds.
Downloaded
Download new and specialized cycles that are not
included in the standard cycles on the appliance.
Appliances that have been successfully registered
can download a variety of specialty cycles specific to
the appliance.
Only one cycle can be stored on the appliance at a
time.
Once cycle download is completed in the appliance,
the appliance keeps the downloaded cycle until a
new cycle is downloaded.
Page 35

35SMART FUNCTIONS
Wireless LAN Module Specifications
Model LCW-004
Frequency Range 2412 - 2462 MHz
IEEE 802.11 b : 22.44 dBm
Output Power
(Max)
FCC Notice (For transmitter module
contained in this product)
This equipment has been tested and found to comply
with the limits for a Class B digital device, pursuant
to Part 15 of the FCC Rules. These limits are
designed to provide reasonable protection against
harmful interference in a residential installation. This
equipment generates, uses, and can radiate radio
frequency energy and, if not installed and used in
accordance with the instructions, may cause harmful
interference to radio communications. However, there
is no guarantee that interference will not occur in a
particular installation. If this equipment does cause
harmful interference to radio or television reception,
which can be determined by turning the equipment
off and on, the user is encouraged to try to correct
the interference by one or more of the following
measures:
• Reorient or relocate the receiving antenna.
• Increase the separation between the equipment and
the receiver.
• Connect the equipment to an outlet on a circuit
different from that to which the receiver is
connected.
• Consult the dealer or an experienced radio/TV
technician for help.
This device complies with part 15 of the FCC Rules.
Operation is subject to the following two conditions:
1) This device may not cause harmful interference
and
2) This device must accept any interference received,
including interference that may cause undesired
operation of the device.
Any changes or modifications in construction of this
device which are not expressly approved by the party
responsible for compliance could void the user’s
authority to operate the equipment.
IEEE 802.11 g : 24.68 dBm
IEEE 802.11 n : 24.11 dBm
FCC RF Radiation Exposure Statement
This equipment complies with FCC radiation
exposure limits set forth for an uncontrolled
environment. This transmitter must not be co-located
or operating in conjunction with any other antenna or
transmitter.
This equipment should be installed and operated with
a minimum distance of 20 cm (7.8 inches) between
the antenna and your body. Users must follow the
specific operating instructions for satisfying RF
exposure compliance.
Open Source Software Notice
Information
To obtain the source code under GPL, LGPL, MPL,
and other open source licenses, that is contained in
this product, please visit http://opensource.lge.com.
In addition to the source code, all referred license
terms, warranty disclaimers and copyright notices are
available for download.
LG Electronics will also provide open source code
to you on CD-ROM for a charge covering the cost
of performing such distribution (such as the cost of
media, shipping, and handling) upon email request
to opensource@lge.com. This offer is valid for a
period of three years after our last shipment of this
product. This offer is valid to anyone in receipt of this
information.
ENGLISH
Page 36

36 SMART FUNCTIONS
Smart Diagnosis™ Function
Should you experience any problems with the
appliance, it has the capability of transmitting data
via your telephone to the LG Customer Information
Center. NFC or Wi-Fi equipped models can also
transmit data to a smartphone using the LG
SmartThinQ application.
Smart Diagnosis™ through the
Customer Information Center
• For appliances with the or logo
This method allows you to speak directly to our
trained specialists. The specialist records the data
transmitted from the appliance and uses it to analyze
the issue, providing a fast and effective diagnosis.
Call the LG Electronics Customer Information
1
Center at:
(LG U.S.A.) 1-800-243-0000
(LG Canada) 1-888-542-2623
When instructed to do so by the call center, place
2
the mouthpiece of the phone close to the Smart
Diagnosis™ icon. Do not press any other buttons.
Press and hold Temp. button for three seconds.
3
NOTE
• Smart Diagnosis™ cannot be activated unless
the appliance can be turned on using the Power
button. If the appliance cannot be turned on,
troubleshooting must be done without using Smart
Diagnosis™.
• For best results, do not move the phone while the
tones are being transmitted.
• If the call center agent is not able to get an accurate
recording of the data, you may be asked to try
again.
• The Smart Diagnosis™ function depends on the
local call quality.
• Bad call quality may result in poor data transmission
from your phone to the call center, which could
cause Smart Diagnosis™ to malfunction.
LG SmartThinQ Smart Diagnosis™
• For appliances with the or logo
Use the Smart Diagnosis feature in the LG
SmartThinQ application for help diagnosing issues
with the appliance without the assistance of the LG
Customer Information Center.
Follow the instructions in the LG SmartThinQ
application to perform a Smart Diagnosis using your
smartphone.
NOTE
• Smart Diagnosis™ cannot be activated unless
the appliance can be turned on using the Power
button. If the appliance cannot be turned on,
troubleshooting must be done without using Smart
Diagnosis™.
Keep the phone in place until the tone
4
transmission has finished.
• For best results, do not move the phone while
the tones are being transmitted.
• If the call center agent is not able to get an
accurate recording of the data, you may be
asked to try again.
Once the countdown is over and the tones have
5
stopped, resume your conversation with the call
center agent, who will then be able to assist you
using the information transmitted for analysis.
Page 37

MAINTENANCE
37MAINTENANCE
WARNING
To reduce the risk of re, electric shock, or injury to persons, read this entire owner's manual,
including the Important Safety Instructions, before operating this washer.
• Unplug the washer before cleaning to avoid the risk of electric shock. Failure to follow this warning can
cause serious injury, re, electric shock, or death.
• Do not use volatile substances (benzene, paint thinner, alcohol, acetone, etc.), abrasive cleaners, or
detergents with strong chemical components when cleaning the washer. Doing so may cause discoloration
or damage to the machine, or may cause a re.
• Certain internal parts are intentionally not grounded and may present a risk of electric shock only during
servicing. Service personnel-do not contact the following parts while the appliance is energized. : pump,
motor, noise lter cover, and heater (on applicable models).
Regular Cleaning
Care After Wash
After the cycle is finished, wipe the lid (door) and the
inside of the lid (door) seal to remove any moisture.
• Leave the lid (door) open to dry the tub interior.
• Wipe the body of the washer with a dry cloth to
remove any moisture.
Cleaning the Exterior
Proper care of your washer can extend its life.
Lid (Door):
Wash with a damp cloth on the outside and inside
and then dry with a soft cloth.
Exterior:
• Immediately wipe off any spills.
• Wipe with a damp cloth.
• Do not touch the surface or the display with sharp
objects.
Care and Cleaning of the Interior
• Use a towel or soft cloth to wipe around the washer
lid (door) opening and lid (door) glass.
• Always remove items from the washer as soon as
the cycle is complete. Leaving damp items in the
washer can cause wrinkling, color transfer, and
odor.
• Run the Tub Clean cycle once a month, or more
often if needed, to remove detergent buildup and
other residue.
Cleaning the Tub
Over time, residue may build up in the tub, leading
to mildew or a musty odor. Run the Tub Clean cycle
monthly to remove residue and prevent odor. Run
the cycle more often under heavy use conditions or if
odor is already present.
Remove any clothing from the tub.
1
Add cleaning agents.
2
Cleaner Instructions
Tub cleaner
Lime scale remover
Liquid chlorine
bleach
Powdered cleaner
Cleaning tablets Place directly into washer tub.
• For other tub cleaning products, follow the
cleaner manufacturer’s instructions and
recommendations.
• Do not exceed the maximum fill line when
adding bleach or powdered cleaners. Powdered
cleaners may remain in the tub after cleaning.
Close the lid (door) and press the Power button
3
to turn the washer on.
Turn the knob or press the cycle buttons to select
4
the Tub Clean cycle then press the Start/Pause
button to begin the cycle.
Follow manufacturer’s
recommendations.
Add to main wash liquid
detergent dispenser.
Follow manufacturer’s
recommendations.
ENGLISH
After the cycle ends, open the lid (door) and allow
5
the tub interior to dry completely.
Page 38

38 MAINTENANCE
NOTE
• Never load laundry while using Tub Clean. The
laundry may be damaged or contaminated with
cleaning products. Make sure to run the Tub Clean
cycle only when the tub is empty.
• Leave the lid (door) open after nishing the laundry,
to keep the tub clean.
• Tub Clean should be repeated monthly.
• If mildew or musty smell already exists, run Tub
Clean once a week for three consecutive weeks.
• Do not exceed the manufacturer's recommended
amount when adding bleach or powdered cleaners.
Powdered cleaner may remain in the tub after
cleaning.
Removing Mineral Buildup
In areas with hard water, mineral scale can form on
internal components of the washer. Periodically clean
the mineral buildup on the internal components to
extend the lifespan of the washer. Use of a water
softener is recommended in areas with hard water.
• Use a descaler, such as Washer Magic®, to remove
visible mineral buildup on the washer tub.
• After descaling, always run the Tub Clean cycle
before washing clothing.
• Mineral scale and other spots may be removed from
the stainless steel tub using a soft cloth soaked in
stainless steel cleaner.
• Do not use steel wool or abrasive cleaners.
Leaving the Lid (Door) Open
• If the washer will not be used for several days,
leave the lid (door) open overnight to allow the tub
to dry.
Cleaning the Dispenser Drawer
Detergent and fabric softener may build up in the
dispenser drawer. Remove the drawer and inserts
and check for buildup once or twice a month.
Remove the drawer by pulling it straight out until it
1
stops. Lift up on the front of the drawer and pull it
completely out.
Remove the inserts from the two compartments.
2
Clean the inserts and drawer with warm water.
3
• Use a soft cloth or brush for cleaning and to
remove any residue.
WARNING
• Do not spray water inside the washer. Doing so
may cause fire or electric shock.
Wipe off any moisture with a dry towel or cloth
4
after cleaning.
To clean the drawer opening, use a small, non-
5
metal brush to clean the recess. Remove all
residue from the upper and lower parts of the
recess.
Return the inserts to the proper compartments
6
and replace the drawer.
• Set the drawer into the opening at an angle,
then lower it and slide it into place.
NOTE
• If you use a descaler or tub cleaner during the Tub
Clean cycle, use the Rinse+Spin option to rinse the
washer tub before running your next wash cycle.
Page 39

39MAINTENANCE
Cleaning the Bleach Dispenser
Bleach may build up on the bleach dispenser cover.
Check for buildup and clean the cover once or twice
a month.
Type 1
Remove the cover from the bleach dispenser. Clean
the cover and the opening with warm water.
Cleaning the Water Inlet
Filters
If the washer does not fill properly, an error message
will show on the display. The inlet valve filter screens
could be plugged by hard water scale, sediment in
the water supply, or other debris.
CAUTION
• The inlet screens protect the delicate parts of
the inlet valve from being damaged by particles
that could enter the valves with the water supply.
Operating the washer with these filters removed
could cause a valve to stick open resulting in
flooding and/or property damage.
• Do not use the washer without the inlet filters. If
you use the washer without the inlet filters it will
cause leaks and malfunction.
• If you use the washer in an area with hard water,
the inlet filter may clog due to lime buildup.
Turn off both water faucets completely.
1
Unscrew the hot and cold water hoses from
2
the back of the washer.
ENGLISH
Type 2
The cover cannot be separated from the dispenser.
Clean the cover using a brush and warm water.
Carefully remove the filters from the water
3
valves.
Remove foreign objects and soak the filters in
4
white vinegar or a lime scale remover.
If using a lime scale remover, follow the
manufacturer’s instructions. Be careful not to
damage the filters while cleaning them.
Rinse filters thoroughly and press them back
5
into place.
Flush then reattach the water hoses.
6
Before reattaching the hoses, flush the hoses and
water lines by running several gallons of water
into a bucket or drain, preferably with the faucets
wide open for maximum flow.
NOTE
• An
the water pressure is low or an inlet filter is clogged
with dirt. Clean the inlet filter.
message may blink on the display when
Page 40

40 MAINTENANCE
Care in Cold Climates
Storing the Washer
If the washer will not be used for an extended period
of time and is in an area that could be exposed to
freezing temperatures, perform the following steps to
protect the washer from damage.
Make sure the tub is empty before following these
steps.
Turn off the water supply.
1
Disconnect hoses from water supply and drain
2
water from hoses.
Plug the power cord into a properly grounded
3
electrical outlet.
Add 1 gallon of nontoxic recreational vehicle
4
(RV) antifreeze to the empty tub and close the lid
(door). Never use automotive antifreeze.
When the Water Line is Frozen
Turn off the faucets connected with the water
1
lines.
Pour hot water on the frozen faucets to thaw the
2
water lines and remove water lines.
Immerse the water lines in hot water to thaw
3
them.
Connect the water lines with the water inlets of
4
the washer and with the faucets.
See Connecting the Water Lines for details.
Turn on the faucets.
5
Press the Power button.
6
Press Special Care repeatedly to select the
7
Rinse+Spin cycle.
Press the Start/Pause button. Verify the water
8
fills properly.
Press the Power button, then select Spin.
5
Press the Start/Pause button to start the drain
6
pump.
Allow the drain pump to run for one minute, then
7
press the Power button to shut off the washer.
This will expel some of the antifreeze, leaving
enough to protect the washer from damage.
Unplug the power cord, dry the tub interior with a
8
soft cloth, and close the lid (door).
Store the washer in an upright position.
9
Remove the inserts from the dispenser. Drain any
10
water in the compartments and let them dry.
To remove the antifreeze from the washer after
11
storage, run a complete Speed Wash cycle using
detergent.
• Do not add laundry to this cycle.
When the Drain Line is Frozen
Pour hot water in the washer tub and close the lid.
1
Wait for 1-2 hours.
Press the Power button after thawing.
2
Press Special Care repeatedly to select the
3
Rinse+Spin cycle.
Press the Start/Pause button. Check to make
4
sure the water drains.
Page 41

TROUBLESHOOTING
41TROUBLESHOOTING
Before Calling for Service
The washer is equipped with an automatic error-monitoring system to detect and diagnose problems at an early
stage. If the washer does not function properly or does not function at all, check the following before you call for
service.
Noises You Might Hear
Noise Possible Cause Solutions
Clicking
Spraying or Hissing
Humming or
Gurgling
Water sloshing
Water being added
after the washer
has already begun
to operate
Rattling and
clanking noise
Thumping sound
Vibrating noise
Squeaking noise Packaging materials were not removed.
Banging noise
when washer is
filling with water
(Water Hammer)
Lid (Door) lock relays when the lid (door)
locks and unlocks.
Water spraying or circulating during the
cycle.
Drain pump is pumping water from the
washer at times during a cycle.
A liquid in the balance ring around
the wash basket helps the basket spin
smoothly.
The washer adapts to the load size and
type to add more water to the cycle as
needed.
The wash load may be unbalanced.
If the washer senses that the load is
unbalanced, it will stop and refill to
redistribute the load.
The washer may be diluting laundry
additives to add to the wash load.
Foreign objects, such as keys, coins, or
safety pins may be in tub or pump.
Heavy wash loads may produce a
thumping sound.
Wash load may be out of balance.
Packaging materials were not removed.
Wash load may be unevenly distributed in
the drum.
Not all leveling feet are resting firmly and
evenly on the floor.
Floor not rigid enough.
Plumbing in the home moves or flexes
when the water valves in the washer shut
off.
Household water supply pressure is very
high.
• Normal Operation
• Normal Operation
• Normal Operation
• Normal Operation
• Normal Operation
• Stop washer, check tub and drain filter for
foreign objects. If noise continues after
washer is restarted, call for service.
• This is normal. If sound continues, washer
is probably out of balance. Stop and
redistribute wash load.
• Pause the cycle and redistribute the load
after the lid (door) unlocks.
• See Unpacking and Removing Shipping
Material in the Installation section.
• Pause the cycle and redistribute the load
after the lid (door) unlocks.
• See Leveling the Appliance in the
Installation section.
• Make sure that the floor is solid and does
not flex. See Flooring in the Installation
section.
• See Unpacking and Removing Shipping
Material in the Installation section.
• Water hammer is not caused by a defect in
the washer. Install water hammer arrestors
(purchased separately at hardware or home
improvement store) between the fill hose
and the washer for best results.
• Adjust household water supply regulator to
a lower pressure or contact a plumber.
ENGLISH
Page 42

42 TROUBLESHOOTING
Operation
Problem Possible Cause Solutions
• Check hoses and connectors for leaks, cracks
and splits.
• Check and tighten hose connections.
• The washer pumps out water very rapidly. Check
for water backing up out of the drain pipe during
drain. If water is seen coming out of the drain,
check for proper drain hose installation and check
for restrictions in the drain. Contact a plumber to
repair drain pipe.
• Tie drain hose to inlet hose or standpipe to
prevent it from coming out during drain. For
smaller drain pipes, insert the drain hose into the
pipe as far as the drain hose flange. For larger
drain pipes, insert the drain hose into the pipe 1-2
inches past the flange.
• Use the Bedding cycle for large or bulky items.
Use extra care and never wash more that half a
load of items that float, such as pillows.
• Stop the washer and check the load. Make sure
the load does not crest above the top edge of the
tub.
• Oversudsing may create leaks, and may be
caused by the type and amount of detergent
used. High-Efficiency detergent is the only
detergent recommended. The normal amount
of detergent to use is 1/4 to 1/2 of the maximum
amount recommended by the detergent
manufacturer. Always reduce the amount of
detergent if the load is small or lightly soiled, or
if the water is very soft. Never use more than
the maximum amount recommended by the
detergent manufacturer.
• Check all fill and drain hose connections to
ensure that they are tight and secure.
• HE detergents are formulated specifically for
High-Efficiency washers and contain sudsreducing agents. Only use detergent with the
High-Efficiency (HE) logo.
• For detergent quantities refer to the Detergent
Use section. If sudsing or detergent residue
continue to be an issue, add an extra rinse.
• Make sure that the plug is plugged securely into a
grounded, 3-prong, 120-VAC, 60 Hz outlet.
• Reset circuit breaker or replace fuse. Do not
increase fuse capacity. If the problem is a
circuit overload, have it corrected by a qualified
electrician.
Water leaking
Water leaks every
load.
Excessive sudsing
Washer will not turn
on.
Hoses are not connected correctly.
House drain pipes are clogged.
Drain hose has come out of drain
connector or is not inserted far
enough.
A large item such as a pillow or
blanket is above the top of the tub.
Oversudsing of detergent.
Hoses are not installed correctly.
Too much detergent or incorrect
detergent.
Power cord is not properly plugged
in.
House fuse is blown, circuit breaker
has tripped, or power outage has
occurred.
Page 43

Problem Possible Cause Solutions
• This is normal. The washer adjusts cycle time
automatically to provide optimal results for the
selected cycle. The time remaining shown in the
display is only an estimate. Actual time may vary.
• Make sure that detergent and additives are put
into the correct dispenser compartments. For
all detergent types, always make sure that the
dispenser drawer is fully closed before the start of
the cycle.
• Make sure that the suggested amount of
detergent is used per the manufacturer’s
recommendations. You may also dilute the
detergent with water to the maximum fill line on
the compartment to avoid clogging. Use only HE
(High-Efficiency) detergent.
NOTE: Always use as little detergent as
possible. High-Efficiency washers need very little
detergent to achieve optimum results. Using too
much detergent will cause poor wash and rinse
performance and may contribute to odors in
washer.
• Make sure that both hot and cold water faucets
are turned on all the way.
• It is normal for a small amount of detergent to
remain in the dispenser. If this residue builds up it
can interfere with normal dispensing of products.
Refer to the cleaning instructions.
• This is normal. Press the Power button to turn
the washer on.
• Make sure cord is plugged securely into a
working outlet.
• Make sure the cycle was set correctly, close the
lid (door) and press the Start/Pause button.
• The washer will not operate if the lid (door) is
open. Close the lid (door) and make sure that
nothing is caught under the lid (door) preventing it
from closing completely.
• Check house circuit breakers/fuses. Replace
fuses or reset breaker. The washer should be
on a dedicated branch circuit. The washer will
resume the cycle where it stopped once power is
restored.
• Press the Power button, then re-select the
desired cycle and press the Start/Pause button.
• Press the Power button then re-select the
desired cycle and press the Start/Pause button.
The washer will shut off if the Start/Pause button
is not pressed within 60 minutes.
• Check another faucet in the house to make sure
that household water pressure is adequate.
• If the washer has been exposed to temperatures
below freezing for an extended period of time,
allow it to warm up before pressing the Power
button. Otherwise, the display will not come on.
Wash cycle time is
longer than usual.
Incomplete or
no dispensing of
detergent
Washer will not
operate.
The washer automatically adjusts
the wash time for the amount of
laundry, water pressure and other
operating conditions.
Detergent compartments clogged
from incorrect filling.
Too much detergent used.
Insufficient water supply.
Normal residue.
Control panel has powered off due
to inactivity.
Washer is unplugged.
Water supply is turned off. • Turn both hot and cold faucets fully on.
Controls are not set properly.
Lid (Door) is open.
Circuit breaker/fuse is tripped/
blown.
Control needs to be reset.
Start/Pause was not pressed after a
cycle was set.
Extremely low water pressure.
Washer is too cold.
43TROUBLESHOOTING
ENGLISH
Page 44

44 TROUBLESHOOTING
Problem Possible Cause Solutions
• Make sure the inlet filters on the fill valves are not
clogged. Refer to the filter cleaning instructions.
• This is a High-Efficiency (HE) washer. As a result,
the water level settings for this washer may be
different than for conventional washers.
• Make sure that both hot and cold water faucets
are turned on all the way.
• The washer will not operate if the lid (door) is
open. Close the lid (door) and make sure that
nothing is caught under the lid (door) preventing it
from closing completely.
• The water will not normally cover the clothes.
The fill level is optimized for the wash motion to
achieve the best wash performance.
• Make sure the drain hose is free of clogs, kinks,
etc., and is not pinched behind or under the
washer.
• Move the end of the drain hose so it’s lower
than 96 inches (2.4 m) above the bottom of the
washer.
• Make sure that the bleach cover is properly
installed and snapped into place before the
beginning of the cycle.
• Lift out the bleach dispenser cover and clean out
the reservoir. Lint and other foreign debris that
collects in the inside the dispenser may prevent
proper dispensing of the bleach.
• You cannot store bleach in the dispenser for
future use. The bleach will be dispensed every
load.
• Overfilling the bleach dispenser will cause the
bleach to dispense immediately, which will
damage the laundry or the washer. Always
measure bleach, but never fill above the max line
on the dispenser. A half cup of bleach is sufficient
for most loads. Never use more than 1 cup of
bleach.
Washer is not filling
properly.
Water in the washer
does not drain or
drains slowly.
Bleach does not
dispense
Premature
dispensing of
bleach
Filter clogged.
Inlet hoses may be kinked. • Check that inlet hoses are not kinked or clogged.
Energy efficiency
Insufficient water supply
The washer lid (door) is open.
Water level is too low.
Drain hose is kinked, pinched, or
clogged.
Drain discharge is more than 96
inches (2.4 m) above bottom of
washer.
Bleach dispenser cover is not
properly installed.
Bleach dispenser is dirty or
clogged.
Bleach dispenser filled for future
load.
Overfilling the bleach dispenser.
Page 45

Performance
45TROUBLESHOOTING
Problem Possible Cause Solutions
• Always remove items from the washer as soon as
the cycle is complete.
• The washer can be fully loaded, but the tub
should not be tightly packed with items. The lid
(door) of the washer should close easily.
• Hot water rinse can set wrinkles in garments.
Check the inlet hose connections.
• Dispenser compartment is overfilled causing
bleach or softener to dispense immediately.
Always measure bleach to prevent overfilling one
cup maximum.
• Dispenser drawer closed too quickly causing
softener to dispense immediately.
• Always use the dispensers to ensure that laundry
produdcts are properly dispensed at the right time
in the cycle.
• Always remove items from the washer as soon as
possible after the cycle is complete.
• Always wash dark colors separately from light
colors and whites to prevent discoloration.
• Never wash heavily soiled items with lightly soiled
items.
• Heavier soils and tougher stains may require
extra cleaning power. Select the Soak or Stain
Care feature to boost the cleaning power of the
selected cycle.
• Articles that have previously been washed may
have stains that have been set. These stains
may be difficult to remove and may require hand
washing or pre-treating to aid in stain removal.
• Use only High-Efficiency (HE) detergent in
accordance with the manufacturer’s instructions.
• Run the Tub Clean cycle regularly.
Wrinkling
Staining
Poor stain removal
Musty or mildewy
odor in washer
Washer not unloaded promptly.
Washer overloaded.
Hot and cold water inlet hoses are
reversed.
Bleach or softener dispensed too
soon.
Bleach or softener was added
directly to the wash load in the tub.
Washer was not unloaded promptly.
Clothes were not properly sorted.
Proper options not selected.
Previously set stains.
Incorrect or too much detergent has
been used.
Inside of tub was not cleaned
properly.
ENGLISH
Page 46

46 TROUBLESHOOTING
Wi-Fi
Problem Possible Cause Solutions
The password for the Wi-Fi
network was entered incorrectly.
Mobile data for your smartphone
is turned on.
The wireless network name (SSID)
is set incorrectly.
Trouble connecting
appliance and
smartphone to Wi-Fi
network
The router frequency is not 2.4
GHz.
The distance between the
appliance and the router is too far.
• Delete your home Wi-Fi network and begin the
registration process again.
• Turn off the Mobile data on your smartphone
before registering the appliance.
• The wireless network name (SSID) should be a
combination of English letters and numbers. (Do
not use special characters.)
• Only a 2.4 GHz router frequency is supported.
Set the wireless router to 2.4 GHz and connect
the appliance to the wireless router. To check the
router frequency, check with your Internet service
provider or the router manufacturer.
• If the appliance is too far from the router, the
signal may be weak and the connection may not
be configured correctly. Move the router closer
to the appliance or purchase and install a Wi-Fi
repeater.
Page 47

Error Codes
47TROUBLESHOOTING
Problem Possible Cause Solutions
If the balance is not successful, this
error will be displayed.
The load is too small.
Heavy articles are mixed with lighter
items.
The load is out of balance.
Water supply faucets are not fully
open.
Water line hoses are kinked,
pinched, or crushed.
Water inlet filters are clogged. • Clean the inlet filters. See Maintenance section.
Water supply pressure to faucet or
house is too low.
Water supply connected with leaklimiting hoses.
Drain hose is kinked, pinched, or
clogged.
Drain discharge is more than 96
inches (2.4 m) above bottom of
washer.
The Control Lock function is on
to prevent anyone from changing
cycles or operating the appliance.
Special drain feature
• The automatic attempt to rebalance the load was
not successful. The cycle has been paused to
allow the load to be manually adjusted.
• Small loads may need additional items to be
added to allow the washer to balance the load.
• The load may have heavy items loaded with
lighter items. Always try to wash articles of
somewhat similar weight to allow the washer
to evenly distribute the weight of the load for
spinning.
• Manually redistribute the load if articles have
become tangled preventing the automatic
rebalancing from working properly.
• Make sure that the water faucets are fully open.
• Make sure that the hoses are not kinked or
pinched. Be careful when moving the washer.
• Check another faucet in the house to make sure
that household water pressure is adequate and
flow is not restricted. Disconnect the inlet hose
from the washer and run a few gallons of water
through the hose to flush the water supply lines.
If flow is too low, contact a plumber to have the
water lines repaired.
• Hoses designed to limit leaks can trip falsely and
prevent the washer from filling. The use of leak
limiting hoses is not recommended.
• Make sure the drain hose is free of clogs or kinks
and is not pinched behind or under the washer.
• Move the end of the drain hose so it’s lower
than 96 inches (2.4 m) above the bottom of the
washer.
• Turn off Control Lock in the control panel. See
Control Lock under Option Buttons.
• If the washer is paused during a cycle for more
than 4 minutes, the cycle will be cancelled and
any water remaining in the tub will be drained.
• This is not an error code. It indicates that the
drain function is operating.
ENGLISH
Page 48

48 TROUBLESHOOTING
Problem Possible Cause Solutions
• Close the lid (door) and press Start/Pause
button. After starting a cycle, it may take a few
moments before the tub begins to turn or spin.
Lid (Door) is not closed properly.
Lid (Door) lock switch error.
The washer will not spin unless the lid (door) is
locked.
• If the error persists once the lid (door) is closed
and the Start/Pause button is pressed, call for
service.
• Make sure that the lid (door) is closed properly
and press the Start/Pause button. The washer
will not operate unless the lid (door) is locked.
• Make sure that nothing is caught under the lid
(door), including shipping material or clothing.
• Make sure that the latch mechanism is fully
retracted.
• If the lid (door) is closed and the lid (door) lock
error message is displayed, call for service.
• Turn the washer off then on again. Press the
Spin button without selecting a cycle to drain and
spin the load.
Foreign objects such as coins, pins,
clips, etc., caught between the wash
plate and the inner basket.
It is time to run the Tub Clean cycle. • Run the Tub Clean cycle.
The washer has detected an out of
balance load.
Control error.
Water level is too high due to a
faulty water valve.
The water level sensor is not
working correctly.
• When the Spin cycle is complete, empty the tub
and find and remove any objects caught in the
wash plate.
• Always check pockets, etc., before washing to
prevent error codes or damage to the washer or
clothing.
• If the washer detects a load that is too far out of
balance to spin, it will display this code while it
is attempting to rebalance the load. The washer
will add water and try to redistribute the load
automatically. This display is for your information
only, and no action is required.
• As a result, the cycle will take longer than initially
estimated.
• Unplug the washer and wait 60 seconds.
Reconnect power and try again. If the error
reappears, call for service.
• Close the water faucets, unplug the washer, and
call for service.
• Close the water faucets, unplug the washer, and
call for service.
A motor error has occurred.
Clutch error
• Allow the washer to stand for 30 minutes and
then restart the cycle. If the LE error code
persists, call for service.
• Mechanical failure
• Unplug the washer and call for service.
Page 49

LIMITED WARRANTY
49LIMITED WARRANTY
FOR USA
ARBITRATION NOTICE: THIS LIMITED WARRANTY CONTAINS AN ARBITRATION PROVISION THAT
REQUIRES YOU AND LG TO RESOLVE DISPUTES BY BINDING ARBITRATION INSTEAD OF IN COURT,
UNLESS YOU CHOOSE TO OPT OUT. IN ARBITRATION, CLASS ACTIONS AND JURY TRIALS ARE NOT
PERMITTED. PLEASE SEE THE SECTION TITLED “PROCEDURE FOR RESOLVING DISPUTES” BELOW.
Should your LG Washer fail due to a defect in materials or workmanship under normal home use, during the
warranty period set forth below, LG will at its option repair or replace the product. This limited warranty is valid
only to the original retail purchaser of the product and applies only when purchased and used within the United
States, including U.S. Territories. Proof of original retail purchase is required to obtain warranty service under
this limited warranty.
Warranty Period
One (1) year from date of original retail
purchase
Three (3) years from date of original
retail purchase
Ten (10) years from date of original
retail purchase
• Replacement products and parts are warranted for the remaining portion of the original warranty period or
ninety (90) days, whichever is greater.
• Replacement products and parts may be new or remanufactured.
Scope of
Warranty
Any internal /
functional Parts and
Labor
Stainless Steel Tub
Tub Motor (Stator,
Rotor)
LG will provide parts and labor to repair or replace
defective parts.
Parts only. Customer will be responsible for any
labor or in-home service to replace defective parts.
Remark
ENGLISH
THIS WARRANTY IS IN LIEU OF ANY OTHER WARRANTY, EXPRESS OR IMPLIED, INCLUDING WITHOUT
LIMITATION, ANY WARRANTY OF MERCHANTABILITY OR FITNESS FOR A PARTICULAR PURPOSE. TO
THE EXTENT ANY IMPLIED WARRANTY IS REQUIRED BY LAW, IT IS LIMITED IN DURATION TO THE
EXPRESS WARRANTY PERIOD ABOVE. NEITHER THE MANUFACTURER NOR ITS U.S. DISTRIBUTOR
SHALL BE LIABLE FOR ANY INCIDENTAL, CONSEQUENTIAL, INDIRECT, SPECIAL, OR PUNITIVE
DAMAGES OF ANY NATURE, INCLUDING WITHOUT LIMITATION, LOST REVENUES OR PROFITS, OR
ANY OTHER DAMAGE WHETHER BASED IN CONTRACT, TORT, OR OTHERWISE.
Some states do not allow the exclusion or limitation of incidental or consequential damages or limitations on how
long an implied warranty lasts, so the above exclusion or limitation may not apply to you. This warranty gives
you specific legal rights and you may also have other rights that vary from state to state.
THIS LIMITED WARRANTY DOES NOT COVER:
• Service trips to deliver, pick up, or install or repair the product; instruction to the customer on operation of
the product; repair or replacement of fuses or correction of wiring or plumbing, or correction of unauthorized
repairs/installation.
• Failure of the product to perform during power failures and interrupted or inadequate electrical service.
• Damage caused by leaky or broken water pipes, frozen water pipes, restricted drain lines, inadequate or
interrupted water supply or inadequate supply of air.
• Damage resulting from operating the product in a corrosive atmosphere or contrary to the instructions outlined
in the product’s owner’s manual.
• Damage to the product caused by accidents, pests and vermin, lightning, wind, fire, floods, or acts of God.
• Damage or failure caused by unauthorized modification or alteration, or if it is used for other than the intended
purpose, or any water leakage where the unit was not properly installed.
Page 50

50 LIMITED WARRANTY
• Damage or failure caused by incorrect electrical current, voltage, or plumbing codes, commercial or industrial
use, or use of accessories, components, or consumable cleaning products that are not approved by LG.
• Damage caused by transportation and handling, including scratches, dents, chips, and/or other damage to the
finish of your product, unless such damage results from defects in materials or workmanship and is reported
within one (1) week of delivery.
• Damage or missing items to any display, open box, discounted, or refurbished product.
• Products with original serial numbers that have been removed, altered, or cannot be readily determined. Model
and serial numbers, along with original retail sales receipts, are required for warranty validation.
• Increases in utility costs and additional utility expenses.
• Repairs when your product is used for other than normal and usual household use (e.g. commercial use, in
offices and recreational facilities) or contrary to the instructions outlined in the product’s owner’s manual.
• Costs associated with removal of your product from your home for repairs.
• The removal and reinstallation of the product if it is installed in an inaccessible location or is not installed in
accordance with published installation instructions, including LG’s owner’s and installation manuals.
• Damage resulting from misuse, abuse, improper installation, repair, or maintenance. Improper repair includes
use of parts not approved or specified by LG.
The cost of repair or replacement under these excluded circumstances shall be borne by the consumer.
TO OBTAIN WARRANTY SERVICE AND ADDITIONAL INFORMATION
For additional product information, visit the LG website at http://www.lg.com
For assistance using this product or to schedule service, contact LG Electronics at 1-800-243-0000.
For further assistance, write: LG Electronics, 201 James Record Road, Huntsville, Alabama 35813
PROCEDURE FOR RESOLVING DISPUTES:
ALL DISPUTES BETWEEN YOU AND LG ARISING OUT OF OR RELATING IN ANY WAY TO THIS LIMITED
WARRANTY OR THE PRODUCT SHALL BE RESOLVED EXCLUSIVELY THROUGH BINDING ARBITRATION,
AND NOT IN A COURT OF GENERAL JURISDICTION. BINDING ARBITRATION MEANS THAT YOU AND LG
ARE EACH WAIVING THE RIGHT TO A JURY TRIAL AND TO BRING OR PARTICIPATE IN A CLASS ACTION.
Definitions. For the purposes of this section, references to “LG” mean LG Electronics U.S.A., Inc., its parents,
subsidiaries and affiliates, and each of their officers, directors, employees, agents, beneficiaries, predecessors
in interest, successors, assigns and suppliers; references to “dispute” or “claim” shall include any dispute,
claim or controversy of any kind whatsoever (whether based in contract, tort, statute, regulation, ordinance,
fraud, misrepresentation or any other legal or equitable theory) arising out of or relating in any way to the sale,
condition or performance of the product or this Limited Warranty.
Notice of Dispute. In the event you intend to commence an arbitration proceeding, you must first notify LG in
writing at least 30 days in advance of initiating the arbitration by sending a letter to LG at LG Electronics, USA,
Inc. Attn: Legal Department- Arbitration 1000 Sylvan Ave, Englewood Cliffs 07632. You and LG agree to engage
in good faith discussions in an attempt to amicably resolve your claim. The notice must provide your name,
address, and telephone number; identify the product that is the subject of the claim; and describe the nature of
the claim and the relief being sought. If you and LG are unable to resolve the dispute within 30 days, either party
may proceed to file a claim for arbitration.
Agreement to Binding Arbitration and Class Action Waiver. Upon failure to resolve the dispute during the
30 day period after sending written notice to LG, you and LG agree to resolve any claims between us only by
binding arbitration on an individual basis, unless you opt out as provided below. Any dispute between you and
LG shall not be combined or consolidated with a dispute involving any other person’s or entity’s product or
claim. More specifically, without limitation of the foregoing, any dispute between you and LG shall not under any
circumstances proceed as part of a class or representative action. Instead of arbitration, either party may bring
an individual action in small claims court, but that small claims court action may not be brought on a class or
representative basis.
Page 51

51LIMITED WARRANTY
Arbitration Rules and Procedures. To begin arbitration of a claim, either you or LG must make a written
demand for arbitration. The arbitration will be administered by the American Arbitration Association (“AAA”)
and will be conducted before a single arbitrator under the AAA’s Consumer Arbitration Rules that are in effect
at the time the arbitration is initiated (referred to as the “AAA Rules”) and under the procedures set forth in this
section. The AAA Rules are available online at www.adr.org/consumer. Send a copy of your written demand for
arbitration, as well as a copy of this provision, to the AAA in the manner described in the AAA Rules. You must
also send a copy of your written demand to LG at LG Electronics, USA, Inc. Attn: Legal Department- Arbitration
1000 Sylvan Avenue Englewood Cliffs, NJ 07632. If there is a conflict between the AAA Rules and the rules
set forth in this section, the rules set forth in this section will govern. This arbitration provision is governed
by the Federal Arbitration Act. Judgment may be entered on the arbitrator’s award in any court of competent
jurisdiction. All issues are for the arbitrator to decide, except that issues relating to the scope and enforceability
of the arbitration provision and to the arbitrability of the dispute are for the court to decide. The arbitrator is
bound by the terms of this provision.
Governing Law. The law of the state of your residence shall govern this Limited Warranty and any disputes
between us except to the extent that such law is preempted by or inconsistent with applicable federal law.
Fees/Costs. You do not need to pay any fee to begin an arbitration. Upon receipt of your written demand for
arbitration, LG will promptly pay all arbitration filing fees to the AAA unless you seek more than $25,000 in
damages, in which case the payment of these fees will be governed by the AAA Rules. Except as otherwise
provided for herein, LG will pay all AAA filing, administration and arbitrator fees for any arbitration initiated in
accordance with the AAA Rules and this arbitration provision. If you prevail in the arbitration, LG will pay your
attorneys’ fees and expenses as long as they are reasonable, by considering factors including, but not limited to,
the purchase amount and claim amount. Notwithstanding the foregoing, if applicable law allows for an award of
reasonable attorneys’ fees and expenses, an arbitrator can award them to the same extent that a court would. If
the arbitrator finds either the substance of your claim or the relief sought in the demand is frivolous or brought for
an improper purpose (as measured by the standards set forth in Federal Rule of Civil Procedure 11(b)), then the
payment of all arbitration fees will be governed by the AAA Rules. In such a situation, you agree to reimburse LG
for all monies previously disbursed by it that are otherwise your obligation to pay under the AAA Rules. Except
as otherwise provided for, LG waives any rights it may have to seek attorneys’ fees and expenses from you if LG
prevails in the arbitration.
Hearings and Location. If your claim is for $25,000 or less, you may choose to have the arbitration conducted
solely on the basis of (1) documents submitted to the arbitrator, (2) through a telephonic hearing, or (3) by
an in-person hearing as established by the AAA Rules. If your claim exceeds $25,000, the right to a hearing
will be determined by the AAA Rules. Any in-person arbitration hearings will be held at a location within the
federal judicial district in which you reside unless we both agree to another location or we agree to a telephonic
arbitration.
Opt Out. You may opt out of this dispute resolution procedure. If you opt out, neither you nor LG can require the
other to participate in an arbitration proceeding. To opt out, you must send notice to LG no later than 30 calendar
days from the date of the first consumer purchaser’s purchase of the product by either: (i) sending an e-mail to
optout@lge.com, with the subject line: “Arbitration Opt Out” or (ii) calling 1-800-980-2973. You must include in
the opt out e-mail or provide by telephone: (a) your name and address; (b) the date on which the product was
purchased; (c) the product model name or model number; and (d) the serial number (the serial number can be
found (i) on the product; or (ii) online by accessing https://www.lg.com/us/support/repair-service/schedule-repaircontinued and clicking on “Find My Model & Serial Number”).
You may only opt out of the dispute resolution procedure in the manner described above (that is, by e-mail or
telephone); no other form of notice will be effective to opt out of this dispute resolution procedure. Opting out of
this dispute resolution procedure will not affect the coverage of the Limited Warranty in any way, and you will
continue to enjoy the full benefits of the Limited Warranty. If you keep this product and do not opt out, then you
accept all terms and conditions of the arbitration provision described above.
ENGLISH
Page 52

52 LIMITED WARRANTY
Warranty Exceptions (U.S.)
The packing materials are not
removed.
Noise, vibration
Tub
support
Remove the packing materials.
Carton
base
A coin or foreign object is stuck
in the washer.
E6 error, the tub won’t spin, noise
The drain hose is installed too
low.
IE error, failure to fill with water,
draining during fill
The water inlet valve filters are
clogged or the water inlet hoses
are kinked.
Water is not coming.
The inlet hoses are installed in
reverse.
Laundry is hot, warm or wrinkled
after finished washing.
The water tap is not turned on.
Water is not supplied.
Cold water
inlet
Water tap
Remove coins or foreign objects
from the laundry before loading.
Reinstall the drain hose
properly.
Clean the inlet valve filter or
reinstall the water inlet hoses.
Inlet lter
Hot water inlet
Reinstall the inlet hoses.
Turn on the water tap.
Improper installation of water
inlet hoses or using third party
inlet hoses
Leakage
Loose connection of power cord
or electrical outlet problem
No power problem
Improper installation or use of product
Service trips to deliver, pick up, install the product
or for instruction on product use.
The removal and reinstallation of the product.
Accidents, pests and vermin, lightning, wind,
fire, floods, or acts of God
Damage to the product
Reinstall the inlet hoses or
replace them with approved
hoses.
Reconnect the power cord or
change the electrical outlet.
The warranty covers manufacturing defects only.
Service resulting from improper Installation is not
covered.
Service resulting from natural disasters rather
than manufacturing defects is not covered by the
warranty.
Page 53

53MEMO
Page 54

54 MEMO
Page 55

MANUAL DEL PROPIETARIO
LAVADORA
ESPAÑOL
Lea detenidamente el manual del propietario antes de poner el electrodoméstico en
funcionamiento y consérvelo a mano en todo momento para su referencia.
Copyright © 2018-2019 LG Electronics Inc. Todos los Derechos Reservados.
www.lg.com
Page 56

2
TABLA DE CONTENIDOS
3 INSTRUCCIONES DE SEGURIDAD
3 INSTRUCCIONES IMPORTANTES DE
SEGURIDAD
7 DESCRIPCIÓN GENERAL DEL
PRODUCTO
7 Partes
7 Accesorios
8 INSTALACIÓN
8 Herramientas necesarias
8 Descripción general de la instalación
9 Especificaciones del producto
10 Elección de la ubicación adecuada
11 Desempacando y removiendo el material de
transporte
12 Conexión del suministro de agua
13 Conexión de la manguera de desagüe
14 Nivelación de la lavadora
15 Conexión al suministro eléctrico
15 Prueba de la lavadora
40 Cuidado en climas fríos
41 SOLUCIÓN DE PROBLEMAS
41 Antes de llamar al servicio técnico
49 GARANTÍA LIMITADA
49 PARA EE. UU.
52 Limitaciones de la Garantía (Estados Unidos)
16 FUNCIONAMIENTO
16 Uso de la lavadora
17 Clasificación de prendas
18 Carga de la lavadora
19 Agregado de productos de limpieza
22 Panel de control
24 Ciclos de lavado
26 Guía de ciclos
29 Botones modificadores de ciclo
30 Cuidado especial función
31 Botones de opción
33 FUNCIONES INTELIGENTES
33 Aplicación LG SmartThinQ
36 Función Smart Diagnosis ™ (Diagnóstico
Inteligente)
37 MANTENIMIENTO
37 Limpieza regular
39 Limpieza de los filtros de entrada de agua
Page 57

INSTRUCCIONES DE SEGURIDAD
LEA TODAS LAS INSTRUCCIONES ANTES DE UTILIZAR
Su seguridad y la de los demás son muy importantes.
Tanto en este manual como en el equipo, hemos proporcionado muchos mensajes de seguridad importantes.
Siempre debe leer y respetar todos los mensajes de seguridad.
Este es el símbolo de alerta de seguridad.
Este símbolo le advierte sobre posibles riesgos que pueden ocasionar lesiones o la muerte a usted o a otros.
El símbolo de alerta de seguridad siempre estará acompañado de las palabras "ADVERTENCIA" o
"PRECAUCIÓN" y seguido de un mensaje de seguridad importante.
Estos términos signican lo siguiente:
ADVERTENCIA
El incumplimiento de estas instrucciones puede causar lesiones graves o la muerte.
PRECAUCIÓN
El incumplimiento de estas instrucciones puede causar lesiones leves, moderadas o daño al producto.
Todos los mensajes de seguridad le dicen cuáles son los peligros potenciales, cómo evitarlos, y qué podría suceder
si no sigue las instrucciones.
3INSTRUCCIONES DE SEGURIDAD
ESPAÑOL
INSTRUCCIONES IMPORTANTES DE SEGURIDAD
ADVERTENCIA
Para disminuir el riesgo de explosiones, incendios, descargas eléctricas, quemaduras,
lesiones o muerte para las personas que usen este artefacto, siga las precauciones
básicas, incluidas las siguientes:
INSTALACIÓN
• Cumpla con todos los procedimientos de seguridad del sector recomendados, incluido el uso de guantes de
manga larga y gafas de seguridad.
• Nunca intente operar este artefacto si se encuentra dañado, si no funciona correctamente, si no está
ensamblado por completo o si tiene piezas faltantes o rotas, incluido un cable o enchufe dañado.
• Antes de ser utilizado, este artefacto debe ser correctamente instalado, conforme a lo descrito en este
manual.
• Para reducir el riesgo de lesiones graves o muerte, siga todas las instrucciones de instalación.
• Consulte las INSTRUCCIONES DE INSTALACIÓN para obtener información detallada sobre los
procedimientos de conexión a tierra. Las instrucciones de instalación se suministran junto con el artefacto
para ser consultadas por el instalador. Si el artefacto se traslada a una nueva ubicación, asegúrese de que
lo revise y lo vuelva a instalar personal de servicio calicado.
• El traslado o la instalación del artefacto requieren de dos o más personas.
• No instale el artefacto en lugares húmedos.
• Almacene e instale el artefacto donde no esté expuesto a temperaturas bajo cero ni a la intemperie.
• Este artefacto no ha sido diseñado para ser usado en embarcaciones o instalaciones móviles, tales como
casas rodantes, remolques o aeronaves.
Page 58

4 INSTRUCCIONES DE SEGURIDAD
• Mantenga los materiales de empaque fuera del alcance de los niños. Los materiales de empaque pueden
ser peligrosos para los niños. Corren riesgo de asxia.
• Destruya el cartón, la bolsa de plástico y los demás materiales de empaque luego de desempacar el
artefacto. Estos materiales podrían utilizarlos los niños para jugar. Las cajas de cartón cubiertas con
tapetes, colchas o láminas plásticas pueden convertirse en cámaras herméticas.
• El artefacto debe ser instalado y conectado a tierra por personal de servicio calicado, de acuerdo con los
códigos locales.
• Por ninguna razón debe cortar o quitar la tercera clavija (tierra) del cable de alimentación.
• Cuando traslade o instale el aparato, tenga especial cuidado en no apretar, aplastar o dañar el cable de
alimentación.
• Debe conectarse a un circuito de alimentación de clasicación y tamaño adecuados y debidamente
protegido para evitar la sobrecarga eléctrica.
• Debe posicionar este artefacto cerca de una fuente de suministro eléctrico.
• Desconecte el cable de alimentación, el fusible del hogar o el interruptor de corriente antes de instalar o
reparar el artefacto.
• El cable de alimentación de este aparato está equipado con un enchufe de 3 clavijas (conexión a tierra)
que se conecta con un tomacorriente estándar de 3 clavijas (tierra) para minimizar la posibilidad de
descarga eléctrica de este aparato.
• Use mangueras nuevas cuando conecte el aparato al suministro de agua. No reutilice mangueras viejas.
FUNCIONAMIENTO
• Lea todas las instrucciones antes de usar el artefacto y consérvelas.
• Use el artefacto únicamente para el n previsto.
• Si el producto se ha mojado accidentalmente, comuníquese con el Centro de Información al Cliente de LG
Electronics para que le den instrucciones antes de reanudar el uso.
• Si detecta un sonido extraño, olor a quemado o a químico, o humo provenientes del artefacto, desconéctelo
de inmediato y contáctese con un Centro de Información al Cliente de LG Electronics.
• Bajo ciertas condiciones, podría producirse gas hidrógeno en un sistema de agua caliente que no ha sido
utilizado por dos semanas o más. EL GAS HIDRÓGENO ES EXPLOSIVO. Si el sistema de agua caliente
no se ha usado durante ese período de tiempo, abra todas las llaves de agua caliente y deje que uya
varios minutos antes de usar el artefacto. Esto eliminará el gas hidrógeno acumulado. Dado que el gas
hidrógeno es inamable, no fume ni use ninguna llama abierta durante este proceso.
• No introduzca las manos en la lavadora si la cuba, el tambor, el agitador o cualquier pieza interior del
artefacto se encuentra en movimiento. Antes de cargar, descargar o agregar artículos, presione Inicio/
Pausa y espere que la cuba o el tambor se detengan por completo antes de introducir las manos en el
interior.
• Este artefacto no ha sido diseñado para ser utilizado por personas con capacidades físicas, sensoriales o
mentales disminuidas (incluidos niños) o que no cuenten con la experiencia o los conocimientos necesarios
para operarlo, salvo que una persona responsable de su seguridad les brinde la supervisión o la instrucción
pertinente en cuanto al uso del artefacto.
• No permita que niños o mascotas jueguen con el electrodoméstico, sobre o dentro de éste. Es necesaria la
supervisión cuando el electrodoméstico es utilizado cerca de niños o mascotas.
• Mantenga los productos de lavandería lejos del alcance de los niños. Para evitar lesiones a las personas,
preste atención a todas las advertencias que guran en las etiquetas de los productos.
• Repare o reemplace de inmediato todos los cables de alimentación deshilachados o dañados de otra
forma. No use un cable que exhiba roturas o abrasión en su longitud o en sus extremos.
• Nunca desconecte el artefacto tirando del cable de alimentación. Sujete siempre con rmeza el enchufe y
tire derecho para extraerlo del tomacorriente.
• No use un cable de extensión ni un adaptador con este artefacto.
• No sujete el cable de alimentación ni toque los controles del artefacto con las manos húmedas.
• No modique ni extienda el cable de alimentación.
Page 59

• Si se daña el cable de electricidad, solo el fabricante está autorizado para reemplazarlo, o bien su agente
de servicio técnico o una persona de calicación similar para prevenir riesgos.
• No coloque prendas aceitosas o grasosas, candelas o materiales inamables encima del artefacto.
• Mantenga el área debajo de los artefactos y sus alrededores libre de materiales combustibles (pelusa,
papel, trapos, etc.), gasolina, productos químicos y otros vapores o líquidos inamables.
• No almacene ni use gasolina u otros líquidos o vapores inamables cerca de este artefacto ni de ningún
otro.
• No mezcle cloro con amoniaco o ácidos, como por ejemplo, vinagre. Siga las instrucciones del envase
cuando utilice productos de lavandería. Su uso incorrecto puede producir gases venenosos, los cuales
pueden ocasionar lesiones graves o la muerte.
• Nunca utilice productos químicos agresivos, limpiadores abrasivos ni solventes para limpiar la lavadora.
Estos productos arruinarán el acabado.
• No lave artículos que hayan sido previamente limpiados, lavados o manchados con gasolina, solventes de
limpieza en seco, aceite vegetal o de cocina u otras sustancias inamables o explosivas, ni artículos a los
cuales se haya sumergido en estos productos, ya que los mismos emiten vapores que pueden inamarse o
explotar.
• No agregue gasolina, solventes de limpieza en seco ni otras sustancias explosivas o inamables al agua
del lavado. Estas sustancias emiten vapores que pueden inamarse o explotar.
• En el caso de que se produzca una fuga de gas (gas propano, gas licuado de petróleo, etc.), no ponga
en funcionamiento este artefacto ni ningún otro. Abra una puerta o una ventana para ventilar el área de
inmediato.
• No utilice indebidamente los controles.
• Asegure la manguera de drenaje de forma segura en su lugar a manera de evitar inundaciones.
• No maltrate la tapa (puerta), no se siente ni se pare sobre ella.
• Al cerrar la tapa (puerta), mantenga sus manos y objetos extraños lejos del área de la tapa (puerta) y del
picaporte.
• Siempre revise el interior del aparato para vericar que no haya objetos extraños.
5INSTRUCCIONES DE SEGURIDAD
ESPAÑOL
MANTENIMIENTO
• No repare ni reemplace ninguna parte del electrodoméstico. Todas las reparaciones deben ser realizadas
por personal de servicio calicado a menos que se recomiende especícamente en este manual del
propietario. Utilice sólo piezas de fábrica autorizadas.
• Desconecte el artefacto del suministro eléctrico antes de limpiarlo o de realizar cualquier tipo de
mantenimiento que pueda realizar el usuario. Colocar los controles en la posición de apagado no
desconecta el artefacto del suministro eléctrico.
• Quite el polvo o los materiales extraños de las clavijas del enchufe de alimentación.
• No desarme ni repare el artefacto por su cuenta.
• Remueva la tapa (puerta) previo a que el electrodoméstico sea retirado para servicio o eliminación a
manera de evitar que niños o animales pequeños queden atrapados dentro.
• Asegúrese de que el cajón dispensador o la tapa (puerta) esté cerrada todo el tiempo cuando no esté
agregando productos de lavado.
INSTRUCCIONES DE CONEXIÓN A TIERRA
• La conexión inadecuada del conductor de conexión a tierra puede resultar en riesgo de choque eléctrico.
Pregunte a un electricista calicado o al personal de servicio si no está seguro si el artefacto está
adecuadamente conectado a tierra. No modique el enchufe que viene con el artefacto. Si no cabe en el
contacto, pida que un electricista calicado instale un contacto apropiado.
• El artefacto debe estar conectado a tierra. En caso de funcionamiento defectuoso o avería, la conexión
a tierra reduce el riesgo de choque eléctrico al establecer una ruta de menor resistencia para la corriente
eléctrica. El artefacto viene equipado con un cable eléctrico que tiene un conductor para conexión a tierra
y un enchufe con conexión a tierra. El enchufe debe ser conectado a un contacto apropiado que esté
instalado y conectado a tierra de acuerdo con todos los códigos y ordenanzas locales.
Page 60

6 INSTRUCCIONES DE SEGURIDAD
PRECAUCIÓN
Para reducir el riesgo de lesiones leves o moderadas a personas, el mal funcionamiento
o daño al producto o propiedad cuando use este producto, siga las precauciones
básicas, incluido lo siguiente:
INSTALACIÓN
• Instale el producto sobre un piso rme y nivelado.
FUNCIONAMIENTO
• No coloque ningún objeto encima del artefacto.
• Cierre las llaves de agua y desconecte el artefacto si este no será usado por un periodo de tiempo
prolongado, por ejemplo, durante las vacaciones.
• SIEMPRE siga las instrucciones para cuidado de los tejidos suministradas por el fabricante.
• Use suavizantes o productos para eliminar la electricidad estática solamente según las recomendaciones
del fabricante.
• No combine productos de lavandería en una misma carga a menos que este uso se especique en la
etiqueta
• No toque el agua de desagüe, ya que podría estar caliente.
• Si la manguera de desagüe y la manguera de suministro de agua se congelan en invierno, descongélelas
antes de usar el artefacto.
• No almacene ni vierta limpiadores, blanqueadores (blanqueador con cloro, blanqueador oxigenado, etc.) ni
detergentes líquidos encima del artefacto. Si lo hace, podría ocasionar corrosión, decoloración o daño de la
supercie del artefacto.
• Prendas o articulos impermeables o resistentes al agua deben ser lavados solamente en el ciclo
Impermeables. (Ej., Prendas resistentes al agua, funda para colchones, ropa para exteriores, tapetes
plásticos, etc.) De lo contrario podría sufrir una herida o causarle daños a la lavadora, prendas, paredes,
piso y objetos circundantes debido a la vibración anormal.
GUARDE ESTAS INSTRUCCIONES
Page 61

DESCRIPCIÓN GENERAL DEL PRODUCTO
9
Partes
7DESCRIPCIÓN GENERAL DEL PRODUCTO
ESPAÑOL
Dispensador de Detergente
1
Compartimiento de
2
blanqueador líquido
Accesorios
Accesorios incluidos
Correa
Accesorios requeridos
Mangueras de Agua Caliente y
Fría
Cuba
3
Tapa (puerta)
4
Panel de control
5
Patas de nivelación
6
Entradas de Agua
7
Cable de Alimentación
8
Manguera de Drenaje
9
NOTA
• Las ilustraciones en esta guía pueden diferir de los componentes y accesorios reales, los cuales están sujetos a
cambios sin previo aviso por parte del fabricante a n de introducir mejoras en el producto.
• Para su seguridad y para prolongar la vida útil del producto, use solo componentes autorizados. El fabricante no se
hace responsable del mal funcionamiento del producto o de accidentes provocados por el uso de componentes o
piezas no autorizados adquiridos por separado.
Page 62

8 INSTALACIÓN
INSTALACIÓN
Herramientas necesarias
Pinzas Destornillador de hoja
plana
Nivel
Descripción general de la instalación
Lea las siguientes instrucciones de instalación inmediatamente después de adquirir este producto o transportarlo a otra
ubicación.
Eligiendo la ubicación adecuada.
Desempacando y removiendo el
material de transporte.
Conectando las lineas de agua.
Conectando la manguera de drenaje.
PRUEBA!
Prueba de la lavadora
Nivelado de la lavadora
Conexión al suministro eléctrico
Page 63

Especicaciones del producto
La apariencia y las especicaciones detalladas en este manual podrían variar debido a mejoras constantes en el
producto.
Requisitos eléctricos 120 V CA, 60 Hz
Presión de agua mín./máx. 20 – 120 psi (138 - 827 kPa)
27” (Ancho) X 28
abierta)
Dimensiones
Peso neto 132.3 lbs. (60.0 kg)
Velocidad máx. de centrifugado 950 RPM (±50 rpm)
68.6 cm (Ancho) X 72.1 cm (Profundad) X 113 cm (Altura), 145.3 cm (Altura con la
puerta abierta)
ADVERTENCIA
• El traslado o la instalación del artefacto requieren de dos o más personas. El incumplimiento de estas instrucciones
podría causar lesiones.
• Almacene e instale el artefacto donde no esté expuesto a temperaturas bajo cero ni a la intemperie. El
incumplimiento de esta advertencia puede causar daños al producto o las piezas, lesiones graves, incendios,
descargas eléctricas o la muerte.
• Conecte la lavadora a tierra adecuadamente, de acuerdo con todos los códigos y las ordenanzas vigentes. El
incumplimiento de esta advertencia puede causar lesiones graves, incendios, descargas eléctricas o la muerte.
• Para reducir el riesgo de descargas eléctricas, no instale el artefacto en sitios húmedos. El incumplimiento de esta
advertencia puede causar lesiones graves, incendios, descargas eléctricas o la muerte.
• Para garantizar una circulación de aire adecuada, no bloquee la abertura grande que se encuentra en la parte
inferior de la lavadora con tapetes u otros materiales.
• No retire la clavija de tierra. No utilice un adaptador ni un cable de extensión. Conecte a un tomacorriente de
3 clavijas con conexión a tierra. El incumplimiento de esta advertencia puede causar lesiones graves, incendios,
descargas eléctricas o la muerte.
• Ciertas piezas internas no tienen conexión a tierra en forma intencional y pueden presentar un riesgo de descarga
eléctrica sólo durante la reparación. Personal de reparación-no toque las siguientes piezas cuando el aparato esté
recibiendo energía : bomba, motor, cubierta de ltro de ruido, y calentador (en modelos aplicables).
3
/8” (Profundidad) X 44 1/2” (Altura), 57 1/4” (Altura con la puerta
9INSTALACIÓN
ESPAÑOL
Page 64

10 INSTALACIÓN
(68.6 cm)
(2.5 cm)
(2.5 cm)
32"
Elección de la ubicación
adecuada
Instale la lavadora sobre un piso sólido que sea
resistente y rígido para soportar el peso de la lavadora,
incluso cuando esta se encuentre completamente
cargada, sin que se hunda ni rebote. Si el piso es muy
exible, puede ser necesario reforzarlo para hacerlo más
rígido. Si el piso no es sólido, puede ocasionar ruido y
vibraciones intensas.
NOTA
• Previo a instalar la lavadora, asegúrese de que el piso
esté limpio, seco y libre de polvo, suciedad, agua y
grasa para que las patas de la lavadora no se deslicen
facilmente. Patas de nivelación que se mueven o
deslizan podrían contribuir a un exceso de vibración y
ruido debido al mal contacto con el piso.
• Permita que quede espacio suciente entre los muros y
la lavadora para su instalación.
Tomacorriente
• El tomacorriente debe estar ubicado dentro de un
perimetro de 60 pulgadas (1.5 m) de cualquiera de los
lados de la lavadora.
• El artefacto y el tomacorriente deben estar ubicados de
manera tal que se pueda acceder al enchufe fácilmente.
• No sobrecargue el tomacorriente conectándole más de
un artefacto.
• Los tomacorrientes deben estar conectados a tierra
según las regulaciones y los códigos de cableado
eléctrico vigentes.
• Utilice un interruptor de circuito o un fusible de acción
retardada.
NOTA
• La lavadora debe instalarse en un suelo rme para
minimizar la vibración que se produce durante el
centrifugado. Los pisos de concreto son los más
indicados, pero un piso de madera es suciente,
siempre y cuando esté construido conforme a las
normas de la FHA.
Instalación en el piso
44 ¼"
(113 cm)
1"
27"
Para garantizar el espacio suciente para las tuberías
de agua y desagüe, y para la circulación de aire, deje un
espacio de, al menos, 1 pulgada (2.5 cm) a los lados y
4 pulgadas (10 cm) detrás de la unidad. Asegúrese de
tener en cuenta las molduras de pisos, puertas o muros
que podrían aumentar los espacios necesarios.
(81.1 cm)
28 ⅜"
(72.1 cm)
1"
3 ½"
(9 cm)
NOTA
• Es responsabilidad personal y obligación del dueño
del producto garantizar la instalación adecuada de un
tomacorriente por un electricista cualicado.
Suelo
• Para minimizar ruidos y vibraciones, la lavadora debe
instalarse en un piso sólidamente construido.
• La pendiente permitida debajo de la lavadora es de una
diferencia máxima de 1 pulgada de lado a lado o del
frente hacia atrás.
• No se recomienda su instalación en supercies
cubiertas por alfombras o baldosas blandas.
• Nunca instale la lavadora sobre una plataforma ni sobre
una estructura de soporte débil.
57 ¼"
(145.3 cm)
26 ¾"
(68 cm)
• El espacio vertical mínimo del piso a los estantes
superiores, gabinetes, techos, etc., es de 58 pulgadas
(147 cm).
Page 65

11INSTALACIÓN
Desempacando y removiendo el
material de transporte
Desempaque todo el material de transporte de la
lavadora para su operación y verique que no hayan
daños provocados durante el envío.
PRECAUCIÓN
• No remover el material de transporte podría causar
ruido y vibración excesiva.
Levante la lavadora de la base de espuma.
1
Luego de quitar el cartón y el material de transporte,
levante la lavadora de la base de espuma. Asegúrese
de quitar el soporte plástico del tambor junto con la
base y que no quede atascado en la parte inferior de
la lavadora.
Para evitar daños, no remueva del tambor el bloque
2
de espuma que contiene el manual del usuario, las
partes, y las muestras de productos de limpieza
hasta que la lavadora se encuentre en su ubicación
nal.
NOTA
• Una vez removido, guarde el bloque de espuma para su
uso futuro. Si llegara a necesitar mover la lavadora, el
bloque de espuma prevendrá que ésta se dañe durante
el transporte.
Desabroche el cable de alimentación de la parte
3
trasera de la lavadora.
ESPAÑOL
Si debe recostar la lavadora para retirar los
materiales de embalaje, siempre proteja sus lados y
recuéstela con cuidado sobre un costado. No apoye
la lavadora sobre su parte posterior o frontal.
Soporte de tina plástico
Base de cartón
Page 66

12 INSTALACIÓN
Conexión del suministro de
agua
Para evitar costosos daños relacionados a las lineas de
agua, compre e instale mangueras de entrada nuevas al
momento de instalar la lavadora.
Verique los conectores y los sellos.
1
Inspeccione el conector roscado de cada manguera
y asegúrese de que cada una cuente con un sello de
goma colocado en cada extremo para evitar fugas.
Sello de goma Sello de goma
Manguera de agua (a la
entrada de agua de la
lavadora)
Conecte las mangueras de suministro de agua.
2
Conecte las mangueras de suministro de agua agua
a las llaves de paso de agua caliente y fría y apriete
las conexiones manualmente. A continuación, utilice
unas pinzas para apretarlas otros 2/3 de vuelta.
Conecte la manguera azul a una llave de agua fría y
la manguera roja a una llave de agua caliente.
Manguera de agua (a
la llave)
Fije las mangueras de agua a la parte posterior de
4
la lavadora.
Fije la manguera de suministro de agua caliente a
la entrada de agua caliente de la parte posterior de
la lavadora. Fije la manguera de suministro de agua
fría a la entrada de agua fría de la parte posterior de
la lavadora. Ajuste los conectores para asegurarlos
bien. Abra por completo ambas llaves y verique
que no existan fugas en los dos extremos de las
mangueras.
Entrada de agua
caliente
Entrada de agua fría
ADVERTENCIA
• No apriete extremadamente ni cruce los conectores
de las mangueras. Al apretar en extremo o cruzar
los conectores se pueden dañar las válvulas o los
acoplamientos y esto podría resultar en fugas y
daños a la propiedad.
• No reutilice mangueras viejas. Utilice únicamente
nuevas mangueras al instalar la lavadora. Las
mangueras viejas podrían tener fugas o estallar
causando una inundación y daño a la propiedad.
Contacte al Centro de Información al Cliente de LG
para asistencia en la compra de mangueras.
Enjuague las mangueras de entrada.
3
Luego de conectar las mangueras de entrada a las
llaves del agua, abra las llaves para enjuagar todas
las sustancias extrañas (suciedad, arena o aserrín)
que pueda haber en las líneas de suministro de
agua. Drene el agua en una cubeta y verique la
temperatura del agua a n de asegurarse de haber
conectado las mangueras a las llaves de paso
correctas.
NOTA
• Revise periódicamente las mangueras para asegurarse
de que no presenten rajaduras, fugas o desgaste y
remplácelas cada cinco años. No estire las mangueras
intencionalmente, y asegúrese de que no se encuentren
pellizcadas, aplastadas o plegadas debido a otros
objetos.
• La presión del suministro de agua debe ser de entre
20 psi y 120 psi (138 – 827 kPa). Si la presión del
suministro de agua es mayor a 120 psi, es necesario
que se instale una válvula reductora.
• Para proporcionar los mejores resultados de lavado,
la temperatura del agua caliente debe jarse a 120 –
135 °F (48 – 57 °C) y la del agua fría a 60 °F (15 °C).
• La lavadora nunca debe instalarse o almacenarse
en un sitio sujeto a temperaturas bajo cero. Puede
provocar daños a las líneas de suministro de agua y a
los mecanismos internos de la lavadora. Si la lavadora
estuvo expuesta a temperaturas bajo cero antes de
su instalación, déjela en una habitación a temperatura
ambiente durante varias horas antes de utilizarla y
compruebe que no presente fugas antes de ponerla en
funcionamiento.
• No utilice mangueras de prevención de inundaciones
con dispositivos de cierre automático. Los dispositivos
podrían activarse durante el llenado y prevenir el
llenado apropiado de la máquina.
Page 67

13INSTALACIÓN
(75 - 244 cm)
(75 - 244 cm)
Conexión de la manguera de
desagüe
La manguera de drenaje puede ser instalada utilizando
un tubo independiente o un lavabo. Usted puede elegir el
método que necesite.
NOTA
• La manguera de desagüe siempre debe estar
conectada adecuadamente. Si la conexión de
la manguera de desagüe no se encuentra bien
asegurada, podrían producirse inundaciones y daños a
la propiedad.
• El desagüe debe estar instalado según las regulaciones
y los códigos locales vigentes.
• Asegúrese de que la manguera de desagüe no se
encuentre estirada, pellizcada, aplastada ni plegada.
• No instale la manguera de drenaje con el extremo a
una altura menor a 29 pulgadas (75 cm) o mayor a 96
pulgadas (244 cm) en relación al fondo de la lavadora,
ni a más de 60 pulgadas (152 cm) de ella.
• Nunca genere un sello hermético entre la manguera
y el desagüe utilizando cinta u otros medios. Si no
existe una trampa de aire, se puede producir un sifón
y el agua puede ser bombeada desde la cuba, lo que
provocará que el desempeño de lavado o enjuague sea
deciente o que las prendas se dañen.
• El extremo de la manguera debe estar a una altura
de entre aproximadamente 35 pulgadas (89 cm) a 47
pulgadas (120 cm) en relación al piso.
Opción 1: Tubo independiente
Inserte el extremo de la manguera de desagüe en el
1
tubo independiente.
Si las válvulas de agua y de drenaje están
3
incorporadas a la pared, abroche la manguera de
drenaje a una de las mangueras de agua con la
correa suministrada (lado corrugado en el interior).
29.5 - 96 "
Correa
29.5 - 96 "
PRECAUCIÓN
• No introduzca el extremo de la manguera de drenaje
al tubo vertical más de 8 pulgadas (20 cm). Hacerlo
podría causar sifoneo, malos olores, o drenaje
inapropiado.
NOTA
• Si el drenaje es lo sucientemente largo para que la
pestaña de la manguera quepa dentro de él, no la
introduzca más de 1-2 pulgadas.
Opción 2: Lavabo
Cuelgue el extremo de la manguera de desagüe
1
sobre el borde del lavabo.
Utilice la correa proveída para asegurar la manguera
2
de desagüe en su lugar.
ESPAÑOL
Utilice la correa proveída para asegurar la manguera
2
de desagüe en su lugar.
Page 68

14 INSTALACIÓN
Nivelación de la lavadora
El tambor de la lavadora gira a velocidades muy altas.
Para minimizar el ruido, la vibración, y los movimientos
no deseados, la lavadora debe ser instalada en una
supercie sólida.
NOTA
• Ajuste las patas de nivelación solo en la medida
necesaria para nivelar la lavadora. Si las patas de
nivelación tienen más altura de la necesaria, se pueden
producir vibraciones.
• Previo a instalar la lavadora, asegúrese de que el piso
esté limpio, seco y libre de polvo, suciedad, agua y
grasa para que las patas de la lavadora no se deslicen
facilmente. Patas que se muevan o deslicen podrían
provocar un exceso de vibración y ruido debido al mal
contacto con el piso.
Coloque la lavadora en su ubicación nal.
1
Tenga cuidado de no pellizcar, forzar o aplastar las
lineas de agua y de drenaje. Si tiene un nivel de
carpintería, utilícelo para vericar que la lavadora
esté nivelada. La pendiente debajo de la lavadora no
debe exceder 1 pulgada, y las cuatro patas deben
estar rmes en el piso.
Nivel
NOTA
• Para vericar que la lavadora esté nivelada de lado a
lado, colóque un nivel en el borde trasero de la tapa
(puerta).
• Para vericar que la lavadora esté nivelada del frente
hacia atrás, coloque un nivel al lado de ella, en el borde
donde el lado del gabinete alcanza la cubierta superior.
No coloque el nivel en la supercie de la tapa (puerta).
Utilizar estas supercies podría provocar el desnivelado
de la lavadora.
Ajuste las patas de nivelación inferiores.
3
Gírelas en una dirección para subir la lavadora y en
la otra dirección para bajarla.
Nivelado de lado a lado
Nivelado del
frente hacia
atrás
1"
Abra la tapa (puerta) y vea desde arriba para
2
vericar que la tina esté centrada.
Si la tina NO está centrada, reajuste las patas
frontales. Si tiene un nivel, verique la lavadora con
él.
Subir Bajar
Vuelva a comprobar la nivelación de la lavadora.
4
Empuje o sacuda los bordes superiores de la
lavadora de manera suave para asegurarse de que
no se balancee. Si la lavadora se balancea, repita los
pasos de 1 a 3.
PRECAUCIÓN
• Utilizar la lavadora sin nivelarla podría causar un
exceso de vibración y ruido, provocando problemas
en el funcionamiento de la máquina.
• Extienda las patas de nivelación solo en la medida
necesaria para nivelar la lavadora. Si extiende las
patas de nivelación más de lo necesario, se pueden
producir vibraciones anormales en la lavadora.
NOTA
• Si la lavadora no está nivelada, la tapa (puerta) podría
no quedarse abierta de forma apropiada. Si esto
sucede, extienda las patas niveladoras frontales hasta
que la lavadora esté nivelada de adelante hacia atrás.
Page 69

15INSTALACIÓN
Conexión al suministro
eléctrico
La lavadora debe conectarse a un tomacorriente de
120 V CA, 60 Hz de 3 clavijas con conexión a tierra.
Conecte la lavadora.
ADVERTENCIA
• No utilice cables o enchufes de alimentación
gastados o dañados. Remplácelos o repárelos de
inmediato. No hacerlo podría provocar un accidente
mortal, un incendio, descarga eléctrica o problemas
en el funcionamiento del aparato.
• No modique el enchufe y el cable de alimentación
proporcionados con el artefacto. Tenga cuidado de
no dañarlos cuando instale o traslade la lavadora.
De hacerlo podría provocar un accidente mortal,
un incendio, descarga eléctrica o problemas en el
funcionamiento del aparato.
• Asegúrese de que la lavadora esté conectada a
tierra.
• Conecte esta lavadora a un tomacorriente con
conexión a tierra acorde a su clasicación antes
del uso. No hacerlo podría provocar un incendio,
descarga eléctrica o problemas en el funcionamiento
del aparato.
• No dañe ni corte la clavija de conexión a tierra del
cable de alimentación. Si lo hace podría provocar un
accidente mortal, un incendio, descarga eléctrica o
problemas en el funcionamiento del aparato.
• La conexión inadecuada del conductor de conexión
a tierra puede resultar en riesgo de choque eléctrico.
Pregunte a un electricista calicado o a un técnico
de servicio si no está seguro si el artefacto está
adecuadamente conectado a tierra. Si el enchufe no
entra en el tomacorriente, un electricista calicado
debe instalarle una toma eléctrica apropiada.
• El artefacto y el tomacorriente deben estar ubicados
de manera tal que se pueda acceder al enchufe
fácilmente.
• No utilice adaptadores ni cables de extensión.
De hacerlo podría provocar un accidente mortal,
lesiones graves, un incendio, descarga eléctrica o
problemas en el funcionamiento del aparato.
• Para un mejor rendimiento, conecte la lavadora
en una toma de corriente individual exclusiva.
Esto ayuda a evitar la sobrecarga de los circuitos
eléctricos de la casa, lo que podría causar un peligro
de incendio por sobrecalentamiento de los cables.
• Si fuera necesario, utilice un adaptador de 3 clavijas
o un cable de extensión de 3 conductores con un
enchufe de 3 clavijas (conexión a tierra), nuevo
y homologado por UL, con una clasicación no
menor a la del circuito derivado. No utilice un cable
de extensión de una longitud mayor a 3 pies. El
incumplimiento de estas advertencias puede resultar
en lesiones graves, incendios, descargas eléctricas
o la muerte.
Prueba de la lavadora
Verique que la lavadora esté correctamente instalada y
ejecute un ciclo de prueba.
Asegúrese de que la tina esté vacía. No cargue nada
1
en la tina para esta prueba.
Presione el botón Encendido/Apagado e
2
inmediatamente después mantenga presionados
los botones Spin y Soil hasta que un código
aparezca en la pantalla. (Encuentre más abajo una
clave para los códigos.)
Pantalla Información
Prueba inicial
El resultado de la prueba anterior fue
bueno.
La prueba anterior presentó un error.
NOTA
•
se muestra primero, y , o se muestra
después.
• La indicación es diferente para cada modelo.
Presione el botón de Inicio/Pausa.
3
La lavadora iniciará la prueba, la cual durará
alrededor de 3 minutos. La prueba revisa
automáticamente las mangueras de entrada de agua
y la manguera de drenaje.
Verique la pantalla para ver los resultados.
4
Si se muestra un código de error, consúlte la
siguiente guía.
Código de
error
Abra completamente los grifos de agua.
Enderece cualquier retorcimiento en las
mangueras de entrada y asegúrese de
que éstas no estén atrapadas contra la
pared o debajo de la lavadora.
Enderece cualquier retorcimiento en
la mangueras de drenaje y asegúrese
de que ésta no esté atrapada contra
la pared o debajo de la lavadora.
Remueva y enjuague la manguera de
drenaje para remover atascos. Ajuste o
repare el drenaje. La altura máxima del
drenaje es de 96 pulgadas.
Fin del ciclo.
5
Al nalizar el ciclo de prueba, se mostrará
. El ciclo de prueba terminará y la lavadora se
apagará automáticamente luego de una pequeña
pausa.
Solución
o
ESPAÑOL
Page 70

16 FUNCIONAMIENTO
FUNCIONAMIENTO
Uso de la lavadora
ADVERTENCIA
• Para reducir el riesgo de incendios, descargas
eléctricas o lesiones a las personas, lea las
INSTRUCCIONES DE SEGURIDAD antes de
operar este artefacto.
Clasicación y carga de la lavadora.
1
Clasique sus prendas a lavar por tipo de tela, nivel
de suciedad, color y tamaño de la carga. Abra la
tapa (puerta) y cargue los artículos en la lavadora.
Agregue productos de limpieza.
2
Agregue la cantidad de detergente de alta
eciencia (HE) adecuada en el dispensador. Si lo
desea, agregue blanqueador o suavizante en los
dispensadores correspondientes.
Seleccione un ciclo.
4
Gire la perilla selectora de ciclos o presione los
botones de ciclo repetidamente hasta que el ciclo
deseado se haya seleccionado. Se muestra la
temperatura de lavado, velocidad de centrifugado,
nivel de suciedad y ajustes de opciones
predeterminados para ese ciclo.
• Presionar el botón Inicio/Pausa sin haber
seleccionado un ciclo hará que inicie el ciclo Normal
inmediatamente.
Ajuste la Conguración.
5
En este momento, pueden modicarse las
conguraciones predeterminadas del ciclo
seleccionado si se desea. Para ello, use los botones
de opción y de modicación de ciclo.
NOTA
• No todas las modicaciones y opciones están
disponibles para todos los ciclos. Sonará una alarma
diferente y el indicador LED no se encenderá si la
selección no está permitida.
Inicie el Ciclo.
6
Presione el botón Inicio/Pausa para iniciar el ciclo
La tapa (puerta) se bloquea y la lavadora se agita
brevemente sin agua para calcular el tamaño del
lavado.
Encienda la lavadora.
3
Presione el botón de Encendido/Apagado para
encender la lavadora. Las luces sobre los botones de
los ciclos se encenderán y sonará una alarma.
Puede añadir prendas adicionales a la tina
7
mientras el indicador Add Garment esté
encendido.
El indicador Add Garment se ilumina cerca del inicio
del ciclo de lavado para indicar el momento en el que
es seguro añadir artículos a la carga. Presione el
botón Inicio/Pausa para pausar el ciclo y añadir las
prendas. Presione el botón Inicio/Pausa de nuevo
para reanudar el ciclo.
NOTA
• Si añade artículos después de que la luz Add Garment
se haya apagado, puede que no obtenga un buen
rendimiento de lavado.
Fin del ciclo.
8
Una melodía sonará cuando el ciclo haya nalizado.
Remueva inmediatamente las prendas de la lavadora
para reducir las arrugas.
• Si la lavadora cuenta con ltros de pelusa, recuerde
revisarlos cada 2 o 3 cargas.
Page 71

17FUNCIONAMIENTO
Clasicación de prendas
PRECAUCIÓN
• La lavadora puede llenarse por completo, pero
el tambor no debe quedar demasiado lleno de
artículos. La tapa (puerta) de la lavadora debe cerrar
facilmente.
• Utilice el ciclo Bedding (Ropa de Cama) para
artículos otantes o no absorbentes, como
almohadas o edredones. El incumplimiento de esta
precaución puede provocar fugas.
• Prendas o articulos impermeables o resistentes
al agua deben ser lavados solamente en el ciclo
Impermeables. (Ej., Prendas resistentes al agua,
funda para colchones, ropa para exteriores, tapetes
plásticos, etc.) De lo contrario podría sufrir una
herida o causarle daños a la lavadora, prendas,
paredes, piso y objetos circundantes debido a la
vibración anormal.
Conjuntos de prendas similares
Para obtener los mejores resultados de lavado y para
reducir la posibilidad de daños en las prendas, se debe
tener la precaución de agrupar la ropa en cargas de
prendas de características similares.
Si se mezclan telas o niveles de suciedad diferentes, el
resultado puede ser un lavado deciente, transferencia
de colores, decoloración, daño de las prendas o que
se desprendan pelusas. Las telas deben clasicarse en
grupos tal como se describe a continuación.
Colores
Clasique las prendas según su color. Lave la ropa
oscura junta, en una carga separada de los colores
claros o blancos. Si se mezclan prendas de colores
oscuros con prendas de colores claros, puede ocurrir
transferencia de tinte o decoloración en la ropa más
clara.
Nivel de suciedad
La ropa muy sucia debe lavarse junta. Si lava las
prendas con menor suciedad en la misma carga que
la ropa muy sucia, el resultado puede ser un lavado
deciente de las prendas de menor suciedad.
Tipo de tela
Las prendas delicadas no deben mezclarse con las
prendas de telas más resistentes o pesadas. Si lava
prendas de telas pesadas en una carga de ropa delicada,
el resultado puede ser un lavado deciente de la ropa
de tela pesada y es posible que se dañen las prendas
delicadas.
Telas que atraen o despiden pelusa
Algunas telas atraen pelusa y esta se adhiere a ellas,
mientras que otras despiden pelusas en el proceso de
lavado. Evite mezclar en la misma carga ropa a la que se
adhiere la pelusa con ropa que despida pelusas. Mezclar
estos materiales puede tener como resultado que, en las
prendas que atraen pelusa, se formen bolitas y que estas
ropas se llenen de pelusa. (Por ejemplo, prenda a la que
se le adhiere la pelusa: suéter tejido; prenda que despide
pelusas: toalla de tejido esponjoso).
Clasificación de prendas
Por
Colores
Blancas Pesado Delicadas
Colores
claros
Oscuras Ligera Resistente
Por
nivel de
suciedad
Normal
Por tela
Cuidado
fácil
Según la
pelusa
Que despide
pelusa
Que recoge
pelusa
Etiquetas de cuidado de las prendas
Muchas prendas incluyen una etiqueta de cuidado de
telas. Utilizando el siguiente cuadro, ajuste el ciclo y las
opciones a manera de cuidar de sus prendas de acuerdo
a las recomendaciones del fabricante.
Categoría
Lavado
Temperatura
del agua
Símbolos
sobre
blanqueador
Etiqueta
Indicaciones
Lavado a mano
Lavado en lavadora, Ciclo
normal
Conguración Planchado
permanente/Resistente a las
arrugas (que tiene un rociado
fresco o frío antes de un
centrifugado más lento)
Suave/Delicado (agitación
lenta y/o menor tiempo de
lavado)
No lavar
No retorcer
Caliente
Tibia
Fría
Cualquier blanqueador
(cuando sea necesario)
Solo blanqueador sin cloro
(cuando sea necesario)
No usar blanqueador
ESPAÑOL
Page 72

18 FUNCIONAMIENTO
Carga de la lavadora
• Revise y vacíe los bolsillos. Los ganchos para papel,
las monedas, los fósforos, etc., pueden dañar las
prendas y la lavadora.
• Asegúrese de que los zípers y los ganchos de la ropa
estén cerrados y amarre cualquier cordón para evitar
que las prendas se enganchen o enreden.
• Para mejores resultados, trate previamente las áreas
con manchas difíciles.
• Combine prendas grandes y pequeñas en una misma
carga. Primero cargue la ropa más grande. Las prendas
grandes no deben representar más de la mitad de la
carga total.
• Lave las prendas gruesas y voluminosas de manera
individual. Las cobijas, los edredones y las colchas
pesadas o las camas para mascotas pueden enredarse
o provocar una carga desequilibrada si se combinan
con otros artículos.
• La lavadora puede llenarse por completo, pero el
tambor no debe quedar demasiado lleno de artículos.
La tapa (puerta) de la lavadora debe cerrar facilmente.
• Utilice el ciclo Bedding (Ropa de Cama) para artículos
largos o voluminosos como chaquetas de poliéster,
edredones, almohadas, etc. Estos artículos no son tan
absorbentes como otros y deben agregarse a una carga
separada a manera de obtener resultados óptimos.
• Los artículos voluminosos deben colocarse hasta abajo
del tambor para obtener resultados óptimos. Siempre
coloque artículos boyantes al fondo del tambor. La
lavadora detectará automáticamente el tamaño de la
carga. Debido al sistema de alta eciencia de lavado, el
nivel de agua podría no cubrir completamente la carga.
• No sobrecargue el tambor. Las prendas deberían
encajar holgadamente en el tambor debajo de la línea
de llenado máximo. Cargar prendas sobre la línea
de llenado podría causar daños a las prendas y a la
lavadora.
- Cargue las prendas holgadamente, y no llene
demasiado el tambor. Para una correcta limpieza, las
prendas necesitan espacio para circular.
- No presione hacia abajo los artículos mientras los
apila en el tambor.
Linea de llenado máximo
• No lave prendas pequeñas individualmente. Agregue
una o dos prendas similares a la carga para evitar que
quede desequilibrada.
• Prendas o articulos impermeables o resistentes al agua
deben ser lavados solamente en el ciclo Impermeables.
(Ej., Prendas resistentes al agua, funda para colchones,
ropa para exteriores, tapetes plásticos, etc.) De lo
contrario podría sufrir una herida o causarle daños a la
lavadora, prendas, paredes, piso y objetos circundantes
debido a la vibración anormal.
• Lave artículos pequeños y livianos en una bolsa de
malla. Artículos pequeños podrían atorarse en el
propulsor al fondo de la tina, y los ganchos de sostenes
podrían dañar otros artículos.
• Con un cepillo, quite el polvo, los pelos y la suciedad
más densa de los artículos antes de lavarlos. El exceso
de suciedad o arena puede raspar otras telas y causar
un lavado deciente.
• La lavadora no se llenará ni operará con la tapa
(puerta) abierta.
• Para un mejor rendimiento, cargue la ropa como se
muestra.
Page 73

19FUNCIONAMIENTO
Agregado de productos de
limpieza
Acerca de los Dispensadores
El dispensador automático cuenta con dos
compartimientos para contener:
• Suavizante líquido
• Detergente líquido o en polvo para el lavado principal
Utilizando los Dispensadores de
Detergente y Suavizante
Para añadir detergente y suavizante al dispensador
automático:
Abra la bandeja del dispensador.
1
Cargue los productos de lavandería en los
2
compartimientos adecuados.
Compartimiento de
Compartimiento de
suavizante líquido
detergente líquido para
lavado principal
Inserto
Compartimiento de detergente para
lavado principal
En este compartimiento se coloca el detergente para
lavadoras correspondiente al ciclo de lavado principal.
En este compartimiento puede utilizarse tanto detergente
líquido como en polvo. El detergente se agrega a la
carga al inicio del ciclo. Siempre utilice detergente de alta
eciencia (HE) en su lavadora.
ESPAÑOL
NOTA
• Nunca exceda las recomendaciones del fabricante
cuando añada detergente. El uso de una cantidad
excesiva de detergente puede ocasionar una
acumulación de detergente en las prendas y en la
lavadora.
• Al utilizar detergente líquido, asegúrese de que el
compartimiento de detergente líquido y el inserto estén
en su lugar. No sobrepase la línea de llenado máximo.
• Al utilizar detergente en polvo, remueva el inserto y el
compartimiento de detergente líquido del dispensador.
El detergente en polvo no se dispensará si el
compartimiento de detergente líquido y el inserto están
en su lugar.
• Si utiliza un detergente que no se disuelve fácilmente o
un detergente de alta viscosidad, éste dejará residuos y
obstruirá el dispensador.
Compartimiento de
detergente en polvo para
Cierre la bandeja completamente previo a iniciar
3
el ciclo.
• Tenga cuidado de no prensar su mano al cerrar la
bandeja.
lavado principal
PRECAUCIÓN
• No coloque ni almacene productos de lavandería,
tales como detergente, blanqueador o suavizante
líquido de telas sobre su electrodoméstico. Limpie
cualquier derrame inmediatamente. Estos productos
pueden dañar el acabado y los controles.
NOTA
• Es normal que quede una pequeña cantidad de agua
en los compartimientos del dispensador al nal del
ciclo.
Compartimiento de suavizante
Este compartimiento contiene suavizante líquido, el
cual se dispensa automáticamente durante el ciclo de
enjuague nal.
NOTA
• No exceda las recomendaciones del fabricante
al momento de añadir suavizante. Utilizar mucho
suavizante podría provocar acumulación en las prendas
y en la lavadora. Puede utilizar suavizante en polvo o
líquido.
• Siga las recomendaciones del fabricante cuando añada
suavizante. No sobrepase la línea de llenado máximo.
El uso de una cantidad excesiva de suavizante puede
manchar las prendas.
• Diluya en agua caliente los suavizantes concentrados.
• Nunca vierta el suavizante directamente sobre las
prendas o en la tina.
Page 74

20 FUNCIONAMIENTO
Utilizando el Dispensador de
Blanqueador Líquido
El dispensador de blanqueador es un compartimiento
separado que se encuentra al frente a la izquierda de la
apertura de la tina.
Tipo 1
El dispensador de blanqueador está conectado a
la válvula de entrada. El blanqueador es diluido y
dispensado automáticamente en el momento adecuado
durante el ciclo de lavado.
NOTA
• El dispensador se activa dos veces para asegurar
el dispensado completo del blanqueador. Cualquier
líquido que quede en él al nalizar el ciclo es agua, no
blanqueador.
Revise las instrucciones especiales en las etiquetas
1
de cuidado de las prendas.
Mida cuidadosamente la cantidad de blanqueador
2
líquido siguiendo las instrucciones en la botella.
• Las lavadoras de alta eciencia utilizan menos
agua, por lo que se requiere menos blanqueador.
Media taza es suciente para la mayoría de cargas.
Vierta cuidadosamente la cantidad pre-medida de
3
blanqueador directamente en el dispensador de
blanqueador.
• Si está utilizando blanqueador en polvo de cualquier
tipo, viértalo directamente en la tina previo a añadir
las prendas de lavado. Nunca añada blanqueador
en polvo al dispensador de blanqueador líquido.
ADVERTENCIA
• NO mezcle cloro con amoniaco o ácidos, como
por ejemplo vinagre o removedores de óxido o
desincrustantes. La mezcla de productos químicos
como los mencionados puede producir gases
letales, que provocan lesiones graves o la muerte.
Tipo 2
Cuando vierta el blanqueador en el dispensador de cloro,
éste se agrega inmediatamente a la tina a medida que se
llena de agua, diluyendo con seguridad el blanqueador.
NOTA
• La cubierta del dispensador no puede ser removida.
Utilice una toalla de papel húmeda para limpiarla.
NOTA
• No añada blanqueador en polvo a este dispensador.
El dispensador de blanqueador está diseñado
para dispensar unicamente blanqueador líquido.
Blanqueador en polvo o para tejidos de color no se
dispensará apropiadamente.
• No coloque artículos de lavado sobre el dispensador
de blanqueador al momento de cargar o descargar la
lavadora.
• Siempre siga las recomendaciones del fabricante al
momento de añadir el blanqueador. Nunca añada más
de una taza y no exceda la línea de llenado máximo ya
que esto podría provocar el dispensado inmediato del
blanqueador, causándole daños a los tejidos. El uso de
mucho blanqueador puede dañar sus prendas.
• Nunca vierta blanqueador líquido sin diluir directamente
sobre las prendas o en la tina. Podría dañar los tejidos.
• No utilice blanqueador protector de color o productos
Oxi en un ciclo de lavado en el que utilice blanqueador
de cloro líquido.
Page 75

Uso del detergente
• Esta lavadora está diseñada para ser usada
únicamente con detergentes de alta eciencia (HE).
Los detergentes de alta eciencia (HE) producen
menos espuma, se disuelven mejor para mejorar
el desempeño de lavado y enjuague, y ayudan a
mantener limpio el interior de la lavadora. El empleo
de un detergente que no sea de alta eciencia puede
producir demasiada espuma y un mal deseempeño,
causando errores, fallas en los ciclos y daños a la
máquina.
Diseñada especialmente para ser
utilizada de forma exclusiva con
detergentes de alta eficiencia (HE)
• Para lograr un buen desempeño de lavado, siempre
mida la cantidad de detergente usando el dispositivo de
medición provisto por el fabricante del detergente. Para
una carga promedio, use menos de la mitad del máximo
recomendado. Use menos detergente para aguas
blandas, ropas con poca suciedad o cargas reducidas.
• Nunca utilice una cantidad de detergente superior
al máximo recomendado por el fabricante. Usar una
cantidad excesiva de detergente puede producir
demasiada espuma, un enjuague deciente,
acumulación de detergente en la ropa y acumulación de
residuos que contribuyen a que se produzcan olores en
el aparato.
• Preste atención especial al medir detergentes
concentrados 2X y 3X porque incluso agregar sólo un
poco más podría provocar problemas.
• Puede que detergentes designados como Compatibles
con HE no provean resultados óptimos.
• No utilice más de una vaina de detergente en la
lavadora. Utilizar demasiado detergente podría generar
un exceso de espuma y afectar el rendimiento de
lavado. Reduzca la cantidad de detergente o añada un
enjuague extra si hay residuos de éste en los tejidos.
Para añadir un enjuague extra, presione el botón Extra
Rinse.
21FUNCIONAMIENTO
ESPAÑOL
Detergente
líquido
Máximo
Cantidad de carga normal
Detergente
en polvo
Page 76

22 FUNCIONAMIENTO
3
4
Panel de control
1
Funciones del panel de control
Botón Encendido/Apagado
1
Presione para encender la lavadora. Presione de
nuevo para apagarla. Presionar el botón Encendido/
Apagado durante un ciclo cancelará dicho ciclo y se
perderá cualquier conguración de lavado. La tapa
(puerta) se desbloqueará después de una pequeña
pausa.
NOTA
• Si queda agua en la tina después de que la
lavadora se apague, ésta se drenará luego de un
retraso de 4 minutos. La lavadora puede reiniciarse
en cualquier momento antes de que el drenaje
inicie. Sin embargo, una vez el drenaje de agua
haya iniciado, todas las funciones se suspenderán
hasta que el agua se haya drenado por completo y
la lavadora se haya apagado.
3 62
3
54
Botones modificadores de ciclo
Use estos botones para ajustar las conguraciones
de temperatura del agua, velocidad del centrifugado
y nivel de suciedad para el ciclo seleccionado. Las
conguraciones actuales se muestran en la pantalla.
Presione el botón para esa opción o seleccione otras
conguraciones.
Botones de Opción y Ciclo especial
5
Presione estos botones para seleccionar ciclos
especiales u opciones de ciclo adicionales. Algunos
botones también le permiten activar funciones
especiales al mantenerlos presionados por tres
segundos.
Pantalla de tiempo y estado
Perilla selectora de ciclos
2
Gire esta perilla para seleccionar el ciclo deseado.
Una vez haya seleccionado el ciclo deseado, los
ajustes predeterminados aparecerán en la pantalla.
Estos ajustes pueden ser ajustados utilizando
los botones modicadores de ciclo en cualquier
momento previo al inicio del ciclo.
NOTA
• Para proteger sus prendas, no todas las
conguraciones están disponibles en todas las
selecciones de ciclos.
Botón de Inicio/Pausa
Presione este botón para iniciar el ciclo
seleccionado. Si la lavadora está funcionando,
utilice este botón para pausar el ciclo sin perder las
conguraciones actuales.
NOTA
• Si el botón Inicio/Pausa no se presiona en un
período de 60 minutos luego de haber seleccionado
el ciclo, la lavadora se apagará y toda la
conguración se perderá. El agua remanente en la
tina será drenada.
6
La pantalla muestra las conguraciones, el tiempo
restante estimado, las opciones y los mensajes de
estado de la lavadora. Cuando la lavadora esté
encendida, se encenderán las conguraciones
predeterminadas.
Page 77

Pantalla de tiempo y estado
1
2
3
23FUNCIONAMIENTO
1
2 3
4
Indicador de Bloqueo de Puerta
El indicador de Puerta bloqueada se encenderá
cuando haya comenzado el ciclo. La luz indicadora
permanecerá encendida hasta que el ciclo haya
nalizado o sea pausado o detenido.
Indicador de conexión Wi-Fi
El indicador se enciende y apaga durante el registro
del producto y la conguración de Wi-Fi, y se ilumina
cuando el electrodoméstico está conectado a una
red Wi-Fi doméstica.
NOTA
• El tiempo que se muestra es solo una estimación.
Este tiempo se basa en condiciones normales de
funcionamiento. Varios factores externos (como el
tamaño de la carga, la temperatura ambiente, la
temperatura del agua entrante, etc.) pueden afectar
el tiempo real.
ESPAÑOL
Indicador de Estado del Ciclo
Estos indicadores LED se iluminan cuando un
ciclo ha sido seleccionado para indicar las etapas
a ejecutar. Cuando un ciclo está en progreso,
el indicador LED de la etapa activa parpadea
y los indicadores LED de las etapas restantes
permanecen estables. Una vez se ha completado
una etapa, el indicador LED se apaga. Si un ciclo es
pausado, el indicador LED de la etapa activa deja de
parpadear.
Tiempo restante estimado
4
Cuando un ciclo se ha seleccionado, el tiempo
predeterminado para éste se mostrará. Este tiempo
cambiará conforme se seleccionen modicadores
u opciones. Una vez el botón Inicio/Pausa ha
sido presionado, la lavadora medirá el tamaño de
la carga. El tiempo estimado podrá cambiar una
vez el tamaño de la carga ha sido establecido. Si
ha seleccionado Delay Wash, el tiempo de retraso
restante cuenta hacia abajo hasta que el ciclo inicie.
NOTA
• El tiempo mostrado es sólo un estimado. Este
tiempo está basado en condiciones de operación
normal. Varios factores externos (tamaño de la
carga, temperatura ambiente, temperatura del agua,
etc.) podrían afectar el tiempo real.
Page 78

24 FUNCIONAMIENTO
Ciclos de lavado
Los ciclos de lavado están diseñados para alcanzar el desempeño óptimo en lavado para cada tipo de carga.
Seleccione el ciclo que mejor se adapte al contenido de la carga para obtener el máximo rendimiento de lavado y del
cuidado de la tela. Consulte la sección Clasicación de Prendas para obtener los mejores resultados, siga las etiquetas
de cuidado de las telas de sus prendas. Para ver una guía de símbolos de cuidado de telas, consulte la sección
Clasicación de Prendas.
Gire la perilla o presione el botón para seleccionar el ciclo deseado. Cuando seleccione un programa de lavado, la luz
correspondiente a dicho programa se encenderá.
NOTA
• Siempre que se haga referencia al peso de la carga, asuma 1 lb (0.45 kg) = 1 toalla de baño gruesa (seca).
Ciclo Descripción Nota
Normal (Normal)
Heavy Duty (Muy
sucia)
Utilice este ciclo para lavar todas las
prendas normales, excepto las de
materiales delicados como lana o seda.
Tipos de tejido: Algodón, lino, camisas,
jeans, cargas mixtas
Este ciclo es para lavar ropa muy sucia
utilizando movimientos de lavado más
potentes.
Tipo de tejido: Tejidos de algodón muy
sucios.
• Presionar el botón Inicio/Pausa, sin haber
seleccionado un ciclo, hará que inicie el ciclo
Normal inmediatamente, utilizando los ajustes
predeterminados.
• A manera de obtener el mejor rendimiento, al lavar
cargas grandes, habrán cortos periodos de 2 minutos
o más sin agitación. Estos períodos de remojo son
parte del diseño del ciclo y son normales.
• No utilice este ciclo para lavar una carga mixta de
ropa de cama y de otro tipo de artículos.
Bedding (Ropa de
cama)
Deep Wash (Lavado
Profundo)
Whites
(Blancos)
Oxi Sanitize™
(Oxi Sanitize™)
Este ciclo es para lavar cobijas o artículos
voluminosos.
Tipo de tejido: Artículos grandes como
sábanas, edredones y mantas
Utilice este ciclo para proveer agua
adicional y para lavar artículos mixtos
muy sucios, a excepción de tejidos
delicados.
Este ciclo es para lavar únicamente
prendas blancas.
Tipo de tejido: Ropa interior, fundas de
almohadas, sábanas, ropa de bebé.
(menos de 12 lb)
Este ciclo de lavado brinda un higiénico
cuidado de la colada cuando se utiliza
con blanqueador, sin alto consumo de
energía eléctrica.
Tipo de tejido: Algodon, ropa interior,
fundas de almohadas, sabanas, ropa de
bebe
• Utilice este ciclo para artículos como almohadas,
edredones, camas de mascotas y otros artículos que
presenten dicultades absorbiendo agua.
• No lave prendas excesivamente grandes. Si los
artículos grandes/voluminosos no caben facilmente
dentro de la tina puede que no haya suciente
espacio para que estos se muevan durante el lavado.
• Mantenga artículos similares juntos; no mezcle
artículos grandes/voluminosos con prendas pequeñas.
-
-
• Siga las instrucciones del fabricante del producto
para el uso de productos Oxi con este ciclo.
• Nunca cargue productos en polvo en el depósito
del blanqueador líquido. Si lo hace, puede provocar
que el producto no se dispense o sea dispensado
incorrectamente. Los productos en polvo pueden
obstruir el depósito de lanqueador, lo que resulta en
pérdidas o daños a la lavadora o la ropa.
Page 79

Ciclo Descripción Nota
• Cuando suene el timbre, pulsa Incio/Pausa para
desbloquear la tapa, añadir el detergente principal
para el dispensador, e inserte el resto de la carga.
Si Incio/Pausa no se presiona dentro de unos tres
minutos, el ciclo continúa.
• Utilice muy poco detergente en este ciclo. Para añadir
un enjuague extra, utilice el botón Extra Rinse.
Pre Wash+Normal
(Prelavado+Normal)
Delicates (Delicadas)
Perm.Press
(Planchado
Permanente)
Speed Wash
(Lavado rápido)
Utilice este ciclo para prelavar manchas sin
necesidad de lavar a mano. El tratamiento
inmediato ayuda a evitar que las manchas
se jen o que se desarrollen olores..
Este ciclo se utiliza para lavar lencería o
prendas nas o de encaje, que se pueden
dañar fácilmente.
Tipo de tejido: Blusas/camisas de vestir,
nylon, prendas con encaje o transparentes
(menos de 8 lb )
Este ciclo sirve para lavar prendas que no
se arrugan o manteles a n de minimizar
las arrugas.
Tipo de tejido: Camisas/pantalones de
vestir, prendas que no se arrugan, prendas
de algodón poliéster, manteles
Utilice el ciclo Speed Wash para lavar
rapidamente prendas ligeramente sucias y
cargas pequeñas. Para una mayor eciencia
de lavado y enjuague, lave pequeñas cargas
de 2-3 prendas ligeramente sucias.
25FUNCIONAMIENTO
-
-
ESPAÑOL
Waterproof
(Impermeables)
Downloaded
(Descargado)
Tipo de tejido: Cargas pequeñas y con
poca suciedad
Este ciclo es utilizado para lavar
materiales impermeables.
Tipo de tejido: Artículos impermeables
como prendas resistentes al agua,
protectores de colchón, ropa de exteriores,
y colchonetas plásticas (menos de 14 lb )
Si descarga un ciclo utilizando esta
función, éste se colocará en la posición
Downloaded Cycle. Elija Downloaded
Cycle para ejecutar el nuevo ciclo.
• No utilice ningún otro ciclo para lavar materiales
impermeables.
• No utilice este ciclo para lavar una carga mixta de
artículos impermeables y no impermeables.
• Verique las instrucciones de lavado sobre artículos
antes de usar este ciclo.
• No lave otros tejidos utilizando este ciclo.
PRECAUCIÓN
• Si se lavan materiales impermeables en un ciclo que
no sea Impermeable, podría sufrir lesiones o dañar
la lavadora, la ropa, las paredes, el suelo u objetos
alrededor a causa de las vibraciones anómalas.
• El ciclo predeterminado para esta posición es Small
Load (Cargas Pequeñas), utilizado para cargas
ligeramente sucias de pocos artículos. El ciclo Small
Load también está disponible para descargar.
Page 80

26 FUNCIONAMIENTO
Guía de ciclos
Cycle Wash Temp.
Hot (Caliente)
Warm (Tibio)
Normal
(Normal)
Heavy Duty
(Muy sucia)
Bedding
(Ropa de
cama)
Deep Wash
(Lavado
Profundo)
Whites
(Blancos)
Semi Warm
(Semi Tibio)
Cold (Fría)
Tap cold (Fría
del grifo)
Hot (Caliente)
Warm (Tibio)
Semi Warm
(Semi Tibio)
Cold (Fría) Low (Baja)
Tap cold (Fría
del grifo)
Hot (Caliente)
Warm (Tibio)
Semi Warm
(Semi Tibio)
Cold (Fría) Low (Baja)
Tap cold (Fría
del grifo)
Hot (Caliente)
Warm (Tibio)
Semi Warm
(Semi Tibio)
Cold (Fría) Low (Baja)
Tap cold (Fría
del grifo)
Hot (Caliente)
Warm (Tibio)
Semi Warm
(Semi Tibio)
Spin
Speed
Extra high
(Extra rápida)
High (Alta)
Medium
(Media)
No spin (Sin
centrifugado)
Extra high
(Extra rápida)
High (Alta)
Medium
(Media)
No spin (Sin
centrifugado)
Medium
(Media)
No spin (Sin
centrifugado)
Extra high
(Extra rápida)
High (Alta)
Medium
(Media)
No spin (Sin
centrifugado)
Extra high
(Extra rápida)
High (Alta)
Medium
(Media)
Low (Baja)
No spin (Sin
centrifugado)
Soil
Level
Heavy
(Pesada)
Normal
(Normal)
Light
(Ligera)
Heavy
(Pesada)
Normal
(Normal)
Light
(Ligera)
Heavy
(Pesada)
Normal
(Normal)
Light
(Ligera)
Heavy
(Pesada)
Normal
(Normal)
Light
(Ligera)
Heavy
(Pesada)
Normal
(Normal)
Light
(Ligera)
Soak
Stain
Care
Cold
Wash
Extra
Rinse
Water
Plus
Turbo
Wash
TM
= opción disponible, = ajuste predeterminado
Page 81

27FUNCIONAMIENTO
Cycle Wash Temp.
Hot (Caliente)
Oxi
Sanitize™
(Oxi
Sanitize™)
Hot (Caliente)
Pre Wash+
Normal
(Prelavado+
Normal)
Delicates
(Delicadas)
Perm. Press
(Planchado
Permanente)
Warm (Tibio)
Semi Warm
(Semi Tibio)
Cold (Fría) Low (Baja)
Tap cold (Fría
del grifo)
Warm (Tibio)
Semi Warm
(Semi Tibio)
Cold (Fría)
Tap cold (Fría
del grifo)
Warm (Tibio)
Semi Warm
(Semi Tibio)
Cold (Fría) Low (Baja)
Tap cold (Fría
del grifo)
Spin
Speed
Extra High
(Extra rápida)
High (Alta)
Medium
(Media)
Low (Baja)
No spin (Sin
centrifugado)
Extra high
(Extra rápida)
High (Alta)
Medium
(Media)
No spin (Sin
centrifugado)
Low (Baja)
No spin (Sin
centrifugado)
High (Alta)
Medium
(Media)
No spin (Sin
centrifugado)
Soil
Level
Heavy
(Pesada)
Normal
(Normal)
Light
(Ligera)
Normal
(Normal)
Light
(Ligera)
Heavy
(Pesada)
Normal
(Normal)
Light
(Ligera)
Heavy
(Pesada)
Normal
(Normal)
Light
(Ligera)
Soak
Stain
Care
Cold
Wash
Extra
Rinse
Water
Plus
Turbo
Wash
TM
ESPAÑOL
= opción disponible, = ajuste predeterminado
Page 82

28 FUNCIONAMIENTO
Cycle Wash Temp.
Speed Wash
(Lavado
rápido)
Waterproof
(Impermeables)
Downloaded
(Descargado)
Predeterminado :
Small Load
(Poca ropa)
Warm (Tibio)
Semi Warm
(Semi Tibio)
Cold (Fría) Low (Baja)
Tap cold (Fría
del grifo)
Warm (Tibio)
Semi Warm
(Semi Tibio)
Cold (Fría) Low (Baja)
Tap cold (Fría
del grifo)
Hot (Caliente)
Warm (Tibio)
Semi Warm
(Semi Tibio)
Cold (Fría)
Tap cold (Fría
del grifo)
Spin
Speed
Extra high
(Extra rápida)
High (Alta)
Medium
(Media)
No spin (Sin
centrifugado)
No spin (Sin
centrifugado)
Extra high
(Extra rápida)
High (Alta)
Medium
(Media)
No spin (Sin
centrifugado)
(Pesada)
(Normal)
(Pesada)
(Normal)
(Pesada)
(Normal)
Soil
Level
Heavy
Normal
Light
(Ligera)
Heavy
Normal
Light
(Ligera)
Heavy
Normal
Light
(Ligera)
Soak
Stain
Care
Cold
Wash
Extra
Rinse
Water
Plus
Turbo
Wash
TM
= opción disponible, = ajuste predeterminado
Page 83

29FUNCIONAMIENTO
Botones modicadores de ciclo
Cada ciclo tiene conguraciones predeterminadas
que se seleccionan automáticamente. También puede
personalizar estas conguraciones usando los botones
modicadores de ciclo. Presione el botón del modicador
deseado hasta que se encienda la luz indicadora de
la conguración que ha seleccionado. La lavadora
automáticamente ajusta el nivel de agua para el tipo y el
tamaño de la carga de lavado, a n de lograr los mejores
resultados y una eciencia máxima. Debido a la alta
eciencia de este producto, los niveles de agua pueden
llegar a ser mucho menores que los normalmente
esperados. Esto es normal y no afectará el rendimiento
del lavado ni del enjuague.
NOTA
• Para proteger sus prendas, no todas las temperaturas
de lavado, velocidades de centrifugado, niveles de
suciedad u opciones están disponibles con cada ciclo.
Una campana sonará y la luz LED no se encenderá si
la selección no es permitida.
Spin (Centrifugado)
Las velocidades de giro más altas extraen más agua de
la ropa, reduciendo el tiempo de secado y ahorrando
energía.
• Presione el botón Spin hasta que la velocidad deseada
se haya seleccionado.
• Algunas telas (las delicadas, por ejemplo) requieren de
velocidades bajas de giro. Para proteger su ropa, no
todas las velocidades de centrifugado están disponibles
para todos los ciclos.
Soil (Suciedad)
Ajustar el nivel de suciedad cambiará los tiempos de ciclo
y/o las acciones de lavado.
• Presione el botón Soil hasta que el nivel de suciedad
deseado haya sido seleccionado.
NOTA
• Esta función requiere más tiempo para la ropa muy
sucia y menos tiempo para las prendas poco sucias.
Special Care (Cuidado especial)
Al presionar el botón de Special Care, podrá seleccionar
funciones adicionales, como Soak, Stain Care y
Rinse+Spin.
• Si presiona el botón Special Care antes de seleccionar
un ciclo, se predeterminará automáticamente al ciclo
Normal con la función Soak seleccionada.
ESPAÑOL
Temp. (Temperatura)
Temp. selecciona la combinación de temperaturas de
lavado y enjuague para el ciclo seleccionado.
• Presione el botón Temp. hasta que la luz indicadora del
ajuste deseado se encienda.
• Todos los enjuagues utilizan agua fría del grifo.
NOTA
• Seleccione la temperatura de agua adecuada para
el tipo de carga que esté a punto de lavar. Siga las
instrucciones en las etiquetas de cuidado de tejidos en
las prendas para obtener los mejores resultados.
Page 84

30 FUNCIONAMIENTO
Cuidado especial función
Presione el botón Special Care para seleccionar los
ciclos especializados o agregar funciones a los ciclos
estándar. Presione el botón repetidamente para pasar
por las funciones disponibles.
NOTA
• Para proteger sus prendas, no todas las funciones
están disponibles para cada ciclo.
• Si no se presiona el botón de Inicio/Pausa antes de
60 minutos para iniciar el ciclo, la lavadora se apagará
y se perderán todas las conguraciones.
Soak (Remojo)
Esta opción provee un pre-enjuague de 30 minutos
previo a iniciar el ciclo seleccionado. Utilice la opción
Soak para pre-enjuagar sus prendas y así ayudar a
remover manchas difíciles en ellas. Al nalizar el tiempo
de pre-enjuague, el ciclo seleccionado iniciará con el
agua utilizada para el enjuague.
NOTA
• No puede seleccionar la opción Soak para el ciclo Tub
Clean.
Stain Care (Cuidado de manchas)
Use esta opción para cargas muy sucias que necesitan
un tratamiento mejorado para manchas. Cuando se
selecciona Stain Care, el ciclo de lavado comenzará
con el agua tibia para ayudar a evitar la jación de
determinados tipos de manchas. Luego, a medida
que progresa el ciclo, se agregará agua caliente para
aumentar gradualmente la temperatura del agua con
el n de ayudar a quitar las manchas que requieren
tratamiento a temperaturas superiores.
Rinse+Spin (Enjuague+Centrifugado)
Seleccione este ciclo para enjuagar y centrifugar una
carga de manera separada de un ciclo regular. Esto
puede ser de utilidad para evitar que se jen manchas
frescas en las prendas. Puede cambiar la velocidad del
centrifugado presionando Spin.
Presione el botón de Encendido/Apagado para
1
encender la lavadora.
2
Presione el botón Special Care repetidamente hasta
que se seleccione Rinse+Spin.
3
Presione el botón de Inicio/Pausa.
Special Drain Feature (Función de drenaje especial)
Esta lavadora está equipada con una función de drenaje
especial que está diseñada para que su lavadora
sea lo más segura posible. Si la lavadora se pausa o
apaga mientras aún hay agua en el tambor, el agua se
drenará automáticamente después de varios minutos de
inactividad. Esto ayuda a mantener a salvo a los niños al
reducir la posibilidad de que el agua permanezca en el
tambor.
Toda el agua que permanezca en el tambor se drenará
automáticamente 4 minutos después de que se haya
apagado la lavadora. Si la lavadora se pausa y no se
presiona el botón Inicio/Pausa antes de 60 minutos,
la lavadora se apagará y se perderán todas las
conguraciones de los ciclos. Se drenará toda el agua
que permanezca en el tambor.
Se puede encender o reiniciar la lavadora en cualquier
momento antes de que comience el drenaje. Sin
embargo, una vez que la lavadora comience a drenar,
todos los controles y las funciones se deshabilitarán
hasta que el agua se haya drenado por completo y se
apague la lavadora.
NOTA
• Se obtienen mejores resultados con manchas más
pequeñas (menos de 6 libras).
• Si selecciona Stain Care, la opción Cold Wash no está
disponible.
Add Garments (Añadir prendas)
Si se olvidó de agregar un elemento o necesita quitar
objetos extraños como monedas o llaves después de que
haya comenzado el ciclo, el mejor momento para hacerlo
es mientras el indicador Add Garments está encendido.
Una vez que el indicador se apaga, puede afectar el
tiempo del ciclo y el rendimiento del lavado si agrega
prendas.
Presione Inicio/Pausa. El ciclo se pausa y la tapa
1
(puerta) se desbloquea.
Abra la tapa (puerta), añada prendas o remueva
2
objetos extraños, y cierre la tapa (puerta).
Presione el botón de Inicio/Pausa para iniciar el
3
ciclo. El ciclo continúa automáticamente.
Page 85

31FUNCIONAMIENTO
Botones de opción
La lavadora presenta varias opciones adicionales
que sirven para personalizar los ciclos a n de que se
adapten a sus necesidades individuales. Para utilizar
estas opciones, seleccione la opción que desea luego de
haber escogido el ciclo deseado.
Luego de seleccionar el ciclo y las conguraciones
deseadas, presione los botones de opción de ciclo
para las opciones que le gustaría agregar. El botón
se iluminará cuando se seleccione esa opción. Si la
opción seleccionada no está permitida para el ciclo
seleccionado, la alarma sonará dos veces para advertirle
y la luz LED no se encenderá.
NOTA
• Para proteger sus prendas, no todas las funciones
están disponibles para cada ciclo.
Cold Wash (Lavado frío)
Esta opción ahorra energía mediante el uso de agua
fría, extendiendo los tiempos de lavado y enjuague para
mantener el rendimiento del lavado.
NOTA
• El tiempo de lavado incrementará varios minutos con
esta opción.
• Para obtener mejores resultados de lavado, lave
unicamente pequeñas cargas (menos de 8 lb) con esta
opción.
Delay Wash (Lavado demorado)
Una vez ha seleccionado el ciclo y demás
conguraciones, presione este botón para retrasar el
inicio del ciclo de lavado.
Cada vez que presione el botón retrasará el inicio 1
hora, hasta llegar a un máximo de 19 horas. Una vez ha
establecido el tiempo de retraso deseado, presione el
botón Inicio/Pausa para iniciárlo.
ESPAÑOL
NOTA
• Si el botón Inicio/Pausa no es presionado para
iniciar el tiempo de retraso, la lavadora se apagará
automáticamente luego de 60 minutos y toda la
conguración del ciclo se perderá.
Signal (Señal)
La lavadora emite una melodía cuando naliza el ciclo de
lavado. El volumen de la melodía se ajusta a través del
botón Signal.
• Presione el botón Signal repetidamente para ajustar el
volumen de la señal.
• La señal se puede Encender o Apagar. Cuando se
apaga el botón LED, la señal está apagada. El volumen
de la señal se puede ajustar en cualquier momento
siempre que la lavadora esté encendida.
Page 86

32 FUNCIONAMIENTO
Turbo Wash™ (Lavado Turbo™)
Agregar la opción Turbo Wash™ a un ciclo reduce la
duración del ciclo mientras se mantiene un desempeño
similar de lavado.
NOTA
• La opción Turbo Wash™ no puede ser utilizada con
todos los ciclos.
• Turbo Wash™ está predeterminado en ciclos de lavado
Normal, PreWash+Normal y Speed Wash.
Water Plus (Extra Agua)
Utilice esta opción para añadir agua adicional al ciclo de
lavado y así obtener un mejor rendimiento (tratamiento
de manchas) con artículos grandes o voluminosos.
NOTA
• Si la lavadora alcanza su nivel de agua máximo, la
opción Water Plus no tendrá ningún efecto.
• Para añadir más agua mientras un ciclo está en
ejecución, pause el ciclo previo a presionar Water Plus.
• Si selecciona la opción Water Plus con el ciclo Normal,
se cambia automáticamente el ciclo a Deep Wash.
Control Lock (Bloqueo Infantil)
Utilice esta opción para deshabilitar los controles. Esta
característica puede prevenir que los niños cambien
de ciclos u operen la máquina. Esta característica no
bloquea la tapa (puerta). Una vez seleccionado Control
Lock, éste debe ser desactivado antes de poder utilizar
cualquier otro control a excepción de Encendido/
Apagado. Una vez la lavadora se haya apagado, el
botón Encendido/Apagado le permitirá encenderla de
nuevo, pero los controles permanecerán bloqueados.
Cuando los controles estén bloqueados, se mostrará
alternadamente con el tiempo restante estimado.
• Mantenga presionado el botón Tub Clean por 3
segundos para activar o desactivar Control Lock.
NOTA
• Una vez que los controles están bloqueados, deben
desbloquearse manualmente para permitir su
operación.
Extra Rinse (Extra enjuague)
Esta opción agregará un enjuague extra al ciclo
seleccionado. Utilice esta opción para asegurar la
eliminación de residuos de detergente o blanqueador
de los tejidos. El suavizante líquido de telas, si se usa,
siempre se dispensa en el enjuague nal.
• Al presionar dos veces el botón Extra Rinse se
añadirán dos enjaugues adicionales al ciclo.
NOTA
• vNo puede seleccionar la opción Extra Rinse con la
opción Spin Only y el ciclo Tub Clean.
• Si selecciona la opción Extra Rinse con el ciclo Normal,
se cambia automáticamente el ciclo a Deep Wash.
Tub Clean (Limpieza de la tina)
Utilice este ciclo para limpiar el tambor de su lavadora.
Vea la sección de Mantenimiento.
Page 87

33FUNCIONES INTELIGENTES
FUNCIONES
INTELIGENTES
Aplicación LG SmartThinQ
La aplicación LG SmartThinQ le permite comunicarse
con el electrodoméstico usando un teléfono inteligente.
Previo a utilizar LG SmartThinQ
• Para electrodomésticos con el logo o .
Utilice un teléfono inteligente para vericar la
1
potencia del enrutador (Red Wi-Fi) cerca del
electrodoméstico.
• Si la distancia entre el electrodoméstico y el
enrutador inalámbrico es muy grande, la señal será
débil. Puede que le tome más tiempo registrarse o
que falle la instalación.
Desactive los Datos Móviles o Datos Celulares en
2
su teléfono inteligente.
• Si el aparato tiene problemas para conectarse a la red
Wi-Fi, es posible que se encuentre demasiado lejos
del router. Adquiera un repetidor Wi-Fi (extensor de
alcance) para mejorar la intensidad de la señal Wi-Fi.
• Es posible que la conexión de red no funcione bien por
cuestiones relacionadas con su proveedor de servicios
de Internet.
• Es posible que la conexión Wi-Fi no se conecte o se
interrumpa debido al entorno de la red doméstica.
• Si el electrodoméstico no puede registrarse debido a
problemas con la transmisión de la señal inalámbrica,
desconéctelo y espere alrededor de un minuto previo a
intentarlo de nuevo.
• Si el cortafuegos de su enrutador inalámbrico está
activado, desactivelo o añada una excepción a éste.
• El nombre de la red inalámbrica (SSID) debe ser una
combinación de letras y números. (No utilice símbolos
especiales)
• La interfaz de usuario (IU) del teléfono inteligente puede
variar dependiendo del sistema operativo (OS) del móvil
y del fabricante.
• Puede que la conguración de red falle si el protocolo
de seguridad del router está en WEP. Cambie el
protocolo de seguridad por otro (es recomendado el
WPA2) y registre el producto de nuevo.
ESPAÑOL
Conecte su teléfono inteligente al enrutador
3
inalámbrico.
NOTA
• Para vericar la conexión Wi-Fi, revise que el ícono Wi-
Fi
en el panel de control esté encendido.
• El electrodoméstico funciona únicamente con redes Wi-
Fi de 2.4 GHz. Contacte a su proveedor de servicios de
internet o verique el manual del enrutador inalámbrico
para revisar la frecuencia de su red.
• LG SmartThinQ no es responsable por ningún problema
de conexión en red, falla, mal funcionamiento o error
causado por la conexión de red.
• El entorno inalámbrico circundante puede hacer que el
servicio de red inalámbrica funcione lentamente.
Instalando la aplicación LG SmartThinQ
Busque la aplicación LG SmartThinQ en la tienda Google
Play o App Store desde su teléfono inteligente. Siga las
instrucciones para descargar e instalar la aplicación.
Page 88

34 FUNCIONES INTELIGENTES
Funciones de la aplicación LG
SmartThinQ
• Para electrodomésticos con el logo o .
Ciclo de Lavado (Inicio Remoto, Descargado)
Seleccione o descargue su ciclo preferido y opérelo a
control remoto.
Asistente de Limpieza de Tina
Esta función muestra la cantidad de ciclos restantes
previo a que sea tiempo de ejecutar el ciclo de Limpieza
de Tina.
Smart Diagnosis™
Esta función brinda información útil para diagnosticar y
resolver problemas con el producto conforme a su patrón
de uso.
Monitoreo de energía
El uso de energía de la lavadora se ve afectado por los
ciclos y las opciones, por lo que puede que vea algunos
cambios en el uso de energía entre un ciclo y otro.
Alertas Emergentes
Tiene la opción de recibir noticaciones automáticas en
su teléfono inteligente cuando haya nalizado el ciclo o
cuando el artefacto presente problemas.
Configuración
Congure el apodo del producto y borre el producto.
NOTA
• Si cambia de enrutador inalámbrico, proveedor de
Internet, o contraseña, borre el electrodoméstico
registrado en la aplicación LG SmartThinQ y proceda a
registrarlo de nuevo.
• Esta información está actualizada en el momento de
su publicación. La aplicación está sujeta a cambios,
con nes de mejorar el producto, sin previo aviso a los
usuarios.
Utilizando Ciclo de Lavado
Remote Start (Inicio Remoto)
Utilice un teléfono inteligente para controlar el
electrodoméstico de forma remota o para revisar el
tiempo restante del ciclo.
Uso de Inicio remoto
Presione el botón de Encendido/Apagado.
1
Cargue las prendas.
2
Mantenga presionado el botón Remote Start por 3
3
segundos para habilitar la función Inicio Remoto.
Inicie un ciclo desde la aplicación LG SmartThinQ en
4
su teléfono inteligente.
NOTA
• Una vez se ha habilitado el Inicio Remoto, usted puede
empezar un ciclo desde la aplicación LG SmartThinQ
para teléfonos inteligentes. Si el ciclo no es iniciado,
la máquina esperará a que el ciclo se inicie hasta que
esta se apague de forma remota desde la aplicación, o
al deshabilitar el modo de Inicio Remoto.
• Cuando se activa Inicio Remoto, la puerta se bloquea
automáticamente.
Deshabilitando Inicio Remoto
Cuando el Inicio Remoto esté activado, mantenga
presionado el botón Remote Start por 3 segundos.
Downloaded (Descargado)
Descargue ciclos nuevos y especiales que no se
encuentran incluidos en los ciclos básicos del artefacto.
Los artefactos que se encuentran correctamente
registrados tienen la posibilidad de descargar una
variedad de ciclos especiales especícos para ellos.
Solamente puede guardarse un ciclo a la vez en el
artefacto.
Una vez que se completa la descarga de un ciclo en el
artefacto, el producto mantiene el ciclo descargado hasta
que se descarga un nuevo ciclo.
Page 89

35FUNCIONES INTELIGENTES
Especificaciones módulo LAN
inalámbrico
Modelo LCW-004
Rango de
frecuencia
Rango de
frecuencia (max.)
Aviso de la FCC (para el módulo transmisor
contenido en este producto)
Este equipo fue probado y se determinó que cumple
con los límites para los dispositivos digitales de Clase
B, en conformidad con la parte 15 de las normas de la
FCC. Estos límites están diseñados para ofrecer una
protección razonable contra interferencias dañinas en
una instalación residencial. Este equipo genera, usa y
puede emitir energía de radiofrecuencia y, si no se instala
y utiliza de acuerdo con las instrucciones, podría causar
interferencias dañinas a las comunicaciones por radio.
Sin embargo, no se garantiza que dicha interferencia
no pueda ocurrir en instalaciones particulares. Si este
equipo causa interferencia dañina a la recepción de
radio o televisión, que se puede determinar encendiendo
y apagando el equipo, se aconseja al usuario intentar
corregir la interferencia realizando alguna de las
siguientes acciones:
• Reorientar o reubicar la antena receptora.
• Aumentar la separación entre el equipo y el receptor.
• Conectar el equipo a una toma de corriente en un
circuito diferente del utilizado por el receptor.
• Consultar al vendedor o a un técnico de radio/TV con
experiencia para solicitar ayuda.
El dispositivo cumple con la parte 15 de las Reglas FCC.
La operación está sujeta a las siguientes dos condiciones:
1) Este dispositivo no debe causar interferencia dañina, y
2) Este dispositivo debe aceptar cualquier interferencia
recibida, incluso aquellas que pudieran causar un
funcionamiento no deseado del dispositivo.
Cualquier cambio o modicación en la construcción de
este dispositivo, que no cuente con la aprobación expresa
de la parte responsable del cumplimiento, puede anular la
autorización del usuario para operarlo.
2412 - 2462 MHz
IEEE 802.11 b : 22.44 dBm
IEEE 802.11 g : 24.68 dBm
IEEE 802.11 n : 24.11 dBm
Declaración sobre exposición a la radiación de
RF de la FCC
Este equipo cumple con los límites de exposición a
la radiación de la FCC establecidos para entornos no
controlados. Este transmisor no se debe ubicar ni operar
junto con ninguna otra antena ni transmisor.
El equipo se debe instalar y operar con una distancia
mínima de 20 cm (7.8 pulg.) entre la antena y su cuerpo.
Los usuarios deben seguir las instrucciones de operación
especícas de manera tal de cumplir con las normas de
exposición a la RF.
Información de anuncio de programas
de código abierto
Para obtener el código fuente bajo GPL, LGPL, MPL
y otras licencias de código abierto que contiene este
producto, visite http://opensource.lge.com. Además del
código fuente, se pueden descargar los términos de la
licencia, las anulaciones de la garantía y los avisos de
derechos de autor.
LG Electronics también le proporcionará el código abierto
en un CD-ROM por un costo que cubra los gastos de
dicha distribución (como el costo del medio, del envío
y de la manipulación) una vez realizado el pedido por
correo electrónico a la dirección opensource@lge.com.
Esta oferta es válida solo durante un período de tres
años después de que se envíe el último cargamento de
este producto. Esta oferta es válida para todo aquel que
reciba esta información.
ESPAÑOL
Page 90

36 FUNCIONES INTELIGENTES
Función Smart Diagnosis ™
(Diagnóstico Inteligente)
En caso de experimentar algún problema con el aparato,
el mismo tiene la capacidad de transmitir datos a través
de su teléfono al Centro de información del cliente de
LG. Los modelos equipados con NFC o Wi-Fi pueden
también transmitir datos a un teléfono inteligente usando
la aplicación LG SmartThinQ.
Smart Diagnosis™ a través del Centro
de información al cliente
• Para electrodomésticos con el logo o
Este método le permite hablar directamente con uno de
nuestros especialistas calicados. El especialista registra
los datos transmitidos desde el aparato y los usa para
analizar el problema, así le brinda un diagnostico efectivo
y rápido.
Comuníquese con el Centro de información al cliente
1
de LG Electronics llamando al:
(LG EE. UU.) 1-800-243-0000
(LG Canadá) 1-888-542-2623
Cuando del centro de información se lo solicite,
2
coloque el micrófono del teléfono cerca del ícono de
Smart Diagnosis™. No presione ningún otro botón.
Mantenga presionado el botón Temp. durante tres
3
segundos.
NOTA
• Smart Diagnosis™ no puede activarse a menos que el
electrodoméstico pueda encenderse utilizando el botón
Encendido/Apagado. Si no es posible encender el
electrodoméstico, entonces la resolución de problemas
debe llevarse a cabo sin usar Smart Diagnosis™.
• Para obtener resultados óptimos, no mueva el teléfono
mientras se transmitan los tonos.
• Si el agente del centro de atención no puede obtener
una grabación precisa de los datos, es posible que le
pida que lo intente nuevamente.
• La calidad de la función Smart Diagnosis™ depende de
la calidad de la llamada local.
• Una llamada de mala calidad podría provocar
problemas en la transmisión de datos enviados al
centro de llamadas desde su teléfono, perjudicando así
el funcionamiento de Smart Diagnosis™ .
LG SmartThinQ Smart Diagnosis™
• Para electrodomésticos con el logo o
Use la función Smart Diagnosis en la aplicación LG
SmartThinQ para ayudar a diagnosticar problemas sin la
ayuda del Centro de información al cliente de LG.
Siga las instrucciones en la aplicación LG SmartThinQ
para realizar un diagnóstico inteligente usando su
teléfono inteligente.
NOTA
• Smart Diagnosis™ no puede activarse a menos que el
electrodoméstico pueda encenderse utilizando el botón
Encendido/Apagado. Si no es posible encender el
electrodoméstico, entonces la resolución de problemas
debe llevarse a cabo sin usar Smart Diagnosis™.
Mantenga el teléfono allí hasta que la transmisión de
4
tonos haya terminado.
• Para obtener resultados óptimos, no mueva el
teléfono mientras se transmitan los tonos.
• Si el agente del centro de atención no puede
obtener una grabación precisa de los datos, es
posible que le pida que lo intente nuevamente.
Una vez que la cuenta regresiva haya terminado y se
5
hayan detenido los tonos, reanude su conversación
con el agente del centro de atención, que podrá,
entonces, ayudarlo a usar la información transmitida
para un análisis.
Page 91

MANTENIMIENTO
ADVERTENCIA
Para reducir el riesgo de incendios, descargas eléctricas o lesiones, lea todo el manual del usuario,
incluyendo las Instrucciones Importantes de Seguridad, previo a operar esta lavadora.
• Desconecte la lavadora antes de limpiar para evitar el riesgo de descargas eléctricas. El incumplimiento de esta
advertencia puede causar lesiones graves, incendios, descargas eléctricas o la muerte.
• No utilice sustancias volátiles (benceno, disolvente, alcohol, acetona, etc.), limpiadores abrasivos, o detergentes
con componentes químicos fuertes al limpiar la lavadora. Hacerlo podría causar decoloración o daño a la máquina,
o podría provocar un incendio.
• Ciertas piezas internas no tienen conexión a tierra en forma intencional y pueden presentar un riesgo de descarga
eléctrica sólo durante la reparación. Personal de reparación-no toque las siguientes piezas cuando el aparato esté
recibiendo energía : bomba, motor, cubierta de ltro de ruido, y calentador (en modelos aplicables).
37MANTENIMIENTO
ESPAÑOL
Limpieza regular
Cuidado después del lavado
Luego de que el ciclo haya terminado, limpie la tapa
(puerta) y el interior del sello de la misma para remover el
contenido de humedad.
• Deje la tapa (puerta) abierta para secar el interior de la
tina.
• Seque el cuerpo de la lavadora con un paño seco para
eliminar cualquier resto de humedad.
Limpieza del exterior
El cuidado adecuado de su lavadora puede prolongar su
vida.
Tapa (Puerta):
Límpiela por fuera y por dentro con un paño húmedo y
luego séquela con un paño suave.
Exterior:
• Seque inmediatamente cualquier derrame.
• Límpielo con un paño húmedo.
• No toque la supercie o la pantalla con objetos
punzantes o losos.
Cuidado y limpieza del interior
• Utilice una toalla o un paño suave para limpiar
alrededor de la apertura de la tapa (puerta) y del vidrio
de la lavadora.
• Siempre retire las prendas de la lavadora tan pronto
como termine el ciclo. Si deja las prendas húmedas en
la lavadora, estas pueden arrugarse, transferir color y
provocar olores.
• Ejecute el ciclo de limpieza de la tina una vez por mes,
o con más frecuencia si le resulta necesario, para
limpiar residuos o acumulación de detergente.
Limpiando el Tambor
Con el tiempo puede que se formen residuos en la tina
y que ésto genere un olor a moho. Ejecute el ciclo Tub
Clean (Limpieza de Tina) mensualmente para remover el
residuo y prevenir la formación de malos olores. Ejecute
el ciclo más a menudo bajo condiciones de uso intenso o
si ya hay olor presente.
Remueva cualquier prenda de la tina.
1
Coloque los productos de limpieza.
2
Producto de
limpieza
Limpiador para la tina
Removedor de cal
Blanqueador con
cloro líquido
Limpiador en polvo
Tabletas de limpieza
• Para otros productos de limpieza del tambor, siga
las instrucciones y recomendaciones del fabricante
del limpiador.
• No sobrepase la línea de llenado máximo al
añadir blanqueador o limpiadores en polvo. Los
limpiadores en polvo podrían permanecer en la tina
aún después del lavado.
Cierre la tapa (puerta) y presione el botón
3
Encendido/Apagado para encender la lavadora.
Gire la perilla o presione los botones de ciclo para
4
seleccionar el ciclo Tub Clean, luego presione el
botón Inicio/Pausa para iniciar.
Luego de que el ciclo haya terminado, abra la tapa
5
(puerta) y permita que el interior de la tina se seque
completamente.
Siga las instrucciones del
fabricante.
Añada al dispensador de
detergente líquido para lavado
principal
Siga las instrucciones del
fabricante.
Colóquela directamente dentro de
la tina de la lavadora.
Instrucciones
Page 92

38 MANTENIMIENTO
NOTA
• Nunca cargue la lavadora mientra utiliza la Limpieza
del Tambor. El lavado podría dañarse o contaminarse
con productos de limpieza. Asegúrese de correr el ciclo
Limpieza del Tambor únicamente cuando el tambor esté
vacío.
• Para mantener la tina limpia, deje la tapa (puerta)
abierta luego de terminar el lavado.
• La limpieza de la tina debe repetirse mensualmente.
• Si ya percibe olor a humedad o a moho, ejecute la
limpieza de la tina semanalmente durante tres semanas
consecutivas.
• No exceda la cantidad recomendada por el fabricante al
añadir blanqueador o productos de limpieza en polvo.
Limpiadores en polvo podrían permanecer en la tina
aún después del lavado.
Remoción de acumulación de minerales
En áreas con aguas duras, se pueden formar sedimentos
minerales en los componentes internos de la lavadora.
Limpie periódicamente la acumulación de minerales en
los componentes internos para prolongar la vida útil de la
lavadora.Se recomienda utilizar un ablandador de agua
en áreas con aguas duras.
• Utilice un descalcicador, como Washer Magic®, para
remover la acumulación mineral visible en el tambor de
la lavadora.
• Luego de limpiar con el desincrustador, siempre ejecute
el ciclo de limpieza de la cuba antes de lavar ropa.
• Las escamas minerales y otras manchas podrían
removerse del tambor de acero inoxidable utilizando un
paño suave previamente remojado en limpiador para
acero inoxidable.
• No use lana de acero ni limpiadores abrasivos.
Dejando la Tapa (Puerta) Abierta
• Si la lavadora no se utilizará por varios días, deje la
tapa (puerta) abierta durante la noche para permitir que
la tina se seque.
Limpiando la Bandeja del Dispensador
Puede que se acumule detergente y suavizante en la
bandeja del dispensador. Remueva la bandeja y los
insertos y revise si hay acumulación una o dos veces al
mes.
Remueva la bandeja al tirar de ella hasta que se
1
detenga. Levante la parte delantera de la bandeja y
retírela completamente.
Remueva los insertos de los dos compartimientos.
2
Limpie los insertos y la bandeja con agua tibia.
3
• Utilice un paño o un cepillo suave para limpiarlos y
remover cualquier residuo.
ADVERTENCIA
• No rocíe agua dentro de la lavadora. Hacerlo podría
causar un incendio o una descarga eléctrica.
Seque la humedad con un paño o una toalla seca
4
luego de limpiar.
Para limpiar la apertura de la bandeja, utilice un
5
pequeño cepillo no metálico. Remueva todo el
residuo de las parte superior e inferior del hueco.
Coloque los insertos de regreso en sus respectivos
6
compartimientos y vuelva a colocar la bandeja.
• Coloque la bandeja en diagonal en la apertura,
bájela y deslícela en su lugar.
NOTA
• Si utiliza un descalcicador o un limpiador de tina
durante el ciclo Limpieza de Tina, utilice la opción
Enjuague+Centrifugado para enjuagar la tina previo a
ejecutar su siguiente ciclo de lavado.
Page 93

39MANTENIMIENTO
Limpiando el Dispensador de Blanqueador
Puede que se acumule blanqueador en la cubierta del
dispensador. Revise que no sea así y limpie la cubierta
una o dos veces al mes.
Tipo 1
Remueva la cubierta del dispensador de blanqueador.
Limpie la cubierta y la apertura con agua tibia.
Limpieza de los ltros de
entrada de agua
Si la lavadora no se llena correctamente, aparecerá un
mensaje de error en la pantalla. Las rejillas del ltro de
la válvula de entrada de agua pueden taparse por el
sarro que se forma en las aguas duras, sedimentos en el
suministro de agua u otros desechos.
PRECAUCIÓN
• Las rejillas de entrada de agua protegen las piezas
delicadas de la válvula de entrada para que no
se dañen por las partículas que pueden ingresar
con el suministro de agua. Si hace funcionar la
lavadora sin estos ltros puede ocasionar que una
válvula quede abierta, lo que puede conducir a
inundaciones o daños a la propiedad.
• No use la lavadora sin los ltros de entrada. Si usa
la lavadora sin los ltros de entrada, puede provocar
fugas y mal funcionamiento.
• Si usa la lavadora en un área de aguas duras, el
ltro de entrada puede obstruirse por la acumulación
de cal.
Cierre por completo ambas llaves de paso de
1
agua.
ESPAÑOL
Tipo 2
La cubierta no puede separarse del dispensador.
Límpiela utilizando un cepillo y agua tibia.
Desenrosque las mangueras de agua caliente y
2
fría de la parte posterior de la lavadora.
Retire los ltros de las válvulas de agua
3
cuidadosamente.
Retire objetos extraños y sumerja los ltros en
4
vinagre blanco o en un removedor de cal.
Si utiliza un removedor de cal, siga las instrucciones
del fabricante. Tenga cuidado de no dañar los ltros
mientras los limpia.
Enjuague bien los ltros y vuelva a colocarlos en
5
su sitio.
Enjuague las mangueras del agua y vuelva a
6
jarlas en su lugar.
Antes de volver a colocar las mangueras, enjuague
las mangueras y las tuberías de agua haciendo
correr bastante agua por ellas hacia una cubeta o
desagüe. Preferentemente, hágalo con las llaves de
paso del agua abiertas por completo, para que ésta
uya al máximo.
NOTA
• Un mensaje
cuando la presión de agua sea muy débil o cuando un
ltro de entrada esté obstruido con suciedad. Limpie el
ltro de entrada.
podría parpadear en la pantalla
Page 94

40 MANTENIMIENTO
Cuidado en climas fríos
Almacenamiento de la lavadora
Si la lavadora no va a ser utilizada por un período
prolongado y se encuentra en una zona en la que puede
quedar expuesta a temperaturas bajo cero, siga los
pasos a continuación para protegerla de daños.
Asegúrese de que la tina esté vacía antes de seguir los
siguientes pasos.
Cierre el suministro de agua.
1
Desconecte las mangueras del suministro de agua y
2
desagote el agua de las mangueras.
Enchufe el cable de alimentación en un tomacorriente
3
correctamente conectado a tierra.
Agregue 1 galón de anticongelante no toxico para
4
vehículo recreativo (RV) al tambor vacío y cierre
la tapa (puerta). Nunca utilice anticongelante
automotriz.
Cuando se congela la línea de
suministro de agua
Cierre las llaves conectadas a las líneas de
1
suministro de agua.
Vierta agua caliente en los grifos congelados para
2
descongelar las líneas de agua y remuévalas.
Sumerja las líneas de suministro de agua en agua
3
caliente para descongelarlas.
Conecte las líneas de suministro de agua a las
4
entradas de agua de la lavadora y a las llaves de
paso.
Consulte la sección Conexión del suministro de agua
para obtener más detalles.
Abra las llaves de paso.
5
Presione el botón de Encendido/Apagado.
6
Presione el botón de Special Care repetidamente
7
para seleccionar el ciclo Rinse+Spin.
Presione el botón de Encendido/Apagado y luego
5
seleccione Spin.
Presione el botón de Inicio/Pausa para dar arranque
6
a la bomba de desagüe.
Deje la bomba de desagüe funcionando durante
7
un minuto y luego pulse el botón de Encendido/
Apagado para apagar la lavadora. Esto expulsará
una cantidad de anticongelante y dejará solo el
necesario para proteger la lavadora de posibles
daños.
Desconecte el cable de alimentación, seque el
8
interior de la tina con un paño suave, y cierre la tapa
(puerta).
Guarde la lavadora en posición vertical.
9
Quite los insertos del dispensador. Desagote el agua
10
que pueda haber en los compartimientos y déjelos
secar.
Para quitar el anticongelante de la lavadora luego
11
de haberla tenido guardada, ejecute un ciclo Speed
Wash completo usando detergente.
• No coloque ropa para lavar en este ciclo.
Presione el botón de Inicio/Pausa. Verique que el
8
agua llene la lavadora correctamente.
Cuando se congela la línea de desagüe
Vierta agua caliente en la tina y cierre la tapa. Espere
1
por 1-2 horas.
Presione el botón de Encendido/Apagado después
2
de descongelar.
Presione el botón de Special Care repetidamente
3
para seleccionar el ciclo Rinse+Spin.
Presione el botón de Inicio/Pausa. Verique que el
4
agua se drene correctamente.
Page 95

SOLUCIÓN DE PROBLEMAS
Antes de llamar al servicio técnico
La lavadora está equipada con un sistema automático de detección de errores para detectar y diagnosticar problemas
en una etapa temprana. Si la lavadora no funciona correctamente o no funciona en absoluto, compruebe lo siguiente
antes de llamar al servicio técnico.
41SOLUCIÓN DE PROBLEMAS
Ruidos posibles
Ruido. Causa posible Soluciones
Haciendo clic
Rociado o silbido Agua que circula o se rocía durante el ciclo. • Funcionamiento normal
Zumbido o gorgoteo
Chapoteo de agua
Agua entrando a la
lavadora después de
que esta ya comenzó
a funcionar.
Ruido metálico y de
traqueteo
Golpeteo
Ruido de Vibración
Ruido de chirridos
Ruido de golpes
cuando la lavadora
se está llenando
con agua (golpe de
ariete)
La tapa (puerta) transmite cuando ésta se
bloquea y desbloquea.
La bomba de desagüe bombea agua desde
la lavadora en ocasiones durante un ciclo.
Un líquido en el anillo de equilibrio
alrededor del cesto de ropa ayuda a que el
cesto gire suavemente.
La lavadora adapta el lavado al tipo y al
tamaño de la carga y agrega más agua al
ciclo cuando resulta necesario.
La carga de ropa puede estar
desequilibrada. Si la lavadora percibe que
la carga está desequilibrada, se detiene y
vuelve a llenarse para redistribuirla.
La lavadora podría estar diluyendo los productos de
lavandería para agregarlos al lavado.
Objetos extraños como llaves, monedas,
o pines de seguridad podrían estar en el
tambor o en la bomba.
Las cargas pesadas pueden producir un
golpeteo.
La carga puede estar desequilibrada.
No se quitaron todos los materiales de
empaque.
La carga de lavado se encuentra distribuida
de manera despareja en el tambor.
No todas las patas de nivelación están
bien afirmadas al suelo y adecuadamente
niveladas.
El suelo no es lo suficientemente rígido.
No se quitaron todos los materiales de
empaque.
La fontanería en el hogar se mueve o
flexiona cuando las válvulas de la lavadora
se cierran.
La presión del suministro de agua
doméstico es muy alta.
• Funcionamiento normal
• Funcionamiento normal
• Funcionamiento normal
• Funcionamiento normal
• Detenga la lavadora, verifique que no haya
objetos extraños en el tambor o el filtro de
desagüe. Si el ruido continúa cuando vuelva a
encender la lavadora, llame al servicio técnico.
• Esto es normal. Si el sonido continua,
probablemente la lavadora se encuentra
desequilibrada. Detenga la lavadora y distribuya
la carga nuevamente.
• Pause el ciclo y redistribuya la carga luego de
que la tapa (puerta) se desbloquee.
• Consulte Desembalaje y remoción de material
de empaque en la sección Instalación.
• Pause el ciclo y redistribuya la carga luego de
que la tapa (puerta) se desbloquee.
• Consulte Nivelación de la lavadora en la
sección Instalación.
• Asegúrese de que el piso es sólido y no se
flexiona. Vea Piso en la sección de Instalación.
• Consulte Desembalaje y remoción de material
de empaque en la sección Instalación.
• El golpe de ariete no es provocado por un
defecto de la lavadora. Instale supresores de
golpes de ariete (se compran aparte, en su
ferretería local o en una tienda de materiales de
construcción) entre la manguera de llenado y la
lavadora para obtener resultados óptimos.
• Ajuste el regulador del suministro de agua doméstico
a una presión menor o llame a un fontanero.
ESPAÑOL
Page 96

42 SOLUCIÓN DE PROBLEMAS
FUNCIONAMIENTO
Problema Causa posible Soluciones
• Revise que no hayan fugas, rajaduras o fracturas en las
mangueras y los conectores.
• Compruebe y apriete las conexiones de las mangueras.
• La lavadora bombea agua a mucha velocidad. Verifique si el
agua vuelve de la tubería de desagüe durante el desagote. Si
ve que sale agua del desagüe, compruebe que la manguera
de desagüe esté correctamente instalada y verifique que no
existan obstrucciones en el desagüe. Llame a un fontanero
para reparar la tubería de desagüe.
• Amarre la manguera de desagüe a la manguera de entrada
o al tubo independiente para evitar que se salga durante
el desagote. Para tuberías de desagüe más pequeñas,
inserte la manguera de desagüe en la tubería hasta la brida
de la manguera. Para tuberías de desagüe de mayores
dimensiones, inserte la manguera de desagüe en la tubería
pasando de 1 a 2 pulgadas la brida de la manguera.
• Utilice el Ciclo Bedding (Ropa de Cama) para artículos largos
o voluminosos. Preste cuidado adicional y nunca lave más de
la mitad de la carga con artículos que floten, como almohadas.
• Detenga la lavadora y compruebe la carga. Asegúrese de que
la carga no se encuentra por encima del borde superior del
tambor.
• El exceso de espuma puede crear fugas, y puede ser
causado por el tipo de detergente y la cantidad utilizada.
Los detergentes de alta eficiencia (HE) son los únicos
recomendados. La cantidad normal de detergente a utilizar
es 1/4 a 1/2 de la cantidad máxima recomendada por el
fabricante. Siempre reduzca la cantidad de detergente si la
carga es pequeña, está poco sucia, o si el agua es muy suave.
Nunca utilice más de la cantidad máxima recomendada por el
fabricante del detergente.
• Revise todas las conexiones de las mangueras de llenado
y drenaje para asegurarse de que estas estén apretadas y
seguras.
• Los detergentes HE están formulados específicamente para
lavadoras de alta eficiencia y contienen agentes de reducción
de espuma. Use solo detergente con el logotipo de alta
eficiencia (HE).
• Para ver las cantidades de detergente, consulte la sección
Uso de Detergente. Si el exceso de espuma o de residuos de
detergente continúa siendo un problema, añada un enjuague
extra.
• Asegúrese de que el enchufe esté conectado de manera
segura en un tomacorriente de 120 V CA, 60 Hz de 3 clavijas
con conexión a tierra.
• Restablezca el interruptor de corriente o remplace el fusible.
No aumente la potencia nominal del fusible. Si el problema es
una sobrecarga del circuito, llame a un electricista calificado
para que lo solucione.
Fuga de agua
Agua se filtra en
cada lavada.
Espuma excesiva
La lavadora no
enciende.
Las mangueras no están
conectadas correctamente.
Los tubos de drenaje están
obstruidos.
La manguera de drenaje
se ha salido del conector
de drenaje o no está lo
suficientemente insertada.
Un objeto grande como una
almohada o manta está por
encima de la parte superior
del tambor.
Exceso de espuma del
detergente.
Las mangueras no están
instaladas correctamente.
Demasiado detergente o
detergente incorrecto.
El cable de alimentación
no está enchufado
correctamente.
Se quemó el fusible del
hogar, saltó el interruptor de
corriente o hay un corte de
energía.
Page 97

Problema Causa posible Soluciones
La lavadora automáticamente
El ciclo de lavado es
más prolongado que
lo normal.
El detergente no
se dispensa o se
dispensa de forma
incompleta
La lavadora no
funciona.
ajusta el tiempo del lavado
según la cantidad de
ropa, la presión del agua
y otras condiciones de
funcionamiento.
Los compartimientos de
detergente están obstruidos
por haber sido llenados de
forma incorrecta.
Se utilizó demasiado
detergente.
Suministro de agua
insuficiente.
Residuo normal.
El panel de control se ha
apagado por estar inactivo.
La lavadora está desenchufada.
El suministro de agua está
cerrado.
Los controles no están
configurados correctamente.
La tapa (puerta) está abierta.
Saltó el interruptor de
corriente/se quemó el fusible.
Deben restablecerse los
controles.
No se presionó el botón de
Inicio/Pausa después de
seleccionar un ciclo.
Presión de agua
extremadamente baja.
La lavadora está demasiado
fría.
• Esto es normal. La lavadora automáticamente ajusta el
tiempo del ciclo a fin de lograr resultados óptimos con el ciclo
seleccionado. El tiempo restante que aparece en la pantalla
es solo una estimación. El tiempo real puede variar.
• Asegúrese de colocar el detergente y los aditivos en los
compartimientos correctos del dispensador. Para todos los
tipos de detergente, asegúrese siempre de que el cajón del
dispensador esté completamente cerrado antes del inicio del
ciclo.
• Asegúrese de utilizar la cantidad de detergente sugerida
según las recomendaciones del fabricante. Podría también
diluir el detergente con agua hasta la línea de llenado
máximo del compartimiento para evitar que este se obstruya.
Utilice solamente detergente de alta eficiencia (HE).
NOTA: Siempre utilice la menor cantidad de detergente que
sea posible. Las lavadoras de alta eficiencia necesitan muy
poca cantidad de detergente para lograr óptimos resultados.
Si usa mucho detergente, puede hacer que el lavado y el
enjuague sean deficientes y contribuir a que se produzcan
olores en la lavadora.
• Asegúrese de que tanto la llave de agua fría como la de
agua caliente estén abiertas por completo.
• Es normal que quede una pequeña cantidad de detergente
en el dispensador. Si este residuo se acumula, puede
interferir con el ingreso normal de los productos de limpieza
a la lavadora. Consulte las instrucciones de limpieza.
• Esto es normal. Presione el botón Encendido/Apagado
para encender la lavadora.
• Asegúrese de que el cable esté conectado de manera
segura a un tomacorriente que funcione.
• Abra por completo las llaves de agua fría y caliente.
• Asegúrese de que el ciclo fue configurado correctamente,
cierre la tapa (puerta) y presione el botón Inicio/Pausa.
• La lavadora no operará con la tapa (puerta) abierta.
Cierre la tapa (puerta) y asegúrese de que no haya nada
atrapado debajo de ella que esté previniendo que cierre
completamente.
• Compruebe el estado del interruptor de corriente/los fusibles
de la casa. Remplace los fusibles o restablezca el interruptor.
La lavadora debe conectarse a un circuito derivado exclusivo
para ella. La lavadora retomará el ciclo donde se detuvo
cuando se restablezca el suministro eléctrico.
• Presione el botón Encendido/Apagado, luego seleccione
nuevamente el ciclo deseado y presione el botón Inicio/Pausa.
• Presione el botón de Encendido/Apagado, luego vuelva a
seleccionar el ciclo deseado y presione el botón de Inicio/
Pausa. La lavadora se apagará si el botón de Inicio/Pausa
no se presiona dentro de los 60 minutos siguientes.
• Compruebe otro grifo de la casa para asegurarse de que la
presión del suministro de agua doméstico es la adecuada.
• Si la lavadora ha sido expuesta a temperaturas bajo cero
por un largo período de tiempo, permita que esta se entibie
previo a presionar el botón Encendido/Apagado. De lo
contrario, la pantalla no se encenderá.
43SOLUCIÓN DE PROBLEMAS
ESPAÑOL
Page 98

44 SOLUCIÓN DE PROBLEMAS
Problema Causa posible Soluciones
• Asegúrese de que los filtros de entrada en las
válvulas de llenado no estén obstruidos. Consulte las
instrucciones de limpieza de los filtros.
• Asegúrese de que las mangueras de entrada no se
encuentren retorcidas ni obstruidas.
• Esta es una lavadora de alta eficiencia (HE). Por lo
tanto, las configuraciones de los niveles de agua
para esta lavadora pueden ser diferentes a las de las
lavadoras convencionales.
• Asegúrese de que tanto la llave de agua fría como la
de agua caliente estén abiertas por completo.
• La lavadora no operará con la tapa (puerta) abierta.
Cierre la tapa (puerta) y asegúrese de que no haya
nada atrapado debajo de ella que esté previniendo
que cierre completamente.
• Normalmente el agua no cubrirá las prendas. El nivel
de llenado es optimizado para que los movimientos
de lavado alcancen los mejores rendimientos.
• Asegúrese de que la manguera de drenaje esté
libre de atascos, pigmentos, etc., y de que no esté
apretada detrás o debajo de la lavadora.
• Mueva el extremo de la manguera de drenaje a
manera de que no esté a más de 96 pulgadas (2.4
m) del fondo de la lavadora.
• Asegúrese de que la cubierta del blanqueador se
encuentre instalada correctamente y bien encastrada
en su lugar antes de iniciar el ciclo.
• Levante la cubierta del dispensador de blanqueador
y limpie el depósito. La presencia de pelusa u otros
residuos extraños que se juntan en el interior del
dispensador puede evitar que el blanqueador ingrese
correctamente en la lavadora.
• No puede almacenar blanqueador en el dispensador
para que sea utilizado en el futuro. El blanqueador se
dispensará en cada carga.
• Llenar en exceso el dispensador de blanqueador
causará que éste se dispense inmediatamente,
dañando así sus prendas o la lavadora. Siempre
mida el blanqueador, pero nunca llene sobre la linea
de llenado máximo en el dispensador. Media taza de
blanqueador es suficiente para la mayoría de cargas.
Nunca utilice más de 1 taza de blanqueador.
La lavadora no se
llena correctamente.
El agua en la
lavadora no drena o
lo hace lentamente.
No se dispensa el
blanqueador
El blanqueador se
dispensa antes de
tiempo
Filtro obstruido.
Las mangueras pueden estar
retorcidas.
Eficiencia en el consumo de energía
Suministro de agua insuficiente
La tapa (puerta) de la lavadora está
abierta.
El nivel de agua es muy bajo.
La manguera de desagüe está
retorcida, pellizcada u obstruida.
La descarga del desagüe se encuentra
a más de 96 pulgadas (2.4 m) en
relación al fondo de la lavadora.
La cubierta del dispensador de
blanqueador no está instalada
correctamente.
El dispensador de blanqueador está
sucio u obstruido.
El dispensador se ha llenado para un
uso futuro.
Llenado en exceso del dispensador de
blanqueador.
Page 99

Desempeño
Problema Causa posible Soluciones
Arrugas
Manchas
Eliminación de
manchas deficiente
Olor a humedad o
moho
La ropa no se retiró de la lavadora
pronto.
Lavadora sobrecargada.
Las mangueras de entrada de agua fría
y caliente están invertidas.
El blanqueador o el suavizante se
dispensan antes de tiempo.
El blanqueador o suavizante fue
añadido directamente al lavado en la
tina.
La ropa no se retiró de la lavadora a
tiempo.
Las prendas no se clasificaron
correctamente.
No se seleccionaron las opciones
adecuadas.
Manchas que se han fijado
previamente.
Se ha usado demasiado detergente o
uno del tipo incorrecto.
El interior del tambor no se limpió
adecuadamente.
• Siempre retire las prendas de la lavadora tan pronto
como termine el ciclo.
• La lavadora puede llenarse por completo, pero
el tambor no debe quedar demasiado lleno de
artículos. La tapa (puerta) de la lavadora debe cerrar
facilmente.
• Un enjuague con agua caliente puede ocasionar
arrugas en las prendas. Compruebe las conexiones
de las mangueras de entrada.
• El compartimiento del dispensador está demasiado
lleno causando que el blanqueador o el suavizante
se dispense inmediatamente. Siempre mida el
blanqueador para evitar llenar más de una taza
máximo.
• La bandeja del dispensador se ha cerrado muy
rápidamente causando que el suavizante se
dispense inmediatamente.
• Siempre utilice los dispensadores para asegurar
que los productos de lavado sean dispensados
apropiadamente en el momento adecuado.
• Siempre retire las prendas de la lavadora tan pronto
como sea posible en cuanto termine el ciclo.
• Siempre lave los colores oscuros separados de
los colores claros y los blancos para evitar que se
produzca decoloración.
• Nunca lave ropa muy sucia con ropa poco sucia.
• Puede que las prendas muy sucias o las manchas
difíciles requieran poder de limpieza adicional.
Seleccione las funciones Soak o Stain Care
para incrementar el poder de limpieza del ciclo
seleccionado.
• Las prendas que ya han sido lavadas pueden tener
manchas que se han fijado. Puede ser difícil eliminar
estas manchas, que quizás requieran un lavado a
mano o un tratamiento previo para quitarlas.
• Use únicamente detergente de alta eficiencia (HE)
según las instrucciones del fabricante.
• Ejecute el ciclo Limpieza del Tambor regularmente.
45SOLUCIÓN DE PROBLEMAS
ESPAÑOL
Page 100

46 SOLUCIÓN DE PROBLEMAS
Wi-Fi
Problema Causa posible Soluciones
La contraseña de la red Wi-Fi fue
ingresada incorrectamente.
Los Datos Móviles para su teléfono
inteligente están activados.
El nombre de la red inalámbrica
(SSID) se ha configurado
incorrectamente.
Problema al conectar el
electrodoméstico y el
teléfono inteligente a la
red Wi-Fi.
La frecuencia del enrutador no es de
2.4 GHz.
La distancia entre el enrutador y el
electrodoméstico es muy grande.
• Borre su red Wi-Fi doméstica e inicie el proceso de
registro de nuevo.
• Desactive los Datos Móviles en su teléfono
inteligente previo a registrar el electrodoméstico.
• El nombre de la red inalámbrica (SSID) debe ser
una combinación de letras y números. (No utilice
símbolos especiales)
• Sólo se admite una frecuencia de enrutador de
2.4 GHz. Configure el enrutador inalámbrico a 2.4
GHz y conecte el electrodoméstico a éste. Para
verificar la frecuencia del enrutador, consulte con
su proveedor de servicios de internet o con el
fabricante del enrutador.
• Si el electrodoméstico se encuentra muy
lejos del enrutador, puede que la señal sea
débil y que la conexión no sea configurada
correctamente. Coloque el enrutador más cerca del
electrodoméstico o compre e instale un repetidor
Wi-Fi.
 Loading...