

LG WT5101H Series Owner's Manual
Life's Good
.....4¸"¸
WASHING ACHt
Please read this manual carefully before operating
your washing machine and retain it for future reference_
WT5101H _-
P/NO : MFL42065469
INT ODUCTION
IMPORTANT SAFETY INSTRUCTIONS
Basic safety precautions ..................................... 3-4
Grounding instructions ........................................... 4
Safety instructions for installation .......................... 5
Safety instructions for use, care and cleaning,
and disposal ........................................................... 6
PARTSAND FEATURES
Special Features ..................................................... 7
Key Parts and Components ................................... 8
INSTALLATION INSTRUCTIONS
Choose the Proper Location .................................. 9
Flooring .................................................................. 9
Clearances ............................................................. 9
Unpack the Washer .............................................. 10
Connecting the Water Lines ................................. 11
Connecting the Drain Line ............................... 11-12
Leveling the Washer ............................................ 12
Connect to the Power Supply .............................. 12
HOW TO USE
Control Panel Features ......................................... 13
Operating the Washer .......................................... 14
Cycle Guide .......................................................... 15
Sorting Wash Loads ............................................. 16
Selecting Detergent .............................................. 17
About the Dispenser ............................................. 17
Loading the Dispenser ......................................... 18
The LED Display ................................................... 19
Cycle Modifier Buttons ................................... 20-21
Cycle Option Buttons .................................... 22-23
CARE AND CLEANING
Regular Cleaning ............................................ 24-25
Maintenance ......................................................... 25
Cleaning the Washer ............................................ 26
TROUBLESHOOTING
Normal Sounds You May Hear ............................. 27
Before Calling for Service ............................... 27-31
SPECIFICATIONS
Key Dimensions and Specifications ..................... 32
WARRANTY ...................................................33
2
THANK YOU!
Congratulations on your purchase
and welcome to the LG family.
Your new LG washing machine
combines the most advanced
washing technology with simple
operation and high efficiency.
Follow the operating and care
instructions in this manual, and your
washer will provide many years of
reliable service.
IMPORTAT SAFETYiNSTRUcTiONS
RSAD ALL iNSTRUCTiONS BEFORS USE
_WARNING For yo.r safety,the information in this manual must be
followed to minimize the risk of fire or explosion, electric shock, or to prevent
property damage, personal injury, or loss of life.
Your safety and the safety of others is very important.
We have provided many important safety messages in this manual and on your appliance. Always read
and obey all safety messages.
_lb his is the safety alert symbol.
This symbol alerts you to potential hazards that can kill or hurt you and others.
All safety messages will follow the safety alert symbol and either the word DANGER or WARNING.
These words mean:
_DANGER: You can be killed or seriously injured if you don't immediately follow instructions.
,_WARN|_G-" You can be killed or seriously injured if you don't follow instructions.
All safety messages will tell you what the potential hazard is, tell you how to reduce the chance of
k,_njury,and tell you what can happen if the instructions are not followed.
5
IMPORTANTSAFETYINST UcTIONS
READ ALL iNSTRUCTiONS BEFORS USE
WARNING Foryoursafety,theinformationinthismanualmustbe
followed to minimize the risk of fire or explosion, electric shock, or to prevent
property damage, personal injury, or loss of life.
_' BASIC SAFETY PRECAUTIONS
_ILWAR_I!_ I_ll_G -" To reduce the risk of fire, electric shock, or personal injury when using this
appliance, follow basic precautions, including the following.
• Before use, the washer must be properly installed as
described in this manual.
• Do not wash articles that have been previously
cleaned in, washed in, soaked in, or spotted with
gasoline, dry cleaning solvents, or other flammable
or explosive substances, as they give off vapors that
could ignite or explode.
• Do not add gasoline, dry cleaning solvents, or other
flammable or explosive substances to the wash
water, These substances give off vapors that could
ignite or explode.
• Under certain conditions, hydrogen gas may be
produced in a hot water system that has not been
used for 2 weeks or more. HYDROGEN GAS IS
EXPLOSIVE. If the hot water system has not been
used for such a period, before using the washer,
turn on all hot water faucets and let the water flow
from each for several minutes. This will release any
accumulated hydrogen gas. As the gas is flammable,
do not smoke or use an open flame during this time,
• Do not allow children to play on or in the washer,
Close supervision of children is necessary when the
washer is used near children.
• Before the washer is removed from service or
discarded, remove the lid to prevent children from
climbing inside.
• Do not install or store the washer where it will be
exposed to the weather or freezing temperatures,
• Do not tamper with controls.
• Do not repair or replace any part of the washer or
attempt any servicing other than as described inthis
manual. We strongly recommend that any service be
performed by a qualified individual,
• See Installation Instructions for grounding
requirements.
• ALWAYS follow the fabric care instructions
supplied by the garment manufacturer,
• Do not place items exposed to cooking oil in your
washer, Items contaminated with cooking oils may
contribute to a chemical reaction that could cause a
load to catch fire.
• Use fabric softeners or products to eliminate static
only as recommended by the manufacturer,
• This washer is not designed for maritime use or for
mobile installations such as in RVs, aircraft, etc.
• Turn off the water taps and unplug the washer if the
machine is to be left for an extended period of time,
such as during vacations.
• Packaging material can be dangerous for children.
There is a risk of suffocatio!! Keep all packaging
from children,
• Always check the inside of the washer for foreign
objects before loading laundry, Keep the lid closed
when not in use.
• Do not reach into the washer while parts are moving.
GROUNDING INSTRUCTIONS
This appliance must be grounded. In the event of malfunction or breakdown, grounding will reduce
the risk of electric shock by providing a path of least resistance for electric current. This appliance is
equipped with a cord having an equipment-grounding conductor and grounding plug. The plug must
be plugged into an appropriate outlet that is properly installed and grounded in accordance with all
local codes and ordinances.
4
,WARNING: Improper connection of the equipment-grounding conductor can result in risk
of electric shock. Check with a qualified electrician or serviceman if you are in doubt as to whether the
appliance is properly grounded. Do not modify the plug provided with the appliance. If it does not fit the
outlet, have a proper outlet installed by a qualified electrician. Failure to follow these warnings can cause
serious injury, fire, electrical shock, or death.
IMPORTAT SAFETYiNSTRUcTiONS
RSAD ALL iNSTRUCTiONS BEFORS USE
,WARNING For yo.r safety,the information in this manual must be
followed to minimize the risk of fire or explosion, electric shock, or to prevent
property damage, personal injury, or loss of life.
SAFETY iNSTRUCTiONS FOR iNSTALLATiON
_h=WAR_I!_ I_ll_G ==To reduce the risk of fire, electric shock, or personal injury when using this
appliance, follow basic precautions, including the following.
• Refer to INSTALLATION INSTRUCTIONS for
detailed grounding procedures, installation
instructions are packed in the washer for installer's
reference, if the washer is moved to a new location,
have it checked and reinstalled by a qualified service
person. Failure to follow this warning can cause
serious injury, fire, electrical shock, or death.
• Do not, under any circumstances cut or remove
the third (ground) prong from the power cord.
Failure to follow this warning can cause serious
injury, fire, electrical shock, or death.
• For personal safety, this appliance must be
properly grounded. Failure to follow this warning
can cause serious injury, fire, electrical shock,
or death.
• The power cord of this appliance is equipped
with a 3-prong (grounding) plug which mates
with a standard 3-prong (grounding) wall outlet to
minimize the possibility of electric shock hazard from
this appliance.
• This washer must be plugged into a 120VAC, 60Hz
grounded outlet. Failure to follow this warning can
cause serious injury, fire, electrical shock, or death.
Have the wall outlet and circuit checked by a
qualified electrician to make sure the outlet is
properly grounded. Failure to follow this warning
can cause serious injury, fire, electrical shock,
or death.
Where a standard 2=prong wall outlet is
encountered, it is your personal responsibility
and obligation to have it replaced with a properly
grounded 3-prong wall outlet. Failure to follow
this warning can cause serious injury, fire, electrical
shock, or death.
• Do not install on carpet. Install washer on a solid
floor. Failure to follow this warning can cause serious
leak damage.
Do not remove ground prong. Do not use an
adapter or extension cord. Plug into a grounded
3=prong outlet. Failure to follow these warnings can
cause serious injury, fire, electrical shock, or death.
• The washer should always be plugged into its
own individual electrical outlet which has a
voltage rating that matches the rating plate. This
provides the best performance and also prevents
overloading house wiring circuits which could cause
a fire hazard from overheated wires.
• Never unplug your washer by pulling on the
power cord. Always grip plug firmly and pull straight
out from the outlet. Failure to follow this warning can
cause serious injury, fire, electrical shock, or death.
• Repair or replace immediately all power cords
that have become frayed or otherwise damaged.
Do not use a cord that shows cracks or abrasion
damage along its length or at either end. Failure
to follow this warning can cause serious injury, fire,
electrical shock, or death.
When installing or moving the washer, be careful
not to pinch, crush, or damage the power cord.
Failure to follow this warning can cause serious
injury, fire, electrical shock, or death.
The washer must be installed and electrically
grounded by a qualified service person in
accordance with local codes to prevent shock
hazard and assure stability during operation.
The washer is heavy. Two or more people may
be needed to install and move the appliance.
Failure to do so can result in back or other injury.
Store and install the washer where it will not
be exposed to temperatures below freezing or
exposed to outlid weather conditions. Failure to
follow this warning can cause serious leak damage.
Do not install the washer in humid spaces to
reduce the risk of electric shock. Failure to follow
this warning can cause serious injury, fire, electrical
shock, or death.
To reduce the risk of personal injury, adhere to
all industry recommended safety procedures
including the use of long sleeved gloves and
safety glasses. Failure to follow all of the safety
warnings in this manual could result in property
damage, personal injury or death.
5
IMPORTANTSAFETYINST UcTIONS
RSAD ALL iNSTRUCTiONS BEFORS USE
WARNING For your safety,the information in this manual must be
followed to minimize the risk of fire or explosion, electric shock, or to prevent
property damage, personal injury, or loss of life.
SAFETY iNSTRUCTiONS FOR USE, CARE AND CLEANING, AND DISPOSAL
_ILWAR_!I_ I_ll_G: To reduce the risk of fire, electric shock, or personal injury when using this
appliance, follow basic precautions, including the following.
• Unplug the washer before cleaning to avoid the
risk of electric shock.
• Never use harsh chemicals, abrasive cleaners,
or solvents to clean the washer. They will
damage the finish.
• Do not put oily or greasy rags or clothing on
top of the washer. These substances give off
vapors that could ignite the materials.
• Do not wash items that are soiled with
vegetable or cooking oil. These items may
contain some oil after laundering. Due to the
remaining oil, the fabric may smoke or catch
fire by itself.
• Disconnect this appliance from the
power supply before attempting any user
maintenance. Turning the controls to the OFF
position does not disconnect this appliance
from the power supply. Failure to follow this
warning can cause serious injury,fire, electrical
shock, or death.
• Do not combine laundry products for use in
one load unless specified on the label.
• Do not mix chlorine bleach with ammonia
or acids such as vinegar. Follow package
directions when using laundry products.
Incorrect usage can produce poisonous gas,
resulting in serious injuryor death.
Do not reach into the washer while parts are
moving. Before loading, unloading or adding
items, press the START/PAUSE button and
allow the drum to coast to a complete stop
before reaching inside. Failure to follow this
warning can cause serious injury,fire, electrical
shock, or death.
• Do not allow children to play on or in the
washer. Close supervision of children is
necessary when the washer is used near
children. As children grow, teach them the
proper, safe use of all appliances. Failure to
comply with these warnings could result in serious
personal injuries or death.
• Destroy the carton, plastic bag and other
packing materials after the washer is
unpacked. Children might use them for play.
Cartons covered with rugs, bedspreads, or
plastic sheets can become airtight chambers.
Failure to comply with these warnings could result
in serious personal injuries or death.
• Keep laundry products out of reach of children.
To prevent personal injury, observe all warnings
on product labels. Failure to comply with these
warnings could result in serious personal injuries.
Remove the lid to the washing compartment
before your washer is removed from service or
discarded to avoid the danger of children or small
animals getting trapped inside. Failure
to do so can result in serious personal injury
or death.
SAVE THESE INSTRUCTIONS
6
PARTSA D FEMU ES
SPEciAL FEATURES
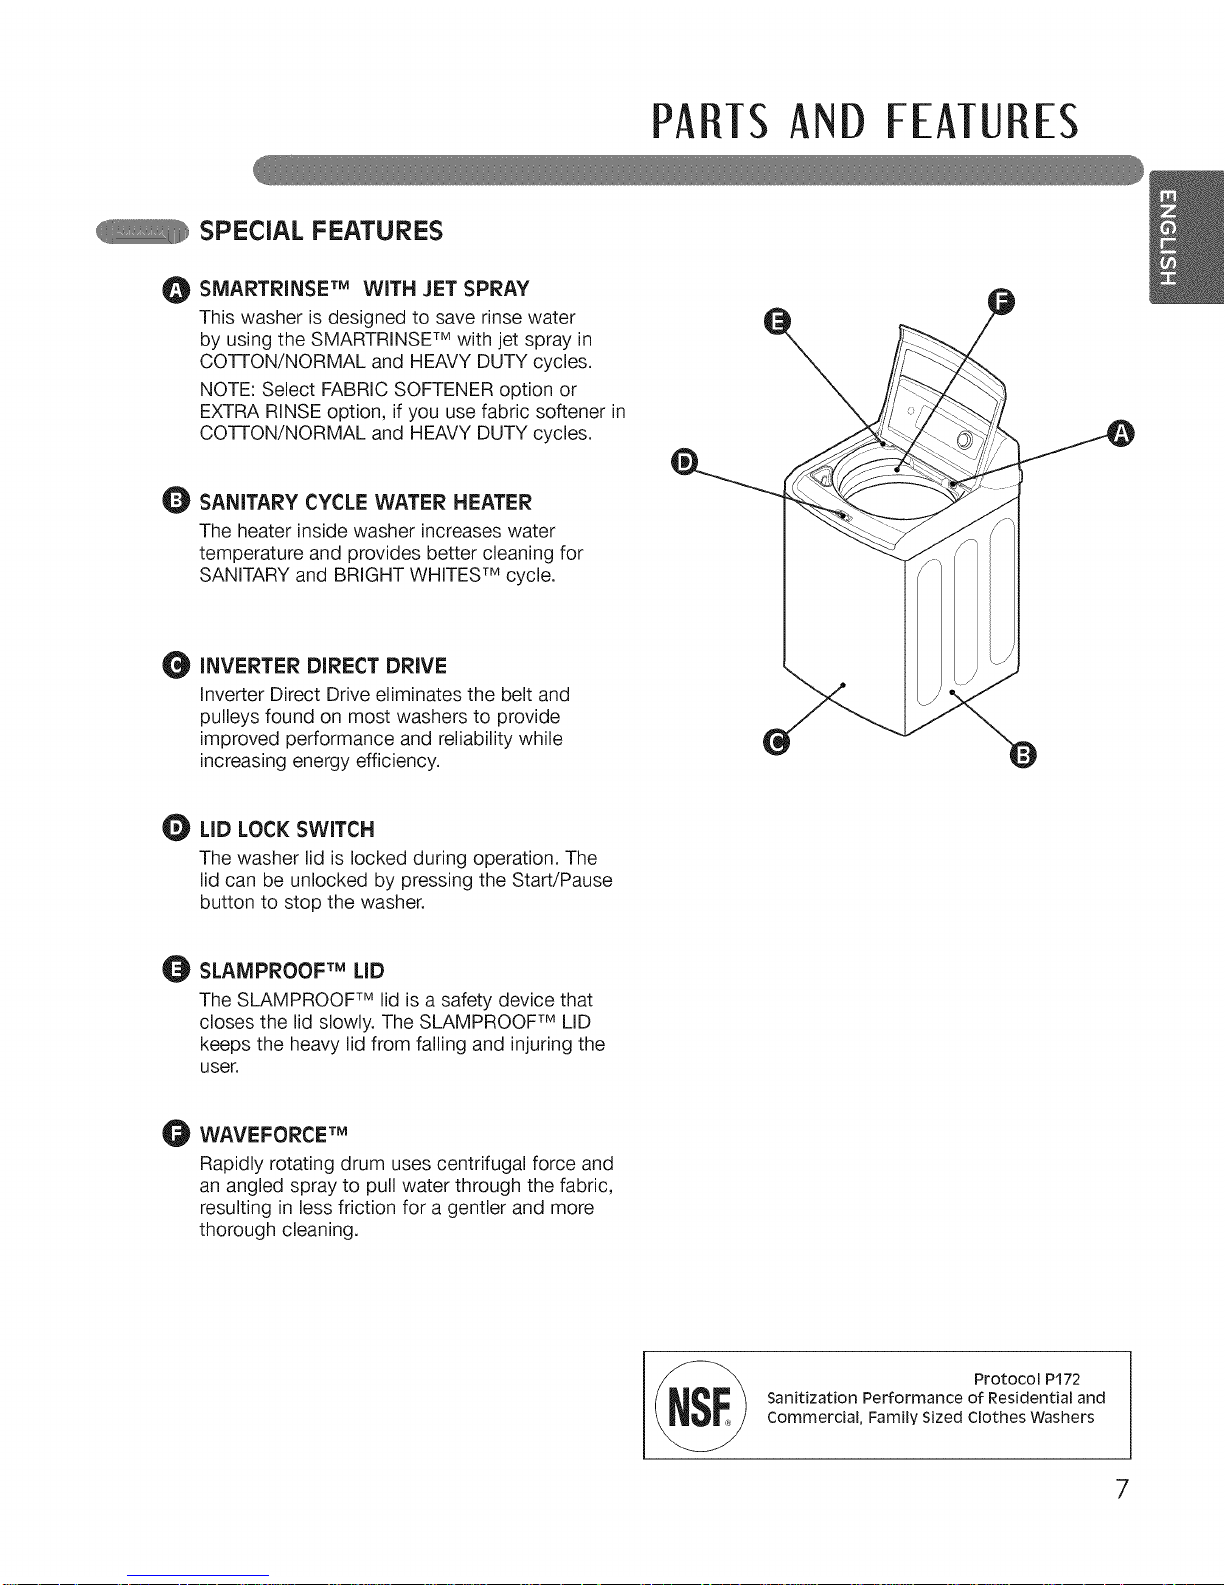
SMARTRINSE TM WITH JET SPRAY
This washer is designed to save rinse water
by using the SMARTRINSF M with jet spray in
Co-IrON/NORMAL and HEAVY DUTY cycles.
NOTE: Select FABRIC SOFTENER option or
EXTRA RINSE option, if you use fabric softener in
Co-IrON/NORMAL and HEAVY DUTY cycles.
_) SANITARY CYCLE WATER HEATER
The heater inside washer increases water
temperature and provides better cleaning for
SANITARY and BRIGHT WHITES TM cycle.
G INVERTER DIRECT DRIVE
Inverter Direct Drive eliminates the belt and
pulleys found on most washers to provide
improved performance and reliability while
increasing energy efficiency.
_) LiD LOCK SWITCH
The washer lid is locked during operation. The
lid can be unlocked by pressing the Start/Pause
button to stop the washer.
_:_ SLAMPROOF TM LID
The SLAMPROOF mlid is a safety device that
closes the lid slowly. The SLAMPROOF MLID
keeps the heavy lid from falling and injuring the
user.
WAVEFORCE TM
Rapidly rotating drum uses centrifugal force and
an angled spray to pull water through the fabric,
resulting in less friction for a gentler and more
thorough cleaning.
Protocol P172
Sanitization Performance of Residential and
Commercial, Family Sized Clothes Washers
7
PA TS AND FEATURES
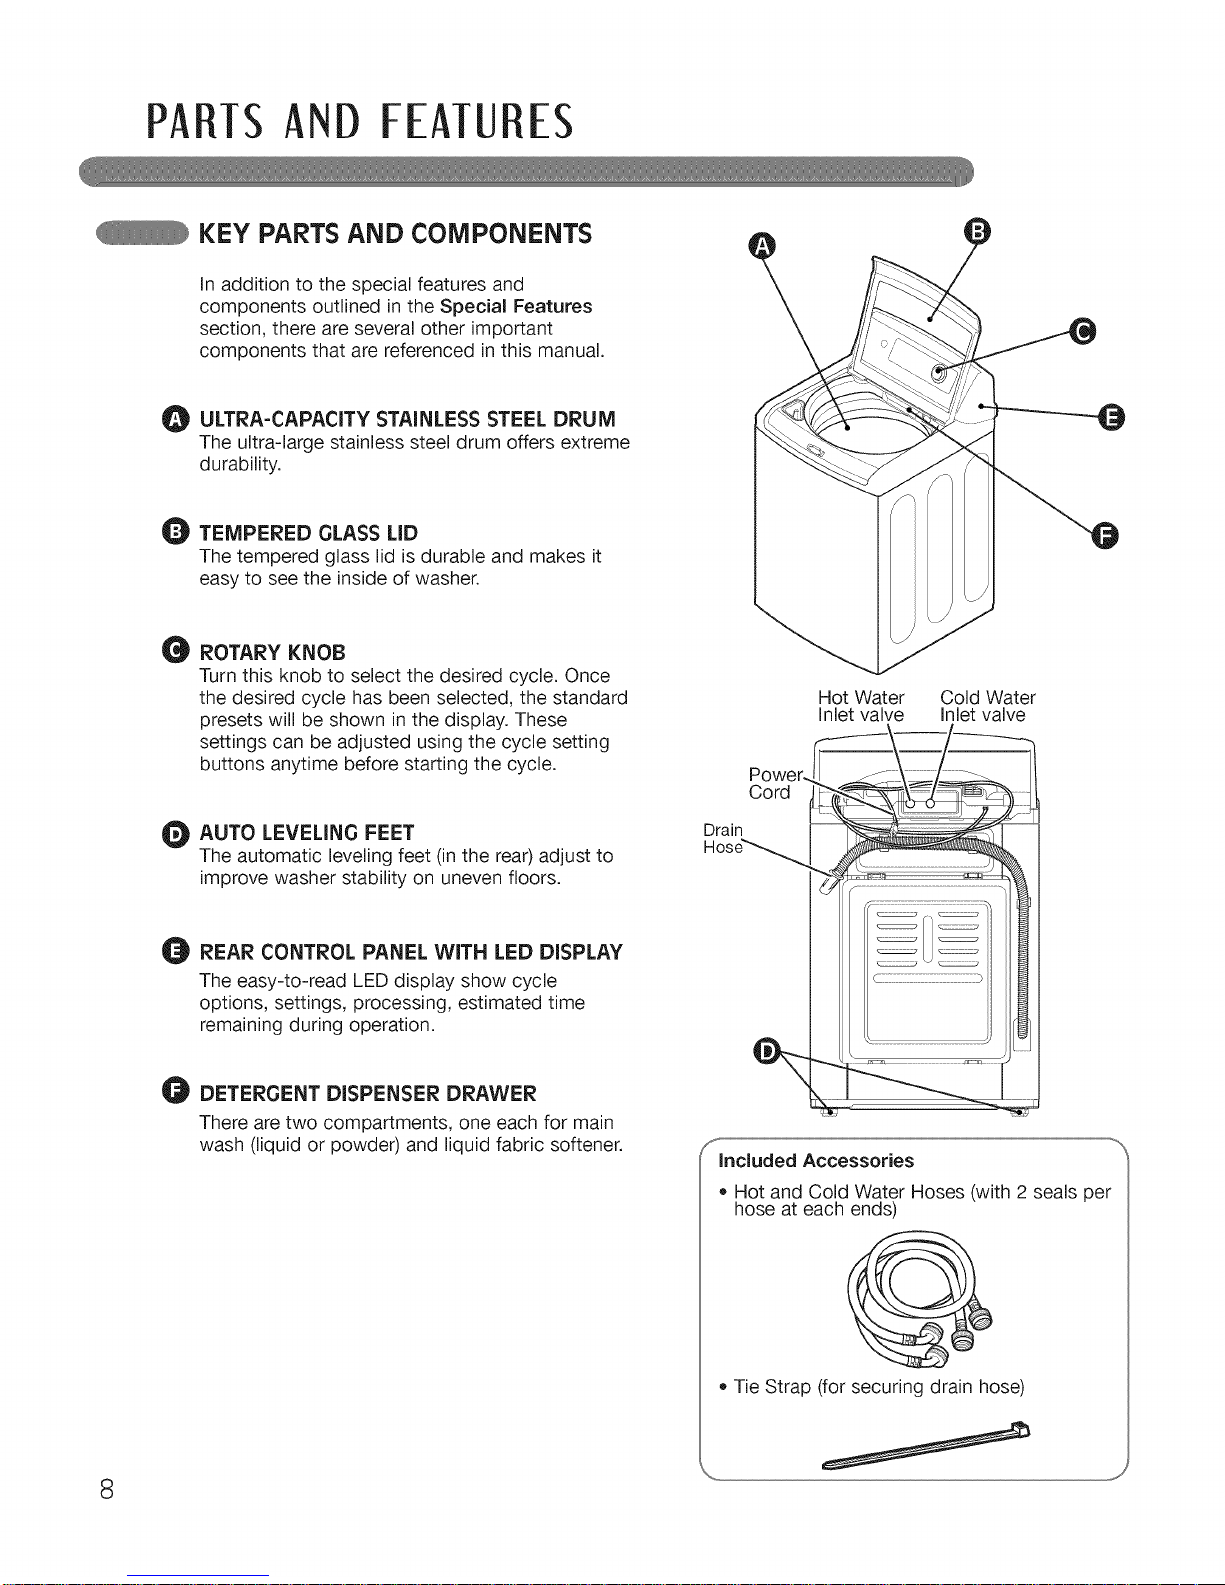
KEY PARTS AND COMPONENTS
In addition to the special features and
components outlined in the Special Features
section, there are several other important
components that are referenced in this manual.
O ULTRA-CAPACITY STAINLESS STEEL
DRUM
The ultra-large stainless steel drum offers extreme
durability.
_) TEMPERED GLASS LID
The tempered glass lid is durable and makes it
easy to see the inside of washer.
8
ROTARY KNOB
Turn this knob to select the desired cycle. Once
the desired cycle has been selected, the standard
presets will be shown in the display. These
settings can be adjusted using the cycle setting
buttons anytime before starting the cycle.
_) AUTO LEVELING FEET
The automatic leveling feet (in the rear) adjust to
improve washer stability on uneven floors.
REAR CONTROL PANEL WITH LED DISPLAY
The easy-to-read LED display show cycle
options, settings, processing, estimated time
remaining during operation.
A
_iP DETERGENT DISPENSER DRAWER
There are two compartments, one each for main
wash (liquid or powder) and liquid fabric softener.
Hot Water Cold Water
Inlet valve Inlet valve
Power.
Cord
Drain
Hose_
included Accessories
• Hot and Cold Water Hoses (with 2 seals per
hose at each ends)
@
• Tie Strap (for securing drain hose)
I STALLATIONINSTRUcTiONS
cHOOSE THE PROPER LOcATiON
WARNING
• The washer is heavy! Two or more people
are required when moving and unpacking
the washer. Failure to do so can result in back
or other injury.
• Store and install the washer where it will not
be exposed to temperatures below freezing
or exposed to outdoor weather conditions.
Failure to follow this warning can cause serious
injury, fire, electrical shock, or death.
• Properly ground washer to conform with all
governing codes and ordinances. Failure to
follow this warning can cause serious injury, fire,
electrical shock, or death.
• To reduce the risk of electric shock, do not
install the washer in humid spaces. Failure to
follow this warning can cause serious injury,fire,
electrical shock, or death.
• The base opening must not be obstructed by
carpeting when the washer is installed on a
carpeted floor.
• Keep the area underneath and around your
appliances free of combustible materials such
as lint, paper, rags, chemicals, etc.
• Do not remove ground prong. Do not use
an adapter or extension cord. Plug into a
grounded 3=prong outlet. Failure to follow this
warning can cause serious injury, fire, electrical
shock, or death.
POWER OUTLET
• The power outlet must be within 60 inches
(1.5 m) of either side of the washer.
• The appliance and outlet must be positioned so
that the plug is easily accessible.
• Do not overload the outlet with more than one
appliance.
• The outlet must be grounded in accordance with
current wiring codes and regulations.
• Time-delay fuse or circuit breaker is recommended.
NOTE: It is the personal responsibility and
obligation of the product owner to have a
proper outlet installed by a qualified electrician.
FLOORING
• To minimize noise and vibration, the washer
MUST be installed on a solidly constructed floor.
• Allowable slope under the entire washer is
1° maximum.
• Carpeting and soft tile surfaces are not
recommended.
• Never install the washer on a platform or weakly
supported structure.
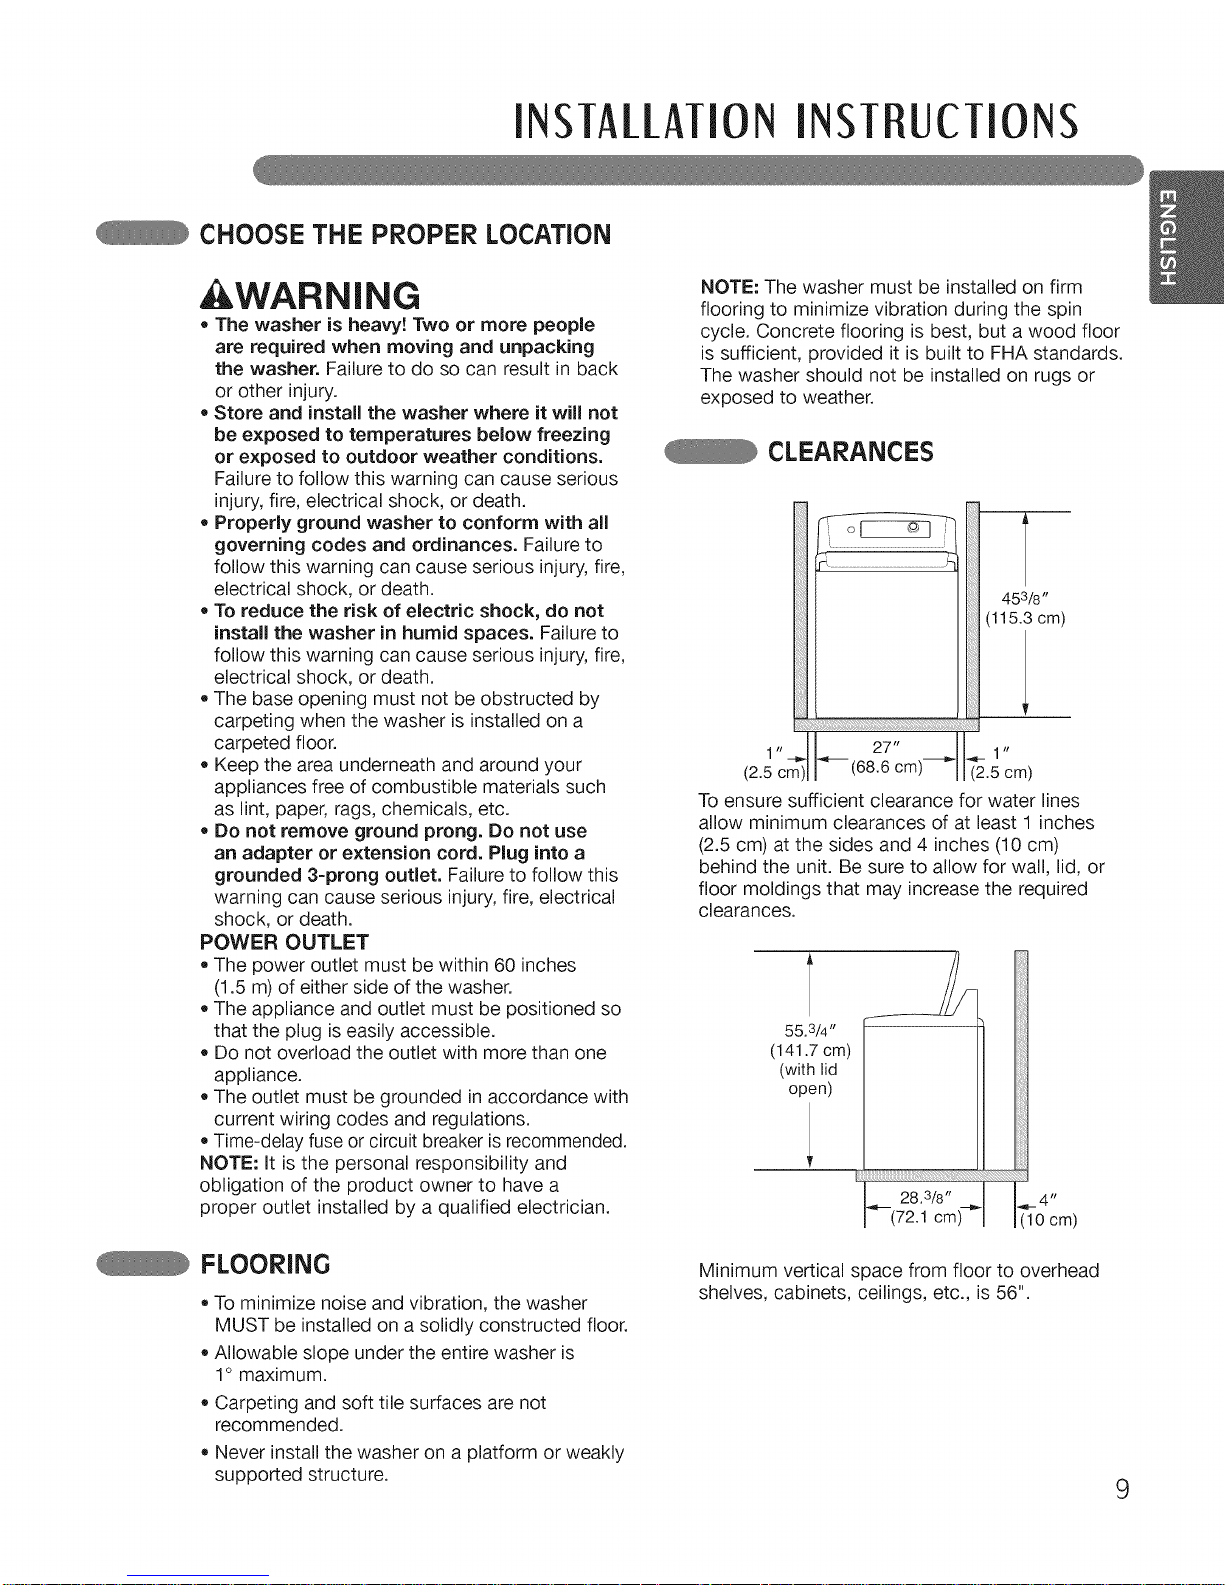
NOTE: The washer must be installed on firm
flooring to minimize vibration during the spin
cycle. Concrete flooring is best, but a wood floor
is sufficient, provided it is built to FHA standards.
The washer should not be installed on rugs or
exposed to weather.
CLEARANCES
453/8 -
(115.3cm)
ilii_
(2.5 cm)
To ensure sufficient clearance for water lines
allow minimum clearances of at least 1 inches
(2.5 cm) at the sides and 4 inches (10 cm)
behind the unit. Be sure to allow for wall, lid, or
floor moldings that may increase the required
clearances.
T
55.3/4"
(141.7 cm)
(with lid
open)
_-- 28 3/8"
(72.1 cm)--_l
(10 cm)
Minimum vertical space from floor to overhead
shelves, cabinets, ceilings, etc., is 56".
9
INSTALLATIONINSTRUCTIONS
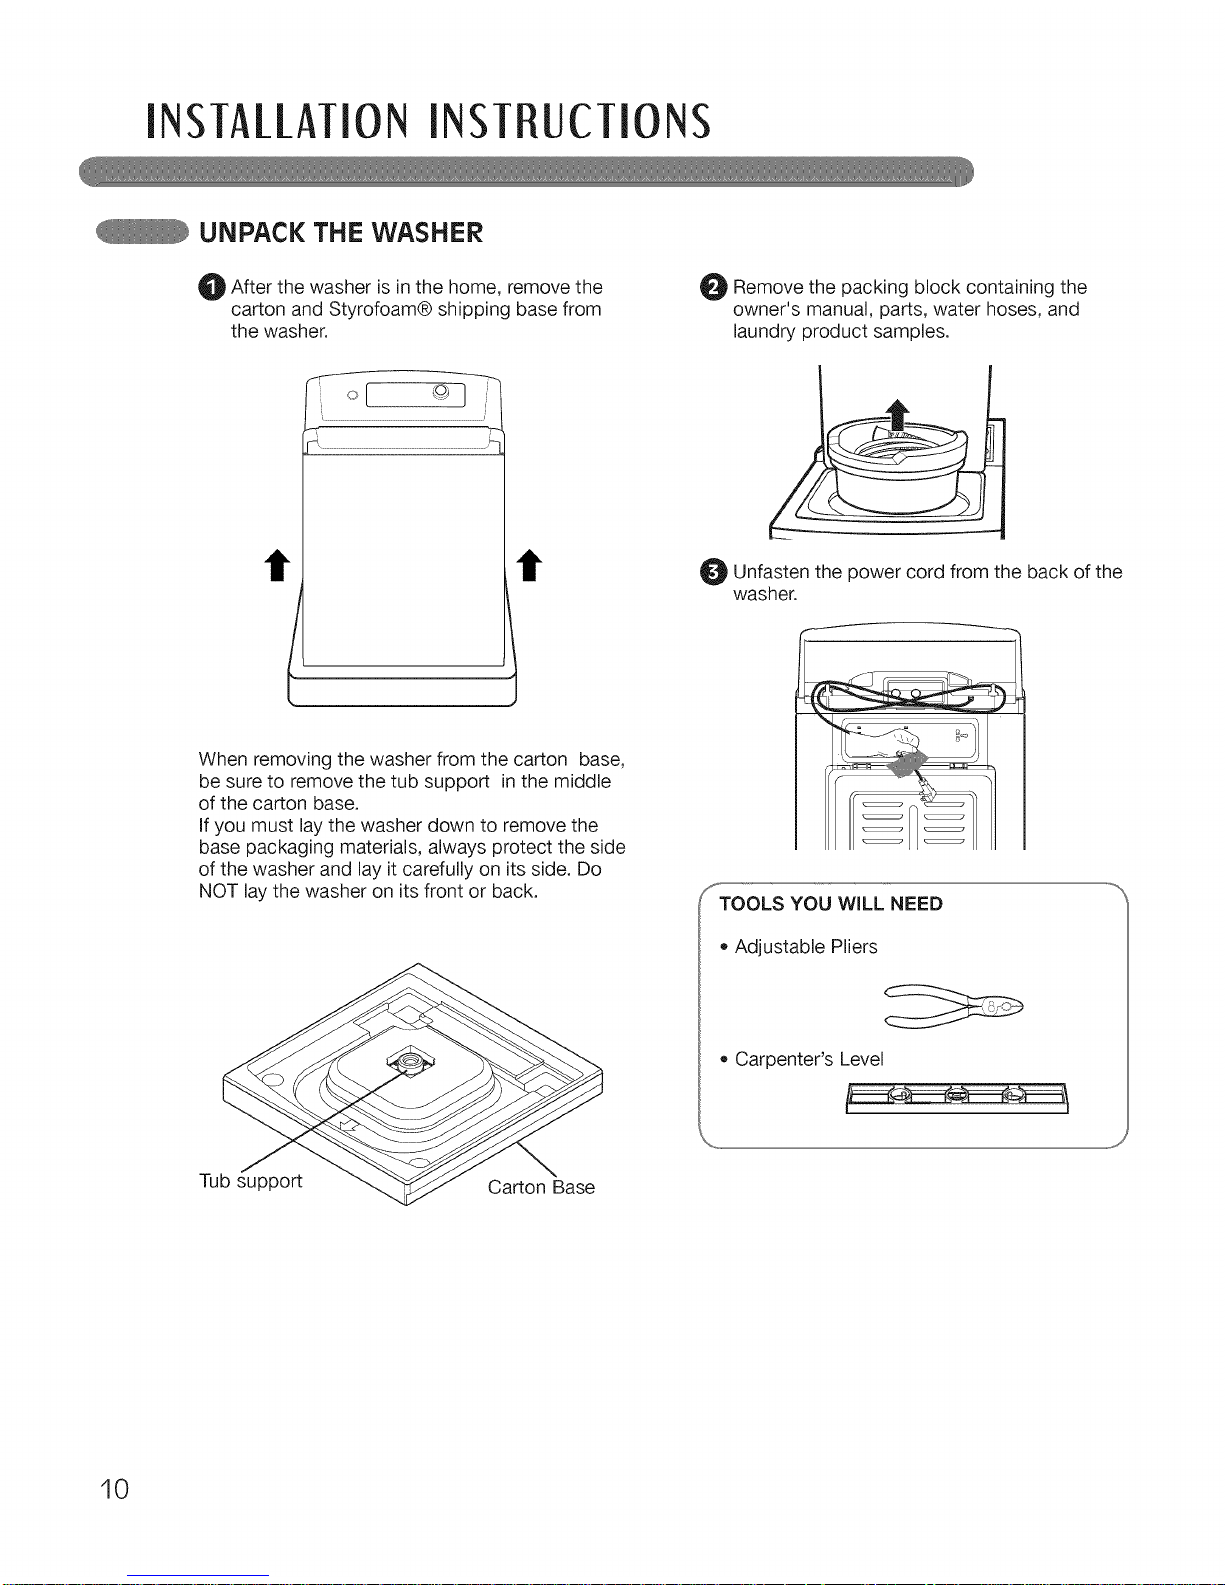
UNPACK THE WASHER
t_ After the washer is in the home, remove the
carton and Styrofoam® shipping base from
the washer.
O Remove the packing block containing the
owner's manual, parts, water hoses, and
laundry product samples.
J
t t
When removing the washer from the carton base,
be sure to remove the tub support in the middle
of the carton base.
If you must lay the washer down to remove the
base packaging materials, always protect the side
of the washer and lay it carefully on its side. Do
NOT lay the washer on its front or back.
Tub support Carton Base
_t Unfasten the cord from the back of thepower
washer.
TOOLS YOU WiLL NEED
• Adjustable Pliers
• Carpenter's Level
10
I STALLATIONINSTRUcTiONS
CONNEcTiNG THE WATER LINES
• IMPORTANT: Use new hoses when installing
the washer. Do NOT reuse old hoses.
• IMPORTANT: Use ONLY the inlet hoses
provided by LG with this laundry product.
Aftermarket hoses are not guaranteed to fit or
function correctly. Other hoses may not tighten
correctly and could cause leaks. Subsequent
damage to product or property will not be
covered under the terms of LG's warranty.
• Water supply pressure must be between 14.5
PSi and 116 PSi (100-800 kPa). If the water
supply pressure is more than 116 PSI,
a pressure reducing valve must be installed.
• Periodically check the hose for cracks, leaks,
and wear, and replace the hose every 5 years.
• Make sure that the water lines are not stretched,
pinched, crushed, or kinked.
• The washer should never be installed or stored
in a location subject to freezing temperatures.
Damage to the water lines and internal
mechanisms of the washer can result. If the
washer was exposed to freezing temperatures
prior to installation, allow it to stand at room
temperature for several hours before use.
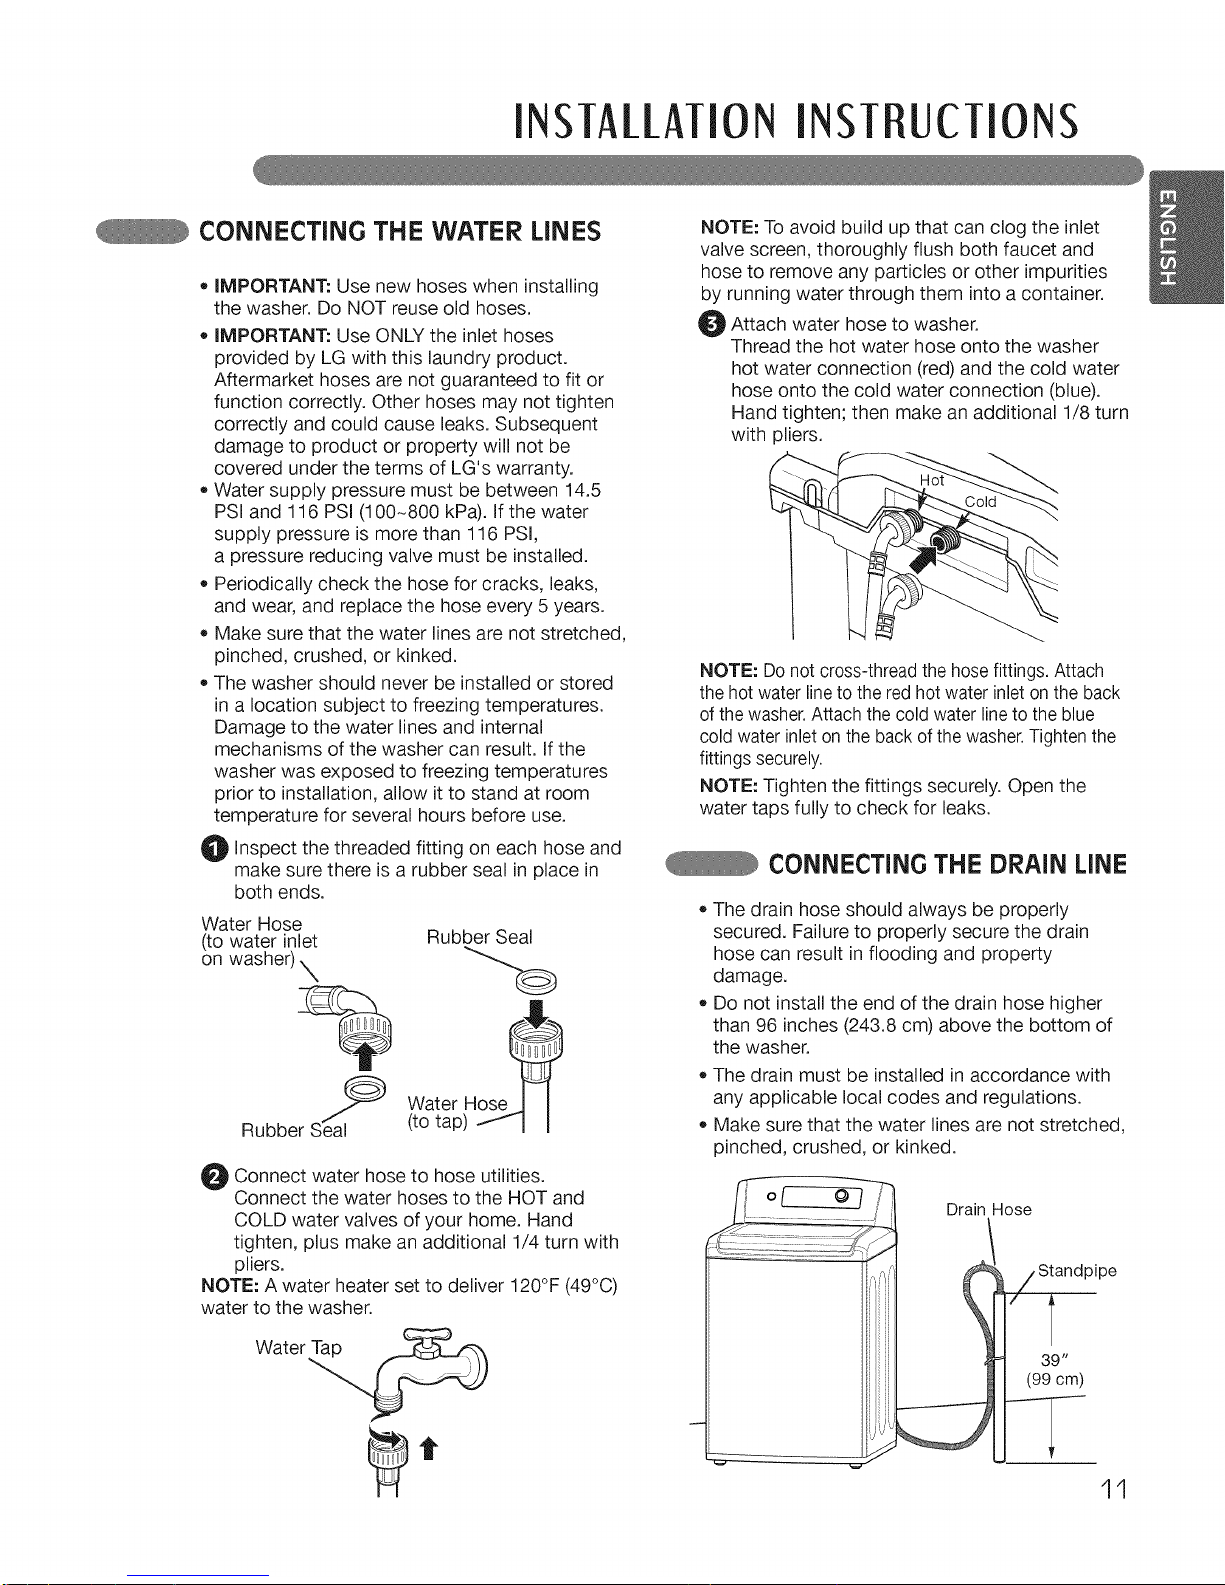
O Inspect the threaded each hose and
fitting on
make sure there is a rubber seal in place in
both ends.
Water Hose
(to water inlet
on washer)
%
Rubber S_
Rubber Seal
Water H__
(to tap) /I I
O Connect water hose to hose utilities.
Connect the water hoses to the HOT and
COLD water valves of your home. Hand
tighten, plus make an additional 1/4 turn with
pliers.
NOTE: A water heater set to deliver 120°F (49°C)
water to the washer.
Water_
NOTE: To avoid build up that can clog the inlet
valve screen, thoroughly flush both faucet and
hose to remove any particles or other impurities
by running water through them into a container.
O Attach water hose to washer.
Thread the hot water hose onto the washer
hot water connection (red) and the cold water
hose onto the cold water connection (blue).
Hand tighten; then make an additional 1/8 turn
with pliers.
NOTE: Do not cross-thread the hose fittings. Attach
the hot water line to the red hot water inlet on the back
of the washer.Attach the cold water line to the blue
cold water inlet on the back of the washer.Tighten the
fittings securely.
NOTE: Tighten the fittings securely. Open the
water taps fully to check for leaks.
CONNECTINGTHE DRAIN LINE
• The drain hose should always be properly
secured. Failure to properly secure the drain
hose can result in flooding and property
damage.
• Do not install the end of the drain hose higher
than 96 inches (243.8 cm) above the bottom of
the washer.
• The drain must be installed in accordance with
any applicable local codes and regulations.
• Make sure that the water lines are not stretched,
pinched, crushed, or kinked.
Drain Hose
,j
39"
(99 cm)
_e
11

INSTALLATIONINSTRUCTIONS
CONNECTINGTHE DRAIN LiNE (cont.)
Firmly insert the free end of the drain hose
into the drain opening of your home. Make sure
the soft rubber end is completely inside the drain
opening.
* Ifthe water valves and drain are built into the
wall, fasten the drain hose to one of the water
hoses with the cable tie (ribbed side on inside).
If your drain is a standpipe, fasten the drain hose
to the standpipe with the cable tie provided.
NOTE:
Total height of the hose end should be approxi-
mately 35 - 47" (0.9 - 1.2 m) from the floor.
The drain hose should be inserted no more
than 8-12 inches into the standpipe.
Raise Lower
Adjust the 2 front leveling feet. Turn clockwise
to raise the washer or counterclockwise to
lower it.
(99cm)
Cable Tie
i.
39"
(99cm)
Cable Tie
LEVELING THE WASHER
The washer spins at very high speeds, up to
1,100 RPM.
NOTE: Adjust the leveling feet only as far as
necessary to level the washer. Extending the
leveling feet more than necessary can cause
the washer to vibrate.
All four leveling feet must rest solidly on the
floor. Rock the washer gently from corner to
corner to make sure that the washer does
not rock.
NOTE: Before installing the washer, make sure
the floor is clean, dry and free of dust, dirt, water
and oils so the washer feet can not slide easily.
Leveling feet that can move or side on the floor
can contribute to excess vibration and noise due
to poor contact with the floor.
O Position the washer in the final location,
taking special care to not pinch, strain, or
crush the water and drain lines. Place a level
across the top of the washer.
O To make sure that the washer is properly
level, open the lid and look from above to see
if it is same as shown above. If you have a
level, check your washer with the level.
To check if the washer is level side to side,
close the lid and place a level at the back of
the lid.
To check if the washer is level front to back,
place a level at the side of the washer on
the edge where the cabinet side meets the
top cover, to side
front to back
Lower Raise
I
If the washer is not level, adjust the front leveling
feet. Turn clockwise to raise, counterclockwise to
lower.
CONNECTTOTHEPOWERSUPPLY
The washer should be plugged
into a 120V AC, 60Hz grounded
3-prong outlet.
Plug in the washer.
12
OW TO USE
CONTROL PANEL FEATURES
LG owo
NVE_TER
Direct Drive
@
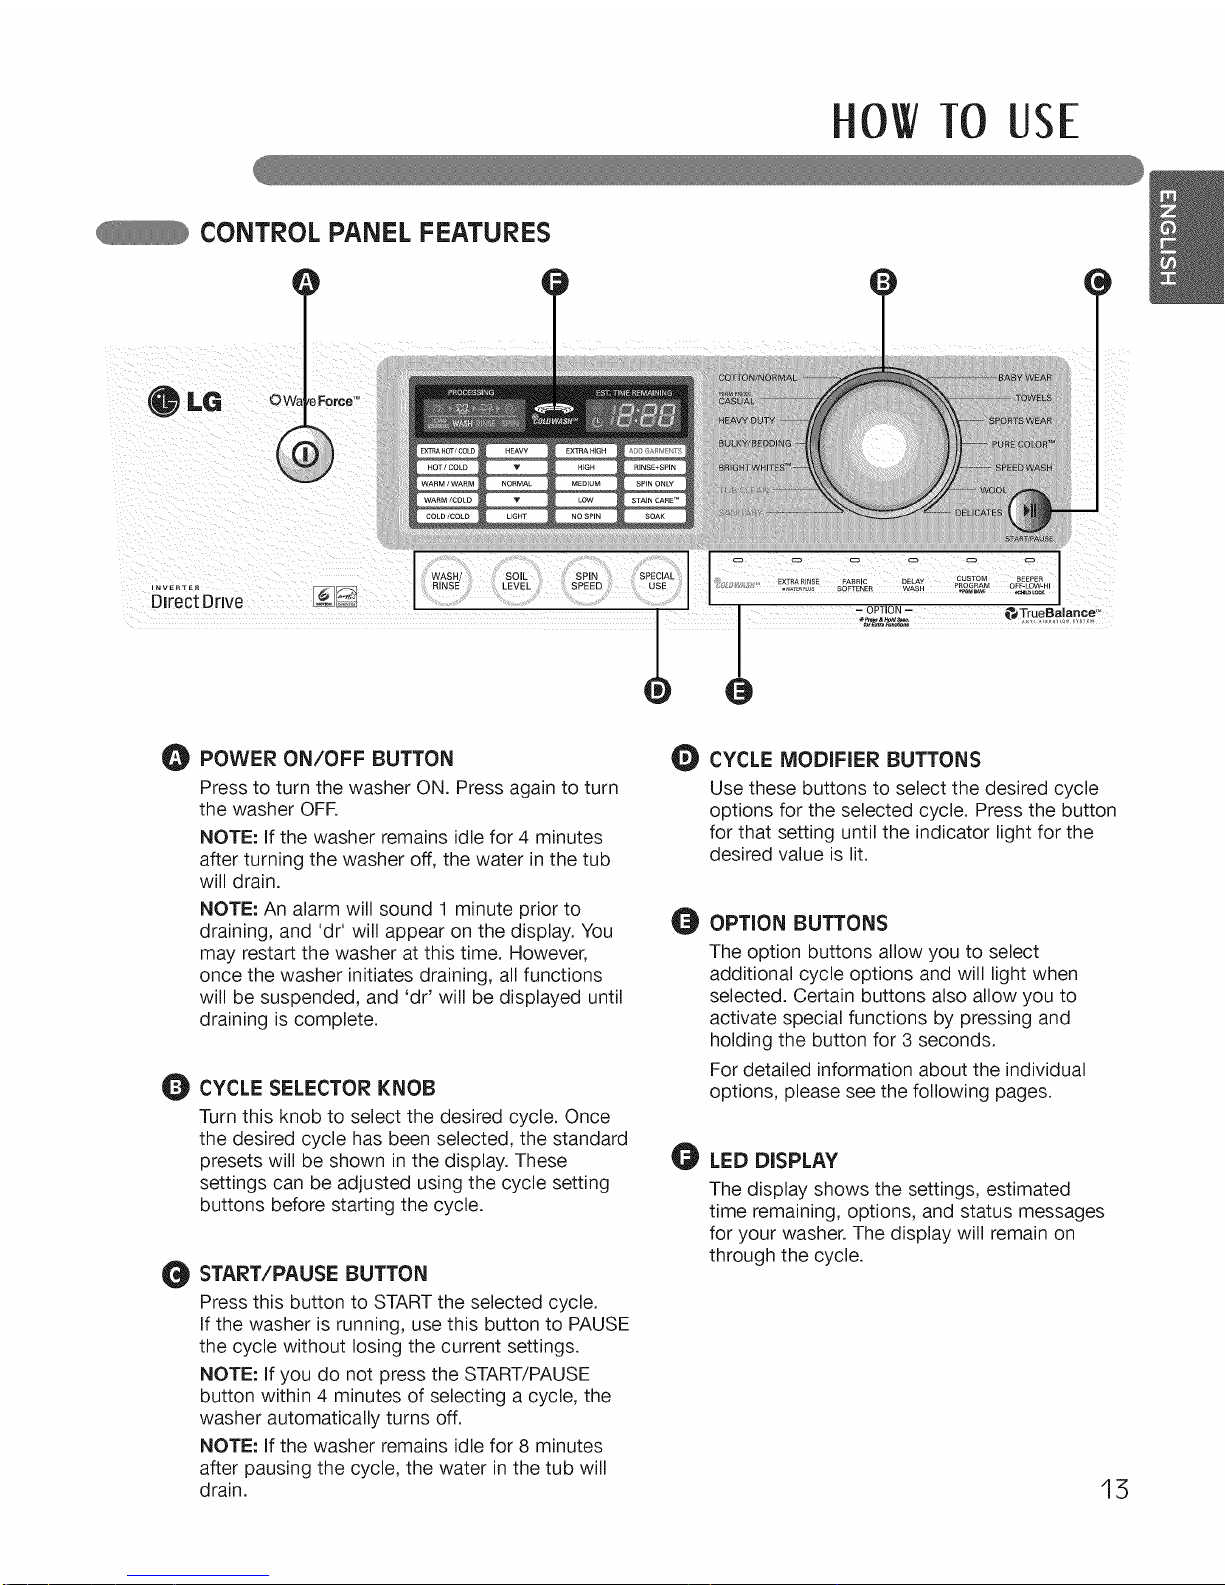
POWER ON/OFF BUTTON
Press to turn the washer ON. Press again to turn
the washer OFR
NOTE: If the washer remains idle for 4 minutes
after turning the washer off, the water in the tub
will drain.
NOTE: An alarm will sound 1 minute prior to
draining, and 'dr' will appear on the display. You
may restart the washer at this time. However,
once the washer initiates draining, all functions
will be suspended, and 'dr' will be displayed until
draining is complete.
CYCLE SELECTOR KNOB
Turn this knob to select the desired cycle. Once
the desired cycle has been selected, the standard
presets will be shown in the display. These
settings can be adjusted using the cycle setting
buttons before starting the cycle.
e
START/PAUSE BUTTON
Press this button to START the selected cycle.
If the washer is running, use this button to PAUSE
the cycle without losing the current settings.
NOTE: If you do not press the START/PAUSE
button within 4 minutes of selecting a cycle, the
washer automatically turns off.
NOTE: If the washer remains idle for 8 minutes
after pausing the cycle, the water in the tub will
drain.
_) CYCLE MODIFIER BUTTONS
Use these buttons to select the desired cycle
options for the selected cycle. Press the button
for that setting until the indicator light for the
desired value is lit.
O OPTION BUTTONS
The option buttons allow you to select
additional cycle options and will light when
selected. Certain buttons also allow you to
activate special functions by pressing and
holding the button for 3 seconds.
For detailed information about the individual
options, please see the following pages.
LED DISPLAY
The display shows the settings, estimated
time remaining, options, and status messages
for your washer. The display will remain on
through the cycle.
15
0 TO USE
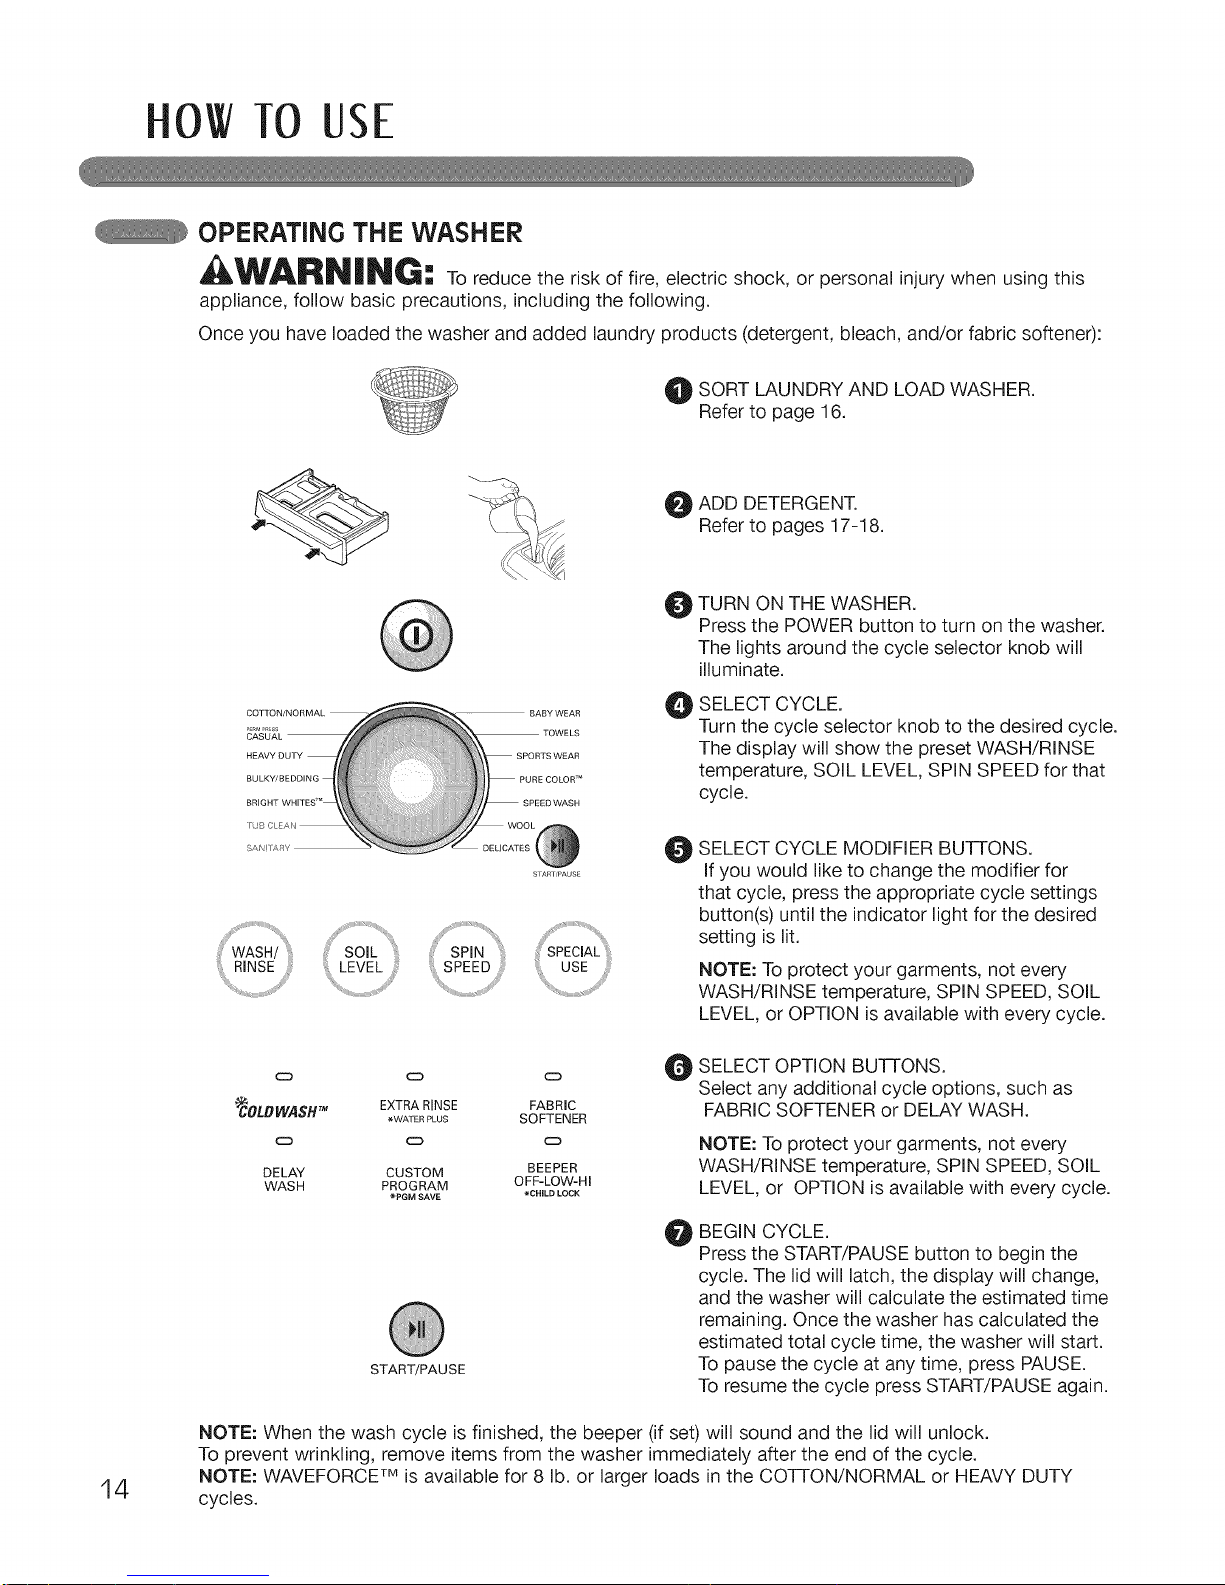
OPERATING THE WASHER
AWARN|NG: To reduce the risk of fire, electric shock, or personal injury when using this
appliance, follow basic precautions, including the following.
Once you have loaded the washer and added laundry products (detergent, bleach, and/or fabric softener):
O SORT LAUNDRY AND LOAD WASHER.
Refer to page 16.
14
O ADD DETERGENT.
Refer to pages 17-18.
O
O
O
TURN ON THE WASHER.
Press the POWER button to turn on the washer.
The lights around the cycle selector knob will
illuminate.
SELECT CYCLE.
Turn the cycle selector knob to the desired cycle.
The display will show the preset WASH/RINSE
temperature, SOIL LEVEL, SPIN SPEED for that
cycle.
SELECT CYCLE MODIFIER BU-FFONS.
If you would like to change the modifier for
that cycle, press the appropriate cycle settings
button(s) until the indicator light for the desired
setting is lit.
NOTE: To protect your garments, not every
WASH/RINSE temperature, SPIN SPEED, SOIL
LEVEL, or OPTION is available with every cycle.
CD
_OLBWASH TM
C_
DE LAY
WASH
CD
EXTRA RINSE
_WATERPLUS
C3
CUSTOM
PROGRAM
"_PGM SAV£
START/PAUSE
c:3
FABRIC
SOFTENER
BEEPER
OFF-LOW-HI
'_CHILD LOCK
0
0
SELECT OPTION BU-FFONS.
Select any additional cycle options, such as
FABRIC SOFTENER or DELAY WASH.
NOTE: To protect your garments, not every
WASH/RINSE temperature, SPIN SPEED, SOIL
LEVEL, or OPTION is available with every cycle.
BEGIN CYCLE.
Press the START/PAUSE button to begin the
cycle. The lid will latch, the display will change,
and the washer will calculate the estimated time
remaining. Once the washer has calculated the
estimated total cycle time, the washer will start.
To pause the cycle at any time, press PAUSE.
To resume the cycle press START/PAUSE again.
NOTE: When the wash cycle is finished, the beeper (if set) will sound and the lid will unlock.
To prevent wrinkling, remove items from the washer immediately after the end of the cycle.
NOTE: WAVEFORCE TM is available for 8 lb. or larger loads in the CO-N-ON/NORMAL or HEAVY DUTY
cycles.
OW TO USE
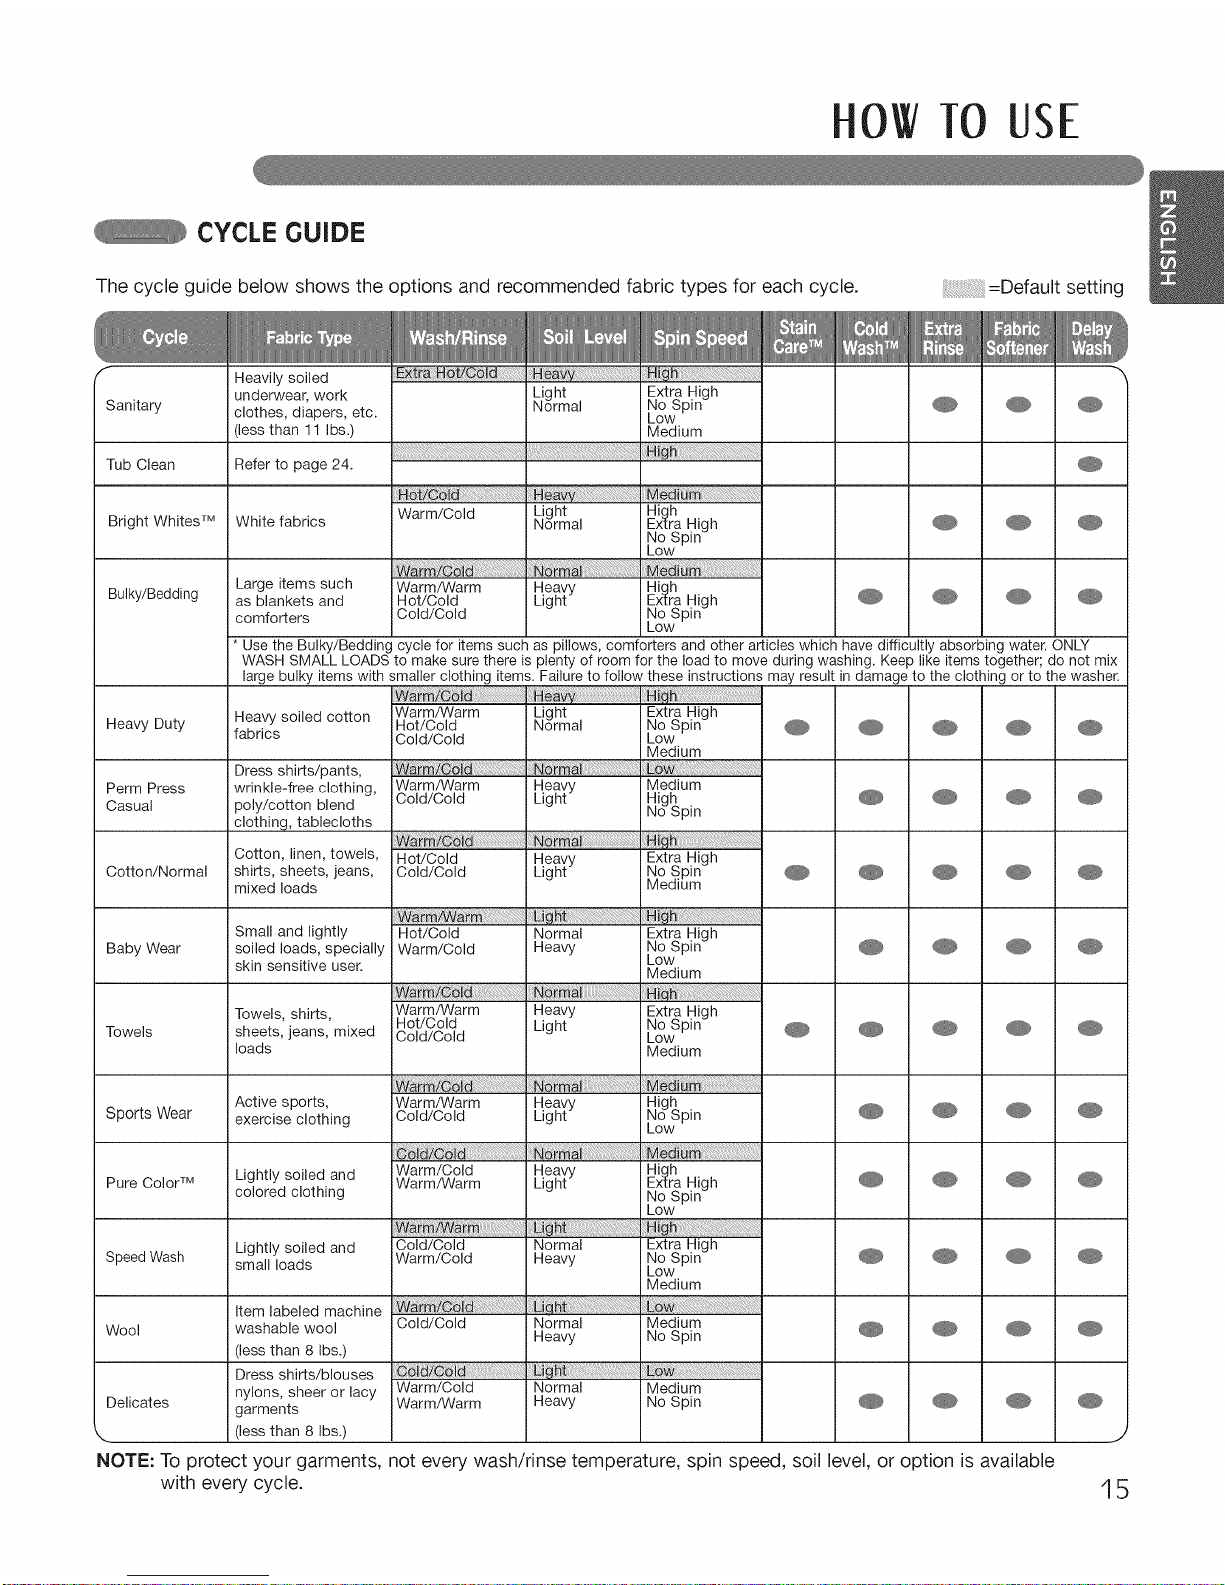
CYCLE GUIDE
The cycle guide below shows the options and recommended fabric types for each cycle.
;;;=Default setting
,Heavily soiled
iunderwear, work Light Extra High
Sanitary iclothes, diapers, etc. Normal No Spin
Low
Medium
i(less than 11 Ibs.)
Tub Clean Refer to page 24.
HSt/
Bright Whites TM White fabrics Warm/Cold Light High
Normal Extra .High
No Sp_n
Low
Bulky/Bedding
Large items such Warm/Warm Heavy High
as blankets and Hot/Cold Light Extra .High _ _ _
No
comforters Cold/Cold LowSpm
* Use the Bulky/Bedding cycle for items such as pillows, comforters and other articles which have difficultly absorbing water. ONLY
WASH SMALL LOADS to make sure there is plenty of room for the load to move during washing. Keep like items together; do not mix
large bulky items with smaller clothing items. Failure to follow these instructions may result in damage to the clothing or to the washer.
Heavy soiled cotton
Heavy Duty ifabrics
Dress shirts/pants,
Perm Press wrinkle-free clothing,
Casual poly/cotton blend
iclothing, tablecloths
iCotton, linen, towels,
Cotton/Normal i shirts, sheets, jeans,
mixed loads
Small and lightly
Baby Wear soiled loads, specially
skin sensitive user.
iTowels, shirts,
Towels sheets, jeans, mixed
loads
iActive sports,
Sports Wear exercise clothing
Pure Color TM Lightly soiled and
colored clothing
Lightly soiled and
Speed Wash small loads
Item labeled machine
Wool washable wool
(less than 8 Ibs.)
Dress shirts/blouses
Delicates nylons, sheer or lacy
garments
k.. (less than 8 Ibs.)
NOTE: To protect your garments,
with every cycle.
Warm/Warm
Hot/Cold
Cold/Cold
Warm/Warm
Cold/Cold
Light
Normal
Heavy
Light
Hot/Cold
Cold/Cold
fW
Hot/Cold
Warm/Cold
Warm/Warm
Hot/Cold
Cold/Cold
Warm/Warm
Cold/Cold
!i;_;_i!_i_i!_!_i!i!_!_i_i_i_i_i_!i!_i!ii_ii!i!!i!i_!i!!i!i!!i!!i!_i!!i_i!!i!_!i_i_ii_i!_!!!!_!_!!_!!_!!_!!_!!!!_!i_i_ii_ii_!i!!i_iTMi
Warm/Cold
Warm/Warm
Wa:_
Cold/Cold
Warm/Cold
Cold/Cold
Warm/Cold
Warm/Warm
Heavy
Light
Normal
Heavy
Heavy
Light
:i
Heavy
Light
i_i_i!_!ii_!_i_i_!iiiii_!_!i_!i_i_i!_i!!i_ii!ii!i!!_!!i!_i!!i!_!!i!!!i!ii!i!_i!_:!:!!i!i_!i_!i_!i_!i!i_!i_i!_i:ii_ii_i_!_!i_!_!_i!_i_!
Heavy
Light
Normal
Heavy
Normal
Heavy
Normal
Heavy
Extra .High
No
howSPIn _ _ _ _
Medium
Medium
High _ _ _
No Spin
Extra High
No Spin _ _ _ _
Medium
Extra .High
No
ho,^SpIn_ _ _ _
Medium
Extra .High
No
Lowspin _ _ _ _
Medium
High
No Spin _ _ _
Low
High
Extra .High _ _ _
No
LowSpin
Extra .High
No @ _ _
Lowspin
Medium
Medium
No Spin _ _ _
Lo
Medium
No Spin _ _
not every wash/rinse temperature, spin speed, soil level, or option is available
15
0 TO USE
SORTING WASH LOADS
CAUTION:
• Do not load items over the tub.
Failure to follow this caution can result in leakage or fabrics damage.
• Use the BULKY/BEDDING cycle for buoyant or nonabsorbent items such as pillow or comforter.
Failure to follow this caution can result in leakage.
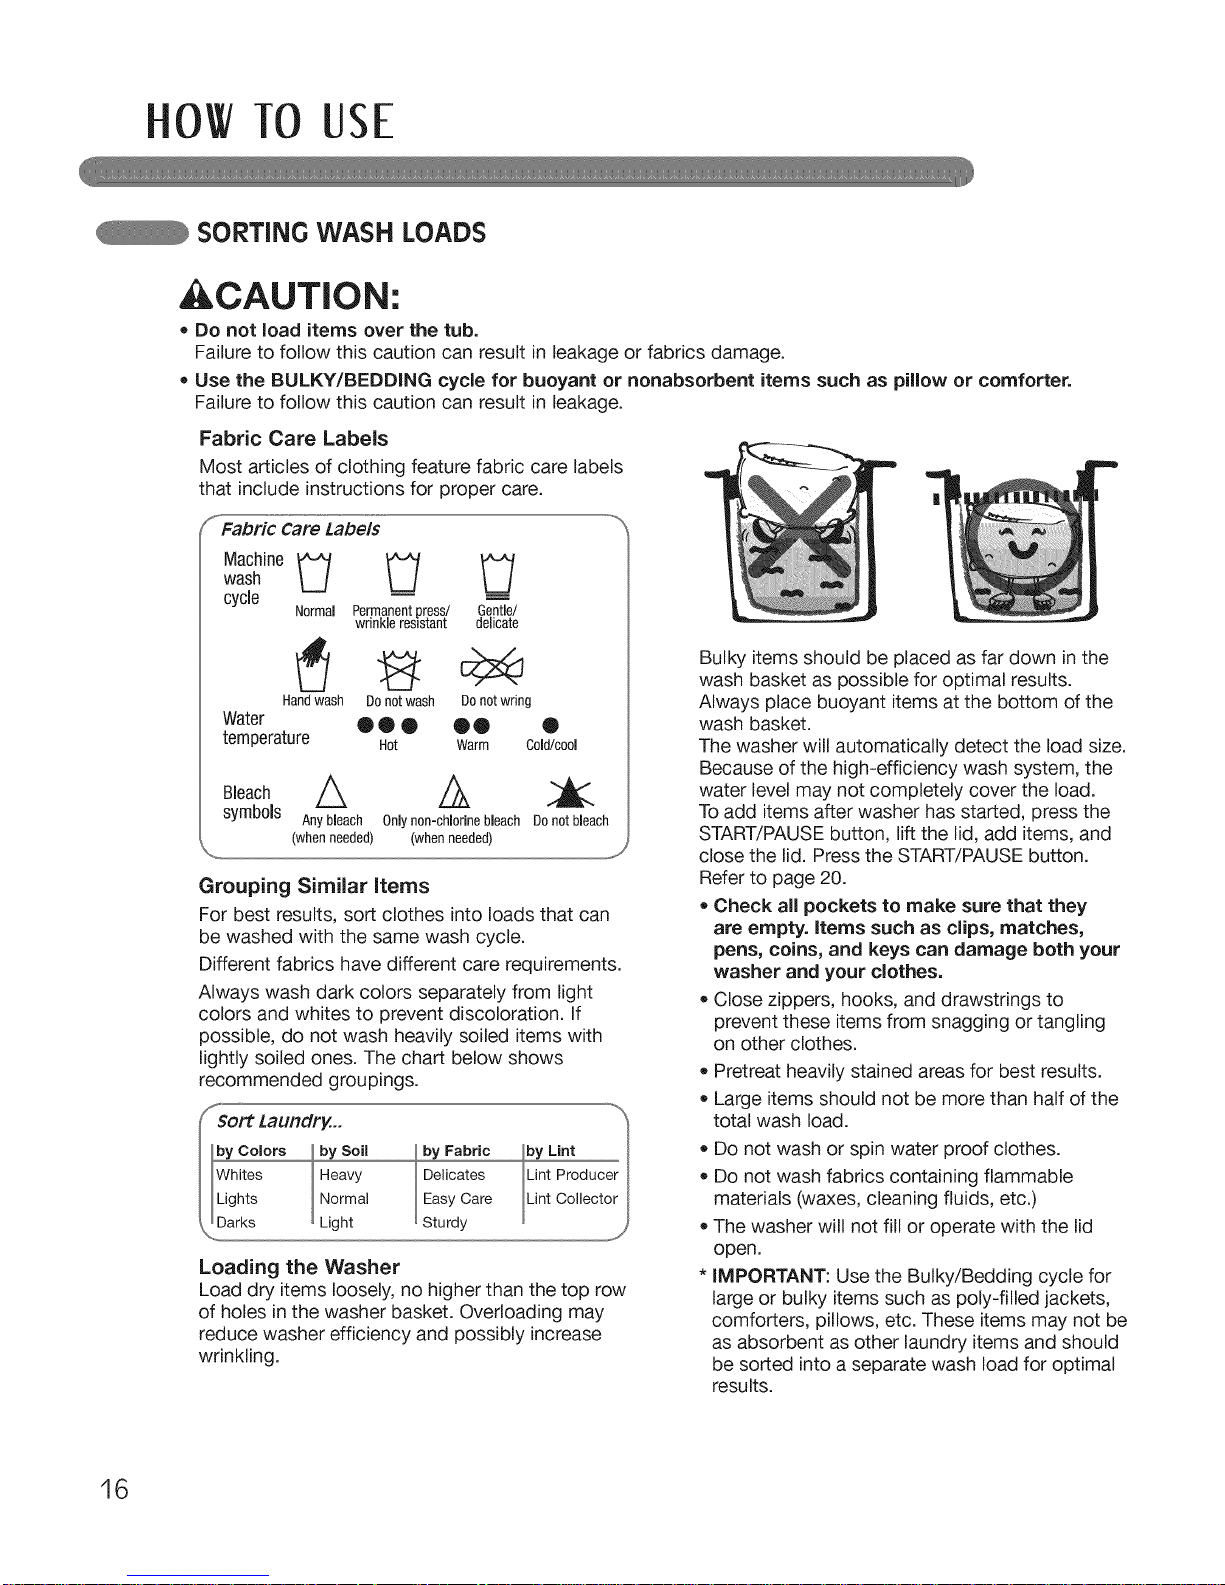
Fabric Care Labels
Most articles of clothing feature fabric care labels
that include instructions for proper care.
Fabric Care Labels
ach,0o Ci C!
wash
cycle m ___
Normal Permanentpress./ Gentle/
wrinkle resBtam delicate
Handwash Donotwash Donot wring
Water Q • • • • •
temperature Hot Warm Cold/cool
A
symbols Anybleach Onlynon-chlorinebleach Donotbleach
(whenneeded) (when needed)
Grouping Similar Items
For best results, sort clothes into loads that can
be washed with the same wash cycle.
Different fabrics have different care requirements.
Always wash dark colors separately from light
colors and whites to prevent discoloration. If
possible, do not wash heavily soiled items with
lightly soiled ones. The chart below shows
recommended groupings.
by Fabric
Deiicates
Easy Care
Sturdy
Loading the Washer
Load dry items loosely, no higher than the top row
of holes in the washer basket. Overloading may
reduce washer efficiency and possibly increase
wrinkling.
Bulky items should be placed as far down in the
wash basket as possible for optimal results.
Always place buoyant items at the bottom of the
wash basket.
The washer will automatically detect the load size.
Because of the high-efficiency wash system, the
water level may not completely cover the load.
To add items after washer has started, press the
START/PAUSE button, lift the lid, add items, and
close the lid. Press the START/PAUSE button.
Refer to page 20.
• check all pockets to make sure that they
are empty, items such as clips, matches,
pens, coins, and keys can damage both your
washer and your clothes.
• Close zippers, hooks, and drawstrings to
prevent these items from snagging or tangling
on other clothes.
• Pretreat heavily stained areas for best results.
• Large items should not be more than half of the
total wash load.
• Do not wash or spin water proof clothes.
• Do not wash fabrics containing flammable
materials (waxes, cleaning fluids, etc.)
• The washer will not fill or operate with the lid
open.
• IMPORTANT: Use the Bulky/Bedding cycle for
large or bulky items such as poly-filled jackets,
comforters, pillows, etc. These items may not be
as absorbent as other laundry items and should
be sorted into a separate wash load for optimal
results.
16
OW TO USE
SELECTING DETERGENT
IMPORTANT: Your washing machine is
designed for use with only High-Efficiency (HE)
detergents, which contain suds-reducing agents.
Always look for the HE symbol when purchasing
detergent.
HE detergents produce fewer suds, dissolve
more efficiently to improve washing and rinsing
performance, and help to keep the interior of your
washer clean.
Using a regular detergent may cause over sudsing
and unsatisfactory performance and could damage
the machine or cause expensive maintenance
issues.
IMPORTANT: Do not place or store laundry
products, such as detergent, bleach, or liquid
fabric softener, on top of your washer or dryer.
Wipe up any spills immediately. These products
can damage the finish and controls.
Designed especially to use only
HE (High-Efficiency) detergent
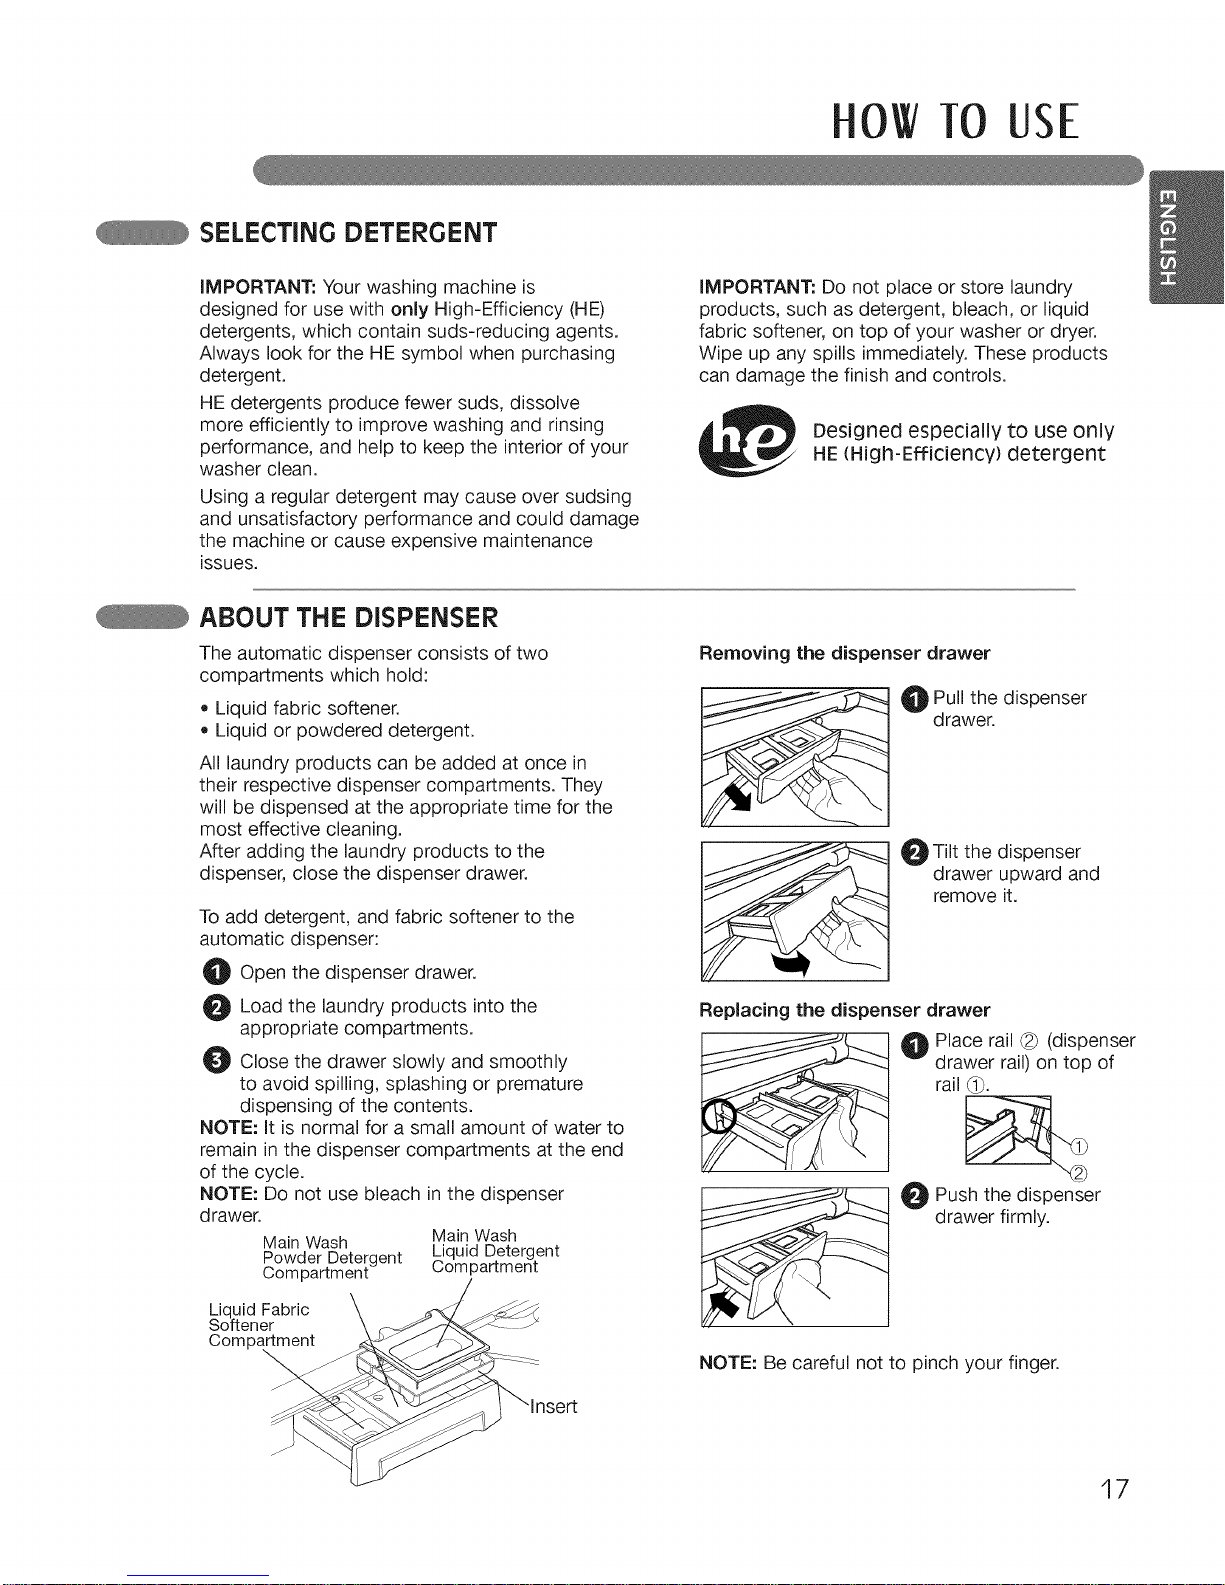
ABOUT THE DISPENSER
The automatic dispenser consists of two
compartments which hold:
• Liquid fabric softener.
Liquid or powdered detergent.
All laundry products can be added at once in
their respective dispenser compartments. They
will be dispensed at the appropriate time for the
most effective cleaning.
After adding the laundry products to the
dispenser, close the dispenser drawer.
To add detergent, and fabric softener to the
automatic dispenser:
O Open the dispenser drawer.
O Load the products into the
laundry
appropriate compartments.
Close the drawer slowly and smoothly
to avoid spilling, splashing or premature
dispensing of the contents.
NOTE: It is normal for a small amount of water to
remain in the dispenser compartments at the end
of the cycle.
NOTE: Do not use bleach in the dispenser
drawer.
Main Wash Main Wash
Powder Detergent Liquid Detergent
Compartment Compartment
Liquid Fabric
Softener
Compartment
Removing the dispenser drawer
O Pull the dispenser
d rawer.
O Tilt the dispenser
drawer upward and
remove it.
Replacing the dispenser drawer
Place rail _) (dispenser
drawer rail) on top of
rail _.
Push the
dispenser
drawer firmly.
NOTE: Be careful not to pinch your finger.
17

0 TO USE
18
LOADING THE DISPENSER
Using the Liquid Bleach Dispenser
The bleach dispenser
automatically dilutes
and dispenses liquid
chlorine bleach at the
proper time in the
wash cycle.
O Check clothing care labels for special
instructions.
O Measure liquid bleach carefully, following
instructions on the bottle.
• Never pour undiluted liquid chlorine bleach
directly onto clothes or into the wash basket.
Do not pour powdered bleach into bleach
dispenser. Do not place load items on top
of the bleach dispenser when loading and
unloading the washer.
Avoid overfilling or splashing when adding
bleach to the dispenser. The maximum
capacity of the bleach dispenser is one cup of
bleach per wash cycle. Overfilling could result
in premature dispensing of bleach.
O Before starting washer, pour a pre-
the
measured amount of bleach directly into
bleach dispenser. If you prefer to use
powdered bleach, add it into the wash basket
directly before adding clothes.
NOTE: Please flush the bleach dispenser with
water after bleach use and then rinse out the
residue by use of Rinse & Spin cycle.
,WAF!INING: Do.OTmixchlorine
bleach with ammonia or acids, such as vinegar or
rust / scale remover.
Mixing chemicals like these can produce gas
which may cause death.
Put the manufacturer's recommended amount of
undiluted liquid chlorine bleach into the bleach
dispenser. During the final portion of the wash
cycle, two sequential flushes of the dispenser put
all the bleach into the wash load and completely
flush the dispenser to eliminate the carryover of
bleach to a subsequent load. Any liquid remaining
in the bleach dispenser at the end of the cycle is
water, not bleach.
To prevent unintentional self-siphoning of the
bleach, never fill the dispenser higher than the
maximum fill level marked on the dispenser.
When adding bleach to the dispenser, be careful
to avoid spilling it into the laundry load or leaving
droplets of bleach around the dispenser. These
things will damage your laundry items.
Main Wash Detergent Compartment
This compartment holds laundry detergent
for the main wash cycle, which is added to
the load at the beginning of the cycle. Always
use HE (High-Efficiency) detergent with your
washing machine.
Never exceed the detergent manufacturer's
recommendations when adding detergent.
Using too much detergent can result in
detergent buildup in clothing and the washer.
Either powdered or liquid detergent may be used.
When using liquid detergent, make sure the
liquid detergent cup and insert are in place.
Do not exceed the maximum fill line.
When using powdered detergent, remove
the insert and liquid detergent cup from the
compartment. Powdered detergent will not
dispense with the liquid detergent cup and
insert in place.
Softener
Main Wasl_
Detergent
Fabric Softener Compartment
This compartment holds liquid fabric softener,
which will be automatically dispensed during the
final rinse cycle.
Always follow the detergent manufacturer's
recommendations when adding fabric softener.
Do not exceed the maximum fill line. Using
too much fabric softener may result in stained
clothes.
Dilute concentrated fabric softeners with warm
water. Do not exceed the maximum fill line.
Never pour fabric softener directly onto the load
or into the drum.
OW TO USE
THE LED DISPLAY
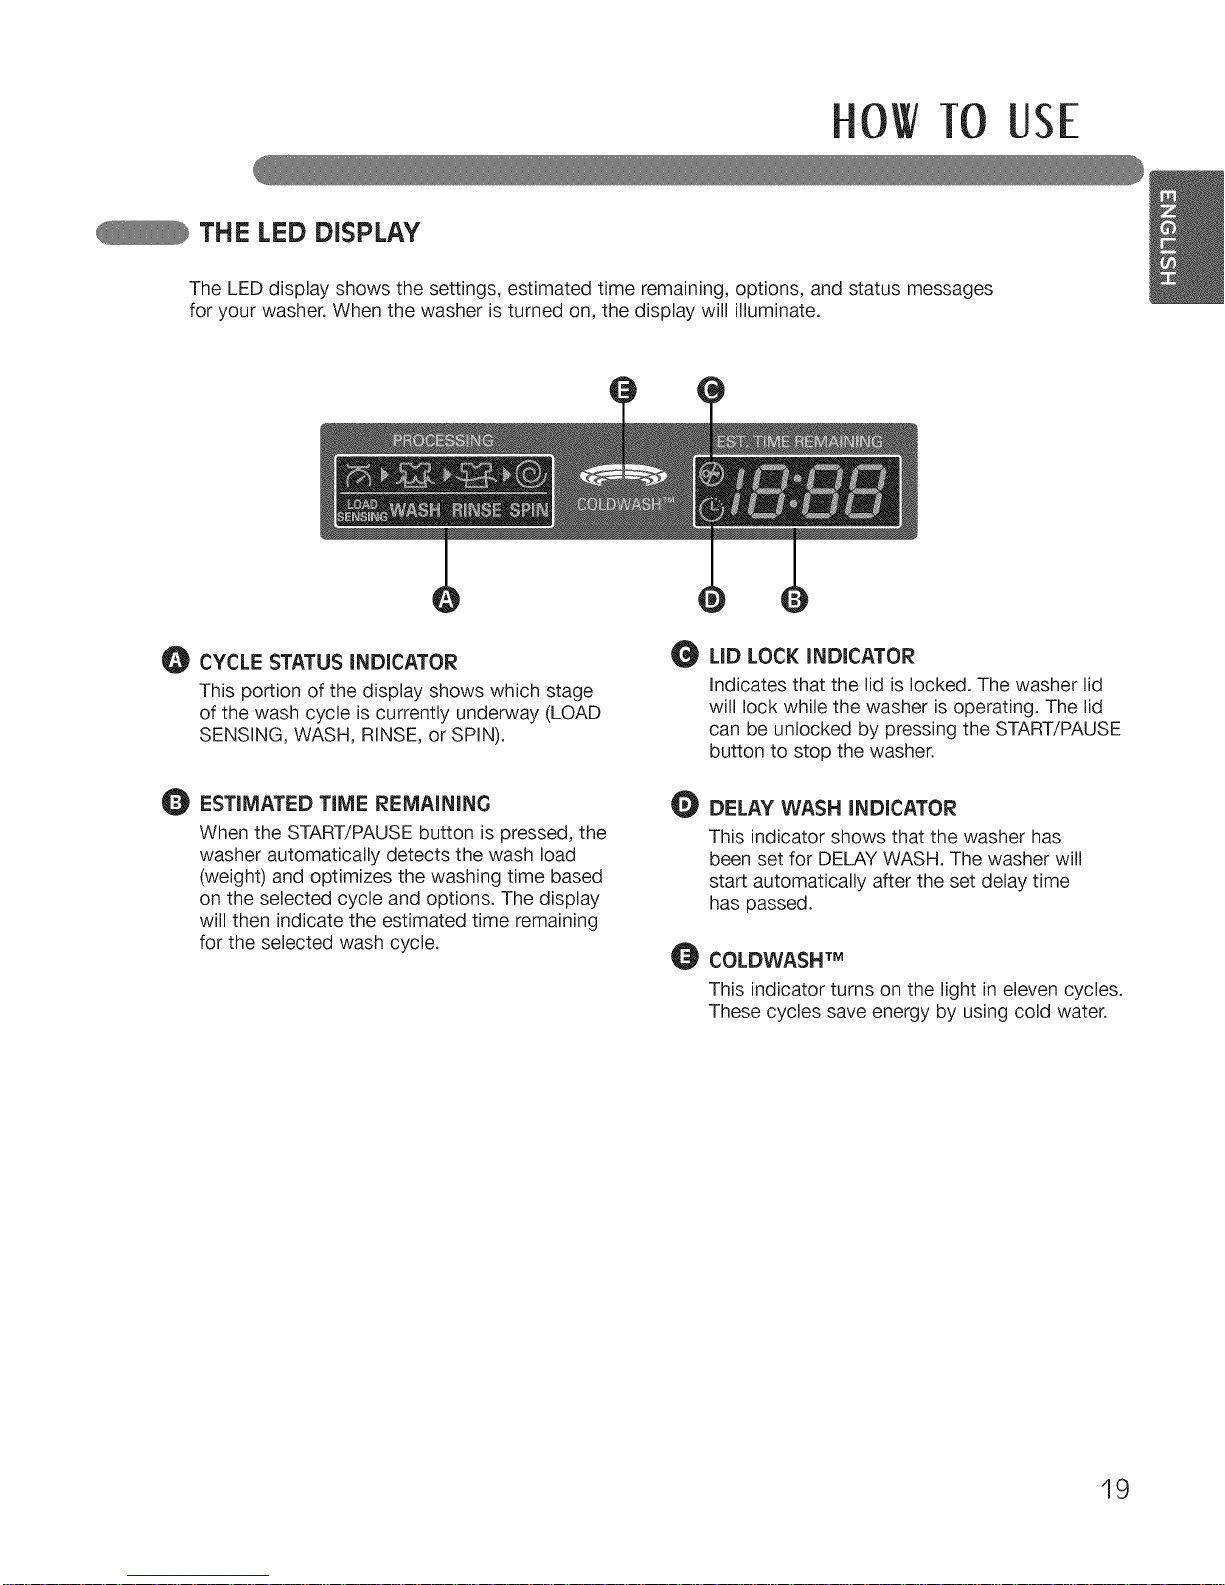
The LED display shows the settings, estimated time remaining, options, and status messages
for your washer. When the washer is turned on, the display will illuminate.
CYCLE STATUS INDICATOR
This portion of the display shows which stage
of the wash cycle is currently underway (LOAD
SENSING, WASH, RINSE, or SPIN).
O ESTIMATED TIME REMAINING
When the START/PAUSE button is pressed, the
washer automatically detects the wash load
(weight) and optimizes the washing time based
on the selected cycle and options. The display
will then indicate the estimated time remaining
for the selected wash cycle.
G
O
O
LiD LOCK iNDICATOR
indicates that the lid is locked. The washer lid
will lock while the washer is operating. The lid
can be unlocked by pressing the START/PAUSE
button to stop the washer.
DELAY WASH INDICATOR
This indicator shows that the washer has
been set for DELAY WASH. The washer will
start automatically after the set delay time
has passed.
COLDWASH TM
This indicator turns on the light in eleven cycles.
These cycles save energy by using cold water.
19
0 TO USE
CYCLE MODiFiER BUTTONS
Each cycle has preset settings that are selected
automatically. You may also customize the
settings using the cycle setting buttons.
Press the button for that setting until the indicator
light for the desired value is lit.
The washer automatically adjusts the water level
for the type and size of wash load for best results
and maximum efficiency. It may seem there is no
water inside the tub in some cycles, but this is
normal.
NOTE." To protect your garments, not every
wash/rinse temperature, spin speed, soil level, or
option is available with every cycle. A beeper will
sound and the LED will not light if a selection is
not allowed. See the Cycle Guide on page 15 for
details.
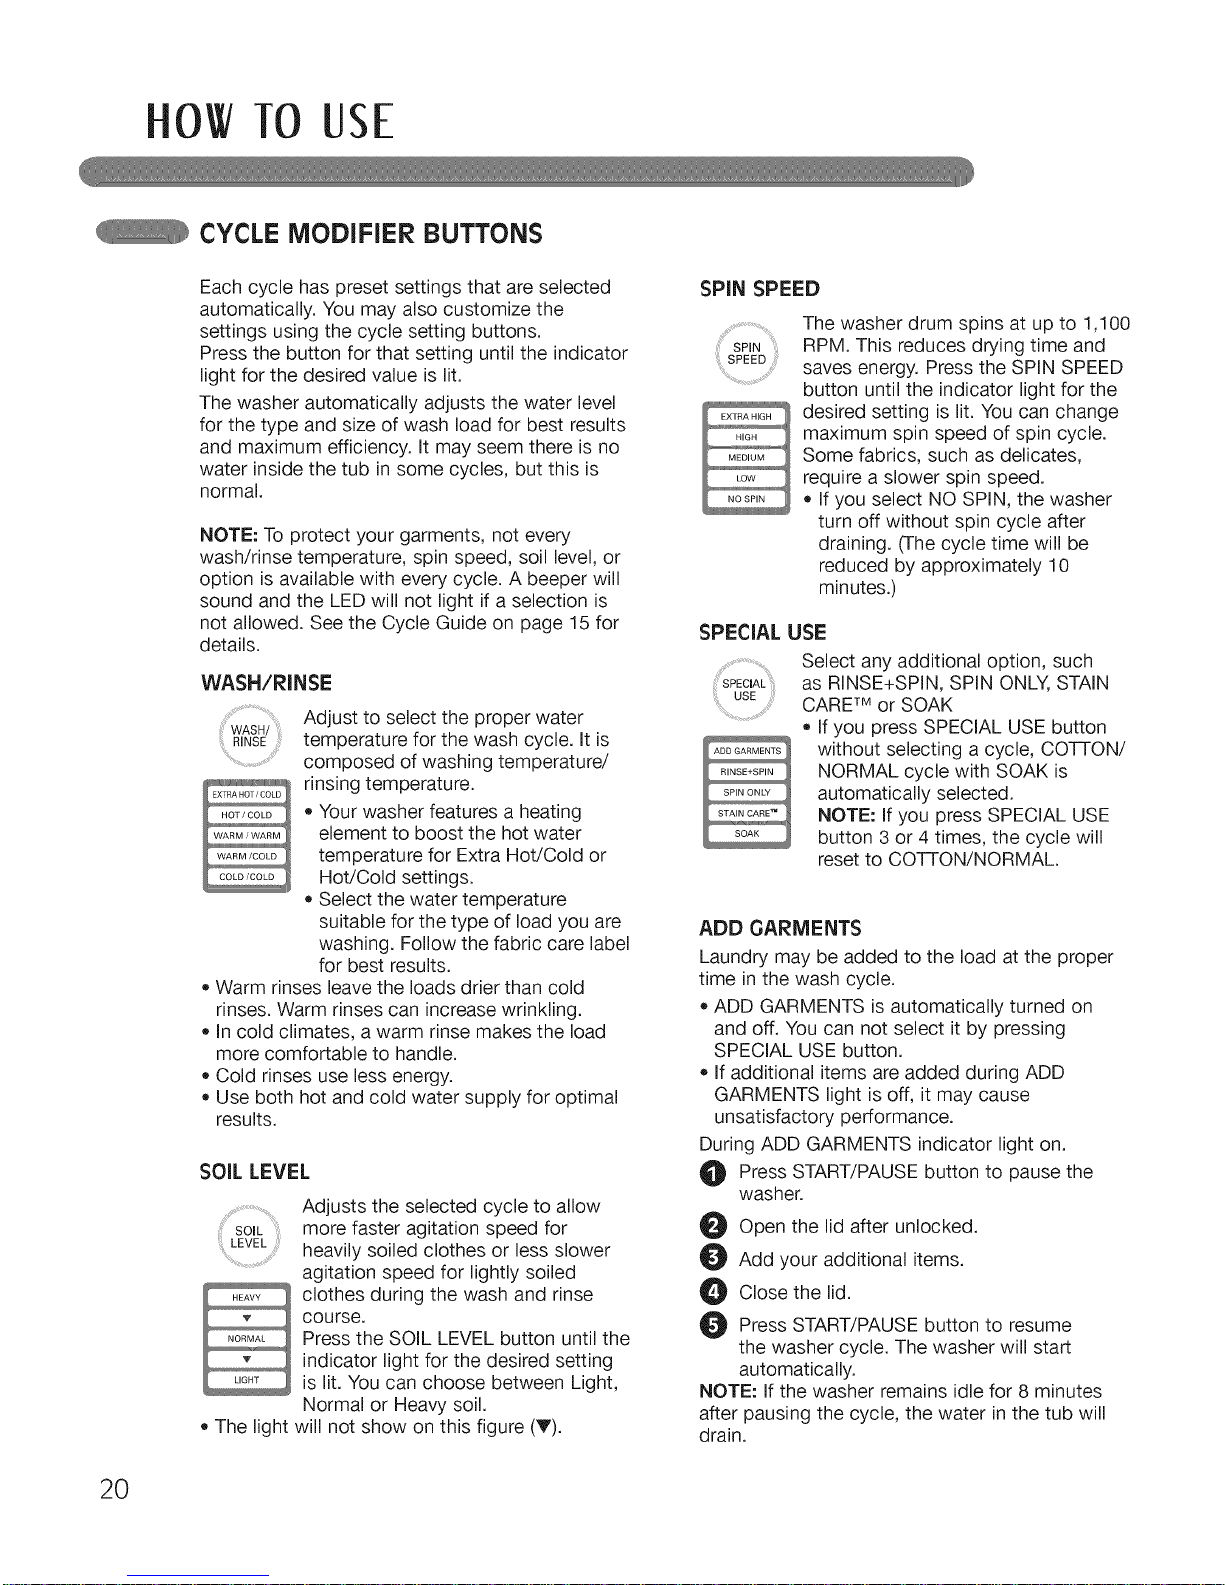
WASH/RINSE
Adjust to select the proper water
WASH/
RINSE temperature for the wash cycle, it is
composed of washing temperature/
rinsing temperature.
* Your washer features a heating
element to boost the hot water
temperature for Extra Hot/Cold or
Hot/Cold settings.
Select the water temperature
suitable for the type of load you are
washing. Follow the fabric care label
for best results.
Warm rinses leave the loads drier than cold
rinses. Warm rinses can increase wrinkling.
in cold climates, a warm rinse makes the load
more comfortable to handle.
Cold rinses use less energy.
Use both hot and cold water supply for optimal
results.
SOIL LEVEL
Adjusts the selected cycle to allow
SO_L more faster agitation speed for
LEVEL heavily soiled clothes or less slower
agitation speed for lightly soiled
clothes during the wash and rinse
course.
Press the SOIL LEVEL button until the
indicator light for the desired setting
is lit. You can choose between Light,
Normal or Heavy soil.
The light will not show on this figure (V).
SPIN SPEED
SPiN
SPEED
The washer drum spins at up to 1,100
RPM. This reduces drying time and
saves energy. Press the SPIN SPEED
button until the indicator light for the
desired setting is lit. You can change
maximum spin speed of spin cycle.
Some fabrics, such as delicates,
require a slower spin speed.
If you select NO SPIN, the washer
turn off without spin cycle after
draining. (The cycle time will be
reduced by approximately 10
minutes.)
SPECIAL USE
ADD GARMENTS
RINSE+SPIN
SPIN ONLY
Select any additional option, such
as RINSE+SPIN, SPIN ONLY, STAIN
CARE TM or SOAK
If you press SPECIAL USE button
without selecting a cycle, CO-I-FON/
NORMAL cycle with SOAK is
automatically selected.
NOTE: If you press SPECIAL USE
button 3 or 4 times, the cycle will
reset to CO-I-FON/NORMAL
ADD GARMENTS
Laundry may be added to the load at the proper
time in the wash cycle.
ADD GARMENTS is automatically turned on
and off. You can not select it by pressing
SPECIAL USE button.
If additional items are added during ADD
GARMENTS light is off, it may cause
unsatisfactory performance.
During ADD GARMENTS indicator light on.
O Press START/PAUSE button to pause the
washer.
e
0
0
0
Open the lid after unlocked.
Add your additional items.
Close the lid.
Press START/PAUSE button to resume
the washer cycle. The washer will start
automatically.
NOTE: If the washer remains idle for 8 minutes
after pausing the cycle, the water in the tub will
drain.
2O
OW TO USE
CYCLE MODIFIER BUTTONS (COnt.)
RINSE + SPIN
Select this option to rinse and spin a load
separately from a regular cycle. This can be
helpful in preventing fresh stains from setting in
fabrics.
• You can change rinse temperature and spin
speed by pressing WASH/RINSE and SPIN
SPEED respectively.
A Press the POWER button to turn on the
washer.
e
Press the SPECIAL USE button until the
RINSE+SPIN indicator light is lit. (The cycle
light will turn off.)
O Press the START/PAUSE button the
to start
cycle. The washer will start automatically.
SPIN ONLY
This button activates the Drain & Spin cycle to
drain and spin.
Press the Power button to turn on the
washer.
O Press the SPECIAL USE button until the
SPIN ONLY indicator light is lit.
O Press the START/PAUSE button to start the
cycle. The washer will start automatically.
SOAK
Allows the consumer to remove stains more
thoroughly by specifying additional time for the
clothing to soak during washing. At the end of
SOAK, the wash cycle will be started without
drain.
Cycle time will be increased by 30 minutes.
It is normal that washer do weak agitation
during SOAK cycle.
NOTE: You cannot select the SOAK option in the
TUB CLEAN cycle.
STAIN CARETM
STAIN CARE TM may be selected as an option with
HEAVY DUTY, Co-IrON/NORMAL and TOWELS
cycles.
Wash only small loads for optimum fabric care.
(less than 8 Ibs.)
Press the POWER button to turn on the
washer.
O Press the SPECIAL USE button until the
STAIN CARE TM indicator light is lit.
Press the START/PAUSE button to start the
cycle. The washer will start automatically.
NOTE: if you select STAIN CARET% the
COLDWASH TM option is not available.
21
 Loading...