

LG WM5005HKA User Manual
MFL67737699
RELEASING THIS DRAWING
WITHOUT PERMISSION LG
Electronics SHOULD BE
ACCUSED ACCORDING TO THE
LAWS AND COMPANY RULES.
이 도면은 LG전자의 자산으로 불법
유출시 관계법과 회사규정에 의해 처벌됨.
WORK
99
SEC.
2 1 0
가
BRAND
LG
<FRONT> <BACK>
나
나
MODEL
WM5000H*A FH3C8CDYK*
다
P/NO.
MFL67737699
PRINTING DEGREE
1
MATERIAL AND PRINTING DESCRIPTION
SNOW WHITE 80g OFFSET 인쇄
LG MODEL 명
<< 주기 >>
가
1. 재질, 인쇄방법, 인쇄도수, 외곽치수등은 작업표에 준한다.
2. 인쇄내용, 문자크기 및 형상, 선의 굵기 등은 설계에서 제시된 FILM에 준함.
3. 외곽치수는 절단후 치수임.
4. 양산전에 설계 한도를 득할 것.
5. 본 부품에 금지물질이 포함되지 않도록 하고, 상세내용은 LG(63)-A-5501-34를 만족할 것
SUFFIX
A**EEUS
LANGUAGE
ENG/SPA
PAGE
96
REMARK
TT-PJT 27”, EUS
수정 업체 : 지디피
양산처 : 남성기획
1
2
3
4
5
6
7
8
9
10
11
12
13
REV. NO.
기호
REVISION DESCRIPTION
변경 사항
P/NO. 다
150 150
장 한 용안 은 주15.07.17EAGF700695인쇄내용 개선에 따른 인쇄내용 변경
장 한 용안 은 주15.07.21EAGF700823 인쇄내용 개선에 따른 변경
장 한 용안 은 주15.07.22EAGF700925인쇄내용 개선에 따른 변경 (호스그림 추가)
장 한 용안 은 주15.07.29EAGF701176제품무게 오기에 따른 수정
김 현 석안 은 주15.09.01EAGF900003인쇄내용 오기에 따른 인쇄내용 변경
김 현 석안 은 주15.10.07EAGFA00259인쇄내용 오기에 따른 인쇄내용 변경
김현석안은주2015.11.07EAGFB00312 Smart ThinQ에 TM추가
김현석안은주2015.12.28EAGFC00789DOE 내용 추가 및 odor issue 내용 추가
김현석안은주2016.02.24EAGG200983odor issue 내용 시카고랩 재감수
김현석이다정2016.09.27EAGG900843 Detergent Pod 관련 문구 추가, 스마트앱 명칭 변경
김 현 석이 다 정2016.10.27EAGGA00845 권장용량 문구 추가/ Tub Clean 문구 개선
김 현 석이 다 정2016.12.06EAGGC00208 모델명 추가/ FCC 문구 개정
김 현 석이 다 정2017.03.16EAGH300133 인쇄내용 수정
APPROVED
REF. NO.
시방 번호
년/월/일
DATE
PREPARED
시방자
승인자
<< NOTES >>
1. Material, printing and exterier size are refer to work tables.
2. Printing, text size and line are based on LG design film.
3. Exterier size on the drawing is cutting line.
4. Before product controlled by criteria sample.
5. The part should not contain prohibited substances(Pb,Cd,Hg,Cr+6,PBB,PBDE)and details
should comply with LG standard of LG(63)-A-5501-34
DR COMPLETED
도면 DR 완료
완료일 :
-
TRIG.
MODELING
LG 전자 (주)
LG Electronics Inc.
UNIT SCALE
REVIEWED DESIGNED
안 은 주
곽 병 희
14.07.15 14.07.15 14.07.16
mm
CHECKED APPROVED
이 성 민
14.07.15
N
S
장 한 용
RELATED DWG.
PDF
ILLUSTRATOR
T
I
MANUAL,OWNER’S
T
L
E
DRUM-EXPORT 1/1
DWG.
No.
MFL67737699

OWNER’S MANUAL
WASHING
MACHINE
ENGLISH
ESPAÑOL
Please read this owner's manual thoroughly before operating and keep it handy
for reference at all times.
WM5000H*A
WM5005H*A
www.lg.com
MFL67737699
Copyright © 2015 - 2017 LG Electronics Inc. All Rights Reserved.

TABLE OF CONTENTS
2
TABLE OF CONTENTS
3 IMPORTANT SAFETY INSTRUCTIONS
3 BASIC SAFETY PRECATUTIONS
4 GROUNDING INSTRUCTIONS
5 SAFETY INSTRUCTIONS FOR INSTALLATION
6 SAFETY INSTRUCTIONS FOR USE, CARE,
CLEANING, AND DISPOSAL
7 PRODUCT FEATURES
8
INTRODUCING YOUR WASHING MACHINE
8 Parts and Accessories
9 Control Panel Features
10 Display
11 INSTALLATION INSTRUCTIONS
11 Preview installation order
12 Checking and choosing the proper location
13 Unpacking and removing shipping bolts
14 Connecting the water lines
15 Connecting the drain line
16 Leveling the washing machine
17 Plugging in the power cord and grounding
17 Test run
18 PREPARATION
18 Sorting wash loads
18 - Precautions for fabric care before wash cycle
19 - Fabric care labels
19 - Sorting laundry
19 Using the detergent dispenser lid
19 - Opening the lid
19 - Closing the lid
20 Using detergent/fabric softener
20 - Recommended detergent
20 - Loading the dispenser
22 USING YOUR WASHING MACHINE
22 Basic operation
23 Cycle guide
24 Main cycle
24 - For white fabrics, Bright Whites™
24 - Reduce laundry allergen, Allergiene™
24 - Reduce laundry bacteria, Sanitary
24 - Blankets or bulky items, Bedding
24 - Heavily soiled items, Heavy Duty
24 - Normal items, Normal
24 - For sportswear, Sportswear
24 - Wrinkle free items, Perm.Press
24 - Sheer items, Delicates
24 - For towels, Towels
24 - Quick wash, Speed Wash
24 - Rinse, drain and spin only, Rinse+Spin
24 - Downloading cycles, Downloded
25 Cycle modifier buttons
25 - Setting the water temperature, Temp.
25 - Setting spin speed, Spin
25 - Setting soil level of laundry, Soil
26 - Adjusts the melody and button tones, Signal
26 Setting options before cycle
26 - High temperature, Steam
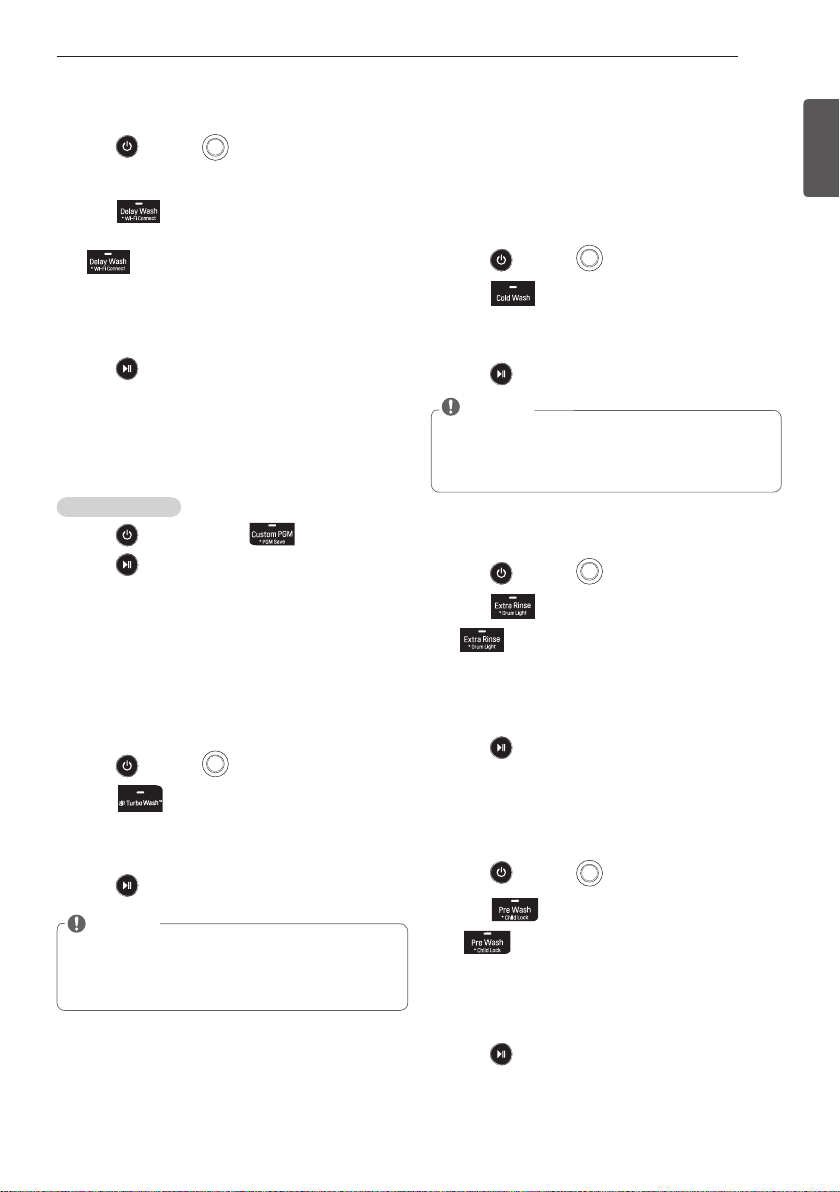
27 - Presetting the start time, Delay Wash
27 - Selecting your customized cycle, Custom PGM
27 - Saving time, Turbo Wash™
27 - Saving energy, Cold Wash
27 - Adding extra rinse cycle, Extra Rinse
27 - Prewashing, Pre Wash
28 Setting the options during cycle
28 - Tumbles clothes to prevent wrinkles, Fresh Care
28 - Saving customized wash cycle, PGM Save
28 - Drum Lighting, Drum Light
28 - Button lock feature, Child Lock
29 SMART FUNCTIONS
29 Smart ThinQ Application
31 Smart Diagnosis™ Function
32 MAINTENANCE
32 Care
32 - Care after wash
32 - Care in cold climates
33 Cleaning
33 - Cleaning the drum, Tub Clean
34 - Cleaning the detergent dispenser
35 - Cleaning the water inlet filters
36 - Cleaning the drain pump filter
37 - Cleaning the door seal
38 TROUBLESHOOTING
38 Checking error messages
39 Before calling for service
44 SPECIFICATIONS
41 WARRANTY

IMPORTANT SAFETY INSTRUCTIONS
3
IMPORTANT SAFETY INSTRUCTIONS
READ ALL INSTRUCTIONS BEFORE USE
WARNING
For your safety, the information in this manual must be followed to minimize the risk of fire or explosion,
electric shock, or to prevent property damage, injury to persons, or death.
Your safety and the safety of others are very important.
We have provided many important safety messages in this manual and on your appliance. Always read and
obey all safety messages.
This is the safety alert symbol.
This symbol alerts you to potential hazards that can kill or hurt you and others.
All safety messages will follow the safety alert symbol and either the word DANGER, WARNING or CAUTION.
These words mean:
DANGER
You will be killed or seriously injured if you don’t immediately follow instructions.
WARNING
You can be killed or seriously injured if you don’t follow instructions.
CAUTION
You may be slightly injured or cause damage to the product if you do not follow instructions.
All safety messages will tell you what the potential hazard is, tell you how to reduce the chance of injury,
and tell you what can happen if the instructions are not followed.
BASIC SAFETY PRECAUTIONS
WARNING
To reduce the risk of fire, electric shock, or injury to persons when using this appliance, follow basic precautions, including the following.
• Use this appliance only for its intended purpose as
described in this owner’s Manual.
• Before use, the washer must be properly installed as
described in this manual.
• Do not wash articles that have been previously
cleaned in, washed in, soaked in, or spotted with
gasoline, dry cleaning solvents, or other flammable or
explosive substances, as they give off vapors that
could ignite or explode.
• Do not add gasoline, dry cleaning solvents, or other
flammable or explosive substances to the wash water.
These substances give off vapors that could ignite
or explode.
• Under certain conditions, hydrogen gas may be
produced in a hot water system that has not been
used for 2 weeks or more. HYDROGEN GAS IS
EXPLOSIVE. If the hot water system has not been
used for such a period, before using the washer, turn
on all hot water faucets and let the water flow from
each for several minutes. This will release any accu-
mulated hydrogen gas. As the gas is flammable, do
not smoke or use an open flame during this time.
• Do not allow children to play on or in the washer.
Close supervision of children is necessary when the
washer is used near children.
• Before the washer is removed from service or discarded, remove the lid to prevent children from climbing inside.
• Do not install or store the washer where it will be
exposed to the weather or freezing temperatures.
• Do not tamper with controls.
• Keep the area underneath and around your appli-
ances free of combustible materials (lint, paper,
rags, etc.), gasoline, chemicals and other flammable
vapors and liquids.
• Do not repair or replace any part of the washer or
attempt any servicing other than as described in this
manual. We strongly recommend that any service be
performed by a qualified technician.
• See Installation Instructions for grounding requirements.
• ALWAYS follow the fabric care instructions supplied
by the garment manufacturer.
• Do not place items exposed to cooking oil in your
washer. Items contaminated with cooking oils may
contribute to a chemical reaction that could cause a
load to catch fire.
• Use fabric softeners or products to eliminate static
only as recommended by the manufacturer.
• This washer is not designed for maritime use or for
mobile installations such as in RVs, aircraft, etc.
• Turn off the water faucets and unplug the washer if
the machine is to be left for an extended period of
time, such as during vacations.
• Do not use to dry articles containing foam rubber or
similarly textured rubber-like materials.
• Packaging material can be dangerous for children.
There is a risk of suffocation! Keep all packaging
from children.
• Always check the inside of the washer for foreign
objects before loading laundry. Keep the lid closed
when not in use.
• Do not reach into the appliance if the tub or agitator is
moving.
• WARNING : This product contains chemicals known
to the State of California to cause cancer and birth
defects or other reproductive harm.
after handling.
Wash hands
ENGLISH

IMPORTANT SAFETY INSTRUCTIONS
4
IMPORTANT SAFETY INSTRUCTIONS
READ ALL INSTRUCTIONS BEFORE USE
WARNING
For your safety, the information in this manual must be followed to minimize the risk of fire or explosion,
electric shock, or to prevent property damage, injury to persons, or death.
GROUNDING INSTRUCTIONS
This appliance must be grounded. In the event of malfunction or breakdown, grounding will reduce the risk
of electric shock by providing a path of least resistance for electric current. This appliance is equipped with
a cord having an equipment-grounding conductor and grounding plug. The plug must be plugged into an
appropriate outlet that is properly installed and grounded in accordance with all local codes and ordinances.
WARNING
Improper connection of the equipment-grounding conductor can result in risk of electric shock. Check with a
qualified electrician or servicer if you are in doubt as to whether the appliance is properly grounded. Do not
modify the plug provided with the appliance. If it does not fit the outlet, have a proper outlet installed by a
qualified electrician. Failure to follow these warnings can cause serious injury, fire, electric shock, or death.

IMPORTANT SAFETY INSTRUCTIONS
5
IMPORTANT SAFETY INSTRUCTIONS
READ ALL INSTRUCTIONS BEFORE USE
WARNING
For your safety, the information in this manual must be followed to minimize the risk of fire or explosion,
electric shock, or to prevent property damage, injury to persons, or death.
SAFETY INSTRUCTIONS FOR INSTALLATION
WARNING
To reduce the risk of fire, electric shock, or injury to persons when using this appliance, follow basic
precautions, including the following.
• Refer to INSTALLATION INSTRUCTIONS for detailed
grounding procedures. Installation instructions are
packed with the washer for installer’s reference. If
the washer is moved to a new location, have it
checked and reinstalled by a qualified service technician. Failure to follow this warning can cause
serious injury, fire, electric shock, or death.
• Do not, under any circumstances, cut or remove the
third (ground) prong from the power cord. Failure to
follow this warning can cause serious injury, fire,
electric shock, or death.
• For personal safety, this appliance must be properly
grounded. Failure to follow this warning can cause
serious injury, fire, electric shock, or death.
• The power cord of this appliance is equipped with a
3-prong (grounding) plug which mates with a standard
3-prong (grounding) wall outlet to minimize the pos-
sibility of electric shock from this appliance.
• This washer must be plugged into a 120 VAC, 60 Hz
grounded outlet. Failure to follow this warning can
cause serious injury, fire, electric shock, or death.
• Have the wall outlet and circuit checked by a qualified
electrician to make sure the outlet is properly grounded. Failure to follow this warning can cause serious
injury, fire, electric shock, or death.
• Where a standard 2-prong wall outlet is encountered,
it is your personal responsibility and obligation to have
it replaced with a properly grounded 3-prong wall
outlet. Failure to follow this warning can cause
serious injury, fire, electric shock, or death.
• Do not install on carpet. Install washer on a solid floor.
Failure to follow this warning can cause serious
leak damage.
• Do not remove ground prong. Do not use an adapter
or extension cord. Plug into a grounded 3-prong outlet. Failure to follow these warnings can cause seri-
ous injury, fire, electric shock, or death.
• The washer should always be plugged into its own
individual electrical outlet which has a voltage rating
that matches the rating plate. This provides the best
performance and also prevents overloading house
wiring circuits which could cause a fire hazard from
overheated wires.
• Never unplug your washer by pulling on the power
cord. Always grip plug firmly and pull straight out
from the outlet. Failure to follow this warning can
cause serious injury, fire, electric shock, or death.
• Repair or immediately replace all power cords that
have become frayed or otherwise damaged. Do not
use a cord that shows cracks or abrasion damage
along its length or at either end. Failure to follow this
warning can cause serious injury, fire, electric
shock, or death.
• When installing or moving the washer, be careful not
to pinch, crush, or damage the power cord. Failure to
follow this warning can cause serious injury, fire,
electric shock, or death.
• The washer must be installed and electrically grounded by a qualified service person in accordance with
local codes to prevent shock hazard and assure
stability during operation.
• The washer is heavy. Two or more people may be
needed to install and move the appliance. Failure to
do so can result in back or other injury.
• Store and install the washer where it will not be exposed to temperatures below freezing or exposed to
outdoor weather conditions. Failure to follow this
warning can cause serious leak damage.
• Do not install the washer in humid spaces to reduce
the risk of electric shock. Failure to follow this warn-
ing can cause serious injury, fire, electric shock, or
death.
• To reduce the risk of injury to persons, adhere to all
industry recommended safety procedures including
the use of long sleeved gloves and safety glasses.
Failure to follow all of the safety warnings in this
manual could result in property damage, injury to
persons or death.
ENGLISH

IMPORTANT SAFETY INSTRUCTIONS
6
IMPORTANT SAFETY INSTRUCTIONS
READ ALL INSTRUCTIONS BEFORE USE
WARNING
For your safety, the information in this manual must be followed to minimize the risk of fire or explosion,
electric shock, or to prevent property damage, injury to persons, or death.
SAFETY INSTRUCTIONS FOR USE, CARE, CLEANING, AND DISPOSAL
WARNING
To reduce the risk of fire, electric shock, or injury to persons when using this appliance, follow basic
precautions, including the following.
• Unplug the washer before cleaning to avoid the risk
of electric shock.
• Never use harsh chemicals, abrasive cleaners, or
solvents to clean the washer. They will damage the
finish.
• Do not put oily or greasy rags or clothing on top of the
washer. These substances give off vapors that could
ignite the materials.
• Do not wash items that are soiled with vegetable or
cooking oil. These items may contain some oil after
laundering. Due to the remaining oil, the fabric may
smoke or catch fire by itself.
• Disconnect this appliance from the power supply
before attempting any user maintenance. Turning the
controls to the OFF position does not disconnect this
appliance from the power supply. Failure to follow
this warning can cause serious injury, fire, electric
shock, or death.
• Do not combine laundry products for use in one load
unless specified on the label.
• Do not mix chlorine bleach with ammonia or acids
such as vinegar. Follow package directions when
using laundry products. Incorrect usage can produce
poisonous gas, resulting in serious injury or death.
• Do not reach into the washer while parts are moving.
Before loading, unloading, or adding items, press the
START/PAUSE button and allow the drum to coast to a
complete stop before reaching inside. Failure to fol-
low this warning can cause serious injury, fire,
electric shock, or death.
• Do not allow children to play on or in the washer.
Close supervision of children is necessary when the
washer is used near children. As children grow, teach
them the proper, safe use of all appliances. Failure to
comply with these warnings could result in serious
injury to persons or death.
• Destroy the carton, plastic bag, and other packing
materials after the washer is unpacked. Children
might use them for play. Cartons covered with rugs,
bedspreads, or plastic sheets can become airtight
chambers. Failure to comply with these warnings
could result in serious injury to persons or death.
• Keep laundry products out of children’s reach. To
prevent injury to persons, observe all warnings on
product labels. Failure to comply with these warn-
ings could result in serious injury to persons or
death..
• Remove the door to the washing compartment to
avoid the danger of children or small animals getting
trapped inside before your washer is removed from
service or discarded. Failure to do so can result in
serious injury to persons or death.
• Make sure the dispenser lid is closed at all times
when not being filled with laundry products. Failure to
keep the lid closed can result in personal injury or
flooding.
SAVE THESE INSTRUCTIONS

PRODUCT FEATURES
7
PRODUCT FEATURES
INVERTER DIRECT DRIVE MOTOR
The inverter motor, which is directly connected to the tub, produces little noise and vibration and offers
great durability and a long lifespan.
SMART DIAGNOSIS™
Should you experience any problems with the appliance, it has the capability of transmitting data via your
telephone to the LG Customer Information Center. NFC or Wi-Fi equipped models can also transmit data to a
smartphone using the LG Smart ThinQ application.
TUB CLEAN
Regular cleaning of the tub on a monthly basis using Tub Clean can help keep the tub clean and fresh.
LARGE CAPACITY STAINLESS STEEL DRUM
The large capacity stainless steel drum offers extreme durability and is tilted to improve efficiency and allow
easier access for large items.
CHILD LOCK
Use this option to disable the controls during a wash cycle. This option can prevent children from changing
cycles or operating the machine.
DETERGENT DISPENSER
The four-compartment dispenser makes it easy to separate the pre-wash detergent, the main laundry
detergent, liquid bleach, and fabric softener into different compartments.
ENGLISH
HIGH TEMPERATURE STEAM CYCLES
During LG's unique high-temperature steam cycles, the hot steam helps to remove tough stains.
INTRODUCING YOUR WASHING MACHINE
8
INTRODUCING YOUR WASHING MACHINE
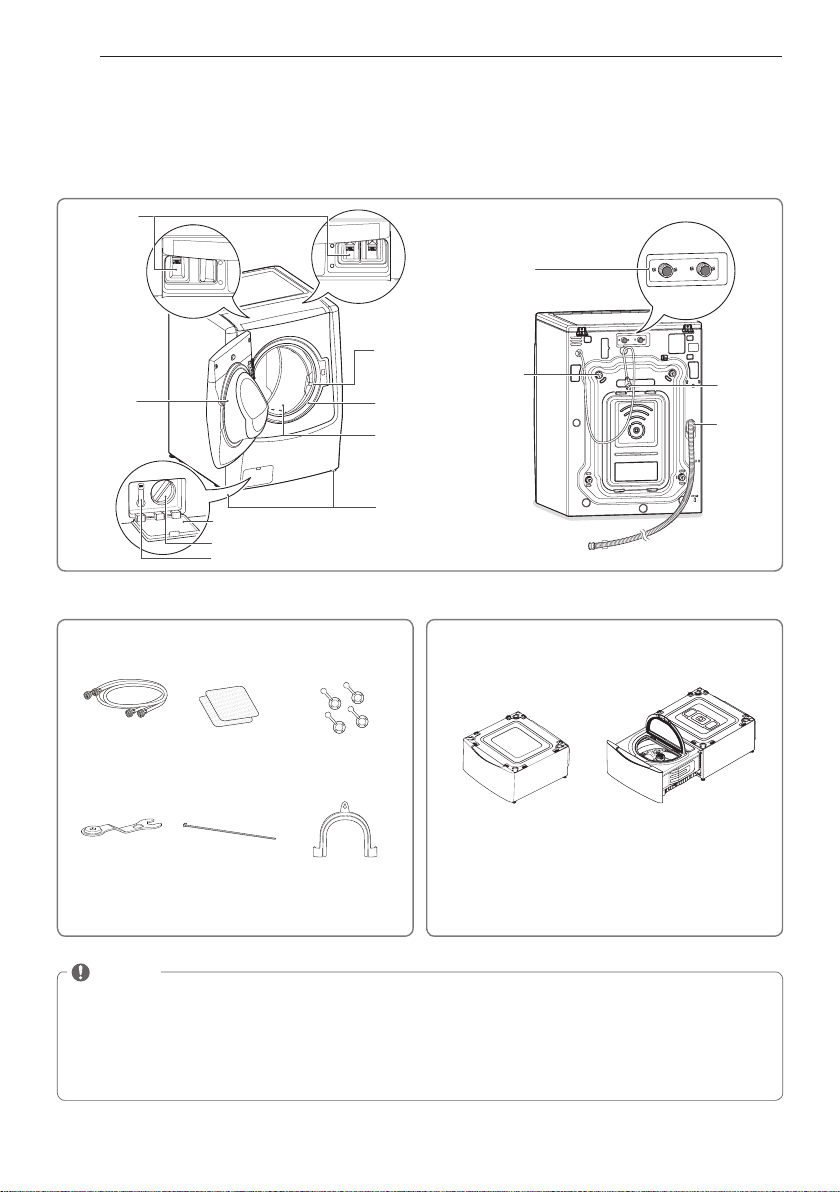
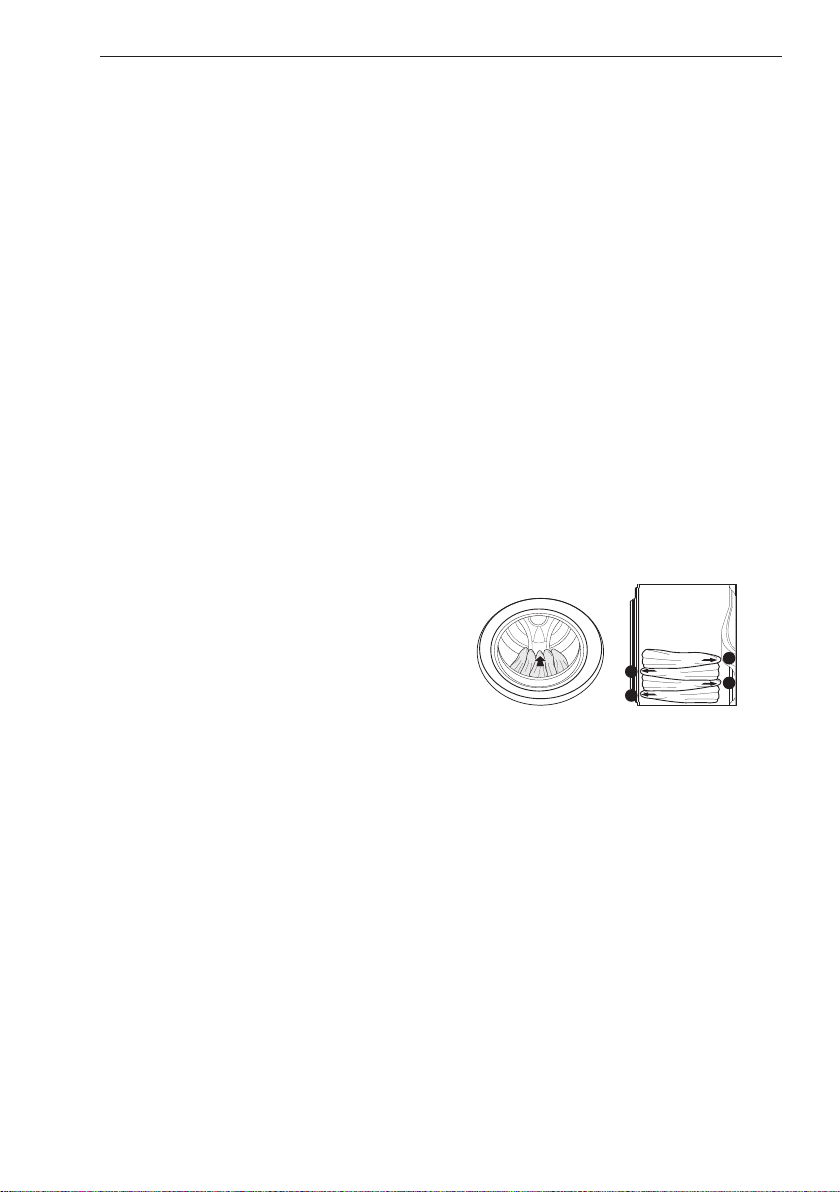
Parts and Accessories
Parts
Detergent
dispenser
(See page 20)
Water inlets
Water
circulation
Door
Accessories
Drain pump filter cover
Drain pump filter
Drain hose
nozzles
Door
seal
Tub
Leveling
feet
Shipping
bolts
Power cord
Drain hose
Included Accessories
Hot/cold water
hoses
Wrench Tie strap
Non-skid pads
Caps for covering
shipping bolt holes
Elbow bracket
(for securing drain hose)
Optional Accessories
Pedestal or Pedestal Washer
(sold separately)
NOTE
yContact LG Customer Service at 1-800-243-0000 (1-888-542-2623 in Canada) if any accessories are missing.
yFor your safety and for extended product life, use only authorized components. The manufacturer is not
responsible for product malfunction or accidents caused by the use of separately purchased unauthorized
components or parts.
yThe images in this guide may be different from the actual components and accessories, and are subject to
change by the manufacturer without prior notice for product improvement purposes.
INTRODUCING YOUR WASHING MACHINE
9
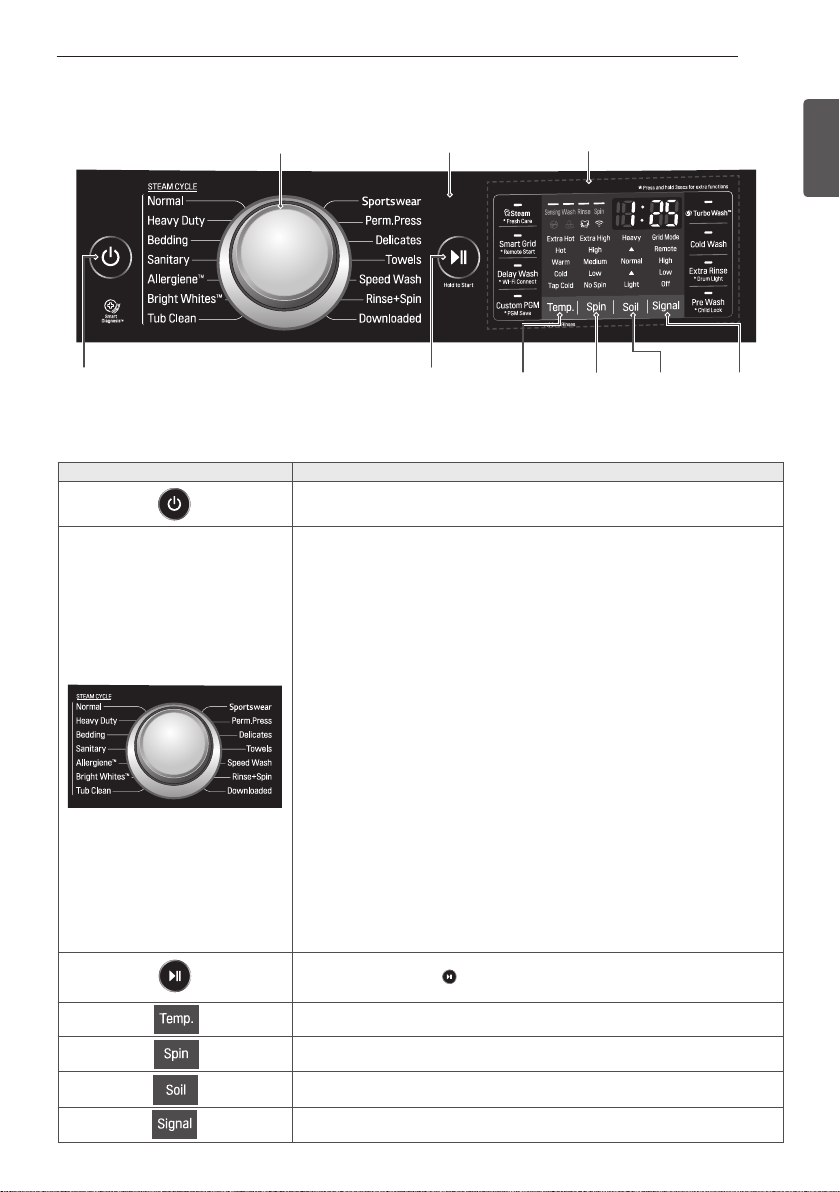
Control Panel Features
Cycle selector
Power
Button
Operation
Button Description
Operation
Start/
Pause
Button
yTurns the washing machine on and off.
y(During the wash cycle) stops operation, and cancels the settings.
Bright Whites™
y
- For white fabrics (see page 24)
Allergiene™
y
- For cotton, underwear (see page 24)
Sanitary
y
- For underwear, diapers, etc. (see page 24)
Bedding
y
- For blankets or large bulky items (see page 24)
Heavy Duty
y
- For heavily soiled cotton fabric (see page 24)
Normal
y
- For general laundry, such as cotton T-shirts or towels (see page 24)
Sportswear
y
- For sportswear (see page 24)
Perm.Press
y
- For wrinkle-free fabrics (see page 24)
Delicates
y
- For sheer and delicate fabrics (see page 24)
Towels
y
- For towels (see page 24)
Speed Wash
y
- For small quantities of lightly soiled items (see page 24)
Rinse + Spin
y
- For Rinse, drain and Spin only (see page 24)
Downloaded
y
- For downloadable cycles. The default cycle is Small Load. (see page 29).
Tub Clean
y
- For tub clean (see page 33)
yStarts or pauses the washing machine cycle. Hold a second to Start
- If you do not press the
machine will turn off automatically.
y(Press repeatedly) Selects the water temperature for the wash cycle (see page 25).
- Select water temperature from 5 settings.
y(Press repeatedly) Selects the spin speed in the desired level (see page 25).
- Selects spin speed from 5 settings.
y(Press repeatedly) Selects a wash cycle by soil level (see page 25).
- Selects soil level from 5 settings.
y(Press repeatedly) Selects a Melody or Button sound by signal(see page 26).
button within 1 hour of selecting a cycle, the washing
Water
Temperature
Selection
Button
Display
Spin
Speed
Selection
Button
Soil
Level
Selection
Button
Signal
Sound
Selection
Button
ENGLISH

INTRODUCING YOUR WASHING MACHINE
10
Operation (continued)
Button Description
Display
Cycle process
indicator
y(Press before starting wash cycle) Use Steam option for extra cleaning power (See page
26).
y(Press and hold 3 seconds) Fresh Care tumbles clothes to prevent wrinkles (See page 28).
yUse Smart Grid to lower your energy costs by avoiding peak usage times
(See page 29).
y(Press and hold 3 seconds before starting wash cycle) Use Remote Start to control
your washer remotely (See page 29).
y(Press before starting wash cycle) Set delay time of starting cycle (See page 27).
y(Press and hold 3 seconds after turning on the machine) Use Wi-Fi Connect for
connecting to the internet through your home Wi-Fi network (See page 29).
yUse Custom PGM to recall the customized wash cycle you had previously saved
(See page 27).
y(Press and hold 3 seconds after setting the desired option) Use PGM Save to save
special combination of setting that you use frequently (See page 28).
yUse Turbo Wash™ to save time (See page 27).
yUse Cold Wash to save on energy consumption (See page 27).
y(Press before wash cycle) Add an extra rinse to the selected cycle (See page 27).
y(Press and hold during wash cycle) The drum is equipped with a white LED light that
illuminates when the washer is turned on (See page 28).
yPre-wash heavily soiled laundry (See page 27).
y(Press and hold 3 seconds during wash cycle) Use the Child Lock option to Lock/
Unlock the controls (See page 28).
Door lock
indicator
Child lock
indicator
Fresh Care
indicator
Wi-Fi
Connection
indicator
Estimated time remaining/
error message display
(See page 38)
Display Icon Description
yThis portion of the display shows which stage of the wash cycle is currently
underway (Sensing, Wash, Rinse and Spin).
yIndicates that the door is locked. The washer door will lock while the washer is operating.
The door can be unlocked by pressing the Start/Pause button to stop the washer.
yWhen Child Lock is set, the Child Lock indicator appears and all buttons are
disabled except the Pre Wash button. This prevents children from changing
settings while the washer is operating.
yThis indicator shows that the washer has been set for Fresh Care. This function
provides periodic tumbling for up to about 19 hours to prevent wrinkles.
yWhen the appliance is connected to the internet through a home Wi-Fi network,
this indicator appears.
yWhen the Start/Pause button is pressed, the washer automatically detects the wash load
(weight) and optimizes the washing time, based on the selected cycle and options. The
display will then indicate the estimated time remaining for the selected wash cycle.
yWhen the
y When the
Smart Grid
signal is detected, this indicator appears.
Remote Start
mode is activated, this indicator appears.
INSTALLATION INSTRUCTIONS
11
INSTALLATION INSTRUCTIONS
Preview installation order
Checking and choosing
the proper location
Connecting the drain line Leveling the washing
Test run
Unpacking and
removing shipping bolts
machine
Connecting the water line
Plugging in the power
cord and grounding
ENGLISH
WARNING
yWasher is heavy! Two or more people are required when moving and unpacking the washer.
can result in back or other injury.
yStore and install the washer where it will not be exposed to temperatures below freezing or exposed to
outdoor weather conditions.
death.
yProperly ground washer to conform with all governing codes and ordinances.
can cause serious injury, fire, electric shock, or death.
yTo reduce the risk of electric shock, do not install the washer in humid spaces.
can cause serious injury, fire, electric shock, or death.
yThe base opening must not be obstructed by carpeting when the washer is installed on a carpeted floor.
yDo not remove ground prong. Do not use an adapter or extension cord. Plug into a grounded 3-prong outlet.
Failure to follow this warning can cause serious injury, fire, electric shock, or death.
Failure to follow this warning can cause serious injury, fire, electric shock, or
Failure to follow this warning
Failure to follow this warning
Failure to do so
INSTALLATION INSTRUCTIONS
(2.5 cm)
(25 cm)
(25 cm)
12
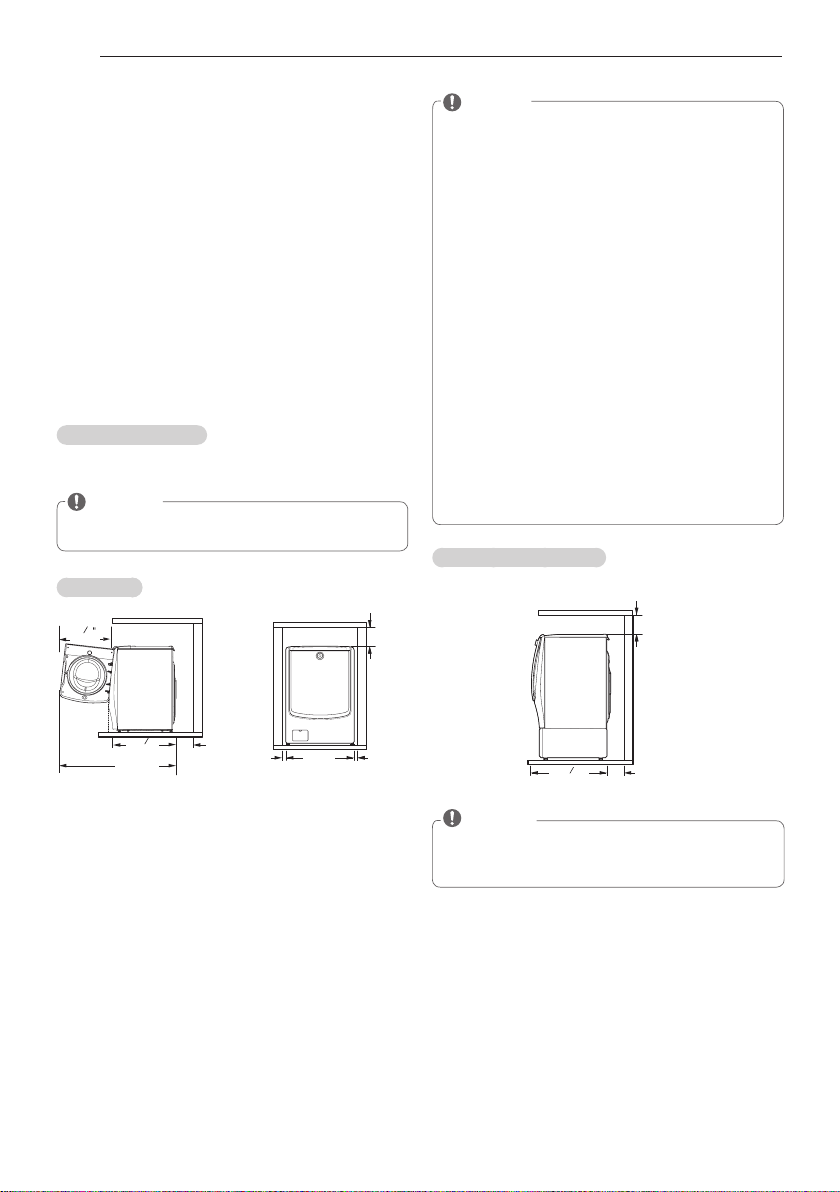
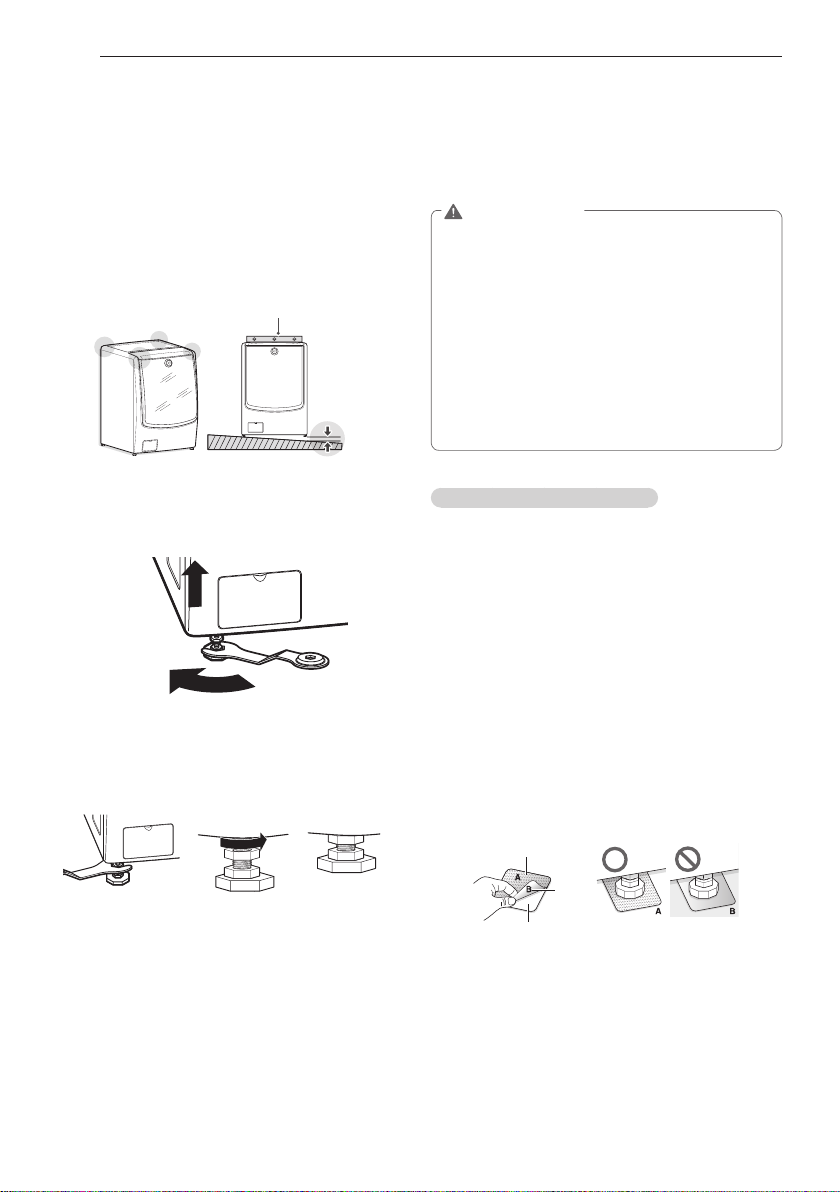
Checking and choosing the proper
location
Install the washing machine on a solid floor that is
strong and rigid enough to support the weight of the
washing machine, even when fully loaded, without
flexing or bouncing. If the floor has too much flex,
you may need to reinforce it to make it more rigid. If
the floor is not solid, it may cause severe vibration
and noise.
Clean the floor before installation.
1
- Make sure to select solid and smooth ground.
Two or more people are needed for moving and
2
unpacking the washing machine.
Allow for sufficient space between the walls and
3
the washing machine for installation.
Space requirements
You must allow sufficient space for water lines, the
drain line, and airflow.
NOTE
yBe sure to allow for wall, door, or floor moldings
that may increase the required clearances.
Clearances
7
23
(59.4cm)
16
10"
NOTE
yThe floor must be strong and rigid enough to
support the weight of the washer, when fully
loaded, without flexing or bouncing. If your
floor has too much flex, you may need to
reinforce it to make it more rigid. A floor that is
adequate for a top-loading washer may not be
rigid enough for a front loading washer, due to
the difference in the spin speed and direction.
If the floor is not solid, your washer may
vibrate and you may hear and feel the vibration
throughout your house.
yBefore installing the washer, make sure the
floor is clean, dry and free of dust, dirt, water
and oils so the washer feet can not slide easily.
Leveling feet that can move or slide on the floor
can contribute to excess vibration and noise
due to poor contact with the floor.
yIf a drip pan must be used, take extra care
to follow the instructions provided with the
drip pan and make sure the leveling feet are
adjusted for firm and even contact with the pan.
Use of drip pans and failure to properly level
the machine may result in increased vibration
and noise during operation.
Installing on a pedestal
10"
9
31 "
16
(80.2 cm)
55"
(139.6 cm)
4"
(10 cm)
27"
1"
(68.6 cm)
1"
(2.5 cm)
13
32 "
(83.2 cm)
16
4"
(10 cm)
NOTE
yRefer to the instructions packaged with the
optional PEDESTAL before installing with a
PEDESTAL.
INSTALLATION INSTRUCTIONS
13
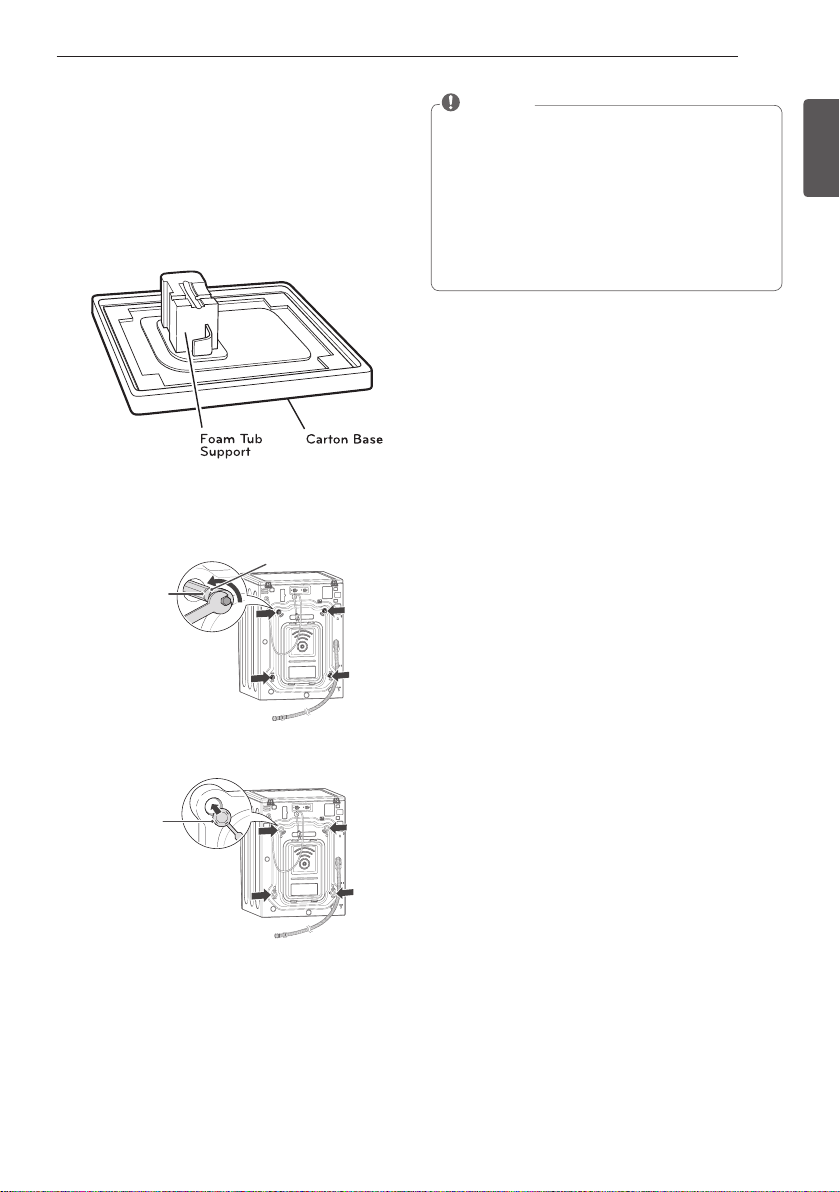
Unpacking and removing shipping bolts
When removing the washer from the carton base, be
sure to remove the foam drum support in the middle of
the carton base.
If you must lay the washer down to remove the base
packaging materials, always lay it carefully on its
side.
Do NOT lay the washer on its front or back.
Starting with the bottom two shipping bolts,
1
use the wrench (included) to fully loosen all four
shipping bolts by turning them counterclockwise.
Remove the bolt assemblies by wiggling them
slightly while pulling them out.
Shipping
bolt
Retainer
NOTE
ySave the bolt assemblies for future use. To
prevent damage to internal components, DO
NOT transport the washer without reinstalling
the shipping bolts.
yFailure to remove shipping bolts and retainers
may cause severe vibration and noise, which
can lead to permanent damage to the washer.
The cord is secured to the back of the washer
with a shipping bolt to help prevent operation
with shipping bolts in place.
ENGLISH
Locate the four hole caps included in the
2
accessory pack and install them in the shipping
bolt holes.
Cap
INSTALLATION INSTRUCTIONS
14
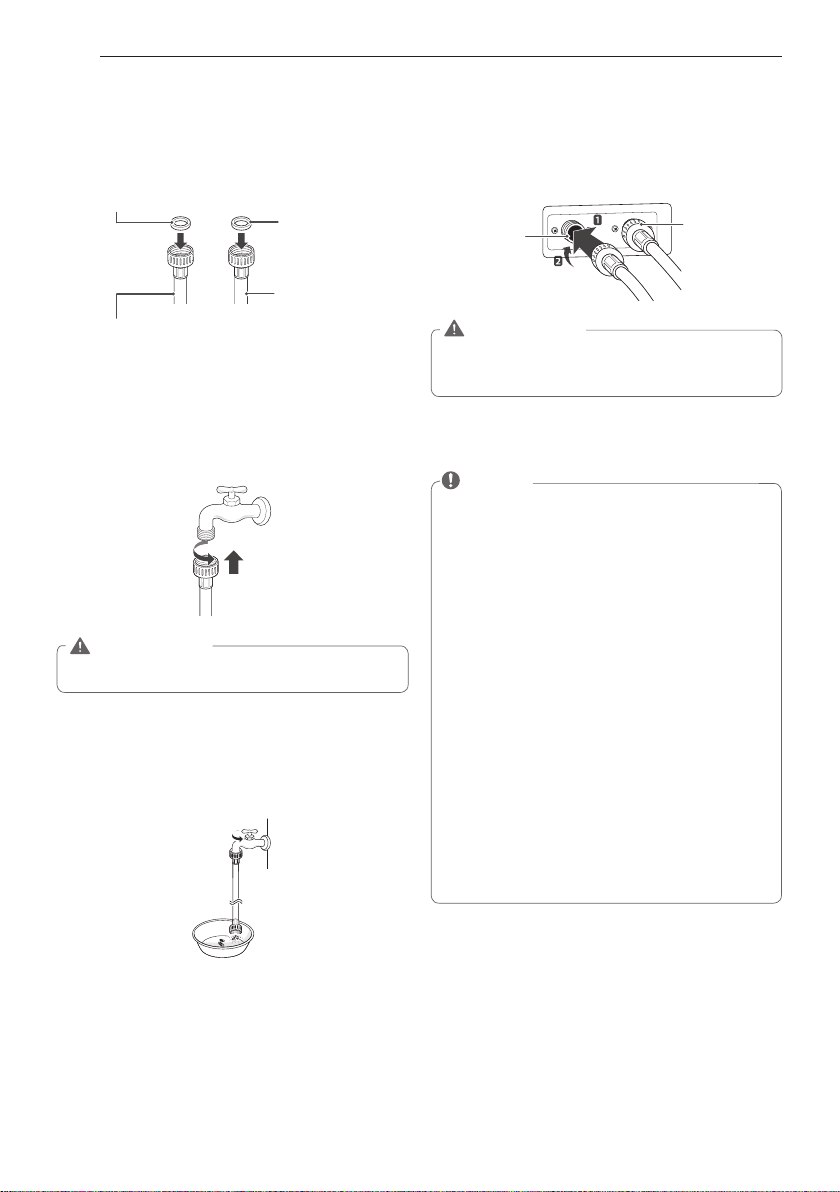
Connecting the water lines
Check the rubber seals on both sides of the hose.
1
- Insert a rubber seal into the threaded fittings on
each hose to prevent leaking.
Rubber seal
Water hose
(To water inlet on the
washing machine)
Connect the water supply hoses to the HOT and
2
COLD water faucets tightly by hand and then
tighten another 2/3 turn with pliers.
- Connect the blue hose to a cold water faucet and
the red hose to a hot water faucet.
WARNING
yDo not overtighten.
result.
After connecting inlet hose to water faucets,
3
turn on the water faucets to flush out foreign
substances (dirt, sand or sawdust) in the water
lines. Let water drain into a bucket, and check the
water temperature.
Damage to the coupling can
Rubber seal
Water hose
(To faucet)
Connect the hoses to the water inlets tightly
4
by hand and then tighten another 2/3 turn with
pliers.
- Connect the blue hose to the cold water inlet
and the red hose to the hot water inlet.
Cold
water
inlet
WARNING
yDo not overtighten the hoses.
can damage the valves resulting in leaking and
property damage.
Check for leaks by turning on the faucets.
5
- If water leaks, check steps 1 to 4 again.
NOTE
yFor your safety, and for extended product
life, use only authorized components. The
manufacturer is not responsible for product
malfunction or accidents caused by the use
of separately purchased, unauthorized parts.
yUse new hoses when you install the washing
machine. Do not reuse old hoses. Use only
the inlet hoses provided with the washer. LG
does not recommend the use of aftermarket
hoses.
yPeriodically check the hoses for cracks, leaks
and wear, and replace the hoses every five
years.
yDo not stretch the water hoses intentionally,
and make sure that they are not crushed by
other objects.
yWater supply pressure must be between 20
psi and 120 psi (138–827 kPa). If the water
supply pressure is more than 120 psi, a
pressure reducing valve must be installed.
yTo provide optimum washing performance
the hot water temperature should be set
at 120-135°F (48-57°C) and the cold at 60°F
(15°C).
Overtightening
Hot water
inlet
INSTALLATION INSTRUCTIONS
15
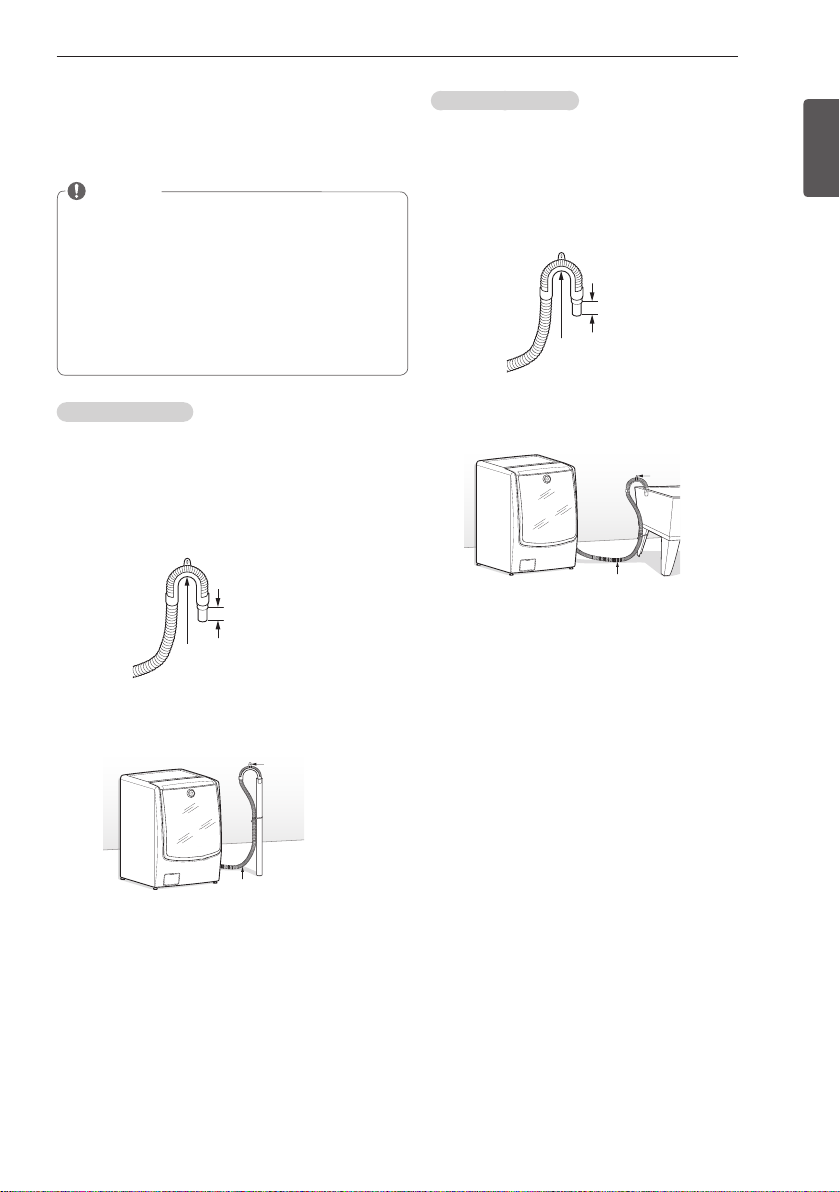
Connecting the drain line
Secure the drain hose in place to prevent moving
and leaking.
NOTE
yThe drain hose should be properly secured.
Failure to properly secure the drain hose can
result in flooding and malfunction.
yTotal height of the house end should not exceed
96 inches (244.8 cm) from the bottom of the
washer.
yThe drain must be installed in accordance with
any applicable local codes and regulations.
yMake sure that the water lines are not stretched,
pinched, crushed, or kinked.
Using a standpipe
Clip the end of the hose into the elbow bracket.
1
- Connect the elbow bracket within 4 inches (10
cm) from the end of the drain hose. If the drain
hose is extended more than 4 inches (10 cm)
beyond the end of the elbow bracket, mold or
microorganisms could spread to the inside of
the washer.
No more than
4 inches (10 cm)
Elbow bracket
Using a laundry tub
Clip the end of the hose into the elbow bracket.
1
- Connect the elbow bracket within 4 inches (10
cm) from the end of the drain hose. If the drain
hose is extended more than 4 inches (10 cm)
beyond the end of the elbow bracket, mold, or
microorganisms could spread to the inside of
the washer.
No more than
4 inches (10 cm)
Elbow bracket
Hang the end of the drain hose over the side of
2
the laundry tub.
Elbow Bracket
Drain Hose
Use a tie strap to secure the drain hose in place.
3
ENGLISH
Insert the end of the drain hose into the
2
standpipe.
Elbow Bracket
Drain Hose
Use a tie strap to secure the drain hose in place.
3
INSTALLATION INSTRUCTIONS
16
Leveling the washing machine
The washer tub of your new washing machine spins
at very high speeds. To minimize vibration, noise,
and unwanted movement, the floor must be perfectly
level and solid.
Check the washing machine’s level.
1
- Check the precise level by rocking the top edges
of the washing machine or placing a level on
the washing machine. The slope beneath the
washing machine must not exceed 1°, and all
four leveling feet must rest firmly on the floor.
Turn the lower leveling feet clockwise to level the
2
washing machine.
- Turning the lower leveling feet clockwise raises
the washing machine.
Raise
Turn the locknuts counterclockwise and tighten
3
them when the washing machine is level.
Level
1°
Check the washing machine’s level again.
4
- Push or rock the top edges of the washing
machine gently to make sure that the washing
machine does not rock.
- If the washing machine rocks, repeat steps 1 to 3.
WARNING
yUsing the washing machine without leveling,
it may result in malfunction caused by the
production of excess vibration and noise.
yIf you are installing the washing machine on the
optional pedestal, you must adjust the leveling
feet on the pedestal to level the washing
machine. The washing machine´s leveling feet
should be minimized and turn the locknuts
counterclockwise to secure.
yUse the leveling feet only when you level the
washing machine.
unnecessarily, it may cause abnormal vibration
of the washing machine.
If you raise the leveling feet
Using non-skid pads (optional)
If you install the washing machine on a slippery
surface, it may move because of excessive vibration.
Incorrect leveling may cause malfunction through
noise and vibration. In the event of this, lay the nonskid pads under the leveling feet and adjust the level.
Clean the floor to attach the non-skid pads.
1
- Use a dry rag to remove and clean foreign
objects or moisture. If moisture remains, the
non-skid pads may slip.
Adjust the level after placing the washing machine
2
in the installation area.
Place the adhesive side of the non-skid pad on
3
the floor.
- It is most effective to install the non-skid pads
under the front legs. If it is hard to place the
pads under the front legs, place them under the
back legs.
This side up
Tighten all 4 lock
nuts securely using
the wrench.
Adhesive
side
Remove
backing
Check the washing machine’s level again.
4
- Push or rock the top edges of the washing
machine gently to make sure that the washing
machine does not rock. If the washing machine
rocks, level the washing machine again.

INSTALLATION INSTRUCTIONS
17
Plugging in the power cord and
grounding
Make sure to ground the washing machine to
prevent a short circuit or an electric shock when
plugging in.
Using a 3-prong outlet
Plug in the electrical outlet without additional
grounding.
WARNING
yThe power outlet must be within 60 inches (1.5 m) of
either side of the washer.
yThe appliance and outlet must be positioned so that the
plug is easily accessible.
yDo not overload the outlet with more than one
appliance.
yThe outlet must be grounded in accordance with
current wiring codes and regulations.
yTime-delay fuse or circuit breaker is recommended.
yIt is the personal responsibility and obligation of the
product owner to have a proper outlet installed by a
qualified electrician.
yDo not use a worn or damaged power cord or power
plug. Replace or repair it immediately.
do so may result in death, fire, electric shock, or
malfunction.
yDo not modify the power cord and take care not to
damage it when installing or moving the washing
Failure to do so may result in death, fire,
machine.
electric shock, or malfunction.
yMake sure that the washing machine is grounded.
yConnect this washing machine to a grounded outlet
conforming to the rating prior to use.
may result in fire, electric shock, or malfunction.
yDo not use adaptors or extension cords.
machine should always be plugged into its own
individual electrical outlet which has a voltage rating
that matches the rating plate. Failure to do so may
result in fire, electric shock or disorder.
yDo not damage or cut off the ground prong of the
power cord.
shock, or product malfunction.
Doing so may cause death, fire, electric
Failure to
Failure to do so
The washing
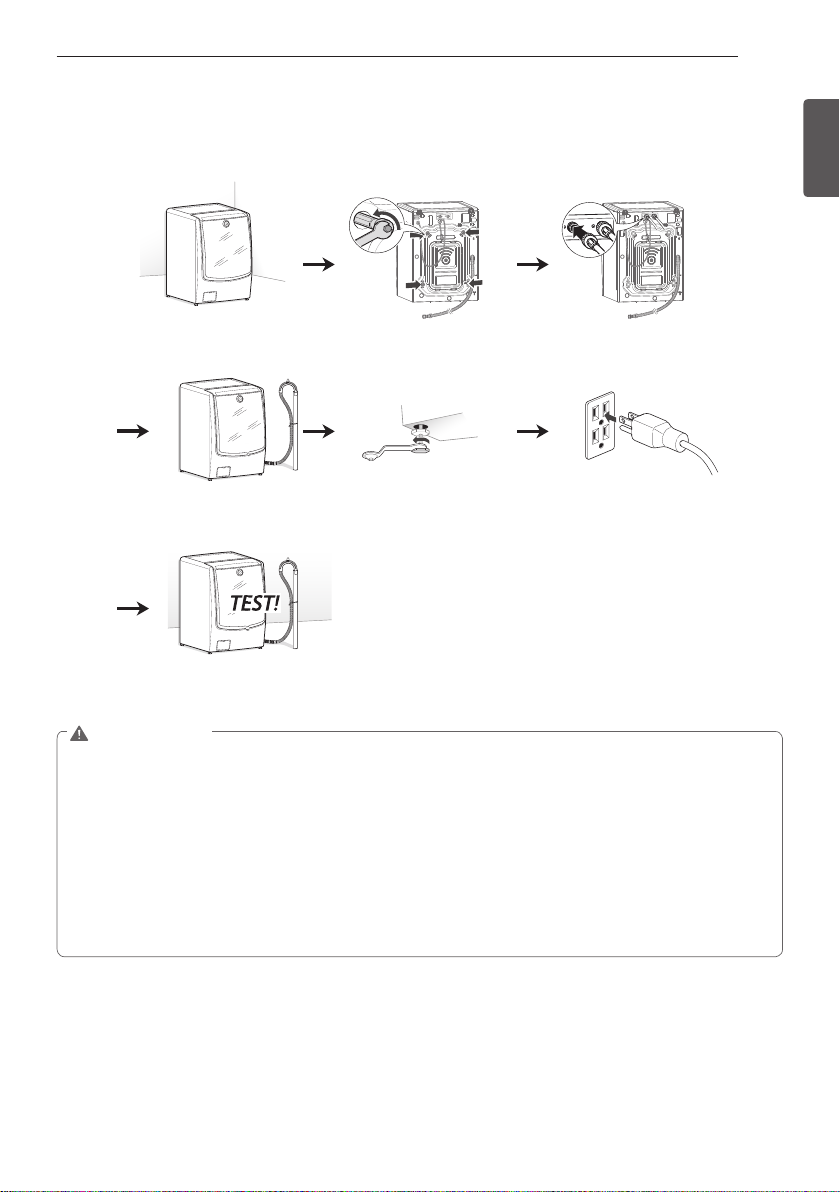
Test run
Check if the washing machine is properly installed
and run a test cycle.
Load the washing machine with 6 pounds of
1
laundry.
Press .
2
Turn to RINSE + SPIN.
3
Press .
4
- The wash cycle starts.
Check if water is supplied, that the washing
5
machine does not rock or vibrates excessively,
and that it drains well during the spin cycle.
- If water leaks during water supply, see page
14,
Connecting the water lines
properly.
- If the washing machine rocks and vibrates
excessively, see page 16,
to level it again.
machine
- If the drain does not work, see page 15,
Connecting the drain line
to connect them
Leveling the washing
to install it properly.
ENGLISH
PREPARATION
18
PREPARATION
Sorting wash loads
Precautions for fabric care before wash cycle
Read and observe the following to prevent shrinkage or damage to clothes.
Check all pockets to make sure that they are
empty.
- Items such as clips, matches, pens, coins, and
keys can damage both your washer and your
clothes.
Close zippers, hooks, and drawstrings to prevent
these items from snagging or tangling on other
clothes.
Pretreat heavily stained areas before washing.
- Doing so will produce clean, stain-free results.
Combine large and small items in a load. Load
large items first.
Large items should not be more than half of the
total washload.
The washer can be fully loaded, but the drum
should not be tightly packed with items.
-The door of the washer should close easily.
Do not wash single items, except for bulky items
such as blankets. Make sure to wash laundry in
similar types of loads.
- Washing a single small item may result in the tub
becoming unbalanced, vibrating and making a
noise.
Do not wash waterproof clothes.
- This may cause abnormal vibration, or may
cause the load to bounce, which could damage
the tub.
Check if there are any other foreign objects in the
door seal and take extra care that clothes do not
get caught there.
- Foreign objects in the door seal may stain
clothes, and water may leak if clothes get caught
in the door seal.
Wash underwear or small, light items in a laundry
net.
- Small, light items may get caught in the door
seal, and a brassiere hook may damage other
items or the tub.
Brush heavy soil, dust, or hair off fabrics before
washing.
- Laundry may not wash clean if there is dirt or
sand on the fabrics, or they may damage due to
particles rubbing against sheer fabrics.
Wash blankets individually.
- Washing more than one blanket together may
result in poor cleaning performance due to
tangling or an unbalanced load.
Always separate fabrics according to their colors
and wash them separately to prevent colors from
running.
- Fabrics may damage or become stained due to
fabric dyes running, or due to foreign objects
transferring from one fabric to another.
For best performance, load clothes as shown.
3
1
- Load clothes loosely, and do not overfill the
drum. Clothes need room to circulate in order to
get clean.
- Do not press down on items while stacking them
in the drum.
4
2
PREPARATION
19
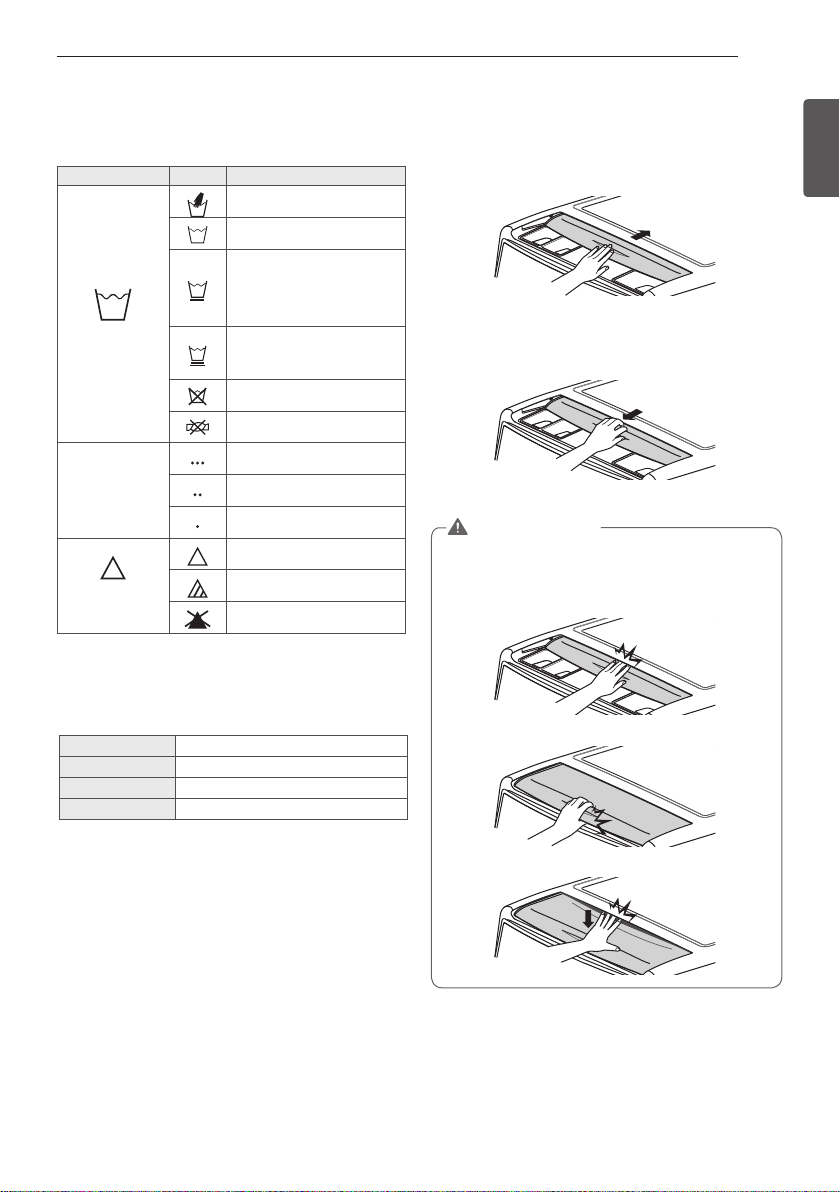
Fabric care labels
Most articles of clothing feature fabric care labels
that include instructions for proper care.
Category Label Directions
Hand Wash
Machine Wash, Normal Cycle
Use Permanent Press/Wrinkle
Resistant washing machine
setting (which has a cool
down or
cold spray before the reduced
spin)
Washing
Water Temperature
Bleach symbols
Use Gentle/Delicate washing
machine setting (slow
agitation and/ or reduced
wash time).
Do Not Wash
Do Not Wring
Hot
Warm
Cold/Cool
Any Bleach (When Needed)
Only Non-Chlorine Bleach
(When Needed)
Do Not Bleach
Sorting laundry
It is recommended that you sort laundry into similar
loads that are washable in the same cycle.
Refer to the following chart for sorting clothes.
Colors
Soil
Fabric
Lint
Whites / Lights / Darks
Heavy / Normal / Light
Delicates / Easy Care / Sturdy Cottons
Lint Producers / Lint Collectors
Using the detergent dispenser lid
Opening the lid
- Push the front handle to slide the lid open.
Closing the lid
- Pull the top of the handle to slide the lid closed.
WARNING
yTo avoid injury, do not place fingers under the
lid or between the lid and the top plate when
pressing or sliding the detergent dispenser lid
open or closed.
ENGLISH
20
PREPARATION
Using detergent/fabric softener
Recommended detergent
Make sure to use HE (High-Efficiency) detergent
for front-loading washing machines. HE detergents
dissolve more efficiently and produce fewer suds to
ensure efficient washing and rinsing. Use the correct
amount of detergent as indicated on the label of the
detergent packaging.
Do not use more than one detergent pod in the
washer. Using too much detergent may cause
oversudsing and unsatisfactory performance. Reduce
detergent amount or add an extra rinse if detergent
residue is left on fabrics. To add an extra rinse, press
the Extra Rinse button.
Designed specially to use only
HE (High-Efficiency) detergent
NOTE
yOnly use HE detergents, because using a
regular detergent may produce excessive suds.
yHE detergents produce fewer suds, dissolve
more efficiently to improve washing and rinsing
performance, and help to keep the interior of
your washer clean.
yUse less detergent for soft water.
yWipe up any spills immediately, as liquids could
damage the finish and the control panel of the
washing machine. If you do not wipe up any
spills with a soft cloth, the cycle and option
selections of the control panel may not operate.
yUsing too much detergent can cause a build-
up in the tub resulting in unsatisfactory
performance and machine malfunction.
yIf you use a detergent that does not dissolve
easily or a detergent with high viscosity, it will
leave a residue and clog on the dispenser.
yDilute concentrated detergents with water; it
will leave a residue on the tub and may not
rinse properly.
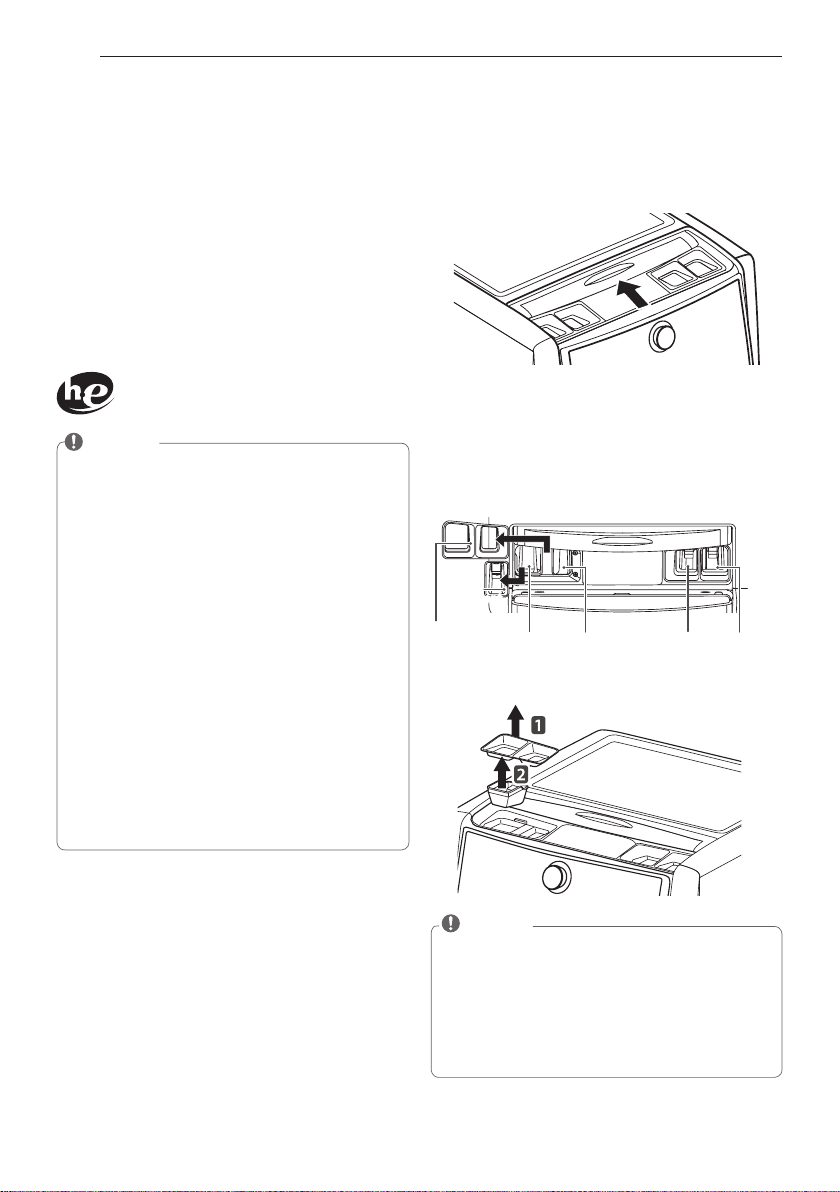
Loading the dispenser
The detergent dispenser of the washing machine has
a dispenser compartment for each detergent type.
Add each detergent to its appropriate compartment.
Slide the detergent dispenser lid open.
1
Add each detergent to its appropriate
2
compartment.
- If you use a liquid detergent, make sure the
liquid detergent cup is in place.
- If you use a powdered detergent, remove the
liquid detergent cup and put the powder in the
main wash detergent compartment.
MAX
MAX
NORMAL
NORMAL
Liquid
chlorine
bleach
compartment
Liquid fabric
softener
compartment
Liquid
detergent
cup
Detergent
dispenser
cover
MAX
NORMAL
Main wash
detergent
compartment
Pre-wash
detergent
compartment
NOTE
y Slide the detergent dispenser lid completely
closed before starting the cycle.
yBe careful not to catch your hand when opening
and closing the lid.
yIt is normal for a small amount of water to
remain in the dispenser compartments at the
end of the cycle.

PREPARATION
21
Pre-Wash Detergent Compartment
Add liquid or powdered detergent to this
compartment when using the pre-wash option.
Always use HE (High-Efficiency) detergent with your
washing machine.
NOTE
yIf liquid detergent is to be used for the main
wash when using the pre-wash option, the
liquid detergent cup accessory must be used
in main wash dispenser to prevent the main
wash liquid detergent from being dispensed
immediately.
yThe amount of detergent added for the pre-
wash option is 1⁄2 the amount recommended for
the main wash cycle. For example, if the main
wash cycle requires one measure of detergent,
add 1⁄2 measure for the pre-wash option.
Main Wash Detergent Compartment
This compartment holds laundry detergent for the
main wash cycle, which is added to the load at
the beginning of the cycle. Always use HE (HighEfficiency) detergent with your washing machine.
Never exceed the manufacturer’s recommendations
when adding detergent. Using too much detergent
can result in detergent buildup in clothing and the
washer. Either powdered or liquid detergent may be
used.
NOTE
yLiquid or powdered color-safe bleach may be
added to the main wash compartment with
detergent of the same type.
yWhen using liquid detergent, make sure the
liquid detergent cup and insert are in place. Do
not exceed the maximum fill line.
yWhen using powdered detergent, remove
the insert and liquid detergent cup from the
compartment. Powdered detergent will not
dispense with the liquid detergent cup and
insert in place.
Liquid Bleach Compartment
This compartment holds liquid chlorine bleach,
which will be dispensed automatically at the proper
time during the wash cycle.
NOTE
yDo not add powdered or liquid color-safe bleach
to this compartment.
yAlways follow the manufacturer’s
recommendations when adding bleach. Do not
exceed the maximum fill line. Using too much
bleach can damage fabrics.
yNever pour undiluted liquid chlorine bleach
directly onto the load or into the drum. Fabric
damage can occur.
Fabric Softener Compartment
This compartment holds liquid fabric softener, which
will be automatically dispensed during the final rinse
cycle.
NOTE
yAlways follow the manufacturer’s
recommendations when adding fabric softener.
Do not exceed the maximum fill line. Using
too much fabric softener may result in stained
clothes.
yDilute concentrated fabric softeners with warm
water. Do not exceed the maximum fill line.
yNever pour fabric softener directly onto the load
or into the drum.
ENGLISH
USING YOUR WASHING MACHINE
22
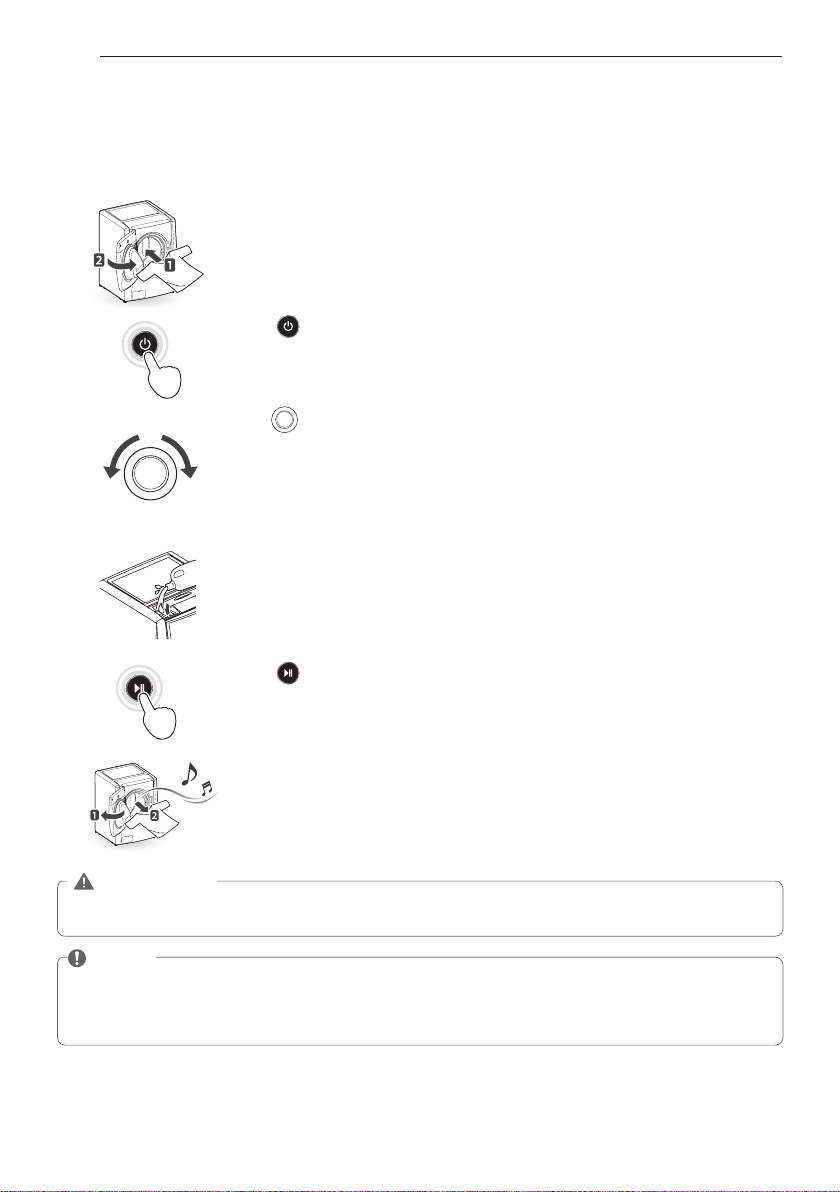
USING YOUR WASHING MACHINE
Basic operation
1
2
3
4
5
6
Load the laundry into the washing machine and close the door.
Press .
- The lights around the cycle selector knob will illuminate and a chime will sound.
Turn
- The proper default option is automatically set according to the wash cycle. See
- See page 24,
- To change the options, press the option button and select the desired option.
- Skip to step 4 to use the default setting without changing the options.
Add the proper amount of detergent and additional products (bleach, softener)
into the dispensers.
- See page 20,
Press
- The washing machine starts.
When the melody plays, the wash cycle is finished.
- When the washing cycle is finished, the door unlocks. Open the door and
- Make sure to check around the door seal when taking out the finished load.
to the desired cycle.
page 23,
Cycle guide
See page 26,
.
remove the laundry immediately.
Small items may be caught in the door seal.
, for more detailed default options for each cycle.
Main cycle
Setting options before cycle
Using detergent/fabric softener
, for details on the wash cycles.
, for more details on options.
, for more details on using detergent.
WARNING
yTo reduce the risk of fire, electric shock, or injury to persons,
before operating this appliance.
read the IMPORTANT SAFETY INSTRUCTIONS
NOTE
yThe front-load washing machine rotates the laundry in a way that allows it to use less water while still
fully saturating your clothing. It is normal to not be able to see water during the wash cycle.
yIf the temperature or the water level inside the machine is too high, the door locks and cannot be opened.
To open the door while washing, use the Rinse + Spin feature.
USING YOUR WASHING MACHINE
23
Cycle guide
The cycle guide below shows the options and recommended fabric types for each cycle.
Display
Cycle Fabric Type
Bright
Whites
Allergiene
Sanitary Heavily soiled
Bedding Large items such as
Heavy Duty Heavily soiled
Normal Cotton, linen,
Sportswear Active sports,
Perm.Press Dress shirts/pants,
Delicates Dress shirts/
Towels Towels 61 ~ 74 Hot
Speed Wash Lightly soiled
Rinse + Spin Rinse, drain and
Tub Clean Periodic use of
Downloaded
* Default: Small
Load
White Fabrics
(less than 15 lb.
™
(6.8kg))
™
Cotton, underwear,
pillow covers,
bed sheets, baby
wear
underwear, work
clothes, diapers,
etc.
blankets and
comforters
Cotton Fabrics
towels, shirts,
sheets, jeans,
mixed loads
exercise clothing
wrinkle-free
clothing, poly/
cotton blend
clothing,
tablecloths
blouses,
nylons, sheer or
lacy garments
clothing
and small loads
(less than 3 lb.
(1.36kg))
spin only
this cycle helps to
prevent mildew or
a musty smell.
Normally soiled
and small loads.
Time(min)
(Option :
Default)
72 ~ 85
103 ~ 138
116 ~ 129
62 Hot
89 ~ 132 Extra Hot
26 ~ 53 Extra Hot
63
37 ~ 47 Hot
41 Warm
15
18
93 ~ 95
49 ~ 51 Hot
Basic Option (=Default) Additional Options
Wash
Temp.
Hot
Warm
Cold
Tap Cold
-
Extra Hot
Warm
Cold
Tap Cold
Hot
Warm
Cold
Tap Cold
Hot
Warm
Cold
Tap Cold
Warm
Cold
Tap Cold
Warm
Cold
Tap Cold
Cold
Tap Cold
Warm
Cold
Tap Cold
Hot
Warm
Cold
Tap Cold
Cold
Warm
Cold
Tap Cold
Spin
Speed
Extra High
High
Medium
Low
No Spin
Extra High
High
Medium
Low
No Spin
Extra High
High
Medium
Low
No Spin
Medium
Low
No Spin
Extra High
High
Medium
Low
Extra High
High
Medium
Low
Medium
Low
No Spin
High
Medium
Low
Medium
Low
No Spin
Extra High
High
Medium
Low
No Spin
Extra High
High
Medium
Low
No Spin
Extra High
High
Medium
Low
No Spin
Extra High
High
Medium
Low
No Spin
Soil
Level
Heavy
Normal
Light
Heavy
Normal
Light
Heavy
Normal
Light
Heavy
Normal
Light
Heavy
Normal
Light
Heavy
Normal
Light
Heavy
Normal
Light
Heavy
Normal
Light
Heavy
Normal
Light
Heavy
Normal
Light
-
Heavy
Normal
Light
Cold
Steam
Wash™
= Available option
Delay
Extra
Wash
Rinse
Pre
Wash
Turbo
Wash™
ENGLISH
Cycle time depends on type and amount of load and detergent,water pressure and chosen additional options.
- If the Turbo Wash™ option is on, you cannot select No Spin as your Spin.
(If the Turbo Wash™ option is off, you can select No Spin as your Spin.)
USING YOUR WASHING MACHINE
24
Main cycle
You can wash laundry items more thoroughly by
selecting the wash cycle that best suits the type
of items to be washed. Turn the
cycle. When you select a wash cycle, the light for
the corresponding wash cycle will turn on. See page
22,
Basic operation
methods.
For white fabrics,
This cycle is for washing white items only.
, for more details on operating
Bright Whites™
Reduce laundry allergen,
This cycle is a powerful, high temperature cycle
designed specifically to reduce certain allergens.
NOTE
ySelecting the Allergiene™ cycle automatically
incorporates steam into the wash cycle.
yThe Allergiene™ cycle can significantly reduce
allergens in bedding and clothing.
yThe Allergiene™ cycle helps reduce dust mite
populations and helps reduce allergens.
yDue to the higher energy and temperatures
used, the Allergiene™ cycle is not
recommended for wool, silk, leather, or any
other delicate or temperature sensitive items
Reduce laundry bacteria,
This wash cycle reduces 99% of bacteria on laundry
through high temperature.
Sanitization Performance of Residential and
Commercial, Family Sized Clothes Washers
NOTE
yThis cycle has been certified by NSF using Tide
HE powder.
Blankets or bulky items,
This cycle is for washing blankets or bulky items.
Heavily soiled items,
This cycle is for washing heavily soiled laundry
though more powerful tub rotation.
to the desired
Allergiene™
Sanitary
Protocol P172
Bedding
Heavy Duty
Normal items,
Use this cycle to wash all normal items, except
delicate fabrics such as wool or silk.
NOTE
yIf you press and then without selecting
another cycle, the washing machine proceeds to
Normal.
For Sportswear,
Use this cycle for garments that are specially
designed and treated for sport.
Wrinkle free items,
This cycle is for washing items such as wrinkle-free
clothes or tablecloths to minimize wrinkles.
Sheer items,
This cycle is for washing lingerie or sheer and lacy
clothes which can easily be damaged.
For towels,
This cycle is for washing towels.
Quick wash,
Use the Speed Wash cycle to quickly wash lightly
soiled clothing and small load. For high wash and
rinse efficiency, it is recommended to wash small
loads of 2-3 lightly soiled garments.
NOTE
yUse very little detergent in this cycle. If you
want more rinsing, you can add an extra rinse
by using the Extra Rinse option button.
Normal
Sportswear
Perm.Press
Delicates
Towels
Speed Wash
Rinse, drain and spin only,
Rinse + Spin
This cycle is for rinsing detergent from the load.
Downloading cycles,
For downloadable cycles. The default cycle is Small
Load. (See page 29.)
Downloaded
USING YOUR WASHING MACHINE
25
Cycle modifier buttons
Each cycle has preset settings that are selected
automatically. You may also customize the settings
using the cycle modifier buttons. Press the button for
that option to view and select other settings.
The washer automatically adjusts the water level for
the type and size of wash load for best results and
maximum efficiency. It may seem there is no water
inside the drum in some cycles, but this is normal.
NOTE
yTo protect your garments, not every wash/rinse
temperature, spin speed, soil level, or option is
available with every cycle. See the Cycle Guide
for details.
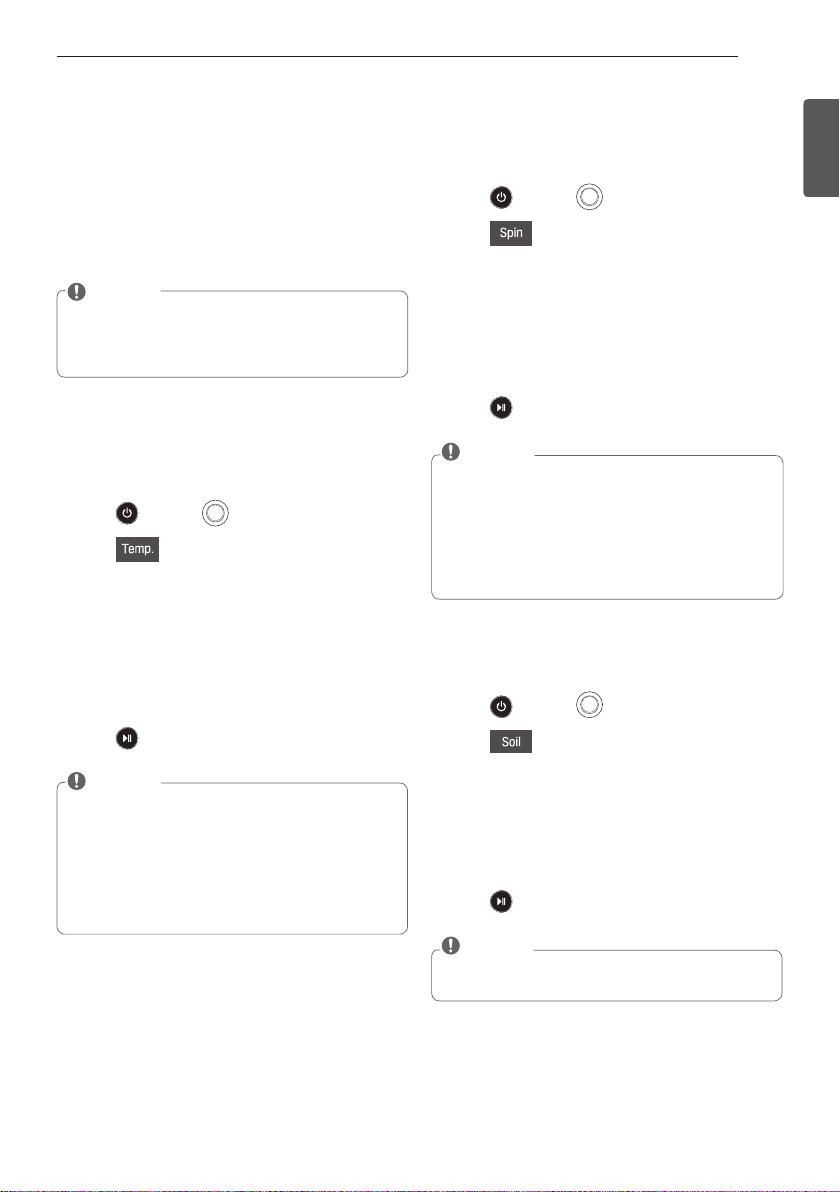
Setting the water temperature, Temp.
Set the water temperature for the wash cycle. Set the
appropriate temperature, as specified in the fabric
care label.
Press and turn to the desired cycle.
1
Press repeatedly to select the desired
2
water temperature:
- When an optional item is selected, an indication
light for the corresponding optional item turns
on.
Press the desired option button to use the other
3
options.
- Skip to step 4 to use the default setting without
changing the options.
Press .
4
NOTE
yCold rinses use less energy.
yYour washer features a heating element to
boost the hot water temperature for Extra
Hot settings. This provides improved wash
performance at normal water heater settings.
ySelect the water temperature suitable for the
type of load you are washing. Follow the fabric
care label for best results.
Setting spin speed, Spin
You can set the desired spin speed.
Use this feature properly according to the
characteristics of the load.
Press and turn to the desired cycle.
1
Press repeatedly to select the desired spin
2
speed.
- When an optional item is selected, an indication
light for the corresponding optional item turns
on.
Press the desired option to use the other options.
3
- Skip to step 4 to use the default setting without
changing the options.
Press .
4
NOTE
yThe Spin button also activates the Drain&Spin
cycle to drain the tub and spin clothes; for
example, if you want to remove clothes before
the cycle has ended.
yTo use Drain&Spin, press the Power button,
then press the Spin button repeatedly to select a
spin speed.
Press the Start/Pause button to begin.
Setting soil level of laundry, Soil
You can wash your laundry more thoroughly by
setting the proper soil level on the washing machine.
Press and turn to desired cycle.
1
Press repeatedly to select a soil level.
2
- When an optional item is selected, an indication
light for the corresponding optional item turns
on.
Press the desired option to use the other options.
3
- Skip to step 4 to use the default setting without
changing the options.
Press .
4
NOTE
yThis feature needs more time for heavily soiled
loads or less time for lightly soiled loads.
ENGLISH
USING YOUR WASHING MACHINE
26
Adjusts the melody and button tones,
Signal
The washing machine plays a melody when the
wash cycle is finished. The buttons make a sound
each time a button is pressed. The volume of the
melody and button tones can be changed or turned
off as desired.
Press .
1
Turn to the desired cycle.
2
Press . Adjust the melody and button tones
3
as desired.
Press the desired option to use the other options.
4
Press .
5
Setting options before cycle
You can select and add the desired optional functions
before you start the washing machine.
High temperature, Steam
Adding the Steam option to these cycles helps to
enhance washing performance.
By using hot steam fabrics get the cleaning benefits
of a super hot wash.
Press and turn to the desired cycle.
1
Press . The washer will automatically adjust
2
the cycle settings.
Set any other desired options.
3
Press .
4
WARNING
yDo not touch the door during steam cycles.
door surface can become very hot. Allow the
door lock to release before opening the door.
yDo not attempt to override the door lock
mechanism or reach into the washer during a
steam cycle.
Steam can cause severe burns.
The
NOTE
y
The steam option cannot be used with all cycles.
y Steam may not be clearly visible during the
steam cycles. This is normal. Too much steam
could damage clothing.
yDo not use steam with delicate fabrics such as
wool, silk, or easily discolored fabrics.
USING YOUR WASHING MACHINE
27
Presetting the start time, Delay Wash
Set the desired start time.
Press and turn to the desired cycle.
1
Press the desired option to use the other options.
2
Press
3
time.
-
- The set start time appears on the display panel.
- Each press of the button increases the delay
time by one hour, up to 19 hours.
Press .
4
repeatedly to select the desired start
light will turn on.
Selecting your customized cycle,
Custom PGM
Recall a customized wash cycle that was previously
saved.
To recall a cycle
Press after then press .
1
Press .
2
You can save a cycle with all the settings and
options you use most frequently.
Saving time, Turbo Wash™
Adding the Turbo Wash™ option reduces cycle time
and provides good performance in normal cycle.
Using Turbo Wash™ saves time without sacrificing
performance.
Press and turn to the desired cycle.
1
Press . The washer will automatically
2
adjust the cycle settings.
Set any other desired options.
3
Press .
4
NOTE
y The Turbo Wash™ option cannot be used with
all cycles.
yThe option is selected by default on the
Normal, Heavy Duty, and Perm. Press cycles.
Saving energy, Cold Wash
Adding the Cold Wash option reduces energy usage
and provides the same washing performance as a
warm water wash.
By using 6 different washing motions (Tumbling,
Rolling, Stepping, Scrubbing, Swing, Filtration),
fabrics get the cleaning benefits, without the energy
usage.
Press and turn to the desired cycle.
1
Press . The washer will automatically
2
adjust the cycle settings.
Set any other desired options.
3
Press .
4
NOTE
y
When you select the Cold Wash option, wash
time will be increased up to 5 - 20 minutes.
yFor high wash efficiency, it is recommended to
use less than 8 pounds.
Adding extra rinse cycle, Extra Rinse
Add an extra rinse cycle to the default rinse cycle.
Press and turn to the desired cycle.
1
Press .
2
light will turn on.
-
Press the desired option to use the other options.
3
- Skip to step 4 to use the default setting without
changing the options.
Press .
4
Prewashing, Pre Wash
Pre-wash for 15 minutes when clothes are covered in
dirt or dust. This feature is suitable for heavily soiled
items.
Press and turn to the desired cycle.
1
Press .
2
-
Press the desired option to use the other options.
3
- Skip to step 4 to use the default setting without
light will turn on.
changing the options.
ENGLISH
Press .
4
USING YOUR WASHING MACHINE
28
Setting the options during cycle
Add the desired options during the wash cycle.
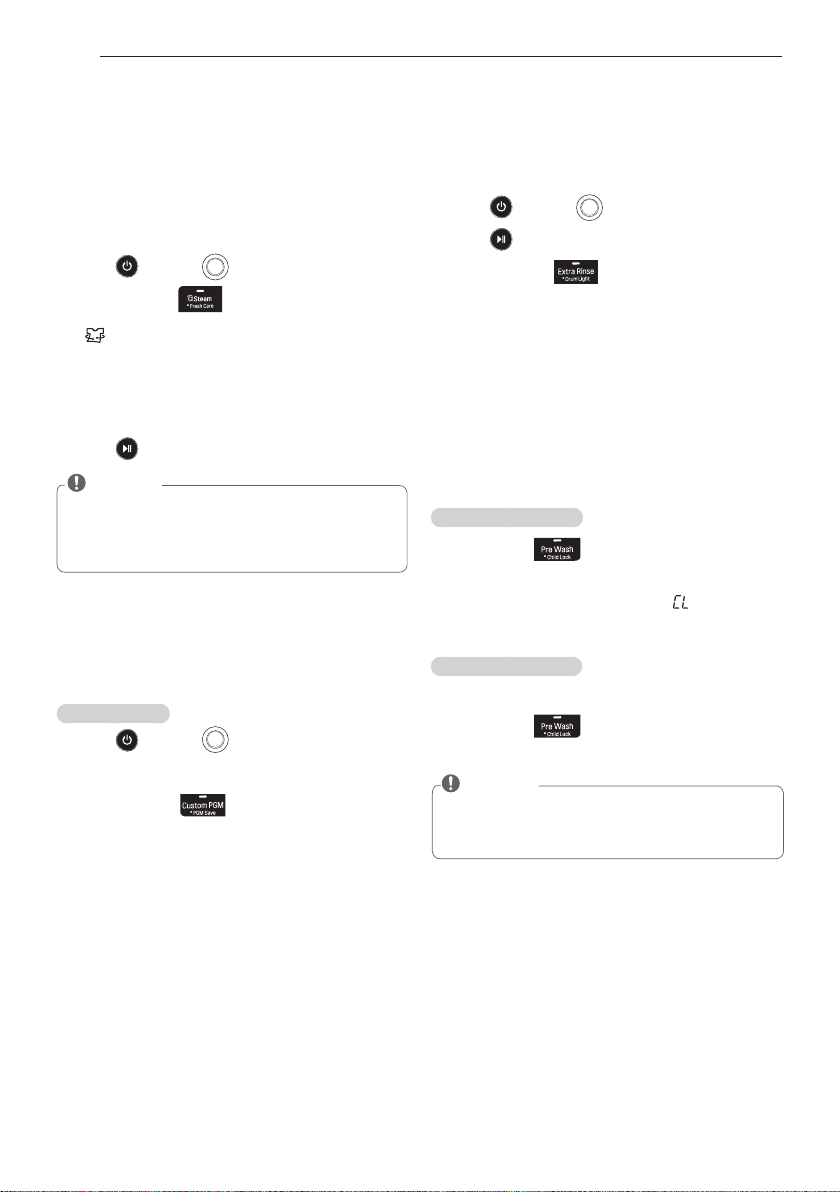
Tumble clothes to prevent wrinkles,
Fresh Care
Use this function when you are not able to take out
your clothes as soon as the wash cycle ends.
Press and turn to the desired cycle.
1
Press and hold for 3 seconds during the
2
wash cycle.
-
light will turn on.
Select any desired options.
3
- Skip to step 4 if you would like to use the
default settings without changing or adding any
options.
Press .
4
NOTE
yThis function provides periodic tumbling for up
to about 19 hours to prevent wrinkles. If you
press the START/ PAUSE or ON/ OFF button, you
can unload your laundry at anytime.
Saving customized wash cycle,
PGM Save
Save a special combination of settings that are used
frequently.
To save a cycle
Press and turn to the desired cycle.
1
Press the desired option to use the other options.
2
Press and hold for 3 seconds during the
3
wash cycle.
- The cycle with your preferred settings and
options is saved.
Drum Lighting, Drum Light
The drum is equipped with a white LED light that
illuminates when the washer is turned on. This light
automatically turns off when the door is closed and
the cycle starts. To turn on the light during a cycle.
Press and turn to the desired cycle.
1
Press .
2
Press and hold
3
wash cycle.
- The drum light will illuminate and then turn off
automatically after 4 minutes.
- Clothes and the gasket may look like yellow due
to lights of the lamp, but it is normal.
for 3 seconds during the
Button lock feature, Child Lock
Lock the washing machine to prevent children or
others from changing the cycle settings by pressing
the buttons during the cycle.
To enable child lock
Press and hold for 3 seconds during the wash
cycle.
- When the Child Lock is enabled, a
the remaining wash time are displayed, in turn, on
the display panel of the washing machine.
To disable child lock
(When the Child Lock is activated.)
Press and hold for 3 seconds during the wash
cycle.
message and
NOTE
y
Child Lock lasts after the end of cycle. If you want
to deactivate this function, Press and hold the
Pre Wash button for 3 seconds.
SMART FUNCTIONS
29
SMART FUNCTIONS
Smart ThinQ Application
The Smart ThinQ application allows you to
communicate with the appliance using a smartphone.
Installing Smart ThinQ Application
Search for the LG Smart ThinQ application from the
Google Play Store or Apple App Store on a smart
phone. Follow instructions to download and install the
application.
Installing Smart ThinQ Application
•For appliances with the or logo.
Washer Cycle (Remote Start + Download Cycle)
Set or download any preferred cycle and operate by
remote control.
Tub Clean Coach
This function shows how many cycles remain before it
is time to run the Tub Clean cycle.
Smart Diagnosis™
This function provides useful information for
diagnosing and solving issues with the appliance based
on the pattern of use.
Energy Monitoring
The washer energy usage is affected by the cycles and
options so you may see some changes in energy usage
from one cycle to another.
Push Alerts
When the cycle is complete or the appliance has
problems, you have the option of receiving push
notifications on a smart phone.
Settings
Set the product nickname and delete product.
NOTE
yTo verify the Wi-Fi connection, check that Wi-Fi
icon on the control panel is lit.
yLG Smart ThinQ is not responsible for any network
connection problems or any faults, malfunctions, or
errors caused by network connection.
yThe machine supports 2.4 GHz Wi-Fi networks only.
yIf the appliance is having trouble connecting to the
Wi-Fi network, it may be too far from the router.
Purchase a Wi-Fi repeater (range extender) to
improve the Wi-Fi signal strength.
yThe Wi-Fi connection may not connect or may
be interrupted because of the home network
environment.
yThe network connection may not work properly
depending on the internet service provider.
yThe surrounding wireless environment can make
the wireless network service run slowly.
yThis information is current at the time of publication.
yThe application is subject to change for product
improvement purposes without notice to users.
Using Washer Cycle
Remote Start
Use a smart phone to control the appliance remotely
or check to see how much time is left in the cycle.
Using Remote Start
Press the
1
Load the laundry.
2
Press and hold
3
to enable the Remote Start function.
Start a cycle from the LG Smart ThinQ application
4
on your smart phone.
Power
button.
Remote Start
button for 3 seconds
NOTE
yOnce the Remote Start mode is enabled,
you can start a cycle from the LG Smart
ThinQ smartphone application. If the cycle
is not started, the machine will wait to start
the cycle until it is turned off remotely from
the application or the Remote Start mode is
disabled.
yWhen Remote Start is turned on, the door is
automatically locked.
Disabling Remote Start
When the Remote Start is activated, press and hold
the
Remote Start
Smart Grid
Reduce energy costs from washing clothes by
avoiding peak usage periods, with information
supplied by the local electric utility company. If the
utility company has equipped Smart Grid technology,
contact the utility company for information regarding
the Smart Grid features.
button for 3 seconds.
NOTE
yWhen Smart Grid is enabled, you may
experience delays or extended cycle times
during peak usage periods.
Download Cycle
Download new and special cycles that are not
included in the basic cycles on the appliance.
Appliances that have been successfully registered
can download a variety of specialty cycles specific to
the appliance.
Only one cycle can be stored on the appliance at a
time.
Once cycle download is completed in the appliance,
the appliance keeps the downloaded cycle until a
new cycle is downloaded.
ENGLISH
 Loading...