

Page 1
Owner's Manual
WM2101H*
Please read this manual carefully. It provides
instructions on safe installation, use, and maintenance.
Retain it for future reference.
Record the model and serial numbers of your machine
and report this information to your dealer if your machine
requires service.
Washing Machine
☎☎
1-800-243-0000
24 HOURS A DAY, 7 DAYS A WEEK FOR LG CUSTOMER SERVICE
☎☎
1-800-243-0000
para el Servicio LG (Atención al Cliente) 24 horas al día, 7 días a la semana
Designed specially to use only
HE (High Efficiency) detergent
Protocol P172
Sanitization Performance of Residential and
Commercial, Family Sized Clothes Washers
Protocolo P172
Ejecucion de Saneamiento en la zona
residencial y comercial, lavodoras del uso del hogar
Protocole P172
Performance en matière d'assainissement des laveuses
résidentielles et commerciales de grande taille
MANUAL DEL
PROPIETARIO
Lavadora
Lea este manual cuidadosamente. Le proveerá
instrucciones para una instalación, uso y mantenimiento
seguros. Consérvelo para futuras referencias. Cite esta
información a su proveedor si requiere de servicio.
Diseñada especialmente para utilizar
solamente detergente HE (Alta eficiencia)
Conçu exclusivement pour les
détersifs HE (haute efficacité)
Page 2

PRODUCT FEATURES
2
CONTENTS
Important Safety Information ..........................................................................................................................3
Specifications..................................................................................................................................................4
Installation Instructions ...................................................................................................................................5
Preparation Before Washing.........................................................................................................................10
Using the Dispenser......................................................................................................................................11
Cycles...........................................................................................................................................................13
How to Use the Washer................................................................................................................................14
Maintenance .................................................................................................................................................17
Troubleshooting Guide..................................................................................................................................20
Warranty..................................................................................................................................................23-24
추가선택, 예약,
WASH
EST. TIME
SPIN
■
Direct Drive System
The advanced Brushless DC motor directly drives the drum without
belt and pulley.
■
Tilted Drum and Extra Large Door Opening
Tilted drum and extra large opening make it possible to load
and unload clothing more easily.
■
RollerJets
Washing ball enhances the wash performance and reduces damage
to the clothing. The jets spray and help tumble clothes to enhance
washing performance while maintaining fabric care.
■
Automatic Wash Load Detection
Automatically detects the load and optimizes the washing time.
■
Built-in Heater
Internal heater helps to maintain water temperature at its optimum level for
selected cycles.
■
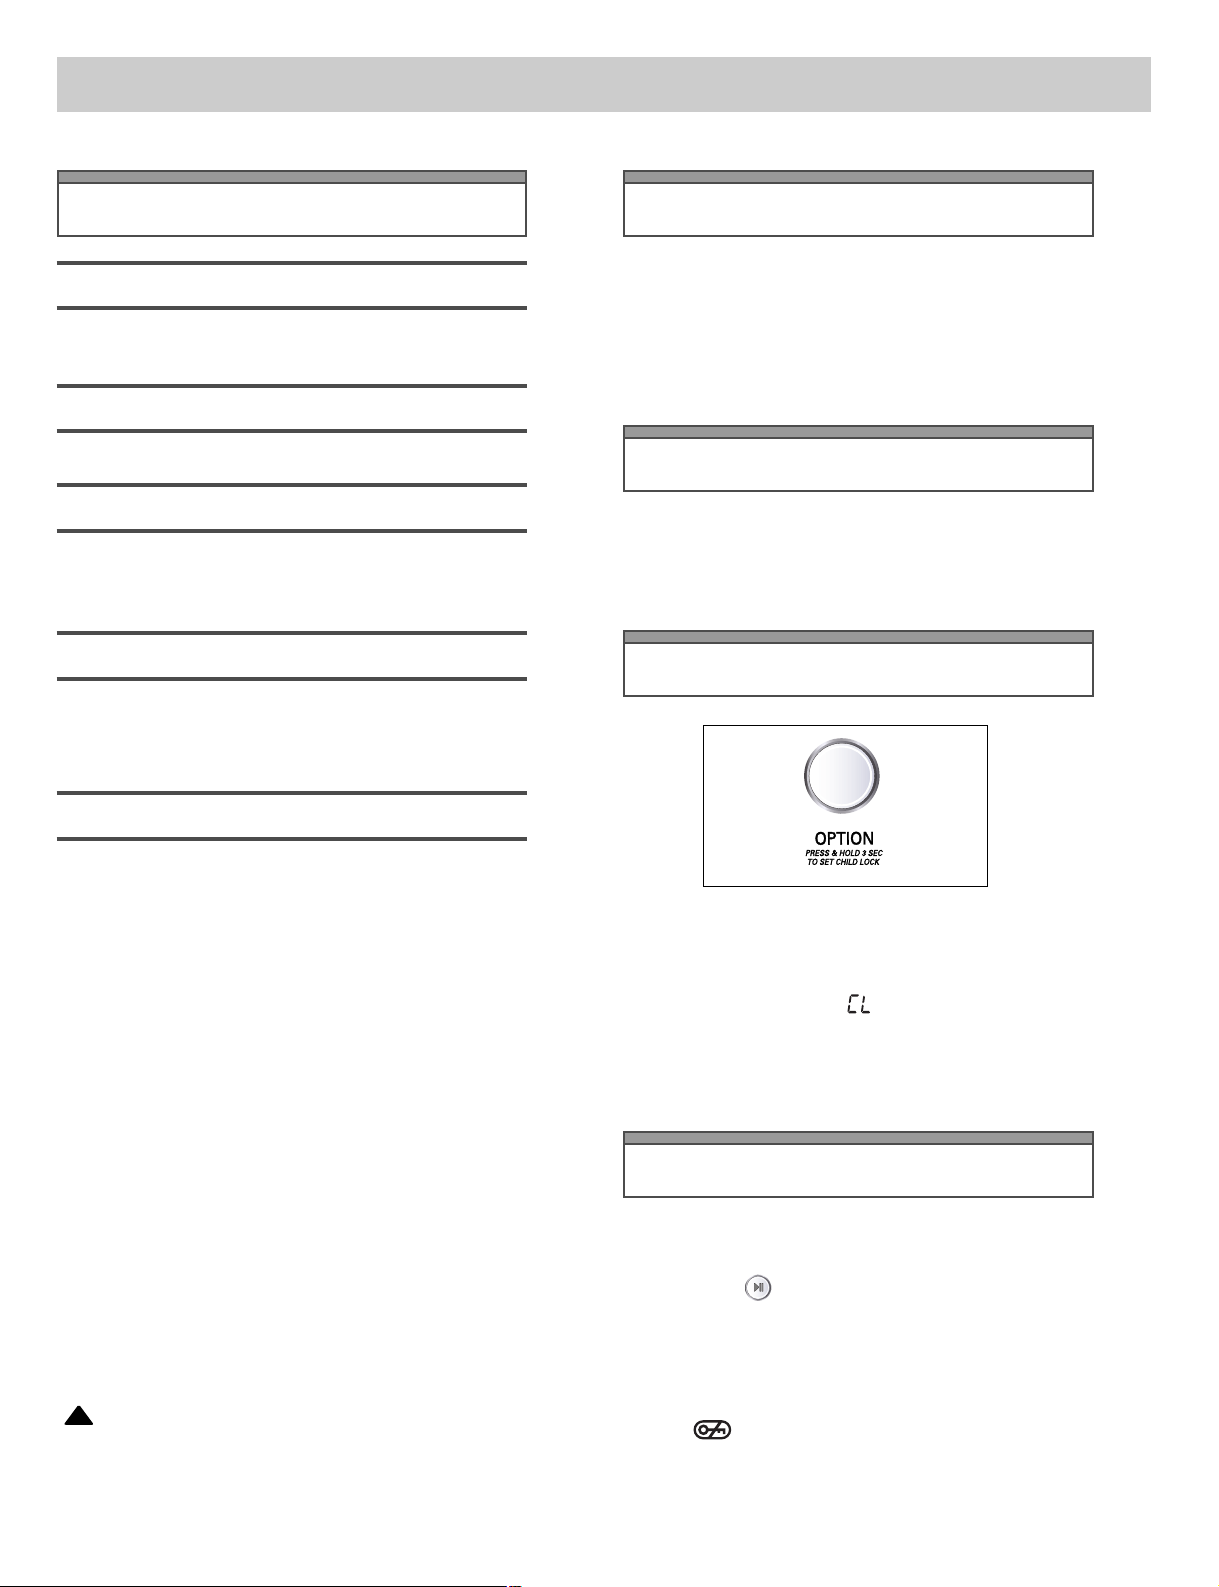
Child Lock
The Child lock prevents children from pressing any button to change the
settings during operation.
■
The LED Display
The LED display shows the settings, estimated time remaining, options,
and status messages for your washer. When the washer is turned on, the
light in the display will illuminate.
Page 3

IMPORTANT SAFETY INFORMATION
ENGLISH
3
READ ALL INSTRUCTIONS BEFORE USE
WARNING!
For your safety, the information in this manual must be followed to minimize the risk of fire or
explosion, electric shock, or to prevent property damage, personal injury, or loss of life.
IIMMPPOORRTTAANNTT SSAAFFEETTYY IINNSSTTRRUUCCTTIIOONNSS
• Read all instructions before using the washer.
• Do not wash articles that have been previously
cleaned in, washed in, soaked in, or spotted with
gasoline, dry cleaning solvents, or other
flammable or explosive substances, as they give
off vapors that could ignite or explode.
• Do not add gasoline, dry cleaning solvents, or
other flammable or explosive substances to the
wash water. These substances give off vapors that
could ignite or explode.
• Under certain conditions, hydrogen gas may be
produced in a hot water system that has not been
used for 2 weeks or more. HYDROGEN GAS IS
EXPLOSIVE. If the hot water system has not been
used for such a period, before using the washing
machine, turn on all hot water faucets and let the
water flow from each for several minutes. This will
release any accumulated hydrogen gas. As the gas
is flammable, do not smoke or use an open flame
during this time.
• Do not allow children to play on or in the washer.
Close supervision of children is necessary when
the washer is used near children.
• Before the washer is removed from service or
discarded, remove the door to prevent children
from hiding inside.
• Do not install or store the washer where it will be
exposed to the weather.
• Do not tamper with controls.
• Do not repair or replace any part of the washer or
attempt any servicing unless specifically
recommended in the user-maintenance
instructions or published user-repair instructions
that you understand and have the skills to carry
out.
• See Installation Instructions for grounding
requirements.
• ALWAYS follow the fabric care instructions
supplied by the garment manufacturer.
• Do not place items exposed to cooking oil in your
washer. Items contaminated with cooking oils may
contribute to a chemical reaction that could cause
a load to catch fire.
• Do not use fabric softeners or products to
eliminate static unless recommended by the
manufacturer of the fabric softener or product.
WARNING
: To reduce the risk of fire, electric shock, or injury to persons when using the washer, follow basic
precautions, including the following:
SSAAVVEE TTHHEESSEE IINNSSTTRRUUCCTTIIOONNSS
This appliance must be grounded. In the event of malfunction or breakdown, grounding will reduce the risk
of electric shock by providing a path of least resistance for electric current. This appliance is equipped with
a cord having an equipment-grounding conductor and grounding plug. The plug must be plugged into an
appropriate outlet that is properly installed and grounded in accordance with all local codes and ordinances.
• Do not use an adapter or extension cord.
• Do not remove ground prong.
• If you don’t have the proper outlet, consult an electrician.
GROUNDING INSTRUCTIONS
WARNING
: Improper connection of the equipment-grounding conductor can result in risk of electric shock.
Check with a qualified electrician or serviceman if you are in doubt as to whether the appliance is
properly grounded. Do not modify the plug provided with the appliance - if it does not fit the outlet,
have a proper outlet installed by a qualified electrician.
!
!
!
Page 4
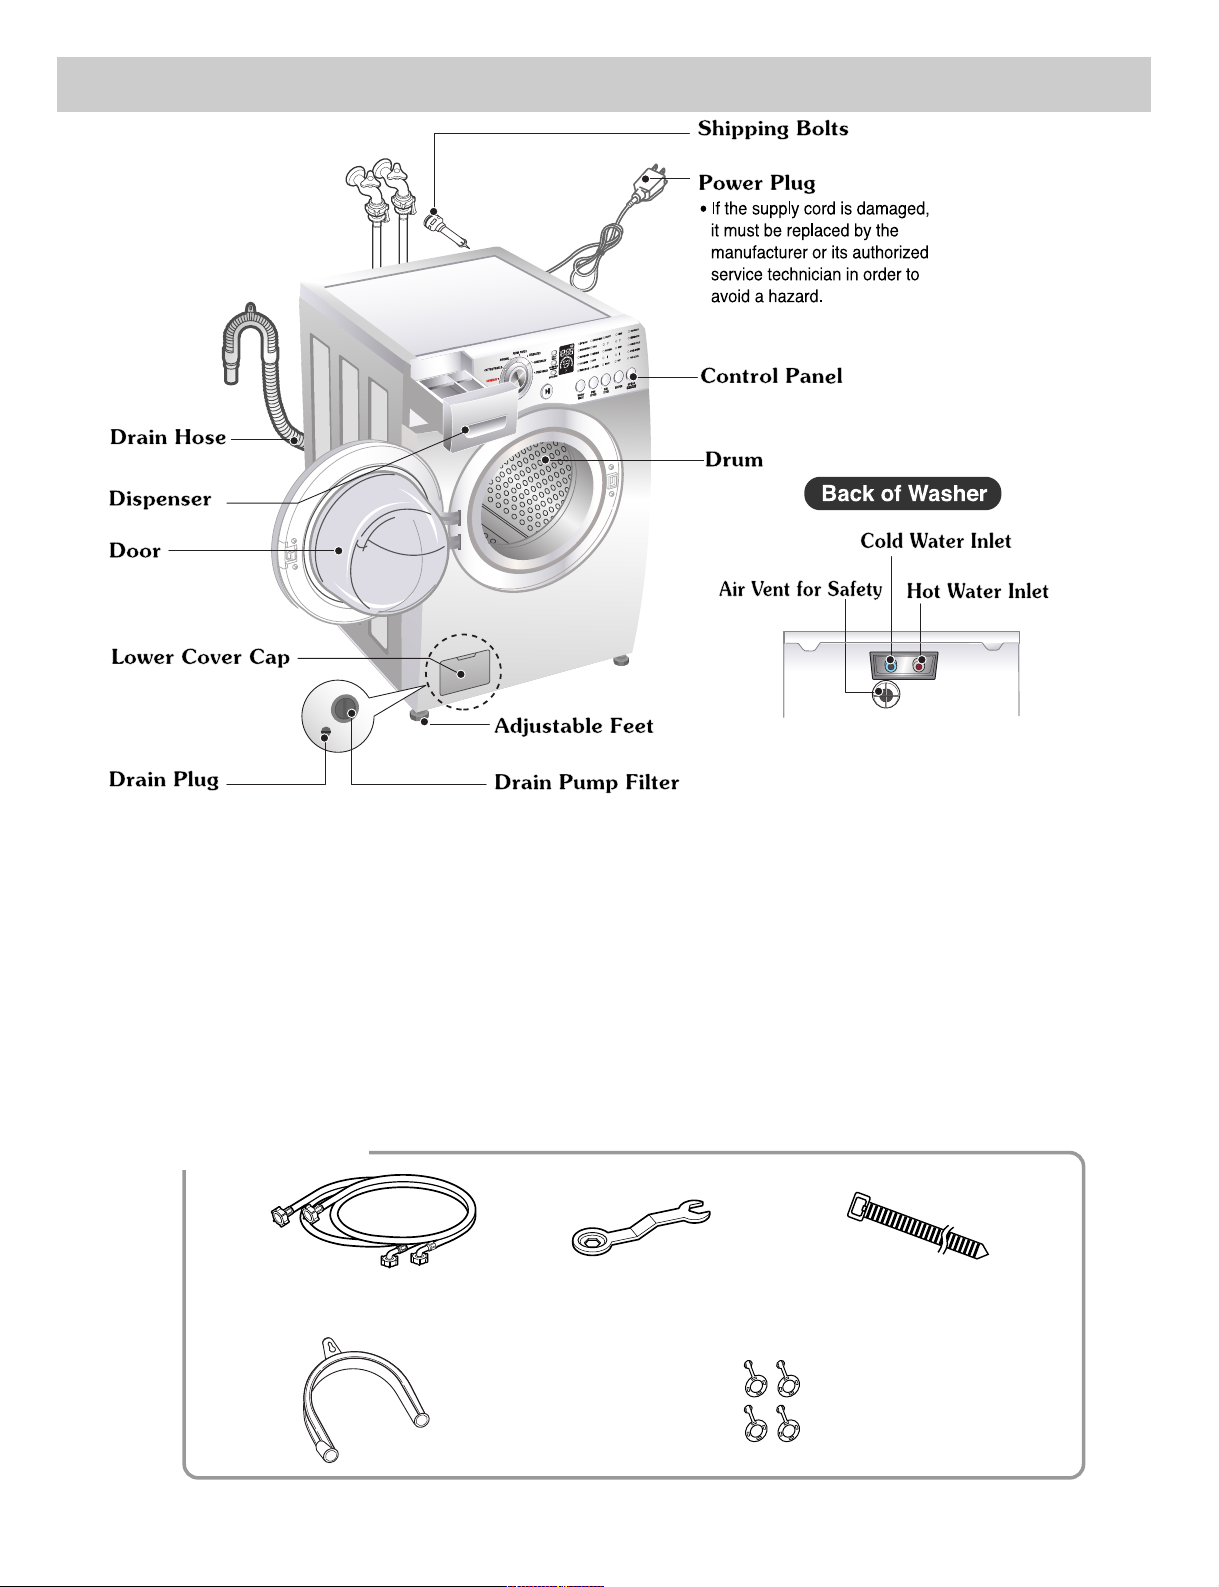
Hose retainer
Hot/Cold (1 each)
Hose
Wrench
Tide
for removing shipping bolts
and leveling the washer
Tie strap
to secure drain hose to standpipe,
inlet hose, or laundry tub
Cap (4 each)
to cover the holes created after
removing the shipping bolts
WASHWASH
EST. TIMEEST. TIME
SPINSPIN
울
란제리란제리
SPECIFICATIONS
4
■
Accessories
■
Name: Front-loading Washing Machine
■
Power susupply: 120V~ 60Hz
■
Size: 68.6 cm (W) X 75.6 cm (D) X 98.3 cm (H), 129.1 cm (D, door open)
27”(W) X 29
3
/
4
”(D) X 38
11
/
16
”(H), 50
13
/
16
”(D, door open)
■
Weight: 190 lbs. (86 kg)
■
Spin speed: 1100 rpm max.
■
Permissible water pressure: 14.5~116 psi(100~800kPa)
Specifications subject to change by manufacturer.
Page 5
5
INSTALLATION INSTRUCTIONS
ENGLISH
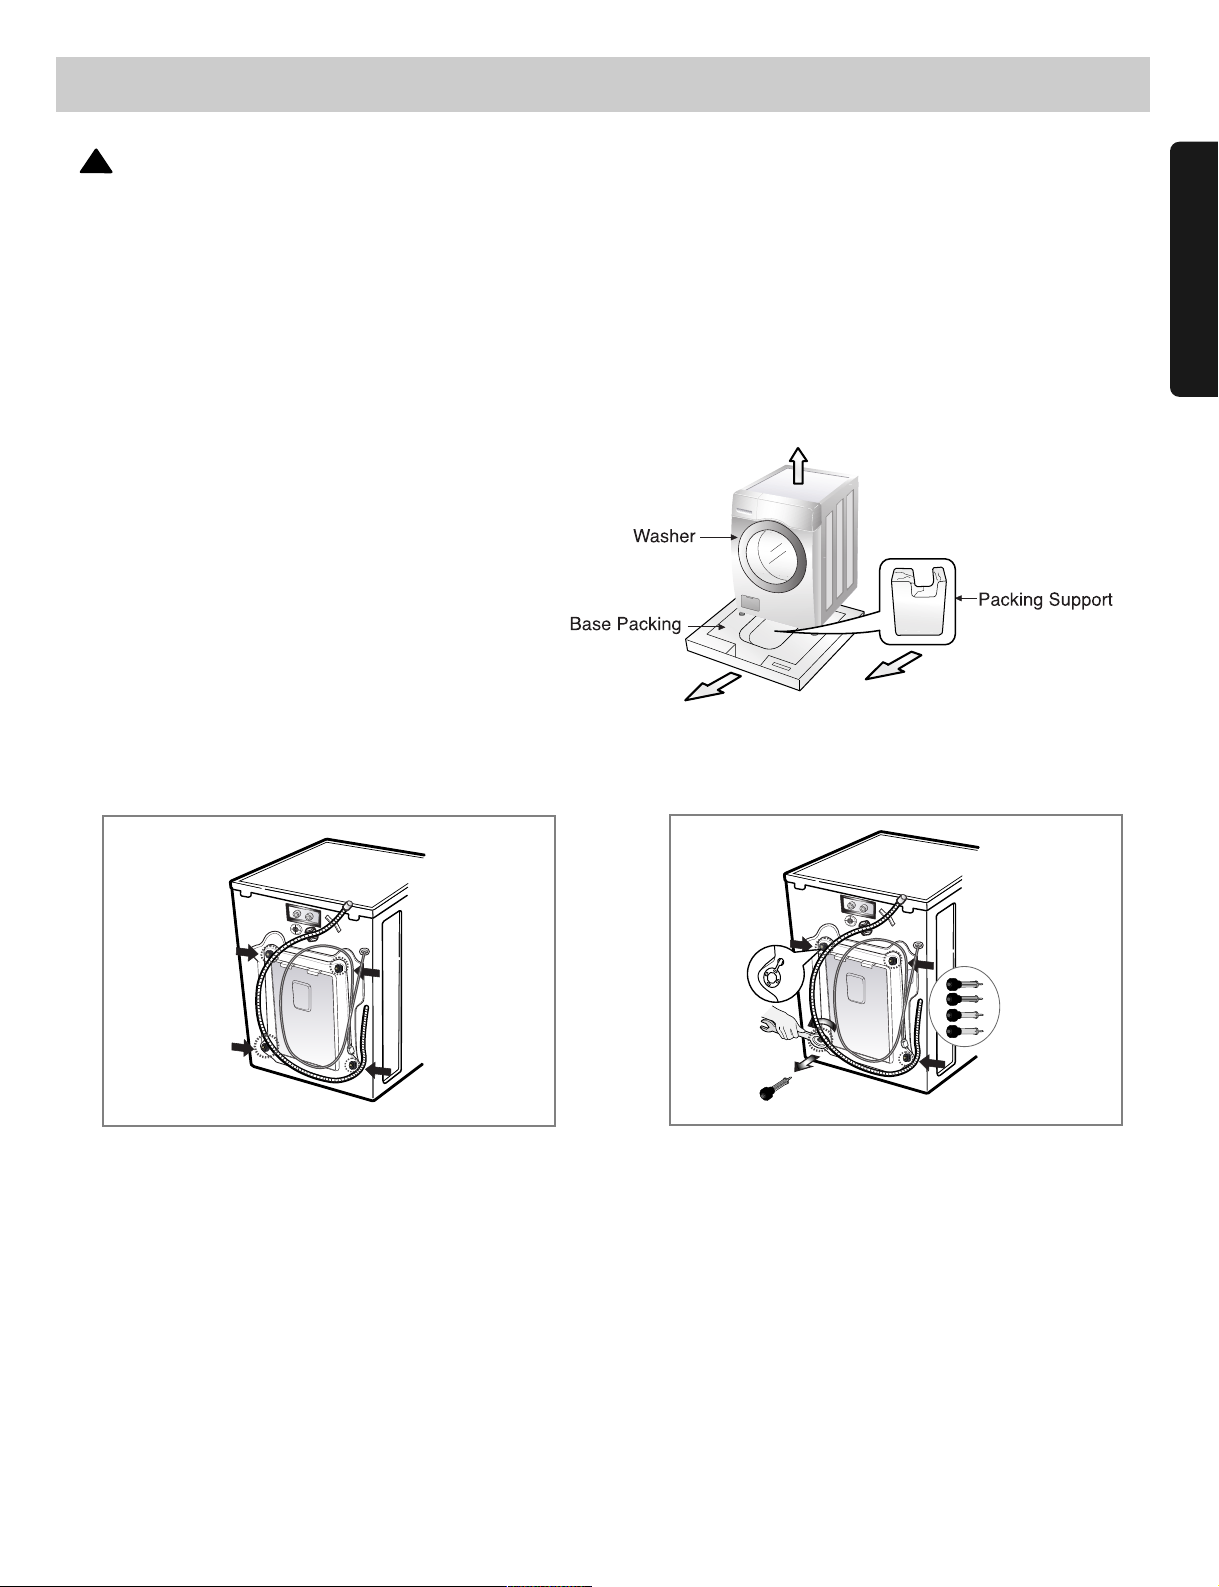
1. To prevent internal damage during transport,
4 locking bolts are installed. Before operating
the washer, remove the bolts and braces.
• If they are not removed, it may cause severe
vibration, noise, and malfunction.
3. Take out the 4 bolts and braces by twisting
the braces slightly. Keep the 4 bolts, braces
and the wrench for future use.
• Whenever the appliance is transported, the
shipping bolts and braces must be reinstalled.
2. Unscrew the 4 bolts with the wrench supplied.
Do first lower side to remove easily. One of the
bolts retains the power cord of the washer to
prevent operating without removing bolts.
4. Close the holes with the caps supplied.
The appliance is fitted with shipping bolts to prevent
internal damage during transportation.
Packing and all shipping bolts must be removed
before using the washer.
When unpacking the base, be sure to remove
the additional packing support in the middle of
the base packing.
: Two or more people may be need to install and move the appliance.
■ Shipping bolts
Install or store unit where it will not be exposed to temperatures below freezing or
exposed to outside weather conditions.
Properly ground washer to conform with all governing codes and ordinances.
To reduce the risk of electric shock, do not install the washer in humid spaces.
The base opening must not be obstructed by carpeting when the washing machine is installed on a carpeted floor.
In countries where there are areas which may be subject to infestation by cockroaches or other vermin, pay
particular attention to keeping the appliance and its surroundings in clean condition at all times.
Damage caused by cockroaches or other vermin will not be covered by the appliance warranty.
■ Removing shipping bolts
cap
!
WARNING
Page 6
INSTALLATION INSTRUCTIONS
6
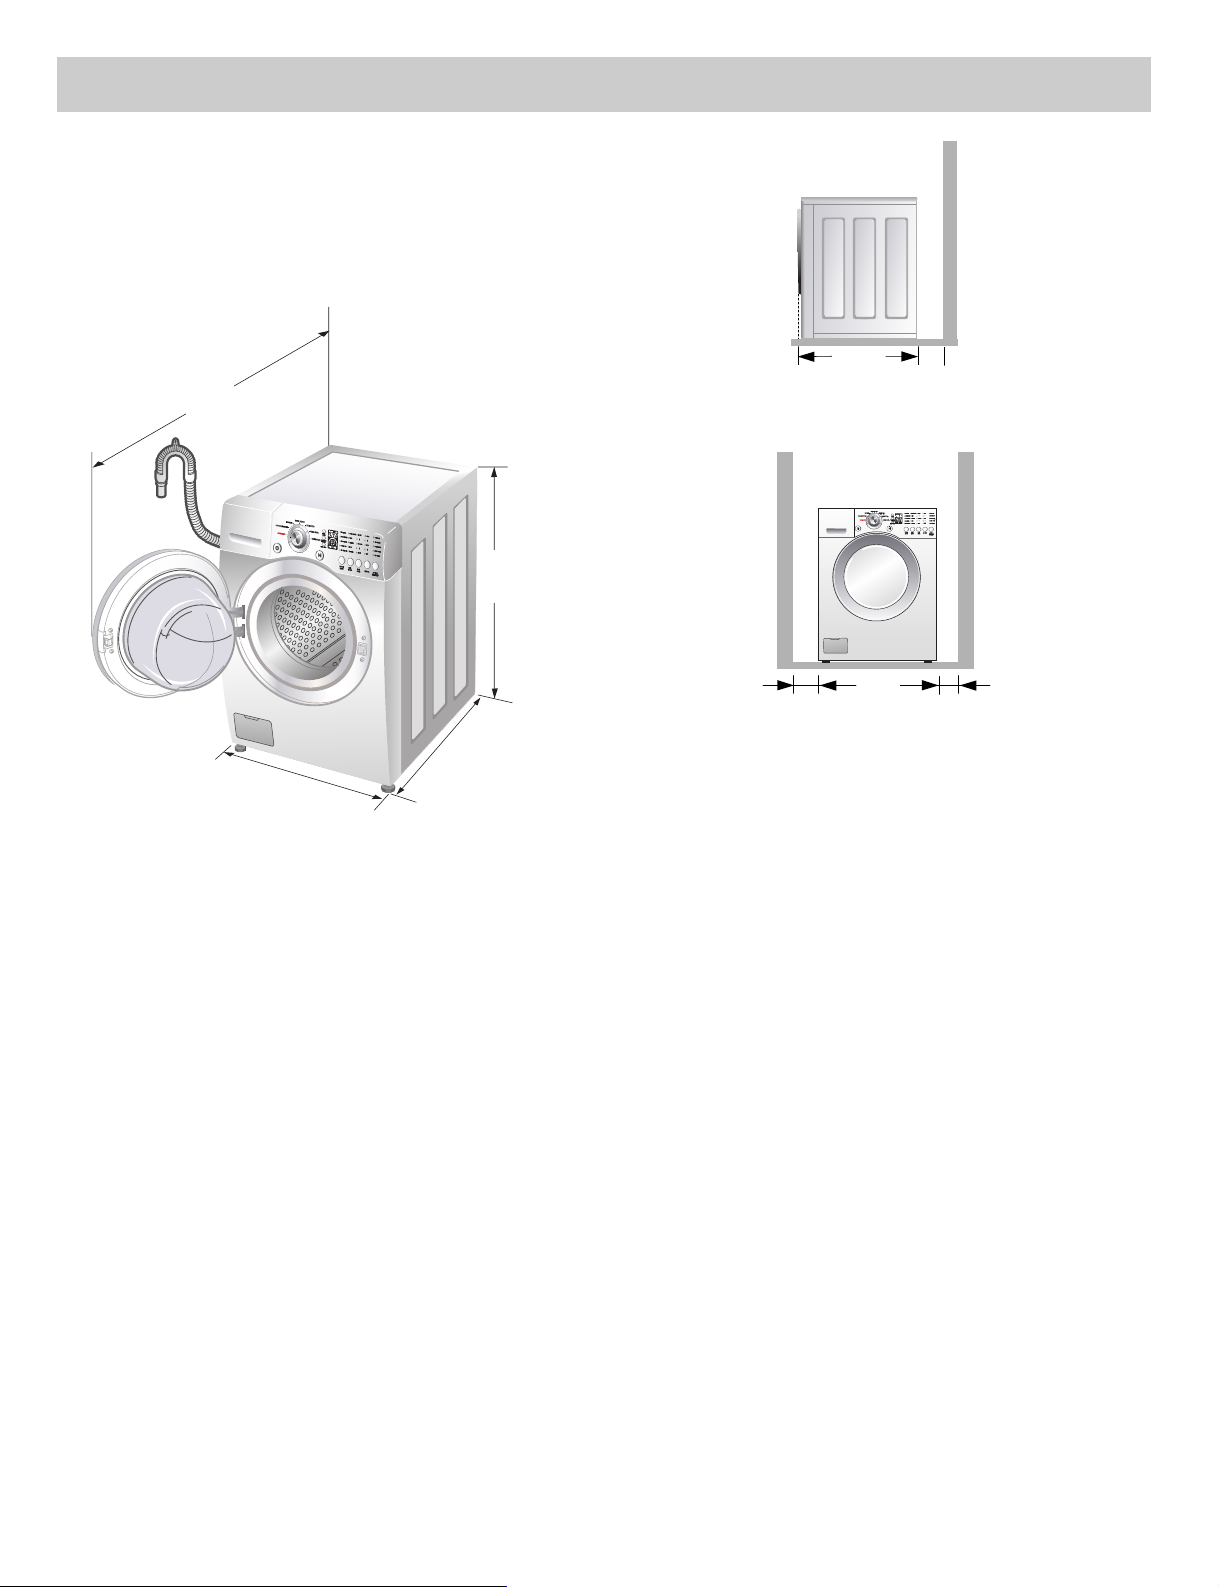
■ Installation clearances
The location must be large enough to fully open
the washer door.
■ Washer dimensions
• Most installations require a minimum 4 in.
(10 cm) clearance behind the washer.
■ Minimum installation spacing for
recessed area installation.
The following dimensions shown are for the minimum
spacing allowed.
Additional spacing should be considered for
installation and servicing.
• Additional clearances might be required for wall,
door and floor moldings.
• Additional spacing of 1 in. (2.5 cm) on all sides of
the washer is recommended to reduce noise
transfer.
Companion appliance spacing should also be
considered.
■ Level floor
• Allowable slope under entire washer is 1°.
• To minimize noise and vibration, the washer
MUST be installed on a solidly constructed
floor.
• Carpeting and soft tile surfaces are not
recommended.
• Never install the washer on a platform or weakly
supported structure.
NOTE: A firm, solid floor is even more critical to a
front-loading washer than to a top-loader.
If your floor is wood and/or frame
construction, you may need to reinforce it.
Front-loaders use substantially faster spin
speeds than top-loaders, causing greater
vibration. If the floor is not solid, your washer
will vibrate. You will hear and feel the
vibration throughout your house.
■ Power outlet
•
Must be within 60 in. (1.5 m) of either side of the
washer. Do not overload the outlet with more
than one appliance.
• Time-delay fuse or circuit breaker is recommended.
NOTE: It is the personal responsibility and obligation
of the customer to have a proper outlet
installed by a qualified electrician.
[Front view]
[Side view]
27"
(68.6 cm)
29
3
/
4
"
(75.6 cm)
38
11
/
16
"
(98.3 cm)
50
13
/
16
"
(129.1 cm)
29 3/4"
(75.6 cm)
4"
(10 cm)
27"
(68.6 cm)
1"
(2.5 cm)
1"
(2.5 cm)
WASHWASH
EST. TIMEEST. TIME
SPINSPIN
Page 7
INSTALLATION INSTRUCTIONS
ENGLISH
7
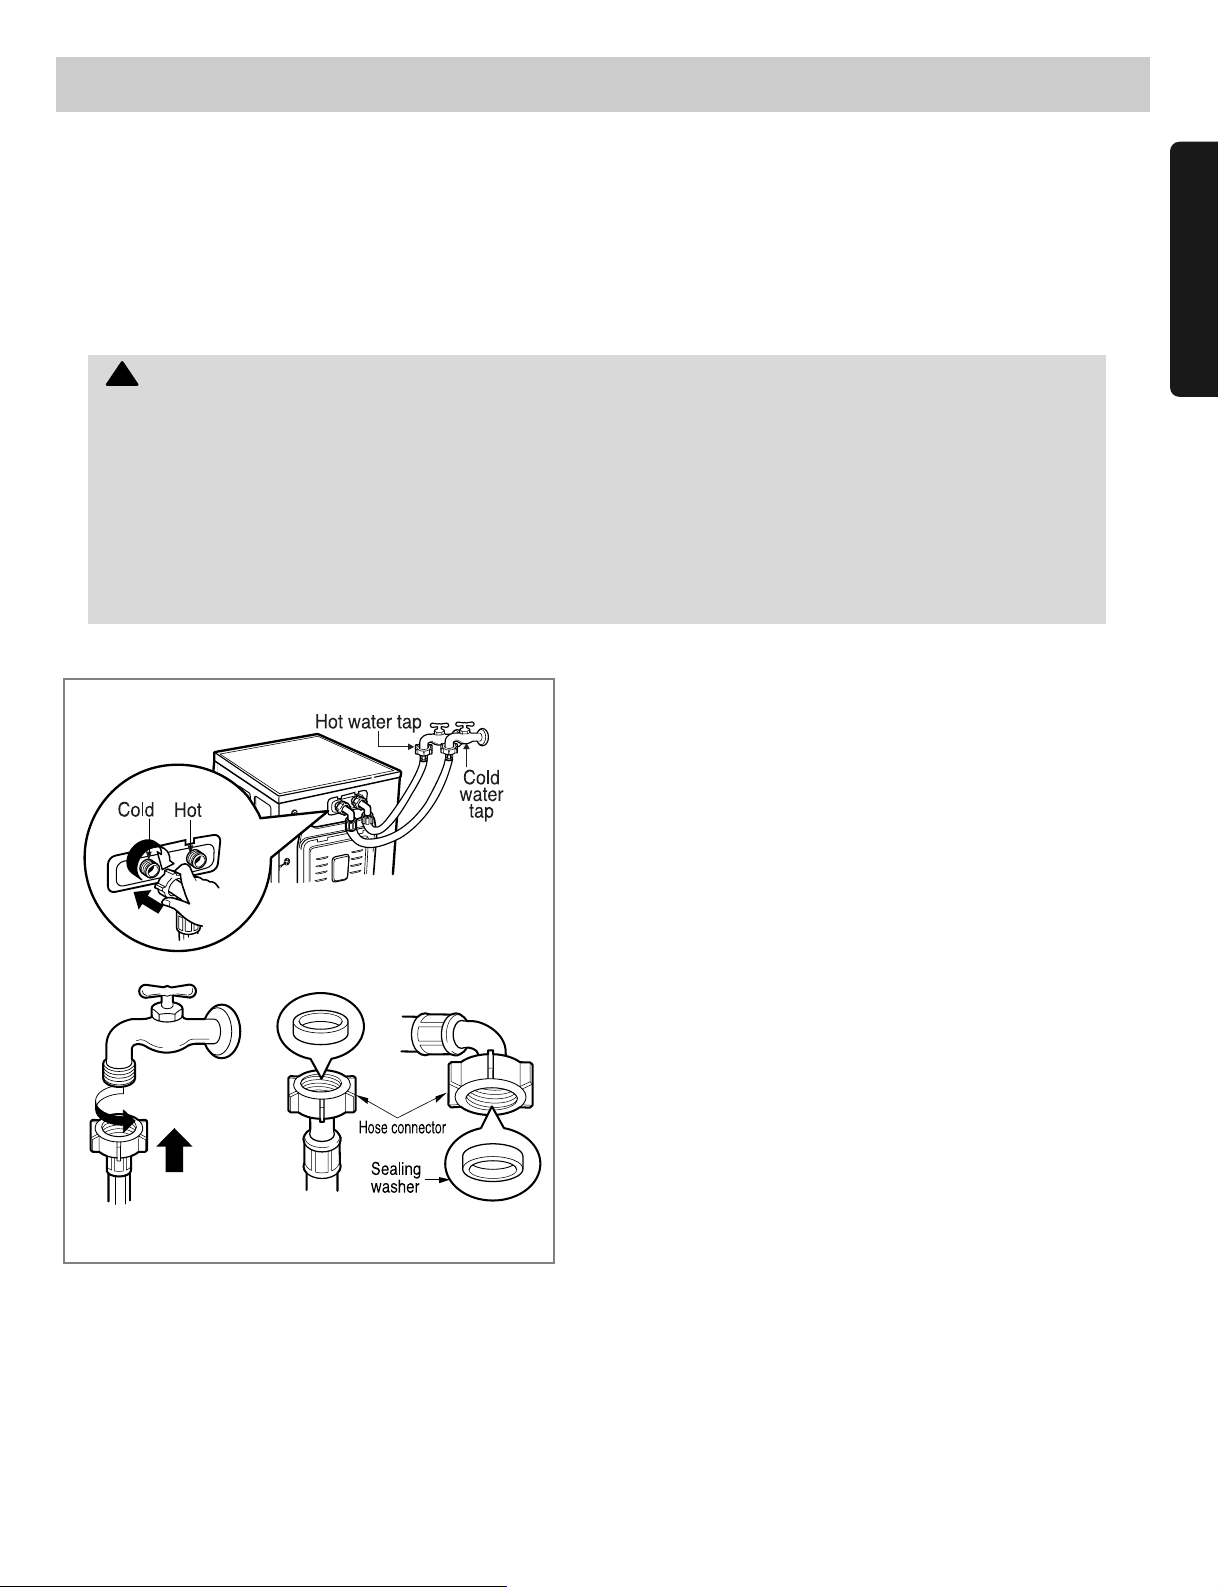
• Water supply pressure must be between
14.5 and 116 psi(100~800 kPa).
• Do not crossthread when connecting inlet hose to the
valve.
• If the water supply pressure is more than 116 psi,
a pressure reducing device should be installed.
• Two Sealing washers are supplied with the water inlet
hoses to prevent water leaks.
• Check for leakage of washing machine connections by
turning the tap completely on.
• Periodically check the condition of the hose and replace
the hose if necessary.
• Make sure that there is no kink in the hose and that it is
not crushed.
• Be sure that the two water input ports are connected to
the correct water faucets. The connector for hot water is
colored red.
• Use ONLY the inlet hoses provided by LG with this
laundry product. Aftermarket hoses are not guaranteed to
fit or function correctly. Other hoses may not tighten
correctly and couldcause leaks. Subsequent damage to
product or property will not be covered under the terms of
LG's warranty.
■ Connecting water supply hose
NOTE: Washing Machine is to be connected to the water mains using new hoses.
Old hoses should not be used.
■ Electrical connection
• Do not use an extension cord or double adapter.
• If the supply cord is damaged, it must be replaced by a qualified person in order to avoid a hazard.
• If the machine will not be used for an extended time, unplug it and shut off the water supply.
• Connect the machine to a grounded outlet in accordance with current wiring regulations.
• The appliance must be positioned so that the plug is easily accessible.
Repairs to the washing machine must only be carried out by qualified personnel. Repairs carried out by
inexperienced persons may cause injury or serious malfunctioning. Contact your local service center.
Do not install your washing machine in a room where temperatures below freezing may occur.
Frozen hoses may burst under pressure. The reliability of the electronic control unit may be impaired
at temperatures below the freezing point.
If the appliance is delivered in the winter months and temperatures are below freezing,
store the washing machine at room temperature for a few hours before putting it into operation.
CAUTION! Concerning the Power Cord
Most appliances recommend they be placed upon a dedicated circuit; that is, a single outlet circuit which powers only that
appliance and has no additional outlets or branch circuits. Check the specification page of this owner's manual to be
certain.
Do not overload wall outlets. Overloaded wall outlets, loose or damaged wall outlets, extension cords, frayed power cords,
or damaged or cracked wire insulation are dangerous. Any of these conditions could result in electric shock or fire.
Periodically examine the cord of your appliance, and if its appearance indicates damage or deterioration, unplug it,
discontinue use of the appliance, and have the cord replaced with an exact replacement part by an authorized servicer.
Protect the power cord from physical or mechanical abuse, such as being twisted, kinked, pinched, closed in a door, or
walked upon. Pay particular attention to plugs, wall outlets, and the point where the cord exits the appliance.
!
Page 8
INSTALLATION INSTRUCTIONS
8
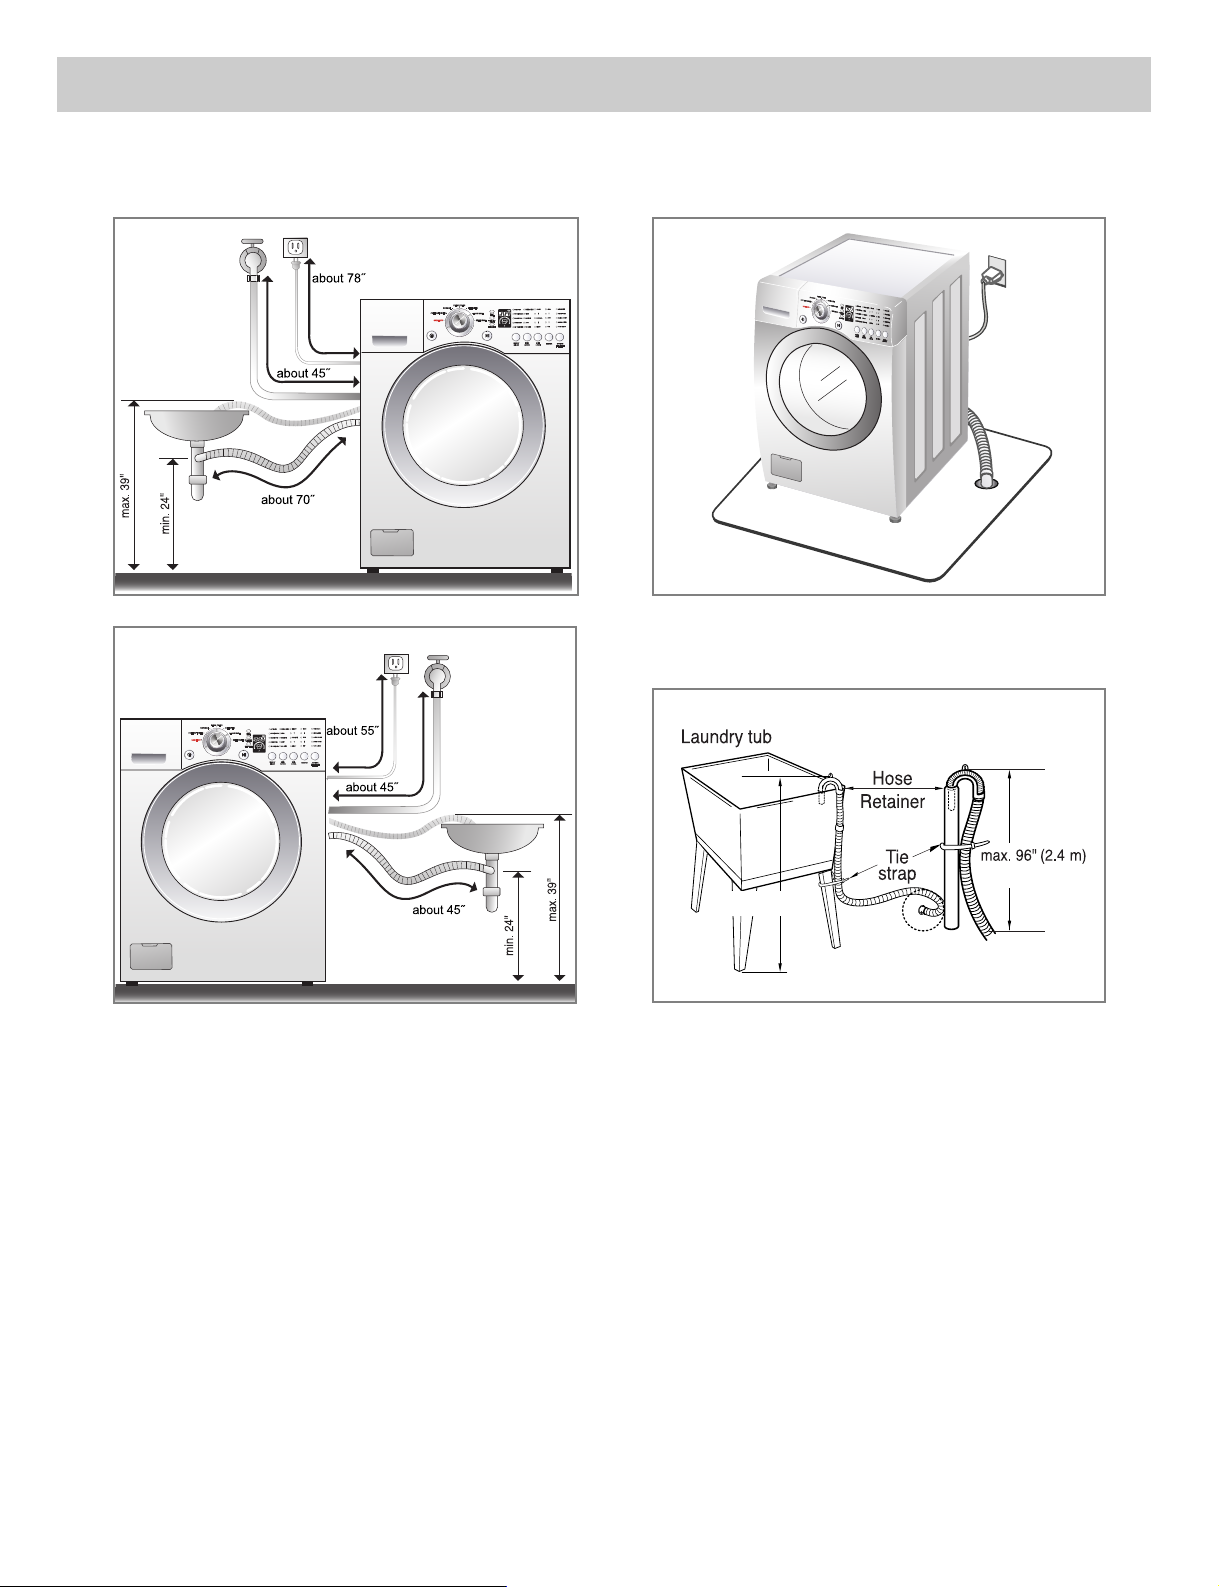
■ Installation of drain hose
WASHWASH
EST. TIMEEST. TIME
SPINSPIN
WASH
EST. TIME
SPIN
WASH
EST. TIME
SPIN
WASH
E
S
T
.
T
I
M
E
SPIN
• The drain hose should not be placed higher than
96 in. from the bottom of the washer.
• Properly securing the drain hose will protect the
floor from damage due to water leakage.
• Place the end of the drain hose in the hole of the
floor drain system.
• When installing the drain hose at a sink, secure it
so it cannot break away and cause flooding and
damage.
• Properly securing the drain hose will protect the
floor from damage due to water leakage.
This equipment is not designed for maritime use or for mobile installations such as in RV’s, aircraft, etc.
Turn off the faucet if the machine is to be left for an extended period of time (e.g. holiday).
When disposing of the appliance, cut off the power cable, and destroy the plug.
Disable the door lock to prevent young children being trapped inside.
Packaging material (e.g. Films, Styrofoam) can be dangerous for children. There is a risk of suffocation! Keep all
packaging from children.
ES
T
.
TIM
E
W
A
S
H
SPIN
EST. TIME
WASH
SPIN
min. 30" (76.2cm)
Page 9
INSTALLATION INSTRUCTIONS
ENGLISH
9
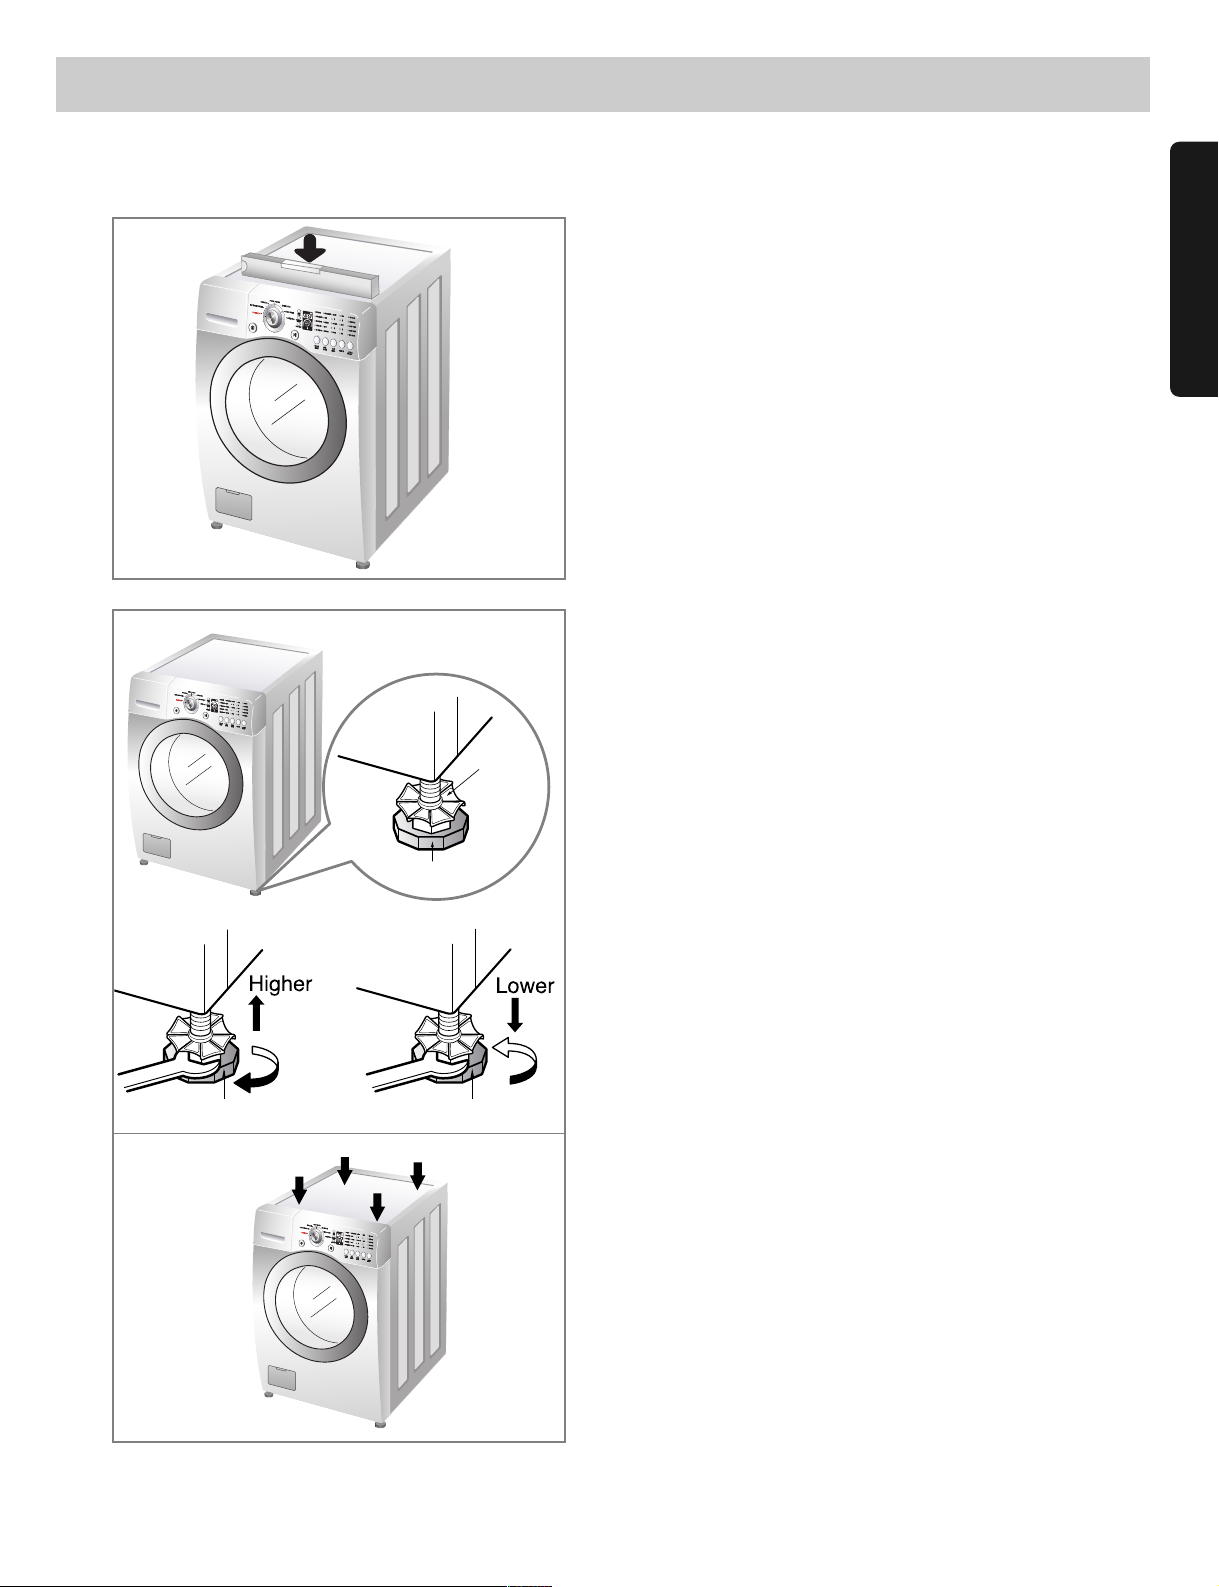
■ Level adjustment
• Leveling the washing machine properly prevents
excessive noise and vibration.
Install the appliance on a solid and level floor surface,
preferably in a corner of the room.
• If the floor is uneven, adjust the adjustable feet as
required. (Do not insert pieces of wood, etc. under the
feet.)
NOTE: Extend the feet no more than necessary to level
the washer. The more the feet are extended, the
more the washer will vibrate.
• Make sure that all four feet are stable and resting on
the floor and then check that the appliance is perfectly
level (Use a level).
• After the washer is level, tighten the lock nuts up
against of the base of the washer. All lock nuts must
be tightened.
• It is critical to adjust the feet perfectly. This must be
done while the washer is spinning with a load. Use the
wrench (supplied) to adjust the feet until there is no
vibration. Then tighten the lock nuts to prevent further
adjustment.
NOTE: If there are vibration and noise during the spin
cycle, re-check the leveling of the washer, adjust
the feet as required, and tighten the lock nuts
securely to prevent changes in adjustment.
Run the washer with a test load to make certain
your washer is properly leveled. Put
approximately 6 pounds of laundry in the
machine. Then, press POWER, RINSE+SPIN, and
START/PAUSE, in that order. When the machine
spins at high speed, verify that it is stable. If not,
adjust the feet accordingly.
Diagonal Check
When pushing down the edges of the washing machine
top plate diagonally, the machine should not move up
and down at all. (Please, check both directions.)
If the machine rocks when pushing the machine top plate
diagonally, adjust the feet again.
W
A
S
H
WASH,
E
S
T
.
T
IM
E
EST. TIME,
SPIN,
WASH
EST. TIME
SPIN
WASH
EST. TIME
SPIN
EST
. TIME
,
WASH
,
SPIN
,
Lock nut
Adjustable feet
Adjustable feet Adjustable feet
EST. TIME
,
WASH
,
SPIN
,
Page 10
PREPARATION BEFORE WASHING
10
1. Fabric Care Labels
Look for a care label on your clothes. This will tell you about the fabric content of your garment and how it should
be washed.
2. Sorting
To get the best results, sort clothes into loads that can be washed with the same wash cycle.
Different fabrics need to be washed in different ways.
Always sort dark colors from pale colors and whites. Wash separately as dye and lint transfer can occur causing
discoloration of white clothing. If possible, do not wash heavily soiled items with lightly soiled ones.
Soil (Heavy, Normal, Light) Separate clothes according to amount of soil.
Color (White, Lights, Darks) Separate white fabrics from colored fabrics.
Lint (Lint Producers, Collectors) Wash lint producers and lint collectors separately.
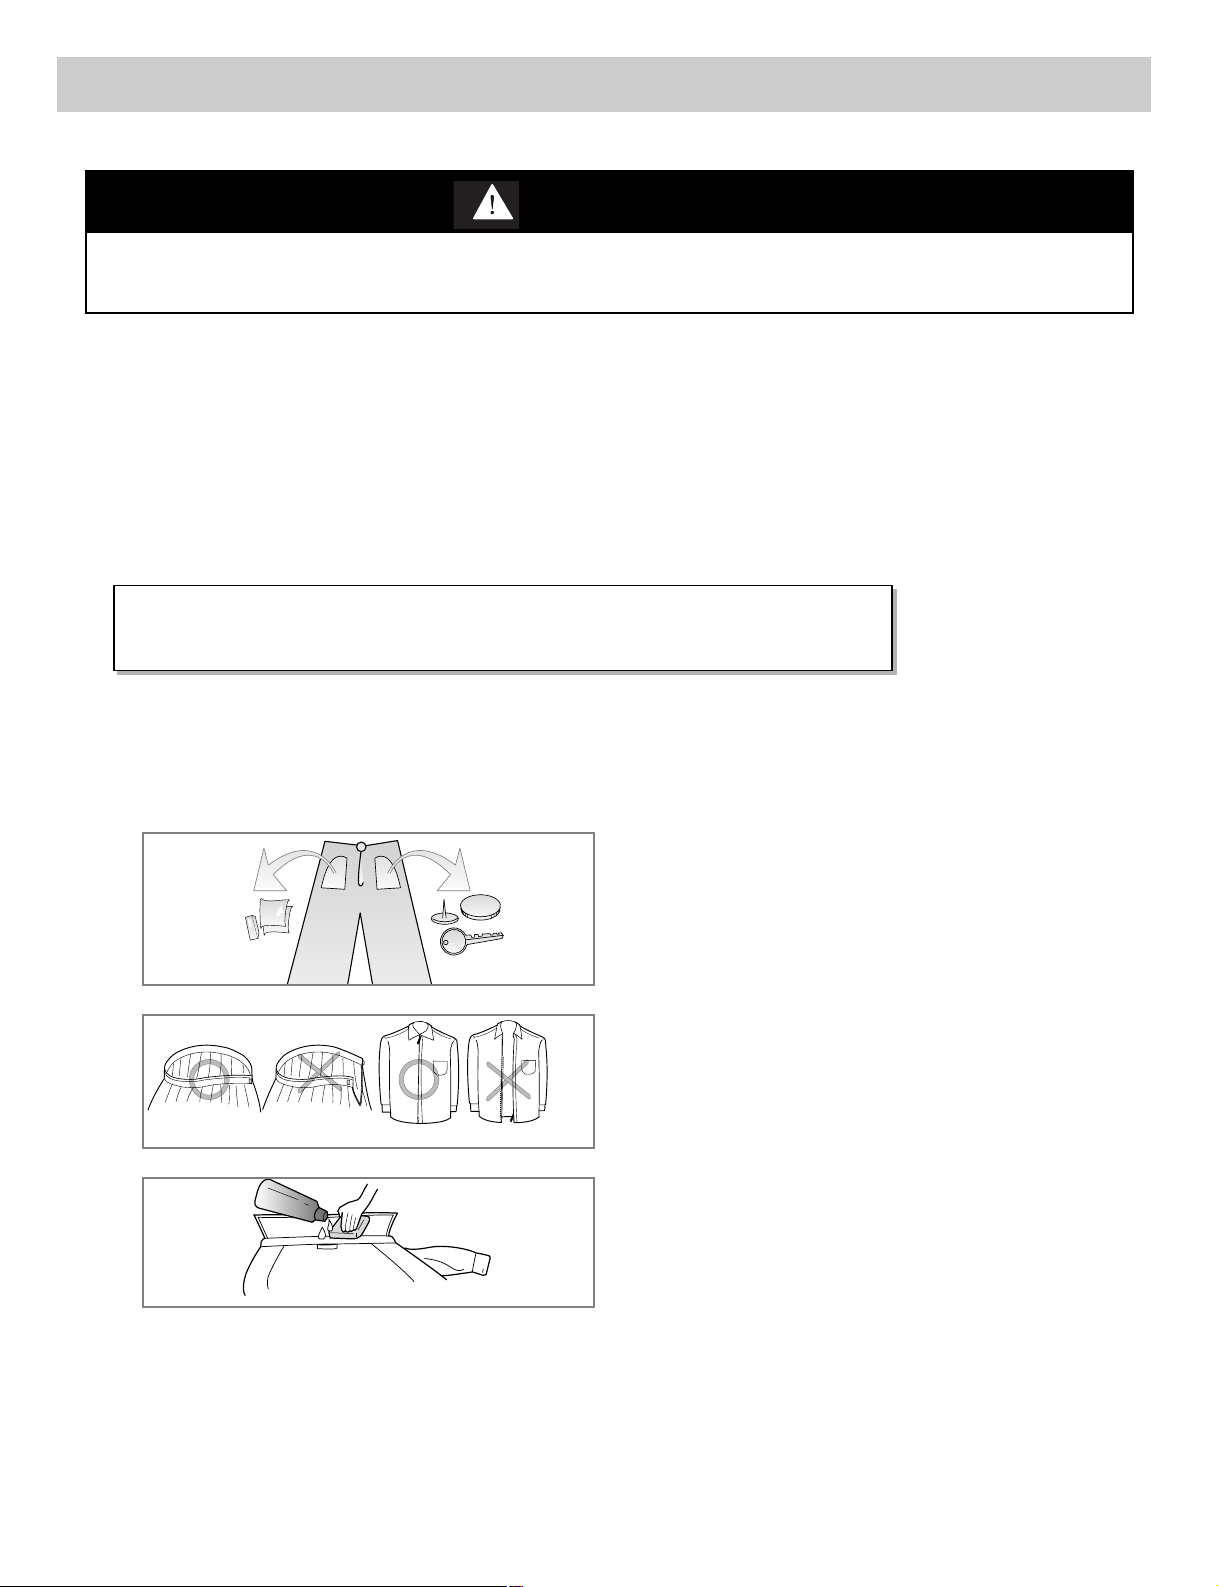
3. Check before loading
Combine large and small items in a load. Load large items first.
Large items should not be more than half the total wash load.
Do not wash single items. This may cause an out-of-balance load. Add one or two similar items.
• Check all the pockets to make sure that they are
empty. Things such as clip, matches, pens,
coins, and keys can damage both your washer
and your clothes.
• Close zippers, hooks, and strings to make sure
that these items do not snag on other clothes.
• Pretreat dirt and stains by brushing a little
detergent dissolved in water onto stains like
collars and cuffs to help lift dirt.
WARNING
To reduce the risk of fire, electric shock, or injury to persons, read the IMPORTANT SAFETY
INSTRUCTIONS before operating this appliance.
NOTE: Do not wash or spin water-proof clothes.
Page 11
USING THE DISPENSER
ENGLISH
11
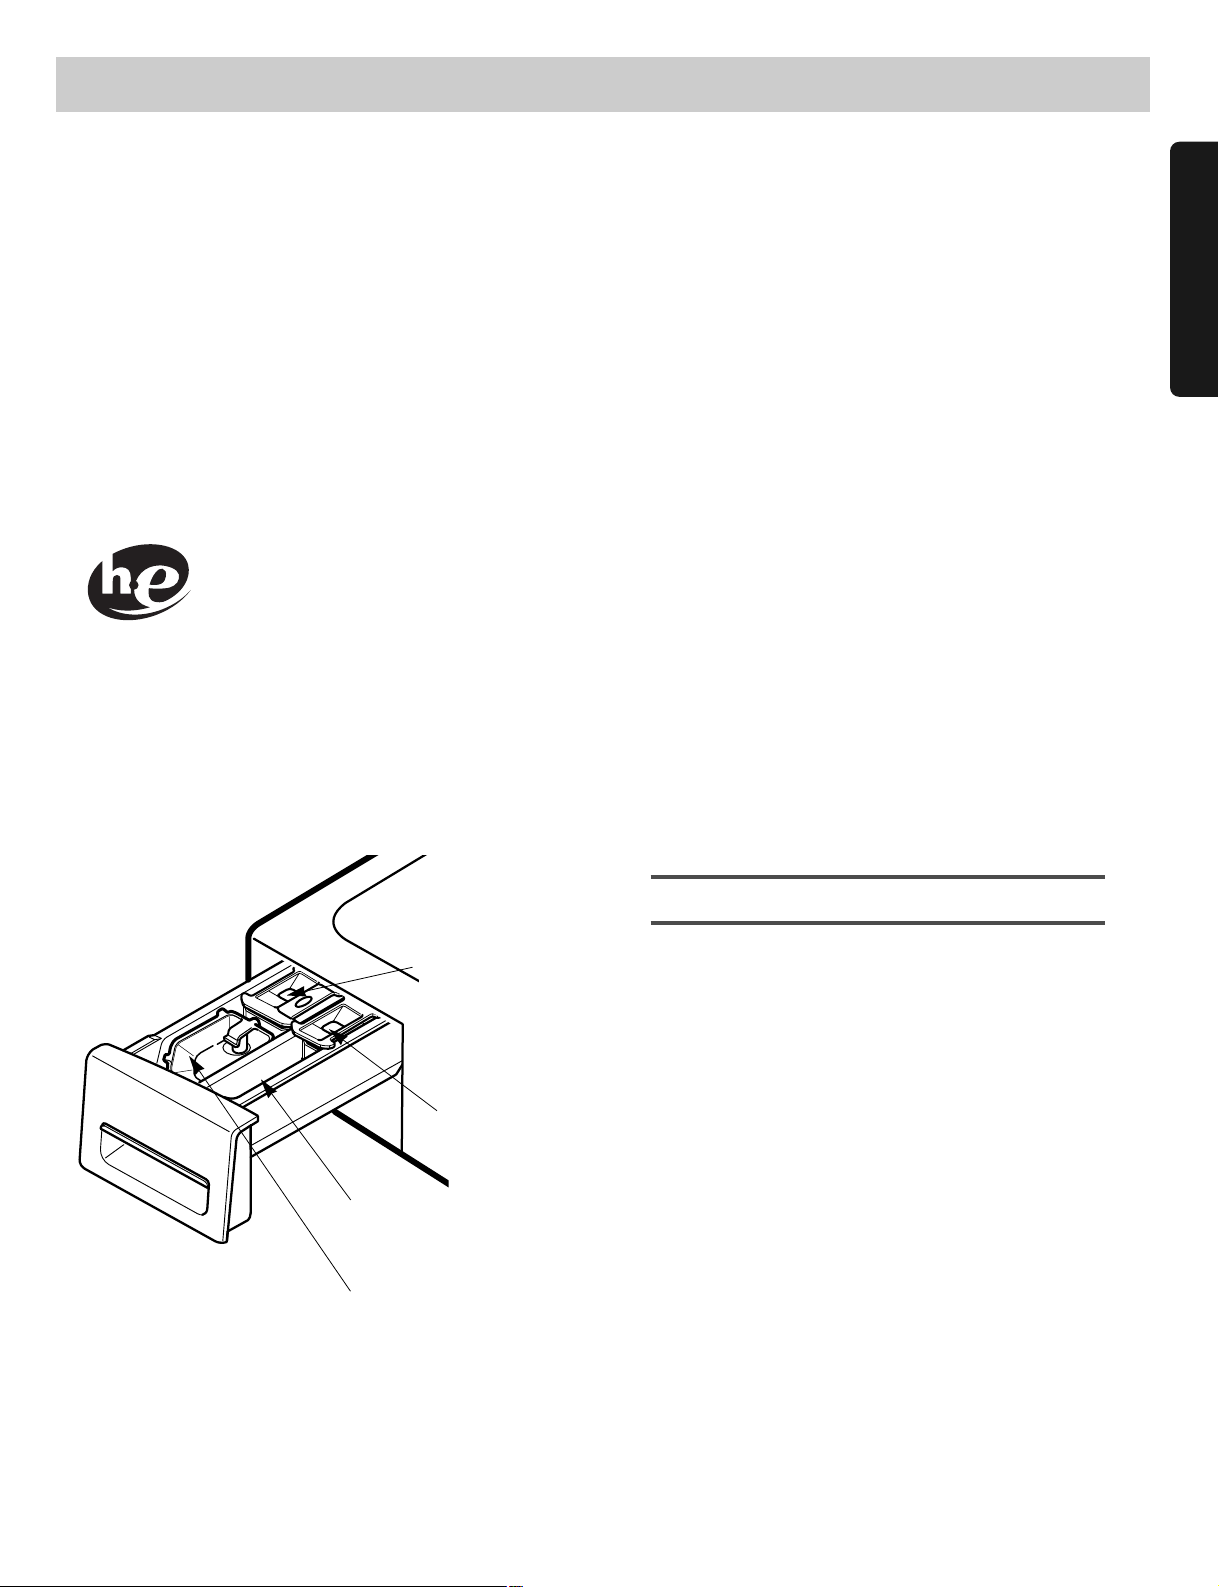
The automatic dispenser consists of four compartments which hold 1) liquid chlorine bleach, 2) liquid fabric
softener, 3) liquid or powdered detergent for prewash and 4) liquid or powdered detergent
and color safe bleach for main wash.
All laundry products can be added at once in their respective dispenser compartments.
They will be dispensed at the appropriate time for most effective cleaning. After loading the laundry
additives into the dispenser, close the dispenser drawer.
Add detergent, bleach and fabric softener to the automatic dispenser following these steps:
1. Open the dispenser drawer.
2. Load the laundry products into the appropriate compartments.
3. Close the dispenser drawer.
■ About detergent
Your LG TROMM washer is designed to use only High Efficiency (HE) detergents.
HE detergents are formulated specifically for front load washers and contain suds reducing components.
HE detergents make less suds, improve washing and rinsing performance, and help to keep the interior
of your LG TROMM washer clean. Use the manufacture’s recommend amount.
If a regular detergent is used, it may cause oversudsing and unsatisfactory performance.
For the best washing and rinsing performance, low-sudsing HE detergents are strongly recommended.
Designed specially to use only
HE(High Efficiency) detergent
• Add detergent to this compartment when using
the Prewash option. Liquid or powdered
detergent may be used in this compartment. The
detergent will automatically be dispensed during
Prewash if the Prewash option is selected.
• Add 1/2 the recommended amount of detergent
to the Prewash compartment and the
recommended amount of detergent to the main
wash compartment.
NOTE : Liquid detergent will drain into the washer
drum as it is added.
1. Prewash Detergent Compartment
Liquid Chlorine
Bleach
Compartment
Liquid Fabric
Softener
Compartment
Prewash
Compartment
Main Wash
Compartment
Page 12
USING THE DISPENSER
12
• Add measured liquid chlorine bleach to this
compartment. The bleach will be automatically
dispensed at the proper time during the wash
cycle.
• Do not exceed the maximum fill line. Overfilling can
cause early dispensing of the bleach which could
result in damaged clothes.
• Do not pour undiluted liquid chlorine bleach directly
onto the load or into the drum. Fabric damage can
occur.
• Do not use powdered bleach in this compartment.
3. Liquid Bleach Compartment
• Add recommended amount of fabric softener to
this compartment.
• Dilute concentrated softeners with warm water to
the fill line.
• Do not exceed the maximum fill line. Overfilling can
cause early dispensing of the fabric softener which
could result in stained clothes.
• Do not pour fabric softener directly on the wash
load.
• The fabric softener will be automatically dispensed
during the last rinse cycle.
NOTE: Do not place, store, or spill laundry products
(soap, detergent, bleach, softener, etc.) on the
top of your washer or dryer. These products
can damage the finish or controls if left there
too long.
4. Fabric Softener Compartment
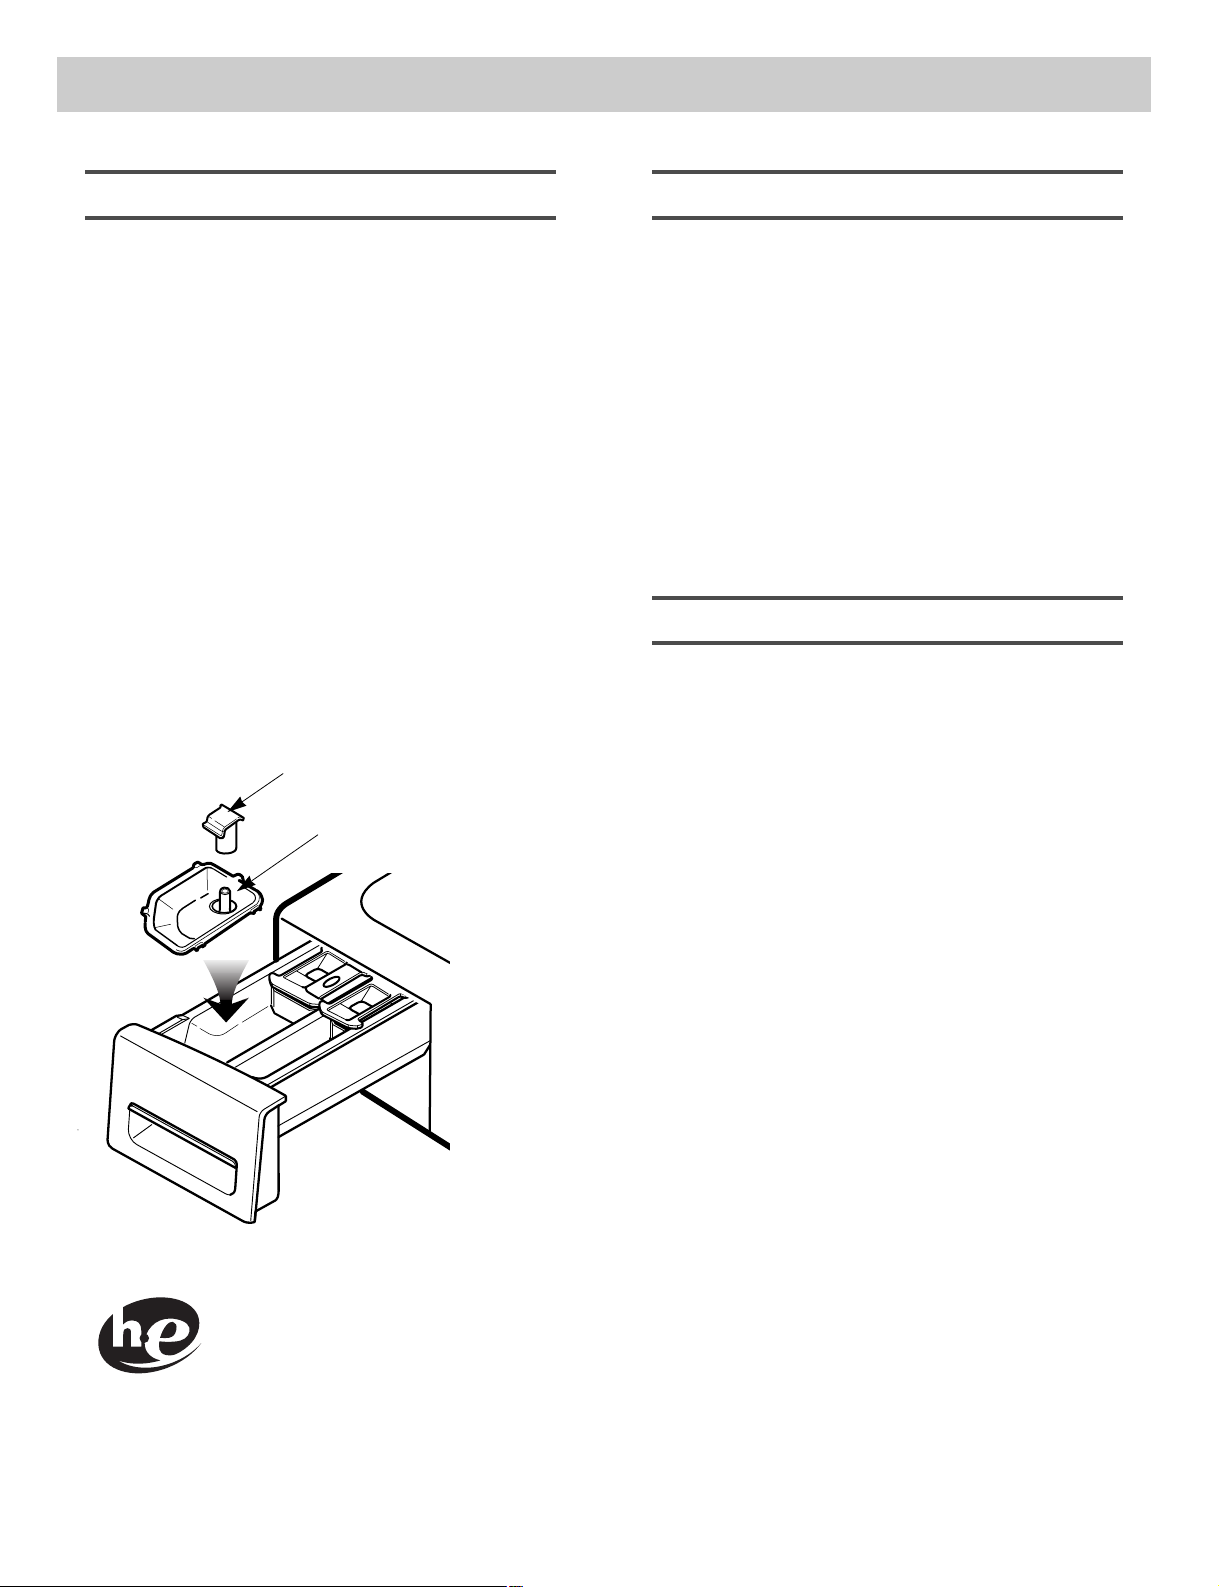
• Add measured detergent to this compartment for
Main wash. Detergent is flushed from the
dispenser at the beginning of the cycle. Either
powdered or liquid detergent can be used.
• Liquid or powdered color-safe bleach may be
added to the main wash compartment along with
the same type of liquid or powdered detergent.
• When using liquid detergent, make sure the liquid
detergent box and insert are in place. Do not
exceed the maximum fill line.
• For powered detergent, remove both the liquid
detergent box and insert.
• Powdered detergent will not dispense with the
liquid detergent box and insert in place.
2. Main Wash Detergent Compartment
Liquid Detergent
Box
Insert
Designed specially to use only
HE(High Efficiency) detergent
Page 13
CYCLES
ENGLISH
13
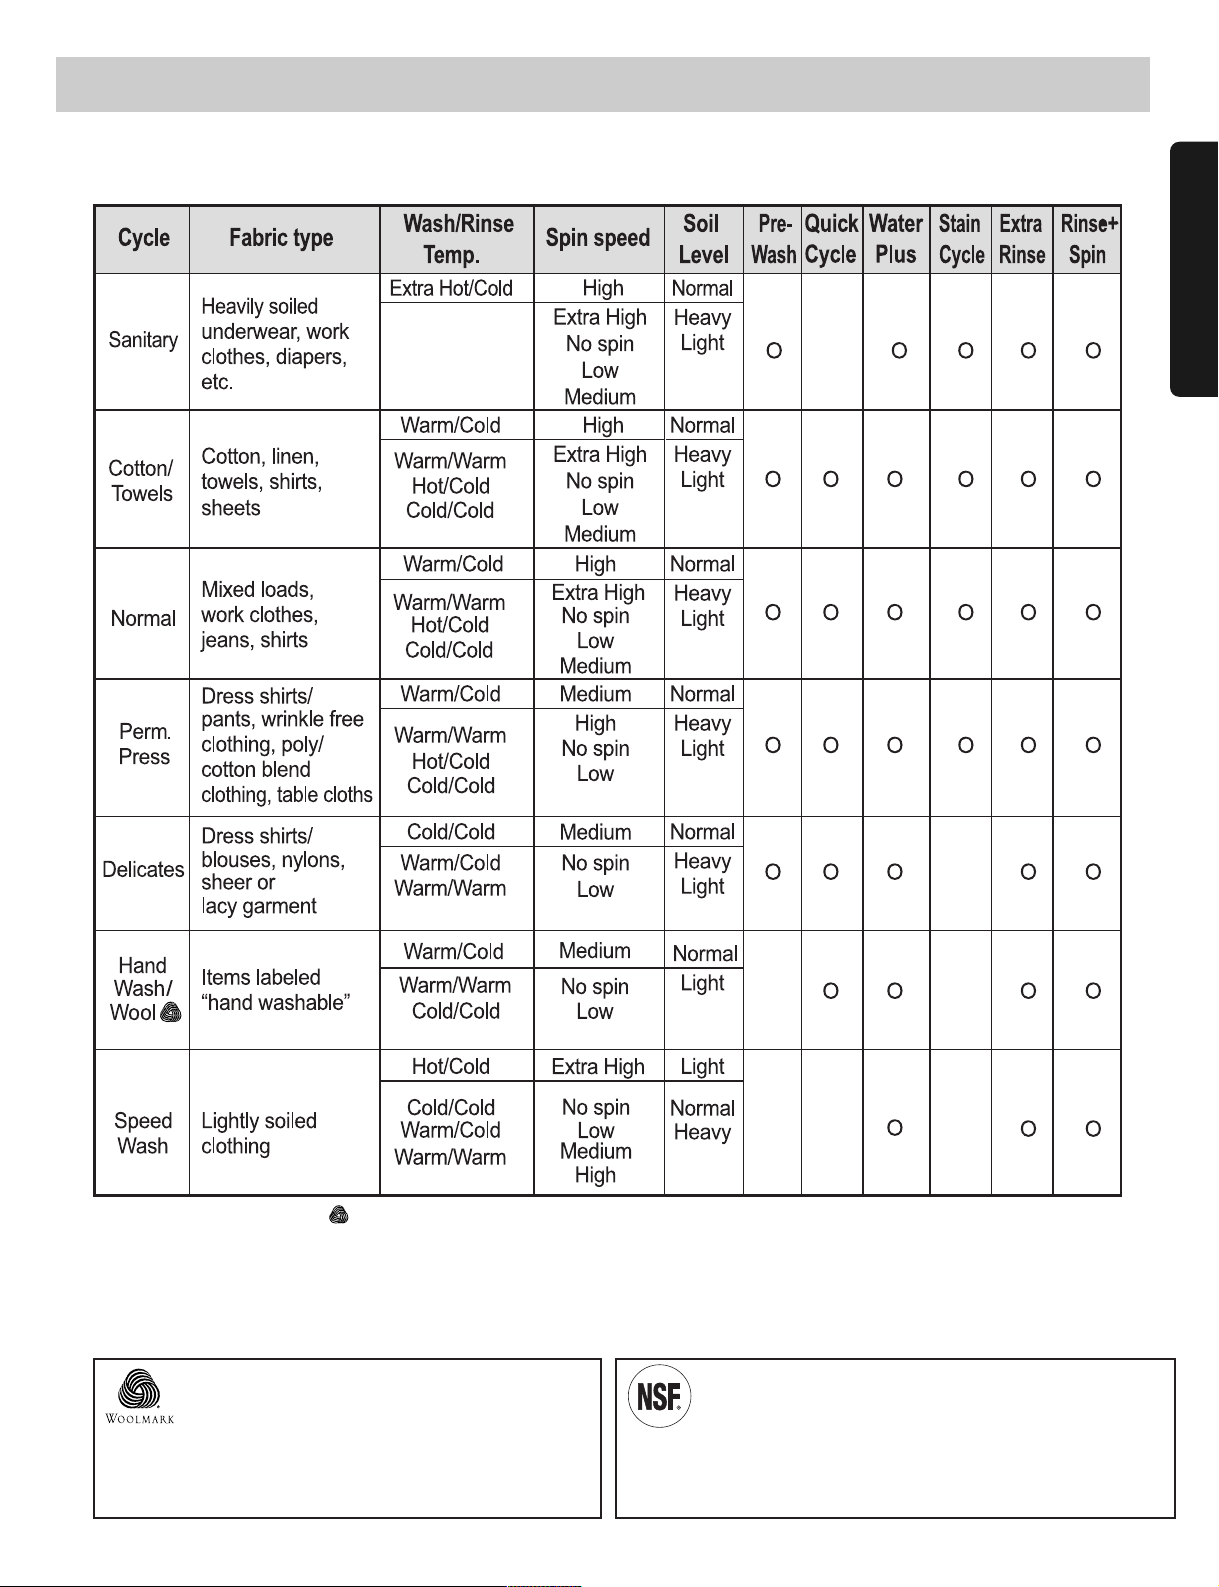
■ Select cycles designed for different types of fabric and soil levels.
HAND WASH/WOOL
• Only woolen items that are designated as “Machine-Washable” should be washed in this washing machine
• Wash only small loads for optimum fabric care (less than 8 lbs.)
• Only neutral (wool safe) detergents should be used (Only a small quantity of detergent is needed due to the small
load size and low volume of water in the cycle.)
• The HANDWASH/WOOL cycle uses a gentle tumble action and low speed spin for ultimate fabric care.
The wool wash cycle of this machine has been
approved by Woolmark for the washing of machine
washable Woolmark products provided that the
products are washed according to the instructions
on the garment label and those issued by the
manufacturer of this washing machine, M0807
Certified by NSF
Certificado por NSF
NSF International (formerly the National Sanitation Foundation),
certifies that SANITARY cycle reduces 99.9% of bacteria on laundry,
and none of bacteria will carry over onto the next laundry load.
Page 14
HOW TO USE THE WASHER
14
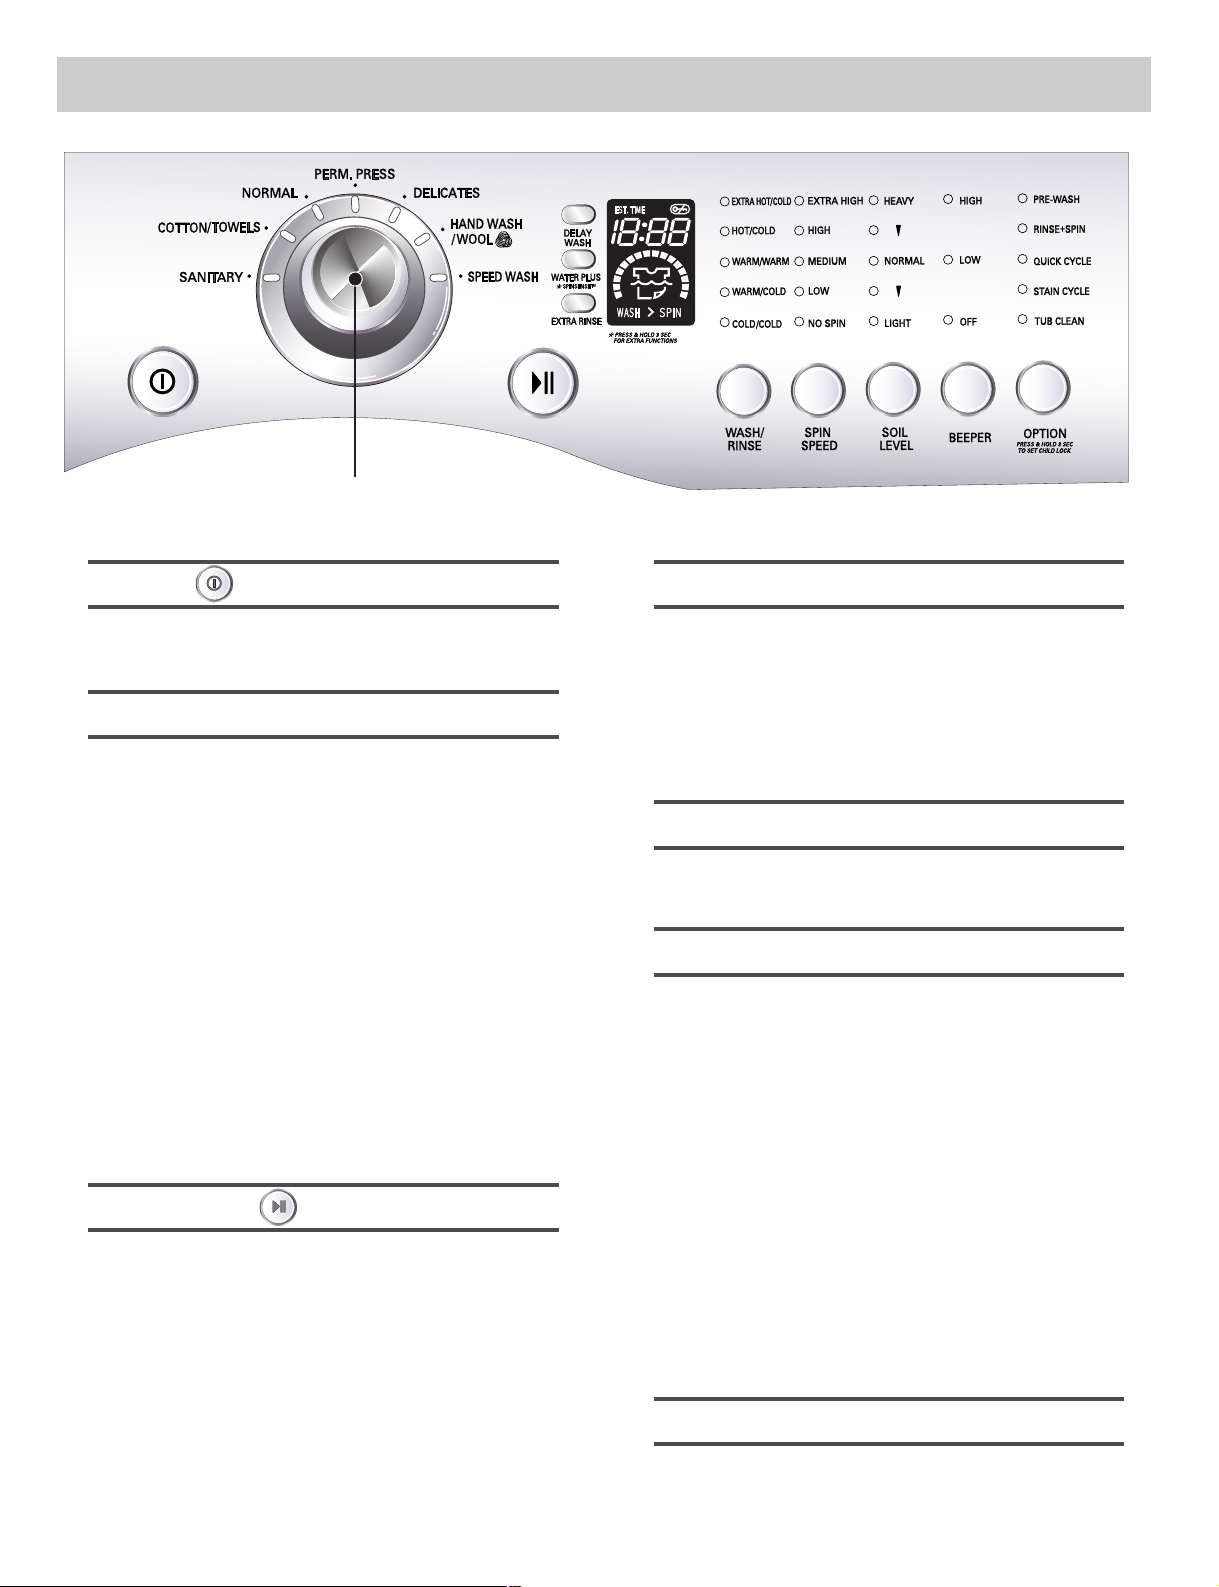
• Rotate the Cycle selector knob to select cycle
designed for different types of fabric and soil
levels.
• Each cycle has a preset Water Temperature, Spin
Speed, Soil Level, and Option (See page 13).
• The preset settings can be changed anytime
before Start.
NOTE: This front load washer requires longer cycle time
and gets clothes much cleaner, yet is more gentle
on the fabrics, than top load washers. Washing
time can be reduced significantly for small loads
or lightly soiled loads by selecting Speed Wash
cycle and setting the Soil Level button at Light.
2. Cycles
• Use this button to turn the Power On/Off.
1. Power
• Use this button to start/stop the washer.
3. Start/Pause
• Allows the start of any cycle to be delayed for
1~12 hours.
• Choose the wash cycle for your load, and then
press the Delay Wash button once for one hour or
press the button again to increase the delay wash
time up to 12 hours in one hour increments.
4. Delay Wash
• Adds extra water to the wash and rinse cycles for
superior results.
5. Water Plus
• This option provides an additional rinse.
• Use this option to ensure the removal of detergent
or bleach residue from garments.
7. Extra Rinse
• SPINSENSETMcan be used when there is a vibration
problem, especially on wood floor installations.
• To operate SPINSENSETMpress and hold the Water
Plus button for 3 seconds when the washing machine
is running on any cycle.
• When SPINSENSETMhas been selected, the Spin
Speed button light will blink on and off continually to
indicate that the SPINSENSETMfunction has been
selected.
• Push and hold the Water Plus button again for 3
seconds to cancel SPINSENSETM.
• Once SPINSENSE
TM
has been selected, if will continue
to function even if interrupted by a power failure.
• 'SPINSENSE' option cannot be selected during the
spinning cycle.
6. SPINSENSE
TM
NOTE: If you do not press the Start/Pause button
within 4 minutes of selecting a cycle, the washer
automatically turns off.
Cycle Selector Knob
Page 15

HOW TO USE THE WASHER
ENGLISH
15
• Press repeatedly to adjust the volume of the
Beeper.
11. Beeper
• Select a water temperature based on the type of
load you are washing.
• Follow the fabric care label and chart below for
best results.
• Warm rinses leave the loads dryer than cold
rinses. Warm rinses increase wrinkling.
• In cold climates, a warm rinse makes the load
more comfortable to handle.
• Cold rinses save energy.
• The Cold rinse temperatures depend on the cold
water at your faucet.
8. Wash/Rinse Temperature
• To change the spin speed, press the Spin Speed
button repeatedly to cycle through available
options.
• To start Drain/Spin cycle:
1. Press Power button to turn on.
2. Press Spin Speed button only.
3. Press Start/Pause button.
9. Spin speed
• To change the soil level, press the Soil Level
button repeatedly until the desired setting is on.
10. Soil Level
LED DISPLAY
When the START/PAUSE button is pressed, the
washer automatically detects the wash load
(weight) and optimizes the washing time, based
on the selected cycle and options. The display
will then indicate the estimated time remaining
for the selected wash cycle.
NOTE: The cycle time displayed may appear much
longer than that of a top-loading washer.
The displayed time is for the complete cycle,
rather than just the agitation portion of the
cycle, as is typically shown on a top-loading
washer.
2. ESTIMATED TIME REMAINING
Indicates that the door is locked. The washer
door will lock while the washer is operating. The
door can be unlocked by pressing the START/
PAUSE button to stop the washer.
1. DOOR LOCK INDICATOR
Shows how much of the current wash cycle has
been completed.
3. CYCLE COMPLETION INDICATOR
This portion of the display shows the selected
cycle, operating status, and special messages.
If a cycle has special instructions, they will also
be displayed in this area.
4. STATUS/CYCLE DISPLAY
2
1
3
4
Suggested Wash Temp.
Garment
Extra Hot
Kitchen towels, sheets,
and baby garments
Hot
Whites and Heavy
soiled color-fast items
Warm
Most loads
Cold
Brightly colored items,
washable woolens
Page 16
HOW TO USE THE WASHER
CHILD LOCK
DOOR LOCKED
16
• Lights whenever the door of the washer is locked.
• The door can be unlocked by pressing the
Start/Pause button to stop the washer.
NOTE: If the water temperature or the level is too
high, the door cannot be unlocked.
Do not try to force the door open when
lights on.
STATUS INDICATOR
• These lights show which portion of the cycle the
washer is operating. (See page 15)
EST. TIME REMAINING
• This display shows:
a) the estimated time remaining in the cycle when
operating,
b) the error code when an error has been
detected.
• Use this option to prevent unwanted use of the
washer. Press and hold OPTION button for 3
seconds to lock/unlock control.
• When Child lock is set, blinks and all buttons
are disabled. You can lock the washer while it is
operating.
OPTION
• Use this option for loads that need pretreatment.
Adds 16 minutes prewash and drain.
1. Prewash
• Adds time to the wash and rinse for better stain
removal.
• Automatically provides a rinse.
4. Stain cycle
• The Quick Cycle offers a quick cycle time.
• Suggested uses include freshening newly purchased
clothes, or clothing that has been packed away.
3. Quick Cycle
• Use this option to rinse and then spin.
2. Rinse+Spin
• A buildup of detergent residue can occur in the
wash tub over time and can lead to a mildewy or
musty smell. The Tub Clean cycle is specially
designed to remove this buildup.
• To start the Tub Clean cycle:
1. Remove any clothing or items from the washer
and close the door.
2. Open the dispenser drawer and add liquid
chlorine bleach to the bleach compartment.
NOTE: Do not add any detergent to the detergent
compartments. Excessive suds may be
produced and leak from the washer.
3. Close the dispenser drawer slowly.
4. Power on the machine, press the “option” and
then select the “Tub Clean”.
5. Press the Start/Pause button to start.
6. After the cycle is complete, leave the door open
to dry around the washer door opening, door
seal and door glass.
CAUTION: If there are small children in the
house, care must be taken so that
they can not climb into or play
inside the washer while it is open
for drying.
5. Tub Clean
!
Page 17
ENGLISH
17
MAINTENANCE
2
3
■ The water inlet filter
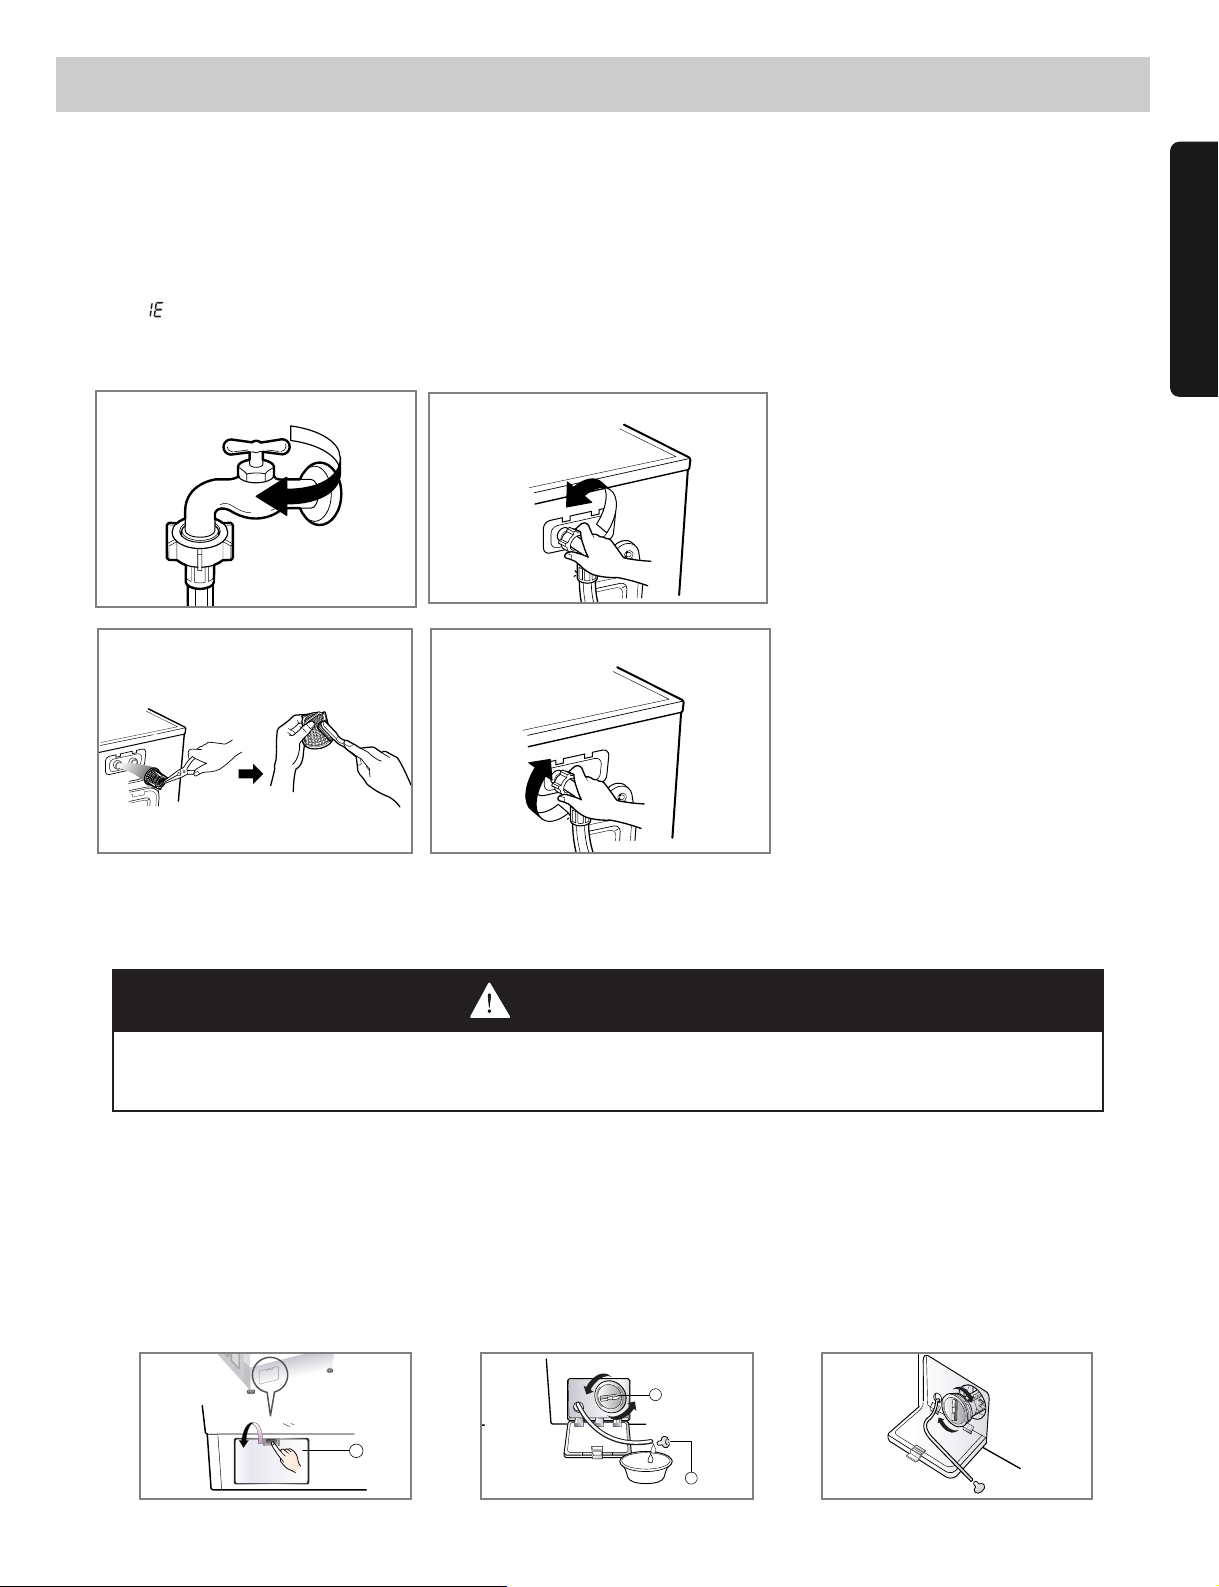
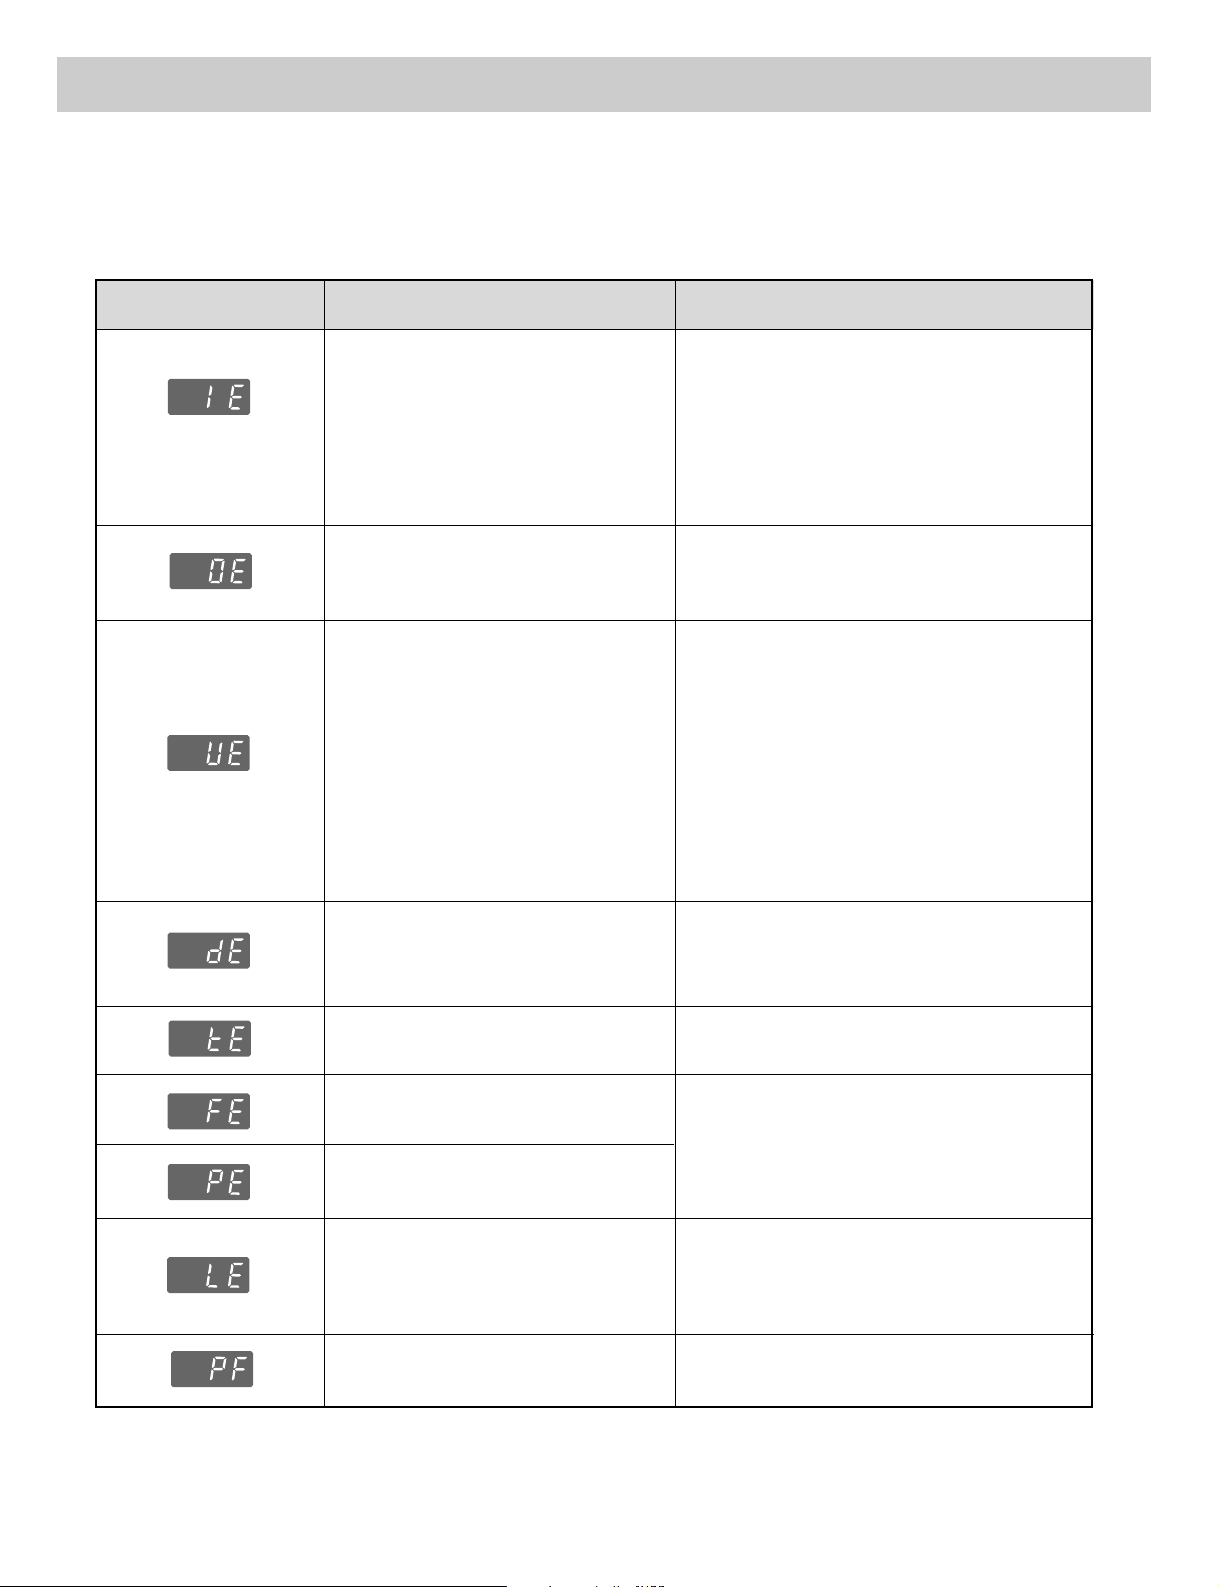
• " " error message will blink on the control panel when water does not enter the dispenser.
• If your water is very hard or contains traces of lime deposit, the water inlet filter may become clogged.
We recommend cleaning it every few months.
Before cleaning the washer interior, unplug the electrical power cord to avoid electrical shock hazards.
When disposing of the appliance, cut off the power cable, destroy the plug, and disable the door lock to prevent
young children from being trapped inside.
1. Open the lower cover cap ().
Turn the drain plug () to pull
out the hose.
2. Unplug the drain plug ,
allowing the water to flow out.
At this time use a vessel to
prevent water from flowing
onto the floor. When water does
not flow any more, turn the
pump filter open to the left.
3. Remove any foreign objects from
the pump filter . After cleaning,
turn the pump filter clockwise
and insert the drain plug to the
original place. Close the lower
cover cap.
■ The drain pump filter
•
The drain filter collects threads and small objects left in the laundry.
Check regularly that the filter is clean to ensure smooth running of your machine.
• Allow the water to cool down before cleaning the drain pump filter.
CAUTION
Drain, using the drain hose, before opening the pump filter to remove objects.
Be careful when draining if the water is hot.
1. Turn off the water tap.
2. Unscrew the water inlet hose.
3. Clean the filter using a hard
bristle brush.
4. Tighten the inlet hose.
• IMPORTANT:
Use ONLY the inlet hoses
provided by LG with this laundry
product.
Aftermarket hoses are not
guaranteed to fit or function
correctly. Other hoses may
not tighten correctly and could
cause leaks. Subsequent
damage to product or property
will not be covered under the
terms of LG's warranty.
1
Page 18
18
MAINTENANCE
■ The washing drum
• If you live in a hard water area, lime scale can continuously build up in places where it cannot be seen
and it is not easily removed from the drum.
Over time the build-up of scale clogs appliances, and if it is not kept in check, these will eventually
have to be replaced.
• Although the washing drum is made of Stainless steel, specks of rust can be caused by small metal articles
(paper clips, safety pins, etc.) which have been left in the drum.
• The washing drum should be cleaned from time to time.
• If you use descaling agents, dyes, or bleaches, make sure they are suitable for washing machine use.
• Descaler could contain components that can damage part of your washing machine.
• Remove the spots with a stainless steel cleaning agent.
• Never use steel wool.
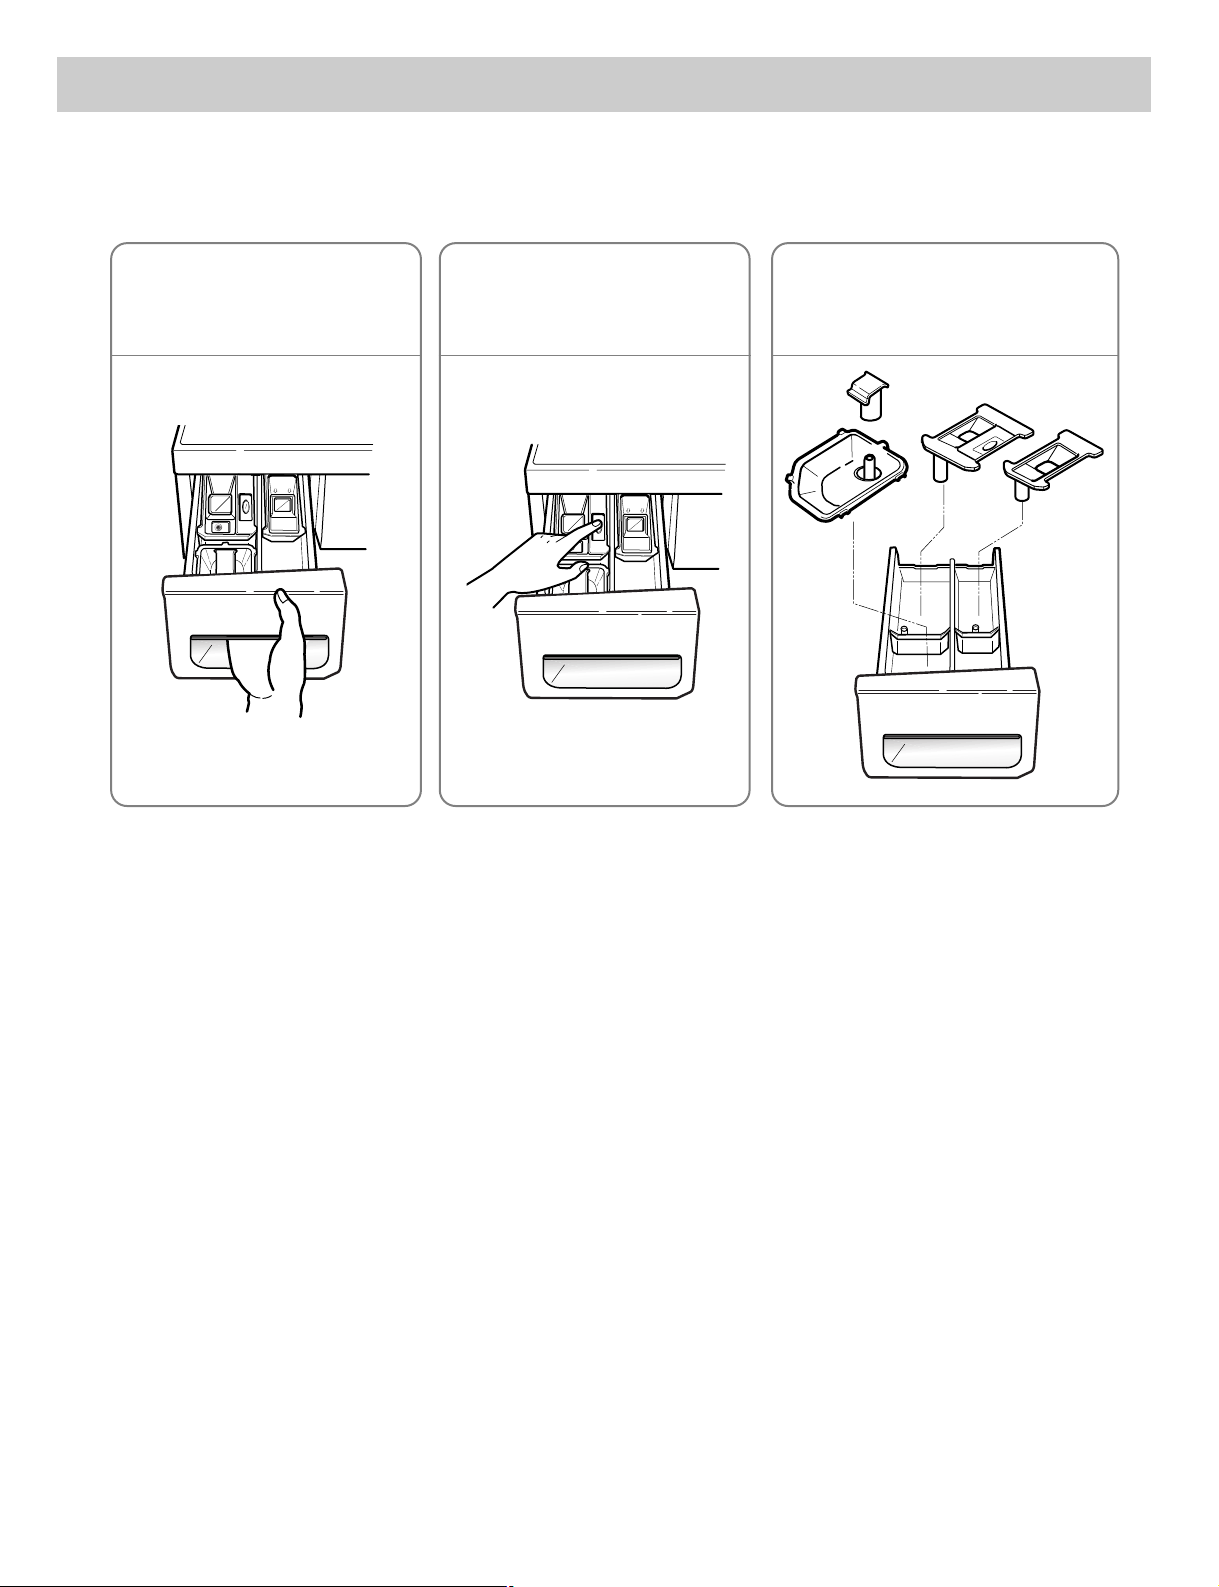
■ Cleaning the Dispenser
•
The dispenser may need to be cleaned periodically due to laundry additive build-up.
• Run warm water and use a soft brush or cloth on the drawer, liquid detergent box and inserts to remove any
excess laundry additives.
• Clean the drawer opening using water and a small brush.
• Follow the illustrations in reverse order to replace the parts to their proper location.
NOTE: Do not use any cleaning substance on the drawer opening other than water because it will drain into the tub.
If this should happen, set the washer for a rinse and spin cycle to remove any cleaning substance from the
washer before doing a load of laundry.
1
SOFTENER
MAX
Pull the dispenser
drawer out until it stops.
2
Press down the lock tab
on the bleach insert.
Remove the drawer.
3
Remove the liquid detergent
box, softener and bleach
inserts from their
compartments.
SOFTENER
MAX
Page 19

ENGLISH
19
MAINTENANCE
■ Cleaning your washer
1. Exterior
Proper care of your washer can extend its life.
The outside of the machine can be cleaned with warm water and a neutral, non-abrasive
household detergent.
Immediately wipe off any spills. Wipe with a damp cloth.
Try not to damage the surface with sharp objects.
IMPORTANT: Do not use methylated spirit, solvents or similar products.
2. Interior
Dry around the washer door opening, flexible gasket and door glass. These areas should always be clean to
ensure a water-tight seal.
Run washer through a complete cycle using hot water.
Repeat process if necessary.
• Read these instructions carefully before beginning the TUB CLEAN cycle.
1. Open the door and remove any clothing in the wash drum.
2. Open the dispenser drawer.
3. Add liquid chlorine bleach or tub cleaner. Some powder or tablet tub cleaners which are manufactured for this
purpose can be used.
(NOTE : Do not add any laundry detergent or fabric softener to the drawer when using TUB CLEAN.)
- If using liquid chlorine bleach
Add liquid chlorine bleach to the bleach compartment of the drawer. (NOTE : Do not exceed the maximum fill
line and do not pour undiluted liquid bleach directly into the wash drum.)
- If using powder cleaner
Remove the liquid detergent cup and add powder cleaner to the main wash compartment of the drawer.
- If using tablet cleaner
Add tablet cleaner to the wash drum directly. (NOTE : Do not add tablet cleaner to the drawer.)
4.Close the drawer and washer door.
5.Select TUB CLEAN and press START.
NOTE : It is recommended that TUB CLEAN should be repeated monthly. If mildew or musty smell already exists,
run TUB CLEAN for 3 consecutive weeks.After TUB CLEAN is complete or when the washer is not used,
leave the washer door open for better ventilation and drying inside of the washer.
NOTE: Remove hard water deposits using only cleaners labeled as safe for washing machines.
■ Winterizing instructions
If the washer is stored in an area where freezing can occur or moved in freezing temperatures, follow these
winterizing instructions to prevent damage to the washer:
1. Turn off water supply tap.
2. Disconnect hoses from water supply and drain water from hoses.
3. Plug electrical cord into a properly grounded electrical outlet.
4. Add 1 gallon (3.8ℓℓ) nontoxic recreational vehicle (RV) antifreeze to empty wash drum. Close door.
5. Set spin cycle and let washer spin for 1 minute to drain out all the water.
Not all of the RV antifreeze will be expelled.
6. Unplug electrical power cord, dry drum interior, and close door.
7. Remove the two-compartment container from the Dispenser. Drain any water in compartments and dry the
compartments.
8. Store washer in an upright position.
9. To remove antifreeze from washer after storage, run empty washer through a complete cycle using detergent.
Do not add laundry.
Page 20
20
TROUBLESHOOTING GUIDE
This washing machine is equipped with automatic safety functions which detect and diagnose problems at an
early stage and react appropriately. When the machine does not function properly or does not function at all,
check the following points before you call the Service Department.
Rattling and clanking noise
Thumping sound
Vibrating noise
Water leaks
Excessive suds
Musty or mildewy
odor in washer
• Foreign objects such as coins
or safety pins may be in drum
or pump.
• Heavy wash loads may
produce a thumping sound.
This is normal.
• Have all the transit bolts and
packing been removed?
• Wash load may be unevenly
distributed in the drum.
• Are all the feet resting firmly
on the ground?
• Fill hose connection is loose at
tap or washer.
• House drain pipes are
clogged.
• Too much detergent or
unsuitable detergent.
• Incorrect or too much
detergent has been used.
• Inside of tub not cleaned
properly.
Stop washer and check drum and drain
filter.
If noise continues after washer is restarted,
call for service.
If sound continues, washer is probably out
of balance. Stop and redistribute wash
load.
See Installation Instructions for removing
shipping bolts.
Stop washer and rearrange wash load.
Adjust the leveling feet.
Make sure all four feet are in firm contact
with the floor, while the washer is in the
spin cycle with load.
Check and tighten hose connections.
Unclog drain pipe. Contact plumber if
necessary.
Reduce detergent amount or use HE
(High Efficiency) detergent.
• Use only HE (High-Efficiency) detergent
in accordance with the manufacturer’s
instructions.
• Run the Tub Clean cycle regularly.
Be sure to wipe around and under the
door seal frequently.
Problem Possible Cause Solution
Designed specially to use only
HE(High Efficiency) detergent
Page 21

ENGLISH
21
TROUBLESHOOTING GUIDE
Washer does not start
Washer won’t spin
Wash cycle time delayed
• Electrical power cord may not
be plugged in or connection
may be loose.
• House fuse is blown, circuit
breaker tripped, or a power
outage has occurred.
• Water supply tap is not turned
on.
• Check that the door is firmly
shut.
• The washing time may vary by
the amount of laundry, water
pressure, water temperature,
and other using conditions.
Make sure plug fits tightly in wall
outlet.
Reset circuit breaker or replace fuse.
Do not increase fuse capacity.
If problem is a circuit overload, have
it corrected by a qualified electrician.
Turn on water supply tap.
Close the door and press the
Start/Pause button. After pressing the
Start/Pause button, it may take a few
moments before the clothes washer
begins to spin. The door must lock before
spin can be achieved.
If the imbalance is detected or if the
suds removing program operates, the
wash time shall be increased.
Problem Possible Cause Solution
Water does not enter
washer or it enters slowly
Water in the washer does
not drain or drains slowly
• Water supply is not adequate
in area.
• Water supply tap is not
completely open.
• Water inlet hose is bent.
• The filter of the inlet hose
clogged.
• Drain hose is bent or clogged.
• The drain filter is clogged.
Check another tap in the house.
Fully open tap.
Straighten hose.
Check the filter of the inlet hose.
Clean and straighten the drain hose.
Clean the drain filter.
Page 22
22
TROUBLESHOOTING GUIDE
• Water supply is not adequate in
area.
• Water supply taps are not
completely open.
• Water inlet hose is bent.
• The filter of the inlet hose clogged.
• Drain hose is bent
or clogged.
• The drain filter is clogged.
• Load is too small.
• Load is out of balance.
• The appliance has an imbalance
detection and correction system. If
individual heavy articles are loaded
(bath mat, bath robe, etc.) and the
imbalance is too great, after several
attempts to restart the spin cycle the
machine will stop and the error code
will be displayed.
• Is the door opened or not
completely closed?
• The water overfills due to the
faulty water valve.
• The water level sensor
malfunction.
• Overload in motor.
• The washer experienced a power
failure.
Check another tap in the house.
Fully open tap.
Straighten hose.
Check the filter of the inlet hose.
Clean and straighten the drain hose.
Clean the drain filter.
Add 1 or 2 similar items to help
balance the load.
Rearrange load to allow proper
spinning.
Close the door completely.
If it is not released, call for service.
Unplug the power plug and call for service.
Close the water tap.
Unplug the power plug.
Call for service.
Allow the washer to stand for 30 minutes to
allow the motor to cool; then restart the
cycle. If the LE error code still appears,
unplug the washer and call for service.
Restart the cycle.
Problem Possible Cause Solution
Page 23

ENGLISH
23
(Stator, Rotor, Hall sensor) :
1-800-243-0000
(24 hours a day, 365 days per year)
10
Page 24

WARRANTY
24
All Parts
Controller
Drum Tub
DD Motor (Stator, Rotor, Hall sensor)BB
1 Years
3 Years
5 Years
10 Years
1 Years(In-Home Service)
1 Years(In-Home Service)
1 Years(In-Home Service)
1 Years(In-Home Service)
Page 25

MEMO
25
Page 26

CARACTERÍSTICAS DEL PRODUCTO
CONTENIDO
Información Importante de Seguridad ..........................................................................................................27
Especificaciones...........................................................................................................................................28
Instrucciones de Instalación .........................................................................................................................29
Preparación Antes de Lavar .........................................................................................................................34
Usando el Distribuidor ..................................................................................................................................35
Ciclos ...........................................................................................................................................................37
Como Usar la Lavadora................................................................................................................................38
Mantenimiento ..............................................................................................................................................41
Guía para la Detección de Problemas..........................................................................................................44
Garantía........................................................................................................................................................47
26
추가선택, 예약,
WASH
EST. TIME
SPIN
■
Sistema DD Invertidor.
El avanzado motor de DC sin cepillo que mueve directamente el cilindro
sin cinturón ni polea.
■
Cilindro Inclinado y Abertura Extra Grande.
El cilindro inclinado y la abertura extra grande, hacen màs
fácil la carga y descarga.
■
Bola de Lavado.
La bola de lavado mejora el desempeño de lavado y reduce
el daño a la ropa.
■
Detección de la carga de lavado automático
Automáticamente detecta la carga y optimiza el tiempo de lavado.
■
Calentador Integrado.
El calentador interno calienta automáticamente el agua a la mejor
temperatura según el ciclo elegido.
■
Seguro de Niños.
El seguro de niños previene que los niños presionen los botones y
cambien la configuración durante la operación.
■
LA PANTALLA DE LED
La pantalla LED los ajustes, el tiempo restante estimado, las
opciones y los mensajes de estado correspondientes a su lavadora.
Cuando se enciende la lavadora, se iluminará la luz de la pantalla.
Page 27

INFORMACIÓN IMPORTANTE DE SEGURIDAD
LEA TODAS LAS INSTRUCCIONES ANTES DE USARLA.
ADVERTENCIA!
Para su seguridad, la información en este manual debe ser seguida para minimizar el riesgo de incendio ó
explosión, descarga eléctrica, ó para prevenir daños a su propiedad, a su persona ó pérdida de la vida.
IInnffoorrmmaacciióónn IImmppoorrttaannttee ddee SSeegguurriiddaadd
• Lea todas las instrucciones antes de usar la lavadora.
• No lave artículos que hayan sido previamente
limpiados con, lavados con, mojados con, ó
manchados con gasolina, solventes para lavado en
seco, u otra sustancia flamable ó explosiva, ya que
estas despiden vapores que pueden incendiarse ó
explotar.
• No agregue gasolina, solventes para lavado en seco ó
cualquier otra sustancia flamable ó explosiva al agua
de lavado. Estas sustancias despiden vapores que
pueden incendiarse ó explotar.
• Bajo ciertas condiciones, se puede producir gas de
hidrógeno en sistemas de agua caliente que no han
sido usados por 2 semanas ó mas. EL GAS DE
HIDRÓGENO ES EXPLOSIVO. Si el sistema de agua
caliente no ha sido usado por 2 semanas ó mas, antes
de usar la lavadora, abra todas las llaves del agua
caliente y deje el agua correr por algunos minutos.
Esto liberará cualquier rastro de gas de hidrógeno
acumulado. Como el gas es flamable, no fume ó use
ninguna flama abierta durante este tiempo.
• No permita que los niños jueguen sobre ó dentro de la
lavadora. Deberá cuidar de cerca a los niños cuando
la lavadora sea usada cerca de ellos.
• Antes de retirar la lavadora para servicio ó desecharla,
retire la puerta para prevenir que los niños se
escondan dentro.
• No instale ó almacene la lavadora donde esté
expuesta a la intemperie.
• No estropee los controles.
• No intente reparar ni reemplazar ninguna parte de la
lavadora ni intente dar servicio a menos que sea
recomendado específicamente en las instrucciones de
mantenimiento del usuario ó publicado en las
instrucciones de reparación para el usuario que usted
entienda y tenga la habilidad de llevar a cabo.
• Vea las instrucciones de instalación para los
requerimientos de conexión a tierra.
• SIEMPRE siga las instrucciones de cuidado de la tela
provistas por el fabricante de la prenda.
• No coloque artículos manchados de aceite de cocina
en su lavadora. Los artículos contaminados con aceite
de cocina pueden contribuir a una reacción química
que provoque el incendio de una carga.
• No use suavizantes de telas ni productos
eliminadores de estática a menos que sea
recomendado por el fabricante del suavizante de telas
ó el producto.
ADVERTENCIA:
Para reducir el riesgo de incendio, descarga eléctrica, ó heridas, al usar la lavadora, siga
las precauciones básicas incluyendo las siguientes:
GGUUAARRDDEE EESSTTAASS IINNSSTTRRUUCCCCIIOONNEESS
Este aparato debe ser conectado a tierra. Dado el caso de descompostura ó mal funcionamiento, la conexión a tierra
reduce el riesgo de recibir una descarga eléctrica proveyendo una vía de menor resistencia a la corriente eléctrica.
Este aparato esta equipado con un cable que tiene un conductor de equipo a tierra y una clavija de tierra. La clavija
debe ser conectada en una toma de corriente adecuada que esté propiamente instalada y conectada a tierra de
acuerdo con los códigos y ordenanzas locales.
• No use un adaptador ni un cable eléctrico de extensión.
• No quite el terminal de conexión a tierra.
• Si no cuenta con la toma de corriente adecuada, consulte a un electricista.
INSTRUCCIONES DE CONECCIONA TIERRA
ADVERTENCIA:
Una conexión inapropiada del conductor de equipo a tierra puede resultar en riesgo de recibir una
descarga eléctrica. Verifique con un electricista calificado si tiene dudas sobre si el aparato esta
correctamente conectado a tierra. No modifique la clavija provista con el aparato. Si no encaja con
la toma de corriente, haga instalar una toma de corriente adecuada por un electricista calificado.
!
!
!
ESPAÑOL
27
Page 28

28
W
ASH
WASH
EST. TIMEEST. TIME
SPINSPIN
울
란제리란제리
ESPECIFICACIONES
■
Nombre: Máquina Lavadora de Carga por el Frontal
■
Suministro de Energía: 120V ~ 60Hz
■
Dimensiones:
68.6 cm (Ancho) X 75.6 cm (Profundidad) X 98.3 cm (Altura), 129.1 cm (P, puerta abierta)
27”(A) X 29
3
/
4
”(P) X 38
11
/
16
”(A), 50
13
/
16
”(P, puerta abierta)
■
Peso: 190 lbs. (86 kg)
■
Velocidad de la Revolución: 1100 rpm max.
■
Presión de Agua Permitida: 14.5~116 psi(100~800kPa)
Especificaciones sujetas a cambio por el fabricante.
Perno para Transportación
Ventilación por Seguridad
Entrada de Agua Fría
Entrada de Agua Caliente
Clavija de Energía
• Si el cable de suministro está
dañado, debe ser reemplazado
por el fabricante ó sus agentes
de servicio, ó alguna persona
calificada en orden a evitar
cualquier riesgo.
Distribuidor
Manguera de Desagüe
Puerta
Cilindro
Panel de Control
Conexión de Desagüe
Patas Ajustables
Filtro de Bomba de Desagüe
Tapa Inferior de Cubierta
Atrás de la Lavadora
Hose retainer
Hot/Cold (1 each)
Hose
Wrench
Tide
for removing shipping bolts
and leveling the washer
Tie strap
to secure drain hose to standpipe,
inlet hose, or laundry tub
Cap (4 each)
to cover the holes created after
removing the shipping bolts
■
ACCESORIOS
Manguera de Agua Caliente
/ Fría (1 de c/u)
Llave
para quitar los tornillos de
transportación y nivelar la lavadora
Plástico sujetador
Cinta Sujetadora de Manguera
de Desagüe
para tapar los agujeros
realizados al retirar los pernos
para transporte
Soporte de manguera
Tapón (1 de c/u)
Page 29

INSTRUCCIONES DE INSTALACIÓN
ESPAÑOL
29
1. Cuatro pernos están instalados para proteger la
lavadora durante el transporte. Antes de operar
la lavadora, retire los pernos y abrazaderas.
• Si no son retirados, pueden causar fuertes
vibraciones, ruido y mal funcionamiento.
3. Retire los 4 pernos y abrazaderas dándoles
vuelta lentamente a las abrazaderas. Conserve
los 4 pernos, las abrazaderas y la llave para su
uso futuro.
• Cuando el aparato sea transportado, los pernos
y abrazaderas deberán ser reinstalada.
2. Desatornille los 4 pernos con la llave Provista.
Haga primero la parte baja para hacer los
movimientos de manera mas sencilla. Uno de
los tornillos detiene el cable de la energía para
prevenir que tenga operación antes de haber
retirado todos los tornillos.
4. Tape los orificios con las tapas provistas.
El artículo está ajustado con unos tornillos
desde el embalaje para prevenir daños
internos durante la transportación. El empaque
y los tornillos deben ser removidos antes de
usarse la lavadora.
Cuando desempaque la base, asegúrese
de remover los empaque adicionales que
se encuentran a la mitad de la base.
■ Pernos de Transportación
Instale ó almacene en un lugar donde no esté expuesta a temperaturas inferiores a la congelación ni expuesta a la
intemperie.
Conecte a tierra correctamente y cumpliendo con todos los códigos y ordenanzas gubernamentales.
Para reducir los riesgos de electrocución, no instale la lavadora en lugares húmedos.
La abertura de la base no debe ser obstruida por alfombra cuando esté instalada sobre un piso con alfombra.
En países donde haya áreas que puedan estar sujetas a plagas de cucarachas ó algún otro bicho, ponga atención
particular a mantener el aparato y sus alrededores en condiciones limpias todo el tiempo. Cualquier daño que pueda
haber sido causado por cucarachas ó algún otro bicho, no será cubierto por la garantía de este aparato.
■ Remover los Pernos de Transportación
Tapón
: Dos o más personas pueden llegar a necesitar la instalación y mover el artículo.
!
ADVERTENCIA
Lavadora
Ayuda Que Embala
Embalaje Bajo
Page 30

INSTRUCCIONES DE INSTALACIÓN
■ Espacios Libres de instalación
El lugar debe ser lo suficientemente grande para
abrir en su totalidad la puerta de la lavadora.
■ Dimensiones de la lavadora
• La mayoría de las instalaciones requieren un
mínimo de 10 cm. Libres detrás de la lavadora.
■ Espacio mínimo de instalación para
área reducida instalación.
Las dimensiones mostradas a continuación son el
espaciado mínimo permitido.
Un espacio adicional debe ser considerado para la
instalación y el mantenimiento.
• Un espacio libre adicional puede ser requerido para
molduras de pared, puerta y piso.
• Un espacio adicional de 2.5 cm a todos los lados de
la lavadora es recomendado para reducir la
transferencia de ruido.
El espacio para una aplicación complementaria
también debe ser considerado.
■ Nivele el Piso
•
La inclinación admisible debajo de la lavadora
completa es de 1°.
•
Pare reducir ruido y vibración, la lavadora
debe ser instalada en un piso construido
sólidamente.
• Superficies con alfombras y azulejos no son
recomendadas.
• Nunca instale la lavadora en una plataforma o
en una estructura débil.
NOTA:
Un piso firme y sólido es más necesario para una
Carga Frontal que para una Carga Superior. Si su
piso es de madera o está en construcción, puede
ser que necesite reforzarlo. Las Cargas Frontales
tienen mayor revolución que las Cargas
Superiores, causando más vibración. Si el piso no
es sólido, su lavadora va a vibrar. Va a oír y
sentir la vibración en toda su casa.
■ Toma de Corriente
• Debe ser de 1.5 m (60 in) hacia cualquier lado
de la lavadora. No sobrecargue la toma de
corriente con mas de un aparato.
• Se recomienda usar un regulador de voltaje
para evitar daños por descarga eléctrica.
NOTA: Es responsabilidad y obligación del
consumidor tener propiamente instalado su
producto por un electricista calificado.
[Vista frontal]
[Vista lateral]
27"
(68.6 cm)
29
3
/
4
"
(75.6 cm)
38
11
/
16
"
(98.3 cm)
50
13
/
16
"
(129.1 cm)
27"
(68.6 cm)
1"
(2.5 cm)
1"
(2.5 cm)
WASHWASH
EST. TIMEEST. TIME
SPINSPIN
29 3/4"
(75.6 cm)
4"
(10 cm)
30
Page 31

INSTRUCCIONES DE INSTALACIÓN
Grifo de agua caliente
Frío Caliente
Grifo de agua
fría
Conector de
manguera
Empaque
ESPAÑOL
31
• La presión de suministro de agua debe estar entre 14.5 y 116
psi (100 y 800 kPa).
• No corte ni desgarre la manguera de entrada a la válvula.
• Si la presión de suministro de agua es
mayor a 116 psi, deberá instalarse un dispositivo reductor de
presión.
• Dos empaques selladores son provistos con las mangueras
de entrada de agua para prevenir fugas.
• Revise cualquier gotera de las conexiones de la lavadora.
• Verifique periódicamente la condición de las mangueras y
reemplácelas de ser necesario.
• Asegúrese de que la manguera no esté torcida
ni rota.
• Asegúrese de que las conexiones de agua estén
correctamente colocadas. La conexión de agua caliente es de
color rojo.
• Usar SOLAMENTE las mangueras de la entrada
proporcionadas por LG de este producto del lavadero. Las
mangueras del mercado de accesorios no están garantizadas
para caber o para funcionar correctamente. Otras mangueras
pueden no apretar correctamente y podrían causar los
escapes. El daños subsecuente al producto o a la propiedad
no serán cubiertos de conformidad con la garantía de LG.
■ Conectando la manguera de suministro de agua.
NOTA: La Lavadora será conectada a las líneas principales del agua usando mangueras nuevas.
No se deben usar mangueras usadas.
■ Conexión Eléctrica
• No use un cable de extensión ni un adaptador doble.
• Si el cordón proveedor de energía es dañado, debe ser repuesto por una persona calificada para evitar peligros.
• Si la lavadora no va a ser usada en un periodo largo de tiempo, deconèctela de la energía y de la corriente de agua.
• Conecte la lavadora a una toma de corriente correctamente conectada a tierra de acuerdo con las
regulaciones de cableado locales.
• El aparato debe estar posicionado de manera que la conexión a la corriente sea de fácil acceso.
Las reparaciones a la lavadora deberán ser llevadas a cabo únicamente por personal calificado. Las
reparaciones llevadas a cabo por personas sin experiencia pueden causarle heridas ó malfuncionamiento.
No instale su lavadora en habitaciones donde puedan darse temperaturas inferiores a la congelación. Una
manguera congelada puede reventarse bajo presión. La fiabilidad de la unidad de control electrónica puede
ser deteriorada a temperaturas por debajo del punto de congelación.
Si el aparato es entregado en los meses de invierno y las temperaturas andan por debajo de la congelación,
mantenga la lavadora a temperatura del interior por algunas horas antes de ponerla en operación.
PRECAUCIÓN! Relacionado al Cordòn de Poder
Muchos electrodomèsticos recomiendan usar un ùnico suplemento de energía; es decir, solamente un circuito de poder
debe de ser usado sin tener otros electrodomèsticos conectados en el mismo. Revise la pàgina de especificaciones en el
Manual de Usuario para estar seguro.
No sature las conexiones de luz. Conexiones saturadas, sueltas o dañadas, extensiones, cables dañados o sueltos son
peligrosos. Cualquiera de estas condiciones pueden ocasionar choques eléctricos o fuego. Periódicamente examine el
cable de su electrodomèstico y si su apariencia indica daño o deterioro, desconéctelo, deje de usar el aparato y haga
reemplazar su cable por un servicio autorizado.
Proteja el cable de poder de cualquier abuso físico o mecánico, como torcerlo, pincharlo, que se quede entre una puerta
cerrada o que se le camine encima. Ponga particular atención a los conectores, enchufes, y el cable.
!
Page 32

32
INSTRUCCIONES DE INSTALACIÓN
■ Instalación de la Manguera de Desagüe
• La manguera de desagüe no debe ubicarse a
mas de 96" desde la base de la lavadora.
• Asegurar adecuadamente la manguera de
desagüe protegerá su piso de daños debidos a
fugas de agua.
• Ubique el extremo de la manguera de desagüe
en el orificio del sistema de drenaje en el piso.
• Cuando dirija la manguera de desagüe a un
lavabo ó tina, asegure el extremo de salida para
evitar que se suelte accidentalmente y ocasione
una inundación ó daños.
• Asegurar adecuadamente la manguera de
desagüe protegerá su piso de daños debidos a
fugas de agua.
Este equipo no está diseñado para uso marítimo ni para su uso en instalaciones móviles tales como campers,
aeronaves, etc.
Cierre el grifo de la máquina si se va a dejar por un periodo largo de tiempo (ej. Vacaciones).
Al desechar el aparato, corte el cable de energía y destruya la clavija.
Deshabilite el seguro de la puerta para evitar que algún niño pequeño quede atrapado dentro.
El material de empaque (ej. envoltura plástica, styrofoam) puede ser peligroso para los niños. ¡Existe el riesgo de
asfixia! Mantenga todo el material de empaque lejos del alcance de los niños.
Tina de ropa sucia
max. 96"
(2.4 m)
min. 30" (76.2 cm)
Plástico
sujetador
Soporte de
manguera
Aprox.
Aprox.
Aprox.
WASHWASH
EST. TIMEEST. TIME
SPINSPIN
WASH
EST. TIME
SPIN
WASH
EST. TIME
SPIN
WASH
EST. TIME
SP
IN
E
S
T
.
T
IM
E
W
A
S
H
SPIN
EST. TIME
WASH
SPIN
Aprox.
Aprox.
Aprox.
Page 33

WASHWASH,
ES
T. TIM
E
EST. TIME
,
S
PIN
SPIN,
WASH
EST. TIME
SPIN
WASH
EST. TIME
SPIN
INSTRUCCIONES DE INSTALACIÓN
■ Nivelar
Pie ajustable
Tuerca
de seguro
Alto
Bajo
Pie ajustable
Pie ajustable
ESPAÑOL
33
• Nivelar correctamente la lavadora previene el ruido y
las vibraciones excesivos. Instale el aparato sobre un
piso sólido y parejo y preferentemente en una esquina
de la habitación.
• Si el piso está disparejo, ajuste las patas ajustables según
lo requiera (No inserte piezas de madera, etc. debajo de
las patas).
NOTA: No extienda las patas niveladoras más de lo necesario.
Mientras más extendidas estén, más vibración puede
haber.
• Asegúrese de que las cuatro patas estén estables y que
reposen sobre el piso, después verifique que el aparato
esté bien nivelado (Utilice una herramienta verificadora de
nivel).
• Después de que la lavadora esté nivelada, apretar la
tuerca de seguro hacia la base de la lavadora.
Asegurarse de que todas las tuercas estén apretadas.
• Es crítico que ajuste las patas correctamente. Esto debe
hacerse mientras la lavadora esté girando con una carga.
Use la llave (abastecida) para ajustar las patas hasta que
no haya vibración. Luego asegure los tornillos para evitar
cambios en el nuevo ajuste.
NOTA: Si existe una vibración o ruido durante el
centrifugado, vuelva a revisar el nivel de balance de
la lavadora. Ajuste las patas hasta donde lo requiera
y asegure los tornillos para evitar cambios en el nuevo
ajuste. Inicie el lavado con una prueba de lavado para
asegurarse que está bien nivelada. Cargue
aproximadamente 6 libras de ropa en la lavadora.
Luego presione ENCENDIDO, ENJUAGUE+GIRO e
INICIAR/PAUSA, en ese orden. Cuando la lavadora
esté girando a su mayor velocidad verifique si está
estable. Si no, ajuste nuevamente las patas.
Verificación Diagonal
Al empujar hacia abajo los extremos de la tapa superior
de la lavadora de forma diagonal, esta no debe moverse
hacia arriba y hacia abajo para nada (Verifíquelo en
ambas direcciones).
Si la máquina se tambalea al empujar diagonalmente los
extremos hacia abajo, ajuste las patas nuevamente.
E
S
T
.
T
IM
E
W
A
S
H
S
P
I
N
E
S
T
.
T
IM
E
W
A
S
H
S
P
IN
Page 34

34
PREPARACIÓN ANTES DE LAVAR
1. Etiquetas de Cuidado
Busque etiquetas de cuidado en sus prendas. Esto le dirá sobre el contenido de las telas de su ropa y como
debe ser lavada.
2. Clasificando
Para obtener los mejores resultados, clasifique al ropa en cargas que puedan ser lavadas con el mismo ciclo
de lavado. Las diferentes telas deben ser lavadas con ciclos diferentes.
Siempre clasifique los colores oscuros de los pálidos y los blancos. Lave por separado ya que puede ocurrir
una transferencia de tinte y pelusa, coloreando los blancos, etc. De ser posible, lave las prendas mas sucias
separadas de las que lo estén menos.
Suciedad (Pesada, Normal, Poca) Separe las prendas de acuerdo a la cantidad de suciedad.
Color (Blancos, Pálidos, Oscuros) Separe las telas blancas de las de color.
Pelusa (Productores de Pelusa, Recolectores) Lave por separado las prendas que producen pelusa de las que la recolectan.
3. Verifique antes de Cargar
Combine artículos pequeños y grandes en una carga. Cargue los artículos grandes primero. Los artículos grandes
no deben ser más de la mitad de la carga total de lavado.
No lave artículos solos. Esto puede causar una carga desbalanceada. Añada una ó dos prendas de igual tamaño.
• Verifique todos los bolsillos para asegurarse de
que están vacíos. Objetos como clavos,
pasadores, cerillos, plumas, monedas y llaves,
pueden dañar tanto su ropa como su lavadora.
• Cierre los cierres, ganchos, y cintas para
asegurar que no se atoren con otras prendas.
• Trate las manchas y suciedad antes de lavar,
cepillando con un poco de detergente disuelto en
agua para aminorar la suciedad.
ADVERTENCIA
Para reducir el riesgo de incendio, descarga eléctrica ó daño a personas, lea las Instrucciones
Importantes de Seguridad antes de operar este aparato.
NOTA: No lave ni centrifugue prendas impermeables (contra agua).
Page 35

USANDO EL DISTRIBUIDOR
El distribuidor automático consiste de cuatro compartimentos que retienen 1) cloro líquido blanqueador, 2)
suavizante de telas líquido, 3) detergente líquido ó en polvo para el prelavado y 4) detergente en polvo ó líquido y
blanqueador seguro para los colores para el lavado principal.
Todos los productos de lavandería pueden ser añadidos al mismo tiempo en su compartimiento distribuidor. Estos se
distribuirán a su debido tiempo para lograr la limpieza mas efectiva. Después de cargar los aditivos de lavandería en
el distribuidor, cierre la tapa.
Añada detergente, blanqueador y suavizante de telas al distribuidor automático de
acuerdo con los siguientes pasos:
1. Abra el cajón distribuidor.
2. Cargue los productos de lavado en los compartimentos correspondientes.
3. Cierre el cajón distribuidor.
■ Acerca del Detergente
NOTA: El detergente líquido será drenado al cilindro de la lavadora al ser añadido al distribuidor.
ESPAÑOL
35
Su lavadora LG TROMM esta diseñada para usar solamente detergentes de Alta Calidad (HE).
Los detergentes tienen una formula especial que se requiere solo en las cargas frontales ya que reducen
componentes de la espuma.
Dicho detergente hace menos espuma, mejora el lavado y el centrifugado y ayuda a mantener el interior de su
lavadora LG TROMM en perfectas condiciones.
Si suele utilizar jabones regulares, puede ocasionar un alto nivel de espuma y de insatisfacción.
Para el mejor proceso de lavado y centrifugado, bajo nivel de espuma. Se recomienda ampliamente utilizar
detergentes de Alta Calidad (HE).
Diseñada especialmente para utilizar
solamente detergente HE (Alta eficiencia)
• Añada detergente a este compartimiento cuando
use la opción de Prelavado. En este
compartimiento se puede usar detergente tanto
líquido como en polvo. El detergente será
distribuido automáticamente durante el
Prelavado si este fue seleccionado en las
opciones.
• Añada la mitad de la cantidad recomendada para
el Prelavado y la cantidad completa
recomendada para el Lavado Principal.
NOTA: El detergente líquido será drenado al
cilindro de la lavadora al ser añadido al
distribuidor.
1. Compartimiento de Detergente para Prelavado
Compartimiento
de cloro líquido
blanqueador.
Compartimiento
de suavizante de
telas líquido.
Compartimiento
de prelavado.
Compartimiento
de lavado
principal.
Page 36

36
USANDO EL DISTRIBUIDOR
• Añada cloro líquido blanqueador a este
compartimiento.
El blanqueador será distribuido automáticamente
a su debido tiempo durante el ciclo.
• No rebase la línea de llenado máximo.
El sobrellenado puede causar derrames
tempranos de blanqueador, lo que puede resultar
en prendas dañadas.
• No vierta cloro líquido sin diluir directamente en el
cilindro ó sobre la ropa. Puede ocurrir daño a las
telas.
• No use blanqueador en polvo en este
compartimiento.
3. Compartimiento de Blanqueador Líquido
• Añada la cantidad recomendada de suavizante de
telas a este compartimiento.
• Diluya suavizantes concentrados con agua tibia
hasta llegar a la línea de llenado.
• No exceda la línea de llenado máximo.
El sobrellenado puede causar derrames
tempranos de suavizante, lo que puede resultar en
prendas sucias.
• No vierta el suavizante de telas directamente
sobre la carga de lavado.
• El suavizante de telas será distribuido
automáticamente durante el último ciclo de
enjuague.
NOTA: No coloque, guarde o derrame productos de
lavado (jabón, detergente, blanqueador,
suavizante, etc.) en la parte superior de su
lavadora o secadora. Estos productos
pueden dañar el terminado o los controles si
se deja por mucho tiempo ahí.
4. Compartimiento de Suavizante de Telas
• Añada el detergente con medida a este
compartimiento para el lavado Principal.
El detergente es drenado del distribuidor al
comenzar el ciclo. Puede usarse tanto detergente
líquido como en polvo.
• Puede añadirse blanqueador que cuide los colores
al compartimiento del Lavado Principal junto con el
mismo tipo de detergente, líquido ó en polvo.
• Cuando use detergente líquido, asegúrese de que
estén insertados correctamente en su
compartimento. No rebase la línea de llenado
máximo.
• Para detergente en polvo, remueva el
compartimento para detergente líquido.
• El detergente en polvo no debe mezclarse con
detergente líquido en el mismo compartimento.
2. Compartimiento de Detergente del
Lavado Principal
Caja Detergente
Líquido
Inserciones
Diseñada especialmente para utilizar
solamente detergente HE (Alta eficiencia)
Page 37

CICLOS
■ Usted puede seleccionar ciclos diseñados para diferentes tipos de telas y niveles de suciedad.
ESPAÑOL
37
Ciclo
Ropa interior muy
sucia,
ropa de trabajo,
pañales,
etc.
O
O
OO
O
Sanitario
(Sanitary)
Extra Caliente/Fría
Alto Normal
Extra Alto
Sin Giros
Bajo
Medio
Pesado
Ligero
Algodón,
Lino,
Toallas,
Camisetas
OOOOO
Algodón/
Toallas
(Cotton/
Towels)
Tibia/Fría
Alto
Normal
Tibia/Tibia
Caliente/Fría
Fría/Fría
Extra Alto
Sin Giros
Bajo
Medio
Pesado
Ligero
Cargas mixtas,
ropa de trabajo,
jeans,
camisas
OOOOO
Normal
(Normal)
Tibia/Fría
Alto Normal
Tibia/Tibia
Caliente/Fría
Fría/Fría
Extra Alto
Sin Giros
Bajo
Medio
Pesado
Ligero
Pantalones,
camisas de vestir,
ropa sin arrugas,
mezclas de poly/
algodón, etc.
O
O
O
OOO O O
Planchado
Permanente
(Perm.
Press)
Tibia/Fría
Medio
Normal
Tibia/Tibia
Caliente/Fría
Fría/Fría
Alto
Sin Giros
Bajo
Pesado
Ligero
Camisas de vestir,
blusas,
nylon,
prendas con encaje
OOOOO
Delicados
(Delicates)
Fría/Fría
Medio
Normal
Tibia/Fría
Tibia/Tibia
Sin Giros
Bajo
Pesado
Ligero
Artículos Etiquetados
para lavado a mano
OOOO
Lavado a
Mano/Lana
(Hand Wash/
Wool )
Tibia/Fría
Medio
Normal
Tibia/Tibia
Fría/Fría
Sin Giros
Bajo
Ligero
Ropa
Ligeramente
Sucia
OOO
Lavado
Rápido
(Speed Wash)
Caliente/Fría Extra Alto
Ligero
Fría/Fría
Tibia/Fría
Tibia/Tibia
Sin Giros
Bajo
Medio
Alto
Normal
Pesado
Tipo de Tela
Temperatura de
Lavado/Enjuague
Velocidad
de Giro
Nivel de
Suciedada
Pre-
lavado
Ciclo
Rápido
Agua
Más
Ciclo de
Manchas
Enjuague
Extra
Enjuague+
Giro
LAVADO A MANO/LANA
• Sólo las prendas de lana marcadas como “apta para lavadora” deben lavarse en esta máquina.
• Lave sólo pequeñas cargas para un cuidado óptimo de las telas (menos de 8 libras).
• Sólo deben usarse detergentes neutrales (aptos para lana) (Sólo se necesita una pequeña cantidad de detergente
debido al tamaño pequeño de carga y el bajo volumen de agua del ciclo).
• El ciclo HANDWASH/WOOL (LAVADO A MANO/LANA) utiliza un secado delicado y un centrifugado de baja
velocidad para un cuidado extremo de las telas.
El ciclo de lavado de lana de esta máquina ha
sido aprobado por Woolmark para el lavado de
productos Woolmark aptos para lavadoras
siempre que tales productos se laven de acuerdo
con las instrucciones de la etiqueta de la prenda y
las emitidas por el fabricante de esta lavadora,
M0807.
Certified by NSF
Certificado por NSF
NSF International (formalmente La Base Nacional de Saneamiento)
certifica el curso SANITARIO, cuyo objetivo es reducir 99,9% de
bacterias, no se convervara a la proxima carga despues del ciclo en
la lavadora
Page 38

• SPINSENSETMpuede ser usado cuando el piso es
de madera o cuando uno tiene la preocupacíón
de que vibre la lavadora.
• Presione el botón Water Plus por 3 seg para
operar SPINSENSE
TM
• Cuando se escoge la opción de Spin Speed la luz en el
botón se encenderá y apagará continuamente.
• Presione el botón del Water Plus por 3 seg de nuevo para
cancelar el ciclo SPINSENSETM.
• Si el ciclo SPINSENSETMfue seleccionado, el ciclo
continuara aplicandose mientras la lavadora está en uso.
• La opción ‘SPINSENSE’ no puede ser seleccionado
durante ciclo de centrifugado.
6. SPINSENSE
TM
COMO USAR LA LAVADORA
• Presione la Selector de Ciclo para seleccionar el ciclo
diseñado para los diferentes tipos de telas y niveles de
suciedad.
• Cada ciclo tiene una temperatura, velocidad de giros,
nivel de suciedad y Opciones predeterminadas
(Véase página 37).
• La configuración predeterminada puede ser cambiada
en cualquier momento antes de comenzar el ciclo
.
.
NOTA: Esta lavadora de carga frontal requiere un tiempo de
ciclo más largo, y obtendrá una mejor limpieza, aun
es más gentil en las prendas, que las lavadoras de
carga superior. El tiempo de lavado se puede reducir
significativamente para cargas pequeñas o para
prendas ligeramente sucias, solo seleccionando el
"Ciclo Rápido" con el botón "Opción" y
programando el botón de "Nivel de Suciedad",
iluminándose la opción.
2. Ciclos
• Use este botón para Encender y Apagar la lavadora.
1. Encendido (Power)
• Use este botón para iniciar y pausar la lavadora.
3. Iniciar/Pausa (Start/Pause)
Selector de Ciclo
• Permite el comienzo de un ciclo con una demora desde
1 hasta 12 horas.
• Haga la selección apropiada para su carga, después
presione el botón de Terminado de Retraso (Delay
Wash) una vez por una hora ó de nuevo hasta 12 horas
de demora en el Terminado de Retraso.
4. Lavado Diferido (Delay Wash)
• Esta opción provee un enjuague adicional.
• Use esta opción para asegurar la eliminación de
residuos de detergente ó blanqueador de las
prendas.
7. Enjuague Extra (Extra Rinse)
• Añade agua adicional a los ciclos de lavado y de
enjuagado para mejores resultados.
5. Agua Más (Water Plus)
38
NOTA: Si usted no presiona el botón Iniciar/Pausa en
los límites de 4 minutos que se dan para
seleccionar el ciclo, el lavado automático se
apagara.
Page 39

COMO USAR LA LAVADORA
• Use este botón para activar o apagar la Alarma.
11. Beeper
• Para cambiar el nivel de suciedad, presione el
botón de Nivel de Suciedad (Soil Level)
repetidamente hasta que el nivel deseado se haya
conseguido.
10. Nivel de Suciedad (Soil Level)
• Seleccione la temperatura del agua basándose en
el tipo de carga que esté lavando.
• Siga las instrucciones de cuidado de las prendas y
clasifíquelas según la tabla de abajo para mejores
resultados.
8. Temperatura de Lavado/Enjuague
(Wash/Rinse)
• Un enjuague tibio deja las carga más seca que un
enjuague frío. Un enjuague tibio incrementa las
arrugas.
• En climas fríos, un enjuague tibio hace la carga
mas cómoda de manejar.
• Un enjuague frío ahorra energía.
• Las temperaturas de los enjuagues fríos dependen
de la temperatura del agua fría de su grifo.
• Para cambiar la velocidad de giro, presione el
botón de Velocidad de Giro (Spin Speed) hasta
configurar la velocidad deseada.
• Para comenzar el ciclo del Drenar/Giro:
1. Presione Encendido para girarse.
2. Presione el botón de velocidad de Giro (Spin Speed)
3. Presione Iniciar/Pausa.
9. Velocidad de Giro (Spin Speed)- Ciclo del Drenar/Giro
ESPAÑOL
39
LA PANTALLA DE LED (LED DISPLAY)
Cuando se aprieta el botón INICIO/PAUSA, la
lavadora detecta automáticamente la carga de
lavado (peso) y optimiza el tiempo de lavado, en
base al ciclo y las opciones seleccionados. Luego
la pantalla indicará el tiempo restante estimado
para dicho ciclo.
NOTA:
El tiempo de ciclo mostrado puede mostrarse
mucho más largo que el de una lavadora de
carga superior. El tiempo mostrado corresponde
al ciclo completo, y no solo la porción de
agitación del ciclo, como se muestra típicamente
en una lavadora de carga superior.
2. ESTIMATED TIME REMAINING (TIEMPO RESTANTE ESTIMADO)
Indica que la compuerta está asegurada.
La compuerta de la lavadora se asegurará
mientras la lavadora se encuentra funcionando.
Se puede liberar la compuerta apretando el botón
INICIO/PAUSA ubicado en la parte superior de
la lavadora.
1. INDICADOR DE SEGURO DE LA COMPUERTA
Muestra la porción del ciclo de lavado actual que
se ha completado.
3. IDICADOR DE COMPLETACIÓN DE CICLO
Esta porción de la pantalla muestra el ciclo
seleccionado, el estado de funcionamiento y los
mensajes especiales. Si el ciclo tiene instrucciones
especiales, también se mostrarán en esta área.
4. PANTALLA DE ESTADO/CICLO
2
1
3
4
Temperatura del Agua Sugerida
Prenda
Extra Caliente
Toallas de cocina, sábanas,
ropa de bebés.
Caliente
Artículos blancos y de
color-rápido muy sucias.
Tibia
La mayoría de las cargas.
Fría
Lanas lavables, artículos
de colores brillantes.
Page 40

OPCIONES (OPTION)
SEGURO PARA NIÑOS (CHILD LOCK)
PUERTA ASEGURADA (DOOR LOCKED)
• Use esta opción para cargas que requieran tratamiento
previo. Añade 16 minutos de prelavado y desagüe.
NOTA: Cuando use la opción de Prelavado, no use
detergente líquido en el compartimiento de
Lavado Principal. Use detergente en polvo.
1. Prelavado (Prewash)
• Se enciende siempre que la puerta de la lavadora
está asegurada.
• La puerta puede desasegurarse presionando el botón
Iniciar/Pausa para detener la lavadora.
NOTA: Si la temperatura o nivel del agua son muy
altas, la puerta no puede ser desbloqueada.
No trate de forzar la puerta para abrirla
cuando la luz de PUERTA ASEGURADA
esté encendida.
TIEMPO RESTANTE ESTIMADO (EST. TIME REMAINING)
• Esta pantalla muestra:
a) El tiempo restante estimado en el ciclo cuando
este está operando.
b) El código de error cuando este ha sido
detectado.
• Use esta opción para prevenir el uso no deseado de
la lavadora. Presione y sostenga el botón de
Option por 3 segundos para bloquear/ desbloquear
el control.
• Cuando esté puesto el seguro para niños,
parpadean las letras “ ” y todos los botones son
lisiados. Usted puede bloquear la lavadora mientras
está operando.
• El Ciclo Rápido ofrece un ciclo de tiempo rápido.
• Su uso se sugiere para refrescar prendas recién
adquiridas ó prendas que han sido
empacadas por un tiempo.
3. Ciclo Rápido (Quick Cycle)
5. Lavar de Tonel (Tub Clean)
• Use esta opción para enjuagar y luego girar.
2. Enjuague+Giro (Rinse+Spin)
COMO USAR LA LAVADORA
• Añade más tiempo a los ciclos de lavado y
enjuagado para mejor remoción de manchas.
• Provee un enjuague automáticamente.
• Puede ocurrir la acumulación de residuos de detergente en
el lavadero después de algún tiempo, lo que puede causar
un olor a humedad o moho. El ciclo Lavar de Tonel está
especialmente diseñado para eliminar esta acumulación.
• Para comenzar el ciclo:
1. Retire toda la ropa que se encuentre en el interior de la
lavadora y cierre la puerta.
2. Abra el despachador de detergentes y agregue
blanqueador a su compartimiento.
NOTA:
No agregue detergente al compartimiento del detergente.
Tenga cuidado si usted coloca demasiado puede ocasionar
goteras dentro de la lavadora.
3. Cierre el despachador de detergente suavemente.
4. Para prender la máquina, presionar el botón ‘Option’ y
luego seleccionar la opción ‘Tub Clean’.
5. Presione el botón de Iniciar/Pausa (Start/Pause).
6. Una vez que el ciclo concluyó, deje la puerta abierta y
seque alrededor de la puerta, su puerta de vidrio.
PRECAUCIÓN:
Si hay algún niño pequeño, tenga cuidado de no dejar la
puerta abierta.
NOTA:
Remueva depósitos de agua dura usando únicamente productos
que en la etiqueta digan que es seguro su uso en lavadoras.
4. Ciclo de Manchas (Stain Cycle)
!
40
INDICADOR DE ESTADO (STATUS INDICATOR)
• Estas luces señalan en que parte del ciclo se está
operando. (Véase página 39)
Page 41

MANTENIMIENTO
2
3
■ El Filtro de Entrada de Agua.
• El mensaje de error “ ”parpadeará en el panel de control cuando no entre agua al compartimiento de detergente.
• Si su agua es muy dura ó contiene residuos de cal, el filtro de entrada de agua puede obstruirse. De tal modo que
resulta bueno limpiarlo de vez en cuando.
Antes de limpiar el interior de la lavadora, desconéctela del suministro eléctrico para evitar recibir una descarga eléctrica.
Cuando deseche el aparato, corte el cable de corriente y destruya la clavija.
Deshabilite el seguro de la puerta para evitar que algún niño pequeño quede atrapado dentro.
1. Abra la tapa de la cubierta
inferior (). Gire la conexión
de la manguera de drenaje
() para sacarla.
2. Desconecte la conexión del
drenaje permitiendo que el
agua salga. Al mismo tiempo use
un recipiente para evitar que el
agua caiga al piso. Cuando deje
de correr el agua, abra el filtro de
la bomba hacia la izquierda.
3. Retire cualquier material extraño
del filtro de la bomba . Después
de limpiar el filtro , gírelo según
las manecillas del reloj e inserte la
conexión del desagüe a su lugar
original. Cierre la tapa de la
cubierta inferior .
■ El Filtro de La Bomba de Drenaje
•
El filtro de drenaje recolecta fibras y objetos pequeños olvidados en la ropa sucia. Verifique
regularmente que el filtro esté limpio para asegurar un funcionamiento suave de su lavadora.
• Permita que el agua se enfríe antes de limpiar la bomba de drenaje.
PRECAUCIÓN
Primero drene usando la manguera de desagüe y después abra el filtro de la bomba para
retirar fibras u objetos.
1
ESPAÑOL
41
1. Cierre la llave del agua.
2. Desatornille la manguera de la
entrada de agua.
3. Limpie el filtro usando un
cepillo de cerdas duras.
4. Apriete fuerte la manguera a la
entrada.
• IMPORTANTE:
Usar SOLAMENTE las
mangueras de la entrada
proporcionadas por LG de este
producto del lavadero. Las
mangueras del mercado de
accesorios no están
garantizadas para caber o para
funcionar correctamente.
Otras mangueras pueden no
apretar correctamente y podrían
causar los escapes. El daños
subsecuente al producto o a la
propiedad no serán cubiertos
de conformidad con la garantía
de LG.
Page 42

MANTENIMIENTO
■ El Cilindro de Lavado
• Si usted vive en un área de agua dura, continuamente se genera la acumulación de residuos de cal en
lugares donde no se ve con facilidad y es difícil remover. Con el tiempo esto puede obstruir su aparato y si no
se verifica periódicamente, podría tener que reemplazarlo.
• Aunque el cilindro de lavado esté hecho de acero inoxidable, pueden llegar a aparecer puntos de óxido
causados por otros artículos pequeños de metal (clips, seguros, etc.) que hayan sido dejados en el cilindro.
• El cilindro de lavado deberá ser lavado de vez en cuando.
• Si usa agentes para remover la cal, asegúrese de que pueden usarse en una lavadora.
• Los agentes para remover la cal pueden contener componentes que dañen su lavadora.
• Remueva las manchas con un agente limpiador de acero inoxidable.
• Nunca use fibra de acero.
42
■ Limpiando el Distribuidor
•
El distribuidor puede necesitar que lo limpie periódicamente debido a los residuos de los aditivos de lavandería.
• Corra agua caliente junto con un cepillo suave o alguna prenda sobre el cajón, para eliminar los excesos de
detergente líquido y cualquier aditivo de lavadería.
• Limpie el cajón usando agua y un cepillo pequeño.
• Siga las ilustraciones del reverso para reemplazar las piezas en su ubicación correcta.
NOTA: No use ninguna sustancia de limpieza en la apertura del cajón más que agua porque se drenará al tina.
Si esto sucediera, ponga la lavadora a realizar un ciclo de enjuague y giro para remover cualquier residuo de
la sustancia antes de lavar ropa.
1
Jale el cajòn dispensador
fuera hasta que termine.
2
Presione abajo la
lengüeta de la cerradura
en el relleno del blanqueo.
Quite el cajón.
3
Remueva la caja del
detergente líquido,
blanqueador y suavizante
de sus compartimentos.
SOFTENER
MAX
SOFTENER
MAX
Page 43

MANTENIMIENTO
■ Limpiando su Lavadora
1. Exterior
El cuidado adecuado de su lavadora puede extender su vida.
El exterior de la máquina puede ser limpiado con agua tibia y un detergente casero neutral, no-abrasivo.
Limpie inmediatamente cualquier derrame. Limpie con un trapo húmedo.
Trate de no golpear la superficie con objetos filosos ó puntiagudos.
IMPORTANTE: No use esencia de metilo, solventes ó productos similares.
2. Interior
Seque alrededor de la abertura de la puerta de la lavadora, la junta flexible y el vidrio de la puerta.
Estas áreas deben estar siempre limpias para asegurar un sellado hermético.
LAVAR DE TONEL es un ciclo especial para limpiar el interior de la lavadora. Este ciclo utiliza un
alto nivel de agua con una velocidad fuerte. Haciendo un ciclo normal.
• Lea detenidamente estas instrucciones antes de iniciar el ciclo LIMPIEZA DE LA CUBETA.
1. Abra la puerta y retire cualquier prenda existente en el tambor de lavado.
2. Abra el compartimento del dispensador.
3. Añada lejía de cloro líquida o limpiador de cubetas. Pueden usarse algunos limpiadores de
cubetas en polvo o pastillas fabricadas a tal efecto. (NOTA: no añada ningún detergente o
suavizante para ropa al realizar la LIMPIEZA DE LA CUBETA).
- Si usa lejía de cloro líquida
Añada lejía de cloro líquida en el compartimento para lejía del dispensador.
(NOTA: no rebase la línea de llenado máximo y no vierta lejía líquida sin diluir directamente
dentro del tambor de lavado).
- Si usa limpiador en polvo
Retire el recipiente de detergente líquido y añada limpiador en polvo al compartimento de
lavado principal del dispensador.
- Si usa limpiador en pastillas
Añada el limpiador en pastillas directamente al tambor de lavado.
(NOTA: no añada limpiador en pastillas al dispensador).
4. Cierre el dispensador y la puerta de la lavadora.
5. Escoja el programa LIMPIEZA DE LA CUBETA (TUB CLEAN) y pulse INICIO.
NOTA : Se recomienda usar el programa de LIMPIEZA DE LA CUBETA una vez al mes.Si ya se hubiera
formado moho o se percibiese olor a humedad, ejecute el programa de LIMPIEZA DE LA CUBETA
semanalmente durante 3 semanas. Una vez completado el programa de LIMPIEZA DE LA CUBETA o
cuando la lavadora no vaya a usarse, deje la puerta de la máquina abierta para lograr una ventilación
y un secado interior óptimo.
NOTA: Remueva depósitos de agua dura usando únicamente productos que en la etiqueta digan que es
seguro su uso en lavadoras.
■ Instrucciones de Invierno
Si la lavadora es almacenada en un lugar donde pueda ocurrir congelación, ó es movida a un lugar con
temperaturas de congelación, siga las siguientes instrucciones de invierno para prevenir daños a su lavadora:
1. Cierre la llave de suministro de agua.
2. Desconecte las mangueras del suministro de agua y del drenaje.
3. Conecte el cable de suministro de energía a una toma de corriente propiamente conectada a tierra.
4. Añada 1 galón (3.8 ℓ) de anticongelante no-tóxico para vehículo de recreo para vaciar el cilindro de
lavado. Cierre la puerta.
5. Configure el ciclo de giro y deje girar a la lavadora por 1 minuto para drenar toda el agua. No todo el
anticongelante será expulsado.
6. Desconecte el cable de suministro de energía, seque el interior del cilindro y cierre la puerta.
7. Retire el contenedor del distribuidor. Drene el agua que haya en los compartimientos y seque los
componentes.
8. Almacene la lavadora en posición parada derecha.
9. Para remover el anticongelante de la lavadora después de almacenada, opérela vacía por un ciclo
completo de lavado usando detergente. No añada ropa.
ESPAÑOL
43
Page 44

GUÍA PARA LA DETECCIÓN DE PROBLEMAS
Esta lavadora está equipada con funciones de seguridad automáticas que detectan y diagnostican fallas
tempranamente y reaccionan apropiadamente. Cuando la máquina no funcione apropiadamente ó no funcione
para nada, verifique los puntos siguientes antes de llamar al Departamento de Servicio.
Ruido de golpeteo
metálico
Ruido Sordo
Ruido vibrante
Fugas de agua
Exceso de espuma
Olor a humedad o
moho en la lavadora
• Algún objeto externo como
monedas ó seguros pueden
estar en el cilindro ó en la
bomba de drenaje.
• Cargas pesadas de ropa
pueden causar este sonido.
Esto es normal.
• ¿Ha retirado los pernos de
transportación y la envoltura
por completo?
• ¿Están todas las patas
reposando sobre el piso
firmemente?
• La manguera de suministro de
agua esta suelta en la llave ó
en la entrada de la máquina.
• Las mangueras de drenaje de
la casa están obstruidas.
• ¿Demasiado detergente ó
detergente no compatible?
• Se ha utilizado demasiado
detergente o el detergente
incorrecto.
• El interior del lavadero no se ha
limpiado adecuadamente.
Detenga la lavadora y revise el cilindro y el
filtro de desagüe. Si el ruido persiste
después de reiniciar la lavadora, llame a
Servicio.
Si el sonido persiste, talvez la lavadora
esté desbalanceada. Deténgala y
redistribuya el peso de la carga.
Véase Instalación para remover los pernos
de transportación.
Si la carga está mal distribuida en el
cilindro de lavado, detenga la lavadora y
redistribuya la carga de manera equitativa.
Ajuste las patas.
Asegúrese que las cuatro patas estén en
firme contacto con el suelo, mientras que
la lavadora está en ciclo de la giro con la
carga.
Verifique y apriete las conexiones.
Descongestione los tubos de drenaje.
Contacte a un plomero de ser necesario.
Reduzca la cantidad de detergente o
utilice detergente de HE (Alta eficiencia)
• Utilice detergente de alta efi ciencia HE
(High-Efficiency) únicamente, según las
instrucciones del fabricante.
• Active el ciclo Lavar de Tonel (Tub
Clean) de manera regular. Asegúrese de
limpiar alrededor y debajo del sello de la
compuerta con frecuencia.
Problema Posible Causa Solución
Diseñada especialmente para
utilizar solamente detergente HE
(Alta eficiencia)
44
Page 45

GUÍA PARA LA DETECCIÓN DE PROBLEMAS
La lavadora no enciende
La lavadora no gira
El tiempo de lavado se
retrasa
• El cable de suministro de
energía puede no estar
conectado ó está suelto.
• El fusible de la casa puede
estar fundido, ó se botó el
interruptor de circuito, ó no
hay luz.
• La llave de suministro de agua
no está abierta.
• Verifique que la puerta esté
bien cerrada.
• El tiempo de lavado puede
variar de acuerdo con la
cantidad de ropa, presión del
agua, temperatura del agua y
otras condiciones de uso.
Asegúrese de que esté bien conectado.
Reemplace el fusible ó reinicie el
interruptor de circuito.
No incremente la capacidad del fusible.
Si el problema es una sobrecarga en el
circuito, hágalo corregir por un electricista
calificado.
Abra la llave del suministro de agua.
Cierre la puerta y presione el botón de
Iniciar/Pausa. Después de presionar el
botón de Iniciar/Pausa, puede tomar unos
momentos antes de que la ropa comience
a girar. La puerta debe cerrar con seguro
antes de iniciar los giros.
Si el desequilibrio es detectado ó si el
programa eliminador de espuma operan, el
tiempo de lavado puede aumentar.
Problema Posible Causa Solución
El Agua no entra a la
lavadora ó entra
lentamente
El agua de la lavadora no
se va ó se va lentamente
• El suministro de agua no es el
correcto en el área.
• La llave de suministro de agua
no está bien abierta.
• La manguera de suministro de
agua está torcida.
• El filtro del suministro de agua
está obstruido.
• La manguera de desagüe está
torcida.
• El filtro de desagüe está
obstruido.
Verifique con otra llave en la casa.
Abra completamente la llave.
Enderece la manguera.
Verifique el filtro en la manguera.
Limpie y enderece la manguera.
Limpie el filtro de desagüe
ESPAÑOL
45
Page 46

GUÍA PARA LA DETECCIÓN DE PROBLEMAS
• El suministro de agua no es
adecuado en el área.
• Las llaves del agua no están
completamente abiertas.
• Las mangueras de entrada de
agua están torcidas.
• El filtro de la manguera de
entrada está obstruido.
• La manguera de desagüe está
torcida u obstruida.
• El filtro de desagüe está
obstruido.
• La carga es muy pequeña.
• La carga está desbalanceada.
• El aparato tiene un sistema de
detección de desequilibrio y
corrección. Si son cargados
artículos individuales pesados
(ej. Bata de baño, colchas,
etc.) este sistema puede
detener el ciclo si el
desequilibrio es muy grande
aun después de un rato.
• ¿Está la puerta abierta ó no
está bien cerrada?
• El agua sobrellena hasta la
válvula de falla de agua.
• Hay una falla en el sensor de
nivel de agua.
• Sobrecarga en el Motor.
• La lavadora estuvo sometida a
una falla de alimentación
eléctríca.
Verifique con otra llave de agua en la casa.
Abra bien las llaves del agua.
Enderece las mangueras.
Verifique el filtro de las mangueras de
entrada de agua.
Limpie y enderece la manguera.
Limpie el filtro de desagüe
Añada 1 ó 2 prendas similares a la carga.
Reacomode la carga para balancearla.
Cierre bien la puerta.
Si el mensaje persiste llame a Servicio.
Desconecte el suministro de energía
y llame a Servicio.
Cierre la llave del agua.
Desconecte la clavija de energía.
Llame a servicio.
Deje la lavadora en espera por 30 minutos
para permitir que se enfrie el motor; luego
reinicie el ciclo. Si aparece el codigo de error
LE, desenchufe la lavadora y llame a
mantenimiento.
Vuelva a comenzar el ciclo.
Problema Posible Causa Solución
46
Page 47

GARANTÍA
Su lavadora LG será reparada o reemplazada, a consideración de LG, si prueba ser defectuosa en material o en ejecución dentro de
un uso normal, dentro del periodo de garantía ("periodo de garantía") descrito en la parte inferior, efectivo desde la fecha ("fecha de
compra") de la compra del producto por el consumidor. Esta garantía limitada es efectiva únicamente para el comprador original del
producto, y efectivo únicamente si ha sido usado en los Estados Unidos, incluyendo Alaska, Hawai y territorio norteamericano.
ESTA GARANTÍA REEMPLAZA CUALQUIER OTRA GARANTÍA, EXPRESA O IMPLÍCITA, INCLUYENDO SIN LIMITACIÓN CUALQUIER
GARANTÍA DE VENTA DE MERCANCÍA O CONVENIENCIA PARA PROPÓSITOS PARTICULARES. EN EL EXTENDIDO CUALQUIER GARANTÍA
IMPLÍCITA ES REQUERIDA POR LEY, ES LIMITADA EN DURACIÓN AL PERÍODO DE GARANTÍA EXPRESA EN LA PARTE INFERIOR.
NI EL FABRICANTE NI SUS DISTRUBUIDORES EN LOS EUA PUEDEN SER RESPONSABLES DE NINGUN DAÑO INCIDENTAL, CONSECUENCIAL,
INDIRECTO, ESPECIAL O PUNITIVO DE NINGUNA NATURALEZA, INCLUYENDO SIN LIMITACIÓN, PÈRDIDAS DE GANANCIAS O
CUALQUIER OTRO DAÑO AUNQUE ESTE BASADO EN CONTRATO O AGRAVIO. Algunos estados no permiten la exclusión o limitación
de daños incidentales o consecuenciales en el tiempo válido de la garantía así que la exclusión mencionada en la parte de
arriba puede que no aplique para usted. Esta garantía le da derechos legales específicos y puede que usted tenga otros
derechos además de los mencionados que varían de estado en estado.
ESTA GARANTÍA LIMITADA NO APLICA A:
• Viajes de Servicio a su casa para llevar, recoger y/o instalar el producto, instruir o reponer fusibles o conectar correctamente
cables, o la corrección de piezas desautorizadas; y
• Daños o problemas operacionales como resultado de un mal uso, abuso, operación dentro de un ambiente no especificado o
contrario a los requerimientos o precauciones en la Guia Operacional, accidente, plagas, incendios, inundaciones, instalación
inapropiada, actos de Dios, alteraciones o modificaciones desautorizadas, voltaje incorrecto, uso comercial, o para el uso de
otros fines que no sean los propósitos intencionados.
El costo de reparaciones o reemplazos que son excluidos de estas circunstancias, deben ser asumidos por el consumidor.
NÚMEROS CENTRALES INTERACTIVOS PARA EL CLIENTE
PERÍODO DE GARANTÍA:
Vigencia: 1 año desde la fecha de compra.
PARTES (exceptuando la siguiente lista):
1 año desde la fecha de compra.
Piezas para el panel de control electrónico:
2 años desde la fecha de compra.
Piezas para el motor de tina Drum (Stator, Rotor, Hall sensor):
10 años desde la fecha de compra.
Piezas para la tina Drum de acero inoxidable: La vida.
Las unidades reemplazadas y reparadas pueden ser nuevas o
refabricadas por la fábrica.
Las unidades reemplazadas y reparadas tienen la misma
porción de garantía que la garantía original de la compra del
producto durante el mismo periodo.
Para obtener Asistencia al Consumidor,
Información de Producto, O centros de Servicio
Autorizados:
PARA CONTACTAR A LG Electronics POR MAIL
LG Customer Interactive Center
P. O. Box 240007
201 James Record Road
Huntsville, Alabama 35824
ATTN: CIC
Llame al 1-800-243-0000 (24 horas por día, 365 días por año) y
seleccione la opción apropiada del menú.
o visite nuestra página de Internet en http://www.lgservice.com.
CÓMO SE MANEJA EL SERVICIO:
Servicio a domicilio: Por favor conserve el recibo del lugar
donde realizó su compra como evidencia de la fecha en
que el producto fue adquirido para validar el periodo de
garantía, y tenga una copia del recibo para la persona de
servicio que la atienda en el momento en que necesite
aplicar su garantìa.
Por favor llame al 1-800-243-0000 y escoja la opción
apropiada para localizar el Centro de Servicio Autorizado LG
más cercano a usted.
O visite nuestra página de internet en
http://www.lgservice.com
LG ELECTRONICS, INC.
Grantía Limitada En Los Estados Unidos De Lavadora LG
ESPAÑOL
47
Page 48

48
CARACTÉRISTIQUES DU PRODUIT
TABLE DES MATIÈRES
■
Moteur à entraînement direct
Le moteur CC sans balais perfectionné entraîne directement le
tambour sans courroie ni poulie.
■
Tambour incliné et très grande ouverture
Le tambour incliné et la très grande ouverture permettent de charger et
de décharger les articles facilement.
■
Billes RollerJets
Améliorent le rendement du lavage et réduit les dommages aux
vêtements. Les jets vaporisent et aident a faire culbuter les vêtements,
rehaussant le rendement du lavage.
■
Détection automatique de charge de lavage
Détecte automatiquement la charge et optimise le temps de lavage.
■
Chauffe-eau intégré
Chauffe automatiquement l’eau à la meilleure température pendant
certains cycles.
■
Verrouillage enfant
Pour empêcher les enfants de presser des touches et modifier les
réglages pendant le fonctionnement.
■
AFFICHEUR DEL
L’affi cheur DEL illustre les réglages, le temps restant estimé, les
options et les messages d’état de votre machine à laver. Lorsque la
machine à laver est en marche, l’affi cheur s’illuminera.
Informations importantes de sécurité.............................................................................................................................49
Données techniques ......................................................................................................................................................50
Instructions d’installation................................................................................................................................................51
Mise en oeuvre avant le lavage .....................................................................................................................................56
Utilisation du distributeur ...............................................................................................................................................57
Cycles ...........................................................................................................................................................................59
Utilisation de la laveuse .................................................................................................................................................60
Entretien ........................................................................................................................................................................63
Guide de dépannage .....................................................................................................................................................66
Garantie .........................................................................................................................................................................69
추가선택, 예약,
WASH
EST. TIME
SPIN
Page 49

FRANÇAIS
49
INFORMATIONS IMPORTANTES DE SÉCURITÉ
LIRE TOUTES LES INSTRUCTIONS AVANT D’UTILISER
AVERTISSEMENT!
Pour la sécurité, l’information de ce guide doit être suivie afin de minimiser le risque d’incendie
ou d’explosion, de choc électrique, de dommages à la propriété ou de blessures.
IINNSSTTRRUUCCTTIIOONNSS IIMMPPOORRTTAANNTTEESS DDEE SSÉÉCCUURRIITTÉÉ
• Lire toutes les instructions avant d’utiliser.
• Ne pas laver d’articles qui ont été lavés, trempés ou
tachés avec de l’essence, des solvants de
nettoyage à sec ou autres substances inflammables
ou explosives, car elles émanent des vapeurs qui
peuvent s’enflammer ou exploser.
• Ne pas ajouter d’essence, des solvants de
nettoyage à sec ou autres substances inflammables
ou explosives à l’eau de lavage, car elles émanent
des vapeurs qui peuvent s’enflammer ou exploser.
• Dans certaines conditions, du gaz hydrogène peut
se produire dans un système d’eau chaude qui n’a
pas été utilisé pendant 2 semaines ou plus.
L’HYDROGÈNE EST UN GAZ EXPLOSIF. Si un
système d’eau chaude n’a pas été utilisé pendant
une telle période, avant d’utiliser la laveuse, ouvrir
tous les robinets d’eau chaude et laisser l’eau
couler quelques minutes. Ceci dégage toute
accumulation d’hydrogène. Comme ce gaz est
inflammable, ne pas fumer ni utiliser une flamme
nue pendant ce temps.
• Ne pas laisser les enfants jouer sur ou dans la
laveuse. Une supervision attentive des enfants est
nécessaire pendant l’utilisation de l’appareil.
• Avant de jeter l’appareil aux rebuts, enlever la porte
pour empêcher les enfants de s’y cacher.
• Ne pas installer ni entreposer l’appareil dans des
endroits où il peut être exposé aux intempéries.
• Ne pas jouer avec les contrôles.
• Ne pas réparer ni remplacer des pièces de l’appareil
ou tenter d’effectuer des réparations à moins que
cela ne soit spécifiquement recommandé dans les
instructions d’entretien de l’utilisateur ou dans les
instructions de réparation publiées à moins d’avoir
l’habileté et la compréhension nécessaires.
• Voir les instructions d’installation concernant les
exigences de mise à la terre.
• TOUJOURS suivre les instructions d’entretien des
tissus fournies par les fabricants.
• Ne pas placer d’articles exposés à l’huile de
cuisson dans la laveuse. Ces articles peuvent
contribuer à une réaction chimique pouvant causer
un incendie.
• Ne pas utiliser d’assouplissant ou de produits
éliminant la statique à moins de recommandations
par le fabricant de l’assouplissant ou du produit.
AVERTISSEMENT:
Pour réduire tout risque d’incendie, de choc électrique ou de blessures ou moment
d’utiliser la laveuse, observer les précautions de base, incluant ce qui suit:
CCOONNSSEERRVVEERR CCEESS IINNSSTTRRUUCCTTIIOONNSS
Cet appareil doit être mis à la terre. En cas de mauvais fonctionnement ou de bris, la mise à la terre réduit le risque de
choc électrique en fournissant un chemin de moindre résistance au courant électrique. Cet appareil est doté d’un
cordon ayant un conducteur de mise à la terre d’équipement et d’une fiche mise à la terre. La fiche doit être branchée
sur une prise appropriée, adéquatement installée et mise à la terre conformément aux codes et règlements locaux.
• Ne pas utiliser un adaptateur ni un câble de rallonge.
• Ne pas enlever la broche de liaison à la terre.
• Si la prise n’est pas adéquate, communiquer avec un électricien.
INSTRUCTIONS DE MISE À LA TERRE
AVERTISSEMENT:
Une connexion inappropriée du conducteur de mise à la terre d’équipement peut causer
un risque de choc électrique. Vérifier avec un électricien qualifié en cas de doute sur la
mise à la terre appropriée de l’appareil. Ne pas modifier la fiche fournie avec l’appareil.
Si elle ne peut être insérée dans la prise, en faire installer une par un électricien qualifié.
!
!
!
Page 50

50
DONNÉES TECHNIQUES
■
Accessoires
■
Nom : Laveuse à chargement frontal
■
Alimentation : 120 volts, 60 Hz
■
Dimensions : 68.6 cm (L) X 75.6 cm (P) X 98.3 cm (H), 129.1 cm (P, porte ouverte)
27”(L) X 29
3
/
4
”(P) X 38
11
/
16
”(H), 50
13
/
16
”(P, porte ouverte)
■
Poids : 190 lbs. (86 kg)
■
Vitesse d’essorage : 1100 tr/min maximum
■
Pression d’eau permise : 14,5 ~ 116 lb/po
2
(100~800 kPa)
Données techniques sujettes à changement sans préavis.
Panneau de contrôle
Boulons d’expédition
Évent de
sécurité
Entrée eau froide
Fiche
• Si le cordon d’alimentation est
endommagé, il doit être
remplacé par le fabricant ou
une agence de service afin
d’éviter tout risque.
Distributeur
Tuyau de vidage
Porte
Tambour
Fiche de drainage
Pieds réglables
Filtre de la pompe de vidage
Capuchon du couvercle
inférieur
Dos de la laveuse
Entrée eau
chaude
Page 51

FRANÇAIS
51
INSTRUCTIONS D’INSTALLATION
1. 4 boulons de retenue sont installés pour
éviter les dommages en cours de transport.
Enlever ces boulons avant de faire
fonctionner la laveuse.
• Si les boulons ne sont pas enlevés, cela peut
causer des vibrations intenses, du bruit et un
mauvais fonctionnement.
3. Enlever les 4 boulons et les cales en tournant
légèrement les cales. Conserver les 4 boulons,
les cales et la clé pour un usage ultérieur.
• Chaque fois que l’appareil est transporté, les
boulons d’expédition et les cales doivent être
réinstallé.
2. Dévisser les 4 boulons ál’aide de la clé fournie.
Dégagez le côté bas en premier pour faciliter le
retrait. Un des boulons retient le cordon
d'alimentation de la laveuse pour empêcher
l'utilisation sans le retrait des boulons.
4. Boucher les trous avec les capuchons fournis.
■ Retrait des boulons d’expédition
L'appareil est muni de boulons d'expédition pour
éviter les dommages internes en cours de
transport.L'emballage et les boulons d'expédition
doivent être enlevés avant d'utiliser la laveuse.
Lors du déballage de la base, assurez-vous
d'enlever le support d'emballage additionnel au
centre de l'emballage de la base.
■ Boulons d’expédition
Installer ou ranger l’appareil dans un endroit où il ne sera pas exposé à des températures en dessous du point de
congélation ou aux intempéries.
L’appareil doit être mis à la terre conformément aux codes et aux règlements en vigueur.
Pour réduire le risque de choc électrique, ne pas installer la laveuse dans un endroit humide.
L’ouverture à la base ne doit pas être obstruée par du tapis lorsque la laveuse est installée sur un plancher avec tapis.
Dans les régions susceptibles infestations de coquerelles ou autres vermines, porter une attention particulière afin que
l’appareil est les alentours soient propres en tout temps.
Tout dommage pouvant être causé par les coquerelles ou autres vermines n’est pas couvert par la garantie de l’appareil.
: Deux personnes ou plus pourront être nécessaires pour déplacer l'appareil.
!
AVERTISSEMENT
Lave-linge
Support d’emballage
Embase
d’emballage
Capuchon
Page 52

52
INSTRUCTIONS D’INSTALLATION
■ Dégagements d’installation
L’emplacement doit être suffisamment large pour
ouvrir complètement la porte de la laveuse.
■ Dimensions de la laveuse
• La plupart des installations requièrent un minimum
de 4 po (10 cm) de dégagement derrière la laveuse.
■ Espacement d’installation minimum
pour espace en retrait.
Les dimensions suivantes illustrées sont pour
l’espacement minimum alloué.
• Un espacement additionnel doit être considéré pour
l’installation et le service.
• Des dégagements additionnels sont requis pour les
moulures de mur, de porte et le plancher.
• Un espacement additionnel de 1 po (2,5 cm) sur les
côtés de la laveuse est recommandé pour réduire le
transfert de bruit.
Il faut aussi prendre en considération l’espacement
de l’appareil qui accompagne la sécheuse.
■ Niveau du plancher
• Inclinaison permise sous la laveuse est 1 po.
• Afin de minimiser le bruit et les vibrations, la
laveuse doit être installée sur un plancher
robuste.
• Les surfaces en carreaux souples et le tapis ne sont
pas recommandés.
• Ne jamais installer la laveuse sur une plateforme ou
une structure faible.
REMARQUE: Un plancher robuste et solide est essentiel
pour une laveuse à chargement frontal
qu’un modèle à chargement sur le dessus.
Si le plancher est en bois et/ou autre
construction, il faudra le renforcer.
La laveuse à chargement frontal effectue un
essorage beaucoup plus rapide que les
autres appareils, causant ainsi plus de
vibrations. Si le plancher n’est pas robuste,
la laveuse peut vibrer. L’on entendra et
sentira les vibrations dans la maison.
■ Prise électrique
•
Doit être à moins de 60 po (1,5 m) d’un côté ou de
l’autre de la laveuse. Ne pas surcharger la prise
avec plus d’un appareil.
• Fusible à retardateur ou coupe-circuit recommandé.
REMARQUE: Il incombe be au consommateur de faire
installer une prise appropriée par un
électricien qualifié.
[Vue avant]
[Vue latérale]
27"
(68,6 cm)
29
3
/
4
"
(75,6 cm)
38
11
/
16
"
(98,3 cm)
50
13
/
16
"
(129,1 cm)
29 3/4"
(75,6 cm)
4"
(10 cm)
27"
(68,6 cm)
1"
(2,5 cm)
1"
(2,5 cm)
Page 53

FRANÇAIS
53
INSTRUCTIONS D’INSTALLATION
• La pression d’alimentation en eau doit être entre 14,5 et
116 lb/po2(100 et 800 kPa).
• Ne pas dégainer ni croiser au moment de brancher le tuyau
d’entrée sur la soupape.
• Si la pression d’alimentation en eau est supérieure à 116
lb/po2, il faut installer un dispositif de réducteur de pression.
• Deux rondelles-joints sont fournies avec les tuyaux d’entrée
d’eau pour empêcher les fuites d’eau.
• Vérifier s’il y a des fuites aux connexions de la laveuse en
ouvrant complétement le robinet.
• Vérifier périodiquement la condition du tuyau et remplacer
au besoin.
• S’assurer qu’il n’y a pas de pli dans le tuyau et qu’il n’est
pas écrasé.
• S’assurer que les deux entrées d’eau sont branchées sur
les robinets appropriés. Le connecteur pour l’eau chaude
est rouge.
• Utiliser SEULEMENT les tuyaux d'entrée fournis par LG
avec cet appareil électromén ager. Il n'est pas garanti que
les tuyaux de rechange s'adaptent ou fonctionnent correct
ement. Les autres tuyaux pourraient ne pas bien se serrer
et causer des fuites. Les dommages subséquents au
produit ou à la propriété ne seront pas couverts confo
rmément aux modalités de la garantie de LG.
■ Connexion du tuyau d’alimentation en eau
REMARQUE: La laveuse doit être branchée sur les canalisations en eau à l’aide des nouveaux tuyaux.
NE pas utiliser les vieux tuyaux.
■ Connexion électrique
• Ne pas utiliser une rallonge ni un adaptateur double.
• Si l’appareil n’est pas utilisé pendant une longue période, le débrancher et fermer l’alimentation en eau.
• Si le cordon d’alimentation est endommagé, il doit être remplacé par un personne qualifiée.
• Brancher l’appareil sur une prise mise à la terre conformément aux règlements de câblage en cours.
• L’appareil doit être placé de façon à ce que la fiche soit facilement accessible.
Toute réparation à la laveuse doit être effectuée par un personnel qualifié seulement. Toute réparation
effectuée par une personne sans expérience peut causer un mauvais fonctionnement ou des blessures.
Communiquer avec le centre de service local.
Ne pas installer la laveuse dans une pièce où les températures peuvent descendre en dessous du point de
congélation. Des tuyaux gelés peuvent éclater sous la pression. La fiabilité des contrôles électroniques peut
être réduite à cause des températures très froides.
Si l’appareil est livré pendant les mois d’hiver et à des températures très froides, laisser l’appareil à la
température de la pièce quelques heures avant de l’utiliser.
Robinet eau chaude
Froide Chaude
Robinet
eau froide
Connecteur
tuyau
Rondelle
joint
ATTENTION ! Concernant le cordon d’alimentation
Il est recommandé que la plupart des appareils soient branchés sur un circuit dédié; c’est-à-dire un circuit simple
qui alimente seulement cet appareil et qu’il n’y a aucune autre prise ni circuit terminal. Vérifier la page de données
techniques dans le guide du propriétaire.
Ne pas surcharger les prises murales. La surcharge de prises, des prises lâches ou endommagées, des
rallonges, des cordons d’alimentation endommagés ou une isolation de fil craquelée peuvent être dangereux. Si
un de ces conditions existe, cela peut causer un choc électrique ou un incendie. Vérifier périodiquement le cordon
de l’appareil et s’il y a apparence de détérioration ou de dommage, le débrancher. Cesser l’utilisation de l’appareil
et faire remplacer le cordon par un cordon de rechange semblable par un centre de service autorisé.
Protéger le cordon d’alimentation de tout abus dont pincement, piétinement, coincé, etc. Porter une attention
particulière aux fiches, prises murales et au point où le cordon sort de l’appareil.
!
Page 54

54
INSTRUCTIONS D’INSTALLATION
environ
environ
environ
WASHWASH
EST. TIMEEST. TIME
SPINSPIN
WASH
EST. TIME
SPIN
WASH
EST. TIME
SPIN
Bac à lessive
max. 96 po
(2,4 m)
min. 30 po (76,2cm)
Attache
Tuyau
Dispositif
de retenue
■ Installation du tuyau de vidage
• Le tuyau de vidage ne doit pas être placé plus
haut qu'à 96 po (2,4 m) de la laveuse.
• Fixer de façon sécuritaire le tuyau de vidage
pour empêcher tout dommage d’eau au
plancher.
• Placer l’extrémité du tuyau de vidage dans le
trou du système de drain du plancher.
• Au moment d’installer le tuyau de vidage sur un
bac, le fixer de façon sécuritaire afin qu’il ne
puisse se défaire et causer une inondation ou
des dommages.
• En fixant adéquatement le tuyau de vidage au
bac, cela protègera le plancher des fuites d’eau.
Cet équipement n’est pas destiné à un usage maritime ou aux installations mobiles comme une roulotte, un avion,
etc.
Fermer le robinet si l’appareil n’est pas utilisé pendant une longue période (ex.: vacances).
Au moment de jeter l’appareil, couper le câble d’alimentation et détruire la fiche. Désactiver le verrouillage de la
porte pour empêcher les jeunes enfants d’être coincés à l’intérieur.
Le matériel d’emballage (ex.: pellicule, styromousse) peut être dangereux pour les enfants. Il y a un risque de
suffocation! Garder hors de la portée des enfants.
W
A
S
H
WASH
E
S
T.
T
IM
E
EST
.
T
I
ME
SPINSPIN
environ
EST. TIME
WASH
SPIN
environ
environ
Page 55

FRANÇAIS
55
INSTRUCTIONS D’INSTALLATION
■ Réglage du niveau
• Mettre la laveuse de niveau de façon appropriée pour
empêcher les bruits et vibrations excessifs. Installer l’appareil
sur une surface de niveau et solide, préférablement dans le
coin d’une pièce.
• Si le plancher n’est pas de niveau, régler les pieds réglables
au besoin. (Ne pas insérer de cales de bois ou autres sous
les pieds.)
REMARQUE: Ne pas allonger les pieds niveleurs plus que
nécessaire pour mettre la laveuse de niveau. Plus
les pieds sont allongés, plus la laveuse vibre.
• S’assurer que les quatre pieds sont stables et reposent sur le
plancher, puis vérifier si l’appareil est bien de niveau à l’aide
d’un niveau.
• Après que la laveuse est de niveau, serrer les écrous de
verrouillage vers le haut de la base de la laveuse. Tous les
écrous de verrouillage doivent être serrés.
• Il est essentiel que les pieds soient bien réglés. Ceci doit être
fait pendant que la laveuse essore avec une charge. Utiliser la
clé (fournie) pour régler les pieds jusqu’à ce qu’il n’y ait plus
de vibration. Ensuite serrer les écrous de verrouillage pour
empêcher tout autre changement.
REMARQUE: S’il y a des vibrations et du bruit pendant le cycle
d’essorage, vérifier de nouveau le niveau de la
laveuse, régler les pieds au besoin et serrer les
écrous de verrouillage de façon sécuritaire afin
d’empêcher les changements de réglage.
Effectuer un test de la laveuse pour s’assurer
qu’elle est mise de niveau de façon appropriée.
Mettre environ 6 lb de vêtements dans l’appareil.
Presser POWER (alimentation), RINSE+SPIN
(rinçage + essorage) et START/PAUSE
(marche/pause), dans cet ordre. Lorsque
l’appareil essore à haute vitesse, s’assurer que la
laveuse est stable. Sinon, régler les pieds de façon
appropriée.
• Si vous montez la laveuse et la sécheuse sur des piédestals,
ajustez-en les pieds pour les mettre au niveau.
Vérification diagonale
En pressant les bords du dessus de la laveuse de façon diagonale,
l’appareil ne devrait pas bouger (vérifier les deux sens).
Si l’appareil bascule, régler les pieds de nouveau.
W
A
S
H
WASH
E
S
T
.
T
I
M
E
EST. TIME
SPINSPIN
W
A
S
H
WASH
E
S
T
.
T
I
M
E
EST. TIME
SPINSPIN
Pied réglable
Écrou de
verrouillage
Haut
Bas
Pied réglable Pied réglable
W
A
S
H
WASH,
E
S
T
.
T
I
M
E
EST. TIME,
SPIN,
Page 56

56
MISE EN ŒUVRE AVANT LE LAVAGE
1. Étiquettes d’entretien
Vérifier l’étiquette d’entretien des vêtements. Elle indique le contenue en fibre et la façon de laver le vêtement.
2. Triage
Pour obtenir de meilleurs résultats, trier les vêtements pouvant être lavés au même cycle.
Différents tissus doivent être lavés de différentes façons.
Toujours trier les couleurs foncées des couleurs pâles et des blancs. Laver séparément puisque la teinture et
la charpie peuvent causer un transfert sur les blancs, etc. Si possible, ne pas laver des articles très sales
avec des articles peu sales.
Saleté (très sale, normal, légère) Séparer les vêtements selon la quantité de saleté.
Couleurs (blancs, pâles, foncées) Séparer les tissus blancs des tissus de couleur.
Charpie (producteur, collecteur) Laver séparément les articles producteurs de charpie de ceux qui l’attirent.
3. Vérifier avant de charger
Combiner de petits et de gros articles dans une charge. Charger les gros articles d’abord. Ils ne doivent pas représenter
plus de la moitié de la charge totale.
Ne pas laver des articles uniques. Ceci peut causer un déséquilibre de la charge. Ajouter un ou deux articles semblables.
De gros articles encombrants comme une couverture, un édredon ou un couvre-lit, peuvent être lessivés séparément.
• S’assurer que les poches sont vides. Des articles
comme des clous, pinces à cheveux, allumettes,
stylos, monnaie et clés peuvent endommager la
laveuse et les vêtements.
• Fermer les glissières, les crochets et attaches
afin qu’ils ne s’accrochent pas dans les
vêtements.
• Prétraiter la saleté et les taches en frottant un
peu de détergent dissout dans l’eau sur les cols
et les poignets.
AVERTISSEMENT
Pour réduire les risques d’incendie, de choc électrique ou de blessure, lire les INSTRUCTIONS
IMPORTANTES DE SÉCURITÉ avant de faire fonctionner l’appareil.
REMARQUE: Ne pas laver ni essorer des vêtements à l’épreuve l’eau.
La laveuse peut être chargée à plein, mais les vêtements ne devraient pas être comprimés.
La porte de la laveuse devrait fermer facilement.
Quand vous sortez le linge, vérifiez si de petits articles tombent sous le joint de la porte.
Page 57

FRANÇAIS
57
UTILISATION DU DISTRIBUTEUR
Le distributeur automatique comprend quatre compartiments 1) javellisant, 2) assouplissant, 3) détergent liquide ou
en poudre pour le prélavage et 4) détergent liquide ou en poudre et javellisant sécuritaire pour les couleurs pour le
lavage principal.
Tous les produits de lessive peuvent être ajoutés à la fois dans les compartiments respectifs du distributeur.
Ils seront distribués au moment approprié pour un nettoyage efficace. Après avoir versé les produits, fermer le
couvercle du distributeur.
Ajouter détergent, javellisant et assouplissant dans le distributeur comme suit:
1. Ouvrir le couvercle.
2. Verser les produits de lessive.
3. Fermez le tiroir du distributeur lentement afin d'éviter une distribution anticipée des produits de lessive.
Remarque: Il est normal qu'il reste un petit peu d'eau dans les logements du distributeur à la fin du cycle.
■ En ce qui concerne le détergent
• Ajouter le détergent dans ce compartiment pour
l’option prélavage. Un détergent liquide ou en
poudre peut être utilisé. Il se déverse
automatiquement pendant le prélavage si cette
option est sélectionnée.
• Ajouter la moitié de la quantité recommandée de
détergent dans le compartiment de prélavage et
la quantité recommandée pour le compartiment
du lavage principal.
REMARQUE: Le détergent liquide se déverse
dans le tambour de la laveuse
lorsqu’il est ajouté.
1. Compartiment pour détergent de prélavage
Compartiment
pour prélavage
Compartiment
pour lavage
principal
Compartiment
d’assouplissant
Compartiment
de javellisant
Seuls des détersifs haute efficacité devraient être utilisés dans une laveuse LG TROMM.
Les détersifs HE sont spécialement conçus pour les laveuses à hublot frontal et contiennent des
composés réducteurs d'émulsion.
Les détersifs HE produisent moins de mousse, améliorant le rendement de la lessive et du rinçage.
Ils aident aussi à garder propre, l'intérieur de votre laveuse LG TROMM.
Utiliser un détersif régulier risque de produire un moussage excessif et réduire l'efficacité.
Des détersifs HE sont fortement recommandés pour assurer une lessive et un rinçage optimaux.
Conçu exclusivement pour les
détersifs HE (haute efficacité)
Page 58

58
UTILISATION DU DISTRIBUTEUR
• Ajouter le détergent mesuré dans ce
compartiment pour le lavage principal. Il est
distribué au début du cycle. Un détergent en
poudre ou liquide peut être utilisé.
• Le javellisant liquide ou en poudre non décolorant
peut être ajouté dans le compartiment de lavage
principal avec le même type de détergent, liquide
ou en poudre.
• Au moment d’utiliser du détergent liquide,
s’assurer que le distributeur de détergent liquide
et l’insertion sont en place. Ne pas excéder la
ligne maximale de remplissage.
• Pour le détergent en poudre, retirer le distributeur
de détergent liquide et l’insertion.
• Le détergent en poudre ne pourra pas être
distribué si le distributeur de détergent liquide et
l’insertion sont en place.
2. Compartiment pour lavage principal
• Ajouter le javellisant liquide mesuré dans ce
compartiment. Le javellisant est automatiquement
déversé au moment approprié du cycle.
• Ne pas excéder la ligne maximale de remplissage.
Trop de javellisant peut endommager les
vêtements.
• Ne pas verser de javellisant liquide non dilué
directement sur la charge ou dans le tambour.
Cela peut endommager les tissus.
• Ne pas utiliser de javellisant en poudre dans ce
compartiment.
3. Compartiment de javellisant
• Ajouter la quantité recommandée dans ce
compartiment.
• Diluer les assouplissants concentrés avec de l’eau
tiède jusqu’à la ligne de remplissage.
• Ne pas excéder la ligne de remplissage. Trop
d’assouplissant peut causer un déversement
prématuré pouvant tacher les tissus.
• Ne pas verser directement dans la charge.
• L’assouplissant sera automatiquement déversé
pendant le cycle de rinçage.
REMARQUE: Ne pas placer, ranger ni verser de
produits pour lessive (savon,
détergent, javellisant, assouplissant,
etc.) sur le dessus de la laveuse ou de
la sécheuse. Ces produits peuvent
endommager le fini ainsi que les
contrôles.
4. Compartiment d’assouplissant
Conçu exclusivement pour les
détersifs HE (haute efficacité)
Distributeur de
détergent liquide
Insertion
Page 59

FRANÇAIS
59
CYCLES
■ Sélectionner les cycles conçus pour les différents types de tissus et le niveau de saleté.
Type
Sous-vêtements très
sales,
vêtements de travail,
couches.
etc.
O
O
OO
O
Sanitaire
(Sanitary)
Très chaud/Froid
Élevé Normale
Très élevé
Sans essorage
Bas
Moyen
Très
Légère
Coton,
serviettes,
chemises
OOOOO
Coton/
serviettes
(Cotton/
Towels)
Tiède/Froid
Élevé
Normale
Tiède/Tiède
Chaud/Froid
Froid/Froid
Très élevé
Sans essorage
Bas
Moyen
Très
Légère
Coton mixte,
vêtement de travail,
jeans,
chemises
OOOOO
Normal
(Normal)
Tiède/Froid Élevé Normale
Tiède/Tiède
Chaud/Froid
Froid/Froid
Très élevé
Sans essorage
Bas
Moyen
Très
Légère
Chemises,
pantalon,
vêtement sans
froissement,
poly/coton
O
O
O
OOO O O
Pressage
permanent
(Perm.
Press)
Tiède/Froid Moyen Normale
Tiède/Tiède
Chaud/Froid
Froid/Froid
Élevé
Sans essorage
Bas
Très
Légère
Chemise,
blouse,
nylon,
voilage, etc.
OOOOO
Délicat
(Delicates)
Froid/Froid Moyen Normale
Tiède/Froid
Tiède/Tiède
Sans essorage
Bas
Très
Légère
Articles lavables
à la main
OOOO
Lavable à
la main/
Laine
(Hand Wash/
Wool )
Tiède/Froid Moyen Normale
Tiède/Tiède
Froid/Froid
Sans essorage
Bas
Légère
Vêtement
légèrement
sale
OOO
Lavage
rapide
(Speed Wash)
Chaud/Froid Très élevé Légère
Froid/Froid
Tiède/Froid
Tiède/Tiède
Sans essorage
Bas
Moyen
Élevé
Normal
Très
Type de tissu
Temp. lavage
/rinçage
Vitesse
essorage
Niveau
saleté
Préla
vage
Cycle
rapide
Eau
Plus
Cycle
tache
Extra
rinçage
Rinçage+
essorage
LAVABLE À LA MAIN/LAINE
• Pour les vêtements en laine lavables en machine.
• Le poids de la brassée doit être inférieur à 8 livres.
• Uniquement des détergents neutres doivent être utilisés pour le lavage des vêtements en laine.
• Le cycle Laine bénéficie « d’un culbutage doux et d’un essorage à faible vitesse » pour la protection des vêtements.
Le cycle Laine de cette machine a été approuvé
par Woolmark pour le lavage des produits
Woolmark lavables en machine, à la condition
que les produits soient lavés conformément aux
instructions de l’étiquette du vêtement et aux
instructions du fabricant de cette machine à laver,
M0807.
Certified by NSF
Certifié par la NSF
La NSF International (anciennement appelée la National Sanitation
Foundation) certifie que le cycle HYGIÉNIQUE élimine 99,9 % des
bactéries sur la lessive et que les bactéries ne seront pas
transférées à la prochaine brassée.
Page 60

60
UTILISATION DE LA LAVEUSE
•
Tourner le bouton de sélection de cycle pour
choisir le cycle désiré selon les différents types de
tissus et de niveau de saleté.
• Chaque cycle a une température préréglée de
lavage, une vitesse d’essorage, niveau de saleté et
option (voir page 59).
• Le réglage préréglé peut être modifié en tout temps
avant la mise en marche.
REMARQUE: Le temps de lessive peut être grandement réduit
pour les petites charges ou les vêtements
légèrement souillés, en choisissant le cycle de
lessive rapide et réglant le bouton de niveau de
saleté sur Léger.
2. Cycles
• Utiliser cette touche pour mettre en circuit ou hors circuit.
1. Power ( Alimentation)
• Utiliser cette touche pour mettre la laveuse en
marche ou l’arrêter.
REMARQUE:
- Si vous n'appuyez pas sur le boutonMarche/Pause dans les 4
minutes suivant le choix d'un cycle, la laveuse s'éteint
automatiquement.
3. Start/Pause (Marche/Pause)
• Permet de mettre en marche le cycle de façon différée
de 1 à 12 heures.
• Faire les sélections appropriées pour la charge, presser
ensuite la touche Delay Wash une fois pour une heure
ou presser de nouveau pour augmenter le différé
jusqu’à 12 heures, en tranches d’une heure.
4. Delay Wash (Lavage différé)
• AJOUTE PLUS DE TEMPS DE LESSIVE ET DE
RINÇAGE POUR MIEUX DÉTACHER.
5. Water Plus (EAU PLUS)
• Cette option offre un rinçage additionnel.
• Utiliser cette option pour s’assurer que tout le
détergent ou le javellisant a été enlevé des
vêtements.
7. Extra Rinse (Extra rinçage)
• SPINSENSEMCs'utilise si le plancher est en bois ou
si l'on se soucie des vibrations.
• Tenez le bouton de EAU PLUS enfoncé 3 s pour
engager le cycle SPINSENSE
MC
pendant tout autre
cycle en cours.
• Quand le cycle SPINSENSE
MC
est choisi, appuyer
sur l'un des boutons de vitesse d'essorage
fera clignoter le témoin correspondant.
• Tenez le bouton de EAU PLUS enfoncé de
nouveau pendant 3 s pour annuler le cycle
SPINSENSE
MC
.
• Une fois le cycle SPINSENSEMCchoisi, il restera
continuellement engagé pour l'essorage, même après
le rétablissement du courant suite à une panne.
• L'option “SPINSENSE” ne peut être choisie
pendant le cycle d'essorage.
6. SPINSENSE
MC
bouton de selection de cycle
Page 61

FRANÇAIS
61
UTILISATION DE LA LAVEUSE
• Presser de façon répétitive pour régler le volume
de l’alarme.
11. Beeper (Tonalité)
• Pour changer la vitesse d’essorage, presser la touche
vitesse d’essorage de façon répétitive pour passer en
séquence les options disponibles.
•
Pour amorcer le cycle de vidange/essorage :
1. Appuyez sur Alimentation pour mettre la machine en marche.
2. Appuyez sur Vit. Ess. seulement.
3. Appuyez sur Marche/Pause .
9. Spin Speed (Vitesse d’essorage)
• Pour modifier le niveau de saleté, presser la
touche niveau de saleté de façon répétitive
jusqu’au réglage désiré.
10. Soil Level (Niveau de saleté)
• Sélectionner une température d’eau en fonction du
type de charge à laver.
• Suivre les instructions sur le vêtement et le tableau
ci-dessous pour de meilleurs résultats.
• Les rinçages tièdes laissent les charges plus sèches
que les rinçages froids. Les rinçages tièdes
augmentent le froissement.
• Dans les endroits où il fait froid, un rinçage tiède
rend la charge plus facile à manipuler.
• Les rinçages froids économisent l’énergie.
• La température du rinçage à froid dépend de la
température de l'eau froide du robinet.
8. Wash/Rinse (Température Lavage/Rinçage)
LED DISPLAY (AFFICHEUR DEL)
Lorsque le bouton MARCHE/PAUSE est enfoncé,
la machine à laver détecte automatiquement la
brassée (poids) et optimise le temps de lavage en
se basant sur le cycle et les options sélectionnés.
L’afficheur indique alors le temps restant estimé
pour le cycle de lavage choisi.
REMARQUE :
Le temps de cycle affiché peut apparaître beaucoup plus
long que celui d’une machine à laver à chargement par le
haut.
Le temps affiché est relatif au cycle complet, plutôt qu’à
la seule portion d’agitation du cycle, comme c’est le cas
pour une machine à laver à chargement par le haut.
2. ESTIMATED TIME REMAINING (ESTIMATED TIME REMAINING )
Indique que la porte est verrouillée. La porte de la
machine à laver se verrouillera automatiquement
lorsqu’elle est en fonction. La porte peut être
déverrouillée à l’aide du bouton MARCHE/PAUSE
pour arrêter la machine.
1. DOOR LOCK INDICATIOR (INDICATEUR DE DOOR LOCK)
Illustre la portion du cycle de lavage actuellement
complétée.
3. CYCLE COMPLETION INDICATOR (INDICATEUR DE CYCLE TERMINÉ)
Cette portion de l’afficheur montre le cycle
sélectionné, l’état en fonctionnement et les
message spéciaux. Si un cycle a des directives
spéciales, elles s’afficheront également dans
cette zone.
4. STATUS/CYCLE DISPLAY (AFFICHAGE D’ÉTAT/CYCLE)
2
1
3
4
Température d’eau suggérée
Vêtements
Serviettes de cuisine, draps,
vêtements de bébé
Blancs et articles grand teint
très sales
La plupart des charges
Articles de couleurs vives,
lainages lavables
Très chaud
Chaud
Tiède
Froid
Page 62

62
UTILISATION DE LA LAVEUSE
OPTION
CHILD LOCK (VERROUILLAGE ENFANT)
DOOR LOCKED (VERROUILLAGE DE PORTE)
• Utiliser cette option pour les charges qui doivent
être prétrempées. Ajoute 16 minutes de prélavage
et de vidage.
1. Prewash (Prélavage)
• S’allume lorsque la porte de la laveuse est verrouillée.
• La porte peut être déverrouillée en pressant la touche
Start/Pause pour arrêter la laveuse.
STATUS INDICATOR (VOYANT DE POSITION)
Ces voyants indiquent quelle portion du cycle de la
laveuse est actionnée. (Voir page 61)
EST. TIME REMAINING (TEMPS RÉSIDUEL ESTIMÉ)
• Cet affichage montre:
a) le temps résiduel estimé du cycle en fonction.
b) le code erreur lorsqu’une erreur est détectée.
• Utiliser cette option pour empêcher une utilisation non
désirée de l’appareil. Presser et maintenir la touche
OPTION pendant 3 secondes pour
verrouiller/déverrouiller.
• Lorsque le « » est réglé, le voyant verrouillage
enfant s’allume et toutes les touches sont désactivées.
L’on peut verrouiller la laveuse pendant son
fonctionnement.
• Ajoute du temps au lavage et au rinçage pour
mieux enlever les taches.
• Fournit automatiquement un rinçage.
4. Stain Cycle (Cycle tache)
• Utiliser cette option pour rincer puis essorer.
2. Rinse+Spin (Rinçage + essorage)
REMARQUE: Si la température et le niveau d’eau
sont trop élevés, la porte ne peut être verrouillée. Ne
pas tenter d’ouvrir la porte par la force lorsque le
voyant DOOR LOCKED (porte verrouillée) est
allumé.
1. Videz le tambour complèetement et refermez la
porte.
2. Ouvrez le tiroir du distributeur et ajoutez un
javellisant liquide dans le casier de javellisant.
REMARQUE : Ne mettez pas de détersif dans le casier
de détersif car cela pourrait entraîner
un moussage excessif et un
débordement.
3. Refermez le tiroir du distributeur lentement.
4. Mettre l'appareil en marche, appuyer sur “option”
et choisir “Tub Clean” (nettoyage de la cuve).
5. Appuyez sur Marche/Pause pour engagner le
cycle.
6. Une fois le cycle terminé, laisssez la porte
ouverte et essuyez le pourtour de la porte, le
joint flexible et la vitre de la porte.
MISE EN GARDE: Si vous avez des petits
enfants, soyez prudent si
vous laissez la porte
ouverte.
5. Tub Clean(Nett. Tamb)
!
• Ce cycle offre une durée de cycle rapide.
• Suggéré pour rafraîchir les vêtements achetés ou
les vêtements qui ont été emballés.
3. Quick Cycle (Cycle rapide)
Page 63

FRANÇAIS
63
ENTRETIEN
2
3
■ Filtre d’entrée d’eau
• Le message d’erreur
« » clignote au panneau de contrôle lorsque l’eau n’entre pas.
• Si l’eau est très calcaire ou contient des traces de dépôt, le filtre d’entrée d’eau peut être obstrué.
Il est préférable de le nettoyer de temps à autre.
Avant de nettoyer l’intérieur de la laveuse, débrancher le cordon d’alimentation pour éviter tout choc électrique et risques.
Au moment de jeter l’appareil, couper le câble d’alimentation et détruire la fiche. Désactiver le verrouillage de porte pour
empêcher les enfants de rester coincés à l’intérieur.
1. Fermer le robinet d’eau. 2. Dévisser le tuyau d’entrée d’eau.
• IMPORTANTE:
Utiliser SEULEMENT les
tuyaux d'entrée fournis par LG
avec cet appareil électromén
ager. Il n'est pas garanti que
les tuyaux de rechange
s'adaptent ou fonctionnent
correct ement.
Les autres tuyaux pourraient
ne pas bien se serrer et causer
des fuites. Les dommages
subséquents au produit ou à la
propriété ne seront pas
couverts confo rmément aux
modalités de la garantie de LG.
3. Nettoyer le filtre à l’aide d’une
brosse à crin rigide.
4. Visser le tuyau d’entrée.
1. Ouvrir le capuchon de
couvercle inférieur ().
Tourner la fiche de drain ()
pour tirer le tuyau.
2. Débrancher la fiche de drain ,
laissant l’eau se vider. À ce
moment, utiliser un bac pour
empêcher l’eau de couler sur le
plancher. Lorsque l’eau ne
coule plus, tourner le filtre de
pompe vers la gauche.
3. Enlever tout objet du filtre de la
pompe . Après le nettoyage,
tourner le filtre de la pompe
dans le sens horaire et insérer la
fiche de drain à sa place
d’origine. Fermer le capuchon du
couvercle inférieur .
■ Filtre de pompe de drain
•
Ce filtre recueille les fils et petits objets laissés dans la charge.
Vérifier régulièrement si le filtre est propre pour assurer un bon fonctionnement de l’appareil.
• Laisser l’eau refroidir avant de nettoyer la pompe de drain.
ATTENTION
Vidanger, à l’aide du tuyau de vidange, avant d’ouvrir le filtre de pompe pour enlever les
objets. Faire attention au moment de vider si l’eau est chaude.
1
Page 64

64
ENTRETIEN
■ Nettoyage du distributeur
•
Le distributeur peut être nettoyé périodiquement.
• Faire couler de l’eau tiède et utiliser une brosse douce ou un chiffon sur le tiroir, le distributeur de détergent
liquide et les insertions afin d’enlever l’excès de produits de lessive.
• Nettoyer l’ouverture du tiroir avec de l’eau et une petite brosse.
• Suivre les illustrations dans l’ordre inverse pour remettre les pièces aux endroits appropriés.
REMARQUE: Ne pas utiliser de produit nettoyant sur l’ouverture du tiroir autre que de l’eau car il s’égouttera
dans la cuve. Si cela se produit, régler la laveuse en mode rinçage et essorage pour enlever tout
produit nettoyant de la laveuse avant d’effectuer un lavage.
■ Tambour
• Retirez les articles de la laveuse dès que le cycle est terminé. Les articles laissés dans le tambour pourront se
froisser, se déteindre et devenir odorants.
• Si l’on réside dans une région où l’eau est calcaire, les dépôts s’accumulent continuellement dans des zones
non visibles et difficiles à nettoyer.
Avec le temps, les accumulations de calcaire obstruent l’appareil. Si l’appareil n’est pas vérifié, il faudra
éventuellement le remplacer.
• Quoique le tambour est fabriqué en acier inoxydable, des taches de rouille peuvent être causées par de petits
objets en métal comme des pinces, trombones, etc. laissés dans le tambour.
• Le tambour doit être nettoyé de temps à autre.
• Si l’on utilise des produits pour enlever le calcaire ou des javellisants, s’assurer qu’ils sont conçus pour une
utilisation avec la laveuse.
• Les produits pour enlever le calcaire contiennent des composants qui peuvent endommager la laveuse.
• Enlever les taches avec un produit nettoyant pour acier inoxydable.
• Ne jamais utiliser de laine d’acier.
1
SOFTENER
MAX
Tirer le tiroir distributeur
jusqu’à ce qu’il s’arrête.
2
Presser la languette de
verrouillage sur l’insertion
javellisant. Retirer le
tiroir.
3
Retirer le distributeur de
détergent liquide et les
insertions pour assouplissant et
javellisant des compartiments.
SOFTENER
MAX
Page 65

FRANÇAIS
65
ENTRETIEN
■ Nettoyage de la laveuse
1. Extérieur
Un entretien approprié prolongera la vie de la laveuse.
L’extérieur de l’appareil peut être nettoyé avec de l’eau tiède et un détergent domestique non abrasif neutre.
Essuyer immédiatement tout déversement. Essuyer avec un chiffon humide.
Ne pas frapper la surface avec des objets pointus.
IMPORTANT: Ne pas utiliser de méthylène, de solvants ou d’autres produits semblables.
2. Intérieur
Le tour de l’ouverture de la porte, le joint flexible et la porte en verre doivent toujours être
nettoyés pour assurer une bonne étanchéité.
NETT. TAMB. est un cycle spécial pour nettoyer l'intérieur du tambour. Le cycle utilise un niveau d'eau et une
vitesse d'essorage plus élevés. Exécutez ce cycle régulièrement.
• Lisez ces instructions soigneusement avant de démarrer le cycle TUB CLEAN.
1. Ouvrez la porte et retirez tout vêtement du tambour de lavage.
2. Ouvrez le tiroir du distributeur.
3. Ajoutez un agent de blanchiment au chlore ou le décapant liquide de tambour. Certains décapants de
tambour en poudre ou en pastilles qui sont fabriqués à cette fin peuvent être employés. (NOTE : n'ajoutez
aucun adoucissant ou détergent dans le distributeur lorsque vous utilisez un cycle TUB CLEAN.)
- Si vous utilisez un agent de blanchiment liquide au chlore (eau de Javel)
Ajoutez l'agent de blanchiment liquide au chlore dans le compartiment d'agent de blanchiment du tiroir
distributeur.(NOTE : ne dépassez pas la ligne maximum de remplissage et ne versez pas l'agent de
blanchiment liquide non dilué directement dans le tambour de lavage.)
- Si vous utilisez le décapant en poudre
Enlevez la boule de détergent liquide et ajoutez le décapant en poudre dans le compartiment principal de
lavage du tiroir de distribution.
- Si vous utilisez le décapant en pastilles
Ajoutez le décapant en pastille directement dans le tambour de la machine à laver.
(NOTE : n’ajoutez pas de décapant en pastilles dans le tiroir de distribution.)
4. Refermez le tiroir et la porte de la machine à laver.
5. Choisissez TUB CLEAN et puis sur START.
REMARQUE : Il est recommandé de répéter le cycle TUB CLEAN une fois par mois.Si la corrosion ou l'odeur de
moisi sont déjà présentes, exécutez le cycle TUB CLEAN pendant 3 semaines consécutives. Après la
fin du cycle TUB CLEAN ou quand la machine à laver n'est pas utilisée, laissez la porte de la
machine ouverte pour une meilleure ventilation et un séchage de l'intérieur.
REMARQUE: Enlever les dépôts de calcaire avec un produit approprié pour les machines à laver.
■ Instructions pour hivériser
Si la laveuse est rangée dans un endroit où il peut y avoir du gel ou déménagée à des températures froides,
suivre les instructions ci-dessous pour éviter tout dommage.
1. Fermer le robinet d’alimentation en eau.
2. Débrancher les tuyaux de l’alimentation en eau et le tuyau de vidage.
3. Brancher le cordon d’alimentation sur une prise appropriée mise à la terre.
4. Ajouter un gallon (3,8ℓℓ) d’antigel de véhicule récréatif non toxique dans le tambour. Fermer la porte.
5. Régler au cycle d’essorage et laisser essorer pendant 1 minute pour vider toute l’eau.
L’antigel ne sera pas tout expulsé.
6. Débrancher le cordon d’alimentation, assécher l’intérieur du tambour et fermer la porte.
7. Enlever le distributeur. Vider toute eau des compartiments et les assécher.
8. Ranger la laveuse en position droite.
9. Pour enlever l’antigel de la laveuse après le rangement, effectuer un cycle complet avec du détergent,
la laveuse vide. Ne pas ajouter de charge.
Page 66

66
GUIDE DE DÉPANNAGE
Cette laveuse est dotée de fonctions sécuritaires automatiques qui détectent et effectuent un diagnostique
rapidement et elle réagit de façon appropriée. Lorsque l’appareil ne fonctionnement pas correctement ou pas
du tout, vérifier les points suivants avant d’effectuer un appel de service.
Ballottement ou bruit
Pilonnement
Vibration
Fuites d’eau
Mousse excessive
Odeur de moisissure dans
la machine à laver
• Objets comme monnaie ou
pince coincés dans le tambour.
• Charge trop lourde.
Ceci est normal.
• Les boulons de transport ont-ils
été enlevés?
• Charge mal distribuée.
• Les pieds reposent-ils
solidement sur le plancher?
• Connexion du tuyau de
remplissage lâche au robinet
ou à la laveuse.
• Tuyau de vidage de la
résidence obstrué.
• Trop de détergent ou détergent
inadéquat.
• Trop de détergent ou un
détergent inapproprié a été
utilisé.
• L’intérieur de la cuve n’a pas
été correctement nettoyé.
Arrêter la laveuse et vérifier le tambour et
le filtre de drain.
Si le bruit persiste une fois la laveuse en
marche, communiquer avec un technicien
qualifié.
Si le bruit persiste, la laveuse est
probablement hors équilibre. Arrêter et
redistribuer la charge.
Voir
“
Installation” concernant les boulons
d’expédition.
Arrêter la laveuse et redistribuer la charge.
Régler les pieds niveleurs.
S’assurer que les quatre (4) pieds sont en
contact avec le plancher, tandis que la
laveuse est dans le cycle de essorage
avec la charge.
Vérifier et serrer les connexions.
Déboucher. Communiquer avec un
plombier au besoin.
Réduire la quantité de détergent ou utiliser
un détersifs HE (haute efficacité)
• Utilisez uniquement un détergent haute
efficacité en conformité avec les
directives du fabricant.
• Effectuez un cycle TUB CLEAN
(nettoyage de la cuve) régulièrement.
Assurez-vous d’essuyer le tour et le
dessous du joint de la porte
fréquemment.
Problème Cause possible Solution
Conçu exclusivement pour les
détersifs HE (haute efficacité)
Page 67

FRANÇAIS
67
GUIDE DE DÉPANNAGE
La laveuse ne se met pas
en marche
La laveuse n’essore pas
Cycle de lavage différé
• Cordon électrique non
branché ou connexion lâche.
• Fusible grillé ou coupe-circuit
déclenché ou panne de
courant.
• Robinet d’alimentation en eau
fermé.
• Vérifier si la porte est bien
fermée.
•
Le temps de lavage peut varier
selon la grosseur de la charge,
de la pression d’eau, de la
température de l’eau et autres
conditions.
S’assurer que la fiche est bien insérée
dans la prise murale.
Remplacer le fusible ou réenclencher le
coupe-circuit.
Si le problème est une surcharge de circuit,
communiquer avec un électricien qualifié.
Ouvrir le robinet.
Fermer la porte et presser la touche
START/PAUSE. Après avoir presser cette
touche, il faut quelques temps avant que la
laveuse commence à essorer. La porte
doit être verrouillée avant que l’essorage
ne puisse se faire.
Si un déséquilibre est détecté ou si le
programme de retrait de mousse fonctionne,
le temps de lavage peut être augmenté.
Problème Cause possible Solution
L’eau n’entre pas dans la
laveuse ou entre
lentement
L’eau de la laveuse ne se
vide pas ou se vide
lentement
•
Alimentation en eau inadéquate.
• Robinet pas assez ouvert.
• Tuyau d’entrée d’eau plié.
•
Filtre du tuyau d’entrée obstrué.
• Tuyau de drain plié ou obstrué.
• Filtre de drain obstrué.
Vérifier un autre robinet dans la maison.
L’ouvrir complètement.
Le redresser.
Vérifier le filtre.
Nettoyer et redresser le tuyau.
Nettoyer le filtre de drain.
Page 68

68
GUIDE DE DÉPANNAGE
• Alimentation en eau
inadéquate dans la région.
• Robinet d’alimentation en eau
non ouvert complètement.
• Tuyau d’entrée d’eau plié
• Filtre du tuyau d’entrée
obstrué.
• Tuyau de drain plié ou
obstrué.
• Filtre de drain obstrué.
• Charge trop petite.
• Charge déséquilibrée.
•
L’appareil est doté d’un
détecteur de déséquilibre et du
système de correction. S’il y a
des articles lourds individuels
(tapis de bain, peignoir, etc.), le
système peut arrêter l’essorage
ou le cycle si le déséquilibre est
trop important.
• Porte ouverte ou mal
fermée.
• L’eau déborde à cause d’une
soupape d’eau défectueuse.
• Figure si le capteur de niveau
d’eau fonctionne mal.
• Surcharge du moteur.
• Panne de courant à la
laveuse.
Vérifier un autre robinet dans la maison.
Ouvrir le robinet complètement
Redresser le tuyau
Vérifier le filtre
Nettoyer et redresser le tuyau
Nettoyer le filtre de drain
Ajouter 1 ou 2 autres articles semblables
pour équilibrer la charge.
Redistribuer la charge.
Fermer complètement la porte.
Si le symbole ne s’éteint pas, faire un
appel de service.
Débrancher le cordon d’alimentation et faire
un appel de service.
Fermer le robinet.
Débrancher la fiche d’alimentation.
Faire un appel de service
Laissez la machine reposer pendant 30
minutes pour permettre au moteur de
refroidir ; puis redemarrez le cycle. Si le code
d’erreur LE apparait toujours, debranchez la
machine a laver et appelez le service.
Relancer le cycle.
Problème Cause possible Solution
Page 69

FRANÇAIS
69
GARANTIE
DD moteur (Stator, Rotor, Hall sensor) 10 ans 1 an
1 an
1 an
1 an
1 an
Page 70

NOTES
70
Page 71

NOTES
71
Page 72

P/No. : MFL31245183
 Loading...