

Page 1

OWNER'S MANUAL
WASHER
Read this owner's manual thoroughly before operating the
appliance and keep it handy for reference at all times.
ENGLISH
WM1455H*A
MFL71521482
Rev.00_122220
www.lg.com
Copyright © 2020 LG Electronics Inc. All Rights Reserved.
Page 2

2
TABLE OF CONTENTS
3 IMPORTANT SAFETY
INSTRUCTIONS
3 READ ALL INSTRUCTIONS BEFORE USE
3 WARNING STATEMENTS
6 CAUTION STATEMENTS
7 PRODUCT OVERVIEW
7 Product Features
9 INSTALLATION
9 Before Installing
10 Choosing the Proper Location
11 Unpacking and Removing Shipping Material
11 Connecting the Water Inlet Hoses
12 Connecting the Drain Hose
14 Leveling the Washer
15 Final Installation Check
17 OPERATION
17 Before Use
18 Sorting Laundry
19 Loading the Washer
20 Adding Cleaning Products
22 Control Panel
24 Wash Cycles
28 Cycle Modifiers
28 Options and Extra Functions
31 SMART FUNCTIONS
31 Using LG ThinQ Application
33 Smart Diagnosis
TM
Function
35 MAINTENANCE
35 Regular Cleaning
35 Periodic Maintenance
39 Care in Cold Climates
41 TROUBLESHOOTING
41 Before Calling for Service
49 LIMITED WARRANTY
49 USA
52 CANADA
Page 3
IMPORTANT SAFETY INSTRUCTIONS
WARNING
3IMPORTANT SAFETY INSTRUCTIONS
READ ALL INSTRUCTIONS BEFORE USE
Safety Messages
Your safety and the safety of others are very important.
We have provided many important safety messages in this manual and on your appliance. Always read and
follow all safety messages.
This is the safety alert symbol.
This symbol alerts you to potential hazards that can kill or injure you and others. All safety messages
will follow the safety alert symbol and either the word WARNING or CAUTION.
These words mean:
WARNING
You may be killed or seriously injured if you do not follow instructions.
CAUTION
You may be injured or cause damage to the product if you do not follow instructions.
All safety messages will tell you what the potential hazard is, tell you how to reduce the chance of injury,
and tell you what may happen if the instructions are not followed.
WARNING STATEMENTS
ENGLISH
• To reduce the risk of explosion, fire, death, electric shock, scalding or injury to persons when using this
product, follow basic precautions, including the following:
Installation
• Adhere to all industry recommended safety procedures including the use of long-sleeved gloves and
safety glasses.
• Never attempt to operate this appliance if it is damaged, malfunctioning, partially disassembled, or has
missing or broken parts, including a damaged cord or plug.
• Before use, the appliance must be properly installed as described in this manual.
• To reduce the risk of severe injury or death, follow all installation instructions.
• Refer to the INSTALLATION INSTRUCTIONS for detailed grounding procedures. Installation instructions
are packed with the appliance for the installer’s reference. If the appliance is moved to a new location,
have it checked and reinstalled by qualified service personnel.
• Moving or installation of the appliance requires two or more people.
• Do not install the appliance in humid spaces.
• Store and install the appliance where it will not be exposed to temperatures below freezing or exposed
to outdoor weather conditions.
• This appliance is not designed for maritime use or for mobile installations such as in RVs, trailers, or
aircraft.
• Keep packing materials out of the reach of children. Packaging material can be dangerous for children.
There is a risk of suffocation.
Page 4

4 IMPORTANT SAFETY INSTRUCTIONS
• Destroy the carton, plastic bag, and other packing materials after the appliance is unpacked. Children
might use them for play. Cartons covered with rugs, bedspreads, or plastic sheets can become airtight
chambers.
• The appliance must be installed and electrically grounded by qualified service personnel in accordance
with local codes.
• When installing or moving the appliance, be careful not to pinch, crush, or damage the power cord.
• Connect to a properly rated, protected, and sized power circuit to avoid electrical overload.
• This appliance must be positioned near to an electrical power supply.
• Disconnect the power cord, house fuse or circuit breaker before installing or servicing the appliance.
• The power cord of this appliance is equipped with a 3-prong (grounding) plug which mates with a
standard 3-prong (grounding) wall outlet to minimize the possibility of electric shock from this appliance.
• Do not, under any circumstances, cut or remove the third (ground) prong from the power cord.
• Use new hoses when connecting the washer to the water supply. Do not reuse old hoses.
Operation
• Read all instructions before using the appliance and save these instructions.
• Use this appliance only for its intended purpose.
• If the product has been submerged in water, sitting in standing water, or waterlogged, do not come in
contact with the product and immediately contact an LG Electronics Customer Information Center for
instructions before resuming use.
• If you detect a strange sound, a chemical or burning smell, or smoke coming from the appliance, unplug
it immediately, and contact an LG Electronics Customer Information Center.
• Under certain conditions, hydrogen gas may be produced in a hot-water system that has not been used
for two weeks or more. HYDROGEN GAS IS EXPLOSIVE. If the hot-water system has not been used for
such a period, before using the appliance, turn on all hot water faucets and let the water flow from each
for several minutes. This will release any accumulated hydrogen gas. As the gas is flammable, do not
smoke or use an open flame during this time.
• Do not reach into the washer if the tub or drum, agitator, or any interior parts are moving. Before
loading, unloading, or adding items, press Start/Pause and allow the tub or drum to coast to a complete
stop before reaching inside.
• This appliance is not intended for use by persons (including children) with reduced physical, sensory or
mental capabilities, or lack of experience and knowledge, unless they have been given supervision or
instruction concerning the use of the appliance by a person responsible for their safety.
• Do not allow children or pets to play on, in or with the appliance. Close supervision is necessary when the
appliance is used near children or pets.
• Keep laundry products out of children’s reach. To prevent injury to persons, observe all warnings on
product labels.
• Repair or immediately replace all power cords that have become frayed or otherwise damaged. Do not
use a cord that shows cracks or abrasion damage along its length or at either end.
• Never unplug the appliance by pulling on the power cord. Always grip the plug firmly and pull straight
out from the outlet.
• Do not use an extension cord or adapter with this appliance.
• Do not grasp the power cord or touch the appliance controls with wet hands.
• Do not modify or extend the power cord.
• If the electrical supply cord is damaged, it must only be replaced by the manufacturer or its service agent
or a similar qualified person in order to avoid a hazard.
• Do not put oily or greasy clothing, candles or flammable materials on top of the appliance.
• Keep the area underneath and around your appliances free of combustible materials (lint, paper, rags,
etc.), gasoline, chemicals and other flammable vapors and liquids.
Page 5

• Do not store or use gasoline or other flammable vapors and liquids in the vicinity of this or any other
appliance.
• Do not mix chlorine bleach with ammonia or acids such as vinegar. Follow package directions when
using laundry products. Incorrect usage can produce poisonous gas, resulting in serious injury or death.
• Never use harsh chemicals, abrasive cleaners, or solvents to clean the washer. They will damage the
finish.
• Do not wash laundry that has been previously cleaned in, washed in, soaked in, or spotted with gasoline,
dry-cleaning solvents, vegetable or cooking oil, or other flammable or explosive substances, as they give
off vapors that could ignite or explode.
• Do not add gasoline, dry cleaning solvents, or other flammable or explosive substances to the wash
water. These substances give off vapors that could ignite or explode.
• In the event of a gas leak (propane gas, LP gas, etc.), do not operate this or any other appliance. Open a
window or door to ventilate the area immediately.
• Do not tamper with controls.
• Fix the drain hose securely in place to avoid flooding.
• Do not abuse, sit on, or stand on the door of the appliance.
• Always check the inside of the appliance for foreign objects.
• Do not allow water, bleach or other liquids to sit in the drum for extended periods. Doing so can corrode
the drum or cause mildew or odors.
• Do not dry unwashed items in the appliance.
5IMPORTANT SAFETY INSTRUCTIONS
ENGLISH
Maintenance
• Do not repair or replace any part of the appliance. All repairs and servicing must be performed by
qualified service personnel unless specifically recommended in this owner’s manual. Use only authorized
factory parts.
• Disconnect this appliance from the power supply before cleaning and attempting any user maintenance.
Turning the controls to the OFF position does not disconnect this appliance from the power supply.
• Remove any dust or foreign matter from the power plug pins.
• Do not disassemble or repair the appliance by yourself.
• Remove the door before the appliance is removed from service or discarded to avoid the danger of
children or small animals getting trapped inside.
• Make sure the dispenser drawer or lid is closed at all times when not being filled with laundry products.
Grounding Instructions
• Improper connection of the equipment-grounding conductor can result in a risk of electric shock. Check
with a qualified electrician or service personnel if you are in doubt whether the appliance is properly
grounded. Do not modify the plug provided with the appliance; if it will not fit the outlet, have a proper
outlet installed by a qualified electrician.
• The appliance must be grounded. In the event of a malfunction or breakdown, grounding will reduce the
risk of electric shock by providing a path of least resistance for electric current. The appliance is
equipped with a cord having an equipment-grounding conductor and a grounding plug. The plug must
be plugged into an appropriate outlet that is installed and grounded in accordance with all local codes
and ordinances.
Page 6

6 IMPORTANT SAFETY INSTRUCTIONS
CAUTION
CAUTION STATEMENTS
• To reduce the risk of minor or moderate injury to persons, malfunction, or damage to the product or
property when using this product, follow basic precautions, including the following:
Installation
• Install the product on a firm and level floor.
Operation
• Do not place objects on top of the appliance.
• Turn off the water faucets and unplug the appliance if the appliance is to be left for an extended period
of time, such as during vacations.
• ALWAYS follow the fabric care instructions supplied by the garment manufacturer.
• Use fabric softeners or products to eliminate static only as recommended by the manufacturer.
• Do not combine laundry products for use in one load unless specified on the label.
• Do not touch draining water which may be hot.
• If the drain hose and the water inlet hose are frozen in winter, defrost them before using the appliance.
• Do not store or spill liquid detergents, cleaners, or bleaches (chlorine bleach, oxygen bleach) on the
appliance. Doing so may result in corrosion, discoloration or damage to the surface of the appliance.
• Clothing or articles that are waterproof or water-resistant must be washed in the Waterproof, Bedding,
Bulky/Large, or Jumbo Wash cycle only. (Examples include water resistant clothing, mattress covers,
outdoor clothes, and plastic mats.) Failure to do so may result in personal injury or damage to the
washer, clothes, walls, floor, and surrounding objects due to abnormal vibration.
Page 7
PRODUCT OVERVIEW
WARNING
7PRODUCT OVERVIEW
Product Features
The images in this guide may be different from the actual components and accessories, which are subject
to change by the manufacturer without prior notice for product improvement purposes.
• For your safety and for extended product life, use only authorized components. The manufacturer is not
responsible for product malfunction, property damage or bodily injury caused by the use of separately
purchased unauthorized components, parts, or non-LG products.
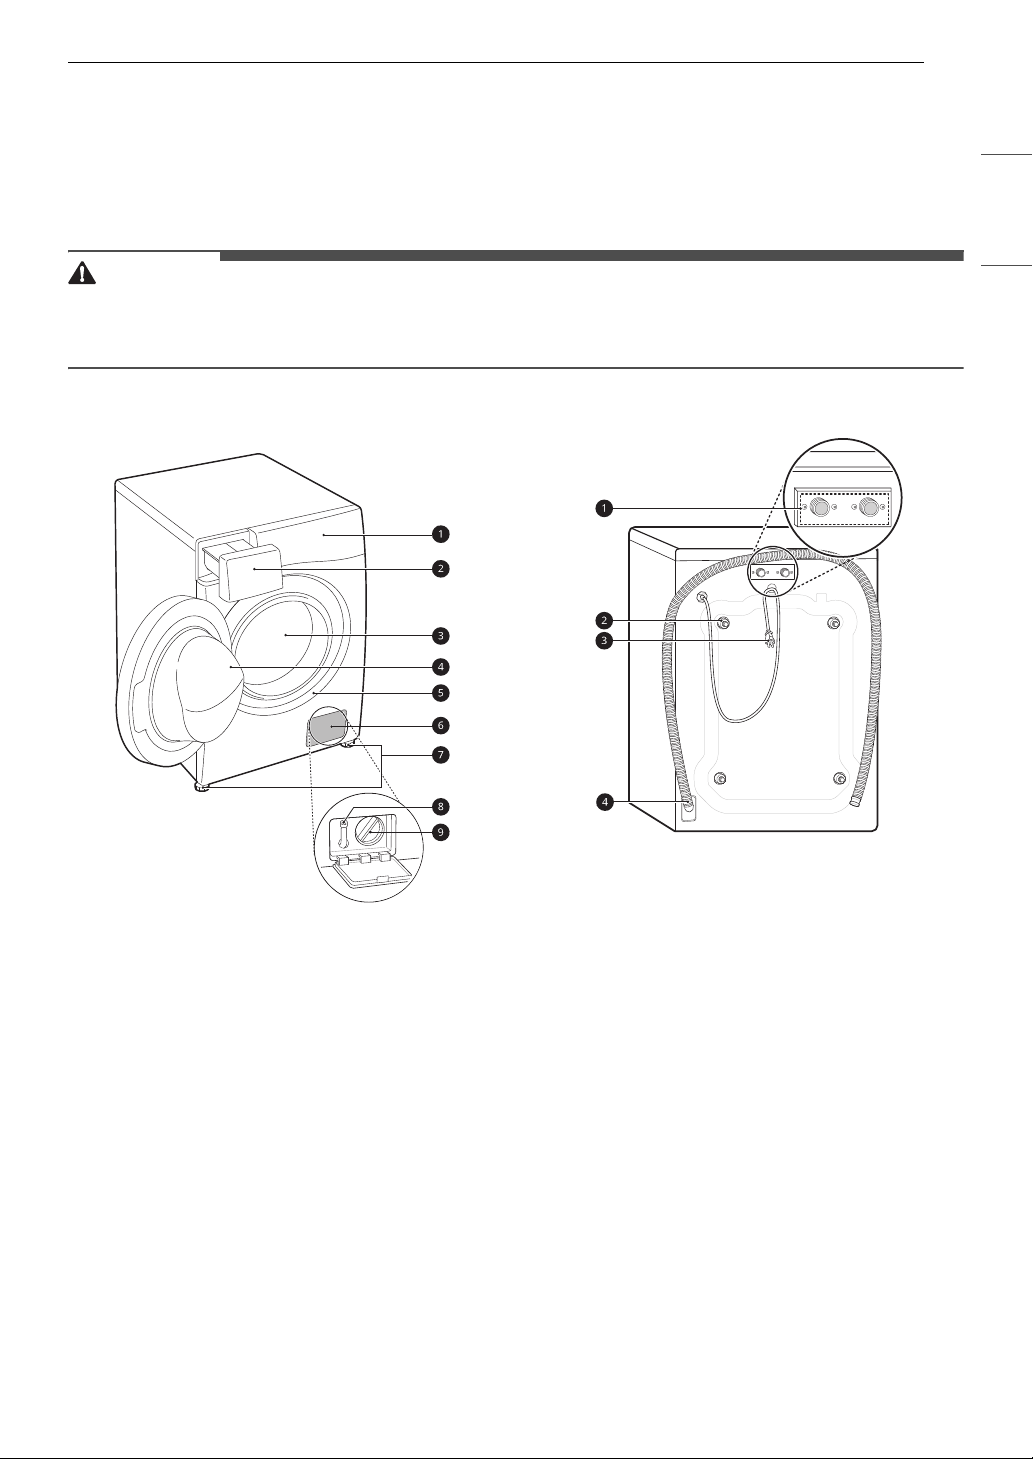
Front View
Rear View
ENGLISH
a Control Panel
b Detergent Dispenser Drawer
c Drum
d Door
e Door Seal
f Drain Pump Filter Cover
g Leveling Feet
h Drain Hose
i Drain Pump Filter
a Water Inlets
b Shipping Bolts
c Power Cord
d Drain Hose
Page 8
8 PRODUCT OVERVIEW
Accessories
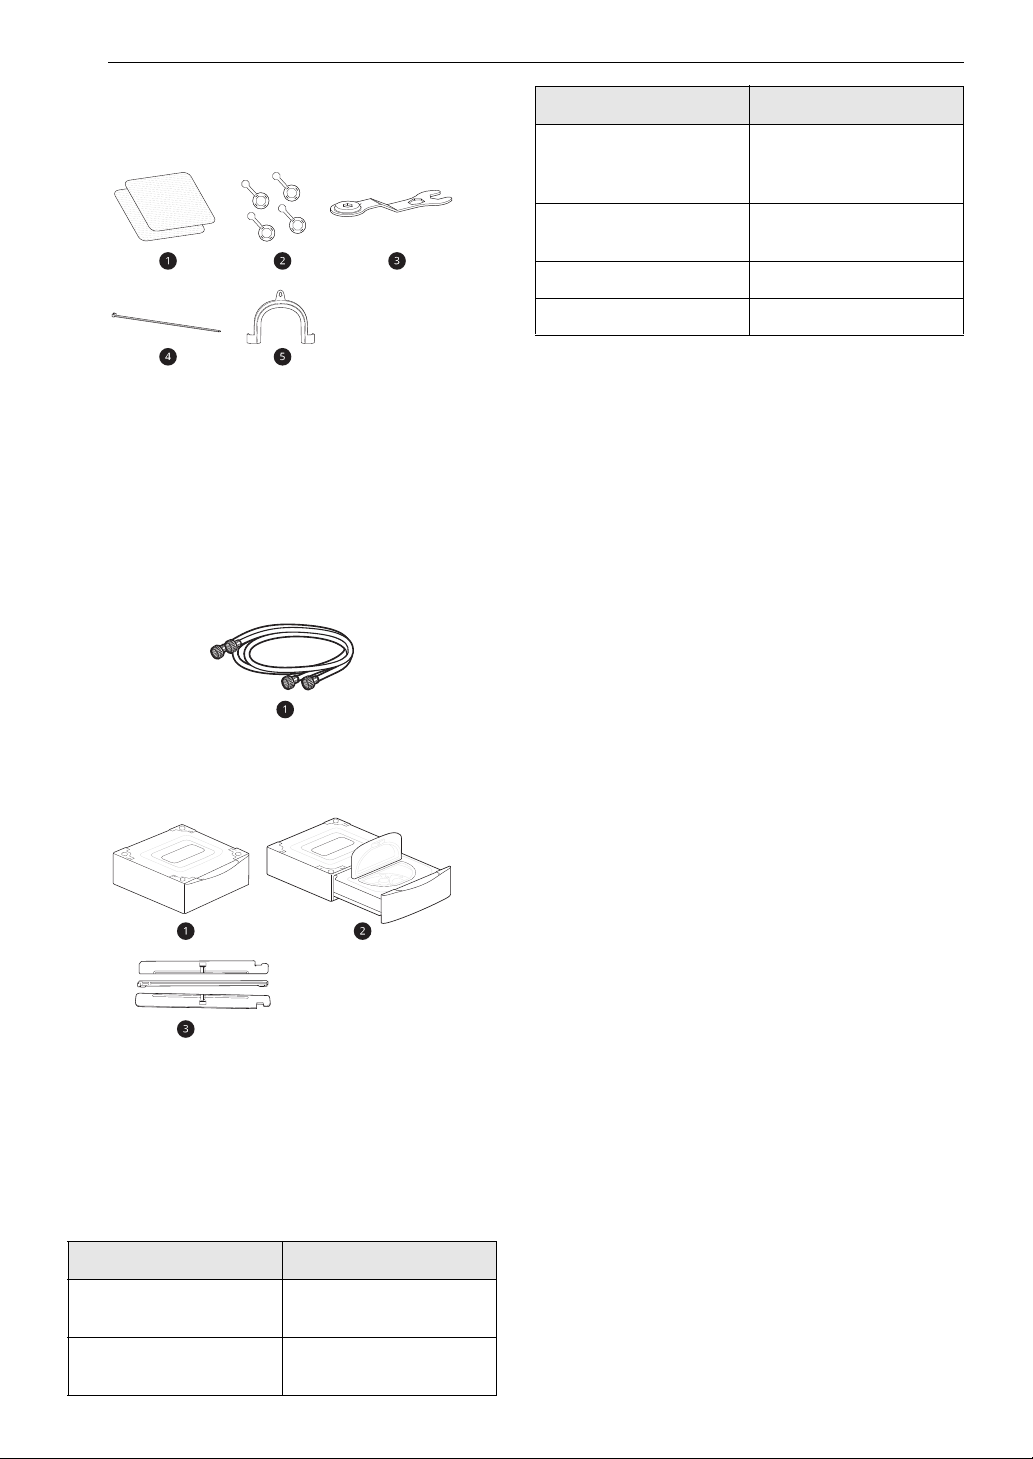
Included Accessories
a
Non-skid Pads
b Hole Caps
c Wrench
d Tie Strap
e Elbow Bracket (for securing drain hose)
Required Accessories
Model WM1455H*A
Dimensions (Width X
Height X Depth)
Maximum Depth with
Door Open
Net Weight 154.3 lb (70 kg)
Max. Spin Speed 1400 rpm
24'' X 33 1/2'' X 22 1/4''
(60 cm X 85 cm X 56.5
43 1/4'' (110 cm)
cm)
Hot and Cold Water Hoses
a
Optional Accessories
a
Pedestal
b Pedestal Washer
c Stacking Kit
Product Specifications
Model WM1455H*A
Electrical
Requirements
120 V~, 60 Hz
Min. / Max. Water
Pressure
20 psi - 120 psi (138 kPa
- 827 kPa)
Page 9
INSTALLATION
WARNING
abc
ef
9INSTALLATION
Before Installing
Installation Overview
Please read the following installation instructions first after purchasing this washer or transporting it to
another location.
ENGLISH
a Choosing the Proper Location
b Unpacking and Removing Shipping Material
c Connecting the Inlet Hoses
d Connecting the Drain Hose
e Leveling the Washer
f Final Installation Check
• Moving or installation of the appliance requires two or more people. Failure to follow these instructions
may result in injury.
• Store and install the appliance where it will not be exposed to temperatures below freezing or exposed
to outdoor weather conditions. Failure to follow this warning can cause product or part failure, serious
injury, fire, electric shock, or death.
• Properly ground the washer to conform with all governing codes and ordinances. Failure to follow this
warning can cause serious injury, fire, electric shock, or death.
• To ensure proper airflow, do not block the large opening on the bottom of the washer with carpeting or
other materials.
• Do not remove the ground prong from the power cord. Do not use an adapter or extension cord. Plug
into a grounded 3-prong outlet. Failure to follow this warning can cause serious injury, fire, electric
shock, or death.
Page 10

10 INSTALLATION
WARNING
FE
E
G
D
C
B
A
• Certain internal parts are intentionally not grounded and may present a risk of electric shock only during
servicing. Service personnel- Do not contact the following parts while the appliance is energized: pump,
valve, motor, control board.
Tools Needed
a Pliers
b Flat-Blade Screwdriver
c Level
Choosing the Proper Location
Check the following requirements for the install
location before installing the washer.
• Allow for sufficient space between the walls and
the washer for installation.
• Make sure that the floor is clean, dry and free of
dust, dirt, water and oil so the leveling feet
cannot slide easily. Leveling feet that can move
or slide on the floor can contribute to excess
vibration and noise.
• If the floor has too much flex, reinforce it to
make it more rigid. If the floor is not solid, it may
cause severe vibration and noise.
• If a drain pan must be used, take extra care to
follow the instructions provided with the drain
pan and make sure the leveling feet are adjusted
for firm and even contact with the pan. Use of
drain pans and failure to properly level the
washer may result in increased vibration and
noise during operation.
• It is the personal responsibility and obligation of
the washer owner to have a proper outlet
installed by a qualified electrician.
Flooring
• To minimize noise and vibration, install the
washer on a level, solidly constructed floor
capable of supporting the washer without
flexing or bouncing.
• The washer must be installed on firm flooring to
minimize vibration during the spin cycle.
Concrete flooring is best, but a wood floor is
sufficient, provided it is built to FHA standards.
• The floor under the washer must not slope more
than 1 inch (2.5 cm) from front to back or side to
side.
• Installing on carpeting and soft tile surfaces is
not recommended.
• Never install the washer on a platform or weakly
supported structure.
Floor Installation
To ensure sufficient clearance for water inlet
hoses, drain hose and airflow, allow minimum
clearances of at least 1 inch (2.5 cm) at the sides
and 4 inches (10 cm) behind the washer. Be sure
to allow for wall, door, or floor moldings that may
increase the required clearances.
Power Outlet
• The power outlet must be within 60 inches (1.5
m) of either side of the washer.
• Position the washer so that the outlet and plug
are easily accessible.
• Do not overload the outlet with more than one
appliance.
• The outlet must be grounded in accordance with
current electrical wiring codes and regulations.
• Use a time-delay fuse or circuit breaker.
Dimensions and Clearances
A 21'' (53 cm)
B 43 1/4'' (110 cm)
C 22 1/4'' (56.5 cm)
D 4'' (10 cm)
E1'' (2.5 cm)
Page 11
11INSTALLATION
CAUTION
CAUTION
NOTE
WARNING
Dimensions and Clearances
F 24'' (60 cm)
G1/4'' (0.5 cm)
Unpacking and Removing Shipping Material
Remove all shipping materials from the washer for
proper operation and inspect it for shipping
damage.
• Failure to remove shipping materials can cause
excessive noise and vibration.
Unpacking Shipping Material
*Some models do not ship with drum support.
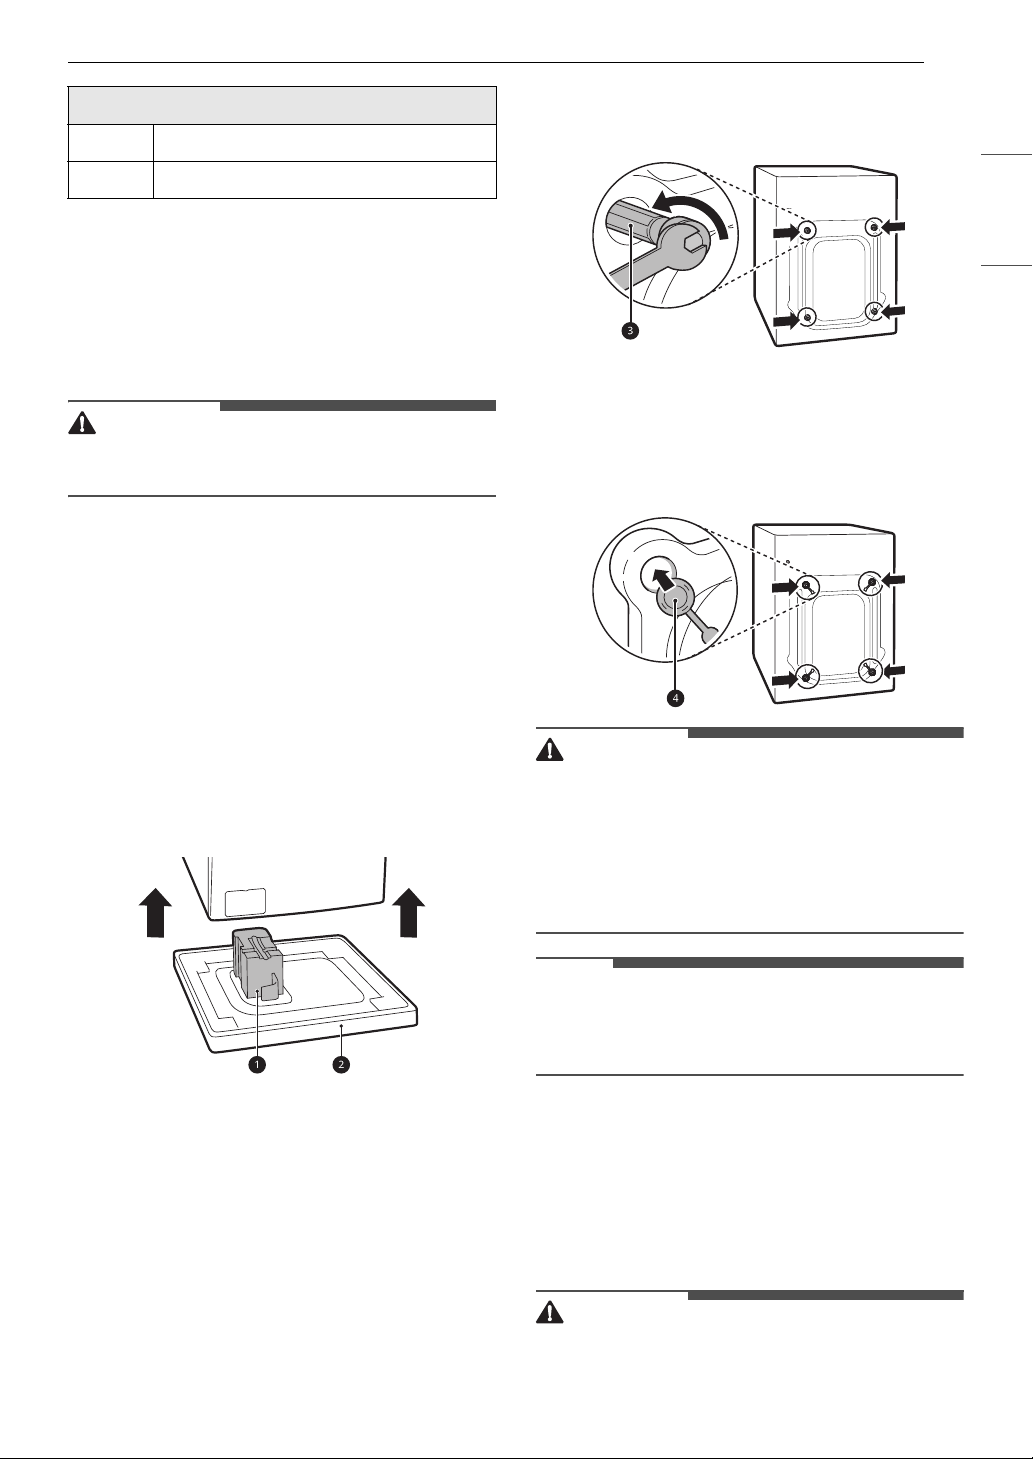
Lift the washer off the foam base.
• After removing the carton and shipping
material, lift the washer off the foam base.
• Make sure the plastic drum support
off with the base and is not stuck to the bottom
of the washer.
• If you must lay the washer down to remove the
carton base b, always protect the side of the
washer and lay it carefully on its side. Do not lay
the washer on its front or back.
a* comes
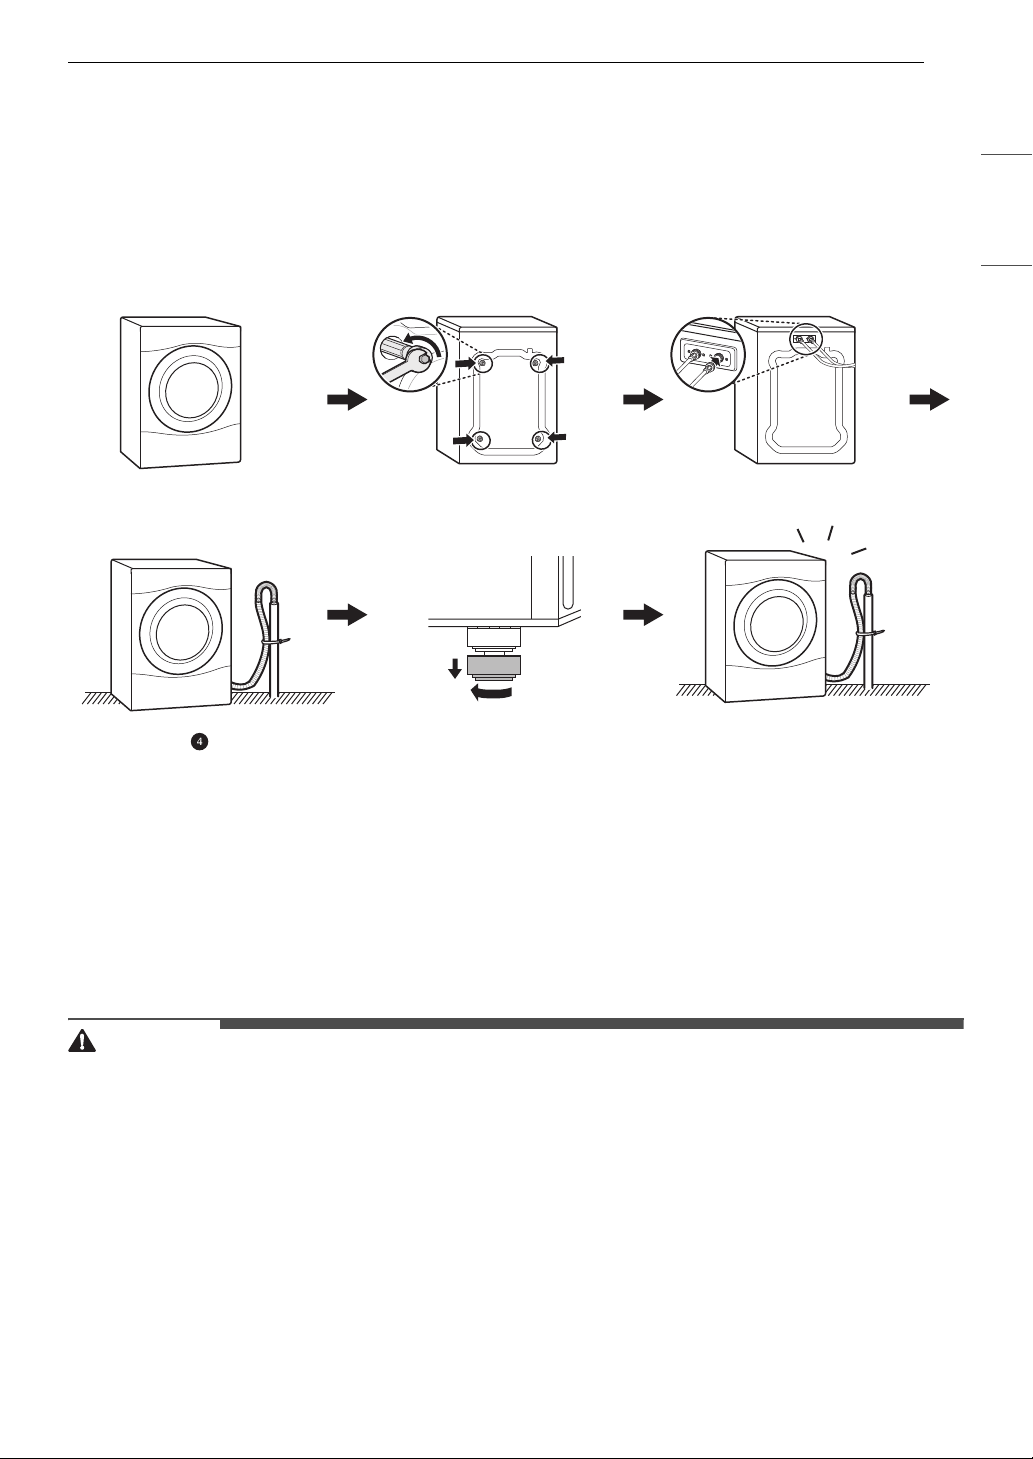
• Remove the bolt assemblies (bolts and
retainers) by wiggling them slightly while
pulling them out.
ENGLISH
2 Install the hole caps.
• Locate the hole caps d included in the
accessory pack or attached to the back of
the washer. Install the caps in the holes left
by the bolt assemblies.
• Once removed, save the bolt assemblies for
future use. To prevent damage to internal
components, do not transport the washer
without reinstalling the shipping bolts. Failure to
remove shipping bolts and retainers may cause
severe vibration and noise, which can lead to
permanent damage to the washer.
*
Removing Shipping Material
1 Remove the bolt assemblies.
• Starting with the bottom two shipping bolts
c , use the included wrench to fully loosen
all 4 shipping bolts by turning them
counterclockwise.
• The power cord is secured to the back of the
washer with a shipping bolt to help prevent
operation with shipping bolts in place.
Connecting the Water Inlet Hoses
To avoid the risk of costly water damage, purchase
and install new water inlet hoses when installing
the washer.
• Do not overtighten the hoses or cross-thread the
hose fittings. Overtightening or cross-threading
Page 12
12 INSTALLATION
NOTE
WARNING
can damage the valves or couplings, resulting in
leaking and property damage.
• Do not reuse old hoses. Use only new hoses
when installing the washer. Old hoses could leak
or burst causing flooding and property damage.
Contact an LG Customer Information Center for
assistance in buying hoses.
• Periodically check the hoses for cracks, leaks,
and wear, and replace the hoses every five years.
• Do not stretch the water hoses intentionally, and
make sure that they are not pinched, crushed or
kinked by other objects.
• Water supply pressure must be between 20 psi
and 120 psi (138 - 827 kPa). If the water supply
pressure is more than 120 psi, a pressure
reducing valve must be installed.
• Your hot water heater should be set to deliver
water at 120–135 °F (48–57 °C) to allow the
washer to properly control wash temperatures.
• Do not store or install the washer in a location
subject to freezing temperatures. Damage to the
water inlet hoses and internal mechanisms of
the washer can result. If the washer was
exposed to freezing temperatures prior to
installation, allow it to stand at room
temperature for several hours before use and
check for leaks prior to operation.
• Do not use flood-preventing hoses with auto
shut off devices. The devices can be tripped
during fill and prevent the washer from filling
properly.
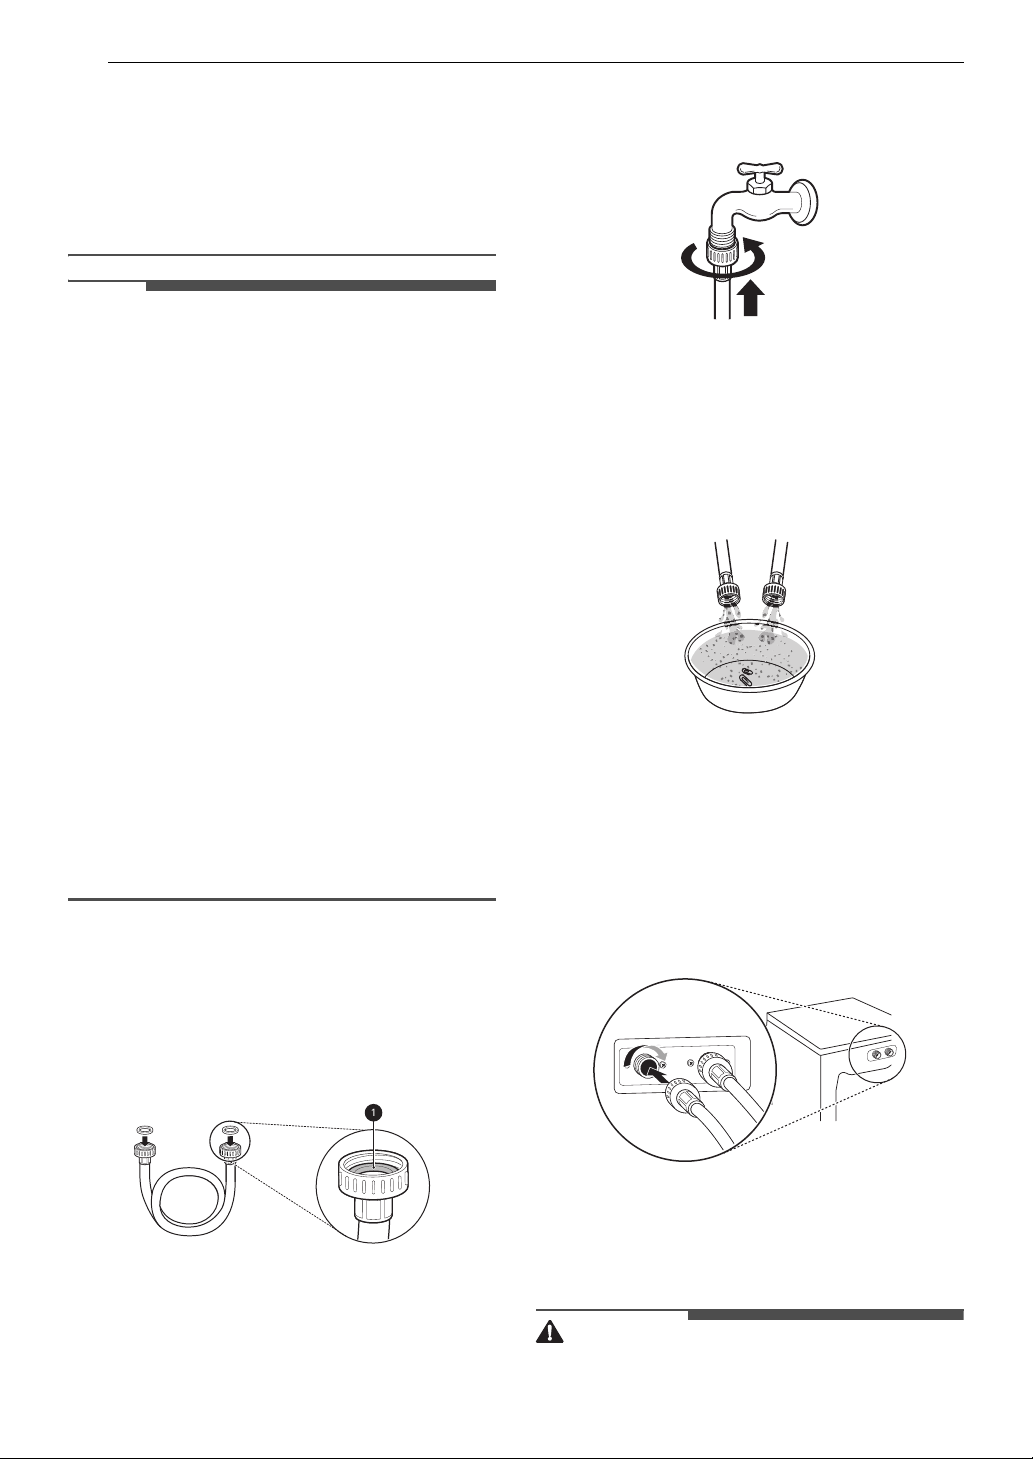
How to Connect the Water Inlet Hoses
• Connect the blue hose to the cold water
faucet and the red hose to the hot water
faucet.
3 Flush out the inlet hoses.
• After the hoses are connected, turn on the
water faucets and flush out any foreign
substances such as dirt, sand, or sawdust.
• Let the water drain into a bucket, and check
the water temperature to make sure you’ve
connected the hoses to the correct faucets.
4 Attach the inlet hoses to the back of the
washer.
• Attach the hot water inlet hose to the hot
water inlet on the back of the washer.
Attach the cold water inlet hose to the cold
water inlet on the back of the washer.
• Tighten the fittings securely. Turn on both
faucets all the way and check for leaks at
both ends of the hoses.
1 Check the fittings and seals. Inspect the
threaded fitting on each hose and make sure
there is a rubber seal a in place in both ends
of each hose to prevent leaking.
2 Connect the water supply hoses.
• Connect the water inlet hoses to the hot
and cold water faucets tightly by hand and
then tighten another 2/3 turn with pliers.
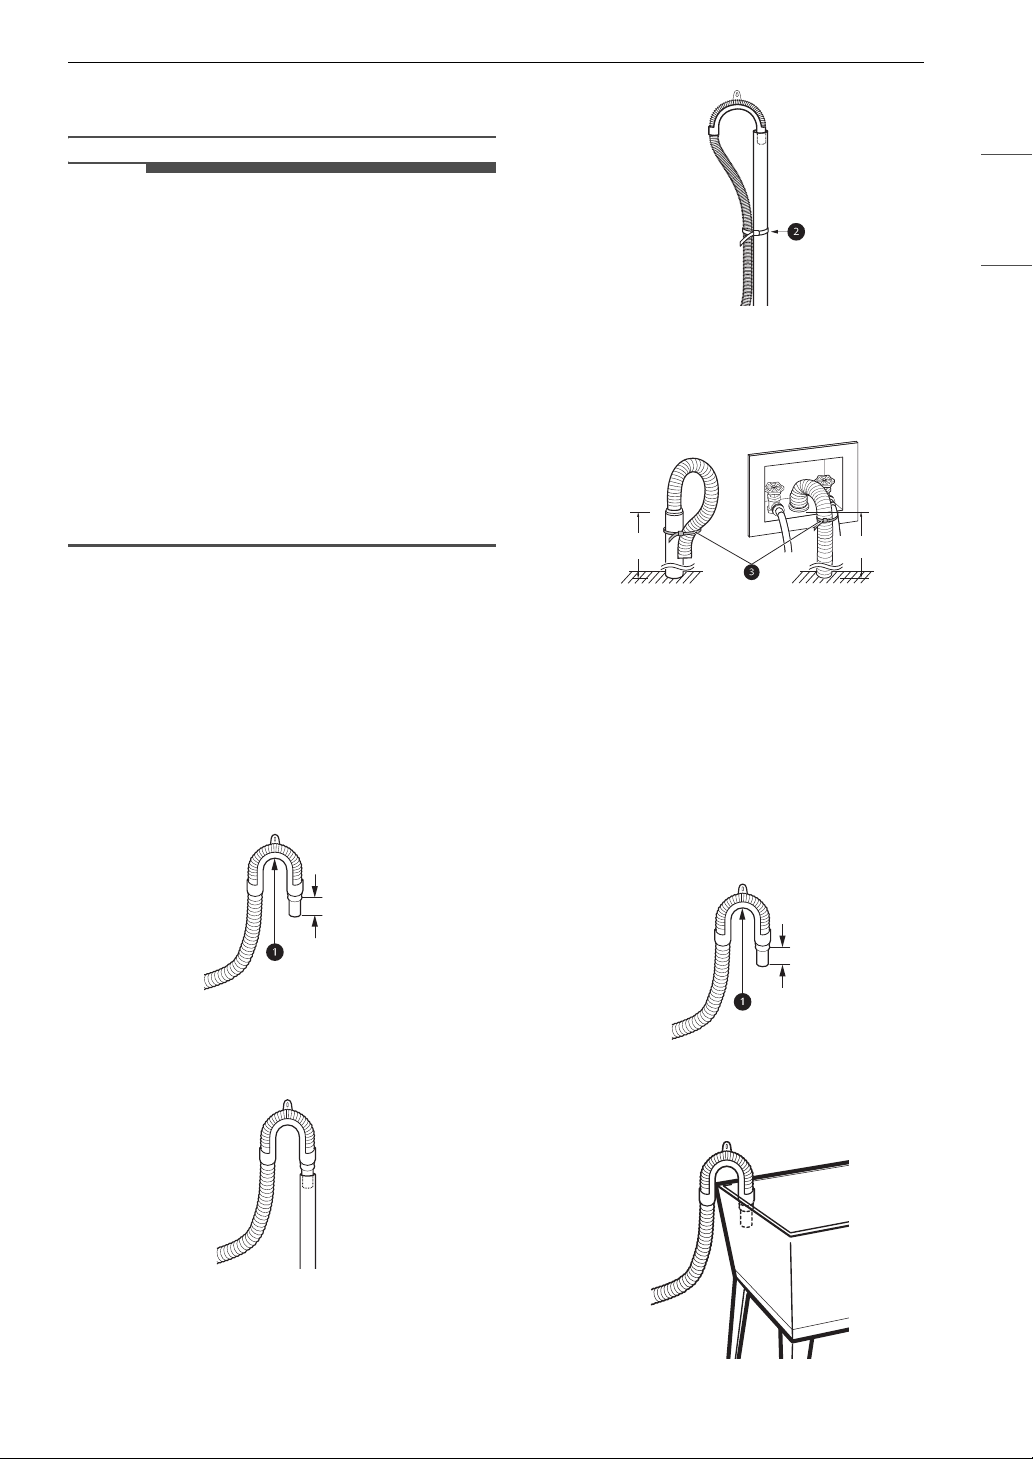
Connecting the Drain Hose
Connect the drain hose to either a standpipe or
laundry tub.
• The drain hose should always be properly
secured. Failure to properly secure the drain
Page 13
hose can result in flooding and property
NOTE
4 "
(10 cm)
damage.
• The drain must be installed in accordance with
any applicable local codes and regulations.
• Make sure that the drain hose is not stretched,
pinched, crushed, or kinked.
• Do not install the drain hose with the end lower
than 29.5 inches (75 cm) or higher than 96
inches (244 cm) above the bottom of the washer
or more than 60 inches (152 cm) away from the
washer.
• Never create an airtight seal between the hose
and the drain with tape or other means. If no air
gap is present, water can be siphoned out of the
drum resulting in poor wash/rinse performance
or clothing damage.
Using a Standpipe to Drain
13INSTALLATION
4 If the water valves and drain are built into the
wall, fasten the drain hose to one of the water
hoses with the provided tie strap
side on inside).
29.5 - 96 "
(75 - 244 cm)
c (ribbed
29.5 - 96 "
(75 - 244 cm)
ENGLISH
1 Clip the end of the hose into the elbow
bracket.
• Connect the elbow bracket
inches (10 cm) of the end of the drain hose.
If the drain hose is extended more than 4
inches (10 cm) beyond the end of the elbow
bracket, mold or microorganisms could
spread to the inside of the washer.
a within 4
2 Insert the end of the drain hose into the
standpipe.
Using the Laundry Tub to Drain
1 Clip the end of the hose into the elbow
bracket.
• Connect the elbow bracket
inches (10 cm) of the end of the drain hose.
If the drain hose is extended more than 4
inches (10 cm) beyond the end of the elbow
bracket, mold or microorganisms could
spread to the inside of the washer.
a within 4
4 "
(10 cm)
2 Hang the end of the drain hose over the side
of the laundry tub.
3 Use the provided tie strap b to secure the
drain hose in place.
Page 14
14 INSTALLATION
CAUTION
NOTE
3 Use the provided tie strap to secure the drain
hose in place.
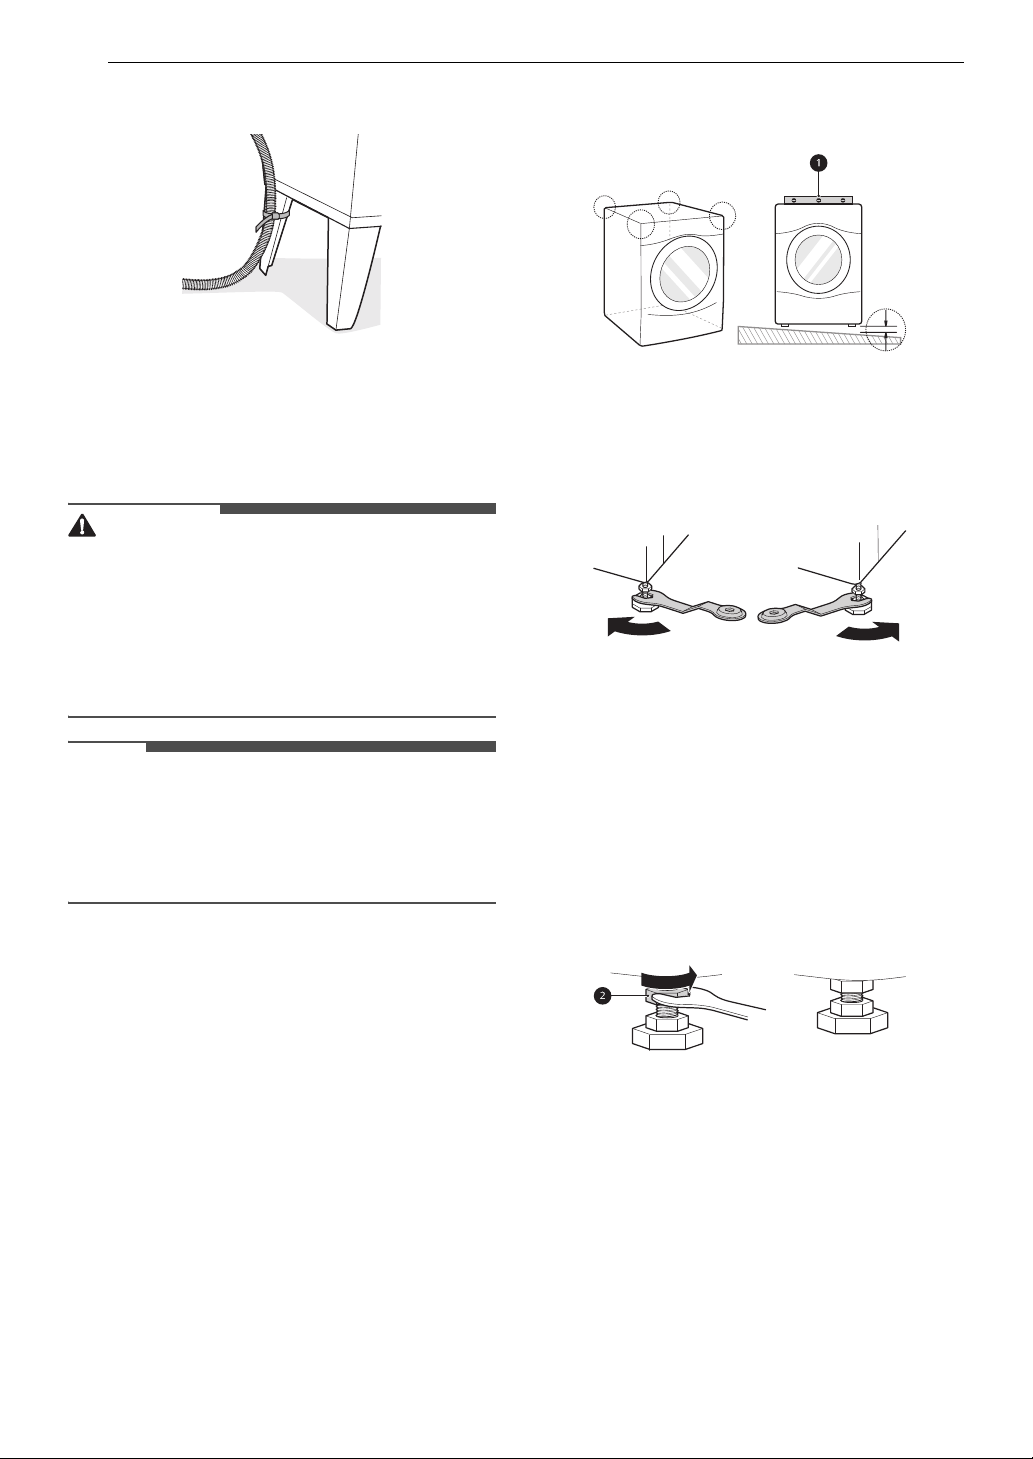
Leveling the Washer
The drum of the washer spins at very high speeds.
To minimize vibration, noise, and unwanted
movement, the floor must be a solid, level surface.
• Using the washer without leveling it may cause
excess vibration and noise, leading to a washer
malfunction.
• Adjust the leveling feet only as far as necessary
to level the washer. Extending the leveling feet
more than necessary can cause the washer to
vibrate.
• Before installing the washer, make sure that the
floor is clean, dry and free of dust, dirt, water
and oil so the washer feet cannot slide easily.
Feet that move or slide on the floor can
contribute to excessive vibration and noise.
inch, and all 4 leveling feet must rest firmly
on the floor.
2 Adjust the leveling feet.
• Turn all 4 leveling feet in one direction to
raise the washer or the other direction to
lower it.
3 Check the level again.
• Push or rock the top edges of the washer
gently to make sure the washer does not
rock. If the washer rocks, readjust the
leveling feet.
4 Tighten the locknuts b
• Turn the locknuts counterclockwise and
tighten them when the washer is level.
How to Level the Washer
1 Position the washer in its final location.
• Take special care not to pinch, strain, or
crush the water and drain hoses. If you have
a carpenter’s level
check that the washer is level. The slope
beneath the washer should not exceed 1
a, you can use it to
Using Non-Skid Pads
If you install the washer on a slippery surface, it
may move because of excessive vibration.
Incorrect leveling may cause malfunction through
noise and vibration. If this occurs, install the nonskid pads under the leveling feet and adjust the
level.
Page 15
15INSTALLATION
WARNING
NOTE
1 Clean the floor to attach the non-skid pads.
• Use a dry rag to remove and clean foreign
objects or moisture. If moisture remains,
the non-skid pads may slip.
2 Adjust the level after placing the washer in the
installation area.
3 Place the adhesive side c of the non-skid pad
on the floor.
• It is most effective to install the non-skid
pads under the front leveling feet. If it is
hard to place the pads under the front
leveling feet, place them under the back
leveling feet.
a This side up
b Remove backing
• Do not damage or cut off the ground prong of
the power cord. Doing so may cause death, fire,
electric shock, or product malfunction.
• Improper connection of the equipment
grounding conductor can result in risk of electric
shock. Check with a qualified electrician or
service technician if you are in doubt as to
whether the appliance is properly grounded. If
the plug does not fit the outlet, have a proper
outlet installed by a qualified electrician.
• The appliance and outlet must be positioned so
that the plug is easily accessible.
• Do not use an adapter or extension cord. Doing
so may result in serious injury, fire, electric
shock, or death.
• For best performance, plug the appliance into its
own individual outlet. This helps prevent
overloading house wiring circuits which could
cause a fire hazard from overheated wires.
• If necessary, use a new, UL-listed 3-prong
(grounding) plug rated at no less than the
branch circuit. Do not use an extension cord
longer than 3 feet. Failure to follow these
warnings may result in serious injury, fire,
electric shock, or death.
ENGLISH
4 Recheck the washer’s levelness.
• Push or rock the top edges of the washer
gently to make sure the washer does not
rock. If the washer rocks, level the washer
again.
Final Installation Check
Connecting to the Power Supply
Plug the washer into a 120 V, 60 Hz grounded 3prong outlet.
• Do not use a worn or damaged power cord or
power plug. Replace or repair it immediately.
Failure to do so may result in death, fire, electric
shock, or malfunction.
• Do not modify the power cord and plug provided
with the appliance. Do not damage it when
installing or moving the appliance. Doing so may
result in death, fire, electric shock, or
malfunction.
• Make sure that the appliance is grounded.
• Connect this appliance to a grounded outlet
conforming to the rating prior to use. Failure to
do so may result in fire, electric shock, or
malfunction.
Testing the Washer
Check if the washer is properly installed and run a
test cycle.
1 Load the washer with 6 thick bath towels
(approximately 6 pounds).
2 Press the Power button.
3 Select the Downloaded cycle. The default
cycle is Rinse+Spin.
4 Press the Start/Pause button to start the
wash cycle.
5 Make sure that water is supplied, that the
washer does not rock or vibrate excessively,
and that it drains well during the spin cycle.
• If water leaks during water supply, see
Connecting the Water Inlet Hoses to connect
them properly.
• If the washer rocks and vibrates excessively, see
Leveling the Washer to level it again.
Page 16

16 INSTALLATION
NOTE
• If the drain does not work, see Connecting the
Drain Hose to install the hose properly.
Page 17

OPERATION
WARNING
17OPERATION
Before Use
• To reduce the risk of fire, electric shock, or injury to persons, read the SAFETY INSTRUCTIONS before
operating this appliance.
Operation Overview
1 Sort laundry and load the washer.
• Sort laundry by fabric type, soil level, color and load size as needed. Open the door and load items
into the washer.
• If using single-use detergent packs, or gel or tablet detergents, place them in the drum before
loading the laundry.
2 Add cleaning products.
• Add the proper amount of HE (High-Efficiency) detergent to the detergent dispenser.
• If desired, add bleach or fabric softener to the appropriate areas of the dispenser drawer.
• Do not place liquid or powdered detergent packs, or gel or tablet detergents in the dispenser.
3 Turn on the washer.
• Press the Power button to turn on the washer.
ENGLISH
4 Select a cycle.
• Turn the cycle selector knob or press the cycle buttons repeatedly until the desired cycle is selected.
• The preset wash temperature, spin speed, soil level and option settings for the selected cycle are
shown.
•The Normal cycle must be selected in order to change its default settings.
• Pressing the Start/Pause button without selecting a cycle immediately starts the Normal cycle with
the default settings.
5 Adjust settings.
• Default settings for the selected cycle can be changed, if desired, using the cycle modifier and
option buttons.
• Not all modifiers and options are available on all cycles. A different chime sounds and the LED does
not light up if the selection is not allowed.
6 Begin cycle.
• Press the Start/Pause button to begin the cycle. The door locks, and the washer agitates briefly
without water to measure the weight of the load.
•If the Start/Pause button is not pressed within a certain time, the washer shuts off and all settings
are lost.
Page 18
18 OPERATION
NOTE
CAUTION
7 End of cycle.
• When the cycle is finished, a melody sounds. Immediately remove the clothing from the washer to
reduce wrinkling.
• Check around the door seal when removing the load for small items that may be caught in the seal.
• The washer rotates the laundry in a way that allows it to use less water while still fully saturating the
clothing. It is normal to be unable to see water during the wash cycle.
• If the temperature or the water level inside the machine is too high, the door locks and cannot be
opened.
Sorting Laundry
• Clothing or articles that are waterproof or water-resistant must be washed in the Waterproof, Bedding,
Bulky/Large, or Jumbo Wash cycle only. (Examples include water resistant clothing, mattress covers,
outdoor clothes, and plastic mats.) Failure to do so may result in personal injury or damage to the
washer, clothes, walls, floor, and surrounding objects due to abnormal vibration.
• Remove the stuffing from pillows and cushions before washing the covers. Failure to do so can cause
excessive vibration, resulting in damage to the washer, clothes, nearby objects, walls, and floor.
Grouping Similar Items
For the best washing results, and to reduce the possibility of damage to clothing, sort clothing into loads
made up of similar items.
Mixing different fabric types and/or soil levels can result in poor wash performance, color transfer,
discoloration, fabric damage or linting. Fabrics should be sorted into groups as described below.
Colors
Sort articles by color. Wash dark clothes separately from light colors or whites. Mixing dark clothes with
light clothes can result in dye transfer or discoloration of the lighter clothes.
Soil Level
Wash heavily soiled clothing together. Washing lightly soiled clothing in the same load with heavily soiled
clothing could result in poor wash performance for the lightly soiled clothing.
Fabric Type
Delicate articles should not be mixed with heavy or sturdy fabric types. Washing heavy fabrics with
delicates can result in poor wash performance for the heavy fabrics and possible damage to the delicates.
Lint Type
Some fabrics attract and bind lint to them while others give off lint in the laundry process. Avoid mixing
these lint collectors and lint producers in the same load. Mixing these fabrics will result in pilling and
linting on the lint collectors. (For example, lint collector - knit sweater; lint producer - terry cloth towels.)
How to Sort Laundry
By Colors By Soil By Fabric By Lint
White Heavy Delicates Lint Producer
Page 19
CAUTION
By Colors By Soil By Fabric By Lint
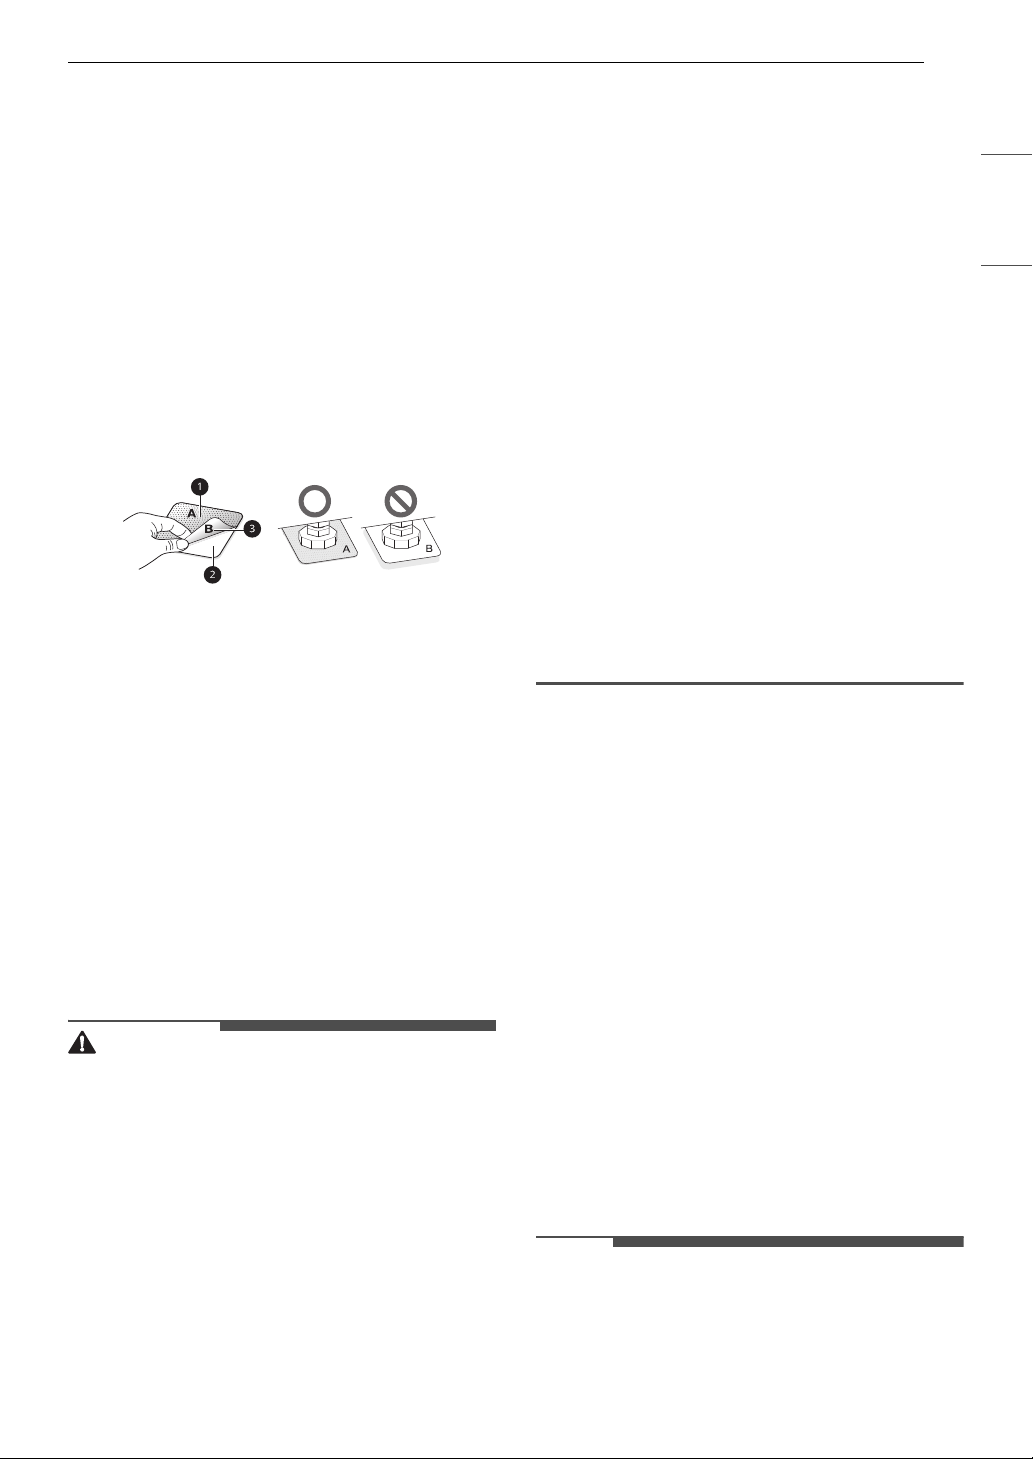
1
3
2
4
Lights Normal Easy Care Lint Collector
Darks Light Sturdy
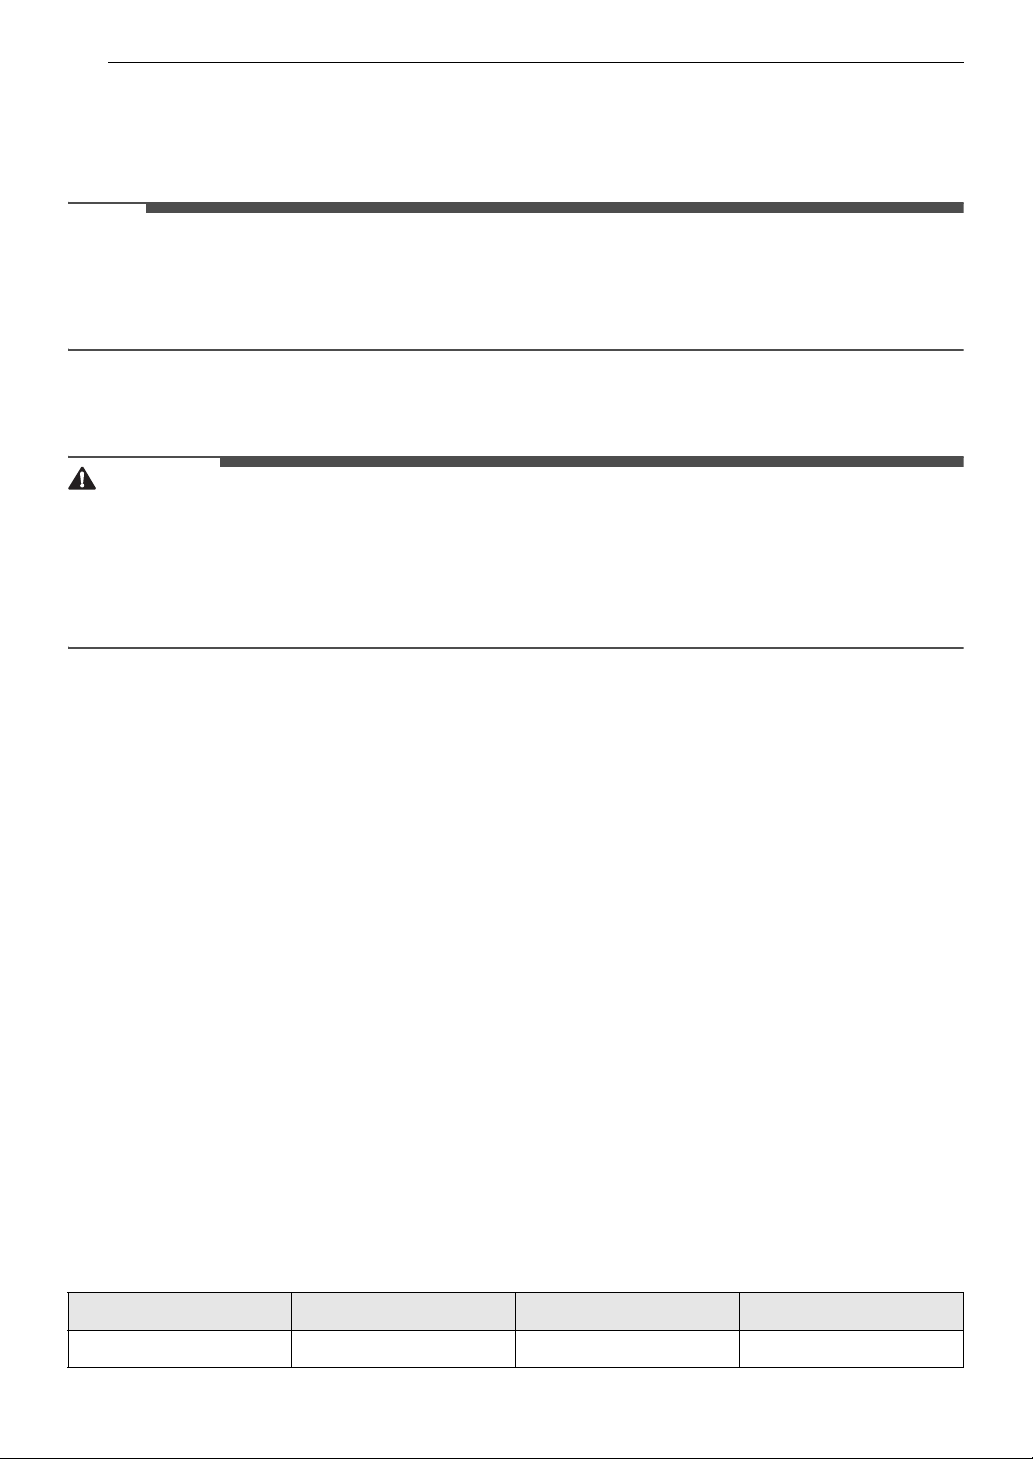
Fabric Care Labels
Many articles of clothing include a fabric care label. Using the chart below, adjust the cycle and option
selections to care for your clothing according to the manufacturer’s recommendations.
Category Label Directions
Hand wash
Machine wash, Normal cycle
Perm Press/Wrinkle Resistant setting (which has a cool down or cold
spray before the slower spin)
Washing
Gentle/Delicate setting (slow agitation and/or reduced wash time)
Do not wash
Do not wring
19OPERATION
ENGLISH
Hot
Water Temperature
Bleach Symbols
Warm
Cold/Cool
Any bleach (when needed)
Only non-chlorine bleach (when needed)
Do not bleach
Loading the Washer
• Clothing or articles that are waterproof or waterresistant must be washed in the Waterproof,
Bedding, Bulky/Large, or Jumbo Wash cycle
only. (Examples include water resistant clothing,
mattress covers, outdoor clothes, and plastic
mats.) Failure to do so may result in personal
injury or damage to the washer, clothes, walls,
floor, and surrounding objects due to abnormal
vibration.
• Pretreat heavily stained areas for best results.
• Brush off heavy soil, dust, and hair from items
before washing. Excess dirt or sand can abrade
other fabrics and lead to poor wash
performance.
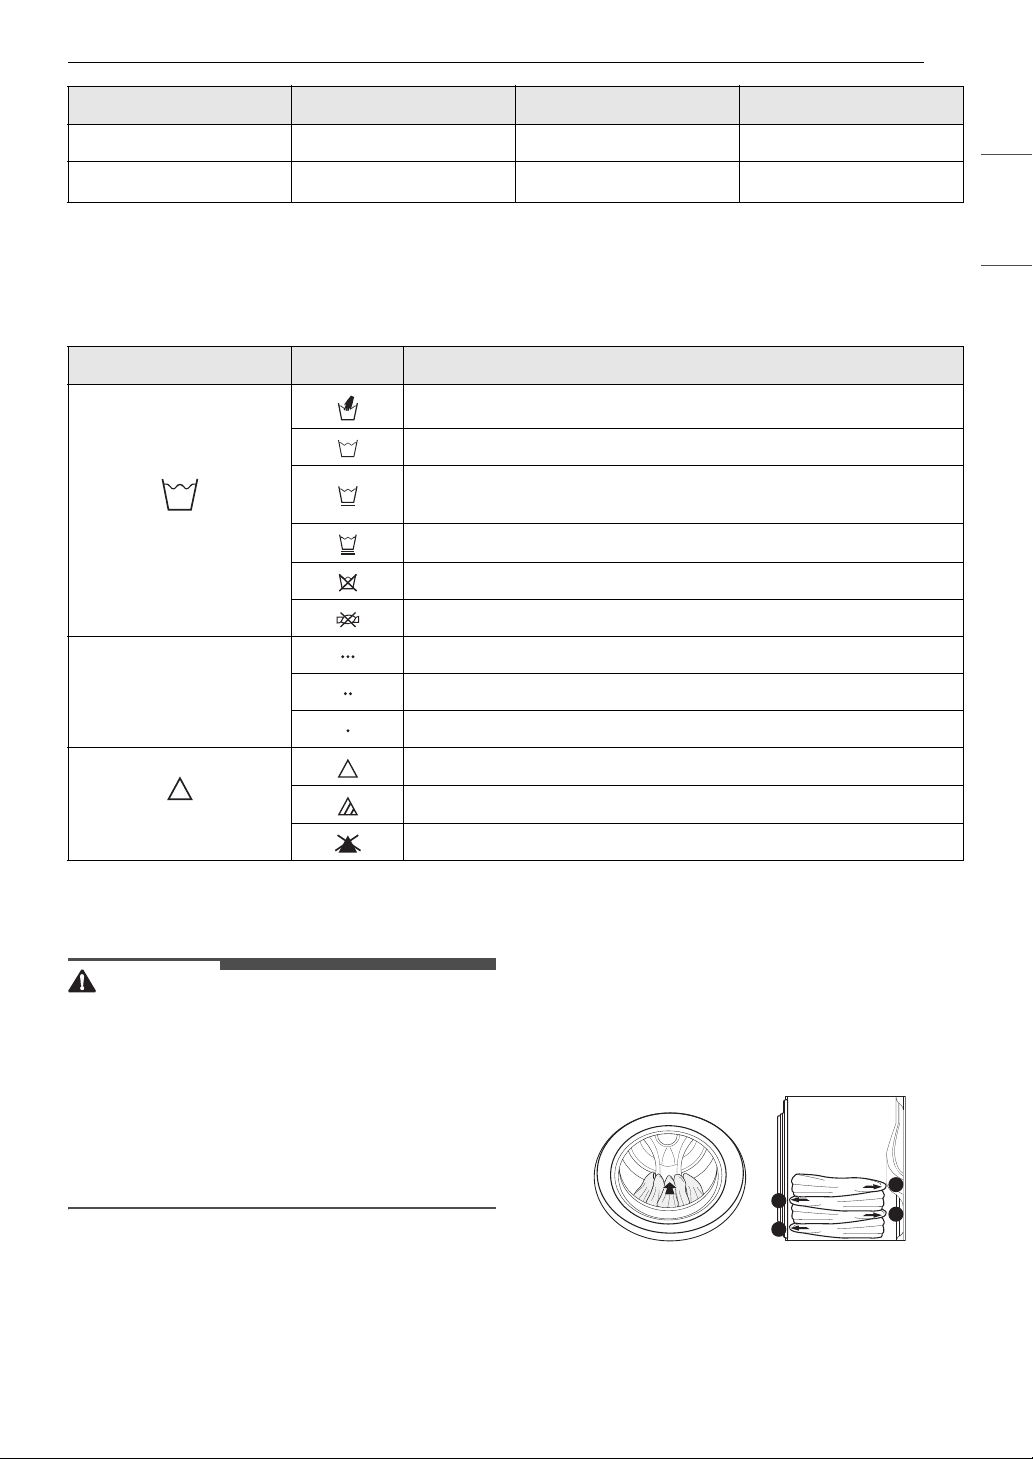
• For best performance, load clothes as shown.
General Tips
• Check and empty pockets. Paper clips, coins,
matches, and other items can damage clothing
and the washer.
• Close zippers and hooks, and tie drawstrings to
prevent snagging or tangling of clothes.
- Do not press down on items while stacking
them in the drum.
- Load clothes loosely, and do not overfill the
drum. Clothes need room to circulate in order
to get clean.
Page 20
20 OPERATION
• Combine large and small items in the drum.
Load large items first. Large items should not be
more than half of the total load.
• The washer can be fully loaded, but the drum
should not be tightly packed with items. The
door of the washer must close easily.
• The washer will not fill or operate with the door
open.
Bulky Items
• Wash thick, bulky items individually. Heavy
blankets, comforters, bedspreads, or pet beds
can get tangled or cause an unbalanced load if
combined with other items.
Small Items
• Do not wash a single small item. Add enough
similar items to the load to prevent an out-ofbalance load.
• Wash small, light items in a mesh bag. Small
items can get caught in the impeller at the
bottom of the drum, and brassiere hooks can
snag on other clothing or the drum.
• Never use more than the maximum amount of
detergent recommended by the manufacturer.
Using too much detergent can lead to
oversudsing, poor rinsing, detergent buildup in
clothing, and residue buildup that can contribute
to odors in the washer.
• Do not use more than one single-use detergent
pack in the washer. Using too much detergent
may cause oversudsing and unsatisfactory
performance. Reduce detergent amount or add
an extra rinse if detergent residue is left on
fabrics. To add an extra rinse, select the Extra
Rinse option.
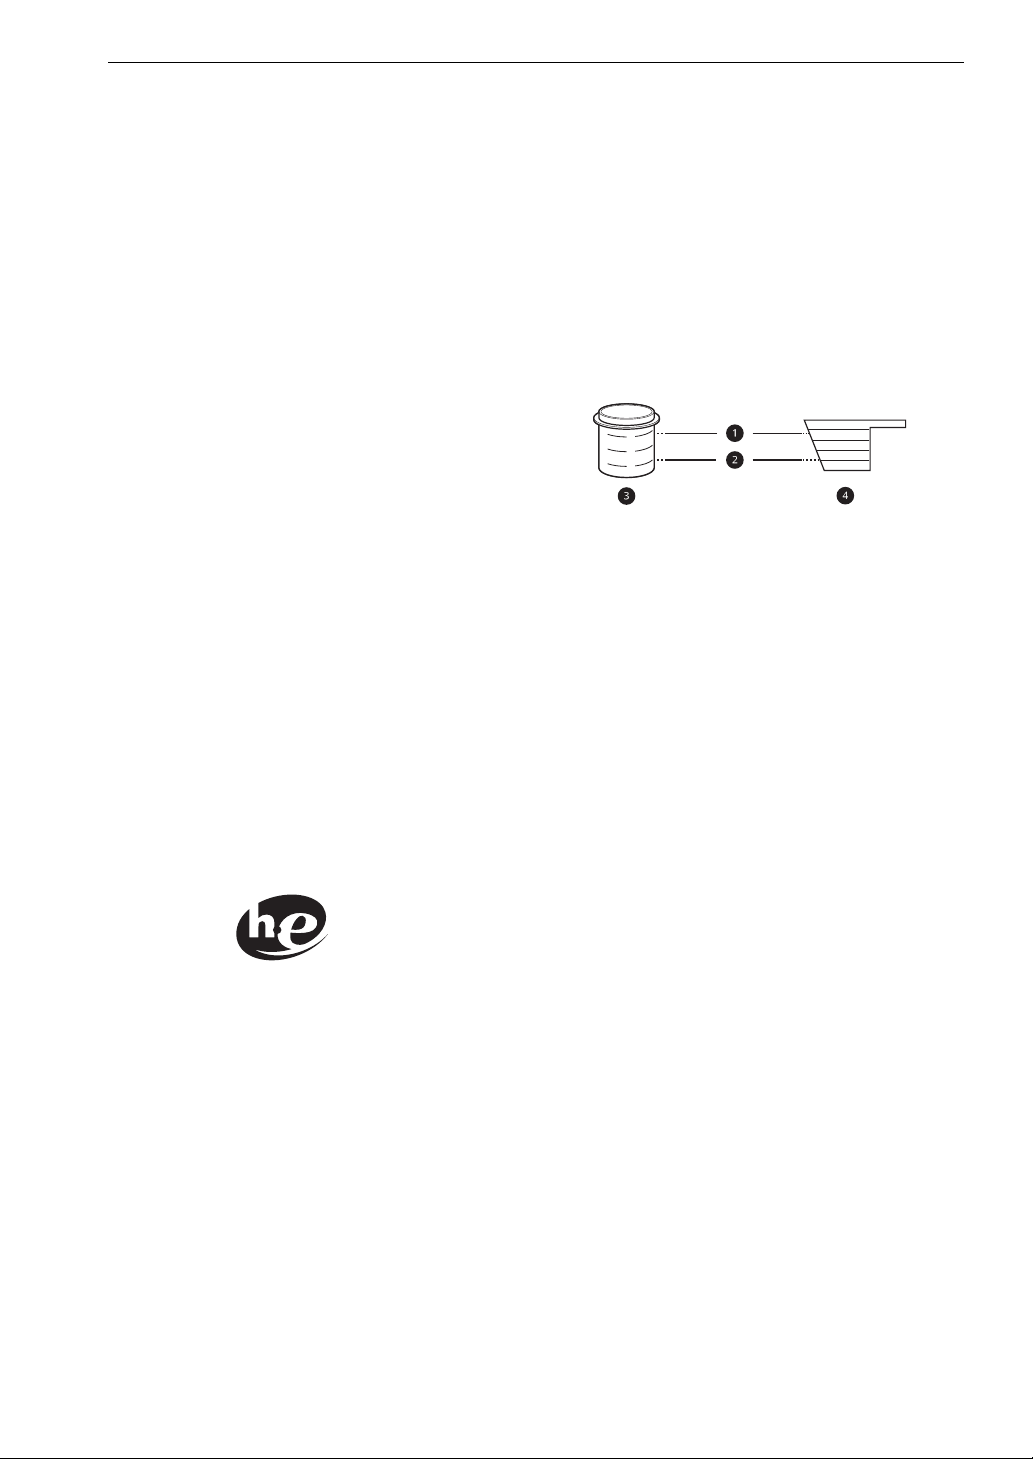
a Maximum fill line
b Average load fill line
c Liquid detergent
d Powdered detergent
Adding Cleaning Products
About Detergent Use
This washer is designed for use with only HE (HighEfficiency) detergents.
• HE detergents produce fewer suds, dissolve
more efficiently to improve washing and rinsing
performance, and help to keep the interior of
the washer clean. Using detergent that is not HE
may cause oversudsing and unsatisfactory
performance which could result in error codes,
cycle failure, and washer damage.
• Detergents designated as HE-compatible may
not provide optimal results.
• For proper wash performance, always measure
detergent using the measuring device provided
by the detergent manufacturer. For an average
load, use less than half of the recommended
maximum. Use less detergent for soft water,
light soil, or smaller loads.
• Use extra care when measuring 2X and 3X
concentrated detergents because even a small
amount of extra detergent can lead to problems.
Single-Use Detergent Packs / Gel or Tablet Detergents
Place liquid or powdered detergent packs, or gel
or tablet detergents in the drum before loading
laundry. Do not place these detergents in the
dispenser.
Using the Dispenser
To add cleaning products to the automatic
dispenser:
1 Open the dispenser drawer.
2 Load the laundry products into the
appropriate compartments.
• Follow the manufacturer’s
recommendations when adding cleaning
products.
Page 21
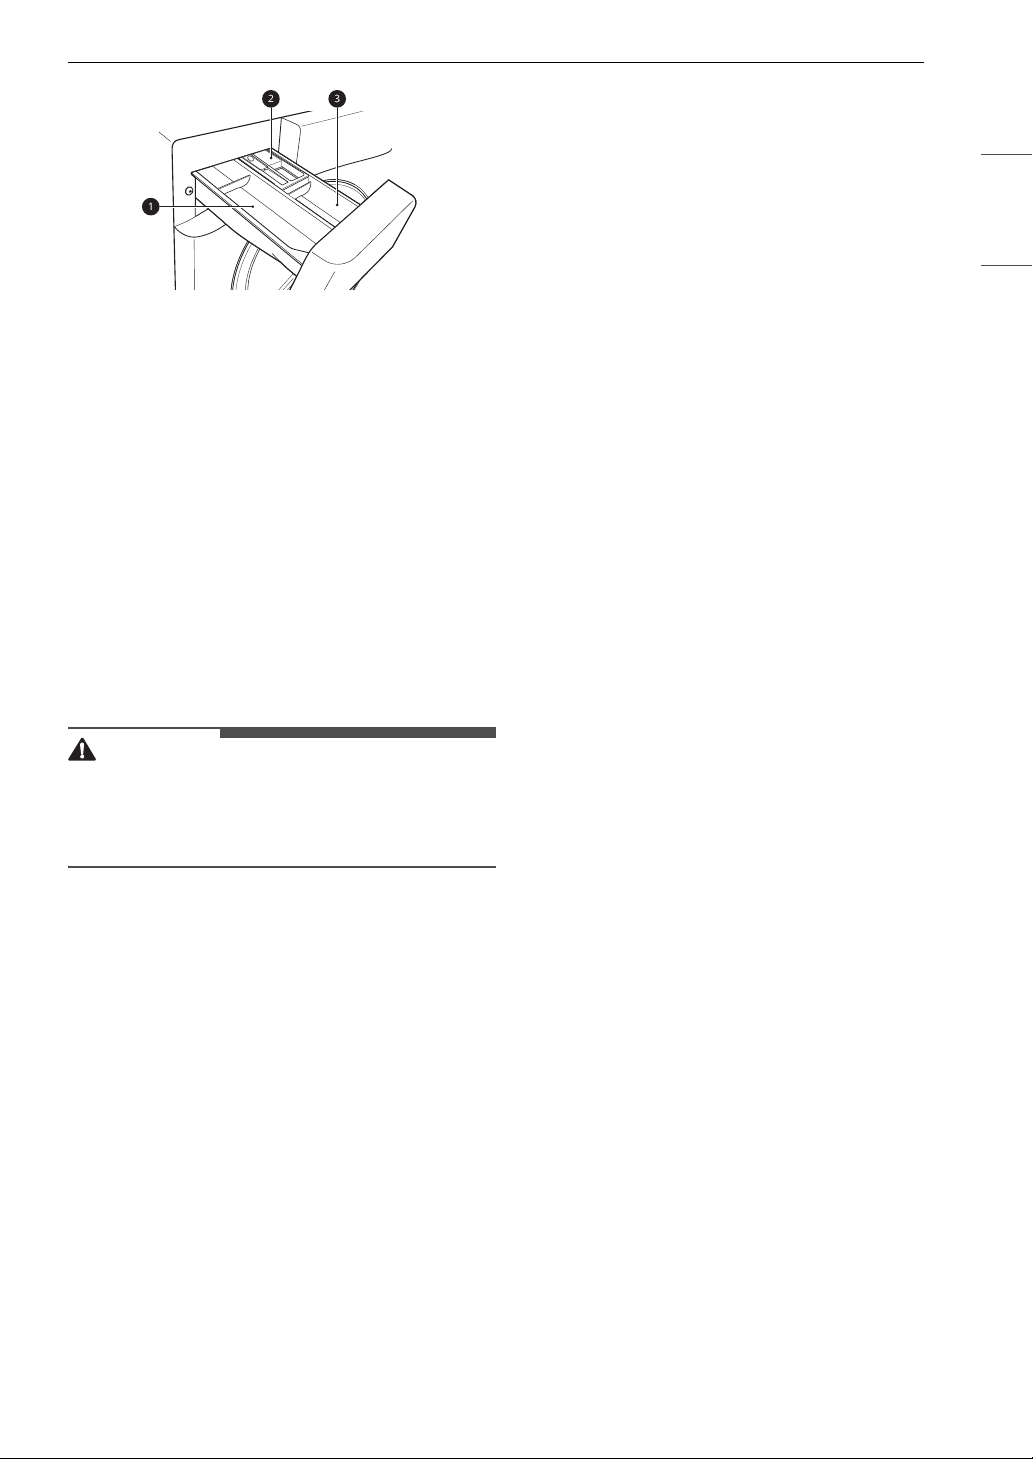
a Main wash detergent compartment
CAUTION
b Liquid fabric softener compartment
c Pre-wash detergent compartment
3 Gently close the detergent dispenser drawer
before starting the cycle.
• Slamming the drawer closed may result in
the detergent overflowing into another
compartment or dispensing into the drum
earlier than programmed.
• Be careful not to get a hand caught in the
drawer while closing.
• It is normal for a small amount of water to
remain in the dispenser compartments at
the end of the cycle.
• Do not place or store laundry products, such as
detergent, bleach, or liquid fabric softener, on
top of your washer. These products can damage
the washer’s finish and controls.
Main Wash Detergent Compartment
This compartment holds laundry detergent for the
main wash cycle. Either powdered or liquid
detergent may be used in this compartment.
• The detergent is added to the load at the
beginning of the cycle. Always use HE (HighEfficiency) detergent with your washer.
• Do not exceed the maximum fill line. Using too
much detergent can result in detergent buildup
in clothing and the washer.
• Liquid or powdered color-safe bleach may be
added to the main wash compartment with
detergent of the same type. Do not mix liquids
and powders
• If the dispenser has a liquid detergent cup and
insert:
- Make sure they are in place when using liquid
detergent.
- Make sure to remove them when using
powdered detergent. Powdered detergent will
21OPERATION
not dispense with the liquid detergent cup and
insert in place.
• When using powdered detergent, remove the
insert and liquid detergent cup from the
dispenser. Powdered detergent will not dispense
with the liquid detergent cup and insert in place.
• If you use a detergent that does not dissolve
easily or a detergent with high viscosity, it will
leave a residue and clog the dispenser.
Fabric Softener Compartment
This compartment holds fabric softener, which is
automatically dispensed during the final rinse
cycle. Either powdered or liquid fabric softener
may be used.
• Do not exceed the maximum fill line. Using too
much fabric softener may stain clothes or cause
buildup on fabrics or in the washer.
• Dilute concentrated fabric softeners with warm
water.
• Never pour fabric softener directly onto the load
or into the drum.
Pre-wash Detergent Compartment
Add liquid or powdered detergent to this
compartment when using the Pre-wash option.
Always use HE (High-Efficiency) detergent with
your washer.
• When using the Pre-wash option, liquid
detergent for the main wash needs to be loaded
in the liquid detergent cup accessory in the main
wash dispenser (where applicable), to prevent it
from being dispensed with the pre-wash
detergent.
• The amount of detergent added for the Pre-
wash option is 1/2 the amount recommended
for the main wash cycle. For example, if the main
wash cycle requires one measure of detergent,
add 1/2 measure for the Pre-wash option.
ENGLISH
Page 22
22 OPERATION
NOTE
NOTE
Control Panel
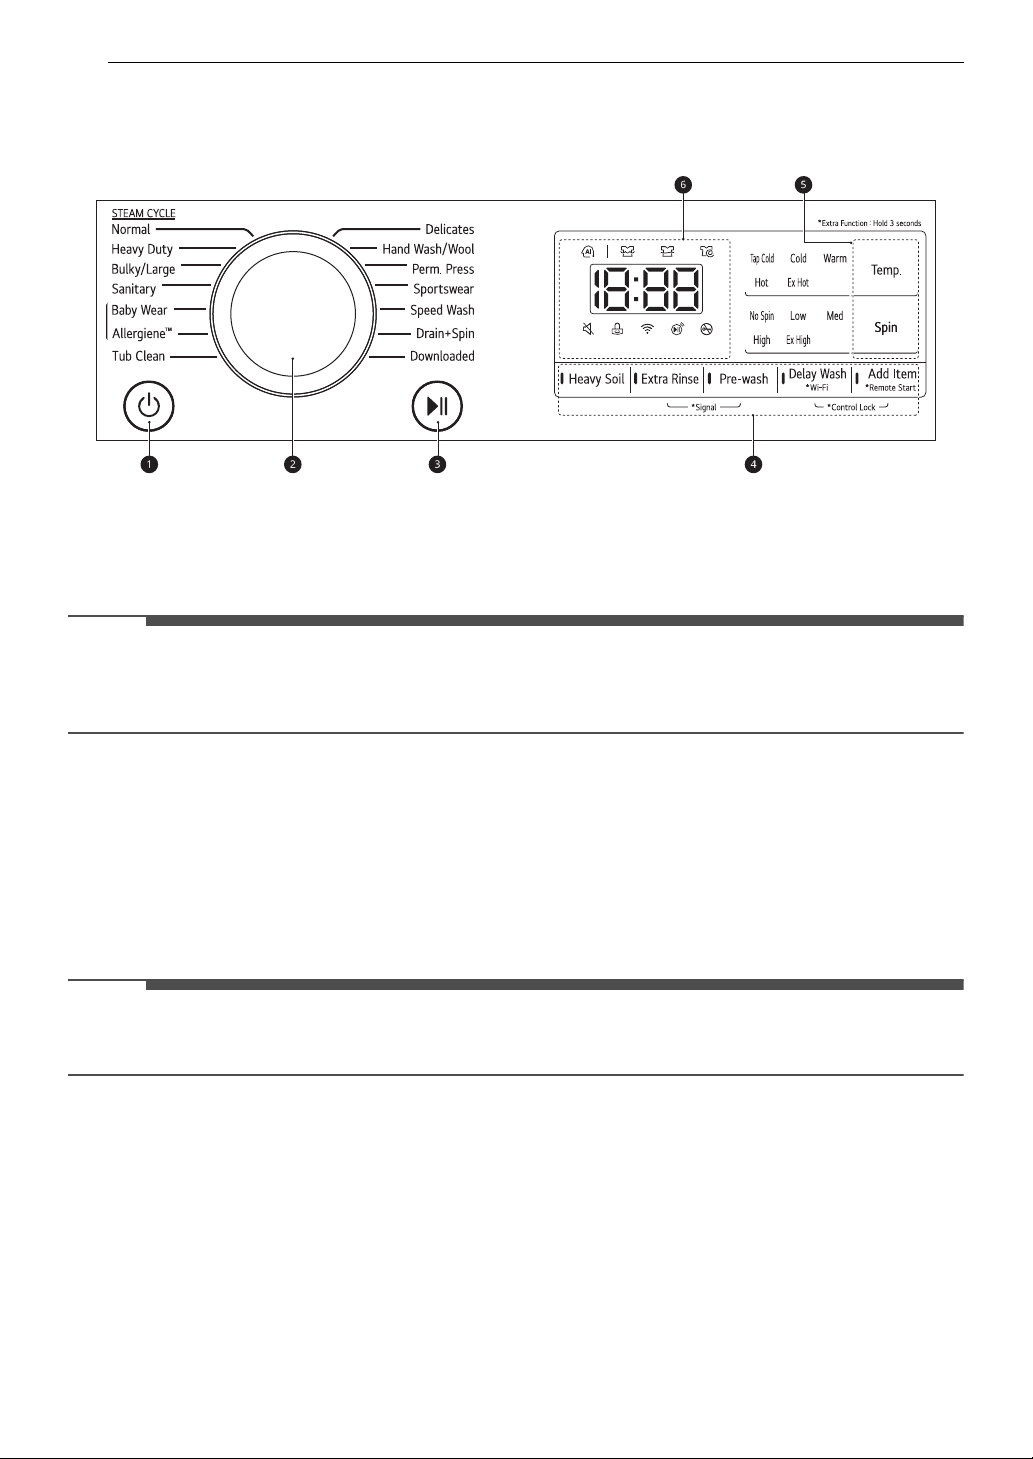
Control Panel Features
a Power On/Off Button
• Press this button to turn the washer on or off.
• Pressing this button during a cycle will cancel that cycle and any load settings will be lost.
• The door will unlock after a brief pause.
• If there is any water remaining in the drum after the washer shuts off, it will drain after a delay. The
washer can be restarted at any time before the drain begins. However, once the water begins to drain,
all functions will be suspended until the water has been completely drained and the washer shuts off.
b Cycle Selector Knob
• Turn this knob to select the desired cycle.
• Once the desired cycle has been selected, the standard presets will appear in the display. These
settings can be adjusted using the Cycle Modifier buttons at any time before starting the cycle.
c Start/Pause Button
• Press this button to start the selected cycle.
• If the washer is running, use this button to pause the cycle without losing the current settings.
• If the Start/Pause button is not pressed to start the selected cycle, after a delay the washer
automatically turns off and all cycle settings are lost. Any water remaining in the drum will be drained.
d Option and Extra Function Buttons
• These buttons allow you to select additional cycle options. Certain buttons also allow you to activate
special functions by pressing and holding the button for 3 seconds.
e Cycle Modifier Buttons
• Use these buttons to adjust the wash temperature, spin speed and soil level settings for the selected
cycle.
• The current settings are shown in the display.
• Press the button for that option to select other settings.
f Time and Status Display
Page 23

Time and Status Display
NOTE
a AI DD Indicator
• AI DD provides the appropriate drum rotation actions after load sensing is completed.
• This indicator lights up when the Normal cycle is selected and operated.
b Cycle Status Indicators
• These LEDs will blink when a cycle is selected to indicate which stages will run.
• When a cycle is running, the LED for the active stage will blink, and the LEDs for the remaining stages
will remain steady. Once a stage is complete, the LED will turn off. If a cycle is paused, the active stage
LED will stop blinking.
c Estimated Time Remaining
• When a cycle is selected, the default time for that cycle is displayed. This time will change as modifiers
or options are selected.
• If the display shows
size.
• The time shown is only an estimate. This time is based on normal operating conditions. Several
external factors (load size, room temperature, incoming water temperature, etc.) can affect the actual
time.
-I--, then the time will be displayed after the load sensing has detected the load
23OPERATION
ENGLISH
• Once the Start/Pause button is pressed, the washer will measure the size of the load. The estimated
time may change once the load size has been measured.
• If the Delay Wash function is set, the remaining delay time counts down until the cycle begins.
d Signal Indicator
• This indicator lights up when the signal is turned off.
e Control Lock Indicator
• This indicator lights up when the control panel is locked.
• CL and the remaining wash time are displayed, in turn, on the time remaining display.
• When this function is set, all controls are disabled except for the Power button.
f Wi-Fi Indicator
• This indicator is lit when the product is connected to a home Wi-Fi network.
g Remote Start Indicator
• This indicator lights up when the Remote Start feature is activated.
h Door Lock Indicator
• This indicator lights up when the cycle starts and the door is locked.
• The indicator light stays on until the cycle is paused, stopped or has finished.
Page 24

24 OPERATION
NOTE
Wash Cycles
The wash cycles are designed for specific types of wash loads. Select the cycle that best matches the load
contents for maximum wash performance and fabric care. See Sorting Laundry section for best results,
and follow the fabric care labels on your garments. For a guide to fabric care symbols, see Sorting
Laundry section.
Cycle Guide
Turn the knob or press the button to select the desired cycle. When you select a wash cycle, the light for
the corresponding wash cycle will turn on.
• Whenever load weights are mentioned, assume 1 lb (0.45 kg) = 1 thick bath towel (dry).
Cycle Normal
Description Use to wash all normal items such as cotton, linen, shirts, jeans or mixed loads, except
delicate fabrics such as wool or silk.
•Pressing the Start/Pause button without selecting a cycle will cause the Normal
cycle to begin immediately, using the default settings.
Wash Temp. Default: Warm Available: All
Spin Speed Default: High Available: All
Cycle Heavy Duty
Description Suitable for washing heavily soiled laundry, such as cotton fabrics, using more powerful
wash motions.
• When washing large loads, there will be brief periods of 2 minutes or more
without agitation. These soak periods are part of the cycle’s design, and are
normal.
Wash Temp. Default: Warm Available: Ex Hot, Hot, Warm
Spin Speed Default: High Available: All
Cycle Bulky/Large
Description Suitable for washing blankets or bulky items which have difficulty absorbing water, such
as pillows, blankets, comforters, sheets or pet bedding.
• Do not use this cycle to wash a mixed load of bedding and non-bedding items.
• Do not mix large/bulky items with smaller articles of clothing.
• Do not wash excessively large items. If large/bulky items do not fit easily into the
drum, there may not be enough room for them to move during washing.
Wash Temp. Default: Tap Cold Available: Hot, Warm, Cold, Tap Cold
Spin Speed Default: High Available: High, Med, Low, No Spin
Cycle Sanitary
Description This cycle reduces bacteria on laundry when used in conjunction with bleach, without high
energy consumption.
Wash Temp. Default: Ex Hot Available: Ex Hot
Page 25
NOTE
Cycle Sanitary
Spin Speed Default: High Available: High, Med, Low, No Spin
Cycle Baby Wear
Description This cycle helps wash food stains from baby clothes using a powerful rinse.
Wash Temp. Default: Ex Hot Available: Ex Hot
Spin Speed Default: High Available: High, Med, Low, No Spin
25OPERATION
ENGLISH
Cycle
Description This cycle is a powerful, high-temperature cycle designed specifically to reduce certain
allergens.
Allergiene
TM
• Selecting this cycle automatically incorporates steam into the wash cycle.
• This cycle can significantly reduce allergens in bedding and clothing.
• This cycle helps reduce dust mite populations and helps reduce allergens. Due to
the higher energy and temperatures used, this cycle is not recommended for wool,
silk, leather, or any other delicate or temperature sensitive items.
Wash Temp. Default: Ex Hot Available: Ex Hot
Spin Speed Default: Ex High Available: All
Cycle Tub Clean
Description This is a special cycle designed to clean the inside of the washer.
Cycle Delicates
Description Suitable for washing dress shirts/blouses, nylons, lingerie, or sheer and lacy clothes which
can easily be damaged.
Wash Temp. Default: Cold Available: Hot, Warm, Cold, Tap Cold
Spin Speed Default: Med Available: Med, Low, No Spin
Cycle Hand Wash/Wool
Description This cycle is for washing shrinkable woolen or hand-washable items requiring delicate
care. Only wash woolen items that are labeled machine washable or hand-washable.
• Laundry weight should be less than 8 pounds (3.6 kg) to prevent damage to the
fabric.
• Use only natural or wool-safe detergent and load 1/2 of the normal amount of
detergent.
• This cycle uses a gentle tumble rotation angle and low-speed spin for the ultimate
fabric care.
Wash Temp. Default: Warm Available: Hot, Warm, Cold, Tap Cold
Spin Speed Default: Med Available: Med, Low, No Spin
Page 26

26 OPERATION
Cycle Perm. Press
Description Use this cycle to minimize wrinkles when washing tablecloths or “wrinkle-free” clothes.
Wash Temp. Default: Hot Available: All
Spin Speed Default: High Available: All
Cycle Sportswear
Description Washes special garments like sports and outdoor wear.
• Use for water-repellent fabric laminate used on clothing.
Wash Temp. Default: Hot Available: Hot, Warm, Cold, Tap Cold
Spin Speed Default: Med Available: Med, Low, No Spin
Cycle Speed Wash
Description Quickly washes lightly soiled clothing and small loads. For high wash and rinse efficiency,
wash small loads of 2-3 lightly soiled garments.
• Use very little detergent in this cycle. To add an extra rinse, use the Extra Rinse
option.
Wash Temp. Default: Cold Available: Hot, Warm, Cold, Tap Cold
Spin Speed Default: Med Available: All
Cycle Drain+Spin
Description This cycle is for draining and spinning without the wash and rinse cycle, or for removing
the load from the washing machine in the middle of the cycle.
• You can change the spin speed by pressing the Spin button repeatedly until the
desired speed is selected.
Cycle Downloaded (Rinse+Spin)
Description You can use a smartphone to download a specialized cycle to this cycle position.
• The default cycle is Rinse+Spin. This cycle is also available for download.
• Refer to the LG ThinQ application to see the cycles available for download.
Spin Speed Default: Ex High Available: All
Page 27

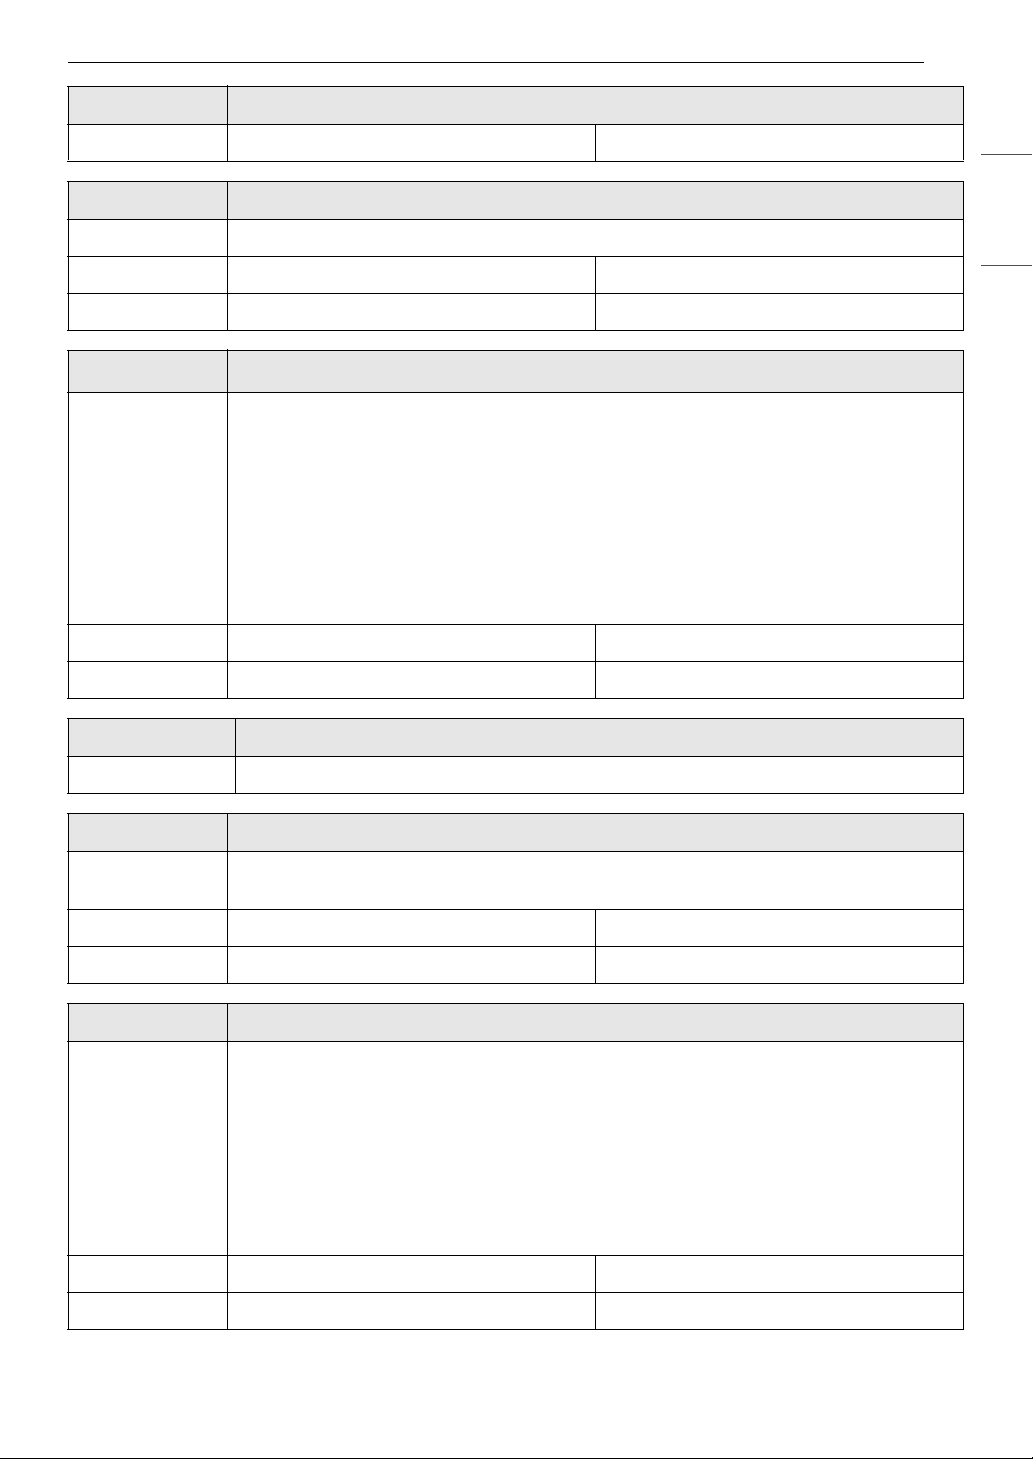
Available Options
NOTE
27OPERATION
•For the Drain + Spin cycle, only the Delay Wash and Add Item options can be selected.
•The Delay Wash and Add Item options are available for every cycle in this table.
Cycle Heavy Soil Extra Rinse Pre-wash
Normal
Heavy Duty
Bulky/Large
Sanitary
Baby Wear
Allergiene
Delicates
Hand Wash/Wool
Perm. Press
Sportswear
Speed Wash
TM
###
###
##
##
##
##
##
##
###
##
###
ENGLISH
Page 28

28 OPERATION
NOTE
NOTE
NOTE
Cycle Modifiers
About Modifier Buttons
Each cycle has default settings that are selected
automatically. You can also customize these
settings using the cycle modifier buttons.
• Repeatedly press the button for the desired
modifier until the indicator light for the desired
setting is lit.
• The washer automatically adjusts the water level
for the type and size of wash load for best results
and maximum efficiency.
• This is a high-efficiency washer, and the water
levels may be much lower than you expect. This
is normal, and cleaning/rinsing performance will
not be compromised.
• The setting lights up when it is selected.
• To protect your garments, not every wash
temperature, spin speed, soil level, or option is
available with every cycle.
• A chime will sound twice and the LED will not
light if the desired setting is not allowed for the
selected cycle.
• Follow the fabric care labels on the garment for
best results.
Temp.
Make sure the wash temperature is suitable for
the type of load you are washing.
• Press the Temp. button repeatedly to select the
wash and rinse temperature combination for the
selected cycle.
• All rinses use unheated cold water.
• Cold rinses use less energy. The actual cold rinse
temperature depends on the temperature of the
cold water at the faucet.
• Your washer features a heating element to boost
the hot water temperature for Ex Hot settings.
This provides improved wash performance at
normal water heater settings.
Spin
Higher spin speeds extract more water from
clothes, reducing drying time and saving energy.
•Press the Spin button repeatedly until the
desired speed is selected.
• Some fabrics, such as delicates, require a slower
spin speed.
Options and Extra Functions
Your washer includes several additional cycle
options to customize cycles to meet your individual
needs.
• Select the desired option after selecting the
desired cycle and settings.
• The LED for the option will light when the option
is selected.
• To protect your garments, not every option is
available with every cycle.
• A chime will sound twice and the LED will not
light if the selected option is not allowed for the
selected cycle.
Using the Pre-wash Option
This option adds a pre-wash (for about 15 - 17
minutes) for improved cleaning of heavily soiled
or stained clothing.
• If you select Pre-wash after putting the
detergent directly in the drum, the detergent
may be washed away, reducing the washing
performance.
Remote Start
Use a smartphone to control your washer
remotely.
• For more information, see SMART FUNCTIONS
in this manual.
Delay Wash
Once you have selected the cycle and other
settings, press the Delay Wash button to delay the
start of the wash cycle.
• Each press of this button increases the delay
time by 1 hour, for up to 19 hours.
Page 29

29OPERATION
NOTE
WARNING
NOTE
NOTE
• Once the desired delay time is set, press the
Start/Pause button to start the delay time.
• If the Start/Pause button is not pressed to begin
the delay time, the washer automatically turns
off after a certain time and all cycle settings are
lost.
Wi-Fi
When the washer is connected to a home Wi-Fi
network, the
• To connect the washer to the LG ThinQ
application, press and hold the Delay Wash
button for 3 seconds.
f icon on the control panel is lit.
Add Item
Use this function to add garments or remove
foreign objects like coins or keys after the cycle has
started.
1 Press the Add Item button while the wash
cycle is running.
• The cycle pauses and the door unlocks.
• To preserve wash performance, wash time may
be extended depending on when garments are
added to a cycle.
• Be careful when opening the door as wet
laundry may drip or fall out.
Extra Rinse
This option adds an extra rinse to the selected
cycle. Use this option to help ensure the removal
of detergent or bleach residue from fabrics.
•Press the Extra Rinse button to add additional
rinses to the cycle.
Heavy Soil
Select this option to wash heavily soiled laundry
with more power than the standard cycle.
•Press the Heavy Soil button to select the option.
Control Lock
Use this function to disable the controls. This
function can prevent children from changing
cycles or operating this washer.
ENGLISH
2 Open the door, add garments or remove
foreign objects, and close the door.
3 Press the Start/Pause button to resume the
cycle. The cycle continues automatically.
• Do not attempt to force the door to open when
locked. Doing so could result in damage to the
appliance, malfunction, or personal injury.
• If the water level and temperature are safe, the
door lock LED turns off and the door unlocks
once the wash movement has stopped.
• If the water level is too high, the door will not
unlock, and this function cannot be used.
• If the temperature in the drum is higher than
113 ℉ (45 ℃), a short warning chime sounds and
this function is not allowed for safety.
• This function is disabled during the Tub Clean
cycle.
• The function does not lock the door.
• Once this function is set, all buttons are locked
except the Power button.
• When the controls are locked,
remaining time are alternately shown on the
display during the wash cycle.
• Turning off the power will not reset this function.
You must deactivate this function before you can
access any other options and functions.
CL and the
Locking/Unlocking the Control Panel
1 Turn on the power.
2 Press and hold the Delay Wash and Add Item
buttons at the same time for 3 seconds to
activate/deactivate this function.
• When the function is deactivated, a chime will
sound and the remaining time for the current
cycle will reappear on the display.
Page 30

30 OPERATION
Signal
The washer plays a melody when the wash cycle is
finished. The buttons make a sound each time a
button is pressed. Use this button to turn the
melody and button tones on or off.
• To turn the function on/off, press and hold the
Extra Rinse and Pre-wash buttons at the same
time for 3 seconds.
Page 31

SMART FUNCTIONS
NOTE
NOTE
31SMART FUNCTIONS
Using LG ThinQ Application
The LG ThinQ application allows you to
communicate with the appliance using a
smartphone.
LG ThinQ Application Features
The app is compatible with products that contain
the wireless LAN module.
• Remote Start
- Control the appliance remotely from the LG
ThinQ application.
• Downloaded
- Download new and specialized cycles that are
not included in the standard cycles on the
appliance.
• Tub Clean Coach
- Find out how many cycles remain before it is
time to run the Tub Clean cycle.
• Energy Monitoring
- Keep track of the washer's power consumption
and how it is affected by your selected wash
cycles and options.
• Smart Diagnosis
- This function provides useful information for
diagnosing and solving issues with the
appliance based on the pattern of use.
• Push Alerts
- When the cycle is complete or the appliance
has problems, you will receive a push
message.
• Settings
- Set various options on the appliance and in the
application.
• If you change your wireless router, Internet
service provider, or password, delete the
connected appliance from the LG ThinQ
application and connect it again.
• This information is current at the time of
publication. The application is subject to change
for product improvement purposes without
notice to users.
TM
Before Using LG ThinQ Application
1 Check the distance between the appliance
and the wireless router (Wi-Fi network).
• If the appliance is too far from the router,
the signal strength becomes weak. It may
take a long time to connect or installation
may fail.
2 Turn off the Mobile data or Cellular Data on
your smartphone.
3 Connect your smartphone to the wireless
router.
• To verify the Wi-Fi connection, check that the f
icon on the control panel is lit.
• The appliance supports 2.4 GHz Wi-Fi networks
only. To check your network frequency, contact
your Internet service provider or refer to your
wireless router manual.
• LG ThinQ is not responsible for any network
connection problems or any faults, malfunctions,
or errors caused by network connection.
• If the appliance is having trouble connecting to
the Wi-Fi network, it may be too far from the
router. Purchase a Wi-Fi repeater (range
extender) to improve the Wi-Fi signal strength.
• The Wi-Fi connection may not connect or may be
interrupted because of the home network
environment.
• The network connection may not work properly
depending on the Internet service provider.
• The surrounding wireless environment can
make the wireless network service run slowly.
ENGLISH
Page 32

32 SMART FUNCTIONS
NOTE
NOTE
NOTE
• If the appliance cannot be registered due to
problems with the wireless signal transmission,
unplug the appliance and wait about a minute
before trying again.
• If the firewall on your wireless router is enabled,
disable the firewall or add an exception to it.
• The wireless network name (SSID) should be a
combination of English letters and numbers. (Do
not use special characters.)
• Smartphone user interface (UI) may vary
depending on the mobile operating system (OS)
and the manufacturer.
• If the security protocol of the router is set to
WEP, network setup may fail. Change the
security protocol (WPA2 is recommended) and
connect the product again.
Installing the LG ThinQ Application
Search for the LG ThinQ application from the
Google Play Store or Apple App Store on a
smartphone. Follow instructions to download and
install the application.
• Once this function is enabled, you can only start
a cycle from the LG ThinQ smartphone
application. If the cycle is not started, the
appliance will wait to start the cycle until it is
turned off remotely from the application or this
function is disabled.
• If the door has been opened, you cannot start a
cycle remotely.
Disabling Remote Start Manually
When the function is activated, press and hold the
Remote Start button for 3 seconds.
Download Cycle
You can download new and specialized cycles that
are not included in the standard cycles on the
appliance.
Appliances that have been successfully connected
can download a variety of specialty cycles specific
to the appliance.
Once cycle download is completed in the
appliance, the product keeps the downloaded
cycle until a new cycle is downloaded.
Using the Appliance Remotely
Remote Start
Use a smartphone to control your appliance
remotely. You can also monitor your cycle
operation so you know how much time is left in the
cycle.
Using Remote Start
1 Put the laundry in the drum and add
detergent to the detergent dispenser drawer.
• If desired, add bleach or fabric softener to
the appropriate areas of the dispenser.
2 Press the Power button.
3 Press and hold the Remote Start button for 3
seconds to enable the remote control
function.
4 Start a cycle from the LG ThinQ application on
your smartphone.
• Only one downloaded cycle can be stored on the
appliance at a time.
Wireless LAN Module Specifications
Frequency
Range
Output Power
(Max)
2412 - 2462 MHz
< 30 dBm
FCC Notice
The following notice covers the transmitter
module contained in this product.
This equipment has been tested and found to
comply with the limits for a Class B digital device,
pursuant to Part 15 of the FCC Rules. These limits
are designed to provide reasonable protection
against harmful interference in a residential
installation. This equipment generates, uses, and
can radiate radio frequency energy and, if not
installed and used in accordance with the
instructions, may cause harmful interference to
radio communications. However, there is no
Page 33

33SMART FUNCTIONS
NOTE
NOTE
guarantee that interference will not occur in a
particular installation. If this equipment does
cause harmful interference to radio or television
reception, which can be determined by turning the
equipment off and on, the user is encouraged to
try to correct the interference by one or more of
the following measures:
• Reorient or relocate the receiving antenna.
• Increase the separation between the equipment
and the receiver.
• Connect the equipment to an outlet on a circuit
different from that to which the receiver is
connected.
• Consult the dealer or an experienced radio/TV
technician for help.
This device complies with part 15 of the FCC Rules.
Operation is subject to the following two
conditions:
(1) This device may not cause harmful interference
and
(2) This device must accept any interference
received, including interference that may cause
undesired operation.
Any changes or modifications in construction of
this device which are not expressly approved by
the party responsible for compliance could void
the user’s authority to operate the equipment.
FCC RF Radiation Exposure Statement
This equipment complies with FCC radiation
exposure limits set forth for an uncontrolled
environment. This transmitter must not be colocated or operating in conjunction with any other
antenna or transmitter.
This equipment should be installed and operated
with a minimum distance of 20 cm (7.8 inches)
between the antenna and your body. Users must
follow the specific operating instructions for
satisfying RF exposure compliance.
IC Radiation Exposure Statement
This equipment complies with IC radiation
exposure limits set forth for an uncontrolled
environment.
This equipment should be installed and operated
with a minimum distance of 20 cm (7.8 inches)
between the antenna and your body.
• THE MANUFACTURER IS NOT RESPONSIBLE FOR
ANY RADIO OR TV INTERFERENCE CAUSED BY
UNAUTHORIZED MODIFICATIONS TO THIS
EQUIPMENT. SUCH MODIFICATIONS COULD
VOID THE USER’S AUTHORITY TO OPERATE THE
EQUIPMENT.
Open Source Software Notice Information
To obtain the source code under GPL, LGPL, MPL,
and other open source licenses, that is contained
in this product, please visit http://
opensource.lge.com. In addition to the source
code, all referred license terms, warranty
disclaimers and copyright notices are available for
download.
LG Electronics will also provide open source code
to you on CD-ROM for a charge covering the cost
of performing such distribution (such as the cost of
media, shipping, and handling) upon email
request to opensource@lge.com. This offer is
valid for a period of three years after our last
shipment of this product. This offer is valid to
anyone in receipt of this information.
Smart DiagnosisTM Function
This feature is only available on models with the c
or d logo.
Use this feature to help you diagnose and solve
problems with your appliance.
ENGLISH
Industry Canada Statement
This device contains licence-exempt transmitter(s)/
receiver(s) that comply with Innovation, Science
and Economic Development Canada’s licenceexempt RSS(s). Operation is subject to the
following two conditions:
(1) This device may not cause interference.
(2) This device must accept any interference,
including interference that may cause undesired
operation of the device.
• For reasons not attributable to LGE’s negligence,
the service may not operate due to external
factors such as, but not limited to, Wi-Fi
unavailability, Wi-Fi disconnection, local app
store policy, or app unavailability.
• The feature may be subject to change without
prior notice and may have a different form
depending on where you are located.
Page 34

34 SMART FUNCTIONS
NOTE
Max.
10 mm
Max.
10 mm
Using LG ThinQ to Diagnose Issues
If you experience a problem with your Wi-Fi
equipped appliance, it can transmit
troubleshooting data to a smartphone using the
LG ThinQ application.
• Launch the LG ThinQ application and select the
Smart Diagnosis
the instructions provided in the LG ThinQ
application.
TM
feature in the menu. Follow
Using Audible Diagnosis to Diagnose Issues
Follow the instructions below to use the audible
diagnosis method.
• Launch the LG ThinQ application and select the
Smart DiagnosisTM feature in the menu. Follow
the instructions for audible diagnosis provided
in the LG ThinQ application.
1 Press the Power button to turn on the
appliance.
• Do not press any other buttons.
2 Place the mouthpiece of your smartphone
close to the
c or d logo.
3 Press and hold the Temp. button for 3
seconds or until the audible tones start. Hold
the smartphone mouthpiece to the logo until
the data transfer is complete.
• Keep the smartphone in place until the data
transfer has finished. Time remaining for
data transfer is displayed.
4 After the data transfer is complete, the
diagnosis will be displayed in the application.
• For best results, do not move the smartphone
while the tones are being transmitted.
Page 35

MAINTENANCE
WARNING
WARNING
NOTE
35MAINTENANCE
• To reduce the risk of fire, electric shock, or injury
to persons, read this entire owner’s manual,
including the SAFETY INSTRUCTIONS, before
operating this appliance.
• Unplug the appliance before cleaning to avoid
the risk of electric shock. Failure to follow this
warning can cause serious injury, fire, electric
shock, or death.
• Do not use volatile substances (benzene, paint
thinner, alcohol, acetone, etc.), abrasive
cleaners, or detergents with strong chemical
components when cleaning the appliance. Doing
so may cause discoloration or damage to the
appliance, or may cause a fire.
• Certain internal parts are intentionally not
grounded and may present a risk of electric
shock only during servicing. Service personnel Do not contact the following parts while the
appliance is energized: pump, valve, motor,
control board.
Regular Cleaning
Care after Wash
After the cycle is finished, wipe the door and the
inside of the door seal to remove any moisture.
• Wipe the body of the washer with a dry cloth to
remove any moisture.
• Leave the door open to dry the drum interior.
• Wipe with a damp cloth.
• Do not touch the surface or the display with
sharp objects.
Periodic Maintenance
• Use a towel or soft cloth to wipe around the
washer door opening and door glass.
• Always remove items from the washer as soon
as the cycle is complete. Leaving damp items in
the washer can cause wrinkling, color transfer,
and odor.
Cleaning the Drum
Over time, residue may build up in the drum,
leading to mildew or a musty odor. Run the Tub
Clean cycle monthly to remove residue and
prevent odor.
• Make sure to run the Tub Clean cycle only when
the drum is empty. Never load laundry while
using this cycle. The laundry may be damaged or
contaminated with cleaning products.
• Run the cycle more often under heavy use
conditions or if odor is already present.
• If mildew or musty smell already exists, run this
cycle once a week for three consecutive weeks.
1 Remove any clothing from the drum.
2 Add cleaning agents.
ENGLISH
• Make sure children and pets do not climb into
the drum. Engage the Control Lock feature if
needed to prevent children from accidentally
starting a wash cycle.
Cleaning the Exterior
Proper care of your washer can extend its life.
Door:
Wash with a damp cloth on the outside and inside
and then dry with a soft cloth.
Exterior:
• Immediately wipe off any spills.
Cleaner Instructions
Drum cleaner Add to main detergent
Lime scale
remover
Liquid chlorine
bleach
Powdered cleaner Pull out liquid detergent cup
Cleaning tablets Place directly into the washer
• For other drum cleaning products, follow
the cleaner manufacturer’s instructions and
recommendations.
compartment of detergent
dispenser
Add to bleach compartment
of detergent dispenser.
before adding to main
detergent compartment
drum.
Page 36

36 MAINTENANCE
WARNING
NOTE
WARNING
• Do not exceed the maximum fill line when
adding bleach or powdered cleaners.
Powdered cleaners may remain in the drum
after cleaning.
3 Close the door and press the Power button.
4 Select the Tub Clean cycle and press the
Start/Pause button to begin the cycle.
5 After the cycle ends, open the door and allow
the drum interior to dry completely.
• Make sure children and pets do not climb into
the drum. Engage the Control Lock feature if
needed to prevent children from accidentally
starting a wash cycle.
• If you use a descaler or drum cleaner during the
Tub Clean cycle, use the Rinse+Spin option to
rinse the washer drum before running your next
wash cycle.
Leaving the Door Open
After you finish using the washer, leave the door
open overnight to allow air to circulate and dry the
drum. This helps prevent odors.
Cleaning the Dispenser Drawer
Leaving detergent in the detergent dispenser
drawer for an extended period of time or using the
washer for a long period of time may cause the
build-up of residue in the detergent dispenser
drawer. Remove and clean the detergent
dispenser drawer once or twice a month.
• Do not spray water inside the washer. Doing so
may cause fire or electric shock.
1 Turn off the washer, and unplug the power
cord.
2 Pull the drawer straight out until it stops.
3 Press down hard on the disengage button
and pull the drawer completely out.
Automatic Alert for Tub Clean
When the power is on and the tcL message blinks
on the display, it means the washer drum needs
cleaning. Use the Tub Clean cycle to clean the
washer drum. The frequency of the automatic
alert’s appearance depends on how often the
washer is used. However, the message will
generally appear every one to two months.
Removing Mineral Buildup
In areas with hard water, mineral scale can form
on internal components of the washer. Periodically
clean the mineral buildup on the internal
components to extend the lifespan of the washer.
Use of a water softener is recommended in areas
with hard water.
• Use a descaler to remove visible mineral buildup
on the washer drum.
• After descaling, always run the Tub Clean cycle
before washing clothing.
• Mineral scale and other spots may be removed
from the stainless steel drum using a soft cloth
soaked in stainless steel cleaner.
• Do not use steel wool or abrasive cleaners.
4 Remove the inserts from the drawer.
5 Clean the inserts and drawer with warm
water.
• Use a soft cloth or brush to clean and to
remove any residue.
Page 37

37MAINTENANCE
CAUTION
WARNING
CAUTION
• Do not use soap when cleaning the drawer
and inserts.
6 Wipe off any moisture with a dry towel or
cloth after cleaning.
7 To clean the drawer opening, use a small,
non-metal brush to clean the recess. Remove
all residue from the upper and lower parts of
the recess.
8 Replace the drawer.
Cleaning the Door Seal
Clean the door seal once a month to prevent
build-up of dirt.
• Cleaning the door seal with undiluted bleach
may cause malfunction of the door seal and
washer parts. You must add water to the bleach
before using it.
1 Wear rubber gloves and protective goggles.
Operating the washer with these filters removed
could cause a valve to open continuously,
resulting in flooding and/or property damage.
ENGLISH
• Do not use the washer without the inlet filters.
Doing so will cause leaks and malfunction.
• If you use the washer in an area with hard water,
the inlet filter may clog due to lime buildup and
require more frequent cleaning.
1 Turn off the washer, and unplug the power
cord.
2 Turn off hot and cold water faucets.
3 Unscrew the hot and cold water hoses from
the back of the washer.
4 Remove the filters from the water valves
carefully.
• Use pliers to pull out the filters from the
water valves.
2 Dilute 3/4 cup (177 mL) of liquid chlorine
bleach in 1 gallon (3.8 L) of water.
3 Wipe around the door seal.
• Soak a sponge or a soft cloth in this diluted
solution and wipe all around the door seal.
4 Wipe up any moisture with a dry towel or
cloth after cleaning.
5 Leave the door open to allow the door seal to
dry completely.
Cleaning the Water Inlet Filters
If the washer does not fill properly, an error
message will appear on the display. The inlet valve
filter screens could be clogged by hard water scale,
sediment in the water supply, or other debris.
• The inlet screens protect the delicate parts of the
inlet valve from being damaged by particles that
could enter the valves with the water supply.
5 Remove foreign objects and soak the filters in
white vinegar or a lime scale remover.
• If using a lime scale remover, follow the
manufacturer’s instructions. Be careful not
to damage the filters while cleaning them.
6 Rinse filters thoroughly and press them back
into place.
7 Flush then reattach the water hoses.
• Before reattaching the water inlet hoses,
flush them by running several gallons of
water through them into a bucket or drain,
preferably with the faucets wide open for
maximum flow.
Page 38

38 MAINTENANCE
NOTE
WARNING
•An IE error message may blink on the display
when the water pressure is low or an inlet filter
is clogged with dirt. Clean the inlet filter.
Cleaning the Drain Pump Filter
The washer fails to drain if the drain pump filter is
clogged. Periodically clean the drain filter to
prevent clogging with foreign objects.
• Opening the drain filter will result in water
overflowing if there is water in the drum. Use a
bucket if the drum is not completely drained
before you open the drain filter.
• Using the washer without the drain filter or with
an incorrectly assembled drain filter may cause
leaks or malfunction of the washer.
4 Remove the pump filter.
• Twist the pump filter counterclockwise to
remove.
5 Clean the pump filter and opening.
1 Turn off the washer, and unplug the power
cord.
2 Open the drain pump filter cover.
3 Drain any remaining water.
• Unclip the drain hose and remove the plug
from the drain hose to drain the remaining
water.
6 Reassemble the plug onto the drain hose and
reclip the drain hose.
7 Insert the drain pump filter and twist it
clockwise.
8 Close the drain pump filter cover.
Page 39

NOTE
•An OE message blinks on the display when the
NOTE
drain pump filter is clogged with dirt. Clean the
drain pump filter.
Care in Cold Climates
7 Press the Start/Pause button to start the
drain pump for 1 minute.
• This will expel some of the antifreeze,
leaving enough to protect the washer from
damage.
8 Turn off the washer and unplug the power
cord.
39MAINTENANCE
ENGLISH
Storing the Washer
If the washer will not be used for an extended
period of time and is in an area that could be
exposed to freezing temperatures, follow these
steps to protect the washer from damage.
• Make sure the drum is empty before following
these steps.
1 Turn off the washer, and unplug the power
cord.
2 Turn off the water faucets.
3 Disconnect the water inlet hoses. Drain any
water from the hoses.
9 Dry the drum interior with a soft cloth, and
close the door.
10 Store the washer in an upright position.
11 Remove the inserts from the dispenser. Drain
any water in the compartments and let them
dry.
12 To remove the antifreeze from the washer
after storage, run the Rinse+Spin cycle using
detergent.
• Do not add laundry to this cycle.
When the Water Inlet Hoses are Frozen
1 Turn off the washer, and unplug the power
cord.
2 Turn off the faucets connected to the water
inlet hoses.
4 Plug the power cord into a properly grounded
electrical outlet.
5 Add 1 gallon of nontoxic recreational vehicle
(RV) antifreeze to the empty drum and close
the door.
• Never use automotive antifreeze.
6 Turn on the washer and press the Spin
button.
3 Pour hot water on the frozen faucets to thaw
the water inlet hoses and remove the water
inlet hoses.
4 Immerse the water inlet hoses in hot water to
thaw them.
5 Reconnect the water inlet hoses to the water
inlets of the washer and to the faucets.
•See Connecting the Water Inlet Hoses for
details.
6 Turn on the faucets.
7 Press the Power button to turn on the
washer.
Page 40

40 MAINTENANCE
8 Press the Spin button to operate spin only
cycle for draining and spinning.
9 Press the Start/Pause button.
When the Drain Hose is Frozen
1 Pour hot water in the washer drum and close
the door.
2 Wait for 1 - 2 hours.
3 Press the Power button.
4 Press the Spin button to operate spin only
cycle for draining and spinning.
5 Press the Start/Pause button to make sure
the water drains.
Page 41

TROUBLESHOOTING
41TROUBLESHOOTING
Before Calling for Service
The washer is equipped with an automatic error-monitoring system to detect and diagnose problems at an
early stage. If the washer does not function properly or does not function at all, check the following before
you call for service.
FAQs
Q: Why does my washer make loud banging noises while it is filling with water?
A: This is actually a problem with the plumbing in your home. When the water valve in the washer shuts
off, it can cause pipes in your home to move, resulting in a loud banging noise. This effect, called
water hammer, can be reduced by installing an item called a water hammer arrestor. Add-on
arrestors can be purchased through your local hardware or home improvement store.
Q: Why is there so little water in my washer? How can it clean the clothes?
A: HE (High-Efficiency) washers are designed to properly wash your laundry while using a minimum
amount of water and energy. Because the water volume is low, the small amount of detergent used is
more concentrated in the water, resulting in excellent cleaning performance.
Q: When I press a button, why does my washer beep and then nothing happens?
A: The Control Lock feature is turned on. To turn it off, turn on the washer, then press and hold the
button that has Control Lock on or under it for 3 seconds.
Q: Where should I pour the powdered laundry products when doing my laundry?
A: If you are using powdered laundry detergent, load it in the main detergent dispenser after removing
the liquid detergent insert. Powdered laundry agents or powdered color safe bleach should be put
directly into the drum. These products can be put in the empty drum before loading or on top of the
laundry after loading the washer.
ENGLISH
Error Messages
Problem Possible Cause & Solution
IE
INLET ERROR
Water supply faucets are not fully open.
• Make sure that the water faucets are fully open.
Water inlet hoses are kinked, pinched, or crushed.
• Make sure that the hoses are not kinked, pinched or crushed behind or under the washer.
Be careful when moving the washer during cleaning or maintenance.
Water inlet filters are clogged.
• Clean the inlet filters. See MAINTENANCE.
Water supply pressure to faucet or house is too low.
• Check another faucet in the house to make sure that household water pressure is
adequate and flow is not restricted.
• Disconnect the water inlet hoses from the washer and run a few gallons of water through
the hoses to flush out any dirt.
• If flow is too low, contact a plumber to have the water supply lines repaired.
Water supply connected with leak-limiting hoses.
• The use of hoses designed to limit leaks is not recommended. Leak limiting hoses can trip
falsely and prevent the washer from filling.
Page 42

42 TROUBLESHOOTING
Problem Possible Cause & Solution
UE
UNBALANCE ERROR
dE, dE1, dEz, dE4
DOOR OPEN ERROR
OE
WATER OUTLET
ERROR
tE
TEMPERATURE
SENSOR ERROR
FE
OVERFLOW ERROR
PE
PRESSURE SENSOR
ERROR
LE
MOTOR LOCKED
ERROR
FF
FROZEN ERROR
CL
CONTROL LOCK
FUNCTION
tcL
TUB CLEAN ALARM
vs
VIBRATION SENSOR
ERROR
dHE
DRY ERROR
The load is too small.
• Add additional items to allow the washer to balance the load.
Heavy articles are mixed with lighter items.
• Always try to wash articles of somewhat similar weight to allow the washer to evenly
distribute the weight of the load for spinning.
The load is out of balance.
• Manually redistribute the load if articles have become tangled, preventing the automatic
rebalancing from working properly.
The door is not secured.
• Close and secure the door. If the message keeps appearing, unplug the power cord and
call for service.
Drain hose is kinked, pinched, or clogged.
• Make sure that the drain hose is free of clogs or kinks and is not pinched behind or under
the washer.
The end of the drain hose is more than 96 inches (2.4 m) above the bottom of the
washer.
• Move the end of the drain hose so that it is lower than 96 inches (2.4 m).
Control error.
• Unplug the washer and wait 60 minutes. Reconnect power and try again.
• If the error code is still displayed, call for service
Water level is too high due to a faulty water valve.
• Close the water faucets, unplug the washer, and call for service.
The water level sensor is not working correctly.
• Close the water faucets, unplug the washer, and call for service.
A motor error has occurred.
• Allow the washer to stand for 30 minutes and then restart the cycle.
• If the error code is still displayed, call for service.
Inlet hose, drain hose or drain pump is frozen.
•See Care in Cold Climates.
The Control Lock function is on to prevent anyone from changing cycles or operating
the washer.
• Turn off the Control Lock function in the control panel. See Control Lock under Options
and Extra Functions.
It is time to run the Tub Clean cycle.
• This is not an error code. It indicates that the Tub Clean cycle is running or needs to be run
to clean the washer drum.
Vibration sensor malfunctions.
• Call for service.
Dryer function not working (on washer/dryer combination models).
• Call for service.
Page 43

Noises
Problem Possible Cause & Solution
Clicking Door lock sounds when the door locks or unlocks.
• Normal operation
Spraying or hissing Water spraying or circulating during the cycle
• Normal operation
Humming or
Gurgling
Water sloshing A liquid in the balance ring around the pulsator helps the basket spin smoothly.
Water being added
after the washer has
already begun to
operate
Rattling and
clanking noise
Thumping sound Heavy wash loads may produce a thumping sound.
Vibrating noise Packaging materials were not removed.
Squeaking noise Packaging materials were not removed.
Banging noise when
the washer is filling
with water. (Water
hammer)
Drain pump is pumping water from the washer at times during a cycle.
• Normal operation
• Normal operation
The washer adapts to the load size and type to add more water to the cycle as needed.
• Normal operation
The wash load may be unbalanced. If the washer senses that the load is unbalanced, it
will stop and refill to redistribute the load.
• Normal operation
The washer may be diluting laundry additives to add to the wash load.
• Normal operation
Foreign objects, such as keys, coins, or safety pins may be in drum or pump.
• Stop the washer, check the drum and the drain filter for foreign objects.
• If noise continues after the washer is restarted, call for service.
• This is normal, but if the sound continues, the washer is probably out of balance. Stop and
redistribute wash load.
Wash load may be out of balance.
• Pause the cycle and redistribute the load after the door unlocks.
•See Unpacking and Removing Shipping Material in INSTALLATION.
Wash load may be unevenly distributed in the drum.
• Pause the cycle and redistribute the load after the door unlocks.
Not all leveling feet are resting firmly and evenly on the floor.
•See Leveling the Washer in INSTALLATION.
Floor is not rigid enough.
• Make sure that the floor is solid and does not flex. See Flooring in INSTALLATION.
•See Unpacking and Removing shipping Material in INSTALLATION.
Plumbing in the home moves or flexes when the water valves in the washer shut off.
• Water hammer is not caused by a defect in the washer. Install water hammer arrestors
(purchased separately at hardware or home improvement store) between the fill hose and
the washer for best results.
Household water supply pressure is very high.
• Adjust household water supply regulator to a lower pressure or contact a plumber.
43TROUBLESHOOTING
ENGLISH
Page 44

44 TROUBLESHOOTING
Operation
Problem Possible Cause & Solution
Water Leaking Hoses are not connected correctly.
• Check hoses and connectors for leaks, cracks, and splits.
• Check and tighten hose connections.
House drain pipes are clogged.
• The washer pumps out water very rapidly. Check for water backing up out of the drain pipe
during drain. If water is seen coming out of the drain, check for proper drain hose
installation and check for restrictions in the drain.
• Contact a plumber to repair drain pipe.
Drain hose has come out of the drain connector or is not inserted far enough.
• Tie drain hose to inlet hose or standpipe to prevent it from coming out during drain.
• For smaller drain pipes, insert the drain hose into the pipe as far as the drain hose flange.
For larger drain pipes, insert the drain hose into the pipe 1 - 2 inches past the flange.
Oversudsing of detergent
• Oversudsing may create leaks, and may be caused by the type and amount of detergent
used. HE (High-Efficiency) detergent is the only detergent recommended. The normal
amount of detergent to use is 1/4 to 1/2 of the maximum amount recommended by the
detergent manufacturer.
• Always reduce the amount of detergent if the load is small or lightly soiled, or if the water
is very soft.
• Never use more than the maximum amount recommended by the detergent
manufacturer.
Excessive sudsing Too much detergent or incorrect detergent
• HE detergents are formulated specifically for HE (High-Efficiency) washers and contain
suds reducing agents. Only use detergent with the HE (High-Efficiency) logo.
• For detergent quantities refer to Detergent Use in OPERATION. If sudsing or detergent
residue continues to be an issue, add an extra rinse.
Washer will not turn
on.
Wash cycle time is
longer than usual.
Power cord is not properly plugged in.
• Make sure that the plug is plugged securely into a grounded, 3-prong, 120-VAC, 60 Hz
outlet.
House fuse is blown, circuit breaker has tripped, or power outage has occurred.
• Reset circuit breaker or replace fuse. Do not increase fuse capacity. If the problem is a
circuit overload, have it corrected by a qualified election.
The washer automatically adjusts the wash time for the amount of laundry, water
pressure and other operating conditions.
• This is normal. The washer adjusts cycle time automatically to provide optimal results for
the selected cycle. The time remaining shown in the display is only an estimate. Actual time
may vary.
Page 45

NOTE
Problem Possible Cause & Solution
Incomplete or no
dispensing of
detergent
Washer will not
operate.
Detergent compartments clogged from incorrect filling.
• Make sure that detergent and additives are put into the correct dispenser compartments.
• For all detergent types, always make sure that the dispenser drawer is fully closed before
the start of the cycle.
Too much detergent used.
• Make sure that the suggested amount of detergent is used according to the
manufacturer’s recommendations. You may also dilute the detergent with water to the
maximum fill line on the compartment to avoid clogging. Use only HE (High-Efficiency)
detergent.
• Always use as little detergent as possible. HE (High-Efficiency) washers need very little
detergent to achieve optimum results. Using too much detergent will cause poor wash and
rinse performance and may contribute to odors in the washer.
Insufficient water supply
• Make sure that both hot and cold water faucets are turned on all the way.
Normal residue
• It is normal for a small amount of detergent to remain in the dispenser. If this residue
builds up, it can interfere with normal dispensing of detergents. Refer to the cleaning
instructions.
Control panel has powered off due to inactivity.
• This is normal. Press the Power button to turn on the washer.
Washer is unplugged.
• Make sure that the power cord is plugged securely into an electrical outlet.
Water supply is turned off.
• Turn both hot and cold faucets fully on.
Controls are not set properly.
• Make sure that the cycle was set correctly, close the door and press the Start/Pause
button to start the wash cycle.
Door is open.
• Close the door and make sure that nothing is caught under the door preventing it from
closing completely.
Circuit breaker/fuse is tripped/blown.
• Check house circuit breakers/fuses. Replace fuses or reset breaker. The washer should be
on a dedicated branch circuit.
Start/Pause button was not pressed after the cycle was set.
• Press the Power button then reselect the desired cycle and press the Start/Pause button.
If the Start/Pause button is not pressed within a certain time, the washer will be turned
off. (The time varies by model, from 4 to 60 minutes.).
Extremely low water pressure.
• Check another faucet in the house to make sure that household water pressure is
adequate.
Washer is too cold.
• If the washer has been exposed to temperatures below freezing for an extended period of
time, allow it to warm up before pressing the Power button. Otherwise, the display will not
come on.
45TROUBLESHOOTING
ENGLISH
Page 46

46 TROUBLESHOOTING
Problem Possible Cause & Solution
Washer is not filling
properly.
Water in the washer
does not drain or
drains slowly.
Filter is clogged.
• Make sure that inlet filters on the fill valves are not clogged. Refer to Cleaning the Water
Inlet Filters in MAINTENANCE.
Inlet hoses may be kinked.
• Check that inlet hoses are not kinked or clogged.
Energy efficiency
• This is a High-Efficiency (HE) washer. As a result, the water level settings for this washer
may be different than for conventional washer.
Insufficient water supply
• Make sure that both hot and cold water faucets are turned on all the way.
Washer door is open.
• Close the door and make sure that nothing is caught under the door preventing it from
closing completely.
Water level is too low.
• The water will not normally cover the clothes. The fill level is optimized for the wash
motion to achieve the best wash performance.
Drain hose is kinked, pinched, or clogged.
• Make sure that the drain hose is free of clogs or kinks and is not pinched behind or under
the washer.
The end of the drain hose is more than 96 inches (2.4 m) above the bottom of the
washer.
• Move the end of the drain hose so that it is lower than 96 inches (2.4 m).
Performance
Problem Possible Cause & Solution
Wrinkling Washer is not unloaded promptly.
• Always remove items from the washer as soon as the cycle is complete.
Washer is overloaded.
• The washer can be fully loaded, but the drum should not be tightly packed with items. The
door of the washer should close easily.
Hot and cold water inlet hoses are reversed.
• Hot water rinse can set wrinkles in garments. Check the Inlet hose connectors.
Staining Bleach or softener dispensed too soon.
• Dispenser compartment was overfilled or closed too quickly, causing the bleach or
softener to dispense immediately. Always measure bleach, and never use more than 1 cup.
Bleach or softener was added directly to the wash load in the drum.
• Always use the dispensers to ensure that laundry products are properly dispensed at the
right time in the cycle.
Washer was not unloaded promptly.
• Always remove items from the washer as soon as possible after the cycle is completed.
Clothes were not properly sorted.
• Always wash dark colors separately from light colors and whites to prevent discoloration.
• Never wash heavily soiled items with lightly soiled items.
Page 47

Problem Possible Cause & Solution
Poor stain removal Proper options are not selected.
• Heavier soils and tougher stains may require extra cleaning power. Select the Heavy Soil
feature to boost the cleaning power of the selected cycle.
Previously set stains.
• Articles that have previously been washed may have stains that have been set. These
stains may be difficult to remove and may require hand washing or pre-treating to aid in
stain removal.
Musty or mildewy
odor in the washer
Incorrect or too much detergent has been used.
• Use only HE (High-Efficiency) detergent in accordance with the manufacturer’s
instructions.
Inside of the drum was not cleaned properly.
• Run the Tub Clean cycle regularly.
Odor
Problem Possible Cause & Solution
Odor Some odor is caused by the rubber attached to the washing machine.
• This odor is normal for new rubber and will disappear after the machine has been run a
few times.
If the rubber door gasket and door seal area are not cleaned regularly, odors can occur
from mold or foreign substances.
• Be sure to clean the gasket and door seal regularly and check under the door seal for small
items when unloading the washer.
Odors can occur if foreign substances are left in the drainage pump filter.
• Be sure to clean the drainage pump filter regularly.
Odors can occur if the drainage hose is not properly installed, causing siphoning (water
flowing back inside the washing machine).
• When installing the drainage hose, be sure that it doesn’t become kinked or blocked.
Using the dry function, odors can occur from lint and other laundry matter sticking to
the heater. (Dryer model only)
• This is not a malfunction.
A particular odor can occur from drying wet clothes with hot air. (Dryer model only)
• The odor will disappear after a short while.
47TROUBLESHOOTING
ENGLISH
Page 48

48 TROUBLESHOOTING
Wi-Fi
Problem Possible Cause & Solution
Trouble connecting
appliance and
smartphone to Wi-Fi
network
The password for the Wi-Fi network was entered incorrectly.
• Delete your home Wi-Fi network and begin the connection process again.
Mobile data for your smartphone is turned on.
• Turn off the Mobile data on your smartphone before connecting the appliance.
The wireless network name (SSID) is set incorrectly.
• The wireless network name (SSID) should be a combination of English letters and
numbers. (Do not use special characters.)
The router frequency is not 2.4 GHz.
• Only a 2.4 GHz router frequency is supported. Set the wireless router to 2.4 GHz and
connect the appliance to the wireless router. To check the router frequency, check with
your Internet service provider or the router manufacturer.
The appliance and the router are too far apart.
• If the appliance is too far from the router, the signal may be weak and the connection may
not be configured correctly. Move the router closer to the appliance or purchase and
install a Wi-Fi repeater.
Page 49

LIMITED WARRANTY
49LIMITED WARRANTY
USA
TERMS AND CONDITIONS
ARBITRATION NOTICE: THIS LIMITED WARRANTY CONTAINS AN ARBITRATION PROVISION THAT
REQUIRES YOU AND LG ELECTRONICS (“LG”) TO RESOLVE DISPUTES BY BINDING ARBITRATION
INSTEAD OF IN COURT, UNLESS YOU CHOOSE TO OPT OUT. IN ARBITRATION, CLASS ACTIONS AND
JURY TRIALS ARE NOT PERMITTED. PLEASE SEE THE SECTION TITLED “PROCEDURE FOR RESOLVING
DISPUTES” BELOW.
Should your LG Washer (“Product”) fail due to a defect in materials or workmanship under normal and
proper use, during the warranty period set forth below, LG will, at its option, repair or replace the Product.
This limited warranty is valid only to the original retail purchaser of the Product (“You”) and applies only
when purchased lawfully and used within the United States including U.S. Territories.
WARRANTY PERIOD
Washer
Parts (internal/ functional parts
only) and Labor: One (1) year from
the date of original retail purchase
• Replacement Products and parts are warranted for the remaining portion of the original warranty period
or ninety (90) days, whichever is greater.
• Replacement Products and parts may be new, reconditioned, refurbished, or otherwise factory
remanufactured.
• Replaced Product or part(s) will be the property of LG.
• Proof of original retail purchase specifying the Product model and date of purchase is required to obtain
warranty service under this limited warranty. In the event of no proof of purchase, warranty start date
will be ninety (90) days from the manufacture date.
EXCEPT TO THE EXTENT PROHIBITED BY APPLICABLE LAW, ANY IMPLIED WARRANTY OF
MERCHANTABILITY OR FITNESS FOR A PARTICULAR PURPOSE ON THE PRODUCT IS LIMITED IN
DURATION TO THE DURATION OF THE ABOVE LIMITED WARRANTY. UNDER NO CIRCUMSTANCES
SHALL LG OR ITS U.S. DISTRIBUTORS/DEALERS BE LIABLE FOR ANY INDIRECT, INCIDENTAL,
CONSEQUENTIAL, SPECIAL, OR PUNITIVE DAMAGES, INCLUDING, WITHOUT LIMITATION, LOST
GOODWILL, LOST REVENUES OR PROFITS, WORK STOPPAGE, IMPAIRMENT OF OTHER GOODS, COST OF
REMOVAL AND REINSTALLATION OF THE PRODUCT, LOSS OF USE, OR ANY OTHER DAMAGES WHETHER
BASED IN CONTRACT, TORT, OR OTHERWISE. LG’S TOTAL LIABILITY, IF ANY, SHALL NOT EXCEED THE
PURCHASE PRICE PAID BY YOU FOR THE PRODUCT.
SOME STATES DO NOT ALLOW THE EXCLUSION OR LIMITATION OF INCIDENTAL OR CONSEQUENTIAL
DAMAGES OR LIMITATIONS ON HOW LONG AN IMPLIED WARRANTY LASTS, SO THE ABOVE
EXCLUSIONS OR LIMITATIONS MAY NOT APPLY TO YOU. THIS LIMITED WARRANTY GIVES YOU
SPECIFIC LEGAL RIGHTS AND YOU MAY ALSO HAVE OTHER RIGHTS THAT VARY FROM STATE TO STATE.
Direct Drive Motor (Stator or
Rotor)
Parts Only: Ten (10) years from the
date of original retail purchase
You are responsible for any
applicable labor cost.
Stainless Steel Drum
Parts Only: Three (3) years from
the date of original retail purchase
You are responsible for any
applicable labor cost.
ENGLISH
THIS LIMITED WARRANTY DOES NOT COVER:
• Service trips to i) deliver, pick up, or install, or; educate how to operate the Product;, ii) correct wiring;, or
iii) correct unauthorized repairs or installations of the Product.
• Damage or failure of the Product to perform during power failures and interrupted or inadequate
electrical service.
Page 50

50 LIMITED WARRANTY
• Damage or failure of the Product caused by leaky or broken water pipes, frozen water pipes, restricted
drain lines, inadequate or interrupted water supply, or inadequate supply of air.
• Damage or failure of the Product resulting from operating the Product in a corrosive atmosphere, in an
unsuitable environment, or otherwise contrary to the Product owner’s manual.
• Damage or failure of the Product caused by accidents, pests and vermin, lightning, wind, fire, floods,
pandemics, acts of nature, or any other causes beyond the control of LG.
• Damage or failure of the Product resulting from misuse, abuse, improper installation, repair, or
maintenance, or service not approved by LG. Improper repair includes use of parts not authorized or
specified by LG. Improper installation or maintenance includes installation or maintenance contrary to
the Product’s owner’s manual.
• Damage or failure of the Product caused by unauthorized modification or alteration, any other property
damage or failure resulting from any water leakage where the Product is not properly installed in
accordance with the Product’s owner’s manual.
• Damage or failure of the Product caused by incorrect electrical current, voltage, or plumbing codes.
• Damage or failure of the Product caused by use of parts, accessories, components, consumable cleaning
products, any other products, or service that are not authorized by LG.
• Replacement of light bulbs, filters, fuses, or any other consumable parts.
• Damage or failure of the Product caused by transportation, storage, and/or handling, including
scratches, dents, chips, and/or other damage to the finish of your Product, unless such damage is
reported within one (1) week of delivery.
• Damage or missing items to any display, open box, refurbished, or discounted Product.
• Refurbished Product or any Product sold “As Is”, “Where Is”, “With all Faults”, or similar disclaimer.
• Products with original serial numbers that have been removed, altered, or cannot be readily determined
at the discretion of LG.
• Increases in utility costs and additional utility expenses in any way associated with the Product.
• Any noises associated with normal operation.
• Products used for other than normal and proper household use, including, without limitation,
commercial or industrial use or, use in offices, and recreational facilities or vehicles, or as otherwise
outlined in the Product owner’s manual.
• Costs associated with removal and/or reinstallation of your Product.
• The removal and reinstallation of the Product if it is installed in an inaccessible location or is not installed
in accordance with the Product owner’s manual.
The cost of repair or replacement under the above excluded circumstances shall be borne by You.
TO OBTAIN WARRANTY SERVICE AND ADDITIONAL INFORMATION
Call 1-800-243-0000 and select the appropriate option from the menu.
Or visit our website at http://www.lg.com
Or by mail: LG Electronics, P.O. Box 240007, Huntsville, AL 35813 ATTN: Customer Service
PROCEDURE FOR RESOLVING DISPUTES:
ALL DISPUTES BETWEEN YOU AND LG ARISING OUT OF OR RELATING IN ANY WAY TO THIS LIMITED
WARRANTY OR THE PRODUCT SHALL BE RESOLVED EXCLUSIVELY THROUGH BINDING ARBITRATION, AND
NOT IN A COURT OF GENERAL JURISDICTION. BINDING ARBITRATION MEANS THAT YOU AND LG ARE EACH
WAIVING THE RIGHT TO A JURY TRIAL AND TO BRING OR PARTICIPATE IN A CLASS ACTION.
Definitions. For the purposes of this section, references to “LG” mean LG Electronics U.S.A., Inc., its
parents, subsidiaries and affiliates, and each of their officers, directors, employees, agents, beneficiaries,
predecessors in interest, successors, assigns and suppliers; references to “dispute” or “claim” shall include
any dispute, claim or controversy of any kind whatsoever (whether based in contract, tort, statute,
regulation, ordinance, fraud, misrepresentation or any other legal or equitable theory) arising out of or
relating in any way to the sale, condition or performance of the product or this Limited Warranty.
Page 51

51LIMITED WARRANTY
Notice of Dispute. In the event you intend to commence an arbitration proceeding, you must first notify
LG in writing at least 30 days in advance of initiating the arbitration by sending a letter to LG at LG
Electronics, USA, Inc. Attn: Legal Department-Arbitration 111 Sylvan Avenue, Englewood Cliffs, NJ 07632.
You and LG agree to engage in good faith discussions in an attempt to amicably resolve your claim. The
notice must provide your name, address, and telephone number; identify the product that is the subject of
the claim; and describe the nature of the claim and the relief being sought. If you and LG are unable to
resolve the dispute within 30 days, either party may proceed to file a claim for arbitration.
Agreement to Binding Arbitration and Class Action Waiver. Upon failure to resolve the dispute during
the 30 day period after sending written notice to LG, you and LG agree to resolve any claims between us
only by binding arbitration on an individual basis, unless you opt out as provided below. Any dispute
between you and LG shall not be combined or consolidated with a dispute involving any other person’s or
entity’s product or claim. More specifically, without limitation of the foregoing, any dispute between you
and LG shall not under any circumstances proceed as part of a class or representative action. Instead of
arbitration, either party may bring an individual action in small claims court, but that small claims court
action may not be brought on a class or representative basis.
Arbitration Rules and Procedures. To begin arbitration of a claim, either you or LG must make a written
demand for arbitration. The arbitration will be administered by the American Arbitration Association
(“AAA”) and will be conducted before a single arbitrator under the AAA’s Consumer Arbitration Rules that
are in effect at the time the arbitration is initiated (referred to as the “AAA Rules”) and under the
procedures set forth in this section. The AAA Rules are available online at www.adr.org/consumer. Send a
copy of your written demand for arbitration, as well as a copy of this provision, to the AAA in the manner
described in the AAA Rules. You must also send a copy of your written demand to LG at LG Electronics,
USA, Inc. Attn: Legal Department-Arbitration 111 Sylvan Avenue, Englewood Cliffs, NJ 07632. If there is a
conflict between the AAA Rules and the rules set forth in this section, the rules set forth in this section will
govern. This arbitration provision is governed by the Federal Arbitration Act. Judgment may be entered on
the arbitrator’s award in any court of competent jurisdiction. All issues are for the arbitrator to decide,
except that issues relating to the scope and enforceability of the arbitration provision and to the
arbitrability of the dispute are for the court to decide. The arbitrator is bound by the terms of this
provision.
Governing Law. The law of the state of your residence shall govern this Limited Warranty and any
disputes between us except to the extent that such law is preempted by or inconsistent with applicable
federal law.
Fees/Costs. You do not need to pay any fee to begin an arbitration. Upon receipt of your written demand
for arbitration, LG will promptly pay all arbitration filing fees to the AAA unless you seek more than $25,000
in damages, in which case the payment of these fees will be governed by the AAA Rules. Except as
otherwise provided for herein, LG will pay all AAA filing, administration and arbitrator fees for any
arbitration initiated in accordance with the AAA Rules and this arbitration provision. If you prevail in the
arbitration, LG will pay your attorneys’ fees and expenses as long as they are reasonable, by considering
factors including, but not limited to, the purchase amount and claim amount. Notwithstanding the
foregoing, if applicable law allows for an award of reasonable attorneys’ fees and expenses, an arbitrator
can award them to the same extent that a court would. If the arbitrator finds either the substance of your
claim or the relief sought in the demand is frivolous or brought for an improper purpose (as measured by
the standards set forth in Federal Rule of Civil Procedure 11(b)), then the payment of all arbitration fees will
be governed by the AAA Rules. In such a situation, you agree to reimburse LG for all monies previously
disbursed by it that are otherwise your obligation to pay under the AAA Rules. Except as otherwise
provided for, LG waives any rights it may have to seek attorneys’ fees and expenses from you if LG prevails
in the arbitration.
Hearings and Location. If your claim is for $25,000 or less, you may choose to have the arbitration
conducted solely on the basis of (1) documents submitted to the arbitrator, (2) through a telephonic
hearing, or (3) by an in-person hearing as established by the AAA Rules. If your claim exceeds $25,000, the
right to a hearing will be determined by the AAA Rules. Any in-person arbitration hearings will be held at a
location within the federal judicial district in which you reside unless we both agree to another location or
we agree to a telephonic arbitration.
Opt Out. You may opt out of this dispute resolution procedure. If you opt out, neither you nor LG can
require the other to participate in an arbitration proceeding. To opt out, you must send notice to LG no
later than 30 calendar days from the date of the first consumer purchaser’s purchase of the product by
either: (i) sending an e-mail to optout@lge.com, with the subject line: “Arbitration Opt Out” or (ii) calling 1-
ENGLISH
Page 52

52 LIMITED WARRANTY
800-980-2973. You must include in the opt out e-mail or provide by telephone: (a) your name and address;
(b) the date on which the product was purchased; (c) the product model name or model number; and (d)
the serial number (the serial number can be found (i) on the product; or (ii) online by accessing https://
www.lg.com/us/support/repair-service/schedule-repair-continued and clicking on “Find My Model & Serial
Number”).
You may only opt out of the dispute resolution procedure in the manner described above (that is, by e-mail
or telephone); no other form of notice will be effective to opt out of this dispute resolution procedure.
Opting out of this dispute resolution procedure will not affect the coverage of the Limited Warranty in any
way, and you will continue to enjoy the full benefits of the Limited Warranty. If you keep this product and
do not opt out, then you accept all terms and conditions of the arbitration provision described above.
CANADA
TERMS AND CONDITIONS
ARBITRATION NOTICE: THIS LIMITED WARRANTY CONTAINS AN ARBITRATION PROVISION THAT
REQUIRES YOU AND LG TO RESOLVE DISPUTES BY BINDING ARBITRATION INSTEAD OF IN COURT,
UNLESS THE LAWS OF YOUR PROVINCE OR TERRITORY DO NOT PERMIT THAT, OR, IN OTHER
JURISDICTIONS, IF YOU CHOOSE TO OPT OUT. IN ARBITRATION, CLASS ACTIONS AND JURY TRIALS
ARE NOT PERMITTED. PLEASE SEE THE SECTION TITLED “PROCEDURE FOR RESOLVING DISPUTES”
BELOW.
Should your LG Washer ("Product") fail due to a defect in materials or workmanship under normal and
proper use, during the warranty period set forth below, LG Electronics Canada, Inc. (“LGECI”) will, at its
option, repair or replace the Product upon receipt of proof of the original retail purchase. This limited
warranty is valid only to the original retail purchaser of the Product and applies only to a Product
distributed, purchased and used within Canada, as determined at the sole discretion of LGECI.
WARRANTY PERIOD (Note: If the original date of purchase cannot be verified, the warranty will
begin sixty (60) days from the date of manufacture)
Washer Stainless Steel Drum
One (1) year from the date of
original retail purchase
Parts and Labor (internal/
functional parts only)
• Replacement products and parts are warranted for the remaining portion of the original warranty period
or ninety (90) days, whichever is greater.
• Replacement products and parts may be new, reconditioned, refurbished, or otherwise factory
remanufactured, all at the sole discretion of LGECI.
• Proof of original retail purchase specifying the Product model and date of purchase is required to obtain
warranty service under this Limited Warranty.
LGECI’S SOLE LIABILITY IS LIMITED TO THE LIMITED WARRANTY SET OUT ABOVE. EXCEPT AS
EXPRESSLY PROVIDED ABOVE, LGECI MAKES NO, AND HEREBY DISCLAIMS, ALL OTHER WARRANTIES
AND CONDITIONS RESPECTING THE PRODUCT, WHETHER EXPRESS OR IMPLIED, INCLUDING BUT NOT
LIMITED TO, ANY IMPLIED WARRANTY OR CONDITION OF MERCHANTABILITY OR FITNESS FOR A
PARTICULAR PURPOSE, AND NO REPRESENTATIONS SHALL BE BINDING ON LGECI. LGECI DOES NOT
AUTHORIZE ANY PERSON TO CREATE OR ASSUME FOR IT ANY OTHER WARRANTY OBLIGATION OR
LIABILITY IN CONNECTION WITH THE PRODUCT. TO THE EXTENT THAT ANY WARRANTY OR
CONDITION IS IMPLIED BY LAW, IT IS LIMITED TO THE WARRANTY PERIOD SET OUT ABOVE. UNDER
NO CIRCUMSTANCES SHALL LGECI, THE MANUFACTURER OR DISTRIBUTOR OF THE PRODUCT, BE
LIABLE FOR ANY INCIDENTAL, CONSEQUENTIAL, SPECIAL, DIRECT, INDIRECT, PUNITIVE OR
EXEMPLARY DAMAGES, INCLUDING, WITHOUT LIMITATION, LOSS OF GOODWILL, LOST PROFITS, LOSS
OF ANTICIPATED PROFITS, LOST REVENUE, LOSS OF USE, OR ANY OTHER DAMAGE, WHETHER ARISING
Three (3) years from the date of
original retail purchase
Parts only (Consumer will be
charged for labor)
Direct Drive Motor (Motor or
Rotor)
Ten (10) years from the date of
original retail purchase
Part only (Consumer will be
charged for labor)
Page 53

53LIMITED WARRANTY
DIRECTLY OR INDIRECTLY FROM ANY CONTRACTUAL BREACH, FUNDAMENTAL BREACH, TORT OR
OTHERWISE, OR FROM ANY ACTS OR OMISSIONS. LGECI’S TOTAL LIABILITY, IF ANY, SHALL NOT
EXCEED THE PURCHASE PRICE PAID BY YOU FOR THE PRODUCT.
This Limited Warranty gives you specific legal rights. You may also have other rights that vary from
province to province depending on applicable provincial laws. Any term of this Limited Warranty that
negates or varies any implied condition or warranty under provincial law is severable where it conflicts
with such provincial law without affecting the remainder of this warranty’s terms.
THIS LIMITED WARRANTY DOES NOT COVER:
• Service trips to i) deliver, pick up, or install or; educate on how to operate the Product; ii) correct wiring;
or iii) correct unauthorized repairs or installations of the Product;
• Damage or failure of the Product to perform during power failures and interrupted or inadequate
electrical service;
• Damage or failure caused by leaky or broken water pipes, frozen water pipes, restricted drain lines,
inadequate or interrupted water supply or inadequate supply of air;
• Damage or failure resulting from operating the Product in a corrosive atmosphere or contrary to the
instructions outlined in the Product’s owner’s manual;
• Damage or failure to the Product caused by accidents, pests and vermin, lightning, wind, fire, floods, acts
of God, or any other causes beyond the control of LGECI or the manufacturer;
• Damage or failure resulting from misuse, abuse, improper installation, repair, or maintenance of the
Product. Improper repair includes use of parts not authorized or specified by LGECI. Improper
installation or maintenance includes installation or maintenance contrary to the Product’s owner’s
manual;
• Damage or failure caused by unauthorized modification or alteration of the Product, or if used for other
than the intended household purpose/use of the Product, or damage or failure resulting from any water
leakage due to improper installation of the Product;
• Damage or failure caused by incorrect electrical current, voltage or plumbing codes;
• Damage or failure caused by use that is other than normal household use, including, without limitation,
commercial or industrial use, including use in commercial offices or recreational facilities, or as
otherwise outlined in the Product’s owner’s manual;
• Damage or failure caused by the use of any accessories, components or cleaning products, including,
without limitation, that are not approved/authorized by LGECI;
• Damage or failure caused by transportation and handling, including scratches, dents, chips and/or other
damage to the finish of the Product, unless such damage results from defects in materials or
workmanship and is reported to LGECI within one (1) week of delivery of the Products;
• Damage or missing items to any display, open box, refurbished or discounted Product;
• Refurbished Product or any Product sold “As Is”, “Where Is”, “With all Faults”, or any similar disclaimer;
• Products with original serial numbers that have been removed, altered or cannot be readily determined
at the discretion of LGECI;
• Increases in utility costs and additional utility expenses in any way associated with the Product;
• Replacement of light bulbs, filters, fuses or any other consumable parts;
• Costs associated with removal and/or reinstallation of the Product for repairs;
• Noises associated with normal operation and failure to follow instructions found in the use and care and
installation guides or operating the unit in an unsuitable environment will not be covered under this
warranty.
• Coverage for "in Home" repairs, for products in-warranty, will be provided if the Product is within a 150
km radius from the nearest authorized service center (ASC), as determined by LG Canada. If your Product
is located outside a 150 km radius from a ASC, as determined by LG Canada, it will be your responsibility
to bring the Product, at your sole expense, to the ASC for in-warranty repair.
ENGLISH
Page 54

54 LIMITED WARRANTY
All costs and expenses associated with the above excluded circumstances, listed under the heading,
This Limited Warranty Does Not Cover, shall be borne by the consumer.
TO OBTAIN WARRANTY SERVICE AND ADDITIONAL INFORMATION, PLEASE CALL OR VISIT OUR WEBSITE:
Call 1-888-542-2623 and select the appropriate option from the menu, or visit our website at http://
www.lg.com
PROCEDURE FOR RESOLVING DISPUTES:
EXCEPT WHERE PROHIBITED AT LAW, ALL DISPUTES BETWEEN YOU AND LG ARISING OUT OF OR RELATING
IN ANY WAY TO THIS LIMITED WARRANTY OR THE PRODUCT SHALL BE RESOLVED EXCLUSIVELY THROUGH
BINDING ARBITRATION, AND NOT IN A COURT OF GENERAL JURISDICTION. EXCEPT WHERE PROHIBITED
AT LAW, YOU AND LG BOTH IRREVOCABLY AGREE TO WAIVE THE RIGHT TO A JURY TRIAL AND TO BRING
OR PARTICIPATE IN A CLASS ACTION.
Definitions. For the purposes of this section, references to “LG” mean LG Electronics Canada, Inc., its
parents, subsidiaries and affiliates, and each of their officers, directors, employees, agents, beneficiaries,
predecessors in interest, successors, assigns and suppliers; references to “dispute” or “claim” shall include
any dispute, claim or controversy of any kind whatsoever (whether based in contract, tort, statute,
regulation, ordinance, fraud, misrepresentation or any other legal or equitable theory) arising out of or
relating in any way to the sale, condition or performance of the product or this Limited Warranty.
Notice of Dispute. In the event you intend to commence an arbitration proceeding, you must first notify
LG in writing at least 30 days in advance of initiating the arbitration by sending a letter to LGECI Legal
Team at 20 Norelco Drive, North York, Ontario, Canada M9L 2X6 (the “Notice of Dispute”). You and LG
agree to engage in good faith discussions in an attempt to amicably resolve your claim. The notice must
provide your name, address, and telephone number; identify the product that is the subject of the claim;
and describe the nature of the claim and the relief being sought. If you and LG are unable to resolve the
dispute within 30 days of LG’s receipt of the Notice of Dispute, the dispute shall be resolved by binding
arbitration in accordance with the procedure set out herein. You and LG both agree that, during the
arbitration proceeding, the terms (including any amount) of any settlement offer made by either you or LG
will not be disclosed to the arbitrator until the arbitrator determines the dispute.
Agreement to Binding Arbitration and Class Action Waiver. Upon failure to resolve the dispute during
the 30 day period after LG’s receipt of the Notice of Dispute, you and LG agree to resolve any claims
between you and LG only by binding arbitration on an individual basis, unless you opt out as provided
below, or you reside in a jurisdiction that prevents full application of this clause in the circumstances of the
claims at issue (in which case if you are a consumer, this clause will only apply if you expressly agree to the
arbitration). To the extent permitted by applicable law, any dispute between you and LG shall not be
combined or consolidated with a dispute involving any other person’s or entity’s product or claim. More
specifically, without limitation of the foregoing, except to the extent such a prohibition is not permitted at
law, any dispute between you and LG shall not under any circumstances proceed as part of a class or
representative action. Instead of arbitration, either party may bring an individual action in small claims
court, but that small claims court action may not be brought on a class or representative basis except to
the extent this prohibition is not permitted at law in your province or territory of jurisdiction as it relates to
the claims at issue between you and LG.
Arbitration Rules and Procedures. To begin arbitration of a claim, either you or LG must make a written
demand for arbitration. The arbitration will be private and confidential, and conducted on a simplified and
expedited basis before a single arbitrator chosen by the parties under the provincial or territorial
commercial arbitration law and rules of the province or territory of your residence. You must also send a
copy of your written demand to LG at LG Electronics, Canada, Inc., Attn: Legal Department- Arbitration, 20
Norelco Drive, North York, Ontario M9L 2X6. This arbitration provision is governed by your applicable
provincial or territorial commercial arbitration legislation. Judgment may be entered on the arbitrator’s
award in any court of competent jurisdiction. All issues are for the arbitrator to decide, except that, issues
relating to the scope and enforceability of the arbitration provision and to the arbitrability of the dispute
are for the court to decide. The arbitrator is bound by the terms of this provision.
Governing Law. The law of the province or territory of your purchase shall govern this Limited Warranty
and any disputes between you and LG except to the extent that such law is preempted by or inconsistent
with applicable federal or provincial/territorial law. Should arbitration not be permitted for any claim,
action, dispute or controversy between you and LG, you and LG attorn to the exclusive jurisdiction of the
Page 55

55LIMITED WARRANTY
courts of the province or territory of your purchase for the resolution of the claim, action, dispute or
controversy between you and LG.
Fees/Costs. You do not need to pay any fee to begin an arbitration. Upon receipt of your written demand
for arbitration, LG will promptly pay all arbitration filing fees unless you seek more than $25,000 in
damages, in which case the payment of these fees will be governed by the applicable arbitration rules.
Except as otherwise provided for herein, LG will pay all filing, administration and arbitrator fees for any
arbitration initiated in accordance with the applicable arbitration rules and this arbitration provision. If you
prevail in the arbitration, LG will pay your attorneys’ fees and expenses as long as they are reasonable, by
considering factors including, but not limited to, the purchase amount and claim amount. Notwithstanding
the foregoing, if applicable law allows for an award of reasonable attorneys’ fees and expenses, an
arbitrator can award them to the same extent that a court would. If the arbitrator finds either the
substance of your claim or the relief sought in the demand is frivolous or brought for an improper purpose
(as measured by the applicable laws), then the payment of all arbitration fees will be governed by the
applicable arbitration rules. In such a situation, you agree to reimburse LG for all monies previously
disbursed by it that are otherwise your obligation to pay under the applicable arbitration rules. Except as
otherwise provided for, LG waives any rights it may have to seek attorneys’ fees and expenses from you if
LG prevails in the arbitration.
Hearings and Location. If your claim is for $25,000 or less, you may choose to have the arbitration
conducted solely (1) on the basis of documents submitted to the arbitrator, (2) through a telephonic
hearing, or (3) by an in-person hearing as established by the applicable arbitration rules. If your claim
exceeds $25,000, the right to a hearing will be determined by the applicable arbitration rules. Any inperson arbitration hearings will be held at the nearest, most mutually-convenient arbitration location
available within the province or territory in which you reside unless you and LG both agree to another
location or agree to a telephonic arbitration.
Severability and Waiver. If any portion of this Limited Warranty (including these arbitration procedures)
is unenforceable, the remaining provisions will continue in full force and effect to the maximum extent
permitted by applicable law. Should LG fail to enforce strict performance of any provision of this Limited
Warranty (including these arbitration procedures), it does not mean that LG intends to waive or has waived
any provision or part of this Limited Warranty.
Opt Out.You may opt out of this dispute resolution procedure. If you opt out, neither you nor LG can
require the other to participate in an arbitration proceeding. To opt out, you must send notice to LG no
later than 30 calendar days from the date of the first consumer purchaser’s purchase of the product by
either (i) sending an e-mail to optout@lge.com, with the subject line: “Arbitration Opt Out;” or (ii) calling 1800-980-2973. You must include in the opt out e-mail or provide by telephone: (a) your name and address;
(b) the date on which the product was purchased; (c) the product model name or model number; and (d)
the serial number (the serial number can be found (i) on the product; or (ii) online by accessing https://
www.lg.com/ca_en/support/repair-service/schedule- repair and clicking on “Find My Model & Serial
Number”).
In the event that you “Opt Out”, the law of the province or territory of your residence shall govern this
Limited Warranty and any disputes between you and LG except to the extent that such law is preempted
by or inconsistent with applicable federal or provincial/territorial law. Should arbitration not be permitted
for any claim, action, dispute or controversy between you and LG, you and LG agree to attorn to the
exclusive jurisdiction of the courts of the province or territory of your residence for the resolution of the
claim, action, dispute or controversy between you and LG.
You may only opt out of the dispute resolution procedure in the manner described above (that is, by e-mail
or telephone); no other form of notice will be effective to opt out of this dispute resolution procedure.
Opting out of this dispute resolution procedure will not affect the coverage of the Limited Warranty in any
way, and you will continue to enjoy the full benefits of the Limited Warranty. If you keep this product and
do not opt out, then you accept all terms and conditions of the arbitration provision described above.
Conflict of Terms. In the event of a conflict or inconsistency between the terms of this Limited Warranty
and the End User License Agreement (“EULA”) in regards to dispute resolution, the terms of this Limited
Warranty shall control and govern the rights and obligations of the parties and shall take precedence over
the EULA.
ENGLISH
Page 56

56 Memo
Page 57

57Memo
Page 58

58 Memo
Page 59

59Memo
Page 60

LG Customer Information Center
Register your product Online!
www.lg.com
For inquiries or comments,
visit www.lg.com or call:
1-800-243-0000
U.S.A .
1-888-542-2623
CANADA
Page 61

MANUEL D’UTILISATION
LAVEUSE
Veuillez lire attentivement le présent manuel de lʼutilisateur
avant de faire fonctionner lʼappareil et conservez-le à portée de
la main pour le consulter en tout temps.
FRANÇAIS
WM1455H*A
MFL71521482
Rev.00_122220
www.lg.com
Copyright © 2020 LG Electronics Inc. Tous droits réservés
Page 62

2
TABLE DES MATIÈRES
3 CONSIGNES DE SÉCURITÉ IMPOR-
TANTES
3 LISEZ TOUTES LES CONSIGNES AVANT LʼUTILI-
SATION
3 AVERTISSEMENTS
6 MISES EN GARDE
7 APERÇU DU PRODUIT
7 Caractéristiques du produit
9 INSTALLATION
9 Avant l’installation
10 Choix de l’emplacement adéquat
11 Déballage et retrait des matériaux d’expédi-
tion
12 Raccordement des tuyaux d’arrivée d’eau
13 Raccordement du tuyau de vidange
14 Mise au niveau de la laveuse
16 Vérification de l’installation finale
17 FONCTIONNEMENT
17 Avant l’utilisation
18 Tri des articles
19 Chargement de la laveuse
20 Ajout de produits de nettoyage
23 Panneau de commande
26 Cycles de lavage
31 Modificateurs de cycle
31 Autres options et fonctionnalités
34 FONCTIONS INTELLIGENTES
34 Utilisation de l’application LG ThinQ
36 Fonctionnalité Smart Diagnosis
MC
38 ENTRETIEN
38 Nettoyage régulier
38 Entretien périodique
42 Entretien dans les climats froids
44 DÉPANNAGE
44 Avant dʼappeler le réparateur
53 GARANTIE LIMITÉE
53 POUR CANADA
Page 63

CONSIGNES DE SÉCURITÉ IMPORTANTES
AVERTISSEMENT
3CONSIGNES DE SÉCURITÉ IMPORTANTES
LISEZ TOUTES LES CONSIGNES AVANT LʼUTILISATION
Messages de sécurité
Il est très important dʼassurer votre sécurité et celle des autres.
Nous fournissons de nombreux conseils de sécurité importants dans ce manuel et sur votre appareil. Lisez
toujours l’ensemble des messages de sécurité et respectez-les.
Ceci est le symbole dʼalerte de sécurité.
Ce symbole est destiné à vous alerter des dangers potentiels pouvant entraîner la mort ou des
blessures. Tous les messages de sécurité seront précédés du symbole dʼalerte de sécurité et du
terme AVERTISSEMENT ou MISE EN GARDE.
Voici le message que ces mots véhiculent :
AVERTISSEMENTS
Vous pouvez être tué ou gravement blessé si vous ne suivez pas les consignes.
MISES EN GARDE
Vous pouvez être légèrement blessé ou pouvez endommager le produit si vous ne suivez pas les
consignes.
Tous les messages de sécurité vous indiqueront quel est le danger potentiel, comment réduire les risques
de blessures et ce qui peut se produire en cas de non-respect des consignes.
FRANÇAIS
AVERTISSEMENTS
• Pour réduire les risques dʼexplosion, dʼincendie, de mort, de décharge électrique, de brûlure ou de
blessures lors de lʼutilisation de lʼappareil, prenez les précautions élémentaires, y compris les suivantes :
Installation
• Respectez toutes les procédures de sécurité recommandées de l’industrie, y compris le port de gants à
longs poignets et de lunettes de sécurité.
• N’essayez jamais d’utiliser cet appareil s’il est endommagé, défectueux ou partiellement désassemblé, s’il
manque des pièces ou si des pièces, y compris le câble et la fiche, sont endommagées.
• Avant d’être utilisé, l’appareil doit être installé conformément aux directives de ce manuel.
• Pour réduire le risque de blessure grave ou de décès, suivez toutes les consignes dʼinstallation.
• Consultez la section DIRECTIVES D’INSTALLATION pour voir la procédure détaillée de mise à la terre. Des
directives d’installation sont incluses avec l’appareil pour que l’installateur puisse les consulter. Si vous
déménagez l’appareil, faites-le inspecter et réinstaller par un technicien qualifié.
• Au moins deux personnes sont requises pour déplacer ou installer lʼappareil.
•Nʼinstallez pas lʼappareil dans un endroit humide.
• Entreposez et installez lʼappareil dans un endroit où il ne sera pas exposé à des températures sous le
point de congélation ni aux intempéries.
• Cet appareil nʼest pas conçu pour un usage nautique ou mobile, comme dans un véhicule récréatif, une
roulotte ou un avion.
Page 64

4 CONSIGNES DE SÉCURITÉ IMPORTANTES
• Gardez le matériel dʼemballage hors de portée des enfants. Le matériel dʼemballage pose un danger
pour les enfants. Il y a un risque de suffocation.
•Détruisez lʼemballage en carton, le sac en plastique et tout autre matériel dʼemballage après avoir
déballé lʼappareil. Les enfants pourraient jouer avec ces articles. Le carton, lorsque recouvert de tapis, de
draps ou de pellicule de plastique, peut se transformer en chambre étanche.
•Lʼappareil doit être installé et mis à la terre conformément au code du bâtiment local par le personnel
qualifié.
• Lorsque vous installez ou déplacez l’appareil, faites attention de ne pas pincer, écraser, ni endommager
le câble d’alimentation.
•Branchez lʼappareil dans un circuit électrique à protection, à valeurs nominales et de taille adéquates
pour éviter une surcharge électrique.
• Cet appareil doit être placé près dʼune prise électrique.
• Débranchez le cordon d’alimentation, le fusible de maison ou le disjoncteur avant l’installation ou un
entretien de l’appareil.
• Le cordon d’alimentation de cet appareil est équipé d’une fiche à trois broches (mise à la terre) qui va
dans une prise à trois trous (mise à la terre) standard, afin de minimiser la possibilité de décharge
électrique.
• Ne coupez ni n’enlevez jamais la broche de mise à la terre du câble d’alimentation.
• Utilisez des tuyaux neufs pour raccorder la laveuse à lʼalimentation en eau. Ne réutilisez pas des tuyaux
usagés.
Fonctionnement
• Lisez toutes les instructions avant dʼutiliser lʼappareil et conservez ces instructions.
•Nʼutilisez lʼappareil quʼaux fins pour lesquelles il est conçu.
• Si le produit a été immergé dans l’eau, s’il a reposé dans l’eau stagnante ou s’il s’est retrouvé gorgé d’eau,
ne lui touchez surtout pas et contactez immédiatement le Centre d’information à la clientèle de LG
Electronics pour obtenir des instructions avant de reprendre l’utilisation.
• Si vous entendez un son étrange, si vous détectez une odeur de produit chimique ou de brûlé, ou si vous
voyez de la fumée provenant de l’appareil, débranchez-le immédiatement et communiquez avec le
Centre d’information à la clientèle de LG Electronics.
• Dans certaines conditions, de lʼhydrogène peut se former dans un système dʼeau chaude qui n'a pas été
utilisé pendant deux semaines ou plus. LʼHYDROGÈNE EST UN GAZ EXPLOSIF. Si le système dʼeau chaude
nʼa pas servi pendant une telle durée, ouvrez tous les robinets dʼeau chaude et laissez lʼeau couler
pendant plusieurs minutes avant dʼutiliser lʼappareil. Cette procédure permettra dʼévacuer toute trace
dʼhydrogène accumulé. Comme lʼhydrogène est un gaz inflammable, ne fumez pas pendant ce temps, et
nʼutilisez pas de feu.
• Ne mettez pas vos mains dans l’appareil si la cuve, le tambour, l’agitateur ou toute autre partie bouge.
Avant de charger, de décharger ou d’ajouter des articles, appuyez sur le bouton Démarrer/pause et
attendez que la cuve ou le tambour s’arrête complètement avant de mettre vos mains à l’intérieur.
• Cet appareil nʼest pas destiné à être utilisé par des personnes (y compris des enfants) dont les capacités
physiques, mentales ou sensorielles sont réduites, ou qui nʼont pas lʼexpérience ou les connaissances
pour le faire, à moins dʼavoir reçu des instructions et dʼavoir été supervisées par une personne
responsable de leur sécurité.
• Ne laissez pas les enfants ou les animaux jouer dans, avec ou sur l’appareil. Vous devez superviser de
près les enfants ou les animaux lorsque vous utilisez l’appareil et qu’ils sont à proximité.
• Gardez les produits de lessive hors de la portée des enfants. Pour prévenir les blessures, respectez tous
les avertissements sur les étiquettes des produits.
• Réparez ou remplacez immédiatement tout câble d’alimentation effiloché ou endommagé. N’utilisez pas
un câble avec des fissures ou des dommages d’abrasion sur sa longueur ou sur une de ses extrémités.
• Ne débranchez jamais l’appareil en tirant sur le cordon d’alimentation. Prenez toujours la fiche
fermement et tirez-la de la prise de courant.
Page 65

• N’utilisez pas de rallonge électrique ni d’adaptateur avec cet appareil.
• Ne saisissez pas le cordon d’alimentation et ne touchez pas les boutons de l’appareil avec les mains
mouillées.
• Ne modifiez et ne prolongez pas le cordon d’alimentation.
• Si le cordon d’alimentation électrique est endommagé, il doit être remplacé par le fabricant uniquement
ou par son agent de service ou encore une personne qualifiée possédant ce type de compétences pour
éviter un risque.
• Ne placez pas d’articles huileux ou graisseux, de chandelles ou de matières inflammables au-dessus de
l’appareil.
• Veillez à maintenir la zone située en-dessous et autour de vos appareils électroménagers dégagée de
matières combustibles (peluche/charpie, papier, chiffons, etc.), dʼessence, de produits chimiques et
dʼautres vapeurs ou liquides inflammables.
•Nʼentreposez ou nʼutilisez pas dʼessence ou dʼautres vapeurs ou liquides inflammables à proximité de cet
appareil ou dʼautres appareils.
• Ne mélangez pas de javellisant chloré avec des agents acides comme le vinaigre. Suivez les directives de
l’emballage lorsque vous utilisez des produits de lessive. Une utilisation incorrecte pourrait produire des
gaz toxiques pouvant causer des blessures graves ou la mort.
• N’utilisez jamais de nettoyants forts, de nettoyants abrasifs, ni de solvants pour nettoyer la laveuse. Ils
peuvent endommager le fini.
• Ne lavez pas les articles préalablement nettoyés, lavés, imbibés ou tachés avec de l’essence, des solvants
de nettoyage à sec, de l’huile végétale, de l’huile de cuisson ou d’autres substances inflammables ou
explosives, car ces substances dégagent des vapeurs susceptibles de s’enflammer ou d’exploser.
• N’ajoutez pas d’essence, de solvants de nettoyage à sec ou autres substances inflammables ou
explosives dans l’eau de lavage. Ces substances dégagent des vapeurs qui peuvent s’enflammer ou
exploser.
• En cas de fuite de gaz (propane, gaz naturel, etc.), ne faites pas fonctionner cet appareil ni tout autre
appareil. Ouvrez immédiatement une fenêtre ou une porte pour aérer la zone.
• Ne modifiez pas les commandes.
• Fixez solidement le tuyau de vidange pour éviter les inondations.
• Ne forcez pas la porte et ne posez pas votre poids sur la porte de lʼappareil.
• Vérifiez toujours s'il y a des objets inhabituels à l'intérieur de l'appareil.
• Ne laissez pas d’eau, de javellisant ou d’autres liquides reposer dans le tambour pendant de longues
périodes. Cela pourrait entraîner la corrosion du tambour ou causer de la moisissure ou de mauvaises
odeurs.
• Ne faites pas sécher d’articles non lavés dans l’appareil.
5CONSIGNES DE SÉCURITÉ IMPORTANTES
FRANÇAIS
Entretien
• Ne réparez ou ne remplacez aucune pièce de l’appareil. Toutes les réparations et tous les entretiens
doivent être effectués par un technicien d’entretien qualifié, à moins qu’il y ait d’autres
recommandations précises dans ce manuel d’utilisation. N’utilisez que des pièces d’origine autorisées.
• Débranchez cet appareil de la prise électrique avant de le nettoyer et avant toute tentative dʼentretien.
Lʼutilisation du panneau de commande pour éteindre lʼappareil ne coupe pas lʼalimentation.
• Retirez toute poussière ou tout corps étranger des fiches du câble d’alimentation.
• Ne désassemblez pas et ne réparez pas lʼappareil vous-même.
• Avant de mettre la laveuse hors service ou au rebut, retirez-en la porte pour éviter que des enfants ou
des petits animaux y soient accidentellement enfermés.
• Assurez-vous que le tiroir ou le rabat du distributeur est fermé en tout temps quand on ne le remplit pas
de produits pour la lessive.
Page 66

6 CONSIGNES DE SÉCURITÉ IMPORTANTES
MISE EN GARDE
Instructions de mise à la terre
• La connexion incorrecte du conducteur pour relier les appareils à la terre peut créer un risque de
décharge électrique. Vérifiez avec un électricien compétent ou un personnel de service si vous n’êtes pas
certain que l’appareil est correctement mis à la terre. Ne modifiez pas la fiche fournie avec l’appareil; si
elle ne rentre pas dans la prise, faites installer une prise appropriée par un électricien compétent.
• L’appareil doit être mis à la terre. En cas d’un mauvais fonctionnement ou d’une panne, la mise à terre
réduira le risque de décharge électrique en fournissant le moins de résistance pour le courant
électrique. L’appareil est équipé d’un cordon avec un conducteur pour relier les appareils à la terre. La
fiche doit être branchée sur une prise appropriée, installée et reliée à la terre conformément aux codes
et règlements locaux.
MISES EN GARDE
• Pour réduire les risques de blessures mineures, de pannes ou de dommages causés à lʼappareil ou à la
propriété lors de lʼutilisation de lʼappareil, prenez les précautions élémentaires, y compris les suivantes :
Installation
• Installez le produit sur un plancher ferme et au niveau.
Fonctionnement
• Ne placez pas dʼobjets sur le dessus de lʼappareil.
• Fermez les robinets dʼeau et débranchez lʼappareil si vous quittez votre résidence pendant longtemps,
comme lorsque vous partez en voyage.
• Suivez TOUJOURS les directives d’entretien du fabricant des articles.
• Utilisez uniquement de l’assouplissant ou des produits antistatiques conformément aux
recommandations du fabricant.
• Ne combinez pas des produits de lessive dans une même brassée sauf si l’étiquette indique de le faire.
• Ne touchez pas à lʼeau de vidange, qui peut être brûlante.
• Si le tuyau de vidange et le tuyau d’alimentation en eau sont gelés, dégelez-les avant d’utiliser l’appareil.
• Ne rangez pas et ne renversez pas les détergents liquides, les nettoyants ou les javellisants (au chlore ou
à lʼoxygène) sur le dessus de lʼappareil. Cela pourrait entraîner de la corrosion, de la décoloration ou des
dommages à la surface de lʼappareil.
• Les vêtements ou les articles imperméables ou résistants à l’eau doivent être lavés à l’aide du cycle
Waterproof (Imperméable), Bedding (Literie), Bulky/Large (Gros articles/Large) ou Jumbo Wash
(Lavage grand format) seulement (p. ex. les vêtements résistants à l’eau, les housses de matelas, les
vêtements de plein air, les tapis en plastique, etc.). Le non-respect de cette consigne pourrait entraîner
des blessures ou des dommages à la laveuse, aux vêtements, aux murs, au plancher et aux objets à
proximité en raison de vibrations anormales.
Page 67

APERÇU DU PRODUIT
AVERTISSEMENT
7APERÇU DU PRODUIT
Caractéristiques du produit
Les illustrations contenues dans ce manuel peuvent être différentes des composants et accessoires réels,
et ceux-ci peuvent être modifiés sans préavis par le fabricant dans le but d’améliorer le produit.
• Pour votre sécurité et pour prolonger la durée de vie du produit, n’utilisez que des composants
autorisés. Le fabricant décline toute responsabilité en cas de dysfonctionnement du produit, de
dommages matériels ou de dommages corporels causés par l’utilisation de composants, de pièces ou de
produits non autorisés de marque autre que LG achetés séparément.
Vue de l’avant
Vue de l’arrière
FRANÇAIS
a Panneau de commande
b Tiroir du distributeur de détergent
c Tambour
d Porte
e Joint de la porte
f Couvercle du filtre de la pompe de vidange
g Pieds de nivellement
h Tuyau de vidange
i Filtre de la pompe de vidange
a Arrivées d’eau
b Boulons d’expédition
c Cordon d’alimentation
d Tuyau de vidange
Page 68

8 APERÇU DU PRODUIT
Accessoires
Accessoires inclus
a
Patins antidérapants
b Cache-trous
c Clé
d Sangle d’attache
e Attache coudée (pour fixer le tuyau de vidange)
Accessoires requis
Modèle WM1455H*A
Dimensions (largeur x
hauteur x profondeur)
Profondeur maximale
avec la porte ouverte
Poids net 70 kg (154,3 lb)
Vitesse d’essorage
maximale
60 cm X 85 cm X 56,5 cm
(24 po X 33 1/2 po X 22
110 cm (43 1/4 po)
1/4 po)
1 400 tr/min
Tuyaux d’eau chaude et d’eau froide
a
Accessoires optionnels
a
Piédestal
b Laveuse sur piédestal
c Trousse de superposition
Caractéristiques du produit
Modèle WM1455H*A
Alimentation
électrique
120 V~, 60 Hz
Pression d’eau
minimale et maximale
De 20 psi à 120 psi (de
138 kPa à 827 kPa)
Page 69

INSTALLATION
AVERTISSEMENT
abc
ef
9INSTALLATION
Avant l’installation
Aperçu de lʼinstallation
Veuillez d’abord lire ces instructions d’installation après avoir acheté cette laveuse ou après l’avoir
transportée à un autre endroit.
FRANÇAIS
a Choix de l’emplacement adéquat
b Déballage et retrait des matériaux d’expédition
c Raccordement des tuyaux d'arrivée d'eau
d Raccordement du tuyau de vidange
e Mise au niveau de la laveuse
f Vérification de l’installation finale
• Au moins deux personnes sont requises pour déplacer ou installer l’appareil. Le non-respect de cette
consigne peut entraîner des blessures.
• Entreposez et installez l’appareil dans un endroit où il ne sera pas exposé à des températures sous le
point de congélation ou aux intempéries. Le non-respect de cet avertissement peut causer une
défaillance du produit ou d’une pièce, des blessures graves, un incendie, une décharge électrique ou la
mort.
• Faites la mise à la terre de la laveuse conformément à tous les codes et ordonnances en vigueur. Le non-
respect de cet avertissement peut causer des blessures graves, un incendie, une décharge électrique ou
la mort.
• Pour assurer une circulation adéquate de l’air, ne bloquez pas la grande ouverture au bas de la laveuse
avec du tapis ou autre.
• Ne retirez pas la broche de mise à la terre du cordon d’alimentation. N’utilisez pas d’adaptateur ni de
rallonge. Branchez la fiche dans une prise pour 3 broches mise à la terre. Le non-respect de cet
avertissement peut causer des blessures graves, un incendie, une décharge électrique ou la mort.
Page 70

10 INSTALLATION
AVERTISSEMENT
• Certaines pièces internes qui ne sont pas mises à la terre intentionnellement posent un risque de
décharge électrique durant l’entretien seulement. Remarque à l’intention du personnel d’entretien –
Évitez tout contact avec les pièces suivantes lorsque l’appareil est sous tension : la pompe, la soupape, le
moteur et le panneau de commande.
Outils nécessaires
a Pinces
b Tournevis plat
c Niveau
Choix de l’emplacement adéquat
Avant d’installer la laveuse, vérifiez les exigences
suivantes concernant l’emplacement d’installation.
• Allouez suffisamment d’espace entre les murs et
la laveuse pour l’installation.
• Vérifiez que le plancher est propre, sec et
exempt de poussières, de saletés, d’eau ou
d’huile afin que les pieds de nivellement ne
glissent pas. Des pieds de nivellement qui
peuvent se déplacer et glisser sur le plancher
peuvent entraîner des vibrations et un bruit
excessifs.
• Si le plancher est trop flexible, renforcez-le pour
qu’il soit plus résistant. Si le plancher n’est pas
solide, cela pourrait produire de fortes
vibrations et beaucoup de bruit.
• Si un bac de vidange doit être utilisé, faites très
attention de bien suivre les directives fournies
avec ce dernier et assurez-vous que les pieds de
nivellement entrent fermement en contact avec
le bac. L’usage d'un bac de vidange et un
mauvais nivellement de la laveuse pourraient
accroître les vibrations et le bruit durant le
fonctionnement.
Prise électrique
• La prise électrique doit être à 1,5 m (60 po) ou
moins d’un des côtés de la laveuse.
• Positionnez la laveuse de façon à ce que la prise
électrique et la fiche soient facilement
accessibles.
• Ne surchargez pas la prise de courant avec plus
d’un appareil.
• La prise doit être mise à la terre conformément
aux règlements actuels concernant les
installations électriques.
• Utilisez un fusible à fusion lente ou un
disjoncteur.
• Le propriétaire de la laveuse a l’obligation et la
responsabilité de faire installer une prise
électrique adéquate par un électricien qualifié.
Plancher
• Pour minimiser le bruit et les vibrations, installez
la laveuse sur un plancher ferme, au niveau et
suffisamment résistant pour supporter son
poids sans flexion ni rebond.
• La laveuse doit être installée sur un plancher
ferme pour minimiser les vibrations durant le
cycle d’essorage. La surface idéale est un
plancher de béton, mais un plancher en bois
suffit, pourvu qu’il soit construit conformément
aux normes de la FHA.
• Le plancher sous la laveuse ne doit pas avoir une
inclinaison supérieure à 2,5 cm (1 pouce) de
l’avant à l’arrière ou d’un côté à l’autre.
• Il n’est pas recommandé d’installer l’appareil sur
du tapis ou des tuiles en matériau souple.
• N’installez jamais la laveuse sur une plateforme
ou une structure mal soutenue.
Installation sur le plancher
Afin d’assurer un dégagement suffisant pour les
tuyaux d’arrivée d’eau, le tuyau de vidange et pour
la circulation d’air, il doit y avoir au moins 2,5 cm
(1 pouce) d’espace libre de chaque côté de la
laveuse et 10 cm (4 pouces) d’espace libre derrière
celle-ci. Assurez-vous de tenir compte des murs,
des portes et des moulures de plancher qui
Page 71

11INSTALLATION
MISE EN GARDE
FE
E
G
D
C
B
A
pourraient augmenter les dégagements
nécessaires.
Dimensions et dégagements
A 53 cm (21 po)
B 110 cm (43 1/4 po)
C 56,5 cm (22 1/4 po)
D 10 cm (4 po)
E2,5 cm (1po)
F 60 cm (24 po)
G 0,5 cm (1/4 po)
Déballage et retrait des matériaux d’expédition
sur le côté. Ne couchez pas la laveuse sur sa
surface avant ou arrière.
FRANÇAIS
*
Retrait des matériaux d’expédition
1 Retirez les assemblages de boulons.
• Commencez par les deux boulons
d’expédition inférieurs c et utilisez la clé
incluse pour desserrer complètement les
quatre boulons d’expédition en les tournant
dans le sens inverse des aiguilles d’une
montre.
• Retirez les assemblages de boulons
(boulons et bagues d’arrêt) en les agitant
légèrement tout en les tirant.
Retirez tous les matériaux d’expédition de la
laveuse pour assurer un fonctionnement adéquat
et inspectez l’appareil pour vérifier s’il a été
endommagé pendant l’expédition.
• L’omission de retirer le matériel d’expédition
peut entraîner du bruit excessif et des
vibrations.
Retrait des matériaux d’expédition
* Certains modèles ne sont pas pourvus du
support du tambour.
Soulevez la laveuse de la base en styromousse.
• Après avoir retiré la boîte en carton et
l’emballage d’expédition, soulevez la laveuse de
la base en styromousse.
• Assurez-vous que le support en plastique du
tambour a* se détache de la base et ne reste
pas collé au fond de la laveuse.
• Si vous devez mettre la laveuse sur le côté pour
enlever la boîte de la base b, protégez toujours
le côté de la laveuse, et placez-la soigneusement
2 Installez les cache-trous.
• Localisez les cache-trous d inclus dans
l’ensemble d’accessoires ou fixés à l’arrière
de la laveuse. Installez les cache-trous dans
les trous laissés par les assemblages de
boulons.
Page 72

12 INSTALLATION
MISE EN GARDE
REMARQUE
AVERTISSEMENT
REMARQUE
• Une fois les assemblages de boulons retirés,
conservez-les pour une utilisation ultérieure.
Afin d’éviter d’endommager les composants
internes, ne transportez pas la laveuse sans
avoir réinstallé les boulons d’expédition. Si vous
ne retirez pas les boulons d’expédition et les
bagues d’arrêt, vous risquez de provoquer de
fortes vibrations et du bruit, ce qui peut
entraîner des dommages permanents à la
laveuse.
• Le cordon d’alimentation est fixé à l’arrière de la
laveuse à l’aide d’un boulon d’expédition pour
aider à prévenir l’utilisation de l’appareil alors
que les boulons d’expédition sont encore en
place.
Raccordement des tuyaux d’arrivée d’eau
Pour éviter les risques de dégâts d’eau coûteux,
achetez et installez de nouveaux tuyaux d'arrivée
d’eau au moment d’installer la laveuse.
• Ne serrez pas trop les tuyaux et ne faussez pas
les raccords filetés. Un serrage excessif ou le
faussement des raccords peut endommager les
soupapes ou les raccords, ce qui peut causer des
fuites et des dégâts matériels.
• Ne réutilisez pas de vieux tuyaux. Utilisez
uniquement des tuyaux neufs lorsque vous
installez la laveuse. Les tuyaux usagés
pourraient fuir ou éclater, causant des
inondations et des dommages matériels.
Communiquez avec le centre d’information à la
clientèle de LG pour obtenir de l’aide pour l’achat
de tuyaux.
• Vérifiez régulièrement les tuyaux pour détecter
des fissures, des fuites et des signes d’usure;
remplacez les tuyaux tous les cinq ans.
• Ne tendez pas intentionnellement les tuyaux
d’eau et assurez-vous qu’ils ne sont pas pincés,
écrasés ou pliés par d’autres objets.
• La pression d’entrée de l’eau doit se situer entre
20 psi et 120 psi (138 et 827 kPa). Si la pression
d’entrée de l’eau est supérieure à 120 psi, une
soupape de réduction de pression doit être
installée.
• L’eau chaude doit être réglée de manière à ce
qu’elle soit distribuée à une température située
entre 48 et 57 °C (120 et 135 °F) pour permettre
à la laveuse de bien contrôler les différentes
températures de lavage.
• N’installez pas ou n’entreposez pas la laveuse
dans un endroit exposé à des températures sous
le point de congélation. Cela pourrait
endommager les tuyaux d’arrivée d’eau et les
mécanismes internes de la laveuse. Si la laveuse
a été exposée à des températures sous le point
de congélation avant d’être installée, laissez-la
reposer à la température de la pièce pendant
plusieurs heures avant de l’utiliser, et vérifiez
qu’il n’y a pas de fuites avant de la faire
fonctionner.
• N’utilisez pas de tuyaux de prévention des
inondations dotés de dispositifs d’arrêt
automatique. Les dispositifs peuvent se
déclencher pendant le remplissage et empêcher
la laveuse de se remplir correctement.
Raccordement des tuyaux d’arrivée d’eau
1 Vérifiez les raccords et les joints d’étanchéité.
Inspectez le raccord fileté sur chaque tuyau et
vérifiez qu’une rondelle d’étanchéité en
caoutchouc
extrémités de chaque tuyau pour empêcher
les fuites.
a est en place aux deux
2 Raccordez les tuyaux d'arrivée d’eau.
• Raccordez les tuyaux d’arrivée d’eau aux
robinets d’eau chaude et froide en les
vissant d’abord fermement à la main, puis
en serrant encore de deux tiers de tour à
l’aide de pinces.
• Raccordez le tuyau bleu au robinet d’eau
froide et le tuyau rouge au robinet d’eau
chaude.
Page 73

13INSTALLATION
AVERTISSEMENT
REMARQUE
3 Purgez les tuyaux d'arrivée d’eau.
• Après avoir raccordé les tuyaux, ouvrez les
robinets pour purger toute substance
étrangère, comme de la saleté, du sable ou
du bran de scie.
• Recueillez l’eau dans un sceau et vérifiez sa
température afin de vous assurer d’avoir
connecté les tuyaux aux bons robinets.
4 Raccordez les tuyaux d'arrivée à l’arrière de la
laveuse.
• Raccordez le tuyau d’eau chaude à l'arrivée
d’eau chaude à l’arrière de la laveuse.
Raccordez le tuyau d’eau froide à l'arrivée
d’eau froide à l’arrière de la laveuse.
• Serrez fermement les connecteurs. Ouvrez
complètement les deux robinets et vérifiez
qu’il n’y a pas de fuite aux deux extrémités
des tuyaux.
• Le tuyau de vidange doit toujours être bien fixé.
Le non-respect de cette consigne peut causer
une inondation et des dommages matériels.
• Le drain doit être installé conformément aux
règlements applicables.
• Assurez-vous que le tuyau de vidange n’est pas
étiré, pincé, écrasé ou déformé.
• N’installez pas l’extrémité de sortie des tuyaux à
une hauteur inférieure à 75 cm (29,5 po) ou
supérieure à 244 cm (96 po) au-dessus du bas de
la laveuse, ou à plus de 152 cm (60 po) de la
laveuse.
• Ne créez jamais de joint étanche entre le tuyau
et le drain avec du ruban ou un autre dispositif.
Sans circulation d’air, l’eau pourrait être
siphonnée du tambour, ce qui réduirait le
rendement du lavage et du rinçage, et pourrait
endommager les vêtements.
Utilisation d’un tuyau vertical pour la vidange
1 Fixez l'extrémité du tuyau dans l’attache
coudée.
• Connectez l’attache coudée a à moins de
10 cm (4 po) de l'extrémité du tuyau de
vidange. Si le tuyau de vidange s’étend sur
une longueur de plus de 10 cm (4 po) de
l’attache coudée, de la moisissure ou des
microorganismes pourraient se propager à
l’intérieur de la laveuse.
FRANÇAIS
Raccordement du tuyau de vidange
Connectez le tuyau de vidange à un tuyau vertical
ou à une cuve de lessive.
4 "
(10 cm)
2 Insérez l’extrémité du tuyau de vidange dans
le tuyau vertical.
Page 74

14 INSTALLATION
MISE EN GARDE
29.5 - 96 "
(75 - 244 cm)
29.5 - 96 "
(75 - 244 cm)
4 "
(10 cm)
3 Utilisez la sangle d’attache fournie b pour
maintenir le tuyau de vidange en place.
2 Accrochez l’extrémité du tuyau de vidange sur
le côté de la cuve.
4 Si les soupapes d’eau et le drain se trouvent
dans le mur, fixez le tuyau de vidange à l’un
des tuyaux d’eau à l’aide de la sangle
d’attache fournie
l’intérieur).
c (face ondulée vers
Utilisation d’une cuve de lessive pour la vidange
1 Fixez l'extrémité du tuyau dans l’attache
coudée.
• Connectez l’attache coudée
10 cm (4 po) de l'extrémité du tuyau de
vidange. Si le tuyau de vidange s’étend sur
une longueur de plus de 10 cm (4 po) de
l’attache coudée, de la moisissure ou des
microorganismes pourraient se propager à
l’intérieur de la laveuse.
a à moins de
3 Utilisez la sangle d’attache fournie pour
maintenir le tuyau de vidange en place.
Mise au niveau de la laveuse
Le tambour de la laveuse tourne à une très grande
vitesse. Pour réduire les vibrations, les bruits et
tout déplacement accidentel de l’appareil, le
plancher doit être stable et au niveau.
• Le fait d’utiliser la laveuse sans la mettre d’abord
au niveau peut provoquer un
dysfonctionnement consécutif à une production
excessive de vibrations et de bruits.
• Ajustez les pieds de nivellement uniquement
pour les besoins de la mise au niveau de la
laveuse. Les allonger plus que nécessaire
pourrait provoquer des vibrations à la laveuse.
Page 75

REMARQUE
• Avant d’installer la laveuse, vérifiez que le
plancher est propre, sec et exempt de
poussières, de saletés, d’eau ou d’huile afin que
les pieds de la laveuse ne glissent pas. Si les
pieds peuvent se déplacer et glisser sur le
plancher, cela peut entraîner des vibrations et
un bruit excessifs.
Mise au niveau de la laveuse
4 Serrez les écrous. b
• Tournez les écrous dans le sens contraire
des aiguilles d’une montre et serrez-les
quand la laveuse est au niveau.
15INSTALLATION
FRANÇAIS
1 Placez la laveuse dans son emplacement
choisi.
• Faites bien attention de ne pas pincer,
coincer ou écraser les tuyaux d’arrivée d’eau
et de vidange. Si vous possédez un niveau
de menuisier
vérifier si la laveuse est au niveau. La pente
sous la laveuse ne doit pas dépasser 2,5 cm
(1 po), et les quatre pieds de nivellement
doivent reposer fermement sur le sol.
a, vous pouvez l’utiliser pour
2 Réglez les pieds de nivellement.
•Tournez les quatre pieds de nivellement
dans une direction pour soulever la laveuse
ou dans l’autre pour l’abaisser.
Utilisation de patins antidérapants
Si vous installez la laveuse sur une surface
glissante, elle peut bouger en raison de vibrations
excessives. Si la laveuse n’est pas au niveau, elle
pourrait mal fonctionner, et produire du bruit et
des vibrations. Si ceci ce produit, installez les
patins antidérapants sous les pieds de nivellement
et réglez le niveau.
1 Nettoyez le plancher et installez les patins
antidérapants.
• Utilisez un chiffon sec pour nettoyer et
enlever les objets étrangers ou l’humidité. Si
le plancher est humide, les patins
antidérapants pourraient glisser.
2 Mettez la laveuse au niveau après l’avoir
placée dans la zone d’installation.
3 Placez le côté adhésif c des patins
antidérapants sur le plancher.
• Les patins antidérapants sont plus efficaces
lorsqu’ils sont installés sous les pieds avant.
S’il est trop difficile d’installer les patins sous
les pieds avant, installez-les sous les pieds
arrière.
3 Vérifiez le niveau à nouveau.
• En appuyant sur les bords supérieurs,
tentez de faire basculer doucement la
laveuse pour vous assurer qu’elle est stable.
Si la laveuse bascule, réajustez les pieds de
nivellement.
a Ce côté vers le haut
b Retirez la bande protectrice
4 Vérifiez de nouveau le niveau de la laveuse.
• En appuyant sur les bords supérieurs,
tentez de faire basculer doucement la
laveuse pour vous assurer qu’elle est stable.
Si la laveuse bascule, remettez-la au niveau.
Page 76

16 INSTALLATION
AVERTISSEMENT
REMARQUE
Vérification de l’installation finale
Branchement électrique
Branchez la laveuse sur une prise de courant à
trois broches, mise à la terre, de 120 V, 60 Hz.
• N’utilisez pas le câble électrique si la gaine ou le
connecteur sont endommagés ou usés.
Remplacez-le ou réparez-le immédiatement. Le
non-respect de cette directive peut causer la
mort, un incendie, une décharge électrique ou
une défaillance.
• Ne modifiez pas le cordon ni la fiche électrique
fournis avec cet appareil. Assurez-vous de ne pas
les endommager en installant ou en déplaçant
l’appareil. Le non-respect de cette directive peut
causer la mort, un incendie, une décharge
électrique ou une défaillance.
• Assurez-vous que l’appareil est mis à la terre.
• Branchez cet appareil sur une prise électrique
mise à la terre et dotée d’une tension nominale
correspondant à la tension indiquée sur la
plaque signalétique avant de l’utiliser. Le nonrespect de cette directive peut causer un
incendie, une décharge électrique ou une
défaillance.
• Ne coupez ou n’endommagez jamais la broche
de mise à la terre du câble d’alimentation. Le
non-respect de cette directive peut causer la
mort, un incendie, une décharge électrique ou
une défaillance.
• Un raccordement incorrect du conducteur de
mise à la terre de l’appareil peut entraîner un
risque de décharge électrique. Consultez un
électricien ou un technicien d’entretien qualifié si
vous avez un doute à savoir si l’appareil est
correctement mis à la terre. Si l’appareil ne peut
pas être branché sur la prise de courant, faites
installer une prise adéquate par un électricien
qualifié.
• L’appareil doit être placé de façon à ce que la
prise électrique reste facile d’accès.
• N’utilisez pas d’adaptateur ni de rallonge. Le
non-respect de cette directive peut causer des
blessures graves, un incendie, une décharge
électrique ou la mort.
• Pour obtenir un rendement optimal, branchez
l’appareil sur une prise électrique qui lui est
réservée. Cela permet d’éviter de surcharger les
circuits de câblage de la maison; une telle
surcharge pourrait provoquer un incendie en
raison de la surchauffe des fils.
• Au besoin, installez une nouvelle fiche à
3 broches (mise à la terre) certifiée UL ayant une
tension nominale égale ou supérieure à celle du
circuit de la prise. N’utilisez pas une rallonge de
plus de 91,4 cm (3 pi) de long. Le non-respect de
ces avertissements peut causer des blessures
graves, un incendie, une décharge électrique ou
la mort.
Essai de la laveuse
Vérifiez si la laveuse est installée correctement et
menez un test de fonctionnement.
1 Chargez la laveuse avec six serviettes de bain
épaisses (environ six livres).
2 Appuyez sur le bouton Marche/arrêt.
3 Sélectionnez le cycle Downloaded (Cycle
téléchargé). Le cycle par défaut est
Rinse+Spin (Rinçage et essorage).
4 Appuyez sur le bouton Démarrer/pause pour
démarrer le cycle de lavage.
5 Assurez-vous que l’eau est acheminée, que la
laveuse ne bascule pas et ne vibre pas de
façon excessive, et que l’évacuation se fait
bien pendant le cycle d’essorage.
• S’il y a une fuite d’eau lorsque l’eau est
acheminée, reportez-vous à la partie
Raccordement des tuyaux d'arrivée d’eau afin
de les raccorder correctement.
• Si la laveuse bascule ou vibre de façon excessive,
consultez la section Mise au niveau de la
laveuse pour la remettre au niveau.
• Si l’évacuation d’eau ne se fait pas bien,
consultez la section Raccordement du tuyau de
vidange pour installer le tuyau correctement.
Page 77

FONCTIONNEMENT
AVERTISSEMENT
17FONCTIONNEMENT
Avant l’utilisation
• Pour réduire le risque d’incendie, de décharge électrique ou de blessures, lisez les DIRECTIVES DE
SÉCURITÉ avant d’utiliser cet appareil.
Aperçu du fonctionnement
1 Triez les articles et chargez la laveuse.
• Triez les articles par type de tissu, niveau de saleté, couleur et poids, au besoin. Ouvrez la porte et
insérez les articles dans la laveuse.
• Si vous utilisez des capsules de détergent à usage unique, ou du gel ou une tablette de détergent,
placez-les dans le tambour avant d’y placer les articles.
2 Ajoutez les produits de nettoyage.
• Ajoutez la quantité appropriée de détergent à haute efficacité (HE) dans le distributeur de
détergent.
• Si vous le désirez, ajoutez du javellisant ou de l’assouplissant dans les compartiments appropriés du
tiroir du distributeur.
• Ne mettez pas de capsule de détergent en poudre ou liquide, ou de gel ou de tablette de détergent,
dans le distributeur.
FRANÇAIS
3 Mettez la laveuse en marche.
• Appuyez sur le bouton Marche/arrêt pour allumer la laveuse.
4 Sélectionnez un cycle.
• Tournez le bouton de sélection des cycles ou appuyez sur les boutons de cycle à plusieurs reprises
jusqu’à ce que le cycle désiré soit sélectionné.
• La température de lavage préréglée, la vitesse d'essorage, le niveau de saleté et les réglages
d'options pour ce cycle s’affichent.
• Le cycle Normal doit être sélectionné pour pouvoir modifier ses réglages par défaut.
• Appuyer sur le bouton Démarrer/pause sans sélectionner un cycle lance immédiatement le cycle
Normal avec les réglages par défaut.
5 Ajustez les réglages.
• Les réglages par défaut du cycle sélectionné peuvent maintenant être modifiés, au besoin, à l’aide
des boutons d’options et de modification des cycles.
• Toutes les modifications et les options ne sont pas disponibles pour certains cycles. Un carillon
différent retentira et le voyant à DEL ne s’allumera pas si la sélection n’est pas permise.
6 Démarrez le cycle.
• Appuyez sur le bouton Démarrer/pause pour lancer le cycle. La porte se verrouille et la laveuse va
s’agiter brièvement sans eau pour mesurer le poids de la brassée.
• Si le bouton Démarrer/pause n’est pas enfoncé dans un certain délai, la laveuse s'arrête et les
réglages sont perdus.
Page 78

18 FONCTIONNEMENT
REMARQUE
MISE EN GARDE
7 Fin du cycle.
• Une mélodie annonce que le cycle est terminé. Retirez immédiatement les vêtements de la laveuse
pour réduire la formation de plis.
• Vérifiez les pourtours du joint de la porte quand vous enlevez la brassée et retirez les petits articles
qui y seraient restés coincés.
• La laveuse fait tourner la lessive de façon à ce que l’appareil consomme moins d’eau tout en imbibant
complètement vos articles. Il est normal de ne pas voir l’eau pendant le cycle de lavage.
• Si la température ou le niveau d’eau à l’intérieur de la machine sont trop élevés, la porte se verrouillera et
ne pourra pas être ouverte.
Tri des articles
• Les vêtements ou les articles imperméables ou résistants à l’eau doivent être lavés à l’aide du cycle
Waterproof, Bedding, Bulky/Large ou Jumbo Wash seulement (p. ex. les vêtements résistants à l’eau,
les housses de matelas, les vêtements de plein air, les tapis en plastique, etc.). Le non-respect de cette
consigne pourrait entraîner des blessures ou des dommages à la laveuse, aux vêtements, aux murs, au
plancher et aux objets à proximité en raison de vibrations anormales.
• Retirez le rembourrage des oreillers et des coussins avant de laver les housses. Le non-respect de cette
consigne peut provoquer des vibrations excessives, ce qui peut endommager la laveuse, les vêtements,
les objets à proximité, les murs et le plancher.
Regrouper les articles similaires
Pour obtenir des résultats de lavage optimaux et réduire le risque d’endommager un article, triez bien vos
articles pour faire des brassées d’articles semblables.
Mélanger des articles avec différents types de tissus et différents niveaux de saleté peut causer un
mauvais rendement de lavage, le transfert de couleurs, la décoloration, l’endommagement des tissus et le
peluchage. Les tissus devraient être triés en groupes comme cela est décrit ci-dessous.
Couleurs
Triez les articles par couleur. Lavez les vêtements foncés ensemble, dans une brassée séparée des
vêtements pâles ou des articles blancs. Mélanger des articles foncés avec des articles pâles peut causer un
transfert de couleurs ou la décoloration des vêtements pâles.
Niveau de saleté
Lavez les vêtements très sales ensemble. Mélanger des vêtements peu sales avec des vêtements très sales
peut causer de mauvais résultats de lavage pour les vêtements peu sales.
Types de tissus
Les articles délicats ne devraient pas être mêlés avec des types de tissus lourds ou robustes. Laver des
tissus lourds avec des articles délicats peut causer de mauvais résultats de lavage pour les tissus lourds et
peut endommager les articles délicats.
Peluchage
Certains tissus attirent les peluches, alors que d’autres produisent des peluches durant le processus de
lavage. Évitez de mélanger les tissus qui attirent les peluches avec ceux qui en produisent dans une même
brassée. Mélanger ces tissus entraînera du boulochage et l'accumulation de peluches sur les collecteurs de
peluches. (Par exemple, un chandail tricoté attire la peluche; les serviettes éponges en produisent.)
Page 79

Comment trier les vêtements
MISE EN GARDE
Par couleur Par saleté Par tissu Par peluchage
Blancs Très sales Délicats Producteurs de peluches
Pâles Normal Sans repassage Collecteurs de peluches
Foncés Peu sales Robustes
Étiquettes d’entretien des tissus
Beaucoup de vêtements comportent une étiquette d’entretien des tissus. Consultez le tableau ci-dessous
pour choisir le cycle et les options en fonction des recommandations du fabricant de vos vêtements.
Catégorie Étiquette Directives
Lavage à la main
Lavage à la machine, cycle normal
Réglage pour tissus infroissables/résistants au froissement (doté
d’une étape de refroidissement ou de vaporisation froide avant
l’essorage lent)
Lavage
Réglage pour tissus doux/délicats (agitation lente ou temps de
lavage réduit)
19FONCTIONNEMENT
FRANÇAIS
Ne pas laver
Ne pas tordre
Chaude
Température de l’eau
Symboles pour javellisant
Tiède
Froide
Tout javellisant (au besoin)
Seulement un javellisant non chloré (au besoin)
Ne pas utiliser de javellisant
Chargement de la laveuse
• Les vêtements ou les articles imperméables ou
résistants à l’eau doivent être lavés à l’aide du
cycle Waterproof, Bedding, Bulky/Large ou
Jumbo Wash seulement (p. ex. les vêtements
résistants à l’eau, les housses de matelas, les
vêtements de plein air, les tapis en plastique,
etc.). Le non-respect de cette consigne pourrait
entraîner des blessures ou des dommages à la
laveuse, aux vêtements, aux murs, au plancher
et aux objets à proximité en raison de vibrations
anormales.
Conseils généraux
• Vérifiez et videz les poches. Les trombones, les
pièces de monnaie, les allumettes et autres
articles peuvent endommager les vêtements et
la laveuse.
• Fermez les fermetures à glissière et les agrafes,
et attachez les cordons pour les empêcher de
s’accrocher ou de s’emmêler aux autres
vêtements.
• Prétraitez les taches tenaces pour obtenir de
meilleurs résultats.
• Brossez les vêtements pour enlever l’excès de
saleté, de poussière et de cheveux avant de les
laver. La saleté ou le sable en excès risquent
Page 80

20 FONCTIONNEMENT
1
3
2
4
d’user les autres tissus et de causer un lavage de
mauvaise qualité.
• Pour de meilleurs résultats, chargez les
vêtements dans l’appareil comme illustré.
Ajout de produits de nettoyage
À propos de l’utilisation du détergent
Cette laveuse est conçue pour être utilisée
uniquement avec des détergents à haute efficacité
(HE).
- N'appuyez pas sur les articles lorsque vous les
déposez dans le tambour.
- Chargez les vêtements grossièrement et ne
surchargez pas le tambour. Les vêtements
nécessitent de l’espace pour circuler pour
assurer leur propreté.
• Combinez les grands et petits articles dans le
tambour. Mettez les grands articles en premier.
Les grands articles ne doivent pas représenter
plus de la moitié de la brassée totale.
• La laveuse peut être complètement remplie,
mais les articles ne doivent pas être compressés
dans le tambour. La porte de la laveuse doit
pouvoir être fermée facilement.
• La laveuse ne peut se remplir d’eau ni
fonctionner si la porte est ouverte.
Articles volumineux
• Lavez les articles épais et lourds
individuellement. Les couvertures épaisses, les
duvets, les couvre-lits ou les lits des animaux
risquent de s’emmêler ou de déséquilibrer la
brassée si on les combine avec d’autres articles.
Petits articles
• Ne lavez pas un petit article seul. Ajoutez
quelques articles semblables à la brassée pour
éviter que la brassée soit déséquilibrée.
• Lavez les petits articles légers dans un sac-filet.
Les petits articles peuvent se coincer dans la
roue de pompe se trouvant au fond du tambour,
et les crochets de soutien-gorge peuvent
s’accrocher à d’autres vêtements ou au tambour.
• Les détergents HE produisent moins de mousse,
se dissolvent plus efficacement pour améliorer
le rendement de lavage et de rinçage, et aident à
garder l’intérieur de la laveuse propre.
L’utilisation d’un détergent qui n’est pas HE peut
causer un excès de mousse et un rendement
insatisfaisant pouvant provoquer des codes
d’erreur, entraîner l’échec d’un cycle et
endommager la laveuse.
• Les détergents identifiés comme étant
compatibles avec la haute efficacité ne
donneront peut-être pas des résultats optimaux.
• Pour obtenir un rendement de lavage
satisfaisant, mesurez toujours le détergent avec
l’outil de mesure fourni par le fabricant du
détergent. Pour une brassée moyenne, utilisez
moins de la moitié de la quantité maximale
recommandée. Utilisez moins de détergent avec
de l’eau douce, des vêtements peu sales ou des
petites brassées.
• Faites très attention lors de la mesure des
détergents concentrés 2X et 3X, puisque même
une petite quantité supplémentaire peut
entraîner des problèmes.
• N’utilisez jamais plus que la quantité maximale
de détergent recommandée par le fabricant.
L’utilisation d’une trop grande quantité de
détergent peut entraîner une production
excessive de mousse, un mauvais rinçage, une
accumulation de détergent dans les vêtements
et une accumulation de résidus qui peuvent
contribuer aux odeurs dans l’appareil.
• N’utilisez pas plus d’une capsule de détergent
dans la laveuse. L’utilisation d’une trop grande
quantité de détergent peut causer la formation
d’une quantité excessive de mousse ainsi qu’un
rendement insatisfaisant. Diminuez la quantité
de détergent ou ajoutez un rinçage
supplémentaire si des résidus de détergent se
retrouvent sur les tissus. Pour ajouter un rinçage
Page 81

21FONCTIONNEMENT
MISE EN GARDE
supplémentaire, sélectionnez l'option Extra
Rinse (Rinçage supplémentaire).
a Ligne de capacité maximale
b Ligne de remplissage moyen
c Détergent liquide
d Détergent en poudre
Capsules de détergent à usage unique / Gel ou tablette de détergent
Déposez la capsule de détergent en poudre ou
liquide, ou le gel ou la tablette de détergent, dans
le tambour avant d’y placer les articles. Ne mettez
pas ces détergents dans le distributeur.
Utilisation du distributeur
Pour ajouter des produits de nettoyage au
distributeur automatique :
1 Ouvrez le tiroir du distributeur.
2 Versez les produits pour la lessive dans les
compartiments appropriés.
• Suivez les recommandations du fabricant
lors de l’ajout de produits de nettoyage.
a Compartiment principal de détergent
b Compartiment pour l’assouplissant liquide
c Compartiment de détergent pour
prélavage
3 Fermez doucement le tiroir du distributeur de
détergent avant de commencer le cycle.
• Le fait de fermer abruptement le tiroir peut
causer le renversement du détergent dans
un autre compartiment ou le versement
dans le tambour plus tôt que prévu.
• Veillez à ne pas vous coincer la main dans le
tiroir lorsque vous le fermez.
• Il est normal qu’une petite quantité d’eau
demeure dans les compartiments du
distributeur à la fin du cycle.
• Ne placez pas et ne rangez pas de produits de
lessive, comme du détergent, du javellisant ou
de l’assouplissant liquide sur le dessus de votre
laveuse. Ces produits peuvent endommager le
fini et les commandes de la laveuse.
Compartiment principal de détergent
Ce compartiment contient le détergent à lessive
utilisé pour le cycle de lavage principal. Le
détergent placé dans ce compartiment peut être
liquide ou en poudre.
• Le détergent est ajouté à la brassée au début du
cycle. Utilisez toujours un détergent HE (haute
efficacité) avec votre laveuse.
• Ne dépassez pas la ligne de remplissage
maximal. Utiliser trop de détergent peut
entraîner une accumulation de détergent dans
les vêtements et la laveuse.
• Un javellisant sûr pour les couleurs, liquide ou en
poudre, peut être ajouté dans le compartiment
de lavage principal avec le détergent de même
type. N’utilisez pas à la fois des liquides et de la
poudre.
• Si le distributeur contient un contenant à
détergent liquide et une insertion :
- Veillez à ce qu’ils soient en place lorsque vous
utilisez du détergent liquide.
- Veillez à les retirer lorsque vous utilisez du
détergent en poudre. Le détergent en poudre
ne sera pas distribué si le contenant à
détergent liquide et l`insertion sont en place.
• Quand vous utilisez du détergent en poudre,
retirez l`insertion et le contenant à détergent
liquide du distributeur. Le détergent en poudre
ne sera pas distribué si le contenant à détergent
liquide et l`insertion sont en place.
• L’utilisation d’un détergent qui ne se dissout pas
rapidement ou d’un détergent de grande
viscosité laissera des résidus qui vont obstruer le
distributeur.
FRANÇAIS
Page 82

22 FONCTIONNEMENT
Compartiment pour l'assouplissant
Ce compartiment contient l’assouplissant, qui est
automatiquement distribué pendant le cycle final
de rinçage. Vous pouvez utiliser de l’assouplissant
en poudre ou liquide.
• Ne dépassez pas la ligne de remplissage
maximal. Utiliser trop d’assouplissant peut
tacher les vêtements ou causer une
accumulation sur les tissus ou dans la laveuse.
• Diluez les assouplissants concentrés avec de
l’eau tiède.
• Ne versez jamais d’assouplissant directement
dans la brassée ou dans le tambour.
Compartiment de détergent pour prélavage
Mettez le détergent liquide ou en poudre dans ce
compartiment quand vous utilisez l’option Pre-
wash (Prélavage). Utilisez toujours un détergent
HE (haute efficacité) avec votre laveuse.
• Quand vous utilisez l’option Pre-wash
(Prélavage), le détergent liquide pour le lavage
principal doit être placé dans le contenant à
détergent liquide, fourni en tant qu’accessoire,
dans le distributeur de lavage principal (s’il y a
lieu) pour empêcher qu’il soit distribué avec le
détergent de prélavage.
• La quantité de détergent utilisé pour l’option
Pre-wash (Prélavage) représente la moitié de la
quantité recommandée pour le cycle de lavage
principal. Par exemple, si le cycle de lavage
principal nécessite une mesure de détergent, il
faut utiliser la moitié de la mesure pour l’option
Pre-wash (Prélavage).
Page 83

Panneau de commande
REMARQUE
REMARQUE
23FONCTIONNEMENT
Caractéristiques du panneau de commande
a Bouton Marche/arrêt
• Appuyez sur ce bouton pour allumer ou éteindre la laveuse.
• Le fait d’appuyer sur ce bouton pendant un cycle annulera ce cycle, et les réglages de la brassée
seront perdus.
• La porte se déverrouillera après une courte pause.
• S’il reste de l’eau dans le tambour après l’arrêt de la laveuse, elle sera évacuée après quelques minutes.
La laveuse peut être redémarrée à tout moment avant le début du drainage. Cependant, une fois que
l’eau commence à être évacuée, toutes les fonctionnalités seront désactivées jusqu’à ce que l’eau soit
complètement vidée et que la laveuse s’arrête.
FRANÇAIS
b Bouton de sélection de cycle
• Tournez ce bouton pour sélectionner le cycle désiré.
• Une fois que le cycle désiré a été sélectionné, les préréglages standards s’affichent. Ces réglages
peuvent être ajustés à l’aide des boutons de modification du cycle à tout moment avant le début du
cycle.
c Bouton Démarrer/pause
• Appuyez sur ce bouton pour démarrer le cycle sélectionné.
• Si la laveuse est en marche, utilisez ce bouton pour interrompre le cycle sans perdre les réglages
actuels.
• Si vous n’appuyez pas sur le bouton Démarrer/pause pour lancer le cycle sélectionné, la laveuse s’éteint
automatiquement après un certain délai et tous les réglages du cycle sont perdus. L’eau restante dans le
tambour sera évacuée.
d Boutons d’options et de fonctions supplémentaires
• Ces boutons vous permettent de sélectionner des options de cycle supplémentaires. Certains
boutons vous permettent également d’activer des fonctions spéciales en appuyant sur le bouton et
en le maintenant enfoncé pendant trois secondes.
e Boutons de modification des cycles
• Utilisez ces boutons pour régler la température de lavage, la vitesse d’essorage et le niveau de saleté
pour le cycle sélectionné.
Page 84

24 FONCTIONNEMENT
REMARQUE
• Les paramètres sélectionnés sont affichés à l’écran.
• Le bouton de cette option permet de sélectionner d’autres paramètres.
f Afficheur de temps et d’état
Afficheur de temps et d’état
a Indicateur AI DD
• La fonction AI DD fait tourner le tambour de façon appropriée lorsque la détection de la brassée est
terminée.
• Cet indicateur s’allume lorsque le cycle Normal est sélectionné et activé.
b Indicateurs d’état du cycle
• Ces voyants à DEL clignotent lorsqu’un cycle est sélectionné afin d’indiquer quelles étapes seront
effectuées.
• Lorsqu’un cycle est en cours, le voyant à DEL de l’étape active clignote et les voyants à DEL des autres
étapes restent complètement allumés. Lorsqu’une étape est terminée, le voyant à DEL s’éteint. Si un
cycle est mis en pause, le voyant à DEL de l’étape active cesse de clignoter.
c Temps restant estimé
• Lorsqu’un cycle est sélectionné, la durée par défaut de ce cycle est affichée. Cette durée change si le
cycle est modifié ou si des options sont sélectionnées.
-I-- apparaît sur l’affichage, alors le temps sera affiché après que la fonction de détection de
•Si
charge ait détecté la taille de la brassée.
• La durée affichée n’est qu’une estimation. Cette durée est basée sur des conditions normales de
fonctionnement. Plusieurs facteurs externes (la taille de la brassée, la température ambiante, la
température de l’eau entrante, etc.) peuvent affecter la durée réelle.
• Une fois le bouton Démarrer/pause enfoncé, la laveuse mesurera la taille de la brassée. La durée
estimée peut changer lorsque la brassée aura été mesurée.
• Si la fonctionnalité de Delay Wash (Lavage différé) est sélectionnée, un compte à rebours indique le
temps restant avant que le cycle commence.
d Indicateur de signal
• Cet indicateur s’allume lorsque le signal est éteint.
e Indicateur de verrouillage des commandes
• Cet indicateur s’allume lorsque le panneau de commande est verrouillé.
CL et le temps de lavage restant sont affichés tour à tour sur l’affichage.
•
• Lorsque cette fonctionnalité est activée, toutes les commandes sont désactivées, sauf le bouton
Marche/arrêt.
f Indicateur Wi-Fi
• Ce témoin est allumé lorsque le produit est connecté à un réseau Wi-Fi domestique.
g Indicateur de démarrage à distance
Page 85

• Cet indicateur s’allume lorsque la fonction Remote Start (démarrage à distance) est activée.
h Témoin de verrouillage de la porte
• Cet indicateur s’allume lorsque le cycle commence et que la porte est verrouillée.
• Le témoin lumineux reste allumé jusqu’à ce que le cycle soit suspendu, arrêté ou terminé.
25FONCTIONNEMENT
FRANÇAIS
Page 86

26 FONCTIONNEMENT
REMARQUE
Cycles de lavage
Les cycles de lavage sont conçus pour différents types de brassées. Sélectionnez le cycle qui correspond le
mieux au contenu de la brassée afin d’obtenir des résultats de lavage et un entretien des tissus optimaux.
Pour obtenir des résultats optimaux, consultez la section Tri des articles et respectez les étiquettes
d’entretien des tissus qui se trouvent sur vos articles. Pour obtenir un guide sur les symboles d’entretien
des tissus, consultez la section Tri des articles.
Guide sur les cycles
Tournez le bouton ou appuyez sur le bouton pour sélectionner le cycle souhaité. Lorsque vous
sélectionnez un cycle de lavage, le témoin correspondant au cycle s’allume.
• Chaque fois que les poids des brassées sont mentionnés, considérez que 0,45 kg (1 lb) représente
environ le poids d’une serviette de bain épaisse (sèche).
Cycle Normal
Description Utilisez ce cycle pour laver tous les articles normaux tels que le coton, le lin, les chemises,
les jeans et les brassées mixtes, à l’exception des tissus délicats comme la laine ou la soie.
• Si vous appuyez sur le bouton Démarrer/pause sans sélectionner un cycle, le cycle
Normal commencera immédiatement en utilisant les réglages par défaut.
Température de
lavage
Vitesse
d’essorage
Cycle Heavy Duty (Haut rendement)
Description Convient au lavage des articles très souillés, tels que les tissus en coton, en utilisant des
Température de
lavage
Vitesse
d’essorage
Cycle Bulky/Large (Gros articles/Large)
Description Convient au lavage des couvertures ou des articles volumineux absorbant difficilement
Par défaut : Warm (Tiède) Disponibilité : Toutes les températures
Par défaut : High (Élevée) Disponibilité : Toutes les températures
mouvements de lavage plus puissants.
• Lors du lavage de brassées importantes, il y aura de brèves périodes de 2minutes
ou plus sans agitation. Ces périodes de trempage font partie du fonctionnement
du cycle et sont normales.
Par défaut : Warm (Tiède) Disponibilité : Ex Hot (Extra chaude), Hot
(Chaude), Warm (Tiède)
Par défaut : High (Élevée) Disponibilité : Toutes les températures
l’eau, tels que les oreillers, les couvertures, les couettes, les draps ou la literie pour
animaux de compagnie.
• N’utilisez pas ce cycle pour laver une brassée mixte de literie et d’articles autres que
de la literie.
• Ne mélangez pas des articles volumineux avec des vêtements plus petits.
• Ne lavez pas d’articles très volumineux. Si les articles volumineux et encombrants
ne rentrent pas facilement dans le tambour, ils pourraient ne pas se déplacer
correctement pendant le lavage.
Page 87

REMARQUE
Cycle Bulky/Large (Gros articles/Large)
27FONCTIONNEMENT
Température de
lavage
Vitesse
d’essorage
Par défaut : Tap Cold (Eau froide du
robinet)
Par défaut : High (Élevée) Disponibilité : High (Élevée), Med
Disponibilité : Hot (Chaude), Warm
(Tiède), Cold (Eau froide), Tap Cold (Eau
froide du robinet)
(Moyenne), Low (Faible), No Spin (Aucun
essorage)
Cycle Sanitary (Soins hygiéniques)
Description Ce cycle réduit la quantité de bactéries sur les articles lorsqu’il est utilisé avec un
javellisant, et ce, tout en consommant peu d’énergie.
Température de
lavage
Vitesse
d’essorage
Par défaut : Ex Hot (Extra chaude) Disponibilité : Ex Hot (Extra chaude)
Par défaut : High (Élevée) Disponibilité : High (Élevée), Med
(Moyenne), Low (Faible), No Spin (Aucun
essorage)
Cycle Baby Wear (Vêtements de bébé)
Description Ce cycle permet de laver les taches de nourriture sur les vêtements de bébé à l’aide d’un
rinçage puissant.
Température de
lavage
Par défaut : Ex Hot (Extra chaude) Disponibilité : Ex Hot (Extra chaude)
FRANÇAIS
Vitesse
d’essorage
Cycle
Description Ce cycle puissant et à température élevée est conçu spécialement pour réduire certains
Par défaut : High (Élevée) Disponibilité : High (Élevée), Med
(Moyenne), Low (Faible), No Spin (Aucun
essorage)
Allergiene
allergènes.
MC
• La sélection de ce cycle ajoute automatiquement de la vapeur au cycle de lavage.
• Ce cycle peut réduire considérablement la présence d'allergènes dans la literie et
les vêtements.
• Ce cycle aide à réduire les populations d’acariens et les allergènes. En raison de
l’énergie et des températures élevées utilisées, ce cycle n’est pas recommandé
pour la laine, la soie, le cuir ou tout autre article délicat sensible à la température.
Température de
lavage
Vitesse
d’essorage
Par défaut : Ex Hot (Extra chaude) Disponibilité : Ex Hot (Extra chaude)
Par défaut : Ex High (Très élevée) Disponibilité : Toutes les températures
Cycle Tub Clean (Nettoyage de la cuve)
Description Il s’agit d’un cycle spécial conçu pour nettoyer l’intérieur de la laveuse.
Page 88

28 FONCTIONNEMENT
Cycle Delicates (Délicats)
Description Convient au lavage des chemises ou chemisiers, des bas de nylon, de la lingerie ou des
vêtements transparents et en dentelle qui peuvent facilement être endommagés.
Température de
lavage
Vitesse
d’essorage
Par défaut : Cold (Eau froide) Disponibilité : Hot (Chaude), Warm
(Tiède), Cold (Eau froide), Tap Cold (Eau
froide du robinet)
Par défaut : Med (Moyenne) Disponibilité : Med (Moyenne), Low
(Faible), No Spin (Aucun essorage)
Cycle Hand Wash/Wool (Lavage à la main/Laine)
Description Ce cycle permet de laver les articles en laine ou lavables à la main qui rapetissent et
demandent un soin particulier. Lavez seulement les articles étiquetés pour le lavage à la
machine ou à la main.
• Une brassée devrait peser moins de 3,6 kg (8 lb) afin d’éviter d’endommager le
tissu.
• Utilisez seulement un détergent naturel ou sans danger pour la laine, et utilisez la
moitié de la quantité recommandée.
• Ce cycle offre un lavage en douceur et un essorage lent, pour un soin optimal des
tissus.
Température de
lavage
Vitesse
d’essorage
Par défaut : Warm (Tiède) Disponibilité : Hot (Chaude), Warm
(Tiède), Cold (Eau froide), Tap Cold (Eau
froide du robinet)
Par défaut : Med (Moyenne) Disponibilité : Med (Moyenne), Low
(Faible), No Spin (Aucun essorage)
Cycle Perm. Press (Tissus infroissables)
Description Utilisez ce cycle pour réduire le froissement lors du lavage de nappes ou de vêtements
« infroissables ».
Température de
lavage
Vitesse
d’essorage
Par défaut : Hot (Chaude) Disponibilité : Toutes les températures
Par défaut : High (Élevée) Disponibilité : Toutes les températures
Cycle Sportswear (Vêtements de sport)
Description Sert à laver des vêtements spéciaux comme des vêtements de sport ou de plein air.
• Utilisez-le pour les tissus laminés hydrofuges.
Température de
lavage
Vitesse
d’essorage
Par défaut : Hot (Chaude) Disponibilité : Hot (Chaude), Warm
(Tiède), Cold (Eau froide), Tap Cold (Eau
froide du robinet)
Par défaut : Med (Moyenne) Disponibilité : Med (Moyenne), Low
(Faible), No Spin (Aucun essorage)
Page 89

Cycle Speed Wash (Lavage rapide)
29FONCTIONNEMENT
Description Permet de laver rapidement les vêtements peu sales et les petites brassées. Pour un
lavage et un rinçage hautement efficaces, lavez de petites brassées de deux ou trois
articles légèrement sales.
• Pour ce cycle, utilisez très peu de détergent. Pour ajouter un rinçage
supplémentaire, utilisez l'option Extra Rinse (Rinçage supplémentaire).
Température de
lavage
Vitesse
d’essorage
Par défaut : Cold (Eau froide) Disponibilité : Hot (Chaude), Warm
(Tiède), Cold (Eau froide), Tap Cold (Eau
froide du robinet)
Par défaut : Med (Moyenne) Disponibilité : Toutes les températures
Cycle Drain+Spin (Drainage et essorage)
Description Ce cycle permet de drainer et d’essorer sans passer par les cycles de lavage et de rinçage,
ou d’enlever la brassée de la laveuse au milieu d’un cycle.
• Vous pouvez changer la vitesse d’essorage en appuyant plusieurs fois sur le
bouton Spin (Vitesse d'essorage) jusqu’à ce que la vitesse souhaitée soit
sélectionnée.
Cycle Downloaded (Rinse+Spin) (Cycle téléchargé (Rinçage et essorage))
Description Vous pouvez utiliser un téléphone intelligent pour télécharger un cycle particulier à cette
position de cycle.
• Le cycle par défaut est Rinse+Spin (Rinçage et essorage). Ce cycle peut aussi être
téléchargé.
• Reportez-vous à l’application LG ThinQ pour découvrir les cycles qu’il est possible
de télécharger.
FRANÇAIS
Vitesse
d’essorage
Par défaut : Ex High (Très élevée) Disponibilité : Toutes les températures
Page 90

30 FONCTIONNEMENT
REMARQUE
Options disponibles
• Lors du cycle Drain+Spin (Drainage et essorage), seules les options Delay Wash (Lavage différé) et
Add Item (Ajouter vêtements) peuvent être sélectionnées.
•Les options Delay Wash (Lavage différé) et Add Item (Ajouter vêtements) sont disponibles pour tous
les cycles de ce tableau.
Cycle
Normal
Heavy Duty (Haut rendement)
Bulky/Large (Gros articles/Large)
Sanitary (Soins hygiéniques)
Baby Wear (Vêtements de bébé)
Allergiene
Delicates (Délicats)
Hand Wash/Wool (Lavage à la main/
Laine)
Perm. Press (Tissus infroissables)
Sportswear (Vêtements de sport)
Speed Wash (Lavage rapide)
MC
Heavy Soil (Saleté
tenace)
###
###
##
##
##
##
##
##
###
##
###
Extra Rinse
(Rinçage
supplémentaire)
Pre-wash
(Prélavage)
Page 91

31FONCTIONNEMENT
REMARQUE
REMARQUE
REMARQUE
Modificateurs de cycle
À propos des boutons de modification
Chaque cycle possède des réglages par défaut qui
sont sélectionnés automatiquement. Vous pouvez
aussi personnaliser ces réglages en utilisant les
boutons de modification des cycles.
• Appuyez à plusieurs reprises sur le bouton de la
modification souhaitée jusqu’à ce que le voyant
lumineux correspondant au réglage désiré
s’allume.
• La laveuse ajuste automatiquement le niveau
d’eau au type de brassée et à la taille de celle-ci
afin d’offrir de meilleurs résultats et une
efficacité maximale.
• Il s’agit d’une laveuse à haute efficacité, et les
niveaux d’eau peuvent être beaucoup plus bas
que prévu. Ceci est normal et les résultats de
nettoyage et de rinçage ne seront pas
compromis.
• Les rinçages à l`eau froide consomment moins
d`énergie. La température actuelle du rinçage à
l`eau froide dépend de la température de l`eau
froide qui sort du robinet.
• Votre laveuse est dotée d`un élément chauffant
pour augmenter la température de l`eau chaude
pour les réglages Ex Hot (Extra chaude). Cela
permet d`améliorer le rendement du lavage avec
les réglages normaux du chauffe-eau.
Spin (Vitesse d'essorage)
Des vitesses d’essorage élevées extraient plus
d’eau des vêtements, ce qui réduit le temps de
séchage et économise l’énergie.
• Appuyez sur le bouton Spin (Vitesse
d'essorage) à plusieurs reprises jusqu’à ce que
la vitesse souhaitée soit sélectionnée.
• Certains tissus, comme les tissus délicats,
exigent une vitesse d’essorage lente.
Autres options et fonctionnalités
Votre laveuse dispose de plusieurs options de
cycle supplémentaires afin de personnaliser les
cycles et de répondre à vos besoins particuliers.
• Choisissez l’option souhaitée après avoir
sélectionné le cycle et les réglages désirés.
FRANÇAIS
• La fonctionnalité s’illumine lorsqu’elle est
sélectionnée.
• Dans le but de protéger vos vêtements, les
cycles n’offrent pas tous les mêmes réglages
(température de lavage, vitesse d’essorage,
niveau de saleté et options).
• Si un réglage sélectionné n’est pas autorisé pour
le cycle choisi, un carillon retentira deux fois et le
voyant à DEL ne s’allumera pas.
• Suivez les instructions des étiquettes d’entretien
des tissus sur les vêtements pour obtenir des
résultats optimaux.
Temp. (Température)
Assurez-vous que la température de lavage est
appropriée pour le type de brassée que vous
désirez laver.
• Appuyez sur le bouton Temp. (Température) à
plusieurs reprises pour sélectionner la
combinaison de température de lavage et de
rinçage pour le cycle sélectionné.
• Tous les rinçages se font à l’eau froide.
• Le voyant à DEL de l’option s’allume lorsque
l’option est sélectionnée.
• Pour protéger vos vêtements, certaines options
ne sont pas disponibles pour certains cycles.
• Si une option sélectionnée n’est pas autorisée
pour le cycle choisi, un carillon retentira deux
fois et le voyant à DEL ne s’allumera pas.
Utilisation de l’option de prélavage
Cette option ajoute un prélavage (d’une durée
d’environ 15 à 17 minutes) afin d’améliorer les
performances de nettoyage des vêtements très
sales ou tachés.
• Si vous sélectionnez l’option Pre-wash
(Prélavage) après avoir mis le détergent
directement dans le tambour, le détergent
risque d’être emporté, ce qui diminuera
l’efficacité du lavage.
Page 92

32 FONCTIONNEMENT
REMARQUE
AVERTISSEMENT
REMARQUE
Remote Start (Démarrage à distance)
Utilisez un téléphone intelligent pour contrôler
votre laveuse à distance.
• Pour obtenir plus de renseignements, consultez
la section FONCTIONS INTELLIGENTES dans ce
manuel.
Delay Wash (Lavage différé)
Lorsque vous avez sélectionné le cycle et les autres
réglages, appuyez sur le bouton Delay Wash
(Lavage différé) pour retarder le début du cycle
de lavage.
• Chaque fois que vous appuyez sur ce bouton,
vous retardez le lavage d’une heure; vous
pouvez le retarder jusqu’à un maximum de
19 heures.
• Une fois le délai désiré réglé, appuyez sur le
bouton Démarrer/pause pour démarrer le
délai.
• Si vous n’appuyez pas sur le bouton Démarrer/
pause pour commencer la mise en marche
différée, la laveuse s’arrêtera automatiquement
après un certain temps et tous les réglages de
cycle seront perdus.
Wi-Fi
Lorsque la laveuse est connectée à un réseau Wi-Fi
domestique, l’icône
est allumée.
• Pour connecter la laveuse à l’application LG
ThinQ, appuyez sur le bouton Delay Wash
(Lavage différé) et maintenez-le enfoncé
pendant trois secondes.
f du panneau de commande
Add Item (Ajouter vêtements)
Utilisez cette fonction pour ajouter des vêtements
ou pour retirer des objets comme des pièces de
monnaie ou des clés une fois le cycle démarré.
1 Appuyez sur le bouton Add Item (Ajouter
vêtements) pendant le cycle de lavage.
• Le cycle se met en pause et la porte se
déverrouille.
2 Ouvrez la porte, ajoutez des vêtements ou
retirez les corps étrangers, puis refermez la
porte.
3 Appuyez sur le bouton Démarrer/pause pour
continuer le cycle. Le cycle se poursuit
automatiquement.
• N’essayez pas de forcer l’ouverture de la porte
lorsque celle-ci est verrouillée, car cela pourrait
endommager l’appareil, entraîner son mauvais
fonctionnement ou provoquer des blessures.
• Si le niveau d’eau et la température sont
sécuritaires, la DEL de verrouillage de la porte
s’éteint et la porte se déverrouille une fois que le
mouvement de lavage s’arrête.
• Si le niveau d’eau est trop élevé, la porte ne se
déverrouillera pas et cette fonction ne pourra
pas être utilisée.
• Si la température de l’eau dans le tambour est
supérieure à 45 °C (113 °F), un bref
avertissement sonore retentit et cette fonction
n’est pas accessible, pour des raisons de
sécurité.
• Cette fonction est désactivée lors du cycle Tub
Clean (Nettoyage de la cuve).
• Pour préserver toute la performance de
nettoyage, le temps de lavage peut être
prolongé, selon le moment où les vêtements
sont ajoutés pendant le cycle.
• Faites attention lorsque vous ouvrez la porte, car
des vêtements mouillés peuvent tomber de la
cuve ou dégoutter sur le sol.
Extra Rinse (Rinçage supplémentaire)
Cette option ajoute un rinçage supplémentaire au
cycle sélectionné. Utilisez cette option pour veiller
à ce que les tissus ne contiennent plus de résidus
de détergent ou de javellisant.
• Appuyez sur le bouton Extra Rinse (Rinçage
supplémentaire) pour ajouter d’autres rinçages
au cycle.
Page 93

Heavy Soil (Saleté tenace)
REMARQUE
Sélectionnez cette option pour laver les articles
très souillés avec plus de puissance que le cycle
normal.
• Appuyez sur le bouton Heavy Soil (Saleté
tenace) pour sélectionner cette option.
Verrouillage des commandes
Utilisez cette fonction pour désactiver les
commandes. Elle peut empêcher les enfants de
modifier les cycles ou de mettre cette laveuse en
marche.
• La fonctionnalité ne verrouille pas la porte.
• Une fois cette fonction réglée, tous les boutons
sont verrouillés sauf le bouton Marche/arrêt.
• Lorsque les commandes sont verrouillées,
le temps restant s’affichent tour à tour pendant
le cycle de lavage.
• Le fait de couper l’alimentation ne réinitialisera
pas la fonctionnalité. Vous devez désactiver la
fonctionnalité pour pouvoir accéder à d’autres
fonctionnalités et options.
CL et
33FONCTIONNEMENT
FRANÇAIS
Verrouillage/déverrouillage du panneau
de commande
1 Mettez l’appareil en marche.
2 Appuyez simultanément pendant trois
secondes sur les boutons Delay Wash
(Lavage différé) et Add Item (Ajouter
vêtements) pour activer ou désactiver cette
fonction.
• Lorsque la fonction est désactivée, un signal
sonore se fait entendre et le temps restant du
cycle en cours réapparaît dans l’affichage.
Signal (Tonalité)
La laveuse joue une mélodie à la fin du cycle de
lavage. Les boutons produisent un son quand on
appuie dessus. Utilisez ce bouton pour activer ou
désactiver la mélodie et la tonalité des boutons.
• Pour activer ou désactiver cette fonction,
Appuyez simultanément pendant trois secondes
sur les boutons Extra Rinse (Rinçage
supplémentaire) et Pre-wash (Prélavage).
Page 94

34 FONCTIONS INTELLIGENTES
REMARQUE
REMARQUE
FONCTIONS INTELLIGENTES
Utilisation de l’application LG ThinQ
L’application LG ThinQ vous permet de
communiquer avec l’appareil à l’aide d’un
téléphone intelligent.
Caractéristiques de l’application LG ThinQ
L’application est compatible avec les produits
dotés du module LAN.
• Remote Start (Démarrage à distance)
- Contrôlez l’appareil à distance à l’aide de
l’application LG ThinQ.
• Downloaded (Cycle téléchargé)
- Téléchargez des cycles nouveaux et spécialisés
qui ne sont pas inclus dans les cycles
standards de l’appareil.
• Instructions pour le nettoyage de la cuve
- Découvrez le nombre de cycles restants avant
qu’il soit temps d’exécuter le cycle Tub Clean
(Nettoyage de la cuve).
• Surveillance de la consommation d’énergie
- Effectuez le suivi de la consommation
énergétique de la laveuse et découvrez
comment cette consommation varie en
fonction des cycles et des options de lavage
sélectionnés.
• Smart Diagnosis
- Cette fonction fournit des renseignements
utiles pour diagnostiquer et résoudre les
problèmes avec lʼappareil en se basant sur le
profil dʼutilisation.
• Notifications poussées
- Si le cycle est terminé ou que l’appareil
éprouve des problèmes, vous recevrez un
message automatisé.
• Paramètres
- Réglez diverses options de l’appareil et de
l’application.
• Si vous changez de routeur sans fil, de
fournisseur de services Internet ou de mot de
passe, supprimez l’appareil connecté de
l’application LG ThinQ, puis connectez-le de
nouveau.
• Cette information est à jour au moment de la
publication. L’application est sujette à des
MC
modifications à des fins d’amélioration du
produit, et ce, sans que l’utilisateur en soit
préalablement avisé.
Avant d’utiliser l’application LG ThinQ
1 Vérifiez la distance entre l’appareil et le
routeur sans fil (réseau Wi-Fi).
• Si la distance entre l’appareil et le routeur
est trop grande, l’intensité du signal
s’affaiblit. La connexion peut prendre du
temps, ou l’installation peut échouer.
2 Désactivez les Données mobiles ou les
Données cellulaires sur votre téléphone
intelligent.
3 Connectez votre téléphone intelligent au
routeur sans fil.
• Pour vérifier l’état de la connexion Wi-Fi, assurezvous que l’icône
de commande est allumée.
• L’appareil prend seulement en charge les
réseaux Wi-Fi de 2,4 GHz. Pour vérifier la
fréquence de votre réseau, contactez votre
fournisseur de services Internet ou reportezvous au manuel de votre routeur sans fil.
• LG ThinQ n’est pas responsable des problèmes
de connexion au réseau ou des défauts,
dysfonctionnements ou erreurs causés par la
connexion au réseau.
• Si l’appareil a des difficultés à se connecter au
réseau Wi-Fi, il est peut-être trop loin du routeur.
Procurez-vous un répéteur Wi-Fi (rallonge de
portée) pour améliorer la force du signal Wi-Fi.
f qui se trouve sur le panneau
Page 95

35FONCTIONS INTELLIGENTES
REMARQUE
REMARQUE
• La connexion Wi-Fi peut ne pas se faire ou être
interrompue à cause de l’environnement du
réseau domestique.
• La connexion réseau peut ne pas fonctionner
correctement selon le fournisseur de services
Internet.
• L’environnement sans fil peut causer un
ralentissement du fonctionnement du réseau
sans fil.
• Si l’appareil ne peut pas être enregistré en raison
de problèmes avec la transmission du signal
sans fil, débranchez l’appareil et attendez
environ une minute avant de réessayer.
• Si le pare-feu de votre routeur sans fil est activé,
désactivez-le ou ajoutez-y une exception.
• Le nom du réseau sans fil (SSID) doit être une
combinaison de lettres et de chiffres anglais.
(N’utilisez pas de caractères spéciaux.)
• L’interface utilisateur (IU) du téléphone
intelligent peut varier en fonction du système
d’exploitation (SE) mobile et du fabricant.
• Si le protocole de sécurité du routeur est
configuré sur WEP, la configuration du réseau
peut échouer. Veuillez changer le protocole de
sécurité (nous recommandons WPA2) et
connectez le produit à nouveau.
2 Appuyez sur le bouton Marche/arrêt.
3 Maintenez le bouton Remote Start
(Démarrage à distance) enfoncé pendant
trois secondes pour activer la fonction de
commande à distance.
4 Démarrez un cycle à partir de l’application LG
ThinQ sur votre téléphone intelligent.
• Une fois cette fonction activée, vous pouvez
seulement lancer un cycle de lavage à l’aide de
l’application pour téléphone intelligent LG
ThinQ. Si le cycle n’est pas démarré, l’appareil
retardera le démarrage jusqu’à ce que le cycle
soit désactivé à distance à partir de l’application
ou que cette fonction soit désactivée.
• Si la porte est ouverte, vous ne pouvez pas
démarrer un cycle de lavage à distance.
Désactivez Remote Start (Démarrage à
distance) manuellement.
Lorsque la fonction est activée, maintenez le
bouton Remote Start (Démarrage à distance)
enfoncé pendant trois secondes.
FRANÇAIS
Installation de l’application LG ThinQ
À partir d’un téléphone intelligent, cherchez
l’application LG ThinQ dans la boutique Google
Play ou l’App Store d’Apple. Suivez les directives
pour télécharger et installer l’application.
Utilisation de l’appareil à distance
Remote Start (Démarrage à distance)
Utilisez un téléphone intelligent pour commander
votre appareil à distance. Vous pouvez également
suivre la progression du cycle et connaître le
temps restant avant la fin de celui-ci.
Utiliser le Remote Start (Démarrage à
distance)
1 Placez les articles dans le tambour et ajoutez
du détergent dans le tiroir du distributeur de
détergent.
• Si vous le désirez, ajoutez du javellisant ou
de l’assouplissant dans les compartiments
appropriés du distributeur.
Download Cycle (Téléchargement dʼun cycle)
Téléchargez des cycles nouveaux et spécialisés qui
ne sont pas inclus parmi les cycles standards de
lʼappareil.
Les appareils qui ont été correctement connectés
peuvent télécharger une variété de cycles de
spécialité propres à lʼappareil.
Une fois le cycle téléchargé dans l'appareil, ce
dernier le conserve jusqu'à ce qu'un nouveau cycle
soit téléchargé.
• Un seul cycle téléchargé peut être enregistré à la
fois sur l’appareil.
Caractéristiques du module LAN sans fil
Gamme de
fréquences
Puissance de
sortie (Max.)
2412 - 2462 MHz
<30dBm
Page 96

36 FONCTIONS INTELLIGENTES
REMARQUE
REMARQUE
Avis d’Industrie Canada
L’émetteur/récepteur exempt de licence contenu
dans le présent appareil est conforme aux CNR
d’Innovation, Sciences et Développement
économique Canada applicables aux appareils
radio exempts de licence. L’exploitation est
autorisée aux deux conditions suivantes :
(1) Cet appareil ne doit pas provoquer
d’interférences.
(2) Cet appareil doit accepter toutes les
interférences, y compris celles pouvant entraîner
son dysfonctionnement.
Énoncé d'IC concerant I'exposition à la radiation
Cet appareil est conforme aux limites d’exposition
aux rayonnements d’Industrie Canada pour un
environnement non contrôlé.
Cet appareil doit être installé et utilisé de façon à
garder une distance minimale de 20 cm
(7,8 pouces) entre la source de rayonnement et
votre corps.
Cette offre est valide pour quiconque possède
cette information.
Fonctionnalité
Smart Diagnosis
Cette fonctionnalité est offerte uniquement sur les
modèles portant le logo
Utilisez cette fonctionnalité pour vous aider à
diagnostiquer et à résoudre les problèmes
qu’éprouve votre appareil.
• Pour des raisons ne relevant pas du contrôle de
LGE, le service pourrait ne pas fonctionner en
raison de facteurs externes, notamment la
disponibilité du Wi-Fi, la connexion Wi-Fi, la
politique de la boutique d’applications ou la
disponibilité de l’application.
• La fonctionnalité pourrait être modifiée sans
préavis et pourrait avoir une apparence
différente selon votre emplacement.
MC
c ou d.
• LE FABRICANT N’EST PAS RESPONSABLE DES
INTERFÉRENCES RADIOÉLECTRIQUES CAUSÉES
PAR DES MODIFICATIONS NON AUTORISÉES
APPORTÉES À CET APPAREIL. DE TELLES
MODIFICATIONS POURRAIENT ANNULER
L’AUTORISATION ACCORDÉE À L’UTILISATEUR DE
FAIRE FONCTIONNER L’APPAREIL.
Renseignements sur l'avis de logiciel libre
Pour obtenir le code source conformément aux
dispositions de la licence publique générale, de la
licence publique générale limitée, de la licence
publique Mozilla et de toute autre licence
régissant les logiciels à code source libre contenus
dans cet appareil, visitez le site http://
opensource.lge.com. En plus du code source,
toutes les dispositions de licence, les exonérations
de garantie et les avis de droits d’auteurs peuvent
aussi être téléchargés.
LG Electronics mettra également à votre
disposition le code source libre sur CD-ROM pour
un prix couvrant le coût de la distribution (coût du
support, de l’expédition et de la manutention) sur
simple demande par courriel à l’adresse
opensource@lge.com. Cette offre est valable
pendant une période de trois ans à compter de la
date de la dernière distribution de ce produit.
Utilisation de l’application LG ThinQ pour diagnostiquer les problèmes
Si vous éprouvez des problèmes avec votre
appareil doté du Wi-Fi, vous pouvez transmettre
des données de dépannage par téléphone
intelligent à l’aide de l’application LG ThinQ.
• Lancez l’application LG ThinQ et sélectionnez la
fonctionnalité Smart Diagnosis
dans le menu. Suivez les instructions indiquées
dans l’application LG ThinQ.
MC
qui se trouve
Utilisation de la fonctionnalité de diagnostic sonore pour diagnostiquer les problèmes
Suivez les instructions ci-dessous pour utiliser la
fonctionnalité de diagnostic sonore.
• Lancez l’application LG ThinQ et sélectionnez la
fonctionnalité Smart Diagnosis
dans le menu. Suivez les instructions relatives au
diagnostic sonore indiquées dans l’application
LG ThinQ.
MC
qui se trouve
1 Appuyez sur le bouton Marche/arrêt pour
allumer l’appareil.
• N’appuyez sur pas sur les autres touches.
Page 97

2 Placez le microphone de votre téléphone
REMARQUE
Max.
10 mm
Max.
10 mm
intelligent tout près du logo c ou d.
3 Maintenez le bouton Temp. (Température)
enfoncé pendant trois secondes ou jusqu’à
ce qu’un son se fasse entendre. Tenez le
microphone de votre téléphone intelligent
près de l’icône jusqu’à ce que le transfert des
données soit terminé.
• Maintenez votre téléphone intelligent en
place jusqu’à ce que le transfert des
données soit terminé. Le temps restant
pour le transfert des données s’affiche à
l’écran.
4 Une fois le transfert des données terminé, le
diagnostic s’affichera dans l’application.
37FONCTIONS INTELLIGENTES
FRANÇAIS
• Pour obtenir des résultats optimaux, évitez de
bouger votre téléphone intelligent pendant la
transmission sonore.
Page 98

38 ENTRETIEN
AVERTISSEMENT
AVERTISSEMENT
REMARQUE
ENTRETIEN
• Pour réduire le risque d’incendie, de décharge
électrique ou de blessures, lisez tout ce manuel
d’utilisation, y compris les DIRECTIVES DE
SÉCURITÉ, avant d’utiliser cet appareil.
• Débranchez l’appareil avant de le nettoyer pour
éviter tout risque de décharge électrique. Le
non-respect de cet avertissement peut entraîner
des blessures graves, un incendie, une décharge
électrique ou la mort.
• N’utilisez pas de substances volatiles (benzène,
diluant à peinture, alcool, acétone, etc.), de
nettoyants abrasifs ou de détergents contenant
des composants chimiques forts lors du
nettoyage de l’appareil. Vous risqueriez de
provoquer une décoloration, d’endommager
l’appareil ou de provoquer un incendie.
• Certaines pièces internes qui ne sont pas mises à
la terre intentionnellement posent un risque de
décharge électrique durant l’entretien
seulement. Remarque à l’intention du personnel
d’entretien – Évitez tout contact avec les pièces
suivantes lorsque l’appareil est sous tension : la
pompe, la soupape, le moteur et le panneau de
commande.
Nettoyage régulier
Porte :
Lavez avec un linge humide l’extérieur et
l’intérieur, et asséchez ensuite avec un linge doux.
Extérieur :
• Essuyez immédiatement toute éclaboussure.
• Essuyez avec un linge humide.
• Ne touchez pas la surface ou l’écran avec des
objets coupants.
Entretien périodique
• Utilisez une serviette ou un linge doux pour
essuyer le tour de l’ouverture de la porte et le
hublot de la porte.
• Retirez toujours les articles de la laveuse aussitôt
que le cycle est terminé. Laisser des articles
humides dans la laveuse peut causer des plis, le
transfert de couleurs et des odeurs.
Nettoyage du tambour
Au fil du temps, des résidus peuvent s’accumuler
dans le tambour, ce qui entraîne la formation de
moisissure ou d’une odeur de moisi. Exécutez le
cycle Tub Clean (Nettoyage de la cuve) chaque
mois pour éliminer les résidus et prévenir les
odeurs.
Entretien après un lavage
Après la fin du cycle, essuyez la porte et l’intérieur
du joint de la porte pour enlever l’humidité.
• Essuyez le bâti de la laveuse avec un linge sec
pour enlever l’humidité.
• Laissez la porte ouverte pour que l’intérieur du
tambour sèche.
• Assurez-vous que les enfants et les animaux
domestiques n’entrent pas dans le tambour.
Utilisez la fonctionnalité Control Lock
(Verrouillage des commandes) si nécessaire
pour empêcher les enfants de démarrer
accidentellement un cycle de lavage.
Nettoyage de lʼextérieur
Bien entretenir votre laveuse peut prolonger sa
durée de vie.
• Assurez-vous d’exécuter le cycle Tub Clean
(Nettoyage de la cuve) uniquement lorsque le
tambour est vide. Ne placez jamais d’articles
dans la cuve pendant l’utilisation de ce cycle. Les
vêtements pourraient être endommagés ou
contaminés par des produits de nettoyage.
• Exécutez le cycle plus souvent en cas d’utilisation
intensive ou si des odeurs sont déjà présentes.
• S'il y a déjà de la moisissure ou si vous sentez
déjà une odeur de moisi, exécutez ce cycle une
fois par semaine pendant trois semaines
consécutives.
1 Retirez tous les articles du tambour.
Page 99

39ENTRETIEN
AVERTISSEMENT
REMARQUE
2 Ajoutez des agents de nettoyage.
Nettoyant Instructions
Nettoyant pour
tambour
Produit détartrant
Javellisant chloré
liquide
Nettoyant en
poudre
Pastilles
nettoyantes
• Pour les autres produits de nettoyage du
tambour, suivez les directives et les
recommandations du fabricant.
• Ne dépassez pas la ligne de remplissage
maximal quand vous ajoutez un javellisant
ou des nettoyants en poudre. Le détergent
en poudre pourrait rester dans le tambour
après le lavage.
Ajoutez-le au compartiment
principal de détergent du
distributeur de détergent.
Ajoutez-le au compartiment
de javellisant du distributeur
de détergent.
Retirez le contenant à
détergent liquide avant de le
mettre dans le compartiment
à détergent principal.
Placez directement dans le
tambour de la laveuse.
3 Fermez la porte et appuyez sur le bouton
Marche/arrêt.
4 Sélectionnez le cycle Tub Clean (Nettoyage
de la cuve) et appuyez sur le bouton
Démarrer/pause pour lancer le cycle.
Alerte automatique de nettoyage de la
cuve
Lorsque l’appareil est sous tension et que le
message
tambour a besoin d’être nettoyé. Utilisez le cycle
Tub Clean (Nettoyage de la cuve) pour nettoyer
le tambour de la laveuse. La fréquence de l’alerte
automatique dépend du nombre d’utilisations de
la laveuse. Toutefois, le message s’affiche
normalement après un ou deux mois.
tcL clignote à l’écran, cela signifie que le
Nettoyage des dépôts minéraux
Si votre eau est dure, des dépôts minéraux
peuvent s’accumuler sur les composants internes
de la laveuse. Nettoyez régulièrement les dépôts
minéraux sur les composants internes pour
prolonger la durée de vie de la laveuse.
L’utilisation d’un adoucisseur d’eau est
recommandée si votre eau est dure.
• Utilisez un produit détartrant pour enlever les
dépôts minéraux visibles sur le tambour de la
laveuse.
• Après chaque détartrage, démarrez toujours le
cycle Tub Clean (Nettoyage de la cuve) avant
de laver des vêtements.
• Les dépôts minéraux et autres taches peuvent
être enlevés du tambour en acier inoxydable
avec un linge doux trempé dans un produit
nettoyant pour acier inoxydable.
• N’utilisez pas de laine d’acier ni de nettoyants
abrasifs.
FRANÇAIS
5 Lorsque le cycle est terminé, ouvrez la porte
• Assurez-vous que les enfants et les animaux
domestiques n’entrent pas dans le tambour.
Utilisez la fonctionnalité Control Lock
(Verrouillage des commandes) si nécessaire
pour empêcher les enfants de démarrer
accidentellement un cycle de lavage.
• Si vous utilisez un détartrant ou un nettoyant
pour tambour pendant le cycle Tub Clean
(Nettoyage de la cuve), utilisez l’option
Rinse+Spin (Rinçage et essorage) pour rincer le
tambour de la laveuse avant de commencer
votre prochain cycle de lavage.
et laissez sécher complètement l’intérieur du
tambour.
Laissez la porte ouverte
Après avoir utilisé la laveuse, laissez la porte
ouverte pendant la nuit afin de permettre à l’air de
circuler et de sécher le tambour. Cela aidera à
prévenir les odeurs.
Nettoyage du tiroir du distributeur
Le fait de laisser du détergent dans le tiroir du
distributeur de détergent pendant une période
prolongée ou d’utiliser la laveuse pendant une
période prolongée peut causer une accumulation
de résidus dans le tiroir du distributeur de
détergent. Retirez et nettoyez le tiroir du
distributeur de détergent une ou deux fois par
mois.
Page 100

40 ENTRETIEN
AVERTISSEMENT
MISE EN GARDE
AVERTISSEMENT
• Ne vaporisez pas d’eau à l’intérieur de la laveuse.
Vous risqueriez de provoquer un incendie ou
une décharge électrique.
Nettoyage du joint de la porte
Nettoyez le joint de la porte une fois par mois
pour prévenir l’accumulation de saleté.
1 Éteignez la laveuse et débranchez le cordon
d’alimentation.
2 Tirez le tiroir jusqu’à ce qu’il s’arrête.
3 Appuyez fortement sur le bouton de
désengagement et sortez complètement le
tiroir.
4 Retirez les insertions du tiroir.
• Le nettoyage du joint de la porte avec du
javellisant non dilué pourrait altérer le joint de la
porte et endommager les pièces de la laveuse.
Vous devez ajouter de l’eau au javellisant avant
de vous en servir.
1 Portez des gants de caoutchouc et des
lunettes de protection.
2 Diluez 3/4 tasse (177 ml) de javellisant chloré
liquide dans 3,8 l (1 gallon) d’eau.
3 Essuyez les pourtours du joint de la porte.
• Trempez une éponge ou un linge doux dans
cette solution diluée et essuyez partout
autour du joint de la porte.
4 Après le nettoyage, essuyez l’humidité avec
une serviette ou un tissu sec.
5 Laissez la porte ouverte pour permettre au
joint de la porte de sécher complètement.
5 Nettoyez les insertions et le tiroir à l’eau tiède.
6 Essuyez toute trace d’humidité avec une
7 Nettoyez la cavité de l’ouverture du tiroir avec
8 Replacez le tiroir.
• Utilisez un chiffon doux ou une brosse pour
nettoyer et enlever les résidus.
• N’utilisez pas de savon pour nettoyer le
tiroir et les insertions.
serviette ou un linge sec après le nettoyage.
une petite brosse non métallique. Retirez tous
les résidus logés dans les parties supérieures
et inférieures de la cavité.
Nettoyage des filtres d'arrivée d’eau
Si la laveuse ne se remplit pas correctement, un
code d’erreur s’affichera à l’écran. Les grilles des
filtres de la soupape d'arrivée sont peut-être
bouchées par des dépôts minéraux causés par de
l’eau dure, des sédiments ou d’autres débris
provenant du système d’approvisionnement en
eau.
• Les grilles d'arrivée protègent les pièces
délicates de la soupape d'arrivée afin qu’elles ne
soient pas endommagées par des particules qui
pourraient entrer dans les soupapes lors de
l’approvisionnement en eau. Le fait de faire
fonctionner la laveuse sans ces filtres peut
entraîner l’ouverture continue d’une soupape et
provoquer des inondations et des dommages
matériels.
 Loading...