

LG WD1275ND Owner’s Manual
OWNER'S MANUAL
WASHING
MACHINE
Before beginning installation, read these instructions carefully.
This will simplify installation and ensure that the product is
installed correctly and safely. Leave these instructions near the
product after installation for future reference.
EN ENGLISH
WD1275ND
MFL70561480
Rev.01_102918
www.lg.com
Copyright © 2018 LG Electronics Inc. All Rights Reserved.

TABLE OF CONTENTS
SAFETY INSTRUCTIONS .......................................................3
IMPORTANT SAFETY INSTRUCTIONS .................................................... 3
Disposal of Your Old Appliance ..................................................................8
INSTALLATION ........................................................................9
Parts ........................................................................................................... 9
Accessories ................................................................................................ 9
Specifications ........................................................................................... 10
Installation Place Requirements ............................................................... 11
Unpacking and Removing Transit Bolts .................................................... 12
Using Anti-Slip Sheets(Some models only) .............................................. 13
Wooden Floors (Suspended Floors) ......................................................... 13
Leveling the Appliance .............................................................................. 14
Connecting the Water Supply Hose..........................................................14
Installing the Drain Hose .......................................................................... 17
OPERATION ...........................................................................18
Using the Washing Machine ..................................................................... 18
Sorting Laundry ........................................................................................ 19
Adding Cleaning Products ........................................................................ 20
Control Panel ............................................................................................ 22
Programme Table .....................................................................................23
Option Programme ................................................................................... 27
This manual may contain images or
content different from the model you
purchased.
This manual is subject to revision by the
manufacturer.
SMART FUNCTIONS .............................................................29
Using Smart Diagnosis™ ......................................................................... 29
MAINTENANCE ......................................................................30
Cleaning Your Washing Machine .............................................................. 30
Cleaning the Water Inlet Filter .................................................................. 30
Cleaning the Drain Pump Filter ................................................................ 31
Cleaning the Dispenser Drawer ................................................................ 32
Tub Clean (Some models only) ................................................................ 32
Caution on Freezing During Winter .......................................................... 33
TROUBLESHOOTING ...........................................................35
Diagnosing Problems ............................................................................... 35
Error Messages ........................................................................................ 38
SAFETY INSTRUCTIONS
The following safety guidelines are intended to prevent
unforeseen risks or damage from unsafe or incorrect
operation of the appliance.
The guidelines are separated into ‘WARNING’ and ‘CAUTION’
as described below.
This symbol is displayed to indicate matters and
operations that can cause risk. Read the part with this
symbol carefully and follow the instructions in order to
avoid risk.
WARNING
This indicates that the failure to follow the instructions can
cause serious injury or death.
CAUTION
This indicates that the failure to follow the instructions can
cause the minor injury or damage to the product.
IMPORTANT SAFETY INSTRUCTIONS
EN
WARNING
To reduce the risk of explosion, fire, death, electric shock,
injury or scalding to persons when using this product,
follow basic precautions, including the following:
Children in the Household
This appliance is not intended for use by persons (including
children) with reduced physical, sensory or mental capabilities, or
lack of experience and knowledge, unless they have been given
supervision or instruction concerning use of the appliance by a
person responsible for their safety. Children should be supervised
to ensure that they do not play with the appliance.
3

Installation
•Never attempt to operate the appliance if it is damaged,
malfunctioning, partially disassembled, or has missing or broken
parts, including a damaged cord or plug.
•This appliance should only be transported by two or more people
holding the appliance securely.
•Do not install the appliance in a damp and dusty place. Do not
install or store the appliance in any outdoor area, or any area that
is subject to weathering conditions such as direct sunlight, wind,
or rain or temperatures below freezing.
•Tighten the drain hose to avoid separation.
•If the power cord is damaged or the hole of the outlet socket is
loose, do not use the power cord and contact an authorized
service centre.
•Do not use double adaptors, multi outlet power boards or
extension cables with this appliance.
EN
4

•This appliance must not be installed behind a lockable door, a
sliding door or a door with a hinge on the opposite side to that of
the appliance, in such a way that a full opening of the appliance
door is restricted.
•This appliance must be grounded. In the event of malfunction or
breakdown, grounding will reduce the risk of electric shock by
providing a path of least resistance for electric current.
•This appliance is equipped with a power cord having an
equipment-grounding conductor and a grounding power plug. The
power plug must be plugged into an appropriate socket outlet that
is installed and grounded in accordance with all local codes and
ordinances.
•Improper connection of the equipment-grounding conductor can
result in risk of electric shock. Check with a qualified electrician or
service personnel if you are in doubt as to whether the appliance
is properly grounded.
•Do not modify the power plug provided with the appliance. If it
does not fit the outlet, have a proper outlet installed by a qualified
electrician.
Operation
•Do not attempt to separate any panels or disassemble the
appliance. Do not apply any sharp objects to the control panel in
order to operate the appliance.
•Do not repair or replace any part of the appliance. All repairs and
servicing must be performed by qualified service personnel unless
specifically recommended in this Owner’s Manual. Use only
authorized factory parts.
EN
5

•Do not put animals, such as pets into the appliance.
•Keep the area underneath and around the appliance free of
combustible materials such as lint, paper, rags, chemicals, etc.
•Do not leave the appliance door open. Children may hang on the
door or crawl inside the appliance, causing damage or injury.
•Use new hose or hose-set supplied with the appliance. Reusing
old hoses can cause a water leak and subsequent property
damage.
•Do not put in, wash or dry articles that have been cleaned in,
washed in, soaked in, or spotted with combustible or explosive
substances (such as waxes, wax removers, oil, paint, gasoline,
degreasers, drycleaning solvents, kerosene, petrol, spot removers,
turpentine, vegetable oil, cooking oil, acetone, alcohol, etc.).
Improper use can cause fire or explosion.
•Never reach into the appliance while it is operating. Wait until the
drum has completely stopped.
•In case of flood, disconnect the power plug and contact the LG
Electronics customer information centre.
•Do not push down the door excessively, when the appliance door
is open.
•Do not touch the door during a high temperature programme.
•Do not use flammable gas and combustible substances (benzene,
gasoline, thinner, petroleum, alcohol, etc.) near the appliance.
•If the drain hose or inlet hose is frozen during winter, use it only
after thawing.
•Keep all washing detergents, softener and bleach away from
children.
EN
6

•Do not touch the power plug or the appliance controls with wet
hands.
•Do not bend the power cable excessively or place a heavy object
on it.
•Do not wash rugs, mats, shoes or pet blankets, or any other items
other than clothes or sheets, in this machine.
•This appliance must only be used for domestic household
purposes and should not be used in mobile applications.
•If there is a gas leakage (isobutane, propane, natural gas, etc.),
do not touch the appliance or power plug and ventilate the area
immediately.
Maintenance
•Securely plug the power plug in the mains outlet socket after
completely removing any moisture and dust.
•Disconnect the appliance from the mains outlet socket before
cleaning the appliance. Setting the controls to the OFF or stand by
position does not disconnect this appliance from the mains power.
•Do not spray water inside or outside the appliance to clean it.
•Never unplug the appliance by pulling on the power cable. Always
grip the power plug firmly and pull straight out from the socket
outlet.
EN
Disposal
•Before discarding an old appliance, unplug it. Cut off the cable
directly behind the appliance to prevent misuse.
•Dispose of all packaging materials (such as plastic bags and
styrofoam) away from children. The packaging materials can
cause suffocation.
•Remove the door before disposing of or discarding this appliance
to avoid the danger of children or small animals getting trapped
inside.
7

Disposal of Your Old Appliance
• This crossed-out wheeled bin symbol indicates that waste electrical and electronic
products (WEEE) should be disposed of separately from the municipal waste stream.
• Old electrical products can contain hazardous substances so correct disposal of your
old appliance will help prevent potential negative consequences for the environment
and human health. Your old appliance may contain reusable parts that could be used
to repair other products, and other valuable materials that can be recycled to
conserve limited resources.
• You can take your appliance either to the shop where you purchased the product, or
contact your local government waste office for details of your nearest authorised
WEEE collection point. For the most up to date information for your country please
see www.lg.com/global/recycling.
EN
8
INSTALLATION
4
6
11
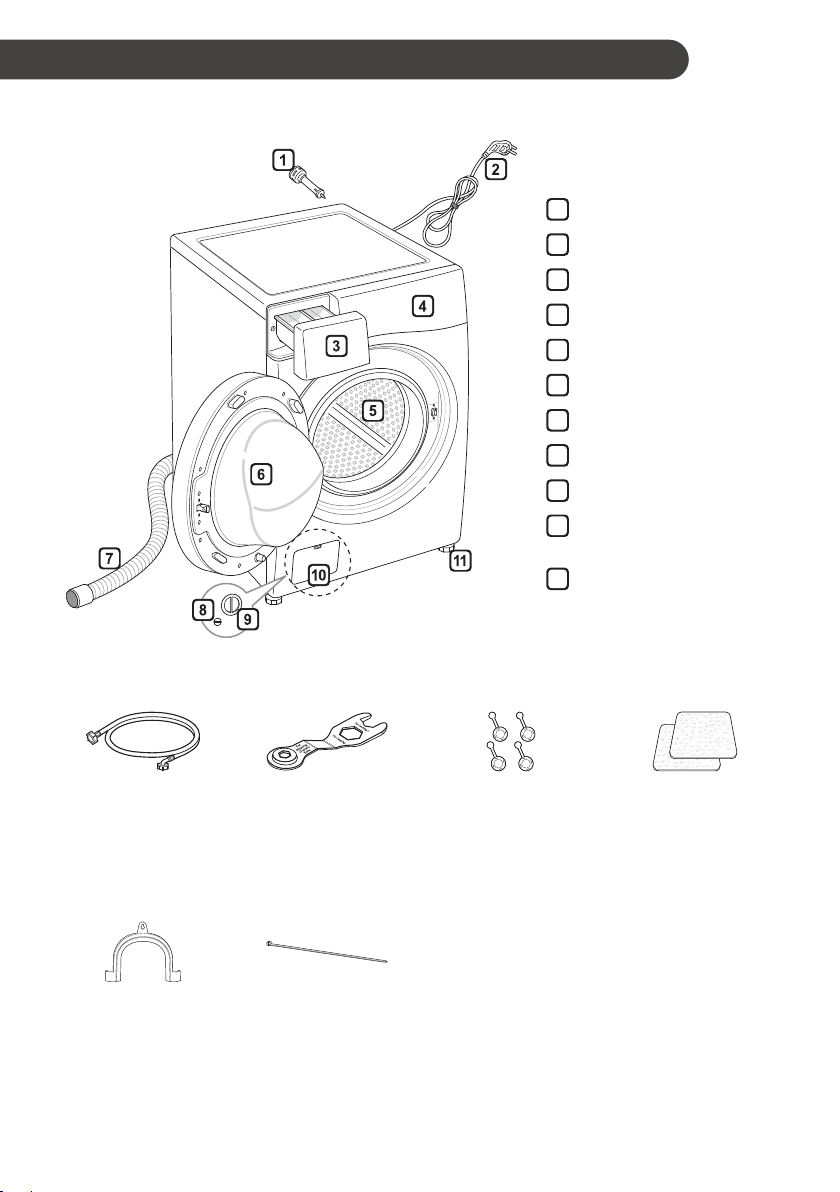
Parts
Transit bolts (x 4)
1
Power plug
2
Drawer
3
Control panel
Drum
5
Door
Drain hose
7
Drain tube
8
Drain pump filter
9
Cover cap (Location may
10
vary depending on products)
Adjustable feet (x 4)
EN
Accessories
Cold supply hose (1
securing drain hose
EA) (Option: Hot (1
EA))
Elbow bracket for
(some models only)
Spanner Caps for covering
transit bolt holes
(some models only)
Tie strap
(some models only)
Anti–slip sheets (2 EA)
(some models only)
9
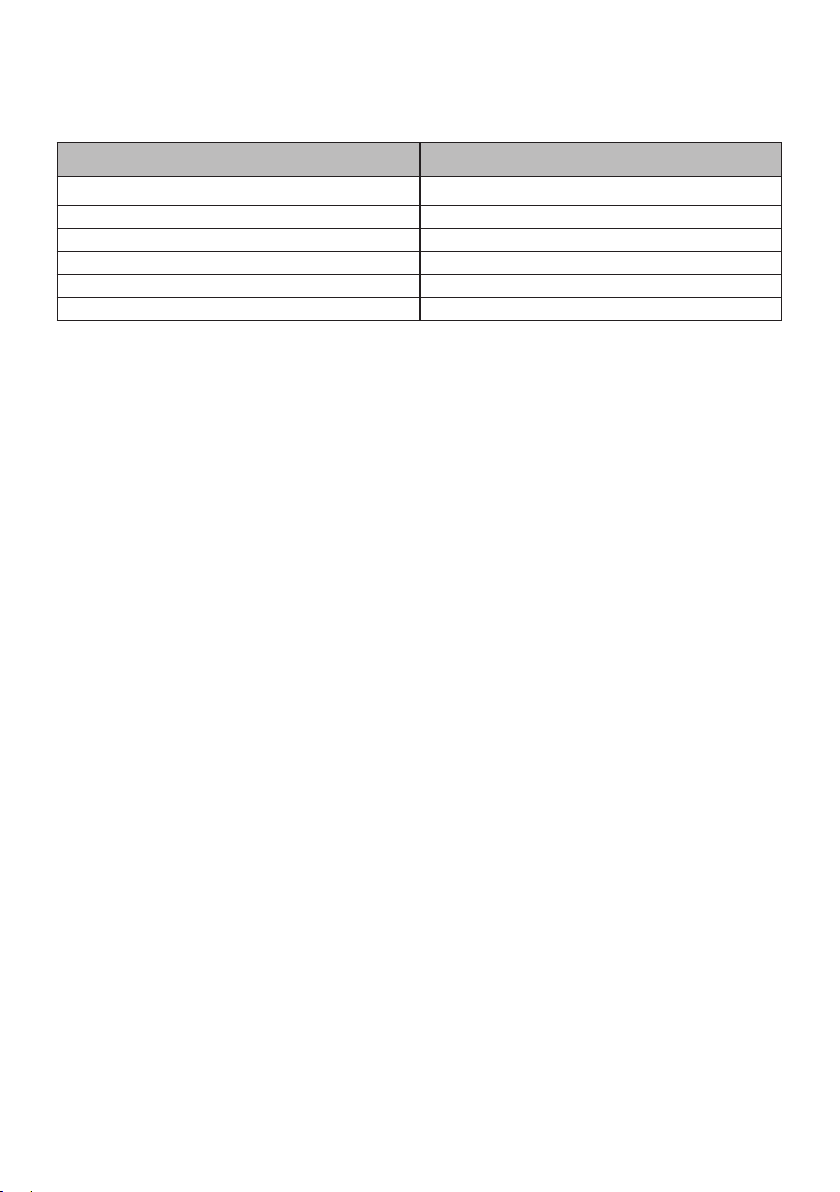
Specifications
Model WD1275ND
Wash Capacity 7.5 kg
Power Supply 220 - 240 V~, 50 Hz
Size 600 mm(W) x 550 mm(D) x 850 mm (H)
Product Weight 60 kg
Permissible Water pressure 100 ~ 800 kPa (1.0 - 8.0 kgf / cm²)
Allowable temperature 5 – 35 °C
• The external hot water supply MUST NOT exceed 65°C
• No further backflow protection required for connection to the water supply.
• Permissible cold water temperature : 4 - 25°C
• Specifications subject to change by manufacturer.
• Country of origin: Made In China.
• Appearance and specifications may change without notice to improve the quality of the product.
EN
10
EN
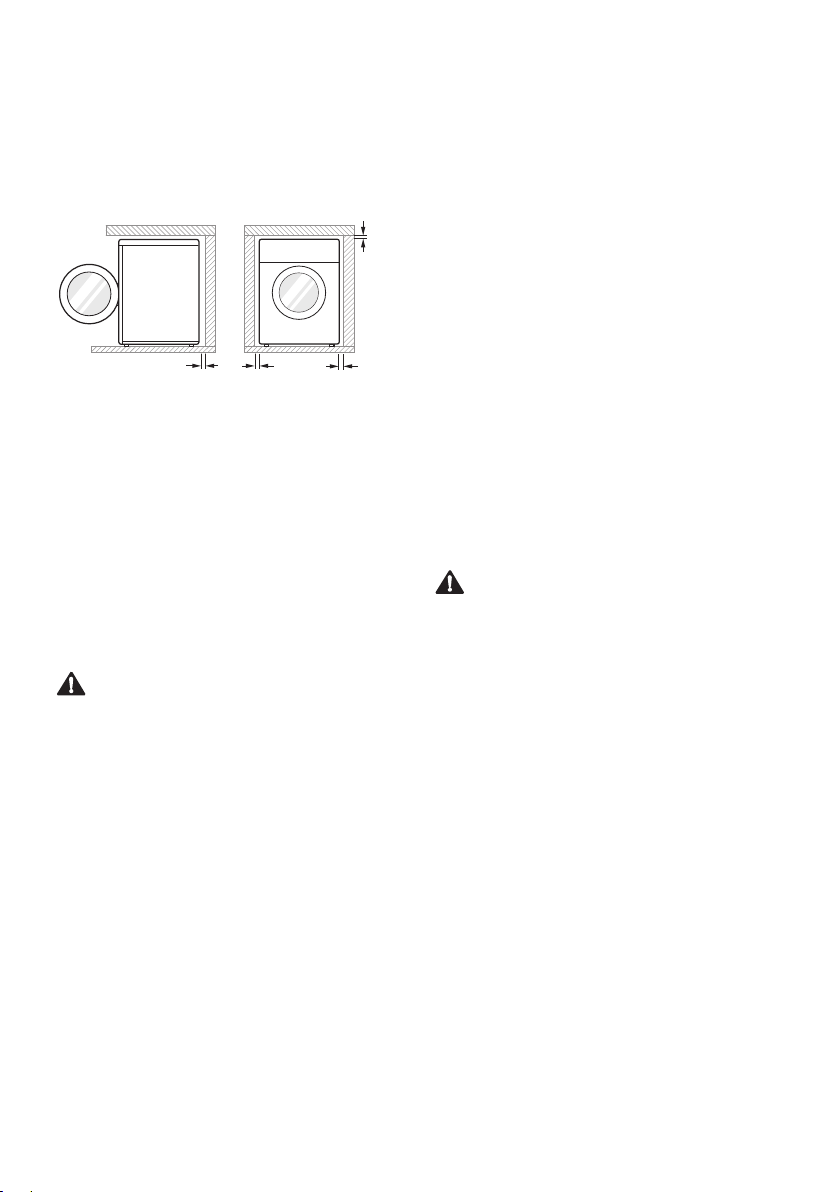
2 cm
0.5 cm
2 cm10 cm
Installation Place
Requirements
Location
Level floor: Allowable slope under the entire
appliance is 1°.
Mains Power outlet: Must be within 1.0 meter
of either side of the location of the appliance.
• Do not overload the outlet with more than one
appliance.
Additional Clearance: For the wall, 10 cm:
rear/2 cm: right & left side
• Do not place or store laundry products on top
of the appliance at any time. These products
may damage the finish or controls.
WARNING
• The plug must be plugged into an appropriate
outlet that is properly installed and grounded
in accordance with all local codes and
ordinances. Do not use or store this appliance
in any outdoor sheltered location. Avoid
installation where it will be exposed to direct
sunlight indoors.
Positioning
• Install the appliance on a flat hard floor.
• Make sure that air circulation around the
appliance is not impeded by carpets, rugs,
etc.
• Never try to correct any unevenness in the
floor with pieces of wood, cardboard or similar
materials under the appliance.
• If it is impossible to avoid positioning the
appliance next to a gas cooker or coal burning
stove, an insulation (85x60 cm) covered with
aluminum foil on the side facing the cooker or
stove must be inserted between the two
appliances.
• Do not install the appliance in rooms where
freezing temperatures may occur. Frozen
hoses may burst under pressure. The
reliability of the electronic control unit may be
impaired at temperatures below freezing point.
• Ensure that when the appliance is installed, it
is easily accessible for an engineer in the
event of a breakdown.
• With the appliance installed, adjust all four
feet using the transit bolt spanner provided to
ensure the appliance is stable, and a
minimum clearance of approximately 5 mm is
left between the top of the appliance and the
underside of any worktop
• If the appliance is delivered in winter and
temperatures are below freezing, place the
appliance at room temperature for a few hours
before putting it into operation.
WARNING
• This equipment is not designed for maritime
use or for use in mobile installations such as
caravans, aircraft etc. It is not suitable for
commercial applications.
Electrical Connection
• Do not use an extension cord or double
adapter.
• Always unplug the appliance and turn off the
water supply after use.
• Connect the appliance to an earthed socket in
accordance with current wiring regulations.
• The appliance must be positioned so that the
plug is easily accessible.
• Repairs to the appliance must only be carried
out by qualified personnel. Repairs carried out
by inexperienced persons may cause injury or
serious malfunctioning. Contact your local
service centre.
11
EN
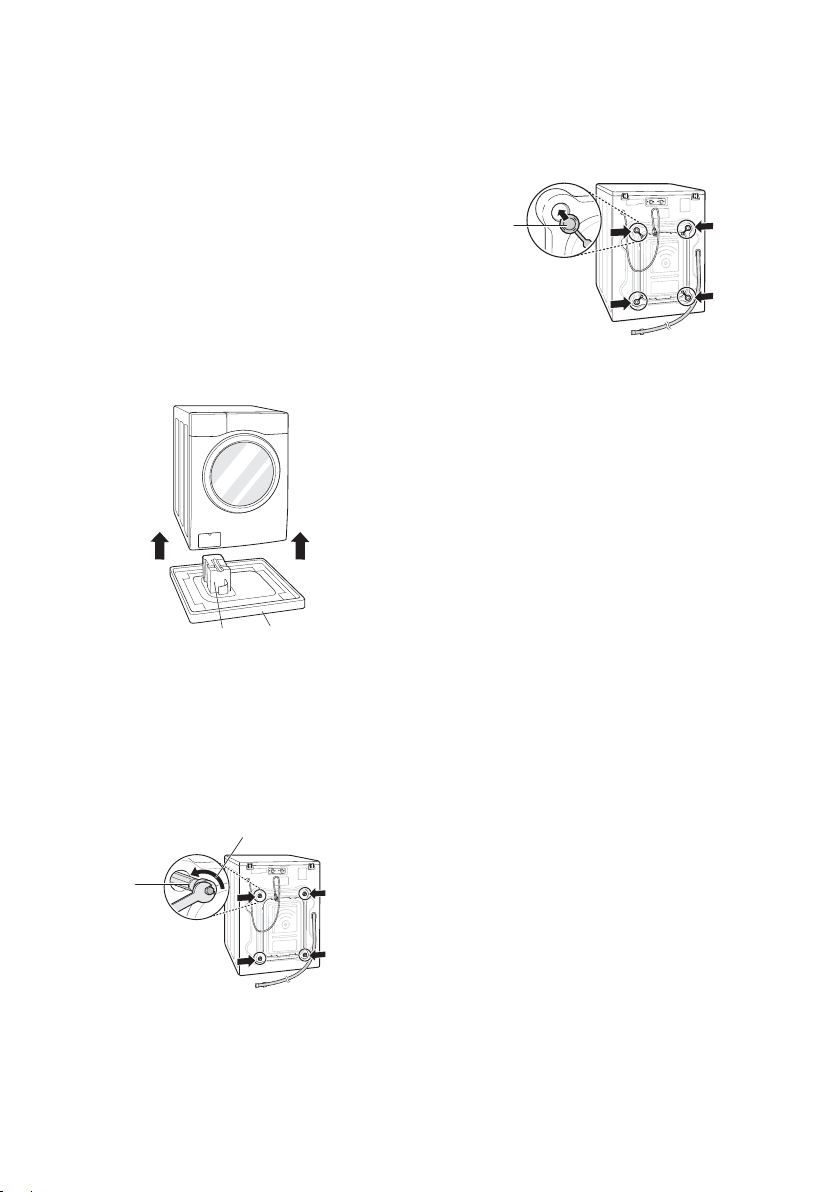
Unpacking and Removing
Transit Bolts
Lift the appliance off the foam base.
1
• After removing the carton and shipping
material, lift the appliance off the foam
base. Make sure the tub support comes
off with the base and is not stuck to the
bottom of the appliance.
• If you must lay the appliance down to
remove the carton base, always protect
the side of the appliance and lay it
carefully on its side. Do not lay the
appliance on its front or back.
Tub Support
(some models only)
Carton base
Install the hole caps.
3
• Locate the hole caps included in the
accessory pack or attached on the back.
Cap
NOTE
• Save the bolt assemblies for future use. To
prevent damage to internal components, Do
not transport the washing machine without
reinstalling the transit bolts.
• Failure to remove transit bolts and retainers
may cause severe vibration and noise, which
can lead to permanent damage to the washing
machine. The cord is secured to the back of
the washing machine with a transit bolt to help
prevent operation with transit bolts in place.
Remove the bolt assemblies.
2
• Starting with the bottom two transit bolts,
use the spanner (included) to fully loosen
all transit bolts by turning them
counterclockwise. Remove the bolt
assemblies by wiggling them slightly while
pulling them out.
Retainer
Transit
bolt
12
 Loading...