

Page 1
UUsseerr GGuuiiddee
MMaannuuaall ddeell UUssuuaarriioo
V
X
4
4
0
0
M
M
B
B
0
0
5
9
7
0
1
(1.1)
U
S
E
R
G
U
I
D
E
Page 2

Contents
LIMITED WARRANTY STATEMENT.......................... 1
Subject ............................................................. 3
Introduction ................................................................... 5
Important Information ...................................... 6
Check Accessories ......................................... 6
Before You Start .......................................................... 7
Safety Instructions ........................................... 7
Safety Information ........................................... 8
FCC RF Exposure Information ....................... 9
Chapter 1. Getting Started ........................................ 12
Cautions ........................................................ 12
Using the Battery Pack ................................. 13
Phone Components....................................... 17
Phone Overview ........................................... 18
Onscreen Icons.............................................. 20
Entering Information Using T9 Text Input..... 21
Chapter 2. Basic Functions ....................................... 26
Turning the Phone On and Off ..................... 26
Making a Call ................................................ 27
Correcting Dialing Mistakes ......................... 28
Receiving Calls ............................................. 28
Using Manner, Silence All, Lock Mode ........ 29
Call Waiting ................................................... 31
Page 3

Mute ............................................................... 31
Redialing Calls .............................................. 31
Adjusting the Volume ................................... 32
Power Save Mode ........................................ 32
Signal Strength .............................................. 33
Caller ID Display ........................................... 33
Speed Dialing ................................................ 34
Caller ID ......................................................... 34
Phone Book Features ................................... 35
Making a Call From Your Phone Book ........ 37
Chapter 3. Menu Features ........................................ 41
General Guidelines to Menu Accessand
Settings .......................................................... 41
Call History..................................................... 42
Phone Book ................................................... 45
Messages ...................................................... 48
Mobile Web ................................................... 63
Get It Now ..................................................... 70
Fun Tools ....................................................... 74
Organizer ....................................................... 75
Settings .......................................................... 79
Phone Info ................................................... 103
Chapter 4. Functions Used During a Call .............. 105
Mute.............................................................. 105
Chapter 5. Accessories ........................................... 106
Chapter 6. Appendix ................................................ 109
Chapter 7. Safety Guidelines ................................... 111
TIA Safety Information ................................ 111
FDA Consumer Update .............................. 116
Consumer Information on SAR ............................... 125
Page 4

LIMITED WARRANTY STATEMENT
1. WHAT THIS WARRANTY COVERS:
LG offers you a limited warranty that the enclosed subscriber unit and its enclosed
accessories will be free from defects in material and workmanship, according to
the following terms and conditions:
(1) The limited warranty for the unit and enclosed accessories shall be a period
of one (1) year from the date of original purchase. The remaining warranty
period for the unit being repaired or replaced shall be determined by
presentation of the original sales receipt for the purchase of the unit.
(2) The limited warranty extends only to the original purchaser of the product
and is not assignable or transferable to any subsequent purchaser/end user.
(3) The limited warranty is good only to the original purchaser of the product
during the warranty period as long as it is in the U.S., including Alaska,
Hawaii, U.S. Territories, and all Canadian Provinces.
(4) The external housing and cosmetic parts shall be free of major defects at the
time of shipment and, therefore, shall not be covered under these limited
warranty terms.
(5) Upon request from LG, the consumer must provide information satisfactory
to LG to prove the date of purchase or exchange.
(6) The customer shall bear the cost of shipping the product to the Customer
Service Department of LG. LG shall bear the cost of shipping the product
back to the consumer after the completion of service under this limited
warranty.
2. WHAT THIS WARRANTY DOES NOT COVER:
(1) Defects or damage resulting from use of the product in other than its normal
and customary manner.
(2) Defect or damage from abnormal use, abnormal conditions, improper
storage, exposure to moisture or dampness, unauthorized modifications,
unauthorized connections, unauthorized repair, misuse, neglect, abuse,
accident, alteration, improper installation, or other acts which are not the fault
of LG, including damage caused by shipping, blown fuses, or spills of food
or liquid.
(3) Breakage or damage to antennas unless caused directly by defects in material
or workmanship.
(4) Alleged defects or malfunctions of the product if the Customer Service
Department at LG was not notified by the consumer during the applicable
limited warranty period.
(5) Products, which have had the serial number, removed or made illegible.
1
Page 5

(6) This limited warranty is in lieu of all other warranties, express or implied
either in fact or by operations of law, statutory or otherwise, including but not
limited to any implied warranty of marketability merchantability or fitness for
a particular use.
(7) Damage resulting from use of non-LG approved accessories.
(8) All plastic surfaces and all other externally exposed parts that are scratched
or damaged due to normal customer use.
(9) Products operated outside published maximum ratings.
(10) Products used or obtained in a rental program.
(11) Consumables (such as fuses).
3. STATE LAW RIGHTS:
N
o other express warranty is applicable to this product. THE DURATION OF
ANY IMPLIED WARRANTIES, INCLUDING THE IMPLIED
WARRANTY OF MARKETABILITY OR MERCHANTABILITY, IS
LIMITED TO THE DURATION OF THE EXPRESS WARRANTY
HEREIN. LG INFOCOMM U.S.A., INC. SHALL NOT BE LIABLE FOR
THE LOSS OF THE USE OF THE PRODUCT, INCONVENIENCE, LOSS
OR ANY OTHER DAMAGES, DIRECT OR CONSEQUENTIAL,
ARISING OUT OF THE USE OF, OR INABILITY TO USE, THIS
PRODUCT OR FOR ANY BREACH OF ANY EXPRESS OR IMPLIED
WARRANTY, INCLUDING THE IMPLIED WARRANTY OF
MARKETABILITY OR MERCHANTABILITY APPLICABLE TO THIS
PRODUCT.
Some states do not allow the exclusive of limitation of incidental or
consequential damages or limitations on how long an implied warranty lasts; so
these limitations or exclusions may not apply to you. This warranty gives you
specific legal rights and you may also have other rights, which vary from state
to state.
4. HOW TO GET WARRANTYSERVICE:
T
o obtain warranty service, please call the following telephone number from
anywhere in the continental United States:
Tel. 1-800-793-8896
www.lgeservice.com
Please call or write for the location of the LGE authorized service center nearest
you and the procedures for obtaining warranty claims.
Electronics Service
Subject
The VX4400 phone has been designed to operate on the
latest digital mobile communication technology, Code
Division Multiple Access (CDMA). This CDMAdigital
technology has greatly enhanced voice clarity and can
provide a variety of advanced features. Currently,
CDMA mobile communication technology has been
commercially used in Cellular and Personal
Communication Service (PCS).
The difference between Cellular and PCS is operating
frequency. Cellular uses 800Mhz and PCS uses 1.9Ghz.
Also, the VX4400 works on Advanced Mobile Phone
Service (AMPS). We call it a tri-mode phone. Since the
phone operates on Cellular, PCS and AMPS, the call fail
rate is less than on a conventional dual-mode or singlemode phone.
CDMA technology adopts DSSS (Direct Sequence
Spread Spectrum). DSSS enables the phone to keep
communication from being crossed and enables multiple
users in the same specific area to use one frequency
channel, resulting in a 10 fold increase in capacity when
compared with the analog mode currently used.
Soft/Softer Handoff, Hard Handoff, and Dynamic RF
power Control technologies are combined into this phone
to reduce call interruptions.
The Cellular and PCS CDMAnetworks consist of MSO
(Mobile Switching Office), BSC (Base Station
Controller), BTS (Base station Transmission System), and
MS (Mobile Station). The following table lists some
major CDMAStandards.
201 JAMES RECORD ROAD, HUNTSVILLE, AL35824
32
Page 6
CDMA Standard
Basic air interface
Network
Service
Performance
Designator Description
TIA/EIA/IS-95-A
ANSI J-STD-008
TIA/EIA/IS-634
TIA/EIA/IS/651
TIA/EIA/IS-41-C
TIA/EIA/IS-124
TIA/EIA/IS-96-B
TIA/EIA/IS-99
TIA/EIA/IS-637
TIA/EIA/IS-657
TIA/EIA/IS-97
TIA/EIA/IS-98
ANSI J-STD-018
ANSI J-STD-019
TIA/EIA/IS-125
Protocol between MS and BTS
for Cellular & AMPS
Protocol between MS and BTS
for PCS
MAS-BS
PCSC-RS
Intersystem operations
Nom-signaling data comm.
Speech CODEC
Assign data and fax
Short message service
Packet data
Cellular base station
Cellular mobile station
PCS personal station
PCS base station
Speech CODEC
* TSB -74: Protocol between an IS-95A system and
ANSI J-STD-008
1xRTT system receives subscribers in wireless
sections twice as much as IS-95. Its battery life is twice
as long as IS-95. High-speed data transmission is also
possible.
Introduction
Highlights
Congratulations! Your new mobile phone will change
the way you communicate and is a compact,
lightweight personal communication system with
added features for the person on the go. Our
advanced digital mobile communication technology
features the following:
Large, easy-to-read, 8-line, backlit LCD with status
G
icons.
Paging, messaging, voice mail, and caller ID.
G
18-key keypad.
G
Long battery standby and talk time.
G
Menu-driven interface with prompts for easy
G
operation and configuration.
Any key answer, auto answer, auto retry, and one-
G
touch dialing and speed dialing with 99 memory
locations.
Bilingual (English and Spanish menu languages are
G
available).
54
Page 7

Important Information
This user’s manual provides important information
on the use and operation of your phone. Please read
all the information carefully prior to using the phone
for the best performance and to prevent any damage
to or misuse of the phone. Any unapproved change or
modification will void your warranty.
Check Accessories
Your mobile phone comes with a one-slot desktop
charger and a rechargeable battery. Please verify that
these accessories are included.
Before You Start
Safety Instructions
WARNING! To reduce the possibility of electric shock, do
not expose your phone to high humidity areas, such as the
bathroom, swimming pool, etc.
Use only LG-approved batteries and desktop chargers to avoid
the damage to the phone. Using other batteries or chargers
voids your warranty and may cause the explosion. Do not use
batteries and desktop chargers for the other purposes other
than their original purpose of using for the phone.
Using other batteries or chargers voids your warranty and may
cause damage.
Always store your phone away from heat. Never store your
phone in settings that may expose it to temperatures less than
32°F or greater than 104°F, such as outside during a snow
storm or in your car on a hot day. Exposure to excessive cold
or heat will result in malfunction, damage and/or catastrophic
failure.
Be careful when using your phone near other electronic
devices. RF emissions from your mobile phone may affect
inadequately shielded electronic equipment nearby. You
should consult with manufacturers of any personal medical
devices, such as pacemakers and hearing aides, to determine if
they are susceptible to interference from your mobile phone.
Turn off your phone in a medical facility or at a gas station.
Never place your phone in a microwave oven as it will cause
the battery to explode.
IMPORTANT! Please read the TIA SAFETY
INFORMATION on page 111 before using your phone.
6
7
Page 8

Safety Information
Please read and observe the following information for the safe
and proper use of your phone and to prevent any unanticipated
damage by accident. Also, keep the user’s manual in an
accessible place all the times after reading it.
Unplug the power cord and charger during a lightning
G
storm to avoid electric shock or fire.
Do not use your phone in high explosive areas as the
G
phone may generate sparks.
Do not put your phone in a place subject to excessive
G
dust, and keep the minimum required distance between
the power cord and heat sources.
Unplug the power cord prior to cleaning your phone, and
G
clean the power plug pin when it is dirty.
Do not damage the power cord by bending, twisting,
G
pulling, or heating. Do not use the plug if it is loose as it
may cause fire or electric shock.
Firmly plug the power cord and unplug the power cord
G
when you complete using. Ensure the plug is firmly
connected. If it is not firmly connected, it may cause
excessive heat or fire.
Do not place any heavy item on the power cord. Do not
G
allow the power cord to be crimped as it may cause fire or
electric shock.
Do not impact to the phone with sharp articles such as nail
G
or animal’s teeth.
Do not disassemble, or impact to the phone, or do not
G
place or answer calls while charging the phone as it may
cause electric shock and fire by the short circuit.
Be careful not to let the battery contact metal conductors
G
such as a necklace or coins. When shorted, it may cause
an explosion.
8
Do not disassemble or impact to the battery as it may cause
G
electric shock, short-circuit, and fire. Store the battery in a
place out of reach of children.
Using a damaged battery or placing a battery in your
G
mouth may cause serious injury.
Do not place items containing magnetic components such
G
as a credit card, phone card, bank book and a subway
ticket, near your phone. The magnetism of the phone may
damage the data stored in the magnetic strip.
Do not hold or let the antenna come in contact with your
G
body during a call.
Talking on your phone for a long period of time may
G
reduce the call quality due to heat generated during the use.
Do not vibrate or impact to the phone.
G
When you do not use the phone for a long period time,
G
store it in a safe area with the power cord unplugged.
Be careful about breakage of the phone as it may result in
G
body injury.
FCC RF Exposure Information
WARNING! Read this information before operating the
phone.
In August 1996, the Federal Communications (FCC) of the
United States, with its action in Report and Order FCC 96326, adopted an updated safety standard for human exposure
to radio frequency (RF) electromagnetic energy emitted by
FCC regulated transmitters. Those guidelines are consistent
with the safety standard previously set by both U.S. and
international standards bodies.
9
Page 9

The design of this phone complies with the FCC guidelines
and these international standards.
CAUTION
Use only the supplied and approved antenna. Use of
unauthorized antennas or modifications could impair call
quality, damage the phone, void your warranty and/or result in
violation of FCC regulations.
Do not use the phone with a damaged antenna. If a damaged
antenna comes into contact with skin, a minor burn may
result. Contact your local dealer for a replacement of antenna.
Body-worn Operation
This device was tested for typical body-worn operations with
the back of the phone kept
comply with FCC RF exposure requirements, a minimum
separation distance of
between the user’s body and the back of the phone, including
the antenna, whether extended or retracted. Third-party beltclips, holsters, and similar accessories containing metallic
components should not be used. Body-worn accessories that
3
cannot maintain
/4inch (2 cm) separation distance between
the user’s body and the back of the phone, and have not been
tested for typical body-worn operations may not comply with
FCC RF exposure limits and should be avoided.
3
/4inch (2 cm) from the body. To
3
/4 inches (2 cm) must be maintained
Vehicle Mounted External Antenna
(optional, if available)
Aminimum separation distance of 8 inches (20 cm) must be
maintained between the user/bystander and the vehicle
mounted external antenna to satisfy FCC RF exposure
requirements.
For more information about RF exposure, visit the FCC
website at www.fcc.gov
10
FCC Part 15 Class B Compliance
This device and its accessories comply with part 15 of FCC
rules. Operation is subject to the following two conditions: (1)
This device and its accessories may not cause harmful
interference, and (2) this device and its accessories must
accept any interference received, including interference that
may cause undesired operation.
Cautions for Battery
Do not disassemble.
G
Do not short-circuit.
G
Do not expose to high temperature: 60°C (140°F).
G
Do not incinerate.
G
Battery Disposal
Please dispose of your battery properly or bring to your
G
local wireless carrier for recycling.
Do not dispose in fire or with hazardous or flammable
G
materials.
Adapter (Charger) Cautions
Using the wrong battery charger could damage your phone
G
and void your warranty.
The adapter or battery charger is intended for indoor use
G
only.
Do not expose the adapter or battery charger to direct sunlight
or use it in places with high humidity, such as the bathroom.
11
Page 10
Chapter 1. Getting Started
Cautions
Using the phone near receiving equipment (i.e.,
G
TV or radio) may cause interference.
Keep your phone in a safe place when not in
G
use.
Only use the batteries, antennas, and chargers
G
provided by LG. Using unauthorized accessories
could void your warranty.
Only authorized personnel should service the
G
phone and its accessories. Faulty installation or
service may result in accidents and consequently
void the warranty.
Do not hold the antenna while the phone is in
G
use.
Do not use the phone in designated no cellular
G
phone use areas.
Do not expose the phone to high temperature or
G
humidity .
Avoid getting your phone wet. If the phone gets
G
wet, turn the power off immediately and remove
the battery. If the phone is non-functional, return
it to the dealer for service.
Avoid shock or impact to the phone.
G
Using the Battery Pack
Charge the battery fully before initial use of the
phone.
The phone comes with a rechargeable battery. Keep
the battery charged while not in use in order to
maximize talk and standby time when using the
phone.
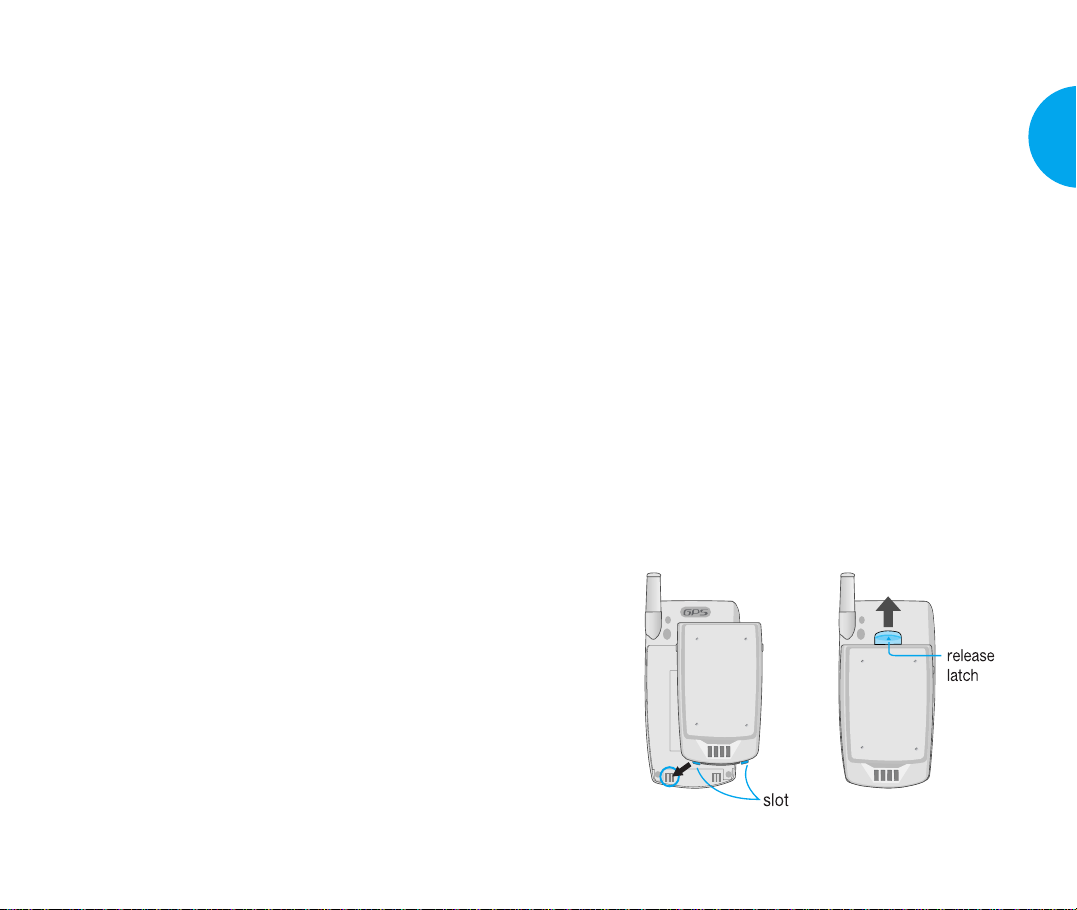
Installing the Battery
To install the battery, insert the bottom of the battery
into the opening on the back of the phone. Then,
push the battery down until the latch clicks.
Removing the Battery
Turn the power off. (If power is on, a loss of stored
numbers and messages may occur.)
Lifting release latch detaches the battery from the
phone.
Getting Started
Getting Started
12
VX4400
13
Page 11
Cellular phone holder
Cellular phone holder
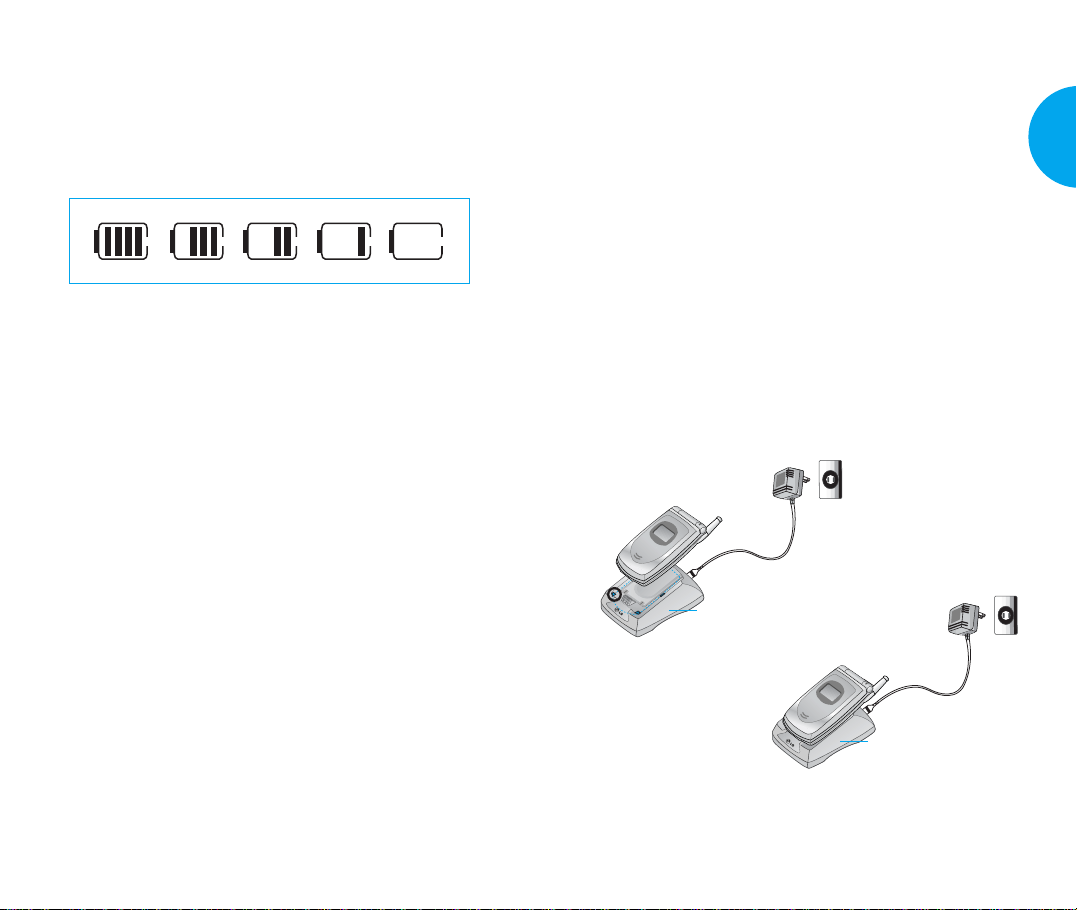
Battery Charge Level
The battery charge level is shown at the top right of
the LCD screen.
2. Insert the phone with an installed battery or a
battery into the slot of the charger.
Red light indicates the battery is being charged.
G
Green light indicates the battery is fully charged.
G
Charging time will vary depending upon battery
level. Maximum charging time for a fully discharged
battery will not exceed 3 hours.
Getting Started
When the battery charge level becomes low, the low
battery sensor will alert you in three ways: sounding
an audible tone, blinking the battery icon outline, and
displaying LOW BATTERYWARNING! If the
battery charge level becomes exceedingly low, the
phone will automatically switch off and any function
in progress will not be saved.
Using the Desktop Charger
The desktop charger has a slot for recharging your
phone’s battery.
Warning! Use only the desktop charger provided with
the phone. Using an unauthorized charger may cause
damage to your phone or battery .
1. Plug the charger into a wall outlet.
The phone must be charged from a 120 V power
G
source only.
Getting Started
14
WARNING!
DO NOT charge the phone battery using desktop
charger and the travel charger simultaneously, this
may cause the battery to be altered or damaged.
VX4400
15
Page 12
Caring for the Battery
1. You do not need to wait until the battery
completely runs down to recharge the battery.
2. Use only LG batteries and chargers specific to
your model of phone. LG’s chargers are designed
to maximize battery life.
3. If you use the unauthorized battery, it may cause
the damage to or explosion of the battery.
Therefore, please prohibit using the unauthorized
ones.
4. Do not disassemble or short-circuit the battery.
5. Keep the battery’s metal contacts clean.
6. Replace the battery when it no longer provides
acceptable performance. The battery can be
recharged several hundred times before it needs
replacing.
7. Recharge the battery if it has not been used for a
long time to maximize battery life.
Do not expose the battery charger to direct sunlight
8.
or use it in areas of high humidity , such as the
bathroom.
9. Do not leave the battery in hot or cold places, as it
may deteriorate battery performance.
Your battery life may vary by location, use patterns,
10.
etc.
11.
Long backlight settings, searching for service,
MiniBrowser, data connectivity, and synchronization
all may affect battery life, talk, and standby times.
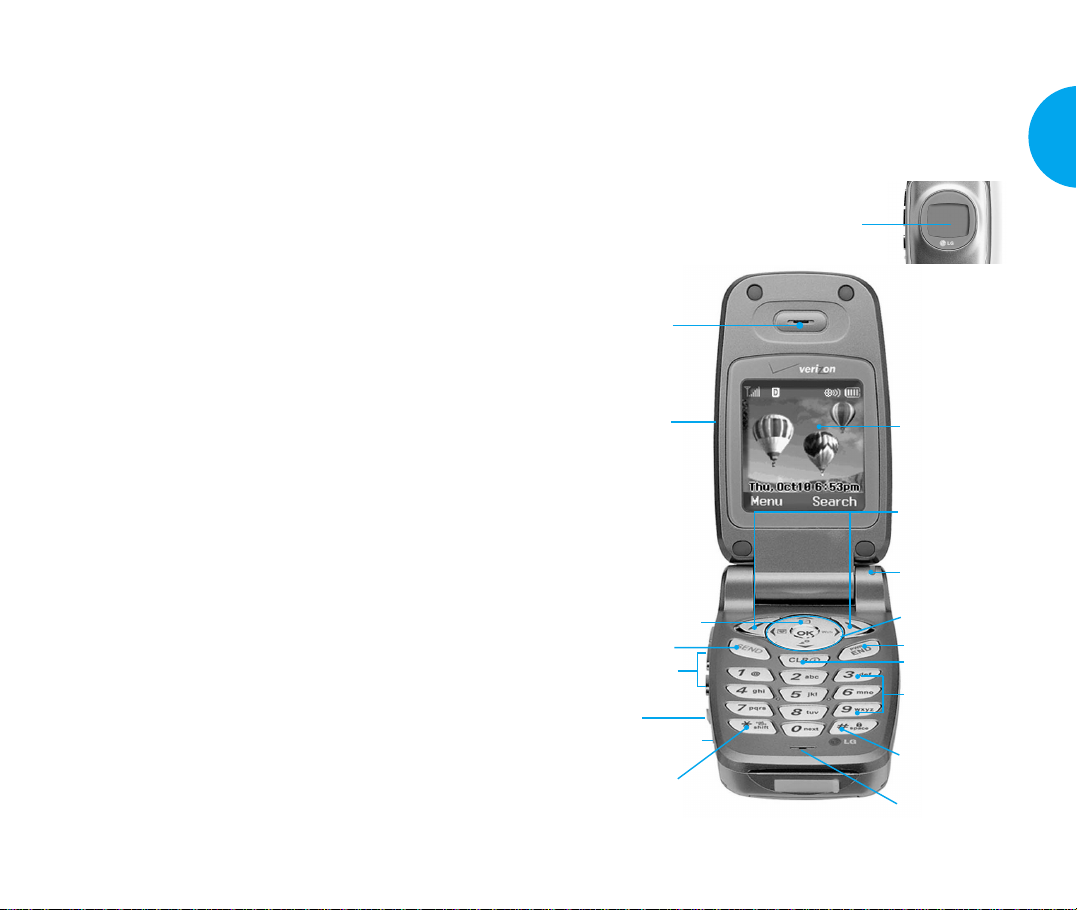
Phone Components
The following shows key components of your mobile
phone.
Caller LCD
1. Earpiece
2. Cellcase
3. Message Key
4. Send
5. Side Keys
6. Voice Memo
Key
7. Headset Jack
8. Manner Mode/
Silence All Key
9. LCD Screen
10. Soft Key 1
Soft Key 2
11. Lamp
12. Navigation Key
13. END/PWR
14. CLR
15. Alphanumeric
Keypad
16. Lock Mode Key
17. Microphone
Getting Started
Getting Started
16
VX4400
17
Page 13

Phone Overview
1. Earpiece
2. Cellcase Open the cellcase (flip) to answer an
incoming call and close to end the call.
Message Key Allow you to retrieve or send
3.
voice and text messages.
SEND Allows you to place or answer calls.
4.
5.
Side Keys
(in standby mode) and earpiece volume (during a
call).
6.
Voice Memo Key
With the cellcase open:
Voice Recognition will be operated by quickly
pressing Voice Memo Key after opening a folder .
Voice Memo Recording will be operated by pressing
and holding Voice Memo Key after opening a folder .
With the cellcase closed:
Allows you to select Manner Mode/Silence All.
7. Headset Jack
8. Manner Mode/Silence All Key
In standby mode, allows you to set the Manner
Mode by pressing and holding the key about
3 seconds.
Selecting Manner Mode will allow you to
maintain your phone under Manner Mode even
when you turn it off and turn it back on.
Allows you to adjust key beep volume
9.
LCD screen
Displays messages and indicator icons.
10. Soft Keys
Soft Key 1
Used to display the function setting menu.
Soft Key 2
Used to select an action within a menu.
Lamp The red light illuminates when you turn
11.
the power on and when you have an incoming
call or message.
Navigation Key
12.
Allows quick access to text
and voice mail notification messages,
Get It Now , Schedule and Browser.
13. END/PWR Turns power on/off and to end a call.
Using this key, you can return to the main menu
display screen.
Clear Key Deletes a single space or character.
14.
Press and hold to delete entire words.
Press this key once in a menu to go back one level.
Alphanumeric keypad Allows you to enter
15.
numbers and characters and choose menu items.
Lock Mode Key
16.
In standby mode, set the lock function by
pressing and holding the key about 3
seconds.
Microphone
17.
Getting Started
Getting Started
18
VX4400
19
Page 14
!
!
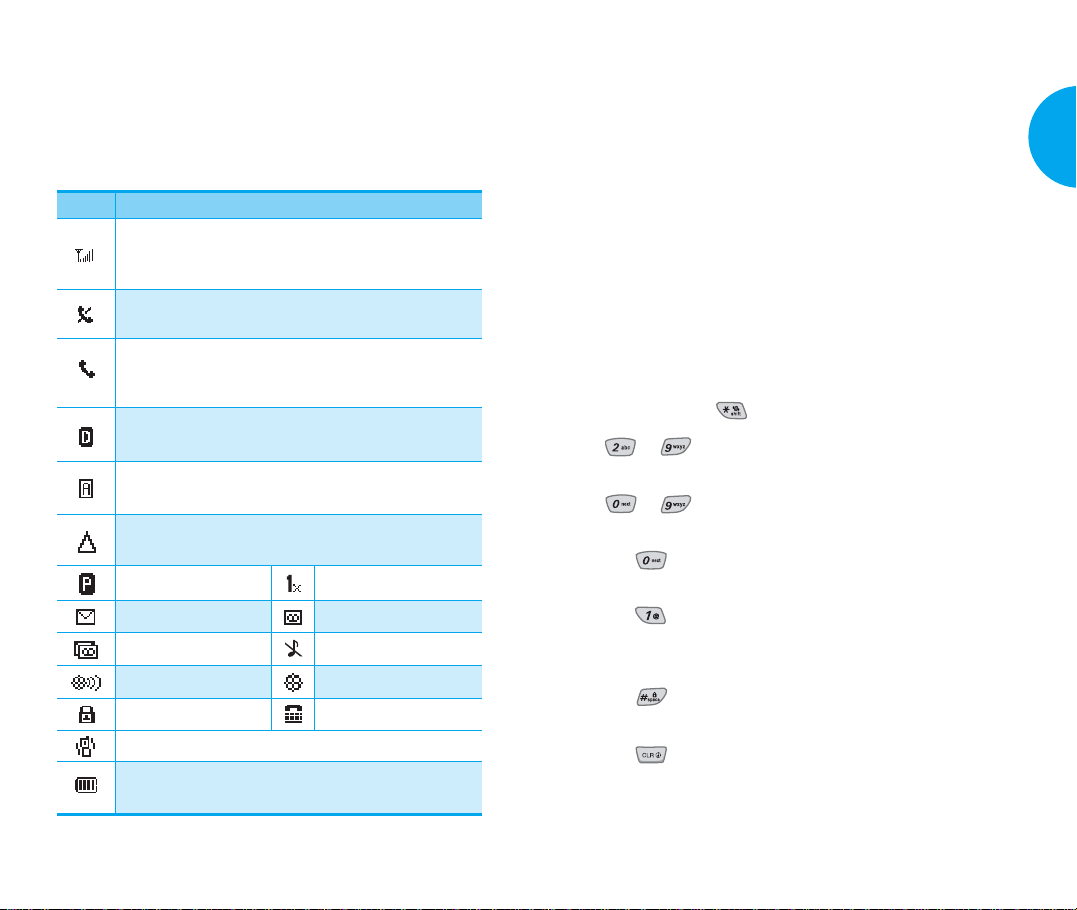
Onscreen Icons
The phone screen displays several onscreen icons
which appear when the phone is powered on.
Icons Descriptions
Strength of the signal received by the phone.
Current signal strength is indicated by the number of
bars displayed on the screen.
No service
The phone is not receiving a system signal.
In use
Acall is in progress.
No icon indicates the phone is in standby mode.
*
Digital indicator
Digital service is available.
Analog indicator
Analog service is available.
Roaming
The phone is outside of its home service area.
Voice privacy
New text msgs
New text & voice
Location on mode
SSL
In Manner Mode (vibration)
Charge level
Indicates battery charge level.
In case of 1x service
New voicemails
In silence all mode
E911 only mode
TTY
Entering information using T9
Text Input
You can edit the Banner, Scheduler, Short Message,
and Phone Book using T9 Text Input.
Key Functions
Soft Key 2: Press to scroll and select a mode
through menus.
- You can scroll through the modes using Soft Key
2 in the following order : T9Word-> Abc->
123-> Symbol-> Smileys->
- Shift Key ( ): Used to change the letter case.
~(Type Text): In T9 mode, press one key
per letter to enter text.
(Type Numbers): In 123 (Numbers)
~
mode, press once to enter numbers.
(Next): In T9 mode, press to display
other matching words.
(Punctuation): In T9 mode, press to
insert punctuation in a word and complete
a sentence.
(Space): Press to complete a word or
insert a space.
(Clear): Press to delete a single space or
character. Press and hold to delete entire
words.
Getting Started
Getting Started
20
VX4400
21
Page 15
!!!
Input mode
T9 Text Input provides five modes for entering text,
numbers, special characters, and punctuation.
T9Word (T9) Mode
Type text using one keystroke per letter. The default
is T9 mode.
ABC (Multi-tap) Mode
Use ABC mode to add words to the T9 database.
123 (Numbers) Mode
Type numbers using one keystroke per number.
To change to 123 mode in a text entry field, press
Soft Key 2 until 123 mode is displayed.
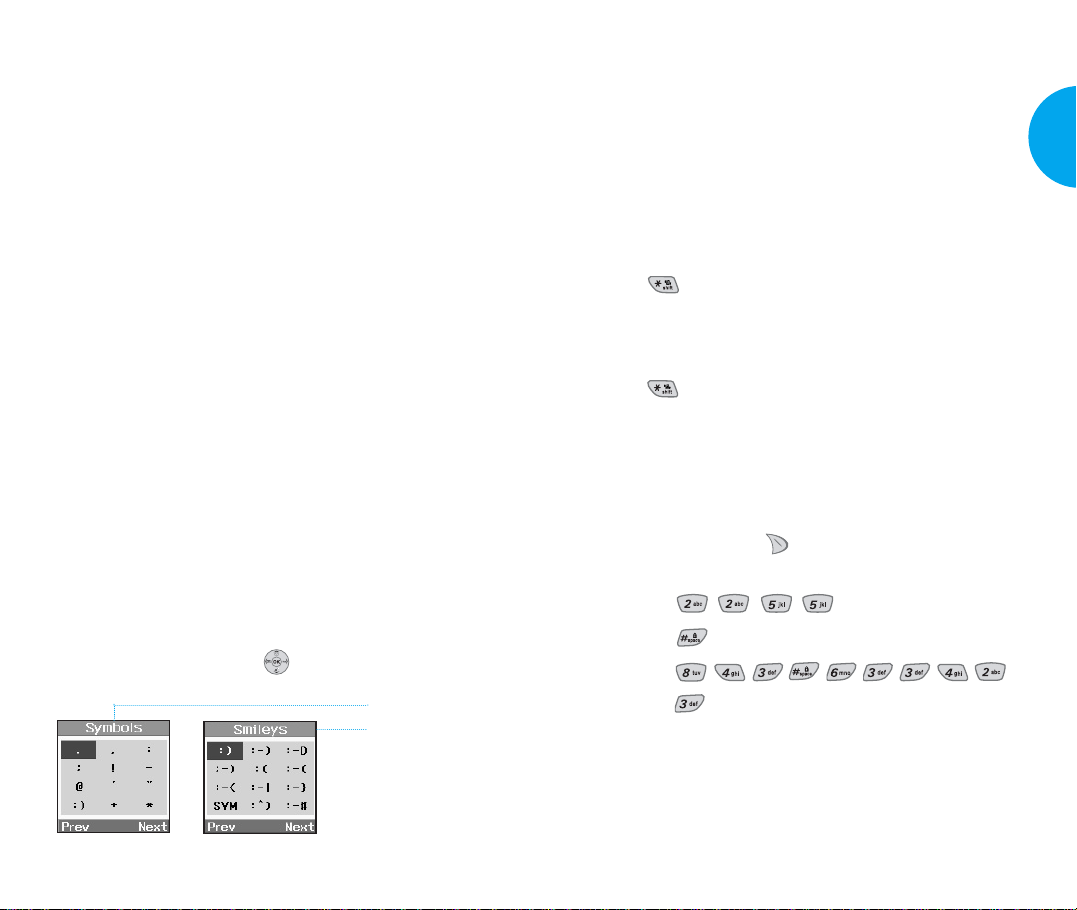
Symbol/Smileys Mode
Insert special characters, punctuation, or smileys.
You may use any of the 35 special characters. When
the cursor is located where you want the special
character, switch to Symbol/Smileys mode. If you
want to add a smiley , switch to the smileys mode.
Press the Navigation Key to cycle through and
select from the following characters:
Symbol Mode
Smileys Mode
Changing Letter Case
There are three options for selecting letter case:
Initial Cap (T9En/Abc)
Only the first letter is capitalized.
Caps Lock (T9EN/ABC)
Press to change letter case to Caps Lock.
All subsequent letters are capitalized.
Lowercase (T9en/abc)
Press again to change letter case to lowercase.
Examples Using T9 Text Input
Typing In T9 Mode
To type a new message, follow these steps:
1. Press: Soft Key 2 to change letter case to
T9En mode.
2. Press: .
3. Press: to complete the word and add a space.
4. Press:
.
5. Display: Call the office.
Getting Started
Getting Started
22
VX4400
23
Page 16

Using the NEXT Key
After you have finished typing a word, if the word
displayed is not the word you want, press to
display additional choices.
For example, follow these steps:
1. Press: .
2. Display: Good
3. Press: .
4. Display: Home, Gone, Hood......
Adding Words to the T9 Database
If a word is not in the T9 database, add it by using
ABC (Multi-tap) mode text entry. The word is
automatically added to the T9 database when you
return to T9 mode. For example, follow these steps:
1. Press: Soft Key 2 to change letter case to ABC
(multi-tap) mode.
2. Press: .
3. Display: Imt
4. Press: Soft Key 2 to change letter case to T9
mode and then the word Imt will be added to the T9
database.
8. Press: .
9. Display: Imt
Examples Using ABC (Multi-tap) Text Input
Typing in ABC (Multi-tap) Mode
To type a new message, follow these steps:
1. Press: Soft Key 2 to change letter case to ABC
mode.
2. Press: to change to ABC Caps Lock mode.
3. Press: .
4. Display: LG
Getting Started
5. Press: to erase the existing word.
6. Press: .
7. Display: got
Getting Started
24
VX4400
25
Page 17

Chapter 2. Basic Functions
Turning the Phone On and Off
Turning the Phone On
1. Install a charged battery pack or connect the phone
to an external power source such as the cigarette
lighter adapter or car kit.
2. Press for a few seconds until the red lamp
flashes.
Fully extend the antenna for the best
G
performance.
NOTE
Turning the Phone Off
1. Press and hold until display screen turns off,
2. Protect the antenna by pushing it back into the
Like any other radio device, avoid any
unnecessary contact with the antenna while
your phone is on.
then release the key.
phone, if extended.
Making a Call
When you make a call, follow these simple steps:
1. Make sure the phone is turned on.
If not, press .
G
2. Enter the phone number, with area code if needed.
3. Press .
If the phone is locked, enter the lock code.
G
Call Failed indicates that the call did not go
G
through.
Restricted*indicates that your outgoing calls
G
*
are in restricted mode. You can only dial phone
numbers saved in the Emergency or Phone
Book list.
To turn off this function:
Menu-> , -> Security-> Enter Lock
Code -> Restrict -> Off -> OK
4. Press to end the call.
When one-touch is enabled, enter the Phone Book
speed dial number or hold the last digit until the call
is made.
Basic Functions
Basic Functions
26
NOTE
Phone number and entry name appear on the
display when you enter the speed dial number
and hold the last digit.
VX4400
27
Page 18
Correcting Dialing Mistakes
If you make mistakes while dialing a number, press
once to erase the last digit entered or hold down
for at least 2 seconds to delete all digits.
Receiving Calls
1. When the phone rings, open the cellcase or if the
cellcase is open, press any key (except , , or
) to answer.
If you press or the Side Keys ( ) or
G
Soft Key quiet while the phone is ringing,
the ringing or vibration is muted for that call.
Using Manner, Silence All, Lock
Mode
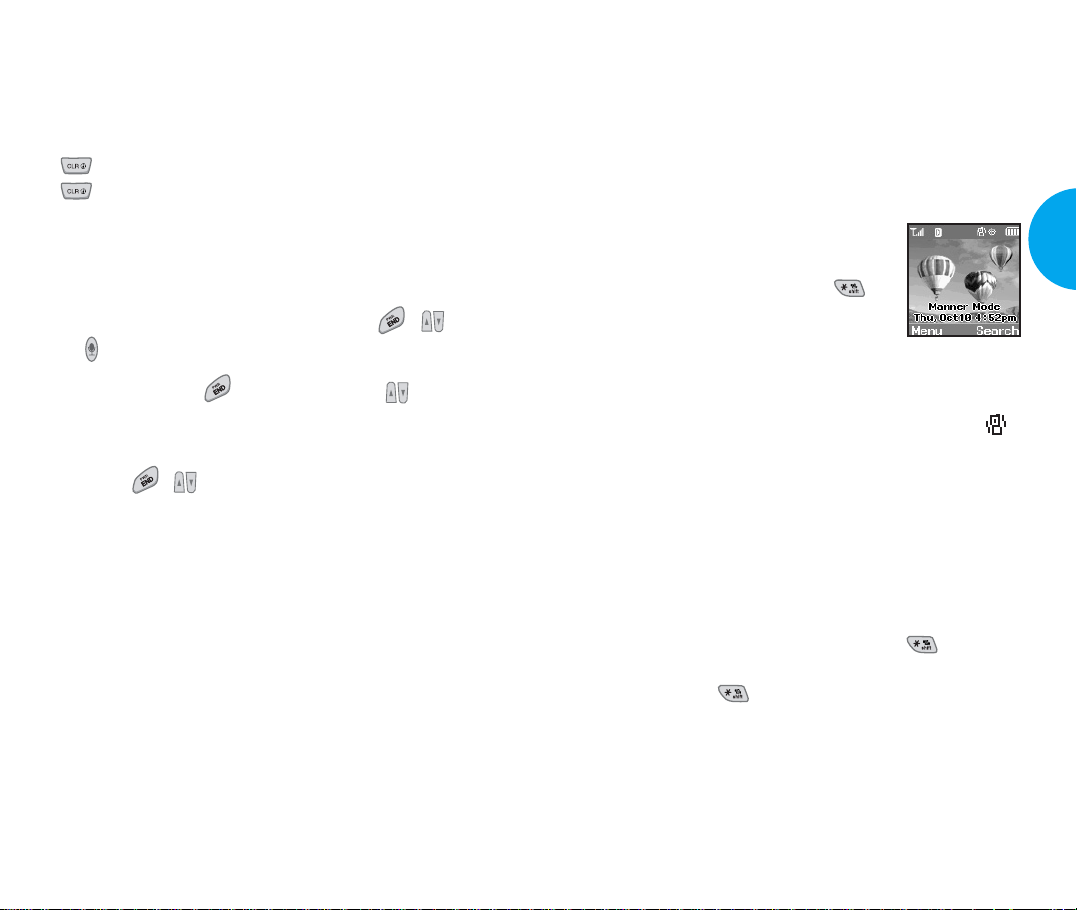
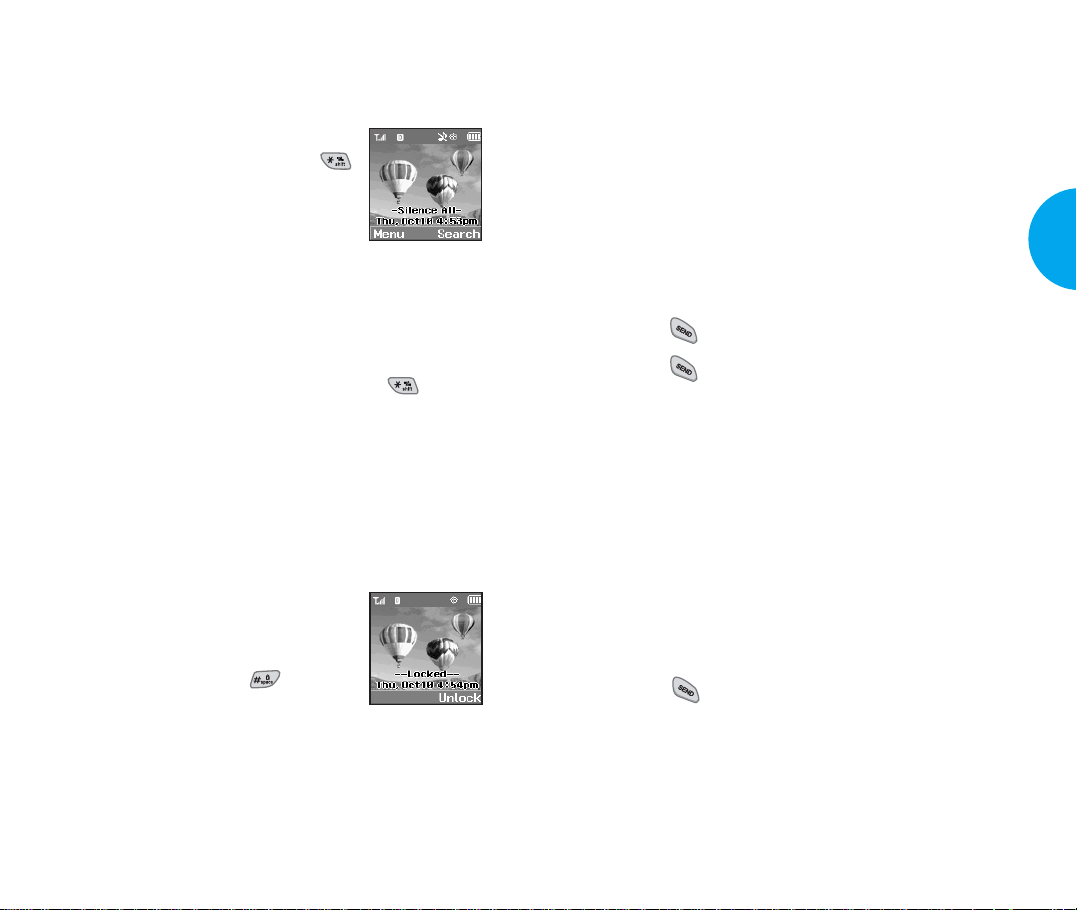
Manner Mode (Quick)
Use Manner Mode in a public place.
1. In Standby Mode, activate Manner
Mode quickly by pressing
(for 3 seconds) instead of using the
Menu function.
- When the cellcase is closed, Manner Mode can be
activated by pressing and holding the Voice Memo Key.
When Manner Mode is set, Manner Mode ()
G
is displayed on the LCD screen.
Basic Functions
2. Press , twice or Soft Key Ignore to end
the call.
Basic Functions
28
When Manner Mode is set, key tone does not
G
sound and Vibration is selected as the ringer.
NOTE
NOTE
Selecting Manner Mode will allow you to
maintain your phone under Manner Mode
even when you turn it off and turn it back on.
To cancel Manner Mode, press again
until Silence All activated! is displayed and
press again until Normal Mode activated!
is displayed.
VX4400
29
Page 19
Silence All mode (Quick)
1.
In Manner Mode, activate Silence
All Mode quickly by pressing
(for 3 seconds).
- When the cellcase is closed, Manner
Mode can be activated by pressing
and holding the Voice Memo Key.
When Silence All Mode is set, there are no tones
G
from the keys and the ringer does not sound but
the lamp blinks instead.
NOTE
NOTE
To cancel Silence All Mode, press again
until Normal Mode activated! is displayed.
To change to a different mode, from Standby
Mode press -> Manner Mode -> Silence All
Mode.
Lock Mode (Quick)
Use Lock Mode to prevent others
from using your phone.
In Standby Mode, to activate Lock
1.
Mode quickly , press (for 3
seconds).
Phone is now locked! will be displayed.
NOTE
To cancel Lock Mode, press Soft Key 2
Unlock, then enter your password (4 digits).
Call Waiting
Your cellular service may offer a call waiting
function. While a call is in progress, you may hear
two beeps indicating another incoming call. When
call waiting is enabled, you may put the active call on
hold while you answer the other incoming call.
Check with your cellular service provider for
information about this function.
1. Press to receive a waiting call.
2. Press again to switch between calls.
Mute
The mute function prevents the other party from
hearing your voice, but allows you to hear the other
party .
1. Press Soft Key 1 Mute during a call.
2. To cancel Mute, press Soft Key 1 Unmute again.
Redialing Calls
1. Press to redial the last number in Call History.
You can also redial any of the last 30 numbers
G
you have dialed. The last 30 numbers are stored
in the call history list.
Basic Functions
Basic Functions
30
VX4400
31
Page 20

Adjusting the Volume
The volume keys on the left side (Side Keys) of the
phone can be used to adjust the earpiece, ringer, and
key beep volumes. The upper key is used to increase
and the lower key is used to decrease the volume.
You may adjust the earpiece volume during a
G
call or through the Menu feature.
Low -> Low Med -> Med -> Med High -> High
The ringer volume can be adjusted in Standby
G
mode or through the Menu feature.
Off -> Vibrate -> Low -> Low Med -> Med ->
Med High -> High -> High & Vib
The key beep volume is adjusted through Menu
G
feature only.
Off -> Low -> Low Med -> Med -> Med High
-> High
Power Save Mode
When the phone is in an area without service for
about 15 minutes, it stops searching for service and
enters into Power Save Mode. When your phone
activates this feature, Power Save is displayed on the
screen. The phone automatically checks for service
periodically or you can check manually by pressing
any key.
Signal Strength
The call quality depends on the signal strength in
your area. The current signal strength is displayed on
the screen as the number of bars next to the signal
strength icon. The more bars, the better the signal
strength. If the signal quality is poor, move to an
open area. If you are in a building, the reception may
be better near a window. For maximum reception,
make sure that the antenna is fully extended.
Caller ID Display
The small LCD on the outside of the
phone displays information such as:
Date and Time.
G
Caller ID (caller’s information
G
[name and/or number]).
Number of new messages.
G
No service status and Power
G
Save Mode.
Wake up and scheduler message.
G
Number of missed calls.
G
The phone will display the most recent information
until the cellcase is opened, then the information will
appear on the main display.
Basic Functions
Basic Functions
32
VX4400
33
Page 21
OK
OK
Speed Dialing(Making a call from Phone Book)
Speed dialing is a convenient feature which allows
you to make phone calls quickly and easily. Your
phone recalls the phone number from your personal
directory, displays it briefly, and then dials it.
1. Enter a speed dial number 01 to 99.
2. Press .
Phone Book Features
You can store up to 200 entries in your Phone Book
with easy access to your most frequently dialed
phone numbers.
Personal Phone Book Memory
The phone has 200 personal phone book memory
locations where you can store up to 5 phone numbers
with 48 digit capacity for each phone number.
Basic Functions
Caller ID
Caller ID lets you know who is calling by displaying
the number of the person calling when your phone
rings. If the caller’s name and number are already
stored in your Phone Book, the corresponding name
appears with the number.
You should check with your service provider to
ensure they offer this feature.
Basic Functions
34
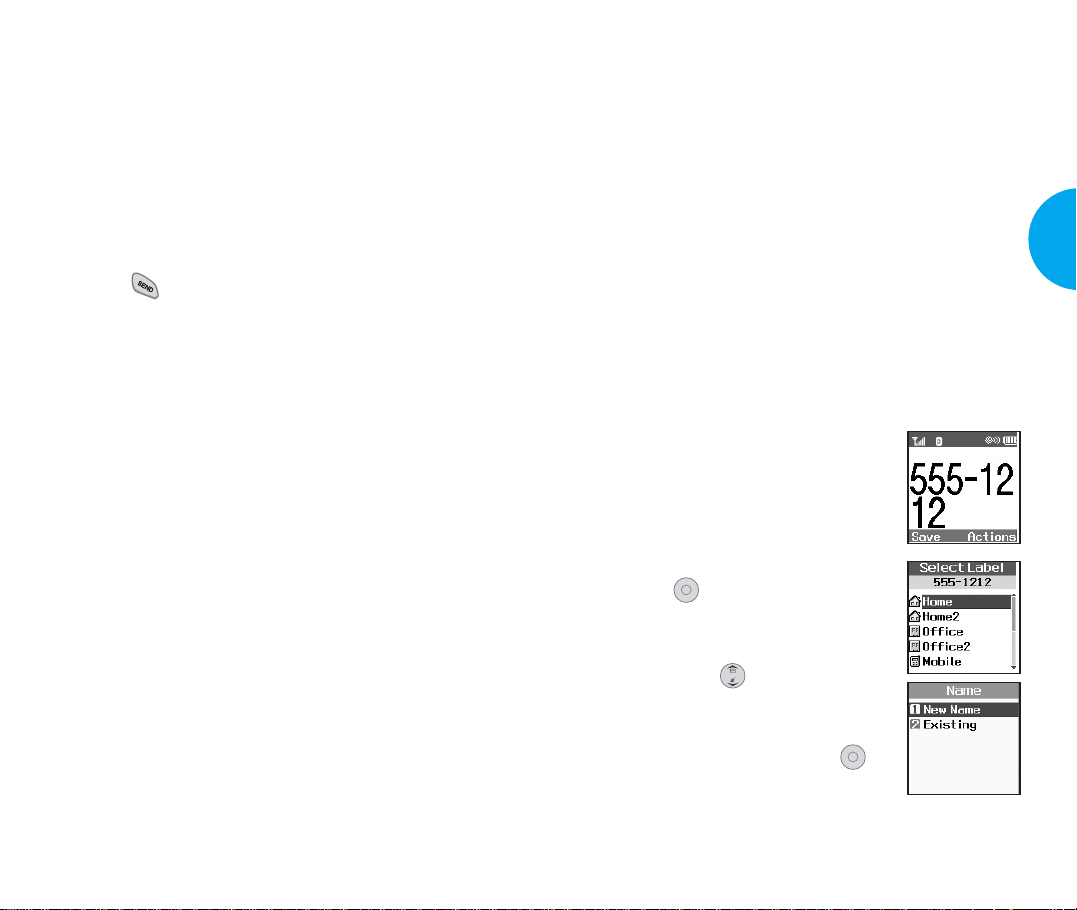
Saving Numbers in Your Personal Phone Book
Memory locations 1 through 9 should be used for
one-touch dialing for your most frequently used
phone numbers.
1.
Input the phone number that you
want to save (up to 32 digits).
2. Press Soft Key 1 Save, the sub-
menu appears.
3. Select Label on the sub-menu and
press .
Select your desired label types
4.
Home, Office, Mobile, Pager, Fax,
None using .
5.
Enter a name for the phone number
(up to 22 characters). If you do not
want to enter a name,
press
to
go to the next step.
VX4400
35
Page 22
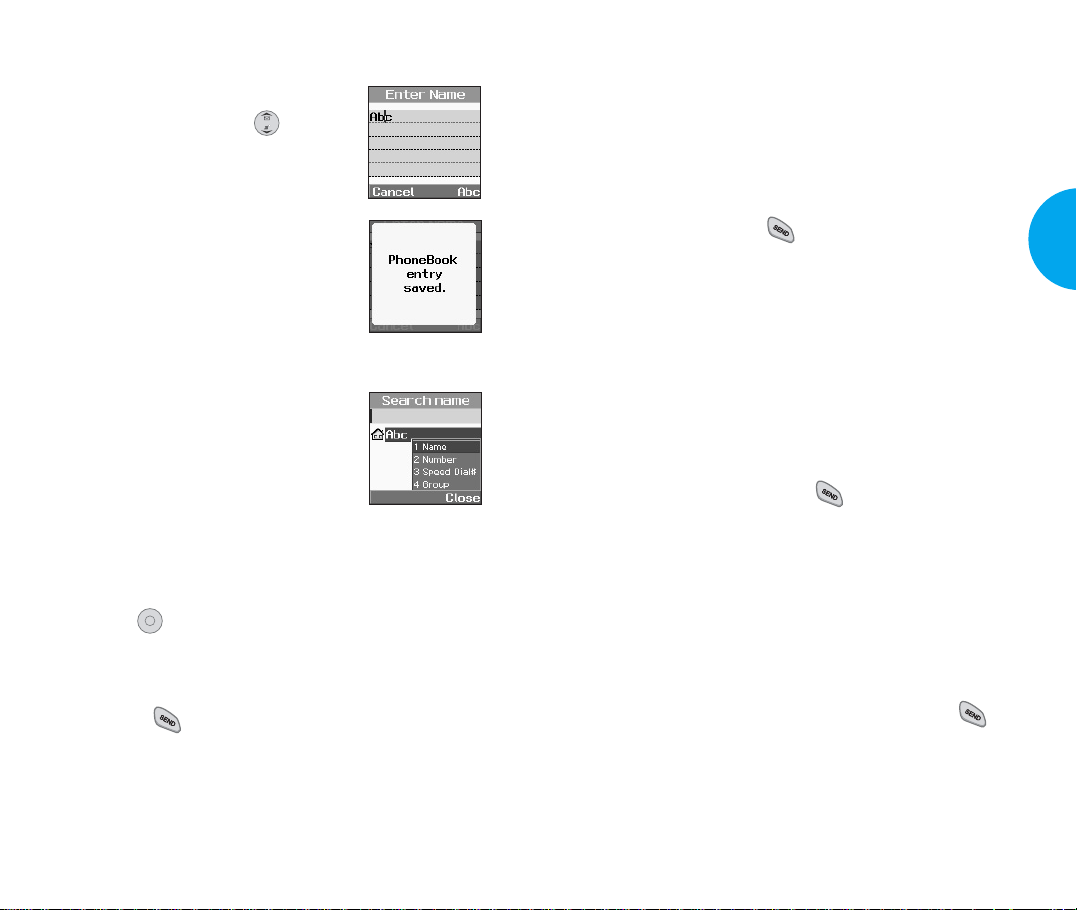
6. You may select the desired ID
OK
ring type, secret and .
7. Press Soft Key 1 Save.
Aconfirmation prompt
PhoneBook entry saved. displays
on the phone.
Retrieving Numbers
Retrieving by Name Search
1. Press Soft Key 2 Search.
2. Press Soft Key 2 Actions.
3. Select Name.
4. Enter the character(s) that you want to search for
(such as the few letters of the name.)
5. Press .
6. You will see a list of matches.
7. Press Soft Key 1 Edit to see specifics in that entry,
or press to place the call.
Making a Call From Your Phone
Book
You can place a call from any memory location either
by using speed dialing or by entering the phone
number and pressing .
One-Touch Speed Dialing: This feature enables you
to dial 9 of your most frequently used numbers using
a single key press. These numbers are stored in your
Phone Book in memory locations (1 through 9).
For locations 1 through 9, you can use one-touch
G
dialing by pressing and holding the corresponding
key to the memory location to be dialed.
or
Press a digit, then press .
G
Two-Touch Speed Dialing: This feature enables you
to dial numbers in your Phone Book through two
keys (for locations 10 to 99).
1. Press the first digit.
2. Press and hold the key of the second digit.
or
1. Press the first and second digit, then press .
Basic Functions
36
Basic Functions
VX4400
37
Page 23

Dialing from an Entry List
1. From an entry list, use the navigation key to go to
the entry you want.
2. Press .
Dialing from a Memory Location
While viewing a memory location, press to place
the call.
Advanced Phone Book Features
Pause Feature: When you call automated systems
G
(such as voice mail or credit billing numbers),
you often have to enter a series of numbers.
Instead of entering these numbers by hand, you
can store the numbers in your phone book
separated by special characters ( P, T ) called
pauses.
There are two different pauses that you can use
when storing a number:
Hard pause (P)
G
The phone will stop dialing until you press Soft
Key 1 Resume to advance to the next number.
2-sec pause (T)
G
The phone will wait 2 seconds before sending
the next string of digits.
Storing a number with pauses.
1) Enter the phone number.
2) Press Soft Key 2 Actions.
3) Select one of the following:
Press 1 Hard Pause.
G
Press 2 2-sec Pause.
G
4) Enter additional number(s) (e.g., pin number or
credit card number).
5) Press Soft Key 1 Save and select label, the submenu will appear. Select Saveon the sub-menu
to save this number with pauses.
6) Select your desired label type Home, Office,
Mobile, Pager, Fax, None using .
7) Enter a name for the phone number (up to 22
characters) or choose to add it to an existing
name in the Phone Book.
Press Soft Key 1 Save. Aconfirmation message
Phone Book entry saved. displays on the phone.
Prepending a Stored Number Prepend can be used if
G
you are out of your home system area and need to
add the area code to an existing Phone Book number.
When a Phone Book entry or message callback
number shows up on the display , you can add to the
beginning of the original number. However, you
cannot edit the original number during Prepend.
1) Recall a number in memory .
2) Enter the prepend digits to the phone number.
3) Press .
Basic Functions
Basic Functions
38
VX4400
39
Page 24

G
Dynamic Search
G
Number Dynamic Search
Compares entered numbers against the entries in
the Phone Book and then displays a matching list
in descending order. You can then call a number
from the list.
G
Name Dynamic Search
Compares entered letters against the entries in the
Phone Book and then displays a matching list in
descending order. You can then call a number
from the list.
40
Basic Functions
Page 25

Chapter 3. Menu Features
General Guidelines to Menu Access
and Settings
1. Press Soft Key 1 Menu. Nine menu items will
appear on the display screen.
2. Press to go through the list of menu features.
3. Press the appropriate number key corresponding
to the menu item that you want to select. The submenu list will then appear on the screen.
4. Press the appropriate number key corresponding to
the sub-menu you want to access.
5. Use to select your preferred setting. Press
to
go back one step while accessing the
menu or selecting a setting.
6. Press to save the settings or press to
cancel without saving.
OK
OK
OK
41
VX4400
Menu Functions
Page 26
OKOKOK
OK
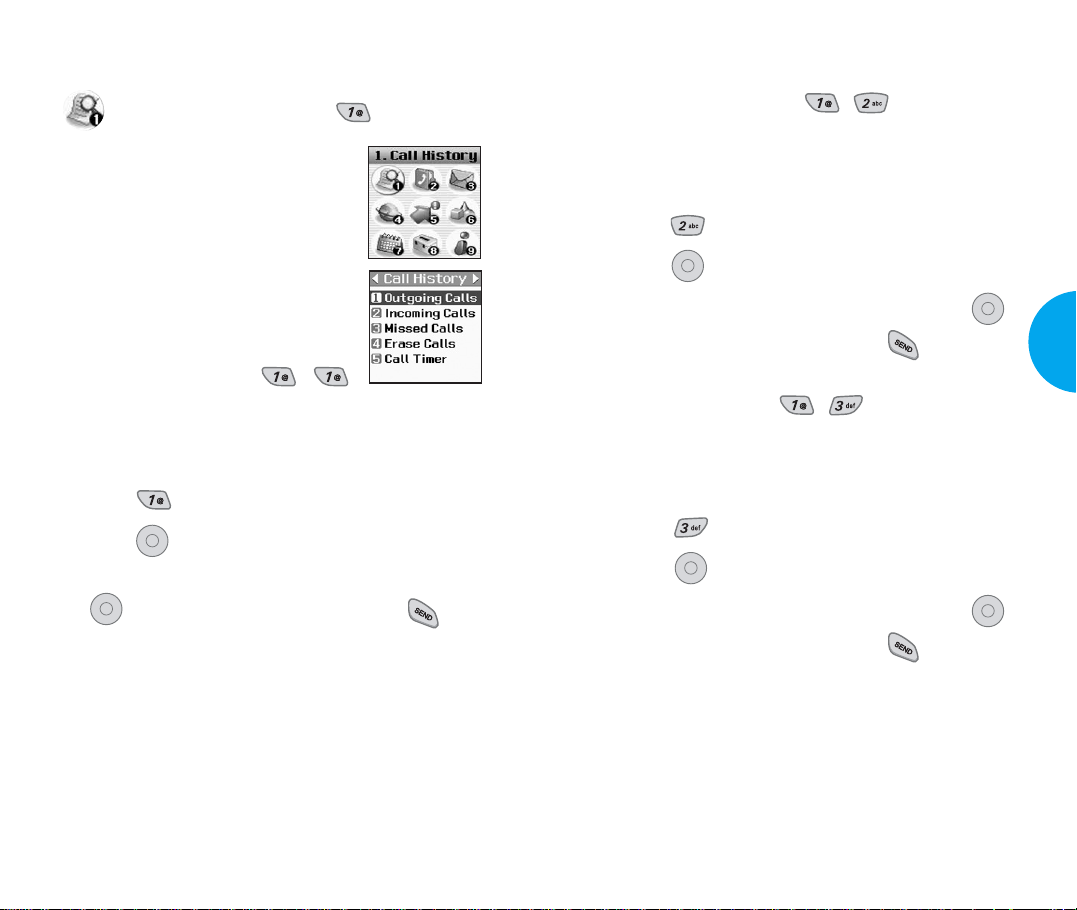
Call History (Menu )
OK
OK
Allows you to view a list of the last
phone numbers or Phone Book
entries for calls you placed, accepted,
or missed. It is continually updated
as new numbers are added to the
beginning of the list and the oldest
entries are removed from the bottom
of the list.
Outgoing Calls (Menu , )
Allows you to view the list of outgoing calls; up to
20 numbers and entries.
1. From the menu, select Call History.
2. Press Outgoing Calls.
3. Press to view the list.
Highlight the entry you wish to view and press
4.
Incoming Calls (Menu , )
Allows you to view the list of incoming calls; up to
20 numbers and entries.
1. From the menu, select Call History.
2. Press Incoming Calls.
3. Press to view the list.
Highlight the entry you wish to view and press ,
4.
or you may place a call by pressing .
Missed Calls (Menu , )
Allows you to view the list of missed calls; up to 20
numbers and entries.
1. From the menu, select Call History.
2. Press Missed Calls.
3. Press to view the list.
Menu Functions
42
, or you may place a call by pressing .
Menu Functions
Highlight the entry you wish to view and press ,
4.
or you may place a call by pressing .
VX4400
43
Page 27
OK
OK
OK
OK
OKOKOK
Erase Calls (Menu , )
OK
OK
OK
Allows you to erase the call history list.
1. From the menu, select Call History.
2. Press Erase Calls.
3. Select the list of calls you wish to erase and press
.
4. Press either 1 Erase, or 2 Cancel and press .
Call Timer (Menu , )
Allows you to view the time duration of the calls.
1. From the menu, select Call History.
2. Press Call Timer.
3. Select from Last Call/Home Calls/Roam
Calls/All Calls, and press .
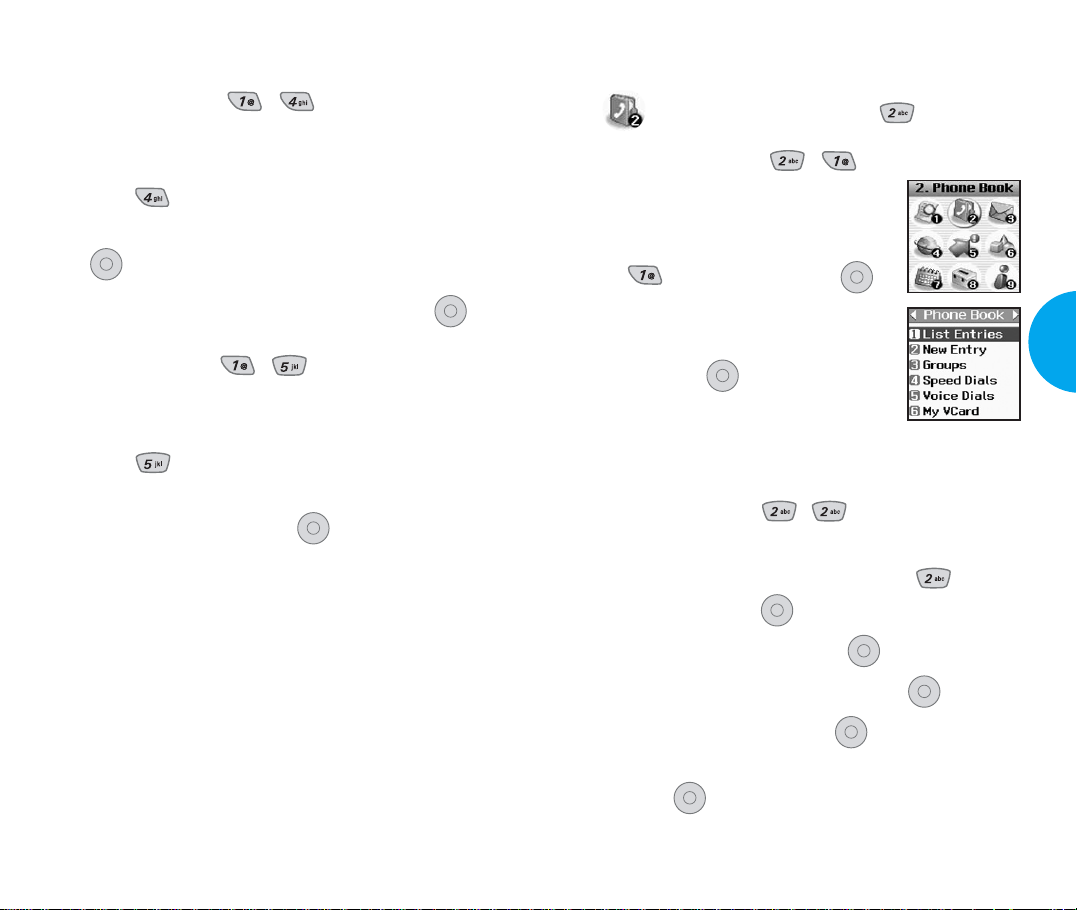
Phone Book (Menu )
List Entries
Allows you to view the list of entries
in the Phone Book.
1. From the Phone Book Menu, select
2. Press Soft Key 2 Actions, and
press either Search or Erase, and
then press .
3. You may register a new phone
number by pressing Soft Key 1 New.
New Entry (Menu , )
Allows you to add new entries into the Phone Book.
1. From the Phone Book Menu, select New
Entry and press .
2. Enter the number and press .
(Menu , )
List Entries and press .
Menu Functions
44
Menu Functions
3. Select the label you want and press .
4. Enter the Name and press .
5. Select either Speed Dial or Voice Dial and
press .
VX4400
45
Page 28
OK
OK
OK
Groups (Menu , )
OK
OK
OK
OK
Allows you to enter a new group, change the name of
a group, or delete a whole group.
From the Phone Book Menu, select Groups
1.
and press .
2. Highlight the Group you wish to view and then
press .
3. To add a new group to the list, press Soft Key 1
Add; to delete a group or to change the name,
press Soft Key 2 Action.
Speed Dials (Menu , )
Allows you to set the speed dial keys for the
designated phone numbers.
From the Phone Book Menu, select Speed
1.
Dials and press .
2. Either select the number you wish to speed dial,
or enter the number you want and press .
Voice Dials (Menu , )
Allows you to view the list of numbers that have
been programmed with voice dialing or add a voice
dial tag to a number in the Phone Book.
From the Phone Book Menu, select Voice
1.
Dials and press .
How to Use: Record the voice dial tags by
following the phone’s prompts.
When recording the voice tag, place
the phone in a normal phone use
position with the speaker by your
ear and the microphone near your
mouth.
NOTE
Recordings should be made in a quiet place
using a clear voice. Hands-free car kits or
headsets should be avoided when recording.
My Vcard (Menu , )
Allows you to enter your own virtual business card to
be used in e-mails or SMS messages.
From the Phone Book Menu, select My
1.
Vcard and press .
Menu Functions
46
Menu Functions
Select the feature you want to edit by highlighting it
2.
and pressing .
VX4400
47
Page 29
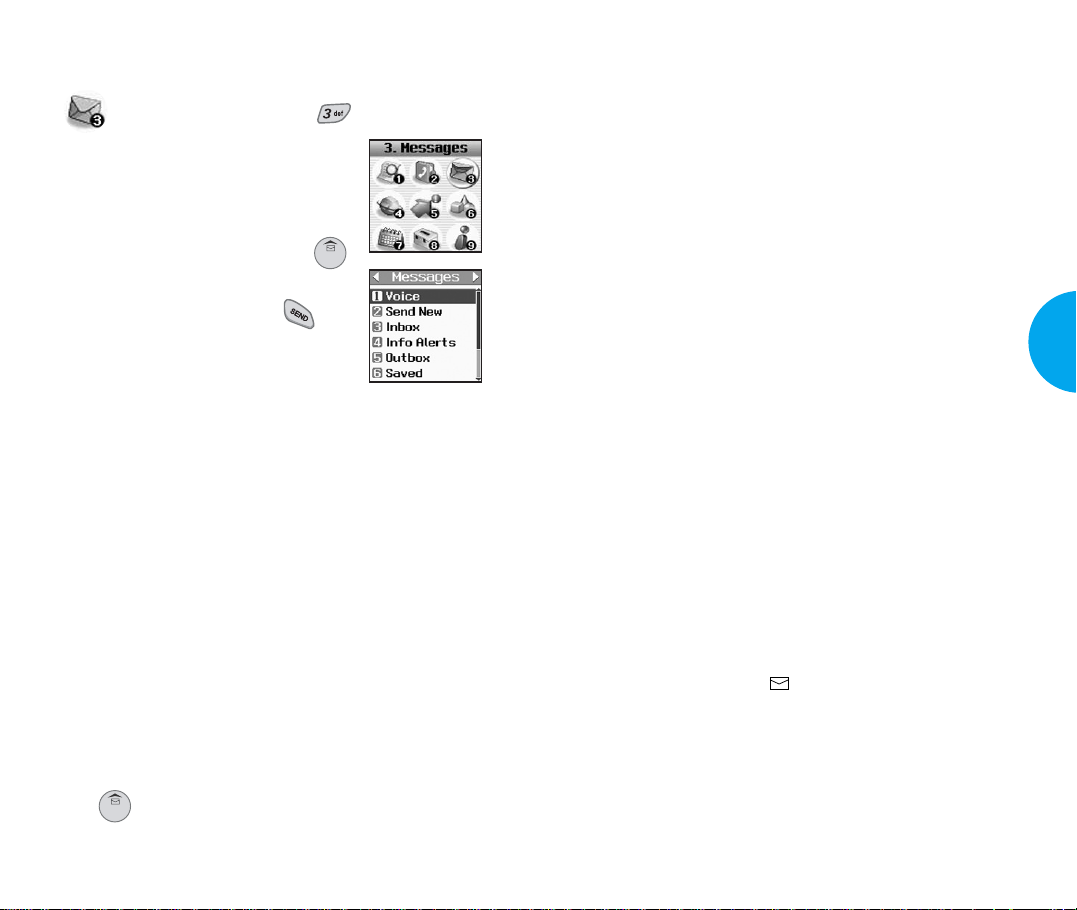
Messages (Menu )
Text messages, pages, and the
voicemail box become available as
soon as the phone is powered on. You
can access the above types of
messages using the message key .
In addition, you can make a call to the
callback number by pressing
during a message check.
The phone can store up to 116
messages (1 voice message: 50 inbox text messages,
50 outbox text messages, 15 saved text messages) with
up to 160 characters per message. Users may read and
edit messages saved in the outbox during transmission
and send them.
Check whether your carrier provides the above
features.
Character limits: The VX4400 supports up to 160
characters per message including header information.
Limits to available characters per message may exist;
please check with your service provider for system
capabilities.
The information that is stored in the message is
determined by phone mode and service capability . You
can check types of messages by pressing the message
key
.
Message Menu
G Voice: Displays the number of messages in the
voicemail box.
G Send New: Sends a message.
G Inbox: Displays the list of received messages.
G Info Alerts: Service is currently unavailable.
G Outbox: Displays the list of sent messages.
G
Saved:
Display
s the list of saved and draft
messages.
G Msg Settings: Selects alert type for new
messages.
G Erase All: Deletes all stored messages.
G My Folder: Special features for messages.
New Message Alert
There are four ways your phone alerts you to new
messages.
1. Amessage is displayed on the lcd screen.
2. One of four ring types is heard, if selected.
3. The red lamp blinks.
The message icon ( ) is displayed on the lcd
4.
screen. In the case of an urgent message, the icon will
flash and it displays as an Urgent message.
NOTE
If you receive the same message twice, your phone
deletes the older one and the new one is stored as a
DUPLICATE.
Menu Functions
Menu Functions
48
VX4400
49
Page 30
OK
Voice (Menu , )
Allows you to view the new voice messages recorded
in the voicemail box. When you have a new voice
message, your phone will alert you. Once you exceed
the storage limit, old messages will be overwritten.
Checking your Voicemail Box
1. Press Soft Key 1 Menu.
2. Press .
3. Select Voice.
G To delete information press Soft Key 1 Clear
and then select Clear Count.
Send New (Menu , )
Allows you to send text messages, page messages,
and e-mail transmissions.
Text messages: Transmits text (with or without
numbers).
Page messages: Transmits only numbers without
text.
To send a message, enter an SMS phone number to
Address 1.
To send e-mail, enter recipient’s e-mail address.
Menu
Address 1: This feature allows multi-sending of up
to 10 total addresses.
Select Actions by using Soft Key 2.
There are 6 optional menus of Send, Priority, Add
Sign, Callback#, Deferred, and Validity.
1. Press Soft Key 1 Menu.
2. Press .
3. Select Send New.
4. Enter the recipients address.
The address can be typed in or taken from a Phone
Book entry .
5. Enter the message.
The text can be entered using the keypad or by
selecting Canned Msg with Soft Key 2 Insert.
G Canned Msgs
There are 11 “predefined” phrases included in the
Canned Msg option. You can also add up to 6 of
your own phrases.
6. Select Actions using Soft Key 2 after entering the
number of other party and the content with the
Navigation Key. Select the item with .
G Send Allows you to send the message.
G Priority Allows you to give priority to
message. Normal or Urgent.
Menu Functions
50
Menu Functions
VX4400
51
Page 31

G Add Sign Allows you to insert a pre-
programmed signature with
your message.
G Callback # Allows you to insert insert a
pre-programmed callback
number with your message.
G Deferred Allows you to delay sending
the message until the
programmed time frame.
G Validity Indicates the validity of
message delivery to the Short
Message Center (SMC) without
being transmitted to the
destination address for certain
periods of time. Those
messages will be deleted within
the programmed time frame.
Validity time frames are as
follows: Default, 30 minutes, 1
hour, 2 hours, 12 hours, 1 day,
2 days, and 3 days.
If you select Send, it notifies you that the message
was sent successfully.
NOTE
If you send a SMS message to a phone without SMS,
you will still be notified that the message was sent,
however the message will not be received.
Inbox (Menu , )
Received text messages, page messages, and e-mail
lists may be searched and the contents may be
viewed. Received messages are displayed from
newest to oldest.
To view the list of the received messages:
1. Press Soft Key 1 Menu.
2. Press .
3. Select Inbox.
Erase/Lock pop up is displayed by pressing Soft
4.
Key 2.
G
Reply with copy
Replies to the SMS with the
original message attached.
G Forward Forwards a received message
to others. After recipients are
entered, the message can be
forwarded.
G Erase Deletes the selected message
from the Inbox.
G Save addr
Stores the callback number,
e-mail address, and numbers
in user data included in the
received message into your
Phone Book. You can store the
received number information
in the corresponding number
Menu Functions
Menu Functions
52
VX4400
53
Page 32

list in the Phone Book. For an
e-mail address, select the
option New Entry and Old
Entry. The new e-mail
address may overwrite an old
address entry . For new entries,
an e-mail address may be
stored with the new memory
number.
G Save object
Service is currently
unavailable.
G
Save quick text
Save the message into the
Canned message list.
G
Save Message
Save Inbox message into the
Saved Folder.
G Block Sender
Service is currently
unavailable.
G Lock/Unlock Locks or unlocks the selected
message. Locked messages
will not be deleted by Erase
Inbox and Erase All
functions of Erase Msgs
Menu.
Out of Memory Warning
When your messages exceed the maximum, no more
messages can be received until enough memory
space becomes available.
At this time, the message NOT ENOUGH MEMORY
will be displayed on the screen and new messages will
not be accepted.
Info Alerts (Menu , )
This service option is
currently not
available.
Menu Functions
Menu Functions
54
VX4400
55
Page 33

Outbox (Menu , )
Up to 50 sent messages can be stored in the
Outbox.
You may view lists and contents of sent messages
in this menu and may also verify if the
transmission was successful or not.
1. Press Soft Key 1 Menu.
2. Press .
3. Select Outbox.
Erase/Lock pop up is displayed by pressing
4.
Soft Key 2.
G Erase Deletes a selected message
from the Outbox.
G Save Addr Saves the address.
G
Save Quick- text
Saves the drafted message in
Canned Msg.
G
Save Message
Saves Outbox message into
the saved folder.
G Lock/Unlock Locks or unlocks the selected
message. Locked messages
may not be deleted by Erase
Inbox and Erase All functions
of Erase Msgs Menu.
G Status Code
Status
Sent
Fail
Delivery
Cancel
Pending
Multi-
sending
Checks the sent message
information (MSG ID/Err
Class/Cause Code).
Descriptions
Messages saved in Short Message
Center (SMC) have been transmitted.
Indicates a failed message transmission.
Message has been delivered.
After transmission to message center has
occurred, messages that have not been
delivered may be canceled by
transmitting cancel message.
Transmission is unavailable in analog
mode or in a no service area. Messages
are pending transmission. Pending
messages are transmitted automatically
when digital mode becomes available.
Indicates more than one designated
recipient.
Menu Functions
G Cancel Cancels the transmitted
message.
Menu Functions
56
VX4400
57
Page 34

Saved (Menu , )
Displays all the saved and draft messages.
Draft Message:
Displays the list of messages which
received failed to send notifications.
Saved Message: Displays the list of saved messages
in Inbox/Outbox.
Msg Settings (Menu , )
Alert, default CB# (callback number), Auto Save, and
Auto Delete may be configured for receiving new
messages.
You are alerted in 3 ways when you receive a new
message:
- By displaying a message on the screen.
- By sounding a beep or vibration.
- By the flashing red lamp.
Callback # (Menu , , )
Allows you to automatically send a designated
callback number when you send a message.
Msg Alerts (Menu , , )
Allows you to select the alert type for a new
message. Alert types are Voice Mail Alert, Text Msg
Alert, Email Alert, Page Alert, and Info Alert.
Signature (Menu , , )
Allows you to edit the signature you want to
automatically send with your messages.
Direct View (Menu , , )
Allows you to directly display the content when
receiving a message.
Menu Functions
Auto Save (Menu , , )
With this feature on, messages are automatically
saved in the Outbox when transmitted.
Auto Delete (Menu , , )
With this feature on, old read messages are
automatically deleted when you exceed storage limit.
Menu Functions
58
Entry Mode (Menu , , )
Allows you to select the default input method
including T9Word, ABC, 123.
Block List (Menu , , )
This service option is currently not available.
Read Ack (Menu , , )
This service option is currently not available.
VX4400
59
Page 35

Font Size (Menu , , )
Allows you to determine the font to use when entering
message content or reading the texts in Inbox,
Outbox, and Saved.
Edit Voicemail Number
(Menu , , )
Allows you to manually enter the access number for
Voice Mail Service. This number should be only used
when VMS access number is not provided from the
network.
Saved (Menu , , )
Deletes all messages from your Saved folder except
those messages which are locked.
All (Menu , , )
Deletes only unlocked messages from Inbox, Outbox,
and Saved. Protected messages are not deleted.
Menu Functions
My Folder (Menu , )
Personalixed features for your phone.
Erase All (Menu , )
All the text messages and pages are deleted when you
select Erase All from the Message Menu screen.
Protected messages are not erased.
Inbox (Menu , , )
Deletes all messages from your Inbox except those
messages which are locked.
Info Alerts (Menu , , )
This service option is currently not available.
Outbox (Menu , , )
Deletes messages from your Outbox except those
messages which are locked.
Menu Functions
60
Small Pictures (Menu , , )
This service option is currently not available.
Large Pictures (Menu , , )
This service option is currently not available.
My Pictures (Menu , , )
This service option is currently not available.
Sounds (Menu , , )
This service option is currently not available.
My Melodies (Menu , , )
This service option is currently not available.
Animations (Menu , , )
This service option is currently not available.
VX4400
61
Page 36

My Animations (Menu , , )
This service option is currently not available.
Canned Msgs (Menu , , )
Display, edit, and add Canned Messages.
62
Menu Functions
Page 37

Mobile Web
The MiniBrowser feature allows you to
view internet content especially
designed for the mobile phone
interface. Access and selections within
this feature are service provider
dependent.
For specific information on
MiniBrowser access through your
phone, contact your service provider.
Start Browser (Menu , )
1) A reminder of the charge will appear; press
Yes to launch MiniBrowser, if required.
2) After a few seconds, you will see the Home Page.
OK
63
VX4400
Menu Functions
Page 38

Ending MiniBrowser Session
Navigation keys
You can end a MiniBrowser session by pressing .
If the prompt To end or Both option is set in the
MiniBrowser Setup, you will be prompted whether
you want to end the browser call.
(Press Soft Key 1 Menu Mobile Web →
Web Settings → Prompt.)
Navigating through the Browser
While using MiniBrowser, you will find that
onscreen items may be presented in one of the
following ways:
numbered options (some options may not be
G
numbered).
G links (embedded in content).
G text or numeric input.
G simple text.
You can act on the options or the links by using the
Soft Keys just below the display screen.
Scrolling Up/Down by Item
You can use to scroll through the content if the
current page does not fit on one screen. The currently
selected item is indicated by a
G cursor on the screen
and will also move the cursor.
Fast Scrolling Up/Down
Press and hold to quickly move the cursor up
and down on the current screen.
Scrolling Up/Down by page
Press Side Keys to move up and down a whole
screen page.
Go to Home Page
Press and hold to go back to the Home Page.
View Browser Menu
Press and hold to use the browser menu when
using the MiniBrowser.
Clearing out text/number entered
When entering text or numbers, press to clear
the last number, letter, or symbol. Press and hold
to clear the input field completely.
Menu Functions
Menu Functions
64
VX4400
65
Page 39

Selecting and activating items using Soft Keys and/or
digits
If the items on a page are numbered, you can use your
keypad (numeric), or you can select the items by
moving the cursor and pressing the appropriate Soft
Keys.
Entering Text, Numbers, or Symbols
When you are prompted to enter text, the current text
entry method will appear on Soft Key 2 as Alpha,
Symbol, Number, Word, or Smart (exact label depends
on implementation).
To change the input mode, use Soft Key 2.
Soft Keys
To navigate to different screens or select special
functions, use the Soft Keys just below the display
screen. Note that the function associated with the Soft
Keys can change for each page and will depend on
each highlighted item.
Soft Key 1
Soft Key 1 is used primarily for first options or
selecting an item. But its function may change,
depending on the content displayed.
Soft Key 2
Soft Key 2 is used primarily for secondary options or
a menu of secondary options.
Menu Functions
66
To create an uppercase character, use . The current
text method will appear on the Soft Key 2 as ALPHAor
SMART.
shifts to text input between cases (uppercase and
lowercase).
Initiating a phone call from MiniBrowser
You can make a phone call from MiniBrowser if the site
you are using supports the feature (the phone number
may be highlighted and Soft Key 1 will appear as Call).
The browser connection will be terminated when you
initiate the call. After you end the call, your phone will
return to the screen from which you initiated the call.
Using Bookmarks
You can bookmark many individual pages for easy
access at a later time. Bookmarks save you time by
reducing the number of steps it takes to access a
desired page.
VX4400
Menu Functions
67
Page 40

To create a bookmark
Go to the page that you want to mark. On the browser
menu, select Mark Site or press and hold .
If the page has a title, it will automatically be used for the
name of the bookmark. When the bookmark is saved,
you can change the bookmark name if you choose.
Selecting Save will save the name and add the page to
the bottom of your list of bookmarks.
Amessage will appear confirming that the bookmark
was added to the list. Select Soft Key 1 OK to return to
the screen that you marked to resume navigation within
MiniBrowser.
This function is dependent upon the html coding of the
page being read and determined by the website.
Finding a bookmark
From the Home Page, press and hold , then
select the bookmark you want.
Web Settings (Menu , )
1. Prompt (Menu , , )
You can set the function of whether or not to see the
information messages when you start up.
Prior to making a MiniBrowser call, the user is
informed that there is a charge and asks if they still
want to launch the browser. This step is used to
prevent accidental activation of the browser since all
subscribers will be provided with the browser
automatically .
Amessage is also available to ask the user if they
want to exit the browser, after they press . Users
can disable this extra step (or enable if it is disabled)
through a menu option.
G To Start: You only see the message asking
whether or not to start up.
G To End: You only see the message asking
whether or not to end the browser session.
Menu Functions
Or
From the Home Page, press and hold the number
associated with the bookmark in the bookmark list.
Web Messages (Menu , )
If there are any browser alerting messages, then the
list will be displayed.
Menu Functions
68
G Both: You see the messages asking whether to
start up or end the browser session.
G None: You will not see the information messages.
2. Alert ( , , )
There are 3 alert options. Mute, 2 alerts, and 4
alerts options are provided in this menu. The user
may select a browser alert sound.
VX4400
69
Page 41

Get It Now
Get It Now allows you to do more
than just talk on your phone. Get It
Now is a technology and service that
allows you to download and use
applications on your phone.
With Get It Now , it is quick and easy
to personalize your phone to your
lifestyle and tastes. Just download the
applications that appeal to you. With a
wide range of software available, from
instant messaging to games to office applications, you
can be assured that you can find something useful,
practical, or down right entertaining.
Plus, there are constantly new applications being
created for your use.
Some examples of available application types:
G Communication programs which allow you to
send instant messages and e-mail.
G Productivity programs which allow you to
synchronize with applications in your office,
home, or PDA for more efficiency and better time
management.
G Entertainment programs which allow you to play
single-player games, multi-player games, listen to
music, watch videos, download custom ringers
and screens for your display.
G Mobile Commerce programs which allow you to do
financial transactions (such as checking your account
balance, trade stocks, etc.).
G General Information programs which allow you to
get current news, weather, sports, or traffic.
You can download and use Get It Now anywhere on
the Verizon Wireless network, as long as your handset
has a digital signal available. Application download
time will vary , but most applications will take
approximately 1 minute to download. If your currently
installed Get It Now application does not need a
network connection, it can be used anywhere.
The time you spend browsing in Get It Now for an
application, and while downloading applications, is
deducted from your monthly airtime allowance.
Most applications do not use a network connection
while in use. However, there are some applications that
will and these will incur airtime charges while in use.
While downloading an application, any incoming calls
will automatically be sent to your voicemail, if
available. If you do not have voicemail, downloading
will not be interrupted by an incoming call, however
the caller will receive a busy signal.
When using an application that does not require a
network connection, an incoming call will
automatically pause the application and allow you to
answer the call. When you complete your call, you can
resume using the application.
Menu Functions
Menu Functions
70
VX4400
71
Page 42

OK
OK
You can personalize your phone by adding new
applications and by removing old ones, at any time.
However, unused application usage will be lost.
If you need more memory , but still want to be able to
access the application later, try using Disable.
Disabling keeps the application usage and purchase
information, but removes it from memory .
To restore an application, go to Options, select the
application and click on Restore. If you have
subscribed to an application, you will still be charged
even when an application is disabled.
Only removing an application deletes it completely
from the memory of the phone. To restore an
application once it has been removed will require that
you pay and download it again.
Airtime charges do apply when removing a
subscription application.
There is no monthly usage fee for Get It Now . Rather,
you pay for each application when you download.
Applications are priced individually , please see the
Verizon W ireless website for a list of currently
available applications and pricing.
This function allows you to download some great
mobile phone programs (such as securities, chatting,
and thematic displays to your mobile phones),
whenever you like.
Get Apps (Menu , )
1. Press Soft Key 1 Menu.
2. Press
Get It Now
.
3. Press Get Apps and press .
Main display of Get It Now will appear.
4. Select [Get It Now] Icon and press .
G Start: allows you to download selected
applications while displaying the Get It Now
application list relayed from the Get It Now
server in connection.
G Options: allows you to display download log
and the current memory capacity of your
mobile phone.
- Information: displays usable capacity for your
mobile phone and the memory capacity in use.
- View Log: displays Get It Now version, MSM
Chip, and downloading record.
Get Info (Menu , )
This submenu gives you information about the Get It
Now selection key.
NOTE
Pressing the down arrow key ( ) will start Get It Now.
Menu Functions
72
Menu Functions
VX4400
73
Page 43

Fun Tools
EZ Tip calc (Menu , )
1. Press Soft Key 1 Menu.
2. Press Fun T ools.
3. Press EZ Tip calc.
Calculator (Menu , )
Calculate simple mathematical
computations.
(Can enter numbers up to the second decimal place.)
1. Press Soft Key 1 Menu.
2. Press Fun Tools.
3. Press Calculator.
NOTE
Calculation should be 32 characters (for example,
32+14-...).
World Clock (Menu , )
Is useful if you need to make a call to another
country and you are not sure about the time
difference.
1. Press Soft Key 1 Menu.
2. Press Fun Tools.
3. Press World Clock.
Organizer
Scheduler Functions
Scheduler keeps your agenda convenient
and easy to access. Simply store your
appointments and your phone alerts you
with a reminder of your appointment.
You can also take advantage of the
Alarm Clock feature.
NOTE
Scheduler will not alert you during a
call, when transmitting SMS, or when
connecting up. After exiting, it will
sound the reminder.
Menu Functions
Menu Functions
74
VX4400
75
Page 44

General Guidelines to Scheduler Access and
OK
Settings
1. Press Soft Key 1 Menu.
2. Scroll through the menu list using .
3. To make a selection, press or press the
number corresponding to the menu you want to
access.
4. Move between entries on the menu using .
How to use buttons
"
Moves cursor to the left.
Schedule (Menu , )
Allows you to input your schedule.
If you input the time and memo, an alarm rings at the
set time.
1. Press Soft Key 1 Menu.
2. Press Organizer.
3. Press Schedule.
NOTE
Pressing the Navigation key ( ) to the left from
Standby mode is a hot key to Schedule.
Alarm Clock (Menu , )
1. Press Soft Key 1 Menu.
Menu Functions
76
Moves cursor to the right.
Moves to the previous week.
Moves to the next week.
Menu Functions
2. Press Organizer.
3. Press Alarm Clock.
4. Select the alarm you want to edit.
5. Set the time for alarm and press Soft Key 1 Save.
G The current time will be displayed in the upper
portion of the screen.
6. You can change the alarm mode and alarm ringer
type using .
7. At the alarm time, “Alarm x” will be displayed on
the LCD screen and the alarm will sound.
VX4400
77
Page 45

Notepad (Menu , )
Allows you to read, add, edit, and erase notes to
yourself.
1. Press Soft Key 1 Menu.
2. Press Organizer.
3. Press Notepad.
4. Press Soft Key 1 Add to write a new note.
Voice Memo (Menu , )
Allows you to listen to, add, and erase short verbal
reminders.
1. Press Soft Key 1 Menu.
2. Press Organizer.
3. Press Voice Memo.
4. Press Soft Key 1 New to record a new voice memo.
78
Menu Functions
Page 46

79
VX4400
Menu Functions
Settings
Sounds (Menu , )
Ringers (Menu , , )
1. Press Soft Key 1 Menu.
2. Press
, ,
.
3. Select CallerID , No Caller
ID , or Restrict .
4.
To switch between default and
downloadable ringers, press Soft
Key 2 (MORE).
5. Then press to save the sound.
Key Tone (Menu , , )
1. Press Soft Key 1 Menu.
2. Press , , .
3. Set Normal/Long with and then press .
G
Normal Sends out a tone for a fixed
period of time even if you keep
the key pressed.
OK
OK
Page 47

OK
OK
Long Sends out a continuous tone
OK
OK
G
for as long as you keep the key
pressed.
NOTE
Volume (Menu , , )
Dual-Tone Multi Frequency (DTMF) Signaling by the
simultaneous transmission of two tones, one from a
group of low frequencies and another from a group
of high frequencies. Each group of frequencies
consists of four frequencies. Setting Key Beep length
to Long will extend the DTMF tone. Press Menu,
then press , , Key Tones using
then select Long. Press .
1. Press Soft Key 1 Menu.
2. Press , , .
3. Select Ringer , Earpiece , or
Key Beep .
4. Adjust the volume of the ringer with .
5. Then press to save the volume.
Alerts (Menu , , )
Allows you to set the 4 Alert options on or off.
1. Press Soft Key 1 Menu.
2. Press , , .
Check each option and turn it off if not desired.
G
1)
Service Change (Menu
,,,
Alerts you when service changes. When you
enter a service area, the phone displays
Entering Service Area message. When you
leave a service area, the phone displays
Leaving Service Area message.
Minute Beep (Menu ,,,)
2)
Alerts you 10 seconds before the end of every
minute during a call.
Call Connect (Menu ,,,)
3)
Alerts you when the call is connected.
Back To Top (Menu ,,,)
4)
Alerts you when you scroll through the end of
a menu list.
3. Select an option and press .
4. Set On/Off with and then press .
)
Menu Functions
Menu Functions
80
VX4400
81
Page 48

OK
!
Power On/Off Tone (Menu , , )
OK
OK
Backlight (Menu , , )
1. Press Soft Key 1 Menu.
2. Press , , .
3. Set On/Off with and then press .
Display (Menu , )
Banner (Menu , , )
Allows you to enter a string of characters (up to 16)
to be displayed on the LCD screen.
1. Press Soft Key 1 Menu.
2. Press , , .
3. Enter a Banner and then press .
1. Timer (,,,)
Allows you to set the duration the backlight is to be on.
1. Press Soft Key 1 Menu.
2. Press ,,,.
3. Choose an option and press .
7 seconds turns the backlight off 7 seconds
G
after the last key was pressed.
15 seconds turns the backlight off 15 seconds
G
after the last key was pressed.
30 seconds turns the backlight off 30 seconds
G
after the last key was pressed.
Always off means that the backlight is never
G
on.
On flip open means that the backlight is
G
always on while flip (cellcase) is open.
Menu Functions
82
Menu Functions
VX4400
83
Page 49

OK
OK
2. Brightness (,,,)
OK
Key Light (Menu , , )
Allows you to set the brightness level of the backlight.
1. Press Soft Key 1 Menu.
2. Press ,,,.
3. Adjust the Brightness with .
4. Then press to save the Brightness setting.
Screens (Menu , , )
Allows you to choose the kind of background to be
displayed on the phone.
1. Press Soft Key 1 Menu.
2. Press , , .
3. Select Wallpaper , Power On , or
Power Off .
4. Select from 5 different screens and press Soft Key
1 Save.
Allows you to set the duration that you wish the Key
Light to be on.
1. Press Soft Key 1 Menu.
2. Press , , .
3. Choose an option and press .
7 seconds turns the Key Light off 7 seconds
G
after the last key was pressed.
15 seconds turns the Key Light off 15
G
seconds after the last key was pressed.
Always off means that the Key Light is never
G
on.
On flip open means that the Key Light is
G
always on while flip (cellcase) is open.
Contrast (Menu , , )
Allows you to set the contrast of the Main and Sub LCD.
1. Press Soft Key 1 Menu.
2. Press , , .
Menu Functions
84
Menu Functions
3. Select Main LCD , Sub LCD .
4. Adjust the contrast with .
5. Press to save the Contrast setting.
VX4400
85
Page 50

OK
OK
Menu Style (Menu , , )
OK
Theme Colors (Menu , , )
Allows you to choose whether you want the menu to
show as a list or as icons.
1. Press Soft Key 1 Menu.
2. Press , , .
3. Select Icon or List and press .
Clocks (Menu , , )
Allows you to choose the kind of clock to be
displayed on the LCD screen.
1. Press Soft Key 1 Menu.
2. Press , , .
3. Select Normal, Analog, or Digital and press
Soft Key 1 Save.
Allows you to choose the color of the background
screen.
1. Press Soft Key 1 Menu.
2. Press , , .
3. Select an option and press .
Default/Green/Pink/Orange
G
Sub LCD Color (Menu , , )
Allows you to choose different colors for the Sub
LCD screens. Sub LCD color is always green while
charging the battery.
1. Press Soft Key 1 Menu.
2. Press , , .
3. Select Incoming Calls , Missed Calls ,
New SMS Alert , Reminders , or
Standby .
Menu Functions
86
Menu Functions
4. Press until you find the color you desire.
5. Press to save the color.
VX4400
87
Page 51

OK
OK
Number Font (Menu , , )
OK
OK
System (Menu , )
Allows you to choose the size and color of the
number font.
1. Press Soft Key 1 Menu.
2. Press , , .
3. Select Size , Color
.
4. Press until you find the size or the color
you desire.
5. Press to save.
Text Input Font (Menu , , )
Allows you to choose the size and color of the text
input font.
1. Press Soft Key 1 Menu.
2. Press , , .
3. Select Size , Color
.
4. Press until you find the size or the color
you desire.
Select System (Menu , , )
This function enables set up of the user’s mobile
phone producer’s management environment. Leave
this setting as the default unless you want to alter the
system selection (as instructed by your service
provider).
1. Press Soft Key 1 Menu.
2. Press , , .
3. Select an option and press .
Home Only/Automatic A/Automatic B.
G
Set NAM (Menu , , )
Select the phone’s NAM (Number Assignment
Module) if the phone is registered with multiple service
providers.
1. Press Soft Key 1 Menu.
2. Press , , .
3. Select NAM1 or NAM2 and press .
Menu Functions
5. Press to save.
Menu Functions
88
VX4400
89
Page 52

OK
Auto NAM (Menu , , )
OK
OK
TTY (Menu , , )
Allows the phone to automatically switch between
programmed telephone numbers corresponding to the
service provider area.
1. Press Soft Key 1 Menu.
2. Press , , .
3. Select On or Off and press .
Serving System (Menu , , )
You can identify the channel number of the System
which is served and the SID Number.
This information is only for technical support.
1. Press Soft Key 1 Menu.
2. Press , , .
3. Press .
Users can attach a TTY device and communicate
with parties also using a TTY device. Aphone with
TTY support is able to translate typed characters to
voice. Voice can also be translated into characters and
then displayed on the TTY.
1. Press Soft Key 1 Menu.
2. Press , , .
3. TTY info displays.
4. Select an option and press .
TTY users must have a TTY/TDD device.
G
Menu Functions
90
Menu Functions
VX4400
91
Page 53

OK
OK
Security (Menu , )
OK
Restrict (Menu , , lock code, )
Lock Phone (Menu , , lock code, )
Protects your phone from unauthorized use. Once the
phone is locked, it is in restricted mode until the lock
code is entered. This will allow you to receive phone
calls and still make emergency calls. The lock code is
commonly the last 4 digits of your phone number. If
you need to modify the lock code, you may modify it
using the Change Code within the Security menu.
1. Press Soft Key 1 Menu.
2. Press , .
3. Enter the four-digit lock code.
4. Press Lock Phone.
5. Select an option and press .
Unlock means that the phone is never locked
G
(Lock mode can be used).
Lock means that the phone is always locked.
G
When locked, you can receive incoming calls or
make only emergency calls.
On Power Up means the phone is locked
G
when it is turned on.
1. Press Soft Key 1 Menu.
2. Press , .
3. Enter the four-digit lock code.
4. Press Restrict.
5. Select On or Off with then press .
If you set it to On, you can only place calls to emergency
numbers and phone numbers stored in the Phone Book.
You can still receive calls in the Restrict Mode.
Emergency #s (Menu , , lock code, )
You can call these designated emergency numbers,
and 911, even when the phone is locked or restricted.
To enter 3 emergency numbers:
1. Press Soft Key 1 Menu.
2. Press , .
3. Enter the four-digit lock code.
4. Press Emergency #s.
5. Select emergency number 1, 2, or 3 using .
6. Enter an emergency number.
Menu Functions
92
Menu Functions
7. Press .
VX4400
93
Page 54

OK
OK
OK
Change Code (Menu , , lock code, )
OK
Allows you to enter a new four-digit lock code
number.
1. Press Soft Key 1 Menu.
2. Press , .
3. Enter the four-digit lock code.
4. Press Change Code.
5. Enter the new four-digit lock code.
6. For confirmation, it will ask you to enter the new
lock code again.
Erase Phonebook (Menu , , lock code, )
Allows you to erase all entries in your Phone Book.
Reset default (Menu , , lock code, )
1. Press Soft Key 1 Menu.
2. Press , .
3. Enter the four-digit lock code.
4. Press Reset default.
5. Pres
s
select Revert and press .
,
Features (Menu , )
Shortcut (Menu , , )
1. Press Soft Key 1 Menu.
2. Press , , .
Menu Functions
1. Press Soft Key 1 Menu.
2. Press , .
3. Enter the four-digit lock code.
4. Press Erase Phonebook.
Select Erase all #s and press .
5.
Menu Functions
94
Auto Retry (Menu , , )
Allows you to set the length of time the phone waits
before automatically redialing a number when an
attempted call fails.
1. Press Soft Key 1 Menu.
2. Press , , .
3. Select an option and press .
Off/Every 10 seconds/Every 30 seconds/
G
Every 60 seconds.
VX4400
95
Page 55

OK
OK
Answer Call (Menu , , )
OK
OK
Allows you to determine when to answer the phone.
1. Press Soft Key 1 Menu.
2. Press , , .
3. Select an option and press .
G Flip Open/Any Key/SEND Only.
G Answering Machine
The phone automatically responds with the
answering machine.
One-Touch Dial (Menu , , )
Allows you to enable/disable one-touch dialing.
1. Press Soft Key 1 Menu.
Menu Functions
2. Press , , .
Auto-Answer (Menu , , )
Allows you to select the number of rings before the phone
automatically answers a call. This feature is used only
with the car kit.
1. Press Soft Key 1 Menu.
2. Press , , .
3. Select an option and press .
G Off
G After 1 ring
When you have an incoming call, the phone
automatically responds after 1 ring.
G After 3 rings
When you have an incoming call, the phone
automatically responds after 3 rings.
Menu Functions
96
3. Select Enable or Disable and press .
Voice Privacy (Menu , , )
Set the voice privacy feature for CDMA calls as
Enhanced or Standard. CDMA offers inherent
voice privacy. Check with your service provider for
availability of the enhanced voice privacy mode.
1. Press Soft Key 1 Menu.
2. Press , , .
3. Select Enhanced or Standard and press .
VX4400
97
Page 56

OK
Auto Volume (Menu , , )
OK
OK
Data Settings (Menu , )
1. Press Soft Key 1 Menu.
2. Press , , .
3. Select On or Off and press .
Language (Menu , , )
Set the bilingual feature according to your preference.
Choose between English and Spanish.
1. Press Soft Key 1 Menu.
2. Press , , .
3. Set English/Spanish with then
press .
Data/Fax (Menu , , )
In Data/Fax setting, you can use your phone to
transmit data and faxes.
Wireless data communication services refer to
utilization of subscriber terminals for access to
Internet with personal computer or laptops at 19.2
Kbps or at maximum of 230.4 Kbps. Speed of
connection depends on carrier’s network and other
variables. Contact communication information
specifications must match network.
1. Press Soft Key 1 Menu.
2. Press , , .
3. Select an option and press .
G Off/Fax In Once/Fax In Always/Data In Once/
Data In Always
NOTE
Data Connection Kit - Your wireless connection to the
Internet and other dial-up networking functions. This Kit
allows you to connect your PC or PDA to your LG wireless
phone, freeing you from having to locate a telephone
outlet. You can send or receive an e-mail, a fax, or access
the Internet anytime, anywhere.
Menu Functions
98
Menu Functions
VX4400
99
Page 57

OK
OK
Select Port (Menu , , )
OK
OK
Voice Services (Menu , )
1. Press Soft Key 1 Menu.
2. Press , , .
3. Select an option and press .
G USB/RS-232C (COM Port)/Closed
Port Speed (Menu , , )
This setting enables the subscriber terminal to set the
port speed.
1. Press Soft Key 1 Menu.
2. Press , , .
3. Select an option and press .
G 19200/115200/230400
Port Speed needs to be set properly based on
carrier’s network. Contact carrier for the maximum
available speed.
NOTE
When using 1X HSPD data service by means of an
RS-232C data cable, port speed shall be set to
115,200 (230,400 shall not be supported). When using
1X HSPD data service by means of USB data cable,
you may get better port speed if the port speed is set
to 230,400 rather than 115,200.
Voice Dial Prompt (Menu , , )
Allows you to set the command for voice dialing.
1. Press Soft Key 1 Menu.
2. Press , , .
3. Select an option and press .
G Key press/Flip open/Disable
Answering Machine (Menu , , )
1. Press Soft Key 1 Menu.
2. Press , , .
3. Select an option and press .
G Speaker on: You can hear the other party
during the recording of the answering machine.
G Speaker off: You cannot hear the other party
during the recording of the answering machine.
Menu Functions
100
Menu Functions
VX4400
101
Page 58

OK
Train Words (Menu , , )
OK
OK
Allows you to help your phone to distinguish your voice
when using voice commands.
In case you have to use words such as Yes or No during
the voice recognition process, if you cannot clearly
recognize the words Yes or No, you can clearly recognize
them by recording your own voice while using this
feature.
1. Press Soft Key 1 Menu.
Location (Menu , )
Menu for GPS(Global Positioning System: Satellite
assisted location information system)mode.
1. Press Soft Key 1 Menu.
2. Press , .
3. Select an option and press .
Menu Functions
G Location On/E911 Only
2. Press , , .
3. Select Yes or No and press .
4. If you have selected Yes, you can record Yes
according to the message of the phone.
5. Select Train or Un-train and press .
6. If you chose Train, press 1 Ok and follow the
voice prompts.
or
If you chose Un-train, press 1 Un-train.
Menu Functions
102
NOTE
GPS satellite signals are not always transmitted,
especially under bad atmospheric and environmental
conditions, indoors or otherwise.
Phone Info
My Phone Number (Menu , )
Allows you to display your phone
number on the screen.
1. Press Soft Key 1 Menu.
2. Press , .
3. Press to exit.
VX4400
103
Page 59

S/W Version (Menu , )
Allows you to view the software, PRL, ERI, and
Browser version.
1. Press Soft Key 1 Menu.
2. Press , .
3. Press to exit.
Icon Glossary (Menu , )
Allows you to view all the icons and their meanings.
1. Press Soft Key 1 Menu.
2. Press , .
3. Press to exit.
Shortcut Help (Menu , )
Allows you to view condensed information about
using the phone.
1. Press Soft Key 1 Menu.
2. Press , .
3. Press to exit.
Or from the Standby screen, press .
OK
104
Menu Functions
Page 60

Chapter 4. Functions Used
During a Call
Mute (During a call: Menu)
G
Sometimes it may be necessary to mute a call.
To use this function during a call, press Soft Key
1 Menu.
G
If you need to cancel the mute feature, press
Soft Key 1 Menu.
* Even when the telephone is set to mute, if you press
the key, the other party can hear Dual Tone Multi
Frequency .
105
VX4400
Functions Used
During a call
Page 61

Chapter 5. Accessories
There are a variety of accessories available for your
mobile phone. You can select these options according
to your personal communication requirements. Consult
your local dealer for availability .
Travel Charger
This charger, model TC-30W,
allows you to charge the battery . It
supports standard U.S. 120 Volt
60 Hz outlets. An orange light
indicates that it is charging, a
green light indicates charging is
complete. It takes 5 hours to
charge a completely discharged
battery .
Battery (LGLI-ABTM, LGLI-ABTL)
Standard battery and extended
battery are available.
Standard
battery
Desktop Charger
The desktop charger, model DCA4W, allows you to place the
phone in the stand for charging.
It can charge a completely
discharged battery in 3 hours.
Extended
battery
Vehicle Power Adapter
You can operate the phone and
trickle charge the phone battery
from your vehicle by using the
vehicle power adapter, model
VPA-30W. It takes 5 hours to
charge a completely discharged
battery .
Hands-Free Car Kit (Portable)
The hands-free car kit, model
PHF-32W, enables you to attach
the phone to the car providing you
with hands-free operation. It will
also charge a completely
discharged battery in 5 hours.
Data Cable Kit
Connects your phone to your PC.
(Model KW-a)
Headset
Connects to your phone, allowing
hands-free operation. Includes
earpiece, microphone, and
integrated call answer /
termination button.
(Model Headset 1000)
Accessories
106
Accessories
VX4400
107
Page 62

USB Cable
Connects your phone to your PC.
(Model LG-USB 6000)
Chapter 6. Appendix
Menu Tree
Press Soft Key 1 Menu. Press to scroll.
AC Adapter
Holster
Call History
1. Outgoing Calls
2. Incoming Calls
3. Missed Calls
4. Erase Calls
G
Outgoing Calls
G
Incoming Calls
G
Missed Calls
G
All Calls
5. Call Timer
G
Last Call
G
Home Calls
G
Roam Calls
G
All Calls
Phone Book Messages
1. List Entries
2. New Entry
3. Groups
4. Speed Dials
5. Voice Dials
6. My VCard
1. Voice
2. Send New
3. Inbox
4. Info Alerts
5. Outbox
6. Saved
7. Msg Settings
G
Auto Save
G
Auto Delete
G
Callback #
G
Msg Alerts
G
Signature
G
Direct View
G
Entry Mode
G
Block List
G
Read Ack
G
Font Size
G
Edit Voice Mail
Number
8. Erase All
G
Inbox
G
Info Alerts
G
Outbox
G
Saved
G
All
9. My Folder
G
Small Pictures
G
Large Pictures
G
My Pictures
G
Sounds
G
My Melodies
G
Animations
G
My Animations
G
Canned Msgs
Mobile Web
1. Start Browser
2.
Web Messages
3. Web Settings
G
Prompt
G
Alert
Appendix
108
Accessories
VX4400
109
Page 63

110
Appendix
1. Get Apps
2. Get Info
1. EZ Tip Calc
2. Calculator
3. World Clock
1. Schedule
2. Alarm Clock
3. Notepad
4. Voice Memo
Press Soft Key 1 Menu. Press to scroll.
Get It Now
Phone Info
Fun Tools
Organizer
Settings
1. Sounds
G
Ringers
G
Key Tone
G
Volume
G
Alerts
G
Power On/Off/Tone
2. Display
G
Banner
G
Backlight
G
Screens
G
Key Light
G
Contrast
G
Menu Style
G
Clocks
G
Theme Colors
G
Sub LCD Color
G
Number Font
G
Text Input Font
3. System
G
System Select
G
Set NAM
G
Auto NAM
G
Serving System
G
TTY
4. Security
G
Lock Phone
G
Restrict
G
Emergency #s
G
Change Code
G
Erase
Phonebook
G
Reset Default
5. Features
G
Shortcut
G
Auto Retry
G
Answer Call
G
Auto-Answer
G
One-Touch Dial
G
Voice Privacy
G
Auto V olume
G
Language
6. Data Settings
G
Data/Fax
G
Select Port
G
Port Speed
7. Voice Services
G
Voice Dial Prompt
G
Answering Machine
G
Train Words
8. Location
1. My Phone
2. S/W Version
3. Icon Glossary
4. Shortcut Help
Page 64

Chapter 7. Safety Guidelines
TIA Safety Information
Provided herein is the complete TIASafety Information for
Wireless Handheld phones. Inclusion of the text covering
Pacemakers, Hearing Aids, and Other Medical Devices is
required in the owner’s manual for CTIACertification. Use
of the remaining TIAlanguage is encouraged when
appropriate.
Exposure to Radio Frequency Signal
Your wireless handheld portable telephone is a low-power
radio transmitter and receiver. When it is ON, it receives and
also sends out radio frequency (RF) signals.
In August, 1996, the Federal Communications Commissions
(FCC) adopted RF exposure guidelines with safety levels for
handheld wireless phones. Those guidelines are consistent
with the safety standards previously set by both U.S. and
international standards bodies:
ANSI C95.1 (1992) *
NCRP Report 86 (1986)
ICNIRP (1996)
Those standards were based on comprehensive and periodic
evaluations of the relevant scientific literature. For example,
over 120 scientists, engineers, and physicians from
universities, government health agencies, and industry
reviewed the available body of research to develop the ANSI
Standard (C95.1).
*
American National Standards Institute; National Council on
Radiation Protection and Measurements; International
Commission on Non-Ionizing Radiation Protection
111
VX4400
Safety Guidelines
Page 65

The design of your phone complies with the FCC
guidelines (and those standards).
Antenna Care
Use only the supplied or an approved replacement antenna.
Unauthorized antennas, modifications, or attachments could
damage the phone and may violate FCC regulations.
Phone Operation
NORMAL POSITION: Hold the phone as you would any
other telephone with the antenna pointed up and over your
shoulder.
TIPS ON EFFICIENT OPERATION
For your phone to operate most efficiently:
Extend your antenna fully.
G
Do not touch the antenna unnecessarily when the
G
phone is in use. Contact with the antenna affects call
quality and may cause the phone to operate at a higher
power level than otherwise needed.
Driving
Check the laws and regulations on the use of wireless
phones in the areas where you drive. Always obey them.
Also, if using your phone while driving, please:
Give full attention to driving —driving safely is your
G
first responsibility;
Use hands-free operation, if available;
G
Pull off the road and park before making or answering
G
a call if driving conditions so require.
Electronic Devices
Most modern electronic equipment is shielded from RF
signals. However, certain electronic equipment may not be
shielded against the RF signals from your wireless phone.
Pacemakers
The Health Industry Manufacturers Association
recommends that a minimum separation of six (6”) inches
be maintained between a handheld wireless phone and a
pacemaker to avoid potential interference with the
pacemaker. These recommendations are consistent with the
independent research by and recommendations of Wireless
Technology Research.
Persons with pacemakers:
Should ALWAYS keep the phone more than six
G
inches from their pacemaker when the phone is
turned ON;
Should not carry the phone in a breast pocket.
G
Should use the ear opposite the pacemaker to
G
minimize the potential for interference.
If you have any reason to suspect that interference
G
is taking place, turn your phone OFF immediately.
Hearing Aids
Some digital wireless phones may interfere with some
hearing aids. In the event of such interference, you may
want to consult your service provider.
Safety Guidelines
Safety guidelines
112
VX4400
VX4400
113
Page 66

Other Medical Devices
If you use any other personal medical device, consult the
manufacturer of your device to determine if they are
adequately shielded from external RF energy. Y our
physician may be able to assist you in obtaining this
information.
Turn your phone OFF in health care facilities when any
regulations posted in these areas instruct you to do so.
Hospitals or health care facilities may be using equipment
that could be sensitive to external RF energy.
Vehicles
RF signals may affect improperly installed or inadequately
shielded electronic systems in motor vehicles. Check with
the manufacturer or its representative regarding your
vehicle.
You should also consult the manufacturer of any
equipment that has been added to your vehicle.
Posted Facilities
Turn your phone OFF in any facility where posted notices
so require.
Aircraft
FCC regulations prohibit using your phone while in the
air. Turn your phone OFF before boarding an aircraft.
Blasting Areas
To avoid interfering with blasting operations, turn your
phone OFF when in a “blasting area” or in areas posted:
“Turn off two-way radio”. Obey all signs and instructions.
Potentially Explosive Atmosphere
Turn your phone OFF when in any area with a potentially
explosive atmosphere and obey all signs and instructions.
Sparks in such areas could cause an explosion or fire
resulting in bodily injury or even death.
Areas with a potentially explosive atmosphere are often,
but not always, marked clearly. Potential areas may
include: fueling areas (such as gasoline stations); below
deck on boats; fuel or chemical transfer or storage
facilities; vehicles using liquefied petroleum gas (such as
propane or butane); areas where the air contains chemicals
or particles (such as grain, dust, or metal powders); and
any other area where you would normally be advised to
turn off your vehicle engine.
For Vehicles Equipped with an Air Bag
An air bag inflates with great force. DO NOT place
objects, including either installed or portable wireless
equipment, in the area over the air bag or in the air bag
deployment area. If in-vehicle wireless equipment is
improperly installed and the air bag inflates, serious injury
could result.
Safety Guidelines
Safety guidelines
114
115
Page 67

FDA Consumer Update
The U.S. Food and Drug Administration’s Center
for Devices and Radiological Health Consumer
Update on Mobile Phones.
1. Do wireless phones pose a health hazard?
The available scientific evidence does not show that any
health problems are associated with using wireless
phones. There is no proof, however, that wireless phones
are absolutely safe. Wireless phones emit low levels of
radiofrequency energy (RF) in the microwave range
while being used. They also emit very low levels of RF
when in the standby mode. Whereas high levels of RF
can produce health effects (by heating tissue), exposure to
low level RF that does not produce heating effects causes
no known adverse health effects. Many studies of low
level RF exposures have not found any biological effects.
Some studies have suggested that some biological effects
may occur, but such findings have not been confirmed by
additional research. In some cases, other researchers have
had difficulty in reproducing those studies, or in
determining the reasons for inconsistent results.
2. What is the FDA's role concerning the safety of
wireless phones?
Under the law, the FDAdoes not review the safety of
radiation-emitting consumer products such as wireless
phones before they can be sold, as it does with new drugs
or medical devices. However, the agency has authority to
take action if wireless phones are shown to emit
radiofrequency energy (RF) at a level that is hazardous to
the user. In such a case, the FDAcould require the
manufacturers of wireless phones to notify users of the
health hazard and to repair, replace, or recall the phones
so that the hazard no longer exists.
Although the existing scientific data do not justify FDA
regulatory actions, the FDAhas urged the wireless phone
industry to take a number of steps, including the
following:
Support needed research into possible biological
G
effects of RF of the type emitted by wireless phones;
Design wireless phones in a way that minimizes any
G
RF exposure to the user that is not necessary for device
function; and
Cooperate in providing users of wireless phones with
G
the best possible information on possible effects of
wireless phone use on human health.
The FDAbelongs to an interagency working group of the
federal agencies that have responsibility for different
aspects of RF safety to ensure coordinated efforts at the
federal level. The following agencies belong to this
working group:
o National Institute for Occupational Safety and Health
o Environmental Protection Agency
o Occupational Safety and Health Administration
o National Telecommunications and Information
Administration
The National Institutes of Health participates in some
interagency working group activities, as well.
The FDAshares regulatory responsibilities for wireless
phones with the Federal Communications Commission
(FCC). All phones that are sold in the United States must
comply with FCC safety guidelines that limit RF
exposure. The FCC relies on the FDAand other health
agencies for safety questions about wireless phones.
The FCC also regulates the base stations that the wireless
phone networks rely upon. While these base stations
operate at higher power than do the wireless phones
Safety Guidelines
Safety guidelines
116
VX4400
117
Page 68

themselves, the RF exposures that people get from these
base stations are typically thousands of times lower than
those they can get from wireless phones. Base stations
are thus not the subject of the safety questions discussed
in this document.
3. What kinds of phones are the subject of this update?
The term “wireless phone” refers here to handheld
wireless phones with built-in antennas, often called
“cell”, “mobile”, or “PCS” phones. These types of
wireless phones can expose the user to measurable
radiofrequency energy (RF) because of the short distance
between the phone and the user’s head.
These RF exposures are limited by FCC safety guidelines
that were developed with the advice of the FDAand
other federal health and safety agencies. When the phone
is located at greater distances from the user, the exposure
to RF is drastically lower because a person's RF exposure
decreases rapidly with increasing distance from the
source. The so-called “cordless phones,” which have a
base unit connected to the telephone wiring in a house,
typically operate at far lower power levels, and thus
produce RF exposures far below the FCC safety limits.
4. What are the results of the research done alr eady?
The research done thus far has produced conflicting
results, and many studies have suffered from flaws in
their research methods. Animal experiments investigating
the effects of radiofrequency energy (RF) exposures
characteristic of wireless phones have yielded conflicting
results that often cannot be repeated in other laboratories.
Afew animal studies, however, have suggested that low
levels of RF could accelerate the development of cancer
in laboratory animals. However, many of the studies that
showed increased tumor development used animals that
had been genetically engineered or treated with cancercausing chemicals so as to be pre-disposed to develop
cancer in the absence of RF exposure. Other studies
Safety guidelines
118
exposed the animals to RF for up to 22 hours per day.
These conditions are not similar to the conditions under
which people use wireless phones, so we don’t know
with certainty what the results of such studies mean for
human health.
Three large epidemiology studies have been published
since December 2000. Between them, the studies
investigated any possible association between the use of
wireless phones and primary brain cancer, glioma,
meningioma, or acoustic neuroma, tumors of the brain or
salivary gland, leukemia, or other cancers. None of the
studies demonstrated the existence of any harmful health
effects from wireless phone RF exposures. However,
none of the studies can answer questions about long-term
exposures, since the average period of phone use in these
studies was around three years.
5. What research is needed to decide whether RF
exposure from wireless phones poses a health risk?
Acombination of laboratory studies and epidemiological
studies of people actually using wireless phones would
provide some of the data that are needed. Lifetime animal
exposure studies could be completed in a few years.
However, very large numbers of animals would be
needed to provide reliable proof of a cancer promoting
effect if one exists. Epidemiological studies can provide
data that is directly applicable to human populations, but
10 or more years follow-up may be needed to provide
answers about some health effects, such as cancer . This is
because the interval between the time of exposure to a
cancer-causing agent and the time tumors develop — if
they do — may be many, many years. The interpretation
of epidemiological studies is hampered by difficulties in
measuring actual RF exposure during day-to-day use of
wireless phones. Many factors affect this measurement,
such as the angle at which the phone is held, or which
model of phone is used.
VX4400
Safety Guidelines
119
Page 69

6. What is the FDA doing to find out more about the
possible health effects of wireless phone RF?
The FDAis working with the U.S. National Toxicology
Program and with groups of investigators around the
world to ensure that high priority animal studies are
conducted to address important questions about the
effects of exposure to radiofrequency energy (RF).
The FDAhas been a leading participant in the World
Health Organization International Electromagnetic Fields
(EMF) Project since its inception in 1996. An influential
result of this work has been the development of a detailed
agenda of research needs that has driven the
establishment of new research programs around the
world. The project has also helped develop a series of
public information documents on EMF issues.
The FDAand the Cellular Telecommunications &
Internet Association (CTIA) have a formal Cooperative
Research and Development Agreement (CRADA) to do
research on wireless phone safety. The FDAprovides the
scientific oversight, obtaining input from experts in
government, industry, and academic or ganizations.
CTIA-funded research is conducted through contracts
with independent investigators. The initial research will
include both laboratory studies and studies of wireless
phone users. The CRADAwill also include a broad
assessment of additional research needs in the context of
the latest research developments around the world.
7. How can I find out how much radio frequency energy
exposure I can get by using my wireless phone?
All phones sold in the United States must comply with
Federal Communications Commission (FCC) guidelines
that limit radio frequency energy (RF) exposures. The
FCC established these guidelines in consultation with the
FDAand the other federal health and safety agencies. The
FCC limit for RF exposure from wireless telephones is set
at a Specific Absorption Rate (SAR) of 1.6 watts per
kilogram (1.6 W/kg). The FCC limit is consistent with the
safety standards developed by the Institute of Electrical
and Electronic Engineering (IEEE) and the National
Council on Radiation Protection and Measurement. The
exposure limit takes into consideration the body’s ability
to remove heat from the tissues that absorb energy from
the wireless phone and is set well below levels known to
have effects. Manufacturers of wireless phones must
report the RF exposure level for each model of phone to
the FCC. The FCC website (http://www .fcc.gov/oet/
rfsafety) gives directions for locating the FCC
identification number on your phone so you can find your
phone’s RF exposure level in the online listing.
8. What has the FDA done to measure the radio
frequency energy coming from wireless phones?
The Institute of Electrical and Electronic Engineers
(IEEE) is developing a technical standard for measuring
the radio frequency energy (RF) exposure from wireless
phones and other wireless handsets with the participation
and leadership of FDAscientists and engineers. The
standard, “Recommended Practice for Determining the
Spatial-Peak Specific Absorption Rate (SAR) in the
Human Body Due to Wireless Communications Devices:
Experimental T echniques,” sets forth the first consistent
test methodology for measuring the rate at which RF is
deposited in the heads of wireless phone users. The test
method uses a tissue-simulating model of the human
head. Standardized SAR test methodology is expected to
greatly improve the consistency of measurements made
at different laboratories on the same phone. SAR is the
measurement of the amount of energy absorbed in tissue,
either by the whole body or a small part of the body. It is
measured in watts/kg (or milliwatts/g) of matter. This
measurement is used to determine whether a wireless
phone complies with safety guidelines.
Safety Guidelines
Safety guidelines
120
VX4400
121
Page 70

9. What steps can I take to reduce my exposure to
radiofrequency energy from my wireless phone?
If there is a risk from these products — and at this point
we do not know that there is — it is probably very small.
But if you are concerned about avoiding even potential
risks, you can take a few simple steps to minimize your
exposure to radiofrequency energy (RF). Since time is a
key factor in how much exposure a person receives,
reducing the amount of time spent using a wireless
phone will reduce RF exposure.
If you must conduct extended conversations by wireless
phone every day, you could place more distance between
your body and the source of the RF , since the exposure
level drops off dramatically with distance. For example,
you could use a headset and carry the wireless phone
away from your body or use a wireless phone connected
to a remote antenna.
Again, the scientific data do not demonstrate that
wireless phones are harmful. But if you are concerned
about the RF exposure from these products, you can use
measures like those described above to reduce your RF
exposure from wireless phone use.
10. What about children using wireless phones?
The scientific evidence does not show a danger to users
of wireless phones, including children and teenagers. If
you want to take steps to lower exposure to
radiofrequency energy (RF), the measures described
above would apply to children and teenagers using
wireless phones. Reducing the time of wireless phone
use and increasing the distance between the user and the
RF source will reduce RF exposure.
Some groups sponsored by other national governments
have advised that children be discouraged from using
wireless phones at all. For example, the government in
the United Kingdom distributed leaflets containing such
a recommendation in December 2000. They noted that
no evidence exists that using a wireless phone causes
brain tumors or other ill effects. Their recommendation
to limit wireless phone use by children was strictly
precautionary; it was not based on scientific evidence
that any health hazard exists.
11. What about wireless phone interference with
medical equipment?
Radio frequency energy (RF) from wireless phones can
interact with some electronic devices. For this reason, the
FDAhelped develop a detailed test method to measure
electromagnetic interference (EMI) of implanted cardiac
pacemakers and defibrillators from wireless telephones.
This test method is now part of a standard sponsored by
the Association for the Advancement of Medical
instrumentation (AAMI). The final draft, a joint effort by
the FDA, medical device manufacturers, and many other
groups, was completed in late 2000. This standard will
allow manufacturers to ensure that cardiac pacemakers
and defibrillators are safe from wireless phone EMI.
The FDAhas tested hearing aids for interference from
handheld wireless phones and helped develop a
voluntary standard sponsored by the Institute of
Electrical and Electronic Engineers (IEEE). This
standard specifies test methods and performance
requirements for hearing aids and wireless phones so that
no interference occurs when a person uses a
“compatible” phone and a “compatible” hearing aid at
the same time. This standard was approved by the IEEE
in 2000.
The FDAcontinues to monitor the use of wireless
phones for possible interactions with other medical
devices. Should harmful interference be found to occur,
the FDAwill conduct testing to assess the interference
and work to resolve the problem.
Safety Guidelines
Safety guidelines
122
VX4400
123
Page 71

12. Where can I find additional information?
For additional information, please refer to the following
resources:
FDAweb page on wireless phones
(http://www.fda.gov/cdrh/phones/index.html)
Federal Communications Commission (FCC) RF Safety
Program
(http://www.fcc.gov/oet/rfsafety)
International Commission on Non-lonizing Radiation
Protection
(http://www.icnirp.de)
World Health Organization (WHO) International EMF
Project
(http://www.who.int/emf)
National Radiological Protection Board (UK)
(http://www.nrpb.or g.uk/)
Consumer Information on SAR
(Specific Absorption Rate)
This Model Phone Meets the Government’s
Requirements for Exposure to Radio Waves.
Your wireless phone is a radio transmitter and receiver . It
is designed and manufactured not to exceed the emission
limits for exposure to radio frequency (RF) energy set by
the Federal Communications Commission (FCC) of the
U.S. Government. These limits are part of
comprehensive guidelines and establish permitted levels
of RF energy for the general population. The guidelines
are based on standards that were developed by
independent scientific organizations through periodic and
thorough evaluation of scientific studies. The standards
include a substantial safety margin designed to assure the
safety of all persons, regardless of age and health.
The exposure standard for wireless mobile phones
employs a unit of measurement known as the Specific
Absorption Rate, or SAR. The SAR limit set by the FCC
is 1.6W/kg. * T ests for SAR are conducted using
standard operating positions specified by the FCC with
the phone transmitting at its highest certified power level
in all tested frequency bands. Although SAR is
determined at the highest certified power level, the actual
SAR level of the phone while operating can be well
below the maximum value. Because the phone is
designed to operate at multiple power levels to use only
the power required to reach the network, in general, the
closer you are to a wireless base station antenna, the
lower the power output.
Safety guidelines
124
VX4400
125
Page 72

Before a phone model is available for sale to the public,
it must be tested and certified to the FCC that it does not
exceed the limit established by the government-adopted
requirement for safe exposure. The tests are performed in
positions and locations (e.g., at the ear and worn on the
body) as required by the FCC for each model. The
highest SAR value for this model phone when tested for
use at the ear is 1.04 W/kg and when worn on the body ,
as described in this user’s manual, is 0.75 W/kg. (Bodyworn measurements differ among phone models,
depending upon available accessories and FCC
requirements.) While there may be differences between
SAR levels of various phones and at various positions,
they all meet the government requirement for safe
exposure.
The FCC has granted an Equipment Authorization for
this model phone with all reported SAR levels evaluated
as in compliance with the FCC RF emission guidelines.
SAR information on this model phone is on file with the
FCC and can be found under the Display Grant section
of http://www .fcc.gov/oet/fccid after searching on FCC
ID BEJTM540.
Additional information on Specific Absorption Rates
(SAR) can be found on the Cellular T elecommunications
Industry Association (CTIA) website at http://www.wowcom.com
* In the United States and Canada, the SAR limit for
mobile phones used by the public is 1.6 watts/kg
(W/kg) averaged over one gram of tissue. The
standard incorporates a substantial margin of safety
to give additional protection for the public and to
account for any variations in measurements.
P/N : MMBB0059701 DATE : 2003. 1. 23
Page 73

UUsseerr GGuuiiddee
MMaannuuaall ddeell UUssuuaarriioo
V
X
4
4
0
0
M
M
B
B
0
0
5
9
7
0
1
(1.1)
U
S
E
R
G
U
I
D
E
Page 74

Contenido
INFORME SOBRE LA GARANTÍA LIMITADA........... 1
Tema................................................................. 3
Introducción .................................................................. 5
Información Importante ................................... 6
Verificación de accesorios............................... 6
Antes de Iniciar ........................................................... 7
Medidas de seguridad .................................... 7
Información de seguridad ............................... 8
INFORMACIÓN DE LA FCC SOBRE LA
EXPOSICIÓN A RADIOFRECUENCIAS....... 9
Capítulo 1. Iniciando................................................... 12
Precauciones ................................................ 12
Uso de la batería .......................................... 13
Componentes del Teléfono ........................... 17
Descripción general del teléfono ................. 18
Iconos en la pantalla...................................... 20
Registro de información con la introducción
de texto T9...................................................... 21
Capítulo 2. Funciones Básicas ................................. 26
Encendiendo y apagando el teléfono .......... 26
Para hacer una llamada ............................... 27
Corrección en errores de marcación ........... 28
Para recibir una llamada .............................. 28
Page 75

Uso de modo modales y silencioso y
de bloqueo ..................................................... 29
Llamada en Espera ...................................... 31
Mudo .............................................................. 31
Repetición manual ........................................ 31
Para ajustar el volumen .............................. 32
Modo de Ahorro de energia.......................... 32
Potencia de la señal ..................................... 33
Mini Pantalla .................................................. 33
Marcado rápido ............................................. 34
ID del llamador .............................................. 34
Funciones de agenda ................................... 35
Para marcar un número de su agenda
telefónica personal ........................................ 37
Capítulo 3. Funciones del Menú................................ 41
Lineamiento general para Acceso y
configuración del menú ................................ 41
Lista Llam....................................................... 42
Contactos ...................................................... 45
Enviand. Msj................................................... 48
Mobile Web ................................................... 64
Get It Now ..................................................... 72
Her. P/div. ...................................................... 76
Organizador ................................................... 77
Configuraciones ............................................ 81
Info de tel...................................................... 106
Capítulo 4. Funciones Utilizadas Durante una
Llamada ................................................. 108
Mudo............................................................. 108
Capítulo 5. Accesorios ............................................. 109
Capítulo 6. Apéndice ............................................... 112
Capítulo 7. Guías de Seguridad .............................. 114
Información de seguridad de la TIA ........... 114
Actualización de la FDA para el
consumidor .................................................. 119
Información para clientes sobre SAR...................... 131
Page 76

INFORME SOBRE LA GARANTÍA LIMITADA
1. Qué cubre esta garantía:
La compañía LG ofrece una garantía limitada al usuario con el fin de ofrecer
una unidad y accesorios, libres de defectos cuanto al material y el servicio técnico, de acuerdo con los siguientes temas y condiciones:
(1) Esta garantía limitada será vigente durante un(1) año, a partir de la fecha
de compra de producto. El período restante de la garantía para la unidad
que se repara o se substituye será determinado por la presentación del recibo de venta para la compra de la unidad.
(2) La garantía limitada será extendida solamente al comprador original de
producto y no será cedida o transferida al siguiente comprador o consumidor final.
(3) Esta garantía limitada es, válida solamente con el comprador original de
producto durante el período garantizado en todo el territorio de Los
Estados Unidos, incluyendo Alaska y Hawai y, Canadá.
(4) La caja exterior y las partes estéticas del producto debem estar libre de
defectos durante su envío. Ypor censiguiente, no serán cubiertos por esta
garantía limitada.
(5) Con la solicitud de la parte de LG, el consumidor deberá proporcionar una
información razonable para comprobar la fecha de compra su teléfono.
(6)El consumidor deberá pagar el gasto de envío del producto al Departamento
de Servicio al Consumidor de LG. YLG responsabilizará el costo de transporte de producto hacia el consumidor, después de completar el servicio
bajo esta garantía limitada.
2. Qué lo que no cubre esta garantía:
(1) Defectos o daños causados por el uso de producto en una forma que no se
puede definir como normal.
(2) Defectos o daños causados por uso anormal, condiciones anormales, alma-
cenamiento inadecuado, exposición a la humedad, modificaciones, conexiones y reparaciones no autorizadas, mal uso, descuido, abuso, accidente,
alteración, instalación inadecuada u otros tipos de actos que no son imputables a la empresa LG, incluyendo el daño causado por el envío, los fusibles
fundidos o por el derrame de comida o bebida sobre el aparato.(3)
Breakage or damage to antennas unless caused directly by defects in material or workmanship.
(3) Rotura o daño de antena, a menos que el daño fuera causado directamente
por algún defecto de material o personal de servicio.
(4) El defecto o mal funcionamiento del producto no declarado por el con-
sumidor al Departamento de Servicio al Consumidor de LG, durante el
período vigente de la garantía limitada.
1
Page 77

(5) Producto que tiene el número de serie borrado o en una condición ilegible.
(6) A diferencia de otros tipos de garantías escritas o implícitas, esta garantía
limitada rige por el hecho o por operación legal. Pero no se limita cualquier
garantía implícita de comerciabilidad de cualquier tipo o la conveniencia
para el uso particular.
(7) Daños causados por el uso de accesorios que no son suministrados por LG.
(8) Ralladuras o daños causados por el uso normal de aparato en toda la super-
ficie plástica y otras partes expuestas al exterior.
(9) Productos utilizados excediendo el valor máximo publicado.
(10) Productos usados u obtenidos de un programa de alquiler de aparato.
(11) Artículos de consumo como los fusibles.
3. Ley de estado aplicado:
Otras garantias escrítas no serán aplicables a este producto. LA DURACIÓN
DE CUALQUIER GARANTÍA IMPLÍCITA, INCLUYENDO LA
GARANTÍA IMPLÍCITA DE COMERCIABILIDAD, SERÁ LIMITADA
POR EL PERIODO DE ESTA GARANTÍA ESCRITA. LG INFOCOMM
INC. NO SE HARÁ RESPONSABLE DE LA PÉRDIDA DE FUNCIONALIDAD DEL PRODUCTO, INCONVENIENCIA, PÉRDIDA O
CUALQUIER OTRO TIPO DE DAÑO CAUSADO EN FORMA DIRECTA O CONSIGUIENTE DE LA VIOLACIÓN DE LA GARANTÍA
IMPLÍCITA O ESCRITA, INCLUYENDO LA GARANTÍA IMPLÍCITA
DE COMERCIABILIDAD APLICABLE A ESTE PRODUCTO.
Algunos estados no reconocen la limitación exclusiva de daños incidentales o
consiguiente o las limitaciones en el período de garantía implícita. Sin embargo estas limitaciones o exclusiones no serán aplicable a usted. Esta garantía le
otorga derechos específicos y usted podrá gozar otros derechos que varía segœn
el estado.
4. Cómo puede obtener el servicio de garant’a:
Para obtener el servicio de garant’a, por favor llame al siguiente nœmero de
teléfono desde cualquier parte del territorio de Los Estados Unidos:
Tel. 1-800-793-8896.
www.lgeservice.com
Por favor, llame o escriba al centro de servicio autorizado de LGE que queda
m‡s cerca de su domicilio para solicitar el servicio garantizado.
Electronics Service
201 JAMES RECORD ROAD, HUNTSVILLE, AL35824
Tema
El teléfono VX4400 ha sido diseñado para ser utilizado con
una tecnología más Avanzada de comunicaciones móviles
digitales, o sea Acceso Múltiple por División de
Código(CDMA). La tecnología digital CDMA da una extraordinaria claridad de voz y permite la ejecución de diversas
funciones avanzadas. Actualmente la tecnología de comunicación móvil digital de CDMA es utilizada comercialmente
en la comunicación celular y los servicios de comunicación
personal (PCS).
La diferencia entre dos sistema se data en el espectro de frecuencia de operación. En el caso de la comunicación celular
utiliza la frecuencia de 800Mhz y el sistema PCS usa 1.9Ghz.
El VX4400 funciona en ambas frecuencias y normalmente
este tipo de teléfono es llamado como el teléfono de doble
modo. Además VX4400 funciona en el Sistema Avanzado de
Teléfono Móvil (AMPS) y por esta razón lo llamamos como
el teléfono de triple modo. Si una de las estaciones base de sistema celular, PCS y AMPS está ubicada cerca de usted, el
índice de falla de llamada de un teléfono de triple modo es
más bajo que un teléfono de doble modo o simple modo.
La tecnología CDMA adopta Espectro Diseminado de
Frecuencias Directas (DSSS). Esta función DSSS permite
mantener la comunicación durante el movimiento y usar un
canal de frecuencia por numerosos usuarios situados en una
misma área específica, incrementandoreducir la posibilidad de
llamadas alteradas o interrumpidas durante una conversación
por teléfono.
El sistema de red de comunicación celular y PCS CDMAconsiste de Oficina de Conmutación Móvil(MSO), Controlador
de Estación Base(BSC), Sistema de Transmisión de Estación
Base(BTS) y Estación Móvil(MS). La siguiente tabla le muestra los principales estándares de CDMA.
32
Page 78

Estándar de CDMA
Interfaz básica de
aire
Red de comunicación
Servicio
Funcionamiento
Institución designada
TIA/EIA/IS-95-A
ANSI J-STD-008
TIA/EIA/IS-634
TIA/EIA/IS/651
TIA/EIA/IS-41-C
TIA/EIA/IS-124
TIA/EIA/IS-96-B
TIA/EIA/IS-99
TIA/EIA/IS-637
TIA/EIA/IS-657
TIA/EIA/IS-97
TIA/EIA/IS-98
ANSI J-STD-018
ANSI J-STD-019
TIA/EIA/IS-125
Protocolo entre MS y BTS para
el sistema celular y AMPS.
Protocolo entre MS y BTS para
PCS.
MAS-BS
PCSC-RS
Operaciones entre sistemas
Comunicación de datos sin
señalización
Palabras de codificador-decodificador
Asigna datos y fax
Servicio de mensaje corto
Datos de paquete
Estación base de celular
Estación móvil de celular
Estación personal de PCS
Estación base de PCS
Palabras de codificador-decodificador
Descripcón
*TSB-74: Protocolo entre un sistema de IS-95A y
ANSI J-STD-008
El sistema 1 x RTT recibe los suscriptores en la sección inalámbrica dos veces mayor que IS-95. La duracion de su batería es doble de la de IS-95. Y también
es posible la transmisión de datos de alta velocidad.
Introducción
Características sobresalientes
Felicitaciones! Su nuevo teléfono inalámbrico cambiará el modo de comunicación y es compacto,
además de ser un sistema de comunicacion personal
ligero con características adicionales para una persona
en movimiento. Nuestra tecnología digital avanzada
de comunicación móvil, le permitirá a usted los siguientes:
Amplia pantalla de VCL(Visualización en Cristal
G
Líquido), fácil de leer, con capacidad para 8 renglones, luz de fondo con iconos indicadores de estado.
Funciones de localización, mensajes, correo de voz
G
e indicación de llamadas.
Teclado de 18 botones.
G
Larga duración de espera y de conversación.
G
Interfaz de menú con indicaciones para facilitar su
G
uso y configuración.
Contestación con cualquier tecla, contestación
G
automática, remarcado automático, marcado con
una sola tecla y marcado rápido, con 199 ubicaciones en memoria.
El español y el Inglés están disponibles para los
G
idiomas de menú.
54
Page 79

Información Importante
Antes de Iniciar
Esta guía del usuario contiene información importante
sobre las funciones y uso de este teléfono. Por favor,
léala detenidamente para asegurar un funcionamiento
óptimo y evitar posibles daños o mal uso de aparato.
Cualquier alteración del teléfono no autorizada en esta
guía podría invalidar la garantía del aparato.
Verificación de accesorios
Su teléfono móvil trae los siguientes accesorios, y
como un cargador de escritorio de una sola ranura una
batería recargable. Por favor, verifique que no falte
ninguno de estos accesorios.
Medidas de seguridad
ADVERTENCIA! Para reducir la posibilidad de Choque eléctrico, no exponga este teléfono en áreas de alto contenido de
humedad como el baño, la piscina, etc.
Siempre almacene el teléfono lejos del calor .Nunca almacene
el teléfono en las situaciones que pueden exponerlo a las temperaturas más bajas que 32°F o más altas que 104°F , tales como
al aire libre durante una tempestad de nieve o en el coche en un
día caliente. La exposición al frío o al calor excesivos resultará
en el malfuncionamiento, en el daño y/o en la avería catastrófica.
Tenga cuidado al usar el teléfono cerca de otros dispositivos
electrónicos. Las emisiones de RF de su teléfono móvil pueden
afectar los equipos electrónicos cercanos inadecuadamente
blindados. Usted debe consultar a los fabricantes de cualquier
tipo de dispositivo médico personal tales como los marcapasos
y las prótesis auditivas para determinar si son susceptibles a la
interferencia de su teléfono móvil. Apague el teléfono en las
instalaciones médica o en las estaciones de servicio. Nunca
coloque el teléfono en un horno de microonda ya que esto
provocará la explosión de la batería.
IMPORTANTE! Antes de usar el aparato, lea la sección
INFORMACIÓN DE SEGURIDAD DE LATIA.
6
7
Page 80

Información de seguridad
Lea y siga la ‘Información de seguridad’ para el uso adecuado
y seguro de su teléfono y para prevenir cualquier daño o accidente esperado. T ambién mantenga el manual del usuario en un
lugar accesible en todo momento después de leerlo.
Desconecte el enchufe de la toma de corriente y el cargador
G
cuando se ilumina porque puede provocar un choque eléctrico o peligro de incendio.
No utilice el teléfono en ambientes con gran peligro de
G
explosión, porque puede influenciar dispositivos de alta frecuencia. No lo instale en el lugar en el que se encuentra
demasiado polvo, y tenga cuidado en mantener la mínima
distancia requerida entre el enchufe de la toma de corriente
y el calentador.
Desconecte el enchufe de la toma de corriente al limpiarlo,
G
y limpie la clavija del enchufe de la toma de corriente cuando está sucio.
No dañe el enchufe de la toma de corriente por modificación
G
o doblándolo o torciéndolo o jalándolo o insertándolo en una
raja y calentándolo, ni utilice el enchufe si está suelto,
porque puede provocar el fuego o choque eléctrico.
Conecte firmemente el enchufe de la toma de corriente, y
G
desconecte el enchufe de la toma de corriente manteniéndolo firme al desconectarlo. Cuando no se conecta firmemente,
puede provocar el calor o el fuego.
No coloque ningunos objetos pesados en el enchufe de la
G
toma de corriente o no presione el enchufe de la toma de
corriente utilizando algún aparato porque puede provocar el
fuego o choque eléctrico.
Tenga cuidado en no dejar que la interfaz de la batería con-
G
tacte los conductores tales como collares o monedas.
Cuando se pone en cortocircuito, puede provocar una
explosión.
8
No desmonte ni choque contra la batería porque puede provo-
G
car el choque eléctrico, el cortocircuito y el fuego. Almacene
la batería en un lugar fuera del alcance de los niños.
Si coloca la batería en la boca o utiliza la batería dañada,
G
puede afectar gravemente el cuerpo.
No coloque objetos magnéticos tales como tarjeta de crédito,
G
tarjeta de teléfono, libreta de ahorros y un billete de metro con
tira magnética cerca de su teléfono porque los datos en la tarjeta puede ser perjudicado por el magnetismo del teléfono.
No agarre la antena ni la deje contactar el cuerpo durante una
G
llamada. Si sigue hablando por teléfono durante un largo
periodo de tiempo, el calor generado puede reducir la calidad
de la llamada.
No vibre ni choque contra su teléfono. Cuando no utiliza el
G
teléfono durante un largo periodo de tiempo, almacénelo en
un área segura con el enchufe de la toma de corriente
desconectado.
INFORMACIÓN DE LA FCC SOBRE LA
EXPOSICIÓN A RADIOFRECUENCIAS
ADVERTENCIA!
teléfono.
En su Informe y resolución FCC 96-326 de agosto de 1996, la
Comisión Federal de Comunicaciones (FCC) de Estados
Unidos adoptó y actualizó normas de seguridad relacionadas
con exposición humana a la energía electromagnética de
radiofrecuencias emitida por transmisores sujetos a reglamentos
de la FCC. Estos lineamientos concuerdan con las normas de
seguridad previamente establecidas por entidades internacionales y estadounidenses. El diseño de este teléfono cumple
plenamente con los lineamientos de la FCC y dichas normas
internacionales.
Lea esta información antes de usar el
9
Page 81

PRECAUCIÓN
Utilice sólo la antena suministrada por el fabricante u otra antena
autorizada para uso con este aparato. El uso de una antena no
autorizada o modificaciones de la antena podría afectar la calidad
de las llamadas, dañar el aparato o infringir las disposiciones de
la FCC.
No utilice este teléfono con una antena dañada. Si una antena
dañada entra en contacto con la piel, podría provocar una ligera
quemadura. Reponga la antena defectuosa contactando con su
distribuidor local.
Al portar el aparato junto al cuerpo
Se ha comprobado la seguridad de usos normales de este aparato con la parte trasera del teléfono a una distancia de dos centímetros del cuerpo del usuario. Afin de cumplir con las disposiciones de la FCC en materia de exposición a radiofrecuencias, la
parte trasera del aparato debe mantenerse a una distancia mínima
de dos centímetros del cuerpo del usuario. Esto incluye la antena, encuéntrese desplegada o retraída. No deben utilizarse portateléfonos para cinturón, fundas o accesorios similares que contengan componentes metálicos. Tampoco deben usarse accesorios para el uso del teléfono cerca del cuerpo que no puedan mantener una separación de dos centimetros entre el cuerpo del
usuario y la parte trasera del teléfono y que no hayan sido sujetos
a pruebas para usos típicos cerca del cuerpo, ya que existe el peligro de no cumplir con los límites fijados por la FCC en materia
de exposición a las radiofrecuencias.
Antena exterior para montaje en veh’culo
(optativa, si se ofrece a la venta)
La antena externa montada en el vehículo debe mantenerse a una
distancia mínima de 20 centímetros del usuario y otras personas,
a fin de cumplir con las disposiciones de la FCC en materia de
exposición a las radiofrecuencias.
Para mayores informes sobre las exposiciones a las radiofrecuencias, visite la página Web de la FCC en www.fcc.gov.
Cumplimiento con la Sección 15, Clase B,
del reglamento de la FCC
Este aparato y sus accesorios cumplen con lo dispuesto en la
Sección 15 del reglamento de la FCC. Su uso está sujeto a las
siguientes dos condiciones: (1) el aparato y sus accesorios no
deben provocar interferencias nocivas; (2) el aparato y sus accesorios deben aceptar las interferencias que pudiera recibir,
incluyendo las que provoquen funcionamiento indeseado.
Precauciones al Usarla batería
No desarme la batería.
G
No provoque corto circuito.
G
No la exponga a altas temperaturas : 60°C(140°F).
G
No la arroje al fuego.
G
Eliminación de las baterías
Deseche la batería apropiadamente o traigala al distribuidor
G
inalámbrico local para el reciclaje.
No deseche la batería tirándola al fuego o a los materiales
G
inflamables y peligrosos.
Precauciones al usar el Adaptador
(Cargador)
El uso de cargador de batería de mala calidad podría provo-
G
car daños al aparato e invalidar la garantía.
El adaptador o cargador está diseñado para utilizarse sólo en
G
interiores.
Jamás exponga el cargador de baterías o adaptador a la luz solar
directa. Tampoco debe usarse en lugares con alto coutenido de
humedad, tales como el baño.
10
11
Page 82

Capítulo 1. Iniciando
Precauciones
El uso del teléfono en la proximidad de equipos
G
receptores (por ejemplo: un televisor o radio)
podría provocar interferencia.
Mantenga su teléfono en lugar seguro cuando no
G
lo utilice.
Utilice sólo las baterías, antenas y cargadores sum-
G
inistrados por LG. La garantia no regirá en productos proporcionados por otros fabricantes.
Sólo personal autorizado debe dar servicio a su
G
teléfono y accesorios. Fallas en la instalación o
servicio podrían provocar accidentes e invalidar la
garantía.
No sujete la antena mientras el teléfono se encuen-
G
tre en uso.
No utilice el teléfono en áreas designadas como no
G
aptas para el uso de teléfonos celulares.
No exponga el teléfono a altas temperaturas o
G
humedad.
Evite mojar el teléfono. Si llega a mojarse, inmedi-
G
atamente apague la corriente y saque la batería. Si
no funciona, devuélvalo a su distribuidor para que
le de servicio.
No exponga el aparato a golpes fuertes.
G
Uso de la batería
Cargue la batería totalmente antes de usar el
teléfono por primera vez
El teléfono se entrega con un paquete de batería recargable. Antes de usar el teléfono, cargue totalmente la
batería. Luego, siempre manténgala cargada mientras
no está en uso, a fin de contar con un máximo de tiempo de conversación y en espera.
Instalación de la batería
Para instalar la batería, inserte la parte inferior de la
misma en la abertura trasera del teléfono y presione
hacia abajo hasta que encaje el pestillo.
Para quitar la batería
Apague la corriente. (Si no se apaga, podrían perderse
los números y mensajes almacenados en la memoria.)
Levant el pestillo de desmontaje para desprender la
batería.
Iniciando
12
Iniciando
VX4400
13
Page 83
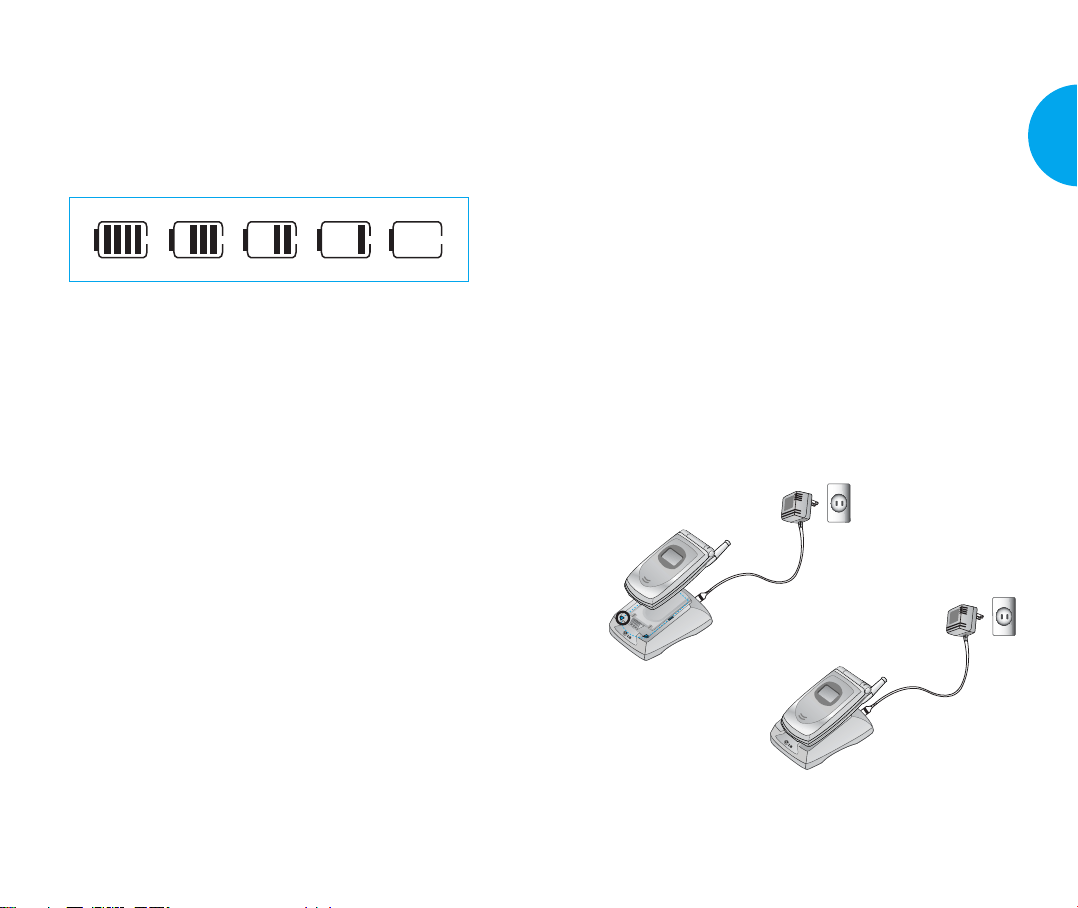
Nivel de carga de la batería
El nivel de carga de la batería aparece en la parte superior derecha de la pantalla de VCL del teléfono.
Cuando el nivel se encuentra bajo, un sensor le alertará
de tres formas: con un sonido, con centelleo del icono
de la batería y mediante un mensaje en pantalla de
ADVERTENCIADE BATERIABAJA!. Si el nivel
de la carga se vuelve excesivamente débil, el teléfono
se apagará automáticamente y no guardará en memoria ninguna función en curso.
Uso del cargador de escritorio
El cargador de escritorio del VX4400 cuenta con una
ranura para recargar la batería. Cabe en la ranura el teléfono o sólo la batería.
Advertencia! Utilice œnicamente el cargador suministrado con el teléfono. Cualquier otro podría dañar el
teléfono o la batería.
1. Enchufe el cargador a una toma de corriente de
pared.
El cargador debe conectarse a una fuente de cor-
G
riente eléctrica de 120V.
2. Coloque en la ranura del cargador el teléfono, con la
batería instalada, o una batería sola.
La luz roja indica que la batería esta siendo cargada.
G
La luz verde indica que la batería esta totalmente
G
cargada.
El tiempo de carga de batería variará dependiendo del
nivel de carga. El tiempo máximo requerido para cargar
una batería totalmente descargada, no excederá de 3 horas.
ADVERTENCIA!
El cargador de escritorio y el cargador de viaje no se
pueden cargar al mismo tiempo porque la batería podría
modificarse o dañarse.
Iniciando
14
Iniciando
VX4400
15
Page 84

Cuidado para la Batería
1. No es necesario esperar a que se descargue totalmente
la batería antes de volver a cargarla.
2. Utilice œnicamente baterías y cargadores de LG. Los
cargadores de LG han sido diseñados para lograr la
óptima duración de la batería.
3. No intente desarmar la batería ni la exponga a cortocircuito.
4. Mantenga limpios los contactos metálicos de la batería.
5. Cambie la batería cuando comienza a disminuir su
rendimiento. La batería podrá recargarse uentos de
veces antes de reemplazarse.
6. Si no utiliza la batería durante un período prolongado,
vuelva a cargarla, ya que así mejorará el rendimiento
de la batería.
7. No exponga el cargador de la batería a la luz directa
del sol ni lo utilice en áreas de gran humedad, tal
como el baño.
8. No deje la batería en lugares sumamente calientes o
fríos, ya que esto podría afectar su rendimiento.
9. La duzación de batería puede variarse segœn la ubicación, fouma de uso, etc.
10. La configuración de Luz de Fondo encendia durante
largo tiempo, la bœsqulda de servicio, el minibrowser la conección de datos y la sincronización
afectan la vida œtil de batería y la duración de espera
y de conversación.
Componentes del Teléfono
La siguiente figura le muestra los componentes de su
teléfono inalámbrico.
LCD del llamador
1. Auricular
2. Filp activo
3. Tecla MSG
4. Send
5. Tecla de lado
6. Tecla de memo
de voz
7. Conector para
headset
8. Modo de vibración/
Tecla de silence all
9. Pantalla LCD
10. Tecla suave 1
Tecla suave 2
11. Lámpara
12.
Tecla de navegación
13. END/PWR
14. CLR
15. Teclados
Alfanuméricos
16. Tecla de bloqueo
17. Micrófono
Iniciando
16
Iniciando
VX4400
17
Page 85

Descripción general del teléfono
1. Auricular
2. Flip activo Cierre el aparato para terminar una llamada
en curso.
3. Tecla MSG
voz y texto.
4. SEND Permite al usuario hacer o recibir llamadas.
5. Teclas de Lado Estas teclas le permite ajustar el volu-
men de los tonos generados por la tecla(en el modo de
espera), así como el volumen del auricular (durante una llamada).
6. Tecla de memo de voz
Con la cubierta del teléfono abierta:
El reconocimiento de voz funcionará si usted presiona la
Tecla de memo de voz después de abrir el folder (la cubierta). La grabación de memo de voz funcionará si usted
mantiene presionada la T ecla de memo de voz después de
abrir el folder.
Con la cubierta del teléfono cerrada:
Le permite seleccionar Modo de modales/Silenciar todos.
7. Conector para headset
8. Modo de vibración /Tecla de silence all
- En el modo de espera, podrá seleccionar el modo de
modales oprimiendo el botón .(durante 3 segundos)
Si se ha configurado el modo de vibración, se mantiene
el modo de vibración aún después de apagar y encender
el teléfono.
Le permite recuperar o enviar mensajes de
9. Pantalla LCD Muestra mensajes e iconos de indicación.
10. Tecla suave
- Tecla suave 1
Usada para mostrar el menœ de configuración de fun-
ción.
- Tecla suave 2
Si presiona esta telca una vez en el menœ, puede voler a
un nivel.
11. Lámpara La luz roja se ilumina al encender el teléfono,
así como cuando se han recibido llamadas y mensajes.
12. Tecla de navegación Esta tecla de navegación
permite el acceso rápido a los mensajes de notificación de
un correo de texto y de voz . Get It Now , Agenda
Browser.
13. END/PWR Tecla de encendido/apagado y se usa también
para dar terminado una llamada. Al oprimir esta tecla,
permite salir del menú para regresar a la pantalla de espera.
14. CLR Oprima esta tecla para retroceder un espacio y bor-
rar un dígito o carácter. Oprima y mantenga presionada
esta tecla para borrar todas las palabras.
15.Teclados alfanuméricos Estas teclas permiten intro-
ducir números, caracteres y escoger elementos del menú.
16. Tecla de bloqueo
- En el modo de espera, configure la función de bloqueo,
presionando el botón (durante 3 segundos)
17. Micrófono
Iniciando
18
Iniciando
VX4400
19
Page 86

!
!
Iconos en la pantalla
Los iconos que aparecen en esta pantalla muestran las
funciones a disposicion del usuario.
20
Iconos
Potencia de la señal.
El nœmero de barras indica la potencia de la señal en ese
momento.
Sin servicio
El teléfono no está recibiendo señal de sistema.
En servicio
Se está haciendo o recibiendo una llamada.
* Sin icono, el teléfono se encuentra en el modo de espera.
Indicador digital
Se dispone de servicio digital.
Indicador analógico
Se dispone de servicio analógico.
Roaming
El teléfono se encuentra fuera del área de servicio local.
Privacidad de voz
Nuevos mensajes de texto
Nuevos textos y voces
Modo de ubicación
SSL
Modo de vibración
Nivel de carga
Indica el nivel de la carga de la batería.
Iniciando
Descripción
En el caso de servicio 1x
Nuevos correos de voz
Modo de silencioso
Modo de sólo E911
TTY
Registro de información con la
introducción de texto T9
Le permite editar el encabezado, el planificador, el
mensaje corto y la agenda de teléfono mediante el uso
de introducción de texto T9.
Funciones de teclas
Tecla suave 2: Utilice para desplazar y seleccionar el modo
deseado en el menú.
- Utilice la tecla suave 2 para despalzar a trav_s de diversos modos en el siguiente orden: Abc -> 123 -> Símbol
-> Smileys-> T9Esp
- La tecla de desplazamiento( ): Used to change the
letter case.
~(para texto): En el modo T9, oprima una tecla
por letra para introducir el texto.
~(para número): En el modo 123(modo
numérico), presione una vez a estas teclas
para ingresar los números.
(Siguiente): En el modo T9, oprima esta tecla
para exponer otras palabras que hace conjunto.
(Puntuación): Oprima esta tecla para insertar
una puntuación en una palabra o completar
una oración.
(Espacio): Utiliza esta tecla para completar una
palabra o puntuación e insertar un espacio.
(Borrado): Presione esta tecla para retroceder
un espacio y borrar un espacio o carácter. Si
desea eliminar todas las palabras, mantenga
presionada la tecla después de oprimirla.
VX4400
Iniciando
21
Page 87

!
!
Modo de entrada
La introducción de texto T9 ofrece 5 modos diferentes
para introducir texto, nœmeros, caracteres especiales y
puntuación.
T9En (T9) Mode
Con el fin de ingresar el texto, presione una tecla por
letra. Este modo corresponde a modo de defecto.
Modo Abc (Multi-tap)
El modo Abc permite adicionar las palabras a la base
de datos de T9.
Modo 123 (Numérico)
Para ingresar los números, presione una tecla por cada
número. Si desea cambiar al modo 123 desde el campo
de entrada de texto, por favor oprima la tecla suave 2
hasta que aparezca el modo 123.
Cambio de tipo de letra
Existen tres opciones para seleccionar la forma de letra:
Primera letra en mayœscula (T9Esp/Abc)
Solamente la primera letra es mayœscula.
Fijación de mayœscula (T9ESP/ABC)
Presione para cambiar la forma de letra, fijando
en forma mayœscula.
Escrito en minœscula (T9esp/abc)
Presione para cambiar la forma de letra en
minœscula.
Ejemplos de uso de introducción de texto T9
Iniciando
Modo Símbol/Modo Smileys
Insertar caracteres especiales, signos de puntuación o
smileys. Puede utilizar cualquiera de los 35 caracteres
especiales. Cuando el cursor se ubica en el lugar donde
uested desea el carácter especial, cambie al modo de
Símbolo/Smileys. Si quiere adicionar un smiley, cambie
al modo de smileys. Presione la T ecla de navegación
para navegar entre los siguinetes caracteres y seleccionar
de ellos:
22
Iniciando
Simbols Modo
Smileys Modo
Escritura en el modo T9
Para escribir un mensaje nuevo, siga los siguientes
pasos:
1. Oprima: Tecla Suave 2 para cambiar la forma
de letra al modo T9.
2. Oprima: .
3. Oprima: para completar una palabra y adicionar
un espacio.
4. Oprima:
.
5. Pantalla: Ball vie office.
VX4400
23
Page 88

Uso de próxima tecla
Una vez que haya terminado de escribir una palabra, si
se encuentra que la palabra que aparece en la pantalla
no es lo correcto, oprima la tecla para exponer las
palabras seleccionadas adicionalmente.
Por ejemplo, efectœe los siguientes pasos:
1. Oprima: .
2. Pantalla: Good
3. Oprima: .
4. Pantalla: home, Gone, Hood......
Adición de palabras a la base de datos de T9
Si una palabra no figura en la base de datos de T9, podá
adicionarla en el texto de entrada, usando el Modo
Abc(Multi-tap). Entonces esta palabra será adicionada
automáticamente a la base de datos de T9 cuando regresa al modo T9. Por ejemplo, efectœe los siguientes
pasos:
1. Oprima: Tecla suave 2 para cambiar el tipo de
letra en el modo de Abc(multi-tap).
2. Oprima: .
3. Pantalla: Imt
4. Oprima: T ecla suave 2 para modificar la forma de
letra al modo T9. Con esto logrará adicionar la palabra Imt a la base de datos de T9.
5. Oprima: para borrar la palabra asentada Imt.
7. Pantalla: got
8. Oprima: .
9. Pantalla: Imt
Ejemplos de uso de introducción de texto
Abc (multi-tap)
Escriba las letras en el modo Abc(Multi-tap).
Siga los siguientes pasos para escribir el nuevo men-
saje:
1. Oprima:
Tecla suave 2
para cambiar el tipo de
letra en el modo de Abc.
2. Oprima: para cambiar al modo de fijación de
mayœscula ABC.
3. Oprima: .
4. Pantalla: LG
Iniciando
6. Oprima: .
Iniciando
24
VX4400
25
Page 89

Capítulo 2. Funciones Básicas
Encendiendo y apagando el teléfono
Para encender el teléono
1. Coloque una batería cargada en el teléfono o conecte
el teléfono a una toma de corriente externa, tal como
un adaptador para encendedor de cigarrillos o una
base para auto.
Oprima durante unos cuantos segundos, hasta que
2.
la luz roja en la parte superior del teléfono comience a
centellear.
Si desea hacer una llamada, despliegue la antena
G
totalmente para lograr los mejores resultados.
NOTA
Para apager el teléfono
1. Oprima y mantenga oprimida la tecla hasta que
2. Al terminar la llamada, si la antena está extendida,
Igual como sucede con otro aparatos radiotransmisores,
evite todo contacto innecesario con la antena mientras el
teléfono se encuentre encendido.
se apague la pantalla. Luego suelte la tecla.
retráigala como una medida de protección.
Para hacer una llamada
Siga estos sencillos pasos para hacer una llamada:
1. Asegœrese que su teléfono se encuentre encendido.
Si no está encendido, oprima el botón .
G
Marque el número de teléfono que desee llamar. De
2.
ser necesario, marque el número junto con el código de área.
3. Oprima .
Si se encuentra bloqueado el teclado, primero
G
ingrese el código de seguro para desbloquear.
Si no se establece la conexión, aparecerá Falla en
G
la llamada en la pantalla.
Si en la pantalla aparece Este teléfono ha sido
G
restringido, ello significa que se encuentra activada la restricción de llamadas salientes. Sim
embargo, puede discar el número de teléfono
almacenado en Emergencia o agenda telefénica.
Si desea cancelar esta función, efectúe los siguientes
pasos:
Menú-> , -> Seguridad-> Anote código
de bloqueo -> Restringir-> Apagado ->OK
4. Oprima para desconectar la llamada.
Funciones Básicas
Functiones Básicas
26
Cuando el marcado con un toque está activado, mantenga presionado el número último para hacer una llamada.
VX4400
27
Page 90

NOTA
La lista de números de teléfono aparece en la pantalla si
presiona el número delante del número guardado en la
agenda telefónoca.
Uso de modo modales y silencioso y de bloqueo
Corrección en errores de marcación
Si usted equivoca al marcar un número, oprima una
vez la tecla para borrar el último dígito marcado.
Al mantener presionado la tecla por lo menos
durante 2 segundos podrá borrar todos los dígitos o
simplemente presione la tecla suave 2 Retro para salir
del estado de marcación.
Para recibir una llamada
1. Al sonar el teléfono, abra el Flip activado para contestar la llamada u oprima cualquier tecla (excepto las
teclas , o ) cuando está abierto el Flip
activado.
Si oprime una vez la tecla
G
() al recibir una llamada, detenerá el sonido
del timbre o la vibración.
2. Oprima , para desconectar la llamada.
o las teclas de lado
Modo de modales(rápido)
Use el modo de modales en un lugar
público.
1. Mantenga presionada la tecla .
Durante 3 segundos y luego desaparecerá el modeo de vibración
- Cuando el flip está cerrado: El teléfono funcionará si
usted mantiene presionada la Tecla de memo de voz.
En caso de que el modo de modales sea configu-
G
rado, Modo Modales () será mostrado en la
pantalla LCD.
Cuando el modo de modales está establecido, el
G
tono de tecla no suena y la vibración se selecciona
como el timbre.
NOTA
NOTA
Si selecciona el modo de modales, se le permite mantener su teléfono con el modo de modales incluso cuando lo apague y lo encienda de nuevo.
Para cancelar el modo de modales, presione de
nuevo hasta que se muestre Silenciar activada, y luego
presione de nuevo hasta que se muestre
Modalidad normal activada.
Funciones Básicas
Functiones Básicas
28
VX4400
29
Page 91

Modo silencioso (rápido)
1.
En el modo de modales, active el modo
silencioso rápidamente presionando el
botón (durante 3 segundos).
- Cuando el flip está cerrado: El teléfono funcionará si usted mantiene
presionada la Tecla de memo de voz.
Cuando el modo silencioso haya sido establecido,
G
no hay tonos en las teclas y la lámpara parpadea en
lugar de sonar.
NOTA
NOTA
Para cancelar el modo silencioso, presione de
nuevo hasta que se muestre Modalidad normal activada.
Para cambiar a un modo diferente, presione modo de
espera -> modo de modales -> modo silencioso.
Supresión de llamadas (rápido)
Esta función impide que personas no
autorizadas utilicen su teléfono.
Para impedir el uso del teléfono, con
1.
el aparato en estado de espera, opri-
ma (durante 3 segundos).
Aparecerá en la pantalla El teléfono se ha desblo-
queado.
NOTA
Para desactivar la supresión de llamadas, oprima la tecla
suave 1 Desbloq y luego marque su contraseña de (4
dígitos).
Llamada en Espera
Es posible que su servicio de telefoniá celular ofrezca
la función de llamada en espera. Si tiene contratada este
servicio y alguien marca su nœmero mientras usted
habla con otra persona, usted escuchará dos tonos cortos para avisarle de la segunda llamada.
Podrá mantener en espera la llamada en curso mientras
contesta la llamada entrante. Solicite a su proveedor de
servicio telefónico mayores informes sobre esta funcion.
1. Oprima para recibir la nueva llamada.
2. Oprima nuevamente para cambiar de una llamada a otra.
Mudo
Esta función impide la transmisión de su voz. Sin
embargo, sí podrá escuchar a la otra persona.
1. Oprima la tecla suave 1 Mudoel durante una llamada.
2. Para desactivar del silenciador, oprima la tecla suave
1 Unmudo y el nuevamente.
Repetición manual
1. Oprima para volver a marcar el œltimo nœmero
que marco.
También podrá volver a marcar cualquiera de los
G
últimos 30 números que haya marcado, los que se
encuentran almacenados en el registro de llamadas.
Funciones Básicas
Functiones Básicas
30
VX4400
31
Page 92

Para ajustar el volumen
Puede utilizar los botones laterales, en la parte superior del costado izquierdo del teléfono, para ajustar el
volumen del auricular, del timbre, y de los tonos de las
teclas. El botón superior aumenta el volumen, mientras
que el botón inferior lo disminuye.
Se puede ajustar el volumen del auricular durante
G
una llamada.
Low -> Low Med -> Med -> Med High -> High
También se puede ajustar el volumen del timbre a
G
traves del menú.
Off -> Vibrate -> Low -> Low Med -> Med -> Med
High -> High -> High & Vib
Se puede ajustar el volumen del timbre mientras el
G
teleféno está sonando.
Off -> Low -> Low Med -> Med -> Med High
-> High
Modo de Ahorro de energia
Si el teléfono está en un area sin servicio durante 15
minutos, dejara de buscar seéal y entrara en el modo de
ahorro de energéa. Al activarse esta función, aparecerá
en pantalla el aviso Ahorro POWER presione
cualquier tecla para salir.
El teléfono automáticamente verificará periódicamente si aún se encuentra fuera del área de servicio, o
usted podrá confirmarlo manualmente, oprimiendo
cualquier tecla.
Potencia de la señal
La calidad de la llamada depende de la potencia de la
señal en el lugar donde se encuentre usted. El nœmero
de barras junto al icono de la señal indica la potencia
de la señal. Cuanto mayor sea el número de barras,
más fuerte sera la señal. Si la señal está débil, treilade
a un espacio abierto. Si se encuentra dentro de un edificio, la señal podria estar m‡s fuerte cerca de una ventana. Para asegurar un rendimiento óptimo, despliegue
por completo la antena.
Mini Pantalla
Una pantalla pequeña en el plegador es
conocidad como pantalla del llamante.
La pantalla del llamante permite visualizar la siguiente información:
Visualización de hora y fecha
G
Información del llamante (nombre
G
or numero)
Número de llamada perdida
G
Número de mensajes nuevos
G
Estado de fuera de servicio y modo de pausa (sleep)
G
Levantarse & Planificador mensajes.
G
El teléfono mostrará la información más reciente hasta
que el teléfono se abra, luego la información aparecerá
en la pantalla principal.
Funciones Básicas
Functiones Básicas
32
VX4400
33
Page 93

OK
Marcado rápido (Para marcar un nœmero
de su agenda telefónico personal )
El marcado rápido es una función muy útil ya que le
permite efectuar una llamada en forma rápida y fácil.
Su teléfono encuentra el número deseado en su agenda
personal, lo demuestra brevemente y luego lo marca.
1. Marque el número correspondiente a la posición de
memoria (entre 01 a 99).
2. Oprima .
ID del llamador
El ID del llamador le permite saber quién está llamando, mostrando el nœmero de la persona que llama
cuando suena su teléfono. Si el nombre y el nœmero
del llamador ya están almacenados en su agenda telefónica, el nombre correspondiente aparece con el
nœmero.
Debe verificar si el proveedor del servicio de teléfono
celular ofrece esta función.
Funciones de agenda
Usted puede almacenar hasta 200 números telefónicos
en su agenda facilitando así el acceso a los números
que marca con mayor frecuencia.
Memoria de la agenda telefónica personal
El teléfono tiene 200 posiciones de memoria de agenda telefónica personal en las que se pueden almacenar
hasta 5 números de teléfono con la capacidad de 48
dígito para cada número de teléfono.
Para guardar nœmeros en su agenda telefónica
personal
Las ubicaciones de 1 a 9 en la memoria deben reservarse para los números que llama con mayor frecuencia para que puedan marcarse con una sola tecla.
1.
Ingrese el número de teléfono que
desee almacenar. (hasta 32 dígitos)
2. Oprima la tecla suave 1 Guardar
para que aparezca el submenú
3. Seleccionar etiqueta en el submenú
y presione .
Seleccione los tipos de la etiqueta
4.
desead Base, Oficina, Móvil, Biper,
Fax, Ninguno utilizando .
Introduzca un nombre para el número
5.
de teléfono(hasta 22 carácteres). Si
no quiere introducir un nombre, vaya
a la siguiente etapa.
Funciones Básicas
Functiones Básicas
34
VX4400
35
Page 94

6. Puede seleccionar el tipo de timbre
OK
deseado de ID, secreto y .
7. Un mensaje de confirmación
Anotación guardado en guía telefónica se muestra en la pantalla.
Obteniendo números
Obteniendo por bœsqueda de nombre
1. Oprima la tecla suave 2 Buscar.
2. Oprima la tecla suave 2 Accione.
3. Seleccione nombre.
4. Ingrese los carácter(es) que desea
buscar (tal como unas cuantas letras del nombre).
5. Oprima .
6. Verá una lista de coincidencias.
7. Presione la tecla suave 1 Modific. para ver detalles
específicos.
Para marcar un número de su
agenda telefónica personal
Usted podrá efectuar una llamada a cualquier número
almacenado en la momoria, ya sea a través del marca-
do rápido u oprimiendo mientras tenga el contenido de la memoria a la vista.
Marcado con una sola tecla: El marcado con una sola
tecla es una función muy práctica que permite llamar a
los números de su agenda telefónica personal que utiliza con mayor frecuencia al oprimir una sola tecla.
(para las posiciones 1 a 9)
Usted podrá utilizar el marcado con una sola tecla
G
para los números en las posiciones 1 a 9, si es que
está habilitada esta función. Oprima y manténgala
oprimida la tecla que corresponda a la posición en
la memoria.
o
Oprima el dígito y luego presione .
G
Marcado con dos teclas: Esta función le permite a
usted marcar números de su agenda telefónica personal utilizando dos teclas. (para las posiciones 10 a 99)
1) Oprima el primer dígito.
2) Oprima y manténgalo oprimido el segundo dígito.
o
1) Oprima el primero y segundo dígito y luego presione .
Funciones Básicas
36
Functiones Básicas
VX4400
37
Page 95

Marcado desde número almacenado en la
memoria
1)
En la lista de memoria, oprima las teclas de desplaza-
miento para pasar a la posición de memoria que desea
usted.
2) Oprima .
Marcado desde una posición en la memoria
Al ver la posición en la memoria del número que
G
desea hacer llamada, oprima .
Funciones avanzadas de la agenda telefónica
1. Marcado con pausas. Al llamar usted a sistemas
automatizados, tales como correos de voz o los utilizados para operaciones con tarjetas de crédito,
generalmente tiene que marcar una serie de
nœmeros. En lugar de ingresar estos números a
mano, puede almacenarlos en su agenda telefónico
con caracteres especiales( P, T ) llamados pausas.
Existe dos tipos de pausas que usted puede user
para almacenar un número.
Existen dos pausas diferentes que se pueden utilizar
al almacenarse un número.
Pausa fija (P)
G
El teléfono hace una pausa hasta que usted oprima la tecla suave 1 Reanud, para pasar al siguiente número.
Pausa 2 seg (T)
G
El teléfono hace una pausa de dos segundos antes
de enviar el siguiente tramo de dígitos.
2. Almacenar un número con pausas
1) Introduzca el número de teléfono.
2) Oprima la tecla suave 2 Accione.
3) Seleccione uno de los siguientes:
Oprima Pause fija
G
Oprima Pausa 2 seg
G
Después de que elija el tipo de pausa, introduzca
4)
número(s) adicional(es) (ej. número de PIN o
número de tarjeta de crédito).
5) Presione la tecla suave 1 Guardar y seleccione la etiqueta, y luego se mostrará el submenú. Seleccione Guardar en el submenú
para guardar este número con pausas.
6)Seleccione los tipos de la etiqueta desead Base,
Oficina, Móvil, Biper, Fax, Ninguno utilizando .
7) Introduzca un nombre para el número de teléfono (hasta 22 carácteres). Si no quiere introducir un nombre, vaya a la siguiente etapa.
Funciones Básicas
Functiones Básicas
38
VX4400
39
Page 96

Presione la tecla OK. Un mensaje de confirmación Anotación guardado en guía telefónica
se muestra en la pantalla
G
Prepending de número almacenado: Prepend
puede usarse si está fuera de su sistema de base
y necesita adicionar el código de área al
número de agenda telefónica existente. Cuando
una entrada de la agenda telefónica o un
número para volver a llamar aparece en la pantalla, puede adicionarlo al inicio del número
original. Pero no puede editar el número original durante el Prepending.
1) Vuelve a llamar al nœmero que está almacenado en la memoria.
2) Puede anteponer los dígitos correspondientes
a nœmeros telefónicos.
3) Oprima .
G
Búsqueda dinámica
G
Búsqueda dinámica de número
Muestra una lista en orden ascendente compara-
do a los números guardados en la agenda telefónica y le permite hacer una llamada en el modo
Editar Número, preisonando las teclas numéricas.
G
Búsqueda dinámica de nombre
Muestra una lista en orden ascendente compara-
do a los nombres guardados en la agenda telefónica y le permite hacer una llamada preisonando las teclas de alfabeto.
40
Functiones Básicas
Page 97

Capítulo 3. Funciones del Menú
Lineamiento general para Acceso y
configuración del menú
1. Al oprimir la tecla suave 1 Menú, aparecerán las
cuatro primeras funciones del menœ.
2. Oprima para recorrer la lista de funciones del
menú.
3.
Oprima el número que corresponda al ítem de menœ
que usted desee seleccionar. En seguida aparecerá en
pantalla la lista del submenú.
4. Oprima la tecla que corresponda a la función a la que
desea acceder en el submenú.
5. Utilice las teclas . para seleccionar la configuración deseada. Oprima la tecla
para retroceder un paso mientras ingresa al menœ o selecciona las configuraciones.
6. Oprima la tecla para guardar la configuración
para terminar la operación, sin guardar la
configuración.
OK
OK
OK
41
VX4400
Funciones del Menú
Page 98

OK
OKOKOK
Lista Llam (Menú )
OK
OK
Muestra la lista de los últimos números
de teléfono o entradas de la agenda telefónica internas para las llamadas hechas,
aceptadas, o perdidas.
Se actualiza continuamente cuando
nuevos números se adicionan al principio de la lista y las entradas más antiguas
se eliminan de la parte inferior de la lista.
Llam. entrante (Menú , )
Le permite ver la lista de llamadas entrantes; hasta 20
números y entradas.
1. En el menú, selecccione Lista llam.
2. Oprima Llam. entrante.
3. Oprima para ver la lista.
Resalte la entrada que quiere ver y presione , o
4.
puede hacer una llamada presionando .
Funciones del Menú
Liam. saliente (Menú , )
Le permite ver la lista de llamadas salientes; hasta 20
números y entradas.
1. En el menú, selecccione Lista llam.
2. Oprima Llam. saliente.
3. Oprima para ver la lista.
Resalte la entrada que quiere ver y presione , o
4.
puede hacer una llamada presionando .
Funciones del Menú
42
Llam. fracasada (Menú , )
Le permite ver la lista de llamadas perdidas; hasta 20
números y entradas.
1. En el menú, selecccione Lista llam.
2. Oprima Llam. fracasada.
3. Oprima para ver la lista.
Resalte la entrada que quiere ver y presione , o
4.
puede hacer una llamada presionando .
VX4400
43
Page 99

OK
OK
OK
OK
OK
OK
OK
Borrado Llam. (Menú , )
OKOKOK
Le permite borrar la lista de historial de llamadas.
1. En el menú, selecccione Lista llam.
2. Oprima Borrado Llam..
3. Seleccione la lista de llamadas que quiere borrar y
presione .
4. Presione 1 Borrar, o 2 Cancelar y presione .
Tiempo de uso (Menú , )
Le permite ver la duración de las llamadas.
1. En el menú, selecccione Lista llam.
2. Oprima Tiempo de uso.
3.Seleccione en Última llamada/Llamadas de base/
Llamadas de roam/Todas las llamadas, y pre-
sione .
Contactos (Menú )
Entrada a la Lista
Muestra la lista de entradas en la
Agenda telefónica.
1. En el menú de Contactos, seleccione , Entrada a la Lista y
presione .
2. Presione la tecla suave 2 Accione,
y presione Buscar o Borrar, y luego
presione .
3. Puede registrar un nuevo número de teléfono seleccionando la tecla suave 1 Nuevo.
Nuevo Entrada (Menú , )
Le permite adicionar nuevas entradas en la Agenda
telefónica.
1. En el menú de Contactos, seleccione , Nuevo
Entrada y presione .
(Menú , )
Funciones del Menú
Funciones del Menú
44
2. Write in the number and press .
3. Seleccione la etiqueta deseada, y presione .
4. Introduzca el Nombre, y presione .
5. Seleccione la Marcación rápida o la Marcación por
voz y presione .
VX4400
45
Page 100

OK
OK
Grupos (Menú , )
OK
OK
OK
OK
OK
Puede introducir un nuevo grupo, cambiar el nombre
del grupo, o borrar el grupo entero.
1. En el menú de Contactos, seleccione
y presione
.
, Grupos
2. Resalte los Grupos que quiere ver, y luego presione
.
3. Para agregar un nuevo grupo a la lista, presione la
tecla suave 1 Agregar; para borrar un grupo o cambiar el nombre del grupo, presione la tecla suave 2
Accióne.
Dis. vocal (Menú , )
Le permite ver la lista de los números que se han programado con la marcación por voz o agregar una etiqueta de marcación por voz a un número en la
Agenda telefónica.
1. En el menú de Contactos, seleccione
vocal
y presione
.
, Dis.
Cómo utilizar: Realice la grabación siguiendo una
instrucción mientras habla por teléfono al colocar el micrófono a la
boca, tocar el altavoz al oído, y
colocar el micrófono al oído.
Funciones del Menú
Ingrese dis. rápido (Menú , )
Le permite definir las teclas de marcación rápida para
los números de teléfono seleccionados.
1. En el menú de Contactos, seleccione
dis. rápido
y presione
.
2. Seleccione el número que quiere marcar rápida-
mente, o introduzca el número deseado, y presione
.
3.
Resalte el número deseado, y luego presione .
Funciones del Menú
46
, Ingree
NOTA
La grabación se debe realizar en un lugar silencioso con
voz clara. Los kits o auriculares manos libres para
automóvil deben evitarse en el momento de la grabación.
Mi tarjeta V (Menú , )
Le permite introducir su propia tarjeta de presentación virtual que se utiliza en correos electrónicos
o mensajes SMS.
1. En el menú de Contactos, seleccione
jeta V
y presione
.
, Mi tar-
VX4400
47
 Loading...