

Page 1
FEATURES
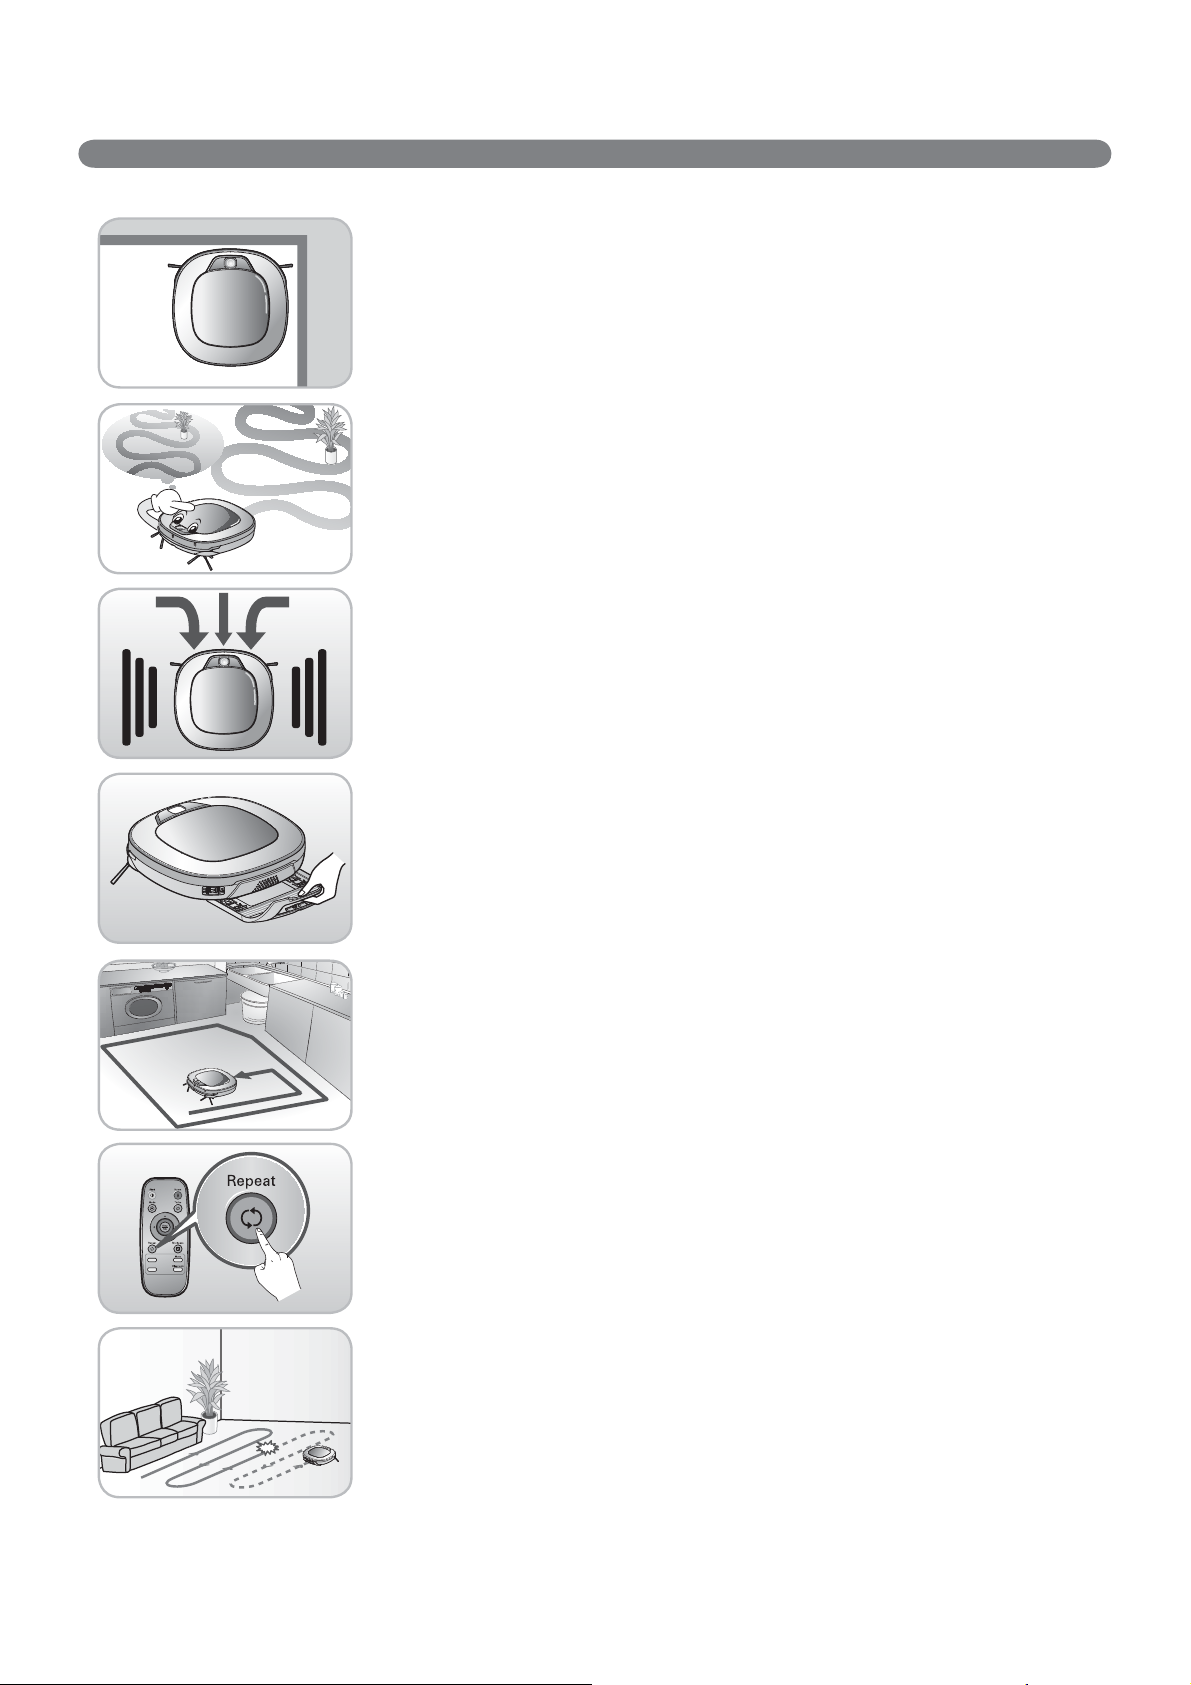
Corner Master
By having adopted a brand new concept design that is appropriate for walls,
the Robot Cleaner's cleaning performance is incredibly efŅ cient.
Learning Mode
The Robot Cleaner is capable of memorizing the cleaning environment
via its Smart Operation feature for smarter cleaning.
Turbo Mode
In the Turbo mode, the Robot Cleaner operates the suction motor and the brushes
at a greater speed giving cleaner results.
Drawer Mop Plate (Selected models only (VR*.LVM))
The "Drawer mop plate" makes it much easier for users to Ņ t and remove the mop
without having to turn over the device over.
My Space Mode
By commanding it to clean a particular area, the Robot Cleaner quickly cleans
that desired area.
Repeat Cleaning
The Robot Cleaner will continuously clean until the battery runs out.
Location Search Function
If the Robot Cleaner is moved from a spot while operating, the device will automatically
search for the previous location and return to the spot from where it was interrupted.
Page 2

CONTENTS
1
BEFORE USING
2~5
6
7~8
9~10
11
12
13
Safety precautions
Included with product
Parts description
Button functions
Display status information
Before you start
Overview
2
METHOD OF USE
14
15
16
17
18~19
20
21
22
23~24
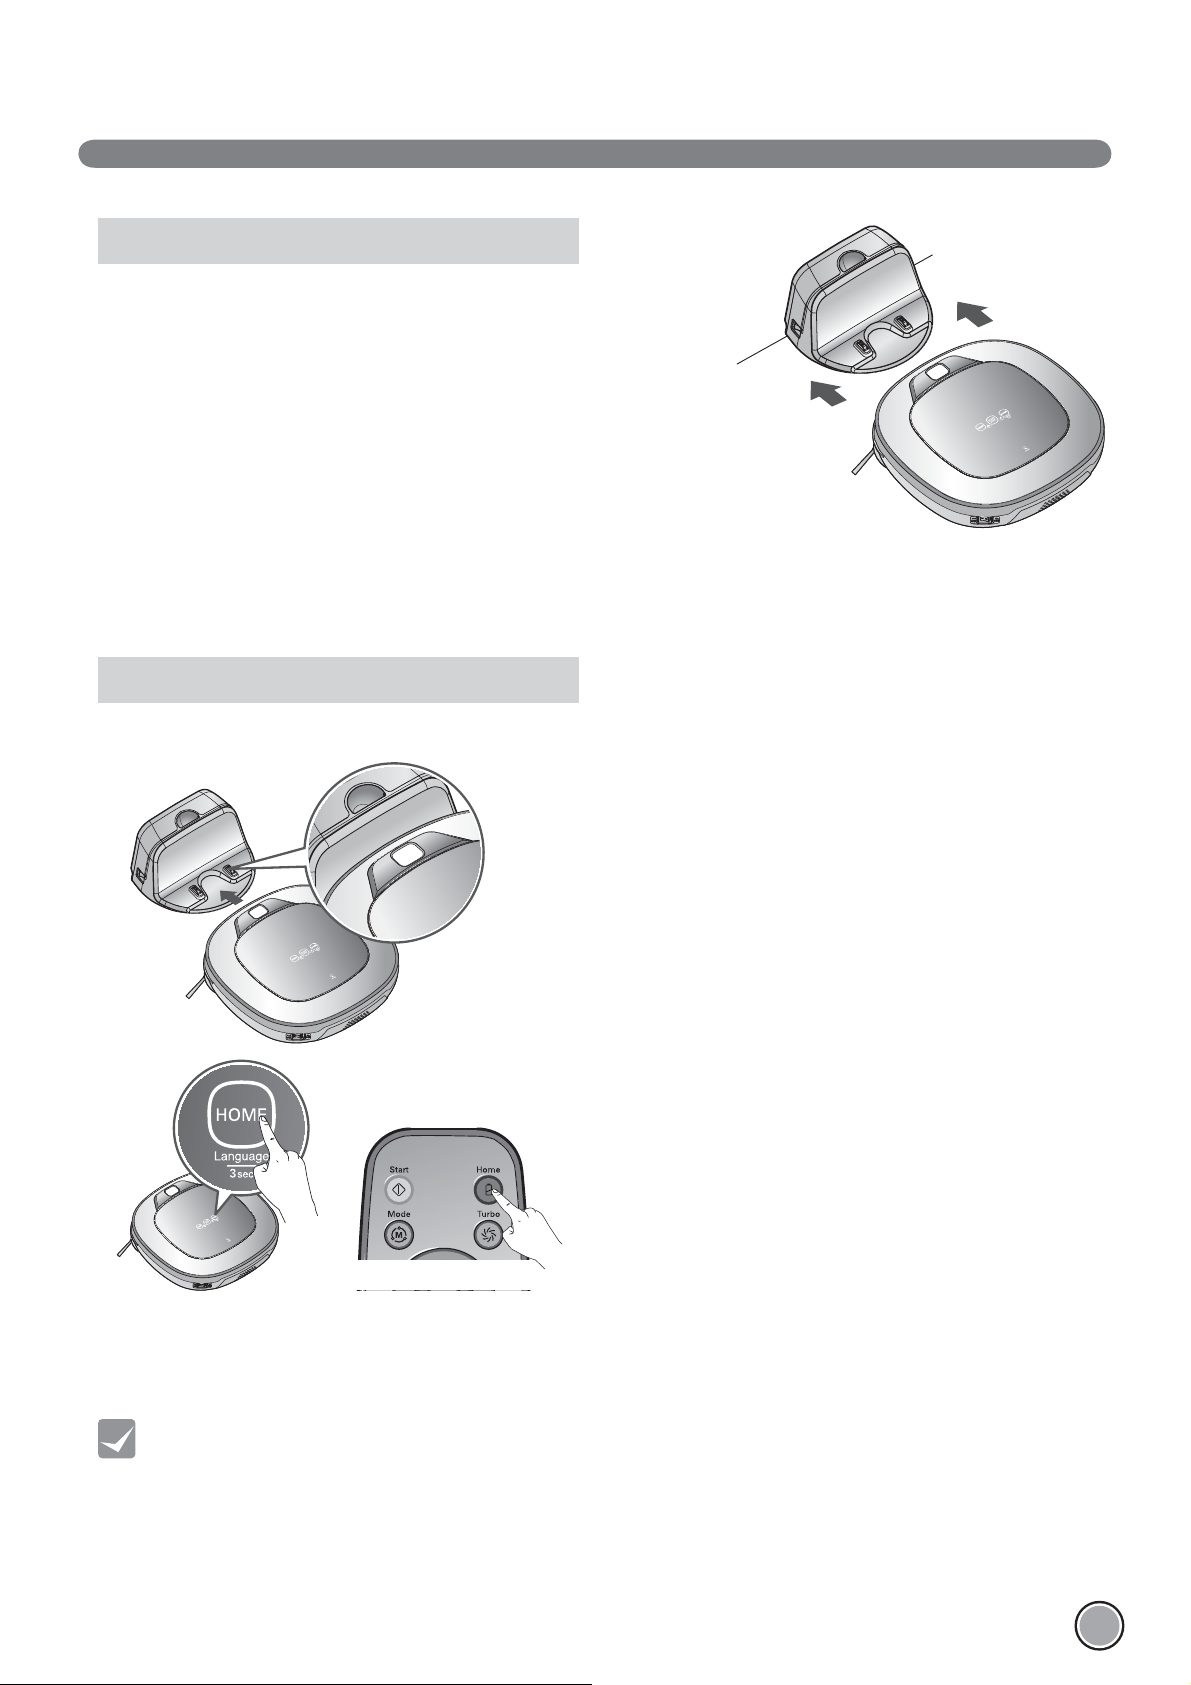
How to install the home station
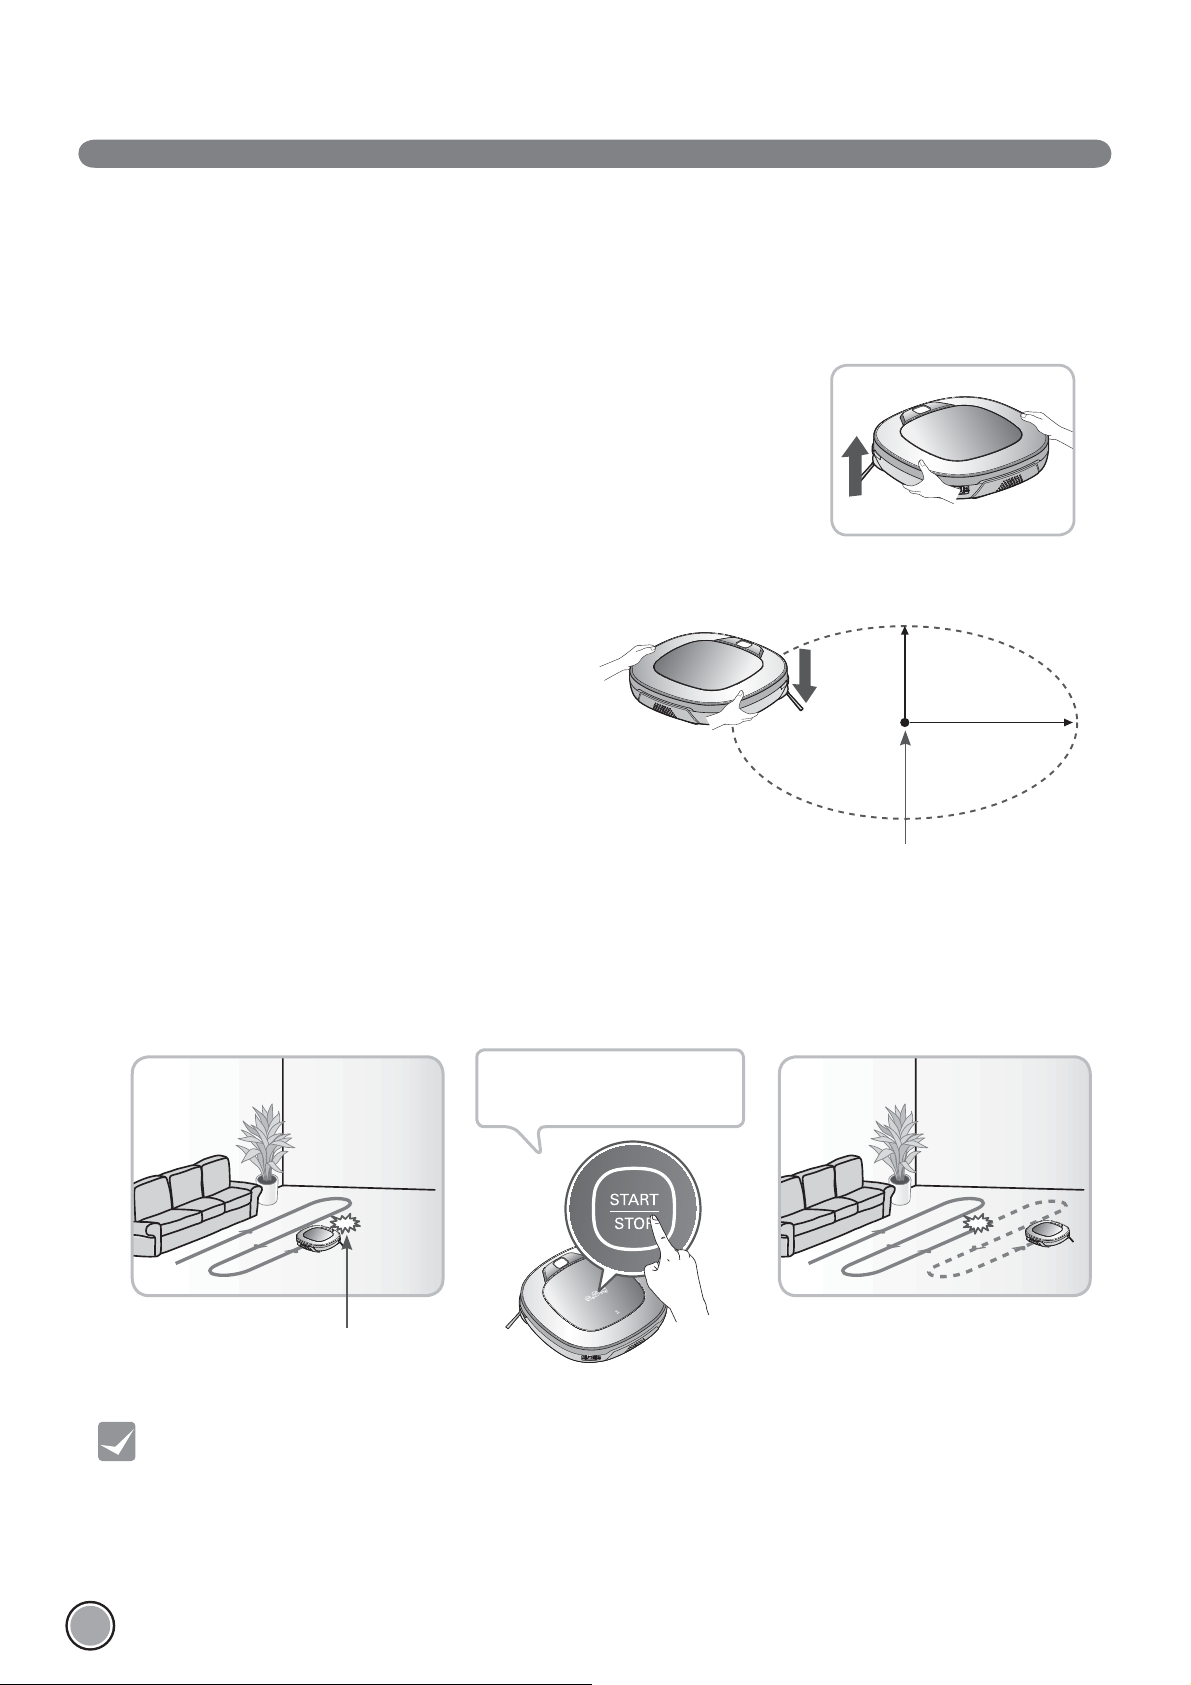
How to turn the Robot Cleaner power supply on & off
How to start and stop cleaning
How to charge the battery
Cleaning modes
Auxiliary cleaning modes
Mop cleaning
(Selected models only (VR*.LVM))
Location search function
Smart diagnosis
4
ADDITIONAL INFORMA TION
31~33
34
Troubleshooting
Before you call for service
5
REFERENCE
35
Reference items
3
HANDLING METHOD AFTER USE
25
26
27
28
29
30
Cleaning the dust bin
Cleaning the dust bin Ņ lter
Cleaning the brush
Cleaning the sensors/charging terminals
Cleaning the side brush
Cleaning the ultra microŅ ber mop
(Selected models only (VR*.LVM))
Page 3
SAFETY PRECAUTIONS
The purpose of the safety precautions described below is for the user to use the product safely and correctly to prevent any
unexpected risk of injury or damage.
Basic safety precautions
After reading this manual, please keep it in an easily accessible location.
This is the safety alert symbol. This symbol alerts you to potential hazards that can result in property damage
and/or serious bodily harm or death.
WARNING
CAUTION
Indicates a hazardous situation which, if not avoided, could result in death or serious injury.
Indicates a hazardous situation which, if not avoided, could result in minor or moderate injury.
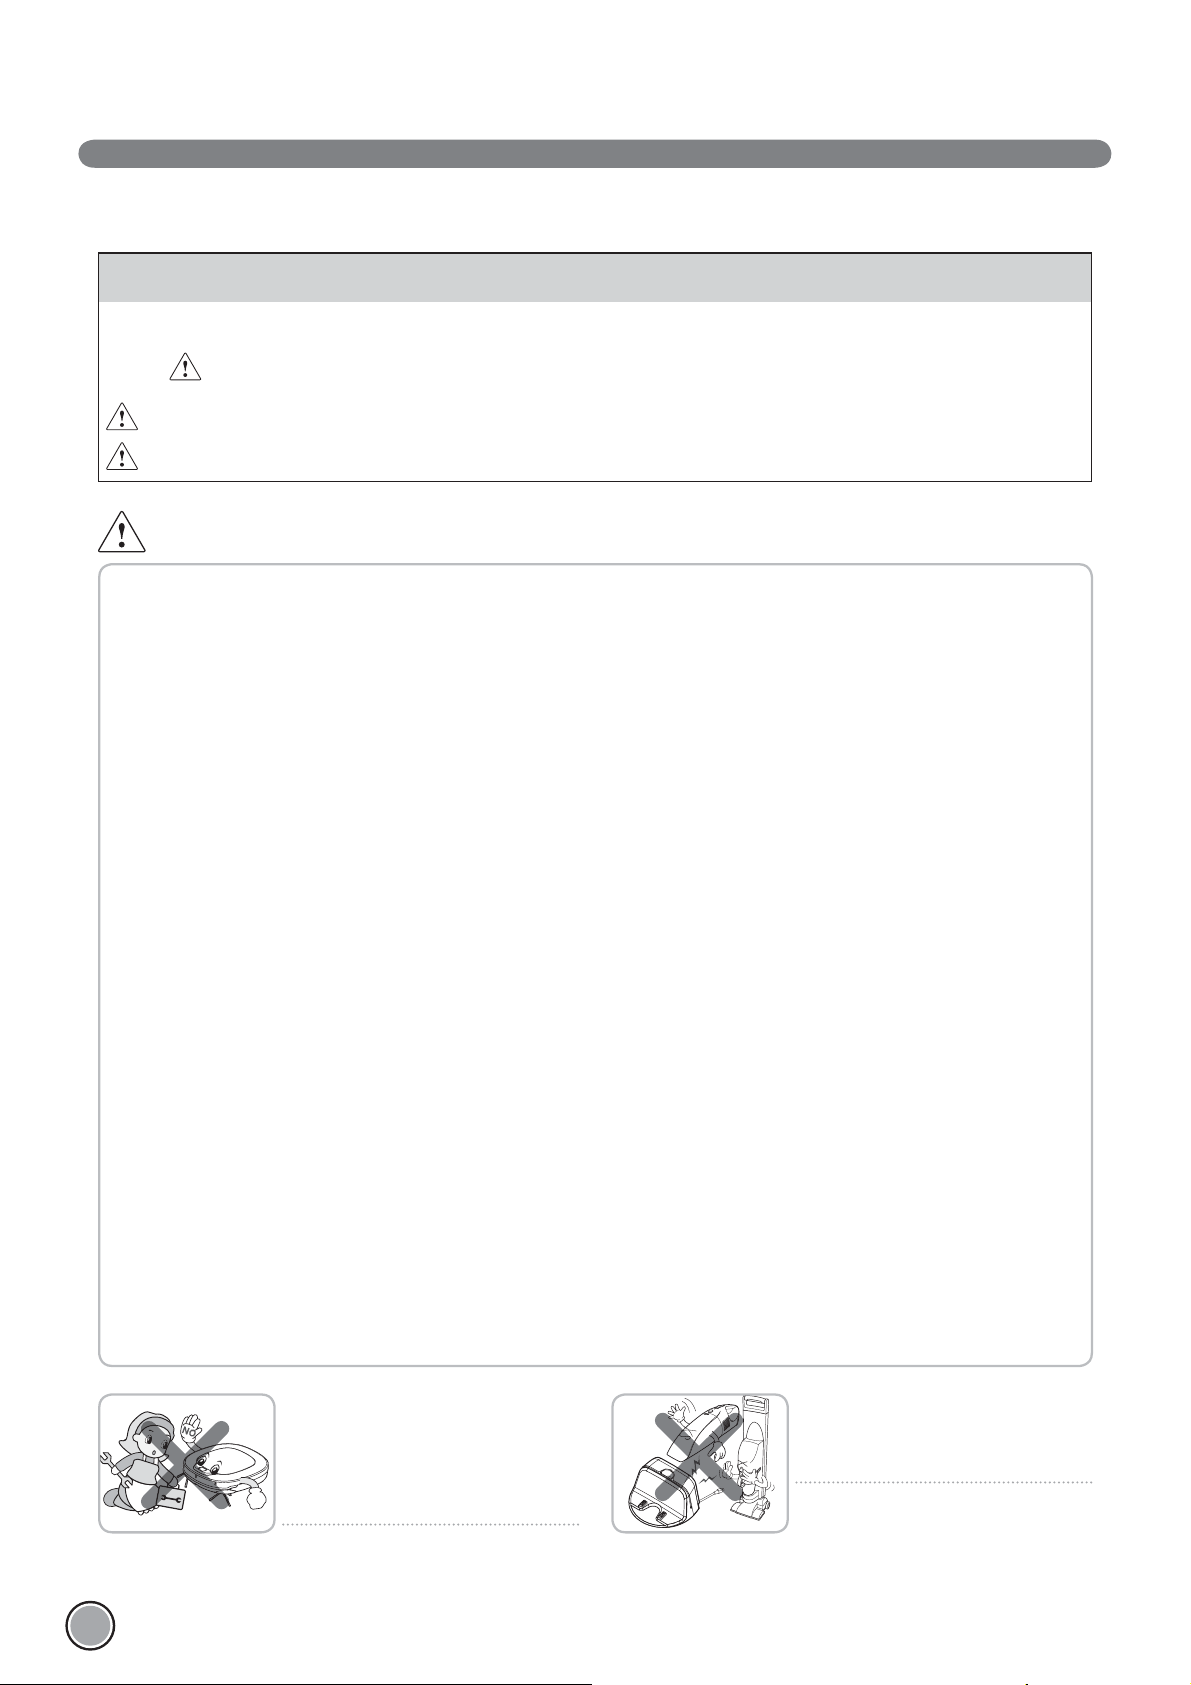
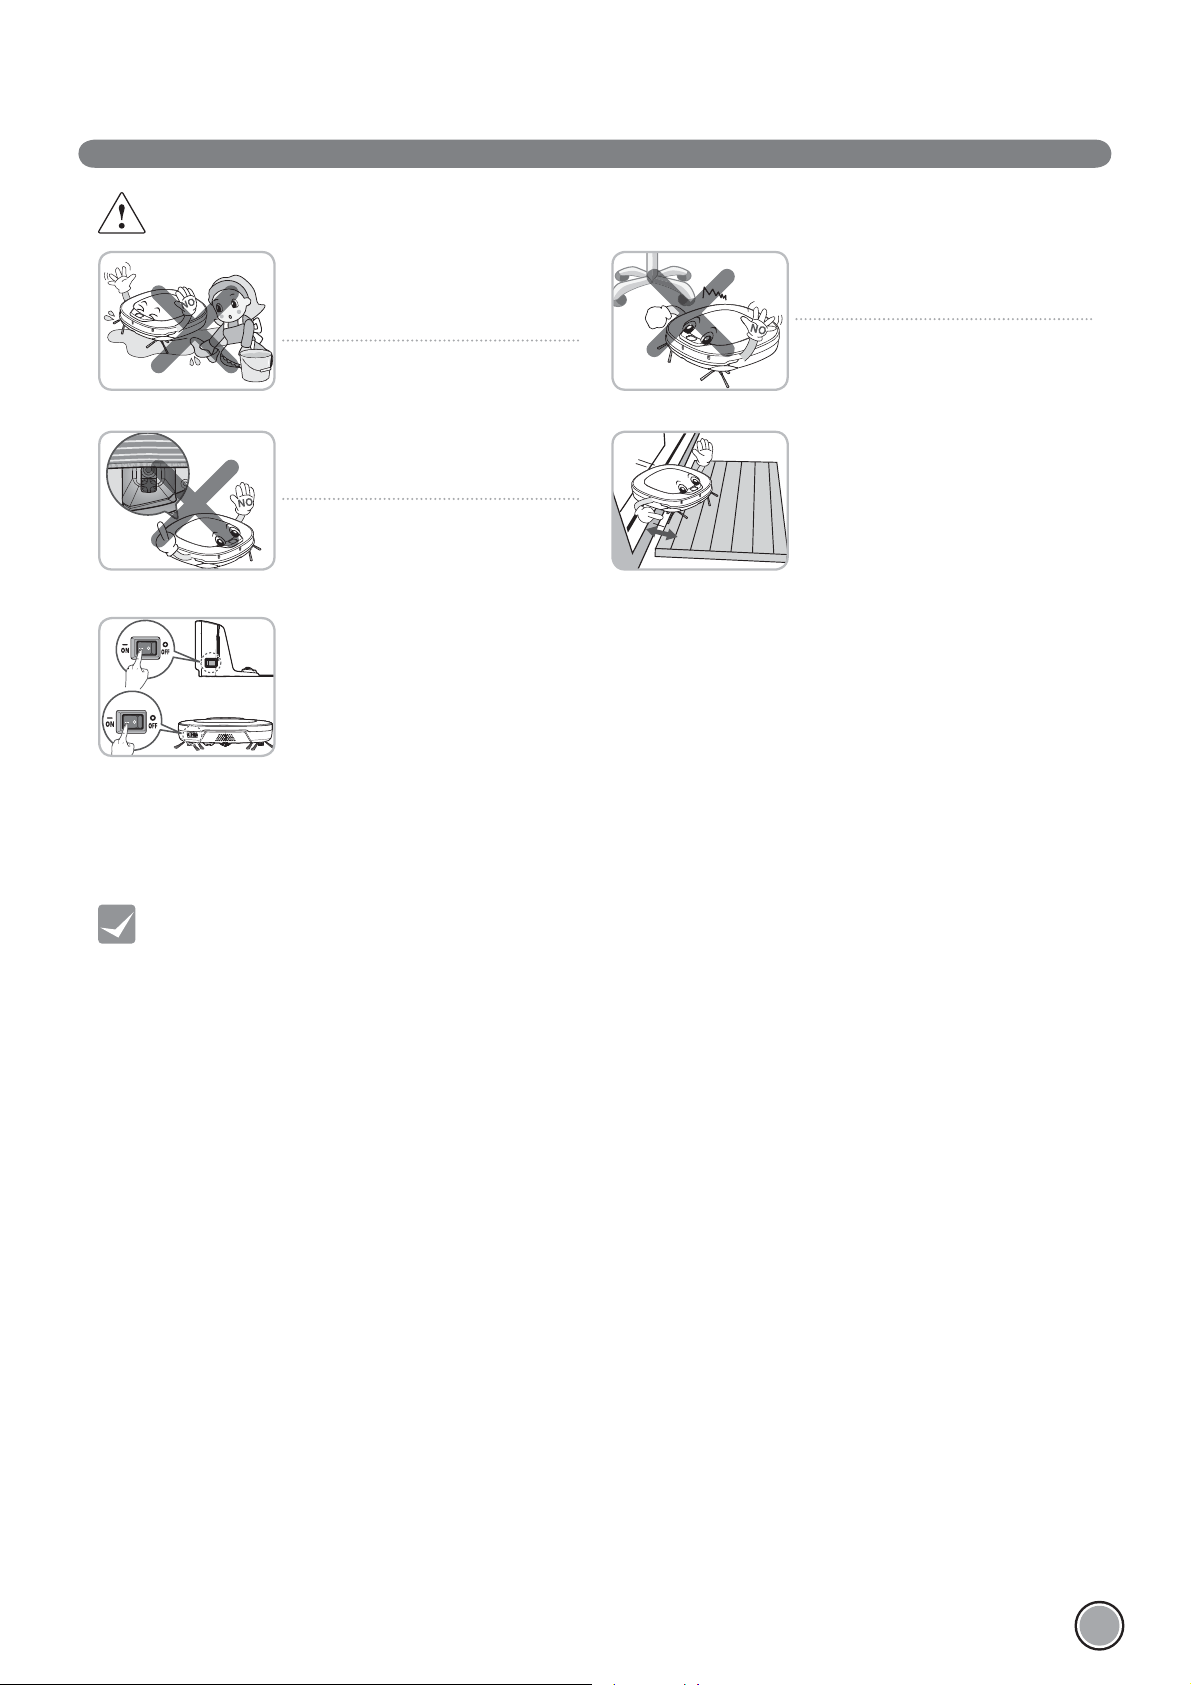
WARNING
1. This appliance is not intended for use by persons (including
children) with reduced physical, sensory or mental capabilities,
or lack of experience and knowledge, unless they have been
given supervision or instruction concerning use of the appliance
by a person responsible for their safety.
2. Children should be supervised to ensure that they do not play
with the appliance.
3. If the supply cord is damaged, it must be replaced by LG
Electronics Service Agent in order to avoid a hazard
4. This appliance can be used by children aged from 8 years and
above and persons with reduced physical, sensory or mental
capabilities or lack of experience and knowledge if they have
been given supervision or instruction concerning use of the
appliance in a safe way and understand the hazards involved.
Children shall not play with the appliance. Cleaning and user
maintenance must not be made by children without supervision.
For your safety, do not remove the battery
from the Robot Cleaner. If you need to
replace the battery of the Robot Cleaner,
take it to the nearest authorized LG
Electronics service center or dealer for
assistance.
Failure to follow this warning can cause Ņ re
or product failure.
Never use the Robot Cleaner with a
battery and/or home station from any
other product than the
Robot Cleaner.
Doing so can cause Ņ re or product failure.
2
Page 4
WARNING
Gasoline
Detergent
SAFETY PRECAUTIONS
Make sure the power cord of the home
station is not crushed under a heavy
object or damaged by contact with sharp
objects.
Failure to follow this warning can cause
electric shock, Ņ re or product failure. If the
power cord is broken, do not plug it in. Take
the product to an LG Electronics Authorised
service repairer.
Do not place the home station and the
Robot Cleaner near a heating device.
Doing so can cause product deformation,
Ņ re, or product failure.
Do not force the power plug to bend. Do
not use the power plug when it has been
damaged or loosened.
Doing so can cause Ņ re or product failure.
Do not touch the power plug with wet
hands.
Doing so can cause electric shock.
Do not use the Robot Cleaner when
candles or fragile objects are placed on
the ņ oor.
Doing so can cause Ņ re or product failure.
Always use a dedicated power outlet with
a 10 amp rating.
If multiple appliances are connected to an
outlet simultaneously, they can generate
enough heat to cause a Ņ re .
When pulling out the home station power
plug, always pull it out by grabbing the
plug, not the cord. When pulling out the
power plug, do not to touch the prongs
with your Ņ ngers.
Doing so can cause an electric shock.
Do not allow children or pets to play with
or rest upon the Robot Cleaner at any
time. Do not use the Robot Cleaner while
an object is hanging from it.
Doing so can cause injury or product
damage.
Do not spray or use inņ ammable materials,
surfactants, or drinking water in the
vicinity of the Robot Cleaner.
Doing so can cause Ņ re or product failure.
* Inņ ammable materials: gasoline, thinner,
etc.
* Surfactant: detergent, articles for bath,
etc.
Do not insert any part of the body, such as
a hand or foot, below the brush or wheels
of the
Robot Cleaner while in use.
Doing so can cause injury or product
damage.
Do not operate the Robot Cleaner on
narrow and high furniture such as a
wardrobe, refrigerator, desk, table, etc.
Doing so can cause injury, product failure
or damage which is not covered by the
warranty.
Do not activate the device on a ņ oor that
has more than a 10 degree incline.
The device may not work properly.
Turn the power supply off immediately
if any abnormal sound, odor, or smoke
is generated from the Robot Cleaner by
removing it from the home station and
turning off the main switch on the rear
side of the unit.
Failure to do so can cause Ņ re or product
failure.
Do not operate the Robot Cleaner in a
room where a child is sleeping.
Doing so can cause injury or product
damage.
Do not leave Children or pets near the
Robot Cleaner unsupervised.
Doing so can cause injury or product
damage.
This product is intended for indoor domestic home use and
should not be used in mobile applications. it should not be used in
commercial applications such as workshops or garages or around
indoor swimming pools, etc.
3
Page 5
SAFETY PRECAUTIONS
CAUTION
Frequently empty the dust bin and
maintain its cleanliness.
The dust collected in the dust bin can
trigger allergies and may contain harmful
insects. it should be cleaned after each use.
Use the Robot Cleaner indoors only.
Using it outdoors can cause product failure
and irreparable damage to the unit.
Close the cover of the dust bin on the
main unit before starting cleaning.
If the cover is not closed, it can cause injury
or product damage.
DO NOT use the Robot Cleaner around a
banister, staircase or any other dangerous
place.
Doing so could cause injury or damage to
the unit.
Do not drop the Robot Cleaner or subject
it to strong impacts.
Doing so can cause injury or product failure
not covered by the warranty.
Do not expose the Robot Cleaner to cold
temperatures (less than -5 %) for a long
period of time.
Doing so can cause product failure.
Remove any cables or string from the ņ oor
before starting.
Cable or string can get tangled in the
wheels of Robot Cleaner and cause product
failure or the cord of an appliance can be
disconnected.
Make sure the Robot Cleaner is not put on
a table or desk, with the power ON.
It may result in an injury or damage to the
product.
In rare cases, the Robot Cleaner’s brush
can damage carpet. If this happens,
immediately stop the cleaning operation.
When a carpet has long tassels, the tassels
can be damaged.
Do not let the main unit and charging
terminal of the home station come into
contact with metallic objects.
Doing so can cause product failure.
Do not put water, detergent, etc. into or
onto the Robot Cleaner.
Doing so can cause product failure. Do not
put any water or detergent on the Robot
Cleaner. If liquids get inside of the Robot
Cleaner, turn off the power supply and
contact an LG Electronics sales agent or
customer care center.
Do not allow the Robot Cleaner to sweep
up liquids, blades, thumb tacks, sharp
objects or ashes, hot or cold, etc.
These items can cause product failure or
damage.
Do not put sharp objects into the opening
of the Robot Cleaner’s ultrasonic sensors.
Doing so can cause product failure.
Do not use the Robot Cleaner when the
dust bin is completely full.
Doing so can cause product failure.
4
Page 6
CAUTION
SAFETY PRECAUTIONS
If the ņ oor is wet or has wet spots, wipe
them up before using the Robot Cleaner.
Do not use the Robot Cleaner on a wet
surface.
Doing so can cause product failure.
When attaching the mop, ensure that it is
Ņ tted correctly so that it does not block
the lower camera sensor.
Blocking the bottom camera sensor may
not allow the product to work correctly.
(Some models may not have the sensor.)
To save energy when the Robot Cleaner
is not in use for longer periods, turn off
the power switch, and turn on the power
switch again just prior to using the Robot
cleaner again.
When the robot cleaner is operating, it
may hit the chair leg, desk leg, table leg or
other narrow pieces of furniture.
For quicker and better cleaning, place the
dining chairs on top of the dining table.
NOTE: Very low thresholds will allow the
Robot cleaner to go over them and perhaps
into an undesirable location. Make sure that
all the doors of the rooms that are not to
be cleaned are closed.
Tip
Check the following items before use:
• Empty the dust bin after each operation or prior to it filling up.
• Remove any cables or long strings from the floor.
• Remove any moisture from the floor before cleaning.
• Close the cover of the dust bin before cleaning.
• Remove fragile or unnecessary objects from the room to be cleaned.
For example, remove expensive ceramics and valuables from the floor.
• Confirm whether the battery has sufficient power, and if it is low, recharge it.
• Close the doors of any room that you do not want the Robot Cleaner to enter.
During cleaning, the Robot Cleaner may enter another room and continue cleaning.
• Do not use this product in the room where a child is sleeping alone. The child can be hurt or woken.
• Remove towels, foot towel or any other thin cloth from the floor as they can get caught by the brush.
• Before starting the device, it's better to remove carpets that are thicker than 20
as they may cause it to malfunction.
• Please close any balcony doors as the wheels may get stuck while cleaning.
5
Page 7
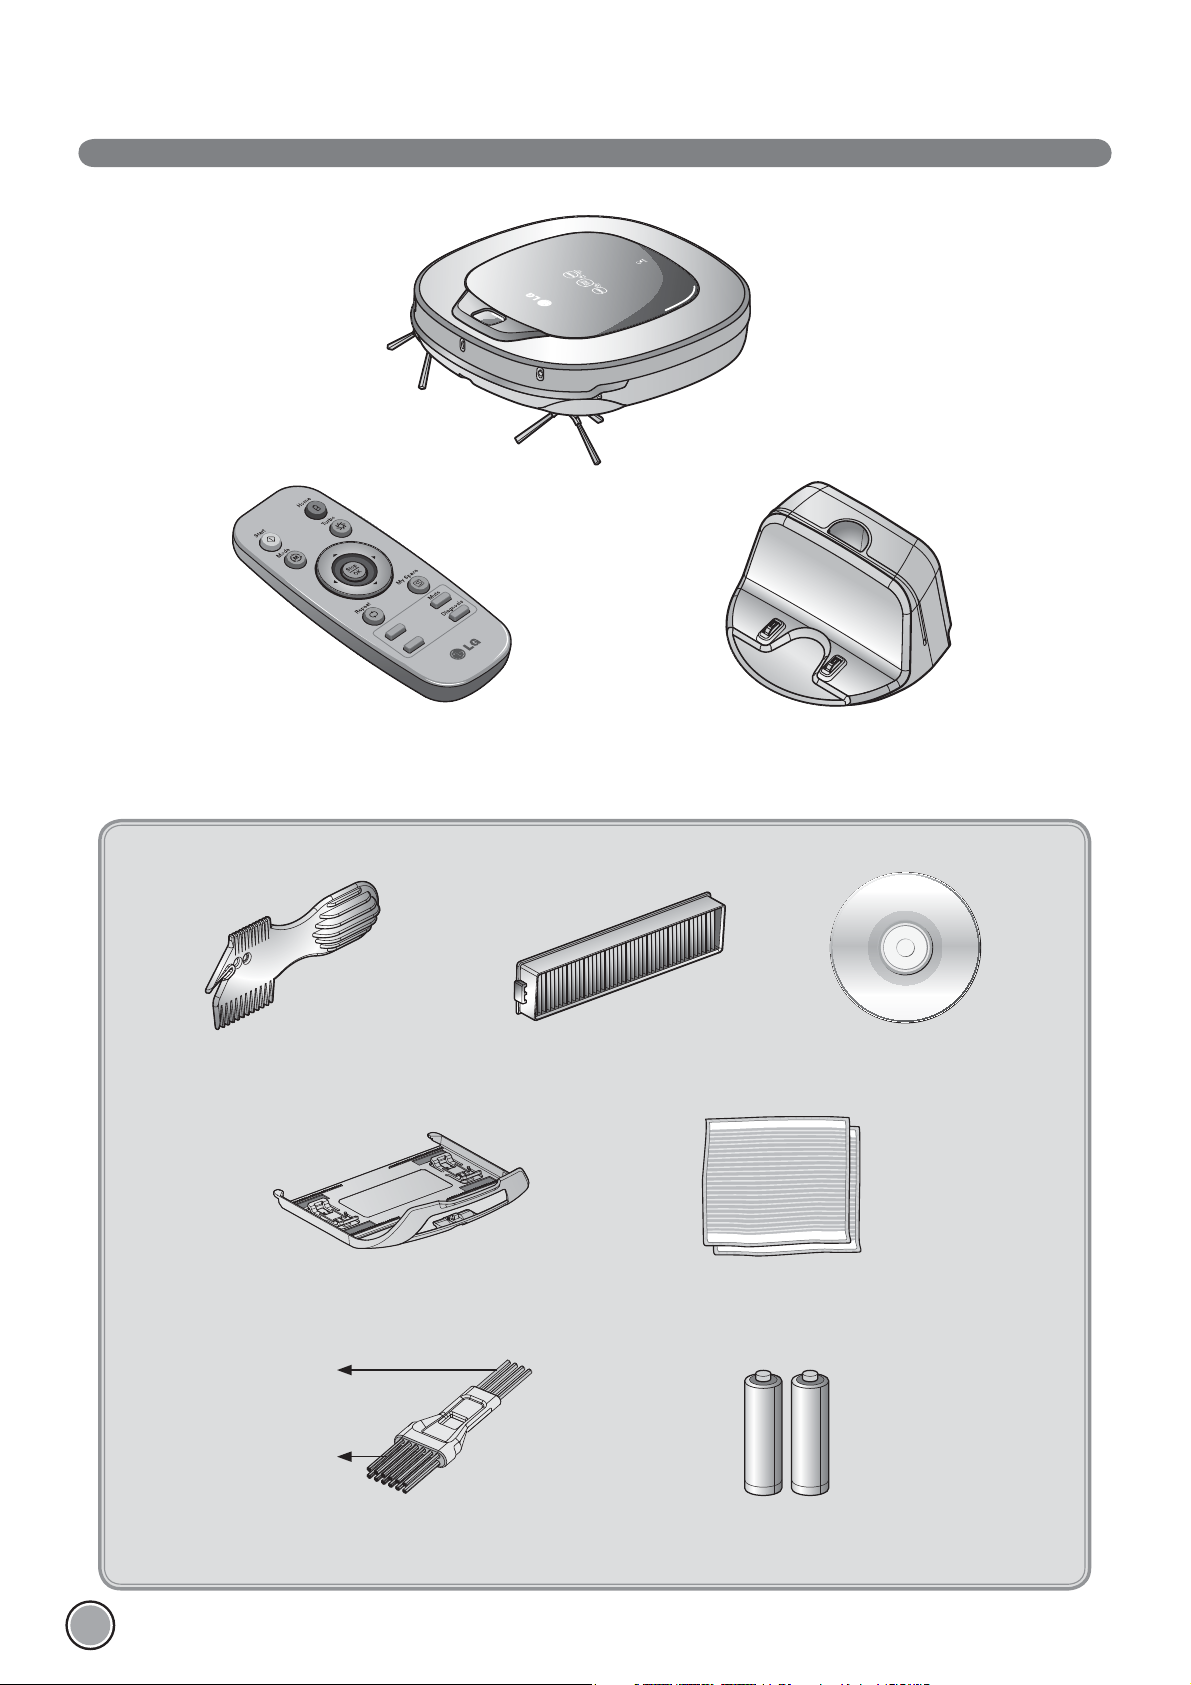
INCLUDED WITH PRODUCT
Robot Cleaner
Remote controller
Figures can be different from actual objects.
Cleaning Tool
Mop plate
(Selected models only (VR*.LVM))
Dust bin filter (spare)
(Optional)
Ultra microfiber mop (2 pieces)
(Selected models only (VR*.LVM))
Home station
DVD Manual
for cleaning
sensors
for cleaning
the filter
Cleaning brush
(It’s on the dust bin cover)
6
Batteries for remote controller
(2 units of AAA size)
Page 8
Plan view
Front view
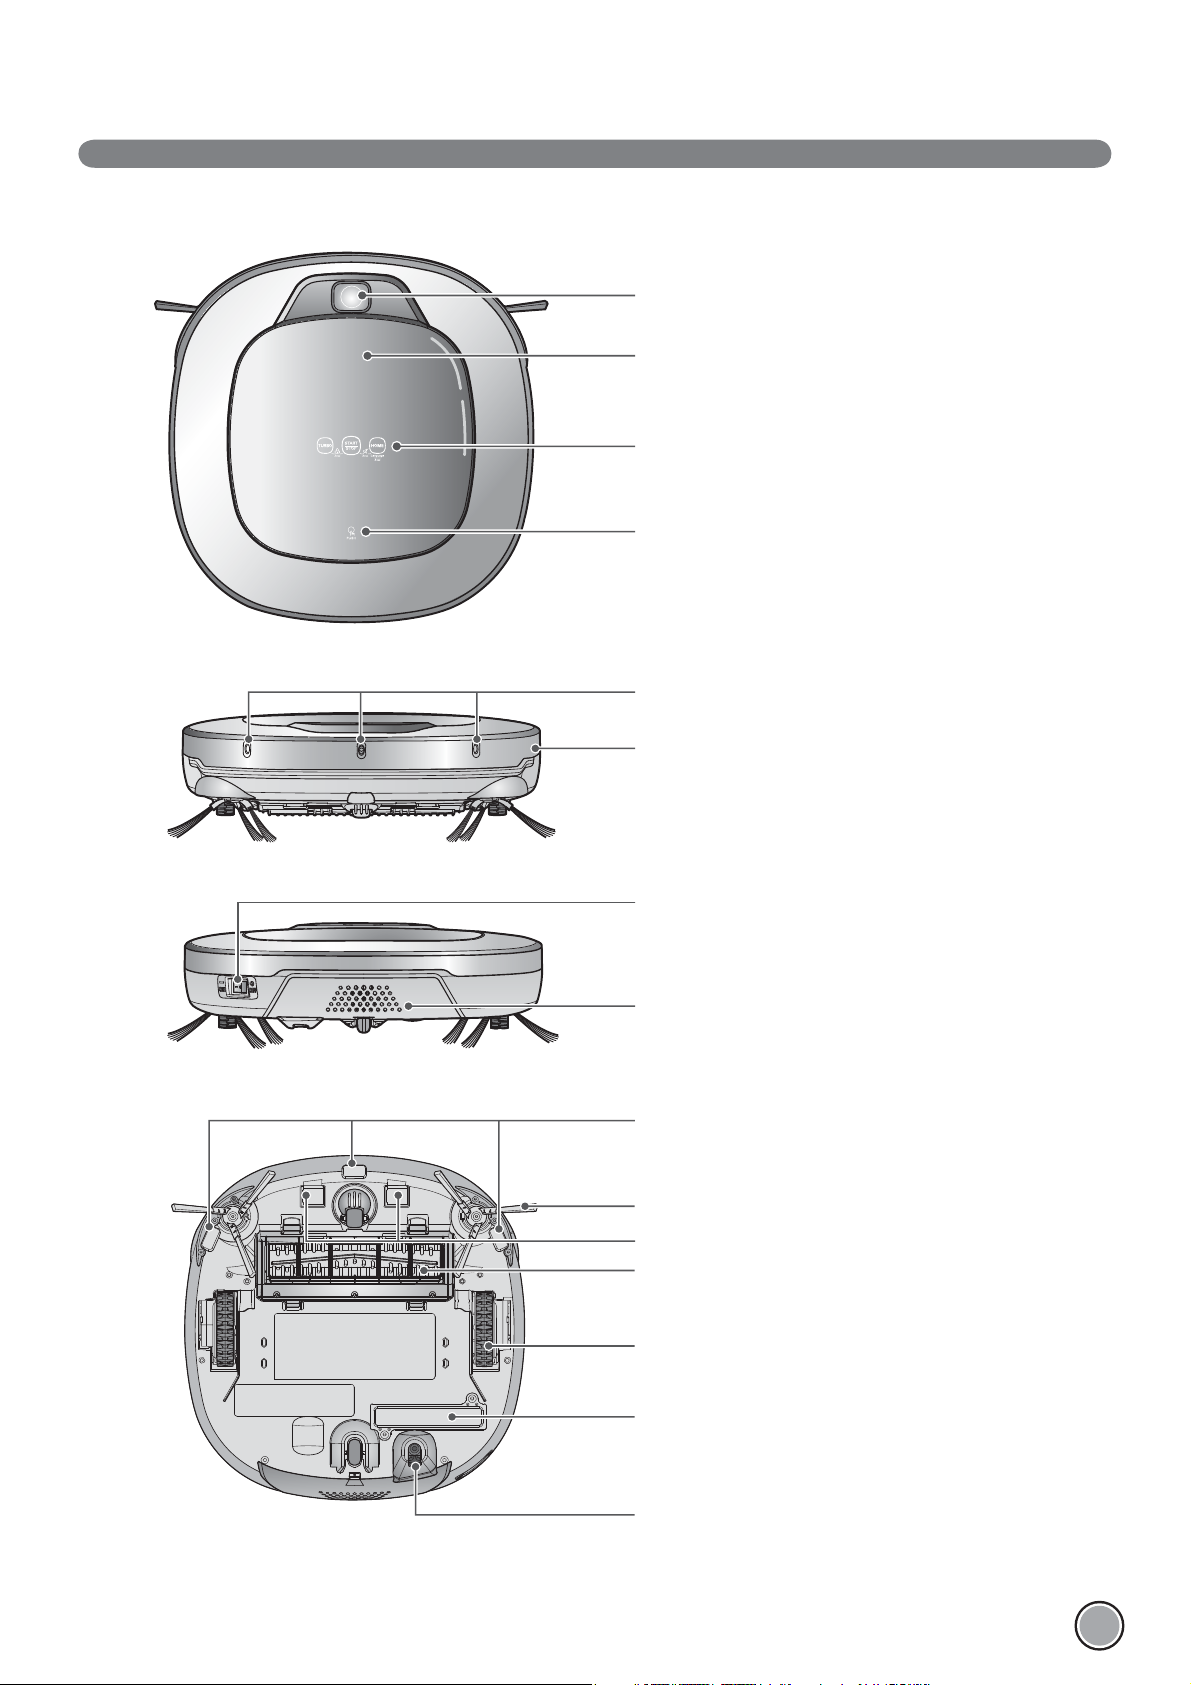
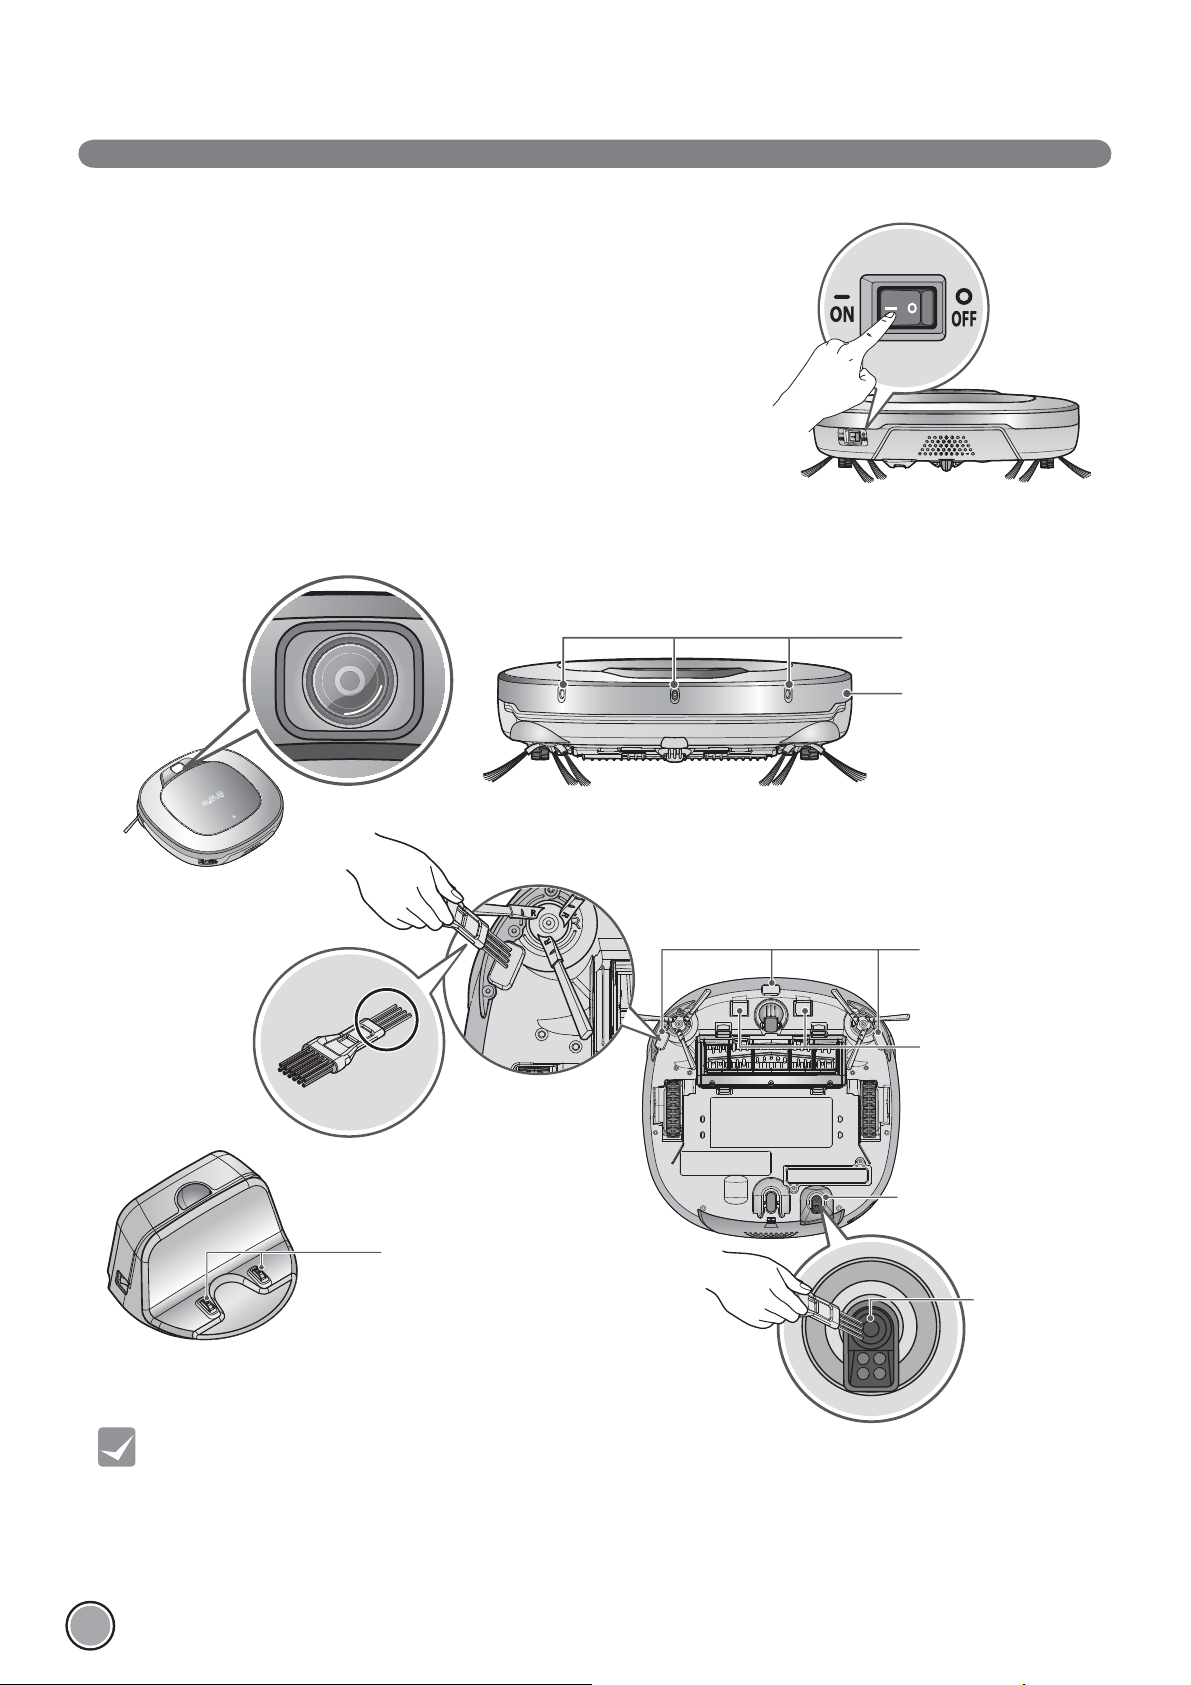
PARTS DESCRIPTION - ROBOT CLEANER
Upper camera sensor
Dust bin cover
Display & function buttons
Dust bin compartment release button
Ultrasonic sensors
Rear view
Bottom view
Obstacle detecting sensor window Detecting
sensors of home station & Receiving sensors of
remote controller
Main Power switch
Ventilation port
Cliff detection sensors
Side brush
Charging terminals
Brush
Figures can be different from actual objects.
Wheel
Battery housing
Lower camera sensor
(Optional)
7
Page 9
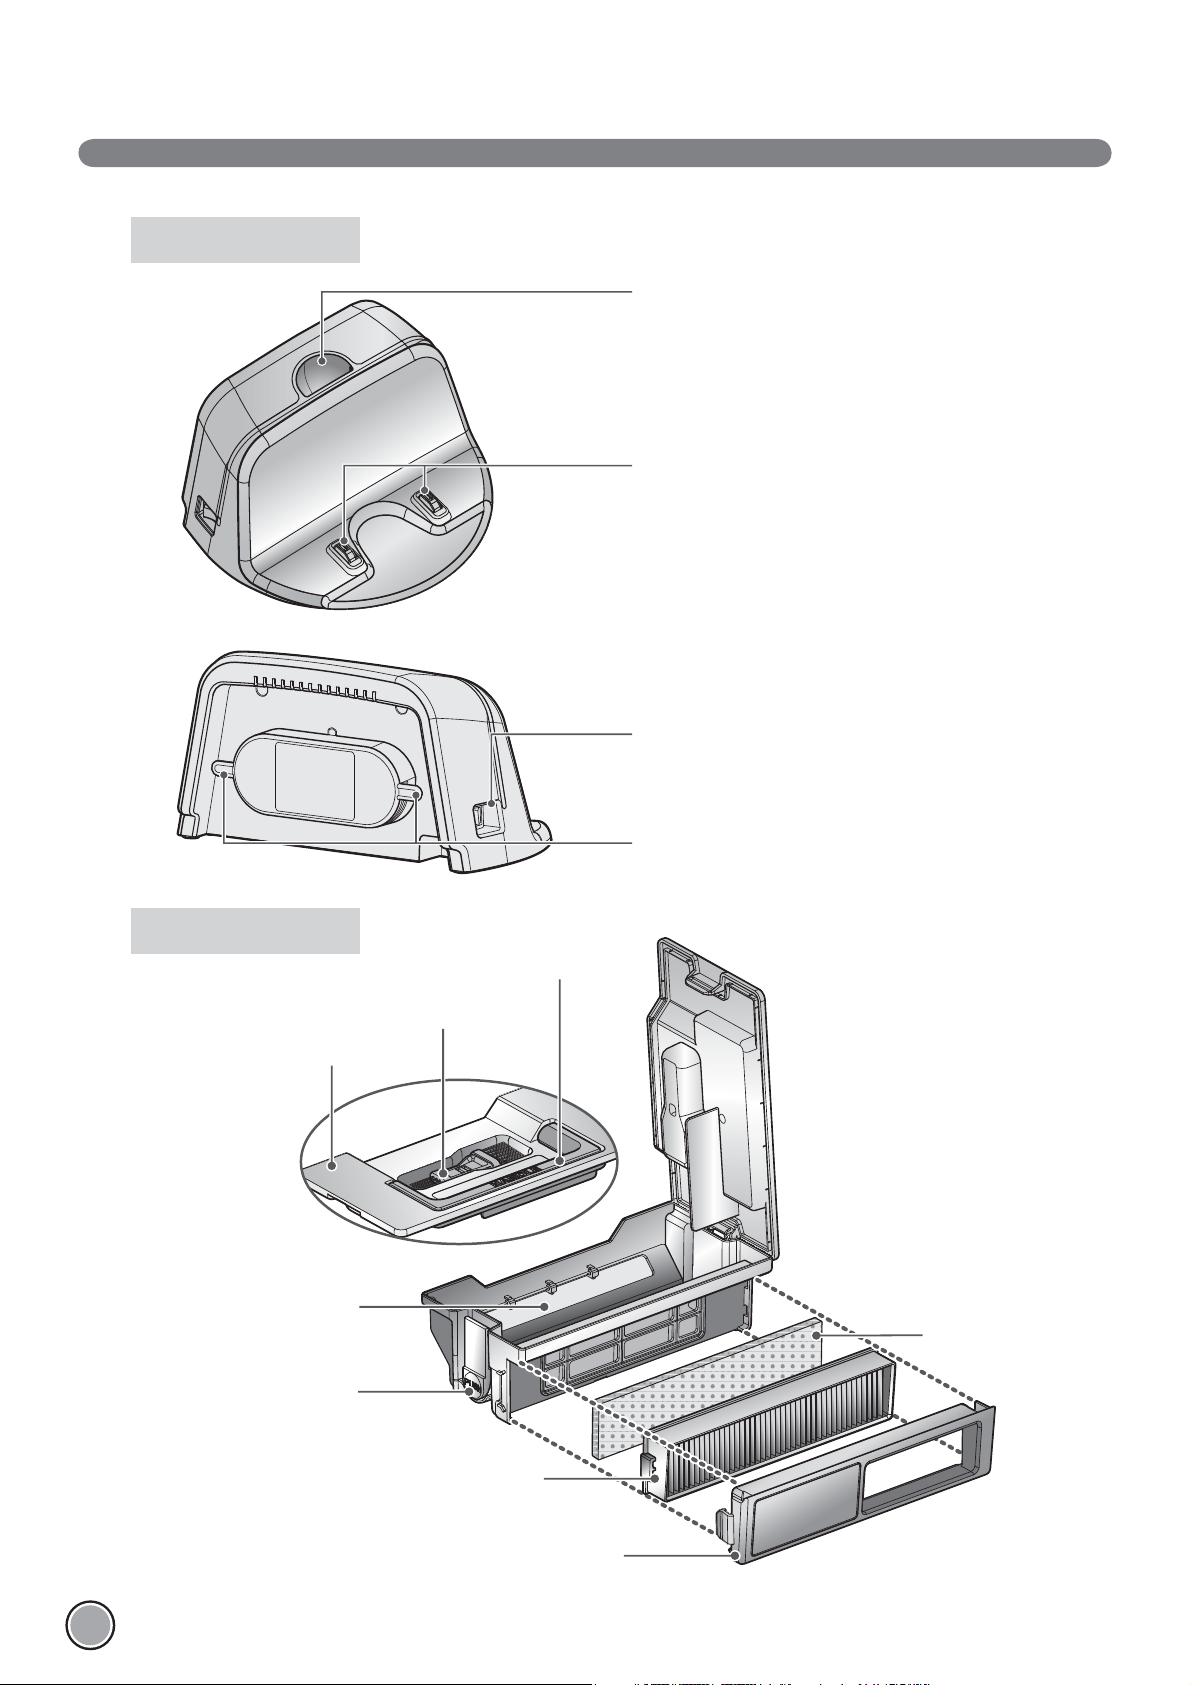
PARTS DESCRIPTION – HOME STATION / DUST BIN
Home station
Remote controller holder
Charging terminals
Dust bin
Dust bin lid
Suction port flap
Power switch
Power cord fixing hook
Dust bin handle
Cleaning brush
Sponge filter
Dust bin lid
opening button
HEPA filter
Filter cover
Figures can be different from actual objects.
8
Page 10
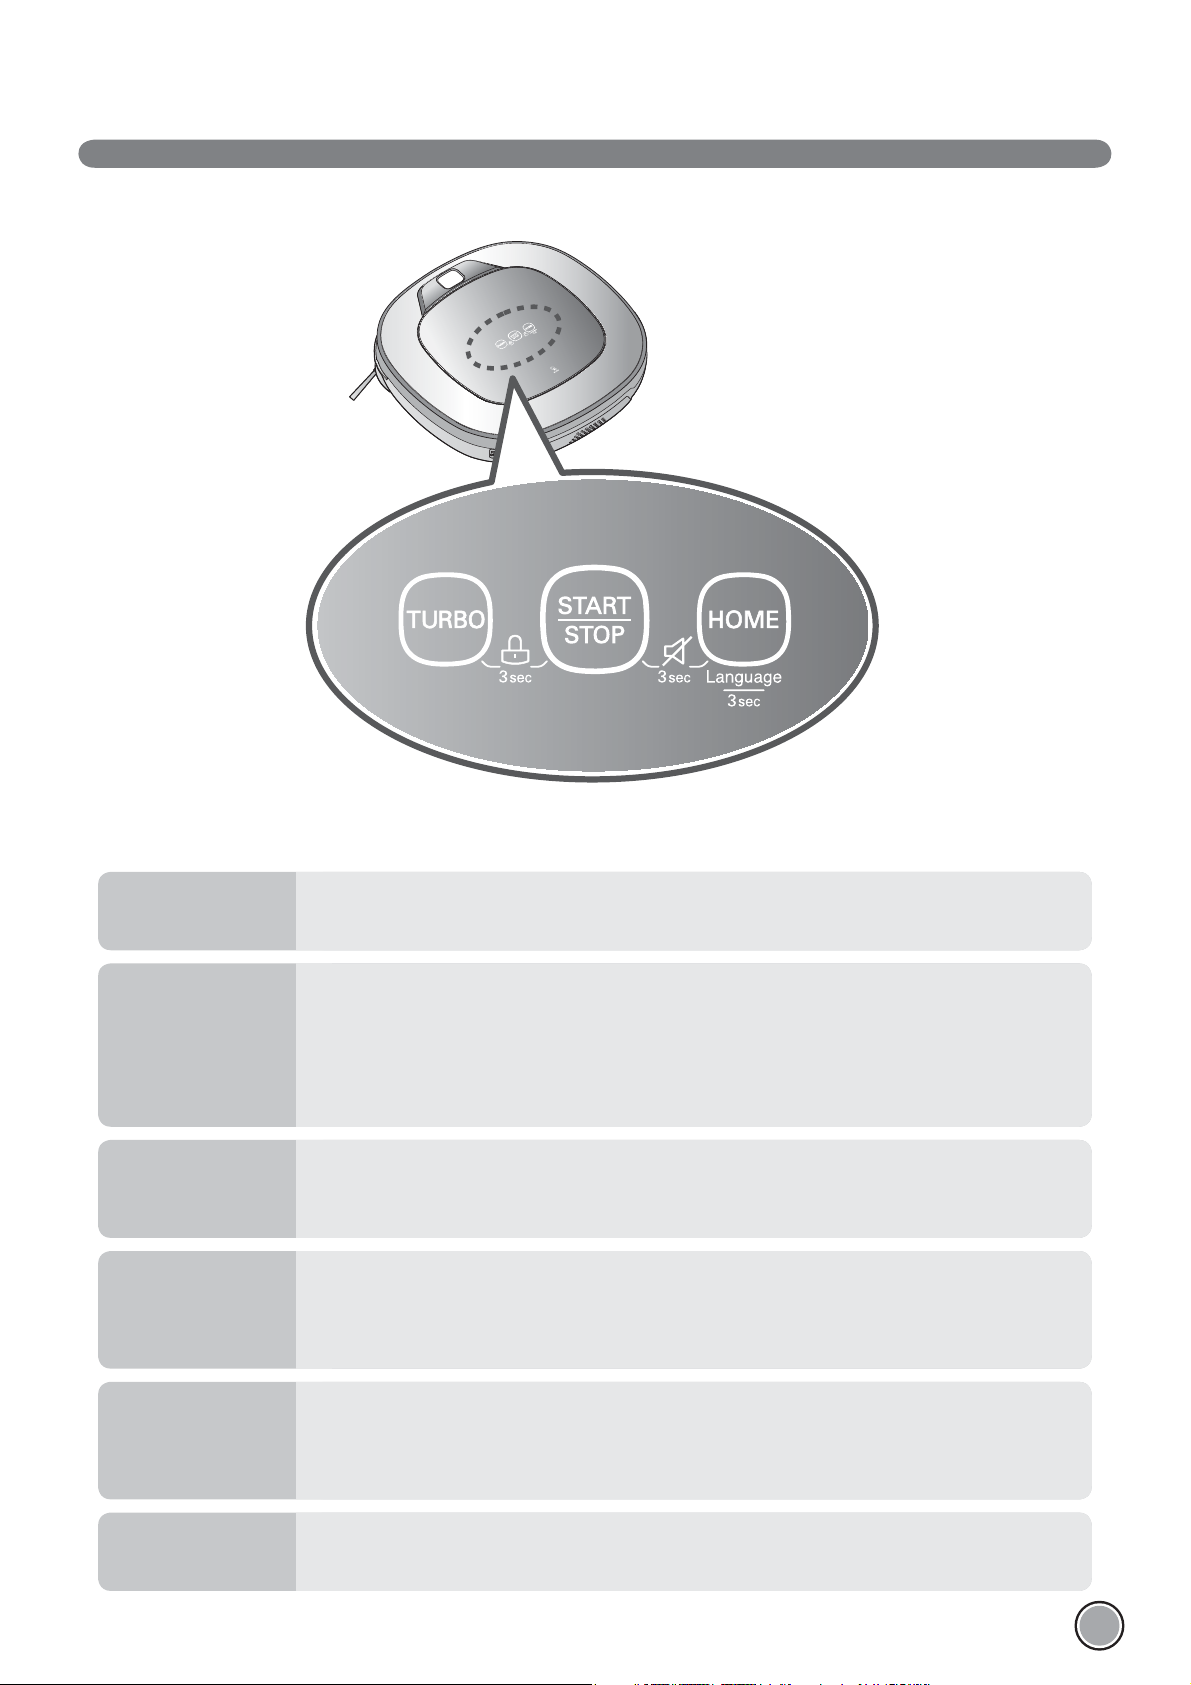
BUTTON FUNCTIONS – ROBOT CLEANER
TURBO
START/STOP
HOME
BUTTON LOCK
On/Off
Voice Alert
On/Off
• If the button is pressed, ‘TURBO Mode’ will be set with a voice confirmation.
• If the button is pressed whilst in ‘TURBO Mode’, it will be canceled.
• Used to turn the power on from Standby, start or stop cleaning.
• If the button is pressed whilst the unit is powered ON, it will start cleaning.
• If button is pressed during the cleaning, it will stop the cleaning.
• If the button is pressed for about 2 sec. whilst the power is ON, the power will be returned to
Standby.
• If the button is pressed in 'Smart Diagnosis' mode, it will end the diagnosis.
• Used to return the Robot Cleaner back to the home station for charging.
• If cleaning is finished or the battery is low, the Robot Cleaner will return to the Home Station by
itself to recharge its battery.
• Pressing the ‘TURBO' and 'START/STOP' button for 3 seconds will activate or deactivate the Lock
function.
• If 'Lock' is ON, a voice announcement "Key lock has already been set" will be heard each time a
button is pressed.
• Press and hold both the 'START/STOP' and HOME button on the main unit for 3 sec. to turn ON/
OFF the Voice Alert.
• If the Voice Alert is OFF, the Mute lamp will be ON.
• You cannot use this feature with the buttons on the remote control.
Language Change
• Pressing the ‘HOME’ button for 3 seconds will change the language for the voice massage.
• You cannot use this function with the button on the remote controller.
9
Page 11
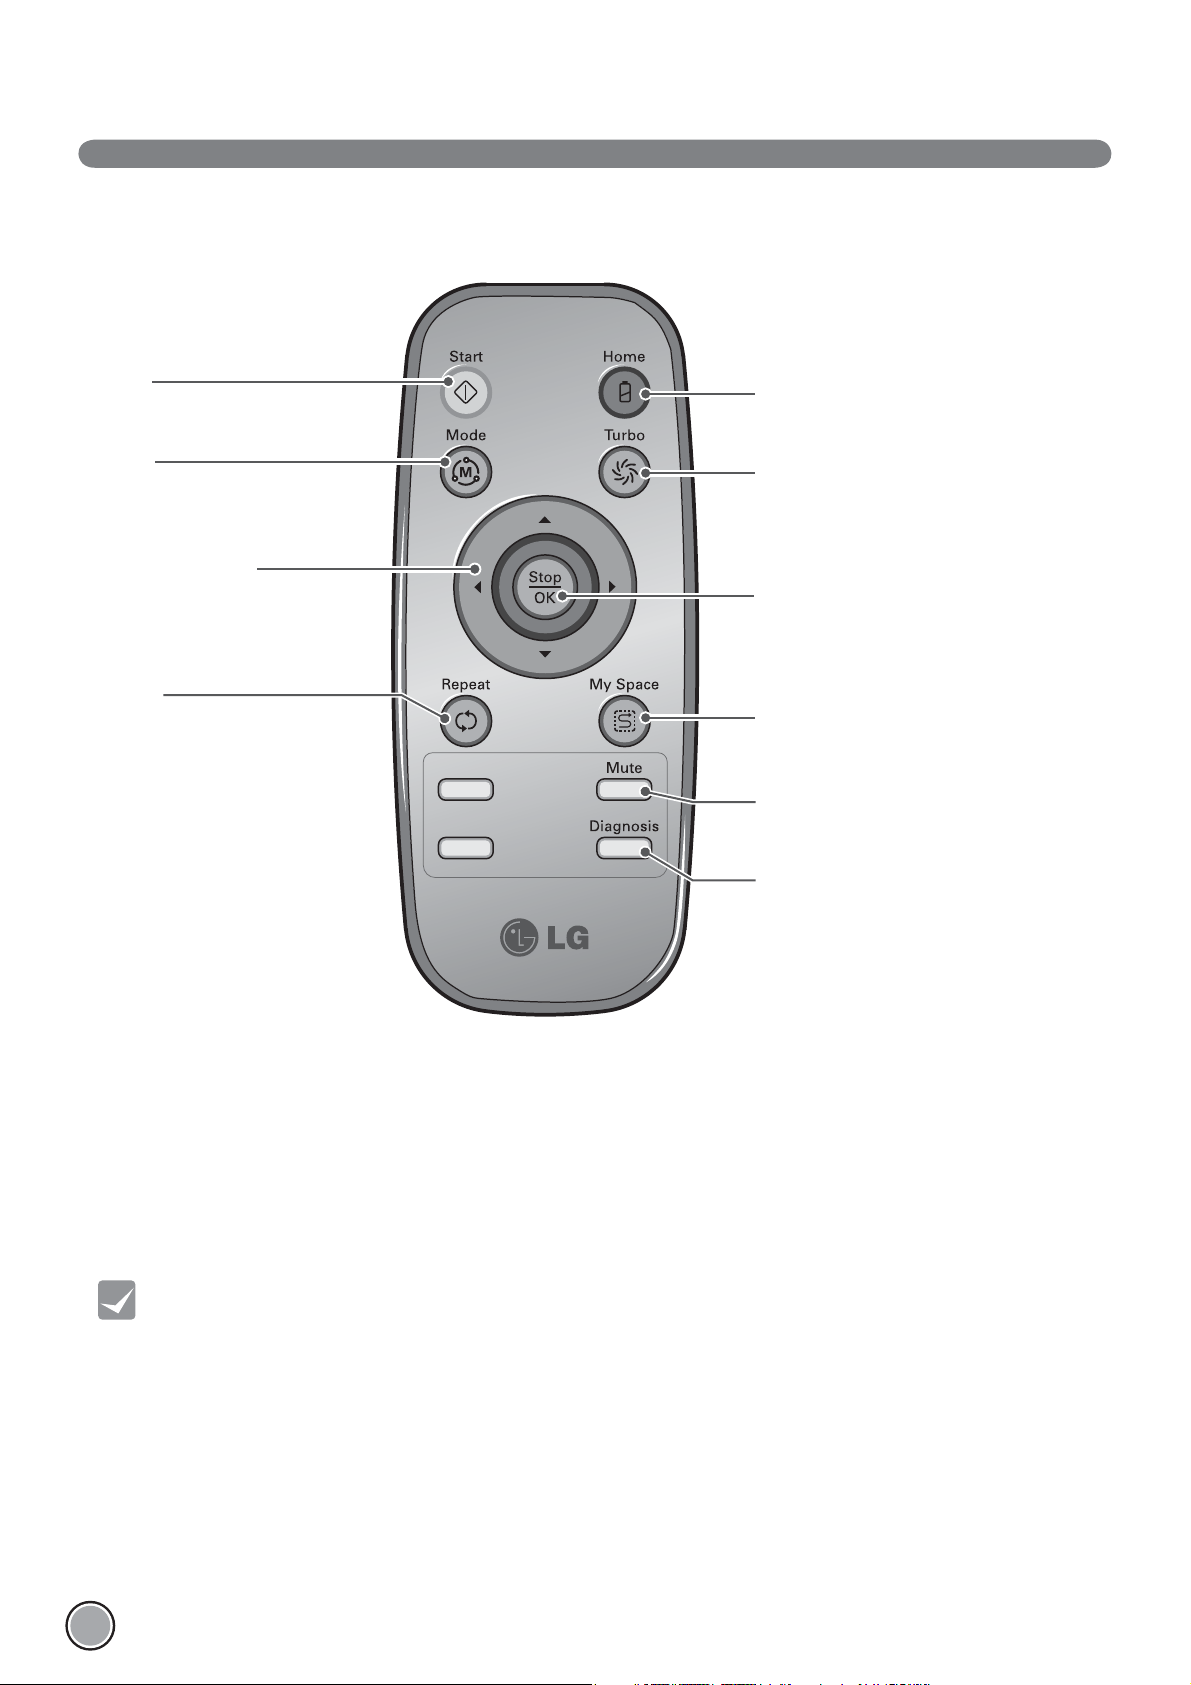
BUTTON FUNCTIONS – REMOTE CONTROLLER
Start
Pressing this button will start
the cleaning. (p16)
Mode
Change the Cleaning Mode of
Robot Cleaner to ZigZag Mode.
(p18)
Directional button
This button enables Manual
Operation and selection of an area
in 'My Space cleaning' mode.
Repeat
This button allows activating or
deactivating 'Repeat Cleaning'
mode. (p20)
Home
Used to recharge the Robot Cleaner by
making it return to the Home Station. (p17)
Turbo
Used to activate or deactivate
'Turbo' mode. (p20)
Stop/OK
Pressing the button will stop
the Robot Cleaner.
My Space
Used to put the Robot Cleaner in
'My Space clean' mode. (p19)
Mute
Used to activate or deactivate
'Mute' mode. (p11)
Diagnosis
Used to run Smart Diagnosis.
Available only when Robot Cleaner
is recharging. (p23)
10
Tip
• Remote Controller does NOT provide a Power ON function.
• With the machine's power OFF, the Remote Controller will not work.
• To turn the power ON/OFF, use the 'START/STOP' button on the upper section of the Robot Cleaner.
• The ‘Mode’ and ‘My Space’ button can only be used after stopping
the Robot Cleaner or whilst it is charging on the Home station.
Page 12
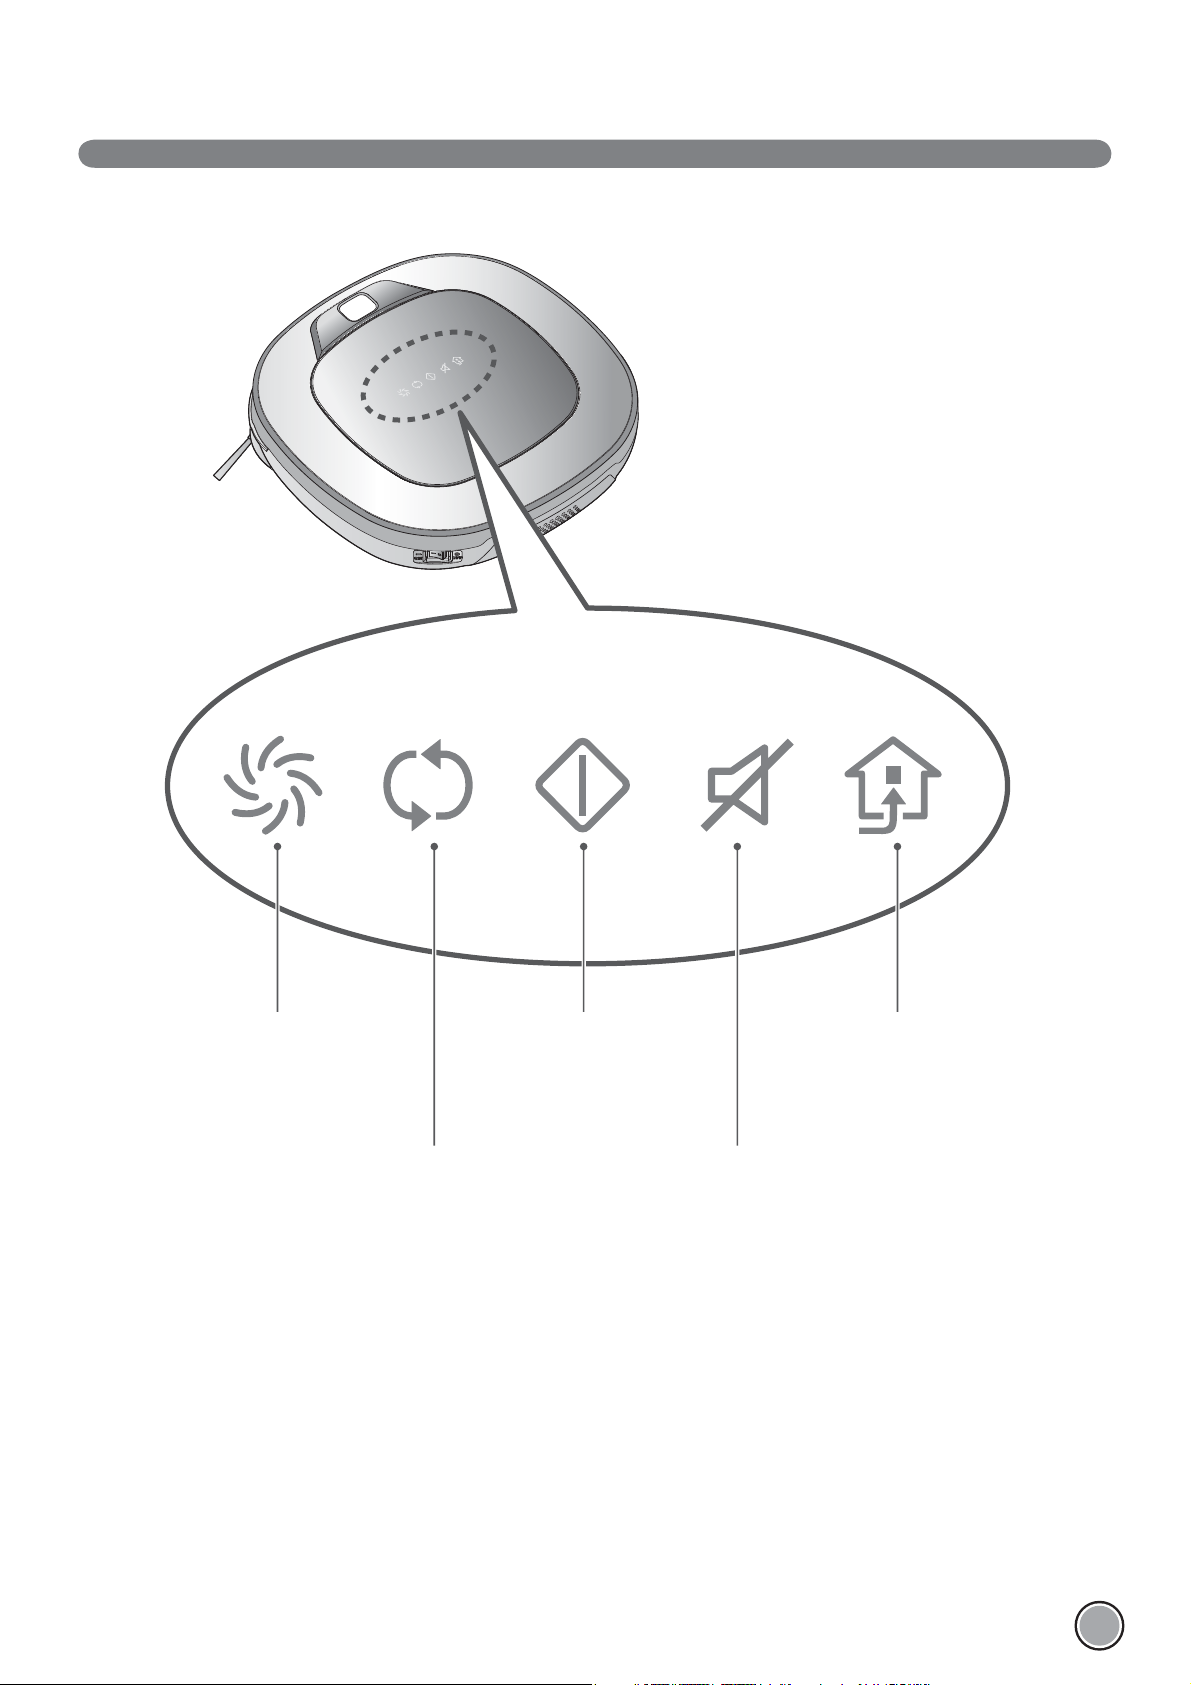
DISPLAY STATUS INFORMATION
Turbo Mode icon
This indicates the settings
for T urbo Mode.
Repeat Mode icon
This indicates the settings
for Repeat Mode.
Operational Status icon
This indicates the operational
status of Robot Cleaner.
Mute icon
This indicates the settings
for Voice Alert.
Homing icon
This indicates the conditions
of Homing and Charging.
11
Page 13
BEFORE YOU START
–
+
+
–
Check these items before cleaning
• Do not use this device in a room where a child is left alone. The child could be injured.
• Remove fragile or unnecessary objects from the room to be cleaned.
Especially, remove expensive ceramics and valuables from the floor.
• Close the cover of the dust bin compartment before cleaning.
• Remove any moisture that might be on the floor.
• Remove cables, strips, towels, mats etc. from the floor so they will not get tangled in the brushes.
• Confirm whether the battery charge is sufficient, and if it is low, recharge it.
• Empty the dust bin before or after each clean, or before it becomes full.
• Close the doors of any room that you do not want the Robot Cleaner to enter. During cleaning,
the Robot Cleaner may enter another room and continue cleaning.
• When the Mop plate(Selected models only (VR*.LVM)) is attached,
Robot Cleaner will not be able to go over thresholds of 5 or higher.
If you are not planning to use the mop for cleaning, remove the mop before using Robot Cleaner.
• Before starting the device, it's better to remove carpets that are thicker than 20 as they may cause it to malfunction.
• Please close any balcony as the wheels may get stuck while cleaning.
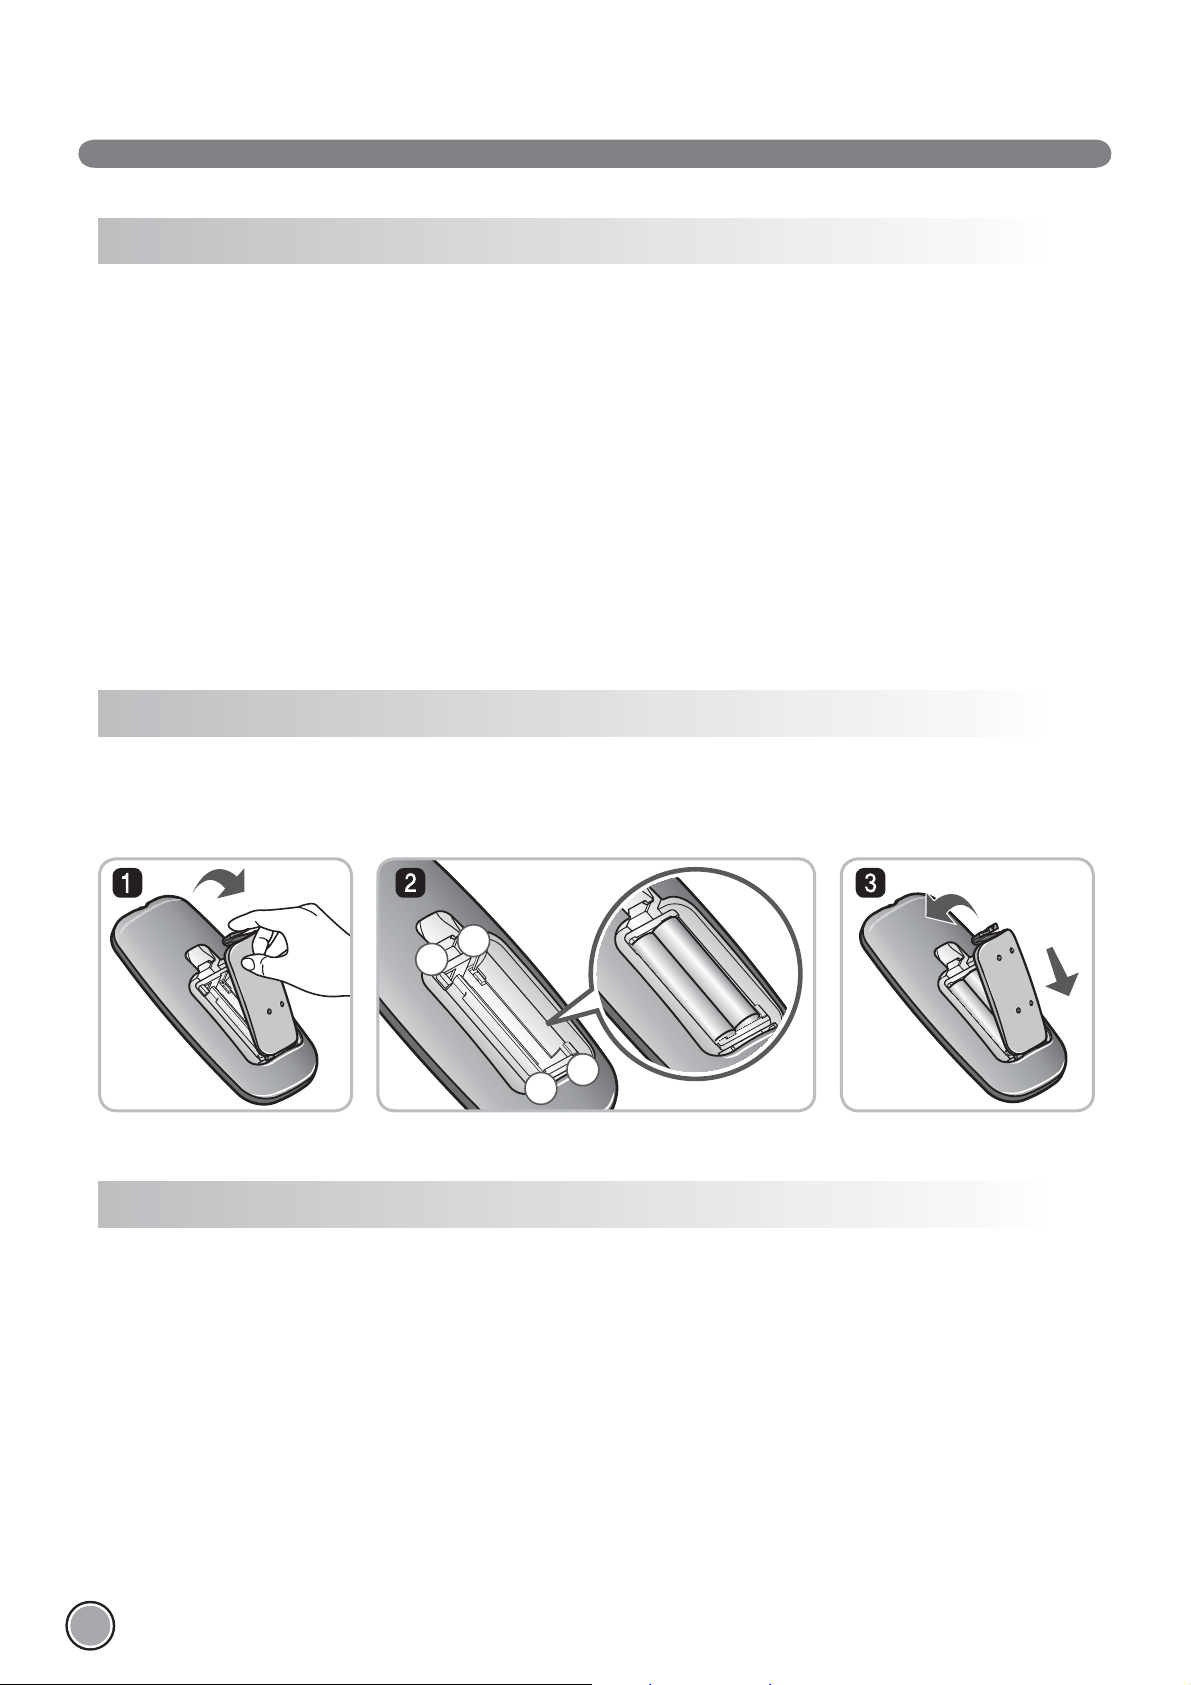
Loading the remote controller battery
1. Open the battery cover by lifting the rear hook of the remote controller.
2. Insert two AAA batteries, checking for +, - nodes while loading.
3. Close the battery cover completely so that the batteries will not fall out.
Precautions while using the remote control
• Only press one button at a time.
• Do not drop or subject it to any impact.
• Do not store it near devices that give off heat, fire or hot air.
• Certain fluorescent lamps, such as the three band radiation lamp, can interfere with the activation of the remote control.
Therefore, use it as far away as possible from such lamps.
• If the remote control is far from the Robot Cleaner when activated, it may fail to operate properly.
Use the remote within 3 of the Robot Cleaner if possible.
12
Page 14
OVERVIEW
1
2
3
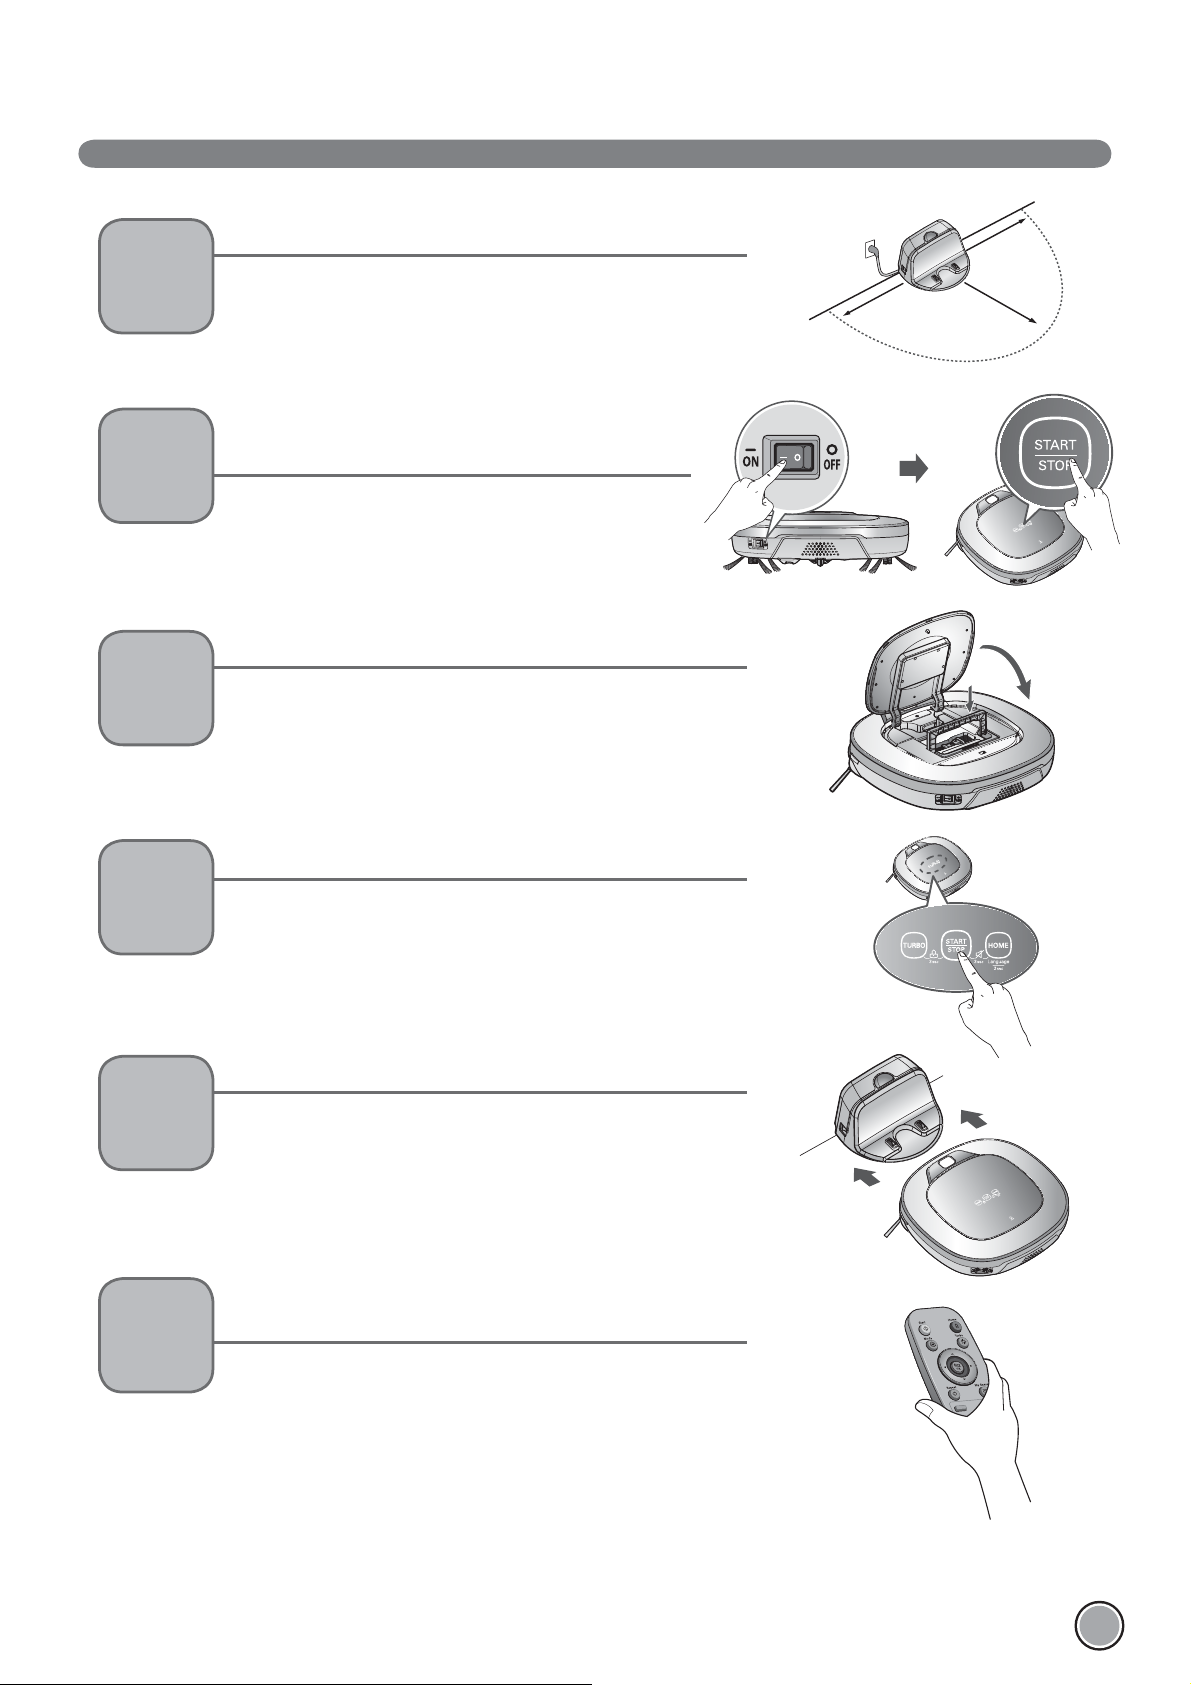
Install the home station. (p14)
Insert the power cord plug into an outlet and locate the station
against a wall. If power is not supplied to the home station, the
Robot Cleaner will not charge.
Turn on the power supply of
the Robot Cleaner. (p15)
Turn ON the power switch on the rear-left of Robot Cleaner,
and press the 'START/STOP' button on the top.
※
If the power supply is not turned on, refer to page 15.
Check the dust bin.
Check the cleanness of the dust bin before starting cleaning and
close the dust bin compartment cover on the main unit.
1.5
1.5
2
4
5
6
Start cleaning. (p16)
Press the START/STOP button once again while the Robot Cleaner
is turned on. You will hear an announcement of the cleaning mode
and cleaning will begin once the Robot Cleaner has reversed and
turned around.
Automatic charge. (p17)
The Robot Cleaner will self-diagnose and automatically return to
the home station to recharge before the complete discharge of the
battery. It takes approximately three hours to charge the battery.
Use the cleaning mode and
auxiliary functions. (p18~21)
Use the buttons on Robot cleaner and Remote Controller to use
each cleaning mode and supporting features.
For Cleaning Mode, you can choose among ZigZag, My Space,
and Repeat; for secondary features, Manual and Microfibre Mop
(Selected models only (VR*.LVM)).
< Warning > When the Robot Cleaner is operated with the dust bin compartment lid left open,
it can cause an injury or serious damage to the product.
13
Page 15
HOW TO INSTALL THE HOME STATION
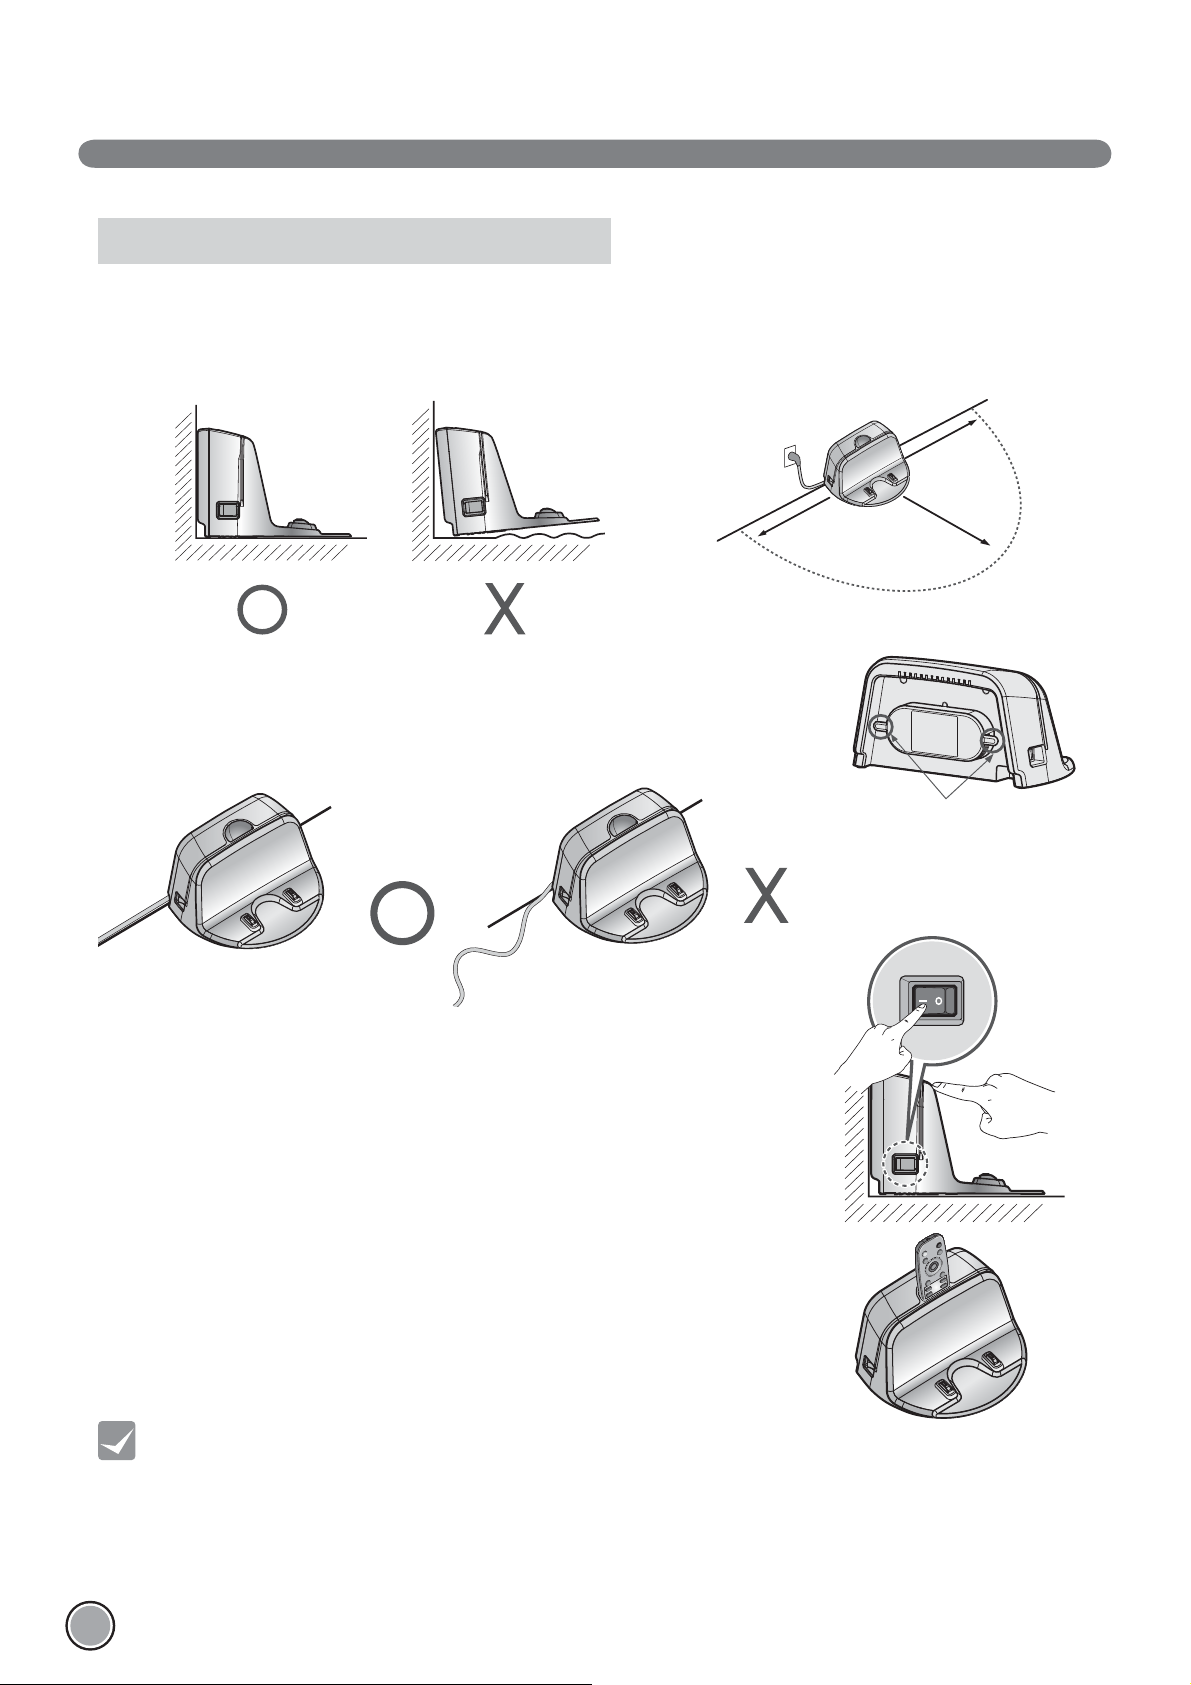
How to Install the Home Station
1. Position the home station against a wall on hard level ņ ooring
to prevent sliding during docking.
Remove objects within 1.5 to the right
and left side and within 2 to the front.
1.5
2. Plug the power cord into an outlet.
Wrap the remaining power cord around the Ņ xed hook on the back side of the
home station or along the wall surface so that the travel path of the Robot
Cleaner will not be obstructed.
3. Fix the home station against the wall so that it does not move.
Then turn on the power switch.
1.5
Fixing hook of power cord
2
4. When the remote controller is not used, store it in the remote controller holder
on the home station.
Tip
< Warning > Do not operate the Robot Cleaner if the Home Station has a damaged cord or plug, if it is not working
14
• Always keep the home station plugged in when in use. If the home station is not plugged in, the Robot
Cleaner will not return to the station to charge automatically.
properly, or if it has been damaged or dropped. To avoid electrical hazards, the cord must be replaced
by LG Electronics, Inc. or a qualified service person.
Page 16
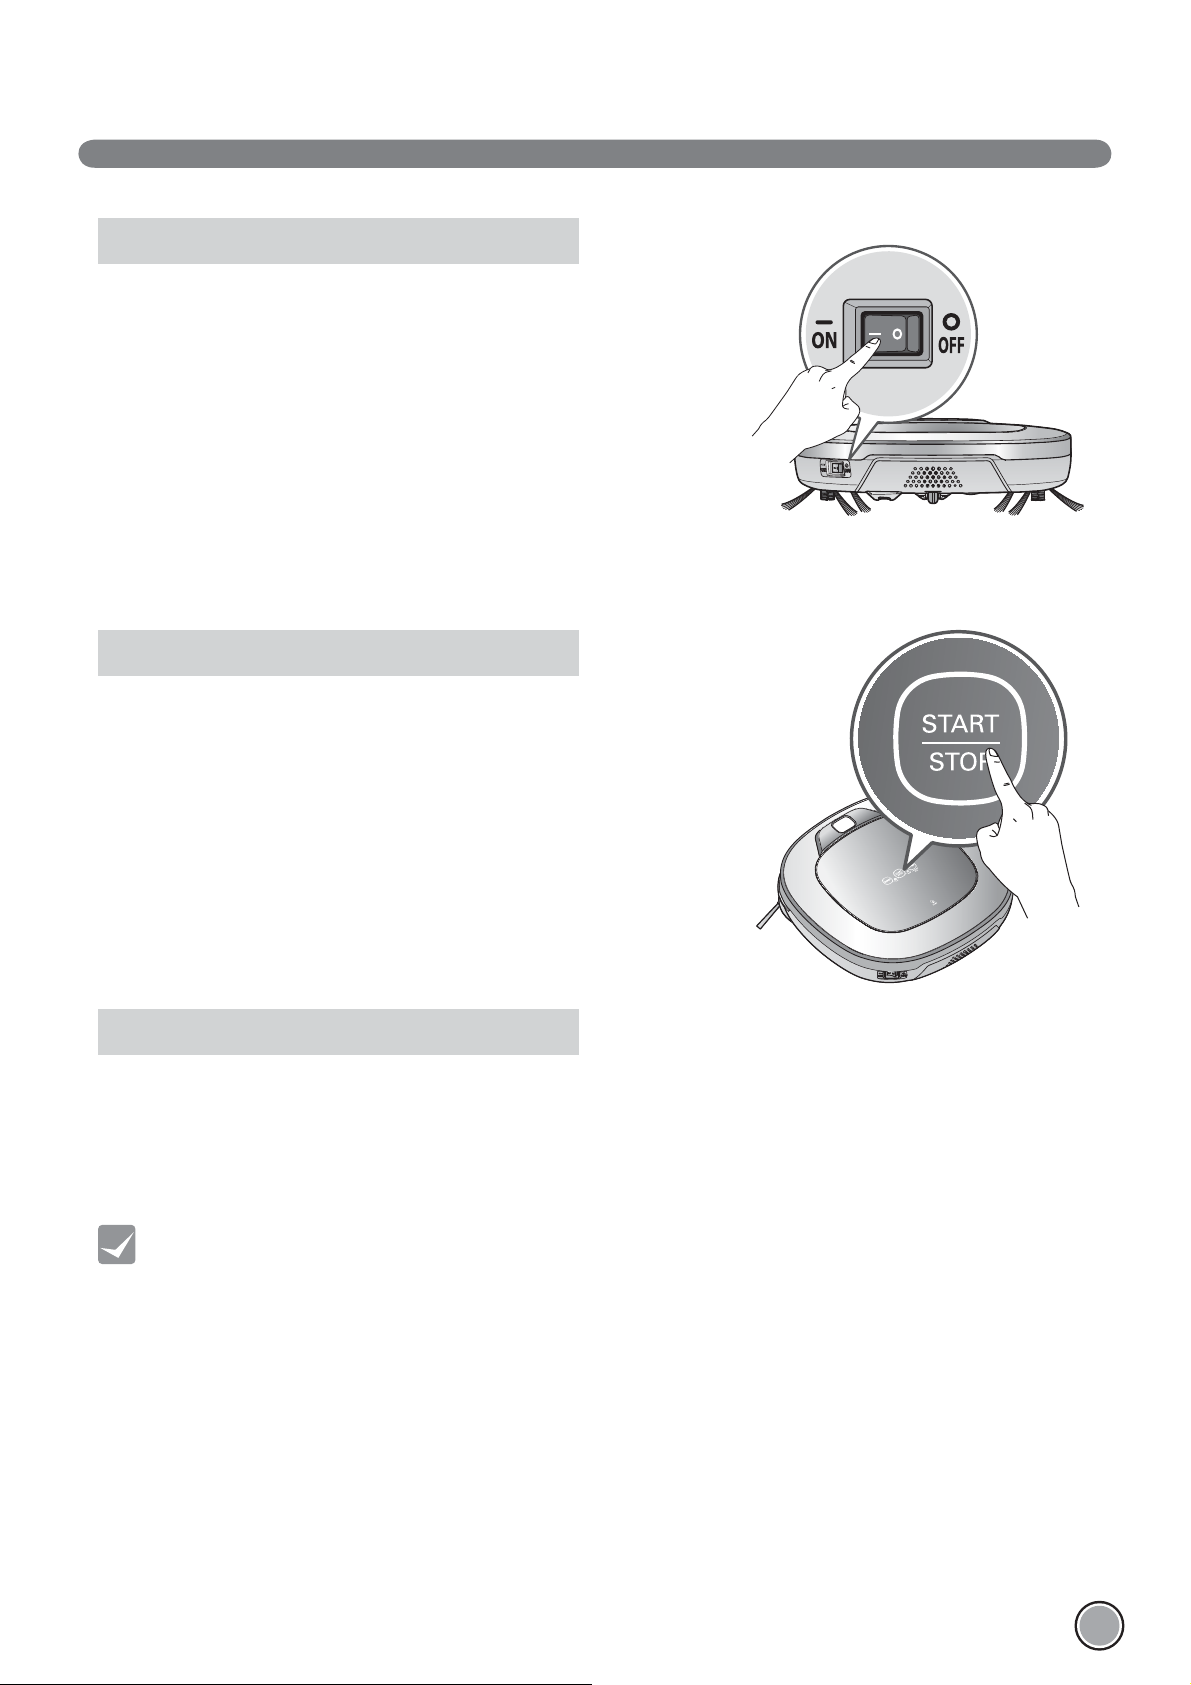
HOW TO TURN THE ROBOT CLEANER POWER SUPPLY ON & OFF
Turning on the main power supply
Make sure the Power Switch is on at the rear-left of the Robot Cleaner.
If the power is OFF, turn the switch ON.
※
When turning on the power switch, do not press or touch any button located
on the upper section of the Robot Cleaner. Button operations can be delayed.
※
Turn off the power switch if the Robot Cleaner is not used for a long period of
time in order to protect the battery. The Robotic Cleaner cannot charge if the
main switch is in the "OFF" position.
Turning on from Stand By power.
With the Standby power of the Robot Cleaner OFF, press 'START/STOP' button
for 1 second until a "Ting" sound is heard. In about 10 seconds, the power will
be on and a melody will sound.
※
If 10 minutes elapse without the Robot Cleaner having being given an active
command after being turned on, the power will automatically return to
Standby again.
Turning off the power supply
Press and hold the START/STOP button for two seconds while the
Robot Cleaner is turned on. A melody will sound when the power is turned off.
Tip
• If the power cannot be turned on, do the following.
- Turn the main power switch OFF, wait 5 seconds then ON again.
- Press the ‘START/STOP’ button after the main power switch has been turned on again.
- If the power is not turned on or if there is no display but only the “Ting” sound,
put the Robot Cleaner manually on to the home station as the battery may be flat.
15
Page 17
HOW TO START AND STOP CLEANING
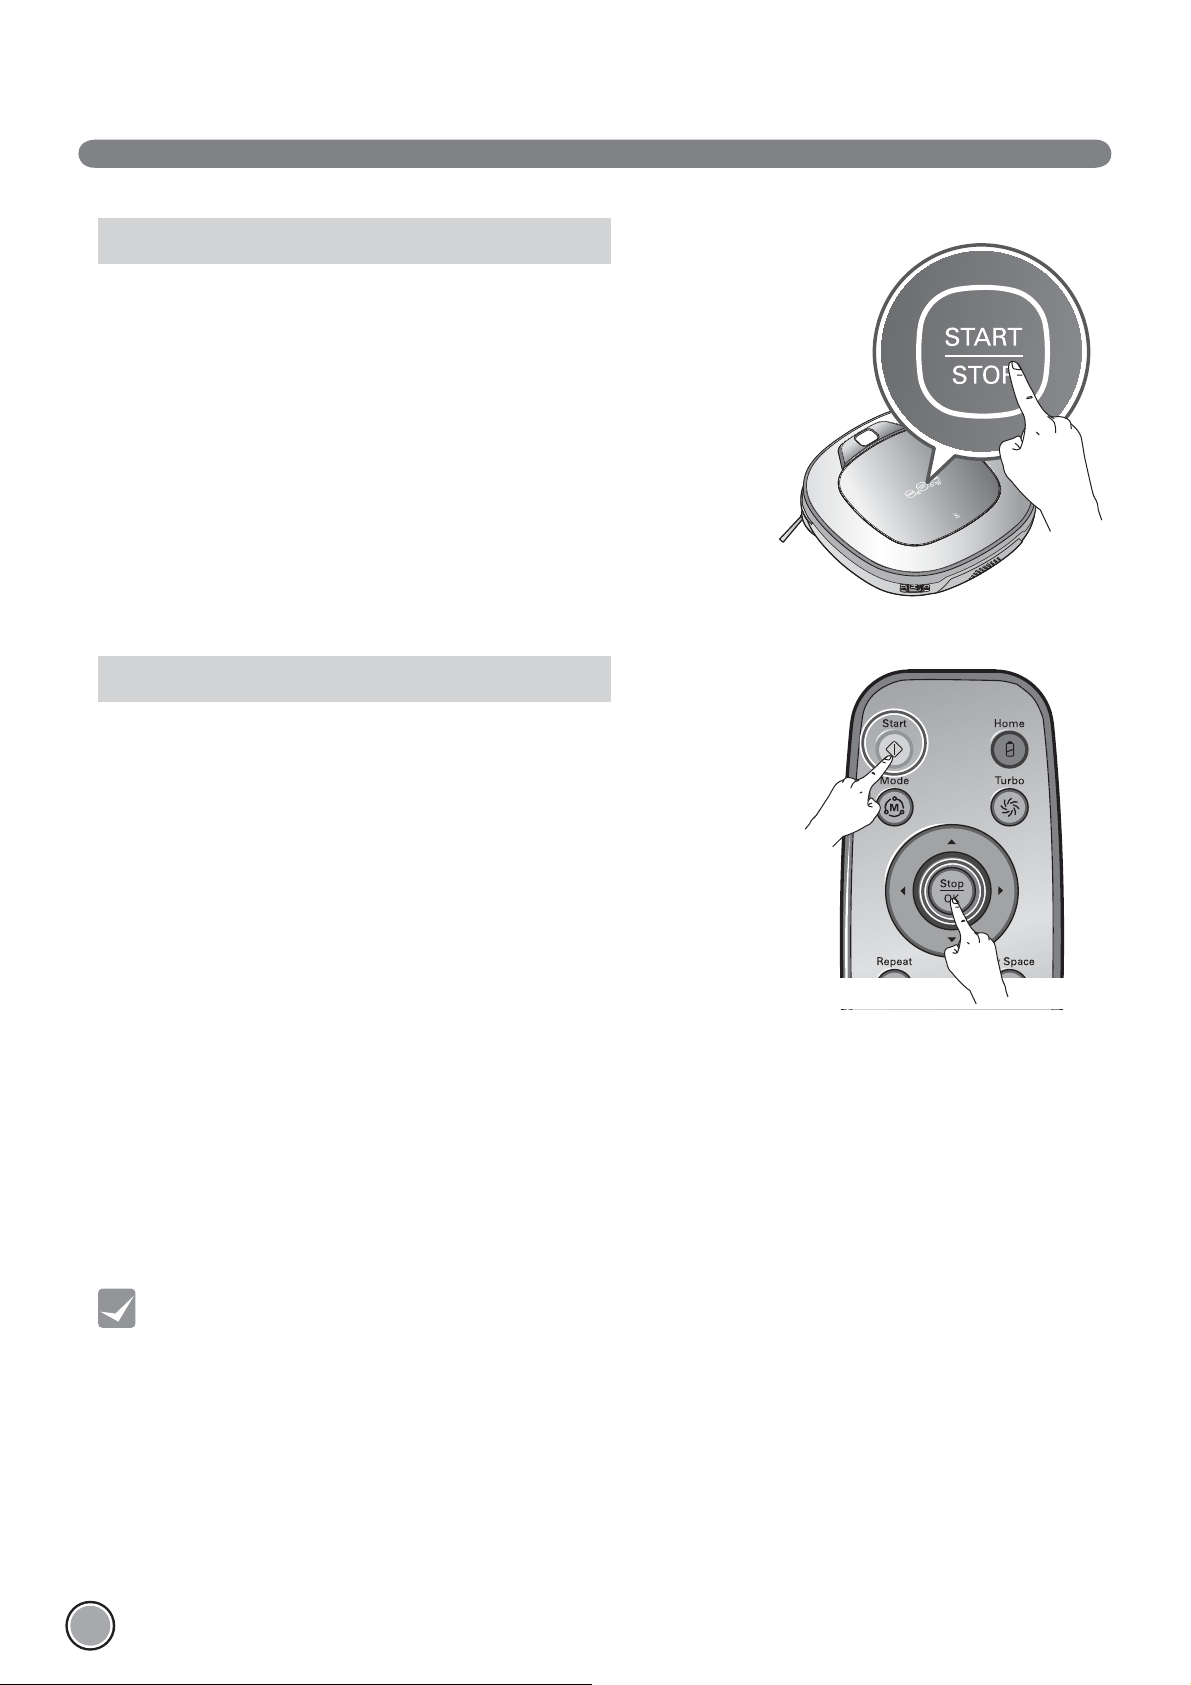
Using the buttons on the Robot Cleaner
After the Robot Cleaner main power switch is turned on, press the START/STOP
button to begin cleaning. A melody will sound and cleaning will begin.
Press the START/STOP button during the cleaning cycle to stop cleaning.
※
When the ‘START/STOP’ button is pressed while the power supply of the Robot
Cleaner is in Standby, the power will be turned on. Press the ‘START/STOP’ button
one more time to start cleaning.
Using the remote controller
After the Robot Cleaner is turned on from the Robotic Cleaner, press the 'Start'
button on the remote control. A melody will sound and cleaning will begin.
Press the 'Stop/OK' button during the cleaning cycle to stop cleaning.
※
The Robot Cleaner cannot be turned on from Standby, by using the remote
controller when the power of the Robot Cleaner is off. When the power is off,
press the ‘START/STOP’ button on the upper side of Robot Cleaner to turn the
power on and to allow the remote to be used.
※
During cleaning, collisions can happen when the sensor cannot detect objects because of their shape (Thin chairs and table legs,
furniture corner). When this happens, the internal impact detecting sensor will react by using a backward motion.
※
If the Robot Cleaner is set to start cleaning at a location away from the home station, put the Robot Cleaner on a ņ at ņ oor in
order to prevent a malfunction of the obstacle detecting sensor. In addition, start cleaning from a location where there are no
obstacles. For example, curtains or walls must be 30 from the Robot Cleaner.
16
Tip
For best results:
• Briefly scan the area to be cleaned for big and small objects that will cause difficulty for the Robot Cleaner.
• If cleaning is started when the Robot Cleaner is at the home station, the device can rapidly be returned to the
home station as the current home position has been accurately read.
• When the Mop plate(Selected models only (VR*.LVM)) is installed, to prevent a 2
contaminated mop, it will not go over door sills of 5 or higher.
nd
contamination from the
Page 18
HOW TO CHARGE THE BATTERY
Automatic charging
The Robot Cleaner returns to the home station
at the end of a cleaning cycle or when its battery is running low.
※
If 10 minutes elapse without the Robot Cleaner moving or
the battery is too low, the power will be automatically turned OFF.
※
Do NOT turn OFF the Main Power Switch as the battery will not be
recharged. If the machine is returned manually with the Main Power Switch
OFF, it announces an error message, "Main power switch on the back of the
Robot cleaner is turned off. Please turn the switch on."
※
In the event that the unit returns to the Home Station due to a low battery
during the cleaning, cleaning will be started, after recharging, from the nearest
place of the area which has not been cleaned before.
※
If Robot Cleaner is unable to dock to the home station on its Ņ rst attempt, it will try again until it docks successfully.
※
When Robot Cleaner has completed all areas that it can clean,
it will return to the home station even when the battery level is not low.
Manual charging
You can manually charge the battery prior to using the Robot Cleaner for the Ņ rst time or to charge the battery during cleaning.
Method 1. Attach the Robot Cleaner to the home station by
aligning to the front side of the home station. A melody
sound will be generated along with an audio message to
start charging.
※ If a voice message, "Main power switch on the back of
the Robot cleaner is turned off. Please turn the switch
on." is announced repeatedly, then turn on the Main
Power Switch.
Method 2. When the 'Home' button of the remote control or the
Robot Cleaner is pressed, charging will be prompted
by automatically generating a searching signal and
returning the Robot Cleaner to the home station.
※ If the Robot Cleaner did not start cleaning from the home station or if the Robot Cleaner is manually charged by pressing the
'Home' button, it may take slightly longer to Ņ nd the home station.
※
If the Robot Cleaner is within 10 of the front of the charging terminal while the power is turned on from Standby,
it will automatically be returned to the home station and charging will begin.
Tip
Take the following precautions when using the home station:
• If foreign material is caught on the charging terminal, charging may not be activated. Wipe the terminal from time
to time with a dry cloth after the power plug is disconnected.(p28)
• To prevent electric shock or damage to the home station,
do not touch the charging terminal with any metallic objects.
• To avoid fire or electric shock, never disassemble or modify the home station.
• Do not to place the Robot cleaner, the home station or power plug near a heating source.
17
Page 19

CLEANING MODES
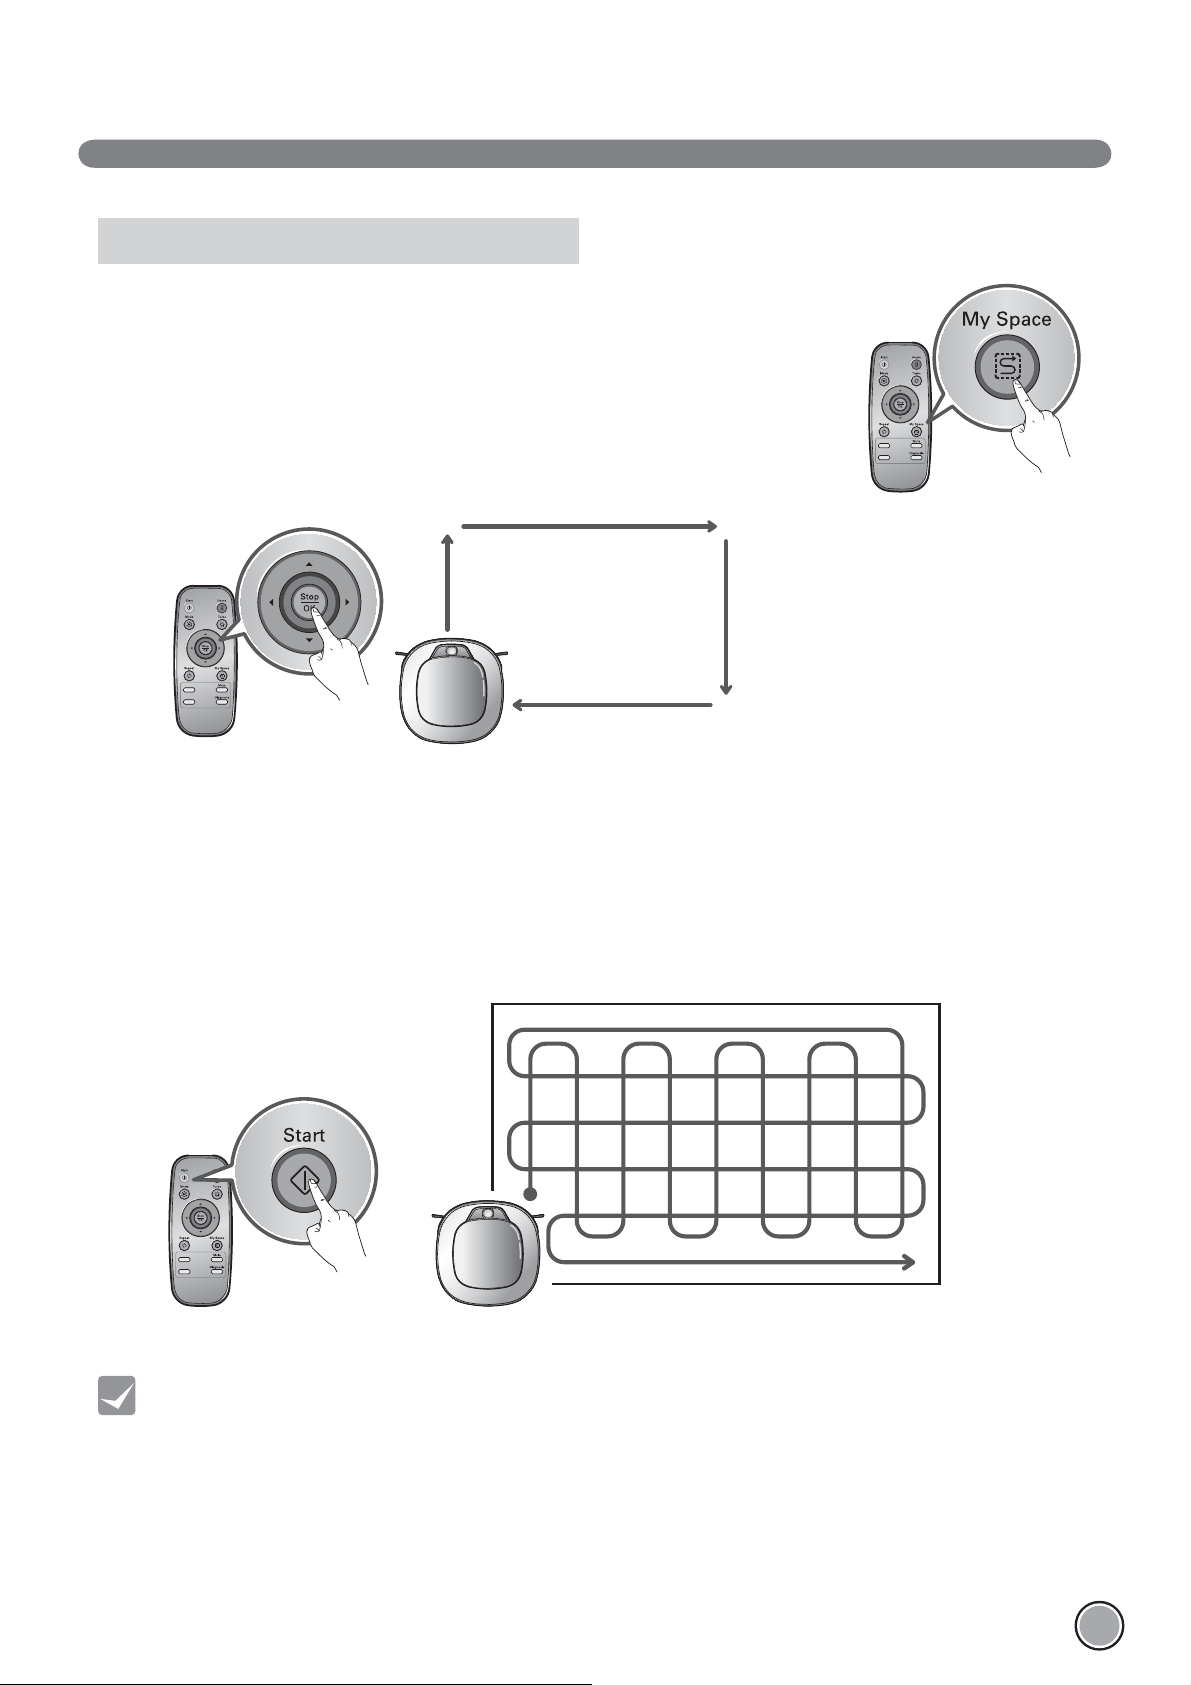
Zigzag Cleaning
In 'Zigzag' mode, Robot Cleaner repeats a zigzag operation to
clean each and every spot in the cleaning area.
If you need to quickly clean an area choose 'Zigzag' mode.
Press ‘Mode’ button on Remote Controller to select 'Zigzag'
mode and press 'Start' button.
※
Factory release default setting is 'Zigzag'.
Manual Cleaning
By pressing a direction key on the Remote Controller, you can move Robot Cleaner in a Manual mode.
Robot Cleaner will clean the area, moving forward/backward/left/right, according to the input of the direction key.
While in 'Manual' mode, the robot cleaner will run into obstacles placed behind it if the backward key on the remote remains held
down.
18
Page 20
CLEANING MODES
My Space Cleaning
Pressing 'My Space' on the Remote Controller will set the My Space cleaning mode with a voice
message. For cleaning of particular spaces, select this mode.
The 1st stage:
Use the Remote Controller to manually set the parrameters of each cleaning block.
※
This cleaning mode will be accepted when the distance of the start and end position is less
than 1 .
My Space
The 2nd stage:
Pressing the 'Start' button will then make the Robot Cleaner clean the manually outlined area by itself.
※
Upon failure to correctly outline a zone, a voice will announce, which says "Area does not meet the speciŅ ed conditions. Please
continue to make speciŅ ed area for cleaning process."
Use the Remote Controller to assign a zone, again.
※
When My Space cleaning is completed, the mode is switched to Auto Clean (ZigZag).
Tip
• While recharging, you cannot activate 'My Space clean' mode.
• To change the cleaning mode while the Robot Cleaner is in operation, press 'Stop/OK' button first then select a
cleaning mode. The cleaning will then start from the begining.
19
Page 21
AUXILIARY CLEANING MODES
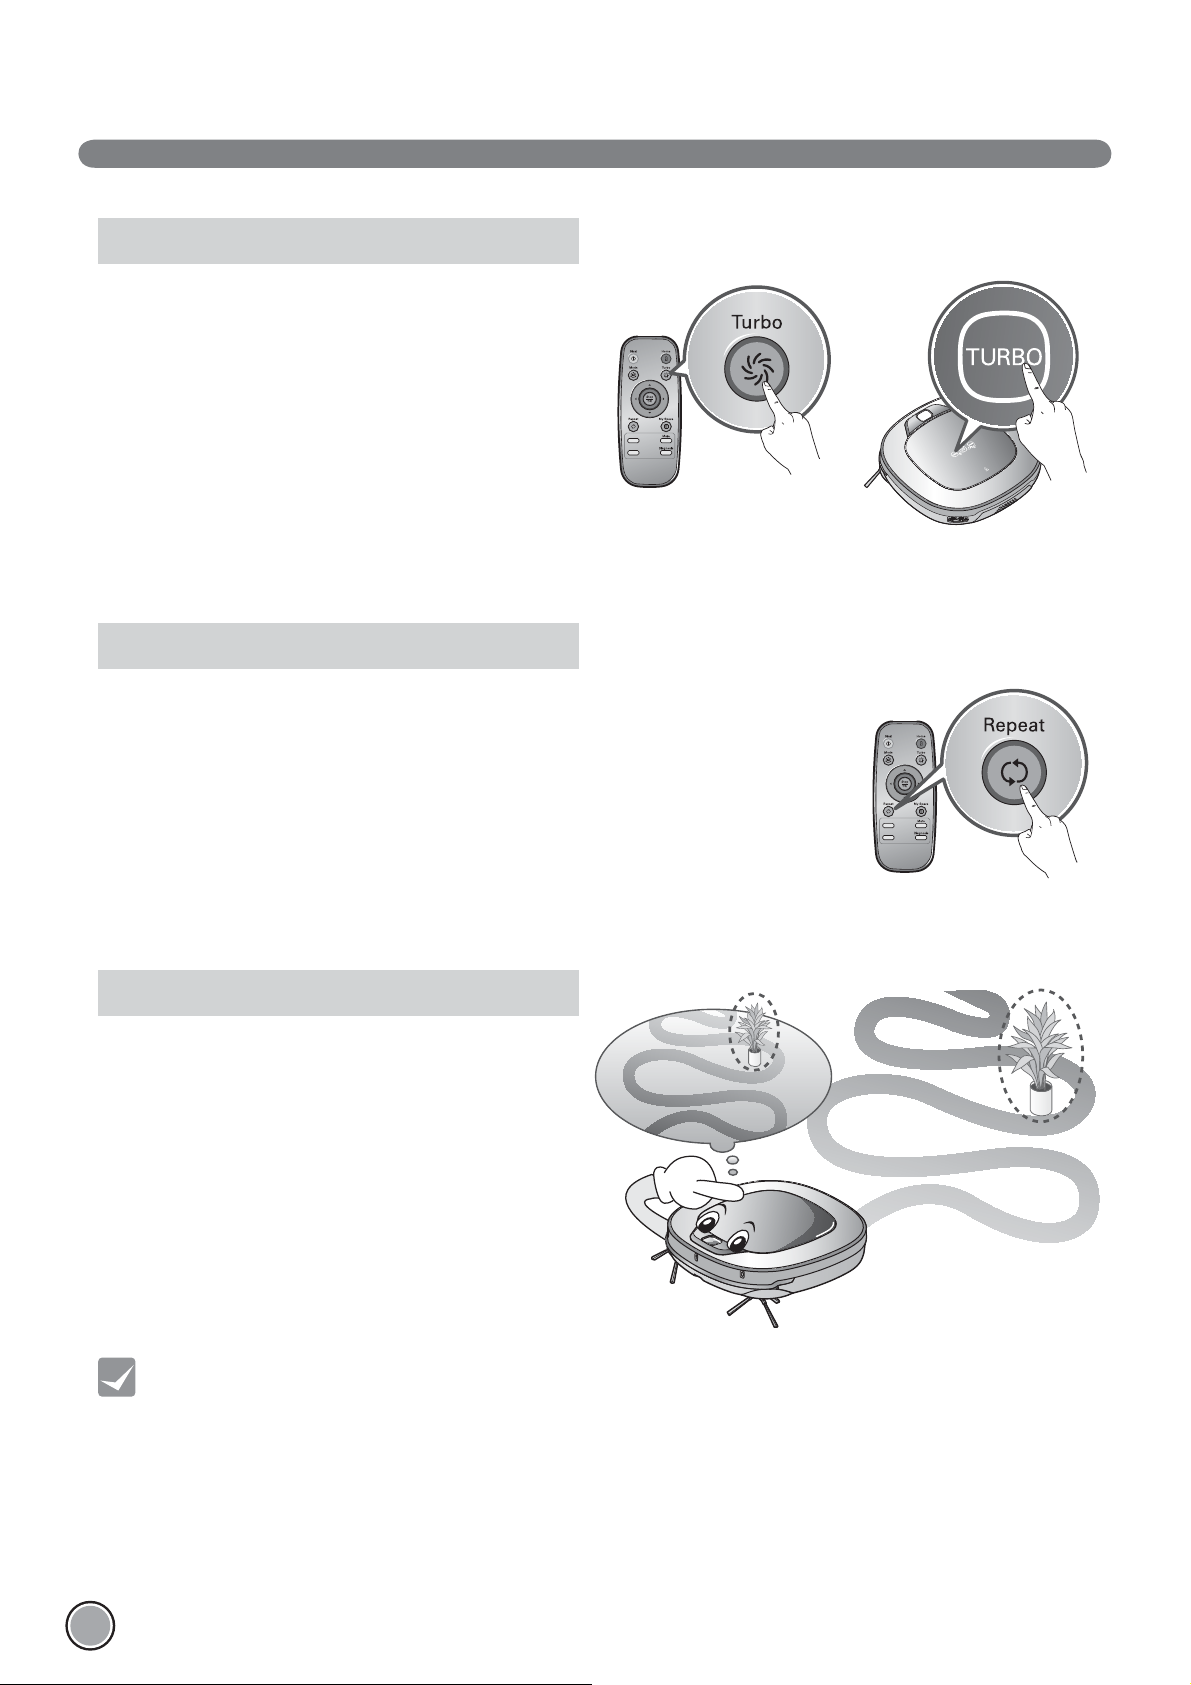
Turbo Mode
Pressing the 'Turbo' button on the Remote Controller or main
unit will activate 'Turbo' mode, with a voice message.
While in 'Turbo' mode, pressing the same button will cancel
'Turbo' mode, with a voice message.
In 'Turbo' mode, Robot Cleaner runs more intensely for a
powerful clean. Mode mode will reduce the battery duration.
Repeat Mode
Pressing 'Repeat' button on Remote Controller will activate 'Repeat' mode, with a voice
message. While in 'Repeat' mode, pressing the same button will cancel 'Repeat' mode, with
a voice message. In 'Repeat' mode, Robot Cleaner repeats the cleaning in progress until the
battery runs out without returning to the home station.
Learning Mode
The Robot Cleaner is capable of memorising the cleaning
environment through its Learning mode for an intelligent
cleaning operation.
※
'Learning Mode' is available only when the machine starts
cleaning from the Home Station.
20
Tip
• Precautions with Smart Operation
- This Learning mode enables memorizing locations with obstacles to help bypass them. Robot Cleaner
memorizes every aspect of the environment it was subjected to from when it started cleaning from the Home
Station to the moment it finishes its course.
- Robot Cleaner learns new conditions again when the location of Home Station has been changed.
- If the learning mode is accepted, a voice message will say "Environment has been studied by learning process."
Page 22
MOP CLEANING (Selected models only (VR*.LVM))
“Click!”
By attaching the ultra microŅ ber mop, you can effectively use
the Robot Cleaner to remove dust on hard ņ oor surfaces.
When the mop plate is attached, the Robot Cleaner will not
climb on to carpets or over thresholds, in order to prevent
transferring dirt from the mop.
Caution
Do not cover the bottom
camera sensor by mop.
For mop cleaning, mount the mop and mop plate to the Robot Cleaner according to the following instructions:
1. Attach the ultra microŅ ber mop to the Velcro of the
mop plate as shown in the Ņ gure.
2. Firmly slide the Mop Plate into the furrows
until you hear a 'click' sound.
※ Note that, if the Mop Plate is not secured correctly, it
may separate during the cleaning.
3. It is essential that the Ņ xing hooks on the Mop Plate
align correctly on to the Ņ xing grooves on the underside
of the cleaner.
Tip
• To avoid odors, wash any foreign material or dust off the mop after cleaning is completed.
• To avoid staining floors, do not use the ultra microfiber mop to clean
when dirt is contaminated with liquids such as coffee or ink.
• To avoid damage to carpets from the Velcro or dirt transfer from the mop,
do not attempt to clean the carpet while the mop plate or mop is attached.
• Keep the ultra microfiber mop dry. Do not use it on wet surfaces.
If there is moisture on the floor, it can interfere with the navigation and damage the unit.
• Smart Diagnosis feature is not available, when the Mop Plate is attached.
• Some models may not come with Microfibre Mop or Mop Plate.
Fixing hook
Fixing groove
“Click!”
21
Page 23
LOCATION SEARCH FUNCTION
The Robot Cleaner remembers its location while cleaning.
If the user moves the Robot Cleaner while it is operating, it will search for the location it was moved from
by using its navigational location search function before continuing to clean.
※
The navigating function will be activated after the Robot Cleaner adequately recognizes
the cleaning environment.
Change location
Manual Relocation.
1. With the power off, locate the Robot Cleaner near the
location where it was originally moved from.
※
The location search is more effective when the Robot
Cleaner is closer to the location where it was moved from.
※
If it is moved from its original cleaning position by more
than 1 , it becomes difŅ cult for the Robot Cleaner to
search for it's previous location.
1
1
2. Press the START/STOP button on the Robot Cleaner or 'Start' button on the remote controller.
Robot Cleaner will then start the location search function along with an audio guide.
※
When the location search is successfully completed, it will continue cleaning from where it was moved.
If the location search fails, it will start again from the beginning.
To Ņ nd exact location, please step
away from the Robot cleaner.
Location of incident
Location of incident
22
Tip
• If the power is turned off after the location search function is set, the location search function will be canceled.
• Location search will be more effective when the Robot Cleaner is closer to the location where it was moved from.
Page 24
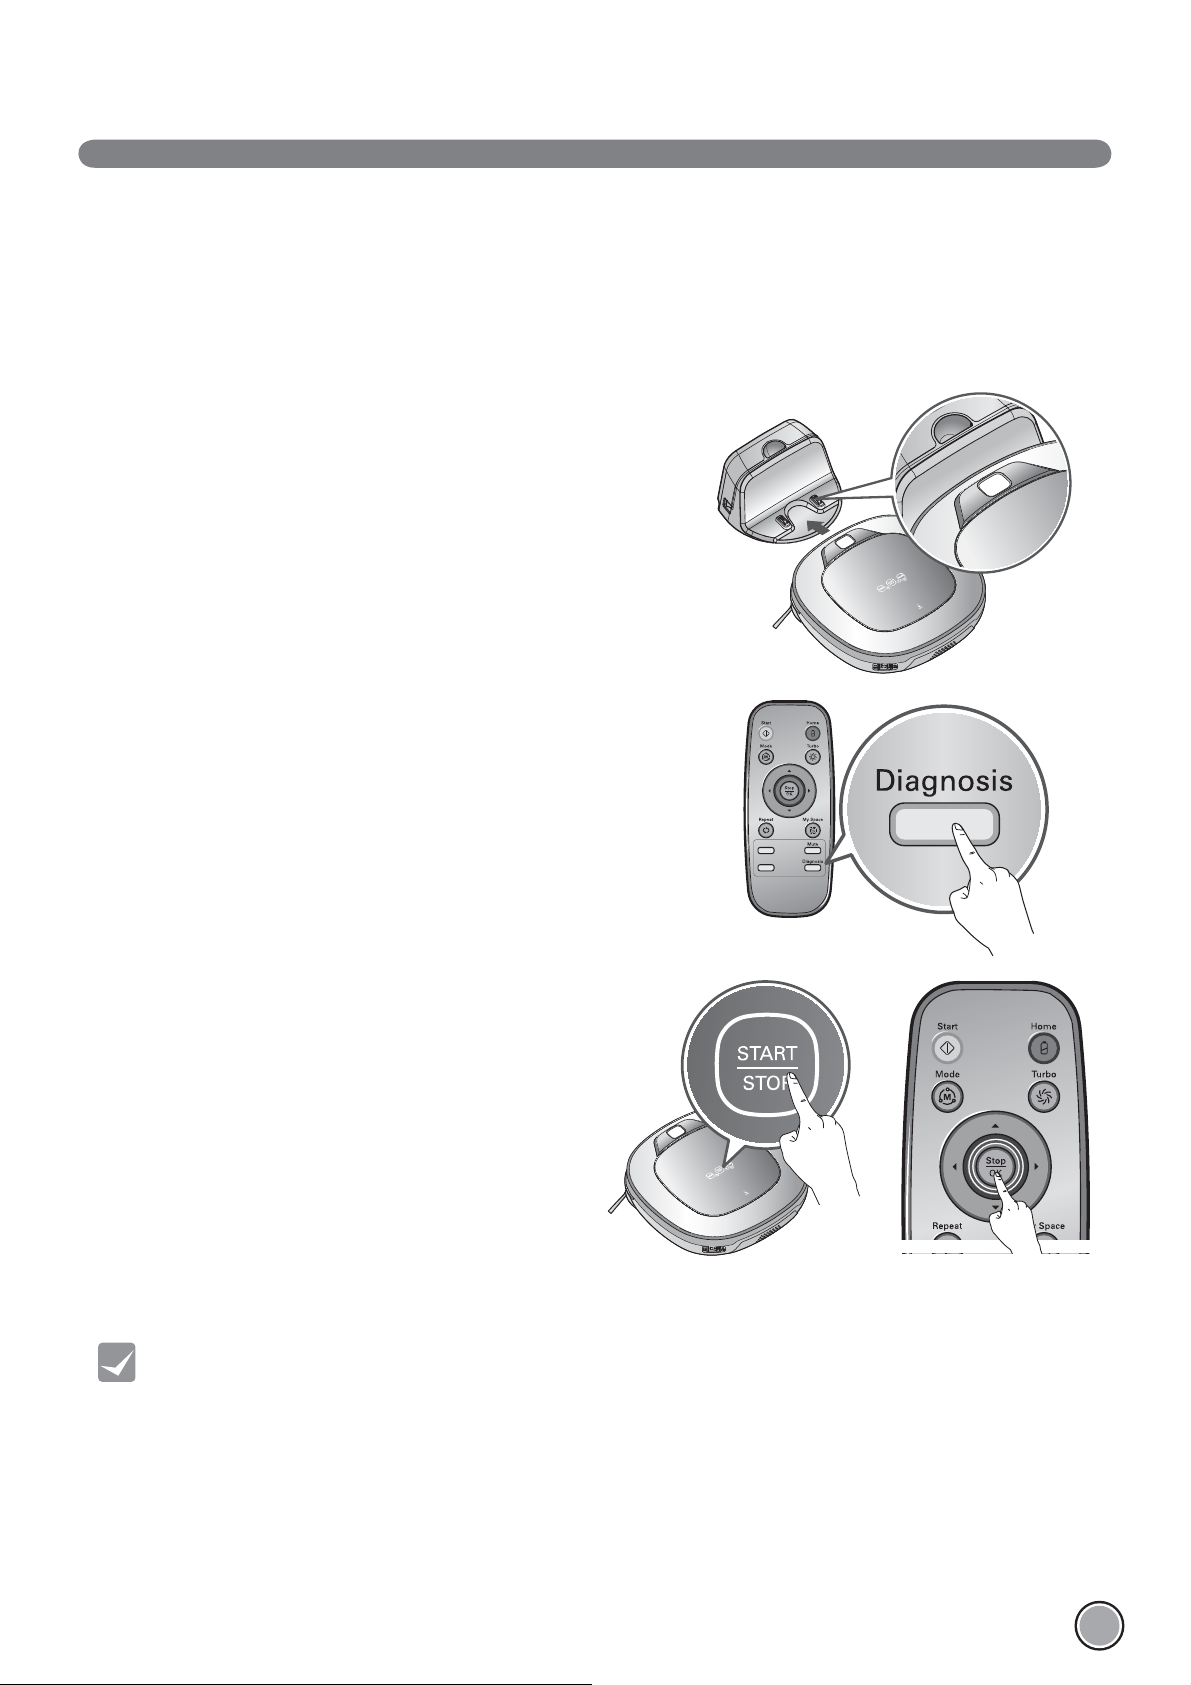
SMART DIAGNOSIS
Robot Cleaner uses this Smart Diagnosis feature to run a self-diagnosis.
If any irregularity is found from the diagnosis, please contact the local LG Electronics service center.
ٙ
During Smart Diagnosis, the Robot Cleaner will move about within a 50 EO radius. So, make sure no objects are in the
way within a 1 O radius around the Home Station, before starting Smart Diagnosis.
1. Smart Diagnosis will operate when the main power switch of the Robot
cleaner and the Home station are turned on, and the unit docked on
the Home station.
ٙ
Smart Diagnosis is only possible when the Robot Cleaner
is attached to the Home Station.
2. Press 'Diagnosis' button on the Remote Controller, then the process
will start with a voice message which says "Robot cleaner smart
diagnosis will be started. Please step away and clear around 1 meter
around the home station."
ٙ
If the Mop Plate(Selected models only (VR*.LVM))
is attached, the process will not be activated.
3. When the Smart Diagnosis has successfully Ņ nished, Robot
Cleaner will return back to the Home Station and inform the
result through a voice message. After the voice message,
pressing the 'Home' button on the Remote Controller or
main unit will allow the voice message to be repeated. To
terminate the diagnosing process, press the 'Stop/OK'
button on the Remote Controller or main unit.
ٙ
After the Smart Diagnosis voice message, the Robot
Cleaner will start recharging after 1minute.
ٙ
If an error is detected with any of the Sensors whilst
in Smart Diagnosis, a voice message will announce,
and the unit will not return to the home station.
Tip
• Be careful not to touch the Robot Cleaner or disturb its operation before Smart Diagnosis is complete.
If it is accidently interrupted, turn the main power switch OFF then ON again to resume the diagnosis.
• Smart Diagnosis will not be activated in each of the following cases.
In each case, check the problem and try again.
- Robot Cleaner is detached from Home Station
- Battery level is insufficient
- No Dust Bin Filter is fitted.
- Mop Plate(Selected models only (VR*.LVM)) is attached
23
Page 25
SMART DIAGNOSIS
If a voice message is announced after Smart Diagnosis, refer to the following table to take proper actions.
Voice message Measures (for refer ence)
Robot Cleaner smart diagnosis will be started. Please step
away and clear around 1 meter around the home station.
Smart diagnosis can start when it is being charged. Please dock
Robot Cleaner to the home station to charge.
No defect found during diagnosis.
Diagnosis mode cannot be operated due to a low battery.
Please try again after the battery is charged.
Please check if the dust bin is installed with the Ņ lter. Open the Dust Bin Cover and examine the bin.
Charging cannot be done due to a problem in infrared sensor. Run Smart Diagnosis again and, if the same message is
Charging cannot be done due to a problem in ultrasonic sensor. Run Smart Diagnosis again and, if the same message is
Charging cannot be done due to a problem in the cliff detection
sensors on the bottom. Please clean the sensors.
Please wipe the obstacle detecting sensor window on the left
and right side of the Robot Cleaner.
A problem has been found on the Gyro Sensor. Run Smart Diagnosis again and, if the same message is
Please check for dirt on the left wheel. Check for foreign materials on the left wheel.
Please check for dirt on the right wheel. Check for foreign materials on the right wheel.
A problem has been found on the left wheel sensor. Run Smart Diagnosis again and, if the same message is
A problem has been found on the right wheel sensor. Run Smart Diagnosis again and, if the same message is
Please check the brushes for obstructions. Check for any foreign material stuck in the Brush.
A problem has been found in the suction motor. Run Smart Diagnosis again and, if the same message is
A problem has been found in the acceleration sensor. Run Smart Diagnosis again and, if the same message is
In order to listen to the smart diagnosis result again, please
press the charging button. To stop, please press the stop
button.
Please try smart diagnosis again after turning the main power
switch off and on from the back of Robot Cleaner. If the
problem continues, please contact LG Electronics customer
care.
Smart diagnosis mode will be turned off.
Smart Diagnosis mode cannot be operated with mop plate
being attached. Please try again after removing it.
Smart diagnosis has failed to operate. Please try it again after
turning off and on the main power switch on the back of the
Robot Cleaner.
Clear any object within a 1 m radius around Home Station,
and stay back until the diagnosis is complete.
Move Robot cleaner to the Home Station to recharge it.
Try the Smart Diagnosis again after recharging the battery.
announced, contact an LG Electronics service center.
announced, contact an LG Electronics service center.
Clean the three Cliff Sensors on the bottom at the front of
the unit.
Clean the lens of the Obstacle Sensors on both the left and
right hand sides.
announced, contact an LG Electronics service center.
announced, contact an LG Electronics service center.
announced, contact an LG Electronics service center.
announced, contact an LG Electronics service center.
announced, contact an LG Electronics service center.
If you need to repeat the diagnosis result, press the 'Home'
button, or press 'Stop/OK' button to Ņ nish the diagnosis.
Run Smart Diagnosis again after removing the Mop Plate.
Turn the main power switch OFF and then ON again to
resume the diagnosis. Do NOT touch the robot or disturb its
operation until the diagnosis is complete.
24
Page 26
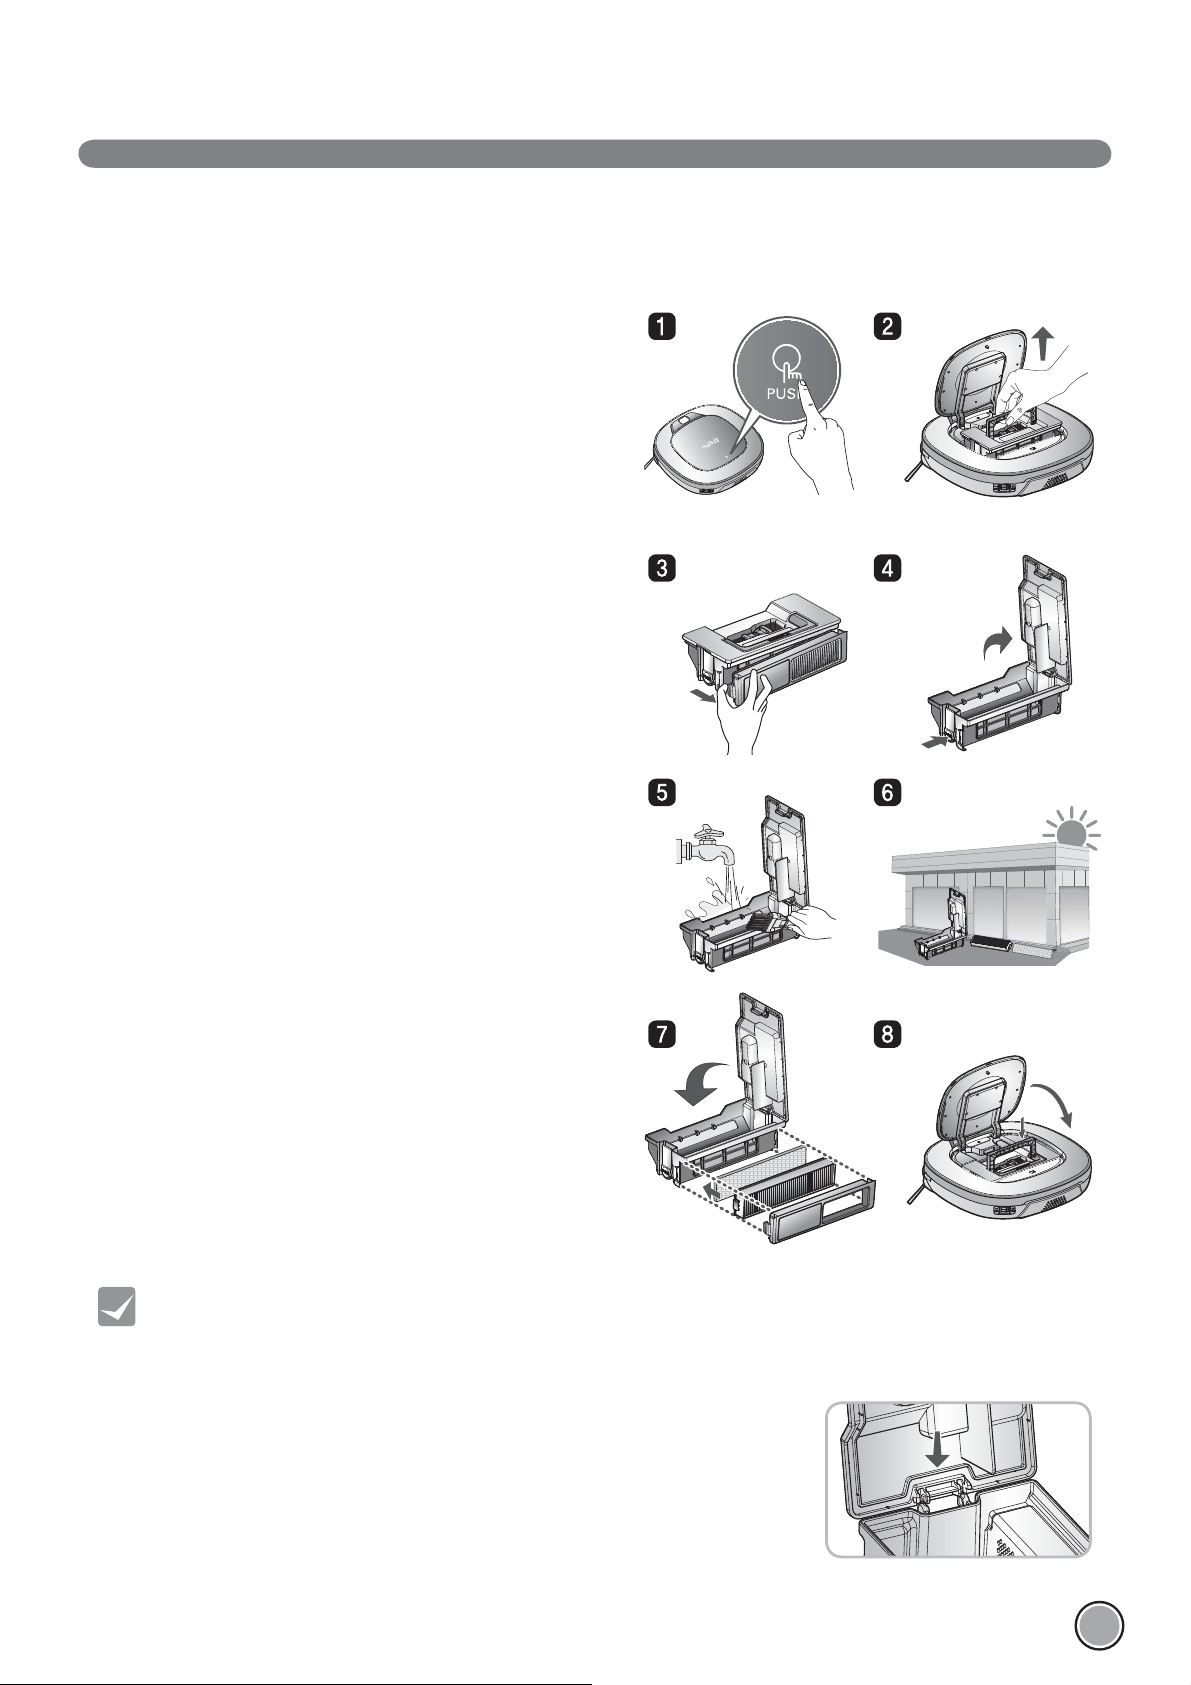
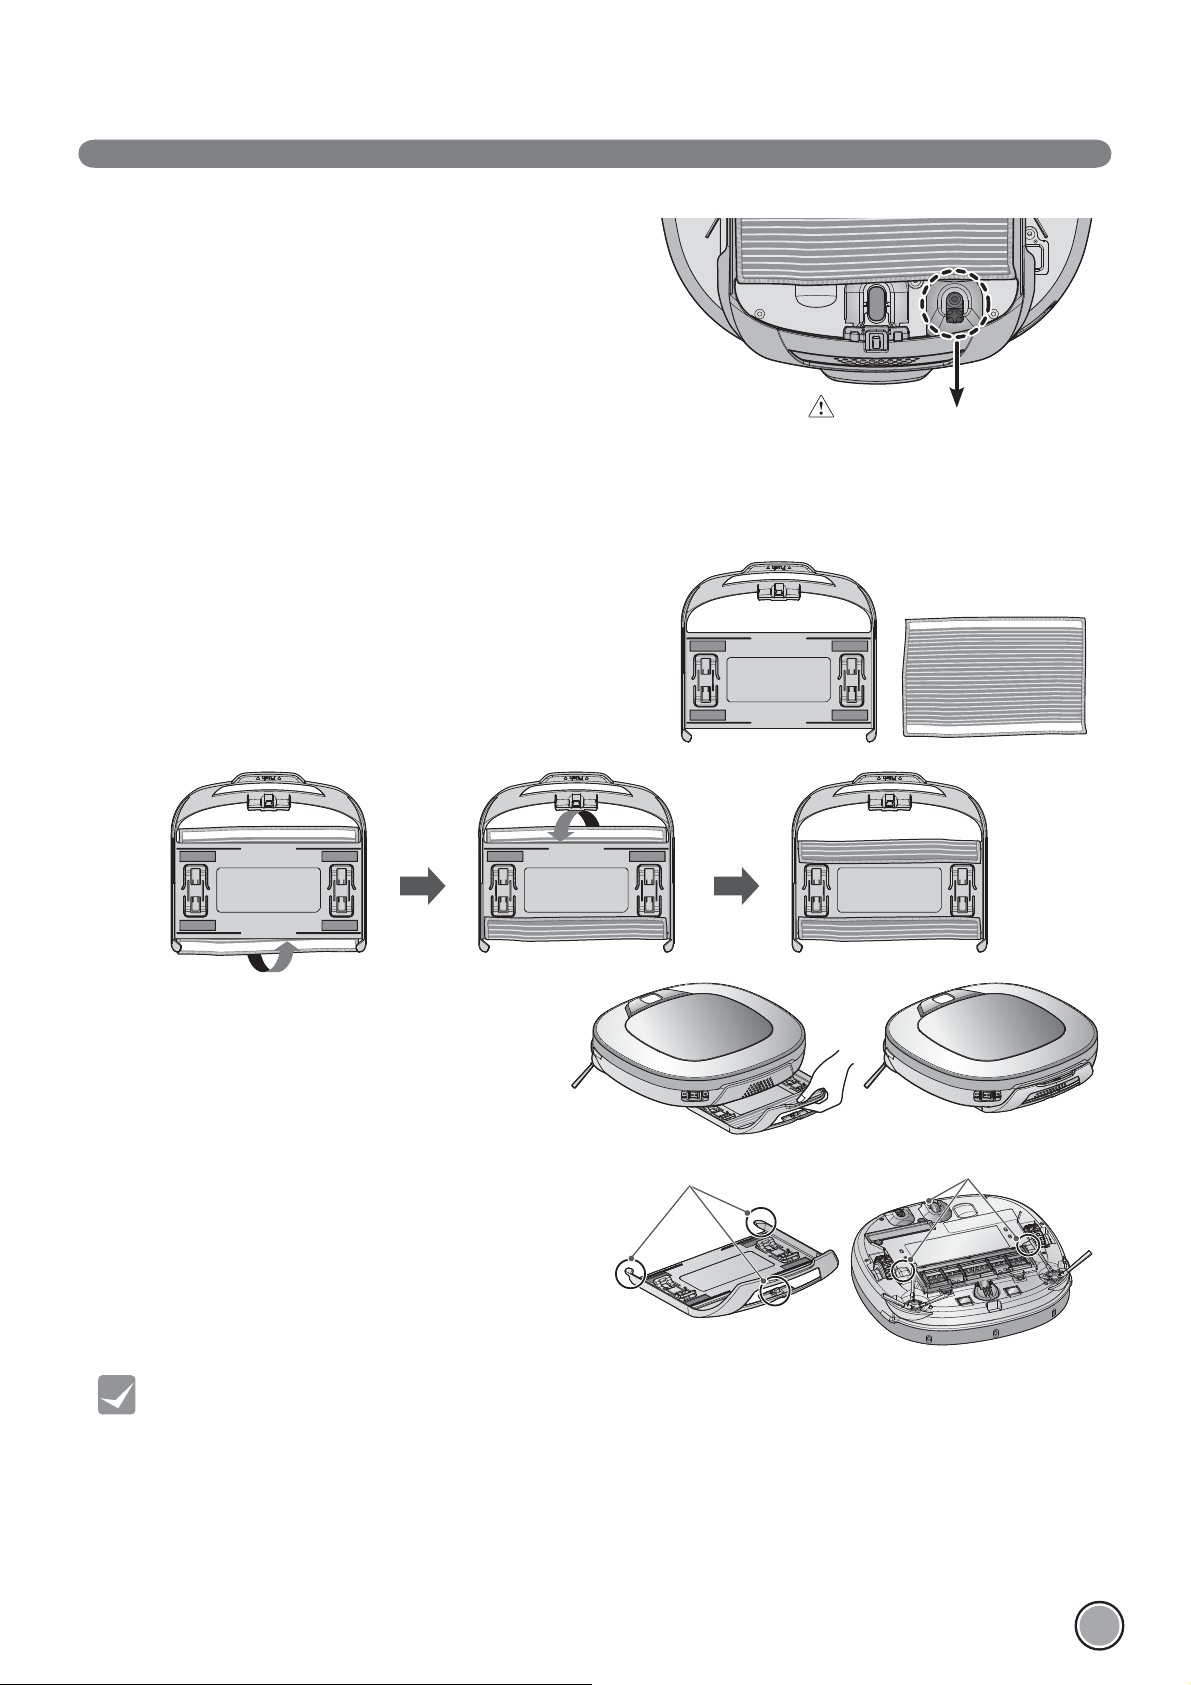
CLEANING THE DUST BIN
If the dust bin is full, suction power can be reduced. Clean the dust bin before or after each cleaning session.
Clean the dust bin using the following sequence:
1. Open the dust bin compartment cover by pressing the
PUSH button on the Robot Cleaner.
2. Grab the handle of the dust bin and pull it upward.
3. Pull the hook on the left of Filter Cover on the rear of
Dust Bin to separate the Ņ lter and the sponge.
※ Note that separating the Ņ lter may result in dust
dropping.
※ Refer to p.26 when cleaning the Dust Bin Filter.
4. Lift the dust bin lid upward while pressing the separation
button on the dust bin.
5. Empty the dust bin and clean it with a cleaning brush or
under running water.
6. After cleaning with water, completely dry the dust bin in
a well-ventilated area out of the direct sunlight.
7. When reassembling or Ņ tting the cleaned Dust Bin,
close the lid and put in the Sponge and HEPA Filter.
※ Refer to p.26 for detailed assembly guides.
8. Put the dust bin into the Robot Cleaner and close the
dust bin compartment cover.
Tip
• Operating the unit without Filters fitted to the dust bin can cause a motor malfunction not covered by warranty.
• After cleaning the Dust Bin, make sure to assemble the filter and fit it to the Dust Bin.
If you initiate cleaning, with no filters fitted to the dust bin or Filter Cover not assembled, a voice message will be
announced which says "Please check if the dust bin is installed with the filter."
• Always ensure that the dust bin lid is refitted correctly after cleaning the
dust bin so that it closes easily and accurately.
25
Page 27

CLEANING THE DUST BIN FILTER
The Dust Bin Filter consists of a HEPA Filter and Sponge Filter.
Clean both the HEPA and Sponge Ņ lters as per the following sequence.
1. Pull the hook on the left of the HEPA Filter module on the
rear side of Dust Bin to separate the HEPA Filter and the
sponge.
2. Thoroughly clean out the Ņ ne dust particles on the HEPA Filter,
with a vacuum cleaner or cleaning brush.
※
Do NOT wash the HEPA Filter with water.
Its suction power will be reduced.
3. Use a cleaning brush to clean the Sponge Filter.
If using water to clean it, allow it to dry completely
in the shade before reŅ tting.
4. Assemble the HEPA and Sponge Ņ lters back onto
the Filter housing as per the following sequence.
※
Fit the rectangular locator on the HEPA Filter into the
locating slot of the Ņ lter body.
※
Be careful not to incorrectly assemble HEPA and Sponge
Filter onto the Filter housing.
26
Tip
• To preserve the performance of the Robot Cleaner, clean the HEPA Filter at least once a week,
with a brush or vacuum cleaner.
• The HEPA and sponge filters must be fitted to the filter housing before refitting the filter to the dust bin.
Operating the Robot cleaner without the HEPA and sponge filters will cause the suction motor to malfunction.
Page 28

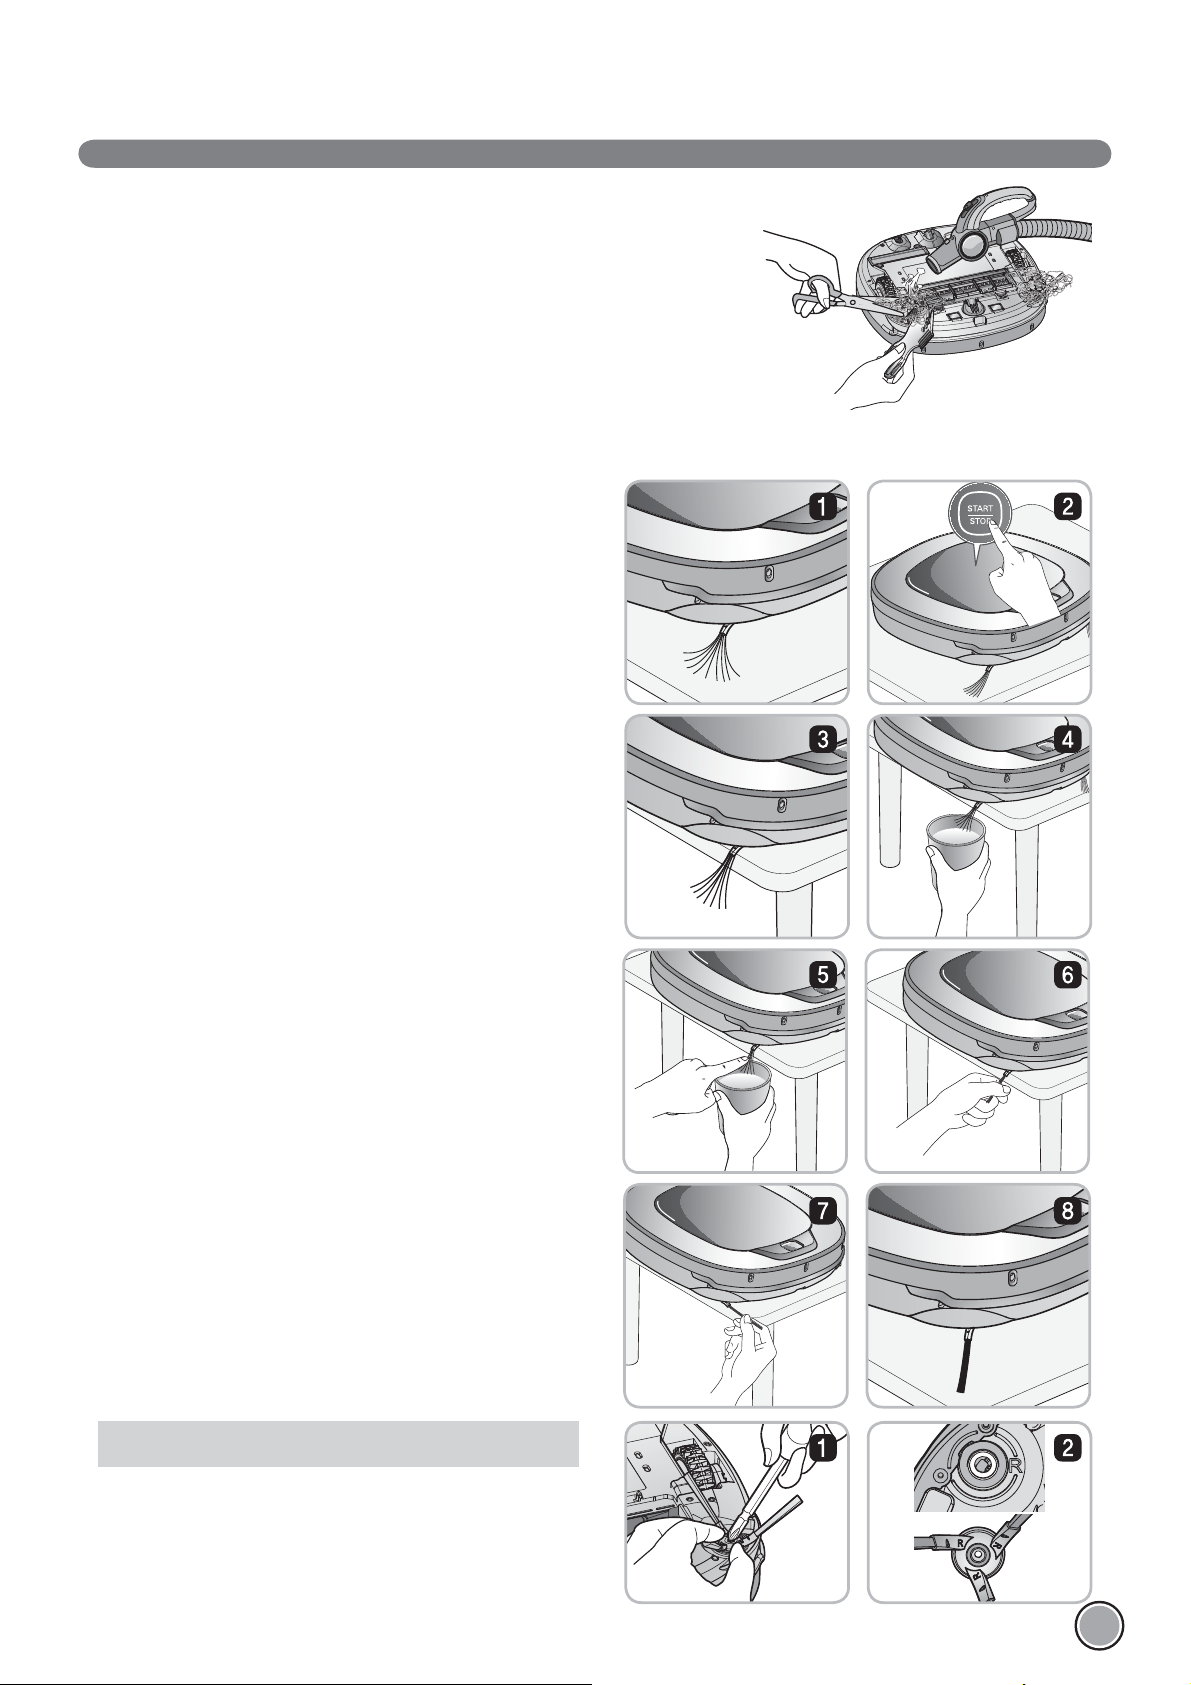
CLEANING THE BRUSH
The rotating Brush, located on the bottom of Robot Cleaner, helps collect the dust. Clean the Brush as per the following sequence.
※
Before turning over the main unit, lay a soft cloth on the ń oor and remove the Dust Bin.
Otherwise, the main unit can get scratched and dust will fall from Dust Bin.
Turn the Main Power Switch OFF
before starting the clean.
Put the Robot Cleaner upside down
on a soft cloth.
Push the Brush all the way into
the yellow protrusion.
After checking for foreign materials,
press down the Fixing Hook and pull it
up to separate the brush Cover.
While pushing the Brush, lift the
white protrusion part up to separate
it from the main unit.
By using the cleaning tool, clear
hairs and other debris and foreign
materials on the Brush and from the
2 smaller jockey wheels.
Carefully clean the Brush with a
vacuum cleaner or scissors.
Fit the Fixing Hook (rectangular
shape) on the side of the Brush into
the slots, with the colors matching.
While pushing the Brush to the
arrow direction, Ņ t the Fixing Hook
(rectangular shape) on the opposite
side into the slot.
Press down and close the Cover until
a 'crack' sound is heard from both
sides of Fixing Hook.
※
Be careful not to trap the side
brush bristles under the cover
when closing it.
27
Page 29
CLEANING THE SENSORS/CHARGING TERMINALS
There are sensors on the Robot Cleaner that detect obstacles, stairways and the
home station for charging the battery. In order to maintain the performance of the
Robot Cleaner, regularly clean the sensors and charging terminals as follows:
1. Turn off the power switch on the rear side of the Robot Cleaner. Injury can be
caused by the activation of the Robot Cleaner if the main power is not turned off.
2. Lay a smooth cloth on the ņ oor, turn over the Robot Cleaner and put it on the cloth.
※
Please make sure to remove the dust bin before rotating the main body.
Otherwise, the dust in the dust bin may fall out.
3. Use a smooth cloth or cleaning brush to wipe the dust off each of the 3 cliff
sensors, camera sensors and ultrasonic sensors and the charging terminal as described below.
Upper camera
sensor
Ultrasonic sensors
Obstacle detecting
sensor window Detecting
sensors of home station
& Receiving sensors of
remote controller
Cliff detection
sensors
Charging terminals
Lower camera sensor
(Optional)
28
Tip
Charging terminals
Lens
• Do not clean the Robot Cleaner by directly spraying it with water, thinners, solvents, benzene, or any other liquids.
• Call the service center if the sensor or charging terminal is damaged.
Sensor and terminal damage can cause the product to malfunction.
• To clean the sensor/charging terminals, use the cleaning brush.
• Some models may not have a Camera Sensor, on the bottom.
Page 30
CLEANING THE SIDE BRUSH
Foreign objects/materials such as hair can easily adhere to the side brush.
Remove such materials at least once a week.
If excessive amounts of foreign materials are stuck to the brush,
there is the risk of damage to the brushes.
If the ņ oor is rough or frequently cleaned, the side brushes may bend or become damaged.
In this case, use the following method to straighten the side brush.
1. The following procedure is helpful in restoring deformed
brushes.
2. Turn off the power by switching the main switch off on the
rear off the unit.
3. Place the Robot Cleaner at the end of a table to make
cleaning the side brush easier. Make sure that the Robot
Cleaner is not in danger of falling.
4. Soak the side brush in warm to hot water.
5. Press down on the side brush for about ten seconds so that
it is completely submerged in the water.
6. Slowly wipe the side brush by sliding it through your hand.
7. Rotate the side brush and repeat steps 4-6 for each section
of the brush.
8. Use the side brush only after it has completely dried.
Side Brush management
1. Remove the screws by using a suitable screw driver and
separate the Side Brush from the main unit.
2. Remove any hair after the separation.
3. Assemble the Side Brush by replacing it onto the bottom of
the Robot Cleaner, with the 'R' and 'L' marking of the Brush
matching the counterparts on Robot Cleaner.
29
Page 31

CLEANING THE ULTRA MICROFIBER MOP (Selected models only (VR*.LVM))
To avoid odors, dirt and dust should be washed off the mop after it is used for cleaning.
Follow these directions to wash the ultra microŅ ber mop:
1. Separate the ultra microŅ ber mop from the mop plate.
210
2. Carefully clean it with warm water.
3. Use the Mop after completely drying it in direct sunlight.
※
If the Mop is used in a damp or wet state,
it will cause the Robot Cleaner to malfunction.
Tip
• To avoid product malfunction, only use the ultra microfiber mop provided with the Robot Cleaner.
• Additional microfiber mops can be purchased by visiting a nearby LG Electronics service center.
• Some models may not come with Microfibre Mop or Mop Plate.
30
Page 32

TROUBLESHOOTING
Upon a voice message,
"The wheels are not touching the ń oor. Please move Robot cleaner onto ń at ń oor."
A warning message will be given if a wheel does not contact the ņ oor surface for any reason.
• Is a wheel trapped in the front door, balcony, stairway, etc?
Move the Robot Cleaner on to the ņ at ņ oor.
Upon a voice message, "Please remove foreign material on the left/right wheel."
• Is any foreign material wound around the wheel?
Turn off the main power switch on the rear side of the Robot cleaner.
Then lay a soft cloth on the ņ oor, turn over the Robot Cleaner, and put it on the cloth.
Remove foreign material after observing the wheel.
※ Please make sure to remove the dust bin before turning over the main body.
Otherwise, the dust in the dust bin may fall out.
Upon a voice message,
"Robot cleaner cannot continue cleaning. Please check the area around Robot Cleaner."
A warning message will be given if Robot Cleaner cannot go on cleaning due to any unfavourable condition.
• Is the Robot Cleaner stuck?
After removing it from the obstacle, place the Robot Cleaner on ņ at ņ oor.
31
Page 33

TROUBLESHOOTING
Upon a voice message, "Please check if the dust bin is installed with the Ń lter."
A warning message will be given if there is no Dust Bin or Filter housing Ņ tted.
• Is the Dust Bin Ņ tted to the Robot Cleaner?
Open the Dust Bin compartment cover and check to ensure the Dust Bin is in place.
Do NOT leave the Dust Bin Cover open.
• Make sure the Filter housing is assembled onto the Dust Bin.
Upon a voice message,
"Battery is low. Please move Robot cleaner onto the home station to charge."
When the remaining amount of battery power is almost nil, the voice, “Battery is low”, is generated.
• Initiate battery charging of the Robot Cleaner by moving it to the home station.
When the Robot Cleaner is attached to the docking station successfully, it will start the recharging with the recharging start
melody.
32
Page 34

TROUBLESHOOTING
Upon a voice message, "Please remove foreign material from the brushes on the bottom."
A warning message will be given if foreign materials restrict the Brush's rotation.
Turn off the main power switch on the rear of the Robot Cleaner.
Lay a soft cloth on the ņ oor and put the Robot Cleaner upside down on it.
※
Before turning over the main unit, remove the Dust Bin. Otherwise, it will cause dust to fall from Dust Bin.
• The brush is making a loud, abnormal sound.
ConŅ rm the correct assembly of the brush by checking the separation groove of the brush
Remove the lower rotating brush from the Robot Cleaner and remove any foreign material from the brush.
• The lower rotating brush or side brush is stuck.
Remove any foreign materials such as cables, thread of hair caught in the side brush or the lower rotating brush.
※
For a more detailed description of this process, refer to the instructions on page 27, 29.
33
Page 35

BEFORE YOU CALL FOR SERVICE
ConŅ rm before reporting the failure of Robot Cleaner.
Problem Solutions (Reference page)
The power supply cannot
be turned on.
The power supply automatically
turns off.
The Robot Cleaner will not charge. Check whether the main power switch is turned on.
Suction power becomes weak. Check whether there is foreign material blocking the suction port. (Page 27)
Noise becomes louder. ConŅ rm that the dust bin has been mounted properly.
The Robot Cleaner will not activate. ConŅ rm that the power switch is turned on. (Page 15)
The lower brush does not rotate. Clean the brush. (Page 27)
Check that the power switch is turned on. (Page 15)
This is not a failure. Robot Cleaner has its own power saving function.
If it is not used for ten minutes after the power supply is turned on,
the power will automatically turn off. (Page 17)
Remove objects around the home station. (Page 15)
ConŅ rm that the power supply is connected to the home station. (Page 14)
Wipe the charging terminals with a dry cloth.
Empty the dust bin. (Page 25)
Clean the dust bin Ņ lter. (Page 26)
ConŅ rm that the dust bin Ņ lter has been mounted properly. (Page 26)
Check whether foreign material is caught in the brush. (Page 27)
ConŅ rm that the battery has been charged. (Page 17)
ConŅ rm that the brush has been mounted properly. (Page 27)
Movements or travel path
are abnormal.
The Robot Cleaner cannot be
activated with the remote control.
Carefully wipe the sensors with a dry soft cloth. (Page 28)
If the ultra microŅ ber mop is attached,
conŅ rm that it is mounted properly. (Page 21)
Turn the main power switch off and on.
Replace the remote control batteries. (Page 12)
ConŅ rm that the control is within the coverage area of the main unit,
which is less than 3 m. (Page 12)
Check whether the main power switch is turned on. (Page 15)
34
Page 36

REFERENCE ITEMS
Open source software notice
To obtain the source code under GPL, LGPL, MPL and other open source licenses, that is contained in this product, please visit
http://opensource.lge.com.
In addition to the source code, all referred license terms, warranty disclaimers and copyright notices are available for download.
Dis/Assembling the battery
Turn off the main power switch on the
back-left side of the Robot Cleaner.
Place a soft cloth on the ņ oor,
remove the dust bin, and ņ ip the
Robot Cleaner over.
Remove the screws by using a Phillips
head screwdriver.
Assemble the battery in the reverse
order.
Separate the wire from the battery
while pressing the connector hook.
Remove the battery from the device.
WARNING
Please be careful of fire, explosion, electric shock, or breakdown.
• Do not charge this Battery Pack(Pack hereafter) with any other type of charger other than
the one originally provided with the Robot Cleaner.
• Do not damage the Pack in such ways as drop, crush, puncture, cut or short extemal contacts.
• Do not attempt to disassembly the pack In any case. When the Pack is damaged or malfunctioning,
bring it and the Robot cleaner and Home station to an authorised service center.
• Do not place this pack near a heat source or do not dispose of in fire or water.
• Please keep the Pack away from any damp or wet environment when the pack is charged.
• Please keep away from children, infant or pets.
35
Page 37

CARACTERÍSTICAS
Experto en esquinas
Gracias a su nuevo diseño, más adecuado, el rendimiento del robot es
increíblemente eficaz.
El aprendizaje de conducción
El robot de limpieza puede memorizar el entorno de limpieza mediante su
función de «Funcionamiento inteligente» para así realizar una limpieza más
inteligente.
El modo Turbo
En el modo «Turbo», el robot de limpieza funciona con mayor potencia, y la
limpieza es más intensa.
El modo «Turbo» se activa automaticamente en alfombras, asi el robot de
limpieza puede funcionar de forma mas eficaz.
Bandeja para mopa
La «Bandeja extraíble para la bayeta» permite que los usuarios cambien la
bayeta fácilmente y sin tener que dar la vuelta al aparato.
Mi espacio
Si desea limpiar rápidamente una zona sucia, solo tiene que programar el
robot de limpieza para que limpie esa zona en particular.
Repita la limpieza
El robot de limpieza continuará limpiando hasta que se agote la batería.
Lugar de búsqueda
Si mueve el robot de limpieza cuando este está limpiando una zona en
particular, el aparato buscará automáticamente esa ubicación, volverá a dicha
zona y continuará la limpieza.
Page 38

ÍNDICE
1
PREPARACIÓN DEL DISPOSITIVO
2~5
6
7~8
9~10
11
12
13
Precauciones de seguridad
Elementos incluidos en el producto
Descripción de las piezas
Funciones de los botones
Pantalla de información de estado
Antes de usar
Vista general
2
FORMA DE USO
14
15
16
17
18~19
20
21
22
23~24
Instalación de la base
Encendido y apagado de la fuente de alimentación
Inicio e interrupción de la limpieza
Carga de la batería
Modos de limpieza
Modos de limpieza auxiliares
Limpieza con bayeta (opcional)
Función de búsqueda de ubicación
Diagnóstico inteligente
4
INFORMACIÓN ADICIONAL
31~33
34
Resolución de problemas
Antes de solicitar asistencia técnica
5
REFERENCIAS
35
Referencias
3
MANEJO DESPUÉS DEL USO
25
26
27
28
29
30
Limpieza del depósito de polvo
Limpieza del fi ltro del depósito de polvo
Limpieza del cepillo
Limpieza del sensor/terminal de carga
Limpieza de los cepillos laterales
Limpieza de la bayeta ultramicrofi bras
(opcional)
Page 39

PRECAUCIONES DE SEGURIDAD
La fi nalidad de las precauciones de seguridad descritas a continuación es asegurar el uso seguro y correcto
del producto por parte del usuario para así prevenir posibles daños o lesiones.
Precauciones de seguridad básicas
Después de leer este manual, consérvelo en un lugar accesible.
Este es el símbolo de alerta de seguridad. Este símbolo le advierte de aquellos riesgos
que pueden provocar daños a la propiedad, lesiones corporales graves o la muerte.
ADVERTENCIA
PRECAUCIÓN
ADVERTENCIA
1. Este electrodoméstico no está destinado para ser utilizado
por personas (incluyendo niños) cuyas capacidades físicas,
sensoriales o mentales sean reducidas, ni por aquellas que
Indica una situación peligrosa que, de no evitarse, puede provocar la muerte o una
lesión grave.
Indica una situación peligrosa que, de no evitarse, puede provocar una lesión leve o
moderada.
no tengan experiencia y conocimientos, a menos que hayan
recibido supervisión o instrucción relacionadas con el uso del
electrodoméstico por parte de una persona responsable por
su seguridad.
2. Los niños deben ser supervisados para asegurarse de que
no jueguen con el electrodoméstico.
3. Si el cable de alimentación está dañado, debe ser sustituido
por un Agente de Servicios de LG Electronics para evitar
riesgos.
4. Este electrodoméstico puede ser utilizado por niños de
8 años de edad y mayores, así como por personas cuyas
capacidades físicas, sensoriales o mentales sean reducidas,
siempre y cuando reciban supervisión o instrucción
relacionadas con el uso seguro del electrodoméstico y
comprendan los riesgos involucrados. Los niños no jugarán
con el electrodoméstico. La limpieza y el mantenimiento del
usuario no las realizarán niños sin la debida supervisión.
Por motivos de seguridad, no
extraiga la batería del robot de
limpieza. Si necesita reemplazar
la batería o el robot de limpieza,
llévelo al distribuidor o al centro de
servicio técnico autorizado de LG
Electronics más cercano.
De no seguir esta advertencia,
podría provocar un incendio o un
2
fallo en el producto.
Nunca use el robot de limpieza con
una batería o con una base que no
esté diseñada para este producto.
Al hacerlo, podría provocar un
incendio o un fallo en el producto.
Page 40

PRECAUCIONES DE SEGURIDAD
Gasoline
Detergent
ADVERTENCIA
Asegúrese de que el cable de alimentación
de la base no queda atrapado bajo un
objeto pesado o dañado por entrar en
contacto con objetos afi lados.
De no seguir esta advertencia, podría
provocar una descarga eléctrica, un
incendio o un fallo en el producto. Si el
cable de alimentación está dañado, no lo
enchufe. Lleve el producto a un centro de
reparación autorizado de LG Electronics.
No coloque la base o el robot de
limpieza cerca de una fuente de
calor.
Al hacerlo, podría provocar la
deformación del producto, un
incendio o un fallo en el producto.
No doble el enchufe de
alimentación. No use el enchufe
de alimentación cuando este esté
dañado o afl ojado.
Al hacerlo, podría provocar un
incendio o un fallo en el producto.
No toque el enchufe de
alimentación con las manos
húmedas.
Al hacerlo, podría provocar una
descarga eléctrica.
No pulverice o aspire materiales
infl amables, surfactantes o agua
potable cerca del robot de limpieza.
Al hacerlo, podría provocar un
incendio o un fallo en el producto.
* Materiales infl amables: gasolina,
disolvente, etc.
* Surfactantes: detergente, artículos
para el baño, etc.
No introduzca ningún miembro
del cuerpo, como, por ejemplo, la
mano o el pie, bajo el cepillo o bajo
las ruedas del robot de limpieza
mientras este esté en uso.
Al hacerlo, podría provocar una
lesión o dañar el producto.
No use el robot de limpieza en mobiliario
estrecho y alto como, por ejemplo,
armarios, frigorífi cos, escritorios o mesas.
Al hacerlo, podría provocar lesiones
o daños y fallos en el producto que
no están cubiertos por la garantía.
No use el robot de limpieza cuando
haya velas u objetos frágiles en el
suelo.
Al hacerlo, podría provocar un
incendio o un fallo en el producto.
Use siempre una toma de corriente
independiente de al menos 5 #.
Si se conectan varios dispositivos
simultáneamente a una toma de
corriente, estos pueden generar
sufi ciente calor como para provocar
una incendio.
Cuando desenchufe el enchufe
de alimentación, hágalo siempre
agarrando el enchufe, y no el cable.
Cuando desenchufe el enchufe de
alimentación, no toque las clavijas.
Al hacerlo, podría provocar una
descarga eléctrica.
No permita en ningún momento que los
niños o los animales de compañía jueguen
con el robot de limpieza o se apoyen en
el mismo. No use el robot de limpieza
mientras un objeto cuelgue del mismo.
Al hacerlo, podría provocar una
lesión o dañar el producto.
Apague la fuente de alimentación
inmediatamente si el robot de
limpieza produce cualquier sonido
u olor anómalo, o si sale humo del
mismo.
De no hacerlo, podría provocar un
incendio o un fallo en el producto.
No use el robot de limpieza en una
habitación donde haya un niño
durmiendo.
Al hacerlo, podría provocar una
lesión o dañar el producto.
No deje que los niños o los animales
de compañía permanezcan cerca
del robot de limpieza sin vigilancia.
Al hacerlo, podría provocar una
lesión o dañar el producto.
No active el aparato sobre aquellos
suelos que tengan más de diez
grados de inclinación.
El aparato no funcionará
correctamente.
3
Page 41

PRECAUCIONES DE SEGURIDAD
PRECAUCIÓN
Vacíe frecuentemente el depósito
de polvo y manténgalo limpio.
El polvo recogido en el depósito
de polvo puede provocar alergias y
contener insectos dañinos.
Use el robot de limpieza
únicamente en espacios interiores.
Si lo usa en espacios exteriores,
puede provocar un fallo en el
producto y daños irreparables en la
unidad.
Cierre la tapa del depósito de polvo
de la unidad principal antes del
inicio de la limpieza.
Si la tapa no está cerrada, podría
provocar lesiones o daños en el
producto.
NO use el robot de limpieza cerca
de barandillas, escaleras o cualquier
otro lugar peligroso.
De lo contrario, el usuario o el
producto podrían estar expuestos a
cualquier daño.
No deje caer el robot de limpieza ni
lo someta a impactos fuertes.
Al hacerlo, podría provocar lesiones
o fallos en el producto que no están
cubiertos por la garantía.
No exponga el robot de limpieza a
bajas temperaturas (por debajo de
-5 %) durante un largo periodo.
Al hacerlo, podría provocar un fallo
en el producto.
Retire cualquier cable o cuerda de
gran longitud que haya en el suelo.
Los cables o las cuerdas pueden
quedar enredados en las ruedas del
robot de limpieza y provocar un fallo
en el producto o la desconexión del
cable.
Nunca coloque el robot de limpieza
sobre una mesa o sobre un
escritorio cuando esté encendido.
Podría provocar una lesión en el
usuario o daños en el producto.
En casos excepcionales, el cepillo
del robot de limpieza puede
dañar las alfombras. En este caso,
detenga la operación de limpieza
inmediatamente.
Los fl ecos largos de las alfombras
pueden resultar dañados.
No permita que la unidad principal
y el terminal de carga de la base
entren en contacto con objetos
metálicos.
Al hacerlo, podría provocar un fallo
en el producto.
No introduzca agua, detergente,
etc., en el robot de limpieza.
Al hacerlo, podría provocar un
fallo en el producto. No introduzca
agua o detergente en el robot de
limpieza. Si algún líquido penetra
en el robot de limpieza, apague la
fuente de alimentación y póngase
en contacto con el centro de
atención al cliente o el agente de
ventas de LG Electronics.
No permita que el robot de
limpieza aspire líquidos, cuchillas,
chinchetas, combustibles, etc.
Estos elementos podrían provocar
un fallo en el producto.
No coloque objetos afi lados en la
abertura del sensor supersónico del
robot de limpieza.
Al hacerlo, podría provocar un fallo
en el producto.
No use el robot de limpieza
cuando el depósito de polvo está
completamente lleno.
Al hacerlo, podría provocar un fallo
en el producto.
4
Page 42

PRECAUCIÓN
PRECAUCIONES DE SEGURIDAD
Si el suelo está mojado o hay
alguna superfi cie húmeda, séquelos
antes de usar el robot de limpieza.
No use el robot de limpieza en
superfi cies húmedas.
De hacerlo, podría provocar un fallo
en el producto.
Cuando acople la bayeta, no
bloquee el sensor de la cámara
inferior.
Si bloquea el sensor de la cámara
inferior, es posible que el producto
no funcione adecuadamente.
(Es posible que algunos modelos
no tengan sensor.)
Para ahorrar energía, apague el
interruptor mientras no lo esté
usando, y enciéndalo para la
limpieza y la carga.
Cuando el robot de limpieza está
en funcionamiento, es posible
que golpee las patas de las sillas,
de los escritorios, de las mesas, o
cualquier otro mueble estrecho.
Para conseguir una limpieza mejor y
más rápida, coloque las sillas sobre
la mesa.
Antes de comenzar la limpieza,
asegúrese de que el umbral de la
puerta sobresale 3 EO del suelo.
Si el umbral es bajo, el robot de
limpieza puede pasar por encima
de él y atravesar la puerta principal.
Consejos
Compruebe los siguientes consejos antes de usar el robot de limpieza:
• Vacíe el depósito de polvo una vez que esté lleno.
• Retire cualquier cable o cuerda de gran longitud que haya en el suelo.
• Seque cualquier superficie húmeda que haya en el suelo antes del inicio de la limpieza.
• Cierre la tapa del depósito de polvo antes del inicio de la limpieza.
• Retire cualquier objeto frágil o innecesario que haya en la habitación que desea limpiar.
Por ejemplo, retire del suelo artículos de cerámica valiosos u otros objetos de valor.
• Compruebe si la batería tiene potencia suficiente y recárguela si es necesario.
• Cierre la puerta de cualquier habitación en la que no quiere que entre el robot de limpieza. Durante la
limpieza, es posible que el robot de limpieza entre en otra habitación y continúe limpiando.
• No use este producto en una habitación donde haya un niño durmiendo. El niño puede resultar herido.
• Retire las toallas o cualquier otro tipo de tela fina del suelo, ya que pueden quedar atrapados en el
cepillo.
• La limpieza puede presentar problemas en alfombras con borlas o con un grosor de mas de 20 .
Por lo tanto, se recomienda que las prepare o las retire antes de usar el producto.
• Cierre todas las puertas de los balcones. Las ruedas pueden atascarse durante la limpieza.
5
Page 43

ELEMENTOS INCLUIDOS EN EL PRODUCTO
Robot de limpieza
Mando a distancia
Base
Las ilustraciones pueden ser diferentes de la apariencia real de los objetos.
Herramienta de limpieza
Bandeja para la bayeta
(opcional)
Filtro del deposito de
polvo (de recambio)
(opcional)
Bayeta ultramicrofibras (2 unidades)
DVD Manual
(opcional)
Para limpiar
los sensores
Para limpiar el
filtro
Cepillo de limpieza
(situado en la tapa del depósito de polvo)
6
Pilas secas para el mando a distancia
(2 unidades de tamaño AAA)
Page 44

DESCRIPCIÓN DE LAS PIEZAS: Robot de limpieza
Vista superior
Sensor de la cámara superior
Tapa del depósito de polvo
Pantalla y botón de manipulación
Botón de la tapa del depósito de polvo
Vista frontal
Sensores ultrasónicos
Vista trasera
Vista inferior
Ventana del sensor de detección de obstáculos
Sensores de detección de la base y sensores
de recepción del mando a distancia
Interruptor de alimentación
Puerto de ventilación
Sensor de detección de alturas
Cepillo lateral
Terminal de carga
Cepillo
Rueda
Batería
Sensor de la cámara inferior(opción)
Las ilustraciones pueden ser diferentes de la apariencia real de los objetos.
7
Page 45

DESCRIPCIÓN DE LAS PIEZAS: Base / Depósito de polvo
Base
Soporte para el mando a distancia
Terminal de carga
Depósito de polvo
Cepillo de limpieza
Tapa del depósito de polvo
Tapa del puerto de
succión
Botón de apertura de
la tapa del depósito de
polvo
Interruptor de alimentación
Lengüetas de fi jación del cable
de alimentación
Asa del depósito
de polvo
Filtro de
esponja
Filtro HEPA
Tapa del fi ltro
Las ilustraciones pueden ser diferentes de la apariencia real de los objetos.
8
Page 46

FUNCIONES DE LOS BOTONES: Robot de limpieza
TURBO
START/STOP
HOME
BLOQUEO
DE BOTONES
activado/
desactivado
• Si pulsa este botón, se activará el modo «Turbo» y se emitirá un mensaje de
voz de confirmación.
• Si pulsa este botón en el modo «Turbo», se cancelará dicho modo.
• Este botón se usa para encender el aparato y para iniciar o interrumpir la limpieza.
• Si pulsa este botón cuando el aparato está encendido, se iniciará la limpieza.
• Si pulsa este botón durante limpieza automática, la limpieza se parará.
• Si pulsa este botón durante aproximadamente 2 segundos cuando el aparato
está encendido, se apagará el aparato.
• Si pulsa este botón cuando la función de «Diagnóstico inteligente» está activada,
se finalizará el diagnóstico.
• Este botón hace que el robot de limpieza vaya a la base para cargar la batería.
• Si la limpieza ha finalizado o si la batería no es suficiente, El robot de limpieza irá
a la base automáticamente para cargar la batería.
• Si pulsa los botones «TURBO» y «START/STOP» durante al menos 3 segundos,
se activará o se desactivará la función de bloqueo de botones.
• Si pulsa cualquier botón cuando el bloqueo de botones está activado, el icono del
bloqueo de botones parpadeará, y el aparato emitirá el mensaje: «El panel está
bloqueado».
Alerta de voz
On/Off
Cambio
de Idioma
• Mantenga pulsados simultáneamente durante 3 seg. los botones 'START/STOP'
y 'HOME' en la unidad principal para ENCENDER/APAGAR la Alerta de Voz.
• Si la Alerta de Voz está DESACTIVADA la lámpara Mute está ENCENDIDA.
• No puede usar esta funcionalidad con el mando a distancia.
• Al pulsar el botón "HOME" durante 3 segundos cambiará el idioma de los
mensajes de voz.
• No es posible utilizar esta función desde el botón del mando a distancia.
9
Page 47

FUNCIONES DE LOS BOTONES: Mando a distancia
Start
Si pulsa este botón, se
iniciará la limpieza.(p16)
Mode
Cambie el Modo de Limpieza
al Modo ZigZag.(p18)
Botón direccional
Este botón se usa para operar
el producto manualmente y
para seleccionar una zona
en el modo de «Limpieza
intensiva en una zona».
Repeat
Este botón permite activar
o desactivar el modo de
«Repetición de limpieza».(p20)
Home
Este botón hace que el robot de limpieza
vaya a la base para cargar la batería.(p17)
Turbo
Este botón se usa para activar o
desactivar el modo «Turbo».(p20)
Stop/OK
Al pulsar el botón se detendrá el
robot limpiador.
My Space
Este botón se usa para poner al robot
de limpieza en el modo de «Limpieza
intensiva en una zona»
Mute
Este botón se usa para activar o
desactivar el modo «Mudo».(p11)
Diagnosis
Este botón se usa para realizar un
diagnóstico inteligente. Solo está
disponible cuando el robot de
limpieza está limpiando.(p23)
.(p19)
10
Consejos
• El mando a distancia NO tiene una función de encendido.
• Si el aparato está apagado, el mando a distancia no funciona.
• Para encender/apagar el aparato, use el botón «START/STOP» situado en la parte superior del robot
de limpieza.
• Use los botones «Mode», «My Space» después de detener el robot de limpieza.
Page 48

PANTALLA DE INFORMACIÓN DE ESTADO
Icono de Modo Turbo
Esto indica los ajustes del
Modo Turbo.
Icono de Modo Repetición
Esto indica los ajustes del Modo
Repetición.
Icono de Estado de
Funcionamieno
Esto indica el estado de
HomBot.
Icono de Silencio
Esto indica los ajustes de
Alerta de Voz.
Icono de Inicio
Esto indica las
condiciones de Inicio y
Carga.
11
Page 49

ANTES DE USAR
–
+
+
–
Compruebe los siguientes consejos antes de usar el robot de limpieza:
• No use este aparato en una habitación donde haya un niño sin vigilancia. El niño puede resultar herido.
• Retire cualquier objeto frágil o innecesario que haya en la habitación que desea limpiar.
En especial, retire del suelo artículos de cerámica valiosos u otros objetos de valor.
• Cierre la tapa del depósito de polvo antes del inicio de la limpieza.
• Seque cualquier superficie húmeda que haya en el suelo.
• Retire cualquier cable, cuerda, toalla, felpudo, etc., del suelo de modo que no quede atrapado por el
cepillo.
• Compruebe si la batería tiene potencia suficiente y recárguela si es necesario.
• Vacíe el depósito de polvo una vez que esté lleno.
• Cierre la puerta de cualquier habitación en la que no quiere que entre el robot de limpieza. Durante la
limpieza, es posible que el robot de limpieza entre en otra habitación y continúe limpiando.
• Cuando la bayeta está acoplada, el robot de limpieza no puede pasar umbrales de altura igual o superior
a 5 .
Si no desea usar la bayeta durante la limpieza, sepárela del aparato antes de usar el robot de limpieza.
• La limpieza puede presentar problemas en alfombras con borlas o con un grosor de mas de 20 . Por
lo tanto, se recomienda que las prepare o las retire antes de usar el producto.
• Cierre todas las puertas de los balcones. Las ruedas pueden atascarse durante la limpieza.
Instalación de las pilas del mando a distancia
1. Abra la tapa del compartimento de las pilas levantando la pestaña de la parte posterior del mando a
distancia.
2. Introduzca dos pilas AAA y compruebe que los polos positivo (+) y negativo (-) están en la posición
correcta.
3. Cierre la tapa del compartimento de las pilas completamente para que estas no se caigan.
Medidas de precaución durante el uso del mando a distancia
• Nunca pulse más de un botón al mismo tiempo.
• No lo deje caer ni lo someta a impactos fuertes.
• No lo guarde en un lugar cercano a fuentes de calor, fuego o aire caliente.
• Ciertas lámparas fluorescentes, como, por ejemplo, tres bandas de radiación de la lámpara, pueden
interferir en la activación del mando a distancia. Por tanto, procure usarlo lo más alejado posible de dichas
lámparas.
• Si el mando a distancia se activa lejos del robot de limpieza, es posible que no funcione de la forma
adecuada. Si es posible, use el mando a una distancia máxima de 3
del robot de limpieza.
12
Page 50

VISTA GENERAL
1
2
3
Instale la base. (p14)
Introduzca el enchufe del cable de alimentación en
una toma de corriente y coloque la base apoyada en
la pared. Si la base no recibe electricidad, el robot de
limpieza no se cargará.
Encienda la fuente de alimentación del robot
de limpieza. (p15)
Coloque en la posición «ON» el interruptor de
alimentación de la parte posterior izquierda del
robot de limpieza y pulse el botón «START/
STOP» de la parte superior.
※
Si la fuente de alimentación no está encendida,
consulte la página 15.
Compruebe el depósito de polvo.
Compruebe que el depósito de polvo está limpio antes
de iniciar la limpieza y cierre la tapa del depósito de
polvo en la unidad principal.
1.5
1.5
2
4
5
6
Inicie la limpieza (p16)
Pulse de nuevo el botón «START/STOP» cuando el
robot de limpieza está encendido. Al iniciar la limpieza,
oirá el sonido de indicación de inicio de la limpieza.
Carga automática. (p17)
El robot de limpieza autoevaluará el estado de la batería
y volverá automáticamente a la base para cargar la
batería antes de que esta se vacíe por completo. La
batería tarda aproximadamente tres horas en cargarse.
Use los modos de limpieza y las funciones
auxiliares. (p18~21)
Use los botones del robot de limpieza y del mando
a distancia para usar cada modo de limpieza y cada
complemento.
Para el Modo Limpieza, puede seleccionar entre ZigZag,
Mi Espacio y Repetir; para funcionalidades secundarias,
Limpieza Manual y Mopa (opcional).
< Advertencia > Si pone en funcionamiento el robot de limpieza con la tapa del depósito de polvo
abierta, podría provocar una lesión o daños graves en el producto.
13
Page 51

INSTALACIÓN DE LA BASE
INSTALACIÓN DE LA BASE
1. Coloque la base sobre suelo liso y apoyada a la pared para así
evitar deslizamientos durante el acoplamiento.
Retire cualquier objeto que se encuentre a menos de 1,5 de
los laterales y a menos de 2 del frontal.
1.5
2. Enchufe el cable de alimentación a una toma de corriente.
Enrolle el cable de alimentación alrededor de las lengüetas de
fi jación de la parte posterior de la base o colóquelo pegado a la
pared de modo que el recorrido del robot de limpieza no quede
obstruido.
3. Fije la base colocándola pegada a la pared para que no se
mueva.
Encienda el interruptor de alimentacion.
1.5
Lengüetas de fi jación del
cable de alimentación
2
4. Cuando el mando a distancia no esté en uso, colóquelo en el
soporte adecuado de la base.
Consejos
• Debe mantener la base enchufada en todo momento. Si la base no está enchufada, el robot de
limpieza no volverá a ella para cargarse automáticamente.
< Advertencia > No ponga en funcionamiento el robot de limpieza si este no funciona
adecuadamente, si está dañado o se ha caído, o si el enchufe o el cable están
dañados. Para evitar peligros, solamente LG Electronics, Inc. o un técnico de
servicio cualificado deben reemplazar el cable.
14
Page 52

ENCENDIDO Y APAGADO DE LA FUENTE DE ALIMENTACIÓN
Encendido de la fuente de alimentación principal
Asegúrese de que el interruptor de alimentación principal de la parte
posterior izquierda del aparato está en la posición «ON». Si está en la
posición «OFF», póngalo en la posición «ON».
※
Cuando encienda el interruptor de alimentación, no pulse el botón
situado en la parte superior del robot de limpieza. La acción del
botón puede verse retrasada.
※
Con el fi n de proteger la batería, ponga el interruptor de alimentación
en la posición «OFF» si no va a usar el robot de limpieza durante un
largo periodo.
Encendido desde el modo en espera.
Con el robot de limpieza apagado, pulse «START/STOP» durante al
menos 1 segundo, hasta que se oiga un «tin». En unos 10 segundos, el
aparato se encenderá, y sonará una melodía.
※
El robot de limpieza se apagará si no se ha movido en 10 minutos y
la batería no está cargada.
Apagado de la fuente de alimentación
Pulse el botón «START/STOP» durante 2 segundos cuando el robot
de limpieza está encendido. Sonará una melodía cuando se apague.
Consejos
• Si no puede encender el aparato, haga lo siguiente:
- Ponga el interruptor de alimentación en la posición «ON» y espere durante más de 3 segundos.
- Pulse el botón «START/STOP» cuando el interruptor de alimentación está encendido.
- Si el aparato no se enciende o si no aparece nada en la pantalla y solo se emite un «tin», coloque
el robot de limpieza en la base.
15
Page 53

INICIO E INTERRUPCIÓN DE LA LIMPIEZA
Mediante los botones del robot de limpieza
Cuando el robot de limpieza está encendido, pulse el botón «START/
STOP» para iniciar la limpieza. Sonará una melodía y se iniciará la
limpieza.
Pulse el botón «START/STOP» durante el ciclo de limpieza para
interrumpir la limpieza.
※
Si pulsa el botón «START/STOP» cuando la fuente de alimentación
del robot de limpieza está apagada, el aparato se encenderá. Pulse
de nuevo el botón «START/STOP» para iniciar la limpieza.
Mediante el mando a distancia
Cuando el robot de limpieza está encendido, pulse el botón «Start»
en el mando a distancia. Sonará una melodía y se iniciará la limpieza.
Pulse el botón 'Stop/OK' durante el ciclo de limpieza para interrumpir
la limpieza.
※
Cuando el robot de limpieza está apagado, este no se puede
encender desde el modo en espera mediante el mando a distancia.
Cuando el aparato está apagado, pulse el botón «START/STOP»
en la parte superior del robot de limpieza para encenderlo y así
poder usar el mando a distancia.
※
Durante la limpieza, se pueden producir colisiones si el sensor no detecta objetos a causa de sus
características físicas (patas fi nas de mesas y sillas, esquinas de los muebles, etc.). Cuando esto
sucede, el sensor de detección de impactos del interior del aparato evitará los obstáculos mediante un
movimiento de retroceso.
※
Si el robot de limpieza está confi gurado para iniciar la limpieza en una ubicación distinta de la base,
coloque el aparato en un suelo liso para prevenir el mal funcionamiento del sensor de detección de
obstáculos. Además, deberá iniciar la limpieza desde una ubicación en la que no haya ningún obstáculo,
como, por ejemplo, cortinas o paredes, en un radio de 30 alrededor del robot de limpieza.
16
Consejos
Para obtener mejores resultados:
• Examine rápidamente la zona a limpiar y retire cualquier objeto, ya sea grande o pequeño, que pueda
dificultar el paso del robot de limpieza.
• Si la limpieza se inicia cuando el robot de limpieza está en la base, el aparato puede volver
rápidamente a ella, ya que habrá leído con precisión la posición actual de la base.
• Cuando la bandeja para la bayeta está instalada, para prevenir una segunda contaminación por la
bayeta contaminada, el aparato no puede atravesar umbrales de altura igual o superior a 5 .
Page 54

CARGA DE LA BATERÍA
Carga automática
El robot de limpieza vuelve a la base al fi nalizar el ciclo de limpieza
o cuando le queda poca batería.
※
El robot de limpieza se apagará si no se ha movido en 10 minutos
y la batería no está cargada.
※
NO ponga el interruptor de alimentación principal en la posición «OFF»,
ya que no se cargará la batería. Si el aparato intenta cargar la batería
con el interruptor de alimentación principal en la posición «OFF»,
se muestra el mensaje de error: "El interruptor principal en la parte
posterior del HomBot está apagado. Por favor, encienda el interruptor."
※
Si el aparato vuelve a la base porque necesita cargar la batería, la
limpieza se reanudará, después de la carga, desde el lugar más
cercano a la zona que aún no se había limpiado.
※
Si el robot de limpieza no consigue acoplarse a la base al primer intento, lo intentará de nuevo hasta que
consiga acoplarse correctamente.
※
Cuando el robot de limpieza haya fi nalizado la limpieza de todas las zonas que puede limpiar, volverá a la
base incluso si no tiene un nivel bajo de batería.
Carga manual
Si usa el robot de limpieza por primera vez o si carga la batería durante la limpieza, puede cargar la batería
manualmente.
Método 1. Acople el robot de limpieza a la base, para
ello, alinéelo con el lado frontal de la base.
Sonará una melodía y un mensaje de audio
que confi rmará el inicio de la carga.
※ Si se repite el mensaje de voz "El
interruptor principal en la parte posterior
del HomBot está apagado. Por favor,
encienda el interruptor.", asegúrese
de que el interruptor de alimentación
principal está en la posición «ON».
Método 2. Si pulsa el botón «Home» del mando a
distancia o del robot de limpieza, se emitirá
automáticamente un sonido de búsqueda
y el robot de limpieza volverá a la base para
iniciar la carga.
※ Si el robot de limpieza no inicia la limpieza desde la base o si se carga manualmente mediante el botón
de carga, es posible que necesite algo más de tiempo para localizar la base.
※
Si el robot de limpieza se encuentra a menos de 10 del frontal del terminal de carga cuando la fuente
de alimentación está encendida, el aparato volverá automáticamente a la base y se iniciará la carga.
Consejos
Tome las precauciones siguientes cuando use la base:
Si hay sustancias extrañas en el terminal de carga, es posible que la carga no se realice adecuadamente.
•
Limpie el terminal periódicamente con un paño seco después de desconectar el enchufe de alimentación.(p28)
• Para evitar una descarga eléctrica, no toque el terminal de carga con objetos metálicos.
• Para evitar un incendio o una descarga eléctrica, nunca desensamble o modifique la base.
• No coloque la base o el enchufe de alimentación cerca de un aparato de calefacción.
17
Page 55

MODOS DE LIMPIEZA
Limpieza en zigzag
En el modo de «Limpieza en zigzag», el robot de limpieza
repite un patrón en zigzag para limpiar todos y cada uno
de los rincones del hogar.
Si necesita terminar la limpieza rápidamente, elija el modo
de «Limpieza en zigzag».
Pulse el botón «Mode» en el mando a distancia para
seleccionar el modo de «Limpieza en zigzag» y, a
continuación, pulse el botón «Start».
※
La confi guración de fábrica predeterminada es el modo
de «Limpieza en zigzag».
Limpieza manual
Al pulsar una tecla de dirección en el mando a distancia, puede mover el robot de limpieza en el modo
«Manual».
El robot de limpieza limpiará el hogar siguiendo la trayectoria que usted defi na mediante la tecla de
dirección: adelante/atrás/izquierda/derecha. En el modo «Manual», el robot de limpieza retrocederá si
colisiona con un obstáculo.
18
Page 56

MODOS DE LIMPIEZA
Limpieza Mi espacio(My Space)
Al pulsar el botón «My Space» en el mando a distancia, se emitirá un mensaje
de voz y el modo de limpieza pasará a «Selectivo».
Si desea limpiar una zona determinada, seleccione este modo.
1.ª etapa:
Use el mando a distancia para realizar manualmente la limpieza del contorno
de cada zona de limpieza.
※
Para que el aparato pueda reconocer el contorno, la distancia entre el punto inicial y el fi nal debe ser
menor de 1 .
Mi espacio
2.ª etapa:
Al pulsar el botón «Start», el robot de limpieza limpiará intensivamente las zonas seleccionadas.
※
Si se produce un fallo durante la selección de una zona, se emitirá el siguiente mensaje de voz:"La zona
no cumple las condiciones especifi cadas. Delimite la zona especifi cada para el proceso de limpieza."
Por tanto, debe usar el mando a distancia para volver a asignar una zona.
※
Si ha fi nalizado la limpieza de My Space , el modo de limpieza cambia a limpieza en (ZigZag).
Consejos
• Cuando el aparato está cargando, no es posible activar el modo de «Mi espacio(My Space)».
• Para cambiar el modo de limpieza cuando el robot de limpieza está en funcionamiento, pulse el
botón 'Stop/OK' y, a continuación, seleccione el modo.
19
Page 57

MODOS DE LIMPIEZA AUXILIARES
Modo Turbo
Al pulsar el botón «Turbo» en el mando a distancia o
en la unidad principal, se emitirá un mensaje de voz y
se activará el modo «Turbo».
Si pulsa el mismo botón cuando el modo «Turbo»
está activado, se emitirá un mensaje de voz y se
cancelará dicho modo.
En el modo «Turbo», el robot de limpieza funciona
con mayor potencia y la limpieza es más intensa.
※
<Modo «Turbo» inteligente>
El modo «Turbo» se pone en funcionamiento
automaticamente cuando el robot de limpieza
limpia alfombras (10 mm ᵐ).
Modo de Repeticion de limpieza(Repeat)
Al pulsar el botón «Repeat» en el mando a distancia, se emitirá un mensaje
de voz y se activará el modo de «Repeticion de limpieza(Repeat)».
Si pulsa el mismo botón cuando el modo de «Repeticion de limpieza(Repeat)»
está activado, se emitirá un mensaje de voz y se cancelará dicho modo.
En el modo de «Repetición de limpieza», el robot de limpieza repite la
limpieza hasta que se agota la batería.
Modo de Memorización
El robot de limpieza puede memorizar el entorno de
limpieza mediante su función de «Funcionamiento
inteligente» para así realizar una limpieza
inteligente.
※
La función de «Funcionamiento inteligente»
solo está disponible cuando el aparato inicia la
limpieza desde la base.
20
Consejos
• Precauciones con la función de «Funcionamiento inteligente»
- Esta función de limpieza inteligente permite memorizar la ubicación de los obstáculos para así
eludirlos. El robot de limpieza memoriza cada aspecto del entorno en el que se encuentra desde
que comienza la limpieza en la base hasta el momento en que finaliza su trabajo.
- El robot de limpieza memoriza las nuevas condiciones del entorno cuando se cambia la ubicación
de la base.
- Si la función de “Funcionamiento inteligente” ha sido reconocida, se emite el mensaje de voz:
«EL proceso de aprendizaje de limpieza ha finalizado.»
Page 58

LIMPIEZA CON BAYETA (OPCIONAL)
Clic
Si acopla la bayeta ultramicrofi bras, puede usar el robot
de limpieza para eliminar el polvo de forma efi caz.
Cuando la bandeja para la bayeta está acoplada,
el robot de limpieza no pasará por encima de las
alfombras o de los umbrales de las puertas para
prevenir así la transferencia de suciedad desde la
bayeta.
Para realizar la limpieza con bayeta, acople la bayeta y la bandeja para la bayeta al robot de limpieza según las
instrucciones siguientes:
1. Acople la bayeta ultramicrofi bras al velcro de
la bandeja para la bayeta como muestra la
ilustración.
Precaución
No cubra el sensor de la cámara.
2. Empuje suavemente la bandeja para la
bayeta en las ranuras hasta oír un clic.
※ Tenga en cuenta que la bandeja para la
bayeta se puede desacoplar durante la
limpieza si no se ha colocado de la forma
correcta.
3. En este modo, es preciso ajustar fi rmemente
las lengüetas de la bandeja para la bayeta
en las ranuras de fi jación ubicadas bajo el
aparato.
La fi jación del
gancho
Ranura
Clic
Consejos
• Para evitar olores, lave cualquier sustancia extraña o desempolve la bayeta una vez completada la
limpieza.
• Para evitar extender manchas por el suelo, no use la bayeta ultramicrofibras para limpiar cuando en
el suelo haya suciedad mezclada con líquidos, como, por ejemplo, café o tinta.
• Para evitar dañar las alfombras con el velcro o con la transferencia de suciedad de la bayeta, no
limpie las alfombras cuando la bayeta o la bandeja para la bayeta estén acopladas.
• Mantenga la bayeta ultramicrofibras seca. No la use en superficies húmedas.
Si hay humedad, esta puede interferir con la navegación.
• La función de «Diagnóstico inteligente» no está disponible cuando la bandeja para la bayeta está
acoplada.
• Algunos modelos pueden no venir con mopa de Microfibras o porta mopas.
21
Page 59

FUNCIÓN DE BÚSQUEDA DE UBICACIÓN
El robot de limpieza recuerda su ubicación durante la limpieza.
Si mueve el robot de limpieza cuando está en funcionamiento, este buscará su
ubicación con la función de búsqueda de ubicación para continuar la limpieza desde la
última ubicación.
Si retira cualquier condición anómala del robot de limpieza o si cambia la
ubicación de este último arbitrariamente, se activará la función de búsqueda
de ubicación.
※
La función de navegación se activará después de que el robot de limpieza
reconozca adecuadamente las condiciones de limpieza.
Cambio de ubicación
1. Coloque el robot de limpieza cerca de la
ubicación desde la que fue movido.
※
La búsqueda de ubicación es más eficaz
cuando el robot de limpieza está cerca de la
ubicación desde la que fue movido.
※
Si está fuera de un diámetro de 1 de la
posición desde la que fue movido, el aparato
tiene dificultades para buscar la posición.
1
1
Ubicación de la colisión
2. Pulse el botón «START/STOP» en el robot de limpieza o el botón «Start» en el mando a distancia. El
robot de limpieza iniciará la función de búsqueda de ubicación y emitirá un mensaje de audio.
※
Cuando la búsqueda de ubicación se ha completado correctamente, el aparato continuará la limpieza
desde el lugar donde fue movido.
Si se produce un fallo en la búsqueda de ubicación, el aparato iniciará la limpieza desde el principio.
Para encontrar la posición exacta,
por favor, apártese del HomBot.
Ubicación de la colisión
Consejos
ţ4JBQBHBFMBQBSBUPDVBOEPMBGVODJ²OEFC¹TRVFEBEFVCJDBDJ²OFTUBDUJWBEBEJDIBGVODJ²O
resultará cancelada.
ţLa búsqueda de ubicación es más eficaz cuando el robot de limpieza está cerca de la ubicación
desde la que fue movido.
ţ4JFMSPCPUFTUDBSHBOEPTFDBODFMBSMBBOUFSJPSQSPHSBNBDJ²OEFMBŞ'VODJ²OEFOBWFHBDJ²Oş
22
Page 60

DIAGNÓSTICO INTELIGENTE
El robot de limpieza usa la función de «Diagnóstico inteligente» para realizar un
autodiagnóstico.
Si el diagnóstico detecta cualquier irregularidad, póngase en contacto con el centro de
servicio técnico de LG Electronics más cercano.
ٙ
Durante el diagnóstico inteligente, es posible que el robot de limpieza se mueva dentro de un radio de
50 EO. Por tanto, antes de iniciar el diagnóstico inteligente, asegúrese de que no haya ningún objeto
dentro de un radio de 1 O alrededor de la base.
1. Ponga el interruptor de alimentación principal de la parte
trasera en la posición «ON» y asegúrese de que el robot
de limpieza está acoplado a la base.
ٙ
La función de «Diagnóstico inteligente» solo está
disponible cuando el robot de limpieza está acoplado a
la base.
2. Pulse el botón «Diagnosis» en el mando a distancia,
a continuación, el proceso se iniciará con el siguiente
mensaje: "Iniciando diagnóstico inteligente de HomBot.
Por favor apártese y quite cualquier objeto a una distancia
de 1 metro o 3 pies aproximadamente."
ٙ
Si la bandeja para la bayeta está acoplada, el proceso
no se activará.
3. Si el diagnóstico inteligente se completa con
normalidad, el robot de limpieza volverá a la base
e informará del resultado mediante un mensaje
de voz. Una vez emitido el mensaje de voz, si
pulsa el botón 'Home' en el mando a distancia
o en la unidad principal, el mensaje se volverá a
emitir. Para fi nalizar el proceso de diagnóstico,
pulse el botón Stop/OK en el mando a distancia
o en la unidad principal.
ٙ
Si, pasado 1 minuto desde el mensaje de voz,
no ha realizado ninguna acción, el robot se
pondrá en modo de «Carga».
ٙ
Si se produce un error en el sensor de obstáculos, en el sensor ultrasónico o en el sensor de alturas, el
robot de limpieza no volverá a la base, sino que fi nalizará el diagnóstico inteligente con el mensaje de voz
correspondiente.
Consejos
• Asegúrese de no tocar el robot de limpieza o de alterar su funcionamiento antes de que el
diagnóstico inteligente haya finalizado. De lo contrario, deberá poner el interruptor de alimentación
principal primero en la posición «OFF» y después en la posición «ON» para reanudar el diagnóstico.
• El diagnóstico inteligente no se activará en cualquiera de los casos siguientes. En cada caso,
compruebe el problema e inténtelo de nuevo.
- El robot de limpieza no está acoplado a la base
- No hay suficiente batería
- El filtro del depósito de polvo no está en su posición
- La bandeja para la bayeta está acoplada
23
Page 61

DIAGNÓSTICO INTELIGENTE
Si se emite un mensaje de voz después del diagnóstico inteligente, consulte la tabla siguiente y actúe en consecuencia.
Mensaje de voz Medidas a tomar (referencia)
Iniciando diagnóstico inteligente de HomBot. Por favor apártese
y quite cualquier objeto a una distancia de 1 metro o 3 pies
aproximadamente.
Hombot tiene que estar cargandose para poder iniciar el diagnóstico
inteligente. Por favor acople el HomBot a la base de carga.
No se encontró ningún defecto durante el diagnóstico.
Imposible iniciar el diagnóstico inteligente debido al bajo nivel de
batería. Por favor, vuelva a intentarlo después de cargar la batería.
Por favor, compruebe que la bolsa de polvo y el fi ltro están
correctamente instalados.
HomBot no se cargará debido a un error del sensor infrarrojo. Repita el diagnóstico inteligente y si se emite el mismo
HomBot no se cargará debido a un error del sensor ultrasónico. Repita el diagnóstico inteligente y si se emite el mismo
HomBot no se cargará debido a un problema con los sensores
de inclinación inferiores. Por favor, limpie los sensores.
Por favor, limpie el sensor de la cámara situado en la parte
inferior del lado derecho.
Por favor, limpie las ventanas del sensor de detección de
obstáculos en ambos lados del HomBot.
Se ha encontrado un problema en el sensor de giro. Repita el diagnóstico inteligente y si se emite el mismo
Por favor, compruebe que no hay materiales extraños en la
rueda izquierda.
Por favor, compruebe que no hay materiales extraños en la
rueda derecha.
Se ha encontrado un problema en el sensor de la rueda
izquierda.
Se ha encontrado un problema en el sensor de la rueda derecha. Repita el diagnóstico inteligente y si se emite el mismo
Se ha encontrado un problema con el cepillo. Por favor,
compruebe que no hay materiales extraños.
Se ha encontrado un problema en el motor de succión. Repita el diagnóstico inteligente y si se emite el mismo
Se ha encontrado un problema en el sensor de aceleración. Repita el diagnóstico inteligente y si se emite el mismo
Para volver a escuchar el resultado del diagnóstico inteligente,
por favor pulse el botón de carga. Para parar, por favor, pulse el
botón de parada.
Por favor, intente de nuevo el diagnóstico inteligente tras apagar
el interruptor principal situado en la parte trasera del HomBot y
encenderlo de nuevo. Si el problema persiste, por favor, contacte
con atención al cliente de LG Electronics.
El modo diagnóstico inteligente se apagará.
El modo diagnóstico inteligente no funcionará con la mopa
acoplada. Por favor, vuelva a intentarlo tras quitarla.
El diagnóstico inteligente no ha podido completar el diagnóstico.
Por favor, vuelva a intentarlo de nuevo tras haber apagado el
interruptor principal situado en la parte posterior del HomBot y
encenderlo de nuevo.
Retire cualquier objeto que se encuentre en un radio de
1 alrededor de la base y aléjese del aparato hasta que el
diagnóstico haya fi nalizado.
Lleve el robot de limpieza a la base para cargarlo.
Repita el diagnóstico inteligente después de cargar la batería.
Abra la tapa del depósito de polvo y examine el interior del mismo.
mensaje, póngase en contacto con el centro de servicio
técnico de LG Electronics más cercano.
mensaje, póngase en contacto con el centro de servicio
técnico de LG Electronics más cercano.
Limpie los tres sensores de alturas de la parte frontal inferior.
Limpie la lente de la cámara del sensor de la parte inferior
derecha.
Limpie la lente de los sensores de obstáculos de la partes
izquierda y derecha.
mensaje, póngase en contacto con el centro de servicio
técnico de LG Electronics más cercano.
Compruebe si hay sustancias extrañas en la rueda izquierda.
Compruebe si hay sustancias extrañas en la rueda derecha.
Repita el diagnóstico inteligente y si se emite el mismo
mensaje, póngase en contacto con el centro de servicio
técnico de LG Electronics más cercano.
mensaje, póngase en contacto con el centro de servicio
técnico de LG Electronics más cercano.
Compruebe si hay sustancias extrañas atrapadas en el
cepillo.
mensaje, póngase en contacto con el centro de servicio
técnico de LG Electronics más cercano.
mensaje, póngase en contacto con el centro de servicio
técnico de LG Electronics más cercano.
Si necesita comprobar de nuevo los resultados del
diagnóstico, pulse el botón «Recharge»; si desea fi nalizar el
diagnóstico, pulse el botón «Stop».
Ponga el interruptor de alimentación principal primero en la
posición «OFF» y después en la posición «ON» para reanudar el
diagnóstico. Si el problema continúa, póngase en contacto con
el centro de servicio técnico de LG más cercano.
Repita el diagnóstico inteligente después de haber extraído
la bandeja para la bayeta.
Ponga el interruptor de alimentación principal primero en
la posición «OFF» y después en la posición «ON» para
reanudar el diagnóstico. NO toque el robot o altere su
funcionamiento hasta que el diagnóstico haya fi nalizado.
24
Page 62

LIMPIEZA DEL DEPÓSITO DE POLVO
Si el depósito de polvo está lleno, la potencia de succión disminuirá. Limpie el depósito de polvo antes y
después de cada sesión de limpieza. Limpie el depósito de polvo siguiendo la secuencia que se indica a
continuación:
1. Pulse el botón «PUSH» en el robot de limpieza
para abrir la tapa del depósito de polvo.
2. Agarre el asa del depósito de polvo y tire de ella
hacia arriba.
3. Tire de la lengüeta del lateral izquierdo del
módulo del fi ltro HEPA situado en la parte trasera
del depósito de polvo para así separar el fi ltro
HEPA y la esponja.
※ Tenga en cuenta que al separar el fi ltro se
puede caer algo de polvo.
※ Consulte la página 26 antes de limpiar el fi ltro
del depósito de polvo.
4. Levante la tapa hacia arriba mientras mantiene
pulsado el botón de separación del depósito de
polvo.
5. Vacíe el depósito de polvo y límpielo con un
cepillo de limpieza o bajo un chorro de agua.
6. Después de limpiar el depósito de polvo con
agua, séquelo completamente en una zona bien
ventilada y a la sombra.
7. Cuando haya fi nalizado la limpieza del depósito
de polvo, cierre la tapa y coloque la esponja y el
fi ltro HEPA.
※ En la página 26 encontrará guías de
ensamblaje detalladas.
8. Coloque el depósito de polvo en el robot de
limpieza y cierre la tapa del depósito de polvo.
Consejos
• Si cierra la tapa del filtro del depósito de polvo sin colocar ningún filtro, el polvo que llega al interior
puede provocar fallos en el aparato.
• Asegúrese de ensamblar el filtro en el depósito de polvo después de limpiarlo.
Si pone el robot de limpieza en funcionamiento sin haber colocado los filtros o sin haber ensamblado
la tapa del filtro, se emitirá el mensaje de voz siguiente: «Por favor, compruebe que la bolsa de polvo
y el filtro están correctamente instalados.»
• Si la cubierta del aparato se desacopla durante la limpieza, acóplela
verticalmente en la ranura del depósito de polvo.
25
Page 63

LIMPIEZA DEL FILTRO DEL DEPÓSITO DE POLVO
El fi ltro del depósito de polvo está compuesto de un fi ltro HEPA y de un fi ltro de esponja.
Limpie el fi ltro HEPA y el fi ltro de esponja siguiendo la secuencia que se indica a continuación:
1. Tire de la lengüeta del lateral izquierdo del
módulo del fi ltro HEPA situado en la parte trasera
del depósito de polvo para así separar el fi ltro
HEPA y la esponja.
2. Limpie a fondo las pequeñas partículas del fi ltro
HEPA con una aspiradora o con un cepillo.
※
NO lave el fi ltro HEPA con agua. Su potencia de
succión podría disminuir.
3. Use un cepillo para limpiar el fi ltro de esponja.
Si lo ha lavado con agua, séquelo completamente
a la sombra.
4. Ensamble el fi ltro HEPA y el fi ltro de esponja en
la tapa siguiendo la secuencia que se indica a
continuación:
※
Encaje el saliente rectangular del lateral del
fi ltro HEPA en la ranura de la tapa.
※
Asegúrese de ensamblar correctamente el fi ltro
HEPA y el fi ltro de esponja en la tapa.
26
Consejos
• Para mantener el rendimiento del robot de limpieza, limpie el filtro HEPA al menos una vez a la
semana con un cepillo o con una aspiradora.
• Si pone el robot de limpieza en funcionamiento con la tapa del filtro ensamblada en el depósito
de polvo sin haber colocado ningún filtro, el polvo que llega al interior puede provocar fallos en el
aparato.
Page 64

LIMPIEZA DEL CEPILLO
El cepillo, situado en la parte inferior del robot de limpieza, ayuda a absorber el polvo. Limpie el cepillo
siguiendo la secuencia que se indica a continuación:
※
Antes de dar la vuelta a la unidad principal, extienda un paño suave en el suelo y extraiga el depósito de
polvo.
De lo contrario, la unidad principal se puede rayar o se puede llenar de polvo procedente del depósito.
Ponga el interruptor de
alimentación principal en
la posición «OFF» antes de
empezar la limpieza. Coloque
el robot de limpieza boca
abajo sobre un paño suave.
Póngase unos guantes y
empuje el cepillo hasta una
protuberancia amarilla.
Después de comprobar si hay
sustancias extrañas, pulse la
lengüeta de fi jación y tire de
ella hacia arriba para separar la
tapa.
Al empujar el cepillo, levante
la protuberancia amarilla
para separarla de la unidad
principal.
Use una herramienta de
limpieza para limpiar los pelos
y otras sustancias extrañas
que haya en el cepillo.
Limpie el cepillo con una
aspiradora o con unas tijeras.
Encaje la lengüeta de fi jación
(de forma rectangular) del
lateral del cepillo en las
ranuras del mismo color.
Mientras empuja el cepillo en la
dirección de la fl echa, encaje la
lengüeta de fi jación (de forma
rectangular) del lateral opuesto
en las ranuras.
Presione el cepillo y cierre la
tapa hasta oír un chasquido
en ambos lados de la
lengüeta de fi jación.
※
Asegúrese de no atascar los
cepillos laterales en la tapa.
27
Page 65

LIMPIEZA DEL SENSOR/TERMINAL DE CARGA
El robot de limpieza tiene sensores que le permiten detectar obstáculos
y escaleras, así como la ubicación de la base para cargar la batería. Para
mantener el rendimiento del robot de limpieza, limpie con frecuencia los
sensores y el terminal de carga como se indica a continuación:
1. Ponga el interruptor de alimentación de la parte inferior del robot de
limpieza en la posición «OFF». Si el interruptor no está en la posición
«OFF», la activación del robot de limpieza puede provocar lesiones.
2. Extienda un paño suave en el suelo, dé la vuelta al robot de limpieza y
colóquelo sobre el paño.
※
Asegúrese de extraer el depósito de polvo antes de dar la vuelta a
la unidad principal. De lo contrario, el polvo del depósito de polvo se
puede caer.
3. Use un paño suave o un cepillo de limpieza para limpiar el polvo de
cada sensor y del terminal de carga como se describe a continuación:
Sensores
Sensor de la
cámara superior
ultrasónicos
Ventana del sensor de
detección de obstáculos
Sensores de detección
de la base y sensores
de recepción del mando
a distancia
28
Sensor de detección
de alturas
Terminal de carga
Sensor de la
cámara inferior(opción)
Terminal de carga
Lente
Consejos
• Cuando limpie el robot de limpieza, nunca pulverice agua, disolvente, benceno, etc., directamente
sobre él.
• Llame al centro de servicio técnico si el sensor o el terminal de carga están dañados. Los daños en
el sensor y en el terminal pueden provocar un mal funcionamiento del aparato.
• Para limpiar el filtro/sensor, use un paño suave o un cepillo de limpieza.
• Es posible que algunos modelos no tengan Sensor de Cámara en la parte inferior.
Page 66

LIMPIEZA DE LOS CEPILLOS LATERALES
Sustancias u objetos extraños, como, por ejemplo, pelos, pueden
quedar adheridos fácilmente a los cepillos laterales. Elimine esas
sustancias al menos una vez a la semana.
Si hay una gran cantidad de sustancias extrañas en los cepillos, es
posible que estos resulten dañados.
Si el suelo es áspero o si se limpian las paredes con frecuencia, los cepillos laterales se pueden doblar o
dañar. En ese caso, siga el método siguiente para alisar los cepillos laterales:
1. El procedimiento siguiente ayuda a restaurar los
cepillos deformados.
2. Pulse el botón «START/STOP» en el robot de
limpieza durante 2 segundos para apagar la
fuente de alimentación.
3. Coloque el robot de limpieza en el extremo de
una mesa para facilitar la limpieza de los cepillos
laterales. Asegúrese de que el robot de limpieza
no se puede caer.
4. Sumerja el cepillo lateral en agua caliente.
5. P resione el cepillo lateral durante
aproximadamente 10 segundos para que esté
completamente sumergido en el agua.
6. Frote suavemente el cepillo lateral deslizándolo
en la mano.
7. Gire el cepillo lateral y repita los pasos 4 a 6 para
cada sección del cepillo.
8. Antes de usar el cepillo lateral, espere a que se
haya secado por completo.
Reemplazo de los cepillos laterales
1. Use un destornillador para extraer los tornillos y así
separar el cepillo lateral de la unidad principal.
2.
Elimine cualquier cabello que pueda haber tras la separación.
3.
Ensamble el cepillo lateral a reemplazar en la parte
inferior del robot de limpieza, colocando las marcas «R»
y «L» del cepillo en sus homólogos del robot de limpieza.
29
Page 67

LIMPIEZA DE LA BAYETA ULTRAMICROFIBRAS (OPCIONAL)
Para evitar olores, lave la suciedad y el polvo de la bayeta una vez fi nalizada la limpieza. Siga estas
indicaciones para lavar la bayeta ultramicrofi bras:
1. Separe la bayeta ultramicrofi bras de la bandeja para la
bayeta.
210
2. Lávela cuidadosamente con agua.
3. Antes de usar la bayeta, séquela a la luz del sol en un lugar
bien ventilado.
※
Si usa la bayeta cuando aún está húmeda, puede provocar
un mal funcionamiento del robot de limpieza.
Consejos
• Para evitar un mal funcionamiento del aparato, use solamente la bayeta ultramicrofibras
proporcionada con el robot de limpieza.
• Puede comprar bayetas ultramicrofibras adicionales en el centro de servicio técnico de LG Electronics
más cercano.
• Algunos modelos pueden no venir con mopa de Microfibras o porta mopas.
30
Page 68

RESOLUCIÓN DE PROBLEMAS
Si se emite el mensaje de voz: «Las ruedas no están en contacto con el suelo.
Por favor, posicione el HomBot en una superfi cie lisa.»
Se emite un mensaje de advertencia cuando una rueda no está en contacto con el suelo o cuando se ha
caído por cualquier motivo.
• ¿Una de las ruedas ha quedado atrapada en la puerta principal, en el balcón, en la escalera, etc.?
Coloque el robot de limpieza en una superfi cie plana.
Si se emite el mensaje de voz: «Por favor, retire cualquier material extraño de
la rueda izquierda/derecha.»
¿Hay alguna sustancia extraña enrollada en la rueda?
Extienda un paño suave en el suelo, dé la vuelta al robot de limpieza y colóquelo sobre el paño.
Elimine las sustancias extrañas de la rueda.
※ Asegúrese de extraer el depósito de polvo antes de dar la vuelta a la unidad principal.
De lo contrario, el polvo del depósito de polvo se puede caer.
Si se emite el mensaje de voz: «HomBot no puede seguir limpiando.
Por favor, compruebe el área a su alrededor»
Se emite un mensaje de advertencia cuando el robot de limpieza no puede continuar la limpieza por la
presencia de un obstáculo.
• ¿El robot de limpieza está atascado?
Después de retirar la pieza que está atascada, coloque el robot de limpieza sobre una superfi cie plana.
31
Page 69

RESOLUCIÓN DE PROBLEMAS
Si se emite el mensaje de voz: «Por favor, compruebe que la bolsa de polvo y
el fi ltro están correctamente instalados.»
Se emite un mensaje de advertencia cuando no hay un depósito de polvo o una tapa del fi ltro instalados.
• ¿El depósito de polvo está instalado en el robot de limpieza?
Abra la tapa del depósito de polvo y si falta el depósito de polvo, colóquelo.
NO deje abierta la rendija de la tapa del depósito de polvo.
• Asegúrese de que la tapa del fi ltro está ensamblada en el depósito de polvo.
Si se emite el mensaje de voz: «Batería baja. Por favor, sitúe el HomBot en la
estación de inicio para cargar.»
Cuando la batería está prácticamente agotada, se emite el mensaje de voz: «Bateria baja»
• Lleve el robot de limpieza a la base para que se inicie la carga de la batería.
Si el robot de limpieza está acoplado a la base, se iniciará la carga y se emitirá la melodía de inicio de
carga.
32
Page 70

RESOLUCIÓN DE PROBLEMAS
Si se emite el mensaje de voz: «Por favor, retire cualquier material extraño
del cepillo de la parte inferior del HomBot.»
Se emite un mensaje de advertencia cuando hay una sustancia extraña en el cepillo.
Extienda un paño suave en el suelo, dé la vuelta al robot de limpieza y colóquelo sobre el paño.
※
Antes de dar la vuelta a la unidad principal, extraiga el depósito de polvo.
De lo contrario, la unidad principal se puede llenar de polvo procedente del depósito.
• El cepillo hace un sonido fuerte y anómalo.
Compruebe la ranura de separación del cepillo para verifi car que este está ensamblado correctamente.
Extraiga el cepillo del robot de limpieza y elimine cualquier sustancia extraña del mismo.
• El cepillo o los cepillos laterales están atascados.
Elimine cualquier sustancia extraña, como, por ejemplo, cables o pelos, que se encuentre en el cepillo
o en los cepillos laterales.
※
En las instrucciones de la página 27, 29 encontrará una descripción más detallada de este proceso.
33
Page 71

ANTES DE SOLICITAR ASISTENCIA TÉCNICA
Compruebe lo siguiente antes de informar del fallo del robot de limpieza.
Problema Soluciones (página de referencia)
La fuente de alimentación no
se puede encender.
La fuente de alimentación se
apaga automáticamente.
El robot de limpieza no carga
la batería.
La potencia de succión ha
disminuido.
El aparato hace más ruido de
lo normal.
Compruebe que el interruptor de alimentación está en la posición
«ON». (Página 15)
Esto no es un fallo. El robot de limpieza tiene su propia función de
ahorro de energía.
Si, después de encender la fuente de alimentación, no usa el aparato
en 10 minutos, la fuente de alimentación se apagará. (Página 17)
Retire los objetos que haya alrededor de la base. (Página 15)
Compruebe que la fuente de alimentación está conectada a la base.
(Página 14)
Limpie el terminal de carga con un paño seco.
Compruebe si hay alguna sustancia extraña bloqueando el puerto
de succión. (Página 27)
Vacíe el depósito de polvo. (Página 25)
Limpie el fi ltro del depósito de polvo. (Página 26)
Compruebe que el depósito de polvo está ensamblado
correctamente.
Compruebe que el fi ltro del depósito de polvo está ensamblado
correctamente. (Página 26)
Compruebe si hay alguna sustancia extraña atascada en el cepillo.
(Página 27)
El robot de limpieza no se
enciende.
El cepillo no gira. Limpie el cepillo. (Página 27)
Los movimientos o el recorrido
son anómalos.
No es posible encender el
robot de limpieza con el
mando a distancia.
Compruebe que el interruptor de alimentación está en la posición
«ON». (Página 15)
Compruebe que la batería está cargada. (Página 17)
Compruebe que el cepillo está ensamblado correctamente.
(Página 27)
Limpie el sensor cuidadosamente con un paño suave. (Página 28)
Si la bayeta ultramicrofi bras está acoplada, compruebe que está
ensamblada correctamente. (Página 21)
Ponga el interruptor de alimentación primero en la posición «OFF» y
después en la posición «ON».
Reemplace las pilas del mando a distancia. (Página 12)
Compruebe que el mando a distancia está dentro del área de cobertura
de la unidad principal, que tiene un radio de 3 . (Página 12)
Compruebe si el interruptor de alimentación principal de la parte
inferior está en la posición «ON». (Página 15)
34
Page 72

REFERENCIAS
Aviso sobre el software de código abierto
Para obtener, bajo licencias de código abierto GPL, LGPL y MPL entre otras, el código fuente contenido en este
producto, entre en http://opensource.lge.com.
Además del código fuente, también podrá descargar todos los términos de la licencia y todas las exenciones de
responsabilidad sobre la garantía a los que se hace referencia.
Ensamblado y desensamblado de la batería
Ponga el interruptor de
alimentación principal de la parte
inferior izquierda del robot de
limpieza en la posición «OFF».
Ponga el interruptor de
alimentación principal de la parte
inferior izquierda del robot de
limpieza en la posición «OFF».
Extraiga el tornillo con un
destornillador y retire la batería
del aparato.
Coloque la batería.
Separe el cable de la batería
mientras presiona el gancho
conector.
ADVERTENCIA
Precauciones en caso de incendio, explosión, descarga eléctrica, o avería.
ţ
No cargue este Paquete de Baterías (Paquete en lo adelante) con otro cargador que no sea el
suministrado originalmente.
ţ/PEB°FMBCBUFS¬BDPNPQPSFKFNQMPDPSUFQJODIFBQMBTUFBDPSUFPDPSUFMPTDPOUBDUPTFYUFSOPT
ţ/PJOUFOUFEFTBSNBSMBCBUFS¬BFOOJOH¹ODBTP$VBOEPFMFOWBTFFTU¨EB°BEPPOPGVODJPOF
DPSSFDUBNFOUFMM¨WFMPBMTFSWJDJPU¨DOJDP
ţ/PDPMPRVFMBCBUFS¬BDFSDBEFVOBGVFOUFEFDBMPSOJMBBSSPKFBMGVFHPPBMBHVB
ţ$VBOEPMBCBUFS¬BFTU¨DBSHBEBQPSGBWPSNBOU¨OHBMBGVFSBEFVOBNCJFOUFI¹NFEPPNPKBEP
ţ1PSGBWPSNBOUFOHBMBCBUFS¬BBMFKBEBEFOJ°PTCFC¨TPNBTDPUBT
35
Page 73

FONCTIONNALITES DE L’ASPIRATEUR ROBOT
Nettoyage des coins
Grâce à sa nouvelle conception adaptée aux angles et coins, l'aspirateur
robot affi che des performances de nettoyage incroyables.
Mémorisation de l'espace
L'aspirateur robot peut mémoriser son environnement de nettoyage grâce à
l'option de fonctionnement intelligent qui lui permet d'optimiser le nettoyage.
Fonction Turbo
En mode « Turbo », l'aspirateur robot est encore plus puissant et effi cace.
Le mode « Smart Turbo » s'active automatiquement sur les tapis pour une
plus grande effi cacite de l'aspirateur robot.
Support pour lingette microfi bre(en option)
Le support s'enlève facilement pour accéder à la lingette microfi bre : plus
besoin de retourner l'appareil !
Mode "My Space"
Lorsqu'il est programmé pour nettoyer une zone particulière, l'aspirateur
robot nettoie rapidement la zone désignée.
Répétition du nettoyage
L'aspirateur robot poursuit le nettoyage jusqu'à épuisement de la batterie.
Reprise du nettoyage
Lorsque l'aspirateur robot est déplacé pendant le nettoyage, il recherche
automatiquement sa position dans la pièce, retourne à l'endroit qu'il vient de
quitter et poursuit le nettoyage.
Page 74

TABLE DES MATIERES
1
AVANT UTILISATION
2~5
6
7
8
9~10
11
12
13
Précautions relatives à la sécurité
Composition du produit
Vue descriptive du produit
Descriptif des pièces périphériques
Fonction associée à chaque bouton
Informations d'indication d'état
Mise en service de l’aspirateur robot
Principales étapes de fonctionnement
2
MODE D'UTILISATION
14
15
16
17
18~19
20
21
22
23~24
Méthode d'installation de la base de
chargement
Mise sous/hors tension
Démarrage et arrêt du nettoyage
Méthode de chargement de la batterie
Mode de nettoyage
Mode de nettoyage manuel
Utilisation de la lingette microfibre (en option)
Fonction de recherche de zones à nettoyer
Fonction auto-diagnostic
4
INFORMATIONS SUPPLÉMENTAIRES
31~33
34
Mesures correctives face à des anomalies
de l’aspirateur robot
Confirmation des éléments avant de
signaler une panne
5
ÉLÉMENTS DE RÉFÉRENCE
35
Note sur les logiciels Open source
3
MANIPULATION APRÈS USAGE
25
26
27
28
29
30
Nettoyage du bac à poussière
Nettoyage du filtre du bac à poussière
Nettoyage des brosses
Entretien des capteurs / de la borne de
chargement
Entretien des brosses latérales
Nettoyage de la lingette microfibre
(en option)
Page 75

PRÉCAUTIONS RELATIVES À LA SÉCURITÉ
Les précautions suivantes visent à prévenir tout danger ou dommage imprévisible grâce à un usage
sécurisé et approprié du produit.
Contenu des avertissements
Après avoir lu ce manuel, conservez-le dans un endroit facilement accessible à tout moment.
Ce symbole a pour objet d'éveiller votre attention sur certains éléments et
manipulations et le danger que cela pourrait causer. Pour éviter tout risque, lisez ce
qui suit soigneusement et suivez les instructions.
AVERTISSEMENT
ATTENTION
AVERTISSEMENT
1. Cet appareil n'est pas prévu pour être utilisé par des personnes
(y compris les enfants) dont les capacités physiques,
Le non respect des instructions peut provoquer des blessures graves, voire la mort
de l'utilisateur.
Le non respect des instructions peut provoquer des blessures ou des dommages
matériels.
sensorielles ou mentales sont réduites, sauf si elles ont pu
bénéficier, par l'intermédiaire d'une personne responsable de
leur sécurité, d'une surveillance ou d'instructions préalables.
2. Il est important de surveiller les enfants afin qu'ils ne jouent
pas avec l'appareil.
3. Si le cordon d'alimentation est endommagé, il doit être
remplacé uniquement pas un technicien SAV LG Electronics
pour éviter tout risque.
4. Cet appareil peut être utilisé par des enfants de 8 ans et plus.
Les personnes aux capacités physiques, sensorielles ou
mentales réduites ne peuvent utiliser l'appareil que sous
surveillance, ou si elles ont reçu des instructions préalables
pour une utilisation sécurisée de l'appareil, en ayant bien
compris les risques.
Les enfants ne doivent pas jouer avec l'appareil.
Le nettoyage et l'entretien ne doivent pas être réalisés par des
enfants non surveillés.
Pour votre sécurité, ne démontez
pas l’aspirateur robot ni sa batterie.
En cas de problème, confi ez
l’appareil à une Station Technique
Agréée.
Ceci pourrait être à l'origine d'un
incendie ou d'une panne.
2
N'utilisez jamais la batterie et la
base de chargement pour un autre
produit que l’aspirateur robot.
Ceci pourrait être à l'origine d'un
incendie ou d'une panne.
Page 76

PRÉCAUTIONS RELATIVES À LA SÉCURITÉ
Gasoline
Detergent
AVERTISSEMENT
Veillez à ce que le cordon
d'alimentation de la base de
chargement ne soit pas compressé
par un objet lourd ou en contact
avec un matériau aiguisé ou pointu.
Ceci pourrait être à l'origine d'un
incendie ou d'une panne. Si le
cordon d'alimentation est abîmé ou
cassé, faites-le changer au SAV.
Ne placez pas la base de
chargement et l’aspirateur robot
à proximité d'un élément de
chauffage.
Vous risqueriez de voir une
déformation de la coque extérieure
ou de provoquer un incendie ou
une défaillance suite à une collision.
Ne pliez pas le cordon
d'alimentation en forçant
dessus. N'utilisez pas le cordon
d'alimentation s'il a été endommagé
ou détendu (étiré).
Ceci pourrait être à l'origine d'un
incendie ou d'une panne.
Ne touchez pas la fi che du cordon
d'alimentation si vos mains sont
mouillées.
Ceci pourrait être à l'origine d'une
décharge électrique (électrocution).
N'utilisez pas l’aspirateur robot si
des bougies ou des objets fragiles
ont été disposés au sol.
Ceci pourrait être à l'origine d'un
incendie ou d'une panne.
Utilisez toujours une prise murale
de plus de 5 # et indépendante.
Si plusieurs appareils sont branchés
en même temps sur une même
prise, vous vous exposez à un risque
d'incendie dû à la chaleur générée
sur la prise.
Lorsque vous débranchez l'appareil du
secteur, faites-le en tirant sur la fi che
située au bout du cordon. Lorsque vous
débranchez la fi che, veillez à ne pas
toucher les broches avec vos doigts.
Ceci pourrait être à l'origine d'une
décharge électrique (électrocution).
N'utilisez pas l’aspirateur robot alors
qu'un enfant ou un objet est dessus.
N'utilisez pas l’aspirateur robot alors
qu'un objet est accroché dessus.
Ceci pourrait être à l'origine de blessures
et de dommages à l'appareil.
Ne vaporisez ni répandez de produit
infl ammable, de détergent ou de
l'eau autour de l’aspirateur robot.
Ceci pourrait être à l'origine d'un
incendie ou d'une panne.
*
Matériau infl ammable : essence, diluant, etc.
*
Détergent : détergent, articles de bain, etc.
Éloignez vos mains, vos pieds ou toute
autre partie du corps des brosses et
roues pendant le fonctionnement de
l’aspirateur robot.
Ceci pourrait être à l'origine de
blessures et de dommages de
l'appareil.
Ne faites pas fonctionner
l’aspirateur robot sur du mobilier
étroit et élevé comme une armoire,
un réfrigérateur, un bureau, une
table, etc.
Ceci pourrait être à l'origine de
blessures et de défaillances de
l'appareil.
Ne pas activer l'appareil sur un sol
incliné à plus de 10 .
Cela risque d'entraver le
fonctionnement de l'appareil.
Coupez immédiatement
l'alimentation en cas de son
anormal, d'odeur de fumée
provenant de l’aspirateur robot.
Ceci pourrait être à l'origine d'un
incendie ou d'une panne.
Ne faites pas fonctionner
l’aspirateur robot dans une pièce où
un bébé dort.
Ne laissez pas les enfants
s'accrocher à l'aspirateur robot.
Ceci pourrait être à l'origine de
blessures et de dommages à
l'appareil.
3
Page 77

PRÉCAUTIONS RELATIVES À LA SÉCURITÉ
ATTENTION
Videz fréquemment le réceptacle à
poussière et maintenez-le propre.
La poussière collectée dans
le réceptacle à poussière peut
provoquer des allergies aux
personnes sensibles et des insectes
nuisibles peuvent s'y être logés.
Utilisez l’aspirateur robot
à l'intérieur des maisons et
appartements uniquement.
À défaut, cela pourrait être à
l'origine de défaillances de l'appareil.
Fermez le couvercle du bac à
poussière sur l'unité principale
avant de commencer le nettoyage.
Si le couvercle n'est pas fermé, il
peut occasionner des blessures ou
endommager le produit.
Ne pas utiliser le l'aspirateur robot
près d'une barrière, d'un escalier,
ou de n'importe quel autre endroit
dangereux.
Faire cela peut exposer l'utilisateur
à des risques de blessures ou le
produit peut être endommagé.
Ne laissez pas tomber l'appareil ou
ne lui infl igez des coups violents.
Ceci pourrait être à l'origine de
blessures et de défaillances de
l'appareil.
Ne laissez pas le produit dans des
lieux à température basse (inférieure
à –5 %) pendant un long moment.
Ceci pourrait être à l'origine d'une
panne de l'appareil.
Retirez tous les câbles et les longs
fi ls du sol.
Les câbles et les longs fi ls peuvent
se coincer dans les roues de
l'aspirateur robot et ainsi entraîner
un dysfonctionnement ou
débrancher le cordon.
Veillez à ce que l'appareil ne soit
pas posé sur une table ou un
bureau alors quil est allumé.
Cela peut entraîner des blessures
ou détériorer l'appareil.
Dans certains cas exceptionnels, la
brosse de l’aspirateur robot peut
endommager la moquette. Si c'est
le cas, arrêtez l'appareil.
Si les fi ls à l'extrémité des tapis
sont longs, ceux-ci peuvent être
endommagés.
Ne laissez jamais le le corps
de l’aspirateur ni la base de
chargement entrer en contact avec
un objet métallique.
Ceci pourrait être à l'origine d'une
panne de l'appareil.
Ne versez pas d'eau, de détergent,
etc. dans l’aspirateur robot.
Ceci pourrait être à l'origine d'une
panne de l'appareil. Si de l'eau
ou un autre liquide pénètre dans
l'appareil, mettez l'appareil hors
tension et contactez le SAV.
Évitez que l’aspirateur robot
n'aspire des liquides, des lames, des
punaises, du petit bois, etc.
Ceci pourrait être à l'origine d'une
panne de l'appareil.
N’introduisez aucune bague, ni tige,
dans les capteurs et détecteurs de
l’aspirateur robot.
Ceci pourrait être à l'origine d'une
panne de l'appareil.
N'utilisez pas l’aspirateur robot
lorsque le réceptacle à poussière
est plein.
Ceci pourrait être à l'origine d'une
panne de l'appareil.
4
Page 78

PRÉCAUTIONS RELATIVES À LA SÉCURITÉ
ATTENTION
Si le sol est mouillé ou humide,
essuyez le sol avant d'utiliser le
produit.
Ceci pourrait être à l'origine d'une
panne de l'appareil.
En fi xant la lingette, n'obstruez pas
le capteur de la caméra situé en bas
de l'appareil.
Cela empêcherait le produit de
fonctionner correctement.
(Certains modèles peuvent ne pas
être fournis avec un capteur.)
Pour économiser de l'énergie,
éteignez le commutateur lorsque
vous n'utilisez pas l'appareil et
allumez-le pour le nettoyage et le
chargement.
Pendant son fonctionnement,
l’aspirateur robot risque de percuter
des meubles tels que les pieds de
chaises, de tables et autres meubles
fi ns et longs.
Pour un nettoyage plus rapide et un
meilleur résultat, otez les chaises et
placez-les en hauteur sur la table.
Avant de commencer le nettoyage,
assurez-vous que les extérieurs de
votre domicile soient au moins à
3 EO de hauteur du sol.
Si le seuil de la porte est
suffi samment bas, l'aspirateur robot
peut aller tout seul jusqu'à la porte
d'entrée.
A savoir
Vérifiez les éléments suivants avant usage.
• Videz le bac à poussière lorsqu’il est plein.
• Retirez câbles et long fils situés au sol.
• Retirez toute humidité du sol avant le nettoyage.
• Fermez le couvercle du bac à poussière avant de nettoyer.
• Retirez les objets fragiles et inutiles de la pièce à nettoyer. Notamment, retirez
systématiquement tous les objets fragiles et autres objets situés sur le sol.
• Vérifiez que la puissance de la batterie est suffisante, sinon effectuez le chargement.
• Fermez la porte des pièces que vous ne souhaitez pas nettoyer.
Durant le nettoyage, l'aspirateur robot se déplacera partout où il lui sera possible de se
déplacer.
• N'utilisez pas ce produit dans une pièce où un bébé dort seul. Le bébé risquerait d'être
blessé.
• Retirez du sol les serviettes, torchons, tapis et tout tissu peu épais qui risqueraient
d'être pris par la brosse.
• Lors d’un nettoyage sur un tapis de plus de 20 d’ épaisseur ou avec franges, il est
conseillé de bien le ranger pour éviter qu’il ne s’abîme.
• Veiller à fermer les portes d'accès aux balcons. Les roues risquent de se bloquer
pendant le nettoyage.
5
Page 79

COMPOSITION DU PRODUIT
Aspirateur robot
Télécommande
Les dessins peuvent être différents des objets réels.
Outil de nettoyage
Support lingette microfi bre
(en option)
Filtre (Hepa11)
(en option)
Base de chargement
DVD Manuel
Lingettes microfi bre
(2 pieces) (en option)
Brosse pour capteurs
Brosse pour fi ltre
Brosse
(sur le couvercle du bac à poussière)
6
Piles pour la télécommande
(2 piles de type AAA)
Page 80

Vue de dessus
Vue de face
VUE DESCRIPTIVE DU PRODUIT
Caméra supérieure
Capot du bac à poussière
Bouton 'START'/'STOP'
Bouton du capot du bac à poussière
Capteurs ultrason
Vue arrière
Vue du dessous
Fenêtre des capteurs de détection
d'obstacles
Commutateur Marche/Arrêt
Ventilation
Capteurs de vide
Brosses auxiliaires
Base de chargement
Brosse principale
Roues
Batterie
Capteur caméra inférieure (en option)
Les dessins peuvent être différents des objets réels.
7
Page 81

DESCRIPTIF DES PIÈCES PÉRIPHÉRIQUES
Base de chargement
Support de la télécommande
Base de chargement
Bac à poussière
Poignée du bac à poussière
Brosse de nettoyage
Capot du bac à poussière
Capot du port
d'aspiration
Commutateur Marche/Arrêt
Rainure de fixation du cordon
d'alimentation
Filtre éponge
Bouton d'ouverture
capot du Bac à
poussière
Filtre HEPA
Couvercle du filtre
Les dessins peuvent être différents des objets réels.
8
Page 82

FONCTION ASSOCIÉE À CHAQUE BOUTON
TURBO
START/STOP
(Démarrer/Arrêter)
HOME
(Base)
VERROUILLAGE
activé / désactivé
ALERTE VOCALE
ON/OFF
• Si le turbo est enclenché, le mode turbo se lancera par reconnaissance vocale.
• Si le bouton est enclenché en mode turbo, la commande sera annulée.
• Utilisé pour mettre l'aspirateur robot en marche, commencer ou terminer le
nettoyage.
• Si le bouton est enclenché et que l'appareil est sous tension, celui-ci démarrera.
• Si le bouton est enclenché pendant le nettoyage, il arrêtera le nettoyage.
• Si le bouton est maintenu appuyé pendant environ 2 secondes et que l'aspirateur
robot est sous tension, l'alimentation se coupera.
• Si le bouton est enclenché en position 'Smart Diagnosis" le diagnostic s'arrêtera.
• Utilisée pour recharger le Robot en le faisant retourner sur sa base.
• Si le nettoyage est terminé ou que la batterie n'est plus suffisamment chargée,
le robot reviendra de lui-même à sa base afin de se recharger.
• Appuyer sur les boutons 'TURBO' et 'START/STOP' pendant 3 secondes minimum
pour verrouiller ou déverrouiller les touches situées sur le capot de l'aspirateur.
• Si le verrouillage est activé, le symbole clignotera, et vous aurez le message vocal :
"Les touches sont verrouillées."
• Appuyez et maintenez appuyés les boutons 'START/STOP' et 'HOME' pendant
3 secondes pour activer/désactiver l'alerte vocale.
• Si l'alerte vocale est activée, le voyant Mute est activé.
Changement de
langue
• Appuyez sur le bouton «HOME» de l’aspirateur robot pendant 3 secondes pour
changer la langue du guide vocal.
• Attention : vous ne pouvez pas utiliser cette fonction avec le bouton de la
télécommande.
9
Page 83

FONCTION ASSOCIÉE À CHAQUE BOUTON
Start (Démarrer)
Appuyer sur ce bouton pour
démarrer le nettoyage. (p16)
Mode
Sélectionnez le mode de
nettoyage ZigZag. (P18)
Boutons directionnels
Ces boutons permettent de
passer en mode manuel et de
sélectionner une zone en mode
"Nettoyage de Mon Espace".
Repeat (Répétition)
Ce bouton permet d'activer
ou de désactiver le mode
"Répéter le nettoyage". (p20)
Home (Base)
Utilisé pour recharger le Robot en
le faisant retourner à sa base. (p17)
Turbo
Utilisé pour activer ou désactiver le
mode Turbo. (p20)
Stop(arrêter)/OK
Appuyer sur le bouton pour arrêter
l'aspirateur robot.
My Space (Mon Espace)
Utilisé pour mettre le Robot en mode
"Nettoyage de Mon Espace". (p19)
Mute (Silencieux)
Utilisé pour activer ou désactiver le
mode silencieux. (p11)
Diagnosis (Diagnostic)
Utilisé pour lancer un Diagnostic
Intelligent. Disponible uniquement
lorsque le Robot est en fonction.
(p23)
10
A savoir
• La télécommande ne permet pas d'allumer l'appareil.
• Lorsque l'aspirateur robot est hors tension, la télécommande ne fonctionnera pas.
• Pour mettre l'aspirateur robot sur / hors tension, utilisez le bouton START/STOP situé
sur la partie supérieure du robot.
• Utiliser le Sélecteur de ‘Mode’ et ‘My Space(Nettoyage de mon espace)’ après avoir
immobilisé l'appareil.
Page 84

INFORMATIONS D'INDICATION D'ÉTAT
Icône du mode Turbo
Lorsqu'il est allumé, ce
voyant indique que le
mode Turbo est activé.
Icône de mode Répétition
Lorsqu'il est allumé, ce
voyant indique que le
mode Repeat est activé.
Icône du mode veille
Cette icône indique
que le Hom-Bot est
sous tension.
Icône Mute
Lorsqu'il est allumé, ce
voyant indique que les alertes
vocales sont désactivées.
Icône Home
Ceci indique que le
Hom-Bot recherche sa
base de chargement.
11
Page 85

MISE EN SERVICE DE L’ASPIRATEUR ROBOT
–
+
+
–
Précautions à prendre avant le nettoyage
• Ne pas utiliser cet appareil dans une pièce où un enfant est laissé seul. L'enfant pourrait être blessé.
• Retirez les objets fragiles et inutiles de la pièce à nettoyer.
Retirez tout particulièrement les objets de valeur posés au sol, comme les vases en céramique.
• Fermez le couvercle du bac à poussière avant de nettoyer.
• Enlevez toute trace d'humidité qui pourrait se trouver sur le plancher.
• Enlevez les câbles, bandes, serviettes, tapis, etc posés au sol de sorte qu'ils ne seront pas pris par la
brosse.
• Vérifiez que le niveau de batterie soit suffisant et s'il est bas, rechargez-la.
• Videz le bac à poussière s'il est plein.
• Fermez les portes de toutes les pièces où vous ne voulez pas que l'aspirateur robot se rende. Pendant le
nettoyage, l'aspirateur robot peut entrer dans une autre pièce et poursuivre le nettoyage.
• Lorsque la lingette microfibre(en option) est fixée, l'aspirateur robot ne sera pas en mesure d'aller sur les
seuils de 5 ou plus.
Si vous ne prévoyez pas d'utiliser la lingette microfibre pour le nettoyage, ôter la lingette microfibre du
support avant d'utiliser l'aspirateur robot.
• Lors d’un nettoyage sur un tapis de plus de 20 d’ épaisseur ou avec franges, il est conseillé de bien le
ranger pour éviter qu’il ne s’abîme.
• Veiller à fermer les portes d'accès aux balcons. Les roues risquent de se bloquer pendant le nettoyage.
Mise en place des piles dans la télécommande
1. Ouvrez le capot de la batterie en appuyant sur le verrouillage à l'arrière de la télécommande.
2. Insérez 2 piles de type AAA en vérifiant les polarités (+/-).
3. Refermez le capot de la batterie pour maintenir les piles en place.
Utilisation de la télécommande
• Appuyez sur les touches de la télécommande les unes après les autres.
• Évitez de heurter l'appareil avec le pied ou autre.
• Ne la rangez pas à proximité d'une source de chaleur.
• Un éclairage fluorescent ou une lampe fluorescente spécifique située à proximité de l'appareil peut
interférer sur le fonctionnement de la télécommande, il est donc recommandé de l'éloigner le plus
possible de ces lampes.
• Si l'appareil et la télécommande sont trop éloignés, le fonctionnement normal peut en être affecté, en
conséquence veillez à respecter dans la mesure du possible une distance de 3 maximum.
12
Page 86

PRINCIPALES ÉTAPES DE FONCTIONNEMENT
1
2
3
Installation de la base de chargement. (p14)
Installez la base de chargement et branchez-la sur
le secteur. Si la base de chargement n'est pas sous
tension, l’aspirateur robot n'est pas automatiquement
chargé.
Mettez l'aspirateur robot sous tension. (p15)
Enclenchez l'interrupteur d'alimentation à l'arrière
gauche du robot et appuyez sur la touche 'START/
STOP' (Démarrer/Arrêter) en haut de l'aspirateur
robot.
※
Si l'appareil n'est pas sous tension, reportez-
vous à la page 15.
Vérifi ez le bac à poussière.
Vérifi ez l'état de propreté du bac à poussière avant de
commencer le nettoyage et fermez le couvercle du bac
à poussière sur l'unité principale.
1.5
1.5
2
4
5
6
Début du nettoyage. (p16)
Appuyez sur le bouton 'START/STOP' une fois
supplémentaire après la mise en tension de l'aspirateur
robot. Le démarrage du nettoyage est accompagné
d'un son indiquant le début du nettoyage.
Si la charge de la batterie est insuffi sante, la
charge s'effectue automatiquement. (p17)
L’aspirateur robot diagnostiquera de lui-même l'état
de la batterie et se chargera automatiquement avant
que la batterie ne soit complètement déchargée. Le
chargement de la batterie dure environ 3 heures.
Utilisation des modes de nettoyage et des
fonctions auxiliaires. (p18~21)
Utilisez les touches sur l'aspirateur robot et la
télécommande pour utiliser chaque mode de nettoyage
et autres caractéristiques.
Pour le mode de nettoyage, vous pouvez choisir parmi
ZigZag, My Space (Mon Espace), Repeat (Répétition)
ou encore nettoyage manuel à l'aide du joystick de la
télécommande.
< Attention > Lorsque l'aspirateur robot fonctionne avec le couvercle du bac à poussière ouvert, il
peut occasionner des blessures ou des dommages matériels.
13
Page 87

MÉTHODE D'INSTALLATION DE LA BASE DE CHARGEMENT
Méthode d'installation de la base de chargement
1. Positionnez la base contre un mur pour la stabiliser.
Retirez les objets à environ 1.5 sur les côtés droit et gauche et
à environ 2 à l'avant.
1.5
2. Raccordez le cordon d'alimentation à une prise.
Enroulez le cordon d’alimentation autour du crochet situé à
l’arrière de la base de chargement ou le long du mur afi n de ne
pas obstruer le chemin de l'aspirateur robot.
3. Fixez la base de chargement en la plaçant le plus proche
possible de la surface du mur afi n qu'elle ne bouge pas.
Mettez l'interrupteur d'alimentation.
1.5
Crochet de fi xation du
cordon d’alimentation
2
4. Lorsque la télécommande n'est pas utilisée, rangez-la sur son
support placée sur la base de chargement.
A savoir
• Branchez toujours le cordon d'alimentation de la base de chargement. Si la base de
chargement n'est pas sous tension, l’aspirateur robot n'est pas automatiquement chargé.
< Attention > Si le cordon d'alimentation est endommagé, pour éviter tout problème, vous
devez le faire remplacer par LG Electronics, un réparateur agréé ou des personnes
équivalentes qualifiées.
14
Page 88

MISE SOUS/HORS TENSION
Mise sous tension par l'interrupteur
Assurez-vous que l'interrupteur d'alimentation principal situé
à l'arrière gauche du robot soit enclenché. Si l'alimentation est
coupée, enclenchez l'interrupteur.
※
Lorsque vous mettez l'interrupteur sur marche, n'appuyez pas
sur le bouton situé sur la section supérieure de l’aspirateur
robot. L'action du bouton peut être retardée.
※
Si vous n'utilisez pas l’aspirateur robot pendant une longue
période, mettez l'interrupteur sur arrêt afi n de protéger la
batterie.
Mise sous tension
Lorsque l'interrupteur principal du robot est sur ON, appuyez
sur 'START/STOP' une seconde jusqu'à ce qu'un signal sonore
retentisse. En quelques secondes, l'aspirateur robot se mettra en
marche et vous informera de son statut.
※
Si pendant 10 minutes vous n'activez pas le robot, et que la
batterie n'est pas complètement chargée, alors l'aspirateur
robot s'éteindra automatiquement.
Mise hors tension
Appuyez sur le bouton 'START/STOP' pendant 2 secondes alors
que l’aspirateur robot est à l'état de marche. La mise hors tension
est accompagnée d'un son mélodieux.
A savoir
• Si l'aspirateur robot ne répond pas :
- Actionnez le bouton d'alimentation et attendez au moins trois secondes.
- Appuyez sur le bouton "START/STOP" une fois l'appareil en marche.
- Si l'appareil ne se met pas en marche ou si l'afficheur est vide mais que vous
entendez un signal sonore, placez l'aspirateur robot sur sa base de chargement.
15
Page 89

DÉMARRAGE ET ARRÊT DU NETTOYAGE
Utilisation des boutons de l’aspirateur robot
Lorsque vous appuyez sur le bouton 'START/STOP' alors que
l’aspirateur robot est en marche, le nettoyage démarre en faisant
entendre une mélodie.
Si vous appuyez de nouveau sur le bouton 'START/STOP' durant le
nettoyage, le nettoyage s'arrête.
※
Si vous appuyez sur le bouton 'START/STOP' alors que l’aspirateur
robot est hors tension, celui-ci passe sous tension. Pour lancer le
nettoyage, appuyez sur le bouton 'START/STOP' de nouveau.
Utilisation de la télécommande
Lorsque vous appuyez sur la touche 'Start' de la télécommande alors
que l’aspirateur robot est en marche, le nettoyage démarre en faisant
entendre une mélodie.
Si vous appuyez sur la touche 'Stop/OK' durant le nettoyage, le
nettoyage s'arrête.
※
Lorsque l'alimentation de l’aspirateur robot est hors tension, il n'est
pas possible d'activer l'appareil avec la télécommande. Si l'appareil
est hors tension, mettez-le sous tension en appuyant sur le bouton
'START/STOP' situé sur le dessus de l’aspirateur robot.
※
Durant le nettoyage, il peut se produire des collisions car le capteur peut ne pas détecter certains
obstacles en raison de leur forme. A ce stade, les obstacles sont évités grâce à un déplacement vers
l'arrière par le biais de l'activation d'un capteur de détection d'impact interne.
※
Lorsque le nettoyage débute sur un emplacement éloigné de la base de recharge, pour prévenir un
dysfonctionnement du capteur de détection des obstacles, placez l'appareil sur un sol plat. En outre,
démarrez le nettoyage à partir d'un emplacement dépourvu d'obstacles comme un rideau ou un mur
dans un environnement de 30 .
16
A savoir
Pour de meilleurs résultats
• Scannez brièvement la zone à nettoyer pour que l'aspirateur robot détecte les petits et
grands objets qui peuvent poser des difficultés lors du nettoyage.
• Si le nettoyage est lancé lorsque l'aspirateur robot est relié à la base de chargement,
l'aspirateur revient plus rapidement sur sa base une fois le nettoyage terminé.
• Dès lors que la lingette microfibre(en option) est utilisée, les obstacles ou barres de
seuil ne doivent pas dépasser 5 .
Page 90

MÉTHODE DE CHARGEMENT DE LA BATTERIE
Chargement automatique
Lorsque le nettoyage est terminé ou si la charge de la batterie est
insuffi sante, l’aspirateur robot regagne automatiquement la base de
chargement pour un rechargement de la batterie.
※
Si l'aspirateur robot ne bouge pas pendant 10 minutes et que la
batterie est déchargée, l'aspirateur robot s'éteindra automatiquement.
※
Ne pas désenclencher l'interrupteur d'alimentation principal puisque
la batterie ne sera pas rechargée. Si le robot est mis en charge alors
que l'interrupteur principal est désenclenché, il affi che un message
d'erreur, "Le bouton marche/arrêt à l'arrière de l'aspirateur robot est
en position arrêt. Placez-le en position marche."
※
Dans le cas où l'aspirateur robot retourne à la station de charge car le niveau de batterie est insuffi sant, le
nettoyage reprendra, une fois la charge effectuée, de manière à terminer le nettoyage.
※
Il peut y avoir plusieurs tentatives de rechargement selon les conditions de fonctionnement de l’aspirateur robot.
※
Même si la charge restante de la batterie est suffi sante, si le nettoyage de la zone est terminé, l'appareil
passe en mode chargement de batterie dès le retour à la base de chargement
Chargement manuel
Dans le cas d'une première utilisation de l’aspirateur robot ou du chargement de la batterie pendant un
nettoyage, il est toujours possible d'effectuer un chargement manuel.
Méthode 1. Fixez l'aspirateur robot sur la base de
rechargement en l'alignant sur la face avant
de celle-ci. Vous entendrez une mélodie
et un message audio pour signaler que le
chargement commence.
※ Si l'interrupteur d'alimentation situé à
l'arrière est éteint, un message vocal
apparaîtra alors.
"Le bouton marche/arrêt à l'arrière de
l'aspirateur robot est en position arrêt.
Placez-le en position marche."
Méthode 2. Lorsque le bouton 'Home' de la
télécommande ou de l'aspirateur robot
est actionné, la recherche de la base
démarre automatiquement avec un son de
recherche et l'aspirateur robot retourne vers
la base de chargement.
※
Si l'aspirateur robot ne commence pas le nettoyage à partir de la base de chargement ou si l'aspirateur robot est chargé
manuellement à l'aide du bouton de recharge, il peut mettre un peu plus de temps à retrouver la base de recharge.
※
Si l’aspirateur robot est mis en attente à moins de 10 en face de la base de recharge avec passage à l'état
de mise sous tension, le chargement démarrera par un retour automatique à la base de chargement.
A savoir
Veillez à suivre les recommandations suivantes en utilisant la base de chargement.
• Le chargement peut être problématique si un corps étranger bloqué sur la base gêne la
recharge.(p28)
• Au risque de voir se produire une décharge électrique, veillez à ne pas toucher la base de
recharge avec un objet métallique.
• Au risque de voir se produire un incendie ou une décharge électrique, ne démontez jamais ni ne
modifiez la base de chargement.
• Veillez à ne pas placer la base de recharge ni la prise secteur à proximité d'un appareil de
chauffage.
17
Page 91

MODE DE NETTOYAGE
Mode ZIGZAG
En mode 'nettoyage en zigzag', l'aspirateur robot répète
une opération en zigzag pour nettoyer chaque recoin de la
maison.
Si vous avez besoin de terminer rapidement le nettoyage,
choisissez le mode 'nettoyage en zigzag'.
Appuyez sur la touche 'Mode' de la télécommande pour
sélectionner le mode «Nettoyage en zigzag» et appuyez sur
le bouton 'Start' (Démarrer).
※
Le paramètre par défaut du communiqué d'usine est 'le
nettoyage en zigzag"
Nettoyage manuel
En appuyant sur une touche de direction de la télécommande, vous pourrez faire passer le robot en mode
manuel.
Le robot va nettoyer la maison, en se déplaçant vers l'avant / arrière / gauche / droite, selon l'entrée d'une
touche de direction. En mode «manuel», le robot peut revenir en arrière, en cours d'éxecution pour éviter un
obstacle.
18
Page 92

MODE DE NETTOYAGE
My Space (Mon espace)
Appuyer sur "My space" de la télécommande peut défi nir le mode de nettoyage
à choisir.
Pour le nettoyage des endroits particuliers, sélectionnez ce mode
1ère étape
Utilisez la télécommande pour défi nir manuellement la zone que vous
souhaitez nettoyer.
※
Pour que la zone soit correctement défi nie, la distance entre le point de départ et le point d'arrivée, que
vous aurez vous-même défi nie, doit être inférieure à 1 mètre.
My Space
(Mon espace)
2ème étape
Appuyer sur la touche 'Start' (Démarrer) permettra à l'aspirateur robot de nettoyer à fond les zones
sélectionnées.
※
En cas d'échec pour sélectionner une zone, un message vocal apparaîtra, annonçant: «La zone ne remplit
pas les conditions nécessaires. Veuillez défi nir une zone à nettoyer.». Utiliser à nouveau la télécommande
pour désigner une zone.
※
Si le nettoyage de la zone est terminée, le mode passe à Auto Clean (ZigZag).
A savoir
• Lors du rechargement, il est impossible d'activer le mode 'My Space' (Mon espace).
• Pour modifier le mode de nettoyage alors que le robot est en marche, appuyez d'abord
sur le bouton 'Stop/OK' (Arrêter) pour sélectionner un mode.
19
Page 93

MODE DE NETTOYAGE MANUEL
Mode turbo
On sélectionne cette fonction en appuyant sur le
bouton 'Turbo' sur la télécommande ou depuis
l'unité principale ou par message vocal.
En mode "Turbo", appuyer sur le même bouton
annulera le mode "Turbo", signalé par un message
vocal.
En mode "Turbo", le robot fonctionne avec plus de
puissance.
※
<Mode Smart Turbo>
Le mode turbo fonctionnera automatiquement
lorsque le robot nettoiera les tapis (10 mm ᵐ).
Mode Répétition
Appuyer sur la touche "Repeat" de la télécommande activera le mode
'répétition' par un message vocal.
En mode "répétition", appuyer sur le même bouton annulera le mode
"répétition" par un message vocal.
En mode "répétition", le robot répète le nettoyage jusqu'à ce que la batterie
soit déchargée.
Mémorisation de l'espace
Le robot est capable de mémoriser l'environnement
à nettoyer grâce à sa fonction mémorisation de
l'espace.
※
Le diagnostic intelligent est uniquement
disponible lorsque la machine lance le nettoyage
depuis la base.
20
A savoir
• Précautions à prendre avec le fonctionnement intelligent
- Cette fonctionnalité de nettoyage intelligente permet de mémoriser les
emplacements des obstacles à contourner. L'aspirateur robot mémorise tous les
aspects de l'environnement durant le nettoyage puis sauvegarde les données lorsqu'il
retourne sur sa base de recharge.
- L'aspirateur robot réinitialise et mémorise les nouvelles conditions si l'emplacement
de la base a été modifié.
- Si la reconnaissance de l'environnement est terminée, le message vocal suivant
retentira "La mémorisation de l'espace est terminée."
Page 94

UTILISATION DE LA LINGETTE MICROFIBRE (EN OPTION)
clic
L'utilisation de la lingette microfi bre permet
d'obtenir une élimination effi cace de la poussière.
Lorsque le support de la lingette microfi bre est fi xé,
l’aspirateur robot ne franchit pas les tapis ou les
seuils afi n d'éviter une pollution secondaire due à
une lingette contaminée.
Prudence
Ne pas couvrir le capteur de la
caméra en bas.
Pour un nettoyage avec la lingette microfi bre, fi xez celle-ci et son support sur l’aspirateur robot en respectant
les étapes suivantes :
1. Fixez la lingette microfi bre sur la bande Velcro
du support comme indiqué sur la fi gure.
2. Pousser doucement le support dans les
sillons jusqu'à ce que vous entendiez un
«clic».
※ Notez que, si le support est mal fi xé, il peut
se détacher lors du nettoyage.
3. Ce mode nécessite la bonne mise en place
des crochets dans les sillons prévus pour
recevoir le support sous l'aspirateur robot.
A savoir
• En cas d’odeurs désagréables, nettoyez la lingette microfibre.
• Si le sol est tâché, ou si du liquide est étalé sur votre sol, n’utilisez pas la lingette
microfibre.
• N’utilisez pas l’aspirateur robot avec la lingette microfibre sur vos tapis.
• N’utilisez la lingette microfibre que sur des surfaces sèches.
Un sol trop humide peut déranger le fonctionnement de l'aspirateur robot.
• La fonction diagnostic intelligent n'est pas disponible lors de la mise en place de la
lingette microfibre.
• Certains modèles ne sont pas vendus avec une lingette microfibre ou un support de
lingette.
crochets
sillons
clic
21
Page 95

FONCTION DE REPRISE DU NETTOYAGE
L'aspirateur robot mémorise la zone pendant le nettoyage.
Si l'utilisateur déplace l'aspirateur robot pendant son fonctionnement, ce dernier
recherchera sa zone à l'aide de la fonction de recherche afi n de continuer le nettoyage à
partir de son emplacement précédent.
Lorsque l'utilisateur change de zone de façon arbitraire l'aspirateur robot, la
fonction de recherche de zone s'active.
※
La fonction navigation sera enclenchée après que l'aspirateur robot
reconnaisse correctement les conditions de nettoyage.
Changement de zone
1. Localiser l'aspirateur robot à proximité de l'endroit
où il a été déplacé.
※
La recherche de zone est plus effi cace lorsque
le Robot est proche de l'emplacement où il a
été déplacé.
※
S'il dépasse le diamètre d'1 de la position
d'occurrence, il devient diffi cile de rechercher
l'emplacement.
1
1
Zone d'incident
2. Appuyez sur la touche 'START/STOP' (Démarrer/Arrêter) sur le robot ou la touche 'Start' (Démarrer) sur
la télécommande. Le robot débutera la fonction recherche d'emplacement avec un guide audio.
※
Lorsque la recherche d'emplacement est terminée avec succès, il continuera le nettoyage à l'endroit où
il a été déplacé.
Si la recherche d'emplacement échoue, il recommencera depuis le début.
Pour trouver l'emplacement exact,
éloignez-vous de l'aspirateur robot.
Zone d'incident
22
A savoir
• Lorsque l'alimentation est coupée après le réglage de la fonction de recherche de
zone, cette dernière est annulée.
• La recherche de zone est plus efficace lorsque l'aspirateur robot est proche de
l'emplacement où il a été déplacé.
Page 96

FONCTION AUTO-DIAGNOSTIC
Le robot utilise cette fonctionnalité d'auto-diagnostic pour exécuter un diagnostic
automatique.
Si une irrégularité est constatée à partir du diagnostic, veuillez contacter le centre de
service LG Electronics.
ٙ
Durant l'auto-diagnostic, le robot peut se déplacer dans un rayon de 50 EO. Assurez-vous donc
qu'aucun objet ne se trouve en chemin dans un rayon de 1 O autour de la base de chargement, avant de
commencer le diagnostic.
1. Mettez l'interrupteur d'alimentation principal à l'arrière et
reliez le robot à sa base.
ٙ
L'auto-diagnostic est uniquement disponible lorsque le
robot est relié à la base de chargement.
2. Appuyer sur la touche 'Diagnosis' (auto-diagnostic) de
la télécommande lance le processus annoncé par le
message vocal: "Démarrage du diagnostic de l'aspirateur
robot. Éloignez-vous et retirez les objets se trouvant à
moins d'un mètre."
ٙ
Si la lingette microfi bre(en option) est placée sous le
robot, le processus peut ne pas s'activer.
3. Si l'auto-diagnostic se termine normalement, le robot
reviendra à la base et communiquera le résultat via
un message vocal. Après le message vocal, appuyer
sur la touche 'Home' (base) de la télécommande ou
du robot peut à nouveau faire apparaître le message.
Pour terminer le processus de diagnostic, appuyer sur
la touche 'Stop/OK' (Arrêter) de la télécommande ou
du robot.
ٙ
Aucun fonctionnement pendant 1 min. après que le
message vocal place le robot en mode recharge.
ٙ
En cas d'erreur dans le détecteur d'obstacle,
capteur d'ultrasons ou le capteur anti-chute, le
robot peut ne pas retourner à la station d'accueil
mais termine toutefois le diagnostic par l'émission
d'un message vocal.
A savoir
• Veillez à ne pas toucher le robot ou perturber son fonctionnement avant que l'autodiagnostic ne soit fini. Autrement, vous devrez désenclencher puis enclencher
l'interrupteur d'alimentation principale pour reprendre le diagnostic.
• L'auto-diagnostic ne peut pas être activé dans un des cas suivants. Dans chaque cas,
vérifier le problème et réessayez.
- Le robot est séparé de la base
- Batterie insuffisante
- Aucun filtre du bac à poussière disponible
- Lingette microfibre(en option) placée sous l'aspirateur robot
23
Page 97

FONCTION AUTO-DIAGNOSTIC
Si un message vocal apparaît après l'auto-diagnostic reportez-vous au tableau suivant pour prendre les
mesures appropriées.
Message vocal Mesures (de référence)
Démarrage du diagnostic de l'aspirateur robot. Éloignezvous et retirez les objets se trouvant à moins d'un mètre.
L'aspirateur robot doit être chargé pour activer le diagnostic.
Placez l'aspirateur robot sur sa base de chargement.
Aucun défaut trouvé pendant le diagnostic.
Impossible de lancer le diagnostic, la batterie est trop faible.
Réessayez après avoir chargé la batterie.
Vérifiez que le bac à poussière et le filtre sont correctement installés.
L'aspirateur robot ne se chargera pas en raison d'un
problème au niveau du capteur infrarouge.
L'aspirateur robot ne se chargera pas en raison d'un
problème au niveau du capteur à ultrasons.
L'aspirateur robot ne se chargera pas en raison d'un problème
au niveau des capteurs de vide. Veuillez Nettoyez les capteurs.
Nettoyez le capteur de la caméra sur le côté inférieur droit.
Nettoyez les capteurs de détection d'obstacles sur les côtés
droit et gauche de l'aspirateur robot.
Un problème a été détecté au niveau du capteur d'angle.
Vérifiez s'il n'y a pas des corps étrangers sur la roue gauche.
Vérifiez s'il n'y a pas des corps étrangers sur la roue droite.
Un problème a été détecté sur le capteur de la roue gauche.
Un problème a été détecté sur le capteur de la roue droite.
Un problème a été détecté au niveau de la brosse. Vérifiez
s'il n'y a pas des corps étrangers.
Un problème a été détecté au niveau de l'aspiration.
Un problème a été détecté au niveau de l'accélèromètre.
Pour réécouter les résultats du diagnostic, appuyez sur le
bouton de chargement. Pour arrêter, appuyez sur le bouton
d'arrêt.
Relancez le diagnostic après avoir permuté le bouton
marche/arrêt à l'arrière de l'aspirateur robot en position arrêt,
puis marche. Si le problème persiste, contactez le service
après-vente de LG Electronics.
Le mode diagnostic sera désactivé.
Le mode diagnostic ne fonctionne pas lorsque la lingette
microfibre est insérée. Retirez-la et refaites une tentative.
Le diagnostic n'a pas pu être terminé. Refaites une tentative
après avoir permuté le bouton marche/arrêt à l'arrière de
l'aspirateur robot en position arrêt, puis marche.
Retirer tout objet dans un rayon de 1 autour de la station
et rester en retrait jusqu'à ce que le diagnostic soit terminé.
Déplacer l'aspirateur robot vers la base pour le recharger.
Réessayez l'auto-diagnostic après avoir rechargé la
batterie.
Ouvrir le couvercle du bac à poussière et examiner le bac.
Rééxecuter l'auto-diagnostic et contacter le centre de service
local LG Electronics si le même message réapparaît.
Rééxecuter l'auto-diagnostic et contacter le centre de service
local LG Electronics si le même message réapparaît.
Nettoyez les trois capteurs d'anti-chute sur la partie
inférieure.
Nettoyer les lentilles du détecteur de la caméra en bas à droite
Nettoyer les lentilles du détecteur d'obstacle à à gauche et à
droite
Rééxecuter l'auto-diagnostic et contacter le centre de service
LG Electronics si le même message réapparaît.
Contrôler les matières étrangères sur la roue gauche.
Contrôler les matières étrangères sur la roue droite.
Rééxecuter l'auto-diagnostic et contacter le centre de service
local LG Electronics si le même message réapparaît.
Rééxecuter l'auto-diagnostic et contacter le centre de service
local LG Electronics si le même message réapparaît.
Contrôler toute matière étrangère coincée dans le balai.
Rééxecuter l'auto-diagnostic et contacter le centre de service
local LG Electronics si le même messagel réapparaît.
Rééxecuter l'auto-diagnostic et contacter le centre de service
local LG Electronics si le même messagel réapparaît.
Si vous avez besoin de vérifier à nouveau le résultat du
diagnostic, appuyer sur la touche 'recharger' ou la touche
'arrêt' pour terminer le diagnostic.
Eteignez et allumez l'interrupteur d'alimentation principal
pour reprendre le diagnostic. Si le problème persiste
contacter le centre de service LG.
Executer l'auto-diagnostic une nouvelle fois après avoir
retiré le support de la lingette microfibre.
Eteignez et allumez l'interrupteur d'alimentation principal pour
reprendre le diagnostic. Ne touchez pas le robot ou perturbez
son fonctionnement jusqu'à ce que le diagnostic soit terminé.
24
Page 98

NETTOYAGE DU BAC À POUSSIÈRE
Si le bac est plein de poussière, la puissance d'aspiration peut s'affaiblir et il est donc recommandé de
nettoyer le bac à poussière avant et après le nettoyage. Nettoyez le bac à poussière en respectant la
séquence suivante.
1. Ouvrez le capot du bac à poussière en appuyant
sur le bouton 'PUSH' de l’aspirateur robot.
2. Attrapez la poignée du bac à poussière et tirez-la
vers le haut.
3. Tirer le crochet sur la gauche du fi ltre HEPA situé
sur l'arrière du bac à poussière pour séparer le
fi ltre et l'éponge .
※ La séparation du fi ltre et de l'éponge est
susceptible d'entraîner la libération de poussière.
※ Réferez-vous à la p26 pour nettoyer le fi ltre du
bac à poussière.
4. Ouvrez le capot vers le haut en appuyant sur le
bouton de séparation du réceptacle à poussière.
5. Videz le bac à poussière et nettoyez-le
complètement en vous aidant de la brosse de
nettoyage ou à l'eau courante.
6. Après avoir nettoyé le fi ltre, séchez complètement
le bac à poussière dans un endroit aéré sans
l'exposer directement aux rayons du soleil.
7. Lorsque vous avez terminé de nettoyer le bac
à poussière, replacez le fi ltre éponge et le fi ltre
HEPA puis refermez le couvercle.
※ Réferez-vous à la p26 pour les guides
d'assemblage détaillés.
8. Placez le bac à poussière dans l’aspirateur robot
et refermez le capot du bac à poussière.
A savoir
• Si vous fermez le couvercle du filtre sur le bac à poussière sans filtres disponibles, il
peut causer une défaillance technique.
• Après avoir nettoyé le bac à poussière, assurez-vous de replacer le fitre dans le bac à
poussière.
Si vous faites fonctionner le robot sans aucun filtre disponible ou si le couvercle du filtre
n'est pas fermé, un message vocal annonçant "Vérifiez
que le bac à poussière et le filtre sont correctement
installés."
• Si le cache de l'appareil se détache pendant le
nettoyage, l'insérer verticalement dans la rainure du bac
à poussière.
25
Page 99

NETTOYAGE DU FILTRE DU BAC À POUSSIÈRE
Le fi ltre du bac à poussière comprend un fi ltre HEPA et un fi ltre éponge.
Nettoyer ces deux fi ltres de la manière suivante
1. Tirez le crochet sur la gauche du fi ltre HEPA sur
la face arrière du bac à poussière pour séparer le
fi ltre HEPA et l'éponge.
2. Nettoyez soigneusement les fi nes particules de
poussière sur le fi ltre HEPA avec un aspirateur ou
une brosse.
※
Ne pas laver le fi ltre HEPA avec de l'eau. Sa
puissance d'aspiration peut s'affaiblir.
3. Utilisez une brosse pour nettoyer le fi ltre éponge.
Si vous avez utilisé de l'eau pour le nettoyer,
séchez le complètement à l'ombre.
4. Assemblez les fi ltres HEPA et éponge sur le
couvercle de la manière suivante.
※
Montez la fi gure rectangulaire à côté du fi ltre
HEPA dans des sillons du couvercle.
※
Veillez à ne pas mal assembler les fi ltres HEPA
et éponge sur le couvercle.
26
A savoir
• Pour préserver les performances de l'aspirateur robot nettoyez le filtre HEPA au moins
une fois par semaine avec une brosse ou un aspirateur.
• Si vous faites fonctionner l'aspirateur robot avec le filtre mal enclenché ou sans filtre,
cela peut entraîner une défaillance technique.
Page 100

NETTOYAGE DES BROSSES
La brosse située au bas du robot permet d'absorber les poussières. Nettoyez le pinceau de la manière
suivante.
※
Avant de retourner l'unité principale, posez un tissu lisse sur le sol et retirez le bac à poussière.
Désenclenchez l'interrupteur
d'alimentation principal avant
de lancer le nettoyage. Placer
le robot à l'envers sur un tissu
lisse.
Mettez des gants et poussez
la brosse tout le long de la
rainure jaune
Après avoir vérifi é qu'il n'y ait
pas de matières étrangères,
appuyez sur le crochet de
fi xation et tirez le vers le haut
pour séparer le couvercle.
Tout en appuyant sur la brosse,
soulevez la partie saillante
jaune pour le séparer de l'unité
principale.
En utilisant un outil de
nettoyage, nettoyez les
cheveux et autres matières
étrangères sur la brosse.
Nettoyez la brosse avec un
aspirateur ou des ciseaux.
Montez le crochet de fi xation
(de forme rectangulaire)
sur la brosse latérale dans
les sillons avec les couleurs
correspondantes.
Poussez la brosse vers le
côté de la fl èche, montez le
crochet de fi xation (de forme
rectangulaire) sur le côté
opposé dans les sillons.
Appuyez vers le bas et
refermez le couvercle jusqu'à
ce qu'un clic soit audible des
deux côtés du crochet de
fi xation.
※
Veillez à ce que la brosse
latérale ne soit pas coincée
dans le couvercle.
27
 Loading...