

LG V-CA683STV Owner's Manual

V-CA683STR/STVR
V-CA683HTR/HTVR
E
M
C
H
S
A
L
2
4
4
5
1
1
6
11
19
20
7
7
8
8
2
1
3
12
3
910
65
3
9
7
10
8
--2--

11
14
12
MAX
MIN
15
MIN
17 18
13
22
MAX
16
19
20
23
21
28
24
26
25
27
--3--
E
Information
Please
which
safety,
appliance.
This
Directives:
Voltage
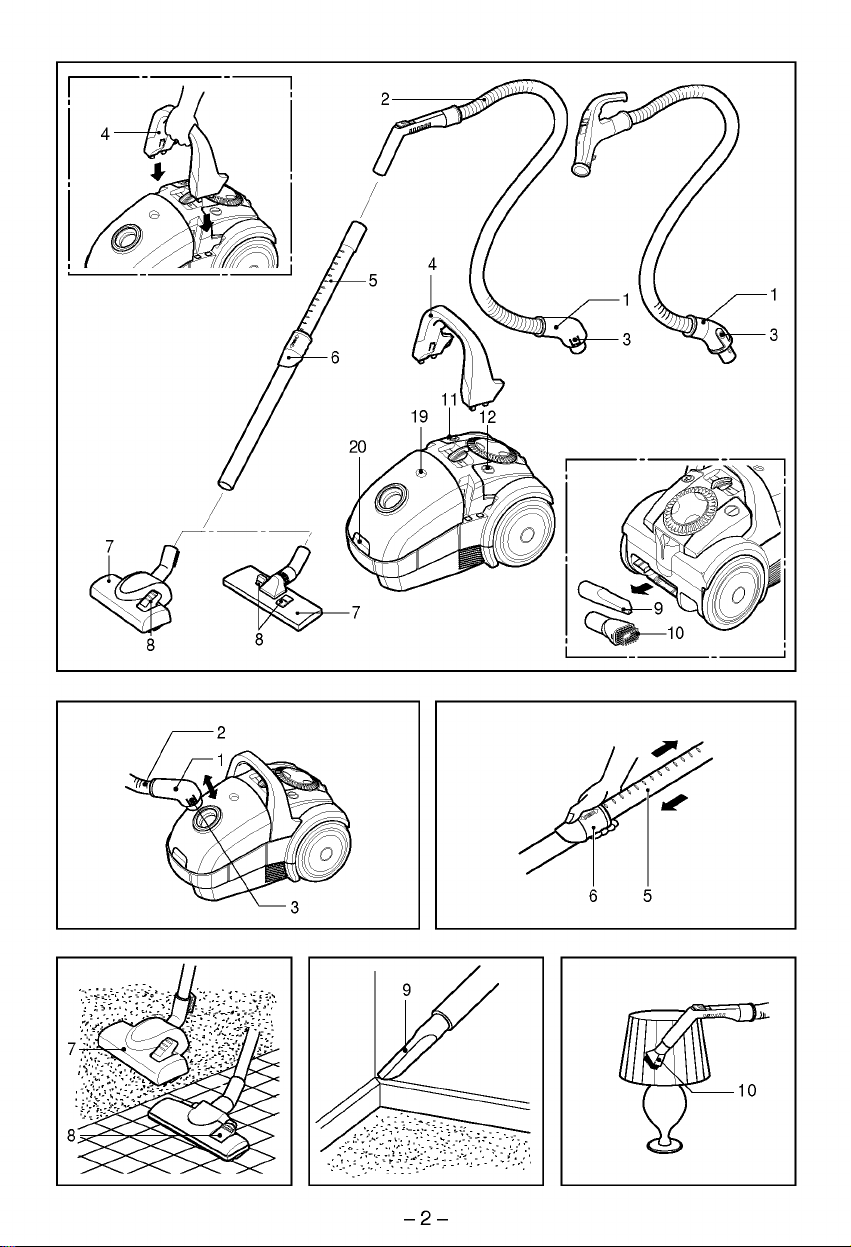
Assembling
To
push
Do
cleaner
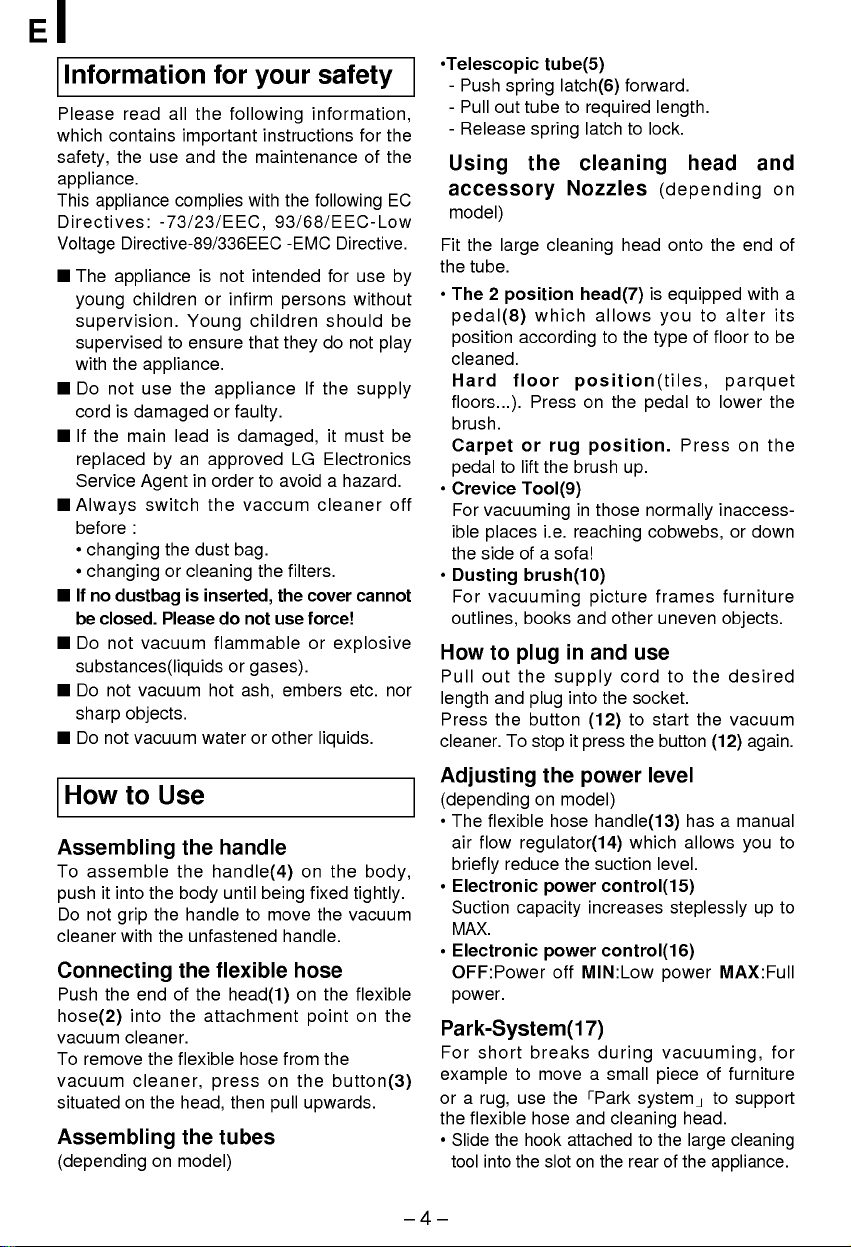
Connecting
Push
hose(2)
vacuum
To
vacuum
situated
Assembling
(dependingonmodel)
read
all
the
contains
the
appliance
use
complies
important
and
-73/23/EEC,
Directive-89/336EEC
The
appliance
children
young
supervision.
supervised
with
the
Do
not
cord
is
damaged
If
the
main
replaced
Service
Always
before
:
?
changing
?
changingorcleaning
If
no
dustbag
be
closed.
Do
not
is
Young
to
ensure
appliance.
use
the
lead
byanapproved
in
Agent
switch
the
dust
is
Please
vacuum
substances(liquidsorgases).
Do
not
vacuum
sharp
objects.
Do
not
vacuum
How
to
Use
the
assemble
it
into
not
grip
with
the
the
the
the
body
handle
unfastened
the
the
endofthe
into
the
cleaner.
remove
the
flexible
cleaner,
on
the
head,
the
for
your
following
the
maintenance
with
not
intended
or
infirm
children
that
appliance
or
faulty.
is
damaged,
ordertoavoidahazard.
the
vaccum
safety
information,
instructions
the
following
93/68/EEC-Low
-EMC
persons
do
they
If
the
LG
Electronics
cleaner
Directive.
for
should
not
it
must
bag.
the
filters.
cover
inserted,
flammable
hot
water
the
do
use
not
ash,
force!
or
explosive
embers
or
other
etc.
liquids.
handle
on
handle.
from
pull
the
fixed
the
hose
on
the
point
the
the
button(3)
upwards.
vacuum
handle(4)
until
to
flexible
head(1)
attachment
hose
press
then
being
move
on
tubes
for
the
of
the
EC
use
by
without
be
play
supply
be
off
cannot
nor
body,
tightly.
flexible
on
the
spring
out
tube(5)
tube
spring
the
latch(6)
to
required
latchtolock.
cleaning
Nozzles
?Telescopic
-
Push
-
Pull
-
Release
Using
accessory
model)
Fit
the
large
the
tube.
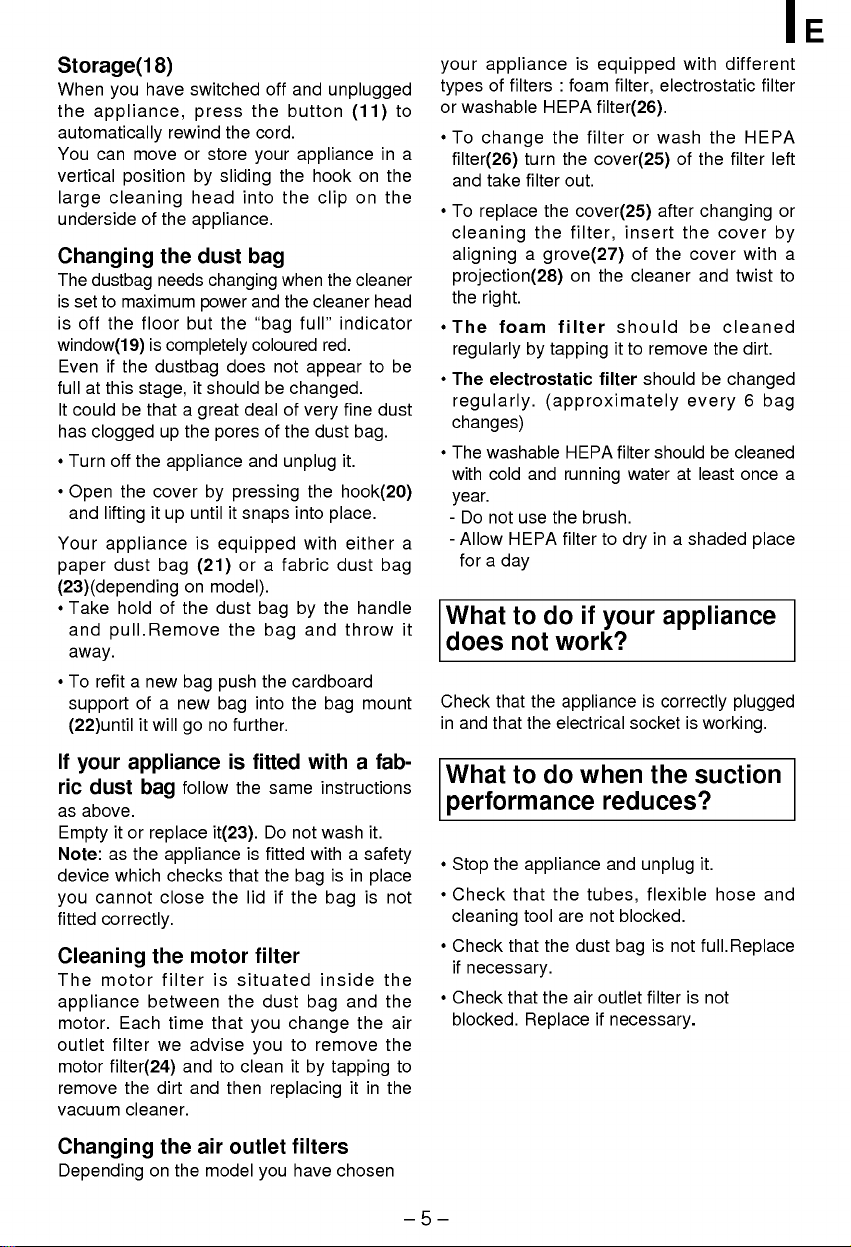
?
The
pedal(8)
position
cleaned.
Hard
floors...).
brush.
Carpet
pedal
?
Crevice
For
vacuuming
ible
places
the
side
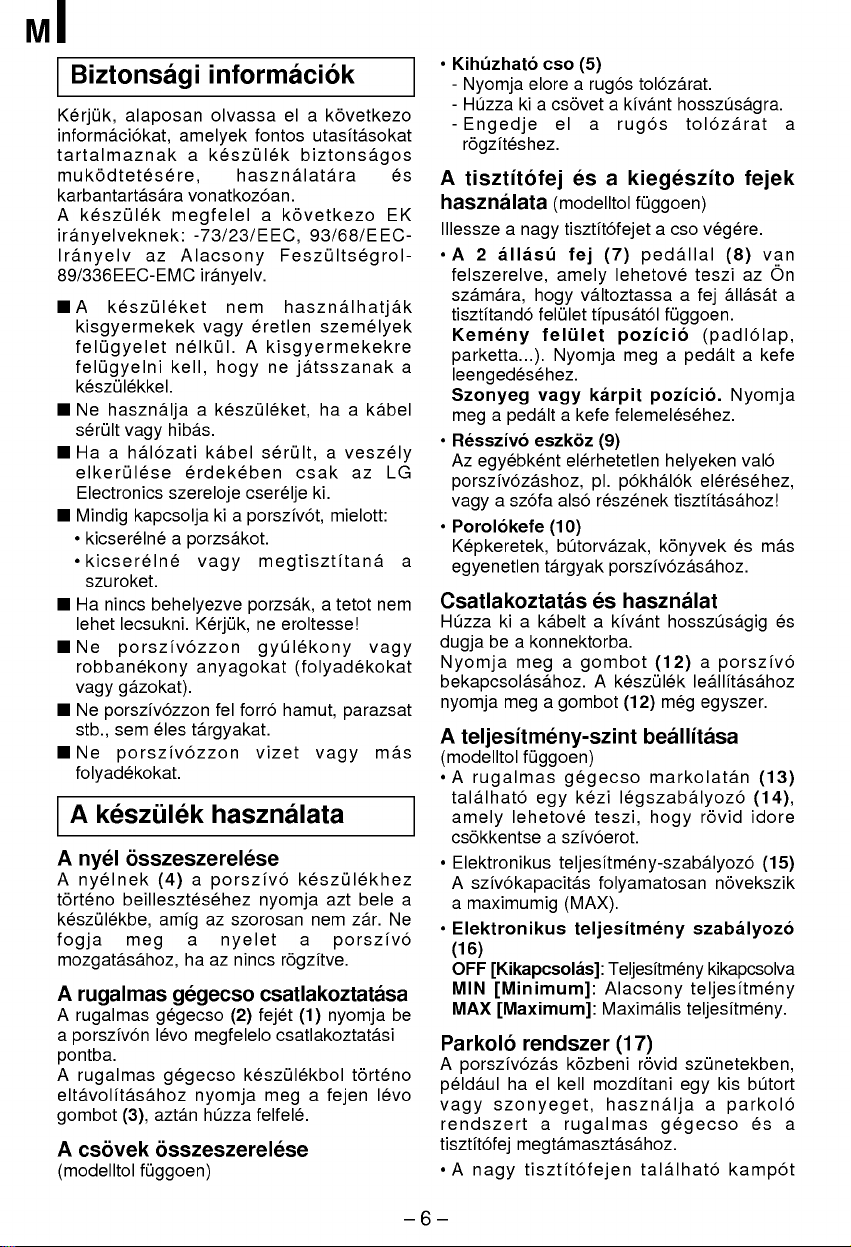
?
Dusting
For
outlines,
How
Pull
out
length
Press
cleaner.
Adjusting
(dependingonmodel)
?
The
air
flow
briefly
?
Electronic
Suction
MAX.
?
Electronic
OFF:Power
power.
cleaning
2
position
which
according
floor
Press
or
rug
to
lift
the
Tool(9)
i.e.
ofasofa!
brush(10)
vacuuming
books
to
plug
the
and
plug
the
button
To
stop
the
flexible
hose
regulator(14)
reduce
power
capacity
power
head(7)
position(tiles,
on
position.
brush
in
reaching
picture
and
in
and
supply
into
(12)
it
press
power
the
suction
increases
off
MIN:Low
Park-System(17)
For
short
breaks
to
move
example
or
a
rug,
the
flexible
?
Slide
tool into
the
use
hook
the
a
the
hose
and
attachedtothe
slotonthe
Park
forward.
length.
(depending
head
is
allows
those
to
the
the
up.
you
type
pedal
normally
cobwebs,
frames
other
uneven
use
cord
the
socket.
to
start
the button
level
handle(13)
which
level.
control(15)
control(16)
power
during
small
vacuuming,
piece
system
cleaning
rear
of
head
onto
the
equipped
to
alter
of
floortobe
parquet
to
lower
Press
inaccess-
or
furniture
objects.
to
the
desired
the
vacuum
(12)
hasamanual
allows
steplessly
MAX:Full
of
furniture
to
head.
large
cleaning
the
appliance.
and
on
end
with
the
on
the
down
again.
you
up
for
support
of
a
its
to
to
--4--
Storage(18)
When
the
automatically
You
vertical
large
underside
Changing
The
is
set
is
off
window(19)
Evenifthe
fullatthis
It
could
has
?
Turn
?
Open
and
Your
paper
(23)(dependingonmodel).
?
Take
and
away.
?
To
support
(22)until
have
move
switched
rewind
or
press
the
store
you
appliance,
can
positionbysliding
of
the
the
needs
floor
is
completely
dustbag
stage,
that
up
the
appliance
cover
itupuntil
head
appliance.
dust
changing
power
but the
does
it
should
a
great
the
pores
by
pressing
it
cleaning
dustbag
to
maximum
the
be
clogged
off
the
lifting
applianceisequipped
dust
holdofthe
pull.Remove
refit
a
of
(21)
bag
dust
the
new
bag
push
a
new
it
will
bag
no
further.
go
the
into
bag
and
coloured
deal
and
snaps
or
off
cord.
your
"bag
be
of
a
bag
bag
the
into
and
button
appliance
the
hook
the
when
the
cleaner
full"
not
appear
changed.
of
very
the
unplug
the
into
with
fabric
by
and
cardboard
the
unplugged
(11)
on
on
clip
the
cleaner
indicator
red.
fine
dust
bag.
it.
hook(20)
place.
either
dust
the
handle
throw
bag
head
to
mount
in
the
the
dust
bag
E
with
of
the
changing
the
cover
and
be
be
every
at
least
is
working.
different
the
filter
cover
twist
cleaned
the
changed
be
cleaned
plugged
HEPA
with
dirt.
6
once
place
filter
left
or
by
a
to
bag
a
your
applianceisequipped
of
types
or
to
?
a
?
filters:foam
washable
To
change
filter(26)
and
take
To
replace
cleaning
HEPA
turn
filter
the
the
filter(26).
the
filterorwash
the
cover(25)
out.
cover(25)
filter,
aligningagrove(27)
on
projection(28)
the
right.
?
The
foam
be
regularlybytapping
?
The
electrostatic
regularly.
the
filter
filter
(approximately
filter,
insert
of
cleaner
should
it
to
remove
should
electrostatic
after
the
changes)
?
The
washable
with
cold
year.
-
Do
not
-
Allow
a
for
a
day
What
it
does
Check
that
in
and
that
HEPA
and
running
use
the
brush.
HEPA
filter
to
to
not
if
do
your
work?
the
applianceiscorrectly
the
electrical
filter
should
water
inashaded
dry
appliance
socket
If
your
ric
dust
as
above.
it
Empty
as
Note:
device
which
cannot
you
fitted
correctly.
Cleaning
The
motor
appliance
motor.
outlet
motor
remove
vacuum
Each
filterweadvise
filter(24)
Changing
Depending
appliance
follow
bag
or
replace
the
appliance
checks
close
the
motor
filterissituated
between
time
andtoclean
the
dirt
and
cleaner.
the
on
the
it(23).
the
that
air
model
is
fitted
the
is
that
lidifthe
the
you
you
then
outlet
same
Do
not
fitted
the
bag
filter
dust
change
to
it
replacing
filters
have
you
withafab-
instructions
wash
it.
with
a
safety
is
in
place
is
bag
inside
bag
remove
by
and
the
tapping
itinthe
chosen
the
the
the
What
performance
?
?
not
?
?
air
to
--5--
the
Stop
Check
cleaning
Check
if
necessary.
Check
blocked.
to
do
appliance
that
tool
that
the
that
the
Replace
the
are
when
reduces?
and
tubes,
not
dust
air
outlet
if
the
unplug
flexible
blocked.
is
bag
filter
necessary.
suction
it.
hose
not
full.Replace
is
not
and
M
Biztonsagi
Kerjuk,
informaciokat,
tartalmaznak
muko
karbantartasara
A
keszulek
iranyelveknek:
Ira
nyelv
89/336EEC-EMC
A
kisgyermekek
felu
felugyelni
keszulekkel.
Ne
serult
Haahalozati
elkerulese
Electronics
Mindig
?
kicserelne
?
kicsere
szuroket.
Ha
lehet
Ne
robbanekony
vagy
Ne
stb.,
Ne
folyadekokat.
A
keszulek
A
nyel
A
nyelnek
torteno
keszulekbe,
fogja
mozgatasahoz,
A
rugalmas
A
rugalmas
a
porszivon
pontba.
A
rugalmas
eltavolitasahoz
gombot
A
csovek
(modelltol
alaposan
amelyek
a
dtetese
re,
vonatkozoan.
megfelel
az
Alacsony
keszuleket
gyelet
ne
kell,
hasznalja
hibas.
vagy
erdekeben
szereloje
kapcsolja
a
porzsakot.
lne
nincs
behelyezve
lecsukni.
porszivozzon
gazokat).
porszivozzon
sem
eles
porszivozzon
osszeszerelese
(4)
beillesztesehez
amig
meg
a
haaznincs
gegecso
gegecso
levo
gegecso
aztan
(3),
osszeszerelese
fuggoen)
informaciok
olvassa
fontos
ke
szulek
haszna
a
-73/23/EEC,
iranyelv.
nem
eretlen
vagy
lkul.A
a
hogy
keszuleket,
kabel
serult,
kisgyermekekre
ne
cserelje
ki
a
porszivot,
vagy
Kerjuk,
megtiszti
porzsak,
ne
gyulekony
anyagokat
fel
forro
targyakat.
vizet
hasznalata
a
porszivo
nyomja
az
szorosan
nyelet
csatlakoztatasa
(2)
fejet
megfelelo
keszulekbol
nyomja
huzza
meg
felfele.
elakovetkezo
utasitasokat
biztonsa
lata
ra
kovetkezo
93/68/EEC-
Feszu
ltsegrol-
hasznalhatjak
szemelyek
jatsszanak
haakabel
a
veszely
csak
az
ki.
mielott:
tana
a
tetot
eroltesse!
(folyadekokat
hamut,
parazsat
vagy
keszulekhez
azt
bele
nem
zar.
a
porszi
rogzitve.
(1)
nyomja
csatlakoztatasi
torteno
a
fejen
gos
nem
vagy
mas
levo
?
Kihuzhato
-
-
-
e
s
A
hasznalata
EK
Illessze
?
A
felszerelve,
szamara,
tisztitando
Kemeny
parketta...).
a
leengedesehez.
Szonyeg
meg
?
Resszivo
LG
Az
porszivozashoz,
vagy
?
Porolokefe
Kepkeretek,
a
egyenetlen
Csatlakoztatas
Huzza
dugja
Nyomja
bekapcsolasahoz.
nyomja
A
(modelltol
?
A
tala
amely
csokkentse
?
A
a
Ne
a
?
Elektronikus
v
o
(16)
OFF
MIN
MAX
be
Parkolo
A
peldaul
vagy
rendszert
tisztitofej
?
A
cso
(5)
elore
Nyomja
Huzza
Engedje
a
kiacsovetakivant
rugos
el
a
rogziteshez.
es
tisztitofej
a
(modelltol
a
nagy
tisztitofejet
2
allasu
fej
(7)
amely
valtoztassa
hogy
felulet
tipusatol
felulet
Nyomja
vagy
a
pedalt
egyebkent
a
szofa
a
eszkoz
also
karpit
kefe
(9)
elerhetetlen
pl.
reszenek
(10)
butorvazak,
targyak
porszivozasahoz.
es
kiakabeltakivant
beakonnektorba.
a
meg
meg
a
gombot
gombot
A
teljesitmeny-szint
fuggoen)
rugalmas
lhato
Elektronikus
szivokapacitas
maximumig
[Kikapcsolas]:
[Minimum]:
[Maximum]:
porszivozas
szonyeget,
nagy
gegecso
lehetove
a
szivoerot.
teszi,
kezi
egy
teljesitmeny-szabalyozo
folyamatosan
(MAX).
teljesitmeny
Teljesitmeny
Alacsony
Maximalis
rendszer
kozbeni
haelkell
a
rugalmas
mozditani
haszna
megtamasztasahoz.
tisztito
fejen
tolozarat.
hosszusagra.
rugos
tolozarat
kiegeszito
fuggoen)
a
cso
llal
peda
lehetove
a
fuggoen.
pozicio
a
meg
felemelesehez.
pokhalok
hasznalat
keszulek
(12)
legszaba
(17)
pedalt
pozicio.
helyeken
tisztitasahoz!
konyvek
hosszusagig
(12)
meg
beallitasa
markolatan
hogy
teljesitmeny.
rovid
szunetekben,
egy
ljaaparkolo
gegecso
tala
lhato
fejek
vegere.
van
(8)
teszi
az
On
allasat
fej
(padlo
lap,
a
kefe
Nyomja
valo
eleresehez,
es
mas
a
porsziv
leallitasahoz
egyszer.
(13)
(14),
lyozo
rovid
idore
(15)
novekszik
szabalyozo
kikapcsolva
teljesitmeny
kis
butort
e
s
kampo
a
a
es
o
a
t
--6--
 Loading...