

Page 1

LG-US760
Printed in Korea
P/NO : MFL67120101(1.0)
H
Page 2

Copyright ©2011 LG Electronics, Inc. All rights reserved.
LG and the LG logo are registered trademarks of LG
Group and its related entities. All other trademarks are the
property of their respective owners.
Page 3

Important Health Information and Safety Precautions
1
When using this product, the
safety precautions below must
be taken to avoid possible legal
liabilities and damages.
Retain and follow all product
safety and operating
instructions. Observe all
warnings in the product
operating instructions. To reduce
the risk of bodily injury, electric
shock, fire, and damage to the
equipment, observe the
following precautions.
ELECTRICAL SAFETY
This product is intended for use
when supplied with power from
the designated battery or power
supply unit. Other usage may
be dangerous and will invalidate
any approval given to this
product.
SAFETY PRECAUTIONS
FOR PROPER GROUNDING
INSTALLATION
CAUTION: Connecting to
improperly grounded equipment
can result in an electric shock to
your device. This product is
equipped with a USB Cable for
connecting to a desktop or
notebook computer. Be sure your
computer is properly grounded
(earthed) before connecting this
product to the computer. The
power supply cord of a desktop or
notebook computer has an
equipment-grounding conductor
and a grounding plug. The plug
must be plugged into an
appropriate outlet which is
properly installed and grounded in
accordance with all local codes
and ordinances.
SAFETY PRECAUTIONS
FOR POWER SUPPLY UNIT
Use the correct external power
source
A product should be operated
only from the type of power
source indicated on the
electrical ratings label. If you are
not sure of the type of power
source required, consult your
authorized service provider or
local power company. For a
product that operates from
battery power or other sources,
refer to the operating
instructions that are included
with the product.
Handle battery packs carefully
This product contains a Li-ion
battery. There is a risk of fire
and burns if the battery pack is
handled improperly. Do not
Page 4

Important Health Information and Safety Precautions
2
attempt to open or service the
battery pack. Do not
disassemble, crush, puncture,
short external contacts or
circuits, dispose of in fire or
water, or expose a battery pack
to temperatures higher than
60°C (140°F).
WARNING: Danger of
explosion if battery is
incorrectly replaced. To reduce
risk of fire or burns, do not
disassemble, crush, puncture,
short external contacts, expose
to temperature above 60°C
(140°F), or dispose of in fire or
water. Replace only with
specified batteries. Recycle or
dispose of used batteries
according to the local
regulations or reference guide
supplied with your product.
Take extra precautions
●
Keep the battery or device
dry and away from water or
any liquid as it may cause a
short circuit.
●
Keep metal objects away so
they don’t come in contact
with the battery or its
connectors as it may lead to
short circuit during operation.
●
The phone should be only
connected to products that
bear the USB-IF logo or have
completed the USB-IF
compliance program.
●
Do not use a battery that
appears damaged, deformed,
or discolored, or one that has
any rust on its casing,
overheats, or emits a foul
odor.
●
Always keep the battery out
of the reach of babies and
small children, to avoid
swallowing of the battery.
Consult a doctor immediately
if the battery is swallowed.
●
Avoid dropping the phone or
battery. If the phone or
battery is dropped, especially
on a hard surface, and the
user suspects damage, take
it to a service center for
inspection.
●
If the battery leaks:
Do not allow the leaking fluid
to come in contact with skin
or clothing. If contact occurs,
flush the affected area
immediately with clean water
and seek medical advice.
Page 5

Important Health Information and Safety Precautions
3
Do not allow the leaking fluid
to come in contact with eyes.
If contact occurs, DO NOT
rub; rinse with clean water
immediately and seek
medical advice.
Take extra precautions to
keep a leaking battery away
from fire as there is a danger
of ignition or explosion.
SAFETY PRECAUTIONS
FOR DIRECT SUNLIGHT
Keep this product away from
excessive moisture and extreme
temperatures. Do not leave the
product or its battery inside a
vehicle or in places where the
temperature may exceed 140°F
(60°C), such as on a car
dashboard, window sill, or
behind glass that is exposed to
direct sunlight or strong
ultraviolet light for extended
periods of time. This may
damage the product, overheat
the battery, or pose a risk to the
vehicle.
PREVENTION OF HEARING
LOSS
CAUTION: Permanent hearing
loss may occur if earphones or
headphones are used at high
volume for prolonged periods
of time.
SAFETY IN AIRCRAFT
Due to the possible interference
caused by this product to an
aircraft’s navigation system and
its communications network,
using this device’s phone
function on board an airplane is
against the law in most
countries. If you want to use
this device when its use is
restricted on board an aircraft,
remember to switch to Airplane
Mode which turns off RF
functions that could cause
interference.
Page 6

Important Health Information and Safety Precautions
4
ENVIRONMENT
RESTRICTIONS
Do not use this product in gas
stations, fuel depots, chemical
plants or where blasting
operations are in progress, or in
potentially explosive atmospheres
such as fueling areas, fuel
storehouses, below deck on
boats, chemical plants, fuel or
chemical transfer or storage
facilities, and areas where the air
contains chemicals or particles,
such as grain, dust, or metal
powders. Please be aware that
sparks in such areas could cause
an explosion or fire resulting in
bodily injury or even death.
EXPLOSIVE ATMOSPHERES
When in any area with a
potentially explosive atmosphere
or where flammable materials
exist, the product should be
turned off and the user should
obey all signs and instructions.
Sparks in such areas could cause
an explosion or fire resulting in
bodily injury or even death. Users
are advised not to use the
equipment at refueling points
such as service or gas stations,
and are reminded of the need to
observe restrictions on the use
of radio equipment in fuel
depots, chemical plants, or
where blasting operations are in
progress. Areas with a potentially
explosive atmosphere are often,
but not always, clearly marked.
These include fueling areas,
below deck on boats, fuel or
chemical transfer or storage
facilities, and areas where the air
contains chemicals or particles,
such as grain, dust, or metal
powders.
ROAD SAFETY
Vehicle drivers in motion are not
permitted to use communication
services with handheld devices,
except in the case of
emergency. In some countries,
using hands-free devices as an
alternative is allowed.
SAFETY PRECAUTIONS
FOR RF EXPOSURE
●
Avoid using your phone near
metal structures (for example,
the steel frame of a building).
●
Avoid using your phone near
strong electromagnetic
sources, such as microwave
ovens, sound speakers, TV
and radio.
Page 7

Important Health Information and Safety Precautions
●
Use only original
manufacturer-approved
accessories, or accessories
that do not contain any metal.
●
Use of non-original
manufacturer-approved
accessories may violate your
local RF exposure guidelines
and should be avoided.
INTERFERENCE WITH
MEDICAL EQUIPMENT
FUNCTIONS
This product may cause medical
equipment to malfunction. The
use of this device is prohibited
in most hospitals and medical
clinics. If you use any personal
medical device(s), consult the
manufacturer of your device(s)
to determine if the device(s) are
adequately shielded from
external RF energy. Your
physician may be able to assist
you in obtaining this
information.
Turn your phone OFF in health
care facilities when any
regulations posted in these
areas instruct you to do so.
Hospitals or health care facilities
may be using equipment that
could be sensitive to external
RF energy.
HEARING AIDS
Some digital wireless phones
may interfere with some hearing
aids. In the event of such
interference, you may want to
consult your service provider, or
call the customer service line to
discuss alternatives.
NON-IONIZING RADIATION
Your device has an internal
antenna. This product should be
operated in its normal-use
position to ensure the radiative
performance and safety from
interference. As with other
mobile radio transmitting
equipment, users are advised
that for satisfactory operation of
the equipment and for personal
safety, it is recommended that
no part of the human body be
allowed to come too close to
the antenna during operation of
the equipment.
Use only the supplied integral
antenna. Use of unauthorized or
modified antennas may impair
call quality and damage the
phone, causing loss of
performance and SAR levels
exceeding the recommended
limits as well as result in noncompliance with local regulatory
requirements in your country.
5
Page 8

Important Health Information and Safety Precautions
6
To assure optimal phone
performance and ensure human
exposure to RF energy is within
the guidelines set forth in the
relevant standards, always use
your device only in its normaluse position. Contact with the
antenna area may impair call
quality and cause your device to
operate at a higher power level
than needed. Avoiding contact
with the antenna area when the
phone is in use optimizes the
antenna performance and the
battery life.
HAC
This phone has been tested and
rated for use with hearing aids
for some of the wireless
technologies that it uses.
However, there may be some
newer wireless technologies
used in this phone that have not
been tested yet for use with
hearing aids.
It is important to try the
different features of this phone
thoroughly and in different
locations, using your hearing aid
or cochlear implant, to
determine if you hear any
interfering noise.
Consult your service provider or
the manufacturer of this phone
for information on hearing aid
compatibility.
If you have questions about
return or exchange policies,
consult your service provider or
phone retailer.
Page 9

Table of Contents
Important Health Information and Safety Precautions . . . .1
Table of Contents . . . . . . . . . . . . . . . . . . . . . . . . . . . . . . . . . .7
Technical Details . . . . . . . . . . . . . . . . . . . . . . . . . . . . . . . . . . .8
The Basics . . . . . . . . . . . . . . . . . . . . . . . . . . . . . . . . . . . . . . .11
Connecting to Networks and Devices . . . . . . . . . . . . . . . .38
Placing and Receiving Calls . . . . . . . . . . . . . . . . . . . . . . . .47
Web . . . . . . . . . . . . . . . . . . . . . . . . . . . . . . . . . . . . . . . . . . . .51
Communication . . . . . . . . . . . . . . . . . . . . . . . . . . . . . . . . . .59
Entertainment . . . . . . . . . . . . . . . . . . . . . . . . . . . . . . . . . . .80
Tools . . . . . . . . . . . . . . . . . . . . . . . . . . . . . . . . . . . . . . . . . . .96
Settings . . . . . . . . . . . . . . . . . . . . . . . . . . . . . . . . . . . . . . . .104
Car Home . . . . . . . . . . . . . . . . . . . . . . . . . . . . . . . . . . . . . .105
Safety . . . . . . . . . . . . . . . . . . . . . . . . . . . . . . . . . . . . . . . . .106
Specifications . . . . . . . . . . . . . . . . . . . . . . . . . . . . . . . . . . .123
FAQ . . . . . . . . . . . . . . . . . . . . . . . . . . . . . . . . . . . . . . . . . . .125
LIMITED WARRANTY STATEMENT . . . . . . . . . . . . . . . .136
Index . . . . . . . . . . . . . . . . . . . . . . . . . . . . . . . . . . . . . . . . . .139
7
Page 10
Technical Details
8
Technical Details
CDMA
Standard
Basic Air
Interface
Network
Designator Description
TIA/EIA-95A
TSB-74
ANSI J-STD-008
TIA/EIA-IS2000
TIA/EIA/IS-634
TIA/EIA/IS-651
TIA/EIA/IS-41-C
TIA/EIA/IS-124
CDMA Dual-Mode Air Interface
14.4kbps Radio Link Protocol and Inter-band
Operations
IS-95 Adapted for PCS Frequency Band
CDMA2000 1xRTT Air Interface
MAS-BS
PCSC-RS
Intersystem Operations
Non-Signaling Data Communications
Service
1x EV-DO
Related
Interface
TIA/EIA/IS-96-B
TIA/EIA/IS-637
TIA/EIA/IS-657
IS-801
TIA/EIA/IS-707-A
TIA/EIA/IS-856
TIA/EIA/IS-878
TIA/EIA/IS-866
TIA/EIA/IS-890
Speech CODEC
Short Message Service
Packet Data
Position Determination Service (gpsOne)
High Speed Packet Data
CDMA2000 High Rate Packet Data Air Interface
1x EV-DO Inter-Operability Specification for HRPD
Access Network Interfaces
Recommended Minimum Performance Standards
for HRPD High Rate Packet Data Access Terminal
Test Application Specification (TAS) for High Rate
Packet Data Air Interface
FCC RF Exposure Information
WARNING!
operating the phone.
Read this information before
In August 1996, the Federal
Communications Commission
(FCC) of the United States, with
its action in Report and Order
FCC 96-326, adopted an
updated safety standard for
human exposure to Radio
Frequency (RF) electromagnetic
energy emitted by FCC regulated
transmitters. Those guidelines are
consistent with the safety standard
previously set by both U.S. and
international standards bodies. The
design of this phone complies with
the FCC guidelines and those
international standards.
Page 11

Technical Details
9
Bodily Contact During Operation
This device was tested for
typical use with the back of the
phone kept 0.79 inches (2.0 cm)
from the body. To comply with
FCC RF exposure requirements,
a minimum separation distance
of 0.79 inches (2.0 cm) must be
maintained between the user
’
s
body and the back of the phone,
including the antenna. Thirdparty belt-clips, holsters, and
similar accessories containing
metallic components should not
be used. Avoid the use of
accessories that cannot
maintain 0.79 inches (2.0 cm)
distance between the user’s
body and the back of the phone
and have not been tested for
compliance with FCC RF
exposure limits.
Vehicle-Mounted External
Antenna
(Optional, if available.)
To satisfy FCC RF exposure
requirements, keep 8 inches (20
cm) between the user /
bystander and vehicle-mounted
external antenna. For more
information about RF exposure,
visit the FCC website at
www.fcc.gov.
FCC Notice and Cautions
This device and its accessories
comply with part 15 of FCC rules.
Operation is subject to the
following two conditions: (1) This
device and its accessories may
not cause harmful interference,
and (2) this device and its
accessories must accept any
interference received, including
interference that causes
undesired operation.
Any changes or modifications not
expressly approved in this user
guide could void your warranty
for this equipment. Use only the
supplied antenna. Use of
unauthorized antennas (or
modifications to the antenna)
could impair call quality, damage
the phone, void your warranty
and/or violate FCC regulations.
’
t use the phone with a
Don
damaged antenna. A damaged
antenna could cause a minor skin
burn. Contact your local dealer
for a replacement antenna.
Part 15.21 statement
Changes or modifications that
are not expressly approved by
the manufacturer could void the
user’s authority to operate the
equipment.
Page 12

Technical Details
10
Part 15.105 statement
This equipment has been tested
and found to comply with the
limits for a class B digital
device, pursuant to Part 15 of
the FCC rules. These limits are
designed to provide reasonable
protection against harmful
interference in a residential
installation. This equipment
generates, uses, and can radiate
radio frequency energy and, if
not installed and used in
accordance with the
instructions, may cause harmful
interference to radio
communications. However,
there is no guarantee that
interference will not occur in a
particular installation. If you
experience interference with
reception (e.g., television),
determine if this equipment is
causing the harmful interference
by turning the equipment off
and then back on to see if the
interference is affected. If
necessary, try correcting the
interference by one or more of
the following measures:
- Reorient or relocate the
receiving antenna.
- Increase the separation
between the equipment and
receiver.
- Connect the equipment into an
outlet on a circuit different
from that to which the receiver
is connected.
- Consult the dealer or an
experienced radio/TV
technician for help.
Page 13

Phone Overview
Front View
Earpiece
Quick Keys
- Phone Key
- Contacts Key
- Messaging Key
owser Key
- Br
The Basics
Touchscreen
11
Menu Key
Home Key
Rear View
Applications Launcher Key
Search Key
Back Key
Microphone
Camera Lens
Camera Flash
Back Cover
Speaker
Page 14
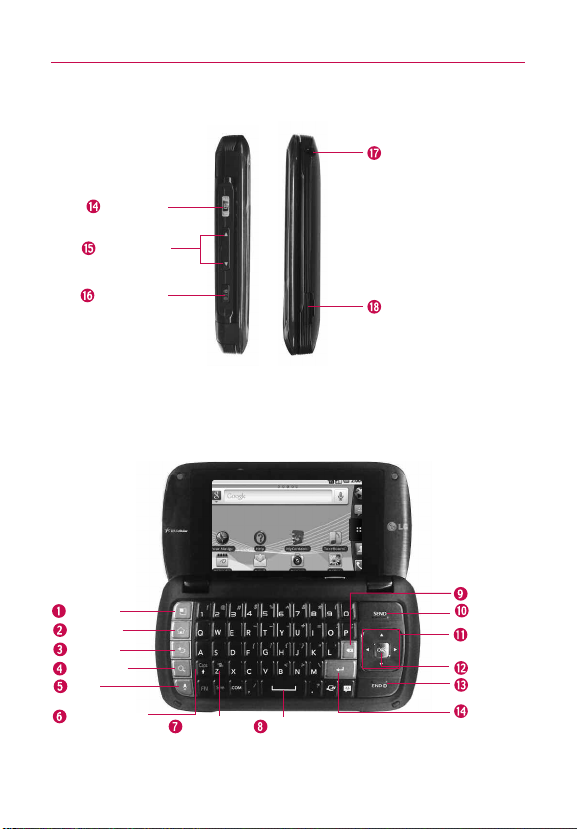
The Basics
12
Camera Key
Volume Keys
Right SideLeft Side
3.5mm Headset
Jack
Power/Lock
Key
QWERTY Keyboard
Menu Key
ey
Home K
ey
Back K
Search Key
Voice
Commands Key
Caps/Shift Key
Vibrate Key
Space Key
Accessory/
Charger Port
Delete Key
Send Key
ectional
Dir
Key
OK Key
End Key
Enter Key
Page 15
The Basics
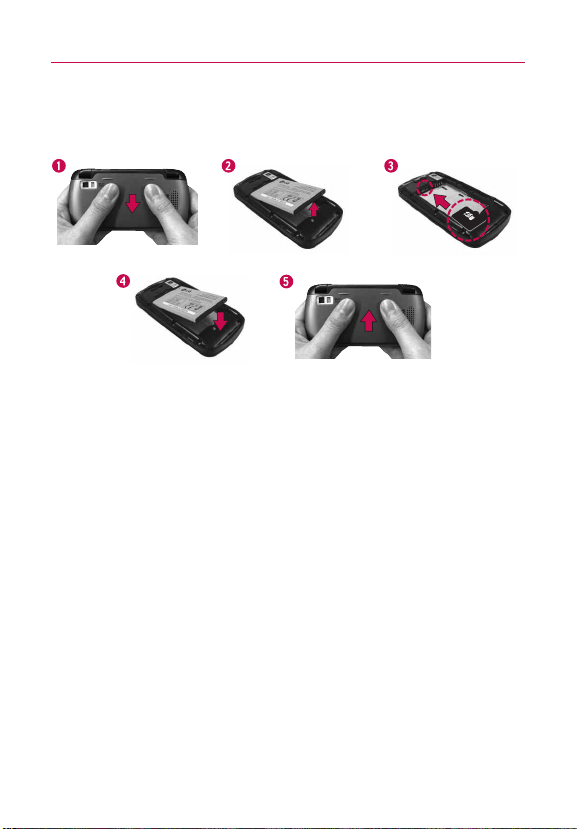
Installing the Battery and microSD Card
NOTE
It is important to fully charge the battery before initial use of the phone.
1. Hold the phone with both hands and use the protruding
ridges to slide open the battery cover.
2. Then use the fingertip cutout to lift the bottom edge of the
battery out.
3. Locate the microSD card slot. Position the microSD card
with the label side facing up and slide it into place until it is
fully inserted and locked in place.
NOTE
The microSD card can be easily damaged by improper operation. Please be
careful when inserting, removing or handling it.
4. Align the battery contacts with the terminals near the top of
the phone, then press the battery into place.
5. Replace the battery cover over the back of the phone. Slide
the battery cover upwards until it clicks into place.
13
Page 16
The Basics
14
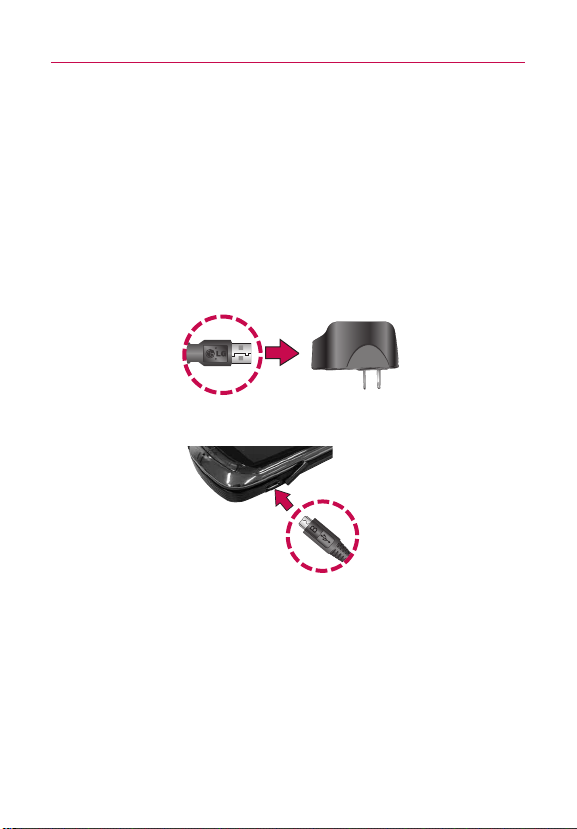
Charging the Phone
Your LG Genesis device comes with a Wall/USB charger and a USB
cable which connect together to charge your phone. To charge your
phone:
NOTICE
Please use only an approved charging accessory to charge your LG phone.
Improper handling of the charger port, as well as the use of an incompatible charger,
may cause damage to your phone and void the warranty.
1. Connect the USB cable into the Wall/USB charger. When
connecting, as shown below, the LG logo on the USB cable
should face toward you.
USB Cable
Wall/USB charger
2. Plug the USB cable (as shown below) into the phone's
charger port.
Charging with USB
You can use your computer to charge your phone. To be able to
charge with the USB cable, you need to have the necessary USB
drivers installed on your PC first. Connect one end of the USB cable
to the charger port on your phone and connect the other end to a
USB port on your PC. It is best to use the rear USB port when
connecting to a desktop PC. The USB hub should be powered by an
external power source.
Page 17
The Basics
Turning the Phone On and Off
Turning the phone on
©
Press and hold the Power/Lock Key for a couple of
seconds.
Turning the phone off
1. Press and hold the Power/Lock Key until the pop-up
menu appears.
2. Touch Power off in the pop-up menu.
3. Touch
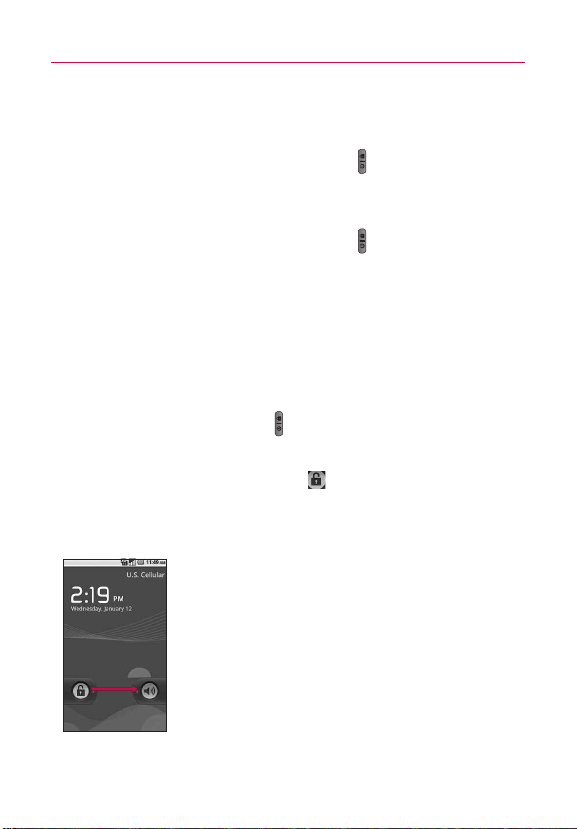
To unlock the phone
If you don’t use the phone for a while, the screen and backlight
will shut off to conserve battery power. To unlock the phone:
1. Press the
2. Touch and drag the
The last screen you were working on opens.
NOTE
OK to confirm that you want to turn off the phone.
Power/Lock Key .
Your Lock Screen will appear.
Unlock icon to the right.
This is the default Lock Screen. If you have set up an Unlock Pattern, use your
fingertip to draw the pattern.
15
Page 18

The Basics
16
Setting Up Your Device
When you turn on your wireless device for the first time, you have
the option to quickly set up various accounts. Simply follow the
onscreen instructions to complete the initial setup of your wireless
device.
To set up your device, follow the steps below :
1. Select your language from English, Español, Korean,
Traditional Chinese
2. If you see the ‘Welcome to the
Continue on the bottom.
3. Configure the time and date settings and touch
4. Select the social networking or email account you want to
set up.
5. Touch
NOTE
Use phone to start using the phone.
Touch Exit if you want to set up your device later. In order to set up the options
given during the setup wizard, you will have to go to the individual options in the
Settings menu (Accounts & sync, Language & keyboard, and Date & time).
or Simplified Chinese.
LG Genesis! page, touch
Next.
Setting up your Google Account
1. At the setup screen, touch Create or Sign in.
2. Enter your username and password.
3. Touch
Now your Gmail, Google Contacts, and Google Calendar events will
all be loaded to your phone automatically.
Sign in.
Page 19
The Basics
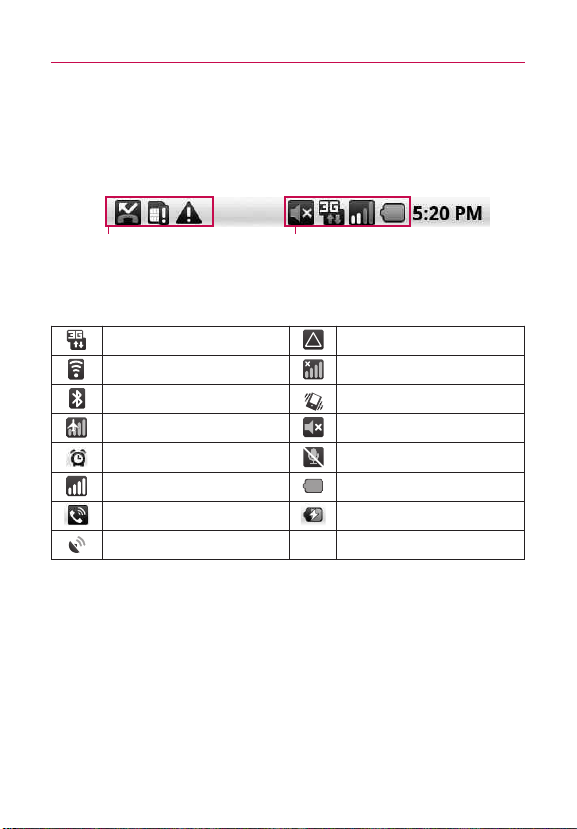
Phone’s Status Icons
The Status Bar appears at the top of every screen. It displays icons
indicating that you’ve received notifications (on the left) and icons
indicating the phone’s status (on the right), along with the current time.
Notification icons Status icons
Status icons
The following icons indicate the status of your phone.
3G in use Roaming
Connected to a Wi-Fi network No signal
Bluetooth is on Vibrate mode
Airplane mode is on Ringer is silenced
An alarm is set Phone microphone is muted
Signal strength Battery is full
Speakerphone is on Battery is charging
Receiving location data from
GPS
17
Page 20
The Basics
18
Notification icons
The following icons indicate that you've received a notification.
New Gmail message
New text or multimedia
message
Problem with text or
multimedia message delivery
New Google Talk message Missed call
New voicemail Uploading data
Upcoming event Downloading data
Data is syncing Download finished
Problem with sign-in or sync Connected to VPN
microSD card is full Disconnected from VPN
An open Wi-Fi network is
available
Phone is connected via USB
cable
No microSD card installed New email message
3 more notifications not
displayed
Call in progress
Call in progress using
Bluetooth headset
Song is playing
USB debugging connected
Page 21
The Basics
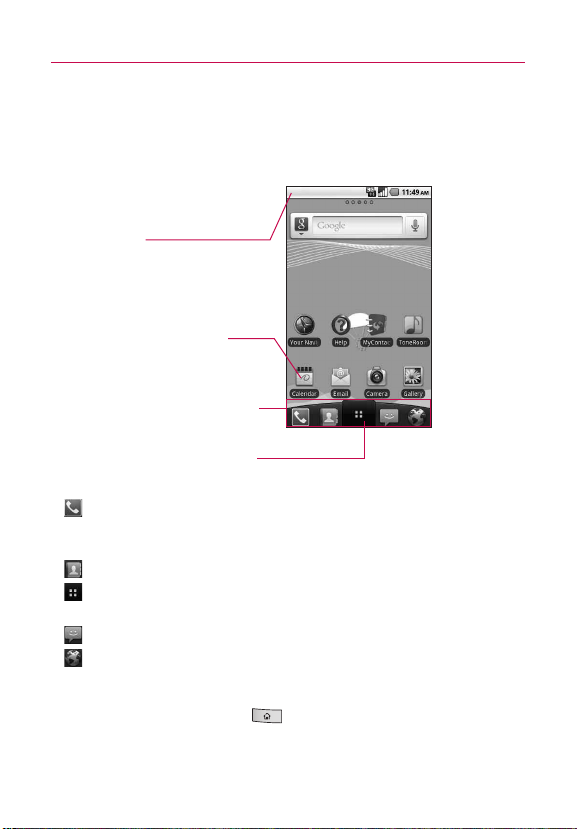
Getting to Know the Home Screen
The Home screen is your starting point to access all the features on
your phone. It displays application shortcuts, icons, widgets,
and other features.
Quick Keys
Status Bar
Shows device status information
including the time, signal strength,
battery status, and notification
icons.
Application Icon
Touch an icon (application, folder,
etc.) to open and use it.
Quick Keys
Provide easy, one-touch access to
the functions you use the most.
Applications Launcher Key
h to open the Launc
Touc
to view installed applications.
h screen
: opens the Phone application which displays the dialpad so
you can dial an unsaved number. Also provides additional
tabs to access Call log, Contacts, and your Favorites.
: opens your Contacts list.
: opens the Launch screen and displays phone options and
applications.
: opens the Messaging application.
: opens the
Browser application.
19
To return to the Home screen
©
Press the Home Key at any time, from any application.
Page 22
The Basics
20
Touchscreen
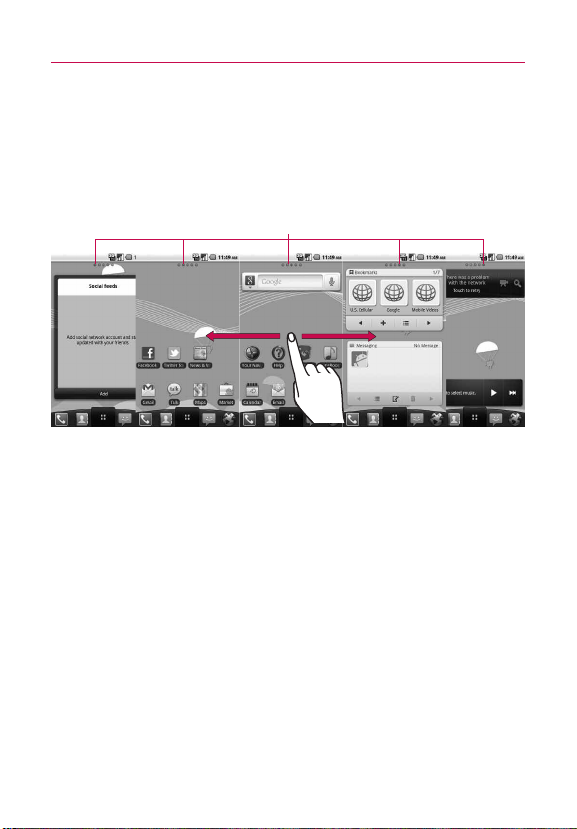
To view other Home screen panes
©
Slide your finger left or right across the Home screen.
The Home screen spans five screen widths allowing more
space for icons, widgets, shortcuts, and other items.
The dots indicate which Home screen pane you are viewing.
The following terms are used for describing the different available
actions using the touchscreen:
Touch A single finger touch selects items.
Touch and hold Touch and hold an item on the screen by
touching it and not lifting your finger until an action occurs.
Drag Touch and hold an item for a moment and then, without
lifting your finger, move your finger on the screen until you reach
the target position. You can drag items on the Home screen to
reposition them, and you drag to open the Notifications panel.
Swipe or slide To swipe or slide, quickly move your finger across
the surface of the screen, without pausing when you first touch it.
Double tap
Double-tap to zoom a web page, map or other
applications.
Pinch-to-zoom Use your index finger and thumb in a pinch or
spread motion to zoom in or out when using the browser, map or
pictures. You can also control the Camera zoom.
Home Screen Pane Indicator
Page 23
The Basics
Rotate the screen From many applications, the orientation of the
screen rotates with the phone as you turn it from vertical to
horizontal and back again.
Keyboard Type
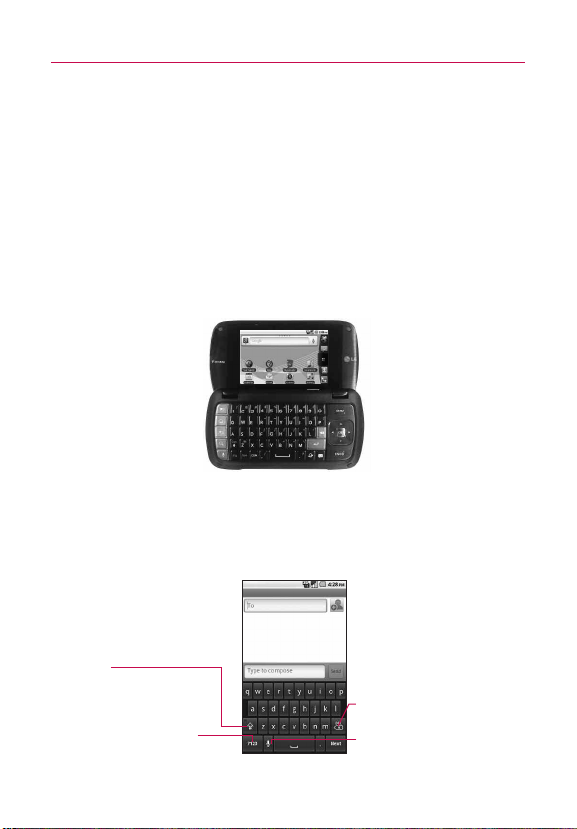
QWERTY Keyboard
Your device has a inner QWERTY keyboard, specifically designed for
easy and comfortable text entry. The QWERTY keyboard uses the
same layout and works just like the keyboard on your computer.
With the flip open, use the QWERTY keyboard out when you are
ready to enter text.
Onscreen Keyboard
You can also enter text using the onscreen keyboard. The onscreen
keyboard displays automatically on the screen when you need to
enter text. To manually display the keyboard, simply touch a text
field where you want to enter text.
21
Shift Key
Touch once to capitalize the
next letter you type.
Double-tap for all caps.
Number and Symbols Key
Touch to change input to
number and symbol entry.
Delete Key
ext Key
oice to T
V
Touch to enter text by voice.
Page 24

The Basics
22
Swype: Swype™ is a text input method that allows you to enter a
word by sliding your finger from letter to letter, lifting your finger
between words. Swype uses error correcting algorithms and a
language model to predict the next word. Swype also includes a
predictive text system. To switch to the Swype, touch and hold a
text field, then touch Input method > Swype.
Android keyboard (default): The default keyboard uses Android
keyboard.
Swype Text Entry Tips
You can access the Swype Tips application and watch a video or
tutorial on using Swype. You can also use the following Swype text
entry tips.
©
Create a squiggle (like an S shape) to create a double letter
(such as pp in apple).
©
Touch and hold a key to view the punctuation menu then
make a selection.
©
Move your finger over the apostrophe to enter contractions.
©
Double-touch on the word you want to change to correct a
misspelled word, then touch the Delete Key to erase one
character. Touch and hold the Delete Key to erase an entire
word.
Swype Settings
To configure Swype settings:
1. From the Home screen, touch the Applications Launcher
Key
> Settings > Language & keyboard > Swype.
2. Configure the Swype settings as you desire.
Page 25
The Basics
Using the onscreen keyboard
1. Touch a text field where you want to type. The onscreen
keyboard will open automatically.Text fields for phone
numbers and other special purposes may display numbers
and symbols or other custom keyboards to make it easier to
enter the required information.
2. Touch the keys on the keyboard to start typing.
●
Touch to delete characters to the left of the cursor.
●
Touch once to capitalize the next letter you type.
●
Touch and hold for all caps. Touch again to switch back to
normal entry.
●
Touch and hold a vowel or the C, N, or S key to open a
small, pop-up window where you can touch other
variations for the letter (e.g., accents, tilda, etc.).
●
Touch and hold to open a pop-up window with a set of
commonly used symbol keys.
●
Touch to switch to the numbers and symbols keyboard.
Touch to view additional symbols; touch it again to
switch back.
●
Touch and hold almost any of the number and symbol keys
to open a window of additional symbols.
3. When you're finished typing, press the
Back Key to
close the keyboard.
NOTE
To change the keyboard orientation, turn the phone horizontal or vertical.
The keyboard rotates to take best advantage of the new phone
orientation. Many people find the larger horizontal onscreen keyboard
easier to use.
Editing text
You can edit the text you enter in text fields and use menu
commands to cut, copy, and paste text, within or across
applications.
23
Page 26

The Basics
24
To cut or copy and paste all the text
1. Touch and hold the text field that contains the text to edit.
2. A pop-up menu opens with options for cutting, copying, and
performing other tasks with the text field.
3. Touch
Cut all or Copy all.
To cut or copy and paste some of the text
1. Put the cursor on the starting or ending point of the text to
copy or paste.
●
Touch the location where to move the cursor.
●
Press the Directional Keys left or right on the QWERTY
Keyboard.
2. Touch and hold the text field that contains the text to edit.
3. A pop-up menu opens with options for cutting, copying, and
performing other tasks with the text field.
4. Touch
Select text.
To enter text
1. Touch a text field.
The onscreen keyboard opens.
2. Touch the keys on the keyboard to type.
The characters you’ve entered appear in a strip above the
keyboard, with suggestions for the word you are typing to
the right. Touch the left or right arrow in the strip to view
more suggestions.
3. Press space or a punctuation mark to enter the bold
suggested word or touch another suggested word to enter it.
4. Use the Delete Key to erase characters to the left of the cursor.
5. When you’re finished typing, press the Back Key to close
the keyboard.
Page 27
To change the keyboard language
1. Touch and hold the Space key.
2. Without lifting your finger, move it to the left or right until
the language you want appears in the center of the small
window above the Space Key.
3. Lift your finger.
If you have many languages available, you may have to
repeat these steps to find the language you want.
NOTE
This option must be set in the Android keyboard settings.
QWERTY Keyboard
Using the QWERTY keyboard
1. Open the QWERTY keyboard to enter text.
2. Use your fingers to enter text.
●
Press to delete characters to the left of the cursor.
●
Press once to capitalize the next letter you type.
●
Press twice for all caps; press it again to switch back.
●
Press and hold vowels, or the C, N, or S keys, to open a
pop-up window where you can touch other variations for
the letter (e.g., accents, tilda, etc.).
●
Press to open a pop-up window with a set of
commonly used symbol keys.
●
Press to enter alternate characters, such as @. To lock
the Caps/Shift Key, press twice; press it again to switch
back to normal entry mode.
The Basics
25
Page 28

The Basics
26
Entering text by speaking
To turn on voice input
If the onscreen keyboard does not display a Microphone Key, voice
input is not turned on or you have it configured to display on the
symbols keyboard.
1. Press the
Settings > Language & keyboard > Android keyboard.
You can also touch and hold the
onscreen keyboard. In the dialog that opens, touch Android
keyboard settings
2. Touch
3. Touch the option for where you want the Microphone Key to
be displayed or touch
To enter text by speaking
You can enter text by speaking, in most places that you can enter
text with the onscreen keyboard.
1. Touch a text field.
2. Touch the
Microphone Key to appear on the symbols keyboard, touch
the Symbols Key first).
3. When prompted to “Speak now,” speak what you want to
enter.
Home Key and Menu Key , then touch
Symbols Key on the
.
Voice Input.
Off to turn off voice input.
Microphone Key on the keyboard (if you set the
Page 29
The Basics
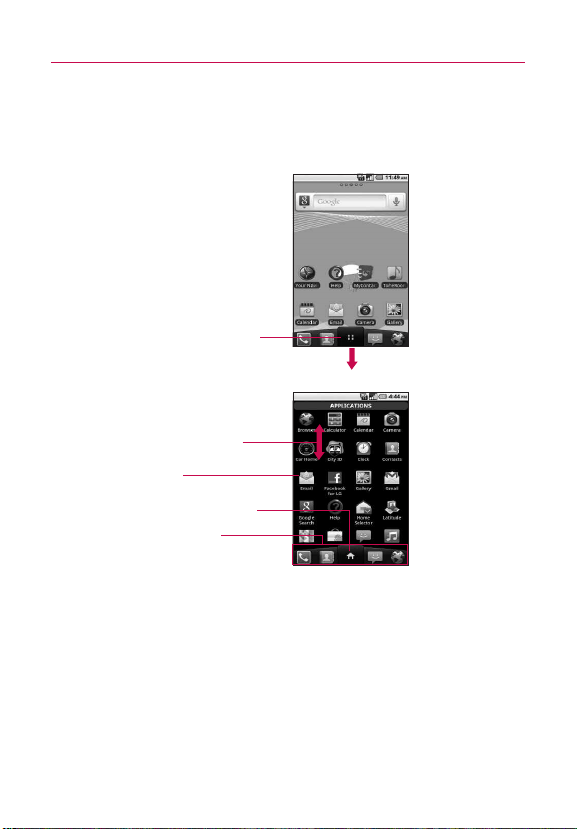
Applications: How to View, Open and Switch
Overview
LG Home screen
Touch to open Launch screen
Launch screen
Slide the screen up or down to
bring more icons into view
Touch an application icon to open
the application
Touch to close Launch screen
Quick Keys
NOTE
The Launch screen closes automatically when you touch an icon to
open its application. Dragging an icon onto your Home screen also
closes the Launch screen automatically.
27
Page 30
The Basics
28
Customizing the LG Home Launch Screen
You can customize the LG Home Launch screen by moving the
position of applications so that you don't have to scroll the screen
up to access the applications you use most often. You can also add
additional categories to the screen to organize your files.
Moving a item
1. To move the icon, open the Launch screen and press the
Menu Key .
2. Touch
Move item.
3. Touch and drag the application icon to the position you want,
then lift your finger. Application icons to the right of the
position shift accordingly.
Adding a category
1. From the Launch screen, press the Menu Key .
2. Touch
Add category and input a category name you want
to add to the LG Home Launch screen.
3. Touch
OK to save the category.
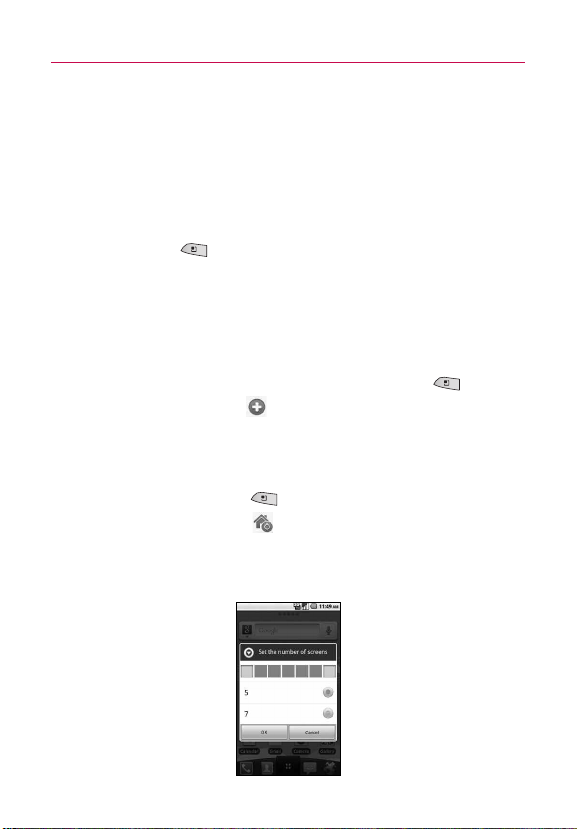
Adding panels to the Home screen
1. Press the Menu Key from the Home screen.
2. Touch
3. Touch
4. Touch
Home settings .
5 or 7 to select the number of Home screen panels
you would like to have.
OK to confirm your selection.
Page 31

The Basics
Opening and Switching Applications
Opening multiple applications
1. Touch an application icon to open it.
2. Press the Home Key .
NOTE
If the application icon you want is on your Home screen, simply touch
the icon to open and use it.
3. Touch the Applications Launcher Key .
4. Touch the icon for the other application you want to open.
TIP
You can customize your Home screen with the application icons you use
most often. Applications are located on the Launch screen, but you can
copy any application icon to your Home screen for faster access. No
matter where the icon is, on the Launch screen or your Home screen,
just touch it to open and use it.
Switching between multiple applications
1. Press and hold the Home Key .
A screen with the icons of applications that
you’ve used recently will appear.
2. Touch the application icon you want to open.
Or touch the
current application.
Back Key to return to the
Touch an icon to open an
application you've used recently.
Adding application icons to the Home screen
Customize your Home screen with the applications you use most often.
1. Open the Launch screen.
2. Touch and hold the application icon you want to add to your
Home screen. Your Launch screen will be minimized so that
you can place the icon on a Home screen.
3. Lift your finger to place it, or drag the icon to where you want
it on the screen, then lift your finger.
29
Page 32

The Basics
30
Setting Keyboard Shortcuts to Applications
You can set certain keys to launch selected applications. This may
be helpful for multi-tasking when you are using the QWERTY
keyboard.
©
From the Home screen, press the Menu Key , touch
Settings > Applications > Quick launch, then select the
keyboard shortcuts you want to set.
Working with Menus
There are two kinds of Android menus: Options menus and Context
menus.
Options menus
Options menus contain tools that apply to the activities of the
current screen or application, not to any specific item on the screen.
To open the available options menu, press the Menu Key . Not
all applications have Options menus; if you press the Menu Key
on a screen that has no Options menu, nothing will happen.
Options menus contain items that apply
rent screen or
to the cur
to the application as a whole.
Page 33

The Basics
Context menus
Context menus contain options that apply to a specific item on the
screen. To open a Context menu, touch and hold an item on the
screen. Not all items have Context menus. If you touch and hold an
item that has no Context menu, nothing will happen.
When you touch and hold
certain items on a screen, a
Context menu opens.
Managing Notifications
Notification icons report the arrival of new messages, calendar events,
alarms, as well as ongoing events, such as when you are in a call.
To open the Notifications panel
©
Touch and drag the Status Bar to the bottom of the screen.
OR
©
From the Home screen, press the Menu Key and touch
Notifications.
31
Touch a
notification
to open it.
Page 34

The Basics
32
To respond to a notification
1. Open the Notifications panel. Your current notifications are
listed in the panel, each with a brief description.
2. Touch a notification to view it.
Searching Your Phone and the Web
You can search for information on your phone and on the web by
using the Google search.
Phone and Web search using text entry
1. Touch the Search Key .
When you touch the
or in the other applications that support this, the Quick
Search Box will open automatically.
NOTE
If you're using the phone with the QWERTY keyboard open, press the Search
Key to open the Quick Search Box to conduct a search.
In some applications, such as Gmail, Contacts, and Browser,
the application's own search box opens when you press the
Search Key .
No matter what application you're working in (except for
Camera), pressing the Search Key will open the Quick
Search Box.
Search Key on the Home screen
Voice Search
Touch to searc
Recent sear
Provides one touch shortcut to
previously searched terms.
h by voice.
esults
ch r
Page 35

The Basics
2. Enter the text you're searching for in the Quick Search Box.
Touch to conduct the search.
As you type, search results from
your phone, previous search
terms, and web search
suggestions appear. Touch an
item to search that term.
3. Touch to search for the entered terms.
OR
If what you want to search for what appears in the
suggestions list, touch that item to conduct the search.
Locking the Screen
You can lock your screen so that only you can unlock it to make
calls, access your data, buy applications, etc.
Setting a Lock Pattern
1. From the Home screen, press the Menu Key .
2. Touch
3. Touch
Settings >
Set up screen lock (under the Screen unlock section
of the settings). The first time you do this, you will see a
tutorial with instructions on how to create an unlock pattern.
4. Select
Pattern, PIN, or Password.
Pattern: The first time you set unlock pattern, you will see a
tutorial with instructions on how to create it. Read the
tutorial and touch Next (twice). Draw your own pattern and
touch Continue. Then redraw your pattern and touch
Confirm. (Connect at least four dots.)
Location & security
.
33
Page 36

The Basics
34
Draw your unlock pattern.
Touch Continue to draw your
tern again to confirm it.
pat
PIN: Enter a PIN (at least of 4 digits) and touch Continue.
Reenter your PIN and touch OK to confirm it.
Password: Enter a Password (at least of 4 characters) and
touch Continue. Reenter your password and touch OK to
confirm it.
From then on, any time you wish to turn the phone on or
unlock the screen, you will need to draw your unlock pattern to
unlock the screen.
NOTES
You have 5 opportunities to enter your unlock Pattern, PIN or Password. If
you used all the 5 opportunities, you can attempt it after 30 seconds.
When you can’t recall your unlock Pattern, PIN, or Password:
If you’ve created a Google account on the phone, touch Forgot pattern?
Then, you are required to sign in with your Google account to unlock your
phone.
If you haven’t created a Google account on the phone, you need to
perform a factory reset.
(Caution: If you perform a factory reset, all user applications and user data
will be deleted. Please remember to back up any important data before
performing a factory reset.)
1. Turn the power off.
2. Press and hold for over 5 seconds: Volume up or down + Home +
Power/Lock .
3. When the power turns on, release these keys.
Page 37

The Basics
Customizing the Home Screen
You can personalize your Home screen by adding application icons,
shortcuts, widgets, and other items to any Home screen pane. You
can also change the wallpaper.
To add an item to the Home screen
1. Go to the Home screen pane where you want to add the
item.
2. Press the
Or, just touch and hold an empty spot on the Home screen.
NOTE
3. In the menu that opens, touch the type of item to add. You
can add the following types of items to the Home screen:
Shortcuts Add shortcuts to applications, a bookmarked web page,
a favorite contact, and more. The shortcuts available depend on
the applications you have installed.
Widgets Add any of a variety of widget applications to your Home
screen, including a clock, a music player, a picture frame, and
more. Note that more widgets can also be found on Android
TM
Market
Folders Add a folder where you can organize other Home screen
shortcuts and icons, or folders that contain all your contacts,
contacts with phone numbers, or starred contacts. Your folders'
contents are kept up to date automatically.
Menu Key and touch Add.
If there is no available space on a particular Home screen pane, Add will
not be available; you must delete or remove an item before you can add
another item. In this case, you have the option of switching to another
Home screen pane.
.
35
Page 38

The Basics
36
To change the Home screen wallpaper
1. From the Home screen, press the Menu Key and
touch Wallpaper.
2. Touch Gallery, Live wallpapers, or Wallpaper gallery.
3. Touch
Set wallpaper or Save.
To rename a folder
1. Touch the folder icon to open it.
2. Touch and hold the folder window's title bar.
3. Touch the current folder name in the text box that appears,
then enter the new folder name.
4. Touch
OK.
Connecting Quickly With Your Contacts
©
Open your Contacts list and touch the contact icon to the
left of the contact's name. A bubble will open with the
available options, displayed as icons. This is the Quick
Contact bubble. Depending on the contact information
saved, the available actions will be displayed above the
name.
©
Touch a Quick Contact icon to communicate with the
contact. Depending on the icon you've touched, a different
application will open.
Page 39

The Basics
If you add a shortcut for a contact to your Home screen, you will be
able to open Quick Contact for that contact.
Optimizing Battery Life
You can extend your battery's life between charges by turning off
features that run in the background. You can also monitor how
applications and system resources consume battery power.
To check the battery charge level
©
From the Home screen, press the Menu Key and touch
Settings > About phone > Status.
To monitor and control what uses the battery
The Battery use screen allows you to see which applications are
consuming the most battery power.
©
From the Home screen, press the Menu Key and touch
Settings > About phone > Battery use. The screen will display
battery usage time.
37
Page 40

Connecting to Networks and Devices
38
Connecting to Mobile Networks
To disable data when roaming
1. From the Home screen, press the Menu Key .
2. Touch
3. Touch
Settings > Wireless & networks > Mobile networks.
Data roaming to remove the checkmark from the box.
With Data roaming unchecked, you can still transmit data
with a Wi-Fi connection.
Connecting to Wi-Fi Networks
To turn Wi-Fi on and connect to a Wi-Fi network
1. From the Home screen, press the Menu Key .
2. Touch
3. Touch
4. Touch a network to connect to it.
To add a Wi-Fi network
1. Turn on Wi-Fi, if it's not already on.
2. From the Wi-Fi settings screen, touch
3. Enter the SSID (name) of the network. If the network is
4. Enter the required passwords and security credentials.
5. Touch
Settings > Wireless & networks > Wi-Fi settings.
Wi-Fi to turn Wi-Fi on and scan for available Wi-Fi
networks.
secured, touch the
type of security deployed on the network.
Save.
Security drop-down menu and touch the
Add Wi-Fi network.
Page 41

Connecting to Networks and Devices
MediaShare
MediaShare uses DLNA (Digital Living Network Alliance) technology
to share digital content through a wireless network. Both devices
must be DLNA certified to support this feature.
To turn MediaShare on and allow sharing contents
1. Touch the Menu Key > Settings > Wireless &
networks
2. Touch
©
Touch Always allow requests if you would like to
automatically accept sharing requests from other devices.
3. Under the Sharing contents section, touch to checkmark the
types of content you would like to share. Choose from
Pictures, Video, and Music.
4. MediaShare is now activated and ready to share contents.
To share contents from your phone to your renderer device
device (e.g., TV)
NOTE
1. While browsing your pictures or videos using the Gallery
application, touch and hold to select files. Then you will be
able to select multiple files to be shared.
2. Touch Share and select MediaShare.
3.
MediaShare is automatically launched with the selected files.
4. Select the device from the list displayed.
5. Touch the play button to let your renderer device play the files.
NOTES
> MediaShare settings.
MediaShare to checkmark and turn the function on.
Make sure that your renderer device is properly configured.
●
Follow the same steps to use the Music player to share music files.
●
Check that your device is connected with your home network using a
Wi-Fi connection to use this application.
39
Page 42

Connecting to Networks and Devices
40
●
Some DLNA enabled device devices (e.g., TV) support only the Digital
Media Player (DMP) feature of DLNA and will not appear in the renderer
device list.
●
Your device might not be able to play some contents.
Tethering & portable hotspot
You can share your phone's mobile data connection via USB or as a
portable Wi-Fi hotspot.
Follow the process below to tether and connect:
From the Home screen, press the
Menu key and touch
Settings > Wireless & networks > Tethering & portable hotspot.
To share your phone's data connection via USB
1. Connect the phone to your computer using a USB cable.
2. Enable
USB tethering using the steps described above.
To share your phone's data connection via hotspot
1. Enable
Portable Wi-Fi hotspot using the steps described
above.
2. Using your other device, find and connect to the hotspot.
Enter any necessary information.
NOTE
A tethering plan is required from your wireless carrier for using this
service. Please contact your carrier for more information.
USB Auto Run
USB Auto Run is a feature that allows a LG Genesis to connect to a PC using
a USB cable and sets up the on a PC without a physical CD-ROM.
©
Automatically installs the LG USB Modem Driver.
©
Allows the phone to be used as a mass storage device when
a microSD card is present in the LG Genesis. It allows
transfer of unprotected content from phone to PC and vice
versa.
Page 43

Connecting to Networks and Devices
NOTES
●
USB Auto Run only works with Windows®XP, Window 7, Vista™, and Mac
OS X®above v10.5 operating systems.
●
Log on to the PC as Administrator. Non-Administrator accounts have
insufficient privilege to install USB Modem driver and don’t run Autorun
feature.
●
Do not unplug USB cable during Auto Run.
Auto Run automatically installs the USB device driver for every USB mode.
Auto Run is not available when:
©
Phone is booting (powering up).
©
PC operating system is not set to Auto Run (automatic
execute command).
Step 1. Connecting Your Your Phone to Your PC
©
Connect your phone to your PC with a compatible USB cable
(supplied) and LG Auto Run starts automatically.
©
Click ‘I accept the terms in the agreement’ and ‘Yes’.
NOTES
●
Without the Auto Run, release notes for USB Auto Run would pop-up as
shown. Auto Run is supported by Windows®XP, Windows®Vista,
®
7, and Mac OS X®above v10.5.
Windows
●
The ‘USB Auto Run’ feature is working only under Administrator account.
The installer has insufficient privilege under Non-Administrator account.
Log on as Administrator. The device is switched back to the user set
mode with 30 seconds.
Step 2. Downloading the LG USB Modem Driver.
NOTES
●
If a previous version of the LG USB Modem Driver is installed in the
computer, it will be updated to the recent version of the driver.
●
If a recent version of the LG USB Modem Driver is installed in the
computer, LG Auto Run skips ‘Step 2.’
41
Step 3. Installing the LG USB Modem Driver.
Page 44

Connecting to Networks and Devices
42
Enable Dial-up Networking
While traveling, you can use your phone as a modem for your notebook.
Before you proceed
©
To connect your device to a computer via USB, you must first
install the USB driver on the computer.
©
Make sure your phone has a data or dial-up modem
connection on the device manager of your computer.
NOTE
A tethering plan is required from your wireless carrier for using this
service. Please contact your carrier for more information.
To connect your phone to a computer via USB
1. Use the USB cable that came with your phone to connect
the phone to a USB port on your computer.
2. Open the Notifications panel, then touch
Mode
.
3. Touch
Mass Storage Mode and then Ok in the dialog box
that opens to confirm that you want to transfer files.
To disconnect your phone from the computer
WARNING!
1. On your computer, complete the process to safely Stop, or
Remove, the USB device (in this case, the phone). For
example, use the Safely Remove Hardware option to Stop
the USB device, on Windows®XP.
2. Open the Notifications panel (on your phone) and touch
Connection Mode
3. Touch
4. Disconnect the USB cable from the computer and the phone.
Carefully follow your computer's instructions to unmount, remove,
or disconnect any removable USB devices or disks, to avoid losing
information on the microSD card when disconnecting your phone
from your computer.
.
Modem Mode and then Ok.
USB Connection
USB
Page 45

Connecting to Networks and Devices
To safely remove the microSD card from your phone
You can safely remove the microSD card from your phone any time
the phone is turned off.
1. Turn the power off.
2. Remove the battery cover and use the fingertip cutout to lift
the bottom edge of the battery out.
3. Locate the microSD card slot.
4. Gently push the exposed border of the microSD card to
release it. Then gently pull it out to remove it.
To format a microSD card
If you purchase a new microSD card, you may need to format it
before you can use it with your phone. You can also format a
microSD card anytime to erase its contents.
1. From the Home screen, press the
2. Touch
Settings > SD card & phone storage > Unmount SD
card > OK
NOTE
.
You can only format a microSD card only when it is unmounted. If
necessary, touch Unmount SD card before proceeding.
3. Touch Format SD card.
OR
●
Touch the Back Key to exit without formatting.
4. Touch
Format SD card > Erase everything.
NOTE
ormat, you should touch Mount SD card to able to use the
After the f
microSD card.
Menu Key .
43
Page 46

Connecting to Networks and Devices
44
Connecting to Bluetooth Devices
To turn Bluetooth on or off
1. From the Home screen, press the Menu Key .
2. Touch
3. Touch Bluetooth to turn the function on or off. A checkmark
The phone supports HFP, HSP, A2DP, AVRCP, OPP, PBAP, FTP, DUN.
To change your phone’s Bluetooth name
Your phone has a generic Bluetooth name by default, which is
visible to other devices when you set the phone as 'Discoverable'.
You can change the name to customize it to your preference.
1. From the Home screen, press the
2. Touch Settings > Wireless & networks > Bluetooth settings.
3. Touch
To pair your phone with a Bluetooth device
You must pair your phone with another device before you can
connect to it.
1. From the Home screen, press the
2. Touch
Settings > Wireless & networks.
indicates that the function is on.
Menu Key .
●
If Bluetooth is off, touch Bluetooth to turn it on. A
checkmark indicates that the function is on.
Device name, enter a new name then touch OK.
Bluetooth is on
Connected to a Bluetooth device
Menu Key .
Settings > Wireless & networks > Bluetooth settings.
Page 47

Connecting to Networks and Devices
• If Bluetooth is off, touch Bluetooth to turn it on. A
checkmark indicates that the function is on.
3. Touch the ID of the device you want to pair with your phone.
• Often, the target device will be discovered and pairing will
occur automatically.
• If you're prompted to enter a passcode, try entering 0000 or
1234 (the most common passcodes), or consult the
documentation that came with the target device to find its
passcode.
• Once the pairing is successful, your phone will connect to the
device.
Connecting to Virtual Private Networks
To add a VPN
1. From the Home screen, press the Menu Key .
2. Touch Settings > Wireless & networks > VPN settings.
3. Touch
4. Touch the type of VPN to add.
5. In the screen that opens, follow the instructions from your
6. Press the
Add VPN.
network administrator to configure each component of the
VPN settings.
Menu Key and touch Save.
The VPN will be added to the list on the VPN settings screen.
45
To connect to a VPN
1. From the Home screen, press the Menu Key .
Settings > Wireless & networks > VPN settings.
2. Touch
The VPNs you've added are listed on the VPN settings screen.
Page 48

Connecting to networks and devices
46
3. Touch the VPN to which you want to connect.
4. In the dialog box that opens, enter any requested credentials
then touch
Connect.
To disconnect from a VPN
©
Open the Notifications panel, then touch the ongoing
notification for the VPN connection. This will allow you to
disconnect from the VPN.
Working With Secure Certificates
If your organization's VPN or Wi-Fi network relies on secure
certificates, you must obtain the certificates and store them in your
phone's microSD card before you can configure access to that VPN
or Wi-Fi network on your phone.
To install a secure certificate from the microSD card
1. Copy the certificate from your computer to the root (that is,
not in a folder) of the microSD card.
2. From the Home screen, press the
3. Touch Settings > Location & security.
4. Touch Install from SD card.
5. Touch the file name of the certificate to install.
Only the names of certificates that you have not already
installed on your phone are displayed.
6. If prompted, enter the certificate's password then touch
7. Enter a name for the certificate then touch OK.
Menu Key .
OK.
Page 49

Placing and Receiving Calls
Placing and Ending Calls
You can place calls using the Phone application. You can dial calls
manually using the Phone tab.
To open the Phone application
©
From the Home screen, or the Launch screen, touch the Phone
icon .
Touch to erase a digit. Touch and hold to erase the entire
number.
©
Dial 011 plus the country code and phone number to make
international calls from the U.S.
©
Touch the Dial Key to dial the number that you entered.
The duration of the call.
ormation from Contacts about
Inf
Touch to switch between a
Bluetooth headset and the
Touch to mute the microphone
phone.
during a call.
the person you
Touch to end a call.
Touch to enter additional
numbers during your call.
Touch to turn the speakerphone
on or off.
're calling.
47
●
You can open other applications during a call. The green
phone icon will appear in the Status Bar while the call is
underway.
●
Press the Volume Keys to adjust the call volume.
Page 50

Placing and Receiving Calls
48
Airplane mode
Some locations may require you to turn off your phone's wireless
connections by placing your phone in Airplane mode.
1. Press and hold the
2. Touch
Airplane mode.
Power/Lock Key .
You can also set to Airplane mode with the Wireless &
networks menu.
Answering or Rejecting Calls
When unlocked When locked
h to decline
Touc
the call.
h to
Touc
er the call.
answ
Touch to send
an SMS instead
of answering.
©
To silence the ringer, press the Volume Down Key.
Drag the
Answer
button to the
right to
answer the
call.
Working with the Call Log
Drag the Decline
button to the left
to reject the call
and send to
voicemail.
The caller is sent
directly to your
voicemail box to
leave a message.
Drag the Excuse
msg Key up to
send an Excuse
message to the
caller instead of
answering the call.
Missed call
Dialed call
Several calls from the
same number.
Received call
k
h to call bac
ouc
T
Touch and hold an entr y for
more options
Page 51

Placing and Receiving Calls
To add an entry’s number to your Contacts
1. Touch and hold the entry.
2. Touch Add to contacts.
3. In the list of contacts that opens, touch
at the top, or touch an existing contact to add the new
number to that existing contact.
Create new contact
Calling Your Contacts
Instead of manually dialing phone numbers using the dialpad, you
can use your Contacts list to dial quickly and easily.
To call a contact
1. From the Home screen, touch the Contacts icon .
2. Touch the contact you wish to call.
3. Touch the phone number you wish to use to call the contact.
To call a favorite contact
1. From the Home screen, touch the Contacts icon , then
touch the Favorites tab. You can add and remove favorites by
touching the star next to their names.
2. Touch the favorite you wish to call.
3. Touch the phone number you wish to use to call the contact.
49
Managing Multiple Calls
If you accept a new call when you're already on a call, you can
switch between the two calls or merge the two calls into a single
conference call. You can also set up a conference call with multiple
callers.
Page 52

Placing and Receiving Calls
Addcall
50
To set up a conference call
1. Place a call to the first participant.
2. When you're connected, touch Add call .
The first participant is put on hold and you're prompted to
dial the second caller.
3. Place the next call using the Phone, Call log, Contacts, or
Favorites tab.
4. After you're connected, touch
The participant is added to the conference call.
5. Touch
End to end a conference call and disconnect all
callers.
Touch to merge the calls.
Merge calls .
Touch to mute the microphone
during a call
h to switch between a
ouc
T
Bluetooth headset and the phone
Listening to Your Voicemail
©
Open the Notifications panel, then touch New voicemail.
OR
©
From the Home screen, touch the Phone Key , then touch
touch and hold . Typically, your carrier's voicemail system
guides you through the process of listening to and managing
your voicemail.
Touch to turn the speakerphone
f
on or of
Page 53

Browser
Browse web pages
1. From the Home screen, open the Launch screen and select
Browser. To access a specific web page, touch the URL input field,
enter the web address (URL) of the web page, and touch .
2. While browsing the web page, use the following options:
©
To zoom in or out, double-tap the screen. You can also use
the two finger zoom; place your two fingers on the screen
and slowly pinch or spread apart.
©
To open a new window, press the Menu Key > .
©
To view the list of bookmarks, press the Menu Key >
. You can also add, edit, or delete a bookmark.
©
To view the currently active windows, press the Menu Key
> . You can open multiple pages and switch back
and forth between them.
©
To reload the current web page, press the Menu Key >
.
The Refresh option appears after the web page finishes
loading.
To stop loading the web page, press the Menu Key
> . The Stop option appears when the web page is
loading.
©
To go to the previous page, press the Back Key .
©
To go to a next page in your history, press the Menu Key
>.
©
To bookmark the current web page, press the Menu Key
> > Add bookmark.
©
To search for text on the web page, press the Menu Key
> > Find on page.
Web
51
Page 54

Web
52
©
To select text on the web page, press the Menu Key >
> Select text. Highlight the text you want with your
finger. The highlighted text is copied to the phone's memory
temporarily and you can paste it anywhere.
©
To view the web page details, press the Menu Key >
> Page info.
NOTES
l
When you are on a secure page, you can see the cerificate of the current
page by touching View certificate on the Page info menu.
©
To send the web address (URL) of the web page to others,
press the Menu Key > > Share page.
©
To view the download history, press the Menu Key >
> Downloads.
©
To customize the browser settings, press the Menu Key
> > Settings.
City ID
City ID is an enhanced Caller ID that automatically displays the city
and state of every wireless call received. City ID enabled handsets
also feature outgoing and call log identification which displays the
city and state of outgoing calls as well as calls within the handset’s
call history.
To purchase City ID
1. From the Home screen, touch the Applications Launcher
Key
.
2. Touch City ID .
3. Touch
4. Confirm that you want to purchase the application by
Subcription status, then touch Subscribe Now to
purchase the application.
touching
Ye s.
Page 55

Web
Market
Opening Android Market and Finding Applications
Open Android Market to browse and search for free and paid applications.
To open Android Market
©
Touch Market on the Home screen or in the Launch
screen.
When you open Android Market for the first time, you must
read and accept the terms of service to continue.
Touch to search Market for specific applications.
Touch a categor y to view its contents.
Touch a featured application to view more
information.
To get help with Android Market
Android Market Help web pages are available from all Android
Market screens.
©
Press the Menu Key and touch Help.
The Browser application opens to Android Market Help page,
with links to many help topics.
53
To search for applications
1. Touch the Search icon at the top right of the screen or
press the Search Key .
2. Enter all or part of an application’s name or description, or the
developer’s name you want to search for, and touch
Search .
Page 56

Web
54
3. Touch a search result to open that application’s details
screen.
To return to the Android Market home screen
You can return to the home screen from most other screens in
Android Market.
©
Touch the Market icon at the top left of the screen.
OR
©
Press the Menu Key and touch Home.
Managing Your Downloads
After you’ve downloaded and installed an application, you can rate it,
view it in a list with your other downloaded applications, and so on.
To view your downloaded applications
You can view a list of the applications you’ve downloaded from
Android Market and use the list for a number of purposes.
©
On the Android Market home screen, press the Menu Key
and touch My apps.
In the list of applications that opens, you can touch one to
rate it, uninstall it and request a refund.
To move applications from the phone to the SD card
1. Touch the Applications Launcher Key > Settings . >
Applications > Manage applications.
2. Touch the application you want to move from the list and
then touch
Move to SD card.
Page 57

News and Weather
Checking the news and weather
©
Touch a tab at the top of the screen to view the weather or
top stories by category. Or just swipe left or right across the
screen to switch news categories.
Scroll to touch the category of news
you’re interested in.
Touch the screen for details.
©
Touch a headline to read the full story.
Touch a headline to read the full stor y.
Swipe left or right to change news
categories.
©
While viewing the weather or news headlines, press the Menu
Key
and touch Refresh to get the latest information.
Web
55
Changing News and Weather settings
You can configure a number of settings for News and Weather.
©
To open the News and Weather settings screen, press the
Menu Key and touch Settings.
Page 58

Web
56
Google Maps
TM
To open Google Maps and view your location
1. Touch the Maps icon in the Launch screen.
2. Touch .
The map centers on a blue dot that indicates your location. A
blue circle around the dot indicates that your actual location
is within the circle.
To get an address and additional information for a location
©
Touch and hold a location on the map. A balloon with the
address and a thumbnail from Street View (if available) opens
over the location.
Touch and hold a location to open a balloon
with its address.
Touch the balloon to access additional
options.
©
Touch the balloon to access additional options.
To view map, satellite, or traffic layers
©
Touch and select a layer option, including Map layer,
Satellite layer and Traffic layer.
Searching For Locations and Places
You can search for a location and view it on a map. You can also
search for places on the map that you're viewing.
Page 59

To search for a location
1. While viewing a map, press the Menu Key and touch
Search or press the Search Key .
2. In the search box, enter the place you're looking for. You can
enter an address, a city, or a type of business or establishment.
3. Press the
Search icon . Markers with letter labels indicate
search matches on the map.
Getting Directions
To get directions
1. While viewing a map, press the Menu Key and touch
Directions.
2. Enter a starting point in the first text box and your destination
in the second text box. You can also touch to open a menu
with options for selecting an address from other locations.
arting and ending locations.
Enter st
Touch a mode of transport.
Touch to get directions.
Web
57
To reverse directions, press the
Menu Key and touch
Reverse Start & End.
3. Touch the icon for car, public transit, bicycle, or walking directions.
4. Touch
Go.The directions to your destination appear in a list.
To view turn-by-turn directions in a list
You can view each turn in your route as a list of written directions.
©
Touch the Directions icon .
©
Touch the Navigation icon to view turn-by-turn directions in
Navigation View.
Page 60

Web
58
To search for locations along your route
©
Press the Search Key and search for locations of interest.
©
When you're finished, touch the Navigation icon to return
to Navigation View.
Latitude
Finding Your Friends with Google Latitude
Google Latitude lets you and your friends view each others' locations on
maps and share status messages with each other. You can also send
messages and emails, make phone calls, and get directions to your
friends' locations using Google Latitude. Your location is not shared
automatically. It is by invitation only. You must join Latitude and then invite
your friends to view your location or accept invitations from your friends.
Press the
friends, See map, Add friends
Menu Key for the following Latitude options: Refresh
and Privacy.
TM
Places
To find places
Touch the Places icon from the Launch screen to choose a category,
such as gas stations, coffee shops, bars, restaurants, etc. Once
selected you’ll see a list of closest matches, including their distance,
compass bearing, description and even user reviews.
RSS Reader
Using RSS reader
RSS (Really Simple Syndication) is a family of web feed formats used
to publish frequently updated content such as blog entries, news
headlines or podcasts. An RSS document, which is called a feed,
web feed, or channel, contains either a summary of content from an
associated web site or the full text. RSS makes it possible for people
to keep up with their favorite web sites in an automated manner that
is easier than checking them manually.
●
NOTES
Press the Menu Key to edit the RSS Reader Settings.
Page 61

Communication
Contacts
©
Touch the Contacts icon on the Home screen or in the
Launch screen.
All of your contacts are displayed alphabetically in a list.
Touch to view only your favorite contacts.
Touch a contact to view its details.
Touch an icon to open Quick Contact.
Touch the contact whose details you want to view.
Touch to open Quick Contact.
You can view the communication history with this contact.
Touch the icon for the method you want to communicate.
Touch the green Phone icon to call the number or touch the
Text icon to start a text message.
You can also press the
contact
to edit the contact's information, or touch Delete
contact
to delete the contact entry.
Menu Key and touch Edit
59
Page 62

Communication
60
To add a new contact
1. From the Home screen, touch Contacts .
2. Press the Menu Key and touch New contact.
To import/export contacts from your microSD card
You can copy contacts, in vCard format, onto your microSD card
then import/export them into your phone.
1. Insert the memory card (that contains the vCard files) into
your phone.
2. From the Home screen, touch
3. Press the
4. Touch
Menu Key and touch More > Import/Export.
Import/Export from/to SD card.
Contacts .
To share a contact
You can share a contact with someone by sending it to them as a
vCard file.
1. From the Home screen, touch
2. Open the contact you want to share.
©
To share one contact, select the contact you wish to share,
then touch the Menu Key > Share.
©
To share several contact, press the Menu Key and
touch Multiselect, check the contacts you wish to share and
Share.
touch
Contacts .
Adding a Contact to Your Favorites
The Favorites tab contains a short list of the contacts you
communicate with most often.
Page 63

Communication
Searching for a Contact
It is easy to search for a contact by name.
To search for a contact
1. From the Home screen, touch Contacts .
2. Touch the
3. Enter the Contact's name.
To connect by using Quick Contact for Android
1. Touch a contact's picture to open Quick Contact for Android.
Search Key .
TM
61
Touch a cont
act
's picture.
2. Touch the icon corresponding to the type of communication
you want to start.
Depending on the contact information saved, the available
actions will be displayed above the name.
Setting Individual Ringtones
You are allowed to set the Ringtone for each contact.
1. From the Home screen, touch
2. Press the
3. Touch
4. Touch
Menu Key and touch Options.
Ringtone and select ringtone.
OK to save your setting.
Contacts .
Page 64

Communication
62
Email
Opening Email and the Accounts Screen
You can use the Email application to read email from services other
than GmailTM. The Email application supports the following account
types: POP3, IMAP and Exchange.
To open the Email application
©
From the Home screen, open the Launch screen and touch
Email .
The first time you open the
to help you add an email account. After the initial setup, Email
displays the contents of your Inbox (if you have only one account) or
the Accounts screen (if you have multiple accounts).
You can also add a shortcut to Email on your Home screen so that
you can open it directly from the Home screen.
The Accounts screen
The Accounts screen lists your Combined Inbox and each of your
email accounts. If you have starred, draft, or unsent messages in
any of your accounts, the folders for those items from all accounts
are displayed as well.
©
Open the Email application. If you're not on the Account
screen, press the Menu Key , then touch Accounts.
Accounts Screen
Email application, a setup wizard opens
h to open your Combined Inbox, with
ouc
T
messages sent to all of your accounts.
Touch to open a list of just your starred
messages.
Touch an account to open its Inbox.
Touch the folder icon to open the account’s
folders.
Page 65

Communication
Each folder and account on the Accounts screen displays the
number of unread messages in green, or will display the
number of messages in Starred, Drafts and Outbox in gray.
You can touch an account to view its Inbox, or an account's
folder icon to view a list of that account's folders.
The account from which you send email by default is
indicated with a checkmark.
To open your Combined Inbox
If you have configured Email to send and receive email from more
than one account, you can view all messages sent to all accounts in
your Combined Inbox.
1. Press the
Launcher Key
SHORTCUT
Home Key , then touch the Applications
> Email .
Press the Home Key , then touch Email on the Home
screen.
2. If you have multiple email accounts, touch Combined Inbox
(in the Accounts screen).
Messages in the Combined Inbox are color coded along
their left sides, by account, using the same colors that are
used for your accounts in the Accounts screen.
Only your account's most recent emails are downloaded to your
phone. To download more (earlier) email messages, touch
more messages
at the bottom of the emails list.
Load
Reading Your Messages
You can read messages from your Combined Inbox, from the Inbox,
or from other folders from the individual accounts.
63
To read a message
1. Press the Home Key , then touch the Applications
Launcher Key
> Email .
Page 66

Communication
64
2. Touch the message you want to read.
The message opens in a screen that includes information
about who sent it, the date it was sent, and other related
information.
Composing and Sending Email
You can send email to your contacts or to other people or groups.
To compose and send a message
1. While in the Email application, press the Menu Key ,
then touch Compose.
2. Enter an address for the message's intended recipient.
As you enter text, matching addresses are offered from your
Contacts. You can touch a suggested address or continue
entering a new one. Separate multiple addresses with
commas.
3. Press the
to Cc or Bcc other contacts/email addresses.
4. Enter a subject for the message.
5. Enter the text of the message.
6. Press the
send a photo with the message.
7. Touch
Menu Key , then touch Add Cc/Bcc to be able
Menu Key , then touch Add attachment to
Send to send the message.
Working with Account Folders
Each account has Inbox, Outbox, Sent, and Drafts folders.
Depending on the features supported by your account's service
provider, you may have additional folders.
To view an account’s folders
1. Open the Email application , press the Menu Key ,
then touch Accounts.
Page 67

Communication
2. Touch an account's folder icon.
The account's Folders screen will open, with a list of the
folders in the account. Touch a folder to view a list of the
messages it contains.
Indicates the number of new messages in the
folder.
Touch a folder to open the messages it
contains.
Adding and Editing Email Accounts
To add an email account
1. Open the Accounts screen.
2. Press the
In the Setup Email screen, enter your email address and
password.
If you're adding a second or subsequent email address, you
can also check the option to use the new account as default
when sending outgoing messages.
3. Touch
the wizard can't configure for you, touch Manual setup.
If you touch Next, Email attempts to communicate with your
email service provider to validate your account.
4. Enter a name for the account, confirm how you want your
name to appear in outgoing mail, then touch
complete adding the account.
Menu Key and touch Add account.
Next or, if you need to enter email account settings
Done to
65
Page 68

Communication
66
To change an account’s settings
You can change a number of settings for an account, including how
often email is checked and how you're notified of new mail.
1. Open the Accounts screen.
2. Touch and hold the account whose settings you want to
change. In the menu that opens, touch
Account settings.
3. When you're finished changing settings, press the
to return to the Accounts screen.
To delete an email account
1. Open the Accounts screen.
2. Touch and hold the account you want to delete.
3. Touch
4. Touch
Remove account in the menu that opens.
OK in the dialog box to confirm that you want to
delete the account.
Facebook for LG
Using the Facebook application
1. From the Home screen, open the Launch screen and touch
Facebook for LG.
2. If this is your first time to use Facebook for LG, follow the
onscreen instructions to sign in to your Facebook account.
3. On the News Feed screen, press the
then touch Home to access the other functions.
NOTE
• While on the Facebook home screen, press the Menu Key and
then touch Settings to set refresh and notification options.
• On some screens, you can press and hold an item to open an Options
menu.
Menu Key and
Back Key
Page 69

Communication
Adding the My status and Social Feeds widget
Add the My status and Social Feeds widget to the Home screen to
let you quickly share your thoughts and view your friends’ status
updates.
NOTE
The widget will only link to the Facebook account that you logged into
on the Facebook application as main account.
1. Press the
2. Drag the widget to a blank space on the Home screen, and then
Home Key > Menu Key and touch Add >
Widgets > My status or Social Feeds
release it.
Gmail
To open the Gmail application
©
Touch the Gmail icon on the Home screen or in the
Launch screen.
The number of unread
messages in your Inbox.
Bold subject lines indicate
conversations with new
(unread) messages.
Touch a conversation to open it
and read its messages.
Recipient indicator (see below)
: indicates that this message was sent directly to you.
: indicates that this message was that you were CC'd on.
(No indicator): indicates that this message was sent to a group
that includes you.
Your account.
The number in
parentheses indicates the
number of messages in
versation
the con
67
Page 70

Communication
68
To open your Inbox when Gmail is running
©
Touch the Back Key until you return to your Inbox.
OR
©
When reading a message, press the Menu Key and
touch Go to inbox.
OR
©
When viewing a list of labeled conversations, press the
Menu Key and touch Go to inbox.
To switch accounts
1. From your Inbox, press the Menu Key and touch
Accounts.
2. Touch the account that contains the email you want to read.
Reading Your Messages
When viewing a list of conversations in your Inbox or in any list of
labeled conversations, you can open a conversation to read its
messages.
To read a message
©
Touch a conversation that contains the message you want to
read.
This conversation has one label.
This conversation has one other message.
It has been minimized because the
message has already been read.
Touch a sender's picture to open
the Quick Contact menu.
hive or delete the
ou can arc
Y
entire conversation or read your
next, oldest, unread message.
Page 71

Communication
To reread a message
When you open a conversation, messages that you've already read
are minimized into a tab that indicates the number of hidden
messages.
1. From the Home screen, touch
conversation you want to view, then touch the tab indicating
minimized messages.
2. Touch the contact name to open that message.
ouc
T
of a message to open it,
so y
Gmail , touch the
Touch the tab that indicates
the number of read
messages to view their
summary tabs.
h the contact name
ou can read it again.
69
When reading a message or when its tab is selected, you can press
Menu Key and touch Mark unread to return a read
the
message to the unread state. For example, to remind yourself to
read it again later.
Page 72

Communication
70
Composing and Sending a Message
You can compose and send a message to people or groups with
Gmail addresses or other email addresses.
To compose and send a message
1. From the Home screen, touch Gmail , press the Menu
Key
2. Enter a recipient's address.
As you enter text, matching addresses are offered from your
Contacts list. You can touch a suggested address or continue
entering text to enter a new one.
3. Press the
Bcc recipients, if necessary.
4. Enter a subject for the message in the Subject field.
5. Continue into the next field to enter your email message.
6. Press the
attachment to the email.
7. Touch the
and touch Compose.
Menu Key and touch Add Cc/Bcc to Cc or
Menu Key and touch Attach to add an
Send button.
Replying to or Forwarding a Message
You can continue an email conversation by replying to a message or
by forwarding it.
To reply to or forward a message
1. Touch to the right of the sender’s name to view your
message options.
2. Touch
3. Write your message and touch .
Reply, Reply to all, or Forward.
Page 73

Communication
Working with Conversations in Batches
You can archive, label, delete, or perform other actions on a batch of
conversations at once, in your Inbox or in another label views.
1. From the Inbox or messages with another label, touch the
checkmark for all the messages you want to include in the
batch.
When you checkmark a conversation, the
Archive, Label,
and Delete buttons appear at the bottom of the screen.
Touch to include the message in the batch.
h to select an action for the batch or press the
Touc
Menu Key for more options.
2. Touch the
Menu Key and touch Add star, Report spam, Mute,
Mark read/ Mark unread, or Deselect all.
Archive, Delete, or Label button. Or press the
Labeling a Conversation
As mentioned previously, conversations are organized by labels.
Gmail has several default labels, but you can also add your own
through Gmail on the web.
71
Starring a Message
You can star an important message or conversation to make it easy
to locate again.
Page 74

Communication
72
Viewing Conversations by Label
You can view a list of the conversations that have the same label,
including conversations with starred messages.
Reporting Spam
The Gmail webmail service is quite effective at preventing spam
(junk mail) from reaching your Inbox. But when spam does make it
through, you can help improve the Gmail service by reporting the
conversation as spam.
Archiving Conversations
You can archive conversations, to move them out of your Inbox
without deleting them. Archived conversations are assigned the All
Mail label, and also retain any other labels you've assigned to them.
Archived conversations are also included in search results. If
someone replies to a message that you've archived, its
conversation will be restored to your Inbox.
Synchronizing Your Messages
The Gmail webmail service has the resources to store all the
messages you've ever sent or received; your phone does not. To
save space, Gmail downloads only some of your messages to your
phone. Use the
applications synchronize their data.
Settings application to control how and when
Changing Gmail Settings
You can change a number of settings for Gmail. Each Google
account has its own settings, so your changes affect only the
current account.
Notification volumes and some synchronization settings can also be
changed in the
Settings application.
Page 75

Communication
©
From the Home screen, touch Gmail , press the Menu
Key
and touch More > Settings.
Messaging
To open Messaging
©
From the Home screen, touch Messaging .
The Messaging window will open, where you can create a
new message or open an ongoing message thread.
Touch to compose a new text or multimedia
message.
Touch to open an ongoing message thread.
©
Touch New message to start a new text or multimedia
message.
©
Touch an existing message thread to open it.
To delete a message thread from the Messaging window
1. Touch and hold the message thread.
2. Touch Delete thread in the menu that opens.
3. Touch
OK to confirm you want to delete it.
73
Exchanging Messages
You can send text (SMS) messages of up to 160 characters to
another mobile phone. If you keep typing after the limit, your
message is converted as MMS message.
Page 76

Communication
74
Multimedia (MMS) messages can contain text and a picture, a
recorded voice, an audio file, a video, or a picture slideshow.
The Messaging application converts a message into a multimedia
message if you attach a subject or attach a media file.
To create and send a message
1. On the Messaging screen, touch New message.
2. Enter a mobile phone number or email address in the To
field. As you type, matching contacts appear. You can touch
a suggested contact or continue typing.
3. Touch the text field to start entering your message.
4. Press the
message subject.
5. Press the Menu Key and touch Attach to open a menu
where you can touch the kind of media file to attach to the
message.
6. Write your message and touch
Menu Key and touch Add subject to add a
Send.
Changing Messaging Settings
You can change a number of Messaging settings.
©
To change Messaging settings, open the Messaging window,
press the Menu Key and touch Settings.
Phone
This allows you to make a call with the dialpad.
Call log
This shows you the history of your call. Press the Menu Key
and choose Multiselect to choose multiple call logs to delete or
Clear call log to erase all logs.
Page 77

Communication
Contacts
You could Search, New contact, Multiselect, Display options,
Accounts
and More by pressing the Menu Key .
Favorites
You can add contact to your list of favorites.
Talk
To open Google Talk and sign in
©
Open the Launch screen and touch the Talk icon .
When you first open Google Talk, your Friends list will be
displayed. This list includes all of the friends you've added by
using Google Talk on the web or on the phone.
75
Your online st
Touch a friend to invite them to chat.
atus.
To return to your friends list
You can return to your Friends list when chatting with a friend, so
that you can invite another friend to chat, add a friend, and so on.
©
Press the Menu Key and touch Friends list.
To sign out of Google Talk
You can sign out of Google Talk. For example, if you want to limit
Google Talk conversations to your computer. Also, signing out can
also extend your battery life.
Page 78

Communication
76
©
From your Friends list, press the Menu Key and touch
Sign out.
You will no longer receive chat notifications or see others'
Google Talk status in other applications, such as GmailTM.
Chatting with Friends
To chat with a friend
1. From the Home screen, open the Launch screen and touch
Talk .
If you're already chatting with someone, you can press the
Menu Key and touch Friends list to return to the
friend's list.
2. Touch the friend you want to chat with.
3. Enter your message and touch
Who you’re chatting with and their online status.
Messages sent and received.
Enter a message then touchSend.
Send.
To configure notifications for new Google Talk messages
1. From the Friends list, press the Menu Key and touch
Settings.
2. Checkmark IM notifications to receive a notification in the
Status bar when a new chat message arrives.
3. Touch
Select ringtone to open a list of the ringtones that will
ring to notify you of a new chat.
Page 79

Communication
4. Checkmark Vibrate to set the phone to vibrate when you
receive notification of a new chat.
To show or hide the mobile indicator to friends
1. From the Friends list, press the Menu Key and touch
Settings.
2. Checkmark or uncheck
If Mobile indicator is checked, your friends see an outline of
an AndroidTMnext to your name in their Friends list when
you're signed into Google Talk on the phone.
Mobile indicator.
Your friend is signed into Google Talk on his or her
phone.
To set whether you sign into Google Talk automatically
1. From the Friends list, press the Menu Key and touch
Settings.
2. Checkmark or uncheck Automatically sign in.
When Automatically sign in is checked, you are signed into
Google Talk when you turn on your phone.
Twitter for LG
Tweeting on your phone
Use the Twitter for LG application to send out tweets, read and
receive tweets from people, search for new Twitter users to follow
and more.
1. If you did not sign in to your Twitter account when you first
turned on the phone, follow the onscreen instructions to sign
in to your Twitter account.
2. Twitter for LG opens in the You + Friends screen.
77
Page 80

Communication
78
Twitter for LG home screen
1. Let’s you view all the tweets sent from everyone you follow.
2. Shows all tweets that mentions your username using the
“@[your username]” convention.
3. Touch to view your profile.
4. Shows people who are marked as favorites.
5. Shows all people you follow and tweets that they have updated.
6. Shows all direct messages you have received.
Page 81

Communication
Sending a direct message
You can only send a direct message to someone who is following you.
1. From the Twitter for LG home screen, touch
messages
2. Touch
3. Touch the To field and then enter the name. As you enter
characters, the names of the Twitter users that match the
characters you enter will appear. Touch the name when you
see it.
4. Enter your message and then touch
.
New Direct Message.
Directed
Send.
Setting Twitter for LG options
1. Open the Twitter for LG application.
2. Press the
of the options available as you desire.
Menu Key and then touch Settings. Set any
Voice Search
Google Voice Search allows someone to use their phone to make
the query.
To use the Voice Search
From the Home screen, touch Application Launcher Key >
Voice Search and speak once the Speak now prompt is
displayed.
79
Page 82

Entertainment
80
Camera
Opening Camera and Taking Pictures
You take pictures and record videos using the Camera application.
You can also view your pictures with the Gallery application.
IMPORTANT
To open the Camera application
To take a picture
Be sure to clean the protective lens cover with a microfiber cloth before
taking pictures. A lens cover with smudges from fingers can cause blurry
pictures with a “halo”effect.
©
Touch the Camera icon on the Home screen or in the
Launch screen.
Camera opens in Landscape mode, ready to take a picture
or record a video.
Drag to switch bet
modes.
Touch to take a picture or to begin recording
a video.
Touch to access your pictures gallery.
Touch the screen to change settings.
ween Camera and Video
1. Open the Camera application.
2. To control your picture exposure manually, touch the screen
to open the camera settings.
3. Frame your subject on the screen.
You can zoom in or out by touching the screen and then
touching the Zoom control .
4. Touch the
Shutter icon .
Page 83

Entertainment
To take pictures with digital zoom
©
Touch the screen to display the settings controls, touch the
Zoom control , and slide the Zoom bar left (zoom out) or
right (zoom in).
OR
Touch to zoom in or to zoom out.
You can also control zoom in or zoom out using the Volume
Keys.
To shoot a video
1. Open the Camera application and drag the control to the
Video position.
2. To change the length of your video or control your video
exposure manually, touch the screen to open the camcorder
settings.
3. Point the lens to frame the scene where you want to start.
4. Touch the
The camcorder starts recording the video. The length of the
recording is displayed on the bottom right part of the screen.
5. Touch the
Record icon .
Stop icon to stop shooting.
81
Reviewing Your Pictures
You can review the pictures you’ve taken in the Camera application,
view them in a slideshow, share them with your friends, and delete
and edit them.
Page 84

Entertainment
82
To review your pictures
1. After taking a picture, touch the Gallery icon .
The picture review screen opens.
2. Touch a picture to view it.
Reviewing Your Videos
You can review the videos you’ve recorded, share them with
friends, delete them, or view them in a slideshow.
1. After recording a video, touch the
2. Touch a video to play it.
To access more features in the Gallery for viewing and sharing your
videos, press the
Menu Key twice.
To change Camera settings
1. Open the Camera application, then touch the screen or
press the Menu Key , and touch the Settings icon .
2. Touch the setting category you want to change and then
touch a setting.
3. Touch the
4. Take your pictures using the new settings.
5. When you
icon , then touch the Reset icon to restore the settings
back to the default values.
NOTE
Back Key to close the Settings menus.
're finished, touch the screen, touch the Settings
When ISO 800 is selected under the normal light condition, the picture
might have a couple of noise bands because this setting value is
targeting at the very low light condition.
Gallery icon .
Page 85

Entertainment
83
YouTube
TM
Opening YouTube and Watching Videos
You can browse, search for, view, upload, and rank YouTube videos
on your phone with the YouTube application.
To open the YouTube application
©
Touch the YouTube icon on the Home screen or in the
Launch screen.
YouTube presents the videos grouped into categories, such
as Most viewed, Most discussed, Most recent, and Top
rated. Touch a video to watch it or touch to learn more
about it.
Touch to search for a video. You can also
search by voice.
Touch to record and share a video.
Touch a video to play it.
Touch to learn more about a video.
To watch and interact with YouTube videos
©
On a YouTube screen, touch a video to play it.
Page 86

Entertainment
84
©
Touch the screen twice to pause playback. To view additional
options, rotate the phone to the vertical position.
©
Touch the Back Key to stop playback and return to the
videos list.
©
Press the Menu Key to view additional options.
To search for videos
1. At the top of the main YouTube screen, touch the Search icon .
2. Enter the text to search for or touch the Microphone icon
to search by voice.
3. Touch a suggestion below the search box or touch the
Search icon .
4. Scroll through the search results and touch a video to watch it.
To share your videos on YouTube
You can record and share a video using YouTube. First, you must
create a YouTube account and sign into it on your phone.
1. Touch the Camera icon at the top right of main YouTube
screen.
2. If you want to set any configurations manually, touch the
screen to open the camcorder settings.
3. Point the lens to frame the scene where you want to start.
4. Touch
5. Touch
6. Touch . You return to the YouTube Upload details screen.
7. Enter a title, description, and tags for your video.
8. If you want to share the video with everyone, checkmark
9. Touch
Record .
Stop to stop recording.
Public.
Upload.
Page 87

Entertainment
Gallery
Opening Gallery and viewing Your Albums
Open the Gallery application to view albums of your pictures and videos.
To open Gallery and view your albums
©
Touch the Gallery icon on the Home screen or in the Launcher.
OR
©
Open Gallery from the Camera application by touching the
Gallery icon .
w of an album.
Typical vie
Scroll left or right to view more albums.
©
Touch an album to open it and view its contents.
The pictures and videos in the album are displayed in
chronological order.
©
Touch a picture or video in an album to view it.
©
Return to the main Gallery screen at any time by touching its
icon at the top left of the screen.
85
Working with Albums
Albums are groups of images and videos in folders on your microSD
card or in Picasa web albums.
Page 88

Entertainment
86
To open an album and view its contents
©
Open the Gallery application and touch the album whose
contents you want to view.
Toggle between grid and stack view.
Displays the name of the current album.
Touch a picture or video to view it.
Slide the bar to scroll horiz
our pictures.
y
©
Use the slider bar at the bottom of the screen to
ontally through
scroll horizontally through your pictures and videos.
©
The date of the images in view is displayed, so you can scroll
by date.
©
You can also scroll through an album by swiping the screen
left or right.
To change how the contents of an album are displayed
You can view the images and videos in your albums in a chronological
grid or in stacks, sorted by the date and the location where they were
taken. You switch album views with the Album View switch at the top
right of the screen.
©
Drag the Album View switch to the right to view the
contents of the album in stacks.
Album View switch
Stacks are sorted by date and location
Page 89

Entertainment
©
Drag the Album View switch to the left to view the
album contents in a chronological grid again.
To get details about an album
1. Open the main Gallery window.
2. Press the
Menu Key twice.
3. Checkmark or uncheck the album(s) you want to see details about.
4. Touch the
More button at the bottom right of the screen,
then touch Details from the pop-up menu.
To delete an album
You can delete an album and its contents from your microSD card.
1. Open the main Gallery window.
2. Press the
Menu Key twice.
3. Checkmark or uncheck the album(s) you want to delete.
4. Touch the
Delete button at the bottom center of the screen.
Touch Confirm Delete in the balloon that pops up.
Working with Pictures
Use Gallery to view pictures that you've taken with the Camera
application, downloaded, copied onto your microSD card, or that are
stored in Picasa web albums.
To view and browse pictures
©
Open a Gallery album and touch a picture.
Touch to zoom in or
out; simply pinch; or
just double-tap the
picture.
Touch the picture to see
the controls.
Drag left or right to see
the next or previous
picture in the album.
87
Page 90

Entertainment
88
To watch a slideshow of your pictures
©
Touch a picture to view the control buttons, then touch the
Slideshow button.
©
Touch a picture to end the slideshow.
To rotate a picture
1. Touch a picture to view the control buttons then press the
Menu Key .
2. Touch the
Mor
e
button.
A menu opens with tools for working with the picture.
3. Touch
Rotate Left or Rotate Right.
The picture is saved with the new orientation.
To use a picture as a contact icon or as Home screen
wallpaper
1. Press the Menu Key while viewing the picture.
2. Touch the More button.
3. Touch
4. Touch
Set as.
Contact icon to set the picture to a Contact or touch
Wallpaper to set the picture as your wallpaper.
To crop a picture
You can crop and save pictures that are stored on your microSD card.
1. Press the
2. Touch the
3. Touch
The cropping rectangle appears on top of the picture.
4. Use the cropping box to select the portion of the picture to
crop.
Menu Key while viewing a picture.
More button.
Crop.
Page 91

Entertainment
©
Drag from the inside of the cropping box to move it.
©
Drag an edge of the cropping box to resize it to any
proportion.
©
Drag a corner of the cropping box to resize it with fixed
proportions.
Drag from inside the cropping box to move
it.
Drag a corner or edge to resiz
cropping box and zoom in or out.
When you
're finished, touch Save.
e the
5. Touch the Save button to save a copy of the picture as you
cropped it. The original uncropped version remains on your
microSD card.
To edit the image
1. Press the Menu Key then touch More > Edit.
2. Edit the image using
Adjust on the left side.
3. You can then Save, Undo, Set as and Share by touching on
the right side.
Select area, Tools, Filter, Image and
89
To get details about a picture
1. Press the Menu Key while viewing a picture.
2. Touch the
3. Touch
More button.
Details.
Page 92

Entertainment
90
To view the location of a picture in Google Maps
TM
If you have configured the Camera application to save location data
with your pictures, you can view the location where you took the
picture in Google Maps.
1. Press the
Menu Key while viewing the picture you
want to view its location in Google Maps.
2. Touch the
More button.
3. Touch Show on map.
Google Maps opens, centered on the location stored in the
picture.
To share a picture
You can share a picture by sending it to friends or posting it in a
Picasa web album.
1. Press the
Menu Key while viewing the picture to
share, then touch the Share button.
2. In the menu that opens, touch the application to use to
share the selected picture.
To delete a picture
You can delete a picture from your microSD card.
1. Press the
delete.
2. Touch the
the dialog box that opens.
Menu Key while viewing the picture to
Delete button and then touch Confirm Delete in
Working with Videos
Use the Gallery application, to play videos that you've taken with
the Camera application and to share them with friends.
Page 93

Entertainment
To play videos
©
Open a Gallery album then touch a video.
The video plays, with the orientation (landscape) you shot it in.
Touch the video to view the playback controls
for pausing, resuming, and skipping
backward and forward.
©
Touch the video to view the playback controls.
To share a video
You can share a video by sending it in an email or with a multimedia
(MMS) message. MMS messages have size limits, typically 1.2MB,
or approximately 1 minute of video with any quality except
640*480. You can also share a video by uploading it to the YouTube
TM
web site.
1. While viewing an album, press the
Menu Key twice.
2. Checkmark the videos or pictures to share.
3. Touch the
Share button.
4. In the menu that opens, touch the application you would like
to use to share the selected videos.
5. Enter the necessary information and send it.
To delete a video
1. While viewing an album, press the Menu Key twice.
2. Checkmark the videos to delete.
3. Touch the
4. Touch
Delete button.
Confirm Delete.
91
Page 94

Entertainment
92
Music
Opening Music and Working with Your Library
After you've copied some music onto your microSD card you can
open the Music application and see your library of music files,
sorted in one of four ways.
To open Music and view your music library
©
Touch the Music icon on the Home screen or in the
Launch screen.
Touch a tab to view your library according to
the theme.
Touch to show a summary of information of
the current track.
You can return to the main Library screen from most other
screens in the
then touching Library.
To search for music in your library
1. Open the main Library screen and touch the Search Key .
2. Start typing the name of the artist, album, or track you
looking for. Matching songs are displayed in the list below
the search box.
3. Touch a matching song to play it or touch a matching album
or artist to view a list of associated songs.
Music application by pressing the Menu Key
're
Page 95

Entertainment
To delete a song from the microSD card
You can delete music from the storage card.
©
Touch and hold a song in a library list. In the menu that
opens, touch Delete.
OR
©
On the Playback screen, press the Menu Key and touch
Delete.
To play music
©
Touch a song in your library to listen to it.
OR
©
While viewing a list of tracks in an album, press the Menu
Key
and touch Play all.
93
Touch to open the current playlist.
h to shuffle the current pla
Touc
h to repeat the current playlist; touc
Touc
rent track.
the cur
h to apply sound effect(Dolby Mobile): no effect, Neutral,
ouc
T
ass Boost, Treble Boost, Vocal Boost
e, B
Expansiv
Touch and hold to search for information.
Skip tracks or pause and resume playback.
Drag the slider to go directly to a specific
section of a track.
ylist.
h again to repeat
To control playback volume
In addition to the techniques for setting media volume, you can
control the volume of music in the Music application.
©
Press the phone's Volume Keys.
A panel opens to show the current media volume.
Some headsets include their own volume controls or ways
to pause and resume playback or to skip tracks.
Page 96

Entertainment
94
To control playback
The Playback screen contains several icons that you can touch to
control the playback of songs, albums, and playlists.
Touch to pause playback.
Touch to resume playback.
Touch to skip to the next track in the album, playlist, or shuffle.
Touch to skip to the previous track in the album, playlist, or shuffle.
Touch to open the current playlist.
Touch to play the current playlist in shuffle mode (tracks are played in
random order).
Touch to set repeat mode: don't repeat, repeat the playlist, or repeat
the current track.
Touch to apply sound effect(Dolby Mobile): No Effect, Neutral,
Expansive, Bass Boost, Treble Boost, Vocal Boost
Manufactured under license from Dolby Laboratories. Dolby and
the double-D symbol are trademarks of Dolby Laboratories.
Video Player
Learn to use the video player to play various kinds of videos. The
video player supports the following file formats: 3gp, mp4, avi,
wmv, asf (Codec: MPEG4, H.263, H.264, VC-1, DivX/XviD).
• Some file formats are not supported depending on the software
of the phone.
• If the file size exceeds the available memory, an error can occur
when you open files.
1. From the Launch screen, touch
2. Select a video to play.
Video player.
Page 97

Entertainment
3. Rotate the device counter-clockwise to landscape view.
4. Control playback with the following icons:
Pause playback.
Plays a video.
Touch and hold to rewind the video. Touch once to start playback
from the beginning.
Touch to fast forward the video.
Voice Recorder
Learn to operate your phone’s voice recorder. You can set voice
memos as call or alarm ringtones.
Record a voice memo
1. From the Home screen, touch the Applications Launcher
Key
and select Voice Recorder.
2. Select to start recording.
3. Speak into the microphone.
4. When you are finished, touch . You can listen to the
recorded memos by touching .
5. To record more voice memos, touch the record icon or
touch
New record if you are in the recordings list.
Play a voice memo
1. From the Home screen, open the Launch screen and select
Voice Recorder.
2. Touch .
3. In a playlist, select a voice memo to play.
NOTE
You can send the voice memo to others by touching and holding a voice
memo and selecting Share.
95
Page 98

Tools
96
Calendar
To open Calendar
©
Touch the Calendar on the Home screen or in the
Launcher.
Events from each account you’ve added to your phone and
configured to synchronize calendars is displayed in Calendar.
Events from each calendar are displayed in a different color.
Agenda view
Agenda, Day, or Week view, touch an
In
event to view its details.
Touch a day in Month view to open that day’s events.
To change your calendar view
©
Press the Menu Key and touch Agenda, Day, Week, or
Month.
Each view displays the events in your calendar for the period
of time that you specify. For details, see:
©
To view more information about an event in Agenda view,
touch the event.
©
To view the events of a day in Month view, touch a day.
Day view
eek view
W
Month view
Page 99

Tools
Creating an event
You can use Calendar on your phone to create events that appear
on your phone and in Google Calendar on the web.
To create an event
1. In any Calendar view, press the Menu Key and touch
More > New event to open an Event details screen for a
new event.
2. Add details about the event.
Enter a name, time, and optional additional details about the
event. Touch to add more reminders.
3. Invite guests to the event.
4. Press the
add details about the event.
5. Touch
added to your calendar.
Menu Key and touch Show extra options to
Done when you finished the editing.The event is
Editing or deleting an event
You can edit or delete an event that you created on the phone or on
the web. You can also edit or delete events created by others, if
they have given you permission.
To edit an event
1. Open an event to view its details.
2. Press the Menu Key from the event, then touch Edit
event
.
3. Make the necessary changes and touch Done.
97
To delete an event
There are a number of ways to delete an event.
©
In Agenda view, touch an event to view its details. Then
press the Menu Key and touch Delete event.
Page 100

Tools
98
©
In Day or Week view, touch and hold the event and touch
Delete event in the menu that opens.
Setting an event reminder
You can set one or more reminders for an event, whether or not
you created the event or have permission to edit its other details.
To set an event reminder
1. Open the event summary.
2. If you already have a reminder set, touch the Plus button
to add a reminder.
3. Touch the reminder time, and in the dialog that opens touch
the length of time before the event that you want to be
reminded of it.
To delete an event reminder
1. Open the event summary.
2. Touch the reminder’s Minus button .
To set whether calendars are stored on the phone or visible
1. Press the Menu Key , touch More > Calendars.
2. Touch the icon next to a calendar to change whether it is
stored on the phone and visible in Calendar.
3. Touch
OK.
Calendar events are synchronized on phone and visible in Calendar
Calendar events are synchronized on phone but not visible in Calendar
Calendar events are not synchronized on the phone
 Loading...