

Page 1
OWNER'S MANUAL
WINE CELLAR
Read this owner’s manual thoroughly before operating the appliance and keep it
handy for reference at all times.
ENGLISH
MFL71467802
Rev.02_120619
www.lg.com
Copyright © 2019 LG Electronics Inc. All Rights Reserved
Page 2

TABLE OF CONTENTS
2
3 SAFETY INSTRUCTIONS
3 IMPORTANT SAFETY INSTRUCTIONS
8 PRODUCT OVERVIEW
8 Product Features
8 Exterior
9 Interior
11 INSTALLATION
11 Installation Overview
11 Unpacking the Refrigerator
12 Choosing the Proper Location
13 Dimensions and Clearances
14 Leveling
14 Turning on the Power
15 OPERATION
15 Before Use
16 Control Panel
19 Sabbath Mode
20 Storing Wine
21 Storage Racks
24 InstaView Door
24 Storing Food
26 Auto-lift Device
35 TROUBLESHOOTING
35 FAQs: Frequently Asked Questions
36 Before Calling for Service
42 LIMITED WARRANTY
42 FOR USA
45 FOR CANADA
28 SMART FUNCTIONS
28 LG ThinQ Application
30 Using the Voice Assistant
32 Smart Diagnosis™ Feature
33 MAINTENANCE
33 Cleaning
34 Air Filter
Page 3
SAFETY INSTRUCTIONS
ENGLISH
SAFETY INSTRUCTIONS
READ ALL INSTRUCTIONS BEFORE USE
Your safety and the safety of others are very important.
We have provided many important safety messages in this manual and on your appliance. Always
read and follow all safety messages.
This is the safety alert symbol.
This symbol alerts you to potential hazards that can kill or injure you and others.
All safety messages will follow the safety alert symbol and either the word WARNING or
CAUTION. These words mean:
WARNING
You may be killed or seriously injured if you do not follow instructions.
CAUTION
3
You may be injured or cause damage to the product if you do not follow instructions.
All safety messages will tell you what the potential hazard is, tell you how to reduce the chance of
injury, and tell you what may happen if the instructions are not followed.
IMPORTANT SAFETY INSTRUCTIONS
WARNING
To reduce the risk of explosion, fire, death, electric shock, scalding or injury to persons
when using this product, follow basic precautions, including the following:
INSTALLATION
• To reduce the risk of injury to persons, adhere to all industry recommended safety procedures including
the use of long-sleeved gloves and safety glasses.
• Never attempt to operate this appliance if it is damaged, malfunctioning, partially disassembled, or has
missing or broken parts, including a damaged cord or plug.
• Only connect this product to a dedicated grounded electrical outlet rated for use with this product
(115 V, 60 Hz, AC only). It is the user’s responsibility to replace a standard 2-prong wall outlet with a
standard 3-prong wall outlet.
• Do not use an outlet that can be turned off with a switch. Do not use an extension cord.
• The appliance must be positioned for easy access to a power source.
• When moving the refrigerator, be careful not to roll over or damage the power cord.
• Contact an authorized service center when installing or relocating the refrigerator.
Page 4

SAFETY INSTRUCTIONS
4
• Do not, under any circumstances, cut or remove the third (ground) prong from the power cord.
• Keep packing materials out of the reach of children. Packaging material can be dangerous for children.
There is a risk of suffocation.
• Do not install the refrigerator in a damp or dusty place where insulation on electrical parts may
deteriorate.
• Do not place the refrigerator in direct sunlight or expose it to the heat from heating appliances such as
stoves or heaters.
• Do not bend or pinch the power cord excessively or place heavy objects on it.
OPERATION
• This product is not to be used for special purposes such as the storage of medicine or test materials or
for use on ships, etc.
• DO NOT allow children to climb, stand, or hang on the refrigerator doors or on the shelves in the
refrigerator. They could damage the refrigerator and seriously injure themselves.
• Do not allow children to climb into the refrigerator. They could be trapped and suffocated.
• Children should be supervised to ensure that they do not play with the refrigerator.
• Keep fingers out of pinch point areas; clearances between the doors and cabinets are necessarily
small. Be careful closing doors when children are nearby.
• Do not touch frozen food or the metal parts in the freezer compartment with wet or damp hands. Doing
so may cause frostbite.
• Do not refreeze frozen food that has thawed completely. Doing so may result in a serious health hazard.
• Do not use an adapter plug or plug the power plug into a multi-outlet extension cord.
• Do not use a cord that shows cracks or abrasion damage along its length or at either the plug or
connector end. Immediately have all power cords that have become frayed or otherwise damaged
repaired or replaced by qualified service personnel.
• Do not operate the refrigerator or touch the power cord with wet hands.
• Do not modify or extend the power cord.
• Do not use an uncertified power outlet. Do not plug appliance into a damaged wall outlet.
• Do not put hands, feet or other objects into the air vents or bottom of the refrigerator. Doing so could
result in personal injury or electric shock.
• In the event of a gas leak (propane/LPG), ensure the area is adequately ventilated and contact an
authorized service center before resuming use. Do not touch the refrigerator or power cord of the
refrigerator.
• Disconnect the power cord immediately and contact an authorized service center if there is a strange
noise, odor, or smoke coming from the appliance.
• Do not use any fuse (such as copper, steel wire, etc.) other than a standard fuse.
• Do not place or use an electrical appliance inside the refrigerator, unless it is of a type recommended by
the manufacturer.
• Do not put animals inside the appliance.
• Do not place heavy or fragile objects, liquid filled containers, combustible substances, or flammable
objects (such as candles and lamps) on the appliance.
• If connected to a circuit protected by fuses, use time delay fuse.
• Do not store explosive substances such as aerosol cans with a flammable propellant in this appliance.
• Keep ventilation openings, in the appliance enclosure or in the built-in structure, clear of obstruction.
Page 5

SAFETY INSTRUCTIONS
ENGLISH
• Do not use mechanical devices or other means to accelerate the defrosting process, other than those
recommended by the manufacturer.
• Do not damage the refrigerant circuit.
• Do not use electrical appliances inside the food storage compartments of the appliance, unless they are
of the type recommended by the manufacturer.
• The refrigerant and insulation blowing gas used in the appliance require special disposal procedures.
When disposing, please consult with service agent or a similarly qualified person.
5
Auto-lift Feature
• If your household includes children or persons with reduced physical, sensory or mental capabilities or
lack of experience and knowledge, turn off the Auto Lift function on the control panel to prevent risk of
injuries when using the Auto Drawer.
• Do not allow children to play with or climb inside the drawer’s inner compartment.
• Do not use the auto-lift function while folding the rear drawer back cover.
• Do not put your hand in the open areas at the sides or back of the drawer when open.
• Keep feet away from the bottom drawer when using the auto-open feature.
• Turn off the refrigerator before cleaning the bottom drawer compartment.
• The auto-lift device is heavy, so remove it with both hands.
• Do not unlock the locking knob of auto-lift device. The device could be activated, unfold, and be
damaged.
MAINTENANCE
• Do not use a hair dryer to dry the inside of the refrigerator.
• Do not light a candle to remove odors in the refrigerator.
• In the event of a refrigerant leak, move flammable objects away from the refrigerator. Ensure the area is
adequately ventilated and contact an authorized service center.
• Keep flammable materials and vapors, such as gasoline, away from the refrigerator.
• This appliance can be used by children aged from 8 years and above and persons with reduced
physical, sensory or mental capabilities or lack of experience and knowledge if they have been given
supervision or instruction concerning use of the appliance in a safe way and understand the hazards
involved. Children shall not play with the appliance. Cleaning and user maintenance shall not be made
by children without supervision.
• Unplug the power plug before cleaning or repairing the refrigerator.
• The refrigerator compartment lights are interior LED lighting, and service should be performed by a
qualified technician.
• Unplug the power plug immediately in the event of a blackout or thunderstorm.
• Turn the power off if water or dust penetrates into the refrigerator. Call a service agent.
• Do not store glass containers or soda in the freezer compartment. Contents may expand when frozen,
break the container and cause injury.
• Do not store, disassemble or repair the appliance yourself or allow unqualified personnel to do so.
• Do not use or place flammable substances (chemicals, medicine, cosmetics, etc) near the refrigerator
or store them inside the refrigerator. Do not place the refrigerator in the vicinity of flammable gas.
Page 6
SAFETY INSTRUCTIONS
6
DISPOSAL
• Junked or abandoned refrigerators are dangerous, even if they are sitting for only a few days. When
disposing of the refrigerator, remove the packing materials from the door or take off the doors but leave
the shelves in place so that children may not easily climb inside.
• If disposing of a refrigerator, make sure the refrigerant is removed for proper disposal by a qualified
servicer. If you release the refrigerant, you may be fined or imprisoned in accordance with the relevant
environmental law.
GROUNDING INSTRUCTIONS
• Improper connection of the equipment-grounding conductor can result in a risk of electric shock. Check
with a qualified electrician or service personnel if you are in doubt whether the appliance is properly
grounded. Do not modify the plug provided with the appliance; if it will not fit the outlet, have a proper
outlet installed by a qualified electrician.
• Have a certified electrician check the wall outlet and wiring for proper grounding.
• Never unplug the appliance by pulling on the power cord. Always grip the plug firmly and pull straight out
from the outlet. Failure to do so may damage the power cord, resulting in a risk of fire and electric shock.
CAUTION
To reduce the risk of minor or moderate injury to persons, malfunction, or damage to
the product or property when using this product, follow basic precautions, including
the following:
INSTALLATION
• Do not install the refrigerator where there may be a danger of the unit falling.
• The refrigerator must be properly installed in accordance with the Installation Instructions.
OPERATION
• Do not use aerosols near the refrigerator.
• This appliance is intended to be used only in domestic and similar applications.
• Do not strike or apply excessive force to any glass surface. Do not touch glass surfaces if they are
cracked or broken.
• Do not overfill or pack items too tightly into door bins. Doing so may cause damage to the bin or
personal injury if items are removed with excessive force.
• Do not overfill the appliance with food. Doing so may cause personal injury or property damage.
Wine Storage
• Pull wine racks open gently. Jerking the racks out may cause bottles to fall.
• Store only wine bottles in the wine storage compartment. The temperature of the compartment is too
high to safely preserve refrigerated foods.
Page 7
SAFETY INSTRUCTIONS
ENGLISH
MAINTENANCE
• Do not use strong detergents like wax or thinners for cleaning. Clean with a soft cloth.
• Remove foreign objects (such as dust and water) off the prongs of the power plug and contact areas.
Do not use a wet or damp cloth when cleaning the plug.
• Do not spray water directly on the inside or outside of the refrigerator.
• Do not clean glass shelves or covers with warm water when they are cold. They may break if exposed
to sudden temperature changes.
This appliance contains a small amount of isobutane refrigerant (R600a), which is combustible.
When transporting and installing the appliance, care should be taken to ensure that no parts of
the refrigerating circuit are damaged. Refrigerant squirting out of the pipes could ignite or cause
an eye injury. If a leak is detected, avoid any naked flames or potential sources of ignition and
air the room in which the appliance is standing for several minutes.
In order to avoid the creation of a flammable gas air mixture if a leak in the refrigerating circuit
occurs, the size of the room in which the appliance may be sited depends on the amount of
refrigerant used. The room must be 10.8 square feet (1 square meter) in size for every 8g of
R600a refrigerant inside the appliance. The amount of refrigerant in your particular appliance is
shown on the identification plate inside the appliance. Never start up an appliance showing any
signs of damage. If in doubt, consult your dealer.
7
SAVE THESE INSTRUCTIONS
Page 8
PRODUCT OVERVIEW
8
PRODUCT OVERVIEW
Product Features
The images in this guide may be different from the actual components and accessories, which are subject
to change by the manufacturer without prior notice for product improvement purposes.
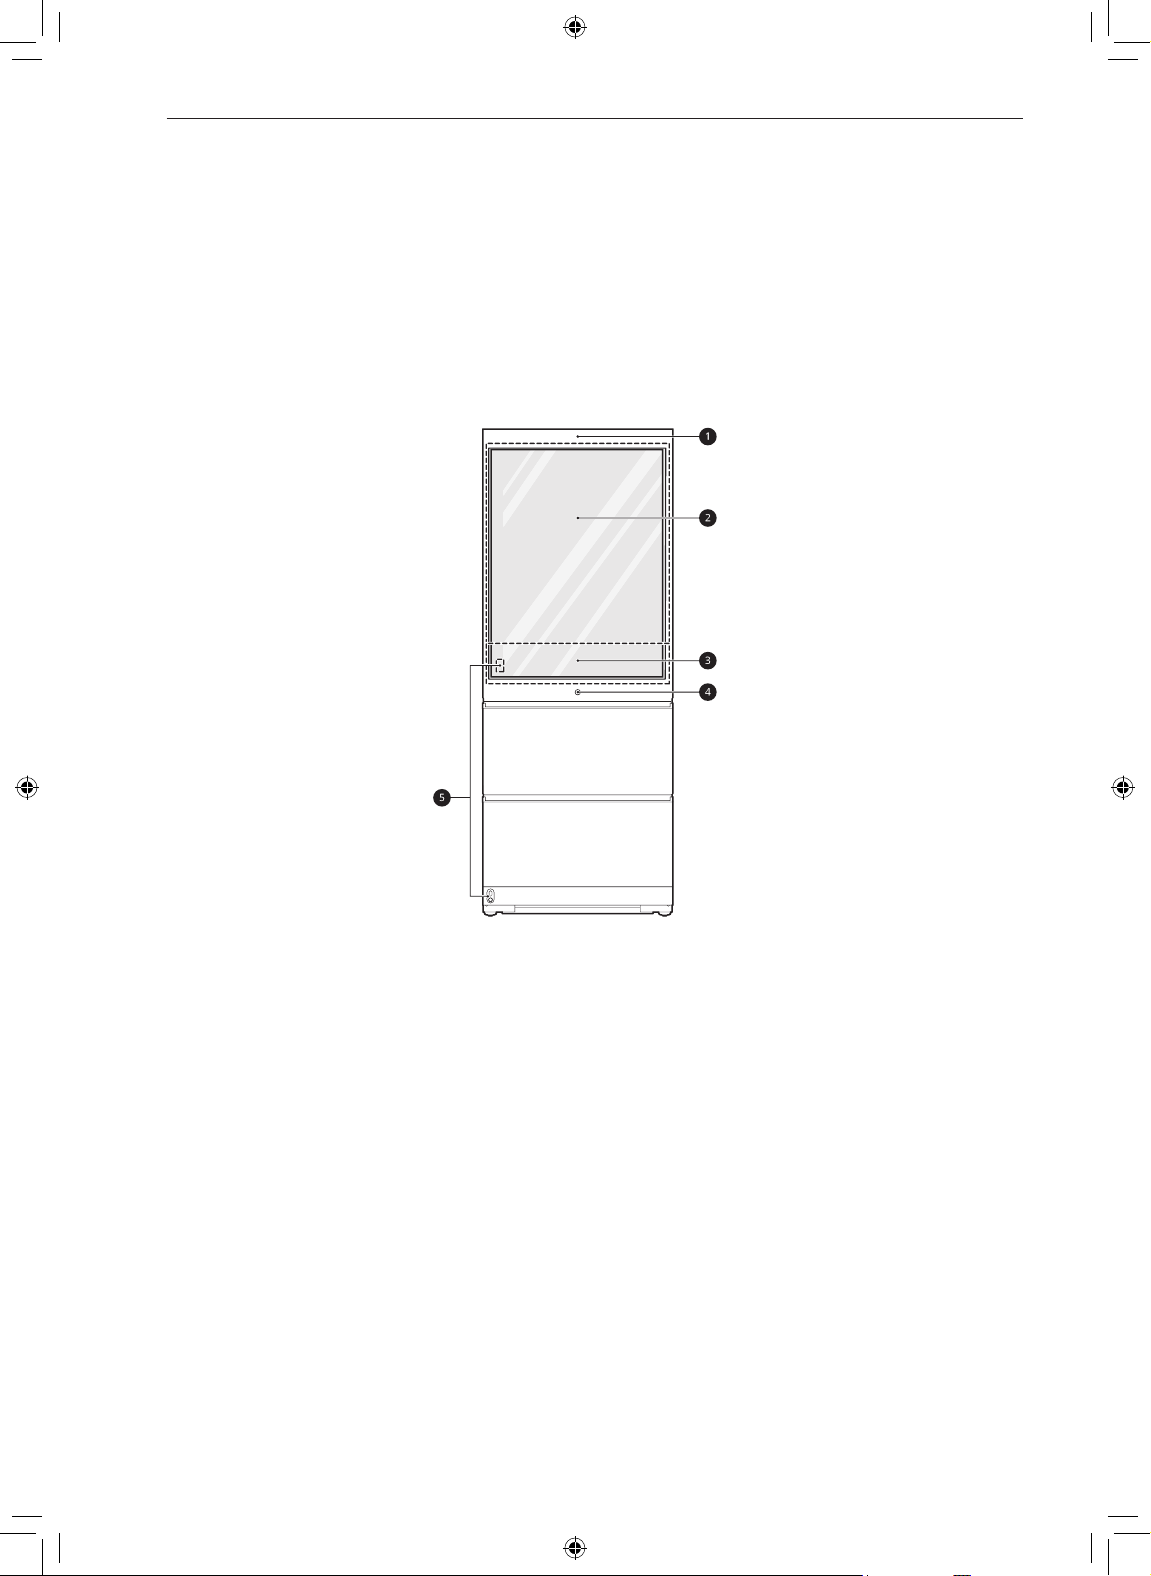
Exterior
a
Voice Assistant Device
A voice assistant device is built into the door.
b
InstaView Door
The sleek tinted glass panel illuminates with two quick knocks, allowing you to see inside the easy
access compartment without ever opening the door.
c
Control Panel
Displays the wine, refrigerator, and freezer temperature controls.
d
Bottom Pullout Drawer button
When the button is pressed, the bottom drawer opens automatically and the inner compartment rises
up for convenient access.
e
Automatic Door Opening Sensors
Stand close enough to the front of the appliance and DOOR OPEN appears on the floor. Pass your
foot over the words on the floor to open the wine storage door automatically.
Page 9
ENGLISH
Interior
PRODUCT OVERVIEW
9
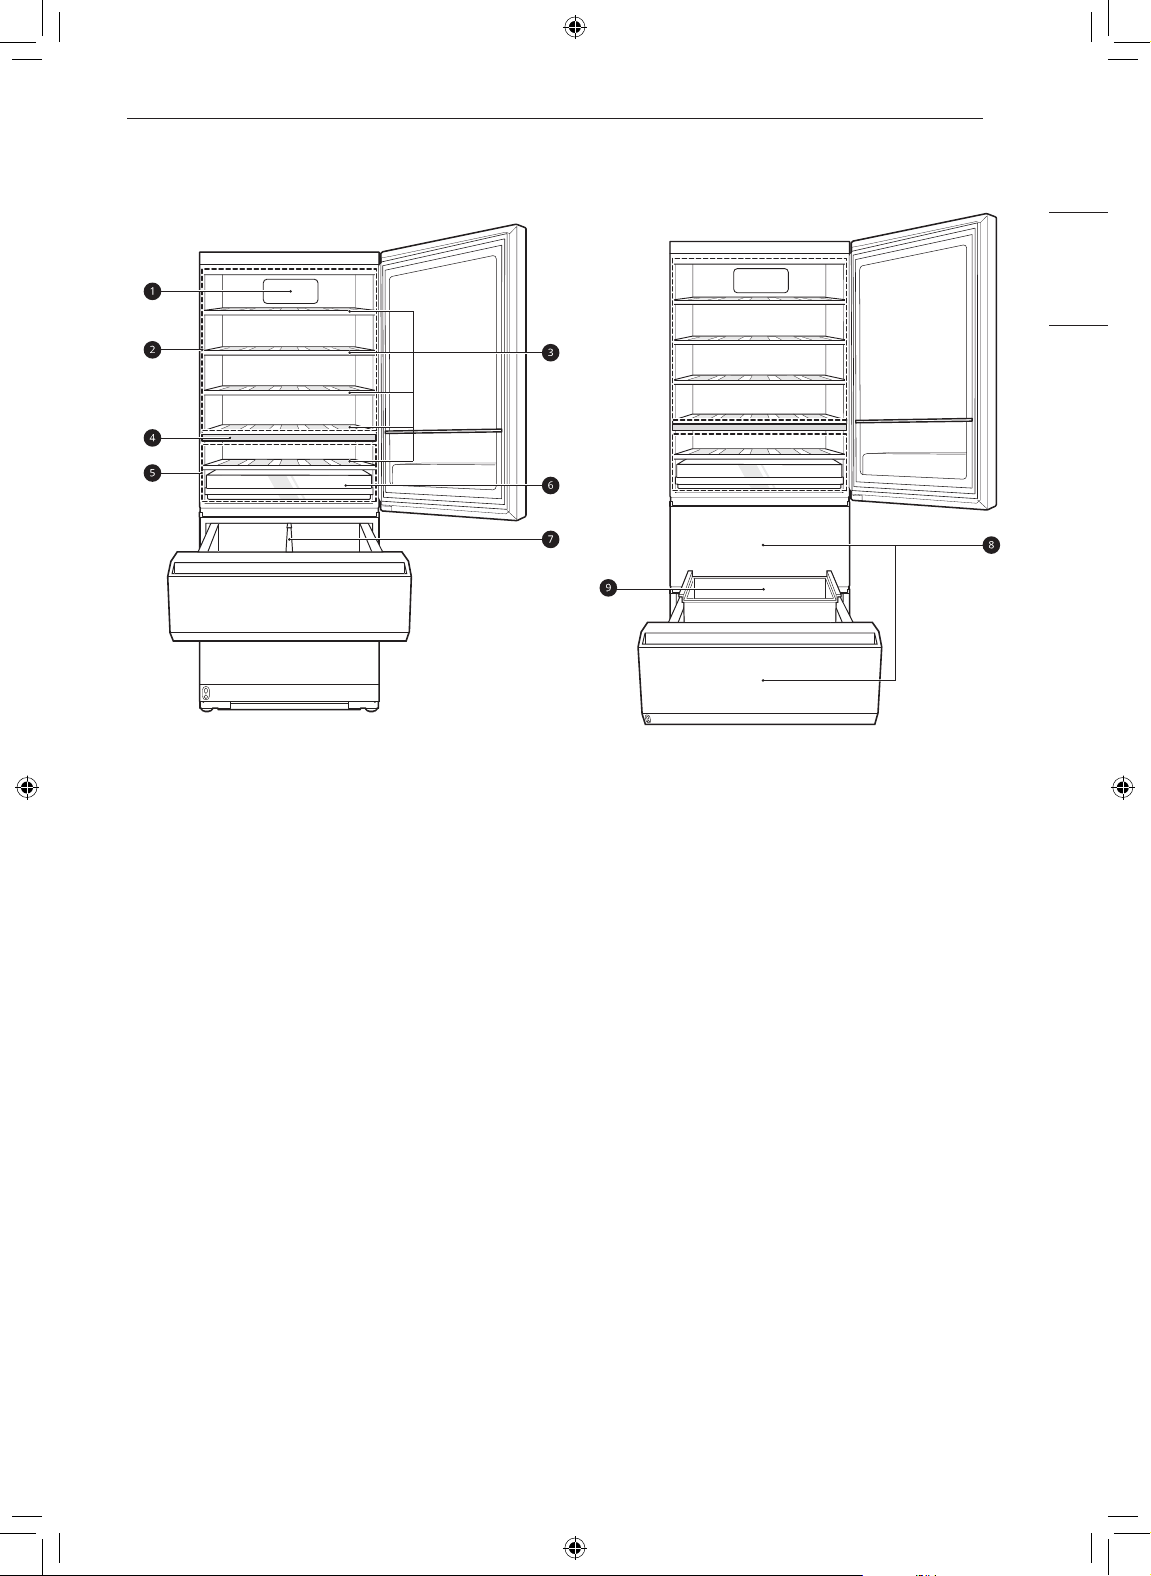
a
Fresh Filter
This reduces odors inside the wine compartment.
b
Upper Zone
Stores bottles of red wine.
c
Storage Rack
Stores wine bottles on their sides for best long-term storage.
d
Zone Divider
Helps maintain separate temperature zones.
e
Lower Zone
Stores bottles of white wine and champagne.
f
Champagne Drawer
Stores champagne bottles. Before storing champagne, turn on the champagne function in the control
panel.
g
Durabase Divider
Provides storage for large food items.
Page 10
PRODUCT OVERVIEW
10
h
Middle / Bottom Drawer
The 2 drawers can be set to either Refrigerator or Freezer mode. Both drawers must use the same
mode.
• To store fresh food, press the Refrigerator Drawer button for at least 1 second.
• To store frozen food, press the Freezer Drawer button for at least 1 second.
CAUTION
• Empty out both drawers before changing the mode from freezer to refrigerator or vice versa.
• If the mode is changed while food is in the drawer, the food could be spoiled.
i
Inner Compartment
Rises during the auto-lift operation.
PRODUCT SPECIFICATIONS
The appearance and specifications listed in this manual may vary due to constant product improvements.
Electrical requirements: 115 V, 60 Hz
Model URETC1408N
Description Wine Cellar
Net weight 386 lb (175 kg)
Page 11
ENGLISH
INSTALLATION
11
INSTALLATION
Installation Overview
Please read the following installation instructions first after purchasing this product or transporting it to
another location.
Unpacking the Refrigerator
Choosing the Proper
Location
Unpacking the Refrigerator
WARNING
• Use two or more people to move and install
the refrigerator. Failure to do so can result in
back injury or other injury.
• The refrigerator is heavy. Protect the floor
when moving the refrigerator for cleaning or
service. Always pull the refrigerator straight
out when moving it. Do not wiggle or walk the
refrigerator when trying to move it, as floor
damage could occur.
• Keep flammable materials and vapors, such
as gasoline, away from the refrigerator.
Failure to do so can result in fire, explosion,
or death.
Leveling and Door
Alignment
• To remove any remaining tape or glue, rub
the area briskly with your thumb. Tape or glue
residue can also be easily removed by rubbing
a small amount of liquid dish soap over the
adhesive with your fingers. Wipe with warm
water and dry.
• Do not use sharp instruments, rubbing alcohol,
flammable fluids, or abrasive cleaners to remove
tape or glue. These products can damage the
surface of your refrigerator.
• Reinstall or adjust shelves as needed.
Refrigerator shelves are installed in the shipping
position. Reinstall shelves according to your
individual storage needs.
NOTE
• Remove tape and any temporary labels from
your refrigerator before using. Do not remove
any warning labels, the model and serial number
label, or the Tech Sheet that is located under the
front of the refrigerator.
Page 12
INSTALLATION
12
Choosing the Proper
Location
Electricity
Use an individual, grounded outlet:115 Volts, 60
Hz, AC, 15 Amps minimum.
WARNING
• Do not overload house wiring and cause a
fire hazard by plugging in multiple appliances
in the same outlet with the refrigerator.
• To reduce the risk of electric shock, do not
install the refrigerator in a wet or damp area.
Flooring
To avoid noise and vibration, the unit must be
installed and leveled on a solidly constructed floor.
If required, adjust the leveling legs to compensate
for the unevenness of the floor.
NOTE
• Installing on carpeting, soft tile surfaces, a
platform or weakly supported structure is not
recommended.
Ambient Temperature
Install this appliance in an area where the
temperature is between 50 °F (10 °C) and 95 °F
(35 °C).
If the temperature around the appliance is too low
or high, cooling ability may be adversely affected.
Page 13
ENGLISH
INSTALLATION
13
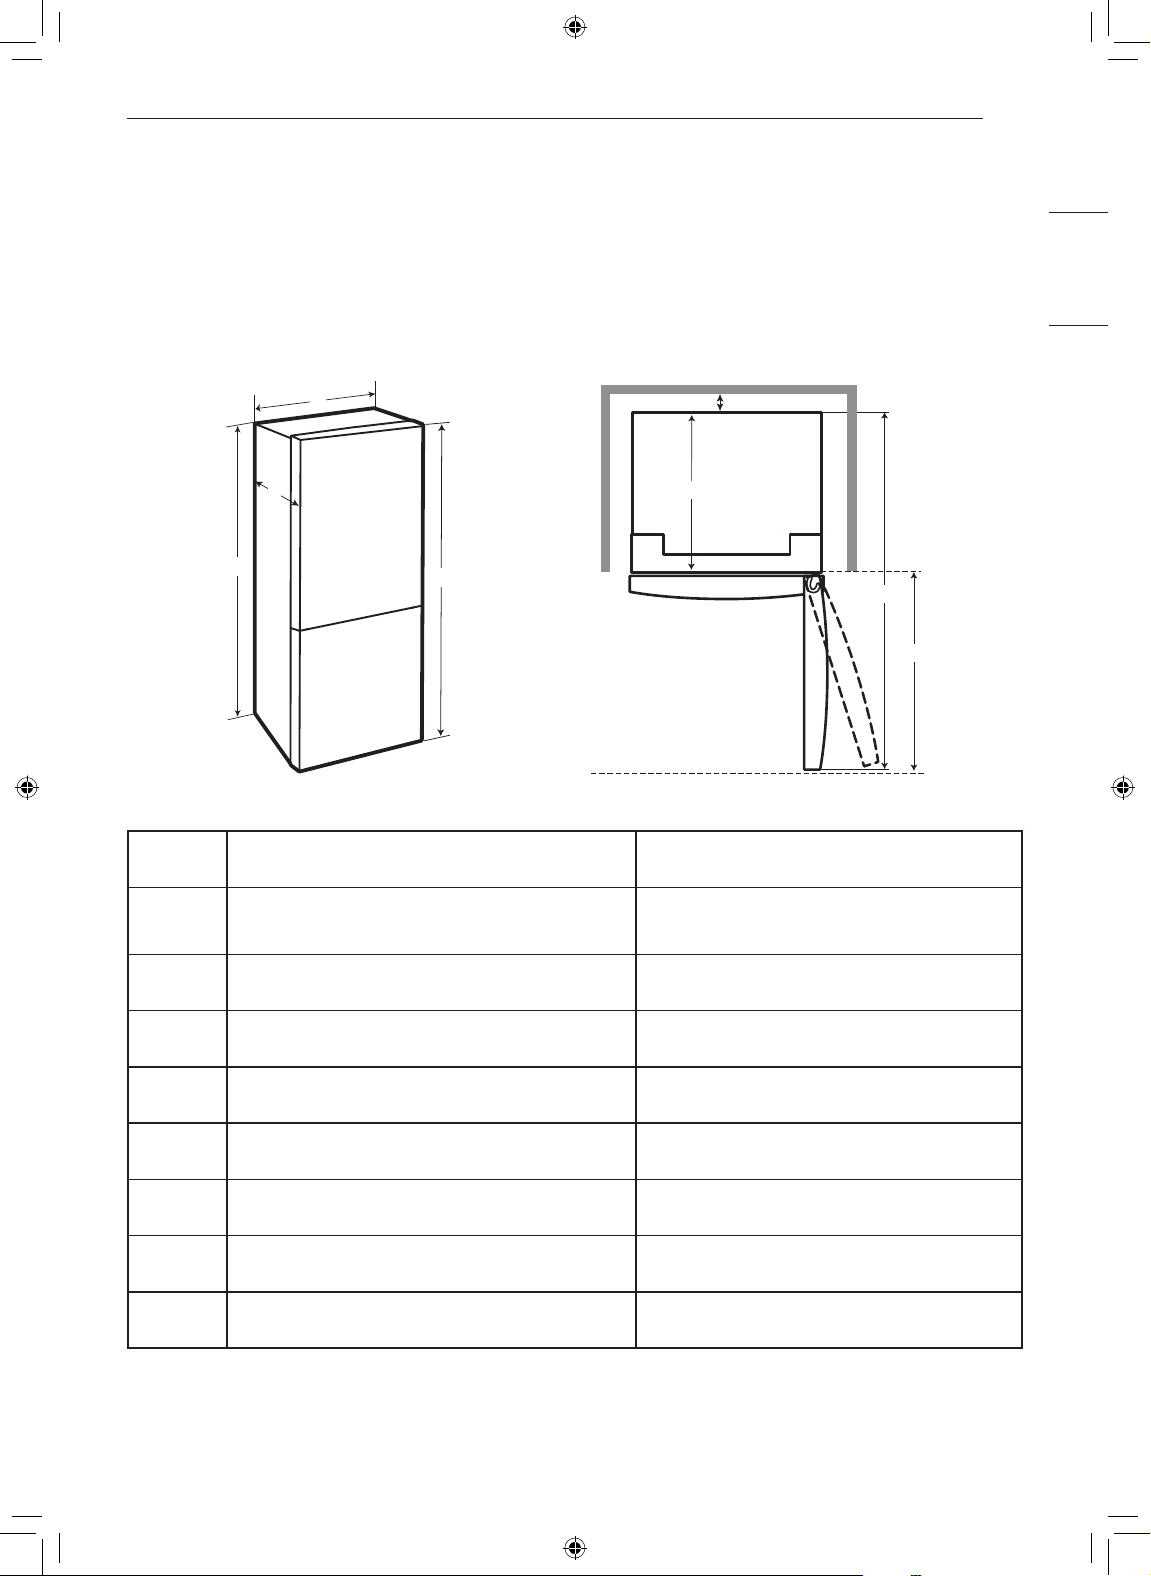
Dimensions and Clearances
• Check the dimensions of the appliance and the installation path to ensure there is sufficient room to
move the refrigerator through doors or narrow openings.
• The installation location chosen for the refrigerator should allow space behind the unit for connections
and airflow and space in front to open the doors.
• Too small of a distance from adjacent items may result in lowered freezing capability and increased
electricity consumption charges.
B
A
C
D
E
F
- List URETC1408N
A Depth
B Width
C Height to Top of Case
D Height to Top of Hinge
E Back Clearance
F Depth without Door
G Depth (Total with Door Open 90°)
H Front Clearance
28 15/16”
(735 mm)
27 9/16”
(700 mm)
69 1/16”
(1753 mm)
70 5/8”
(1793 mm)
2”
(50 mm)
24 15/16”
(633 mm)
53 3/16”
(1350 mm)
25 5/8”
(727 mm)
G
H
Page 14
INSTALLATION
14
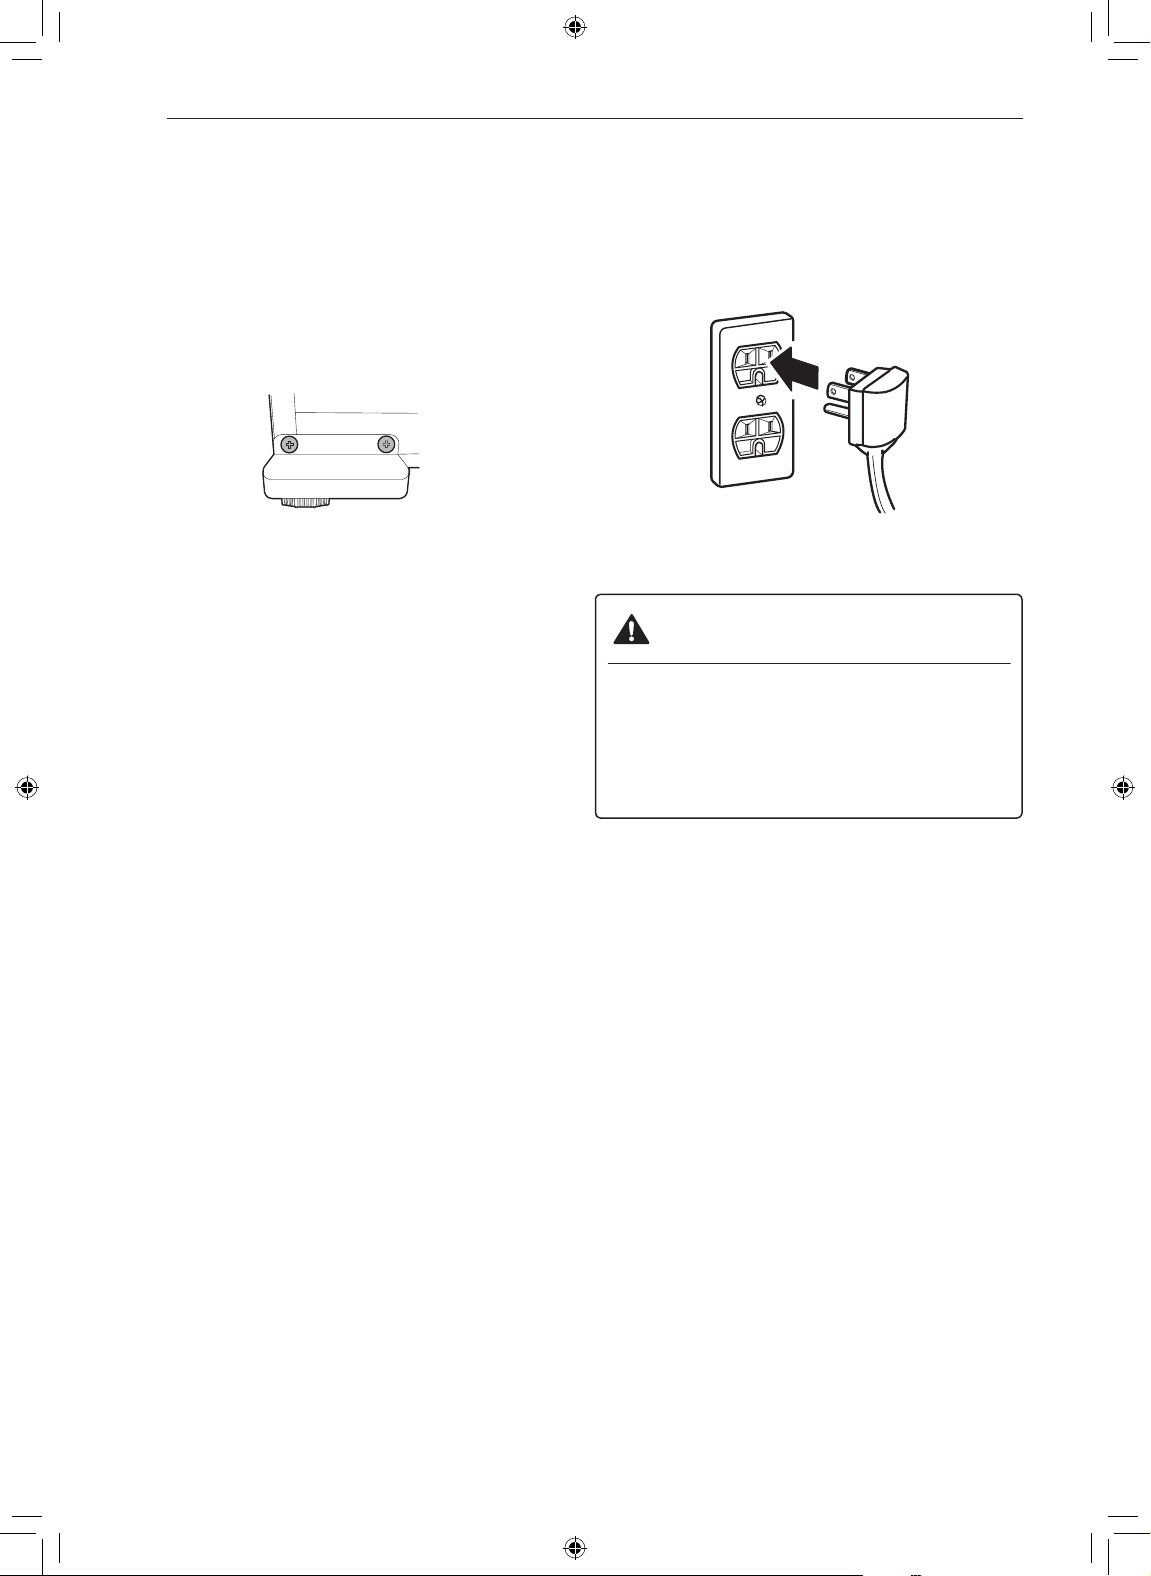
Leveling
The refrigerator has two front leveling legs. Adjust
the legs to alter the tilt from front-to back or side-to
side. If the refrigerator seems unsteady, or the
door does not close easily, adjust the refrigerator’s
tilt using the instructions below:
Open the bottom drawer and remove the cover
1
from the appliance.
Turn the leveling leg to the left to raise that
2
side of the refrigerator or to the right to lower
it. It may take several turns of the leveling leg
to adjust the tilt of the refrigerator.
Open the door and the drawers and check to
3
make sure that they close easily. If they do
not close easily, tilt the refrigerator slightly
more to the rear by turning both leveling legs
to the left. It may take several more turns, and
be sure to turn both leveling legs the same
amount.
When the refrigerator is level, open the bottom
4
drawer and reassemble the cover.
Turning on the Power
• After installing, plug the refrigerator’s power cord
into a 3-prong grounded outlet and push the
refrigerator into the final position.
CAUTION
• Connect to a rated power outlet.
• Have a certified electrician check the wall
outlet and wiring for proper grounding.
• Do not damage or cut off the ground terminal
of the power plug.
Position the Refrigerator
• Arrange the refrigerator so that it does not
vibrate against adjoining surfaces or against the
wall. Be sure to maintain at least a 2” clearance
behind the refrigerator for proper ventilation.
Page 15

ENGLISH
OPERATION
Before Use
OPERATION
Clean the refrigerator.
Clean the refrigerator thoroughly and wipe off all dust that accumulated during
shipping.
15
CAUTION
• Do not scratch the refrigerator with a sharp object or use a detergent
that contains alcohol, a flammable liquid or an abrasive when removing
any tape or adhesive from the refrigerator. Remove adhesive residue by
wiping it off with your thumb or dish detergent.
• Do not peel off the model or serial number label or the technical
information on the rear surface of the refrigerator.
Open refrigerator doors to ventilate the interior.
The inside of the refrigerator may smell like plastic at first. Remove any
adhesive tape from inside the refrigerator and open the refrigerator doors for
ventilation.
Wait for the refrigerator to cool.
Allow the refrigerator to run for at least two to three hours before putting food
in it. Check the flow of cold air in the freezer compartment to ensure proper
cooling.
CAUTION
• Putting food in the refrigerator before it has cooled could cause the food
to spoil, or a bad odor to remain inside the refrigerator.
The refrigerator makes a loud noise after initial operation.
This is normal. The volume will decrease as the temperature decreases.
Page 16

OPERATION
16
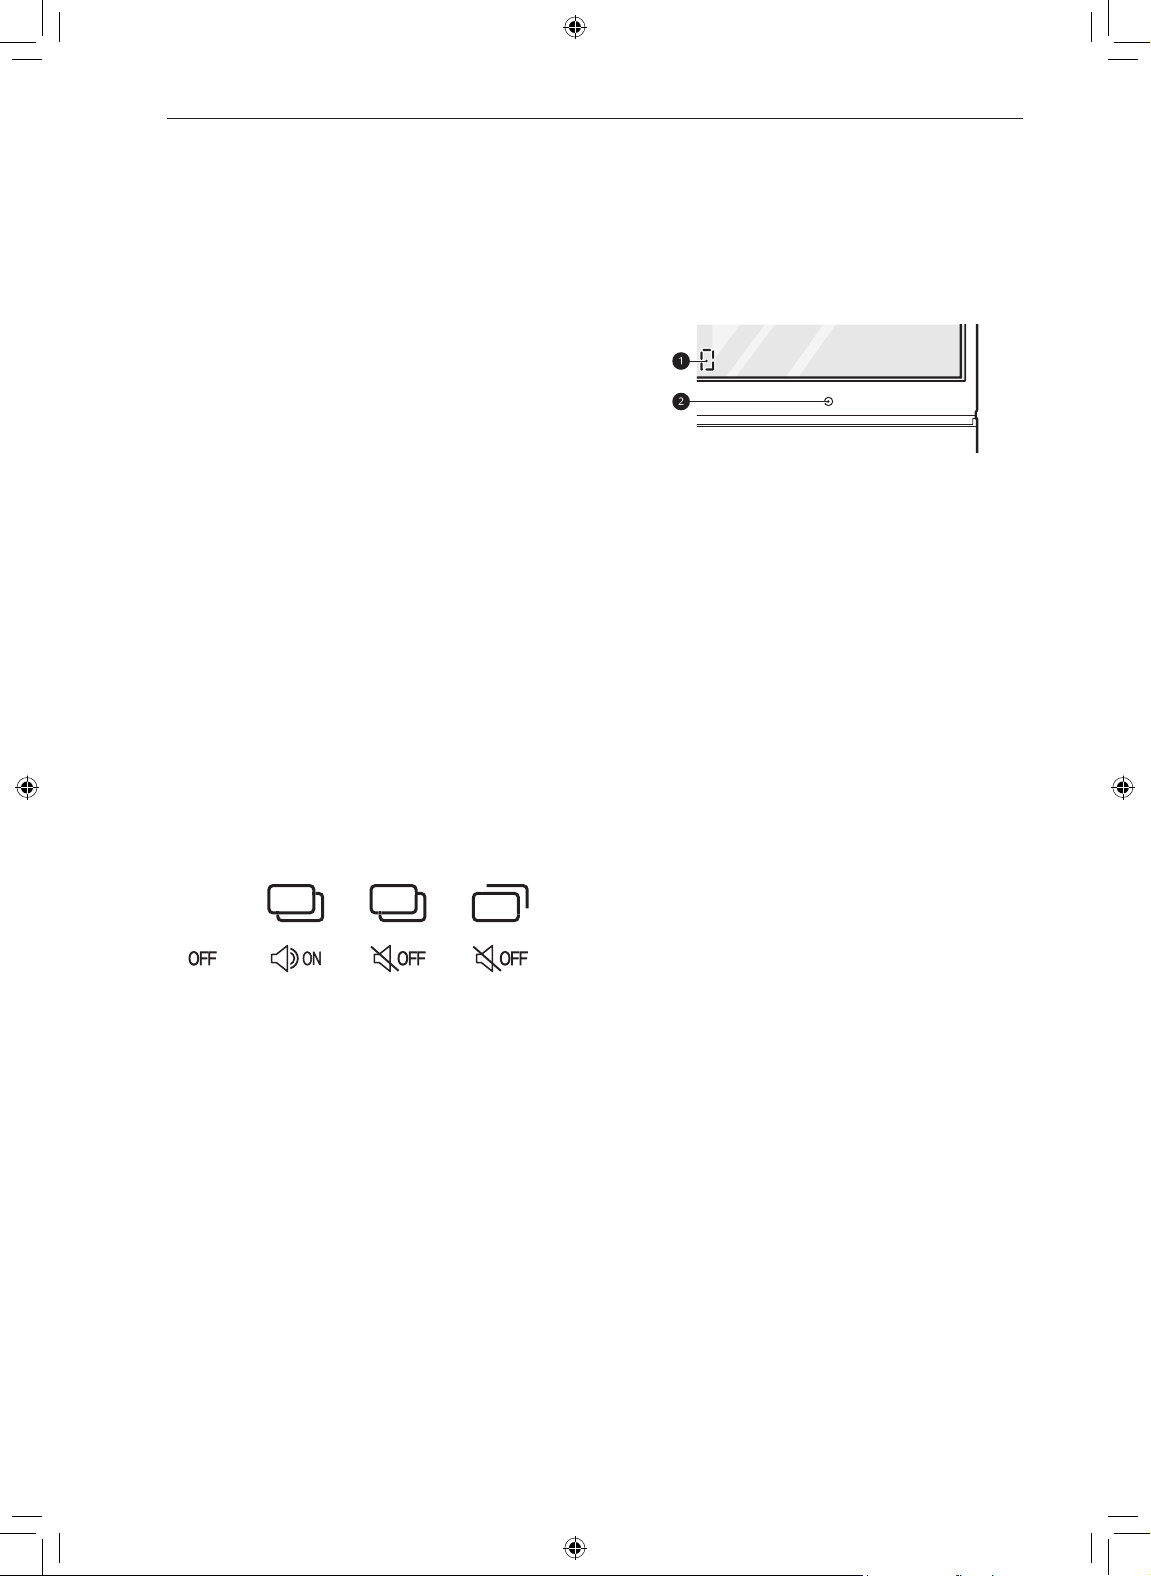
Control Panel
The control panel may differ from model to model.
Control Panel Features
a
Voice Assistant
Changes voice assistant settings. This
button allows the appliance to connect to
a home Wi-Fi network. Refer to SMART
FUNCTIONS for information on the initial
setup of the LG ThinQ application.
Using the Auto Door Function
When the automatic door opening
1
function is enabled, text is displayed on
the floor near the motion sensor.
b
Wi-Fi
The Wi-Fi button, when used with the
LG ThinQ app, allows the refrigerator to
connect to a home Wi-Fi network. Refer to
Smart Functions for information on the initial
setup of the application.
The icon shows the status of the
refrigerator’s network connection. The icon
illuminates when the refrigerator is connected
to the Wi-Fi network.
Press and hold the Wi-Fi button for 3
seconds to connect to the network. The
icon blinks while the connection is being
made, then turns on once the connection is
successfully made.
c
Auto Door
The wine compartment door opens
automatically if you place a foot near the
motion sensor at the bottom of the door. This
is convenient when you have both hands
full and need to open the wine compartment
door. To set the automatic opening door
function, press the button repeatedly to
toggle between the ON, Sound Off, and OFF
settings.
Pass one foot in front of the motion
2
sensor and step on the displayed text.
The wine compartment door opens. If the
door opens less than about 20 degrees
and is not opened further, it will close
automatically after 3 seconds.
NOTE
Place your foot close enough to the sensor
that the text appears on top of the foot, not
just on the toes.
Page 17
ENGLISH
CAUTION
You may want to disable the automatic
door opening function if you have
young children or persons with reduced
physical, sensory, or mental capabilities
in the home. They could be injured if the
door opens unexpectedly while they are
nearby.
NOTE
• The displayed text may not be readable
on some flooring materials, but this will not
affect the performance of the automatic
door opening function.
• If flooring material is highly reflective
(metal, glass tile), the motion sensor
may malfunction and the automatic door
opening function may not work properly.
• Reflective objects placed in front of the
motion sensor may cause the text to
display, but the text disappears if no
movement is detected.
• If a pet passes by below when a person
stands in front of the product, the
automatic door opening function may be
triggered.
d
Wine Upper
Indicates the set temperature of the upper
zone in Celsius (°C) or Fahrenheit (°F).
The default temperature is 55 °F (13 °C).
Press the Wine Upper button repeatedly to
select a new set temperature from 52 °F to
64 °F (11 °C to 18 °C).
OPERATION
f
Champagne
Press the Champagne button repeatedly
to turn on and off this function. The default
condition is turned off.
NOTE
• If you turn off this function, the temperature
inside the champagne drawer remains the
same as the temperature of the lower wine
compartment.
g
Lock
The lock function disables every other button
on the display.
• When power is initially connected to the
refrigerator, the lock function is off.
• To lock the control panel buttons, press
and hold the Lock button until the icon
appears in the display and the function is
activated.
• To disable the function, press and hold
the Lock button for approximately three
seconds.
h
Express Freeze
This function increases the freezing
capabilities.
• To activate, press and hold the Express
Freeze button until the LED lights up on
the control panel.
• The function operates for about 24 hours,
then turns off automatically.
• Stop the function manually by pressing and
holding the button again.
17
e
Wine Lower
Indicates the set temperature of the lower
zone in Celsius (°C) or Fahrenheit (°F).
The default temperature is 46 °F (8 °C).
Press the Wine Lower button repeatedly to
select a new set temperature from 41 °F to
52 °F (5 °C to 11 °C).
Page 18
OPERATION
18
i
Auto Lift
When Auto Lift is enabled, pressing the
bottom pullout drawer button automatically
opens the drawer and raises the inner
compartment for convenient access.
Press the bottom pullout drawer button again
to automatically lower the inner compartment
and close the drawer.
Setting Auto Lift
Press the Auto Lift button repeatedly to
toggle between Off ~ Sound On ~ Sound
Off ~ Auto Drawer Opening Only.
The setting is indicated by the icon in the
display.
• When the auto door sensor a detects
motion in front of the refrigerator, the
bottom pullout drawer button b lights
up. If the button does not light up, move
closer to the refrigerator to trip the
sensor.
− Off: The drawer must be opened
manually and the auto-lift function is
disabled.
− Sound On: Sound is heard, the drawer
is automatically opened and the inner
compartment is raised
− Sound Off: The drawer automatically
opens without sound and the inner
compartment is raised
− Auto Drawer Opening Only: The drawer
opens automatically without sound, but
the inner compartment is not raised.
Using Auto Lift
Press the Auto Lift button to turn Auto
1
Lift on.
Press the bottom pullout drawer button
3
b to automatically lower the inner
compartment and close the drawer.
NOTE
• When the auto-lift function is turned off in
the control panel:
− Standing in front of the refrigerator will
not activate the light around the bottom
pullout drawer button.
− When the bottom pullout drawer button
is pressed, the light blinks 3 times.
• When the auto-lift function is turned on in
the control panel:
− If pressing the bottom pullout drawer
button does not close the bottom drawer,
open the middle drawer or manually
close the bottom drawer.
− If pressing the bottom pullout drawer
button does not open the bottom drawer,
manually opening the drawer will cause
the inner compartment to lift up.
Press the bottom pullout drawer button
2
b. The bottom drawer automatically
opens and the inner compartment is
raised.
− The auto-lift function does not work
when the middle drawer is open.
Page 19
ENGLISH
OPERATION
19
j
Freezer Drawer
Indicates the set temperature of the drawers
in Celsius (°C) or Fahrenheit (°F). The
default Freezer mode temperature is 0 °F
(-18 °C). Press the Freezer Drawer button
repeatedly to select a new set temperature
from - 7 °F to 5 °F (-23 °C to -15 °C).
Setting Drawers to Freezer Mode
To set the drawers to the freezer mode,
press and hold the Freezer Drawer button
for approximately 1 second.
k
Refrigerator Drawer
Indicates the set temperature of the drawers
in Celsius (°C) or Fahrenheit (°F). The default
Refrigerator mode temperature is 37 °F (3
°C). Press the Refrigerator Drawer button
repeatedly to select a new set temperature
from 33 °F to 43 °F (1 °C to 7 °C).
Setting Drawers to Refrigerator Mode
To set the drawers to the refrigerator mode,
press and hold the Refrigerator Drawer
button for approximately 1 second.
To deactivate / activate:-
− With either refrigerator door opened, press the
Express Freeze button 3 times consecutively
while pressing the Refrigerator Drawer
button. The control panel beeps and the
temperature settings display to confirm that
Display Mode is deactivated. Use the same
procedure to activate Display Mode.
Sabbath Mode
Using the Sabbath Mode
Sabbath mode is used on the Jewish Sabbath and
holidays.
To turn Sabbath mode on, close all doors or
1
drawers.
Touch the display to activate it, then press and
2
hold the Wi-Fi and Freezer Drawer buttons for
3 seconds until both LEDs turn on.
NOTE
• The displayed temperature is the
target temperature, and not the actual
temperature of the refrigerator. The actual
temperature depends on the food inside
the refrigerator.
l
Humidity
Press the Humidity button to raise the
humidity in all temperature zones.
m
Air Filter
Replace the air filter when the icon turns on.
After replacing the air filter, press and hold
the Air Filter button for three seconds to
turn the icon light off. Replace the air filter
approximately every six months.
NOTE
Display Mode (For Store Use Only)
• The Display Mode disables all cooling in the
refrigerator and freezer sections to conserve
energy while on display in a retail store. When
activated, Demo Mode is displayed on the
control panel about 5 seconds.
CAUTION
• If you open the bottom drawer while the
refrigerator is returning from Sabbath mode
to the normal operation mode, the bottom
drawer will be closed automatically.
NOTE
• Sabbath mode automatically turns off after 96
hours.
• To turn Sabbath mode off manually, press and
hold the Wi-Fi and Freezer Drawer buttons for
3 seconds.
• Once turned on, Sabbath mode is maintained
even after a power outage.
• Selecting Sabbath mode automatically turns off
the alarm, auto-lift, InstaView door, and auto
door opening functions.
• You may hear a clicking sound when the
refrigerator returns from the Sabbath mode to
the normal operation mode. It is normal to hear
the clicking sound made during the operation
check.
• You can activates or deactivates the Sabbath
mode and sets schedule for the mode activation
through the LG ThinQ application. Before
activating this mode, close the door and
drawers.
Page 20
OPERATION
20
Storing Wine
CAUTION
• Do not overfill or pack items too tightly onto
storage racks. Doing so may cause damage
to the rack or personal injury if items are
removed with excessive force.
NOTE
• If you are leaving home for a short period, like a
short vacation, the refrigerator should be left on.
• If you are leaving the refrigerator turned off for
an extended period, remove all contents and
turn off the power. Clean the interior, and leave
the door and drawers open to prevent fungi from
growing in the refrigerator.
• If the refrigerator is kept in a hot and humid
place, frequent opening of the door may cause
condensation to form. Wipe off the condensation
with a clean cloth or a paper towel.
• If the refrigerator door is opened or closed too
often, warm air may penetrate the refrigerator
and raise its temperature. This can increase the
running costs of the unit and shorten the storage
life of wines.
• Do not install the wine cooler near heat sources
or where it will be exposed to direct sunlight.
41-45 °F (6-10 ˚C)—Non-vintage Champagne
and Sparkling Wines
Cava, Asti, Prosecco, Sekt
43-46 °F (6-8 ˚C)—Sweet White Wines
45-50 °F (7-10 ˚C)—Vintage Champagne, Light
White and Rosé Wines
Muscat, Rosé, Riesling, Pinot Grigio, Sauvignon
Blanc, Semillon
50-55 °F (10-13 ˚C)—Full-Bodied White Wines
and Light Red Wines
Chardonnay, Viognier, White Burgundy, Chablis,
Pinot Noir, Beaujolais, Barbera, Grenache
54-61 °F (12-16 ˚C)—Tawny Port
58-64 °F (15-18 ˚C)—Medium- or Full-Bodied
Red Wines, Aged Reds
Zinfandel, Chianti, Red Burgundy, Cabernet
Sauvignon, Merlot, Malbec, Shiraz, Syrah,
Bordeaux
64-68 °F (18-20 ˚C)— Vintage Port
Storage Capacity
The wine storage compartment of this product
is designed to store only wine, so it is not
recommended for storing other liquor/beverages.
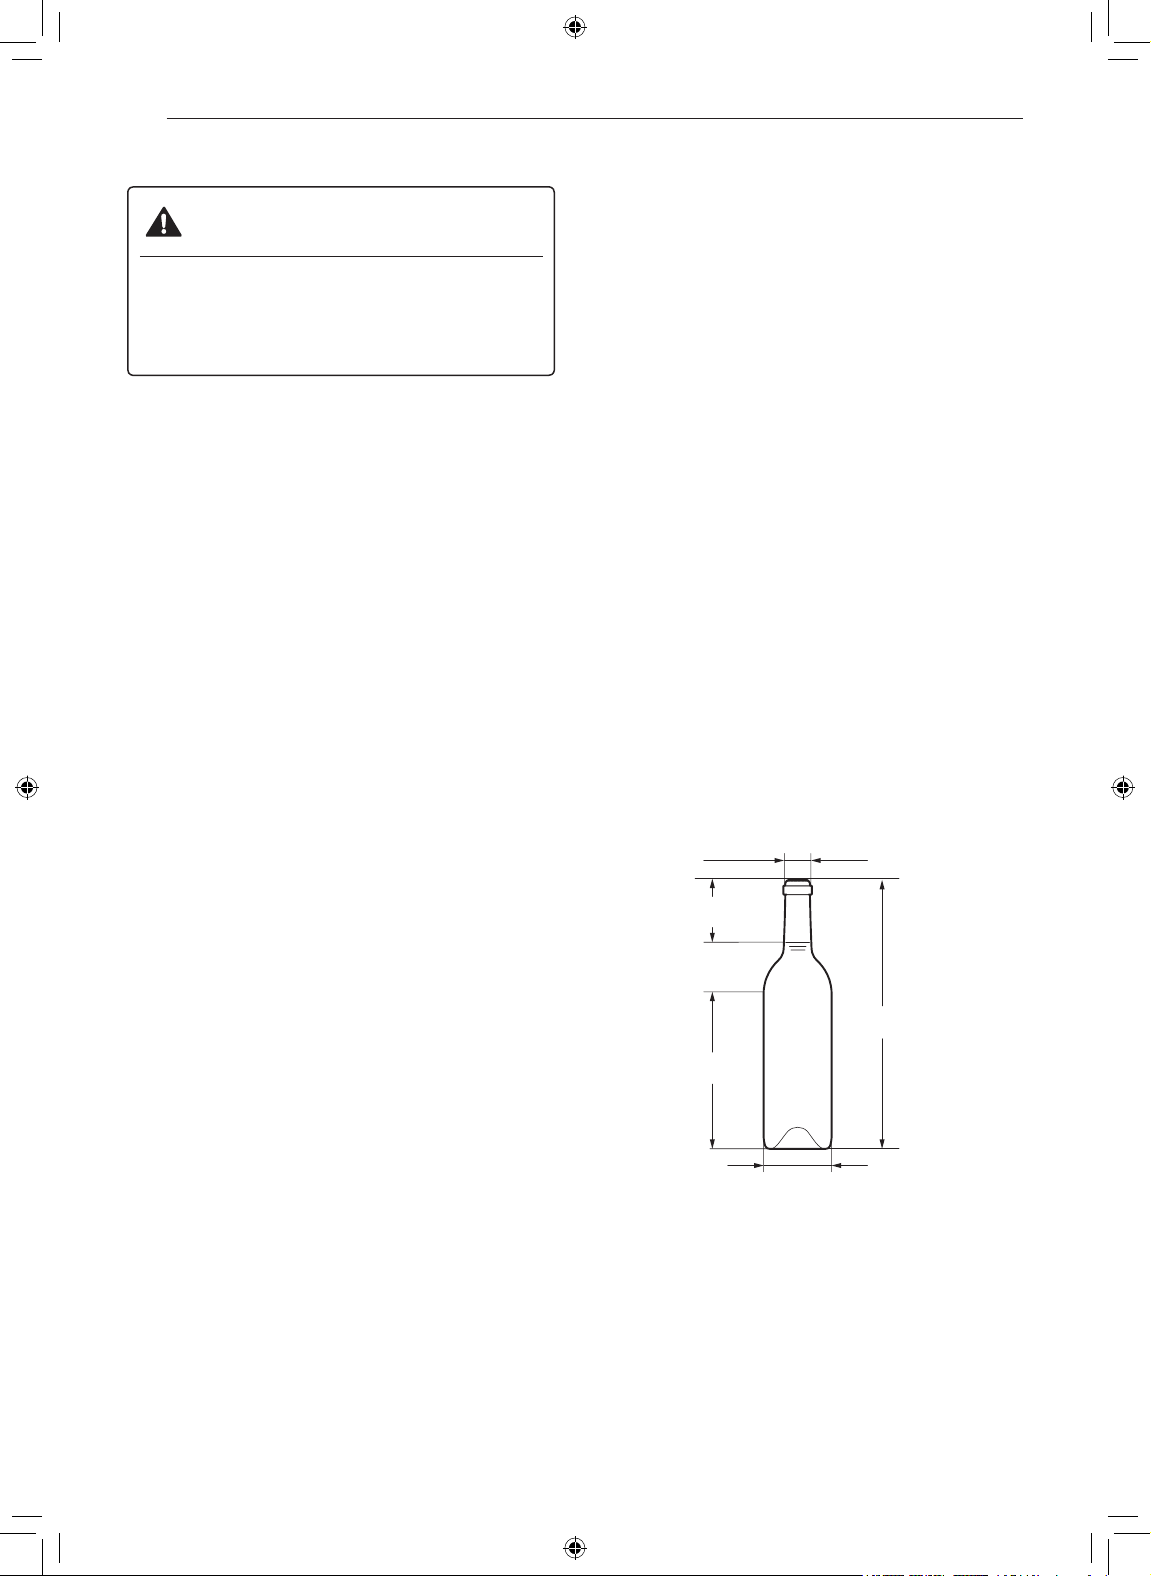
Ø 13/32″ (27.5 mm)
Serving Temperature
If you plan to serve a wine within a few weeks, you
may want to set one zone to store the wine at its
recommended serving temperature. This does not
preserve the quality of the wine as well long-term,
but allows you to serve the wine without having
to chill it or let it stand to bring it to the correct
serving temperature. Serve wines kept at serving
temperature within a few months. Check the label
or consult a guide for the recommended serving
temperature for specific wines.
21/2″ (63 mm)
1127/32″ (300.5 mm)
61/4″ (158.5 mm)
Ø 3″ (76.1 mm)
Page 21
ENGLISH
OPERATION
21
NOTE
Stagger the fronts and backs of the bottles on the
racks for safer storage.
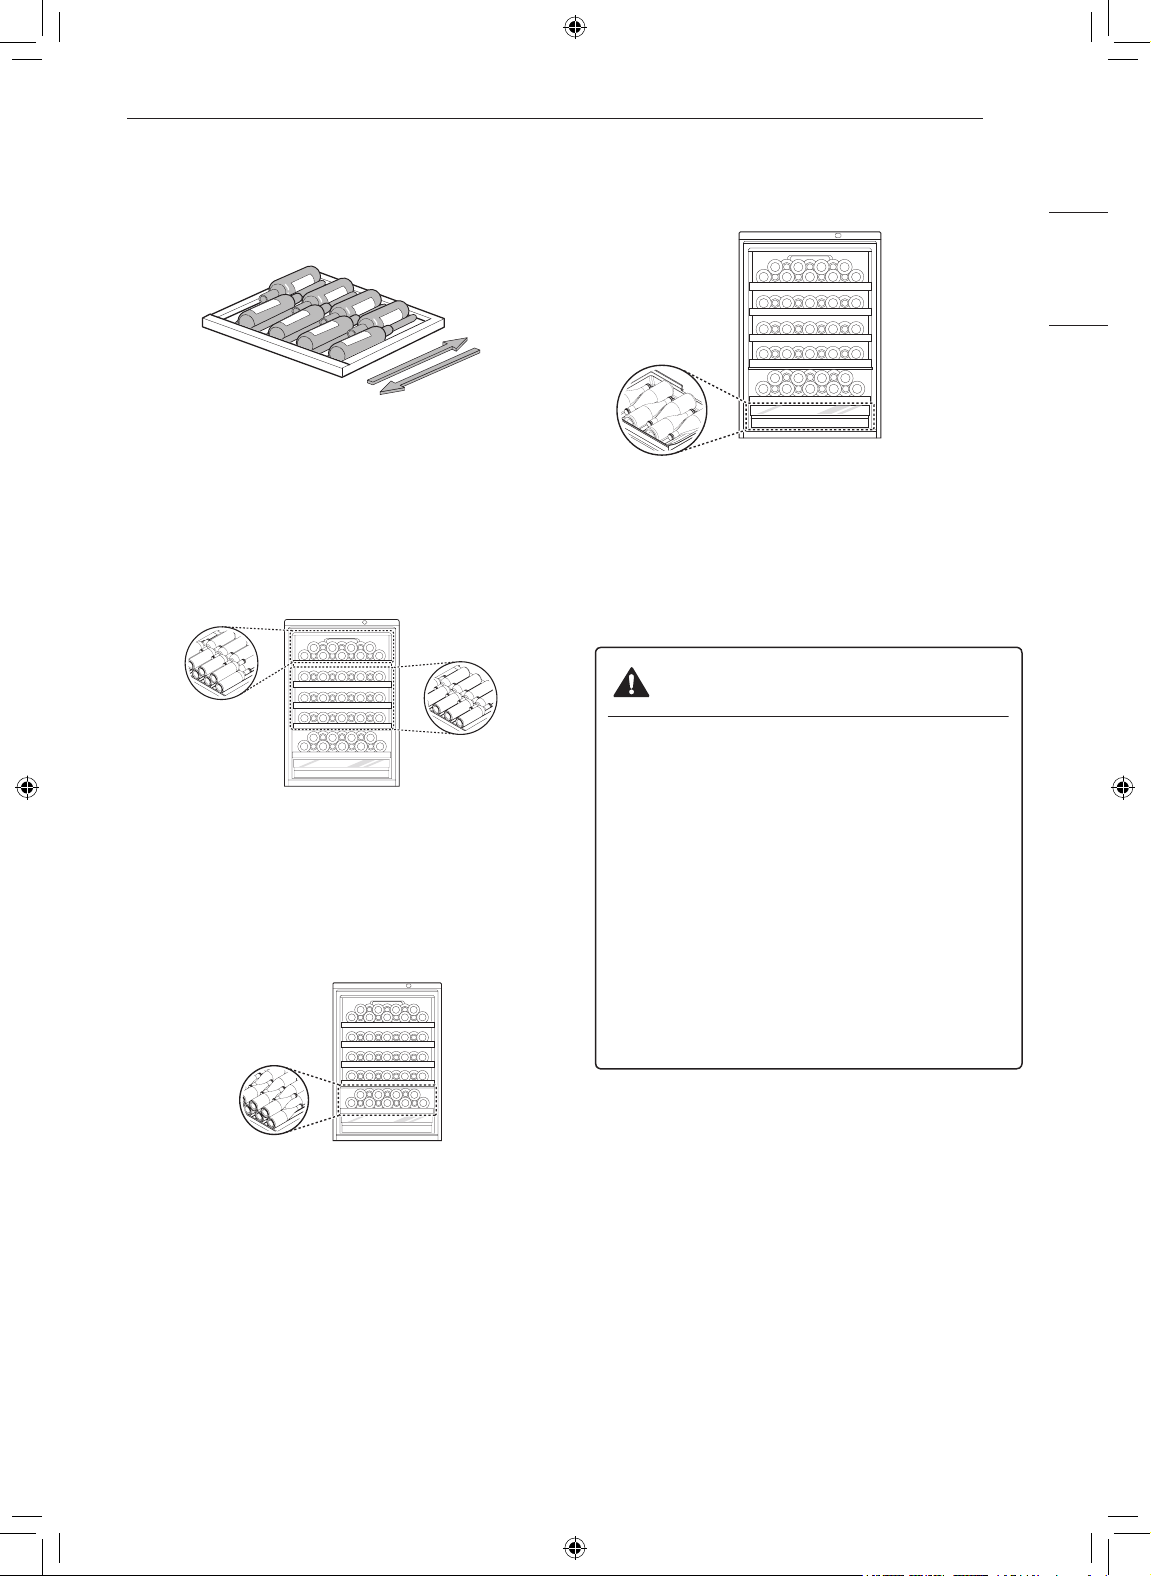
Storing Red Wine
The top shelf can hold up to 16 bottles. The
remaining shelves can hold up to 9 bottles each.
Storing Champagne
The drawer can hold up to 6 bottles.
Storage Racks
The sliding racks help keep bottles organized and
easy to reach.
CAUTION
Storing White Wine
The shelf can hold up to 16 bottles.
• The storage racks are heavy. Always use
two hands when removing or assembling the
racks to avoid product damage or personal
injury. Always empty racks before removing
them.
• Always open the door completely before
removing or assembling the racks.
• As a natural product, the wood used for the
racks can vary in color and grain, including
the presence of knots.
• Due to the nature of the wood, spilled wine
and other liquids may stain or discolor the
racks.
Page 22
OPERATION
22
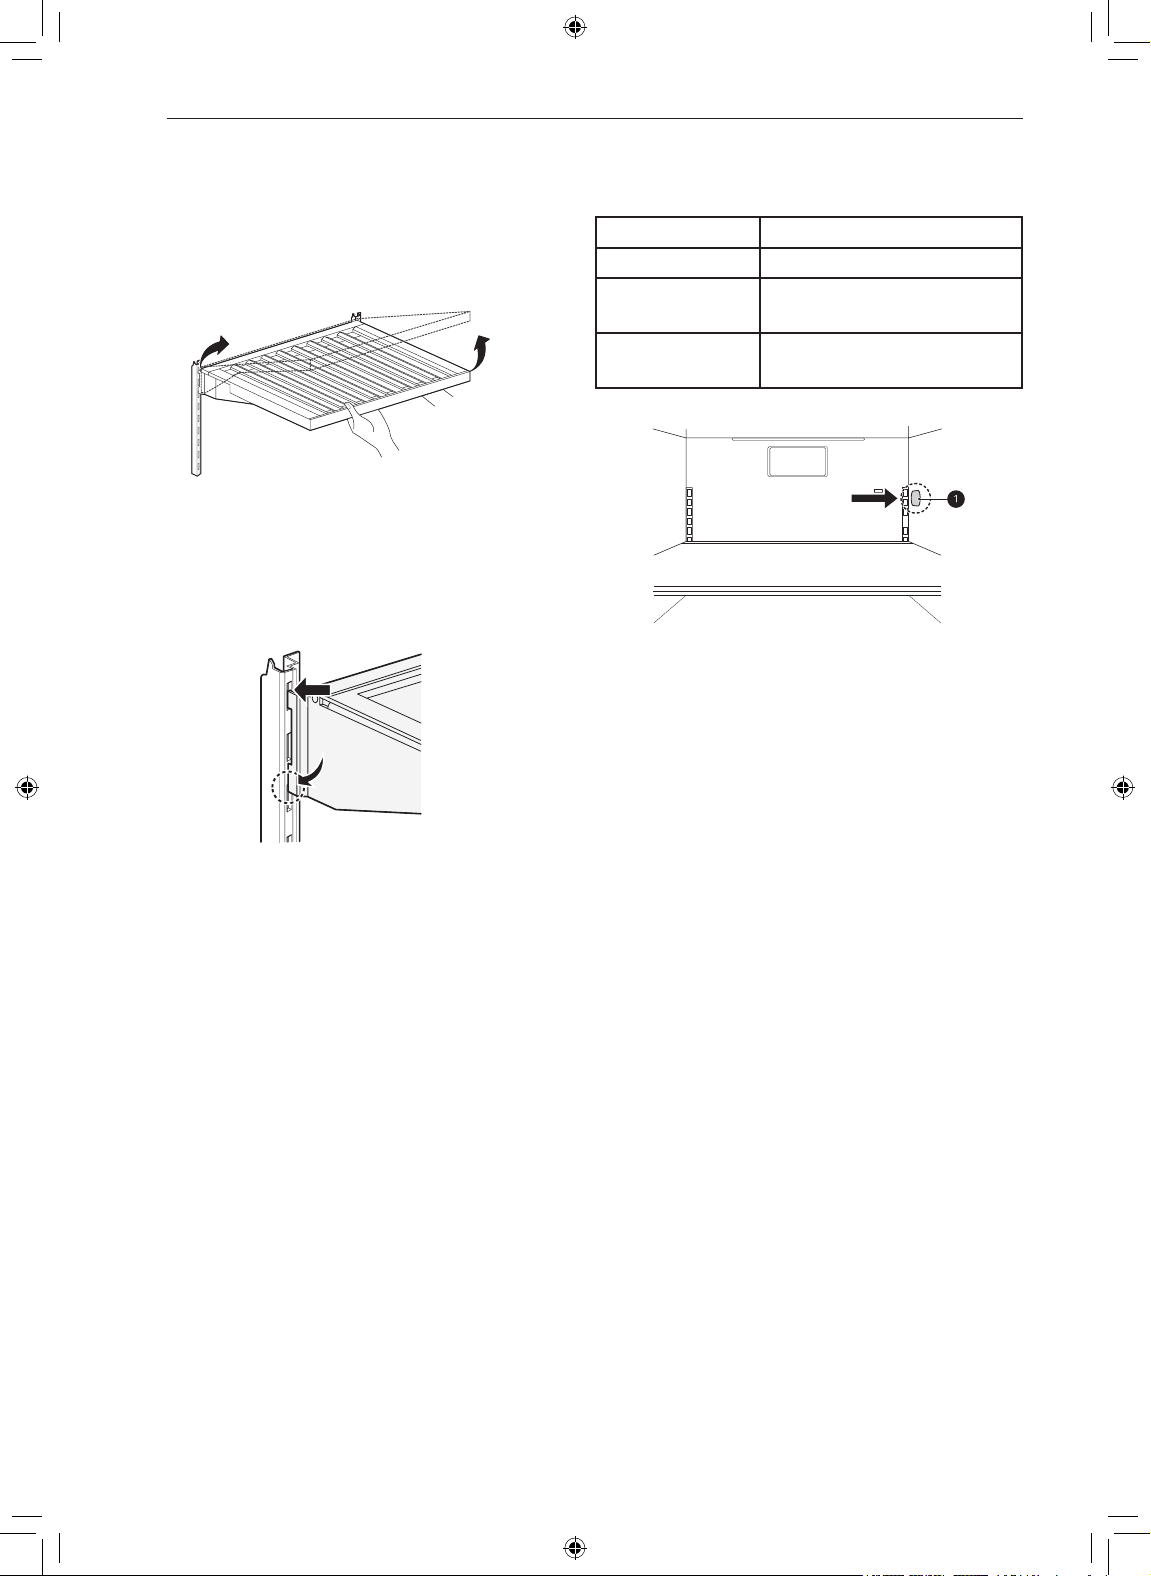
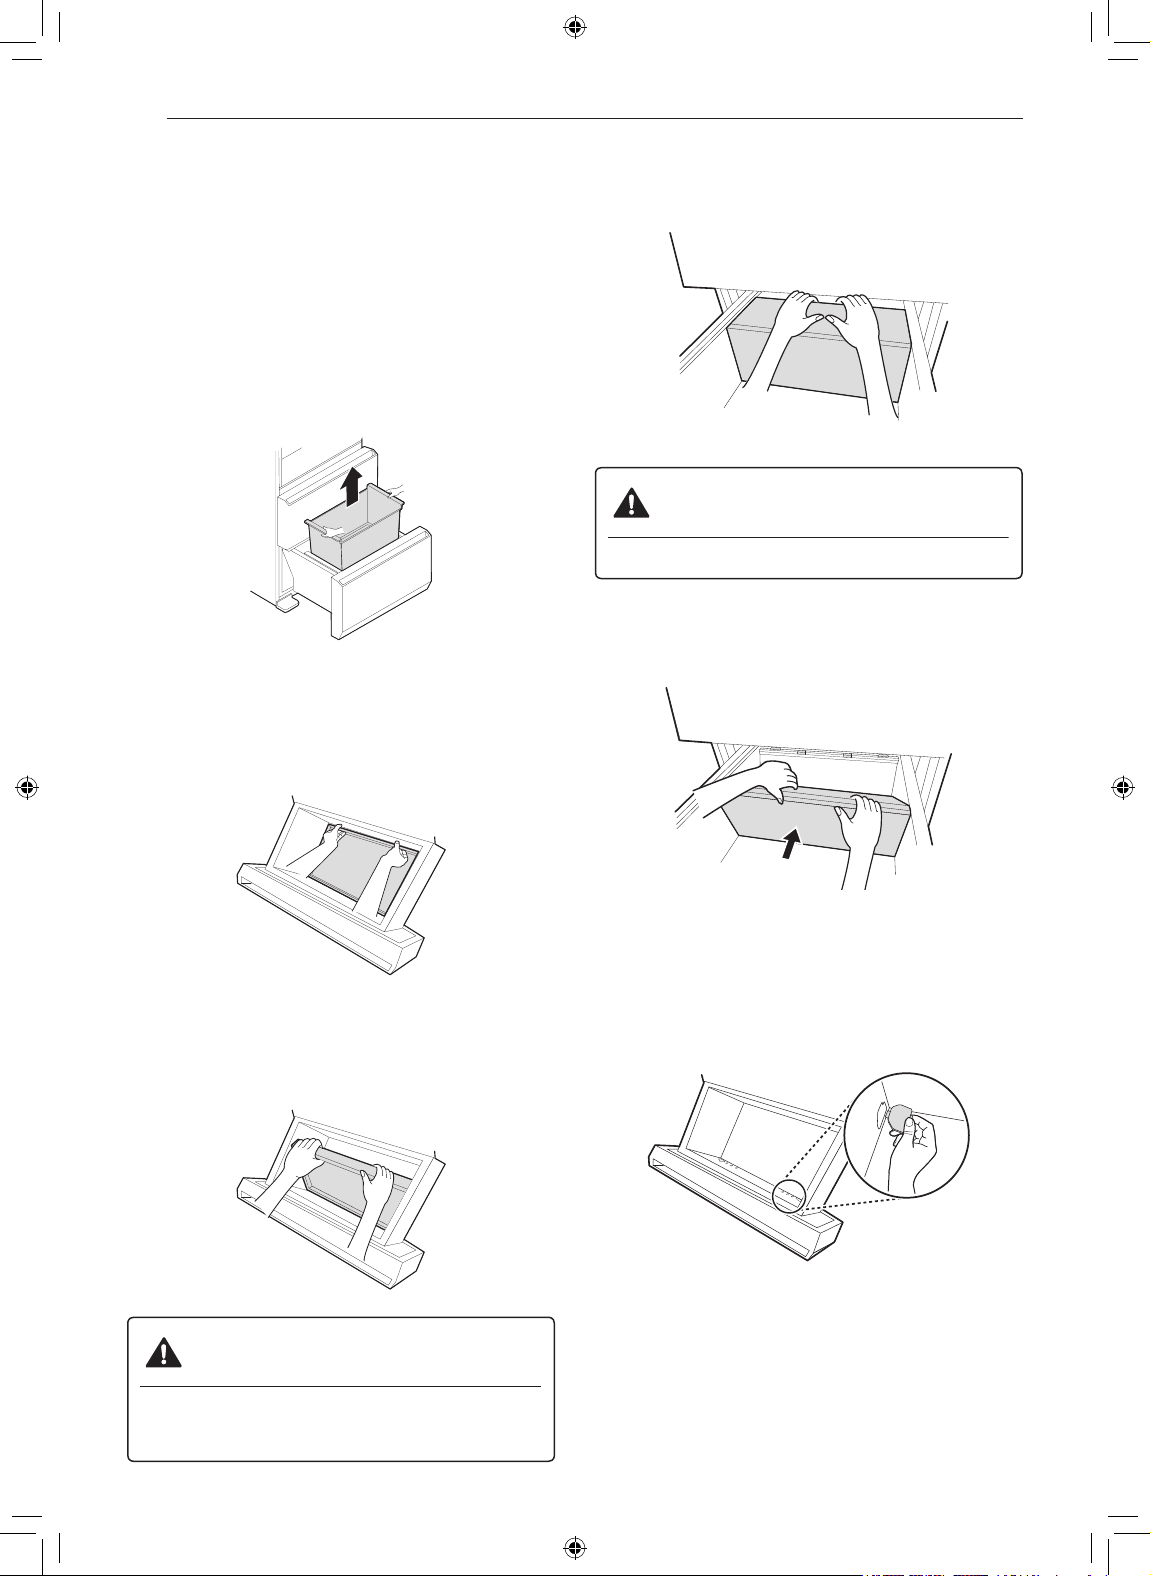
Removing and Assembling Red Wine
Racks
To remove, raise the front of the shelf to
1
disengage the shelf hooks, then lift the shelf
from the back.
To assemble, tilt the front of the shelf up
2
and guide the shelf hooks into the slots at a
desired height.
NOTE
• Foreign objects and dirt between the shelf and
the inner cabinet wall could prevent the shelf
light from turning on.
Wireless Power Transfer
a Specifications
Frequency 350 kHz ± 20 kHz
Rated voltage DC 12 V
Delivered power Less than or equal to 1.2 W
per shelf
Transmission
mode
NOTE
• Installing the shelf in the middle position will
disable the shelf light.
• The shelf light turns on only when the shelf is
installed in the highest or lowest positions.
• The shelf light turns on when the door is
opened.
• The shelf light turns off after seven minutes or
when the door is closed.
Electromagnetic induction
Page 23
ENGLISH
OPERATION
23
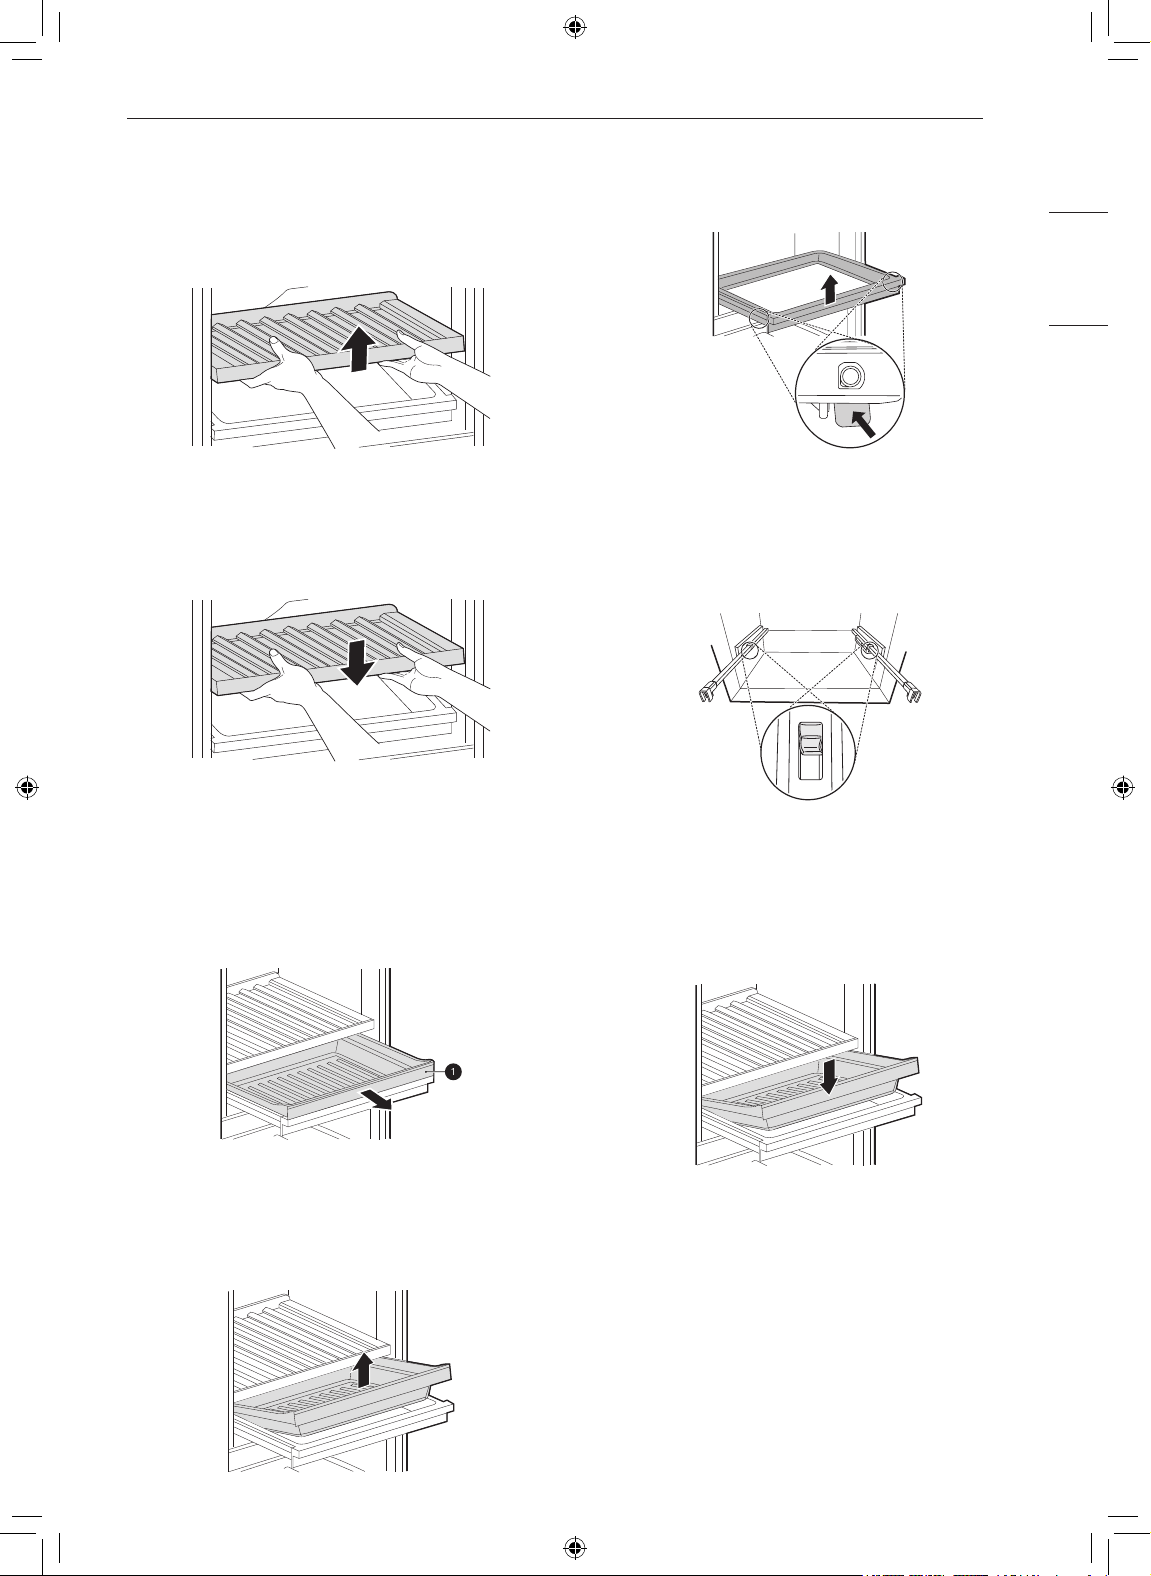
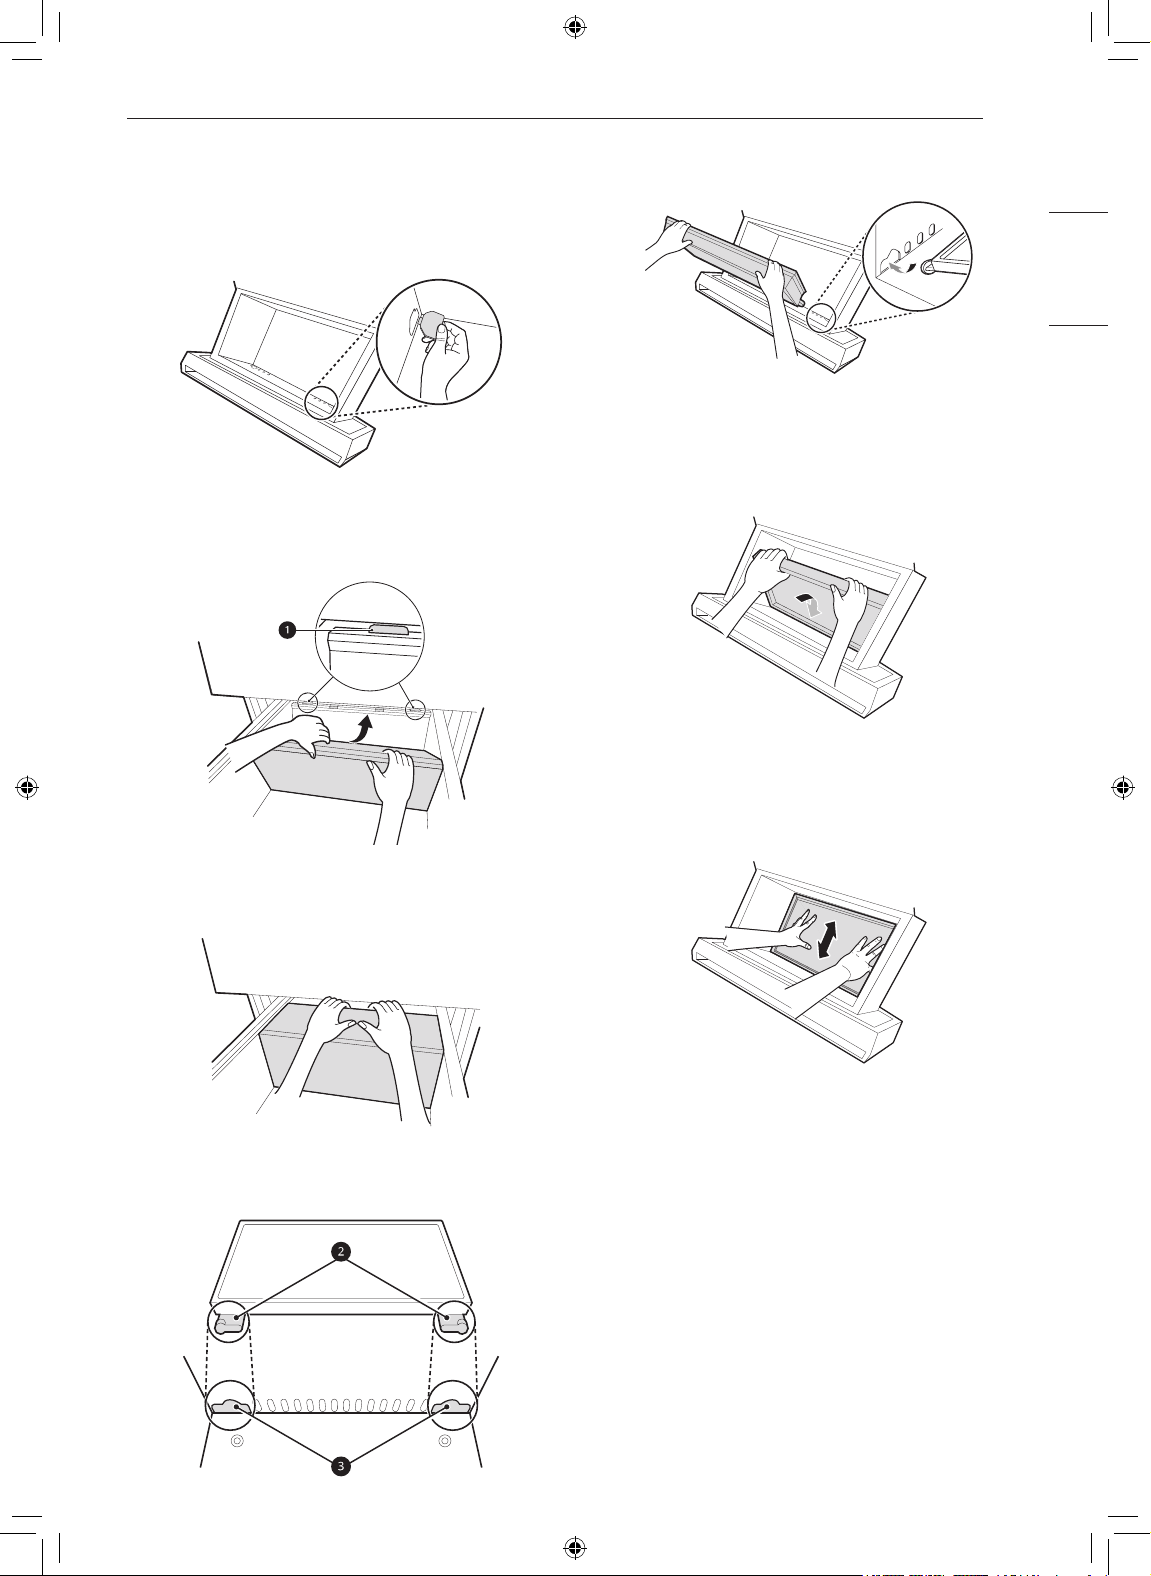
Removing and Assembling White
Wine Rack
To remove the rack, lift the rack and pull
1
straight out.
To assemble the rack, insert the rack into the
2
frame and lower it into place.
While keeping both levers pressed, lift the
3
drawer support slightly and remove it from the
rail system.
Align the drawer support on the rail and press
4
it down until you hear snap sound.
Removing and Assembling
Champagne Drawer
To remove, pull the drawer out.
1
Lift the drawer straight up and out of the
2
frame.
To assemble, pull the drawer frame out until it
5
stops. Angle the drawer into the frame and set
it in place.
Slide the drawer back until it lowers into place
6
on the frame. Slide the assembled drawer into
the compartment.
Page 24
OPERATION
24
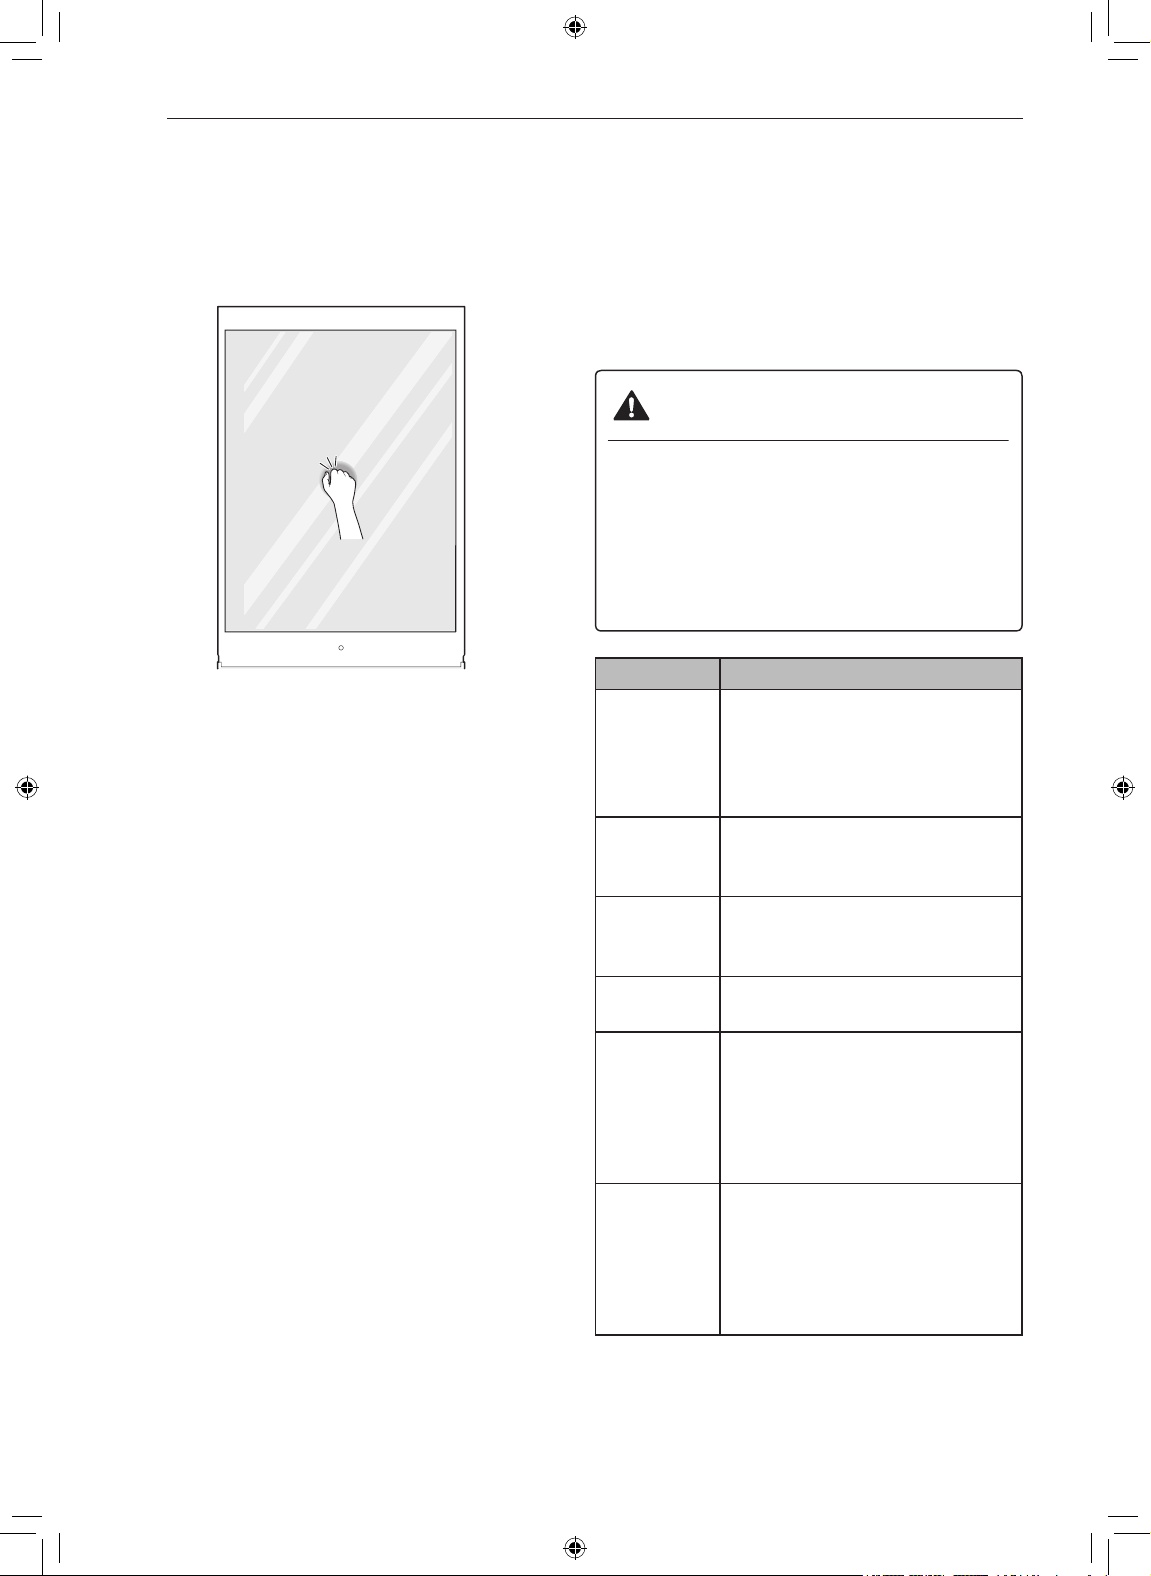
InstaView Door
The sleek tinted glass panel illuminates with two
quick knocks, allowing you to see inside the wine
storage compartment without ever opening the
door.
Knock twice on the glass to turn the LED light
1
inside the door on or off.
The LED light turns off automatically after ten
2
seconds.
NOTE
• The InstaView Door function is disabled for 2
seconds after closing the door.
• Knock near the center of the glass. Knocking
near the edges of the glass may not activate the
InstaView Door function.
• Knock hard enough so that the knocking sound
is audible.
• The InstaView Door function may activate if a
loud noise occurs near the refrigerator.
• Clean the glass door with a dry cloth. To remove
stubborn stains, slightly moisten a clean cloth
with lukewarm water or a glass cleaner. Do not
spray glass cleaner directly at the glass door.
Storing Food
Food Storage Tips
Wrap or store food in the refrigerator in airtight
and moisture-proof material unless otherwise
noted. This prevents food odor and taste transfer
throughout the refrigerator. For dated products,
check date code to ensure freshness.
CAUTION
• Do not overfill or pack items too tightly into
door bins. Doing so may cause damage
to the bin or personal injury if items are
removed with excessive force.
• Do not store glass containers in the freezer.
Contents may expand when frozen, break
the container and cause injury.
Food How to Store
Butter or
Margarine
Cheese Store in original wrapping until
Milk Wipe milk cartons. For coldest
Eggs Store in original carton on interior
Fruit Do not wash or hull fruit until it
Leafy
Vegetables
Keep opened butter in covered
dish or closed compartment.
When storing an extra supply,
wrap in freezer packaging and
freeze.
used. Once opened, rewrap tightly
in plastic wrap or aluminum foil.
milk, place containers on an
interior shelf.
shelf, not on door shelf.
is ready to be used. Sort and
keep fruit in original container in
a crisper, or store in completely
closed paper bag on refrigerator
shelf.
Remove store wrapping, trim or
tear off bruised and discolored
areas, wash in cold water, and
drain. Place in plastic bag or
plastic container and store in
crisper.
Page 25
ENGLISH
OPERATION
25
Vegetables
with skins
(carrots,
peppers)
Fish Freeze fresh fish and shellfish
Leftovers Cover leftovers with plastic wrap
Place in plastic bags or plastic
container and store in crisper.
if they are not being eaten the
same day purchased. Eating fresh
fish and shellfish the same day
purchased is recommended.
or aluminum foil, or store in plastic
containers with tight lids.
Storing Frozen Food
Check a freezer guide or a reliable cookbook
for further information about preparing food for
freezing or food storage times.
Freezing
Your freezer will not quick-freeze a large quantity
of food. Do not put more unfrozen food into the
freezer than will freeze within 24 hours (no more
than 2 to 3 pounds of food per cubic foot of freezer
space). Leave enough space in the freezer for air
to circulate around packages. Be careful to leave
enough room at the front so the door can close
tightly. Storage times will vary according to the
quality and type of food, the type of packaging
or wrap used (how airtight and moisture-proof)
and the storage temperature. Ice crystals inside
a sealed package are normal. This simply means
that moisture in the food and air inside the
package have condensed, creating ice crystals.
NOTE
• Allow hot foods to cool at room temperature
for 30 minutes, and then package and freeze.
Cooling hot foods before freezing saves energy.
Packaging
• Plastic-coated paper
• Non-permeable plastic wraps
• Specified freezer-grade self-sealing plastic bags
Follow package or container instructions for
proper freezing methods.
Do not use
• Bread wrappers
• Non-polyethylene plastic containers
• Containers without tight lids
• Wax paper or wax-coated freezer wrap
• Thin, semi-permeable wrap
NOTE
• If you are leaving home for a short period, like a
short vacation, the refrigerator should be left on.
Refrigerated foods that are able to be frozen will
stay preserved longer if stored in the freezer.
• If you are leaving the refrigerator turned off for
an extended period, remove all food and unplug
the power cord. Clean the interior, and leave the
door open to prevent fungi from growing in the
refrigerator.
• Do not store food with high moisture content
towards the top of the refrigerator. The moisture
could come in direct contact with the cold air
and freeze.
• Wash food before storing it in the refrigerator.
Vegetables should be washed, and food
packaging should be wiped down to prevent
adjacent foods from being contaminated.
• If the refrigerator is kept in a hot and humid
place, frequent opening of the door or storing a
lot of vegetables in the refrigerator may cause
condensation to form. Wipe off the condensation
with a clean cloth or a paper towel.
• If the refrigerator door or freezer drawer
is opened or closed too often, warm air
may penetrate the refrigerator and raise its
temperature. This can increase the running
costs of the unit.
Successful freezing depends on correct
packaging. When you close and seal the package,
it must not allow air or moisture in or out. If it
does, you could have food odor and taste transfer
throughout the refrigerator and could also dry out
frozen food.
Packaging recommendations
• Rigid plastic containers with tight-fitting lids
• Straight-sided canning/freezing jars
• Heavy-duty aluminum foil
Page 26
OPERATION
26
Auto-lift Device
Removing the Auto-lift Device
Remove the auto-lift device in the bottom drawer
to increase the storage space or for cleaning.
Unplug the refrigerator or disconnect power.
1
Open the bottom drawer, hold the inner
2
compartment with both hands and pull it out.
Insert the fingertips of both hands under the
5
cover at the center and pull the cover forward
gently.
The auto-lift device is at the bottom of the
3
drawer. Hold the inner edge of the device with
both hands and pull it up.
Hold the top of the auto-lift device with both
4
hands and remove it from the bottom drawer.
CAUTION
• Pull the cover gently to avoid damaging it.
Fold the back of the cover down and push the
6
folded cover back slightly.
Insert the supplied hole cover into the groove
7
at the bottom of the drawer.
WARNING
• The auto-lift device is heavy, so remove it
with both hands.
Page 27
ENGLISH
OPERATION
27
Assembling the Auto-lift Device
Remove the hole cover from the bottom of the
1
drawer.
Raise the back section of the folded cover and
2
rest it on the guide a at the rear of the drawer.
Lift the auto-lift device with both hands.
5
Insert the hinges on the auto-lift device into the
6
slots at the front of the drawer.
Hold the middle of the cover and lift it slightly
3
into the groove.
Make sure the hinges on the auto-lift device
4
are aligned with the slots in the drawer.
Lower the device into place and move it back
7
and forth to make sure it is engaged.
Use both hands to assemble the inner
8
compartment in the drawer.
Plug in the refrigerator or connect power.
9
Page 28
SMART FUNCTIONS
28
SMART FUNCTIONS
LG ThinQ Application
The LG ThinQ application allows you to
communicate with the appliance using a
smartphone.
LG ThinQ Application Features
• Smart Care+†
− Provides more personalized experience based
on the usage pattern analysis of consumers.
• Smart Sabbath†
− Activates or deactivates the Sabbath mode
and sets schedule for the mode activation.
• Energy Monitoring†
− This feature keeps track of the refrigerator’s
power consumption and the number of door
openings.
• Push Messages†
− If the door remains open for more than ten
minutes, you will receive a push message.
When Ice Plus is finished, you will receive a
push message.
Before Using LG ThinQ Application
Use a smartphone to check the strength of
1
the wireless router (Wi-Fi network) near the
appliance.
• If the distance between the appliance and the
wireless router is too far, the signal strength
becomes weak. It may take a long time to
register or installation may fail.
Turn off the Mobile data or Cellular Data on
2
your smartphone.
Connect your smartphone to the wireless
3
router.
• Smart Diagnosis™
− This function provides useful information
for diagnosing and solving issues with the
appliance based on the pattern of use.
• Settings
− Allows you to set various options on the
refrigerator and in the application.
† This feature is only available on some models.
NOTE
• If you change your wireless router, Internet
service provider, or password, delete the
registered appliance from the LG ThinQ
application and register it again.
• This information is current at the time of
publication. The application is subject to change
for product improvement purposes without
notice to users.
NOTE
• To verify the Wi-Fi connection, check that Wi-Fi
f icon on the control panel is lit.
• The appliance supports 2.4 GHz Wi-Fi networks
only. To check your network frequency, contact
your Internet service provider or refer to your
wireless router manual.
• LG ThinQ is not responsible for any network
connection problems or any faults, malfunctions,
or errors caused by network connection.
• The surrounding wireless environment can
make the wireless network service run slowly.
• If the appliance is having trouble connecting
to the Wi-Fi network, it may be too far from
the router. Purchase a Wi-Fi repeater (range
extender) to improve the Wi-Fi signal strength.
• The network connection may not work properly
depending on the Internet service provider.
• The Wi-Fi connection may not connect or may
be interrupted because of the home network
environment.
Page 29
ENGLISH
SMART FUNCTIONS
29
• If the appliance cannot be registered due to
problems with the wireless signal transmission,
unplug the appliance and wait about a minute
before trying again.
• If the firewall on your wireless router is enabled,
disable the firewall or add an exception to it.
• The wireless network name (SSID) should be a
combination of English letters and numbers. (Do
not use special characters.)
• Smartphone user interface (UI) may vary
depending on the mobile operating system (OS)
and the manufacturer.
• If the security protocol of the router is set to
WEP, network setup may fail. Change the
security protocol (WPA2 is recommended), and
register the product again.
Installing the LG ThinQ Application
Search for the LG ThinQ application from the
Google Play Store or Apple App Store on a
smartphone. Follow instructions to download and
install the application.
Connecting to Wi-Fi
The Wi-Fi button, when used with the LG ThinQ
application, allows the appliance to connect to a
home Wi-Fi network. The Wi-Fi icon shows the
status of the appliance’s network connection. The
icon illuminates when the appliance is connected
to the Wi-Fi network.
Initial Appliance Registration
Run the LG ThinQ application and follow the
instructions in the application to register the
appliance.
Re-registering the Appliance or
Registering Another User
Press and hold the Wi-Fi button for 3
seconds to temporarily turn it off. Run the
LG ThinQ application and follow the instructions in
the application to register the appliance.
NOTE
• To disable the Wi-Fi function, press and hold the
Wi-Fi button for 3 seconds. Wi-Fi icon will be
turned off.
Wireless LAN Module Specifications
Model PWFSA2
Frequency Range 2412 - 2462 MHz
Output Power (Max) < 30 dBm
FCC Notice
• The following notice covers the transmitter
module contained in this product.
This equipment has been tested and found to
comply with the limits for a Class B digital device,
pursuant to Part 15 of the FCC Rules and also
Part 18 of the FCC Rules. These limits are
designed to provide reasonable protection against
harmful interference in a residential installation.
This equipment generates, uses, and can radiate
radio frequency energy and, if not installed
and used in accordance with the instructions,
may cause harmful interference to radio
communications. However, there is no guarantee
that interference will not occur in a particular
installation. If this equipment does cause harmful
interference to radio or television reception, which
can be determined by turning the equipment off
and on, the user is encouraged to try to correct
the interference by one or more of the following
measures:
• Reorient or relocate the receiving antenna.
• Increase the separation between the equipment
and the receiver.
• Connect the equipment into an outlet on a
circuit different from that to which the receiver is
connected.
• Consult the dealer or an experienced radio/TV
technician for help.
This device complies with part 15 and part 18
of the FCC Rules. Operation is subject to the
following two conditions:
(1) This device may not cause harmful interference
and
(2) This device must accept any interference
received, including interference that may cause
undesired operation.
Any changes or modifications in construction of
this device which are not expressly approved by
the party responsible for compliance could void the
user’s authority to operate the equipment.
The manufacturer is not responsible for any
radio or TV interference caused by unauthorized
modification to this device. It is the responsibility of
the user to correct such interference.
Page 30
SMART FUNCTIONS
30
FCC RF Radiation Exposure
Statement
This equipment complies with FCC radiation
exposure limits set forth for an uncontrolled
environment. This transmitter must not be
colocated or operating in conjunction with any
other antenna or transmitter.
This equipment should be installed and operated
with a minimum distance of 20 cm (7.8 inches)
between the antenna and your body. Users must
follow the specific operating instructions for
satisfying RF exposure compliance.
Industry Canada Statement
• For transmitter module contained in this product
This device contains licence-exempt transmitter(s)/
receiver(s) that comply with Innovation,
Science and Economic Development Canada’s
licenceexempt RSS(s). Operation is subject to the
following two conditions:
(1) This device may not cause interference.
(2) This device must accept any interference,
including interference that may cause undesired
operation of the device.
Open Source Software Notice
Information
To obtain the source code under GPL, LGPL, MPL,
and other open source licenses, that is contained
in this product, please visit http://opensource.lge.
com. In addition to the source code, all referred
license terms, warranty disclaimers and copyright
notices are available for download.
LG Electronics will also provide open source code
to you on CD-ROM for a charge covering the cost
of performing such distribution (such as the cost of
media, shipping, and handling) upon email request
to opensource@lge.com. This offer is valid for a
period of three years after our last shipment of this
product. This offer is valid to anyone in receipt of
this information.
Using the Voice Assistant
Before Using
The product must be connected to the LG ThinQ
app in order to use the voice assistant feature.
For more information on connecting the product,
refer to the SMART FUNCTIONS section.
IC Radiation Exposure Statement
This equipment complies with IC radiation
exposure limits set forth for an uncontrolled
environment.
This equipment should be installed and operated
with a minimum distance of 20 cm (7.8 inches)
between the antenna and your body.
NOTE
• THE MANUFACTURER IS NOT
RESPONSIBLE FOR ANY RADIO OR
TV INTERFERENCE CAUSED BY
UNAUTHORIZED MODIFICATIONS TO THIS
EQUIPMENT. SUCH MODIFICATIONS COULD
VOID THE USER’S AUTHORITY TO OPERATE
THE EQUIPMENT.
NOTE
Voice assistant supports English commands only,
so it will not be responded to other than English
language.
Voice Assistant Features
Use your voice to automatically open the door and
get information such as the weather or time of day.
Function Command (example)
Open the refrigerator door.
Could you open the refrigerator
Open Door
Information
door?
Please open the refrigerator
door.
What day is it today?
What time is it now?
Page 31

ENGLISH
NOTE
• Voice assistant results may vary based on the
volume of the user’s voice, their intonation, and
the ambient noise.
• For best results, keep background noise to a
minimum and stand within 10 ft. (3 m) of the
refrigerator.
• On some models, the motion sensor works
with the voice assistant to answer certain voice
commands.
Setting up the Voice Assistant
You must wake the voice assistant up before it can
assist you. You can select 2 different ways to do
this.
Mode Details
This mode allows you to use
either motion sensor activation or
voice activation.
• Wake Zone: Stand close
Wake Zone
+ Wake
Word
Wake Word
OFF
enough to the front of the
product and the voice assistant
will wake automatically without
the wake word.
• Wake Word: Stand within 10
feet (3 m) of the refrigerator and
clearly say, “Hi, LG”.
This mode allows you to use voice
activation.
• Wake Word: Stand within 10
feet (3 m) of the refrigerator and
clearly say, “Hi, LG”.
This mode turns off the voice
assistant
SMART FUNCTIONS
CAUTION
• When the voice assistant function is in
standby mode, the built-in microphone is
activated whether the display is on or off.
Voice is then sent over the network to the
server.
NOTE
• When the voice assistant is set to the Wake
Zone + Wake Word mode:
− Every time you pass in front of the refrigerator,
the voice assistant is activated by the wake
zone and enters the standby mode to
recognize voice commands. Saying “Hi, LG”
will not activate the wake word function in this
case.
31
Using Wake Word
To use the wake word, stand within 10 feet (3 m)
of the refrigerator.
To wake the voice assistant, say, “Hi, LG”.
1
• The voice assistant control window
automatically displays “Go ahead, I’m
listening.” and enters the ready mode.
Clearly issue your command.
2
• Example: Open the refrigerator door.
• If the voice assistant does not recognize
the command, repeat it or try a different
command.
Using Wake Zone
Voice Assistant
Wake Zone
Wake Word
Voice Assistant
Wake Word
Voice Assistant
OFF
To use the wake zone, stand near the front
of the refrigerator and the voice assistant will
automatically wake and enter standby mode to
receive voice commands.
Stand in front of the product and wait a
1
moment.
• The voice assistant control window
automatically displays “Go ahead, I’m
listening.” and enters the ready mode.
Clearly issue your command.
2
• Example: Open the refrigerator door.
Page 32

SMART FUNCTIONS
32
NOTE
Voice assistant supports English commands only,
so it will not be responded to other than English
language.
• To issue a new voice command, say, “Hi, LG” or
move away from the refrigerator and then move
close again (within 3.25 ft. or 1 m).
• If the voice command is not recognized, the
voice assistant function exits the standby mode.
Smart Diagnosis™ Feature
This feature is only available on models with the c
or d logo.
Use this feature to help you diagnose and solve
problems with your appliance.
NOTE
• For reasons not attributable to LGE’s
negligence, the service may not operate due to
external factors such as, but not limited to, Wi-Fi
unavailability, Wi-Fi disconnection, local app
store policy, or app unavailability.
Using LG ThinQ to Diagnose Issues
Using Audible Diagnosis to
Diagnose Issues
Follow the instructions below to use the audible
diagnosis method.
• Launch the LG ThinQ application and select the
Smart Diagnosis feature in the menu. Follow
the instructions for audible diagnosis provided in
the LG ThinQ application.
Hold the Lock button for three seconds.
1
• If the display has been locked for over five
minutes, you must deactivate the lock and
then reactivate it.
Open the refrigerator door.
2
Hold the mouthpiece of your phone in front of
3
the speaker that is located on the right hinge
of the refrigerator door, when instructed to do
so by the call center.
Press and hold the Freezer Drawer button for
4
three seconds while continuing to hold your
phone to the speaker.
If you experience a problem with your Wi-Fi
equipped appliance, it can transmit troubleshooting
data to a smartphone using the LG ThinQ
application.
• Launch the LG ThinQ application and select
the Smart Diagnosis feature in the menu.
Follow the instructions provided in the LG ThinQ
application.
After you hear three beeps, release the
5
Freezer Drawer button.
Keep the phone in place until the tone
6
transmission has finished. The display will
count down the time. Once the countdown
is over and the tones have stopped, the
diagnosis will be displayed in the application.
NOTE
• For best results, do not move the phone while
the tones are being transmitted.
Page 33

ENGLISH
MAINTENANCE
33
MAINTENANCE
Cleaning
WARNING
• Use non-flammable cleaner. Failure to do so
can result in fire, explosion, or death.
CAUTION
• Do not use an abrasive cloth or sponge
when cleaning the interior and exterior of the
refrigerator.
• Do not place your hand on the bottom
surface of the refrigerator when opening and
closing the doors.
General Cleaning Tips
• Both the refrigerator and freezer sections defrost
automatically; however, clean both sections
once a month to prevent odors.
• Wipe up spills immediately.
• Unplug the refrigerator or disconnect power
before cleaning.
• Remove all removable parts, such as shelves.
• Use a clean sponge or soft cloth and a mild
detergent in warm water. Do not use abrasive or
harsh cleaners.
• Hand wash, rinse and dry all surfaces
thoroughly.
• When cleaning the inside or outside of the
appliance, do not wipe it with a rough brush,
toothpaste, or flammable materials. Do not
use cleaning agents containing flammable
substances.
− This may cause discoloration or damage to
the appliance.
Exterior
Waxing external painted metal surfaces helps
provide rust protection. Do not wax plastic parts.
Wax painted metal surfaces at least twice a year
using appliance wax (or auto paste wax). Apply
wax with a clean, soft cloth.
For products with black stainless steel exterior,
spray glass cleaner on a clean, microfiber cloth
and rub in direction of grain. Do not spray glass
cleaner directly at the display panel. Do not use
harsh or abrasive cleaners.
Inside Walls
• Allow freezer to warm up so the cloth will not
stick.
To help remove odors, wash the inside of the
refrigerator with a mixture of baking soda and
warm water. Mix 2 tablespoons of baking soda to 1
quart of water (26 g soda to 1 liter water.) Be sure
the baking soda is completely dissolved so it does
not scratch the surfaces of the refrigerator.
Door Liners and Gaskets
Use a clean sponge or soft cloth and a mild
detergent in warm water. Do not use cleaning
waxes, concentrated detergents, bleaches,
or cleaners containing petroleum on plastic
refrigerator parts.
Plastic Parts (covers and panels)
Use a clean sponge or soft cloth and a mild
detergent in warm water. Do not use glass
cleaners, abrasive cleaners, or flammable fluids.
These can scratch or damage the material.
− Flammable substances: alcohol (ethanol,
methanol, isopropyl alcohol, isobutyl alcohol,
etc.), thinner, bleach, benzene, flammable
liquid, abrasive, etc.
Page 34

MAINTENANCE
34
Air Filter
Replacing the Fresh Filter
Replace the air filter:
• Approximately every six months.
• When the air filter LED blinks or the replacement
indcator icon is displayed.
Remove the cover to the air filter compartment
1
by inserting the blunt end of a plastic pen into
the groove at the base of the compartment on
either side.
Remove the filter inside the air filter cover and
2
replace it with a new filter.
• Make sure to insert the new filter with the “Back”
label facing out.
To reset the filter replacement period, press
3
the Air Filter button on the control panel until
the icon on the control panel turns off.
Page 35

ENGLISH
TROUBLESHOOTING
TROUBLESHOOTING
FAQs: Frequently Asked Questions
Q: What are the best temperature settings for my freezer and refrigerator?
A: The default setting for the freezer is 0° Fahrenheit (-18° Celsius). The default setting for the
refrigerator is 37° Fahrenheit (3° Celsius). Adjust these settings as necessary to keep food at
desired temperatures. Milk should be cold when stored on the inner shelf of the refrigerator. Ice
cream should be firm and ice cubes should not melt in the freezer. To switch the display from
Fahrenheit to Celsius, press and hold the Freezer Drawer and Refrigerator Drawer buttons until
you hear a beep and the settings in the display change.
Q: How do I set the freezer and refrigerator temperatures?
A: Repeatedly press the Freezer Drawer or Refrigerator Drawer button on the control panel until
the desired temperature appears. The numbers will cycle from highest to lowest and then return to
the highest again with continuous pressing.
Q: My refrigerator is powered on and the controls are working, but it’s not cooling and the
display shows “Demo Mode”. What is wrong?
35
A: The refrigerator is in Display Mode. The Display Mode disables all cooling in the refrigerator
and freezer sections to conserve energy while on display in a retail store. When activated,
Demo Mode is displayed on the control panel and the display remains on for 5 seconds. With
either refrigerator door opened, press the Express Freeze button 3 times consecutively while
pressing the Refrigerator Drawer button. The control panel beeps and the temperature settings
display to confirm that Display Mode is deactivated. Use the same procedure to activate Display
Mode.
Page 36

TROUBLESHOOTING
36
Before Calling for Service
Review this section before calling for service; doing so will save you both time and money.
Cooling
Problem Possible Cause & Solutions
The refrigerator control is set to OFF (some models).
• Turn the control ON. Refer to the Setting the Controls section for proper temperature
settings.
Refrigerator is in the defrost cycle.
Refrigerator
and Freezer
section are not
cooling.
• During the defrost cycle, the temperature of each compartment may rise slightly. Wait
30 minutes and confirm the proper temperature has been restored once the defrost
cycle has completed.
Refrigerator was recently installed.
• It may take up to 24 hours for each compartment to reach the desired temperature.
Refrigerator was recently relocated.
• If the refrigerator was stored for a long period of time or moved on its side, it is
necessary for the refrigerator to stand upright for 24 hours before connecting it to
power.
Cooling
system runs
too much.
Refrigerator is replacing an older model.
• Modern refrigerators require more operating time but use less energy due to more
efficient technology.
Refrigerator was recently plugged in or power restored.
• The refrigerator will take up to 24 hours to cool completely.
The door is opened often or a large amount of food / hot food was added.
• Adding food and opening the door warms the refrigerator, requiring the compressor to
run longer in order to cool the refrigerator back down. In order to conserve energy, try
to get everything you need out of the refrigerator at once, keep food organized so it is
easy to find, and close the door as soon as the food is removed. (Refer to the Food
Storage Guide.)
Doors are not closed completely.
• Firmly push the doors shut. If they will not shut all the way, the “Doors will not close
correctly or pop open” section.
Refrigerator is installed in a hot location.
• The compressor will run longer under warm conditions. At normal room temperatures
(70 °F) expect your compressor to run about 40 % to 80 % of the time. Under warmer
conditions, expect it to run even more often. The refrigerator should not be operated
above 110 °F.
Page 37

ENGLISH
Problem Possible Cause & Solutions
Doors are opened often or for long periods of time.
• When the doors are opened often or for long periods of time, warm, humid air
enters the compartment. This raises the temperature and moisture level within
the compartment. To lessen the effect, reduce the frequency and duration of door
openings.
Doors are not closed correctly.
• See the “Doors will not close correctly or pop open” section.
Weather is humid.
Interior
moisture
buildup.
• Humid weather allows additional moisture to enter the compartments when the
doors are opened leading to condensation or frost. Maintaining a reasonable level
of humidity in the home will help to control the amount of moisture that can enter the
compartments.
Defrost cycle recently completed.
• During the defrost cycle, the temperature of each compartment may rise slightly and
condensation may form on the back wall. Wait 30 minutes and confirm that the proper
temperature has been restored once the defrost cycle has completed.
Food is not packaged correctly.
• Food stored uncovered or unwrapped, and damp containers can lead to moisture
accumulation within each compartment. Wipe all containers dry and store food in
sealed packaging to prevent condensation and frost.
TROUBLESHOOTING
37
Food is
freezing in the
refrigerator
compartment.
Refrigerator
or Freezer
section is too
warm.
Food with high water content was placed near an air vent.
• Rearrange items with high water content away from air vents.
Refrigerator temperature control is set incorrectly.
• If the temperature is too cold, adjust the control one increment at a time and wait for
the temperature to stabilize. Refer to the Control Panel section for more information.
Refrigerator is installed in a cold location.
• When the refrigerator is operated in temperature below 41°F (5°C), food can freeze in
the refrigerator compartment. The refrigerator should not be operated in temperature
below 55°F (13°C).
Refrigerator was recently installed.
• It may take up to 24 hours for each compartment to reach the desired temperature.
The air vents are blocked. Cold air circulates from the freezer to the fresh food
section and back again through air vents in the wall dividing the two sections.
• Locate air vents by using your hand to sense airflow and move all packages that
block vents and restrict airflow. Rearrange items to allow air to flow throughout the
compartment.
Page 38

TROUBLESHOOTING
38
Problem Possible Cause & Solutions
Doors are opened often or for long periods of time.
• When the doors are opened often or for long periods of time, warm, humid air
enters the compartment. This raises the temperature and moisture level within
the compartment. To lessen the effect, reduce the frequency and duration of door
openings.
Unit is installed in a hot location.
• The refrigerator should not be operated in temperatures above 110 °F.
A large amount of food or hot food was added to either compartment.
Refrigerator
or Freezer
section is too
warm.
• Adding food warms the compartment requiring the cooling system to run. Allowing hot
food to cool to room temperature before putting it in the refrigerator will reduce this
effect.
Doors not closed correctly.
• See the Doors will not close correctly or pop open section in Parts & Features
Troubleshooting.
Temperature control is not set correctly.
• If the temperature is too warm, adjust the control one increment at a time and wait for
the temperature to stabilize.
Refrigerator
or Freezer
section is too
cold.
Frost or ice
crystals form
on frozen
food (inside
of sealed
package).
Frost or ice
crystals form
on frozen food
(outside of
package).
Defrost cycle has recently completed.
• During the defrost cycle, the temperature of each compartment may rise slightly and
condensation may form on the back wall. Wait 30 minutes and confirm the proper
temperature has been restored once the defrost cycle has completed..
Incorrect temperature control settings.
• If the temperature is too cold, adjust the control one increment at a time and wait for
the temperature to stabilize. Refer to the Control Panel for more information.
Condensation from food with a high water content has frozen inside of the food
package.
• This is normal for food items with a high water content.
Food has been left in the freezer for a long period of time.
• Do not store food items with high water content in the freezer for a long period of
time.
Door is opened frequently or for long periods of time.
• When the doors are opened often or for long periods of time, warm, humid air
enters the compartment. This raises the temperature and moisture level within the
compartment. Increased moisture will lead to frost and condensation. To lessen the
effect, reduce the frequency and duration of door openings.
Door is not closing properly.
• Refer to the Doors will not close correctly or pop open section in the Troubleshooting
section.
Page 39

ENGLISH
Parts & Features
Problem Possible Cause & Solutions
TROUBLESHOOTING
39
Doors will not
close correctly
or pop open.
Doors are
difficult to
open.
Refrigerator
wobbles
or seems
unstable
Food packages are blocking the door open.
• Rearrange food containers to clear the door and door shelves.
Ice bin, crisper cover, shelves, door bins, or drawers are out of position.
• Push bins all the way in and put crisper cover, shelves and drawers into their correct
positions. See the Operation section for more information.
The doors were removed during product installation and not properly replaced.
• Contact the installer to properly install the doors.
Refrigerator is not leveled properly.
• Contact the installer to properly level the refrigerator.
The gaskets are dirty or sticky.
• Clean the gaskets and the surfaces that they touch. Rub a thin coat of appliance
polish or kitchen wax on the gaskets after cleaning.
Door was recently closed.
• When you open the door, warmer air enters the refrigerator. As the warm air cools,
it can create a vacuum. If the door is hard to open, wait one minute to allow the air
pressure to equalize, then see if it opens more easily.
Leveling legs are not adjusted properly.
• Contact the installer to properly level the refrigerator.
Floor is not level.
• It may be necessary to add shims under the leveling legs or rollers to complete
installation.
Lights do not
work.
The interior of
the refrigerator
is covered
with dust or
soot.
Voice
Assistant
function
turns on
automatically.
LED interior lighting failure.
• The refrigerator compartment lamp is LED interior lighting, and service should be
performed by a qualified technician.
The refrigerator is located near a fire source, such as a fireplace, chimney, or
candle.
• Make sure that the refrigerator is not located near a fire source, such as a fireplace,
chimney or candle.
The voice assistant is set to the Wake Zone + Wake Word mode. Every time you
pass in front of the refrigerator, the voice assistant wakes and enters the standby
mode to recognize voice commands.
• Change Voice Assistant from Wake Zone + Wake Word to Wake Word.
Page 40

TROUBLESHOOTING
40
Noises
Problem Possible Cause & Solutions
The defrost control will click when the automatic defrost cycle begins and ends.
Clicking
Rattling
Whooshing
The thermostat control (or refrigerator control on some models) will also click
when cycling on and off.
• Normal Operation
Rattling noises may come from the flow of refrigerant or items stored on top of
or around the refrigerator.
• Normal Operation
Refrigerator is not resting solidly on the floor.
• Floor is weak or uneven or leveling legs need to be adjusted. See the Leveling and
Door Alignment section.
Refrigerator with linear compressor was jarred while running.
• Normal Operation
Evaporator fan motor is circulating air through the refrigerator and freezer
compartments.
• Normal Operation
Gurgling
Popping
Sizzling
Vibrating
Dripping
Pulsating or
high-pitched
sound
Air is being forced over the condenser by the condenser fan.
• Normal Operation
Refrigerant flowing through the cooling system.
• Normal Operation
Contraction and expansion of the inside walls due to changes in temperature.
• Normal Operation
Water dripping on the defrost heater during a defrost cycle.
• Normal Operation
If the side or back of the refrigerator is touching a cabinet or wall, some of the
normal vibrations may make an audible sound.
• To eliminate the noise, make sure that the sides and back cannot vibrate against any
wall or cabinet.
Water running into the drain pan during the defrost cycle.
• Normal Operation
Your refrigerator is designed to run more efficiently to keep your food items at
the desired temperature. The high efficiency compressor may cause your new
refrigerator to run longer than your old one, but it is still more energy efficient
than previous models. While the refrigerator is running, it is normal to hear a
pulsating or high-pitched sound.
• Normal Operation
Page 41

ENGLISH
Wi-Fi
Problem Possible Cause & Solutions
TROUBLESHOOTING
41
Trouble
connecting
appliance and
smartphone to
Wi- Fi network
The password for the Wi-Fi network was entered incorrectly.
• Delete your home Wi-Fi network and begin the registration process again.
Mobile data for your smartphone is turned on.
• Turn off the Mobile data on your smartphone before registering the appliance.
The wireless network name (SSID) is set incorrectly.
• The wireless network name (SSID) should be a combination of English letters and
numbers. (Do not use special characters.)
The router frequency is not 2.4 GHz.
• Only a 2.4 GHz router frequency is supported. Set the wireless router to 2.4 GHz and
connect the appliance to the wireless router. To check the router frequency, check
with your Internet service provider or the router manufacturer.
The distance between the appliance and the router is too far.
• If the appliance is too far from the router, the signal may be weak and the connection
may not be configured correctly. Move the router closer to the appliance or purchase
and install a Wi-Fi repeater.
Page 42

LIMITED WARRANTY
42
LIMITED WARRANTY
FOR USA
ARBITRATION NOTICE: THIS LIMITED WARRANTY CONTAINS AN ARBITRATION PROVISION
THAT REQUIRES YOU AND LG TO RESOLVE DISPUTES BY BINDING ARBITRATION INSTEAD
OF IN COURT, UNLESS YOU CHOOSE TO OPT OUT. IN ARBITRATION, CLASS ACTIONS AND
JURY TRIALS ARE NOT PERMITTED. PLEASE SEE THE SECTION TITLED “PROCEDURE FOR
RESOLVING DISPUTES” BELOW.
Should your LG Refrigerator (“Product”) fail due to a defect in materials or workmanship under normal and
proper use, during the warranty period set forth below, LG Electronics (“LG”) will, at its option, repair or
replace the Product. This limited warranty is valid only to the original retail purchaser of the Product and
applies only when purchased and used within the United States including U.S. Territories.
WARRANTY PERIOD
Sealed System
Refrigerator/Freezer
One (1) year from the date
of original retail purchase
Parts and Labor (internal/
functional parts only)
(Condenser, Dryer,
Connecting Tube and
Evaporator)
Five (5) years from the
date of original retail
purchase
Parts and Labor Parts and Labor
Five (5) years from
the date of original
retail purchase
Compressor
Linear / Inverter
Compressor Only : Parts
Only for years 6-10 from
the date of original retail
purchase (Consumer will
be charged for labor)
• Replacement products and parts are warranted for the remaining portion of the original warranty period
or ninety (90) days, whichever is greater.
• Replacement products and parts may be new, reconditioned, refurbished, or otherwise factory
remanufactured.
• Proof of original retail purchase specifying the Product model and date of purchase is required to obtain
warranty service under this limited warranty.
EXCEPT TO THE EXTENT PROHIBITED BY APPLICABLE LAW, ANY IMPLIED WARRANTY
OF MERCHANTABILITY OR FITNESS FOR A PARTICULAR PURPOSE ON THE PRODUCT IS
LIMITED IN DURATION TO THE DURATION OF THE ABOVE LIMITED WARRANTY. UNDER NO
CIRCUMSTANCES SHALL LG OR ITS U.S. DISTRIBUTORS/DEALERS BE LIABLE FOR ANY
INDIRECT, INCIDENTAL, CONSEQUENTIAL, SPECIAL, OR PUNITIVE DAMAGES, INCLUDING,
WITHOUT LIMITATION, LOST GOODWILL, LOST REVENUES OR PROFITS, WORK STOPPAGE,
IMPAIRMENT OF OTHER GOODS, COST OF REMOVAL AND REINSTALLATION OF THE PRODUCT,
LOSS OF USE, OR ANY OTHER DAMAGES WHETHER BASED IN CONTRACT, TORT, OR
OTHERWISE. LG’S TOTAL LIABILITY, IF ANY, SHALL NOT EXCEED THE PURCHASE PRICE PAID
BY YOU FOR THE PRODUCT.
Some states do not allow the exclusion or limitation of incidental or consequential damages or limitations
on how long an implied warranty lasts, so the above exclusions or limitations may not apply to you. This
limited warranty gives you specific legal rights and you may also have other rights that vary from state to
state.
Page 43

ENGLISH
LIMITED WARRANTY
THIS LIMITED WARRANTY DOES NOT COVER:
• Service trips to deliver, pick up, or install, educate how to operate, correct wiring, or correct unauthorized
repairs.
• Damage or failure of the Product to perform during power failures and interrupted or inadequate
electrical service.
• Damage or failure caused by leaky or broken water pipes, frozen water pipes, restricted drain lines,
inadequate or interrupted water supply or inadequate supply of air.
• Damage resulting from operating the product in a corrosive atmosphere or contrary to the product
owner’s manual.
• Damage or failure to the Product caused by accidents, pests and vermin, lightning, wind, fire, floods,
acts of God, or any other causes beyond the control of LG.
• Damage or failure caused by unauthorized modification or alteration, or if used for other than the
intended purpose.
• Damage or failure resulting from misuse, abuse, improper installation, repair, or maintenance. Improper
repair includes use of parts not authorized by LG. Improper installation or maintenance includes
installation or maintenance contrary to the Product owner’s manual.
• Damage or failure caused by unauthorized modification or alteration, or if used for other than the
intended purpose.
• Damage or failure caused by incorrect electrical current, voltage, or plumbing codes.
• Damage or failure caused by transportation and handling, including scratches, dents, chips, and/or other
damage to the finish of the Product, unless such damage is reported within one (1) week of delivery.
• Damage or missing items to any display, open box, or discounted Product.
• Refurbished Product or any Product sold “As Is”, “Where Is”, “With all Faults”, or similar disclaimer.
• Products with original serial numbers that have been removed, altered, or cannot be readily determined.
• Increases in utility costs and additional utility expenses.
• Any noises associated with normal operation.
• Use of accessories (e.g., water filters, etc.), components, or consumable cleaning products that are not
authorized by LG.
• Replacement of light bulbs, filters, or any consumable parts.
• When Product is used for other than normal and proper household use (e.g. commercial or industrial
use, offices, and recreational facilities or vehicles) or contrary to the instructions outlined in the Product’s
owner’s manual.
• Costs associated with removal and reinstallation of your Product for repairs.
• Shelves, door bins, drawers, handle and accessories, except for internal/functional parts covered under
this limited warranty.
43
The cost of repair or replacement under these excluded circumstances shall be borne by the
consumer.
TO OBTAIN WARRANTY SERVICE AND ADDITIONAL INFORMATION
Call 1-800-984-6306 and select the appropriate option from the menu.
Or visit our website at http://www.lg.com
Or by mail: LG Electronics Customer Service P.O. Box 240007 Huntsville, AL 35813 ATTN: CIC
PROCEDURE FOR RESOLVING DISPUTES:
ALL DISPUTES BETWEEN YOU AND LG ARISING OUT OF OR RELATING IN ANY WAY TO THIS
LIMITED WARRANTY OR THE PRODUCT SHALL BE RESOLVED EXCLUSIVELY THROUGH BINDING
ARBITRATION, AND NOT IN A COURT OF GENERAL JURISDICTION. BINDING ARBITRATION
MEANS THAT YOU AND LG ARE EACH WAIVING THE RIGHT TO A JURY TRIAL AND TO BRING OR
PARTICIPATE IN A CLASS ACTION.
Page 44

LIMITED WARRANTY
44
Fees/Costs. You do not need to pay any fee to begin an arbitration. Upon receipt of your written demand
for arbitration, LG will promptly pay all arbitration filing fees to the AAA unless you seek more than
$25,000 in damages, in which case the payment of these fees will be governed by the AAA Rules. Except
as otherwise provided for herein, LG will pay all AAA filing, administration and arbitrator fees for any
arbitration initiated in accordance with the AAA Rules and this arbitration provision. If you prevail in the
arbitration, LG will pay your attorneys’ fees and expenses as long as they are reasonable, by considering
factors including, but not limited to, the purchase amount and claim amount. Notwithstanding the
foregoing, if applicable law allows for an award of reasonable attorneys’ fees and expenses, an arbitrator
can award them to the same extent that a court would. If the arbitrator finds either the substance of your
claim or the relief sought in the demand is frivolous or brought for an improper purpose (as measured
by the standards set forth in Federal Rule of Civil Procedure 11(b)), then the payment of all arbitration
fees will be governed by the AAA Rules. In such a situation, you agree to reimburse LG for all monies
previously disbursed by it that are otherwise your obligation to pay under the AAA Rules. Except as
otherwise provided for, LG waives any rights it may have to seek attorneys’ fees and expenses from you if
LG prevails in the arbitration.
Hearings and Location. If your claim is for $25,000 or less, you may choose to have the arbitration
conducted solely on the basis of (1) documents submitted to the arbitrator, (2) through a telephonic
hearing, or (3) by an in-person hearing as established by the AAA Rules. If your claim exceeds $25,000,
the right to a hearing will be determined by the AAA Rules. Any in-person arbitration hearings will be held
at a location within the federal judicial district in which you reside unless we both agree to another location
or we agree to a telephonic arbitration.
Opt Out. You may opt out of this dispute resolution procedure. If you opt out, neither you nor LG can
require the other to participate in an arbitration proceeding. To opt out, you must send notice to LG no later
than 30 calendar days from the date of the first consumer purchaser’s purchase of the product by either: (i)
sending an e-mail to optout@lge.com, with the subject line: “Arbitration Opt Out” or (ii) calling 1-800-980-
2973. You must include in the opt out e-mail or provide by telephone: (a) your name and address; (b) the
date on which the product was purchased; (c) the product model name or model number; and (d) the serial
number (the serial number can be found (i) on the product; or (ii) online by accessing https://www.lg.com/
us/support/repair-service/schedule-repair-continued and clicking on “Find My Model & Serial Number”).
You may only opt out of the dispute resolution procedure in the manner described above (that is, by e-mail
or telephone); no other form of notice will be effective to opt out of this dispute resolution procedure.
Opting out of this dispute resolution procedure will not affect the coverage of the Limited Warranty in any
way, and you will continue to enjoy the full benefits of the Limited Warranty. If you keep this product and do
not opt out, then you accept all terms and conditions of the arbitration provision described above.
Page 45

ENGLISH
LIMITED WARRANTY
45
FOR CANADA
ARBITRATION NOTICE: THIS LIMITED WARRANTY CONTAINS AN ARBITRATION PROVISION THAT
REQUIRES YOU AND LG TO RESOLVE DISPUTES BY BINDING ARBITRATION INSTEAD OF IN
COURT, UNLESS THE LAWS OF YOUR PROVINCE OR TERRITORY DO NOT PERMIT THAT, OR, IN
OTHER JURISDICTIONS, IF YOU CHOOSE TO OPT OUT. IN ARBITRATION, CLASS ACTIONS AND
JURY TRIALS ARE NOT PERMITTED. PLEASE SEE THE SECTION TITLED “PROCEDURE FOR
RESOLVING DISPUTES” BELOW.
Should your LG Refrigerator (“Product”) fail due to a defect in materials or workmanship under normal
and proper use, during the warranty period set forth below, LG Electronics Canada, Inc. (“LGECI”) will,
at its option, repair or replace the Product upon receipt of proof of the original retail purchase. This
limited warranty is valid only to the original retail purchaser of the Product and applies only to a Product
distributed, purchased and used within Canada, as determined at the sole discretion of LGECI.
WARRANTY PERIOD (Note: If the original date of purchase cannot be verified, the warranty will
begin sixty (60) days from the date of manufacture)
Refrigerator
One (1) year from the
date of original retail
purchase
Parts and Labor
(internal/ functional
parts only)
Sealed System (Condenser, Dryer,
Connecting Tube and Evaporator)
One (1) year from
the date of original
retail purchase
Parts and Labor
Seven (7) years from
the date of original
retail purchase
Parts only (Consumer
will be charged for labor)
Linear / Inverter Compressor
Ten (10) years from the date
of original retail purchase
Part only (Consumer will be
charged for labor)
• Replacement products and parts are warranted for the remaining portion of the original warranty period
or ninety (90) days, whichever is greater.
• Replacement products and parts may be new, reconditioned, refurbished, or otherwise factory
remanufactured, all at the sole discretion of LGECI.
• Proof of original retail purchase specifying the Product model and date of purchase is required to obtain
warranty service under this Limited Warranty.
LGECI’S SOLE LIABILITY IS LIMITED TO THE LIMITED WARRANTY SET OUT ABOVE. EXCEPT
AS EXPRESSLY PROVIDED ABOVE, LGECI MAKES NO, AND HEREBY DISCLAIMS, ALL OTHER
WARRANTIES AND CONDITIONS RESPECTING THE PRODUCT, WHETHER EXPRESS OR
IMPLIED, INCLUDING BUT NOT LIMITED TO, ANY IMPLIED WARRANTY OR CONDITION OF
MERCHANTABILITY OR FITNESS FOR A PARTICULAR PURPOSE, AND NO REPRESENTATIONS
SHALL BE BINDING ON LGECI. LGECI DOES NOT AUTHORIZE ANY PERSON TO CREATE OR
ASSUME FOR IT ANY OTHER WARRANTY OBLIGATION OR LIABILITY IN CONNECTION WITH
THE PRODUCT. TO THE EXTENT THAT ANY WARRANTY OR CONDITION IS IMPLIED BY LAW,
IT IS LIMITED TO THE WARRANTY PERIOD SET OUT ABOVE. UNDER NO CIRCUMSTANCES
SHALL LGECI, THE MANUFACTURER OR DISTRIBUTOR OF THE PRODUCT, BE LIABLE FOR
ANY INCIDENTAL, CONSEQUENTIAL, SPECIAL, DIRECT, INDIRECT, PUNITIVE OR EXEMPLARY
DAMAGES, INCLUDING, WITHOUT LIMITATION, LOSS OF GOODWILL, LOST PROFITS, LOSS OF
ANTICIPATED PROFITS, LOST REVENUE, LOSS OF USE, OR ANY OTHER DAMAGE, WHETHER
ARISING DIRECTLY OR INDIRECTLY FROM ANY CONTRACTUAL BREACH, FUNDAMENTAL
BREACH, TORT OR OTHERWISE, OR FROM ANY ACTS OR OMISSIONS. LGECI’S TOTAL LIABILITY,
IF ANY, SHALL NOT EXCEED THE PURCHASE PRICE PAID BY YOU FOR THE PRODUCT.
This Limited Warranty gives you specific legal rights. You may also have other rights that vary from
province to province depending on applicable provincial laws. Any term of this Limited Warranty that
negates or varies any implied condition or warranty under provincial law is severable where it conflicts with
such provincial law without affecting the remainder of this warranty’s terms.
Page 46

LIMITED WARRANTY
46
THIS LIMITED WARRANTY DOES NOT COVER:
• Service trips to i) deliver, pick up, or install or; educate on how to operate the Product; ii) correct wiring
or plumbing; or iii) correct unauthorized repairs or installations of the Product;
• Damage or failure of the Product to perform during power failures and interrupted or inadequate
electrical service;
• Damage or failure caused by leaky or broken water pipes, frozen water pipes, restricted drain lines,
inadequate or interrupted water supply or inadequate supply of air;
• Damage or failure resulting from operating the Product in a corrosive atmosphere or contrary to the
instructions outlined in the Product’s owner’s manual;
• Damage or failure to the Product caused by accidents, pests and vermin, lightning, wind, fire, floods,
acts of God, or any other causes beyond the control of LGECI or the manufacturer;
• Damage or failure resulting from misuse, abuse, improper installation, repair, or maintenance of the
Product. Improper repair includes use of parts not authorized or specified by LGECI. Improper installation
or maintenance includes installation or maintenance contrary to the Product’s owner’s manual;.
• Damage or failure caused by unauthorized modification or alteration of the Product, or if used for other
than the intended household purpose/use of the Product, or damage or failure resulting from any water
leakage due to improper installation of the Product;
• Damage or failure caused by incorrect electrical current, voltage or plumbing codes;
• Damage or failure caused by use that is other than normal household use, including, without limitation,
commercial or industrial use, including use in commercial offices or recreational facilities, or as otherwise
outlined in the Product’s owner’s manual;
• Damage or failure caused by the use of any accessories, components or cleaning products, including,
without limitation, water filters, that are not approved/authorized by LGECI;
• Replacement of the water filter cartridge due to water pressure that is outside the specified operating
range or due to excessive sediment in the water supply;
• Damage or failure caused by transportation and handling, including scratches, dents, chips and/or
other damage to the finish of the Product, unless such damage results from defects in materials or
workmanship and is reported to LGECI within one (1) week of delivery of the Products;
• Damage or missing items to any display, open box, refurbished or discounted Product;
• Refurbished Product or any Product sold “As Is”, “Where Is”, “With all Faults”, or any similar disclaimer;
• Products with original serial numbers that have been removed, altered or cannot be readily determined
at the discretion of LGECI;
• Increases in utility costs and additional utility expenses in any way associated with the Product;
• Any noises associated with normal operation of the Product;
• Replacement of light bulbs, filters, fuses or any other consumable parts;
• Replacement of any part that was not originally included with the Product;
• Costs associated with removal and/or reinstallation of the Product for repairs; and
• Shelves, door bins, drawers, handle and accessories to the Product, except for internal/functional parts
covered under this Limited Warranty.
• Coverage for “in Home” repairs, for products in-warranty, will be provided if the Product is within a 150
km radius from the nearest authorized service center (ASC), as determined by LG Canada. If your
Product is located outside a 150 km radius from a ASC, as determined by LG Canada, it will be your
responsibility to bring the Product, at your sole expense, to the ASC for in-warranty repair.
All costs and expenses associated with the above excluded circumstances, listed under the
heading, This Limited Warranty Does Not Cover, shall be borne by the consumer.
TO OBTAIN WARRANTY SERVICE AND ADDITIONAL INFORMATION, PLEASE CALL OR VISIT OUR
WEBSITE:
Call 1-888-542-2623 and select the appropriate option from the menu, or visit our website at http://www.lg.com
Page 47

ENGLISH
LIMITED WARRANTY
PROCEDURE FOR RESOLVING DISPUTES:
EXCEPT WHERE PROHIBITED AT LAW, ALL DISPUTES BETWEEN YOU AND LG ARISING OUT
OF OR RELATING IN ANY WAY TO THIS LIMITED WARRANTY OR THE PRODUCT SHALL BE
RESOLVED EXCLUSIVELY THROUGH BINDING ARBITRATION, AND NOT IN A COURT OF GENERAL
JURISDICTION. EXCEPT WHERE PROHIBITED AT LAW, YOU AND LG BOTH IRREVOCABLY AGREE
TO WAIVE THE RIGHT TO A JURY TRIAL AND TO BRING OR PARTICIPATE IN A CLASS ACTION.
Definitions. For the purposes of this section, references to “LG” mean LG Electronics Canada, Inc., its
parents, subsidiaries and affiliates, and each of their officers, directors, employees, agents, beneficiaries,
predecessors in interest, successors, assigns and suppliers; references to “dispute” or “claim” shall
include any dispute, claim or controversy of any kind whatsoever (whether based in contract, tort, statute,
regulation, ordinance, fraud, misrepresentation or any other legal or equitable theory) arising out of or
relating in any way to the sale, condition or performance of the product or this Limited Warranty.
Notice of Dispute. In the event you intend to commence an arbitration proceeding, you must first notify
LG in writing at least 30 days in advance of initiating the arbitration by sending a letter to LGECI Legal
Team at 20 Norelco Drive, North York, Ontario, Canada M9L 2X6 (the “Notice of Dispute”). You and LG
agree to engage in good faith discussions in an attempt to amicably resolve your claim. The notice must
provide your name, address, and telephone number; identify the product that is the subject of the claim;
and describe the nature of the claim and the relief being sought. If you and LG are unable to resolve the
dispute within 30 days of LG’s receipt of the Notice of Dispute, the dispute shall be resolved by binding
arbitration in accordance with the procedure set out herein. You and LG both agree that, during the
arbitration proceeding, the terms (including any amount) of any settlement offer made by either you or LG
will not be disclosed to the arbitrator until the arbitrator determines the dispute.
47
Agreement to Binding Arbitration and Class Action Waiver. Upon failure to resolve the dispute during
the 30 day period after LG’s receipt of the Notice of Dispute, you and LG agree to resolve any claims
between you and LG only by binding arbitration on an individual basis, unless you opt out as provided
below, or you reside in a jurisdiction that prevents full application of this clause in the circumstances of the
claims at issue (in which case if you are a consumer, this clause will only apply if you expressly agree to
the arbitration). To the extent permitted by applicable law, any dispute between you and LG shall not be
combined or consolidated with a dispute involving any other person’s or entity’s product or claim. More
specifically, without limitation of the foregoing, except to the extent such a prohibition is not permitted at
law, any dispute between you and LG shall not under any circumstances proceed as part of a class or
representative action. Instead of arbitration, either party may bring an individual action in small claims
court, but that small claims court action may not be brought on a class or representative basis except to
the extent this prohibition is not permitted at law in your province or territory of jurisdiction as it relates to
the claims at issue between you and LG.
Arbitration Rules and Procedures. To begin arbitration of a claim, either you or LG must make a written
demand for arbitration. The arbitration will be private and confidential, and conducted on a simplified
and expedited basis before a single arbitrator chosen by the parties under the provincial or territorial
commercial arbitration law and rules of the province or territory of your residence. You must also send a
copy of your written demand to LG at LG Electronics, Canada, Inc., Attn: Legal Department- Arbitration,
20 Norelco Drive, North York, Ontario M9L 2X6. This arbitration provision is governed by your applicable
provincial or territorial commercial arbitration legislation. Judgment may be entered on the arbitrator’s
award in any court of competent jurisdiction. All issues are for the arbitrator to decide, except that, issues
relating to the scope and enforceability of the arbitration provision and to the arbitrability of the dispute are
for the court to decide. The arbitrator is bound by the terms of this provision.
Governing Law. The law of the province or territory of your purchase shall govern this Limited Warranty
and any disputes between you and LG except to the extent that such law is preempted by or inconsistent
with applicable federal or provincial/territorial law. Should arbitration not be permitted for any claim, action,
dispute or controversy between you and LG, you and LG attorn to the exclusive jurisdiction of the courts
of the province or territory of your purchase for the resolution of the claim, action, dispute or controversy
between you and LG.
Page 48

LIMITED WARRANTY
48
Fees/Costs. You do not need to pay any fee to begin an arbitration. Upon receipt of your written demand
for arbitration, LG will promptly pay all arbitration filing fees unless you seek more than $25,000 in
damages, in which case the payment of these fees will be governed by the applicable arbitration rules.
Except as otherwise provided for herein, LG will pay all filing, administration and arbitrator fees for any
arbitration initiated in accordance with the applicable arbitration rules and this arbitration provision.
If you prevail in the arbitration, LG will pay your attorneys’ fees and expenses as long as they are
reasonable, by considering factors including, but not limited to, the purchase amount and claim amount.
Notwithstanding the foregoing, if applicable law allows for an award of reasonable attorneys’ fees and
expenses, an arbitrator can award them to the same extent that a court would. If the arbitrator finds either
the substance of your claim or the relief sought in the demand is frivolous or brought for an improper
purpose (as measured by the applicable laws), then the payment of all arbitration fees will be governed
by the applicable arbitration rules. In such a situation, you agree to reimburse LG for all monies previously
disbursed by it that are otherwise your obligation to pay under the applicable arbitration rules. Except as
otherwise provided for, LG waives any rights it may have to seek attorneys’ fees and expenses from you if
LG prevails in the arbitration.
Hearings and Location. If your claim is for $25,000 or less, you may choose to have the arbitration
conducted solely (1) on the basis of documents submitted to the arbitrator, (2) through a telephonic
hearing, or (3) by an in-person hearing as established by the applicable arbitration rules. If your claim
exceeds $25,000, the right to a hearing will be determined by the applicable arbitration rules. Any inperson arbitration hearings will be held at the nearest, most mutually-convenient arbitration location
available within the province or territory in which you reside unless you and LG both agree to another
location or agree to a telephonic arbitration.
Severability and Waiver. If any portion of this Limited Warranty (including these arbitration procedures)
is unenforceable, the remaining provisions will continue in full force and effect to the maximum extent
permitted by applicable law. Should LG fail to enforce strict performance of any provision of this Limited
Warranty (including these arbitration procedures), it does not mean that LG intends to waive or has waived
any provision or part of this Limited Warranty.
Opt Out. You may opt out of this dispute resolution procedure. If you opt out, neither you nor LG can
require the other to participate in an arbitration proceeding. To opt out, you must send notice to LG no later
than 30 calendar days from the date of the first consumer purchaser’s purchase of the product by either (i)
sending an e-mail to optout@lge.com, with the subject line: “Arbitration Opt Out;” or (ii) calling 1-800-980-
2973. You must include in the opt out e-mail or provide by telephone: (a) your name and address; (b) the
date on which the product was purchased; (c) the product model name or model number; and (d) the serial
number (the serial number can be found (i) on the product; or (ii) online by accessing https://www.lg.com/
ca_en/support/repair-service/schedule-repair and clicking on “Find My Model & Serial Number”).
In the event that you “Opt Out”, the law of the province or territory of your residence shall govern this
Limited Warranty and any disputes between you and LG except to the extent that such law is preempted
by or inconsistent with applicable federal or provincial/territorial law. Should arbitration not be permitted for
any claim, action, dispute or controversy between you and LG, you and LG agree to attorn to the exclusive
jurisdiction of the courts of the province or territory of your residence for the resolution of the claim, action,
dispute or controversy between you and LG.
You may only opt out of the dispute resolution procedure in the manner described above (that is, by e-mail
or telephone); no other form of notice will be effective to opt out of this dispute resolution procedure.
Opting out of this dispute resolution procedure will not affect the coverage of the Limited Warranty in any
way, and you will continue to enjoy the full benefits of the Limited Warranty. If you keep this product and do
not opt out, then you accept all terms and conditions of the arbitration provision described above.
Conflict of Terms. In the event of a conflict or inconsistency between the terms of this Limited Warranty
and the End User License Agreement (“EULA”) in regards to dispute resolution, the terms of this Limited
Warranty shall control and govern the rights and obligations of the parties and shall take precedence over
the EULA.
Page 49

MANUAL DEL PROPIETARIO
BODEGA DE VINOS
Lea detenidamente el manual del propietario antes de poner el electrodoméstico en
funcionamiento y consérvelo a mano en todo momento para su referencia.
ESPAÑOL
Copyright © 2019 LG Electronics Inc. Todos los derechos reservados
www.lg.com
Page 50

TABLA DE CONTENIDOS
2
3 INSTRUCCIONES DE
SEGURIDAD
3 INSTRUCCIONES IMPORTANTES DE
SEGURIDAD
8 DESCRIPCIÓN GENERAL DEL
PRODUCTO
8 Características del Producto
8 Exterior
9 Interior
11 INSTALACIÓN
11 Descripción general de la instalación
11 Desempacando el refrigerador
12 Elección de la ubicación adecuada
13 Dimensiones y Espacios
14 Nivelando
14 Encendido
15 FUNCIONAMIENTO
35 SOLUCIÓN DE PROBLEMAS
35 Preguntas frecuentes
36 Antes de llamar al servicio técnico
42 GARANTÍA LIMITADA
42 PARA EE. UU.
45 PARA CANADÁ
15 Antes de Usar
16 Panel de control
19 Modo Sabbath
20 Conservación del vino
21 Rejillas de almacenamiento
24 Puerta InstaView
24 Almacenando Alimentos
26 Dispositivo de elevación automática
28 FUNCIONES INTELIGENTES
28 Aplicación LG ThinQ
30 Uso del asistente de voz
32 Función Smart Diagnosis™
33 MANTENIMIENTO
33 Limpieza
34 Filtro de Aire
Page 51

INSTRUCCIONES DE SEGURIDAD
ESPAÑOL
INSTRUCCIONES DE SEGURIDAD
LEA TODAS LAS INSTRUCCIONES ANTES DE UTILIZAR
Su seguridad y la de los demás son muy importantes.
Tanto en este manual como en el equipo, hemos proporcionado muchos mensajes de seguridad
importantes. Siempre debe leer y respetar todos los mensajes de seguridad.
Este es el símbolo de alerta de seguridad.
Este símbolo le advierte sobre posibles riesgos que pueden ocasionar lesiones o la muerte a
usted o a otros.
El símbolo de alerta de seguridad siempre estará acompañado de las palabras "ADVERTENCIA"
o "PRECAUCIÓN" y seguido de un mensaje de seguridad importante. Estos términos significan lo
siguiente:
ADVERTENCIA
Podría sufrir lesiones graves o la muerte si no sigue las instrucciones.
3
PRECAUCIÓN
Puede resultar lesionado o causar daño al producto si no sigue las instrucciones.
Todos los mensajes de seguridad le indicarán cuál es el riesgo potencial, le indicarán cómo reducir la
probabilidad de lesiones y le proporcionarán información sobre qué podría suceder si no se siguen las
instrucciones.
INSTRUCCIONES IMPORTANTES DE SEGURIDAD
ADVERTENCIA
Para disminuir el riesgo de explosiones, incendios, descargas eléctricas, quemaduras,
lesiones o muerte para las personas que usen este artefacto, siga las precauciones básicas,
incluidas las siguientes:
INSTALACIÓN
• Para reducir el riesgo de lesiones personales, respete todos los procedimientos de seguridad recomendados
por la industria, incluso el uso de guantes de manga larga y gafas de seguridad.
• Nunca intente operar este artefacto si se encuentra dañado, si no funciona correctamente, si no está
ensamblado por completo o si tiene piezas faltantes o rotas, incluido un cable o enchufe dañado.
• Conecte este producto únicamente a un tomacorriente dedicado, conectado a tierra, apto para usar con este
producto (115 voltios, 60 Hz, solo CA). El usuario tiene la responsabilidad de reemplazar un tomacorriente de
pared estándar de 2 tomas por un tomacorriente de pared estándar de 3 tomas.
• No use un tomacorriente que pueda apagarse con un interruptor. No use un cable de extensión.
Page 52

INSTRUCCIONES DE SEGURIDAD
4
• Posicione el electrodoméstico de un modo que le permita acceder fácilmente a la alimentación eléctrica.
• Al mover el electrodoméstico, tenga cuidado de no torcer ni dañar el cable de alimentación.
• Póngase en contacto con un centro de servicio autorizado antes de instalar o cambiar de lugar el
electrodoméstico.
• Por ninguna razón debe cortar o quitar la tercera clavija (tierra) del cable de alimentación.
• Mantenga los materiales de empaque fuera del alcance de los niños. Los materiales de empaque pueden ser
peligrosos para los niños. Corren riesgo de asfixia.
• No instale el electrodoméstico en un lugar húmedo o polvoriento, donde el aislamiento de las piezas
eléctricas podría deteriorarse.
• No coloque el electrodoméstico bajo la luz solar directa ni lo exponga a electrodomésticos que emitan calor,
como cocinas o calefactores.
• No doble ni pellizque en exceso el cable de alimentación, ni coloque objetos pesados sobre este.
FUNCIONAMIENTO
• No use este electrodoméstico para fines especiales, como para conservar medicamentos o materiales de
ensayo, usar en barcos, etc.
• NO permita que los niños entren y se paren o se cuelguen de las puertas o los estantes del electrodoméstico.
Podrían dañar el refrigerador o sufrir lesiones graves.
• No permita que los niños entren al electrodoméstico. Podrían quedar atrapados y sofocarse.
• Debe supervisar a los niños para asegurarse de que no jueguen con el electrodoméstico.
• Mantenga los dedos lejos de los puntos de riesgo de pinzamiento; las distancias de separación entre las
puertas y los gabinetes son necesariamente pequeñas. Tenga cuidado al cerrar las puertas cuando haya
niños cerca.
• No toque los alimentos congelados ni las partes metálicas del compartimento del congelador si tiene las
manos mojadas o húmedas. Hacerlo podría causar congelación.
• No vuelva a congelar alimentos congelados que se hayan descongelado por completo. Esto podría ser
peligroso para su salud.
• No use adaptadores ni enchufe el cable de alimentación en un alargador de múltiples tomacorrientes.
• No use un cable que tenga grietas o daño de abrasión en su longitud o en algún extremo del enchufe o
conector. Haga que personal de servicio calificado repare inmediatamente todo cable de energía que esté
gastado o dañado de alguna manera.
• No use el refrigerador ni toque el cable de alimentación con las manos mojadas.
• No modifique ni extienda el cable de alimentación.
• No use un tomacorriente que no esté certificado. No enchufe el electrodoméstico en un tomacorriente de
pared dañado.
• No coloque las manos, los pies u otros objetos en la ventilación de aire ni en la parte inferior del refrigerador.
Si lo hace, podría sufrir lesiones personales o descargas eléctricas.
• Si se produce una fuga de gas (propano/GPL), asegúrese de que el área esté adecuadamente ventilada y
póngase en contacto con un centro de servicio autorizado antes de volver a usar el refrigerador. No toque ni
desarme el electrodoméstico ni el cable de alimentación del electrodoméstico.
• Ante la presencia de ruidos u olores extraños, o si sale humo del electrodoméstico, desconecte el cable de
alimentación de inmediato y póngase en contacto con un centro de servicio autorizado.
• No use fusibles (como cobre, alambre de acero, etc.) que no sean los fusibles estándar.
• No coloque ni use un aparato eléctrico dentro del electrodoméstico, a menos que sea de un tipo
recomendado por el fabricante.
Page 53

INSTRUCCIONES DE SEGURIDAD
ESPAÑOL
• No introduzca animales con vida dentro del electrodoméstico.
• No coloque objetos pesados o frágiles, contenedores llenos de líquido, sustancias combustibles u objetos
inflamables (como velas y lámparas) sobre el electrodoméstico.
• Si se conecta a un circuito protegido con fusibles, utilice un fusible de retardo.
• No almacene sustancias explosivas como latas de aerosol con propulsores inflamables en este
electrodoméstico.
• Mantenga las aperturas de ventilación, en la cubierta del electrodoméstico o en la estructura incorporada,
despejadas de obstrucciones.
• No utilice dispositivos mecánicos u otros medios para acelerar el proceso de descongelado, con excepción
de aquellos recomendados por el fabricante.
• No dañe el circuito refrigerante.
• No utilice aparatos eléctricos dentro de los compartimientos de almacenaje de alimentos del
electrodoméstico, a menos que sean de un tipo recomendado por el fabricante.
• El gas refrigerante y de aislamiento usado en el electrodoméstico requiere procedimientos de desechado
especiales. Al desechar, por favor consulte con un agente de servicio o persona similarmente calificada.
5
Función de elevación automática
• Si, en su hogar, hay niños o personas con capacidades físicas, sensoriales o mentales reducidas o con falta
de experiencia y conocimiento, desactive la función de elevación automática en el panel de control para
evitar el riesgo de lesiones al usar el Auto Drawer (cajón automático).
• No permita que los niños jueguen con el compartimento interno del cajón ni que se paren en su interior.
• No utilice la función de elevación automática mientras pliega la cubierta trasera del cajón.
• No meta las manos en las zonas abiertas de los laterales o de la parte trasera del cajón cuando esté abierto.
• Mantenga los pies alejados del cajón inferior cuando utilice la función de apertura automática.
• Desconecte el refrigerador antes de limpiar el compartimento del cajón inferior.
• El dispositivo de elevación automática es pesado; retírelo con las dos manos.
• No libere la perilla de bloqueo del dispositivo de elevación automática. El dispositivo podría activarse,
desplegarse y dañarse.
MANTENIMIENTO
• No use secadoras eléctricas para secar el interior del producto.
• No prenda velas para remover el olor interno del producto.
• En el caso de fuga del refrigerante, aleje los objetos inflamables del refrigerador. Asegúrese de que el área
esté bien ventilada y póngase en contacto con un centro de servicio autorizado.
• Mantenga materiales inflamables y vapores, como gasolina, alejados del refrigerador.
• Los niños mayores de 8 años y las personas con capacidades físicas, sensoriales o mentales reducidas,
o sin experiencia o conocimientos pueden usar este electrodoméstico, si cuentan con la supervisión o la
instrucción necesarias sobre el uso seguro del electrodoméstico y comprenden los riesgos involucrados. Los
niños no deben jugar con el electrodoméstico. Los niños que no estén supervisados no deben realizar la
limpieza ni el mantenimiento del producto.
• Desenchufe el cable de alimentación antes de limpiar o reparar el electrodoméstico.
• Las luces del compartimiento del refrigerador son LED para interiores, y únicamente personal técnico
calificado debe darles servicio.
Page 54

INSTRUCCIONES DE SEGURIDAD
6
• En caso de apagón o tormenta eléctrica, desenchufe el cable de alimentación de inmediato.
• Apague la alimentación si ingresa agua o polvo en el electrodoméstico. Llame a un agente de servicio.
• No almacene contenedores de vidrio ni refrescos en el compartimento del congelador. Al congelarse, los
contenidos pueden expandirse, romper el contenedor y provocar lesiones.
• No almacene, desarme ni repare el electrodoméstico usted mismo ni permita que el personal no calificado lo
haga.
• No utilice ni ubique sustancias inflamables (químicos, medicamentos, cosméticos, etc.) cerca del
refrigerador; tampoco los almacene dentro del refrigerador. No sitúe el refrigerador cerca de una fuente de
gas inflamable.
ELIMINACIÓN
• Los electrodomésticos desechados o abandonados son peligrosos, incluso si se dejan de usar solo por unos
pocos días. Al momento de desechar el refrigerador, retire los materiales de embalaje de la puerta o quite las
puertas, pero deje los estantes en su lugar, a fin de que los niños no puedan ingresar fácilmente a este.
• Si desechara un refrigerador, asegúrese de retirar el refrigerante para que un miembro calificado del personal
de servicio lo deseche correctamente. Si usted libera el refrigerante, podría ser multado o encarcelado de
conformidad con la ley ambiental vigente.
INSTRUCCIONES DE CONEXIÓN A TIERRA
• La conexión inadecuada del conductor de conexión a tierra puede resultar en riesgo de choque eléctrico.
Pregunte a un electricista calificado o al personal de servicio si no está seguro si el artefacto está
adecuadamente conectado a tierra. No modifique el enchufe que viene con el artefacto. Si no cabe en el
contacto, pida que un electricista calificado instale un contacto apropiado.
• Haga que un técnico certificado verifique que el tomacorriente de pared y los cables estén adecuadamente
conectados a tierra.
• Nunca tire del cable de alimentación para desenchufar el electrodoméstico. Agarre siempre el enchufe
firmemente y tire del mismo para retirarlo del tomacorriente. Si no hace esto, podría dañar el cable de
alimentación y generar un riesgo de incendio y descarga eléctrica.
PRECAUCIÓN
Para reducir el riesgo de lesiones leves o moderadas a personas, el mal funcionamiento o
daño al producto o propiedad cuando use este producto, siga las precauciones básicas,
incluido lo siguiente:
INSTALACIÓN
• No coloque el electrodoméstico en un lugar donde podría caerse.
• El refrigerador debe instalarse correctamente, teniendo en cuenta las instrucciones de instalación.
Page 55

INSTRUCCIONES DE SEGURIDAD
ESPAÑOL
7
FUNCIONAMIENTO
• No use aerosoles cerca del electrodoméstico.
• Este refrigerador está destinado únicamente a usos domésticos y similares.
• No golpee ni aplique demasiada fuerza en las superficies de vidrio. No toque las superficies de vidrio si están
agrietadas o rotas.
• No llene ni envase en exceso los alimentos en los compartimentos de la puerta. Esto podría dañar el
compartimento o provocar lesiones personales al retirar los alimentos aplicando una fuerza excesiva.
• No llene demasiado el electrodoméstico con alimento. Si lo hace, puede causar lesión personal o daño a la
propiedad.
Almacenamiento de vinos
• Abra los estantes para vinos con suavidad. Si lo hace de manera brusca, podrían caerse las botellas.
• Guarde únicamente botellas de vino en el compartimento para vinos. La temperatura del compartimento es
demasiado alta para conservar alimentos refrigerados de manera segura.
MANTENIMIENTO
• No use detergentes fuertes como cera o diluyentes para la limpieza. Limpie con un trapo suave.
• Retire los objetos extraños (como polvo y agua) de las clavijas del enchufe y las áreas de contacto. No use
un trapo mojado o húmedo para limpiar el enchufe.
• No rocíe agua directamente en el interior o exterior del electrodoméstico.
• Cuando estén fríos, no limpie los estantes de vidrio ni las tapas con agua caliente. Si se exponen a cambios
de temperatura repentinos, podrían romperse.
Este electrodoméstico contiene una pequeña cantidad de refrigerante isobutano (R600a), que es
combustible. Al transportar e instalar el electrodoméstico, debe prestar atención para asegurar
que ninguna parte del circuito refrigerante se dañe. Fuga del refrigerante fuera de las pipas podría
generar un incendio o causar una lesión ocular. Si se detecta una fuga, evite cualquier llama
descubierta o fuentes potenciales de incendio, y ventile el ambiente en el que se encuentra el
electrodoméstico por varios minutos.
A manera de evitar la creación de una mezcla de gas y aire inflamable en caso ocurra una fuga
en el circuito refrigerante, el tamaño del ambiente en el que el electrodoméstico se ubica deberá
corresponder a la cantidad de refrigerante usada. El espacio debe ser de 10.8 pies cuadrados (1
metro cuadrado) por cada 8g de refrigerante R600a dentro del electrodoméstico. La cantidad de
refrigerante en su electrodoméstico particular se muestra en la placa de identificación ubicada
dentro del mismo. Nunca inicie un electrodoméstico mientras este muestre algún signo defectuoso.
En caso de dudas, consulte con su distribuidor.
GUARDE ESTAS INSTRUCCIONES
Page 56

DESCRIPCIÓN GENERAL DEL PRODUCTO
8
DESCRIPCIÓN GENERAL DEL PRODUCTO
Características del Producto
Las ilustraciones en esta guía pueden diferir de los componentes y accesorios reales, los cuales están sujetos a
cambios sin previo aviso por parte del fabricante a fin de introducir mejoras en el producto.
Exterior
a
Dispositivo de Asistencia de Voz
La puerta tiene instalado un dispositivo de asistencia de voz.
b
Puerta InstaView
El elegante panel de vidrio polarizado se ilumina con dos golpecitos rápidos, lo que permite ver el interior
del compartimento de acceso fácil sin necesidad de abrir la puerta.
c
Panel de control
Muestra los controles de temperatura del vino, el refrigerador y el congelador.
d
Botón del cajón extraíble inferior
Al presionar el botón, se abre el cajón inferior de forma automática, y el compartimento interior se eleva
para permitir un acceso conveniente.
e
Sensores de apertura automática de la puerta
Párese lo suficientemente cerca delante del electrodoméstico, y verá la frase DOOR OPEN en el suelo.
Pase el pie sobre las palabras proyectadas en el suelo para abrir de forma automática la puerta del
compartimento para vinos.
Page 57

ESPAÑOL
Interior
DESCRIPCIÓN GENERAL DEL PRODUCTO
9
a
Filtro fresco
Esto reduce los olores dentro del compartimento para vinos.
b
Zona superior
Almacena botellas de vino tinto.
c
Rejilla de almacenamiento
Almacena las botellas de vino acostadas para una mejor conservación a largo plazo.
d
Divisor de zonas
Ayuda a mantener las zonas de diferente temperatura separadas.
e
Zona inferior
Almacena botellas de vino blanco y de champaña.
f
Cajón para champaña
Almacena botellas de champaña. Antes de introducir las botellas, active la función de champaña en el
panel de control.
g
Divisor Durabase
Provee almacenaje para productos alimenticios de gran tamaño.
Page 58

DESCRIPCIÓN GENERAL DEL PRODUCTO
10
h
Cajón central/inferior
Los dos cajones pueden configurarse en modo de refrigerador o de congelador. Se debe seleccionar el
mismo modo para ambos cajones.
• Para almacenar alimentos frescos, presione el botón Refrigerator Drawer durante al menos
1 segundo.
• Para almacenar alimentos congelados, presione el botón Freezer Drawer durante al menos 1 segundo.
PRECAUCIÓN
• Vacíe ambos cajones antes de cambiar el modo de congelador a refrigerador, o viceversa.
• Si se cambia el modo con alimentos dentro del cajón, estos podrían echarse a perder.
i
Compartimento interno
Se levanta durante la operación de elevación automática.
ESPECIFICACIONES DEL PRODUCTO
La apariencia y las especificaciones detalladas en este manual podrían variar debido a mejoras constantes en
el producto.
Requerimientos Eléctricos: 115 V, 60 Hz
Modelo URETC1408N
Descripción Bodega de vinos
Peso neto 386 lb (175 kg)
Page 59

INSTALACIÓN
ESPAÑOL
INSTALACIÓN
Descripción general de la instalación
Lea las siguientes instrucciones de instalación inmediatamente después de adquirir este producto o
transportarlo a otra ubicación.
11
Desempacando el
refrigerador
Elección de la ubicación
adecuada
Desempacando el
refrigerador
ADVERTENCIA
• Utilice a dos o más personas para mover e
instalar el refrigerador. Si no lo hace, puede
resultar en lesiones en la espalda o de otro
tipo.
• El refrigerador es pesado. Proteja el piso al
mover el refrigerador para limpieza o servicio.
Siempre empuje el refrigerador hacia afuera al
moverlo. No menee o sacuda el refrigerador al
intentar moverlo pues puede dañar el piso.
• Mantenga materiales inflamables y vapores,
como gasolina, alejados del refrigerador. Si no
lo hace puede provocar un incendio, explosión
o muerte.
Nivelando y Alineando la
Puerta
• Para remover cualquier cinta adhesiva o goma
restante frote enérgicamente el área con su pulgar.
La cinta adhesiva o residuos de goma pueden
ser fácilmente removidos frotando una pequeña
cantidad de jabón líquido para platos con sus
dedos. Limpie con agua caliente y seque.
• No utilice instrumentos puntiagudos, alcohol
para frotar, fluidos inflamables o limpiadores
abrasivos para remover cinta adhesiva o goma.
Estos productos pueden dañar la superficie de su
refrigerador.
• Reinstale o ajuste lo estantes como sea necesario.
Los estantes del refrigerador están instalados en
su posición de embarque. Reinstale los estantes
de acuerdo a sus necesidades de almacenamiento
individuales.
NOTA
• Remueva la tapa y cualquier etiqueta temporal
de su refrigerador previo a su uso. No remueva
ninguna etiqueta de precaución, modelo y número
de serie, o la Hoja Técnica que se encuentra bajo
la parte frontal del refrigerador.
Page 60

INSTALACIÓN
12
Elección de la ubicación
adecuada
Electricidad
Utilice un enchufe con conexión a tierra individual:
115 Volts, 60 Hz, AC Amps mínimo.
ADVERTENCIA
• No sobrecarge el cableado del hogar causando
peligro de incendio al conectar múltiples
electrodomésticos en el mismo enchufe del
refrigerador.
• Para reducir el riesgo de descarga eléctrica,
no instale el refrigerador en un área húmeda ni
mojada.
Suelo
Para evitar ruido y vibración, la unidad debe
ser instalada y nivelada en un piso sólidamente
construido. De ser necesario, ajuste el nivel de las
patas para compensar la irregularidad del piso.
NOTA
• No es recomendable la instalación sobre
alfombrado, baldosas suaves o estructuras
débilmente apoyadas.
Temperatura ambiente
Instale este electrodoméstico en un área donde la
temperatura esté entre 50 °F (10 °C) y 95 °F (35 °C).
Si la temperatura alrededor del electrodoméstico es
muy baja o alta, la capacidad de enfriamiento puede
ser afectada negativamente.
Page 61

INSTALACIÓN
ESPAÑOL
13
Dimensiones y Espacios
• Revise las dimensiones del electrodoméstico y el proceso de instalación para asegurar que haya suficiente
espacio para mover el refrigerador a través de puertas o aperturas angostas.
• La ubicación de instalación elegida para el refrigerador debería considerar espacio en la parte trasera de la
unidad para conexiones, circulación de aire y espacio en el frente para abrir las puertas.
• Colocar el electrodoméstico demasiado cerca de elementos adyacentes puede disminuir la capacidad de
refrigeración y aumentar el consumo de energía.
B
A
C
D
E
F
G
H
- Lista URETC1408N
A Profundidad 28 15/16” (735 mm)
B Ancho 27 9/16” (700 mm)
C Altura a la Punta de la Caja 69 1/16” (1753 mm)
D Altura a la Punta de la Bisagra 70 5/8” (1793 mm)
E Espacio Trasero 2" (50 mm)
F Profundidad sin Puerta 24 15/16” (633 mm)
G Profundidad (Total con Puerta Abierta 90°) 53 3/16” (1350 mm)
H Espacio Frontal 25 5/8” (727 mm)
Page 62

INSTALACIÓN
14
Nivelando
El refrigerador cuenta con dos patas niveladoras
frontales. Ajuste las patas para modificar la
inclinación desde adelante hacia atrás o de un lado al
otro. Si el equipo se ve inestable o la puerta no cierra
bien, ajuste la inclinación del refrigerador siguiendo
las instrucciones a continuación:
Abra el cajón inferior y retire la cubierta del
1
electrodoméstico.
Gire la pata de nivelación hacia la izquierda
2
para levantar ese lado del refrigerador o hacia
la derecha para bajarlo. Puede ser necesario
nivelar las patas varias veces para ajustar la
inclinación del refrigerador.
Abra la puerta y los cajones, y verifique que
3
cierren sin inconvenientes. De no ser así, incline
el refrigerador un poco más hacia atrás girando
ambas patas hacia la izquierda. Es posible que
deba girar las patas varias veces; asegúrese de
girar ambas en la misma proporción.
Cuando el refrigerador esté nivelado, abra el
4
cajón inferior y vuelva a instalar la cubierta.
Encendido
• Luego de la instalación, conecte el cable de
corriente a un enchufe con conexión a tierra de tres
espigas y empuje el refrigerador a su posición final.
PRECAUCIÓN
• Conecte a un enchufe de potencia nominal.
• Haga que un técnico certificado verifique que
el tomacorriente de pared y los cables estén
adecuadamente conectados a tierra.
• No dañe o corte la terminal de tierra del enchufe
de poder.
Posicione el Refrigerador
• Coloque el refrigerador para que no vibre contra
las superficies adyacentes ni contra la pared.
Asegúrese de mantener un espacio de al menos
2” detrás del refrigerador para una ventilación
adecuada.
Page 63

ESPAÑOL
FUNCIONAMIENTO
Antes de Usar
Limpie el refrigerador.
Limpie el refrigerador intensivamente y sacuda todo el polvo acumulado durante el
envío.
FUNCIONAMIENTO
15
PRECAUCIÓN
• No raye el refrigerador con objetos puntiagudos ni use detergente que
contenga alcohol, líquidos inflamables o abrasivos al remover cualquier cinta
o adhesivo del mismo. Remueva los residuos de adhesivos borrándolos con
su pulgar o detergente para platos.
• No despegue la etiqueta de número de serie, modelo o información técnica
del panel trasero del refrigerador.
Abra las puertas del refrigerador para ventilar el interior.
El interior del refrigerador puede oler a plástico al inicio. Remueva toda cinta
adhesiva del interior del refrigerador y abra las puertas del refrigerador para
ventilación.
Espere a que el refrigerador enfríe.
Permita que el refrigerador funcione por al menos dos o tres horas previo a colocar
alimentos en él. Verifique el flujo de aire frío en el compartimento del congelador
para asegurar el enfriado adecuado.
PRECAUCIÓN
• Si coloca alimentos en el refrigerador previo a que este haya enfriado puede
causar que los alimentos se echen a perder o que un mal olor permanezca
en su interior.
El refrigerador hace un sonido fuerte luego de la operación inicial.
Esto es normal. El volumen disminuirá conforme la temperatura baje.
Page 64

INSTALACIÓN
16
Panel de control
El panel de control podrá variar entre modelo y modelo.
Funciones del panel de control
a
Voice Assistant
Cambia los ajustes del asistente de voz.
Este botón le permite al electrodoméstico
conectarse a una red Wi-Fi doméstica. Vea
SMART FUNCTIONS para obtener más
información acerca de la configuración inicial
de la aplicación LG ThinQ.
Uso de la función de puerta automática
Cuando la función de apertura automática
1
de la puerta está activada, se proyecta
una frase en el suelo, cerca del sensor de
movimiento.
b
Wi-Fi
Cuando se utiliza con la aplicación LG ThinQ,
el botón Wi-Fi permite conectar el refrigerador
a una red Wi-Fi doméstica. Consulte la sección
Funciones inteligentes para obtener más
información sobre la configuración inicial de la
aplicación.
El ícono muestra el estado de la conexión de
red del refrigerador. El ícono se ilumina cuando
el refrigerador está conectado a la red Wi-Fi.
Presione y mantenga presionado el botón
Wi-Fi por 3 segundos para conectar a la red.
El ícono parpadea mientras la conexión está
en proceso, luego se enciende cuando se ha
logrado exitosamente.
c
Auto Door
La puerta del compartimento para vinos se
abre de forma automática al acercar un pie al
sensor de movimiento que se encuentra en la
parte inferior de la puerta. Esto resulta práctico
cuando desea abrir la puerta del compartimento
para vinos y tiene las manos ocupadas. Para
configurar la función de apertura automática,
presione el botón varias veces para seleccionar
entre los ajustes ON, Sound Off y OFF.
Pase el pie por adelante del sensor
2
de movimiento y párese sobre el texto
proyectado. Se abrirá la puerta del
compartimento para vinos. Si la puerta se
abre menos de unos 20 grados y no se
abre más, se cerrará automáticamente
después de 3 segundos.
NOTA
Coloque el pie lo suficientemente cerca del
sensor de modo tal que el texto se proyecte
en la parte superior del pie, y no solo sobre los
dedos.
Page 65

ESPAÑOL
PRECAUCIÓN
Es posible que quiera desactivar la función
de apertura automática de la puerta si
hay niños pequeños o personas con
capacidades físicas, sensoriales o mentales
limitadas en su hogar. Estos podrían
lastimarse si la puerta se abre de forma
inesperada cuando están cerca.
NOTA
• El texto proyectado no será legible sobre
suelos de ciertos materiales, pero esto
no afecta el rendimiento de la función de
apertura automática de la puerta.
• Si el material del suelo es muy reflectante
(metal o vidrio), es posible que el sensor de
movimiento falle y que la función de apertura
automática de la puerta no funcione bien.
• Los objetos reflectantes que se encuentren
delante del sensor de movimiento pueden
activar la proyección del texto, pero este
desaparecerá si no se detecta movimiento.
• La función de apertura automática de la
puerta podría activarse si una mascota pasa
mientras una persona está parada frente al
producto.
d
Wine Upper
Indica la temperatura establecida para la zona
superior en grados Celsius (°C) o Fahrenheit
(°F).
La temperatura predeterminada es de 55 °F
(13 °C). Presione repetidamente el botón Wine
Upper para seleccionar una nueva temperatura
entre 52 °F y 64 °F (11 °C y 18 °C).
INSTALACIÓN
f
Champagne
Presione el botón Champagne varias veces
para activar y para desactivar esta función.
Esta función viene desactivada por defecto.
NOTA
• Si desactiva esta función, la temperatura
del interior del cajón para champaña se
mantendrá igual que la temperatura del
compartimento para vinos inferior.
g
Lock
La función de bloqueo deshabilita todos los
demás botones en la pantalla.
• Cuando la energía es inicialmente conectada
al refrigerador, la función de bloqueo está
desactivada.
• Para bloquear los botones del panel de
control, mantenga presionado el botón Lock
hasta que aparezca el ícono en la pantalla y
se desactive la función.
• Para desactivar esta función, mantenga
presionado el botón Lock por
aproximadamente tres segundos.
h
Express Freeze
Esta función incrementa las capacidades del
congelador.
• Para activarla, mantenga presionado el botón
Express Freeze hasta que se enciendan las
luces LED en el panel de control.
• La función opera durante alrededor de 24
horas, luego se apaga automáticamente.
• Detenga la función manualmente
manteniendo el botón presionado.
17
e
Wine Lower
Indica la temperatura establecida para la zona
inferior en grados Celsius (°C) o Fahrenheit
(°F).
La temperatura predeterminada es de 46 °F
(8 °C). Presione repetidamente el botón Wine
Lower para seleccionar una nueva temperatura
entre 41 °F y 52 °F (5 °C y 11 °C).
Page 66

INSTALACIÓN
18
i
Auto Lift
Cuando la función Auto Lift está activada, al
presionar el botón del cajón extraíble inferior,
se abre el cajón y se eleva el compartimento
interno que permite un acceso cómodo.
Presione nuevamente el botón del cajón
extraíble inferior para bajar el compartimento
interno de forma automática y cerrar el cajón.
Configuración de la función de elevación
automática
Presione el botón Auto Lift varias veces para
seleccionar una de las siguientes opciones: Off
~ Sound On ~ Sound Off ~ Auto Drawer
Opening Only.
La configuración seleccionada se indica con el
ícono en la pantalla.
− Off: el cajón debe abrirse de forma manual
y se desactiva la función de elevación
automática.
− Sound On: se oye un sonido, el cajón se
abre de forma automática y se eleva el
compartimento interno.
− Sound Off: el cajón se abre de forma
automática sin sonido y se eleva el
compartimento interno.
• Cuando el sensor de puerta automática
a detecta movimiento delante del
refrigerador, el botón del cajón extraíble
inferior b se ilumina. Si no se ilumina el
botón, acérquese más al refrigerador para
activar el sensor.
Presione el botón del cajón extraíble
3
inferior b para bajar el compartimento
interno de forma automática y cerrar el
cajón.
NOTA
• Cuando se desactiva la función de elevación
automática en el panel de control:
− Pararse delante del refrigerador no hará
que se encienda la luz del botón del cajón
extraíble inferior.
− Auto Drawer Opening Only: el cajón se
abre de forma automática sin sonido, pero
el compartimento interno no se eleva.
Uso de la función de elevación automática
Presione el botón Auto Lift para activar la
1
función de elevación automática.
Presione el botón del cajón extraíble
2
inferior b. El cajón inferior se abre
de forma automática y se eleva el
compartimento interno.
− Cuando se presiona el botón del cajón
extraíble inferior, la luz parpadea 3 veces.
• Cuando se activa la función de elevación
automática en el panel de control:
− Si, al presionar el botón del cajón extraíble
inferior, no se cierra el cajón inferior, abra
el cajón central o cierre el cajón inferior
manualmente.
− Si, al presionar el botón del cajón extraíble
inferior, no se abre el cajón inferior, abrir el
cajón manualmente hará que se eleve el
compartimento interno.
− La función de elevación automática no
funciona si el cajón central está abierto.
j
Freezer Drawer
Indica la temperatura configurada de los
cajones en grados Celsius (°C) o Fahrenheit
(°F). La temperatura predeterminada del modo
de congelador es 0 °F (−18 °C). Presione
repetidamente el botón Freezer Drawer para
seleccionar una temperatura nueva entre los
−7 °F y 5 °F (−23 °C y −15 °C).
Page 67

INSTALACIÓN
ESPAÑOL
19
Configuración de los cajones en modo
congelador
Para configurar los cajones en modo
congelador, mantenga presionado el
botón Freezer Drawer durante 1 segundo
aproximadamente.
k
Refrigerator Drawer
Indica la temperatura configurada de los
cajones en grados Celsius (°C) o Fahrenheit
(°F). La temperatura predeterminada del
modo refrigerador es 37 °F (3 °C). Presione
repetidamente el botón Refrigerator Drawer
para seleccionar una temperatura nueva entre
los 33 °F y 43 °F (1 °C y 7 °C).
Configuración de los cajones en modo
refrigerador
Para configurar los cajones en modo
refrigerador, mantenga presionado el botón
Refrigerator Drawer durante 1 segundo
aproximadamente.
NOTA
• La temperatura indicada es la temperatura
establecida, no la temperatura real del
refrigerador. La temperatura real depende de
los alimentos que se encuentren dentro del
refrigerador.
l
Humidity
Presione el botón Humidity para aumentar
el nivel de humedad en todas las zonas de
temperatura.
m
Air Filter
Reemplace el filtro de aire cuando se ilumine
el ícono. Luego de reemplazar el filtro de aire,
mantenga presionado el botón Air Filter por
tres segundos para apagar la luz del ícono.
Reemplace el filtro de aire cada seis meses
aproximadamente.
NOTA
Modo de Visualización (Únicamente Para Uso de
Tiendas)
• El Modo de Visualización deshabilita toda
refrigeración en las secciones del refrigerador y
congelador para conservar energía mientras se
exhibe en una tienda minorista. Cuando se activa,
Demo Mode se muestra en el panel de control por
5 segundos.
Para desactivar / activar:-
− Con cualquier puerta del refrigerador abierta,
presione el botón Express Freeze 3 veces
de manera consecutiva mientras presiona
el botón Refrigerator Drawer. El panel de
control emite un pitido y la configuración de la
temperatura muestra la confirmación de que el
Modo de Exhibición está desactivado. Use el
mismo procedimiento para activar el Modo de
Exhibición.
Modo Sabbath
Modo Sabbath
El modo Sabbath es utilizado en el Sabbat y las
festividades Judías.
Para activar el modo Sabbath, cierre todas las
1
puerta o los cajones.
Toque la pantalla para activarla, y luego
2
mantenga presionados los botones Wi-Fi y
Freezer Drawer durante 3 segundos, hasta que
se enciendan ambas LED.
PRECAUCIÓN
• Si abre el cajón inferior cuando el refrigerador
está pasando del modo Sabbath al modo de
funcionamiento normal, el cajón inferior se
cerrará de forma automática.
NOTA
• El modo Sabbath se desactiva automáticamente
después de 96 horas.
• Para desactivar el modo Sabbath de forma manual,
mantenga presionados los botones Wi-Fi y Freezer
Drawer durante 3 segundos.
• Una vez encendido, el modo Sabbath se mantendrá
activo incluso si ocurre un apagón.
• Al seleccionar el modo Sabbath, se desactivan
de forma automática las funciones de alarma,
elevación automática, puerta InstaView y apertura
automática de la puerta.
• Es posible que oiga un chasquido cuando el
refrigerador regrese del modo Sabbath al modo
de funcionamiento normal. Es normal que se
oiga un chasquido durante la verificación de
funcionamiento.
• Puede activar o desactivar el modo Sabbath y
configurar la programación para la activación del
modo a través de la aplicación LG ThinQ. Antes de
activar este modo, cierre la puerta y los cajones.
Page 68

INSTALACIÓN
20
Conservación del vino
PRECAUCIÓN
• No llene en exceso, ni almacene artículos
demasiado cerca en las rejillas de
almacenamiento. Esto podría dañar la rejilla
o provocar lesiones personales al retirar los
productos aplicando fuerza excesiva.
NOTA
• Si se va de su hogar por un período breve, como
unas vacaciones cortas, el refrigerador debe
dejarse encendido.
• Si va a dejar el refrigerador apagado por un
período prolongado, retire todo el contenido
y desconecte la corriente eléctrica. Limpie el
interior y deje la puerta y los cajones abiertos para
prevenir la formación de hongos en el refrigerador.
• Si el refrigerador se mantiene en un lugar caliente
y húmedo, abrir frecuentemente la puerta podría
causar la formación de condensación. Limpie la
condensación con un paño limpio o una toalla de
papel.
• Si la puerta del refrigerador se abre o cierra
con demasiada frecuencia, aire caliente podría
ingresar y elevar así su temperatura. Esto podría
elevar los gastos de funcionamiento de la unidad y
reducir el período de conservación de los vinos.
• No instale el refrigerador de vinos cerca de fuentes
de calor o donde quede expuesto a luz solar
directa.
De 41 °F a 45 °F (de 6 °C a 10 °C) — Vinos
espumosos y Champagne sin añada
Cava, Asti, Prosecco, Sekt
De 43 °F a 46 °F (de 6 ˚C a 8 ˚C) — Vinos blancos
dulces
De 45 °F a 50 °F (de 7 ˚C a 10 ˚C) — Champagne
con añada, vinos rosados y blancos ligeros
Moscatel; Rosé, Riesling, Pinot Grigio, Sauvignon
Blanc, Semillón
De 50 °F a 55 °F (de 10 ˚C a 13 ˚C) — Vinos
blancos robustos y vinos tintos ligeros
Chardonnay, Viognier, Borgoña blanco, Chablis,
Pinot Noir, Beaujolais, Barbera, Grenache
De 54 °F a 61 °F (de 12 ˚C a 16 ˚C): Oporto
De 58 °F a 64 °F (de 15 ˚C a 18 ˚C) — Vinos tintos
robustos o medianos, tintos añejos
Zinfandel, Chianti, Borgoña tinto, Cabernet
Sauvignon, Merlot, Malbec, Shiraz, Syrah, Bordeaux
De 64 °F a 68 °F (de 18 ˚C a 20 ˚C) — Oporto con
añada
Capacidad de almacenamiento
El compartimento para vinos de este producto está
diseñado exclusivamente para almacenar vinos,
por lo que no se recomienda colocar otros licores o
bebidas.
Ø 13/32″ (27.5 mm)
21/2″ (63 mm)
Temperatura para servir
Si planea servir un vino en unas semanas, puede
establecer una zona para almacenar el vino a la
temperatura recomendada para servirlo. De esta
forma, no preservará la calidad del vino a largo
plazo, pero podrá servir el vino sin tener que enfriarlo
o dejarlo reposar para llevarlo a la temperatura
para servir correcta. Sirva los vinos almacenados a
temperatura para servir dentro de unos pocos meses.
Verifique en la etiqueta o consulte una guía para
conocer la temperatura recomendada para servir de
vinos específicos.
1127/32″ (300.5 mm)
61/4″ (158.5 mm)
Ø 3″ (76.1 mm)
Page 69

INSTALACIÓN
ESPAÑOL
21
NOTA
Intercale las bocas y las bases de las botellas en los
estantes para mayor seguridad.
Almacenamiento de vino tinto
El estante superior puede almacenar hasta
16 botellas. Los demás estantes pueden almacenar
hasta 9 botellas cada uno.
Almacenamiento de champaña
El cajón puede almacenar hasta 6 botellas.
Rejillas de almacenamiento
Las rejillas deslizantes ayudan a mantener las
botellas organizadas y a darle un fácil acceso.
PRECAUCIÓN
Almacenamiento de vino blanco
El estante puede almacenar hasta 16 botellas.
• Las rejillas de almacenamiento son pesadas.
Siempre utilice ambas manos al remover o
ensamblar las rejillas para evitar una lesión o
que se dañe el producto. Siempre vacíe las
rejillas previo a removerlas.
• Siempre abra las puertas completamente
previo a remover o ensamblar las rejillas.
• Al ser un producto natural, la madera utilizada
para las rejillas puede variar en color y grano, e
incluir la presencia de nudos.
• Debido a las características de la madera,
el vino u otros líquidos derramados pueden
manchar o descolorar las rejillas.
Page 70

INSTALACIÓN
22
Extracción y ensamblaje de los
estantes de vino tinto
Para extraerlos, primero, levante la parte
1
delantera del estante de modo tal de liberar los
ganchos y, luego, levante la parte trasera.
Para ensamblarlo, incline hacia arriba la parte
2
frontal del estante y guíe los ganchos hacia
dentro de las ranuras a la altura deseada.
NOTA
• La presencia de objetos extraños y suciedad entre
el estante y la pared del gabinete interno podría
impedir que se encienda la luz del estante.
Especificaciones de transferencia de
energía inalámbrica a
Frecuencia 350 kHz ± 20 kHz
Voltaje Nominal DC 12 V
Alimentación
suministrada
Modo de
transmisión
NOTA
• La instalación del estante en la posición central
desactivará la luz del estante.
• La luz del estante se enciende solamente cuando
este se instala en las posiciones superior o inferior.
• La luz del estante se enciende cuando la puerta se
abre.
• La luz del estante se apaga después de siete
minutos o cuando la puerta se cierra.
Menor o igual que 1,2 W por
estante
Inducción electromagnética
Page 71

INSTALACIÓN
ESPAÑOL
23
Extracción y ensamblaje del estante
para vino blanco
Para extraer el estante, levántelo y tire hacia
1
afuera.
Para ensamblar el estante, insértelo en el marco
2
y bájelo hasta colocarlo.
Mientras mantiene presionadas ambas palancas,
3
levante ligeramente el soporte del cajón y quítelo
del sistema de rieles.
Alinee el soporte del cajón con el riel y
4
presiónelo hacia abajo hasta escuchar el sonido
de encastre.
Extracción y ensamblaje del cajón
para champaña
Para extraerlo, tire el cajón hacia afuera.
1
Mueva el cajón hacia arriba y hacia afuera del
2
marco.
Para ensamblarlo, tire el marco del cajón hasta
5
el tope. Coloque el cajón en ángulo en el marco
y ubíquelo en su posición.
Deslice el cajón por el marco hasta que baje a su
6
lugar. Deslice el cajón ensamblado hacia adentro
del compartimento.
Page 72

INSTALACIÓN
24
Puerta InstaView
El elegante panel de vidrio polarizado se ilumina con
dos golpecitos rápidos, lo que permite ver el interior
del compartimento para vinos sin necesidad de abrir
la puerta.
Golpee suavemente el vidrio dos veces para
1
encender o apagar la luz LED en el interior de la
puerta.
La luz LED se apaga automáticamente luego de
2
diez segundos.
NOTA
• La función de puerta InstaView se desactiva
2 segundos después de cerrar la puerta.
• Dé un golpecito cerca del centro del vidrio. Si lo
hace cerca de los bordes del vidrio, es posible que
no se active la función de puerta InstaView.
• Dé un golpe lo suficientemente fuerte como para
que el sonido sea audible.
• La función de puerta InstaView podría activarse
si se produce un ruido fuerte cerca del refrigerador.
• Limpie la puerta de vidrio con un paño seco. Para
eliminar manchas difíciles, humedezca ligeramente
un paño limpio con agua tibia o con un limpiador
de vidrios. No pulverice el limpiador de vidrios
directamente sobre la puerta.
Almacenando Alimentos
Consejos de Almacenamiento de
Alimentos
Envuelva o almacene alimentos en el refrigerador
en materiales herméticos y a prueba de humedad
a menos que se indique lo contrario. Esto previene
que el olor y sabor de los alimentos se transfiera a
través del refrigerador . Para productos con fecha
de caducidad, revise las fechas para asegurar su
frescura.
PRECAUCIÓN
• No llene ni envase en exceso los alimentos en
los compartimentos de la puerta. Esto podría
dañar el compartimento o provocar lesiones
personales al retirar los alimentos aplicando
una fuerza excesiva.
• No almacene contenedores de vidrio en el
congelador. Al congelarse, los contenidos
pueden expandirse, romper el contenedor y
provocar lesiones.
Comida Cómo Almacenar
Manteca o
Margarina
Queso Almacene en empaquetado original
Leche Limpie las cajas de leche. Para
Huevos Almacene en cartón original en el
Fruta No lave o pele fruta hasta que esté
Mantenga manteca abierta en un
plato cerrado o compartimento
cerrado. Cuando almacene
suministros adicionales, envuélvalos
en empaquetado de congelado y
congele.
hasta que se use. Una vez abierto,
reempaque ajustadamente en
envoltorio plástico o papel aluminio.
leche más fría coloque los
contenedores en un estante interior.
estante interior, no en el estante de
la puerta.
lista para ser usada. Organice y
mantenga la fruta en el cajón de
verduras en sus contenedores
originales, o almacénelas en bolsas
de papel completamente cerradas
en el estante del refrigerador.
Page 73

INSTALACIÓN
ESPAÑOL
25
Vegetales
Frondosos
Vegetales
con piel
(zanahorias,
pimientos)
Pescado
Restos de
comida
Remueva el empaquetado de la
tienda, recorte o arranque áreas
descoloridas y dañadas, lave en
agua fría y escurra. Coloque en
bolsas o contenedores plásticos y
almacene en el cajón de verduras.
Coloque en bolsas o contenedores
plásticos y almacene en el cajón de
verduras.
Congele pescado fresco y mariscos
si éstos no son consumidos el mismo
día de la compra. Es recomendable
comer pescado fresco y mariscos el
mismo día de la compra.
Cubra los restos de comida con
envoltorio plástico o papel aluminio,
o almacénelos en contenedores
plásticos con tapas ajustadas.
Almacenando Alimentos Congelados
Revise una guía de congelado o un libro de cocina
confiable para mayor información acerca del
preparado de alimentos para congelado o tiempos de
almacenamiento.
Congelando
Su congelador no congelará rápidamente una gran
cantidad de alimentos. No coloque más alimentos
descongelados en el congelador que los que se
enfriarán durante las próximas 24 horas (no más
de 2 a 3 libras de comida por pie cúbico del espacio
del congelador). Deje suficiente espacio en el
congelador para que circule aire alrededor de los
empaquetados. Tenga cuidado de dejar suficiente
espacio en la parte frontal para que la puerta pueda
cerrar correctamente. El tiempo de almacenamiento
variará dependiendo de la calidad y el tipo de
alimentos, el tipo de empaquetado o envoltura
utilizada (cuán hermética o a prueba de humedad) y
la temperatura de almacenaje. Los cristales de hielo
dentro de paquetes sellados son normales. Esto
simplemente significa que la humedad en la comida y
el aire dentro del empaquetado se han condensado,
creando hielos de cristal.
NOTA
• Permita que los alimentos calientes se enfríen a
temperatura ambiente por 30 minutos, y luego
empaque y congele. Enfriar alimentos calientes
previo a congelarlos ahorra energía.
Empaquetado
El congelamiento exitoso dependerá del empaquetado
correcto. Cuando cierre y selle el empaquetado, éste
no debe permitir que entre o salga aire o humedad. Si
lo hace, puede que el olor y sabor de sus alimentos se
transfieran a través del refrigerador y esto puede también
causar que los alimentos congelados se sequen.
Recomendaciones de empaquetado
• Contenedores plásticos rígidos con tapas ajustadas.
• Enlatado de lados rectos / tarros de congelamiento
• Papel aluminio pesado
• Papel plastificado
• Empaques plásticos impermeables
• Bolsas plásticas autosellables para congelador
Siga las instrucciones del empaque o contenedor
para métodos de congelamiento apropiados.
No use
• Envoltorios de pan
• Contenedores plásticos que no sean de polietileno
• Contenedores sin tapas ajustadas
• Papel de cera o envoltorios de congelado
recubiertos de cera.
• Envoltorio delgado y semipermeable.
NOTA
• Si se ausentará de casa por un corto período
de tiempo, como unas pequeñas vacaciones, el
refrigerador debe dejarse encendido. La comida
refrigerada que pueda ser congelada se preservará
por más tiempo si es almacenada en el congelador.
• Si dejará el refrigerador apagado por un
período largo de tiempo, saque toda la comida y
desconecte el cable de corriente. Limpie el interior
y deje la puerta abierta para prevenir la formación
de hongos en el refrigerador.
• No almacene alimentos con contenido muy
húmedo cerca del área superior del refrigerador.
La humedad podría entrar en contacto directo con
el aire frío y congelarse.
• Lave los alimentos previo a almacenarlos en el
refrigerador. Frutas y vegetales deben ser lavados,
y empaques de alimentos deben ser limpiados para
evitar que alimentos cercanos sean contaminados.
• Si el refrigerador se mantiene en un lugar caliente y
húmedo, abrir frecuentemente la puerta o almacenar
muchos vegetales en el refrigerador podría causar la
formación de condensación. Limpie la condensación
con un paño limpio o una toalla de papel.
• Si la puerta del refrigerador o el estante del congelador
se abre y cierra muy a menudo, aire caliente puede
penetrarlo y elevar así su temperatura. Esto puede
incrementar los gastos de funcionamiento de la unidad.
Page 74

INSTALACIÓN
26
Dispositivo de elevación
automática
ADVERTENCIA
Extracción del dispositivo de
elevación automática
Retire el dispositivo de elevación automática del
cajón inferior para ganar espacio de almacenamiento
o para limpiar.
Desenchufe el refrigerador o desconéctelo de la
1
corriente eléctrica.
Abra el cajón inferior, sujete el compartimento
2
interno con las dos manos y tire hacia afuera.
El dispositivo de elevación automática se
3
encuentra al fondo del cajón. Sujete el borde
interno del dispositivo con las dos manos y tire
hacia arriba.
• El dispositivo de elevación automática es
pesado; retírelo con las dos manos.
Inserte la punta de los dedos de ambas manos
5
debajo del centro de la cubierta y tire de la
cubierta hacia adelante con suavidad.
PRECAUCIÓN
• Tire de la cubierta con suavidad para evitar
dañarla.
Pliegue la parte trasera de la cubierta hacia
6
abajo y empuje la cubierta plegada ligeramente
hacia atrás.
Sujete la parte superior del dispositivo de
4
elevación automática con las dos manos y
retírelo del cajón inferior.
Inserte la cubierta del orificio suministrada en la
7
ranura que se encuentra en el fondo del cajón.
Page 75

INSTALACIÓN
ESPAÑOL
27
Ensamblaje del dispositivo de
elevación automática
Retire la cubierta del orificio del fondo del cajón.
1
Levante la sección trasera de la cubierta plegada
2
y apóyela sobre la guía a de la parte posterior
del cajón.
Levante el dispositivo de elevación automática
5
con las dos manos.
Inserte las bisagras del dispositivo de elevación
6
automática en las ranuras de la parte delantera
del cajón.
Sujete el centro de la cubierta y levántelo un
3
poco hasta la ranura.
Asegúrese de que las bisagras del dispositivo
4
de elevación automática estén alineadas con las
ranuras del cajón.
Baje el dispositivo hasta su posición y muévalo
7
hacia atrás y hacia adelante para verificar que
esté enganchado.
Use ambas manos para ensamblar el
8
compartimento interno en el cajón.
Enchufe el refrigerador o conecte la corriente
9
eléctrica.
Page 76

FUNCIONES INTELIGENTES
28
FUNCIONES
INTELIGENTES
Aplicación LG ThinQ
La aplicación LG ThinQ le permite comunicarse con
el electrodoméstico usando un teléfono inteligente.
Funciones de la aplicación LG ThinQ
• Smart Care+†
− Proporciona una experiencia más personalizada
según el análisis del patrón de uso de los
consumidores.
• Smart Sabbath†
− Activa o desactiva el modo Sabbath y configura
la programación para la activación del modo.
• Monitoreo de energía†
− Esta función lleva un registro del consumo de
energía del refrigerador y la cantidad de veces
que se abrió la puerta.
Antes de usar la aplicación LG ThinQ
Utilice un teléfono inteligente para verificar la
1
potencia del enrutador (Red Wi-Fi) cerca del
electrodoméstico.
• Si la distancia entre el electrodoméstico y el
enrutador inalámbrico es muy grande, la señal
será débil. Puede que le tome más tiempo
registrarse o que falle la instalación.
Desactive los Datos Móviles o Datos
2
Celulares en su teléfono inteligente.
Conecte su teléfono inteligente al enrutador
3
inalámbrico.
• Mensajes Push†
− Si la puerta permanece abierta durante más de
diez minutos, recibirá un mensaje automático.
También recibirá un mensaje automático cuando
la función Ice Plus finalice.
• Smart Diagnosis™
− Esta función brinda información útil para
diagnosticar y resolver problemas con el
producto conforme a su patrón de uso.
• Configuración
− Le permite ajustar varias opciones en el
refrigerador y en la aplicación.
† Esta característica solo está disponible en algunos
modelos.
NOTA
• Si cambia de enrutador inalámbrico, proveedor de
Internet, o contraseña, borre el electrodoméstico
registrado en la aplicación LG ThinQ y proceda a
registrarlo de nuevo.
• Esta información está actualizada en el momento
de su publicación. La aplicación está sujeta a
cambios, con fines de mejorar el producto, sin
previo aviso a los usuarios.
NOTA
• Para verificar la conexión Wi-Fi, revise que el ícono
Wi-Fi f en el panel de control esté encendido.
• El electrodoméstico funciona únicamente con
redes Wi-Fi de 2.4 GHz. Contacte a su proveedor
de servicios de internet o verifique el manual del
enrutador inalámbrico para revisar la frecuencia de
su red.
• LG ThinQ no es responsable por ningún problema
de conexión en red, falla, mal funcionamiento o
error causado por la conexión de red.
• El entorno inalámbrico circundante puede hacer que
el servicio de red inalámbrica funcione lentamente.
• Si el aparato tiene problemas para conectarse a la
red Wi-Fi, es posible que se encuentre demasiado
lejos del router. Adquiera un repetidor Wi-Fi
(extensor de alcance) para mejorar la intensidad
de la señal Wi-Fi.
• Es posible que la conexión de red no funcione bien
por cuestiones relacionadas con su proveedor de
servicios de Internet.
• Es posible que la conexión Wi-Fi no se conecte o se
interrumpa debido al entorno de la red doméstica.
Page 77

FUNCIONES INTELIGENTES
ESPAÑOL
29
• Si el electrodoméstico no puede registrarse
debido a problemas con la transmisión de la señal
inalámbrica, desconéctelo y espere alrededor de
un minuto previo a intentarlo de nuevo.
• Si el cortafuegos de su enrutador inalámbrico está
activado, desactivelo o añada una excepción a éste.
• El nombre de la red inalámbrica (SSID) debe ser
una combinación de letras y números. (No utilice
símbolos especiales)
• La interfaz de usuario (IU) del teléfono inteligente
puede variar dependiendo del sistema operativo
(OS) del móvil y del fabricante.
• Puede que la configuración de red falle si el protocolo
de seguridad del router está en WEP. Cambie el
protocolo de seguridad por otro (es recomendado el
WPA2) y registre el producto de nuevo.
Instalación de la aplicación LG ThinQ
Busque la aplicación LG ThinQ en la tienda Google
Play o App Store desde su teléfono inteligente.
Siga las instrucciones para descargar e instalar la
aplicación.
Conexión a Wi-Fi
El botón Wi-Fi, al ser usado con la aplicación LG
ThinQ, permite al electrodoméstico conectarse a
la red Wi-Fi doméstica. El ícono Wi-Fi muestra el
estado de la conexión de red del electrodoméstico.
El ícono se ilumina cuando el electrodoméstico está
conectado a la red Wi-Fi.
Registro Inicial del Electrodoméstico
Ejecute la aplicación LG ThinQ y siga
las instrucciones en ella para registrar el
electrodoméstico.
Volver a Registrar el Electrodoméstico o
Registrar Otro Usuario
Mantenga presionado el botón Wi-Fi por 3 segundos
para un apagado temporal. Ejecute la aplicación LG
ThinQ y siga las instrucciones en ella para registrar
el electrodoméstico.
NOTA
• Para desactivar la función Wi-Fi, mantenga
presionado el botón Wi-Fi por 3 segundos. El
ícono Wi-Fi se apagará.
Especificaciones módulo LAN
inalámbrico
Modelo PWFSA2
Rango de frecuencia 2412 - 2462 MHz
Rango de frecuencia (max.) < 30 dBm
Aviso de la FCC
• El siguiente aviso cubre el módulo transmisor
contenido en este producto.
Este equipo fue probado y se determinó que cumple
con los límites para los dispositivos digitales de Clase
B,de conformidad con la Parte 15 de las Reglas de
la FCC y también la Parte 18 de las Reglas de la
FCC. Estos límites están diseñados para ofrecer una
protección razonable contra interferencias dañinas
en una instalación residencial. Este equipo genera,
usa y puede emitir energía de radiofrecuencia
y, si no se instala y utiliza de acuerdo con las
instrucciones, podría causar interferencias dañinas
a las comunicaciones por radio. Sin embargo, no
se garantiza que dicha interferencia no pueda
ocurrir en instalaciones particulares. Si este equipo
causa interferencia dañina a la recepción de radio o
televisión, que se puede determinar encendiendo y
apagando el equipo, se aconseja al usuario intentar
corregir la interferencia realizando alguna de las
siguientes acciones:
• Reorientar o reubicar la antena receptora.
• Aumentar la separación entre el equipo y el
receptor.
• Conecte el equipo a una toma de corriente en un
circuito diferente al que está conectado el receptor.
• Consultar al vendedor o a un técnico de radio/TV
con experiencia para solicitar ayuda.
Este dispositivo cumple con la parte 15 y la parte 18
de las Reglas de la FCC. La operación está sujeta a
las siguientes condiciones:
(1) Este dispositivo no debe causar interferencia
dañina, y
(2) este dispositivo debe aceptar cualquier
interferencia que reciba, incluida la interferencia que
pueda causar un funcionamiento no deseado.
Cualquier cambio o modificación en la construcción
de este dispositivo, que no cuente con la aprobación
expresa de la parte responsable del cumplimiento,
puede anular la autorización del usuario para operarlo.
El fabricante no es responsable de ninguna
interferencia de radio o televisión causada por
modificaciones no autorizadas a este dispositivo. Es
responsabilidad del usuario corregir dicha interferencia.
Page 78

FUNCIONES INTELIGENTES
30
Declaración sobre exposición a la
radiación de RF de la FCC
Este equipo cumple con los límites de exposición a
la radiación de la FCC establecidos para entornos
no controlados. Este transmisor no se debe ubicar ni
operar junto con ninguna otra antena ni transmisor.
El equipo se debe instalar y operar con una distancia
mínima de 20 cm (7.8 pulg.) entre la antena y su
cuerpo. Los usuarios deben seguir las instrucciones
de operación específicas de manera tal de cumplir
con las normas de exposición a la RF.
Declaración de Industry Canada
• Para el módulo transmisor contenido en este
producto
Este dispositivo contiene transmisores/receptores
exentos de licencia que cumplen con los RSS
exentos de licencia de Innovación, Ciencia y
Desarrollo Económico (Science and Economic
Development, RSS) de Canadá. La operación está
sujeta a las siguientes condiciones:
(1) Este dispositivo no debe causar interferencia
dañina, y
(2) este dispositivo debe aceptar cualquier
interferencia que reciba, incluidas las interferencias
que puedan afectar su funcionamiento.
Declaración sobre Exposición a
Radiación de la IC
Este equipo cumple con los límites de exposición a
la radiación de la IC establecidos para entornos no
controlados.
Este equipo debe ser instalado y operado con una
distancia mínima de 20 cm (7.8 pulg.) entre la antena
y su cuerpo.
Software de código abierto
Para obtener el código fuente bajo GPL, LGPL, MPL
y otras licencias de código abierto que contiene este
producto, visite http://opensource.lge.com. Además
del código fuente, se pueden descargar los términos
de la licencia, las anulaciones de la garantía y los
avisos de derechos de autor.
LG Electronics también le proporcionará el código
abierto en un CD-ROM por un costo que cubra
los gastos de dicha distribución (como el costo
del medio, del envío y de la manipulación) una
vez realizado el pedido por correo electrónico a la
dirección opensource@lge.com. Esta oferta es válida
solo durante un período de tres años después de
que se envíe el último cargamento de este producto.
Esta oferta es válida para todo aquel que reciba esta
información.
Uso del asistente de voz
Antes de usar
El producto debe estar conectado con la aplicación
LG ThinQ para poder usar la función del asistente
de voz.
Para obtener más información sobre la conexión
del producto, consulte la sección FUNCIONES
INTELIGENTES.
NOTA
El asistente de voz solo es compatible con comandos
en inglés, por lo que no responderá a otros idiomas.
Funciones del asistente de voz
Use su voz para abrir la puerta de forma automática
y para obtener información, como el clima o la hora.
NOTA
• EL FABRICANTE NO SE HACE RESPONSABLE
DE CUALQUIER INTERFERENCIA DE TV O
RADIO CAUSADA POR MODIFICACIONES
NO AUTORIZADAS A ESTE EQUIPO. TALES
MODIFICACIONES PODRÍAN ANULAR LA
AUTORIDAD DEL USUARIO PARA PONER EL
EQUIPO EN FUNCIONAMIENTO.
Función Comando (ejemplo)
Open the refrigerator door.
Abrir puerta
Información
Could you open the refrigerator
door?
Please open the refrigerator door
What day is it today?
What time is it now?
Page 79

ESPAÑOL
NOTA
• El rendimiento del asistente de voz puede variar
según el volumen de la voz y la entonación del
usuario y el ruido del ambiente.
• Para optimizar el rendimiento, minimice el ruido de
fondo y párese a una distancia máxima de 10 pies
(3 m) del refrigerador.
• En algunos modelos, el sensor de movimiento
trabaja con el asistente de voz para responder a
ciertos comandos de voz.
Configuración del asistente de voz
Debe activar al asistente de voz antes de utilizarlo.
Puede optar por dos formas de hacer esto.
Modo Detalles
Este modo permite usar la
activación por sensor de
movimiento o por voz.
• Wake Zone: párese lo
suficientemente cerca del frente
Wake Zone +
Wake Word
Wake Word
OFF
Voice Assistant
Wake Zone
Wake Word
del producto y el asistente de voz
se activará de forma automática
sin la palabra de activación.
• Wake Word: párese a una
distancia máxima de 10 pies
(3 m) del refrigerador y diga con
claridad “Hi, LG”.
Este modo permite utilizar la
activación por voz.
• Wake Word: párese a una
distancia máxima de 10 pies
(3 m) del refrigerador y diga con
claridad “Hi, LG”.
Este modo desactiva el asistente
de voz.
Voice Assistant
Wake Word
Voice Assistant
OFF
FUNCIONES INTELIGENTES
PRECAUCIÓN
• Cuando la función del asistente de voz está
en modo de espera, el micrófono integrado se
activa con la pantalla encendida o apagada.
A continuación, la voz se envía por la red al
servidor.
NOTA
• Cuando el asistente de voz está configurado en el
modo de Wake Zone + Wake Word:
− Cada vez que pase por adelante del refrigerador,
el asistente de voz se activará mediante la zona
de activación e ingresará al modo de espera
para reconocer los comandos de voz. En este
caso, al decir “Hi, LG”, no se activará la función
de palabra de activación.
31
Uso de la palabra de activación
Para utilizar la palabra de activación, párese a una
distancia máxima de 10 pies (3 m) del refrigerador.
Para activar el asistente de voz, diga “Hi, LG”.
1
• La ventana de control del asistente de voz
mostrará automáticamente “Go ahead, I’m
listening.” e ingresará al modo disponible.
Pronuncie el comando con claridad.
2
• Por ejemplo, Open the refrigerator door.
• Si el asistente de voz no reconoce el comando,
repítalo o intente con un comando diferente.
Uso de la zona de activación
Para utilizar la zona de activación, párese cerca
del frente del refrigerador y el asistente de voz se
activará de forma automática e ingresará al modo de
espera para recibir comandos de voz.
Párese frente al producto y espere un momento.
1
• La ventana de control del asistente de voz
mostrará automáticamente “Go ahead, I’m
listening.” e ingresará al modo disponible.
Pronuncie el comando con claridad.
2
• Por ejemplo, Open the refrigerator door.
Page 80

FUNCIONES INTELIGENTES
32
NOTA
El asistente de voz solo es compatible con comandos
en inglés, por lo que no responderá a otros idiomas.
• Para emitir un nuevo comando de voz, diga “Hi,
LG” o apártese del refrigerador y, a continuación,
vuelva a acercarse (a 3.25 pies o 1 m, como
máximo).
• Si no se reconoce el comando de voz, la función
del asistente de voz sale del modo de espera.
Función Smart Diagnosis™
Esta característica solo está disponible en el modelo
con el logo c o d.
Utilice esta función como ayuda para diagnosticar y
resolver problemas con su electrodoméstico.
NOTA
• Por motivos no atribuibles a la negligencia de
LGE, es posible que el servicio no pueda funcionar
debido a factores externos como por ejemplo, la
indisponibilidad de Wi-Fi, desconexión de WiFi, política de la tienda de aplicaciones local o
indisponibilidad de aplicaciones, entre otros.
Uso de LG ThinQ para diagnosticar
problemas
Si experimenta un problema con su electrodoméstico
equipado con Wi-Fi, este puede transmitir datos
sobre la resolución de problemas a un teléfono
inteligente con la aplicación LG ThinQ.
• Inicie la aplicación LG ThinQ y seleccione la
función Smart Diagnosis en el menú. Siga las
instrucciones provistas en la aplicación LG ThinQ .
Uso del diagnóstico audible para
diagnosticar problemas
Siga las instrucciones a continuación para utilizar el
método de diagnóstico audible.
• Inicie la aplicación LG ThinQ y seleccione la
función Smart Diagnosis en el menú. Siga las
instrucciones para el diagnóstico audible provistas
en la aplicación LG ThinQ.
Mantenga presionado el botón Lock durante tres
1
segundos.
• Si la pantalla ha sido bloqueada por más de
cinco minutos, debe desactivar el bloqueo y
luego reactivarlo.
Abra la puerta del refrigerador.
2
Mantenga el micrófono de su teléfono frente al
3
altavoz que se encuentra ubicado en la bisagra
derecha de la puerta del refrigerador, cuando así
se lo indique el centro de llamadas.
Mantenga presionado el botón Freezer Drawer
4
por tres segundos mientras sujeta su teléfono
junto al altavoz.
Tras escuchar tres pitidos, suelte el botón
5
Freezer Drawer.
Mantenga el teléfono en su sitio hasta que haya
6
terminado la transmisión de tonos. La pantalla
mostrará el recuento de tiempo. Una vez que
haya finalizado el recuento de tiempo y los tonos
se hayan detenido, aparecerá el diagnóstico en
la aplicación.
NOTA
• Para obtener resultados óptimos, no mueva el
teléfono mientras se transmitan los tonos.
Page 81

MANTENIMIENTO
ESPAÑOL
33
MANTENIMIENTO
Limpieza
ADVERTENCIA
• Utilice un limpiador no inflamable. Si no lo
hace, puede resultar en incendio, explosión o
muerte.
PRECAUCIÓN
• No use un trapo abrasivo o esponja mientras
limpia el interior y exterior del refrigerador.
• No coloque su mano en la superficie inferior del
refrigerador cuando abra y cierre las puertas.
Consejos Generales de Limpieza
• Tanto las secciones del refrigerador como del
congelador se descongelan automáticamente; sin
embargo, limpie ambas secciones una vez al mes
para prevenir olores.
• Limpie derrames inmediatamente.
• Desconecte el refrigerador o la corriente eléctrica
previo a la limpieza.
• Remueva todas las partes removibles, como los
estantes.
• Use una esponja limpia o un paño suave y
un detergente ligero en agua tibia. No utilice
abrasivos o limpiadores ásperos.
• Lave a mano, enjuague y seque todas las
superficies intensivamente.
• Al limpiar el interior o exterior del electrodoméstico,
no utilice un cepillo de dientes, pasta dental, o
materiales inflamables. No utilice agentes de
limpieza que contengan sustancias inflamables.
− Esto podría causar decoloración o daños al
electrodoméstico.
Exterior
Sustancias inflamables: alcohol (etanol, metanol,
alcohol isopropílico, alcohol isobutílico, etc.),
disolventes, cloro, benceno, líquidos inflamables,
abrasivos, etc.
Para productos con un exterior de acero inoxidable
negro, rocíe limpiador de vidrio en un paño limpio de
microfibra y frote en dirección de la fibra. No rocíe
limpiador de vidrio directamente al panel de pantalla.
No utilice limpiadores ásperos o abrasivos.
Paredes Interiores
• Permita que el congelador se caliente para que el
paño no se pegue.
Como ayuda para remover olores, lave el interior del
refrigerador con una mezcla de bicarbonato de sodio
y agua tibia. Mezcle 2 cucharadas de bicarbonato
de sodio con 1 cuarto de galón de agua (26 g de
bicarbonato en 1 litro de agua). Asegúrese de que el
bicarbonato de sodio está completamente disuelto
para que este no raye las superficies del refrigerador
.
Revestimientos de Puertas y Juntas
Use una esponja limpia o un paño suave y un
detergente ligero en agua tibia. No utilice ceras
de limpieza, detergentes concentrados, lejías o
limpiadores que contengan petróleo en las partes
plásticas del refrigerador.
Partes Plásticas (Cubiertas y
Paneles)
Use una esponja limpia o un paño suave y un
detergente ligero en agua tibia. No utilice limpiadores
de vidrio, limpiadores abrasivos o líquidos
inflamables. Estos pueden rayar o dañar el material.
− Sustancias inflamables: alcohol (etanol, metanol,
alcohol isopropílico, alcohol isobutílico, etc.),
disolventes, cloro, benceno, líquidos inflamables,
abrasivos, etc.
Page 82

MANTENIMIENTO
34
Filtro de Aire
Reemplazo del filtro de aire
Reemplace el filtro de aire:
• Aproximadamente cada seis meses.
• Cuando el LED del filtro de aire parpadee o
aparezca el ícono indicador de reemplazo.
Retire la cubierta del compartimento del filtro
1
de aire insertando el extremo romo de una
lapicera de plástico en la ranura de la base del
compartimento, en cualquiera de los lados.
Extraiga el filtro del interior de la cubierta y
2
reemplácelo por uno nuevo.
• Asegúrese de insertar el filtro nuevo con la
etiqueta “Back” orientada hacia afuera.
Para reiniciar el período de reemplazo del filtro,
3
presione el botón Air Filter en el panel de
control hasta que el ícono del panel de control
desaparezca.
Page 83

SOLUCIÓN DE PROBLEMAS
ESPAÑOL
35
SOLUCIÓN DE PROBLEMAS
Preguntas frecuentes
P: ¿Cuál es el mejor ajuste de temperatura para mi congelador y refrigerador?
R: La configuración predeterminada del congelador es 0° Fahrenheit (-18° Celsius). La configuración
predeterminada del refrigerador es 37° Fahrenheit (3° Celsius). Ajuste esta configuración según sus
necesidades para mantener los alimentos a la temperatura deseada. La leche deberá mantenerse fría
al almacenarse en el estante interior del refrigerador. El helado deberá estar firme y los cubos de hielo
no deberán derretirse en el congelador. Para cambiar la pantalla de Fahrenheit a Celsius, mantenga
presionados los botones Freezer Drawer y Refrigerator Drawer hasta que escuche un sonido y vea el
cambio de ajustes en la pantalla.
P: ¿Cómo establezco la temperatura del refrigerador y Refrigerador congelador?
R: Presione repetidamente el botón Freezer Drawer o Refrigerator Drawer en el panel de control hasta
que aparezca la temperatura deseada. Los números se mostrarán de mayor a menor y volverán a
comenzar por el mayor a medida que siga presionando.
P: Mi refrigerador está encendido y los controles están funcionando, pero no está enfriando y la
pantalla muestra "Demo Mode". ¿Qué está mal?
R: El refrigerador está en Modo de Exhibición. El Modo de Visualización deshabilita toda refrigeración en
las secciones del refrigerador y congelador para conservar energía mientras se exhibe en una tienda
minorista. Cuando se activa, se muestra en el panel de control por 5 segundos. Con cualquier puerta
del refrigerador abierta, presione el botón Express Freeze 3 veces de manera consutiva mientras
presiona el botón Refrigerator Drawer. El panel de control emite un pitido y la configuración de la
temperatura muestra la confirmación de que el Modo de Exhibición está desactivado. Utilice el mismo
procedimiento para activar el Modo de Exhibición.
Page 84

MANTENIMIENTO
36
Antes de llamar al servicio técnico
Revise esta sección antes de llamar para servicio; hacerlo le ahorrará tiempo y dinero.
Enfriamiento
Problema Posibles causas y soluciones
El control del refrigerador está configurado en APAGADO (algunos modelos).
• Configure el control en ENCENDIDO. Consulte la Configuración en la sección Controles
para los ajustes apropiados de temperatura.
El refrigerador está en el ciclo de descongelado.
Las
secciones del
Refrigerador
y Congelador
no están
enfriando.
• Durante el ciclo de descongelado, la temperatura de cada compartimento puede
incrementarse levemente. Espere 30 minutos y confirme que la temperatura apropiada
haya sido restaurada una vez que el ciclo de descongelado haya sido completado.
El refrigerador fue instalado recientemente.
• Puede tomar hasta 24 horas para que cada compartimento alcance la temperatura
deseada.
El refrigerador fue reubicado recientemente.
• Si el refrigerador estaba almacenado por un período largo de tiempo o reclinado, es
necesario que éste se mantenga en posición vertical por 24 horas previo a conectarlo a la
corriente eléctrica.
El sistema de
enfriamiento se
ejecuta mucho.
El refrigerador está reemplazando un modelo anterior.
• Los refrigeradores modernos requieren más tiempo de operación pero usan menos
energía debido a tecnología más eficiente.
El refrigerador fue conectado recientemente o su fuente de energía fue restablecida.
• Puede tomar hasta 24 horas para que el refrigerador enfríe completamente.
La puerta es abierta frecuentemente o una gran cantidad de alimentos / alimentos
calientes fueron añadidos.
• Al añadir alimentos y abrir las puertas el refrigerados se calienta, requiriendo que
el compresor se ejecute más tiempo a manera de enfriarlo de nuevo. A manera de
conservar energía, intente retirar todo lo que necesita del refrigerador al mismo tiempo,
mantenga los alimentos organizados para que sea fácil encontrarlos, y cierre la puerta en
cuanto los alimentos sean retirados. (Consulte la Guía de Almacenamiento de Alimentos.)
Las puertas no están completamente cerradas.
• Cierre las puertas firmemente. Si éstas no cierran completamente, vea la sección Puertas
no cierran o abren completamente en Solución de Problemas.
El refrigerador está instalado en una ubicación caliente.
• El compresor se ejecutará por más tiempo en condiciones templadas. En temperaturas
normales de habitación (70 °F) espere que su compresor se ejecute de un 40% a un 80%
del tiempo. Bajo condiciones más calientes, espere que éste se ejecute más seguido. El
refrigerador no debe ser operado sobre 110 °F.
Page 85

ESPAÑOL
Problema Posibles causas y soluciones
Las puertas están abiertas constantemente o por períodos largos de tiempo.
• Cuando las puertas están abiertas constantemente o por períodos largos de tiempo, el
aire caliente y húmedo entra al compartimento. Esto eleva la temperatura y el nivel de
humedad dentro del compartimento. Para disminuir el efecto, reduzca la frecuencia y
duración de apertura de la puerta.
Las puertas no están cerradas correctamente.
• Vea la sección Puertas no cierran o abren completamente en Solución de Problemas de
Partes & Características.
El clima es húmedo.
• El clima húmedo permite que humedad adicional ingrese a los compartimentos cuando
Acumulación
de humedad
interior.
las puertas se abren, provocando condensación o escarcha. Mantener un nivel de
humedad razonable en el hogar ayudará a controlar la cantidad de humedad que pueda
ingresar a los compartimentos.
Ciclo de descongelado recientemente completado.
• Durante el ciclo de descongelado, la temperatura de cada compartimento puede
incrementar levemente y puede que se forme condensación en la pared trasera. Espere
30 minutos y confirme que la temperatura adecuada se ha restaurado una vez el ciclo de
descongelado ha sido completado.
MANTENIMIENTO
37
Los alimentos
se están
congelando
en el
compartimento
del refrigerador.
Las
secciones del
Refrigerador
y Congelador
están muy
calientes.
Los alimentos no están empacados correctamente.
• Los alimentos almacenados, descubiertos o desenvueltos, y contenedores húmedos
pueden llegar a generar acumulación de humedad dentro de cada compartimento. Seque
todos los contenedores y almacene los alimentos en empaques sellados para prevenir
condensación y escarcha.
Alimentos con contenido alto en agua fueron ubicados cerca de una ranura de
ventilación.
• Reorganice los artículos con contenido alto en agua alejados de las ranuras de
ventilación.
La temperatura del refrigerador está configurada incorrectamente.
• Si la temperatura es muy baja, ajuste el control mediante un incremento a la vez y espere
a que la temperatura se estabilice. Consulte la sección Ajustando los Controles para más
información.
El refrigerador está instalado en una ubicación fría.
• Cuando el refrigerador es operado en una temperatura inferior a 41°F (5°C), los alimentos
pueden congelarse en el compartimento del refrigerador. El refrigerador no debe ser
operado en temperaturas inferiores a 55°F (13°C).
El refrigerador fue instalado recientemente.
• Puede tomar hasta 24 horas para que cada compartimento alcance la temperatura
deseada.
Los respiraderos están bloqueados. Aire frío circula desde el congelador hasta la
sección de alimentos frescos y luego de regreso a través de los respiraderos en la
pared que divide las dos secciones.
• Reorganice los artículos con contenido alto en agua alejados de las ranuras de
ventilación.
Page 86

MANTENIMIENTO
38
Problema Posibles causas y soluciones
Las puertas están abiertas constantemente o por períodos largos de tiempo.
• Cuando las puertas están abiertas constantemente o por períodos largos de tiempo, el
aire caliente y húmedo entra al compartimento. Esto eleva la temperatura y el nivel de
humedad dentro del compartimento. Para disminuir el efecto, reduzca la frecuencia y
duración de apertura de la puerta.
Reorganice los artículos con contenido alto en agua alejados de las ranuras de
ventilación.
• Reorganice los artículos con contenido alto en agua alejados de las ranuras de ventilación.
Reorganice los artículos con contenido alto en agua alejados de las ranuras de
ventilación.
Las
secciones del
Refrigerador
y Congelador
están muy
calientes.
• Reorganice los artículos con contenido alto en agua alejados de las ranuras de
ventilación.
Reorganice los artículos con contenido alto en agua alejados de las ranuras de
ventilación.
• Vea la sección Puertas no cierran o abren completamente en Solución de Problemas de
Partes & Características.
Reorganice los artículos con contenido alto en agua alejados de las ranuras de
ventilación.
• Si la temperatura es muy alta, ajuste el control un incremento a la vez y espere a que la
temperatura se estabilice.
La sección del
Refrigerador
o Congelador
está muy fría.
Se forma
escarcha
o cristales
de hielo en
alimentos
congelados
(dentro de
paquete
sellado).
Formación
de escarcha
o cristales
de hielo en
alimentos
congelados
(fuera del
empaque).
Reorganice los artículos con contenido alto en agua alejados de las ranuras de
ventilación.
• Durante el ciclo de descongelado, la temperatura de cada compartimento puede
incrementar levemente y formar condensación en la pared trasera. Espere 30 minutos
y confirme que la temperatura apropiada haya sido restaurada una vez el ciclo de
descongelado haya sido completado.
Ajustes de control de temperatura incorrectos.
• Si la temperatura es muy fría, ajuste el control un incremento a la vez y espere a que la
temperatura se estabilice. Consulte el Panel de Control para mayor información.
Condensación de alimentos con un alto contenido de agua se ha congelado dentro
del paquete.
• Esto es normal para alimentos con un alto contenido de agua.
Alimentos se han dejado en el congelador por un largo período de tiempo.
• No almacene alimentos con un alto contenido de agua en el congelador por un largo
período de tiempo.
La puerta es abierta frecuentemente o por períodos prolongados de tiempo.
• Cuando las puertas son abiertas constantemente o por períodos largos de tiempo,
aire caliente y húmedo entra al compartimento. Esto eleva la temperatura y el nivel de
humedad dentro del compartimento. Para disminuir el efecto, reduzca la frecuencia y
duración de apertura de la puerta.
La puerta no cierra correctamente.
• Vea la sección de Las puertas no cierran o abren correctamente en la sección de
Resolución de problemas.
Page 87

ESPAÑOL
Partes y Características
Problema Posibles causas y soluciones
Paquetes de alimentos están bloqueando la puerta e impiden que se cierre.
• Reorganice los contenedores de alimentos para liberar la puerta y los estantes de la
puerta.
El depósito de hielo, la cubierta del cajón de vegetales, los estantes, contenedores de
Las puertas
no se cierran
correctamente
o se quedan
abiertas.
Es difícil abrir
las puertas.
puerta o cajones están en la posición equivocada.
• Empuje los contenedores hasta el fondo, y colóque la cubierta del cajón de vegetales,
los estantes y los cajones en su posición adecuada. Vea la sección de Operación para
obtener más información.
Las puertas se desmontaron durante la instalación del producto y no se volvieron a
colocar correctamente.
• Contácte al instalador para instalar apropiadamente las puertas.
El refrigerador no está correctamente nivelado.
• Contácte al instalador para nivelar apropiadamente el refrigerador.
Las juntas están sucias o pegajosas.
• Limpie las juntas y las superficies que tocan. Aplique una fina capa de cera para
electrodomésticos o cera de cocina en las juntas después de limpiarlas.
La puerta se acaba de cerrar.
• Cuando abre la puerta, aire más caliente entra al refrigerador. Al enfriarse, puede crear un
vacío. Si le cuesta abrir la puerta, espere un minuto para permitir que la presión del aire
se ecualice y, a continuación, compruebe si se abre con más facilidad.
MANTENIMIENTO
39
El refrigerador
se tambalea
o parece
inestable.
Las luces no
funcionan.
El interior del
refrigerador
está cubierto
con polvo u
hollín.
La función del
asistente de
voz se activa
de forma
automática.
Las patas niveladoras no están correctamente ajustadas.
• Contácte al instalador para nivelar apropiadamente el refrigerador.
El piso no está nivelado.
• Puede ser necesario agregar calibradores debajo de las patas o rodillos de nivelación o
para completar la instalación.
Falla de iluminación interior LED.
• La lámpara del compartimento del refrigerador es una iluminación interior LED, por lo que
el mantenimiento deberá ser realizado por un técnico calificado.
El refrigerador está ubicado cerca de una fuente de fuego, como una chimenea o
candela.
• Asegúrese de que el refrigerador no se encuentre ubicado cerca de una fuente de fuego,
como una chimenea o candela.
El asistente de voz está configurado en el modo Wake Zone + Wake Word. Cada vez
que pase por adelante del refrigerador, el asistente de voz se activará e ingresará al
modo de espera para reconocer los comandos de voz.
• Cambie la configuración del Asistente de voz de Wake Zone + Wake Word a Wake
Word.
Page 88

MANTENIMIENTO
40
Ruidos
Problema Posibles causas y soluciones
El control de descongelado hará un “clic” cuando el ciclo de descongelado comience
Haciendo clic
Traqueteo
Crujido
y termine. El control del termostato (o control del refrigerador en algunos modelos)
también hará un clic al iniciar o finalizar un ciclo.
• Funcionamiento normal
Ruidos de traqueteo podrían provenir del flujo de refrigerante o de artículos
almacenados sobre o alrededor del refrigerador.
• Funcionamiento normal
El refrigerador no está sólidamente apoyado en el suelo.
• El suelo es poco sólido o irregular, o es necesario ajustar las patas de nivelación.
Consulte la sección Nivelación y Alineación de las Puertas.
El refrigerador con compresor lineal se sacudió mientras estaba funcionando.
• Funcionamiento normal
El motor del ventilador del evaporador está circulando el aire a través de los
compartimentos del refrigerador y del congelador.
• Funcionamiento normal
Vibración
Vibración
Chisporroteo
Vibración
Goteo
Sonido de
pulsación o
agudo.
El ventilador del condensador está forzando el paso de aire a través del condensador.
• Funcionamiento normal
El refrigerante está fluyendo a través del sistema de enfriamiento.
• Funcionamiento normal
Contracción y expansión de las paredes internas debido a cambios en la temperatura.
• Funcionamiento normal
El agua cayendo en el calentador de descongelación durante un ciclo de
descongelado.
• Funcionamiento normal
Si el lateral o la parte posterior del refrigerador están en contacto con un mueble o
una pared, algunas de las vibraciones normales pueden producir un sonido audible.
• Para eliminar el ruido, asegúrese de que los laterales y la parte posterior no puedan
vibrar contra las paredes o los muebles.
Agua cayendo en la batea de drenaje durante el ciclo de descongelado.
• Funcionamiento normal
Su refrigerador está diseñado para funcionar de forma más eficiente para conservar
los alimentos a la temperatura deseada. El compresor de alta eficiencia puede hacer
que su nuevo refrigerador funcione durante más tiempo que su antiguo refrigerador,
y aun así será más eficiente energéticamente que los modelos anteriores. Mientras
el refrigerador está en funcionamiento, es normal escuchar un sonido de pulsación o
agudo.
• Funcionamiento normal
Page 89

ESPAÑOL
Wi-Fi
Problema Posibles causas y soluciones
La contraseña para la red Wi-Fi se introdujo de forma incorrecta.
• Elimine su red Wi-Fi doméstica y comience el proceso de registro nuevamente.
Los Datos Móviles para su teléfono inteligente están activados.
• Desactive los Datos Móviles en su teléfono inteligente previo a registrar el
electrodoméstico.
MANTENIMIENTO
41
Problemas para
conectar el
electrodoméstico
y el teléfono
inteligente a la
red Wi-Fi
El nombre de la red inalámbrica (SSID) se ha configurado incorrectamente.
• El nombre de la red inalámbrica (SSID) debe ser una combinación de letras y números.
(No utilice símbolos especiales)
La frecuencia del enrutador no es de 2.4 GHz.
• Sólo se admite una frecuencia de enrutador de 2.4 GHz. Configure el enrutador
inalámbrico a 2.4 GHz y conecte el electrodoméstico a éste. Para verificar la frecuencia
del enrutador, consulte con su proveedor de servicios de internet o con el fabricante del
enrutador.
La distancia entre el electrodoméstico y el enrutador es muy grande.
• Si el electrodoméstico se encuentra muy lejos del enrutador, puede que la señal sea débil
y que la conexión no sea configurada correctamente. Coloque el enrutador más cerca del
electrodoméstico o compre e instale un repetidor Wi-Fi.
Page 90

GARANTÍA LIMITADA
42
GARANTÍA LIMITADA
PARA EE. UU.
AVISO DE ARBITRAJE: ESTA GARANTÍA LIMITADA CONTIENE UNA CLÁUSULA DE ARBITRAJE QUE
LE DEMANDA A USTED Y A LG RESOLVER CONFLICTOS A TRAVÉS DE UN ARBITRAJE VINCULANTE
EN LUGAR DE HACERLO EN LA CORTE, A MENOS QUE USTED DECIDA NO PARTICIPAR. EN EL
ARBITRAJE NO ESTÁN PERMITIDAS LAS ACCIONES COLECTIVAS NI LOS JUICIOS CON JURADO.
POR FAVOR, VEA A CONTINUACIÓN LA SECCIÓN TITULADA “PROCEDIMIENTO PARA RESOLVER
CONFLICTOS”.
En caso de que su refrigerador LG (“Producto”) presente alguna falla por defectos de materiales o de
fabricación bajo uso apropiado y normal durante el período de garantía establecido más abajo, el mismo será
reparado o reemplazado por LG Electronics ("LG"), a su opción. Esta garantía limitada es válida únicamente
para el comprador final original del producto, y únicamente cuando el producto ha sido comprado y utilizado
dentro de los Estados Unidos, incluidos los territorios norteamericanos.
PERÍODO DE GARANTÍA
Sistema Sellado
Refrigerador/Congelador
Un (1) año a partir de la fecha
original de compra
Piezas y mano de obra (solo
piezas internas/ funcionales)
(Condensador, Filtro
desecante, Tubo
Conector y Evaporador)
Cinco (5) años a partir
de la fecha original de
compra
Piezas y mano de obra
Compresor
Cinco (5) años a
partir de la fecha
original de compra
Piezas y mano de
obra
Sólo Compresor Lineal /
Inversor : Partes sólo para
los años 6-10 desde la
fecha original de compra.
(La mano de obra se le
cargará al consumidor)
• Los productos y las piezas de repuesto están garantizados durante el tiempo restante del período original de
garantía o noventa (90) días, lo que resulte mayor.
• Los productos y las piezas de repuesto pueden ser nuevos, reparados, reacondicionados, o reconstruidos por
la fábrica.
• Es necesario presentar prueba de la compra minorista especificando el modelo del producto y la fecha de
compra para obtener el servicio de garantía bajo esta garantía limitada.
Salvo lo prohibido por la ley, toda garantía de comercialización o idoneidad implícita, para un propósito
particular en el producto, está limitada a la duración de la garantía arriba expresada. Bajo ninguna
circunstancia deberá LG o sus distribuidores/representantes ser responsable por cualquier daño
indirecto, incidental, consecuente, especial, o punitivo, lo cual incluye pero no se limita a, pérdida de
fondos del comercio, ganancias perdidas, interrupción del trabajo, deterioro de otros bienes, costo
de remover y reinstalar el producto, pérdida de uso, o cualquier otro daño ya sea basado en contrato,
perjuicio, u otros. La responsabilidad total de LG, en caso exista, no excederá el precio que usted pagó
por adquirir el producto.
Algunos estados no permiten la exclusión o limitación de daños incidentales o emergentes, o limitaciones a
la duración de la garantía implícita, por lo que la exclusión o limitación anteriormente mencionada podrían no
corresponder en su caso. Esta garantía limitada le otorga derechos legales específicos y es posible que usted
cuente con otros derechos que varían según el estado.
Page 91

GARANTÍA LIMITADA
ESPAÑOL
ESTA GARANTÍA LIMITADA NO CUBRE LO SIGUIENTE:
• Viajes del servicio técnico para entregar, buscar o instalar el producto, instruir al cliente sobre la operación del
mismo, corregir el cableado o las reparaciones/instalaciones no autorizadas.
• Daño o fallo del producto al operar durante fallas e interrupciones del suministro eléctrico, o resultado de un
servicio eléctrico inadecuado.
• Daños o fallas causadas por tuberías de agua rotas o con fugas, tuberías de agua congeladas, líneas de
desagüe restringidas, suministro de agua inadecuado o interrumpido, o suministro de aire inadecuado.
• Daños resultantes de operar el producto en una atmósfera corrosiva o contraria a las instrucciones detalladas
en el manual del propietario del producto.
• Daños o fallos del producto causados por accidentes, pestes y alimañas, rayos, viento, incendio,
inundaciones, hechos de fuerza mayor, o cualquier otra causa fuera del control de LG.
• Daños o fallos causados por modificaciones o alteraciones no autorizadas, o si se usa para otro fin que no
sea el previsto.
• Daños o fallos resultantes de mal uso, abuso, instalación, reparación o mantenimiento incorrectos. Una
reparación incorrecta incluye el uso de piezas no autorizadas, aprobadas o especificadas por LG. La instalación o
el mantenimiento inadecuado incluye aquellos contrarios a lo especificado en el manual del usuario del producto.
• Daños o fallos causados por modificaciones o alteraciones no autorizadas, o si se usa para otro fin que no
sea el previsto.
• Daños o fallos causados por corriente o voltaje eléctrico incorrecto, o por códigos de fontanería.
• Daños o fallos causados por el transporte y el manejo, incluye rayas, muescas, astillados y/u otros daños al
acabado del producto, a menos que tales daños se informen dentro del plazo de una (1) semana de la entrega.
• Daños o artículos faltantes a productos comprados con descuento, con la caja abierta o que hayan estado en
exhibición.
• Productos reacondicionados o cualquier producto vendido con los avisos "En el estado actual", "En el sitio
actual", "Con todos sus defectos" o similares.
• Productos cuyos números de serie originales hayan sido retirados, alterados o no se puedan determinar fácilmente.
• Aumentos en los costos de los servicios públicos y otros gastos adicionales de dichos servicios.
• Cualquier ruido asociado con la operación normal.
• Uso de accesorios (Ej, filtros de agua, etc.), componentes, o productos de limpieza consumibles que no estén
autorizados por LG.
• Reemplazo de focos, filtros o cualquier parte consumible.
• Cuando el producto se use de otra forma que no sea uso doméstico usual y normal (p. ej., uso comercial o
industrial, en oficinas e instalaciones recreativas o vehículos) o uso contrario a las instrucciones detalladas en
el manual del propietario del producto.
• Costos asociados con el retiro y la reinstalación de su producto para realizar reparaciones.
• Estantes, bandejas de puerta, cajones, manijas y accesorios, a excepción de las partes internas/funcionales
cubiertas bajo esta garantía limitada.
43
El costo de la reparación o el reemplazo en estas circunstancias excluidas estará a cargo
del consumidor.
PARA OBTENER SERVICIO EN GARANTÍA E INFORMACIÓN ADICIONAL
Llame al 1-800-984-6306 y seleccione la opción apropiada desde el menú.
O visite nuestro sitio web en http://www.lg.com
O por correo: LG Electronics Customer Service P.O. Box 240007 Huntsville, AL 35813 ATTN: CIC
PROCEDIMIENTO PARA RESOLVER CONFLICTOS:
TODOS LOS CONFLICTOS ENTRE USTED Y LG QUE SURJAN FUERA DE O RELACIONADOS DE ALGUNA
MANERA CON ESTA GARANTÍA LIMITADA O CON EL PRODUCTO, SE RESOLVERÁN EXCLUSIVAMENTE
A TRAVÉS DE UN ARBITRAJE VINCULANTE Y NO EN UNA CORTE DE JURISDICCIÓN GENERAL.
ARBITRAJE VINCULANTE SIGNIFICA QUE USTED Y LG RENUNCIAN AL DERECHO DE UN JUICIO CON
JURADO Y A REALIZAR O PARTICIPAR EN UNA DEMANDA COLECTIVA.
Page 92

GARANTÍA LIMITADA
44
Tarifas / Costos. Usted no debe pagar ninguna tarifa para comenzar un arbitraje. Al recibir su solicitud de
arbitraje por escrito, LG pagará todos los gastos administrativos rápidamente a la AAA, a menos que usted
solicite más de $25,000.00 por daños, en cuyo caso el pago de estos gastos se regirá por las Normas de la
AAA. Salvo disposición contraria prevista en el presente documento, LG pagará a la AAA todos los gastos
documentales, administrativos y de arbitraje para cualquier arbitraje iniciado, de conformidad con las Normas
de la AAA y esta disposición de arbitraje. Si usted prevalece en el arbitraje, LG pagará los honorarios y gastos
de sus abogados, siempre y cuando sean razonables, considerando factores que incluyen, entre otros, el monto
de la compra y el monto del reclamo. No obstante lo anterior, si la ley aplicable permite una adjudicación de
honorarios y gastos razonables de abogados, un árbitro puede otorgarlos en la misma medida que lo haría
un tribunal. Si el árbitro considera que la sustancia de su reclamo o la reparación solicitada en la demanda es
frívola o se utiliza para un propósito inadecuado (calificado según las normas establecidas en la Norma Federal
de Procedimiento Civil 11 (b)), el pago de todos los honorarios de arbitraje se regirá por las Normas de la AAA.
En tal situación usted se compromete a reembolsar a LG todos los fondos erogados previamente por ella, cuyo
pago es, por otra parte, su obligación, según las Normas de la AAA. Salvo disposición contraria, LG renuncia a
cualquier derecho que pudiera tener para solicitarle los honorarios y gastos de sus abogados, si LG prevalece
en el arbitraje.
Audiencias y ubicación. Si su reclamo es por $25,000 o menos, usted puede optar que el arbitraje sea
realizado únicamente sobre la base de: (1) documentos presentados al árbitro, (2) a través de una audiencia
telefónica o (3) por una audiencia en persona, según lo establecido por las Normas de la AAA. Si su reclamo
excede $25,000, el derecho a una audiencia estará determinado por las Normas de la AAA. Cualquier audiencia
de arbitraje en persona se realizará en un lugar dentro del distrito judicial federal en el cual resida, a menos que
ambos acuerden otra ubicación o estemos de acuerdo con el arbitraje telefónico.
Exclusión. Usted puede quedarse fuera de este procedimiento de resolución de la disputa. Si se excluye,
ni usted ni LG pueden solicitar al otro que participe en un procedimiento de arbitraje. Para excluirse usted
debe enviar una notificación a LG, en un lapso de hasta 30 días continuos, contados a partir de la fecha de la
primera compra del consumidor del producto, ya sea por: (i) el envío de un correo electrónico a optout@lge.
com con el siguiente Asunto: “Exclusión del arbitraje” o (ii) llamada al 1-800-980-2973. Debe incluir en el correo
electrónico de exclusión o suministrar por teléfono: (a) su nombre y dirección; (b) la fecha en la cual el producto
fue comprado; (c) el nombre o el número del modelo del producto; y (d) el número del serial (el número del
serial puede ser hallado (i) en el producto, o (ii) en la dirección de https://www.lg.com/us/support/repair-service/
schedule-repair-continued al hacer clic en “Find My Model & Serial Number”).
Sólo puede excluirse del procedimiento de resolución de conflictos en la forma descrita anteriormente (es decir,
por correo electrónico o por teléfono); ninguna otra forma de notificación será efectiva para hacerlo. Excluirse
de este procedimiento de resolución de controversias no afectará de ninguna manera la cobertura de la
Garantía Limitada, por lo que usted continuará disfrutando de todos sus beneficios. Si conserva este producto y
no se excluye, usted acepta todos los términos y condiciones de la cláusula de arbitraje descrita anteriormente.
Page 93

GARANTÍA LIMITADA
ESPAÑOL
45
PARA CANADÁ
AVISO DE ARBITRAJE: ESTA GARANTÍA LIMITADA CONTIENE UNA CLÁUSULA DE ARBITRAJE QUE LE
DEMANDA A USTED Y A LG A RESOLVER CONFLICTOS A TRAVÉS DE UN ARBITRAJE VINCULANTE EN
LUGAR DE HACERLO EN LA CORTE, A MENOS QUE LA LEY EN SU PROVINCIA O TERRITORIO NO LO
PERMITA O QUE, EN OTRAS JURISDICCIONES, USTED DECIDA NO PARTICIPAR. EN EL ARBITRAJE NO
ESTÁN PERMITIDAS LAS ACCIONES COLECTIVAS NI LOS JUICIOS CON JURADO. POR FAVOR VEA A
CONTINUACIÓN LA SECCIÓN TITULADA "PROCEDIMIENTO PARA RESOLVER CONFLICTOS".
Si su Refrigerador LG ("Producto") falla debido a defectos en los materiales o en la mano de obra bajo
condiciones normales y apropiadas de uso, durante el período de garantía expresado a continuación, LG
Electronics Canadá, Inc. ("LGECI") llevará a cabo, a su criterio, la reparación o el reemplazo del producto
una vez se haya presentado el recibo original de compra. Esta garantía limitada es válida únicamente para
el comprador original del producto y aplica únicamente a productos distribuidos, comprados y utilizados en
Canadá, según lo determinado a discreción de LGECI.
PERÍODO DE GARANTÍA (Nota: Si la fecha original de compra no pudiera ser verificada, la vigencia de
la garantía comenzará sesenta (60) días a partir de la fecha de manufactura)
Refrigerador
Un (1) año a partir de
la fecha original de
compra
Piezas y mano de obra
(solo piezas internas/
funcionales)
Sistema Sellado (Condensador, Filtro
desecante, Tubo Conector y Evaporador)
Un (1) año a partir de
la fecha original de
compra
Piezas y mano de
obra
Siete (7) años a partir
de la fecha original de
compra
Solo piezas (Se le
cobrará mano de obra al
consumidor)
Compresor Lineal / Inversor
Diez (10) años a partir de la
fecha original de compra
Solo piezas (Se le cobrará mano
de obra al consumidor)
• Los productos y las piezas de repuesto están garantizados durante el tiempo restante del período original de
garantía o noventa (90) días, lo que resulte mayor.
• Los productos y las piezas de repuesto pueden ser nuevos, reacondicionados, renovados, o refabricados,
todo esto a discreción de LGECI.
• A manera de obtener el servicio de garantía bajo esta Garantía Limitada, se requiere prueba de la compra
original del producto especificando el modelo del mismo y la fecha de compra.
LA RESPONSABILIDAD EXCLUSIVA DE LGECI SE LIMITA A LA GARANTÍA LIMITADA ARRIBA
EXPRESADA. SALVO LO EXPRESAMENTE PROVISTO MÁS ARRIBA, LGECI NO OTORGA Y POR LA
PRESENTE NIEGA TODA OTRA GARANTíA O CONDICIÓN RESPECTO AL PRODUCTO, EXPRESA
O IMPLÍCITA, INCLUYENDO A TÍTULO ENUNCIATIVO MÁS NO LIMITATIVO CUALQUIER GARANTÍA
O CONDICIÓN DE COMERCIABILIDAD, O APTITUD PARA UN FIN PARTICULAR; Y NINGUNA
DECLARACIÓN SERÁ VINCULANTE PARA LGECI. LGECI NO AUTORIZA A NINGUNA PERSONA A
CREAR O ASUMIR EN SU NOMBRE CUALQUIER OTRA OBLIGACIÓN DE GARANTÍA EN RELACIÓN CON
EL PRODUCTO. EN LA MEDIDA EN QUE TODA GARANTÍA O CONDICIÓN ES IMPLÍCITA DE ACUERDO
A LA LEY, ÉSTA SE LIMITA AL PERÍODO DE GARANTÍA EXPRESADO PREVIAMENTE. BAJO NINGUNA
CIRCUNSTANCIA SERÁ LGECI, EL FABRICANTE, O DISTRIBUIDOR, RESPONSABLE POR DAÑOS
INCIDENTALES, CONSECUENTES, ESPECIALES, DIRECTOS O INDIRECTOS, DAÑOS PUNITIVOS O
EJEMPLARES, INCLUYENDO, SIN LIMITARSE A, PÉRDIDA DE USO O CUALQUIER OTRO DAÑO, YA
SEA QUE SURJA DIRECTA O INDIRECTAMENTE DE CUALQUIER INCUMPLIMIENTO CONTRACTUAL,
FUNDAMENTAL, PERJUICIO, O POR CUALQUIER ACCIÓN U OMISIÓN. TODA RESPONSABILIDAD DE
LGECI, EN CASO EXISTIR, NO DEBERÁ EXCEDER EL PRECIO QUE USTED HAYA PAGADO POR EL
PRODUCTO.
Esta Garantía Limitada le otorga derechos legales específicos. Usted podría contar con otros derechos,
que pueden variar de provincia a provincia, dependiendo de las leyes provinciales aplicables. Todo término
incluido en esta Garantía Limitada que niegue o modifique cualquier condición o garantía implícita sujeto a la
ley provincial es divisible y separable cuando entre en conflicto con la ley provincial sin afectar el resto de los
términos de esta garantía.
Page 94

GARANTÍA LIMITADA
46
ESTA GARANTÍA LIMITADA NO CUBRE LO SIGUIENTE:
• Viajes del servicio técnico para i) entregar, buscar, instalar o; educar al cliente sobre la operación del
Producto; ii) corrección de cableado o fontanería; ó iii) corrección de reparaciones/instalaciones no
autorizadas en el Producto;
• Dañas o fallos en el funcionamiento del Producto debido a fallas e interrupciones del suministro eléctrico o a
un servicio eléctrico inadecuado;
• Daños o fallos causados por tuberías de agua rotas o con fugas, tuberías de agua congeladas, líneas de
desagüe restringidas, suministro de agua inadecuado o interrumpido, o suministro de aire inadecuado;
• Daños o fallos resultantes de operar el producto en una atmósfera corrosiva o contraria a las instrucciones
detalladas en el manual del propietario del Producto;
• Daños o fallas del Producto causados por accidentes, pestes y alimañas, rayos, viento, incendio,
inundaciones, hechos de fuerza mayor, o por cualquier otra causa fuera del control de LGECI o del fabricante;
• Daño o fallo causado por el mal uso, abuso, instalación, reparación o mantenimiento inapropiados del
Producto. La reparación inapropiada incluye la utilización de piezas no autorizadas o especificadas por
LGECI. El mantenimiento o la instalación inapropiada incluye todo aquel llevado a cabo de forma contraria a
lo expresado en el manual del propietario del Producto;
• Daño o fallo causado por la modificación o alteración no autorizada del Producto, o si se ha utilizado para otro
propósito/uso que no fuera el doméstico previsto, o daños o fallos provocados por cualquier pérdida de agua
ocasionada por una instalación inapropiada del Producto;
• Daño o fallo causado por corriente eléctrica o voltaje incorrectos, o códigos de cañería;
• Daño o fallo causado por un uso distinto al normal hogareño, incluyendo, sin limitación, el uso comercial
o industrial, incluyendo aquel en oficinas comerciales o instalaciones de recreación, o contrario a las
instrucciones incluidas en el manual del propietario del Producto.
• Daño o fallo causado por el uso de cualquier accesorio, componente o producto de limpieza no aprobado/
autorizado por LGECI, incluyendo, sin limitarse a, filtros de agua;
• Reemplazo del cartucho del filtro de agua debido a, presión del agua fuera del rango de operación
específicado o, a cantidades excesivas de sedimento en el suministro de agua;
• Daño o fallo causado por el transporte y el manejo, incluye rayas, muescas, astillado y otros daños al
acabado del Producto, a menos que tales daños resulten de defectos de materiales o de fabricación, y se
informe a LGECI dentro del plazo de una (1) semana de la entrega del Producto.
• Daño o elementos faltantes de cualquier producto de exposición, caja abierta, restaurado o de descuento;
• Producto restaurado o vendido como "En el estado actual", "En el sitio actual", "Con todos sus defectos", o
con cualquier aviso similar;
• Productos con números de serie originales que hayan sido removidos, alterados o que no pueden ser
fácilmente determinados a discreción de LGECI;
• Aumentos en los costos de los servicios públicos y otros gastos adicionales relacionados de cualquier manera
con el Producto;
• Cualquier ruido asociado con la operación normal del Producto;
• Reemplazo de bombillas, filtros, fusibles o cualquier otra parte consumible;
• Reemplazo de cualquier parte que no haya sido incluida originalmente con el Producto;
• Gastos relacionados con la retirada y/o reinstalación del Producto para reparación; y
• Estantes, bandejas de puerta, cajones, manijas y accesorios del Producto, a excepción de las partes internas/
funcionales cubiertas bajo esta Garantía Limitada.
• Se proveerá cobertura para reparaciones "en casa" a aquellos productos con garantía que se encuentren
dentro de un radio de 150 km desde el centro de servicio autorizado (ASC) más cercano, según ha sido
determinado por LG Canada. Si su Producto se encuentra ubicado fuera del radio de 150 km a partir del ASC,
según ha sido determinado por LG Canada, será su responsabilidad llevar el Producto, y cubrir los gastos
que esto implique, al ASC para una reparación bajo garantía en dicho centro.
Page 95

GARANTÍA LIMITADA
ESPAÑOL
Todos los costos y gastos asociados con las circunstancias de exclusión mencionadas
anteriormente, listadas bajo el título, Esta Garantía Limitada No Cubre, serán abonados por
el consumidor.
PARA OBTENER SERVICIO DE GARANTÍA E INFORMACIÓN ADICIONAL, POR FAVOR LLAME O VISITE
NUESTRO SITIO WEB:
Comuníquese al 1-888-542-2623 y seleccione la opción apropiada del menú, o visite nuestro sitio web en
http://www.lg.com
47
Page 96

48
MEMORÁNDUM
Page 97

MEMORÁNDUM
49
Page 98

50
MEMORÁNDUM
Page 99

MANUEL DU PROPRIÉTAIRE
CAVE À VIN
Veuillez lire attentivement le présent manuel de lʼutilisateur avant de faire fonctionner
lʼappareil et conservez-le à portée de la main pour le consulter en tout temps.
FRANÇAIS
Copyright © 2019 LG Electronics Inc. Tous droits réservés
www.lg.com
Page 100

TABLE DES MATIÈRES
2
3 CONSIGNES DE SÉCURITÉ
3 CONSIGNES DE SÉCURITÉ IMPORTANTES
8 APERÇU DU PRODUIT
8 Caractéristiques du produit
8 Extérieur
9 Intérieur
11 INSTALLATION
11 Aperçu de lʼinstallation
11 Déballage du réfrigérateur
12 Choix de l’emplacement adéquat
13 Dimensions et dégagements
14 Nivellement
14 Mise en marche
15 FONCTIONNEMENT
15 Avant l’utilisation
16 Panneau de contrôle
19 Mode Sabbat
20 Conservation du vin
21 Tablettes de rangement
24 Porte InstaView
24 Stockage des aliments
26 Dispositif de soulèvement automatique
35 DÉPANNAGE
35 Foire aux questions
36 Avant dʼappeler le réparateur
42 GARANTIE LIMITÉE
42 POUR ÉTATS-UNIS
44 POUR CANADA
28 FONCTIONS INTELLIGENTES
28 Application LG ThinQ
30 Utilisation de l’assistance vocale
32 Fonction Smart Diagnosis
MC
33 ENTRETIEN
33 Nettoyage
34 Filtre à air
 Loading...