

OWNER’S MANUAL
AIR
CONDITIONER
E
NG
L
IS
H
E
S
P
A
Ñ
O
L
Please read this manual carefully before operating
your set and retain it for future reference.
TYPE : Ceiling Concealed Duct
MODEL : UB-H368GSS0 UB-H608RSS0
MFL69135901
www.lg.com
TIPS FOR SAVING ENERGY
2
ENGLISH
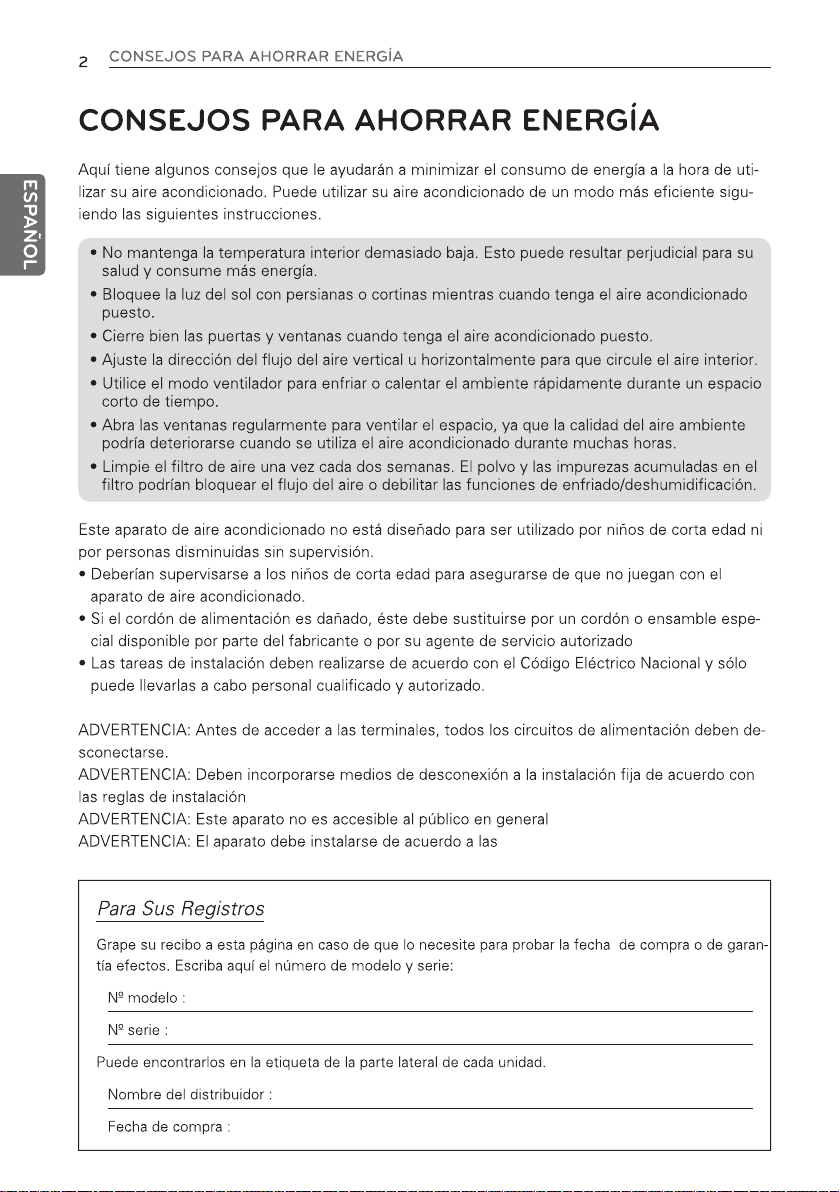
TIPS FOR SAVING ENERGY
Here are some tips that will help you minimize the power consumption when you use the air
conditioner. You can use your air conditioner more efficiently by referring to the instructions
below:
• Do not cool excessively indoors. This may be harmful for your health and may consume more
electricity.
• Block sunlight with blinds or curtains while you are operating the air conditioner.
• Keep doors or windows closed tightly while you are operating the air conditioner.
• Adjust the direction of the air flow vertically or horizontally to circulate indoor air.
• Speed up the fan to cool or warm indoor air quickly, in a short period of time.
• Open windows regularly for ventilation as the indoor air quality may deteriorate if the air conditioner is used for many hours.
• Clean the air filter once every 2 weeks. Dust and impurities collected in the air filter may block the
air flow or weaken the cooling / dehumidifying functions.
For your records
Staple your receipt to this page in case you need it to prove the date of purchase or for warranty
purposes. Write the model number and the serial number here:
Model number :
Serial number :
You can find them on a label on the side of each unit.
Dealer’s name :
Date of purchase :
SAFETY PRECAUTIONS
IMPORTANT SAFETY INSTRUCTIONS
READ ALL INSTRUCTIONS BEFORE USING THE APPLIANCE.
Always comply with the following precautions to avoid dangerous situations and ensure peak
performance of your product
WARNING
!
It can result in serious injury or death when the directions are ignored
CAUTION
!
It can result in minor injury or product damage when the directions are ignored
WARNING
!
• Use two or more people to lift and transport the product. Avoid personal injury.
• The information contained in the manual is intended for use by a qualified service technician
familiar with safety procedures and equipped with the proper tools and test instruments.
• Failure to carefully read and follow all instructions in this manual can result in equipment malfunction, property damage, personal injury and/or death.
Installation
• Do not use a defective or underrated circuit breaker. Use this appliance on a dedicated circuit.
- There is risk of fire or electric shock.
• For electrical work, contact the dealer, seller, a qualified electrician, or an Authorized Service Center.
- Do not disassemble or repair the product. There is risk of fire or electric shock.
• Always ground the product.
- There is risk of fire or electric shock.
• Install the panel and the cover of control box securely.
- There is risk of fire or electric shock.
• Always install a dedicated circuit and breaker.
- Improper wiring or installation may cause fire or electric shock
• Use the correctly rated breaker or fuse.
- There is risk of fire or electric shock.
• Use the specified wires to connect the unit.
- There is risk of fire or electric shock.
• Do not install, remove, or re-install the unit by yourself (customer).
- There is risk of fire, electric shock, explosion, or injury.
• Be cautious when unpacking and installing the product.
- Sharp edges could cause injury. Be especially careful of the case edges and the fins on the con-
denser and evaporator.
• For installation, always contact the dealer or an Authorized Service Center.
- There is risk of fire, electric shock, explosion, or injury.
• Do not install the product on a defective installation stand.
- It may cause injury, accident, or damage to the product.
• Be sure the installation area does not deteriorate with age.
- If the base collapses, the air conditioner could fall with it, causing property damage, product failure,
and personal injury.
3
ENGLISH

4
ENGLISH
• Do not let the air conditioner run for a long time when the humidity is very high and a door or a win-
Operation
• Take care to ensure that power cable could not be pulled out or damaged during operation.
• Do not place anything on the power cable.
• Do not plug or unplug the power supply plug during operation.
• Do not touch(operate) the product with wet hands.
• Do not place a heater or other appliances near the power cable.
• Do not allow water to run into electric parts.
• Do not store or use flammable gas or combustibles near the product.
• Do not use the product in a tightly closed space for a long time.
• When flammable gas leaks, turn off the gas and open a window for ventilation before turn the prod-
• If strange sounds, or small or smoke comes from product. Turn the breaker off or disconnect the
• Stop operation and close the window in storm or hurricane. If possible, remove the product from the
• Do not open the panel of the product during operation. (Do not touch the electrostatic filter, if the
• When the product is soaked (flooded or submerged), contact an Authorized Service Center.
• Be cautious that water could not enter the product.
• Ventilate the product from time to time when operating it together with a stove, etc.
• Turn the main power off when cleaning or maintaining the product.
• When the product is not be used for a long time, disconnect the power supply plug or turn off the
• Take care to ensure that nobody could step on or fall onto the unit.
SAFETY PRECAUTIONS
dow is left open. Moisture may condense and wet or damage furniture.
- There is risk of fire or electric shock.
- There is risk of fire or electric shock.
- There is risk of fire or electric shock.
- There is risk of fire or electrical shock.
- There is risk of fire and electric shock.
- It may cause failure of the product or electric shock.
- There is risk of fire or failure of product.
- Oxygen deficiency could occur.
uct on.
- Do not use the telephone or turn switches on or off. There is risk of explosion or fire
power supply cable.
- There is risk of electric shock or fire.
window before the hurricane arrives.
- There is risk of property damage, failure of product, or electric shock.
unit is so equipped.)
- There is risk of physical injury, electric shock, or product failure.
- There is risk of fire or electric shock.
- There is risk of fire, electric shock, or product damage.
- There is risk of fire or electric shock.
- There is risk of electric shock.
breaker.
- There is risk of product damage or failure, or unintended operation.
- This could result in personal injury and product damage.

SAFETY PRECAUTIONS
CAUTION
!
Installation
• Always check for gas (refrigerant) pressure after installation or repair of product.
- Low refrigerant levels may cause failure of product.
• Install the drain hose to ensure that water is drained away properly.
- A bad connection may cause water leakage.
• Keep level even when installing the product.
- To avoid vibration or water leakage.
• Do not install the product where the noise or hot air from the outdoor unit could damage the neigh-
borhoods.
- It may cause a problem for your neighbors.
• Use two or more people to lift and transport the product. Avoid personal injury.
• Do not install the product where it will be exposed to sea wind (salt spray) directly.
- It may cause corrosion on the product. Corrosion, particularly on the condenser and evaporator
fins, could cause product malfunction or inefficient operation.
Operation
• Do not expose the skin directly to cool air for long periods of time. (Don't sit in the draft.)
- This could harm to your health.
• Do not use the product for special purposes, such as preserving foods, works of art, etc. It is a consumer air conditioner, not a precision refrigeration system.
- There is risk of damage or loss of property.
• Do not block the inlet or outlet of air flow.
- It may cause product failure.
• Use a soft cloth to clean. Do not use harsh detergents, solvents, etc.
- There is risk of fire, electric shock, or damage to the plastic parts of the product.
• Do not touch the metal parts of the product when removing the air filter. They are very sharp!
- There is risk of personal injury.
• Do not step on or put anything on the product. (outdoor units)
- There is risk of personal injury and failure of product.
• Always insert the filter securely. Clean the filter every four weeks or more often if necessary.
- A dirty filter reduces the efficiency of the air conditioner and could cause product malfunction or
damage.
• Do not insert hands or other objects through the air inlet or outlet while the product is operated.
- There are sharp and moving parts that could cause personal injury.
• Do not drink the water drained from the product.
- It is not sanitary and could cause serious health issues.
• Use a firm stool or ladder when cleaning or maintaining the product.
- Be careful and avoid personal injury.
• Replace the all batteries in the remote control with new ones of the same type. Do not mix old and
new batteries or different types of batteries. There is rik of fire or explosion.
• Do not recharge or disassemble the batteries. Do not dispose of batteries in a fire. They may burn or
explode.
• If the liquid from the batteries gets onto your skin of blothes, wash it well wih clean water. Do not
use the remote if the batteries have leaked. The chemicals in batteries could cause burns or other
health hazards.
• If you eat the liquid from the batteries, bruch your teeth and see doctor. Do not use the remote if
the batteries have leaked. The chemicals in batteries could cause burns or other health hazards.
5
ENGLISH

PRODUCT INTRODUCTION
BEFORE USE
Preparing for operation
• Contact an installation specialist for installation.
• Use a dedicated circuit.
Usage
• Being exposed to direct airflow for an extended period of time could be hazardous to your
health. Do not expose occupants, pets, or plants to direct airflow for extended periods of time.
• Due to the possibility of oxygen deficiency, ventilate the room when used together with stoves
or other heating devices.
• Do not use this air conditioner for non-specified special purposes (e.g. preserving precision devices, food, pets, plants, and art objects). Such usage could damage the items.
Cleaning and maintenance
• Do not touch the metal parts of the unit when removing the filter. Injuries can occur when handling sharp metal edges.
• Do not use water to clean inside the air conditioner. Exposure to water can destroy the insulation, leading to possible electric shock.
• When cleaning the unit, first make sure that the power and breaker are turned off. The fan rotates at a very high speed during operation. There is a possibility of injury if the unit’s power is
accidentally triggered on while cleaning inner parts of the unit.
7
ENGLISH
Service
For repair and maintenance, contact your authorized service dealer.

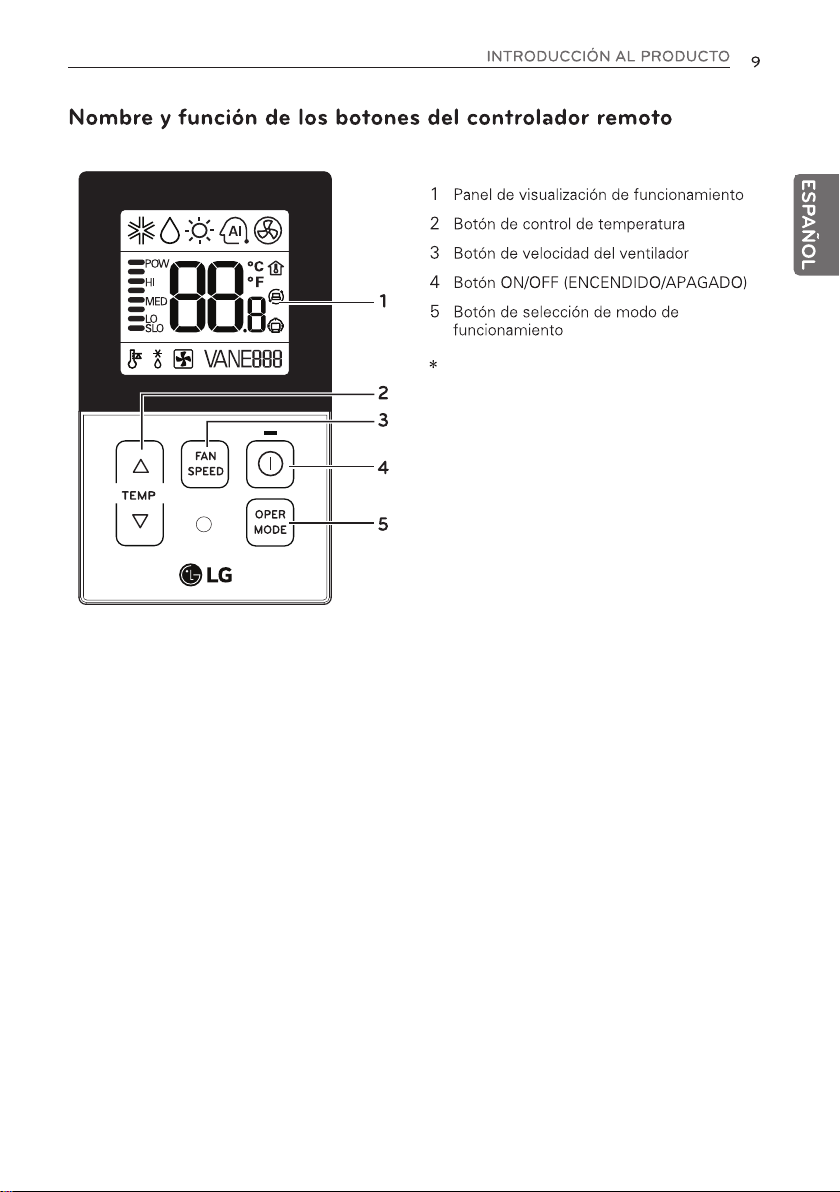
Simple Wired Remote Controller
TEMP
FAN
SPEED
OPER
MODE
2
3
4
5
1
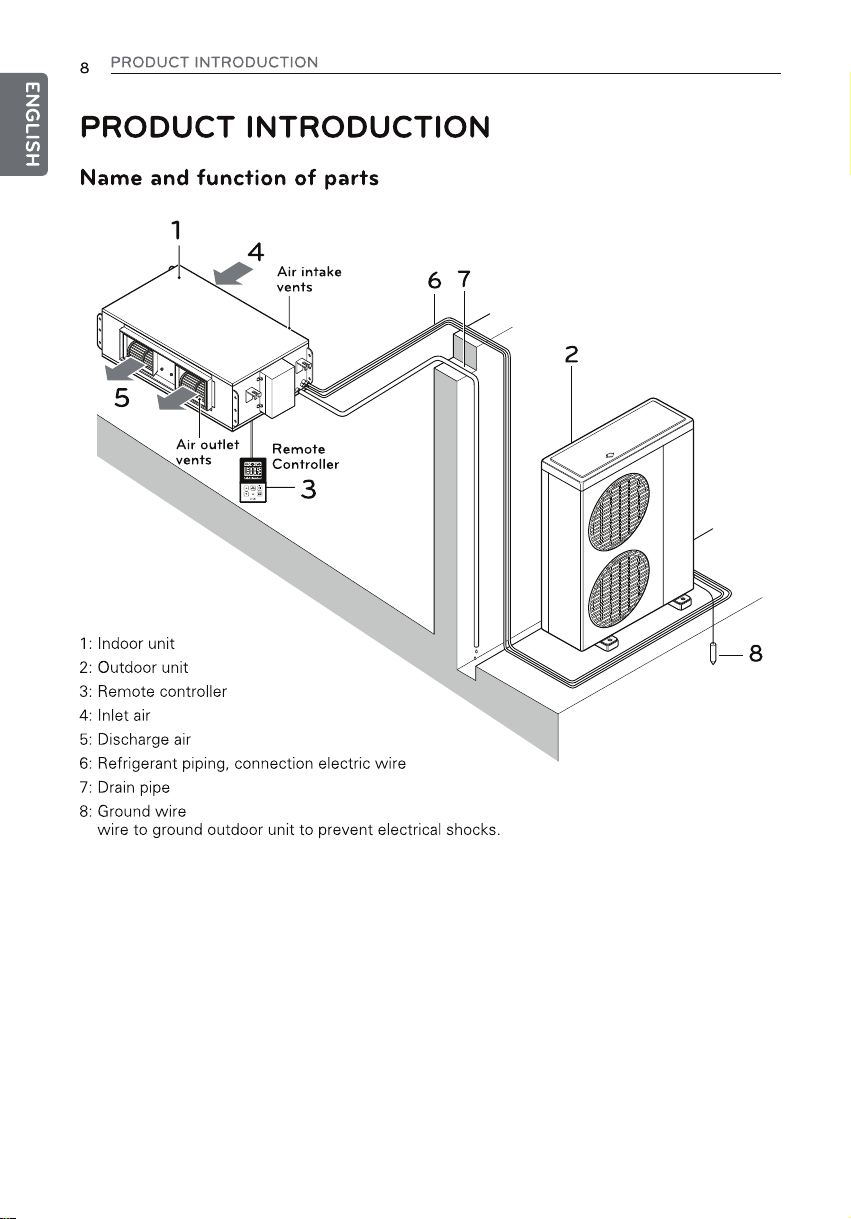
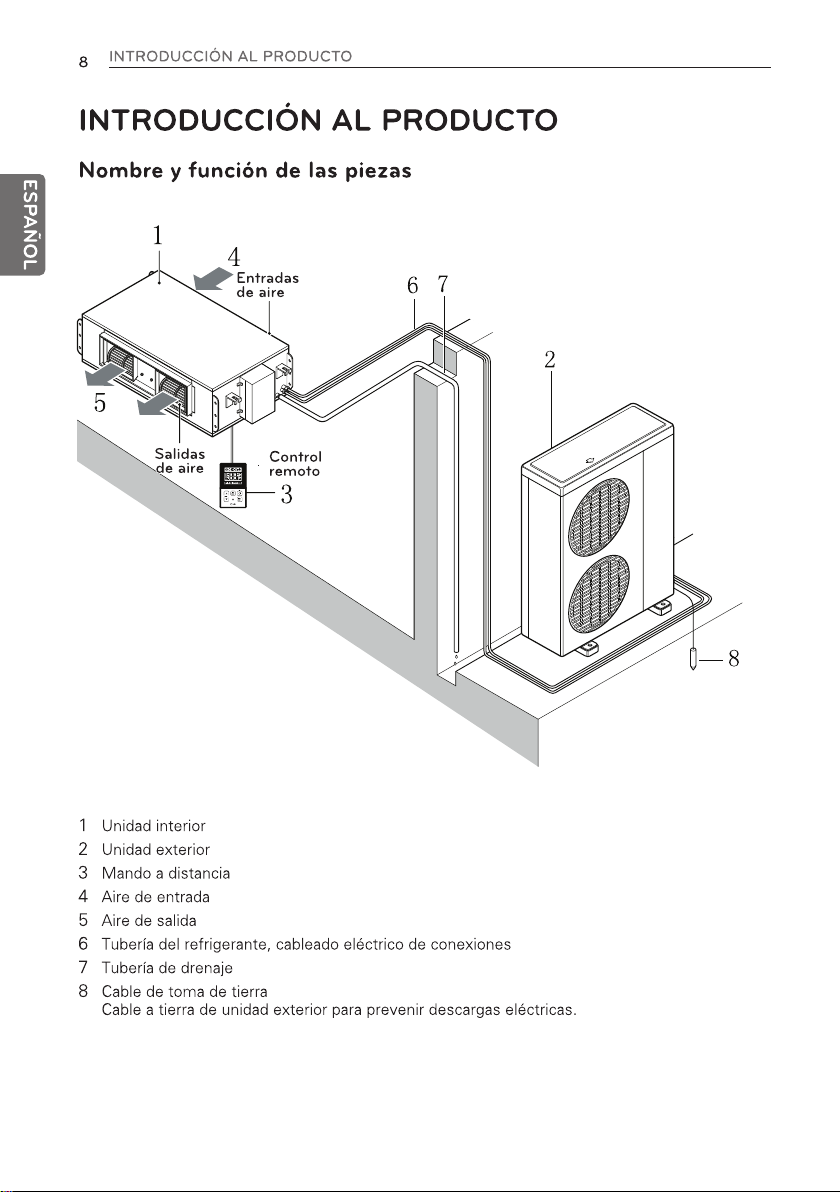
PRODUCT INTRODUCTION
1 Operation Display Panel
2 Temperature Control Button
3 Fan Speed Button
4 On/Off Button
5 Operation Mode select Button
* Each function will be shown on the dis-
play panel for three seconds or so
when the power is applied at first.
9
ENGLISH
OWNER'S INSTRUCTION
10
ENGLISH
OWNER'S INSTRUCTION
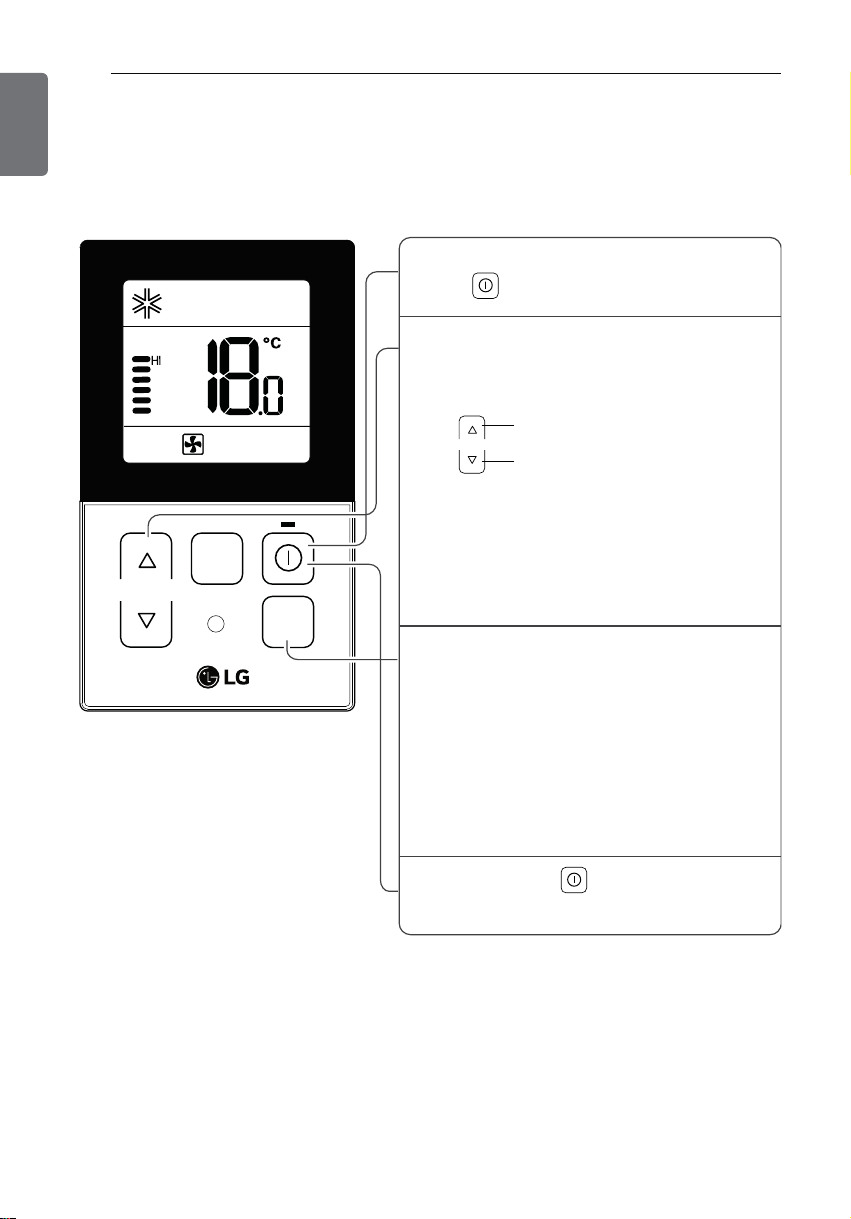
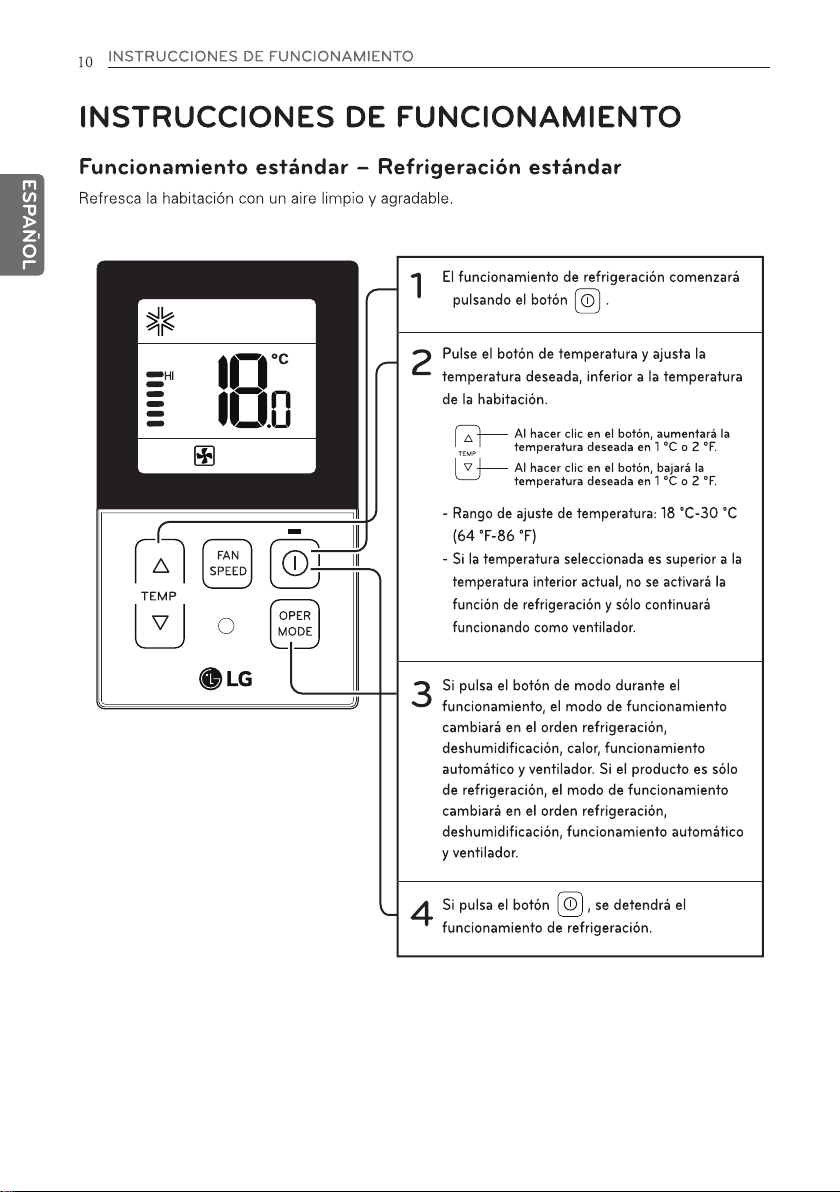
Standard Operation - Cooling Mode
It cools the room by comfortable and clean wind.
FAN
SPEED
TEMP
OPER
MODE
Cooling operation will begin if you press
1
the button.
Press the temperature button and set the
2
desired room temperature lower than the
current room temperature.
A click of the button will increase the
desired temperature by 1 °C or 2 °F.
TEMP
A click of the button will decrease the
desired temperature by 1 °C or 2 °F.
-
Setting temp range : 18 °C~30 °C (64 °F~86 °F)
- If the desired temperature is set higher
than the current room temperature, the
cooling function will not begin and just the
blowing operation will continue.
If you press the mode button during the
3
operation, the operation mode will be
changed in the order of cooling,
dry(dehumidification),heating,auto-operation
and fan operation. If the product is a
cooling-only model, the operation mode will
be changed in the order of cooling,
dry(dehumidification), auto-operation and fan
operation.
If you press the button, the cooling
4
operation will stop.
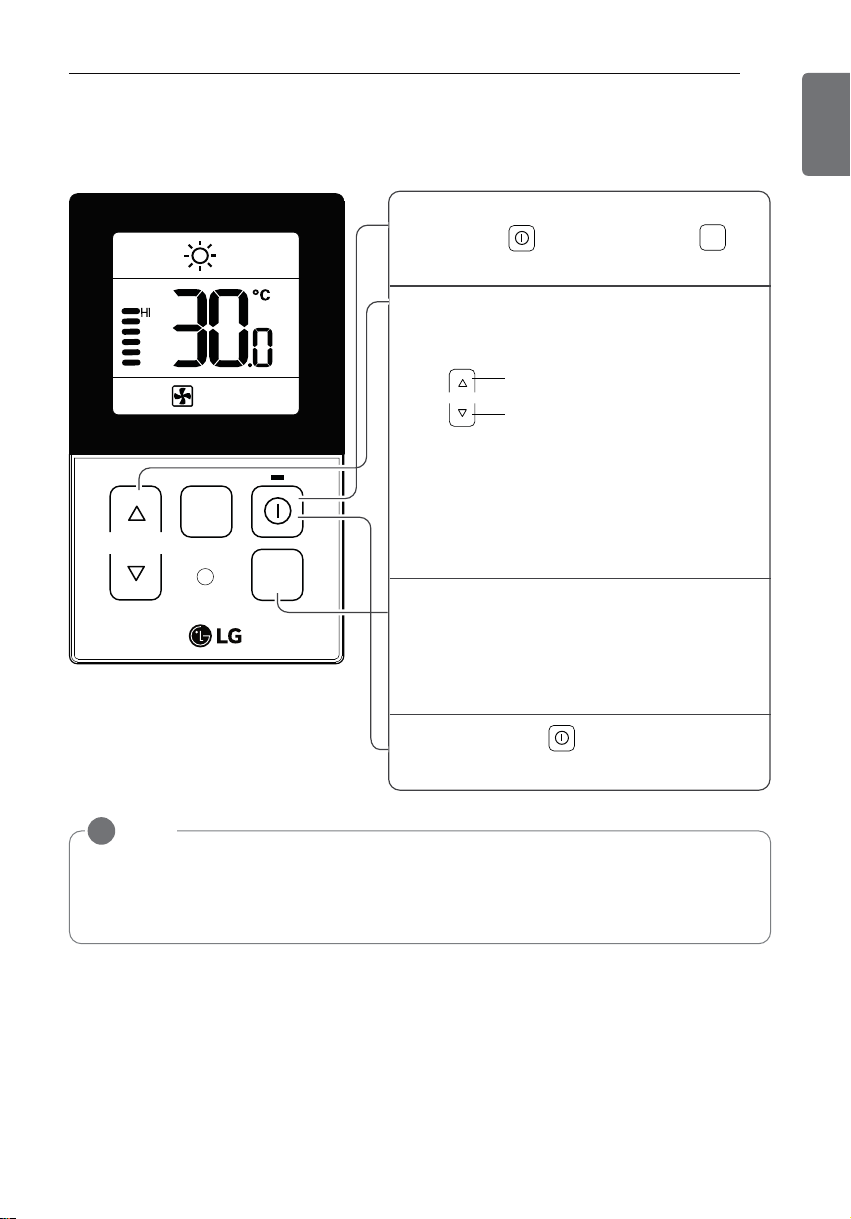
Standard Operation - Heating Mode
It supplies warm wind to the indoor
If you want to set the heating operation,
1
press the button. And press the
button.
Set the desired room temperature higher
2
than the current room temperature.
-
FAN
SPEED
TEMP
OPER
MODE
- If the desired temperature is set lower
If you press the mode button during the
3
operation, the operation mode will be
changed in the order of cooling,
dry(dehumidification),heating,auto-operation
and fan operation.
OWNER'S INSTRUCTION
A click of the button will increase the
desired temperature by 1 °C or 2 °F.
TEMP
A click of the button will decrease the
desired temperature by 1 °C or 2 °F.
Setting temp range : 16 °C~30 °C (60 °F~86 °F)
than the current room temperature, the
heating function will not begin.
OPER
MODE
11
ENGLISH
If you press the button, the cooling
4
operation will stop.
NOTE
!
What is the three-minute delay function?
It will take time for the product to blow warm air. The delay is to protect the compressor.
The room will be heated with warm air after three minutes when the compressor begins operation.
* The cooling-only model will not do heating function.
OWNER'S INSTRUCTION
12
ENGLISH
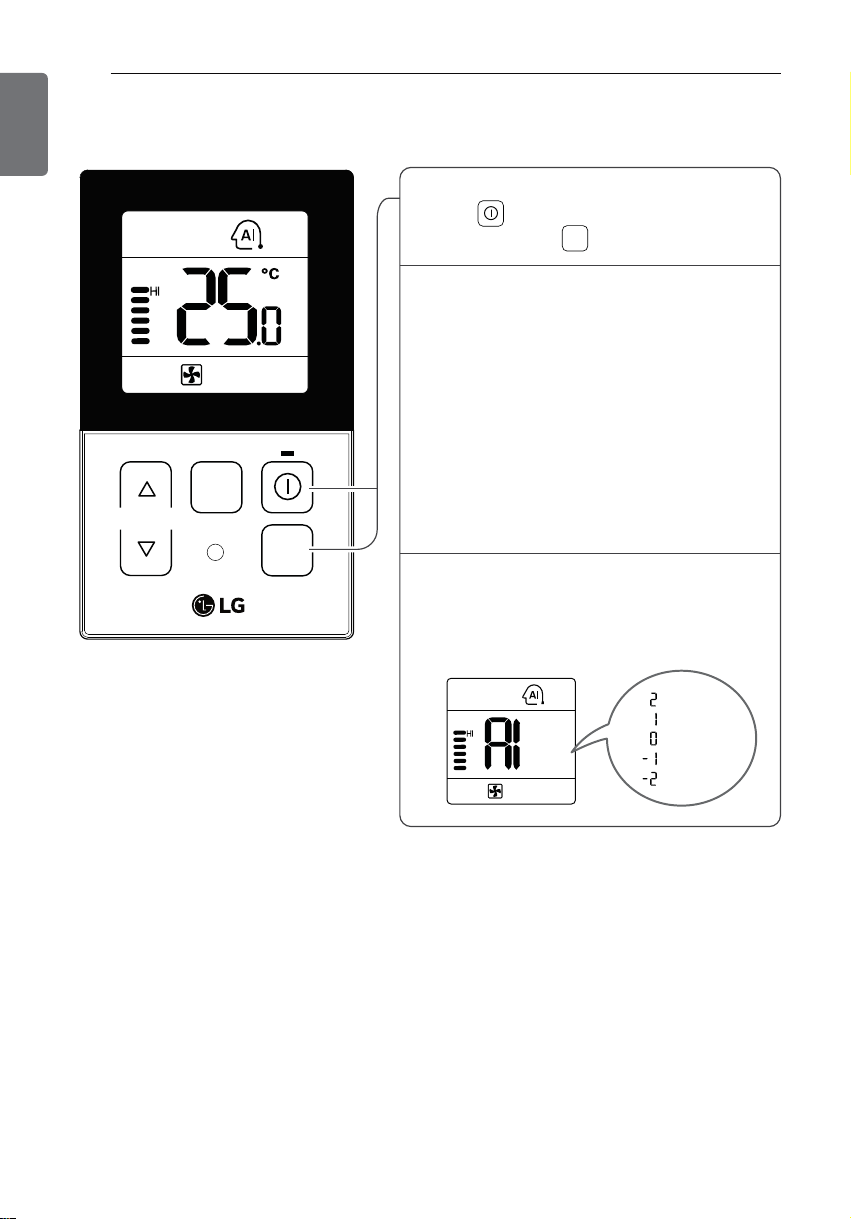
Standard Operation - Auto Operation Mode
1
2
FAN
SPEED
TEMP
OPER
MODE
3
After operating the product by pressing
the button, set up the auto operation
by pressing the button.
“Auto Change Over Mode” – Heat pump model only
When desired the set temperature is higher than the
room temperature during the auto operation
=> Heating operation
[For Heat pump models only]
When desired the set temperature is lower than the
room temperature during the auto operation
=> Cooling operation
- Setting temp range : 18 °C~30 °C (64 °F~86 °F)
“Auto Operation Mode”
For the products with the exclusive purpose
of cooling only, “AI” is indicated at the
temperature display section.
OPER
MODE
When cold
When cool
When appropriate
When warm
When hot
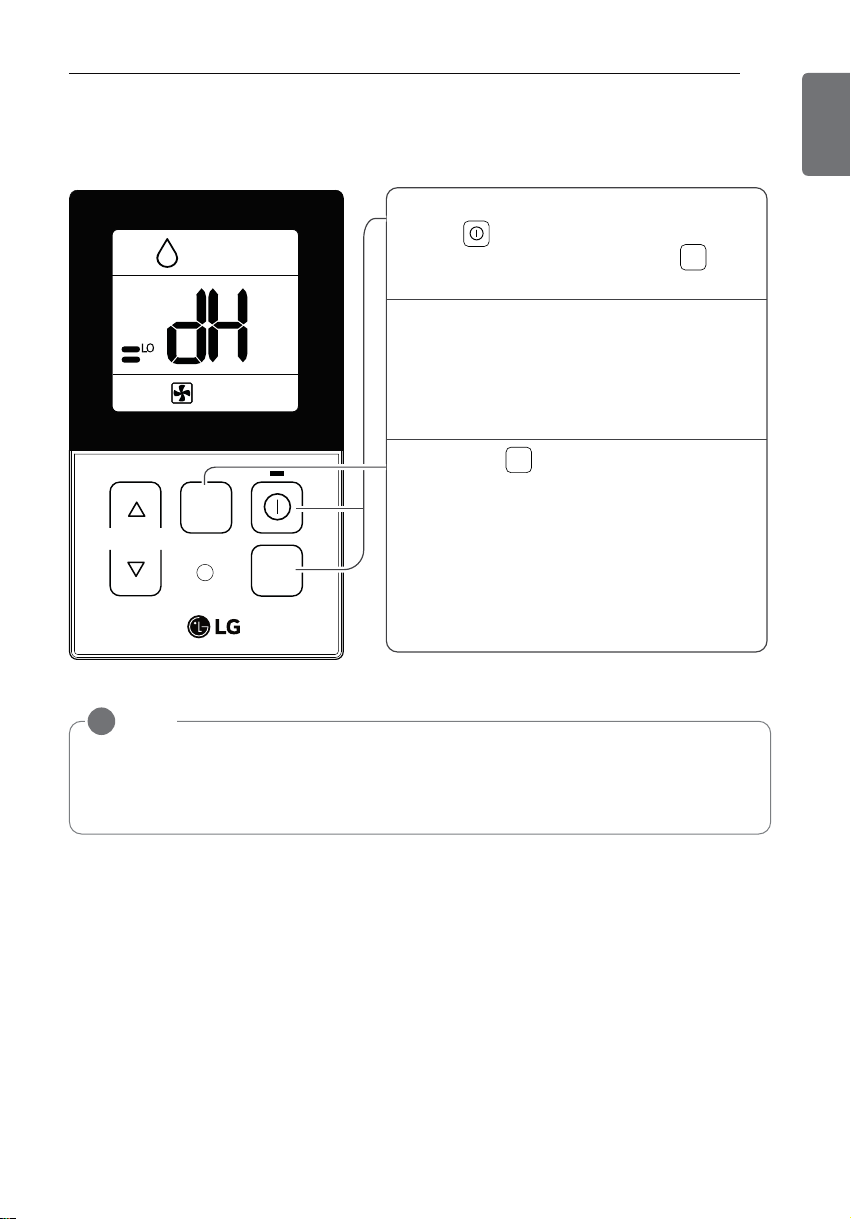
Standard Operation - Dehumidification Mode
It removes humidity while air-cooling weakly.
After operating the product by pressing
1
the button, set up the dry
button.
When the dry operation is selected, “dh”
2
will be shown on the display window as
shown on the left side.
- The temperature setting can not be
adjusted during operation this mode.
FAN
SPEED
TEMP
FAN
SPEED
OPER
MODE
3
[ LOMEDHI ].
- The initial wind powerfulness of humidity
removal drive is ‘weak’.
OWNER'S INSTRUCTION
OPER
MODE
13
ENGLISH
NOTE
!
• In rainy season or high humidity climate, it is possible to operate simultaneously dehumidifier and cooling mode to remove humidity effectively.
• The menu item of wind powerfulness might not be partially selected according to the product.

OWNER'S INSTRUCTION
14
ENGLISH
Standard Operation - Fan Mode
It blows the air as it is in the indoor, not the cold wind.
FAN
SPEED
TEMP
OPER
MODE
After operating the product by pressing
1
the button, set up the fan operation by
pressing the button.
When the dry operation is selected, “Fn”
2
will be shown on the display window as
shown on the left side.
- The temperature setting can not be
adjusted during operation this mode.
Press the button to select airflow rate
3
[ LOMEDHI ].
When running ventilation, compressor of
AHU doesn’t work.
FAN
SPEED
OPER
MODE
NOTE
!
• Ventilation drive does not release cool wind but general fan.
• Because it releases the wind that has no temperature difference from the room, it functions to circulate the inside air.
• The menu item of wind powerfulness might not be partially selected according to the product.

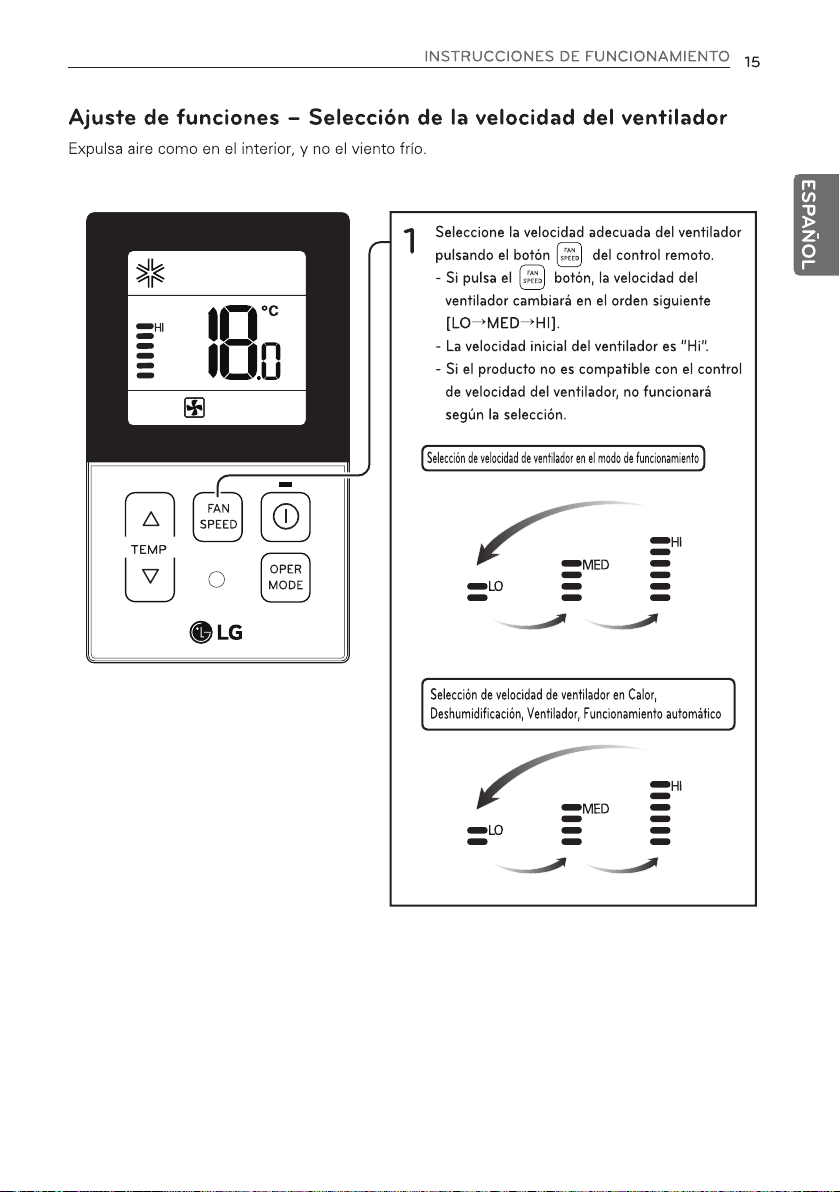
Function Setting - Fan Speed Selection
It blows the air as it is in the indoor, not the cold wind.
Select the proper fan speed which you want
1
by pressing the button on the remote
controller.
- If you press the button, the fan speed
will change in the order of [
].
H i
- The initial fan speed is “Hi”.
- If the product is not compatible with the fan
speed Control, it will not function as per
your selection.
Fan Speed Selection in Cooling Operation
FAN
SPEED
TEMP
OPER
MODE
OWNER'S INSTRUCTION
FAN
SPEED
LoMed
15
ENGLISH
Fan Speed Selection in Heating, Dry, Fan,
Auto-Operation


OWNER'S INSTRUCTION
TEMP
FAN
SPEED
OPER
MODE
During the operation, when pressing the
button and button for approx. 3 seconds,
the ‘Child Lock’ Function can be used.
-
At the time of initial setting of the ‘Child
Lock’, the ‘CL’ Will be indicated approx. 3
seconds at the temperature Display section
before resuming to the previous mode.
After the setting of the ‘CL’, if another button
is setup, the button can not be recognized as
the ‘CL’ is indicated at the temperature
display section for approx. 3 seconds.
1
If the ‘CL’ function is wanted to be used
under the operation standby state, press the
button and Button for approx.
3 seconds under the standby mode state
and the system will be the ‘CL’ state.
2
As for the releasing method, when pressing
the Button and button for approx.
3 seconds, the ‘CL’ function can be released.
3
FAN
SPEED
FAN
SPEED
FAN
SPEED
Function setting - Child Lock
It is the function to use preventing children or others from careless using.
17
ENGLISH

OWNER'S INSTRUCTION
18
ENGLISH
Function setting - Celsius / Fahrenheit Switching
This function is used for switching the display between Celsius and Fahrenheit.
(Optimized only for U.S.A)
When pressing the button and
1
button simultaneously for more than 3
seconds, the system will be entered into the
installer setting mode.
- After entering into the installer setting
mode, select the ceiling height setting code
value by pressing the oper-mode button.
* Celsius/Fahrenheit setting code value : 07
Select the desired setting value with the
2
temperature up(▲), down(▼) button.
OPER
MODE
FAN
SPEED
TEMP
OPER
MODE
When pressing button, currently
3
established celsius/Fahrenheit setting
value will be set up.
When pressing the button and
4
button simultaneously for more than 3
seconds after the setting has been
completed, the setting mode will be
released.
- If there isn’t any button input for more than
25 seconds, the installer setting mode will
also be released.
NOTE
!
• Whenever press temp up(▲), down(▼) button in Fahrenheit mode, the temperature will
increase/drop 2 degrees.
Code value
Value
*Setting value
00:Celsius
01:Fahrenheit
OPER
MODE
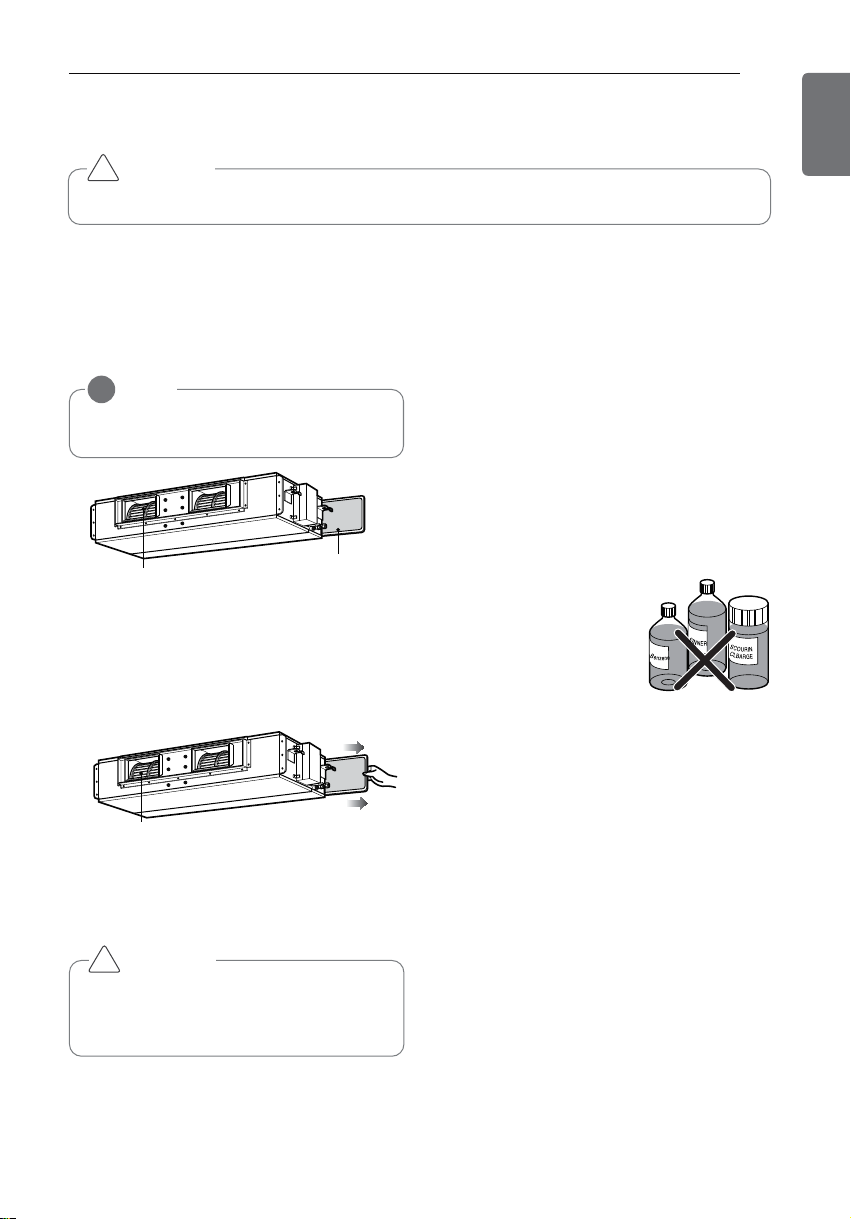
MAINTENANCE AND SERVICE
Air outlet vent
Air filters
Air outlet vent
MAINTENANCE AND SERVICE
CAUTION
!
Before performing any maintenance, turn off the main power to the system.
19
ENGLISH
Grille, Case, and Remote
Control
- Turn the system off before cleaning. To
clean, wipe with a soft, dry cloth. Do not use
bleach or abrasives.
NOTE
!
Supply power must be disconnected
before cleaning the indoor unit.
Air Filter
The air filters behind Indoor unit
(the suction side) should be checked and
cleaned once every 2 weeks or more often if
necessary.
2 Clean dirt from the air filter using a vacuum
cleaner or washing with water.
- If dirt is conspicuous, wash with a neutral
detergent in lukewarm water.
- If hot water (40 °C or more) is used, it
may be deformed.
3 After washing with water, dry well in the
shade.
- Do not expose the air filter to direct sunlight or heat from a fire when drying it.
4. Install the air filter.
Never use any of the followings:
- Water hotter than 40 °C
Could cause deformation and/or discoloration.
- Volatile substances
Could damage the surfaces
of the air conditioner.
1 Remove the Air filters.
- Take hold of the tab and pull slightly forward to remove the filter.
CAUTION
!
When the air filter is to be removed, do
not touch the metal parts of the indoor
unit. It may cause an injury.


MANUAL DEL PROPIETARIO
AIRE
ACONDICIONADO
Por favor lea este manual detenidamente antes de
utilizar su equipo y guárdelo para consultas futuras.
TIPO: Conducto empotrado en el techo
MODELO : UB-H368GSS0 UB-H608RSS0

refrigeración
Modo de
Control remoto sencillo con cable
calefacción
Modo de
Modo de
deshumidificación
Cambio
Centígrados / Fahrenheit
Rejilla, carcasa y control remoto
Filtro de aire
Cuando no funcione el aparato de aire
acondicionado
Cada función se mostrará en el panel
durante tres segundos o cuando se
encienda por primera vez.

Introduce viento caliente en la habitación
FAN
SPEED
TEMP
OPER
MODE
calefacción
Si desea seleccionar el funcionamiento de
1
calor, pulse el botón . Y pulse el botón
OPER
MODE
Ajuste la temperatura deseada superior a la
2
temperatura actual de la habitación.
l hacer clic en el botón, aumentará
la temperatura deseada en 1ºC o 2ºF.
TEMP
l hacer clic en el botón, bajará la
temperatura deseada en 1ºC o 2ºF.
-
Rango de ajuste de temperatura:
16 °C~30 °C (60 °F~86 °F)
- Si la temperatura se selecciona inferior
a la temperatura actual de la habitación,
no se activará la función
de calor.
Si pulsa el botón de modo durante el
3
funcionamiento, el modo de funcionamiento
cambiará en el orden refrigeración, seco
(deshumidificación), calor, funcionamiento
automático y ventilador.
Si pulsa el botón , se detendrá el
4
funcionamiento derefrigeración.
NOTA
!
Qué es la función de re tardo de tres minutos?
Es el tiempo necesario para que el producto sople aire cálido. El retardo protege el
compresor.La habitación se calentará con aire cálido después de tres minutos cuando
el compresor se ponga en funcionamiento.
* EI modo de sólo refrigeración no tiene la función de calor.

“Cambio automático de modo” – Sólo modelo de
bomba de calor
Cuando la temperatura seleccionada es superior a la
temperatura interior durante el funcionamiento
automático => Funcionamiento de calefacción
[Sólo para modelos de bomba de calor]


NOTA
Debido a que la disribución de la temperatura del espacio de instalación del control remoto
no es uniforme, se pueden generar ligeras diferencias entre la temperatura real y la
indicación de temperatura del control remoto.


Cambio Centígrados / Fahrenheit
Esta función se utiliza para cambiar la pantalla entre Centígrados y Fahrenheit
Optimizado solo para EE.UU.
y el botón durante más de 3
segundos, el sistema entra en el modo de
ajustes de instalador
Tras acceder al modo de ajuste de
instalador,seleccione el valor del código de
ajuste de altura de techo pulsando el botón
de modo de operación.
Valor de código de ajuste Celsius/Fahrenheit: 07
Seleccione el valor de ajuste deseado con el
botón subir , bajar temperatura.
Valor de código
Valor
Al pulsar el botón , se configurará el
valor
de
centígrados/fahrenheit establecido
en ese mometo.
Valor de configuración
Centígrados
Fahrenheit
Cuando se pulsan al mismo tiempo el botón
y el botón durante más de 3
segundos tras haberse realizado el ajuste,
sale del modo de ajustes.
Si no se pulsa ningún botón durante más
de 25 segundos, también se sale del modo
de ajustes de instalador.
NOTA
Cuando se pulse el botón subir , bajar temperatura en modo Fahrenheit,
la temperatura subirá/bajará 2 grados.


 Loading...