

Page 1

OWNER’S MANUAL
DRYER
Before beginning installation, read these instructions carefully.
This will simplify installation and ensure that the product is installed correctly
and safely. Leave these instructions near the product after installation for future
reference.
TD-C80NPW
TD-C90NPE
MFL67653085
Rev.00_060116
www.lg.com
Page 2

TABLE OF CONTENTS
SAFETY INSTRUCTIONS .......................................................03
IMPORTANT SAFETY INSTRUCTIONS .................................................. 03
INSTALLATION ........................................................................09
Specifications ........................................................................................... 09
Accessories (Optional) ............................................................................. 09
Installation Place Requirements ............................................................... 10
Stacking Installation Instructions .............................................................. 11
OPERATION ............................................................................14
Using the Appliance .................................................................................. 14
Sorting Laundry ........................................................................................ 15
Control Panel ............................................................................................ 16
Programme Table ..................................................................................... 17
Option Cycle ............................................................................................. 19
Rack Dry (Optional) .................................................................................. 21
SMART FUNCTION .................................................................22
Using Smart Function (Optional) .............................................................. 22
Using the Smart Diagnosis™ Function .................................................... 23
This manual may contain images or
content different from the model you
purchased.
This manual is subject to revision by the
manufacturer.
MAINTENANCE .......................................................................24
Cleaning the Lint Filter .............................................................................. 24
Emptying the Water Container..................................................................25
Cleaning the Cool Air Inlet Grill ................................................................. 25
Wiping the Moisture Sensor ..................................................................... 25
Cleaning the Condenser ........................................................................... 26
TROUBLESHOOTING .............................................................27
Diagnosing Problems ............................................................................... 27
Error Codes .............................................................................................. 31
Page 3
SAFETY INSTRUCTIONS
The following safety guidelines are intended to prevent
unforeseen risks or damage from unsafe or incorrect operation
of the appliance.
The guidelines are separated into ‘WARNING’ and ‘CAUTION’ as
described below.
This symbol is displayed to the indicate matters and
operations that can cause risk. Read the part with this
symbol carefully and follow the instructions in order to
avoid risk.
WARNING
instructions can cause serious injury or death.
CAUTION
instructions can cause the minor injury or damage the
product.
IMPORTANT SAFETY INSTRUCTIONS
WARNING
To reduce the risk of re, electric shock, or injury to persons
when using your product, basic safety precautions should
be followed, including the following:
- This indicates that the failure to follow the
- This indicates that the failure to follow the
Children in the Household
This appliance is not intended for use by persons (including
children) with reduced physical, sensory or mental capabilities, or
lack of experience and knowledge, unless they have been given
supervision or instruction concerning use of the appliance by a
person responsible for their safety. Children should be supervised to
ensure that they do not play with the appliance.
03
Page 4

Installation
•Make sure the appliance is properly installed, grounded,
and adjusted by qualied service personnel according to the
installation instructions.
•Never attempt to operate this appliance if it is damaged,
malfunctioning, partially disassembled, or has missing or broken
parts, including a damaged cord or plug.
•This appliance should only be transported by two or more people
holding the appliance securely.
•Do not install the appliance in a damp and dusty place. Do not
install or store the appliance in any outdoor area, or any area that
is subject to weathering conditions such as direct sunlight, wind,
rain, or temperatures below freezing.
•Tighten the drain hose to avoid separation.
•If the power cord is damaged or the hole of the socket outlet
is loose, do not use the power cord and contact an authorized
service centre.
•The appliance must not be installed behind a lockable door, a
sliding door or a door with a hinge on the opposite side to that of
the appliance, in such a way that a full opening of the appliance
door is restricted.
•The appliance must be grounded. In the event of malfunction or
breakdown, grounding will reduce the risk of electric shock by
providing a path of least resistance for electric current.
•The appliance is equipped with a cord having an equipmentgrounding conductor and grounding plug. The plug must be
plugged into an appropriate outlet that is properly installed and
grounded in accordance with all local codes and ordinances.
04
Page 5

•Improper connection of the equipment-grounding conductor can
result in risk of electric shock. Check with a qualied electrician or
service person if you are in doubt as to whether the appliance is
properly grounded.
•Do not modify the plug provided with the appliance. If it does not t
the outlet, have a proper outlet installed by a qualied electrician.
Operation
•Do not attempt to separate any panels or disassemble the
appliance. Do not apply any sharp objects to the control panel in
order to operate the appliance.
•Do not repair or replace any part of the appliance. All repairs and
servicing must be performed by qualied service personnel unless
specically recommended in this Owner’s Manual. Use only
authorized factory parts.
•Keep the area underneath and around your appliance free of
combustible materials such as lint, paper, rags, chemicals, etc.
•Do not put animals, such as pets into the appliance.
•Do not leave the appliance door open. Children may hang on the
door or crawl inside the appliance, causing damage or injury.
•Never reach into this appliance while it is operating. Wait until the
drum has completely stopped.
•Do not put in, wash or dry articles that have been cleaned in,
washed in, soaked in, or spotted with combustible or explosive
substances (such as wax, oil, paint, gasoline, degreasers,
drycleaning solvents, kerosene, vegetable oil, cooking oil, etc.).
Improper use can cause re or an explosion.
05
Page 6

•In case of ood, disconnect the power plug and contact the LG
Electronics customer information centre.
•Do not push down on the door excessively, when the appliance
door is open.
•Use new hose or hose-set supplied with the appliance. Reusing
old hoses can cause a water leak and subsequent property
damage.
•Do not touch the door during steam or drying programmes.
•Do not use or store ammable or combustible substances (ether,
benzene, alcohol, chemical, LPG, combustible spray, insecticide,
air freshener, cosmetics, etc.) near the appliance.
•If the drain hose or supply hose is frozen during winter, use it only
after thawing.
•Keep all washing detergents, softener and bleach away from
children.
•Do not plug multiple socket outlets, an extension power cable or
adapter with this appliance.
•Do not touch the power plug or the appliance controls with wet
hands.
•Do not bend the power cable excessively or place a heavy object
on it.
Maintenance
•Securely plug the power plug in the socket outlet after completely
removing any moisture and dust.
•Disconnect the appliance from the power supply before cleaning
the appliance. Setting the controls to the OFF or stand by position
does not disconnect this appliance from the power supply.
•Do not spray the water inside or outside the appliance to clean it.
06
Page 7

•Never unplug the appliance by pulling on the power cable. Always
grip the power plug rmly and pull straight out from the socket
outlet.
Technical Safety for Using the Appliance
•Do not dry unwashed items in the appliance.
•Fabric softeners, or similar products, should be used as specied
by the fabric softener instructions.
•Remove all objects from pockets such as lighters and matches.
•Never stop the appliance before the end of the drying cycle unless
all items are quickly removed and spread out so that the heat is
dissipated.
•The appliance is not to be used if industrial chemicals have been
used for cleaning.
•Items such as foam rubber (latex foam), shower caps, waterproof
textiles, rubber backed articles and clothes or pillows tted with
foam rubber pads should not be dried in the appliance.
•Do not drink the condensed water. Failure to do so may result in
food-borne illnesses.
•The lint trap has to be cleaned frequently.
•Lint must not to be allowed to accumulate around the appliance.
•Do not spray dry cleaning detergent directly onto the appliance or
use the appliance to dry clothes left with dry cleaning detergent.
•Do not dry clothes stained with oil substances. Oil substances
(including edible oils) stained on clothes cannot be completely
removed even after washing with water.
•The appliance must not be supplied through an external switching
device, such as a timer, or connected to a circuit that is regularly
switched on and off by a utility.
07
Page 8

•Remove clothes from the product immediately when drying is
complete or the power is turned off during the drying process.
Leaving clothes that has been dried in the appliance unattended
could result in re. Clothes removed from the appliance after
drying could result in re. Remove clothes immediately after
drying, and then hang or lay the clothes at to cool.
•Oil-affected items can ignite spontaneously, especially when
exposed to heat sources such as in a tumble dryer. The items
become warm, causing an oxidation reaction in the oil. Oxidation
create heat. If the heat cannot escape, the items can become hot
enough to catch re. Piling, stacking or storing oil-affected items
can prevent heat from escaping and so create a re hazard.
•If it is unavoidable that fabrics that contain vegetable or cooking
oil or have been contaminated by hair care products be placed in
a tumble dryer they should rst be washed in hot water with extra
detergent – this will reduce, but not eliminate, the hazard.
Disposal
•Before discarding an old appliance, unplug it. Cut off the cable
directly behind the appliance to prevent misuse.
•Dispose of all packaging materials (such as plastic bags and
styrofoam) away from children. The packaging material can cause
suffocatoion.
•Remove the door before disposing of or discarding this appliance
to avoid the danger of children or small animals getting trapped
inside.
08
WARNING - To avoid a re
Do not wash or dry clothes or items that have any
contaminants of ammable solvents or substances. Do not
clean the product or expose it to ammable substances.
Page 9
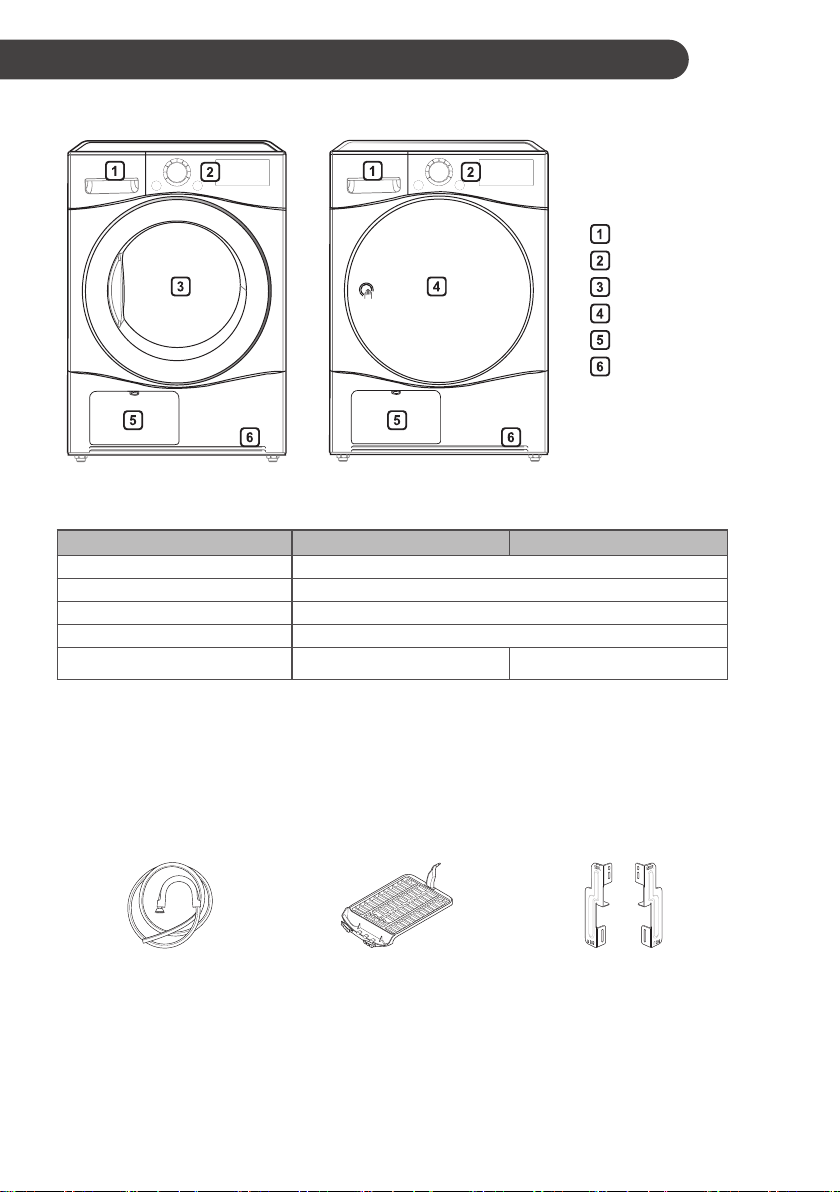
INSTALLATION
Specications
Water container
Control panel
Glass door
Opaque door
Condenser cover
Air ventilation grill
Model
Power supply
Size 600 mm (W) X 640 mm (D) X 850 mm(H)
Product weight 43 - 46 kg
Allowable temperature 5 - 35 °C
Max. capacity 8 kg
•Appearance and specications may vary without notice to improve the quality of the appliance.
TD-C80NPW TD-C90NPE
220 - 240
V~, 50 Hz
9 kg
Accessories (Optional)
Please contact the LG Electronics Customer Information Centre for purchase.
Condensing Drain Hose
and Hose Holder
Dry Rack Stacking Kit
09
Page 10

Installation Place Requirements
Location
30 -50 cm 2 cm 2 cm
Level oor :
appliance is 1 °.
Power outlet :
side of the location of the appliance.
•Do not overload the outlet with more than one
appliance.
Additional Clearance :
rear/2 cm: right & left side
•Do not place or store laundry products on top of
the appliance at any time.
•These products may damage the nish or
controls.
NOTE
•For better drying performance, please keep the
rear of the appliance away from wall.
•Do not install the appliance where there is a risk
of frost or dust.
•The appliance may not be able to operate
properly or may be damaged by freezing of
condensed water in the pump and drain hose.
•Do not install the appliance next to a hightemperature appliance like refrigerator, oven
or stove etc, which can cause poor drying
performance and programme duration, and
adversely affect the proper functioning of the
compressor. The appliance performs best at a
room temperature of 23 °C.
Allowable slope under the entire
Must be within 1.5 meters of either
For the wall, 30 – 50 cm:
Positioning
•Install the appliance on a at hard oor.
•Make sure that air circulation around the
appliance is not impeded by carpets, rugs, etc.
•Never try to correct any unevenness in the
oor with pieces of wood, cardboard or similar
materials under the appliance.
•Do not install the appliance in rooms where
freezing temperatures may occur. Frozen hoses
may burst under pressure. The reliability of
the electronic control unit may be impaired at
temperatures below freezing point.
•If the appliance is delivered in winter and
temperatures are below freezing, place the
appliance at room temperature for a few hours
before putting it into operation.
•Please ensure that when the appliance is
installed, it is easily accessible for an engineer
in the event of a breakdown.
•With the appliance installed, adjust all four
feet using a transit bolt spanner to ensure
the appliance is stable, and a clearance of
approximately 20 mm is left between the top of
the appliance and the underside of any worktop.
Ventilation Requirement
•Alcove or under counter
– Ensure air ow of 3.17 m3/min through
appliance
•Closet
–Closet door must have 2 (louvered)
openings, each having a minimum area of
387 cm2, located 8 cm from bottom and top
of door.
10
Page 11

WARNING
•Avoid installing the appliance around a heat
source.The rear side of the appliance must
be well ventilated. Failure to follow these
instructions may result in problems.
•The appliance should not be installed next to a
refrigeration appliance.
•The appliance is not designed for maritime
use or for use in mobile installations such as
caravans, aircraft etc.
Electrical Connection
•Do not use an extension cord or double adapter.
•Always unplug the appliance after use.
•Connect the appliance to an earthed socket in
accordance with current wiring regulations.
•The appliance must be positioned so that the
plug is easily accessible.
Stacking Installation
Instructions
Your dryer can be placed on top of an LG front
loader washing machine and securely xed with a
stacking kit. This installation must be conducted by
qualied service personnel to ensure it has been
installed correctly.
The qualied service personnel will ensure you
have the correct stacking kit for your model of
washing machine and will ensure it is rmly xed.
For these reasons, expert tting is essential.
Stacking Kit
In order to stack this dryer an LG stacking kit is
required.
Dryer
Front
loader
washing
machine
This dryer may only be stacked on top of an LG
front loader washing machine. Do not attempt to
stack this dryer on any other washing machine, as
damage, injury or property damage could result.
Shape and
assembly
direction
Washing Machine Top plate size
550 mm 600 mm
11
Page 12
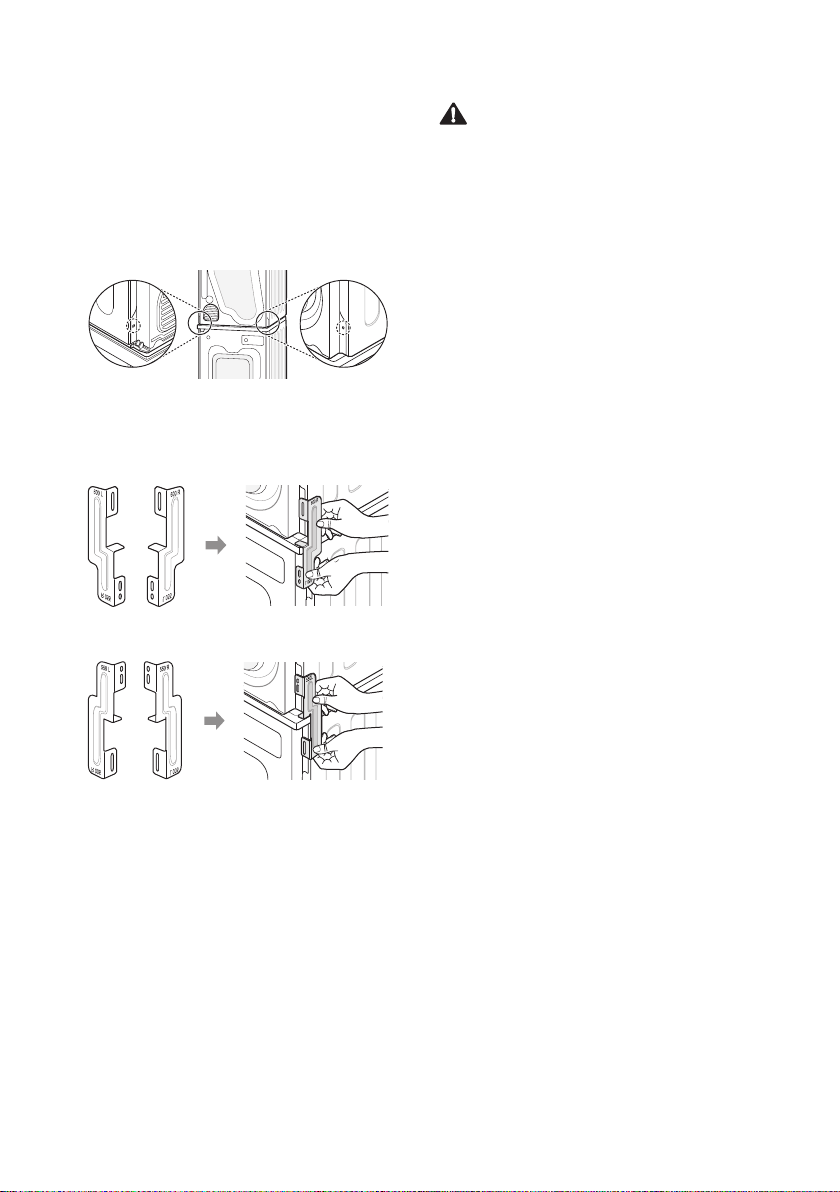
Installation Procedure
Place the LG dryer on the LG washing
1
machine.
Remove the two screws from the bottom of
2
the rear cover on each side as illustrated
below.
Align the stacking kit holes and the rear cover
3
holes.
3-1) 600 mm
3-2) 550 mm
WARNING
•Incorrect installation can cause serious
accidents.
•The weight of the appliance and the height of
installation make the stacking procedure too
risky for one person. This procedure should
be performed by two or more qualied service
personnel.
•The appliance is not suitable for a built-in
installation. Please do not install as a built-in
appliance.
•Do not operate if the appliance is not properly
stacked.
Fasten the two screws that were removed
4
earlier from the dryer to the stacking kit.
Use the four screws in the accessory box (16
5
mm) to assemble the washing machine rear
cover and stacking kit.
The procedure for the opposite side will be
6
the same.
12
Page 13

Condensed Water Drain-out
Normally, condensed water is pumped up to the
water container where water is collected until
manually emptied. Water can also be drained out
directly to a mains drain, especially when the dryer
is stacked on top of a washing machine. With a
connecting kit for the mains drain hose, simply
change the water path and re-route to the drainage
facility as below:
Take the connecting kit out.
1
Separate the water container hose from the
2
kit.
Leveling the Appliance
Leveling the appliance prevents unnecessary noise
and vibration. Place the appliance on a solid, level
oor.
If the appliance is not properly level, adjust the
front leveling feet as necessary.
Turn them clockwise to raise and counterclockwise to lower until the appliance no longer
wobbles, both front-to-back and side-to-side and
corner-to-corner.
Adjustable Feet
Connect the drain hose to the kit.
3
Adjustable Feet
Adjustable Feet
Diagonal Check
When pushing down the edges of the top plate
diagonally, the appliance should not move up and
down at all (Check both directions). If the appliance
rocks when pushing the top plate diagonally, adjust
the feet again.
13
Page 14

OPERATION
Using the Appliance
Before the rst cycle, set the appliance to dry for
ve minutes to warm up the drum. Open the door
between loads the rst few times you use the
appliance to allow any odours from the interior of
the appliance to disperse.
Ensure the lint lter and water container are
1
clean.
•The lint lter is inside the door rim. It needs
to be cleaned before each drying cycle.
•Open the door and ensure the lint lter is
clean. If it is not, please clean the lint lter.
•Also check if the water container needs to
be emptied for optimum drying results.
CAUTION
•Be careful not to trap laundry between the door
and rubber seal.
Turn the power on.
3
•Press the
above the button will become illuminated,
indicating that the appliance is all set to
run.
Select the drying programme you want.
4
•You can choose a programme by turning
the programme selector knob until the
required programme is indicated.
•If you press the
choosing a programme, the appliance
will proceed with the Cotton programme.
Please refer to the programme table for the
detailed information.
Power
button. The indicator icon
Start/Pause
button without
WARNING
•Do not drink the condensed water.
NOTE
•In some instances, LED window may display
(Empty water symbol) and the appliance
may stop because the water container is full.
Place laundry into the drum after sorting.
2
•The clothes should be sorted by fabric type
and dryness level and all the strings and
belts of clothes should be well tied and
xed before being put into the drum. Push
the laundry to the back to keep it away from
the door seal. Otherwise, the door seal and
clothes may be damaged. Close the door.
14
Press the
5
After the cycle has nished, open the door
6
and remove the laundry.
Turn off the appliance.
7
•Press the
Start/Pause
Power
button.
button.
Page 15
CAUTION
•Be careful! The drum inside may still be hot.
•The appliance must not be used for purposes
other than those for which it was designed.
NOTE
•The nal part of a tumble dryer cycle occurs
without heat (cool down cycle) to ensure that
laundry is left at a temperature that ensures the
laundry will not be damaged.
•A high atmospheric temperature and a small
room may both increase drying time as well as
energy consumption.
Rubber and Plastics
Do not dry any items made from or containing
rubber or plastics such as:
–Aprons, Bibs and Chair Covers
– Curtains and Table Clothes
–Bathmats
Fiberglass
Do not dry berglass items in the appliance. Glass
particles left in the appliance may be subsequently
picked up by your clothes in later cycles.
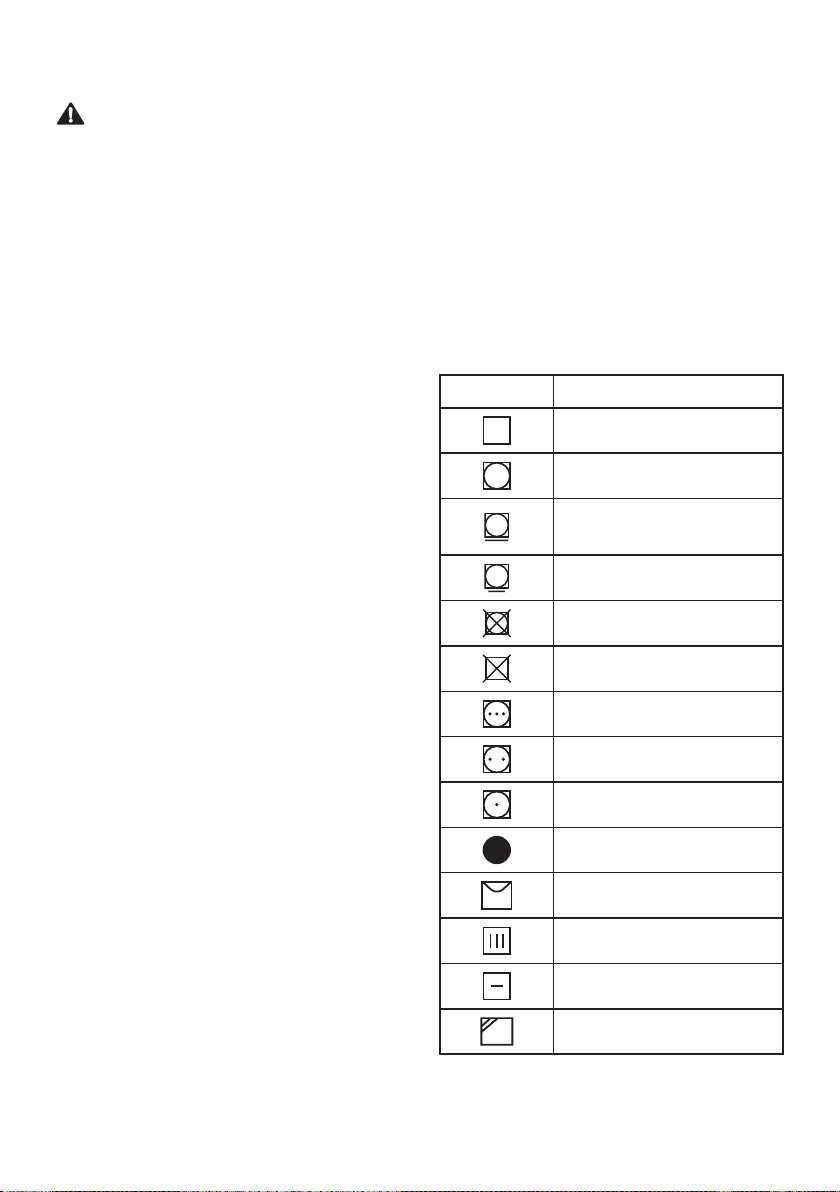
Symbols Instructions
Sorting Laundry
Clothes have their own wash care labels, so drying
according to the wash care label is recommended.
Not only that, the laundry must be sorted according
to size and type of fabric.
For the best drying performance and most efcient
energy usage, do not overload the appliance.
Woollens
Dry woollens on the Wool programme. Be sure
to follow fabric care label symbols rst. Wool may
not be completely dried from the cycle, so do not
repeat drying. Pull woollens to their original shape
and dry them at.
Woven and Loopknit Materials
Some woven and loopknit materials may shrink,
depending on quality.
Permanent Press and Synthetics
Do not overload the appliance. Take out permanent
press items as soon as the appliance stops to
reduce creases.
Baby Clothes and Night Gowns
Always check fabric care labels.
Dry
Tumble dry
Permanent Press /
Crease resistant
Gentle / Delicate
Do not tumble dry
Do not dry
High heating
Medium heating
Low heating
No heat / air
Line Dry / hang to dry
Drip dry
Dry at
In the shade
15
Page 16

Control Panel
Power button
•Press the
and off.
•Press the
Time Delay function.
Programme Selector
•Programmes are available according to
the laundry type.
•The lamp will light up to indicate the
selected programme.
Start/Pause button
•This
or pause a dry cycle.
•When in Pause, the power is turned off
automatically after four minutes.
Additional Programme buttons
•Use these buttons to select the desired
options for the selected programme.
Options
•This allows you to select additional
options and will illuminate when selected.
Power
Power
Start/Pause
button to turn power on
button to cancel the
button is used to start
Display
• : This icon indicates that the lint lter
should be cleaned or is clogged.
–Cleaning notice: When you press the
Power
button, the icon will become
displayed.
–Clogging notice: This icon will become
displayed with a buzzer sound whilst
the appliance is in operation.
• : This icon indicates that the water
container needs to be emptied or is full.
–Emptying notice: When you press the
Power
button, this icon will become
displayed.
–Full water notice: The icon will become
displayed and a buzzer will sound
while the appliance is in operation.
• : This icon indicates that the
condenser should be cleaned. If the
icon is displayed, clean the condenser
promptly.
16
Page 17

Programme Table
Drying Programme
Sensor Dry Programmes
Programme Laundry Type Detail Drying Level
Cotton
Mixed
Fabric
Easy Care
Towels, dressing gowns and bed
linen
Terry towels, tea towels, towels
and bed linen
Bath towels, tea towels,
underwear and cotton socks
Sheets, pillowcase and towels
Bed linen, table linen, towels,
T-shirts, polo shirts and work
clothes
Bed linen, table linen, tracksuits,
anoraks and blankets
Shirts and blouses
Trousers, dressers, skirts and
blouses
Shirts, T-shirts, trousers, underwear and socks
Shirts, T-shirts, under-wear,
anoraks and socks
For thick and quilted fabrics Extra
For thick and quilted fabrics that
do not need to be ironed
For fabrics that do not need to be
ironed
For fabrics that do not need to be
ironed
For fabrics that need to be ironed Iron
For thick and quilted fabrics that
do not need to be ironed
For fabrics that do not need to be
ironed
For fabrics that need to be ironed Iron
For polyamide, acrylic, and
polyester that do not need to be
ironed
For polyamide, acrylic, polyester
that do need to be ironed
Very
Cupboard
Light
Very
Cupboard
Cupboard
Iron
Bulky Item
Jeans
Bed clothes, sheets For bulky items -
Jeans and colour fading
garments.
For jeans which do not need to
be ironed
-
17
Page 18

Sensor Dry Programmes
Programme Laundry Type Detail Drying Level
Cotton Soft
Sports
Wear
Quick Dry
Delicate
Wool
Programme Laundry Type Detail Drying Level
Rack Dry
Cool Air
Warm Air
T-shirts, pillowcase, and towels
Soccer kit and training wear For polyester material -
Linen and towels (excluding
delicate fabrics) sports wear,
bulky Item cycle.
Silk, ne fabrics and lingerie
Wool For wool fabrics -
Manual Dry Programmes
Silk, wool, delicate lingerie
All fabrics that need refreshing Tumbles without heat -
Bath towels, bath robes,
dishclothes and acrylic quilted
fabrics
For cotton fabrics which do not
need to be ironed
For small loads of suitable fabrics
with short drying times
For fabrics that are heat-sensitive,
such as synthetic fabrics
Refreshes clothes without tumble
drying
Small Items & damp clothing,
Everyday items suitable for heat
drying
-
-
-
-
-
CAUTION
•If the load is less than 1 kg, please use the
items should be dried using the
lingerie should be dried using the
load when you select your desired programme. Otherwise, your clothes may be damaged.
Wool
Delicate
Warm Air
programme and heat-sensitive fabrics including silk, underwear and
programme. Please comply with the recommended laundry
programme in Manual Dry programmes. Wool
NOTE
•Set program at “Cotton, Cupboard “ option for test in accordance or in conformity with AS/NZS 2442.1.
•The test results depend on room temperature, type and amount of load, water hardness and water inlet
temperature.
•If the appliance is installed as built under, it may cause performance degradation.
•If the laundry is not spun at a high speed during washing, energy consumption and drying time will increase.
18
Page 19

Option Cycle
Time Delay
You can use the Time Delay option to delay the
nishing time of the drying cycle. Maximum Time
Delay is 19 hours. Minimum Time Delay is 3 hours.
Turn the appliance on.
1
Select a programme.
2
Press the
3
Set time delay hour(s) by pressing the
4
Time or Less Time
Time Delay
button.
button.
More
Drum Light
Whilst the appliance is running it is possible to
see inside the drum if you select the
function.
•Light on : Door is opened.
•Light off : Door is closed. The light is turned off
automatically.
Drum Light
Temp.
Adjusts the temperature setting from Ultra Low to
High. This allows precise care of your fabrics and
garments.
•Press the
through available settings.
Temp.
button repeatedly to scroll
Press the
5
Start/Pause
button.
Anti Crease ( )
The Anti Crease option prevents creases that are
formed when the laundry is not unloaded promptly
at the end of the drying cycle. When
is selected, the appliance repeatedly runs and
pauses, giving you two hours to unload the laundry.
If the door is opened during the Anti Crease option,
the option is cancelled.
Anti Crease
Favorite
The Favorite option allows you to store a
customized dry programme for future use.
Turn the appliance on.
1
Select a programme.
2
Select the option or additional programme.
3
(Anti Crease, Temp. etc.)
Press and hold the
4
three seconds.
Favorite
option button for
Option
Hand Iron
This function keeps the garments more moist than
the standard Iron dry level.
Turn the appliance on.
1
Select a programme.
2
Press the
3
Press the
4
Iron
Press the
5
Hand Iron is available to programmes specied in
the table below.
Dry level
Option
.
Start/Pause
Programme Dry Level
Cotton
button and select
button and select
button.
IronMixed Fabric
Iron
Hand
.
The Favorite option is now stored for future use. To
reuse the stored programme, select the
option and press the
Start/Pause
button.
Favorite
Easy Care
19
Page 20

Damp Dry Beep
With this option, the appliance will beep when the
load is ready for ironing.
This allows you to remove faster-drying lightweight
items or items that you would like to iron or hang
while still slightly damp.
Child Lock ( )
Select this function to lock the buttons on the
control panel to prevent tampering.
Locking the control panel
Turn the appliance on.
1
Select a programme.
2
Press the
3
Press the
4
Dry Beep
Press the
5
When the laundry is ready for ironing, the
6
buzzer will sound for approximately one
minute.
Press the
7
door.
Take out laundry which you wish to iron.
8
(Leave the other laundry in the appliance.)
Close the door and press the
9
button.
Damp Dry Beep is available to programmes
specied in the table below.
Dry level
Option
.
Start/Pause
Start/Pause
button and select a level.
button and select
Damp
button.
button and open the
Start/Pause
Press and hold the
1
three seconds.
* Child Lock
A beeper will sound, and CL will appear on
2
the display.
When the
locked except the
Child Lock
Child Lock
is set, all buttons are
Power
button for
button.
NOTE
•Turning off the power will not reset the Child
Lock function. You must deactivate child lock
before you can access any other functions.
Unlocking the control panel
Press and hold the
seconds.
•A beeper will sound and the remaining time for
the current programme will reappear on the
display.
Child Lock
button for three
Programme Dry Level
Cotton
Mixed Fabric Very/Cupboard
Easy Care Cupboard
20
Cupboard/Light
Extra/Very
Buzzer
This option enables you to adjust the volume of the
beeper sound.
Page 21

Rack Dry (Optional)
The dryer rack is placed inside the appliance, as
in the picture below. Remove and discard packing
material before use.
The Rack Dry is designed for use with laundry
that must be dried at, without tumbling, including
sweaters and delicate fabrics.
Open the door.
1
Insert the hook to the drum centre.
2
Place the dryer rack on the structure
3
above the lint lter and press it to complete
assembly.
Close the door.
5
Turn power on and select
6
Press the
7
NOTE
•Check the lint lter and remove any lint
accumulated from items dried on the rack.
Start/Pause
Rack Dry
button.
.
Place wet items on top of the rack. Allow
4
space around items for air to circulate.
•The rack does not move, but the drum will
rotate.
21
Page 22

SMART FUNCTION
Using Smart Function
(Optional)
Using the Tag On Function
The Tag On function allows you to conveniently use
the LG Smart Diagnosis™ and Cycle Download
features to communicate with your appliance right
from your own smart phone.
•The Tag On function can only be used with most
smart phones equipped with the NFC function
and based on the Android operating system
(OS).
Installation of the application
•Search LG Smart Laundry&DW Global on the
Google Play Store from your smart phone.
-(ᜅษ✙
Using the Application
LG Smart Laundry&DW Global application allows
you to use various features for your convenience.
•Cycle Download
•Smart Diagnosis™
•Tag On Cycle Set
•Laundry Stats
NOTE
•Press in the LG Smart Laundry&DW Global
application for a more detailed guide on how to
use the Tag On function.
•Depending on the smart phone manufacturer
and Android OS version, the NFC activation
process may differ. Refer to the manual of your
smart phone for details.
•Because of the characteristics of NFC, if the
transmission distance is too far, or if there is
a metal sticker or a protective case on the
phone, transmission will not be good. In some
cases, NFC-equipped phones may be unable to
transmit successfully.
•The content found in this manual may differ
depending on the version of LG Smart
Laundry&DW Global application, and it may be
modied without customers being informed.
22
Page 23

Using the Smart Diagnosis™
Function
Use this function if you need an accurate diagnosis
by an LG Electronics Customer Information Centre
when the product malfunctions or fails. Use this
function only to contact the service representative,
not during normal operation.
Press the
1
appliance. Do not press any other buttons or
turn the programme selector knob.
When instructed to do so by the call center,
2
place the mouthpiece of your phone close
to the Smart Diagnosis™ icon and
button.
Power
button to turn on the
Max.
10 mm
Power
Once the countdown is over and the tones
5
have stopped, resume your conversation with
the call center agent, who will then be able to
assist you using the information transmitted
for analysis at the call to the LG Electronics
Customer Information Centre.
NOTE
•The Smart Diagnosis™ function depends on the
local call quality.
•The communication performance will improve
and you can receive better service if you use a
home phone.
•If the Smart Diagnosis™ data transfer is poor
due to poor call quality, you may not receive the
best Smart Diagnosis™ service.
Press and hold the
3
three seconds, while holding the mouthpiece
of your phone close to the Smart Diagnosis™
icon and
Keep the phone in place until the tone
4
transmission has nished.
The display will count down the time.
Power
•For best results, do not move the phone
while the tones are being transmitted.
•If the call center agent is not able to get an
accurate recording of the data, you may be
asked to try again.
More Time
button.
button for
LG Electronics
service centre
23
Page 24

MAINTENANCE
WARNING
•Remove the power plug when you clean the
appliance. Not removing the plug may result in
electric shock.
Cleaning the Lint Filter
Clean the lint lter before each drying cycle. It
should also be cleaned if the icon becomes
illuminated and the buzzer sounds while the
appliance is in operation.
Cleaning the lint lter will reduce drying time and
energy consumption.
Open the door.
1
Remove the lint lter.
2
Open the lint lter and remove all the lint.
3
Dry the lint lter completely, close and reinsert
5
the lint lter.
NOTE
•Remove moisture from the mesh. Otherwise, the
lint lter may be clogged due to water lm and
the appliance may not operate.
•If the lint lter is not in the appliance, you can
not operate the appliance.
Rinse away the lint under warm, running
4
water.
24
Page 25

Emptying the Water Container
Condensed water is collected in the water
container.
Empty the water container after every use. Not
doing so will affect the drying performance.
If the water container is full, the icon glows and
the buzzer sounds while the appliance is operating.
If this should occur, the water container needs to
be emptied within the next hour.
Pull out the water container.
1
Empty the water container in the sink.
2
Cleaning the Cool Air Inlet Grill
Vacuum the Cool Air Inlet grill 3 - 4 times a year
to make sure there is no build up of lint or dirt that
may cause improper air ow.
NOTE
•Warm air is exhausted through the ventilation
grill.
•Adequate ventilation should be provided to
avoid the back ow of gases into the room from
units burning other fuels, such as open res.
Wiping the Moisture Sensor
This device senses the moisture level of the
laundry during operation, which means it must be
cleaned regularly to remove any build up of lime
scale on the surface of the sensor.
Push it back into the appliance.
3
Press the
4
Start/Pause
Wipe the sensors inside the drum.
button.
CAUTION
•Do not wipe the moisture sensor with abrasive
materials. Always clean the sensor with a rough
sponge.
25
Page 26

Cleaning the Condenser
The condenser is also a very important part for
efcient drying performance result, so it needs
special care from you. It is recommended that the
condenser be cleaned three or four times a year or
when the icon blinks.
Push the cap and open the condensing cover.
1
Open the seal by turning the locking lever.
2
Clean the condenser thoroughly under a tap,
4
letting the water ow through.
Put everything back together by following the
5
instructions in reverse order.
Pull the condenser out by inserting a nger
3
into the tab at the front of the condenser. (Do
not force the condenser).
NOTE
•If the icon is displayed, clean the condenser
promptly.
26
CAUTION
•The locking lever must be closed after cleaning
the condenser as illustrated above.
•Operating when the condenser is clogged
with lint can damage the appliance. This also
increases energy consumption.
•Do not use sharp objects to clean the heat
exchanger. This could cause damage and
leaking.
•Never operate the appliance without the heat
exchanger.
Page 27

TROUBLESHOOTING
The appliance is equipped with an automatic error-monitoring system to detect and diagnose problems at
an early stage. If the appliance does not function properly or does not function at all, check the following
before you call for service:
Diagnosing Problems
Symptoms Reason Solution
Appliance will not
turn on
Appliance does not
heat
Clothes take too
long to dry
Power cord is not properly
plugged in.
House fuse is blown, circuit
breaker has tripped, or power
outage has occurred.
House fuse is blown, circuit
breaker has tripped, or power
outage has occurred.
Load is not properly sorted.
Large load of heavy fabrics.
Appliance controls are not set
properly.
•Make sure that the plug is securely
plugged into a grounded outlet
matching the appliance’s rating plate.
•Reset circuit breaker or replace fuse.
Do not increase fuse capacity. If the
problem is a circuit overload, have it
corrected by a qualied electrician.
•Reset circuit breaker or replace fuse.
Do not increase fuse capacity. If the
problem is a circuit overload, have it
corrected by a qualied electrician.
•Separate heavy items from lightweight
items. Larger and heavier items take
longer to dry. Light items in a load
with heavy items can fool the sensor
because the light items dry faster.
•Heavy fabrics take longer to dry
because they tend to retain more
moisture. To help reduce and maintain
more consistent drying times for large
and heavy fabrics, separate these
items into smaller loads of a consistent
size.
•Use the appropriate control settings for
the type of load you are drying. Some
loads may require an adjustment of
the dry level setting for proper drying.
Lint lter needs to be cleaned.
•Remove the lint from the lint lter
before every cycle. With the lint
removed, hold the lint lter up to a
light to see if it is dirty or clogged. With
some loads that produce high amounts
of lint, such as new bath towels, it may
be necessary to pause the cycle and
clean the lter during the cycle.
27
Page 28

Symptoms Reason Solution
Clothes take too
long to dry
Drying time is not
consistent
House fuse is blown, circuit
breaker has tripped, or power
outage has occurred.
Appliance is overloaded.
Appliance is underloaded.
Heat settings, load size, or
dampness of clothing is not
consistent.
Fabric softener is used
incorrectly.
•Reset circuit breaker or replace fuse.
Do not increase fuse capacity. If the
problem is a circuit overload, have it
corrected by a qualied electrician.
•Divide extra large loads into smaller
loads for better drying performance
and efciency.
•If you are drying a very small load,
add a few extra items to ensure proper
tumbling action. If the load is very
small and you are using Sensor Dry
programmes, the electronic control
cannot properly sense the dryness of
the load and may shut off too soon.
Use Manual Dry programmes or add
some extra wet clothes to the load.
•The drying time for a load will vary
depending on the type of heat used
(electric), the size of the load, the type
of fabrics, the wetness of the clothes,
and lint lter. Even an unbalanced
load in the appliance can cause poor
spinning, resulting in wetter clothes
which will take longer to dry.
•When washing laundry that is to
be dried in the appliance, use the
correct amount of fabric softener as
recommended by the manufacturer of
the fabric softener.
Greasy or dirty
spots are left on
clothes
28
Clean and dirty clothes are
being dried together.
Clothes were not properly
cleaned or rinsed before being
placed in the appliance.
•Use the appliance to dry only clean
items. Soil from dirty clothes can
transfer to the clean clothes in the
same or later loads.
•Stains on dried clothes could be
stains that were not removed during
the washing process. Make sure
that clothes are being completely
cleaned or rinsed according to the
instructions for your washing machine
and detergent. Some difcult soils may
require pre-treating prior to washing.
Page 29

Symptoms Reason Solution
Clothes are
wrinkled
Clothes are
shrinking
Lint is left on
clothes
Clothes have dried too long
(overdried).
Clothes have been left in the
appliance for too long after
cycle ends.
Garment care instructions are
not being followed.
Lint lter has not been
cleaned properly.
Laundry has not been sorted
properly.
Appliance is overloaded.
•Over drying a load of laundry can
lead to wrinkled clothes. Try a shorter
drying time.
•Use the
•To avoid shrinking your clothes,
•Remove the lint from the lint lter
•Some fabrics are lint producers (i.e., a
•Divide extra large loads into smaller
Anti crease
always consult and follow fabric care
instructions. Some fabrics will naturally
shrink when washed. Other fabrics can
be washed but will shrink when dried
in the appliance. Use a low or no heat
setting.
before every cycle. With the lint
removed, hold the lint lter up to a light
to see if it is dirty or clogged. If it looks
dirty, follow the cleaning instructions.
With some loads that produce high
amounts of lint, it may be necessary to
clean the lint lter during the cycle.
fuzzy white cotton towel) and should
be dried separately from clothes that
are lint trappers (i.e., a pair of black
linen pants).
loads for drying.
option.
Excess static in
clothes after drying
Tissue, paper, etc., has been
left in pockets.
Clothes have dried for too
long (overdried).
Drying synthetics, permanent
press, or synthetic blends.
•Check pockets thoroughly before
drying clothes.
•Overdrying a load of laundry can cause
a buildup of static electricity. Adjust
settings and use a shorter drying time,
or use Sensor Dry programmes.
•These fabrics are naturally more
prone to static buildup. Try using fabric
softener, or use shorter Manual Dry
time settings.
29
Page 30

Symptoms Reason Solution
Water leaks
Clothes have
damp spots after
a Sensor Dry
programme
The water container hose
or the drain hose is not
connected correctly.
The door is closed while
laundry or foreign substance
is caught in the door.
Very large load or very small
load. Single large item such
as a blanket or comforter.
•Connect the water container hose or
the drain hose correctly.
•Check if laundry or foreign substance
is caught in the door before using the
appliance. If water leaks continuously,
contact the LG Electronics Customer
Information Centre.
•If items are too tightly packed or too
sparse the sensor may have trouble
reading the dryness level of the load.
Use a Manual Dry programme for very
small loads.
•Large, bulky items such as blankets
or comforters can sometimes wrap
themselves into a tight ball of fabric.
The outside layers will dry and register
on the sensors, while the inner core
remains damp. When drying a single
bulky item, it may help to pause the
cycle once or twice and rearrange the
item to unwrap and expose any damp
areas.
•To dry a few remaining damp items
from a very large load or a few damp
spots on a large item after a Sensor
Dry programme has completed, empty
the lint trap, then set a Manual Dry
programme to nish drying the item(s).
30
Page 31

Error Codes
Symptoms Reason Solution
The door has been opened
dE
while the appliance is in
operation or the appliance is
being operated without the
door being closed properly.
•Close the door completely.
•If dE is not released, call for service.
tE1
tE3
Temperature Sensor has
malfunctioned.
•Unplug the power plug and call for
service.
31
Page 32

 Loading...