

LG TD-C7014 series Service Manual

CONDENSING DRYER
SERVICE MANUAL
READ THIS MANUAL CAREFULLY TO DIAGNOSE TROUBLE
CORRECTLY BEFORE OFFERING SERVICE.
CAUTION
MODEL : TD-C7014** Series
2
IMPORTANT SAFETY NOTICE
The information in this service guide is intended for use by individuals possessing adequate backgrounds of electrical,
electronic, and mechanical experience. Any attempt to repair a major appliance may result in personal injury and property
damage.The manufacturer or seller cannot be responsible for the interpretation of this information, nor can it assume any
liability in connection with its use.
To avoid personal injury, disconnect power before servicing this product. If electrical power is required
for diagnosis or test purposes, disconnect the power immediately after performing the necessary checks.
WARNING !
RECONNECT ALL GROUNDING DEVICES
If grounding wires, screws, straps, clips, nuts, or washers used to complete a path to ground are
removed for service, they must be returned to their original position and properly fastened.
IMPORTANT
Electrostatic Discharge (ESD)
Sensitive Electronics
ESD problems are present everywhere. ESD may damage or weaken the electronic control
assembly. The new control assembly may appear to work well after repair is finished, but
failure may occur at a later date due to ESD stress.
Use an anti-static wrist strap. Connect wrist strap to green ground connection point or unpainted
metal in the appliance.
-OR -
Touch your finger repeatedly to a green ground connection point or unpainted metal in the
appliance.
Before removing the part from its package, touch the anti-static bag to a green ground connection point or
unpainted metal in the appliance.
Avoid touching electronic parts or terminal contacts; handle electronic control assembly by edges only.
When repackaging failed electronic control assembly in anti-static bag, observe above instructions.

3
CONTENTS
1. SPECIFICATIONS ...........................................................................................................................................................4
2. FEATURES AND LOOK ..................................................................................................................................................5
3. PART IDENTIFICATION ..................................................................................................................................................6
4. PROGRAM CYCLE .........................................................................................................................................................7
5. INSTALLATION INSTRUCTIONS ...................................................................................................................................10
6. MAINTENANCE INSTRUCTIONS ..................................................................................................................................12
7. COMPONENT TESTING TIPS ........................................................................................................................................15
8. CONTROL LAY-OUT.....................................................................................................................................................17
9. WIRING DIAGRAM .....................................................................................................................................................18
10. TROUBLESHOOTING..................................................................................................................................................19
11. DIAGOSTIC TEST........................................................................................................................................................21
12. DISASSEMBLY INSTRUCTIONS....................................................................................................................................28
13. EXPLODED VIEW .......................................................................................................................................................38
SPECIFICATIONS
1
4
ITEMS TD-C70140E REMARK
MATERIAL & FINISHES
DRYING TYPE Condensation
WEIGHT 40 kg (Gross : 46 kg)
DIMENSION 595(W) x 850(H) x 600(D)
STANDARD DRYING CAPACITY 7.0 kg
CONTROL TYPE Electronic Control
POWER SUPPLY AC 220~230V, 50Hz (16A) LGEUK : 13A, LGEAP : 10A
MOTOR 250W
HEATER 2500W(22.5) LGEUK : 2350W, LGEAP : 1900W
LAMP 15W(125mA)
DOOR SWITCH 250V(10A)
THERMOSTAT 240V(25A)
CONTROL TYPE Electronic
DRUM CAPACITY 116 Liter
SAFETY DEVICES Thermal Fuse (Motor)
Over current protect (Motor)
Thermostat
SENSING TYPE Micom electronic Control
1. Temperature : 2 thermistors
2. Humidity : Electrode Sensor
FILTER Removable (Double screen)
DRUM SPEED 56~57 rpm
REVERSIBLE DOOR Available
DRUM Stainless steel
DRYER RACK Available
CHILD LOCK Available
TEMPERTURE CONTROL Available (Quick/Gentle buttons) Default : ON
IRON-DRY BUZZER Available Default : OFF
ANTI-CREASE COURSE Available
TIME-ADDING Available 3~19 hours
TIME DELAY Available
DRUM INTERIOR LIGHT Available
LED DISPLAY TIME DISPLAY
RUNNING STATUS INDICATOR
EMPTY WATER
CLEAN FILTER
CHILD LOCK
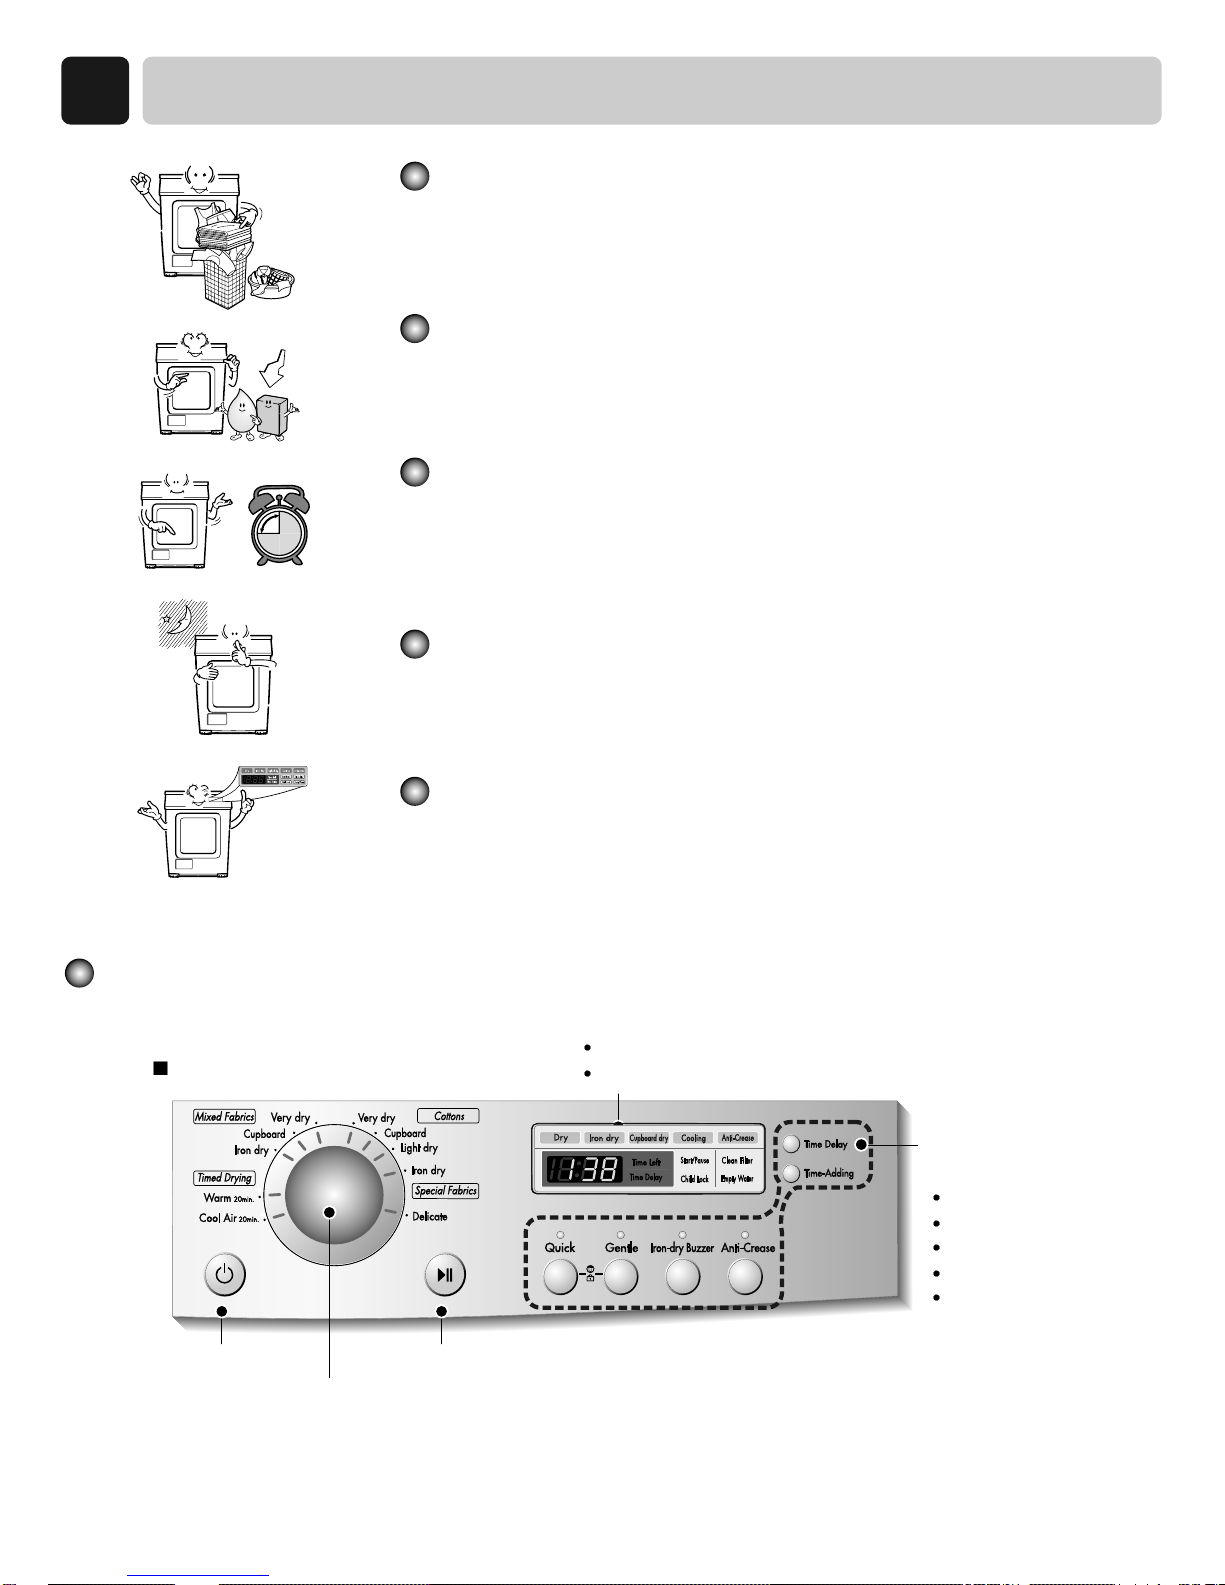
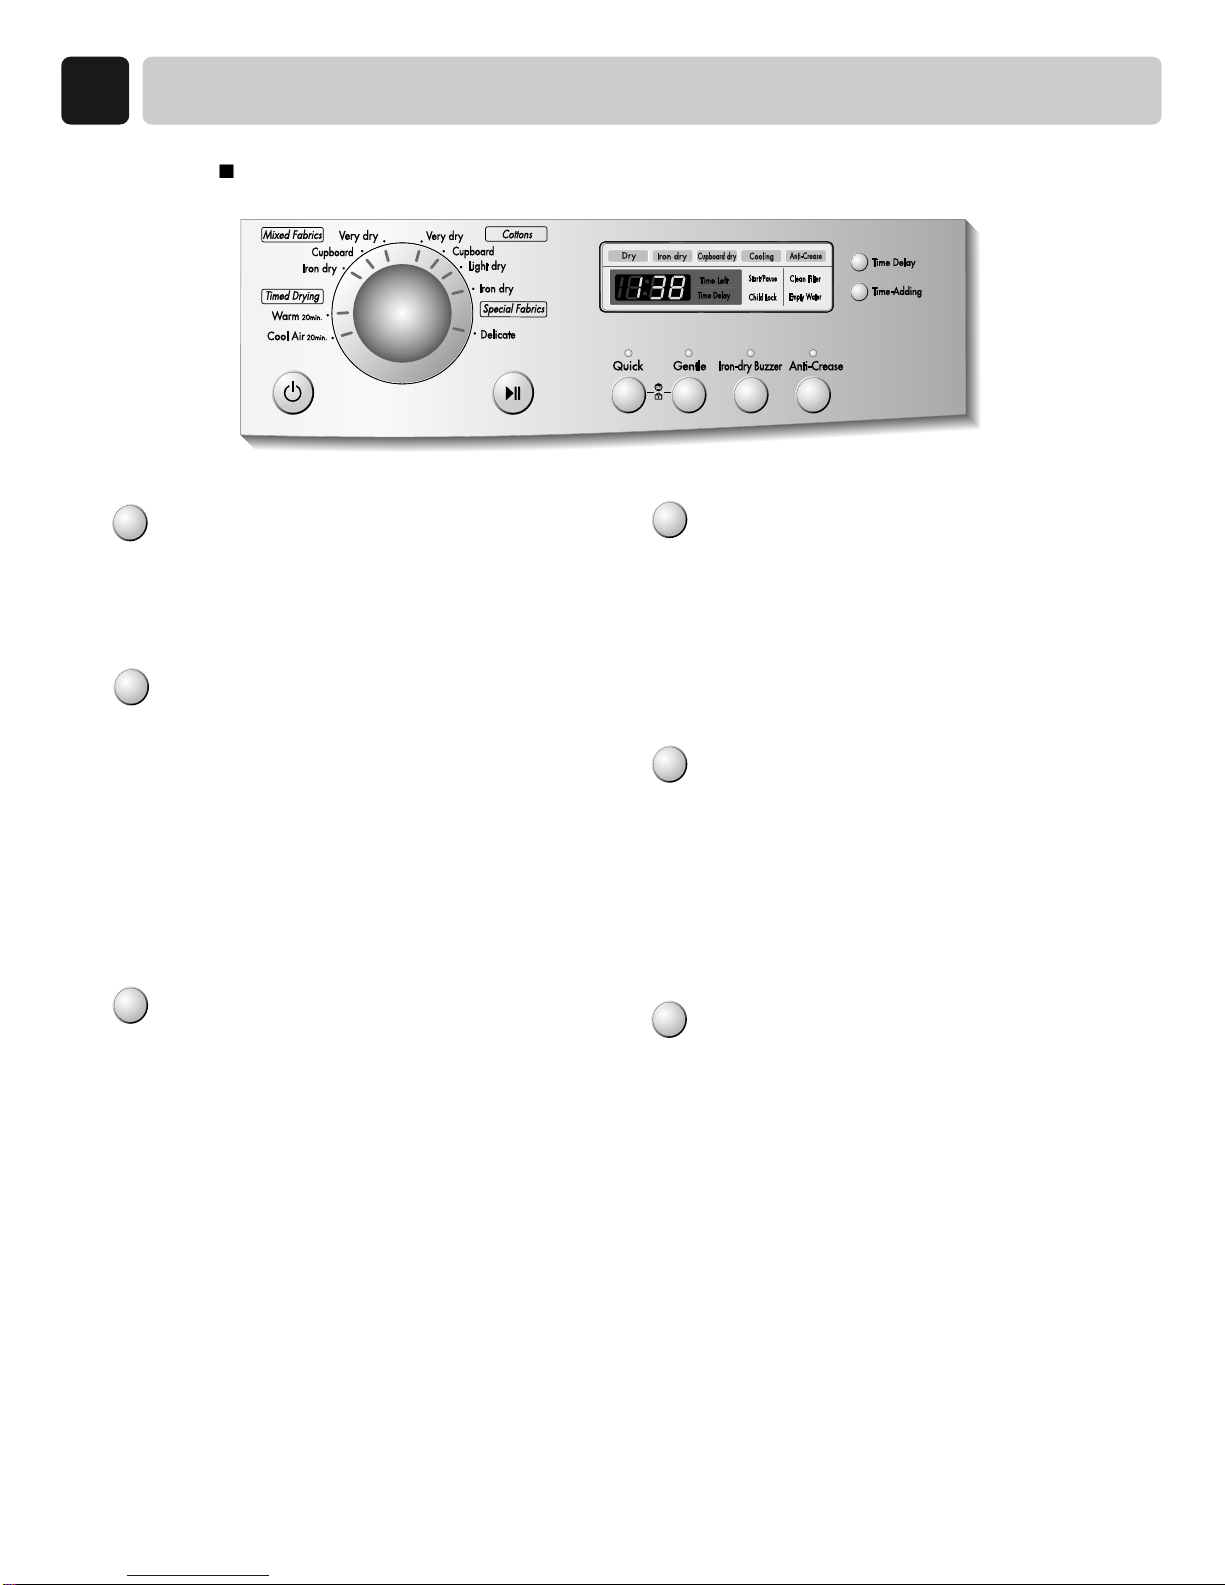
FEATURES AND LOOK
2
5
Energy
save
Ultra big Capacity Drum
LG Dryer has 7.0kg capacity which is the ultra big capacity.
Lower Energy Consumption
Energy is saved by Sirocco fan.
Reduced drying time
Drying time is shortened by efficient air flow mechanism and
optimized heater.
Innovative noise performance
Noise gets reduced by Noise-absorption & screening technology.
Easy of Use
Wide LED display using electric control.
Control Panel
Program selector
Start/Pause
LED Display
Time Display
Indicator lamps
Additional function
buttons
Quick/Gentle
Iron-dry Buzzer
Anti-Crease
Time Delay
Time-Adding
TD-C70140E/145E
Power
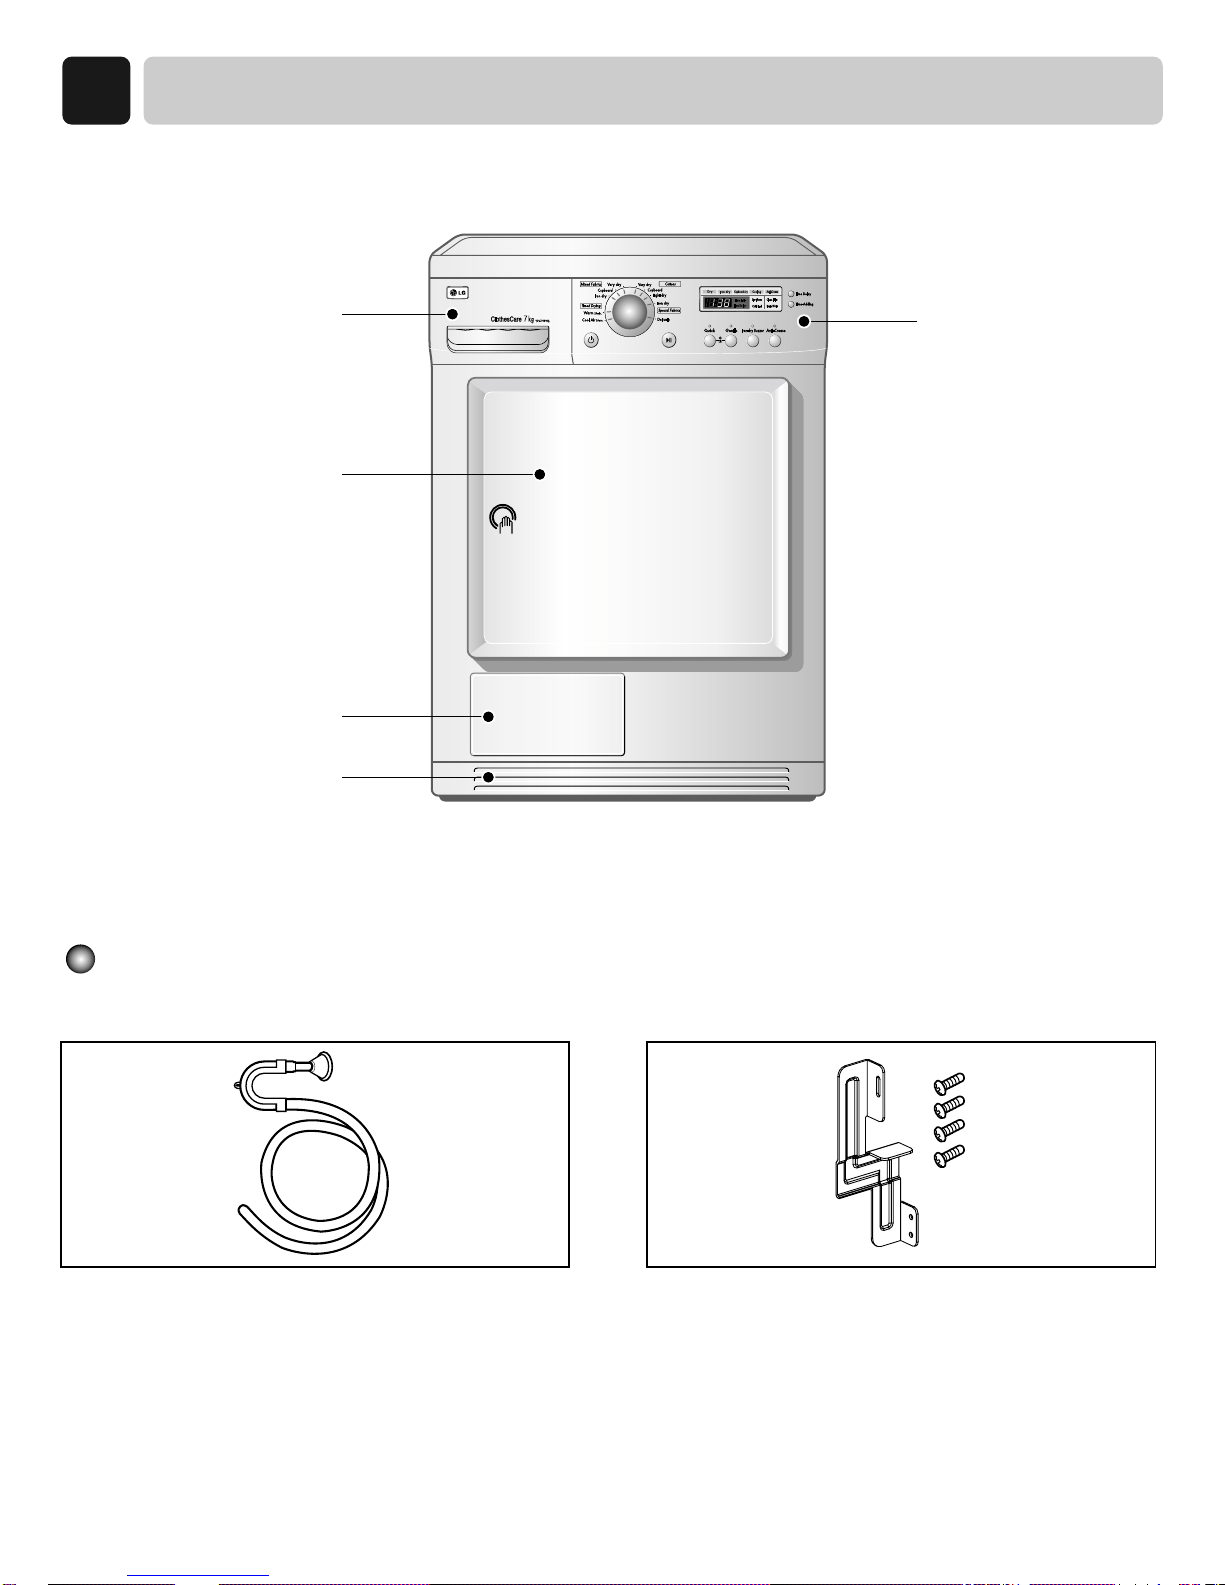
PART IDENTIFICATION
3
6
Accessories
1.Drain Hose Assembly (Purchased Separately) 2.Stacking kit Assembly (Purchased Separately)
P/No.:5001EL2001A
P/No.:5001EL2001C
Water container
Control panel
Door
Condenser Cover
Air ventilation grill
PROGRAM CYCLE
4
7
TD-C70140E/145E
Quick / Gentle
These are functioning to shorten or lengthen the
cycle time by increasing or decreasing
temperature.
Iron-dry Buzzer
Select Iron-dry Buzzer to alert you that your
clothes are approximately 80% dry.
This is useful when you want to remove
lightweight items in a mixed load to prevent
overdrying or remove partially dry items that
may need ironing.
NOTE : The Iron-dry Buzzer is only available
with the Cottons, Mixed Fabrics.
Time Delay
You can use the Time Delay function to delay
the finishing time of drying cycle.
Maximum Time Delay is 19 hours.
1. Turn the dryer on
2. Select cycle
3. Set time delay hour
4. Press Start/Pause button
Time-Adding
Press Time-Adding until the desired drying
time is displayed. Tap Time-Adding and the
time will change by 20 minute intervals.
NOTE : The Time-Adding function can be
used with Timed Drying.
Child-Lock
For the safety of your children, press “Quick”
and “Gentle” Buttons at the same time for
about 3 seconds.
You can see the “child lock” lamp is on, which
means this function is activated.
Anti-Crease
Anti-Crease is functioning to prevent creases
and rumples that are formed when the laundry
is not unloaded promptly at the end of drying
cycle. In this function, the dryer repeatedly
runs and pauses to the cycle end.
If the door is open during Anti-Crease process,
this function is cancelled. But in case of door
open during normal operation without
selecting Anti-Crease, this function will be
remembered and processed.
PROGRAM CYCLE
4
8
CAUTION!
If the load is less than 1kg, please use "Timed Drying Course"
Heat-sensitive fabrics including silk, underwears, lingerie should be used in delicates courses.
Otherwise, these clothes can cause undesirable drying results.
Standard
Program
Very Dry
Cupboard dry
Iron Dry
Very Dry
Cupboard dry
light Dry
Iron Dry
Warm (20min.)
Cool Air (20min.)
Delicates
Bed linen and table linen, tracksuits,
anorak, blankets
shirts, blouses and sportswear
Trousers, dressers, skirts, blouses
Terry toweling, tea towels, towel,
bed linen
Bath towels, tea towels,
underwear, cotton socks
T-shirts, trousers, underwear,
work clothes
Bed linen, table linen, towels, T-shirts
Polo shirts and work clothes
Bath towels, bath robes, dishcloths,
Quilted fabrics made of acrylic
All fabrics needing freshing, tumbles without heat
Silk, Women's thin clothes, lingerie
For thick and quilted fabrics which do not need to be ironed.
For fabrics which do not need to be ironed.
For fabrics which do need to be ironed.
For thick and quilted fabrics which do not need to be ironed.
For fabrics which do not need to be ironed.
For fabrics which do need to be ironed lightly, not completely.
For fabrics which do need to be ironed.
Small clothes & pre-dried laundry Normal
Normal fabrics using hot temperature for 20minutes
For fabrics which are heat-sensitive like synthetic fabrics.
Electronic Auto Dry Cycles
Mixed-Fabric cycles
(Note) press the "Gentle" button for heat-sensitive items
Cotton (Whites and coloreds)
(Note) press the "Gentle" button for heat-sensitive items
Time Cycles for selected length of time
Special Fabrics
Cycle Selection Table

PROGRAM CYCLE
4
9
Course Quick Gentle
Iron-dry Buzzer
Anti-Crease Time left
Cottons Very dry O O O O 120
Cupboard dry O O O O 115
Light dry O O O O 103
Iron dry O O O O 97
Mixed Fabric Very dry O O O O 53
Cupboard dry O O O O 48
Iron dry O O O O 41
Timed Drying
Warm 20min. OOXO20
Cool Air 20min. XXXO20
Special Fabric
Delicate X X O O 69
INSTALLATION INSTRUCTIONS
5
10
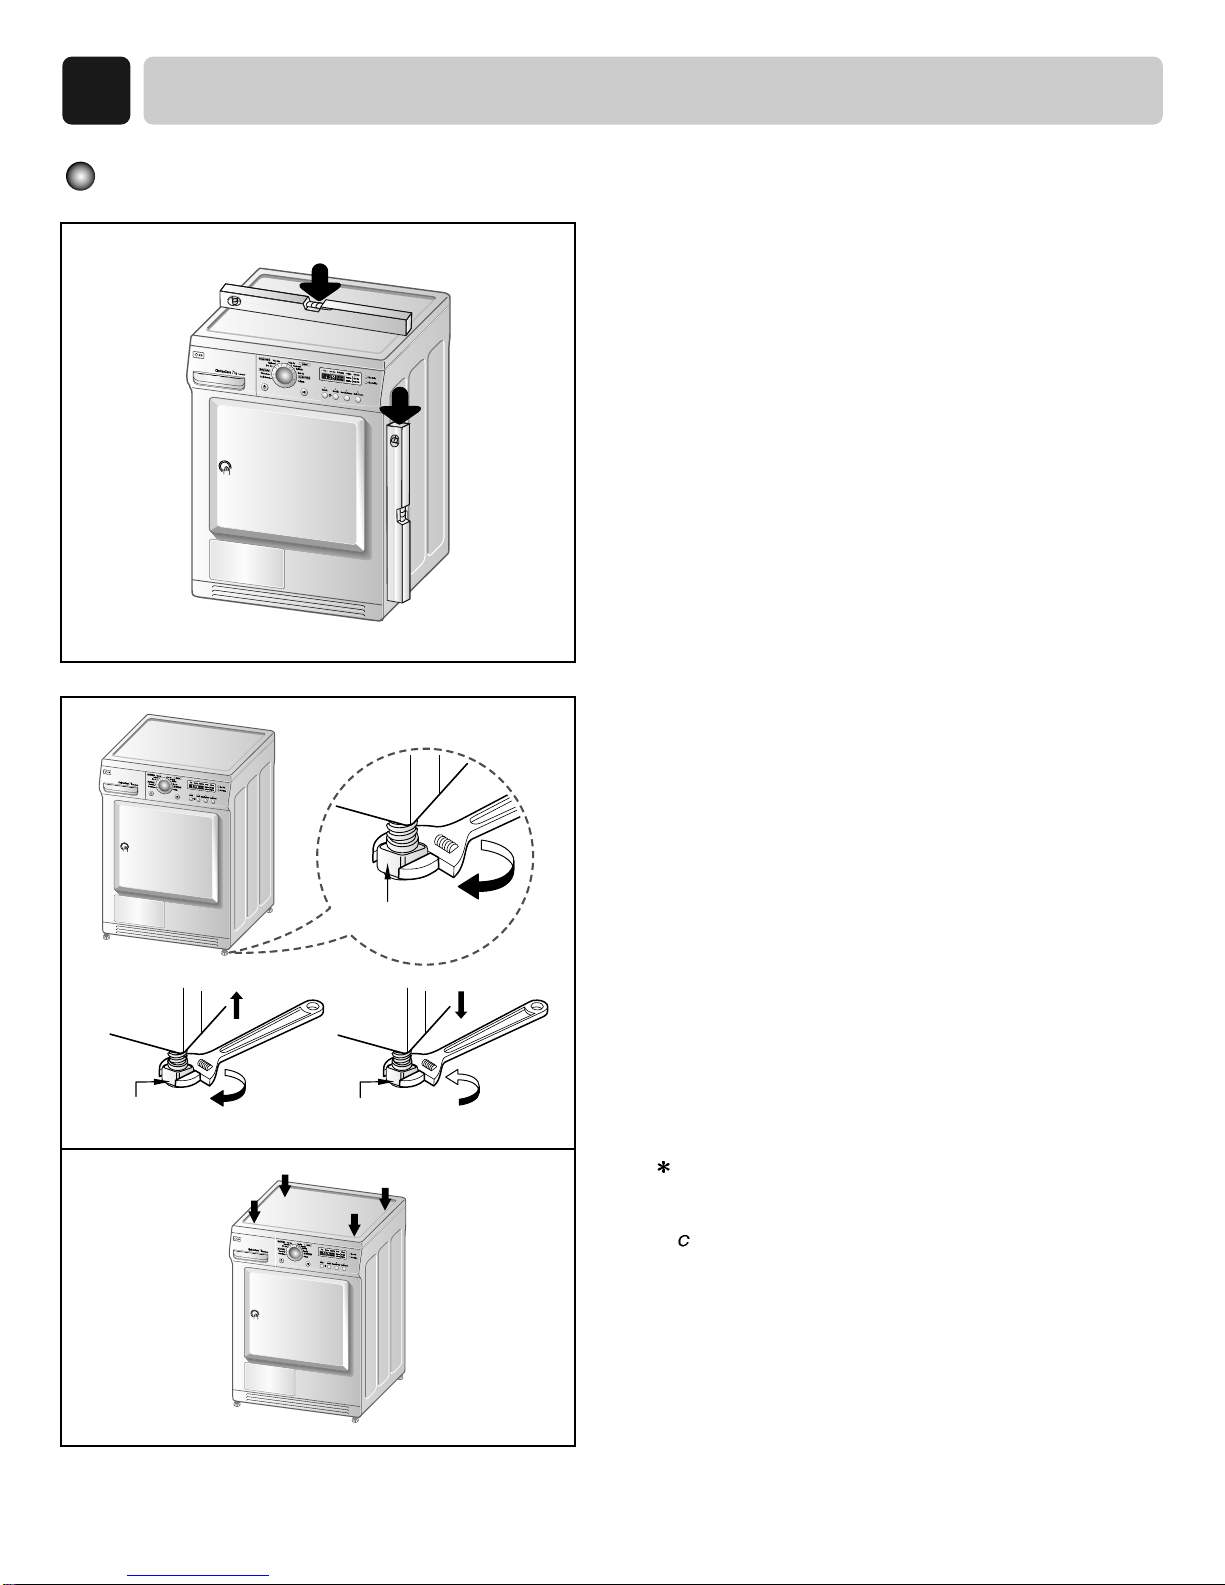
Level the dryer
Adjustable feet
Adjustable feetAdjustable feet
Raise Lower
1. Leveling the dryer is to prevent undesirable
noise and vibration.
When placing your dryer in an solid and level
area where water is not dripping and freezing,
flammable materials are not stored.
2. If the dryer is not properly level, adjust the front
leveling legs up and down as necessary.
Turn them clockwise to raise and
counterclockwise to lower until the dryer is not
wobbling both front-to-back and side-to-side.
Diagonal Check
When pushing down the edges of the washing machine,
the machine should not move up and down at all. (Please,
heck both of two directions)
If machine rocks when pushing the machine top plate
diagonally,adjust the feet again.
INSTALLATION INSTRUCTIONS
5
11
GROUNDING INSTRUCTION
This appliance must be grounded. In the event of
malfunction or breakdown, grounding will reduce
the risk of electric shock by providing a path of
least resistance for the electric current.
This appliance is equipped with a cord having an
equipment grounding conductor and a grounding
plug. The plug must be plugged into an appropriate
outlet that is properly installed and grounded in
accordance with all local codes and ordinances.
Additional Grounding Procedure
Some local codes may require a separate ground. In
such cases, the required accessory ground wire,
clamp and screw must be purchased separately.
Condensate Drain
The dryer can drain water without delivering to
water container. Water is directly pumped out of
the dryer.
Improper connection of the equipment
grounding conductor can result in a risk of
electric shock. Check with a qualified electrician
or a service person if you are in doubt as to
wether the dryer is properly grounded.
WARNING !
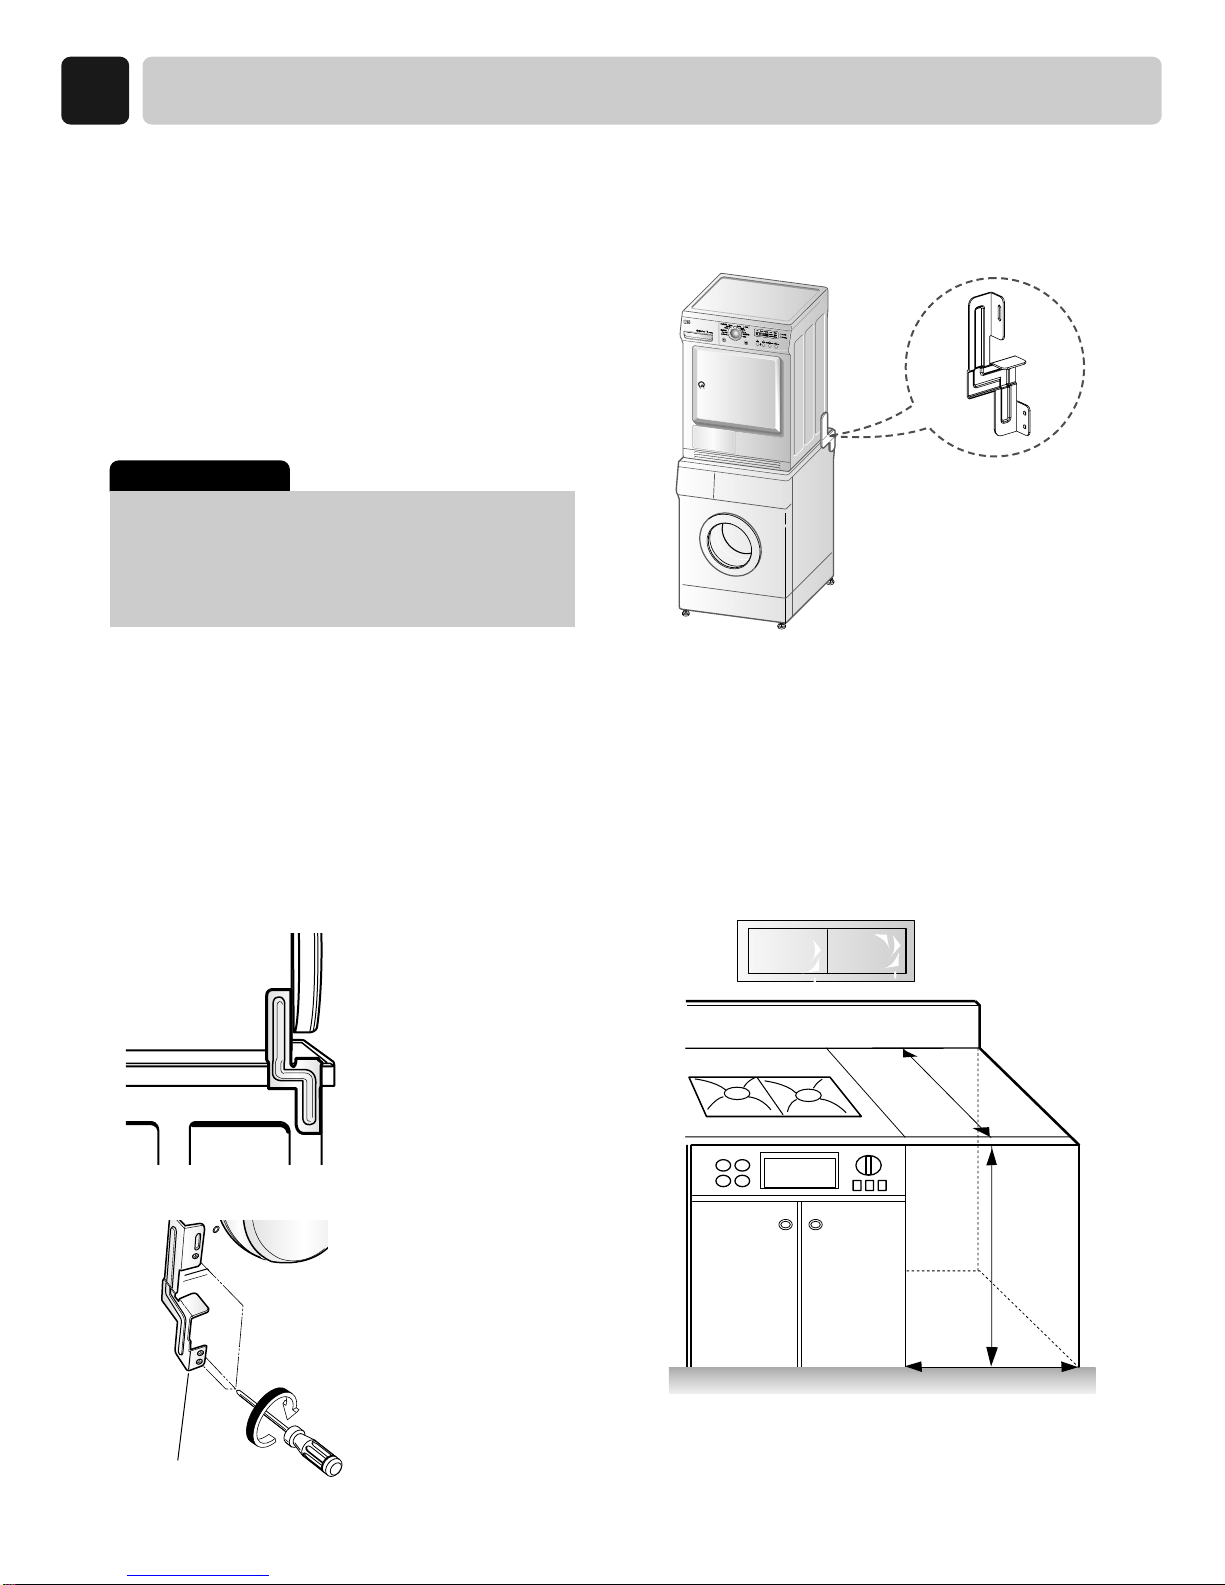
Installed Stacking kitside view
Installed Stacking kit rear view
Stacking Kit
In order to stack this dryer on a LG washing
machine, a stacking kit is needed.
Built-in Installation
Your dryer can be built-in. You can fit the dryer
under-counter in a kitcken cabinet opening.
Opening dimensions are shown as follows.
For your safety, metal cover must be tightly fitted.
This must be placed by an experienced service
person and installed under a continuous worktop.
600
850
595
MAINTENANCE INSTRUCTIONS
6
12
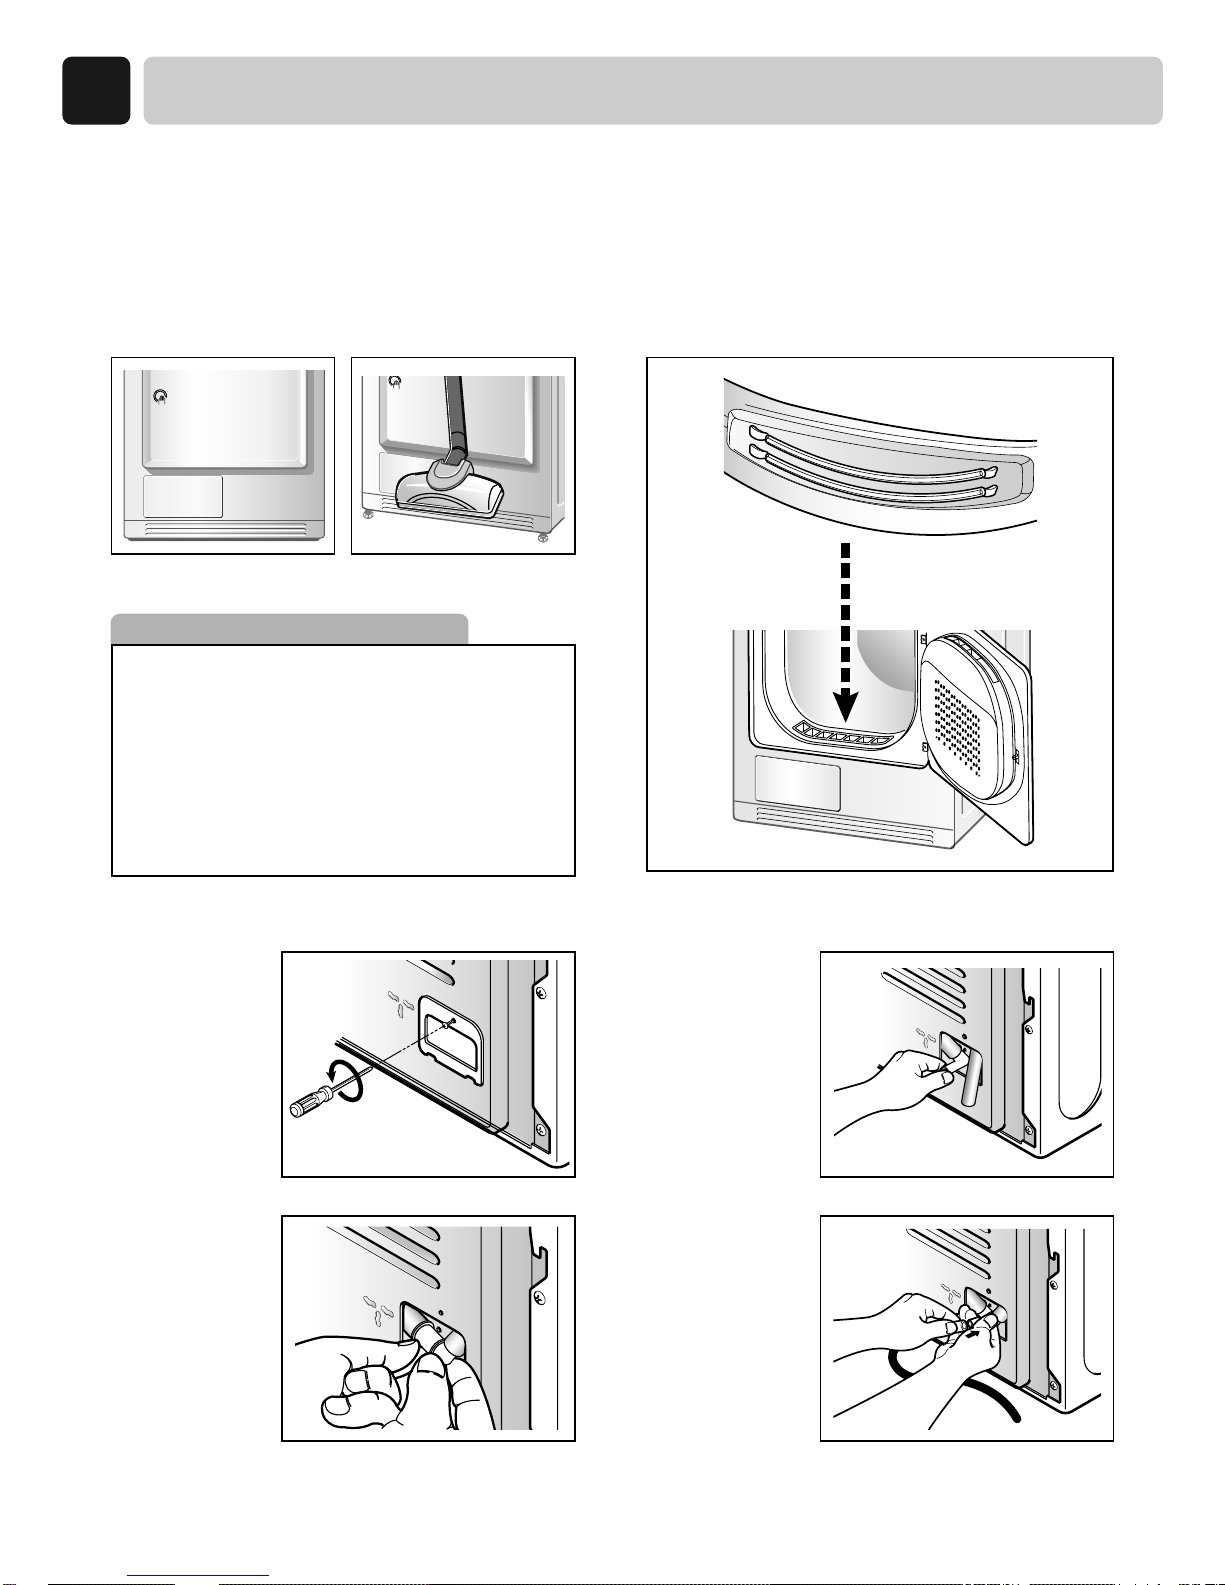
Front Ventilation Grille
Vacuum the front ventilation grill 3~4 time a year to
make sure there must be no build-up of lints or dirts
which cause improper intake air flow.
Normally, condensed water is pumped up to water
container where water is collected until emptied.
Not only using water container, but water can be drained
out directly to drain hose especially when dryer is stacked
on top of washing machine.
With connecting kit for drain hose, you can simply change
water path and water reroute to the drainage facility.
Please follow the below steps.
Condensed water Drain-out
Moisture Sensor?
This device functions to sense the moisture
remaining contents of the laundry during operation
which means it must be cleaned all the time. The
main reason of cleaning this part is to remove the
build-up of lime scale on the surface of sensor. Wipe
the sensors inside drum (Shown in the picture).
1.Unscrew
cover.
3. Separate water
container hose
from the kit.
2. Take
connecting kit
out.
4. Connect drain
hose to the kit.
MAINTENANCE INSTRUCTIONS
6
13
Reverse the door
The door can be reversed to fit to your own
installation conditions. From the factory, the door
hinge is located on the right side.
1. This work may cause the injury of your
hands so you must be careful to handle
some sharp devices like torque screwdriver or
slotted screwdriver.
2. When the door is revered, the hand sticker
on the door also must be replaced.
Do not use a machine screwdriver.
Caution !
1. Unscrew the bottom hinge of the door first
and top hinge. And then place on the blanket
to prevent scratches.
2. Remove the
door lock
cover.
3. Remove the
door lock and
replace where
door lock
cover is
4. Detach both
hinge point
covers.
5. Unscrew two
door hinges.
6. Replace both
hinge point
covers where
door hinge is
located.
7. Replace the
door catch to
the reverse
location.
8. Screw the
door hinges.
MAINTENANCE INSTRUCTIONS
6
14
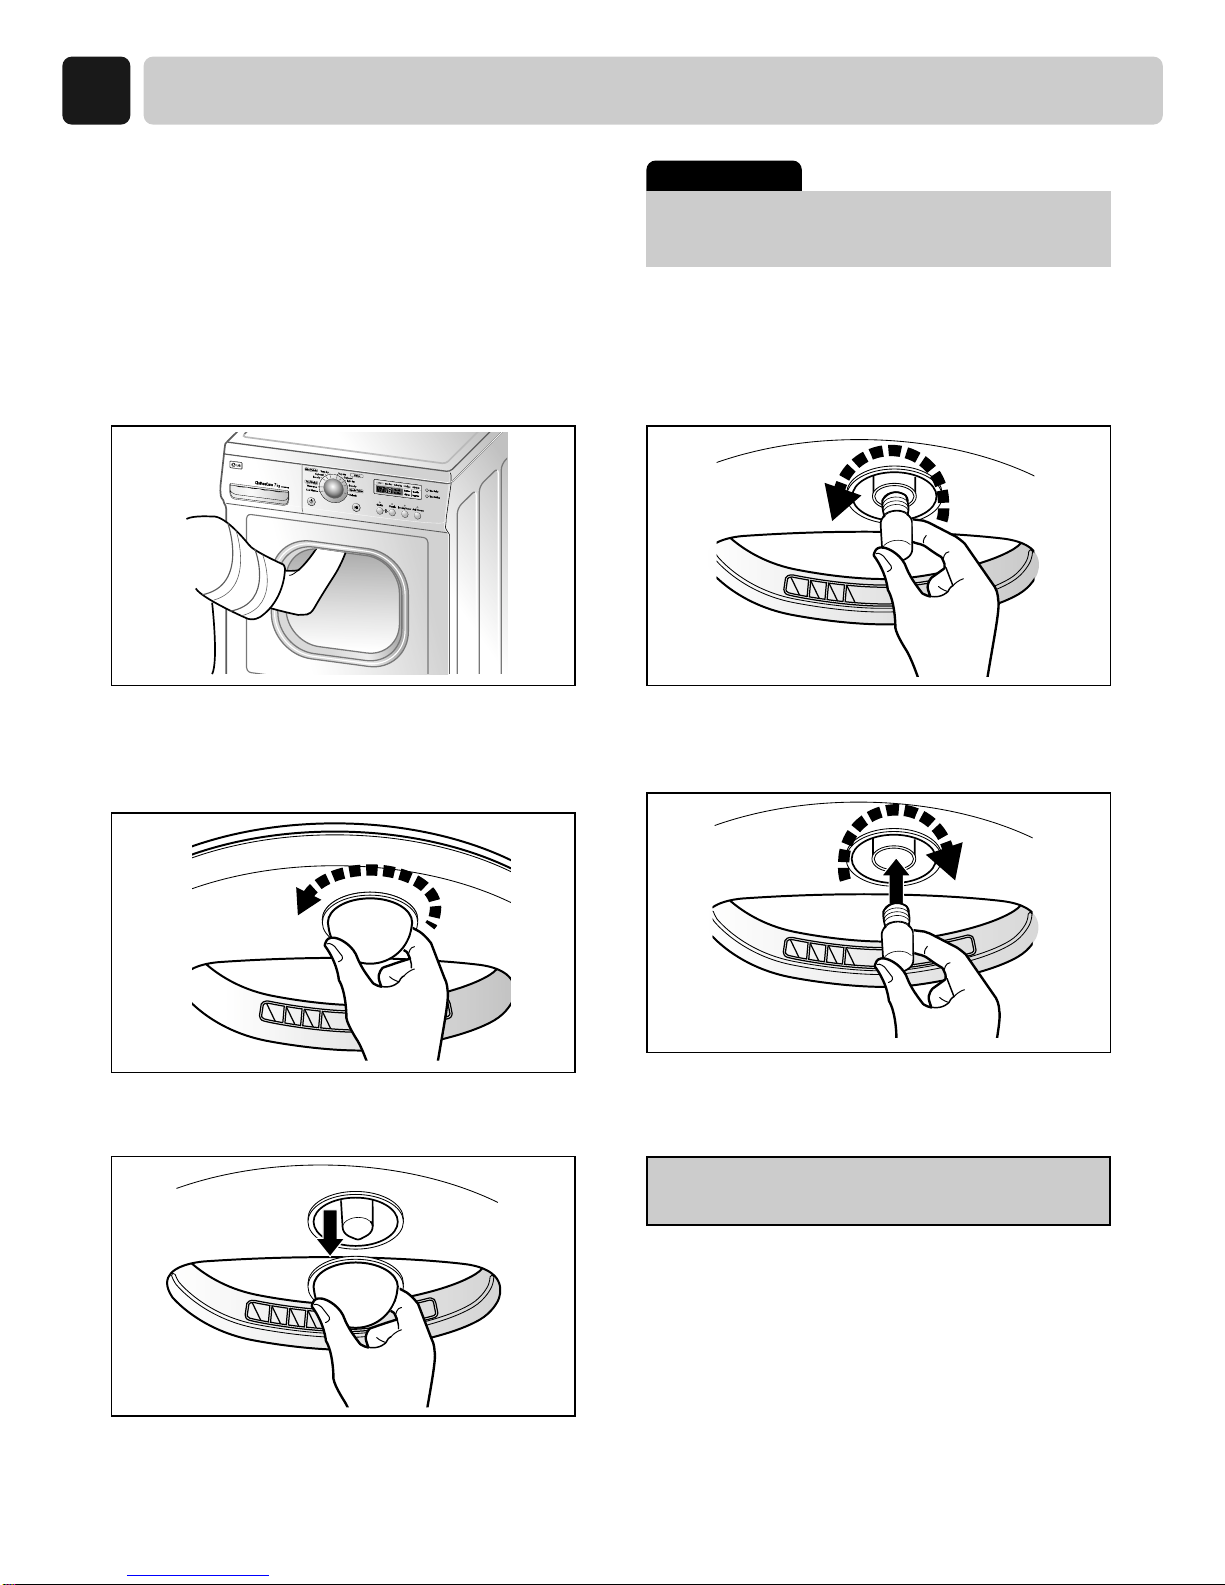
Change the Bulb
The bulb itself could be very hot when the dryer just
finishes its operation. So before changing the bulb,
be sure that the inside of the drum is cool down.
1. Open the door, put a hand into the drum and
grasp a bulb cover.
2. With bulb held by a hand, turn the bulb to the
clockwise direction with a certain amount of
force.
3. Separate bulb cover from the socket housing.
Power cord must be unplugged before this
work to avoid danger of electric shock.
Caution !
4. Remove the current bulb turning it to Counter
clockwise direction.
Be careful that it does not fall off.
5. Screw in the new bulb in the reverse
unscrewing direction.
Do not need any special tool for this work.
All steps can be done manually.
 Loading...