

LG T90SJSF1Z, T70SJAS1Z, T90SJAS1Z Owner’s Manual

OWNER'S MANUAL
WASHING
MACHINE
Please read this manual carefully before operating
washing machine and retain it for future reference
T65SJ
T70SJ
T80SJ
T90SJ
T10SJ
T65SN
*
T70SN
*
T80SN
*
*
*
MFL68486520
Rev.00_150720
*
*
*
T65SP
*
T70SP
*
T7288
*
www.lg.com
Copyright © 2020 LG Electronics Inc. All Rights Reserved.

ontents
READ THIS MANUAL
C
Inside you will find many helpful hints on how to use and maintain your washer
properly. Just a little preventive care on your part can save you a great deal of time and
money over the life of your washer. You will find many answers to common problems
in the Troubleshooting section. If you review our chart of Troubleshooting Tips first, you
may not need to call for service at all.
Introduction
Installation
Before Starting to Wash
Washing Programs
Additional Function
Program
Care and Maintenance
Troubleshooting
Installation Check sheet
Terms of Warranty
Features & Specifications
Safety Information
Product Feature
Identification of Parts
Placing, Leveling & Installation
Connecting water supply Hose & Drain Hose
Preparation Before Washing
Use of Water, Detergent, Bleach and Softener
Special Guide for Stain Removal 15
Control Panel
Other Useful Functions
Normal
Quick Wash
Gentle (Wool/Saree)
Turbo Wash
Strong ( Jeans)
Tub Clean
Aqua Reserve Wash
+
Pre Wash Normal Wash
Favourite Wash
AIR DRY
ENERGY SAVING GUIDE
Smart Closing Door
Soak Wash
Option Washing
DELAY START (RESERVATION) Wash
Cleaning and Maintenance
Common Washing Problems
Troubleshooting
Earthing
Smart Diagnosis
Disposal of old appliance
Installation Check sheet
Warranty
Features & Specifications
TM
Page No
3
6
7
8
9
11
12
16
17
18
18
19
19
19
19
19
20
20
20
21
22
22
23
24
25
27
28
29
29
31
32
33
35
* Product feature may vary according to different models. Refer page 35 for modelwise
features for your purchased model.
2

afety Information
S
Read carefully and thoroughly go through this booklet as it contains important safety information
that will protect the user from unexpected dangers and prevent potential damages to the product.
This booklet is divided into 2 parts : Warning and Caution.
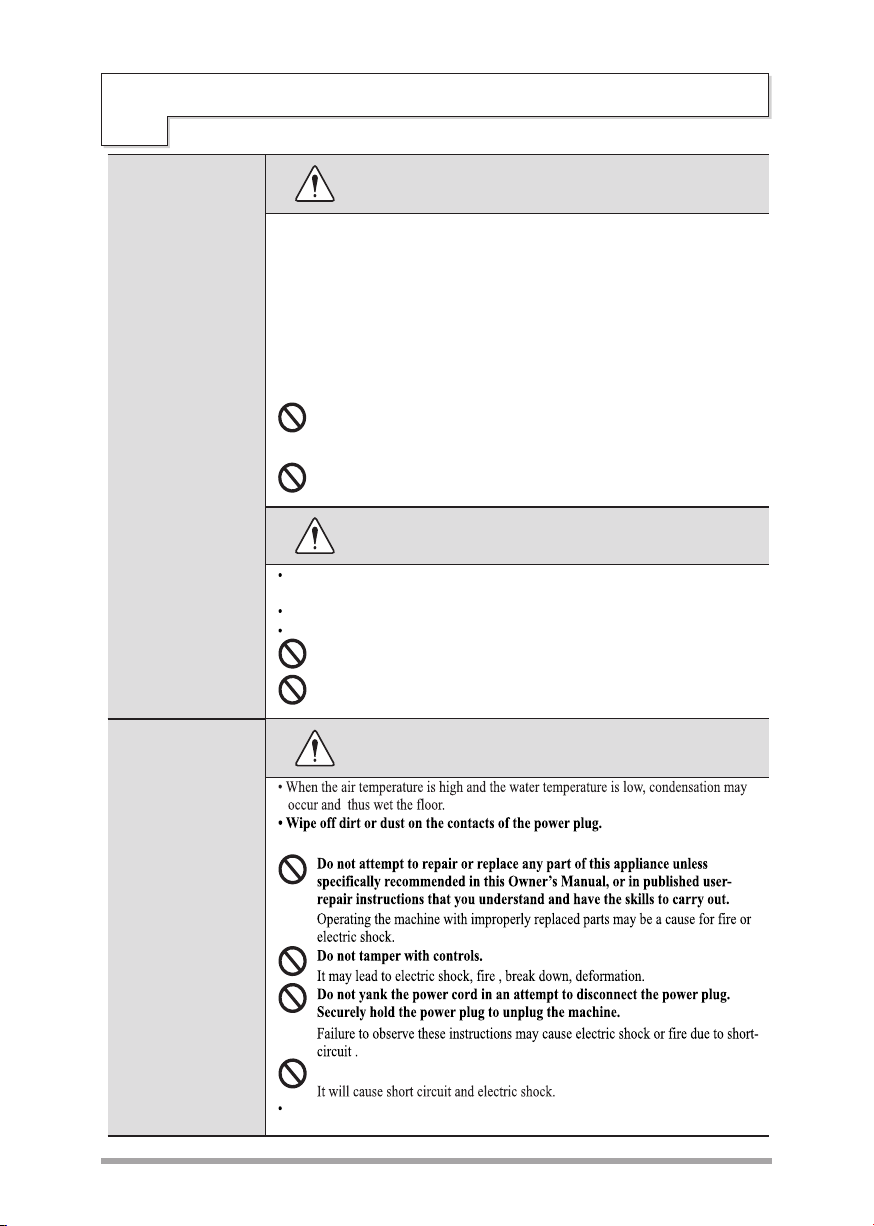
: This is a warning sign specifying user’s applications which might be dangerous.
: This is a sign specifying ‘Strictly Forbidden’ applications.
:
Failure to comply with the instructions under this
WARNING
sign may result in major physical injuries or death.
CAUTION
Disclaimer : The user should follow the instructions as per the owner’s manual to avoid
any malfunctioning of the product, accident or damage.
The manufacturer is not liable for any accident or consequential or resulting liability, damage
or loss to property or life arising directly or indirectly from the product. The manufacturer's
liability is limited only to the extent of repair or replacement of the product as per the terms and
condition mentioned elsewhere in the document.
: Failure to comply with the instructions under this
sign may result in minor physical injuries or
damages to the product.
WARNING
•
Make sure the plug is completely pushed into the outlet.
Failure to do so may cause electric shock and fire due to overheating.
PROPER
INSTALLATION
CAUTION
•
Machine must be positioned so that the plug is accessible.
If the plug is placed between the wall and the machine, it may get damaged, possibly causing fire or
electric shock.
• Washer shall be placed in dry areas specifically during rainy season.
• Washer shall be placed in dry areas specifically during rainy season.
Humid conditions may cause rusting which may result in product failure.
• •
The base opening must not be obstructed by carpeting when the washing machine is installed on
a carpeted floor.
•
Install or store where it will not be exposed to temperature below freezing or exposed to the
weather (Rain/Water Splash/ Direct Sunlight).
If the product is exposed to such conditions, electric shock, fire, break down or deformation may occur.
3

afety Information
S
• Keep the area underneath and around your appliances free of combustible
materials such as lint, paper, rags, chemical, etc.
Operating with such materials around the machine may trigger explosion or
fire.
• Close supervision is necessary if this appliance is used by or near children.
Do not allow children to play on, with, or inside this or any other appliance.
There is potential danger that children might drown in the tub.
YOUR
LAUNDRY
AREA
WARNING
Do not touch the Power Plug with a wet hand.
It will cause electric shock
CAUTION
Do not put your hand, foot or anything under the washing machine
while the washing machine is in operation.
There is a rotating mechanism under the machine, so you could be injured.
• Do not put or keep any magnet near Lid of Washer, it will result in
Malfunctioning of the Product.
WHEN USING
THE WASHER
Children should be supervised to ensure that they
do not operate or play with the appliance. Inconstancy to this may damage machine,
serious injury and electrical shock.
Do not use power plug, power socket outlet and wiring equipment for
more than their rated capacity.
for laundry
or Tub Wash.
4
afety Information
S
• Disconnect the Washer from the household distribution panel by removing the Power
Plug from Power Socket outlet before attempting any maintenance or cleaning
Inconstancy to this may Cause electrical shock
• Make sure that drainage is working properly.
If water is not drained properly, your floor may get flooded.
Flooded floors may induce electricity leakage, further resulting in electric shock or fire.
• If, during spinning, opening the lid does not stop the tub within about 15 second,
immediately discontinue operating the machine.
Call for repair. A machine that spins with its door open may cause injuries.
WHEN USING
THE WASHER
Do not use washer for any other purpose other than its intended purpose.
- Use this appliance only for household purpose.
Do not use water hotter than 60°C.
Do not connect washer to hot water supply.
WARNING
Never reach into the machine while it is running.
Wait until the machine has completely stopped before opening the lid.
Even slow rotation can cause injury.
Never attempt to operate this appliance if it is damaged, malfunctioning, partially
disassembled, or has missing or broken parts, including a damaged cord or plug.
Operating with a damaged plug may cause electric shock.
CAUTION
Use of excessively hot water may cause damage to fabrics or cause
leakage of water.
Ensure No water logging near or below washer to prevent rusting.
Rusting on certain parts may result in product failure
WHEN NOT
IN USE
WARNING
Customer may Slip too.
Using unclean power socket plug may cause fire.
Do not use wet cloth to clean the machine, Always use dry cotton cloth.
Turn off the water faucets to relieve pressure on hoses; they may need Replacement after
5 Years Inconstancy to this may rupture hose which leads to water Leakage.
5

roduct Features
P
Pre Wash Normal
The purpose of this program is to deliver best Wash Performance by adding extra 8 min of uniquely
designed washing pattern before the main wash cycle.
Jet Spray+
A technology uniquely designed to spray inlet water with greater force to penetrate deep into the
clothes to bring out the best washing and rinsing performance.
Smart Closing Door
Smart hinge prevents sudden closing of the door. Gives you a soft and safe door closing.
Turbowash*
Turbowash program delivers high wash performance in least cycle time using revolutionary Jetspray+
technology which optimizes water & energy consumption.
Normal logic control
A built-in load sensor automatically detects the laundry
load and a microprocessor optimizes washing conditions
such as ideal WATER LEVEL and washing time.
Advanced technology is built into the Electronic Control System which ensures the best washing result.
TurboDrum washing
When "Punch + 3" washing wings turn, the washing tub turns in the opposite direction.
This makes the both sides current of water which improve wash-performance by rubbing
clothes strongly.
Washer doesn't operate while the lid is opened. If the lid is opened during the wash, rinse
or spin cycles, the operation stops for safety.
+
#
SENSING
START
Laundry Sensor
Water Level Sensor
SETTING
Optimum
Washing
Condition
WASHING
AUTO
POWER
OFF
3 Step washing
3 step washing makes the best washing performance with low tangling.
Rubbing
Rubbing and
Shaking
Shaking and
Disentangling
Smart Diagnosis
It is the technology to transmit the anomalies to the service center when there
is a problem with the washer. It provides the service that gives faith and trust
to the customers through precise and fast analysis.
Auto Restart
Auto Restart allows the program to restart all by itself in case of power failure. It resumes
from stage where it stopped, however, the wash cycle time may vary.
# Works during Wash cycle in Normal, Pre Wash+ Normal, Turbo Wash & Aqua Reserve from WL1 to 7 and during Rinse cycle
in Normal, Pre Wash+ Normal, Turbo Wash & Aqua Reserve Programs at all water levels.
Jet Spray performance may vary with Inlet water pressure, for optimum results pressure should be > 0.9 Bar
Product feature may vary according to different models. Refer page 35 for modelwise features for your purchased model.
*
6
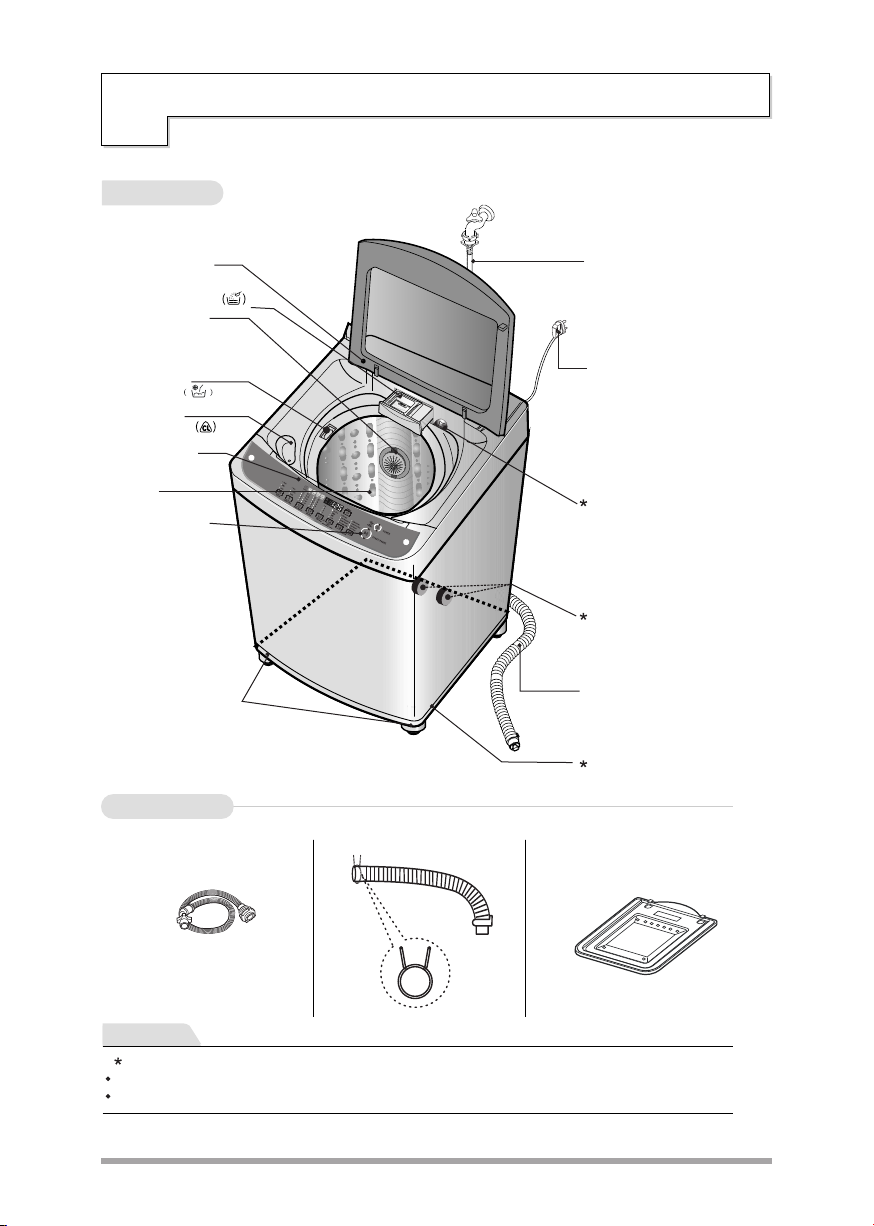
Body
dentification of Parts
I
Smart Hinge
POWDER
DETERGENT BOX
MAGIC FILTER
Clean regularly to
stop linting on the
clothes load.
SOFTENER
INLET
BLEACH
DISPENSER
FUNCTION
SELECTOR
TUB
START/PAUSE
BUTTON
Use to start or
stop the washing
machine
temporarily.
ADJUSTABLE LEGS
Use to level the washing
machine for correct
balance & spin
operation.
Accessories
WATER SUPPLY
HOSE
Make sure the
water does not
leak.
POWER PLUG
If the supply cord is
damaged, it must be
Do not open
replaced by the
manufacturer or its
service agents or
similarly qualified
person in order to
avoid a hazard.
JET SPRAY NOZZLE
Depending upon the Inlet
Water Pressure, performance
of Jet Spray may vary.
(Works in Normal, Turbo Wash,
+
Pre Wash Normal & Aqua
Reserve Wash Programs).
CASTORS
Use for easy
translocation
(at rear bottom edge)
DRAIN HOSE
Keep the drain hose
flipped down while
washing is in progress.
BASE
Water supply hose
Drain hose
Anti-rat cover
For Cold Water
Snap Ring
NOTE
NOTE
“ ” Parts can be different as per purchased model.
Please do not match this figure with model as it may be different from your model .These are schematic diagrams only.
Due to continuous improvements at LG, specification of washing machine are subject to change without prior notice.
7

lacing, Leveling and Installation
Improper installation of the washer may cause noise and malfunctioning.
Note :
1.
The ventilating openings in the base area must not be obstructed by carpeting when the washing machine is
installed on a carpeted floor.
Install the washing machine on a level and firm
2.
surface.
3. Handle all packaging materials (such as plastic
bags and thermacol) to keep away from children.
The packaging materials can cause suffocation.
How to adjust leveling
Adjustable leg
Turn the adjustable legs to set the washer
horizontal (Both the front legs).
Don't add anything under back side legs.
Distance between drain hose and the wall
Distance between drain hose and the wall should be more
than 10cm, and the distance between the other part or the
rear part and the wall should be more than 2 cm.
More than 10cm
.
Installation area
1
Install the washer on flat and firm surface.
Checking level
2
The Basement is not flat, fill the water just touching the
Pulsator and see uniform distribution. If not, adjust the
legs as shown in the figure.
Checking Proper placement
3
Top View
More than 2cm
More than 2cm
Press the corners of the machine diagonally
as shown in the figure, If any movement is observed,
adjust the legs for proper leveling.
# Moving of the Machine
Anti-rat cover installation
Insert the Anti rat cover firmly from back side side of washing machine.
Be sure to remove the product from the carton base, otherwise the machine will not be able to operate
properly.
# Product feature may vary according to different models. Refer page 35 for model wise features for your purchased model.
Please do not match the figures with model as it may be different from your model. These are schematic diagrams only.
Casters are provided for easy translocation of your machine
* Grip the machines properly as shown in fig.
* Tilt the machine towards your side at a angle
O O
45 ~ 55 .
Casters
Note : * Be careful that you should not drop the machine.
* Never move the machine on casters when there is load inside.
8
onnecting Water Supply Hose & Drain Hose
C
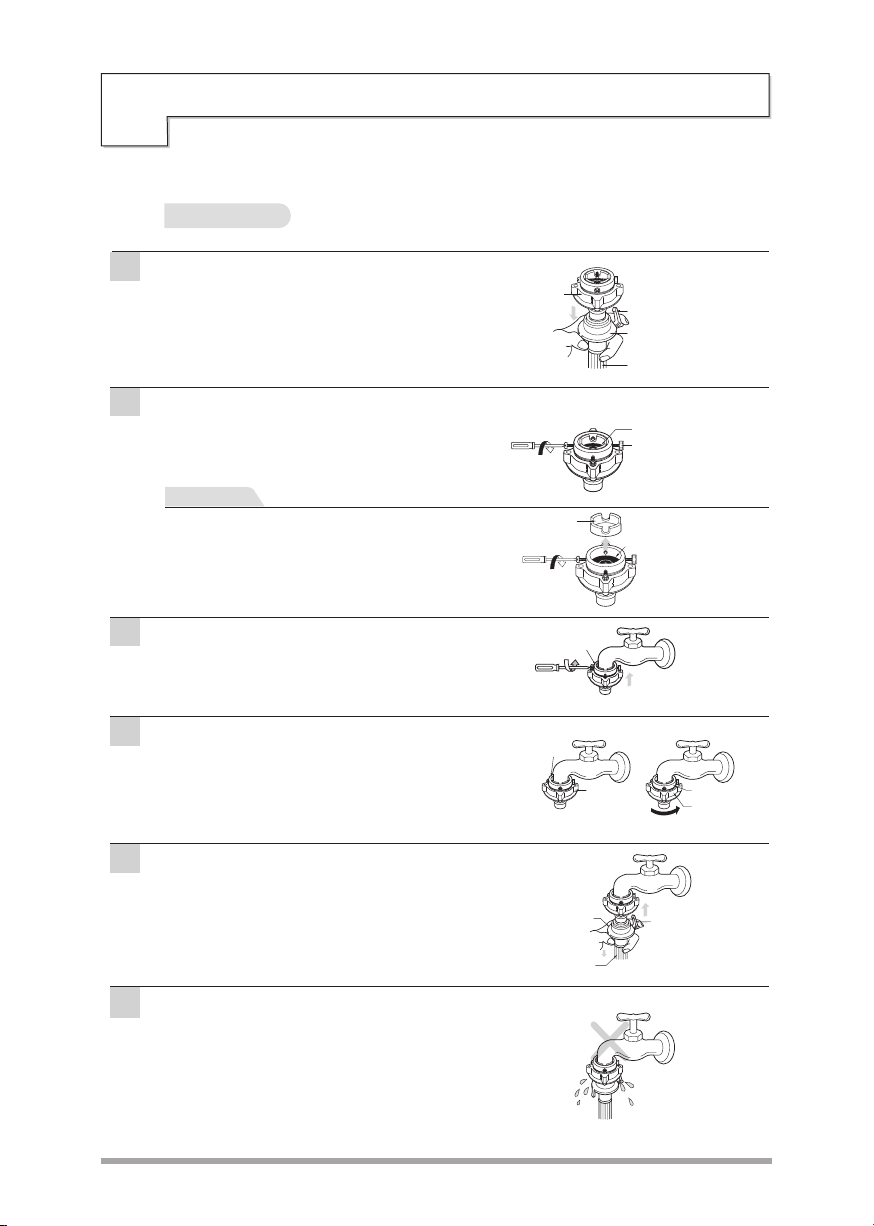
Water Supply Hose
Normal Type
Separate Middle connector from Water Supply Hose
1
Separate Middle connector from the Water
Supply Hose by pulling the Pressing Rod and the
Pressing Handle that is attached to the Water
Supply Hose
Loosen the fixed nuts to connect the connector to the tap
2
Untighten the screw of the connector so that the
tap can be placed in the middle.
.
NOTE
(Normal tap without thread & one touch type inlet hose.)
Middle
connector
In case tap is too large.
If the tap diameter is too large or is square,
untighten the 4 screws and remove the guide
plate. Then follow step1
Fixing Connectors to the Tap
3
Push the upper connector up till the rubber
packing is in tight contact with the tap. Then
tighten the 4 screws
Fixing Upper Connector and Middle Connector
4
Remove the fixed sticker in between the Upper
and Middle Connectors. Tighten the connectors
by holding one connector and twist middle
connector to the right.
.
.
Guide plate
Connector
Connector
Pressing Handle
Pressing Rod
Water Supply Hose
Rubber packing
Middle
Connector
Rubber packing
screw
Connector
Middle
Connector
Connecting Middle Connector and Water Supply Hose
5
Press down the pressing rod of the Water Supply
Hose which was separated from middle connector
(refer to Step1) and then join it to the middle
connector.
Water Supply Hose
Check for water leakage
6
After connecting the
check for any water leakage.
If the connection leaks, close the tap and start
again from step 1.
If you skip step 1, water leakage may occur.
other end of hose to machine open the tap to
9
Pressing rod
Pressing handle

After connecting inlet hose to water faucets, turn on the water faucets to
flush out foreign substances (dirt, sand, or sawdust) in the water lines. Let
water drain into a bucket, and check the water condition.
For your safety and for extended product life, use only authorized components. The manufacturer is not responsible
for product malfunction or accidents caused by the use of separately purchased unauthorized parts.
Use new hoses when you install the washing machine. Do not reuse old hoses. Use only the inlet hoses provided with
the washer . LG does not recommend the use of aftermarket hoses.
Periodically check the hoses for cracks, leaks and wear, and replace the hoses every 5 years.
Do not stretch the water hoses intentionally, and make sure that they are not crushed by other objects.
Connecting Water Supply Hose to Washer
Check to see if there is a rubber seal inside the connector.
Connect the water supply hose to inlet valve of the washing machine,
and then lock it by turning the hose connecting part.
Drain Hose
Connecting the Drain Hose to Washer
Insert the drain hose to the connecting area at the body.
1 2
1.
Press the hose clip.
While pressing, push the hose towards
2.
the body.
Release the hose clip after pushing the
3.
hose.
Less than 2m
The hose is placed
over a doorsill.
The hose is clogged by
alien substances.
Make sure that the
hose is not crushed.
Less than 3m
If Extension hose is used
should be less than 3m
Less than 6cm
Less than 10cm
Make sure that the hose is
not crushed between the
wall and the washer
Avoid submerging
the end of hose.
10

reparation Before Washing
P
Care Labels
Look for a care label on your clothes. This will tell you about the fabric content of your garment and how it
should be washed.
Sort clothes into loads that can be washed with the same wash cycle.
Sorting
To get the best results, different fabrics need to be washed in different ways.
• SOIL (Heavy, Normal, Light)
COLOR (Whites, Lights, Darks)
•
LINT (Lint Producers, Collectors)
•
Lint Producers
Lint Collectors
Check before Loading
• Check all pockets to make sure that they are emtpy. Things such as nails, hairclips, matches,
pens, coins, and keys can damage both your washer and your clothes.
• Mend any torn garments or loose buttons. Tears or holes may become larger during washing.
• Remove belts, underwires, etc. to prevent damage to the machine or your clothes.
• Pretreat any dirt and stains.
• Make sure the clothes are washable in water.
• Check the washing instructions.
• Remove tissue from pockets.
Do not wash or spin any item labeled or known to be water-proof or water-resistant, even if the product care label on the item
permits machine washing. Failure to follow these instructions could result in severe damage to your laundry, your washer and/or
property damage as a result of abnormal vibration of the washer.
- Examples of water-proof or water-resistant items include certain mattress pads, mattress covers, rain gear, camping gear, skiing apparel, outdoor
gear and similar items.
Pretreatment on stains or heavy soil
• Pretreat shirt collars and cuffs with a pre-wash product or liquid Detergent when placing them in the washer.
Before washing treat special stains with bar soaps, liquid Detergent or a paste of water and granular Detergent.
• Use a pretreat soil and stain remover.
Treat stains AS SOON AS POSSIBLE. The longer they are left the harder they are to remove.
(For more detail refer to page15)
Loading
Do not wash fabrics containing flammable materials
(waxes, cleaning fluids, etc.)
Load Size
The WATER LEVEL should just cover the clothes.
Adjust the load size accordingly. Loosely load
clothes not higher than the top row of holes in the
washer tub. To add items after washer has started,
press Start button and submerge additional items.
Close the lid and press Start button again to restart.
Separate clothes according to the type and amount of soil.
Separate white fabrics from colored fabrics.
Separate lint producers and lint collectors.
Terry cloth, Towels, Nappies, Diapers
Synthetics, Socks
CAUTION
Fire Hazard
Never place items in the washer that are dampened with gasoline
or other flammable fluids. No washer can completely remove oil.
Do not dry anything that has ever had any type of oil on it (including
cooking oils). Doing so can result in death, explosion, or fire.
WIRE
WARNING
Light and Large-sized clothing
Clothes like downs and woollens are light weight, large and float easily. Use a nylon net and
wash them in a small amount of water. If the laundry floats during the wash cycle, it may
become damaged. Use dissolved Detergent to prevent the Detergent from clumping.
Long laundry items
Use nylon nets for long, DELICATE items. For laundry with long strings or long length , a net will prevent
tangling during washing. Fasten zippers, hook, and strings to make sure that these items don't snag on other clothes.
Nylon net is not supplied by LG.
*
*
11
*
 Loading...